

Page 1

4-460-572-31(2)
Digital Still Camera / Instruction Manual GB
Appareil photo numérique / Mode d’emploi FR
DSC-HX50/HX50V
Page 2

English
Learning more about the camera (“Cyber-shot User Guide”)
“Cyber-shot User Guide” is an on-line manual. Refer to it for
in-depth instructions on the many functions of the camera.
1 Access the Sony support page.
http://www.sony.net/SonyInfo/Support/
2 Select your country or region.
3 Search for the model name of your camera within the
support page.
• Check the model name on the bottom of your camera.
Checking the supplied items
The number in parentheses indicates the number of pieces.
• Camera (1)
• Rechargeable battery pack NP-BX1 (1)
• Micro USB cable (1)
• AC Adaptor AC-UB10/UB10B/UB10C/UB10D (1)
• Power cord (mains lead) (not supplied in the USA and Canada) (1)
• Wrist strap (1)
• Shoe cap (1) (Attached on the camera)
• Instruction Manual (this manual) (1)
GB
2
Page 3

Owner’s Record
The model and serial numbers are located on the bottom. Record the serial number in the
space provided below. Refer to these numbers whenever you call your Sony dealer
regarding this product.
Model No. DSC-HX50/DSC-HX50V
Serial No. _____________________________
Model No. AC-UB10/AC-UB10B/AC-UB10C/AC-UB10D
Serial No. _____________________________
WARNING
To reduce fire or shock hazard, do not expose the unit to rain or
moisture.
IMPORTANT SAFETY INSTRUCTIONS
-SAVE THESE INSTRUCTIONS
DANGER
TO REDUCE THE RISK OF FIRE OR
ELECTRIC SHOCK, CAREFULLY
FOLLOW THESE INSTRUCTIONS
If the shape of the plug does not fit the power outlet, use an attachment plug adaptor of the
proper configuration for the power outlet.
CAUTION
[ Battery pack
If the battery pack is mishandled, the battery pack can burst, cause a fire or even chemical
burns. Observe the following cautions.
• Do not disassemble.
• Do not crush and do not expose the battery pack to any shock or force such as
hammering, dropping or stepping on it.
• Do not short circuit and do not allow metal objects to come into contact with the battery
terminals.
• Do not expose to high temperature above 60°C (140°F) such as in direct sunlight or in a
car parked in the sun.
• Do not incinerate or dispose of in fire.
• Do not handle damaged or leaking lithium ion batteries.
GB
GB
3
Page 4

• Be sure to charge the battery pack using a genuine Sony battery charger or a device that
can charge the battery pack.
• Keep the battery pack out of the reach of small children.
• Keep the battery pack dry.
• Replace only with the same or equivalent type recommended by Sony.
• Dispose of used battery packs promptly as described in the instructions.
[ AC Adaptor
Use the nearby wall outlet (wall socket) when using the AC Adaptor. Disconnect the AC
Adaptor from the wall outlet (wall socket) immediately if any malfunction occurs while
using the apparatus.
For Customers in the U.S.A. and Canada
[ RECYCLING LITHIUM-ION BATTERIES
Lithium-Ion batteries are recyclable.
You can help preserve our environment by returning your used
rechargeable batteries to the collection and recycling location nearest
you.
For more information regarding recycling of rechargeable batteries,
call toll free
1-800-822-8837, or visit http://www.rbrc.org/
Caution: Do not handle damaged or leaking Lithium-Ion batteries.
[ Battery pack
This device complies with Part 15 of the FCC Rules. Operation is subject to the following
two conditions:
(1) This device may not cause harmful interference, and (2) this device must accept any
interference received, including interference that may cause undesired operation.
This Class B digital apparatus complies with Canadian ICES-003.
This equipment complies with FCC/IC radiation exposure limits set forth for an
uncontrolled environment and meets the FCC radio frequency (RF) Exposure Guidelines
in Supplement C to OET65 and RSS-102 of the IC radio frequency (RF) Exposure rules.
This equipment has very low levels of RF energy that are deemed to comply without
testing of specific absorption ratio (SAR).
GB
4
Page 5

For Customers in the U.S.A.
UL is an internationally recognized safety organization.
The UL Mark on the product means it has been UL Listed.
If you have any questions about this product, you may call:
Sony Customer Information Center
1-800-222-SONY (7669).
The number below is for the FCC related matters only.
[ Regulatory Information
Declaration of Conformity
Trade Name: SONY
Model No.: DSC-HX50V
Responsible Party: Sony Electronics Inc.
Address: 16530 Via Esprillo,
Telephone No.: 858-942-2230
This device complies with Part15 of the FCC Rules. Operation is subject to the
following two conditions: (1) This device may not cause harmful interference, and (2)
this device must accept any interference received, including interference that may cause
undesired operation.
This equipment must not be co-located or operated in conjunction with any other antenna
or transmitter.
[ CAUTION
You are cautioned that any changes or modifications not expressly approved in this manual
could void your authority to operate this equipment.
[ Note:
This equipment has been tested and found to comply with the limits for a Class B digital
device, pursuant to Part 15 of the FCC Rules.
These limits are designed to provide reasonable protection against harmful interference in
a residential installation. This equipment generates, uses, and can radiate radio frequency
energy and, if not installed and used in accordance with the instructions, may cause
harmful interference to radio communications. However, there is no guarantee that
interference will not occur in a particular installation. If this equipment does cause harmful
interference to radio or television reception, which can be determined by turning the
equipment off and on, the user is encouraged to try to correct the interference by one or
more of the following measures:
– Reorient or relocate the receiving antenna.
– Increase the separation between the equipment and receiver.
– Connect the equipment into an outlet on a circuit different from that to which the
receiver is connected.
– Consult the dealer or an experienced radio/TV technician for help.
San Diego, CA 92127 U.S.A.
GB
GB
5
Page 6

The supplied interface cable must be used with the equipment in order to comply with the
limits for a digital device pursuant to Subpart B of Part 15 of FCC Rules.
For Customers in Canada
This device complies with Industry Canada licence-exempt RSS standard(s).
Operation is subject to the following two conditions: (1) this device may not cause
interference, and (2) this device must accept any interference, including interference that
may cause undesired operation of the device.
For Customers in Europe
Hereby, Sony Corporation, declares that this DSC-HX50/HX50V Digital Still Camera is in
compliance with the essential requirements and other relevant provisions of the Directive
1999/5/EC. For details, please access the following URL:
http://www.compliance.sony.de/
[ Notice for the customers in the countries applying EU Directives
This product has been manufactured by or on behalf of Sony Corporation, 1-7-1 Konan
Minato-ku Tokyo, 108-0075 Japan. Inquiries related to product compliance based on
European Union legislation shall be addressed to the authorized representative, Sony
Deutschland GmbH, Hedelfinger Strasse 61, 70327 Stuttgart, Germany. For any service or
guarantee matters, please refer to the addresses provided in the separate service or
guarantee documents.
This product has been tested and found compliant with the limits set out in the EMC
regulation for using connection cables shorter than 3 meters (9.8 feet).
[ Attention
The electromagnetic fields at the specific frequencies may influence the picture and sound
of this unit.
[ Notice
If static electricity or electromagnetism causes data transfer to discontinue midway (fail),
restart the application or disconnect and connect the communication cable (USB, etc.)
again.
GB
6
Page 7

[ Disposal of Old Electrical & Electronic Equipment (Applicable in
the European Union and other European countries with separate
collection systems)
This symbol on the product or on its packaging indicates that this product
shall not be treated as household waste. Instead it shall be handed over to
the applicable collection point for the recycling of electrical and
electronic equipment. By ensuring this product is disposed of correctly,
you will help prevent potential negative consequences for the
environment and human health, which could otherwise be caused by
inappropriate waste handling of this product. The recycling of materials
about recycling of this product, please contact your local Civic Office, your household
waste disposal service or the shop where you purchased the product.
will help to conserve natural resources. For more detailed information
[ Disposal of waste batteries (applicable in the European Union
and other European countries with separate collection systems)
This symbol on the battery or on the packaging indicates that the battery
provided with this product shall not be treated as household waste.
On certain batteries this symbol might be used in combination with a
chemical symbol. The chemical symbols for mercury (Hg) or lead (Pb) are
added if the battery contains more than 0.0005% mercury or 0.004% lead.
potentially negative consequences for the environment and human health which could
otherwise be caused by inappropriate waste handling of the battery. The recycling of the
materials will help to conserve natural resources.
In case of products that for safety, performance or data integrity reasons require a
permanent connection with an incorporated battery, this battery should be replaced by
qualified service staff only. To ensure that the battery will be treated properly, hand over
the product at end-of-life to the applicable collection point for the recycling of electrical
and electronic equipment.
For all other batteries, please view the section on how to remove the battery from the
product safely.
Hand the battery over to the applicable collection point for the recycling of waste batteries.
For more detailed information about recycling of this product or battery, please contact
your local Civic Office, your household waste disposal service or the shop where you
purchased the product.
By ensuring these batteries are disposed of correctly, you will help prevent
GB
GB
7
Page 8

Notice for customers in the United Kingdom
A moulded plug complying with BS 1363 is fitted to this equipment for your safety and
convenience.
Should the fuse in the plug supplied need to be replaced, a fuse of the same rating as the
supplied one and approved by ASTA or BSI to BS 1362, (i.e., marked with an or
mark) must be used.
If the plug supplied with this equipment has a detachable fuse cover, be sure to attach the
fuse cover after you change the fuse. Never use the plug without the fuse cover. If you
should lose the fuse cover, please contact your nearest Sony service station.
For Customers in Singapore
GB
8
Page 9
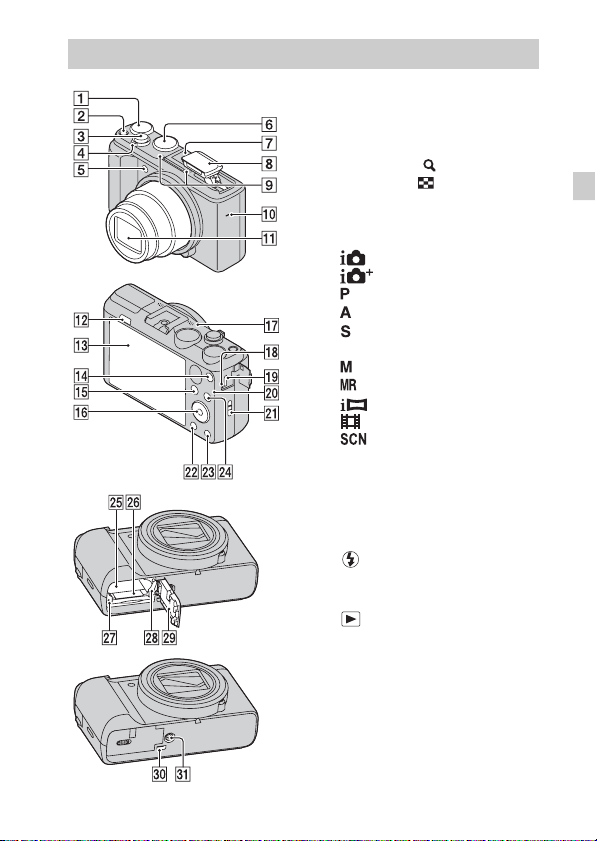
Identifying parts
A Exposure compensation dial
B ON/OFF (Power) button
C Shutter button
D For shooting: W/T (zoom) lever
For viewing: (Playback
zoom) lever/ (Index) lever
E Self-timer lamp/Smile Shutter
lamp/AF illuminator
F Mode dial:
(Intelligent Auto)/
(Superior Auto)/
(Program Auto)/
(Aperture Priority Shooting)/
(Shutter Speed Priority
Shooting)/
(Manual Exposure Shooting)/
(Memory recall mode)/
(iSweep Panorama)/
(Movie Mode)/
(Scene Selection)
G Multi interface shoe
H Flash
I Microphone
J Speaker
K Lens
L (Flash pop-up) button
M LCD screen
N MOVIE (Movie) button
O (Playback) button
P Control wheel
Q GPS receiver (built-in,
DSC-HX50V only)
R Charge lamp
S Multi/Micro USB Terminal
T Wi-Fi receiver (built-in)
U Hook for wrist strap
V MENU button
*1
*2
GB
GB
9
Page 10
W / (In-Camera Guide/Delete)
button
X CUSTOM (Custom) button
• You can assign a desired function
to the CUSTOM button. The
default setting is set to [ISO].
Y Battery insertion slot
Z Memory card slot
wj Access lamp
wk Battery eject lever
wl Battery/Memory card cover
e; HDMI micro jack
ea Tripod receptacle
• Use a tripod with a screw less
than 5.5 mm (7/32 inches) long.
Otherwise, you cannot firmly
secure the camera, and damage to
the camera may occur.
1
*
For details on compatible
accessories for the multi interface
shoe, visit the Sony web site, or
consult your Sony dealer or local
authorized Sony service facility.
You can also use accessories that
are compatible with the accessory
shoe. Operations with other
manufacturers’ accessories are not
guaranteed.
2
*
Supports Micro USB compatible
device.
GB
10
Page 11

Inserting the battery pack
Battery eject lever
Open the cover.
1
Insert the battery pack.
2
• While pressing the battery eject lever, insert the battery pack as
illustrated. Make sure that the battery eject lever locks after insertion.
• Closing the cover with the battery inserted incorrectly may damage the
camera.
GB
GB
11
Page 12
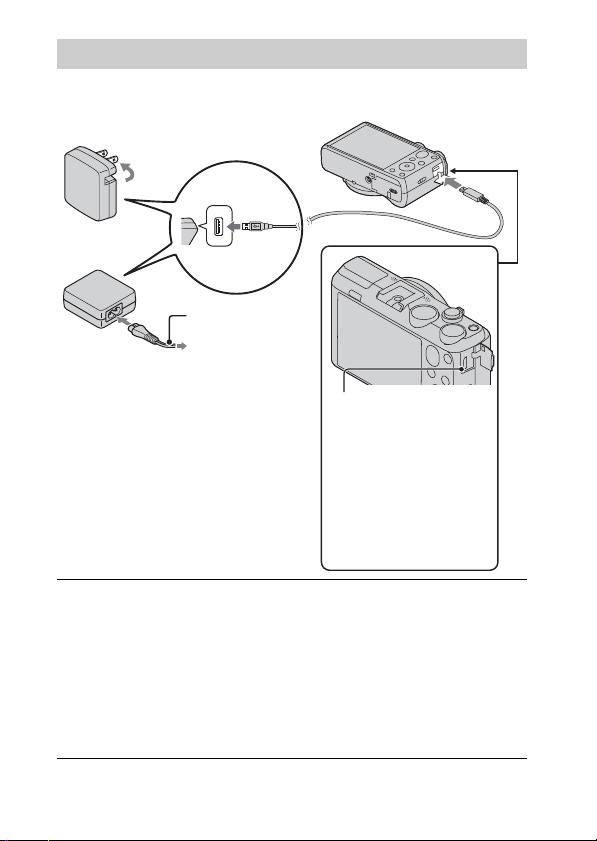
Charging the battery pack
For customers in the USA
and Canada
Power cord
(Mains lead)
For customers in countries/regions
other than the USA and Canada
Connect the camera to the AC Adaptor (supplied),
1
using the micro USB cable (supplied).
Charge lamp
Lit: Charging
Off: Charging finished
Flashing:
Charging error or
charging paused
temporarily because the
camera is not within the
proper temperature
range
Connect the AC Adaptor to the wall outlet (wall socket).
2
The Charge lamp lights orange, and charging starts.
• Turn off the camera while charging the battery.
• You can charge the battery pack even when it is partially charged.
• When the Charge lamp flashes and charging is not finished, remove and
re-insert the battery pack.
GB
12
Page 13
Notes
• If the Charge lamp on the camera flashes when the AC Adaptor is connected to the
wall outlet(wall socket), this indicates that charging is temporarily stopped
because the temperature is outside the recommended range. When the temperature
gets back within the appropriate range, the charging resumes. We recommend
charging the battery pack in an ambient temperature of between 10°C to 30°C
(50ºF to 86ºF).
• The battery pack may not be effectively charged if the terminal section of the
battery is dirty. In this case, wipe any dust off lightly using a soft cloth or a cotton
swab to clean the terminal section of the battery.
• Connect the AC Adaptor (supplied) to the nearest wall outlet(wall socket). If any
malfunctions occur while using the AC Adaptor, disconnect the plug from the wall
outlet(wall socket) immediately to disconnect the power source.
• When charging is finished, disconnect the AC Adaptor from the wall outlet(wall
socket).
• Be sure to use only genuine Sony brand battery packs, micro USB cable (supplied)
and AC Adaptor (supplied).
x
Charging time (Full charge)
The charging time is approximately 230 min. using the AC Adaptor
(supplied).
Notes
• The above charging time applies when charging a fully depleted battery pack at a
temperature of 25°C (77°F). Charging may take longer depending on conditions of
use and circumstances.
x
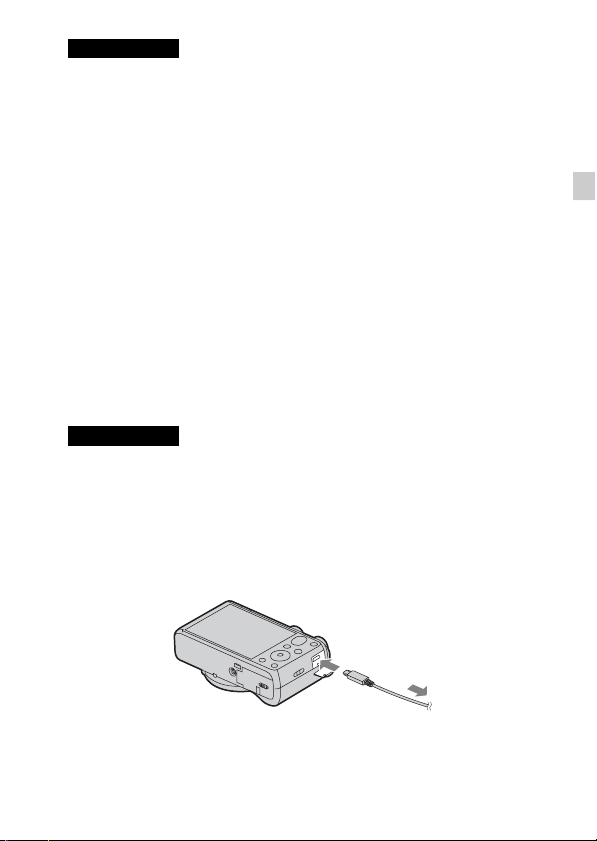
Charging by connecting to a computer
The battery pack can be charged by connecting the camera to a computer using
a micro USB cable.
GB
To a USB jack
GB
13
Page 14

Notes
• Note the following points when charging via a computer:
– If the camera is connected to a laptop computer that is not connected to a power
source, the laptop battery level decreases. Do not charge for an extended period
of time.
– Do not turn on/off or restart the computer, or wake the computer to resume from
sleep mode when a USB connection has been established between the computer
and the camera. The camera may cause a malfunction. Before turning on/off, or
restarting the computer or waking the computer from sleep mode, disconnect the
camera and the computer.
– No guarantees are made for charging using a custom-built computer or a
modified computer.
x
Battery life and number of images you can record and
view
Battery life Number of images
Shooting (still images) Approx. 200 min. Approx. 400 images
Typical movie shooting Approx. 55min. –
Continuous movie shooting Approx. 90 min. –
Viewing (still images) Approx. 320 min. Approx. 6400 images
Notes
• The above number of images applies when the battery pack is fully charged. The
number of images may decrease depending on the conditions of use.
• The number of images that can be recorded is for shooting under the following
conditions:
– Using Sony “Memory Stick PRO Duo” (Mark2) media (sold separately)
– The battery pack is used at an ambient temperature of 25°C (77°F).
– [GPS setting] is set to [Off] (DSC-HX50V only).
– [Disp. Resolution] is set to [Standard].
• The number for “Shooting still images” is based on the CIPA standard, and is for
shooting under the following conditions:
(CIPA: Camera & Imaging Products Association)
– DISP (Display Setting) is set to [ON].
– Shooting once every 30 seconds.
– The zoom is switched alternately between the W and T ends.
– The flash strobes once every two times.
– The power turns on and off once every ten times.
GB
14
Page 15

• The numbers of minutes for movie shooting are based on the CIPA standard, and
are for shooting under the following conditions:
– Movie quality: AVC HD HQ
– Typical movie shooting: Battery life based on repeatedly starting/stopping
shooting, zooming, turning on/off, etc.
– Continuous movie shooting: Battery life based on non-stop shooting until the
limit (29 minutes) has been reached, and then continued by pressing the MOVIE
button again. Other functions, such as zooming, are not operated.
x
Supplying power
The camera can be supplied with power from the wall outlet(wall socket) by
connecting to the AC Adaptor, using the micro USB cable (supplied).
You can import images to a computer without worrying about draining the
battery pack by connecting the camera to a computer using the micro USB
cable.
In addition, you can use the AC Adaptor AC-UD10 (sold separately) or
AC-UD11 (sold separately) for shooting to supply power when shooting.
Notes
• Power cannot be supplied when the battery pack is not inserted in the camera.
• Shooting is not possible when the camera is connected directly to a computer or to
a power outlet using the supplied AC Adaptor.
• If you connect the camera and a computer using the micro USB cable while the
camera is in playback mode, the display on the camera will change from the
playback screen to the USB connection screen. Press (Playback) button to
switch to the playback screen.
• The AC Adaptor AC-UD11 (sold separately) may not be available in some
countries/regions.
GB
GB
15
Page 16

Inserting a memory card (sold separately)
Ensure the notched corner faces
correctly.
Open the cover.
1
Insert the memory card (sold separately).
2
• With the notched corner facing as illustrated, insert the memory card
until it clicks into place.
Close the cover.
3
16
GB
Page 17

x
Memory cards that you can use
Memory card For still images For movies
A Memory Stick XC-HG Duo
Memory Stick PRO Duo (Mark2 only)
B
Memory Stick PRO-HG Duo
C Memory Stick Micro (M2) (Mark2 only)
SD memory card (Class 4 or faster)
D
SDHC memory card (Class 4 or faster)
SDXC memory card (Class 4 or faster)
microSD memory card (Class 4 or faster)
E
microSDHC memory card (Class 4 or faster)
microSDXC memory card (Class 4 or faster)
• In this manual, the products in the table are collectively referred to as follows:
A: “Memory Stick XC Duo” media
B: “Memory Stick PRO Duo” media
C: “Memory Stick Micro” media
D: SD card
E: microSD memory card
Notes
• To use a “Memory Stick Micro” media or microSD memory card with the camera,
be sure to insert it into a dedicated adaptor first.
x
To remove the memory card/battery pack
Memory card: Push the memory card in once to eject the memory card.
Battery pack: Slide the battery eject lever. Be sure not to drop the battery pack.
Notes
• Never remove the memory card/battery pack when the access lamp (page 9) is lit.
This may cause damage to data in the memory card/internal memory.
GB
GB
17
Page 18
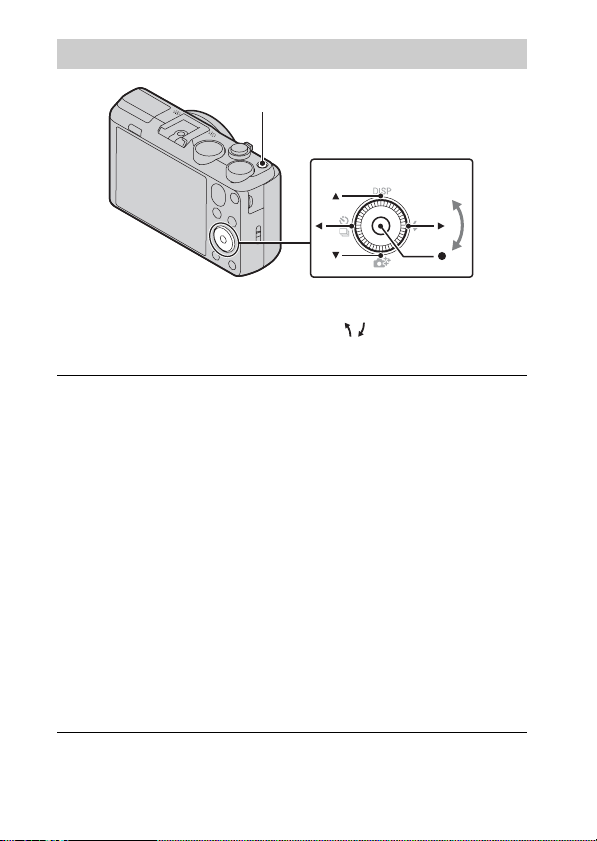
Setting the clock
ON/OFF (Power)
Control wheel
Select items: v/V/b/B
Set the numeric value of date and
time: /
z
Set:
Press the ON/OFF (Power) button.
1
Date & Time setting is displayed when you turn on the camera for the first
time.
• It may take time for the power to turn on and allow operation.
Select a desired language.
2
Select a desired geographic location by following the
3
on-screen instructions, then press z.
Set [Date & Time Format], [Daylight Savings] or
4
[Summer Time] and [Date & Time], then select [OK] t
[OK].
• Midnight is indicated as 12:00 AM, and noon as 12:00 PM.
Follow the instructions on the screen.
5
• The battery pack will run out quickly when:
– [GPS setting] is set to [On] (DSC-HX50V only).
– [Disp. Resolution] is set to [High].
18
GB
Page 19
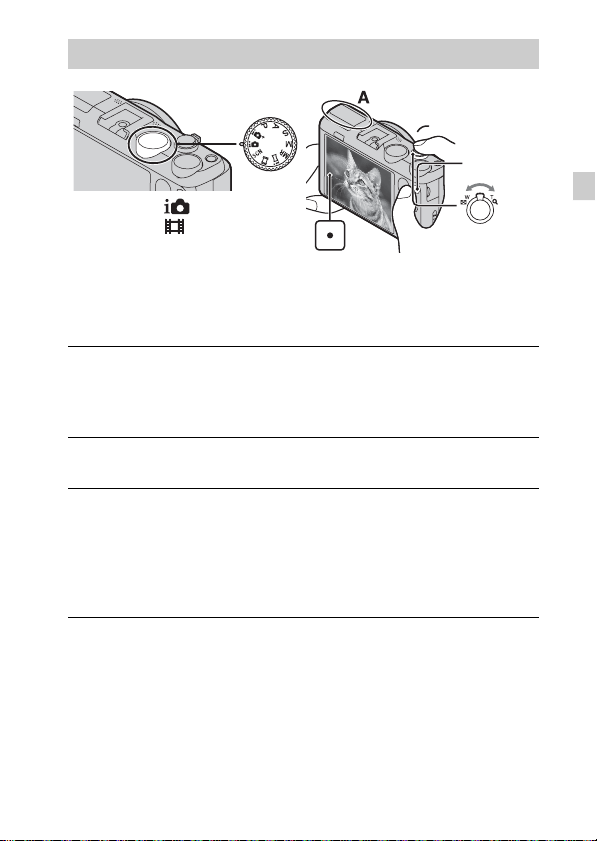
Shooting still images/movies
Shutter button
Mode dial
: Intelligent Auto
: Movie Mode
Do not cover the flash (A).
Shooting still images
Press the shutter button halfway down to focus.
1
When the image is in focus, a beep sounds and the z indicator lights.
Press the shutter button fully down to shoot an image.
2
Shooting movies
Press the MOVIE (Movie) button to start recording.
1
• Use the W/T (zoom) lever to change the zoom scale.
• Press the shutter button to shoot still images while continuing to record
the movie.
Press the MOVIE button again to stop recording.
2
W/T (Zoom)
lever
W: zoom out
T: zoom in
MOVIE
GB
GB
19
Page 20
Notes
• If you use the zoom function while shooting a movie, the sounds of the lens
moving and the lever being operated will be recorded. The sound of the MOVIE
button operating may also be recorded when movie recording is finished.
• The panoramic shooting range may be reduced, depending on the subject or the
way it is shot. Therefore even when [360°] is set for panoramic shooting, the
recorded image may be less than 360 degrees.
• Continuous shooting is possible for approximately 29 minutes at one time at the
camera’s default settings and when the temperature is approximately 25°C (77°F).
When movie recording is finished, you can restart recording by pressing the
MOVIE button again. Recording may stop to protect the camera depending on the
ambient temperature.
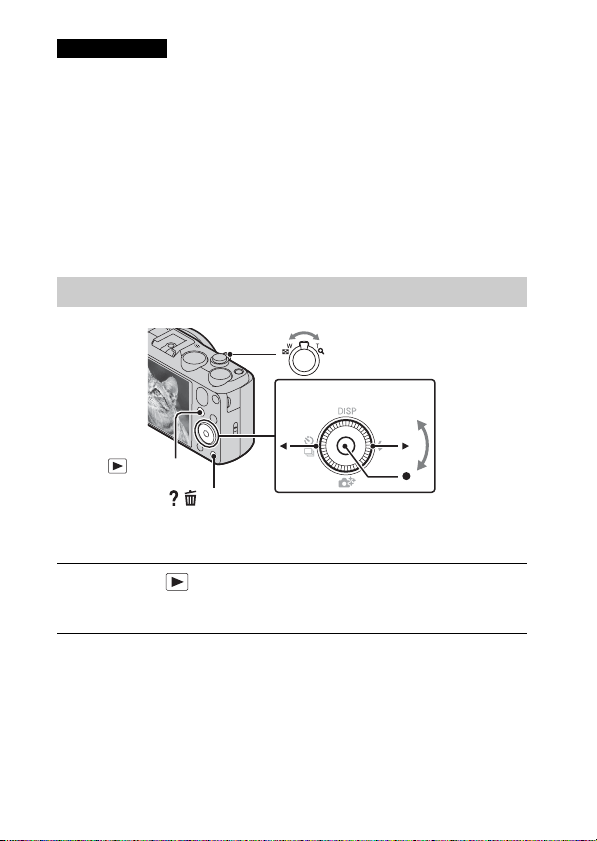
Viewing images
W: zoom out
T: zoom in
Control wheel
(Playback)
/ (Delete)
Press the (Playback) button.
1
• When images on a memory card recorded with other cameras are played
back on this camera, the registration screen for the data file appears.
Select images: B (next)/b (previous) or
turn the control wheel
Set: z
x
Selecting next/previous image
Select an image by pressing B (next)/b (previous) on the control wheel or by
turning the control wheel. Press z in the center of the control wheel to view
movies.
GB
20
Page 21

x
Deleting an image
1 Press / (Delete) button.
2 Select [This Image] with v on the control wheel, then press z.
x
Returning to shooting images
Press the shutter button halfway down.
In-Camera Guide
This camera contains an internal function guide. This allows you to search the
camera’s functions according to your needs.
/ (In-Camera Guide)
MENU
Press the MENU button.
1
Select the desired MENU item, then press the /
2
(In-Camera Guide) button.
The operation guide for the selected item is displayed.
• If you press the / (In-Camera Guide) button when the MENU screen
is not displayed, you can search the guide using keywords or icons.
GB
GB
21
Page 22
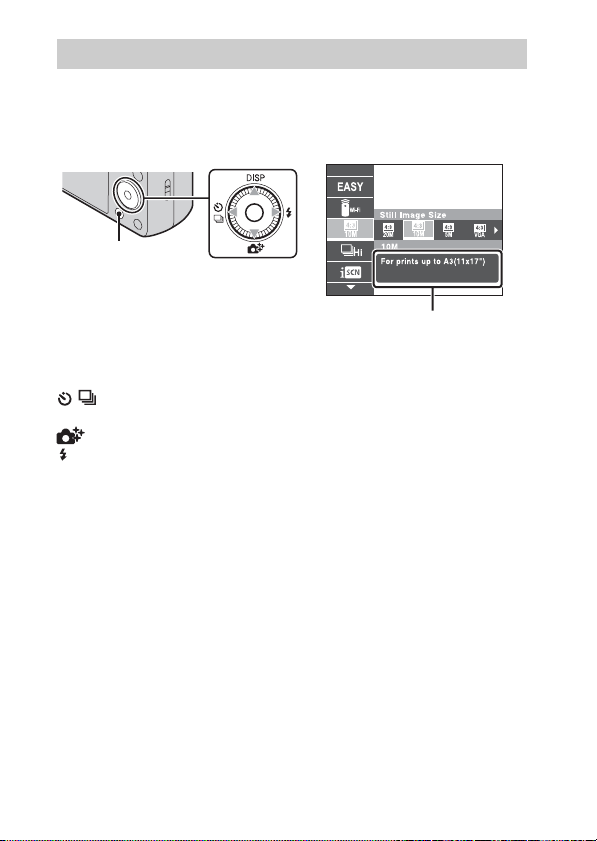
Introduction of other functions
Other functions used when shooting or playing back can be operated using the
control wheel or MENU button on the camera. This camera is equipped with a
Function Guide that allows you to easily select from the functions. While
displaying the guide, try the other functions.
MENU
x
Control wheel
DISP (Display Setting): Allows you to change the screen display.
/ (Cont. Shooting/Self-Timer): Allows you to use the self-timer and
burst shooting mode.
(Photo Creativity): Allows you to operate the camera intuitively.
(Flash): Allows you to select a flash mode for still images.
Center button (Tracking focus): The camera tracks the subject and adjusts
focus automatically even when the subject is moving.
GB
Control wheel
Function Guide
22
Page 23

x
Menu Items
Shooting
Movie shooting
scene
Panorama
Shooting Scene
Picture Effect
Scene Selection Select pre-set settings to match various scene conditions.
Memory recall
mode
Easy Mode Shoot still images using minimal functions.
Defocus Effect
Ctrl with
Smartphone
Send to
Computer
Still Image
Size(Dual Rec)
Still Image Size/
Panorama Image
Size/Movie Quality/
Movie Size
HDR Painting
effect
Area of emphasis
Color hue
Extracted Color
Illustration Effect
1
*
Select movie recording mode.
Select recording mode when shooting panoramic images.
Shoot a still image with an original texture according to
the desired effect.
Select a setting you want to recall when the mode dial is
set to [Memory recall mode].
Set the level of background defocus effect when
shooting in Background Defocus mode.
Shoot still images and movies by controlling the camera
remotely by a smartphone.
Back up images by transferring them to a computer
connected to a network.
Set the still image size shot while recording a movie.
Select the image size and the quality for still images,
panoramic images or movie files.
When [HDR Painting] is selected in Picture Effect, set
the effect level.
When [Miniature] is selected in Picture Effect, set the
part to focus on.
When [Toy camera] is selected in Picture Effect, set the
color hue.
When [Partial Color] is selected in Picture Effect, select
the color to extract.
When [Illustration] is selected in Picture Effect, set the
effect level.
GB
GB
23
Page 24

ISO Adjust the luminous sensitivity.
White Balance Adjust color tones of an image.
White Balance
Shift
Adjust color tones according to the adjusted value set
based on the selected White Balance tone.
Focus Select the focus method.
Metering Mode
Cont. Shooting
Interval
Select the metering mode that sets which part of the
subject to measure to determine the exposure.
Select the number of images taken per second for Burst
shooting.
Bracket Setting Set the type of the bracket shooting.
Scene Recognition Set to automatically detect shooting conditions.
Soft Skin Effect Set the Soft Skin Effect and the effect level.
Smile Shutter
Smile Detection
Sensitivity
Face Detection
Color Mode
Set to automatically release the shutter when a smile is
detected.
Set the Smile Shutter function sensitivity for detecting
smiles.
Select to detect faces and adjust various settings
automatically.
Select the vividness of the image, accompanied by
effects.
Color Saturation Adjust the vividness of the image.
Contrast Adjust the contrast of the image.
Sharpness Adjust the sharpness of the image.
Noise Reduction Adjust the image resolution and the noise balance.
Anti Blink
Set to automatically shoot two images and select image
in which the eyes are not blinking.
Set the strength of SteadyShot in Movie Mode. If you
Movie SteadyShot
change the setting for [Movie SteadyShot], the angle of
view will change.
Position
Information
GPS Log REC
GB
*2
Check the GPS triangulating status and update the
position information.
*2
Record the route taken while carrying the camera.
24
Page 25

Register Setting
In-Camera Guide Search the camera’s functions according to your needs.
*1Displayed only when a memory card is inserted.
2
*
DSC-HX50V only
Register the desired modes or camera settings. Set the
mode dial to (Memory recall mode) to retrieve the
registered settings.
Viewing
Send to
Smartphone
View on TV View images on a network-enabled TV.
Send to Computer*
Retouch Retouch an image using various effects.
Picture Effect Add various texture on images.
Slideshow Select a method of continuous playback.
Delete Delete an image.
3D Viewing Set to play back images shot in 3D mode on a 3D TV.
View Mode
Display Cont.
Shooting Group
Protect Protect the images.
Print (DPOF)
Rotate Rotate a still image to the left or right.
In-Camera Guide Search the camera’s functions according to your needs.
* Displayed only when a memory card is inserted.
*
Upload and transfer images to a smartphone.
Back up images by transferring them to a computer
connected to a network.
Select the display format for images.
Select to display burst images in groups or display all
images during playback.
*
Add a print order mark to a still image.
GB
GB
25
Page 26

x
Setting items
If you press the MENU button while shooting or during playback,
(Settings) is provided as a final selection. You can change the default
settings on the (Settings) screen.
Movie format/AF Illuminator/Grid Line/Clear Image
Shooting Settings
Zoom/Digital Zoom/Wind Noise Reduct./Micref Level/
Red Eye Reduction/Blink Alert/Write Date/Expanded
Focus/Custom Button/Disp. Resolution
Beep/Panel Brightness/Language Setting/Display color/
Demo Mode/Initialize/Function Guide/HDMI
Main Settings
Resolution/CTRL FOR HDMI/USB Connect Setting/
USB Power Supply/LUN Setting/Download Music/
Empty Music/Airplane Mode/GPS setting
*
3
data
/Dlt.GPS Log Data
*
3
/Eye-Fi
*
3
*
1
/Power Save/
/GPS assist
Version
Network Settings
Memory Card
*2
Tool
Clock Settings
*1Displayed only when an Eye-Fi memory card is inserted.
2
If a memory card is not inserted, (Internal Memory Tool) will be displayed
*
and only [Format] can be selected.
3
*
DSC-HX50V only
WPS Push/Access point settings/Edit Device Name/
SSID/PW Reset/Disp MAC Address
Format/Create REC.Folder/Change REC.Folder/Delete
REC.Folder/Copy/File Number
Area Setting/Date & Time Setting/Auto Clock ADJ
Auto Area ADJ
*
3
*
3
/
26
GB
Page 27

Features of “PlayMemories Home”
The software “PlayMemories Home” allows you to import still images and
movies to your computer and use them. “PlayMemories Home” is required for
importing AVCHD movies to your computer.
Sharing images on
“PlayMemories Online”
Uploading images to
network services
Importing
images from
your camera
Viewing images
on Calendar
Creating movie
discs
z Downloading “PlayMemories Home” (for Windows only)
You can download “PlayMemories Home” from the following URL:
www.sony.net/pm
Notes
• An Internet connection is required to install “PlayMemories Home”.
• An Internet connection is required to use “PlayMemories Online” or other network
services. “PlayMemories Online” or other network services may not be available
in some countries or regions.
• “PlayMemories Home” is not compatible with Macs. Use the applications that are
installed on your Mac. For details, visit the following URL:
http://www.sony.co.jp/imsoft/Mac/
GB
GB
27
Page 28

x
Installing “PlayMemories Home” on a computer
Using the Internet browser on your computer, go to the
1
following URL, then click [Install] t [Run].
www.sony.net/pm
Follow the
2
instructions on the
screen to complete
the installation.
• When the message to
connect the camera to a
computer is displayed,
connect the camera and
computer using the micro
USB cable (supplied).
x
Viewing “PlayMemories Home Help Guide”
For details on how to use “PlayMemories Home”, refer to the “PlayMemories
Home Help Guide”.
Double-click the [PlayMemories Home Help Guide] icon
1
on the desktop.
• To access the “PlayMemories Home Help Guide” from the start menu:
Click [Start] t [All Programs] t [PlayMemories Home] t
[PlayMemories Home Help Guide].
• For Windows 8, select the [PlayMemories Home] icon from the Start
screen to start [PlayMemories Home], then select [PlayMemories Home
Help Guide] from [Help] menu.
• For details on “PlayMemories Home”, you can also see the “Cyber-shot User
Guide” (page 2) or the following PlayMemories Home support page (English
only):
http://www.sony.co.jp/pmh-se/
To the Multi/
Micro USB
Terminal
To a USB jack
28
GB
Page 29

Number of still images and recordable time of movies
The number of still images and recordable time may vary depending on the
shooting conditions and the memory card.
x
Still images
(Units: Images)
Capacity
Size
20M 7 295
VGA 155 6400
16:9(15M) 8 325
x
Movies
The table below shows the approximate maximum recording times. These are
the total times for all movie files. Continuous shooting is possible for
approximately 29 minutes (a product specification limit). The maximum
continuous recording time of an MP4 (12M) format movie is about 15 minutes
(limited by the 2 GB file size restriction).
Capacity
Size
AVC HD 28M (PS)
AVC HD 24M (FX)
AVC HD 9M (HQ)
MP4 12M — 15 m
MP4 3M — 1 h 10 m
The number in ( ) is the minimum recordable time.
• The recordable time of movies varies because the camera is equipped with VBR
(Variable Bit Rate), which automatically adjusts image quality depending on the
shooting scene. When you record a fast-moving subject, the image is clearer but
the recordable time is shorter because more memory is required for recording.
Internal memory Memory card
Approx. 48 MB 2 GB
(h (hour), m (minute))
Internal memory Memory card
Approx. 48 MB 2 GB
—
—
—
8m
(8 m)
10 m
(10 m)
25 m
(15 m)
GB
GB
29
Page 30

The recordable time also varies depending on the shooting conditions, the subject
or the image quality/size settings.
Notes on using the camera
Functions built into this camera
• This manual describes each of the functions of 1080 60i-compatible devices and
1080 50i-compatible devices.
– To determine whether your camera supports the GPS function, check the model
name of your camera.
GPS-compatible: DSC-HX50V
GPS-incompatible: DSC-HX50
– To check if your camera is a 1080 60i-compatible device or 1080 50i-compatible
device, check for the following marks on the bottom of the camera.
1080 60i-compatible device: 60i
1080 50i-compatible device: 50i
• This camera is compatible with 1080 60p or 50p-format movies. Unlike standard
recording modes up to now, which record in an interlacing method, this camera
records using a progressive method. This increases the resolution, and provides a
smoother, more realistic image.
• While abroad an airplane, set [Airplane Mode] to [On] (DSC-HX50V only).
• Do not watch 3D images shot with this camera for extended periods of time on
3D-compatible monitors.
• When you view 3D images shot with this camera on a 3D-compatible monitor,
you may experience discomfort in the form of eye strain, fatigue, or nausea. To
prevent these symptoms, we recommend that you take regular breaks. However,
you need to determine for yourself the length and frequency of breaks you require,
as they vary according to the individual. If you experience any type of discomfort,
stop viewing the 3D images until you feel better, and consult a physician as
necessary. Also refer to the operating instructions supplied with the device or
software you have connected or are using with this camera. Note that a child’s
eyesight is still at the development stage (particularly children below the age of 6).
Consult a pediatrician or ophthalmologist before letting your child view 3D
images, and make sure he/she observes the above precautions when viewing such
images.
On GPS-compatible devices (DSC-HX50V only)
• Use GPS in accordance with regulations of countries and regions where you use it.
• If you do not record the location information, set [GPS setting] to [Off].
On use and care
Avoid rough handling, disassembling, modifying, physical shock, or impact such as
hammering, dropping, or stepping on the product. Be particularly careful of the lens.
GB
30
Page 31

Notes on recording/playback
• Before you start recording, make a trial recording to make sure that the camera is
working correctly.
• The camera is neither dust-proof, nor splash-proof, nor water-proof.
• Avoid exposing the camera to water. If water enters inside the camera, a
malfunction may occur. In some cases, the camera cannot be repaired.
• Do not aim the camera at the sun or other bright light. It may cause the
malfunction of the camera.
• If moisture condensation occurs, remove it before using the camera.
• Do not shake or strike the camera. It may cause a malfunction and you may not be
able to record images. Furthermore, the recording media may become unusable or
image data may be damaged.
Do not use/store the camera in the following places
• In an extremely hot, cold or humid place
In places such as in a car parked in the sun, the camera body may become
deformed and this may cause a malfunction.
• Under direct sunlight or near a heater
The camera body may become discolored or deformed, and this may cause a
malfunction.
• In a location subject to rocking vibration
• Near a location that generates strong radio waves, emits radiation or is strongly
magnetic place. Otherwise, the camera may not properly record or play back
images.
• In sandy or dusty places
Be careful not to let sand or dust get into the camera. This may cause the camera to
malfunction, and in some cases this malfunction cannot be repaired.
Notes on the screen and lens
The screen is manufactured using extremely high-precision technology so over
99.99% of the pixels are operational for effective use. However, some tiny black
and/or bright dots (white, red, blue or green) may appear on the screen. These dots
are a normal result of the manufacturing process, and do not affect the recording.
On camera’s temperature
Your camera and battery may get hot due to continuous use, but it is not a
malfunction.
On the overheat protection
Depending on the camera and battery temperature, you may be unable to record
movies or the power may turn off automatically to protect the camera.
A message will be displayed on the screen before the power turns off or you can no
longer record movies. In this case, leave the power off and wait until the camera and
battery temperature goes down. If you turn on the power without letting the camera
and battery cool enough, the power may turn off again or you may be unable to
record movies.
GB
GB
31
Page 32

On charging the battery
If you charge a battery that has not been used for a long time, you may be unable to
charge it to the proper capacity.
This is due to the battery characteristics, and is not a malfunction. Charge the battery
again.
Warning on copyright
Television programs, films, videotapes, and other materials may be copyrighted.
Unauthorized recording of such materials may be contrary to the provisions of the
copyright laws.
No compensation for damaged content or recording failure
Sony cannot compensate for failure to record or loss or damage of recorded content
due to a malfunction of the camera or recording media, etc.
Cleaning the camera surface
Clean the camera surface with a soft cloth slightly moistened with water, then wipe
the surface with a dry cloth. To prevent damage to the finish or casing:
– Do not expose the camera to chemical products such as thinner, benzine, alcohol,
disposable cloths, insect repellent, sunscreen or insecticide.
Maintaining the screen
• Hand cream or moisturizer left on the screen may dissolve its coating. If you get
any on the screen, wipe it off immediately.
• Wiping forcefully with tissue paper or other materials can damage the coating.
• If fingerprints or debris are stuck to the screen, we recommend that you gently
remove any debris and then wipe the screen clean with a soft cloth.
Note on wireless LAN
We assume no responsibility whatsoever for any damage caused by unauthorized
access to, or unauthorized use of, destinations loaded on the camera, resulting from
loss or theft.
Note on disposal/transfer of the camera
To protect personal data, perform the following when disposing of or transferring
the camera.
• Format the internal memory (page 26), record images up to full capacity of the
internal memory with the lens covered, and then format the internal memory
again.
This will make it difficult to recover any of your original data.
• Reset all camera settings by performing [Initialize] t [All settings] (page 26).
32
GB
Page 33

Specifications
Camera
[System]
Image device: 7.82 mm (1/2.3 type)
Exmor R CMOS sensor
Total pixel number of camera:
Approx. 21.1 Megapixels
Effective pixel number of camera:
Approx. 20.4 Megapixels
Lens: Sony G 30× zoom lens
f = 4.3 mm – 129 mm (24 mm –
720 mm (35 mm film equivalent))
F3.5 (W) – F6.3 (T)
While shooting movies (16:9):
26.5 mm – 795 mm*
While shooting movies (4:3):
32.5 mm – 975 mm*
* When [Movie SteadyShot] is set
to [Standard]
SteadyShot: Optical
Exposure control: Automatic exposure,
Shutter speed priority, Aperture
priority, Manual exposure, Scene
Selection
White balance: Automatic, Daylight,
Cloudy, Fluorescent 1/2/3,
Incandescent, Flash, One Push,
White Balance Shift
File format:
Still images: JPEG (DCF, Exif,
MPF Baseline) compliant, DPOF
compatible
3D still images: MPO (MPF
Extended (Disparity Image))
compliant
Movies (AVCHD format):
AVCHD format Ver.2.0
compatible
Video: MPEG-4 AVC/H.264
Audio: Dolby Digital 2ch,
equipped with Dolby Digital Stereo
Creator
• Manufactured under license from
Dolby Laboratories.
Movies (MP4 format):
Video: MPEG-4 AVC/H.264
Audio: MPEG-4 AAC-LC 2ch
Recording media: Internal Memory
(Approx. 48 MB), “Memory Stick
XC Duo” media, “Memory Stick
PRO Duo” media, “Memory Stick
Micro” media, SD cards, microSD
memory cards
Flash: Flash range (ISO sensitivity
(Recommended Exposure Index)
set to Auto):
Approx. 0.25 m to 5.6 m
(0.82 ft. to 18.37 ft.) (W)/
Approx. 2.0 m to 3.0 m
(6.56 ft. to 9.84 ft.) (T)
GB
GB
33
Page 34

[Input and Output connectors]
HDMI connector: HDMI micro jack
Multi/Micro USB Terminal
USB communication
USB communication: Hi-Speed USB
(USB 2.0)
* Supports Micro USB compatible
device.
*
:
[LCD screen]
LCD panel: 7.5 cm (3.0 type) TFT
drive
Total number of dots: 921 600 dots
[Power, general]
Power: Rechargeable battery pack
NP-BX1, 3.6 V
AC Adaptor AC-UB10/UB10B/
UB10C/UB10D, 5 V
Power consumption (during shooting):
Approx. 1.2 W
Operating temperature: 0 °C to 40 °C
(32 °F to 104 °F)
Storage temperature: –20 °C to +60 °C
(–4 °F to +140 °F)
Dimensions (CIPA compliant):
108.1 mm × 63.6 mm × 38.3 mm
(4 3/8 inches × 2 5/8 inches ×
1 9/16 inches)
(W/H/D)
Mass (CIPA compliant) (including
NP-BX1 battery pack, “Memory
Stick PRO Duo” media):
Approx. 272 g (9.6 oz)
Microphone: Stereo
Speaker: Monaural
Exif Print: Compatible
PRINT Image Matching III:
Compatible
[Wireless LAN]
Supported standard: IEEE 802.11 b/g/n
Frequency: 2.4GHz
Supported security protocols: WEP/
WPA-PSK/WPA2-PSK
Configuration method: WPS (Wi-Fi
Protected Setup) / manual
Access method: Infrastructure Mode
AC Adaptor AC-UB10/UB10B/
UB10C/UB10D
Power requirements: AC 100 V to
240 V, 50 Hz/60 Hz, 70 mA
Output voltage: DC 5 V, 0.5 A
Operating temperature: 0 °C to 40 °C
(32 °F to 104 °F)
Storage temperature: –20 °C to +60 °C
(–4 °F to +140 °F)
Dimensions:
Approx. 50 mm × 22 mm × 54 mm
(2 inches × 7/8 inches × 2 1/4
inches) (W/H/D)
Mass:
For the USA and Canada: Approx.
48 g (1.7 oz)
For countries or regions other than
the USA and Canada: Approx. 43 g
(1.5 oz)
Rechargeable battery pack
NP-BX1
Used battery: Lithium-ion battery
Maximum voltage: DC 4.2 V
Nominal voltage: DC 3.6 V
Maximum charge voltage: DC 4.2 V
Maximum charge current: 1.89 A
Capacity: 4.5 Wh (1 240 mAh)
Design and specifications are subject to
change without notice.
34
GB
Page 35

Trademarks
• The following marks are trademarks
of Sony Corporation.
, “Cyber-shot,”
“Memory Stick XC-HG Duo,”
“Memory Stick PRO Duo,”
“Memory Stick PRO-HG Duo,”
“Memory Stick Duo,” “Memory
Stick Micro”
• “AVCHD Progressive” and
“AVCHD Progressive” logotype are
trademarks of Panasonic Corporation
and Sony Corporation.
• The terms HDMI and HDMI
High-Definition Multimedia
Interface, and the HDMI Logo are
trademarks or registered trademarks
of HDMI Licensing LLC in the
United States and other countries.
• Windows is registered trademark of
Microsoft Corporation in the United
States and/or other countries.
• Mac, App Store are registered
trademarks of Apple Inc.
• iOS is a registered trademark or
trademark of Cisco Systems, Inc.
and/or its affiliates in the United
States and certain other countries.
• Android, Google Play are trademarks
of Google Inc.
• Wi-Fi, the Wi-Fi logo, Wi-Fi
PROTECTED SET-UP are registered
trademarks of the Wi-Fi Alliance.
• DLNA and DLNA CERTIFIED are
trademarks of Digital Living
Network Alliance.
• SDXC logo is a trademark of SD-3C,
LLC.
• “ ” and “PlayStation” are
registered trademarks of Sony
Computer Entertainment Inc.
• Facebook and the “f” logo are
trademarks or registered trademarks
of Facebook, Inc.
• YouTube and the YouTube logo are
trademarks or registered trademarks
of Google Inc.
• In addition, system and product
names used in this manual are, in
general, trademarks or registered
trademarks of their respective
developers or manufacturers.
However, the ™ or ® marks are not
used in all cases in this manual.
• Add further enjoyment with your
PlayStation 3 by downloading the
application for PlayStation 3 from
PlayStation Store (where available.)
• The application for PlayStation 3
requires PlayStation Network
account and application download.
Accessible in areas where the
PlayStation Store is available.
Additional information on this
product and answers to frequently
asked questions can be found at
our Customer Support Website.
Printed on 70% or more recycled paper
using VOC (Volatile Organic
Compound)-free vegetable oil based
ink.
GB
GB
35
Page 36

Français
Mieux connaître votre appareil (« Guide de l’utilisateur du Cyber-shot »)
Le « Guide de l’utilisateur du Cyber-shot » est un manuel en
ligne. Reportez-vous y pour des instructions approfondies sur
les nombreuses fonctions de l’appareil.
1 Accédez à la page de support Sony.
http://www.sony.net/SonyInfo/Support/
2 Sélectionnez votre pays ou région.
3 Recherchez le nom de modèle de votre appareil sur la
page de support.
• Vérifiez le nom de modèle sur la face inférieure de
votre appareil.
Vérification des éléments fournis
Le nombre entre parenthèses indique le nombre d’unités.
• Appareil photo (1)
• Batterie rechargeable NP-BX1 (1)
• Câble micro-USB (1)
• Adaptateur secteur AC-UB10/UB10B/UB10C/UB10D (1)
• Cordon d’alimentation (non fourni aux Etats-Unis et au Canada) (1)
• Dragonne (1)
• Capuchon de la griffe (1) (fixée à l’appareil)
• Mode d’emploi (ce manuel) (1)
FR
2
Page 37

Aide-mémoire
Les numéros de modèle et de série se situent sous l’appareil. Prendre en note le numéro de
série dans l’espace prévu ci-dessous. Se reporter à ces numéros lors des communications
avec le détaillant Sony au sujet de ce produit.
Modèle no DSC-HX50/DSC-HX50V
No de série ____________________________
Modèle no AC-UB10/AC-UB10B/AC-UB10C/AC-UB10D
No de série ____________________________
AVERTISSEMENT
Afin de réduire les risques d’incendie ou de décharge électrique,
n’exposez pas cet appareil à la pluie ou à l’humidité.
IMPORTANTES INSTRUCTIONS DE SECURITE
- CONSERVEZ CES INSTRUCTIONS
DANGER
AFIN DE REDUIRE LE RISQUE D’INCENDIE OU DE
DECHARGE ELECTRIQUE, SUIVEZ EXACTEMENT CES
INSTRUCTIONS
Si la forme de la fiche ne correspond pas à la prise secteur, utilisez un adaptateur de fiche
accessoire de configuration correcte pour la prise secteur.
ATTENTION
[ Batterie
Toute erreur de manipulation de la batterie peut provoquer son explosion, entraîner un
incendie, voire même des brûlures de substances chimiques. Respectez les précautions
suivantes :
• Ne démontez pas la batterie.
• N’écrasez et n’exposez pas la batterie à des chocs ou à une force extérieure. Vous ne
devez pas la frapper avec un marteau, la laisser tomber ou marcher dessus.
• Ne court-circuitez pas les bornes de la batterie et maintenez-les à l’écart de tout contact
avec des objets métalliques.
• N’exposez pas la batterie à des températures supérieures à 60 °C (140 °F), notamment
les rayons directs du soleil ou l’habitacle d’un véhicule garé au soleil.
• N’incinérez pas la batterie et ne la jetez pas au feu.
• Ne manipulez jamais des batteries lithium ion qui sont endommagées ou présentent une
fuite.
FR
FR
3
Page 38

• Veillez à recharger la batterie à l’aide d’un chargeur Sony authentique ou d’un appareil
capable de la recharger.
• Tenez la batterie hors de la portée des petits enfants.
• Gardez la batterie au sec.
• Remplacez-la uniquement par une batterie de même type ou d’un type équivalent
recommandé par Sony.
• Mettez les batteries au rebut sans attendre, de la manière décrite dans les instructions.
[ Adaptateur secteur
Lorsque vous utilisez l’adaptateur secteur, branchez-le à une prise murale se trouvant à
proximité. En cas de dysfonctionnement lors de l’utilisation de l’appareil, débranchez
immédiatement l’adaptateur secteur de la prise murale.
Pour les utilisateurs au Canada
[ RECYCLAGE DES ACCUMULATEURS AUX IONS DE LITHIUM
Les accumulateurs aux ions de lithium sont recyclables.
Vous pouvez contribuer à préserver l’environnement en rapportant les
piles usagées dans un point de collecte et de recyclage le plus proche.
Pour plus d’informations sur le recyclage des accumulateurs,
téléphonez au numéro gratuit 1-800-822-8837 (Etats-Unis et Canada
uniquement), ou visitez
http://www.rbrc.org/
Avertissement : Ne pas utiliser des accumulateurs aux ions de lithium qui sont
endommagés ou qui fuient.
[ Batterie
Cet appareil est conforme à la section 15 des règlements FCC. Son fonctionnement est
soumis aux deux conditions suivantes : (1) cet appareil ne doit pas provoquer
d’interférences nuisibles, (2) cet appareil doit accepter toute interférence, y compris celles
susceptibles de provoquer son fonctionnement indésirable.
Cet appareil numérique de la classe B est conforme à la norme NMB-003 du Canada.
Cet appareil est conforme aux exigences de la FCC (Commission américaine des
communications) et d’IC (Industrie Canada) relatives aux limites d’exposition aux
radiations énoncées pour un environnement non contrôlé. Il est également conforme aux
directives de la FCC en matière d’exposition aux fréquences radioélectriques (RF)
énoncées au Supplément C de l’OET65, ainsi qu’aux normes d’IC relatives à l’exposition
aux fréquences radioélectriques énoncées au CNR-102 (Cahier des charges sur les normes
radioélectriques).
Cet appareil présente des niveaux très peu élevés d’énergie RF, réputés conformes sans test
du débit d’absorption spécifique (SAR).
FR
4
Page 39

À l’intention des clients aux É.-U.
UL est une organisation de sécurité reconnue internationalement.
La marque UL sur le produit signifie que celui-ci est listé par UL.
Pour toute question au sujet de cet appareil, appeler :
Sony Centre d’information à la clientèle
1-800-222-SONY (7669).
Le numéro ci-dessous concerne seulement les questions relevant de la Commission
fédérale des communications des États-Unis (FCC).
[ Information réglementaire
Déclaration de conformité
Nom commercial : SONY
No de modèle : DSC-HX50V
Responsable : Sony Electronics Inc.
Adresse : 16530 Via Esprillo, San Diego, CA 92127 É.-U.
No de téléphone : 858-942-2230
Cet appareil est conforme à la Partie 15 de la réglementation de la FCC des États-Unis.
Son utilisation est sujette aux deux conditions suivantes : (1) Cet appareil ne doit pas
générer d’interférences nuisibles et (2) il doit être en mesure d’accepter toute
interférence reçue, y compris les interférences pouvant générer un fonctionnement
indésirable.
Cet équipement ne doit pas être co-situé ou utilisé en conjonction avec une autre antenne
ou émetteur.
[ AVERTISSEMENT
Par la présente, vous êtes avisé du fait que tout changement ou toute modification ne
faisant pas l’objet d’une autorisation expresse dans le présent manuel pourrait annuler
votre droit d’utiliser l’appareil.
FR
FR
5
Page 40

[ Note :
L’appareil a été testé et est conforme aux exigences d’un appareil numérique de Classe B,
conformément à la Partie 15 de la réglementation de la FCC.
Ces critères sont conçus pour fournir une protection raisonnable contre les interférences
nuisibles dans un environnement résidentiel. L’appareil génère, utilise et peut émettre des
fréquences radio ; s’il n’est pas installé et utilisé conformément aux instructions, il pourrait
provoquer des interférences nuisibles aux communications radio. Cependant, il n’est pas
possible de garantir que des interférences ne seront pas provoquées dans certaines
conditions particulières. Si l’appareil devait provoquer des interférences nuisibles à la
réception radio ou à la télévision, ce qui peut être démontré en allumant et éteignant
l’appareil, il est recommandé à l’utilisateur d’essayer de corriger cette situation par l’une
ou l’autre des mesures suivantes :
– Réorienter ou déplacer l’antenne réceptrice.
– Augmenter la distance entre l’appareil et le récepteur.
– Brancher l’appareil dans une prise ou sur un circuit différent de celui sur lequel le
récepteur est branché.
– Consulter le détaillant ou un technicien expérimenté en radio/téléviseurs.
Le câble d’interface fourni doit être utilisé avec l’appareil pour que celui-ci soit conforme
aux critères régissant les appareils numériques, conformément à la sous-partie B de la
Partie 15 de la réglementation de la FCC.
Pour les utilisateurs au Canada
Le présent appareil est conforme aux CNR d’Industrie Canada applicables aux appareils
radio exempts de licence. L’exploitation est autorisée aux deux conditions suivantes : (1)
l’appareil ne doit pas produire de brouillage, et (2) cet appareil doit accepter tout
brouillage, y compris un brouillage qui pourrait provoquer un fonctionnement inopportun
de l’appareil.
Note pour les clients européens
Par la présente Sony Corporation déclare que l’appareil photo numérique (DSC-HX50/
HX50V) est conforme aux exigences essentielles et aux autres dispositions pertinentes de
la directive 1999/5/CE. Pour toute information complémentaire, veuillez consulter l’URL
suivante:
http://www.compliance.sony.de/
FR
6
Page 41

[ Avis aux consommateurs des pays appliquant les Directives UE
Ce produit a été fabriqué par ou pour le compte de Sony Corporation, 1-7-1 Konan
Minato-ku Tokyo, 108-0075 Japon. Toutes les questions relatives à la conformité des
produits basées sur la législation européenne doivent être adressées à son représentant,
Sony Deutschland Gmbh, Hedelfinger Strasse 61, 70327 Stuttgart, Allemagne.
Pour toute question relative au Service Après-Vente ou à la Garantie, merci de bien vouloir
vous référer aux coordonnées qui vous sont communiquées dans les documents « Service
(SAV) » ou Garantie.
Cet appareil a été testé et jugé conforme aux limites établies par la réglementation EMC
visant l’utilisation de câbles de connexion de moins de 3 mètres (9,8 pi.).
[ Attention
Le champ électromagnétique à des fréquences particulières peut avoir une incidence sur
l’image et le son de cet appareil.
[ Avis
Si l’électricité statique ou les champs électrostatiques entraînent une interruption lors du
transfert des données (échec), redémarrez l’application ou débranchez, puis rebranchez le
câble de connexion (USB, etc.).
[ Traitement des appareils électriques et électroniques en fin de
vie (Applicable dans les pays de l’Union Européenne et aux
autres pays européens disposant de systèmes de collecte
sélective)
Ce symbole, apposé sur le produit ou sur son emballage, indique que ce
produit ne doit pas être traité avec les déchets ménagers. Il doit être remis
à un point de collecte approprié pour le recyclage des équipements
électriques et électroniques. En vous assurant que ce produit sont mis au
rebut de façon appropriée, vous participez activement à la prévention des
conséquences négatives que leur mauvais traitement pourrait provoquer
sur l’environnement et sur la santé humaine. Le recyclage des matériaux
toute information complémentaire au sujet du recyclage de ce produit, vous pouvez
contacter votre municipalité, votre déchetterie locale ou le point de vente où vous avez
acheté le produit.
contribue par ailleurs à la préservation des ressources naturelles. Pour
FR
FR
7
Page 42

[ Elimination des piles et accumulateurs usagés (Applicable dans
les pays de l’Union Européenne et aux autres pays européens
disposant de systèmes de collecte sélective)
Ce symbole, apposé sur les piles et accumulateurs ou sur les emballages,
indique que les piles et accumulateurs fournis avec ce produit ne doivent
pas être traités comme de simples déchets ménagers.
Sur certains types de piles, ce symbole apparaît parfois combiné avec un
symbole chimique. Les symboles pour le mercure (Hg) ou le plomb (Pb)
0,004% de plomb.
En vous assurant que ces piles et accumulateurs sont mis au rebut de façon appropriée,
vous participez activement à la prévention des conséquences négatives que leur mauvais
traitement pourrait provoquer sur l’environnement et sur la santé humaine. Le recyclage
des matériaux contribue par ailleurs à la préservation des ressources naturelles.
Pour les produits qui pour des raisons de sécurité, de performance ou d’intégrité de
données nécessitent une connexion permanente à une pile ou à un accumulateur, il
conviendra de vous rapprocher d’un service technique qualifié pour effectuer son
remplacement.
En rapportant votre appareil électrique en fin de vie à un point de collecte approprié vous
vous assurez que la pile ou l’accumulateur incorporé sera traité correctement.
Pour tous les autres cas de figure et afin d’enlever les piles ou accumulateurs en toute
sécurité de votre appareil, reportez-vous au manuel d’utilisation. Rapportez les piles ou
accumulateurs usagés au point de collecte approprié pour le recyclage.
Pour toute information complémentaire au sujet du recyclage de ce produit ou des piles et
accumulateurs, vous pouvez contacter votre municipalité, votre déchetterie locale ou le
point de vente où vous avez acheté ce produit.
sont rajoutés lorsque ces piles contiennent plus de 0,0005% de mercure ou
Pour les utilisateurs au Royaume-Uni
Une fiche moulée conforme à BS 1363 est installée sur cet équipement pour votre sécurité
et commodité.
Si le fusible dans la fiche fournie doit être remplacé, un fusible de même ampérage que
celui fourni et approuvé par ASTA ou BSI à BS 1362, (c’est-à-dire portant une marque
ou ) doit être utilisé.
Si la fiche fournie avec cet équipement comporte un couvercle de fusible détachable,
assurez-vous de remettre en place le couvercle de fusible après avoir remplacé le fusible.
N’utilisez jamais la fiche sans le couvercle de fusible. Si vous perdez le couvercle de
fusible, veuillez contacter le service après-vente Sony le plus proche.
Pour les clients à Singapour
FR
8
Page 43

Identification des pièces
A Molette de compensation
d’exposition
B Touche ON/OFF (Alimentation)
C Déclencheur
D Pour la prise de vue : levier
W/T (zoom)
Pour la visualisation : levier
(Zoom de lecture)/levier
(Index)
E Témoin de retardateur/Témoin
de détection de sourire/
Illuminateur AF
F Sélecteur de mode :
(Mode Auto Intelligent)/
(Automatique supérieur)/
(Programme Auto)/
(Prise de vue à priorité
ouverture)/
(Prise de vue à priorité vitesse
d’obturation)/
(Prise de vue expo manuelle)/
(Mode rappel de mémoire)/
(i-Panorama par balayage)/
(Mode Film)/
(Sélection scène)
G Griffe multi-interface
H Flash
I Micro
J Haut-parleur
K Objectif
L Touche (Flash escamotable)
M Ecran LCD
N Touche MOVIE (Film)
O Touche (Lecture)
P Molette de commande
Q Récepteur GPS (intégré,
DSC-HX50V seulement)
R Témoin de charge
*1
FR
FR
9
Page 44

S Multi/micro connecteur USB
T Récepteur Wi-Fi (intégré)
U Crochet pour dragonne
V Touche MENU
W Touche / (Guide intégré à
l’appareil/Supprimer)
X Touche CUSTOM
(Personnalisé)
• Vous pouvez affecter n’importe
quelle fonction souhaitée à la
touche CUSTOM. Par défaut, il
s’agit de la fonction [ISO].
Y Fente d’insertion de la batterie
Z Fente de carte mémoire
wj Témoin d’accès
wk Levier d’éjection de la batterie
wl Couvercle de batterie/carte
mémoire
e; Micro-prise HDMI
ea Douille de trépied
• Utilisez un trépied ayant une
longueur de vis de moins de
5,5 mm (7/32 po). Sinon vous ne
pouvez pas fixer fermement
l’appareil et celui-ci pourrait être
endommagé.
1
*
Pour plus de détails sur les
accessoires compatibles de la griffe
multi-interface, visitez le site Web
Sony ou consultez votre revendeur
Sony ou un centre de service
après-vente local agréé Sony.
Vous pouvez également utiliser des
accessoires compatibles avec la
griffe porte-accessoire. Avec des
accessoires d’autres fabricants, le
bon fonctionnement n’est pas
garanti.
*2
2
*
Prend en charge les dispositifs
compatibles micro-USB.
10
FR
Page 45

Insertion de la batterie
Levier d’éjection de la batterie
Ouvrez le couvercle.
1
Insérez la batterie.
2
• Tout en appuyant sur le levier d’éjection de la batterie, insérez la
batterie comme illustré. Assurez-vous que le levier d’éjection de la
batterie se verrouille après l’insertion.
• La fermeture du couvercle alors que la batterie est incorrectement
insérée peut endommager l’appareil.
FR
FR
11
Page 46

Charge de la batterie
Pour les client s résidant aux
Etats-Unis et au Canada
Cordon
d’alimentation
Pour les clients résidant dans des
pays/régions autres que les
Etats-Unis et le Canada
Raccordez l’appareil à l’adaptateur secteur (fourni) à
1
l’aide du câble micro-USB (fourni).
Branchez l’adaptateur secteur sur la prise murale.
2
Le témoin de charge s’allume en orange et la charge commence.
• Mettez l’appareil hors tension pendant la charge de la batterie.
• Vous pouvez charger la batterie même lorsqu’elle est partiellement
chargée.
• Lorsque le témoin de charge clignote et que la charge n’est pas
terminée, retirez la batterie et réinsérez-la.
FR
Témoin de charge
Allumé : Charge en cours
Eteint : Charge terminée
Clignotant :
Erreur de charge ou charge
temporairement suspendue,
car la température de
l’appareil photo n’est pas
comprise dans la plage de
températures correcte
12
Page 47

Remarques
• Si le témoin de charge de l’appareil clignote lorsque l’adaptateur secteur est
branché sur une prise murale, cela indique que la charge est interrompue
temporairement parce que la température est hors de la plage recommandée.
Lorsque la température revient dans la plage appropriée, la charge reprend. Nous
vous recommandons de recharger la batterie à une température ambiante comprise
entre 10 °C et 30 °C (50 ºF à 86 ºF).
• Il se peut que la batterie ne soit pas effectivement chargée si la section borne de la
batterie est sale. Dans ce cas, enlevez légèrement toute poussière à l’aide d’un
tissu doux ou d’un coton-tige pour nettoyer la section borne de la batterie.
• Branchez l’adaptateur secteur (fourni) sur la prise murale la plus proche. Si des
dysfonctionnements se produisent pendant l’utilisation de l’adaptateur secteur,
débranchez immédiatement la fiche de la prise murale pour déconnecter la source
d’alimentation.
• Lorsque la charge est terminée, débranchez l’adaptateur secteur de la prise murale.
• Assurez-vous de n’utiliser que des batteries, un câble micro-USB (fourni) et un
adaptateur secteur (fourni) de marque Sony garantis d’origine.
x
Durée de charge (Charge complète)
La durée de charge est d’environ 230 min en utilisant l’adaptateur secteur
(fourni).
Remarques
• La durée de charge ci-dessus s’applique lors de la charge d’une batterie
complètement déchargée, à une température de 25 °C (77 °F). Selon les
conditions d’utilisation et les circonstances, la charge peut prendre plus
longtemps.
x
Charge par raccordement à un ordinateur
La batterie peut être chargée en raccordant l’appareil à un ordinateur à l’aide
d’un câble micro-USB.
FR
Vers une prise USB
FR
13
Page 48

Remarques
• Notez les points suivants lors d’une charge via un ordinateur :
– Si l’appareil est raccordé à un ordinateur portable qui n’est pas connecté à une
source d’alimentation, le niveau de la batterie du portable diminue. N’effectuez
pas la charge pendant une longue durée.
– Ne mettez pas sous/hors tension ou ne redémarrez pas l’ordinateur, ne le
réveillez pas non plus du mode de veille quand une connexion USB a été établie
entre l’ordinateur et l’appareil. L’appareil peut provoquer un
dysfonctionnement. Avant de mettre l’ordinateur sous/hors tension, de le
redémarrer ou de le réveiller du mode de veille, déconnectez l’appareil et
l’ordinateur.
– Il n’y a aucune garantie que la charge soit effectuée lors de l’utilisation d’un
ordinateur personnalisé ou modifié.
x
Autonomie de la batterie et nombre d’images pouvant
être enregistrées et visualisées
Autonomie de la
batterie
Prise de vue (images fixes) Environ 200 min Environ 400 images
Prise de vue de film standard Environ 55 min –
Prise de vue de film en continu Environ 90 min –
Visualisation (images fixes) Environ 320 min Environ 6400 images
Remarques
• Le nombre d’images ci-dessus s’applique lorsque la batterie est complètement
chargée. Il se peut que le nombre d’images soit inférieur selon les conditions
d’utilisation.
• Le nombre d’images pouvant être enregistrées est celui lors d’une prise de vue
dans les conditions suivantes :
– Utilisation d’un « Memory Stick PRO Duo » (Mark2) Sony (vendu séparément)
– La batterie est utilisée à une température ambiante de 25 °C (77 °F).
– [Réglage du GPS] est réglé sur [Désact] (DSC-HX50V uniquement).
– [Résolut. affichage] est réglé sur [Standard].
• Le nombre pour « Prise de vue d’images fixes » est basé sur la norme CIPA et il
correspond à une prise de vue dans les conditions suivantes :
(CIPA : Camera & Imaging Products Association)
– DISP (Réglage affichage) est réglé sur [ACTIVÉ].
– Prise de vue une fois toutes les 30 secondes.
– Zoom commuté alternativement entre le côté W et le côté T.
FR
– Flash déclenché une fois sur deux.
– Mise sous et hors tension toutes les dix fois.
14
Nombre d’images
Page 49

• Les nombres de minutes pour la prise de vue de films sont basés sur la norme
CIPA et correspondent à une prise de vue dans les conditions suivantes :
– Qualité de film : AVC HD HQ
– Prise de vue de film standard : autonomie de la batterie basée sur une prise de
vue lancée/arrêtée à plusieurs reprises, avec zoom, mise sous/hors tension, etc.
– Prise de vue de film en continu : autonomie de la batterie basée sur une prise de
vue ininterrompue jusqu’à ce que la limite (29 minutes) soit atteinte, puis
poursuivie via un nouvel appui sur la touche MOVIE. Les autres fonctions, telles
que le zoom, ne sont pas utilisées.
x
Alimentation de l’appareil
L’appareil peut être alimenté depuis la prise murale en le raccordant à
l’adaptateur secteur à l’aide du câble micro-USB (fourni).
Vous pouvez importer des images sur un ordinateur sans vous inquiéter de la
décharge de la batterie en raccordant l’appareil à un ordinateur à l’aide du
câble micro-USB.
Vous pouvez en outre utiliser un adaptateur secteur AC-UD10 (vendu
séparément) ou AC-UD11 (vendu séparément) pour fournir une alimentation
pendant la prise de vue.
Remarques
• L’appareil n’est pas alimenté si aucune batterie n’est insérée.
• La prise de vue n’est pas possible lorsque l’appareil est raccordé directement à un
ordinateur ou à une prise électrique à l’aide de l’adaptateur secteur fourni.
• Si vous raccordez l’appareil et un ordinateur à l’aide du câble micro-USB alors
que l’appareil est en mode de lecture, l’affichage sur l’appareil passe de l’écran de
lecture à l’écran de connexion USB. Appuyez sur la touche (Lecture) pour
passer à l’écran de lecture.
• Il est possible que l’adaptateur secteur AC-UD11 (vendu séparément) ne soit pas
disponible dans certains pays/régions.
FR
FR
15
Page 50

Insertion d’une carte mémoire (vendue séparément)
Assurez-vous que le coin entaillé
est correctement orienté.
Ouvrez le couvercle.
1
Insérez la carte mémoire (vendue séparément).
2
• Le coin entaillé étant dans le sens illustré, insérez la carte mémoire
jusqu’à ce qu’elle se mette en place avec un déclic.
Fermez le couvercle.
3
16
FR
Page 51

x
Cartes mémoire compatibles
Carte mémoire
A Memory Stick XC-HG Duo
Memory Stick PRO Duo (Mark2
B
Memory Stick PRO-HG Duo
Memory Stick Micro (M2) (Mark2
C
Carte mémoire SD (Classe 4 ou plus
Carte mémoire SDHC (Classe 4 ou plus
D
Carte mémoire SDXC (Classe 4 ou plus
Carte mémoire microSD (Classe 4 ou plus
Carte mémoire microSDHC (Classe 4 ou plus
E
Carte mémoire microSDXC (Classe 4 ou plus
• Dans ce manuel, les produits dans le tableau sont collectivement appelés comme
suit :
A : « Memory Stick XC Duo »
B : « Memory Stick PRO Duo »
C : « Memory Stick Micro »
D : carte SD
E : carte mémoire microSD
Remarques
• Pour utiliser une carte mémoire « Memory Stick Micro » ou microSD avec
l’appareil photo, veillez à l’insérer d’abord dans un adaptateur dédié.
Pour des images
fixes
Pour des films
seulement)
seulement)
rapide)
rapide)
rapide)
rapide)
rapide)
rapide)
FR
x
Pour retirer la carte mémoire/la batterie
Carte mémoire : enfoncez une fois la carte mémoire pour l’éjecter.
Batterie : faites glisser le levier d’éjection de la batterie. Veillez à ne pas faire
tomber la batterie.
FR
17
Page 52

Remarques
• Ne retirez jamais la carte mémoire/la batterie lorsque le témoin d’accès (page 9)
est allumé. Cela pourrait endommager les données dans la carte mémoire/mémoire
interne.
Réglage de l’horloge
ON/OFF (Alimentation)
Molette de commande
Sélection des paramètres :
v/V/b/B
Définissez la valeur numérique de
la date et de l’heure : /
Réglage :
Appuyez sur la touche ON/OFF (Alimentation).
1
Le réglage Date & Heure s’affiche la première fois que vous mettez
l’appareil sous tension.
• La mise sous tension peut prendre un certain temps avant que
l’utilisation soit possible.
Sélectionnez la langue souhaitée.
2
z
Sélectionnez l’emplacement géographique souhaité en
3
suivant les instructions sur l’écran, puis appuyez sur z.
Réglez [Format date&heure], [Heure été] et
4
[Date&heure], puis sélectionnez [OK] t [OK].
• Minuit est indiqué par 12:00 AM et midi par 12:00 PM.
FR
18
Page 53

Suivez les instructions sur l’écran.
5
• La batterie se déchargera rapidement lorsque :
– [Réglage du GPS] est réglé sur [Act] (DSC-HX50V uniquement).
– [Résolut. affichage] est réglé sur [Élevée].
Prise de vue d’images fixes/films
Déclencheur
Sélecteur
de mode
: Mode Auto Intelligent
: Mode Film
Ne couvrez pas le flash (A).
Prise de vue d’images fixes
Enfoncez le déclencheur à mi-course pour effectuer la
1
mise au point.
Lorsque l’image est mise au point, un bip se fait entendre et l’indicateur
z s’allume.
Enfoncez complètement le déclencheur pour prendre la
2
photo.
Levier W/T
(zoom)
W : zoom
arrière
T : zoom
avant
FR
MOVIE
FR
19
Page 54

Enregistrement de films
Appuyez sur la touche MOVIE (Film) pour commencer
1
l’enregistrement.
• Utilisez le levier W/T (zoom) pour changer le facteur de zoom.
• Appuyez sur le déclencheur pour prendre des images fixes tout en
continuant à enregistrer le film.
Appuyez à nouveau sur la touche MOVIE pour arrêter
2
l’enregistrement.
Remarques
• Si vous utilisez la fonction de zoom lorsque vous enregistrez un film, les sons de
déplacement de l’objectif et du levier seront également enregistrés. Il se peut que
le son de fonctionnement de la touche MOVIE soit aussi enregistré lorsqu’un
enregistrement de film est terminé.
• Selon le sujet ou le mode de prise de vue, la plage de prise de vue panoramique
peut être réduite. Par conséquent, même si [360°] est sélectionné pour la prise de
vue panoramique, l’image enregistrée peut être inférieure à 360 degrés.
• Une prise de vue continue est possible pendant environ 29 minutes par séance aux
réglages par défaut de l’appareil et lorsque la température est d’environ 25 °C
(77 °F). Lorsqu’un enregistrement de film est terminé, vous pouvez redémarrer
l’enregistrement en appuyant à nouveau sur la touche MOVIE. Selon la
température ambiante, il se peut que l’enregistrement s’arrête pour protéger
l’appareil.
20
FR
Page 55

Visualisation d’images
W : zoom arrière
T : zoom avant
Molette de commande
(Lecture)
/ (Supprimer)
Appuyez sur la touche (Lecture).
1
• Lorsque des images sur une carte mémoire enregistrées avec un autre
appareil sont lues sur cet appareil, l’écran d’enregistrement pour le
fichier de données apparaît.
x
Sélection de l’image suivante/précédente
Sélectionnez une image en appuyant sur B (suivante)/b (précédente) de la
molette de commande ou en tournant celle-ci. Appuyez sur z au centre de la
molette de commande pour visualiser des films.
x
Suppression d’une image
1 Appuyez sur la touche / (Supprimer).
2 Sélectionnez [Cette img] avec v de la molette de commande, puis appuyez
sur z.
x
Retour à la prise d’images
Enfoncez le déclencheur à mi-course.
Sélection d’images :
B (suivante)/
b (précédente) ou
tournez la molette de
commande
Réglage : z
FR
FR
21
Page 56

Guide intégré à l’appareil
Cet appareil intègre un guide de fonction interne. Ce qui vous permet de
rechercher les fonctions de l’appareil selon vos besoins.
/ (Guide intégré à l’appareil)
MENU
Appuyez sur la touche MENU.
1
Sélectionnez le paramètre MENU souhaité, puis
2
appuyez sur la touche / (Guide intégré à l’appareil).
Le guide d’opérations pour le paramètre sélectionné s’affiche.
• Si vous appuyez sur la touche / (Guide intégré à l’appareil) lorsque
l’écran MENU n’est pas affiché, vous pouvez rechercher le guide à
l’aide de mots-clés ou d’icônes.
22
FR
Page 57

Introduction d’autres fonctions
D’autres fonctions utilisées lors de la prise de vue ou de la lecture peuvent être
commandées à l’aide de la molette de commande ou de la touche MENU de
l’appareil. Cet appareil est équipé d’un Guide de fonction qui vous permet de
sélectionner facilement parmi les fonctions. Pendant que le guide est affiché,
essayez les autres fonctions.
FR
MENU
x
Molette de commande
DISP (Réglage affichage) : permet de changer l’affichage sur écran.
/ (Prise d. v. continu/Retardateur) : permet d’utiliser le retardateur ou le
mode de prise de vue en rafale.
(Créativité photo) : permet d’utiliser l’appareil de manière intuitive.
(Flash) : permet de sélectionner un mode de flash pour les images fixes.
Bouton central (Mise au point continue) : l’appareil suit le sujet et règle
automatiquement la mise au point, même lorsque le sujet se déplace.
Molette de
commande
Guide de fonction
FR
23
Page 58

x
Paramètres du menu
Prise de vue
Scène Enreg. film Pour sélectionner le mode d’enregistrement de film.
Scène enreg. en
panorama
Effet de photo
Sélection scène
Mode rappel de
mémoire
Mode Facile
Effet de flou
Contrôl. via
smartph.
Envoyer vers
*1
ordinat.
Taille image
fixe(Dual Rec)
Taille image fixe/
Taille d’image
panoramique/
Qualité du film/
Taille film
Effet peinture HDR
Zone de mise en
évidence
Teinte de la
couleur
FR
Pour sélectionner le mode d’enregistrement lors de la
prise de vue d’images panoramiques.
Pour prendre une image fixe avec une texture originale
en fonction de l’effet souhaité.
Pour sélectionner des paramètres prédéfinis
correspondant aux diverses conditions de scène.
Pour sélectionner un réglage que vous souhaitez rappeler
lorsque le sélecteur de mode est réglé sur [Mode rappel
de mémoire].
Pour prendre des images fixes en utilisant les fonctions
minimales.
Pour régler le niveau de l’effet de flou de profondeur lors
de la prise de vue en mode Flou de profondeur.
Pour prendre des images fixes ou enregistrer des vidéos
en commandant l’appareil à distance à l’aide d’un
smartphone.
Pour sauvegarder des images en les transférant sur un
ordinateur connecté au réseau.
Pour régler la taille d’image fixe prise pendant
l’enregistrement d’un film.
Pour sélectionner la taille et la qualité d’image pour les
images fixes, les images panoramiques ou les fichiers de
film.
Lorsque [Peinture HDR] est sélectionné en mode Effet
de photo, permet de spécifier le niveau d’effet.
Lorsque [Miniature] est sélectionné en mode Effet de
photo, permet de spécifier la partie sur laquelle mettre au
point.
Lorsque [Caméra jouet] est sélectionné en mode Effet de
photo, permet de spécifier la teinte de la couleur.
24
Page 59

Couleur Extraite
Effet d’illustration
ISO Pour régler la sensibilité à la lumière.
Bal blanc Pour régler les tonalités de couleur d’une image.
Réglage balance
des blancs
Mise au P Pour sélectionner la méthode de mise au point.
Mode de mesure
Interval. prise d. v.
en continu
Réglages
bracketing
Reconnaissance
de scène
Effet peau douce Pour régler l’Effet peau douce et le niveau de l’effet.
Détection de
sourire
Sensibilité sourire
Détection de
visage
Mode couleur
Saturation des
couleurs
Contraste Pour régler le contraste de l’image.
Netteté Pour régler la netteté de l’image.
Réduction de bruit
Lorsque [Couleur partielle] est sélectionné en mode
Effet de photo, permet de sélectionner la couleur à
extraire.
Lorsque [Illustration] est sélectionné en mode Effet de
photo, permet de spécifier le niveau d’effet.
Pour régler les tonalités de couleur selon la valeur
ajustée définie à partir de la tonalité de balance des
blancs choisie.
Pour sélectionner le mode de mesure qui définit la partie
du sujet à mesurer pour déterminer l’exposition.
Pour sélectionner le nombre d’images prises par seconde
pour la prise de vue en Rafale.
Pour définir le type de prise de vue bracketing.
Pour activer la détection automatique des conditions de
prise de vue.
Pour activer le déclenchement automatique de
l’obturateur lorsqu’un sourire est détecté.
Pour régler la sensibilité de la fonction Détection de
sourire pour détecter des sourires.
Pour sélectionner automatiquement la détection de
visages et le réglage de divers paramètres.
Pour sélectionner la vivacité de l’image accompagnée
d’effets.
Pour régler la vivacité de l’image.
Pour régler la résolution de l’image et la balance du
bruit.
FR
FR
25
Page 60

Attén. yeux fermés
et la sélection de l’image sur laquelle les yeux ne sont
pas fermés.
Pour régler l’intensité de SteadyShot en mode Film. Si
Pour activer la prise de vue automatique de deux images
SteadyShot film
vous modifiez le réglage de [SteadyShot film], l’angle de
champ change.
Information
*2
position
ENREGISTREME
NT log GPS
*2
Pour vérifier l’état de la triangulation GPS et mettre à
jour les informations relatives à la position.
Pour enregistrer l’itinéraire emprunté lors du transport de
l’appareil.
Pour enregistrer les modes et réglages de l’appareil
Enregistrer réglage
souhaités. Réglez le sélecteur de mode sur (Mode
rappel de mémoire) pour récupérer les réglages
enregistrés.
Guide intégré à
l’appareil
*1S’affiche uniquement si une carte mémoire est insérée.
2
*
DSC-HX50V uniquement
Pour rechercher les fonctions de l’appareil selon vos
besoins.
Visualisation
Envoy. vers
smartph.
Visionner sur TV
Envoyer vers
l’ordinateur
*
Pour télécharger et transférer des images sur un
smartphone.
Pour visualiser des images sur un téléviseur adapté
réseau.
Pour sauvegarder des images en les transférant sur un
ordinateur connecté au réseau.
Retoucher Pour retoucher une image à l’aide de divers effets.
Effet de photo Pour ajouter diverses textures sur des images.
Diaporama Pour sélectionner une méthode de lecture continue.
Supprimer Pour supprimer une image.
Affichage 3D
Mode
Visualisation*
FR
Pour activer la lecture d’images prises en mode 3D sur
un téléviseur 3D.
Pour sélectionner le format d’affichage des images.
26
Page 61

Aff. groupe prise d.
v. en cont.
Protéger Pour protéger les images.
Impression
(DPOF)*
Pivoter
Guide intégré à
l’appareil
* S’affiche uniquement si une carte mémoire est insérée.
Pour sélectionner l’affichage des images en rafale dans
des groupes ou l’affichage de toutes les images pendant
la lecture.
Pour ajouter une marque d’ordre d’impression à une
image fixe.
Pour faire pivoter une image fixe vers la gauche ou la
droite.
Pour rechercher les fonctions de l’appareil selon vos
besoins.
FR
FR
27
Page 62

x
Paramètres de réglage
Si vous appuyez sur la touche MENU pendant la prise de vue ou pendant la
lecture, (Réglages) est indiqué comme sélection finale. Vous pouvez
modifier les réglages par défaut sur l’écran (Réglages).
Format Film/Illuminat. AF/Quadrillage/Zoom Image
Réglages prise de
vue
Claire/Zoom numérique/Réduction bruit vent/Niv.
référence micro/Attén. yeux roug/Alerte yeux fermés/
Inscrire date/Mise au pnt étendue/Bouton personnalisé/
Résolut. affichage
Bip/Luminosité écran/Language Setting/Couleur
d’affichage/Mode Démo/Initialiser/Guide fonct/
Réglages
principaux
Réglages Réseau
Outil Carte
*2
Mémoire
Réglages horloge
*1S’affiche uniquement si une carte mémoire Eye-Fi est insérée.
2
*
Si aucune carte mémoire n’est insérée, (Outil Mémoire Interne) s’affiche et
seul [Formater] peut être sélectionné.
3
*
DSC-HX50V uniquement
Résolution HDMI/COMMANDE HDMI/Régl.
connexion USB/Alimentation USB/Réglage LUN/
Téléch musi/Musique vide/Mode avion/Réglage du
*
3
GPS
/Data assistant GPS
*
1
Eye-Fi
/Économie d’énergie/Version
*
3
/Sup. don. log GPS
*
3
/
WPS Push/Réglag. point d’accès/Éditer Nom Dispositif/
Réinit. SSID/MdP/Affich. Adresse MAC
Formater/Créer dos ENR./Chg doss ENR./Supprim. doss
ENR/Copier/Numéro de fichier
*
Réglage zone/Régl. date&heure/AJU auto horloge
AJU auto zone
*
3
3
/
28
FR
Page 63

Fonctions de « PlayMemories Home »
Le logiciel « PlayMemories Home » vous permet d’importer des images fixes
et des films sur votre ordinateur et de les utiliser. « PlayMemories Home » est
indispensable pour importer des films AVCHD sur votre ordinateur.
Partage d’images sur
« PlayMemories
Online »
Téléchargement d’images
vers des services réseau
Importation
d’images
depuis votre
appareil photo
Visualisation
d’images sur le
Calendrier
Création de
disques de films
z Téléchargement de « PlayMemories Home » (pour Windows
uniquement)
Vous pouvez télécharger « PlayMemories Home » à partir de l’URL suivante :
www.sony.net/pm
Remarques
• Une connexion Internet est nécessaire pour installer « PlayMemories Home ».
• Une connexion Internet est nécessaire pour utiliser « PlayMemories Online » ou
d’autres services réseau. Il se peut que « PlayMemories Online » ou d’autres
services réseau ne soient pas disponibles dans certains pays ou régions.
• « PlayMemories Home » n’est pas compatible avec un Mac. Utilisez les
applications installées sur votre Mac. Pour plus d’informations, visitez l’URL
suivante :
http://www.sony.co.jp/imsoft/Mac/
FR
FR
29
Page 64

x
Installation de « PlayMemories Home » sur un
ordinateur
A l’aide du navigateur Internet de votre ordinateur,
1
accédez à l’URL suivante, puis cliquez sur [Installation]
t [Exécuter].
www.sony.net/pm
Suivez les
2
instructions sur
l’écran pour terminer
l’installation.
• Lorsque le message de
connexion de l’appareil
photo à un ordinateur
s’affiche, raccordez
l’appareil photo à
l’ordinateur à l’aide du
câble micro-USB (fourni).
x
Affichage du « Guide d’assistance de PlayMemories
Vers le
Multi/micro
connecteur USB
Vers une prise USB
Home »
Pour plus d’informations sur l’utilisation de « PlayMemories Home »,
reportez-vous au « Guide d’assistance de PlayMemories Home ».
Double-cliquez sur l’icône [Guide d’assistance de
1
PlayMemories Home] sur le bureau.
• Pour accéder au « Guide d’assistance de PlayMemories Home » depuis
le menu Démarrer : cliquez sur [Démarrer] t [Tous les programmes]
t [PlayMemories Home] t [Guide d’assistance de PlayMemories
Home].
• Pour Windows 8, sélectionnez l’icône [PlayMemories Home] dans
l’écran Démarrer pour démarrer [PlayMemories Home], puis
sélectionnez [Guide d’assistance de PlayMemories Home] dans le menu
[Aide].
• Pour obtenir de plus amples informations sur « PlayMemories Home », vous
pouvez également consulter le « Guide de l’utilisateur du Cyber-shot »
(page 2) ou la page de support PlayMemories Home suivante (en anglais
uniquement) :
FR
30
http://www.sony.co.jp/pmh-se/
Page 65

Nombre d’images fixes et durée enregistrable de films
Le nombre d’images fixes et la durée enregistrable peuvent différer en
fonction des conditions de prise de vue et de la carte mémoire.
x
Images fixes
(Unités : images)
Capacité
Taille
20M 7 295
VGA 155 6400
16:9(15M) 8 325
x
Films
Le tableau ci-dessous indique les durées d’enregistrement maximales
approximatives. Ce sont les durées totales pour tous les fichiers de film. Une
prise de vue continue est possible pendant environ 29 minutes (limite des
spécifications du produit). La durée d’enregistrement continu maximale d’un
film au format MP4 (12M) est d’environ 15 minutes (limitée par la restriction
de taille de fichier de 2 Go).
Capacité
Taille
AVC HD 28M (PS)
AVC HD 24M (FX)
AVC HD 9M (HQ)
MP4 12M — 15 m
MP4 3M — 1 h 10 m
Les valeurs entre ( ) sont les durées enregistrables minimales.
Mémoire interne Carte mémoire
Environ 48 Mo 2Go
(h (heures), m (minutes))
Mémoire interne Carte mémoire
Environ 48 Mo 2Go
—
—
—
8m
(8 m)
10 m
(10 m)
25 m
(15 m)
FR
FR
31
Page 66

• La durée d’enregistrement des films varie parce que l’appareil photo est équipé de
la fonction VBR (Variable Bit Rate) qui règle automatiquement la qualité de
l’image en fonction de la scène filmée. Lorsque vous enregistrez un sujet se
déplaçant rapidement, l’image est plus claire, mais la durée enregistrable est plus
courte, car plus de mémoire est nécessaire pour l’enregistrement.
La durée enregistrable varie aussi en fonction des conditions de prise de vue, du
sujet ou des réglages de qualité/taille d’image.
Remarques sur l’utilisation de l’appareil
Fonctions incorporées dans cet appareil
• Ce manuel décrit chacune des fonctions des appareils compatibles 1080 60i et des
appareils compatibles 1080 50i.
– Pour déterminer si votre appareil prend en charge la fonction GPS, vérifiez son
nom du modèle.
Compatible GPS : DSC-HX50V
Incompatible GPS : DSC-HX50
– Pour vérifier si votre appareil est compatible 1080 60i ou compatible 1080 50i,
recherchez les repères suivants en dessous de l’appareil photo.
Appareil compatible 1080 60i : 60i
Appareil compatible 1080 50i : 50i
• Cet appareil est compatible avec les films au format 1080 60p ou 50p.
Contrairement aux modes d’enregistrement standard qui existaient jusqu’à présent
et qui utilisaient une méthode d’entrelaçage, cet appareil enregistre au moyen
d’une méthode progressive. Cela augmente la résolution et permet de restituer des
images plus fluides et plus réalistes.
• A bord d’un avion, réglez [Mode avion] sur [Act] (DSC-HX50V uniquement).
• Ne regardez pas longtemps des images 3D prises avec cet appareil sur des écrans
compatibles 3D.
• Lorsque vous visualisez des images 3D prises avec cet appareil sur un écran
compatible 3D, vous pouvez ressentir une gêne sous forme de tension des yeux,
fatigue ou nausée. Pour éviter ces symptômes, nous vous recommandons de faire
des pauses régulières. Vous devez toutefois déterminer par vous-même la
longueur et la fréquence des pauses dont vous avez besoin, car elles varient en
fonction de l’individu. Si vous ressentez un type de gêne quelconque, arrêtez de
visualiser les images 3D jusqu’à ce que vous vous sentiez mieux et consultez un
médecin si nécessaire. Consultez aussi le mode d’emploi fourni avec le dispositif
ou le logiciel que vous avez raccordé ou utilisé avec cet appareil. Notez que la vue
d’un enfant est encore au stade du développement (en particulier chez les enfants
de moins de 6 ans).
Consultez un pédiatre ou un ophtalmologiste avant de laisser votre enfant regarder
des images 3D et assurez-vous qu’il respecte les précautions ci-dessus lors de la
FR
visualisation de ces images.
32
Page 67

Sur les appareils compatibles GPS (DSC-HX50V uniquement)
• Utilisez la fonction GPS en respectant la législation des pays et régions dans
lesquels vous vous trouvez.
• Pour ne pas enregistrer les informations de localisation, réglez [Réglage du GPS]
sur [Désact].
Utilisation et entretien
Evitez toute manipulation brusque, tout démontage, toute modification de l’appareil,
tout choc mécanique et tout impact tel que celui d’un marteau, ne laissez pas tomber
l’appareil et ne le piétinez pas. Prenez tout particulièrement soin de l’objectif.
Remarques sur l’enregistrement/lecture
• Avant de commencer à enregistrer, effectuez un essai d’enregistrement pour être
sûr que l’appareil fonctionne correctement.
• L’appareil n’est ni étanche à la poussière, ni étanche aux projections liquides, ni
étanche à l’eau.
• Evitez d’exposer l’appareil à l’eau. Si de l’eau pénètre dans l’appareil, il peut se
produire un dysfonctionnement. Dans certains cas, l’appareil ne pourra pas être
réparé.
• Ne dirigez pas l’appareil vers le soleil ou une forte lumière. Ceci pourrait entraîner
un dysfonctionnement de l’appareil.
• Si une condensation d’humidité se produit, éliminez-la avant d’utiliser l’appareil.
• Ne secouez pas et ne heurtez pas l’appareil. Ceci pourrait provoquer un
dysfonctionnement et empêcher l’enregistrement des images. En outre, le support
d’enregistrement pourrait devenir inutilisable ou les données d’image être
endommagées.
N’utilisez/ne rangez pas l’appareil dans les endroits suivants
• Endroits très chauds, très froids ou très humides
Dans des endroits tels qu’un véhicule stationné en plein soleil, le boîtier de
l’appareil peut se déformer et ceci peut provoquer un dysfonctionnement.
• En plein soleil ou près d’une source de chaleur
Le boîtier de l’appareil risquerait de se décolorer ou se déformer et ceci pourrait
provoquer un dysfonctionnement.
• Endroits soumis à des vibrations oscillantes
• Près d’un endroit qui génère de fortes ondes radio, émet des radiations ou est
fortement magnétique. A défaut, l’appareil risquerait de ne pas pouvoir enregistrer
ou lire correctement les images.
• Endroits sablonneux ou poussiéreux
Veillez à ce que du sable ou de la poussière ne pénètre pas dans l’appareil. Ceci
risquerait d’entraîner un dysfonctionnement de l’appareil pouvant dans certains
cas être irréparable.
FR
FR
33
Page 68

Remarques sur l’écran et l’objectif
L’écran est fabriqué avec une technologie d’extrêmement haute précision et plus de
99,99 % des pixels sont donc opérationnels pour une utilisation effective. Il se peut
toutefois que de minuscules points noirs et/ou brillants (blancs, rouges, bleus ou
verts) apparaissent sur l’écran. Ces points sont un résultat normal du procédé de
fabrication et n’affectent pas l’enregistrement.
Température de l’appareil
En cas d’utilisation continue, votre appareil photo et la batterie peuvent chauffer,
mais il ne s’agit pas d’un dysfonctionnement.
Protection contre la surchauffe
Selon la température de l’appareil et de la batterie, il se peut que vous ne puissiez
pas enregistrer de films ou que l’alimentation se coupe automatiquement pour
protéger l’appareil.
Un message s’affiche sur l’écran avant que l’alimentation se coupe ou que vous ne
puissiez plus enregistrer de films. Dans ce cas, laissez l’appareil hors tension et
attendez que la température de l’appareil et de la batterie baisse. Si vous mettez
l’appareil sous tension sans laisser l’appareil et la batterie se refroidir suffisamment,
il se peut que l’alimentation se coupe à nouveau ou que vous ne puissiez pas
enregistrer des films.
Charge de la batterie
Si vous chargez une batterie qui n’a pas été utilisée pendant longtemps, il se peut
que vous ne puissiez pas la charger à la capacité correcte.
Cela est dû aux caractéristiques de la batterie et n’est pas un dysfonctionnement.
Chargez à nouveau la batterie.
Avertissement sur les droits d’auteur
Les émissions de télévision, films, cassettes vidéo et autres œuvres peuvent être
protégés par des droits d’auteur. L’enregistrement non autorisé de telles œuvres peut
constituer une infraction à la loi sur les droits d’auteur.
Pas d’indemnisation en cas de contenu endommagé ou
d’enregistrement manqué
Sony ne peut octroyer aucune indemnisation en cas d’enregistrement manqué ou
pour la perte ou la détérioration du contenu enregistré en raison d’un
dysfonctionnement de l’appareil photo ou du support d’enregistrement, etc.
Nettoyage de l’extérieur de l’appareil
Nettoyez l’extérieur de l’appareil avec un chiffon doux légèrement imbibé d’eau,
puis essuyez-le avec un chiffon sec. Afin d’éviter d’endommager la finition ou le
boîtier :
– N’exposez pas l’appareil à des produits chimiques tels que diluants, benzine,
alcool, lingettes nettoyantes jetables, insectifuges, écrans solaires ou insecticides.
FR
34
Page 69

Entretien de l’écran
• Si vous laissez de la crème pour les mains ou du lait hydratant sur l’écran, cela
risque de dissoudre son revêtement. Si un tel produit se trouve sur l’écran,
essuyez-le immédiatement.
• Un essuyage trop intense avec du papier absorbant ou d’autres matériaux risque
d’endommager le revêtement.
• Si des traces de doigt ou des débris adhèrent à l’écran, il est recommandé
d’éliminer délicatement les débris, puis d’essuyer l’écran à l’aide d’un chiffon
doux.
Remarque sur le LAN sans fil
Nous déclinons toute responsabilité quant à d’éventuels dégâts occasionnés par
l’utilisation ou l’accès non autorisé aux destinations chargées sur l’appareil, à la
suite de sa perte ou de son vol.
Remarque sur la mise au rebut et le transfert de l’appareil photo
Pour protéger vos données personnelles, procédez comme suit lors de la mise au
rebut ou du transfert de l’appareil photo.
• Formatez la mémoire interne (page 28), enregistrez les images jusqu’à la pleine
capacité de la mémoire interne avec l’objectif couvert, puis formatez à nouveau la
mémoire interne.
La récupération de vos données originales sera ainsi plus difficile.
• Réinitialisez tous les paramètres de l’appareil photo en exécutant [Initialiser] t
[Tous réglages] (page 28).
FR
FR
35
Page 70

Spécifications
Appareil photo
[Système]
Dispositif d’image : Capteur Exmor R
CMOS 7,82 mm (type 1/2,3)
Nombre total de pixels de l’appareil :
Environ 21,1 mégapixels
Nombre de pixels utiles de l’appareil :
Environ 20,4 mégapixels
Objectif : Objectif zoom Sony G 30×
f = 4,3 mm – 129 mm (24 mm –
720 mm (équivalent à un film
35 mm))
F3,5 (W) – F6,3 (T)
Pendant l’enregistrement de films
(16:9) : 26,5 mm – 795 mm*
Pendant l’enregistrement de films
(4:3) : 32,5 mm – 975 mm*
* Lorsque [SteadyShot film] est
réglé sur [Standard]
SteadyShot : Optique
Commande de l’exposition :
Exposition automatique, Priorité à
la vitesse d’obturateur, Priorité à
l’ouverture, Exposition manuelle,
Sélection de scène
Balance des blancs : Automatique,
Lumière jour, Nuageux,
Fluorescent 1/2/3, Incandescent,
Flash, Pression unique, Réglage
balance des blancs
FR
36
Format de fichier :
Images fixes : Conformes à JPEG
(DCF, Exif, MPF Baseline),
compatibles DPOF
Images fixes 3D : Conformes à
MPO (MPF Extended (Disparity
Image))
Films (format AVCHD) :
Compatibles avec le format
AVCHD Ver.2.0
Vidéo : MPEG-4 AVC/H.264
Audio : Dolby Digital 2 canaux,
équipé de Dolby Digital Stereo
Creator
• Fabriqué sous licence de Dolby
Laboratories.
Films (format MP4) :
Vidéo : MPEG-4 AVC/H.264
Audio : MPEG-4 AAC-LC 2 can.
Support d’enregistrement : Mémoire
interne (environ 48 Mo),
« Memory Stick XC Duo »,
« Memory Stick PRO Duo »,
« Memory Stick Micro », cartes
SD, cartes mémoire microSD
Flash : Portée du flash (sensibilité ISO
(Indice de lumination
recommandé) réglée sur Auto) :
environ 0,25 m à 5,6 m (0,82 pi à
18,37 pi) (W)/
environ 2,0 m à 3,0 m (6,56 pi à
9,84 pi) (T)
[Connecteurs d’entrée et de sortie]
Connecteur HDMI : Micro-prise
HDMI
Multi/micro connecteur USB
communication USB
Communication USB : Hi-Speed USB
(USB 2.0)
* Prend en charge les dispositifs
compatibles micro-USB.
*
:
Page 71

[Ecran LCD]
Dalle LCD : Matr ice active TFT 7,5 cm
(type 3,0)
Nombre total de points : 921 600 points
[Alimentation, caractéristiques
générales]
Alimentation : Batterie rechargeable
NP-BX1, 3,6 V
Adaptateur secteur AC-UB10/
UB10B/UB10C/UB10D, 5 V
Consommation électrique (pendant la
prise de vue) : Environ 1,2 W
Température de fonctionnement : 0 °C
à 40 °C (32 °F à 104 °F)
Température de stockage : –20 °C à
+60 °C (–4 °F à +140 °F)
Dimensions (conformes à CIPA) :
108,1 mm × 63,6 mm × 38,3 mm
(4 3/8 po × 2 5/8 po × 1 9/16 po)
(L/H/P)
Poids (conforme à CIPA) (y compris
une batterie NP-BX1, un
« Memory Stick PRO Duo ») :
Environ 272 g (9,6 oz)
Micro : Stéréo
Haut-parleur : Mono
Exif Print : Compatible
PRINT Image Matching III :
Compatible
[LAN sans fil]
Norme prise en charge : IEEE 802.11
b/g/n
Fréquence : 2,4 GHz
Protocoles de sécurité pris en charge :
WEP/WPA-PSK/WPA2-PSK
Méthode de configuration : WPS
(Wi-Fi Protected Setup) / manuelle
Méthode d’accès : Mode infrastructure
Adaptateur secteur AC-UB10/
UB10B/UB10C/UB10D
Alimentation requise : 100 V à 240 V
CA, 50 Hz/60 Hz, 70 mA
Tension de sortie : 5 V CC, 0,5 A
Température de fonctionnement : 0 °C
à 40 °C (32 °F à 104 °F)
Température de stockage : –20 °C à
+60 °C (–4 °F à +140 °F)
Dimensions :
Environ 50 mm × 22 mm × 54 mm
(2 po × 7/8 po × 2 1/4 po) (L/H/P)
Poids :
Pour les Etats-Unis et le Canada :
Environ 48 g (1,7 oz)
Pour les pays ou régions autres que
les Etats-Unis et le Canada :
Environ 43 g (1,5 oz)
Batterie rechargeable
NP-BX1
Batterie utilisée : Batterie Lithium-ion
Tension maximale : 4,2 V CC
Tension nominale : 3,6 V CC
Tension de charge maximale : 4,2 V
CC
Courant de charge maximal : 1,89 A
Capacité : 4,5 Wh (1 240 mAh)
La conception et les spécifications sont
susceptibles de modifications sans
préavis.
FR
FR
37
Page 72

Marques
• Les marques suivantes sont des
marques commerciales de Sony
Corporation.
« Memory Stick XC-HG Duo »,
« Memory Stick PRO Duo »,
« Memory Stick PRO-HG Duo »,
« Memory Stick Duo », « Memory
Stick Micro »
• « AVCHD Progressive » et le logo
« AVCHD Progressive » sont des
marques commerciales de Panasonic
Corporation et Sony Corporation.
• Les termes HDMI et HDMI
High-Definition Multimedia
Interface, ainsi que le logo HDMI
sont des marques commerciales ou
déposées de HDMI Licensing LLC
aux Etats-Unis et dans d’autres pays.
• Windows est une marque déposée de
Microsoft Corporation aux
Etats-Unis et/ou dans d’autres pays.
• Mac, App Store sont des marques
déposées de Apple Inc.
• iOS est une marque déposée ou
commerciale de Cisco Systems, Inc.
et/ou de ses filiales aux Etats-Unis et
dans d’autres pays.
• Android et Google Play sont des
marques commerciales de Google
Inc.
• Wi-Fi, le logo Wi-Fi et Wi-Fi
PROTECTED SET-UP sont des
marques déposées de Wi-Fi Alliance.
• DLNA et DLNA CERTIFIED sont
des marques commerciales de Digital
Living Network Alliance.
• Le logo SDXC est une marque
commerciale de SD-3C, LLC.
• « » et « PlayStation » sont des
marques déposées de Sony Computer
Entertainment Inc.
FR
, « Cyber-shot »,
38
• Facebook et le logo “f” sont des
marques commerciales ou déposées
de Facebook, Inc.
• YouTube et le logo YouTube sont
des marques commerciales ou
déposées de Google Inc.
• De plus, les noms de système et de
produit utilisés dans ce manuel sont
généralement des marques
commerciales ou des marques
déposées de leurs créateurs ou
fabricants respectifs. Notez que les
symboles ™ ou ® ne sont pas
toujours utilisées dans ce manuel.
• Prenez encore plus de plaisir avec
votre PlayStation 3 en téléchargeant
l’application pour PlayStation 3
depuis PlayStation Store (où il est
disponible).
• L’application pour PlayStation 3
nécessite un compte PlayStation
Network et doit être téléchargée.
Accessible dans les régions où le
PlayStation Store est disponible.
Des informations co mplémentaires
sur ce produit et des réponses à des
questions fréquemment posées
sont disponibles sur notre site Web
d’assistance client.
Imprimé sur papier recyclé à 70 % ou
plus avec de l’encre à base d’huile
végétale sans COV (composés
organiques volatils).
Page 73

FR
FR
39
Page 74

40
FR
Page 75

FR
FR
41
Page 76

© 2013 Sony Corporation Printed in China
 Loading...