

Page 1

4-530-690-21(1)
Digital Still Camera / Instruction Manual GB
Cámara fotografía digital / Manual de instrucciones ES
DSC-HX400/HX400V
Page 2
English
Learning more about the camera (“Help Guide”)
“Help Guide” is an on-line manual. Refer to it for in-depth
instructions on the many functions of the camera.
1 Access the Sony support page.
http://www.sony.net/SonyInfo/Support/
2 Select your country or region.
3 Search for the model name of your camera within the
support page.
• Check the model name on the bottom of your camera.
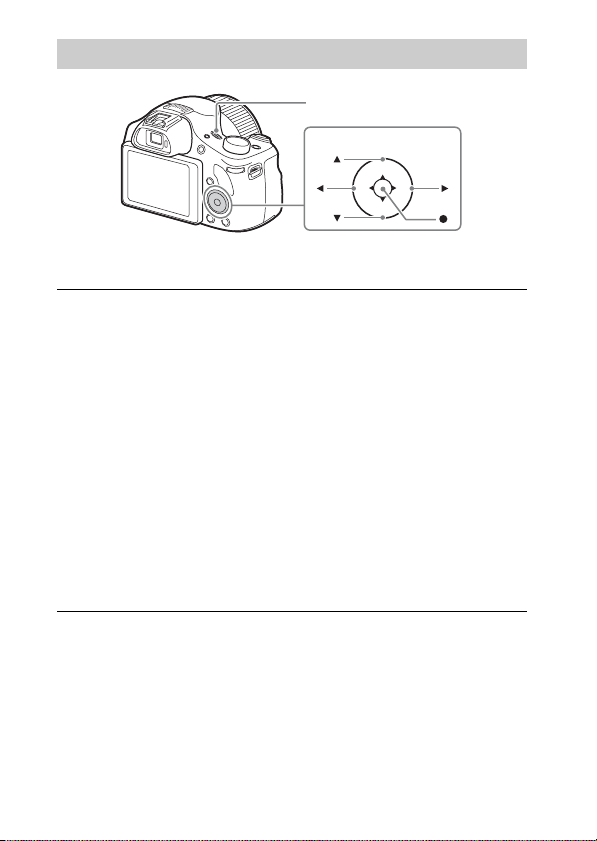
Viewing the Guide
This camera is equipped with a built-in instruction guide.
Fn (Function)
MENU
In-Camera Guide
The camera displays explanations for MENU/Fn (Function) items and the
setting values.
1 Press the MENU button or the Fn (Function) button.
2 Select the desired item, then press the (In-Camera Guide) button.
Shooting Tip
The camera displays shooting tips for the shooting mode selected.
1 Press the (In-Camera Guide) button in shooting mode.
2 Select the desired shooting tip, then press z on the control button.
The shooting tip is displayed.
GB
• You can scroll the screen using v/V and change shooting tips using b/B.
2
(In-Camera Guide)
Page 3

Owner’s Record
The model and serial numbers are located on the bottom. Record the serial number in the
space provided below. Refer to these numbers whenever you call your Sony dealer
regarding this product.
Model No. DSC-HX400/DSC-HX400V
Serial No. _____________________________
Model No. AC-UB10C/AC-UB10D
Serial No. _____________________________
WARNING
To reduce fire or shock hazard, do not expose the unit to rain or
moisture.
IMPORTANT SAFETY INSTRUCTIONS
-SAVE THESE INSTRUCTIONS
DANGER
TO REDUCE THE RISK OF FIRE OR ELECTRIC
SHOCK, CAREFULLY FOLLOW THESE
INSTRUCTIONS
If the shape of the plug does not fit the power outlet, use an attachment plug adaptor of the
proper configuration for the power outlet.
CAUTION
[ Battery pack
If the battery pack is mishandled, the battery pack can burst, cause a fire or even chemical
burns. Observe the following cautions.
• Do not disassemble.
• Do not crush and do not expose the battery pack to any shock or force such as
hammering, dropping or stepping on it.
• Do not short circuit and do not allow metal objects to come into contact with the battery
terminals.
• Do not expose to high temperature above 60°C (140°F) such as in direct sunlight or in a
car parked in the sun.
• Do not incinerate or dispose of in fire.
• Do not handle damaged or leaking lithium ion batteries.
GB
GB
3
Page 4

• Be sure to charge the battery pack using a genuine Sony battery charger or a device that
can charge the battery pack.
• Keep the battery pack out of the reach of small children.
• Keep the battery pack dry.
• Replace only with the same or equivalent type recommended by Sony.
• Dispose of used battery packs promptly as described in the instructions.
[ AC Adaptor
Use the nearby wall outlet (wall socket) when using the AC Adaptor. Disconnect the AC
Adaptor from the wall outlet (wall socket) immediately if any malfunction occurs while
using the apparatus.
For Customers in the U.S.A. and Canada
[ RECYCLING LITHIUM-ION BATTERIES
Lithium-Ion batteries are recyclable.
You can help preserve our environment by returning your used
rechargeable batteries to the collection and recycling location nearest
you.
For more information regarding recycling of rechargeable batteries,
call toll free
1-800-822-8837, or visit http://www.call2recycle.org/
Caution: Do not handle damaged or leaking Lithium-Ion batteries.
[ Battery pack
This device complies with Part 15 of the FCC Rules. Operation is subject to the following
two conditions:
(1) This device may not cause harmful interference, and (2) this device must accept any
interference received, including interference that may cause undesired operation.
CAN ICES-3 B/NMB-3 B
This equipment complies with FCC/IC radiation exposure limits set forth for an
uncontrolled environment and meets the FCC radio frequency (RF) Exposure Guidelines
in Supplement C to OET65 and RSS-102 of the IC radio frequency (RF) Exposure rules.
This equipment has very low levels of RF energy that are deemed to comply without
testing of specific absorption ratio (SAR).
GB
4
Page 5

For Customers in the U.S.A.
If you have any questions about this product, you may call:
Sony Customer Information Center
1-800-222-SONY (7669)
The number below is for the FCC related matters only.
[ Regulatory Information
Declaration of Conformity
Trade Name: SONY
Model No.: DSC-HX400V
Responsible Party: Sony Electronics Inc.
Address: 16530 Via Esprillo,
Telephone No.: 858-942-2230
This device complies with Part15 of the FCC Rules. Operation is subject to the
following two conditions: (1) This device may not cause harmful interference, and (2)
this device must accept any interference received, including interference that may cause
undesired operation.
This equipment must not be co-located or operated in conjunction with any other antenna
or transmitter.
[ CAUTION
You are cautioned that any changes or modifications not expressly approved in this manual
could void your authority to operate this equipment.
[ Note:
This equipment has been tested and found to comply with the limits for a Class B digital
device, pursuant to Part 15 of the FCC Rules.
These limits are designed to provide reasonable protection against harmful interference in
a residential installation. This equipment generates, uses, and can radiate radio frequency
energy and, if not installed and used in accordance with the instructions, may cause
harmful interference to radio communications. However, there is no guarantee that
interference will not occur in a particular installation. If this equipment does cause harmful
interference to radio or television reception, which can be determined by turning the
equipment off and on, the user is encouraged to try to correct the interference by one or
more of the following measures:
– Reorient or relocate the receiving antenna.
– Increase the separation between the equipment and receiver.
– Connect the equipment into an outlet on a circuit different from that to which the
receiver is connected.
– Consult the dealer or an experienced radio/TV technician for help.
San Diego, CA 92127 U.S.A.
GB
The supplied interface cable must be used with the equipment in order to comply with the
limits for a digital device pursuant to Subpart B of Part 15 of FCC Rules.
GB
5
Page 6

For Customers in Canada
This device complies with Industry Canada licence-exempt RSS standard(s).
Operation is subject to the following two conditions: (1) this device may not cause
interference, and (2) this device must accept any interference, including interference that
may cause undesired operation of the device.
For Customers in Europe
[ Notice for the customers in the countries applying EU Directives
Manufacturer: Sony Corporation, 1-7-1 Konan Minato-ku Tokyo, 108-0075 Japan
For EU product compliance: Sony Deutschland GmbH, Hedelfinger Strasse 61, 70327
Stuttgart, Germany
Hereby, Sony Corporation, declares that this equipment is in compliance with the essential
requirements and other relevant provisions of Directive 1999/5/EC. For details, please
access the following URL:
http://www.compliance.sony.de/
[ Notice
If static electricity or electromagnetism causes data transfer to discontinue midway (fail),
restart the application or disconnect and connect the communication cable (USB, etc.)
again.
This product has been tested and found compliant with the limits set out in the EMC
regulation for using connection cables shorter than 3 meters (9.8 feet).
The electromagnetic fields at the specific frequencies may influence the picture and sound
of this unit.
GB
6
Page 7
[ Disposal of waste batteries and electrical and electronic
equipment (applicable in the European Union and other
European countries with separate collection systems)
This symbol on the product, the battery or on the packaging indicates that
the product and the battery shall not be treated as household waste. On
certain batteries this symbol might be used in combination with a
chemical symbol. The chemical symbols for mercury (Hg) or lead (Pb) are
added if the battery contains more than 0.0005% mercury or 0.004% lead.
will help prevent potentially negative consequences for the environment and human health
which could otherwise be caused by inappropriate waste handling. The recycling of the
materials will help to conserve natural resources.
In case of products that for safety, performance or data integrity reasons require a
permanent connection with an incorporated battery, this battery should be replaced by
qualified service staff only. To ensure that the battery and the electrical and electronic
equipment will be treated properly, hand over these products at end-of-life to the
applicable collection point for the recycling of electrical and electronic equipment. For all
other batteries, please view the section on how to remove the battery from the product
safely. Hand the battery over to the applicable collection point for the recycling of waste
batteries. For more detailed information about recycling of this product or battery, please
contact your local Civic Office, your household waste disposal service or the shop where
you purchased the product or battery.
By ensuring these products and batteries are disposed of correctly, you
For Customers in Singapore
Checking the supplied items
The number in parentheses indicates the number of pieces.
• Camera (1)
• Rechargeable Battery Pack NP-BX1 (1)
• Micro USB Cable (1)
• AC Adaptor AC-UB10C/UB10D (1)
• Power Cord (mains lead) (not supplied in the USA and Canada) (1)
• Shoulder Strap (1)
• Lens Cap (1)
• Shoe Cap (1) (Attached on the camera)
• Instruction Manual (this manual) (1)
• Wi-Fi Connection/One-touch (NFC) Guide (1)
This guide explains the functions that require a Wi-Fi connection.
GB
GB
7
Page 8
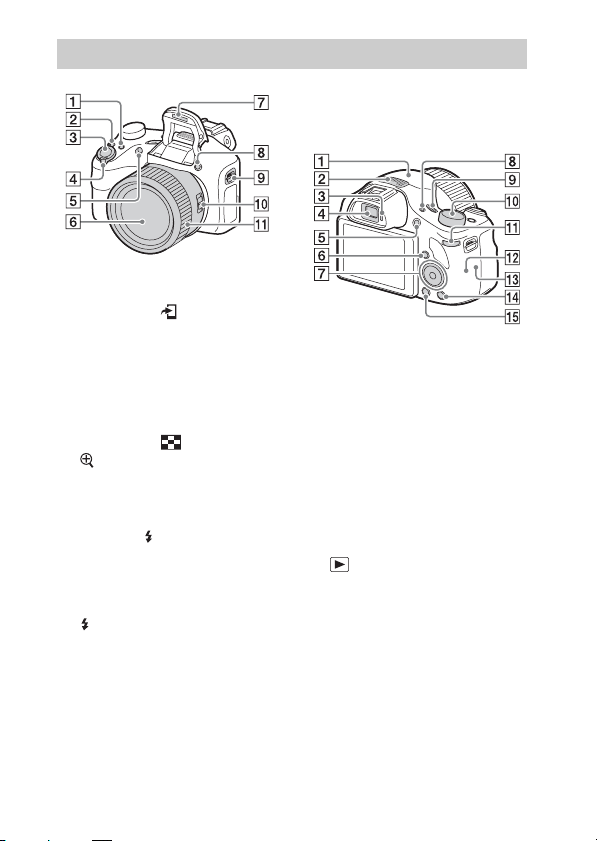
Identifying parts
A For shooting: Fn (Function)
button
For viewing: (Send to
Smartphone) button
B CUSTOM (Custom) button
• You can assign a desired function
to the CUSTOM button.
C Shutter button
D For shooting: W/T (zoom) lever
For viewing: (Index) lever/
(Playback zoom) lever
E Self-timer lamp/AF illuminator
F Lens
G Flash
• Press the (Flash pop-up)
button to use the flash. The flash
does not pop up automatically.
• When not using the flash, press it
back into the camera body.
H (Flash pop-up) button
I Hook for Shoulder Strap
J Zoom/Focus switch
K Manual ring
• When the Zoom/Focus switch is
set to AF/ZOOM, turn the
manual ring to perform the zoom
function.
GB
8
• When the Zoom/Focus switch is
set to MF or DMF, turn the
manual ring to adjust the focus.
A GPS receiver (built-in, DSC-
HX400V only)
B Stereo microphone
C Eye sensor
D Viewfinder
• When you look into the
viewfinder, the viewfinder mode
is activated, and when you move
your face away from the
viewfinder, the viewing mode
returns to the screen mode.
E MOVIE (Movie) button
F (Playback) button
G Control button
H FINDER/MONITOR button
• This button switches whether to
display the image on the screen
or in the viewfinder.
I ON/OFF (Power) button and
Power/Charge lamp
Page 9
J Mode dial
(Intelligent Auto)/
(Superior Auto)/
(Program Auto)/
(Aperture Priority)/
(Shutter Priority)/
(Manual Exposure)/
1/2 (Memory recall)/
(Movie)/ (iSweep
Panorama)/ (Scene
Selection)
K Control dial
L Wi-Fi sensor (built-in)
M (N Mark)
• Touch the mark when you
connect the camera to a
smartphone equipped with the
NFC function.
• NFC (Near Field
Communication) is an
international standard of the
short-range wireless
communication technology.
N (In-Camera Guide)/
(Delete) button
O MENU button
• When adjusting the diopter level,
point the camera to a bright area
to make it easier to adjust the
diopter level.
C Multi/Micro USB Terminal*
• Supports Micro USB compatible
device.
D Connector cover
E HDMI micro jack
F Speaker
G LCD screen
A Battery/Memory card cover
B Battery insertion slot
C Battery eject lever
D Access lamp
E Memory card slot
F Tripod socket hole
• Use a tripod with a screw less
than 5.5 mm (7/32 inches) long.
Otherwise, you cannot firmly
secure the camera, and damage to
the camera may occur.
GB
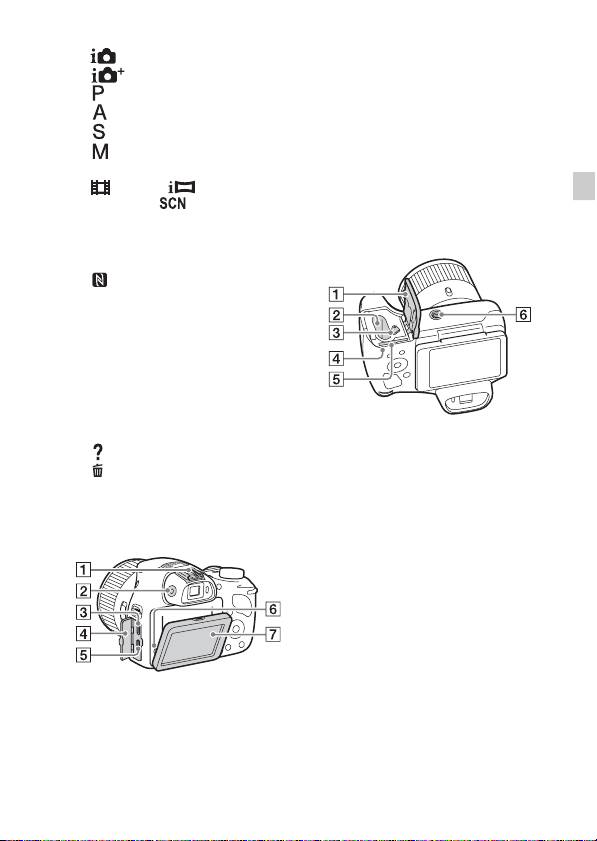
A Multi interface shoe*
B Diopter-adjustment dial
• Adjust the diopter-adjustment
dial to your eyesight until the
display appears clearly in the
viewfinder.
GB
9
Page 10

* For details on compatible accessories
for the multi interface shoe and the
Multi/Micro USB Terminal, visit the
Sony web site, or consult your Sony
dealer or local authorized Sony
service facility. You can also use
accessories that are compatible with
the accessory shoe. Operations with
other manufacturers’ accessories are
not guaranteed.
10
GB
Page 11
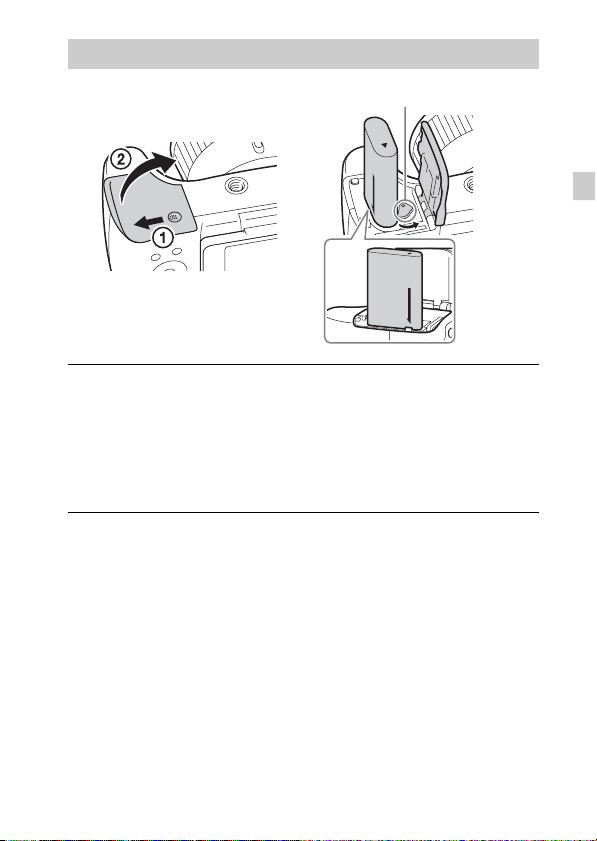
Inserting the battery pack
Battery eject lever
Open the cover.
1
Insert the battery pack.
2
• While pressing the battery eject lever, insert the battery pack as
illustrated. Make sure that the battery eject lever locks after insertion.
• Closing the cover with the battery inserted incorrectly may damage the
camera.
GB
GB
11
Page 12
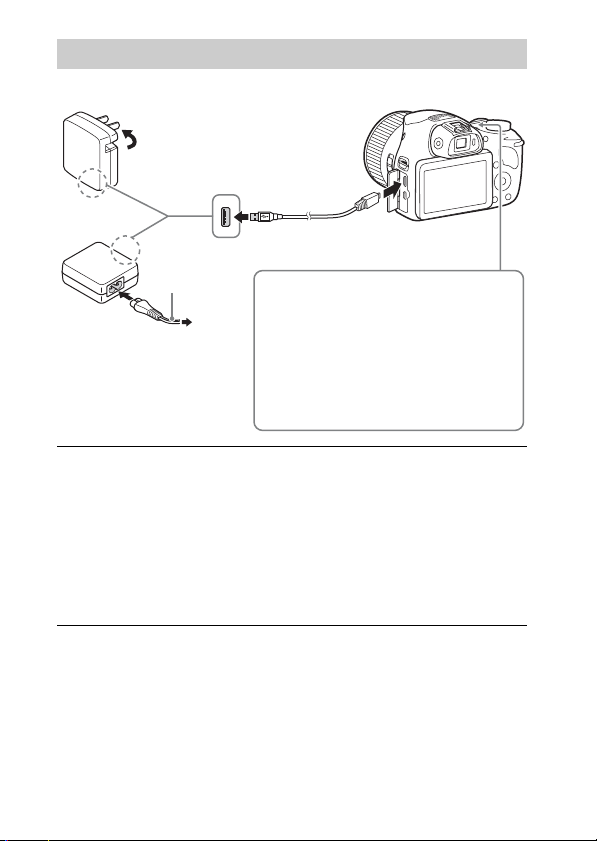
Charging the battery pack
For customers in the USA and Canada
Power cord
(Mains lead)
For customers in countries/
regions other than the USA
and Canada
Connect the camera to the AC Adaptor (supplied),
1
using the micro USB cable (supplied).
Connect the AC Adaptor to the wall outlet (wall socket).
2
The Power/Charge lamp lights orange, and charging starts.
• Turn off the camera while charging the battery.
• You can charge the battery pack even when it is partially charged.
• When the Power/Charge lamp flashes and charging is not finished,
remove and re-insert the battery pack.
Power/Charge lamp
Lit: Charging
Off: Charging finished
Flashing:
Charging error or charging paused
temporarily because the camera is not
within the proper temperature range
12
GB
Page 13

Notes
• If the Power/Charge lamp on the camera flashes when the AC Adaptor is
connected to the wall outlet (wall socket), this indicates that charging is
temporarily stopped because the temperature is outside the recommended range.
When the temperature gets back within the appropriate range, the charging
resumes. We recommend charging the battery pack in an ambient temperature of
between 10°C to 30°C (50ºF to 86ºF).
• The battery pack may not be effectively charged if the terminal section of the
battery is dirty. In this case, wipe any dust off lightly using a soft cloth or a cotton
swab to clean the terminal section of the battery.
• Connect the AC Adaptor (supplied) to the nearest wall outlet (wall socket). If
malfunctions occur while using the AC Adaptor, disconnect the plug from the wall
outlet (wall socket) immediately to disconnect from the power source.
• When charging is finished, disconnect the AC Adaptor from the wall outlet (wall
socket).
• Be sure to use only genuine Sony brand battery packs, micro USB cable (supplied)
and AC Adaptor (supplied).
x
Charging time (Full charge)
The charging time is approximately 230 minutes using the AC Adaptor
(supplied).
Notes
• The above charging time applies when charging a fully depleted battery pack at a
temperature of 25°C (77°F). Charging may take longer depending on conditions of
use and circumstances.
x
Charging by connecting to a computer
The battery pack can be charged by connecting the camera to a computer using
a micro USB cable.
GB
To a USB jack
GB
13
Page 14

• If you connect the camera to a computer when power is turned on, the battery
is not charged but the camera will be powered by the computer, which allows
you to import images to a computer without worrying about the battery
running out.
Notes
• Note the following points when charging via a computer:
– If the camera is connected to a laptop computer that is not connected to a power
source, the laptop battery level decreases. Do not charge for an extended period
of time.
– Do not turn on/off or restart the computer, or wake the computer to resume from
sleep mode when a USB connection has been established between the computer
and the camera. That may cause the camera to malfunction. Before turning on/
off, or restarting the computer or waking the computer from sleep mode,
disconnect the camera and the computer.
– No guarantees are made for charging using a custom-built computer or a
modified computer.
x
Battery life and number of images that can be
recorded and played back
Battery life Number of images
Shooting (still
images)
Typical movie
shooting
Continuous
movie shooting
Viewing (still images) Approx. 250 min. Approx. 5000 images
Notes
• The above number of images applies when the battery pack is fully charged. The
number of images may decrease depending on the conditions of use.
• The number of images that can be recorded is for shooting under the following
conditions:
– Using a Sony Memory Stick PRO Duo™ (Mark2) media (sold separately).
– The battery pack is used at an ambient temperature of 25°C (77°F).
– [GPS On/Off] is set to [Off] (DSC-HX400V only)
– [Display Quality] is set to [Standard]
GB
Screen Approx. 150 min. Approx. 300 images
Viewfinder Approx. 190 min. Approx. 380 images
Screen Approx. 50 min. —
Viewfinder Approx. 55 min. —
Screen Approx. 85 min. —
Viewfinder Approx. 95 min. —
14
Page 15

• The number for “Shooting (still images)” is based on the CIPA standard, and is for
shooting under the following conditions:
(CIPA: Camera & Imaging Products Association)
– DISP is set to [Display All Info.].
– Shooting once every 30 seconds.
– The zoom is switched alternately between the W and T ends.
– The flash is used once every two times.
– The power is turned on and off once every ten times.
• The number of minutes for movie shooting is based on the CIPA standard, and is
for shooting under the following conditions:
– [ Record Setting]: 60i 17M(FH)/50i 17M(FH).
– Typical movie shooting: Battery life based on repeatedly starting/stopping
shooting, zooming, turning on/off, etc.
– Continuous movie shooting: Battery life based on non-stop shooting until the
limit (29 minutes) has been reached, and then continued by pressing the MOVIE
button again. Other functions, such as zooming, are not operated.
x
Supplying power
You can use the AC Adaptor AC-UD10 (sold separately) or AC-UD11 (sold
separately) for shooting and playback to supply power when shooting or
playing back images.
Notes
• If you shoot or play back images when the camera is connected to the
supplied AC Adaptor, power will not be supplied through the AC Adaptor.
GB
GB
15
Page 16
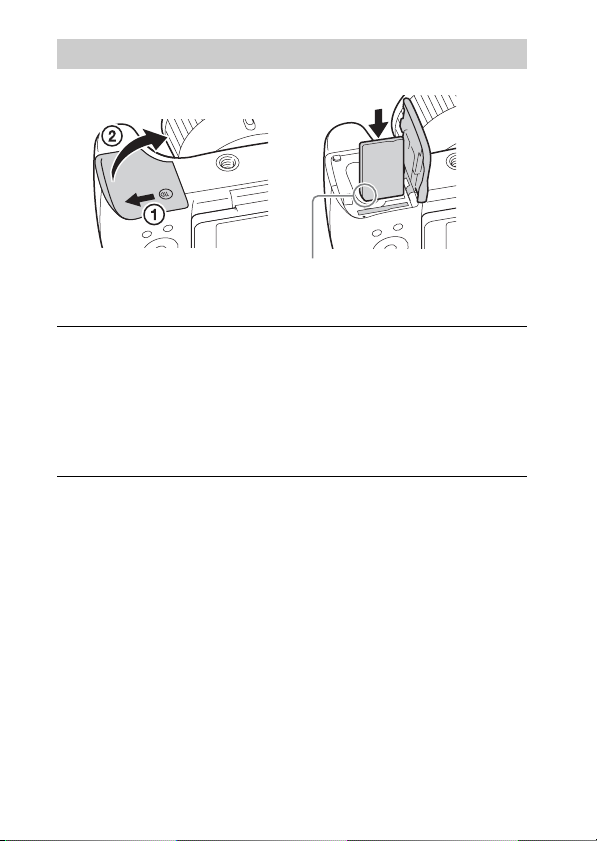
Inserting a memory card (sold separately)
Ensure that the notched corner
is faced correctly.
Open the cover.
1
Insert the memory card (sold separately).
2
• With the notched corner facing as illustrated, insert the memory card
until it clicks into place.
Close the cover.
3
16
GB
Page 17
x
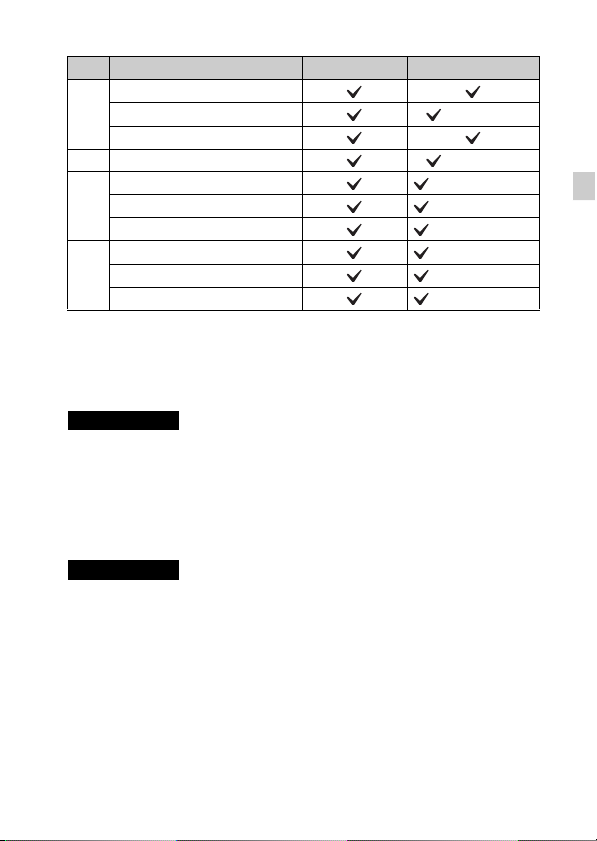
Memory cards that can be used
Memory card For still images For movies
Memory Stick XC-HG Duo™
A
Memory Stick PRO Duo™ (Mark2 only)
Memory Stick PRO-HG Duo™
B Memory Stick Micro™ (M2) (Mark2 only)
SD memory card (Class 4 or faster)
C
SDHC memory card (Class 4 or faster)
SDXC memory card (Class 4 or faster)
microSD memory card (Class 4 or faster)
D
microSDHC memory card (Class 4 or faster)
microSDXC memory card (Class 4 or faster)
• In this manual, the products in the table are collectively referred to as follows:
A: Memory Stick PRO Duo media
B: Memory Stick Micro media
C: SD card
D: microSD memory card
Notes
• When using Memory Stick Micro media or microSD memory cards with this
camera, make sure to use with the appropriate adaptor.
x
To remove the memory card/battery pack
Memory card: Push the memory card in once to eject the memory card.
Battery pack: Slide the battery eject lever. Be sure not to drop the battery pack.
Notes
• Never remove the memory card/battery pack when the access lamp (page 9) is lit.
This may cause damage to data in the memory card.
GB
GB
17
Page 18
Setting the clock
ON/OFF (Power)
Control button
Select items: v/V/b/B
Set: z
Press the ON/OFF (Power) button.
1
The Date & Time setting is displayed when you turn on the camera for the
first time.
• It may take some time for the power to turn on and allow operation.
Check that [Enter] is selected on the screen, then press
2
z on the control button.
Select a desired geographic location by following the
3
on-screen instructions, then press z.
Set [Daylight Savings], [Date/Time] and [Date Format],
4
then press z.
• When setting [Date/Time], midnight is 12:00 AM, and noon is
12:00 PM.
Check that [Enter] is selected, then press z.
5
18
GB
Page 19
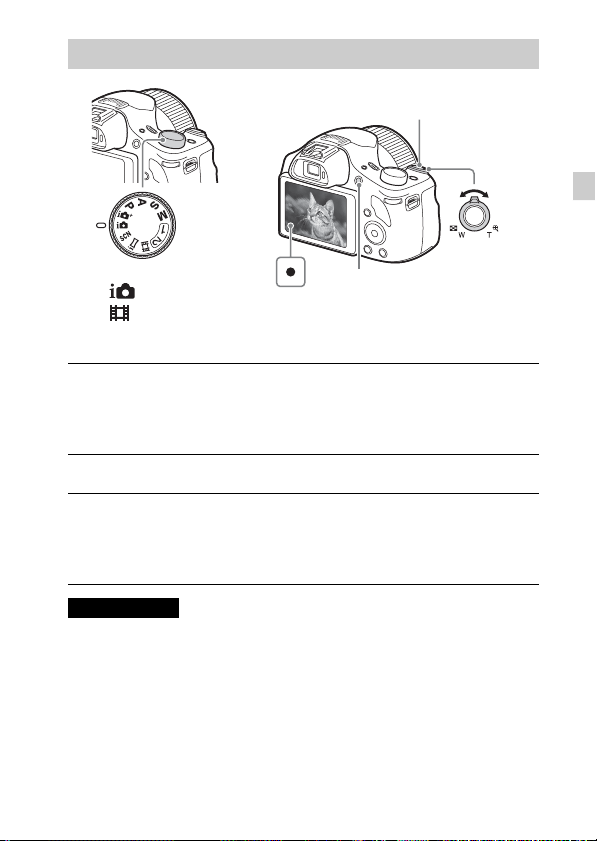
Shooting still images/movies
Shutter button
W/T (zoom)
Mode dial
: Intelligent Auto
: Movie
Shooting still images
Press the shutter button halfway down to focus.
1
When the image is in focus, a beep sounds and the z indicator lights.
Press the shutter button fully down to shoot an image.
2
Shooting movies
Press the MOVIE (Movie) button to start recording.
1
• Use the W/T (zoom) lever to change the zoom ratio.
Press the MOVIE button again to stop recording.
2
Notes
• Do not pull up the flash manually. This may cause a malfunction.
• When using the zoom function while shooting a movie, the sound of the camera
operating will be recorded. The sound of the MOVIE button operating may also be
recorded when movie recording is finished.
• The panoramic shooting range may be reduced, depending on the subject or the
way it is shot. Therefore even when [360°] is set for panoramic shooting, the
recorded image may be less than 360 degrees.
MOVIE
lever
W: zoom out
T: zoom in
GB
GB
19
Page 20
• For the continuous shooting time of a movie recording, refer to “Number of still
images and recordable time of movies” (page 29). When movie recording is
finished, you can restart recording by pressing the MOVIE button again.
Recording may stop to protect the camera depending on the ambient temperature.
Viewing images
Control dial
(Playback)
(Delete)
Press the (Playback) button.
1
• When images on a memory card recorded with other cameras are played
back on this camera, the registration screen for the data file appears.
x
Selecting next/previous image
Select an image by pressing B (next)/b (previous) on the control button. Press
z in the center of the control button to view movies.
x
Deleting an image
1 Press the (Delete) button.
2 Select [Delete] with v on the control button, then press z.
x
Returning to shooting images
Press the shutter button halfway down.
GB
W: zoom out
T: zoom in
Control button
Select images: B (next)/b (previous)
or turn the control dial
Set: z
20
Page 21
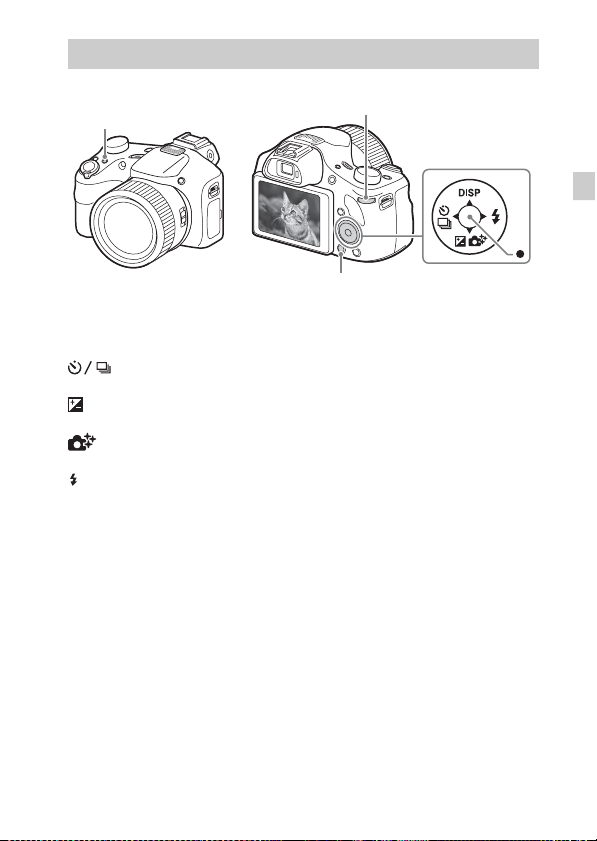
Introduction of other functions
Fn (Function)
x
Control button
DISP (Display Contents): Allows you to change the screen display.
(Drive Mode): Allows you to switch between shooting methods, such
as single shooting, continuous shooting or bracket shooting.
(Exposure Comp.): Allows you to compensate the exposure and brightness
for the entire image.
(Photo Creativity): Allows you to operate the camera intuitively and
shoot creative images easily.
(Flash Mode): Allows you to select a flash mode for still images.
z (Lock-on AF): The camera tracks the subject and adjusts focus
automatically even when the subject is moving.
x
Fn (Function) button
Allows you to register 12 functions and recall those functions when shooting.
1 Press the Fn (Function) button.
2 Select the desired function by pressing v/V/b/B on the control button.
3 Select the setting value by turning the control dial.
x
Control dial
You can instantly change the appropriate setting for each shooting mode just
by turning the control dial.
Control dial
MENU
Control button
GB
GB
21
Page 22
x
Menu Items
(Camera Settings)
Image Size Selects the size of still images.
Aspect Ratio Selects the aspect ratio for still images.
Quality Sets the image quality for still images.
Panorama: Size Selects the size of panoramic images.
Panorama: Direction Sets the shooting direction for panoramic images.
File Format Selects the movie file format.
Record Setting Selects the size of the recorded movie frame.
Drive Mode Sets the drive mode, such as for continuous shooting.
Flash Mode Sets the flash settings.
Flash Comp. Adjusts the intensity of flash output.
Red Eye Reduction Reduces the red-eye phenomenon when using flash.
Focus Area Selects the area of focus.
AF Illuminator
Exposure Comp. Compensates the brightness of the entire image.
ISO Adjusts the luminous sensitivity.
Metering Mode
White Balance Adjusts the color tones of an image.
DRO/Auto HDR
Creative Style Selects the desired image processing.
Picture Effect
Focus Magnifier
High ISO NR
GB
Sets the AF illuminator, which provides light for a
dark scene to aid focusing.
Selects the metering mode that sets which part of the
subject to measure to determine the exposure.
Compensates automatically for brightness and
contrast.
Selects the desired effect filter to achieve a more
impressive and artistic expression.
Enlarges the image before shooting so that you can
check the focus in detail.
Sets noise reduction processing for high-sensitivity
shooting.
22
Page 23
Lock-on AF
Smile/Face Detect.
Sets the function to track a subject and continue
focusing.
Selects to detect faces and adjust various settings
automatically. Sets to automatically release the
shutter when a smile is detected.
Soft Skin Effect Sets the Soft Skin Effect and the effect level.
Analyzes the scene when capturing faces, close-ups,
Auto Obj.
Framing
Scene Selection
Movie
or subjects tracked by the Lock-on AF function, and
automatically trims and saves another copy of the
image with a more impressive composition.
Selects pre-set settings to match various scene
conditions.
Selects the shooting mode to suit your subject or
effect.
SteadyShot Sets SteadyShot for shooting movies.
Auto Slow Shut.
Micref Level
Wind Noise Reduct. Reduces wind noise during movie recording.
Shooting Tip List Displays the shooting tip list.
Memory Registers the desired modes or camera settings.
Sets the function that automatically adjusts the shutter
speed following the brightness of the environment in
movie mode.
Sets the microphone reference level when recording
movies.
(Custom Settings)
MF Assist Displays an enlarged image when focusing manually.
Focus Magnif. Time
Grid Line
Auto Review
Peaking Level
Sets the length of time the image will be shown in an
enlarged form.
Sets a grid line display to enable alignment to a
structural outline.
Sets auto review to display the captured image after
shooting.
Enhances the outline of in-focus ranges with a
specific color when focusing manually.
GB
GB
23
Page 24
Peaking Color Sets the color used for the peaking function.
Exposure Set. Guide
Zoom Setting
FINDER/MONITOR
Write Date
Function Menu Set.
Custom Key Settings Assigns a desired function to the button.
MOVIE Button Sets whether to always activate the MOVIE button.
Sets the guide displayed when exposure settings are
changed in the shooting screen.
Sets whether to use the Clear Image Zoom and Digital
Zoom when zooming.
Sets the method for switching between the viewfinder
and screen.
Sets whether to record a shooting date on the still
image.
Customizes the functions displayed when the Fn
(Function) button is pressed.
(Wireless)
Send to Smartphone Transfers images to display on a smartphone.
Send to Computer
View on TV You can view images on a network-enabled TV.
One-touch(NFC)
Airplane Mode
WPS Push
Access Point Set. You can register your access point manually.
Edit Device Name
Disp MAC Address Displays the MAC address of the camera.
SSID/PW Reset
GB
Reset Network Set. Resets all network settings.
Backs up images by transferring them to a computer
connected to a network.
Assigns an application to One-touch (NFC). You can
call up the application when shooting by touching an
NFC-enabled smartphone to the camera.
You can set this device not to perform wireless
communications and GPS functions.
You can register the access point to the camera easily
by pushing the WPS button.
You can change the device name under Wi-Fi Direct,
etc.
Resets the SSID and password for the smartphone
connection.
24
Page 25

(Application)
Application List
Introduction Displays instructions on using the application.
Displays the application list. You can select the
application you want to use.
(Playback)
Delete Deletes an image.
View Mode
Image Index Displays multiple images at the same time.
Slide Show Shows a slide show.
Rotate Rotates the image.
Sets the way in which images are grouped for
playback.
Enlarge Image Enlarges the playback images.
4K Still Image PB
Protect Protects the images.
Motion Interval ADJ
Specify Printing Adds a print order mark to a still image.
Outputs still images in 4K resolution to an HDMIconnected TV that supports 4K.
Adjusts the interval for showing the tracking of
subjects in [Motion Shot Video], where the tracking
of the subject’s motion will be shown when playing
back movies.
(Setup)
Monitor Brightness Sets the screen brightness.
Volume Settings Sets the volume for movie playback.
Audio signals Sets the functional sounds of the camera.
GPS Settings
(DSC-HX400V only)
Upload Settings
Tile Menu
Sets the GPS function.
Sets the upload function of the camera when using an
Eye-Fi card.
Sets whether to display the tile menu every time you
press the MENU button.
GB
GB
25
Page 26

Mode Dial Guide
Display Quality Sets the display quality.
Pwr Save Start Time
PAL/NTSC Selector
(only for 1080 50i
compatible models)
Demo Mode Sets demonstration movie playback to on or off.
HDMI Resolution
CTRL FOR HDMI
USB Connection Sets the USB connection method.
USB LUN Setting
USB Power Supply
Language Selects the language.
Date/Time Setup Sets the date and time, and daylight savings.
Area Setting Sets the location of use.
Format Formats the memory card.
File Number
Select REC Folder Changes the selected folder for storing images.
New Folder
Folder Name Sets the folder name for still images.
Recover Image DB
Display Media Info.
GB
Turns the mode dial guide (the explanation of each
shooting mode) on or off.
Sets the length of time until the camera turns off
automatically.
By changing the TV format of the device, shooting in
a different movie format is possible.
Sets the resolution when the camera is connected to
an HDMI TV.
Operates the camera from a TV that supports
BRAVIA™ Sync.
Enhances compatibility by limiting the functions of
the USB connection.
Sets whether or not to supply power through USB
connection.
Sets the method used to assign file numbers to still
images and movies.
Creates a new folder for storing still images and
movies (MP4).
Recovers the image database file and enables
recording and playback.
Displays the remaining recording time of movies and
the recordable number of still images on the memory
card.
26
Page 27

Version Displays the camera software version.
Setting Reset Restores settings to their defaults.
Features of PlayMemories Home™
The software PlayMemories Home allows you to import still images and
movies to your computer and use them. PlayMemories Home is required for
importing AVCHD movies to your computer.
Playing back importe d
images
Importing images from
your camera
GB
For Windows, the following functions are also
available:
Viewing images
on a calendar
Notes
• An Internet connection is required to install PlayMemories Home.
• An Internet connection is required to use PlayMemories Online or other network
services. PlayMemories Online or other network services may not be available in
some countries or regions.
• Use the following URL for Mac applications:
http://www.sony.co.jp/imsoft/Mac/
Creating
movie
discs
Uploading
images to
network services
Sharing images on
PlayMemories Online™
GB
27
Page 28

• If the software PMB (Picture Motion Browser), supplied with models released
before 2011, has already been installed on your computer, PlayMemories Home
will overwrite it during the installation. Use PlayMemories Home, the successor
software of PMB.
x
System requirements
You can find the system requirements for the software at the following URL:
www.sony.net/pcenv/
x
Installing PlayMemories Home on a computer
Using the Internet browser on your computer, go to the
1
following URL, and then install PlayMemories Home.
www.sony.net/pm/
• For details on PlayMemories Home, refer to the following
PlayMemories Home support page (English only):
http://www.sony.co.jp/pmh-se/
• When installation is complete, PlayMemories Home starts.
Connect the camera to your computer using the micro
2
USB cable (supplied).
• Turn on the camera.
• New functions may be installed in PlayMemories Home. Connect the
camera to your computer even if PlayMemories Home is already
installed on your computer.
Notes
• Do not disconnect the micro USB cable (supplied) from the camera while the
operating screen or the accessing screen is displayed. Doing so may damage the
data.
• To disconnect the camera from the computer, click on the tasktray, then click
(disconnect icon). For Windows Vista, click on the tasktray.
GB
28
Page 29

Adding functions to the camera
You can add the desired functions to your camera by connecting to the
application download website (PlayMemories Camera Apps™) via the
Internet.
http://www.sony.net/pmca
• After installing an application, you can call up the application by touching an
NFC-enabled Android smartphone to the N mark on the camera, using the
[One-touch(NFC)] function.
Number of still images and recordable time of movies
The number of still images and recordable time may vary depending on the
shooting conditions and the memory card.
x
Still images
[ Image Size]: L: 20M
When [ Aspect Ratio] is set to [4:3]*
Quality
Capacity
Standard 295 images
Fine 200 images
* When the [ Aspect Ratio] is set to other than [4:3], you can record more
pictures than shown above.
2 GB
GB
GB
29
Page 30

x
Movies
The table below shows the approximate maximum recording times. These are
the total times for all movie files. Continuous shooting is possible for
approximately 29 minutes (a product specification limit). The maximum
continuous recording time of an MP4 (12M) format movie is about 15 minutes
(limited by the 2 GB file size restriction).
(h (hour), m (minute))
Record Setting
Capacity
60i 24M(FX)/50i 24M(FX) 10 m
60i 17M(FH)/50i 17M(FH) 10 m
60p 28M(PS)/50p 28M(PS) 9 m
24p 24M(FX)/25p 24M(FX) 10 m
24p 17M(FH)/25p 17M(FH) 10 m
1440×1080 12M 15 m
VGA 3M 1 h 10 m
• The recordable time of movies varies because the camera is equipped with VBR
(Variable Bit-Rate), which automatically adjusts the image quality depending on
the shooting scene. When you record a fast-moving subject, the image is clearer
but the recordable time is shorter because more memory is required for recording.
The recordable time also varies depending on the shooting conditions, the subject
or the image quality/size settings.
2 GB
30
GB
Page 31

Notes on using the camera
Functions built into this camera
• This manual describes 1080 60i-compatible devices and 1080 50i-compatible
devices.
– To determine whether your camera supports the GPS function, check the model
name of your camera.
GPS-compatible: DSC-HX400V
GPS-incompatible: DSC-HX400
– To check whether your camera is a 1080 60i-compatible device or 1080 50i-
compatible device, check for the following marks on the bottom of the camera.
1080 60i-compatible device: 60i
1080 50i-compatible device: 50i
• This camera is compatible with 1080 60p or 50p-format movies. Unlike standard
recording modes up to now, which record in an interlacing method, this camera
records using a progressive method. This increases the resolution, and provides a
smoother, more realistic image.
• While aboard an airplane, set [Airplane Mode] to [On].
On GPS-compatible devices (DSC-HX400V only)
• Use GPS in accordance with regulations of countries and regions where you use it.
• If you do not record the location information, set [GPS On/Off] to [Off].
On use and care
Avoid rough handling, disassembling, modifying, physical shock, or impact such as
hammering, dropping, or stepping on the product. Be particularly careful of the lens.
ZEISS lens
The camera is equipped with a ZEISS lens which is capable of reproducing sharp
images with excellent contrast. The lens for the camera has been produced under a
quality assurance system certified by ZEISS in accordance with the quality
standards of ZEISS in Germany.
Notes on recording/playback
• Before you start recording, make a trial recording to make sure that the camera is
working correctly.
• The camera is neither dust-proof, nor splash-proof, nor water-proof.
• Do not aim the camera at the sun or other bright light. It may cause a malfunction
of the camera.
• If moisture condensation occurs, remove it before using the camera.
• Do not shake or strike the camera. It may cause a malfunction and you may not be
able to record images. Furthermore, the recording media may become unusable or
image data may be damaged.
GB
GB
31
Page 32

Do not use/store the camera in the following places
• In an extremely hot, cold or humid place
In places such as in a car parked in the sun, the camera body may become
deformed and this may cause a malfunction.
• Under direct sunlight or near a heater
The camera body may become discolored or deformed, and this may cause a
malfunction.
• In a location subject to shaking or vibration
• Near a location that generates strong radio waves, emits radiation or is strongly
magnetic
In such locations, the camera may not properly record or play back images.
• In sandy or dusty places
Be careful not to let sand or dust get into the camera. This may cause the camera to
malfunction, and in some cases this malfunction cannot be repaired.
Notes on the screen, electronic viewfinder and lens
• The screen and electronic viewfinder are manufactured using extremely highprecision technology, and over 99.99% of the pixels are operational for effective
use. However, some tiny black and/or bright dots (white, red, blue or green) may
appear on the screen and electronic viewfinder. These dots are a normal result of
the manufacturing process, and do not affect the recording.
• Take care that your fingers or other objects are not caught in the lens when it is
operating.
Notes on the flash
• Do not carry the camera by the flash unit, or use excessive force on it.
• If water, dust or sand get into the open flash unit, it may cause a malfunction.
• Take care that your finger is not in the way when pushing the flash down.
On camera’s temperature
Your camera and battery may get hot due to continuous use, but it is not a
malfunction.
On the overheat protection
Depending on the camera and battery temperature, you may be unable to record
movies or the power may turn off automatically to protect the camera.
A message will be displayed on the screen before the power turns off or you can no
longer record movies. In this case, leave the power off and wait until the camera and
battery temperature goes down. If you turn on the power without letting the camera
and battery cool down enough, the power may turn off again or you may be unable
to record movies.
32
GB
Page 33

On charging the battery
• If you charge a battery that has not been used for a long time, you may be unable
to charge it to the proper capacity.
This is due to the battery characteristics. Charge the battery again.
•
Batteries which have not been used for more than a year may have become
deteriorated.
Warning on copyright
Television programs, films, videotapes, and other materials may be copyrighted.
Unauthorized recording of such materials may be contrary to the provisions of the
copyright laws.
No guarantee in the case of damaged content or recording failures
Sony cannot provide a guarantee in the case of failure to record or loss or damage of
recorded content due to a malfunction of the camera or recording media, etc.
Cleaning the camera surface
Clean the camera surface with a soft cloth slightly moistened with water, then wipe
the surface with a dry cloth. To prevent damage to the finish or casing:
– Do not expose the camera to chemical products such as thinner, benzine, alcohol,
disposable cloths, insect repellent, sunscreen or insecticide.
Maintaining the screen
• Hand cream or moisturizer left on the screen may dissolve its coating. If you get
any on the screen, wipe it off immediately.
• Wiping forcefully with tissue paper or other materials can damage the coating.
• If fingerprints or debris are stuck to the screen, we recommend that you gently
remove any debris and then wipe the screen clean with a soft cloth.
Notes on wireless LAN
We assume no responsibility whatsoever for any damage caused by unauthorized
access to, or unauthorized use of, destinations loaded on the camera, resulting from
loss or theft.
GB
GB
33
Page 34

Specifications
Camera
[System]
Image device: 7.82 mm (1/2.3 type)
Exmor R™ CMOS sensor
Total pixel number of camera:
Approx. 21.1 Megapixels
Effective pixel number of camera:
Approx. 20.4 Megapixels
Lens: ZEISS Vario-Sonnar T* 50×
zoom lens
f = 4.3 mm – 215 mm (24 mm –
1 200 mm (35 mm film
equivalent))
F2.8 (W) – F6.3(T)
While shooting movies (16:9):
26.5 mm – 1 325 mm
While shooting movies (4:3):
32.5 mm – 1 625 mm
*1
When [ SteadyShot] is set to
[Standard]
Filter diameter: 55 mm
SteadyShot: Optical
File format:
Still images: JPEG compliant
(DCF, Exif, MPF Baseline), DPOF
compatible
Movies (AVCHD format):
AVCHD format Ver. 2.0
compatible
Video: MPEG-4 AVC/H.264
Audio: Dolby Digital 2ch,
equipped with Dolby Digital Stereo
Creator
• Manufactured under license from
Dolby Laboratories.
Movies (MP4 format):
Video: MPEG-4 AVC/H.264
Audio: MPEG-4 AAC-LC 2ch
GB
34
Recording media: Memory Stick PRO
Duo media, Memory Stick Micro
media, SD cards, microSD memory
cards
Flash: Flash range (ISO sensitivity
(Recommended Exposure Index)
set to Auto):
Approx. 0.5 m to 8.5 m
(1.64 ft. to 27.89 ft.) (W)/
Approx. 2.4 m to 3.5 m
(7.87 ft. to 11.48 ft.) (T)
[Input and Output connectors]
HDMI connector: HDMI micro jack
Multi/Micro USB Terminal*:
*1
*1
USB communication
USB communication: Hi-Speed USB
(USB 2.0)
* Supports Micro USB compatible
device.
[Viewfinder]
Type: Electronic viewfinder
Total number of dots:
201 600 dots equivalent
Frame coverage: 100%
[Screen]
LCD screen:
7.5 cm (3.0 type) TFT drive
Total number of dots:
921 600 dots
Page 35

[Power, general]
Power: Rechargeable battery pack
NP-BX1, 3.6 V
AC Adaptor AC-UB10C/UB10D,
5V
Power consumption:
Approx. 1.4 W (during shooting
with the LCD screen)
Approx. 1.1 W (during shooting
with the viewfinder)
Operating temperature: 0 °C to 40 °C
(32 °F to 104 °F)
Storage temperature: –20 °C to +60 °C
(–4 °F to +140 °F)
Dimensions (CIPA compliant):
129.6 mm × 93.2 mm × 103.2 mm
(5 1/8 inches × 3 3/4 inches ×
4 1/8 inches) (W/H/D)
Mass (CIPA compliant) (Approx.):
660 g (1 lb 7.3 oz) (including NP-
BX1 battery pack, Memory Stick
PRO Duo media)
Microphone: Stereo
Speaker: Monaural
Exif Print: Compatible
PRINT Image Matching III:
Compatible
[Wireless LAN]
Supported standard: IEEE 802.11 b/g/n
Frequency: 2.4 GHz
Supported security protocols: WEP/
WPA-PSK/WPA2-PSK
Configuration method: WPS (Wi-Fi
Protected Setup) / manual
Access method: Infrastructure Mode
NFC: NFC Forum Type 3 Tag
compliant
AC Adaptor AC-UB10C/UB10D
Power requirements: AC 100 V to
240 V, 50 Hz/60 Hz, 70 mA
Output voltage: DC 5 V, 0.5 A
Operating temperature: 0 °C to 40 °C
(32°F to 104°F)
Storage temperature: –20 °C to +60 °C
(–4 °F to +140 °F)
Dimensions (Approx.):
50 mm × 22 mm × 54 mm
(2 inches × 7/8 inches ×
2 1/4 inches) (W/H/D)
Rechargeable Battery Pack
NP-BX1
Battery type: Lithium-ion battery
Maximum voltage: DC 4.2 V
Nominal voltage: DC 3.6 V
Maximum charge voltage: DC 4.2 V
Maximum charge current: 1.89 A
Capacity: 4.5 Wh (1 240 mAh)
Design and specifications are subject to
change without notice.
GB
GB
35
Page 36

Trademarks
• Memory Stick and are
trademarks or registered trademarks
of Sony Corporation.
• “AVCHD Progressive” and the
“AVCHD Progressive” logotype are
trademarks of Panasonic Corporation
and Sony Corporation.
• Dolby and the double-D symbol are
trademarks of Dolby Laboratories.
• The terms HDMI and HDMI HighDefinition Multimedia Interface, and
the HDMI Logo are trademarks or
registered trademarks of HDMI
Licensing LLC in the United States
and other countries.
• Windows and Windows Vista are
registered trademarks of Microsoft
Corporation in the United States and/
or other countries.
• Mac is a registered trademark of
Apple Inc. in the United States and
other countries.
• iOS is a registered trademark or
trademark of Cisco Systems, Inc.
• iPhone and iPad are registered
trademarks of Apple Inc. in the
United States and other countries.
• SDXC logo is a trademark of SD-3C,
LLC.
• Android and Google Play are
trademarks of Google Inc.
• Wi-Fi, the Wi-Fi logo and Wi-Fi
PROTECTED SET-UP are registered
trademarks of the Wi-Fi Alliance.
• The N Mark is a trademark or
registered trademark of NFC Forum,
Inc. in the United States and in other
countries.
• DLNA and DLNA CERTIFIED are
trademarks of Digital Living
Network Alliance.
GB
36
• Facebook and the “f” logo are
trademarks or registered trademarks
of Facebook, Inc.
• YouTube and the YouTube logo are
trademarks or registered trademarks
of Google Inc.
• Eye-Fi is a trademark of Eye-Fi, Inc.
• In addition, system and product
names used in this manual are, in
general, trademarks or registered
trademarks of their respective
developers or manufacturers.
However, the ™ or ® marks may not
be used in all cases in this manual.
Additional information on this
product and answers to frequently
asked questions can be found at
our Customer Support Website.
Page 37

GB
GB
37
Page 38

Español
Más información sobre la cámara (“Guía de Ayuda”)
La “Guía de Ayuda” es un manual on-line. Consúltela para
ver instrucciones exhaustivas sobre las muchas funciones de
la cámara.
1 Acceda a la página de soporte de Sony.
http://www.sony.net/SonyInfo/Support/
2 Seleccione su país o región.
3 Busque el nombre del modelo de su cámara en la página
de atención al cliente.
• Compruebe el nombre de modelo en la parte inferior de
su cámara.
Visionado de la Guía
Esta cámara está equipada con una guía de instrucciones incorporada.
Fn (Función)
MENU
Guía en la cámara
La cámara visualiza explicaciones para los elementos de MENU/Fn (Función)
y los valores de ajuste.
1 Pulse el botón MENU o el botón Fn (Función).
2 Seleccione el elemento deseado, después pulse el botón (Guía en la
cámara).
ES
(Guía en la cámara)
2
Page 39

Consejos para tomar imágenes
La cámara visualiza consejos para tomar imágenes para el modo de toma de
imagen seleccionado.
1 Pulse el botón (Guía en la cámara) en modo de toma de imagen.
2 Seleccione el consejo deseado para tomar imágenes, después pulse z del
botón de control.
Se visualiza el consejo para tomar imágenes.
• Puede desplazar la pantalla utilizando v/V y cambiar los consejos para
tomar imágenes utilizando b/B.
ES
ES
3
Page 40

Nombre del producto: Cámara Digital
Modelo: DSC-HX400/DSC-HX400V
POR FAVOR LEA DETALLADAMENTE ESTE MANUAL DE INSTRUCCIONES
ANTES DE CONECTAR Y OPERAR ESTE EQUIPO.
RECUERDE QUE UN MAL USO DE SU APARATO PODRÍA ANULAR LA
GARANTÍA.
AVISO
Para reducir el riesgo de incendio o descarga eléctrica, no
exponga la unidad a la lluvia ni a la humedad.
INSTRUCCIONES DE SEGURIDAD IMPORTANTES
-GUARDE ESTAS INSTRUCCIONES
PELIGRO
PARA REDUCIR EL RIESGO DE INCENDIO O DESCARGA
ELÉCTRICA, SIGA ATENTAMENTE ESTAS INSTRUCCIONES
PRECAUCIÓN
[ Batería
Si la batería se manipula indebidamente, puede explotar y causar un incendio o provocarle
quemaduras químicas. Tenga en cuenta las siguientes precauciones.
• No desmonte el producto.
• No aplaste ni exponga la batería a impactos tales como golpes o caídas, ni la deje caer o
la pise.
• No provoque un cortocircuito en la batería ni permita que objetos metálicos entren en
contacto con sus terminales.
• No exponga la batería a temperaturas superiores a 60 °C como a la luz solar directa, o en
el interior de un automóvil estacionado al sol.
• No la incinere ni la arroje al fuego.
• No manipule baterías de iones de litio dañadas o con fugas.
• Asegúrese de cargar la batería con un cargador de baterías original de Sony o con un
dispositivo que pueda cargarla.
• Mantenga la batería fuera del alcance de niños pequeños.
• Mantenga la batería seca.
• Sustitúyala únicamente por otra del mismo tipo o equivalente recomendada por Sony.
ES
• Deshágase de la baterías usada lo antes posible según el procedimiento que se describe
en las instrucciones.
4
Page 41

[ Adaptador de ca (FUENTE DE ALIMENTACIÓN)
Utilice una toma de corriente de la pared cercana cuando utilice el adaptador de ca
(FUENTE DE ALIMENTACIÓN). Desconecte el adaptador de ca (FUENTE DE
ALIMENTACIÓN) de la toma de corriente de la pared inmediatamente si se produce
algún malfuncionamiento mientras utiliza el aparato.
Atención para los clientes en Europa
[ Aviso para los clientes de países en los que se aplican las
directivas de la UE
Fabricante: Sony Corporation, 1-7-1 Konan Minato-ku Tokyo, 108-0075 Japón
Para la conformidad del producto en la UE: Sony Deutschland GmbH, Hedelfinger St rasse
61, 70327 Stuttgart, Alemania
Por medio de la presente Sony Corporation declara que este equipo cumple con los
requisitos esenciales y cualesquiera otras disposiciones aplicables o exigibles de la
Directiva 1999/5/CE. Para mayor información, por favor consulte el siguiente URL:
http://www.compliance.sony.de/
[ Aviso
Si la electricidad estática o el electromagnetismo interrumpen la transmisión de datos
(fallo), reinicie la aplicación o desconecte el cable de comunicación (USB, etc.) y vuelva a
conectarlo.
Este producto ha sido probado y cumple con los límites estipulados por el reglamento
EMC para utilizar cables de conexión de menos de 3 metros de longitud.
Los campos electromagnéticos a frecuencias específicas podrán influir en la imagen y el
sonido de esta unidad.
ES
ES
5
Page 42

[ Tratamiento de las baterías y equipos eléctricos y electrónicos
al final de su vida útil (aplicable en la Unión Europea y en países
europeos con sistemas de tratamiento selectivo de residuos)
Este símbolo en el producto, en la batería o en el embalaje indica que el
producto y la batería no pueden ser tratados como un residuo doméstico
normal. En algunas baterías este símbolo puede utilizarse en combinación
con un símbolo químico. El símbolo químico del mercurio (Hg) o del
plomo (Pb) se añadirá si la batería contiene más del 0,0005% de mercurio
desechan correctamente, usted ayuda a prevenir las consecuencias potencialmente
negativas para el medio ambiente y la salud humana que podrían derivarse de la incorrecta
manipulación. El reciclaje de materiales ayuda a conservar los recursos naturales.
En el caso de productos que por razones de seguridad, rendimiento o mantenimiento de
datos sea necesaria una conexión permanente con la batería incorporada, esta batería solo
deberá ser reemplazada por personal técnico cualificado para ello. Para asegurarse de que
la batería será tratada correctamente, entregue estos productos al final de su vida útil en un
punto de recogida para el reciclado de aparatos eléctricos y electrónicos. Para las demás
baterías, consulte la sección donde se indica cómo extraer la batería del producto de forma
segura. Deposite la batería en el correspondiente punto de recogida para el reciclado de
baterías. Para recibir información detallada sobre el reciclaje de este producto o de la
batería, póngase en contacto con el ayuntamiento, el punto de recogida más cercano o el
establecimiento donde ha adquirido el producto o la batería.
o del 0,004% de plomo. Al asegurarse de que estos productos y baterías se
AVISO IMPORTANTE PARA MÉXICO
La operación de este equipo está sujeta a las siguientes dos condiciones: (1) es posible que
este equipo o dispositivo no cause interferencia perjudicial y (2) este equipo o dispositivo
debe aceptar cualquier interferencia, incluyendo la que pueda causar su operación no
deseada.
Para consultar la información relacionada al número del certificado, refiérase a la etiqueta
del empaque y/o del producto.
ES
6
Page 43

Comprobación de los elementos suministrados
El número entre paréntesis indica el número de piezas.
• Cámara (1)
• Batería recargable NP-BX1 (1)
• Cable micro USB (1)
• Adaptador de ca (FUENTE DE ALIMENTACIÓN) AC-UB10C/UB10D (1)
• Cable de alimentación (no suministrado en EE.UU. y Canadá) (1)
• Correa de bandolera (1)
• Tapa del objetivo (1)
• Tapa de zapata (1) (colocada en la cámara)
• Manual de instrucciones (este manual) (1)
• Wi-Fi Connection/One-touch (NFC) Guide (1)
Esta guía explica las funciones que requieren una conexión Wi-Fi.
ES
ES
7
Page 44

Identificación de las partes
A Para toma de imagen: Botón Fn
(Función)
Para visionado: Botón
(Enviar a smartphone)
B Botón CUSTOM
(Personalizado)
• Puede asignar una función
deseada al botón CUSTOM.
C Botón disparador
D Para toma de imagen: Palanca
W/T (zoom)
Para visionado: Palanca
(Índice)/palanca (Zoom
de reproducción)
E Luz del autodisparador/
Iluminador AF
F Objetivo
G Flash
• Pulse el botón (extracción de
flash) para utilizar el flash. El
flash no se extrae
automáticamente.
• Cuando no esté utilizando el
flash, vuelva a presionarlo hacia
abajo para meterlo en el cuerpo
de la cámara.
H Botón (extracción de flash)
ES
I Gancho para la correa de
bandolera
8
J Conmutador de zoom/enfoque
K Anillo manual
• Cuando el conmutador de zoom/
enfoque esté ajustado a AF/
ZOOM, gire el anillo manual
para realizar la función de zoom.
• Cuando el conmutador de zoom/
enfoque esté ajustado a MF o
DMF, gire el anillo manual para
ajustar el enfoque.
A Receptor GPS (incorporado,
DSC-HX400V solamente)
B Micrófono estéreo
C Sensor de ojo
D Visor
• Cuando mira por el visor, se
activa el modo de visor, y cuando
aparta la cara del visor, el modo
de visualización vuelve al modo
de pantalla.
E Botón MOVIE (Película)
F Botón (Reproducción)
G Botón de control
H Botón FINDER/MONITOR
• Este botón cambia entre
visualizar la imagen en la
pantalla o en el visor.
Page 45

I Botón ON/OFF (Alimentación)
y luz de alimentación/carga
J Dial de modo
(Auto. inteligente)/
(Automático superior)/
(Programa auto.)/
(Priorid. abertura)/
(Prior. tiempo expos.)/
(Exposición manual)/
1/2 (Recuperar memoria)/
(Película)/ (iBarrido
panorámico)/ (Selección
escena)
K Dial de control
L Sensor de Wi-Fi (incorporado)
M (marca N)
• Toque la marca cuando quiera
conectar la cámara a un
smartphone equipado con la
función NFC.
• NFC (Near Field
Communication) es un estándar
internacional de la tecnología de
comunicación inalámbrica de
corto alcance.
N Botón (Guía en la cámara)/
(Borrar)
O Botón MENU
A Zapata de interfaz múltiple*
B Dial de ajuste de dioptrías
• Regule el dial de ajuste de
dioptrías a su vista hasta que la
visualización aparezca
claramente en el visor.
• Cuando ajuste el nivel dioptrías,
oriente la cámara hacia un área
luminosa para que le resulte más
fácil ajustar el nivel de dioptrías.
C Terminal multi/micro USB*
• Admite dispositivo compatible
con micro USB.
D Tapa de conectores
E Toma micro HDMI
F Altavoz
G Pantalla LCD
A Tapa de la batería/tarjeta de
memoria
B Ranura de inserción de la batería
C Palanca de expulsión de la
batería
D Luz de acceso
E Ranura para tarjeta de memoria
F Orificio roscado para trípode
• Utilice un trípode con un tornillo
de menos de 5,5 mm de largo. De
lo contrario, no podrá sujetar
firmemente la cámara, y es
posible que la cámara se dañe.
ES
ES
9
Page 46

* Para ver detalles sobre accesorios
compatibles para la zapata de interfaz
múltiple y el terminal multi/micro
USB, visite el sitio web de Sony, o
consulte con el distribuidor de Sony o
con la oficina de servicio local
autorizada de Sony. También puede
utilizar accesorios que sean
compatibles con la zapata para
accesorios. Las operaciones con
accesorios de otros fabricantes no
están garantizadas.
10
ES
Page 47

Inserción de la batería
Palanca de expulsión de la batería
Abra la tapa.
1
Inserte la batería.
2
• Mientras pulsa la palanca de expulsión de la batería, inserte la batería
como se muestra en la ilustración. Asegúrese de que la palanca de
expulsión de la batería se bloquea después de insertar la batería.
• Si cierra la tapa con la batería insertada incorrectamente podrá dañar la
cámara.
ES
ES
11
Page 48

Carga de la batería
Para clientes en Estados Unidos y Canadá
Cable de
alimentación
Para clientes en países y
regiones fuera de Estados
Unidos y Canadá
Conecte la cámara al adaptador de ca (suministrado),
1
utilizando el cable micro USB (suministrado).
Conecte el adaptador de ca a la toma de corriente de la
2
pared.
Se ilumina en naranja la lámpara de alimentación/carga, y comienza la
carga.
• Apague la cámara mientras carga la batería.
• Puede cargar la batería incluso cuando esté parcialmente cargada.
• Cuando la lámpara de alimentación/carga parpadee y la carga no haya
finalizado, extraiga la batería y vuelva a insertarla.
Lámpara de alimentación/carga
Encendida: Cargando
Apagada: Carga finalizada
Parpadea:
Error de carga o carga puesta en
pausa temporalmente porque la
cámara no está dentro del rango de
temperatura apropiado
12
ES
Page 49

Notas
• Si la lámpara de alimentación/carga de la cámara parpadea cuando el adaptador de
ca está conectado a la toma de corriente de la pared, indica que la carga se ha
detenido temporalmente porque la temperatura está fuera del rango recomendado.
La carga se reanuda cuando la temperatura vuelve a estar dentro del rango
adecuado. Le recomendamos cargar la batería a una temperatura ambiente de entre
10 °C a 30 °C
• La batería podrá no cargarse eficazmente si la sección del terminal de la batería
está sucia. En este caso, limpie ligeramente cualquier resto de polvo de la sección
del terminal de la batería utilizando un paño suave o un bastoncillo de algodón.
• Conecte el adaptador de ca (suministrado) a la toma de corriente de la pared más
cercana. Si se produce un mal funcionamiento mientras utiliza el adaptador de ca,
desenchufe la clavija de la toma de corriente de la pared inmediatamente para
desconectar la fuente de alimentación.
• Cuando termine la carga, desconecte el adaptador de ca de la toma de corriente de
la pared.
• Asegúrese de utilizar solamente baterías, cable micro USB (suministrado) y
adaptador de ca (suministrado) de la marca Sony genuinos.
x
Tiempo de carga (Carga completa)
El tiempo de carga es de aproximadamente 230 minuto utilizando el adaptador
de ca (suministrado).
Notas
• El tiempo de carga indicado arriba se aplica cuando se carga una batería
totalmente agotada a una temperatura de 25 °C
La carga podrá llevar más tiempo dependiendo de las condiciones de uso y de las
circunstancias.
ES
ES
13
Page 50

x
Carga mediante conexión a un ordenador
La batería se puede cargar conectando la cámara a un ordenador utilizando un
cable micro USB.
A una toma USB
• Si conecta la cámara a un ordenador cuando la alimentación está conectada,
la batería no se cargará pero la cámara será alimentada por el ordenador, lo
que le permite importar imágenes a un ordenador sin tener que preocuparse
de que se agote la batería.
Notas
• Tenga en cuenta los siguientes factores cuando realice la carga a través de un
ordenador:
– Si se conecta la cámara a un ordenador portátil que no está conectado a una
fuente de alimentación, disminuye el nivel de batería del portátil. No cargue
durante un periodo de tiempo prolongado.
– No encienda, apague ni reinicie el ordenador, ni lo reanude a partir del modo de
ahorro de energía, cuando se haya establecido una conexión USB entre el
ordenador y la cámara. Eso podrá ocasionar que la cámara no funcione
correctamente. Antes de encender, apagar o reiniciar el ordenador, o de
reanudarlo a partir del modo de ahorro de energía, desconecte la cámara y el
ordenador.
– No se ofrece ninguna garantía de que se pueda realizar la carga utilizando un
ordenador ensamblado de forma personalizada, o un ordenador modificado.
14
ES
Page 51

x
Duración de la batería y número de imágenes que se
pueden grabar y reproducir
Duración de la
batería
Tomar
(imágenes fijas)
Toma típica de
película
Toma continua
de película
Visionado (imágenes fijas) Aprox. 250 minuto Aprox. 5 000 imágenes
Notas
• El número de imágenes de arriba se aplica cuando la batería está completamente
cargada. El número de imágenes podrá disminuir dependiendo de las condiciones
de uso.
• El número de imágenes que se pueden grabar es para tomar en las condiciones
siguientes:
– Utilizando un Memory Stick PRO Duo™ (Mark2) de Sony (se vende por separado).
– La batería es utilizada a una temperatura ambiente de 25 °C
– [Act./Desact. GPS] está ajustado a [Desactivar] (DSC-HX400V solamente)
– [Calidad visual] está ajustado a [Estándar]
• El número para “Tomar (imágenes fijas)” está basado en el estándar CIPA, y es
para tomar imágenes en las condiciones siguientes:
(CIPA: Camera & Imaging Products Association)
– DISP está ajustado a [Mostrar toda info.].
– Toma de una imagen cada 30 segundo.
– El zoom es cambiado alternativamente entre los extremos W y T.
– El flash se utiliza una de cada dos veces.
– La alimentación se conecta y desconecta una de cada diez veces.
• El número de minuto para toma de película está basado en el estándar CIPA, y es
para tomar película en las condiciones siguientes:
– [ Grabar ajuste]: 60i 17M(FH)/50i 17M(FH).
– Toma típica de película: La duración de la batería está basada utilizando las
operaciones de inicio/detención de la toma, zoom, apagado/encendido, etc.,
repetidamente.
– Toma continua de película: La duración de la batería está basada en la toma de
película sin parar hasta alcanzar el límite (29 minuto), y continuando después
pulsando el botón MOVIE otra vez. No se utilizan otras funciones, tal como el
zoom.
Pantalla Aprox. 150 minuto Aprox. 300 imágenes
Visor Aprox. 190 minuto Aprox. 380 imágenes
Pantalla Aprox. 50 minuto —
Visor Aprox. 55 minuto —
Pantalla Aprox. 85 minuto —
Visor Aprox. 95 minuto —
Número de
imágenes
ES
ES
15
Page 52

x
Suministro de alimentación
Puede utilizar el adaptador de ca AC-UD10 (se vende por separado) o ACUD11 (se vende por separado) para tomar y reproducir imágenes mientras
suministra alimentación cuando toma o reproduce imágenes.
Notas
• Si toma o reproduce imágenes cuando la cámara está conectada al adaptador
de ca suministrado, no se suministrará alimentación a través del adaptador de
ca.
16
ES
Page 53

Inserción de una tarjeta de memoria (se vende por separado)
Asegúrese de que la esquina
recortada está orientada
correctamente.
Abra la tapa.
1
Inserte la tarjeta de memoria (se vende por separado).
2
• Con la esquina recortada orientada como se muestra en la ilustración,
inserte la tarjeta de memoria hasta que encaje con un chasquido.
Cierre la cubierta.
3
ES
ES
17
Page 54

x
Tarjetas de memoria que se pueden utilizar
Tarjeta de memoria
Memory Stick XC-HG Duo™
A
Memory Stick PRO Duo™
Memory Stick PRO-HG Duo™
B Memory Stick Micro™ (M2)
Tarjeta de memoria SD (clase 4 o más
Tarjeta de memoria SDHC (clase 4 o más
C
Tarjeta de memoria SDXC (clase 4 o más
Tarjeta de memoria microSD (clase 4 o más
Tarjeta de memoria microSDHC (clase 4 o más
D
Tarjeta de memoria microSDXC (clase 4 o más
• En este manual, los productos de la tabla son referidos colectivamente como sigue:
A: Memory Stick PRO Duo
B: Memory Stick Micro
C: Tarjeta SD
D: Tarjeta de memoria microSD
Notas
• Cuando utilice Memory Stick Micro o tarjetas de memoria microSD con esta
cámara, asegúrese de utilizar el adaptador apropiado.
x
Para retirar la tarjeta de memoria/batería
Para imágenes
fijas
Para películas
(Mark2 solamente)
(Mark2 solamente)
rápida)
rápida)
rápida)
rápida)
rápida)
rápida)
Tarjeta de memoria: Empuje la tarjeta de memoria hacia dentro una vez para
expulsarla.
Batería: Deslice la palanca de expulsión de la batería. Asegúrese de no dejar
caer la batería.
Notas
• No extraiga nunca la tarjeta de memoria/batería cuando la luz de acceso (página 9)
ES
esté encendida. Esto podrá ocasionar daños a los datos de la tarjeta de memoria.
18
Page 55

Ajuste del reloj
ON/OFF (Alimentación)
Botón de control
Seleccionar elementos: v/V/b/B
Ajustar: z
Pulse el botón ON/OFF (Alimentación).
1
El ajuste de fecha y hora se visualiza cuando la cámara es encendida por
primera vez.
• Es posible que la alimentación lleve algún tiempo en conectarse y
permitir la operación.
Compruebe que [Intro] está seleccionado en la pantalla,
2
después pulse z del botón de control.
Seleccione un lugar geográfico deseado siguiendo las
3
instrucciones en pantalla, después pulse z.
Ajuste [Horario verano], [Fecha/Hora] y [Formato de
4
fecha], después pulse z.
• Cuando ajuste [Fecha/Hora], la medianoche es a las 12:00 AM, y el
mediodía es a las 12:00 PM.
Compruebe que [Intro] está seleccionado, después
5
pulse z.
ES
ES
19
Page 56

Toma de imágenes fijas/películas
Botón disparador
Palanca W/T
Dial de modo
: Auto. inteligente
: Película
Toma de imágenes fijas
Pulse el botón disparador hasta la mitad para enfocar.
1
Cuando la imagen está enfocada, suena un pitido y se ilumina el indicador z.
Pulse el botón disparador a fondo para tomar una imagen.
2
Toma de películas
Pulse el botón MOVIE (Película) para comenzar a grabar.
1
• Utilice la palanca W/T (zoom) para cambiar la escala de zoom.
Pulse el botón MOVIE de nuevo para detener la grabación.
2
MOVIE
(zoom)
W: alejar con
zoom
T: acercar
con zoom
Notas
• No suba el flash manualmente. Se podría ocasionar un mal funcionamiento.
• Cuando utilice la función de zoom mientras toma una película, se grabará el
sonido del funcionamiento de la cámara. Es posible que tamb ién se grabe el sonido
de funcionamiento del botón MOVIE cuando termine la grabación de película.
• La amplitud de la toma panorámica podrá reducirse, dependiendo del motivo o la
manera en que éste sea tomado. Por lo tanto, aun cuando [360°] esté ajustado para
ES
toma panorámica, la imagen grabada podrá ser de menos de 360 grados.
20
Page 57

• Para el tiempo de toma continua de una grabación de película, consulte “Número
de imágenes fijas y tiempo grabable de películas” (página 31). Cuando termine la
grabación de película, puede volver a grabar pulsando el botón MOVIE otra vez.
Es posible que la grabación se detenga para proteger la cámara dependiendo de la
temperatura ambiente.
Visionado de imágenes
Dial de control
(Reproducción)
(Borrar)
Pulse el botón (Reproducción).
1
• Cuando se reproduzcan en esta cámara imágenes de una tarjeta de
memoria grabadas con otras cámaras, aparecerá la pantalla de registro
para el archivo de datos.
x
Selección de la imagen siguiente/anterior
Seleccione una imagen pulsando B (siguiente)/b (anterior) del botón de
control. Pulse z en el centro del botón de control para ver películas.
x
Borrado de una imagen
1 Pulse el botón (Borrar).
2 Seleccione [Borrar] con v del botón de control, después pulse z.
x
Retorno a la toma de imágenes
Pulse el botón disparador hasta la mitad.
W: alejar con zoom
T: acercar con zoom
Botón de control
Seleccionar imágenes:
Ajustar: z
B
(siguiente)/b (anterior)
o gire el dial de control
ES
ES
21
Page 58

Presentación de otras funciones
Fn (Función)
x
Botón de control
DISP (Mostrar contenido): Le permite cambiar la visualización en pantalla.
(Modo manejo): Le permite cambiar entre los métodos de toma de
imagen, como toma única, toma continua o toma con variación.
(Compensar exp.): Le permite compensar la exposición y el brillo para toda
la imagen.
(Creatividad fotogr.): Le permite utilizar la cámara intuitivamente y
tomar imágenes creativas fácilmente.
(Modo flash): Le permite seleccionar un modo de flash para imágenes fijas.
z (AF de bloqueo): La cámara sigue al motivo y ajusta el enfoque
automáticamente incluso cuando el motivo se está moviendo.
x
Botón Fn (Función)
Le permite registrar 12 funciones e invocar esas funciones cuando toma
imágenes.
1 Pulse el botón Fn (Función).
2 Seleccione la función deseada pulsando v/V/b/B del botón de control.
3 Seleccione el valor de ajuste girando el dial de control.
Dial de control
MENU
Botón de control
x
Dial de control
Puede cambiar instantáneamente el ajuste apropiado para cada modo de toma
simplemente girando el dial de control.
ES
22
Page 59

x
Elementos de menú
(Ajustes de cámara)
Tamaño imagen Selecciona el tamaño de las imágenes fijas.
Relación aspecto
Selecciona la relación de aspecto para las imágenes
fijas.
Calidad Ajusta la calidad de imagen para las imágenes fijas.
Panorama: tamaño Selecciona el tamaño de las imágenes panorámicas.
Panorama: dirección
Ajusta la dirección de toma de imagen para las
imágenes panorámicas.
Formato archivo Selecciona el formato de archivo de película.
Grabar ajuste
Modo manejo
Modo flash Establece los ajustes del flash.
Compensac. flash Ajusta la intensidad de la luz del flash.
Reducción ojos rojos
Área de enfoque Selecciona el área de enfoque.
Iluminador AF
Compensar exp. Compensa el brillo de toda la imagen.
ISO Ajusta la sensibilidad luminosa.
Modo medición
Balance blanco Ajusta los tonos de color de una imagen.
DRO/HDR automát. Compensa automáticamente el brillo y el contraste.
Estilo creativo Selecciona el procesamiento de imagen deseado.
Efecto de foto
Selecciona el tamaño de fotograma de la película
grabada.
Ajusta el modo de manejo, tal como para toma
continua.
Reduce el efecto de ojos rojos cuando se utiliza el
flash.
Ajusta el iluminador AF, que provee luz a una escena
oscura para ayudar a enfocarla.
Selecciona el modo de medición que establece la
parte del motivo que se mide para determinar la
exposición.
Selecciona el filtro de efecto deseado para lograr una
expresión más impresionante y artística.
ES
ES
23
Page 60

Amplific. enfoque
RR ISO Alta
AF de bloqueo
Sonrisa/Detec. cara
Amplía la imagen antes de hacer la toma para que
pueda comprobar el enfoque detalladamente.
Ajusta el procesamiento de reducción de ruido para la
toma de imágenes de alta sensibilidad.
Ajusta la función para seguir un motivo y continuar
enfocando.
Selecciona para detectar caras y hacer varios ajustes
automáticamente. Ajusta para liberar el obturador
automáticamente cuando se detecta una sonrisa.
Efecto piel suave Ajusta el Efecto piel suave y el nivel de efecto.
Analiza la escena cuando se capturan caras, primeros
Encuadre autom.
Selección escena
Película
planos, o motivos seguidos con la función AF de
bloqueo, y automáticamente recorta y guarda otra
copia de la imagen con una composición más
impresionante.
Selecciona ajustes predeterminados para adaptarlos a
diversas condiciones de escena.
Selecciona el modo de toma de imagen según el
motivo o el efecto.
SteadyShot Ajusta SteadyShot para tomar películas.
Auto obtur. lento
Nivel referencia mic
Reducc. ruido viento
Consejos de toma Visualiza la lista de consejos para la toma de imagen.
Memoria Registra los modos o ajustes de la cámara deseados.
Establece la función que ajusta automáticamente el
tiempo de exposición según el brillo del entorno en
modo película.
Establece el nivel de referencia del micrófono cuando
se graban películas.
Reduce el ruido del viento durante la grabación de
películas.
(Ajustes personalizad.)
Asistencia MF
Tiempo aum. enfoq.
ES
24
Visualiza una imagen ampliada cuando se enfoca
manualmente.
Ajusta el tiempo durante el que la imagen se mostrará
ampliada.
Page 61

Línea de cuadrícula
Rev.automática
Nivel de resalte
Color de resalte Ajusta el color utilizado en la función de resalte.
Guía ajuste exposic.
Ajuste de zoom
FINDER/MONITOR
Inscribir fecha
Ajustes menú func.
Ajuste tecla person. Asigna una función deseada al botón.
Botón MOVIE Ajusta si se activa siempre o no el botón MOVIE.
Ajusta una visualización de línea de cuadrícula para
permitir alinear con el contorno de una estructura.
Ajusta la revisión automática para visualizar la
imagen capturada después de hacer la toma.
Resalta el contorno de los rangos de enfoque con un
color específico cuando se enfoca manualmente.
Ajusta la guía que se visualiza cuando se cambian
ajustes de exposición en la pantalla de toma.
Ajusta si se utilizan o no el zoom de imagen clara y el
zoom digital cuando se usa el zoom.
Ajusta el método para cambiar entre el visor y la
pantalla.
Ajusta si debe grabarse la fecha de una toma en la
imagen fija.
Personaliza las funciones visualizadas cuando se
pulsa el botón Fn (Función).
(Inalámbrico)
Enviar a smartphone
Enviar a ordenador
Ver en TV
Un solo toque (NFC)
Modo avión
WPS Push
Transfiere imágenes para visualizar en un
smartphone.
Hace una copia de seguridad de las imágenes
transfiriéndolas a un ordenador conectado a una red.
Puede ver imágenes en un televisor que pueda
conectarse a la red.
Asigna una aplicación a Un solo toque (NFC). Puede
invocar la aplicación cuando toma imagen tocando la
cámara con un smartphone que admita NFC.
Puede ajustar este dispositivo para que no realice
comunicaciones inalámbricas y funciones GPS.
Puede registrar el punto de acceso en la cámara
fácilmente pulsando el botón WPS.
ES
ES
25
Page 62

Conf. punto acceso Puede registrar su punto de acceso manualmente.
Edit. Nombre Dispos.
Mostr. Direcc. MAC Visualiza la dirección MAC de la cámara.
Rest. SSID/Cntrsñ
Restablecer conf. red Restaura todos los ajustes de red.
Puede cambiar el nombre de dispositivo bajo Wi-Fi
Direct. etc.
Restaura el nombre SSID y la contraseña para la
conexión del smartphone.
(Aplicación)
Lista de aplicaciones
Presentación
Visualiza la lista de aplicaciones. Puede seleccionar la
aplicación que quiere utilizar.
Visualiza instrucciones sobre la utilización de la
aplicación.
(Reproducción)
Borrar Borra una imagen.
Modo visualización
Índice imágenes Visualiza múltiples imágenes al mismo tiempo.
Diapositivas Muestra un pase de diapositivas.
Rotar Gira la imagen.
Ajusta la forma en que se agrupan las imágenes para
la reproducción.
Aumentar Amplía las imágenes de reproducción.
Repr. imagen fija 4K
Proteger Protege las imágenes.
Aj. intervalo animac.
Especific. Impresión Añade una orden de impresión a una imagen fija.
Emite imágenes fijas en resolución 4K a un televisor
conectado mediante HDMI que admite 4K.
Ajusta el intervalo para mostrar el seguimiento de
motivos en [Capt. animac. video], donde será
mostrado el seguimiento del movimiento del motivo
cuando se reproduzcan películas.
(Ajustes)
ES
Brillo de monitor Ajusta el brillo de la pantalla.
26
Page 63

Ajustes de volumen Ajusta el volumen para la reproducción de películas.
Señales audio Ajusta los sonidos de funcionamiento de la cámara.
Ajustes GPS
(DSC-HX400V
solamente)
Ajustes de carga
Menú mosaico
Guía dial de modo
Calidad visual Ajusta la calidad de la visualización.
Hora inic. ahor. ener.
Selector PAL/NTSC
(solamente para
modelos compatibles
con 1080 50i)
Modo demostración
Resolución HDMI
CTRL.POR HDMI
Conexión USB Ajusta el método de conexión USB.
Ajuste USB LUN
Alimentación USB
Idioma Selecciona el idioma.
Ajuste fecha/hora Ajusta la fecha y la hora, y el horario de verano.
Configuración área Ajusta la ubicación de utilización.
Formatear Formatea la tarjeta de memoria.
Ajusta la función GPS.
Ajusta la función de subida de datos a Internet de la
cámara cuando se utiliza una tarjeta Eye-Fi.
Ajusta si se visualiza o no el menú de títulos cada vez
que pulsa el botón MENU.
Activa o desactiva la guía del dial de modo (la
explicación de cada modo de toma).
Ajusta el tiempo a transcurrir hasta que la cámara se
apaga automáticamente.
Cambiando el formato de televisión del dispositivo,
es posible tomar imágenes en un formato de película
diferente.
Ajusta la reproducción de película de demostración a
activado o desactivado.
Ajusta la resolución cuando se conecta la cámara a un
televisor HDMI.
Controla la cámara desde un televisor compatible con
BRAVIA™ Sync.
Realza la compatibilidad limitando las funciones de la
conexión USB.
Ajusta si se suministra alimentación o no a través de
la conexión USB.
ES
ES
27
Page 64

Número archivo
Selec. carpeta grab.
Carpeta nueva
Nombre carpeta Ajusta el nombre de carpeta para imágenes fijas.
Recuperar BD imág.
Ver info del soporte
Versión Visualiza la versión del software de la cámara.
Restablecer ajuste Restablece los ajustes a sus valores predeterminados.
Ajusta el método utilizado para asignar números de
archivo a imágenes fijas y películas.
Cambia la carpeta seleccionada para almacenar
imágenes.
Crea una carpeta nueva para guardar imágenes fijas y
películas (MP4).
Recupera el archivo de base de datos de imagen y
habilita la grabación y la reproducción.
Visualiza el tiempo de grabación restante de películas
y el número de imágenes fijas que se pueden grabar
en la tarjeta de memoria.
28
ES
Page 65

Características de PlayMemories Home™
El software PlayMemories Home le permite importar imágenes fijas y
películas a su ordenador y utilizarlas. Para importar películas AVCHD a su
ordenador se requiere PlayMemories Home.
Reproducción de
imágenes importadas
Importar imágenes
desde su cámara
ES
Para Windows, también están disponibles las
funciones siguientes:
Visionado de
imágenes en
un calendario
Notas
• Se necesita una conexión a Internet para instalar PlayMemories Home.
• Para utilizar PlayMemories Online u otros servicios de la red se requiere una
conexión a Internet. Es posible que PlayMemories Online u otros servicios de la
red no estén disponibles en algunos países o regiones.
• Para aplicaciones de Mac, utilice la URL siguiente:
http://www.sony.co.jp/imsoft/Mac/
• Si el software PMB (Picture Motion Browser), suministrado con modelos
lanzados antes de 2011, ya ha sido instalado en su ordenador, PlayMemories
Home lo sobrescribirá durante la instalación. Utilice PlayMemories Home, el
software sucesor de PMB.
Creación
de discos
de película
Subida de imágenes
a servicios de
Internet
Compartir imágen es en
PlayMemories Online™
ES
29
Page 66

x
Requisitos del sistema
Puede encontrar los requisitos del sistema para el software en la URL
siguiente:
www.sony.net/pcenv/
x
Instalación de PlayMemories Home en un ordenador
Utilizando el explorador de Internet de su ordenador,
1
vaya a la URL siguiente, después instale PlayMemories
Home.
www.sony.net/pm/
• Para más detalles sobre PlayMemories Home, consulte la siguiente
página de soporte de PlayMemories Home (inglés solamente):
http://www.sony.co.jp/pmh-se/
• Cuando se haya completado la instalación, se iniciará PlayMemories
Home.
Conecte la cámara a su ordenador, utilizando el cable
2
micro USB (suministrado).
• Encienda la cámara.
• Es posible que se instalen funciones nuevas en PlayMemories Home.
Conecte la cámara a su ordenador aunque PlayMemories Home ya esté
instalado en su ordenador.
Notas
• No desconecte el cable micro USB (suministrado) de la cámara mientras esté
visualizada la pantalla de operación o la pantalla de acceso. Si lo hace podrá dañar
los datos.
• Para desconectar la cámara del ordenador, haga clic en de la bandeja de tareas,
después haga clic en (icono de desconexión). Para Windows Vista, haga clic
en de la bandeja de tareas.
ES
30
Page 67

Para añadir funciones a la cámara
Puede añadir las funciones deseadas a su cámara conectándose al sitio web de
descarga de aplicaciones (PlayMemories Camera Apps™) a través de
Internet.
http://www.sony.net/pmca
• Después de instalar una aplicación, puede invocar la aplicación tocando la
marca N de la cámara con un smartphone Android que admita NFC,
utilizando la función [Un solo toque (NFC)].
Número de imágenes fijas y tiempo grabable de películas
El número de imágenes fijas y el tiempo grabable podrán variar dependiendo
de las condiciones de la toma y de la tarjeta de memoria.
x
Imágenes fijas
[ Tamaño imagen]: L: 20M
Cuando [ Relación aspecto] está ajustado a [4:3]*
Calidad
Capacidad
Estándar 295 imágenes
Fina 200 imágenes
* Cuando [ Relación aspecto] está ajustado a algo distinto de [4:3], puede grabar
más imágenes de las que se muestran arriba.
2 GB
ES
ES
31
Page 68

x
Películas
La tabla de abajo muestra los tiempos de grabación máximos aproximados.
Son los tiempos totales para todos los archivos de película. Es posible tomar
imágenes continuamente durante 29 minuto aproximadamente (un límite
específico del producto). El tiempo de grabación continua máximo de una
película de formato MP4 (12M) es de unos 15 minuto (limitado por la
restricción de tamaño de archivo de 2 GB)
(h (hora), min (minuto))
Grabar ajuste
Capacidad
60i 24M(FX)/50i 24M(FX) 10 min
60i 17M(FH)/50i 17M(FH) 10 min
60p 28M(PS)/50p 28M(PS) 9 min
24p 24M(FX)/25p 24M(FX) 10 min
24p 17M(FH)/25p 17M(FH) 10 min
1 440×1 080 12M 15 min
VGA 3M 1 h 10 min
• El tiempo grabable para películas varía porque la cámara está equipada con VBR
(Velocidad de bits variable), que ajusta automáticamente la calidad de imagen
dependiendo de la escena que se está tomando. Cuando grabe un motivo que se
mueve rápidamente, la imagen será más clara pero el tiempo grabable será más
corto porque se requiere más memoria para grabar.
El tiempo grabable también varía dependiendo de las condiciones de la toma, del
motivo o de los ajustes de calidad y tamaño de imagen.
2 GB
32
ES
Page 69

Notas sobre la utilización de la cámara
Funciones incorporadas en esta cámara
• Este manual describe los dispositivos compatibles con 1080 60i y los dispositivos
compatibles con 1080 50i.
– Para determinar si su cámara admite la función GPS, compruebe el nombre de
modelo de su cámara.
Compatible con GPS: DSC-HX400V
Incompatible con GPS: DSC-HX400
– Para comprobar si su cámara es un dispositivo compatible con 1080 60i o
compatible con 1080 50i, busque las siguientes marcas en la parte inferior de la
cámara.
Dispositivo compatible con 1080 60i: 60i
Dispositivo compatible con 1080 50i: 50i
• Esta cámara es compatible con películas de formato 1080 60p o 50p. A diferencia
de los modos de grabación estándar usados hasta ahora, que graban en un método
entrelazado, esta cámara graba utilizando un método progresivo. Esto aumenta la
resolución, y proporciona una imagen más uniforme y más realista.
• Mientras esté a bordo de un avión, ajuste [Modo avión] a [Activar].
Acerca de los dispositivos compatibles con GPS (DSC-HX400V
solamente)
• Utilice el GPS de acuerdo con los reglamentos de los países y regiones donde lo
utilice.
• Si no quiere grabar la información de ubicación, ajuste [Act./Desact. GPS] a
[Desactivar].
Acerca de la utilización y el cuidado
Evite un manejo brusco, desmontaje, modificación, golpes físicos, o impactos tales
como golpear, dejar caer o pisar el producto. Sea particularmente cuidadoso con el
objetivo.
Objetivo ZEISS
La cámara está equipada con un objetivo ZEISS que puede reproducir imágenes
nítidas con excelente contraste. El objetivo de la cámara ha sido fabricado bajo el
sistema de garantía de calidad certificado por ZEISS de acuerdo con las normas de
calidad de ZEISS en Alemania.
Notas sobre la grabación/reproducción
• Antes de comenzar a grabar, realice una grabación de prueba para asegurarse de
que la cámara funciona correctamente.
• La cámara no está hecha a prueba de polvo, ni a prueba de salpicaduras, ni a
prueba de agua.
• No dirija la cámara hacia el sol u otra fuente de luz brillante. Podrá ocasionar un
mal funcionamiento de la cámara.
• Si se produce condensación de humedad, elimínela antes de utilizar la cámara.
ES
ES
33
Page 70

• No agite ni golpee la cámara. Podrá ocasionar un mal funcionamiento y no poder
grabar imágenes. Además, el soporte de grabación podrá volverse inutilizable o
los datos de imagen podrán dañarse.
No utilice o almacene la cámara en los siguientes lugares
• En un lugar muy caluroso, frío o húmedo
En lugares como un automóvil aparcado al sol, es posible que el cuerpo de la
cámara se deforme. Esto podría ocasionar un mal funcionamiento.
• Bajo la luz solar directa o cerca de una estufa
El cuerpo de la cámara puede decolorarse o deformarse, y esto puede ocasionar un
mal funcionamiento.
• En un lugar expuesto a temblores o vibración
• Cerca de un lugar que genere ondas de radio intensas, emita radiación o su
magnetismo sea fuerte.
En tales lugares, la cámara podrá no grabar o reproducir imágenes debidamente.
• En lugares arenosos o polvorientos
Procure que no entre en la cámara arena o polvo. Esto puede ocasionar un mal
funcionamiento en la cámara, y en algunos casos este mal funcionamiento no
puede repararse.
Notas sobre la pantalla, el visor electrónico y el objetivo
• La pantalla y el visor electrónico están fabricados utilizando tecnología de muy
alta precisión, y más del 99,99% de los píxeles son operativos para uso efectivo.
Sin embargo, es posible que aparezcan algunos puntos diminutos negros y/o
brillantes (de color blanco, rojo, azul o verde) en la pantalla y en el visor
electrónico. Estos puntos son el resultado normal del proceso de fabricación, y no
afectan a la grabación.
• Tenga cuidado de que sus dedos u otros objetos no sean pillados en el objetivo
cuando este esté funcionando.
Notas acerca del flash
• No transporte la cámara cogiéndola por la unidad de flash, ni utilice fuerza
excesiva en ella.
• Si entra agua, polvo o arena en la unidad de flash cuando está abierta, podrá
ocasionar un mal funcionamiento.
• Tenga cuidado de que su dedo no se encuentre en medio cuando empuje el flash
hacia abajo.
Acerca de la temperatura de la cámara
Es posible que la cámara y la batería se sobrecalienten debido al uso continuo, pero
no se trata de un fallo de funcionamiento.
34
ES
Page 71

Acerca de la protección de recalentamiento
Dependiendo de la temperatura de la cámara y de la batería, es posible que no pueda
grabar películas o que la alimentación se desconecte automáticamente para proteger la
cámara.
Antes de que se desconecte la alimentación o de que no pueda grabar más películas se
visualizará un mensaje en la pantalla. En este caso, deje la alimentación desconectada y
espere hasta que la temperatura de la cámara y de la batería haya bajado. Si conecta la
alimentación sin dejar que la cámara y la batería se hayan enfriado suficientemente, la
alimentación podrá desconectarse otra vez o es posible que no pueda grabar películas.
Acerca de la carga de la batería
• Si carga una batería que no ha sido utilizada durante largo tiempo, es posible que
no pueda cargarla a la capacidad apropiada.
Esto se debe a las características de la batería. Cargue la batería otra vez.
•
Las baterías que no hayan sido utilizadas durante más de un año podrán
haberse deteriorado.
Aviso sobre los derechos de autor
Los programas de televisión, películas, cintas de vídeo y demás materiales pueden
estar protegidos por copyright. La grabación no autorizada de tales materiales puede
ir en contra de los artículos de las leyes de copyright.
No hay garantía en el caso de que se dañe el contenido o se
produzcan fallos de grabación
Sony no puede proveer garantía en el caso de un fallo de grabación o la pérdida del
contenido grabado debido a un mal funcionamiento de la cámara o del soporte de
grabación, etc.
Limpieza de la superficie de la cámara
Limpie la superficie de la cámara con un paño suave ligeramente humedecido con
agua, después limpie la superficie con un paño seco. Para evitar dañar el acabado o
la envoltura:
– No exponga la cámara a productos químicos tales como diluyente, bencina,
alcohol, paños desechables, repelente de insectos, bronceador o insecticida.
Mantenimiento de la pantalla
• La crema para manos o hidratante dejada en la pantalla podrá disolver su
recubrimiento. Si deja cualquier resto en la pantalla, límpielo inmediatamente.
• Si limpia con fuerza con un pañuelo de papel u otros materiales podrá dañar el
recubrimiento.
• Si en la pantalla hay adheridas huellas dactilares o suciedad, se recomienda quitar
con cuidado cualquier suciedad y después limpiar la pantalla con un paño suave.
Notas sobre la LAN inalámbrica
Nosotros no asumimos ninguna responsabilidad en absoluto por cualquier daño
causado por el acceso no autorizado a, o uso no autorizado de, destinos cargados en
la cámara, que resulten en pérdida o hurto.
ES
ES
35
Page 72

Especificaciones
Cámara
[Sistema]
Dispositivo de imagen: Sensor de
7,82 mm (tipo 1/2,3 ) Exmor R™
CMOS
Número total de píxeles de la cámara:
Aprox. 21,1 Megapíxeles
Número efectivo de píxeles de la
cámara:
Aprox. 20,4 Megapíxeles
Objetivo: Objetivo zoom ZEISS Vario-
Sonnar T* 50×
f = 4,3 mm – 215 mm (24 mm –
1 200 mm (equivalente a película
de 35 mm))
F2,8 (W) – F6,3 (T)
Mientras se toman películas (16:9):
26,5 mm – 1 325 mm
Mientras se toman películas (4:3):
32,5 mm – 1 625 mm
*1
Cuando [ SteadyShot] está
ajustado a [Estándar]
Diámetro del filtro: 55 mm
SteadyShot: Óptico
Formato de archivo:
Imágenes fijas: Cumple con JPEG
(DCF, Exif, MPF Baseline),
compatible con DPOF
Películas (Formato AVCHD):
Compatible con formato AVCHD
versión 2,0
Vídeo: MPEG-4 AVC/H.264
Audio: Dolby Digital 2 canales,
equipado con Dolby Digital Stereo
Creator
• Fabricado bajo licencia de Dolby
Laboratories.
Películas (Formato MP4):
Vídeo: MPEG-4 AVC/H.264
ES
*1
*1
36
Audio: MPEG-4 AAC-LC 2
canales
Soporte de grabación: Memory Stick
PRO Duo, Memory Stick Micro,
tarjetas SD, tarjetas de memoria
microSD
Flash: Alcance del flash (sensibilidad
ISO (Índice de exposición
recomendado) ajustado a Auto):
Aprox. 0,5 m a 8,5 m (W)/Aprox.
2,4 m a 3,5 m (T)
[Conectores de entrada y salida]
Conector HDMI: Toma micro HDMI
Terminal multi/micro USB*:
Comunicación USB
Comunicación USB: Hi-Speed USB
(USB 2.0)
* Admite dispositivo compatible con
micro USB.
[Visor]
Tipo: Visor electrónico
Número total de puntos:
Equivalente a 201 600 puntos
Cobertura de cuadro: 100%
[Pantalla]
Pantalla LCD:
Unidad TFT de 7,5 cm (tipo 3,0)
Número total de puntos:
921 600 puntos
Page 73

[Alimentación, general]
Alimentación: Batería recargable
NP-BX1, cc 3,6 V
Adaptador de ca (FUENTE DE
ALIMENTACIÓN) AC-UB10C/
UB10D, cc 5 V
Consumo:
Aprox. 1,4 W (durante la toma con
la pantalla LCD)
Aprox. 1,1 W (durante la toma con
el visor)
Temperatura de funcionamiento:
De 0 °C a 40 °C
Temperatura de almacenamiento:
De –20 °C a +60 °C
Dimensiones (cumple con CIPA):
129,6 mm × 93,2 mm × 103,2 mm
(An/Al/Pr)
Peso (cumple con CIPA) (Aprox.):
660 g (incluyendo bater ía NP-BX1,
Memory Stick PRO Duo)
Micrófono: Estéreo
Altavoz: Monoaural
Exif Print: Compatible
PRINT Image Matching III:
Compatible
[LAN inalámbrica]
Estándar admitido: IEEE 802.11 b/g/n
Frecuencia: 2,4 GHz
Protocolos de seguridad admitidos:
WEP/WPA-PSK/WPA2-PSK
Método de configuración: WPS (Wi-Fi
Protected Setup) / manual
Método de acceso: Modo
Infraestructura
NFC: cumple con NFC Forum Type 3
Tag
Adaptador de ca (FUENTE DE
ALIMENTACIÓN) AC-UB10C/
UB10D
Alimentación: ca 100 V a 240 V 50 Hz/
60 Hz 70 mA
Tensión de salida: cc 5 V 0,5 A
Temperatura de funcionamiento:
De 0 °C a 40 °C
Temperatura de almacenamiento:
De –20 °C a +60 °C
Dimensiones (Aprox.):
50 mm × 22 mm × 54 mm
(An/Al/Pr)
Batería recargable NP-BX1
Tipo de batería: batería de iones de litio
Tensión máxima: cc 4,2 V
Tensión nominal: cc 3,6 V
Tensión de carga máxima: cc 4,2 V
Corriente de carga máxima: 1,89 A
Capacidad: 4,5 Wh (1 240 mAh)
El diseño y las especificaciones están
sujetos a cambios sin previo aviso.
ES
ES
37
Page 74

Marcas comerciales
• Memory Stick y son marcas
comerciales o marcas comerciales
registradas de Sony Corporation.
• “AVCHD Progressive” y el logotipo
de “AVCHD Progressive” son
marcas comerciales de Panasonic
Corporation y Sony Corporation.
• Dolby y el símbolo de la doble D son
marcas comerciales de Dolby
Laboratories.
• Los términos HDMI y HDMI HighDefinition Multimedia Interface, y el
logotipo de HDMI son marcas
comerciales o marcas comerciales
registradas de HDMI Licensing LLC
en los Estados Unidos y otros países.
• Windows y Windows Vista son
marcas comerciales registradas de
Microsoft Corporation en los Estados
Unidos y/u otros países.
• Mac es una marca comercial
registrada de Apple Inc. en los
Estados Unidos y en otros países.
• iOS es una marca comercial
registrada o marca comercial de
Cisco Systems, Inc.
• iPhone y iPad son marcas
comerciales registradas de Apple Inc.
en los Estados Unidos y en otros
países.
• El logotipo de SDXC es una marca
comercial de SD-3C, LLC.
• Android y Google Play son marcas
comerciales de Google Inc.
• Wi-Fi, el logotipo de Wi-Fi y Wi-Fi
PROTECTED SET-UP son marcas
comerciales registradas de Wi-Fi
Alliance.
• N Mark es una marca comercial o una
marca comercial registrada de NFC
Forum, Inc. en los Estados Unidos y
en otros países.
ES
38
• DLNA y DLNA CERTIFIED son
marcas comerciales de Digital Living
Network Alliance.
• Facebook y el logotipo de “f” son
marcas comerciales o marcas
comerciales registradas de Facebook,
Inc.
• YouTube y el logotipo de YouTube
son marcas comerciales o marcas
comerciales registradas de Google
Inc.
• Eye-Fi es una marca comercial de
Eye-Fi, Inc.
• Además, los nombres de sistemas y
productos utilizados en este manual
son, en general, marcas comerciales o
marcas comerciales regis tradas de sus
respectivos desarrolladores o
fabricantes. Sin embargo, las marcas
™ o ® podrán no ser utilizadas en
todos los casos en este manual.
En la página Web de atención al
cliente puede encontrar
información adicional sobre este
producto y respuesta a las
preguntas hechas con más
frecuencia.
Page 75

ES
ES
39
Page 76

40
ES
Page 77

ES
ES
41
Page 78

42
ES
Page 79

ES
ES
43
Page 80

© 2014 Sony Corporation Printed in China
 Loading...