

Sony DRX-S77U Operating Instructions Manual

IT
DVD/CD
Rewritable Drive
Operating Instructions
JP
FR
DE
ES
IT
CS
DRX-S77U
© 2009 Sony Corporation

Table of Contents
Introduction
Package Contents ............................ 4
Features ...........................................4
System Requirements .....................4
Part Names and Functions ..............5
Setup
Connecting with the PC .................. 6
Installation .................................... 6
Disconnection ...............................7
Operation
Using the Drive ...............................8
Supplied Software
(For Windows only) ..................... 8
Using Generic Software with
the Drive .......................................9
Compatible Discs .......................... 10
Recommended Writable Discs ...12
Writable Discs and
Compatibility .............................. 13
Precautions on Writing/
Playing Discs ................................14
Miscellaneous
Precautions for Use .......................16
Support Overview .........................17
User Support Web Site ...............17
Update the Drive Firmware ........17
Product and Support
Information .................................17
Specifications ................................18
2

• Pentium is a registered trademark of Intel Corporation.
• Microsoft, Windows, and Windows Vista are registered trademarks of Microsoft Corporation.
• Macintosh and Mac OS are registered trademarks of Apple Inc.
• Other system and product names used herein are registered trademarks or trademarks of their
respective manufacturers, although the ™ and ® marks are not used in the text.
❑ Our product warranty is valid only when the supplied accessories (including software) are
used in the specified or recommended system environment, in accordance with the
documentation, and applies only to this DVD/CD rewritable drive. Our customer service
and user support apply only under these product warranty conditions.
❑ Please note that we cannot accept responsibility for failure of the computer or other
devices, incompatibility with special hardware, operating problems caused by improper
installation of software, loss of data, discs or other accidental or incidental damage that
might occur when using this product.
❑ The guarantee and user support for this product are valid only within the countries or sales
regions specified on the warranty card.
❑ Copyright laws prohibit the copying in part or in full of the supplied software and
documentation, or loaning the software, without obtaining permission of the copyright
holder.
❑ We cannot accept responsibility for any direct or indirect financial damage or loss of profit
that might occur when using the supplied software.
❑ The supplied software can only be used with this product.
❑ Specifications of the supplied software may be changed without notice in the interest of
product improvement.
Please Record Responsibly
Before copying anything onto a disc, please be sure that you are not violating copyright
laws. Most software companies allow you to make a backup or archive copy of software.
Check your software’s license agreement for details.
3

B Introduction
Package Contents
Please verify that the package contains the
following when unpacking.
If any of these items appear to be missing
and/or damaged, please contact your dealer.
•Drive
• USB cable
•Quick start guide
• Product Information
•AC power cord
• AC power adapter
•Software disc
• Warranty card
Note
Make sure that you back up the supplied
software disc on another disc because the
software disc is not distributed
independently.
Features
This product offers the following features.
❑ Slim portable DVD/CD Rewritable
drive with Hi-Speed USB (USB 2.0
compliant) interface.
❑ Stylish and sleek finished design for
business and home.
System Requirements
The drive should be used with a system that
meets the following requirements1).
For Windows
❑ CPU: Pentium III 1.0 GHz or higher
(Pentium 4, 2.0 GHz or higher
recommended)
❑ 256 MB RAM or more (512 MB RAM
for Windows Vista)
❑ 1.5 GB free hard disk space (10 GB for
DVD creation)
❑ Operating system:
Windows XP
• Windows XP Home Edition SP3
• Windows XP Professional SP3
Windows Vista
• Windows Vista Home Basic SP1
• Windows Vista Home Premium SP1
• Windows Vista Business SP1
• Windows Vista Ultimate SP1
Windows 7
• Windows 7 Home Premium
• Windows 7 Professional
• Windows 7 Ultimate
❑ Hi-Speed USB (USB 2.0) port
For Mac OS X
❑ Operating system:
Mac OS 10.4.11 (Tiger)
Mac OS 10.5.8 (Leopard)
Mac OS 10.6.1 (Snow Leopard)
or later
❑ Hi-Speed USB (USB 2.0) port
1)
The above requirements are the minimum
necessary requirements to write to disc
normally. Under actual operating conditions,
the requirements imposed by your software
must also be met. For details, refer to your
software documentation.
4
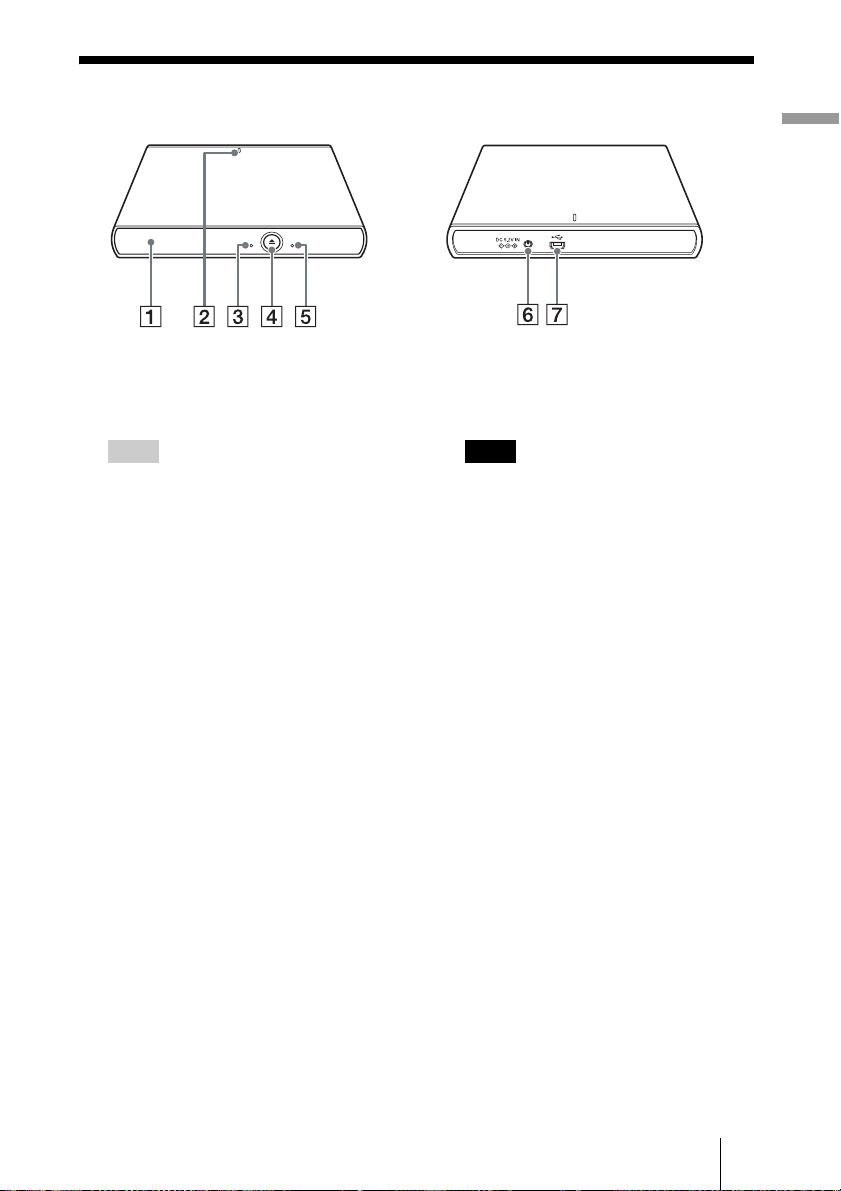
Part Names and Functions
Introduction
A Disc tray
Insert discs here, label side up.
Hint
When you insert a disc, use your fingers to
press around the center of the disc until it is
firmly seated in the drive.
When you remove a disc, lift up on the edge
of the disc with your thumb while supporting
the center of the disc with your forefinger.
B Power indicator
Indicates the power status.
Lit: Power on
Off: Power off
C Busy indicator
Indicates the drive status.
Lit/Blinking:
The drive is reading or
writing data.
Off: The drive is in a state other
than those outlined above.
D Eject button
Press to open the disc tray.
E Emergency eject hole
If you cannot open the disc tray with the
eject button, turn off the drive, and then
insert a thin, elongated object into this
hole to eject the disc tray manually.
F DC IN Jack
Connect the supplied AC power adapter.
Note
Be sure to use the supplied AC power adapter.
G USB Connector
Used with a USB cable to connect the
drive to a computer.
5
B Setup
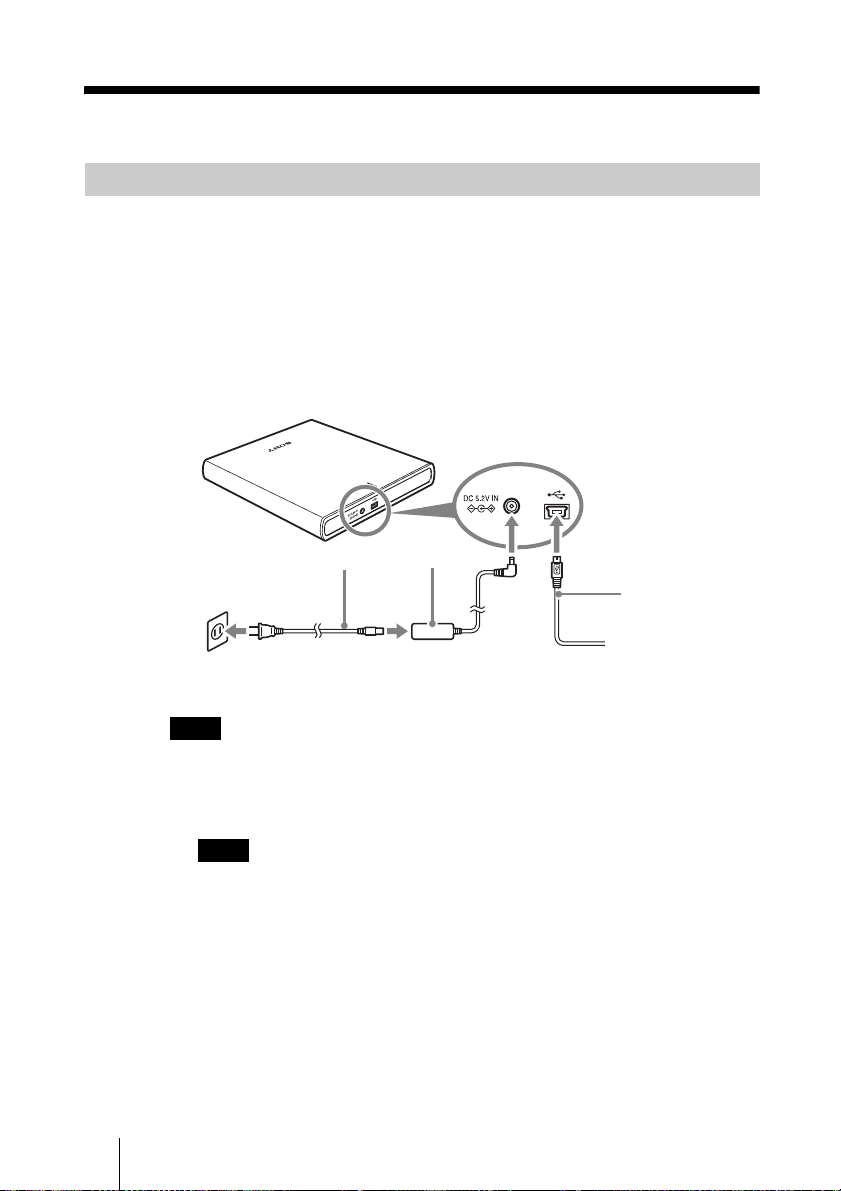
Connecting with the PC
Installation
1 Start your computer.
2 Connect the necessary cables.
• Place the drive horizontally on a stable surface.
• Connect the USB cable to the drive’s USB connector.
• Connect the supplied AC power cord to the supplied AC power adapter. Then
connect the AC power adapter to the drive’s DC IN jack, and connect the
power cord to the power outlet.
AC power
AC power cord
adapter
USB Cable
Note
This drive does not have a power switch. The drive turns on when connected to a power
supply with the AC power adapter.
3 Connect the other end of the USB cable to your computer.
Note
Connect the drive to a USB port on the computer. Do not connect the drive via a USB
hub device.
4 [Windows PC] Insert the supplied software disc into the DVD/CD
rewritable drive and install the software.
6
 Loading...