

Page 1
Digital Surround
Headset System
4-194-154-12(1)
DR-GA500
©2010 Sony Corporation
Operating Instructions
Mode d’emploi
Bedienungsanleitung
Manual de instrucciones
GB
FR
DE
ES
Page 2

2
GB
WARNING
To reduce the risk of fire or electric shock, do
not expose this apparatus to dripping or
splashing, and do not place objects filled with
liquids, such as vases, on the apparatus.
To avoid electrical shock, do not open the
cabinet. Refer servicing to qualified
personnel only.
Do not install the appliance in a confined
space, such as a bookcase or built-in
cabinet.
Notice for customers: the following
information is only applicable to
equipment sold in countries applying EU
directives
The manufacturer of this product is Sony
Corporation, 1-7-1 Konan Minato-ku Tokyo,
108-0075 Japan. The Authorized
Representative for EMC and product safety is
Sony Deutschland GmbH, Hedelfinger
Strasse 61, 70327 Stuttgart, Germany. For any
service or guarantee matters please refer to
the addresses given in separate service or
guarantee documents.
Disposal of Old Electrical &
Electronic Equipment
(Applicable in the
European Union and other
European countries with
separate collection
systems)
This symbol on the product or on its packaging
indicates that this product shall not be treated as
household waste. Instead it shall be handed over to
the applicable collection point for the recycling of
electrical and electronic equipment. By ensuring
this product is disposed of correctly, you will help
prevent potential negative consequences for the
environment and human health, which could
otherwise be caused by inappropriate waste
handling of this product. The recycling of materials
will help to conserve natural resources. For more
detailed information about recycling of this
product, please contact your local Civic Office,
your household waste disposal service or the shop
where you purchased the product.
As the main plug of AC power adaptor is
used to disconnect the AC power adaptor
from the mains, connect it to an easily
accessible AC outlet.
Should you notice an abnormality in it,
disconnect it from the AC outlet immediately.
The validity of the CE marking is restricted to
only those countries where it is legally
enforced, mainly in the countries EEA
(European Economic Area).
Page 3

The digital surround processor for this system
incorporates the Dolby Pro Logic II decoder.
Manufactured under licence from Dolby
Laboratories.
“Dolby,” “Pro Logic,” and the double-D symbol
are trademarks of Dolby Laboratories.
“Virtualphones Technology” and “VPT” are
registered trademarks of Sony Corporation.
Microsoft and Windows are registered
trademarks or trademarks of Microsoft
Corporation in the United States and/or other
countries.
Macintosh and Mac OS are registered
trademarks of Apple Inc. in the U.S. and other
countries.
IBM and PC/AT are trademarks and registered
trademarks of International Business Machines
Corporation.
Pentium is a trademark or registered trademark
of Intel Corporation.
In this manual, Windows® XP Home Edition,
Windows® XP Professional and Windows® XP
Media Center Edition are referred to as Windows
XP.
In this manual, Windows Vista® is referred to as
Windows Vista.
In this manual, Windows® 7 Edition is referred to
as Windows 7.
In this manual, Macintosh® is referred to as
Macintosh.
All other names of systems and products are
trademarks or registered trademarks of their
respective owners. ™ and ® marks are omitted in
this manual.
PC screen terms depicted in this manual may
differ from the actual terms.
Table Of Contents
Features .............................................4
Checking the Components and
Accessories .....................................5
Location and Function of Parts........6
Digital Surround Processor
Part Descriptions .....................................6
Headset Part Descriptions ..........................7
Connecting the Headset system ......8
Step 1-: Connecting a 7.1ch Sound
Device .......................................................8
Step 1-: Connecting a 5.1ch Sound
Device .......................................................9
Step 1-: Connecting a 2ch Sound
Device ....................................................10
Step 1-: Connecting to the Computer
Using the USB cable .............................11
Step 2: Connecting the AC Adaptor ......12
Step 3: Preparing the Headset .................12
Step 4: Checking the Settings of the
Computer ..............................................13
Listening to Sounds ....................... 16
Troubleshooting ............................ 20
Precautions .................................... 22
GB
Specifications ................................. 23
3
GB
Page 4
Features
VPT (Virtualphones Technology)*1 achieves precision three-dimensional surround
7.1ch
sound with multi-channel speakers.
Ideal for shooting games, typically requiring accurate reproduction of directional sound
characteristics in “FPS*2 mode.”
Built-in Dolby Pro Logic IIx decoder for 7.1ch extended surround from a 5.1ch/2ch/USB
input source.
COMPRESSION feature attenuates explosive sounds while enhancing lower level sounds
(footsteps, etc.).
40mm driver unit for premium gaming sound quality.
Open-air type, three-cushion design maintains a comfortable fit during long-term use.
Lightweight structure provides wearing comfort ideal for PC gaming.
*1 Superior “Virtualphones Technology (VPT)” creates that surround-sound realism typical of movie
theatres, thanks to Sony audio analysis and digital signal processing technology.
*2 FPS = First Person Shooting
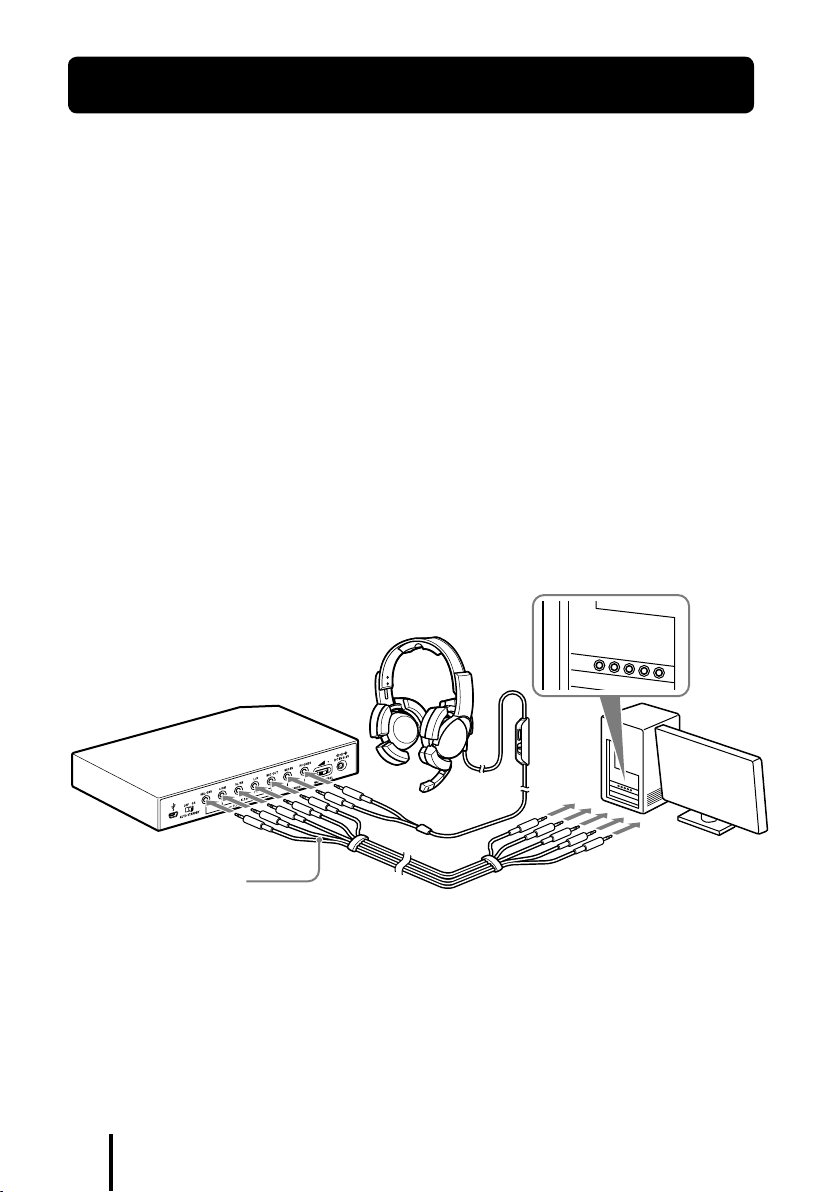
The processor is optimised for the supplied headset. Although any headset can be used, use the supplied
headset to obtain the best surround effects.
to sound outputs and
microphone input jacks
Headset
Rear panel of processor
to 7.1ch/5.1ch/2ch jacks
Multi-channel cable
(supplied)
GB
4
Computer
to HEADSET jacks
Page 5
Preparation
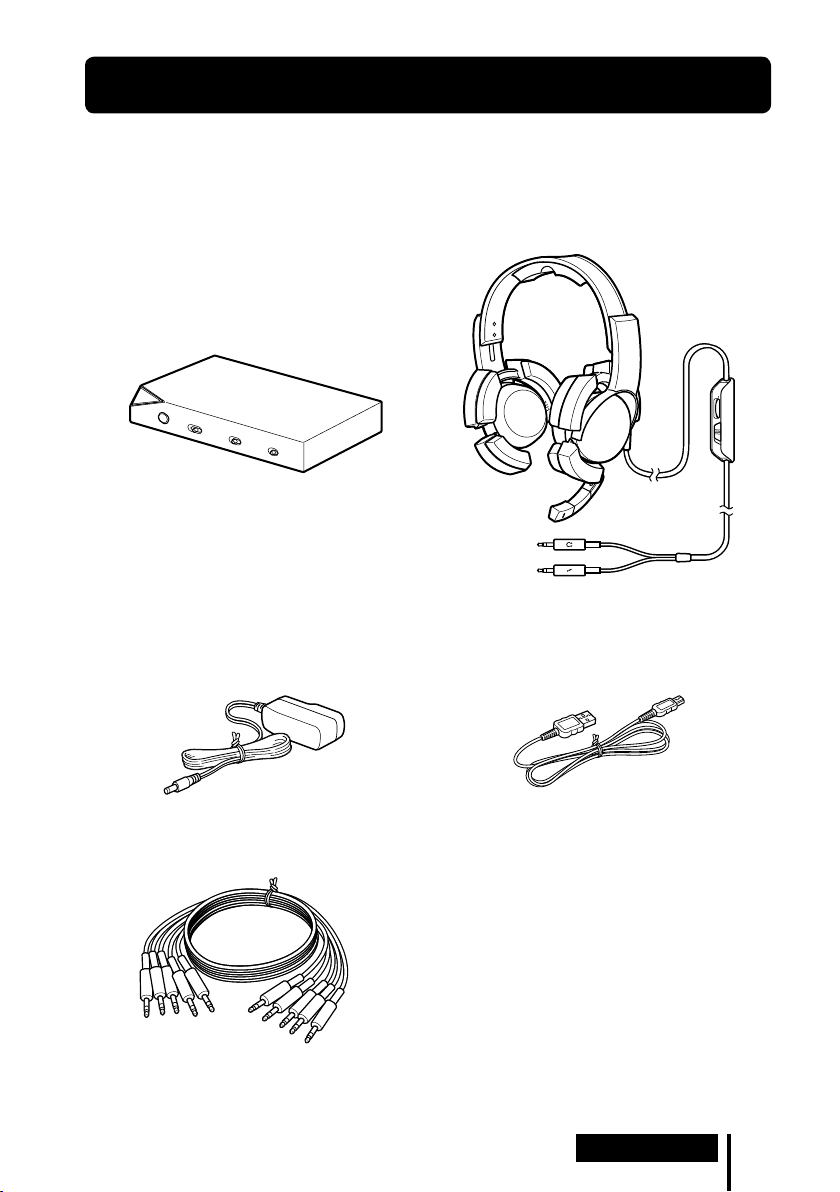
Checking the Components and Accessories
Before setting up the system, check that all of the components are included.
Processor DP-GA500 (1)
AC adaptor (1)
Headset DR-GA210 (1)
Dedicated USB cable (1)
Multi-channel cable (7.1ch+MIC) (1)
Preparation
GB
5
Page 6

6
GB
Preparation
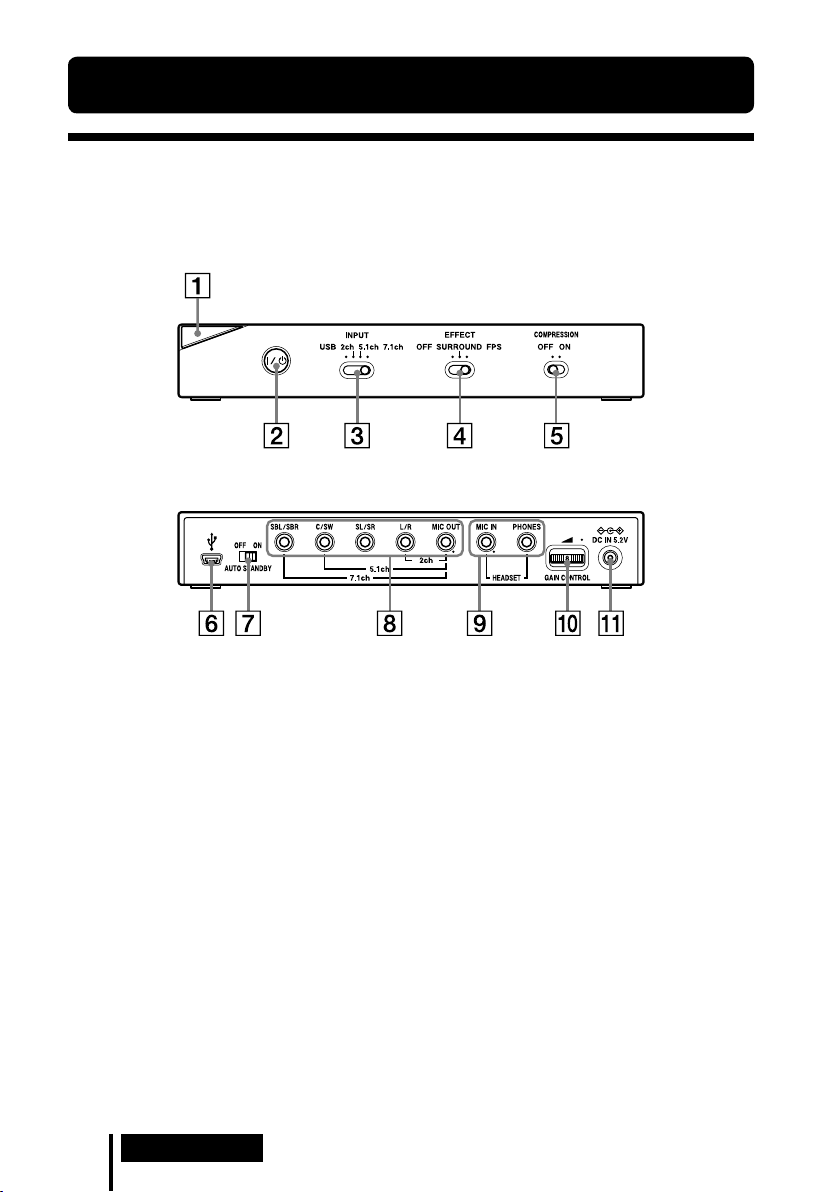
Location and Function of Parts
Digital Surround Processor Part Descriptions
Front panel of processor
Rear panel of processor
Power indicator
(See page 16)
/ (on / standby) switch
(See page 16)
INPUT (USB/2ch/5.1ch/7.1ch) switch
EFFECT (OFF/SURROUND/FPS) switch
(See page 17)
COMPRESSION (OFF/ON) switch
(See page 18)
* There is a tactile dot on the processor for easy recognition.
USB port
(See page 11)
AUTO STANDBY (OFF/ON) switch
(See page 19)
7.1ch/5.1ch/2ch (SBL/SBR, C/SW, SL/
SR, L/R, MIC OUT*) jacks
HEADSET (MIC IN
(See page 12)
GAIN CONTROL
(See page 19)
DC IN 5.2V jack
(See page 12)
*, PHONES) jacks
*
Page 7
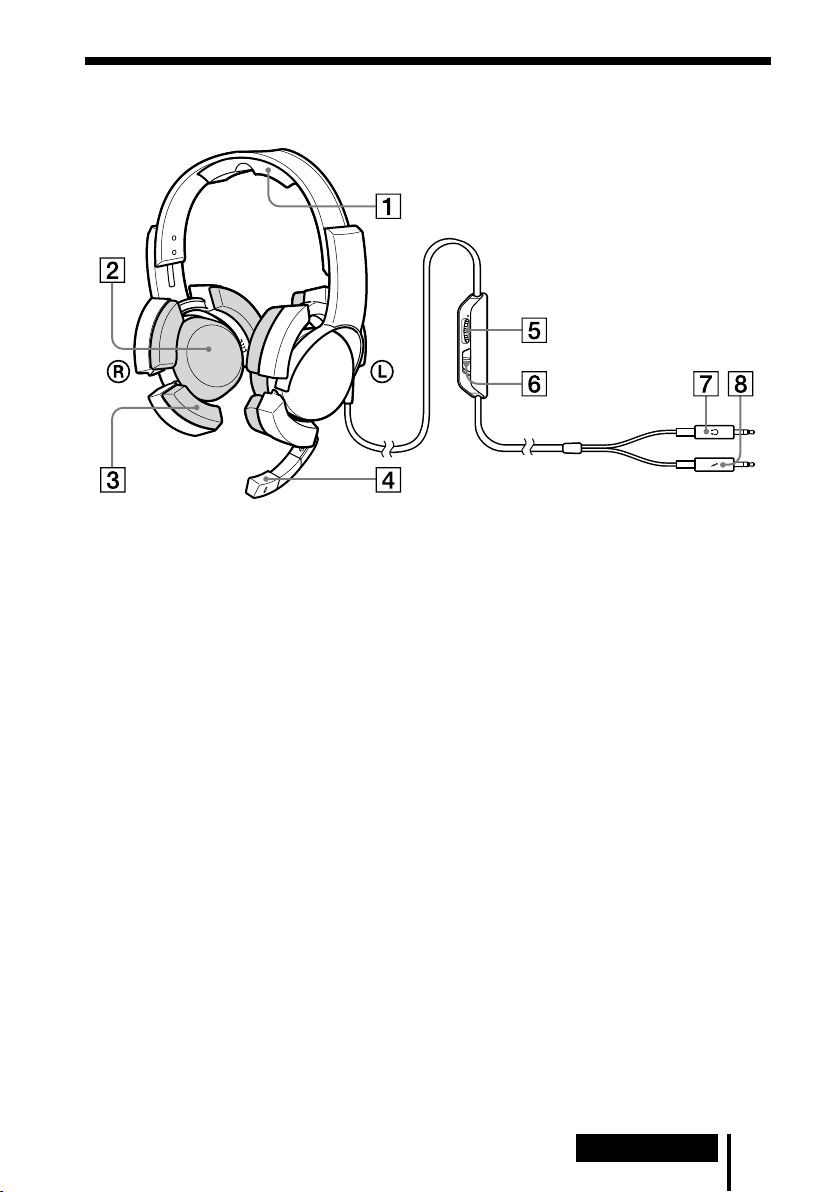
Headset Part Descriptions
Head-band
Earpads
Support-pads
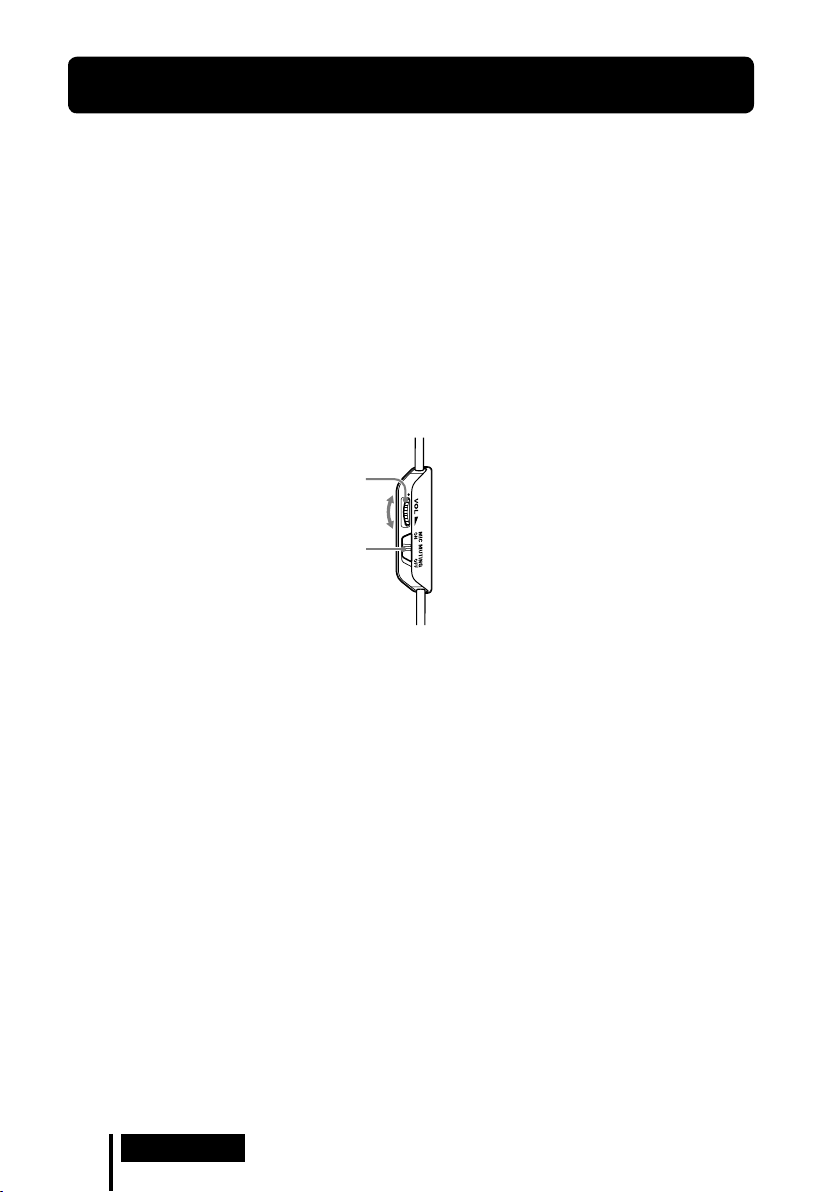
Microphone
VOL (volume) control
(See page 16)
* There is a tactile dot on the headset for easy recognition.
*
MIC MUTING switch
(See page 16)
(headphone) plug (Black)
(microphone) plug (Red)
Preparation
GB
7
Page 8
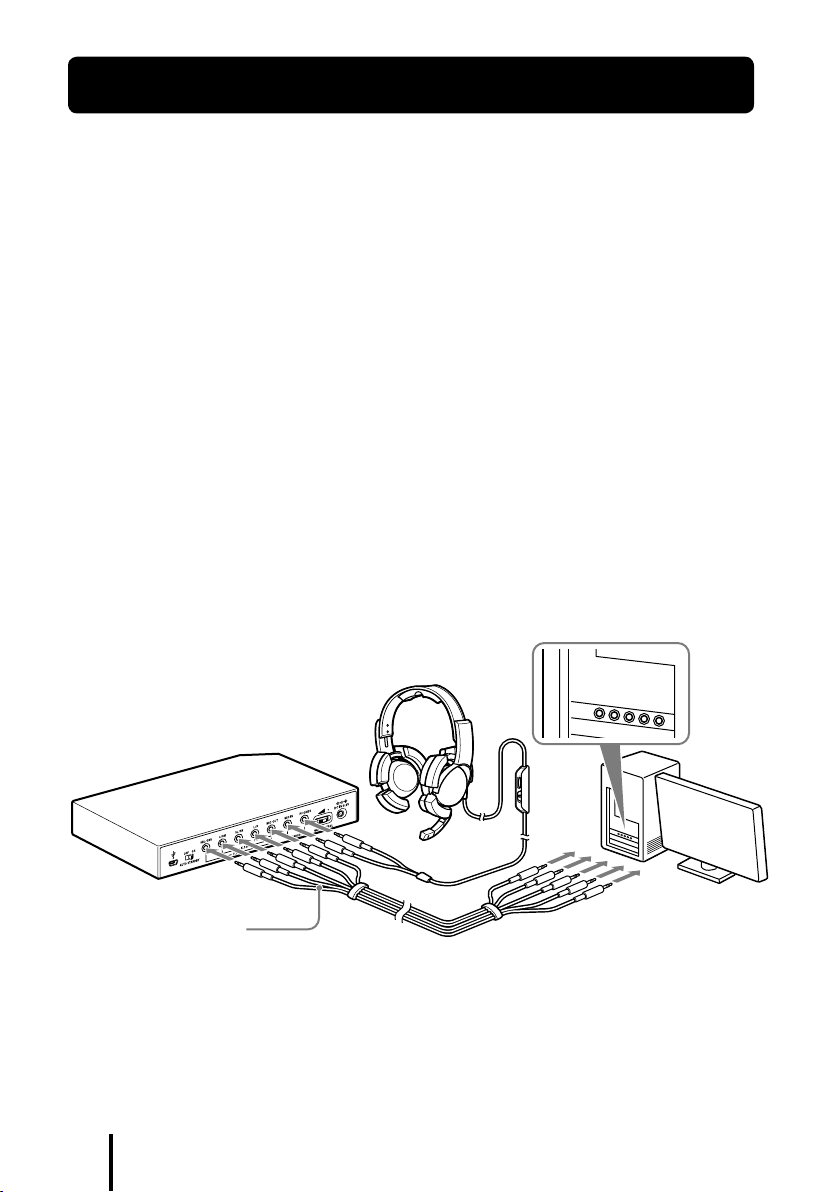
Connection
Connecting the Headset system
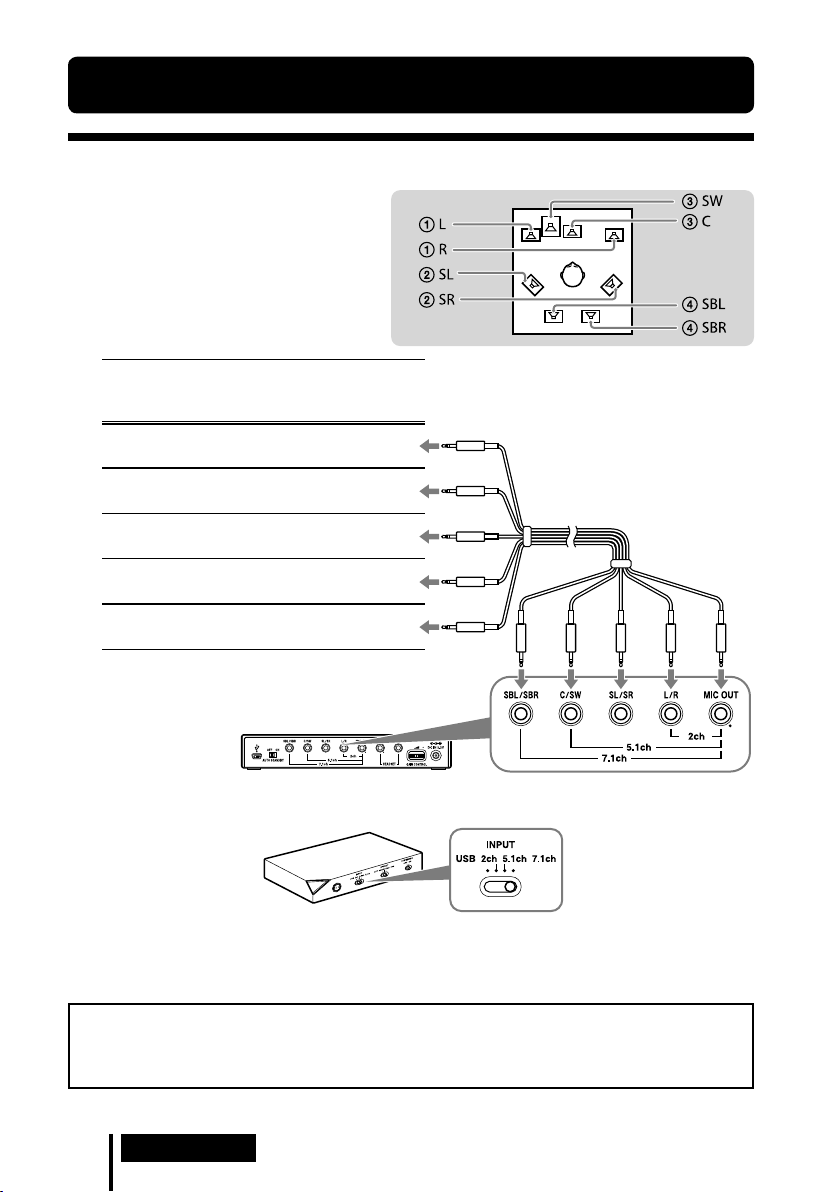
Step 1-: Connecting a 7.1ch Sound Device
1 Connect the processor to the
sound device as illustrated below.
Cable
plug
names
MIC
L / R
SL / SR
C / SW
SBL / SBR
Multi-channel cable
(supplied)
Connecting jacks of the sound
device*
MIC IN
Connect to MIC IN jack
L/R OUT
Connect to L/R OUT jack
Surround L/R OUT
Connect to SL/SR OUT jack
Center/Subwoofer OUT
Connect to C/SW OUT jack
Surround back L/R OUT
Connect to SBL/SBR OUT jack
* The jack name varies depending on the sound
device.
Rear panel of processor
2 Slide the INPUT switch to “7.1ch.”
Front panel of
processor
3 Set the 7.1ch speaker mode in the computer.
For details on operation of your computer/sound device, refer to the operating instructions
for it.
Do not connect the USB cable with multi-channel cable at the same time when you connect
the processor to the computer. The computer sound setting may be switched to an
unintended device.
GB
8
Connection
Page 9
Step 1-: Connecting a 5.1ch Sound Device
Connect the 5.1ch jacks of the processor by the supplied multi-channel cable. The EFFECT
function provides 7.1ch extended surround output from a 5.1ch input source.
1 Connect the processor to the
sound device as illustrated below.
Cable
plug
names
MIC
L / R
SL / SR
C / SW
SBL / SBR
Multi-channel cable
(supplied)
Connecting jacks of the sound
device*
MIC IN
Connect to MIC IN jack
L/R OUT
Connect to L/R OUT jack
Surround L/R OUT
Connect to SL/SR OUT jack
Center/Subwoofer OUT
Connect to C/SW OUT jack
Not connected
* The jack name varies depending on the sound
device.
Rear panel of processor
2 Slide the INPUT switch to “5.1ch.”
Front panel of
processor
3 Set the 5.1ch speaker mode in the computer.
For details on operation of your computer/sound device, refer to the operating instructions
for it.
Do not connect the USB cable with multi-channel cable at the same time when you connect
the processor to the computer. The computer sound setting may be switched to an
unintended device.
Connection
GB
9
Page 10
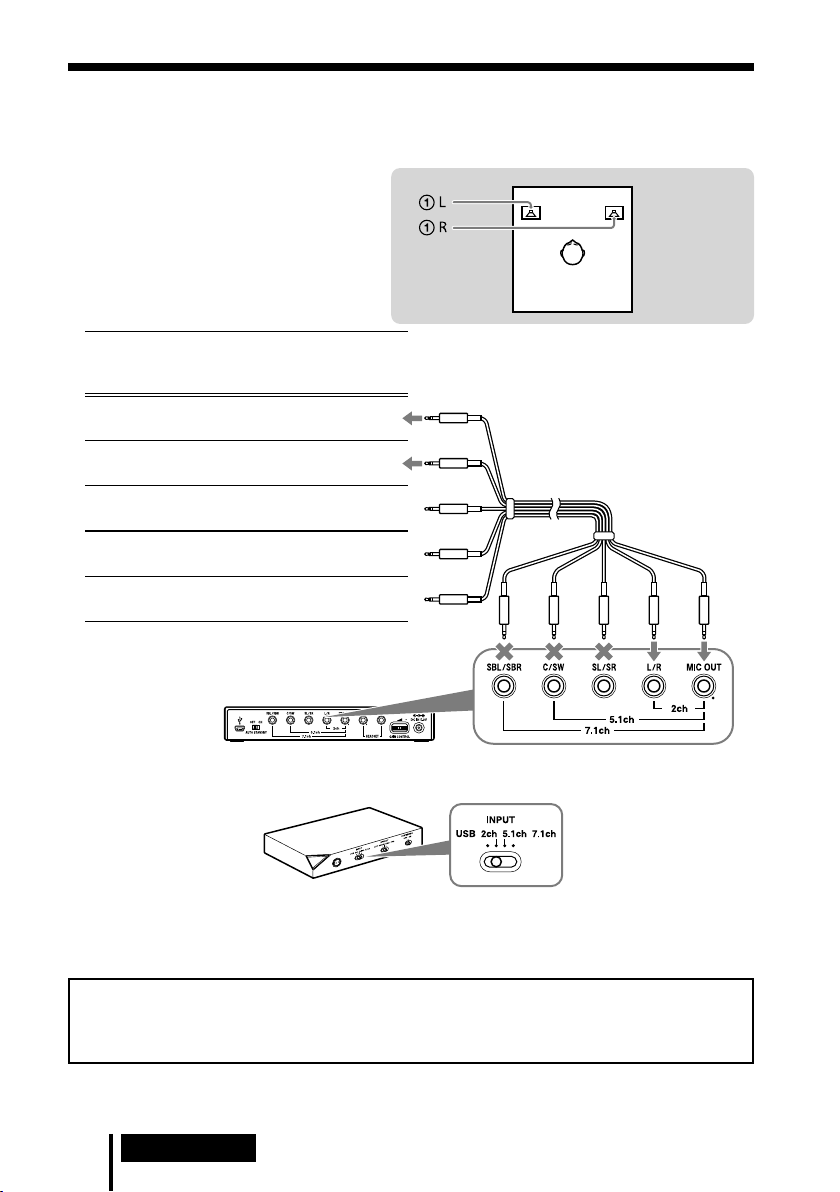
Step 1-: Connecting a 2ch Sound Device
Connect the 2ch jacks of the processor by the supplied multi-channel cable. The EFFECT
function provides 7.1ch extended surround output from a 2ch input source.
1 Connect the processor to the
sound device as illustrated below.
Cable
plug
names
MIC
L / R
SL / SR
C / SW
SBL / SBR
Multi-channel cable
(supplied)
Connecting jacks of the sound
device*
MIC IN
Connect to MIC IN jack
L/R OUT
Connect to L/R OUT jack
Not connected
Not connected
Not connected
* The jack name varies depending on the sound
device.
Rear panel of processor
2 Slide the INPUT switch to “2ch.”
Front panel of
processor
3 Set the 2ch speaker mode in the computer.
For details on operation of your computer/sound device, refer to the operating instructions
for it.
Do not connect the USB cable with multi-channel cable at the same time when you connect
the processor to the computer. The computer sound setting may be switched to an
unintended device.
GB
10
Connection
Page 11
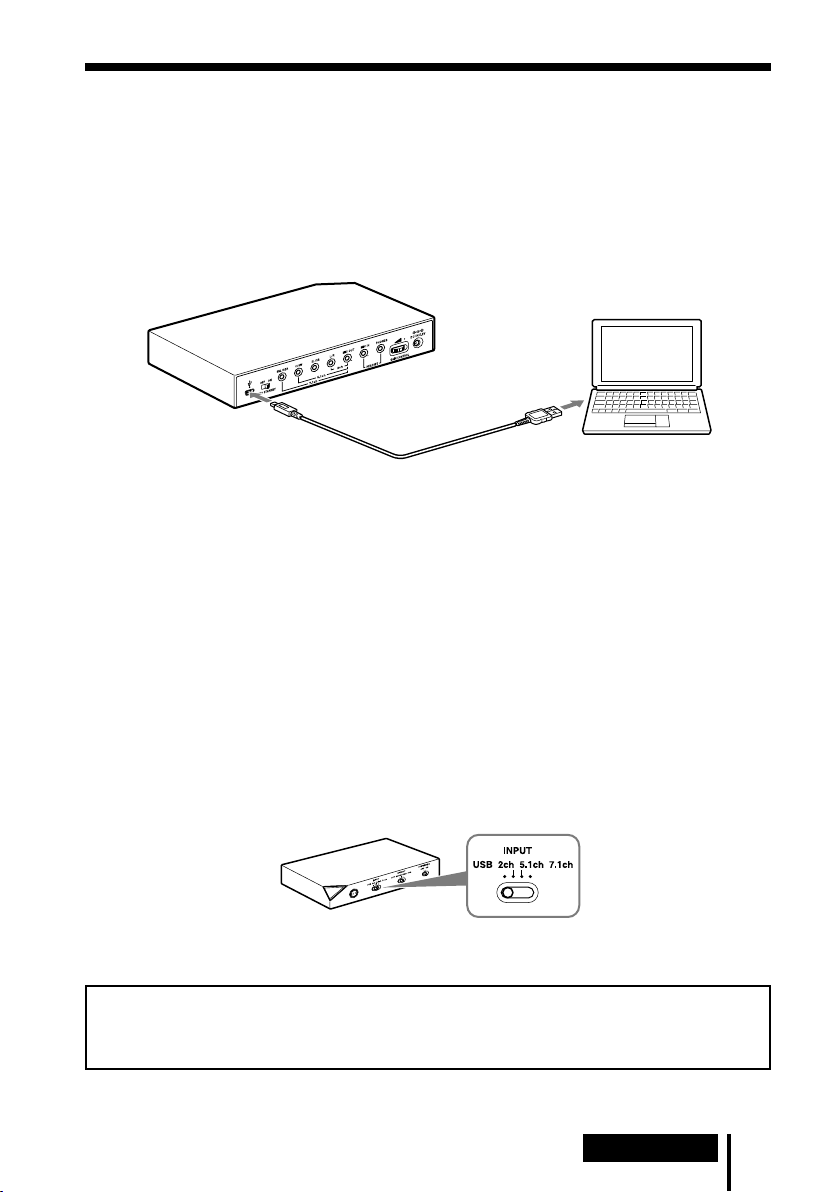
Step 1-: Connecting to the Computer Using the USB
cable
Connect the USB port on the computer to the USB port of the processor by the supplied USB
cable.
Although the processor works as an external 2ch sound device, the EFFECT functions provide
7.1ch extended surround from 2ch input.
1 Connect the processor to the computer.
to USB port
to USB port
Dedicated USB cable
(supplied)
USB drivers are included in operating systems such as Windows XP, Windows Vista, Windows
7 and Mac OS X. USB drivers will be installed automatically when the processor is turned on at
the first time after connecting and starting the computer.
When connecting to different USB ports, a computer may install USB drivers again.
Notes
The headset is not guaranteed to operate with a USB hub or USB extension cable. Use the supplied USB
cable only.
When the headset is connected to the computer, the volume level of the computer may be set to
maximum. Turn down the volume of the computer beforehand.
The sound of digital broadcasting might not be output via USB of the computer when connecting by the
USB cable. Connect it with the multi-channel cable if you cannot hear the sound of digital broadcasting
(page 8 to 10).
Computer
2 Slide the INPUT switch to “USB.”
Front panel of
processor
3 Check the sound settings of the computer.
For details on operation of your computer device, refer to the operating instructions for it.
Do not connect the USB cable with multi-channel cable at the same time when you connect
the processor to the computer. The computer sound setting may be switched to an
unintended device.
Connection
11
GB
Page 12
Step 2: Connecting the AC Adaptor
Connect the supplied AC adaptor to the processor, and then connect the AC adaptor to the AC
outlet.
Rear panel of processor
To DC IN 5.2V jack
To AC outlet
AC adaptor (supplied)
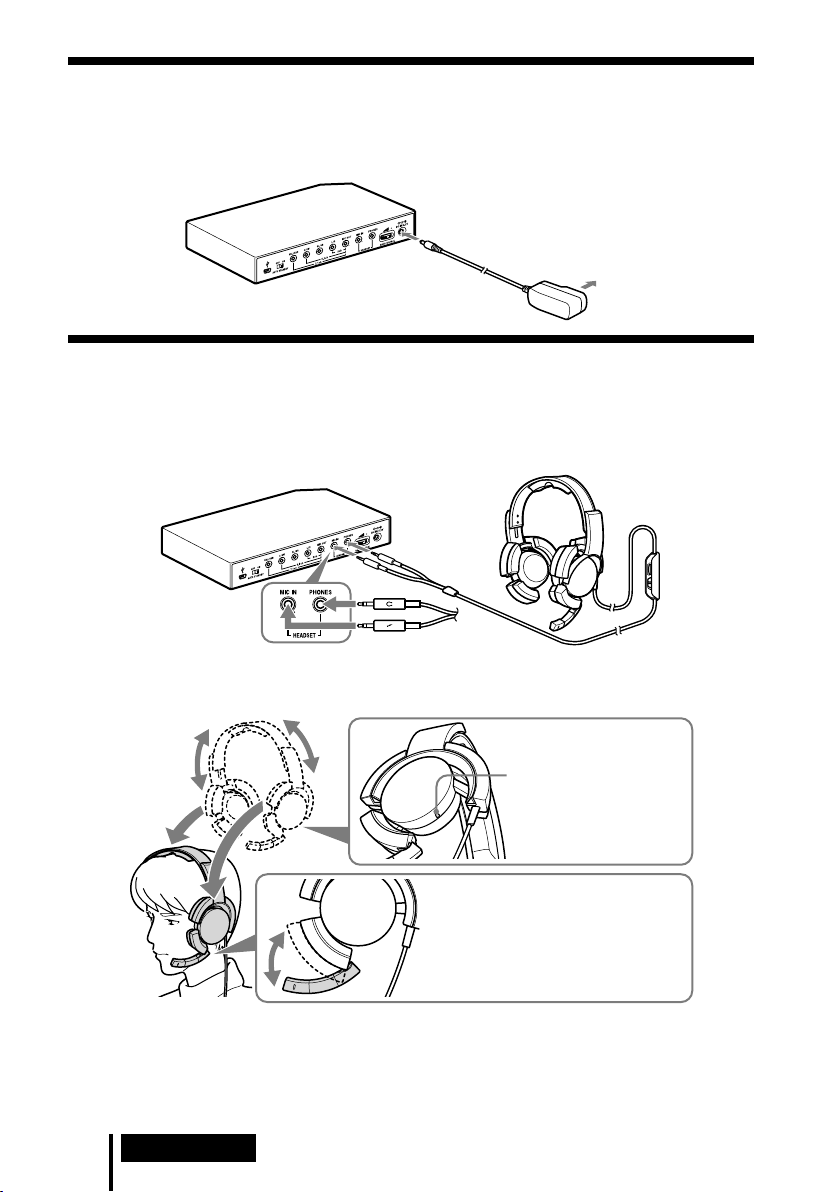
Step 3: Preparing the Headset
1 Connect the (microphone) plug of the headset to the HEADSET (MIC IN) jack of
the processor, and connect the (headphone) plug to the HEADSET (PHONES)
jack.
Rear panel of processor
Headset
Black
Red
2 Adjust the band of the headset, and wear the earpad marked on your right ear,
and the one marked on your left ear.
There is a tactile dot on the
hanger marked to
distinguish the left side.
Adjust the position of the
microphone for effective pickup of
your voice.
Return the position of the
microphone to rest near the earpad
when not in use.
Note
If the position of the microphone is not correct, the sensitivity of the microphone will decrease, and sound
from the headphone may enter the microphone.
GB
12
Connection
Page 13

Step 4: Checking the Settings of the Computer
To check the sound device settings of the computer
Before using the processor, check the setting of the sound device by following the instructions
below according to your operating system. For details on the operation of your computer/
sound device, refer to the operating instructions for it.
For Windows
Windows XP in Category View
Click the [start] menu, select [Control Panel], [Sounds, Speech and Audio Devices], [Sounds
and Audio Devices], [Audio] tab, and then select the regular sound device (or [USB PnP Sound
Device] if connection is by the supplied USB cable) for [Default device] in the Sound playback
or Sound recording menu.
Windows Vista
Click the [Start] menu, select [Control Panel], [Hardware and Sound], [Sound], [Playback] or
[Recording] tab, select the regular sound device (or [USB PnP Sound Device] if connection is
by the supplied USB cable) for the playback device or recording device, and then click [Set
default].
Windows 7
Click the [Start] menu, select [Control Panel], [Hardware and Sound], [Sound], [Playback] or
[Recording] tab, select the regular sound device (or [USB PnP Sound Device] if connection is
by the supplied USB cable) for the playback device or recording device, and then click [Set
default].
For Macintosh
Mac OS X
Click the [Apple] menu, select [System Preferences], [Sound], [Output] or [Input] tab, and then
select the regular sound device (or [USB PnP Sound Device] if connection is by the supplied
USB cable) for [Select a device for sound output] or [Select a device for sound input].
(Continued)
Connection
13
GB
Page 14

To adjust the volume level of the sound
When connecting the computer to the processor with the USB cable, adjust the volume level
using the VOL control on the headset.
When connecting with the multi-channel cable, you can adjust the volume level not only by the
VOL control on the headset, but also by changing the computer volume level as below.
For Windows
Windows XP in Category View
Click the [start] menu and select [Control Panel], [Sounds, Speech and Audio Devices],
[Sounds and Audio Devices], click [Volume] in Sound menu, and adjust the master volume
level.
Windows Vista
Click the [Start] menu and select [Control Panel], [Hardware and Sound], [Adjust system
volume], and adjust the master volume level.
Windows 7
Click the [Start] menu and select [Control Panel], [Hardware and Sound], [Adjust system
volume], and adjust the master volume level.
For Macintosh
Mac OS X
Click the [Apple] menu, select [System Preferences], [Sound], [Output] tab, and adjust the
speaker output level.
Notes
You may have to perform settings depending on the software. For details, refer to the operating
instructions of your software.
The headset volume and the output level of the computer are not synchronized.
To set for music CD playback
This setting is necessary when playing back a music CD in the CD-ROM drive, if connection is
by the supplied USB cable.
Follow the instructions below according to your operating system and click the check box of
[Enable digital CD audio for this CD-ROM device]. For Windows Vista, Windows 7 and
Macintosh, setting for music CD playback is not necessary.
For Windows XP in Category View
Click the [start] menu, and select [Control Panel], [Sounds, Speech and Audio Devices],
[Sounds and Audio Devices], and [Hardware] tab. Select the CD-ROM drive for playing music,
click [Properties], and then click the [Properties] tab. Click the check box of [Enable digital CD
audio for this CD-ROM device].
GB
14
Connection
Page 15

To adjust the volume level of the microphone
Before using the processor, check and adjust the volume level of the microphone by the
computer. Follow the instructions below according to your operating system, and check/adjust
the volume level.
For details on the operation of your computer, refer to the operating instructions for it.
For Windows
Before adjusting the volume of the microphone, check the input level of the microphone by
performing test recording with a sound recorder etc.
Windows XP in Category View
Click the [start] menu and select [Control Panel], [Sounds, Speech and Audio Devices],
[Sounds and Audio Devices], and [Audio] tab. Check that [Default device] in the Sound
recording menu is set to the regular sound device (or [USB PnP Sound Device] if connection is
by the supplied USB cable), click [Volume] in the Sound recording menu, and adjust the
microphone input level.
Windows Vista
Click the [Start] menu, select [Control Panel], [Hardware and Sound], [Sound], [Recording]
tab, and select the regular sound device (or [USB PnP Sound Device] if connection is by the
supplied USB cable) for the recording device and click [Set Default]. Select the regular sound
device (or [USB PnP Sound Device] if connection is by the supplied USB cable) again, click
[Properties], select the [Levels] tab, and adjust the microphone input level.
Windows 7
Click the [Start] menu, select [Control Panel], [Hardware and Sound], [Sound], [Recording]
tab, and select the regular sound device (or [USB PnP Sound Device] if connection is by the
supplied USB cable) for the recording device and click [Set Default]. Select the regular sound
device (or [USB PnP Sound Device] if connection is by the supplied USB cable) again, click
[Properties], select the [Levels] tab, and adjust the microphone input level.
For Macintosh
Mac OS X
Click the [Apple] menu, select [System Preferences], [Sound], [Input] tab, and adjust the
microphone input level.
Notes
The microphone does not support muting on the audio recording device of your computer. Slide the
MIC MUTING switch of the Headset to “ON” muting the microphone.
You may have to perform settings depending on the software. For details, refer to the operating
instructions of your software.
Connection
15
GB
Page 16
Operation
Listening to Sounds
1 Turn on the connected computer.
2 Press the
The power indicator of the processor lights white.
If you connect the USB port on the computer to the USB port of the processor by the
supplied USB cable, USB drivers will be installed automatically when the processor is
turned on at the first time after connecting and starting the computer.
3 Put on the headset.
(See page 12)
4 Start playback from the computer.
To adjust the volume
Adjust the volume level of the headset, and set the microphone muting mode.
/ (on / standby) switch to turn the processor on.
VOL (volume)
Adjust the volume level of
the headset.
MIC MUTING
ON: The microphone is set to
the MIC MUTING ON mode.
OFF: The microphone is set to
the MIC MUTING OFF mode.
Notes
When watching films, be careful not to increase the volume too high in quiet scenes. You may hurt your
ears when a loud scene is played.
The headset volume and the output level of the computer are not synchronised. Also note that the
microphone muting mode is not synchronised.
The music/sound might not be output from the headset if you connect to the processor by the USB cable
and slide the INPUT switch to “USB” while using music software. In this case, restart the music software.
GB
16
Operation
Page 17
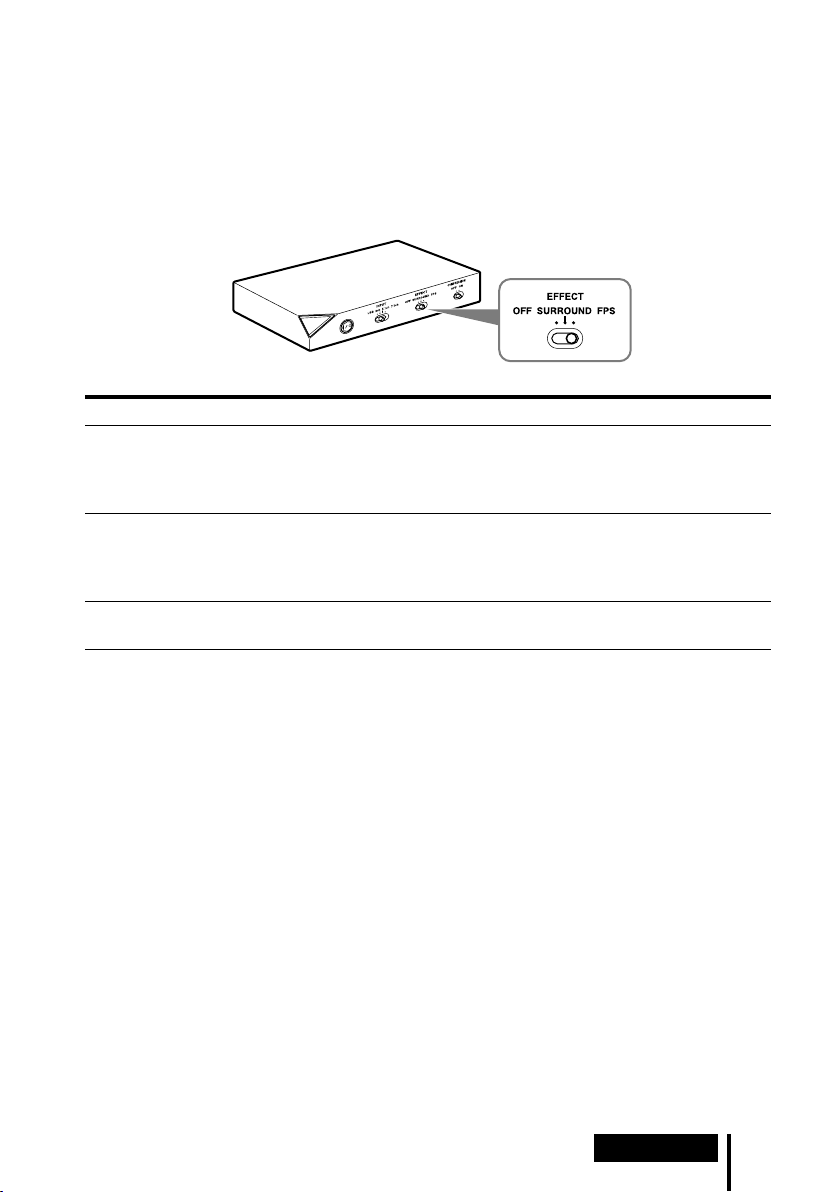
To select your preferred sound field (EFFECT function)
The EFFECT switch allows you to select your preferred sound field.
With 5.1ch, 2ch, or USB is connected when “FPS” or “SURROUND” is selected, the built-in
Dolby Pro Logic IIx decoding will provide a similar sense of realism to 7.1ch. However, if the
INPUT switch position does not match the connection, the EFFECT function will not work
properly.
Front panel of the processor
Position of switch Sound field mode and suitable sound source
FPS (First Person Shooting) This setting provides clear localization of sounds respective of image.
This is the recommended setting for FPS where locality of sounds need to be
accurately perceived. The sound is listener-friendly, natural, clear and realistic. It
is characterized by very sharply perceived localization of all channels.
SURROUND This setting provides a seamless reproduction of all channels.
The overall sound is perceived more as a whole than with the FPS mode, and
provides the best sound field for playing multichannel surround games in general.
Also recommended for movie watching.
OFF 2ch sound is output.
A multichannel source (7.1ch/5.1ch) is downmixed to 2ch sound.
Note
The EFFECT function does not work for monaural sound sources.
About property of sound with the EFFECT function
The EFFECT function may not be obtained from sound sources that do not incorporate video, such as
music CDs.
VPT (Virtualphones Technology) simulates the average human HRTF (head-related transfer function)*.
The effect is perceived differently, depending on individual.
* HRTF = Head-Related Transfer Function. A mathematical measurement to show changes in sound
between the source and your ears.
(Continued)
Operation
17
GB
Page 18
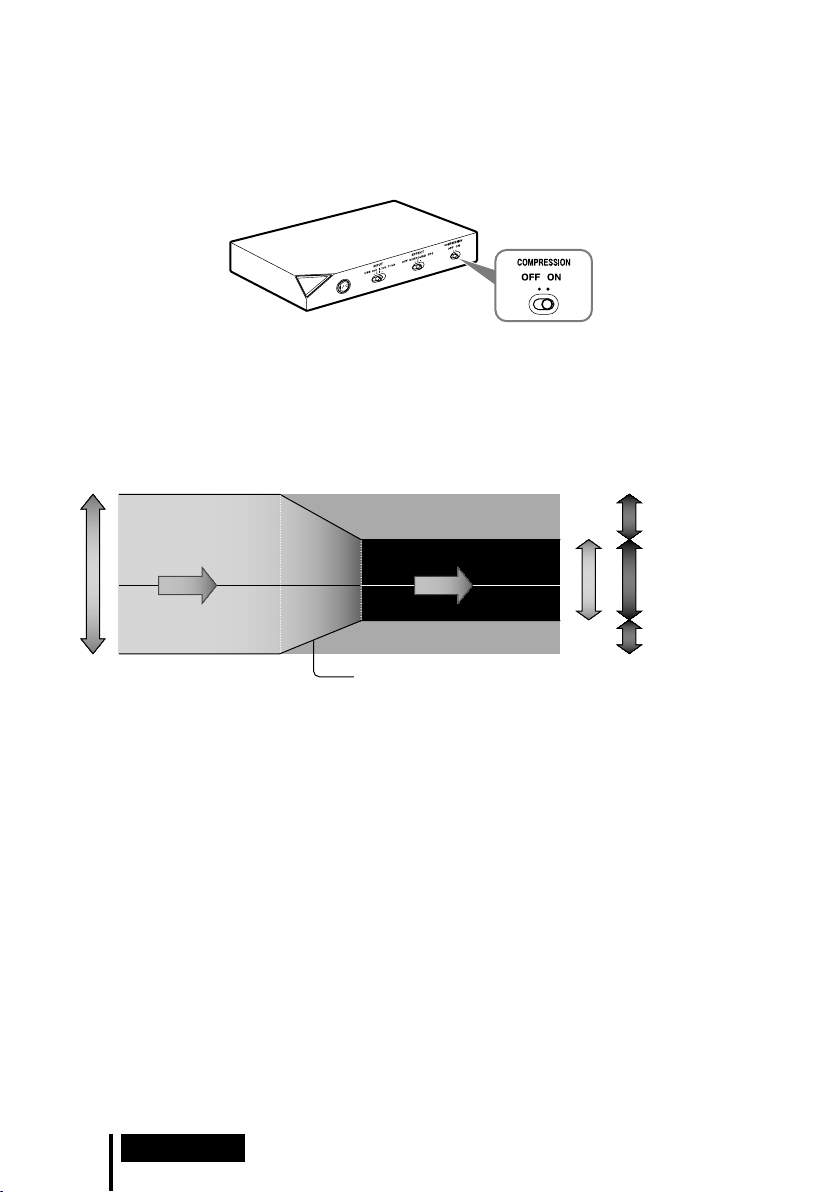
To make the sound to comfortable to hear (COMPRESSION function)
Slide the COMPRESSION switch to ON/OFF.
This function maintains the overall level of program material: explosive sounds are attenuated while lower
level sounds (footsteps, etc.) are enhanced. It is very effective for limiting high dynamic range source
material.
Front panel of the processor
Note
Check carefully the volume control with the COMPRESSION function.
With the COMPRESSION function on, the sound may seem loud with when the audio signal from the
computer is comparatively low. In this case, increase the computer’s volume gradually, and set where overall
the sound is consistent. Conversely, the sound may be felt to be too low. In this case, decrease the
computer’s volume gradually, and set for the most consistent overall sound.
Illustration of the compression process
explosion
dynamic range
dialogue
footsteps, background noise
input signal
compression
output signal
explosion
dialogue
footsteps, background noise
standard
Dynamic range compression by built-in
DSP (Digital Signal Processor) processor
Uncomfortable
dynamic range
Easy to hear
Difficult to hear
18
GB
Operation
Page 19
To adjust the volume level from the sound device
OFF
AUTO STANDBY
ON
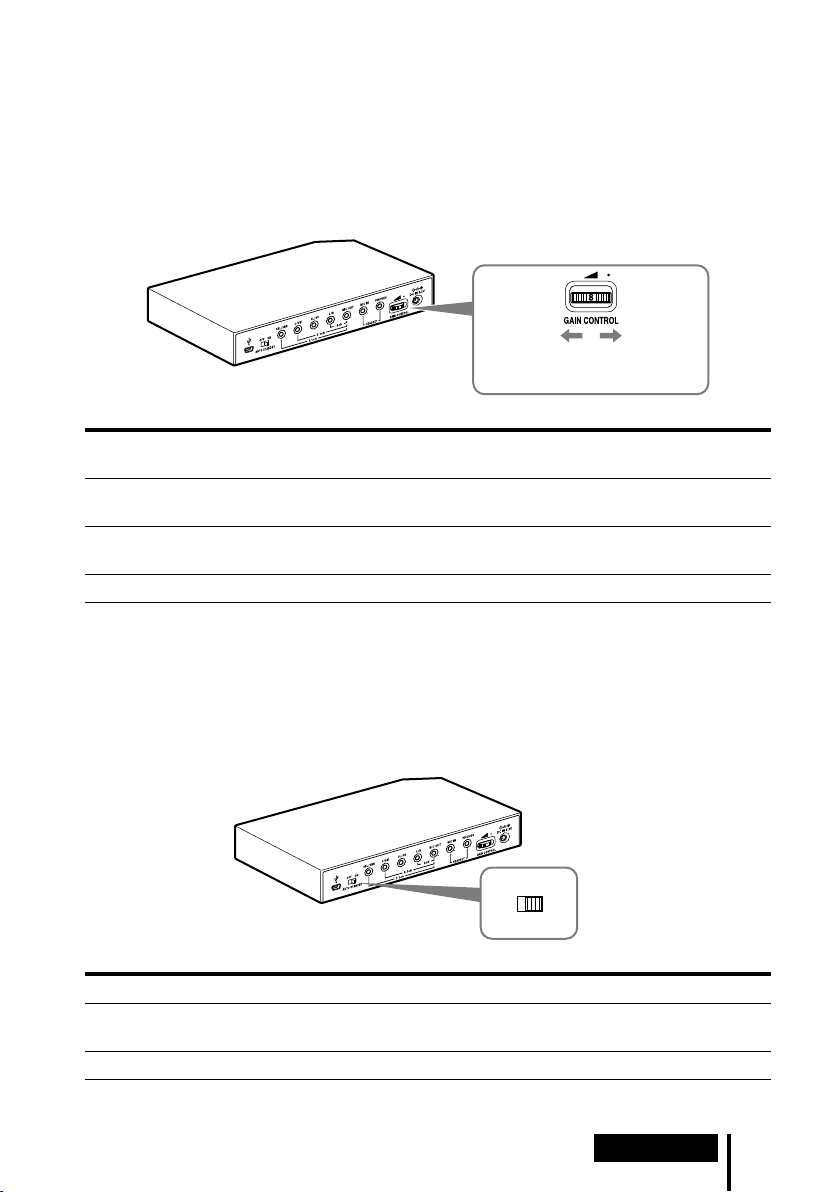
(GAIN CONTROL)
The GAIN CONTROL adjusts the volume according to the rated output of the sound device
(initial setting is “8”). Increase the GAIN CONTROL more than “8” if the output is low, even
when the volume of the sound device is maximized. And if sound is distorted, decrease the
volume level of the output on the sound device.
Rear panel of the processor
Rotate left to
decrease the
level
Sound device
rated output
More than 2Vrms Adjust the GAIN CONTROL level to “8,” and then adjust the audio output device
2Vrms This processor is calibrated for 2Vrms standard output to the sound device when
Less than 2Vrms “8” - “10,” the GAIN CONTROL level adjust for the louder volume.
GAIN CONTROL level
to lower the sound.
the GAIN CONTROL is set to “8.”
Rotate right
to increase
the level
To set the system to enter the standby mode automatically
(AUTO STANDBY function)
The processor enters the standby mode automatically if the processor does not input sound for
about 30 minutes.
You can turn the AUTO STANDBY function ON/OFF by the AUTO STANDBY switch.
Rear panel of the processor
Position of switch Effect
ON The AUTO STANDBY function will work. Turn on the system again by pressing
the / (on / standby) switch.
OFF The AUTO STANDBY function will not work.
Operation
19
GB
Page 20

Additional Information
Troubleshooting
If you run into any problems using this system, use the following checklist. Should any problem
persist, consult your nearest Sony dealer.
Symptom Cause and remedy
No sound
Distorted or intermittent
sound (sometimes with
noise)
Low sound
Check the connection between the processor and the computer.
Turn on the computer connected to the processor, and start the playback.
Turn on the processor.
The INPUT setting does not match the actual connection method. (Example:
the input signal is USB, the INPUT setting is 7.1ch, etc.)
Set the INPUT switch to the appropriate input signal.
Increase the headset volume.
Connect the headphone plug properly.
Increase the volume level of the computer and the music playback software.
The system is connected while music software is in use.
Restart the music software.
The sound device of your computer is not set correctly (page 13).
The volume control of your computer or the music playback software, etc., is
set to mute.
Unset mute.
The GAIN CONTROL level is “0.”
Increase the GAIN CONTROL.
Your computer does not recognize the headset as a USB device if connection is
by the supplied USB cable.
Restart your computer.
The CD-ROM drive of your computer does not support the digital play
function if connection is by the supplied USB cable.
Use a CD-ROM drive that supports the digital playback function.
Digital broadcasts might not be heard with the USB connection.
Connect the computer by the multi-channel cable (page 8 to 10).
AUTO STANDBY activated because no sound was input for approx. 30
minutes.
Turn on the processor again.
Decrease the volume level on the connected computer.
Increase the volume level on the connected computer and the music playback
software.
Increase the headset volume.
Increase the GAIN CONTROL.
20
GB
Additional Information
Page 21

Symptom Cause and remedy
Loud background noise
The surround sound effect
is not obtained
Sound is disrupted
No sound from the
microphone
Low sound from the
microphone
Recorded sound from the
microphone is noisy
Distorted sound from the
microphone
The MIC MUTING switch
does not work
The computer output level
settings of the center
speaker and subwoofer may
be reversed.
If you connect the processor to a computer using the multi-channel cable,
increase the volume level on the connected sound device.
Separate the processor from the computer.
The INPUT setting does not match the actual connection method. (Example:
the input signal is 2ch, the INPUT setting is 7.1ch, etc.)
Set the INPUT switch to the appropriate input signal.
Set the EFFECT switch to “FPS” or “SURROUND” (page 17).
The surround effect does not work for monaural sound sources.
The INPUT setting does not match the actual connection method. (Example:
the input signal is 2ch, the INPUT setting is 7.1ch, etc.)
Set the INPUT switch to the appropriate input signal.
The CPU of your computer is overloaded, if connection is by the supplied USB
cable.
Exit other unnecessary applications.
Other USB devices are connected to your computer and being used
simultaneously while connected by the supplied USB cable.
Quit operating other USB devices.
Connect the microphone plug properly.
The MIC MUTING switch on the headset is set to “ON.”
Slide the MIC MUTING switch to “OFF.”
The audio recording device of your computer is not set correctly (page 13).
Connect the microphone plug properly.
Move the microphone to the correct position.
The volume level of the microphone is set too low on the computer.
Increase the volume level of the microphone on the computer.
There are electrical wires, fluorescent lights, or mobile phones near the headset
(especially the microphone).
Move away from any possible sources of electromagnetic interference.
Headphone sound leaked to the microphone.
Move the microphone to the correct position.
The volume level of the microphone is set too high on the computer.
Decrease the volume level of the microphone on the computer.
The computer’s microphone input is already muted.
Cancel microphone muting on the computer.
Depending on the computer, the computer output level settings of the center
speaker and subwoofer may be reversed. Before changing the computer output
level, refer to the operating instructions for details on operation of your
computer.
Additional Information
21
GB
Page 22

Precautions
On safety
Do not drop, hit, or otherwise expose the
processor or headset to strong shock of any kind.
This could damage it.
Do not disassemble or attempt to open any parts
of the system.
The earpads and head cushion may deteriorate
due to long-term storage or use.
On placement
Do not place the system in any of the following
locations.
– Location exposed to direct sunlight, near a
heater, or other extremely high temperature
location
– Dusty location
– On an unsteady or inclined surface
– Location exposed to large amounts of
vibration
– Bathroom or other high-humidity locations
On AC adaptor
Be sure to use the supplied AC adaptor. Using
AC adaptors with different plug polarity or other
characteristics can cause product failure.
Unified polarity plug
Be sure to always use the supplied AC adaptor.
Even AC adaptors having the same voltage and
plug polarity can damage this product due to the
current capacity or other factors.
If you are not going to use the system for a long
time, unplug the AC adaptor.
On headphones
Act considerately
When the volume is too high, the sound leaks
outside the headphones. Be careful not to increase
the volume so high that it bothers people around
you.
There is a tendency to increase the volume when
using in noisy places. However, for reasons of
safety, it is advised to keep the volume at a level
whereby you can still hear sounds around you.
On cleaning
Use a soft cloth slightly moistened with mild
detergent solution. Do not use solvents such as
thinner, benzene or alcohol as these may damage
the surface.
If the product breaks
If the product breaks, or if a foreign object gets
inside the unit, immediately turn off the power
and consult your nearest Sony dealer.
When taking the system to a Sony dealer, be sure
to take both the headphones and processor.
22
GB
Additional Information
Page 23

Specifications
Digital surround processor (DP-GA500)
Decoder functions
Dolby Pro Logic IIx
Virtual surround function
OFF
SURROUND
FPS
Compression function
OFF
ON
Frequency response
20 – 20,000 Hz
Distortion rate
1% or less (1 kHz)
Input/Output jacks
USB jack
7.1ch/5.1ch/2ch (SBL/SBR, C/SW, SL/SR,
L/R, MIC OUT) jacks (stereo mini-jacks)
HEADSET (PHONES, MIC IN) jacks (stereo
mini-jack)
Power requirements
DC 5.2 V (from the supplied AC adaptor)
Dimensions
Approx. 190 × 30 × 117 mm (w/h/d)
Mass Approx. 310 g
Operating environment Compliant computer
IBM PC/AT or compatible computers
Apple Macintosh
CPU: Pentium II 266 MHz or better
USB port*
Compliant OS:
Windows 7
Starter/Home Basic/Home Premium/
Professional/Ultimate
Windows Vista
Home Basic/Home Premium/Business/
Ultimate
Windows XP
Home Edition (SP2 or later)/Professional
(SP2 or later)/Media Center Edition 2004
(SP2 or later)/ Media Center Edition 2005
(SP2 or later)
Mac OS X (10.3 or later)
1
Stereo Headset (DR-GA210)
Cord 1.5 m
Plug Gold-plated stereo mini plug
Mass Approx. 240 g (without cord)
Headphones
Type Open air dynamic
Driver unit
40 mm, dome type (CCAW adopted)
Power handling capacity
1,000 mW (IEC*2)
Impedance
40 Ω at 1 kHz
Sensitivity
100 dB/mW
Frequency response
14 - 22,000 Hz
Microphone
Design Boom microphone
Type Electret condenser
Open circuit voltage level
-38 dB (0 dB = 1 V/Pa)
Effective frequency rage
20 - 20,000 Hz
Supplied accessories
AC adaptor (5.2 V) (1)
Multi-channel cable (7.1ch+MIC) (1)
Dedicated USB cable (1)
Card warranty (1)
Operating Instructions (1)
*1 The processor supports USB 2.0 (USB 2.0 Full
Speed).
*2 IEC (International Electronic Committee)
tested.
For the operating environment mentioned above,
the headset is not guaranteed to operate with all
computers.
The headset is not guaranteed to operate with
home-built computers, operating systems that
are personally up-graded, or multiple operating
systems.
The headset is not guaranteed to operate with
functions such as system suspend, sleep and
hibernation.
Design and specifications are subject to change
without notice.
Additional Information
23
GB
Page 24
2
FR
AVERTISSEMENT
Pour éviter tout risque d’incendie ou
d’électrocution, n’exposez pas cet appareil aux
éclaboussures et évitez de placer dessus des
objets remplis de liquide, tels que des vases.
Pour éviter tout risque d’électrocution,
n’ouvrez pas le coffret. Ne confiez les
réparations qu’à un technicien qualifié.
N’installez pas l’appareil dans un espace
restreint, comme une bibliothèque ou un
meuble encastré.
Avis à l’intention des clients : les
informations suivantes concernent
uniquement les appareils vendus dans
les pays appliquant les directives de l’UE
Le fabricant de ce produit est Sony
Corporation, 1-7-1 Konan Minato-ku Tokyo,
108-0075 Japon. Le représentant autorisé
pour les questions de compatibilité
électromagnétique (EMC) et la sécurité des
produits est Sony Deutschland GmbH,
Hedelfinger Strasse 61, 70327 Stuttgart,
Allemagne. Pour toute question relative au
SAV ou à la garantie, merci de bien vouloir
vous référer aux coordonnées contenues dans
les documents relatifs au SAV ou la garantie.
Traitement des appareils
électriques et
électroniques en fin de vie
(Applicable dans les pays
de l’Union Européenne et
aux autres pays européens
disposant de systèmes de
collecte sélective)
Ce symbole, apposé sur le produit ou sur son
emballage, indique que ce produit ne doit pas être
traité avec les déchets ménagers. Il doit être remis à
un point de collecte approprié pour le recyclage des
équipements électriques et électroniques. En
s’assurant que ce produit est bien mis au rebut de
manière appropriée, vous aiderez à prévenir les
conséquences négatives potentielles pour
l’environnement et la santé humaine. Le recyclage
des matériaux aidera à préserver les ressources
naturelles. Pour toute information supplémentaire
au sujet du recyclage de ce produit, vous pouvez
contacter votre municipalité, votre déchetterie ou le
magasin où vous avez acheté le produit.
Comme la fiche de l’adaptateur secteur est
utilisée pour le débrancher de l’alimentation,
branchez-la à une prise secteur facilement
accessible.
Si vous remarquez une anomalie au niveau de
la fiche, débranchez-la immédiatement de la
prise secteur.
La marque CE est valable uniquement dans
les pays où elle a force de loi, c’est-à-dire
principalement dans les pays de l’EEE
(Espace Economique Européen).
Page 25

Le processeur ambiophonique numérique de ce
système intègre le décodeur Dolby Pro Logic II.
Fabriqué sous licence de Dolby Laboratories.
Les termes « Dolby », « Pro Logic » et le sigle
double D sont des marques commerciales de
Dolby Laboratories.
« Virtualphones Technology » et « VPT » sont
des marques déposées de Sony Corporation.
Microsoft et Windows sont des marques
déposées ou des marques commerciales de
Microsoft Corporation aux Etats-Unis et/ou dans
d’autres pays.
Macintosh et Mac OS sont des marques déposées
d’Apple Inc. aux Etats-Unis et dans d’autres pays.
IBM et PC/AT sont des marques commerciales et
des marques déposées d’International Business
Machines Corporation.
Pentium est une marque commerciale ou une
marque déposée d’Intel Corporation.
Dans ce manuel, Windows® XP Home Edition,
Windows® XP Professional et Windows® XP
Media Center Edition sont désignés en tant que
Windows XP.
Dans ce manuel, Windows Vista fait référence à
Windows Vista®.
Dans ce manuel, Windows 7 fait référence à
Windows® 7 Edition.
Dans ce manuel, Macintosh fait référence à
Macintosh®.
Tous les autres noms de systèmes et de produits
sont des marques commerciales ou des marques
déposées de leurs propriétaires respectifs. Les
symboles ™ et ® ne sont pas repris dans ce
manuel.
Les termes de l’écran de l’ordinateur repris dans
ce manuel peuvent être différents des termes
réels.
Table des matières
Caractéristiques ................................4
Inventaire des composants et des
accessoires .....................................5
Position et fonctions des pièces ......6
Description des pièces du processeur
ambiophonique numérique ...................6
Description des pièces du casque ..............7
Raccordement du système de
casque d’écoute .............................8
Etape 1- : Raccordement d’un
périphérique audio 7.1 canaux ..............
Etape 1- : Raccordement d’un
périphérique audio 5.1 canaux ..............
Etape 1- : Raccordement d’un
périphérique audio 2 canaux ..............
Etape 1- : Raccordement à
l’ordinateur à l’aide du câble USB .......11
Etape 2 : Raccordement de l’adaptateur
secteur ....................................................12
Etape 3 : Préparation du casque .............12
Etape 4 : Vérification des paramètres
de l’ordinateur .......................................13
Ecoute du son ................................. 16
Guide de dépannage ..................... 20
Précautions .................................... 22
10
8
9
FR
Spécifications ................................. 23
3
FR
Page 26
Caractéristiques
La technologie
VPT (Virtualphones Technology)*1 7.1 canaux reproduit un son
ambiophonique tridimensionnel de précision via des enceintes multicanaux.
Idéal pour les jeux de tir qui exigent généralement une reproduction précise du son
directionnel en « mode FPS*
Décodeur Dolby Pro Logic IIx intégré pour un son ambiophonique étendu 7.1 canaux
2
».
provenant d’une source d’entrée 5.1ch/2ch/USB.
La fonction COMPRESSION atténue les sons très puissants tout en accentuant les sons plus
doux (bruits de pas, etc.).
Transducteur de 40 mm pour une excellente qualité audio dans les jeux.
Modèle à trois coussins de type ouvert pour un port confortable en cas d’utilisation
prolongée.
Structure légère pour un port confortable, idéal pour les jeux PC.
*1 La technologie « Virtualphones Technology (VPT) » supérieure crée ce son ambiophonique réaliste que
l’on peut entendre dans les salles de cinéma, grâce à la technologie d’analyse audio et de traitement des
signaux numériques Sony.
*2 FPS = First Person Shooting
Le processeur est optimisé pour le casque fourni. Bien que n’importe quel casque convienne, utilisez le
casque fourni pour obtenir des effets surround optimaux.
vers les sorties audio et les
prises d’entrée pour micro
Casque
Face arrière du processeur
vers les prises
7.1ch/5.1ch/2ch
Câble multicanaux
(fourni)
FR
4
Ordinateur
vers les prises
HEADSET
Page 27

Préparation
Inventaire des composants et des accessoires
Avant d’installer le système, vérifiez que tous les composants sont présents.
Processeur DP-GA500 (1)
Adaptateur secteur (1)
Casque DR-GA210 (1)
Câble USB dédié (1)
Câble multicanaux (7.1 canaux + MIC) (1)
Préparation
FR
5
Page 28
6
FR
Préparation
Position et fonctions des pièces
Description des pièces du processeur ambiophonique
numérique
Face avant du processeur
Face arrière du processeur
Témoin d’alimentation
(Voir page 16)
Commutateur
(Voir page 16)
Commutateur INPUT (USB/2ch/5.1ch/
7.1ch)
Commutateur EFFECT (OFF/
SURROUND/FPS)
(Voir page 17)
Commutateur COMPRESSION (OFF/
ON)
(Voir page 18)
* Le processeur possède un point tactile pour vous permettre de la reconnaître aisément.
/ (activité/veille)
Port USB
(Voir page 11)
Commutateur AUTO STANDBY (OFF/
ON)
(Voir page 19)
Prises 7.1ch/5.1ch/2ch (SBL/SBR,
C/SW, SL/SR, L/R, MIC OUT*)
Prises HEADSET (MIC IN
(Voir page 12)
GAIN CONTROL
(Voir page 19)
Prise DC IN 5,2V
(Voir page 12)
*
*, PHONES)
Page 29

Description des pièces du casque
Serre-tête
Oreillette
Tampons de soutien
Micro
Commande VOL (volume)
(Voir page 16)
* Le casque possède un point tactile pour vous permettre de le reconnaître aisément.
*
Commutateur MIC MUTING
(Voir page 16)
(casque) (Noire)
Fiche
(micro) (Rouge)
Fiche
Préparation
FR
7
Page 30

8
FR
Raccordement
Raccordement
Raccordement du système de casque d’écoute
Etape 1- : Raccordement d’un périphérique audio
7.1 canaux
1 Raccordez le processeur au
périphérique audio de la manière
illustrée ci-dessous.
Prises de raccordement du
périphérique audio*
MIC IN
A raccorder à la prise MIC IN
L/R OUT
A raccorder à la prise L/R OUT
L/R OUT ambiophonique
A raccorder à la prise SL/SR OUT
OUT enceinte centrale/caisson de graves
A raccorder à la prise C/SW OUT
L/R OUT ambiophonique arrière
A raccorder à la prise SBL/SBR OUT
* Le nom des prises varie selon le périphérique
audio.
Face arrière du processeur
2 Faites glisser le commutateur INPUT sur la position « 7.1ch ».
Face avant du
processeur
Noms des
fiches de
câbles
SBL / SBR
MIC
L / R
SL / SR
C / SW
Câble multicanaux
(fourni)
3 Sélectionnez le mode d’enceintes 7.1 canaux sur l’ordinateur.
Pour plus de détails sur le fonctionnement de votre ordinateur/périphérique audio, reportezvous au mode d’emploi qui l’accompagne.
Lors du raccordement du processeur à l’ordinateur, ne branchez pas le câble USB en même
temps que le câble multicanaux. Le réglage du son de l’ordinateur pourrait basculer vers un
périphérique non désiré.
Page 31

Etape 1- : Raccordement d’un périphérique audio
5.1 canaux
Raccordez les prises 5.1ch au processeur à l’aide du câble multicanaux fourni. La fonction
EFFECT reproduit un son ambiophonique étendu 7.1 canaux à partir d’une source d’entrée
5.1 canaux.
1 Raccordez le processeur au
périphérique audio de la manière
illustrée ci-dessous.
Prises de raccordement du
périphérique audio*
MIC IN
A raccorder à la prise MIC IN
L/R OUT
A raccorder à la prise L/R OUT
L/R OUT ambiophonique
A raccorder à la prise SL/SR OUT
OUT enceinte centrale/caisson de graves
A raccorder à la prise C/SW OUT
Non raccordée
* Le nom des prises varie selon le périphérique
audio.
Face arrière du processeur
2 Faites glisser le commutateur INPUT sur la position « 5.1ch ».
Face avant du
processeur
Noms des
fiches de
câbles
SBL / SBR
MIC
L / R
SL / SR
C / SW
Câble multicanaux
(fourni)
3 Sélectionnez le mode d’enceintes 5.1 canaux sur l’ordinateur.
Pour plus de détails sur le fonctionnement de votre ordinateur/périphérique audio, reportezvous au mode d’emploi qui l’accompagne.
Lors du raccordement du processeur à l’ordinateur, ne branchez pas le câble USB en même
temps que le câble multicanaux. Le réglage du son de l’ordinateur pourrait basculer vers un
périphérique non désiré.
Raccordement
FR
9
Page 32

10
FR
Raccordement
Etape 1- : Raccordement d’un périphérique audio
2 canaux
Raccordez les prises 2ch au processeur à l’aide du câble multicanaux fourni. La fonction
EFFECT reproduit un son ambiophonique étendu 7.1 canaux à partir d’une source d’entrée
2 canaux.
1 Raccordez le processeur au
périphérique audio de la manière
illustrée ci-dessous.
Prises de raccordement du
périphérique audio*
MIC IN
A raccorder à la prise MIC IN
L/R OUT
A raccorder à la prise L/R OUT
Non raccordée
Non raccordée
Non raccordée
* Le nom des prises varie selon le périphérique
audio.
Face arrière du processeur
Noms des
fiches de
câbles
SL / SR
C / SW
SBL / SBR
MIC
L / R
Câble multicanaux
(fourni)
2 Faites glisser le commutateur INPUT sur la position « 2ch ».
Face avant du
processeur
3 Sélectionnez le mode d’enceintes 2 canaux sur l’ordinateur.
Pour plus de détails sur le fonctionnement de votre ordinateur/périphérique audio, reportezvous au mode d’emploi qui l’accompagne.
Lors du raccordement du processeur à l’ordinateur, ne branchez pas le câble USB en même
temps que le câble multicanaux. Le réglage du son de l’ordinateur pourrait basculer vers un
périphérique non désiré.
Page 33

Etape 1- : Raccordement à l’ordinateur à l’aide du
câble USB
Raccordez le port USB de l’ordinateur au port USB du processeur à l’aide du câble USB
fourni.
Même si le processeur fonctionne comme un périphérique audio 2 canaux externe, la fonction
EFFECT reproduit un son ambiophonique étendu 7.1 canaux à partir d’une source 2 canaux.
1 Raccordez le processeur à l’ordinateur.
vers le port USB
vers le port
USB
Les pilotes USB sont compris dans les systèmes d’exploitation tels que Windows XP, Windows
Vista, Windows 7 et Mac OS X. Les pilotes USB seront automatiquement installés lors de la
première mise en route du processeur après le raccordement et le démarrage de l’ordinateur.
Lors du raccordement à des ports USB différents, il est possible que l’ordinateur installe à
nouveau les pilotes USB.
Remarques
Nous ne pouvons pas garantir le fonctionnement de ce casque avec un concentrateur USB ou une
rallonge USB. Utilisez exclusivement le câble USB fourni.
Lorsque vous raccordez le casque à l’ordinateur, il se peut que le volume de ce dernier soit réglé au
maximum. Réduisez d’abord le volume de l’ordinateur.
Lors du raccordement à l’aide du câble USB, il se peut que le son des programmes numériques ne soit pas
reproduit par le port USB de l’ordinateur. Pour l’entendre, raccordez le casque à l’aide du câble
multicanaux (pages 8 à 10).
2 Faites glisser le commutateur INPUT sur la position « USB ».
Face avant du
processeur
Câble USB dédié
(fourni)
Ordinateur
3 Vérifiez les paramètres audio de l’ordinateur.
Pour plus de détails sur le fonctionnement de votre ordinateur, reportez-vous au mode
d’emploi qui l’accompagne.
Lors du raccordement du processeur à l’ordinateur, ne branchez pas le câble USB en même
temps que le câble multicanaux. Le réglage du son de l’ordinateur pourrait basculer vers un
périphérique non désiré.
Raccordement
11
FR
Page 34

12
FR
Raccordement
Etape 2 : Raccordement de l’adaptateur secteur
Raccordez l’adaptateur secteur fourni au processeur, puis branchez l’adaptateur secteur sur la
prise secteur.
Face arrière du processeur
Vers la prise DC IN 5,2V
Vers la prise secteur
Adaptateur secteur (fourni)
Etape 3 : Préparation du casque
1 Raccordez la fiche (micro) du casque à la prise HEADSET (MIC IN) du processeur,
puis raccordez la fiche (casque) à la prise HEADSET (PHONES).
Face arrière du processeur
Casque
Noir
Rouge
2 Réglez le serre-tête du casque, puis posez l’écouteur marqué sur l’oreille droite
et l’écouteur marqué sur l’oreille gauche.
La partie suspendue
possède un point tactile
marqué afin de
distinguer le côté gauche.
Réglez la position du micro afin qu’il
capte efficacement votre voix.
Lorsque vous n’utilisez pas le micro,
remettez-le en position de repos, à
côté de l’écouteur.
Remarque
Si la position du micro est incorrecte, sa sensibilité diminue et le son provenant du casque risque d’être
capté par le micro.
Page 35

Etape 4 : Vérification des paramètres de l’ordinateur
Pour vérifier les paramètres du périphérique audio sur l’ordinateur
Avant d’utiliser le processeur, vérifiez les paramètres du périphérique audio en vous conformant
aux instructions ci-dessous selon votre système d’exploitation. Pour plus de détails sur le
fonctionnement de votre ordinateur/périphérique audio, reportez-vous au mode d’emploi qui
l’accompagne.
Pour Windows
Windows XP en mode Affichage des catégories
Cliquez sur le menu [démarrer], sélectionnez [Panneau de configuration], [Sons, voix et
périphériques audio], [Sons et périphériques audio], onglet [Audio], puis sélectionnez le
périphérique audio ordinaire (ou [USB PnP Sound Device] en cas de raccordement à l’aide du
câble USB fourni) comme [Unité par défaut] dans le menu Lecture audio ou Enregistrement
audio.
Windows Vista
Cliquez sur le menu [Démarrer], sélectionnez [Panneau de configuration], [Matériel et audio],
[Son], onglet [Lecture] ou [Enregistrement], sélectionnez le périphérique audio ordinaire (ou
[USB PnP Sound Device] en cas de raccordement à l’aide du câble USB fourni) comme
périphérique de lecture ou d’enregistrement, puis cliquez sur [Par défaut].
Windows 7
Cliquez sur le menu [Démarrer], sélectionnez [Panneau de configuration], [Matériel et audio],
[Son], onglet [Lecture] ou [Enregistrement], sélectionnez le périphérique audio ordinaire (ou
[USB PnP Sound Device] en cas de raccordement à l’aide du câble USB fourni) comme
périphérique de lecture ou d’enregistrement, puis cliquez sur [Par défaut].
Pour Macintosh
Mac OS X
Cliquez sur le menu [Pomme], sélectionnez [Préférences Système], [Son], onglet [Sortie] ou
[Entrée], puis sélectionnez le périphérique audio ordinaire (ou [USB PnP Sound Device] en cas
de raccordement à l’aide du câble USB fourni) pour l’option [Sélectionnez un périphérique de
sortie audio] ou [Sélectionnez un périphérique d’entrée audio].
Raccordement
(Suite)
13
FR
Page 36

14
FR
Raccordement
Pour régler le volume du son
Lorsque vous raccordez l’ordinateur au processeur à l’aide du câble USB, réglez le niveau du
volume au moyen de la commande VOL du casque.
Lorsque vous effectuez le raccordement à l’aide du câble multicanaux, vous pouvez régler le
niveau du volume non seulement au moyen de la commande VOL du casque, mais aussi en
réglant le niveau du volume de l’ordinateur de la manière décrite ci-dessous.
Pour Windows
Windows XP en mode Affichage des catégories
Cliquez sur le menu [démarrer] et sélectionnez [Panneau de configuration], [Sons, voix et
périphériques audio], [Sons et périphériques audio], puis cliquez sur [Volume] dans la section
Lecture audio et réglez le niveau de volume principal.
Windows Vista
Cliquez sur le menu [Démarrer] et sélectionnez [Panneau de configuration], [Matériel et
audio], [Ajuster le volume du système], puis réglez le niveau de volume principal.
Windows 7
Cliquez sur le menu [Démarrer] et sélectionnez [Panneau de configuration], [Matériel et
audio], [Ajuster le volume du système], puis réglez le niveau de volume principal.
Pour Macintosh
Mac OS X
Cliquez sur le menu [Pomme] et sélectionnez [Préférences Système], [Son], onglet [Sortie],
puis réglez le niveau de sortie des enceintes.
Remarques
Selon le logiciel, il peut être nécessaire de définir certains paramètres. Pour plus de détails, reportez-vous
au mode d’emploi de votre logiciel.
Le volume du casque et le niveau de sortie audio de l’ordinateur ne sont pas synchronisés.
Pour définir les paramètres de lecture d’un CD audio
Ce réglage est nécessaire en cas de lecture d’un CD audio inséré dans le lecteur de CD-ROM, si
vous avez effectué le raccordement à l’aide du câble USB fourni.
Conformez-vous aux instructions ci-dessous selon votre système d’exploitation et activez la case
à cocher [Activer la lecture numérique de CD audio sur ce lecteur de CD-ROM.]. Sous
Windows Vista, Windows 7 et Macintosh, il n’est pas nécessaire de définir les paramètres de la
lecture de CD audio.
Pour Windows XP en mode Affichage des catégories
Cliquez sur le menu [démarrer] et sélectionnez [Panneau de configuration], [Sons, voix et
périphériques audio], [Sons et périphériques audio], puis l’onglet [Matériel]. Sélectionnez le
lecteur de CD-ROM à utiliser pour la lecture de musique, puis cliquez sur [Propriétés] et sur
l’onglet [Propriétés]. Activez la case à cocher [Activer la lecture numérique de CD audio sur ce
lecteur de
CD-ROM
.].
Page 37

Pour régler le volume du micro
Avant d’utiliser le processeur, vérifiez et réglez le niveau de volume du micro à l’aide de
l’ordinateur. Conformez-vous aux instructions ci-dessous selon votre système d’exploitation et
vérifiez/réglez le volume.
Pour plus de détails sur le fonctionnement de votre ordinateur, reportez-vous au mode d’emploi
qui l’accompagne.
Pour Windows
Avant de régler le volume du micro, vérifiez son niveau d’entrée en réalisant un enregistrement
test à l’aide d’un enregistreur audio, etc.
Windows XP en mode Affichage des catégories
Cliquez sur le menu [démarrer] et sélectionnez [Panneau de configuration], [Sons, voix et
périphériques audio], [Sons et périphériques audio], puis l’onglet [Audio]. Vérifiez que le
périphérique audio ordinaire (ou [USB PnP Sound Device] en cas de raccordement à l’aide du
câble USB fourni) est sélectionné comme [Unité par défaut] dans la section Enregistrement
audio, puis cliquez sur [Volume] dans la section Enregistrement audio et réglez le niveau
d’entrée du micro.
Windows Vista
Cliquez sur le menu [Démarrer], sélectionnez [Panneau de configuration], [Matériel et audio],
[Son], onglet [Enregistrement], sélectionnez le périphérique audio ordinaire (ou [USB PnP
Sound Device] en cas de raccordement à l’aide du câble USB fourni) comme périphérique
d’enregistrement, puis cliquez sur [Par défaut]. Sélectionnez à nouveau le périphérique audio
ordinaire (ou [USB PnP Sound Device] en cas de raccordement à l’aide du câble USB fourni),
cliquez sur [Propriétés], sélectionnez l’onglet [Niveaux] et réglez le niveau d’entrée du micro.
Windows 7
Cliquez sur le menu [Démarrer], sélectionnez [Panneau de configuration], [Matériel et audio],
[Son], onglet [Enregistrement], sélectionnez le périphérique audio ordinaire (ou [USB PnP
Sound Device] en cas de raccordement à l’aide du câble USB fourni) comme périphérique
d’enregistrement, puis cliquez sur [Par défaut]. Sélectionnez à nouveau le périphérique audio
ordinaire (ou [USB PnP Sound Device] en cas de raccordement à l’aide du câble USB fourni),
cliquez sur [Propriétés], sélectionnez l’onglet [Niveaux] et réglez le niveau d’entrée du micro.
Pour Macintosh
Mac OS X
Cliquez sur le menu [Pomme] et sélectionnez [Préférences Système], [Son], onglet [Entrée],
puis réglez le niveau d’entrée du micro.
Remarques
Le micro ne prend pas en charge la coupure du son du périphérique d’enregistrement audio de votre
ordinateur. Faites glisser le commutateur MIC MUTING du casque sur « ON » pour désactiver le micro.
Selon le logiciel, il peut être nécessaire de définir certains paramètres. Pour plus de détails, reportez-vous
au mode d’emploi de votre logiciel.
Raccordement
15
FR
Page 38

16
FR
Fonctionnement
Fonctionnement
Ecoute du son
1 Mettez sous tension l’ordinateur raccordé.
2 Appuyez sur le commutateur
tension.
Le témoin d’alimentation du processeur s’allume en blanc.
Si vous connectez le port USB de l’ordinateur au port USB du processeur à l’aide du câble
USB fourni, les pilotes USB sont automatiquement installés la première fois que vous
mettez le processeur sous tension après avoir connecté et démarré l’ordinateur.
3 Mettez le casque.
(Voir page 12)
4 Lancez la lecture depuis l’ordinateur.
Pour régler le volume
Réglez le niveau de volume du casque et sélectionnez le mode de désactivation du micro.
VOL (volume)
Réglez le niveau de volume
du casque.
/ (activité/veille) pour mettre le processeur sous
MIC MUTING
ON : Le micro est réglé en
mode MIC MUTING ON.
OFF : Le micro est réglé en
mode MIC MUTING OFF.
Remarques
Lorsque vous regardez des films, veillez à ne pas trop augmenter le volume pendant les scènes calmes.
Lors de la scène bruyante suivante, le son pourrait endommager votre ouïe.
Le volume du casque et le niveau de sortie audio de l’ordinateur ne sont pas synchronisés. Notez
également que le mode de désactivation du micro n’est pas synchronisé.
Il se peut que le casque ne reproduise pas la musique ou le son si vous le raccordez au processeur à l’aide
du câble USB et faites glisser le commutateur INPUT sur la position « USB » lors de l’utilisation d’un
logiciel de musique. Dans ce cas, redémarrez le logiciel de musique.
Page 39

Pour sélectionner votre champ acoustique préféré (fonction EFFECT)
Le commutateur EFFECT permet de sélectionner votre champ acoustique préféré.
Lors d’un raccordement 5.1 canaux, 2 canaux ou USB avec « FPS » ou « SURROUND »
sélectionné, le décodeur Dolby Pro Logic IIx intégré donne une impression de réalisme
similaire à celle du son 7.1 canaux. Cependant, si la position du commutateur INPUT ne
correspond pas au raccordement, la fonction EFFECT ne produit pas les effets escomptés.
Face avant du processeur
Position du commutateur Champ acoustique et source audio appropriée
FPS (First Person Shooting) Ce paramètre offre une localisation nette des sons par rapport à l’image.
Il s’agit du paramètre FPS recommandé lorsque la source du son doit être perçue
avec précision. Le son est agréable, naturel, clair et réaliste. Il se caractérise par une
localisation très nette de tous les canaux.
SURROUND Ce paramètre offre une reproduction transparente de tous les canaux.
Le son général est perçu de manière plus globale qu’avec le mode FPS et le champ
acoustique obtenu s’avère optimal pour la plupart des jeux ambiophoniques
multicanaux. Egalement recommandé pour le visionnage de films.
OFF Reproduction d’un son 2 canaux.
Le son d’une source multicanaux (7.1 canaux/5.1 canaux) est remixé en son
2 canaux.
Remarque
La fonction EFFECT n’est pas disponible pour les sources audio mono.
A propos des propriétés du son lors de l’utilisation de la fonction EFFECT
Il peut être impossible d’appliquer la fonction EFFECT aux sources audio ne comprenant pas d’élément
vidéo, telles que les CD audio.
La technologie VPT (Virtualphones Technology) simule le niveau moyen de HRTF (head-related
transfer function)* de l’être humain. Chaque individu perçoit l’effet différemment.
* HRTF = Head-Related Transfer Function. Mesure mathématique montrant les variations du son entre la
source et les oreilles.
(Suite)
Fonctionnement
17
FR
Page 40

18
FR
Fonctionnement
Pour reproduire un son agréable (fonction COMPRESSION)
Faites glisser le commutateur COMPRESSION sur la position ON/OFF.
Cette fonction maintient le niveau général de la programmation : les sons très puissants sont atténués tandis
que les sons plus doux (bruits de pas, etc.) sont accentués. Cela est très efficace pour limiter le son d’une
source audio possédant une plage dynamique élevée.
Face avant du processeur
Remarque
Soyez attentif lors du réglage du volume si la fonction COMPRESSION est activée.
Lorsque la fonction COMPRESSION est activée, le son peut paraître trop fort par rapport au signal audio
de l’ordinateur. Dans ce cas, augmentez graduellement le volume de l’ordinateur et déterminez le niveau
auquel le son général est cohérent. A l’inverse, le son peut paraître trop faible. Dans ce cas, réduisez
graduellement le volume de l’ordinateur et déterminez le niveau auquel le son général est le plus cohérent.
Illustration du processus de compression
son très puissant
plage dynamique
dialogue
bruit de pas, bruit de fond
signal d’entrée
compression
signal de sortie
son très puissant
dialogue
bruit de pas, bruit de fond
standard
Compression de la plage dynamique au
moyen d’un processeur DSP (Digital
Signal Processor) intégré
Désagréable
plage dynamique
Facile à
entendre
Difficile à
entendre
Page 41

Pour régler le volume depuis le périphérique audio
OFF
AUTO STANDBY
ON
(GAIN CONTROL)
GAIN CONTROL permet de régler le volume en fonction de la sortie nominale du
périphérique audio (réglage initial : « 8 »). Augmentez GAIN CONTROL au-delà de « 8 » si la
sortie est faible alors que le volume du périphérique audio est réglé au maximum. Si le son est
déformé, réduisez le volume de sortie sur le périphérique audio.
Face arrière du processeur
Tourner vers la
gauche pour
réduire le niveau
Puissance nominale du
périphérique audio
Plus de 2Vrms Réglez le niveau de GAIN CONTROL sur « 8 », puis réduisez le volume du son du
2Vrms Ce processeur est étalonné pour la sortie 2Vrms standard sur le périphérique
Moins de 2Vrms « 8 » - « 10 », le niveau de GAIN CONTROL permet d’augmenter le volume.
Niveau de GAIN CONTROL
périphérique de sortie audio.
audio avec GAIN CONTROL réglé sur « 8 ».
Tourner vers la
droite pour
augmenter le niveau
Pour configurer le système afin qu’il passe automatiquement en
mode veille (fonction AUTO STANDBY)
Le processeur passe automatiquement en mode veille s’il ne capte aucun son pendant environ
30 minutes.
Vous pouvez régler la fonction AUTO STANDBY sur ON/OFF à l’aide du commutateur AUTO
STANDBY.
Face arrière du processeur
Position du commutateur Effet
ON La fonction AUTO STANDBY est activée. Remettez le système sous tension en
appuyant sur le commutateur / (activité/veille).
OFF La fonction AUTO STANDBY est désactivée.
Fonctionnement
19
FR
Page 42

20
FR
Informations complémentaires
Informations complémentaires
Guide de dépannage
Si vous rencontrez un problème pendant l’utilisation de ce système, vérifiez la liste ci-dessous.
Si le problème persiste, consultez votre revendeur Sony le plus proche.
Symptôme Cause et solution
Aucun son
Son déformé ou
intermittent (parfois
accompagné de parasites)
Son faible
Vérifiez le branchement entre le processeur et l’ordinateur.
Mettez sous tension l’ordinateur raccordé au processeur et démarrez la lecture.
Mettez le processeur sous tension.
Le réglage INPUT ne correspond pas au mode de raccordement réel.
(Exemple : signal d’entrée USB alors que INPUT est réglé sur 7.1ch, etc.)
Réglez le commutateur INPUT sur le signal d’entrée correct.
Augmentez le volume du casque.
Raccordez correctement la fiche du casque.
Augmentez le volume de l’ordinateur et du logiciel de lecture audio.
Le système est raccordé alors qu’un logiciel de musique est utilisé.
Redémarrez le logiciel de musique.
Le périphérique audio n’est pas correctement configuré sur votre ordinateur
(page 13).
Le volume de votre ordinateur, du logiciel de musique, etc. est désactivé.
Réactivez le son.
Le niveau de GAIN CONTROL est « 0 ».
Augmentez le niveau de GAIN CONTROL.
Votre ordinateur ne reconnaît pas le casque comme un périphérique USB en
cas de raccordement à l’aide du câble USB fourni.
Redémarrez l’ordinateur.
Le lecteur de CD-ROM de votre ordinateur ne prend pas en charge la fonction
de lecture numérique en cas de raccordement à l’aide du câble USB fourni.
Utilisez un lecteur de CD-ROM prenant en charge la lecture numérique.
En cas de raccordement USB, il se peut que le son des programmes numériques
ne soit pas reproduit.
Raccordez l’ordinateur à l’aide du câble multicanaux (pages 8 à 10).
Le mode AUTO STANDBY s’est activé, car aucun son n’a été capté pendant
environ 30 minutes.
Remettez le processeur sous tension.
Réduisez le volume sur l’ordinateur raccordé.
Augmentez le volume sur l’ordinateur raccordé et dans le logiciel de lecture
audio.
Augmentez le volume du casque.
Augmentez le niveau de GAIN CONTROL.
Page 43

Symptôme Cause et solution
Bruit de fond important
L’effet de son
ambiophonique n’est pas
disponible
Le son est irrégulier
Le micro ne capte aucun
son
Le son capté par le micro est
faible
Le son enregistré par le
micro s’accompagne de
parasites
Le son du micro est
déformé
Le commutateur MIC
MUTING ne fonctionne
pas
Les réglages du niveau de
sortie de l’enceinte centrale
et du caisson de graves
peuvent être inversés sur
l’ordinateur.
Si vous raccordez le processeur à l’ordinateur à l’aide du câble multicanaux,
augmentez le volume sur le périphérique audio raccordé.
Séparez le processeur de l’ordinateur.
Le réglage INPUT ne correspond pas au mode de raccordement réel.
(Exemple : signal d’entrée 2 canaux alors que INPUT est réglé sur 7.1ch, etc.)
Réglez le commutateur INPUT sur le signal d’entrée correct.
Réglez le commutateur EFFECT sur « FPS » ou « SURROUND » (page 17).
L’effet ambiophonique n’est pas disponible pour les sources audio mono.
Le réglage INPUT ne correspond pas au mode de raccordement réel.
(Exemple : signal d’entrée 2 canaux alors que INPUT est réglé sur 7.1ch, etc.)
Réglez le commutateur INPUT sur le signal d’entrée correct.
En cas de raccordement à l’aide du câble USB fourni, il se peut que l’UC de
votre ordinateur soit surchargée.
Quittez les autres applications inutiles.
En cas de raccordement à l’aide du câble USB fourni, il se peut que d’autres
périphériques USB soient raccordés à l’ordinateur et soient utilisés
simultanément.
Cessez d’utiliser les autres périphériques USB.
Raccordez correctement la fiche du micro.
Le commutateur MIC MUTING du casque est réglé sur « ON ».
Faites glisser le commutateur MIC MUTING sur la position « OFF ».
Le périphérique d’enregistrement audio n’est pas correctement configuré sur
votre ordinateur (page 13).
Raccordez correctement la fiche du micro.
Positionnez correctement le micro.
Le niveau de volume du micro défini sur l’ordinateur est trop faible.
Augmentez le volume du micro sur l’ordinateur.
Des câbles électriques, un éclairage fluorescent ou des téléphones mobiles se
trouvent à proximité du casque (et en particulier du micro).
Eloignes toute source potentielle d’interférences électromagnétiques.
Le son du casque est audible dans le micro.
Positionnez correctement le micro.
Le niveau de volume du micro défini sur l’ordinateur est trop élevé.
Réduisez le volume du micro sur l’ordinateur.
Le son de l’entrée micro de l’ordinateur est déjà désactivé.
Réactivez le son du micro sur l’ordinateur.
Selon l’ordinateur, il est possible que les réglages du niveau de sortie de
l’enceinte centrale et du caisson de graves soient inversés sur l’ordinateur. Avant
de modifier le niveau de sortie sur l’ordinateur, reportez-vous au mode d’emploi
pour plus d’informations sur l’utilisation de votre ordinateur.
Informations complémentaires
21
FR
Page 44

22
FR
Informations complémentaires
Précautions
Sécurité
Ne faites pas tomber le processeur ou le casque,
ne les heurtez pas et ne leur faites pas subir de
chocs violents. Vous risqueriez de les
endommager.
Ne démontez pas le système et n’essayez pas d’en
ouvrir quelque partie que ce soit.
L’oreillette et le coussin de tête peuvent se
détériorer suite à une utilisation ou un stockage
prolongés.
Mise en place
N’entreposez pas le système dans un
emplacement :
– exposé à la lumière directe du soleil, à
proximité d’un chauffage ou dans tout autre
endroit dont la température est très élevée ;
– poussiéreux ;
– instable ou sur une surface inclinée ;
– sujet à d’importantes vibrations ;
– très humide, par exemple une salle de bain.
Adaptateur secteur
Veillez à utiliser l’adaptateur secteur fourni.
L’utilisation d’adaptateurs secteur dont la polarité
de fiche ou d’autres caractéristiques diffèrent de
celles de cet adaptateur peut entraîner une panne
de l’appareil.
Casque
Respectez votre entourage
Lorsque le volume est trop élevé, le son est audible
même pour ceux qui ne portent pas le casque. Ne
montez pas trop le volume afin de ne pas déranger
les gens qui se trouvent autour de vous.
Dans des endroits bruyants, la première réaction
est généralement d’augmenter le volume.
Cependant, par souci de sécurité, il est conseillé de
le maintenir à un niveau vous permettant
d’entendre les sons alentours.
Nettoyage
Utilisez un chiffon doux légèrement imbibé d’une
solution détergente douce. N’utilisez pas de
solvants tels que des diluants, de l’essence ou de
l’alcool qui pourraient endommager la surface de
l’appareil.
Si l’appareil se brise
Si l’appareil se brise ou si un corps étranger
pénètre à l’intérieur, mettez immédiatement
l’appareil hors tension et consultez votre
revendeur Sony le plus proche.
Lorsque vous apportez le système chez votre
revendeur Sony, apportez le casque et le
processeur.
Fiche à polarité unifiée
Veillez à toujours utiliser l’adaptateur secteur
fourni. Même les adaptateurs secteur dont la
tension et la polarité de fiche sont les mêmes que
celles de cet adaptateur risquent d’endommager
l’appareil à cause de leur capacité électrique ou
d’autres facteurs.
Si vous prévoyez de ne pas utiliser le système
pendant une période prolongée, débranchez
l’adaptateur secteur.
Page 45

Spécifications
Processeur ambiophonique numérique
(DP-GA500)
Fonctions de décodeur
Dolby Pro Logic IIx
Fonction de son virtuel
OFF
Fonction de compression
OFF
Réponse en fréquence
20 – 20 000 Hz
Taux de distorsion
1 % ou moins (1 kHz)
Prises d’entrée/sortie
Prise USB
Prises 7.1ch/5.1ch/2ch (SBL/SBR, C/SW,
Prises HEADSET (PHONES, MIC IN)
Alimentation
5,2 V CC (de l’adaptateur secteur fourni)
Dimensions
Environ 190 × 30 × 117 mm (l/h/p)
Poids Environ 310 g
Ordinateur compatible avec l’environnement
d’exploitation
IBM PC/AT ou ordinateurs compatibles
UC : Pentium II 266 MHz ou supérieur
Port USB*
Systèmes d’exploitation compatibles :
Windows 7
Windows Vista
Windows XP
Mac OS X (10.3 ou ultérieur)
SURROUND
FPS
ON
SL/SR, L/R, MIC OUT) (mini-prises stéréo)
(mini-prise stéréo)
Apple Macintosh
1
Starter/Home Basic/Home Premium/
Professional/Ultimate
Home Basic/Home Premium/Business/
Ultimate
Home Edition (SP2 ou ultérieur)/
Professional (SP2 ou ultérieur)/Media Center
Edition 2004 (SP2 ou ultérieur)/ Media
Center Edition 2005 (SP2 ou ultérieur)
Casque stéréo (DR-GA210)
Cordon 1,5 m
Fiche Mini-fiche stéréo plaquée or
Poids Environ 240 g (sans le cordon)
Casque
Type Dynamique ouvert
Transducteur
40 mm, type à dôme (CCAW adopté)
Puissance admissible
1 000 mW (CEI*
Impédance
40 Ω à 1 kHz
Sensibilité
100 dB/mW
Réponse en fréquence
14 - 22 000 Hz
Micro
Conception
Micro monté sur tige
Type Micro à électret
Niveau de tension du circuit ouvert
-38 dB (0 dB = 1 V/Pa)
Gamme de fréquences efficace
20 - 20 000 Hz
2
)
Accessoires fournis
Adaptateur secteur (5,2 V) (1)
Câble multicanaux (7.1 canaux + MIC) (1)
Câble USB dédié (1)
Carte de garantie (1)
Mode d’emploi (1)
*1 Le processeur prend en charge USB 2.0 (USB 2.0
haut débit).
*2 Testé par la CEI (Commission Electrotechnique
Internationale).
Dans les environnements d’exploitation
mentionnés ci-dessus, le fonctionnement du
casque n’est pas garanti avec tous les ordinateurs.
Le fonctionnement du casque n’est pas garanti avec
des ordinateurs montés par l’utilisateur, des systèmes
d’exploitation mis à jour par l’utilisateur ou des
ordinateurs à plusieurs systèmes d’exploitation.
Nous ne pouvons pas garantir le fonctionnement
de ce casque en ce qui concerne des fonctions
telles que la suspension de l’exécution, le mode
de veille ou le mode de veille prolongée.
La conception et les spécifications sont sujettes à
modification sans préavis.
Informations complémentaires
23
FR
Page 46

Vorsicht
Um Feuergefahr und die Gefahr eines
elektrischen Schlags zu verringern, schützen
Sie das Gerät vor Tropf- oder Spritzwasser
und stellen Sie keine Gefäße mit Flüssigkeiten
darin, wie z. B. Vasen, auf das Gerät.
Um einen elektrischen Schlag zu vermeiden,
öffnen Sie das Gehäuse nicht. Überlassen Sie
Wartungsarbeiten stets nur qualifiziertem
Fachpersonal.
Stellen Sie das Gerät nicht in einem
geschlossenen Bücherregal, einem
Einbauschrank u. ä. auf, wo eine
ausreichende Belüftung nicht gegeben ist.
Hinweis für Kunden: Die folgenden
Informationen gelten nur für Geräte, die
in Ländern verkauft werden, in denen
EU-Richtlinien gelten
Der Hersteller dieses Produktes ist Sony
Corporation, 1-7-1 Konan Minato-ku Tokio,
108-0075 Japan. Bevollmächtigter für EMV
und Produktsicherheit ist Sony Deutschland
GmbH, Hedelfinger Strasse 61, 70327
Stuttgart, Deutschland. Für Kundendienstoder Garantieangelegenheiten wenden Sie
sich bitte an die in Kundendienst- oder
Garantiedokumenten genannten Adressen.
Die Gültigkeit des CE-Zeichens beschränkt
sich ausschließlich auf die Länder, in denen
es gesetzlich erforderlich ist, vor allem im
europäischen Wirtschaftsraum.
Entsorgung von
gebrauchten elektrischen
und elektronischen
Geräten (anzuwenden in
den Ländern der
Europäischen Union und
anderen europäischen
Ländern mit einem
separaten Sammelsystem
für diese Geräte)
Das Symbol auf dem Produkt oder seiner
Verpackung weist darauf hin, dass dieses Produkt
nicht als normaler Haushaltsabfall zu behandeln
ist, sondern an einer Annahmestelle für das
Recycling von elektrischen und elektronischen
Geräten abgegeben werden muss. Durch Ihren
Beitrag zum korrekten Entsorgen dieses Produkts
schützen Sie die Umwelt und die Gesundheit Ihrer
Mitmenschen. Umwelt und Gesundheit werden
durch falsches Entsorgen gefährdet.
Materialrecycling hilft, den Verbrauch von
Rohstoffen zu verringern. Weitere Informationen
zum Recycling dieses Produkts erhalten Sie bei
Ihrer Gemeindeverwaltung, den kommunalen
Entsorgungsbetrieben oder dem Geschäft, in dem
Sie das Produkt gekauft haben.
Da der Netzstecker des Netzteils zur
Trennung des Netzteils von der
Netzsteckdose verwendet wird, schließen Sie
ihn an eine leicht zugängliche Netzsteckdose
an.
Sollten an dem Netzteil irgendwelche
Störungen auftreten, trennen Sie es sofort
von der Netzsteckdose.
DE
2
Page 47

Der digitale Raumklangprozessor dieses Systems
enthält einen Dolby Pro Logic II-Decoder.
Hergestellt in Lizenz der Dolby Laboratories.
„Dolby“, „Pro Logic“ und das Doppel-D-Symbol
sind Markenzeichen der Dolby Laboratories.
„Virtualphones Technology“ und „VPT“ sind
eingetragene Markenzeichen der Sony
Corporation.
Microsoft und Windows sind Markenzeichen
oder eingetragene Markenzeichen der Microsoft
Corporation in den USA und/oder anderen
Ländern.
Macintosh und Mac OS sind eingetragene
Markenzeichen der Apple Inc. in den USA und
anderen Ländern.
IBM und PC/AT sind Markenzeichen und
eingetragene Markenzeichen der International
Business Machines Corporation.
Pentium ist ein Markenzeichen oder ein
eingetragenes Markenzeichen der Intel
Corporation.
In dieser Anleitung werden Windows® XP Home
Edition, Windows® XP Professional und
Windows® XP Media Center Edition als
Windows XP bezeichnet.
In dieser Anleitung wird Windows Vista® als
Windows Vista bezeichnet.
In dieser Anleitung wird Windows® 7 Edition als
Windows 7 bezeichnet.
In dieser Anleitung wird Macintosh® als
Macintosh bezeichnet.
Alle anderen System- und Produktnamen sind
Markenzeichen oder eingetragene
Markenzeichen der jeweiligen Eigentümer. In
dieser Anleitung sind die Markenzeichen nicht
mit den Zeichen ™ und ® markiert.
Die in dieser Anleitung beschriebenen PC-
Bildschirme können sich von den tatsächlichen
Bildschirmanzeigen unterscheiden.
Inhalt
Merkmale ..........................................4
Überprüfen des Lieferumfangs .......5
Lage und Funktion der Teile ............6
Beschreibung der Teile am digitalen
Raumklangprozessor ..............................6
Beschreibung der Teile am Headset ..........7
Anschließen des
Headset-Systems ...........................8
Schritt 1-: Anschließen des Prozessors
an ein 7.1-Kanal-Soundgerät .................8
Schritt 1-: Anschließen des Prozessors
an ein 5.1-Kanal-Soundgerät .................9
Schritt 1-: Anschließen des Prozessors
an ein 2-Kanal-Soundgerät .................10
Schritt 1-: Anschließen des Prozessors
an den Computer mithilfe des USB-
Kabels .....................................................11
Schritt 2: Anschließen des Netzteils.......12
Schritt 3: Vorbereiten des Headsets .......12
Schritt 4: Überprüfen der Einstellungen am
Computer ..............................................13
DE
Tonwiedergabe .............................. 16
Störungsüberprüfungen ............... 20
Zur besonderen Beachtung .......... 22
Technische Daten ........................... 23
DE
3
Page 48

Merkmale
Dank 7.1-Kanal-
VPT (Virtualphones Technology)*1 lässt sich mit mehrkanaligen
Lautsprechern ein hochpräziser dreidimensionaler Raumklang erzielen.
2
Ideal für „FPS*
“-Spiele (First Person Shooter, Ego-Shooter), die in der Regel eine präzise
Wiedergabe der Klangrichtung erfordern.
Integrierter Dolby Pro Logic IIx-Decoder zur Wiedergabe des Tons von 5.1ch/2ch/USB-
Eingangsquellen im erweiterten 7.1-Kanal-Raumklangformat.
Funktion COMPRESSION zum Dämpfen lauter Geräusche wie zum Beispiel Explosionen
bei gleichzeitiger Verstärkung leiser Geräusche (beispielsweise Schritte).
Tonerzeugende Komponente mit 40 mm für Premium-Klangqualität bei Spielen.
Offenes Design mit drei Polstern für bequemen Sitz auch bei langer Nutzungsdauer.
Leichtbauweise für idealen Tragekomfort bei PC-Spielen.
*1 Die hochwertige „Virtualphones Technology (VPT)“ erzeugt mithilfe von Audioanalyse- und digitalen
Signalverarbeitungstechnologien von Sony einen naturgetreuen Raumklang in Kinoqualität.
*2 FPS = First Person Shooting
Der Prozessor wurde optimal auf das mitgelieferte Headset eingestellt. Sie können zwar ein beliebiges
Headset verwenden, allerdings erzielen Sie mit dem mitgelieferten Headset die besten Raumklangeffekte.
an Audioausgänge und
Mikrofoneingänge
Headset
Rückseite des Prozessors
Computer
an 7.1ch/5.1ch/2ch-Buchsen
Mehrkanal-Kabel
(mitgeliefert)
DE
4
an HEADSETBuchsen
Page 49

Vorbereitungen
Überprüfen des Lieferumfangs
Überprüfen Sie, ob Sie alle hier genannten Teile erhalten haben, bevor Sie das System
anschließen.
Prozessor DP-GA500 (1)
Netzteil (1)
Headset DR-GA210 (1)
Dediziertes USB-Kabel (1)
Mehrkanal-Kabel (7.1ch+MIC) (1)
Vorbereitungen
DE
5
Page 50

6
DE
Vorbereitungen
Lage und Funktion der Teile
Beschreibung der Teile am digitalen
Raumklangprozessor
Vorderseite des Prozessors
Rückseite des Prozessors
Netzanzeige
(siehe Seite 16)
Schalter
(siehe Seite 16)
Schalter INPUT (USB/2ch/5.1ch/7.1ch)
Schalter EFFECT (OFF/SURROUND/
FPS)
(siehe Seite 17)
Schalter COMPRESSION (OFF/ON)
(siehe Seite 18)
* Zur leichteren Orientierung befindet sich auf dem Prozessor ein fühlbarer Punkt.
/ (Ein/Bereitschaft)
USB-Anschluss
(siehe Seite 11)
Schalter AUTO STANDBY (OFF/ON)
(siehe Seite 19)
7.1ch/5.1ch/2ch-Buchsen (SBL/SBR,
C/SW, SL/SR, L/R, MIC OUT*)
HEADSET-Buchsen (MIC IN
(siehe Seite 12)
GAIN CONTROL
(siehe Seite 19)
Buchse DC IN 5.2V
(siehe Seite 12)
*, PHONES)
*
Page 51

Beschreibung der Teile am Headset
Kopfband
Ohrpolster
Seitenpolster
Mikrofon
Regler VOL (Lautstärke)
(siehe Seite 16)
* Zur leichteren Orientierung befindet sich auf dem Headset ein fühlbarer Punkt.
*
Schalter MIC MUTING
(siehe Seite 16)
Kopfhörerstecker
Mikrofonstecker
Vorbereitungen
(schwarz)
(rot)
DE
7
Page 52

8
DE
Anschlüsse
Anschlüsse
Anschließen des Headset-Systems
Schritt 1-: Anschließen des Prozessors an ein
7.1-Kanal-Soundgerät
1 Schließen Sie den Prozessor wie in
der Abbildung unten dargestellt
an das Soundgerät an.
Anschlussbuchsen des
Soundgeräts*
MIC IN
Anschluss an Buchse MIC IN
L/R OUT
Anschluss an Buchse L/R OUT
Surround L/R OUT
Anschluss an Buchse SL/SR OUT
Center/Subwoofer OUT
Anschluss an Buchse C/SW OUT
Surround Back L/R OUT
Anschluss an Buchse SBL/SBR OUT
* Die Buchsennamen variieren je nach Soundgerät.
Rückseite des Prozessors
Kabelstecker-
namen
SL / SR
C / SW
SBL / SBR
MIC
L / R
Mehrkanal-Kabel
(mitgeliefert)
2 Schieben Sie den Schalter INPUT auf „7.1ch“.
Vorderseite
des Prozessors
3 Stellen Sie am Computer den 7.1-Kanal-Lautsprechermodus ein.
Einzelheiten zum Betrieb des Computers bzw. Soundgeräts finden Sie in der dazugehörigen
Bedienungsanleitung.
Schließen Sie das USB-Kabel und das Mehrkanal-Kabel nicht gleichzeitig an, wenn Sie den
Prozessor an den Computer anschließen. Andernfalls wechselt die Klangeinstellung am
Computer möglicherweise zu einem anderen Gerät als gewünscht.
Page 53

Schritt 1-: Anschließen des Prozessors an ein 5.1Kanal-Soundgerät
Schließen Sie die 5.1ch-Buchsen des Prozessors über das mitgelieferte Mehrkanal-Kabel an. Dank
der Funktion EFFECT lässt sich der Ton von 5.1ch-Eingangsquellen als erweiterter 7.1-KanalRaumklang wiedergeben.
1 Schließen Sie den Prozessor wie in
der Abbildung unten dargestellt
an das Soundgerät an.
Anschlussbuchsen des
Soundgeräts*
MIC IN
Anschluss an Buchse MIC IN
L/R OUT
Anschluss an Buchse L/R OUT
Surround L/R OUT
Anschluss an Buchse SL/SR OUT
Center/Subwoofer OUT
Anschluss an Buchse C/SW OUT
Nicht angeschlossen
* Die Buchsennamen variieren je nach Soundgerät.
Rückseite des Prozessors
Kabelstecker-
namen
SL / SR
C / SW
SBL / SBR
MIC
L / R
Mehrkanal-Kabel
(mitgeliefert)
2 Schieben Sie den Schalter INPUT auf „5.1ch“.
Vorderseite
des Prozessors
3 Stellen Sie am Computer den 5.1-Kanal-Lautsprechermodus ein.
Einzelheiten zum Betrieb des Computers bzw. Soundgeräts finden Sie in der dazugehörigen
Bedienungsanleitung.
Schließen Sie das USB-Kabel und das Mehrkanal-Kabel nicht gleichzeitig an, wenn Sie den
Prozessor an den Computer anschließen. Andernfalls wechselt die Klangeinstellung am
Computer möglicherweise zu einem anderen Gerät als gewünscht.
Anschlüsse
DE
9
Page 54

10
DE
Anschlüsse
Schritt 1-: Anschließen des Prozessors an ein
2-Kanal-Soundgerät
Schließen Sie die 2ch-Buchsen des Prozessors über das mitgelieferte Mehrkanal-Kabel an.
Dank der Funktion EFFECT lässt sich der Ton von 2ch-Eingangsquellen als erweiterter 7.1Kanal-Raumklang wiedergeben.
1 Schließen Sie den Prozessor wie in
der Abbildung unten dargestellt
an das Soundgerät an.
Anschlussbuchsen des
Soundgeräts*
MIC IN
Anschluss an Buchse MIC IN
L/R OUT
Anschluss an Buchse L/R OUT
Nicht angeschlossen
Nicht angeschlossen
Nicht angeschlossen
* Die Buchsennamen variieren je nach Soundgerät.
Rückseite des Prozessors
Kabelstecker-
namen
SL / SR
C / SW
SBL / SBR
MIC
L / R
Mehrkanal-Kabel
(mitgeliefert)
2 Schieben Sie den Schalter INPUT auf „2ch“.
Vorderseite
des Prozessors
3 Stellen Sie am Computer den 2-Kanal-Lautsprechermodus ein.
Einzelheiten zum Betrieb des Computers bzw. Soundgeräts finden Sie in der dazugehörigen
Bedienungsanleitung.
Schließen Sie das USB-Kabel und das Mehrkanal-Kabel nicht gleichzeitig an, wenn Sie den
Prozessor an den Computer anschließen. Andernfalls wechselt die Klangeinstellung am
Computer möglicherweise zu einem anderen Gerät als gewünscht.
Page 55

Schritt 1-: Anschließen des Prozessors an den
Computer mithilfe des USB-Kabels
Verbinden Sie den USB-Anschluss am Computer über das mitgelieferte USB-Kabel mit dem
USB-Anschluss am Prozessor.
Der Prozessor fungiert in diesem Fall zwar als externes 2-Kanal-Soundgerät, aber dank der
Funktion EFFECT lässt sich der Ton von 2ch-Eingangsquellen als erweiterter 7.1-KanalRaumklang wiedergeben.
1 Schließen Sie den Prozessor an den Computer an.
an USB-Anschluss
an USB-Anschluss
Dediziertes USBKabel (mitgeliefert)
USB-Treiber sind in Betriebssystemen wie Windows XP, Windows Vista, Windows 7 und Mac
OS X enthalten. Die USB-Treiber werden automatisch installiert, wenn der Prozessor nach dem
Anschließen und Starten des Computers das erste Mal eingeschaltet wird.
Wenn Sie die Verbindung über einen anderen USB-Anschluss vornehmen, werden am
Computer eventuell erneut USB-Treiber installiert.
Hinweise
Das Headset funktioniert mit einem USB-Hub oder USB-Verlängerungskabel unter Umständen nicht.
Verwenden Sie ausschließlich das mitgelieferte USB-Kabel.
Wenn Sie das Headset an den Computer anschließen, gilt am Computer unter Umständen die höchste
Lautstärkeeinstellung. Stellen Sie die Lautstärke am Computer daher zuvor auf einen niedrigen Wert ein.
Der Ton digitaler Sendungen wird bei einer Verbindung mit dem USB-Kabel möglicherweise nicht über
den USB-Anschluss am Computer ausgegeben. Nehmen Sie den Anschluss über das Mehrkanal-Kabel
vor, wenn der Ton digitaler Sendungen nicht zu hören ist (Seite 8 bis 10).
Computer
2 Schieben Sie den Schalter INPUT auf „USB“.
Vorderseite
des Prozessors
3 Überprüfen Sie die Klangeinstellungen am Computer.
Einzelheiten zum Betrieb des Computers finden Sie in der dazugehörigen
Bedienungsanleitung.
Schließen Sie das USB-Kabel und das Mehrkanal-Kabel nicht gleichzeitig an, wenn Sie den
Prozessor an den Computer anschließen. Andernfalls wechselt die Klangeinstellung am
Computer möglicherweise zu einem anderen Gerät als gewünscht.
Anschlüsse
11
DE
Page 56

12
DE
Anschlüsse
Schritt 2: Anschließen des Netzteils
Schließen Sie das mitgelieferte Netzteil an den Prozessor und dann an eine Netzsteckdose an.
Rückseite des Prozessors
an Buchse DC IN 5.2V
an eine Netzsteckdose
Netzteil (mitgeliefert)
Schritt 3: Vorbereiten des Headsets
1 Schließen Sie den Mikrofonstecker des Headsets an die Buchse HEADSET (MIC
IN) am Prozessor und den Kopfhörerstecker an die Buchse HEADSET (PHONES)
an.
Rückseite des Prozessors
Headset
schwarz
rot
2 Stellen Sie das Kopfband des Headsets ein und tragen Sie das Ohrpolster mit der
Markierung auf dem rechten, das mit der Markierung auf dem linken Ohr.
Am mit markierten
Hänger befindet sich ein
fühlbarer Punkt, an dem
Sie die linke Seite
erkennen können.
Stellen Sie die Position des
Mikrofons so ein, dass Ihre Stimme
gut aufgenommen wird.
Klappen Sie das Mikrofon bei
Nichtgebrauch in die
Ausgangsposition neben dem
Ohrpolster.
Hinweis
Wenn die Position des Mikrofons nicht stimmt, verringert sich die Empfindlichkeit des Mikrofons und der
Ton vom Kopfhörer wird möglicherweise vom Mikrofon aufgenommen.
Page 57

Schritt 4: Überprüfen der Einstellungen am Computer
So überprüfen Sie die Einstellungen für das Soundgerät am
Computer
Überprüfen Sie vor der Inbetriebnahme des Prozessors anhand der folgenden Anweisungen zu
Ihrem Betriebssystem die Einstellungen für das Soundgerät. Einzelheiten zum Betrieb des
Computers bzw. Soundgeräts finden Sie in der dazugehörigen Bedienungsanleitung.
Windows
Windows XP in Kategorieansicht
Klicken Sie auf das Menü [Start], wählen Sie [Systemsteuerung], [Sounds, Sprachein-/ausgabe
und Audiogeräte], [Sounds und Audiogeräte] und die Registerkarte [Audio] und wählen Sie
dann im Menü „Soundwiedergabe“ oder „Soundaufnahme“ das normale Soundgerät (bzw.
[USB PnP Sound Device] bei einer Verbindung über das mitgelieferte USB-Kabel) als
[Standardgerät].
Windows Vista
Klicken Sie auf das Menü [Start], wählen Sie [Systemsteuerung], [Hardware und Sound],
[Sound] und die Registerkarte [Wiedergabe] oder [Aufnahme], wählen Sie dann das normale
Soundgerät (bzw. [USB PnP Sound Device] bei einer Verbindung über das mitgelieferte USBKabel) als Wiedergabe- oder Aufnahmegerät und klicken Sie zuletzt auf [Als Standard].
Windows 7
Klicken Sie auf das Menü [Start], wählen Sie [Systemsteuerung], [Hardware und Sound],
[Sound] und die Registerkarte [Wiedergabe] oder [Aufnahme], wählen Sie dann das normale
Soundgerät (bzw. [USB PnP Sound Device] bei einer Verbindung über das mitgelieferte USBKabel) als Wiedergabe- oder Aufnahmegerät und klicken Sie zuletzt auf [Als Standard].
Macintosh
Mac OS X
Klicken Sie auf das Menü [Apple], wählen Sie [Systemeinstellungen], [Ton] und die
Registerkarte [Ausgabe] oder [Eingabe] und wählen Sie dann unter [Wählen Sie ein Gerät aus
für die Tonausgabe] oder [Wählen Sie ein Gerät aus für die Toneingabe] das normale
Soundgerät (bzw. [USB PnP Sound Device] bei einer Verbindung über das mitgelieferte USBKabel).
(Fortsetzung)
Anschlüsse
13
DE
Page 58

14
DE
Anschlüsse
So stellen Sie den Lautstärkepegel für den Ton ein
Wenn Sie den Computer über das USB-Kabel an den Prozessor anschließen, stellen Sie den
Lautstärkepegel mit dem Regler VOL am Headset ein.
Wenn Sie ihn über das Mehrkanal-Kabel anschließen, können Sie den Lautstärkepegel nicht
nur mit dem Regler VOL am Headset, sondern auch durch Ändern des Lautstärkepegels am
Computer einstellen, wie im Folgenden erläutert.
Windows
Windows XP in Kategorieansicht
Klicken Sie auf das Menü [Start] und wählen Sie [Systemsteuerung], [Sounds, Sprachein-/
ausgabe und Audiogeräte], [Sounds und Audiogeräte]. Klicken Sie im Menü „Sound“ auf
[Lautstärke] und stellen Sie den Master-Lautstärkepegel ein.
Windows Vista
Klicken Sie auf das Menü [Start], wählen Sie [Systemsteuerung], [Hardware und Sound],
[Systemlautstärke anpassen] und stellen Sie den Master-Lautstärkepegel ein.
Windows 7
Klicken Sie auf das Menü [Start], wählen Sie [Systemsteuerung], [Hardware und Sound],
[Systemlautstärke anpassen] und stellen Sie den Master-Lautstärkepegel ein.
Macintosh
Mac OS X
Klicken Sie auf das Menü [Apple], wählen Sie [Systemeinstellungen], [Ton] und die
Registerkarte [Ausgabe] und stellen Sie den Lautsprecherausgangspegel ein.
Hinweise
Die Einstellungen müssen möglicherweise je nach Software unterschiedlich vorgenommen werden.
Erläuterungen dazu finden Sie in der Bedienungsanleitung zur Software.
Die Headset-Lautstärke und der Ausgangspegel am Computer werden nicht synchronisiert.
So stellen Sie die Wiedergabe von Musik-CDs ein
Diese Einstellungen sind erforderlich, wenn die Verbindung über das mitgelieferte USB-Kabel
vorgenommen wurde und Sie im CD-ROM-Laufwerk eine Musik-CD abspielen wollen.
Gehen Sie nach den folgenden Anweisungen zu Ihrem Betriebssystem vor und klicken Sie auf
das Kontrollkästchen [Digitale CD-Wiedergabe für den CD-Player aktivieren]. Bei Windows
Vista, Windows 7 und Macintosh sind Einstellungen für die Wiedergabe von Musik-CDs nicht
erforderlich.
Windows XP in Kategorieansicht
Klicken Sie auf das Menü [Start] und wählen Sie [Systemsteuerung], [Sounds, Sprachein-/
ausgabe und Audiogeräte], [Sounds und Audiogeräte] und die Registerkarte [Hardware].
Wählen Sie das CD-ROM-Laufwerk für die Musikwiedergabe, klicken Sie auf [Eigenschaften]
und dann auf die Registerkarte [Eigenschaften]. Klicken Sie auf das Kontrollkästchen [Digitale
CD-Wiedergabe für den CD-Player aktivieren].
Page 59

So stellen Sie die Mikrofonlautstärke ein
Vor der Inbetriebnahme des Prozessors können Sie am Computer die Mikrofonlautstärke
überprüfen und einstellen. Gehen Sie zum Überprüfen/Einstellen der Lautstärke nach den
folgenden Anweisungen zu Ihrem Betriebssystem vor.
Einzelheiten zum Betrieb des Computers finden Sie in der dazugehörigen
Bedienungsanleitung.
Windows
Überprüfen Sie vor dem Einstellen der Mikrofonlautstärke den Eingangspegel des Mikrofons,
indem Sie mit einem Sound-Recorder o. Ä. eine Probeaufnahme machen.
Windows XP in Kategorieansicht
Klicken Sie auf das Menü [Start] und wählen Sie [Systemsteuerung], [Sounds, Sprachein-/
ausgabe und Audiogeräte], [Sounds und Audiogeräte] und die Registerkarte [Audio].
Vergewissern Sie sich, dass [Standardgerät] im Menü „Soundaufnahme“ auf das normale
Soundgerät (bzw. [USB PnP Sound Device] bei einer Verbindung über das mitgelieferte USBKabel) gesetzt ist, klicken Sie im Menü „Soundaufnahme“ auf [Lautstärke] und stellen Sie den
Mikrofoneingangspegel ein.
Windows Vista
Klicken Sie auf das Menü [Start], wählen Sie [Systemsteuerung], [Hardware und Sound],
[Sound] und die Registerkarte [Aufnahme], wählen Sie dann das normale Soundgerät (bzw.
[USB PnP Sound Device] bei einer Verbindung über das mitgelieferte USB-Kabel) als
Aufnahmegerät und klicken Sie zuletzt auf [Als Standard]. Wählen Sie erneut das normale
Soundgerät (bzw. [USB PnP Sound Device] bei einer Verbindung über das mitgelieferte USBKabel), klicken Sie auf [Eigenschaften], wählen Sie die Registerkarte [Pegel] und stellen Sie den
Mikrofoneingangspegel ein.
Windows 7
Klicken Sie auf das Menü [Start], wählen Sie [Systemsteuerung], [Hardware und Sound],
[Sound] und die Registerkarte [Aufnahme], wählen Sie dann das normale Soundgerät (bzw.
[USB PnP Sound Device] bei einer Verbindung über das mitgelieferte USB-Kabel) als
Aufnahmegerät und klicken Sie zuletzt auf [Als Standard]. Wählen Sie erneut das normale
Soundgerät (bzw. [USB PnP Sound Device] bei einer Verbindung über das mitgelieferte USBKabel), klicken Sie auf [Eigenschaften], wählen Sie die Registerkarte [Pegel] und stellen Sie den
Mikrofoneingangspegel ein.
Macintosh
Mac OS X
Klicken Sie auf das Menü [Apple], wählen Sie [Systemeinstellungen], [Ton] und die
Registerkarte [Eingabe] und stellen Sie den Mikrofoneingangspegel ein.
Hinweise
Das Mikrofon unterstützt nicht die Stummschaltung am Audioaufnahmegerät des Computers. Schieben
Sie zum Stummschalten des Mikrofons den Schalter MIC MUTING am Headset auf „ON“.
Die Einstellungen müssen möglicherweise je nach Software unterschiedlich vorgenommen werden.
Erläuterungen dazu finden Sie in der Bedienungsanleitung zur Software.
Anschlüsse
15
DE
Page 60

16
DE
Betrieb
Betrieb
Tonwiedergabe
1 Schalten Sie den angeschlossenen Computer ein.
2 Schalten Sie den Prozessor mit dem Schalter
Die Netzanzeige des Prozessors leuchtet weiß.
Wenn Sie den USB-Anschluss am Computer über das mitgelieferte USB-Kabel mit dem
USB-Anschluss am Prozessor verbinden, werden automatisch USB-Treiber installiert,
sobald der Prozessor nach dem Anschließen und Starten des Computers das erste Mal
eingeschaltet wird.
3 Setzen Sie das Headset auf.
(siehe Seite 12)
4 Starten Sie die Wiedergabe am Computer.
So stellen Sie die Lautstärke ein
Stellen Sie den Lautstärkepegel am Headset ein und schalten Sie den Stummschaltmodus für
das Mikrofon ein.
VOL (Lautstärke)
Hier stellen Sie den Lautstärkepegel
für das Headset ein.
MIC MUTING
ON: Das Mikrofon ist in den Modus
MIC MUTING ON geschaltet, also
stummgeschaltet.
OFF: Das Mikrofon ist in den Modus
MIC MUTING OFF geschaltet.
/ (Ein/Bereitschaft) ein.
Hinweise
Stellen Sie die Lautstärke bei Filmen in leisen Szenen nicht zu hoch ein. Andernfalls kann es zu
Gehörschäden kommen, wenn unversehens eine laute Szene beginnt.
Die Headset-Lautstärke und der Ausgangspegel am Computer werden nicht synchronisiert. Auch die
Stummschaltung des Mikrofons wird nicht synchronisiert.
Wenn Sie die Verbindung zum Prozessor über das USB-Kabel herstellen und den Schalter INPUT auf
„USB“ schieben, wird die Musik oder der Ton bei Musiksoftware unter Umständen nicht über das
Headset wiedergegeben. Starten Sie die Musiksoftware in diesem Fall neu.
Page 61

So wählen Sie das gewünschte Klangfeld aus (Funktion EFFECT)
Mit dem Schalter EFFECT können Sie das gewünschte Klangfeld auswählen.
Wenn Sie „FPS“ oder „SURROUND“ auswählen, erzeugt der integrierte Dolby Pro Logic IIxDecoder bei einer 5.1-Kanal-, 2-Kanal- oder USB-Verbindung einen Raumklang, der in seiner
naturgetreuen Wirkung an 7.1-Kanal-Raumklang heranreicht. Wenn die Position des Schalters
INPUT jedoch nicht zur Verbindung passt, hat die Funktion EFFECT nicht die gewünschte
Wirkung.
Vorderseite des Prozessors
Position des Schalters Klangfeldmodus und geeignete Tonquellen
FPS (First Person Shooting) Bei dieser Einstellung wird die Richtung der Töne in Bezug auf das Bild präzise
wiedergegeben.
Diese Einstellung empfiehlt sich für FPS-Spiele, die eine präzise Wiedergabe der
Klangrichtung erfordern. Der Klang ist hörerfreundlich, natürlich, klar und
realistisch. Sein besonderer Vorzug liegt in der klaren räumlichen Wiedergabe
aller Kanäle.
SURROUND Bei dieser Einstellung werden alle Kanäle als nahtloses Gesamtklangbild
wiedergegeben.
Im Gegensatz zur Wiedergabe im FPS-Modus wirkt der Klang als Ganzes und das
Klangfeld eignet sich im Allgemeinen sehr gut für die Wiedergabe von Spielen im
Mehrkanalraumklang. Auch für die Wiedergabe von Filmen ist diese Einstellung
zu empfehlen.
OFF Der Ton wird als 2-Kanal-Ton wiedergegeben.
Eine mehrkanalige Tonquelle (7.1 Kanäle/5.1 Kanäle) wird auf 2 Kanäle
heruntergemischt.
Hinweis
Bei monauralen Tonquellen hat die Funktion EFFECT keine Wirkung.
Hinweise zu den Klangeigenschaften bei der Funktion EFFECT
Die Funktion EFFECT hat bei reinen Tonquellen ohne Video, wie zum Beispiel Musik-CDs, keine
Wirkung.
VPT (Virtualphones Technology) simuliert die durchschnittliche HRTF (Head-Related Transfer
Function)* des Menschen. Jeder Mensch nimmt den Effekt etwas anders wahr.
* HRTF = Head-Related Transfer Function. Mathematisches Messverfahren zur Darstellung der
Tonveränderungen zwischen der Tonquelle und dem Ohr des Hörers.
(Fortsetzung)
Betrieb
17
DE
Page 62

18
DE
Betrieb
So erzielen Sie eine angenehme Tonwiedergabe (Funktion
COMPRESSION)
Schieben Sie den Schalter COMPRESSION auf ON oder OFF.
Bei dieser Funktion wird der Gesamttonpegel des programmierten Materials komprimiert:
Explosionsgeräusche werden gedämpft, leise Geräusche (beispielsweise Schritte) werden verstärkt. Auf
diese Weise lässt sich ein großer Dynamikbereich beim wiedergegebenen Material sehr wirksam begrenzen.
Vorderseite des Prozessors
Hinweis
Nehmen Sie die Lautstärkeeinstellung bei der Funktion COMPRESSION sehr sorgsam vor.
Wenn die Funktion COMPRESSION eingeschaltet ist, kann der Ton bereits recht laut erscheinen, obwohl
das Audiosignal vom Computer relativ leise ist. Erhöhen Sie in diesem Fall die Lautstärke am Computer
nach und nach, bis Sie einen insgesamt zufrieden stellenden Klang erreicht haben. Andererseits kann der
Klang auch zu leise wirken. Verringern Sie in diesem Fall die Lautstärke am Computer nach und nach, bis
Sie einen möglichst gleichmäßigen Klang erreicht haben.
Diagramm zum Komprimierungsprozess
Explosion
Dynamikbereich
Eingangssignal
Dialog
Schritte, Hintergrundgeräusch
Komprimierung
Ausgangssignal
Komprimierung des Dynamikbereichs durch
den integrierten DSP-Prozessor (Digital Signal
Processor)
Explosion
Dialog
Schritte, Hintergrundgeräusch
Standard
Unangenehm
Dynamikbereich
Angenehm zu
hören
Schwer zu
hören
Page 63

So stellen Sie den Lautstärkepegel des Tons vom Soundgerät ein
OFF
AUTO STANDBY
ON
(GAIN CONTROL)
Mit GAIN CONTROL können Sie die Lautstärke je nach Nennausgangsleistung des
Soundgeräts regulieren (Anfangseinstellung ist „8“). Erhöhen Sie GAIN CONTROL auf einen
Wert über „8“, wenn der ausgegebene Ton selbst bei höchster Lautstärkeeinstellung für das
Soundgerät noch immer zu leise ist. Sollte der Klang verzerrt sein, verringern Sie den
Lautstärkepegel für die Tonwiedergabe über das Soundgerät.
Rückseite des Prozessors
Zum Verringern
des Pegels nach
links drehen
Nennausgangsleistung
des Soundgeräts
Höher als 2Vrms Stellen Sie den GAIN CONTROL-Pegel auf „8“ und regeln Sie die Lautstärke am
2Vrms Der Prozessor ist so kalibriert, dass standardmäßig 2Vrms ans Soundgerät
Niedriger als 2Vrms „8“-„10“, Einstellung des GAIN CONTROL-Pegels für eine höhere Lautstärke.
GAIN CONTROL-Pegel
Audioausgabegerät dann herunter.
ausgegeben werden, wenn GAIN CONTROL auf „8“ eingestellt ist.
Zum Erhöhen
des Pegels nach
rechts drehen
So schaltet das System automatisch in den Bereitschaftsmodus
(Funktion AUTO STANDBY)
Wenn am Prozessor etwa 30 Minuten lang kein Ton eingeht, schaltet der Prozessor automatisch
in den Bereitschaftsmodus.
Mit dem Schalter AUTO STANDBY können Sie die Funktion AUTO STANDBY auf ON oder
OFF stellen, also ein- oder ausschalten.
Rückseite des Prozessors
Position des Schalters Wirkung
ON Die Funktion AUTO STANDBY ist eingeschaltet. Nach dem Ausschalten können
Sie das System mit dem Schalter / (Ein/Bereitschaft) wieder einschalten.
OFF Die Funktion AUTO STANDBY ist ausgeschaltet.
Betrieb
19
DE
Page 64

20
DE
Weitere Informationen
Weitere Informationen
Störungsüberprüfungen
Wenn an diesem System ein Problem auftritt, versuchen Sie bitte anhand der folgenden
Checkliste, das Problem zu beheben. Sollte das Problem bestehen bleiben, wenden Sie sich an
Ihren Sony-Händler.
Symptom Ursache und Abhilfemaßnahmen
Es ist kein Ton zu hören.
Der Ton ist verzerrt oder
setzt aus (manchmal in
Verbindung mit
Störgeräuschen).
Der Ton ist zu leise.
Überprüfen Sie die Verbindung zwischen dem Prozessor und dem Computer.
Schalten Sie den Computer ein, an den der Prozessor angeschlossen ist, und
starten Sie die Wiedergabe.
Schalten Sie den Prozessor ein.
Die Position des Schalters INPUT entspricht nicht der Verbindungsmethode.
(Beispiel: Das Eingangssignal ist USB, aber INPUT ist auf 7.1ch gestellt usw.)
Stellen Sie INPUT ordnungsgemäß auf das Eingangssignal ein.
Erhöhen Sie die Lautstärke am Headset.
Schließen Sie den Kopfhörerstecker ordnungsgemäß an.
Erhöhen Sie den Lautstärkepegel des Computers und der
Musikwiedergabesoftware.
Das System wurde angeschlossen, als bereits eine Musiksoftware lief.
Starten Sie die Musiksoftware neu.
Das Soundgerät des Computers ist nicht korrekt eingestellt (Seite 13).
Die Lautstärke des Computers oder der Musikwiedergabesoftware usw. ist
stummgeschaltet.
Heben Sie die Stummschaltung auf.
Als GAIN CONTROL-Pegel ist „0“ eingestellt.
Erhöhen Sie den GAIN CONTROL-Pegel.
Der Computer erkennt das Headset bei einer Verbindung über das mitgelieferte
USB-Kabel nicht als USB-Gerät.
Starten Sie den Computer neu.
Das CD-ROM-Laufwerk des Computers unterstützt die digitale Wiedergabe
bei einer Verbindung über das mitgelieferte USB-Kabel nicht.
Verwenden Sie ein CD-ROM-Laufwerk, das die digitale Wiedergabe
unterstützt.
Digitale Sendungen lassen sich bei einer USB-Verbindung unter Umständen
nicht wiedergeben.
Schließen Sie den Computer über das Mehrkanal-Kabel an (Seite 8 bis 10).
AUTO STANDBY wurde aktiviert, da etwa 30 Minuten lang kein Ton
eingespeist wurde.
Schalten Sie den Prozessor wieder ein.
Verringern Sie den Lautstärkepegel am angeschlossenen Computer.
Erhöhen Sie den Lautstärkepegel des angeschlossenen Computers und der
Musikwiedergabesoftware.
Erhöhen Sie die Lautstärke am Headset.
Erhöhen Sie den GAIN CONTROL-Pegel.
Page 65

Symptom Ursache und Abhilfemaßnahmen
Es sind laute
Hintergrundgeräusche zu
hören.
Der Raumklangeffekt fehlt.
Der Ton setzt aus.
Über das Mikrofon geht
kein Ton ein.
Der Ton vom Mikrofon ist
zu leise.
Der über das Mikrofon
aufgenommene Ton ist
gestört.
Der Ton vom Mikrofon ist
verzerrt.
Der Schalter MIC MUTING
funktioniert nicht.
Die
Ausgangspegeleinstellungen
am Computer für den
mittleren Lautsprecher und
den Tiefsttonlautsprecher sind
möglicherweise vertauscht.
Wenn Sie den Prozessor mit dem Mehrkanal-Kabel an den Computer
anschließen, erhöhen Sie den Lautstärkepegel des angeschlossenen
Soundgeräts.
Trennen Sie den Prozessor vom Computer.
Die Position des Schalters INPUT entspricht nicht der Verbindungsmethode.
(Beispiel: Das Eingangssignal ist 2-kanalig, aber INPUT ist auf 7.1ch gestellt
usw.)
Stellen Sie INPUT ordnungsgemäß auf das Eingangssignal ein.
Stellen Sie den Schalter EFFECT auf „FPS“ oder „SURROUND“ (Seite 17).
Bei monauralen Tonquellen lässt sich kein Raumklangeffekt erzeugen.
Die Position des Schalters INPUT entspricht nicht der Verbindungsmethode.
(Beispiel: Das Eingangssignal ist 2-kanalig, aber INPUT ist auf 7.1ch gestellt
usw.)
Stellen Sie INPUT ordnungsgemäß auf das Eingangssignal ein.
Die CPU des Computers ist bei einer Verbindung über das mitgelieferte USB-
Kabel überlastet.
Beenden Sie andere, nicht benötigte Anwendungen.
Andere USB-Geräte sind an den Computer angeschlossen und werden benutzt,
während gleichzeitig die Verbindung über das mitgelieferte USB-Kabel benutzt
wird.
Benutzen Sie die anderen USB-Geräte nicht weiter.
Schließen Sie den Mikrofonstecker ordnungsgemäß an.
Der Schalter MIC MUTING am Headset steht auf „ON“.
Schieben Sie den Schalter MIC MUTING auf „OFF“.
Das Audioaufnahmegerät des Computers ist nicht korrekt eingestellt (Seite 13).
Schließen Sie den Mikrofonstecker ordnungsgemäß an.
Bringen Sie das Mikrofon in die richtige Position.
Der Lautstärkepegel des Mikrofons ist am Computer zu niedrig eingestellt.
Erhöhen Sie den Lautstärkepegel des Mikrofons am Computer.
In der Nähe des Headsets (vor allem des Mikrofons) befinden sich elektrische
Leitungen, Leuchtstoffröhren oder Mobiltelefone.
Entfernen Sie sich von allen möglichen Quellen elektromagnetischer
Interferenzen.
Ton vom Kopfhörer wurde vom Mikrofon aufgenommen.
Bringen Sie das Mikrofon in die richtige Position.
Der Lautstärkepegel des Mikrofons ist am Computer zu hoch eingestellt.
Verringern Sie den Lautstärkepegel des Mikrofons am Computer.
Der Mikrofoneingang ist bereits am Computer stummgeschaltet.
Beenden Sie die Mikrofonstummschaltung am Computer.
Bei manchen Computern sind die Ausgangspegeleinstellungen am Computer
für den mittleren Lautsprecher und den Tiefsttonlautsprecher möglicherweise
vertauscht. Schlagen Sie vor dem Ändern des Ausgangspegels am Computer in
der Bedienungsanleitung Einzelheiten zum Bedienen Ihres Computers nach.
Weitere Informationen
21
DE
Page 66

22
DE
Weitere Informationen
Zur besonderen Beachtung
Sicherheit
Lassen Sie den Prozessor und das Headset nicht
fallen, stoßen Sie nicht dagegen und schützen Sie
sie vor sonstigen starken Erschütterungen.
Andernfalls könnten die Geräte beschädigt
werden.
Versuchen Sie nicht, die Komponenten des
Systems zu öffnen oder zu zerlegen.
Die Ohrpolster und das Kopfpolster können sich
bei langer Verwendung oder Lagerung abnutzen.
Aufstellung
Verwenden Sie das System nicht an einem Ort,
an dem es folgenden Bedingungen ausgesetzt ist:
– Direktem Sonnenlicht, der Wärme eines
Heizgeräts oder sehr hohen Temperaturen
– Staub
– Auf einer instabilen oder geneigten Oberfläche
– Starken Vibrationen
– Hoher Luftfeuchtigkeit, wie zum Beispiel in
einem Badezimmer
Netzteil
Verwenden Sie bitte ausschließlich das
mitgelieferte Netzteil. Bei Verwendung eines
Netzteils mit anderer Steckerpolarität oder
anderweitig abweichenden Merkmalen kann es
zu Fehlfunktionen kommen.
Kopfhörer
Nehmen Sie Rücksicht.
Wenn die Lautstärke zu hoch ist, ist der Ton auch
in der Umgebung der Kopfhörer zu hören. Stellen
Sie die Lautstärke daher nicht zu hoch ein, damit
andere nicht gestört werden.
Wenn die Umgebung laut ist, neigt man dazu, die
Lautstärke zu erhöhen. Aus Sicherheitsgründen
empfiehlt es sich jedoch dringend, die Lautstärke
nur so hoch einzustellen, dass man
Umgebungsgeräusche noch wahrnehmen kann.
Reinigung
Verwenden Sie ein weiches, mit einer milden
Reinigungslösung angefeuchtetes Tuch. Verwenden
Sie keine Lösungsmittel wie Verdünnung, Benzin
oder Alkohol. Diese könnten die Oberfläche
angreifen.
Beschädigungen
Wenn das Produkt beschädigt wird oder ein
Fremdkörper hineingelangt, schalten Sie es
sofort aus und bringen Sie es zu Ihrem SonyHändler.
Bringen Sie in einem solchen Fall immer
Kopfhörer und Prozessor zu Ihrem SonyHändler.
Stecker mit vereinheitlichter Polarität
Verwenden Sie bitte ausschließlich das
mitgelieferte Netzteil. Selbst Netzteile mit
derselben Spannung und Steckerpolarität
können aufgrund der unterschiedlichen
Strombelastbarkeit und anderer Faktoren zu
einer Beschädigung dieses Produkts führen.
Wenn Sie das System längere Zeit nicht benutzen
wollen, trennen Sie das Netzteil von der
Netzsteckdose.
Page 67

Technische Daten
Digitaler Raumklangprozessor
(DP-GA500)
Decoder-Funktionen
Dolby Pro Logic IIx
Virtuelle Raumklangfunktion
OFF
SURROUND
FPS
Komprimierungsfunktion
OFF
ON
Frequenzgang
20 – 20.000 Hz
Verzerrungsrate
1 % oder weniger (1 kHz)
Ein-/Ausgangsbuchsen
USB-Buchse
7.1ch/5.1ch/2ch-Buchsen (SBL/SBR, C/SW,
HEADSET-Buchsen (PHONES, MIC IN)
Betriebsspannung
5,2 V Gleichstrom (vom mitgelieferten
Abmessungen
ca. 190 × 30 × 117 mm (B/H/T)
Gewicht ca. 310 g
Als Betriebsumgebung geeignete Computer
IBM PC/AT oder kompatible Computer
CPU: Pentium II mit 266 MHz oder mehr
USB-Anschluss*
Geeignete Betriebssysteme:
Windows 7
Windows Vista
Windows XP
Mac OS X (10.3 oder höher)
L/R, MIC OUT) (Stereominibuchsen)
SL/SR,
(Stereominibuchsen)
Netzteil)
Apple Macintosh
Starter/Home Basic/Home Premium/
Professional/Ultimate
Home Basic/Home Premium/Business/
Ultimate
Home Edition (SP2 oder höher)/Professional
(SP2 oder höher)/Media Center Edition 2004
(SP2 oder höher)/Media Center Edition 2005
(SP2 oder höher)
1
Stereo-Headset (DR-GA210)
Kabel 1,5 m
Stecker Vergoldeter Stereoministecker
Gewicht ca. 240 g (ohne Kabel)
Kopfhörer
Typ Offen, dynamisch
Tonerzeugende Komponente
40 mm, Kalotte (mit CCAW)
Belastbarkeit
1.000 mW (IEC*2)
Impedanz
40 Ω bei 1 kHz
Empfindlichkeit
100 dB/mW
Frequenzgang
14 - 22.000 Hz
Mikrofon
Design Galgenmikrofon
Typ Elektret-Kondensatormikrofon
Leerlaufspannungspegel
-38 dB (0 dB = 1 V/Pa)
Effektiver Frequenzbereich
20 - 20.000 Hz
Mitgeliefertes Zubehör
Netzteil (5,2 V) (1)
Mehrkanal-Kabel (7.1ch+MIC) (1)
Dediziertes USB-Kabel (1)
Garantiekarte (1)
Bedienungsanleitung (1)
*1 Der Prozessor unterstützt USB 2.0 (USB 2.0 Full
Speed).
*2 Vom IEC (International Electronic Committee)
getestet.
Auch bei den oben angegebenen
Betriebsumgebungen funktioniert das Headset
nicht unbedingt bei allen Computern.
Das Headset funktioniert möglicherweise nicht
bei selbst zusammengestellten Computern,
Betriebssystemen, die Sie selbst aktualisiert
haben, oder Rechnern, die unter mehreren
Betriebssystemen laufen.
Das Headset ist möglicherweise nicht mit
Funktionen wie Standby-Modus, Schlafmodus
oder Ruhezustand kompatibel.
Änderungen, die dem technischen Fortschritt
dienen, bleiben vorbehalten.
Weitere Informationen
23
DE
Page 68

ADVERTENCIA
Para reducir el riesgo de incendio o
electrocución, no exponga el aparato a goteos
o salpicaduras ni coloque encima objetos que
contengan líquidos como, por ejemplo,
jarrones.
Para evitar descargas eléctricas, no abra la
unidad. En caso de avería, solicite los
servicios de personal cualificado.
No sitúe el aparato en un espacio cerrado,
como una estantería o un armario
empotrado.
Aviso para los clientes: la siguiente
información sólo se aplica al equipo que
se comercializa en países que aplican las
directivas de la UE
El fabricante de este producto es Sony
Corporation, 1-7-1 Konan Minato-ku Tokyo,
108-0075 Japón. El representante autorizado
para EMC y seguridad en el producto es Sony
Deutschland GmbH, Hedelfinger Strasse 61,
70327 Stuttgart, Alemania. Para cualquier
asunto relacionado con servicio o garantía
por favor diríjase a la dirección indicada en
los documentos de servicio o garantía
adjuntados con el producto.
La validez de la marca CE se limita
únicamente a aquellos países en los que la
legislación la impone, especialmente los
países de la EEA (Área económica europea).
Tratamiento de los
equipos eléctricos y
electrónicos al final de su
vida útil (aplicable en la
Unión Europea y en países
europeos con sistemas de
recogida selectiva de
residuos)
Este símbolo en el equipo o el embalaje indica que
el presente producto no puede ser tratado como
residuos domésticos normales, sino que debe
entregarse en el correspondiente punto de recogida
de equipos eléctricos y electrónicos. Al asegurarse
de que este producto se desecha correctamente, Ud.
ayuda a prevenir las consecuencias negativas para
el medio ambiente y la salud humana que podrían
derivarse de la incorrecta manipulación en el
momento de deshacerse de este producto. El
reciclaje de materiales ayuda a conservar los
recursos naturales. Para recibir información
detallada sobre el reciclaje de este producto,
póngase en contacto con el ayuntamiento, el punto
de recogida más cercano o el establecimiento
donde ha adquirido el producto.
Debido a que la clavija principal del
adaptador de alimentación de ca se utiliza
para desconectar el adaptador de
alimentación de ca de la corriente, conéctelo
a una toma de corriente de ca de fácil acceso.
Si observa cualquier irregularidad en el
adaptador, desconéctelo de la toma de
corriente de ca inmediatamente.
ES
2
Page 69

El procesador de sonido envolvente digital para
el sistema incluye el decodificador Dolby Pro
Logic II.
Fabricado bajo licencia de Dolby Laboratories.
“Dolby”, “Pro Logic” y el símbolo de la doble D
son marcas comerciales de Dolby Laboratories.
“Virtualphones Technology” y “VPT” son
marcas comerciales registradas de Sony
Corporation.
Microsoft y Windows son marcas comerciales
registradas o marcas comerciales de Microsoft
Corporation en los Estados Unidos y/o en otros
países.
Macintosh y Mac OS son marcas comerciales
registradas de Apple Inc. en EE. UU. y en otros
países.
IBM y PC/AT son marcas comerciales y marcas
comerciales registradas de International Business
Machines Corporation.
Pentium es una marca comercial o marca
comercial registrada de Intel Corporation.
En este manual, el término Windows XP se
utiliza para hacer referencia a Windows® XP
Home Edition, Windows® XP Professional y
Windows® XP Media Center Edition.
En este manual, el término Windows Vista se
utiliza para hacer referencia a Windows Vista®.
En este manual, el término Windows 7 se utiliza
para hacer referencia a Windows® 7 Edition.
En este manual, el término Macintosh se utiliza
para hacer referencia a Macintosh®.
Todos los demás nombres de sistemas y
productos son marcas comerciales o marcas
comerciales registradas de sus respectivos
propietarios. En este manual no se especifican las
marcas ™ y ®.
Es posible que los términos referentes a la
pantalla del ordenador que se muestran en este
manual difieran de los términos reales.
Tabla de contenido
Características ..................................4
Comprobación de los componentes y
accesorios.......................................5
Ubicación y función de las piezas ....6
Descripción de las piezas del procesador
de sonido envolvente digital ..................6
Descripción de las piezas de los
auriculares ................................................7
Conexión del sistema de
auriculares .....................................8
Paso 1-: conexión de un dispositivo de
sonido de 7.1 canales ..............................8
Paso 1-: conexión de un dispositivo de
sonido de 5.1 canales ..............................9
Paso 1-: conexión de un dispositivo de
sonido de 2 canales ..............................10
Paso 1-: conexión al ordenador
mediante el cable USB ......................... 11
Paso 2: conexión del adaptador de ca ....12
Paso 3: preparación de los auriculares ...12
Paso 4: comprobación de la configuración
del ordenador ........................................13
Cómo escuchar sonidos ................ 16
Solución de problemas ................. 20
Precauciones .................................. 22
Especificaciones ............................. 23
ES
ES
3
Page 70

Características
La tecnología
VPT (Virtualphones Technology) de 7.1 canales*1 alcanza una precisión de
sonido envolvente tridimensional con los altavoces multicanal.
Resulta ideal para los juegos en los que se producen disparos, que normalmente requieren
una reproducción precisa de las características de sonido direccional en el “modo FPS*
Decodificador Dolby Pro Logic IIx incorporado para un sonido envolvente ampliado de 7.1
2
”.
canales desde una fuente de entrada 5.1ch/2ch/USB.
La función COMPRESSION atenúa los sonidos explosivos y aumenta el volumen de los
sonidos de nivel más bajo (pasos o similares).
Unidad auricular de 40 mm para una calidad de sonido de juego excelente.
El diseño de tres almohadillas de tipo abierto permite mantener un ajuste cómodo durante
un uso prolongado.
La estructura ligera proporciona una comodidad de uso ideal para los juegos de ordenador.
*1 La tecnología “Virtualphones Technology (VPT)” superior crea el realismo de sonido envolvente típico
de las salas de cine, gracias a la tecnología de procesamiento de señales digitales y de análisis de audio de
Sony.
*2 FPS = First Person Shooting
El procesador está optimizado para los auriculares suministrados. Aunque es posible utilizar cualquier tipo
de auriculares, utilice los auriculares suministrados para obtener los mejores efectos de sonido envolvente.
a las salidas de sonido y a las
tomas de entrada del micrófono
Auriculares
Panel posterior del procesador
a las tomas 7.1ch/5.1ch/2ch
Cable multicanal
(suministrado)
ES
4
Ordenador
a las tomas
HEADSET
Page 71

Preparación
Comprobación de los componentes y
accesorios
Antes de configurar el sistema, compruebe que estén incluidos todos los componentes.
Procesador DP-GA500 (1)
Adaptador de ca (1)
Auriculares DR-GA210 (1)
Cable USB específico (1)
Cable multicanal (7.1ch+MIC) (1)
Preparación
ES
5
Page 72

6
ES
Preparación
Ubicación y función de las piezas
Descripción de las piezas del procesador de sonido
envolvente digital
Panel frontal del procesador
Panel posterior del procesador
Indicador de alimentación
(Consulte la página 16)
Interruptor
espera)
(Consulte la página 16)
Interruptor INPUT (USB/2ch/5.1ch/
7.1ch)
Interruptor EFFECT (OFF/SURROUND/
FPS)
(Consulte la página 17)
Interruptor COMPRESSION (OFF/ON)
(Consulte la página 18)
* El procesador dispone de un punto táctil para facilitar el reconocimiento.
/ (encendido/en
Puerto
Interruptor AUTO STANDBY (OFF/ON)
Tomas 7.1ch/5.1ch/2ch (SBL/SBR,
Tomas HEADSET (MIC IN
GAIN CONTROL
Toma DC IN 5.2V
USB
(Consulte la página 11)
(Consulte la página 19)
C/SW, SL/SR, L/R, MIC OUT*)
(Consulte la página 12)
(Consulte la página 19)
(Consulte la página 12)
*, PHONES)
*
Page 73

Descripción de las piezas de los auriculares
Diadema
Almohadilla para el oído
Almohadilla de soporte
Micrófono
Control VOL (volumen)
(Consulte la página 16)
* Los auriculares disponen de un punto táctil para facilitar el reconocimiento.
*
Interruptor MIC MUTING
(Consulte la página 16)
Clavija
Clavija
(auriculares) (Negro)
(micrófono) (Rojo)
Preparación
ES
7
Page 74

8
ES
Conexión
Conexión
Conexión del sistema de auriculares
Paso 1-: conexión de un dispositivo de sonido de
7.1 canales
1 Conecte el procesador al
dispositivo de sonido tal como se
indica en la siguiente ilustración.
Tomas de conexión del
dispositivo de sonido*
MIC IN
Conéctela a la toma MIC IN
L/R OUT
Conéctela a la toma L/R OUT
L/R OUT de sonido envolvente
Conéctela a la toma SL/SR OUT
OUT central/potenciador de graves
Conéctela a la toma C/SW OUT
L/R OUT posterior de sonido envolvente
Conéctela a la toma SBL/SBR OUT
* El nombre de la toma varía en función del dispositivo de
sonido.
Panel posterior del procesador
2 Deslice el interruptor INPUT hasta “7.1ch”.
Panel frontal
del procesador
Nombres de
las clavijas de
los cables
MIC
L / R
SL / SR
C / SW
SBL / SBR
Cable multicanal
(suministrado)
3 Ajuste el modo de altavoz de 7.1 canales en el ordenador.
Para obtener más información sobre el funcionamiento del ordenador y el dispositivo de
sonido, consulte los respectivos manuales de instrucciones.
Cuando conecte el procesador al ordenador, no conecte el cable USB con un cable
multicanal al mismo tiempo, ya que el ajuste de sonido del ordenador podría cambiar a un
dispositivo imprevisto.
Page 75

Paso 1-: conexión de un dispositivo de sonido de
5.1 canales
Conecte las tomas 5.1ch del procesador mediante el cable multicanal suministrado. La función
EFFECT proporciona una salida de sonido envolvente ampliado de 7.1 canales desde una fuente
de entrada de 5.1 canales.
1 Conecte el procesador al
dispositivo de sonido tal como se
indica en la siguiente ilustración.
Tomas de conexión del
dispositivo de sonido*
MIC IN
Conéctela a la toma MIC IN
L/R OUT
Conéctela a la toma L/R OUT
L/R OUT de sonido envolvente
Conéctela a la toma SL/SR OUT
OUT central/potenciador de graves
Conéctela a la toma C/SW OUT
Sin conexión
* El nombre de la toma varía en función del dispositivo de
sonido.
Panel posterior del procesador
2 Deslice el interruptor INPUT hasta “5.1ch”.
Panel frontal
del procesador
Nombres de
las clavijas de
los cables
MIC
L / R
SL / SR
C / SW
SBL / SBR
Cable multicanal
(suministrado)
3 Ajuste el modo de altavoz de 5.1 canales en el ordenador.
Para obtener más información sobre el funcionamiento del ordenador y el dispositivo de
sonido, consulte los respectivos manuales de instrucciones.
Cuando conecte el procesador al ordenador, no conecte el cable USB con un cable
multicanal al mismo tiempo, ya que el ajuste de sonido del ordenador podría cambiar a un
dispositivo imprevisto.
Conexión
ES
9
Page 76

10
ES
Conexión
Paso 1-: conexión de un dispositivo de sonido de 2
canales
Conecte las tomas 2ch del procesador mediante el cable multicanal suministrado. La función
EFFECT proporciona una salida de sonido envolvente ampliado de 7.1 canales desde una
fuente de entrada de 2 canales.
1 Conecte el procesador al
dispositivo de sonido tal como se
indica en la siguiente ilustración.
Tomas de conexión del
dispositivo de sonido*
MIC IN
Conéctela a la toma MIC IN
L/R OUT
Conéctela a la toma L/R OUT
Sin conexión
Sin conexión
Sin conexión
* El nombre de la toma varía en función del dispositivo
de sonido.
Panel posterior del procesador
2 Deslice el interruptor INPUT hasta “2ch”.
Panel frontal
del procesador
Nombres de
las clavijas de
los cables
MIC
L / R
SL / SR
C / SW
SBL / SBR
Cable multicanal
(suministrado)
3 Ajuste el modo de altavoz de 2 canales en el ordenador.
Para obtener más información sobre el funcionamiento del ordenador y el dispositivo de
sonido, consulte los respectivos manuales de instrucciones.
Cuando conecte el procesador al ordenador, no conecte el cable USB con un cable
multicanal al mismo tiempo, ya que el ajuste de sonido del ordenador podría cambiar a un
dispositivo imprevisto.
Page 77

Paso 1-: conexión al ordenador mediante el cable
USB
Conecte el puerto USB del ordenador al puerto USB del procesador mediante el cable USB
suministrado.
Aunque el procesador funciona como un dispositivo de sonido externo de 2 canales, las
funciones EFFECT proporcionan un sonido envolvente ampliado de 7.1 canales desde una
entrada de 2 canales.
1 Conecte el procesador al ordenador.
al puerto USB
al puerto USB
Cable USB específico
(suministrado)
Los sistemas operativos como Windows XP, Windows Vista, Windows 7 y Mac OS X incluyen
controladores USB. Los controladores USB se instalarán automáticamente cuando active el
procesador por primera vez después de conectar e iniciar el ordenador.
Al realizar la conexión a distintos puertos USB, es posible que el ordenador vuelva a instalar los
controladores USB.
Notas
No se garantiza que los auriculares funcionen con un concentrador USB o con un cable prolongador
USB. Utilice únicamente el cable USB suministrado.
Cuando los auriculares están conectados al ordenador, es posible que el nivel de volumen del ordenador
se ajuste al máximo. Baje el volumen del ordenador de antemano.
Es posible que el ordenador no pueda emitir el sonido de las transmisiones digitales a través de USB
cuando se realice la conexión mediante el cable USB. Conéctelo con el cable multicanal si no puede
escuchar el sonido de las transmisiones digitales (páginas de la 8 a la 10).
2 Deslice el interruptor INPUT hasta “USB”.
Panel frontal
del procesador
Ordenador
3 Compruebe la configuración de sonido del ordenador.
Para obtener más información sobre el funcionamiento del dispositivo de su ordenador,
consulte el respectivo manual de instrucciones.
Cuando conecte el procesador al ordenador, no conecte el cable USB con un cable
multicanal al mismo tiempo, ya que el ajuste de sonido del ordenador podría cambiar a un
dispositivo imprevisto.
Conexión
11
ES
Page 78

12
ES
Conexión
Paso 2: conexión del adaptador de ca
Conecte el adaptador de ca suministrado al procesador y, a continuación, conecte el adaptador
de ca a la toma de corriente de ca.
Panel posterior del
procesador
A la toma DC IN 5.2V
A la toma de corriente de ca
Adaptador de ca (suministrado)
Paso 3: preparación de los auriculares
1 Conecte la clavija (micrófono) de los auriculares a la toma HEADSET (MIC IN)
del procesador y conecte la clavija (auriculares) a la toma HEADSET (PHONES).
Panel posterior del procesador
Auriculares
Negro
Rojo
2 Ajuste la banda de los auriculares y póngase la almohadilla para el oído con la
marca en el oído derecho y la que lleva la marca en el oído izquierdo.
Existe un punto táctil en la
base del suspensor que
lleva la marca para
distinguir el lado
izquierdo.
Ajuste la posición del micrófono
para que recoja su voz de manera
efectiva.
Vuelva a colocar el micrófono en su
posición de descanso, cerca de la
almohadilla para el oído, cuando no
lo utilice.
Nota
Si la posición del micrófono no es correcta, la sensibilidad de este disminuirá y es posible que el sonido
procedente de los auriculares se introduzca en el micrófono.
Page 79

Paso 4: comprobación de la configuración del
ordenador
Comprobación de la configuración del dispositivo de sonido del
ordenador
Antes de utilizar el procesador, compruebe la configuración del dispositivo de sonido; para ello,
siga las instrucciones que se indican a continuación de acuerdo con su sistema operativo. Para
obtener más información sobre el funcionamiento del ordenador y el dispositivo de sonido,
consulte los respectivos manuales de instrucciones.
Para Windows
Windows XP en Vista por categorías
Haga clic en el menú [Inicio], seleccione [Panel de control], [Dispositivos de sonido, audio y
voz], [Dispositivos de sonido y audio] y la pestaña [Audio], a continuación, seleccione el
dispositivo de sonido normal (o [USB PnP Sound Device] si la conexión se realiza mediante el
cable USB suministrado) para [Dispositivo predeterminado] en el menú Reproducción de
sonido o Grabación de sonido.
Windows Vista
Haga clic en el menú [Inicio], seleccione [Panel de control], [Hardware y sonido], [Sonido] y la
pestaña [Reproducción] o [Grabar], a continuación, seleccione el dispositivo de sonido normal
(o [USB PnP Sound Device] si la conexión se realiza mediante el cable USB suministrado) para
el dispositivo de reproducción o el dispositivo de grabación y, a continuación, haga clic en
[Predeterminar].
Windows 7
Haga clic en el menú [Inicio], seleccione [Panel de control], [Hardware y sonido], [Sonido] y la
pestaña [Reproducción] o [Grabar], a continuación, seleccione el dispositivo de sonido normal
(o [USB PnP Sound Device] si la conexión se realiza mediante el cable USB suministrado) para
el dispositivo de reproducción o el dispositivo de grabación y, a continuación, haga clic en
[Predeterminar].
Para Macintosh
Mac OS X
Haga clic en el menú [Apple], seleccione [Preferencias del Sistema], [Sonido], la pestaña
[Salida] o [Entrada] y, a continuación, seleccione el dispositivo de sonido normal (o [USB PnP
Sound Device] si la conexión se realiza mediante el cable USB suministrado) para [Seleccione
un dispositivo para la salida de sonido] o [Seleccione un dispositivo para la entrada de sonido].
(Continuación)
Conexión
13
ES
Page 80

14
ES
Conexión
Ajuste del nivel de volumen del sonido
Cuando conecte el ordenador al procesador con el cable USB, ajuste el nivel de volumen
mediante el control VOL de los auriculares.
Cuando los conecte con el cable multicanal, además de poder ajustar el nivel de volumen
mediante el control VOL de los auriculares, también lo podrá hacer si cambia el nivel de
volumen del ordenador tal y como se indica a continuación.
Para Windows
Windows XP en Vista por categorías
Haga clic en el menú [Inicio] y seleccione [Panel de control], [Dispositivos de sonido, audio y
voz], [Dispositivos de sonido y audio]; en el menú Sonido, haga clic en [Volumen] y ajuste el
nivel de volumen general.
Windows Vista
Haga clic en el menú [Inicio] y seleccione [Panel de control], [Hardware y sonido], [Ajustar
volumen del sistema] y ajuste el nivel de volumen general.
Windows 7
Haga clic en el menú [Inicio] y seleccione [Panel de control], [Hardware y sonido], [Ajustar
volumen del sistema] y ajuste el nivel de volumen general.
Para Macintosh
Mac OS X
Haga clic en el menú [Apple], seleccione [Preferencias del Sistema], [Sonido] y la pestaña
[Salida], a continuación, ajuste el nivel de salida del altavoz.
Notas
En función del software, es posible que deba realizar algunos ajustes. Para obtener más información,
consulte el manual de instrucciones del software.
El volumen de los auriculares y el nivel de salida del ordenador no están sincronizados.
Ajuste para la reproducción de un CD de música
Esta configuración es necesaria cuando se reproduce un CD de música en la unidad de CDROM, si la conexión se realiza mediante el cable USB suministrado.
Siga las instrucciones que se indican a continuación de acuerdo con su sistema operativo y haga
clic en la casilla de verificación de [Habilitar audio digital de CD para este dispositivo de CDROM.]. Para Windows Vista, Windows 7 y Macintosh, el ajuste para la reproducción de un CD
de música no es necesario.
Para Windows XP en Vista por categorías
Haga clic en el menú [Inicio] y seleccione [Panel de control], [Dispositivos de sonido, audio y
voz], [Dispositivos de sonido y audio] y la pestaña [Hardware]. Seleccione la unidad de CDROM donde desea reproducir la música, haga clic en [Propiedades] y, a continuación, haga clic
en la pestaña [Propiedades]. Haga clic en la casilla de verificación de [Habilitar audio digital de
CD para este dispositivo de CD-ROM.].
Page 81

Ajuste del nivel de volumen del micrófono
Antes de utilizar el procesador, compruebe y ajuste el nivel de volumen del micrófono mediante
el ordenador. Siga las instrucciones que se indican a continuación de acuerdo con su sistema
operativo y compruebe o ajuste el nivel de volumen.
Para obtener más información sobre el funcionamiento del ordenador, consulte el respectivo
manual de instrucciones.
Para Windows
Antes de ajustar el volumen del micrófono, compruebe el nivel de entrada del micrófono; para
ello, realice una prueba de grabación con una grabadora de sonido o un dispositivo similar.
Windows XP en Vista por categorías
Haga clic en el menú [Inicio] y seleccione [Panel de control], [Dispositivos de sonido, audio y
voz], [Dispositivos de sonido y audio] y la pestaña [Audio]. En el menú Grabación de sonido,
compruebe que [Dispositivo predeterminado] esté ajustado en el dispositivo de sonido normal
(o en [USB PnP Sound Device] si la conexión se realiza mediante el cable USB suministrado);
en el menú Grabación de sonido, haga clic en [Volumen] y ajuste el nivel de entrada del
micrófono.
Windows Vista
Haga clic en el menú [Inicio], seleccione [Panel de control], [Hardware y sonido], [Sonido] y la
pestaña [Grabar], a continuación, seleccione el dispositivo de sonido normal (o [USB PnP
Sound Device] si la conexión se realiza mediante el cable USB suministrado) para el dispositivo
de grabación y haga clic en [Predeterminar]. Vuelva a seleccionar el dispositivo de sonido
normal (o [USB PnP Sound Device] si la conexión se realiza mediante el cable USB
suministrado), haga clic en [Propiedades], seleccione la pestaña [Niveles] y ajuste el nivel de
entrada del micrófono.
Windows 7
Haga clic en el menú [Inicio], seleccione [Panel de control], [Hardware y sonido], [Sonido] y la
pestaña [Grabar], a continuación, seleccione el dispositivo de sonido normal (o [USB PnP
Sound Device] si la conexión se realiza mediante el cable USB suministrado) para el dispositivo
de grabación y haga clic en [Predeterminar]. Vuelva a seleccionar el dispositivo de sonido
normal (o [USB PnP Sound Device] si la conexión se realiza mediante el cable USB
suministrado), haga clic en [Propiedades], seleccione la pestaña [Niveles] y ajuste el nivel de
entrada del micrófono.
Para Macintosh
Mac OS X
Haga clic en el menú [Apple], seleccione [Preferencias del Sistema], [Sonido] y la pestaña
[Entrada], a continuación, ajuste el nivel de entrada del micrófono.
Notas
El micrófono no admite el ajuste de silencio en el dispositivo de grabación de audio del ordenador.
Deslice el interruptor MIC MUTING de los auriculares hasta el ajuste de silencio “ON” del micrófono.
En función del software, es posible que deba realizar algunos ajustes. Para obtener más información,
consulte el manual de instrucciones del software.
Conexión
15
ES
Page 82

16
ES
Utilización
Utilización
Cómo escuchar sonidos
1 Encienda el ordenador conectado.
2 Pulse el interruptor
El indicador de alimentación del procesador se ilumina en blanco.
Si conecta el puerto USB del ordenador al puerto USB del procesador mediante el cable
USB suministrado, los controladores USB se instalarán automáticamente cuando active el
procesador por primera vez después de que se haya conectado e iniciado el ordenador.
3 Póngase los auriculares.
(Consulte la página 12)
4 Inicie la reproducción desde el ordenador.
Ajuste del volumen
Ajuste el nivel de volumen de los auriculares y establezca el modo de silencio del micrófono.
VOL (volumen)
Ajuste el nivel de volumen
de los auriculares.
MIC MUTING
ON: el micrófono está
ajustado en el modo MIC
MUTING ON.
OFF: el micrófono está
ajustado en el modo MIC
MUTING OFF.
Notas
Cuando vea películas, tenga cuidado de no subir demasiado el volumen en las escenas silenciosas, ya que
cuando se reproduzca una escena de volumen elevado podría dañar sus oídos.
El volumen de los auriculares y el nivel de salida del ordenador no están sincronizados. Asimismo, tenga
en cuenta que el modo de silencio del micrófono no está sincronizado.
Es posible que los auriculares no puedan emitir la música o el sonido si los conecta al procesador
mediante el cable USB y desliza el interruptor INPUT hasta “USB” mientras utiliza el software de música.
En este caso, reinicie el software de música.
/ (encendido/en espera) para encender el procesador.
Page 83

Selección del campo de sonido preferido (función EFFECT)
El interruptor EFFECT le permite seleccionar el campo de sonido preferido.
Si está conectado con 5.1 canales, 2 canales o un USB cuando se ha seleccionado “FPS” o
“SURROUND”, la decodificación Dolby Pro Logic IIx incorporada proporcionará una
sensación de realismo similar a 7.1 canales. Sin embargo, si la posición del interruptor INPUT
no coincide con la conexión, la función EFFECT no funcionará correctamente.
Panel frontal del procesador
Posición del interruptor Modo de campo de sonido y fuente de sonido adecuada
FPS (Disparo en primera
persona)
SURROUND Esta configuración proporciona una reproducción perfecta de todos los canales.
OFF Se emite sonido de 2 canales.
Esta configuración proporciona la clara localización de los sonidos respecto de la
imagen.
Este es el ajuste recomendado para FPS cuando es necesario que la localización de
los sonidos se perciba con precisión. El sonido es agradable para el oyente, natural,
claro y realista. Se caracteriza por la localización de todos los canales, que se
perciben de manera muy nítida.
El sonido global se percibe más como un conjunto que con el modo FPS y, en
general, proporciona el mejor campo de sonido para la reproducción de juegos de
sonido envolvente multicanal. Asimismo, está recomendado para ver películas.
Una fuente multicanal (7.1 canales o 5.1 canales) se rebaja a un sonido de
2 canales.
Nota
La función EFFECT no funciona para las fuentes de sonido monoaural.
Acerca de las propiedades del sonido con la función EFFECT
La función EFFECT no se puede obtener de las fuentes de sonido que no incorporan vídeo, como los CD
de música.
La tecnología VPT (Virtualphones Technology) simula la función HRTF (head-related transfer
function)* media de los humanos. El efecto se percibe de manera distinta en función de cada persona.
* HRTF = Head-Related Transfer Function. Es una medida matemática que muestra los cambios de sonido
entre la fuente y nuestros oídos.
(Continuación)
Utilización
17
ES
Page 84

18
ES
Utilización
Conversión del sonido para que se oiga sin esfuerzo (función
COMPRESSION)
Deslice el interruptor COMPRESSION hasta ON/OFF.
Esta función mantiene el nivel global del material del programa: se atenúan los sonidos explosivos y
aumenta el volumen de los sonidos de nivel más bajo (pasos o similares). Es muy efectivo para limitar el
material de las fuentes de alto rango dinámico.
Panel frontal del procesador
Nota
Compruebe cuidadosamente el control de volumen con la función COMPRESSION.
Con la función COMPRESSION activada, es posible que el sonido parezca de volumen elevado cuando la
señal de audio proveniente del ordenador sea comparativamente de volumen bajo. En este caso, suba el
volumen del ordenador de manera gradual y establézcalo donde el sonido global sea coherente. Si ocurre a
la inversa, es posible que tenga la sensación de que el sonido es demasiado bajo. En este caso, baje el
volumen del ordenador de manera gradual y establézcalo para obtener el sonido global más coherente.
Ilustración del proceso de compresión
explosión
rango dinámico
conversación
pasos, ruido de fondo
señal de entrada
compresión
señal de salida
Compresión de rango dinámico mediante
un procesador DSP (Procesador de
señales digitales) incorporado
explosión
conversación
pasos, ruido de fondo
estándar
Inaudible
rango dinámico
Fácil de oír
Difícil de oír
Page 85

Ajuste del nivel de volumen desde el dispositivo de sonido
OFF
AUTO STANDBY
ON
(GAIN CONTROL)
La función GAIN CONTROL permite ajustar el volumen de acuerdo con la salida nominal del
dispositivo de sonido (la configuración inicial es “8”). Aumente el valor de GAIN CONTROL a
más de “8” si el volumen de salida es bajo, incluso si el volumen del dispositivo de sonido está
maximizado. En cambio, si el sonido está distorsionado, baje el nivel de volumen de la salida
del dispositivo de sonido.
Panel posterior del procesador
Gírelo hacia la
izquierda para
bajar el nivel
Salida nominal del
dispositivo de sonido
Más de 2Vrms Ajuste el nivel de GAIN CONTROL en “8” y, a continuación, ajuste el dispositivo
2Vrms Este procesador se ha calibrado para una emisión estándar de 2Vrms hacia el
Menos de 2Vrms De “8” a “10”, es el ajuste de nivel de GAIN CONTROL para obtener el volumen
Nivel de GAIN CONTROL
de salida de audio para bajar el volumen de sonido.
dispositivo de sonido cuando el valor de GAIN CONTROL esté ajustado en “8”.
más elevado.
Gírelo hacia la
derecha para
subir el nivel
Ajuste del sistema para que entre automáticamente en el modo de
espera (función AUTO STANDBY)
El procesador entra automáticamente en el modo de espera si no recibe sonido durante unos
30 minutos.
Puede activar o desactivar (ON/OFF) la función AUTO STANDBY mediante el interruptor
AUTO STANDBY.
Panel posterior del procesador
Posición del interruptor Efecto
ON La función AUTO STANDBY se activará. Vuelva a encender el sistema; para ello,
pulse el interruptor / (encendido/en espera).
OFF La función AUTO STANDBY se desactivará.
Utilización
19
ES
Page 86

20
ES
Información adicional
Información adicional
Solución de problemas
Si se encuentra con algún problema al utilizar este sistema, consulte la siguiente lista de
verificación. Si el problema persiste, consulte con el distribuidor Sony más cercano.
Problema Causa y solución
No hay sonido
Sonido distorsionado o
intermitente (a veces con
ruido)
Sonido de volumen bajo
Compruebe la conexión entre el procesador y el ordenador.
Encienda el ordenador que está conectado al procesador e inicie la
reproducción.
Encienda el procesador.
El ajuste de INPUT no coincide con el método de conexión real. (Ejemplo: la
señal de entrada es de USB, pero el ajuste de INPUT es 7.1ch, etc.)
Ajuste el interruptor INPUT en la señal de entrada adecuada.
Suba el volumen de los auriculares.
Conecte la clavija de los auriculares correctamente.
Suba el nivel de volumen del ordenador y del software de reproducción de
música.
El sistema se ha conectado mientras se reproducía el software de música.
Reinicie el software de música.
El dispositivo de sonido del ordenador no se ha ajustado correctamente
(página 13).
El control de volumen del ordenador o el software de reproducción de música,
etc., está ajustado en el modo de silencio.
Desactive el modo de silencio.
El nivel de GAIN CONTROL es “0”.
Suba el valor de GAIN CONTROL.
El ordenador no reconoce los auriculares como un dispositivo USB si se realiza
la conexión mediante el cable USB suministrado.
Reinicie el ordenador.
La unidad de CD-ROM del ordenador no admite la función de reproducción
digital si se realiza la conexión mediante el cable USB suministrado.
Utilice una unidad de CD-ROM que sea compatible con la función de
reproducción digital.
Las transmisiones digitales casi no se pueden oír con la conexión USB.
Conecte el ordenador mediante el cable multicanal (páginas de la 8 a la 10).
Se ha activado el modo AUTO STANDBY porque no se ha recibido ningún
sonido durante aproximadamente 30 minutos.
Vuelva a encender el procesador.
Baje el nivel de volumen del ordenador conectado.
Suba el nivel de volumen del ordenador conectado y del software de
reproducción de música.
Suba el volumen de los auriculares.
Suba el valor de GAIN CONTROL.
Page 87

Problema Causa y solución
Ruido de fondo alto
No se obtiene el efecto de
sonido envolvente
El sonido se interrumpe
El micrófono no emite
ningún sonido
El micrófono emite sonido
de volumen bajo
El sonido grabado
proveniente del micrófono
contiene ruido
El micrófono emite sonido
distorsionado
El interruptor MIC
MUTING no funciona
Es posible invertir los
ajustes de nivel de salida del
ordenador del altavoz
central y del altavoz
potenciador de graves.
Si conecta el procesador a un ordenador mediante el cable multicanal, suba el
nivel de volumen del dispositivo de sonido conectado.
Aleje el procesador del ordenador.
El ajuste de INPUT no coincide con el método de conexión real. (Ejemplo: la
señal de entrada es de 2 canales, pero el ajuste de INPUT es de 7.1 canales, etc.)
Ajuste el interruptor INPUT en la señal de entrada adecuada.
Ajuste el interruptor EFFECT en “FPS” o “SURROUND” (página 17).
El efecto de sonido envolvente no funciona para las fuentes de sonido
monoaural.
El ajuste de INPUT no coincide con el método de conexión real. (Ejemplo: la
señal de entrada es de 2 canales, pero el ajuste de INPUT es de 7.1 canales, etc.)
Ajuste el interruptor INPUT en la señal de entrada adecuada.
La CPU del ordenador se sobrecarga si la conexión se realiza mediante el cable
USB suministrado.
Cierre las aplicaciones que no sean necesarias.
Hay otros dispositivos USB conectados al ordenador que se utilizan
simultáneamente mientras está conectado mediante el cable USB suministrado.
Desactive los otros dispositivos USB.
Conecte la clavija del micrófono correctamente.
El interruptor MIC MUTING de los auriculares está ajustado en “ON”.
Deslice el interruptor MIC MUTING hasta “OFF”.
El dispositivo de grabación de audio del ordenador no se ha ajustado
correctamente (página 13).
Conecte la clavija del micrófono correctamente.
Desplace el micrófono hasta colocarlo en la posición correcta.
El nivel de volumen del micrófono se ha ajustado demasiado bajo en el
ordenador.
Suba el nivel de volumen del micrófono en el ordenador.
Cerca de los auriculares (especialmente, cerca del micrófono) hay cables
eléctricos, lámparas fluorescentes o teléfonos móviles.
Aléjese de cualquier posible fuente de interferencias electromagnéticas.
El sonido de los auriculares se ha filtrado hacia el micrófono.
Desplace el micrófono hasta colocarlo en la posición correcta.
El nivel de volumen del micrófono se ha ajustado demasiado alto en el
ordenador.
Baje el nivel de volumen del micrófono en el ordenador.
La entrada de micrófono del ordenador ya está ajustada en el modo de silencio.
Cancele el ajuste de silencio del micrófono en el ordenador.
En función del ordenador, es posible invertir los ajustes de nivel de salida del
ordenador del altavoz central y del altavoz potenciador de graves. Antes de
cambiar el nivel de salida del ordenador, consulte el manual de instrucciones
para obtener información detallada sobre el funcionamiento del ordenador.
Información adicional
21
ES
Page 88

22
ES
Información adicional
Precauciones
Seguridad
No deje caer, ni golpee ni exponga el procesador
o los auriculares a impactos fuertes de ningún
tipo, ya que se podrían dañar.
No desmonte ni intente abrir ninguno de los
componentes del sistema.
Es posible que la almohadilla para los oídos y la
almohadilla para la cabeza se deterioren con el
paso del tiempo a causa de las condiciones de
almacenamiento y del uso.
Ubicación
No coloque el sistema en ninguna de las
siguientes ubicaciones.
– Lugares expuestos a la luz solar directa, cerca
de un calefactor o en cualquier otro lugar con
temperaturas extremadamente altas
– Lugares con mucho polvo
– Sobre una superficie inclinada o inestable
– Lugares expuestos a vibraciones intensas
– En el baño o en cualquier otro lugar con una
humedad elevada
Sobre el adaptador de ca
Asegúrese de utilizar el adaptador de ca
suministrado. El uso de adaptadores de ca con
polaridades de clavija diferentes u otras
características distintas pueden provocar un fallo
de funcionamiento del producto.
Sobre los auriculares
Respeto por los demás
Si el volumen es demasiado alto, el sonido se emite
fuera de los auriculares. Tenga cuidado de no subir
demasiado el volumen porque podría molestar a la
gente de su alrededor.
Existe la tendencia de subir el volumen cuando se
utilizan en lugares ruidosos. No obstante, por
motivos de seguridad, se recomienda mantener el
volumen a un nivel en el que aún pueda oír los
sonidos de su alrededor.
Limpieza
Utilice un paño suave ligeramente humedecido con
una solución de detergente suave. No utilice
disolventes como diluyentes, bencina o alcohol, ya
que pueden dañar la superficie.
Si el producto se rompe
Si el producto se rompe o si un objeto extraño se
introduce en la unidad, desconecte la
alimentación inmediatamente y consulte con el
distribuidor Sony más cercano.
Cuando lleve el sistema al distribuidor Sony,
asegúrese de llevar tanto el procesador como los
auriculares.
Clavija de polaridad unificada
Asegúrese de utilizar siempre el adaptador de ca
suministrado. Incluso los adaptadores de ca que
tienen el mismo voltaje y la misma polaridad de
enchufe pueden dañar este producto, debido a la
capacidad de corriente o a otros factores.
Si no va a utilizar el sistema durante un largo
período de tiempo, desenchúfelo del adaptador
de ca.
Page 89

Especificaciones
Procesador de sonido envolvente digital
(DP-GA500)
Funciones del decodificador
Dolby Pro Logic IIx
Función de sonido envolvente virtual
OFF
SURROUND
FPS
Función de compresión
OFF
ON
Respuesta en frecuencia
De 20 a 20.000 Hz
Tasa de distorsión
Del 1% o inferior (1 kHz)
Tomas de entrada/salida
Toma USB
Tomas 7.1ch/5.1ch/2ch (SBL/SBR, C/SW,
SL/SR, L/R, MIC OUT) (minitomas estéreo)
Tomas HEADSET (PHONES, MIC IN)
(minitoma estéreo)
Requisitos de alimentación
cc de 5,2 V (desde el adaptador de ca
suministrado)
Dimensiones
Aprox. 190 × 30 × 117 mm (an/al/prf)
Masa Aprox. 310 g
Entorno operativo Ordenador compatible
IBM PC/AT u ordenadores compatibles
Apple Macintosh
CPU: Pentium II 266 MHz o superior
Puerto USB*
Sistemas operativos compatibles:
Windows 7
Starter/Home Basic/Home Premium/
Professional/Ultimate
Windows Vista
Home Basic/Home Premium/Business/
Ultimate
Windows XP
Home Edition (SP2 o posterior)/Professional
(SP2 o posterior)/Media Center Edition 2004
(SP2 o posterior)/Media Center Edition 2005
(SP2 o posterior)
Mac OS X (10.3 o posterior)
1
Auriculares estéreo (DR-GA210)
Cable 1,5 m
Clavija Miniclavija estéreo dorada
Masa Aprox. 240 g (sin el cable)
Auriculares
Tipo Abierto, dinámico
Unidad auricular
40 mm, tipo cúpula (CCAW adoptado)
Capacidad de potencia
1.000 mW (IEC*2)
Impedancia
De 40 Ω a 1 kHz
Sensibilidad
100 dB/mW
Respuesta en frecuencia
De 14 a 22.000 Hz
Micrófono
Diseño Micrófono con dispositivo extensible
Tipo Condensador de electreto
Nivel de voltaje del circuito abierto
-38 dB (0 dB = 1 V/Pa)
Rango de frecuencias efectivo
De 20 a 20.000 Hz
Accesorios suministrados
Adaptador de ca (5,2 V) (1)
Cable multicanal (7.1ch+MIC) (1)
Cable USB específico (1)
Tarjeta de garantía (1)
Manual de instrucciones (1)
*1 El procesador admite USB 2.0 (USB 2.0 de alta
velocidad).
*2 Probado por la IEC (Comisión Electrotécnica
Internacional).
No se garantiza que los auriculares sean
compatibles con todos los ordenadores del
entorno operativo mencionado anteriormente.
No se garantiza que los auriculares sean
compatibles con ordenadores ensamblados y
sistemas operativos que el usuario ha actualizado
ni con ordenadores con varios sistemas
operativos.
No se garantiza que los auriculares sean
compatibles con algunas funciones del
ordenador, como la suspensión, el reposo o la
hibernación del sistema.
El diseño y las especificaciones están sujetos a
cambios sin previo aviso.
Información adicional
23
ES
Page 90

Page 91

Page 92

Printed in Malaysia
 Loading...