

Page 1
Wireless Stereo
Headset
4-108-812-42(1)
DR-BT160iK
©2008 Sony Corporation
Operating Instructions
Manual de instrucciones
US
ES
Page 2

US US
32
WARNING
To reduce the risk of fire or
electric shock, do not expose
this apparatus to rain or
moisture.
To reduce the risk of electrical
shock, do not open the cabinet.
Refer servicing to qualified
personnel only.
Do not install the appliance in a
conned space, such as a bookcase or
built-in cabinet.
To reduce the risk of re, do not cover
the ventilation of the apparatus with
newspapers, tablecloths, curtains, etc.
And do not place lighted candles on
the apparatus.
To reduce the risk of re or electric
shock, do not place objects lled
with liquids, such as vases, on the
apparatus.
Connect the AC power adaptor to an
easily accessible AC outlet. Should
you notice an abnormality in the AC
power adaptor, disconnect it from the
AC outlet immediately.
Do not expose the battery to excessive
heat such as direct sunlight, re or
the like.
Excessive sound pressure from
earphones and headphones can cause
hearing loss.
iPod is a trademark of Apple, Inc.,
registered in the U.S. and other
countries.
e Bluetooth word mark and logos
are owned by the Bluetooth SIG, Inc.
and any use of such marks by Sony
Corporation is under license.
Other trademarks and trade names are
those of their respective owners.
MPEG Layer-3 audio coding
technology and patents licensed from
Fraunhofer IIS and omson.
Owner’s Record
For Bluetooth headset, the model
number and the serial number are
located at the rear of the right housing.
For Bluetooth transmitter, the model
number and the serial number are
located on the rear of the transmitter.
Record these numbers in the spaces
provided below. Refer to them
whenever you call upon your Sony
dealer regarding this product.
Model No. DR-BT160AS
Serial No.
Model No. TMR-BT8iP
Serial No.
Information
is device complies with Part 15 of
FCC Rules and RSS-Gen of IC Rules.
Operation is subject to the following
two conditions: (1) this device may
not cause interference, and (2) this
device must accept any interference,
including interference that may cause
undesired operation of this device.
You are cautioned that any changes or
modications not expressly approved
in this manual could void your
authority to operate this equipment.
is equipment must not be co-located
or operated in conjunction with any
other antenna or transmitter.
Page 3

32
is equipment complies with FCC/IC
radiation exposure limits set forth for
uncontrolled equipment and meets the
FCC radio frequency (RF) Exposure
Guidelines in Supplement C to OET65
and RSS-102 of the IC radio frequency
(RF) Exposure rules. is equipment
has very low levels of RF energy that it
is deemed to comply without testing of
specic absorption ratio (SAR).
Note
is equipment has been tested and
found to comply with the limits for
a Class B digital device, pursuant
to Part 15 of the FCC Rules. ese
limits are designed to provide
reasonable protection against
harmful interference in a residential
installation. is equipment generates,
uses and can radiate radio frequency
energy and, if not installed and used in
accordance with the instructions, may
cause harmful interference to radio
or television reception, which can be
determined by turning the equipment
o and on, the user is encouraged to
try to correct the interference by one
or more of the following measures:
– Reorient or relocate the receiving
antenna.
– Increase the separation between the
equipment and receiver.
– Connect the equipment into
an outlet on a circuit dierent
from that to which the receiver is
connected.
– Consult the dealer or an
experienced radio/TV technician
for help.
RECYCLING LITHIUM-ION
BATTERIES
Lithium-Ion batteries
are recyclable.
You can help preserve
our environment by
returning your used
rechargeable batteries
to the collection and
recycling location nearest you.
For more information regarding
recycling of rechargeable batteries, call
toll free 1-800-822-8837, or visit
http://www.rbrc.org/
Caution: Do not handle damaged or
leaking Lithium-Ion batteries.
Informations
Cet appareil est conforme à la section 15
de la réglementation FCC ainsi qu’à la
RSS-Gen de la réglementation IC. Son
utilisation est autorisée seulement aux
conditions suivantes : (1) il ne doit pas
produire de brouillage et (2) l’utilisateur
du dispositif doit être prêt à accepter
tout brouillage radioeléctrique reçu,
même si ce brouillage est susceptible
de compromettre le fonctionnement du
dispositif.
Vous devez savoir que tout changement
ou toute modication non expressément
approuvé dans ce mode d’emploi risque
d’annuler votre pouvoir d’utiliser cet
appareil.
Cet équipement est conforme aux
limitations concernant l’exposition
aux radiations établies par la FCC/IC
dénies dans un environnement non
contrôlé ainsi qu’aux directives relatives
à l’exposition aux fréquences radio
(RF) FCC du supplément C du bulletin
OET65 et au règlement RSS-102 relatif
à l’exposition aux radiofréquences (RF)
IC. Cet équipement présente des niveaux
d’énergie RF très bas considérés comme
conformes et ne nécessite pas de test du
débit d’absorption spécique (SAR).
32
Page 4
US US
54
i
P
o
d
n
a
n
o
3
r
d
g
e
n
e
r
a
t
i
o
n
(
v
i
d
e
o
)
i
P
o
d
t
o
u
c
h
i
P
o
d
c
l
a
s
s
i
c
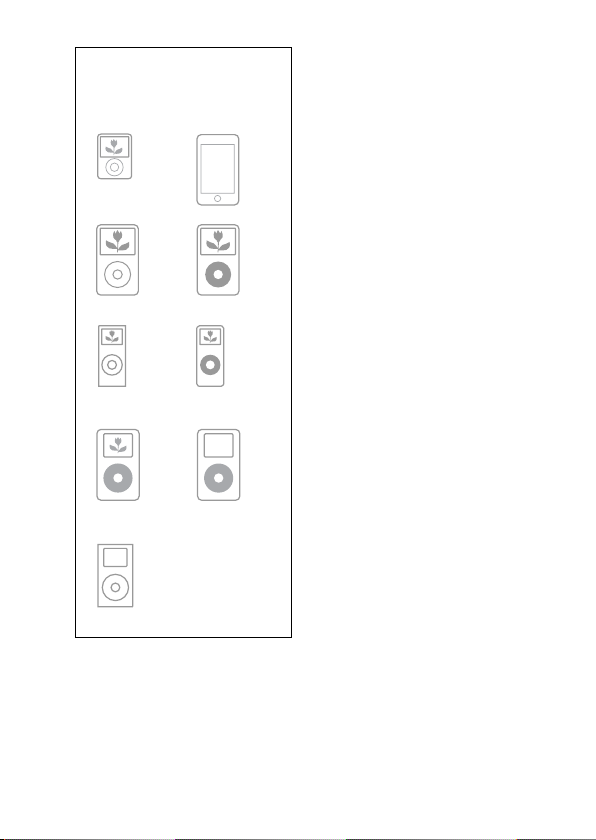
Compatible iPod models
The compatible iPod models are as
follows. Update your iPod to use
the latest software before you use it.
i
P
o
d
5
t
h
g
e
n
e
r
a
t
i
o
n
(
v
i
d
e
o
)
i
P
o
d
n
a
n
o
2
n
d
g
e
n
e
r
a
t
i
o
n
(
a
l
u
mi
n
u
m
)
iPodnano
1st generation
iPod 4th
generation
(color display)
iPod 4th
generation
iPod mini
Notes
This Bluetooth transmitter is designed for
•
iPod only. You cannot connect any other
portable audio players.
Sony cannot accept responsibility in the
•
event that data recorded to iPod is lost or
damaged when using an iPod connected to
Bluetooth transmitter.
this
Page 5

54
Table of Contents
WARNING ................................... 2
What is
Bluetooth wireless
technology? ........................... 6
Welcome! ................................... 7
Getting Started
Checking supplied items ........8
Location and Function of
Parts ......................................... 9
Bluetooth headset .......................... 9
Bluetooth transmitter .................10
Basic use of headset ..............11
Charging the headset ................11
Wearing ........................................... 14
Connecting to an iPod ...........16
Operating
Listening to music of the
iPod ........................................18
Controlling an iPod with the
headset .................................20
Advanced operation
Pairing with other Bluetooth
devices ..................................21
What is pairing? ............................ 21
Pairing transmitter with other
Bluetooth receiving devices ...21
Pairing headset with other
Bluetooth transmitting
devices ........................................... 24
Re-pairing the transmitter and
the headset ..................................27
Calling with headset ..............28
Preparation for calling
(Bluetooth connection) ............28
To receive a call.............................30
To call ............................................... 30
To terminate a call ....................... 30
Controlling the Bluetooth
mobile phone – HFP, HSP........ 31
Calling while playing back
music .....................................32
Additional Information
Precautions .............................33
Troubleshooting .....................36
Initializing ................................38
Initializing the transmitter ........38
Initializing the headset ..............38
Specications ..........................39
General ............................................39
Transmitter .....................................39
Headset ...........................................39
US
54
Page 6

What is Bluetooth wireless
technology?
Bluetooth® wireless technology is
a short-range wireless technology
that enables wireless data
communication between digital
devices, such as a computer or
digital camera. Bluetooth wireless
technology operates within a range
of about 10 meters (about 30 feet).
Connecting two devices as necessary
is common, but some devices can be
connected to multiple devices at the
same time.
You do not need to use a cable for
connection, nor is it necessary for
the devices to face one another, such
is the case with infrared technology.
For example, you can use such a
device in a bag or pocket.
Bluetooth standard is an
international standard supported
by thousands of companies all over
the world, and employed by various
companies worldwide.
Communication System
and Compatible Bluetooth
Profiles of this product
Prole is standardization of the
function for each Bluetooth device
specication. is product supports
the following Bluetooth version and
proles:
Communication System :
Bluetooth Specication version 2.0 +
1
EDR*
Compatible Bluetooth Proles:
– A2DP (Advanced Audio Distribution
Prole)
– AVRCP (Audio/Video Remote Control
Prole)
(e following two proles are headset
only.)
– HSP (Headset Prole)*
phone/Operating the phone.
– HFP (Hands-free Prole)*
on the phone/Operating the phone by
hands-free.
*1 Enhanced Data Rate
*2 When you use a Bluetooth mobile
phone supported by both HFP (Handsfree Prole) and HSP (Headset Prole),
set to HFP.
Notes
• To be able to use the Bluetooth function,
the Bluetooth device to be connected
requires the same prole as this
product’s.
Note also that even if the same prole
exists, devices may vary in function
depending on their specications.
• Due to the characteristic of
wireless technology, the sound played
on this product is slightly delayed from
the sound played on the Bluetooth
device during listening to the music or
talking on the telephone.
2
: Talking on the
2
: Talking
Bluetooth
US
6
Page 7
Welcome!
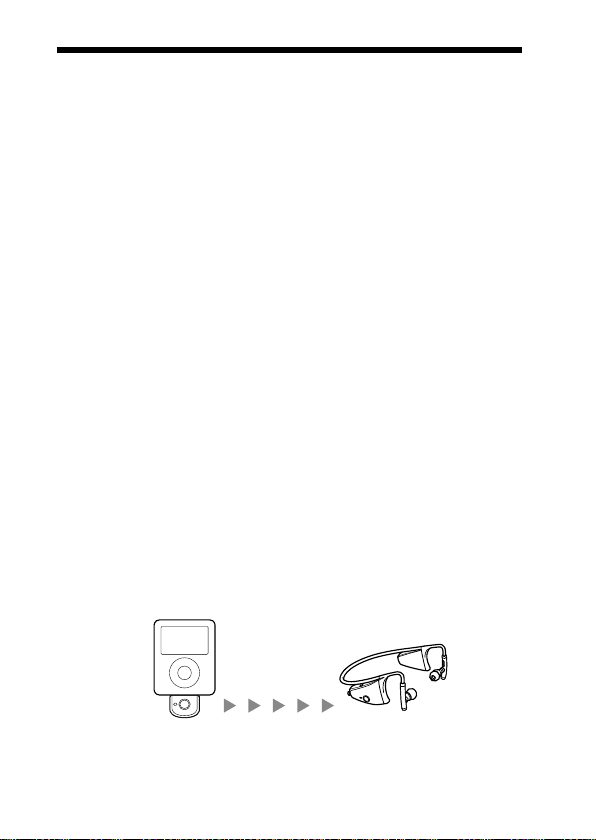
is product is an audio kit comprising of a transmitter and headset using
Bluetooth wireless technology.
You can enjoy music wirelessly by transmitting the audio signals to a headset
by connecting the Bluetooth transmitter to iPod (see page 4 for compatible
iPod models) with the iPod connector* (30 pin).
* iPod connector is a dedicated multiple connector for connecting accessories to
your iPod.
is product’s features are as follows:
Wireless headset and transmitter for streaming of high-quality stereo music
•
from iPod.
Transmits music to headset using
•
Headset and transmitter have been pre-paired for easy connection and use.
•
Ultra secure, lightweight and balanced t with dual support mechanism
•
and adjustable earpiece sha for active use (for headset only).
So and exible contoured design for comfortable over-the-ear t (for
•
headset only).
Water resistant (for headset only).
•
Basic remote control operation (play, pause, etc.) of iPod functions by
•
included headset via Bluetooth connection.
Transmitter power supplied from iPod so no additional battery or charging
•
is needed (for transmitter only).
Bluetooth version 2.0 + EDR*1 for higher quality audio with less
•
interference and lower power consumption.
You can enjoy listening to music wirelessly by using the transmitter and the
•
headset separately to be used together with other Bluetooth devices*2.
*1 Enhanced Data Rate
2
*
e connected Bluetooth device is required to support A2DP (Advanced Audio
Distribution Prole).
iPod with dock
connector port
(30 pin)
Bluetooth
transmitter
Bluetooth wireless technology.
Bluetooth
headset
Tip
For details on Bluetooth wireless technology, see page 6.
US
7
Page 8
Getting Started
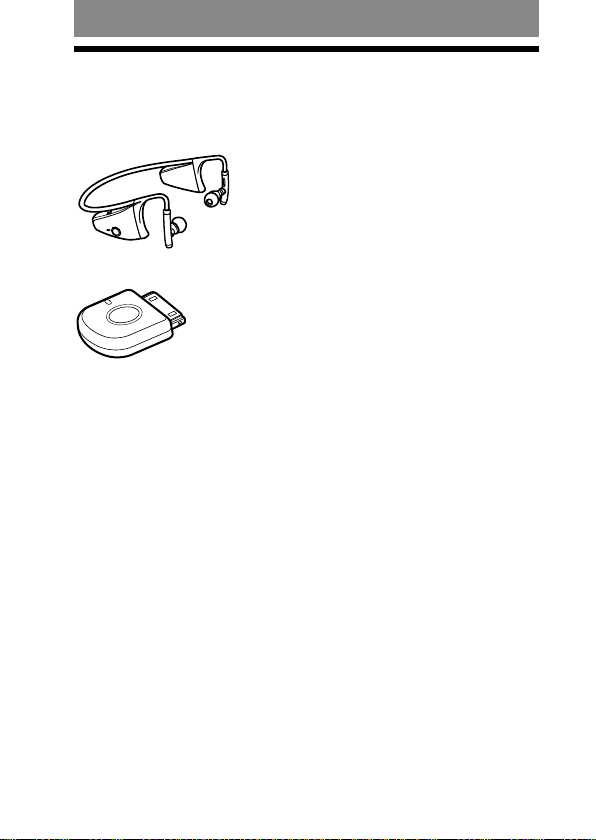
Checking supplied items
Bluetooth headset DR-BT160AS (1)
•
Bluetooth transmitter TMR-BT8iP (1)
•
AC power adaptor (1)
•
Operating Instructions (this book) (1)
•
Warranty Card (1)
•
US
8
Page 9

Location and Function of Parts
Bluetooth headset
1 Microphone
2 Indicator (red)
Indicates the power status of
the headset.
3 Indicator (blue)
Indicates the communication
status of the headset.
4 POWER button
5 Earpiece
6 RESET button
Push this button when the
headset does not operate
properly. Pairing information
is not deleted by this
operation.
7 PAIRING button
8 Multi function
button
Controls various call
functions.
9 Jog switch
Controls various functions
when listening to music.
Adjust the volume of the
headset when talking over
the telephone.
0 DC IN 3 V jack
US
9
Page 10

US US
1110
Bluetooth transmitter
iPod connector (30 pin)
Connects to the dock
connector of an iPod
(page 16).
Transmitter indicator
Indicates the transmitter’s
status (page 23).
Hereaer, “Bluetooth headset” is abbreviated as “headset,” and “Bluetooth
transmitter” as “transmitter.”
Power button
Performs the following:
• Turning on/o of the
transmitter (page 16).
• Pairing (page 21).
• Initializing the
transmitter (page 38).
Page 11
1110
Basic use of headset
Charging the headset
e headset contains a rechargeable Lithium-Ion battery, which
should be charged before using for the rst time.
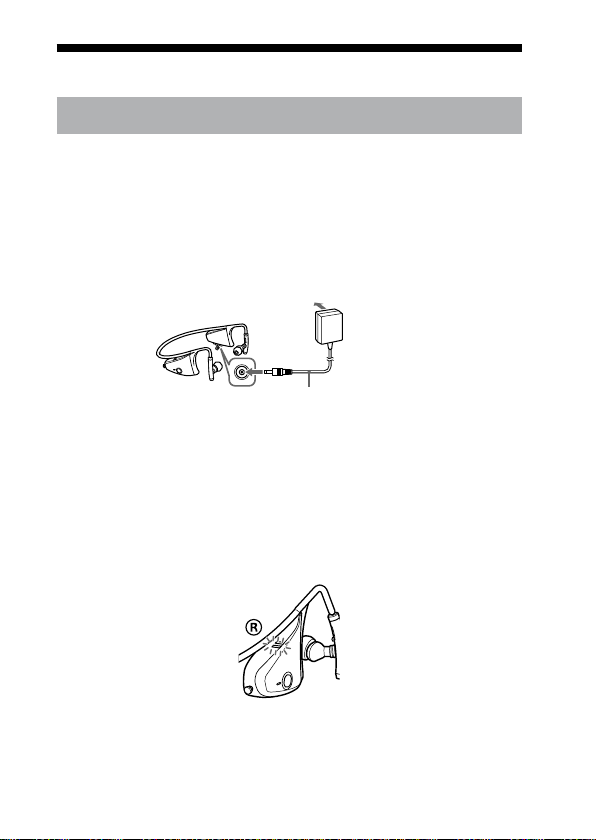
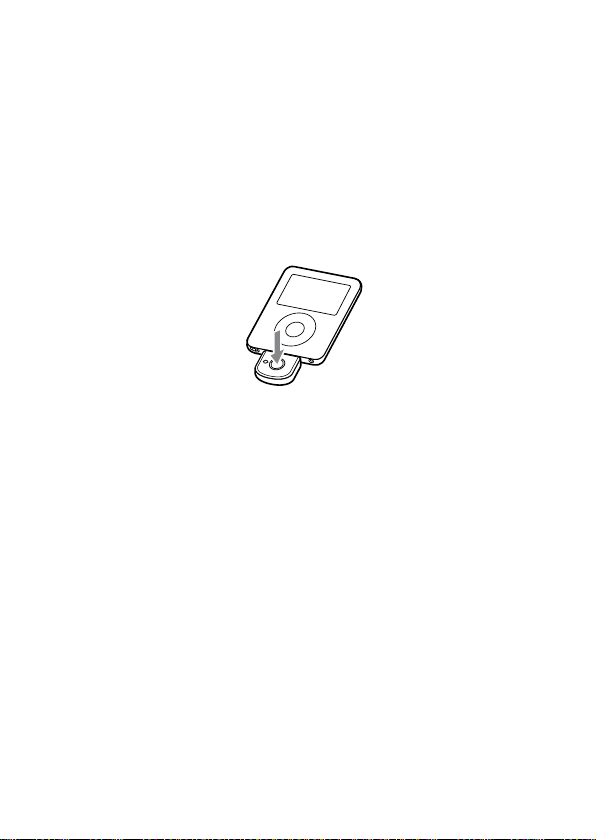
1 Remove the cover attached to the DC IN 3 V jack on the headset.
2
Connect the supplied AC power adaptor to the DC IN 3 V jack on the
headset.
Wireless Stereo
Headset
To an AC outlet
To DC IN 3 V jack
When the AC power adaptor is connected to an AC outlet,
charging starts.
Tips
f the AC power adaptor is connected to an AC outlet while the headset is
I
turned on, the headset will be turned o automatically.
The headset cannot be turned on while charging.
3
Make sure that headset indicator (red) lights up while charging.
Charging is completed in about 2.5 hours* and the headset
indicator (red) goes o automatically.
* Time required for empty battery to recharge.
AC power adaptor (supplied)
Continued
1110
Page 12

US US
1312
Notes
If this unit is not used for a long time, the headset indicator (red) may not light
•
up when you connect the AC power adaptor to charge this unit. In this case, do
not disconnect the AC power adaptor from the unit and wait until the headset
indicator (red) lights up.
To close the cover of the DC IN 3 V jack aer completion of charging, push in
•
the cover securely until it is pressed against the jack.
Caution
If the headset detects a problem while charging, the headset indicator (red) may
turn o, although charging is not complete.
Check for the following causes:
– Ambient temperature exceeds the range of 0 °C – 45 °C (32 °F – 113 °F).
– ere is a problem with the battery.
In this case, charge again within the above-mentioned temperature range.
If the problem persists, consult your nearest Sony dealer.
Notes
If the battery is not used for a long time, battery may be quickly depleted,
•
however, aer a few recharges, battery life will improve.
If the life of the built-in rechargeable battery drops to half the normal length, the
•
battery should be replaced. Consult your nearest Sony dealer for replacement of
the rechargeable battery.
Avoid exposure to temperature extremes, direct sunlight, moisture, sand, dust or
•
mechanical shock. Never leave in a car parked in the sun.
Use only the supplied AC power adaptor. Do not use any other AC power
•
adaptor.
Battery usage hours
*
Status Approx. usage hours
Communication time (including music
7 hours
playback time) (up to)
Standby time (up to) 100 hours
* Time stated above may vary, depending on ambient temperature or conditions
of use.
Page 13

1312
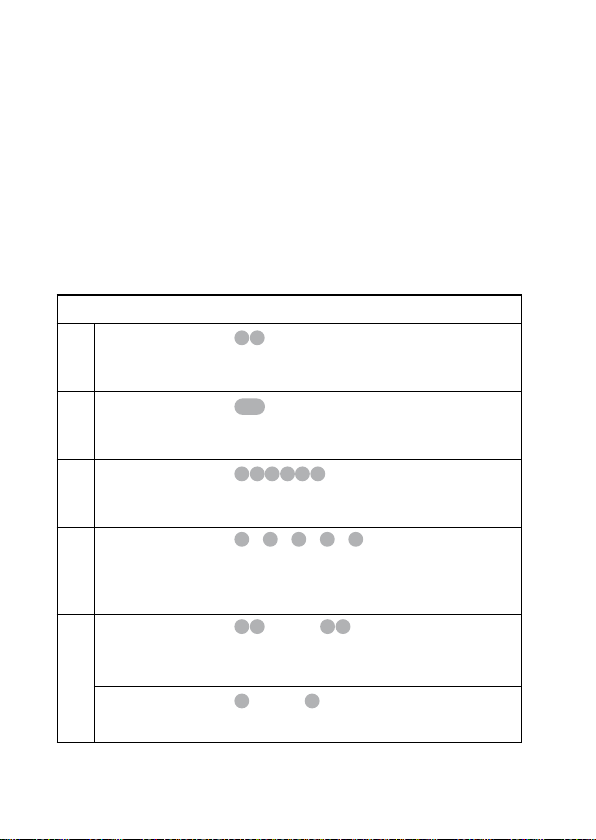
Checking the remaining battery
When pressing the POWER button while the headset is turned on,
the headset indicator (red) ashes. You can check the remaining
battery by the number of times the headset indicator (red) ashes.
Headset Indicator (red)
3 times Full
2 times Mid
1 time Low (needs to charge)
Note
You cannot check the remaining battery immediately aer the headset is turned on,
or while pairing.
When the battery is almost empty
e headset indicator (red) ashes slowly automatically.
When the battery becomes empty, a beep sounds and the headset will turn o
automatically.
Status
Continued
1312
Page 14
14
US
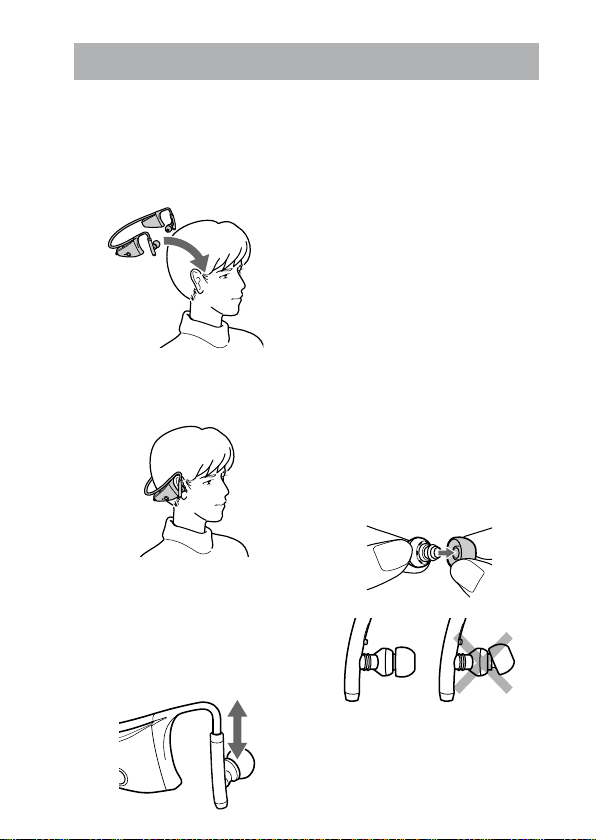
Wearing
1
Place the hangers on both
ears.
e headset with the
POWER button is for the
right ear.
2
Adjust the neckband and
the earpiece angle for a
comfortable fit.
How to install the earbuds
correctly
If the earbuds do not fit your ears
correctly, low-bass sound may not
be heard. To enjoy better sound
quality, change the earbuds to
another size, or adjust the earbuds
position to sit on your ears
comfortably and fit your ears
snugly.
The M size earbuds are attached to
the headphones before shipment.
If you feel the M size earbuds do
not suit your ears, replace them
with the supplied S or L size
earbuds.
When you change the earbuds,
install them firmly on the
headphones to prevent the earbuds
from detaching and remaining in
your ear. Rotate the earpieces to
ensure a secure fit.
Adjust
the length of the
adjustable earpiece shaft.
Adjust the angle of the
adjustable earpiece sha
so that the earpieces t
comfortably in your ears.
Page 15
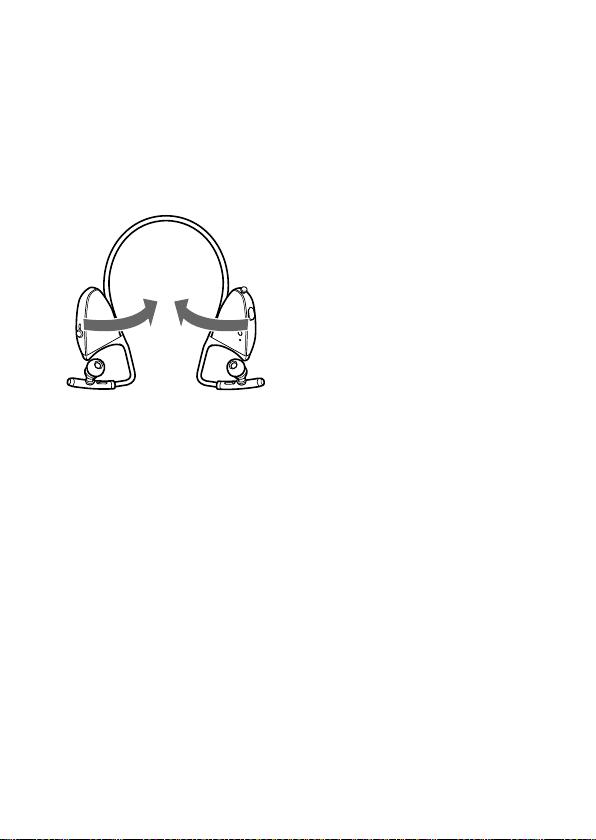
If the hanger is open,
If the headset is le unused for
a long time, the hanger may
be open as shown in the gure
below. In this case, twist the
hanger in the arrow direction to
restore its original shape before
use.
US
15
Page 16

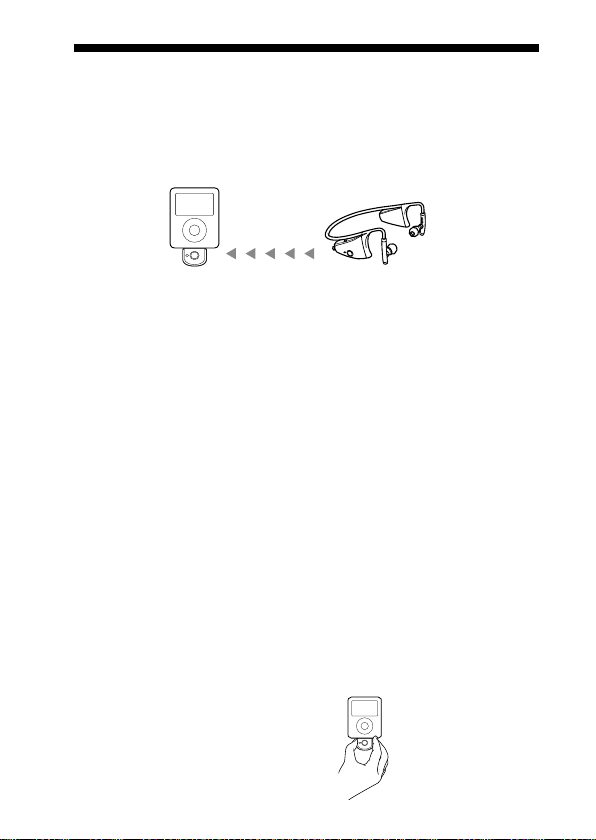
Connecting to an iPod
Connect the transmitter to the dock connector port of an iPod (see
page 4 for compatible iPod models) rmly.
Dock connector port
(30 pin)
Power button
To turn on the transmitter
1
Connect the transmitter to the iPod.
2
Press the power button of the transmitter for about 1 second to
turn it on, or start to play back on iPod.
When the transmitter turns on, the indicator ashes twice.
Note
If the transmitter cannot turn on, operate the iPod.
To turn o the transmitter
To turn o the transmitter, press and hold the transmitter’s power
button for about 1 second. e
the transmitter turns o.
Tip
Maximum communication time or standby time may vary depending on your
iPod.
transmitter
indicator ashes once and
US US
Page 17

Notes
To listen to music from the headphone jack of the iPod, disconnect the
•
transmitter from the iPod.
While the transmitter is turned on, it consumes power from the iPod. We
•
recommend disconnect the transmitter from iPod when not using the Bluetooth
function.
If the headphone is connected to the iPod while the iPod is playing back, it
•
consumes power from iPod.
If you turn o the transmitter while the iPod is playing back, iPod will power o.
•
It is not recommended to turn o iPod as the linkage will lost between the
•
transmitter and the Bluetooth receiving device.
T
here is no need to charge the transmitter as it will receive power from the connected
•
iPod. It is recommended to check the iPod’s remaining battery before using.
US
1716
17
Page 18

US US
1918
Operating
Listening to music of the iPod
You can listen to music of the iPod (see page 4 for compatible iPod
models) on the headset.
1
Press and hold the POWER button on the headset for about 2
seconds.
e headset indicator (blue) and headset indicator (red) ash
together twice and the headset is turned on.
2
Connect the transmitter to the iPod then turn on the iPod and
start playback on the iPod.
e transmitter indicator status will vary as follows, and the
Bluetooth connection between the transmitter and the headset is
established.
Transmitter indicator ashes twice: Power is on
Transmitter indicator ashes (at about 1-second intervals):
Connecting in process
Transmitter indicator ashes twice slowly (at about 5-second
intervals): Connected (Playback will start automatically)
If the Bluetooth connection is not established within 5 minutes*,
the transmitter automatically turns itself o. In this case, turn
it on again by pressing and holding the power button on the
transmitter for about 1 second.
* iPod backlight may turn on in this 5 minutes.
Notes
If the Bluetooth connection cannot be established with the headset paired
•
already, try pairing again (page 27).
•
If playback cannot start automatically, try start playback on iPod.
•
If you press and hold the power button on the transmitter for about 1
second, the transmitter will connect to the iPod and start playback
automatically.
Even if you control the volume on the iPod, sound from the headset will not
•
change.
Page 19

1918
If the transmitter and the headset become out of range and the Bluetooth
•
connection terminates, repeat the procedure from step 1.
Playback through a Bluetooth connection may cause noise, sound break, or
•
playback speed change depending on the location and the usage (page 33).
Tip
You can control the volume on the headset. (e volume of the iPod is not
changed.) You can also fast-forward or fast-rewind while playing back (page
20).
1918
Page 20
US US
2120
Controlling an iPod with the headset
You can control an iPod (see page 4 for compatible iPod models)
using the control button of the headset.
Before starting remote control operation, check that step 1 and 2 of
“Listening to music of the iPod” are completed (page 18).
Transmitter
Remote control
Bluetooth headset
(playback, pause, etc.)
Control for the iPod
You can playback or pause the iPod by pressing the button on
the headset.
You can turn o the iPod and transmitter by pressing and holding
the button on the headset for more than 2 seconds.
Control music
You can skip forward or backward each song on the iPod by pressing
the / button. You can also fast-forward or fast-rewind
songs by holding down the / button.
Notes
Even if you control the volume on the iPod, the volume of the headset does not
•
change.
When operating the iPod by remote control, do not cover the transmitter with
•
your hands, etc.
You may need to press the play/pause button twice depending on the Bluetooth
•
receiving device.
You may need to press the play/pause button of the Bluetooth receiving device
•
twice when you operate the button on the iPod.
Operation of the iPod with the transmitter by the Bluetooth receiving device will
•
vary depending on the Bluetooth receiving device’s specication.
When the iPod is playing a video or photo, remote control operation may
•
become unstable.
Tip
When you press the pause button on the
Bluetooth receiving device, the iPod goes
to pause mode for 10 minutes and the iPod
backlight is turns on and o at interval.
Do not cover the
transmitter with hands.
Page 21

2120
Advanced operation
Pairing with other Bluetooth devices
What is pairing?
Bluetooth devices need to be “paired” with each other beforehand.
Once Bluetooth devices are paired, there is no need for pairing again,
except in the following cases:
• Pairing information is deleted aer repair, etc.
•
is product is paired with 9 or more receiving devices.
is product can be paired with up to 8 Bluetooth device respectively.
If a new device is paired aer 8 devices have been paired, the device
whose latest connection time is the oldest among the 8 paired devices
is replaced by the new one.
• is product is initialized.
All pairing information is deleted (page 38).
Pairing transmitter with other Bluetooth receiving devices
1
Turn on the power of iPod.
(Make sure the iPod is in pause mode.)
2
Connect the transmitter to the iPod (page 16).
3
Place the transmitter and the Bluetooth receiving device to be
paired together within 1 m (3 ft).
4
Set the Bluetooth receiving device to enter “Pairing in process.”
See the operating instructions supplied with the Bluetooth
receiving device.
Notes
Passcode* of the transmitter is xed at “0000,” “1234,” or “8888.”
•
Depending on the Bluetooth receiving device, it may be necessary to input
the passcode (in this case, “0000,” “1234,” or “8888”). e transmitter
cannot be paired with a Bluetooth receiving device whose passcode is not
“0000,” “1234,” or “8888.”
If the Bluetooth receiving device requires a passcode, input “0000.”
•
* Passcode may be called “Passkey
“Password.”
,” “PIN code,” “PIN number, ” or
Continued
2120
Page 22
US US
2322
5
Press and hold the power button of the transmitter for about 7
seconds or more to enter “Pairing in process.”
Aer about 1 second, the transmitter indicator will ash twice,
but keep pressing the power button.
Notes
When rst power on the transmitter aer initialized, the transmitter will
•
enter “Pairing in process” automatically.
e pairing information is initialized if you press and hold the power button
•
for 15 seconds. e transmitter indicator lights up for 5 seconds before the
initialization starts. Release the button immediately when the transmitter
indicator lights up.
When the transmitter indicator ashes quickly, stop pressing.
e transmitter enters “Pairing in process.”
e transmitter indicator status will vary as follows, and pairing
is established with the Bluetooth receiving device.
e transmitter indicator ashes quickly: Pairing in process
e transmitter indicator ashes (at about 1-second intervals)
when responding to the Bluetooth receiving device: Connectable
(Pairing successful)
e transmitter indicator ashes (at about 5-second intervals):
Connected
Notes
“Pairing in process” of the transmitter is released aer about 5 minutes. If
•
pairing is not established within about 5 minutes, repeat the above procedure
from step 4. iPod backlight may turn on in this 5 minutes.
•
To enter “Pairing in process,” you need to turn o the power of the
transmitter rst.
When not completed pairing
Repeat the procedure from step 2.
Page 23
2322
To quit “Pairing in process”
Press and hold the power button of the transmitter for about 1 second to turn o
the transmitter.
Tip
When pairing the transmitter with a number of Bluetooth receiving devices, repeat
steps 3 to 5 for each device individually.
Note
For using the Bluetooth function, it is required that the Bluetooth device on the
other side is corresponding with the same prole as the transmitter. However, even
if it is corresponding with the same prole, functions may dier depending on the
specication of the Bluetooth device.
On Transmitter Indicators
Status Indicator
Flashes twice
Power on
Flashes once
Power o
Flashes quickly
Pairing
Flashes
(at about 1-second
intervals)
Connecting
Listening *1
(ashes twice at
about 5-second
intervals)
With no music *
Connected
(ashes once at about
5-second intervals)
– – – – – …
– – – – – – – – – –
2
– – – – –
...
– – – – –
…
…
Continued
2322
Page 24
US US
2524
*1 When press on the iPod, the music pause. e indicator ashes twice on the
transmitter. e transmitter transmit the data of no sound.
*2 When press the pause button on the Bluetooth receiving device, the music pause.
e indicator ashes once on the transmitter. e transmitter does not transmit
the music.
Pairing headset with other Bluetooth transmitting devices
1
Place the Bluetooth transmitting device to be paired together
within 1 m (3 ft) of the headset.
2
Press and hold the PAIRING button of the headset for about 2
seconds or more to enter “Pairing in process” while the headset is
turned o.
Release the PAIRING button when the headset indicator starts
ashing quickly. e headset enters the pairing process.
3
Turning Bluetooth transmitting device to pairing standby
mode.
See the operating instructions supplied with the Bluetooth
transmitting device.
e list of detected devices appears on the display of the
Bluetooth transmitting device.
e headset is displayed as “DR-BT160AS.”
is headset indicator status will vary as follows, and pairing is
established with the Bluetooth transmitting device.
Page 25

2524
e headset indicator ashes quickly: Pairing in process
e headset indicator ashes (at about 1-second intervals) when
responding to the Bluetooth transmitting device: Connectable
(Pairing successful)
e headset indicator ashes (at about 5-second intervals):
Connected
Note
Passcode* of the headset is xed at “0000.” Depending on the Bluetooth
receiving device, it may be necessary to input the passcode (in this case,
“0000”). e headset cannot be paired with a Bluetooth receiving device
whose passcode is not “0000.”
* Passcode may be called “Passkey,” “PIN code,” “PIN number,” or “Password.”
When not completed pairing
Repeat the procedure from step 2.
To quit “Pairing in process”
Press and hold the POWER button of the headset for about 3 seconds to turn o
the headset.
Note
For using the Bluetooth function, it is required that the Bluetooth device on the
other side is corresponding with the same prole as the headset. However, even if
it is corresponding with the same prole, the function may dier depending on the
specication of the Bluetooth device.
Continued
2524
Page 26

US US
2726
On Headset Indicators
Status Indicator
Searching
Pairing
Connectable
Connecting
Connecting
HFP/HSP or A2DP
(Standby for receiving audio
signal)
HFP/HSP and
A2DP
Connected
(Standby for receiving audio
signal)
Listening
Music
Listening during
standby for
telephone call
Incoming call
Talking
Phone
Calling while
playing back music
B
R
B
–
R
B
R
B
–
R
B
–
R
B
–
R
B
–
R
B
–
R
B
–
R
B
–
R
B : Headset indicator (blue)
R : Headset indicator (red)
– – – – – – – – …
– – – – – – – –
…
– – – – – – – – – – …
– – – – – – – – – – …
– – – – – – – – – –
– – – – – – – – – – – – – –
– – – – –
– – – – – – – – – – – –
– – –
– – – – – – –
…
– – – –
– – – – – – – – – – – –
– – – – – – –
…
…
…
…
– – –
…
– – –
…
…
Page 27

2726
Re-pairing the transmitter and the headset
1
Turn on the power of iPod.
(Make sure the iPod is in pause mode.)
2
Connect the transmitter to the iPod (page 16).
3
Place the transmitter and the headset to be paired together
within 1 m (3 ft).
4
Press and hold the PAIRING button of the headset for about 2
seconds or more to enter “Pairing in process” wh ile the hea dse t
is tu rned off.
e headset indicator (red) and the headset indicator (blue) will
ash together and the headset enters into pairing mode.
5
Press and hold the power button of the transmitter for about 7
seconds or more to enter “Pairing in process.”
Aer about 1 second, the transmitter indicator will ash twice,
but keep pressing the power button.
Notes
When rst power on the transmitter aer initialized, the transmitter will
•
enter “Pairing in process” automatically.
e pairing information is initialized if you press and hold the power button
•
for 15 seconds. e transmitter indicator lights up for 5 seconds before the
initialization starts. Release the button immediately when the transmitter
indicator lights up.
Pairing in process” is released aer about 5 minutes. If pairing is not
•
established within about 5 minutes, repeat the above procedure from step 4.
iPod backlight may turn on in this 5 minutes.
To enter “Pairing in process,” you need to turn o the power of the
•
transmitter rst.
2726
Page 28

US US
2928
Calling with headset
Preparation for calling (Bluetooth connection)
Check the following before operating the headset.
– T
he Bluetooth function is active on the mobile phone.
– Pairing of the headset and the
complete.
1
Press and hold the POWER button for about 3 seconds while the
headset is turned o.
e headset indicator (blue) and headset indicator (red) ash
together twice, the headset turns on and then the headset tries to
connect to the last Bluetooth mobile phone that was used.
Tip
e headset will stop trying to connect to the Bluetooth mobile phone aer 1
minute. In such a case, press the multi function button to try to connect again.
Bluetooth mobile phone is
VOL +
Headset indicator (blue)
Headset indicator (red)
POWER button
VOL –
Multi function button
When the headset does not connect to a Bluetooth mobile phone
automatically
You can make a connection by operating Bluetooth mobile phone or by operating
the headset to connect the last connected Bluetooth device.
Page 29

2928
To make a connection by operating Bluetooth mobile
phone
1
Make the Bluetooth connection (HFP or HSP*) from the Bluetooth
mobile phone to the headset.
Refer to the manual supplied with your Bluetooth mobile phone
for operation details.
e list of recognized devices appears on the display of the
Bluetooth mobile phone. e headset is displayed as
“DR-BT160AS.”
When you use the Bluetooth mobile phone features both HFP
(Hands-free Prole) and HSP (Headset Prole), set to HFP.
Note
When connecting to a Bluetooth mobile phone which is dierent from the last
connected one, make the connection following the above procedure.
* For details on proles, see page 6.
To make a connection with the last connected Bluetooth
device by operating the headset.
1
Press the multi function button.
e headset indicator (blue) and headset indicator (red)
start ashing at the same time, and the headset performs the
connection operation for about 5 seconds.
Note
When listening to music with this headset, a Bluetooth connection cannot be
made with the multi function button.
To adjust the volume
Press the VOL + or – button.
Tips
You cannot adjust the volume when not communicating.
•
Volume level for calling and listening to music can be set independently.
•
Even if you change the volume while playing back the music, the volume of a call
does not change.
Continued
2928
Page 30

US US
3130
To receive a call
When an incoming call arrives, a ring tone will be heard from the
headset.
1
Press the multi function button on the headset.
e ring tone diers in the following ways, depending on your
mobile phone.
– ring tone set on the headset
– ring tone set on the mobile phone
– ring tone set on the mobile phone only for
Note
If you received a call by pressing the button on the Bluetooth mobile phone,
some Bluetooth mobile phones may have handset use priority. In this case, set
to talk with the headset by pressing and holding the multi function button for
about 2 seconds, or by operating the Bluetooth mobile phone. For details, refer
to the manual supplied with your Bluetooth mobile phone.
Bluetooth connection
To call
1
Use the buttons on your mobile phone when making a call.
If no dial tone is heard on the headset, press and hold the multi
function button for about 2 seconds.
Tip
You can call in the following way, depending on the Bluetooth mobile phone. Refer
to the manual supplied with your mobile phone on operating details.
– When not communicating, you can call using the voice-dial function by
pressing the multi function button.
– You can call the last dialled number by pressing the multi function button for
about 2 seconds.
To terminate a call
You can end a call by pressing the multi function button on the
headset.
Page 31

3130
Controlling the Bluetooth mobile phone – HFP, HSP
e operation of the buttons on the headset varies depending on
your mobile phone.
HFP (Hands-free Prole) or HSP (Headset Prole) is used for
Bluetooth mobile phone. Refer to the operating instructions supplied
with your Bluetooth mobile phone on supported Bluetooth proles
or how to operate.
HFP (Hands-free Prole)
Bluetooth
mobile phone
Status
Standby Start Voice Dial
Voice Dial active Cancel Voice Dial
Outgoing call End outgoing call Change call device
Incoming call Answer Reject
During call End call Change call device
HSP (Headset Prole)
Bluetooth
mobile phone
Status
Standby Dial
Outgoing call End outgoing call
Incoming call Answer
During call End call
*1 Some functions may not be supported depending on the Bluetooth mobile
phone. Refer to the operating instructions supplied with your mobile phone.
*2 is may vary, depending on the Bluetooth mobile phone.
*3 Some functions may not be supported when calling using the Bluetooth mobile
phone.
Multi function button
Short Press Long Press
1
*
*
Multi function button
Short Press Long Press
1
*
3
*
Last number redial
1
1
*
End outgoing call or change
call device to headset*
Change call device to headset
2
3130
Page 32

Calling while playing back music
e Bluetooth connection using HFP or HSP as well as A2DP is
necessary to make a call while playing back music.
For example, to make a call using a Bluetooth mobile phone while
listening to music on a Bluetooth compatible music player, the
headset needs to be connected to the mobile phone using HFP or
HSP.
Make a Bluetooth connection between the headset and the
device in use following the procedures outlined below.
1
Make a Bluetooth connection between the headset and the mobile
phone in use with HFP or HSP following the procedures outlined in
“Calling with headset” (page 28).
2
Make a Bluetooth connection between the transmitter and the
headset (page 18).
To make a call while playing back music
1
Press the multi function button while playing back music (page
31), or operate your Bluetooth mobile phone to make a telephone
call.
If no dial tone is heard on the headset, press and hold the multi
function button for about 2 seconds.
To receive a call while playing back music
When an incoming call arrives, the music pauses and the ring tone
is heard from the headset.
1
Press the multi function button and talk.
Aer nishing the call, press the multi function button. e
headset is switched back to music playback.
When no ring tone is heard even if an incoming call arrives
1
Stop music playback.
2
When ringing, press the multi function button and talk.
US US
Page 33

Additional Information
Precautions
On Bluetooth communication
• Bluetooth wireless technology operates
within a range of about 10 meters
(about 30 feet).
Maximum communication range
may vary depending on obstacles
(human body, metal, wall, etc.) or
electromagnetic environment.
Steel cabinet
The transmitter
Optimal performance
Limited performance
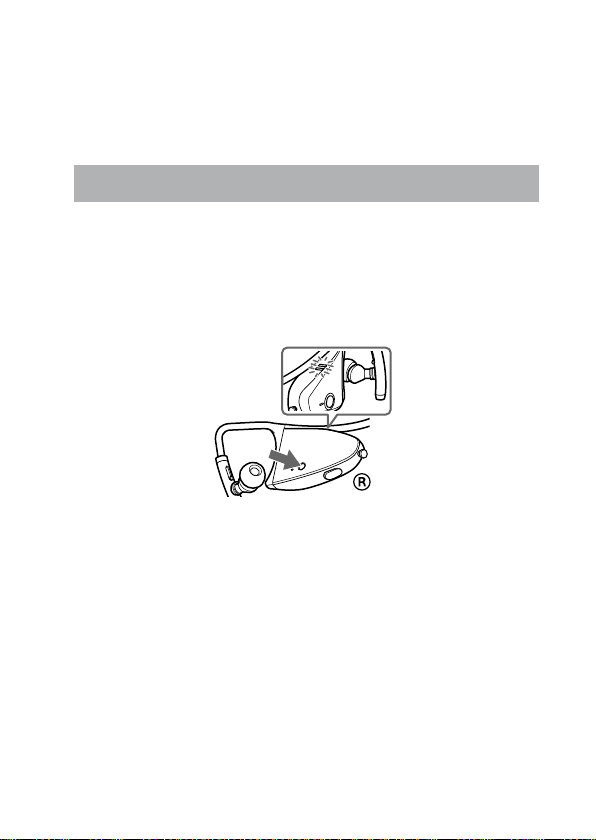
• e aerial of the headset is built into
the right housing as illustrated in the
dotted line.
e aerial of the transmitter is shown
as illustrated in the dotted line.
Location of
built-in aerial
e sensitivity of the Bluetooth
communication will improve by
turning the direction of the built-in
aerial to the connected Bluetooth
device.
e communication distance shortens
when the obstacles are between the
aerial of the connected device and this
product.
• e following conditions may cause
noise, sound break or playback speed
change.
– When using inside the metal bag.
– When using inside the backpack or
shoulder bag.
– A device using 2.4 GHz frequency,
such as a wireless LAN device,
cordless telephone, or microwave
oven, is in use near this product.
Bluetooth devices and
• Because
wireless LAN (IEEE802.11 b/g) use
the same frequency, microwave
interference may occur and resulting
in communication speed deterioration,
noise, or invalid connection if this
product is used near a wireless LAN
device. In such a case, perform the
following.
– Install this product and
device as near to each other as
possible.
– If this product is used within about
10 meters (about 30 feet) of a
wireless LAN device, turn o the
wireless LAN device.
Bluetooth
Location of
built-in aerial
Continued
33PB
Page 34

3534
• Microwaves emitting from a Bluetooth
device may aect the operation of
electronic medical devices. Turn o
this unit and other Bluetooth devices in
the following locations, as it may cause
an accident.
where inammable gas is present,
–
in a hospital, train, airplane, or a
petrol station
– near automatic doors or a re alarm
• is unit supports security capabilities
that comply with the Bluetooth
standard to provide a secure
connection when the Bluetooth
wireless technology is used, but
security may not be enough depending
on the setting. Be careful when
communicating using Bluetooth
wireless technology.
• We do not take any responsibility
for leakage of information during
Bluetooth communication.
• Connection with all
cannot be guaranteed.
– A device featuring
function is required to conform to
the Bluetooth standard specied
by Bluetooth Sig, Inc. and be
authenticated.
Even if the connected device
–
conforms to the above mentioned
Bluetooth
may not be connected or work
correctly, depending on the features
or specications of the device.
• Depending on the device to be
connected, communication may take
some time.
Bluetooth devices
Bluetooth
standard, some devices
On safety
• Do not drop, hit, or otherwise expose
the product to strong shock of any
kind. is could damage the product.
• Do not disassemble or attempt to open
any parts of the product.
On placement
• Do not place the product in any of the
following locations.
– Direct sunlight, near a heater, or
other extremely high-temperature
location
– Dusty location
– An unsteady or inclined surface
– Location exposed to large amounts
of vibration
– Bathroom or other high-humidity
location
– In a car subject to the direct rays of
the sun
Note on using in a car
Do not attempt to connect this
product, or to operate this product,
an audio output device or a car radio
while driving or waiting at a trac
signal.
Cleaning
Clean the product with a so, dry
cloth, or a so cloth lightly moistened
with a mild detergent solution. Do not
use any type of solvent, such as alcohol
or benzene, which may damage the
nish.
US US
Page 35

3534
On splash proof structure
e headset has splash proof structure
which prevents the function of the
headset from being aected by splash of
water (except for earpiece and AC power
adaptor). However, the headset cannot
be used in water. Take the following
precautions.
• Do not put the headset in water or use
it in a place with high humidity such as
bathroom.
• In the event water is spilled on the
earpiece, wipe o the water with a dry
cloth, etc. to dry the earpiece before
using the headset.
On the supplied AC power
adaptor
• Use the AC power adaptor supplied
with this product. Do not use any
other AC power adaptor since it may
cause the headset to malfunction.
Polarity of the plug
• If you are not going to use the AC
power adaptor for a long time, unplug
it from the AC outlet. To remove
the AC power adaptor from the wall
outlet, grasp the adaptor plug itself;
never pull the cord.
Others
• Be careful not to pinch your ngers
when folding the headset.
• Using the
• If you experience discomfort aer
• Listening with this product at high
• Do not put weight or pressure on this
• e ear pads are consumable. ey
• If you have any questions or problems
Bluetooth device may not
function on mobile phones, depending
on radio wave conditions and location
where the equipment is being used.
using the Bluetooth device, stop using
the Bluetooth device immediately.
Should any problem persist, consult
your nearest Sony dealer.
volume may aect your hearing. For
trac safety, do not use this product
while driving or cycling.
product as it may cause the product to
deform during long storage.
may deteriorate due to long-term
storage or use. Replace with new ones
if they are damaged.
concerning this product that are not
covered in this manual, please consult
your nearest Sony dealer.
Note on static electricity
In particularly dry air conditions, mild
tingling may be felt on your ears. is is
a result of static electricity accumulated
in the body, and not a malfunction of the
headphones.
e eect can be minimized by wearing
clothes made from natural materials.
3534
Page 36

3736
Troubleshooting
If you run into any problems using this product, use the following
checklist and read the product support information on our website.
Should any problem persist, consult your nearest Sony dealer.
Symptom Cause / Remedy
e transmitter is
not turned on.
(Or turns o shortly
aer turning on.)
e headset is not
turned on.
No sound
Low sound level
Cannot change the
volume.
Distorted sound
Press and hold the transmitter’s power button for
about 1 second.
Check the remaining battery of the iPod. If the
remaining battery is not enough, charge the iPod.
Reset your iPod.
If your iPod have no content, add some content to
your iPod.
Charge the battery of the headset.
e headset is not turned on while charging. Unplug
the headset from AC power adaptor and then turn on
the headset.
Check the connection between the transmitter and
the iPod.
Check that both the transmitter and the headset are
turned on.
Ensure that the transmitter is not too far from the
headset, or this product is not receiving interference
from a wireless LAN, other 2.4 GHz wireless device,
or microwave oven.
Pair the transmitter and the headset again (page 27).
Check that music is being played back by the iPod.
Check that the volume of the headset is not set too
low.
Turn up the volume of the headset as high as possible
to the extent that sound is not distorted.
Change the volume on the headset.
Turn down the volume of the headset to the point
where the sound is no longer distorted.
Ensure that this product is not receiving interference
from a wireless LAN, other 2.4 GHz wireless device,
or microwave oven.
Turn o the EQ of iPod.
US US
Page 37

3736
Symptom Cause / Remedy
Sound break, noise
or playback speed
change.
e headset does not
operate properly.
Pairing cannot be
established.
Bluetooth connection
cannot be established
with a device that
has been “paired”
before.
Cannot make
the Bluetooth
connection.
Cannot make the
Bluetooth connection
from your mobile
phone to the headset.
If a device that generates electromagnetic radiation,
such as a wireless LAN, other Bluetooth device(s), or
a microwave oven is nearby, move away from such
sources.
Remove any obstacle between the transmitter and the
headset or move away from the obstacle.
Locate the transmitter and the headset as near as
possible.
Re-position or re-orient the transmitter and the
headset.
Reset the headset. Pairing information is not deleted
by this operation.
Insert a small pin, etc., into the hole, and push until
you feel a click.
Locate the transmitter and the headset as near as
possible.
Check if you input correct passcode of the
transmitter (page 21).
Check if you input correct passcode of the headset
(page 25).
Locate the transmitter and other Bluetooth device(s)
as near as possible.
Pairing information may be deleted. Pair the device
again.
Check that this product is turned on.
e Bluetooth connection is terminated. Make the
Bluetooth connection again.
Press the multi function button of the headset. (e
Bluetooth connection is unavailable during music
playback on the headset.)
Perform the Bluetooth connection with the Bluetooth
compatible mobile phone. (For details on how to
operate the Bluetooth compatible mobile phone, see
the operating instructions supplied with it.)
3736
Page 38

Initializing
Initializing the transmitter
You can reset the transmitter to its default and delete all pairing
information.
1
Connect the transmitter to the iPod.
2
Press and hold the power button for more than about 15 seconds.
During these 15 seconds, the transmitter indicator changes in
sequence as follows:
–
ash (at about 1 second intervals) for about 5 seconds
– ash quickly for about 5 seconds
– lights up for about 5 seconds
– ash 4 times
en, the transmitter is reset to default setting and all pairing
information is deleted.
Note
Do not operate your iPod while initializing the transmitter.
Initializing the headset
You can reset the headset to its default (such as volume setting) and
delete all pairing information.
1
If the headset is turned on, press and hold the POWER button for
about 3 seconds to turn o the headset.
2
Press and hold the POWER button and multi function button
together for about 7 seconds.
e headset indicator (blue) and the headset indicator (red)
ash together four times, and the headset is reset to the default
setting. All pairing information is deleted.
US US
US US
Page 39

Specications
General
Output
Bluetooth Specication Power Class 2
Maximum communication range
Line of sight approx. 10 m (30 )*
Frequency band
2.4 GHz band (2.4000 GHz – 2.4835 GHz)
Modulation method
FHSS
Transmission range (A2DP)
20 - 20,000 Hz (Sampling frequency
44.1 kHz)
Transmitter
Communication System
Bluetooth Specication Version 2.0 +
EDR*
Compatible Bluetooth Proles*
A2DP (Advanced Audio Distribution
Prole)
AVRCP (Audio/Video Remote Control
Prole)
Supported Codec*
SBC*
Terminal
iPod connector (30 pin)
Operating temperature
0 °C to 35 °C (32 °F to 95 °F)
Dimensions
Approx. 31 × 28 × 8 mm
(1/ × 1/ × / in) (w/h/d)
(including protruding parts)
Mass
Approx. 5 g (0.2 oz)
Headset
Communication System
Bluetooth Specication version 2.0 +
EDR
*
Compatible Bluetooth Proles*
A2DP (Advanced Audio Distribution
Prole)
AVRCP (Audio/Video Remote Control
Prole)
HSP (Headset Prole)
HFP (Hands-free Prole)
Supported Codecs*
SBC*, MP3
Supported content protection method
SCMS-T
Power source
DC 3.7 V: Built-in lithium-ion
rechargeable battery
Mass
Approx. 40 g (1.4 oz)
Receiver
Type
Closed type, dynamic
Driver unit
9 mm dome type
Reproduction frequency range
6 – 23,000 Hz
Microphone
Type
Omni directional, electret condenser
Eective frequency range
100 – 4,000 Hz
Operating temperature
0 °C to 45 °C (32 °F to 113 °F)
3938
3938
Page 40

* e actual range will vary depending on
factors such as obstacles between devices,
magnetic elds around a microwave oven,
static electricity, reception sensitivity,
aerial’s performance, operating system,
soware application, etc.
* Enhanced Data Rate
* Bluetooth standard proles indicate the
purpose of Bluetooth communication
between devices.
* Codec: Audio signal compression and
conversion format
* Subband Codec
Design and specications are subject
to change without notice.
US US
Page 41

4140
Page 42

ADVERTENCIA
Para reducir el riesgo de
incendios o electrocución, no
exponga el aparato a la lluvia ni
a la humedad.
Para evitar descargas eléctricas,
no abra la unidad. En caso de
avería, solicite los servicios de
personal cualificado.
No sitúe el aparato en un espacio
cerrado, como una estantería o un
armario empotrado.
Para reducir el riesgo de incendios, no
cubra la ventilación del aparato con
periódicos, manteles, cortinas, etc. ni
coloque velas encendidas encima del
mismo.
Para reducir el riesgo de incendio o
sacudida eléctrica, no ponga objetos
que contengan líquido, tal como
oreros, encima del aparato.
Conecte el adaptador de alimentación
de ca a una toma de ca de fácil acceso.
Si percibe alguna anormalidad en
el adaptador de alimentación de ca,
desconéctelo inmediatamente de la
toma de ca.
No exponga la pila a fuentes de calor
excesivo como luz solar directa, fuego
o similar.
La excesiva presión acústica de
los auriculares y los cascos puede
producir pérdidas auditivas.
iPod es una marca comercial de Apple
Inc., registrada en los Estados Unidos
y en otros países.
La marca de la palabra Bluetooth y sus
logotipos son propiedad de Bluetooth
SIG, Inc. y cualquier uso de los
mismos por parte Sony Corporation se
realiza bajo licencia.
Las demás marcas y nombres
comerciales pertenecen a sus
respectivos propietarios.
Tecnología de codicación de audio
MPEG Layer-3 y patentes con licencia
de Fraunhofer IIS y omson.
Información
Se le advierte de que la realización
de cambios o modicaciones no
aprobados explícitamente en este
manual pueden anular su autoridad
para utilizar este equipo.
El equipo no debe colocarse ni
utilizarse junto con ninguna otra
antena o transmisor.
Para clientes de los EE UU
RECYCLADO DE BATERIAS
DE IONES DE LITIO
Las baterías de
iones de litio son
reciclables. Usted
podrá ayudar a
conservar el medio
ambiente
devolviendo las baterías usadas al
punto de reciclaje mas cercano.
Para más información sobre el
reciclado de baterías, llame al
número gratuito 1-800-822-8837, o
visite http://www.rbrc.org/
Precaución: No utilice baterías de
iones de litio dañadas o con fugas.
ES
2
Page 43

Modelos de iPod compatibles
Los modelos de iPod compatibles
son los siguientes. Se recomienda
la actualización del software del
iPod a la última versión antes de
proceder a su utilización con esta
unidad.
iPod nano de
segunda
generación (aluminio
)
iPod touc
h
iPod nano de
tercera generación
(vídeo
)
iPod classi
c
iPod de
cuarta generación
(pantalla en color)
iPod de cuarta
generación
iPod mini
iPod de quinta
generación (vídeo)
iPod nano de
primera
generación
Notas
Este transmisor
para reproductores iPod únicamente. No
es posible conectar otros reproductores de
audio portátiles.
Sony declina toda responsabilidad en el
caso de la pérdida o corrupción de datos
grabados en el iPod, si éste se utiliza
conectado a este transmisor Bluetooth.
Bluetooth está diseñado
ES
3
Page 44

4
ES
Page 45

Tabla de contenido
ADVERTENCIA ...............................2
¿Qué es la tecnología
inalámbrica Bluetooth? ............6
Bienvenido ....................................7
Procedimientos iniciales
Comprobación de los elementos
suministrados ............................ 8
Ubicación y función de los
componentes .............................9
Auriculares Bluetooth ...................9
Transmisor Bluetooth ..................10
Utilización básica de los
auriculares ................................11
Carga de los auriculares ............11
Colocación .....................................14
Conexión a un iPod ....................16
Funcionamiento
Escuchar música del iPod .........18
Control de un iPod con los
auriculares ................................20
Funcionamiento avanzado
Emparejamiento con otros
dispositivos
¿Qué es el emparejamiento? ... 21
Emparejamiento del
transmisor con otros
dispositivos de recepción
Bluetooth ....................................... 21
Emparejamiento de los
auriculares con otros
dispositivos de transmisión
Bluetooth ....................................... 25
Cómo volver a emparejar el
transmisor y los auriculares....28
Bluetooth............21
Realización de llamadas con los
auriculares ................................30
Preparación para efectuar
llamadas (conexión
Bluetooth) .....................................30
Para recibir una llamada ............32
Para efectuar llamadas...............32
Para nalizar una llamada .........32
Control del teléfono móvil
Bluetooth – HFP, HSP .................33
Realización de llamadas
durante la reproducción
de música
.................................34
Información complementaria
Precauciones ...............................35
Solución de problemas
.............38
Inicialización ...............................41
Inicialización del transmisor ....41
Inicialización de los
auriculares .................................... 41
Especicaciones .........................42
Generales ........................................ 42
Transmisor ......................................42
Auriculares .....................................42
ES
ES
5
Page 46

¿Qué es la tecnología inalámbrica
Bluetooth?
Bluetooth® es una tecnología
inalámbrica de corto alcance
que permite la comunicación
inalámbrica de datos entre
dispositivos digitales como,
por ejemplo, un ordenador
o una cámara digital. La
tecnología inalámbrica
Bluetooth funciona en un
rango de aproximadamente 10
metros.
Lo habitual es conectar
dos dispositivos, pero algunos
dispositivos admiten la conexión
a varios dispositivos a la vez.
No es necesario utilizar un cable
para realizar la conexión, ni
tampoco es necesario encarar los
dispositivos entre sí, como sucede
con la tecnología de infrarrojos.
Por ejemplo, puede utilizar los
dispositivos en una bolsa o en
un bolsillo. El estándar Bluetooth
es una convención internacional
reconocida y utilizada por miles
de empresas de todo el mundo.
Sistema de comunicación y
perl Bluetooth compatible
con este producto
Un perl es una estandarización
de la función para cada
especicación del dispositivo
Bluetooth. Este dispositivo es
compatible con los perles y
la versión Bluetooth siguientes:
ES
6
Sistema de comunicación:
Especicación Bluetooth versión
2.0 + EDR*1
Perl Bluetooth compatible:
A2DP (Advanced Audio
–
Distribution Prole)
AVRCP (Audio/Video
–
Remote Control Prole)
(Los dos perles que se indican
a continuación se aplican
únicamente a los auriculares.)
HSP (Headset Prole)*
–
Hablar por teléfono/
funcionamiento del teléfono.
HFP (Hands-free Prole)*
–
Hablar por teléfono/uso del
teléfono mediante la función
de manos libres.
*1 Velocidad de transmisión de datos
mejorada.
*2 Cuando utilice un teléfono móvil
Bluetooth compatible con las funciones
HFP (Hands-free Prole) y HSP
(Headset Prole), ajústelo en HFP.
Notas
Para poder utilizar la función
Bluetooth, el dispositivo Bluetooth
que desea conectar debe tener el
mismo perl que el dispositivo.
Tenga en cuenta también que
aunque exista el mismo perl, el
funcionamiento de los dispositivos
puede variar dependiendo de las
especicaciones de estos.
Debido a las características de la
tecnología inalámbrica Bluetooth,
el sonido que se reproduce en este
dispositivo sufre un ligero retardo
respecto al sonido que se reproduce
en el dispositivo Bluetooth cuando
se habla por teléfono o se escucha
música.
2
:
2
:
Page 47

Bienvenido
Este dispositivo es un kit de audio compuesto por un transmisor y unos
auriculares que utilizan tecnología inalámbrica Bluetooth.
Puede escuchar música de forma inalámbrica mediante la transmisión de
señales de audio a unos auriculares a través de la conexión del transmisor
Bluetooth al iPod (consulte la página 3 para obtener información acerca de
los modelos de iPod compatibles) con el conector para iPod* (de 30 clavijas).
* Un conector para iPod es un conector múltiple especíco para conectar
accesorios al iPod.
Características del dispositivo:
Transmisor y auriculares inalámbricos para el ujo de música estéreo
de alta calidad del iPod.
Transmite música a los auriculares mediante la tecnología inalámbrica
Bluetooth.
Los auriculares y el transmisor se han emparejado previamente para
facilitar su conexión y utilización.
Ajuste equilibrado, ligero y de máxima seguridad con mecanismo
de soporte doble y eje ajustable del auricular para uso activo (Para
auriculares únicamente).
Diseño de contorno suave y exible para proporcionar un ajuste
cómodo sobre la oreja (Para auriculares únicamente).
Impermeable (Para auriculares únicamente)
Control básico mediante el mando a distancia (reproducción, pausa,
etc.) de las funciones del iPod a través de los auriculares incluidos con
la conexión Bluetooth.
El transmisor recibe alimentación del iPod, por lo que no es necesario
disponer de batería o carga adicional (sólo para el transmisor).
Bluetooth versión 2.0 + EDR*1 para ofrecer audio de calidad superior
conmenos interferencias y menor consumo de energía.
Para escuchar música de forma inalámbrica, puede utilizar el transmisor
y los auriculares por separado con otros dispositivos Bluetooth*2.
* Velocidad de transmisión de datos mejorada
El dispositivo Bluetooth conectado debe ser compatible con el perl A2DP
*
(Advanced Audio Distribution Prole).
iPod con toma de
conector de puertos
(de 30 clavijas)
Transmisor Bluetooth
Sugerencia
Para obtener más información sobre la tecnología inalámbrica Bluetooth, consulte
la página 6.
.
Auriculares Bluetooth
ES
7
Page 48

Procedimientos iniciales
Comprobación de los elementos
suministrados
Auriculares Bluetooth DR-BT160AS (1)
Transmisor Bluetooth TMR-BT8iP (1)
Adaptador de alimentación de ca (1)
Manual de instrucciones (este documento) (1)
Tarjeta de garantía (1)
ES
8
Page 49

Ubicación y función de los componentes
Auriculares Bluetooth
Micrófono
Indicador (rojo)
Indica el estado de la
alimentación de los
auriculares
Indicador (azul)
Indica el estado de la
comunicación de los
auriculares
Botón POWER
Auricular
Botón RESET
Pulse este botón si los
auriculares no funcionan
correctamente. Al realizar esta
operación, la información
del emparejamiento no se
elimina.
.
.
Botón PAIRING
Botón multifunción
Controla varias funciones de
llamada.
Interruptor de
desplazamiento
Controla varias funciones
cuando se escucha música.
Ajuste el volumen de la
unidad cuando hable por
teléfono.
Toma DC IN 3 V
ES
9
Page 50

Transmisor Bluetooth
Conector para iPod
(de 30 clavijas)
Se conecta al conector de
puertos del dispositivo
iPod (página 16).
Indicador del
transmisor
Indica el estado del
transmisor (página 24).
En adelante, “los auriculares Bluetooth” aparecerán abreviados como “auriculares”,
y el “transmisor Bluetooth” como “transmisor”.
ES
10
Botón de alimentación
Realiza las siguientes
funciones:
• Encender/apagar el
transmisor (página 16).
• Emparejamiento
(página 21).
• Inicialización del
transmisor (página 41).
Page 51

Utilización básica de los auriculares
Carga de los auriculares
Los auriculares contienen una batería de iones de litio recargable,
que se debe cargar antes de utilizarla por primera vez.
1
Retire
la tapa instalada en la toma
2
Conecte el adaptador de alimentación de ca suministrado a la
toma DC IN 3 V de los auriculares.
Auriculares estéreo Bluetooth
DC
IN 3 V de los auriculares.
A una toma de corriente de ca
A la toma DC IN 3 V
La carga comienza al conectar el adaptador de alimentación de
ca a una toma de corriente de ca.
Sugerencias
Si el adaptador de alimentación de ca está conectado a una toma de ca
mientras los auriculares están encendidos, éstos se apagarán
automáticamente.
Los auriculares no pueden encenderse mientras se están cargando.
3
Asegúrese de que el indicador de los auriculares (rojo) se ilumina
durante el proceso de carga.
La carga se completa transcurridas aproximadamente
2,5 horas* y el indicador de los auriculares (rojo) se apaga
automáticamente.
* Tiempo necesario para volver a cargar una batería agotada.
Adaptador de alimentación de ca (suministrado)
Continúa
ES
11
Page 52

12
ES
Notas
Si la unidad no se utiliza durante un período de tiempo prolongado, es posible
que el indicador (rojo) de los auriculares no se ilumine al conectar el adaptador
de alimentación de ca para cargar la unidad. En tal caso, no desconecte el
adaptador de alimentación de ca de la unidad y espere a que el indicador (rojo)
de los auriculares se ilumine.
Para cerrar la tapa de la toma DC IN 3 V una vez completada la carga, empújela
firmemente y presiónela hasta que encaje en la toma.
Precaución
Si los auriculares detectan un problema durante la carga, es posible que el
indicador de los auriculares (rojo) se apague aunque no haya nalizado la carga.
Compruebe si se debe a las causas siguientes:
– La temperatura ambiental excede la gama entre los 0 ºC y los 45 ºC.
– La batería tiene un problema.
En este caso, cárguela de nuevo entre las temperaturas indicadas anteriormente. Si
el problema persiste, póngase en contacto con el distribuidor Sony más cercano.
Notas
Si no se utiliza la batería durante un período de tiempo prolongado, es posible
que la carga se agote rápidamente. Sin embargo, después de varias recargas,
aumentará la duración.
Si la vida útil de la batería recargable incorporada disminuye hasta la mitad de
la duración normal, la batería deberá reemplazarse. Para reemplazar la batería
recargable, póngase en contacto con el distribuidor Sony más cercano.
Evite la exposición de la unidad a temperaturas extremas, la luz solar directa,
la humedad, la arena, el polvo o los golpes. No la deje nunca en un automóvil
estacionado al sol.
Utilice únicamente el adaptador de alimentación de ca suministrado. No utilice
ningún otro adaptador de alimentación de ca.
Duración de la batería*
Estado Duración aproximada
Tiempo de comunicación (incluido el
tiempo de reproducción de música)
(máximo)
Tiempo en espera (máximo) 100 horas
* Estos tiempos pueden variar según la temperatura ambiente o las condiciones de
uso.
7 horas
Page 53

Comprobación de la batería restante
Si pulsa el botón POWER mientras los auriculares están encendidos,
el indicador (rojo) parpadeará. Puede comprobar la batería restante
mediante el número de veces que parpadea el indicador de los
auriculares (rojo).
Indicador de los auriculares (rojo)
3 veces Completa
2 veces Media
1 vez Baja (debe cargarla)
Nota
No puede comprobar la batería restante inmediatamente después de encender los
auriculares o durante el emparejamiento.
Cuando la batería está prácticamente agotada
El indicador de los auriculares (rojo) parpadea lentamente de forma automática.
Cuando la batería se agota por completo, suena un pitido y los auriculares se
apagan automáticamente.
Estado
ES
13
Page 54

14
ES
Colocación
1
Colóquese los ganchos en
ambas orejas.
El auricular con el botón
POWER se coloca en la
oreja derecha.
2
Ajuste la banda para el cuello
y el ángulo del auricular para
que se adapte cómodamente.
Ajuste la longitud del eje
ajustable del auricular.
Ajuste el ángulo del eje
ajustable del auricular de
forma que los auriculares se
adapten cómodamente a sus
orejas.
Instalación correcta de las
almohadillas
Si las almohadillas no se ajustan a
las orejas correctamente, es posible
que no pueda oír los sonidos
graves. A n de escuchar un sonido
de mejor calidad, cambie las
almohadillas por unos de otra talla
o ajuste su posición para que le
resulten cómodos y se adapten
perfectamente a las orejas.
Las almohadillas de talla M vienen
colocadas de fábrica en los
auriculares. Si las almohadillas de
la talla no se ajustan a sus orejas,
sustitúyalos por los de las tallas S o
L suministrados.
Cuando cambie las almohadillas,
colóquelos rmemente en los
auriculares para evitar que se
suelten y se le queden en los oídos.
Gire los auriculares para garantizar
un ajuste seguro.
Page 55

Si el gancho está abierto,
Si los auriculares no se utilizan
durante un tiempo prolongado,
es posible que el gancho se
abra tal como se muestra en la
gura que aparece más abajo.
En tal caso, gire el gancho en la
dirección de la echa para que
vuelva a su estado original antes
de su utilización.
ES
15
Page 56

16
ES
Conexión a un iPod
Conecte rmemente el transmisor al conector de puertos de un
iPod (consulte la página 3 para obtener información acerca de los
modelos de iPod compatibles).
Toma de conector de puertos (de 30 clavijas)
Botón de alimentación
Para encender el transmisor
1
Conecte el transmisor al iPod.
2
Pulse el botón de alimentación del transmisor durante
1 segundo aproximadamente para encenderlo o inicie la
reproducción en el iPod.
Cuando se enciende el transmisor, el indicador parpadea dos
veces.
Nota
Si no puede encender el transmisor, utilice el iPod.
Para apagar el transmisor
Mantenga pulsado el botón de alimentación del transmisor
durante unos 1 segundo para apagarlo. El
parpadeará una vez y el transmisor se apagará.
Sugerencia
Tanto el tiempo de comunicación como el tiempo de espera máximos pueden
variar en función del dispositivo iPod.
indicador
del transmisor
Page 57

Notas
Para escuchar música a través de la toma de auriculares del iPod, desconecte el
transmisor del iPod.
Mientras el transmisor esté encendido, consume energía del dispositivo iPod. Se
recomienda desconectar el transmisor del iPod cuando no se utiliza la función
Bluetooth.
Si se conectan los auriculares al iPod durante la reproducción en éste, se
consume alimentación del iPod.
Si apaga el transmisor durante la reproducción en el iPod, éste se apagará.
No se recomienda apagar el iPod, ya que se perderá la conexión entre el
transmisor y el dispositivo Bluetooth receptor.
No es necesario cargar el transmisor puesto que recibirá alimentación del
dispositivo iPod conectado. Se recomienda comprobar la batería restante del
dispositivo iPod antes de utilizarlo.
ES
17
Page 58

18
ES
Funcionamiento
Escuchar música del iPod
Puede escuchar música del iPod (consulte la página 3 para obtener
información acerca de los modelos de iPod compatibles) a través de
los auriculares.
1
Mantenga pulsado el botón POWER de los auriculares durante
aproximadamente 2 segundos.
Los indicadores de los auriculares (azul) y (rojo) parpadean dos
veces juntos y los auriculares se enciende.
2
Conecte el transmisor al iPod y, a continuación, encienda el iPod e
inicie la reproducción en éste.
El estado del indicador del transmisor variará de la siguiente
manera y la conexión Bluetooth entre el transmisor y los
auriculares quedará establecida.
El indicador del transmisor parpadea dos veces: Encendido
El indicador del transmisor parpadea (en intervalos de 1
segundo aproximadamente): Conexión en proceso
El indicador del transmisor parpadea dos veces lentamente
(en intervalos de aproximadamente 5 segundos):
establecida
Si la conexión Bluetooth no se ha establecido en 5 minutos*, el
transmisor se apaga automáticamente. En ese caso, enciéndalo
de nuevo manteniendo pulsado el botón de alimentación del
transmisor durante aproximadamente 1 segundo.
* Es posible que la luz de fondo del iPod se encienda durante estos 5 minutos.
Notas
Si no es posible establecer la conexión Bluetooth con unos auriculares ya
Si no es posible iniciar la reproducción automáticamente, intente iniciarla en
Si mantiene pulsado el botón de alimentación en el transmisor durante 1
(la reproducción se iniciará automáticamente)
emparejados, repita el procedimiento de emparejamiento (página 28).
el iPod.
segundo aproximadamente, éste se conectará al iPod y la reproducción se
iniciará automáticamente.
Conexión
Page 59

Aunque controle el volumen en el dispositivo iPod, el sonido emitido desde
los auriculares no cambiará.
Si el transmisor y los auriculares salen del rango de comunicación y la
conexión Bluetooth naliza, repita el procedimiento desde el paso 1.
La reproducción a través de una conexión
interrupciones del sonido o cambios en la velocidad de reproducción, en
función de la ubicación y la utilización (página 35) de los dispositivos.
Bluetooth puede ocasionar ruidos,
Sugerencia
Es posible controlar el volumen en los auriculares. (El volumen del iPod no ha
cambiado.) También es posible avanzar o retroceder rápidamente durante la
reproducción (página 20).
ES
19
Page 60

20
ES
Control de un iPod con los auriculares
Es posible controlar un iPod (consulte la página 3 para obtener
información acerca de los modelos de iPod compatibles) mediante el
botón de control de los auriculares.
Antes de utilizar el mando a distancia, compruebe que se hayan
realizado los pasos 1 y 2 de “Escuchar música del iPod” (página 18).
Transmisor
Mando a distancia
Auriculares Bluetooth
(reproducir, pausa, etc.)
Control del iPod
Para llevar a cabo la reproducción o insertar una pausa en el iPod,
puede pulsar el botón de los auriculares.
Para apagar el iPod y el transmisor, mantenga pulsado el botón
de los auriculares durante más de 2 segundos.
Control de música
Es posible avanzar o retroceder cada canción del iPod mediante la
pulsación del botón /. También es posible avanzar o retroceder
rápidamente las canciones si mantiene pulsado el botón /.
Notas
Aunque controle el volumen del iPod, el volumen de los auriculares no cambiará.
Cuando utilice el iPod con el mando a distancia, no cubra el transmisor con las
manos, etc.
Es posible que necesite pulsar el botón de reproducción/pausa dos veces según el
dispositivo Bluetooth receptor.
Es posible que necesite pulsar el botón de reproducción/pausa del dispositivo
Bluetooth receptor dos veces si utiliza el botón del iPod.
El funcionamiento del iPod con el transmisor a través del dispositivo Bluetooth
receptor variará en función de las especicaciones del dispositivo Bluetooth receptor.
Al reproducir un vídeo o fotografías en el iPod, es posible que el funcionamiento con
el mando a distancia se vuelva inestable.
Sugerencia
Al pulsar el botón de pausa en el dispositivo
Bluetooth receptor, el iPod entra en modo de
pausa durante 10 minutos y la luz de fondo
del iPod se enciende y apaga a intervalos.
No cubra el transmisor con
las manos.
Page 61

Funcionamiento avanzado
Emparejamiento con otros dispositivos
Bluetooth
¿Qué es el emparejamiento?
Los dispositivos Bluetooth deben “emparejarse” previamente entre
sí. Una vez que los dispositivos Bluetooth se han emparejado, no es
necesario volver a hacerlo excepto en los casos siguientes:
Si la información de emparejamiento se ha eliminado tras una
reparación, etc.
Cuando el producto se ha emparejado con 9 o más dispositivos
receptores.
Este producto puede emparejarse con hasta 8 dispositivos
Bluetooth respectivamente. Este nuevo dispositivo se puede
emparejar hasta con otros 8, pero si se conecta otro más éste
reemplazará el que se haya conectado en primer lugar de los 8.
Cuando se ha inicializado el producto.
Se elimina toda la información de emparejamiento (página 41).
Emparejamiento del transmisor con otros dispositivos
de recepción Bluetooth
1
Encienda el iPod.
(Asegúrese de que el iPod se encuentra en modo de pausa.)
2
Conecte el transmisor al dispositivo iPod (página 16).
3
Coloque el transmisor y el dispositivo Bluetooth receptor que va a
emparejar a menos de 1 m.
4
Ajuste el dispositivo Bluetooth receptor para entrar en la función
“Emparejamiento en proceso”.
Consulte el manual de instrucciones suministrado con el
dispositivo Bluetooth receptor.
Continúa
ES
21
Page 62

22
ES
Notas
La contraseña* del transmisor es “0000”, “1234” o “8888”. En función del
dispositivo Bluetooth receptor, es posible que sea necesario introducirla (en
este caso, “0000”, “1234” o “8888”). El transmisor no podrá emparejarse con
un dispositivo Bluetooth receptor cuya contraseña no sea “0000”, “1234” o
“8888”.
Si se solicita una clave de acceso en el dispositivo
introduzca “0000”.
* La contraseña puede denominarse “clave de acceso”, “código PIN”, “número
PIN” o “código de acceso”.
5
Mantenga pulsado el botón de alimentación del transmisor
Bluetooth receptor,
durante aproximadamente 7 segundos o más para entrar en la
función “Emparejamiento en proceso”.
Una vez transcurridos 1 segundo aproximadamente, el indicador
del transmisor parpadeará dos veces. No obstante, mantenga
pulsado el botón de alimentación.
Notas
Al encender por primera vez el transmisor después de inicializarlo, la
función “Emparejamiento en proceso” se activa automáticamente.
Si mantiene pulsado el botón de alimentación durante 15 segundos, se
inicializará la información de emparejamiento. El indicador del transmisor
se enciende durante 5 segundos antes de que se comience la inicialización.
Suelte el botón inmediatamente cuando se encienda el indicador del
transmisor.
Cuando el indicador del transmisor parpadea rápidamente,
suelte el botón.
El transmisor inicia la función “Emparejamiento en proceso”.
El estado del indicador del transmisor variará de la siguiente
manera y el emparejamiento quedará establecido con el
dispositivo Bluetooth receptor.
Page 63

El indicador del transmisor parpadea rápidamente:
Emparejamiento en proceso
El indicador del transmisor parpadea (en intervalos de 1
segundo aproximadamente) al responder al dispositivo Bluetooth
receptor: Conexiones disponibles (Emparejamiento nalizado
correctamente)
El indicador del transmisor parpadea (en intervalos de
aproximadamente 5 segundos): Conexión establecida
Notas
La función “Emparejamiento en proceso” del transmisor se desactiva
transcurridos unos 5 minutos. Si no se ha establecido el emparejamiento en
estos 5 minutos, repita el procedimiento de emparejamiento desde el paso 4.
Es posible que la luz de fondo del iPod se encienda durante estos 5 minutos.
Para entrar en la función “Emparejamiento en proceso”, debe apagar
primero el transmisor.
Si el emparejamiento no ha nalizado
Repita el procedimiento desde el paso 2.
Para salir de la función “Emparejamiento en proceso”
Mantenga pulsado el botón de alimentación del transmisor durante
aproximadamente 1 segundo para apagarlo.
Sugerencia
Cuando desee emparejar el transmisor con más dispositivos Bluetooth receptores,
repita los pasos del 3 al 5 para cada uno de ellos.
Nota
Para poder utilizar la función Bluetooth, el dispositivo Bluetooth que desea conectar
debe tener el mismo perl que el transmisor. Tenga en cuenta también que aunque
exista el mismo perl que la unidad, el funcionamiento de los dispositivos puede
variar en función de las especicaciones de éstos.
Continúa
ES
23
Page 64

24
ES
Acerca del indicador del transmisor
Estado Indicador
Parpadea dos veces
Encendido
Parpadea una vez
Apagado
Parpadea rápidamente
Emparejamiento
Parpadea
(en intervalos
de 1 segundo
Conexión
aproximadamente)
Escuchar *1
(parpadea dos veces
en intervalos de
aproximadamente
5 segundos)
Con la música
apagada*2
(parpadea una vez
en intervalos de
Conexión establecida
aproximadamente
5 segundos)
*1 Al pulsar en el iPod, se inserta una pausa en la reproducción de música. El
indicador parpadea dos veces en el transmisor. El transmisor transere los datos
que no son de sonido.
*2 Al pulsar el botón de pausa del dispositivo Bluetooth receptor, se inserta una
pausa en la reproducción de música. El indicador parpadea una vez en el
transmisor. El transmisor no transere música.
…
– – – – –
– – – – –
– – – – – …
– – – – –
– – – – –
…
…
Page 65

Emparejamiento de los auriculares con otros
dispositivos de transmisión Bluetooth
1
Coloque el dispositivo de transmisión Bluetooth que va a emparejar
a menos de 1 m de los auriculares.
2
Mantenga pulsado el botón PAIRING de los auriculares
durante unos 2 segundos como mínimo para activar la función
“Emparejamiento en proceso” mientras los auriculares estén
apagados.
Suelte el botón PAIRING cuando el indicador de los auriculares
empiece a parpadear rápidamente. Los auriculares iniciarán el
proceso de emparejamiento.
3
Ajuste del dispositivo de envío Bluetooth en el modo de espera del
emparejamiento.
Consulte el manual de instrucciones suministrado con el
dispositivo de transmisión Bluetooth.
La lista de dispositivos detectados aparece en la pantalla del
dispositivo de transmisión Bluetooth.
Continúa
ES
25
Page 66

26
ES
Los auriculares se muestran como “DR-BT160AS”.
El indicador de estado de los auriculares cambiará del modo
siguiente, y se establecerá el emparejamiento con el dispositivo
de transmisión Bluetooth.
El indicador de los auriculares parpadea rápidamente:
Emparejamiento en proceso
El indicador de los auriculares parpadea (en intervalos de
1 segundo aproximadamente) al responder al dispositivo
de transmisión Bluetooth: Conexiones disponibles
(Emparejamiento nalizado correctamente)
El indicador de los auriculares parpadea (en intervalos de
aproximadamente 5 segundos): Conexión establecida
Nota
La contraseña* de los auriculares es “0000”. En función del dispositivo
Bluetooth receptor, es posible que sea necesario introducirla (en este caso,
“0000”). Los auriculares no podrán emparejarse con un dispositivo Bluetooth
receptor cuya contraseña no sea “0000”.
* La contraseña puede denominarse “clave de acceso”, “código PIN”, “número
PIN” o “código de acceso”.
Si el emparejamiento no ha nalizado
Repita el procedimiento desde el paso 2.
Para salir de la función “Emparejamiento en proceso”
Mantenga pulsado el botón POWER de los auriculares durante unos 3 segundos
para apagarlos.
Nota
Para poder utilizar la función Bluetooth, el dispositivo Bluetooth que desea conectar
debe tener el mismo perl que los auriculares. Tenga en cuenta también que
aunque exista el mismo perl que la unidad, el funcionamiento de los dispositivos
Bluetooth puede variar en función de las especicaciones de éstos.
Page 67

Acerca del indicador de los auriculares
B : Indicador de auriculares (azul)
R : Indicador de auriculares (rojo)
Estado Indicador
Búsqueda
Emparejamiento
Conexiones
disponibles
En proceso de
Conexión
conexión
HFP/HSP o A2DP
(en espera para recibir señal
de audio)
B
– – – – – – – – …
R
– – – – – – – –
B
– – – – – – – – – – …
–
R
B
– – – – – – – – – – …
R
– – – – – – – – – –
B
– – – – – – – – – – – – – –
–
R
…
…
…
HFP/HSP y A2DP
(en espera para recibir señal
de audio)
Conexión establecida
Escucha
Escucha durante
Música
tiempo de espera
para llamada de
teléfono
Llamada entrante
Conversación
Teléfono
Realización de
llamadas durante
la reproducción de
música
B
– – – – – – – – – – – –
–
R
B
– – – – – – – – – – – –
–
R
B
– – – – – – –
–
R
B
–
R
B
– – – – – – – – – – – –
–
R
B
–
R
…
– – – – – – –
– – –
– – –
…
…
…
…
…
ES
27
Page 68

28
ES
Cómo volver a emparejar el transmisor y los auriculares
1
Encienda el iPod.
(Asegúrese de que el iPod se encuentra en modo de pausa.)
2
Conecte el transmisor al dispositivo iPod (página 16).
3
Coloque el transmisor y los auriculares que va a emparejar a menos
de 1 m.
4
Mantenga pulsado el botón PAIRING de los auriculares
durante unos 2 segundos como mínimo para activar la función
“Emparejamiento en proceso” mientras los auriculares estén
apagados.
Tanto el indicador de los auriculares (rojo) como el indicador
de los auriculares (azul) parpadearán juntos y los auriculares
entrarán en modo de emparejamiento.
Page 69

5
Mantenga pulsado el botón de alimentación del transmisor
durante aproximadamente 7 segundos o más para entrar en la
función “Emparejamiento en proceso”.
Una vez transcurridos 1 segundo aproximadamente, el indicador
del transmisor parpadeará dos veces. No obstante, mantenga
pulsado el botón de alimentación.
Notas
Al encender por primera vez el transmisor después de inicializarlo, la
función “Emparejamiento en proceso” se activa automáticamente.
Si mantiene pulsado el botón de alimentación durante 15 segundos, se
inicializará la información de emparejamiento. El indicador del transmisor
se enciende durante 5 segundos antes de que se comience la inicialización.
Suelte el botón inmediatamente cuando se encienda el indicador del
transmisor.
La función “Emparejamiento en proceso” se desactiva transcurridos unos
5 minutos. Si no se ha establecido el emparejamiento en estos 5 minutos,
repita el procedimiento de emparejamiento desde el paso 4. Es posible que la
luz de fondo del iPod se encienda durante estos 5 minutos.
Para entrar en la función “Emparejamiento en proceso”, debe apagar primero
el transmisor.
ES
29
Page 70

30
ES
Realización de llamadas con los auriculares
Preparación para efectuar llamadas (conexión Bluetooth)
Antes de utilizar los auriculares, compruebe lo siguiente.
– La función
– Ha nalizado el emparejamiento de los auriculares y el teléfono móvil
Bluetooth.
1
Con los auriculares apagados, mantenga pulsado el botón POWER
durante aproximadamente 3 segundos.
Los indicadores (azul) y (rojo) parpadean juntos dos veces,
los auriculares se encienden y, a continuación, éstos intentan
conectarse automáticamente al último teléfono móvil Bluetooth
que se ha usado.
Sugerencia
Los auriculares dejarán de intentar establecer conexión con el teléfono móvil
Bluetooth transcurrido 1 minuto. En ese caso, pulse el botón multifunción para
intentar conectar de nuevo.
Bluetooth está activada en el teléfono móvil.
VOL +
Indicador de los auriculares (azul)
Indicador de los auriculares (rojo)
Botón POWER
VOL –
Botón multifunción
Page 71

Si los auriculares no se conectan a un teléfono móvil Bluetooth
automáticamente
Puede realizar una conexión utilizando el teléfono móvil Bluetooth o los auriculares
para conectarse al último dispositivo Bluetooth al que se ha conectado.
Para usar el teléfono móvil Bluetooth para realizar la
conexión
1
Realice la conexión Bluetooth (HFP o HSP*) desde el teléfono móvil
Bluetooth a los auriculares.
Para obtener más información sobre el procedimiento a
seguir, consulte el manual suministrado con el teléfono móvil
Bluetooth.
La lista de dispositivos reconocidos aparecerá en la pantalla del
teléfono móvil Bluetooth. Los auriculares aparecen como
“DR-BT160AS”.
Cuando utilice las funciones HFP (Hands-free Prole) y HSP
(Headset Prole) del teléfono móvil Bluetooth, ajústelo en HFP.
Nota
Si desea conectarse con un teléfono móvil Bluetooth distinto del que se conectó
la última vez, siga el procedimiento anterior.
* Para obtener más información sobre los perles, consulte la página 6.
Para usar los auriculares para realizar una conexión con el
último dispositivo Bluetooth al que se ha conectado.
1
Pulse el botón multifunción de los auriculares.
Los indicadores (azul) y (rojo) empiezan a parpadear a la vez y
los auriculares realizan la conexión durante unos 5 segundos.
Nota
No es posible establecer una conexión Bluetooth con el botón multifunción
mientras se escucha música en los auriculares.
Para ajustar el volumen
Pulse los botones VOL + o –.
Sugerencias
No puede ajustar el volumen cuando no se realicen comunicaciones.
El nivel de volumen para realizar llamadas o escuchar música se puede ajustar de
forma independiente.
Aunque modique el volumen mientras reproduce música, el volumen de la
llamada no variará.
Continúa
ES
31
Page 72

32
ES
Para recibir una llamada
Al recibir una llamada entrante, oirá un tono de llamada de los
auriculares.
1
Pulse el botón multifunción de los auriculares.
El tono de llamada varía de las formas siguientes, en función del
teléfono móvil.
– tono de llamada ajustado en los auriculares
– tono de llamada ajustado en el teléfono móvil
– tono de llamada ajustado en el teléfono móvil sólo para la conexión
Nota
Si pulsó el botón del teléfono móvil Bluetooth para recibir una llamada, tenga
en cuenta que es probable que algunos teléfonos móviles Bluetooth tengan
activada la prioridad para utilizar el teléfono. En este caso, ajústelo para hablar
con los auriculares manteniendo pulsado el botón multifunción durante unos
2 segundos o bien realice el ajuste desde el teléfono móvil Bluetooth. Para
obtener más información, consulte el manual suministrado con el teléfono
móvil Bluetooth.
Bluetooth
Para efectuar llamadas
1
Utilice los botones del teléfono móvil para realizar llamadas.
Si los auriculares no emiten ningún tono de llamada, mantenga
pulsado el botón multifunción durante unos 2 segundos.
Sugerencia
Puede realizar llamadas de la manera siguiente, en función del teléfono móvil
Bluetooth que utilice. Para obtener más información sobre el funcionamiento,
consulte el manual suministrado con el teléfono móvil.
– Cuando no se realicen comunicaciones, podrá llamar utilizando la función de
marcación por voz si pulsa el botón multifunción.
– Para llamar al último número marcado, pulse el botón multifunción durante
unos 2 segundos.
Para nalizar una llamada
Para nalizar una llamada puede pulsar el botón multifunción de los
auriculares.
Page 73

Control del teléfono móvil Bluetooth – HFP, HSP
El uso de los botones de los auriculares varía en función del teléfono
móvil que utilice.
Para efectuar el emparejamiento con un teléfono móvil Bluetooth
se utilizan los perles HFP (Hands-free Prole) o HSP (Headset
Prole). Consulte el manual de instrucciones suministrado junto
con el teléfono móvil Bluetooth para obtener información sobre los
perles Bluetooth admitidos y cómo funcionan.
HFP (Hands-free Prole)
Estado del
teléfono móvil
Bluetooth
En espera Inicia la marcación por
Marcación por
voz activa
Llamada saliente Fin de la llamada saliente Cambio de dispositivo de
Llamada entrante Responde a la llamada Rechaza la llamada
Durante la
llamada
HSP (Headset Prole)
Estado del
teléfono móvil
Bluetooth
En espera Marcación
Llamada saliente Fin de la llamada
Llamada entrante Responde a la llamada
Durante la
llamada
*1 Es posible que algunas funciones no se admitan en función del teléfono móvil
Bluetooth. Consulte las instrucciones de uso suministradas con su teléfono
móvil.
*2 Puede variar en función del teléfono móvil Bluetooth utilizado.
*3 Es posible que algunas funciones no se admitan cuando se realice una llamada
mediante el teléfono móvil Bluetooth.
Botón multifunción
Pulsar Mantener pulsado
1
voz
*
Cancela la marcación
1
por voz
*
Finaliza la llamada Cambio de dispositivo de
Botón multifunción
Pulsar Mantener pulsado
1
saliente
*
Finaliza la llamada
Repite la marcación del
último número
llamada
llamada
Fin de la llamada saliente
o cambio llamada a los
auriculares*
3
*
Cambio del dispositivo de
llamada a los auriculares
1
*
2
ES
33
Page 74

Realización de llamadas durante la
reproducción de música
La conexión Bluetooth con HFP o HSP, así como con A2DP, es
necesaria para realizar una llamada mientras reproduce música.
Por ejemplo, para realizar una llamada con un teléfono móvil
Bluetooth mientras escucha música en un reproductor de música
compatible con Bluetooth, los auriculares deben estar conectados al
teléfono móvil con HFP o HSP.
Para realizar una conexión Bluetooth entre los auriculares y el
dispositivo que utiliza, siga el procedimiento que se describe
a continuación.
1
Realice una conexión Bluetooth entre los auriculares y el teléfono
móvil que utiliza con HFP o HSP a través de los procedimientos
que se describen en “Realización de llamadas con los auriculares”
(página 30).
2
Establezca una conexión Bluetooth entre el transmisor y los
auriculares (página 18).
Para realizar una llamada mientras se reproduce música
1
Pulse el botón multifunción durante la reproducción de música
(página 33) o utilice el teléfono móvil Bluetooth para hacer una
llamada.
Si los auriculares no emiten ningún tono de llamada, mantenga
pulsado el botón multifunción durante unos 2 segundos.
Para recibir una llamada mientras se reproduce música
Al recibir una llamada entrante, la música se detendrá y se oirá un
tono de llamada de los auriculares.
1
Pulse el botón multifunción y hable.
Cuando termine la llamada, pulse el botón multifunción. Los
auriculares vuelven a reproducir la música.
Si no se oye el tono de llamada al recibir una llamada entrante
1
Detenga la reproducción de música.
2
Cuando suene el tono, pulse el botón multifunción y hable.
ES
34
Page 75

Información complementaria
Precauciones
Comunicación Bluetooth
La tecnología inalámbrica
Bluetooth funciona en un rango de
aproximadamente 10 metros.
El rango máximo de comunicación
puede variar en función de los
obstáculos (personas, objetos
metálicos, paredes, etc.) o del entorno
electromagnético.
Compartimiento de
acero
Transmisor
Rendimiento óptimo
Rendimiento limitado
La antena de los auriculares está
incorporada en el receptáculo derecho
como se muestra con la línea de
puntos.
Ubicación de la
antena incorporada
La antena del transmisor se indica con
una línea de puntos en la ilustración.
La sensibilidad de la comunicación
Bluetooth mejorará al girar la antena
incorporada hacia el dispositivo
Bluetooth conectado.
La distancia de comunicación se
reduce cuando existen obstáculos entre
la antena del dispositivo conectado y
este producto.
Las condiciones siguientes pueden
provocar ruido, interrupciones
o cambios en la velocidad de
reproducción.
– El uso de esta unidad dentro de una
bolsa de metal.
– El uso de esta unidad dentro de una
mochila o bolso.
– El uso de dispositivos que utilicen
una frecuencia de 2,4 GHz como,
por ejemplo, un dispositivo de LAN
inalámbrica, un teléfono inalámbrico
o un microondas cerca de la unidad.
Como los dispositivos
LAN inalámbricas (IEEE802.11
b/g) utilizan la misma frecuencia,
pueden producirse interferencias
de microondas que provoquen
el deterioro de la velocidad de la
comunicación, la aparición de ruido o
una conexión no válida si el producto
se utiliza cerca de un dispositivo de
LAN inalámbrica. En este caso, realice
el procedimiento siguiente.
– Instale este producto y el dispositivo
Bluetooth a la distancia más corta
posible entre sí.
– Si utiliza este producto a menos
de 10 m de un dispositivo de
LAN inalámbrica, apague dicho
dispositivo.
Bluetooth y las
Ubicación de la
antena incorporada
Continúa
ES
35
Page 76

Las microondas que emite un
dispositivo Bluetooth pueden afectar
el funcionamiento de dispositivos
médicos electrónicos. Apague esta
unidad y los demás dispositivos
Bluetooth en los lugares siguientes, ya
que podrían provocar un accidente:
– donde exista gas inamable, en un
hospital, tren, avión o gasolinera
– cerca de puertas automáticas o
alarmas de incendios
Esta unidad admite capacidades
de seguridad que cumplen con el
estándar Bluetooth para proporcionar
una conexión segura al utilizar la
tecnología inalámbrica Bluetooth,
pero es posible que la seguridad no
sea suciente según el ajuste. Tenga
cuidado al realizar una comunicación
con la tecnología inalámbrica
Bluetooth.
No se aceptan responsabilidades por
la pérdida de información que pudiera
producirse durante una comunicación
Bluetooth.
No se puede garantizar la conexión
con todos los dispositivos Bluetooth.
– Un dispositivo que disponga de la
función Bluetooth debe cumplir
el estándar Bluetooth especicado
por Bluetooth SIG, Inc. y estar
autenticado.
– Incluso en el caso de que el
dispositivo conectado cumpla el
estándar Bluetooth mencionado
anteriormente, es posible
que algunos dispositivos no
puedan conectarse o funcionar
correctamente, según las
características o las especicaciones
del dispositivo.
En función del dispositivo que vaya a
conectarse, es posible que transcurra
cierto tiempo antes de que se inicie la
comunicación.
ES
36
Seguridad
No deje caer, golpee ni exponga la
producto a impactos fuertes de ningún
tipo ya que, de lo contrario, podrían
producirse daños en el producto.
No desmonte ni intente abrir ninguna
de las piezas de la producto.
Ubicación
No coloque la producto en ninguno de
los lugares siguientes.
– Cerca de un calefactor, o en un
lugar expuesto a la luz solar directa
o a temperaturas extremadamente
elevadas
– En un lugar polvoriento
– En una supercie inestable o
inclinada
– En un lugar expuesto a fuertes
vibraciones
– En un cuarto de baño o en un
lugar en el que se condense mucha
humedad
– En el interior de un automóvil
expuesto a la luz solar directa
Nota sobre el uso en un
automóvil
No intente conectar ni utilizar la
producto, un dispositivo de salida
de audio o una radio de automóvil
mientras conduce o espera ante una
señal de tráco.
Limpieza
Limpie la producto con un paño
suave y seco o con un paño suave
ligeramente humedecido con
una solución de detergente poco
concentrada. No utilice ningún tipo de
disolvente como, por ejemplo, alcohol
o bencina, ya que podría dañar el
acabado.
Page 77

Estructura resistente a las
salpicaduras
La estructura de los auriculares
es resistente a las salpicaduras, lo
que evita que el funcionamiento de
los auriculares se vea afectado por
las salpicaduras de agua (excepto
los auriculares y el adaptador de
alimentación de ca). Sin embargo,
no es posible utilizar los auriculares
en el agua. Tome las siguientes
precauciones.
No introduzca los auriculares en agua
ni los utilice en lugares con humedad
elevada como el cuarto de baño.
En caso de que los auriculares se
salpiquen de agua, séquelos con un
paño seco, etc. antes de utilizarlos.
Adaptador de alimentación
de ca suministrado
Utilice solamente el adaptador de
alimentación de ca suministrado
con este producto. No utilice ningún
otro adaptador de alimentación
de ca, ya que puede causar un mal
funcionamiento de los auriculares.
Polaridad de la clavija
Si no va a utilizar el producto
durante un período prolongado de
tiempo, desconecte el adaptador
de alimentación de ca de la toma
de ca. Para retirar el adaptador de
alimentación de ca de la toma de
corriente de pared, tire del enchufe del
adaptador, nunca del cable.
Nota sobre la electricidad
estática
Es posible que sienta un ligero
zumbido en las orejas, especialmente
en condiciones de sequedad ambiental.
Esto sucede como resultado de la
electricidad estática acumulada en
el cuerpo y no indica un fallo en el
funcionamiento de los auriculares.
Se puede minimizar este efecto si lleva
puesta ropa de tejidos naturales.
Otros
Tenga cuidado de no pillarse los dedos
al plegar los auriculares.
Es posible que el dispositivo
no funcione en teléfonos móviles en
función del estado de las ondas de
radio y del lugar donde se utilice el
equipo.
Si no se siente cómodo después de
utilizar el dispositivo Bluetooth, deje
de utilizarlo inmediatamente. Si el
problema persiste, consulte con el
distribuidor Sony más cercano.
Si usa el producto a un volumen alto,
puede sufrir daños en los oídos. Por
razones de seguridad vial, no utilice
el producto mientras conduce o va en
bicicleta.
No coloque ningún peso ni ejerza
presión sobre el producto, ya que ésta
podría deformarse durante períodos de
almacenamiento prolongado.
Las almohadillas son consumibles.
Pueden deteriorarse debido a un
almacenamiento o uso prolongado.
Cámbielas por otras nuevas cuando se
estropeen.
Si desea realizar alguna consulta o
solucionar algún problema relativo
a el producto que no se trate en este
manual, póngase en contacto con el
distribuidor Sony más cercano.
Bluetooth
ES
37
Page 78

Solución de problemas
Si tiene dicultades para utilizar este producto, sírvase de la
siguiente lista de comprobaciones y consulte la información de
ayuda del producto en nuestro sitio Web.
Si el problema persiste, consulte con el distribuidor Sony más
cercano.
Problema Causa / Solución
El transmisor no está
encendido.
(o se apaga al poco
tiempo de haberlo
encendido.)
Los auriculares no
están encendidos.
No hay sonido
El nivel de sonido
es bajo
Mantenga pulsado el botón de la alimentación del
transmisor durante unos 1 segundo.
Compruebe la batería restante del dispositivo iPod. Si
no hay batería suciente, cargue el dispositivo iPod.
Restaure su iPod.
Si éste no dispone de contenido, añada contenido a su
iPod.
Cargue la batería de los auriculares.
Los auriculares no están encendidos durante la
carga. Desenchufe los auriculares del adaptador de
alimentación de ca y, a continuación, enciéndalos.
Compruebe la conexión del transmisor con el
dispositivo iPod.
Compruebe que tanto el transmisor como los
auriculares están encendidos.
Asegúrese de que el transmisor no se encuentra
demasiado alejado de los auriculares o que no recibe
interferencias de una red LAN inalámbrica, de otro
dispositivo inalámbrico de 2,4 GHz o de un horno
microondas.
Empareje el transmisor y los auriculares de nuevo
(página 28).
Compruebe que el dispositivo iPod está
reproduciendo música.
Compruebe que el volumen de los auriculares no está
demasiado bajo.
Suba el volumen de los auriculares al máximo posible
sin que se produzca una distorsión del sonido.
38
ES
Page 79

Problema Causa / Solución
No es posible
modicar el nivel de
volumen.
El sonido se emite
distorsionado
Se interrumpe el
sonido, aparece
ruido o la velocidad
de reproducción
cambia.
Los auriculares
no funcionan
correctamente.
No se puede
llevar a cabo el
emparejamiento.
No es posible
establecer la
conexión Bluetooth
con un dispositivo
que ya haya sido
“emparejado”.
Modique el nivel de volumen en los auriculares.
Baje el volumen de los auriculares hasta que el sonido
no se emita distorsionado.
Asegúrese de que el producto no recibe interferencias
de una red LAN inalámbrica, de otros dispositivos
inalámbricos de 2,4 GHz o de un horno microondas.
Desactive la función EQ del iPod.
Si hay cerca un dispositivo que genera radiación
electromagnética como, por ejemplo, una red
LAN inalámbrica, otro dispositivo Bluetooth o un
microondas, aleje la unidad de estas fuentes.
Retire cualquier obstáculo entre el transmisor y los
auriculares o aléjese del obstáculo.
Coloque el transmisor y los auriculares lo más cerca
posible uno del otro.
Vuelva a colocar u orientar el transmisor y los
auriculares.
Reinicie los auriculares. Al realizar esta operación, la
información del emparejamiento no se elimina.
Inserte un pequeño pasador, etc., en el oricio con
cierto ángulo y empuje hasta escuchar un chasquido.
Coloque el transmisor y los auriculares lo más cerca
posible uno del otro.
Compruebe que ha introducido la contraseña del
transmisor (página 22).
Compruebe que ha introducido la contraseña de los
auriculares (página 26).
Coloque el transmisor y otros dispositivos Bluetooth
lo más cerca posible.
Es posible que la información del emparejamiento se
haya eliminado. Empareje el dispositivo de nuevo.
Continúa
ES
39
Page 80

Problema Causa / Solución
No es posible
efectuar la conexión
Bluetooth.
No es posible
realizar la conexión
Bluetooth desde el
teléfono móvil a los
auriculares.
Compruebe que el producto está encendido.
La conexión Bluetooth ha nalizado. Establezca la
conexión Bluetooth de nuevo.
Pulse el botón multifunción de los auriculares. (La
conexión Bluetooth no está disponible durante la
reproducción de música en los auriculares.)
Realice la conexión Bluetooth con el teléfono móvil
compatible con Bluetooth. (Para obtener más
información sobre cómo utilizar el teléfono móvil
compatible con Bluetooth, consulte el manual de
instrucciones suministrado con el mismo.)
40
ES
Page 81

Inicialización
Inicialización del transmisor
Es posible restablecer el transmisor a los ajustes predeterminados y
eliminar toda la información de emparejamiento.
1
Conecte el transmisor al iPod.
2
Mantenga pulsado el botón de alimentación durante más de 15
segundos aproximadamente.
Durante estos 15 segundos, el indicador del transmisor cambiará
en secuencia como se indica a continuación:
– parpadeará (a intervalos de 1 segundo aproximadamente)
durante unos 5 segundos
– parpadeará rápidamente durante unos 5 segundos
– permanecerá iluminado durante unos 5 segundos
– parpadeará 4 veces
A continuación, el transmisor se restaurará a los valores
predeterminados y se eliminará toda la información de
emparejamiento.
Nota
No utilice el iPod mientras inicializa el transmisor.
Inicialización de los auriculares
Es posible restablecer los ajustes predeterminados de los auriculares
(como el ajuste del volumen) y eliminar toda la información de
emparejamiento.
1
Si los auriculares están encendidos, mantenga pulsado el botón
POWER durante unos 3 segundos para apagarlos.
2
Mantenga pulsados los botones POWER y multifunción a la vez
durante unos 7 segundos.
Los indicadores de los auriculares (azul) y (rojo) parpadearán
juntos cuatro veces y los auriculares se restablecerá a los
ajustes predeterminados. Se elimina toda la información de
emparejamiento.
ES
41
Page 82

Especicaciones
Generales
Salida
Clase de potencia 2 de la especicación
Bluetooth
Rango de comunicación máximo
Línea de vista de aprox. 10 m*
Banda de frecuencia
Banda de 2,4 GHz (2,4000 GHz -
2,4835 GHz)
Método de modulación
FHSS
Intervalo de transmisión (A2DP)
20 - 20.000 Hz (frecuencia de muestreo
de 44,1 kHz)
Transmisor
Sistema de comunicación
Especicación Bluetooth versión 2.0 +
EDR*
Perles Bluetooth compatible*
A2DP (Advanced Audio Distribution
Prole)
AVRCP (Audio/Video Remote Control
Prole)
Códec admitidos*
SBC*
Terminal
Conector para iPod (de 30 clavijas)
Temperatura di utilizzo
De 0 ºC a 35 ºC
Dimensiones
Aprox. 31 × 28 × 8 mm (an/al/prf)
(incluyendo las partes salientes)
Peso
Aprox. 5 g
ES
42
Auriculares
Sistema de comunicación
Especicación Bluetooth versión 2.0 +
2
EDR*
Perles Bluetooth compatible*
A2DP (Advanced Audio Distribution
Prole)
AVRCP (Audio/Video Remote Control
Prole)
HSP (Headset Prole)
HFP (Hands-free Prole)
Códecs admitidos*
SBC*, MP3
Sistema de protección de contenido
admitido
SCMS-T
Fuente de alimentación
cc de 3,7 V: batería recargable de iones
de litio incorporada
Peso
Aprox. 40 g
Receptor
Tipo
Tipo cerrado, dinámico
Unidad auricular
9 mm, tipo cúpula
Gama de frecuencias de reproducción
6 – 23.000 Hz
Page 83

Micrófono
Tipo
Condensador de electreto
omnidireccional
Gama de frecuencias efectiva
100 – 4.000 Hz
Temperatura di utilizzo
De 0 ºC a 45 ºC
* El rango real variará en función de
factores como, por ejemplo, los obstáculos
que puedan interponerse entre los
dispositivos, los campos magnéticos
que puedan existir en torno a hornos
microondas, la electricidad estática, la
sensibilidad de recepción o el rendimiento
de la antena, el sistema operativo, la
aplicación de soware, etc.
* Velocidad de transmisión de datos
mejorada
* Los perles estándar Bluetooth indican la
nalidad de la comunicación Bluetooth
entre dispositivos.
* Códec: formato de conversión y
compresión de señales de audio
* Códec de banda secundaria
El diseño y las especicaciones están
sujetos a cambios sin previo aviso.
ES
43
Page 84

Printed in Malaysia
(1)
 Loading...