

Page 1
DPP-EX50
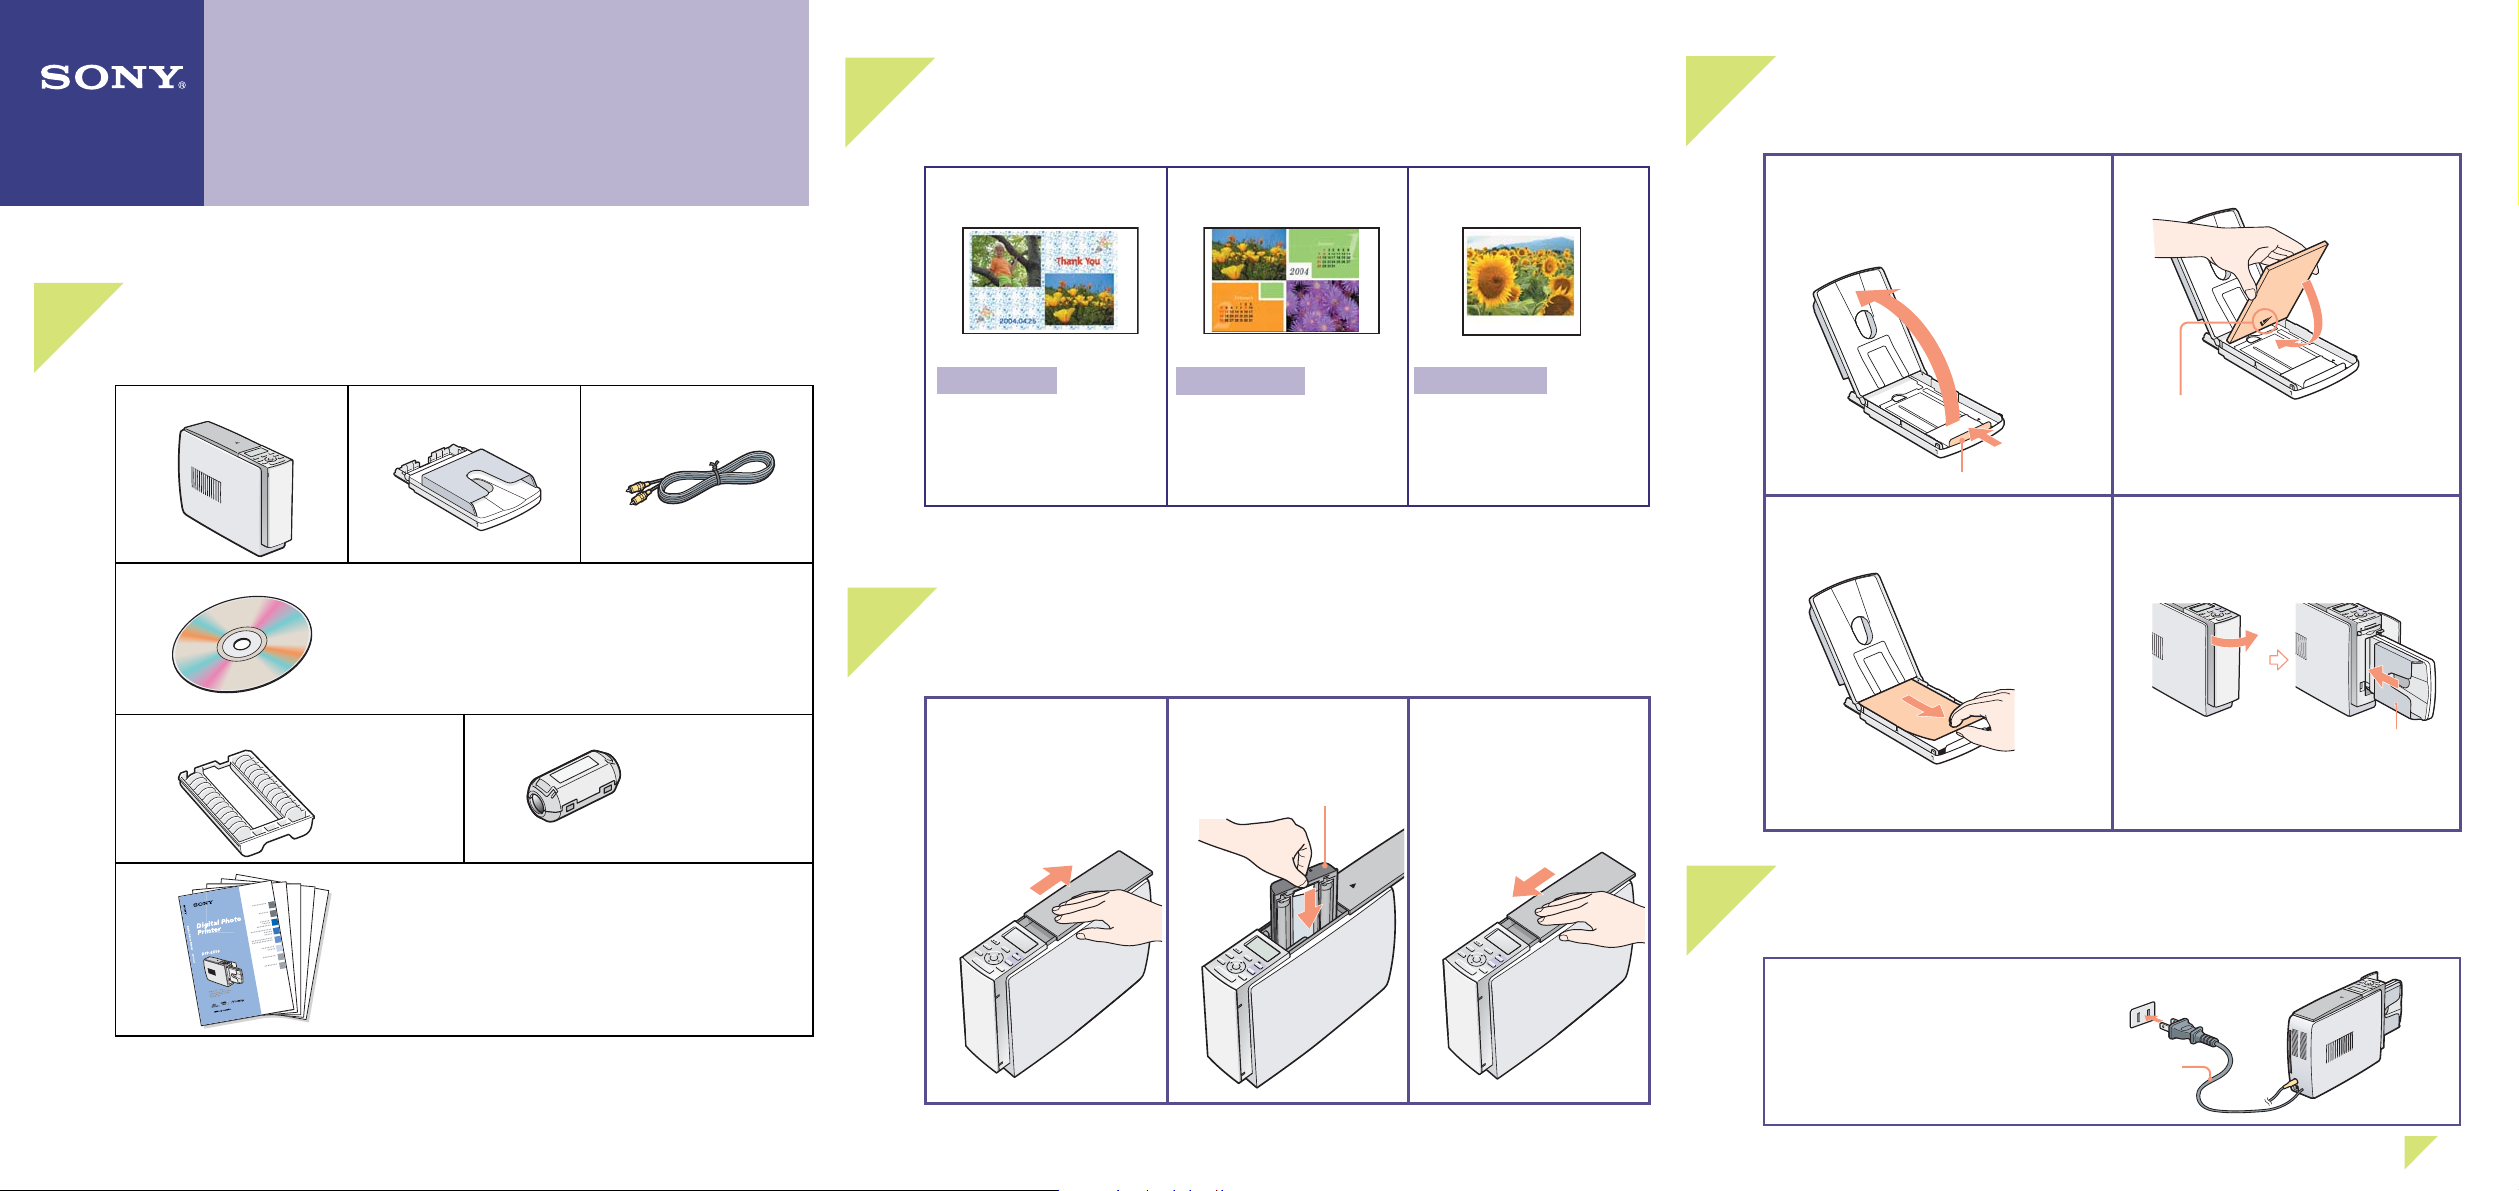
Check the contents of the package.
1
Printer (1) Paper tray (1) Video connecting cable
Quick Start Guide
Follow the procedures in steps 1 through 6 to make a print.
For details, see the Operating Instructions.
(1)
Prepare the printing pack (not supplied).
2
For post card size printing:
SVM-25LS
• Post card (4 x 6 inch)
size print paper (25
sheets)
• Print cartridge (1)
For 3.5 x 5 inch size
printing:
SVM-30MS
• 3.5 x 5 inch size print
paper (30 sheets)
• Print cartridge (1)
For Small size printing:
SVM-30SS
• Small (3.5 x 4 inch)
size print paper (30
sheets)
• Print cartridge (1)
4
Insert the print paper.
1 Open the paper tray cover, and then
adjust the spacer to fi t the paper
size.
Spacer
2 Insert the print paper.
Insert the print paper with the arrow of the
Protective sheet facing backwards (the
feeding direction).
CD-ROM(1)
• Sony DPP-EX50 Printer Driver Software for
Windows® 98SE/Me/2000 Professional/XP Home
Edition/XP Professional
• PictureGear Studio V.2.0
Cleaning cartridge (1) Clamp fi lter (1)
• Operating Instructions (1)
• Quick Start Guide (this leafl et, 1)
• Warranty (1)
• Owner registration card (1)
• Sony End User Software License Agreement (1)
For the details, see page 12 of Operating Instructions.
Load the print cartridge.
3
1 Slide open the cartridge
compartment cover.
2 Insert the print
cartridge.
"Sony" logo
3 Close the cover.
5
3 Remove the protective sheet, and
then close the paper tray cover.
You can use the protective sheet as
cleaning sheet. Keep it together with the
cleaning cartridge.
4 Push and open the printer's paper
Connect to the AC outlet.
Connect the AC power cord to the AC
outlet.
AC power cord
tray compartment cover and insert
the paper tray into the printer.
Insert it fi rmly until it clicks into place.
© 2004 Sony Corporation Printed in Korea 3-207-730-12(1)
Go to step 6.,
Page 2
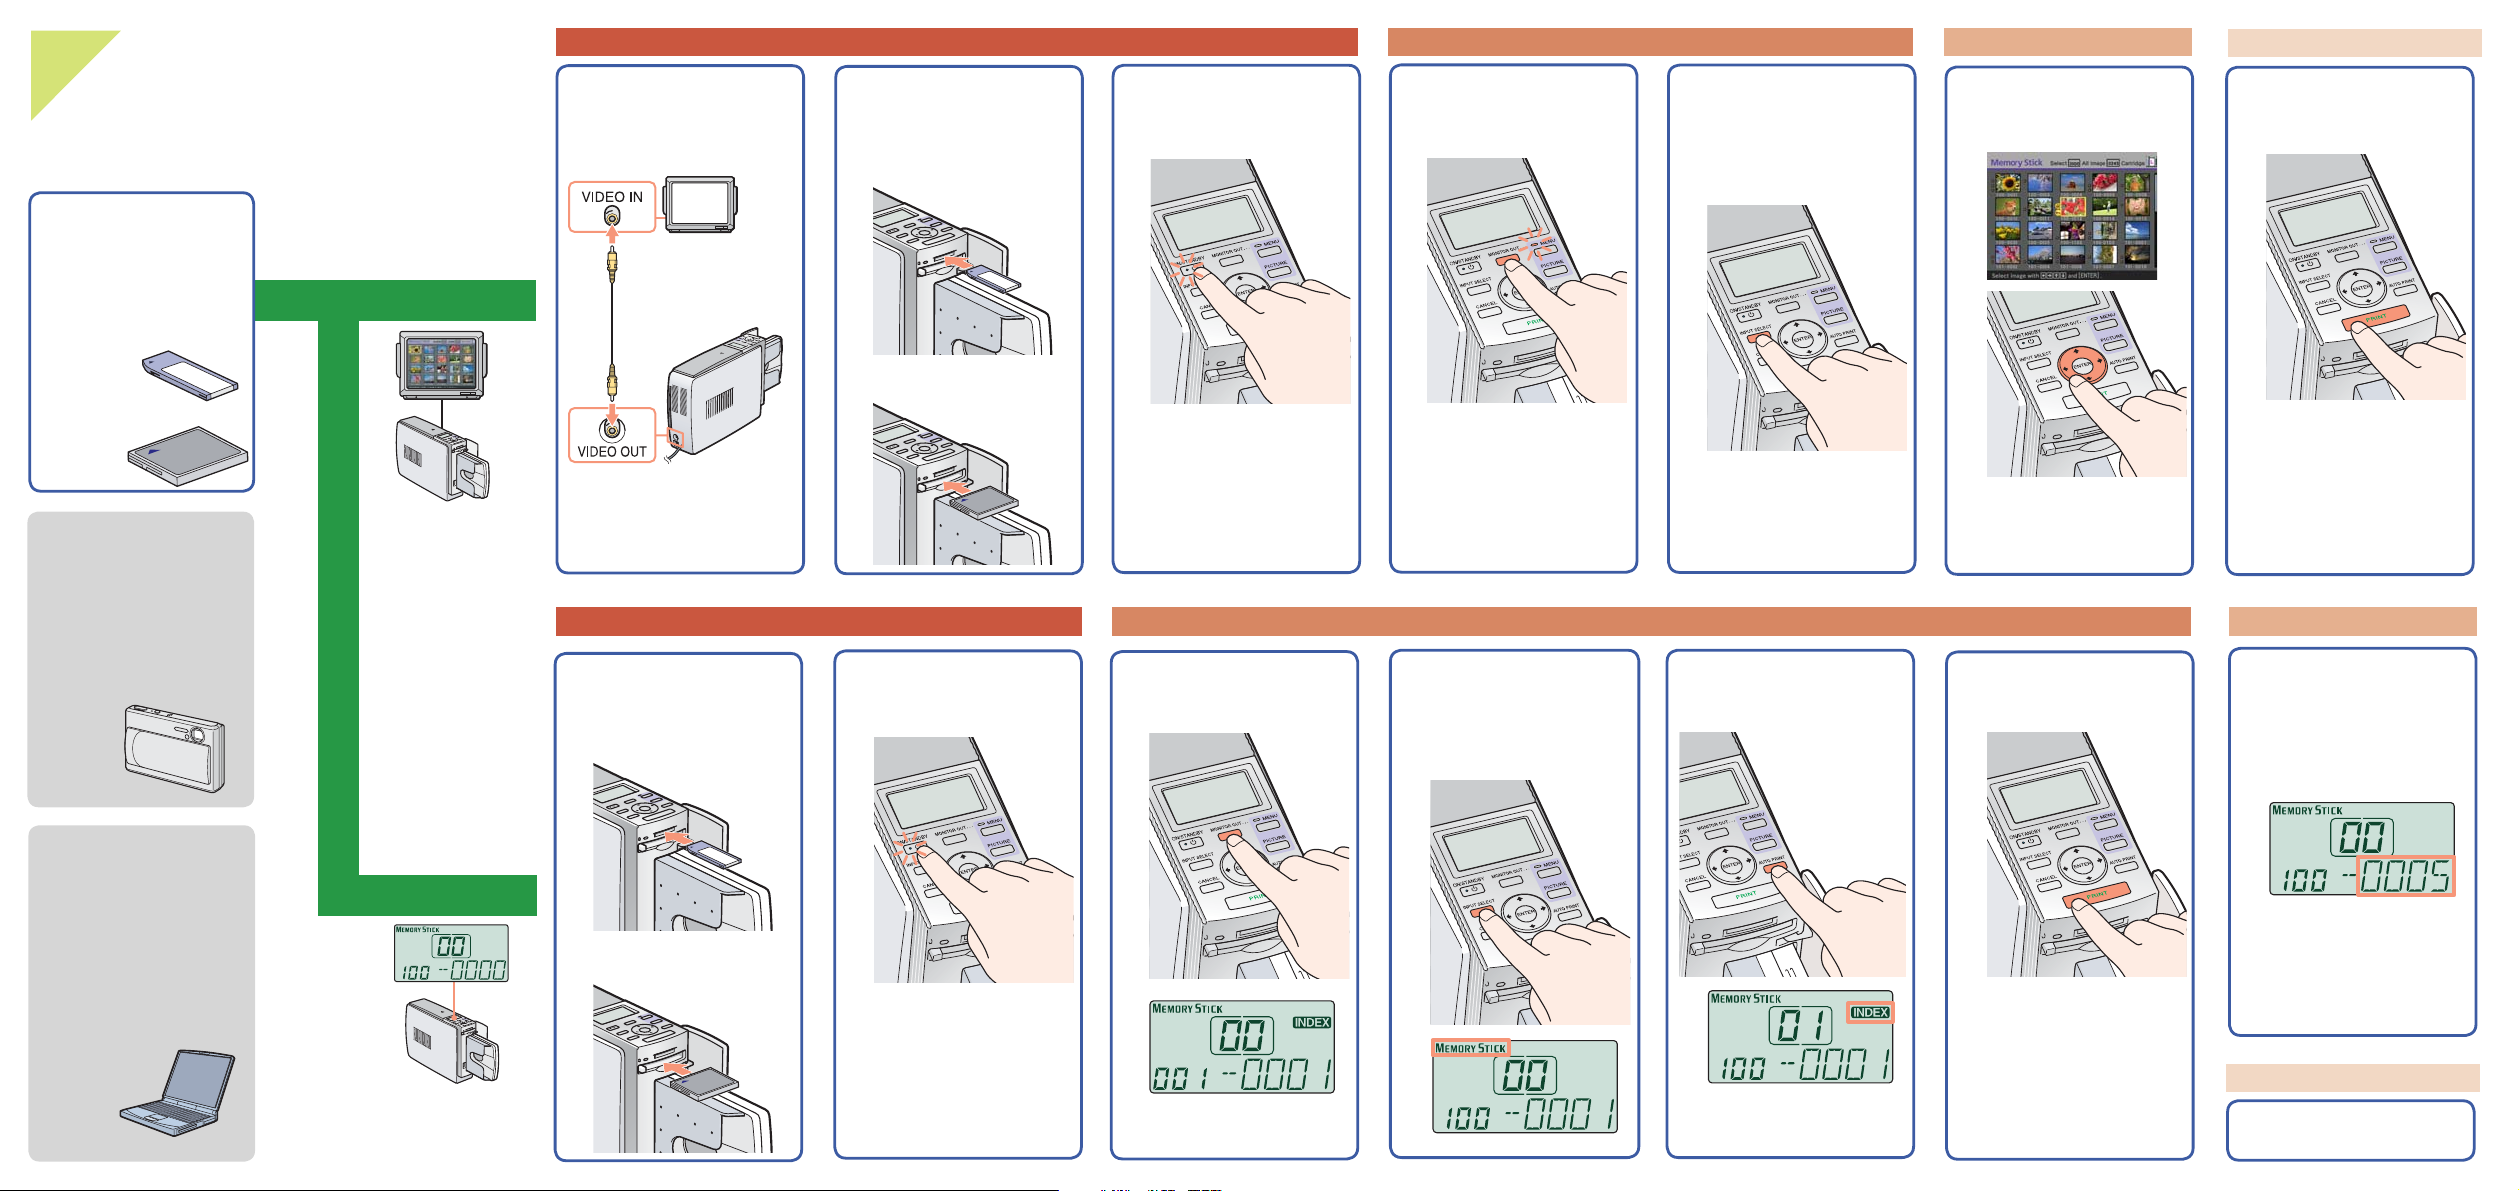
Print an image.
6
Depending on the memory card or device you
use, the printing procedures differ:
Preparations Displaying images Selecting an image
1 Connect the printer to a
TV monitor and turn on
the TV monitor.
2 Insert a "Memory Stick"
or a CompactFlash card.
"Memory Stick"
3 Press ON/STANDBY to
turn on the printer.
4 Display the images on
the TV monitor.
5 Press INPUT SELECT to
display "Memory Stick"
or "CompactFlash" on
the TV monitor.
6 Select an image for
printing.
Printing
7 Press PRINT.
Printing an image
stored on a
"Memory Stick" or a
CompactFlash card
"Memory Stick"
CompactFlash card
Printing an image from
a PictBridge-compliant
digital camera
See page 81 of
the Operating
Instructions.
Printing using a
connected TV monitor
zzz
zzzz
CompactFlash card
Press MONITOR OUT to
turn on the indictor.
Set the TV monitor in the
video mode.
Preparations Displaying images Selecting an image
1 Insert a "Memory Stick"
or a CompactFlash card.
"Memory Stick"
2 Press ON/STANDBY to
turn on the printer.
3 Press MONITOR OUT to
turn off the indicator.
4 Press INPUT SELECT to
display "Memory Stick"
or "CompactFlash" on
the LCD display.
5 Press AUTO PRINT to
display "INDEX."
Press (B/b/V/v) to move
the yellow frame (cursor)
to the image you want to
print.
6 Press PRINT.
To print multiple copies
See page 24 on the
operating instructions.
7 Select an image for
printing.
Press the arrow (B/b)
button to display the
desired image number.
Printing an image
from a PC
See page 85 of
the Operating
Instructions.
Printing using the
printer's LCD display
z
CompactFlash card
z
z
z
z
z
The index of the images
in the memory card is
printed, allowing you to
check the image numbers.
z
Printing
8 Press PRINT.
To print multiple copies
Press ENTER repeatedly to
display the desired number.
z
 Loading...