

Page 1
NETWORKVIDEO RECEIVER Quick Setup Guide
DMX-NV1
© Sony Corporation 2007. Printed in USA. 3-216-111-11(2)
Package Contents
AC Adapter with
AC Power Cord
Stand
Warranty Card
Attachment Guide
Quick Setup Guide
NE
T
W
O
RK
VI
D
E
O
R
ECEIVE
R
Q
u
i
c
k Set
u
p
G
u
i
d
e
DMX
-
N
V
1
© So
n
y Corpo
r
a
t
ion
2007
.
Prin
t
ed
in
U
S
A
.
3
-
126
-
111
-
11
(
1
)
Receiver (DMX-NV1)
& Cable Cover
Mounting Bracket
Mounting Knobs
Screws, Type 1
Screws, Type 2
USB Cable
HDMI Cable
POWER
PORT 1
PORT 2
PORT 3
PORT 4
Gaming Adapter as Wireless Bridge
Ethernet Cable
POWER
PORT 1
Wireless Router
Gaming
Adapter
Powerline Ethernet Adapter
Ethernet Cable
POWER
PORT 1
PORT 2
PORT 3
PORT 4
Ethernet Cable
E
x
i
s
t
i
n
g
E
l
e
c
t
r
i
c
a
l
W
i
r
i
n
g
Router
Powerline
Ethernet
Adapter
POWER
PORT 1
PORT 2
PORT 3
PORT 4
Direct to Router
Ethernet Cable
Router
POWER
INTERNET
Modem
OUT
LAN
DC IN 9V
NETWORK
INPUT
SERVICE
%
$
#
"
OUT
LAN
DC IN 9V
OUT
LAN
DC IN 9V
Front of
Receiver
OUT
LAN
DC IN 9V
%
$
#
"
B
1
B
OUT
LAN
DC IN 9V
%
#
HDMI
DMe
x
NETWORK
Power LED
Network LED
Internet
Video Icon
Network Icon
Video Icon
Media Category Bar
2
3
4
5
6
7
8
B
OUT
LAN
DC IN 9V
OUT
LAN
DC IN 9V
Front of
Receiver
When you see... Receiver...
Power
LED
Green is powered “On.”
Red is not connected. Check all cable
components.
Orange is in update mode.
Network
LED
Green is connected to the Internet.
Blinking
Green
has network activity.
z Remote control not supplied. To operate this receiver, use your TV’s remote
control equipped with the DMeX button.
Setting up the BRAVIA
The
BRAVIATM Internet Video Link receiver is compatible with certain Sony televisions with the XMBTM(XrossMediaBar®) and DMeX interface. High-speed Internet access is also required.
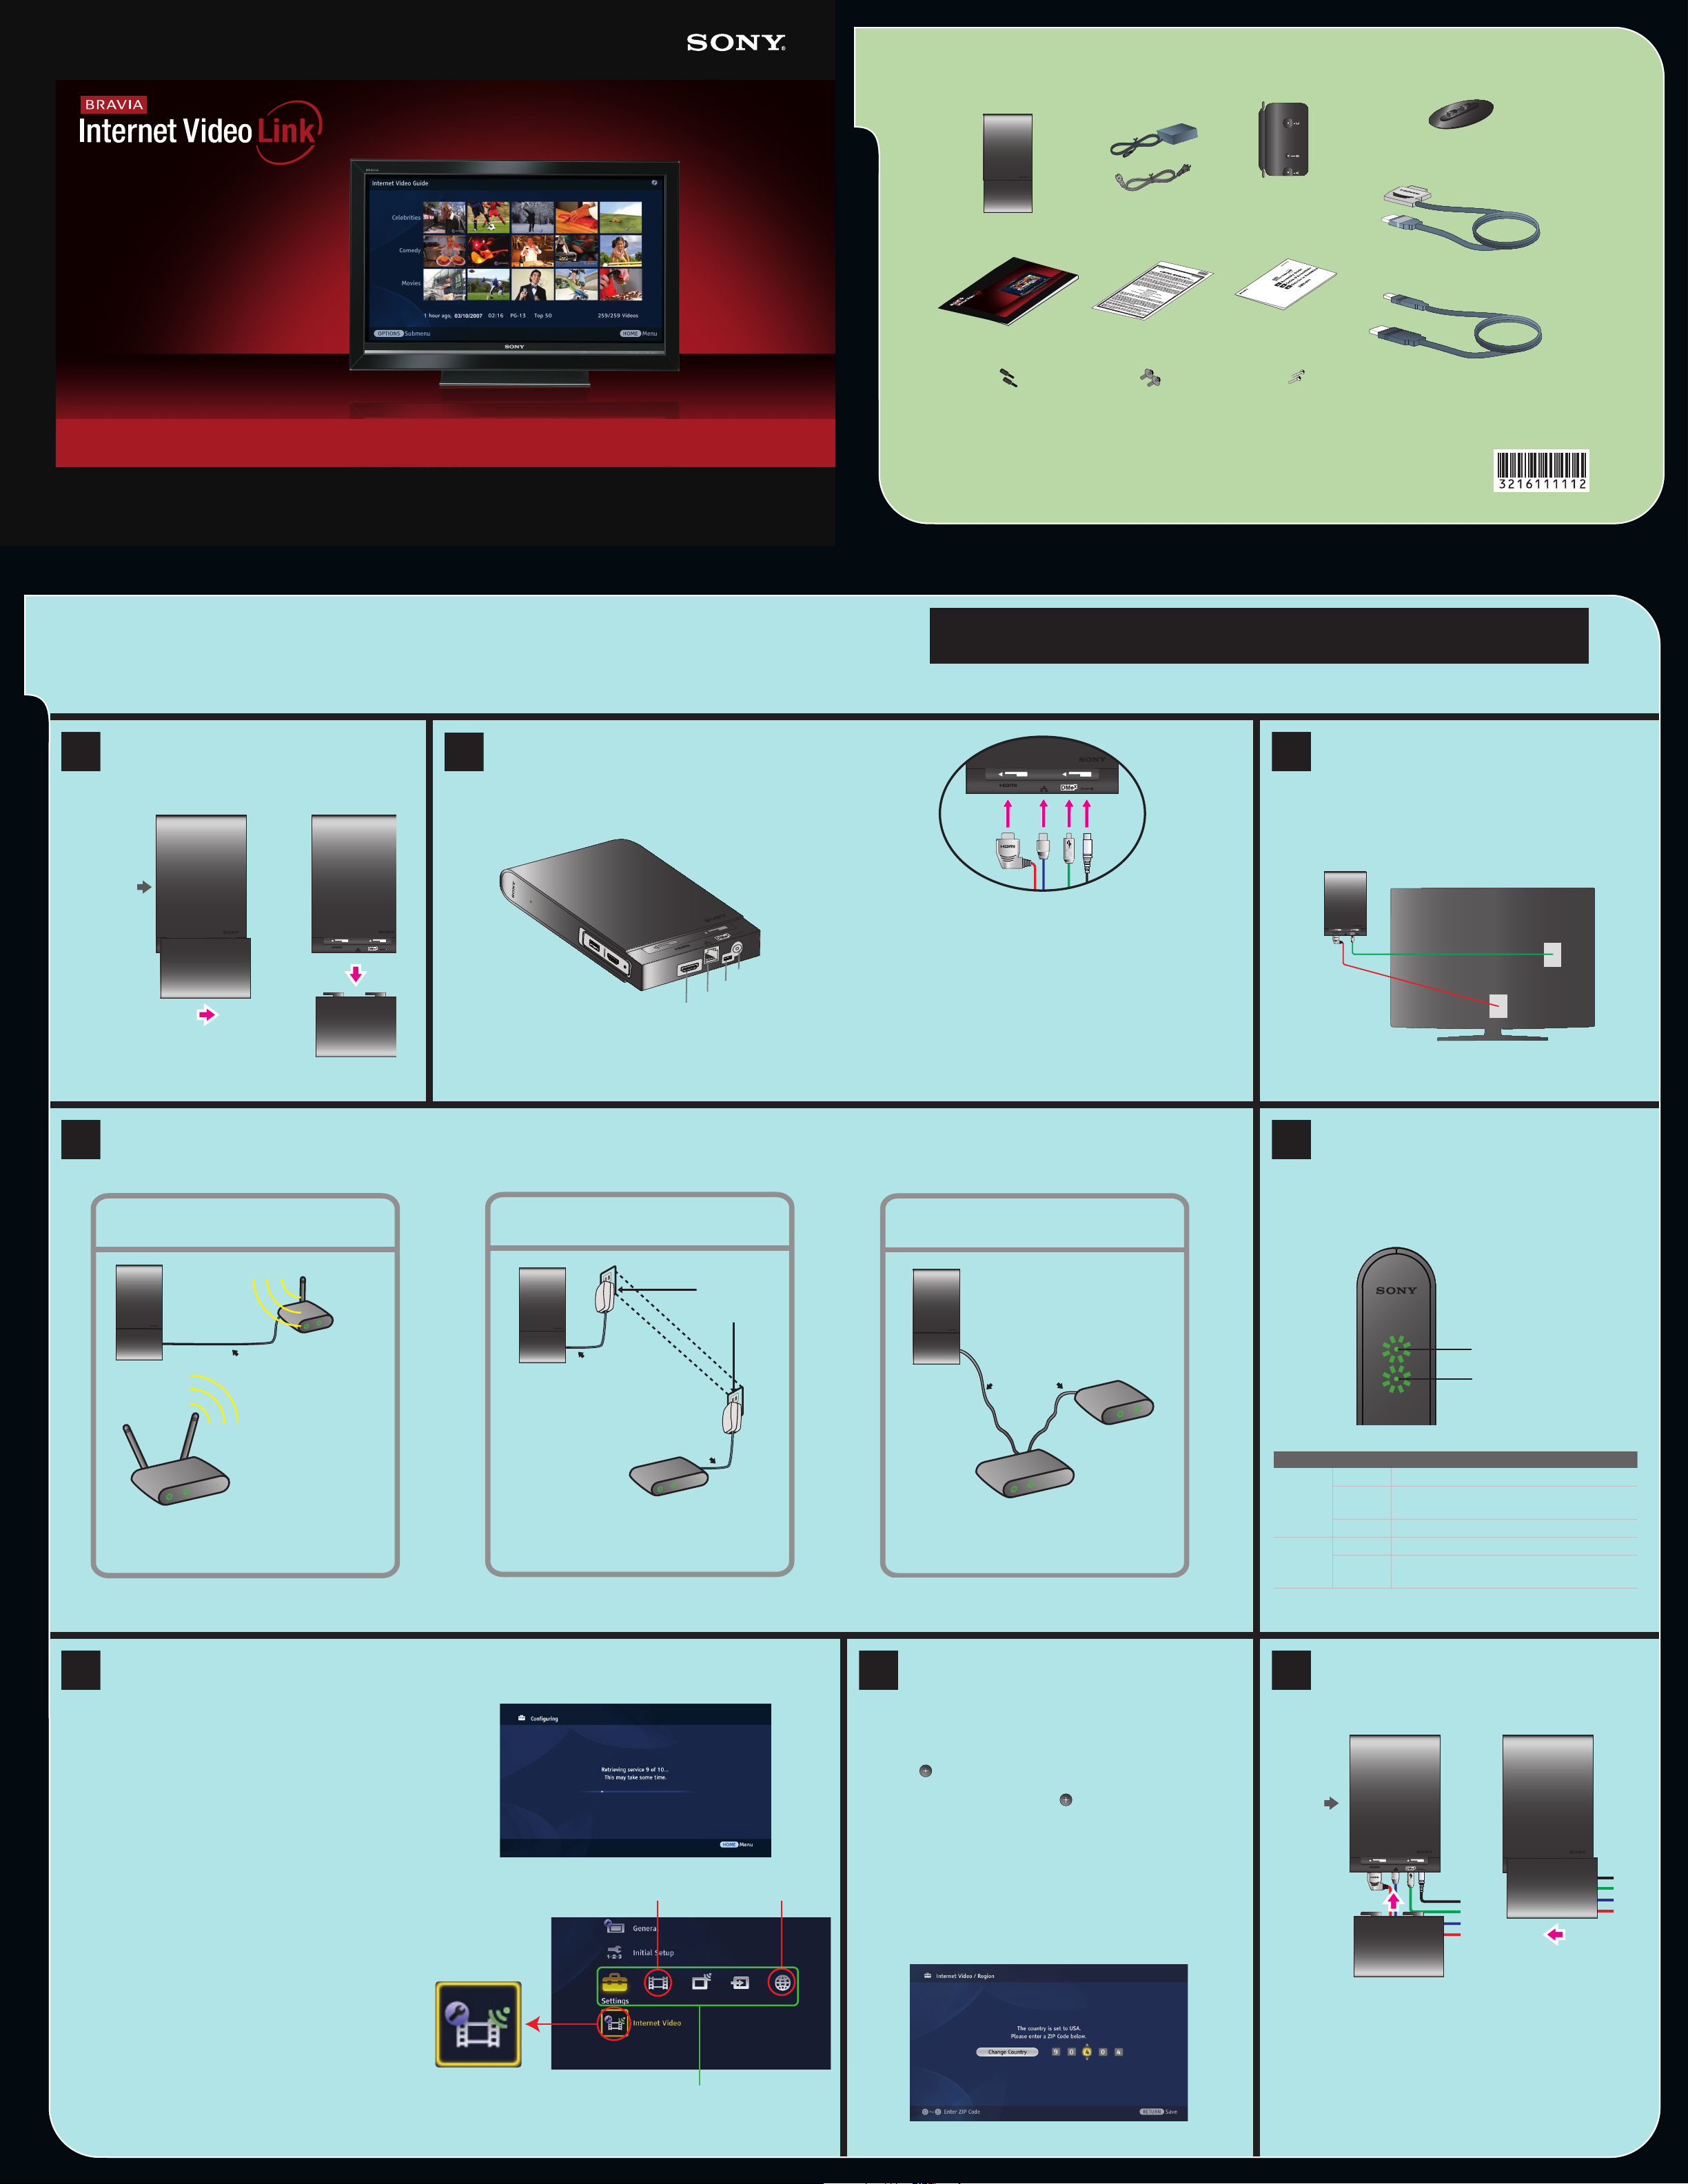
Power off your TV before beginning the setup. The receiver can be installed either as a stand-alone or mounted to the back of your TV set.
Remove Cable Cover
Remove the cable cover to expose the ports
located on the bottom of the receiver.
Internet Video Link
Connect Cables
Connect the cables in the order shown below.
TM
z Ethernet cable required (not supplied).
z Using your PC, view the Operating Instruction Manual on the Internet at
http://internet.sony.tv/manual
Please read all instructions before beginning the installation.
Refer to the separate Attachment Guide for instructions on attaching to your TV.
Connect to TV
B Connect the large end of the USB cable
to the DMeX/SERVICE port on the TV.
D Connect the straight end of the HDMI cable
to any HDMI port on the TV.
A DC IN 9V: Connect the AC adapter to this port. Do not
plug into the wall outlet at this time.
B DMex: Connect the small end of the USB cable to this
port.
C LAN: Connect an Ethernet cable (not supplied) to this
port.
D HDMI OUT: Connect the L-shaped end of the HDMI cable
to this port.
Connect to the Internet
Connect an Ethernet cable to your Internet source by choosing one of the following recommendations for easy “plug and play.” Your receiver will automatically attempt to
connect to the Internet.
z The rear view and location of the ports as shown may differ from your TV set.
Verify Connection
a. Plug in the receiver and power on the TV.
b. Once the receiver and TV are powered on,
confirm the LED lights.
Standard Definition video: 802.11g
High Definition video: 802.11n
z If you need to configure a fixed IP address or proxy server, check the Operating Instruction Manual for more information.
Confirm Connection
Follow these instructions to confirm.
a. Press the DMeX button on your TV’s remote control
to view the connection status.
z If “Fea
ture available with DMeX module” appears on the
screen, wait a few moments and try again.
b. When you see the message “Configuration Successful,”
press the HOME button on your TV’s remote control.
These menu icons associated with the receiver will appear
on the
z IMPORTANT:
XMBTM (XrossMediaBar®)
remote control to access the BRAVIA™ Internet Video
Link. It is available on the
Do not press the INPUT button on the
XMBTM.
.
Standard Definition video: HomePlug Turbo,
HomePlug AV, UPA, HD-PLC
High Definition video: HomePlug AV, UPA, HD-PLC
Enter Region
It is strongly recommended that you complete
Region Setup before using your receiver.
a. Highlight the Internet Video icon at the bottom of the
Settings menu on the XMBTM (XrossMediaBar®) and
press .
b. Highlight Region and press .
c. Follow the on-screen instructions to complete the setup.
z Default country is the United States. Press the B button
to select a different country.
Attach Cable Cover
Slide the cable cover back into place.
z For attachment options to the TV, see the separate
Attachment Guide.
Page 2
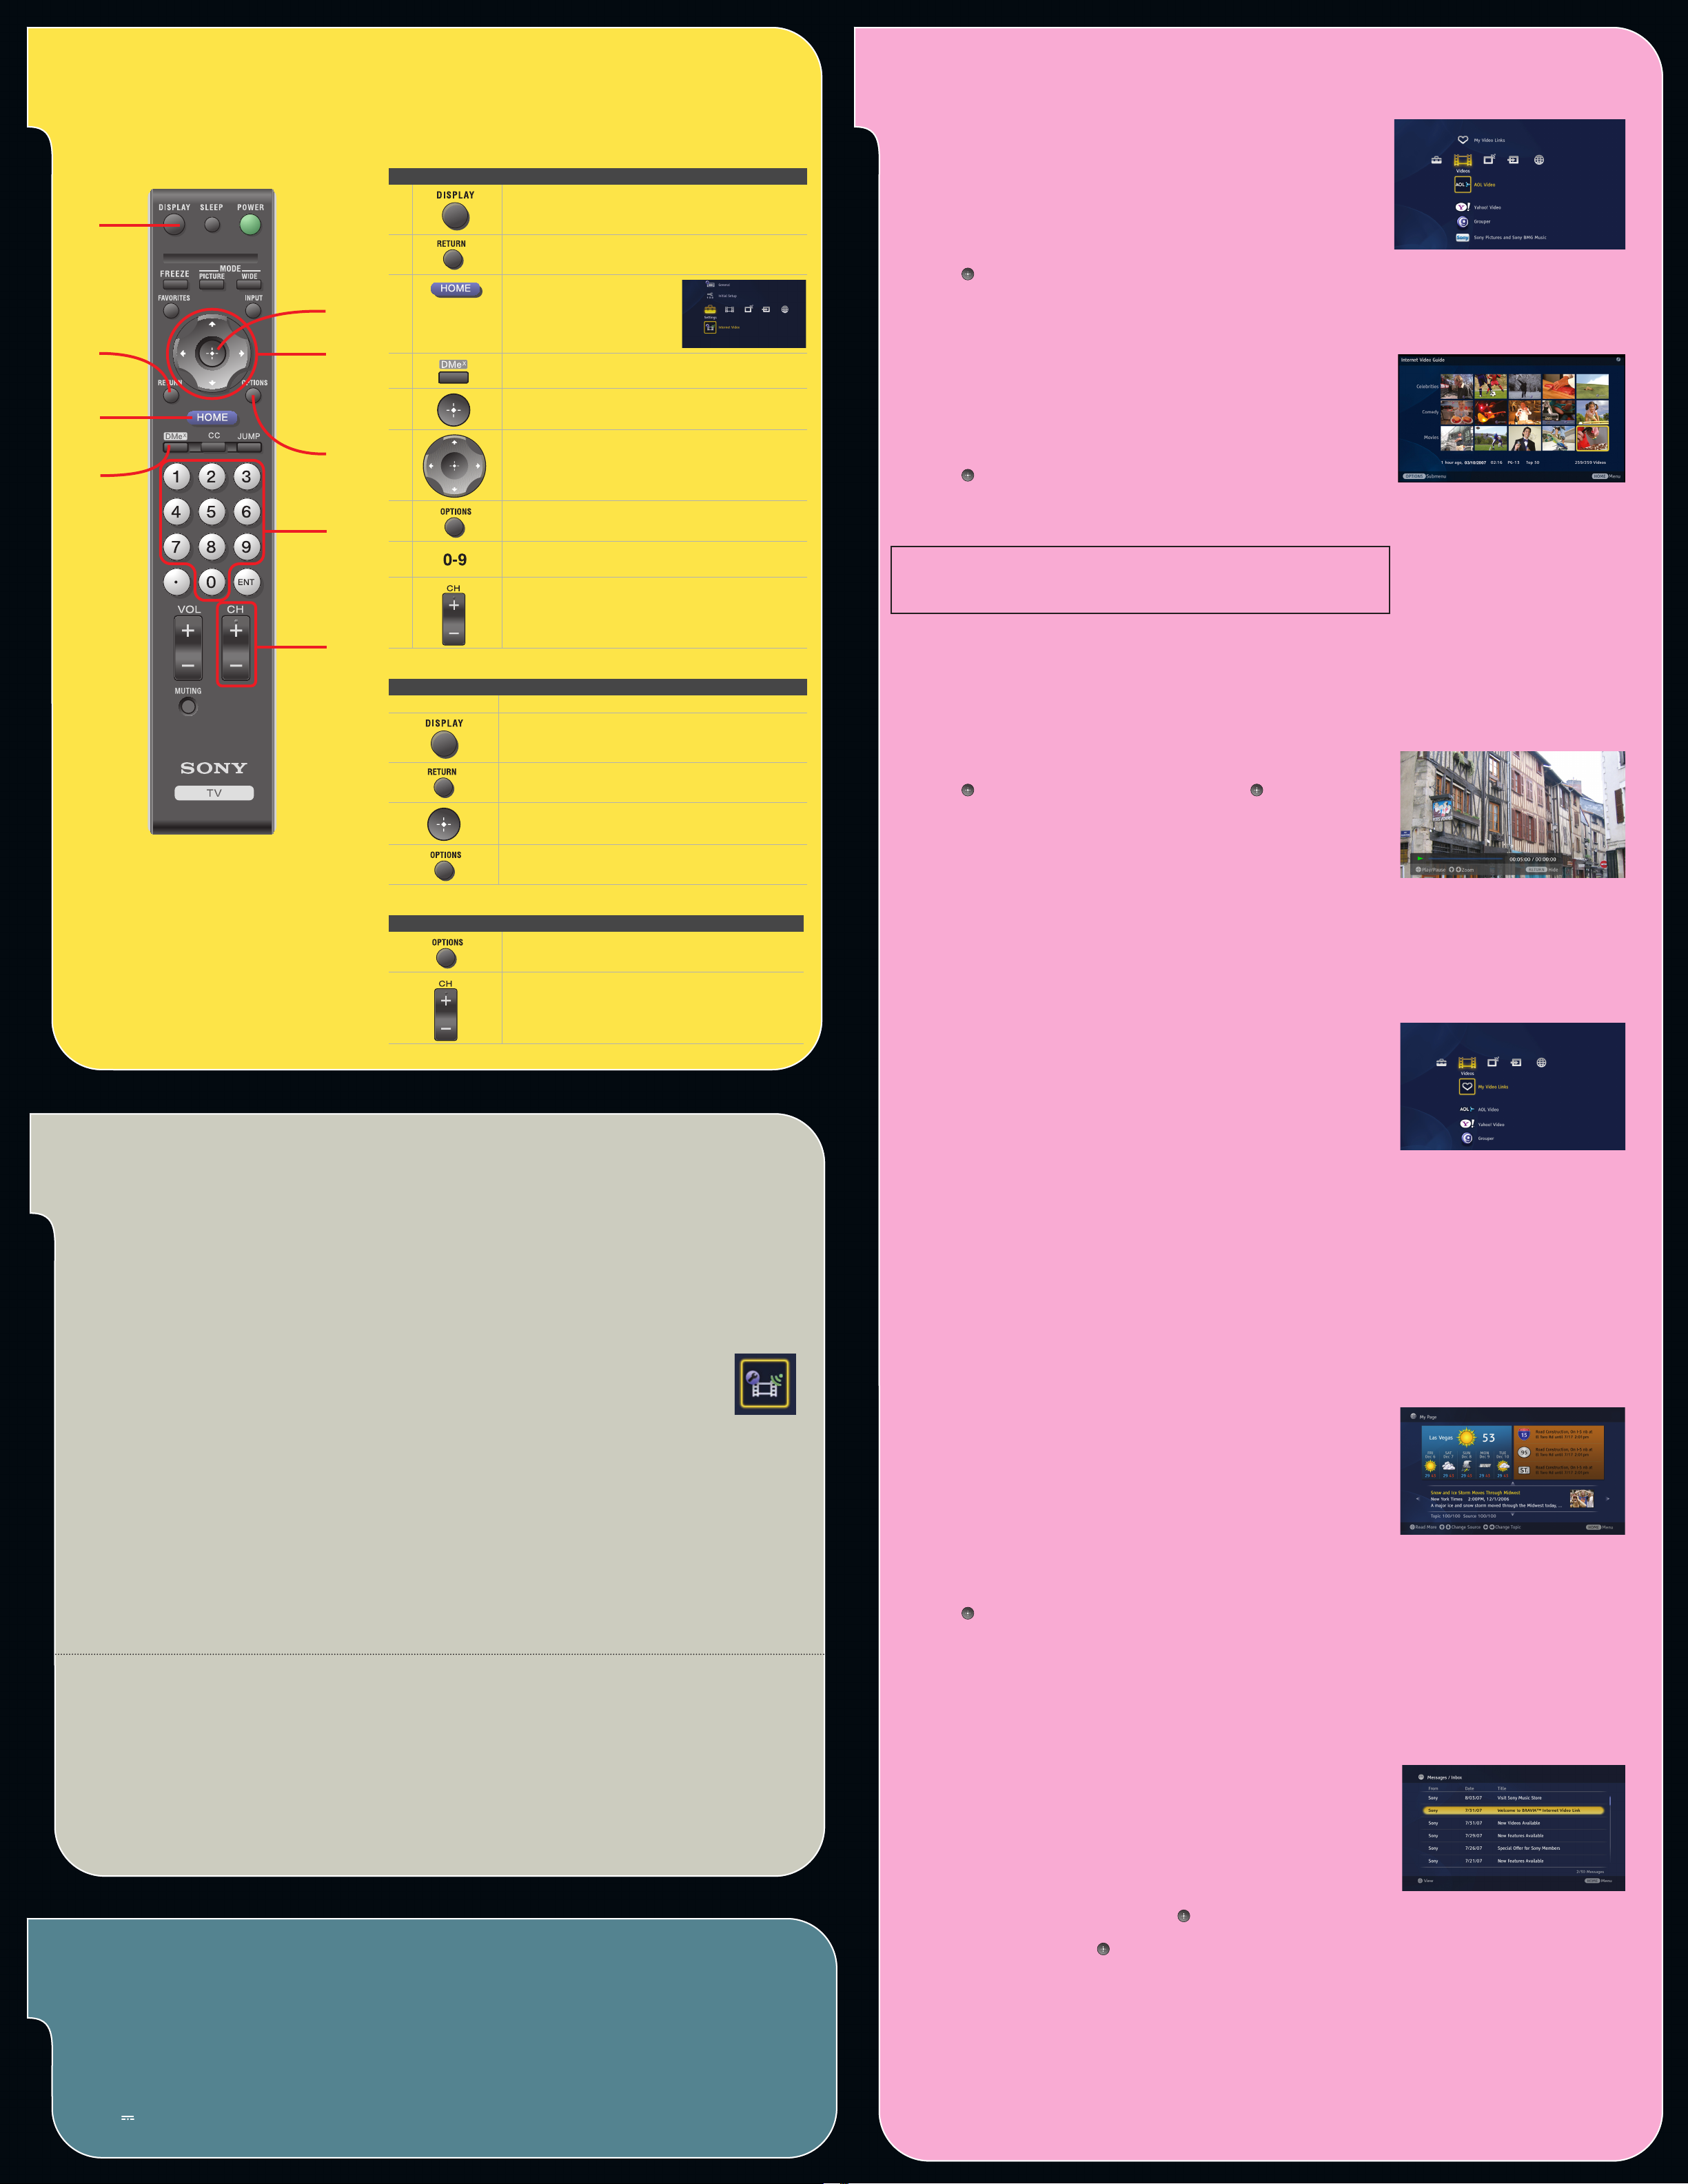
Using Your TV’s Remote Control with Your Receiver
While in the Video Player
While in the Internet Video Guide
Button Button description for receiver use
Displays the Control Panel in the Video Player
Returns to the previous screen or saves selections,
depending on the screen
Opens the TV Home Menu/
XMB
TM
(XrossMediaBar®)
Look for the Internet Video
icon on the Settings menu
when connected
Launches My Page
Make or confirm a selection
Move up, down, left or right on the screen
Displays Options menu to select additional features
unique to the receiver
Enters numbers
Page Up/Down
Press... To Do This
7/W Zoom in/out (if available)
View the control panel
Stop video playback and return to Internet Video
Guide
Pause/play a video
Display Options menu to zoom in and out
Press... To Do This
View Home Category, view additional Categories,
Sort by category, Save this Link
Page up/down in Internet Video Guide
(connected, green)
Getting to Know Your Receiver
Use your Sony TV’s remote control with the DMe
This receiver does not come with its own remote control.
X
button to operate the BRAVIATM Internet Video Link receiver.
Internet Video Guide
BRAVIA Internet Video Link is a gateway that brings Internet videos
straight to your BRAVIA TV.
1. Press HOME on your TV’s remote control to access the Video menu on
the XMBTM (XrossMediaBar®).
2. Press the v button to highlight the service content provider of your
choice.
3. Press to open the Internet Video Guide with videos provided by the
service content provider.
The videos in the Internet Video Guide are arranged in thumbnails. Each
video’s title and parental guideline rating is labeled in the lower left-hand
corner of the screen.
1. Scroll between videos using the V/v/B/b buttons. To page up and
down, press CH +/–.
2. Highlight the video you want to watch.
3. Press to open the video in the Video Player.
z In the Internet Video Guide, press OPTIONS and select Categories to
view more videos.
Remote controls may vary.
Shown with RM-YD018.
IMPORTANT: The Parental Lock function set on the TV will block video
content based on the TV Rating. The Movie Rating will not block content
with this receiver.
Video Player
= Press to Pause the video during playback. Press again to Play.
= Press the RETURN button to stop the video and return to the Internet
Video Guide.
= Press V/v to zoom in/out.
z Original quality of the picture may be lost when zooming in or out.
Helpful Hints and Troubleshooting
• The receiver should be installed near an easily accessible power outlet.
• To turn off or reset the receiver, unplug it from the wall.
• Test the receiver’s connection before mounting it to your TV, especially if you are mounting the TV to a wall.
• If icons related to the receiver do not appear as shown in step 6 of Setting up the BRAVIA
cable connections and Internet connection.
• Make sure that the USB and the HDMI cables are connected to the receiver and to the corresponding ports on the TV set.
• Verify your network connection by ensuring the
• If the screen is black, press the
• To view more videos while in the
• Some videos may not be available for viewing, depending on the TV’s
• Videos saved to
• Your receiver will update software from time to time. See the Operating Instruction Manual for more details.
• It is normal to see a black screen following an update or a reset of the receiver. To proceed, press the
• Recommended connection speed: Standard Definition video 2.5 Mbps, High Definition video 10 Mbps
• To register your BRAVIA
• To view or download the Operating Instruction Manual, visit http://internet.sony.tv/manual
• A hard copy of the Operating Instruction Manual is available by calling 800-488-SONY (7669) or by visiting
• For further assistance, contact Sony at
XMBTM under the Settings menu.
receiver. Do not try to access the receiver using the
input on the TV will not activate the receiver.
Category to return to the main page.
select an icon from the
http://www.sony.com/accessories (handling charges may apply).
My Video Links may not be available if they have been removed from the service content provider.
XMBTM.
TM
Internet Video Link and access enhanced features, visit https://internet.sony.tv
TM
Internet Video Link, check your
Internet Video icon, shown to the right, appears on the
HOME button to access the XMBTM and select an icon associated with the
INPUT button on the remote control. The HDMI
Internet Video Guide, press the OPTIONS button and select Categories. Select Home
Parental Lock.
HOME button and
866-918-BIVL (2485)
My Video Links
Follow the instructions below to save videos to My Video Links for quick
and easy viewing.
Save this Link
1. In the Internet Video Guide, highlight the video you wish to save.
2. Press the OPTIONS button and select Save this Link.
View My Video Links
1. Press the HOME button and highlight the Video menu.
2. Press the UP button to select My Video Links.
z The Favorites button on your TV’s remote control is specifically for TV
channel Favorites.
My Page
You must complete Region Setup before accessing this feature.
My Page gives you instant access to news, weather, and traffic
information, all with the click of a button. To access My Page, press the
shortcut button, DMeX, on your remote control.
To control the news articles:
1. Press the B/b buttons on your TV’s remote control to change source.
2. Press the V/v buttons to change topics.
3. Press to view the full article in a new screen.
Messages
Specifications
Model Name:
Power Requirement:
DC Input:
9V 1A 9W
Network Video Receiver DMX-NV1
AC 120V ~ 0.5A 60Hz External AC Adapter
Dimensions (receiver alone):
4.1 x 6.4 x 1.3 inches (105.4 x 163.7 x 32.3 mm)
Dimensions (with cable cover and stand):
4.1 x 8.8 x 4.3 inches (105.4 x 224 x 32.3 mm)
Mass (receiver alone):
1.1 lbs (0.5 kg)
From time to time, Sony and the service content providers will send
important information to your Message Inbox.
To open your Message Inbox:
1. Press HOME on your TV’s remote control to access the Network menu
on the XMBTM (XrossMediaBar®).
2. Highlight the Messages icon and press .
3. Your Message Inbox will open. To read a message, highlight it using
the V/v buttons and press .
z The screen images shown above may differ from the actual images you see on your TV.
 Loading...