

Page 1

Color Printer
3-868-283-11(1)
Operating Instructions
Mode d’emploi
GB
FR
DMP-1000
©1999 Sony Corporation
Page 2

WARNING
To prevent fire or shock hazard, do not
expose the unit to rain or moisture.
To avoid electrical shock, do not open the
cabinet. Refer servicing to qualified
personnel only.
This symbol is intended to alert
the user to the presence of
uninsulated “dangerous voltage”
within the product’s enclosure
that may be of sufficient
magnitude to constitute a risk of
electric shock to persons.
This symbol is intended to alert
the user to the presence of
important operating and
maintenance (servicing)
instructions in the literature
accompanying the appliance.
For Customers in the U.S.A.
Owner’s Record
The model and serial numbers are located on
the bottom. Record the serial number in the
space provided below. Refer to this number
whenever you call upon your Sony dealer
regarding this product.
Model No. DMP-1000
Serial No.
WARNING
This equipment has been tested and found to
comply with the limits for a Class B digital
device, pursuant to Part 15 of the FCC Rules.
These limits are designed to provide
reasonable protection against harmful
interference in a residential installation. This
equipment generates, uses, and can radiate
radio frequency energy and, if not installed
and used in accordance with the instructions,
may cause harmful interference to radio
communications. However, there is no
guarantee that interference will not occur in a
particular installation. If this equipment does
cause harmful interference to radio or
television reception, which can be determined
by turning the equipment off and on, the user
is encouraged to try to correct the interference
by one or more of the following measures:
– Reorient or relocate the receiving antenna.
– Increase the separation between the
equipment and receiver.
– Connect the equipment into an outlet on a
circuit different from that to which the
receiver is connected.
– Consult the dealer or an experienced
radio/TV technician for help.
• Microsoft, MS, MS-DOS and Windows®
are registered trademarks of Microsoft
Corporation in the United States and
other countries.
• IBM PC/AT is a registered trademarks
of IBM Corporation of the U.S.A.
GB
2
CAUTION
You are cautioned that any changes or
modifications not expressly approved in this
manual could void your authority to operate
this equipment.
CAUTION
To prevent electric shock, match wide blade
of plug to wide slot, fully insert.
CAUTION
The nameplate and graphical symbol are
located on the bottom enclosure.
Page 3

Table of contents
Getting Started
Features ....................................................... 4
Unpacking the printer............................... 5
Identifying the parts.................................. 6
Setting Up
Connecting the printer .............................. 8
Connecting to the video equipment .... 8
Connecting the AC power cord ........... 9
Adjusting the clock .................................. 10
Using optional supplies (print packs) .. 12
Loading the print cartridge .................... 13
Inserting the print paper......................... 15
Inserting the print paper using the
supplied automatic feeder .................. 15
Inserting the print paper manually ... 17
Notes on handling the print paper .... 18
Using the floppy disk.............................. 19
Printing
Printing an image from the video
equipment ........................................... 20
Printing an image recorded on the
floppy disk .......................................... 23
Making Various Print
Making split prints .................................. 26
Making a mirror image print ................. 30
Making a label for a floppy disk............ 32
Making an index list of images.............. 34
Recording the video picture as a still
image ................................................... 36
Printing the date ...................................... 38
Capturing the picture using the
optional foot switch........................... 39
For Your Information
Precautions ............................................... 40
Troubleshooting ....................................... 43
Optional supplies (print packs) ............. 48
Specifications............................................ 49
Chart for various print mode................. 50
Index .......................................................... 51
3
GB
GB
Page 4

Getting Started
Features
With the Color Printer DMP-1000, you can print
images from the video equipment and the Digital
Mavica.
Fine print resolution
With a printing resolution of 306 dpi × 306 dpi, you can
print postcard size pictures and characters at nearphoto quality.
Printing and saving images from the video
equipment
By connecting the video equipment, you can print the
input images. You can also save the input images on
the floppy disk.
Various types of printing
You can make various prints such as a standard print,
split planes, labels for floppy disks and an index print
of the specified images.
GB
4
Printing 25 sheets continuously
With the supplied automatic feeder, you can print up
to 25 sheets continuously.
Direct printing of the image from the Digital Mavica
You can directly print the images recorded with the
Digital Mavica without a PC, by inserting a recorded
3.5-inch floppy disk into the printer.
Capturing a picture with the optional remote
switch
With the optional Foot Switch FS-20, you can designate
the picture remotely without using the controls of the
unit.
Getting Started
Page 5

Unpacking the printer
Make sure that the following accessories are supplied
with your printer.
• Automatic feeder (1)
• AC power cord (1)
• Video connecting cable (1)
Getting Started
• Instruction Manual (1)
• Warranty (1)
Getting Started
GB
5
Page 6
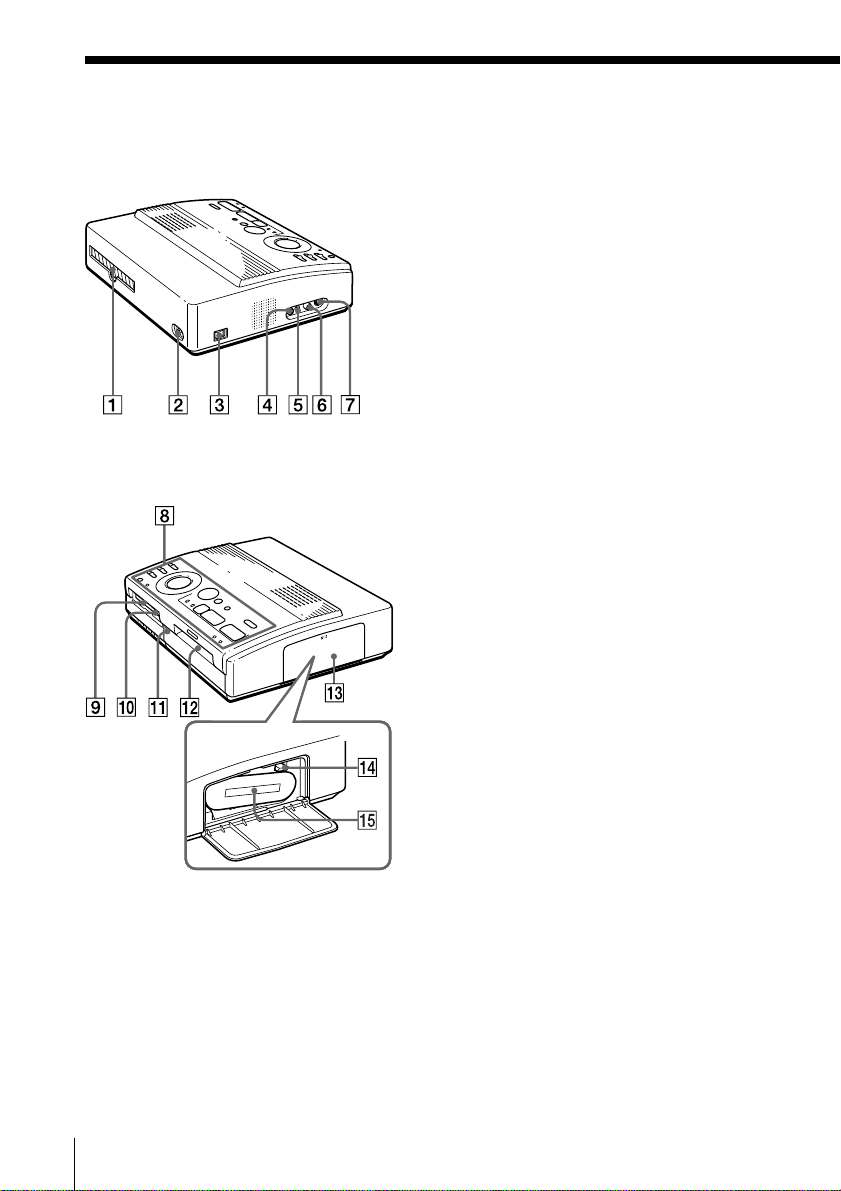
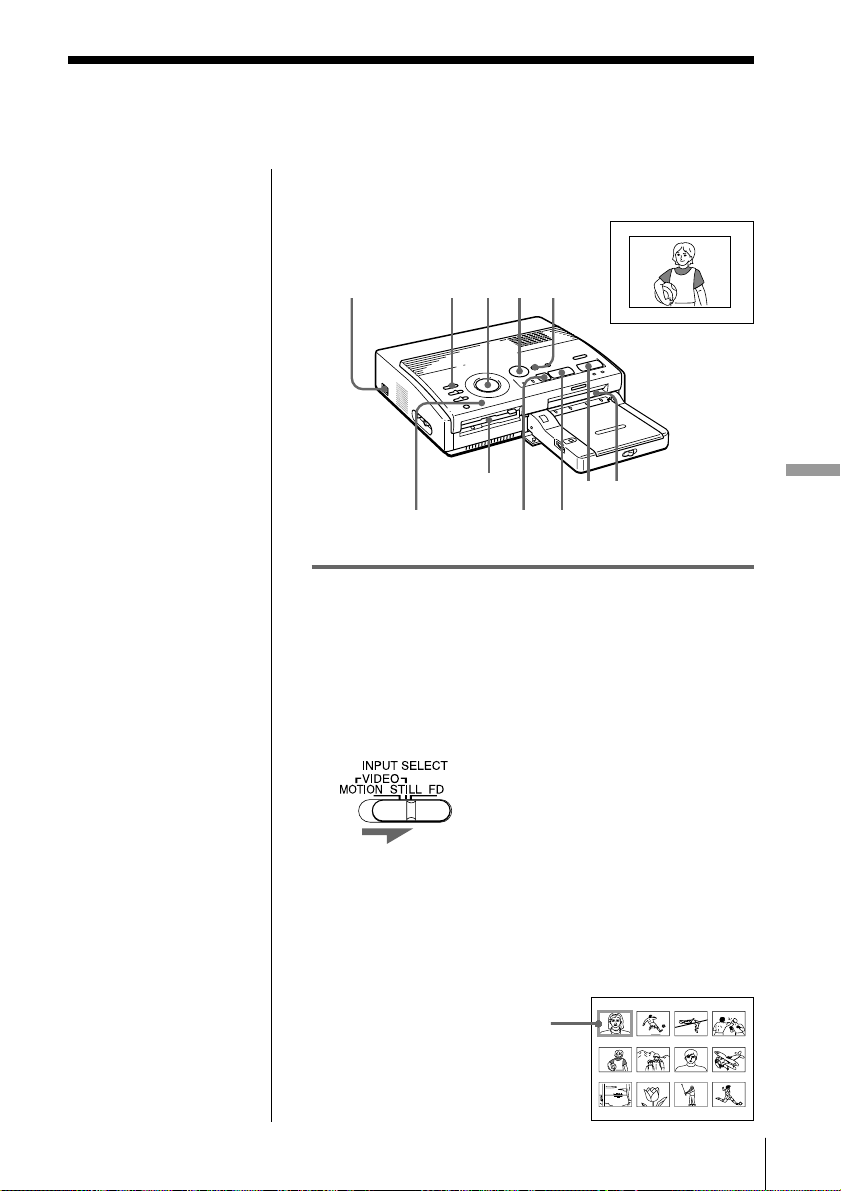
Identifying the partsIdentifying the parts
See the pages given in parentheses for use of the parts.
1 Paper outlet (page 47)
2 AC power connector (page 9)
3 POWER switch (page 10)
4 VIDEO OUTPUT connector (page 8,
19)
5 REMOTE CAPTURE jack (page 39)
6 VIDEO INPUT connector (page 8)
7 S VIDEO INPUT connector (page 8)
8 Operation panel (page 7)
9 3.5-inch floppy disk insertion slot
(page 19)
0 3.5-inch floppy disk eject button
(page 19)
qa Cover for the automatic feeder
(page 17)
qs Paper inlet/outlet for manual
feeding (page 17, 47)
qd Cartridge door (page 13, 14)
qf Eject lever (page 14)
qg Print cartridge (page 13, 14) (not
supplied)
GB
6
Cartridge compartment
Getting Started
Page 7

Operation Panel
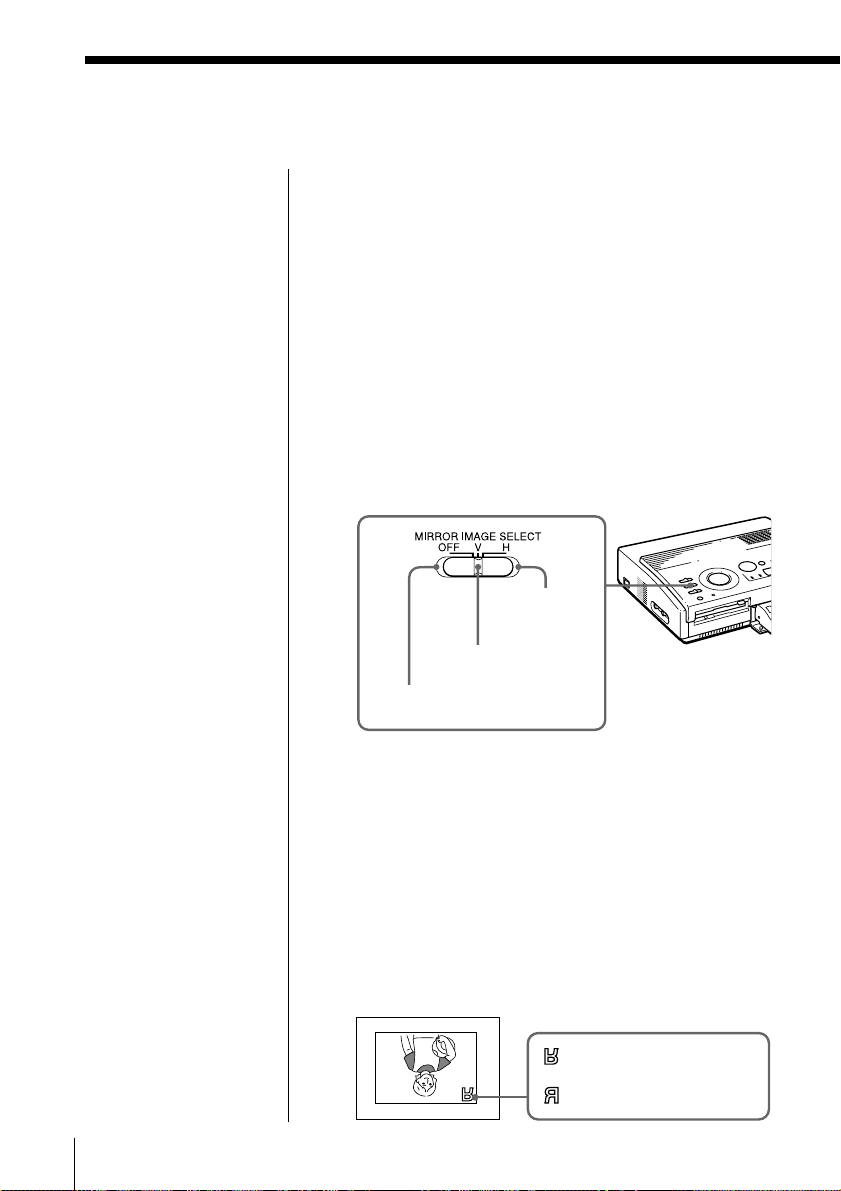
1 MIRROR IMAGE SELECT switch
(page 30)
2 INPUT SELECT switch (page 20, 23)
3 Print mode dial (page 21, 24, 26, 28,
32, 34)
4 Arrow buttons (B/b/V/v) (page
24)
5 ENTER button (page 24)
6 CLEAR ALL button (page 21)
7 SAVE button (page 36)
8 CLOCK SET button (page 10)
9 DATE switch (page 38)
0 PICTURE button (page 23, 25)
qa CAPTURE button (page 21, 24)
qs PRINT button (page 22, 25)
Indicators
1 POWER indicator (page 10)
2 INPUT indicator (page 21, 45)
3 MEMORY indicator (page 21, 45)
4 Print indicator (page 22, 25, 45)
5
Paper supply indicator (page 45)
6 Ribbon error indicator (page 45)
Getting Started
Getting Started
GB
7
Page 8

Setting Up
Connecting the printer
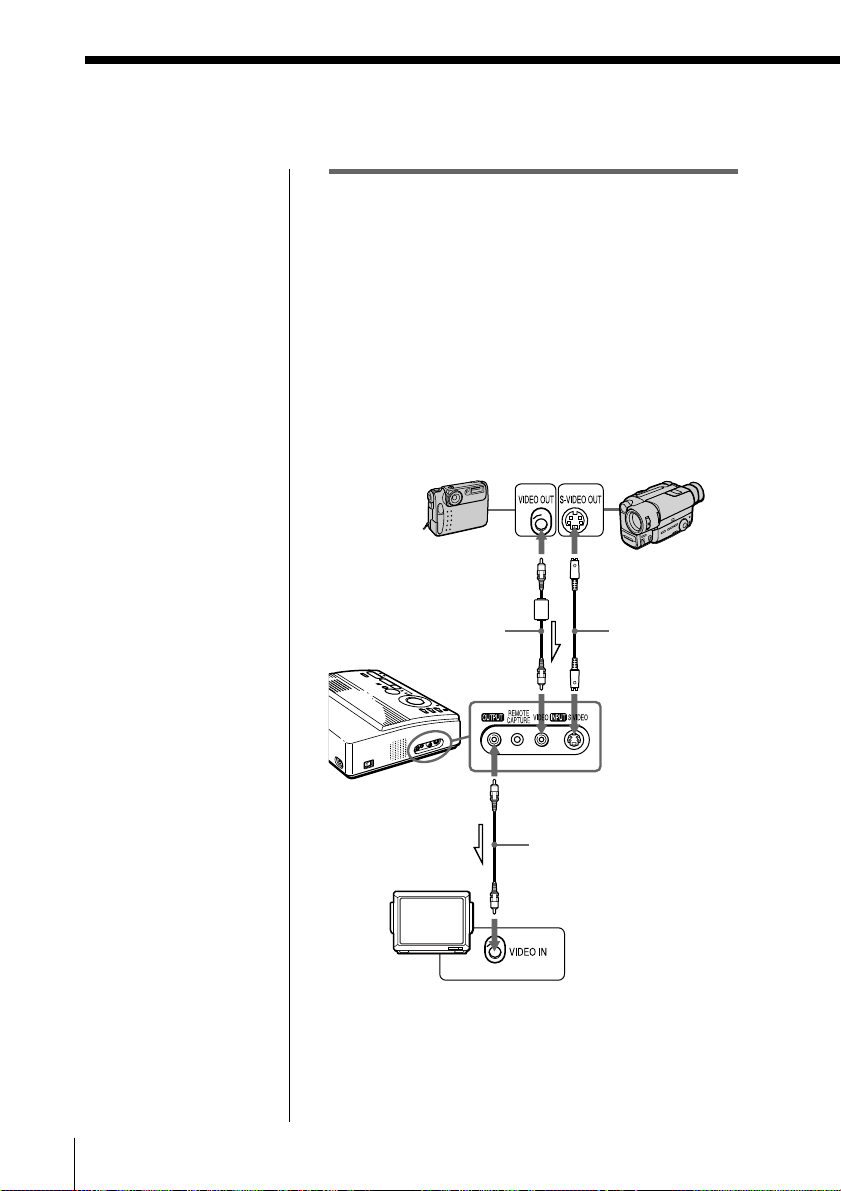
Connecting to the video equipment
When printing images from the video equipment such
as a VCR or camcorder, use the supplied video
connecting cable to connect the video equipment and
the printer. Also connect the printer to the television to
display the images to be printed.
For printing operations, see page 20.
If the video equipment
has the S-video output
connector
Connect it to the S VIDEO
INPUT connector of the
printer using the optional
S-video connecting cable
so that you can get better
picture quality. In this
case, you do not need to
connect the video
connector.
When both the S VIDEO
INPUT and VIDEO INPUT
connectors of the
printer are connected
The input signals from
the S VIDEO INPUT
connector are
automatically selected.
Notes
• Before making
connections, turn off
the power of the
printer, the video
equipment and
television.
• See also to the
instruction manuals for
the video equipment.
GB
Setting Up
8
Digital still camera or
video camera
equipped with the
video output
connector
Video connecting
cable (not supplied)
To VIDEO
INPUT
Television
Set input selector to
“VIDEO.”
Or
To VIDEO OUTPUT
Video connecting
cable (supplied)
Video camera or
etc. equipped with
the S-video output
connector
S-video connecting
cable (not
supplied)
To S VIDEO
INPUT
: Signal flow
l
Page 9
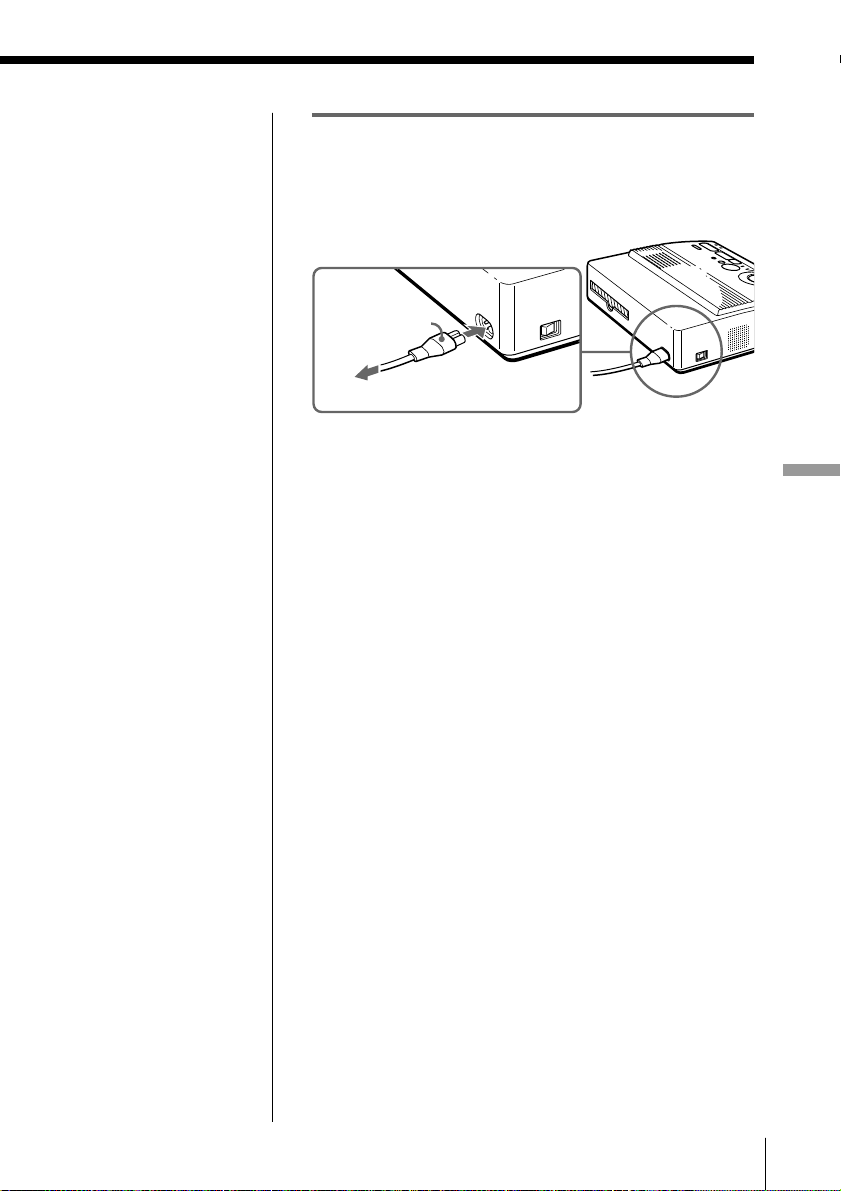
Connecting the AC power cord
After you make connections, connect the supplied AC
power cord to the AC power connector of the printer
and then to the AC outlet.
AC Power cord
(supplied)
To the AC outlet
Setting Up
Setting Up
GB
9
Page 10
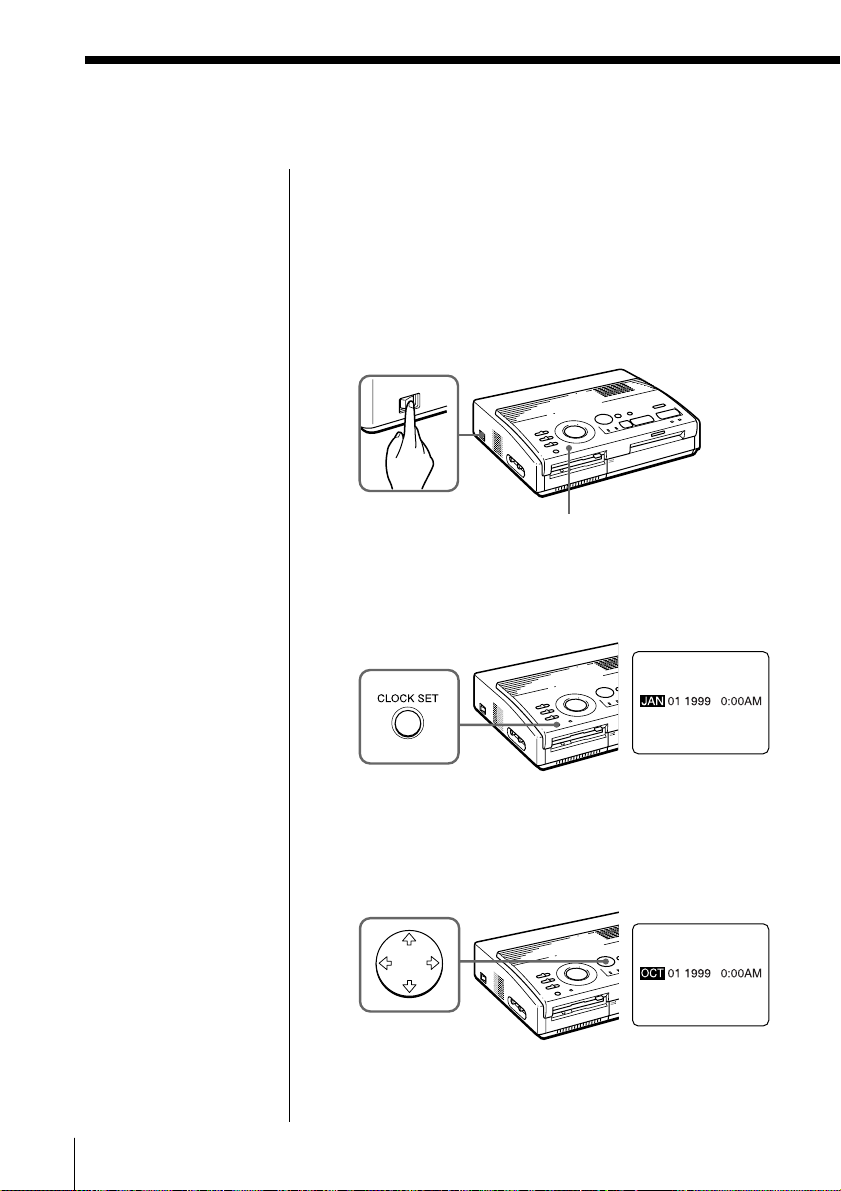
Adjusting the clock
You can save the time when the images are captured
from the video equipment by adjusting the clock of the
printer. Once you adjust the clock, the clock is
maintained with the battery even if you turn off the
power.
1 Turn on the power of the printer.
The POWER indicator lights up.
POWER switch
POWER indicator
2 Press and hold CLOCK SET, then press b.
The clock setting display appears on the television.
3 Press V/v to set the month.
Pressing V increases the number.
Pressing v decreases the number.
10
GB
Setting Up
Page 11
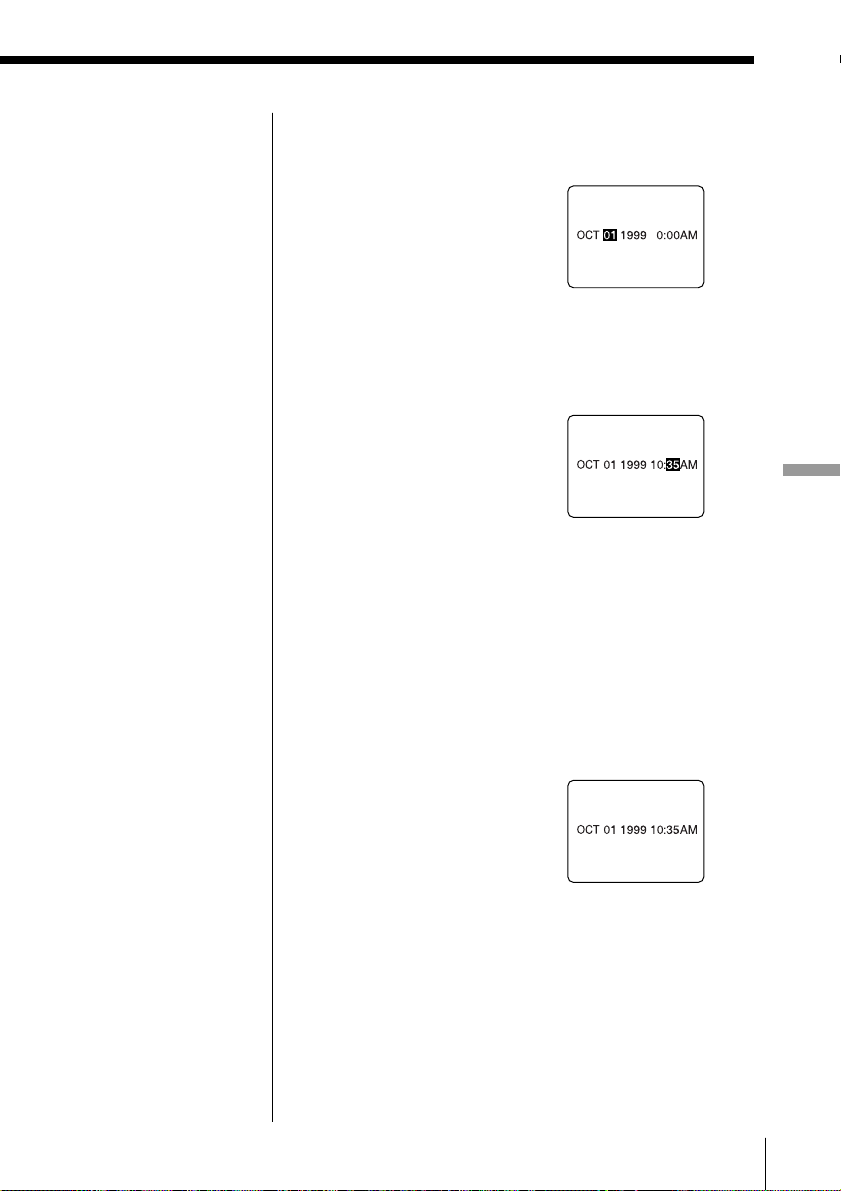
4 Press b.
The cursor moves to the next item.
5 Repeat steps 3 and 4 to set all items: month, date,
year, hour and minute.
If you want to set the previous item, press B.
6 Press CLOCK SET.
The clock setting display disappears.
Displaying the clock
When the INPUT indicator is on, press CLOCK SET to
display the current time on the center of the screen. To
turn off the time display, press CLOCK SET again.
Setting Up
Setting Up
11
GB
Page 12

Using optional supplies (print packs)
You need an optional print pack. The pack contains
print paper and ink ribbon cartridge for printing.
The following types of print packs are available:
Print Model Print paper Print cartridge
Standard DPM-50STA Standard type for 50 prints
Note
Use the set of the print
paper and ink ribbon
cartridge supplied
together in the same
carton. If you use them in
different combination,
proper printing results
may not be obtained, or
paper jam or other trouble
may occur.
GB
Setting Up
12
Page 13
Loading the print cartridge
Insert the print cartridge into the printer.
Use only the print cartridge supplied with the print
paper packed in the same carton.
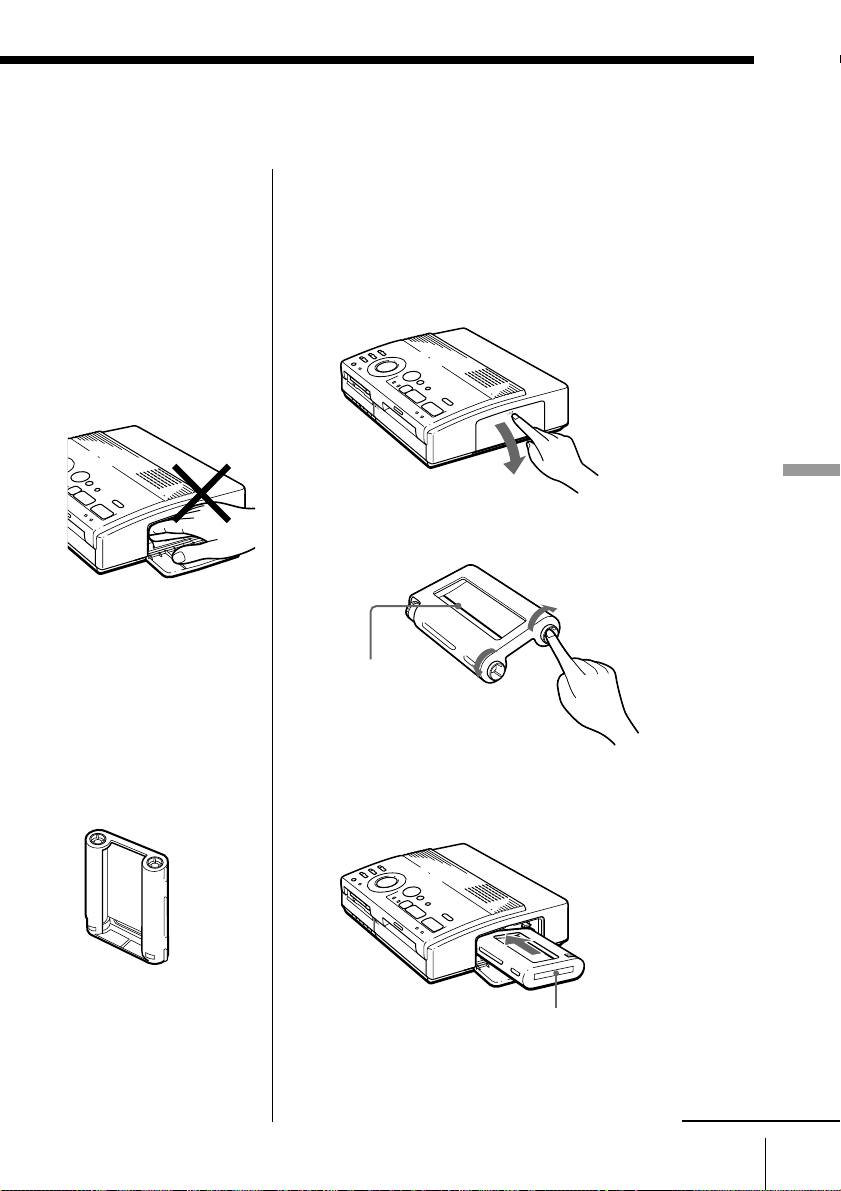
Caution
Never put your hand into
the cartridge
compartment. The
thermal head reaches
high temperatures,
especially after repeated
printing.
Notes
• If the print cartridge is
not loaded when you
turn on the printer, the
warning sound beeps
and the ribbon error
indicator lights up.
• When installing the ink
ribbon cartridge, stand
it as illustrated so that
dust will not get on the
ink ribbon.
1 Press PUSH to open the cartridge compartment lid.
Setting Up
2 Wind up the ink ribbon to remove the slack.
While pressing the
center of the reel, wind
the ink ribbon in the
direction of the arrow.
Wind the ribbon
until the black
line comes to the
left edge.
3 Insert the print cartridge firmly until it clicks into
place and close the cartridge compartment lid.
• Do not touch the ink
ribbon or place the
print cartridge in a
dusty location.
Fingerprints or dust on
the ink ribbon may
result in imperfect
printing.
Labeled side
If the print cartridge does not click into place
Remove the print cartridge, and then re-insert it.
continued
Setting Up
13
GB
Page 14

Loading the print cartridge (continued)
To replace the print cartridge
If the ribbon indicator flashes and the inserted paper
emerges after you insert the paper and the paper is
automatically loaded, remove the print paper and
replace the print cartridge.
Open the cartridge compartment lid and push up the
eject lever. Remove the used print cartridge and
replace it with a new one.
Eject lever
Notes on storing the
print cartridge
• Avoid placing the
cartridge in a location
subject to:
– high temperatures
– high humidity
– excessive dust
– direct sunlight
• When you are going to
store a partially-used
cartridge for an
extended period of
time, store it in its
original bag.
GB
Setting Up
14
Paper supply indicator
Ribbon error indicator
Push up the eject lever,
then remove the used
print cartridge.
To load the half-used ink ribbon cartridge
While pressing the
center of the reel, wind
the ink ribbon in the
direction of the arrow.
Wind the ribbon
until the black
line comes to the
left edge.
If ink ribbon should tear
Repair the ribbon with transparent tape. There should
be no problem with using the remaining portion of the
ribbon. Before loading the ink ribbon cartridge into the
printer, turn the reel until the transparent tape can no
longer be seen.
Repair with
transparent tape.
Page 15

Inserting the print paper
Inserting the print paper using the supplied automatic feeder
By using the supplied automatic feeder, you can
supply the print paper automatically.
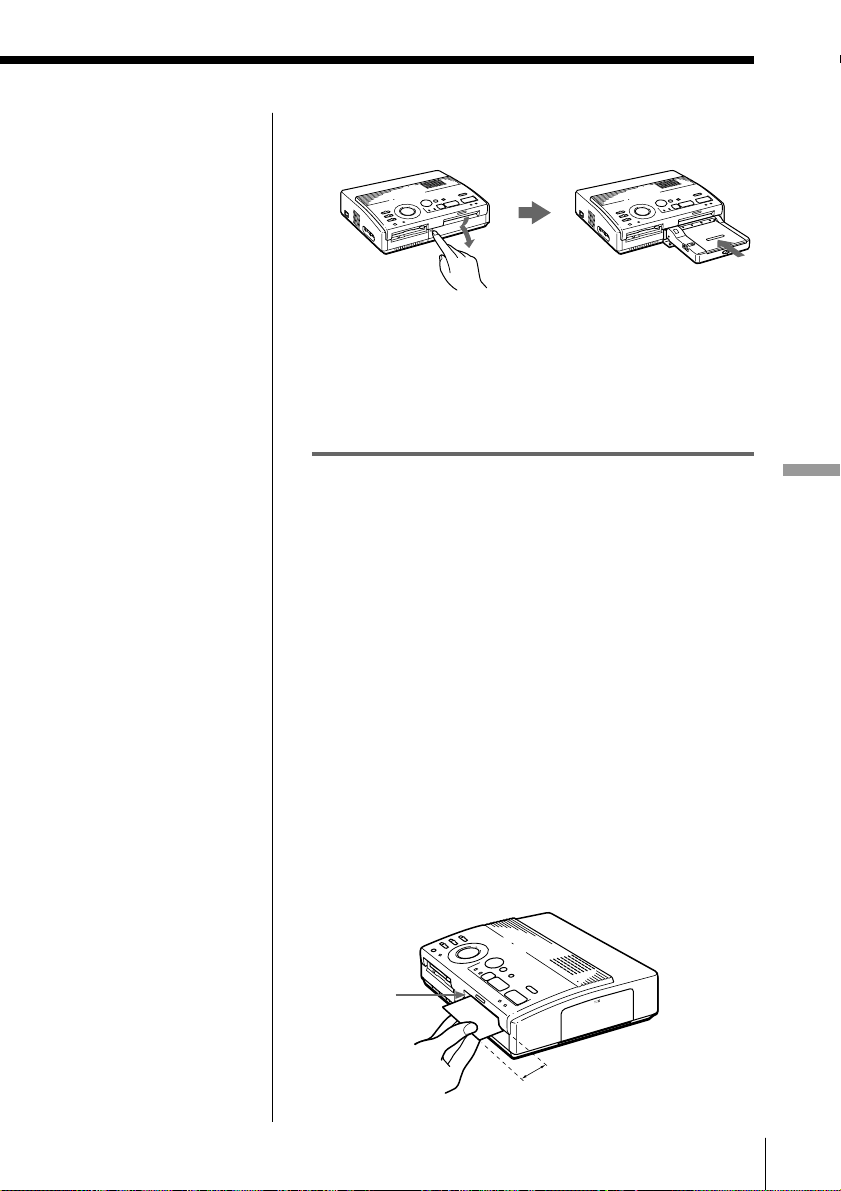
1 Open the lid of the paper tray by sliding the switch
on front to the right.
Notes on using
automatic feeder
• If trouble occurs in
feeding the print paper,
the lamp on the printer
flashes. Remove the
feeder from the printer
and check that there is
no paper jammed in the
printer. When you
reinstall the feeder and
press the print button,
the printer prints the
set number of copies
again.
• The feeder can hold up
to 25 sheets of paper.
When you add paper to
a partially full feeder,
make sure that the total
number of sheets does
not exceed this limit. If
you do, the paper may
jam.
• Do not place different
types of paper in the
feeder. If you do, the
paper may jam.
• To insert paper after
the feeder is attached to
the printer, first remove
the feeder from the
printer and then insert
the paper into the
feeder.
• While printing, do not
open the feeder lid. If
you do, the paper may
jam.
2 Make sure that the spacer is raised.
Spacer
3 Riffle the print paper to avoid jamming the print
paper.
Make sure not to touch the printing surface (the
glossy side where nothing is printed).
Setting Up
Setting Up
GB
15
Page 16

Inserting the print paper (continued)
4 Insert print paper with its printing surface (the side
where nothing is printed) facing up.
Make sure not to touch the printing surface and not
to bend the corners of the paper. You can load up
to 25 sheets of print paper or the print paper
designed for the printer into the feeder.
Make sure that the metal tabs on both sides fir over
the print paper.
Printing surface
5 Turn on the printer and press MEMORY or
CAPTURE to store an image for printing.
For the details, refer to “Printing” in the operating
instructions of the printer.
6 Turn the dial to set the number of copies to be
printed continuously.
You can set 1, 2, 3, 4, 5,10 or 25 copies. Turn the
dial until the desired number appears in the
window. Make sure it clicks at that time.
Otherwise, you may get the wrong number of
copies.
Front
Paper
Metal tab
To print a number of
copies not specified on
the dial
Insert the desired number
of sheets and set the dial
to 25.
GB
Setting Up
16
2
Page 17
7 Press “Push” on the cover of the automatic feeder,
then insert the feeder until it clicks.
8 Press the print button of the printer.
The print paper is automatically loaded into the
printer and printing starts.
To stop continuous
printing
Set the dial to 1. Printing
stops after the current
printing finishes.
If print paper runs out
during continuous
printing
Remove the feeder from
the printer. Then, insert
more print paper into the
feeder and reinstall the
feeder to the printer. The
printing resumes
automatically.
Notes on inserting the
print paper manually
• Insert the print paper
straight along the guide
to the left of the paper
port. If the paper is
positioned to the right
or slanted, the printing
area may get out of
position.
• The paper may not be
loaded automatically if
you do not insert the
paper firmly.
Inserting the print paper manually
Insert the print paper sheet by sheet. This section
explains how to insert the standard type print paper.
Use the print paper designated for this printer only.
1 Turn on the power of the printer.
The POWER indicator lights up.
2 Follow printing procedures.
For details, see pages 20 to 39.
3 Insert the print paper straight with its blank
printing surface facing up, along the guide to the
left of the paper port.
Insert the paper until less than 2 cm (approx. 0.8
inches) remains. The paper is automatically loaded
when printing starts.
Guide
Less than 2 cm
Setting Up
Setting Up
GB
17
Page 18

Inserting the print paper (continued)
Notes on handling the print paper
• You cannot type on the printing surface before
printing. If you want to write greetings or draw on
the printing surface after printing, use an oil ink pen.
• When handling the print paper, do not touch the
printing surface (glossy side where nothing is
printed).
• Do not place the print paper in a dusty location.
Fingerprints or dust on the printing surface may
result in imperfect printing.
• Use the print paper designed for the printer only. If
you use a different type of paper, the printer may not
print properly or may malfunction.
• Do not fold or bend the print paper.
Notes on storing the print paper
• Avoid placing the print paper in a location subject to:
– high temperatures
– high humidity
– excessive dust
– direct sunlight
• When you are going to store the partially-used print
paper for an extended period of time, store it in its
original bag.
18
GB
Setting Up
Page 19
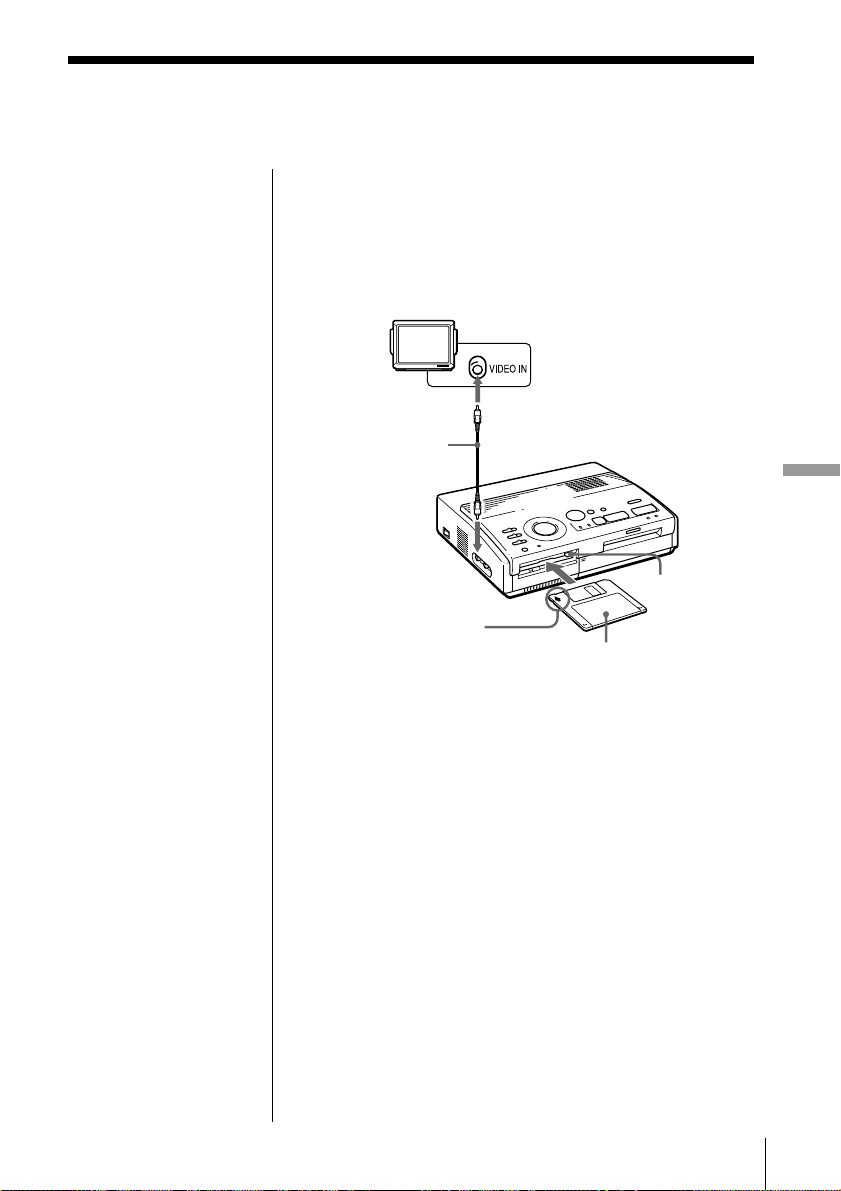
Using the floppy disk
When printing images recorded on the floppy disk,
insert the floppy disk into the insertion slot for the 3.5inch floppy disk of the printer. Also connect the printer
to the television to display the images to be printed.
For printing operations, see page 23.
Video connecting
cable (supplied)
To VIDEO
OUTPUT
With the arrow facing
left forward and insert
the disk firmly, facing
down.
Television
Set input selector
to “VIDEO.”
Setting Up
Floppy disk
eject button
Floppy disk
Notes
• Before making
connections, turn off
the power of both the
printer and television.
• If the floppy disk does
not fit properly, do not
attempt to force it into
the slot. Confirm the
inserting direction
again and re-insert it
into the slot.
Ejecting the floppy disk
Press the floppy disk eject button.
Usable floppy disks
You can use a 3.5-inch 2HD 1.44MB floppy disk in the
MS-DOS format.
Setting Up
19
GB
Page 20
Printing
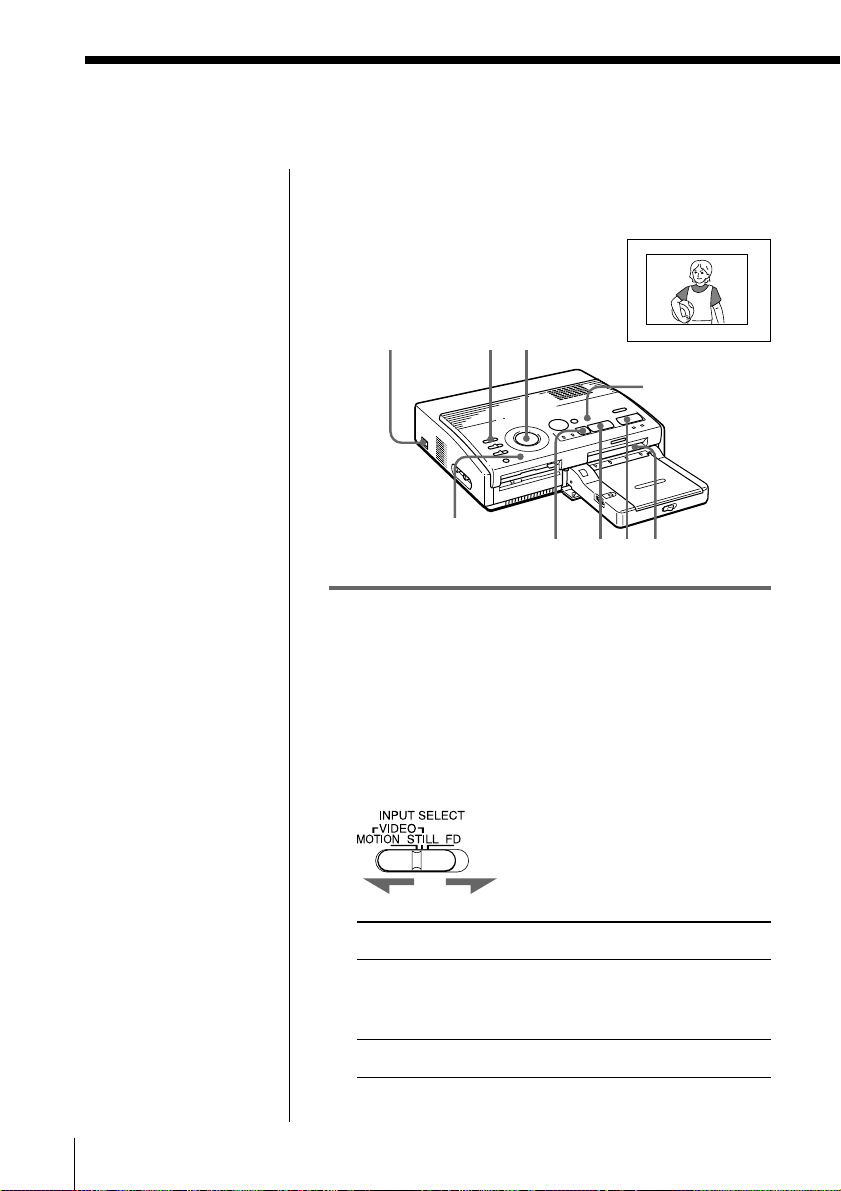
Printing an image from the video equipment
You can capture the input image from the video
equipment connected to the VIDEO INPUT connector
of the printer and print it in full-size (standard print).
Preparation1Preparation
POWER indicator
1
2
PICTURE
Standard print
CLEAR ALL
34 5
Preparations
1 Turn on the printer and television and set the input
selector of the television to “VIDEO.”
The POWER indicator turns on.
2 Set INPUT SELECT to “VIDEO MOTION” or
“VIDEO STILL.”
20
To Selector position
Print the motion picture VIDEO MOTION
while compensating for the
image blur
Print the still image VIDEO STILL
GB
Printing
Page 21
Blur compensation
When you set INPUT
SELECT to “VIDEO
MOTION,” the selected
image appears on the
screen and the horizontal
red line moves from the
top to the bottom on the
left half of screen, then
moves from the top to the
bottom on the right half of
screen. In this sequence, if
there is motion blur on
the image, the printer
automatically
compensates for the
image (blur
compensation).
When the blur
compensation ends, the
screen darkens once and
the print image appears in
the screen.
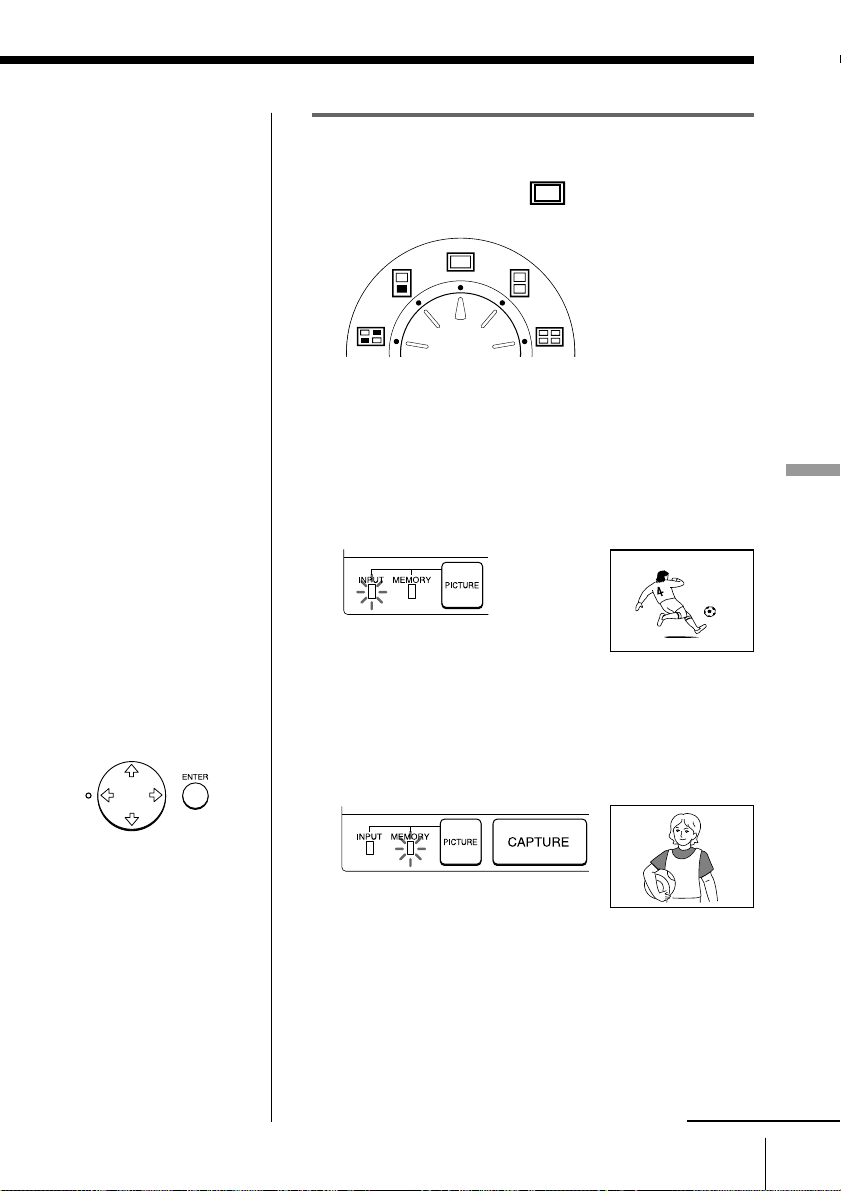
Printing
1 Set print mode dial to “ (standard)”.
2 Start playback on the video equipment.
While the INPUT indicator lights up, the playback
picture appears on the screen (input picture).
For details on playing back on the video
equipment, refer to the instruction manual of your
equipment.
Printing
Re-selecting the image
Press B before pressing
PRINT. The playback
picture appears on the
screen.
You can also re-select the
image by pressing
PICTURE instead of
pressing B. (You cannot
capture a image while the
MEMORY indicator lights
up. Press CAPTURE
while the MEMORY
indicator goes off.)
If you press CLEAR ALL,
the printer is reset to
stand by mode.
Perform printing
procedures from the
beginning.
Input image
3 Press CAPTURE when the picture you want to
print appears on the screen.
The selected full-size image appears in the screen,
and the MEMORY indicator lights up.
Print image
continued
Printing
21
GB
Page 22

Printing an image from the video equipment (continued)
4 Press PRINT.
The print indicator flashes and the print paper
is automatically loaded. The paper supply
indicator flashes while loading the print paper.
Notes
• While printing, never
move or turn off the
printer; the print
cartridge or paper may
become stuck. If this
happens, turn the
printer off and on, and
resume printing from
the beginning.
• Do not insert another
sheet of print paper
until you remove the
printed sheet.
• During printing, the
print paper is partially
ejected from the paper
outlet several times.
Never pull out the
paper forcibly.
• It is not recommended
to select an image while
pausing the video
equipment because the
picture quality will be
lost.
• Avoid storing the paper
with the printed faces
contacting each other or
contacting with rubber
or plastic products
including vinyl
chloride or plasticizer
for an extended period
of time; the ink may
transfer on to them.
If the print paper is not
loaded
The print indicator and
the paper supply
indicator flash.
Insert the print paper.
GB
Printing
22
Printing direction
The image displayed on the digital camera is
printed in the direction as shown below.
5 Remove the print from the printer.
When printing ends, the print paper
automatically emerges from the print outlet.
The print indicator turns out.
Printing the same image again
Make sure that the desired image is displayed on
the screen, then press PRINT.
With the supplied automatic feeder, you can print
the same image continuously up to 25 sheets.
Capturing a picture by using the optional foot
switch
You can use the optional foot switch FS-20 to select
the disired image instead of using CAPTURE.
For details, see “Capturing a picture by using the
optional foot switch” on page 39.
Print indicator
Displayed image
Printed image
Page 23
Printing an image recorded on the floppy disk
You can select an image recorded on the floppy disk
and print it in full-size (standard print).
Preparation1Preparation
POWER indicator PICTURE
2
Preparation
123
3
CAPTURE
Standard print
45
Preparations
1 Turn on the printer and television and set the input
selector of the television to “VIDEO.”
The POWER indicator lights up.
2 Set INPUT SELECT to “FD.”
Printing
Notes
• Avoid getting liquids
on the floppy disk or
using floppy disks in
areas subject to high
humidity. Otherwise,
data may be rendered
unreadable.
• When the access
indicator is lit, do not
eject the floppy disk.
Otherwise, the disk
may crash.
3 Insert the floppy disk on which you record images
into the floppy disk insertion slot. (page 19)
While the printer is accessing the floppy disk, the
access indicator flashes. When the printer ends
reading images, recorded images are displayed as
thumbnails.
White
frame
(cursor)
Printing
23
GB
Page 24
Printing an image recorded on the floppy disk (continued)
Scrolling the pages
When multiple pages
exist, you can change the
pages back and forth. To
display the next page
(when appears at the
bottom-right), move the
white frame to the bottom
line of the image list and
press v. To display to the
previous page (when
appears at the top-right),
move the white frame to
the top line and press V.
The access lamp flashes
and pages switches.
Cancelling the selection
Move the white frame to
the image you want to
cancel the selection and
press ENTER. The blue
frame disappears and the
selection is canceled.
Selecting multiple
images
Repeat steps 2 and 3 until
you select all images you
want to print.
Displaying the image in
full-size
Move the white frame to
the desired image, then
press CAPTURE in step 3.
The selected full-size
image appears in the
center of the screen.
To display the next or
previous full-size image,
press v (next image) or V
(previous image).
If you want to re-select
the image, press
PICTURE to return to the
image list then repeat
steps 2 and 3.
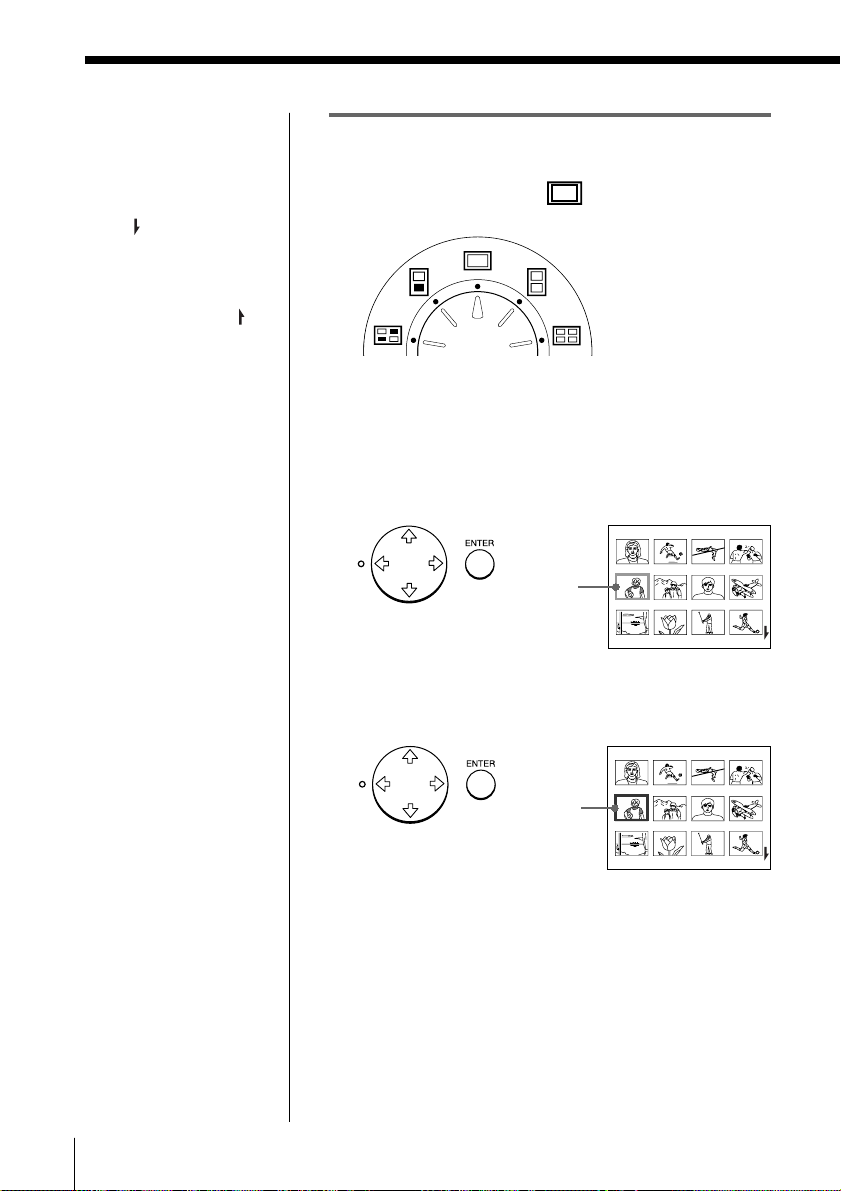
Printing
1 Set print mode dial to “ (standard)”.
2 Press the arrow (B/b/V/v) buttons to move the
white frame (cursor) to the image you want to
print.
Move the white frame up (V), down (v), rightward
(b) , or leftward (B).
Move the
white frame.
3 Press ENTER.
The blue frame appears inside the white frame and
the selected image is specified to be printed.
The white
frame
changes to
blue.
Note
The displayed full-size
image may not
correspond with the
actual print in details.
GB
Printing
24
Page 25

Notes
• An image which is
damaged or has some
trouble does not appear
in the image list.
• If there are no images
stored in the floppy
disk, “NO FILE”
appears on the display.
• If you press PRINT
while displaying the
actual print image, only
the displayed image is
printed.
• If you press PRINT
while displaying the
thumbnail list, all
images with the blue
frame are printed.
• While printing, never
move or turn off the
printer; the print
cartridge or paper may
become stuck. If this
happens, turn the
printer off and on, and
resume printing from
the beginning.
• Do not insert another
sheet of print paper
until you remove the
printed sheet.
• During printing, the
print paper is partially
ejected from the paper
outlet several times.
Never pull out the
paper forcibly.
• Avoid storing the paper
with the printed faces
contacting each other or
contacting with rubber
or plastic products
including vinyl
chloride or plasticizer
for an extended period
of time; the ink may
transfer on to them.
If the print paper is not
loaded
The print indicator and
the paper supply
indicator flash.
Insert the print paper.
4 Press PRINT.
The print indicator flashes and the print paper is
automatically loaded. The paper supply indicator
flashes while loading the print paper.
Print indicator
Printing direction
The image displayed on the digital camera is
printed in the direction as shown below.
Displayed image
Printed image
5 Remove the print from the printer.
When printing ends, the print paper automatically
emerges from the print outlet.
The print indicator turns out.
Printing the same image again
Press PRINT.
With the supplied automatic feeder, you can print the
same image continuously up to 25 sheets.
Printing other images
Press PICTURE so that the thumbnail screen appears,
then perform steps 1 to 5.
Printing multiple images continuously
You can print multiple images continuously up to 25
sheets using the supplied automatic feeder.
Printing
Printing
GB
25
Page 26

Making Various Print
Making split prints
Printing images from the video
equipment
You can make prints divided into multiples of 1/2-, 1/
4- or 1/16-size pictures. You can also select the same
image, or different images for the split print.
Before you begin
1 Turn on the printer and television and set the input
selector of the television to “VIDEO.”
2 Set INPUT SELECT to “VIDEO MOTION” or
“VIDEO STILL.”
1 Select the type of split using the print mode dial.
You can select 2-split, 4-split, 16-split planes of the
same image or different images.
GB
Making Various Prints
26
2-split printing using
different images
4-split printing
using different
images
16-split printing using
different images
2-split printing using
the same image
4-split printing
using the same
image
16-split printing using
the same image
Page 27

When you select “VIDEO
MOTION”
When you set INPUT
SELECT to “VIDEO
MOTION,” the selected
image is blurcompensated in step 2.
Re-selecting the image
Press CLEAR ALL. The
selected image is removed
and the printer returns to
stand by mode.
Perform printing
procedures from the
beginning.
You can also re-select the
image by pressing B.
When you set to split
printing with the different
images and re-select the
image by pressing B, only
a image that you most
recently selected is
removed.
When you set to split
printing with the same
images, you can also
press PICTURE to display
the input picture, then reselect a new image. (You
cannot capture a image
while the MEMORY
indicator lights up. Press
CAPTURE while the
MEMORY indicator goes
off.)
2 Select the image.
•When selecting the same image for all the split
planes:
1 Turn on the video
equipment and start
playback.
2 Press CAPTURE when the
picture you want to print
appears on the screen.
When you select 4split printing
The memory image is
displayed in the split
planes selected in the step
1.
•When selecting the different images for each split
plane:
1 Turn on the video equipment and start
playback.
2 Press CAPTURE when the picture you want to
print appears on the screen.
The memory image is displayed in the first
plane of the split planes selected in the step 1.
After a while, the memory image disappears
and the input picture automatically appears.
3 Repeat step 2 until you select images for all
split planes.
The selected pictures are allocated as follows:
upper left t upper right t lower left t
lower right.
When you select 4-split printing
3 Press PRINT.
The print indicator flashes while printing, and the
selected image is printed.
Making Various Prints
Making Various Prints
GB
27
Page 28

Making split prints (continued)
Printing images from the floppy disk
You can make prints divided into multiples of 1/2-, 1/
4- or 1/16-size pictures. You can select the same image,
or different images for the split print.
Before you begin
1 Turn on the printer and television and set the input
selector of the television to “VIDEO.”
2 Set INPUT SELECT to “FD.”
3 Insert the floppy disk into the floppy disk slot.
1 Select the type of split using the print mode dial.
You can select 2-split, 4-split, 16-split planes of the
same image or different images.
Printing the date
You can print the date
when the image was
saved by setting DATE to
“ON.”
GB
Making Various Prints
28
2-split printing using
different images
4-split printing
using different
images
16-split printing using
different images
2-split printing using
the same image
4-split printing
using the same
16-split printing using
the same image
2 Select the image.
•When selecting the same image for all the split
planes:
1 Press arrow button to move the white frame to
the image you want to print, then press
ENTER. (The blue frame appears inside the
white frame.)
2 If you want to make other same image prints,
repeat step 1.
image
Page 29
Re-selecting the image
Move the white frame to
the image you want to
cancel the selection for
and press ENTER. The
blue frame disappears
and the selection is
canceled.
If you want to re-select
the image after displaying
the actual print image,
press PICTURE to return
to the thumbnail screen,
then repeat step 2.
Re-selecting the type of
the split
Press PICTURE so that
the thumbnail screen
appears. Re-select the
split type using the print
mode dial. You can use
the selected images, or
change the selection.
• When selecting the different images for each split
plane:
1 Press the arrow button to move the white
frame to the image you want to print, then
press ENTER. (The blue frame appears inside
the white frame.)
2 Repeat step 1 to select images for the split
planes in the desired order.
The pictures are placed
from the upper left to the
lower right on the sheet in
order of the selection, not
in order of the image list.
You can also select an image from the different
pages.
If you select more images than the number of
the split planes, the images are automatically
placed on the next print.
To check the actual print image
Press CAPTURE.
The actual print image appears in the center of the
screen.
To display multiple split prints, press V or v.
Making Various Prints
Canceling the operation
Press CLEAR ALL. The
selected image is removed
and the printer returns to
stand by mode.
Perform printing
procedures from the
beginning.
Note
If you press PRINT when
the actual print image is
displayed, only the
displayed image is
printed.
When you select 4split printing using a
same image
When you select 4split printing using
different images
3 Press PRINT.
The print indicator flashes while printing, and the
selected image is printed.
Making Various Prints
29
GB
Page 30
Making a mirror image print
You can make a mirror image or upside-down mirror
image when you print a picture from video equipment.
You can use this feature with the standard printing
(page 20 to 22) and split printing (page 26 to 27).
Before you begin
1 Turn on the printer and television and set the input
selector of the television to “VIDEO.”
2 Set INPUT SELECT to “VIDEO MOTION” or
“VIDEO STILL.”
1 Set MIRROR IMAGE SELECT to the desired type of
image reversal.
Horizontally
reversed
(mirror image)
Vertically reversed
(upside-down image)
No reversal
(original image)
Note
You cannot make a mirror
image print when you
want to print the image in
the floppy disk.
GB
Making Various Prints
30
2 Start playback on the video equipment.
While the INPUT indicator lights up, the playback
picture appears on the screen (input picture).
3 Press CAPTURE when the picture you want to
print appears on the screen.
The selected picture appears. When you set
MIRROR IMAGE SELECT to “V” or “H,” “R”
(reversed) mark appears on the lower right of the
screen.
: Indicates an upside-down
mirror image.
: Indicates a mirror image.
Page 31

4 Press PRINT.
The mirror image is printed.
Making a mirror image print in the split
printing mode
Set MIRROR IMAGE SELECT to the desired type
before performing the printing procedures in the
“Printing images from the video equipment” (page 26).
When you use different images
You can change the mirror image type for each split
plane.
Example
• Plane 1 and 3: vertically reversed
• Plane 2 and 4: horizontally reversed
Vertically
reversed
Horizontally
reversed
To change the mirror image type for each split plane,
change the MIRROR IMAGE SELECT setting each time
before you press CAPTURE.
Making Various Prints
When you use the same image
The same mirror image in the split planes is printed.
Making Various Prints
31
GB
Page 32

Making a label for a floppy disk
You can make a label for a floppy disk by using the
sticker-type print paper.
The selected image is printed as large picture on one
label, and 3 thumbnail images with lines are printed on
the other label. The total number of images is printed
at the bottom left of the label.
Before you begin
1 Turn on the printer and television and set the input
selector of the television to “VIDEO.”
2 Set INPUT SELECT to “FD.”
1 Select “ (FD label print)” using the print mode
dial.
When printing the input
image from the video
equipment
You cannot make a label
for a floppy disk.
Printing the date
You can print the date
when the image was
saved by setting DATE to
“ON.”
GB
Making Various Prints
32
FD label print
2 Select the image for printing.
1 Insert the floppy disk into the floppy disk slot.
2 Press the arrow buttons to move the white
frame to the image you want to print, then
press ENTER.
The selected image is placed on the upper half
of the print and the leftmost of the thumbnail
on the lower half.
Page 33

3 Repeat step 2 to select images for the other 2
thumbnails.
4 Press CAPTURE if you want to check the
actual print image.
To display multiple print images, press V or v.
The first
selected image
The second and
third selected
images
Total images
Date (when set
to print)
3 Insert the sticker type paper into the printer, then
press PRINT.
The print indicator flashes while printing, and the
label for the floppy disk is printed.
You can use each part of the label for the floppy
disk. Cut the paper so it fits the label side.
Making Various Prints
Cancelling the selection
Move the white frame to
the image you want to
cancel the selection and
press ENTER. The blue
frame disappears and the
selection is canceled.
To remove the all selected
images, press CLEAR
ALL.
Perform printing
procedures from the
beginning.
Note
You cannot type on the
printing surface before
printing. If you want to
write greetings or draw
on the printing surface
after printing, use an oil
ink pen.
Making Various Prints
33
GB
Page 34

Making an index list of images
You can make an index list of images saved in a floppy
disk. When you want to search for the recorded image,
you can find the desired images immediately with this
index list.
Before you begin
1 Turn on the printer and television and set the input
selector of the television to “VIDEO.”
2 Set INPUT SELECT to “FD.”
1 Select “ (Index print)” using the print mode
dial.
Index print
About date printing
The date when the image
was saved is printed
regardless of the DATE
setting. However, the date
does not appear on the
displayed image.
GB
Making Various Prints
34
2 Insert the floppy disk into the floppy disk slot.
All the images recorded in the floppy disk are
displayed in a thumbnail list.
If there are multiple pages, press V or v to display
the next or previous page.
Page 35

To display the actual print image
Press CAPTURE.
All the images recorded in the floppy disk are
displayed as the thumbnail images.
3 Press PRINT.
The print indicator flashes while printing, and the
index list of the recorded images on the floppy disk
is printed.
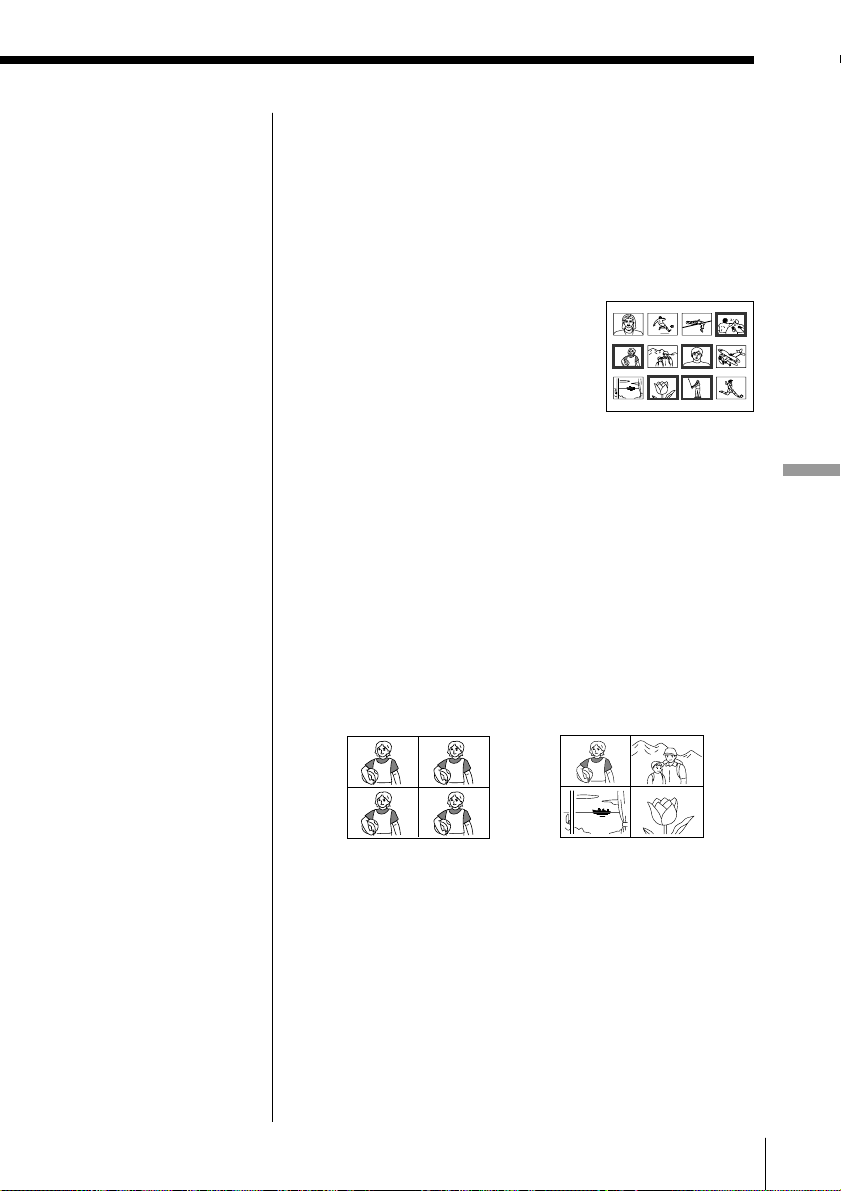
The size of each image depends on the number of
the images.
• When the number of images is 1 to 12
The images are made into the
size of 12 thumbnails. Each
thumbnail has the
corresponding image
number.
• When the number of images is 13 to 20
The images are made into the
size of 20 thumbnails. Each
thumbnail has the
corresponding image
number.
Making Various Prints
Notes
• If the number of images
is less than that of split
planes, planes without
images remain blank.
• If the number of image
is over 43, the image
number 43 or more is
not printed.
• When the number of images is over 21
The images are made into the
size of 42 thumbnails. Each
thumbnail has the
corresponding image
number.
Making Various Prints
35
GB
Page 36

Recording the video picture as a still image
You can record the playback picture from the video
equipment as a still image onto the floppy disk.
Before you begin
1 Turn on the printer and television and set the input
selector of the television to “VIDEO.”
2 Set INPUT SELECT to “VIDEO MOTION” or
“VIDEO STILL.”
1 Set the print mode dial to “ (standard)” or split
printing mode.
When you set the print
mode dial to the split
mode
You can also record the
picture in the split mode.
In this case, only the most
recently selected picture
is recorded onto the
floppy disk.
Re-selecting the image
Press PICTURE before
pressing SAVE. The
playback picture appears
on the screen. Follow step
2. (You cannot capture a
image while the
MEMORY indicator lights
up. Press CAPTURE
while the MEMORY
indicator goes off.)
You can also re-select the
image by pressing the
arrow (B) instead of
pressing PICTURE.
2 Select the image to be recorded.
For details of operating procedures, refer to the
pages for the corresponding printing mode.
1 Turn on and start playback on the video
equipment.
2 Press CAPTURE when the picture you want to
record appears on the screen.
3 Insert the floppy disk into the floppy disk slot.
Insert a floppy disk formatted in the MS-DOS
format. Check that the write protect switch on the
disk is set to the write enable position.
4 Press SAVE.
The access indicator of the floppy disk drive lights
up, and the displayed image is recorded onto the
floppy disk.
If you press CLEAR ALL,
the printer is reset to
stand by mode.
Perform printing
procedures from the
beginning.
GB
Making Various Prints
36
Page 37

About file name of the recorded image
The image is recorded with the file name “MVC-###f
.jpg.” The number “###” is sequentially allocated
following the largest file number (same as the image
number) recorded in the floppy disk.
If an error message appears
Error message Meaning
DISK ERROR The inserted floppy disk is not
formatted.
Insert a disk in the MS-DOS
format.
DISK FULL There is not enough space to
record the image.
Replace the floppy disk with new
one.
DISK PROTECT The write protect tab on the
inserted floppy disk is set to write
protect position. Set it to the write
enable position and then record
the image.
Making Various Prints
Making Various Prints
37
GB
Page 38

Printing the date
When printing the image in the
floppy disk, you can print the
date shot with the Digital
Mavica.
Note that you cannot print the
date when you print the image
from the video equipment.
Before you begin
1 Turn on the printer and television and set the
2 Set INPUT SELECT to “FD.”
1 Set DATE to “ON.”
Date
input selector of the television to “VIDEO.”
Date is not printed.
Date is printed.
GB
Making Various Prints
38
2 Select the desired print using the print mode
dial.
You can select standard printing (page 20, 23),
split printing (page 26 to 29), label printing
(page 32) or index printing (page 34).
3 Select the image for printing.
1 Insert the floppy disk into the floppy disk
slot.
2 Press the arrow buttons to move the white
frame to the image you want to print, then
press ENTER.
4 Press PRINT.
The selected image is printed with the date.
Page 39

Capturing the picture using the optional foot switch
When you make a print from the video equipment, you
can use the optional foot switch FS-20 to select the
desired image remotely.
Connecting the optional foot switch
Connect the optional foot switch FS-20 to REMOTE
CAPTURE jack on this unit.
Notes
• Turn off the power of
this unit before
connecting the optional
foot switch.
• You cannot use other
remote controller for
this unit.
To REMOTE
CAPTURE
Optional foot
switch FS-20
Using the optional foot switch
When you select the desired picture, use the optional
foot switch instead of pressing CAPTURE.
Making Various Prints
Making Various Prints
GB
39
Page 40

For Your Information
Precautions
On safety
• Operate the printer on 110 to 120 V AC, 50/60 Hz
only.
• Be careful not to set or drop any heavy objects on the
power cord, or to damage the power cord in any
way. Never operate this printer with a damaged
power cord.
• Should any solid object or liquid fall into the cabinet,
unplug the printer and have it checked by qualified
personnel before operating it any further.
• Never disassemble the printer.
• To disconnect the power cord, pull it out by the plug.
Never pull the power cord itself.
• When the printer is not going to be used for an
extended period of time, disconnect the power cord
from the wall outlet.
• Do not handle the printer roughly.
• To reduce the risk of electrical shock, always unplug
the printer from electrical outlet before cleaning and
servicing the printer.
GB
For Your Information
40
On installation
• Avoid placing the unit in a location subject to:
– vibration
– high humidity
– excessive dust
– direct sunlight
– extremely high or low temperatures
• Do not use electrical equipment near the unit. The
unit will not work properly in electromagnetic fields.
• The unit is designed to operate horizontally. Never
attempt to operate the printer in a tilted position. If
the unit was placed on its side or with its top panel
facing down, make sure to remove the paper tray
and check that the print papers are set properly
before starting operation.
Page 41

• Do not place heavy objects on the printer.
• Leave enough room around the printer so that the
ventilation holes are not blocked. Blocking these
holes may cause internal heat build-up.
On moisture condensation
If the printer is brought directly from a cold location to
warm location or placed in an extremely warm or
humid room, moisture may condense inside the unit.
In such cases the printer will probably not work
properly and may even develop a fault if you persist in
using it. If moisture condensation occurs, turn off the
power and do not use the printer for at least one hour.
On transport
When you transport the printer, remove the print
cartridge from the printer and put the unit in the
original box with the protective packaging.
If you no longer have the original box and packing
parts, use the substitutive packing material so that it
will not be damaged while transporting.
On cleaning
Clean the cabinet, panel and controls with a soft dry
cloth, or a soft cloth lightly moistened with a mild
detergent solution. Do not use any type of solvent,
such as alcohol or benzine, which may damage the
finish.
For Your Information
For Your Information
41
GB
Page 42

Precautions (continued)
On floppy disks
To protect data recorded on floppy disk, note the
following:
• Avoid storing floppy disks near magnets or magnetic
fields such as those of speakers and televisions,
permanent erasure of disk data may result.
• Avoid storing floppy disks in areas subject to direct
sunlight or sources of high temperature, such a
heating device. Floppy disk warping of damage may
result, rendering the disk useless.
• Avoid contact with the disk’s surface by opening the
disk shutter plate. If the disk’s surface becomes
blemished, data may be rendered unreadable.
• Avoid getting liquids on the floppy disk or using
floppy disks in areas subject to high humidity.
Otherwise, data may be rendered unreadable.
• Be sure to use the floppy disk case to ensure
protection of important data.
• Use only a 2HD type disk head cleaner when
cleaning the disk drive.
• Even when you use a 3.5 inch 2HD floppy disk,
image data may not be recorded and/or displayed
depending on the using environment. In this case,
use the other brand disks.
GB
For Your Information
42
Back up recommendation
To avoid the potential risk of data loss, always copy
(back up) data to the other floppy disk.
On print paper
Use the set of the print paper and print cartridge
supplied together in the same carton. If you use them
in different combination, proper printing results may
not be obtained, or paper jam or other trouble may
occur.
Page 43

Troubleshooting
If you run into any problems using the printer, use the
following table to troubleshoot the problem.
If the problem persists, consult your Sony dealer.
When you use the printer with the printer utility, see
also the User’s Guide for Printer Utility.
Cannot operate the printer after the power switch
is turned on.
c Connect the AC power cord to an AC outlet
The television displays no images.
c Set the input selector of the television to “VIDEO.”
c Turn on the printer and connected devices
c Connect the printer to the television and video
c Insert a floppy disk which is formatted in the MS-
c Start playback on the video equipment.
c Set INPUT SELECT to appropriate position.
Error message appears on the TV screen.
c Refer to “If an error message appears” on page 44.
Cannot remove the print cartridge.
c Turn the printer off then on. After the motor
Printing takes longer than usual.
c If the printing indicator is flashing, see “If the
securely (page 9).
For Your Information
including the television and the video equipment.
equipment (page 8).
DOS format properly. Check that images are
recorded on the inserted floppy disk.
sound stops, try to remove the cartridge (page 14).
indicators are on” on page 45.
For Your Information
43
GB
Page 44

Troubleshooting (continued)
Cannot print.
c Insert the print paper (page 17).
c Try printing again after removing the print paper
c See ”If the indicators are on” on the next page.
c Insert the print paper if you use the automatic
c Insert the print cartridge (page 13).
c Use the proper set of the print cartridge and print
The beeps sound.
c Check that you operate with the correct
c See ”If the indicators are on” on the next page.
If an error message appears
NO DISK
c The floppy disk is not inserted. Insert the floppy
DISK ERROR
c The inserted floppy disk is not formatted, or there
DISK PROTECT
c The write protect tab on the inserted floppy disk is
DISK FULL
c There is not enough space to record the image.
if the print paper has emerged from the paper
outlet at the rear.
feeder (page 15).
paper (page 12).
procedures.
disk into the floppy disk slot.
is something wrong with the disk. Format the
floppy disk in the MS-DOS format (512 byte × 18
sector) using the Digital Mavica or your PC.
set to the write protect position. Set it to the write
enable position and then record the image.
Delete unnecessary images, or use a new floppy
disk.
GB
For Your Information
44
Page 45

NO FILE
c There is no image recorded on the disk. Insert the
disk on which images are recorded.
FILE ERROR
c The selected image is broken.
If the indicators are on
If you cannot print, check the indicators on the front
panel.
INPUT indicator
MEMORY indicator
Paper supply indicator
Ribbon error indicator
Printing indicator
POWER indicator
The ribbon error indicator lights.
c The print cartridge is not loaded. Insert the print
cartridge (page 13).
c The print cartridge has run out. Change the print
cartridge (page 14). The printer will start printing
automatically.
Both the ribbon error and paper supply indicators
flash.
c The combination of the print paper and print
cartridge is not proper. Use the print paper for the
print cartridge you are using (page 12).
When you use the optional automatic feeder,
remove it the from the printer, then insert the print
paper and reinstall the automatic feeder.
For Your Information
Note
The POWER indicator
always lights up while the
printer is turned on.
For Your Information
45
GB
Page 46

Troubleshooting (continued)
The paper supply indicator and printing indicators
light up.
c No paper is inserted. Insert the print paper (page
The MEMORY indicator flashes.
c The printer is processing the data for storing to the
The ribbon error, paper supply and printing
indicators flash.
c Print paper is jammed.
All indicators flash.
c An error has occured. Turn off the printer, then
15, 17).
When you use the automatic feeder, remove it the
from the printer, then insert the print paper and
reinstall the automatic feeder.
internal memory. It takes some time to operate
again.
See “If the print paper is jammed” below.
turn on again.
GB
For Your Information
46
Page 47

If the print paper is jammed
If the print paper is jammed, the ribbon error, paper
supply and printing indicators flash and printing stops.
Turn off the power and remove the jammed paper.
Remove the jammed paper from the paper outlet on
the rear panel.
Print paper
Pull out the jammed
paper slowly.
Remove the jammed paper from the automatic feeder.
Pull out the
jammed paper
slowly.
For Your Information
Notes
• When you print from
the video equipment,
printing may not
resume automatically
even after you have
removed the jammed
paper.
In this case, turn the
power off and on.
Then, try printing from
the video equipment
after capturing the
desired image again.
• If you cannot remove
the jammed paper,
contact your Sony
dealer.
For Your Information
47
GB
Page 48

Optional supplies (print packs)
You need an optional set of print paper and ink ribbon
cartridge.
Make sure to use the following set.
DPM-50STA (Standard papers)
One print cartridge for printing up to 50 sheets and
two set of 25 sheets of standard paper
About number of print
If you try printing with the already printed paper, the
print paper is left over, because the each print cartridge
allows you to make print in the same number of print
papers contained in the print pack.
GB
For Your Information
48
Page 49

Specifications
Printing system
Effective pixels
Printing size
Gradations
Printing time
Input/output connectors
Print cartridge
Print paper
Power requirements
Power consumption
Operating temperature
Dimensions (Main unit)
Mass (Main unit)
Supplied accessories
Design and specifications are subject to change without notice.
Sublimation dye transfer printing (Yellow/Magenta/
Cyan 3 pass)
1,376 (H) x 1,024 (V) dot
114 (H) x 85 (V) mm (maximum)
(4 1/2 x 3 3/8 inches)
256 levels (8 bits), per color (24 bits)
Approx. 16,770,000 colors
Approx. 100 seconds per sheet
(excluding the time for data processing and data
transferring from the video equipment or floppy
disk)
VIDEO INPUT connector (phono jack x 1)
1 Vp-p, 75 ohms (unbalanced), sync negative
S VIDEO INPUT connector
(4-pin mini-DIN x 1)
Y: 1 Vp-p, 75 ohms (unbalanced), sync negative
C: 0.286 Vp-p (color burst),
75-ohms (unbalanced)
VIDEO OUTPUT connector
(phono jack x 1)
1 Vp-p, 75 ohms (unbalanced), sync negative
REMOTE CAPTURE jack (mini-stereo jack x 1)
For use with the optional foot switch FS-20 only
3.5” Floppy disk drive
See page 45.
100 × 140 mm (4 x 5 5/8 inches)
See page 45.
110 - 120 V AC, 50/60 Hz, 0.6 A
72W (printing)
13 W (stand by mode)
5 ˚C to 35 ˚C (41 ˚F to 95 ˚F)
Approx. 301 × 83 × 246 mm
(w/h/d, excluding protruding parts)
(12 × 3 3/8 × 9 7/8 inches)
(Automatic feeder)
Approx. 149 × 32 × 185 mm
(w/h/d, excluding protruding parts)
(5 7/8 × 1 5/16 × 7 3/8 inches)
Approx. 3 kg (6 lb 10 oz)
(Automatic feeder)
Approx. 360 g (13 oz)
See page 5.
For Your Information
For Your Information
GB
49
Page 50

Chart for various print mode
Split printing using the same image (page 26, 28)
Standard printing
(page 20, 23)
Date printing
(page 38)
Mirror printing
(page 30)
4-split printing 16-split printing
2-split printing
Split printing using different images (page 26, 28)
4-split printing
2-split printing
Floppy disk
label printing
(page 32)
Index printing (page 34)
16-split printing
GB
For Your Information
50
Page 51

Index
A
AC power connector 9
Adjusting the clock 10
Arrow buttons (B/b/V/
v) 24
Automatic feeder 15
C
CAPTURE button 21, 24
Cartridge door 13, 14
Chart for various print
mode 50
CLEAR ALL button 21
Clock
adjusting the clock 10
displaying the clock
11
CLOCK SET button 10
Connecting
video equipment 8
AC power cord 9
D, E, F
DATE switch 38
Eject lever 14
ENTER button 24
Error messages 44
Features 4
Floppy disk
inserting 19
Precautions 42
I, J, K, L, M, N, O
Identifying the parts 6
INPUT indicator 21, 45
INPUT SELECT switch
20, 23
MEMORY indicator 21,
45
Mirror image print 30
MIRROR IMAGE
SELECT switch 30
Operation panel 7
Optional supplies 12
P
Paper inlet/outlet 17
Paper outlet 47
Paper supply indicator
45
PICTURE button 23, 25
POWER indicator 10
POWER switch 10
Precautions 40
PRINT button 22, 25
Print cartridge
loading 13
Optional supplies 12,
48
Print indicator 22, 25, 45
Print mode dial 21, 24,
26, 28, 32, 34
Print packs 12, 48
Print paper
inserting 15
Optional supplies 12,
48
Printing
the date 38
an image from the
video equipment 20
an image recorded on
the floppy disk 23
an index list 34
a label 32
a mirror image 30
split prints 26
R, S, T, U
Recording the video
picture 36
REMOTE CAPTURE jack
39
Ribbon error indicator
45
S VIDEO INPUT
connector 8
SAVE button 36
Specifications 49
Troubleshooting 43
Unpacking 5
V
VIDEO INPUT connector
8
VIDEO OUTPUT
connector 8, 19
Others
3.5-inch floppy disk eject
button 19
3.5-inch floppy disk
insertion slot 19
For Your Information
For Your Information
51
GB
Page 52

AVERTISSEMENT
Pour éviter tout risque d’incendie ou
d’électrocution, n’exposez pas cet appareil
à la pluie ou à l’humidité.
Pour éviter toute électrocution, n’ouvrez
pas le boîtier. Confiez l’entretien de cet
appareil uniquement à un technicien
compétent.
ATTENTION
Pour éviter tout risque d’électrocution, faites
correspondre la lame large de la fiche avec la
fente large de la prise et enfichez-la
complètement.
ATTENTION
La plaquette signalétique et le symbole
graphique sont situés sur le dessous du
châssis.
• Microsoft, MS, MS-DOS et Windows
sont des marques de commerce de
Microsoft Corporation déposées aux
Etats-Unis et dans d’autres pays.
• IBM PC/AT est une marque de
commerce déposée de IBM Corporation
of the U.S.A.
FR
2
®
Page 53

Table des matières
Préparation
Caractéristiques ...................................................... 4
Déballage de l’imprimante .................................... 5
Identification des composants .............................. 6
Installation
Raccordement de l’imprimante ............................ 8
Raccordement de l’appareil vidéo ................... 8
Branchement du cordon d’alimentation ......... 9
Réglage de l’horloge............................................. 10
Utilisation de fournitures en option
(jeux d’impression) ........................................ 12
Chargement de la cassette d’impression........... 13
Introduction du papier d’impression ................ 15
Introduction du papier d’impression à
l’aide de l’introducteur automatique fourni.15
Introduction manuelle du papier
d’impression...................................................... 17
Remarques sur la manipulation du papier
d’impression...................................................... 18
Utilisation de la disquette....................................19
Impression
Impression d’une image depuis
l’appareil vidéo .............................................. 20
Impression d’une image enregistrée sur
une disquette .................................................. 23
Réalisation de différents tirages
Réalisation de tirages fractionnés.......................26
Réalisation d’une impression d’image miroir .. 30
Réalisation d’une étiquette pour une
disquette.......................................................... 32
Réalisation d’une liste d’index d’images .......... 34
Enregistrement d’une image vidéo
comme une image fixe .................................. 36
Impression de la date ........................................... 38
Capture de l’image à l’aide de
l’interrupteur au pied en option.................. 39
Pour votre information
Précautions ............................................................ 40
Dépannage ............................................................. 43
Fournitures en option (jeux d’impression) ....... 48
Spécifications......................................................... 49
Organigramme des différents modes
d’impression ................................................... 50
Index ....................................................................... 51
FR
FR
3
Page 54

Préparation
Caractéristiques
L'imprimante couleur DMP-1000 vous permet
d'imprimer des images provenant d'un appareil vidéo
et d'un Mavica numérique.
Résolution d’impression fine
Grâce à la résolution d’impression de 306 ppp x 306
ppp, vous puvez imprimer des images et des caractères
de la taille d’une carte postale avec une qualité proche
d’une photographie.
Impression et sauvegarde d’images d’un appareil
vidéo
En raccordant l'appareil vidéo, vous pouvez imprimer
les images d'entrée. Vous pouvez également
enregistrer les images d’entrée sur une disquette.
Plusieurs types d’impression
Vous pouvez réaliser différents tirages comme
l’impression standard, les plans fractionnés, les
étiquettes pour disquettes et l'impression d’index
d’images spécifiées.
FR
4
Impression de 25 feuilles en continu
Le chargeur automatique fourni vous permet
d'imprimer jusqu'à 25 feuilles en continu.
Impression directe d’une image depuis le Digital
Mavica
Vous pouvez imprimer directement les images
enregistrées avec le Digital Mavica sans passer par un
PC, en insérant une disquette enregistrée de 3,5 pouces
dans l’imprimante.
Saisie de l'image au moyen du commutateur à
distance en option
Le commutateur au pied FS-20 en option vous permet
de choisir l'image à distance sans utiliser les
commandes de l'appareil.
Préparation
Page 55

Déballage de l’imprimante
Vérifiez si les accessoires suivants vous ont été fournis
avec votre imprimante.
• Chargeur automatique
• Cordon d’alimentation secteur (1)
• Câble de connexion vidéo (1)
Préparation
• Mode d’emploi (1)
• Garantie (1)
Préparation
FR
5
Page 56

Identification des composants
Pour plus de détails sur l’utilisation des composants, reportez-vous aux pages
indiquées entre parenthèses.
1 Sortie du papier (page 47)
2 Connecteur d’alimentation (page 9)
3 Commutateur d’alimentation (page
10)
4 Connecteur VIDEO OUTPUT (page
8, 19)
5 Prise REMOTE CAPTURE (page 39)
6 Connecteur VIDEO INPUT (page 8)
7 Connecteur S VIDEO INPUT (page
8)
8 Panneau de commande (page 7)
9 Fente d’insertion de disquette 3,5"
(page 19)
0 Touche d’éjection de disquette 3,5"
(page 19)
qa Couvercle du chargeur automatique
(page 17)
qs Entrée/sortie de papier pour
alimentation manuelle (page 17, 47)
qd Volet de la cassette (page 13, 14)
qf Levier d’éjection (page 14)
qg Cassette d’impression (page 13, 14)
(non fournie)
FR
6
Compartiment à cassette
Préparation
Page 57

Panneau de commande
1 Commutateur MIRROR IMAGE
(page 30)
2 Commutateur INPUT SELECT
(page 20, 23)
3 Molette de mode d’impression
(page 21, 24, 26, 28, 32, 34)
4 Touches fléchées (B /b/V /v) (page
24)
5 Touche ENTER (page 21)
6 Touche CLEAR ALL (page 21)
7 Touche SAVE (page 36)
8 Touche CLOCK SET (page 10)
9 Commutateur DATE (page 38)
0 Touche PICTURE (page 23, 25)
qa Touche CAPTURE (page 21, 24)
qs Touche PRINT (page 22, 25)
Indicateurs
1 Indicateur POWER (page 10)
2 Indicateur INPUT (page 21, 45)
3 Indicateur MEMORY (page 21, 45)
4 Indicateur d’impression (page 22,
25, 45)
5
Indicateur d’appoint de papier
(page 45)
6
Indicateur d’erreur de ruban
(page 45)
Préparation
Préparation
FR
7
Page 58
Installation
Raccordement de l’imprimante
Raccordement de l’appareil vidéo
Pour imprimer des images au départ d’un appareil
vidéo comme un magnétoscope ou un caméscope,
utilisez le câble de connexion vidéo fourni pour
raccorder l’appareil vidéo et l’imprimante.
Raccordez également l’imprimante au téléviseur
pour afficher les images à imprimer. Pour les
opérations d’impression, voir page 20.
Si votre appareil vidéo
dispose d'un connecteur
de sortie S VIDEO
OUTPUT
Raccordez-le au
connecteur S VIDEO
INPUT (entrée) de
l’imprimante à l’aide du
câble de connexion Svideo en option de
manière à obtenir une
meilleure qualité d’image.
Dans ce cas, vous ne
pouvez pas raccorder le
connecteur vidéo.
Lorsque les connecteurs
S VIDEO INPUT et VIDEO
INPUT de l'imprimante
sont tous deux
raccordés
Les signaux d'entrée du
connecteur S VIDEO
INPUT sont
automatiquement
sélectionnés.
Remarques
• Avant d’établir quelque
connexion que ce soit,
mettez l’imprimante,
l’appareil vidéo et le
téléviseur hors tension.
• Voir également le mode
d’emploi de l’appareil
vidéo.
FR
Installation
8
Appareil photo
numérique fixe ou
caméra vidéo équipée
d'un connecteur de
sortie vidéo
Câble de connexion
vidéo (non fourni)
Vers VIDEO
INPUT
Téléviseur
Réglez le sélecteur
d’entrée sur “VIDEO”.
Ou
Vers VIDEO OUTPUT
Câble de connexion
vidéo (fourni)
Caméra vidéo,
etc., équipée d’un
connecteur de
sortie S-VIDEO
Câble de
connexion SVIDEO (non
fourni)
Vers S VIDEO
INPUT
: Sens du signal
l
Page 59

Branchement du cordon
d’alimentation
Après avoir établi les connexions, branchez le cordon
d’alimentation secteur fourni sur le connecteur
d’alimentation de l’imprimante et ensuite sur une prise
murale (secteur).
Cordon
d’alimentation
(fourni)
Vers une prise murale (secteur)
Installation
Installation
FR
9
Page 60

Réglage de l’horloge
Vous pouvez enregistrer l'heure lorsque les images
sont capturées par l'appareil vidéo en réglant l'horloge
de l'imprimante.Après que vous avez réglé l’heure,
l’horloge continue à fonctionner sur la batterie même si
vous mettez le système proprement dit hors tension.
1 Mettez l’imprimante sous tension.
L’indicateur d’alimentation s’allume.
Commutateur
POWER
2 Maintenez CLOCK SET enfoncé, puis appuyez sur
b.
L'affichage du réglage de l'horloge apparaît sur
l'écran du téléviseur.
Indicateur POWER
10
FR
3 Appuyez sur V/v pour régler le mois.
Lorsque vous appuyez sur V, l’indication de
l’année augmente.
Lorsque vous appuyez sur v, l’indication de
l’année diminue.
Installation
Page 61

4 Appuyez sur b.
Le curseur se déplace vers le paramètre suivant.
5 Répétez les étapes 3 et 4 pour régler tous les
paramètres: mois, date, année, heure et minute.
Si vous désirez régler le paramètre précédent,
appuyez sur B.
6 Appuyez sur CLOCK SET.
Le menu de réglage de l’horloge disparaît.
Affichage de l’horloge
Lorsque l'indicateur INPUT est allumé, appuyez sur
CLOCK SET pour afficher l'heure en cours au centre de
l'écran.
Pour désactiver l'affichage de l'heure, appuyez de
nouveau sur CLOCK SET.
Installation
Installation
11
FR
Page 62

Utilisation de fournitures en option
(jeux d’impression)
Il vous faut un jeu d'impression en option. Un jeu
d’impression est composé de papier d’impression et
d’une cassette à ruban encreur.
Pour l’impression, utilisez les jeux d’impression
suivants:
Impression Modèle Papier d’impression Cassette d’impression
Standard DPM-50STA Type standard pour 50 tirages
Remarque
Utilisez le papier
d’impression et la cassette
à ruban encreur fournis
ensemble dans le même
carton. Si vous utilisez
une autre combinaison de
papier et de ruban
encreur, il est possible
que vous n’obteniez pas
des résultats d’impression
adéquats ou alors un
bourrage de papier ou
une autre défaillance
risque de se produire.
FR
Installation
12
Page 63

Chargement de la cassette
d’impression
Attention
N’introduisez jamais les
doigts dans le
compartiment à cassette. La
tête thermique atteint de
très hautes températures,
en particulier après des
impressions répétées.
Remarques
• Si la cassette
d’impression n’est pas
chargée lorsque vous
mettez l’imprimante sous
tension, un bip
d’avertissement retentit
et l’indicateur d’erreur
de ruban s’allume.
• Pour installer la cassette
à ruban encreur,
présentez-la comme
illustré de façon à ce qu’il
n’y ait pas de poussière
qui se dépose sur le
ruban encreur.
Introduisez la cassette à ruban encreur dans
l’imprimante.
Utilisez uniquement la cassette à ruban encreur fournie
avec le papier d’impression et emballée dans le même
carton.
1 Appuyez sur PUSH pour ouvrir le couvercle du
compartiment de la cassette.
2 Enroulez le ruban encreur de façon à le tendre.
Tout en appuyant au
centre de la bobine,
enroulez le ruban
encreur dans le sens
de la flèche.
Enroulez le ruban
jusqu’à ce que la
ligne noire se trouve
près du bord gauche.
3 Introduisez fermement la cassette à ruban encreur
jusqu’à ce qu’elle s’encliquette en position et
refermez le couvercle du compartiment à cassette.
Installation
• Ne touchez pas le ruban
encreur et ne placez pas
la cassette à ruban
encreur dans un endroit
poussiéreux. La présence
de traces de doigts ou de
poussière sur le ruban
encreur peut entraîner
des résultats
d’impression imparfaits.
Face étiquetée
Si la cassette d'impression n'émet pas de déclic
lorsqu'elle est engagée
Retirez la cassette d'impression, puis remettez-la en
place.
Installation
13
FR
Page 64

Chargement de la cassette d’impression (suite)
Pour remplacer la cassette d’impression
Lorsque l’indicateur de ruban se met à clignoter et que
le papier introduit ressort après l’introduction et est
ensuite chargé automatiquement, retirez le papier
d’impression et remplacez la cassette d’impression.
Ouvrez le couvercle du compartiment à cassette et
relevez le levier d’éjection. Retirez la cassette
d’impression usagée et remplacez-la par une neuve.
Levier d'éjection
Remarques sur le
rangement des cassettes
d’impression
• Ne placez pas les
cassettes dans des
endroits soumis à:
– de hautes
températures;
– une forte humidité;
– un empoussiérement
excessif;
– au rayonnement
direct du soleil.
• Avant de ranger une
cassette partiellement
employée pour une
longue période, glissezla dans son emballage
d’origine.
FR
Installation
14
Indicateur d’appoint de papier
Indicateur d’erreur de ruban
Poussez le levier d'éjection
vers le haut, puis retirez la
cassette d'impression usagée
Pour charger une cassette à ruban encreur
partiellement employée
Tout en appuyant au
centre de la bobine,
enroulez le ruban
encreur dans le sens
de la flèche.
Enroulez le ruban
jusqu’à ce que la
ligne noire se trouve
près du bord gauche.
If ink ribbon should tear
Si le ruban encreur se déchire
Réparez le ruban à l’aide de bande adhésive
transparente. Vous ne devriez pas avoir de problème
pour employer le reste de ruban de la cassette. Avant
de charger la cassette à ruban encreur dans
l’imprimante, tournez la bobine jusqu’à ce que la bande
transparente ait disparu.
Réparez à l’aide de
bande adhésive
transparente.
Page 65

Introduction du papier d’impression
Introduction du papier d’impression à
Remarques sur le
chargeur automatique
• S'il y a un problème en
cours de chargement du
papier, le témoin de
l'imprimante se met à
clignoter. Retirez le
chargeur de
l'imprimante et vérifiez
qu'il n'y a pas de papier
coincé à l'intérieur de
l'imprimante. Lorsque
vous réinstallez le
chargeur et appuyez sur
la touche d'impression,
l'imprimante imprime à
nouveau le nombre de
copies sélectionné.
• Le chargeur peut
contenir un maximum
de 25 feuilles. Lorsque
vous ajoutez du papier
dans le chargeur alors
qu'il en reste encore,
assurez-vous que le total
des feuilles ne dépasse
pas la limite. Si c'est le
cas, il y a un risque de
bourrage du papier.
• Ne placez pas différents
types de papier dans le
chargeur. Un bourrage
de papier risque sinon
de se produire.
• Pour pouvoir introduire
du papier alors que le
chargeur se trouve sur
l'imprimante, vous
devez d'abord retirer le
chargeur de
l'imprimante et ensuite
seulement placer du
papier dans le chargeur.
• N'ouvrez pas le
couvercle du chargeur
pendant l'impression.
Un bourrage de papier
risque sinon de se
produire.
l’aide de l’introducteur automatique
fourni
Le chargeur automatique fourni vous permet
d'alimenter le papier d'impression automatiquement.
1 Ouvrez le couvercle du magasin à papier, puis
faites glisser le curseur frontal vers la droite.
2 Assurez-vous que l'espaceur est soulevé.
Espaceur
3 Pour éviter les bourrages de papier, déramez le
papier d'impression.
Veillez à ne pas en toucher la surface d'impression
(la face qui ne comporte aucune mention
imprimée).
Installation
Installation
FR
15
Page 66

Introduction du papier d'impression (suite)
4 Introduisez le papier d'impression avec la surface
d'impression (la face qui ne comporte aucune
mention imprimée) orientée vers le haut.
Veillez à ne pas toucher la surface d'impression et à
ne pas corner les coins du papier. Vous pouvez
charger jusqu'à 25 feuilles de papier d'impression
ou de papier conçu pour l'imprimante dans le
chargeur.
Veillez à ce que les onglets métalliques sur les deux
faces recouvrent le papier d'impression.
Surface
d'impression
5 Mettez l'imprimante sous tension et appuyez sur la
touche MEMORY ou CAPTURE pour enregistrer
une image en vue de l'impression.
Pour plus de détails, reportez-vous à la section
“Impression”.
Avant
Papier
Onglet
métallique
Pour imprimer un
nombre de copies non
spécifié sur la molette
Introduisez le nombre de
feuilles voulu et tournez
la molette sur 25.
FR
Installation
16
6 Tournez la molette pour sélectionner le nombre de
copies à imprimer en continu.
Vous pouvez sélectionner 1, 2, 3, 4, 5, 10 ou 25
copies. Tournez la molette jusqu'à ce que le nombre
voulu apparaisse dans la fenêtre d'affichage. La
molette doit produire un déclic. Sinon, vous
n'obtiendrez pas le nombre de copies voulu.
2
Page 67

Pour arrêter l'impression
continue
Mettez la molette sur 1.
L'impression s'arrête
après que l'impression en
cours se termine.
S'il manque de papier
d'impression pendant
l'impression en continu
Retirez le chargeur de
l'imprimante. Ensuite,
introduisez le papier
d'impression dans le
chargeur et réinstallez le
chargeur dans
l'imprimante.
L'impression reprend
automatiquement.
7 Appuyez sur "Push" du couvercle du chargeur
automatique, puis installez le chargeur jusqu'à ce
qu'il émette un déclic.
8 Appuyez sur PRINT de l'imprimante.
Le papier d'impression est chargé automatiquement
dans l'imprimante et l'impression démarre.
Introduction manuelle du papier
d’impression
Introduisez le papier d’impression feuille à feuille.
Cette section vous explique comment introduire le
papier d’impression de type standard. N’utilisez que
le papier d’impression destiné à cette imprimante.
1 Mettez l'imprimante sous tension.
Le témoin POWER s'allume.
2 Suivez les procédures d'impression.
Pour plus de détails, reportez-vous aux pages 20 à
39.
Installation
Remarques sur
l'introduction manuelle
du papier d'impression
• Introduisez le papier
d'impression
horizontalement le long
du guide sur la gauche
de l'entrée du papier. Si
le papier est positionné
sur la droite ou s'il est
incliné, la zone
d'impression peut être
de biais.
• Le papier ne peut pas
être chargé
automatiquement si
vous n'introduisez pas
le papier fermement.
3 Introduisez le papier d'impression horizontalement
avec la surface d'impression vierge orientée vers le
haut, en procédant le long du guide sur la
gauche de l'entrée du papier.
Introduisez le papier jusqu'à ce que moins de 2 cm
(environ 0,8 po) ressortent. Le papier est
automatiquement chargé lorsque l'impression
démarre.
Guide
Moins de 2 cm
Installation
17
FR
Page 68

Introduction du papier d'impression (suite)
Remarques sur la manipulation du
papier d’impression
• Vous ne pouvez pas taper à la machine sur la surface
d'impression avant d'imprimer. Si vous désirez écrire
des salutations ou dessiner sur la surface
d'impression après l'impression, utilisez un stylo à
encre à base d'huile.
• Lorsque vous manipulez du papier d'impression,
veillez à ne pas toucher la surface d'impression (la
face brillante sans aucune mention imprimée).
• Ne placez pas le papier d'impression à un endroit
poussiéreux. La présence de traces de doigts ou de
poussière sur la surface d'impression peut entraîner
des résultats d'impression imparfaits.
• N'utilisez que le papier d'impression conçu pour
cette imprimante. Si vous utilisez un type de papier
différent, il se peut que l'imprimante n'imprime pas
correctement ou provoque un problème.
• Ne pliez pas et ne courbez pas le papier
d'impression.
Remarques sur la conservation du papier
d'impression
• Evitez de placer le papier d'impression dans un
endroit exposé à:
– des températures élevées
– une humidité élevée
– de la poussière en excès
– aux rayons directs du soleil
• Si vous comptez stocker le papier d'impression
partiellement utilisé pendant une période prolongée,
placez-le dans son emballage d'origine.
18
FR
Installation
Page 69

Utilisation de la disquette
Pour imprimer des images enregistrées sur une
disquette, introduisez la disquette dans la fente
d’insertion de disquette 3,5" de l’imprimante.
Raccordez l’imprimante au téléviseur pour afficher les
images à imprimer. Pour les opérations d’impression,
voir page 23.
Câble de
connexion vidéo
(fourni)
Vers VIDEO
OUTPUT
Avec la flèche vers
l’avant gauche,
introduisez la disquette
retournée vers le bas.
Téléviseur
Réglez le sélecteur
d’entrée sur “VIDEO”.
Installation
Touche
d'éjection de la
disquette.
Disquette
Remarques
• Avant d’établir quelque
connexion que ce soit,
mettez l’imprimante et
le téléviseur hors
tension.
• Si la disquette n’est pas
correctement installée
dans la fente, ne forcez
pas. Vérifiez une
nouvelle fois le sens
d’introduction et
réintroduisez-la dans la
fente.
Ejection de la disquette
Appuyez sur la touche d’éjection de la disquette.
Disquettes utilisables
Vous pouvez utiliser une disquette 3,5" 2HD 1,44 MB
de format MS-DOS.
Installation
19
FR
Page 70

Impression
Impression d’une image depuis
l’appareil vidéo
Vous pouvez capturer l'image entrée de l'appareil
vidéo raccordé au connecteur VIDEO INPUT de
l'imprimante et l'imprimer en format pleine page
(impression standard).
Préparation1Préparation
Indicateur
POWER
1
2
PICTURE
impression standard
CLEAR ALL
34 5
Preparations
1 Mettez l’imprimante et le téléviseur sous tension et
réglez le sélecteur d’entrée du téléviseur sur
“VIDEO”.
L’indicateur d’alimentation s’allume.
2 Réglez INPUT SELECT sur “VIDEO MOTION” ou
“VIDEO STILL”.
20
FR
Pour Position du sélecteur
Imprimer une image VIDEO MOTION
animée tout en en
corrigeant la netteté
Imprimer une image fixe VIDEO STILL
Impression
Page 71

Impression
Correction de la netteté
Lorsque vous réglez
INPUT SELECT sur
“VIDEO MOTION”,
l’image sélectionnée
apparaît sur l’écran et la
ligne rouge horizontale se
déplace du haut en bas de
la moitié gauche de
l’écran et, ensuite, du haut
en bas de la moitié droite
de l’écran.
Durant cette séquence, le
flou éventuel de l’image
est automatiquement
corrigé par l’imprimante
(compensation du flou).
Lorsque la correction de
la netteté est terminée,
l’écran s’assombrit et
l’image à imprimer
apparaît sur l’écran.
Resélection de l'image
Appuyez sur B avant
d’appuyer sur PRINT.
L’image de lecture
apparaît à l’écran.
Vous pouvez également
resélectionner l’image en
appuyant sur PICTURE
au lieu de B. (Vous ne
pouvez pas saisir une
image lorsque l’indicateur
MEMORY est allumé.
Appuyez sur CAPTURE
lorsque l’indicateur
MEMORY est éteint.)
Lorsque vous appuyez
sur CLEAR ALL,
l’imprimante revient en
mode de veille.
Recommencez la
procédure d’impression
depuis le début.
1 Réglez la molette de mode d’impression sur “
(standard)”.
2 Démarrez la lecture sur l’appareil vidéo.
Pendant que l'indicateur INPUT s'allume, l'image
de lecture apparaît sur l'écran (image d'entrée).
Pour plus de détails sur la lecture sur l’appareil
vidéo, reportez-vous au mode d’emploi qui
l’accompagne.
Image entrée
3 Appuyez sur CAPTURE lorsque l’image que vous
voulez imprimer apparaît à l’écran.
L’image plein écran sélectionnée apparaît à l’écran,
et l’indicateur MEMORY s’allume.
Image d'impression
suite
Impression
Impression
FR
21
Page 72

Impression d’une image depuis l’appareil vidéo (suite)
Remarques
• En cours d’impression,
ne déplacez pas
l’imprimante et ne la
mettez pas hors tension;
il se peut sinon que la
cassette d’impression ou
le papier se bloque. Si
cela se produit, mettez
l’imprimante hors et
puis à nouveau sous
tension, et recommencez
ensuite l’impression
depuis le début.
• N’introduisez pas une
autre feuille de papier
d’impression avant
d’avoir retiré la feuille
imprimée.
• Pendant l’impression, le
papier d’impression est
partiellement éjecté à
plusieurs reprises de la
fente de sortie du papier.
Ne tirez pas sur le papier
à ce moment.
• Il est déconseillé de
sélectionner une image
alors que l’appareil
vidéo se trouve en mode
de pause parce que cela
provoque une perte de
qualité de l’image.
• Ne laissez pas des
feuilles de papier avec la
face imprimée l’une
contre l’autre ou en
contact avec des
produits en caoutchouc
ou en plastique (y
compris le chlorure de
vinyle et les plastifiants)
pendant une longue
période; l’encre risque
sinon de se transférer
dessus.
Si le papier d’impression
n’est pas chargé
L'indicateur d'impression
et l'indicateur d'appoint de
papier clignotent.
Introduisez du papier
d’impression.
FR
Impression
22
4 Appuyez sur PRINT.
L’indicateur d’impression clignote et le papier
d’impression est chargé automatiquement.
L’indicateur d’appoint de papier clignote
pendant le chargement du papier d’impression.
Indicateur d’impression
Sens d’impression
L’image affichée sur la caméra numérique est
imprimée dans le sens indiqué ci-dessous.
Image affichée
Image imprimée
5 Retirez le tirage de l’imprimante.
Lorsque l’impression est terminée, le papier
d’impression émerge automatiquement de la
sortie d’éjection des tirages.
L’indicateur d’impression s’éteint.
Réimpression de la même image
Assurez-vous que l’image voulue est affichée sur
l’écran et appuyez ensuite sur PRINT.
Le chargeur automatique fourni vous permet
d'imprimer la même image en continu sur 25
feuilles maximum.
Capture d'une image à l'aide de l'interrupteur
au pied en option
Vous pouvez utiliser l’interrupteur au pied en
option FS-20 pour sélectionner l’image désirée au
lieu d’utiliser CAPTURE.
Pour plus de détails, voir “Capture d'une image à
l’aide de l’interrupteur au pied en option” à la page
39.
Page 73

Impression d’une image enregistrée
sur une disquette
Vous pouvez sélectionner une image enregistrée sur
une disquette et l’imprimer en format pleine page
(impression standard).
Remarques
• Veillez à ce qu’aucun
liquide n’entre en
contact avec les
disquettes et à ne pas
utiliser les disquettes
dans des endroits
soumis à une forte
humidité. Sinon, les
données qui y sont
enregistrées risquent
d’être devenues
inutilisables.
• N’éjectez pas la
disquette pendant que
l’indicateur d’accès est
allumé. La disquette
risque sinon de se
bloquer.
Préparation1Préparation
Indicateur POWER PICTURE
2
Préparation
123
3
CAPTURE
impression standard
45
Préparation
1 Mettez l’imprimante et le téléviseur sous tension et
réglez le sélecteur d’entrée du téléviseur sur
“VIDEO”.
L'indicateur POWER s'allume.
2 Réglez INPUT SELECT sur “FD”.
3 Introduisez la disquette comportant des images
enregistrées dans la fente d’insertion de disquette.
(page 19)
Pendant l’accès à la disquette, l’indicateur d’accès
clignote. Lorsque les images de la disquette ont été
lues, elles sont affichées en réduction dans la liste.
Cadre blanc
(curseur)
Impression
Impression
FR
23
Page 74

Impression d’une image enregistrée sur une disquette (suite)
Défilement des pages
Lorsqu'il y a plusieurs pages,
vous pouvez modifier les
pages vers l'arrière et vers
l'avant. Pour afficher la page
suivante (lorsque apparaît
en bas à droite), déplacez le
cadre blanc sur la ligne du
bas de la liste d'images et
appuyez sur v. Pour afficher
la page précédente (lorsque
apparaît en haut à droite),
déplacez le cadre blanc sur la
ligne du dessus et appuyez
sur V. La lampe d'accès
clignote et les pages
permutent.
Annulation de la sélection
Déplacez le cadre blanc sur
l'image dont vous désirez
annuler la sélection et
appuyez sur ENTER. Le
cadre bleu disparaît et la
sélection est annulée.
Sélection de pages
multiples
Répétez les étapes 2 et 3
jusqu'à ce que vous ayez
sélectionné toutes les images
que vous voulez imprimer.
Affichage de l'image en
format plein écran
Déplacez le cadre blanc sur
l'image voulue et appuyez
ensuite sur CAPTURE à
l'étape 3.
L'image pleine page
sélectionnée apparaît au
centre de l'écran.
Pour afficher l'image pleine
page suivante ou la
précédente, appuyez sur v
(image suivante) ou V (image
précédente).
Si vous désirez resélectionner
l'image, appuyez sur
PICTURE pour revenir à la
liste d'images, puis répétez
les étapes 2 et 3.
Remarque
L'image pleine page affichée
peut ne pas correspondre à
l'impression réelle jusque
dans les détails.
FR
Impression
24
Impression
1 Réglez la molette de mode d’impression sur “
(standard)”.
2 Appuyez sur les touches fléchées (B/b/V/v) pour
déplacer le cadre blanc (curseur) sur l’image que
vous voulez imprimer.
Déplacez le cadre blanc vers le haut (V), le bas (v),
la droite (b) ou la gauche (B).
Déplacez le
cadre blanc.
3 Appuyez sur ENTER.
Le cadre bleu apparaît à l'intérieur du cadre blanc
et l'image sélectionnée est désignée pour
l'impression.
Le cadre
blanc
devient bleu.
Page 75

Remarques
• Une image endommagée ou
présentant certaines
anomalies n'apparaît pas
dans la liste d'images.
• Si aucune image n'est
enregistrée sur la disquette,
“NO FILE” s'affiche.
• Si vous appuyez sur PRINT
pendant que l'image
d'impression est affichée,
seule l'image affichée est
imprimée.
• Si vous appuyez sur PRINT
pendant que la liste
d’onglets est affichée, toutes
les images avec un cadre
bleu sont imprimées.
• En cours d’impression, ne
déplacez pas l’imprimante et
ne la mettez pas hors
tension; il se peut sinon que
la cassette d’impression ou
le papier se bloque. Si cela se
produit, mettez
l’imprimante hors et puis à
nouveau sous tension, et
recommencez ensuite
l’impression depuis le
début.
• N’introduisez pas une autre
feuille de papier
d’impression avant d’avoir
retiré la feuille imprimée.
• Pendant l’impression, le
papier d’impression est
partiellement éjecté à
plusieurs reprises de la fente
de sortie du papier. Ne tirez
pas sur le papier à ce
moment.
• Ne laissez pas des feuilles de
papier avec la face imprimée
l’une contre l’autre ou en
contact avec des produits en
caoutchouc ou en plastique
(y compris le chlorure de
vinyle et les plastifiants)
pendant une longue
période; l’encre risque sinon
de se transférer dessus.
Si le papier d’impression n’est
pas chargé
L'indicateur d'impression et
l'indicateur d'appoint de papier
clignotent.
Introduisez du papier
d’impression.
4 Appuyez sur PRINT.
L’indicateur d’impression clignote et le papier
d’impression est chargé automatiquement.
L’indicateur d’appoint de papier clignote pendant
que le papier d’impression est chargé.
Indicateur d’impression
Sens d’impression
L’image affichée sur la caméra numérique est
imprimée dans le sens indiqué ci-dessous.
Image affichée
Image imprimée
5 Retirez le tirage de l’imprimante.
Lorsque l’impression est terminée, le papier
d’impression émerge automatiquement de la sortie
d’éjection des tirages.
L’indicateur d’impression s’éteint.
Réimpression de la même image
Appuyez sur PRINT.
Le chargeur automatique fourni vous permet
d'imprimer la même image en continu sur 25 feuilles
maximum.
Impression d’autres images
Appuyez sur PICTURE de façon à ce que l’écran
d’images en réduction apparaisse et exécutez ensuite
les étapes 1 à 5.
Impression d'images multiples en continu
Vous pouvez imprimer plusieurs images en continu
sur 25 feuilles maximum grâce au chargeur
automatique fourni.
Impression
Impression
FR
25
Page 76

Réalisation de différents tirages
Réalisation de tirages fractionnés
Impression d’images depuis un
appareil vidéo
Vous pouvez réaliser des tirages fractionnés en 2, 4 ou
16 images. Vous pouvez également désigner
l’impression fractionnée de la même image ou
d’images différentes.
Avant de commencer...
1 Mettez l’imprimante et le téléviseur sous tension et
réglez le sélecteur d’entrée du téléviseur sur
“VIDEO”.
2 Réglez INPUT SELECT sur “VIDEO MOTION” ou
“VIDEO STILL”.
1 Sélectionnez le type de fractionnement à l’aide de la
molette de mode d’impression.
Vous pouvez sélectionner l’impression de 2, 4 ou 16
fois la même image ou de 2, 4 ou 16 images
différentes.
FR
Réalisation de différents tirages
26
Impression
fractionnée de 2
images différentes
Impression
fractionnée
de 4 images
différentes
Impression fractionnée
de 16 images différentes
Impression
fractionnée de 2 fois
la même image
Impression
fractionnée
de 4 fois la
même image
Impression fractionnée
de 16 fois la même image
Page 77

Si vous sélectionnez
“VIDEO MOTION”
Lorsque vous mettez
INPUT SELECT sur
“VIDEO MOTION”, le
flou de l’image
sélectionnée est corrigé à
l’étape 2.
Resélection de l’image
Appuyez sur CLEAR
ALL. L’image
sélectionnée est retirée et
l’imprimante revient en
mode de veille.
Suivez les procédures
d’impression jusqu’au
début.
Vous pouvez également
resélectionner l’image en
appuyant sur B. Lorsque
vous sélectionnez
l’impression fractionnée
avec différentes images et
resélectionnez l’image en
appuyant sur B, seule
l’image sélectionnée la
plus récemment est ôtée.
Lorsque vous choisissez
l’impression fractionnée
avec les mêmes images,
vous pouvez également
appuyer sur PICTURE
pour afficher l’image
d'entrée afin de
resélectionner une
nouvelle image. (Vous ne
pouvez pas saisir une
image lorsque l’indicateur
MEMORY est allumé.
Appuyez sur CAPTURE
lorsque l’indicateur
MEMORY est éteint.)
2 Sélectionnez l’image.
•Pour sélectionner la même image pour tous les
plans fractionnés:
1 Mettez l’appareil vidéo
sous tension et démarrez
la lecture.
2 Appuyez sur CAPTURE
lorsque l’image que vous
voulez imprimer apparaît
sur l’écran.
Si vous sélectionnez
une impression
fractionnée en 4
L’image en mémoire est
affichée dans les plans
fractionnés sélectionnés à
l’étape 1.
•Si vous sélectionnez des images différentes pour
chaque plan fractionné:
1 Mettez l’appareil vidéo sous tension et
démarrez la lecture.
2 Appuyez sur CAPTURE lorsque l’image que
vous voulez imprimer apparaît sur l’écran.
L’image en mémoire est affichée dans le
premier des plans fractionnés sélectionnés à
l’étape 1.
Après un certain temps, l'image de la mémoire
disparaît et l'image entrée apparaît
automatiquement.
3 Répétez les étapes 2 jusqu’à ce que vous ayez
sélectionné les images pour tous les plans
fractionnés.
Les images sélectionnées sont sélectionnées
comme suit:
supérieur gauche t supérieur droit t
inférieur gauche t inférieur droit.
Si vous sélectionnez une impression fractionnée en 4
3 Appuyez sur PRINT.
L’indicateur d’impression clignote pendant
l’impression et l’image sélectionnée est imprimée.
Réalisation de différents tirages
Réalisation de différents tirages
FR
27
Page 78

Réalisation de tirages fractionnés (suite)
Impression d’images depuis une
disquette
Vous pouvez réaliser des tirages fractionnés en 2, 4 ou
16 images. Vous pouvez également désigner
l’impression fractionnée de la même image ou
d’images différentes.
Avant de commencer...
1 Mettez l’imprimante et le téléviseur sous tension et
réglez le sélecteur d’entrée du téléviseur sur
“VIDEO”.
2 Réglez INPUT SELECT sur “FD”.
3 Introduisez une disquette dans la fente à disquette.
1 Sélectionnez le type de fractionnement à l'aide de la
molette de mode d'impression.
Vous pouvez sélectionner une impression
fractionnée en 2, 4 ou 16 fois la même image ou des
images différentes.
Impression de la date
Vous pouvez imprimer la
date si l’image a été
sauvegardée en réglant
DATE sur “ON.”
FR
Réalisation de différents tirages
28
Impression
fractionnée de 2
images différentes
Impression
fractionnée
de 4 images
différentes
Impression fractionnée
de 16 images différentes
Impression fractionnée
de 16 fois la même image
2 Sélectionnez l’image.
• Pour sélectionner la même image pour tous les
plans fractionnés:
1 Appuyez sur les touches fléchées pour
déplacer le cadre blanc sur l’image que vous
voulez imprimer et appuyez ensuite sur
ENTER. (Le cadre bleu apparaît à l'intérieur
du cadre blanc.)
Impression
fractionnée de 2 fois
la même image
Impression
fractionnée
de 4 fois la
même image
Page 79

Resélection d’une image
Déplacez le cadre blanc
sur l'image dont vous
désirez annuler la
sélection et appuyez sur
ENTER. Le cadre bleu
disparaît et la sélection est
annulée.
Si vous désirez
resélectionner l'image
après avoir affiché l'image
d'impression réelle,
appuyez sur PICTURE
pour revenir à l'écran en
pendentif, puis répétez
l'étape 2.
Resélection du type de
fractionnement
Appuyez sur PICTURE
de sorte que l'écran en
pendentif apparaisse.
Resélectionnez le type de
fractionnement à l'aide de
la molette du mode
d'impression. Vous
pouvez utiliser les images
sélectionnées ou modifier
la sélection.
2 Si vous voulez réaliser d’autres tirages
fractionnés d’une même image, répétez l’étape
1.
• Pour sélectionner des images différentes pour
chaque plan fractionné:
1 Appuyez sur les touches fléchées pour
déplacer le cadre blanc sur l’image que vous
voulez imprimer et appuyez ensuite sur
ENTER. (Le cadre bleu apparaît à l'intérieur
du cadre blanc.)
2 Répétez l’étape 1 pour sélectionner des
images pour les plans fractionnés dans l’ordre
de votre choix.
Les images sont placées à
partir du coin supérieur
gauche de la feuille
jusqu'au coin inférieur
droit dans l'ordre de la
sélection, et non pas dans
l'ordre de la liste d'images.
Vous pouvez également sélectionner une
image de différentes pages.
Si vous sélectionnez plus d’images que le
nombre de plans fractionnés, les images sont
automatiquement désignées pour le tirage
suivant.
Pour contrôler l’image à imprimer
Appuyez sur CAPTURE.
L’image d'impression en cours apparaît au centre
de l’écran.
Pour afficher plusieurs tirages fractionnés, appuyez
sur V ou v.
Réalisation de différents tirages
Annulation de
l’opération
Appuyez sur CLEAR
ALL. L'image sélectionnée
est retirée et l'imprimante
revient en mode de veille.
Suivez les procédures
d'impression jusqu'au
début.
Remarque
Si vous appuyez sur
PRINT lorsque l'image
d'impression est affichée,
seule l'image affichée est
imprimée.
Si vous sélectionnez
l’impression fractionnée
de 4 fois la même image
Si vous sélectionnez l’impression
fractionnée de 4 images différentes
3 Appuyez sur PRINT.
L’indicateur d’impression clignote pendant
l’impression et l’image sélectionnée est imprimée.
Réalisation de différents tirages
29
FR
Page 80

Réalisation d’une impression d’image
miroir
Vous pouvez réaliser une image miroir ou une image
tête-bêche lorsque vous imprimez une image d'un
appareil vidéo.
Vous pouvez utiliser cette fonction avec l'impression
standard (pages 20 à 22) et l'impression fractionnée
(pages 26 à 27).
Avant de commencer...
1 Mettez l'imprimante et le téléviseur sous tension et
placez le sélecteur d'entrée de la télévision sur
“VIDEO”.
2 Placez INPUT SELECT sur “VIDEO MOTION” ou
“VIDEO STILL”.
1 Placez MIRROR IMAGE SELECT sur le type de
renversement d'image souhaité.
Renversement
horizontal
(image miroir)
Renversement
vertical (image
Pas de renversement
(image d'origine)
tête-bêche)
Remarque
Vous ne pouvez pas
réaliser d'impression
d'image miroir lorsque
vous désirez imprimer
l'image sur la disquette.
FR
Réalisation de différents tirages
30
2 Lancez la lecture sur l'appareil vidéo.
Pendant que l'indicateur INPUT est allumé, l'image
de lecture apparaît à l'écran (image d'entrée).
3 Appuyez sur CAPTURE lorsque l'image que vous
désirez imprimer apparaît à l'écran.
L'image sélectionnée apparaît. Lorsque vous placez
MIRROR IMAGE SELECT sur “V” ou “H”, le
repère “R” (renversement) apparaît en bas à droite
de l'écran.
: Indique une image tête-
bêche.
: Indique une image miroir.
Page 81

4 Appuyez sur PRINT.
L'image miroir est imprimée.
Tirage d'une image miroir en mode
d'impression fractionnée
Placez MIRROR IMAGE SELECT sur le type désiré
avant de démarrer les procédures d'impression dans
"Impression d'images de l'appareil vidéo" (page 26).
Lorsque vous utilisez différentes images
Vous pouvez modifier le type d'image miroir pour
chaque plan fractionné.
Exemple
• Plans 1 et 3: renversement vertical
• Plans 2 et 4: renversement horizontal
Renversement
vertical
Renversement
horizontal
Réalisation de différents tirages
Pour modifier le type d'image miroir pour chaque plan
fractionné, changez le réglage de MIRROR IMAGE
SELECT chaque fois avant d'appuyer sur CAPTURE.
Lorsque vous utilisez la même image
La même image miroir des plans fractionnés est
imprimée.
Réalisation de différents tirages
31
FR
Page 82

Réalisation d’une étiquette pour une
disquette
Vous pouvez réaliser une étiquette pour une disquette
à l'aide du papier d'impression de type étiquette.
L'image sélectionnée est imprimée comme grande
image sur une étiquette et 3 images en pendantif
séparées par des lignes sont imprimées sur l'autre
étiquette. Le nombre total d'images est imprimé en bas
à gauche de l'étiquette.
Avant de commencer...
1 Mettez l’imprimante et le téléviseur sous tension et
réglez le sélecteur d’entrée du téléviseur sur
“VIDEO.”
2 Mettez INPUT SELECT sur “FD.”
1 Sélectionnez “ (FD label print)” à l’aide de la
molette de mode d’impression.
Lorsque vous imprimez
l'image d'entrée de
l'appareil vidéo
Vous ne pouvez pas
réaliser une étiquette pour
une disquette.
Impression de la date
Vous pouvez imprimer la
date si l’image a été
sauvegardée en réglant
DATE sur “ON.”
FR
Réalisation de différents tirages
32
FD label print
2 Sélectionnez l’image à imprimer.
1 Introduisez une disquette dans la fente à
disquette.
2 Appuyez sur les touches fléchées pour
déplacer le cadre blanc sur l’image que vous
voulez imprimer et appuyez ensuite sur
ENTER.
L'image sélectionnée est placée dans la moitié
supérieure de l'imprimé et l'image en
pendentif la plus à gauche dans la moitié
inférieure.
Page 83

Annulation de la
sélection
Déplacez le cadre blanc
sur l'image dont vous
souhaitez annuler la
sélection et appuyez sur
ENTER. Le cadre bleu
disparaît et la sélection est
annulée.
Pour supprimer toutes les
images sélectionnées,
appuyez sur CLEAR ALL.
Suivez les procédures
d'impression depuis le
début.
3 Répétez l’étape 2 pour sélectionner des
images pour les deux autres images en
pendentif.
4 Appuyez sur CAPTURE si vous voulez
contrôler l’image d’impression.
Pour afficher plusieurs tirages fractionnés,
appuyez sur V ou v.
La première
image
sélectionnée
Les deuxième et
troisième images
sélectionnées
Total d'images
Date (pour
l'impression)
3 Introduisez le papier de type étiquette dans
l'imprimante, puis appuyez sur PRINT.
L'indicateur d'impression clignote pendant
l'impression, puis l'étiquette pour la disquette
s'imprime.
Vous pouvez utiliser chaque partie de l'étiquette
pour la disquette. Découpez le papier de sorte qu'il
s'adapte au côté étiquette.
Réalisation de différents tirages
Remarque
Ne dactylographiez rien
sur la surface
d’impression avant
l’impression. Si vous
voulez écrire un message
ou dessiner sur la surface
d’impression après
l’impression, utilisez un
feutre gras.
Réalisation de différents tirages
33
FR
Page 84

Réalisation d’une liste d’index
d’images
Vous pouvez réaliser un index des images
sauvegardées sur une disquette. Lorsque vous
recherchez une image enregistrée, vous pouvez la
retrouver immédiatement grâce à cet index.
Avant de commencer...
1 Mettez l’imprimante et le téléviseur sous tension et
réglez le sélecteur d’entrée du téléviseur sur “VTR”.
2 Réglez INPUT SELECT sur “FD”.
1 Sélectionnez “ (Index print)” à l’aide de la
molette de mode d’impression.
Index print
A propos de l'impression
de la date
La date de sauvegarde de
l'image est imprimée quel
que soit le réglage de
DATE. La date n'apparaît
cependant pas sur l'image
affichée.
FR
Réalisation de différents tirages
34
2 Introduisez la disquette dans la fente à disquette.
Toutes les images enregistrées sur la disquette sont
affichées en pendentif sous forme de liste.
S'il y a des pages multiples, appuyez sur V ou v
pour afficher la page suivante ou précédente.
Page 85

Pour afficher l'image d'impression
Appuyez sur CAPTURE.
Toutes les images enregistrées sur la disquette sont
affichées sous forme d'images miniatures.
3 Appuyez sur PRINT.
L’indicateur d’impression clignote pendant
l’impression et une liste des images enregistrées sur
la disquette est imprimée.
La taille de chaque image dépend du nombre
d’images.
• S’il y a de 1 à 12 images
Les images sont réduites à un
format correspondant à 12
images. Chaque image est
identifiée par un numéro
d’image.
• S’il y a de 13 à 20 images
Les images sont réduites à un
format correspondant à 20
images. Chaque image est
identifiée par un numéro
d’image.
Réalisation de différents tirages
Remarques
• Si le nombre d'images
est inférieur au nombre
de plans fractionnés, les
plans sans image
restent blancs.
• Si le nombre d'images
est supérieur à 43,
l'image numéro 43 et
les suivantes ne sont
pas imprimées.
• S’il y a plus de 21 images
Les images sont réduites à un
format correspondant à 42
images. Chaque image est
identifiée par un numéro
d’image.
Réalisation de différents tirages
35
FR
Page 86

Enregistrement d’une image vidéo
comme une image fixe
Vous pouvez enregistrer l’image de lecture de
l’appareil vidéo comme une image fixe sur une
disquette.
Avant de commencer...
Lorsque vous mettez la
molette du mode
d’impression sur le
mode de fractionnement
Vous pouvez également
enregistrer l’image dans
le mode de
fractionnement.
Dans ce cas, seule l’image
que vous avez
sélectionnée le plus
récemment est enregistrée
sur une disquette dans ce
cas.
Resélection de l'image
Appuyez sur PICTURE
avant d'appuyer sur
PRINT. L'image de
lecture apparaît à l'écran.
Suivez l’étape 2. (Vous ne
pouvez pas saisir une
image lorsque l’indicateur
MEMORY est allumé.
Appuyez sur CAPTURE
lorsque l’indicateur
MEMORY est éteint.)
Vous pouvez également
resélectionner l'image en
appuyant sur la flèche (B)
au lieu d'appuyer sur
PICTURE.
Lorsque vous appuyez
sur CLEAR ALL,
l’imprimante revient en
mode de veille.
Recommencez la
procédure d’impression
depuis le début.
FR
Réalisation de différents tirages
36
1 Mettez l’imprimante et le téléviseur sous tension et
réglez le sélecteur d’entrée du téléviseur sur
“VIDEO”.
2 Réglez INPUT SELECT sur “VIDEO MOTION” ou
“VIDEO STILL”.
1 Réglez la molette de mode d’impression sur “
(standard)” ou sur fractionné.
2 Sélectionnez l’image à enregistrer.
Pour plus de détails sur les procédures à appliquer,
reportez-vous aux pages correspondant au mode
d’impression voulu.
1 Mettez l’appareil vidéo sous tension et
démarrez la lecture.
2 Appuyez sur CAPTURE lorsque l’image que
vous voulez enregistrer apparaît sur l’écran.
3 Introduisez la disquette dans la fente à disquette.
Introduisez une disquette formatée en MS-DOS.
Vérifiez si le taquet de protection contre l’écriture
de la disquette est réglé de façon à permettre
l’enregistrement.
4 Appuyez sur SAVE.
L'indicateur d'accès de l'unité de disquette s'allume
et l'image affichée est enregistrée sur la disquette.
Page 87

A propos du nom de fichier de l'image enregistrée
L'image est enregistrée avec le nom de fichier "MVC###f.jpg". "###" est le numéro alloué séquentiellement
après le numéro de fichier le plus élevé (le même que le
numéro d'image) enregistré sur la disquette.
Si un message d'erreur apparaît
Message d'erreur Signification
DISK ERROR La disquette introduite n'est pas
formatée. Introduisez une
disquette au format MS-DOS.
DISK FULL Il n'y a pas d'espace disque en
suffisance pour enregistrer
l'image. Remplacez la disquette
par une neuve.
DISK PROTECT La languette de protection contre
l'écriture de la disquette
introduite est en position de
protection contre l'écriture.
Mettez-la dans la position
permettant l'écriture, puis
enregistrez l'image.
Réalisation de différents tirages
Réalisation de différents tirages
37
FR
Page 88

Impression de la date
Lorsque vous imprimez une
image de la disquette, vous
pouvez imprimer la date
enregistrée avec le Digital
Mavica.
Sachez que vous ne pouvez pas
imprimer la date lorsque vous
imprimez l'image à partir de
l'appareil vidéo.
Avant de commencer...
1 Mettez l’imprimante et le téléviseur sous tension
et réglez le sélecteur d’entrée du téléviseur sur
“VIDEO”.
2 Mettez INPUT SELECT sur “FD”.
1 Réglez DATE sur “ON.”
La date n'est pas imprimée.
La date est imprimée.
Date
FR
Réalisation de différents tirages
38
2 Sélectionnez l’impression voulue à l’aide de la
molette de mode d’impression.
Vous pouvez sélectionner l'impression standard
(page 20, 23), l'impression fractionnée (page 26
to 29), l'impression d'étiquettes (page 32) ou
l'impression d'index (page 34).
3 Sélectionnez l’image à imprimer.
1 Introduisez une disquette dans la fente à
disquette.
2 Appuyez sur les touches fléchées pour
déplacer le cadre blanc sur l’image que
vous voulez imprimer et appuyez ensuite
sur ENTER.
4 Appuyez sur PRINT.
L’image sélectionnée est imprimée avec la date.
Page 89

Capture de l’image à l’aide de
l’interrupteur au pied en option
Lorsque vous effectuez un tirage à partir d’un appareil
vidéo, vous pouvez utiliser l’interrupteur au pied en
option FS-20 pour sélectionner l’image désirée à
distance.
Raccordement de l’interrupteur au pied en
option
Raccordez l’interrupteur au pied en option FS-20 à la
prise REMOTE CAPTURE de cet appareil.
Remarques
• Mettez cet appareil
hors tension avant de
raccorder l’interrupteur
au pied en option.
• Vous ne pouvez pas
utiliser d'autre
télécommande pour cet
appareil.
Vers REMOTE
CAPTURE
Interrupteur au pied
en option FS-20
Utilisation de l'interrupteur au pied en option
Lorsque vous sélectionnez l’image désirée, utilisez
l’interrupteur au pied en option au lieu d’appuyer sur
CAPTURE.
Réalisation de différents tirages
Réalisation de différents tirages
FR
39
Page 90

Pour votre information
Précautions
Sécurité
• Faites uniquement fonctionner l'imprimante sur une
tension de 110 à 120 V CA, 50/60 Hz.
• Evitez de déposer ou de laisser tomber des objets
lourds sur le cordon d'alimentation ou
d'endommager le cordon par tout autre moyen. Ne
faites en aucun cas fonctionner cet appareil avec un
cordon endommagé.
• Si des liquides ou des solides venaient à pénétrer à
l’intérieur du châssis, débranchez l’imprimante et
faites-la vérifier par le personnel qualifié avant de la
remettre en service.
• Ne démontez en aucun cas l’imprimante.
• Pour débrancher le cordon, saisissez-le par la fiche.
Ne tirez jamais sur le cordon proprement dit.
• Si vous prévoyez de ne pas utiliser l’imprimante
pendant une période prolongée, débranchez le
cordon d’alimentation de la prise murale (secteur).
• Ne manipulez pas l’imprimante avec brusquerie.
• Pour réduire les risques d’électrocution, débranchez
toujours l’imprimante de la prise murale avant les
opérations de nettoyage et d’entretien.
FR
Pour votre information
40
Installation
• N’installez pas l’appareil dans des endroits :
– soumis à des vibrations;
– très humides;
– excessivement poussiéreux;
– exposés au rayonnement direct du soleil;
– extrêmement chauds ou froids.
• N’utilisez pas d’appareil électrique à proximité de
l’imprimante. L’imprimante ne fonctionne pas
correctement lorsqu’elle se trouve dans un champ
électromagnétique.
Page 91

• L’imprimante est conçue pour fonctionner dans une
position horizontale. Ne tentez jamais de faire
fonctionner l’imprimante dans une position inclinée.
Si l’imprimante a été placée sur le côté ou carrément
à l’envers, retirez le magasin à papier et vérifiez si le
papier d’impression est correctement positionné
avant de démarrer une impression.
• Ne posez pas d’objets lourds sur l’imprimante.
• Laissez suffisamment d’espace libre autour de
l’imprimante de façon à ne pas obstruer les ouïes de
ventilation. L’obstruction de ces orifices risque de
provoquer une surchauffe interne.
Condensation d’humidité
Si l’imprimante est transportée directement d’un
endroit froid dans un endroit extrêmement chaud ou
humide, de l’humidité risque de se condenser à
l’intérieur de l’appareil. En pareil cas, l’imprimante ne
fonctionnera probablement pas correctement et
risquera de présenter une défaillance si vous persistez
à vouloir l’utiliser. Si de l’humidité se condense, mettez
l’imprimante hors tension et attendez au moins une
heure avant de l’utiliser.
Transport
Avant de transporter l’imprimante, retirez la cassette
d’impression et remballez l’imprimante dans le carton
et les matériaux de conditionnement d’origine.
Si vous ne disposez plus du carton et des matériaux de
conditionnement d’origine, protégez l’imprimante de
façon à ne pas l’endommager durant le transport.
Pour votre information
Nettoyage
Nettoyez le châssis, le panneau et les commandes avec
un chiffon doux et sec, ou un chiffon doux légèrement
imprégné d’une solution détergente neutre. N’utilisez
aucun type de solvant comme de l’alcool ou de la
benzine, qui risqueraient de ternir le fini du châssis.
Pour votre information
41
FR
Page 92

Précautions (suite)
A propos des disquettes
Pour protéger les données enregistrées sur des
disquettes, conformez-vous aux précautions suivantes:
• Ne rangez pas les disquettes à proximité d’un aimant
ou de champs magnétiques tels que ceux de hautparleurs et de téléviseurs. Vous risquez sinon de
provoquer un effacement irrémédiable des
disquettes.
• Ne rangez pas les disquettes dans des endroits
soumis au rayonnement direct du soleil ou à des
sources de chaleur importante comme à proximité
d’une installation de chauffage. Il peut en résulter
une déformation ou des dommages qui rendent les
disquettes totalement inutilisables.
• Evitez tout contact avec la surface du disque
proprement dit en ouvrant l’obturateur. Si la surface
du disque présente des défauts d’aspect, les données
qui y sont enregistrées risquent d’être devenues
inutilisables.
• Veillez à ce qu’aucun liquide n’entre en contact avec
les disquettes et à ne pas utiliser les disquettes dans
des endroits soumis à une forte humidité. Sinon, les
données qui y sont enregistrées risquent d’être
devenues inutilisables.
• Rangez les disquettes dans leur boîtier de protection
de manière à préserver les données importantes.
• Utilisez uniquement un dispositif de nettoyage de
tête de lecture de type 2HD pour nettoyer l’unité de
disquette.
• Même si vous utilisez une disquette 3,5" 2HD, il se
peut que les données d’image ne soient pas
enregistrées et/ou affichées en fonction de
l’environnement d’utilisation. Dans ce cas, utilisez
des disquettes d’une autre marque.
FR
Pour votre information
42
N’oubliez pas les copies de sauvegarde
Pour écarter tout risque de perte de données, effectuez
toujours une copie de sauvegarde de vos données sur
une autre disquette.
A propos du papier d'impression
Utilisez le papier d'impression et la cartouche
d'impression fournis ensemble dans le même carton. Si
vous les utilisez dans des combinaisons différentes, il
se peut que vous n'obteniez pas les résultats
d'impression adéquats, que le papier se coince ou
qu'une autre défaillance se produise.
Page 93

Dépannage
Si vous rencontrez des problèmes dans le cadre de
l’utilisation de l’imprimante, consultez le tableau
suivant pour tenter d’y remédier.
Si le problème persiste, consultez votre revendeur
Sony.
Si vous employez l’imprimante avec l’utilitaire
d’imprimante, consultez également le mode d’emploi
de l’utilitaire d’imprimante.
Impossible de faire fonctionner l’imprimante après
avoir actionné le commutateur d’alimentation.
c Branchez fermement le cordon d’alimentation sur
une prise murale (secteur) (page 9).
Le téléviseur n’affiche aucune image.
c Réglez le sélecteur d’entrée du téléviseur sur
“VIDEO”.
c Mettez l’imprimante sous tension et raccordez des
appareils, dont le téléviseur et un appareil vidéo.
c Raccordez l’imprimante au téléviseur et à
l’appareil vidéo. (page 8).
c Introduisez une disquette correctement formatée
en MS-DOS. Vérifiez si des images sont
enregistrées sur la disquette que vous venez
d’introduire.
c Démarrez la lecture sur l’appareil vidéo.
c Réglez INPUT SELECT sur la position appropriée.
Un message d’erreur apparaît sur l’écran du
téléviseur.
c Reportez-vous à la section “Messages d’erreur” à
la page 44.
Impossible de retirer la cassette d’impression.
c Mettez l’imprimante hors et puis à nouveau sous
tension. Dès que le bruit du moteur a cessé,
essayez de retirer la cassette. (page 14).
L’impression dure plus longtemps que d’habitude.
c Si l’indicateur d’impression clignote, voir “Si les
indicateurs sont allumés” à la page 45.
Pour votre information
Pour votre information
43
FR
Page 94

Dépannage (suite)
Impossible d’imprimer.
c Introduisez du papier d’impression. (page 17).
c Réessayez d’imprimer après avoir retiré le papier
d’impression s’il dépassait de la fente d’éjection du
papier à l’arrière.
c Voir “Si les indicateurs sont allumés” à la page
suivante.
c Introduisez du papier d’impression si vous utilisez
le chargeur automatique (page 15).
c Introduisez la cassette d’impression (page 13).
c Utilisez la combinaison de cassette à ruban encreur
et de papier d’impression appropriée (page 12).
Un bip sonore retentit.
c Assurez-vous que vous appliquez les procédures
correctes.
c Voir “Si les indicateurs sont allumés” à la page
suivante.
Si un message d’erreur apparaît.
NO DISK
c Il n’y a pas de disquette dans l’appareil.
Introduisez une disquette dans la fente à disquette.
DISK ERROR
c La disquette utilisée n’est pas formatée ou présente
une anomalie. Formatez la disquette en MS-DOS
(512 bytes x 18 secteurs) à l'aide du Digital Mavica
ou de votre PC.
DISK PROTECT
c Le taquet de protection contre l’écriture de la
disquette utilisée est réglé de façon à empêcher
l’enregistrement. Réglez-le de manière à permettre
l’enregistrement et sauvegardez l’image.
DISK FULL
c Il ne reste plus suffisamment d’espace libre pour
enregistrer l’image. Effacez des images jugées
inutiles ou prenez une autre disquette.
FR
Pour votre information
44
Page 95

Remarque
L’indicateur POWER est
toujours allumé lorsque
l’imprimante est sous
tension.
NO FILE
c Aucune image n'est enregistrée sur la disquette.
Introduisez la disquette sur laquelle les images
sont enregistrées.
FILE ERROR
c L'image sélectionnée est corrompue.
Si les indicateurs sont allumés
Si vous ne parvenez pas à imprimer, vérifiez les
indicateurs sur le panneau frontal.
Indicateur INPUT
Indicateur MEMORY
Indicateur d’appoint de papier
Indicateur d’erreur de ruban
Indicateur d’impression
Indicateur POWER
L’indicateur d’erreur de ruban clignote.
c La cassette d’impression n’est pas chargée.
Introduisez la cassette d’impression (page 13).
c La cassette d’impression est épuisée. Changez de
cassette d’impression (page 14). L’imprimante
redémarrera automatiquement l’impression.
Les indicateurs d’erreur de ruban et d’appoint de
papier clignotent tous les deux.
c La combinaison du papier d’impression et de la
cassette d’impression est inadéquate. Utilisez le
papier d’impression prévu pour la cassette
d’impression que vous employez (page 12).
Si vous utilisez le chargeur automatique en option,
retirez-le de l’imprimante, introduisez-y du papier
d’impression et réinstallez le chargeur sur
l’imprimante.
Pour votre information
Pour votre information
FR
45
Page 96

Dépannage (suite)
Les indicateurs d’appoint de papier et d’impression
clignotent tous les deux.
c Il n’y a pas de papier. Introduisez du papier
d’impression (page 15, 17).
Si vous utilisez le chargeur automatique, retirez-le
de l’imprimante, introduisez-y du papier
d’impression et réinstallez le chargeur sur
l’imprimante.
L’indicateur MEMORY clignote.
c L’imprimante est en train de traiter les données en
vue de l’enregistrement dans la mémoire interne. Il
peut falloir un certain temps avant de pouvoir à
nouveau utiliser l’imprimante.
Les indicateurs d’erreur de ruban, d’appoint de
papier et d’impression sont allumés.
c Bourrage du papier d’impression.
Retirez le papier coincé de la fente d’éjection du
papier à l’arrière.
Tous les indicateurs clignotent.
c Une erreur s’est produite. Mettez l’imprimante
hors tension et puis à nouveau sous tension.
FR
Pour votre information
46
Page 97

Remarques
• Si vous imprimez
depuis l’appareil vidéo,
il se peut que
l’impression ne
reprenne pas
automatiquement
même après que vous
avez retiré le papier
coincé.
Dans ce cas, mettez
l’imprimante hors et
puis à nouveau sous
tension.
Redémarrez ensuite
l’impression depuis
l’appareil vidéo après
avoir à nouveau saisi
l’image voulue.
• Si vous ne pouvez pas
retirer le papier coincé,
consultez votre
revendeur Sony.
En cas de bourrage du papier
d’impression
Lorsque le papier d’impression s’est coincé, les
indicateurs d’erreur de ruban, d’appoint de papier et
d’impression clignotent et l’impression est
interrompue. Mettez l’imprimante hors tension et
retirez le papier coincé.
Retirez le papier coincé de la fente d’éjection du papier
à l’arrière
Papier d’impression
Retirez lentement le
papier coincé.
Retirez le papier coincé du chargeur automatique.
Retirez lentement
le papier coincé.
Pour votre information
Pour votre information
FR
47
Page 98

Fournitures en option (jeux
d’impression)
Il vous faut un jeu de papier d’impression et une
cartouche de ruban encreur en option.
Utilisez l’un des jeux d’impression suivants:
DPM-50STA (papier standard)
Une cassette d’impression permettant d’imprimer
jusqu’à 50 feuilles et deux sets de 25 feuilles de papier
standard
A propos du nombre de tirages
Si vous tentez d'imprimer sur du papier déjà imprimé,
le papier d'impression restera parce que chaque
cartouche d'impression vous permet d'effectuer un
tirage dans le même nombre de papiers d'impression
contenus dans le jeu d'impression.
FR
Pour votre information
48
Page 99

Spécifications
Système d’impression
Pixels réels
Format d’impression
Gradations
Durée d’impression
Connecteurs d’entrée/sortie
Cassette d’impression
Papier d’impression
Puissance de raccordement
Consommation électrique
Température de service
Dimensions (appareil principal)
Masse (appareil principal)
Accessoires fournis
La conception et les spécifications sont sujettes à modifications sans
préavis.
Impression par sublimation du transfert d’encre (3
passages jaune/magenta/cyan)
1.376 (H) x 1.024 (V) points
114 (H) x 85 (V) mm (maximum)
1
/2 x 3 3/8 pouces)
(4
256 niveaux (8 bits) par couleur (24 bits)
Approx. 16.770.000 couleurs
Approx. 100 secondes par feuille
(sauf la durée de traitement des données et de transfert
des données depuis l'appareil vidéo ou la disquette)
Connecteur VIDEO INPUT (entrée) (prise phono x 1)
1 Vcc, 75 ohms (asymétrique), sync négative
Connecteur S VIDEO INPUT (entrée)
(miniconnecteur DIN à 4 broches x 1)
Y: 1 Vcc, 75 ohms (asymétrique), sync négative
C: 0,286 Vcc (séparation des couleurs), 75-ohms
(asymétrique)
Connecteur VIDEO OUTPUT (sortie)
(prise phono x 1)
1 Vcc, 75 ohms (asymétrique), sync négative
Prise REMOTE CAPTURE (prise ministéréo x 1)
Pour l'utilisation avec l'interrupteur au pied en
option FS-20 uniquement
Lecteur de disquette 3.5"
Voir page 45.
5
100 x 140 mm (4 x 5
Voir page 45.
110 - 120 V CA, 50/60 Hz, 0,6 A
72 W (impression)
13 W (mode de veille)
5 à 35 ˚C (41 à 95 ˚F)
Approx. 301 × 83 × 246 mm
(l/h/p, parties saillantes non comprises)
3
/8 × 9 7/8 pouces)
(12 × 3
(Chargeur automatique)
Approx. 149 × 32 × 185 mm
(l/h/p, parties saillantes non comprises)
7
/8 × 1 5/16 × 7 3/8 pouces)
(5
Approx. 3 kg (6 lb 10 oz)
(Chargeur automatique)
Approx. 360 g (13 oz)
Voir page 5.
/8 pouces)
Pour votre information
Pour votre information
FR
49
Page 100

Organigramme des différents
modes d’impression
Impression fractionnée de la même image (page 26, 28)
Impression standard
(page 20, 23)
Impression de la date
(page 38)
Impression d'image
miroir (page 30)
Impression
fractionnée en 4
Impression fractionnée en 2
Impression fractionnée de différentes images (page 26, 28)
Impression
fractionnée en 4
Impression fractionnée en 2
Impression d’une
étiquette pour
disquette
(page 32)
Impression d’index (page 34)
Impression
fractionnée en 16
Impression
fractionnée en 16
FR
Pour votre information
50
 Loading...