

Page 1

Compact Disc
Compact Player
Operating Instructions
About area code
The area code of the player you purchased is shown on upper loft of the bar
code label on the package.
For accessories supplied with your player, check the area code of your model
and refer to "Supplied accessories" toward the end of this manual.
3-862-091-21 (1)
DIGITAL AUDIO
D-E900
D-E905
Sony Corporation ©1998 Printed in Japan
I I
Page 2

Welcome!
Thank you for purchasing the Sony
Compact Disc Compact Player.
Before operating your player, please
read this manual and retain it for
future reference.
About this manual
The instructions in this manual are for tlic
D-E900 and D-E905. Before you start reading,
check your model number.
Owner's Record
The mode! and the serial numbers are located at
the bottom. Record these numbers in the spaces
provided below. Refer to them whenever you
cal) upon your Sony dealer regarding this
product.
Model No.
Serial No._
WARNING
To prevent fire or shock
hazard, do not expose
the unit to rain or
moisture.
To avoid electrical
shock, do not open the
cabinet. Refer servicing
to qualified personnel
only.
CAUTION
The use of optical instruments with this product
will increase eye hazard.
For the customers in the USA
I his et|uipment has been tested and found to
comply with the limits for a Class B digital
device, pursuant to Part 15 of the FCC Rules.
These limits are designed to provide reasonable
protection against harmful interference in a
residential installation. This equipment
generates, uses, and can radiate radio frequency
energy and, if not installed and used in
accordance with the instructions, may cause
harmful interference to radio communications.
However, there is no guarantee that interference
will not occur in a particular installation. If this
equipment does cause harmful interference to
radio or television reception, which can be
determined by turning the equipment off and on,
the user is encouraged to try to correct the
interference by one or more of the following
measures:
- Reorient or relocate the receiving antenna.
- Increa.se the separation between the equipment
and receiver.
- Connect the equipment into an outlet on a
circuit different from that to which the receiver
is connected.
- Consult the dealer or an e.\perienced radio/TV
technician for help.
You arc cautioned that any changes or
modifications not expre.ssly approved in this
manual could \ oid your authoritv to operate this
equipment.
For the customers in Australia
file supply cord of the AC power adaptor cannot
be replaced; it the cord is damaged, the AC
power adaptor should be discarded.
For the customers not in Poland
The ^ mark on the unit is valid only for
products marketed in Poland.
For the customers not in Europe
The CE mark on the unit is valid
€ only for products marketed in the
^ European Union.
For the customers not in Russia
The mark on the unit and package is
valid only for products marketed in Russia.
Page 3
r^rr
•a'* 'I*
itfrtivv . i'lei-i.
Playing a CD right
away!
If you want to play a CD right now, choose to use your player on house
current. Other choices are the following two: rechargeable batteries and
dry batteries (see "Power Sources" on the reverse side).
■
isr: \
'. V №
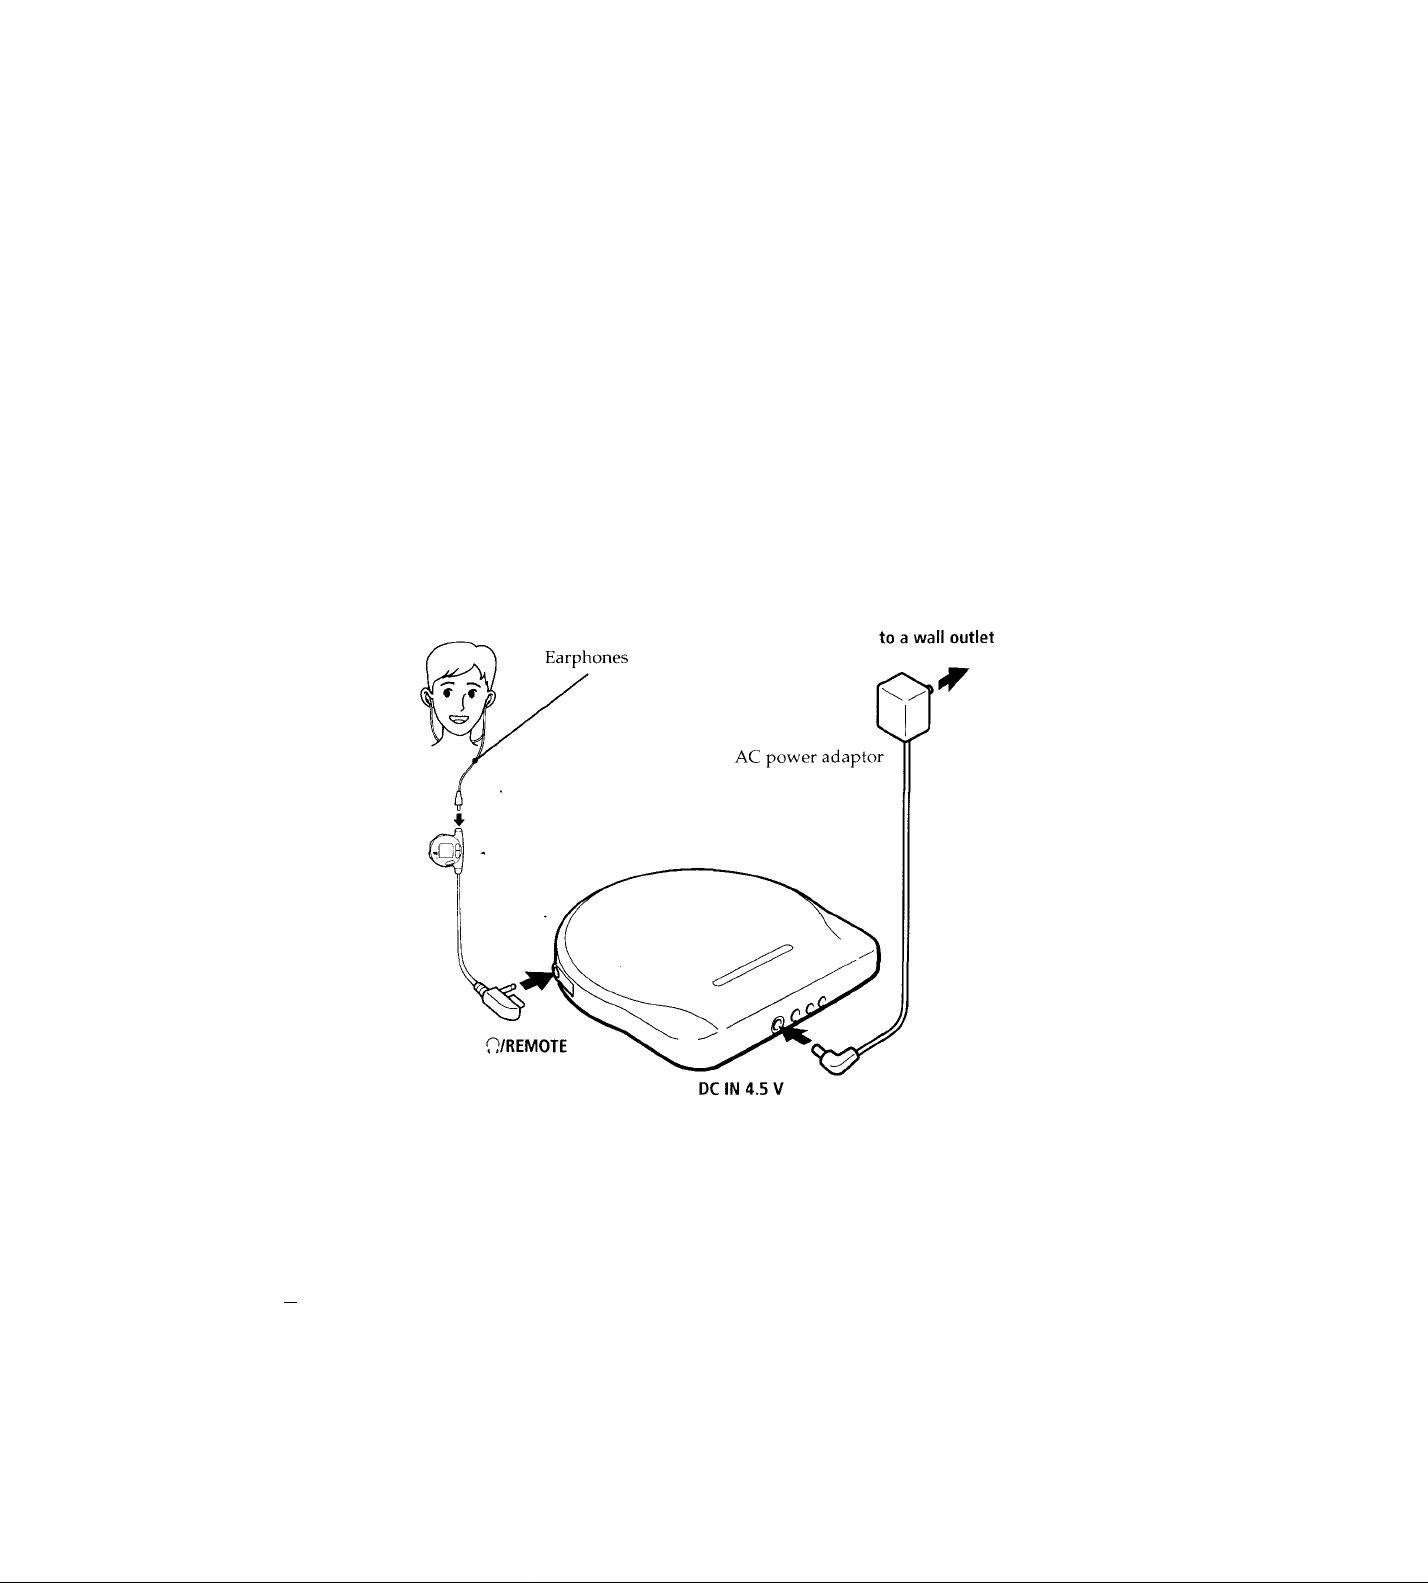
Connect
»1
■
■
i«l
I
■
For models supplied with the AC plug adaptor
If the AC power adaptor does not fit the wall outlet, use the AC plug atlaptor.
For models supplied with the remote control
• Connect the microplug of the earphones to the remote control, not to the D/REMOTE jack
of the player.
• Connect the earphones to the remote control firmly. A loose connection may cause noise
during playback.
Page 4
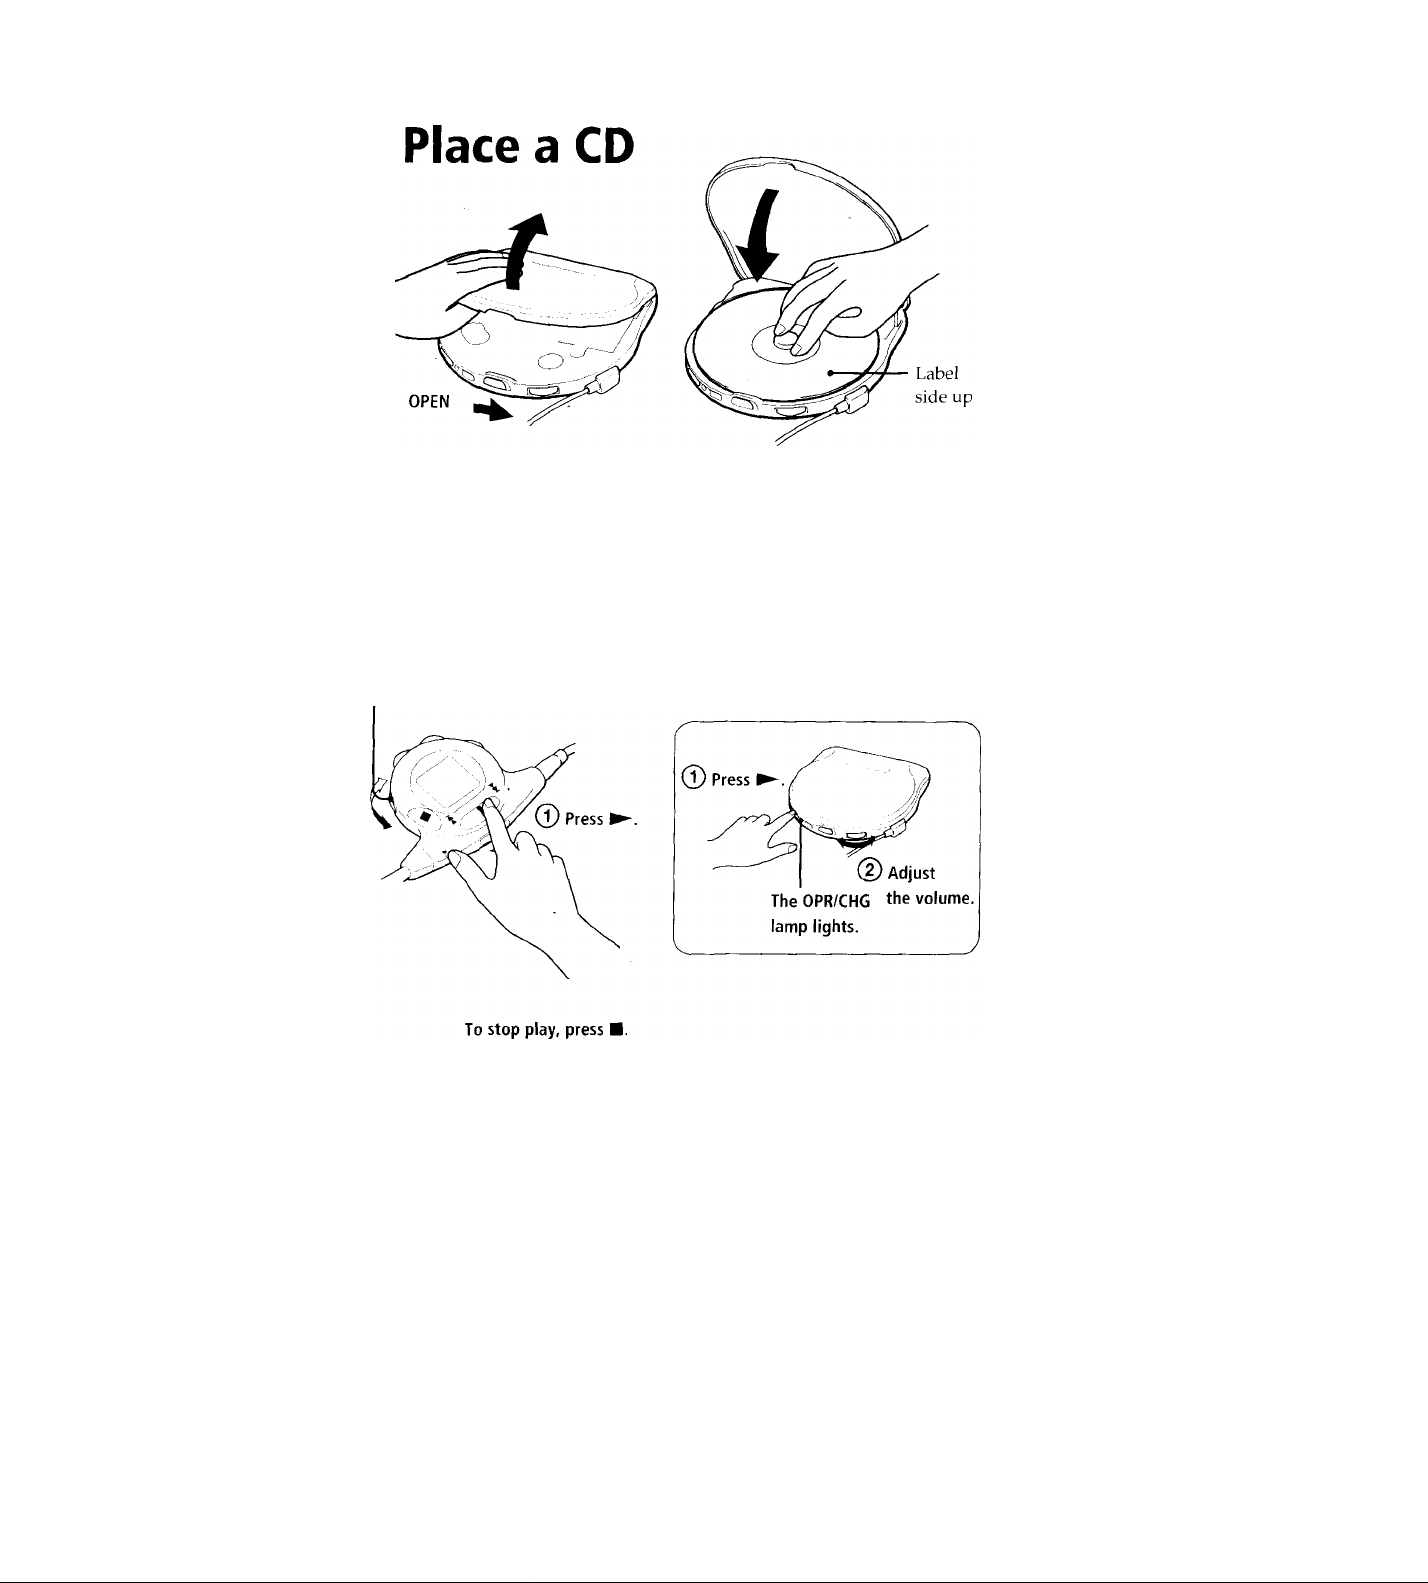
(D Slide OPEN to open the lid.
Play
d) Fit the CD to the pivot.
(3) Close the lid.
(2) Adjust the volume.
Using the player
Page 5
To
Press
Find the beginning
of the current track
(AMS*)
Find the beginning
of previous tracks
(AMS)
Find the beginning
of the next track
(AMS)
Find the beginning
of succeeding
tracks (AMS)
Go forward
quickly
Go backwards
quickly
*AMS = Automatic Music Sensor
«◄sideof ►
once
\« side
repeatedly
►►1 side once
►W side
repeatedly
Hold down
►►1
Hold down
To remove the CD
Remove the CD while pressing the pivot.
Note on controlling the volume with the
remote control
Set the VOL (volume) control on the remote
ccintrol to MAX. Then adjust the volume on
the player to the level that you want to be the
maximum volume of the remote control.
Notes on display
• When you press ► (when RESUME is set
to OFF), the total number of tracks in the CD
and the total playing time appear for about
2 seconds.
• During play, the track number and the
elapsed playing time of the current track
appear.
• Between tracks, the time to the beginning of
the next track will appear with the
indication.
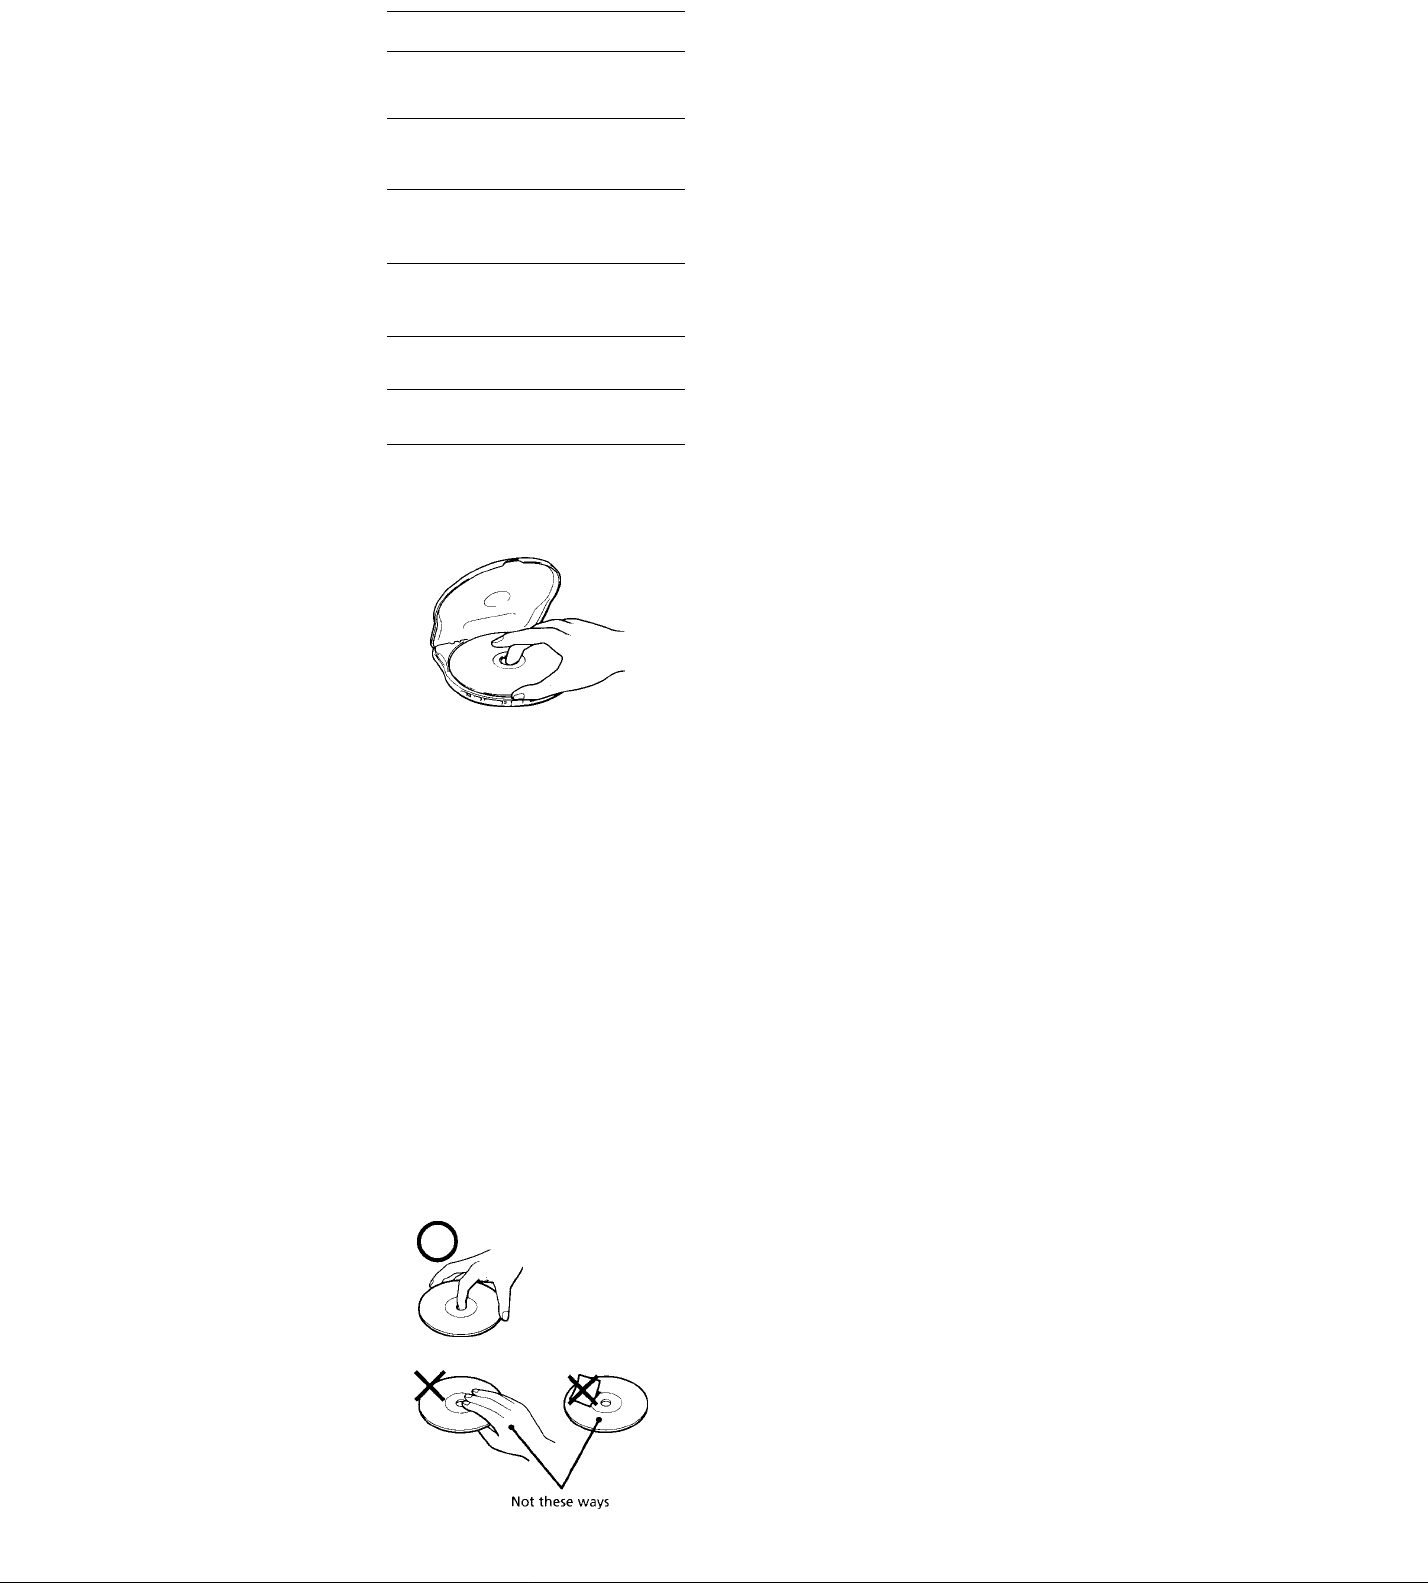
Notes on handling CDs
• To keep the CD clean, handle it by its edge.
Do not touch the surface.
• Do not stick paper or tape onto the CD.
• Do not expose the CD to direct sunlight or
heat sources such as hot air ducts. Do not
leave the CD in a car parked under direct
sunlight.
Page 6
►other Operations
Playing tracks repeatedly
(Repeat Play)
You can play tracks repeatedly in normal,
INTRO PGM and shuffle play modes. Repeat
all the tracks or only one track.
REPEAT/ENTER
To repeat all the tracks
Press REPEAT/ENTER during play.
The " " indication appears.
n (
U I
nn.n
uu-u
To cancel repeat play, press REPEAT/ENTER
again.
To repeat a single track
1 Press REPEAT/ENTER while the track you
want to repeat is playing.
The " Cf " indication appears.
n c
U Ji
n t. in
U !• < I
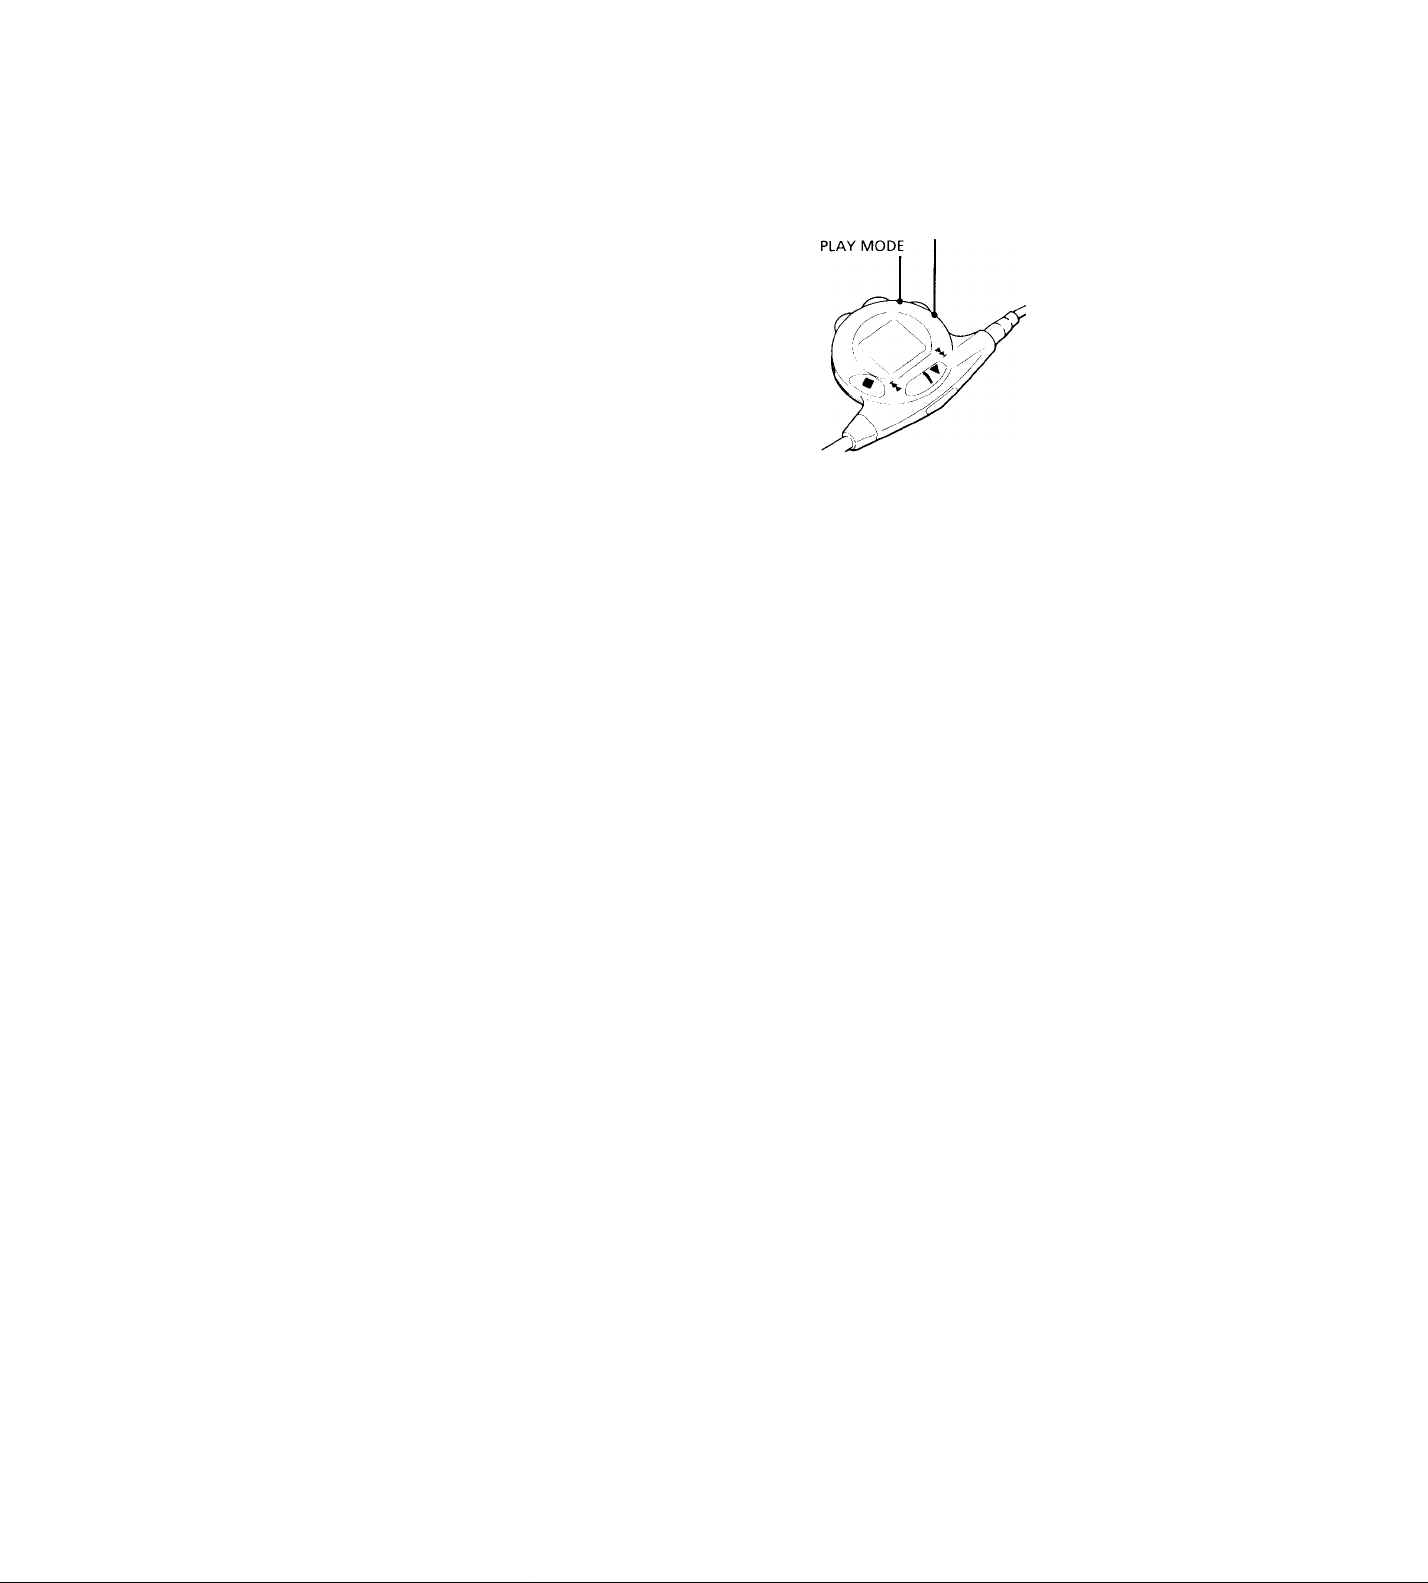
2 Press PLAY MODE repeatedly until "1"
appears.
n c
U JI
n i.jiiz
U I’L J
To repeat another track, press I
side of ►".
To cancel repeat play, press REPEAT/ENTER
again.
Page 7

M
Pfaying only the tracks
you want (INTRO PGM Play)
You am choose and play your favorite tracks
by scanning through the beginning of each
track in a CD.
REPEAT/ENTER
During play, press PI.AY MODH
repeatedly until "INTRO PGM" flashe
Flashing slowly
-INTRO PGM! -
'ft'
fn
i
u
nn.mz
uu u Jl
Page 8

^ I’r'ss Kt'-I’l-.A I /I'.N I (o sl.irt scdnnin^ .
riu- pl.iycr plays about the first 15
suronds of oarh track and "INTRC^ PC.M"
flashes faster,
3 RliPI-A'I /HNl I:R while the tr.u k
you want is playing. To skip the track,
prc'ss side of ► or just wait for the
next track.
After you have g(me through the CD,
"'INTRC^ PCM" stops flashing and the tracks
you have chosen play automatically.
To finish programming before hearing
through the CD, press PLAY MODIT The
tracks you have chosen play automatically.
If you pr(‘ss the program will be erased.
To prevent accidental erasure, set the
RHSUME switch to ON.
To cancel INTRO PGM play, press PLAY
MODE repeatedly until the play mode
indication disappears from the display.
Using other functions
To minimize skipping (ESP^)
The I'SP {Electronic Shock Protection)
function minimize skipping b\ using a InitfcT
memory that stores music data and pla\ s it
back in the event of a shock.
The new ESP’ (ESP Squared) s\’slern uses a
new DSP (Digital Signal Processor) wdiich can
read and store music data more efficienth',
p")roviding a level of continuous skip
protection not found in traditional buffer
memory units. This decreases the frequency
of sound skipping and the need to utilize the
buffer memory. Use this function when
listening in a car or while walking.*
* Although ESP^ provides excellent protectii>n
against skipping, it will not pre\ ent skipping
while jogging or running.
Playing tracks in random
order (Shuffle Play)
You can play the tracks in a CD in random
order.
PLAY MODE
During play, press PLAY MODE repeatedly
until "SHUF" appears.
The tracks play in random order.
To cancel shuffle play, press PLAY MODE
repeatedly until the play mode indication
disappears from the display.
Set ESP to ON.
The ESP indication appears.
To release the ESP function, set ESP to OFF.
Notes
• Playing may stop when the pla)’er gets a strong
shock even with the ESP function on.
• You may hear a noise or .sound skip when:
— listening to a dirty or scratched CD,
— listening to an audio test CD or,
— the player receives continuous shock.
• Sound may drop for a while if you set ESP to
ON during play.
To enjoy more powerful bass sound
You can enjoy a powerful bass-boosted sound.
SOUND
SOUND
Note
• During shuffle play, you cannot return to
previous tracks by pressing K4 side of ►
Press SOUND to select BASS M or
BASS . BASS is more effective.
Note
• If the sound is distorted when emphasizing
bass, turn down the volume.
Page 9

To lock the buttons
You c.in lock your pluycr or ri'iiiotc a^]ltrol
.iguinst cUiv accidr'utul opor<itions.
To avoid accidental operation of the player,
slide HOLD on the player in. the direction of
the arrow.
When you press any button, the HOLD lamp
flashes and you cannot operate the player.
(You can still operate the player with the
remote control.)
To avoid accidental operation of the remote
control, slide HOLD on the remote control in
the direction of the arrow.
When you press any button, "Hoi d" appears
in the display and you cannot operate the
player using the remote control.
(You can still operate the player using the
buttons on the player.)
Connecting to other stereo
equipment
Y(Hi Ccin listen to the C'l) thmii^li other stereo
equipment or record <i CD on d cdssette tape.
Keler to tht' instruclioiT manual oi the (>thi‘r
ek|uipment for details. I5ek>re making
C(.>nnections, turn oft each piece' ot (’quipment.
Stereo system,
cassette recorder,
radio cassette
recorder, etc.
To unlock, slide HOLD back.
To protect your hearing (AVLS)
The AVLS (Automatic Volume Limiter
System) function keeps ciown the maximum
volume to protect your ears.
Set AVLS to LIMIT.
Note
• If you use the SOUND function and the AVLS
function at the same time, sound may be
distorted. If this happens, turn down the
volume.
Notes
• When you use a connecting cord, the' SOUND
function will be disabled.
• before you plav the CD, turn down the v'olume
the connected equipment so as not to
damage the connected speakers.
• The beep sound is not output from the LINT
OUT jack.
• When you connect other equipment to th('
IJNh OUT jack of this pla\'er, adjust the
volume on the connected equipment.
• When you record a CD on a ca.ssette tape using
a tape recorder that has the blank search
function, release the ESP function, if the ESP
function is on, the blank search function does
not work.
Page 10

To resume playing from the point you stopped the CD (Resume Play)
Normally, every time you stop and play,
playing starts from the beginning of the CD.
The resume play function, however, let you
listen to from the point at which you last
turned off the player.
Set RESUME to ON.
To cancel resume play, set RESUME to GEE.
Notes
• Even it RESUME is set to ON, playing starts
from the beginning when you open the lid.
• The resume point may be inaccurate by about
30 seconds.
To turn off the beep
You can turn off the beep that sounds as you
operate your player.
Disconnect the power source (AC power
adaptor, rechargeable battery or alkaline
batteries). While you press and hold down ■,
connect the power source again. To make the
beep sound again, disconnect the power
source, and then connect it without pressing
Page 11

^Power Sources
Using rechargeable
batteries
Charge the rechargeable batteries betöre
using them for the first lime.
Use the NH-I4WM rechargeable batteries
(supplied) or the batteries listed in the
Recommended accessories for this player.
You cannot use any other rechargeable
batteries.
1 Open the lid of the player, and open the
lid of the battery compartment.
Insert two rechargeable batteries by
matching the © and 0 to the diagram
inside the battery compartment and close
the lid. (lie sure to close it firmly, or the
CD may be damaged.) Then close the lid
of the player.
remove the battery, pull
the ribbon.)
Page 12

3 Connect the AC power adaptor.
The OPR/CHG lamp on the player
flashes. Charging time is about 4 hours.
•4. DC IN 4.5 V
AC power
adaptor
to a wall outlet
4 When fully charged, the OPR/CHG lamp
goes out. Then, disconnect the AC power
adaptor.
When to charge the rechargeable batteries
When the rechargeable batteries become
weak, the <Xi indication in the display on the
remote control flashes. When the batteries are
used up, the indication stops flashing and
lights up. Charge the rechargeable batteries.
To keep the original battery capacity for a
long time, recharge the batteries when the
batteries are used up (discharged).
Page 13

Notes
• Charj;ing time varies depending on how the
rechargeable batterN' is used.
• li the battery is new or has not been used for a
long time, it may not be charged completely
until you charge and discharge it several times.
• If the battery life becomes shorter bv about half,
replace it with Sony N1 h9VVM rechargeable
battery. Do not use any other rechargeable
battery.
Using dry batteries
1 Hook the battery case' onto the player and
fasten the screw.
0 Hook
0 Screw
Open the lid of tlie battery case.
3 Insert two LR6 (size AA) alkaline
batteries by matching the © and © to the
diagram inside the battery compartment
and close the lid.
Note
• Do not use manganese batteries for this player.
For extended use
Insert the rechargeable batteries and also
attach the battery case.
For the battery life, see the table below.
When to replace the dry batteries
When the battery becomes weak, the ^
indication in the display on the remote
control flashes. When the ‘CXi indication stops
flashing and lights up, replace all the batteries
with new ones.
Notes
• Do not charge the dry batteries.
• Do not mix new batteries with old ones.
• Do not use different types of batteries together.
• When the batteries are not to be used for a long
time, remove them.
• If the battery leakage occurs, wipe off any
deposit in the battery compartment, and install
now batteries.
Page 14

Battery life (approx, hours) (EIAJ*)
When using ESP function
TwoNH-14WM
off on
9
8
(charged for
about 4 hours“)
Two NH-9WM
7.5
6.5
(charged for
about 4 hours**)
Two Sony alkaline
13 12
batteries LR6SG
Redia rgea b 1 e ba tier) es
24 22
NH-14WM and two
alkaline batteries
Rechargeable batteries
22.5
20.5
NH-9WM and twt>
alkaline batteries
‘Moasurt'd value by the standard ot fdAJ
(I-lectronic Industries Association of Japan)
(When voii use the player on a flat and stable
place.)
"Charging time s,.uie> tlepi'nding on ln>w the
rechargeable batterv Is used
Page 15

^Additional Information
Precautions
On safety
• Should any solid objects or liquid fail into the
player, unplug it and have it checked by
qualified personnel before operating it any
further.
• Do not put any foreign objects in the DC IN
4.5 V (external power input) jack.
On power sources
• When you are not using the player for a long
time, disconnect all power sources from the
player.
• The nameplate indicating operating voltage,
power consumption, etc. is located on the
bottom. (On the AC power adaptor for EA3
only.)
On the AC power adaptor
• Use only the supplied AC power adaptor. If
your player is not supplied with it, use ACE45HG AC power adaptor. Do not use any
other AC power adaptor.
Polarity of the plug
• To unplug the AC power adaptor from the wall
outlet, grasp the adaptor itself, do not pul! its
cord.
On dry and rechargeable batteries
• Do not throw the batteries into fire.
• Do not carry the batteries with coins or other
metallic objects. It can generate heat if the
positive and negative terminals of the battery
are accidentally contacted by a metallic object.
» Do not mix rechargeable batteries with dry
batteries.
)n the player
Keep the lens.on the player clean and do not
touch it. If you do so, the lens may be
damaged and the player will not operate
properly.
Do not put any heavy object on top of the
player. The player and the CD may be
damaged.
Do not leave the player in a location near heat
sources, or in a place subject to direct sunlight,
excessive dust or sand, moisture, rain,
mechanical shock, unleveled surface, or in a car
with its windows closed.
If the player causes interference to the radio or
television reception, turn off the player or move
it away from the radio or television.
Do not wrap the player in a cloth or blanket
Juring use as it may cause malfunction or
ierious accidents.
Page 16

Roaa sarexy
Do not uso luMdphone.s/tMrphoncs vvhili'
driving, cycling, or operating any motorized
vehicle. It may create a traffic hazard and is
illegal in some areas. It can also be potentially
dangerous to play your headsets at high volume
while walking, especially at pedestrian crossings.
You should exercise extreme caution or
discontinue use in potentially hazardous
situations.
Preventing hearing damage
Avoid using headphones/earphones at high
volume. Hearing experts advise against
continuous, loud and extended play. If you
experience a ringing in your ears, reduce volume
or discontinue use.
Caring for others
Keep the volume at a moderate level. This will
allow you to hear outside sounds and to be
considerate to the people around you.
On the remote control
Use only the supplied remote control. You
cannot operate this unit with the remote control
supplied with other models.
Page 17

Maintenance
To clean the lens
C'lo.in tho k-ns w ith a lens cleaning kit KK-I.)M1.
To clean the casing
Use a soft cloth slightly moistened in water or a
mild detergent solution. Do nt>t use alcohol,
benzine or thinner.
Troubleshooting
Should any problem persist after you have made
these checks, consult your nearest Sony dealer.
The CD does not play or "no di SC "
appears in the display though a CD
is placed in the player.
The CD is dirtv or defective.
-> Insert the CD with the label side up.
.Moisture condensation has occurred.
Leave the player aside for several hours
until the moisture evaporates.
-> I he lens is dirty.
Close the lid of the plaver and the battery
compartment firmly.
Make sure the batteries are inserted
correctly.
Connect the AC power adaptor to a wall
(Hitlot securely.
When you press "00" appears in
the display for a moment, and
disappears. The CD does not play.
Rechargeable battery or drv batteries are
used up. Charge the rechargeable batterv
or replace dry batteries with new ones.
No sound, or noise is heard.
Connect the plugs firmly.
Plugs are dirty. Clean the plugs with a dry
soft cloth periodically.
"HI dc I n" appears in the display.
-> Use only the supplied AC power adaptor
or recommended AC pow'er adaptor ACE45HG (not supplied).
HOLD lamp flashes when you press a
button on a player.
The buttons are locked on a^^layer. Slide
hlOLD back.
"Hoi d" appears in the display when
you press a button on the remote
control.
-> The buttons are liTcked on a remote eontrid
Slide HOI.D hack.
The battery life is short.
-> Manganese batteries are used. Use alkaline
batteriv’s.
Replace the batteries with iU‘w ones.
The volume is limited to a certain
level even if you attempt to turn it
up.
■¥ AVl.S selector is set to LIMIT. Vt it
Nt'tRM.
Page 18

Specifications
System
Comp.K l liisc Jigil.i! nueiio
Laser diode properties
M.ilcri.il: C ¡.lAlAs
W.ivoU'figtli: X -- 7S0 nm
L'mission tiuTiition: Continuous
l.asiT (Uif[nit: Loss tlian 44.(-> pW ( I his luitput
is the value measured at a distance oi 2(K) mm
from the objecti\'e lens surface on the optical
pick-up block with 7 mm aperture. )
Error correction
Sony Super Strategy Cross Interleave Reed
S<4omon Code
D-A conversion
1-bit (.ju.irt/ time-axis control
Frequency response
20 - 20,000 11/, *|dB (measured by FJA] CP-
307)
Output (at 4.5 V input level)
Headphones (stereo minijack)
10 mW + 10 mW at 16 ohms
Line output (stereo minijack)
Output level 0.7 V rms at 47 kilohms
Recommended load impedance over 10
kilohms
General
Power requirements
For the area code of the model you purchased,
check the upper left side of the bar code on the
package.
• Two Sony NH-9WM/NH-14WM
rechargeable batteries: 2.4 V DC
• Two FR6 (si/e AA) batteries: 3 V DC
• AC power adaptor (DC IN 4.5 V jack):
U2/CA2/F92 model: 120 V, 60 Hz
CFD/CFF/CFX/FF1/F13 model:
220 - 230 V. 50/60 Hz
CFK model: 230 - 240 V, .50 Hz
|;A3 model: HO - 240 V, 50/60 Hz
AU2 model: 240 V, .50 Hz
JF.W/F33 model: 100 - 240 V, 50/60 I Iz
HK2 model:220 V, 50/60 Hz
CN2 model: 220 V, 50 Hz
Dimensions (w/h/d) (without projecting parts
and controls)
Approx. 131 X 19,4 X 131.7 mm
(5 X -N: X 5 A in.)
Mass (without rechargeable batteries)
Approx. 175 g (6.2 oz)
Operating temperature
5"C-35"C (4rF-95"F)
Supplied accessories
For the area code of the model you purchased,
check the upper left side of the bar code on the
package.
AC power adaptor (1)
Earphones with remote control (1)
Rechargeable batteries (2)
Connecting cord (Phono plug x 2 stereo
minipJug) (1)*’
Battery case (1)
Carrying case (1)
AC plug adaptor (1)*-
Not supplied with CFD, CFK and JE.W
models
Supplied with E13 and JE.W models
Design and specifications are subject to change
without notice.
For US customers
AC power adaptor supplied is not intended to be
serviced. Should the AC power adaptor cease to
function in its intended manner, during the
warranty period, the adaptor should be returned
to youi nearest Sony Service Center or Sony
Authorized Repair Center for replacement, or
after warranty period, it should be discarded.
Page 19

Recommended accessories
Active speaker system SRS-A15, SKS-A35,
SKS-A71, SKS-Tl’
Rechargeable battery N1 byWM
t onnectingcord KK-G129HC, KK-G13hllc;
AC power adaptor AC-F,45i IG
Stereo headphones MDK-A44L, MDK-3()1U’,
MDR-E848LP, MDR-35
When connecting optional headphones to
the supplied remote control
Use only headphones with micro plugs. You
cannot use headphones with stereo mini plugs.
Micro plug
Your dealer may not handle some of the above
listed accessories. Please ask the dealer for
detailed information about the accessories in
your country.
 Loading...