

Page 1
3-864-764-01(1)
コンパクトディスク
コンパクトプレーヤー
取扱説明書
お買い上げいただきありがとうございます。
警告
この取扱説明書と別冊の「安全のために」をよくお読みのうえ、製品
を安全にお使いください。お読みになったあとは、いつでも見られる
ところに必ず保管してください。
電気製品は安全のための注意事項を守らないと、火災
や人身事故になることがあります。
ページ
2
Operating Instructions page 29
D-E707
©1998 by Sony Corporation
Page 2

この取扱説明書に
ついて
この取扱説明書では
国内モデルとワールドモデルについ
て説明しています。
国内モデルとワールドモデルは付属
品に違いがあります。
D-E707
ワールドモデルとは
日本でも海外でも使用できるように
海外、国内の電気事情(電源電圧
AC100〜240V)
パワーアダプターが付属されている
モデルです。
ワールドモデルには、ACプラグア
ダプターが付属されています。
プラグアダプターはACパワーア
AC
ダプターがコンセントと合わない場
合にお使いください。
に合わせた
の日本
AC
主な特長
高音質連続音飛びキャンセ
ラー
従来の
る機能がすぐれ、より音飛びに強く
なっています。
また本機ではさらに高音質化を計
り、付属のヘッドホンを使用してよ
りよい音を楽しめます。
ESP=Electronic Shock Protection
光デジタル出力端子付き
の音をミニディスクレコーダー
CD
などにデジタル録音することができ
ます。
LOOP
演奏中の曲の2地点を選んで、その
間を繰り返し演奏することができま
す。
リモコン表示窓に照明
外部電源(ACパワーアダプター、
カーバッテリー)でお使いになる
と、リモコンの表示窓に照明がつき
ます。
2
ESP
機能よりメモリーを貯え
ESP
(ループ)演奏
あなたが録音したものは、個人
として楽しむなどのほかは、著
作権上、権利者に無断で使用で
きません。
2
Page 3

目次
を聞く.................................................................
CD
のいろいろな聞きかた ........................................
CD
5
9
繰り返し聞く(リピート演奏)...............................................................
聞きたい曲だけを聞く(イントロプログラム演奏)............................
順不同に聞く(シャッフル演奏)........................................................
好きな順に聞く(プログラム演奏).....................................................
いろいろな機能を使う .......................................................................
音飛びを防ぐには(
低音を強調するには(
誤動作を防ぐには(ホールド機能)..............................................
音もれを抑え耳にやさしい音で聞くには(
止めたところからCDを聞くには(リジューム機能)...................
動作の確認音を止めるには .........................................................
ステレオ機器につなぐ .......................................................................
車の中で聞くには ..............................................................................
2
)..........................................................
ESP
SOUND
機能)..........................................
)......................
AVLS
電源 .......................................................................
充電式電池で使う ..............................................................................
乾電池で使う .....................................................................................
次のページに続くm
9
10
11
11
12
12
13
13
14
14
14
15
16
17
17
18
3
Page 4

目次(つづき)
その他....................................................................
使用上のご注意 .................................................................................
お手入れ ............................................................................................
故障かな?と思ったら .......................................................................
主な仕様 ............................................................................................
保証書とアフターサービス ................................................................
各部のなまえ .....................................................................................
English
(英文ダイジェスト)..............................
20
20
22
23
24
26
27
29
4
Page 5
CD
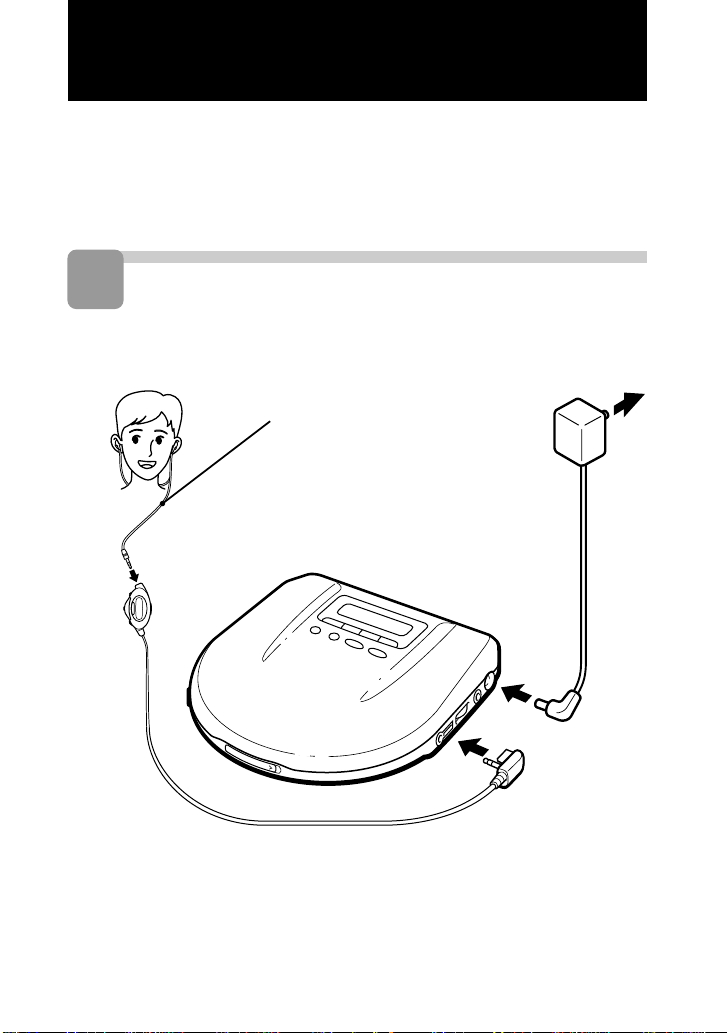
付属のACパワーアダプターを使ってCDを聞いてみましょう。
充電式電池、乾電池(「電源」
こともできます。
1
を聞く
つなぐ
ヘッドホン
A
17〜19
ページ)や車のバッテリーで聞く
コンセントへ
パワーアダプター
AC
(付属)
DC IN 4.5 V
2
/REMOTE
次のページに続くm
へ
へ
5
Page 6
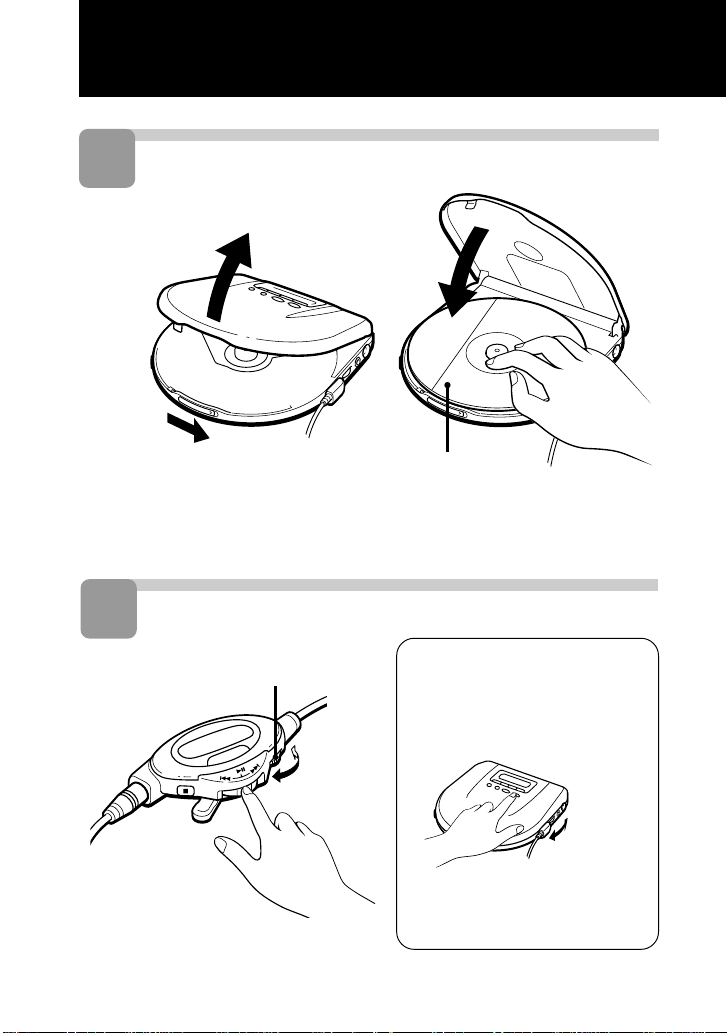
2
を入れる
CD
ラベル面を上に
1
3
1 ジョグレバーの
^を押す。
止めるにはpボタンを押す。
6
つまみをスライド
OPEN
させてふたを開ける。
聞く
2 音量を調節
する。
2
をはめこむ。
CD
3 ふたを閉める。
本体で操作するには
1^ボタンを
押す。
2音量を調節
する。
Page 7

リモコンを使うには
リモコンの=
グレバーになっています。矢印の方
向に押したり、動かしたりすると、
それぞれの操作が始まります。
動かす
+部はジョ
-^-
押す
動かす
RPT/ENT
ENTER
てから、+で最後の曲まで頭出しまた
は早送りし続けると
た、=で1曲目まで頭出しまたは早戻し
し続けると最後の曲になります。
左の表の操作は、本体の同じなまえのボ
タンを使って行なうこともできます。
CD
ボタン(本体では
ボタン)を押して「 」を表示し
REPEAT/
曲目に戻ります。ま
1
を取り出すには
中心の黒い部分を押さえながら、端
のほうからつまみあげます。
操作
一時停止する
一時停止を解除
する
今聞いている曲を
頭出しする
(
機能)
AMS*
前の曲、さらに前の
曲を頭出しする
(
機能)
AMS
次の曲を
(
(サーチ機能)
(サーチ機能)
頭出しする
機能)
AMS
さらに先の曲を頭出
しする(
AMS
早戻しする
早送りする
オートマチックミュージックセンサー
機
能)
リモコンでの操作
ジョグレバーの^
を押す
ジョグレバーの^
を押す
ジョグレバーを
=側に
1
動かす。
**
=側に繰り返し
動かす。
**
+側に
1
動かす。
**
+側に繰り返し
動かす。
**
=側に押したまま
にする。
**
+側に押したまま
にする。
**
*AMSはAutomatic Music Sensor
です。曲の頭を探す機能です。
これらの操作は、演奏中にも一時停止
**
中にもできます。
度
リモコン操作で音量を調節
するには
まずリモコン側の
まみを最大に合わせ、本体の
度
の略
VOLUME
のときの音量を決めます。
ボリューム
VOL(volume)
つ
つまみでリモコンが最大
次のページに続くm
7
Page 8
表示窓について
^ボタンを押すと(
•
イッチが
演奏時間が約2秒間出ます。
演奏中は、演奏中の曲番号とその
•
経過時間が出ます。
曲間には、次の曲が始まるまでの
•
時間が出ます。
一時停止中は、止まった時点の表
•
示が点滅します。
OFF
RESUME
のとき)、総曲数と総
ス
リモコン表示窓の照明につ
いて
外部電源(ACパワーアダプター、
カーバッテリー)でお使いの場合に
は、動作中は常に照明がつき、表示
が見やすくなります。(pボタンを
押してCDが止まると消えます。)
充電式電池または乾電池でお使いの
場合には、操作ボタンを押したあ
と、約5秒間照明がつきます。ただ
し、光デジタルケーブル使用時には
点灯しません。リモコンの
ボタンを押すと、表示窓に約5秒間
照明がつきます。
表示窓の照明がつかないようにする
には、まず、充電式電池または乾電
池を取り出します。それから、本体
の
PLAY MODE
ら、充電式電池や乾電池を入れ直し
ます。
ボタンを押しなが
LIGHT
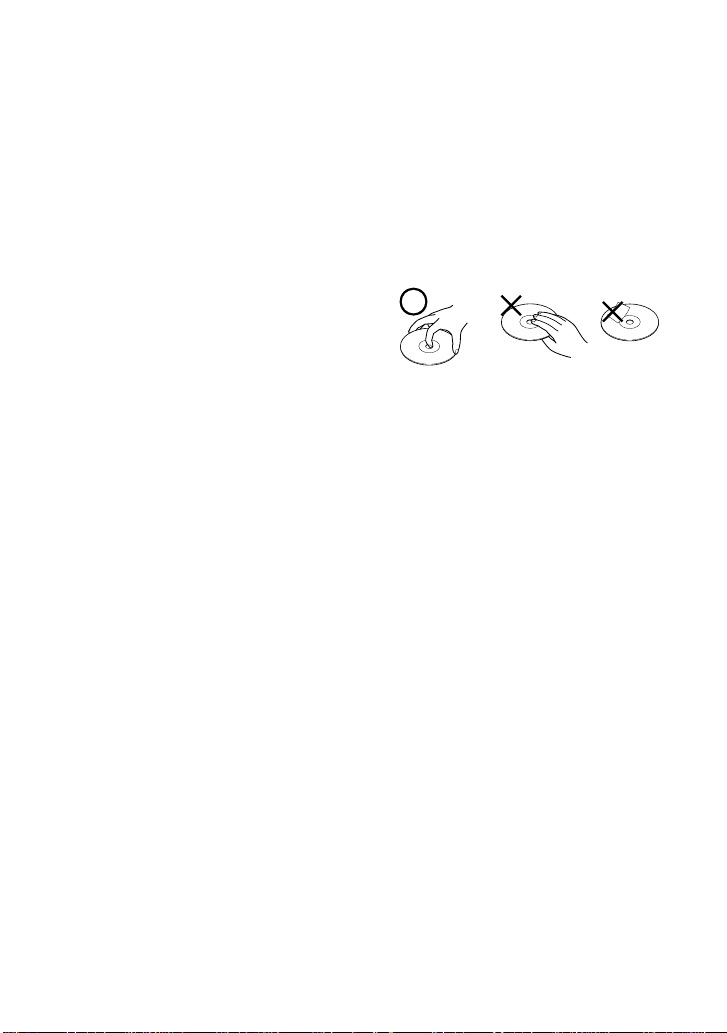
の取り扱いについて
CD
演奏面に手を触れないように持っ
•
てください。
紙やテープを表面に貼らないでく
•
ださい。
直射日光があたるところなど高温
•
の場所や、直射日光下で窓を閉め
切った車の中に放置しないでくだ
さい。
8
Page 9
z
いろいろな聞きかた
繰り返し聞く
(リピート演奏)B
通常の演奏や、イントロプログラム
演奏、シャッフル演奏、プログラム
演奏を繰り返し聞けます。1曲だけ
でも繰り返し演奏できます。
全曲を繰り返すには
演奏中に
ボタン(本体では
(enter)
ボタン)を押します。
ENTER
「 」が出ます。
^
=+
P MODE RPT/ENT
リピート エンター
RPT (repeat)/ENT
REPEAT/
2 「
」が出るまで
1
MODE
MODE
す。
他の曲を繰り返すにはジョグレバー
を=側または+側に動かしま
す。
リピート演奏をやめるには、もう一
度
RPT/ENT
P (play)
ボタン(本体では
ボタン)を繰り返し押
ボタンを押します。
PLAY
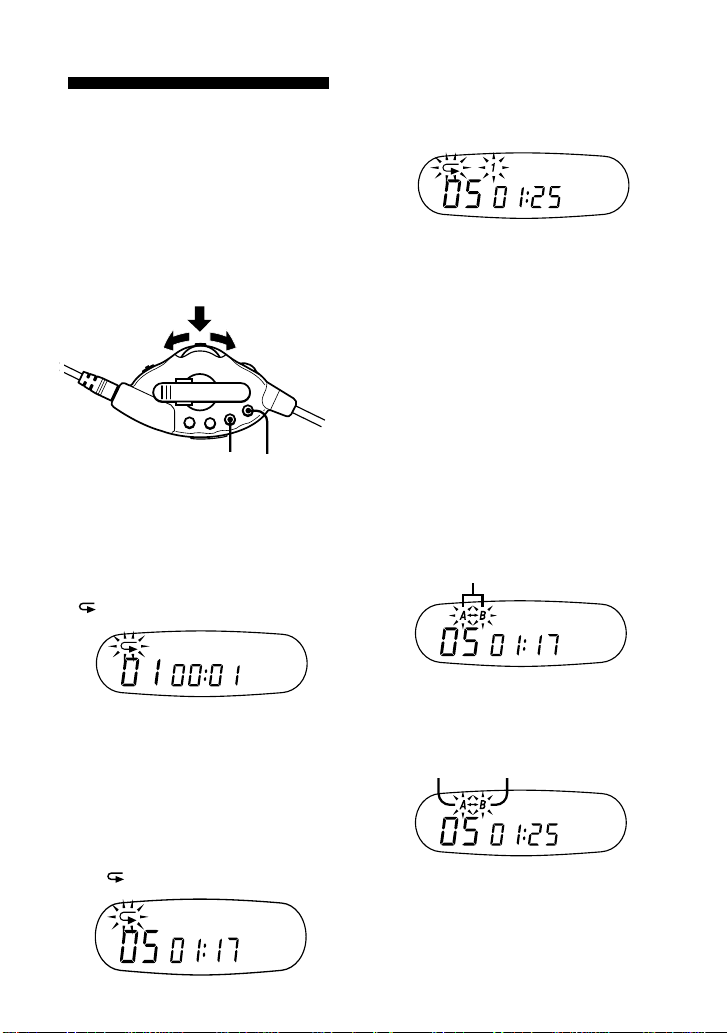
同一曲内の指定した部分を
繰り返すには
(
LOOP
1 演奏中に「
(ループ)演奏)
A˜B
するまで
返し押す。
P MODE
点滅
」表示が点滅
ボタンを繰り
リピート演奏をやめるには、もう一
度
RPT/ENT
曲だけを繰り返すには
1
1 繰り返したい曲の演奏中に
ENT
「 」が出ます。
ボタンを押します。
RPT/
ボタンを押す。
2 繰り返し演奏を始めたいところ
(A点)で
す。
A
RPT/ENT
点滅点灯
点が登録されました。
ボタンを押
次のページに続くm
9
Page 10
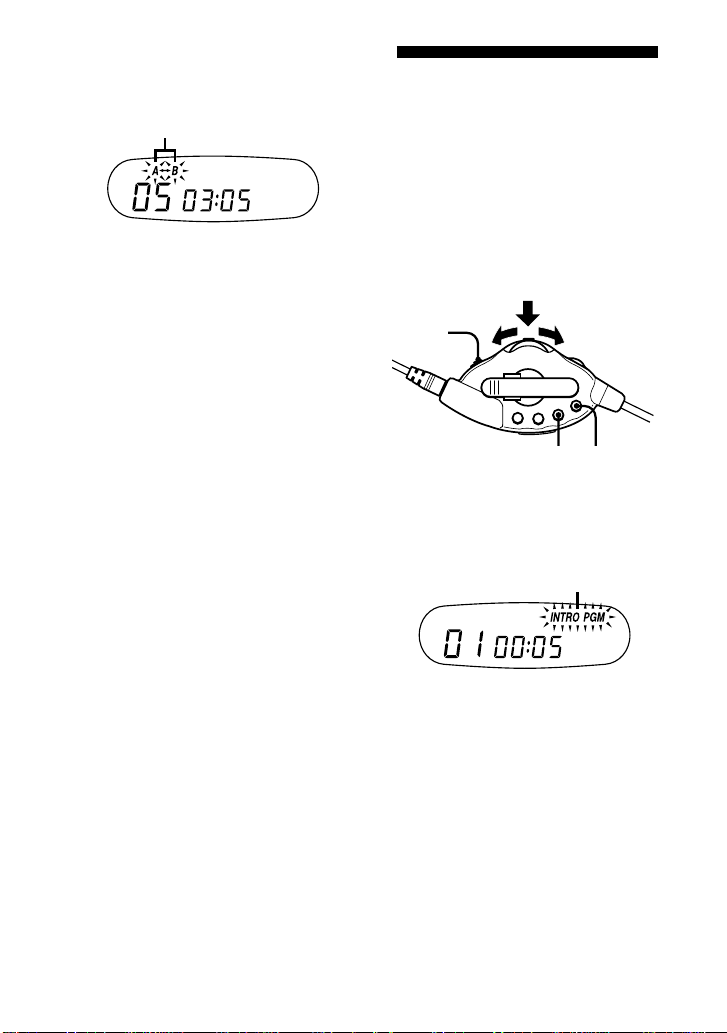
3 繰り返し演奏を終わらせたいと
ころ(B点)で
を押す。
点灯
RPT/ENT
ボタン
聞きたい曲だけを
聞く
(イントロプログラム演奏)
C
点が登録され、A点から演奏が
B
始まります。
登録したA、B点を変更するには、
「
」表示が点滅するまで
A˜B
ボタンを押し続けた後、操作
ENT
を行ないます。
2、3
他の曲で
い場合は、ジョグレバーを+側ま
たは=側に動かして曲を選び直し
た後、操作2、3を行ないます。
pボタンを押すと、登録した地点が
消えてしまいます。消したくないと
きは、本体裏面の
チをONに合わせてください。
(ループ)演奏をやめるに
LOOP
は、「
A˜B
P MODE
す。
(ループ)演奏した
LOOP
RESUME
」表示が消えるまで
ボタンを繰り返し押しま
RPT/
スイッ
曲の最初の15秒をひと通り聞きなが
ら曲を選び、選んだ曲だけを聞けま
す。
p
1
演奏中に「
出るまで
り返し押す。
^
=+
P MODE RPT/ENT
イントロプログラム
INTRO PGM
P MODE
ボタンを繰
ゆっくり点滅
」が
2 ジョグレバーの^を押す。
各曲の最初の15秒を次々に演奏し
ます。「
します。
INTRO PGM
」は速く点滅
10
3 聞きたい曲になったら
ボタンを押す。
ENT
曲が登録されます。聞きたくな
いときは次の曲に移るまで待つ
か、ジョグレバーを+側に動
かします。
RPT/
Page 11
最後の曲の演奏が終わると、
「
INTRO PGM
登録した曲だけが自動的に演奏され
ます。
最後の曲までいかずに登録を終了す
るには、ジョグレバーの^を押し
ます。登録した曲が演奏されます。
」の点滅が止まり、
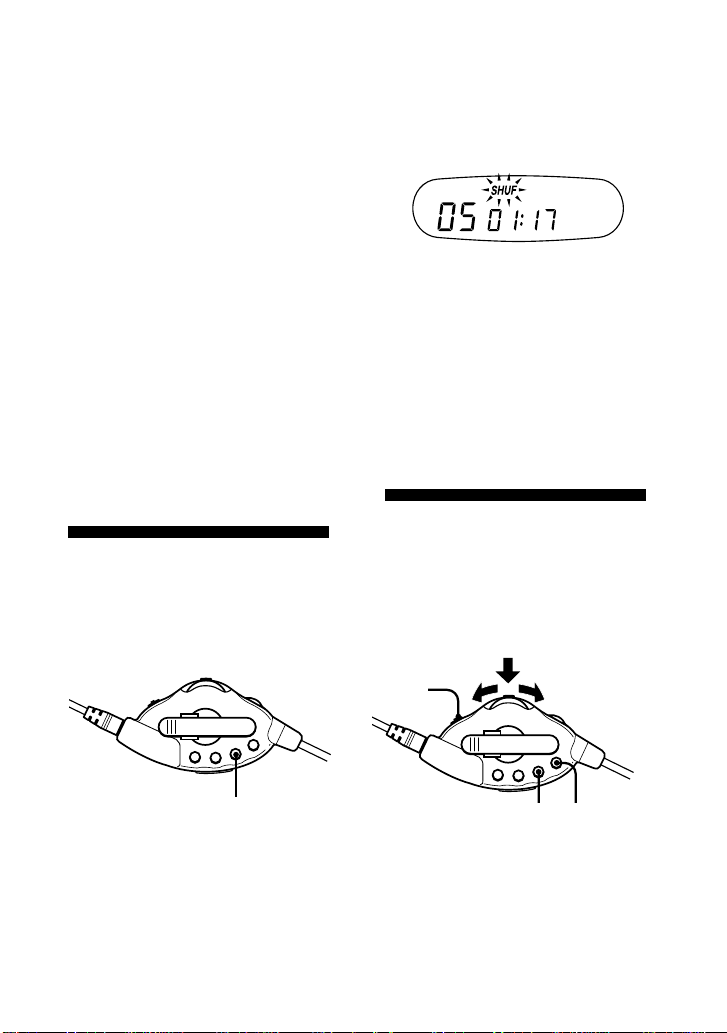
演奏中に「
P MODE
シャッフル
」が出るまで、
SHUF
ボタンを繰り返し押
す。
次の曲から順不同で全曲を1回演奏し
ます。
pボタンを押すと、登録した曲順が
消えてしまいます。消したくないと
きは、本体裏面の
チをONに合わせてください。
イントロプログラム演奏をやめるに
は、演奏モードの表示が消えるまで
P MODE
す。
RESUME
ボタンを繰り返し押しま
スイッ
順不同に聞く
(シャッフル演奏)D
全曲を順不同に聞けます。
P MODE
シャッフル演奏をやめるには、演奏
モードの表示が消えるまで、
ボタンを繰り返し押します。
ご注意
シャッフル演奏中は、ジョグレバーを
•
=側に動かしても前の曲には戻りませ
ん。
P MODE
好きな順に聞く
(プログラム演奏)E
最大22曲まで好きな順に聞けます。
^
=+
p
P MODE RPT/ENT
次のページに続くm
11
Page 12

1
演奏中に「
まで、
返し押す。
*RMSはRandom Music Sensor
略です。
アールエムエス
RMS*
P MODE
点滅
ランダムミュージックセンサー
」が点滅する
ボタンを繰り
2 ジョグレバーを+側または
=側に動かして曲番を選ぶ。
曲番と演奏順が出ます。
曲番 点滅
演奏順
プログラムした曲順を確認す
るには
プログラム中
プログラム演奏中
の
RPT/ENT
と演奏順が表示されます。
ご注意
•22
ぶと、最初にプログラムした内容が消え
て、新しい曲がプログラムされます。
ボタンを押すたびに曲番
曲をプログラムした後さらに曲を選
の操作の前に
5
RPT/ENT
を押します。
「
RMS
るまで
ボタンを繰り返し
押し、点滅したら
RPT/ENT
を押します。
ボタン
」が点滅す
P MODE
ボタン
3
RPT/ENT
4
2、3
選ぶ。
ボタンを押す。
を繰り返して好きな曲順を
5 ジョグレバーの^を押す。
「
」の点滅が止まり、選ん
RMS
だ順に演奏が始まります。
pボタンを押すと、登録した曲順が
消えてしまいます。消したくないと
きは、本体裏面の
チをONに合わせてください。
プログラム演奏をやめるには、演奏
モードの表示が消えるまで、
P MODE
12
RESUME
ボタンを押します。
スイッ
いろいろな機能を
使う
イーエスピースクエアード
音飛びを防ぐには
F
エレクトロニック ショック
ESP(Electronic Shock
プロテクション
Protection)
導体メモリーに貯えておくことによ
り、音飛びを防ぎます。
ESP
リーに貯える機能がすぐれ、より音
飛びに強くなっています。
移動中、歩行中や車の中など振動の
多いところで聞くときは、この機能
を使ってください。
機能はCDのデータを半
2
は、従来の
機能よりメモ
ESP
(ESP2)
Page 13

ESP
切換ボタンを押します。
ESP
「
」が出ます。
ESP
機能を解除するには、もう一度
ESP
ボタンを押します。
ESP
ご注意
強い衝撃が加わると演奏が停止すること
•
があります。
次のような場合、ノイズが出たり、音が飛
•
んだりすることがあります。
— 汚れや傷のあるディスクを聞いてい
るとき
— 特殊な信号が入ったテストディスク
などを聞いているとき
— 本機に連続的に衝撃が加わっている
とき
演奏中に
•
しの間、音がとぎれます。
光デジタルケーブルをお使いの場合は
•
ESP
機能を切り換えると、少
ESP
機能は働きません。
低音を強調するには
(
SOUND
音楽に合わせて、重厚で迫力のある
音で演奏を楽しめます。
サウンド メガベース
SOUND
(Mega Bass)
(Groove)
「
GRV
れます。
ご注意
音がひずむときは、音量を下げてくださ
•
い。
機能)
G
SOUND
ボタンを押して、「
」または「
」を選びます。
」のほうがより低音が強調さ
グルーブ
GRV
MB
誤操作を防ぐには
(ホールド機能)
本機をカバンに入れているときなど、
誤ってボタンが押されるのを防げま
す。(リモコンで操作することはでき
ます。)
H
次のページに続くm
13
Page 14

ホールド
スイッチを矢印の方向へ動か
HOLD
します。
操作ボタンを押しても、「Hold」が
出て動作しません。
ホールド機能を解除するには、
スイッチを矢印と反対の方向
HOLD
へ動かします。
止めたところからCDを聞く
には(リジューム機能)
通常は演奏を止めると、次は1曲目
から演奏されますが、リジューム機
能を使うと、最後に止めたところか
ら演奏されます。
J
音もれを抑え耳にやさしい
音で聞くには
AVLS(Automatic Volume
リミッター システム
Limiter System
音にするために、音量がある一定以
上に上がらないようにします。
スイッチを
AVLS
す。
「
」が出ます。
AVLS
ご注意
•SOUND
音がひずむことがあります。その場合は
音量を下げてください。
エーブイエルエス
オートマチック ボリューム
(AVLS)
)は耳にやさしい
LIMIT
機能と
を同時に使うと、
AVLS
14
I
(裏面)
に合わせま
(裏面)
リジューム
RESUME
ます。
リジューム機能を解除するには、
RESUME
ます。
ご注意
リジューム機能をONにしていても、ふ
•
たを開けると最後に止めたところの記憶
が消え、CDの1曲目から演奏が始まり
ます。
リジューム演奏は、±約30秒の誤差が
•
出ることがあります。
スイッチをONに合わせ
スイッチを
OFF
に合わせ
動作の確認音を止めるには
動作確認のためのピッという音を鳴
らないようにできます。
本体電源(ACパワーアダプター、充
電式電池、乾電池)をはずします。本
体のpボタンを押しながら、再び電
源を接続します。
再び確認音が鳴るようにするには、
本体電源をはずし、pボタンを押さ
ずに本体電源を接続します。
Page 15

ステレオ機器につ
なぐK
他のステレオ機器でCDを聞いた
り、テープやミニディスクに録音で
きます。詳しくは、接続する機器の
取扱説明書をご覧ください。接続す
る機器の電源を必ず切ってから接続
してください。
LINE OUT
(OPTICAL)
ご注意
を聞く前に、つないだ機器の音量を
•CD
下げてください。思わぬ大音量が出て、
スピーカーを破損するおそれがありま
す。
「ピッ」という操作音は
•
(OPTICAL)
せん。
ジャックからは出力されま
•LINE OUT (OPTICAL)
ケーブルを接続しているときには、つな
いだ機器で音量を調節してください。
ブランクサーチ(無音部検出)機能のあ
•
るカセットデッキなどで録音するとき
は、
機能を切ってください。ブラ
ESP
ンクサーチ機能が働かなくなります。
録音するときは、ACパワーアダプター
•
をお使いください。充電式電池や乾電池
を使うと録音途中で電池を消耗すること
があります。
LINE OUT
ジャックに
光デジタル
ケーブル
接続コード
RK-G129
(別売り)
POC-5B
(別売り)
ポータブルミニ
ディスクレコー
ダーや
キなど
**
ステレオシステム、
デッ
DAT
*LINE INやREC IN
をつなぐときは、別売りの接続コード
RK-G134
します。
**
5AB
を使って
角型ジャック付き機器の場合は
(別売り)をお使いください。
カセットデッキ、
ラジオカセット
レコーダーなど
ジャックのない機器
ジャックに接続
MIC
(白)
L
(赤)
R
POC-
接続コードをお使いの場合
•SOUND
機能は働きません。
*
光デジタルケーブルをお使いの
場合
MD、DAT
等への録音は、下記のよ
うに行なってください。
1CD側の^ボタンを押す。
(
PLAY
する)
2 もう一度^ボタンを押す。(一時
停止する)
3 =または+ボタンを押して、
録音したい曲にする。
4MD、
等の録音ボタンを押
DAT
す。
5CD側の^ボタンを押して一時
停止を解除する。
次のページに続くm
15
Page 16

ご注意
光デジタルケーブルの接続はCDプレー
•
ヤーが停止している状態で行ってくださ
い。
側を一時停止せずに録音を行うと、
•CD
ディスクによっては
しく録音されないことがあります。
•SOUND
機能は2
らの出力には働きますが、
(OPTICAL)
ん。
機能は働きません。
•ESP
曲目の曲番が、正
1
/REMOTE
ジャックか
LINE OUT
からの出力には働きませ
車の中で聞くには
本機をカーカセットデッキにつなぐ
と、車の中でCDを聞くことができ
ます。
本機ではカーマウントプレートはお
使いになれません。車の中でお聞き
になるときは、運転の妨げにならな
い安全な場所にしっかりと固定して
ください。
本機をカーカセットデッキにつなぐ
には、次のカーアクセサリーが必要
です。
カーバッテリーコード
•
とカーコネクティングパッ
E245
ク
CPA-8/CPA-9
くわしくは各製品の取扱説明書をご
覧ください。
DCC-
ご注意
本機をダッシュボードの上に置かないで
•
ください。
本機を直射日光の当たる車の中に置かな
•
いでください。
雑音を減らすためソニーのカーコネク
•
ティングパックを使うことをおすすめし
ます。
カーバッテリーコードは、別売りアクセ
•
サリーに記載されているものをお使いく
ださい。これ以外のものをお使いになる
と、発煙・発火ならびに故障の原因にな
ります。
イグニッション連動オフ機能
(カーバッテリーコードでお使いの
場合)
充電式電池や乾電池が入っていて
も、車のエンジンを切る(イグニッ
ションキーを
にする)と、本機
OFF
は自動的に停止状態になります。
(車種によってはこの機能が働かな
いことがあります。)
16
Page 17

z
電源
充電式電池で使う
L
初めてお使いになるときは、充電式
電池を充電してください。
充電式電池は
をお使いください。これ以外の充電
式電池は使えません。
NH-DM2AA
1 電池入れのふたを開ける。
2 充電式電池
電池入れの‘’の表示に合わ
せて入れ、ふたを閉める。
NH-DM2AA2
(付属)
(裏面)
本を
3
下の絵のように付属の
パワーアダプターをつなぎ、約
時間充電する。
4
充電中は「
(すでに充電が完了している場合
は、「
す。)
CHG
」と が点滅しま
CHG
電源コンセントへ
AC
」が出ます。
DC IN
4.5 V
パワー
AC
アダプター
(付属)
へ
4 充電し終わって「
えたら、
をはずす。
パワーアダプター
AC
次のページに続くm
CHG
」が消
17
Page 18

充電式電池を取り出すには
電池入れのふたの裏側の絵、または
下の絵に合わせて、正しく取り出し
てください。
充電の目安
充電式電池が消耗すると が表示
され、その後「Lo ba 」が表示さ
れます。充電式電池を充電してくだ
さい。
充電式電池を長持ちさせるために、
充電式電池は消耗してから充電して
ください。
充電式電池を持ち運ぶとき
は
付属のバッテリーキャリングケース
をお使いください。
金属性のものと一緒に携帯すると
ショートして、発熱、発火する場合
があります。
ご注意
充電時間は充電式電池の使用状態により
•
異なります。
初めて充電するときや長時間使用しなか
•
った後では、充電しても通常の持続時間
より短いことがあります。何回か充放電
をすると通常の状態に戻ります。
充電後、常温で使える時間の半分くらい
•
で電池がなくなってしまうときは、新し
い充電式電池
ください。これ以外の充電式電池は使え
ません。
付属の充電式電池は本機専用ですので、
•
他の製品には使えません。
NH-DM2AA
と交換して
乾電池で使うM
充電式電池と同じ方法で正しく入れ
てください。
1
パワーアダプターを取りは
AC
ずし、電池入れのふたを開け
る。
2 単
形アルカリ乾電池2本(別
3
売り)を電池入れの‘’の表示
に合わせて入れ、ふたを閉め
る。
18
Page 19

ご注意
本機には、マンガン電池はお使いになれ
•
ません。
乾電池を取り出すには
充電式電池と同じ方法で正しく取り
出してください。
電池交換の目安
電池が消耗すると が表示され、
その後「Lo ba 」が表示されま
す。2本とも新しい乾電池と交換し
てください。
乾電池の取り扱いについて
液漏れや破裂を防ぐため次のことをお守
りください。
•新しいものと古いもの、または違う種類
のものを混用しないでください。
•充電しないでください。
•
長い間使わないときは、出しておいてく
ださい。
•万一、液漏れしたときは、よく拭き取っ
てから、新しい電池に入れ換えてくださ
い。
電池の持続時間(水平に置き、
振動のない状態で演奏した場合;光
デジタルケーブルをつないでない場
合)
(EIAJ*)
が
ESP
のときONのとき
OFF
NH-DM2AA約13
(約
時間
4
充電**)
アルカリ 約
乾電池
LR6SG 2
*EIAJ
づいています。
**
り異なります。
本
(日本電子工業会)の測定方法に基
充電時間は充電式電池の使用状態によ
時間 約12時間
時間 約21時間
23
ESP
が
19
Page 20

z
その他
使用上のご注意
安全のために
本機に使われているレーザー光が
•
目にあたると危険です。絶対にプ
レーヤーを分解したりしないでく
ださい。
万一、異物が中に入ったときは、
•
電源を切り、お買い上げ店または
ソニーサービス窓口にご相談くだ
さい。
• DC IN 4.5 V(
クには異物を入れないでくださ
い。
電源について
本機を使用しないときは、すべて
•
の電源をはずしておいてくださ
い。
パワーアダプターにつ
AC
いて
付属のACパワーアダプターまた
•
は
AC-E45L/AC-E45MA
り、国内用)
り、海外用)をご使用ください。
これ以外のACパワーアダプター
を使用すると、故障の原因となる
ことがあります。
外部電源)ジャッ
(別売
/AC-E45HG
(別売
充電式電池と乾電池につい
て
本機は、安全確保のため一般の充電式
電池や乾電池は充電できない構造にな
っています。
専用充電式電池
一般の乾電池、充電式電池
お買い求めの際は、必ず専用の充電式
電池をお求めください。
専用充電式電池:
組)
詳しくは、お求めの販売店でご確認く
ださい。
電池を火の中に入れないでくださ
•
い。
発熱、発火などのおそれがあります
•
ので、充電式電池や乾電池の‘端子
と’端子を金属で接続しないでくだ
さい。(金属性のボールペン、ネッ
クレス、コイン、ヘアーピンなどと
一緒に携帯、保管はしないでくださ
い。)
乾電池と充電式電池の併用はしな
•
いでください。
NH-DM2AA(2
本
極性統一形
プラグ
電源コンセントから抜くときは、
•
必ずACパワーアダプターを持っ
て抜いてください。
20
Page 21

本機の取り扱いについて
ディスクテーブルのレンズには指
•
を触れないでください。また、ホ
コリがつかないように、ディスク
の出し入れ以外はふたを必ず閉じ
ておいてください。
落としたり重いものを乗せたりし
•
ないでください。本機に強いショ
ックを与えたり、圧力をかけたり
しないでください。
ディスクに傷がついたり、本機の
故障の原因となることがありま
す。
次のような場所に置かないでくだ
•
さい。
— 直射日光があたる場所や暖房器
具の近くなど温度が非常に高
いところ。
— ダッシュボードや直射日光下で
窓を閉め切った自動車内(特に
夏季)。
— 磁石やスピーカー、テレビのす
ぐそばなど磁気を帯びたとこ
ろ。
— ホコリの多いところ。
— ぐらついた台の上や傾いたとこ
ろ。
— 振動の多いところ。
— 風呂場など、湿気の多いとこ
ろ。
ラジオやテレビの音に雑音が入る
•
ときは、本機の電源を切って、ラ
ジオやテレビから離してくださ
い。
パワーアダプターでご使用中
•AC
は、本機を絶対に布などでくるま
ないでください。本機の内部およ
び外部の温度が上がり、思わぬ結
果が発生することがあります。
ディスクの取り扱いについ
て
本機では円形ディスクのみお使い
•
いただけます。円形以外の特殊な
形状(星型、ハート型など)をし
たディスクを使用すると、本機の
故障の原因となることがありま
す。
ヘッドホンで聞くときのご
注意
交通安全のために
•
自転車やバイク、自動車などの運
転中は、ヘッドホンは絶対に使わ
ないでください。歩行中でも音量
を上げすぎるとまわりの音が聞こ
えなくなり危険です。とくに、踏
切や横断歩道では充分にご注意く
ださい。
耳を守るために
•
耳を刺激するような大きな音量で
長時間続けて聞くと、聴力に悪い
影響を与えることがあります。耳
を守るため、音量を上げすぎない
ように注意しましょう。
まわりの人のことを考えて
•
ヘッドホンは、音量を上げすぎる
と音が外にもれます。音量を上げ
すぎて、まわりの人の迷惑になら
ないように気をつけましょう。
雑音の多い所では、音量を上げてし
まいがちですが、ヘッドホンで聞く
ときはいつも呼びかけられて返事が
できるくらいの音量を目安にしてく
ださい。
次のページに続くm
21
Page 22

別売りのヘッドホンで付属
のリモコンを使う場合は
アラカルトヘッドホン(ステレオミ
ニプラグ)をお使いください。マイク
ロプラグのものは使えません。
お手入れ
レンズの汚れは
レンズクリーニングキット
別売り)を使ってクリーニン
DM1(
グしてください。
KK-
ステレオ
ミニプラグ
マイクロ
プラグ
リモコンについて
付属のリモコンでは他のCDコンパ
クトプレーヤーを操作できないこと
があります。また、他機種に付属の
リモコンでは本機の操作はできませ
ん。
レンズ
キャビネットの汚れは
柔らかい布で空ぶきします。汚れが
ひどいときは、うすい中性洗剤溶液
でしめらせた布でふいてください。
シンナー、ベンジン、アルコールな
どは表面の仕上げをいためますので
使わないでください。
22
Page 23

故障かな?と思っ
たら
サービス窓口にご相談になる前にも
う1度チェックしてみてください。
それでも具合が悪いときはお買い上
げ店またはソニーサービス窓口にご
相談ください。
演奏が始まらない。または、
ディスクを入れても「no
dlSC」が出る。
b
ディスクが汚れている、または大
きな傷がある。大きな傷がある場
合は、ディスクを取り換える。
b
ディスクのラベル面を上にして入
れる。
b
結露している。ディスクを取り出
して、そのまま数時間置く。
b
レンズが汚れている。
b
本体、電池入れのふたをしっかり
閉める。
b
充電式電池と乾電池を正しく入れ
る。
b
パワーアダプターをコンセント
AC
にしっかり差し込む。
ジョグレバーの^を押す
と、「
消える。演奏が始まらない。
ボリュームを最大にしても
音量が小さすぎる。
」が一瞬表示されて
00
b
電池の残量がない。充電式電池は充
電する。乾電池はすべて新しいもの
に取り換える。
b
スイッチが
AVLS
る。
NORM
b
LINE OUT
つないでいる。2
クにつなぐ。
にする。
ジャックにヘッドホンを
になってい
LIMIT
/ROMOTE
ジャッ
音が出ない、または雑音が聞こ
える。
b
プラグをしっかり差し込む。
b
プラグの先が汚れている。乾いた
柔らかい布でクリーニングする。
「Hl dc ln」表示が出て
いる。
b
付属のACパワーアダプターか別売
パワーアダプター
りの
AC
AC-
E45L/AC-E45MA/AC-E45HG
使う。
b
カーバッテリーコードは、別売りア
クセサリーに記載されているものを
使う。
ボタンを押すと「Hold」が
出る。
b
状態になっている。
HOLD
スイッチを矢印と逆の方向にずら
し、
機能を解除する。
HOLD
HOLD
ボタンを押すと「Lo
ba 」が出る。
b
充電式電池が消耗している。
パワーアダプターを接続し、充電式
電池を充電する。
b
新しい乾電池と取り換える。
AC
乾電池使用時の演奏時間が短
い。
b
マンガン乾電池を使用している。
アルカリ乾電池を使う。
b
新しい乾電池と取り換える。
デジタル録音時に曲番が正
しく録音されない。
b
または
MD
しく入れ直す。
b
ステレオ機器につなぐKの項の録
音手順で録音する。
などの機器側で正
DAT
を
23
Page 24

主な仕様
型式
コンパクトディスクデジタルオー
ディオシステム
取り込み方式
非接触光学式読み取り
(半導体レーザー使用)
レーザー
ダブルヘテロダイオー
GaAIAs
ド
λ=
780 nm
回転数
約
500 rpm〜200 rpm(ESP
時)
OFF
約
1000 rpm〜350 rpm(ESP
時)
ON
エラー訂正方式
ソニースーパーストラテジー
(クロスインターリーブリードソロ
モンコード)
復号化(
周波数特性
ワウ•フラッター
出力端子(電源電圧
)
D/A
クォーツ時間軸制御
1 bit
20 Hz〜20,000 Hz +1 dB*
測定限界以下
ライン出力(ステレオミニジャック)
個
1
最大出力レベル
(
Ω)
47 k
推奨負荷インピーダンス
Ω以上
10 k
ヘッドホン出力(ステレオミニ
ジャック)
個
1
最大出力レベル
*
4.5 V
–
時)
0.7 Vrms
15 mW+15 mW
(
EIAJ/16
推奨負荷インピーダンス
Ω)
光デジタル出力(光ミニジャック)
個
1
最大出力レベル
–21〜–15 dBm
発光波長
*
日本電子機械工業会(
る測定値です。
630 〜 690 nm
)規格によ
EIAJ
電源•その他
電源
充電式ニッケル水素電池
•
DM2AA
本(付 属):
2
単3形アルカリ乾電池2本(別 売
•
り):
DC 2.4 V
DC 3.0 V
外部電源ジャック 定格
•
パワーアダプター(付属)を接
AC
続して
AC 100V
ワールドモデルは
電源から使用可能
240 V
カーバッテリーコード(別売り)を
接続して自動車バッテリーから使
用可能
本体寸法
約
131.8 × 23.9. × 142.0 mm
2
(幅/高さ/奥行き、最大突起部含まず、
奥行きは傾斜部含まず)
最大外形寸法
約
131.8 × 25.3 × 142.3 mm
(幅/高さ/奥行き)
質量
本体 約
200 g
ご使用時 約
ィスク、リモコン付きヘッドホンを含
む)
310 g
動作温度
5°C〜35°C
Ω
16
NH-
DC 4.5 V
電源から使用可能
〜
AC 100
(充電式電池、デ
24
Page 25

付属品
パワーアダプター
AC
充電式電池
リモコン付きヘッドホン
キャリングケース
バッテリーキャリングケース
取扱説明書
サービス窓口•ご相談窓口のご案内
保証書
仕様および外観は、改良のため予告なく
変更することがありますが、ご了承くだ
さい。
(2)
(1)
(1)
(1)
(1)
(
1)
(1)
(1)
別売りアクセサリー
国内のみ販売
パワーアダプター
AC
AC-E45L
AC-E45MA
カーコネクティングパック
接続コード
カーバッテリーコード付きカーコネ
クティングパック
国内、海外で販売
アクティブスピーカー
RK-G129、RK-G134
CPA-83U
SRS-A21
SRS-A41、SRS-A71
光デジタルケーブル
POC-5B
POC-10B、POC-15B、POC-
、
POC-10AB、POC-15AB
5AB
カーバッテリーコード
ヘッドホン
MDR-35、MDR-
DCC-E245
E848LP
充電式電池
海外でのみ販売
AC
カーコネクティングパック
接続コード
カーバッテリーコード付きカーコネ
クティングパック
NH-DM2AA
パワーアダプター
RK-G129HG
DCC-E26CP
AC-E45HG
、
CPA-8
、
CPA-9
製品上の
国で販売されるもののみに有
効です。
、
マークはEU加盟
CE
国によって扱っているアクセサリーが違
います。詳しくはお買い上げ店、サービ
ス窓口、海外ソニーサービス特約店にご
相談ください。
25
Page 26

保証書と
アフターサービス
保証書
・この製品には保証書が添付されていま
すので、お買い上げの際お受け取りく
ださい。
・所定事項の記入および記載内容をお確
かめのうえ、大切に保存してくださ
い。
・保証期間は、お買い上げ日より1年間
です。
アフターサービス
調子が悪いときはまずチェックを
この説明書をもう一度ご覧になってお調
べください。
それでも具合が悪いときはサービスへ
お買い上げ店、または添付の「ソニーご相
談窓口のご案内」にあるお近くのソニー
サービス窓口にご相談ください。
保証期間中の修理は
保証書の記載内容に基づいて修理させて
いただきます。詳しくは保証書をご覧く
ださい。
保証期間経過後の修理は
修理によって機能が維持できる場合は、
ご要望により有料修理させていただきま
す。
部品の保有期間について
当社では、CDコンパクトプレーヤーの
補修用性能部品(製品の機能を維持する
ために必要な部品)を、製造打ち切り後
年間保有しています。この部品保
最低
8
有期間を修理可能の期間とさせていただ
きます。保有期間が経過した後も、故障
箇所によっては修理可能の場合がありま
すので、お買い上げ店かサービス窓口に
ご相談ください。
ワールドモデルをお買
い上げのお客様へ
海外での保証とアフタ
ーサービスについて
• 保証期間は、日本国内では
お買い上げ日より1年間、海
外では90日です。
• 海外での修理やアフター
サービスについてご不明な
点は、保証書に記載の海外
ソ ニーサービス特約店にお
問い合わせください。
26
Page 27

各部のなまえN
( )内のページに詳しい説明があります。
本 体
1 表示窓
2
3
4 =/+
5
6
7 p (停止)ボタン
8 ^ (演奏/一時
(8-14)
プレイ モード
PLAY MODE
ボタン
(9-12)
イーエスピー
ボタン
ESP*
エーエムエス
サーチ)
(AMS**/
ボタン
(7)
ホールド
スイッチ
HOLD
(13)
オープン
つまみ
OPEN
(6)
停止)ボタン
(6、7)
(12)
(6)
リピート エンター
9
REPEAT/ENTER
ボタン
(9-12)
サウンド
!º
エーブイエルエス
!¡
AVLS***
スイッチ(裏面)
!™
!£
ボタン
SOUND
(快適音量)
リジューム
RESUME
(裏面)
(14)
ディーシーイン
DC IN 4.5V
電源入力)ジャック
(5)
ライン アウト
!¢
LINE OUT
オプティカル
(OPTICAL)
出力(光デジタル))
ジャック
ボリューム
!∞
VOLUME
節)つまみ
リモート
!§ 2
/REMOTE
(ヘッドホン/リモ
ジャック
コン)
(13)
(14)
スイッチ
(外部
(ライン
(15)
(音量調
(6)
(5)
*
**
***
エレクトロニック ショック プロテクション
ESPはElectronic Shock Protection
オートマチック ミュージック センサー
AMSはAutomatic Music Sensor
曲の頭出しをして選曲する方法です。
オートマチック ボリューム リミッター システム
の略です。
AVLSはAutomatic Volume Limiter System
の略です。
の略です。
次のページに続くm
27
Page 28

各部のなまえ(つづき)
リモコン
(表面)
6 p (停止)ボタン
(裏面)
リピート エンター
7
RPT (repeat)/ENT (enter)
ボタン
(9-12)
ホールド
1
HOLD
(13)
(6)
5 ジョグレバー
^:演奏
=/+:
プレイ モード
8
P (play) MODE
ボタン
(9-12)
9
スイッチ
2 表示窓
一時停止
/
エーエムエス
AMS/
サウンド
SOUND
(8-14)
ボリューム
4
VOL (volume)
調節)つまみ
(6、7)
サーチ
ボタン
(13)
(7)
3
!º
ライト
LIGHT
(音量
(6)
イーエスピー
ESP
ボタン
ボタン
(8)
(12)
28
!¡ クリップ
回して角度を変えることができます。
Page 29

English
As you read, refer to the illustrations
in the Japanese corresponding text
(labeled with A, B, etc.).
zDisc Playing
Playing a CD right
away! A
If you want to play a CD right now,
choose to use your player on house
current. Other choices are the
following three: rechargeable battery,
dry batteries (see "Power Sources") and
car battery.
To use the remote control
The lever marked with =-^-+
is the jog lever. When you press or
slide the lever, operation starts.
To Do this
Pause
Resume play after
pause
Find the beginning of
the current track
(AMS*)
Press the jog
lever toward
^
Press the jog
lever toward
^
Slide the jog
lever toward
=once**
1 Make connections.
Connect the supplied earphones
with remote control to the
2/REMOTE jack firmly. Also
connect the supplied AC power
adaptor to the DC IN 4.5 V jack of
your player and a wall outlet. If
the AC power adaptor does not fit
the wall outlet, use the AC plug
adaptor.
2 Place a CD.
1 Slide OPEN to open the lid.
2 Fit the CD to the pivot with
the label side up.
3 Close the lid.
3 Play a CD.
1 Press the jog lever toward ^.
(Press ^ on the player.)
2 Adjust the volume.
To stop play, press p.
Find the beginning of
the previous tracks
(AMS)
Find the beginning of
the next track (AMS)
Find the beginning of
the succeeding tracks
(AMS)
Go forward quickly
Go backwards
quickly
*AMS = Automatic Music Sensor
**These operations are possible during
both play and pause.
Slide the jog
lever toward
=
repeatedly**
Slide the jog
lever toward
+ once**
Slide the jog
lever toward
+
repeatedly**
Slide and hold
the jog lever
toward +**
Slide and hold
the jog lever
toward =**
29
Page 30

If you press RPT/ENT (REPEAT/
ENTER on the player) to display “ ”,
you can locate the tracks continuously
in the following order :
• When using +: next track n
next track ...... last track n first
track n second track ......
• When using =: previous track n
previous track ...... first track n last
track n second to last track ......
You can do the operations shown in
the table on page 29 by using the
buttons with the same marks on the
player.
To remove the CD
Remove the CD while pressing the
pivot.
Notes on controlling the
volume with the remote
control
Set the VOL (volume) control on the
remote control to the maximum. Then
adjust the volume on the player to the
level that you want to be the
maximum volume of the remote
control.
Notes on display
• When you press ^ (when
RESUME is set to OFF), the total
number of the tracks in the CD and
the total playing time appear for 2
seconds.
• During play, the track number and
the elapsed playing time of the
current track appear.
• Between the tracks, the time to the
beginning of the next track will
appear with the “–” indication.
• During pause, the elapsed playing
time of the current point flashes.
Illumination of the display on
the remote cotrol
When using the player on the AC
power adaptor or car battery, the
display is always illuminated. (Light of
the display goes out when you press p
and the CD stops.)
When you use the player on the
rechargeable batteries or alkaline
batteries, the display is illuminated for
about 5 seconds when you press any
operation button on the player. But,
when using the optical digital
connecting cord, the display is not
illuminated. When you press the
LIGHT button on the remote control,
the display is illuminated for about 5
seconds.
You can turn off the illumination of the
display by first removing the
rechargeable battery or alkaline
batteries; then while pressing the
PLAY MODE button, reinsert the
batteries.
Notes on Handling CDs
• To keep the CD clean, handle it by
its edge. Do not touch the surface.
• Do not stick paper or tape onto the
CD.
• Do not expose the CD to direct
sunlight or heat sources such as hot
air ducts. Do not leave the CD in a
car parked in direct sunlight.
Playing tracks
repeatedly (Repeat
Play) B
You can play track repeatedly in
normal, INTRO PGM, shuffle or RMS
(Random Music Sensor) play modes.
Repeat all the tracks or only one track.
30
To repeat all the tracks
Press RPT/ENT (REPEAT/ENTER on
the player) during play.
“ ” appears.
To cancel repeat play, press RPT/ENT
again.
Page 31

To repeat a single track
1 Press RPT/ENT while the track you
want to repeat is playing.
“ ” appears.
2 Press P (play) MODE (PLAY MODE
on the player) repeatedly until “1”
appears.
To repeat another track, slide the jog
lever toward = or + .
To cancel repeat play, press RPT/ENT
again.
To repeat the specified part
within the same track
(LOOP Play)
1 During play, press P MODE
repeatedly until “A˜B” flashes in
the display.
2 Press RPT/ENT to set the point
(point A) where you want to start
repeat play.
Point A is stored in the memory.
3 Press RPT/ENT again to set the
point (point B) where you want to
stop repeat play.
Point B is stored in the memory, and
repeat play starts from point A.
To change points A and B, press and
hold RPT/ENT until “A˜B” flashes
in the display, then do steps 2 and 3
again.
To set points A and B on other tracks,
slide the jog lever toward = or +
to select another track, then do steps 2
and 3 again.
If you press p, the stored points will
be erased. To prevent accidental
erasure, set the RESUME switch at the
rear of the player to ON.
Playing only the
tracks you want
(INTRO PGM Play) C
You can choose and play your favorite
tracks by scanning through the
beginning of each track in a CD.
1 During play, press P MODE
repeatedly until “INTRO
PGM”flashes.
2 Slide the jog lever toward ^ to
start scanning.
The player plays about the first 15
seconds of each track and “INTRO
PGM” flashes faster.
3 Press RPT/ENT while the track
you want is playing. To skip the
track, slide the jog lever toward
+ or just wait for the next track.
After you have gone through the CD,
“INTRO PGM” stops flashing and the
tracks you have chosen play
automatically.
To finish programming before going
through the CD, press the jog lever
toward ^. The selected tracks will be
played.
If you press p, the program will be
erased. To prevent accidental erasure,
set the RESUME switch at the rear of
the player to ON.
To cancel INTRO PGM play, press
P MODE until the play mode
indication disappears from the display.
To cancel repeat play, press P MODE
until “A˜B” disappears from the
display.
31
Page 32

Playing tracks in
random order (Shuffle
Play) D
You can play the tracks on a CD in
random order.
During play, press P MODE
repeatedly, until “SHUF” appears.
The tracks play in random order.
To cancel shuffle play, press P MODE
repeatedly until the play mode
indication disappears from the display.
Playing tracks in the
order you want (RMS
play) E
You can program up to 22 tracks to
play in any order you choose.
1 During play, press P MODE
repeatedly until “RMS*” flashes.
*RMS = Random Music Sensor
2 Slide the jog lever toward = or
+ to choose a track.
The track number and the playing
order appear.
3 Press RPT/ENT to program the
track.
4 Repeat steps 2 and 3 to program
the remaining tracks.
5 Press the jog lever toward ^ .
“RMS” stops flashing and the
tracks you have chosen play in the
order you specified.
If you press p, the program will be
erased. To prevent accidental erasure,
set the RESUME switch at the rear of
the player to ON.
To cancel RMS play, press P MODE
until “RMS” disappears.
To check the program
During programming:
Press RPT/ENT before step 5.
During RMS play:
Press P MODE repeatedly until
“RMS” flashes, then press RPT/
ENT.
Each time you press the button, the
track numbers appear in the order you
specified.
Using other functions
To minimize skipping (ESP2) F
The ESP (Electronic Shock Protection)
function minimize skipping by using a
buffer memory that stores music data
and plays it back in the event of a
shock.
The new ESP2 (ESP Squared) system
uses a new DSP (Digital Signal
Processor) which can read and store
music data more efficiently, providing
a level of continuous skip protection
not found in traditional buffer memory
units. This decreases the frequency of
sound skipping and the need to utilize
the buffer memory. Use this function
when listening in a car or while
walking.*
* Although ESP2 provides excellent
protection against skipping, it will not
prevent skipping while jogging or
running.
Press ESP.
The ESP indication appears.
To release the ESP function, press ESP
again.
32
Page 33

To enjoy more powerful bass
sound G
You can enjoy a powerful bass-boosted
sound.
Press SOUND to select
MB (Mega Bass) or GRV (Groove).
GRV is more effective.
To lock the buttons H
You can lock your player against any
accidental operations. (You can still
operate the player with the remote
control.)
Slide HOLD in the direction of arrow.
When you press any button, “Hold”
appears in the display.
To unlock, slide HOLD back.
To protect your hearing (AVLS)
I
The AVLS (Automatic Volume Limiter
System) function keeps down the
maximum volume to protect your ears.
Set AVLS to LIMIT.
The AVLS indication appears.
To resume playing from the
point you stopped the CD
(Resume Play) J
Normally, every time you stop and
play, playing starts from the beginning
of the CD. The resume play function,
however, lets you listen to from the
point at which you last turned off the
player.
Set RESUME to ON.
To cancel resume play, set RESUME to
OFF.
To turn off the beep
You can turn off the beep that sounds
as you operate your player.
Disconnect the power source (AC
power adaptor, rechargeable batteries
or alkaline batteries). While you press
and hold down p on the player,
connect the power source again. To
make the beep sound again, disconnect
the power source, and then connect it
without pressing p.
Connecting to other stereo
equipment K
You can listen to the CD through other
stereo equipment, or record a CD on a
cassette tape or a MiniDisc. Refer to
the instruction manual of the other
equipment for details. Before making
connections, turn off each piece of
equipment.
When you connect the player to a
stereo system, cassette recorder, radio
cassette recorder, etc., use the
connecting cord.
Note
When you use a connecting cord, the
SOUND function will be disabled.
When you connect the player to a
MiniDisc recorder, DAT deck, etc., use
the optical digital connecting cord.
Recording with optical digital
connection
Record a CD on a MiniDisc, DAT, etc.,
according to the following procedure.
1 Press ^ on the player to start play.
2 Press ^ again to pause.
3 Press =/+ to select the track
you want to record.
4 Press r (record) on the MiniDisc
recorder, DAT recorder, etc.
5 Press ^ on the player to release
pause.
33
Page 34

Notes
•Connect the optical digital connecting
cord while the player is in stop mode.
•If you record without pausing the
player, some CD may have problem
with recording the first track number
correctly.
•SOUND function works on output from
the 2/REMOTE jack, but does not work
on optical digital output from the LINE
OUT (OPTICAL) jack.
•When you use an optical digital
connecting cord, the ESP function will
be disabled.
Playing a CD in a car
You can use your player in a car by
connecting it to the car cassette deck.
You cannot use the car mount plate for
this player.
When you use the player in a car,
install it securely in a location which
does not interfere your driving.
To connect your player to a car cassette
deck, you need the following
accessories:
• Car battery cord DCC-E245 and Car
connecting pack CPA-8/CPA-9
Refer to the instruction manual of each
accessory for details.
zPower Sources
Using rechargeable
batteries L
Charge the rechargeable batteries
before using them for the first time.
You can use the NH-DM2AA
rechargeable battery for this player.
You cannot use any other rechargeable
batteries.
1 Open the lid of the battery
compartment.
2 Insert two rechargeable batteries
by matching the ‘ and ’ to the
diagram inside the battery
compartment and close the lid.
3 Connect the AC power adaptor.
The indication “CHG” lights up.
Charge for about 4 hours.
(When the battery has been
already charged, “CHG” and
flash.)
4 When fully charged, “CHG”
disappears. Disconnect the AC
power adaptor.
Switched ignition function
(when using the car battery
cord)
With this feature, your player stops
automatically when you turn off the
engine of the car. (This function is not
possible with some cars depending on
the model.)
34
To take out the rechargeable
batteries
Take out the batteries in the proper
way as illustrated inside the lid.
When to charge the batteries
When the batteries become weak,
indication appears in the display. If
“Lo ba ” appears in the display,
charge the rechargeable batteries,
because the batteries are used up.
To keep the original battery capacity
for a long time, recharge the batteries
when the batteries are used up
(discharged).
Page 35

When carrying the
rechargeable battery
Make sure to use the battery carrying
case (supplied to the rechargeable
battery).
If you carry the rechargeable battery
with a metal object, short circuit,
smoke, fire or malfunction may occur.
Notes
•This player is designed so that it cannot
charge any other rechargeable batteries
or dry batteries for safety reasons.
•Charging time varies depending on how
the rechargeable battery is used.
•If the battery is new or has not been
used for a long time, it may not be
charged completely until you charge
and discharge it several times.
•If the battery life becomes shorter by
about half, replace it with Sony NHDM2AA rechargeable battery. Do not
use any other rechargeable battery.
•The supplied rechargeable batteries are
only for this player. You cannot use
them for other models.
Using dry batteries M
Insert the batteries properly in the same
way as the rechargeable batteries.
1 Disconnect the AC power adaptor
and open the lid of the battery
compartment.
2 Insert two LR6 (size AA) alkaline
batteries by matching the ‘ and ’
to the diagram inside the battery
compartment and close the lid.
When to replace the dry
batteries
When the battery becomes weak,
indication appears in the display. If the
battery is used up, “Lo ba ”
appears in the display. Replace all the
batteries with new ones.
Notes
•Do not charge the dry batteries.
•Do not mix new batteries with old ones.
•Do not mix rechargeable batteries with
dry batteries.
•Do not use different types of batteries
together.
•When the batteries are not to be used for
a long time, remove them.
•If the battery leakage occurs, wipe off
any deposit in the battery compartment,
and install new batteries.
Battery life (approx. hours)
(EIAJ*)
When using ESP function
on off
NH-DM2AA 12 13
(charged for
about 4 hours**)
Two alkaline batteries 21 23
LR6SG
*Measured value by the standard of EIAJ
(Electronic Industries Association of
Japan).
(When you use the player on a flat and
stable place; When you do not use the
optical digital connecting cord)
**Charging time varies depending on
how the rechargeable battery is used.
Note
•Do not use manganese batteries for this
player.
To take out the dry batteries
Take out the batteries properly in the
same way as the rechargeable
batteries.
35
Page 36

Parts identification N
Main unit
1 Display
2 PLAY MODE button
3 ESP* button
4 =/+ (AMS**/search) buttons
5 HOLD switch
6 OPEN switch
7 p (stop) button
8 ^ (play/pause) button
9 REPEAT/ENTER button
!º SOUND button
!¡ AVLS*** switch (rear)
!™ RESUME swich (rear)
!£ DC IN 4.5 V jack (external power
intput jack)
!¢ LINE OUT (OPTICAL) jack
!∞ VOLUME control
!§ 2 (headphones)/REMOTE jack
*Electronic Shock Protection
**Automatic Music Sensor
***Automatic Volume Limiter System
Remote control
1 HOLD switch
2 Display
3 LIGHT button
4 VOL (volume) control
5 Jog lever
^: play/pause
=/+: AMS/search
6 p (stop) button
7 RPT (repeat)/ENT (enter) button
8 P (play) MODE button
9 SOUND button
!º ESP button
!¡ Clip
You can turn and change the angle
of the clip.
ソニー株式会社
お問い合わせはお客様ご相談センターへ
●東京(03)5448-3311 ●名古屋(052)232-2611 ●大阪(06)539-5111
「
Sony online
トロニクスとエンターテインメントのホームページです。
〒
141-0001
東京都品川区北品川6-7-35
」は、インターネット上のソニーのエレク
Printed in Malaysia
36
 Loading...