

Page 1
Digital Video Camera Recorder
Operating Guide
2-597-462-11 (1)
© 2005 Sony Corporation
Recording/
Playback
Getting Started
16
30
Enjoying your
DVD Handycam
10
Playback on DVD devices
40
Using the recorded disc
46
Using the Setup items
48
Editing on DVD Handycam
66
Dubbing
72
Using a Computer
75
Troubleshooting
80
Additional Information
97
Easy
Handycam
25
DCR-DVD7
Page 2
2
Read this first
Before operating the unit, please read this
manual thoroughly, and retain it for future
reference.
WARNING
To prevent fire or shock hazard,
do not expose the unit to rain or
moisture.
This symbol is intended to
alert the user to the presence
of uninsulated “dangerous
voltage” within the product’s
enclosure that may be of
sufficient magnitude to
constitute a risk of electric
shock to persons.
This symbol is intended to
alert the user to the presence
of important operating and
maintenance (servicing)
instructions in the literature
accompanying the appliance.
CAUTION
The use of optical instruments with this
product will increase eye hazard. Use of
controls or adjustments or performance
of procedures other than those specified
herein may result in hazardous radiation
exposure.
For customers in the U.S.A. and
CANADA
RECYCLING LITHIUM-ION BATTERIES
Lithium-Ion batteries are
recyclable. You can help preserve
our environment by returning
your used rechargeable batteries
to the collection and recycling
location nearest you.
For more information regarding recycling of
rechargeable batteries, call toll free 1-800-8228837, or visit http://www.rbrc.org/
Caution: Do not handle damaged or leaking
Lithium-Ion batteries.
Owner’s Record
The model and serial numbers are located on the
bottom. Record the serial number in the space
provided below. Refer to these numbers whenever
you call upon your Sony dealer regarding this
product.
Model No. DCR-DVD7
Serial No.
Model No. AC-
Serial No.
For customers in the U.S.A.
If you have any questions about this product, you
may call:
Sony Customer Information Center
1-800-222-SONY (7669).
The number below is for the FCC related matters
only.
Page 3

3
Regulatory Information
Declaration of Conformity
Declaration of Conformity
Trade Name: SONY
Model No.: DCR-DVD7
Responsible Party: Sony Electronics Inc.
Address: 16450 W. Bernardo Dr, San Diego, CA
92127 U.S.A.
Telephone No.: 858-942-2230
This device complies with Part 15 of the FCC
Rules. Operation is subject to the following
two conditions: (1) This device may not cause
harmful interference, and (2) this device must
accept any interference received, including
interference that may cause undesired operation.
CAUTION
You are cautioned that any changes or
modifications not expressly approved in this
manual could void your authority to operate this
equipment.
Note
This equipment has been tested and found to
comply with the limits for a Class B digital
device, pursuant to Part 15 of the FCC Rules.
These limits are designed to provide reasonable
protection against harmful interference in a
residential installation.
This equipment generates, uses, and can radiate
radio frequency energy and, if not installed
and used in accordance with the instructions,
may cause harmful interference to radio
communications. However, there is no guarantee
that interference will not occur in a particular
installation. If this equipment does cause harmful
interference to radio or television reception,
which can be determined by turning the
equipment off and on, the user is encouraged to
try to correct the interference by one or more of
the following measures:
– Reorient or relocate the receiving antenna.
– Increase the separation between the equipment
and receiver.
– Connect the equipment into an outlet on a
circuit different from that to which the receiver
is connected.
– Consult the dealer or an experienced radio/TV
technician for help.
The supplied interface cable must be used with
the equipment in order to comply with the limits
for a digital device pursuant to Subpart B of Part
15 of FCC Rules.
Notes on use
Your camcorder is supplied with 2
kinds of operations guides.
– “Operating guide” (This manual)
– “First Step Guide” for using the supplied
software (stored on the supplied CD-ROM)
On using the camcorder
•
Do not hold the camcorder by the
following parts.
Battery cover
Disc cover
•
When you operate your camcorder placed
on a table or so, make sure it is so stable
that there is no risk that the camcorder
may fall down. Using the supplied stand
(p. 16) is recommended.
•
To prevent discs from being broken or
recorded pictures from being lost, do
not do the following when either of the
respective lamps of the POWER switch
(p. 20) or the ACCESS lamp (p. 23) is on:
− to remove the battery pack or AC
Adaptor from the camcorder.
− to apply mechanical shock or vibration
to the camcorder.
Page 4

4
•
Before connecting your camcorder to
another device with a USB cable etc.,
be sure to insert the connector plug in
the proper direction. If you insert the
connector plug forcibly in the wrong
direction, the terminal may be damaged,
or this may cause a malfunction of your
camcorder.
Notes on the Setup items, LCD screen
and lens
•
A setup item that is grayed out is not
available under the current recording or
playback conditions.
•
The LCD screen is manufactured using
extremely high-precision technology, so
over 99.99% of the pixels are operational
for effective use. However, there may
be some tiny black points and/or bright
points (white, red, blue, or green in color)
that appear constantly on the LCD screen.
These points are normal.
•
Exposing the LCD screen or the lens to
direct sunlight for long periods of time
may cause malfunctions. Be careful when
placing the camera near a window or
outdoors.
•
If you apply mechanical shock to around
the lens or shake the camcorder back and
forth, the picture may be distorted for a
moment.
•
Do not aim at the sun. Doing so might
cause your camcorder to malfunction.
Take pictures of the sun only in low light
conditions, such as at dusk.
On recording
•
Before starting to record, test the
recording function to make sure the
picture and sound are recorded without
any problems. You cannot delete images
once you record them on a DVD-R. Use
a DVD-RW/DVD+RW (not supplied) for
trial recording (p.13).
•
Compensation for the contents of
recordings cannot be provided, even if
recording or playback is not possible
Read this first (continued)
due to a malfunction of the camcorder,
storage media, etc.
•
TV color systems differ depending on
the countries/regions. To view your
recordings on a TV, you need an NTSC
system-based TV.
•
Television programs, films, video tapes,
and other materials may be copyrighted.
Unauthorized recording of such materials
may be contrary to the copyright laws.
You cannot dub copyright protected
software on your camcorder.
On this manual
•
The images of the LCD screen used on this
manual are captured using a digital still
camera, and thus may appear different from
what you see.
•
The on-screen displays in each local
language are used for illustrating the
operating procedures. Change the screen
language before using your camcorder if
necessary (p.63).
About the Carl Zeiss lens
Your camcorder is equipped with a Carl
Zeiss lens, which was developed jointly
by Carl Zeiss, in Germany, and Sony
Corporation, and produces superior images.
It adopts the MTF* measurement system
for video cameras and offers a quality
typical of a Carl Zeiss lens.
* MTF stands for Modulation Transfer
Function. The number value indicates the
amount of light from a subject coming
into the lens.
Page 5
5
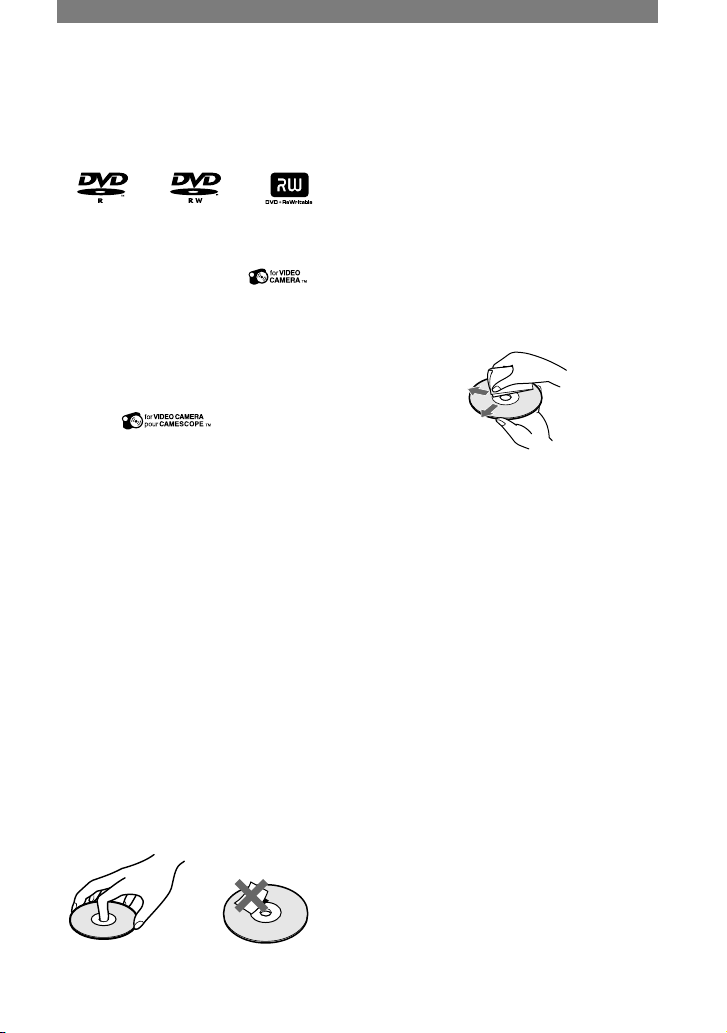
•
You can use 8cm DVD-Rs, 8cm DVD-
RWs and 8cm DVD+RWs only. Use the
discs with marks listed below.
•
For reliability and durability of recording
/playback, we recommend that you use
Sony discs or discs with the *
“for VIDEO CAMERA” mark for your
DVD Handycam. Using a disc other
than above may cause unsatisfactory
recording/playback or you may not be
able to remove the disc from your DVD
Handycam.
* Depending on the place you bought, the disc
has the mark.
Notes on use
•
Hold the disc by its edge while supporting
the center hole lightly. Do not touch the
recording side (the opposite of the printed
side when using a single sided disc).
•
Before shooting, be sure to remove
dust and fingerprints from the disc with
the cleaning cloth supplied with your
camcorder.
Otherwise you may not be able to record
or play normally in some situations using
that disc.
•
When you set the disc in your camcorder,
press firmly until it clicks. When the
message [C:13:] appears on the LCD
screen, open the disc cover and set the
disc again.
•
Do not attach any adhesive material such
as a sticker on the surface of a disc. If you
do so, the disc may become unbalanced,
and this may cause a malfunction of the
disc or your camcorder.
About the disc
Care and storage of the discs
•
Keep the disc clean, or the quality of the
audio and video output may deteriorate.
•
Clean the disc with the supplied cleaning
cloth.
Wipe the disc from the center out. For
dirt, clean the disc with a soft cloth
slightly moistened in water, then remove
the moisture with a soft, dry cloth. Do
not use solvents such as benzine, cleaners
intended for vinyl LPs or antistatic splay,
as they may cause a malfunction to the
disc.
•
Do not expose the disc to direct sunlight
or leave it in a humid place.
•
When you carry or store the disc, put it in
its case.
•
When you want to write letters or marks,
etc. on a single sided disc, write only on
the printed side using an oil-based marker
with a felt-tip, and do not touch the ink
until it dries. Do not heat the disc or use a
sharp-pointed tool, such as ball point pen.
Do not dry the surface by heating. You
cannot write on, or mark, on the doublesided discs.
Page 6

6
Table of Contents
Enjoying your DVD Handycam
What you can do with your DVD Handycam ............................................10
Choosing a disc ....................................................................................... 13
Getting Started
Step 1: Checking supplied items .............................................................16
Step 2: Charging the battery pack ...........................................................17
Step 3: Turning the power on, and holding your camcorder ....................20
Step 4: Using the touch panel .................................................................21
Step 5: Setting the date and time ............................................................22
Step 6: Inserting a disc ............................................................................ 23
Easy Handycam
– using your camcorder with automatic settings
Operate your camcorder with ease .........................................................25
Recording with ease ................................................................................26
Playing back with ease ............................................................................27
Preparation for playing back on a DVD player (Finalizing) ......................28
Recording/Playback
Recording ................................................................................................30
Playback .................................................................................................. 31
Functions used for recording/playback, etc. ............................................32
Recording
To zoom�
To adjust the exposure for backlit subjects
To adjust the focus for an off center subject
To fix the exposure for the selected subject
To add special effects
To use a tripod
Playback
To play back the images in sequence
To use PB ZOOM
Page 7

7
Recording/playback
To check the remaining battery
To turn off the operation confirmation beep
To initialize the settings
Other part names and functions
Checking/Deleting the last scene
(Review/Review deleting) ........................................................................34
Indicators displayed during recording/playback .......................................35
Remote Commander ...............................................................................37
Playing the picture on a TV .....................................................................38
Playback on DVD devices
Making the disc compatible with DVD players or DVD drives
(Finalizing) ...............................................................................................40
Playing back a disc on DVD players, etc. ................................................44
Playing back a disc on a computer with a DVD drive installed ................44
Using the recorded disc (DVD-RW/DVD+RW)
Recording additional scenes after finalizing ............................................46
Deleting all of the scenes on the disc (Formatting) .................................47
Using the Setup items
Using the Setup items ....................................................................48
Setup items .............................................................................................50
CAMERA SET ...................................................................................52
Settings to adjust your camcorder to the recording conditions
(EXPOSURE/WHITE BAL./STEADYSHOT, etc.)
STILL SET ........................................................................................56
Settings for still images
(QUALITY/FILE NO.)
PICT.APPLI.. .....................................................................................57
Special effects on pictures or additional functions on recording
playback (D.EFFECT/PICT.EFFECT/SLIDE SHOW, etc.)
DISC SET ..........................................................................................59
Settings for discs
(FORMAT/FINALIZE/UNFINALIZE, etc.)
Page 8

8
STANDARD SET ...............................................................................59
Settings while recording on a disc or other basic settings
(REC MODE/LCD SET/USB SPEED, etc.)
TIME/LANGU. ..................................................................................63
(CLOCK SET/AREA SET/LANGUAGE, etc.)
Customizing Personal Menu ....................................................................64
Editing on DVD Handycam (DVD-RW: VR mode)
Editing the original data ........................................................................... 66
Creating the Playlist ................................................................................68
Playing the Playlist ..................................................................................71
Dubbing
Connecting to a VCR or TV .....................................................................72
Jacks to connect external devices
Dubbing to VCR/DVD devices .................................................................73
Recording images from a TV or VCR/DVD device .................................74
Using a computer
Before referring to the “First Step Guide” on your computer ...................75
Installing the software ..............................................................................76
Viewing “First Step Guide” .......................................................................79
Table of Contents (continued)
Page 9

9
Troubleshooting
Troubleshooting .......................................................................................80
Warning indicators and messages ..........................................................93
Additional Information
Using your camcorder abroad .................................................................97
About the “InfoLITHIUM” battery pack .....................................................99
Maintenance and precautions ...............................................................101
Specifications ........................................................................................105
Index ......................................................................................................107
Page 10
10
Enjoying your DVD Handycam
What you can do with your DVD Handycam
Your DVD Handycam records images on an 8cm DVD* disc, which makes it easier to record
and view images.
You can enjoy your DVD Handycam in ways that are different from those of other media.
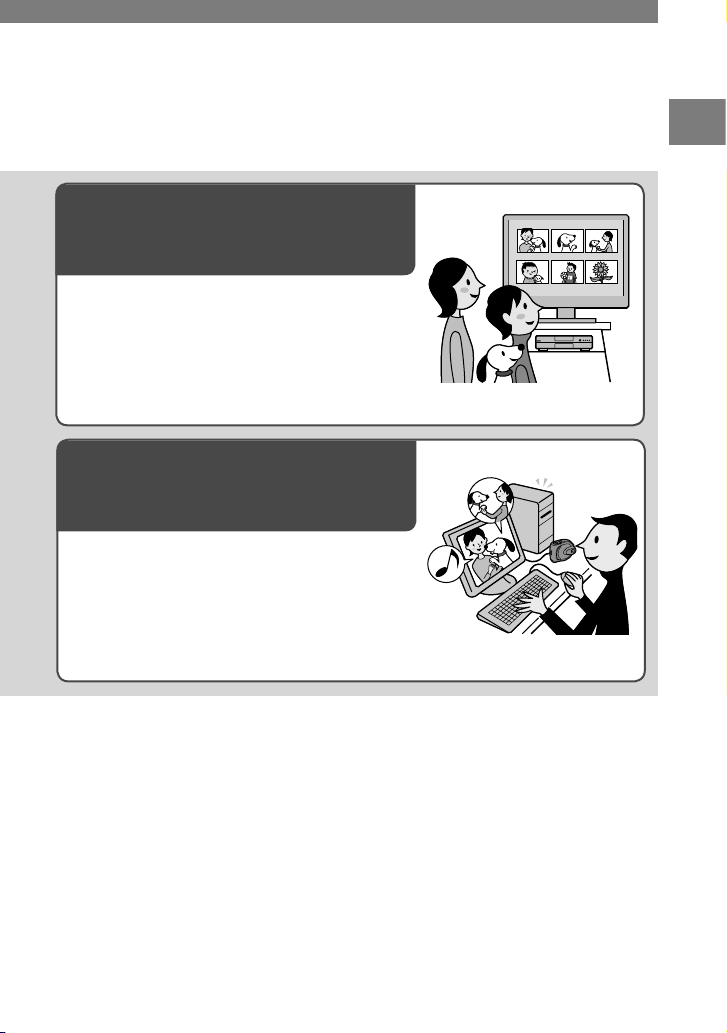
A VISUAL INDEX screen shows the disc
contents at a glance
Movies and still images are recorded on the same
disc. You can find the desired scene quickly using
this index (p. 27, 31).
A Slide show plays back still images,
one after another
You can play back still images one after another
using the Slide show function. You can also enjoy
the Slide show on a DVD player if you finalize**
the disc (p. 28, 40).
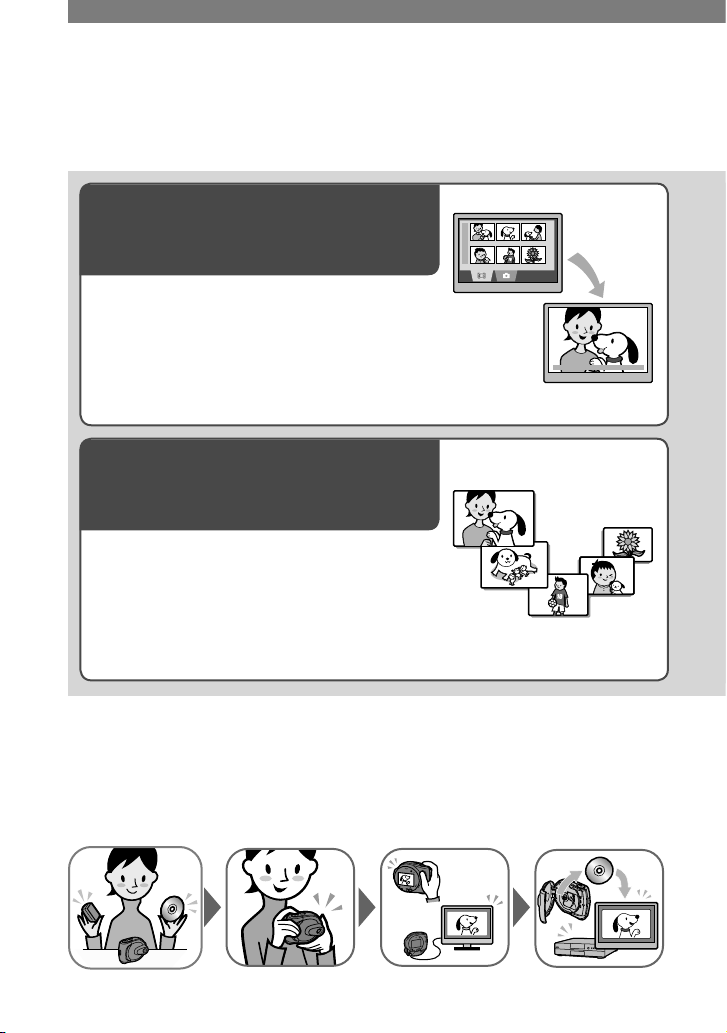
Using your DVD Handycam
Preparing Recording
Playing back
on the DVD
Handycam
Playing back on
DVD players
(Finalize** the disc)
(p. 16) (p. 26, 30) (p. 27, 31) (p. 28, 40)
Page 11
11
Enjoying your DVD Handycam
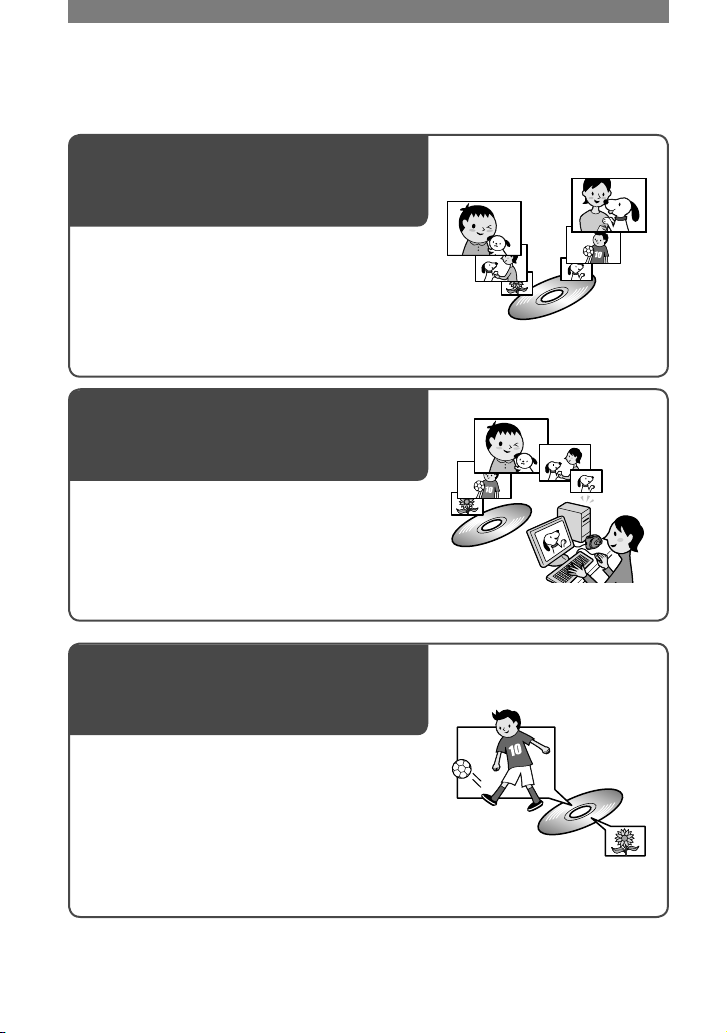
Playing back the recorded disc on
other DVD devices
You can play back a disc on other DVD players or
on the DVD drive of a computer if you finalize**
it. You can also create a DVD menu that helps you
to find the desired image quickly, from a list of
thumbnails (p. 28, 40).
Editing a disc using the supplied
software
You can create your own DVD discs adding special
effects or music to images using the Picture Package
software supplied with your camcorder (p. 75).
* DVD (Digital Versatile Disc) is a high capacity optical disc which enables you to record images. In this
manual, an 8cm DVD disc is described as a “disc.”
**Finalizing means converting a recorded disc so that it can be played back on other DVD playback
equipment (p. 28, 40). After finalizing a disc, you may not be able to record on it again on your DVD
Handycam, depending on the disc type and the recording format (p. 13).
Page 12
12
What you can do with your DVD Handycam (continued)
DVD functions different from those of tape media
Easy to record, then to play back
recordings without rewinding
You can start recording and check the recorded
images without rewinding or fast forwarding.
Images are stored on the free space on the disc
automatically. Therefore, you will not delete
important images accidentally.
Transferring data to your computer at
high speed
You can import data to your computer in less time
than the actual recording time. If your computer
supports Hi-Speed USB (USB2.0), you can transfer
data at a faster rate.
Adjusting the image quality that suits
each scene
You can record images on a disc utilizing the disc
capacity more effectively thanks to the VBR*
encoding system that adjusts image quality
automatically according to the scene being recorded.
Recording an object that moves fast requires more
space to record clear images on a disc. Therefore,
the available recording time may be shorter than
normal.
* VBR stands for Variable Bit Rate. This feature enables your DVD Handycam to adjust the bit rate
(recording capacity per a certain time) automatically in accordance with each of the recorded scenes.
Page 13
13
Enjoying your DVD Handycam
Enjoying your DVD Handycam
Choosing a disc
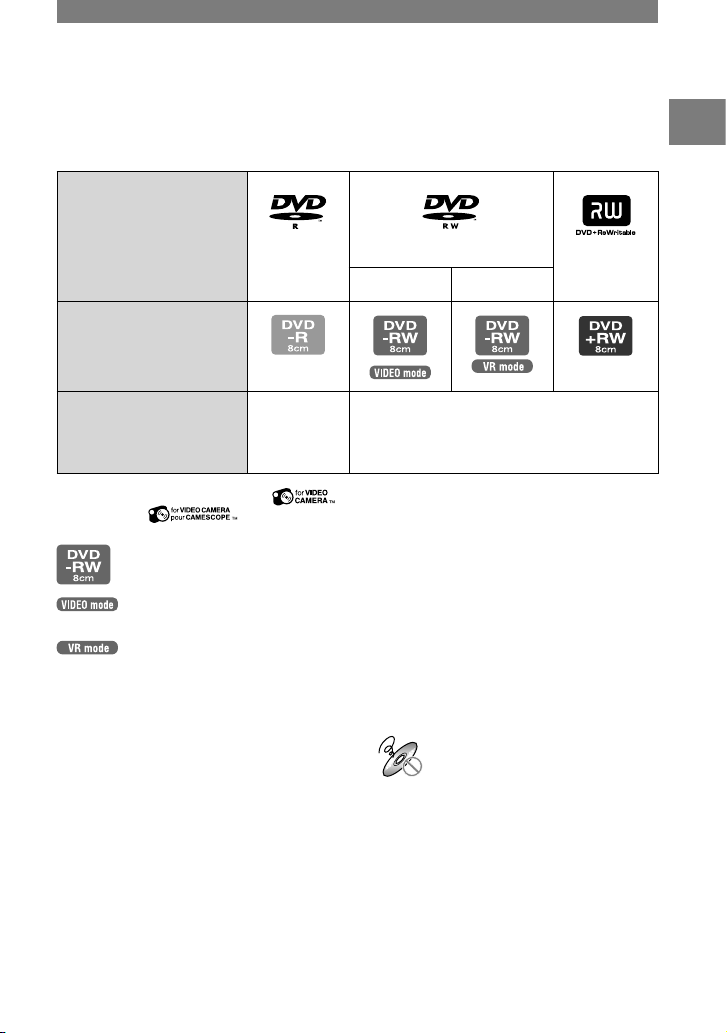
What kinds of disc can I use?
The kinds of disc that you can use in your DVD Handycam are as follows. When you use a
DVD-RW, you can choose the recording format from VIDEO mode or VR mode.
Disc type and the recording
format
8cm DVD-R 8cm DVD-RW 8cm DVD+RW
VIDEO mode VR mode
Marks used in this manual
Features
This kind
of disc can
be recorded
only once.
This kind of disc can be overwritten repeatedly,
even when the disc is full, if you format* it.
•
Use Sony disc or discs with the mark. Depending on the place you bought it, the
disc has the mark.
Differences in the recording
format on DVD-RWs
Note on DVD+RW
If you playback the DVD+RW recorded in
[16:9WIDE] (p. 55) on a DVD player connected
to a 4:3 TV which does not support 16:9 pictures,
the picture will appear compressed lengthwise. If
the DVD+RW is recorded in the default setting,
the picture will appear in 4:3 ratio when it is
played back under the above condition.
•
Refer to the instruction manuals supplied with
your TV.
Examples of incompatible
discs
•
12cm DVD-R
•
12cm DVD-RW
•
12cm DVD+RW
•
DVD+R
•
DVD-RAM
•
DVD-ROM
•
CD
•
CD-R
•
CD-ROM
•
CD-RW
has wide compatibility with other
players.
(Video Recording mode) enables
you to edit, such as deleting or dividing
scenes, the material you have recorded on
your DVD Handycam. Once you finalize
the disc, you can play back the disc with a
DVD player that supports VR mode.
•
Refer to the specifications of your playback
equipment for additional compatibility
information.
* Formatting makes a disc ready for recording. Also, formatting removes all images data from a previously
recorded disc, allowing you to recover the full capacity of that disc. Therefore, you can use the disc
repeatedly (p. 47).
Page 14
14
Choosing a disc (continued)
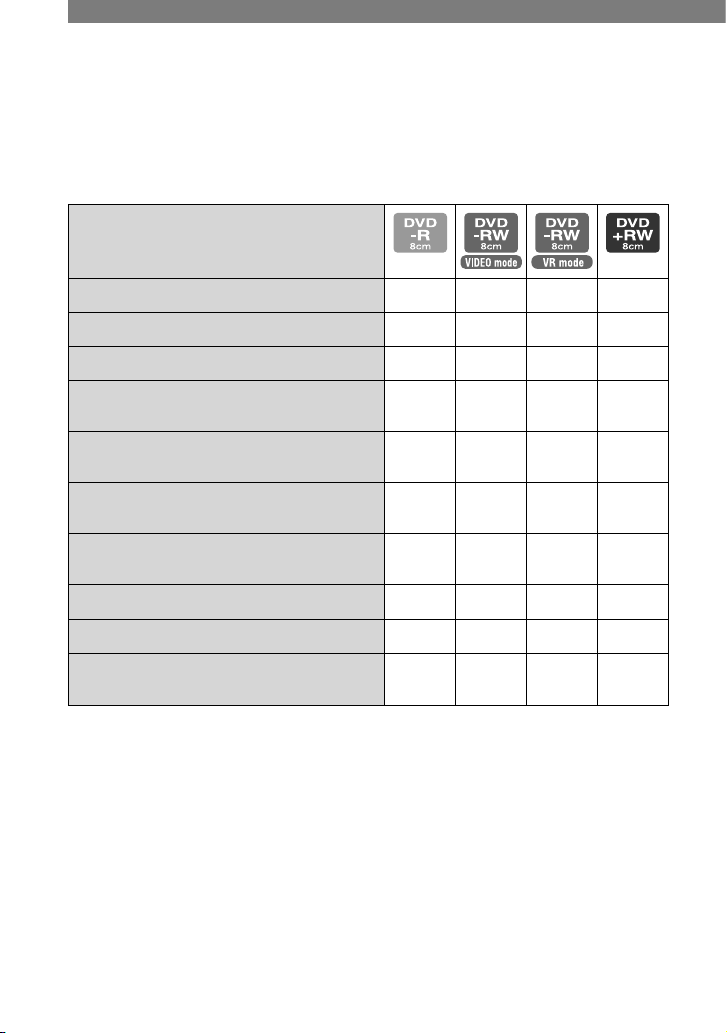
Do the features differ according to the disc?
What you can do with your disc differs, depending on the disc type and the recording format
used.
The number in the parentheses indicates the reference page.
Disc type
Recording movies and still images (26, 30)
Playing back the last scene immediately (34)
Deleting the last scene immediately (34)
–
Playing back recordings on other DVD
players if you finalize the disc
1)
(28, 40)
Playing back recordings on other DVD
players even if you do not finalize the disc
1)
(40)
– – –
2)
Creating the DVD menu when you finalize
the disc
(41)
–
Recording additional scenes after finalizing
the disc
(46)
–
3)
4)
Using the disc repeatedly by formatting it (47)
–
Editing images on your DVD Handycam (66)
– –
–
Transferring recorded scenes to your
computer and editing them
(75)
1)
DVD discs recorded by Sony DVD Handycam are designed to be played back on home DVD players,
DVD recorders, and computer DVD drives. DVD-RWs recorded in the VR mode must be played back
on DVD playback equipment that supports the VR mode. Note that playback on all home DVD players,
DVD recorders, and computer DVD drives may not be guaranteed. Refer to the specifications of your
playback equipment for additional compatibility information.
2)
Do not try to play back these discs in the DVD-ROM drive on your computer. This may cause a
malfunction.
3)
Unfinalizing is required (p. 46).
4)
A confirmation dialog asking you if you want to record additional material appears (p. 46).
Page 15
15
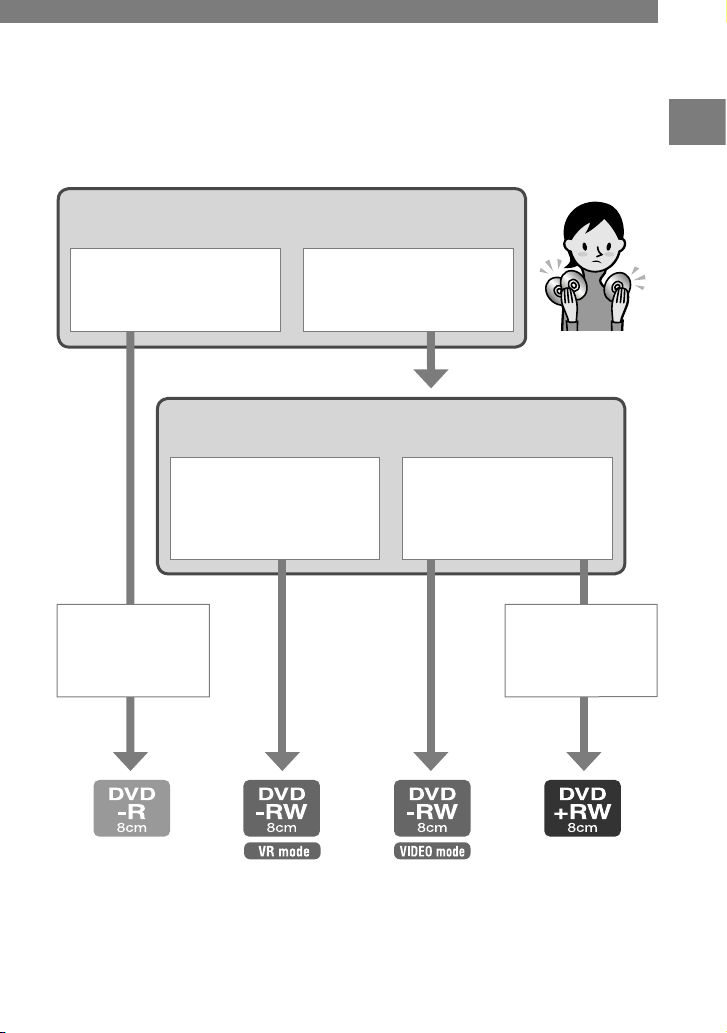
What do you want to do with the disc after recording on it?
I want to edit the disc, such
as dividing or deleting
images.
I want to play back the disc
on various DVD playback
devices.
Do you want to use the disc repeatedly?
No. I do not want to delete
images once I record them.
Yes. I want to use the disc
repeatedly.
Enjoying your DVD Handycam
How to choose a disc
The figure below helps you to choose the best disc for your purpose.
And, I want to
play back the disc
on various DVD
playback devices.
And, I want to
play back the disc
without finalizing
it.
Did you find the disc type that suits your purpose?
Now, enjoy your DVD Handycam.
Page 16
16
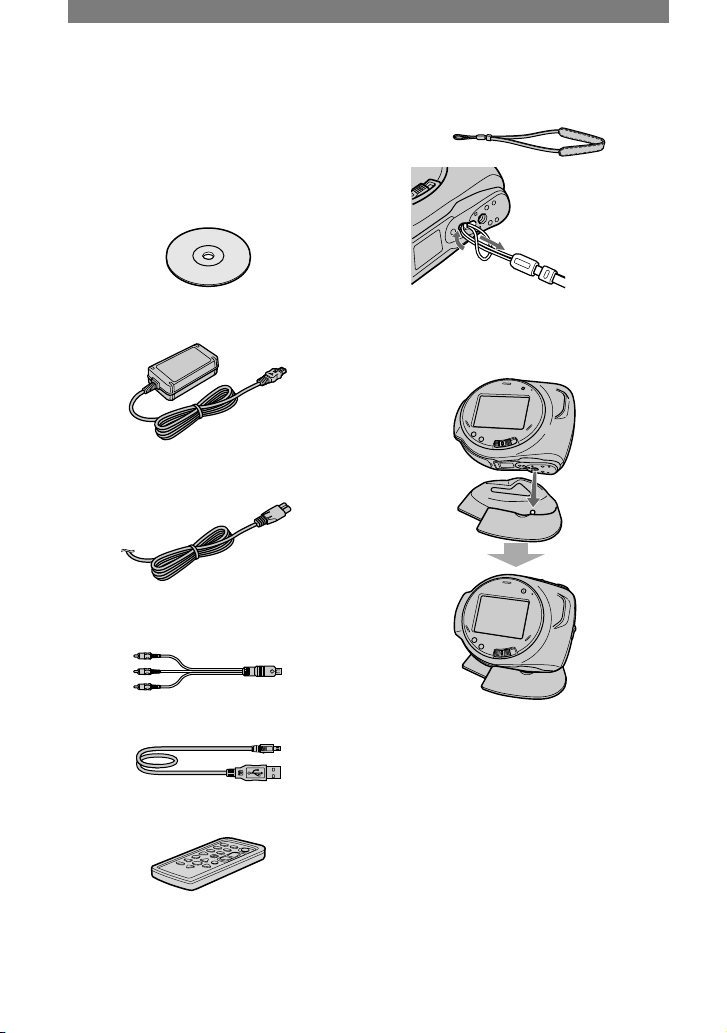
Step 1: Checking supplied items
Make sure that you have following items
supplied with your camcorder.
The number in the parentheses indicates the
number of that item supplied.
8cm DVD-R DMR30 (1) (p. 13)
AC Adaptor (1) (p. 17)
Power cord (1) (p. 17)
A/V connecting cable (1) (p. 38, 72)
USB cable (1) (p. 75)
Wireless Remote Commander (1) (p. 37)
A button-type lithium battery is already installed.
Wrist strap (1)
How to attach
the wrist strap
Stand (1)
How to place your
camcorder on the stand
Cleaning cloth (1)
LCD protective sheet (2) (p. 102)
Rechargeable battery pack NP-FA50 (1)
(p. 17)
CD-ROM “Picture Package Ver.1.8” (1)
(p. 75)
Operating Guide (This manual) (1)
Page 17
17
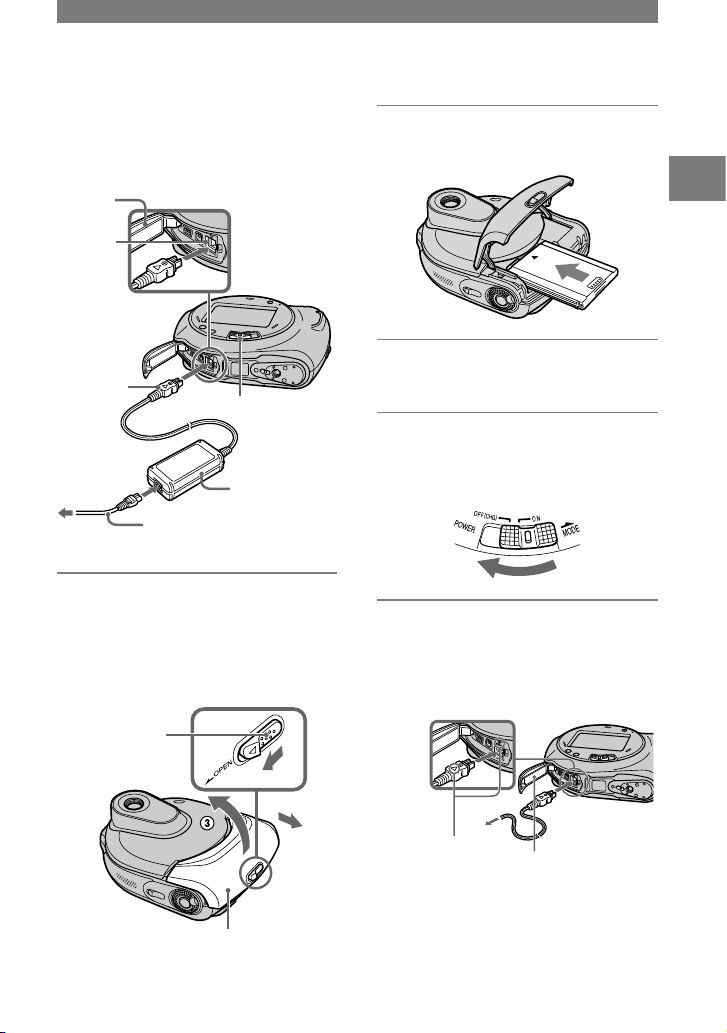
Step 2: Charging the battery pack
You can charge the battery after inserting
the “InfoLITHIUM” battery pack (A
series) (p. 99) into your camcorder.
DC IN jack
cover
DC IN
jack
DC plug
POWER
switch
Power cord
AC
Adaptor
To the wall outlet
1 While sliding the battery cover
OPEN switch in the direction of
the arrow , move the battery
cover toward the direction of the
arrow . Then open the cover .
1
2
Battery
cover OPEN
switch
Battery
cover
2 Insert a battery pack to the end
with the mark facing out.
3 Close the battery cover.
Be sure to close the cover completely.
4 Slide the POWER switch in the
direction of the arrow to set it to
OFF (CHG) (The default setting).
5 Connect the AC Adaptor to the
DC IN jack on your camcorder.
Open the DC IN jack cover to connect
the AC Adaptor.
Match the mark
on the DC plug with
mark on your
camcorder.
DC IN jack
cover
Getting Started
Page 18
18
Step 2: Charging the battery pack (continued)
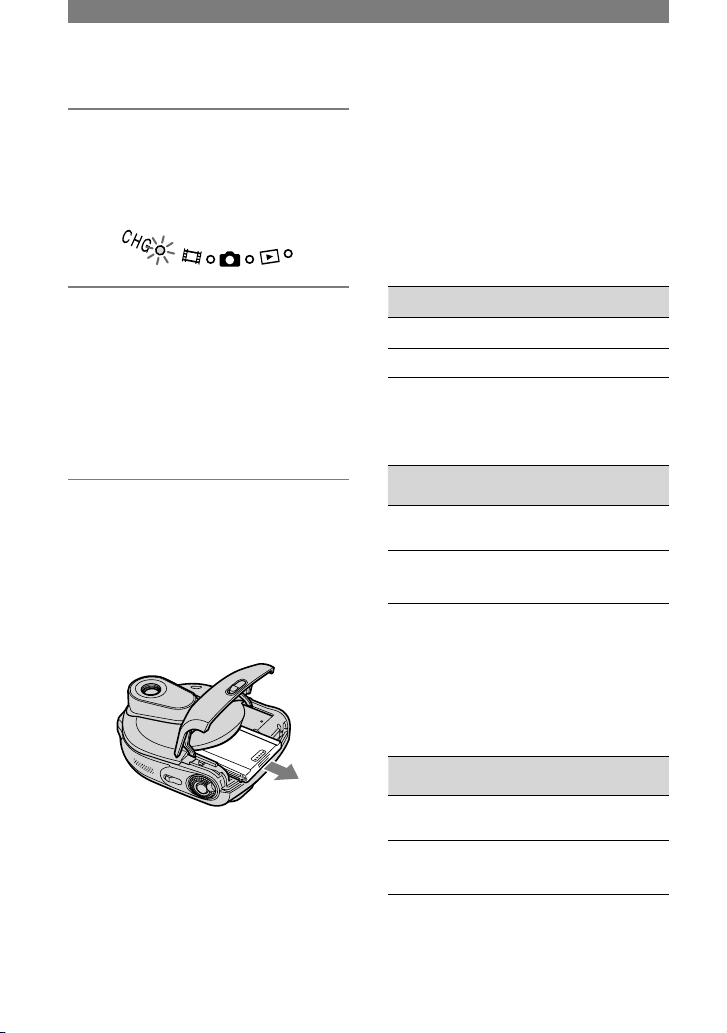
6 Connect the AC Adaptor to the
wall outlet using the power cord.
The CHG (charge) lamp lights up and
charging starts.
7 The CHG (charge) lamp turns off
when the battery is fully charged.
Disconnect the AC Adaptor
from the DC IN jack on your
camcorder.
Disconnect the AC Adaptor holding
both your camcorder and the DC plug.
To remove a battery pack
Slide the battery cover OPEN switch in the
same way as when installing a battery pack.
After opening the battery cover, pull the
battery pack out.
•
When you remove the battery pack, make
sure that none of the respective lamps of the
POWER swtich is on.
When storing the battery pack
Use up the battery pack completely if you
do not intend to use it for a long time (p.
99).
To use an outside power source
Make the same connections as you do when
charging the battery pack. The battery pack
will not lose its charge in this case.
Charging time (full charge)
Approximate charging time (min.) required
when you fully charge an empty battery
pack.
Battery pack Charging time
NP-FA50 (supplied) 125
NP-FA70 155
Recording time
Approximate time (min.) available when
you use a fully charged battery pack.
Battery pack
Continuous
recording time
Typical
recording time
NP-FA50
(supplied)
90
100
40
45
NP-FA70
170
190
80
90
If you record under the following conditions:
Top: When the LCD backlight is on
Bottom: When the LCD backlight is off
Playback time
Approximate time (min.) available when
you use a fully charged battery pack.
Battery pack
LCD screen
backlight on
LCD screen
backlight off
NP-FA50
(supplied)
100 115
NP-FA70 190 215
Page 19

19
Getting Started
On the battery pack
•
Before changing the battery pack, slide the
POWER switch to OFF (CHG).
•
The CHG (charge) lamp may flash during
charging, or BATTERY INFO (p. 33) may not
be correctly displayed under the following
conditions:
– The battery pack is not inserted correctly.
– The battery pack is damaged.
– The battery pack is fully discharged.
(For BATTERY INFO only.)
•
The power will not be supplied from the battery
as long as the AC Adaptor is connected to the
DC IN jack of your camcorder, even when the
power cord is disconnected from the wall outlet.
On the charging/recording/playback time
• Times are measured at 25 °C (77°F). (10-30°C
(50-86°F) is recommended.)
• Available recording and playback time will be
shorter when you use your camcorder in low
temperatures.
• The available recording and playback time will
be shorter depending on the conditions under
which you use your camcorder.
On the AC Adaptor
• Use the nearby wall outlet when using the AC
Adaptor. Disconnect the AC Adaptor from the
wall outlet immediately if any malfunction
occurs while using your camcorder.
• Do not use the AC Adaptor placed in a narrow
space, such as between a wall and furniture.
• Do not short-circuit the DC plug of the AC
Adaptor or battery terminal with any metallic
objects. This may cause a malfunction.
PRECAUTION
• Even if your camcorder is turned off, AC power
(house current) is still supplied to it while
connected to the wall outlet via the AC Adaptor.
Page 20
20
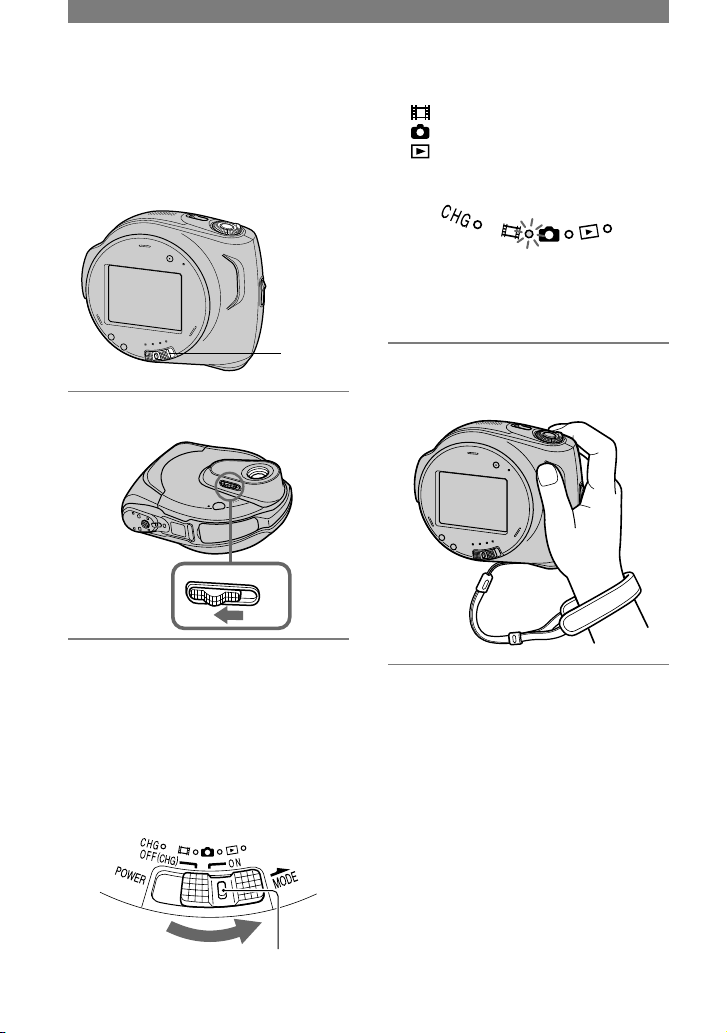
(Movie): To record movies
(Still): To record still images
(Play/Edit): To play back pictures on
your camcorder, or to edit them (DVD-RW:
VR mode only)
•
When you turn on the power of your
camcorder after setting the date and time
([CLOCK SET], p. 22), the current date and
time will be displayed on the LCD screen
for a few seconds.
3 Hold your camcorder correctly.
To turn off the power
Slide the POWER switch to OFF (CHG).
•
At the time of purchase, the power will be
set to turn off automatically if you leave your
camcorder without any operation attempted for
approximately 5 minutes to save battery power
([A.SHUT OFF], p. 62).
Step 3: Turning the power on, and holding your camcorder
To record or play back, slide the POWER
switch to turn on the respective lamp.
When using your camcorder for the first
time, the [CLOCK SET] screen appears
(p. 22).
1 Open the lens cover.
2 Turn on the power by sliding the
POWER switch in the direction
of the arrow while pressing the
green button in the center.
When you record or play back, switch
the power mode by sliding the POWER
switch in the direction of the arrow until
the respective lamp lights up.
POWER
switch
Slide in the
direction of
the arrow.
Green button
Page 21
21
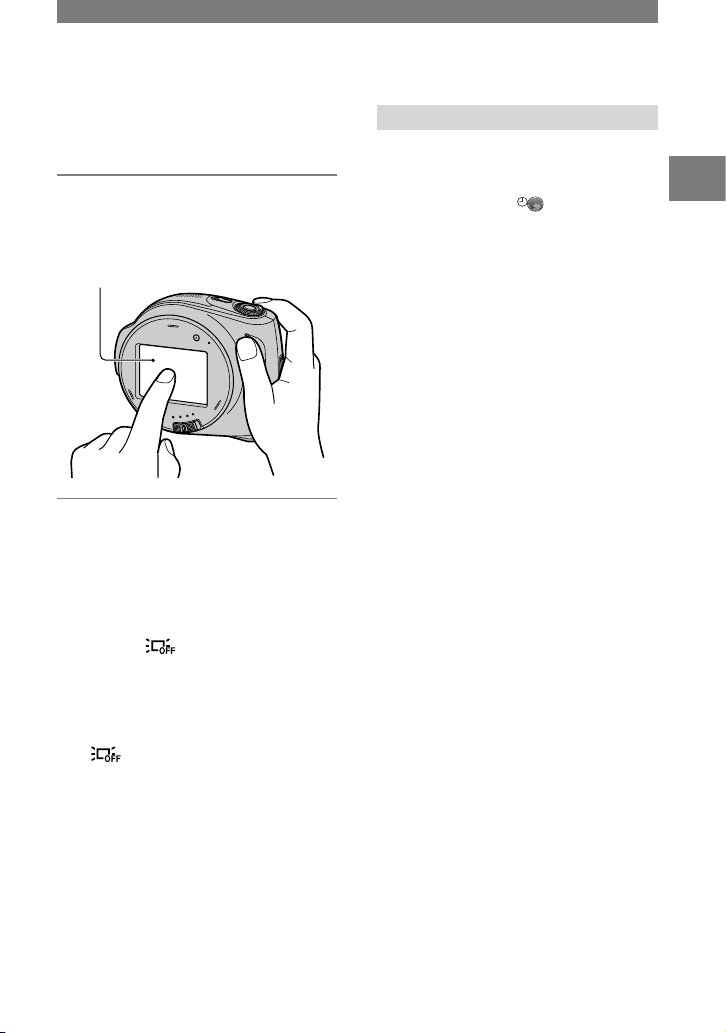
Step 4: Using the touch panel
You can play back recorded pictures (p. 27,
31), or change the settings (p. 48) using the
touch panel.
Hold your camcorder firmly, then
touch the LCD screen as illustrated.
To hide the screen indicators
Press DISP/BATT INFO to toggle the
screen indicators such as counter on or off.
To darken the LCD screen
Press and hold DISP/BATT INFO for a few
seconds until appears.
This setting is practical when you use your
camcorder in bright conditions or you want
to save battery power. The recorded picture
will not be affected by the setting. To
cancel, press and hold DISP/BATT INFO
until disappears.
•
See [LCD SET] - [LCD BRIGHT] (p. 60) to
adjust the brightness of the LCD screen.
Changing the language setting
You can change the on-screen displays
to show messages in a specified
language. Select the screen language
in [LANGUAGE] on TIME/
LANGU. (p. 63).
Touch the button
on the LCD screen
Getting Started
Page 22
22
Set the date and time when using this
camcorder for the first time. If you do not
set the date and time, the [CLOCK SET]
screen appears every time you turn on your
camcorder or slide the POWER switch.
• If you do not use your camcorder for about
2 months, the built-in rechargeable battery
gets discharged and the date and time settings
may be cleared from the memory. In that case,
charge the rechargeable battery and then set the
date and time again (p. 103).
Skip to step 4 when you set the clock for
the first time.
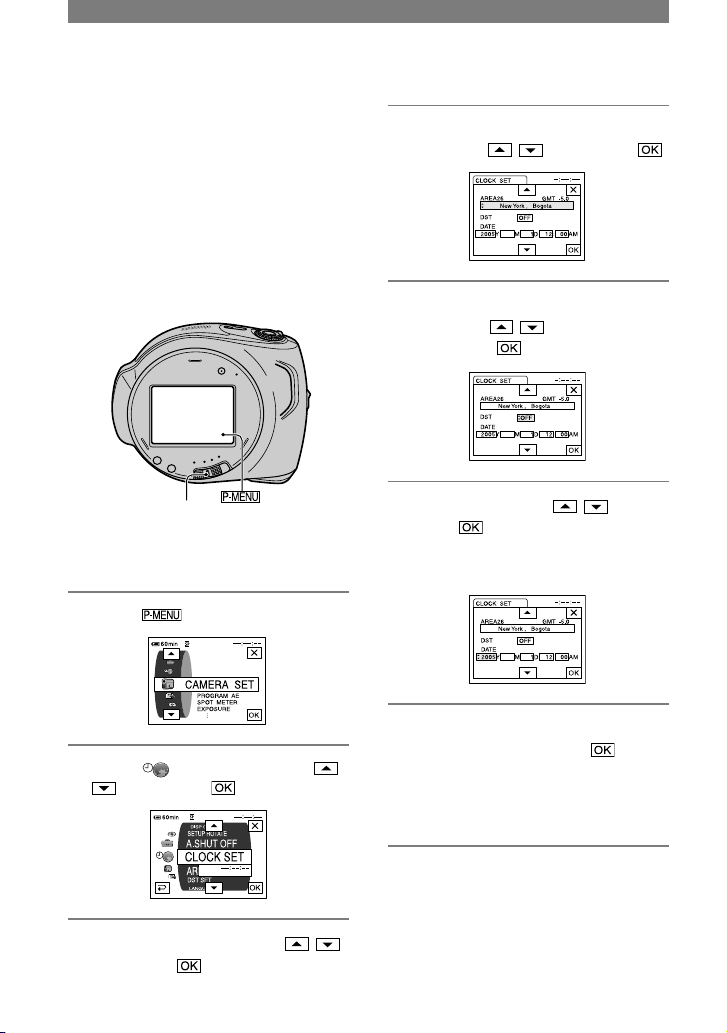
1 Touch [SETUP].
2 Select TIME/LANGU. with /
, then touch .
3 Select [CLOCK SET] with
/
,
then touch .
4 Select the desired geographical
area with
/
, then touch .
JAN
5 Set [DST] or [SUMMERTIME] to
[ON] with
/
, if necessary,
then touch .
JAN
6 Set [Y] (year) with
/
, then
touch .
You can set any year up to the year
2079.
JAN
7 Set [M] (month), [D] (day), hour
and minute, then touch .
The clock starts.
For midnight, set it to 12:00 AM.
For midday, set it to 12:00 PM.
•
Refer to page 98 for information concerning
“World time difference.”
•
Instead of [DST], [SUMMERTIME] is
displayed for some models.
Step 5: Setting the date and time
POWER switch
Page 23
23
Getting Started
A new 8 cm DVD-R, DVD-RW, or
DVD+RW is required for recording (p. 13).
• Remove dust or fingerprints from the
disc beforehand, using the cleaning
cloth supplied with your camcorder (p.
5).
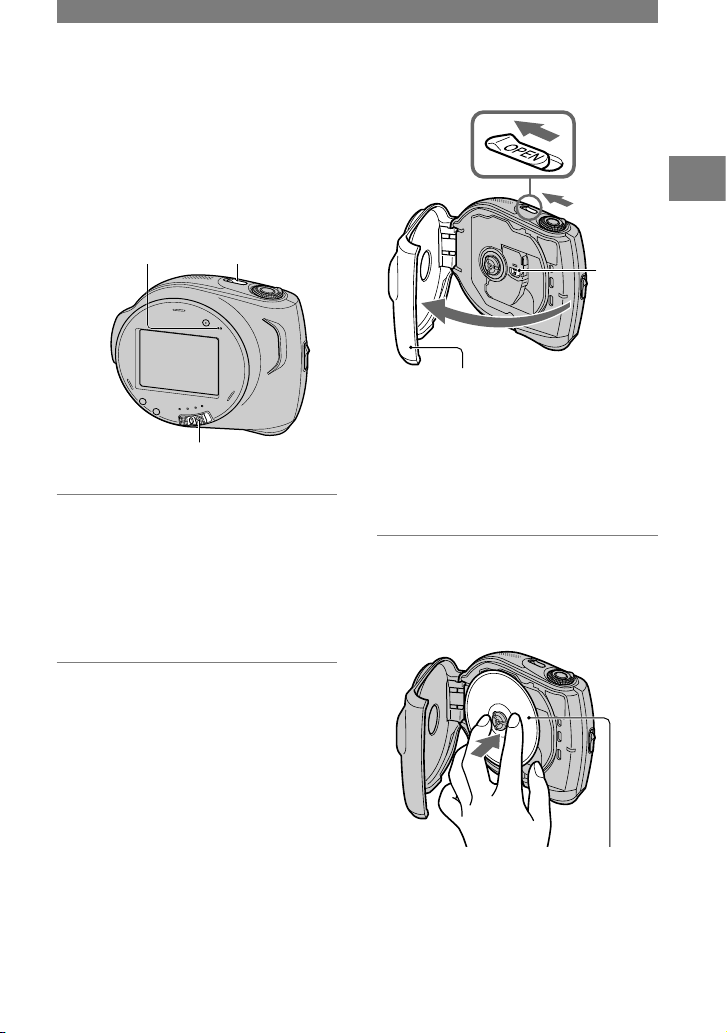
Disc cover
OPEN switch
POWER switch
ACCESS lamp
1 Check that the power of your
camcorder is on.
•
You can remove the disc when a power
source is connected to your camcorder
even when your camcorder is turned off.
However, the disc recognition process
(step 4) does not start.
2 Slide the disc cover OPEN switch
in the direction of the arrow
(OPEN).
[PREPARING TO OPEN] appears on the
LCD screen. Then the opening melody
sounds once, and the camcorder beeps.
After the beeps stop, the disc cover
opens slightly automatically.
Disc cover
OPEN
switch
Pickup
lens
When the disc cover opens
slightly, open it further.
•
Be careful not to obstruct the opening or
closing of the disc cover, with your hand or
other objects.
•
Be careful not to catch the wrist strap when
closing the disc cover. This may cause your
camcorder to malfunction.
3 Set the disc with the recording
side facing your camcorder, then
press the center of the disc until
it clicks.
Set the disc with the label
side facing out when using
a single sided disc.
•
Do not touch the recording side of the disc
or pickup lens. For details about pickup
lens, see page 103.
Step 6: Inserting a disc
Page 24
24
4 Close the disc cover.
Your camcorder starts recognizing the
inserted disc.
It may take some time to recognize the
disc depending on the disc type and
condition.
DVD-R
You can start recording immediately
after [DISC ACCESS] disappears from
the LCD screen. You do not need to
proceed to steps after step 5.
DVD-RW
Select the recording format, then format
the disc. Proceed to step 5.
DVD+RW
The [FORMAT] screen appears.
Proceed to step 6.
•
During Easy Handycam operation (p. 25),
[Format the disc? If not, remove the disc.]
appears. Touch then Proceed to step 7.
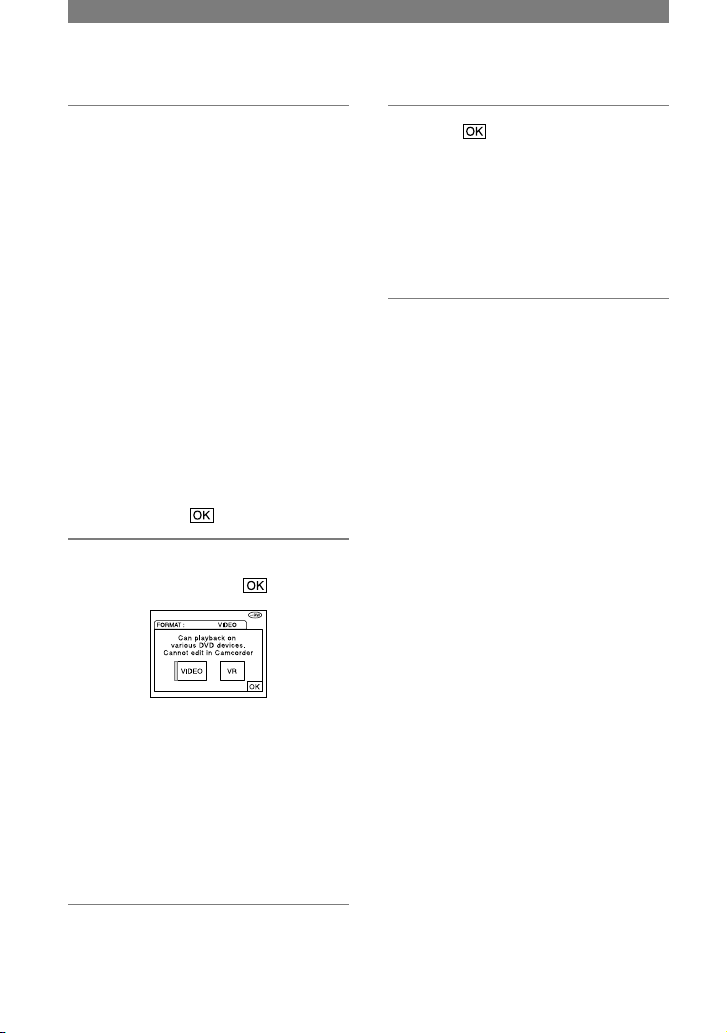
5 Select the recording format for a
DVD-RW, and touch .
VIDEO mode
You can play back the disc on most of
DVD players if you finalize it.
VR mode
You can edit, delete pictures, or divide
movies on your camcorder (p. 66).
However, the disc can be played back
only on DVD players that support VR
mode when you finalize it.
6 Touch [YES] [YES].
7 Touch when [Completed.]
appears.
When the formatting is completed, you
can start recording on the DVD-RW or
the DVD+RW.
•
Do not remove the battery pack or
disconnect the AC Adaptor while
formatting.
To remove the disc
Perform steps 1 and 2 to open the disc
cover, then remove the disc.
It may take some time to remove the
disc depending on the disc condition or
recorded materials.
•
Do not apply shock or vibration to your
camcorder while the ACCESS lamp lights up or
flashes, or [DISC ACCESS] or [PREPARING
TO OPEN] is displayed on the LCD screen.
•
If you close the disc cover with the disc set
incorrectly, it may cause your camcorder to
malfunction.
•
After your camcorder recognizes the disc, disc
information such as the date you started to use
it and information on previously recorded areas
appears for about 8 seconds. The information
on previously recorded areas may not be
displayed correctly depending on the condition
of the disc.
•
To delete all of the previously recorded pictures
from a DVD-RW/DVD+RW, then to use it
again to record new pictures, see “Deleting all
of the scenes on the disc (Formatting)” on page
47.
Step 6: Inserting a disc (continued)
Page 25
25
Easy Handycam – using your camcorder with automatic settings
Operate your camcorder with ease
With this Easy Handycam operation, most of the camera settings are automatically adjusted
optimally, which frees you from detailed adjustment.
Since only basic functions become available and screen font size increases for easy viewing,
even first time users can enjoy easy operation.
Complete the preparations described in steps 1 to 6 (p. 16 to 23) before operation.
•
When inserting a new DVD-RW, it will be formatted in VIDEO mode.
•
When using a DVD-RW disc formatted in VR mode, you cannot use the editing function (p. 66).
If you do not intend to use the Easy Handycam operation, go to page 30.
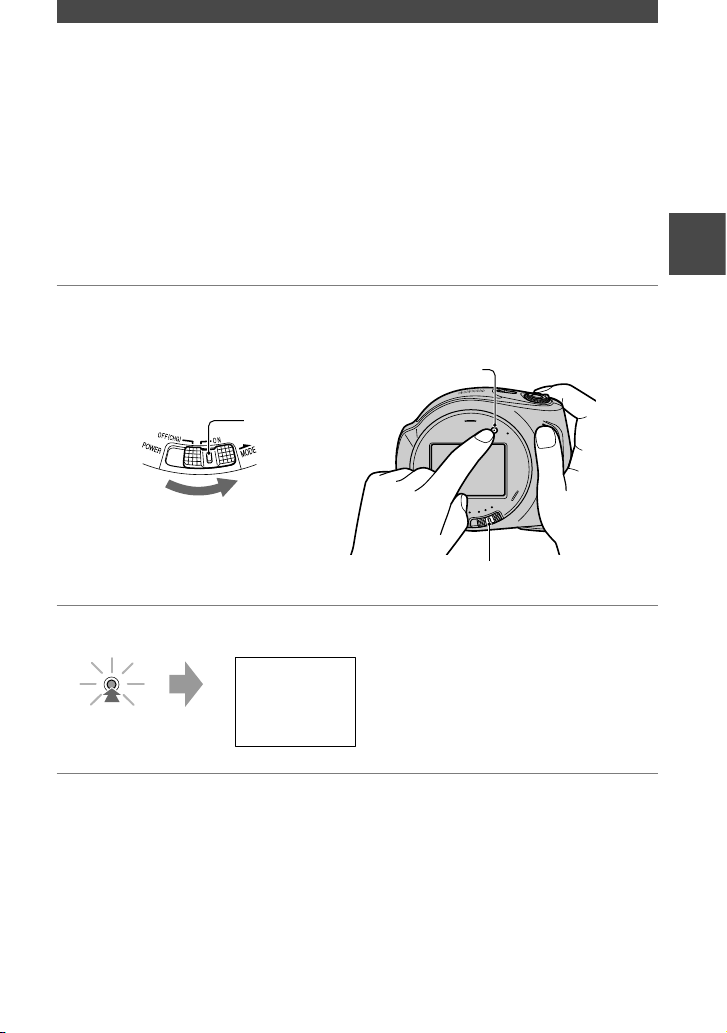
1 Turn on the power by sliding the POWER switch in the direction of the arrow
while pressing the green button in the center.
POWER switch
Green button
POWER switch
EASY button
2 Press EASY.
Easy Handycam
operation
ON
EASY
Now try recording
To cancel Easy Handycam
Press EASY again.
The EASY lamp turns off.
•
If you turn off the power without canceling
Easy Handycam operation, your camcorder
turns on in Easy Handycam operation
automatically when you turn on the power.
During Easy Handycam operation
•
You cannot use some buttons or switches (p. 26,
27), and some setup items (p. 50).
•
If you set an invalid operation, [Invalid during
Easy Handycam operation] appears.
Easy Handycam– using your camcorder with automatic settings
Page 26
26
Easy Handycam – using your camcorder with automatic settings (continued)
Recording with ease
During Easy Handycam operation, the [REC MODE] of movies and the [QUALITY] of still
images are set to the default settings (p. 56, 59).
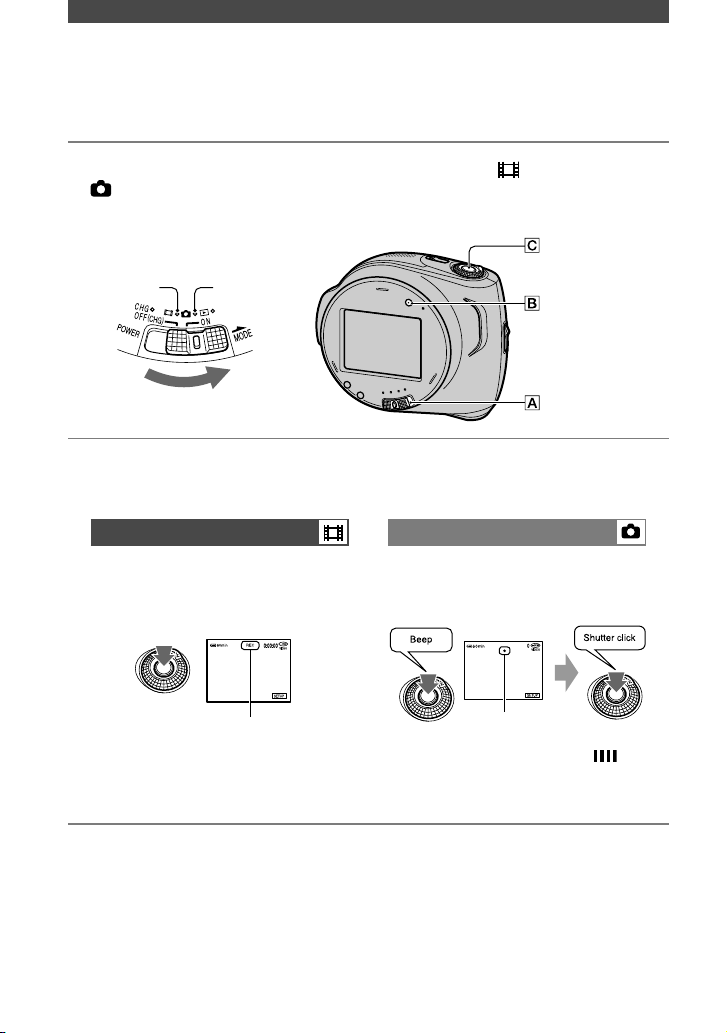
1 Slide the POWER switch
repeatedly to light up the (Movie) or
(Still) lamp.
Make sure the EASY lamp lights up in blue. If not, press EASY to light it up (p. 25).
REC
START/STOP
(PHOTO)
To record
movies
To record
still images
2 Start recording.
To record movies or still images, press the REC START/STOP (PHOTO) for both
operations.
Movies Still Images
Press REC START/STOP (PHOTO)
.
Press REC START/STOP (PHOTO)
lightly to adjust the focus (),
then press it fully ().
[STBY] [REC]
Flashing Lights up
To stop recording, press it again. A shutter sound is heard. When
disappears, the image is recorded.
To record the next images
Perform step 2.
•
You can continue recording on the same
disc if there is space remaining, unless it
has not been finazlised (p. 28), when:
– you turn off the power, then turn it on again.
– you remove a disc from your camcorder, then
insert it again.
•
When you record in Easy Handycam
operation, you cannot use following
functions:
– BACK LIGHT (p. 32)
–
Turning off the
backlight of the LCD screen
(p. 21)
– Checking/Deleting the last scene (p. 34)
Page 27
27
Playing back with ease
1 Slide the POWER switch
repeatedly to light up the (Play/Edit) lamp.
The VISUAL INDEX screen appears on the LCD screen.
Make sure the EASY lamp lights up in blue. If not, press EASY to light it up (p. 25).
To playback
Movie tab
Still image tab
Previous
6 pictures
Next
6 pictures
Appears on the image that
was played back last on
the tab.
VISUAL INDEX screen
2 Start playing back.
Movies Still Images
Touch the Movie tab, then the
movie to be played back.
Touch the Still image tab, then
the still image to be played back.
Beginning of the
scene/previous
scene
Toggles Play or
Pause as you
touch
Next
scene
Stop (go to the
VISUAL
INDEX screen)
Reverse/
forward
JAN 12 2005
PM
Recording
date/time
JAN 15 2005
AM
Previous/Next
Go to the VISUAL
INDEX screen
Recording
date/time
When the selected movie has played
back to the end, the screen returns to the
VISUAL INDEX screen.
•
Touch / during pause to play
back movie slowly.
•
When you touch a movie marked with
, you can play it back from the point
you have stopped previously.
When you record a new image,
appears on the image.
•
When you playback during Easy
Handycam operation, you cannot use
following functions:
– PB ZOOM (p. 33)
– Turning off the backlight of the LCD screen
(p. 21)
Easy Handycam– using your camcorder with automatic settings
Page 28

28
With Easy Handycam operation, your DVD Handycam sets up the following options
automatically. Therefore, you can finalize a disc easily.
– creating a DVD menu to display images as thumbnails on a DVD player, etc (p. 41).
– creating a Photomovie to play back still images on a DVD player, etc (p. 42).
If you want to customize the settings above and finalize a disc, cancel Easy Handycam
operation, then finalize the disc normally (p. 40).
• A DVD-R cannot be overwritten once you finalize it even when there is space to
record.
• If you finalize a DVD-RW (VIDEO mode)/DVD+RW, you cannot record additional
material on the disc during Easy Handycam operation. Cancel Easy Handycam
operation, then follow the steps on page 46.
1 Place your camcorder in a stable position. Connect the AC Adaptor to the
DC IN jack on your camcorder.
DC IN jack
AC Adaptor
to wall outlet
POWER switch
EASY button
•
Be sure to use the AC Adaptor to prevent your camcorder from running out of power
during finalizing.
2 Turn on your camcorder and make sure the EASY lamp lights up.
When the EASY lamp is off, press EASY to set the Easy Handycam operation to on.
3 Insert the disc to be finalized.
See "Step 6: Inserting a disc" on page 23 for details.
Easy Handycam – using your camcorder with automatic settings (continued)
Preparation for playing back on a DVD player (Finalizing)
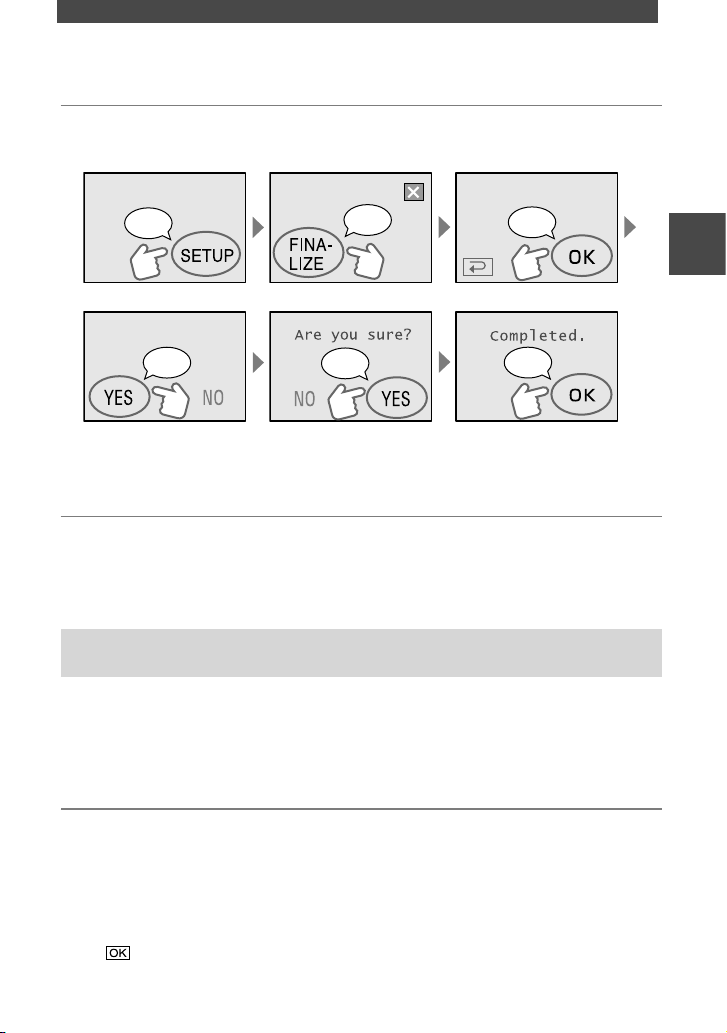
Page 29
29
4 Touch the LCD screen in the following steps.
Touch
Touch
Touch
Touch
Touch
Touch
•
Do not apply shock or vibration to your camcorder, and do not disconnect the AC Adaptor during
finalizing.
•
The shorter the amount of material recorded, the longer it takes for finalizing.
5 Remove the disc from your camcorder.
Enjoy watching images on the DVD player, etc.
Refer also to the instruction manuals supplied with the DVD players, etc.
Deleting all the scenes after playback (format)
(DVD-RW:VIDEO mode/DVD+RW)
If you format the disc, the disc recovers the used capacity and is reusable for recording
thereafter.
If you want to reuse a DVD-RW to record in VR mode, format the disc after canceling Easy
Handycam operation (p. 47).
• Note that you cannot recover a scene once you delete it.
Touch the LCD screen in the following steps.
[SETUP]
[FORMAT]
[YES]
[YES]
Easy Handycam– using your camcorder with automatic settings
Page 30
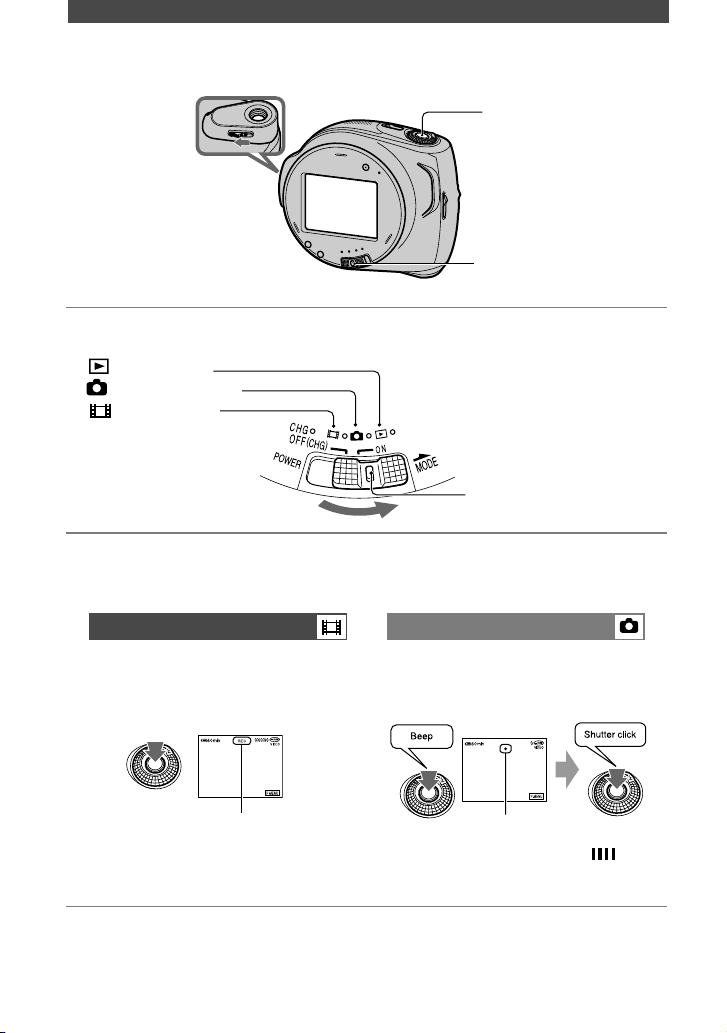
30
A
1 Slide the POWER switch repeatedly to light up the respective lamp.
Slide the POWER switch in the
direction of the arrow while
pressing the green button if the
POWER switch is in the OFF
(CHG) position.
:To record movies
:To record still images
:To playback/edit
2 Start recording.
To record movies or still images, press the REC START/STOP (PHOTO) for both
operations.
Movies Still Images
Press REC START/STOP (PHOTO)
.
Press REC START/STOP (PHOTO)
lightly to adjust the focus (),
then press it fully ().
[STBY] [REC]
Flashing Lights up
To stop recording, press it again. A shutter sound is heard. When
disappears, the image is recorded.
To check or delete the last recording
(Review/Review deleting)
See page 34.
To record the new movies/still images
Even the disc was once removed, you can
continue recording on the disc if there is
space remaining.
Perform step 2.
Recording
POWER switch
Open lens cover by
sliding the switch in
the direction of the
arrow.
REC START/STOP
(PHOTO)
Page 31

31
Playback
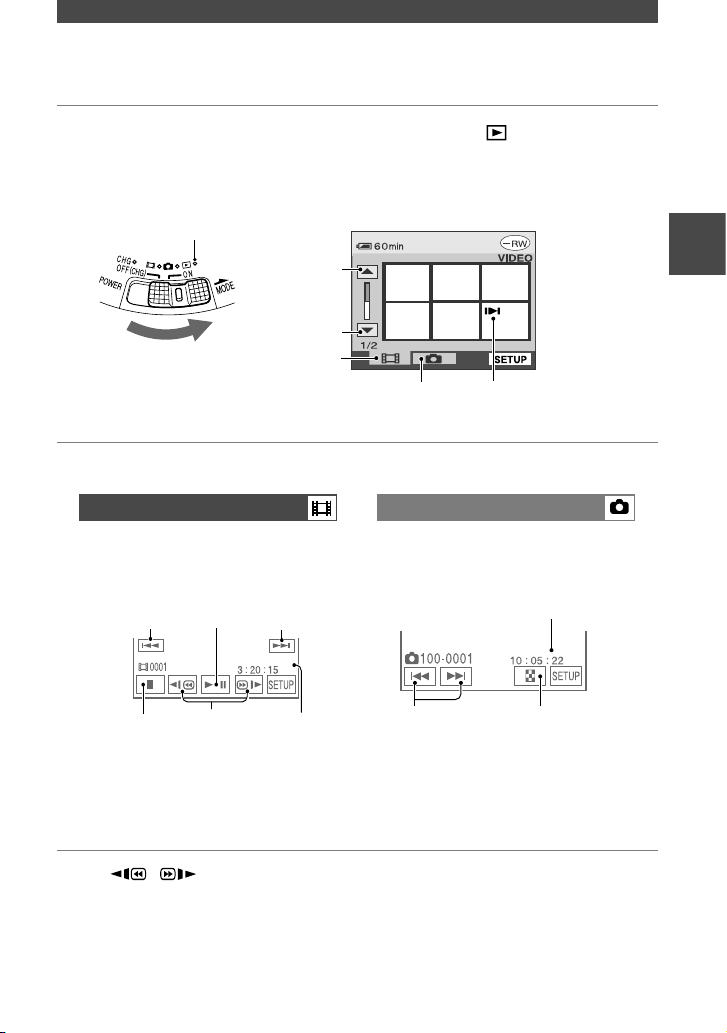
1 Slide the POWER switch repeatedly to light up the (Play/Edit) lamp.
The VISUAL INDEX screen appears on the LCD screen.
P-MENU
Previous
6 pictures
Next
6 pictures
Movie tab
Still image tab
Disc type
Appears on the image
that was played back last
on each of the tab.
2 Start playing back.
Movies Still Images
Touch the Movie tab, then the
movie to be played back.
Touch the Still image tab, then
the still image to be played back.
Beginning of the
scene/previous
scene
Toggles Play or
Pause as you
touch
Next
scene
Stop (go to the
VISUAL INDEX
screen)
Reverse/
forward
P-MENU
Previous/Next
Go to the VISUAL
INDEX screen
P-MENU
When the selected movie is played back
until the end, the screen returns to the
VISUAL INDEX screen.
•
Touch / during pause to play
back movie slowly.
•
One touch makes the reverse/fast forward
approximately 5 times faster, 2 touches makes it
approximately 10 times* faster.
* Approx. 8 times faster for a DVD+RW
•
When you touch a movie marked with ,
you can play it back from the point you have
stopped previously.
When you record a new image, appears on
the image.
To adjust the volume
Touch [VOLUME], then adjust
it with / .
•
If you cannot find [VOLUME ] in ,
touch [SETUP] (p. 59).
To play back the disc on other DVD
devices
See page 40.
Recording/Playback
Page 32

32
Functions used for recording/playback, etc.
Recording
To zoom .................................
Move the power zoom lever slightly for
a slower zoom. Move it further for a faster
zoom.
Wider range of
view:
(Wide)
Close view:
(Telephoto)
•
Do not remove your finger from the power
zoom lever when you are zooming. If you
do so, the sound of the lever moving may be
recorded.
•
The minimum distance required between
your camcorder and the subject to get a sharp
focus is about 1 cm (about 1/2 inch) for wide
angle and about 80 cm (about 2 5/8 feet) for
telephoto.
•
You can set [DIGITAL ZOOM] (p. 55) if you
want to zoom to a level greater than 10
×.
To adjust the exposure for backlit
subjects .................................
To adjust the exposure for backlit subjects,
press BACK LIGHT to display . To
cancel the back light function, press BACK
LIGHT again.
To adjust the focus for an off center
subject ..................................
See [SPOT FOCUS] on page 54.
To fix the exposure for the selected
subject ..................................
See [SPOT METER] on page 53.
To add special effects .................
See PICT. APPLI. on page 57.
To use a tripod .........................
Attach the tripod (optional: the length of
the screw must be less than 5.5 mm) to the
tripod receptacle using a tripod screw.
Page 33

33
Playback
To play back the images
in sequence .............................
See [SLIDE SHOW] on page 58.
To use PB ZOOM .......................
You can magnify pictures from about 1.1 to
5 times the original size.
Magnification can be adjusted with the
power zoom lever .
Play back the picture you want to
magnify.
Magnify the picture with T (Telephoto).
A frame appears on the LCD screen.
Touch the portion that you want to
display in the center of the LCD screen.
Adjust the magnification with W (Wide
angle)/T (Telephoto).
To cancel, touch [END].
Recording/playback
To check the remaining battery ......
Set the POWER switch to OFF (CHG),
and then press DISP/BATT INFO . If
you press this button once, the BATTERY
INFO appears on the screen for about 7
seconds. If you press and hold the button
for a while, this information is displayed
for about 20 seconds.
Remaining
battery
(approx.)
Recording
capacity
(approx.)
To turn off the operation confirmation
beep .....................................
See [BEEP] (p. 62) to set the operation
confirmation beep.
To initialize the settings ..............
Press RESET to initialize all the
settings, including settings for date and
time. (Setup items customized on Personal
Menu are not initialized.)
Other part names and functions
Built-in stereo microphone
Remote sensor
Point the Remote Commander (p. 37)
towards the remote sensor to operate
your camcorder.
Recording lamp
The recording lamp lights up in red
during recording (p. 62).
Speaker
Sounds come out from the speaker.
•
For how to adjust the volume, see page 31.
Recording/Playback
Page 34

34
Checking/Deleting the last scene (Review/Review deleting)
You can check or delete the last
recorded scene.
However, you cannot delete it if:
– you have removed the disc.
– you have recorded the new scenes.
Checking the last scene
(Review)
1 Slide the POWER switch to light
up the (Movie) or (Still)
lamp, then touch .
The playback of the latest scene starts.
30/3 0
VIDEO
100- 0001
REVIE W
60min
To return to recording
Touch .
•
The recording data (DATA CODE) does not
appear on the Review screen.
Deleting the last scene (Review
deleting) (DVD-RW/DVD+RW
only)
If the checked scene is unnecessary, you
can delete it on the spot.
Data once recorded on DVD-Rs cannot be
deleted.
1 Press during the review.
2 Touch [YES].
• You cannot recover a scene once you delete it.
•
You can only delete the last recorded scene.
When is grayed out, you cannot delete
the scene due to the following reasons.
– The last recorded scene has been already
deleted.
– There is a movie or a still image that has been
recorded just after the scene being played
back.
Touch to display the function buttons
below.
: Return to the beginning of the
viewing movie.
/ :Adjust the volume.
Movie
Still image
Page 35

35
Indicators displayed during recording/playback
Recording Movies
P-MENU
60min
REC
0:00:00
[30min]
VIDEO
1 32 4 5
9
7
6
8
Remaining battery (approx.) (33)
Recording mode ( or or ) (59)
Recording status ([STBY] (standby) or
[REC] (recording)
Counter (hour: minute: second)
Disc type (13)
Recording format of a DVD-RW (13)
Remaining time of the disc (approx.) (61)
Review button (34)
Displays the most recently recorded image.
Touch to return to standby.
Personal Menu button (64)
Recording still images
60min
P-MENU
7
VIDEO
[153 0]
FINE
9
1 0 5 6
8
qs
qa
Quality ([FINE] or [STD]) (56)
The number of recorded still images
The number of recordable still image
(approx.) (61)
Viewing movies
P-MENU
0001
60min
0:00:00
VIDEO
1 2 4 65
9qh
qd
qf
qg
Playback mode
Previous/Next button (27, 31)
Scene number
Video operation buttons (27, 31)
Recording/Playback
( ) is a reference page.
The indicators during recording will not be recorded.
Viewing still images
60min
w;
qk
ql
P-MENU
100- 0001
9
12/3 0
VIDEO
1 5 6qj
Number of played back still images /Total
number of recorded still images
Data file name
VISUAL INDEX button (27, 31)
Previous/Next button (27, 31)
Page 36

36
Indicators on the LCD screen
When you can change the setup items, or
during recording or playback, following
indicators are displayed.
Upper left Upper center Upper right
P.MENU
60min 0:00: 00
[30min]
VIDEO
STBY
W
T
Upper left
Indicator Meaning
Self-timer recording (55)
MICREF LEVEL low
(60)
Upper center
Indicator Meaning
Repeat of Slide show (58)
Upper right
Indicator Meaning
WHITEFADER
BLACKFADER
Fader (57)
OVERLAP
WIPE
LCD backlight off (21)
Center
Indicator Meaning
Color Slow Shutter (54)
Warning (93)
Bottom
Indicator Meaning
Picture effect (58)
Digital effect (58)
Manual focus (54)
PROGRAM AE (52)
Backlight (32)
White balance (53)
WIDE SELECT (55)
SteadyShot off (56)
Flexible spot meter (53)/
Exposure (53)
DATA CODE while recording
The recording data (date/time or various
settings in effect when recording) is
recorded automatically on the disc.
They are not displayed while recording.
However, you can check them as [DATA
CODE] during playback (p.61).
( ) is a reference page.
Bottom
Center
Indicators displayed during recording/playback (continued)
Page 37

37
Remote Commander
Remove the insulation sheet before using
the Remote Commander.
Insulation sheet
DATA CODE (p. 61)
PHOTO (p. 26, 30)
When you press this button, the on screen
image will be recorded as a still image.
SCAN/SLOW (p. 27, 31)
(Previous/Next) (p. 27, 31)
PLAY (p. 27, 31)
STOP (p. 27, 31)
DISPLAY (p. 21)
Transmitter
START/STOP (p. 26, 30)
Power zoom (p. 32, 33)
PAUSE (p. 27, 31)
VISUAL INDEX (p. 27, 31)
Displays the VISUAL INDEX screen when
you press this while playing back.
/ / /
/ ENTER
When you press any button, the orange frame
appears on the LCD screen. Select a desired
button or an item with / / / , then press
ENTER to execute.
When no commands have been sent from the
Remote Commander in a certain period, the
orange frame disappears. When you press any
of / / / , or ENTER again, the frame
appears at the position where it was displayed
last.
• Point the Remote Commander towards the
remote sensor to operate your camcorder (p. 33).
• To change the battery, see page 104.
Recording/Playback
Page 38

38
Playing the picture on a TV
Connect your camcorder to the wall outlet using the supplied AC Adaptor for this operation
(p. 17). Refer also to the instruction manuals supplied with the devices to be connected.
1
2
A/V connecting cable (supplied)
Connect to the input jack of the other device.
A/V connecting cable with S VIDEO
(optional)
When connecting to another device via the
S VIDEO jack, by using an A/V connecting
cable with an S VIDEO cable (optional),
higher quality pictures can be produced than
with an A/V connecting cable. Connect the
white and red plug (left/right audio) and the
S VIDEO plug (S VIDEO channel) of the
A/V connecting cable with an S VIDEO cable
(optional). The yellow plug connection is not
necessary.
When your TV is connected to a VCR
Connect your camcorder to the LINE
IN input on the VCR. Set the input
selector on the VCR to LINE.
When your TV is monaural (When
your TV has only one audio input jack)
Connect the yellow plug of the A/V
connecting cable to the video input jack
and connect the white (left channel) or the
red (right channel) plug to the audio input
jack of your TV or VCR.
• You can display the counter on the TV screen by
setting [DISP OUTPUT] to [V-OUT/PANEL]
(p. 62).
A/V jack
: Signal flow
S VIDEO VIDEO AUDIO
(Yellow)
(White) (Red)
VCRs or TVs
Page 39

39
Page 40

40
Finalizing allows the recorded disc to be played back on other DVD players (DVD player/
DVD recorder, etc.) or the DVD drive on your computer. The finalizing procedure differs
depending on the disc type.
• Playback compatibility is not guaranteed with all players.
Finalizing is required.
The disc cannot be overwritten once you finalize it even when there is space
to record.
Finalizing is required.
The disc can be overwritten on your camcorder if you unfinalize it (p. 46),
then have to finalize it again to play it back on other DVD players.
Finalizing is required.
Once you finalize the disc, you can play it back on DVD players that support
the VR mode.
Unfinalizing is not necessary to record additional materials on the disc.
Likewise, you do not need to finalize it again after additional recording.
You can play back the disc on DVD players without finalizing it. However,
you need to finalize the disc in the following cases:
– when you want to create a DVD menu (p. 41).
– when you want to create a Photomovie (p. 42).
– when you want to play back images on a DVD drive of a computer.
– when recording time is the following:
HQ mode: less than 5 minutes
SP mode: less than 8 minutes
LP mode: less than 15 minutes
If a DVD menu/Photomovie has been created in finalizing, a conformation
dialog appears when you try to record additional material. Since the DVD
menu/Photomovie is deleted by additional recording, you have to finalize the
disc again to create a new DVD menu/Photomovie on it.
Making the disc compatible with DVD players or DVD drives (Finalizing)
Page 41

41
Playback on DVD devices
Steps for finalizing
Follow the steps below.
• It takes from a minute to a few hours
for finalizing. The shorter the amount of
material recorded on the disc, the longer
it takes for finalizing.
• Use an AC Adaptor as the power source
to prevent your camcorder from running
out of power during finalizing.
• When you finalize a double-sided disc, you
must finalize each side of the disc.
Step 1: Preparing for finalizing
(p. 41)
Step 2: Customizing a DVD menu*
(p. 41)
If you have set the DVD menu
setting, you can create a menu
screen to view the thumbnails as
a list when the disc is played back
on DVD devices.
Step 3: Customizing a Photomovie*
(p. 42)
If you have set the Photomovie
setting, you can create a
Photomovie to view still images
on other DVD devices.
Step 4: Changing the disc title
(p. 42)
You can make a title on each disc.
As the default, the date when the
disc was first used is used as a
disc title.
Step 5: Finalizing a disc
(p. 43)
* You cannot do this using a DVD-RW (VR
mode).
Step 1: Preparing for finalizing
1 Place your camcorder in a
stable position. Connect the AC
Adaptor to the DC IN jack on your
camcorder.
2 Turn on the power by sliding the
POWER switch.
3 Insert the disc to be finalized.
4 Touch [FINALIZE]
[SET].
Step 2: Customizing a DVD
menu
What is a DVD menu?
A DVD menu is a menu screen that allows
you to display the index to check the
contents of the disc or to select desired
scenes easily. When you create the DVD
menu on your camcorder, the first scenes
of each movie are displayed with date as
thumbnails.
• You cannot create a DVD menu using a DVDRW (VR mode).
Page 42

42
1 Touch [DVD MENU].
2 Select the desired one from 4
types with
/
.
Select [NO MENU] if you do not create
a DVD menu.
3 Touch .
Step 3: Customizing a
Photomovie
What is a Photomovie ?
A Photomovie involves converting still
images in JPEG format to movies in MPEG
format to play them back on other DVD
players or on your computer. The original
still image remains in the JPEG format on
the disc.
Converted still images are played back in
sequence like a slide show. The resolution
(pixels) of the converted Photomovie,
however, is lower than that of the original
still images.
• It may take more time for finalizing when you
create a Photomovie, since the more still images
recorded on the disc, the more time it takes to
create a Photomovie.
• You can view still images in the JPEG format
using the DVD drive on your computer without
creating a Photomovie (p. 44).
• You cannot create a Photomovie on a DVD-RW
(VR mode) in this step. Customize it on the
[EDIT] screen (p. 70).
1 Touch [PHOTOMOVIE].
2 Touch [YES].
Select [NO] if you do not create a
Photomovie.
3 Touch .
Step 4: Changing the disc title
Skip to “Step 5: Finalizing a disc” (p.43) if
you do not change the disc title.
1 Touch [DISC TITLE].
2 Delete unnecessary characters
by touching [].
The yellow cursor moves and characters
are deleted from the end.
3 Select the type of a character,
then touch the desired character.
JAN
To erase a character: Touch [].
To insert a space: Touch [].
4 Touch [] as you register a
character to move to the next
entry point.
• Up to 20 characters can be registered.
Making the disc compatible with DVD players or DVD drives (Finalizing)
(continued)
Page 43

43
Playback on DVD devices
5 When you have finished entering
characters, touch .
The disc title changes to the one you
entered.
6 Touch [END].
• When the disc has a title already set by other
devices, the 21st and subsequent characters are
deleted by this operation.
Step 5: Finalizing a disc
1 Confirm the settings you made in
steps from 2 to 4 of the “steps for
finalizing” on the LCD screen.
2 Touch .
3 Touch [YES] [YES].
Finalizing starts.
• Do not apply shock or vibration to your
camcorder, and do not disconnect the AC
Adaptor during finalizing.
When you need to disconnect the AC
Adaptor, make sure that the power of your
camcorder is set to off and disconnect the
AC Adaptor after the CHG (charge) lamp
goes off. Finalizing restarts when you
connect the AC Adaptor and turn on your
camcorder again.
You cannot remove the disc until the
finalizing operation is completed.
4 Touch , when [Completed]
appears.
When using a DVD-R/DVD-RW
(VIDEO mode)/DVD+RW,
flashes after finalizing is completed
when the POWER switch is set to
(Movie) or (Still). Remove the disc
from your camcorder.
• When you make the settings to enable a
creation of a DVD menu on DVD-R/DVD-RW
(VIDEO mode)/DVD+RW, and finalize the
disc, the DVD menu appears for a few seconds
while finalizing the disc.
• You cannot view a Photomovie with the
DVD-R/DVD-RW (VIDEO mode) on your
camcorder.
• After finalizing a disc, the disc indicator and the
recording format are displayed as shown below:
DVD-R
DVD-RW (VIDEO mode)
DVD-RW (VR mode)
DVD+RW
Page 44

44
Playing back a disc on DVD players, etc.
• Do not use the 8cm CD adaptor with an
8cm DVD as it may cause a malfunction.
• Make sure that a vertically installed DVD
device is placed in the position where a
disc can be placed horizontally.
1 Insert a disc into the DVD
devices.
2 Play back the disc.
The playback procedure varies
depending on the DVD device. For
details, refer to the instruction manual
supplied with your DVD device.
If you have created a DVD menu
(DVD-R/DVD-RW:VIDEO mode/
DVD+RW)
You can select the desired scene in the
menu.
A Photomovie is listed after all the movies
in the menu.
JAN
JAN JAN JAN
JAN JAN JAN
• Discs may not be played back, playback may be
interrupted, or some functions may be disabled
on some DVD devices.
• Still images are played back as a Photomovie
swapping images in every 3 seconds.
Photomovie
Playing back a disc on a
computer with a DVD drive
installed
• Do not use the 8cm CD adaptor with an
8cm DVD as it may cause a malfunction.
• Even when you are using a DVD+RW,
you must finalize the disc. Otherwise, it
may cause a malfunction.
Playing back movies
Use a DVD drive that supports 8cm discs,
and a DVD playback application must have
been installed on your computer.
1 Insert the finalized disc into the
DVD drive of your computer.
2 Play back the disc using a DVD
playback application.
• The disc may not be played back on some
computers. For details, refer to the instruction
manuals of your computer.
• You cannot play back or edit movies that have
been copied from the disc to the hard disk of
your computer. For details on how to import
movies, refer to the “First Step Guide” supplied
with the CD-ROM.
Page 45

45
Playback on DVD devices
Playing back still images
Still images stored on the disc are
displayed in the JPEG format.
Note that erasing or changing the original
data may occur accidentally in this
operation since you use the original data
on the disc.
1 Insert the finalized disc into the
DVD drive of your computer.
2 Click [Start] [My Computer].
Or, double-click the [My Computer]
icon on the desktop.
3 Right-click the DVD drive with the
disc inserted, then click [Open].
4 Double-click [DCIM]
[100MSDCF].
5 Double-click the file to be
displayed.
The selected still image appears on the
screen.
The date the disc was first used is
recorded on the volume label of the
disc.
<e.g.>
When the disc was first used at 6:00 pm on
January 1st 2005:
2005_01_01_06H00M_PM
Volume
label
Images are stored in the following
folders on the disc.
Movies
DVD-R/DVD-RW(VIDEO mode)/DVD+RW:
VIDEO_TS folder
DVD-RW (VR mode):
DVD_RTAV folder
Still images
DCIM\100MSDCF folder
<e.g.>
The folder for data on DVD-Rs/DVD-RWs
(VIDEO mode)/DVD+RWs
When using Windows XP:
Still image
folder
Page 46

46
Recording additional scenes after finalizing
You can record additional material on the
finalized DVD-RWs (VIDEO mode)/
DVD+RWs by following the steps below if
there is space to record on the disc.
When using the finalized DVD-RW (VR
mode) disc, you can record additional
material on the disc without any additional
steps.
• Use an AC Adaptor as power source to prevent
your camcorder from running out of power
during operation.
• Do not apply shock or vibration to your
camcorder, and do not disconnect the AC
Adaptor during operation.
• A DVD menu and a Photomovie created during
finalizing are deleted.
• When you use a double-sided disc, following
procedures are required on each side.
When using a DVD-RW (VIDEO
mode) disc (Unfinalizing)
1 Connect the AC Adaptor to the
DC IN jack on your camcorder,
then connect the power cord to
the wall outlet.
2 Turn on the power by sliding the
POWER switch.
3 Insert the finalized disc into your
camcorder.
4 Touch [SETUP].
5 Touch DISC SET
[UNFINALIZE].
6 Touch [YES] [YES], then touch
when [Completed.] appears.
When using a DVD+RW
If you have created a Photomovie or a
DVD menu in finalizing (p. 40), the
following steps are required.
1 Connect the AC Adaptor to the
DC IN jack on your camcorder,
then connect the power cord to
the wall outlet.
2 Slide the POWER switch to light
up the (Movie) or (Still)
lamp.
3 Insert the finalized disc into your
camcorder.
A confirmation dialog asking if you
record additional scenes appears.
4 Touch [YES] [YES].
[Completed.] appears, then the screen
returns to the recording screen.
Page 47

47
Playback on DVD devices
Deleting all of the scenes on the disc (Formatting)
Formatting makes the recorded disc
new and reusable by deleting all the
data recorded on the disc. The recording
capacity of the disc is recovered by
formatting it.
The procedure for formatting differs
depending on the disc type.
You cannot format this kind of
disc. Use a new disc.
You can format this kind of
disc and reuse it.
If you have finalized the disc,
it is unfinalized.
You can format this kind of
disc and reuse it.
If you have finalized the
disc, the previous records on
finalizing remain on the disc.
You can format this kind of
disc and reuse it.
If you have finalized the
disc, the previous records on
finalizing remain on the disc.
• Use an AC Adaptor as power source to
prevent your camcorder from running out
of power during formatting.
• Do not apply shock or vibration to your
camcorder, and do not disconnect the AC
Adaptor during formatting.
• When you use a double-sided disc,
formatting is required on each side.
1 Connect the AC Adaptor to the
DC IN jack on your camcorder,
then connect the power cord to
the wall outlet.
2 Turn on the power by sliding the
POWER switch.
3 Insert the disc to be formatted
into your camcorder.
4 Touch [FORMAT].
DVD-RW
Select the recording format, then format
the disc. Proceed to step 5.
DVD+RW
The [FORMAT] screen appears.
Proceed to step 6.
5 Select the recording format for a
DVD-RW, then touch .
For details on a recording format, see
page 13.
6 Touch [YES] [YES], then touch
when [Completed.] appears.
• During the Easy Handycam operation (p. 25),
the screen in step 5 does not appear even if you
insert a DVD-RW into your camcorder. Proceed
to step 6.
• You cannot format a disc that has been
protected on other equipment. Cancel the
protection with the original equipment, and then
format it.
Using the recorded disc (DVD-RW/DVD+RW)
Page 48

48
Using the Setup items
1 Slide the POWER switch to light up the respective lamp.
: Settings for movies
: Settings for still images
: Settings for viewing/editing
Slide the POWER
switch while pressing
the green button in the
center if the POWER
switch is in the OFF
(CHG) position.
2 Touch the LCD screen to select the setup item.
Unavailable items will be grayed out.
To use the short-cuts of Personal Menu
On Personal Menu, short-cuts for frequently used setup items are added.
• You can customize Personal Menu as you like (p. 64).
Touch .
EXPOSURE
SPOT
FOCUS
FINA-
LIZE
SPOT
METER
FADER
SETUP
Touch the desired setup item.
If the desired setup item is not displayed on the screen, touch / until it is displayed.
Select the desired setting, then touch .
To use setup items
You can customize setup items that are not added to Personal Menu.
OK
FOCUSFOCUS
SPOT FOCUSSPOT FOCUS
AUTOSHUTTERAUTOSHUTTER
SELF-TIMERSELF-TIMER
DIGITALZOOM
WIDESELECTWIDESELECT
OFF
0:00: 00
STBY
VIDEO
60min
COLOR SLOW S
Page 49

49
Using the Setup items
Touch [SETUP].
Select the desired setup item.
Touch / to select the item, then touch .
Select the desired item.
Touch / to select the item, then touch .
•
You can also touch the item directly to select it.
Customize the item.
After finishing the settings, touch (close) to hide the [SETUP] screen.
If you decide not to change the setting, touch to return to the previous screen.
• During Easy Handycam operation (p. 25), available setup items are displayed when you touch [SETUP]
on the LCD screen.
Page 50

50
Position of lamp:
Movie
Still
Play/Edit
Easy
Handycam
CAMERA SET (p. 52)
PROGRAM AE
–
AUTO
SPOT METER
–
AUTO
EXPOSURE
–
AUTO
WHITE BAL.
–
AUTO
AUTO SHUTTER
–
–
ON
SPOT FOCUS
–
AUTO
FOCUS
–
AUTO
COLOR SLOW S
–
–
OFF
SELF-TIMER
–
OFF
DIGITAL ZOOM
–
–
OFF
WIDE SELECT
–
–
4:3
STEADYSHOT
–
–
ON
STILL SET (p. 56)
QUALITY
–
–
FINE
FILE NO.
–
–
–*
PICT.APPLI. (p. 57)
FADER
–
–
OFF
D. EFFECT
–
–
OFF
PICT. EFFECT
–
–
OFF
REC CTRL
–
–
–
SLIDE SHOW
–
–
–
DEMO MODE
–
–
ON
DISC SET (p. 59)
FORMAT
FINALIZE
UNFINALIZE
–
DISC TITLE
–
Setup items
Page 51

51
Using the Setup items
Available setup items () vary depending on the position of a lamp.
*The setting value before entering Easy Handycam operation will be retained.
Position of lamp:
Movie
Still
Play/Edit
Easy
Handycam
STANDARD SET (p. 59)
REC MODE
–
–
SP
VOLUME
–
–
*
MULTI-SOUND
–
–
STEREO
MICREF LEVEL
–
–
NORMAL
LCD SET
–/
NORMAL/
–/–*
USB SPEED
–
–
–*
DATA CODE
–
–
–
DISC REMAIN
–
AUTO
REMOTE CTRL
ON
REC LAMP
–
ON
BEEP
*
DISP OUTPUT
LCD
PANEL
SETUP ROTATE
–
A.SHUT OFF
5min
CALIBRATION
–
–
–
TIME/LANGU. (p. 63)
CLOCK SET
*
AREA SET
–*
DST SET/SUMMERTIME
–*
LANGUAGE
*
Page 52

52
The default settings are marked with .
The indicators in parentheses appear when
the items are selected.
See page 48 for details on selecting
setup items.
PROGRAM AE
You can record pictures effectively in
various situations with the PROGRAM AE
function.
AUTO
Select to automatically record pictures
effectively without the [PROGRAM AE]
function.
SPOTLIGHT*( )
Select to prevent people’s faces from
appearing excessively white when subjects
are lit by strong light.
PORTRAIT (Soft portrait) ( )
Select to bring out the subject such as
people or flowers while creating a soft
background.
SPORTS*(Sports lesson) ( )
Select to minimize shake when shooting
fast moving subjects.
BEACH&SKI*( )
Select to prevent people’s faces from
appearing dark in strong light or reflected
light, such as at a beach in midsummer or
on a ski slope.
SUNSET&MOON**( )
Select to maintain the atmosphere of
situations such as sunsets, general night
views or fireworks.
LANDSCAPE**( )
Select to shoot distant subjects clearly.
This setting also prevents your camcorder
from focusing on glass or metal mesh
in windows that comes in between the
camcorder and the subject.
• Items with 1 asterisk (*) can be adjusted
so as not to focus on subjects only a short
distance away. Items with 2 asterisks (**)
can be adjusted to focus on subjects farther
away.
• The setting returns to [AUTO] when you
have the power source disconnected from
your camcorder for more than 5 minutes.
CAMERA SET
Settings to adjust your camcorder to
the recording conditions
(EXPOSURE/WHITE BAL./
STEADYSHOT, etc.)
Page 53

53
Using the Setup items
SPOT METER (Flexible spot meter)
You can adjust and fix the exposure
to the subject, so that it is recorded in
suitable brightness even when there is
strong contrast between the subject and
the background, such as subjects in the
spotlight on stage.
Touch the point where you want to fix and
adjust the exposure on the screen.
appears.
Touch [END].
To return the setting to automatic exposure,
touch [AUTO][END].
•
If you set [SPOT METER], [EXPOSURE] is
automatically set to [MANUAL].
• The setting returns to [AUTO] when you have
the power source disconnected from your
camcorder for more than 5 minutes.
EXPOSURE
You can fix the brightness of a picture
manually. When recording indoors on
a clear day, for instance, you can avoid
backlight shadows on people next to the
window by fixing the exposure to that of
the wall side of the room.
Touch [MANUAL].
appears.
Adjust the exposure by touching
/ .
Touch .
To return the setting to automatic exposure,
touch [AUTO] .
• The setting returns to [AUTO] when you have
the power source disconnected from your
camcorder for more than 5 minutes.
WHITE BAL. (White balance)
You can adjust the color balance to the
brightness of the recording environment.
AUTO
The white balance is adjusted
automatically.
OUTDOOR ( )
The white balance is set to the brightness
of the outdoor environment or daylight
under fluorescent lamps.
INDOOR ()
The white balance is set to the brightness
of warm white fluorescent lamps.
ONE PUSH ( )
The white balance will be adjusted
according to the ambient light.
Touch [ONE PUSH].
Frame a white object such as a piece of
paper, to fill the screen under the same
lighting conditions as you will shoot
the subject.
Touch [ ].
flashes quickly. When the white
balance has been adjusted and stored
in the memory, the indicator stops
flashing.
•
Do not shake your camcorder while
is flashing quickly.
•
flashes slowly if white balance could
not be set.
•
If keeps flashing even after you have
touched , set [WHITE BAL.] to
[AUTO].
• When you have changed the battery pack
while [AUTO] is selected, or you bring your
camcorder outdoors from inside the house
while using fixed exposure, select [AUTO] and
aim your camcorder at a nearby white object
for about 10 seconds for better color balance
adjustment.
Page 54

54
• Redo the [ONE PUSH] procedure if you change
the [PROGRAM AE] settings, or bring your
camcorder outdoors from inside the house, or
vice versa when [ONE PUSH] is set to on.
• Set [WHITE BAL.] to [AUTO] or [ONE
PUSH] under white or cool white fluorescent
lamps.
• The setting returns to [AUTO] when you have
the power source disconnected from your
camcorder for more than 5 minutes.
AUTO SHUTTER
Automatically activates the electronic
shutter to adjust the shutter speed when
recording in bright conditions if you set it
to [ON] (the default setting).
SPOT FOCUS
You can select and adjust the focal point to
aim it at a subject not located in the center
of the screen.
Touch the subject on the screen.
appears.
Touch [END].
To adjust the focus automatically, touch
[AUTO][END].
•
If you set [SPOT FOCUS], [FOCUS] is
automatically set to [MANUAL].
• The setting returns to [AUTO] when you have
the power source disconnected from your
camcorder for more than 5 minutes.
FOCUS
You can adjust the focus manually. Select
this when you want to focus on a certain
subject intentionally.
Touch [MANUAL].
appears.
Touch (focusing on close subjects)/
(focusing on distant subjects) to
sharpen the focus. appears when the
focus cannot be adjusted any closer, and
appears when the focus cannot be adjusted
farther away.
Touch .
To adjust the focus automatically, touch
[AUTO] in step .
• It is easier to focus on the subject by moving
the power zoom lever towards T (telephoto) to
adjust the focus, then towards W (wide angle)
to adjust the zoom for recording. When you
want to record a subject at close range, move
the power zoom lever to W (wide angle), then
adjust the focus.
•
The minimum distance required between
your camcorder and the subject to get a sharp
focus is about 1 cm (about 1/2 inch) for wide
angle and about 80 cm (about 2 5/8 feet) for
telephoto.
• The setting returns to [AUTO] when you have
the power source disconnected from your
camcorder for more than 5 minutes.
COLOR SLOW S
(Color Slow Shutter)
When you set [COLOR SLOW S] to [ON],
you can record an image brighter in color
even in dark places.
and [COLOR SLOW SHUTTER] flash
on the screen.
To cancel [COLOR SLOW S], touch
[OFF].
CAMERA SET (continued)
Page 55

55
Using the Setup items
•
Adjust the focus manually ([FOCUS], p. 54)
when it is hard to focus automatically.
•
The shutter speed of your camcorder changes
depending on the brightness. The motion of the
picture may slow down at this time.
SELF-TIMER
The self-timer starts recording after about
10 seconds.
Touch [SETUP] CAMERA
SET[SELF-TIMER][ON] .
appears.
Press REC START/STOP (PHOTO) to
record movies, or still images. To cancel
the count down, touch [RESET].
To cancel the self-timer, select [OFF] in
step .
• You can also use the self-timer with the Remote
Commander (p.37).
DIGITAL ZOOM
You can select the maximum zoom level in
case you want to zoom greater than 10 ×,
optical zoom magnification.
Note that the image quality decreases when
you use the digital zoom.
The right side of the bar shows the
digital zooming factor. The zooming
zone appears when you select the
zooming level.
OFF
Up to 10 × zoom is performed optically.
20 ×
Up to 10 × zoom is performed optically,
and after that, up to 20 × zoom is
performed digitally.
120 ×
Up to 10 × zoom is performed optically,
and after that, up to 120 × zoom is
performed digitally.
WIDE SELECT
You can record a picture in a ratio suitable
for the screen on which it will be displayed.
4:3
Standard setting (to record pictures to be
played back on a 4:3 TV).
16:9 WIDE
Records pictures to be played back on a
16:9 wide TV in full screen mode.
When viewed on the LCD screen
with [16:9WIDE] selected.
When viewed on a 16:9 wide
screen TV
*1
When viewed on a standard TV
(4:3 screen)
*2
*1
When 16:9 wide TV switches to full screen
mode, the picture appears on the TV screen at
the right ratio.
*2
When you play back in TV (4:3 screen), the
picture may be compressed. When you play
back in the wide mode, the picture appears as
you see it on the LCD screen.
• You cannot change the aspect ratio in the
following cases:
– while recording movie.
– when [D.EFFECT] is set to [OLD MOVIE]
(p.58).
• When recording on a DVD-R/DVD-RW
(VIDEO mode)/DVD+RW, the available
recording time may get shorter in the following
conditions:
– when you record both [4:3] and [16:9WIDE]
picture.
– when you change the [REC MODE] in [4:3]
(p. 59).
Page 56

56
Images played back on a TV
connected to a DVD device
The way you see images on the TV screen
may be different depending on the device.
For details, refer to the instruction manuals
supplied with the device you are using.
• When you play back pictures recorded in
[16:9WIDE] on a DVD+RW with a DVD
player or a DVD recorder, they may appear to
be compressed in the lengthwise direction.
• When you connect your camcorder to a TV
compatible with the ID-1/ID-2 system, or via
an S VIDEO jack, and play back a disc, the TV
switches to full mode automatically. Refer also
to the instruction manuals supplied with your
TV (p. 38).
STEADYSHOT
You can record pictures using
[STEADYSHOT] (the default setting is
[ON]). Set [STEADYSHOT] to [OFF] ( )
when using a tripod (optional).
STILL SET
Settings for still images
(QUALITY/FILE NO.)
The default settings are marked with .
The indicators in parentheses appear when
the items are selected.
See page 48 for details on selecting
setup items.
QUALITY
FINE ( )
Records still images at the fine image
quality level.
STANDARD ( )
Records still images at the standard image
quality level.
The size of still images
[FINE] : approx. 150KB.
[STANDARD] : approx. 60KB.
Number of still images recordable on
a disc (approx.)
DVD-R
5100
8100
DVD-RW (VIDEO mode)
5400
8600
DVD-RW (VR mode)
5400
8600
DVD+RW
2950
3800
Top: [FINE]
Bottom: [STANDARD]
• Still images are recorded in 640×480 on your
camcorder.
• The table shows approximate recordable
number and the numbers apply to a single-sided
disc, and they will be doubled for a doublesided disc.
CAMERA SET (continued)
Page 57

57
Using the Setup items
FILE NO.
SERIES
Assigns numbers to files in sequence even
if the disc is changed.
RESET
Resets the file numbering to 0001 each
time the disc is changed.
PICT.APPLI.
Special effects on pictures or
additional functions on recording/
playback
(D.EFFECT/PICT.EFFECT/SLIDE
SHOW, etc.)
The default settings are marked with .
The indicators in parentheses appear when
the items are selected.
See page 48 for details on selecting
setup items.
FADER
You can add the following effects to
currently recording pictures.
Select the desired effect, then touch .
When you select [OVERLAP] or [WIPE],
the image is stored as a still image. (While
storing the image, the screen turns to blue.)
Press REC START/STOP (PHOTO).
The fader indicator stops flashing and
disappears when the fade is completed.
To cancel the operation, touch [OFF] in
step .
Fading out Fading in
WHITE FADER
BLACK FADER
OVERLAP (fade in only)
WIPE (fade in only)
Page 58

58
D. EFFECT (Digital effect)
You can add digital effects to your
recordings. appears.
Touch the desired effect.
When you select [LUMI. KEY], adjust the
effect with / , then touch .
The image displayed when you touch
is saved as a still image.
Touch .
appears.
To cancel [D. EFFECT], touch [OFF] in
step .
LUMI. KEY (luminance key)
Replaces a brighter area in a previously
recorded still image (e.g. a person) with a
movie.
OLD MOVIE
Adds an old movie effect to pictures.
PICT. EFFECT (Picture effect)
You can add special effects to a picture
during recording. appears.
OFF
Does not use [PICT. EFFECT] setting.
SEPIA
Picture appears in sepia.
B&W
Picture appears in black and white.
PASTEL
Picture appears like a pale pastel drawing.
MOSAIC
Picture appears mosaic-patterned.
REC CTRL
See page 74.
SLIDE SHOW
Plays back all the images stored on a disc
in sequence (slide show).
Still images start to change to the next one
in sequence when you touch [START].
To cancel [SLIDE SHOW], touch [END].
To pause, touch [PAUSE]. Touch [START]
again to restart the slide show.
•
You can select the first picture for the slide
show with / before touching
[START].
•
You can repeat the slide show by touching .
The default setting is set to [ON] (repeat slide
show).
DEMO MODE
The default setting is [ON] so that you
can view the demonstration in about 10
minutes, after you have set the POWER
switch to (Movie) without inserting a
disc.
•
The demonstration will be suspended in
situations such as those described below.
– When you touch the screen during the
demonstration. (The demonstration starts
again in about 10 minutes.)
– When you slide the disc cover OPEN switch.
– When the POWER switch is set to other than
(Movie).
PICT. APPLI. (continued)
Page 59

59
Using the Setup items
DISC SET
Settings for discs
(FORMAT/FINALIZE/UNFINALIZE, etc.)
See page 48 for details on selecting
setup items.
FORMAT
See page 47.
FINALIZE
See page 40.
UNFINALIZE
See page 46.
DISC TITLE
You can make a title on each disc. As the
default, the date when the disc was first
used is used as a disc title.
Touch [SETUP] DISC
SET [DISC TITLE].
Enter the disc title.
Follow steps 2 to 5 in “Step 4: Changing
the disc title” of the “Making the disc
compatible with DVD players or DVD
drives (Finalizing)” (p. 42).
To cancel editing the title, touch [ESC] in
step .
STANDARD SET
Settings while recording on a disc or
other basic settings
(REC MODE/LCD SET/USB SPEED,
etc.)
The default settings are marked with .
The indicators in parentheses appear when
the item is selected.
See page 48 for details on selecting
setup items.
REC MODE (Recording mode)
You can select an image quality of the
movie from 3 levels.
HQ ( )
Record in high quality mode
(approx. recordable time is up to 20 min).
SP ( )
Records in standard quality mode
(approx. recordable time is up to 30 min).
LP ( )
Increases the recording time (Long Play)
(approx. recordable time is up to 60 min).
• The time in parenthesis indicates the
approximate recordable time when
recording only a movie on a single-sided
disc. When recording on a double-sided
disc, this value is applied for both sides.
• Your camcorder has a VBR encoding
system (p.12) so when you record an
object that moves fast, the time available
for recording may shorten.
•
If you record in the LP mode, the quality of
scenes may be degraded, or scenes with quick
movements may appear with a block noise
when you play back the disc.
VOLUME
See page 31.
Page 60

60
MULTI-SOUND
You can select to play back audio recorded
using other devices whether with dual
sound or with stereo sound.
STEREO
Plays back with main and sub sound (or
stereo sound).
1
Plays back with main sound or the left
channel sound.
2
Plays back with sub sound or the right
channel sound.
•
The setting returns to [STEREO] when you
have the power source disconnected from your
camcorder for more than 5 minutes.
MICREF LEVEL
You can select the microphone level for
recording sound.
Select [LOW] when you want to record
exciting and powerful sound in a concert
hall, etc.
NORMAL
Records various surround sounds,
converting them into the same level.
LOW
Records surround sound faithfully.
This setting is not suitable for recording
conversations.
•
The setting returns to [NORMAL] when you
have the power source disconnected from your
camcorder for more than 5 minutes.
LCD SET
The recorded picture will not be affected
even when you change the setting.
LCD BRIGHT
You can adjust the brightness of the LCD
screen.
Adjust the brightness with / .
Touch .
LCD BL LEVEL
You can adjust the brightness of the LCD
screen’s backlight.
NORMAL
Standard brightness.
BRIGHT
Brightens the LCD screen.
•
When you use an AC Adaptor as the power
source, [BRIGHT] is automatically selected for
the setting.
•
When you select [BRIGHT], battery life is
slightly reduced during recording.
LCD COLOR
You can adjust the color on the LCD screen
with / .
Low intensity
High intensity
WIDE DISPLAY
You can select how a 16:9 aspect ratio
picture appears in the LCD screen.
LETTER BOX
Normal setting (standard type of display)
SQUEZE (Squeeze)
Expands the picture vertically when black
bands appear at the top and bottom of the
screen in 16:9 aspect ratio.
• When you set the POWER switch to (Still),
[WIDE DISPLAY] does not appear.
USB SPEED
You can select data transfer speed used to
transfer data to your computer.
AUTO
Sends data by switching automatically
between the Hi-Speed USB (USB2.0) and
the speed corresponding to USB1.1 (full
speed transfer).
FULL SPEED
Sends data corresponding to USB1.1 (full
speed transfer).
STANDARD SET (continued)
Page 61

61
Using the Setup items
•
The data code is displayed on the TV screen if
you connect your camcorder to a TV.
•
The indicator toggles through the following
sequences as you press DATA CODE on
the Remote Commander: DATE/TIME
CAMERA DATA OFF (no indicator).
•
Depending on the disc condition, bars [--:--:--]
appear.
•
The setting returns to [OFF] when you have
the power source disconnected from your
camcorder for more than 5 minutes.
DISC REMAIN
AUTO
Displays the remaining disc indicator for
about 8 seconds in situations such as those
described below.
•
When you check the disc remaining by
sliding the POWER switch to (Movie)
or (Still).
•
When you set the POWER switch to
(Movie) or (Still), then press DISP/
BATT INFO to switch the indicator from
off to on.
•
When the remaining capacity of the disc is
less than 5 minutes for (Movie) or 30
images for (Still).
•
When you start recording from the line
input.
ON
Always displays the remaining disc
indicator.
REMOTE CTRL (Remote control)
The default setting is [ON] so that you can
use the Remote Commander (p. 37).
•
Set to [OFF] to prevent your camcorder
from responding to a command sent by other
equipment’s remote control.
•
The setting returns to [ON] when you have
the power source disconnected from your
camcorder for more than 5 minutes.
DATA CODE
You can check the display information
recorded automatically (data code) during
playback.
OFF
Data code is not displayed.
CAMERA DATA
Displays the camera setting data of
recorded images.
DATE/TIME
Displays the date and time of recorded
images.
CAMERA DATA
Movie
VIDEO
AWB100
9dB
F1. 8
AUTO
0:00:00
60min
Still image
5
6
7
OEV
60
F1. 8
VIDEO
10/1 0
60min
SteadyShot off
Exposure
White balance
Gain
Shutter speed
Aperture value
Exposure value
DATE/TIME
60min
11:23:45AM
JAN 1 2005
VIDEO
0:00: 00
9
8
Date
Time
Page 62

62
REC LAMP (Recording lamp)
The camera recording lamp will not light
up during recording when you set this to
[OFF]. (The default setting is [ON].)
BEEP
ON
A melody sounds when you start/stop
recording, or operate the touch panel.
OFF
Cancels the melody.
DISP OUTPUT
LCD PANEL
Shows displays such as the counter on the
LCD screen.
V-OUT/PANEL
Shows the display also on the TV screen.
SETUP ROTATE
NORMAL
Scrolls the setup items downwards by
touching .
OPPOSITE
Scrolls the setup items upwards by
touching .
A.SHUT OFF (Auto shut off)
5 min
The camcorder is automatically turned off
when you do not operate your camcorder
for more than approximately 5 minutes.
NEVER
The camcorder is not automatically turned
off.
•
When you use the AC Adaptor as the power
source, [A.SHUT OFF] is automatically set to
[NEVER].
CALIBRATION
See page 102.
STANDARD SET (continued)
Page 63

63
Using the Setup items
TIME/LANGU.
(CLOCK SET/AREA SET/LANGUAGE,
etc.)
The default settings are marked with .
The indicators in parentheses appear when
the item is selected.
See page 48 for details on selecting
setup items.
CLOCK SET
See page 22.
AREA SET
Set your local area using / when using
your camcorder overseas.
Refer to the World time difference on page
98.
DST SET/SUMMERTIME
OFF
Does not set the summertime (daylight
saving time).
ON
Sets the summertime (daylight saving
time).
You can adjust a time difference in
the [AREA SET] and the [DST SET]/
[SUMMERTIME] setting without stopping
the clock.
LANGUAGE
You can select the language to be used on
the LCD screen.
You can select from English, Simplified
English, Canadian-French, Latin American
Spanish, Brazilian-Portuguese, or Korean.
•
Traditional Chinese is also available from
setup items for customers who bought
this product in Asia, Middle East, Canada,
Latin America or Japan (as an Overseas
Model).
•
Your camcorder offers [ENG[SIMP]]
(simplified English) for when you cannot
find your native tongue among the
options.
Page 64

64
Deleting a setup item
1 Touch [P-MENU SET UP]
[DELETE].
If the desired setup item is not
displayed, touch / .
Sel ect button to delete .
1/3
END
SETU P
FINA -
LIZE
0:00: 00
60min
STBY
EXPOSURE
SPOT
FOCUS
SPOT
METER
FADER
2 Touch the setup item that you
want to delete.
Dele te thi s from
mode 's
P-MENU?
DEL ETE
YES NO
0:00: 00
60min
STBY
3 Touch [YES] .
•
You cannot delete [SETUP], [FINALIZE]
and [P-MENU SET UP].
Customizing Personal Menu
You can add desired setup items to
Personal Menu, and customize Personal
Menu settings for each POWER switch
position. This is convenient if you add
frequently used setup items to Personal
Menu.
Adding a setup item
You can add up to 27 setup items for each
POWER switch position. Delete a less
important setup item, if you want to add
more.
1 Touch [P-MENU SET
UP] [ADD].
END
Sel ect th e cat egor y
CAMERA SET
PICT. APPLI.
DISC SET
STANDARD SET
TIME / LANGU.
0:00: 00STBY
60min
OK
2 Touch / to select a setup
category, then touch .
END
Sel ect th e ite m.
PROGRAM AE
SPOT METER
EXPOSURE
WHITE BAL.
AUTO SHUTTER
0:00: 00
60min
OK
STBY
3 Touch / to select a setup
item, then touch [YES]
.
The setup item is added to the end of
list.
Page 65

65
Using the Setup items
Arranging the order of setup
items displayed on Personal
Menu
1 Touch [P-MENU SET UP]
[SORT].
If the desired setup item is not
displayed, touch / .
2 Touch the setup item you want to
move.
3 Touch / to move the setup
item to the desired place.
4 Touch .
To sort more items, repeat steps 2 to 4.
5 Touch [END] .
•
You cannot move [P-MENU SET UP].
Initializing the Personal Menu
settings (Reset)
Touch [P-MENU SET UP]
[RESET] [YES] [YES] .
Page 66

66
Editing the original data
This function is available only for DVD-RWs (VR
mode).
“Original data” refers to the recorded
movies and still images data on the disc.
Using DVD-RWs recorded in VR mode,
you can edit the original images on your
camcorder.
Deleting images
1 Slide the POWER switch
repeatedly to light up the
(Play/Edit) lamp.
2 Insert the recorded disc into your
camcorder.
3 Select the (Movie) tab or the
(Still image) tab that includes
the image you want to delete,
then touch [EDIT].
4 Touch [DELETE].
5 Touch the image to be deleted.
The selected scene is marked with .
Press and hold the image on the LCD
screen to confirm the image. Touch
to return to the previous screen.
•
You can select several movies and still
images at the same time.
6 Touch [YES].
•
You cannot recover an image once you
delete it.
To delete all movies or still images
on the disc at the same time
Touch [DELETE ALL] in step 4.
•
If you delete an original movie that is listed
in a Playlist (p. 68), it is also deleted from the
Playlist.
•
Deleting scenes may not provide enough space
to record movies or still images additionally.
•
To delete all the images on the disc and restore
original recording capacity, format the disc (p.
47).
Dividing a movie
1 Slide the POWER switch
repeatedly to light up the
(Play/Edit) lamp.
2 Insert the disc with the movies
recorded into your camcorder.
3 Touch the (Movie) tab
[EDIT].
4 Touch [DIVIDE].
Page 67

67
Editing on DVD Handycam (DVD-RW:VR mode)
5 Touch the scene to be divided.
The playback of the selected movie
starts.
6 Touch at the point at which
you want to divide the movie into
scenes.
The movie pauses.
60min 0:00:52
0:20001
DIVID E
VR
OK
When you touch , the operational
buttons below appears.
Returns to the beginning of the
selected movie.
Adjusts the
volume
Adjusts the dividing point with
more precision after the dividing
point has been selected.
60min
0:00: 52
0:20001
DIVID E
VR
OK
To hide the buttons, touch .
•
Play and pause toggle as you press .
•
A slight difference may occur from the point
where you touch and the actual dividing
point, as your camcorder selects the dividing
point based on half-second increments.
7 Touch [YES].
•
Once you divide a movie, you cannot return
it to the state it was in before you divided it.
•
If the movie is added in the Playlist, dividing
the original movie does not affect the movie in
the Playlist.
Page 68

68
The selected scene is marked with .
Press and hold the image on the LCD
screen to confirm the image. Touch
to return to the previous screen.
•
You can select several movies and still
images at the same time.
6 Touch [YES].
•
When you add still images in a Playlist,
they are converted automatically to a movie
and added to the Movie tab.
A movie converted from still images is
shown with .
The original still images remain on the disc.
The resolution of the converted movie
may be lower than that of the original still
images.
To add all the movies on the disc at
the same time
Touch [ ADD ALL] in step 4.
To add all the still images on the disc
in a Playlist
It is recommended that you create a
Photomovie (p.70) beforehand, then add it
in a Playlist.
Erasing unnecessary scenes
from the Playlist
1 Slide the POWER switch
repeatedly to light up (Play/
Edit) lamp.
2 Insert the disc with images added
in a Playlist.
Creating the Playlist
This function is available only for DVD-RWs
(VR mode).
A Playlist is a list showing thumbnails
of the still images and movies that you
have selected. The original scenes are not
changed even though you edit or delete the
scenes in the Playlist.
•
You can add up to 999 scenes in the Playlist.
•
Do not remove the battery pack or the AC
Adaptor from your camcorder while editing the
Playlist. It may damage the disc.
1 Slide the POWER switch
repeatedly to light up the
(Play/Edit) lamp.
2 Insert the recorded disc into your
camcorder.
3 Select the (Movie) tab or the
(Still image) tab that includes
the scene you want to add to the
Playlist, then touch [EDIT].
4 Touch [ ADD].
Touch / to display [ ADD]
when [ ADD] is not displayed.
5 Touch the scene to be added to
the Playlist.
Page 69

69
Editing on DVD Handycam (DVD-RW:VR mode)
3 Touch the (Playlist) tab
[EDIT].
4 Touch [ERASE].
5 Touch the scene to be deleted
from the list.
The selected scene is marked with .
Press and hold the image on the LCD
screen to confirm the image. Touch
to return to the previous screen.
•
You can select several movies and still
images at the same time.
6 Touch [YES].
To erase all the scenes at the same
time
Touch [ERASE ALL] in step 4 [YES].
•
The original scenes are not changed even
though you erase the scenes from the Playlist.
Changing the order within the
Playlist
1 Slide the POWER switch
repeatedly to light up the
(Play/Edit) lamp.
2 Insert the disc with movies added
into a Playlist.
3 Touch the (Playlist) tab
[EDIT].
4 Touch [MOVE].
5 Touch the scene to be moved.
The selected scene is marked with .
Press and hold the image on the LCD
screen to confirm the image. Touch
to return to the previous screen.
•
You can select several movies and still
images at the same time.
6 Touch .
7 Select the designated position
with []/[].
Move destination bar
8 Touch [YES].
•
When you have selected multiple scenes, the
scenes move following the order appeared in
the Playlist.
Page 70

70
Converting all the still images
on a disc to a movie file
(Photomovie)
Photomovie converts still images on a disc
(JPEG format) to a movie (MPEG format)
to play them back on other DVD players
or on your computer, and stores them as
a Photomovie on the disc. Converted still
images are played back in sequence, like a
slide show. However, the resolution (pixels)
of the converted Photomovie may be lower
than that of the original still images.
Since Photomovie categorizes still images
as a movie, you can add more images in the
Playlist.
1 Slide the POWER switch
repeatedly to light up the
(Play/Edit) lamp.
2 Insert the disc with the still
images recorded into your
camcorder.
3 Touch the (Still image) tab
[EDIT] [PHOTOMOVIE].
4 Touch .
All of the still images on the disc
are converted to a single movie file,
and added to a movie tab. A movie
converted from still images is shown
with on the upper right.
•
It may take more time to create a Photomovie
as more still images are recorded on the disc.
•
Still images which are not compatible with your
camcorders, such as ones shot using a digital
still camera and then copied to a computer
can not be converted from still images to a
Photomovie.
Dividing a movie within the
Playlist
1 Slide the POWER switch
repeatedly to light up the
(Play/Edit) lamp.
2 Insert the disc with movies added
into a Playlist.
3 Touch the (Playlist) tab
[EDIT].
4 Touch [DIVIDE].
5 Touch the scene to be divided.
The playback of the selected movie
starts.
6 Touch at the point at which
you want to divide the movie into
scenes.
The movie pauses.
Touch to display functional
buttons.
See page 67 for details.
60min 0:00:52
0:20001
DIVID E
VR
OK
•
Play and pause toggles as you press .
•
A slight difference may occur from the point
where you touch and the actual dividing
point, as your camcorder selects the dividing
point based on half-second increments.
7 Touch [YES].
•
The original scenes are not changed even
though you divide scenes in the Playlist.
Creating the Playlist (continued)
Page 71

71
Editing on DVD Handycam (DVD-RW:VR mode)
Playing the Playlist
This function is available only for DVD-RWs
(VR mode).
1 Slide the POWER switch
repeatedly to light up the
(Play/Edit) lamp.
2 Insert the disc on which the
Playlist is added into your
camcorder.
3 Touch the (Playlist) tab.
A list of the scenes added in the Playlist
appears.
4 Touch the image from which you
want to playback.
The screen returns to the VISUAL
INDEX screen when the Playlist is
played back from the selected scene to
the end.
Page 72

72
Jacks to connect external
devices
DC IN jack (p. 17)
A/V (audio/video) jack (p. 72)
(USB) jack (p. 75)
Connecting to a VCR or TV
Connect your camcorder to the wall outlet using the supplied AC Adaptor for this operation
(p. 17). Refer also to the instruction manuals supplied with the devices to be connected.
1
2
A/V jack
: Video Signal flow
S VIDEO
VIDEO AUDIO
(Yellow)
(White)
(Red)
VCRs or TVs
A/V connecting cable (supplied)
Connect to the input jack of the other device.
A/V connecting cable with S VIDEO
(optional)
When connecting to another device via the
S VIDEO jack, by using an A/V connecting
cable with an S VIDEO cable (optional),
higher quality pictures can be produced than
with an A/V cable connection. Connect the
white and red plug (left/right audio) and the
S VIDEO plug (S VIDEO channel) of the
A/V connecting cable with an S VIDEO cable
(optional). The yellow plug connection is not
necessary.
• Connect the A/V connecting cable to the output
jack of a device you are dubbing a picture
from, or to the input jack of another device for
dubbing a picture from your camcorder.
• When you are connecting your camcorder to a
monaural device, connect the yellow plug of the
A/V connecting cable to the video jack, and the
red (right channel) or white (left channel) plug
to the audio jack on the VCR or the TV.
Page 73

73
Dubbing
Dubbing to VCR/DVD devices
You can copy pictures played back on your
camcorder to other recording devices, such
as VCRs or DVD recorders.
After dubbing them to an HDD (hard
disc drive) video recorder, you can enjoy
images stored on the hard disk of the
recorder.
• To hide the screen indicators such as a counter
on the screen of the monitor of the device
connected with the supplied A/V connecting
cable, set [DISP OUTPUT] to [LCD PANEL]
(the default setting, p. 62).
1 Connect your camcorder to the
VCR using the A/V connecting
cable (supplied).
Connect your camcorder to the input
jacks of a VCR or a DVD device. See
page 72 for details on how to make the
proper connections.
2 Insert the recording media into
your VCR or DVD recorder.
If your recording device has an input
selector, set it to the input mode.
3 Slide the POWER switch
repeatedly to light up the
(Play/Edit) lamp.
4 Insert the recorded disc into your
camcorder.
5 Start the playback on your
camcorder, and record it on the
recording device.
Refer to the instruction manuals
supplied with your recording device for
details.
6 When the dubbing is finished,
stop your camcorder and the
recording device.
• To record the date/time and camera
settings data, display them on the screen
(p. 61).
Page 74

74
Recording images from a TV or VCR/DVD device
You can record pictures or TV programs
from a VCR or TV onto a disc using your
camcorder.
•
You cannot record TV programs which allow
you to record once, or have copy control
technology.
1 Connect your camcorder to the
TV or VCR/DVD device using the
A/V connecting cable (supplied).
Connect your camcorder to the output
jacks of a TV or VCR/DVD device. See
page 72 for details on how to make the
proper connections.
2 If you are recording from a VCR/
DVD device, insert the cassette
or DVD disc into the playback
device.
3 Slide the POWER switch
repeatedly to light up the
(Play/Edit) lamp.
4 Touch [REC CTRL].
If you connect your camcorder to the
device which has the S VIDEO jack,
touch [SET] [VIDEO INPUT]
[S VIDEO] .
•
Touch [SET] to change the recording mode
or adjust the volume.
•
Touch [SET] [DISC REMAIN]
[ON] to display the remaining disc indicator
all the time.
5 Insert a blank disc into your
camcorder.
Format the disc if you use a new DVDRW/DVD+RW (p. 47).
6 Start playing the cassette or the
disc on the playback device, or
select a TV program.
The picture played on the connected
device appears on the LCD screen of
your camcorder.
7 Touch [REC] at the point you
want to start recording.
8 Touch at the point you want
to stop recording.
9 Touch [END].
•
There may be a time difference between the
point where you press [REC] and the actual
point that the recording starts/stops.
•
You cannot record a picture as a still image
even if you press the REC START/STOP
(PHOTO) button during recording.
•
You cannot record images from a TV with no
output jacks.
Page 75

75
Using a Computer
Before referring to the "First Step Guide" on your computer
When you install the Picture Package
software on a Windows computer from
the supplied CD-ROM, you can enjoy the
following operations by connecting your
camcorder to your computer.
• Picture Package software does not
support Macintosh computer.
Viewing and Handling Pictures
Picture Package DVD Viewer
You can view the video and still images
by selecting it from thumbnails. Video
and still images are saved in folders by
date.
You can delete unnecessary scenes of
videos, or create DVDs with menus.
Music Video/Slideshow Producer
Picture Package Producer2
You can select your favorite video and
still images and easily create an original
video with added music and visual
styles.
Duplicating a disc
Picture Package Duplicator
You can copy the disc you recorded
with your camcorder.
•
The CD-ROM (supplied) includes the
following software.
– USB Driver
– Picture Package Ver.1.8
– “First Step Guide”
About “First Step Guide”
The “First Step Guide” is an instruction
manual you can refer to on your computer.
This describes basic operations, from initial
hookup of your camcorder and computer
and making settings, to general operation
the first time you use the software stored
on the CD-ROM (supplied). After inserting
the CD-ROM, referring to “Installing
software” (p. 76), start the “First Step
Guide,” then follow the instructions.
About the help function of the
software
The Help guide explains all the functions
of all the software applications. Refer to the
Help guide for further detailed operations
after reading the “First Step Guide”
thoroughly. To display the Help guide, click
the [?] mark on the screen.
System requirements
OS: Microsoft Windows 2000 Professional,
Windows XP Home Edition or Windows
XP Professional
Standard installation is required. Operation
is not assured if the above OS has been
upgraded.
CPU: Intel Pentium III 600MHz or faster
(Pentium III 1GHz or faster recommended)
Application: DirectX 9.0c or later (This
product is based on DirectX technology.
It is necessary to have DirectX installed.)/
Windows Media Player 7.0 or later/
Macromedia Flash Player 6.0 or later
Sound system: 16 bit stereo sound card and
stereo speakers
Page 76

76
Before referring to the “First
Step Guide” on your computer
(continued)
Memory: 128 MB or more (256 MB or more
recommended)
Hard disk: Available memory required for
installation: 250 MB or more (2GB
or more when using Picture Package
Duplicator)
Available free hard disk space
recommended: 6 GB or more (depending
on the size of the image files edited)
Display: 4 MB VRAM video card, Minimum
800 × 600 dots, High color (16 bit color,
65 000 colors), DirectDraw display driver
capability (this product will not operate
correctly at 800 × 600 dots or less, and 256
colors or less.)
Others: USB port (this must be provided as
standard)
•
Your camcorder is compatible with Hi-Speed
USB (USB2.0).
You can transfer data at a faster rate using a
computer compatible with Hi-Speed USB.
When you connect a USB interface not
compatible with Hi-Speed USB, the data
transfer ratio will be that of USB1.1 (USB full
speed).
•
Operations are not guaranteed on all the
recommended environments.
Installing the software
You need to install the software to your
Windows computer to enjoy editing your
recorded video and still images. The
installation is required only for the first
time.
1 Confirm that your camcorder is
not connected to the computer.
2 Turn on the computer.
Log on as Administrators for
installation.
Close all applications running on the
computer before installing the software.
3 Place the CD-ROM in the disc
drive of your computer.
The installation screen appears.
If the screen does not appear:
Double-click [My Computer] (If you are
using Windows XP, click [Start], then [My
Computer].)
Double-click [PICTUREPACKAGE]
(Disc drive).
*
*
Drive names (such as (E:)) may vary
depending on the computer.
Page 77

77
Using a Computer
4 Click [Install].
Depending on the operating system
on the computer, a message appears
notifying you that “First Step Guide”
cannot be installed automatically with
the InstallShield Wizard. In such a case,
manually copy “First Step Guide”
to your computer according to the
message’s instructions.
5 Select the language for the
application to be installed, then
click [Next].
6 Click [Next].
7 Read [License Agreement], check
[I accept the terms of the license
agreement] when you agree, then
click [Next].
8 Select where to save the
software, then click [Next].
9 Select [NTSC], then click [Install].
10 Click [Install] on the [Ready to
Install the Program] screen.
The installation of Picture Package
starts.
11 Click [Next], then follow the on-
screen instructions to install the
“First Step Guide.”
Page 78

78
Depending on the computer, this screen
may not be displayed. In such a case,
skip to step 12.
12 Click [Next], then follow the
on-screen instructions to install
“ImageMixer EasyStepDVD.”
13 If the [Installing Microsoft (R)
DirectX(R)] screen is displayed,
follow the steps below to install
DirectX 9.0c. If not, skip to step
14.
Read [License Agreement], then click
[Next].
Click [Next].
Click [Finish].
14 Make sure [Yes, I want to restart
my computer now.] is checked,
then click [Finish].
The computer turns off once, then starts
up again automatically (Restart). The
short-cut icons for [Picture Package
Menu], [Picture Package Menu
destination Folder] (and “First Step
Guide,” if installed in step 11) appear
on the desktop.
15 Remove the CD-ROM from the
disc drive of your computer.
•
If you have any questions about Picture
Package, see “For inquires about this
software” (p. 79).
Installing the software (continued)
Page 79

79
Using a Computer
Viewing “First Step Guide”
Displaying “First Step Guide”
To view “First Step Guide” on your
computer, Microsoft Internet Explorer
Ver.6.0 or later is recommended.
Double-click the icon on the desktop.
You can also start by selecting [Start],
[Programs] ([All Programs] for
Windows XP), [Picture Package], and
[First Step Guide], then start up [First
Step Guide].
• To view “First Step Guide” in HTML without
using automatic installation, copy the desired
language folder from the [FirstStepGuide]
folder on the CD-ROM, and then double-click
[Index.html].
• Refer to “FirstStepGuide.pdf” in the following
cases:
– when printing “First Step Guide”
– when “First Step Guide” is not displayed
correctly due to the browser setting even in
recommended environment.
– when the HTML version of “First Step
Guide” is not installed automatically.
For inquires about this software
Pixela User Support Center
Pixela Home Page
http://www.ppackage.com/
– North America (Los Angeles) Telephone:
+1-213-341-0163
– Europe (U.K.) Telephone:
+44-1489-564-764
– Asia (Philippines) Telephone:
+63-2-438-0090
On Copyrights
Music works, sound recording or other
third party musical contents you may
acquire from CDs, the Internet or other
sources (the “Music Contents”) are the
copyrighted work of the respective owners
thereof and are protected by copyright laws
and other applicable laws of each country/
region. Except to the extent expressly
permitted by applicable laws, you are
not permitted to use (including,
without limitation, copying, modifying,
reproducing, uploading, transmitting or
placing to the external network accessible
to the public, transferring, distributing,
lending, licensing, selling and publishing)
any of the Music Contents without
obtaining authorization or approval of
the respective owners thereof. License
of Picture Package by Sony Corporation
would not be construed as conferring to
you by implication, estoppel or otherwise,
any license or right to use the Music
Contents.
Page 80

80
Troubleshooting
If you run into any problems using your camcorder, use the following table to troubleshoot
the problem. If the problem persists, remove the power source and contact your Sony dealer.
Overall operations/Easy Handycam
The camcorder does not operate even when the power is set to on.
•
Disconnect the AC Adaptor from the wall outlet or remove the battery pack, then reconnect it
after about 1 minute. If the functions still do not work, press the RESET button (p. 33) using
a sharp-pointed object. (If you press the RESET button, all settings, including the clock
setting, are reset, except the Personal Menu items.)
•
The temperature of your camcorder is extremely high. Turn off your camcorder and leave it
for a while in a cool place.
Buttons do not work.
•
During Easy Handycam operation, the available buttons are limited. Cancel Easy Handycam
operation (p. 25).
You cannot turn the Easy Handycam operation on or off.
•
During recording or communicating with another device via USB cable, you cannot turn
Easy Handycam operation on or off. Cancel Easy Handycam operation (p. 25).
Settings change during Easy Handycam operation.
•
Some of the settings of your camcorder are restored to the default setting when you set Easy
Handycam operation (p. 25).
[DEMO MODE] does not start.
•
Remove the disc from your camcorder (p. 58).
Your camcorder vibrates.
•
A vibration occurs depending on the condition of the disc. This is not a malfunction.
A vibration is felt in your hand or a faint sound is heard during operation.
•
This is not a malfunction.
A motor sound is heard from your camcorder periodically.
•
This is not a malfunction.
A motor sound is heard from your camcorder when you close the disc cover
without inserting a disc.
•
Your camcorder is checking to see if a disc has been inserted or not. This is not a
malfunction.
Page 81

81
Troubleshooting
Your camcorder gets hot during use for a long period.
•
This is not a malfunction. Turn off your camcorder and leave it for a while in a cool place.
Batteries/Power sources
The power does not turn on.
•
The battery pack is not inserted into the camcorder. Insert a charged battery pack into the
camcorder (p. 17).
•
The battery pack is discharged or running low. Charge the battery pack (p. 17).
•
The plug of the AC Adaptor has been disconnected from the wall outlet. Connect it to the
wall outlet (p. 17).
The power abruptly turns off.
•
When approximately 5 minutes have elapsed while you do not operate your camcorder, the
camcorder is automatically turned off (A.SHUT OFF). Change the setting of [A.SHUT OFF]
(p. 62), or turn on the power again, or use the AC Adaptor.
•
The battery pack is discharged or running low. Charge the battery pack (p. 17).
The CHG (charge) lamp does not light when charging the battery pack.
•
Slide the POWER switch to OFF (CHG) (p. 17).
•
Insert the battery pack into the camcorder correctly (p. 17).
•
No power is supplied from the wall outlet (p. 17).
•
The battery charge is completed (p. 17).
The CHG (charge) lamp flashes when charging the battery pack.
• Insert the battery pack into the camcorder correctly (p. 17). If the problem persists,
disconnect the AC Adaptor from the wall outlet and contact your Sony dealer. The battery
pack may be damaged.
The power turns off frequently although the remaining battery indicator
indicates that the battery pack has enough power to operate.
•
A problem has occurred in the remaining battery time indicator, or the battery pack has not
been charged enough. Fully charge the battery again to correct the indication (p. 17).
The remaining battery time indicator does not indicate the correct time.
•
The temperature of the environment is too high or too low. This is not a malfunction.
•
The battery pack has not been charged enough. Fully charge the battery again. If the problem
persists, replace the battery pack with a new one (p. 17).
•
The indicated time may not be correct depending on the environment of use.
The battery pack is quickly discharged.
•
The temperature of the environment is too high or low. This is not a malfunction.
•
The battery pack has not been charged enough. Fully charge the battery again. If the problem
persists, replace the battery pack with a new one (p. 17).
Page 82

82
A problem occurs when the camcorder is connected to the AC Adaptor.
•
Turn off the power, and disconnect the AC Adaptor from the wall outlet. Then, connect it
again.
LCD screen
An unknown picture appears on the screen.
•
The camcorder is in [DEMO MODE] (p. 58). Touch the LCD screen or insert a disc to
cancel [DEMO MODE].
An unknown indicator appears on the screen.
•
They may be warning indicators or messages (p. 93).
The picture remains on the LCD screen.
•
This occurs if you disconnect the AC Adaptor from the wall outlet or remove the battery
pack without turning off the power first. This is not a malfunction.
You cannot turn the LCD backlight off.
•
During Easy Handycam operation, you cannot turn the LCD backlight on/off using the
DISP/BATT INFO. Cancel Easy Handycam operation (p. 25).
The buttons do not appear on the touch panel.
•
Touch the LCD screen lightly.
•
Press DISP/BATT INFO on your camcorder (or DISPLAY on the Remote Commander) (p.
21, 37).
The buttons on the touch panel do not work correctly or do not work at all.
•
Adjust the screen ([CALIBRATION]) (p. 102).
•
If you change the aspect ratio of the picture, the aspect ratio of the button and indicators on
the touch panel will switch to the selected one (p. 55).
Disc
The disc cannot be removed.
•
Make sure the power source (battery pack or AC Adaptor) is connected correctly (p. 17).
•
Remove the battery pack from the camcorder, then insert it again (p. 17).
•
Insert a charged battery pack into the camcorder (p. 17).
•
The temperature of your camcorder is extremely high. Turn off your camcorder and leave it
for a while in a cool place.
•
Moisture condensation has occurred with the disc. Turn off your camcorder and leave it for
about 1 hour (p. 101).
•
Finalizing is interrupted by turning off your camcorder. Turn on your camcorder and remove
the disc after finalizing is completed.
Troubleshooting (continued)
Page 83

83
Troubleshooting
Remaining disc space indicator is not displayed.
•
Set [DISC REMAIN] to [ON] to always display the remaining disc space indicator (p. 61).
The indicators of the disc type and the recording format on the LCD screen are
grayed out.
•
The disc may be created by other than your camcorder. You can play back the disc on your
camcorder, but you cannot record additional scenes.
Recording
Refer also to “Adjusting the image during recording” (p. 84).
Pressing REC START/STOP (PHOTO) does not record movies/still images.
•
Slide the POWER switch repeatedly to light up the (Movie) or (Still) lamp.
•
Your camcorder is recording the scene you have just shot on the disc. You cannot press REC
START/STOP (PHOTO) while [CAPTURE] or appears on the LCD screen (p. 26, 30).
•
The disc has run out of space. Use a new disc or format the disc (DVD-RW/DVD+RW only,
p. 47).
•
The DVD-RW (VIDEO mode)/DVD+RW has been finalized. Make a disc to be able to
record additional scenes (p. 46).
•
The temperature of your camcorder is extremely high. Turn off your camcorder and leave it
for a while in a cool place.
•
Moisture condensation has occurred with the disc. Turn off your camcorder and leave it for
about 1 hour (p. 101).
The ACCESS lamp lights up even when you stop recording.
•
Your camcorder is recording the scene you have just shot on the disc.
The shutter sound is not heard when you record a still image.
•
Set [BEEP] to [ON] (p. 62).
The actual recording time for movie is less than the expected approximate
recording time.
•
When you record an object that moves fast, the time available for recording may shorten (p.
12, 59).
The recording stops.
•
The temperature of your camcorder is extremely high. Turn off your camcorder and leave it
for a while in a cool place.
•
Moisture condensation has occurred with the disc. Turn off your camcorder and leave it for
about 1 hour (P. 101).
Page 84

84
There is a time difference between the point where you press the REC START/
STOP (PHOTO) and the point that the recording movie starts/stops.
•
On your camcorder, there may be a slight time difference between the point where you press�
the REC START/STOP (PHOTO) and the actual point that recording movie starts/stops. This
is not a malfunction.
Adjusting the image during recording
Refer also to “Setup items” (p. 86).
The auto focus does not function.
•
Set [FOCUS] to [AUTO] (p. 54).
•
The recording conditions are not suitable for auto focus. Adjust the focus manually (p. 54).
[STEADYSHOT] does not function.
•
Set [STEADYSHOT] to [ON] (p. 56).
•
[STEADYSHOT] may not work for an excessive camera shake even if [STEADYSHOT] is
set to [ON].
The back light function does not function.
•
The back light function is cancelled when you set [EXPOSURE] to [MANUAL] (p. 53) or
select [SPOT METER] (p. 53).
•
The back light function does not work during Easy Handycam operation. Cancel Easy
Handycam operation (p. 25).
A vertical band appears when recording candlelight or electric light in the dark.
•
This occurs when the contrast between the subject and the background is too high. This is
not a malfunction.
A vertical band appears when recording a bright subject.
•
This phenomenon is called the smear effect. This is not a malfunction.
Tiny spots in white, red, blue, or green appear on the screen.
•
The spots appear when you are recording in [COLOR SLOW S]. This is not a malfunction.
The screen is so dark that pictures cannot be seen.
•
The LCD screen backlight is switched off. Turn on the LCD backlight by pressing and
holding DISP/BATT INFO (p. 21).
Flickering or changes in color occurs.
•
This occurs when recording pictures under a fluorescent lamp, sodium lamp, or mercury
lamp with [PORTRAIT] or [SPORTS]. Cancel [PROGRAM AE] in this case (p. 52).
Troubleshooting (continued)
Page 85

85
Troubleshooting
Black bands appear when you record a TV screen or computer screen.
•
Set [STEADYSHOT] to [OFF] (p. 56).
Remote Commander
The supplied Remote Commander does not function.
•
Set [REMOTE CTRL] to [ON] (p. 61).
•
Insert a battery into the battery holder with the +/– polarities correctly matching the
+/– marks (p. 104).
•
Remove any obstructions between the Remote Commander and the remote sensor.
•
Point the remote sensor away from strong light sources such as direct sunlight or overhead
lighting. Otherwise, the Remote Commander may not function properly.
Another DVD device malfunctions when you use the supplied Remote
Commander.
•
Select a commander mode other than DVD 2 for your DVD device, or cover the sensor of
your DVD device with black paper.
Playing back a disc on your camcorder
You cannot play back a disc.
•
Slide the POWER switch repeatedly to light up (Play/Edit).
•
Check the disc compatibility (p. 13).
•
Insert a disc with the recording side facing your camcorder (p. 23).
•
The disc recorded in other devices may not be played back on your camcorder.
The playback picture is distorted.
•
Clean the disc using the cleaning cloth (supplied, p. 5).
“?” is indicated on an image in the VISUAL INDEX screen.
•
Clean the disc using the cleaning cloth (supplied, p. 5).
•
Loading of the data may have failed. It may be indicated correctly when you turn off the
power and then turn it on again, or remove the disc once and insert it again.
95.1ch appears on the LCD screen.
•
5.1ch surround sound was recorded on the disc on another device. Your camcorder is not
compatible with 5.1ch surround recording.
No sound or only a low sound is heard when playing back a disc.
•
Set [MULTI-SOUND] to [STEREO] (p. 60).
•
Turn up the volume (p. 31).
•
When you record sound with [MICREF LEVEL] set to [LOW] (p. 60), the recorded sound
may be difficult to hear.
Page 86

86
Playing back a disc on other players
You cannot play back the disc or a disc cannot be recognized.
•
Clean the disc using the cleaning cloth (supplied, p. 5).
•
Finalize the disc (p. 40).
•
A disc recorded in VR mode cannot be played back on a player that does not support VR
mode. Check the compatibility in the instruction manual of the playback device.
The playback picture is distorted.
•
Clean the disc using the cleaning cloth (supplied, p. 5).
“?” is indicated on an image in the DVD menu.
•
Loading of the data may have failed when the disc was finalized. For DVD-RW (VIDEO
mode)/DVD+RW, make the disc capable of additional recording (p. 46), then remake the
DVD menu by finalizing the disc again. The DVD menu may be displayed correctly.
Playback freezes for an instant between the scenes.
•
The image may freeze for an instant between scenes depending on the DVD device being
used.
Playback does not move to the previous scene when you press .
•
If you press at the beginning of the 2nd title of 2 titles that have been made
automatically by your camcorder, playback may not move to the previous scene. Refer to the
instruction manual of the playback device for further information.
Setup items
Setup items are grayed out.
•
You cannot select grayed items in the current situation.
You cannot use [PROGRAM AE].
•
You cannot use [PROGRAM AE] together with:
– [COLOR SLOW S]
– [OLD MOVIE]
•
[SPORTS] will not work when the POWER switch is set to (Still).
You cannot use [SPOT METER].
•
You cannot use [SPOT METER] together with [COLOR SLOW S].
•
If you set [PROGRAM AE], [SPOT METER] is automatically set to [AUTO].
Troubleshooting (continued)
Page 87

87
Troubleshooting
You cannot use [EXPOSURE].
•
You cannot use [EXPOSURE] together with [COLOR SLOW S].
•
If you set [PROGRAM AE], [EXPOSURE] is automatically set to [AUTO].
You cannot use [SPOT FOCUS].
•
You cannot use [SOPT FOCUS] together with [PROGRAM AE].
[COLOR SLOW S] does not operate correctly.
•
[COLOR SLOW S] may not operate correctly in total darkness.
•
You cannot use [COLOR SLOW S] together with:
– [FADER]
– [D. EFFECT]
– [PROGRAM AE]
– [EXPOSURE]
– [SPOT METER]
You cannot use [SELF-TIMER].
•
You cannot use [SELF-TIMER] together with [FADER].
You cannot use [FADER].
•
You cannot use [FADER] together with:
– [COLOR SLOW S]
– [D. EFFECT]
You cannot use [D. EFFECT].
•
You cannot use [D. EFFECT] together with:
– [COLOR SLOW S]
– [FADER]
•
You cannot use [OLD MOVIE] together with:
– [PROGRAM AE]
– [PICT. EFFECT]
– [WIDE SELECT]
You cannot use [PICT.EFFECT].
•
You cannot use [PICT.EFFECT] together with [OLD MOVIE].
You cannot adjust [LCD BL LEVEL].
•
You cannot adjust [LCD BL LEVEL] when the power is supplied from the AC Adaptor.
Page 88

88
Editing (DVD-RW: VR mode)
Unable to edit.
•
There are no images recorded on the disc.
•
The disc is unable to edit because of the condition of the image.
•
You cannot edit an image protected on another device.
Scenes cannot be added to the Playlist.
•
The disc is full, or the added scenes exceed 999. Delete unnecessary scenes or add all the
still images by converting them to a movie (Photomovie, p. 70).
A movie cannot be divided.
•
A movie that is too short cannot be divided.
•
A movie with the mark cannot be divided (p. 66, 70).
•
A movie protected on another device cannot be divided.
A scene cannot be deleted.
•
A scene protected on another device cannot be deleted.
Dubbing/Connecting to other devices
Pictures from connected devices are not displayed on the LCD screen.
•
Touch [REC CTRL] (p. 74).
Pictures from connected devices cannot be zoomed.
•
You cannot zoom scenes input from another device on your camcorder.
No sound is heard when playing back a disc.
•
The audio will not be output when you connect a device via the S video plug only. Connect
the white and red plugs of the A/V connecting cable, too (p. 72).
You cannot dub correctly using the A/V connecting cable.
•
Set [DISP OUTPUT] to [LCD PANEL] (p. 62).
•
The A/V connecting cable is not connected properly. Make sure that the A/V connecting
cable is connected to the proper jack, i.e. to the output jack of a device you are dubbing
a picture from, or to the input jack of another device for dubbing a picture from your
camcorder (p. 72).
Troubleshooting (continued)
Page 89

89
Troubleshooting
Others
Unable to finalize.
•
Battery is running out during finalizing. Use the AC Adaptor.
• The disc has already been finalized. If you are using a DVD-RW (VIDEO mode)/DVD+RW,
follow the required procedure to record additional material on the disc (p. 46).
You cannot edit or record additional material on a disc using other devices.
•
You may not be able to edit a disc recorded on your camcorder using other devices.
The disc title cannot be changed.
•
You cannot record a disc title on a finalized DVD-R.
•
The disc has already been finalized. If you are using a DVD-RW (VIDEO mode)/DVD+RW,
follow the required procedure to record additional material on the disc (p. 46).
•
The disc title may not be changed on your camcorder if the disc title has been made by
another device.
A photomovie cannot be created.
• There are no still images.
•
There may be a lot of still images on a disc and the remaining disc capacity is low. Delete
unnecessary images from the disc (p. 66).
The melody or beep sounds for 5 seconds.
•
The temperature of your camcorder is extremely high. Turn off your camcorder and leave it
for a while in a cool place.
•
Moisture condensation has occurred with the disc. Turn off your camcorder and leave it for
about 1 hour (p. 101).
•
Some problems have occurred in your camcorder. Remove the disc and insert it again, then
operate your camcorder again.
Page 90

90
Connecting to a computer
The computer does not recognize your camcorder.
•
Install the Picture Package software (p. 76).
•
Disconnect the cable from the computer and camcorder, then connect them again firmly.
•
Disconnect USB device other than the keyboard, the mouse, and the camcorder from the
computer.
•
Disconnect the cable from the computer and camcorder, restart the computer, then connect
them again correctly.
•
Confirm the USB driver is correctly installed with the following procedures.
For Windows XP
1 Click [Start], then [Control Panel].
2 Click [Performance and Maintenance], then [System].
The [System Properties] window appears.
3 Click the [Hardware] tab.
4 Click [Device Manager].
The [Device Manager] window appears.
5 Make sure that [SONY DDX-C1000 USB Device] appears in [DVD/CD-ROM drives],
[Generic volume] in [Storage volumes], and [USB Mass Storage Device] in [Universal
Serial Bus controllers] respectively.
When all the devices appear, the USB driver is installed correctly. If any of these devices
are not shown, install the USB driver.
Place the supplied CD-ROM in the disc drive on your computer.
Double-click [My Computer].
Right-click [PICTUREPACKAGE] icon (Disc drive)*, then click [Open].
*Drive names (such as (E:)) may vary depending on the computer.
Double-click [Driver]
[Setup. exe].
Troubleshooting (continued)
Page 91

91
Troubleshooting
For Windows 2000
1 Click [Start], [Settings], then [Control Panel].
2 Click [System].
The [System Properties] window appears.
3 Click the [Hardware] tab.
4 Click [Device Manager].
The [Device Manager] window appears.
5 Make sure that [SONY DDX-C1000 USB Device] appears in [DVD/CD-ROM drives],
[Generic volume] in [Storage volumes], and [USB Mass Storage Device] in [Universal
Serial Bus controllers] respectively.
When all the devices appear, the USB driver is installed correctly. If any of these devices
are not shown, install the USB driver.
Place the supplied CD-ROM in the disc drive on your computer.
Double-click [My Computer].
Right-click [PICTUREPACKAGE] icon (Disc drive)*, then click [Open].
*Drive names (such as (E:)) may vary depending on the computer.
Double-click [Driver]
[Setup. exe].
An error message appears when you place the supplied CD-ROM in your
computer.
•
Set the computer display as follows:
– Windows: 800 × 600 dots or more, High Color (16 bits, 65 000 colors) or more
You cannot use the supplied CD-ROM on a Macintosh computer.
•
The supplied CD-ROM is not compatible with a Macintosh computer.
Page 92

92
[Cannot start Easy Handycam with USB connected] or [Cannot cancel Easy
Handycam with USB connected] appears on the screen of your camcorder.
•
You cannot start or cancel the Easy Handycam operation while the USB cable is connected.
Disconnect the USB cable from your camcorder first.
You cannot transfer image data from your camcorder to a computer.
•
Set [USB SPEED] to [FULL SPEED] (p. 60).
The images or sound of your camcorder cannot be played back correctly.
•
When you connect your camcorder to a computer not compatible with Hi-Speed USB
(USB2.0), it may not be played back correctly. However, it does not affect the images or
sound transferred to your computer.
•
When you set [USB SPEED] to [FULL SPEED] (p. 60), it may not be played back correctly.
However, it does not affect the images or sound transferred to your computer.
•
Depending on the computer you use, the played back image or sound may stop temporarily,
but this does not affect images or sound transferred to your computer.
You cannot write data from your computer on a disc in your camcorder using
the USB cable.
•
The disc is not compatible with your camcorder. Use a disc compatible with your camcorder
(p. 13).
•
You cannot write data from other than the Picture Package on a disc in your camcorder.
Picture Package does not function correctly.
•
Close Picture Package, then restart the computer.
An error message appears while operating Picture Package.
•
Close Picture Package first, then slide the POWER switch on your camcorder to turn on
another lamp.
The “First Step Guide” is not displayed correctly.
•
Refer to the PDF file of “First Step Guide” (FirstStepGuide.pdf). For details on copying the
PDF file, see page 79.
Troubleshooting (continued)
Page 93

93
Troubleshooting
Warning indicators and messages
Self-diagnosis display/Warning
indicators
If indicators appear on the LCD screen,
check the following.
Some symptoms can be fixed by yourself.
If the problem persists even after you have
tried a couple of times, contact your Sony
dealer or local authorized Sony service
facility.
C:21:00
C:(or E:) : (Self-diagnosis
display)
C:04:
•
The battery pack is not an
“InfoLITHIUM” battery pack. Use an
“InfoLITHIUM” battery pack (p. 99).
C:13:
•
The disc is faulty. Use a compatible
disc with your camcorder (p. 13).
•
The disc is dirty or has scratches on
it. Clean the disc with the supplied
cleaning cloth.
C:21:
•
Moisture condensation has occurred
with the disc. Turn off your camcorder
and leave it for about 1 hour (p. 101).
C:32:
•
Symptoms that are not described
above have occurred. Remove the disc
and insert it again, then operate your
camcorder again.
•
Disconnect the power source.
Reconnect it again and operate your
camcorder again.
E:20: / E:31: / E:40: /
E:61: / E:62: / E:91: /
E:94:
•
A malfunction that you cannot service
has occurred. Contact your Sony
dealer or local authorized Sony service
facility. Inform them of the 5-digit
code, which starts from “E.”
100-0001 (Warning indicator
pertaining to files)
Slow flashing
•
The file is damaged.
•
The file is unreadable.
(Warning indicator pertaining to
discs)
Slow flashing
•
A disc is not inserted.*
•
Less than 5 minutes remains for
recording movies.
•
Fewer than 30 images can be
accommodated in the remaining space.
Fast flashing
•
An unrecognizable disc is inserted.*
•
A finalized DVD-RW (VIDEO mode)
or DVD+RW is inserted into your
camcorder when (Movie) or
(Still) is selected.
•
The disc is fully recorded.*
•
A disc that cannot be read or written is
inserted, such as the single-sided disc
inserted inside out.
•
The disc recorded in the different TV
color system from your camcorder
is inserted when (Movie) is
selected.*
Page 94

94
You need to remove the disc*
Fast flashing
•
An unrecognizable disc is inserted.
•
The disc is fully recorded.
•
An error might have occurred with the
disc drive in your camcorder.
(Battery level warning)
Slow flashing
•
The battery pack is nearly used up.
•
Depending on the operating,
environment, or battery conditions,
may flash, even if there are
approximately 20 minutes remaining.
(Moisture condensation warning)*
Fast flashing
•
Moisture condensation has occurred
with the disc. Turn off your camcorder
and leave it for about 1 hour.
(High temperature warning)
Slow flashing
•
The temperature of your camcorder is
getting higher.
Fast flashing
•
The temperature of your camcorder
is extremely high.* Turn off your
camcorder and leave it for a while in a
cool place.
* You hear a melody when the warning indicators
appear on the screen (p. 62).
Description of warning
messages
If messages appear on the screen, follow
the instructions.
Battery
Use the “infoLITHIUM” battery pack
(p. 99).
Battery level is low (p. 17, 99).
Old Battery Use a new one (p. 99).
Drive
Drive error Turn on power again
•
A problem may have occurred with the
disc drive. Turn off and then turn on
again.
Moisture condensation
Moisture condensation Turn off
for 1H (p. 101)
Condensation Cannot open Try
later (p. 101)
Disc
Overheated Recording disabled
Overheated Cannot open Try
later
Warning indicators and messages (continued)
Page 95

95
Troubleshooting
Recording disabled
•
A malfinction has occurred with the
disc and it cannot be used.
Disc movie area full Cannot
record movies
•
Delete unnecessary scenes (p. 66).
Scene number full
•
Delete unnecessary scenes (p. 66).
Disc full Cannot record
•
Delete unnecessary scenes (p. 66).
Movie recording disabled
•
Movies cannot be recorded due to some
limitations of the disc. However, you
might be able to record still images.
Still recording disabled
•
Still images cannot be recorded due to
some limitations of the disc. However,
you might be able to record movies.
Playback prohibited
•
You are trying to play back an
incompatible disc with your camcorder.
Disc finalized Cannot record
on disc
•
A finalized DVD-R cannot be recorded.
Use a new disc.
Need to unfinalize
•
To record on the finalized DVD-RW
(VIDEO mode), unfinalize it (p. 46).
Disc error Remove disc
•
The incompatible disc with your
camcorder is inserted. Your camcorder
cannot recognize the disc because of
malfunctions such as scratches, or the
disc is not set correctly.
Format error
•
The disc recorded in the different
format code from your camcorder.
Formatting the disc may enable you to
use the disc on your camcorder (DVDRW/DVD+RW only, p. 47) .
Access error
•
An error occurred during reading or
writing the disc.
Data error
•
An error occurred during reading or
writing the disc.
Lens cover
Cover is not open (p. 20)
Easy Handycam
Cannot start Easy Handycam (p. 25)
Cannot cancel Easy Handycam
(p. 25)
Cannot start Easy Handycam with
USB connected (p. 25)
Page 96

96
Cannot cancel Easy Handycam with
USB connected (p. 25)
Invalid during Easy Handycam
operation (p. 25)
No recording in Easy Handycam
operation (p. 25)
•
The DVD+RW has been finalized.
Make the disc to be able to record
additional scenes (p. 46).
Other
Please connect AC adaptor
•
When the battery capacity is low,
you are trying to finalize or format
a disc, or making the disc capable
of additional recording. Use the AC
Adaptor as the power source to prevent
the battery from wearing out in the
middle of those operations.
Playlist full
• You cannot create the Playlist
exceeding 999 scenes.
• You cannot add still images in a
Playlist due to the lack of remaining
capacity on the disc.
Cannot divide
•
You cannot divide a movie that was
converted from still images.
•
You cannot divide a movie that is
extremely short.
Data protected
•
The disc has been protected on another
device.
Copy inhibit
•
You cannot copy scenes with the copy
protection signal.
Disc cover open, accidentally Turn
on power again (p. 20)
Recovering data Avoid any
vibration
•
Your camcorder tries to recover data
automatically if the data writing was
not performed properly.
Cannot recover data
•
Writing data to the disc has failed.
Attempts were made to recover the
data, but they were unsuccessful.
Warning indicators and messages (continued)
Page 97

97
Additional Information
Using your camcorder abroad
Power supply
You can use your camcorder in any
countries/regions using the AC Adaptor
supplied with your camcorder within the
AC 100 V to 240 V, 50/60 Hz range.
Use a commercially available AC plug
adaptor [a], if necessary, depending on the
design of the wall outlet [b].
AC-L200
[a]
[b]
On TV color systems
Your camcorder is an NTSC systembased camcorder. If you want to view the
playback picture on a TV, it must be an
NTSC system based TV with an AUDIO/
VIDEO input jack.
System Used in
NTSC
Bahama Islands, Bolivia,
Canada, Central America,
Chile, Colombia, Ecuador,
Guyana, Jamaica, Japan, Korea,
Mexico, Peru, Surinam, Taiwan,
the Philippines, the U.S.A.,
Venezuela, etc.
PAL
Australia, Austria, Belgium,
China, Czech Republic,
Denmark, Finland, Germany,
Holland, Hong Kong, Hungary,
Italy, Kuwait, Malaysia, New
Zealand, Norway, Poland,
Portugal, Singapore, Slovak
Republic, Spain, Sweden,
Switzerland, Thailand, United
Kingdom, etc.
PAL - M
Brazil
PAL - N
Argentina, Paraguay, Uruguay.
SECAM
Bulgaria, France, Guiana, Iran,
Iraq, Monaco, Russia, Ukraine,
etc.
Page 98

98
Simple setting of the clock by time difference
You can easily set the clock to the local time by setting a time difference when using your
camcorder abroad. Set [AREA SET] and [DST SET]/[SUMMERTIME] in TIME/
LANGU. (p. 63).
World time difference
1 2 3 4 6 8 10 12 13 14 16 17 18 19 20 21 22 23 24 25 26 27 29 30 31
Area
code
Time-zone
differences
Area setting
1 GMT Lisbon, London
2 +01:00 Berlin, Paris
3 +02:00 Helsinki, Cairo
4 +03:00 Moscow, Nairobi
5 +03:30 Tehran
6 +04:00 Abu Dhabi, Baku
7 +04:30 Kabul
8 +05:00 Karachi, Islamabad
9 +05:30 Calcutta, New Delhi
10 +06:00 Almaty, Dhaka
11 +06:30 Rangoon
12 +07:00 Bangkok, Jakarta
13 +08:00 HongKong, Singapore
14 +09:00 Seoul, Tokyo
15 +09:30 Adelaide, Darwin
16 +10:00 Melbourne, Sydney
Area
code
Time-zone
differences
Area setting
17 +11:00 Solomon Is
18 +12:00 Fiji, Wellington
19 – 12:00 Eniwetok, Kwajalein
20 – 11:00 Midway Is., Samoa
21 – 10:00 Hawaii
22 – 09:00 Alaska
23 – 08:00 LosAngeles, Tijuana
24 – 07:00 Denver, Arizona
25 – 06:00 Chicago, MexicoCity
26 – 05:00 New York, Bogota
27 – 04:00 Santiago
28 – 03:30 St. John’s
29 – 03:00 Brasilia, Montevideo
30 – 02:00 Fernando de Noronha
31 – 01:00 Azores
Using your camcorder abroad (continued)
Page 99

99
Additional Information
About the “InfoLITHIUM” battery pack
Your camcorder operates only with an
“InfoLITHIUM” battery pack, and is
compatible with an “InfoLITHIUM” A
series battery pack.
“InfoLITHIUM” A series battery packs
have the mark.
What is an “InfoLITHIUM” battery
pack?
An “InfoLITHIUM” battery pack is a
lithium-ion battery pack that has functions
for communicating information related
to operating conditions between your
camcorder and an AC Adaptor/charger
(optional).
The “InfoLITHIUM” battery pack
calculates the power consumption
according to the operating conditions of
your camcorder, and displays the remaining
battery time in minutes.
Charging the battery pack
•
Be sure to charge the battery pack before you
start using your camcorder.
•
It is recommended that you charge the battery
pack in an ambient temperature of between
10°C and 30°C (50°F to 86°F) until CHG
(charge) lamp turns off. If you charge the
battery pack outside of this temperature range,
you may not be able to charge the battery pack
efficiently.
•
After charging is complete, either disconnect
the cable from the DC IN jack on your
camcorder or remove the battery pack.
Effective use of the battery pack
•
Battery pack performance decreases when the
surrounding temperature is 10°C (50°F) or
below, and the length of time you can use the
battery pack becomes shorter. In that case, do
one of the following to use the battery pack for
a longer time.
– Put the battery pack in a pocket to warm it up,
and insert it into your camcorder right before
you start taking shots.
– Use a large capacity battery pack: NP-FA70
(optional).
•
Frequent playback, fast forward or reverse
operation wears out the battery pack faster. It
is recommended that you use a large capacity
battery pack: NP-FA70 (optional).
•
Be sure to slide the POWER switch to OFF
(CHG) when not shooting or playing back
on your camcorder. The battery pack is also
consumed when your camcorder is in the
standby mode or playback is paused.
•
Have spare battery packs ready for 2 or 3 times
the expected recording time, and make trial
recordings on a DVD-RW/DVD+RW (optional)
before making the actual recording.
•
Do not expose the battery pack to water. The
battery pack is not water-resistant.
Remaining battery time indicator
•
If the power goes off even though the remaining
battery time indicator indicates that the battery
pack has enough power to operate, charge the
battery pack fully again so that the indication
on the remaining battery time indicator is
correct. Note, however, that the correct battery
indication sometimes will not be restored if
the battery is used in high temperatures for a
long time or left in a fully charged state, or
the battery pack is used frequently. Regard
the remaining battery time indication as the
approximate shooting time.
•
The mark indicating that there is little
remaining battery time sometimes flashes
depending on the operating conditions or
ambient temperature and environment even if
the remaining battery time is approximately 20
minutes.
How to store the battery pack
•
If the battery pack is not used for a long time,
fully charge the battery pack and discharge
it on your camcorder once a year to maintain
the proper function. To store the battery pack,
remove it from your camcorder and put it in a
dry, cool place.
•
To use the battery pack up on your camcorder,
leave your camcorder in the recording standby
without a disc inserted with [A.SHUT OFF] set
to [NEVER] in STANDARD SET in the
SETUP screen until the power goes off (p. 62).
Page 100

100
Battery life
•
The battery life is limited. Battery capacity
drops little by little as you use it more and
more, and as time passes. When the available
battery time is shortened considerably, a
probable cause is that the battery pack has
reached the end of its life. Please buy a new
battery pack.
• The battery life varies according to how
it is stored, the operating conditions, and
environment in which each battery pack is used.
About the “InfoLITHIUM” battery pack (continued)
 Loading...