

Page 1
3-285-366-11(1)
US
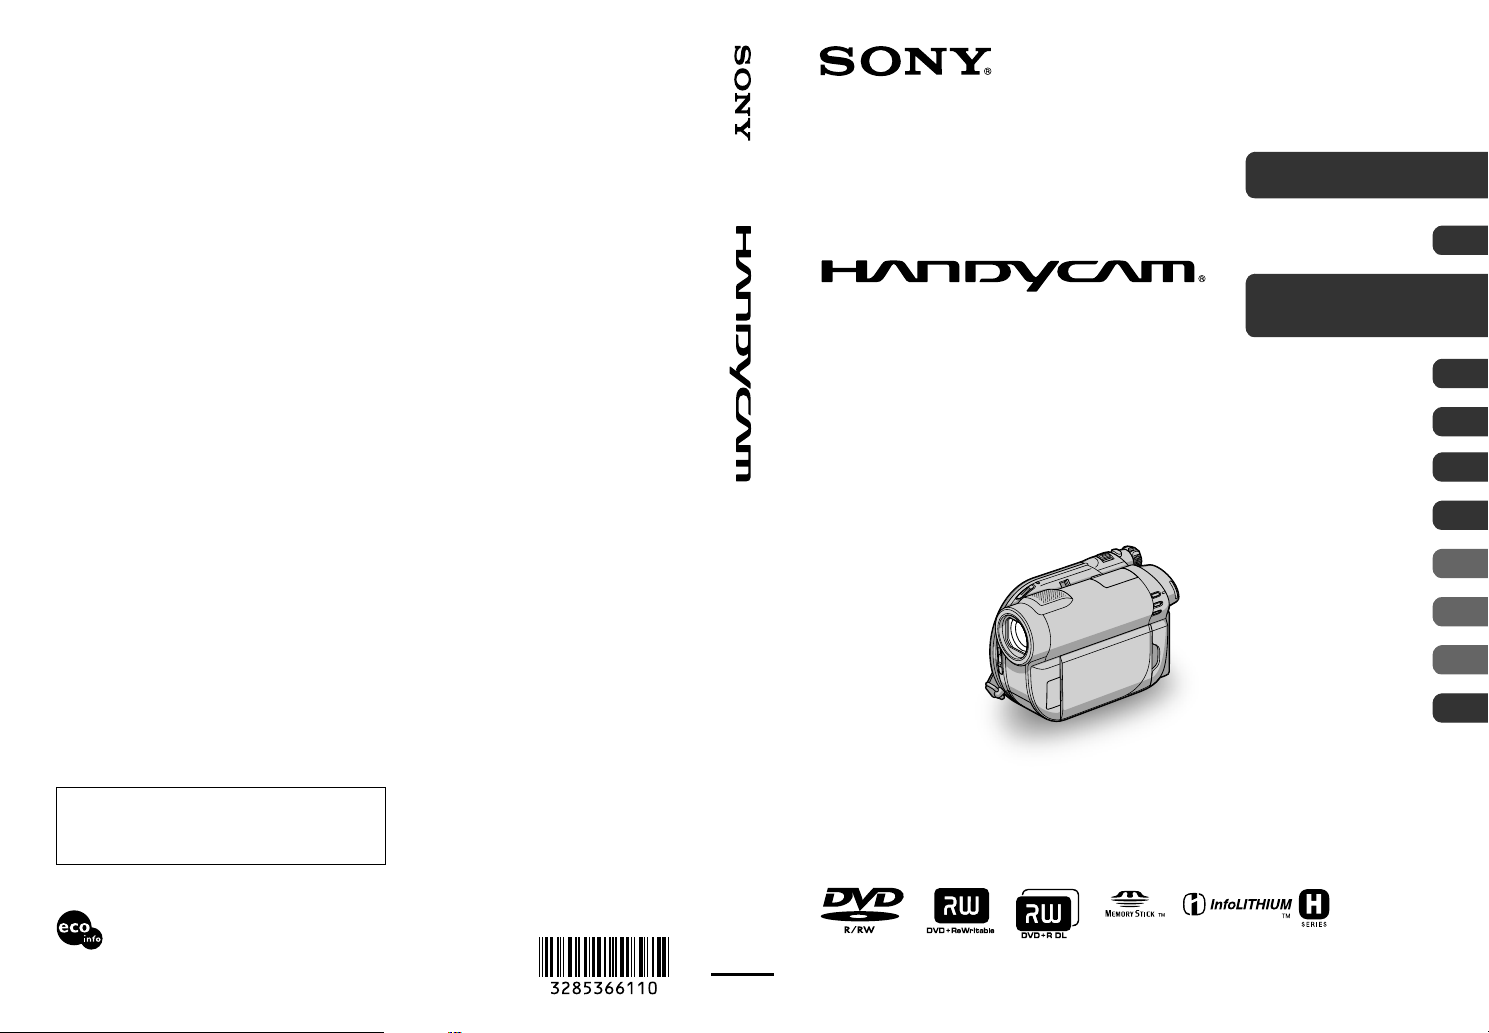
Digital Video Camera Recorder
Operating Guide
DCR-DVD610/DVD710/
DVD810
Enjoying with Your
Camcorder
Getting Started 20
Recording/Playback 34
Editing 50
Utilizing Media 66
Customizing Your
Camcorder
Performing with Your
Computer
Troubleshooting 101
Additional
Information
Quick
Reference
Spanish Quick Guide/
Guía rápida en español
12
78
97
114
129
140
Additional information on this product and answers
to frequently asked questions can be found at our
Customer Support Website.
http://www.sony.net/
Printed on 70% or more recycled paper
using VOC (Volatile Organic Compound)free vegetable oil based ink.
Printed in China
© 2008 Sony Corporation
Page 2
WARNING
To reduce fire or shock hazard, do
not expose the unit to rain or
moisture.
This symbol is intended to alert
the user to the presence of
uninsulated “dangerous
voltage” within the product’s
enclosure that may be of
sufficient magnitude to
constitute a risk of electric
shock to persons.
This symbol is intended to alert
the user to the presence of
important operating and
maintenance (servicing)
instructions in the literature
accompanying the appliance.
IMPORTANT
SAFEGUARDS
For your protection, please read these safety
instructions completely before operating
the appliance, and keep this manual for
future reference.
Carefully observe all warnings, precautions
and instructions on the appliance, or the one
described in the operating instructions and
adhere to them.
Use
Power Sources
This set should be operated only from the type of
power source indicated on the marking label. If
you are not sure of the type of electrical power
supplied to your home, consult your dealer or
local power company. For those sets designed to
operate from battery power, or other sources, refer
to the operating instructions.
Polarization
This set may be equipped with a polarized ac
power cord plug (a plug having one blade wider
than the other).
This plug will fit into the power outlet only one
way. This is a safety feature. If you are unable to
insert the plug fully into the outlet, try reversing
the plug. If the plug should still fail to fit, contact
your electrician to have a suitable outlet installed.
Do not defeat the safety purpose of the polarized
plug by forcing it in.
Overloading
Do not overload wall outlets, extension cords or
convenience receptacles beyond their capacity,
since this can result in fire or electric shock.
Object and Liquid Entry
Never push objects of any kind into the set
through openings as they may touch dangerous
voltage points or short out parts that could result
in a fire or electric shock. Never spill liquid of any
kind on the set.
Attachments
Do not use attachments not recommended by the
manufacturer, as they may cause hazards.
2
Page 3

Cleaning
Unplug the set from the wall outlet before
cleaning or polishing it. Do not use liquid cleaners
or aerosol cleaners. Use a cloth lightly dampened
with water for cleaning the exterior of the set.
outlet and disconnect the antenna or cable system.
This will prevent damage to the set due to
lightning and power-line surges.
Service
Installation
Water and Moisture
Do not use power-line operated sets near water –
for example, near a bathtub, washbowl, kitchen
sink, or laundry tub, in a wet basement, or near a
swimming pool, etc.
Power-Cord Protection
Route the power cord so that it is not likely to be
walked on or pinched by items placed upon or
against them, paying particular attention to the
plugs, receptacles, and the point where the cord
exits from the appliance.
Accessories
Do not place the set on an unstable cart, stand,
tripod, bracket, or table. The set may fall, causing
serious injury to a child or an adult, and serious
damage to the set. Use only a cart, stand, tripod,
bracket, or table recommended by the
manufacturer.
Ventilation
The slots and openings in the cabinet are provided
for necessary ventilation. To ensure reliable
operation of the set, and to protect it from
overheating, these slots and openings must never
be blocked or covered.
– Never cover the slots and openings with a cloth
or other materials.
– Never block the slots and openings by placing
the set on a bed, sofa, rug, or other similar
surface.
– Never place the set in a confined space, such as
a bookcase, or built-in cabinet, unless proper
ventilation is provided.
– Do not place the set near or over a radiator or
heat register, or where it is exposed to direct
sunlight.
Lightning
For added protection for this set during a lightning
storm, or when it is left unattended and unused for
long periods of time, unplug it from the wall
Damage Requiring Service
Unplug the set from the wall outlet and refer
servicing to qualified service personnel under the
following conditions:
– When the power cord or plug is damaged or
frayed.
– If liquid has been spilled or objects have fallen
into the set.
– If the set has been exposed to rain or water.
– If the set has been subject to excessive shock by
being dropped, or the cabinet has been
damaged.
– If the set does not operate normally when
following the operating instructions. Adjust
only those controls that are specified in the
operating instructions. Improper adjustment of
other controls may result in damage and will
often require extensive work by a qualified
technician to restore the set to normal operation.
– When the set exhibits a distinct change in
performance – this indicates a need for service.
Servicing
Do not attempt to service the set yourself as
opening or removing covers may expose you to
dangerous voltage or other hazards.
Refer all servicing to qualified service personnel.
Replacement parts
When replacement parts are required, be sure the
service technician has used replacement parts
specified by the manufacturer that have the same
characteristics as the original parts.
Unauthorized substitutions may result in fire,
electric shock, or other hazards.
Safety Check
Upon completion of any service or repairs to the
set, ask the service technician to perform routine
safety checks (as specified by the manufacturer)
to determine that the set is in safe operating
condition.
3
Page 4

Read this before operating your camcorder
Before operating the unit, please read this
manual thoroughly, and retain it for future
reference.
WARNING
Do not expose the batteries to
excessive heat such as sunshine,
fire or the like.
CAUTION
The use of optical instruments with this product
will increase eye hazard. Use of controls or
adjustments or performance of procedures other
than those specified herein may result in
hazardous radiation exposure.
Replace the battery with the
specified type only. Otherwise, fire
or injury may result.
Owner’s Record
The model and serial numbers are located on the
bottom. Record the serial number in the space
provided below. Refer to these numbers whenever
you call upon your Sony dealer regarding this
product.
Model No. DCRSerial No.
Model No. ACSerial No.
For customers in the U.S.A. and
CANADA
RECYCLING LITHIUM-ION BATTERIES
Lithium-Ion batteries are
recyclable. You can help preserve
our environment by returning
your used rechargeable batteries
to the collection and recycling
location nearest you.
For more information regarding recycling of
rechargeable batteries, call toll free 1-800-8228837, or visit http://www.rbrc.org/
Caution: Do not handle damaged or leaking
Lithium-Ion batteries.
4
For customers in the U.S.A.
If you have any questions about this product, you
may call:
Sony Customer Information Center
1-800-222-SONY (7669).
The number below is for the FCC related matters
only.
Regulatory Information
Declaration of Conformity
Trade Name: SONY
Model No.: DCR-DVD610
Responsible Party:Sony Electronics Inc.
Address: 16530 Via Esprillo, San Diego, CA
92127 U.S.A.
Telephone No.: 858-942-2230
This device complies with Part 15 of the FCC
Rules. Operation is subject to the following two
conditions: (1) This device may not cause
harmful interference, and (2) this device must
accept any interference received, including
interference that may cause undesired operation.
Declaration of Conformity
Trade Name: SONY
Model No.: DCR-DVD710
Responsible Party:Sony Electronics Inc.
Address: 16530 Via Esprillo, San Diego, CA
92127 U.S.A.
Telephone No.: 858-942-2230
This device complies with Part 15 of the FCC
Rules. Operation is subject to the following two
conditions: (1) This device may not cause
harmful interference, and (2) this device must
accept any interference received, including
interference that may cause undesired operation.
Page 5

Declaration of Conformity
Trade Name: SONY
Model No.: DCR-DVD810
Responsible Party:Sony Electronics Inc.
Address: 16530 Via Esprillo, San Diego, CA
92127 U.S.A.
Telephone No.: 858-942-2230
This device complies with Part 15 of the FCC
Rules. Operation is subject to the following two
conditions: (1) This device may not cause
harmful interference, and (2) this device must
accept any interference received, including
interference that may cause undesired operation.
CAUTION
You are cautioned that any changes or
modifications not expressly approved in this
manual could void your authority to operate this
equipment.
Note
This equipment has been tested and found to
comply with the limits for a Class B digital
device, pursuant to Part 15 of the FCC Rules.
These limits are designed to provide reasonable
protection against harmful interference in a
residential installation. This equipment generates,
uses, and can radiate radio frequency energy and,
if not installed and used in accordance with the
instructions, may cause harmful interference to
radio communications.
However, there is no guarantee that interference
will not occur in a particular installation. If this
equipment does cause harmful interference to
radio or television reception, which can be
determined by turning the equipment off and on,
the user is encouraged to try to correct the
interference by one or more of the following
measures:
– Reorient or relocate the receiving antenna.
– Increase the separation between the equipment
and receiver.
– Connect the equipment into an outlet on a
circuit different from that to which the receiver
is connected.
– Consult the dealer or an experienced radio/TV
technician for help.
The supplied interface cable must be used with t he
equipment in order to comply with the limits for a
digital device pursuant to Subpart B of Part 15 of
FCC Rules.
Battery pack
This device complies with Part 15 of the FCC
Rules. Operation is subject to the following two
conditions:
(1) This device may not cause harmful
interference, and (2) this device must accept any
interference received, including interference that
may cause undesired operation.
This Class B digital apparatus complies with
Canadian ICES-003.
For the State of California, USA only
Perchlorate Material - special handling may
apply, See
www.dtsc.ca.gov/hazardouswaste/perchlorate
Perchlorate Material: Lithium battery contains
perchlorate.
Notes on use
Your camcorder is supplied with two
kinds of operations guides.
– “Operating Guide” (This manual)
– “PMB Guide” for using your camcorder
with a computer connected (stored on the
supplied CD-ROM) (p. 97)
Types of the disc you can use in your
camcorder
You can use the following discs only.
– 8cm DVD-RW
– 8cm DVD+RW
– 8cm DVD-R
– 8cm DVD+R DL
Use the discs with marks listed below. See
page 13 for details.
For reliability and durability of recording/
playback, we recommend that you use Sony
Continued ,
5
Page 6
Read this before operating your camcorder (Continued)
discs or discs with a *(for VIDEO
CAMERA) mark for your camcorder.
* Depending on the place you purchase, the disc
has mark.
b Note
• Using a disc other than the above may cause the
unsatisfactory recording/playback or you may
not be able to remove the disc from your
camcorder.
Types of “Memory Stick” you can use
in your camcorder
• For recording movies, it is recommended
that you use a “Memory Stick PRO Duo”
of 512 MB or larger marked with:
– (“Memory Stick
PRO Duo”)*
– (“Memory Stick
PRO-HG Duo”)
* You can use a “Memory Stick PRO Duo”
marked either with “Mark2” or without.
• See page 33 for the recordable time of a
“Memory Stick PRO Duo.”
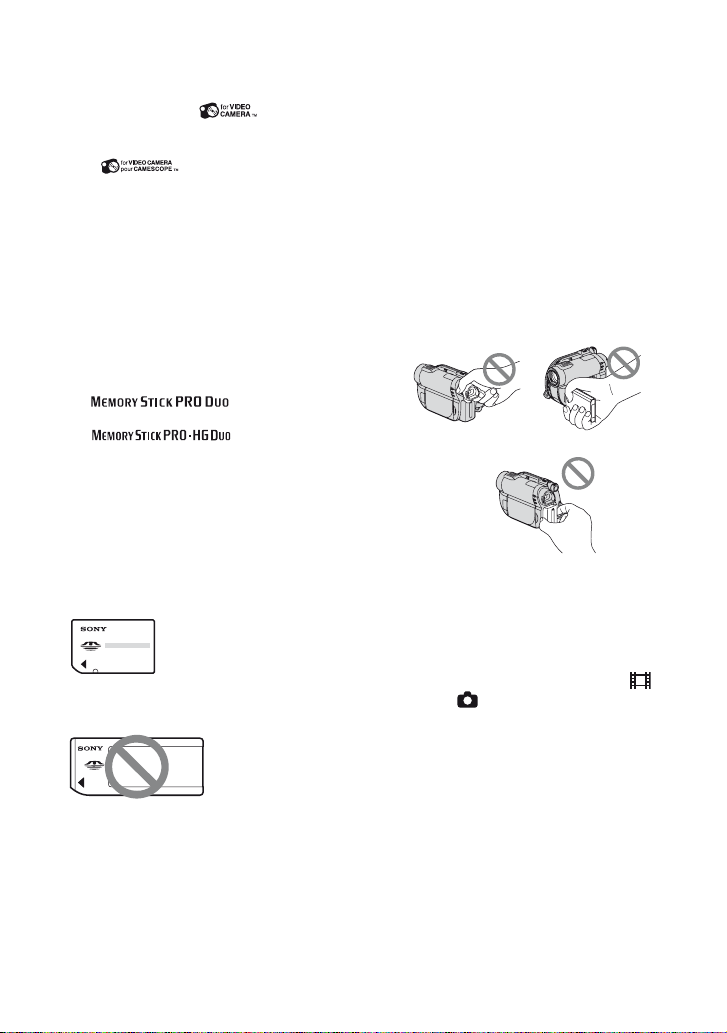
“Memory Stick PRO Duo”/“Memory Stick
PRO-HG Duo”
(This size can be used with your
camcorder.)
“Memory Stick”
(You cannot use it in your camcorder.)
• “Memory Stick PRO Duo” and “Memory
Stick PRO-HG Duo” are both referred to
as “Memory Stick PRO Duo” in this
manual.
• You cannot use any type of memory card
other than those mentioned above.
• “Memory Stick PRO Duo” can be used
only with “Memory Stick PRO”
compatible equipment.
6
• Do not attach a label or the like on a
“Memory Stick PRO Duo” or a Memory
Stick Duo adaptor.
• When using a “Memory Stick PRO Duo”
with “Memory Stick” compatible
equipment, be sure to insert the “Memory
Stick PRO Duo” into the Memory Stick
Duo adaptor.
Using the camcorder
• Do not hold the camcorder by the
following parts.
Viewfinder LCD screen
Battery
• The camcorder is not dustproofed,
dripproofed or waterproofed. See “About
handling of your camcorder” (p. 121).
• To prevent media from being broken or
recorded images from being lost, do not
do the following when either of the
(Movie)/ (Still) lamps (p. 25) or the
ACCESS/access lamps (p. 30, 32) are on:
– to remove the battery pack or AC
Adaptor from the camcorder
– to apply mechanical shock or vibration to
the camcorder
– to remove the “Memory Stick PRO Duo”
from the camcorder
• When connecting your camcorder to
another device with a cable, be sure to
insert the connector plug in the correct
way. Pushing the plug forcibly into the
terminal will damage the terminal and
may result in a malfunction of your
camcorder.
Page 7
About menu items, LCD panel,
viewfinder, and lens
• A menu item that is grayed out is not
available under the current recording or
playback conditions.
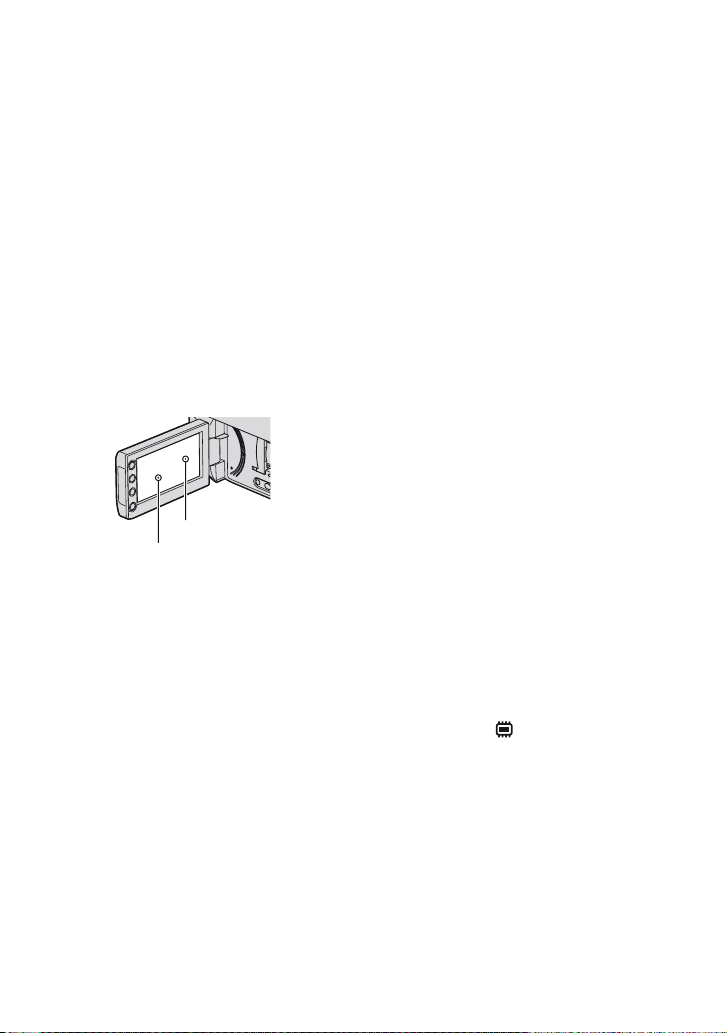
• The LCD screen and the viewfinder are
manufactured using extremely highprecision technology, so over 99.99% of
the pixels are effective. However, there
may be some tiny black points and/or
bright points (white, red, blue, or green in
color) that appear constantly on the LCD
screen and the viewfinder. These points
are normal results of the manufacturing
process and do not affect the recording in
any way.
Black point
White, red, blue or
green point
• Exposing the LCD screen, the viewfinder,
or the lens to direct sunlight for long
periods of time may cause malfunctions.
• Do not aim at the sun. Doing so might
cause your camcorder to malfunction.
Take images of the sun only in low light
conditions, such as at dusk.
On recording
• Before starting to record, test the
recording function to make sure the image
and sound are recorded without any
problems.
– DCR-DVD610/DVD710
Use a DVD-RW/DVD+RW for trial
recording.
– DCR-DVD810
Make trial recording on the internal memory.
• Compensation for the contents of
recordings cannot be provided, even if
recording or playback is not possible due
to a malfunction of the camcorder,
recording media, etc.
• TV color systems differ depending on the
countries/regions. To view your
recordings on a TV, you need an NTSC
system-based TV.
• Television programs, films, video tapes,
and other materials may be copyrighted.
Unauthorized recording of such materials
may be contrary to the copyright laws.
• If you repeat recording/deleting images
for a long time, fragmentation of data
occurs on the internal memory (DCRDVD810) or a “Memory Stick PRO
Duo.” Images cannot be saved or
recorded. In such a case, save your images
on another type of media first (p. 55, 62),
and then format the media (p. 72).
About language setting
The on-screen displays in each local
language are used for illustrating the
operating procedures. Change the screen
language before using your camcorder if
necessary (p. 26).
About disposal/transfer (DCRDVD810)
Even if you format the internal memory on
your camcorder (p. 72), data may not be
completely deleted from the internal
memory. When you give or sell your
camcorder to somebody, it is recommended
that you perform [ EMPTY] (p. 77) to
prevent the recovery of your data. In
addition to the above, when you dispose of
the camcorder, it is recommended that you
destroy the actual body of the camcorder.
About the Carl Zeiss lens
Your camcorder is equipped with a Carl
Zeiss lens, which was developed jointly by
Carl Zeiss, in Germany, and Sony
Corporation, and produces superior images.
It adopts the MTF measurement system for
video cameras and offers a quality typical
of a Carl Zeiss lens.
Continued ,
7
Page 8
Read this before operating your camcorder (Continued)
MTF = Modulation Transfer Function. The
number value indicates the amount of light
from a subject coming into the lens.
About this manual
• The LCD screens and the viewfinder
images and indicators shown in this
manual were taken with a digital still
camera, and may look different from what
you actually see.
• Discs in this manual refers to 8cm DVD
discs.
• In this manual, the internal memory
(DCR-DVD810), a disc and a “Memory
Stick PRO Duo” are called the media.
• Unless otherwise specifically indicated,
illustrations in this manual are based on
DCR-DVD810.
• Design and specifications of media and
other accessories are subject to change
without notice.
About the marks used in this manual
• The operations available depend on the
media used. The following marks are
used to indicate the type of media you
can use for a particular operation.
Internal Memory
Disc
“Memory Stick PRO Duo”
8
Page 9
Table of Contents
Read this before operating your
camcorder .....................................4
Table of Contents ...........................9
Subject examples and solutions ... 11
Enjoying with Your Camcorder
Enjoy using various “Media”
according to your needs .............12
Media for your camcorder .............13
Using your camcorder ..................15
“ HOME” and “ OPTION”
- Taking advantage of two types of
menus .........................................17
Getting Started
Step 1: Checking supplied items ..20
Step 2: Charging the battery pack 21
Step 3: Turning the power on, and
setting the date and time ............25
Changing the language setting .. 26
Step 4: Making adjustments before
recording .....................................26
Step 5: Selecting media ................28
Step 6: Inserting a disc or a “Memory
Stick PRO Duo” .......................... 30
Recording in dark places (NightShot
plus) .......................................... 41
Adjusting the exposure for backlit
subjects .................................... 41
Recording in mirror mode ........... 41
Playback .......................................43
Searching for scenes with pinpoint
accuracy (Film Roll Index) ........ 45
Searching for desired scenes by a
face (Face Index) ..................... 45
Searching for desired images by
date (Date Index) ...................... 46
Using PB zoom ........................... 46
Playing back a series of still images
(Slide show) .............................. 47
Playing the images on a TV ..........48
Editing
(OTHERS) category ................50
Deleting images ............................51
Capturing a still image from a movie
.....................................................53
Dubbing/copying images to media
within your camcorder .................55
Dividing movies .............................58
Creating the Playlist ......................59
Dubbing movies to VCR or DVD/HDD
recorders .....................................62
Printing still images (PictBridge
compliant printer) ........................64
Recording/Playback
Recording and playing back with ease
(Easy Handycam operation) ....... 34
Recording .....................................38
Zooming ...................................... 40
Recording sound with more
presence (5.1ch surround
recording) (DCR-DVD710/
DVD810) ................................... 40
Starting to record quickly (QUICK
ON) ........................................... 41
Utilizing Media
(MANAGE MEDIA) category .66
Making the disc compatible with
playback on other devices
(Finalizing) ..................................67
Playing a disc on other devices ....70
Checking media information .........71
Formatting media ..........................72
Continued ,
9
Page 10

Table of Contents (Continued)
Recording additional movies after
finalizing .................................... 74
Finding the right disc (DISC SELECT
GUIDE) ....................................... 75
Repairing the image database file
.................................................... 76
Preventing data on the internal
memory from being recovered
(DCR-DVD810) .......................... 77
Customizing Your Camcorder
What you can do with the
(SETTINGS) category of the
HOME MENU ........................ 78
Using the HOME MENU .............. 78
List of the (SETTINGS) category
items ......................................... 79
MOVIE SETTINGS ....................... 80
(Items for recording movies)
PHOTO SETTINGS ..................... 82
(Items for recording still images)
VIEW IMAGES SET ..................... 84
(Items to customize the display)
SOUND/DISP SET ....................... 86
(Items to adjust sound and the screen)
OUTPUT SETTINGS ................... 87
(Items for when connecting other devices)
CLOCK/ LANG ......................... 88
(Items to set clock and language)
GENERAL SET ............................ 88
(Other setup items)
Activating functions using the
OPTION MENU ..................... 90
Using the OPTION MENU ........... 90
Recording items on the OPTION
MENU ....................................... 91
Viewing items on the OPTION
MENU ....................................... 91
Functions set in the OPTION
MENU ......................................... 92
Performing with Your Computer
What you can do with Windows
computer .....................................97
Troubleshooting
Troubleshooting ..........................101
Warning indicators and messages
................................................... 110
Additional Information
Using your camcorder abroad ....114
File/folder structure on the internal
memory (DCR-DVD810) and a
“Memory Stick PRO Duo” ......... 116
Maintenance and precautions ....117
About the disc ........................... 117
About the “Memory Stick” ......... 118
About the “InfoLITHIUM” battery
pack ........................................ 119
About handling of your camcorder
................................................. 121
Specifications .............................125
Quick Reference
Identifying parts and controls ..... 129
Indicators displayed during recording/
playback ...................................133
Glossary .....................................135
Index ........................................... 136
10
Page 11
Subject examples and solutions
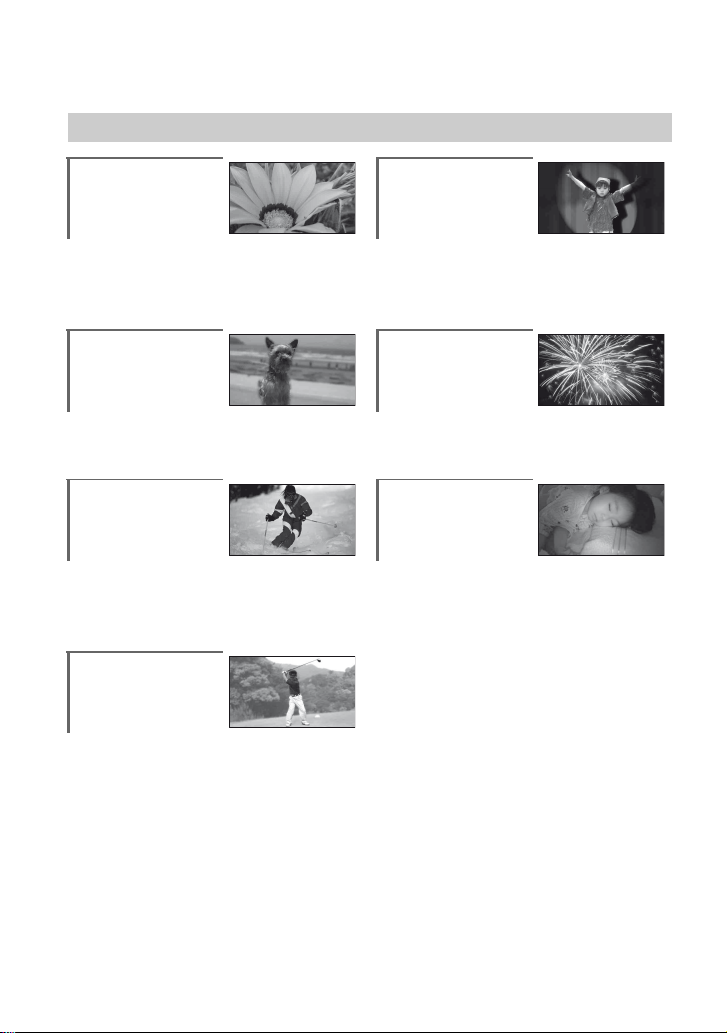
Shooting
Flowers in close-up
B PORTRAIT...................................... 94
B FOCUS............................................ 92
B TELE MACRO ................................. 92
Focusing on the
dog on the left side
of the screen
B FOCUS............................................ 92
B SPOT FOCUS.................................. 92
Getting a good shot
of a ski slope or
beach
B BACK LIGHT ................................... 41
B BEACH............................................ 94
B SNOW ............................................ 94
Checking your golf
swing
B SPORTS ......................................... 94
A child on the stage
under a spot light
B SPOTLIGHT.....................................94
Fireworks with all
its splendor
B FIREWORKS....................................93
B FOCUS ............................................92
A sleeping child
under dim light
B NightShot plus ................................41
B COLOR SLOW SHTR.......................95
11
Page 12
Enjoying with Your Camcorder
Enjoy using various “Media” according to your needs
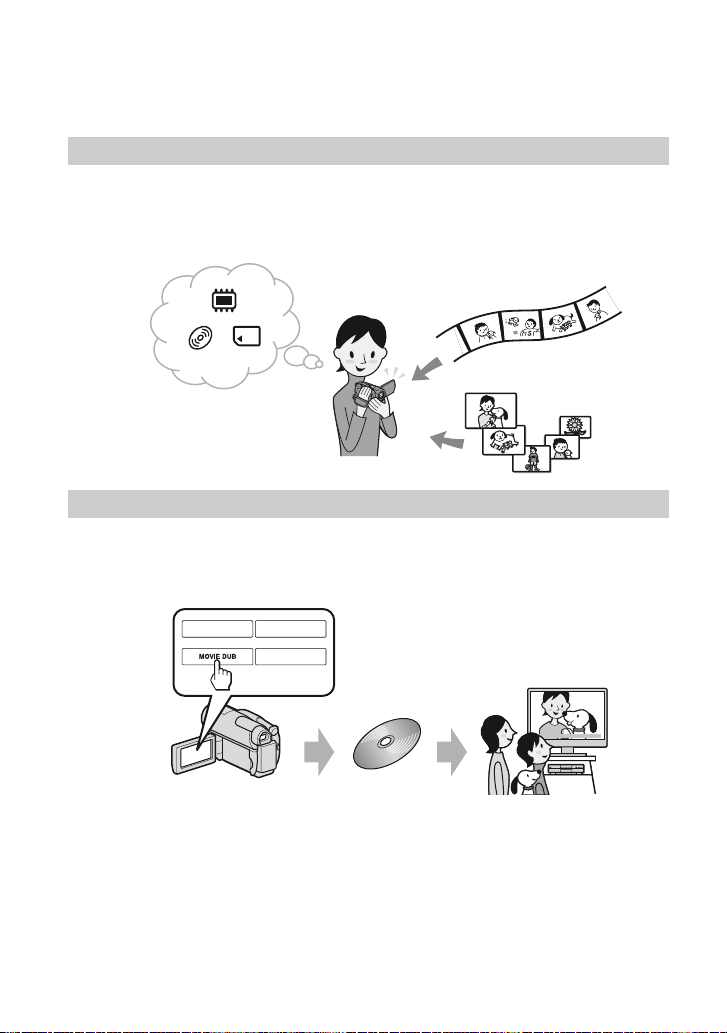
Selecting media
You can select desired media for recording/playback/editing from the internal memory (DCRDVD810), a disc or a “Memory Stick PRO Duo” (p. 28). To set the media for movies or still
images, you can select either [MOVIE MEDIA SET] or [PHOTO MEDIA SET] (DCRDVD810) according to your needs.
Dubbing from one type of media to another
Using the [MOVIE DUB] function on the camcorder, you can dub movies recorded on the
internal memory (DCR-DVD810) or a “Memory Stick PRO Duo” to a disc without
connecting another device (p. 55).
b Notes
• You may not be able to dub movie contents depending on the type of your camcorder. For details on the
compatibility of types, see page 55.
12
Page 13
Media for your camcorder
With your camcorder, you can record images on either the internal memory (DCR-DVD810),
an 8cm DVD-RW, DVD+RW, DVD-R or DVD+R DL disc, or a “Memory Stick PRO Duo.”
See page 6 for the types of “Memory Stick” you can use in your camcorder.
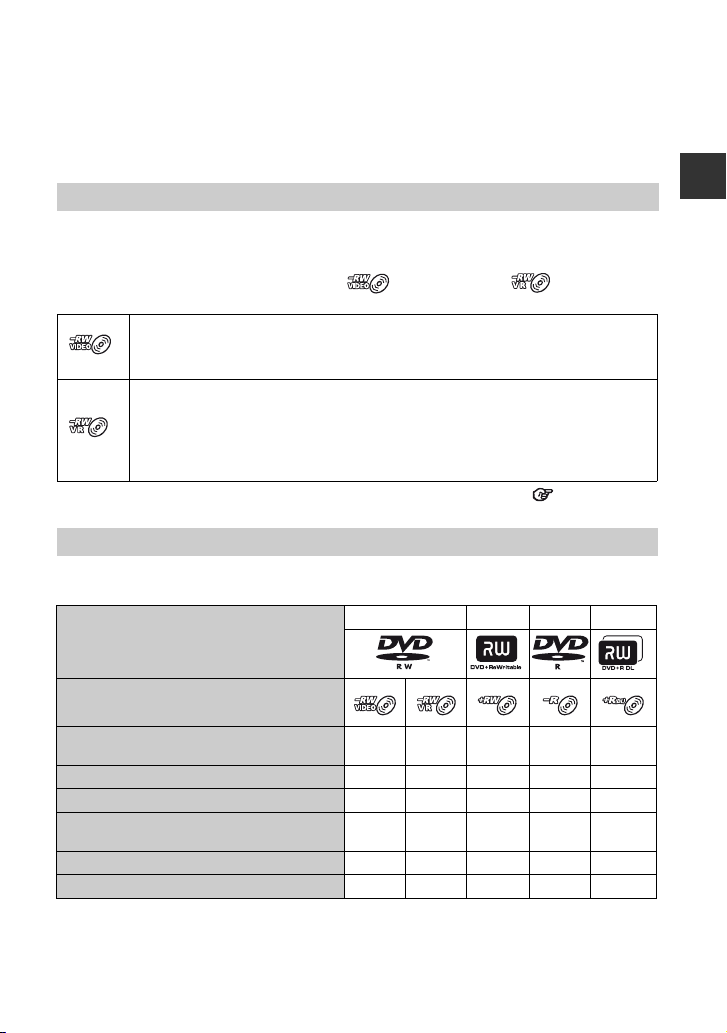
Recording format for DVD-RW
When you use a DVD-RW, you can choose the recording format from VIDEO mode or VR
mode.
In this manual, VIDEO mode is indicated as and VR mode as .
A recording format that is compatible with most DVD devices, especially after
finalizing.
In VIDEO mode, only the most recent movie can be deleted.
A recording format that enables editing with y our camcorder (deleting and rearranging
the order of images).
A finalized disc can be played back in DVD devices that support VR mode.
Refer to the instruction manual of your DVD device to see whether it supports the VR
mode of DVD-RW.
VIDEO mode and VR mode Glossary (p. 135)
Disc features
Figures in parentheses ( ) indicate reference pages.
DVD-RW DVD+RW DVD-R DVD+R DL
Disc types and symbols
Symbols used in this manual
Both 16:9 (wide) and 4:3 movie can be recorded
on the same disc
Deleting the most recent movie (52) zzz ––
Deleting or editing movie on your camcorder (51)
Using a disc repeatedly by formatting, even if the
disc becomes full*
Finalizing required to play on other devices (67)
Making longer recordings on a side of a disc ––––z
* Formatting deletes all images and returns the recording media to its original empty state (p. 72). Even
when using a new disc, format it with your camcorder (p. 30).
** Finalizing is required to play the disc in a DVD drive on a computer. A DVD+RW that is not finalized
may cause the computer to malfunction.
(30)
(72)
zz – zz
– z –––
zzz ––
zz
*1
–** zz
Continued ,
Enjoying with Your Camcorder
13
Page 14
Media for your camcorder (Continued)
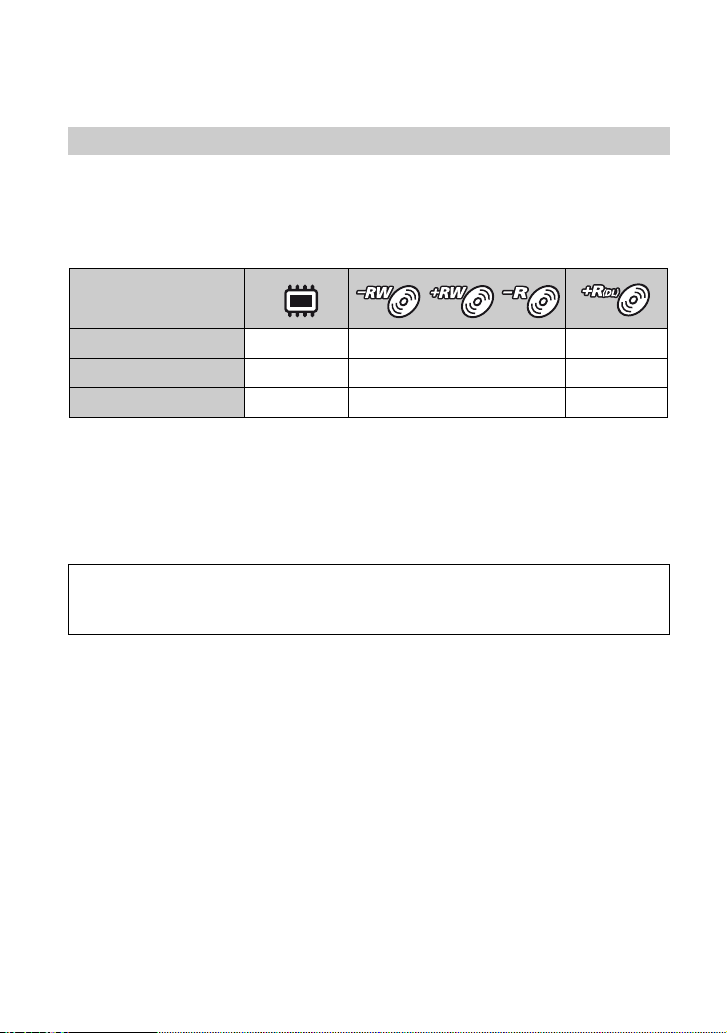
Recording time of movies
Figures in the table are the approximate recording time in minutes using the internal memory
(DCR-DVD810) and on one side of a disc.
The recordable time on the acceptable media varies depending on media type and the [REC
MODE] (p. 80) setting.
Media type
Figures in ( ) are the minimum recording time.
*
9M (HQ) (high quality)
6M (SP) (standard quality)
3M (LP) (long play)
* DCR-DVD810
z Tips
• Figures such as 9M and 6M in the table show the average bit rate. M stands for Mbps.
• You can check the recordable time with [MEDIA INFO] (p. 71).
• When you use a double-sided disc, you can record images on both sides (p. 117).
• See page 33 for the recordable time on a “Memory Stick PRO Duo.”
Your camcorder uses the VBR (Variable Bit Rate) format to automatically adjust image quality to suit the
recording scene. This technology causes fluctuations in the recording time of media. Movies containing
quickly moving and complex images are recorded at a higher bit rate, and this reduces the overall recording
time.
115 (100) 20 (18) 35 (32)
170 (100) 30 (18) 55 (32)
325 (215) 60 (44) 110 (80)
14
Page 15
Using your camcorder
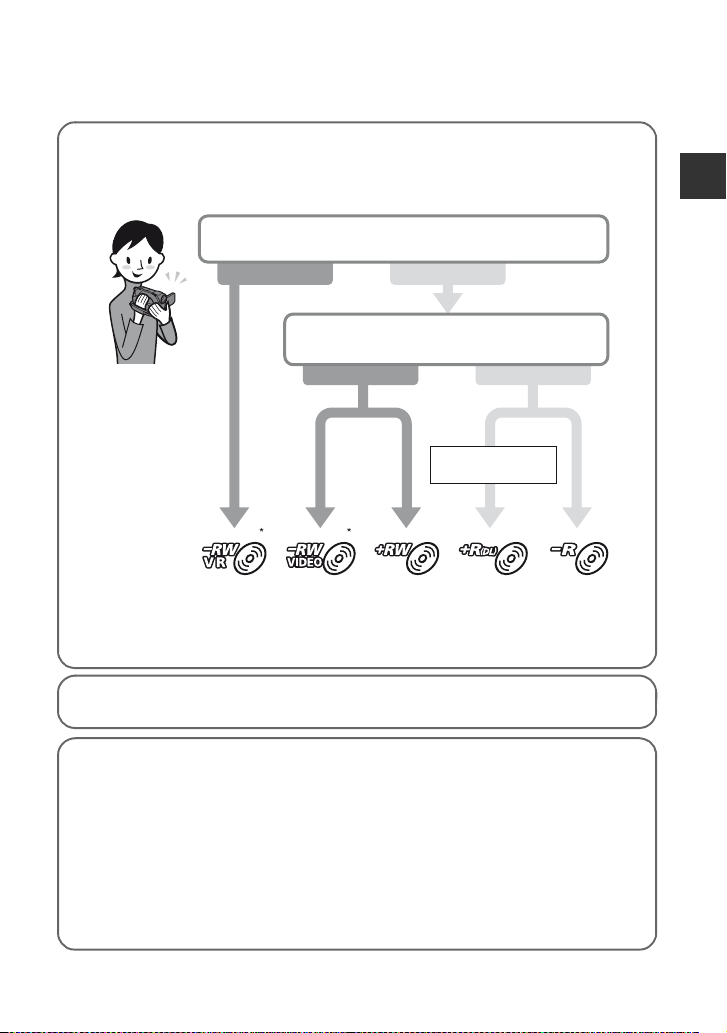
1Selecting media (p. 28)
You can select media separately for movies and still images.
In the case of recording on a disc, select the disc that best suits your needs.
Do you want to delete or edit images on your
camcorder?
Yes No
Do you want to delete images and reuse
the disc?
Yes No
For long recording
* Select the recording format and format the disc on your camcorder (p. 30).
zTips
• You can select the disc from [DISC SELECT GUIDE] (p. 75).
Enjoying with Your Camcorder
2Recording images (p. 38)
3Editing/Saving images
The available functions depend on the selected media.
x Dubbing/copying images to another type of media within your camcorder (p. 55)
x Dubbing movies to other devices (p. 62)
x Editing on a computer (p. 97)
Using the supplied application software “Picture Motion Browser,” you can import
images to a computer, and save them on a disc.
Continued ,
15
Page 16
Using your camcorder (Continued)
4Viewing on other devices
x Viewing images on a TV (p. 48)
You can view the images recorded and edited on your camcorder on the connected TV.
x Playing the disc on other devices (p. 70)
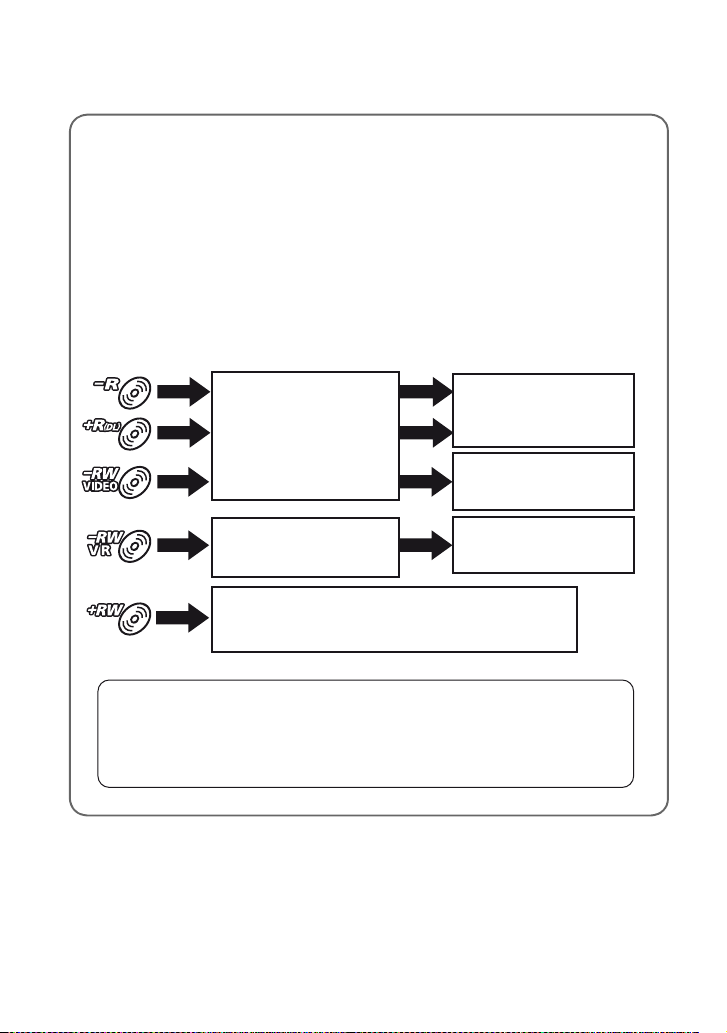
To play a disc recorded on your camcorder on other devices, you need to finalize the
disc first.
bNotes
• The less the recording volume of the disc is, the more it takes time to finalize the disc.
The features of a finalized disc depend on disc type.
Like commercially sold DVD,
this disc can be played back in
most DVD devices after
finalizing.
The disc can be played back in
a device compatible with the
DVD-RW VR mode.
The disc can be played back without finalizing.
But finalizing is required in some cases.
For details, see page 67.
Recordings cannot be added
even if there is free space left.
Unfinalizing allows you to add
movies (p. 74).
Movies can be added without
unfinalizing.
Playback compatibility
Playback compatibility with all DVD devices is not guaranteed. Refer to the instruction manual
supplied with your DVD device or consult your dealer.
16
Page 17
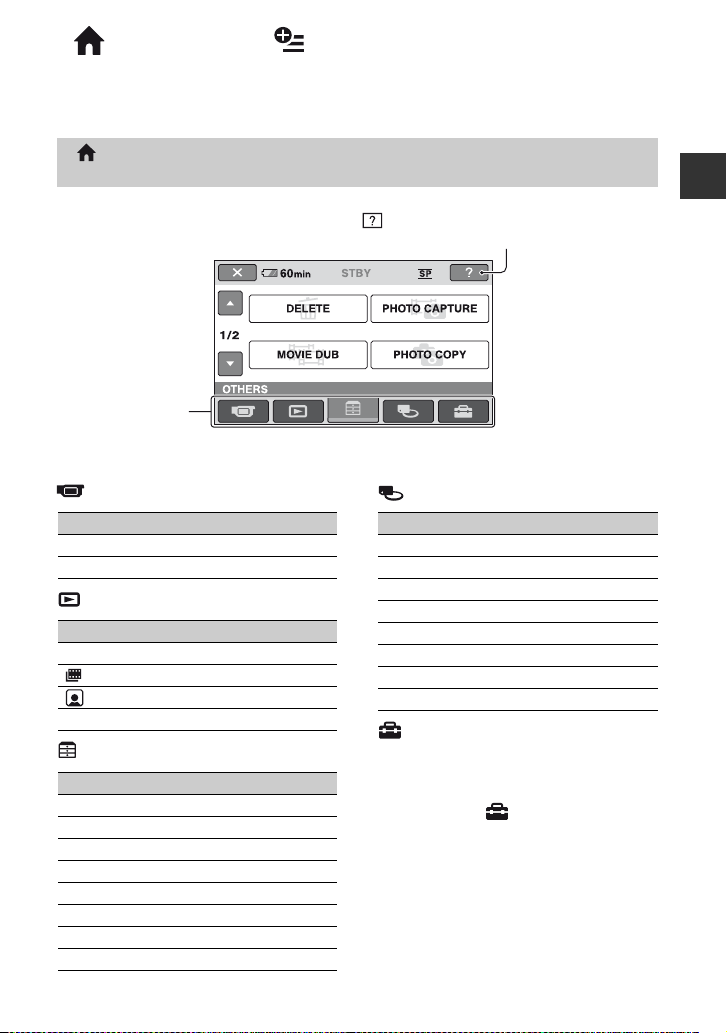
“ HOME” and “ OPTION”
- Taking advantage of two types of menus
“ HOME MENU” - the starting point for operations with your
camcorder
(HELP)
Displays a description of the item (p. 18)
Category
B Categories and items of the HOME MENU
Enjoying with Your Camcorder
(CAMERA) category
Items Page
MOVIE*
PHOTO*
1
1
39
39
(VIEW IMAGES) category
Items Page
VISUAL INDEX*
INDEX*
INDEX*
PLAYLIST 59
1
1
1
43
45
45
(OTHERS) category
Items Page
2
DELETE*
PHOTO CAPTURE*
MOVIE DUB*
PHOTO COPY*
EDIT 58
PLAYLIST EDIT 59
PRINT 64
USB CONNECT 97
3
3
3
51
53
55
56
(MANAGE MEDIA) category
Items Page
MOVIE MEDIA SET*
PHOTO MEDIA SET*
FINALIZE*
MEDIA INFO 71
MEDIA FORMAT*
UNFINALIZE 74
DISC SELECT GUIDE 75
REPAIR IMG.DB F. 76
(SETTINGS) category
To customize your camcorder (p. 78).
1
You can also set these items during Easy
*
Handycam operation (p. 34). For items
available in the (SETTINGS) category,
see page 79.
2
The item is available during Easy Handycam
*
operation (p. 34) when you select [INT.
MEMORY] (DCR-DVD810) or [MEMORY
STICK] on [MOVIE MEDIA SET] (p. 28).
3
*
You may not be able to use this item depending
on your camcorder model.
1
1*3
1
1
28
28
67
72
1
*
Continued ,
17
Page 18
“ HOME” and “ OPTION” - Taking advantage of two types of menus
(Continued)
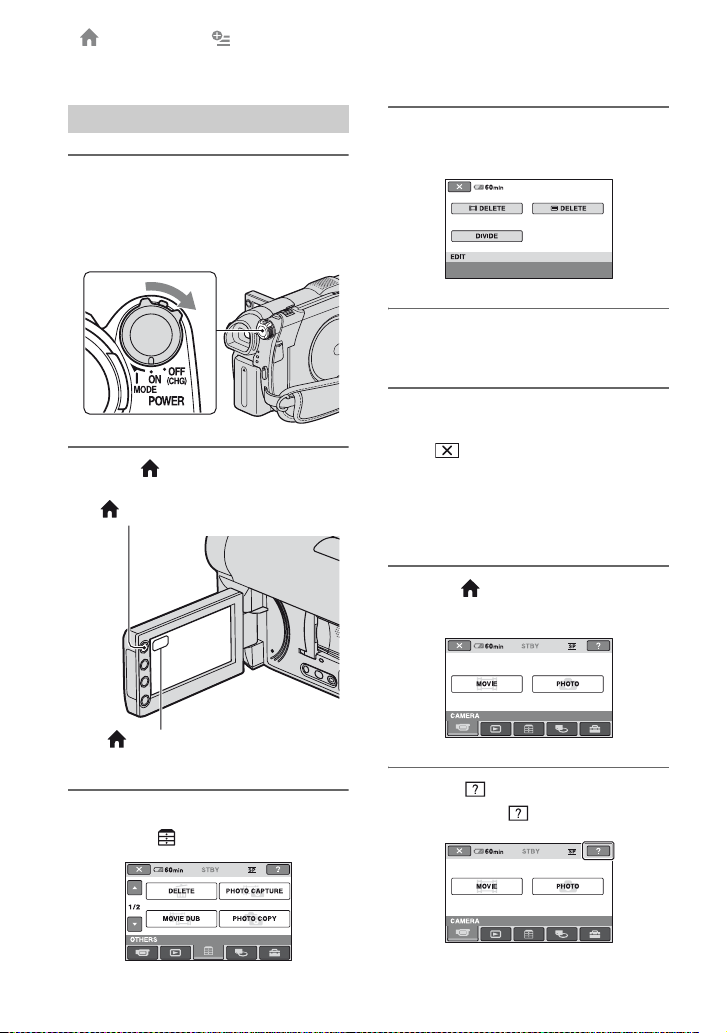
Using the HOME MENU
1 While pressing the green button,
turn the POWER switch in the
direction of the arrow to turn on
your camcorder.
2 Press (HOME) A (or B).
(HOME) A
4 Touch the desired item.
Example: [EDIT]
5 Follow the guide on the screen for
further operation.
To hide the HOME MENU screen
Touch .
When you want to know something
about the function of each item on the
HOME MENU - HELP
1 Press (HOME).
The HOME MENU appears.
(HOME) B
3 Touch the desired category.
Example: (OTHERS) category
18
2 Touch (HELP).
The bottom of (HELP) turns orange.
Page 19
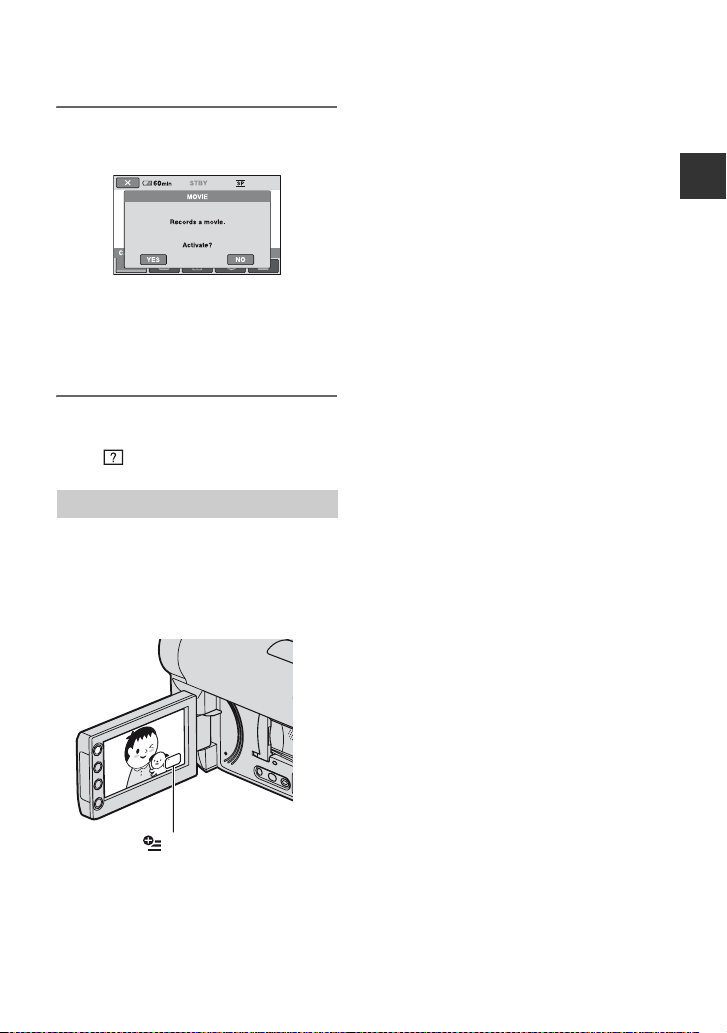
3 Touch the item you want to know
the content.
When you touch an item, its explanation
appears on the screen.
To apply the option, touch [YES],
otherwise, touch [NO].
To deactivate the HELP
Touch (HELP) again in step 2.
Using the OPTION MENU
Just a touch on the screen during shooting
or playback displays the functions available
at that moment. You will find it easy to
make various settings. See page 90 for
further details.
Enjoying with Your Camcorder
(OPTION)
19
Page 20
Getting Started
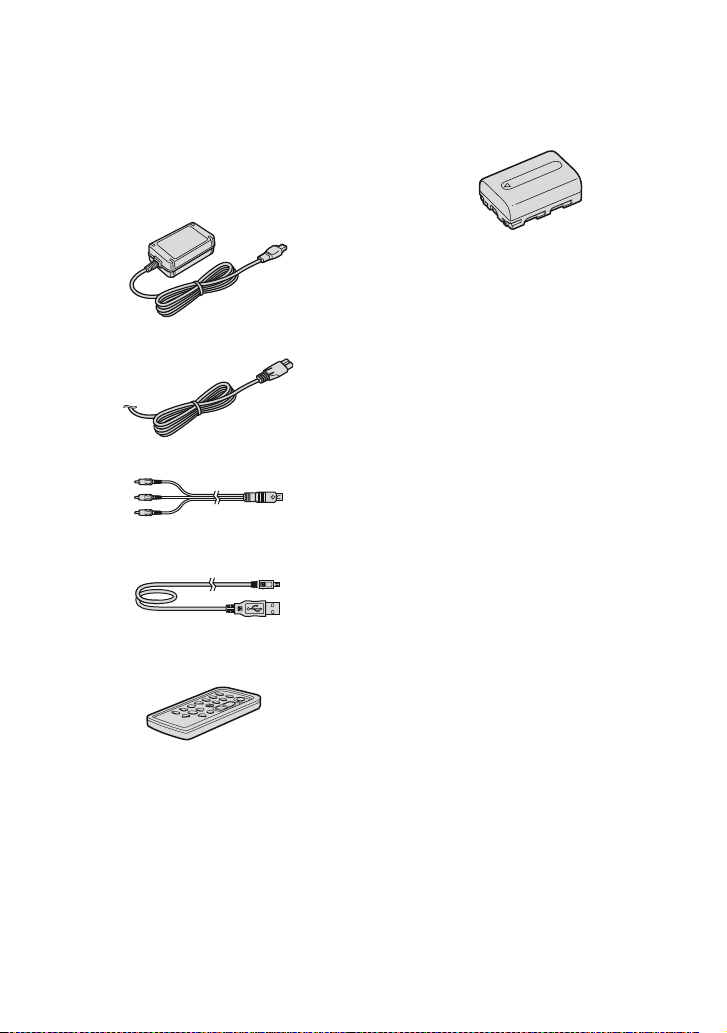
Step 1: Checking supplied items
Make sure that you have the following
items supplied with your camcorder.
The number in the parentheses indicates the
number of that item supplied.
AC Adaptor (1) (p. 21)
Power cord (mains lead) (1) (p. 21)
A/V connecting cable (1) (p. 48, 62)
USB cable (1) (p. 64)
Wireless Remote Commander (DCRDVD710/DVD810) (1) (p. 132)
Rechargeable battery pack NP-FH40 (1)
(p. 21)
CD-ROM “Handycam Application
Software” (1) (p. 97)
– Picture Motion Browser (Software)
–PMB Guide
Operating Guide (This manual) (1)
A button-type lithium battery is already installed.
20
Page 21
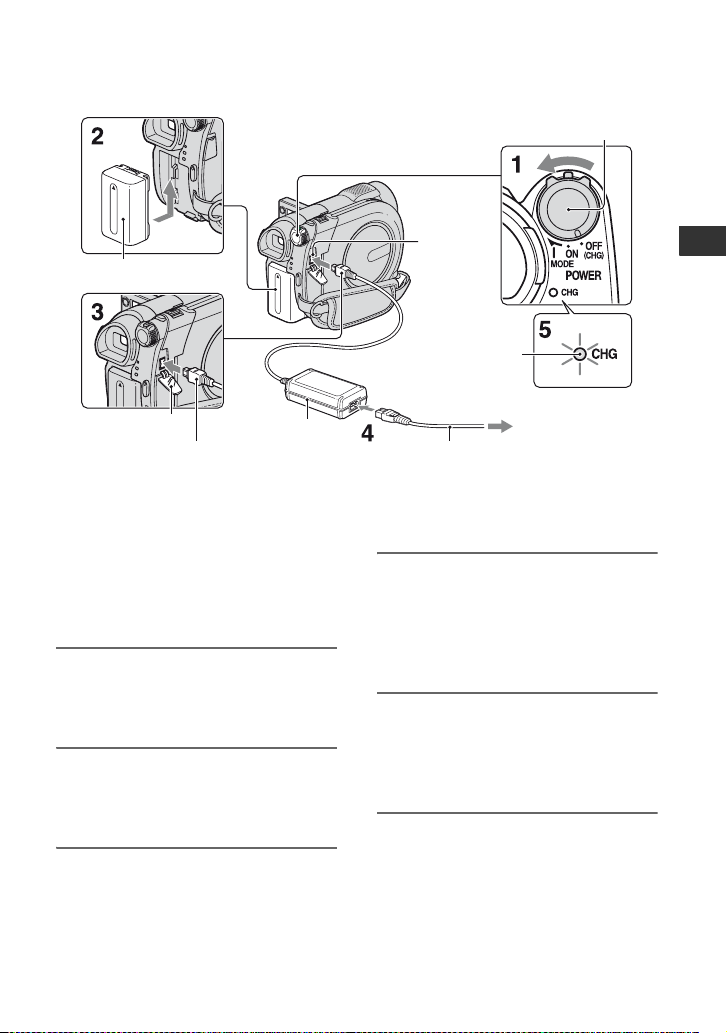
Step 2: Charging the battery pack
DC IN jack
Battery
CHG (charge) lamp
Jack cover
DC plug
AC Adaptor
Power cord (mains lead)
POWER switch
Getting Started
To the wall outlet
(wall socket)
You can charge the “InfoLITHIUM”
battery pack (H series) (p. 119) after
attaching it to your camcorder.
b Notes
• Your camcorder operates only with
“InfoLITHIUM” battery pack (H series).
1 Turn the POWER switch in the
direction of the arrow to OFF
(CHG) (the default setting).
2 Attach the battery pack by sliding
it in the direction of the arrow
until it clicks.
3 Connect the AC Adaptor to the
DC IN jack of your camcorder.
Open the jack cover, and connect the
DC plug of the AC Adaptor.
Match the v mark on the DC plug with
the v mark on your camcorder.
4 Connect the power cord (mains
lead) to the AC Adaptor and the
wall outlet (wall socket).
The CHG (charge) lamp lights up and
charging starts.
5 The CHG (charge) lamp turns off
when the battery is fully charged.
Disconnect the AC Adaptor from
the DC IN jack.
b Notes
• Disconnect the AC Adaptor from the DC IN
jack holding both the camcorder and the DC
plug.
Continued ,
21
Page 22
Step 2: Charging the battery pack (Continued)
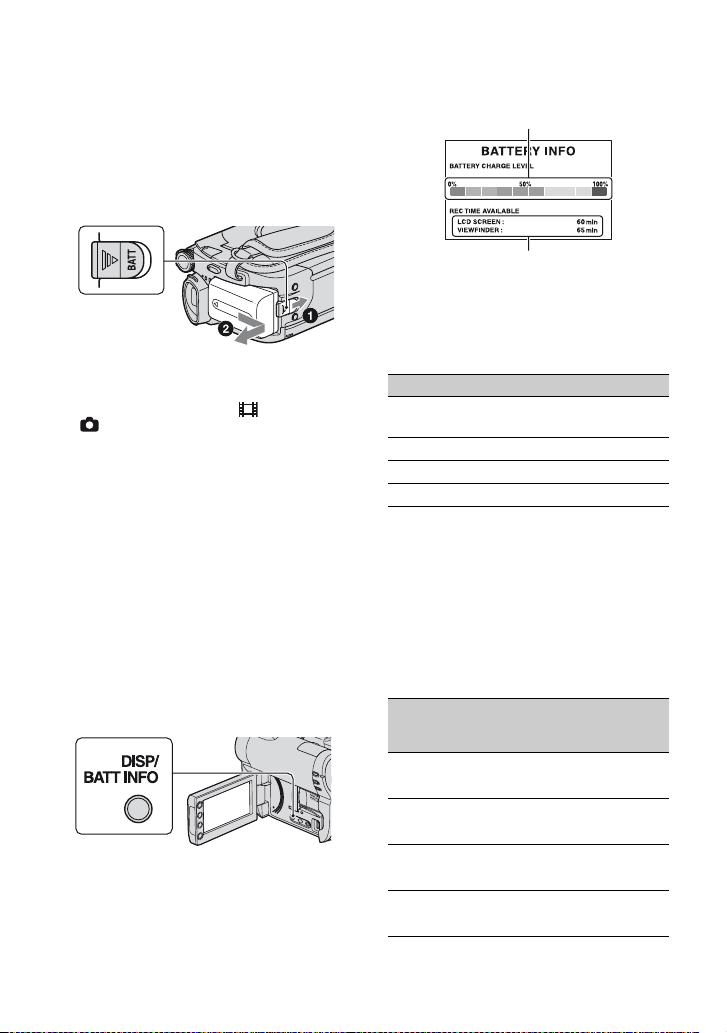
To remove the battery pack
1 Turn the POWER switch to OFF
(CHG).
2 Slide the BATT (battery) release lever
(1) and remove the battery pack (2).
BATT (battery)
release lever
b Notes
• When you remove the battery pack or the AC
Adaptor, make sure that the (Movie) lamp/
(Still) lamp (p. 25)/ACCESS lamp (p. 30)/
access lamp (p. 32) are turned off.
• When you store the battery pack, fully discharge
the battery before storing it for an extended
period (p. 119).
To use a power source from a wall
outlet (wall socket)
Make the same connections as you do when
charging the battery pack. The battery pack
will not lose its charge in this case.
To check the remaining battery
(Battery Info)
Set the POWER switch to OFF (CHG), then
press DISP/BATT INFO.
After a while, the approximate recordable
time and battery information appear for
about 7 seconds. You can view the battery
information for up to 20 seconds by
pressing DISP/BATT INFO again while the
information is displayed.
22
Remaining battery (approx.)
Recording capacity (approx.)
Charging time
Approximate time (min.) required when
you fully charge a fully discharged battery
pack.
Battery pack Charging time
NP-FH40
(supplied)
NP-FH50 135
NP-FH70 170
NP-FH100 390
125
Recording time
Approximate time (min.) available when
you use a fully charged battery pack.
When recording on the internal
memory (DCR-DVD810) or a
“Memory Stick PRO Duo”
DCR-DVD610
Battery pack
NP-FH40
(supplied)
NP-FH50 130 60
NP-FH70 280 130
NP-FH100 625 300
Continuous
recording
time
Typical
recording
time*
110 50
120 55
140 65
300 140
680 325
Page 23

DCR-DVD710/DVD810
Battery pack
NP-FH40
(supplied)
Continuous
recording
time
Typical
recording
time*
95 45
110 50
NP-FH50 110 50
130 60
NP-FH70 235 110
280 130
NP-FH100 535 255
625 300
When recording on a disc
DCR-DVD610
Battery pack
NP-FH40
(supplied)
Continuous
recording
time
Typical
recording
time*
95 40
100 45
NP-FH50 110 45
120 50
NP-FH70 235 105
255 110
NP-FH100 535 240
580 260
DCR-DVD710/DVD810
Battery pack
NP-FH40
(supplied)
Continuous
recording
time
Typical
recording
time*
80 35
95 40
NP-FH50 95 40
110 45
NP-FH70 205 90
235 105
NP-FH100 470 210
535 240
* Typical recording time shows the time when
you repeat recording start/stop, turning the
power on/off and zooming.
b Notes
• See page 28 for selecting the media.
• All times measured with recording mode [SP]
under the following conditions:
Top: When the LCD backlight turns on.
Bottom: When recording with the viewfinder
while the LCD panel is closed.
Playing time
Approximate time (min.) available when
you use a fully charged battery pack.
When playing the internal memory
(DCR-DVD810) or a “Memory Stick
PRO Duo”
DCR-DVD610
Battery pack
LCD panel
opened*
NP-FH40
(supplied)
NP-FH50 170 195
NP-FH70 370 415
NP-FH100 830 925
DCR-DVD710/DVD810
Battery pack
LCD panel
opened*
NP-FH40
(supplied)
NP-FH50 165 195
NP-FH70 350 415
NP-FH100 785 925
LCD panel
closed
150 170
LCD panel
closed
140 170
Getting Started
Continued ,
23
Page 24
Step 2: Charging the battery pack (Continued)
When playing a disc
DCR-DVD610
Battery pack
NP-FH40
LCD panel
opened*
LCD panel
closed
120 135
(supplied)
NP-FH50 140 155
NP-FH70 300 330
NP-FH100 680 745
DCR-DVD710/DVD810
Battery pack
NP-FH40
LCD panel
opened*
LCD panel
closed
115 135
(supplied)
NP-FH50 135 155
NP-FH70 290 330
NP-FH100 650 745
* When the LCD backlight is on.
b Notes
• See page 28 for selecting the media.
On the battery pack
• Before changing the battery pack, turn the
POWER switch to OFF (CHG) and turn off the
(Movie) lamp/ (Still) lamp (p. 25)/
ACCESS lamp (p. 30)/access lamp (p. 32).
• The CHG (charge) lamp flashes during
charging, or Battery Info (p. 22) will not be
correctly displayed under the following
conditions:
– The battery pack is not attached correctly.
– The battery pack is damaged.
– The battery pack is worn-out (for Battery Info
only).
• The power will not be supplied from the battery
as long as the AC Adaptor is connected to the
DC IN jack of your camcorder, even when the
power cord (mains lead) is disconnected from
the wall outlet (wall socket).
• When attaching an optional video light, it is
recommended that you use an NP-FH70/NPFH100 battery pack (DCR-DVD710/DVD810).
• We do not recommend using an NP-FH30,
which only allows short recording and playback
times, with your camcorder.
On the charging/recording/playback time
• Times measured when using the camcorder at
25 °C (77 °F) (10 °C to 30 °C (50 °F to 86 °F) is
recommended).
• The available recording and playback time will
be shorter when you use your camcorder in low
temperatures.
• The available recording and playback time will
be shorter depending on the conditions under
which you use your camcorder.
On the AC Adaptor
• Use the nearby wall outlet (wall socket) when
using the AC Adaptor. Disconnect the AC
Adaptor from the wall outlet (wall socket)
immediately if any malfunction occurs while
using your camcorder.
• Do not use the AC Adaptor placed in a narrow
space, such as between a wall and furniture.
• Do not short-circuit the DC plug of the AC
Adaptor or battery terminal with any metallic
objects. This may cause a malfunction.
• Even if your camcorder is turned off, AC power
source (mains) is still supplied to it while
connected to the wall outlet (wall socket) via the
AC Adaptor.
24
Page 25
Step 3: Turning the power on, and setting the date and time
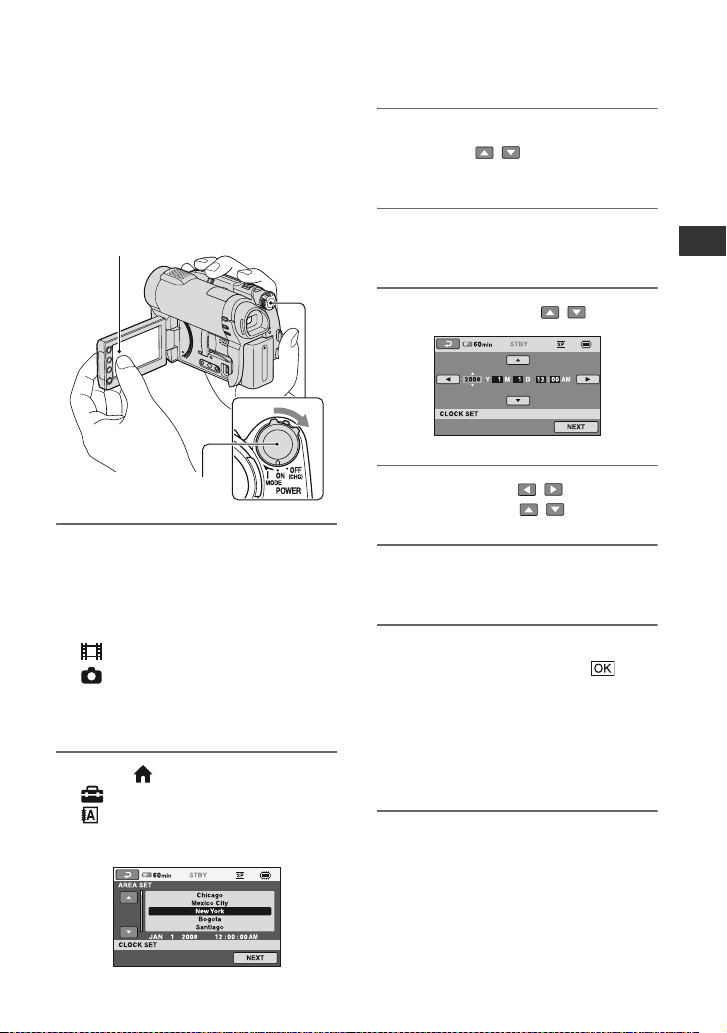
Set the date and time when using this
camcorder for the first time. If you do not
set the date and time, the [CLOCK SET]
screen appears every time you turn on your
camcorder or change the POWER switch
position.
Touch the button on the LCD screen.
3 Select the desired geographical
area with / , then touch
[NEXT].
4 Set [DST SET] or [SUMMERTIME],
then touch [NEXT].
5 Set [Y] (year) with / .
Getting Started
POWER switch
1 While pressing the green button,
turn the POWER switch
repeatedly in the direction of the
arrow until the respective lamp
lights up.
(Movie): To record movies
(Still): To record still images
Go to step 3 when you turn on your
camcorder for the first time.
2 Touch (HOME) t
(SETTINGS) t [CLOCK/
LANG] t [CLOCK SET].
The [CLOCK SET] screen appears.
6 Select [M] with / , then set
the month with / .
7 Set [D] (day), hour and minute in
the same way, then touch [NEXT].
8 Make sure that the clock is
correctly set, then touch .
The clock starts.
You can set any year up to the year
2037.
For midnight, set it to 12:00 AM.
For midday, set it to 12:00 PM.
To turn off the power
Turn the POWER switch to OFF (CHG).
Continued ,
25
Page 26
Step 3: Turning the power on, and
setting the date and time (Continued)
b Notes
• If you do not use your camcorder for about 3
months, the built-in rechargeable battery gets
discharged and the date and time settings may
be cleared from the memory. In that case,
charge the built-in rechargeable battery and then
set the date and time again (p. 124).
• It takes a few seconds for your camcorder to be
ready to shoot after the power is turned on. You
cannot operate your camcorder during this time.
• In the default setting, the power turns off
automatically if you leave your camcorder
unoperated for approximately 5 minutes, to save
battery power ([A.SHUT OFF], p. 89).
z Tips
• The date and time does not appear during
recording, but they are automatically recorded
on the media, and can be displayed during
playback ([DATA CODE], p. 84).
• See page 115 for information concerning
“World time difference.”
• If the buttons on the touch panel do not work
correctly, adjust the touch panel
([CALIBRATION], p. 122).
Changing the language setting
You can change the on-screen displays to
show messages in a specified language.
Touch (HOME)
t [CLOCK/ LANG] t
[ LANGUAGE SET], then select the
desired language.
t (SETTINGS)
Step 4: Making adjustments before recording
Opening the lens cover
Slide the LENS COVER switch to OPEN.
After recording, set the LENS COVER
switch to CLOSE to close the lens cover.
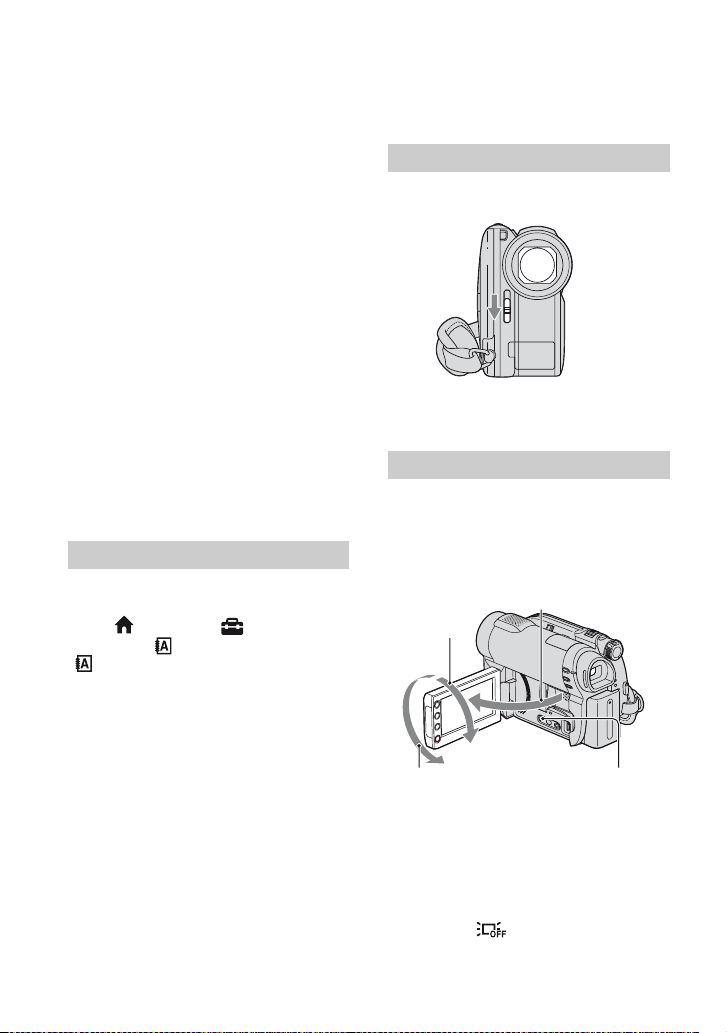
Adjusting the LCD panel
Open the LCD panel 90 degrees to the
camcorder (1), then rotate it to the best
angle to record or play (2).
190 degrees to the
camcorder
290 degrees
(max.)
26
2180 degrees
(max.)
DISP/BATT INFO
To turn off the LCD backlight to make
the battery last longer
(DCR-DVD710/DVD810)
Press and hold DISP/BATT INFO for a few
seconds until appears.
This setting is practical when you use your
camcorder in bright conditions or you want
Page 27
to save battery power. The recorded image
will not be affected by the setting. To turn
on the LCD backlight, press and hold DISP/
BATT INFO for a few seconds until
disappears.
z Tips
• You can adjust the brightness of the viewfinder
backlight by touching (HOME)
t (SETTINGS) t [SOUND/DISP SET]
t [VF B.LIGHT] (p. 86).
b Notes
• Do not press the buttons on the LCD frame
accidentally when you open or adjust the LCD
panel.
z Tips
• If you open the LCD panel 90 degrees to the
camcorder, then rotate it 180 degrees to the lens
side, you can close the LCD panel with the LCD
screen facing out. This is convenient during
playback operations.
• Touch (HOME) t (SETTINGS) t
[SOUND/DISP SET] t [LCD BRIGHT]
(p. 86), and adjust the brightness of the LCD
screen.
• The information is displayed or hidden (display
y no display) each time you press DISP
BATT/INFO.
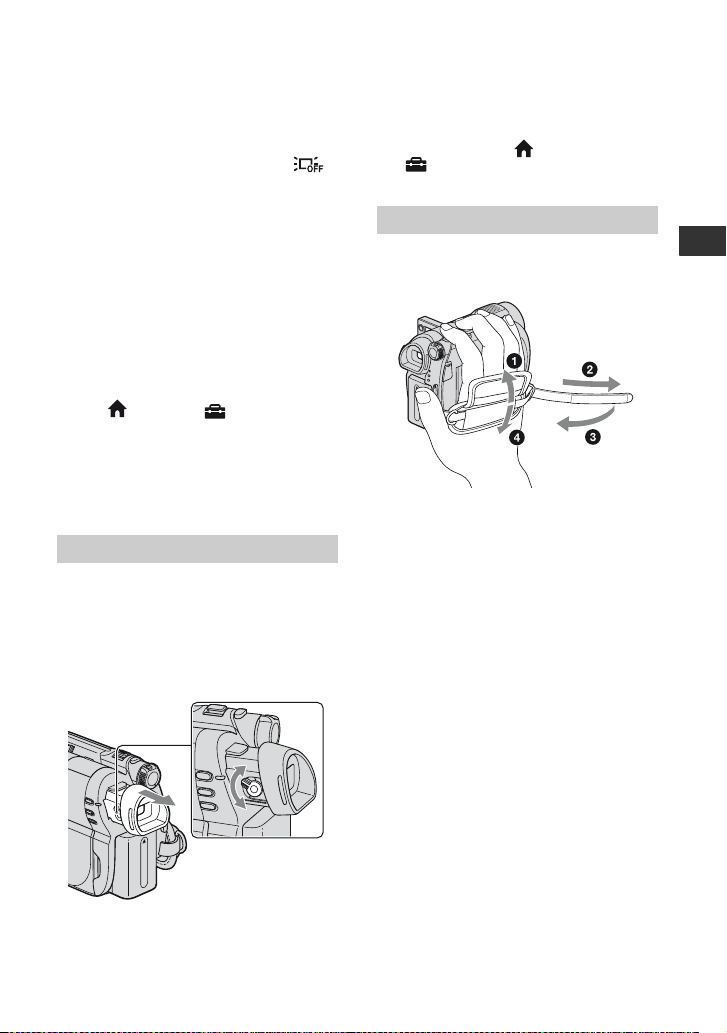
Adjusting the viewfinder
You can view images using the viewfinder
to avoid wearing down the battery, or when
the image seen on the LCD screen is poor.
Pull out and look into the viewfinder.
Adjust the viewfinder to your eyesight.
Viewfinder
Fastening the grip belt
Adjust and fasten the grip belt as illustrated,
and hold your camcorder properly.
Getting Started
Viewfinder lens
adjustment lever
Move it until the
image becomes clear.
27
Page 28
Step 5: Selecting media
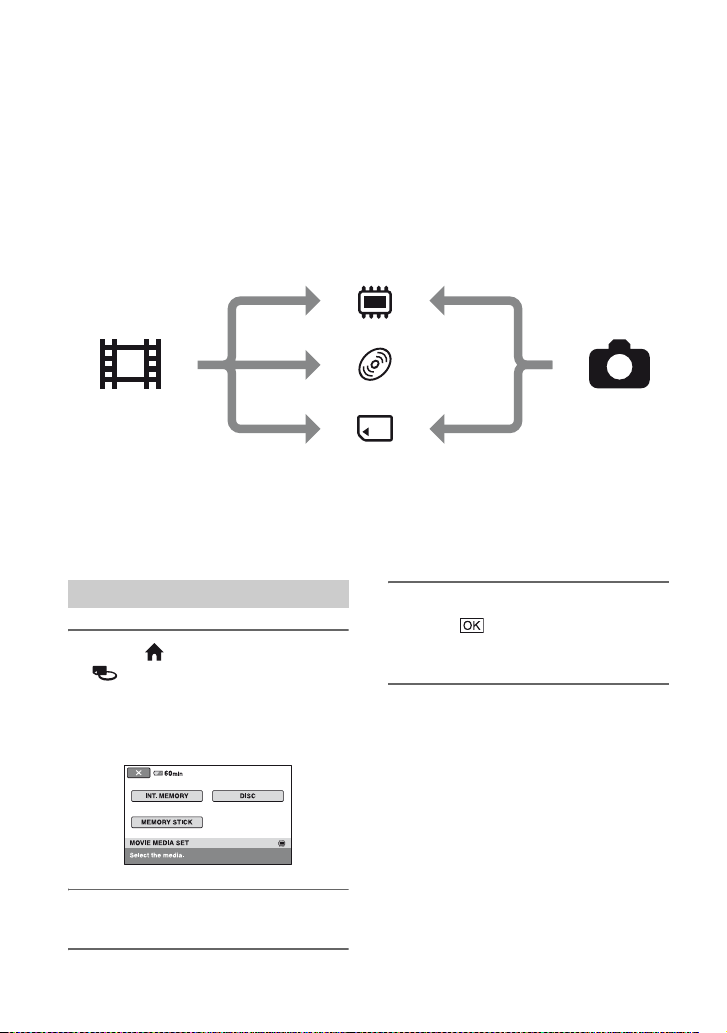
You can set the media to be used for movies and still images separately.
For movies, you can select the internal memory*, a disc, or a “Memory Stick PRO Duo.” For
still images, you can select the internal memory*, or a “Memory Stick PRO Duo.”
DCR-DVD610/DVD710
In the default setting, movies are recorded on a disc. Still images are recorded on a “Memory
Stick PRO Duo” only.
DCR-DVD810
In the default setting, both movies and still images are recorded on the internal memory.
*
Internal memory
Movie Still image
“Memory Stick PRO Duo”
* DCR-DVD810
b Notes
• You can record, play back, or edit images on the selected media. When you record, play back, or edit
images on other media, select media again.
Selecting media for movies
1 Touch (HOME) t
(MANAGE MEDIA) t [MOVIE
MEDIA SET].
The movie media setting screen
appears.
Disc
4 When [Completed.] appears,
touch .
The movie media is changed.
2 Touch the desired media.
3 Touch [YES].
28
Page 29
Selecting media for still images
(DCR-DVD810)
1 Touch (HOME) t
(MANAGE MEDIA) t [PHOTO
MEDIA SET].
The still image media setting screen
appears.
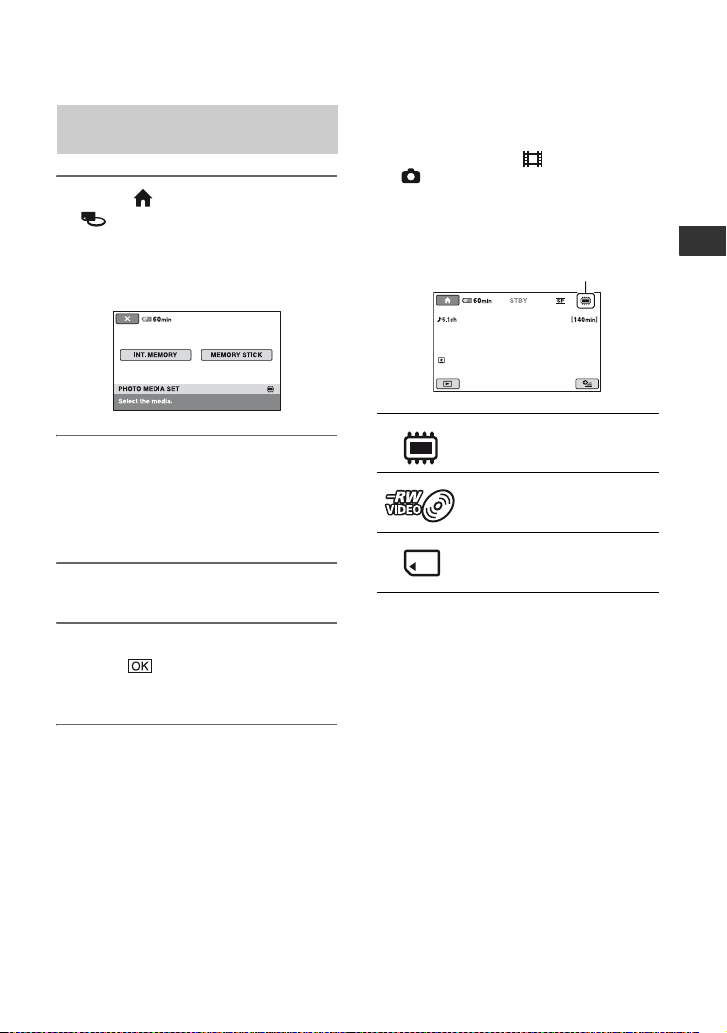
To confirm the selected media
1 Slide the POWER switch to turn on the
lamp of the mode ( (Movie)/
(Still)) that you want to check the
media.
2 Confirm the media icon displayed at the
upper right corner of the screen.
Media icon
Getting Started
2 Touch the desired media.
b Notes
• You cannot select a disc for the still image
media.
3 Touch [YES].
4 When [Completed.] appears,
touch .
The still image media is changed.
Internal memory*
Disc (The icon differs
depending on the disc type
(p. 13).)
“Memory Stick PRO Duo”
* DCR-DVD810
29
Page 30
Step 6: Inserting a disc or a “Memory Stick PRO Duo”
When you select [INT. MEMORY] in
“Step 5,” this “Step 6” operation is
unnecessary (DCR-DVD810).
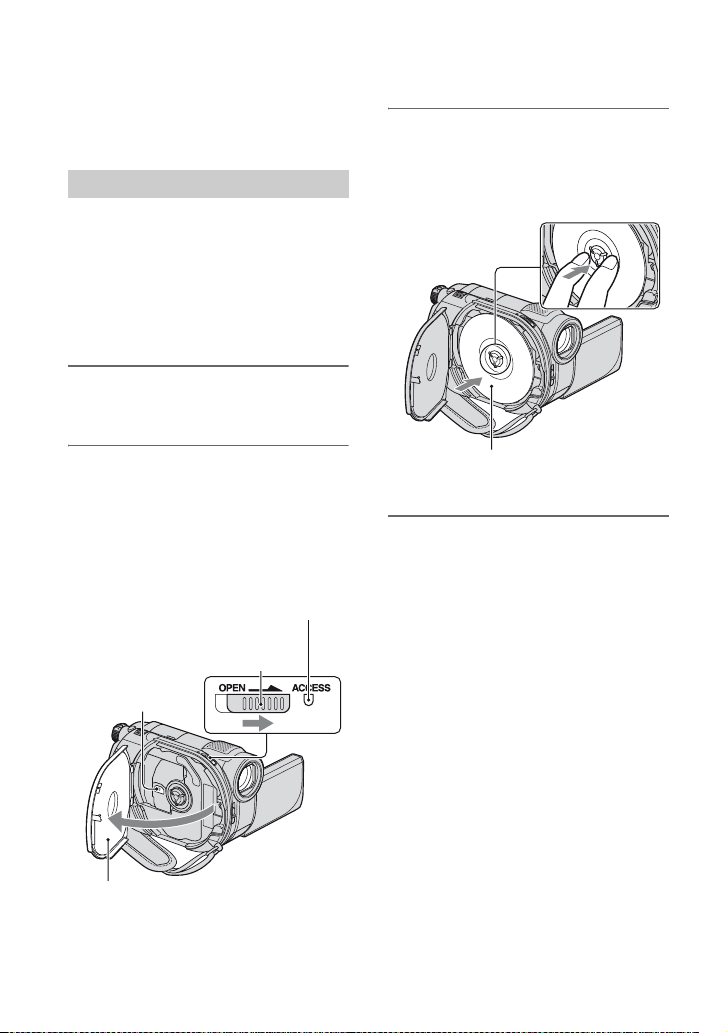
Inserting a disc
When you select [DISC] in “Step 5,” a new
8 cm DVD-RW, DVD+RW, DVD-R, or
DVD+R DL is required (p. 13).
b Notes
• Remove dust or fingerprints from the disc
beforehand, using a soft cloth (p. 118).
1 Check that the power of your
camcorder is on.
3 Set the disc with the recording
side facing your camcorder, then
press the center of the disc until it
clicks.
2 Slide the disc cover OPEN switch
in the direction of the arrow
(OPEN l).
[PREPARING TO OPEN] appears on
the screen. The disc cover slightly opens
automatically.
ACCESS lamp (Disc)
Disc cover OPEN
switch
Pickup lens
When the disc cover opens slightly, open it
further.
30
Set the disc with the label side facing out when
using a single-sided disc.
4 Close the disc cover.
[DISC ACCESS] appears on the screen.
It may take some time for the camcorder
to recognize the disc.
x DVD-RW/DVD+RW
A screen appears to ask whether you
will use [DISC SELECT GUIDE].
Using [DISC SELECT GUIDE] lets you
format the disc by following the
guidance on the screen. If you do not
want to use it, proceed to step 5.
x DVD-R/DVD+R DL
You can start recording immediately
after [DISC ACCESS] disappears from
the screen. You do not need to proceed
to steps after step 5.
Page 31
5 Touch the option that is right for
you on the screen.
x DVD-RW
Select the recording format, [VIDEO]
or [VR] (p. 13), then touch
.
x DVD+RW
Select the aspect ratio of the movie,
[16:9 WIDE] or [4:3], then touch
6 Touch [YES].
7 When [Completed.] is displayed,
touch .
When the formatting is completed, you
can start recording on the disc.
z Tips
• When you use a DVD-RW while the Easy
Handycam operation (p. 34) is set, the
recording format is fixed to VIDEO
mode.
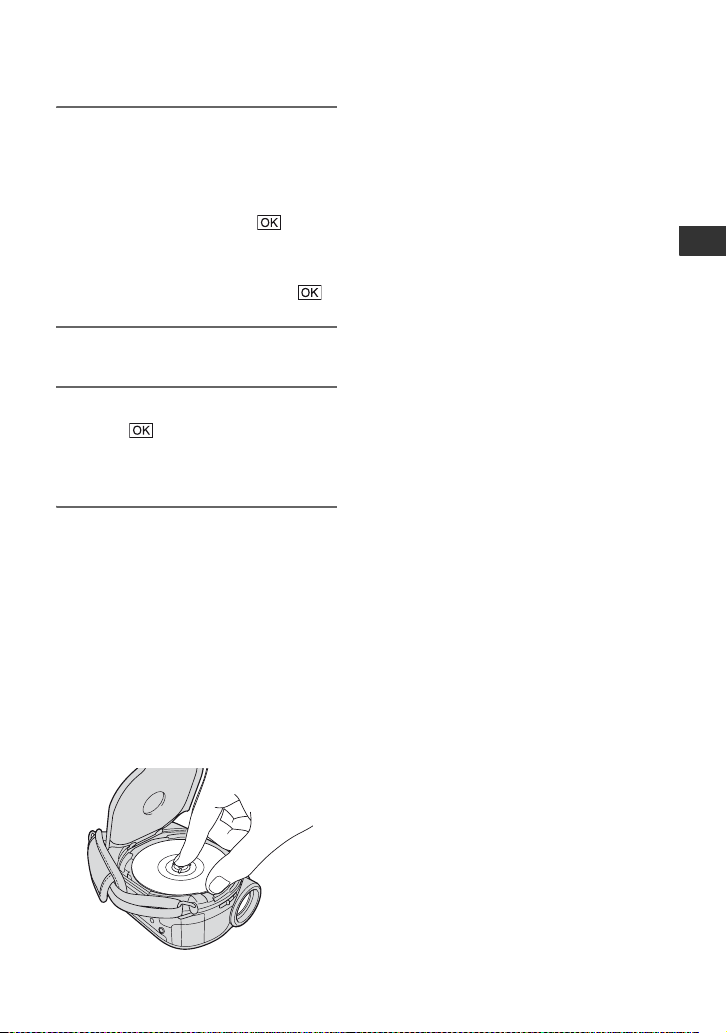
To remove the disc
1 Perform steps 1 and 2 to open the disc
cover.
2 Press the disc holder in the center of the
disc compartment, and remove the disc by
holding the edge.
b Notes
• Be careful not to obstruct the operation with
your hand or other objects, when opening or
closing the disc cover. Move the grip belt to the
bottom of the camcorder, then open or close the
disc cover.
• If you catch the grip belt when closing the disc
cover, it may cause your camcorder to
malfunction.
• Do not touch the disc with the recording side or
.
pickup lens (p. 123).
When using a double-sided disc, take care not to
smudge the surface with fingerprints.
• If you close the disc cover with the disc set
incorrectly, it may cause your camcorder to
malfunction.
• Do not disconnect the power sources while
formatting a disc.
• Do not apply shock or vibration to your
camcorder since your camcorder is reading/
writing on the disc:
– while the ACCESS lamp is on
– while the ACCESS lamp is flashing
– while [DISC ACCESS] or [PREPARING TO
OPEN] is displayed on the LCD screen
• It may take some time to remove the disc
depending on the recorded contents.
• It may take about 10 minutes to remove a disc if
the disc has scratches or is dirty with
fingerprints, etc. In that case, the disc might be
damaged.
z Tips
• You can insert or remove the disc when a power
source is connected to your camcorder even
when your camcorder is turned off. However,
the disc recognition process (step 4) does not
start.
• To delete all of the previously recorded images
from a DVD-RW/DVD+RW, then to use it
again to record new images, see “Formatting
media” (p. 72).
• You can check the right disc using [DISC
SELECT GUIDE] on the HOME MENU
(p. 75).
Getting Started
Continued ,
31
Page 32
Step 6: Inserting a disc or a “Memory Stick PRO Duo” (Continued)
Inserting a “Memory Stick PRO
Duo”
This operation is necessary only when you
select [MEMORY STICK] in “Step 5.”
See page 6 on the “Memory Stick” you can
use with your camcorder.
z Tips
• If you record only still images on the “Memory
Stick PRO Duo,” operations after step 3 are
unnecessary.
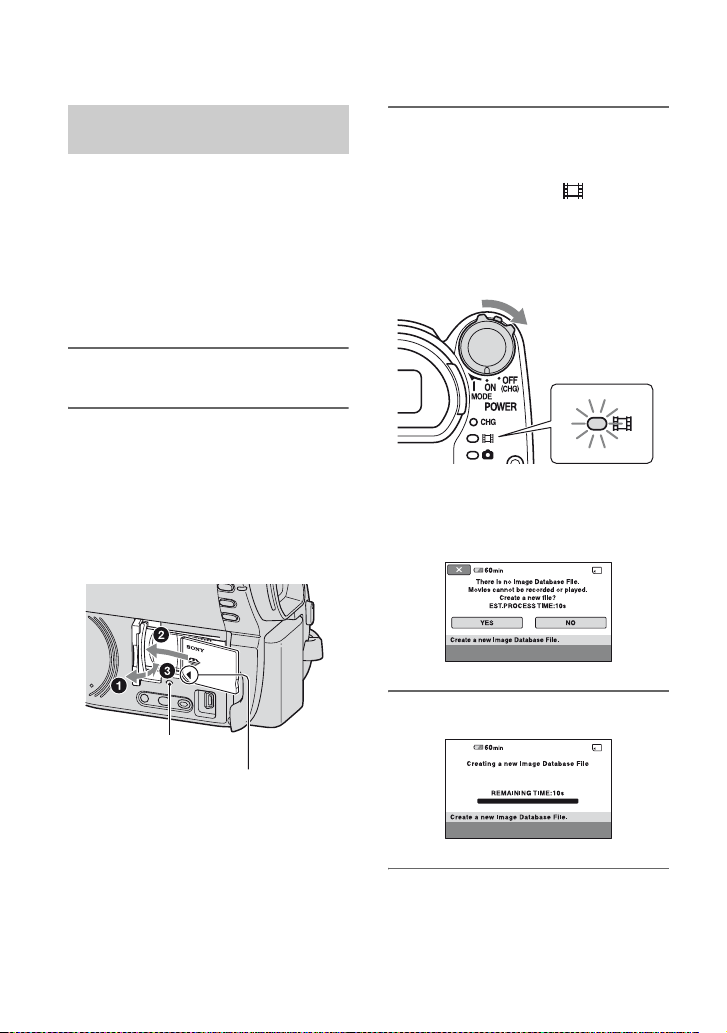
1 Open the LCD panel.
2 Insert the “Memory Stick PRO
Duo.”
1 Open the Memory Stick Duo cover in
the direction of the arrow.
2 Insert the “Memory Stick PRO Duo”
into the Memory Stick Duo slot in the
right direction until it clicks.
3 Close the Memory Stick Duo cover.
3 If you select [MEMORY STICK] in
“Step 5” for movie recording,
slide the POWER switch
repeatedly until the (Movie)
lamp lights up.
If the POWER switch is set to OFF
(CHG), turn it on while pressing the
green button.
The [Create a new Image Database
File.] screen appears on the screen when
you insert a new “Memory Stick PRO
Duo.”
32
4 Touch [YES].
Access lamp
Face the b mark towards the
LCD screen.
Page 33

To remove the “Memory Stick PRO
Duo”
Open the LCD panel and Memory Stick
Duo cover. Lightly push the “Memory Stick
PRO Duo” in once, then slide it out of the
slot.
b Notes
• To prevent media from being broken or
recorded images from being lost, do not do the
following when the access lamp ( p. 32) is on:
– to remove the battery pack or AC Adaptor
from the camcorder
– to apply mechanical shock or vibration to the
camcorder
– to remove the “Memory Stick PRO Duo”
from the camcorder
• Do not open the Memory Stick Duo cover
during recording.
• Inserting a “Memory Stick PRO Duo” forcibly
in the wrong direction may cause a malfunction
to the “Memory Stick PRO Duo,” Memory
Stick Duo slot, or image data.
• If [Failed to create a new Image Database File.
It may be possible that there is not enough free
space.] is displayed in step 4, format the
“Memory Stick PRO Duo” (p. 72). All recorded
data on the “Memory Stick PRO Duo” will be
deleted when you format.
• Do not pinch and remove the “Memory Stick
PRO Duo” forcibly. It may cause a malfunction.
Recording time of movies on a
“Memory Stick PRO Duo”
Figures in the table are approximate
recording time in minutes of “Memory
Stick PRO Duo.”
Figures in ( ) are minimum recording time.
Recording
mode
512MB
1GB
2GB
4GB
8GB
9M (HQ)
(high
quality)
6 (5) 9 (5) 15 (10)
10 (10) 20 (10) 35 (25)
25 (25) 40 (25) 80 (50)
55 (50) 80 (50) 160 (105)
115 (100) 170 (100) 325 (215)
6M (SP)
(standard
quality)
3M (LP)
(long play)
b Notes
• Numbers in the table are of when using a
“Memory Stick PRO Duo” made by Sony
Corporation. The recordable time varies
depending on the recording conditions, the type
of “Memory Stick,” or the [REC MODE] setting
(p. 80).
• When the recordable time is less than 5 minutes,
appears.
z Tips
• See page 83 for the recordable numbers of still
images.
Getting Started
33
Page 34
Recording/Playback
Recording and playing back with ease (Easy Handycam operation)
Easy Handycam operation makes nearly all settings automatic so that you can perform
recording or playing back operation without detailed settings. It also makes the screen font
size larger for easy viewing. The images are recorded on the selected media (p. 28).
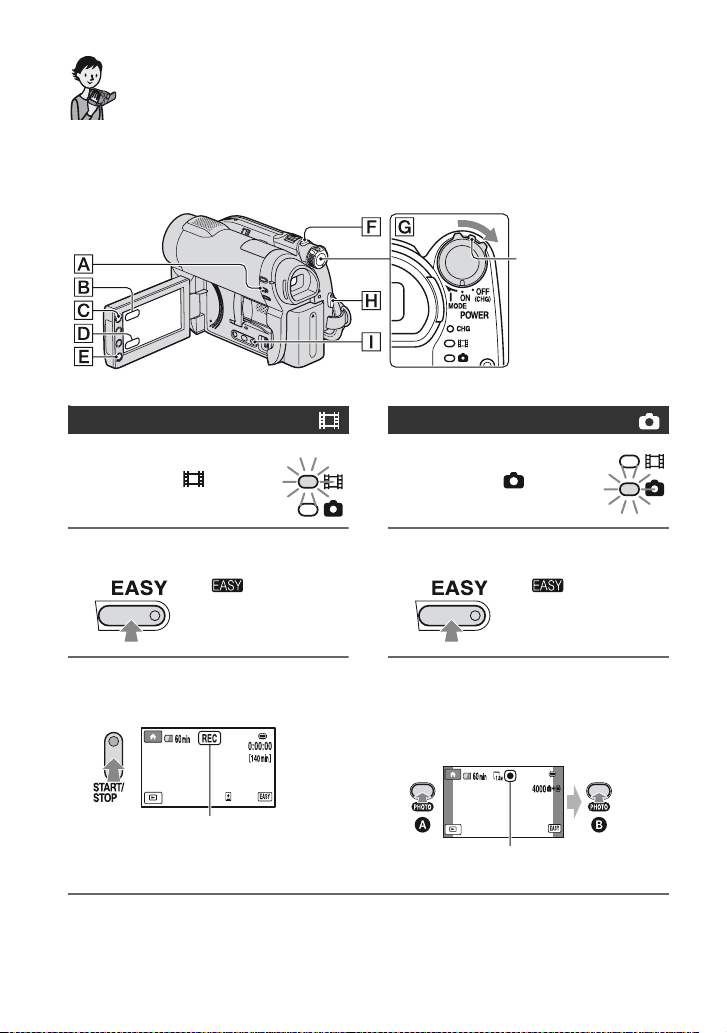
If the POWER switch
is set to OFF (CHG),
turn it while pressing
the green button.
R
Movies
Still Images
1 Turn the POWER switch
G until the (Movie)
lamp lights up.
2 Press EASY A.
appears on the
screen.
,
3 Press START/STOP H (or E) to
start recording*.
[STBY] t [REC]
To stop recording, press START/STOP
again.
* Movies are recorded in the [SP] recording mode.
34
1 Turn the POWER switch
G until the (Still)
lamp lights up.
2 Press EASY A.
appears on the
screen.
,
3
Press PHOTO F lightly to adjust
the focus
press it fully
sounds).
A
(a beep sounds), then
B
(a shutter click
Flashing t Lights up
Page 35
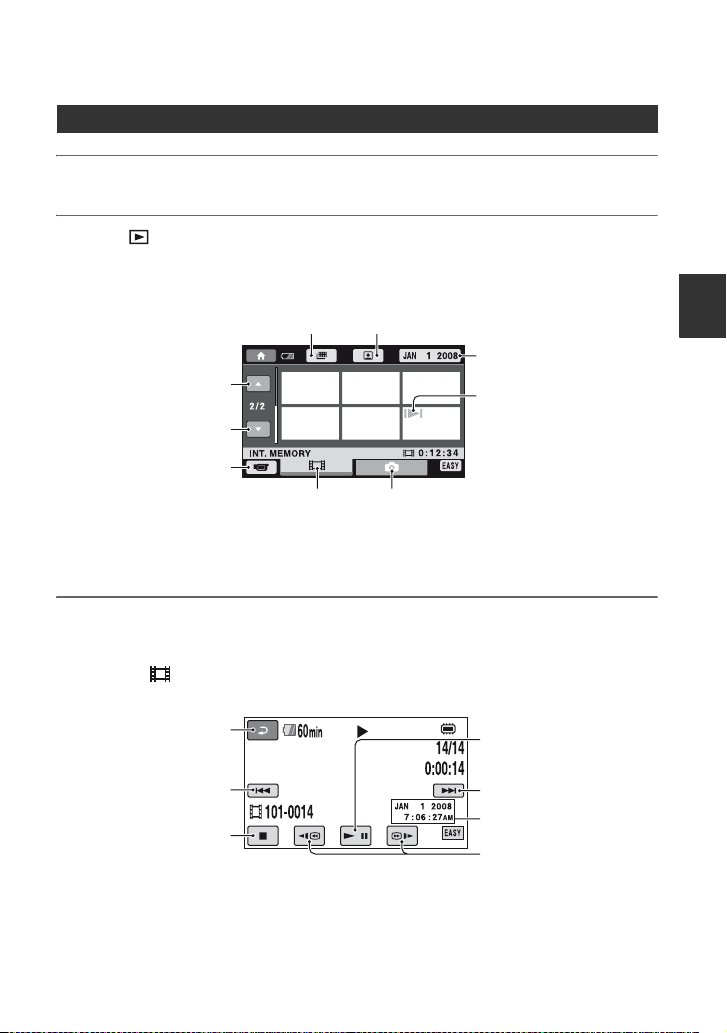
Playing back recorded movies/still images
1 Turn the POWER switch G to turn on your camcorder.
2 Press (VIEW IMAGES) I (or D).
The VISUAL INDEX screen appears on the screen. (It may take some time to display the
thumbnails.)
Film Roll Index (p. 45)
Previous 6 images
Next 6 images
Returns to the recording
* When you select [DISC] on [MOVIE MEDIA SET] (p. 28), a disc type appears. You cannot search
for movies by recording date.
screen.
Displays movies.
Face Index (p. 45)
Searches for images by
recording date (p. 46).*
Appears with the image on
each of the tab that was lastly
played back/recorded (B for
the still image recorded on
“Memory Stick PRO Duo”).
Displays still images.
3 Start playback.
Movies:
Touch the tab and the movie to be played back.
Returns to the VISUAL
INDEX screen.
Beginning of the scene/
previous scene
Stop (goes to the
VISUAL INDEX screen.)
* The setting of [DATA CODE] is fixed to [DATE/TIME] (p. 84).
Toggles Play or Pause as
you touch.
Next scene
Recording date/time*
Reverse/Forward
Recording/Playback
Continued ,
35
Page 36
Recording and playing back with ease (Easy Handycam operation)
(Continued)
zTips
• When playback from the selected movie reaches the last movie, the screen returns to the VISUAL
INDEX screen.
• You can slow down the playback speed by touching / during pause.
• You can adjust the volume by touching (HOME) t (SETTINGS) t [SOUND
SETTINGS] t [VOLUME], then with / .
• You can change the movie media with [MOVIE MEDIA SET] (p. 28).
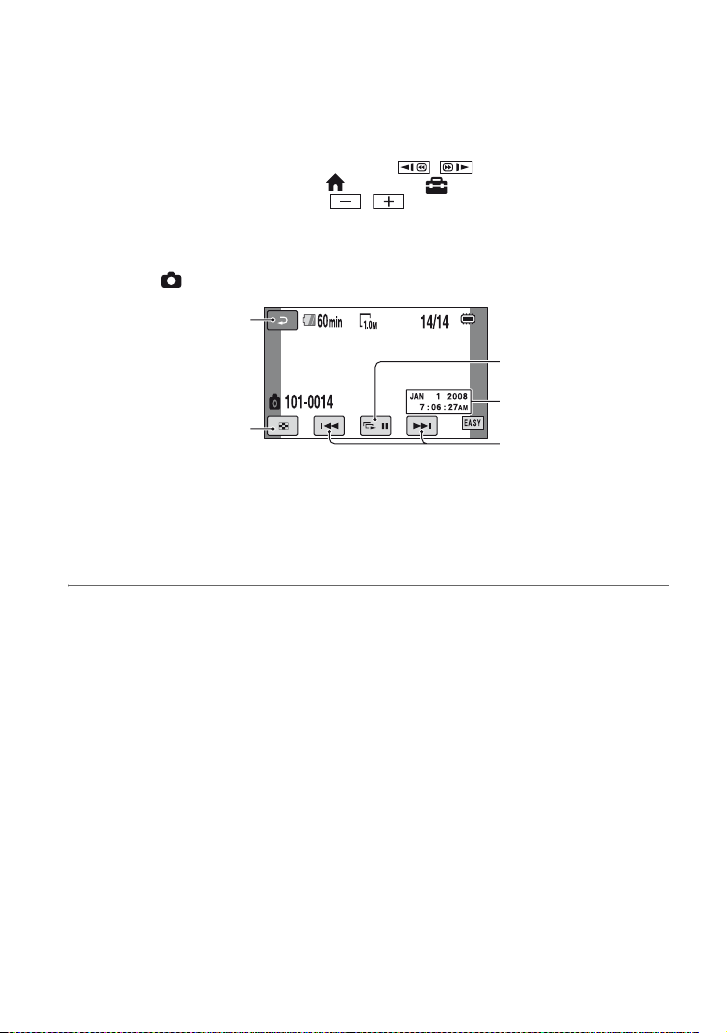
Still images:
Touch the tab and the still image to be played back.
Returns to the VISUAL
INDEX screen.
Side show (p. 47)
Recording date/time*
Goes to the VISUAL
INDEX screen.
* The setting of [DATA CODE] is fixed to [DATE/TIME] (p. 84).
zTips
• You can switch the still image media with [PHOTO MEDIA SET] (DCR-DVD810) (p. 28).
Previous/Next
36
Page 37

To cancel Easy Handycam operation
Press EASY A again. disappears
from the screen.
Menu settings during Easy Handycam
operation
Touch (HOME) C (or B) to display
the menu items available for setup changes
(p.17, 78).
b Notes
• Most of the menu items automatically return to
the default settings. The settings of some menu
items are fixed. For details, see page 79.
• DVD-RW is formatted with VIDEO mode (p.
13).
• You cannot use the (OPTION) menu.
• Cancel Easy Handycam operation if you want to
add effects to images or change settings.
Invalid buttons during Easy Handycam
operation
You cannot use some buttons/functions
during Easy Handycam operation since
they are automatically set (
p. 79). If you set
an invalid operation, [Invalid during Easy
Handycam operation] appears.
To view movies on a disc on other
devices (Finalize)
To view movies stored on a disc on other
devices or a computer, you need to
“finalize” the disc. For details on finalizing
operation, see page 67.
b Notes
• For DVD-R, DVD+R DL, you cannot reuse the
disc or record additional movies onto the disc
once you finalize the disc even if the disc has
free space.
• You cannot record additional movies on a
finalized disc during Easy Handycam operation
(p. 74).
Recording/Playback
37
Page 38
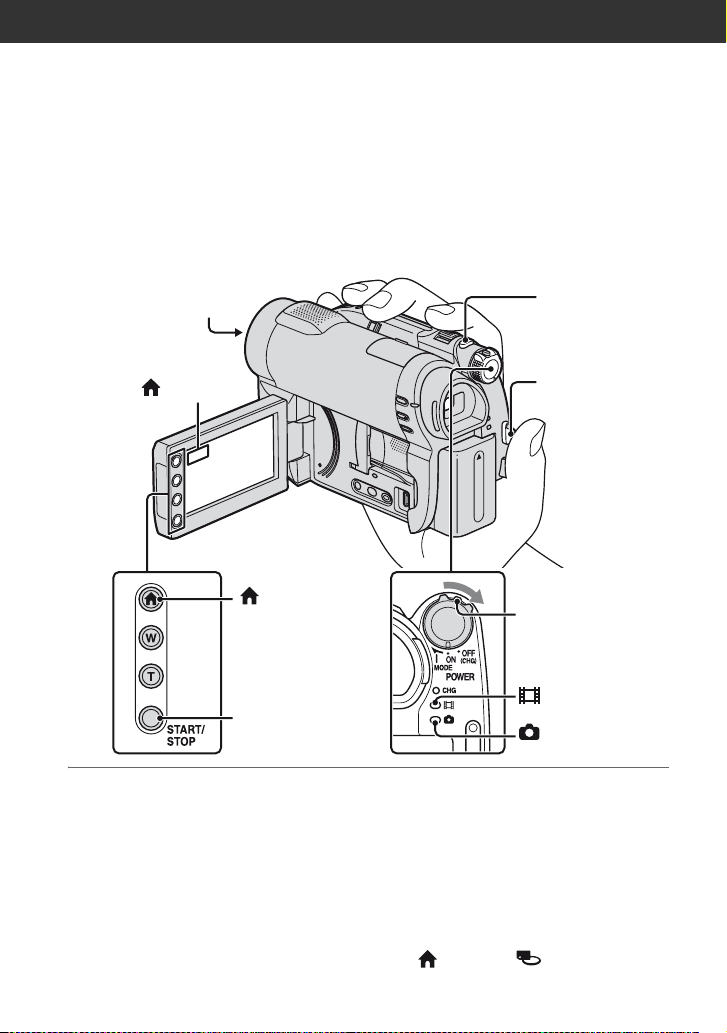
Recording
The images are recorded on the media selected on the media setting (p. 28).
DCR-DVD610/DVD710
In the default setting, movies are recorded on a disc. Still images are recorded on a “Memory
Stick PRO Duo” only.
DCR-DVD810
In the default setting, both movies and still images are recorded on the internal memory.
Open the lens cover
b Notes
• If the ACCESS/access lamps (p. 30, 32) are lit or flashing after recording is finished, it means data is still
being written onto the media. Do not apply shock or vibration to your camcorder, and do not remove the
battery pack or the AC Adaptor.
• In the case that [INT. MEMORY] (DCR-DVD810) or [MEMORY STICK] is selected on [MOVIE
MEDIA SET] (p. 28), when a movie file exceeds 2 GB, the next movie file is created automatically.
z Tips
• See page 6 for the “Memory Stick PRO Duo” you can use in your camcorder.
• You can check the free media space for movies by touching (HOME) t (MANAGE MEDIA)
t [MEDIA INFO] (p. 71).
(p. 26).
(HOME) E
(HOME) D
START/STOP C
PHOTO F
START/STOP B
POWER switch A
If the POWER switch is
set to OFF (CHG), turn it
while pressing the green
button.
(Movie) lamp
(Still) lamp
38
Page 39
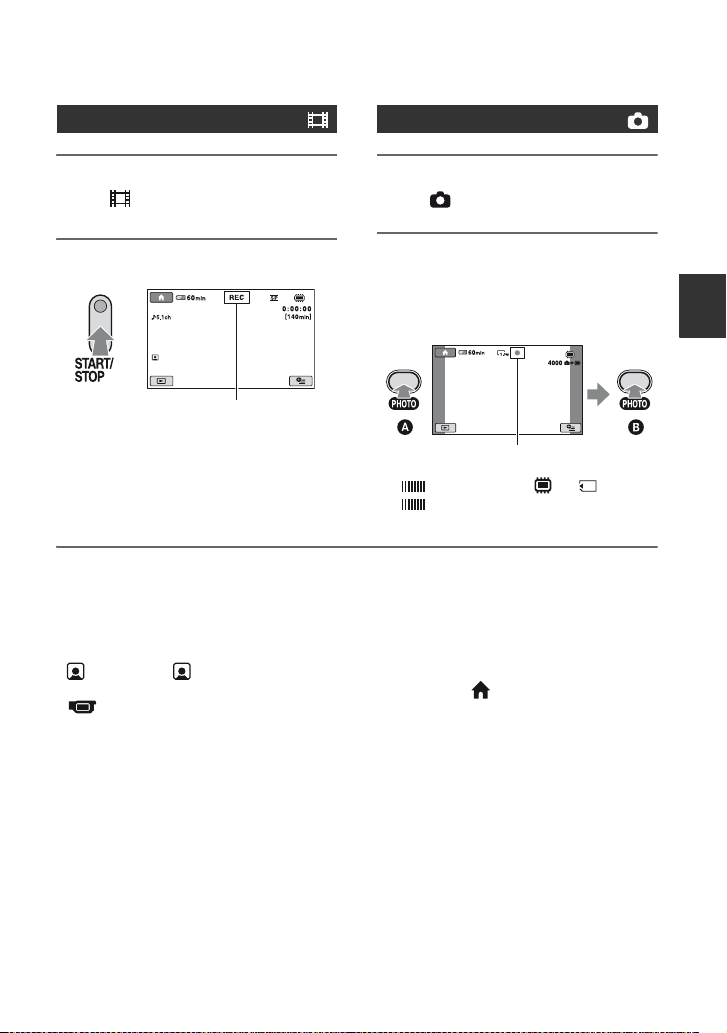
Movies
Still Images
1 Turn the POWER switch A until
the (Movie) lamp lights up.
2 Press START/STOP B (or C).
[STBY] t [REC]
To stop recording, press START/STOP
again.
b Notes
• You cannot record still images on a disc.
z Tips
• See page 14 for the recordable time of movies, and page 83 for the number of recordable still images.
• appears when [ INDEX SET] is set to [ON] (the default setting) during movie recording (p. 82).
• You can switch recording between movies and still images by touching (HOME) D (or E) t
(CAMERA) t [MOVIE] or [PHOTO].
• You can create still images from recorded movies (p. 53).
1 Turn the POWER switch A until
the (Still) lamp lights up.
2
Press PHOTO F lightly to adjust
the focus
press it fully
sounds).
recorded.
A
(a beep sounds), then
B
(a shutter click
Flashing t Lights up
appears next to or . When
disappears, the image has been
Recording/Playback
Continued ,
39
Page 40
Recording (Continued)
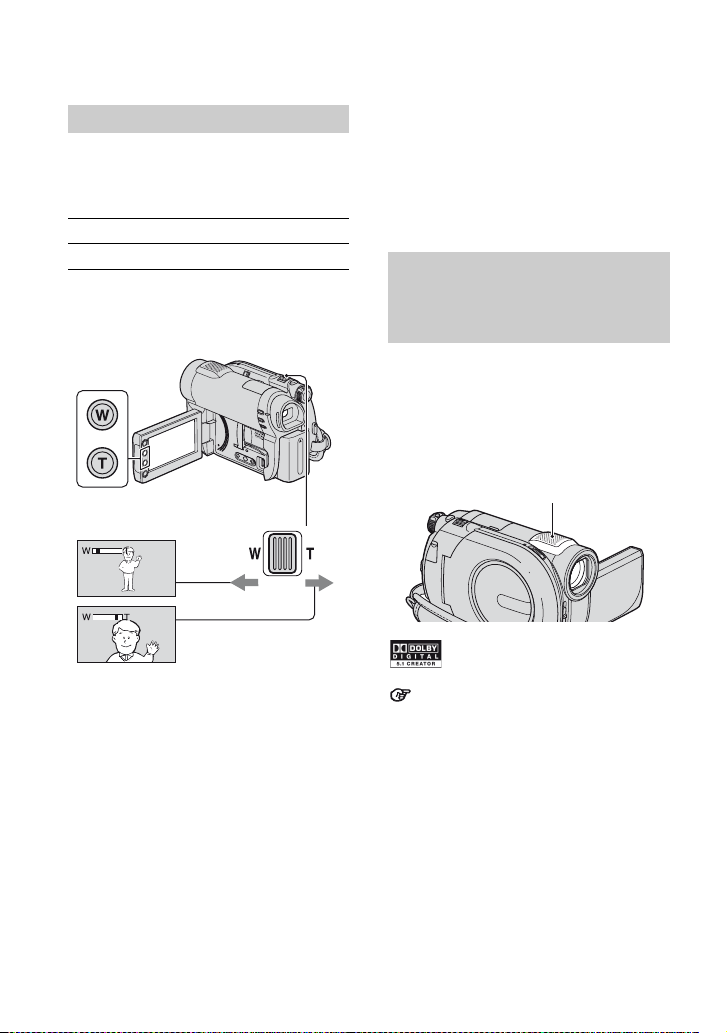
Zooming
You can zoom in up to the magnifications
shown in the following table.
(optical zoom)
DCR-DVD610 40 ×
DCR-DVD710/DVD810 25 ×
You can adjust the magnification with the
power zoom lever or the zoom button on
the LCD frame.
Wider range of view:
(Wide angle)
Close view: (Telephoto)
Move the power zoom lever slightly for a
slower zoom. Move it further for a faster
zoom.
b Notes
• [STEADYSHOT] may not reduce image
blurring as desired when the power zoom lever
is set to the T (Telephoto) side.
• Be sure to keep your finger on the power zoom
lever. If you move your finger off the power
zoom lever, the operation sound of the lever
may also be recorded.
• You cannot change the zoom speed with the
zoom buttons on the LCD frame.
• The minimum possible distance between
camcorder and subject while maintaining sharp
40
focus is about 1 cm (about 13/32 in.) for wide
angle and about 80 cm (about 2 5/8 feet) for
telephoto.
z Tips
• Using [DIGITAL ZOOM] (p. 81), you can
zoom in further than the magnification shown in
the table when recording movies.
Recording sound with more presence (5.1ch surround recording) (DCR-DVD710/ DVD810)
Sound picked up by the built-in microphone
is converted to 5.1ch surround sound and
recorded.
Enjoy realistic sound when playing the
movies on devices that support 5.1ch
surround sound.
Built-in microphone
Dolby Digital 5.1 Creator, 5.1ch surround sound
Glossary (p. 135)
b Notes
• 5.1ch sound is converted to 2ch when played back
on your camcorder.
z Tips
• You can select the recording sound, [5.1ch
SURROUND] or [2ch STEREO] ([AUDIO
MODE], p. 80).
Page 41
Starting to record quickly (QUICK ON)
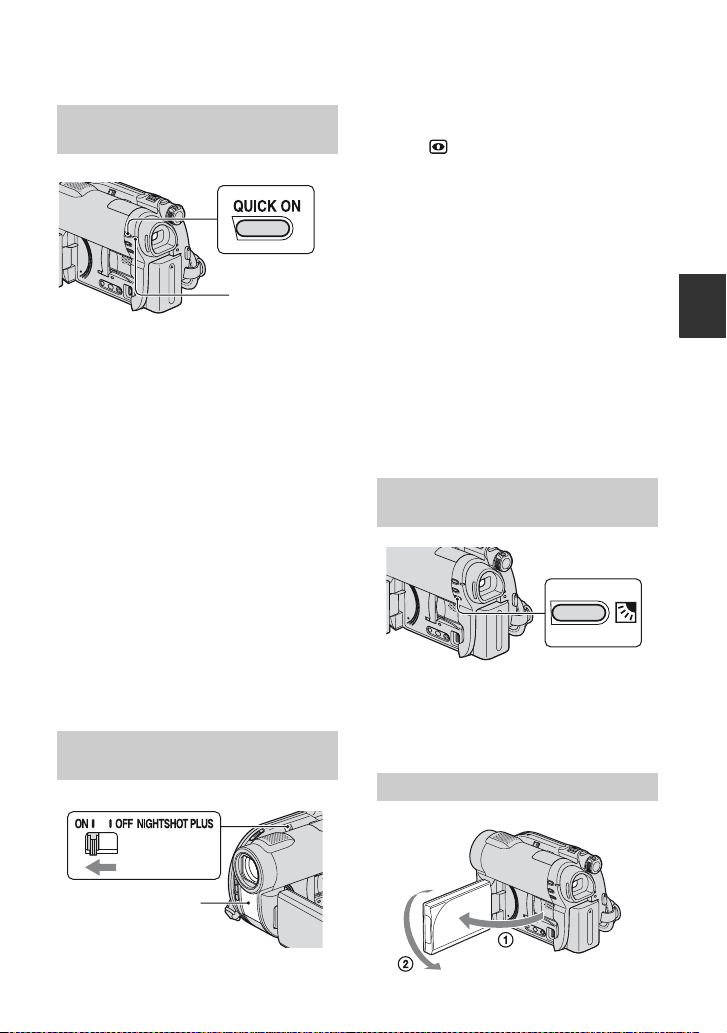
QUICK ON
amp
l
If you press QUICK ON instead of turning
off the POWER switch, the power
consumption will be reduced (sleep mode).
In sleep mode, the QUICK ON lamp
flashes. If you press QUICK ON again
when you want to start next recording, your
camcorder will be ready for recording after
about 1 second.
b Notes
• While the camcorder is in sleep mode, the
power consumption will be about half that used
during recording. You can save the battery
power.
• If you do not operate your camcorder and leave
it in sleep mode for a while, your camcorder
automatically turns off. With [QUICK ON
STBY], you can set the time after which the
camcorder turns off in sleep mode (p. 89).
• If you press QUICK ON during recording, your
camcorder stops recording and becomes sleep
mode.
Recording in dark places (NightShot plus)
To record in dark places, set the
NIGHTSHOT PLUS switch to ON to
display .
b Notes
• The NightShot plus and Super NightShot plus
functions use infrared light. Therefore, do not
cover the infrared port with your fingers or other
objects.
• Remove the conversion lens (optional).
• Adjust the focus manually ([FOCUS], p. 92)
when it is hard to focus automatically.
• Do not use the NightShot plus and Super
NightShot plus functions in bright places. This
may cause a malfunction.
z Tips
• To record an image brighter, use Super
NightShot plus function (p. 95). To record a
movie more faithfully to the original colors, use
Color Slow Shutter function (p. 95).
Adjusting the exposure for backlit subjects
To adjust the exposure for backlit subjects,
press . (BACK LIGHT) to display .. To
cancel the back light function, press
. (BACK LIGHT) again.
Recording in mirror mode
Recording/Playback
Infrared port
Continued ,
41
Page 42

Recording (Continued)
Open the LCD panel 90 degrees to the
camcorder (1), then rotate it 180 degrees
to the lens side (2).
z Tips
• A mirror-image of the subject appears on the
LCD screen, but the image will be normal when
recorded.
• When recording in mirror mode, the images are
not displayed in the viewfinder.
42
Page 43
Playback
You can play back images recorded on the media selected in the media setting (p. 28).
DCR-DVD610/DVD710
In the default setting, movies on a disc are played. Still images are recorded and played on a
“Memory Stick PRO Duo” only.
DCR-DVD810
In the default setting, images in the internal memory are played.
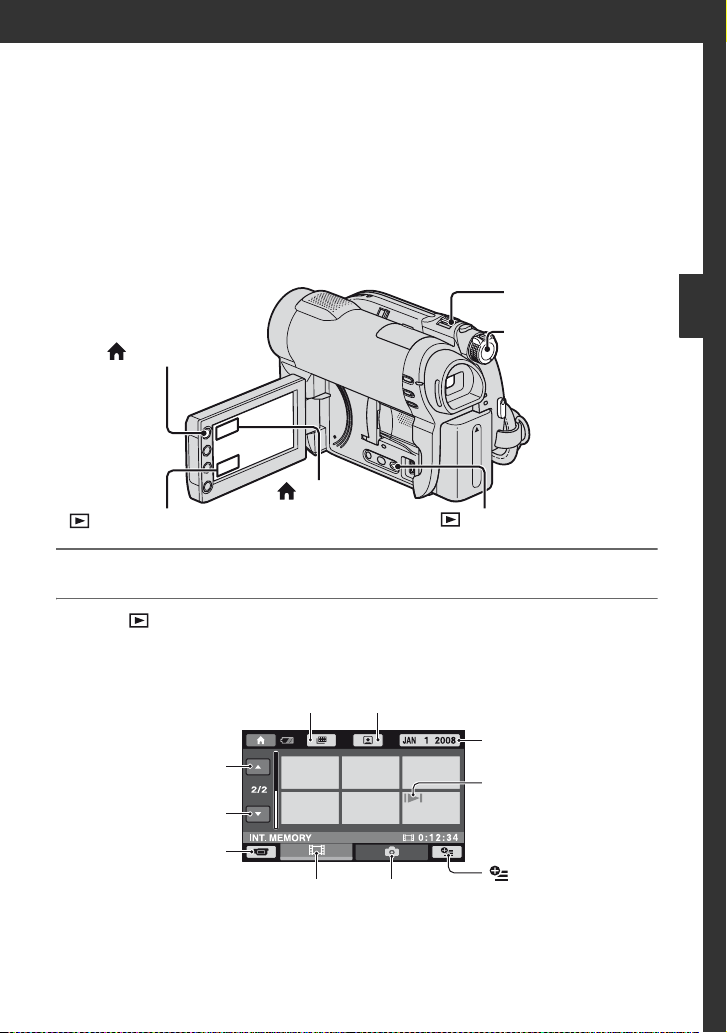
Power zoom lever F
(HOME) D
(HOME) E
(VIEW IMAGES) C
POWER switch A
(VIEW IMAGES) B
1 Turn the POWER switch A to turn on your camcorder.
2 Press (VIEW IMAGES) B (or C).
The VISUAL INDEX screen appears on the screen. (It may take some time to display the
thumbnails.)
Previous 6 images
Next 6 images
Returns to the recording
screen.
Film Roll Index (p. 45)
Displays movies.
Face Index (p. 45)
Displays still images.
Searches for images by
recording date (p. 46).*
Appears with the image on
each of the tab that was lastly
played back/recorded (B for
the still image recorded on
“Memory Stick PRO Duo”).
(OPTION)
Recording/Playback
* When you select [DISC] on [MOVIE MEDIA SET] (p. 28), a disc type appears. You cannot
search for movies by recording date.
Continued ,
43
Page 44
Playback (Continued)
z Tips
• The number of the images on the VISUAL INDEX screen can be changed 6 y 12 by moving the power
zoom lever
IMAGES SET] t [ DISPLAY] (p. 85).
F. To fix this number, touch (HOME) D (or E) t (SETTINGS) t [VIEW
3 Start playback.
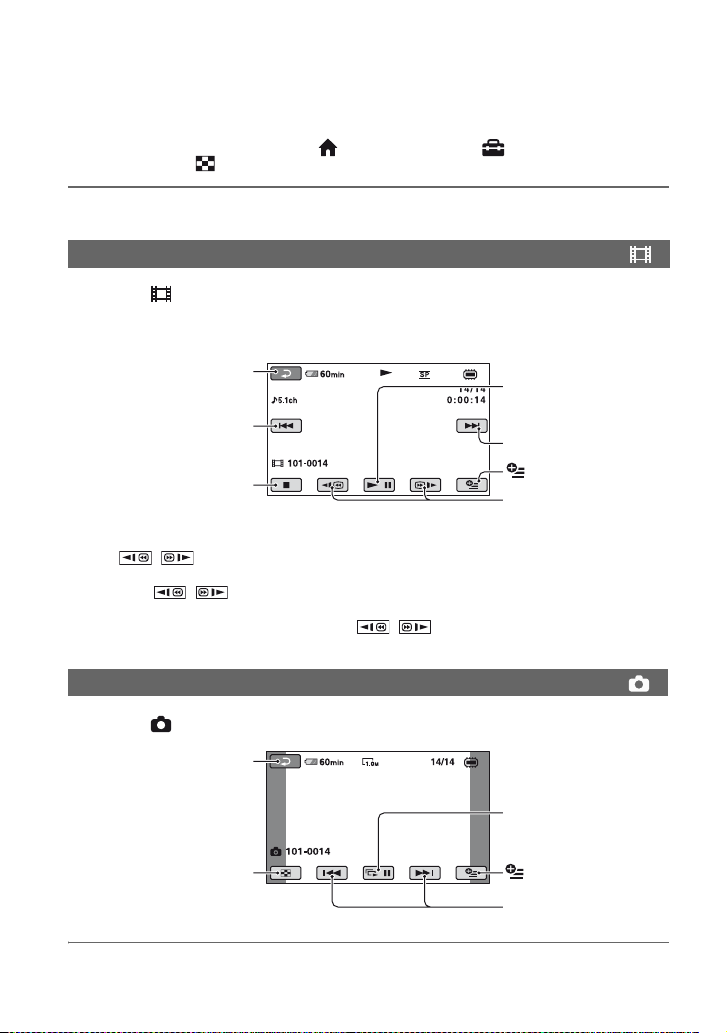
Movies
Touch the tab and the movie to be played back.
When playback from the selected movie reaches the last movie, the screen returns to the
VISUAL INDEX screen.
Returns to the VISUAL
INDEX screen.
Beginning of the movie/
previous movie
Stop (goes to the VISUAL
INDEX screen.)
z Tips
• Touch / during pause to play back movie slowly.
• When playing movies from the internal memory (DCR-DVD810) or from a “Memory Stick PRO Duo,”
one touch of / makes the movie reverse/fast forward about 5 times faster than normal, 2
touches about 10 times, 3 touches about 30 times, and 4 touches about 60 times faster.
• When playing the movies on a disc, one touch of / makes the movie reverse/fast forward
about 5 times faster than normal, 2 touches about 10 times faster (about 8 times faster for a DVD+RW).
Toggles Play or Pause as
you touch.
Next movie
(OPTION)
Reverse/ Forward
Still Images
Touch the tab and the still image to be played back.
Returns to the VISUAL
INDEX screen.
Goes to the VISUAL
INDEX screen.
44
Slide show (p. 47)
(OPTION)
Previous/Next
Page 45
To adjust the sound volume of movies
While playing back movies, touch
(OPTION) t tab t [VOLUME],
then adjust the volume with / .
z Tips
• You can switch screen to the VISUAL INDEX
screen by touching (HOME) D (or E) t
(VIEW IMAGES) t [VISUAL INDEX].
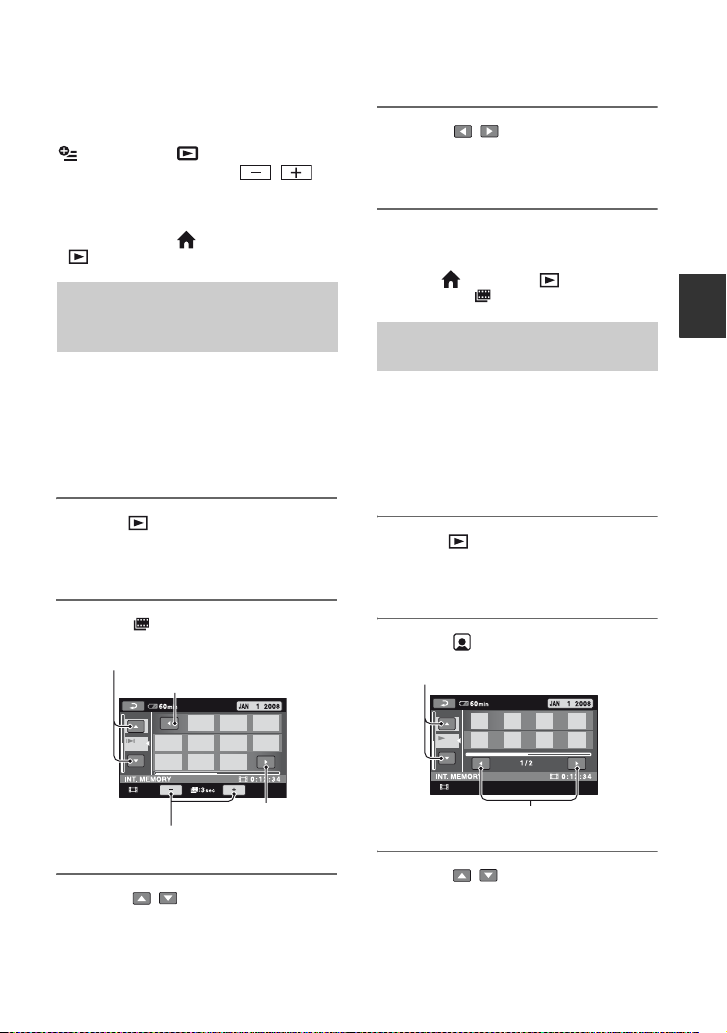
Searching for scenes with pinpoint accuracy (Film Roll Index)
Movies can be divided by a set time, and
the first scene of each division is displayed
on the INDEX screen. You can start playing
back a movie from the selected scene.
Select beforehand media which contains the
movie you want to play back (p. 28).
4 Touch / to search for the
desired scene.
Playback starts from the selected scene.
z Tips
• You can display the Film Roll Index screen by
touching (HOME) t (VIEW
IMAGES) t [ INDEX].
Searching for desired scenes by a face (Face Index)
The detected face images during recording
are displayed on the INDEX screen.
You can play back the movie from the
selected face image.
Select beforehand media which contains the
movie you want to play back (p. 28).
Recording/Playback
1 Press (VIEW IMAGES) on your
camcorder.
The VISUAL INDEX screen appears.
2 Touch (Film Roll Index).
Previous/Next movie
Previous scene
Next scene
Changes the interval of scenes.
3 Touch / to select the desired
movie.
1 Press (VIEW IMAGES) on your
camcorder.
The VISUAL INDEX screen appears.
2 Touch (Face Index).
Previous/Next movie
Previous/Next face image
3 Touch / to select the desired
movie.
Continued ,
45
Page 46
Playback (Continued)
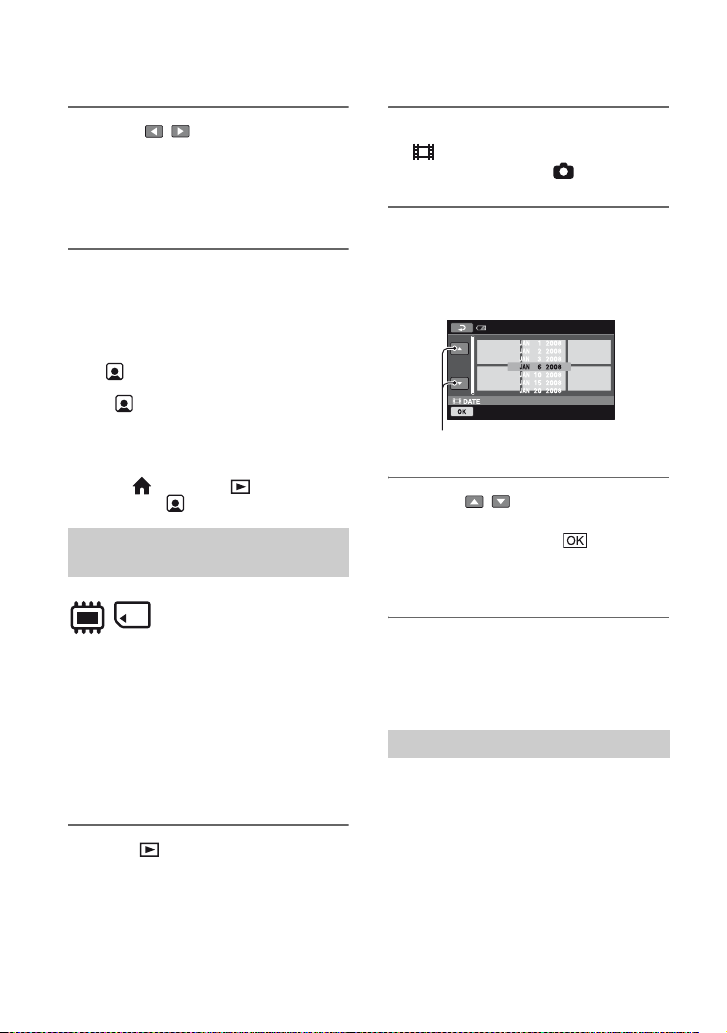
4 Touch / to search for the
desired face image, then select
the face image of the scene you
want to play back.
Playback starts from the selected scene.
b Notes
• Faces may not be detected depending on
recording conditions.
Example: People wearing glasses or hats, or not
facing towards the camera.
• Set [ INDEX SET] to [ON] (the default
setting) before recording to play back movies
from [ INDEX] (p. 82). Face Index may not
appear properly if no face was detected.
z Tips
• You can display the Face Index screen by
touching (HOME) t (VIEW
IMAGES) t [ INDEX].
Searching for desired images by date (Date Index)
You can efficiently search for desired
images by date.
Select beforehand media which contains the
movie you want to play back (p. 28).
b Notes
• You cannot use the Date Index with the disc,
and still images on the “Memory Stick PRO
Duo.”
1 Press (VIEW IMAGES) on your
camcorder.
The VISUAL INDEX screen appears.
2 To search for movies, touch the
tab. To search for still
images, touch the tab.
3 Touch the date button at the
upper right corner of the screen.
The recording dates of images are
displayed on the screen.
Previous/Next date
4 Touch / to select the
recording date of the desired
images, then touch .
The images recorded on the selected
date are displayed on the screen.
z Tips
• On the Film Roll Index screen or the Face Index
screen, you can display the Date Index function
by following the steps 3 to 4.
Using PB zoom
You can magnify still images from about
1.1 to 5 times the original size.
Magnification can be adjusted with the
power zoom lever or the zoom buttons on
the LCD frame.
46
Page 47
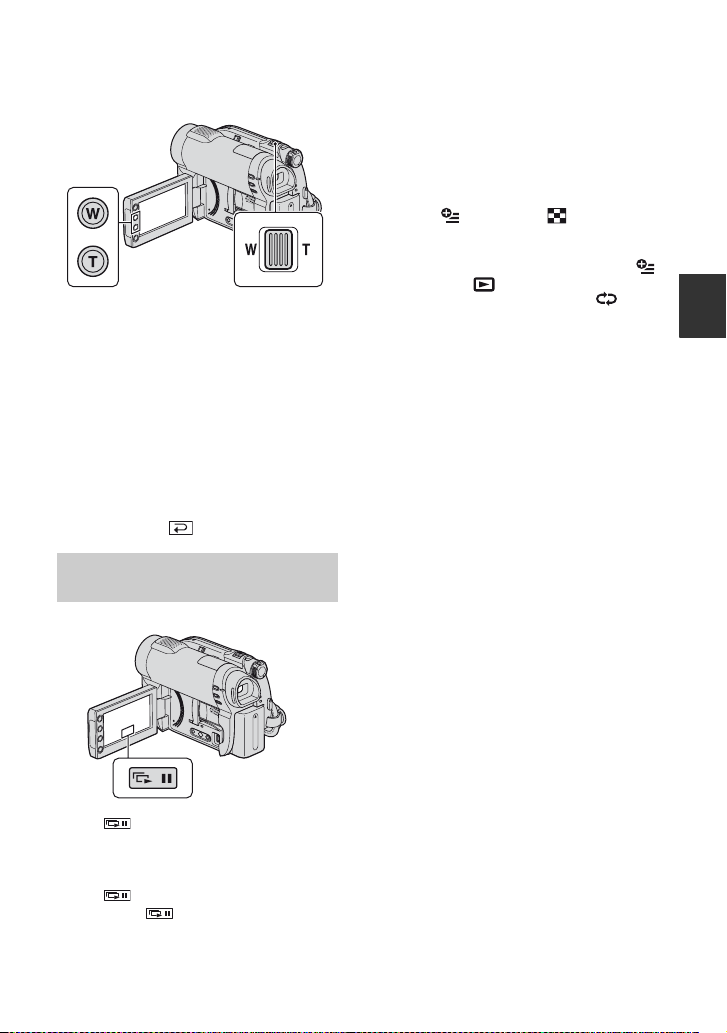
1 Play back the still image you want to
magnify.
2 Magnify the still image with T
(Telephoto).
The screen is framed.
3 Touch the screen at the point you want
to display in the center of the displayed
frame.
4 Adjust the magnification with W (Wide
angle)/T (Telephoto).
To cancel, touch .
Playing back a series of still images (Slide show)
b Notes
• You cannot operate playback zoom during slide
show.
z Tips
• You can also play back the slide show by
touching (OPTION) t tab t [SLIDE
SHOW] on the VISUAL INDEX screen.
• While playing back still images, you can set
continuous slide show playback by touching
(OPTION) t tab t [SLIDE SHOW
SET]. As the default setting is [ON], is
displayed on the LCD screen and your
camcorder repeats a slide show of still images.
If you set [SLIDE SHOW SET] to [OFF], your
camcorder plays the still images in slide show
mode once, starting from the selected still
image.
Recording/Playback
Touch on the still image playback
screen.
The slide show begins from the selected
still image.
Touch to stop the slide show. To
restart, touch again.
47
Page 48
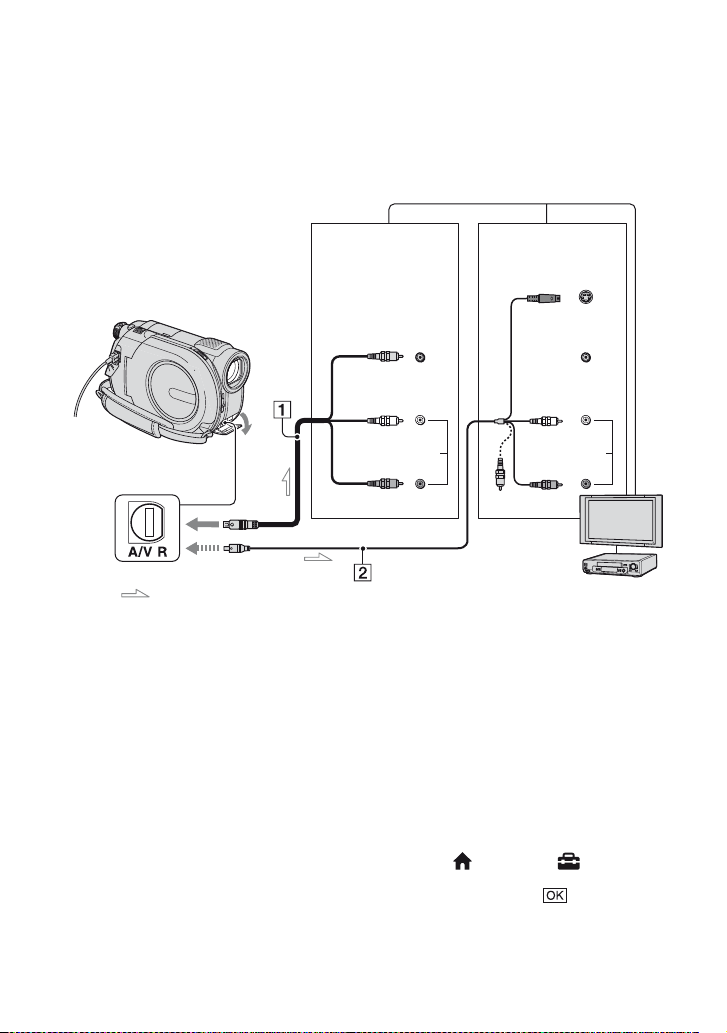
Playing the images on a TV
Connect your camcorder to the input jack of a TV or VCR using the A/V connecting cable 1
or an A/V connecting cable with S VIDEO 2. Connect your camcorder to the wall outlet (wall
socket) using the supplied AC Adaptor for this operation (p. 21). Refer also to the instruction
manuals supplied with the devices to be connected.
A/V Remote
Connector
: Signal flow
1 A/V connecting cable (supplied)
Connect to the input jack of the other device.
2 A/V connecting cable with S VIDEO
(optional)
When connecting to the other device via the S
VIDEO jack, by using an A/V connecting cable
with S VIDEO (optional), higher quality
images can be produced than with an A/V
connecting cable. Connect the white and red
plugs (left/right audio) and the S VIDEO plug
(S VIDEO channel) of the A/V connecting
cable with S VIDEO (optional). The yellow
plug connection is not necessary. Connecting
only the S VIDEO plug will not output audio.
Device without
S VIDEO jack
IN
VIDEO
(Yellow)
(White)
AUDIO
(Red)
When your TV is connected to a VCR
Connect your camcorder to the LINE IN
input on the VCR. Set the input selector on
the VCR to LINE (VIDEO 1, VIDEO 2, etc.),
if the VCR has an input selector.
To set the aspect ratio according to
the connected TV (16:9/4:3)
Change the setting according to the screen
aspect ratio of the TV you will view images
on.
1 Turn on your camcorder.
2 Touch (HOME) t (SETTINGS)
Device with
S VIDEO jack
IN
t [OUTPUT SETTINGS] t [TV TYPE]
t [16:9] or [4:3] t .
S VIDEO
VIDEO
(White)
AUDIO
(Red)
VCRs or TVs
48
Page 49
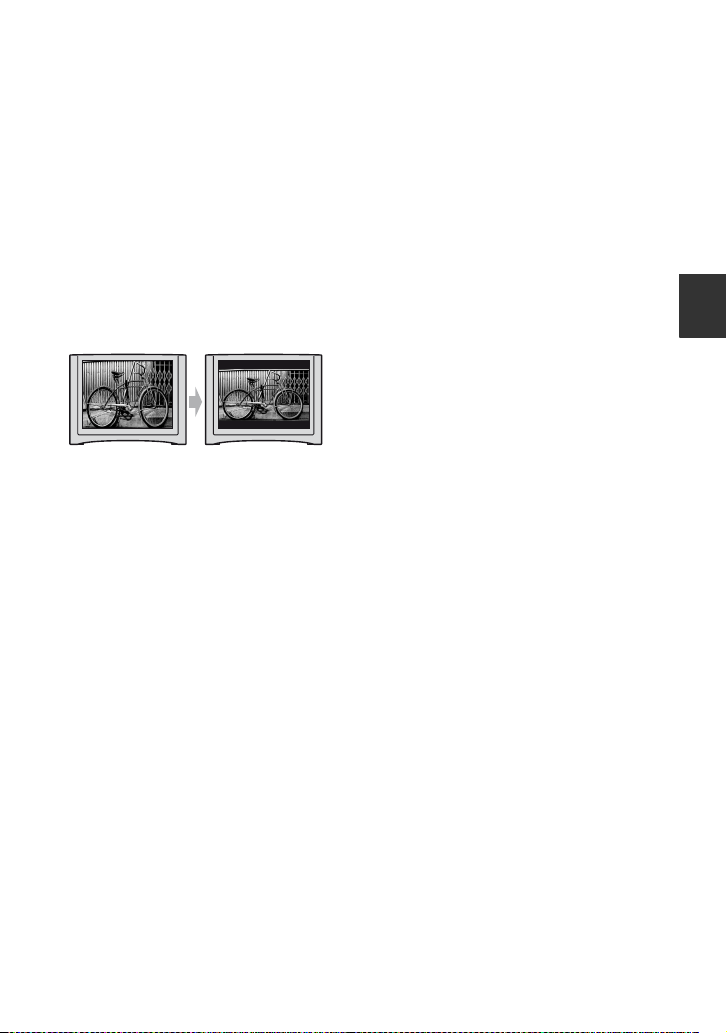
b Notes
• When you connect your camcorder to a TV
compatible with the ID-1/ID-2 system, set [TV
TYPE] to [16:9]. The TV switches to full mode
automatically. Refer also to the instruction
manuals supplied with your TV.
• When you set [TV TYPE] to [4:3], the image
quality may deteriorate. Also, when the record ed
image’s aspect ratio switches between 16:9
(wide) and 4:3, the image may jitter.
• When you play back an image recorded in 16:9
(wide) aspect ratio on a 4:3 TV not compatible
with the 16:9 (wide) signal, set [TV TYPE] to
[4:3].
When your TV is monaural (When your
TV has only one audio input jack)
Connect the yellow plug of the A/V
connecting cable to the video input jack and
connect the white (left channel) or the red
(right channel) plug to the audio input jack
of your TV or VCR.
z Tips
• You can display the counter on the TV screen by
setting [DISP OUTPUT] to [V-OUT/PANEL]
(p. 87).
Recording/Playback
49
Page 50
Editing
(OTHERS) category
This category enables you to edit or print
images on the media, or copy them onto
your computer for viewing, editing or
creating an original DVD.
(OTHERS) category
b Notes
• You can select the media of the image to be
edited by touching (HOME) t
(MANAGE MEDIA) t [MOVIE
MEDIA SET]/[PHOTO MEDIA SET] (p. 28).
Item list
DELETE
You can delete images on the media (p. 51).
PHOTO CAPTURE
You can capture a selected scene from a
recorded movie as a still image (p. 53).
MOVIE DUB
You can dub movies recorded on the
internal memory (DCR-DVD810) or a
“Memory Stick PRO Duo” to a disc (p. 55).
PLAYLIST EDIT
You can create and edit a Playlist (p. 59).
PRINT
You can print still images on a connected
PictBridge printer (p. 64).
USB CONNECT
You can connect your camcorder to a
computer or another device using the USB
cable (p. 97).
PHOTO COPY (DCR-DVD810)
You can copy still images recorded on the
internal memory to a “Memory Stick PRO
Duo” (p. 56).
EDIT
You can edit the images on the media
(p. 58).
50
Page 51
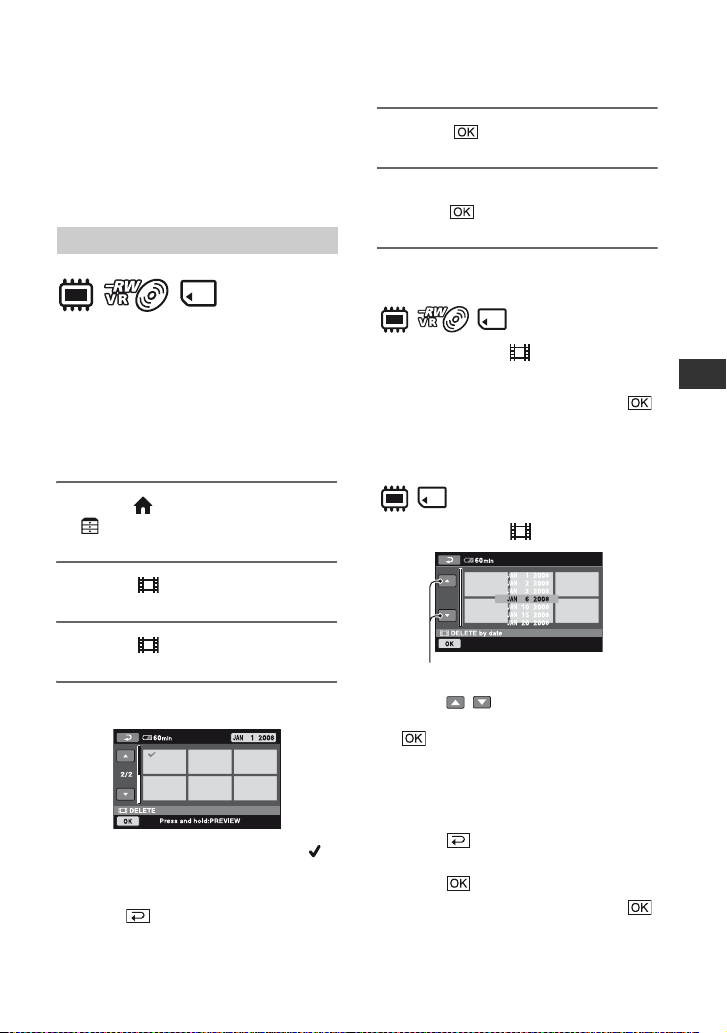
Deleting images
b Notes
• You cannot restore images once they are
deleted.
z Tips
• You can select up to 100 images at one time.
Deleting movies
Select beforehand the media which contains
the movie you want to delete (p. 28).
b Notes
• When you select [DISC] on [MOVIE MEDIA
SET] (p. 28), you cannot delete movies during
Easy Handycam operation (p. 34). Cancel Easy
Handycam operation first.
1 Touch (HOME) t
(OTHERS) t [DELETE].
2 Touch [ DELETE].
5 Touch t [YES].
6 When [Completed.] appears,
touch .
To delete all movies at one time
1 In step 3, touch [ DELETE ALL].
2 Touch [YES] t [YES].
3 When [Completed.] appears, touch .
To delete all the movies recorded on
the same day at one time
1 In step 3, touch [ DELETE by date].
Editing
3 Touch [ DELETE].
4 Touch the movie to be deleted.
The selected movie is marked with .
Press and hold the movie on the screen
to confirm.
Touch to return to the previous
screen.
Previous/Next date
2 Touch / to select the recording
date of the desired movies, then touch
.
The movies recorded on the selected
date are displayed on the screen.
Touch the movie on the screen to
confirm.
Touch to return to the previous
screen.
3 Touch t [YES].
4 When [Completed.] appears, touch .
Continued ,
51
Page 52
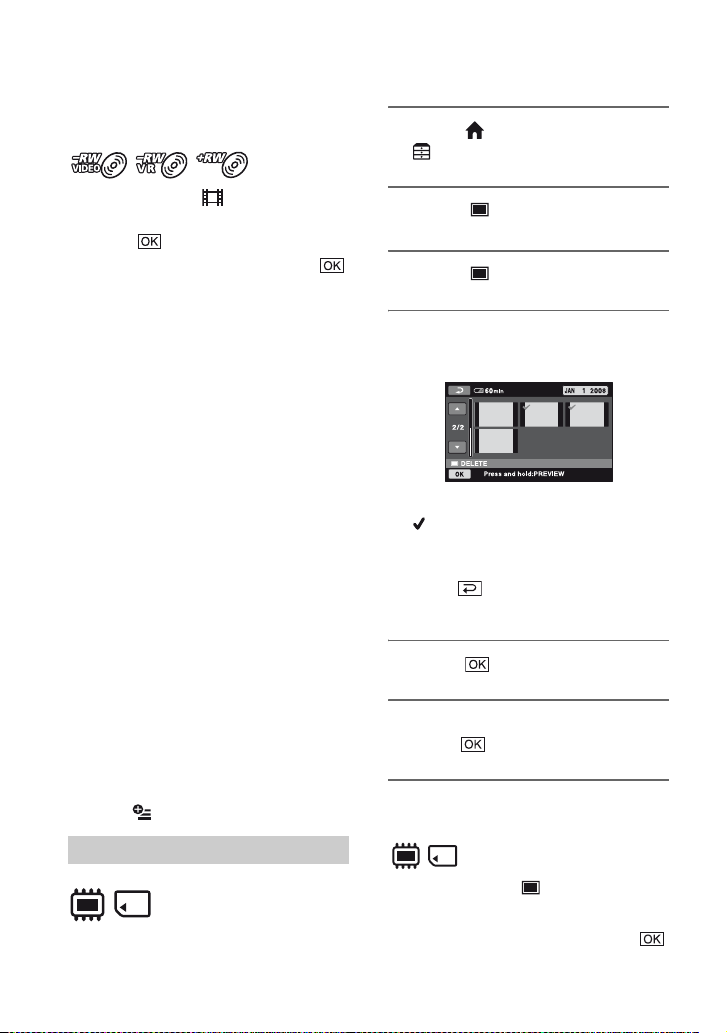
Deleting images (Continued)
To delete the most recently recorded
movie
1 In step 3, touch [ LAST SCENE
DEL].
2 Touch t [YES].
3 When [Completed.] appears, touch .
You cannot delete the most recently
recorded movie:
–if you remove the disc from your
camcorder after recording.
–if you turn off your camcorder after
recording.
b Notes
• Do not remove the battery pack or the AC
Adaptor from your camcorder while deleting
movies.
• Do not remove the “Memory Stick PRO Duo”
while deleting movies from the “Memory Stick
PRO Duo.”
• If the deleted movie is included in a Playlist
(p. 59), the movie is deleted also from the
Playlist.
• You cannot delete movies from the “Memory
Stick PRO Duo” if the movies are protected by
another device.
• Even if you delete unnecessary movies from the
disc, the remaining disc capacity may not
increase as much as you can make additional
recording.
z Tips
• To delete all images recorded on the media and
recover all the recordable space of the media,
format the media (p. 72).
• You can delete a movie when viewing it by
touching (OPTION).
1 Touch (HOME) t
(OTHERS) t [DELETE].
2 Touch [ DELETE].
3 Touch [ DELETE].
4 Touch the still image to be
deleted.
The selected still image is marked with
.
Press and hold the still image on the
screen to confirm.
Touch to return to the previous
screen.
5 Touch t [YES].
6 When [Completed.] appears,
touch .
To delete all still images at one time
Deleting still images
Select beforehand the media which contains
the still image you want to delete (p. 28).
52
1 In step 3, touch [ DELETE ALL].
2 Touch [YES] t [YES].
3 When [Completed.] appears, touch .
Page 53
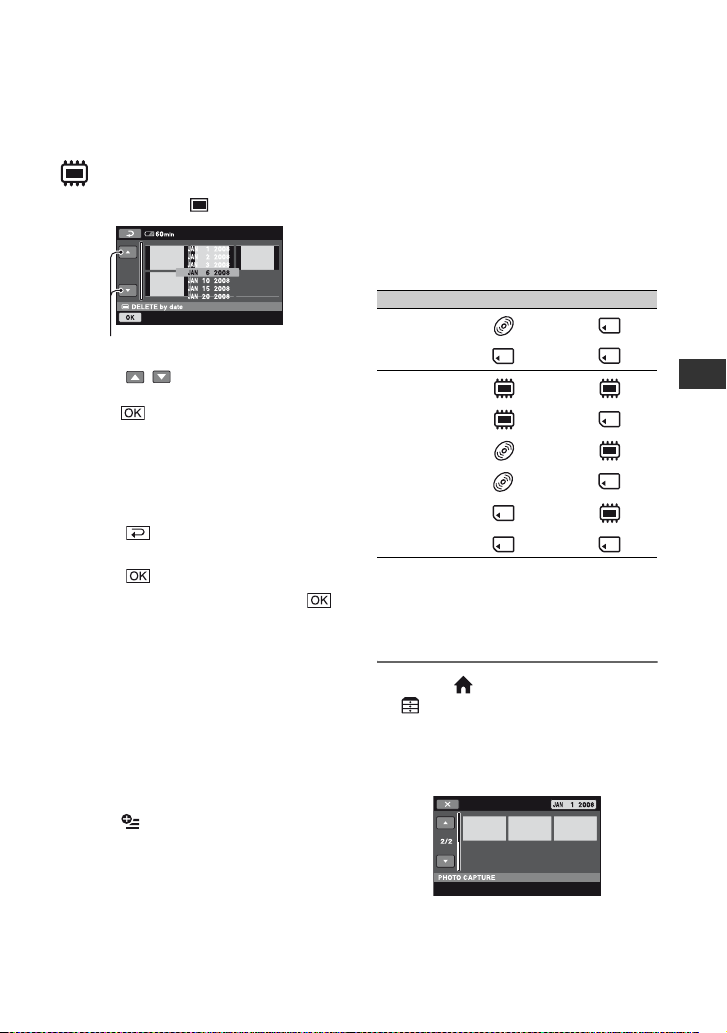
To delete all the still images recorded
on the same day at one time
1 In step 3, touch [ DELETE by date].
Previous/Next date
2 Touch / to select the recording
date of the desired still images, then
touch .
The still images recorded on the
selected date are displayed on the
screen.
Touch the still image on the screen to
confirm.
Touch to return to the previous
screen.
3 Touch t [YES].
4 When [Completed.] appears, touch .
b Notes
• You cannot delete still images from the
“Memory Stick PRO Duo” if the still images are
protected by another device.
z Tips
• To delete all images recorded in the internal
memory (DCR-DVD810) or a “Memory Stick
PRO Duo,” and recover all the recordable space
of the media, format the media (p. 72).
• You can delete a still image when viewing it by
touching (OPTION).
Capturing a still image from a movie
You can capture a still image at any point
during movie playback.
Select the media which contains the movies
beforehand, and the media where you want
to save the still images (p. 28).
When you select [MEMORY STICK] to
save the still images, insert a “Memory
Stick PRO Duo” beforehand.
The media you can select depends on your
camcorder model. See the table below.
Model Movies in Still images in
DCRDVD610/
DVD710
DCRDVD810
b Notes
• Using the AC Adaptor as the power source is
recommended to prevent the power from being
turned off during operation.
1 Touch (HOME) t
(OTHERS) t [PHOTO
CAPTURE].
The [PHOTO CAPTURE] screen
appears.
t
t
t
t
t
t
t
t
Editing
Continued ,
53
Page 54
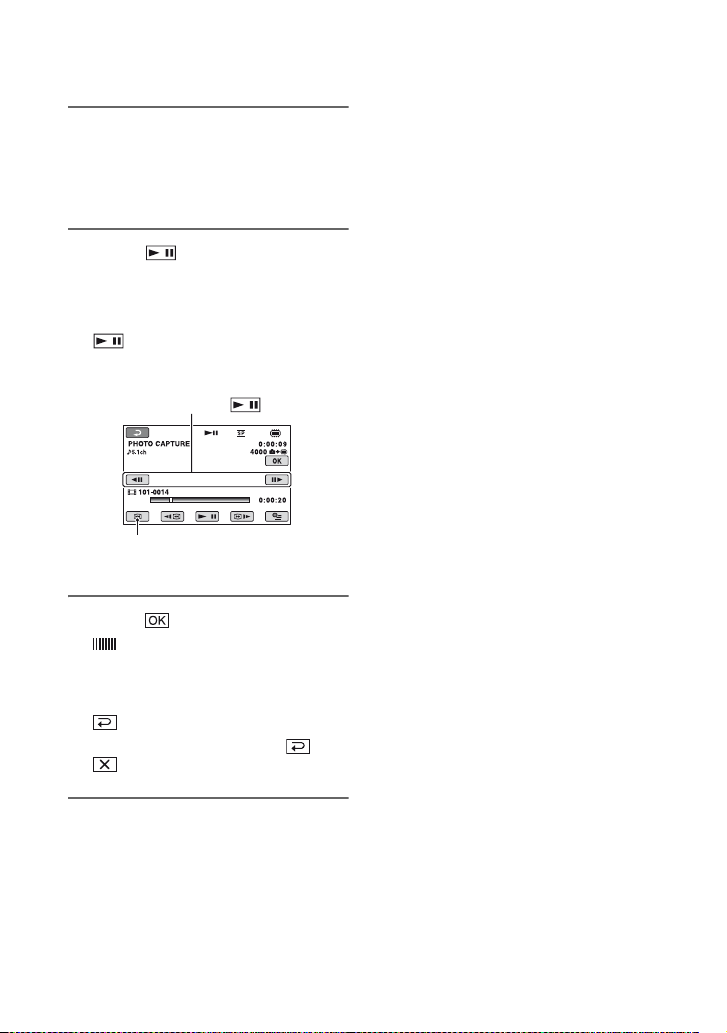
Capturing a still image from a movie (Continued)
b Notes
2 Touch the movie that you want to
play back and capture an image
from.
The selected movie is played back.
3 Touch to pause at the point
where you want to capture.
The movie pauses.
Play and pause toggles as you press
.
Adjusts the capturing point with more
precision after the capturing point has
been selected with .
Returns to the beginning of the
selected movie.
• The media where you want to save still images
has to have enough free space.
• Recording date and time of created still images
are the same as the recording date and time of
the movies.
• If the movies do not have data code, recording
date and time of still images are saved as the
time you create them from the movies.
4 Touch .
appears while the still image is
captured and stored on the media you
selected.
To capture another still image, touch
and repeat from step 2.
To finish the operation, touch t
.
54
Page 55
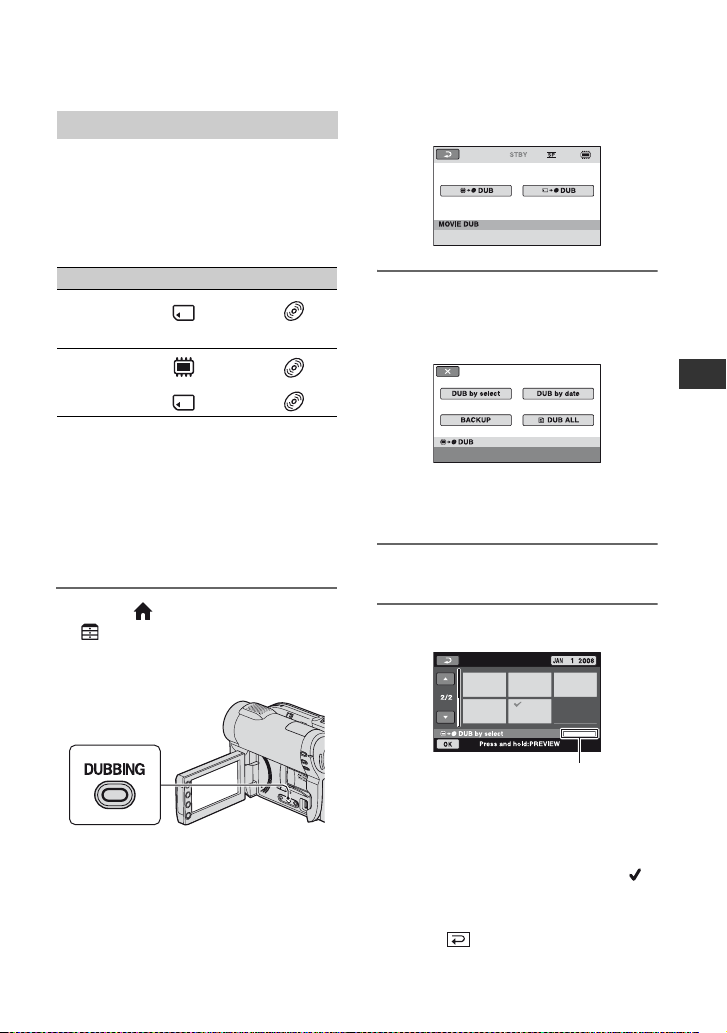
Dubbing/copying images to media within your camcorder
Dubbing movies
You can dub movies from the internal
memory (DCR-DVD810)
or a “Memory Stick PRO Duo” to a disc.
Insert a disc in your camcorder beforehand.
The media you can select depends on your
camcorder model. See the table below.
Model From To
DCRDVD610/
DVD710
DCRDVD810
b Notes
• Using the AC Adaptor as the power source is
recommended to prevent the power from being
turned off during operation.
z Tips
• To check dubbed movies on the disc, select
[DISC] on [MOVIE MEDIA SET] (p. 28).
t
t
t
1 Touch (HOME) t
(OTHERS) t [MOVIE DUB].
Or, press DUBBING on your
camcorder (DCR-DVD810).
The [MOVIE DUB] screen appears.
2 DCR-DVD810:
Touch media which contains the
movie to be dubbed.
Editing
DCR-DVD610/DVD710:
Step 2 is unnecessary. Go to step 3.
3 Touch [DUB by select].
4 Touch the movie to be dubbed.
Remaining disc space*
* x: Used
x (green): To be used to save the selected
movie
s: Free space
The selected movie is marked with .
Press and hold the movie on the screen
to confirm.
Touch to return to the previous
screen.
Continued ,
55
Page 56
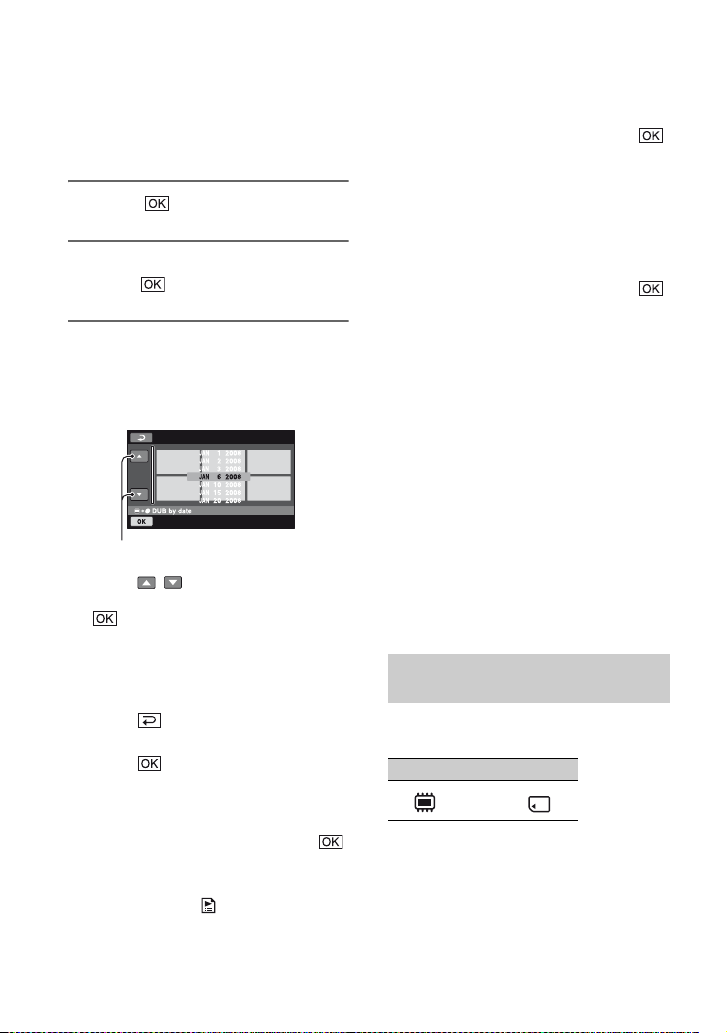
Dubbing/copying images to media within your camcorder (Continued)
If the disc space is not sufficient to
record the entire movie, [Not enough
memory space.] appears.
5 Touch t [YES].
6 When [Completed.] appears,
touch .
To dub all the movies recorded on the
same day at one time
1 In step 3, touch [DUB by date].
Previous/Next date
2 Touch / to select the recording
date of the desired movies, then touch
.
The movies recorded on the selected
date are displayed on the screen.
Touch the movie on the screen to
confirm.
Touch to return to the previous
screen.
3 Touch t [YES].
If the disc space is not sufficient to
record the entire movie, [Not enough
memory space.] appears.
4 When [Completed.] appears, touch .
To dub all movies in a Playlist (p. 59)
1 In step 3, touch [ DUB ALL].
If the disc space is not sufficient to
record the entire movie, [Not enough
memory space.] appears.
2 Touch [YES].
3 When [Completed.] appears, touch .
To back up movies that have not been
backed up yet
1 In step 3, touch [BACKUP].
2 Touch [Backs up unbacked up movies.]
t [YES].
3 When [Completed.] appears, touch .
If the disc space is not sufficient to
record the entire movie, [Disc is full.]
appears, and the number of one-sided
discs required will be displayed. Prepare
discs, and repeat from step 1.
b Notes
• If movies are backed up on 2 or more discs, the
movie recorded at the end of each disc is
divided automatically to fit in the full disc
capacity.
z Tips
• In step 3, by touching [BACKUP] t [Backup
starts from the first movie. Previous backup
history will be deleted.], you can back up all
movies, including movies that have been backed
up previously. Your camcorder will keep a
backup history of movies only when they are
saved with the [BACKUP] function.
Copying still images (DCRDVD810)
You can copy still images from the internal
memory to a “Memory Stick PRO Duo.”
From To
t
Insert a “Memory Stick PRO Duo” into
your camcorder beforehand.
b Notes
• Using the AC Adaptor as the power source is
recommended to prevent the power from being
turned off during operation.
56
Page 57
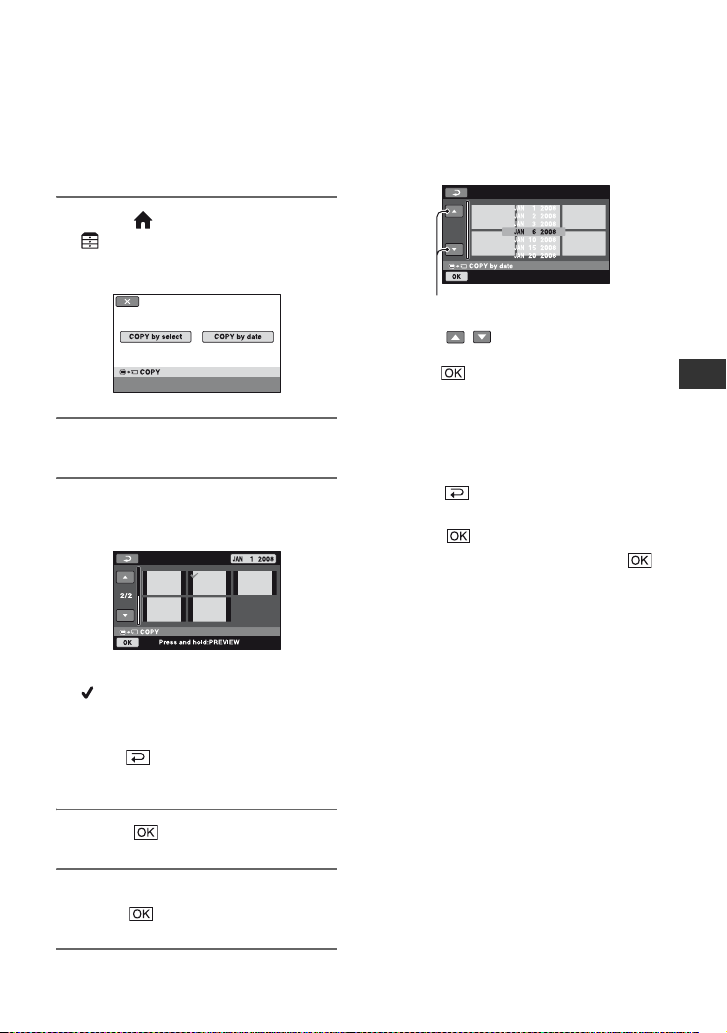
z Tips
• To check the copied still images, select
[MEMORY STICK] on [PHOTO MEDIA SET]
(p. 28).
1 Touch (HOME) t
(OTHERS) t [PHOTO COPY].
The [PHOTO COPY] screen appears.
2 Touch [COPY by select].
3 Touch the still image to be
copied.
The selected still image is marked with
.
Press and hold the still image on the
screen to confirm.
Touch to return to the previous
screen.
To copy all the still images recorded
on the same day at one time
1 In step 2, touch [COPY by date].
Previous/Next date
2 Touch / to select the recording
date of the desired still images, then
touch .
The still images recorded on the
selected date are displayed on the
screen.
Touch the still image on the screen to
confirm.
Touch to return to the previous
screen.
3 Touch t [YES].
4 When [Completed.] appears, touch .
Editing
4 Touch t [YES].
5 When [Completed.] appears,
touch .
57
Page 58
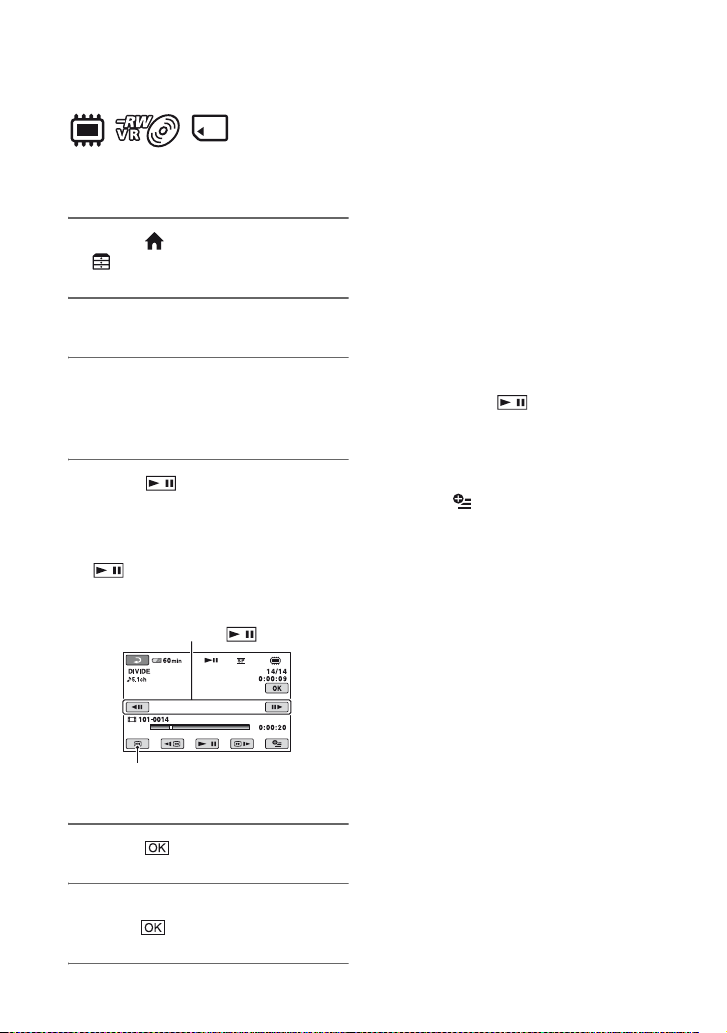
Dividing movies
Select beforehand the media which contains
the movie you want to divide (p. 28).
1 Touch (HOME) t
(OTHERS) t [EDIT].
2 Touch [DIVIDE].
3 Touch the movie that you want to
divide.
The selected movie is played back.
4 Touch at the point where
you want to divide.
The movie pauses.
Play and pause toggles as you press
.
Adjusts the dividing point with more
precision after the dividing point has
been selected with .
b Notes
• You cannot restore movies once they are
divided.
• Do not remove the battery pack or the AC
Adaptor from your camcorder while dividing
movies.
• Do not remove the “Memory Stick PRO Duo”
while dividing movies in the “Memory Stick
PRO Duo.”
• When you select [INT. MEMORY] (DCRDVD810) or [MEMORY STICK] on [MOVIE
MEDIA SET] (p. 28), and the divided original
movie is included in a Playlist, the movie in the
Playlist will also be divided. When you select
[DISC] on [MOVIE MEDIA SET] (p. 28), the
movie in a Playlist is not divided.
• A slight difference may occur from the point
where you touch and the actual dividing
point, as your camcorder selects the dividing
point based on about half-second increments.
z Tips
• You can divide a movie when viewing it by
touching (OPTION).
• The images recorded on your camcorder are
called “original.”
Returns to the beginning of the
selected movie.
5 Touch t [YES].
6 When [Completed.] appears,
touch .
58
Page 59
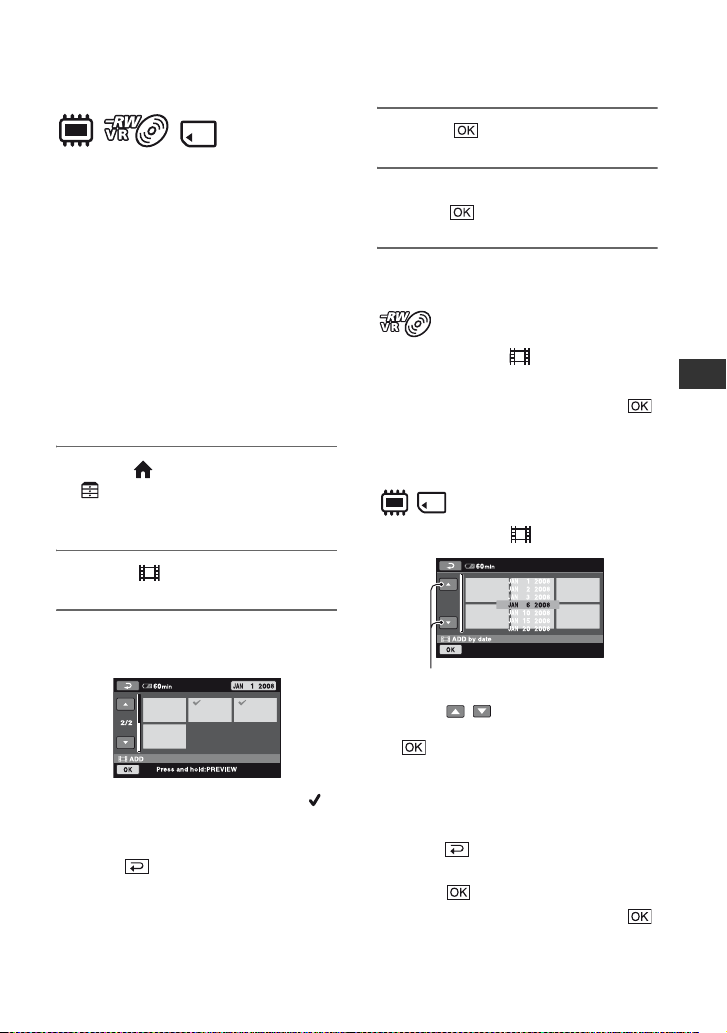
Creating the Playlist
A Playlist is a list showing thumbnails of
the movies that you have selected. The
original scenes are not changed even
though you edit or delete the movies in the
Playlist.
Select beforehand the media to use to
create, play, or edit a Playlist (p. 28).
z Tips
• To a Playlist, you can add a maximum of 99
movies on the internal memory (DCR-DVD810)
or a “Memory Stick PRO Duo,” or 999 movies
on a disc.
• The images recorded on your camcorder are
called “original.”
1 Touch (HOME) t
(OTHERS) t [PLAYLIST
EDIT].
2 Touch [ ADD].
4 Touch t [YES].
5 When [Completed.] appears,
touch .
To add all the movies to the Playlist
1 In step 2, touch [ ADD ALL].
2 Touch [YES] t [YES].
3 When [Completed.] appears, touch .
To add all the movies recorded on the
same day at one time
1 In step 2, touch [ ADD by date].
Editing
3 Touch the movie to be added to
the Playlist.
.
The selected movie is marked with .
Press and hold the movie on the screen
to confirm.
Touch to return to the previous
screen.
Previous/Next date
2 Touch / to select the recording
date of the desired movies, then touch
.
The movies recorded on the selected
date are displayed on the screen.
Touch the movie on the screen to
confirm.
Touch to return to the previous
screen.
3 Touch t [YES].
4 When [Completed.] appears, touch .
Continued ,
59
Page 60
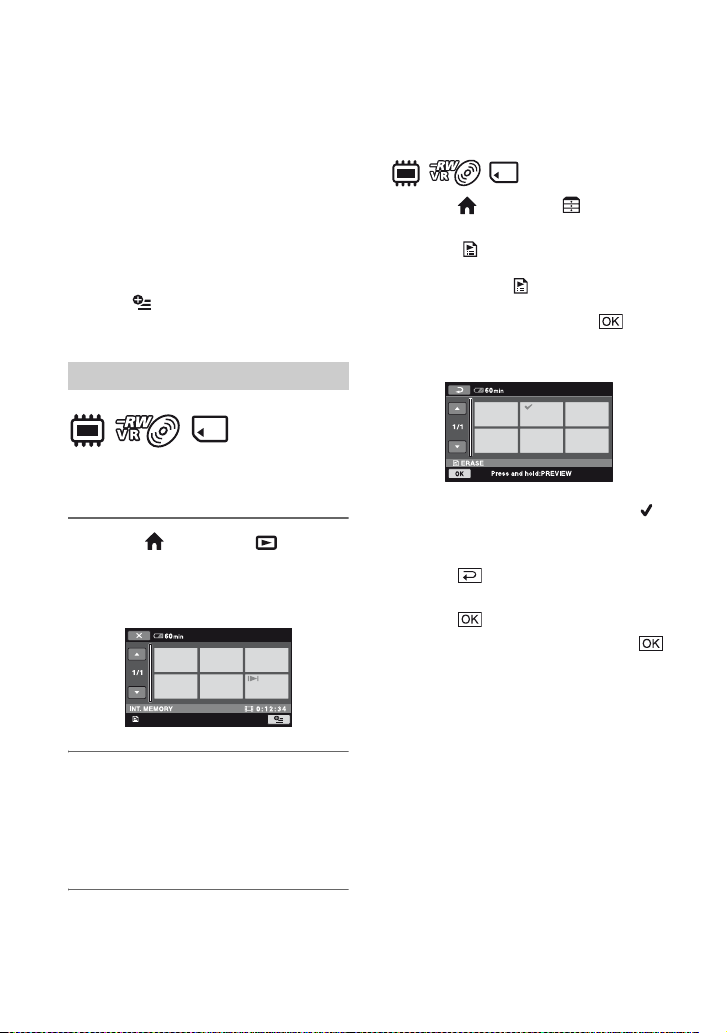
Creating the Playlist (Continued)
b Notes
• Do not remove the battery pack or the AC
Adaptor from your camcorder while adding the
movies.
• Do not remove the “Memory Stick PRO Duo”
while adding movies in the “Memory Stick PRO
Duo.”
• You cannot add still images to a Playlist.
z Tips
• You can add a movie when viewing it by
touching (OPTION).
• You can copy the Playlist to a disc as it is, by
using the supplied software.
Playing the Playlist
Select beforehand the media to use to
create, play or edit a Playlist (p. 28).
1 Touch (HOME) t (VIEW
IMAGES) t [PLAYLIST].
The movies in the Playlist screen
appear.
To erase unnecessary movies from
the Playlist
1 Touch (HOME) t (OTHERS)
t [PLAYLIST EDIT].
2 Touch [ ERASE].
To erase all the movies from the
Playlist, touch [ ERASE ALL] t
[YES] t [YES]. Then, when
Completed.] appears, touch .
[
3 Touch the movie to be erased from the
Playlist.
The selected movie is marked with .
Press and hold the movie on the screen
to confirm.
Touch to return to the previous
screen.
4 Touch t [YES].
5 When [Completed.] appears, touch .
z Tips
• The original movies are not erased even if you
erase movies from the Playlist.
2 Touch the movie from which you
want to play back.
The Playlist is played back from the
selected movie to the end, then the
screen returns to the Playlist screen.
60
Page 61
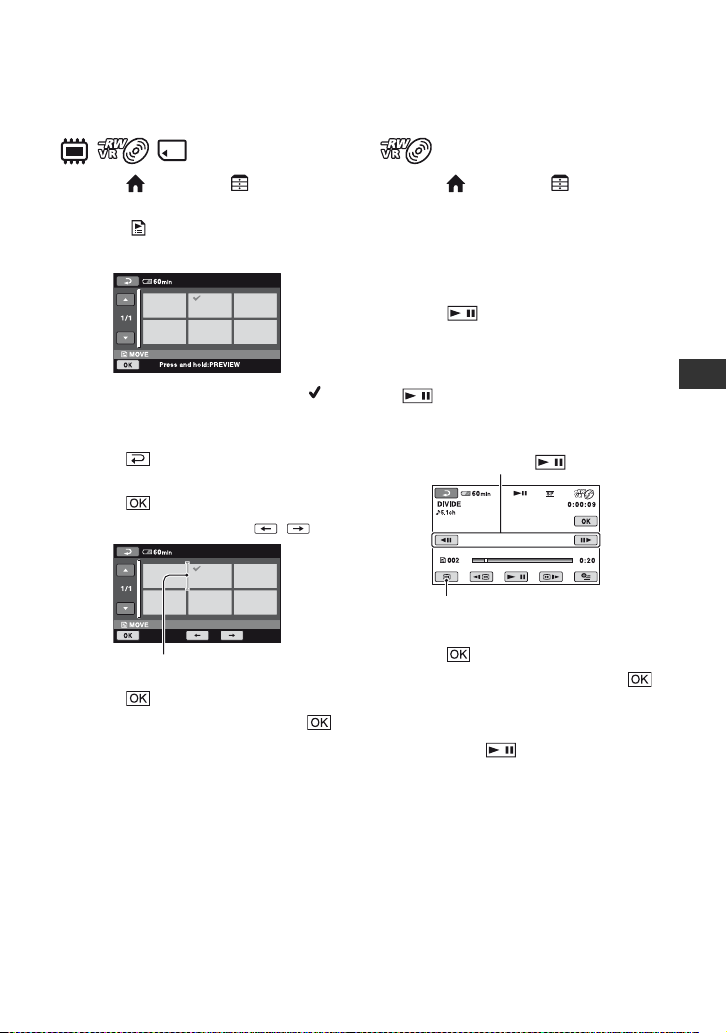
To change the order within the Playlist
To divide a movie in the Playlist
1 Touch (HOME) t (OTHERS)
t [PLAYLIST EDIT].
2 Touch [ MOVE].
3 Select the movie that you want to move.
The selected movie is marked with .
Press and hold the movie on the screen
to confirm.
Touch to return to the previous
screen.
4 Touch .
5 Select the destination with / .
Destination bar
6 Touch t [YES].
7 When [Completed.] appears, touch .
z Tips
• When you select multiple movies, the movies
are moved following the order appeared in the
Playlist.
1 Touch (HOME) t (OTHERS)
t [PLAYLIST EDIT].
2 Touch [DIVIDE].
3 Touch the movie that you want to
divide.
The selected movie is played back.
4 Touch at the point where you
want to divide.
The movie pauses.
Play and pause toggles as you press
.
Adjusts the dividing point with more
precision after the dividing point has
been selected with .
Returns to the beginning of the
selected movie.
5 Touch t [YES].
6 When [Completed.] appears, touch .
b Notes
• A slight difference may occur from the point
where you touch and the actual dividing
point, as your camcorder selects the dividing
point based on about half-second increments.
z Tips
• The original movies are not divided even if you
divide the movie in the Playlist.
Editing
61
Page 62
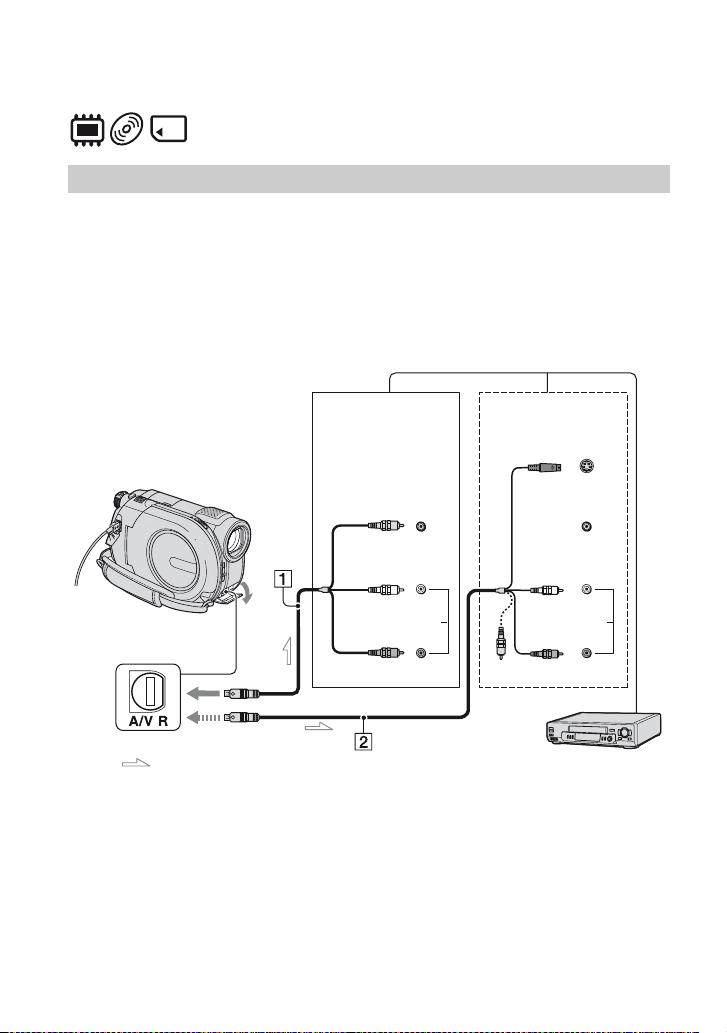
Dubbing movies to VCR or DVD/HDD recorders
Connecting a device with the A/V connecting cable
You can dub movies played back on your camcorder to other recording devices, such as VCRs
or DVD/HDD recorders. Connect the device in either of the following ways.
Connect your camcorder to the wall outlet (wall socket) using the supplied AC Adaptor for
this operation (p. 21). Refer also to the instruction manuals supplied with the devices to be
connected.
b Notes
• Since dubbing is performed via analog data transfer, the image quality may deteriorate.
A/V Remote
Connector
: Video/Signal flow
A A/V connecting cable (supplied)
Connect to the input jack of the other
device.
B A/V connecting cable with S
VIDEO (optional)
When connecting to the other device via
the S VIDEO jack, by using an A/V
connecting cable with S VIDEO
(optional), higher quality movies can be
produced than with an A/V connecting
62
Device without
S VIDEO jack
IN
VIDEO
(Yellow)
(White)
AUDIO
(Red)
b Notes
• To hide the screen indicators, such as a counter
Device with
S VIDEO jack
IN
VCRs or DVD/HDD recorders
S VIDEO
VIDEO
(White)
AUDIO
(Red)
cable. Connect the white and red plugs
(left/right audio) and the S VIDEO plug
(S VIDEO channel) of the A/V
connecting cable with S VIDEO
(optional). The yellow plug connection
is not necessary. Connecting only the S
VIDEO plug will not output audio.
on the screen of the monitor device connected,
Page 63
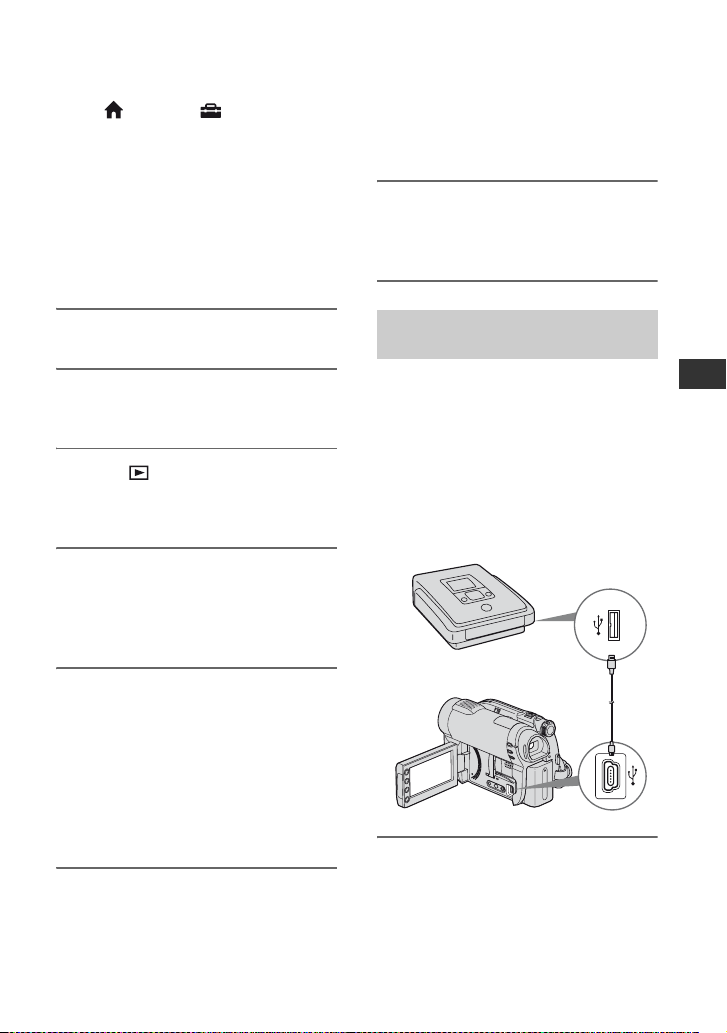
touch (HOME) t (SETTINGS) t
[OUTPUT SETTINGS] t [DISP OUTPUT]
t [LCD PANEL] (the default setting) (p. 87).
• To record the date/time and camera settings
data, display them on the screen (p. 84).
• When you are connecting your camcorder to a
monaural device, connect the yellow plug of the
A/V connecting cable to the video input jack,
and the red (right channel) or the white (left
channel) plug to the audio input jack on the
device.
Refer to the instruction manuals
supplied with your recording device for
details.
7 When dubbing is finished, stop
the recording device, and then
your camcorder.
1 Turn on your camcorder.
2 Select the media which contains
the movie you want to dub (p. 28).
3 Press (VIEW IMAGES).
Set [TV TYPE] according to the display
device (p. 48).
4 Insert the recording media in the
recording device.
If your recording device has an input
selector, set it to the input mode.
5 Connect your camcorder to the
recording device (VCR or DVD/
HDD recorder) with the A/V
connecting cable (supplied) 1 or
an A/V connecting cable with S
VIDEO (optional) 2.
Connect your camcorder to the input
jacks of the recording device.
6 Start playback on your
camcorder, and record it on the
recording device.
Connecting a device with the
USB cable
By connecting a DVD writer, etc. that is
capable of movie dubbing via USB
connection to your camcorder, you can dub
movies without the declination of their
image quality.
Connect your camcorder to the wall outlet
(wall socket) using the supplied AC
Adaptor for this operation (p. 22). Refer
also to the instruction manuals supplied
with the devices to be connected.
1 Turn on your camcorder.
Editing
Continued ,
63
Page 64
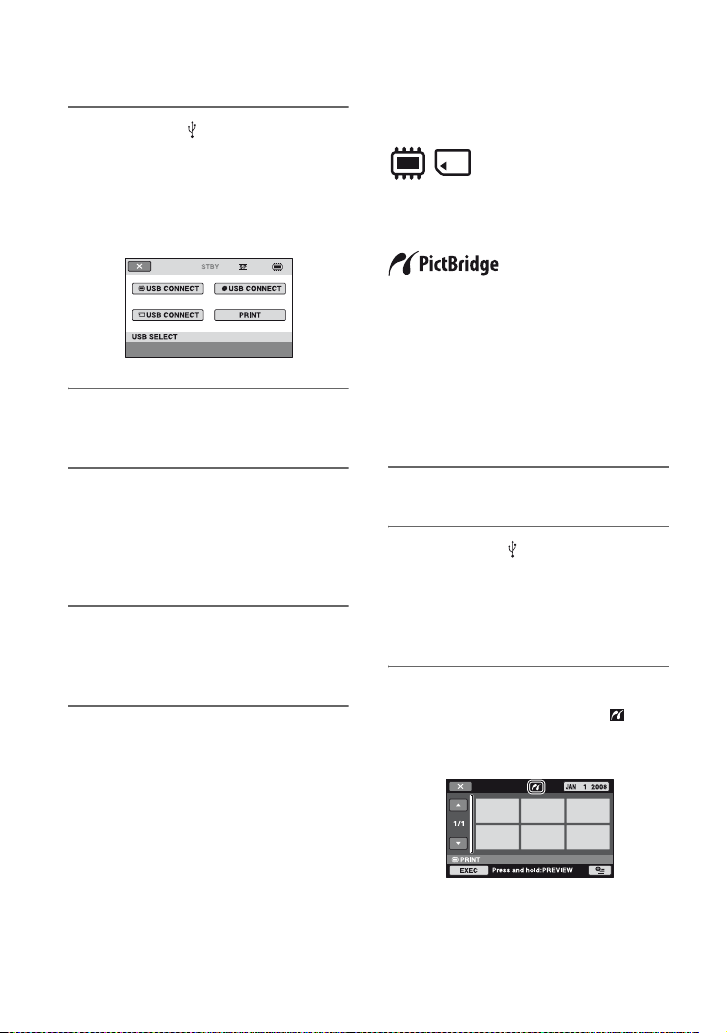
Dubbing movies to VCR or DVD/
HDD recorders (Continued)
2 Connect the (USB) jack of your
camcorder to a DVD writer, etc.
using the supplied USB cable (p.
129).
The [USB SELECT] screen appears on
the screen.
3 Touch media which contains the
movie to be dubbed.
Printing still images (PictBridge compliant printer)
You can print out still images using a
PictBridge compliant printer, without
connecting the camcorder to a computer.
Connect your camcorder to the AC Adaptor
to obtain power from the wall outlet (wall
socket) (p. 21).
Select beforehand the media which contains
the still image you want to print (p. 28).
Also, turn on the printer.
To print still images on a “Memory Stick
PRO Duo,” insert the “Memory Stick PRO
Duo” containing them into your camcorder.
4 Start recording on the connected
device.
Refer to the instruction manuals
supplied with the connected device for
details.
5 When dubbing is finished, touch
[END] t [YES] and disconnect
the USB cable.
64
1 Turn on your camcorder.
2 Connect the (USB) jack of your
camcorder to the printer using
the supplied USB cable (p. 129).
The [USB SELECT] screen appears on
the screen.
3 Touch [PRINT].
When connection is complete,
(PictBridge connecting) appears on the
screen.
Page 65
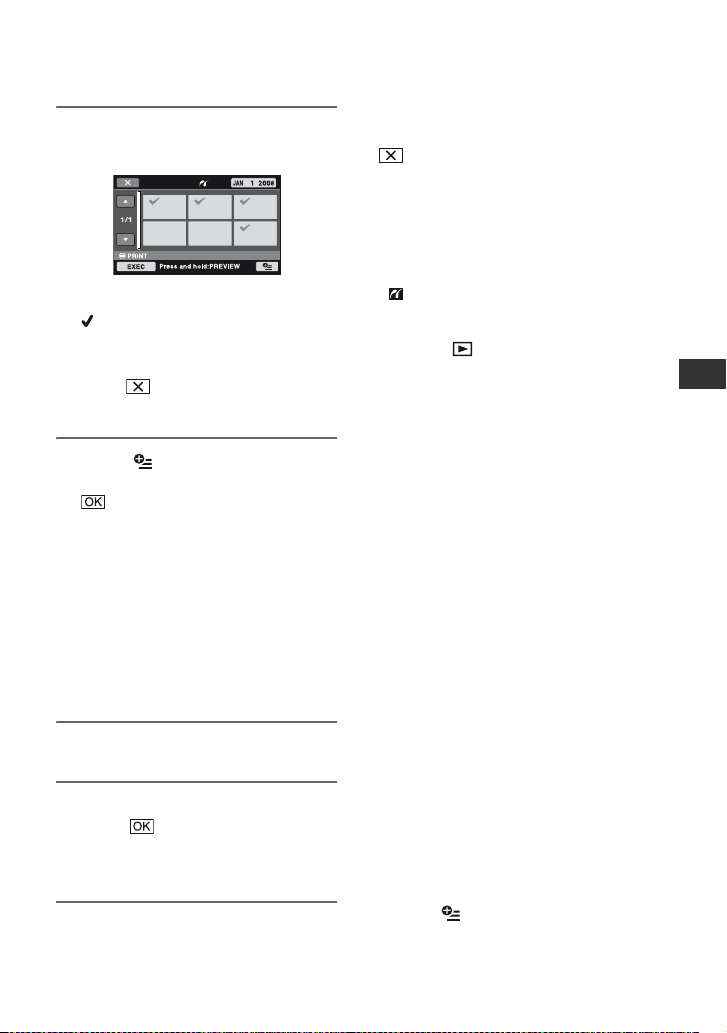
4 Touch the still image to be
printed.
The selected still image is marked with
.
Press and hold the still image on the
screen to confirm.
Touch to return to the previous
screen.
5 Touch (OPTION), set the
following options, then touch
.
[COPIES]: Set number of copies of a
still image to be printed. You can set up
to 20 copies.
[DATE/TIME]: Select [DATE],
[DAY&TIME], or [OFF] (no date/time
printed).
[SIZE]: Select the paper size.
If you do not change the setting, go to
step 6.
6 Touch [EXEC] t [YES].
7 When [Completed.] appears,
touch .
The still image selection screen appears
again.
To finish printing
On the INDEX screen of still images, touch
.
b Notes
• We can guarantee the operation of only models
that are PictBridge compatible.
• Refer also to the instruction manual of the
printer to be used.
• Do not attempt the following operations when
is on the screen. The operations may not be
performed properly.
– To operate the POWER switch
– To press (VIEW IMAGES)
– To disconnect the USB cable from your
camcorder or the printer
– To remove the “Memory Stick PRO Duo”
from your camcorder
• If the printer stops working, disconnect the USB
cable, turn the printer off and on again, and
restart the operation from the beginning.
• You can select only the paper sizes that the
printer can print.
• On some printer models, the top, bottom, right,
and left edges of still images may be trimmed. If
you print a still image recorded in a 16:9 (wide)
ratio, the left and right ends of the image may be
trimmed widely.
• Some printer models may not support the date
printing function. Refer to your printer’s
instruction manual for details.
• You may not be able to print the following:
– still images edited by a computer
– still images recorded by other devices
– still images of 4MB or more
– still images with a pixel size larger than
3,680 × 2,760
z Tips
• PictBridge is an industry standard established
by the Camera & Imaging Products Association
(CIPA). You can print still images without using
a computer by connecting a printer directly to a
digital video camera or digital still camera,
regardless of model or manufacturer.
• You can print a still image when viewing it by
touching (OPTION).
Editing
65
Page 66
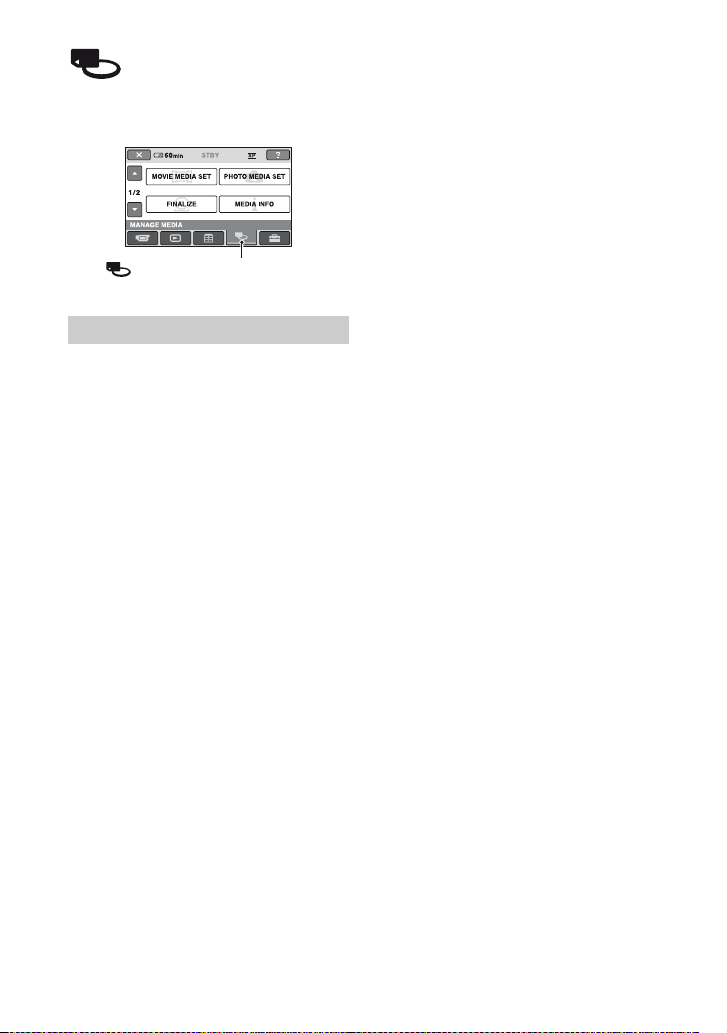
Utilizing Media
(MANAGE MEDIA) category
This category enables you to use the media
for various purposes.
(MANAGE MEDIA) category
Item list
MOVIE MEDIA SET
You can select the media for movies
(p. 28).
PHOTO MEDIA SET (DCR-DVD810)
You can select the media for still images
(p. 28).
FINALIZE
You can enable discs to be played on other
devices by finalizing them (p. 67).
MEDIA INFO
You can display the media information,
such as recordable time (p. 71).
MEDIA FORMAT
You can format the media and recover the
recordable free space (p. 72).
UNFINALIZE
You can unfinalize a disc and record more
images on the disc (p. 74).
DISC SELECT GUIDE
Your camcorder advises you of the right
disc for your purpose (p. 75).
REPAIR IMG.DB F.
You can repair the image database file of
the internal memory (DCR-DVD810) or
“Memory Stick PRO Duo” (p. 76).
66
Page 67
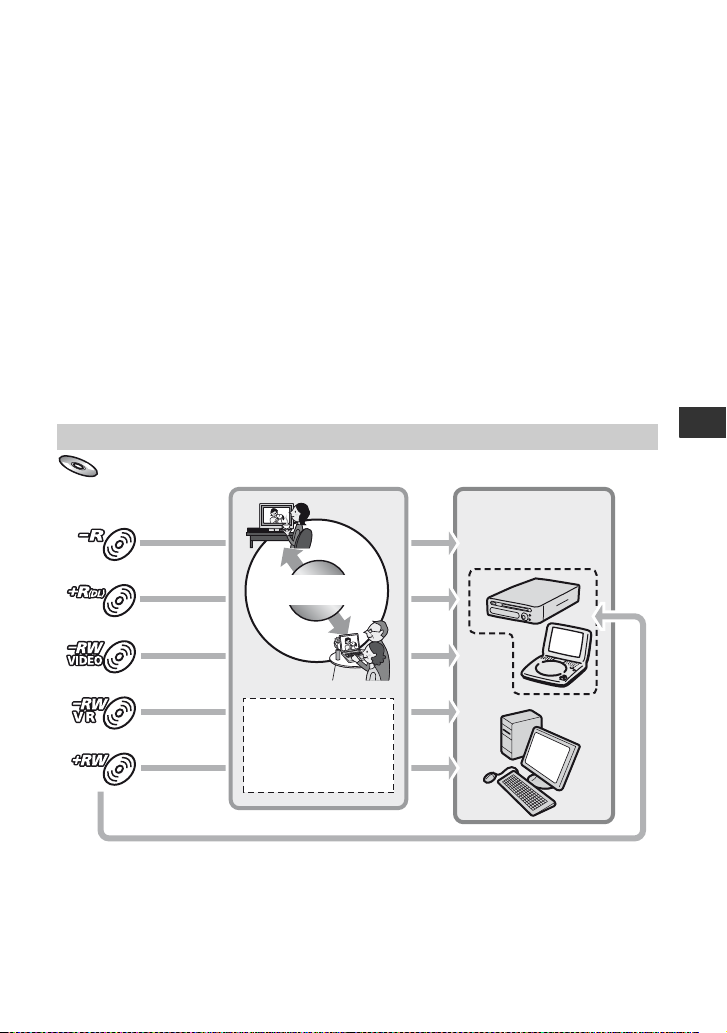
Making the disc compatible with playback on other devices (Finalizing)
Finalizing makes the recorded disc compatible for playback with other devices and DVD
drives of computers.
Before finalizing, you can select the style of the DVD menu which displays the movie list
(p. 69).
Finalizing is required depending on the type of disc.
• DVD-RW/DVD-R/DVD+R DL: Finalizing is required.
• DVD+RW: Finalizing is not required, except in the following cases:
1 To create a DVD menu
2 To play back on a computer DVD drive
3 If the disc has a short total recording time (less than 5 min. in HQ mode, 8 min. in SP mode,
or 15 min. in LP mode)
b Notes
• Playback compatibility with all devices is not guaranteed.
• No DVD menu is created for DVD-RW (VR mode).
Operation flow
To play back a disc in other devices for the first time (p.69)
Finalize
Make desired settings
for the DVD menu.
In case 1, 2
or 3
Playback on
other devices
Continued ,
Utilizing Media
67
Page 68
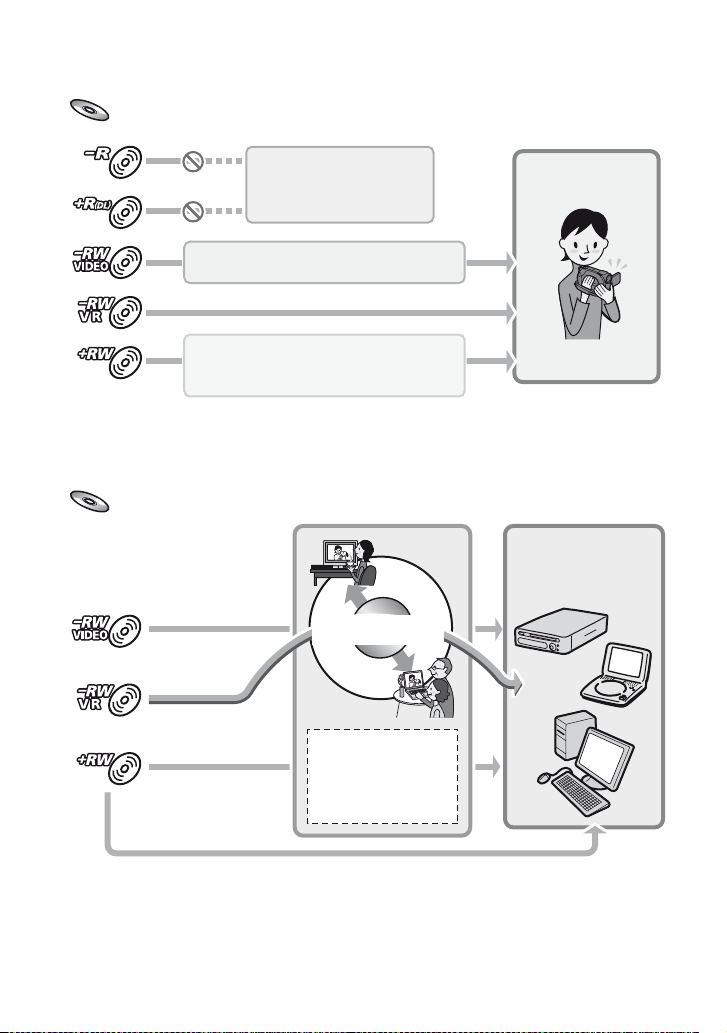
Making the disc compatible with playback on other devices (Finalizing)
(Continued)
To add movies to a finalized disc (p.74)
Movies cannot be
added.
Unfinalize the disc.
Movies can be added as usual.
When the DVD menu has been created, a
confirmation screen prompts you to confirm
that you wish to add movies.
b Notes
• During Easy Handycam operation (p. 34), even when you are using a DVD-RW or DVD+RW, you cannot
record additional movies onto the disc after finalizing the disc. Cancel Easy Handycam operation.
Make a new
recording
To play back a disc in other devices after adding movies (p.69)
Playback on
other devices
Finalize
68
Only in case 1
Make desired settings
for the DVD menu.
Page 69
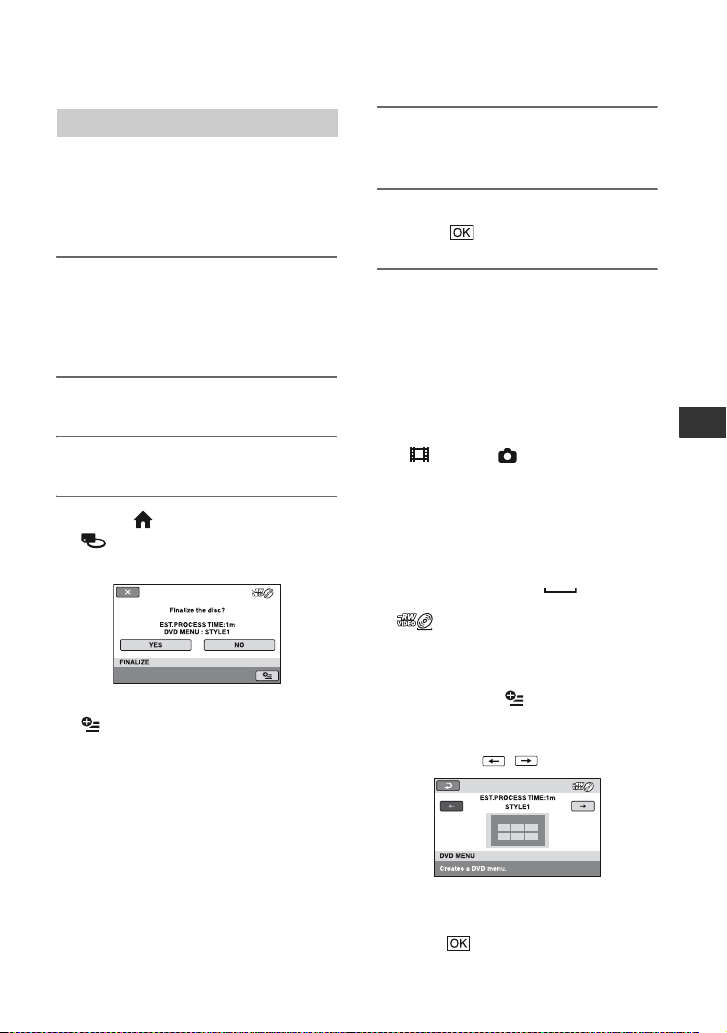
Finalizing a disc
b Notes
• It takes from a minute to a maximum of several
hours to finalize a disc. The shorter the amount
of material recorded on the disc, the longer it
takes for finalizing.
1 Place your camcorder in a stable
place, and connect the AC
Adaptor to the DC IN jack on your
camcorder.
2 Turn on your camcorder.
3 Insert the disc to be finalized.
4 Touch (HOME) t
(MANAGE MEDIA) t
[FINALIZE].
To select a DVD menu style, touch
(OPTION) t [DVD MENU]
(p. 69).
Go to step 5 if you want to finalize the
disc using [STYLE1] (the default
setting).
5 Touch [YES] t [YES].
Finalizing starts.
6 When finalizing is completed,
touch .
b Notes
• When you finalize a double-sided disc, you
must finalize each side of the disc individually.
• Do not apply shock or vibration to your
camcorder, and do not disconnect the AC
Adaptor during finalizing.
When you need to disconnect the AC Adaptor,
make sure that the power of your camcorder is
set to off and disconnect the AC Adaptor after
the (Movie) or (Still) lamp goes off.
Finalizing restarts when you connect the AC
Adaptor and turn on your camcorder again.
z Tips
• When you set to create a DVD menu and
finalize the disc, the DVD menu appears for a
few seconds while finalizing the disc.
• After the disc is finalized, “ ” is attached
at the bottom of the disc indicator, such as
“ ” in the case of DVD-RW (VIDEO
mode).
To select a DVD menu style
1 In step 4, touch (OPTION) t
[DVD MENU].
2 Select the desired style from 4 types of
pattern with / .
Utilizing Media
Select [NO MENU] if you do not create
a DVD menu.
3 Touch .
Continued ,
69
Page 70

Making the disc compatible with playback
on other devices (Finalizing) (Continued)
b Notes
• During Easy Handycam operation (p. 34), the
DVD menu style is fixed to [STYLE1].
• You cannot create a DVD menu for a DVD-RW
(VR mode).
Playing a disc on other devices
Playing a disc on other devices
Finalizing a disc (p. 67) allows you to view
movies recorded by your camcorder on
other DVD devices. However, we do not
guarantee proper playback on all devices.
You can play back DVD+RW on other
devices without finalizing the disc.
b Notes
• Do not use an 8 cm CD adaptor with an 8 cm
DVD as it may cause a malfunction.
• Make sure that a vertically installed device is
placed in a position such as that the disc can be
placed horizontally.
• On some devices, some discs may not be played
back, movies may freeze for an instant between
scenes, or some functions may be disabled.
z Tips
• Devices that support subtitles can display the
recording date and time where the subtitles
normally appear (p. 82). Refer to the instruction
manual of your device.
• If you have created a DVD menu (p. 69), you
can select the desired scene in the menu.
Playing a disc on a computer
If you finalize the disc (p. 67) that was
recorded on your camcorder, you can play
back the disc on a computer that DVD
playback application is installed.
b Notes
• Even when you use a DVD+RW, you must
finalize the disc (p. 67). Otherwise, a
malfunction may occur.
• Make sure that the DVD drive of the computer
can play an 8 cm DVD.
• Do not use an 8 cm CD adaptor with an 8 cm
DVD as it may cause a malfunction.
• The disc may not be played back, or the movies
may not be played smoothly on some
computers.
• Movies stored on a disc cannot be copied
directly onto a computer to be played back or
edited.
70
Page 71
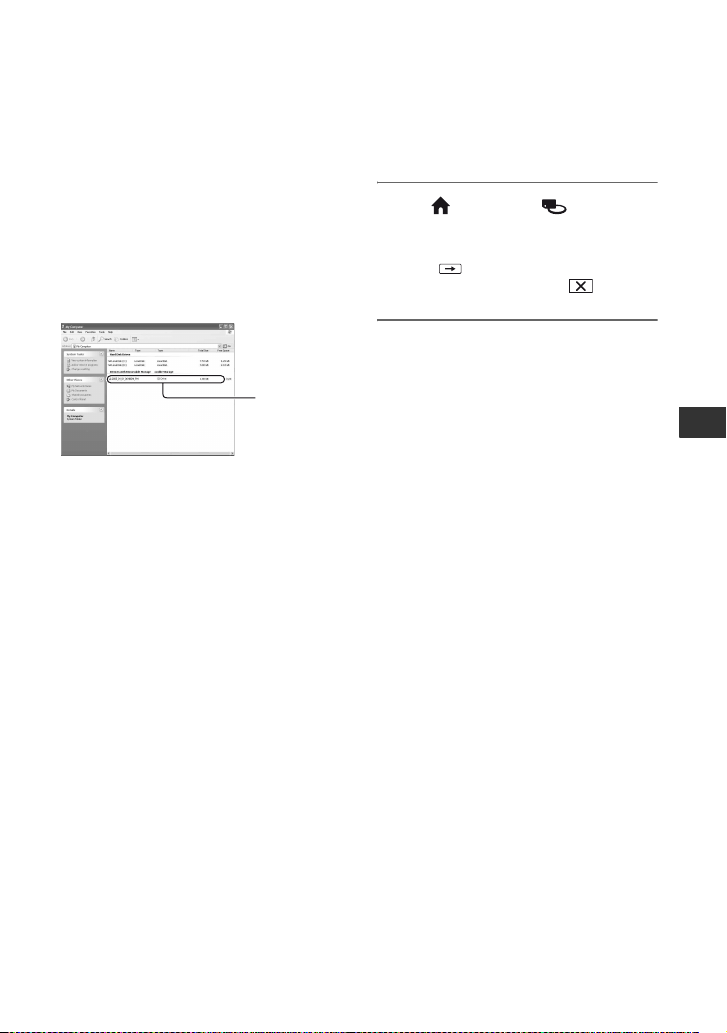
z Tips
• For details on operations and procedures, see the
“PMB Guide” on the supplied CD-ROM (p. 97).
The volume label of the disc
The date when the disc was first used is
recorded.
<e.g.>
When the disc was first used at 0:00 am on
January 1st 2008:
2008_01_01_00H00M_AM
Volu me
label
z Tips
• Movies on discs are stored in the following
folders:
– DVD-RW (VR mode)
DVD_RTAV folder
– Other discs and modes
VIDEO_TS folder
Checking media information
You can check the remaining recordable
time or space of the media selected on
[MOVIE MEDIA SET] (p. 28).
Touch (HOME) t (MANAGE
MEDIA) t [MEDIA INFO].
You can check other information by
touching .
To turn off the display, touch .
b Notes
• The calculation for the space of the internal
memory (DCR-DVD810) and “Memory Stick
PRO Duo” is 1MB = 1,048,576 bytes. The
fractions less than 1 MB are discarded when the
media space is displayed. Therefore, the total
amount of available and unavailable space
appears slightly smaller.
• Since there is an image database file area, the
used space is not displayed as 0 MB even if you
perform [MEDIA FORMAT] (p. 72).
z Tips
• Only the information for the media selected on
[MOVIE MEDIA SET] is displayed. Change
the media setting as necessary (p. 28).
Utilizing Media
71
Page 72
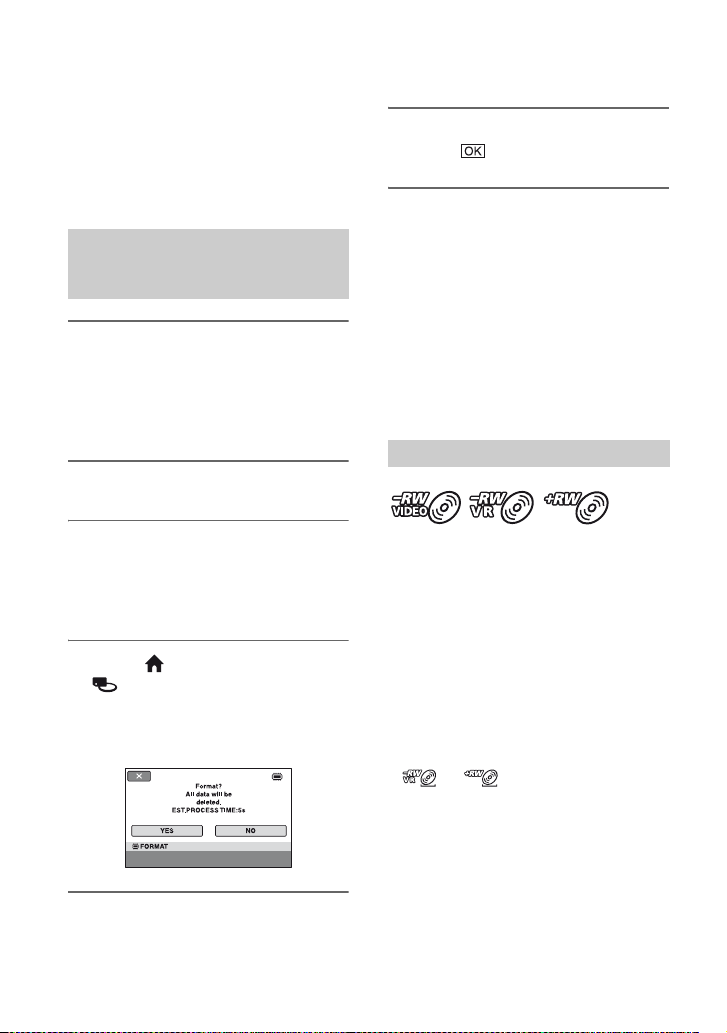
Formatting media
Formatting deletes all images and returns
the recording media to its original empty
state.
To avoid the loss of important images, dub
or copy them on other media (p. 55, 62)
before performing [MEDIA FORMAT].
Formatting the internal memory
(DCR-DVD810) or “Memory
Stick PRO Duo”
1 Connect the AC Adaptor to the
DC IN jack on your camcorder,
then connect the power cord
(mains lead) to the wall outlet
(wall socket).
2 Turn on your camcorder.
6 When [Completed.] appears,
touch .
b Notes
• Do not apply shock or vibration to your
camcorder, and do not disconnect the AC
Adaptor during formatting.
• Even the images protected with another device
against accidental deletion are also deleted.
• Do not attempt the following operations when
[Executing...] is on the screen:
– To operate the POWER switch or buttons
– To remove the “Memory Stick PRO Duo”
when formatting the “Memory Stick PRO
Duo”
Formatting the disc
3 When formatting a “Memory Stick
PRO Duo,” insert the “Memory
Stick PRO Duo” to be formatted
into your camcorder.
4 Touch (HOME) t
(MANAGE MEDIA) t [MEDIA
FORMAT] t [INT. MEMORY]
(DCR-DVD810) or [MEMORY
STICK].
5 Touch [YES] t [YES].
72
A DVD-R/DVD+R DL cannot be
formatted. Replace it with a new
disc.
If you format a finalized disc
• A DVD-RW (VIDEO mode) returns to
the unfinalized state. The disc must be
finalized again to view its contents on
other devices.
• In the case of a DVD-RW (VR mode)/
DVD+RW, formatting deletes all movies
on a finalized disc. Even after formatting,
or will appear on the screen.
You do not need to finalize the disc again
before playing the disc on other devices.*
* To create the DVD menu on a DVD+RW,
finalize the disc again (p. 69).
Page 73
1 Connect the AC Adaptor to the
DC IN jack on your camcorder,
then connect the power cord
(mains lead) to the wall outlet
(wall socket).
2 Turn on your camcorder.
3 Insert the disc to be formatted
into your camcorder.
4 Touch (HOME) t
(MANAGE MEDIA) t [MEDIA
FORMAT] t [DISC].
x DVD-RW
Select the recording format, [VIDEO]
or [VR] (p. 13), then touch
.
x DVD+RW
Select the aspect ratio of the movie,
[16:9 WIDE] or [4:3], then touch .
5 Touch [YES].
• You cannot format a disc that has been
protected on other devices. Cancel the
protection with the original device, and then
format it.
z Tips
• When you format a DVD-RW during Easy
Handycam operation (p. 34), the recording
format is fixed to VIDEO mode.
Utilizing Media
6 When [Completed.] appears,
touch .
b Notes
• Do not apply shock or vibration to your
camcorder, and do not disconnect the AC
Adaptor during formatting.
• When you use a double-sided disc, formatting is
required on each side. You can format each side
in the different recording format.
• In the case of DVD+RW, you cannot change the
movie aspect ratio midway. Format the disc
again to change the aspect ratio.
73
Page 74
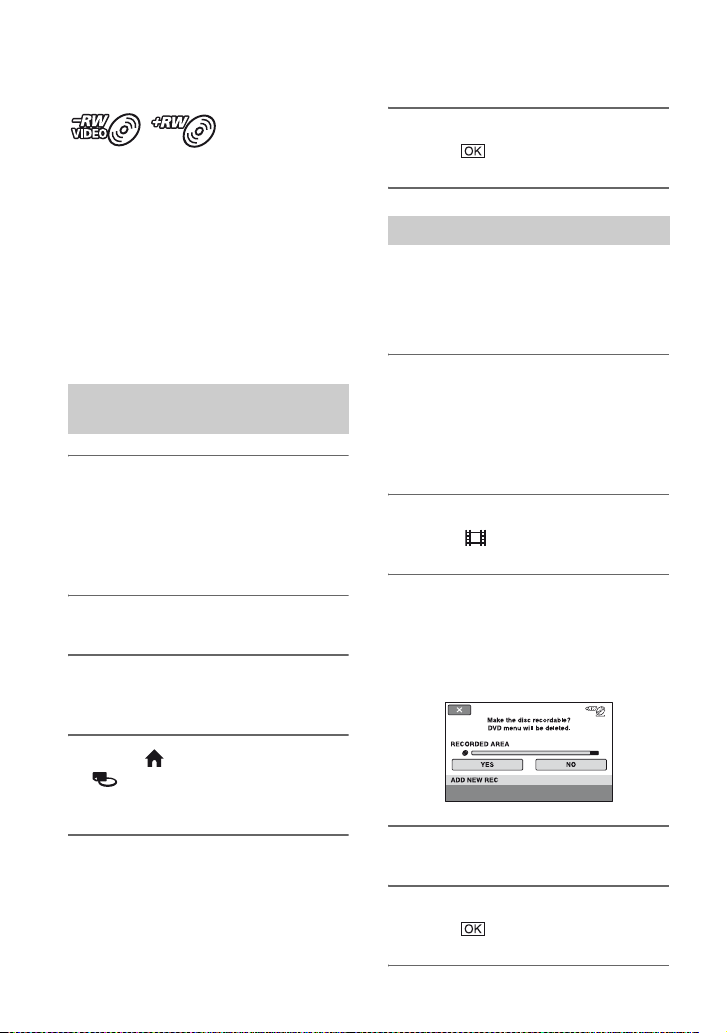
Recording additional movies after finalizing
6 When [Completed.] appears,
You can record additional movies on the
finalized DVD-RW (VIDEO mode)/
DVD+RW discs after the following steps, if
the disc has free space.
When using the finalized DVD-RW (VR
mode), you can record additional movies on
the disc without any additional steps.
b Notes
• You cannot record additional movies on
the DVD-R/DVD+R DL after finalizing.
Use a new disc.
When using a DVD-RW (VIDEO
mode) (Unfinalizing)
1 Connect the AC Adaptor to the
DC IN jack on your camcorder,
then connect the power cord
(mains lead) to the wall outlet
(wall socket).
2 Turn on your camcorder.
3 Insert the finalized disc into your
camcorder.
touch .
When using a DVD+RW
If you have created a DVD menu (p. 69)
during finalizing, you must perform the
following steps prior to recording
additional movies.
1 Connect the AC Adaptor to the
DC IN jack on your camcorder,
then connect the power cord
(mains lead) to the wall outlet
(wall socket).
2 Turn the POWER switch to turn
on the (Movie) lamp.
3 Insert the finalized disc into your
camcorder.
A confirmation screen appears to
prompt you to confirm that you wish to
record additional movies.
4 Touch (HOME) t
(MANAGE MEDIA) t
[UNFINALIZE].
5 Touch [YES] t [YES].
74
4 Touch [YES] t [YES].
5 When [Completed.] appears,
touch .
Page 75

b Notes
• Do not apply shock or vibration to your
camcorder, and do not disconnect the AC
Adaptor during the operation.
• A DVD menu created during finalizing is
deleted.
• For a double-sided disc, perform these steps for
each side of the disc.
Finding the right disc (DISC SELECT GUIDE)
Select the option that is right for you on the
screen, then you will be informed of the
appropriate disc for your purposes.
1 Touch (HOME) t
(MANAGE MEDIA) t [DISC
SELECT GUIDE].
2 Touch the option that is right for
you on the screen.
If you insert the same type of disc as
indicated in [DISC SELECT GUIDE],
you can format it with your selected
settings (p. 72).
Utilizing Media
75
Page 76
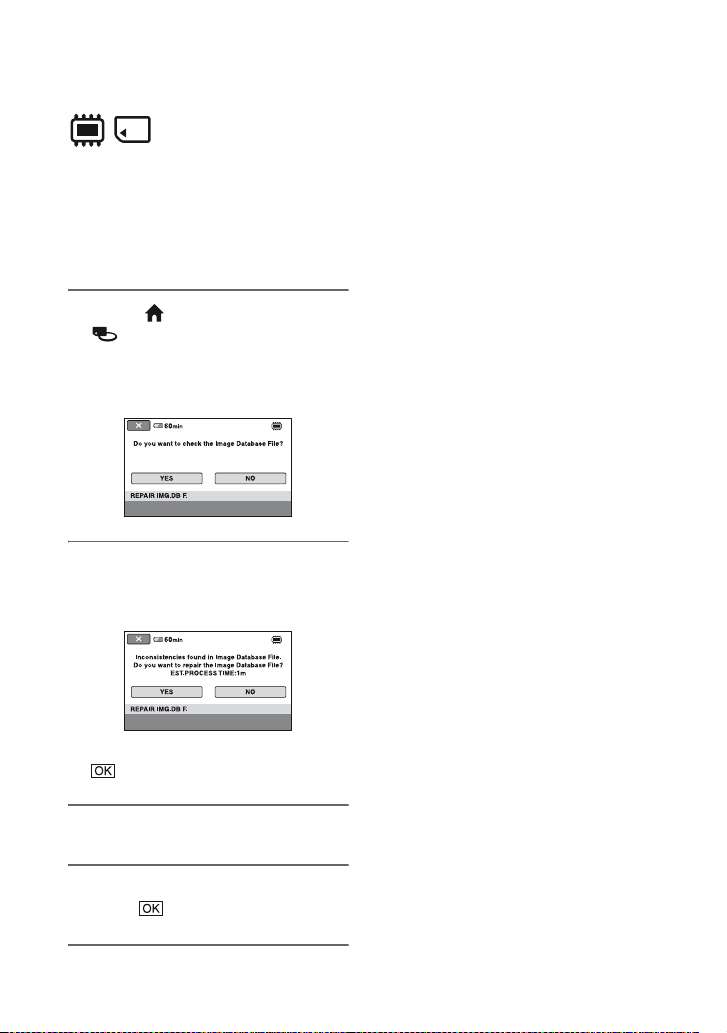
Repairing the image database file
b Notes
• Do not apply mechanical shock or vibration to
This function checks the image database
file and the consistency of movies and still
images on the internal memory (DCRDVD810), or movies in the “Memory Stick
PRO Duo,” and repairs any inconsistencies
found.
1 Touch (HOME) t
(MANAGE MEDIA) t
[REPAIR IMG.DB F.] t [INT.
MEMORY] (DCR-DVD810) or
[MEMORY STICK].
2 Touch [YES].
Your camcorder will check the image
database file.
the camcorder during this operation.
• Do not disconnect the AC Adaptor or remove
the battery pack.
• While the image database file on the “Memory
Stick PRO Duo” are being repaired, do not
remove the “Memory Stick PRO Duo.”
• Repairing for the internal memory (DCRDVD810) and a “Memory Stick PRO Duo” are
performed separately.
When mismatching is not found, touch
to finish the operation.
3 Touch [YES].
4 When [Completed.] appears,
touch .
76
Page 77
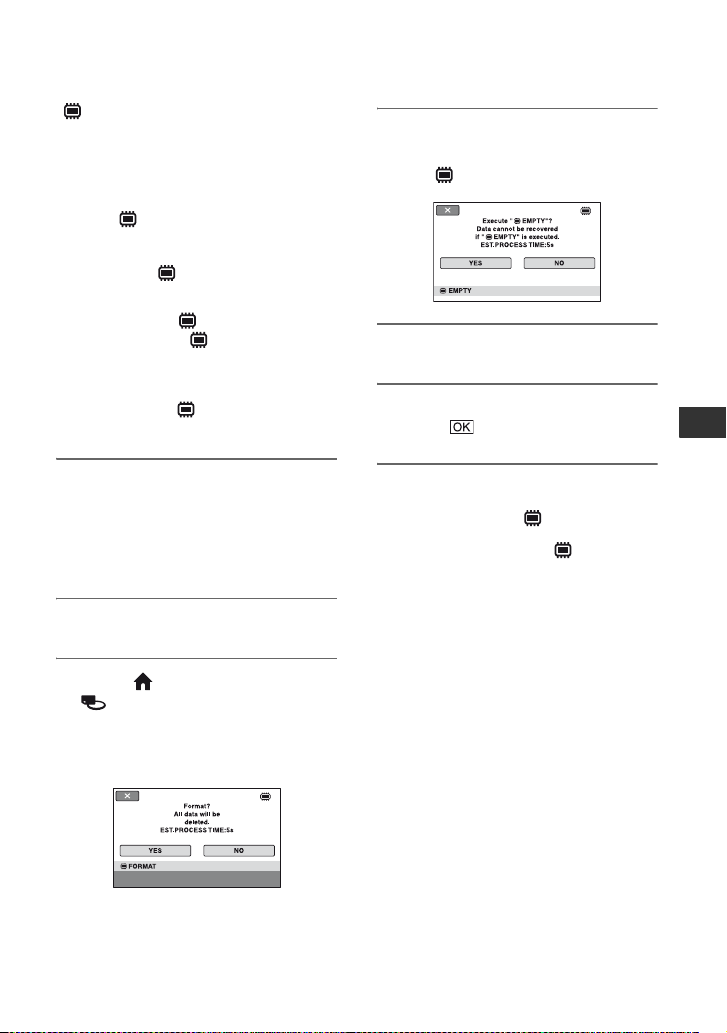
Preventing data on the internal memory from being recovered (DCR-DVD810)
[ EMPTY] allows you to write
unintelligible data onto the internal
memory. In this way, it may become more
difficult to recover any original data. When
you dispose of or give the camcorder to
somebody, it is recommended that you
perform [ EMPTY].
b Notes
• If you perform [ EMPTY], all the images are
deleted. To avoid the loss of important images,
dub or copy them on other media (p. 55, 62)
before performing [ EMPTY].
• You cannot perform [ EMPTY] unless you
connect the AC Adaptor to the wall outlet (wall
socket).
• Disconnect all cables except the AC Adaptor.
• While performing [ EMPTY], do not apply
any vibrations or shocks to the camcorder.
4 Press and hold the . (BACK
LIGHT) button down (p. 129).
The [ EMPTY] screen appears.
5 Touch [YES] t [YES].
6 When [Completed.] appears,
touch .
Utilizing Media
1 Connect the AC Adaptor to the
DC IN jack on your camcorder,
then connect the power cord
(mains lead) to the wall outlet
(wall socket).
2 Turn on your camcorder.
3 Touch (HOME) t
(MANAGE MEDIA) t [MEDIA
FORMAT] t [INT. MEMORY].
The screen of formatting the internal
memory appears.
b Notes
• If you stop performing [ EMPTY] while
[Executing...] is displayed, be sure to complete
the operation by performing [ EMPTY]
again before you use the camcorder the next
time.
77
Page 78
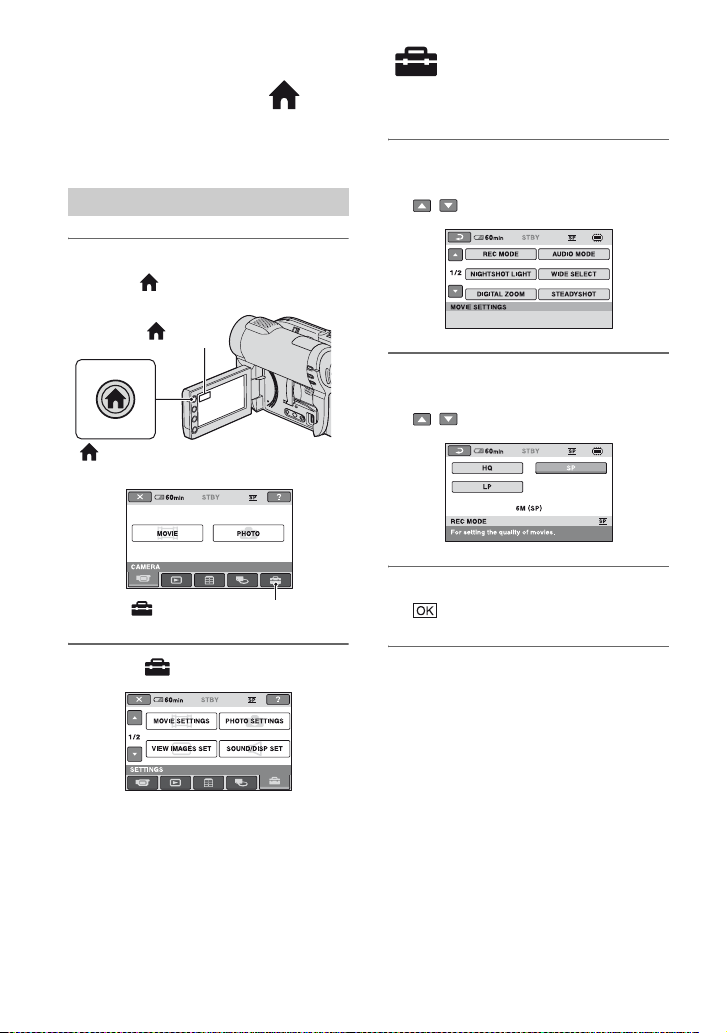
Customizing Your Camcorder
What you can do with the (SETTINGS) category of the HOME MENU
You can change the recording functions and
the operating settings for your convenience.
Using the HOME MENU
1 Turn on your camcorder, then
press (HOME).
(HOME)
(HOME)
3 Touch the desired setup item.
If the item is not on the screen, touch
/ to change the page.
4 Touch the desired item.
If the item is not on the screen, touch
/ to change the page.
(SETTINGS) category
2 Touch (SETTINGS).
78
5 Change the setting, then touch
.
Page 79
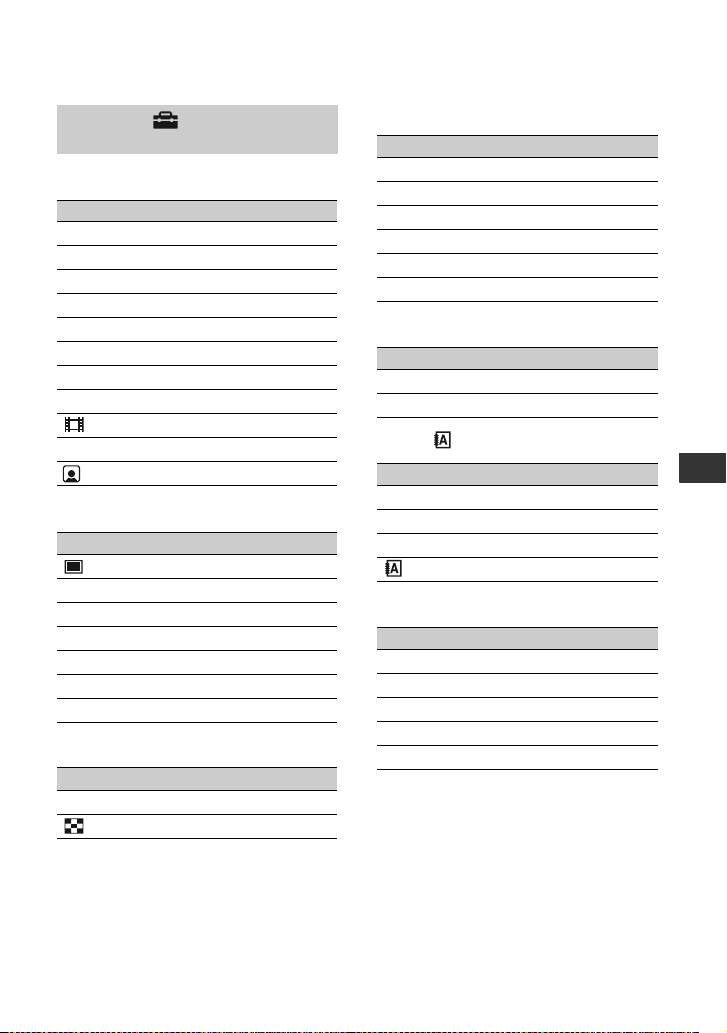
List of the (SETTINGS) category items
MOVIE SETTINGS (p. 80)
Items Page
REC MODE
AUDIO MODE*
1
NIGHTSHOT LIGHT
WIDE SELECT
DIGITAL ZOOM
STEADYSHOT
AUTO SLW SHUTTR
GUIDEFRAME
REMAINING SET
SUB-T DATE
INDEX SET*
2
PHOTO SETTINGS (p. 82)
Items Page
IMAGE SIZE*
FILE NO.
NIGHTSHOT LIGHT
GUIDEFRAME
FLASH MODE*
FLASH LEVEL*
REDEYE REDUC*
2
1*2
1
1
VIEW IMAGES SET (p. 84)
Items Page
DATA CODE
DISPLAY
80
80
80
80
81
81
81
81
81
82
82
82
83
80
81
83
83
84
84
85
3
*
SOUND/DISP SET
Items Page
VOLUME*
BEEP*
LCD BRIGHT
LCD BL LEVEL
LCD COLOR
VF B.LIGHT
2
2
(p. 86)
86
86
86
86
86
86
OUTPUT SETTINGS (p. 87)
Items Page
TV TYPE
DISP OUTPUT
87
87
CLOCK/ LANG (p. 88)
Items Page
CLOCK SET*
AREA SET
DST SET/SUMMERTIME
2
LANGUAGE SET*
25
88
88
2
88
GENERAL SET (p. 88)
Items Page
DEMO MODE
CALIBRATION
A.SHUT OFF
QUICK ON STBY
REMOTE CTRL*
*1DCR-DVD710/DVD810
2
*
You can set these items also during Easy
Handycam operation (p. 34).
3
*
[SOUND SETTINGS] during Easy Handycam
operation (p. 34)
1
88
122
89
89
89
Customizing Your Camcorder
79
Page 80
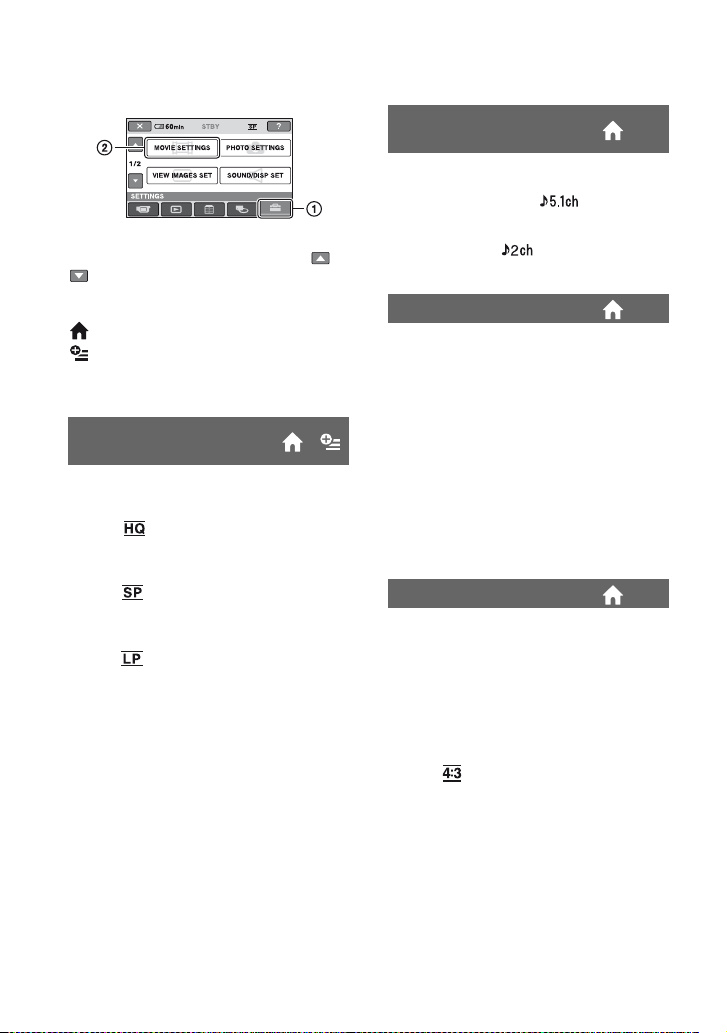
MOVIE SETTINGS
(Items for recording movies)
Touch 1, then 2.
If the item is not on the screen, touch /
to change the page.
AUDIO MODE (DCRDVD710/DVD810)
You can select audio recording format.
B 5.1ch SURROUND ( )
Records 5.1ch surround sound.
2ch STEREO ( )
Records stereo sound.
How to set
(HOME MENU) t page 78
(OPTION MENU) t page 90
The default settings are marked with B.
REC MODE (Recording
mode)
You can select a recording mode to record a
movie with the image quality from 3 levels.
HQ ( )
Records in high quality mode.
(9M (HQ))
B SP ( )
Records in standard quality mode.
(6M (SP))
LP ( )
Increases the recording time (Long Play).
(3M (LP))
b Notes
• If you record in LP mode, the quality of scenes
may be degraded, or scenes with quick
movements may appear with block noise when
you play back the movie.
z Tips
• See page 14, 33 on the expected recording time
of each recording mode.
• You can set the recording mode separately for
each media (p. 28).
NIGHTSHOT LIGHT
When using either the NightShot plus
(p. 41) or the [S. NIGHTSHOT PLS]
(p. 95) function to record, you can record
clearer images by setting [NIGHTSHOT
LIGHT], which emits infrared light
(invisible). The default setting is [ON].
b Notes
• Do not cover the infrared port with your fingers
or other objects (p. 131).
• Remove the conversion lens (optional).
• The maximum shooting distance using
[NIGHTSHOT LIGHT] is about 3 m (10 feet).
WIDE SELECT
When recording images, you can select the
aspect ratio according to the TV connected.
Refer also to the instruction manuals
supplied with your TV.
B 16:9 WIDE
Records images to the full screen on a 16:9
(wide) TV screen.
4:3 ( )
Records images to the full screen on a 4:3
TV screen.
b Notes
• Set [TV TYPE] correctly according to the TV
connected for playback (p. 48).
80
Page 81
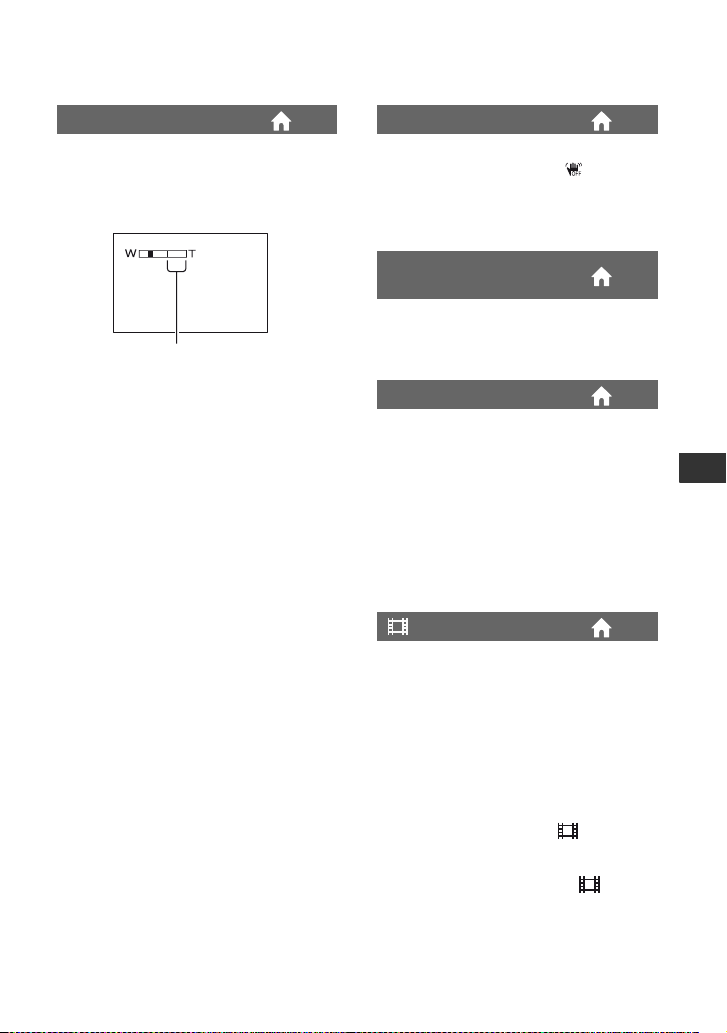
DIGITAL ZOOM
You can select the maximum zoom level in
case you want to zoom greater than optical
zoom magnification. Note that the image
quality decreases when you use the digital
zoom.
The right side of the bar shows the digital
zooming factor. The zooming zone appears
when you select the zooming level.
DCR-DVD610
B OFF
Up to 40 × zoom is performed optically.
80×
Up to 40 × zoom is perf ormed optically, and
after that, up to 80 × zoom is performed
digitally.
2000×
Up to 40 × zoom is perf ormed optically, and
after that, up to 2,000 × zoom is performed
digitally.
DCR-DVD710/DVD810
B OFF
Up to 25 × zoom is performed optically.
50×
Up to 25 × zoom is perf ormed optically, and
after that, up to 50 × zoom is performed
digitally.
2000×
Up to 25 × zoom is perf ormed optically, and
after that, up to 2,000 × zoom is performed
digitally.
STEADYSHOT
You can compensate for camera shake. Set
[STEADYSHOT] to [OFF] ( ) when
using a tripod (optional), then the image
becomes natural. The default setting is
[ON].
AUTO SLW SHUTTR
(Auto slow shutter)
When recording in dark places, the shutter
speed is automatically reduced to 1/30
second. The default setting is [ON].
GUIDEFRAME
You can display the frame and check that
the subject is horizontal or vertical by
setting [GUIDEFRAME] to [ON].
The frame is not recorded. Press DISP/
BATT INFO to make the frame disappear.
The default setting is [OFF].
z Tips
• Positioning the subject at the cross point of the
guide frame makes a balanced composition.
REMAINING SET
B ON
Always displays the remaining media
capacity indicator.
AUTO
Displays the remaining recording time of
movie for about 8 seconds in the following
situations.
– When your camcorder recognizes the
remaining media capacity when the
POWER switch is set to (Movie).
– When you press DISP/BATT INFO to
switch the indicator from off to on when
the POWER switch is set to (Movie).
– When you select the movie recording
mode on the HOME MENU.
Customizing Your Camcorder
Continued ,
81
Page 82
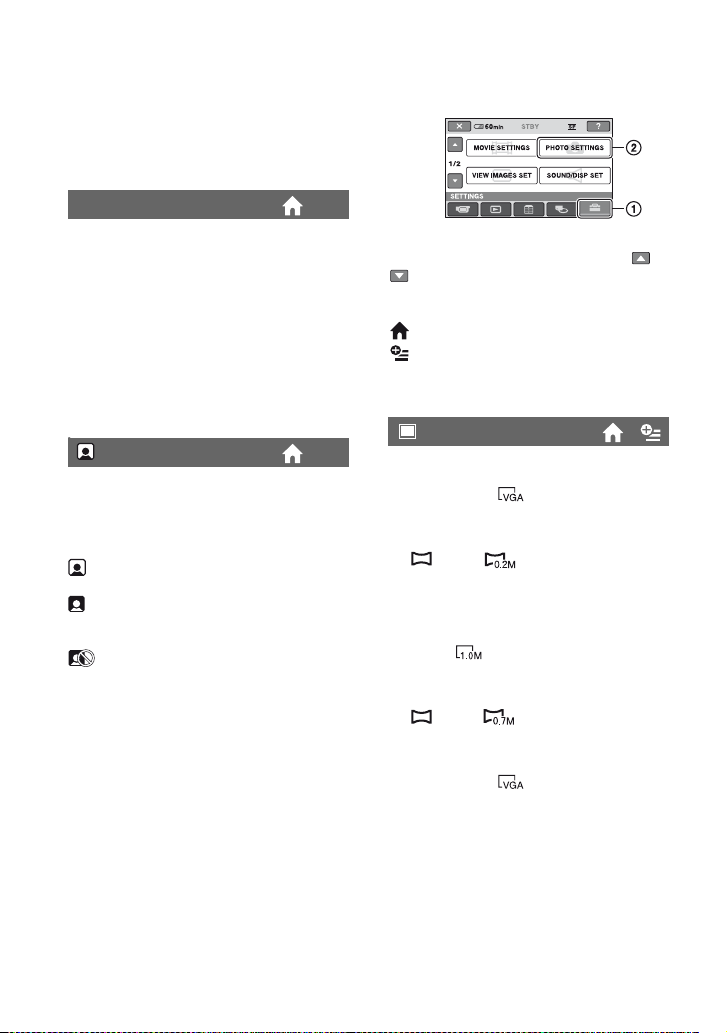
MOVIE SETTINGS (Continued)
b Notes
• When the remaining recordable time for movies
is less than 5 minutes, the indicator stays on the
screen.
SUB-T DATE
You can display the recording date and time
when playing back a disc on a device with a
subtitle display function. The default setting
is [ON].
Also refer to the instruction manual of the
playback device.
b Notes
• You cannot set [SUB-T DATE] for the internal
memory (DCR-DVD810) or a “Memory Stick
PRO Duo.”
S
INDEX SET
The camcorder detects faces automatically
during movie recording. The default setting
is [ON].
Face icons and their meanings
: This icon appears when the setting is
[ON].
: This icon flashes when your camcorder
detects a face. The icon stops flashing when
the face is recorded in Face Index.
: This icon appears when faces cannot
be recored in Face Index.
To play back scenes using Face Index, see
page 45.
b Notes
• The number of faces detected in a movie is
limited.
PHOTO SETTINGS
(Items for recording still images)
Touch 1, then 2.
If the item is not on the screen, touch /
to change the page.
How to set
(HOME MENU) t page 78
(OPTION MENU) t page 90
The default settings are marked with B.
IMAGE SIZE
DCR-DVD610
B VGA (0.3M) ( 640 × 480)
Records the still images of aspect ratio 4:3
clearly.
0.2M ( 640 × 360)
Records still images clearly in the 16:9
(wide) ratio.
DCR-DVD710/DVD810
B 1.0M ( 1152 × 864)
Records still images of aspect ratio 4:3
clearly.
0.7M ( 1152 × 648)
Records still images clearly in the 16:9
(wide) ratio.
VGA (0.3M) ( 640 × 480)
Records the maximum number of still
images of aspect ratio 4:3.
82
Page 83
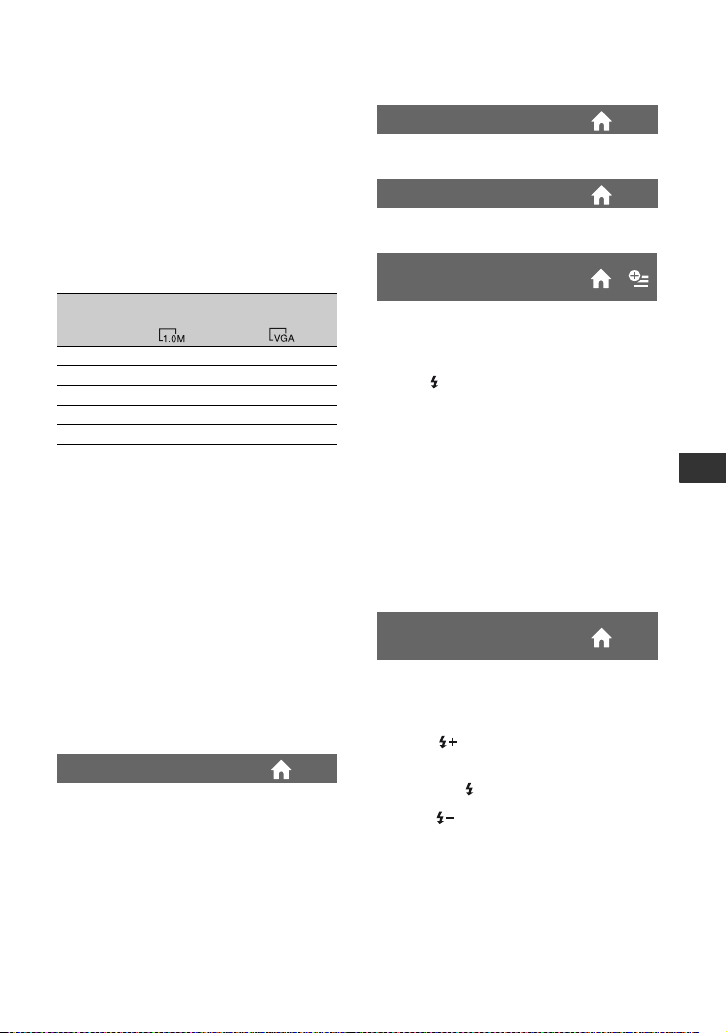
Number of still images recordable on
the internal memory (DCR-DVD810)
You can record up to 9,999 still images on
the internal memory. The recordable
number of still images varies depending on
the recording condition.
Number of still images recordable on
a “Memory Stick PRO Duo” (approx.)
1.0M
1152 × 864
512MB
1GB
2GB
4GB
8GB
b Notes
• Numbers in the table are of when using a
“Memory Stick PRO Duo” made by Sony
Corporation. The recordable number of still
images varies depending on the recording
conditions or the type of “Memory Stick.”
z Tips
• You can use a “Memory Stick PRO Duo” with a
capacity of 256MB or smaller for recording still
images.
• The numbers in the table are of the recordable
number of still images of the maximum image
size that can be recorded with your camcorder.
Check the actual recordable number on the
screen when you are recording still images
(p. 133).
880 2800
1800 5800
3700 11500
7200 23000
14500 47000
VGA (0.3M)
640 × 480
FILE NO. (File number)
B SERIES
Assigns file numbers in sequence, even if
the “Memory Stick PRO Duo” is replaced
with another one.
RESET
Assigns individual file numbers for each
“Memory Stick PRO Duo.”
NIGHTSHOT LIGHT
See page 80.
GUIDEFRAME
See page 81.
FLASH MODE (DCRDVD710/DVD810)
You can set this function when you use an
external flash (optional) that is compatible
with your camcorder.
B ON ( )
Flashes every time.
AUTO
Flashes automatically.
b Notes
• Remove any dust from the surface of the flash
before using it. Flash effect may be impaired if
heat discoloration or dust obscures the lamp.
• If you use the flash in bright places such as
when shooting a backlit subject, the flash may
not be effective.
FLASH LEVEL (DCRDVD710/DVD810)
You can set this function when you use an
external flash (optional) that is compatible
with your camcorder.
HIGH( )
Makes the flash level higher.
B NORMAL( )
LOW( )
Makes the flash level lower.
Customizing Your Camcorder
Continued ,
83
Page 84
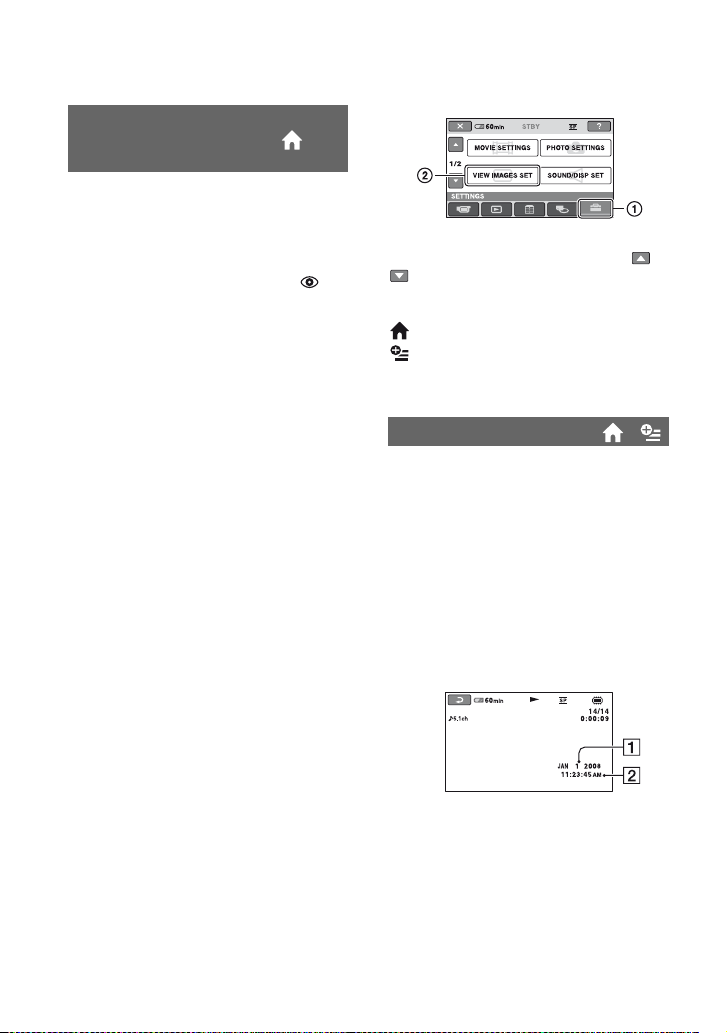
PHOTO SETTINGS (Continued)
REDEYE REDUC
(Redeye reduction)
(DCR-DVD710/DVD810)
You can set this function when you record
still images using an external flash
(optional) that is compatible with your
camcorder. If you set [FLASH MODE]
(p. 83) to [AUTO] or [ON] when
[REDEYE REDUC] is set to [ON],
appears on the screen. You can prevent
redeye by activating the pre-flash before
recording.
b Notes
• The redeye reduction may not produce the
desired effect due to individual differences and
other conditions.
VIEW IMAGES SET
(Items to customize the display)
Touch 1, then 2.
If the item is not on the screen, touch /
to change the page.
How to set
(HOME MENU) t page 78
(OPTION MENU) t page 90
The default settings are marked with B.
DATA CODE
During playback, your camcorder displays
the information (data code) recorded
automatically at the time of recording.
B OFF
Data code is not displayed.
DATE/TIME
Displays the date and time.
CAMERA DATA
Displays camera setting data.
DATE/TIME
84
ADate
BTime
Page 85
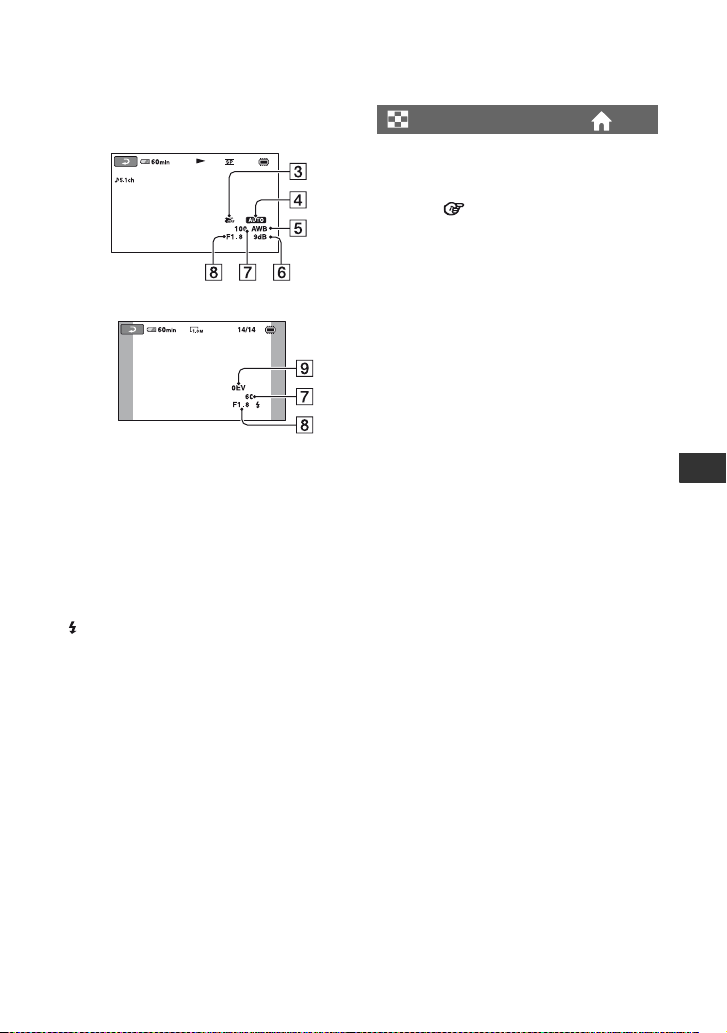
CAMERA DATA
Movie
Still image
CSteadyShot off
DBrightness
EWhite balance
FGain
GShutter speed
HAperture value
IExposure
z Tips
• appears in the following cases.
– Still images recorded on your camcorder
using an optional flash (DCR-DVD710/
DVD810)
– Still images recorded on other cameras using
a flash
• The data code is displayed on the TV screen if
you connect your camcorder to a TV.
• The indicator toggles through the following
sequences as you press DATA CODE on the
Remote Commander: [DATE/TIME] t
[CAMERA DATA] t [OFF] (no indication)
(DCR-DVD710/DVD810).
• Depending on the media condition, bars [--:--:--]
appear.
DISPLAY
You can s elect the number of thumbnails that
appear on the VISUAL INDEX or Playlist
screen.
Thumbnail Glossary (p. 135)
B ZOOM LINK
Changes the number of thumbnails (6 or 12)
with the power zoom lever on your
camcorder.*
6IMAGES
Displays thumbnails of 6 images.
12IMAGES
Displays thumbnails of 12 images.
* You can operate with the zoom buttons on the
LCD frame or on the Remote Commander
(DCR-DVD710/DVD810).
Customizing Your Camcorder
85
Page 86
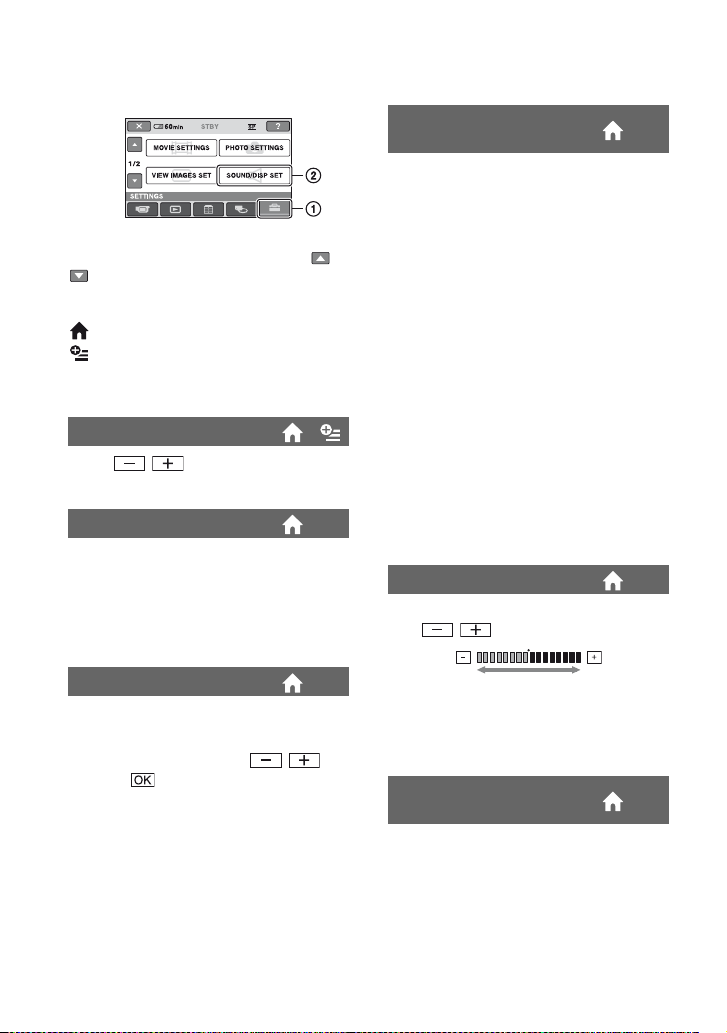
SOUND/DISP SET
(Items to adjust sound and the screen)
Touch 1, then 2.
If the item is not on the screen, touch /
to change the page.
How to set
(HOME MENU) t page 78
(OPTION MENU) t page 90
The default settings are marked with B.
VOLUME
Touch / to adjust the volume
(p. 45).
BEEP
B ON
A melody sounds when you start/stop
recording, or operate the touch panel.
OFF
Cancels the melody and shutter sound.
LCD BL LEVEL (LCD
backlight level)
You can adjust the brightness of the LCD
screen’s backlight.
B NORMAL
Standard brightness.
BRIGHT
Brightens the LCD screen.
b Notes
• When you connect your camcorder to outside
power sources, [BRIGHT] is automatically
selected for the setting.
• When you select [BRIGHT], battery life is
slightly reduced during recording.
• If you open the LCD panel 180 degrees to face
the screen outside and close the LCD panel to
the camcorder body, the setting becomes
[NORMAL] automatically.
z Tips
• This adjustment does not affect the recorded
images in any way.
LCD COLOR
You can adjust the color of the LCD screen
with / .
LCD BRIGHT
You can adjust the brightness of the LCD
screen.
1 Adjust the brightness with / .
2 Touch .
z Tips
• This adjustment does not affect the recorded
images in any way.
86
Low intensity High intensity
z Tips
• This adjustment does not affect the recorded
images in any way.
VF B.LIGHT (Viewfinder
backlight)
You can adjust the brightness of the
viewfinder.
B NORMAL
Standard brightness.
BRIGHT
Brightens the viewfinder screen.
Page 87
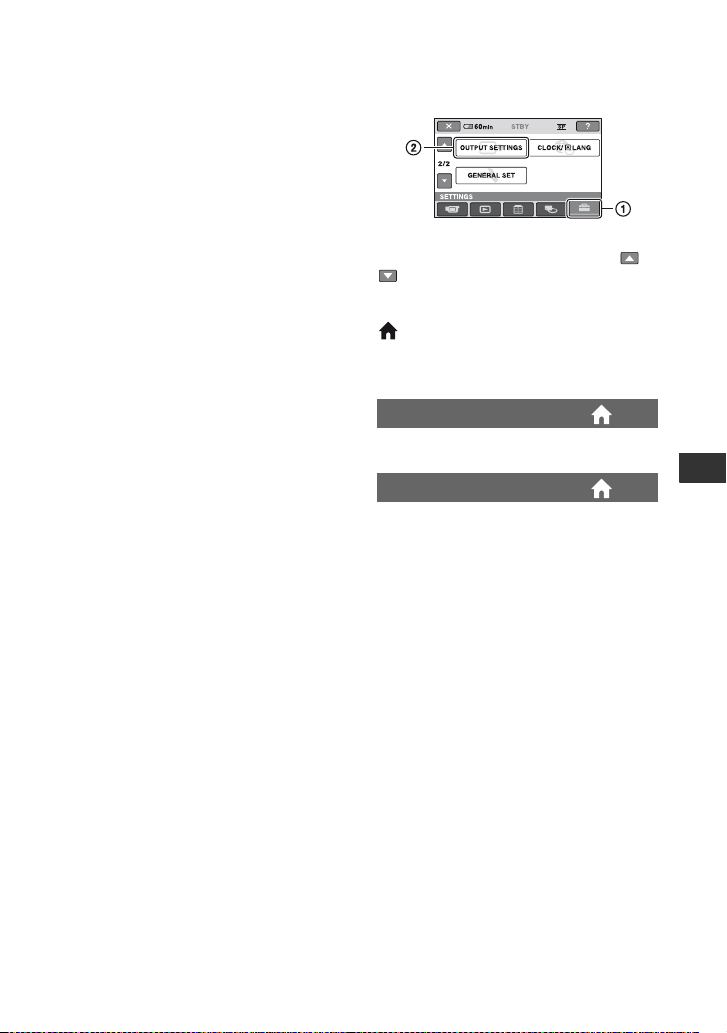
b Notes
• When you connect your camcorder to outside
power sources, [BRIGHT] is automatically
selected for the setting.
• When you select [BRIGHT], battery life is
slightly reduced during recording.
z Tips
• This adjustment does not affect the recorded
images in any way.
OUTPUT SETTINGS
(Items for when connecting other devices)
Touch 1, then 2.
If the item is not on the screen, touch /
to change the page.
How to set
(HOME MENU) t page 78
The default settings are marked with B.
TV TYPE
See page 48.
DISP OUTPUT
B LCD PANEL
Shows displays such as the time code on
the LCD screen and in the viewfinder.
V-OUT/PANEL
Shows displays such as the time code on
the TV screen, LCD screen, and in the
viewfinder.
Customizing Your Camcorder
87
Page 88
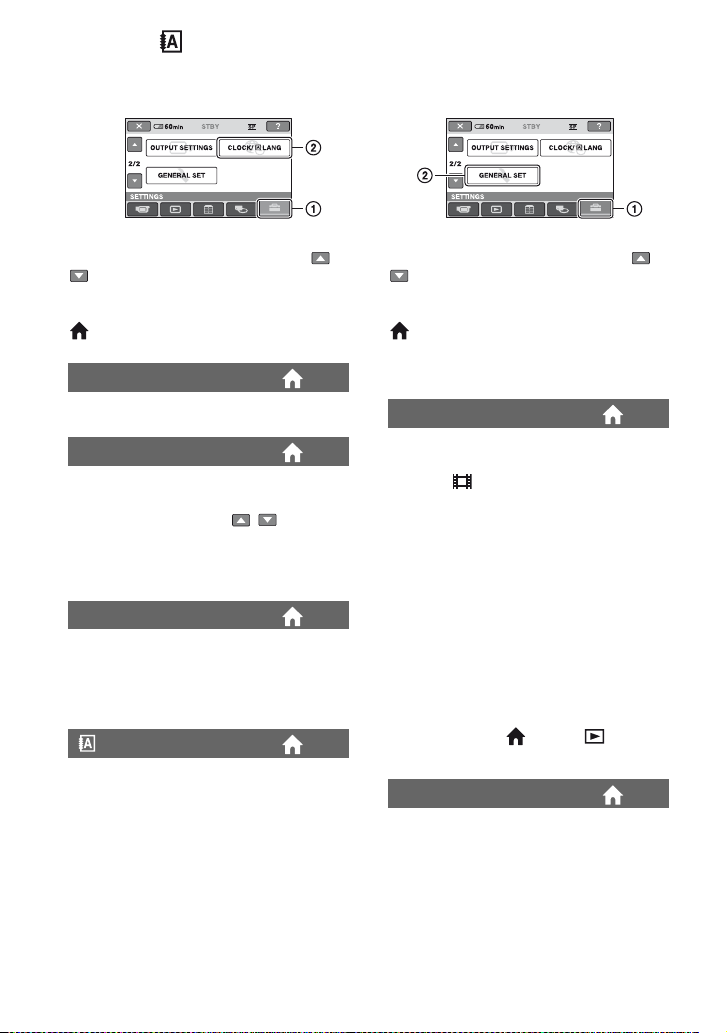
CLOCK/ LANG
(Items to set clock and language)
GENERAL SET
(Other setup items)
Touch 1, then 2.
If the item is not on the screen, touch /
to change the page.
How to set
(HOME MENU) t page 78
CLOCK SET
See page 25.
AREA SET
You can adjust a time difference without
stopping the clock.
Set your local area using / when
using your camcorder in other time zones.
Refer to the world time difference on page
115.
DST SET/SUMMERTIME
You can change this setting without
stopping the clock.
Set this to [ON] to move the time forward
1 hour.
LANGUAGE SET
You can select the language to be used on
the LCD screen.
z Tips
• Your camcorder offers [ENG[SIMP]]
(simplified English) for when you cannot find
your native tongue among the options.
Touch 1, then 2.
If the item is not on the screen, touch /
to change the page.
How to set
(HOME MENU) t page 78
The default settings are marked with B.
DEMO MODE
You can view the demonstration in about
10 minutes, after you turn the POWER
switch to (Movie). The default setting
is [ON].
z Tips
• The demonstration will be suspended in the
following situations.
– When you press START/STOP.
– When you press DUBBING (DCR-DVD810)
– When you touch the screen during the
demonstration (The demonstration starts
again after about 10 minutes).
– When you slide the disc cover OPEN switch.
– When you move the POWER switch to still
image recording.
– When you press (HOME)/ (VIEW
IMAGES).
CALIBRATION
See page 122.
88
Page 89

A.SHUT OFF (Auto shut
off)
B 5min
The camcorder is automatically turned off
when you do not operate your camcorder
for more than approximately 5 minutes.
NEVER
The camcorder is not automatically turned
off.
b Notes
• When you connect your camcorder to a wall
outlet (wall socket), [A.SHUT OFF] is
automatically set to [NEVER].
QUICK ON STBY
You can set the time after which the
camcorder turns off automatically in sleep
mode. The default setting is [10min].
b Notes
• [A.SHUT OFF] does not work in sleep mode (p.
41).
REMOTE CTRL (Remote
control) (DCR-DVD710/
DVD810)
You can use the supplied Remote
Commander (p. 132). The default setting is
[ON].
z Tips
• Set to [OFF] to prevent your camcorder from
responding to a command sent by another VCR
remote control unit.
Customizing Your Camcorder
89
Page 90
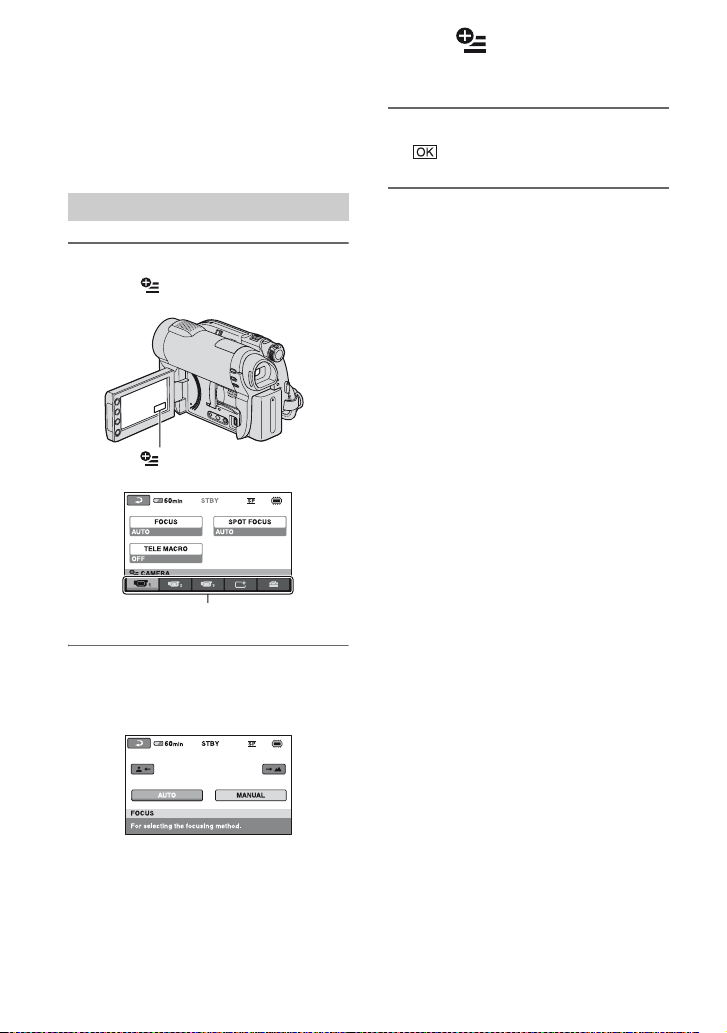
Activating functions using the OPTION MENU
The OPTION MENU appears just like the
pop-up window that appears when you
right-click the mouse on a computer.
Various functions are displayed.
3 Change the setting, then touch
.
Using the OPTION MENU
1 While using your camcorder,
touch (OPTION) on the screen.
(OPTION)
Tab
2 Touch the desired item.
If you cannot find the desired item,
touch another tab to change the page.
b Notes
• The tabs and items that appear on the screen
depend on the recording/playback status of your
camcorder at the time.
• Some items appear without a tab.
• The OPTION MENU cannot be used during
Easy Handycam operation (p. 34).
If you cannot find the item anywhere,
the function does not work under the
current situation.
90
Page 91
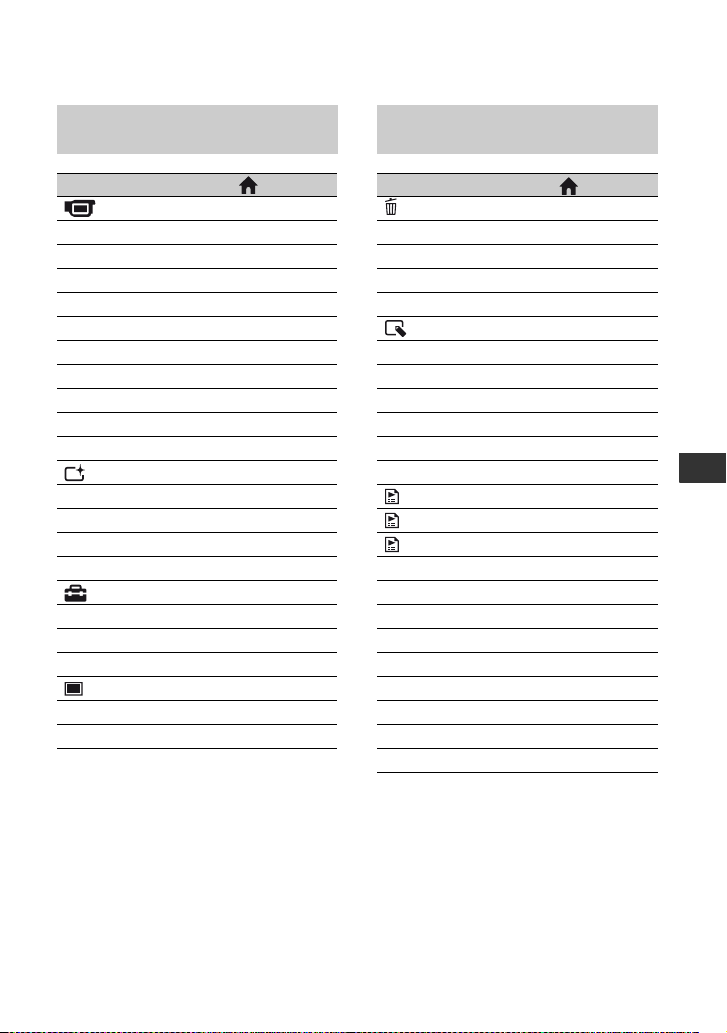
Recording items on the OPTION MENU
Viewing items on the OPTION MENU
Items * Page
tab
FOCUS
SPOT FOCUS
TELE MACRO
EXPOSURE
SPOT METER
SCENE SELECTION
WHITE BAL.
COLOR SLOW SHTR
S. NIGHTSHOT PLS
-92
-92
-92
-93
-93
-93
-94
-95
-95
tab
FADER
D.EFFECT
PICT.EFFECT
-95
-96
-96
tab
REC MODE
BLT-IN ZOOM MIC
MICREF LEVEL
IMAGE SIZE
SELF-TIMER
FLASH MODE**
* Items that are included also in the HOME
MENU
** DCR-DVD710/DVD810
a 80
-96
-96
a
82
-96
a 83
Items * Page
tab
DELETE**
DELETE by date**
DELETE ALL**
a 51
a 51
a 51
tab
DIVIDE
ERASE**
ERASE ALL**
MOVE**
a 58
a 60
a 60
a 61
-- (A tab depends on the situation/No tab)
ADD**
ADD by date**
ADD ALL**
PRINT
SLIDE SHOW
VOLUME
DATA CODE
SLIDE SHOW SET
COPIES
DATE/TIME
SIZE
DVD MENU
* Items that are included also in the HOME
MENU
** These items are also available in the HOME
MENU, but with different item names.
a 59
a 59
a 59
a 64
-47
a 86
a 84
-47
-64
-64
-64
-69
Customizing Your Camcorder
91
Page 92
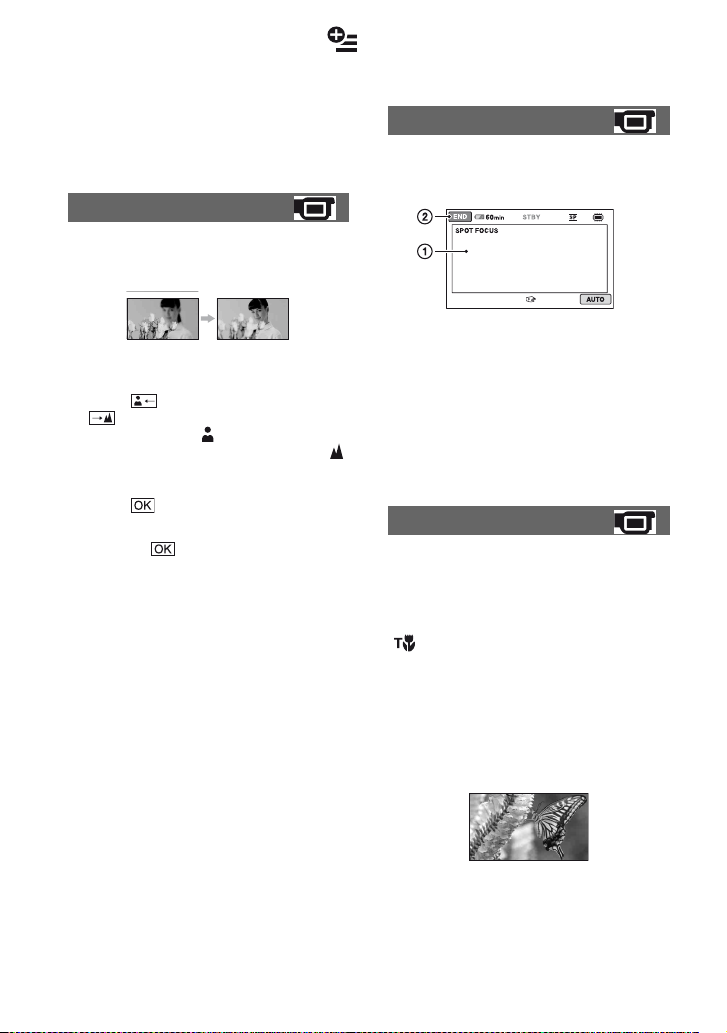
Functions set in the OPTION MENU
Items you can set only on the OPTION
MENU will be described below.
The default settings are marked with B.
FOCUS
You can adjust the focus manually. You can
select this function also when you want to
focus on a certain subject intentionally.
1 Touch [MANUAL].
9 appears.
2 Touch (focusing on close subjects)/
(focusing on distant subjects) to
sharpen the focus. appears when the
focus cannot be adjusted any closer, and
appears when the focus cannot be adjusted
farther away.
3 Touch .
To adjust the focus automatically, touch
[AUTO] t in step 1.
b Notes
• The minimum possible distance between the
camcorder and the subject while maintaining
sharp focus is about 1 cm (about 13/32 in.) for
wide angle and about 80 cm (about 2 5/8 feet)
for telephoto.
z Tips
• It is easier to focus on the subject by moving the
power zoom lever towards T (telephoto) to
adjust the focus, then towards W (wide angle) to
adjust the zoom for recording. When you want
to record a subject at close range, move the
power zoom lever to W (wide angle), then
adjust the focus.
• The focal distance information (the distance at
which the subject is focused on, for when it is
dark and hard to adjust focus) appears for a few
seconds in the following cases. (It will not be
displayed correctly if you are using a conversion
lens (optional).)
– When the focus mode is switched from
automatic to manual.
– When you set focus manually.
92
SPOT FOCUS
You can select and adjust the focal point to
aim it at a subject not located at the center
of the screen.
1 Touch the subject on the screen.
9 appears.
2 Touch [END].
To adjust the focus automatically, touch
[AUTO] t [
b Notes
• If you set [SPOT FOCUS], [FOCUS] is
automatically set to [MANUAL].
END] in step 1.
TELE MACRO
This is useful to record small subjects, such
as flowers or insects. You can blur out
backgrounds and the subject stands out
clearer.
When you set [TELE MACRO] to [ON]
( ), the zoom (p. 40) moves to the top of
the T (telephoto) side automatically and
allows recording subjects at a close
distance.
– DCR-DVD610
Down to about 43 cm (17 in.)
– DCR-DVD710/DVD810
Down to about 38 cm (15 in.)
To cancel, touch [OFF], or zoom to wide
angle (W side).
b Notes
• When recording a distant subject, focusing may
be difficult and can take some time.
Page 93
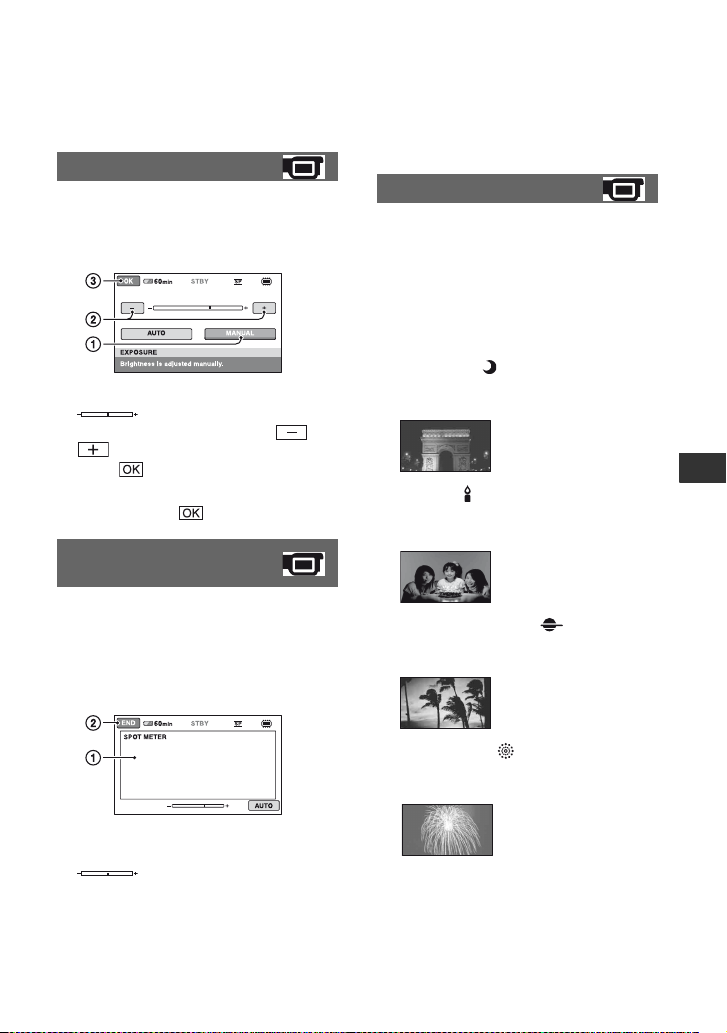
• Adjust the focus manually ([FOCUS], p. 92)
when it is hard to focus automatically.
EXPOSURE
You can fix the brightness of an image
manually. Adjust the brightness when the
subject is too bright or too dark relative to
the background.
1 Touch [MANUAL].
2 Adjust the exposure by touching /
3 Touch .
appears.
.
To return the setting to automatic exposure,
touch [AUTO] t in step 1.
SPOT METER (Flexible
spot meter)
You can adjust and fix the exposure to the
subject, so that it is recorded in suitable
brightness even when there is strong
contrast between the subject and the
background, such as subjects in the
spotlight on stage.
b Notes
• If you set [SPOT METER], [EXPOSURE] is
automatically set to [MANUAL].
SCENE SELECTION
You can record images effectively in
various situations with the [SCENE
SELECTION] function.
B AUTO
Select this to automatically record images
effectively without the [
SELECTION
TWILIGHT* ()
Select this to take night view without
losing the mood.
CANDLE ( )
Select this to take scene without losing
candle mood.
SUNRISE&SUNSET* ()
Select this to reproduce the atmosphere of
scenes such as sunsets or sunrises.
SCENE
] function.
Customizing Your Camcorder
1 Touch the point where you want to fix and
adjust the exposure on the screen.
2 Touch [END].
appears.
To return the setting to automatic exposure,
touch [AUTO] t [
END] in step 1.
FIREWORKS* ()
Select this to take spectacular shots of
fireworks.
Continued ,
93
Page 94
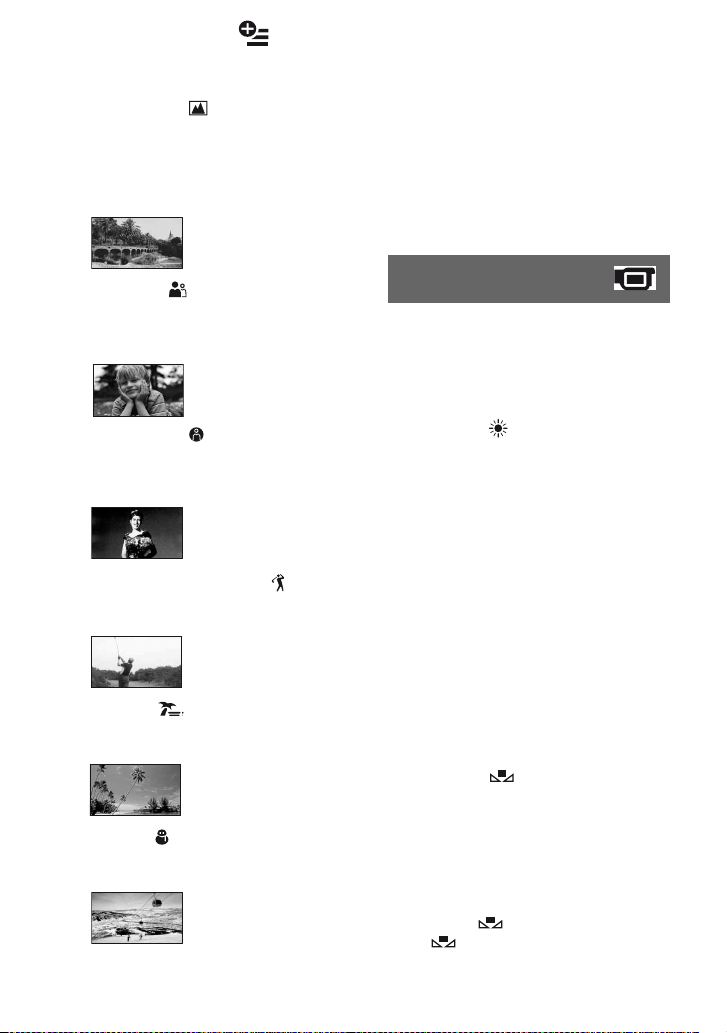
Functions set in the OPTION MENU (Continued)
LANDSCAPE* ()
Select this to record distant subjects
clearly. This setting also prevents your
camcorder from focusing on glass or metal
mesh in windows that comes in between
the camcorder and the subject.
PORTRAIT ( )
Select this to bring out the subject such as
people or flowers while creating a soft
background.
SPOTLIGHT** ()
Select this to prevent people’s faces from
appearing excessively white when subjects
are lit by strong light.
SPORTS** (Sports lesson) ( )
Select this to minimize shake when
recording fast moving subjects.
BEACH** ()
Select this to take the vivid blue of the
ocean or a lake.
SNOW** ()
Select this to take bright pictures of a white
landscape.
94
* Your camcorder is set to focus only on distant
subjects.
** Your camcorder is set not to focus on nearby
subjects.
b Notes
• The [WHITE BAL.] setting is cleared when you
set [SCENE SELECTION].
WHITE BAL. (White
balance)
You can adjust the color balance to the
brightness of the recording environment.
B AUTO
The white balance is adjusted
automatically.
OUTDOOR ( )
The white balance is adjusted to be
appropriate for the following recording
conditions:
– Outdoors
– Night views, neon signs and fireworks
– Sunrise or sunset
– Under daylight fluorescent lamps
INDOOR (n)
The white balance is adjusted to be
appropriate for the following recording
conditions:
– Indoors
– At party scenes or studios where the lighting
conditions change quickly
– Under video lamps in a studio, or under
sodium lamps or incandescent-like color
lamps
ONE PUSH ( )
The white balance will be adjusted
according to the ambient light.
1 Touch [ONE PUSH].
2 Frame a white object such as a piece of
paper, to fill the screen under the same
lighting conditions as you will record
the subject.
3 Touch [ ].
flashes quickly. When the white
balance is adjusted and stored in the
memory, the indicator stops flashing.
Page 95
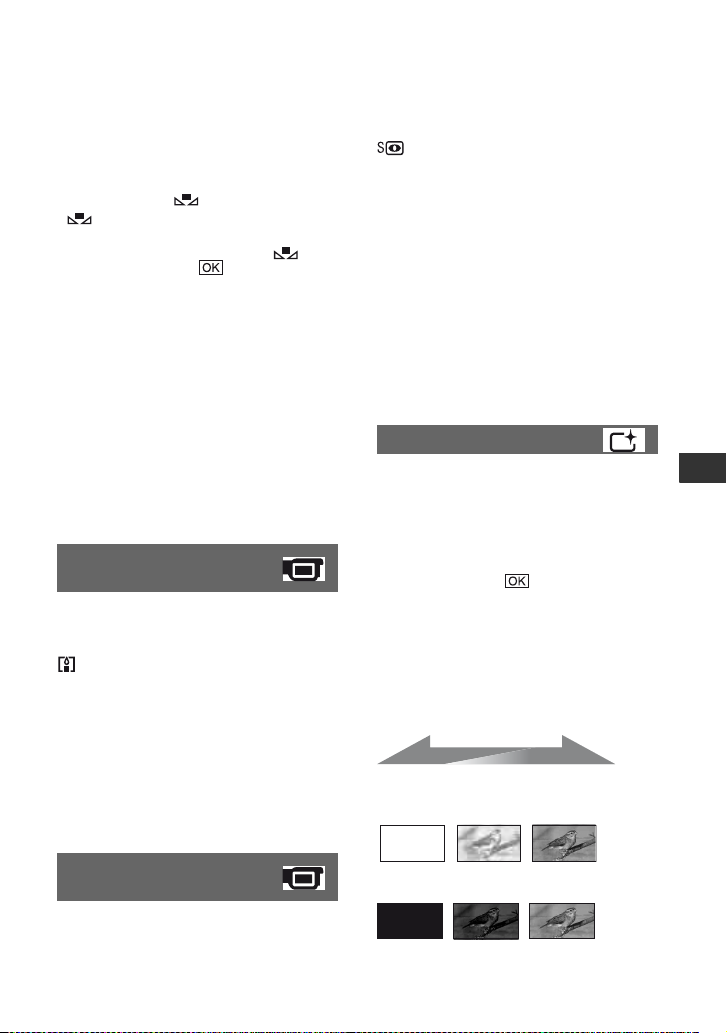
b Notes
• Set [WHITE BAL.] to [AUTO] or adjust the
color in [ONE PUSH] under white or cool white
fluorescent lamps.
• When you select [ONE PUSH], keep framing
white object while is flashing quickly.
•
flashes slowly if [ONE PUSH] could not
be set.
• When [ONE PUSH] was selected, if keeps
flashing after touching , set [WHITE
BAL.] to [AUTO].
• If you set [WHITE BAL.], [SCENE
SELECTION] is automatically set to [AUTO].
z Tips
• If you changed the battery pack, or moved your
camcorder to or from outdoors when [AUTO]
was selected, aim your camcorder at a nearby
white object with [AUTO] for about 10 seconds
for better color balance adjustment.
• If you changed the [SCENE SELECTION]
setting or moved your camcorder to or from
outdoors during white balance setting with
[ONE PUSH], you need to repeat the [ONE
PUSH] operation.
COLOR SLOW SHTR
(Color Slow Shutter)
When you set [COLOR SLOW SHTR] to
[ON], you can record an image brighter in
color even in dark places.
appears on the screen.
To cancel [COLOR SLOW SHTR], touch
[OFF].
b Notes
• Adjust the focus manually ([FOCUS], p. 92)
when it is hard to focus automatically.
• The shutter speed of your camcorder changes
depending on the brightness, which may result
in a slowdown of the motion of the image.
to [ON] while the NIGHTSHOT PLUS
switch (p. 41) is also set to ON.
appears on the screen.
To return to the normal setting, set [S.
NIGHTSHOT PLS] to [OFF].
b Notes
• Do not use [S. NIGHTSHOT PLS] in bright
places. This may cause a malfunction.
• Do not cover the infrared port with your fingers
or other objects (p. 131).
• Remove the conversion lens (optional).
• Adjust the focus manually ([FOCUS], p. 92)
when it is hard to focus automatically.
• The shutter speed of your camcorder changes
depending on the brightness, which may result
in a slowdown of the motion of the image.
FADER
You can record a transition with the
following effects adding to the interval
between scenes.
1 Select the desired effect in [STBY] (during
fading in) or [REC] (during fading out)
mode, then touch .
2 Press START/STOP.
The fader indicator stops flashing and
disappears when the fade is complete.
To cancel the fader before starting the
operation, touch [OFF] in step 1.
If you press START/STOP, the setting is
cleared.
STBY REC
Fading out Fading in
WHITE FADER
Customizing Your Camcorder
S. NIGHTSHOT PLS
(Super NightShot plus)
The image will be recorded at a maximum
of 16 times the sensitivity of NightShot plus
recording if you set [S. NIGHTSHOT PLS]
BLACK FADER
Continued ,
95
Page 96
Functions set in the OPTION MENU (Continued)
D.EFFECT (Digital effect)
When you set [OLD MOVIE], appears
and you can add an old movie effect to
images.
To cancel [D.EFFECT], touch [OFF].
PICT.EFFECT (Picture
effect)
You can add special effects to an image
during recording. appears.
B OFF
Does not use [PICT.EFFECT] setting.
SEPIA
Images appear in sepia.
B&W
Images appear in black and white.
PASTEL
Images appear as a pale pastel drawing.
BLT-IN ZOOM MIC
When you set [BLT-IN ZOOM MIC] to
[ON] ( ), you can record sound with
directivity as you move the power zoom
lever. The default setting is [OFF].
LOW ( )
Records surround sound faithfully. This
setting is not suitable for recording
conversations.
SELF-TIMER
When you set [SELF-TIMER] to [ON],
appears on the screen.
When you press PHOTO, your camcorder
starts counting down, and records a still
image after about 10 seconds.
To cancel recording, touch [RESET].
To cancel the self-timer, select [OFF].
z Tips
• You can also operate by pressing PHOTO on
the Remote Commander (DCR-DVD710/
DVD810) (p. 132).
MICREF LEVEL
You can select the microphone level for
recording sound.
Select [LOW] when you want to record
exciting and powerful sound in a concert
hall, etc.
B NORMAL
Records various surround sounds,
converting them into the certain level.
96
Page 97

Performing with Your Computer
What you can do with Windows computer
When you install the “Picture Motion
Browser” on a Windows computer from the
supplied CD-ROM, you can enjoy the
following operations.
x Importing images taken with your
camcorder to a computer
x Viewing imported images on a
computer
x Creating a DVD
x Copying a disc
t Video Disc Copier
For details on the functions of “Picture
Motion Browser,” see “PMB Guide”
(p. 99).
x Using a Macintosh computer
The supplied software “Picture Motion
Browser” does not support a Macintosh
computer.
On the advanced use of images on your
camcorder connected to your Macintosh
computer, see the following URL:
http://guide.d-imaging.sony.co.jp/mac/
ms/us/
Installing the software
x Environment for using “Picture Motion
Browser”
OS: Microsoft Windows 2000 Professional
SP4/Windows XP SP2*/Windows Vista*
* 64-bit editions and Starter (Edition) are not
supported.
• Standard installation is required.
• Operation is not assured if the above OS has
been upgraded or in a multi-boot environment.
CPU: Intel Pentium III 1 GHz or faster
Application: DirectX 9.0c or later (This
product is based on DirectX technology. It
is necessary to have DirectX installed.)
Sound system: Direct Sound compatible
sound card
Memory: 256 MB or more
Hard disk: Disk volume required for
installation: Approximately 500 MB (5 GB
or more may be necessary when creating a
DVD.)
Display: Minimum 1,024 × 768 dots
Others: USB port (this must be
provided as standard), Hi-Speed USB (USB
2.0 compatible is recommended), DVD
burner (CD-ROM drive is necessary for
installation.)
b Notes
• Your computer must meet hardware
requirements other than those described above
for each OS.
• Even in a computer environment where the
operations are guaranteed, frames may be
dropped from movies, resulting in uneven
playback. However, imported images and
images on discs created subsequently will not be
affected.
• Operations are not guaranteed on all the
recommended environments. For example, other
open or background applications running on
currently may limit product performance.
• “Picture Motion Browser” does not support
5.1ch surround sound reproduction. The sound
is reproduced in 2ch sound.
Continued ,
Performing with Your Computer
97
Page 98
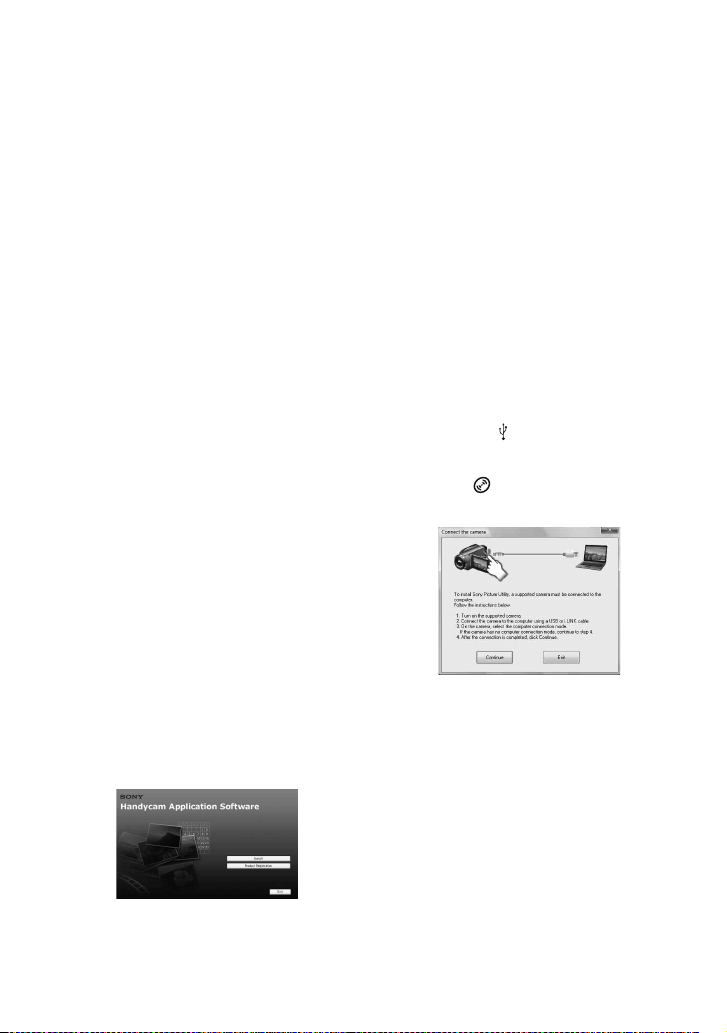
What you can do with Windows computer (Continued)
• Depending on your computer, 8 cm media
(DVD+R DL, etc.) cannot be used.
• If you use a Notebook PC, connect it to the AC
Adaptor as the power source. Otherwise, the
software will not work properly due to the
power saving function of the PC.
• You can read images recorded on a “Memory
Stick PRO Duo” in a Memory Stick slot of a
computer. However, in the following cases, do
not use the Memory Stick slot of the computer,
but connect your camcorder to the computer
with the USB cable:
– The computer is not compatible with a
“Memory Stick PRO Duo.”
– A Memory Stick Duo adaptor is required.
– A “Memory Stick PRO Duo” cannot be read
in the Memory Stick slot.
– Reading data from the Memory Stick slot is
slow.
x Installation procedure
You need to install the software to your
Windows computer before connecting
your camcorder to the computer. The
installation is required only for the first
time.
Contents to be installed and procedures
may differ depending on your OS.
1 Confirm that your camcorder is not
connected to the computer.
2 Turn on the computer.
b Notes
• Log on as an Administrator for installation.
• Close all applications running on the
computer before installing the software.
3 Place the supplied CD-ROM in the disc
drive of your computer.
The installation screen appears.
If the screen does not appear
1 Click [Start], then click [My Computer].
(For Windows 2000, double-click [My
Computer].)
2 Double-click [SONYPICTUTIL (E:)]
(CD-ROM) (disc drive).*
* Drive names (such as (E:)) may vary
depending on the computer.
4 Click [Install].
5 Select the language for the application to
be installed, then click [Next].
6 As the screen to confirm the connection
appears, connect your camcorder to the
computer following the steps below.
1 Connect the AC Adaptor to a wall outlet
(wall socket).
2 Turn on your camcorder.
3 Connect the (USB) jack (p. 129) of your
camcorder to the computer using the
supplied USB cable.
4 Touch [
screen of your camcorder.
USB CONNECT] on the
7 Click [Continue].
8 Read [License Agreement], select [I accept
the terms of the license agreement] if you
agree, then click [Next].
9 Confirm the installation settings, then click
[Install].
b Notes
• Even if a screen prompting you to restart
your computer appears, you do not need to
restart it at this time. Restart your computer
after completing the installation.
• It may take some time for the
authentication.
0 Follow the on-screen instructions to install
the software.
98
Page 99
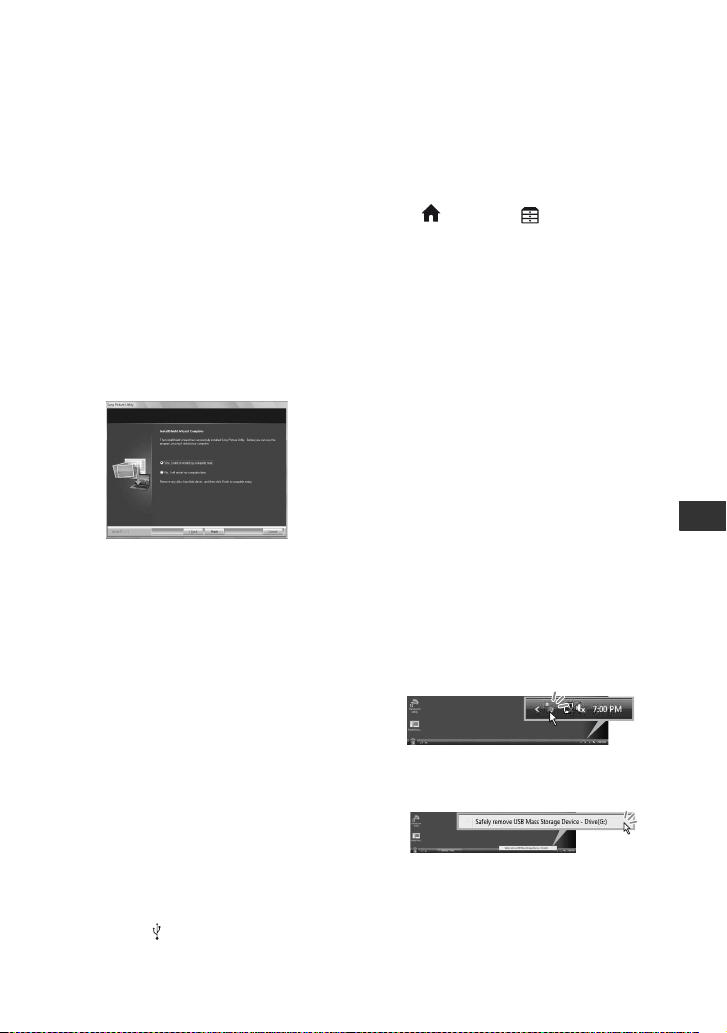
One of the following installation screens
appears, depending on the computer
environment. Check the screen and follow
the instructions displayed to install the
required software.
– Sonic UDF Reader*
Software required to recognize a DVD-RW
(VR mode) disc
– Windows Media Format 9 Series Runtime
(Windows 2000 only)
Software required to create a DVD
– Microsoft DirectX 9.0c*
Software required to handle movies
* Windows 2000, Windows XP only
qa Restart the computer if required to
complete the installation.
qs Remove the CD-ROM from the disc drive
of your computer.
x Operating the Picture Motion Browser
• To start “Picture Motion Browser,” click
[Start] - [All Programs] - [Sony Picture
Utility] - [PMB - Picture Motion
Browser].
• The basic operation of “Picture Motion
Browser” is described on “PMB Guide.”
To view “PMB Guide,” click [Start] - [All
Programs] - [Sony Picture Utility] [Help] - [PMB Guide].
x Connecting your camcorder to a
computer
To connect your camcorder to a computer,
follow the steps below.
1 Connect the AC Adaptor to your camcorder
and a wall outlet (wall socket).
2 Turn on your camcorder.
3 Connect the (USB) jack (
camcorder to a computer using the supplied
USB cable.
p. 129) of your
The [USB SELECT] screen appears on
your camcorder. Touch the item you want
to operate on the screen.
z Tips
• If the [USB SELECT] screen does not appear,
touch (HOME) t (OTHERS) t
[USB CONNECT].
Recommended USB cable connection
To assure the proper functioning of your
camcorder, connect your camcorder to a
computer as below.
• Connect only the camcorder to the USB port of
your computer. Do not connect anything else to
other USB ports of a computer.
• When connecting to a computer with a USB
keyboard and USB mouse connected as standard
equipment, connect the camcorder to another
USB port using the USB cable.
b Notes
• Operations are not guaranteed when multiple
USB devices are connected to a computer.
• Be sure to connect the USB cable to a USB port.
If the USB cable is connected to a computer via
a USB keyboard or USB hub, operations are not
guaranteed.
To disconnect the USB cable
1 Click the [Unplug or eject hardware] icon
on the task tray on the bottom right of the
desk top.
2 Click [Safely remove USB Mass Storage
Device].
3 Click [OK] (Windows 2000 only).
4 Touch [END] on the screen of your
camcorder.
5 Touch [YES] on the screen of your
camcorder.
Continued ,
Performing with Your Computer
99
Page 100

What you can do with Windows computer (Continued)
6 Disconnect the USB cable from the
camcorder and the computer.
b Notes
• Do not disconnect the USB cable while the
ACCESS/access lamp is lit.
• Before turning off your camcorder, disconnect
the USB cable following the proper procedures
described above.
• Disconnect the USB cable using the proper
procedures described above. Otherwise, files
stored on the media may not be updated
correctly. Also, disconnecting the USB cable
improperly may cause a malfunction of the
media.
100
 Loading...