

Page 1
4-111-429-11(1)
DCC-NWFMT1
Car FM Stereo Transmitter
Operating Instructions
Mode d’emploi
Manual de instrucciones
©2008 Sony Corporation Printed in China
A
to a cigarette
lighter socket
vers un allume-cigare
2
WALKMAN
1
Insert this unit into the cigarette lighter socket securely until the
frequency appears in the frequency display window.
Insérez correctement l’appareil dans l’allume-cigare jusqu’à ce que la
fréquence s’affiche sur la fenêtre d’affichage de la fréquence.
B
<Example of installation in a car with its FM radio antenna
built-in the rear window, or its rod antenna mounted on the
rear of the car body>
<Exemple d’installation dans une voiture dont l’antenne radio
FM est incorporée dans la vitre arrière, ou dont l’antenne-tige
est montée sur l’arrière de la carosserie>
Antenna cable
Câble d’antenne
C
<Example of attaching the antenna cable magnet to a
passenger’s seat rail>
<Exemple de fixation de l’aimant du câble d’antenne sur la
glissière du siège passager>
WALKMAN
Use the above basic examples B & C as general guidelines. Adjust the
antenna for the best reception, depending on your car.
Utilisez les exemples de base B & C ci-dessus comme guides généraux.
Réglez l’antenne pour obtenir la meilleure réception, selon votre voiture.
Magnet
Aimant
Seat rail
Glissière
du siège
D
2
5
E
Cigarette lighter plug
Allume-cigare
4
End of the plug
Extrémité de la
fiche
3
Fuse
Fusible
1
to tighten
pour serrer
to remove
pour le retirer
For customers who purchased this product in the USA
Please register this product on line at
http://www.sony.com/productregistration.
Proper registration will enable us to send you periodic mailings about
new products, services, and other important announcements.
Registering your product will also allow us to contact you in the
unlikely event that the product needs adjustment or modification.
Thank you.
English
WARNING
To reduce the risk of fire or electric shock, do not expose this
apparatus to rain or moisture.
To reduce the risk of electrical shock, do not open the cabinet.
Refer servicing to qualified personnel only.
You are cautioned that any changes or modifications not expressly approved
in this manual could void your authority to operate this equipment.
The following FCC/IC statement applies only to the version of
this model manufactured for sale in the USA and Canada. Other
versions may not comply with FCC/IC technical regulations.
Note
This device complies with Part 15 of the FCC Rules and RSS-Gen of the
IC rules.
Operation is subject to the following two conditions: (1) this device may
not cause harmful interference, and (2) this device must accept any
interference received, including interference that may cause undesired
operation of the device.
The following FCC statement applies only to the version of this
model manufactured for sale in the USA. Other versions may
not comply with FCC technical regulations.
Note
This equipment has been tested and found to comply with the limits for a
Class B digital device, pursuant to Part 15 of the FCC Rules. These limits
are designed to provide reasonable protection against harmful interference
in a residential installation. This equipment generates, uses and can radiate
radio frequency energy and, if not installed and used in accordance with
the instructions, may cause harmful interference to radio communications.
However, there is no guarantee that interference will not occur in a
particular installation. If this equipment does cause harmful interference to
radio or television reception, which can be determined by turning the
equipment off and on, the user is encouraged to try to correct the
interference by one or more of the following measures :
– Reorient or relocate the receiving antenna.
– Increase the separation between the equipment and receiver.
– Connect the equipment into an outlet on a circuit different from that to
which the receiver is connected.
– Consult the dealer or an experienced radio/TV technician for help.
Features
With this unit, you can enjoy listening to audio played on portable audio
devices through a car FM radio. Music from supports WM-PORT equipped
WALKMAN*
Stable clear sound
• Using the flexible transmitting antenna cable, it is possible to transmit a
stable FM radio wave in any kind of car. The flexible transmitting
antenna cable has a magnet to anchor itself to a metal part inside the car.
• Digital frequency selection, rather than analog, assures a more stable and
clear transmission.
Selectable frequency from full-range of
FM broadcasting (88.1-107.9 MHz)
You will be able to find an open frequency for transmitting, even where
many stations are broadcast.
4 direct memory buttons
By memorizing often-used frequencies to the 4 memory buttons, you can
select a frequency with one press.
1
is transmitted to the car’s FM radio via FM radio waves.
Supports WM-PORT equipped Walkman
Available for recharging the WALKMAN
This unit takes power supply from the cigarette lighter socket, and supplies
it to the WALKMAN.
*
WALKMAN operation while charging varies depending on the WALKMAN.
Note
Connects to a 12 V DC car battery (only for negative # grounded cars) only.
This unit cannot be connected to a 24 V DC car battery.
Compact design
The small design of this unit allows it to be used in the cigarette lighter socket.
This unit is designed so as its protruding part is in one direction only, and
when installed can be rotated in order to avoid any obstructions around the
cigarette lighter socket.
No dry batteries
This unit connects to a 12 V DC car battery (cigarette lighter socket),
available in many types of cars and trucks.
*1“WALKMAN” and “WALKMAN” logo are registered trademarks of
Sony Corporation.
* in a car
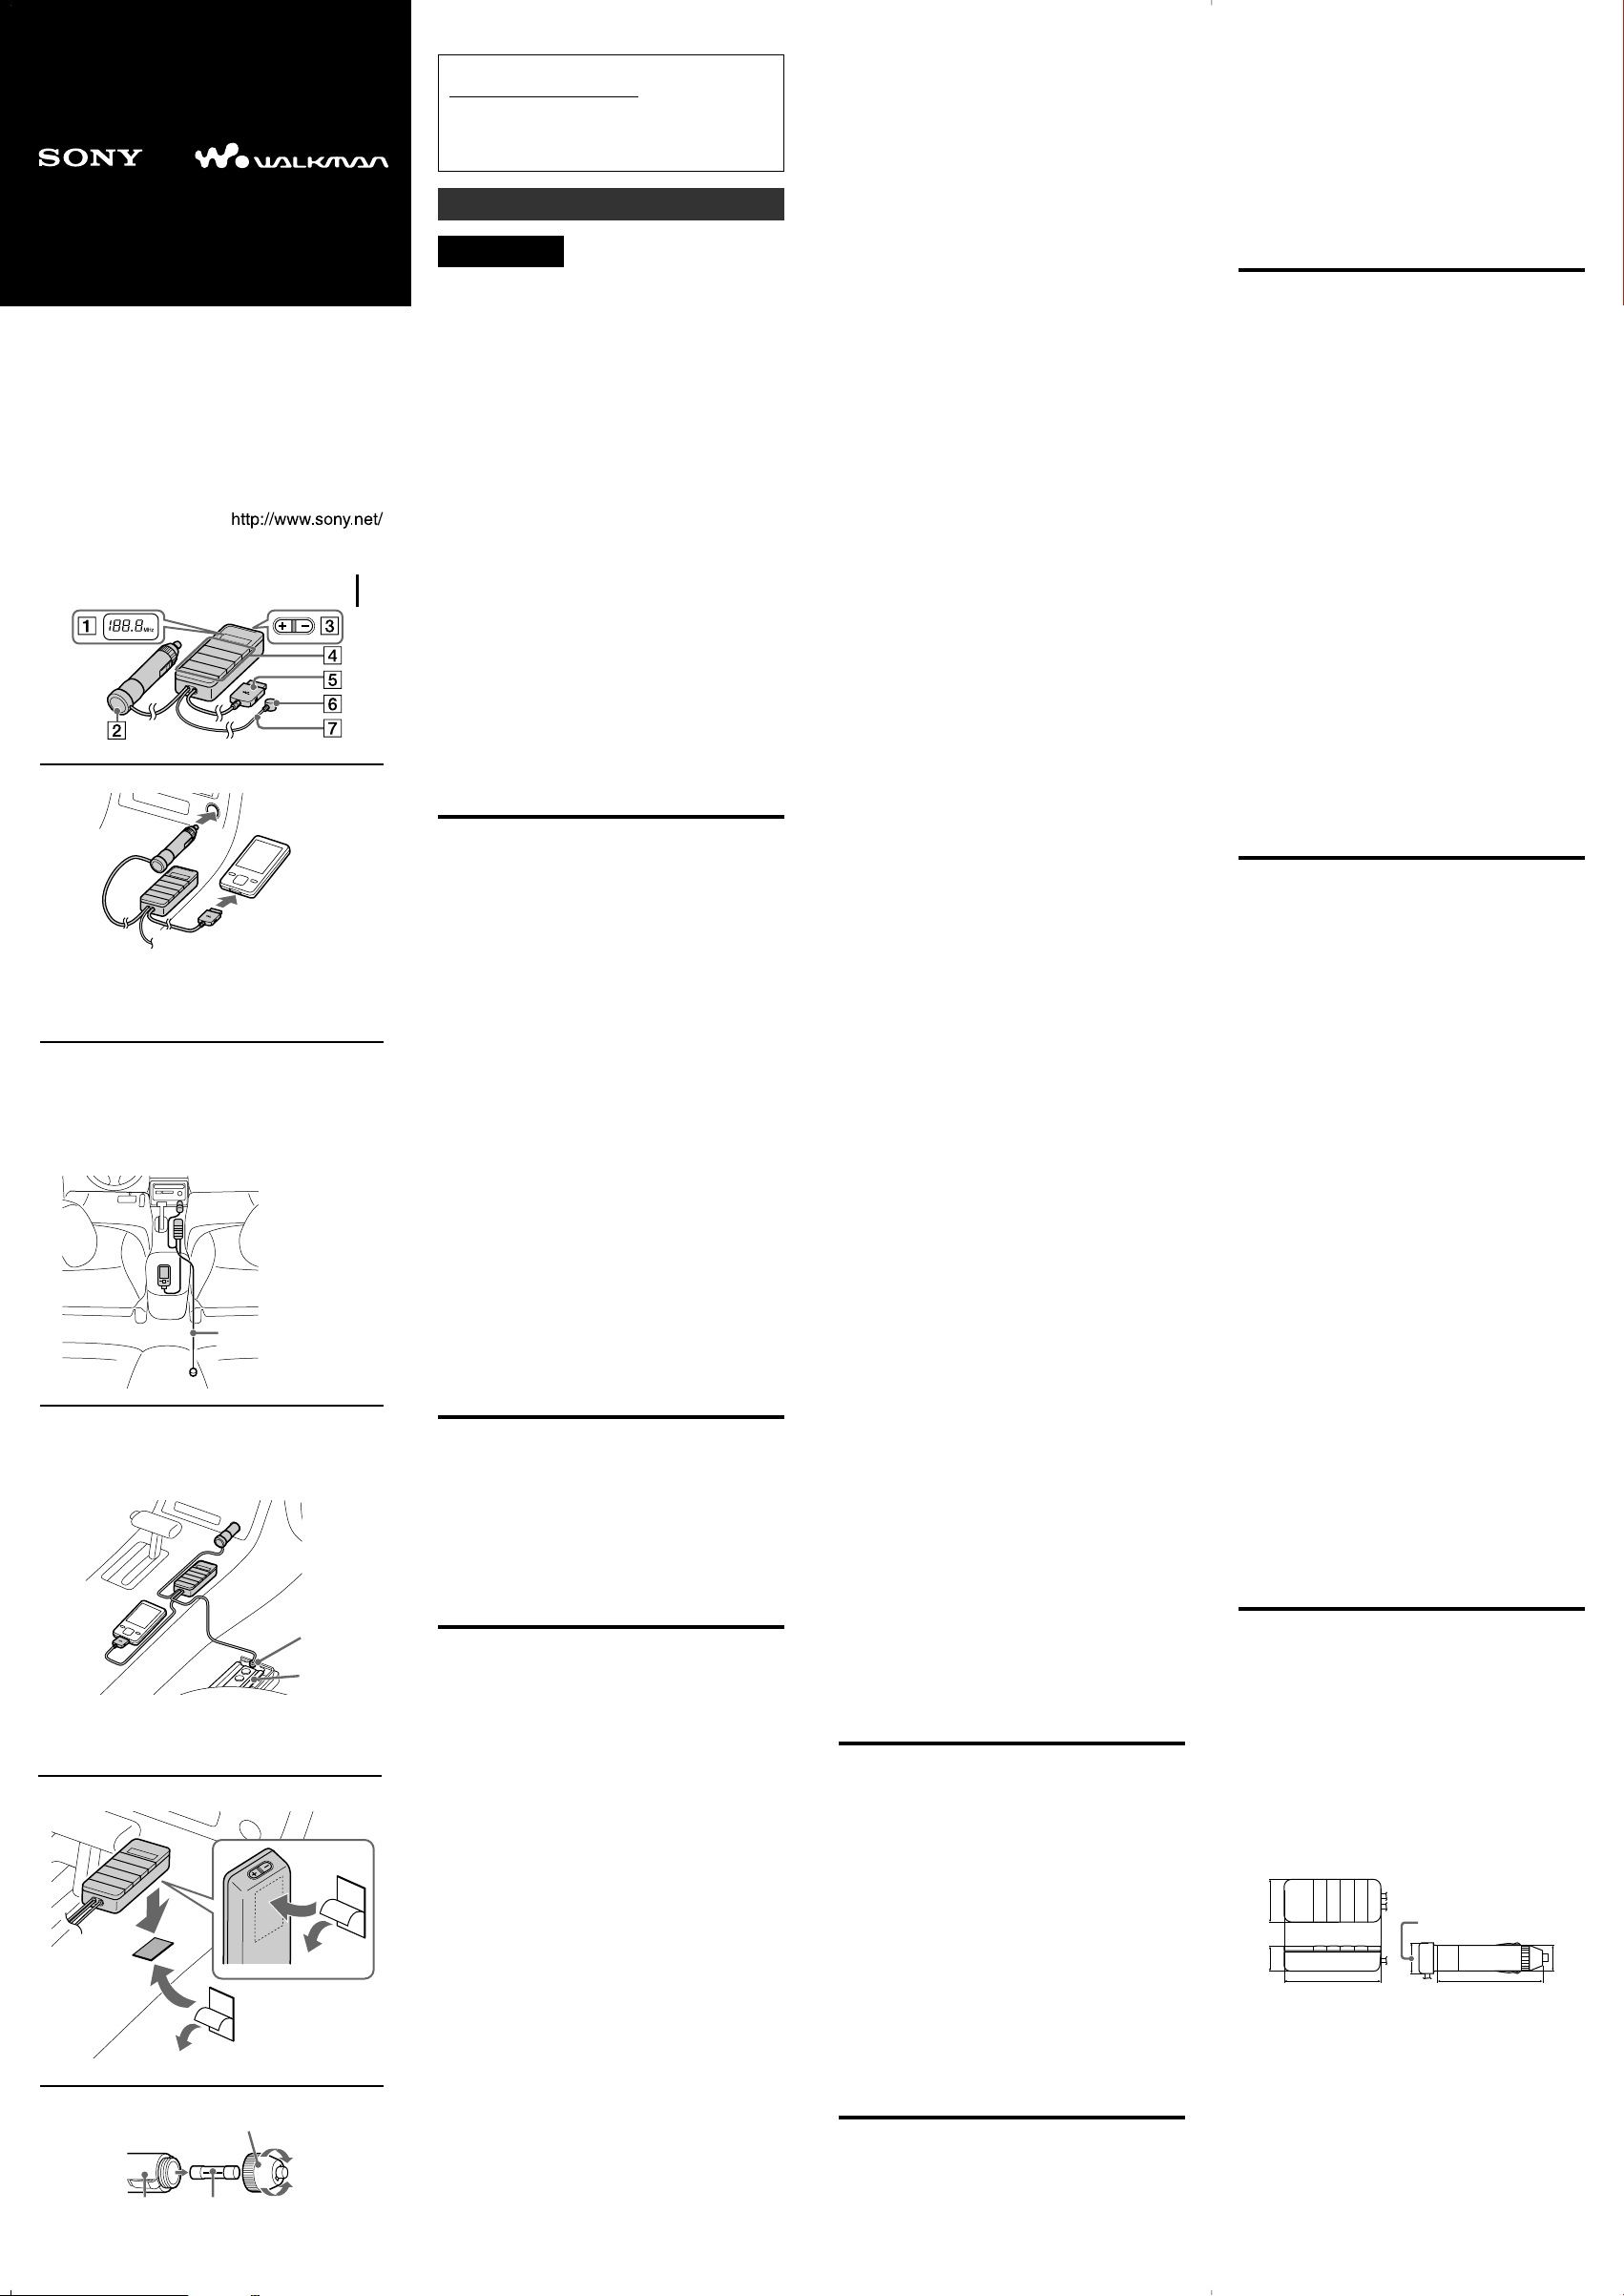
Location and Function
of Parts
1 Frequency
display window
2 Cigarette lighter
plug
3 Frequency +/–
button
4 Memory buttons
5 WM-PORT
connector
6 Magnet
7 Antenna cable
How to Use
Be sure to install this unit with the engine of the car running. If this unit is
left plugged into the cigarette lighter socket when the engine is not
running, power may be consumed from the car battery.
Do not connect or operate this unit, a WALKMAN while driving or
waiting at a traffic signal. Park in a safe place first.
Notes
• Ensure that this unit is safely installed so as not to interfere with the
operation of the accelerator or gears.
• Never perform connection and operation while your car is in motion.
• For details about car radio, car radio antenna and the connected
WALKMAN, refer to the operating instructions supplied with the
WALKMAN.
Set the car radio
1
Set your car radio to FM.
2 Select a channel that does not get good FM broadcast
reception between 88.1 MHz–107.9 MHz.
The FM broadcast reception conditions may change as your location
changes. If the selected frequency becomes occupied by a broadcast
signal, select another open frequency.
Note
Turn the car radio volume down before setting the car radio.
Install the unit
1
Connect the WM-PORT connector to the WM-PORT of
your WALKMAN. (See fig. A-1)
2 Insert this cigarette lighter plug into the cigarette lighter
socket securely until the frequency appears in the frequency
display window (See fig. A-2).
3 Press the frequency +/– button repeatedly to select the same
frequency that you set on the car radio.
Each press changes the frequency by 0.1 MHz, cycling through
88.1 MHz–107.9 MHz.
Tips
•
Keep pressing the frequency +/– button to change the frequency rapidly.
• The next time you turn on this unit, this unit is tuned to the last
selected frequency.
4 Start playback on the WALKMAN.
Notes
• Do not activate any bass boost or equalizer function on the
WALKMAN. Otherwise, sound may be distorted.
•While connected to this unit, you cannot adjust the volume on the
WALKMAN. Adjust the volume on the car audio unit.
5 Route the antenna cable inside the car for best audio
reception from this unit.
The method to install the antenna cable will depend on your
car type. Find the position that provides the best reception,
and then install the cable (See fig. B).
Notes
• Route the antenna cable close to the car antenna. This may help to
improve the reception from this unit.
• For details about the car radio antenna, refer to the car operating
instructions.
About the antenna cable magnet
The antenna cable is supplied with a magnet attached at the
end. It is used to anchor the cable to a metal part of the car,
such as a passenger’s seat rail. The magnet at the end of the
antenna cable is to anchor the antenna’s best reception
position and prevents it being moved, for example, when
passengers get in or out of the car.
To use the antenna cable magnet, do the following
(See fig. C).
1 Route the antenna cable where the best reception from this unit is
obtained.
2 Attach the magnet at the end of the antenna cable to a metal part of
the car, such as a passenger’s seat rail, to anchor the antenna cable
in place.
3 If the reception from this unit becomes worse after attaching the
magnet at the end of the antenna cable to a passenger’s seat rail,
etc., in step 2, revert to a previous position (to best reception) in
step 1, without using the magnet (without attaching it to a
passenger’s seat rail, etc.).
Notes
• Be careful to line the cable so that it will not interfere with driving,
become entangled with passenger movements, or be damaged by
seat adjustments, etc.
• If the magnet is attached near movable objects, such as doors or seat
rails, make sure that the antenna cable does not become entangled.
This may cause the wire to break.
• Do not leave floppy disks or personal credit cards with magnetic
coding near the antenna cable magnet.
If the reception from this unit declines
If the reception from this unit declines, even though it was good at the
frequency set in the beginning, solve the problem referring to the following
remedies, according to your circumstances.
After setup, reception from this unit declines while driving.
c FM broadcast reception may be poor in certain locations, such as
underground parking, behind tall buildings, etc. If the car radio and
this unit were set up in such a location; due to poor FM broadcast
reception, the frequency you set for this unit may be already
occupied. If so, the occupying FM broadcast station is received
when its reception conditions improve (as you drive) resulting in
interference with this unit’s same set frequency. In this case, reset
the car radio and this unit to another open frequency in a location
where the FM broadcast reception is better.
Reception from this unit is disrupted when you move to a new
location.
c FM broadcast reception conditions vary from one location to
another. After setting an open frequency in one location, as you
move to other areas, that frequency may become occupied by a
broadcast station’s signal. In this case, reset the frequency on both
the car radio and this unit to another open frequency.
Interference or noise occurs.
c
Other FM broadcasts or non-licensed broadcastings in a city area may
interfere with the reception of the frequency set for this unit. In this
case, set the car radio and this unit to a less-influenced frequency.
To memorize the selected frequency
The frequency for the memory buttons is set to 88.1 MHz at the factory
setting.
Select the frequency in step 3 of “Install the unit,” then hold down one of
the memory buttons until the memory button number appears in the
frequency display window.
Once you memorize the desired frequency, you can select it by simply
pressing the memory button.
Note
If a frequency is already memorized on the button, that frequency will be
replaced with the new one.
Charge your WALKMAN
WALKMAN operation while charging varies depending on the
WALKMAN.
1 Set the WALKMAN to recharge.
It may not be necessary to set the WALKMAN to recharge. (See
WALKMAN’s Operation Guide.)
2 When charging is finished, disconnect the WALKMAN
from this unit.
Notes
• Plug securely into the cigarette lighter socket.
• This unit may not fit, depending on the location or shape of the cigarette
lighter socket.
• Be careful to route all the cables properly so that:
– they will not interfere with your driving.
– they will be out of the reach of children.
• Install this unit in a manner that will not hinder the airbag function in an
emergency.
• Do not use the device in a place subject to liquid or moisture to avoid fire
or electric shock.
• Do not place this unit or the WALKMAN in a location where it is subject
to extreme high temperature. It mat result in damage.
While not using this unit
To avoid unnecessary car battery consumption, unplug this unit from the
cigarette lighter socket when not in use.
When you turn the car engine off
Unplug this unit from the cigarette lighter socket whenever the engine of
the car is not running. Depending on the car type, even if the engine is off,
the power supply may not turn off automatically. In this case, this may
cause unnecessary car battery consumption.
Fastening the unit
You can fasten the unit to your car interior using the supplied Hook and
Loop Fasteners.
1 Peel the back of the one of the Hook and Loop Fastener
(See fig. D-1).
2 Stick the Hook and Loop Fastener to the unit
(See fig. D-2).
3 Peel the back of the other Hook and Loop Fastener film
sheet (See fig. D-3).
4 Stick the Hook and Loop Fastener to a flat surface of the car
interior (See fig. D-4).
5 Match the Hook and Loop Fasteners to fasten the unit
(See fig. D-5).
Notes
•
Do not place the unit or the Hook and Loop Fastener onto places such as :
– the shift lever or the hand brake
– around the moving parts of the driver’s seat or the passenger’s seat
– in direct sunlight, such as on the dashboard or steering wheel, where it
may deform
– where the unit stands vertically.
• Remove any dirt or dust from surfaces before attaching the fasteners.
Fuse Replacement
If this unit does not work correctly, check the fuse of the cigarette lighter plug.
If the fuse is blown, replace it (See fig. E).
1 Pull this unit out of the cigarette lighter socket.
2 Detach the end of the plug by turning it counter-clockwise.
3 Take out the fuse.
4 Check the fuse.
If the fuse is blown, go to Step 5.
If the fuse is not blown, go to Step 6.
5 Install a new fuse.
Use a fuse of the correct amperage, as stated on the fuse compartment
of this unit (1 A, 125 V, 20 mm).
6 Insert the fuse.
7 Reattach the end of the plug by turning it clockwise firmly.
Notes
• Use of a higher amperage fuse may cause serious damage or fire.
• Do not use a piece of wire instead of a fuse.
• If the replaced fuse blows again, consult your dealer.
Precautions
On safety
• Do not connect or operate this unit, a car radio, or a WALKMAN while
driving or waiting at a traffic signal. Park in a safe place first.
• Unplug this unit from the cigarette lighter socket whenever the engine of
the car is not running. Depending on the car type, even if the ignition key
is off, the power supply may not turn off automatically. In this case, this
may cause unnecessary car battery consumption.
•
When not in use, unplug this unit from the cigarette lighter socket and
store in a safe place where it will not interfere with your driving or become
entangled in parts of the car interior (seat, door, etc.). To disconnect the
unit, grasp the unit and pull it. Never pull the cord connected to the unit.
• Should any liquid or solid object fall into the unit, disconnect the unit
from the cigarette lighter socket and the equipment and have the unit
checked by qualified personnel before operating it any further.
Installation
• Do not place this unit in a location where it is:
– subject to extreme high temperature.
– subject to direct sunlight or near a heat source.
– subject to mechanical vibration or shock.
– subject to excessive dust.
• Be sure to fully secure the connected device connected to the unit to
avoid moving when braking.
Operation
•
Never yank or pull the cables. This may cause malfunctions or wire breaks.
• To prevent damage, be careful not to drop or hit the unit. This may cause
a mechanical shock or malfunctions to the unit.
• This unit may become warm while using. This is not a malfunction.
•
After using, disconnect the unit from the cigarette lighter socket and the equipment.
On charging
•
Make sure the current and voltage of the
the outlet.
•
For safety, if the input current is too high, the unit will automatically shut down.
• To avoid short-circuiting, do not allow the terminals of the unit or
connector to touch any metal object.
• Note that data stored in the WALKMAN connected to this unit may be
lost or damaged if the engine is started or stopped with this unit inserted
into the cigarette lighter socket.
WALKMAN
rechargeable device match
Troubleshooting
Should any problem persist after you have made the following checks,
consult your nearest Sony dealer.
There is no sound from the
❒ This unit is not fully plugged into the cigarette lighter socket.
c Insert this unit correctly and securely.
❒ This unit is not fully connected to the WALKMAN.
c Connect this unit correctly and securely.
❒
The transmission frequency of the unit and the FM car radio do not coincide.
c Set both the unit and the FM car radio to the same frequency.
❒ There is no sound from the connecting WALKMAN.
c Start playback on the WALKMAN.
c Set the volume control of the WALKMAN as high as possible but
not so high that the audio signal becomes distorted.
The volume is low.
❒ The volume of the WALKMAN is set too low.
c Set the volume control of the car audio unit as high as possible but
not so high that the audio signal becomes distorted.
The sound is distorted.
❒ The bass boost function on the WALKMAN is on.
c Cancel the bass boost function.
Noise is generated.
❒ The frequency of the unit does not coincide with the FM car radio.
c Set the unit and the FM car radio to the same frequency.
❒ The reception from this unit is not good.
c Route the antenna cable for the unit inside the car. Position the
antenna close to the car antenna, or stabilize the antenna cable with
the magnet to the passenger’s seat rail, and so on. This may help to
improve the reception from this unit.
❒ The FM car radio receives a broadcast signal.
c Select an empty frequency (a non-broadcast frequency, indicated by
a static hissing sound).
❒ The selected frequency is occupied or the signal is jammed.
c Select another open frequency which is less influenced by jamming
(a non-broadcast frequency, indicated by a static hissing sound).
The sound is interrupted.
❒ The signal is jammed locally.
c Select another frequency which is less influenced by jamming (a
non-broadcast frequency, indicated by a static hissing sound).
The frequency display window does not light.
❒ This unit is not completely plugged into the cigarette lighter socket.
c Insert this unit correctly and securely.
❒ Depending on the car type, the engine must be started for electric
current to flow to the cigarette lighter socket.
c Start the engine.
❒ The fuse is blown.
c Replace the fuse.
WALKMAN
to the car radio.
Specifications
Transmission system
multiplex stereo
Transmission frequency
88.1 MHz – 107.9 MHz (0.1 MHz step)
Electric strength
less than 250 µV/m (3 m)
Power voltage
DC 12 V (only for negative # grounded cars)
Input
WM-PORT connector
Rated output voltage
DC 5.0 V
Rated output current
800 mA
Dimensions
34
24.2
19.5
WM-PORT cable length
Approx. 0.5 m (1.6 ft)
Cigarette lighter plug cable length
Approx.1 m (3.3 ft)
Antenna cable length
Approx.1.5 m (4.9 ft)
Mass
Approx. 130 g (4.6 oz) (including cables)
Supplied accessories
Operating Instructions (1)
Warranty (1)
Hook and Loop Fasteners (1 pair)
Design and specifications are subject to change without notice.
78
Unit: mm
20.5
83.9
 Loading...