

Sony CSDMD5 Operating Manual

MD/CD STEREO RADIO RECEIVER
RECEPTOR ESTEREOFÓNICO CON MD/CD
CHAINE STEREO AVEC LECTEUR DE DISQUES COMPACTS/MINI DISQUE
CSD-MD5
OPERATING INSTRUCTIONS
See page 2.
MANUAL DE INSTRUCCIONES
Ver la página 28.
MODE D’EMPLOI
Voir page 54.
En
(English)
E
(Español)
F
(Français)
88-CD2-905-11
980810BAO-I-S
U
WARNING
TO REDUCE THE RISK OF FIRE OR
ELECTRIC SHOCK, DO NOT EXPOSE THIS
APPLIANCE TO RAIN OR MOISTURE.
PRECAUTIONS
Read the Operating Instructions carefully and completely
before operating the unit. Be sure to keep the Operating
Instructions for future reference. All warnings and cautions in
the Operating Instructions and on the unit should be strictly
followed, as well as the safety suggestions below.
CAUTION
RISK OF ELECTRIC SHOCK
DO NOT OPEN
“CAUTION: TO REDUCE THE RISK OF
DO NOT REMOVE COVER (OR BACK).
NO USER-SERVICEABLE PARTS INSIDE.
ELECTRIC SHOCK,
REFER SERVICING TO QUALIFIED
SERVICE PERSONNEL.”
Explanation of Graphical Symbols:
The lightning flash with arrowhead symbol, within
an equilateral triangle, is intended to alert the user
to the presence of uninsulated “dangerous voltage” within the product’s enclosure that may be of
sufficient magnitude to constitute a risk of electric
shock to persons.
The exclamation point within an equilateral triangle is intended to alert the user to the presence of
important operating and maintenance (servicing)
instructions in the literature accompanying the
appliance.
OWNER’S RECORD
For your convenience, record the model number and serial number
(you will find them on the rear of the unit) in the space provided below.
Please refer to them when you contact your AIWA dealer in case of
difficulty.
Model No. Serial No.
Installation
1 Water and moisture - Do not use this unit near water,
such as near a bathtub, washbowl, kitchen sink, laundry
tub, in a wet basement, swimming pool, or the like.
2 Heat - Do not use this unit near sources of heat, including
heating vents, stoves, or other appliances that generate
heat.
It also should not be placed in temperatures less than 5°C
(41°F) or greater than 35°C (95°F).
3 Mounting surface - Place the unit on a flat, even surface.
4 Ventilation - The unit should be situated with adequate
space around it so that proper heat ventilation is assured.
Allow 10 cm (4 in.) clearance from the rear and the top of
the unit and 5 cm (2 in.) from each side.
- Do not place the unit on a bed, rug, or similar surface
that may block the ventilation openings.
- Do not install the unit in a bookcase, cabinet, or airtight
rack where ventilation may be impeded.
5 Objects and liquid entry - Take care that objects or
liquids do not get inside the unit through the ventilation
openings.
6 Carts and stands - When placed or
mounted on a stand or cart, the unit should
be moved with care.
Quick stops, excessive force, and uneven
surfaces may cause the unit or cart to
overturn or fall.
7 Condensation - Moisture may form on the CD pickup
lens when:
- The unit is moved from a cold spot to a warm spot
- The heating system has just been turned on
- The unit is used in a very humid room
- The unit is cooled by an air conditioner
When this unit has condensation inside, it may not
function normally. Should this occur, leave the unit for a
few hours, then try to operate again.
8 Wall or ceiling mounting - The unit should not be
mounted on a wall or ceiling, unless specified in the
Operating Instructions.
NOTE
This equipment has been tested and found to comply with the limits for
a Class B digital device, pursuant to Part 15 of the FCC Rules. These
limits are designed to provide reasonable protection against harmful
interference in a residential installation.
This equipment generates, uses, and can radiate radio frequency
energy and, if not installed and used in accordance with the instructions, may cause harmful interference to radio communications. However, there is no guarantee that interference will not occur in a particular
installation. If this equipment does cause harmful interference to radio
or television reception, which can be determined by turning the equipment off and on, the user is encouraged to try to correct the interference
by one or more of the following measures:
.... Reorient or relocate the receiving antenna.
.... Increase the separation between the equipment and receiver.
.... Connect the equipment into an outlet on a circuit different from that
to which the receiver is connected.
.... Consult the dealer or an experienced radio/TV technician for help.
CAUTION
Modifications or adjustments to this product, which are not expressly
approved by the manufacturer, may void the user’s right or authority to
operate this product.
2 ENGLISH
Electric Power
1 Power sources - Use on AC house current, as specified
in the Operating Instructions and marked on the unit.
2 Polarization - As a safety feature, some units are
equipped with polarized AC power plugs which can only
be inserted one way into a power outlet. If it is difficult or
impossible to insert the AC power plug into an outlet, turn
the plug over and try again. If it still does not easily insert
into the outlet, please call a qualified service technician to
service or replace the outlet. To avoid defeating the
safety feature of the polarized plug, do not force it into a
power outlet.
3 AC power cord
- When disconnecting the AC power cord, pull it out by
the AC power plug. Do not pull the cord itself.
- Never handle the AC power plug with wet hands, as this
could result in fire or shock.
- Power cords should be firmly secured to avoid being
bent, pinched, or walked upon. Pay particular attention
to the cord from the unit to the power socket.
- Avoid overloading AC power plugs and extension cords
beyond their capacity, as this could result in fire or
shock.

4 Extension cord - To help prevent electric shock, do not
use a polarized AC power plug with an extension cord,
receptacle, or other outlet unless the polarized plug can
be completely inserted to prevent exposure of the blades
of the plug.
5 When not in use - Unplug the AC power cord from the
AC outlet if the unit will not be used for several months or
more. When the cord is plugged in, a small amount of
current continues to flow to the unit, even when the power
is turned off.
Maintenance
Clean the unit only as recommended in the Operating
Instructions.
Damage Requiring Service
Have the units serviced by a qualified service technician if:
- The AC power cord or plug has been damaged
- Foreign objects or liquid have got inside the unit
- The unit has been exposed to rain or water
- The unit does not seem to operate normally
- The unit exhibits a marked change in performance
- The unit has been dropped, or the cabinet has been
damaged
DO NOT ATTEMPT TO SERVICE THE UNIT YOURSELF.
TABLE OF CONTENTS
PRECAUTIONS ................................................................... 2
PREPARATIONS
CONNECTIONS................................................................... 4
REMOTE CONTROL ........................................................... 4
ELECTRIC OPERATION PANEL ........................................ 5
BEFORE OPERA TION ........................................................ 5
CD PLAYING
BASIC OPERA TIONS.......................................................... 6
PROGRAMMED PLA Y ........................................................ 7
MD PLAYING
BASIC OPERA TIONS.......................................................... 8
PROGRAMMED PLA Y ........................................................ 9
RADIO RECEPTION
MANUAL TUNING ............................................................. 10
PRESETTING STATIONS .................................................. 11
SOUND
ADJUSTING THE SOUND................................................. 13
MD RECORDING
RECORDING A WHOLE CD ............................................. 14
RECORDING ONL Y ONE TRACK..................................... 15
PROGRAMMED RECORDING OF A CD.......................... 15
RECORDING FROM THE RADIO OR A CD
MANUALLY ........................................................................ 16
EXTENDED RECORDING -
WHAT IS AN MD (MINI DISC)?..............................................
MONAURAL RECORDING..
MD EDIT
REGISTERING THE DISC TITLE AND TRACK TITLE...... 18
DIVIDING A TRACK........................................................... 19
COMBINING TWO TRACKS .............................................. 20
CHANGING THE ORDER OF THE TRACKS..................... 20
ERASING TRACKS ........................................................... 21
CLOCK AND TIMER
SETTING THE CLOCK ...................................................... 22
SETTING THE TIMER ........................................................ 22
SETTING THE SLEEP TIMER ........................................... 23
GENERAL
CARE AND MAINTENANCE............................................. 24
SPECIFICATIONS ............................................................. 25
TROUBLESHOOTING GUIDE........................................... 25
MD GUIDE MESSAGES .................................................... 26
PARTS INDEX.................................................................... 27
16
17
En
E
F
ENGLISH 3
PREPARATIONS
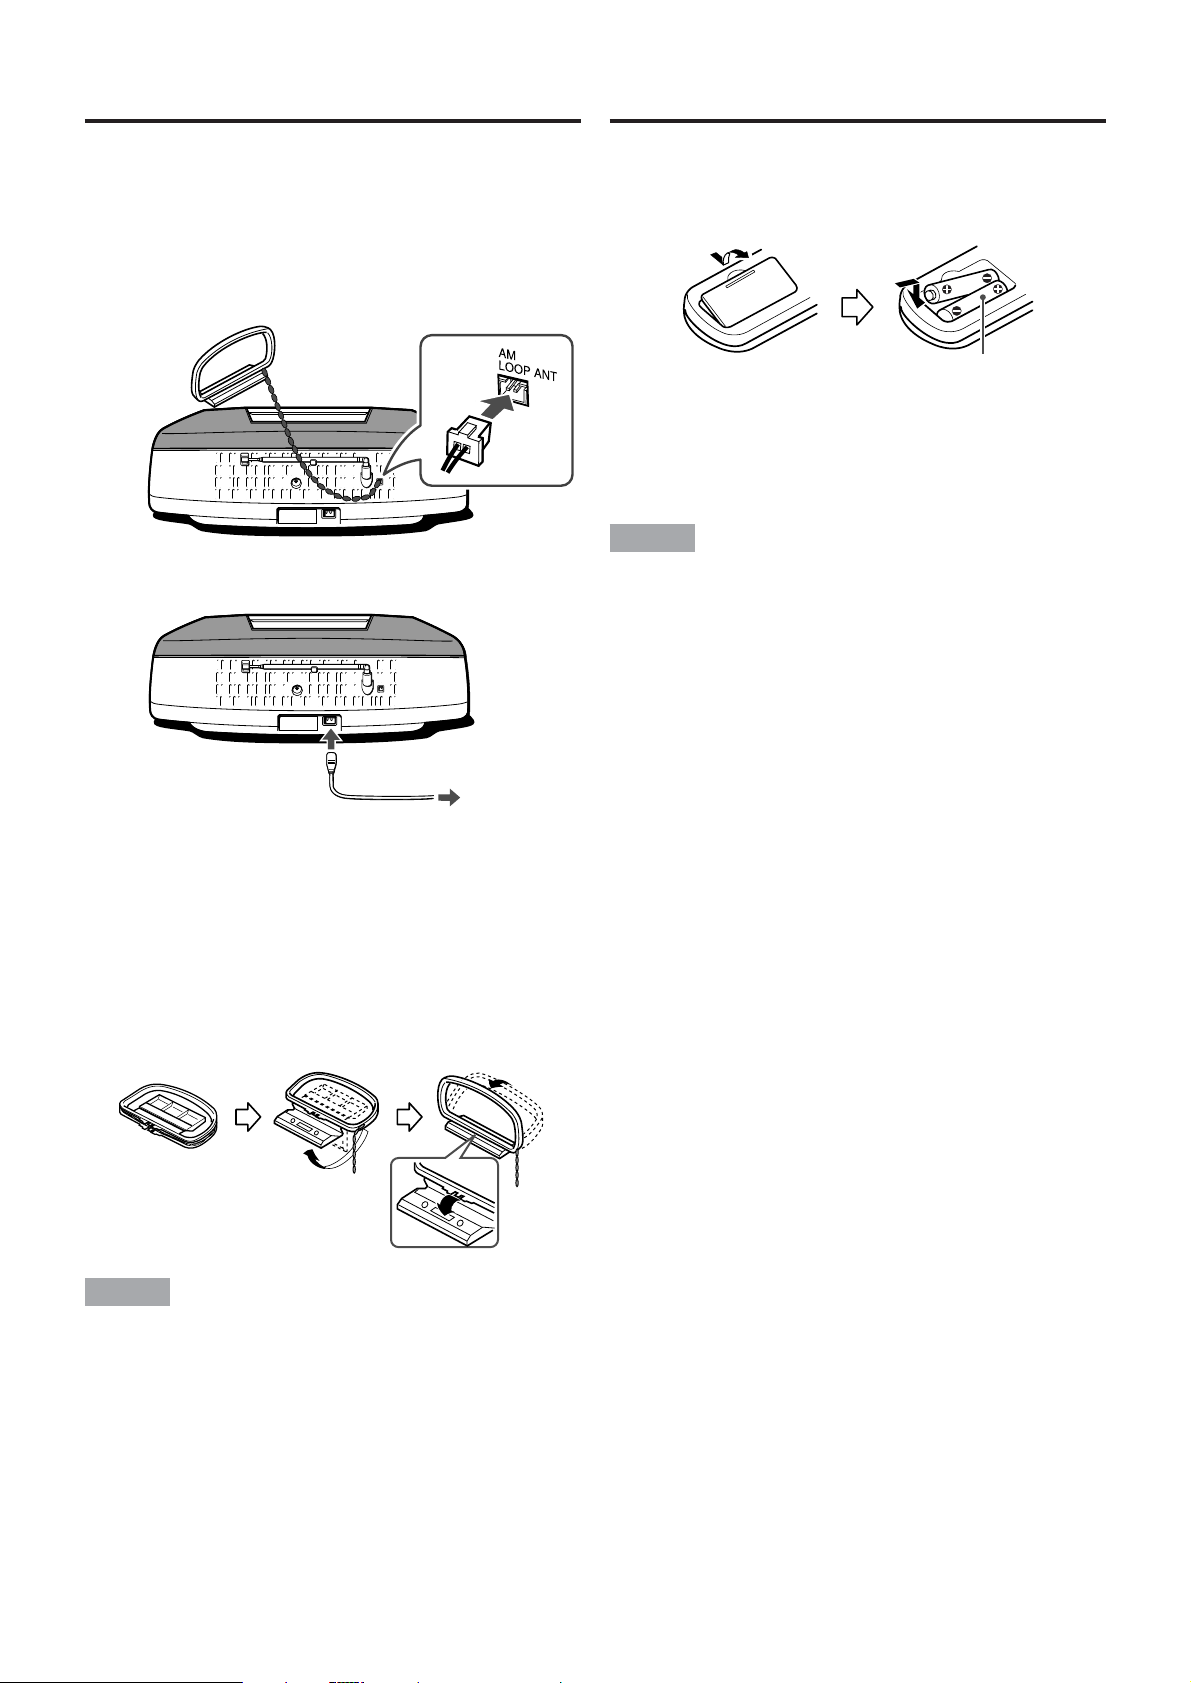
CONNECTIONS
IMPORTANT
Be sure to connect the AM antenna first, then connect the
AC cord in the end.
1 Connect the supplied AM antenna to AM LOOP
ANT terminal.
2 Connect the AC cord to an AC outlet.
REMOTE CONTROL
Inserting batteries
Detach the battery cover on the rear of the remote control
and insert two R6 (size AA) batteries.
R6 (AA)
When to replace the batteries
The maximum operational distance between the remote
control and the sensor on the main unit should be
approximately 5 meters (16 feet). When this distance
decreases, replace the batteries with new ones.
NOTE
• If the unit is not going to be used for an extended period of
time, remove the batteries to prevent possible electrolyte
leakage.
• The remote control may not operate correctly when:
- The line of sight between the remote control and the unit
is exposed to intense light, such as direct sunlight
- Other remote controls are used nearby (television, etc.)
The display window demonstrates the functions of the
unit. (To set the current time, see SETTING THE
CLOCK on page 22.)
CAUTION
Use only the supplied AC cord. Use with other cords may
result in the risk of fire.
To stand the AM antenna on a surface
Fix the claw to the slot.
NOTE
• Do not disconnect the AC cord while the power is being
on. Otherwise, the data concerning the contents of the MD
recording may not be registered properly.
• Do not bring the AM antenna near the AC cord since noise
will be picked up.
• Do not unwind the AM antenna wire.
4 ENGLISH
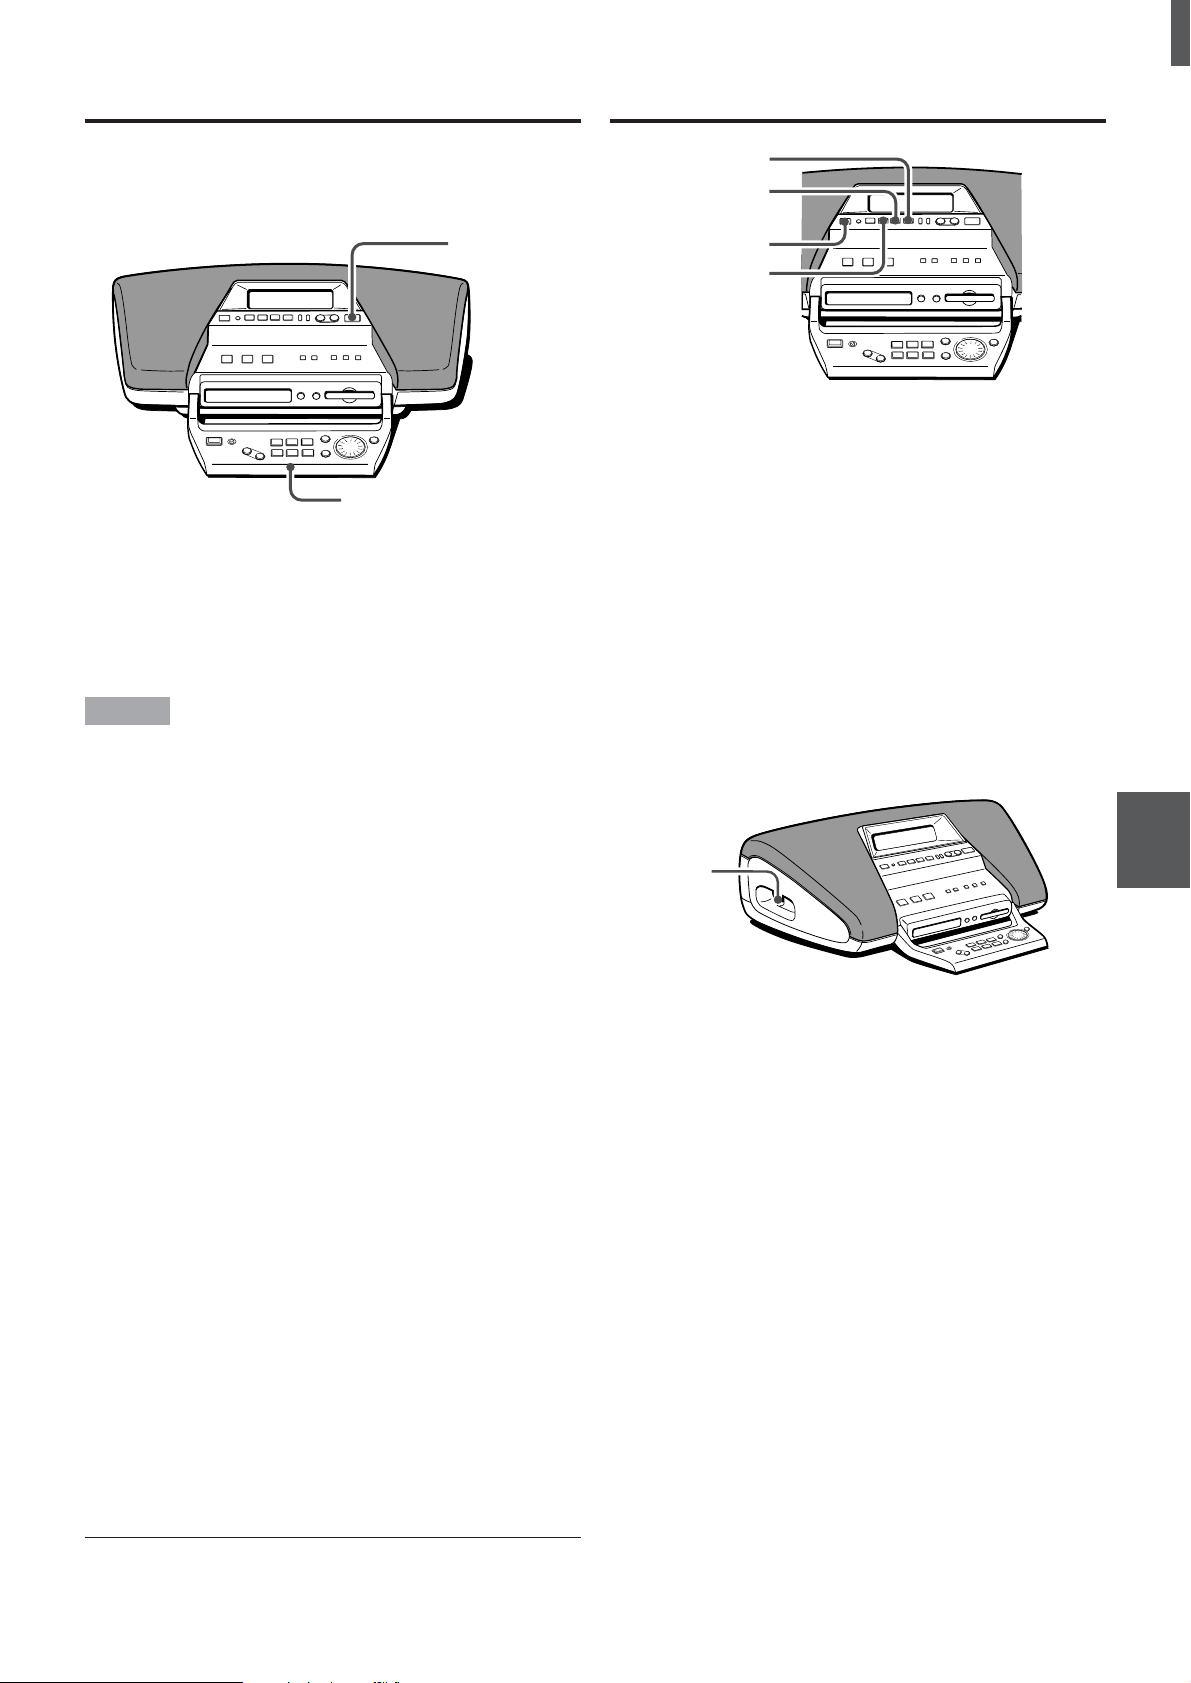
ELECTRIC OPERATION PANEL
BEFORE OPERATION
The electric operation panel is simple and easy to use
enabling CD/MD search, radio tuning, MD recording/editing,
etc.
OPEN/CLOSE
Electric operation panel
To open the operation panel
Press OPEN/CLOSE. To close the panel, press again.
When turning the unit off with the panel open
The panel automatically closes. When turning the unit on the
next time, the panel automatically opens.
NOTE
• Do not use the operation panel as a handle to carry the
unit.
• Do not place objects in front of the unit. It may block the
opening panel, causing malfunction.
MDe
CDe
POWER
RADIO/BAND
To turn the unit on
Press POWER.
When pressing CD e or MD e, the unit is turned on
and the inserted disc begins.
When pressing RADIO/BAND, the unit is turned on and the
previously tuned station is received.
To turn the unit off
Press POWER.
On the speaker ducts
• The unit should be situated so that its location or position
does not interfere with the speaker duct on each side.
Otherwise low frequency sound may be inhibited or it may
cause a malfunction.
• Take care that objects do not get inside the speaker ducts.
Otherwise it may cause a malfunction.
Speaker duct
En
E
F
The instructions in this manual refer to the operations with
the panel open.
ENGLISH 5
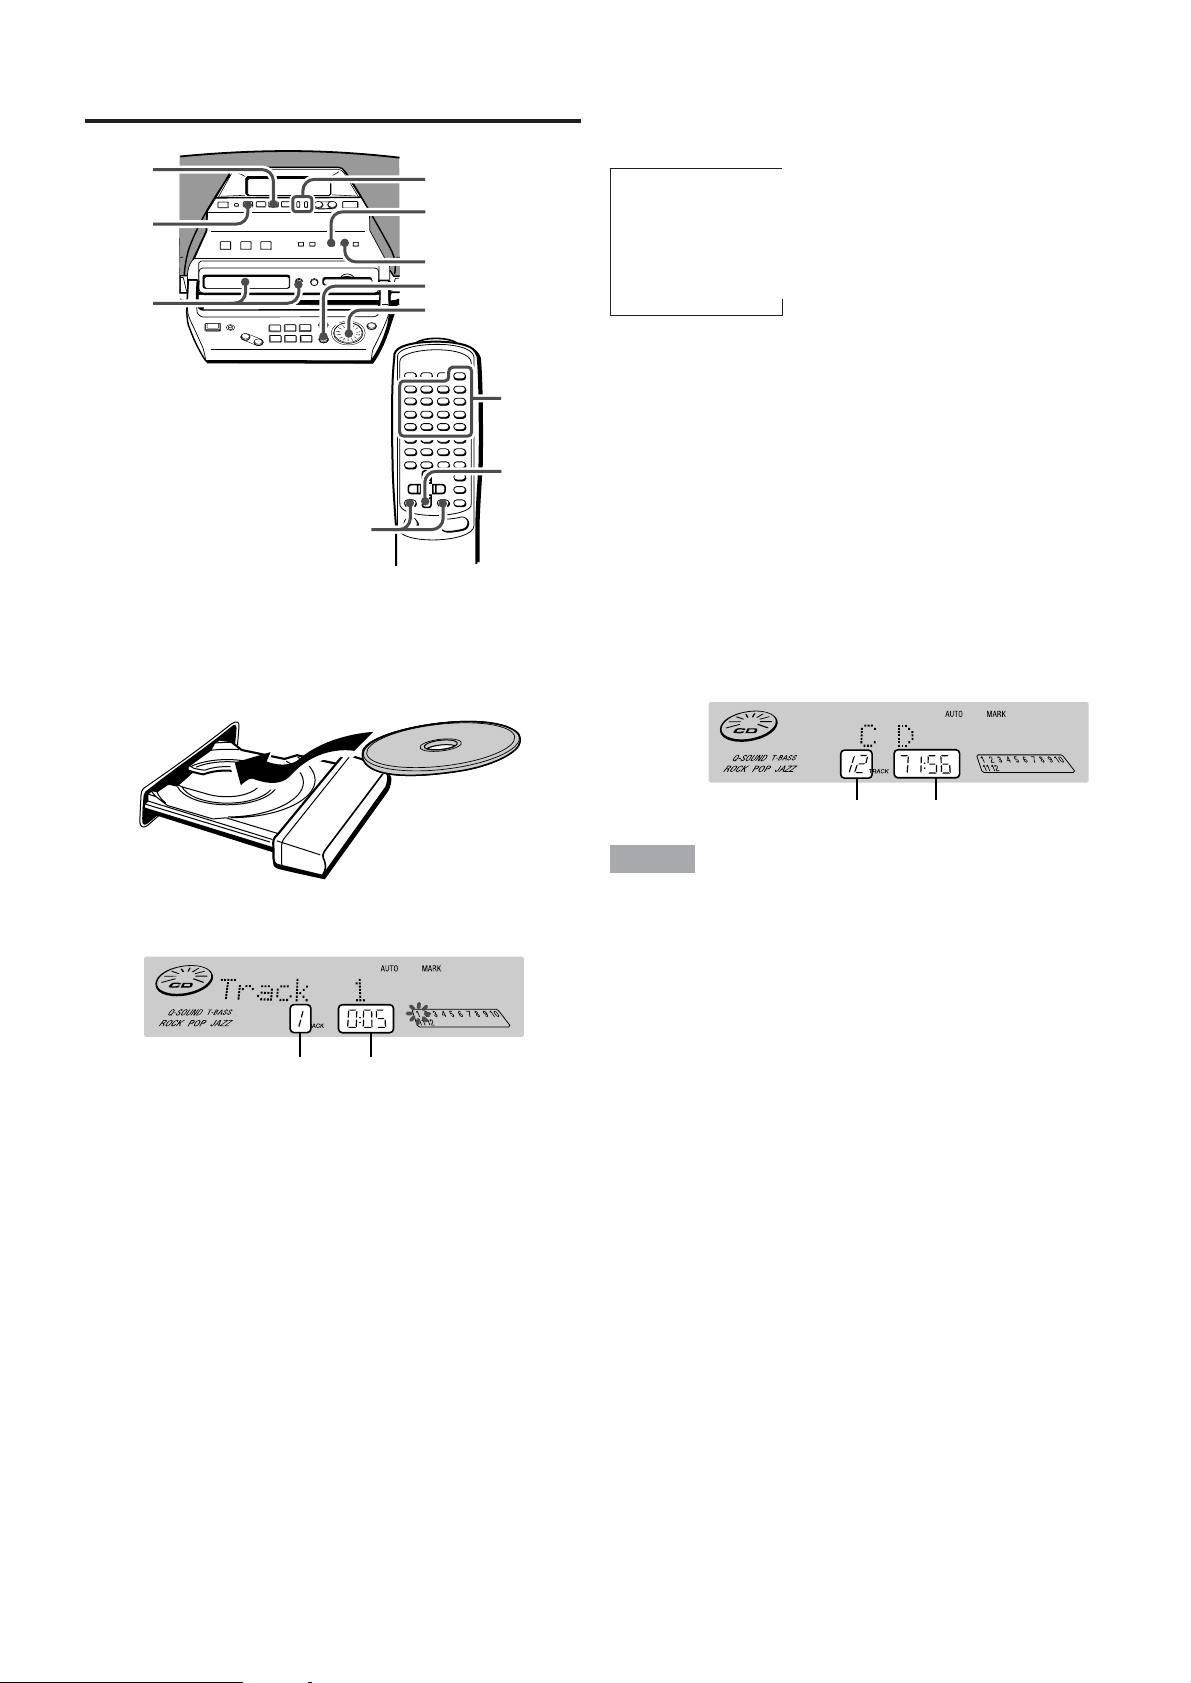
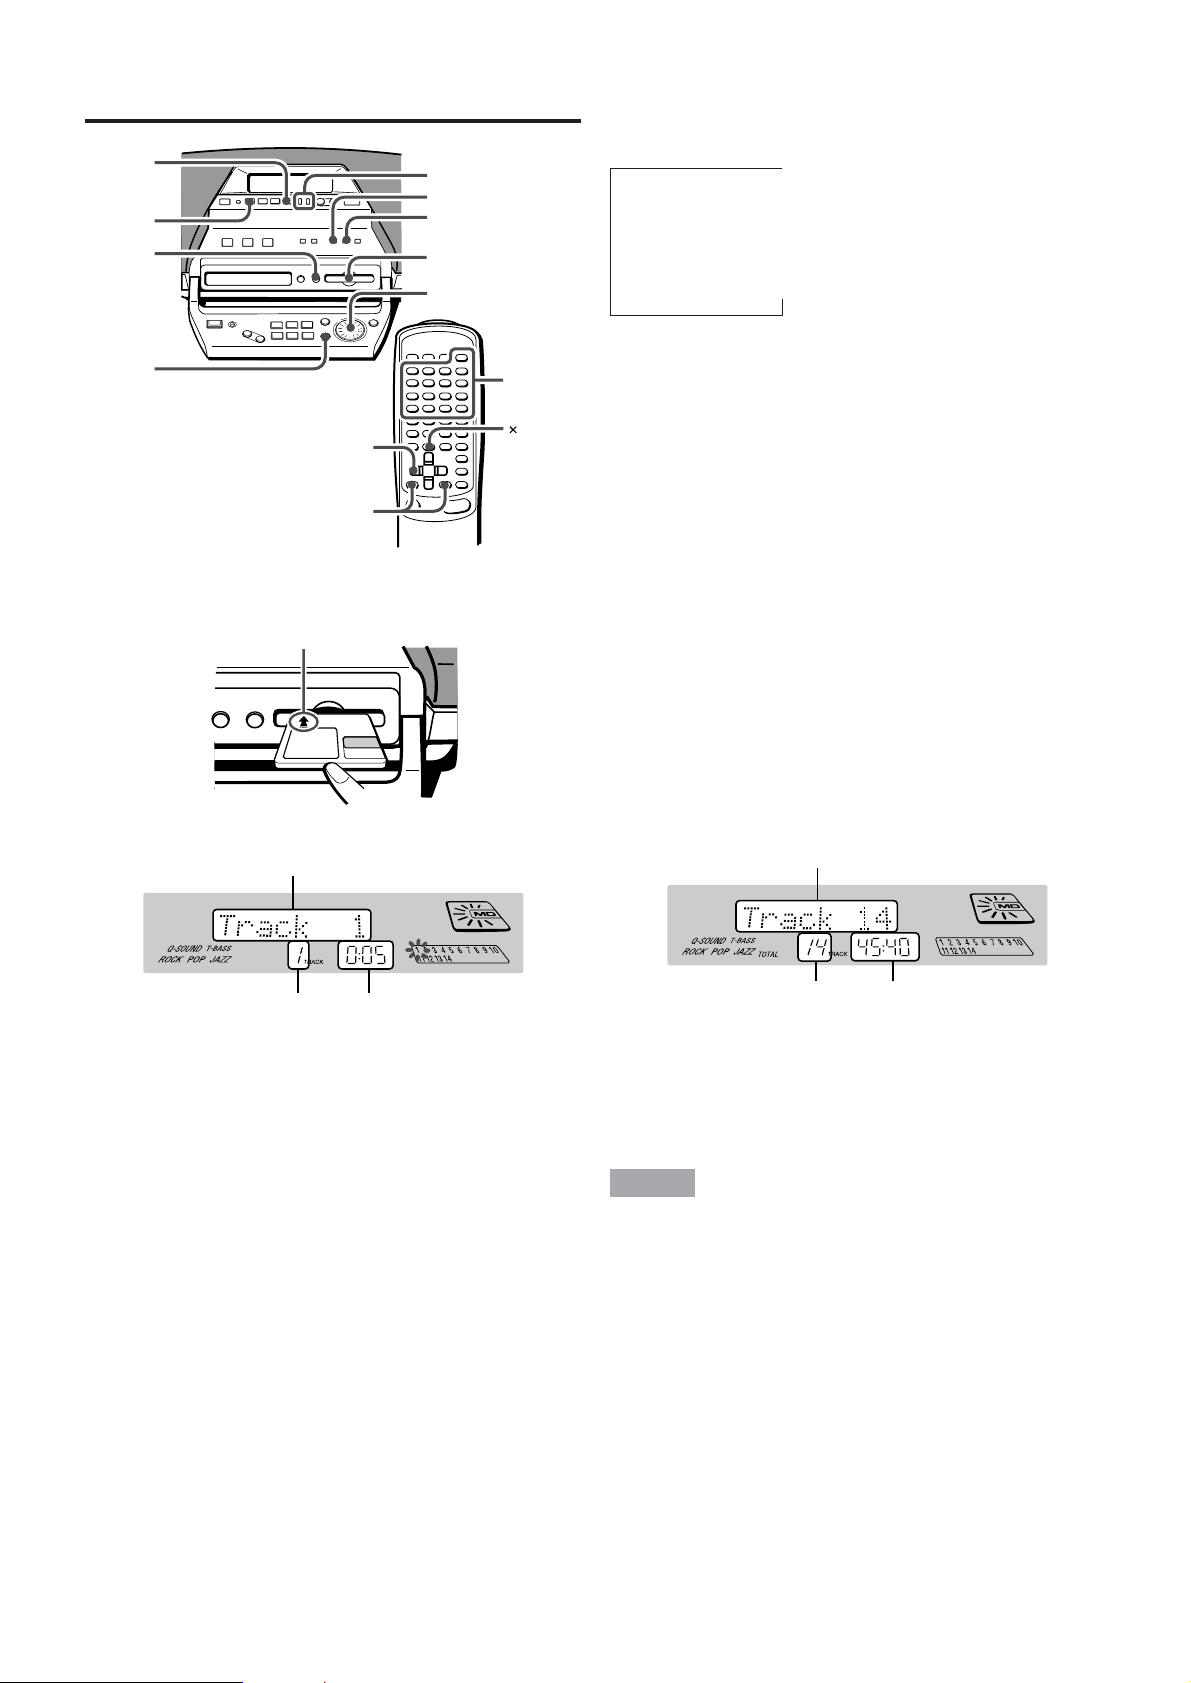
CD PLAYING
BASIC OPERATIONS
2
sSTOP
1
r, t
1 Press z CD EJECT to open the disc
compartment and place a disc on the tray with
the printed side up. Then close the disc
compartment by pressing z CD EJECT.
r, t
RANDOM
REPEAT
DISP
JOG DIAL
0-15, +10
CDs
To check the remaining time
During play, press DISP repeatedly.
Each time it is pressed, the display changes cyclically.
↓
1 Elapsed playing time of the track
↓
2 Remaining time of the track
↓
3 Remaining time of the disc
1 TRACK is lit up on the display.
2 TRACK and REMAIN are lit up on the display.
3 TOTAL and REMAIN are lit up on the display.
You cannot check the remaining time of the disc when
RANDOM or " 1 is lit up.
To select a track with the remote control
Press the numbered buttons 0-15 and +10.
Example:
To select the 25th track, press +10 twice and 5.
To select the 20th track, press +10 twice and 0.
CD play starts from the selected track and continues to the
last track.
Display information in stop mode
2 Press CD e to start play.
Elapsed playing timeTrack number
To stop play, press s STOP. CD s on the remote control
is also available.
To pause play, press CD e. To resume play, press
again.
To search for a particular point during play, keep r or
t pressed and release it at the desired point.
To skip to the beginning of a track, press r or t
repeatedly or turn JOG DIAL until the desired track is
displayed.
To remove the disc, press z CD EJECT.
To start play when the power is off
Press CD e. The power is turned on and play of the
loaded disc begins.
When z CD EJECT is pressed, the power is also turned on.
Total number of tracks
Total playing time
NOTE
• Do not use irregular shaped CDs (example: heart-shaped,
octagonal ones).
• When loading an 8-cm (3-inch) disc, pull it on the inner
circle of the tray.
• Do not place more than one compact disc in the disc
compartment.
• Do not tilt the unit with disc loaded. Doing so may cause
malfunction.
6 ENGLISH
RANDOM PLAY
2
1
4
t
CDs
All the tracks on the disc can be played randomly.
Press RANDOM so that RANDOM is lit up on the display.
To cancel random play
Press RANDOM to turn off RANDOM.
NOTE
• During random play, you cannot skip to the previously
played track with r or JOG DIAL.
• When you select the track with the numbered buttons,
random play is automatically canceled.
REPEAT PLAY
One track, all the tracks or programmed tracks can be played
repeatedly.
Press REPEAT so that " 1 or " is lit up on the display.
To repeat the current track only, select " 1.
To repeat all the tracks, select ".
To cancel repeat play
Press REPEAT to turn off ".
To repeat the desired tracks only
Program the tracks and press REPEAT so that " is lit up.
To select random/repeat play
Press RANDOM then press REPEAT.
One track repeat (" 1) cannot be selected.
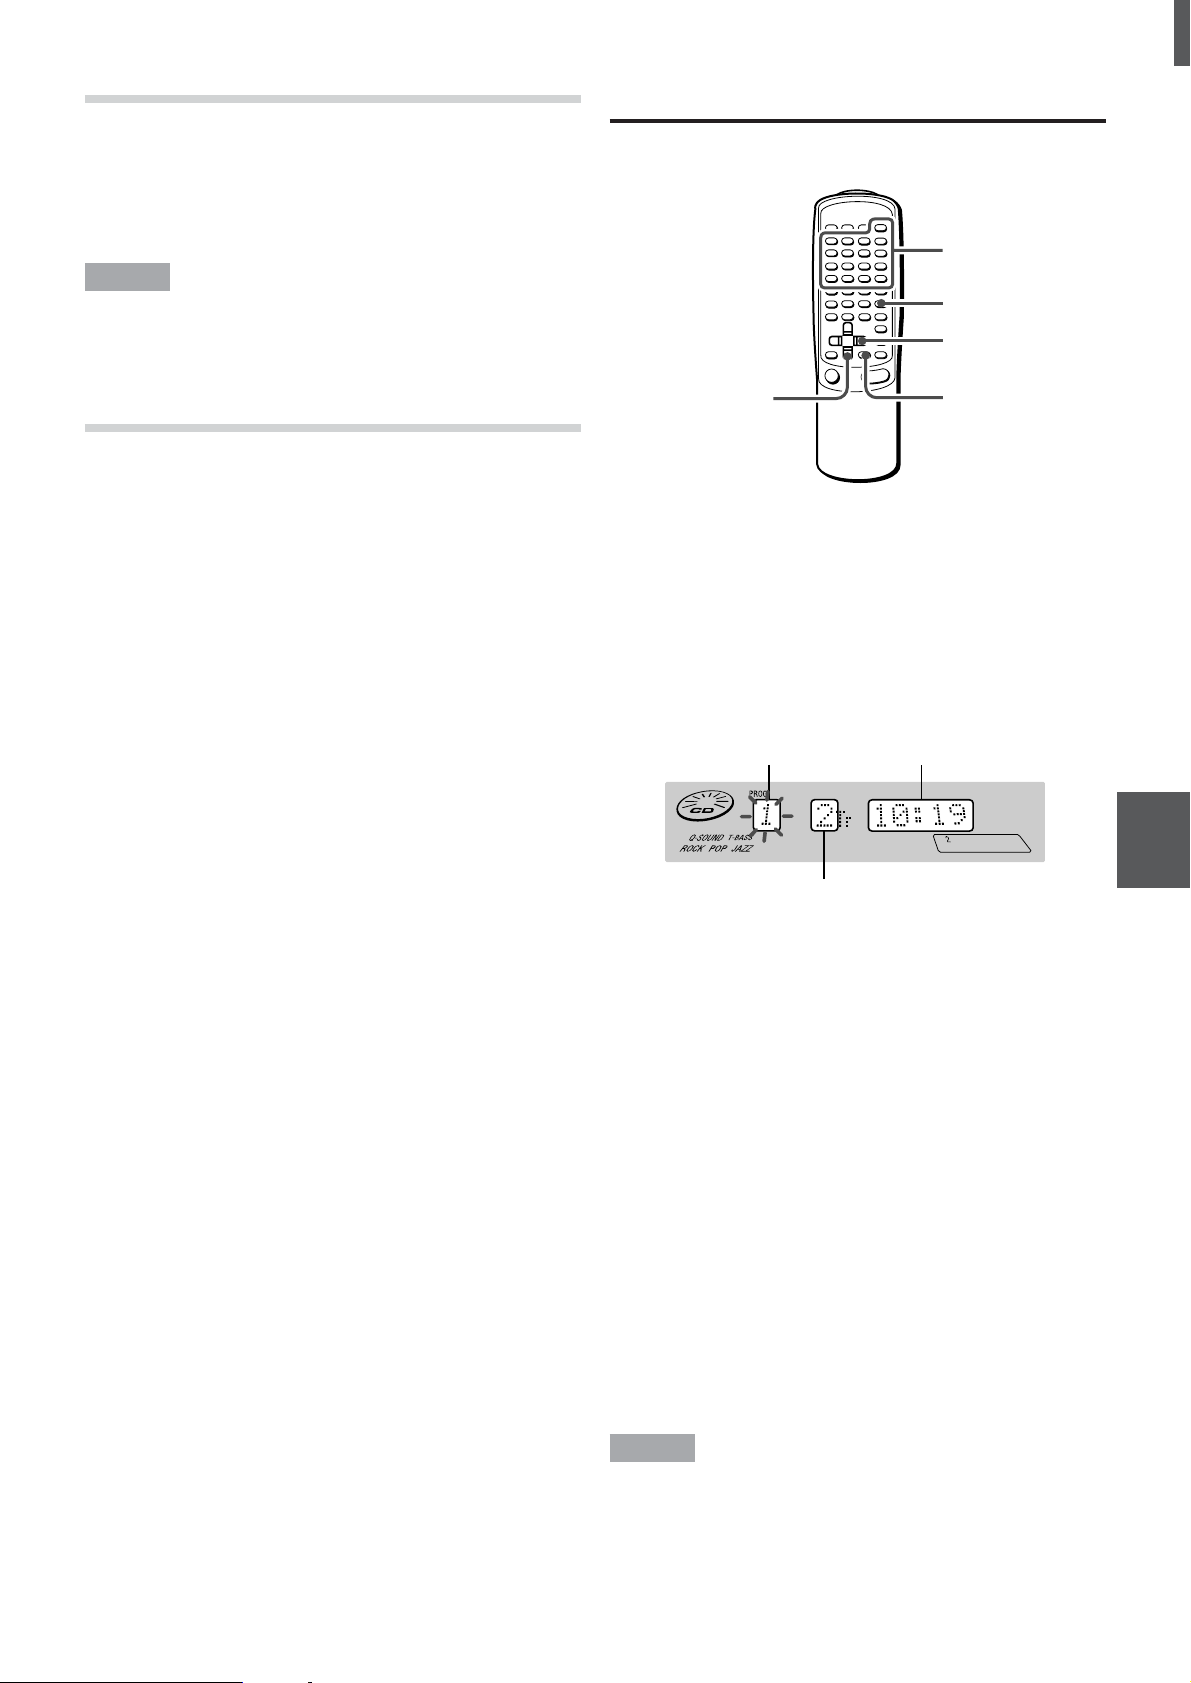
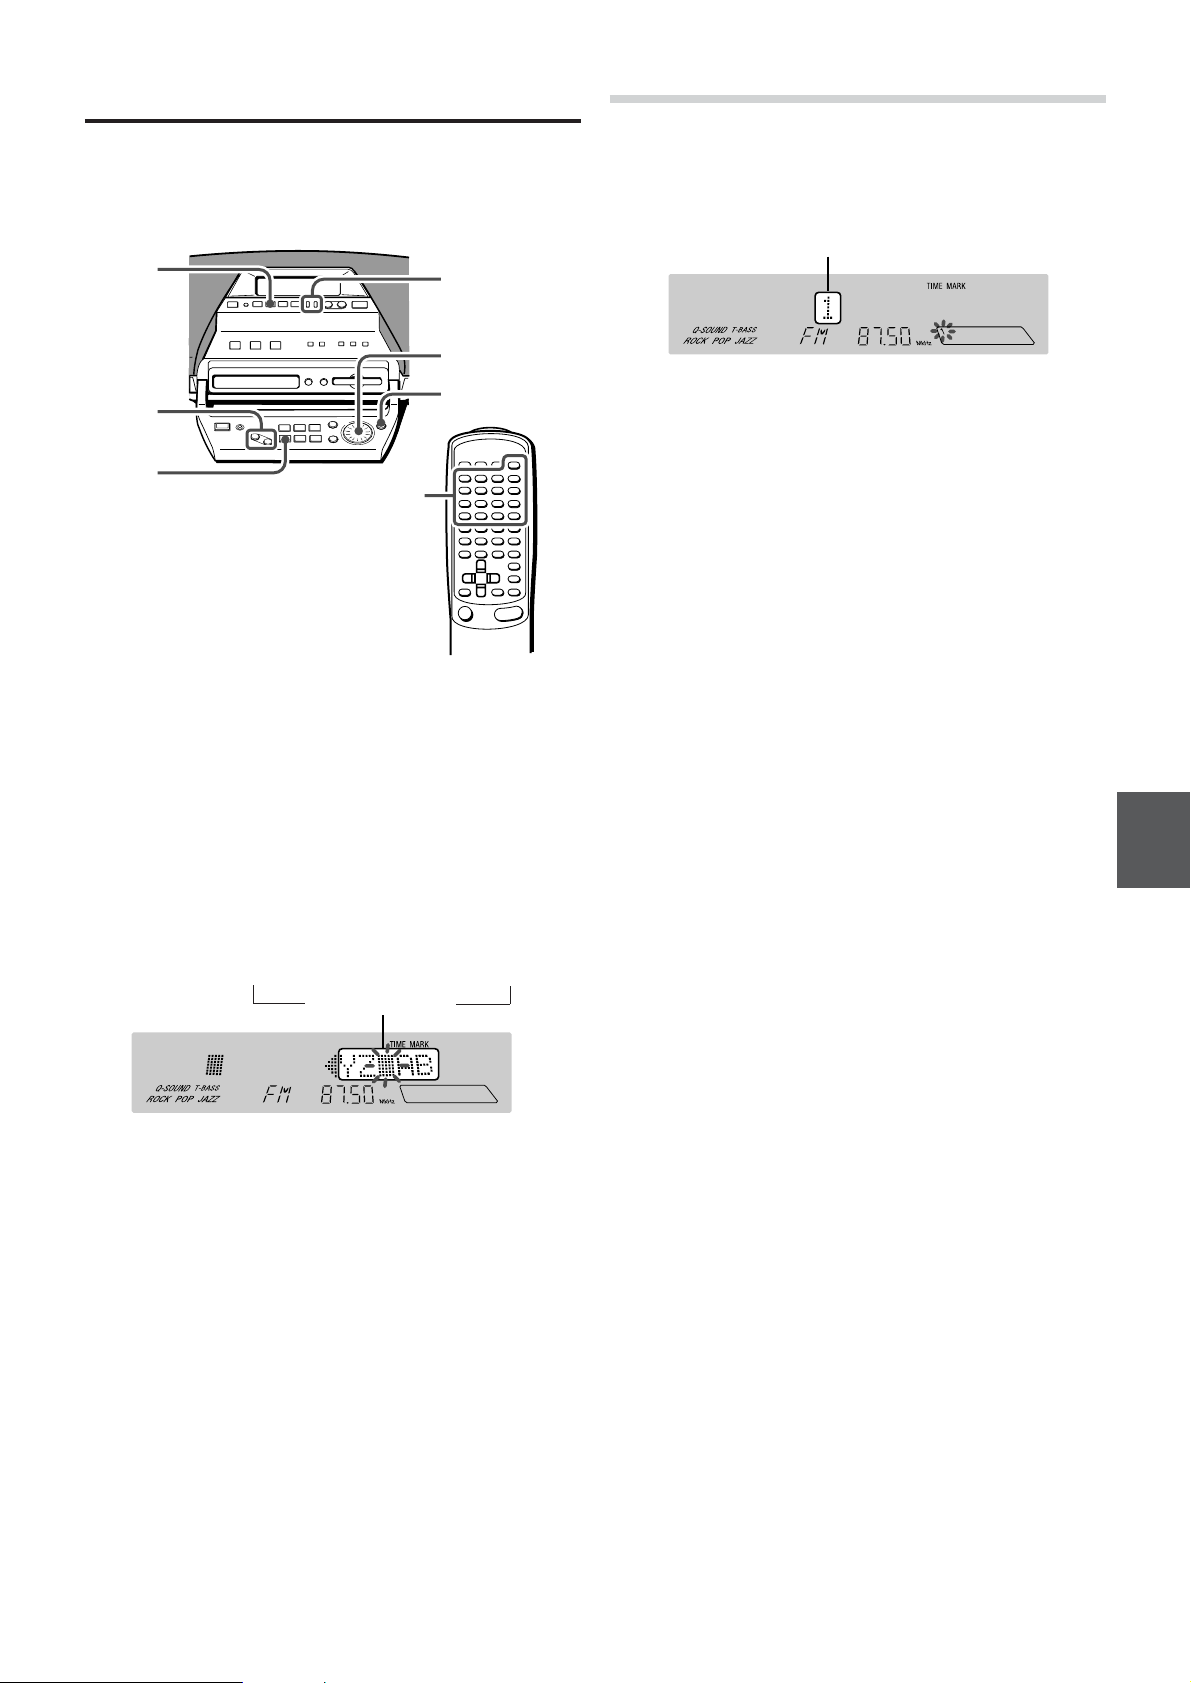
PROGRAMMED PLAY
Up to 16 tracks can be programmed from the inserted disc.
Use the remote control.
1 Press PRGM in stop mode.
PROG is lit up on the display.
2 Press the numbered buttons 0-15 and +10 to
program a track.
Example:
To select the 25th track, press +10 twice and 5.
To select the 20th track, press +10 twice and 0.
Program number
Total playing time of
the selected tracks
Selected track number
3 Repeat step 2 to program other tracks.
4 Press CD e to start play.
To check the program
Each time t is pressed in stop mode, a track number and
program number will be displayed.
To add tracks to the program
Repeat step 2 in stop mode. The new track will be
programmed after the last track.
To clear the program
Press CD s in stop mode.
To change the programmed tracks
Clear the program and repeat all the steps again.
To program tracks on the main unit
1 Press PROGRAM in stop mode.
2 Turn JOG DIAL to select a track and press ENTER to
program it.
3 Press CD e to start play.
En
E
F
NOTE
• During programmed play, you cannot perform random play
or select a track.
• If the programmed time is more than 99:59 minutes, or the
disc track number 31 or above is programmed, the display
shows --:-- as the total playing time.
ENGLISH 7
MD PLAYING
BASIC OPERATIONS
2
sSTOP
zMD
EJECT
DISP
MDs
r, t
1 Insert a disc into the disc drive with the label
side up and in the direction of the arrow.
Arrow
r, t
RANDOM
REPEAT
1
JOG DIAL
0-15, +10
2
To check the remaining time
During play, press DISP repeatedly.
Each time it is pressed, the display changes cyclically.
↓
1 Elapsed playing time of the track
↓
2 Remaining time of the track
↓
3 Remaining time of the disc
1 TRACK is lit up on the display.
2 TRACK and REMAIN are lit up on the display.
3 TOTAL and REMAIN are lit up on the display.
You cannot check the remaining time of the disc when
RANDOM or " 1 is lit up.
To select a track with the remote control
Press the numbered buttons 0-15 and +10.
Example:
To select the 25th track, press +10 twice and 5.
To select the 20th track, press +10 twice and 0.
MD play starts from the selected track and continues to the
last track.
2 Press MD e to start play.
Track number or track title*
Track number
* applicable when the track title is registered.
To stop play, press s STOP. MD s on the remote control
is also available.
To pause play, press MD e. To resume play, press
again.
To search for a particular point during play, keep r or
t pressed and release it at the desired point.
To skip to the beginning of a track, press r or t
repeatedly or turn JOG DIAL until the desired track is
displayed.
To remove the disc, press z MD EJECT.
To start play when the power is off
Press MD e. The power is turned on and play of the
loaded disc begins.
Elapsed playing time
To play a disc at double speed
Press × 2 on the remote control during play.
To resume normal play, press again.
When using the main unit, keep MD e pressed during
regular play until disc plays at double speed.
To resume, repeat the above.
Display information in stop mode
Total number of tracks or disc title*
Total number of tracks
* applicable when the disc title is registered
TOC READING is displayed while:
The unit reads the data on the inserted disc. After
completion, the information contained in the disc is
displayed.
Total playing time
NOTE
• Do not open or close the operating panel while ejecting the
disc, otherwise a disc may be scratched.
• Do not hold the disc while ejecting it, otherwise a disc
cannot be inserted the next time.
If this happens, turn off the power and disconnect the AC
cord. Then connect it again.
• Nothing other than an MD should be inserted into the disc
drive. Otherwise the disc may become scratched, causing
a malfunction or safety hazard such as an electric shock.
• Do not attempt to insert another MD while a disc is already
inside the drive.
• Do not tilt the unit with disc loaded. Doing so may cause
malfunction.
8 ENGLISH
RANDOM PLAY
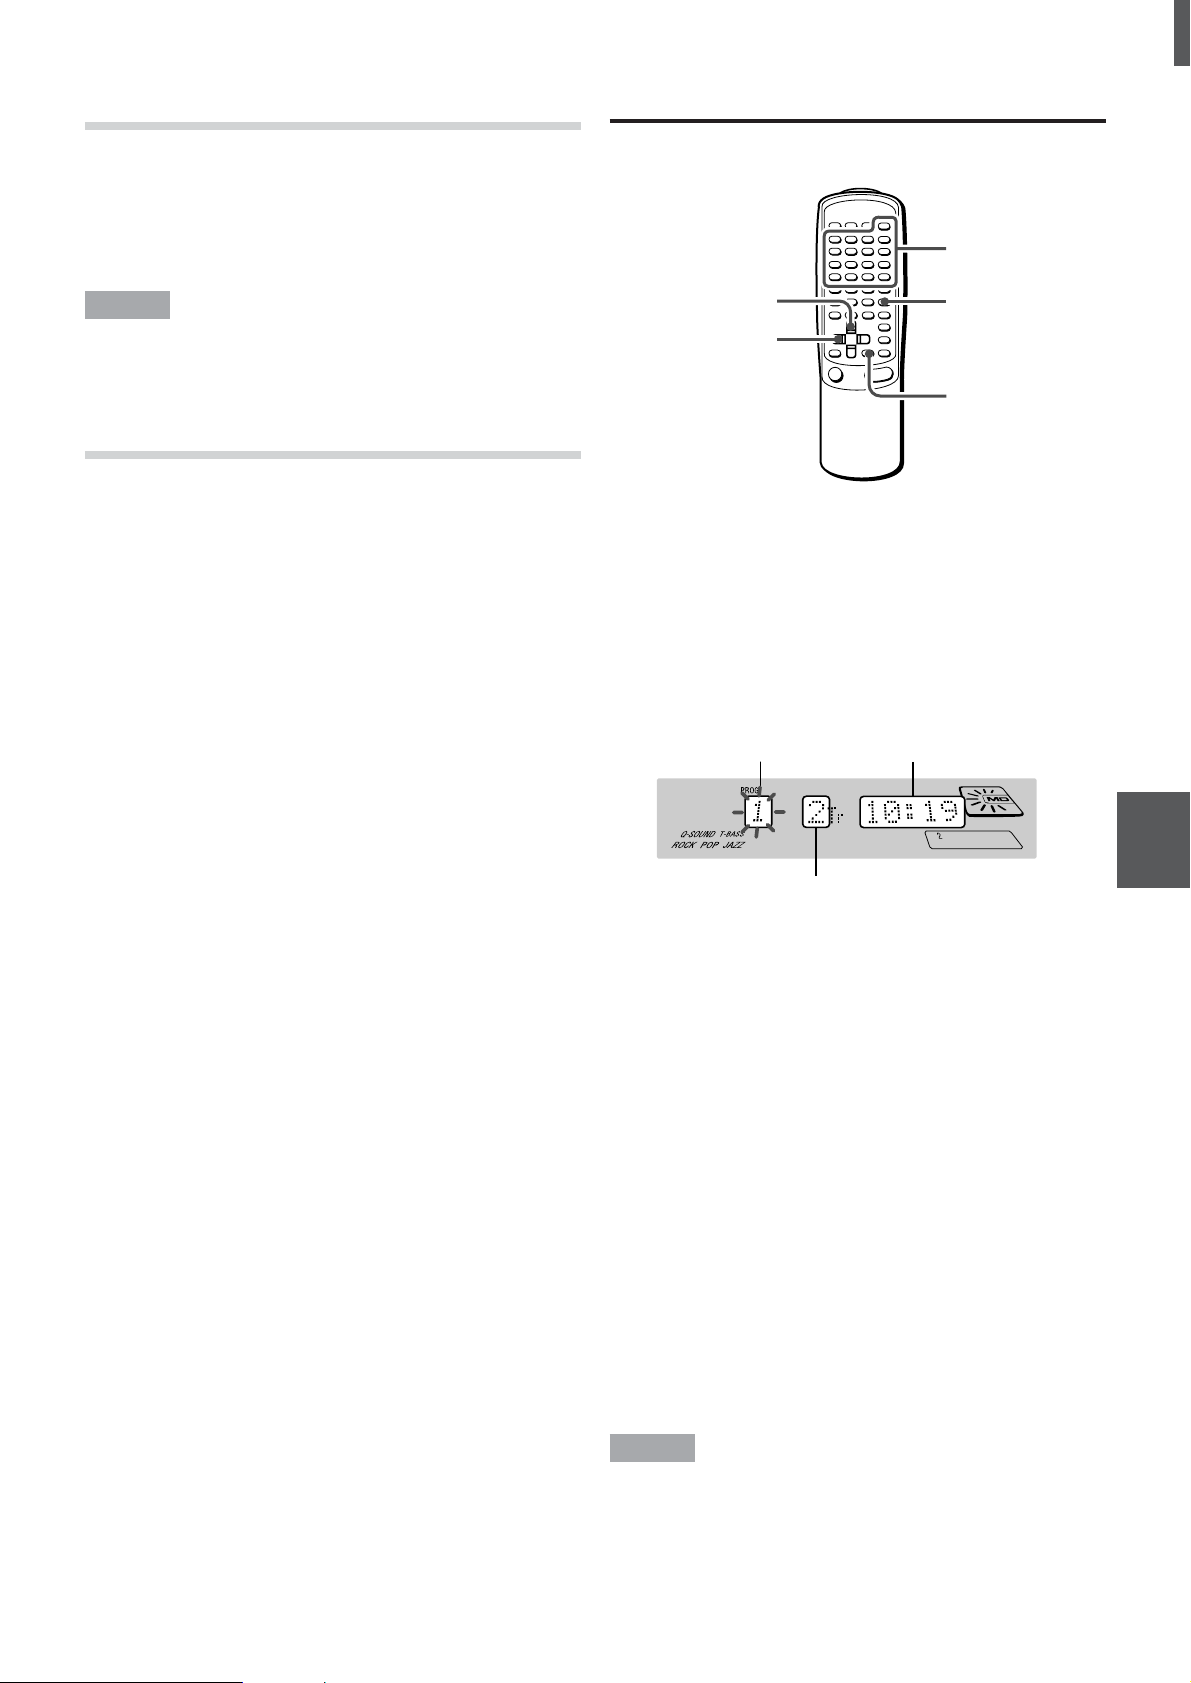
PROGRAMMED PLAY
All the tracks on the disc can be played randomly.
Press RANDOM so that RANDOM is lit up on the display.
To cancel random play
Press RANDOM to turn off RANDOM.
NOTE
• During random play, you cannot skip to the previously
played track with r or JOG DIAL.
• When you select the track with the numbered buttons,
random play is automatically canceled.
REPEAT PLAY
One track, all the tracks or programmed tracks can be played
repeatedly.
Press REPEAT so that " 1 or " is lit up on the display.
To repeat the current track only, select " 1.
To repeat all the tracks, select ".
To cancel repeat play
Press REPEAT to turn off ".
To repeat the desired tracks only
Program the tracks and press REPEAT so that " is lit up.
To select random/repeat play
Press RANDOM then press REPEAT.
One track repeat (" 1) cannot be selected.
Up to 16 tracks can be programmed from the inserted disc.
2
4
MDs
Use the remote control.
1 Press PRGM in stop mode.
PROG is lit up on the display.
2 Press the numbered buttons 0-15 and +10 to
program a track.
Example:
To select the 25th track, press +10 twice and 5.
To select the 20th track, press +10 twice and 0.
Program number
Total playing time of the
selected tracks
1
t
Selected track number
3 Repeat step 2 to program other tracks.
4 Press MD e to start play.
To check the program
Each time t is pressed in stop mode, a track number and
program number will be displayed.
To add tracks to the program
Repeat step 2 in stop mode. The new track will be
programmed after the last track.
To clear the program
Press MD s in stop mode.
To change the programmed tracks
Clear the program and repeat all the steps again.
To program tracks on the main unit
1 Press PROGRAM in stop mode.
2 Turn JOG DIAL to select a track and press ENTER to
program it.
3 Press MD e to start play.
En
E
F
NOTE
• During programmed play, you cannot perform random play
or select a track.
• If the programmed time is more than 199:59 minutes, the
display shows --:-- as the total playing time.
ENGLISH 9
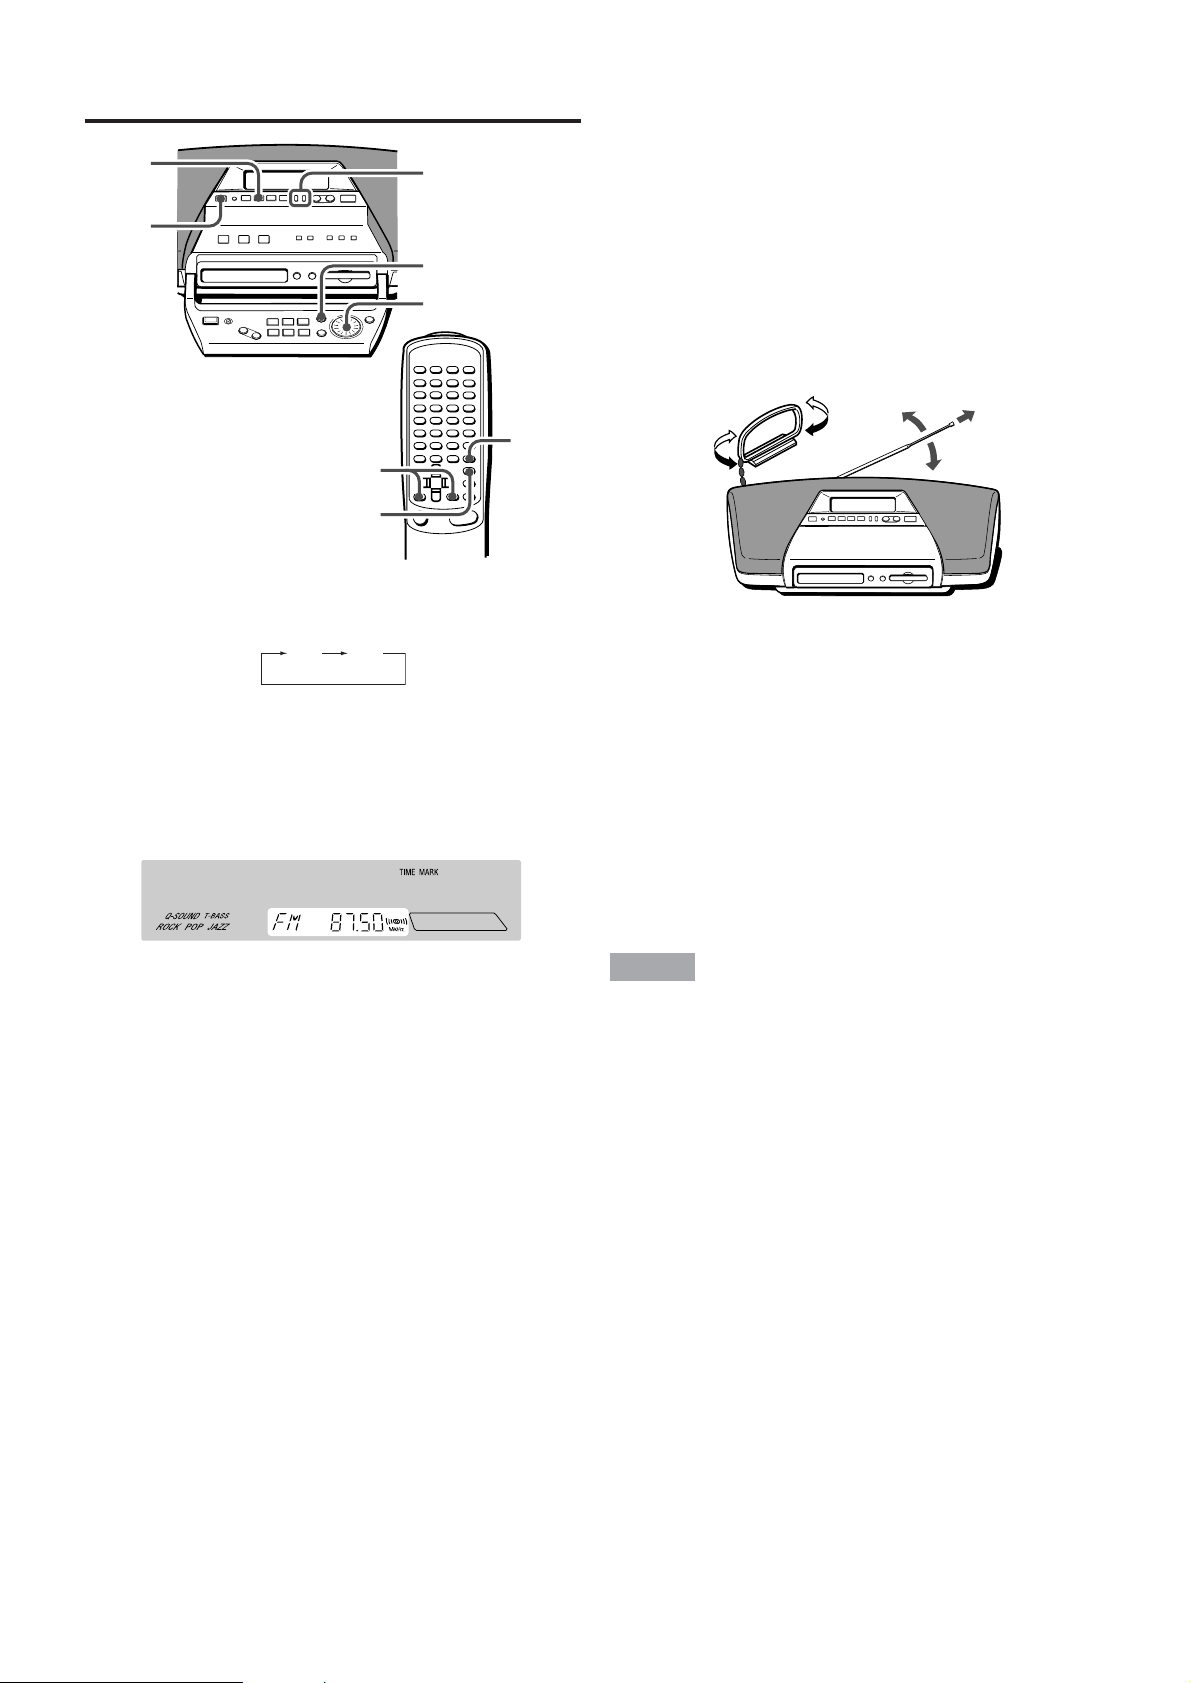
RADIO RECEPTION
MANUAL TUNING
1
POWER
k, i
MODE
2
MO/ST
f, g
RADIO FM/AM
1 Press RADIO/BAND* repeatedly to select the
desired band.
FM AM
When RADIO/BAND is pressed while the power is off,
the power is turned on directly.
* or RADIO FM/AM on the remote control
2 Turn JOG DIAL to select a station.
During FM stereo reception, 1 is displayed.
When using the remote control, press f or g.
To search for a station quickly (Auto Search)
Keep k or i* pressed until the tuner starts searching for a
station. After tuning in a station, the search stops.
To stop the Auto Search manually, press k or i.
The Auto Search may not stop at stations with very weak
signals.
* or f, g on the remote control
For better reception
FM
Extend the FM antenna and orient it for the best reception.
AM
Keep the AM antenna away from other electrical appliances
and orient it for the best reception.
AM
FM
When an FM stereo broadcast contains noise
Press MODE* so that MONO is displayed.
Noise is reduced, although reception is monaural.
To restore stereo reception, press MODE so that STEREO is
displayed.
* or MO/ST on the remote control
To change the AM tuning interval
The default setting of the AM tuning interval is 10 kHz/step.
If you use this unit in an area where the frequency allocation
system is 9 kHz/step, change the tuning interval.
When the power is on, press POWER and RADIO/BAND
simultaneously, then release RADIO/BAND first.
To reset the interval, repeat the above.
NOTE
When the AM tuning interval is changed, all preset stations
are cleared. The preset stations have to be set again.
10 ENGLISH
PRESETTING STATIONS
PRESET NUMBER TUNING
The unit can store a total of 20 preset stations. When a
station is stored, not only a preset number is assigned to the
station, but a station name can be registered.
Use the preset number to tune in a preset station directly.
1
k, i
2, 5
3,
4,
5
5
5
0-15, +10
1 Press RADIO/BAND to select a band.
2 Turn JOG DIAL to select a station.
3 Press ENTER.
MANUAL SET is displayed for 10 seconds.
4 Within 10 seconds, press ENTER to store the
station.
The unit turns into character entry mode.
5 Enter the station name.
(1) Press CHARACTER repeatedly to select the kind of
character (capital letters, small letters or number/
symbols).
→ Capital letters → Small letters —
Numbers/symbols ←
1 Press RADIO/BAND to select a band.
2 Press k, i repeatedly.
Each time it is pressed, the next ascending number is
selected.
Preset number
To select a preset number directly with the remote
control
Press RADIO FM/AM to select a band. Then, press the
numbered buttons 0-15 and +10 to select a preset number.
Example:
To select preset number 20, press +10 twice and 0.
To select preset number 16, press +10 and 6.
En
E
(2) Turn JOG DIAL to select a desired character.
(3) Press CURSOR b after you have selected a
character.
The selected character stops flashing and the flashing
moves to the right.
Repeat steps (1) to (3) to enter all the characters (up to
10 characters).
After entering the name press ENTER.
• If the unit is left for one minute, the station name is not
registered.
• Refer also to page 18 on character entry in detail.
6 Repeat steps 1 to 5 to store stations.
F
ENGLISH 11
CHANGING THE STATION NAME
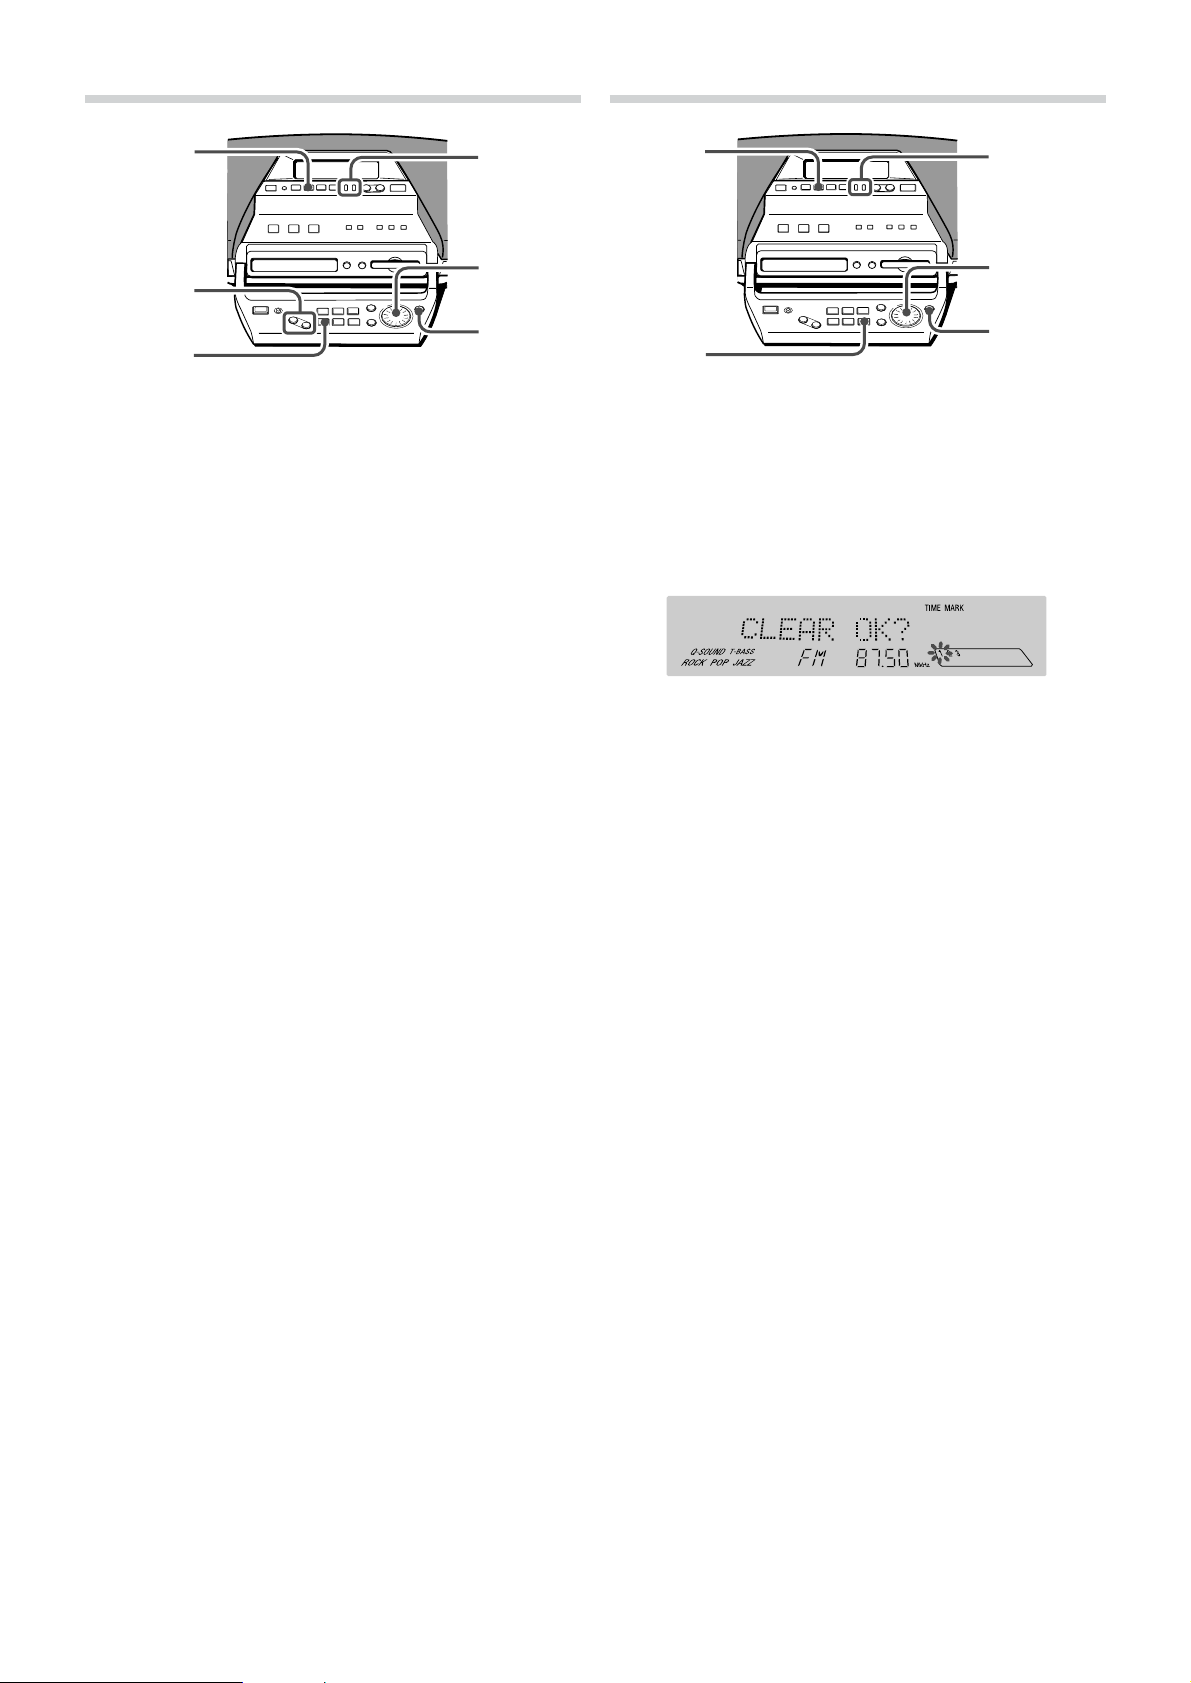
CLEARING THE PRESET STATIONS
1
2
3
CURSOR
3, 4, 5
CHARACTER
1 Press RADIO/BAND to select a band.
2 Press k, i to select a preset number.
3 Press ENTER and turn JOG DIAL until STATION
NAME is displayed.
4 Within 10 seconds, press ENTER.
The unit turns into character entry mode.
Enter the station name with CHARACTER, JOG DIAL or
CURSOR.
5 After entering the name, press ENTER.
To cancel entering
Press CANCEL.
1
1
2
2, 3, 4
CANCEL
1 Press RADIO/BAND to select a band and k, i
to select a preset number to be cleared.
2 Press ENTER and turn JOG DIAL to display
MEMORY CLEAR.
3 Within 10 seconds, press ENTER.
“CLEAR OK?” is displayed for 10 seconds. Check to
make sure it is all right to clear the station.
To cancel, press CANCEL.
4 Within 10 seconds, press ENTER again.
The station is cleared.
12 ENGLISH
SOUND
ADJUSTING THE SOUND
VOLUME
T-BASS
QSOUND
GEQ
ROCK
POP
JAZZ
VOLUME
Press VOLUME.
The volume level is displayed as a number from 0 to MAX
(31).
The volume level is automatically set to 20 when the power
is turned off when the volume level is set to 21 or more.
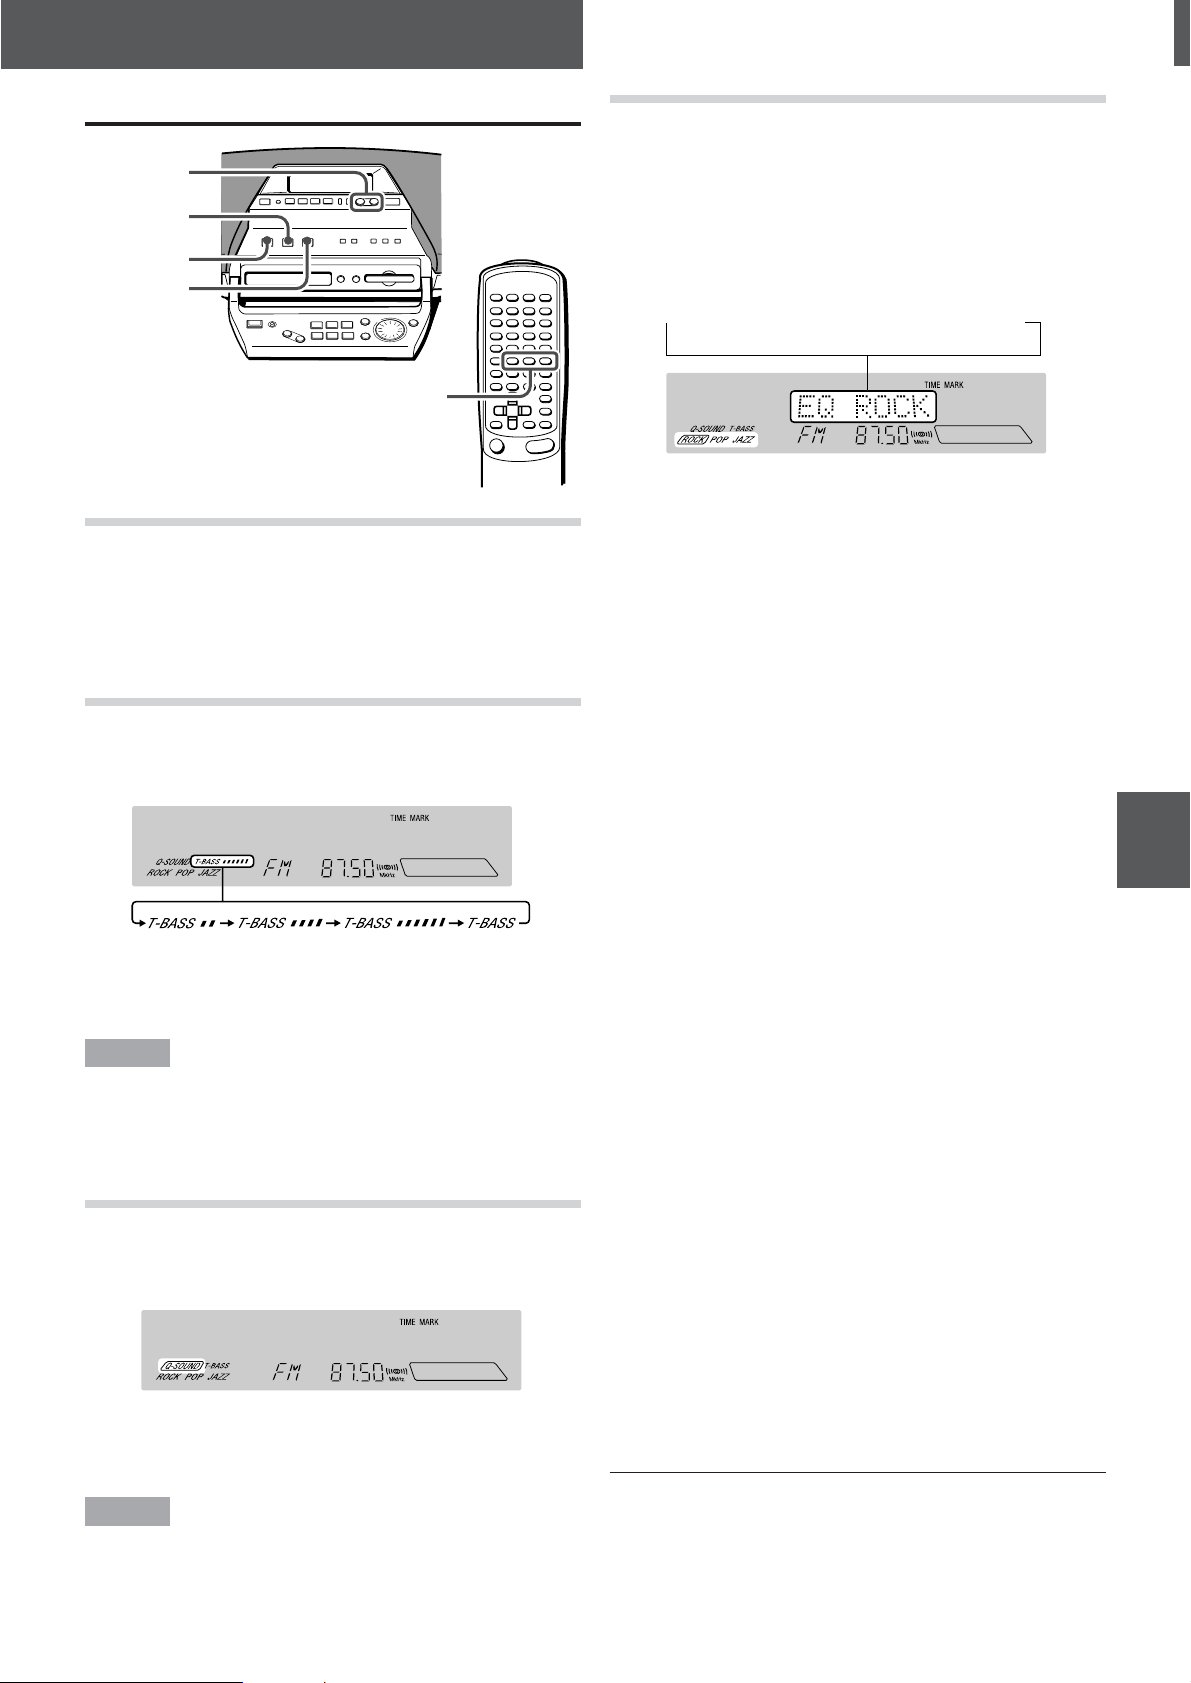
GRAPHIC EQUALIZER
This unit provides the following three different equalization
curves.
EQ ROCK: Powerful sound emphasizing treble and bass
EQ POP: More presence in the vocals and midrange
EQ JAZZ: Accented lower frequencies for jazz-type music
Press GEQ repeatedly.
The GEQ mode is displayed cyclically.
→ EQ ROCK → EQ POP → EQ JAZZ → EQ OFF
(cancel)
To select with the remote control
Press ROCK, POP or JAZZ.
To cancel the selected mode, press the selected button
again.
SUPER T-BASS SYSTEM
The T-BASS system enhances the realism of low-frequency
sound.
Press T-BASS.
(cancel)
Each time it is pressed, the level changes. Select one of the
three levels, or the off position to suit your preference.
NOTE
Low frequency sound may be distorted when the T-BASS
system is used for a disc in which low frequency sound is
originally emphasized. In this case, cancel the T-BASS
system.
QSOUND SYSTEM
The QSOUND system provides rich, three dimensional
sound.
Press QSOUND.
En
E
F
To cancel the QSOUND system
Press QSOUND again.
NOTE
At higher volumes, turning QSOUND on may cause sound
distortion. In this case, turn the volume down.
Using the headphones
Connect headphones with a stereo mini plug (ø 3.5 mm, 1/8
inch) to PHONES jack on the rear of the unit.
No sound is output from the speakers while the headphones
are plugged in.
ENGLISH 13
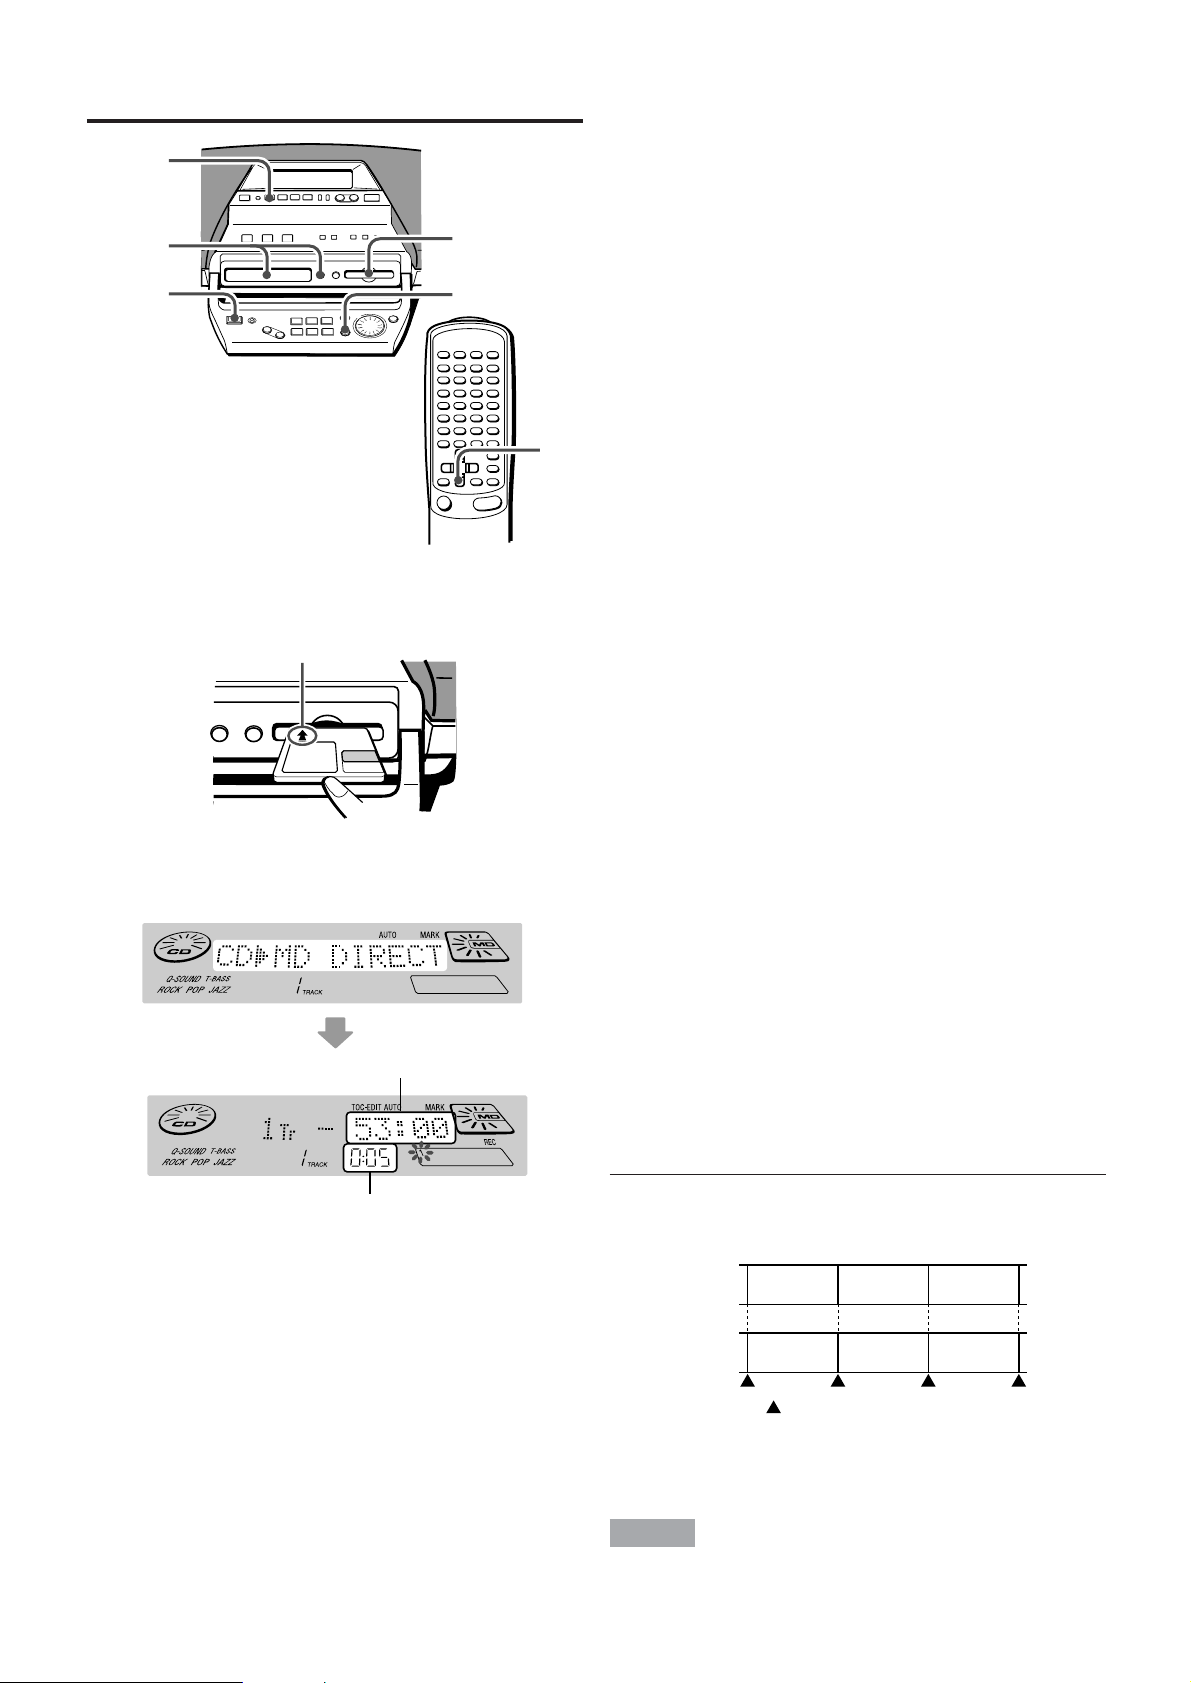
MD RECORDING
RECORDING A WHOLE CD
sSTOP
2
2
1 Insert a recordable MD into the disc drive with
the label side up and in the direction of the
arrow.
Arrow
1
DISP
CDs
To stop recording
Press s STOP. Recording stops and TOC data is
registered.
To stop playing the CD, press s STOP again.
When pressing CD s on the remote control, recording and
CD play stop simultaneously.
• When pressing DISP in stop mode, the remaining
recordable time is displayed for 4 seconds.
To record on a previously recorded MD
If there is an unrecorded section left on the MD, the new
recording automatically starts from where the previous
recording finished.
If you want to start recording from the beginning of a
previous recorded MD, erase the previous recording
completely. (See page 21.)
T. OVER is displayed when:
The remaining recordable time of the MD is not enough to
record a whole CD.
Press s STOP and replace the MD with another one.
If it does not matter whether recording is cut short or not,
press CD c MD again to start recording.
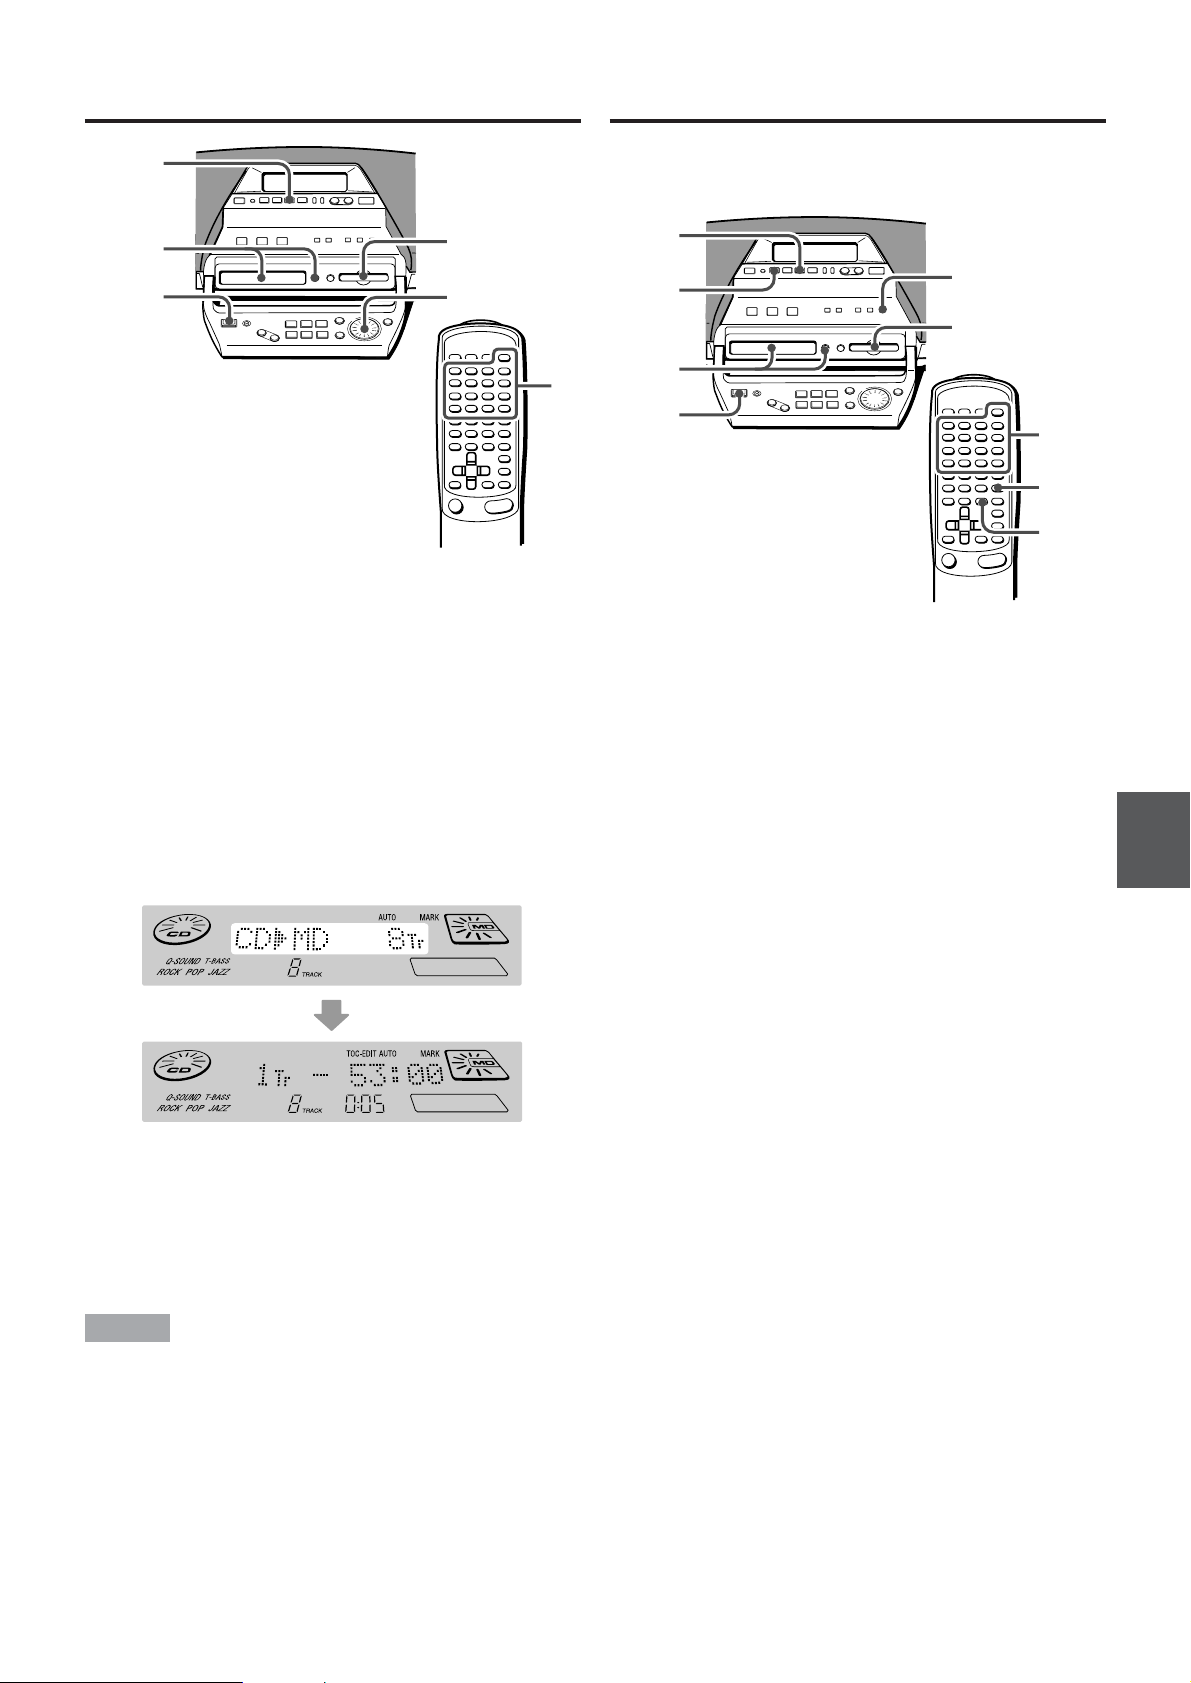
2 Load a CD and press CD c MD in stop mode.
CD c MD DIRECT is displayed and the recording
begins.
Remaining recordable time of the MD
Elapsed playing time of the CD
When the last track of the CD finishes playing, the recording
stops automatically.
When the recording finishes, TOC-EDIT flashes while the
data concerning the contents of the recording are registered.
• The track order information in the original CD will be
copied as the index marks.
Registering the index mark automatically
- When recording from a CD, the index mark information
recorded on the CD is copied as it is.
CD
Recording (MD)
2nd
track
2nd
track
: Index mark
3rd
track
3rd
track
4th
track
4th
track
14 ENGLISH
- When recording from the radio, the index mark information
is registered every 5 minutes.
NOTE
There may be a case where index marks are not registered
accurately.
RECORDING ONLY ONE TRACK
PROGRAMMED RECORDING OF A CD
2
2
4
1
3
3
1 Insert a recordable MD into the disc drive with
the label side up and in the direction of the
arrow.
2 Press CD e to select CD function and load a
CD.
3 Select the track that you want to record with
JOG DIAL or the numbered buttons on the
remote control.
4 Press CD c MD to start recording.
The selected track is recorded.
If the track to be recorded is playing when CD c MD is
pressed, the CD returns to the beginning of the selected
track to be recorded.
Up to 16 tracks can be programmed and recorded from the
inserted CD.
2
sSTOP
3
1
2
5
4
PRGM
CDcMD
1 Insert a recordable MD into the disc drive with
the label side up and in the direction of the
arrow.
2 Press CD e to select CD function and load a
CD.
3 Press PROGRAM* in stop mode.
PROG is lit up on the display.
* or PRGM on the remote control
4 Press the numbered buttons to program tracks.
5 Press CD c MD to start recording.
Recording begins.
When the programmed tracks finish playing, the
recording stops automatically.
When the recording finishes, TOC-EDIT flashes while
the data concerning the contents of the recording are
registered.
• The index mark is registered automatically at the
beginning of each track in the programmed order.
En
E
F
When the track of the CD finishes playing, the recording
stops automatically and the CD goes to the next track.
When the recording finishes, TOC-EDIT flashes while
the data concerning the contents of the recording are
registered.
• The index mark is registered automatically at the
beginning of the track.
NOTE
• While TOC-EDIT flashes on the display, do not disconnect
the AC cord or shake the unit. Otherwise, the TOC data is
not registered properly.
• During CD c MD recording, pause cannot be selected.
ENGLISH 15
RECORDING FROM THE RADIO OR
EXTENDED RECORDING -
A CD MANUALLY
This section explains how to record from the radio or a CD
from a point selected manually.
2
5
4
2
1
2
ENTER
3
1 Insert a recordable MD into the disc drive with
the label side up and in the direction of the
arrow.
2 Prepare the source to be recorded.
To record from the radio, press RADIO/BAND and
tune in a station.
To record from a CD, press CD e to select CD
function and load a CD. Then select the track that you
want to record with JOG DIAL or r, t.
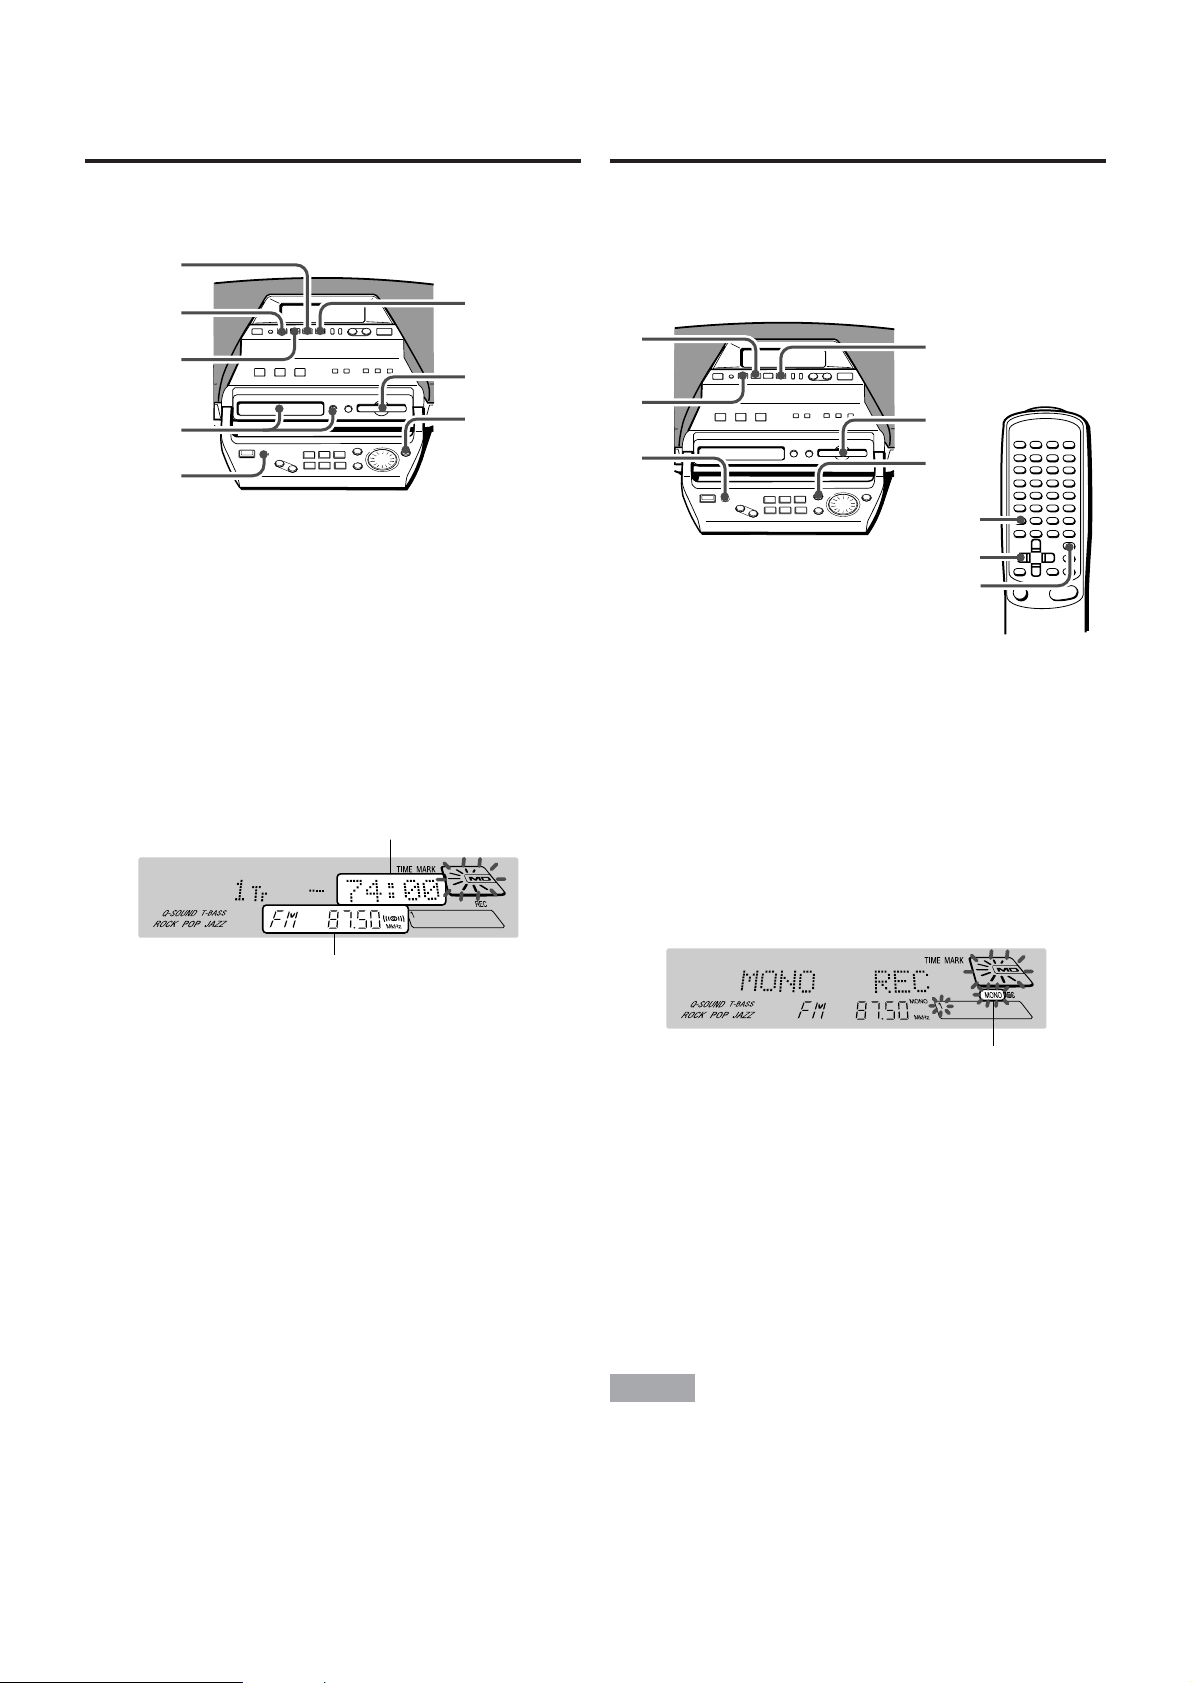
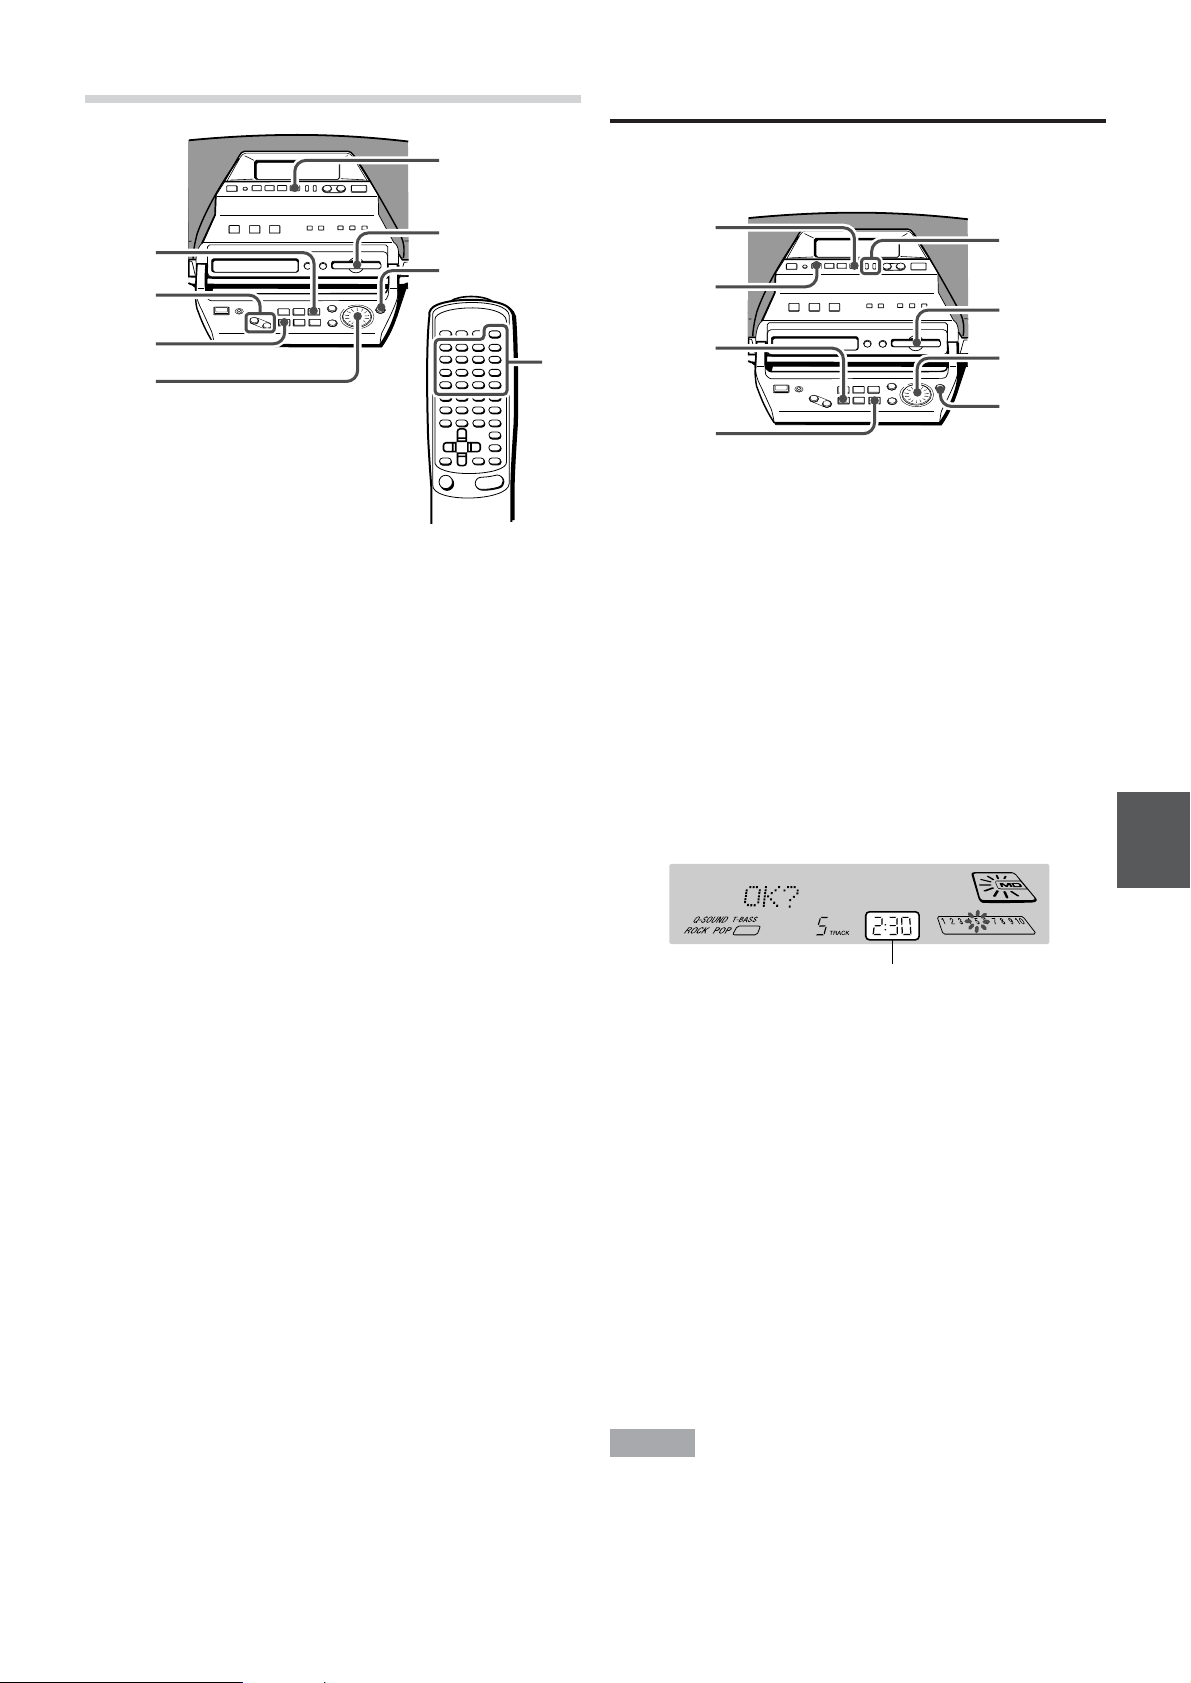
3 Press REC.
The unit enters the standby mode and waits until the
recordable remaining time is displayed.
Remaining recordable time of the MD
MONAURAL RECORDING
By using the monaural recording mode, the available time
printed for recording on the MD can be doubled. In this
case, the recording is monaural.
Extended recording is applicable when recording from the
radio only.
2
5
6
1
3
RADIO FM/AM
1 Insert a recordable MD into the disc drive with
the label side up and in the direction of the
arrow.
2 Press RADIO/BAND* to select a band and tune
in a station.
* or RADIO FM/AM on the remote control
3 Press REC.
The unit enters the standby mode and waits until the
recordable remaining time is displayed.
4 Press MODE* repeatedly until MONO REC is
displayed.
4
REC MODE
MDs
Source to be recorded
4 Press MD e to start recording.
5 Press s STOP to stop recording.
When recording finishes, TOC-EDIT flashes while the
data concerning the contents of the recording are
registered.
•When pressing DISP in stop mode, the remaining
recordable time is displayed for 4 seconds.
To add index marks during recording
Press ENTER at the desired point during recording.
MONO flashes
* or REC MODE on the remote control
5 Press MD e to start recording.
6 Press s STOP* to stop recording.
When recording finishes, TOC-EDIT flashes while the
data concerning the contents of the recording are
registered.
* or MD s on the remote control
To restore stereo recording
Press MODE repeatedly until STEREO REC is displayed in
step 4.
NOTE
There may be a case where index marks are not registered
accurately.
16 ENGLISH
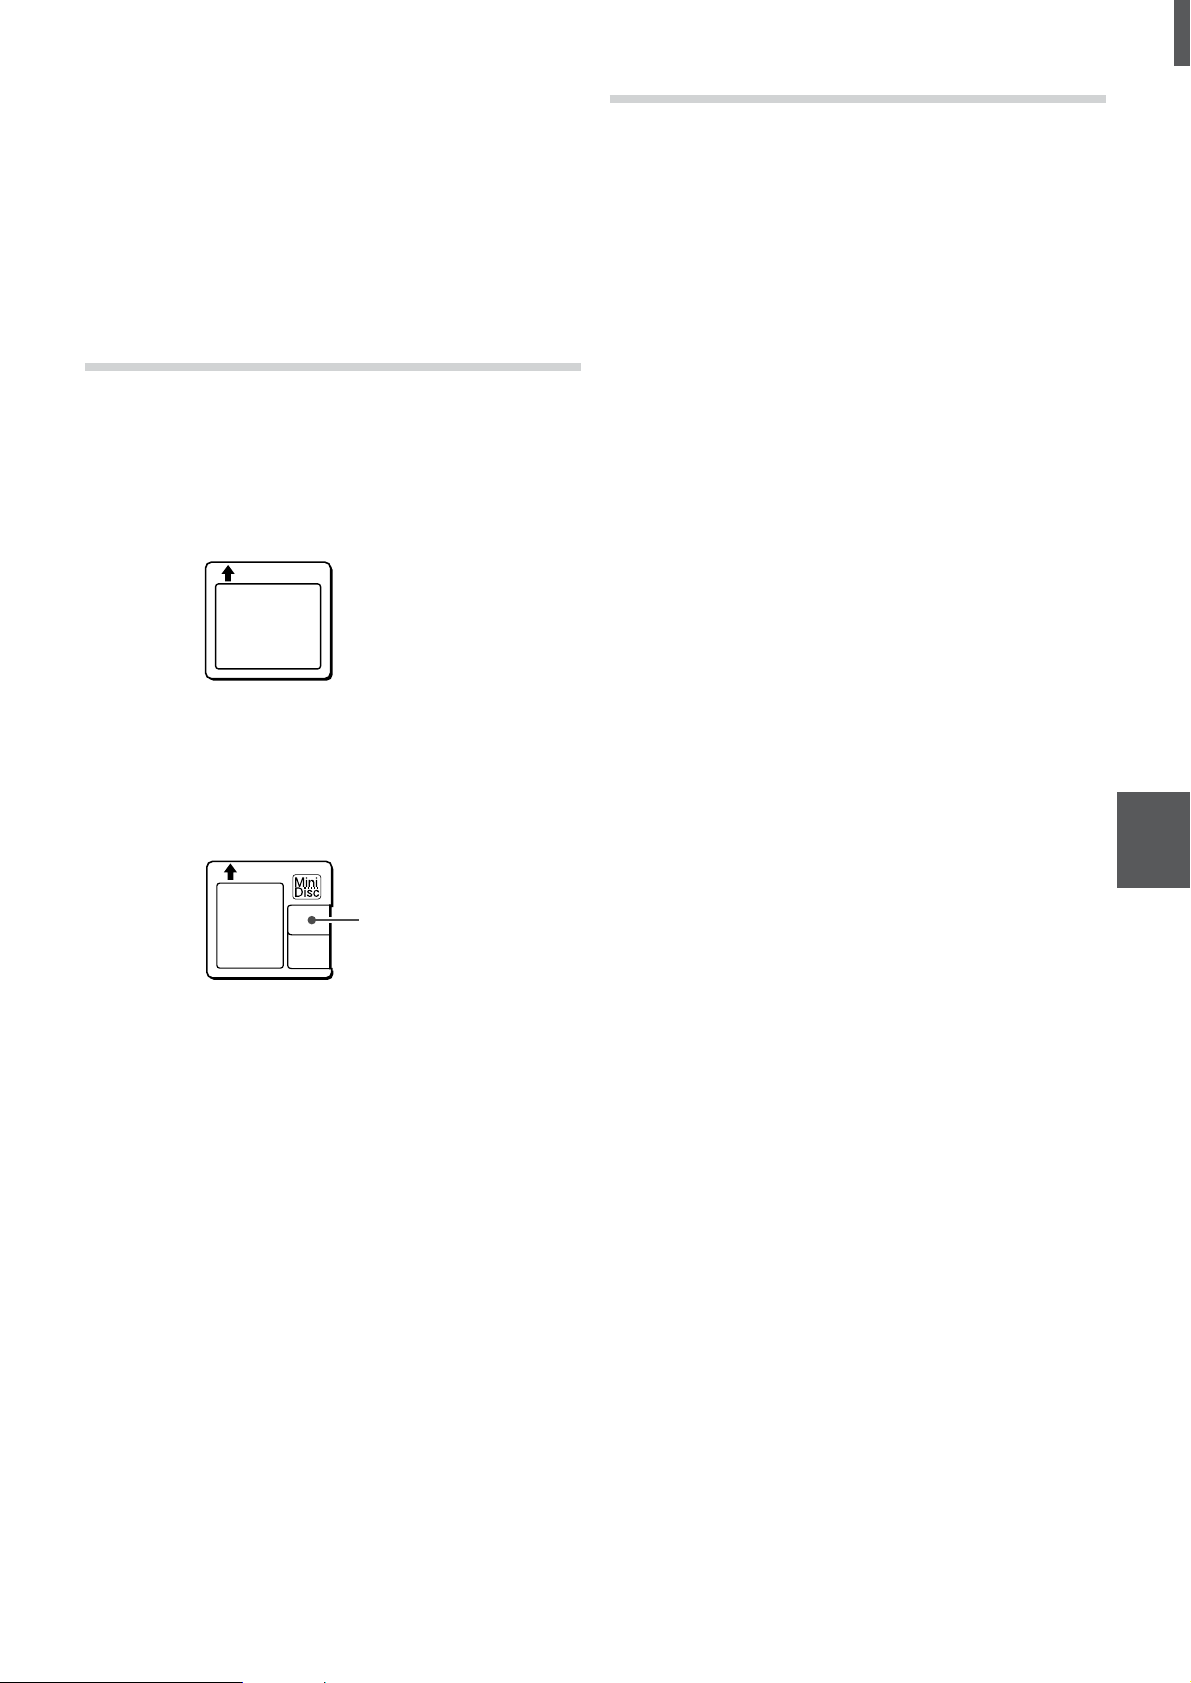
WHAT IS AN MD (MINI DISC)?
An MD is only 64 mm (25/8 inches) in diameter, about half the
size of a conventional CD. But an MD can be used to store
and playback a full 74 minutes of data such as a CD. Unlike
a CD, an MD comes in a plastic cartridge, so that it can be
handled with ease. The cartridge also protects the disc inside
from shocks, dust and scratches. Unlike cassette tapes,
which can become stretched or tangled, an MD is an
excellent durable media.
TYPE OF MD
There are two types of MDs: “Optical discs” and “Magnetooptical discs”. Both types use laser beams and optical pickup technology to read recorded data during playback.
Optical discs
These are playback only discs. Like CDs, they are used as
prerecorded music discs. You cannot record or edit them.
Label
Recordable MO*1 discs
These are recordable discs which can be recorded on again
and again, like cassette tapes. The recording method called
magneto-optical technology employs a laser and magnetism
to record signals. Therefore, the quality of recorded sound
does not deteriorate even after many playbacks and
recordings.
Label
*1 MO: An abbreviation of Magneto Optical
The shutter covers the
opening only on the nonlabeled side of the MD.
The shutter covers the
opening on both sides of
the MD.
THE LIMITATIONS OF MD
Recording on the MD is performed differently from that of a
cassette tape or a DAT. Therefore, the MD system is subject
to the following restrictions.
“Toc* Full” is displayed even if the recording time does
not reach the maximum recordable time of the disc (60minute or 74-minute)
“Toc Full” is displayed when 254 tracks are already recorded
on a disc, without respect to the recording time.
* Toc: An abbreviation of Table Of Contents.
“Toc Full” is displayed even if a disc is not fully
recorded on
If there are lots of emphasis data in a particular track, the
unit handles the data as index codes, and tracks are
counted, in addition, without respect to the time and number
of tracks.
The remaining time on a disc is not increased even after
some short tracks have been erased
When the remaining time on a disc is displayed, it may not
be increased even after erasing short tracks because the
sections less than eight seconds are not counted.
Tracks cannot be joined (the COMBINE function does
not function)
Tracks created by editing may not be joined.
The total of the recorded time and the remaining time on
a disc does not match the maximum recordable time of
the disc (60-minute or 74-minute)
Recording is performed in a minimum unit of one cluster (two
seconds). Even if the recorded section is shorter than two
seconds, a two-second space is needed in recording.
Therefore, the available time becomes shorter.
Track numbers may not be registered properly
When recording from a CD with CD c MD, small tracks may
be created depending on the contents of a CD.
In addition, track numbers may not be registered properly
depending on the contents of the CD.
En
E
Ultra compact size made possible by ATRAC*
technology
A newly developed digital audio compression technology
called the ATRAC system automatically extracts only the
frequencies that are actually audible to the human ear and
cuts the frequencies which are inaudible. This compresses
the amount of data to be recorded to 1/5 of the normal
amount. The ATRAC system is based upon studies carried
out in the field of auditory psychology and does not impair
the quality of the audible sound.
*2 ATRAC: An abbreviation of Adaptive TRansform Acoustic
Coding
Quick random access
One of the great features of the MD is that you can search
for desired tracks quickly. There are also quick and easy
functions for random playback, in which the order of the
tracks can be rearranged at random, and for renumbering
tracks enabling them to be played in any order.
2
F
ENGLISH 17
MD EDIT
REGISTERING THE DISC TITLE
AND TRACK TITLE
REGISTERING THE DISC TITLE
1
2
4
1
4
4
3,
6
CANCEL
1 Press MD e to select MD function and insert
an MD.
2 Press TITLE in stop mode.
“Disc Title ?” is displayed for 10 seconds.
3 Within 10 seconds, press ENTER.
The unit turns into character entry mode.
4 Enter a character.
(1) Press CHARACTER repeatedly to select the kind of
character (capital letters, small letters or number/
symbols).
→ Capital letters → Small letters —
Numbers/symbols ←
DELETE
SPACE
To cancel entering
Press CANCEL.
To change a character
Press CURSOR B or b repeatedly until the character to be
changed flashes. Then enter the desired character again.
To delete characters
Press CURSOR B or b repeatedly until the character to be
deleted flashes. Then press DELETE.
To insert a space between the characters
Press CURSOR B or b repeatedly until the part to be
entered as a space flashes. Then press SPACE.
These symbols can be used
! “ # $ % & ‘ ( ) * + , - . / : ; < > ? @ _ `
NOTE
If the unit is left for one minute at steps 4 and 5, the
character entry mode is canceled.
(2) Turn JOG DIAL to select a desired character.
(3) Press CURSOR b after you have selected a
character.
The selected character stops flashing and the flashing
moves to the right.
5 Repeat step 4 to enter all the characters (up to
50 characters).
6 Press ENTER.
When z MD EJECT is pressed to eject a disc, TOC
EDIT is displayed and the data concerning the contents
of the editing are registered.
18 ENGLISH
REGISTERING THE TRACK TITLES
DIVIDING A TRACK
1
1
2
3
4
4
2
4
2,
1 Press MD e to select MD function and insert
an MD.
2 Select the track with JOG DIAL or the numbered
buttons. Then press TITLE.
“Track Title?” is displayed for 10 seconds.
3 Within 10 seconds, press ENTER.
The unit turns into character entry mode.
4 Enter a character.
(1) Press CHARACTER repeatedly to select the kind of
character (capital letters, small letters or number/
symbols).
(2) Turn JOG DIAL to select a desired character.
(3) Press CURSOR b after you have selected a
character.
The selected character stops flashing and the flashing
moves to the right.
5 Repeat step 4 to enter all the characters (up to
50 characters).
When entering the characters during MD play, the track
is played repeatedly until ENTER is pressed in step 6.
6 Press ENTER.
When z MD EJECT is pressed to eject a disc, TOC
EDIT is displayed and the data concerning the contents
of the editing are registered.
You can divide a track into two parts by registering an index
mark.
1,
2
5
7
1
3
5
4, 6
CANCEL
Example:
The 5th track can be divided by registering an index mark
anywhere you want to divide the 5th track into tracks 5 and
6.
1 Press MD e to select MD function and insert
an MD.
2 During play, press MD e at the point to be
divided.
The unit enters play pause mode.
3 Press DIVIDE.
“Divide ?” is displayed for 10 seconds.
4 Within 10 seconds, press ENTER.
A 3-second segment is played repeatedly to confirm the
point to be divided.
The point MD e is pressed
A 6-second segment is played repeatedly when MONO
is displayed.
5 Adjust the point to be divide with r, t or
JOG DIAL referring to the play sound.
6 Within 1 minute, press ENTER.
The index mark is registered and the track number
advances by one. At the same time, all the succeeding
track numbers advance by one.
The unit enters play pause mode.
7 Press s STOP.
Play stops.
When z MD EJECT is pressed to eject a disc, TOC
EDIT is displayed and the data concerning the contents
of the editing are registered.
En
E
F
To cancel editing
Press CANCEL.
NOTE
A track cannot be divided in the following cases:
- when an inserted disc already contains 254 tracks.
- when elapsed time is displayed as 0:00.
ENGLISH 19
COMBINING TWO TRACKS
CHANGING THE ORDER OF THE
You can combine two tracks by erasing the index mark in
between.
6
1
1
3
CANCEL
Example:
The 2nd track and the 3rd track can be combined by erasing
the index mark at the beginning of the 3rd track.
1 Press MD e to select MD function and insert
an MD.
2 Play the latter track of the two tracks that you
want to combine.
Example:
To combine the 2nd track and the 3rd track, play the 3rd
track.
3 Press COMBINE.
“Combine ?” is displayed for 10 seconds.
4 Within 10 seconds, press ENTER.
Example:
“2+3” is displayed when ENTER is pressed during play
of the 3rd track.
4, 5
TRACKS
You can change the order of tracks after completing a
recording.
7
1
1
3
5
4, 6
CANCEL
Example:
The 3rd track is moved to the 1st track.
1 Press MD e to select MD function and insert
an MD.
2 Play the track that you want to move.
Example:
To move the 3rd track, play the 3rd track.
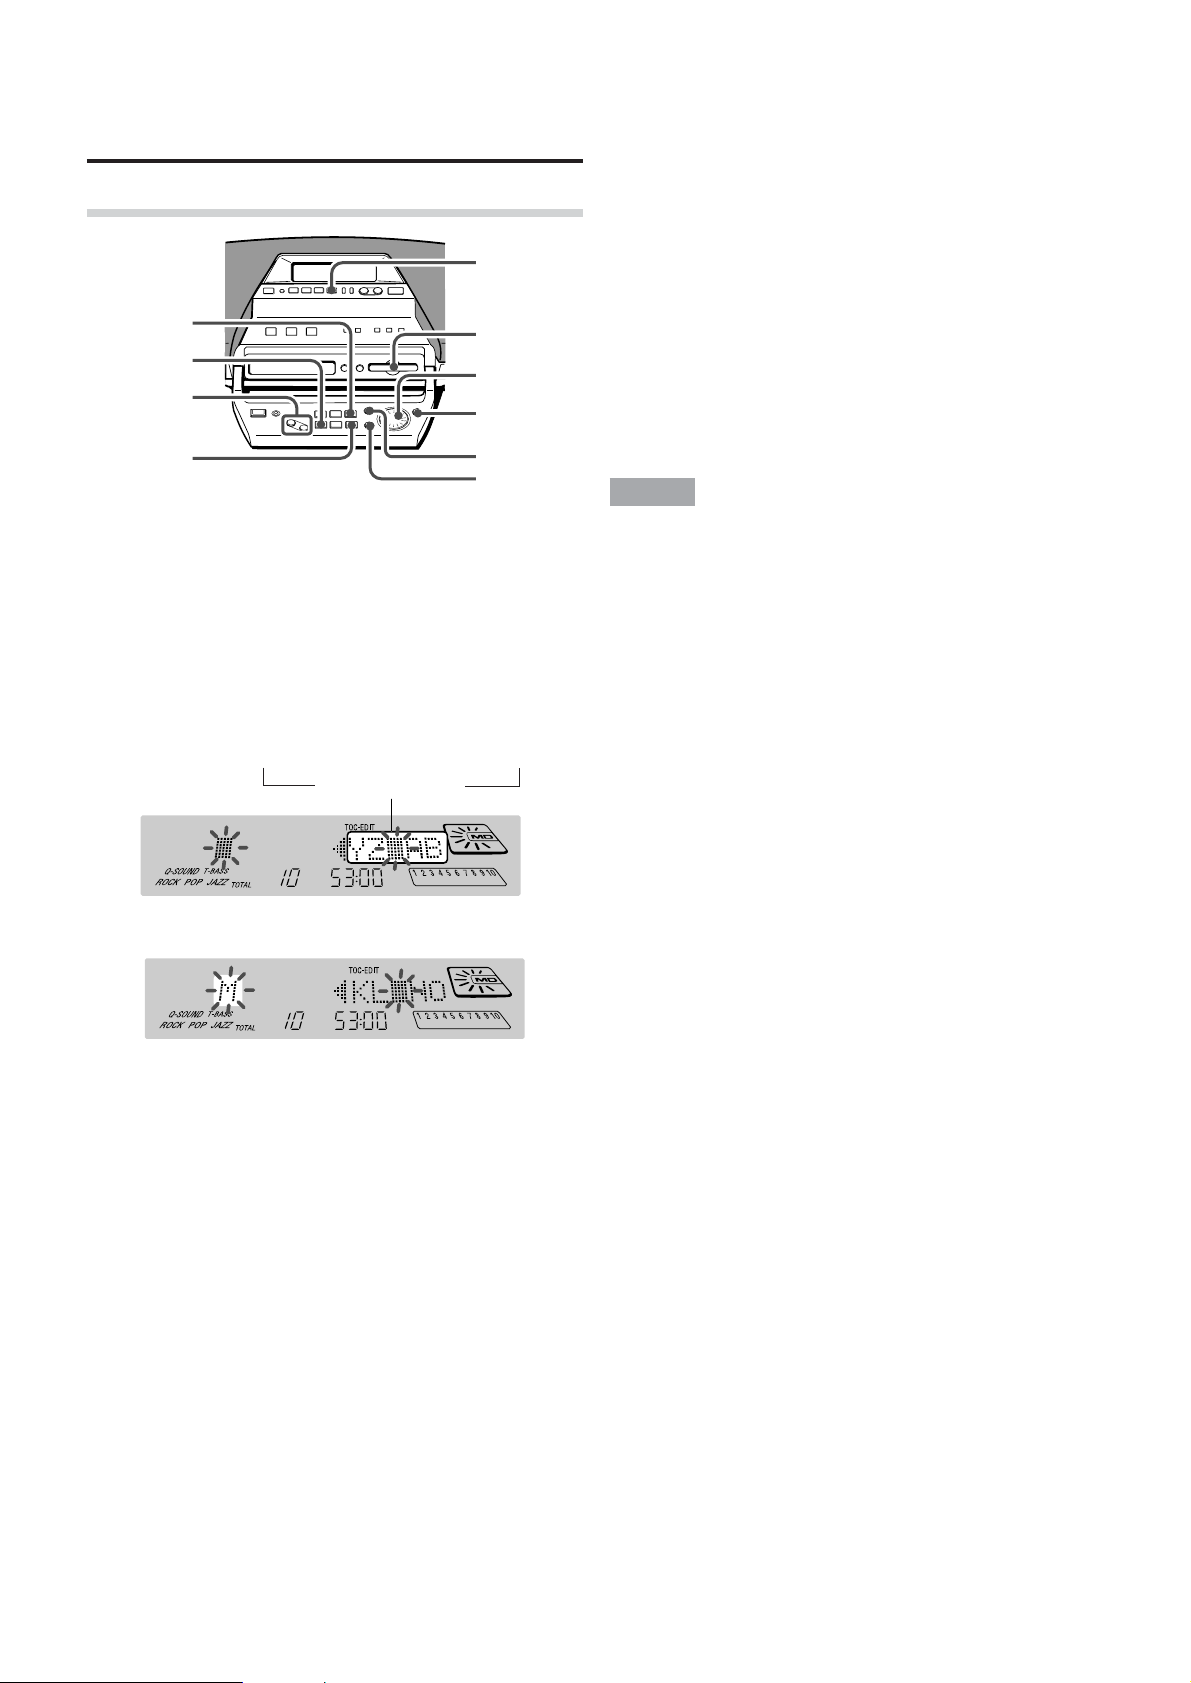
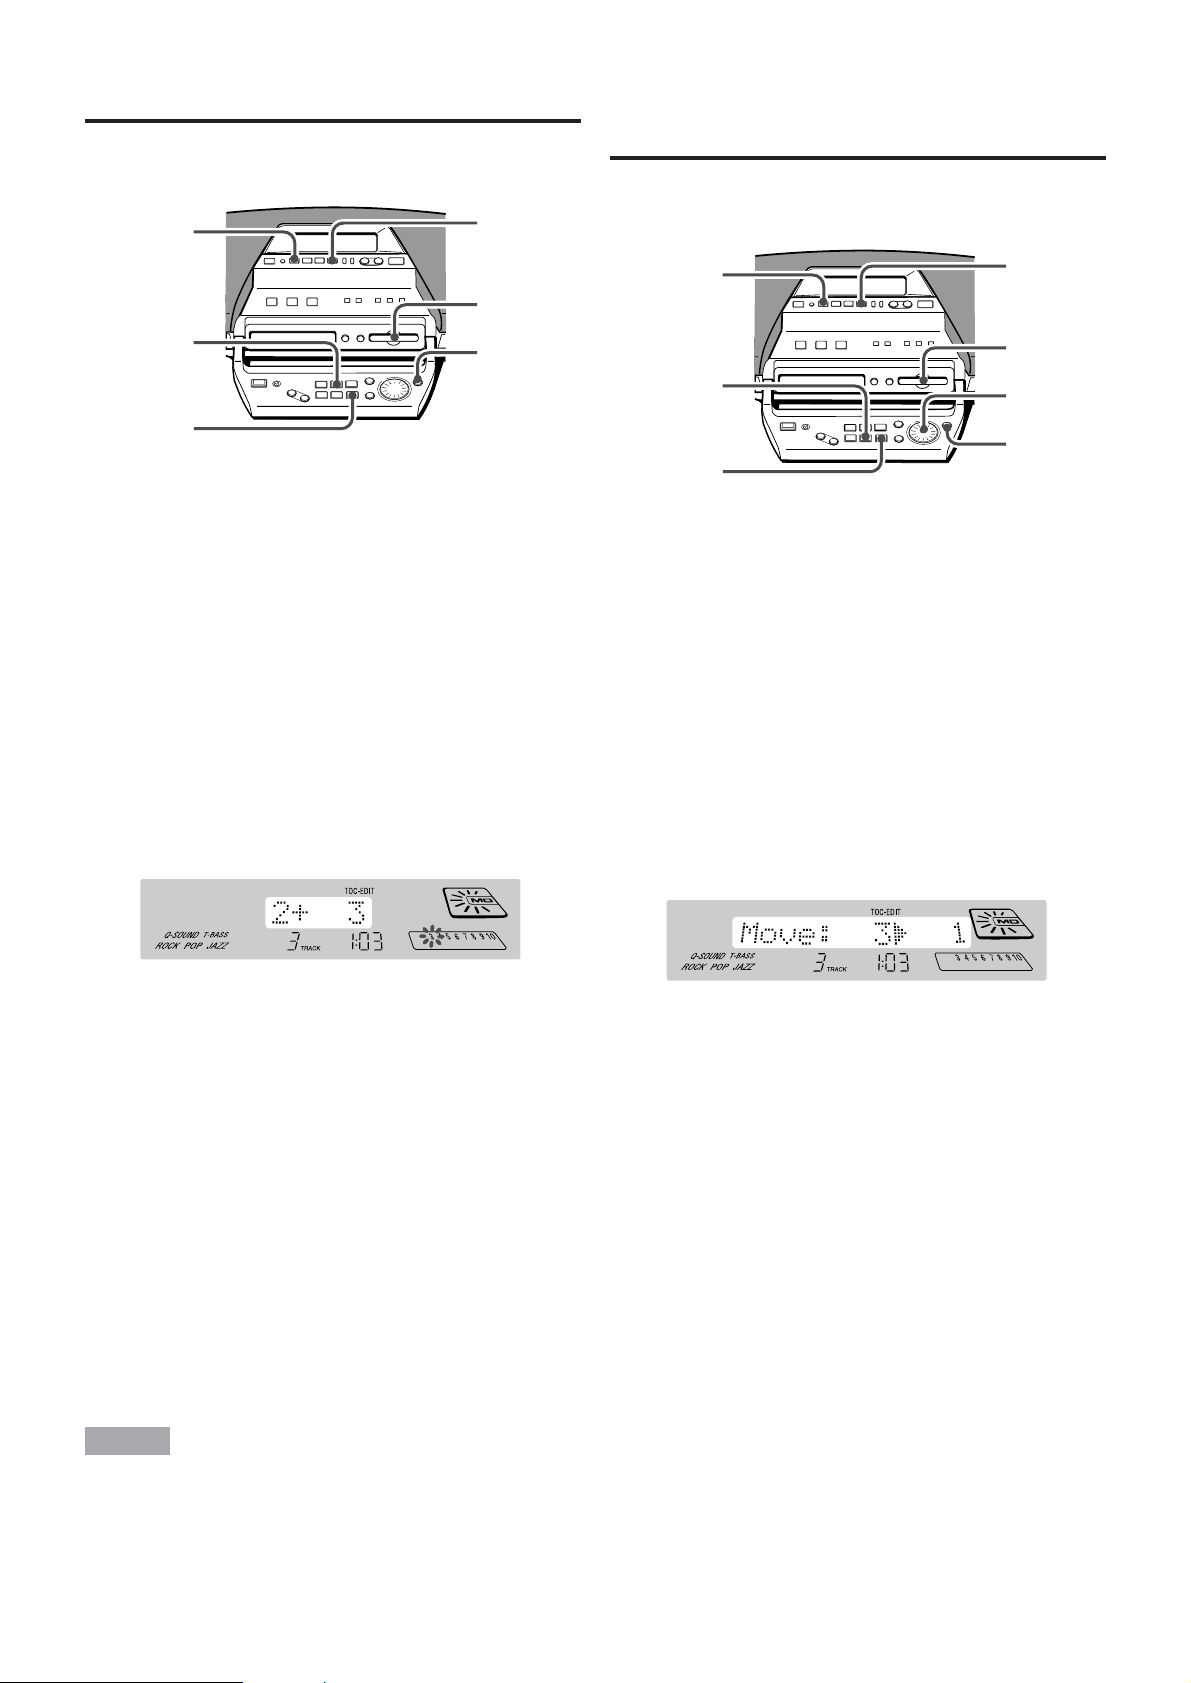
3 Press MOVE.
“Move ?” is displayed for 10 seconds.
4 Within 10 seconds, press ENTER.
5 Turn JOG DIAL to select the desired track
number to move the track to.
Example:
The 3rd track moves to the 1st position.
5 Within 1 minute, press ENTER again.
The index mark of the selected track is erased and the
2nd track and the 3rd track are combined. At the same
time, all the succeeding track numbers move down by
one.
6 Press s STOP.
Play stops.
When z MD EJECT is pressed to eject a disc, TOC
EDIT is displayed and the data concerning the contents
of the editing are registered.
To cancel editing
Press CANCEL.
If the tracks are titled
If both of the tracks are titled, the title of the lower number
track remains.
If only one track is titled on the tracks to be combined, this
title remains.
NOTE
You cannot combine a track recorded in monaural and a
track recorded in stereo.
6 Within 10 seconds, press ENTER again.
The order of the track is changed.
7 Press s STOP.
Play stops.
When z MD EJECT is pressed to eject a disc, TOC
EDIT is displayed and the data concerning the contents
of the editing are registered.
To cancel editing
Press CANCEL.
20 ENGLISH
ERASING TRACKS
ERASING ONLY ONE TRACK
ERASING ALL THE TRACKS ON A DISC
1
1
2
CANCEL
1 Press MD e to select MD function and insert
an MD.
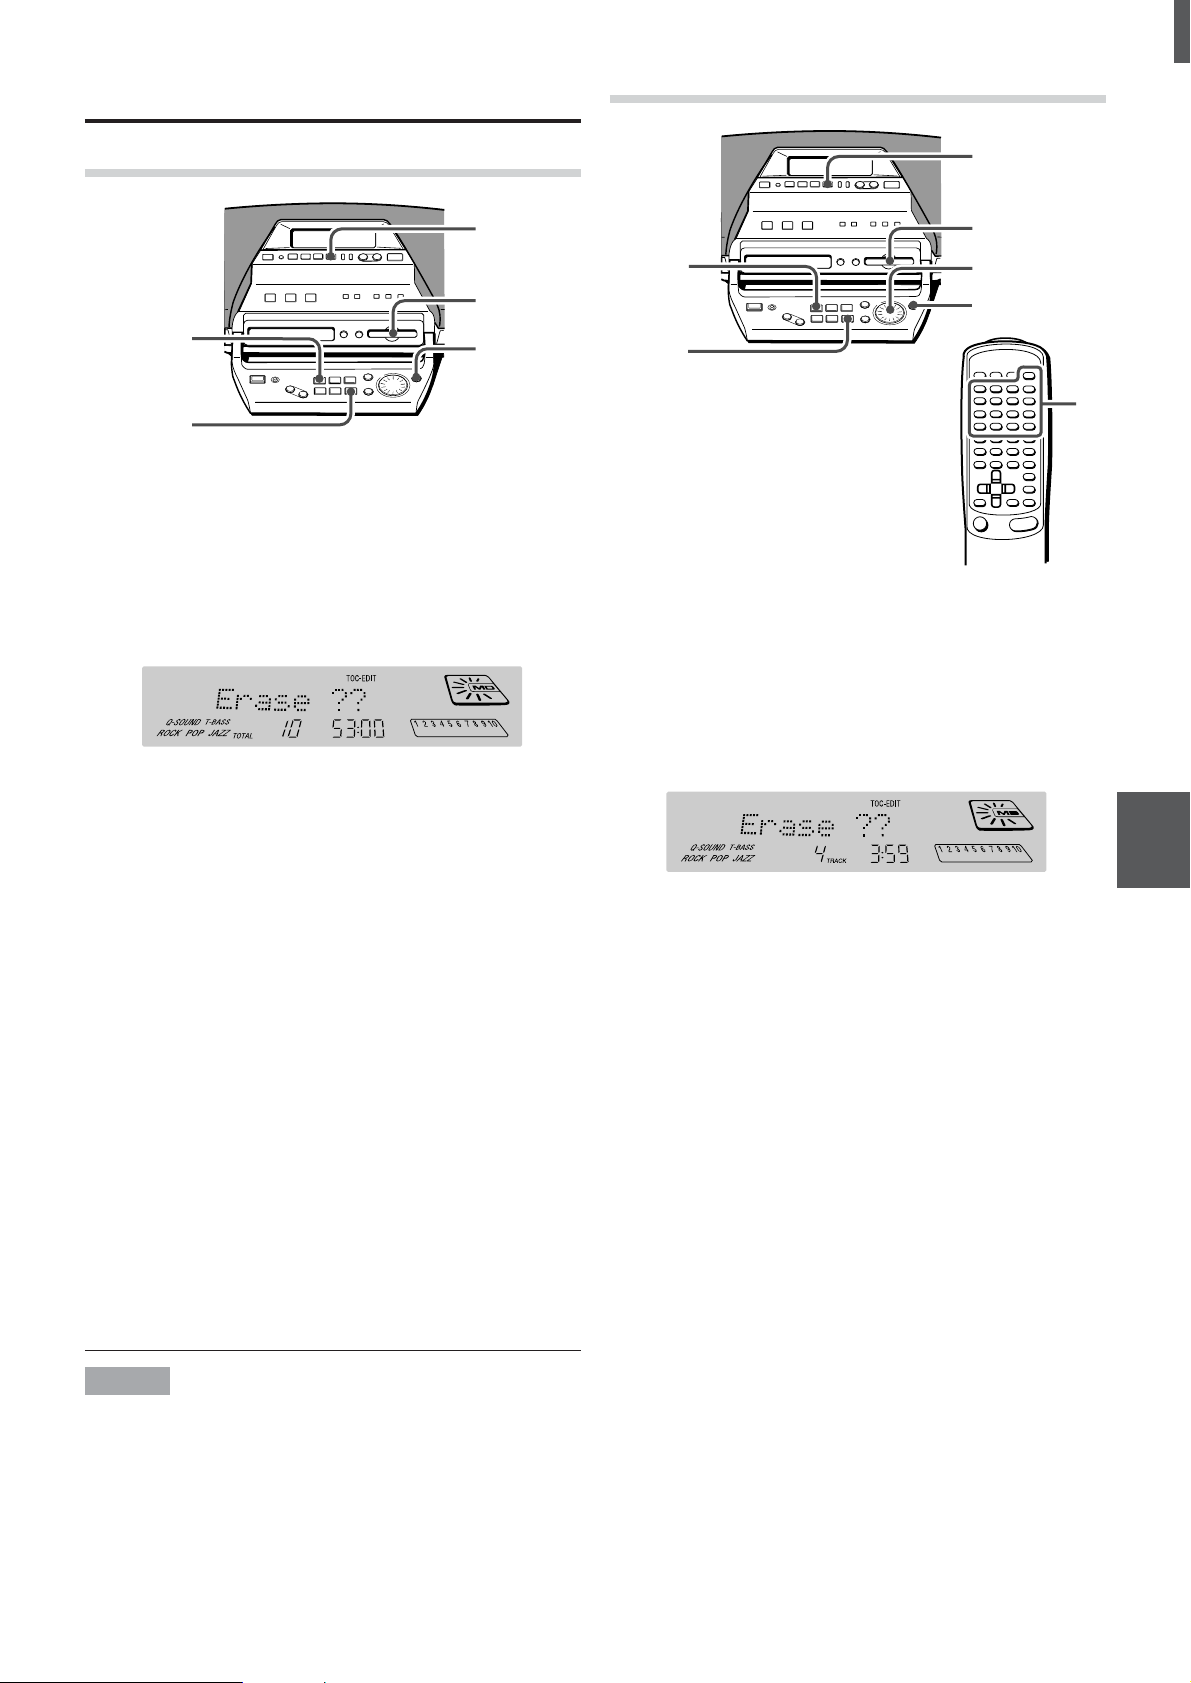
2 Press ERASE in stop mode.
“ALL Erase ?” is displayed for 10 seconds.
3 Within 10 seconds, press ENTER.
Make sure to check that it is all right to erase all the
tracks.
To cancel, press CANCEL.
4 Within 1 minute, press ENTER again.
All the tracks on the inserted disc are erased.
TOC EDIT is displayed and the data concerning the
contents of the editing are registered.
3, 4
1
1
2
CANCEL
2
3,
4
2
1 Press MD e to select MD function and insert
an MD.
2 Select the track with JOG DIAL or the numbered
buttons. Then press ERASE.
“Track Erase?” is displayed for 10 seconds.
3 Within 10 seconds, press ENTER.
Make sure to check that it is all right to erase the track.
To cancel, press CANCEL.
4 Within 1 minute, press ENTER again.
The selected track is erased and all the succeeding track
numbers also move down by one.
When TOC EDIT is displayed, the data concerning the
contents of the editing are registered.
En
E
NOTE
• While TOC EDIT is displayed, do not disconnect the AC
cord or shake the unit. Otherwise, the TOC data is not
registered properly.
•A disc cannot be edited:
- when a prerecorded disc is inserted. (“PB Disc” is
displayed.)
- when the record-protect tab on an inserted disc is moved
to the protected position. (“Protected” is displayed.)
- during programmed play.
F
ENGLISH 21
CD MD TUNER
CLOCK AND TIMER
SETTING THE CLOCK
s
r, t
1
2, 3
1,
2,
3
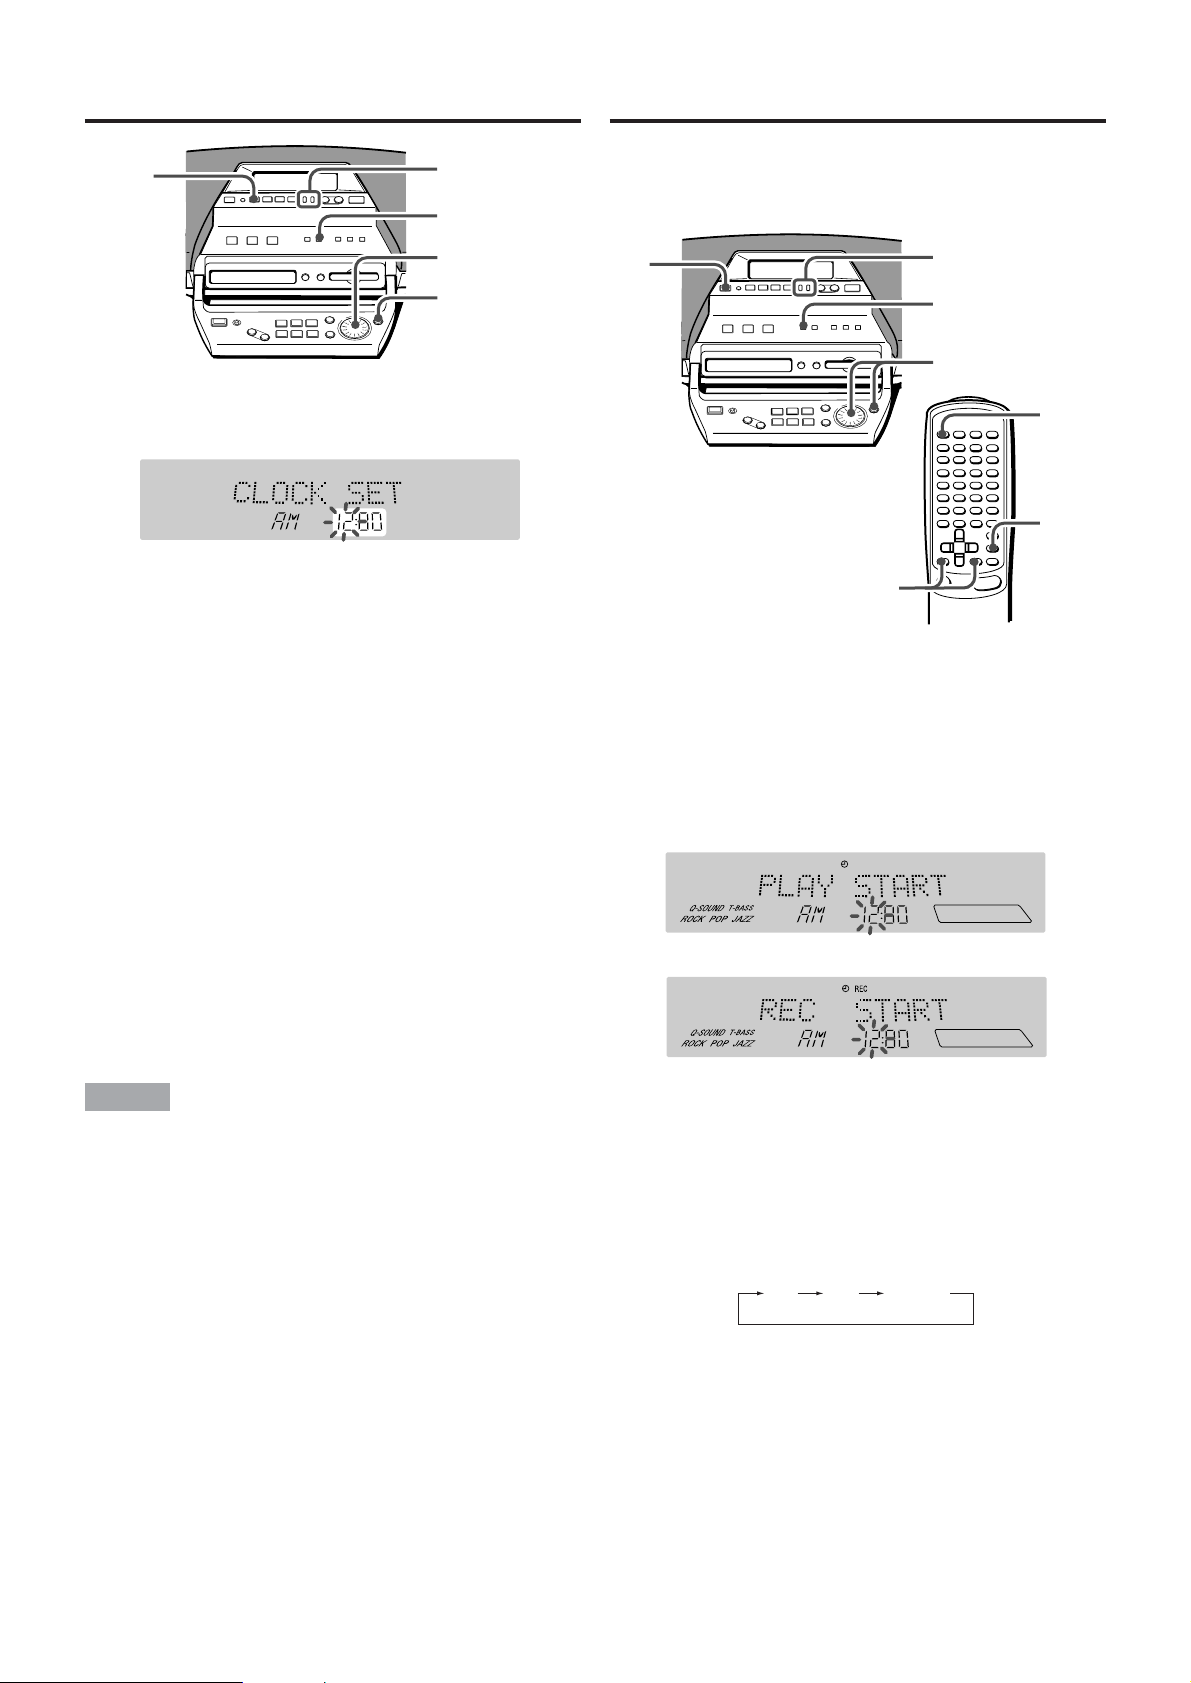
1 Press CLOCK and press ENTER within 4
seconds.
(12-hour standard)
2 Turn JOG DIAL to designate the hour, and
press ENTER.
The hour stops flashing on the display and the minute
starts flashing.
3 Turn JOG DIAL to designate the minute, and
press ENTER.
The minute stops flashing on the display and the clock
starts from 00 seconds.
To display the current time
Press CLOCK. The time is displayed for 4 seconds.
However, the time cannot be displayed during recording.
SETTING THE TIMER
The unit can be turned on at the specified time every day
with the built-in timer.
Timer recording is applicable for TUNER source only.
7
r, t
1
2,
3, 4,
r, t
Preparation
Make sure the clock is set correctly.
1 Press TIMER once or twice so that TIMER PLAY
or TIMER REC is displayed and press ENTER
within 4 seconds.
The hour flashes.
(Example: Timer play)
5
TIMER
ENTER
To switch to the 12/24-hour standard
While the current time is displayed, press s.
If the clock display flashes
This is caused by a power interruption. Set the current time
if it is not correct.
If power is interrupted for more than 10 hours, all settings
stored in memory after purchase need to be reset.
NOTE
During operation r and t are also available instead of
JOG DIAL.
(Example: Timer recording)
2 Designate the hour of the timer-on time with
JOG DIAL and press ENTER.
Repeat to designate the minute of the timer-on time.
After you designate the timer-on time, one of the source
names is displayed.
3 Select a source with JOG DIAL and press
ENTER.
To set the timer recording, skip this step.
22 ENGLISH
1
r, t
2
4 Select the duration for the timer-activated
period with JOG DIAL and press ENTER.
(Example: Timer play)
(Example: Timer recording)
The duration for the timer-activated period can be set
between 5 and 120 minutes in 5-minute steps.
5 Adjust the volume with JOG DIAL and press
ENTER.
The volume level is adjusted from 0 to 20.
6 Prepare the source.
To listen to a CD, load a CD.
To listen to an MD, insert an MD.
To listen to the radio, tune in a station.
To record from the radio, tune in a station and insert
an MD.
7 Press POWER to turn the unit off.
5 remains on the display after the power is turned off
(timer-standby mode).
When the timer-on time is reached, the unit turns on.
SETTING THE SLEEP TIMER
The unit can be turned off automatically at a specified time.
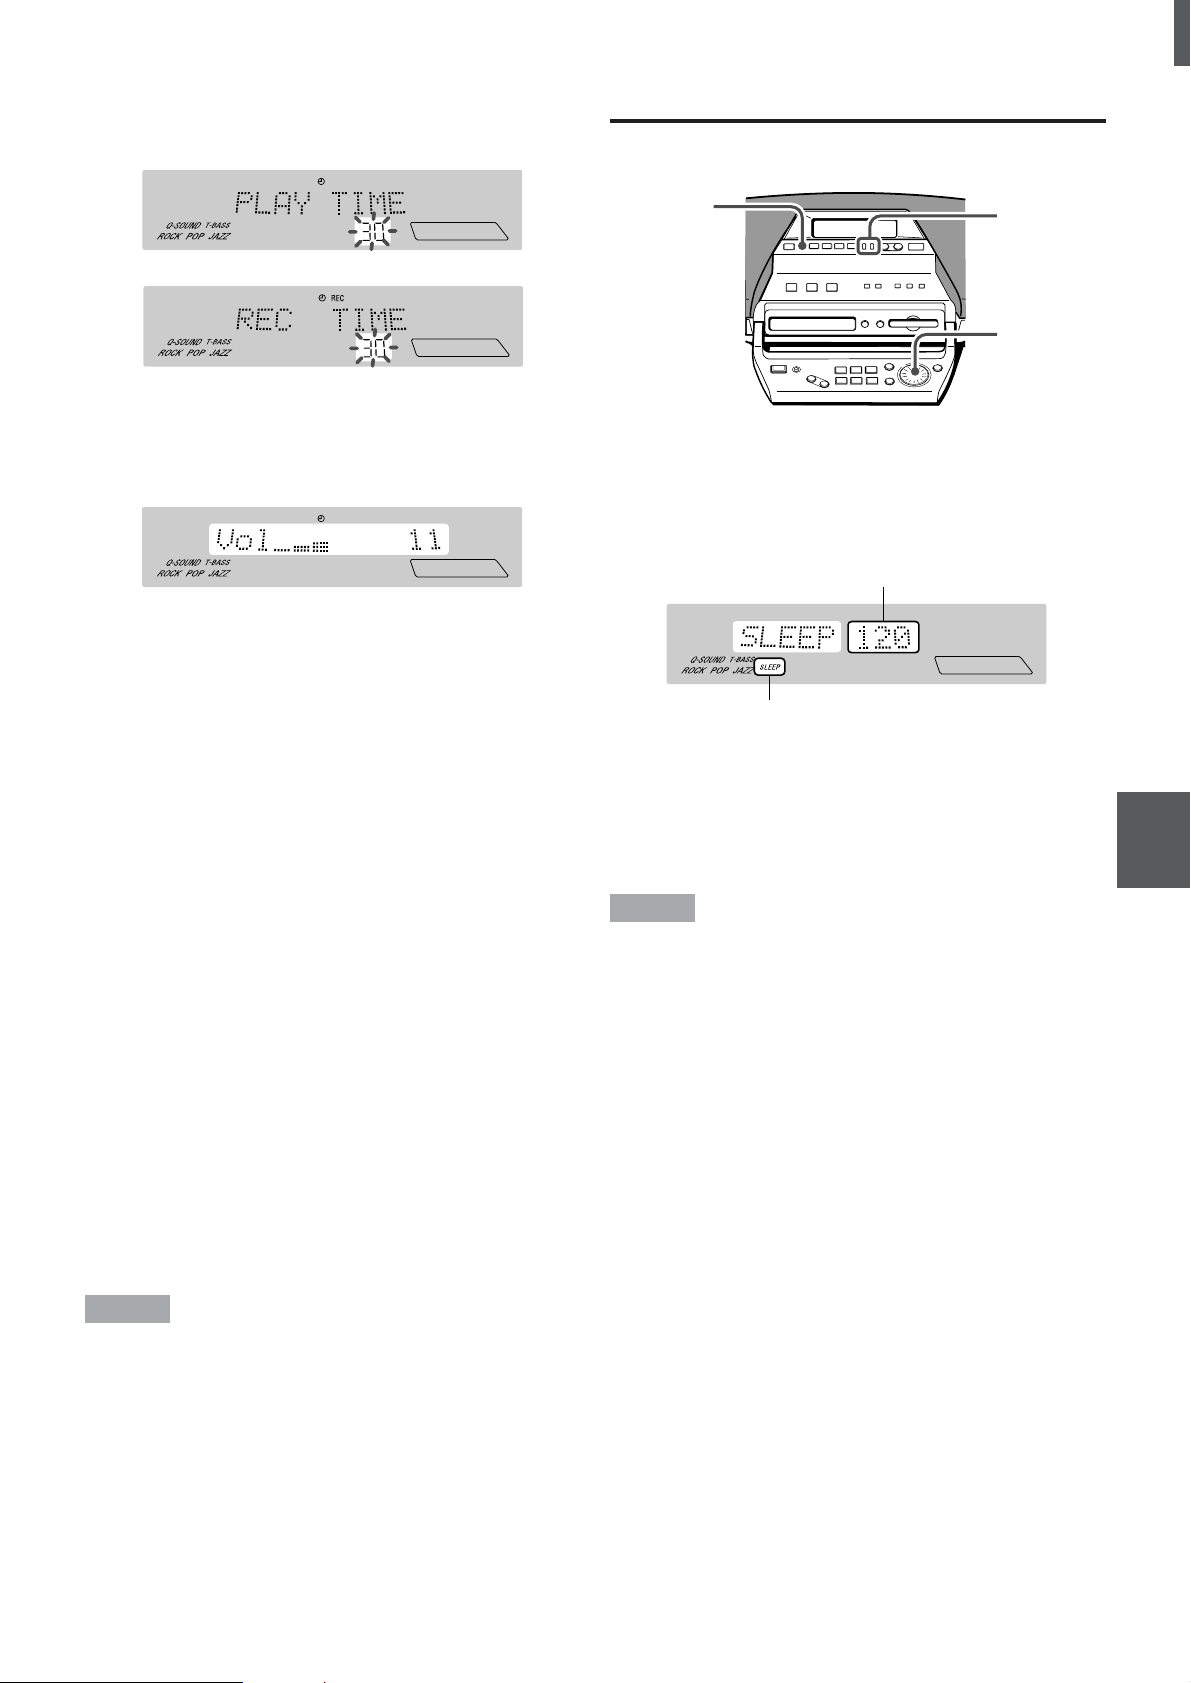
1 Press SLEEP.
2 Within 4 seconds, turn JOG DIAL to specify the
time until the power is turned off.
The time changes between 5 to 120 minutes in 5-minute
steps.
Specified time
SLEEP
To check the time remaining until the power is turned off
Press SLEEP once. The remaining time is displayed for 4
seconds.
To cancel the sleep timer
Press SLEEP twice so that SLEEP OFF is displayed.
En
To check or change the specified items
Press TIMER on the remote control then press ENTER
within 4 seconds. Each time ENTER is pressed, each item is
displayed.
If you want to change the specified items, press r or t.
To cancel timer standby mode temporarily
Press TIMER repeatedly so that TIMER OFF is displayed.
To use the unit in timer standby mode
You can use the unit normally.
Before turning the unit off, repeat step 6 to prepare the
source.
MD < REC TIME is displayed when:
The duration for the timer-activated period is longer than the
remaining recordable time of the MD.
NOTE
• If the unit is left for one minute at steps 2 and 5, the timer
setting mode is canceled.
• Timer play and timer recording will not begin unless the
power is turned off.
• During operation r and t are also available instead
of JOG DIAL.
NOTE
During operation r and t are also available instead of
JOG DIAL.
E
F
ENGLISH 23
GENERAL
CARE AND MAINTENANCE
Occasional care and maintenance of the unit and the
software are needed to optimize the performance of your
unit.
To clean the cabinet
Use a soft and dry cloth.
If the surfaces are extremely dirty, use a soft cloth lightly
moistened with mild detergent solution. Do not use strong
solvents, such as alcohol, benzine or thinner as these could
damage the finish of the unit.
Care of CDs
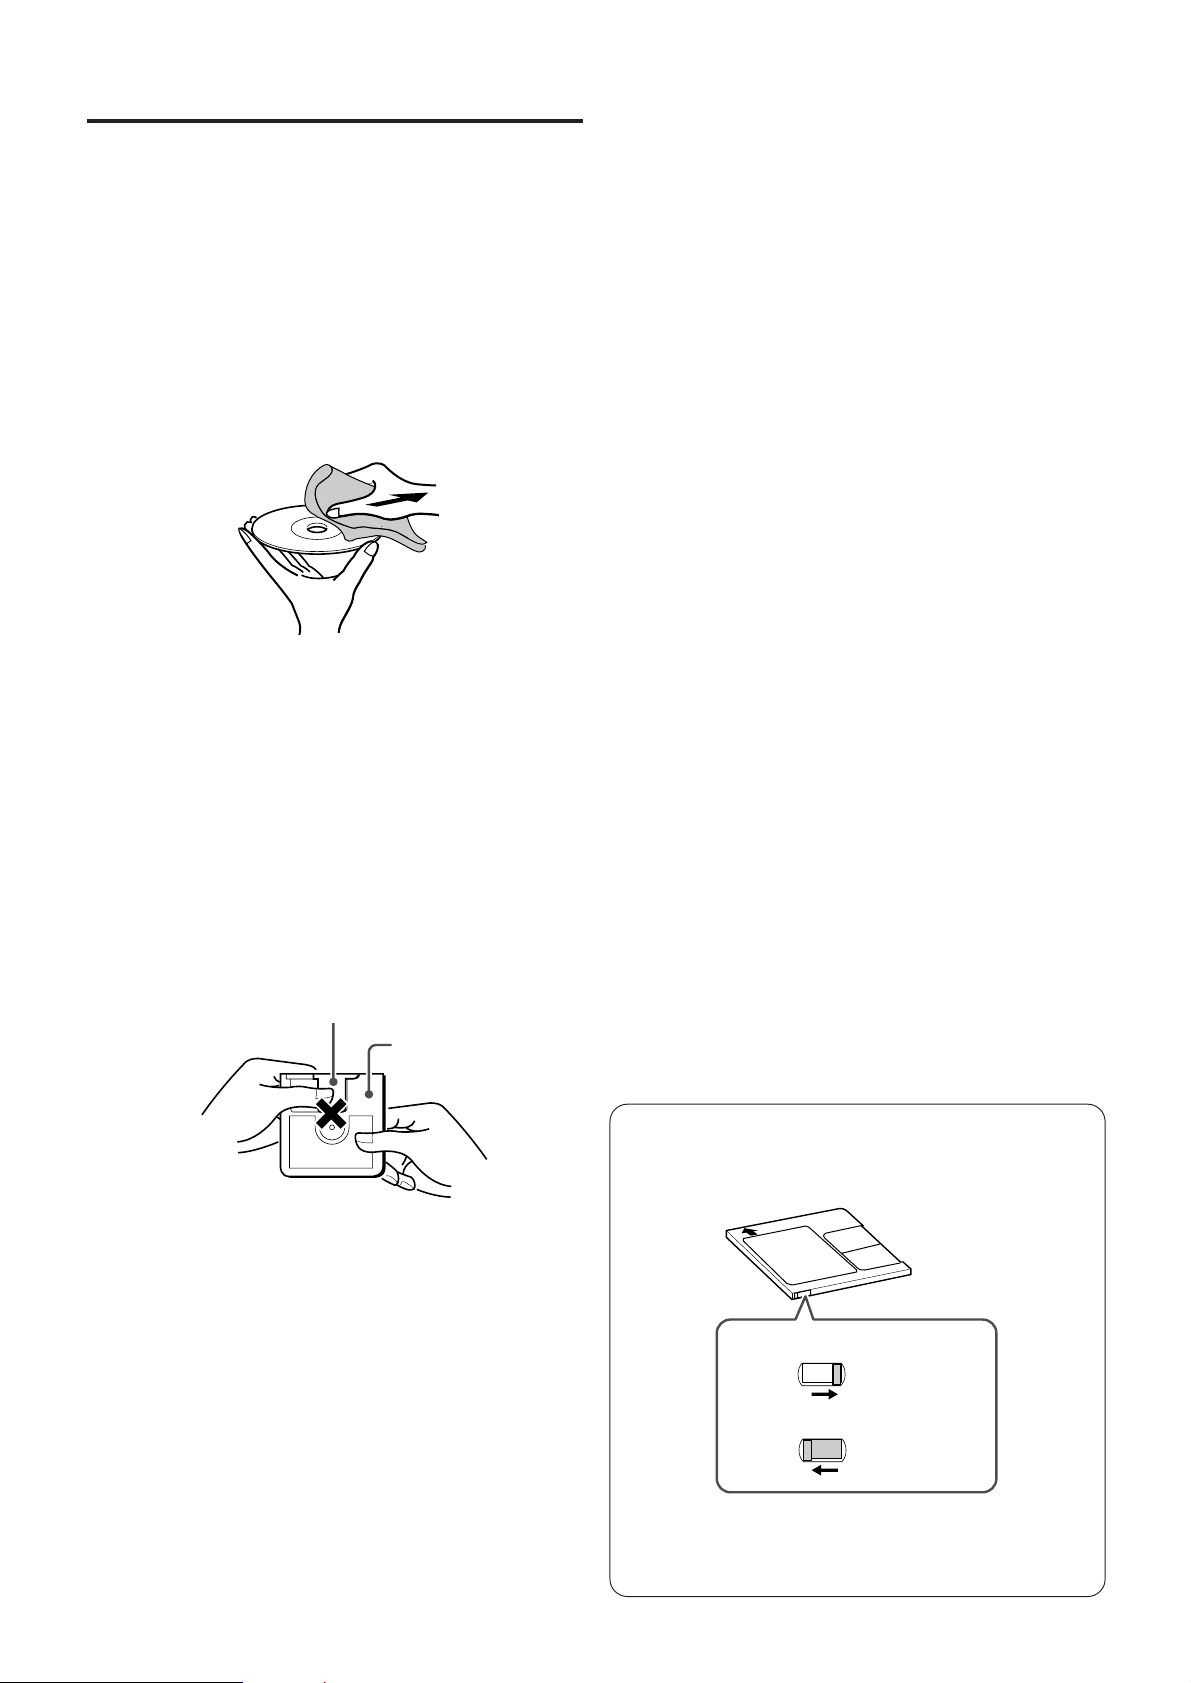
• When a CD becomes dirty, wipe the CD from the center
out with a cleaning cloth.
• After playing a CD, store the CD in its case. Do not leave
the CD in places that are hot or humid.
Care of MDs
Since MDs come in a cartridge which protects the discs
inside from fingerprints and dust, you do not have to be
overly careful when handling them. However, soiled or
damaged cartridges can lead to malfunctions in the unit.
Observe the following tips when handling MDs.
• Keep a cartridge in the attached case.
• Do not open the shutter of the cartridge to touch the disc
directly. If the disc inside becomes soiled, it is very difficult
to clean. The cartridge can also be damaged.
• Close the shutter if it opens while handling or ejecting a
disc. Otherwise dust may enter or a disc may become
scratched.
Disc shutter
Cartridge
To prevent accidental erasure of recorded material
Slide the record-protect tab as shown below.
Slide the tab so that it is completely locked.
24 ENGLISH
To protect recorded contents
To record
If recording is attempted when the tab is set to the
protected position, “Protected” appears on the display.
Slide the record-protect tab to the original position.
 Loading...