

Sony CMT-HP7 User Manual
4-246-667-11(1)
Micro Hi-Fi
Component
System
Operating Instructions
Owner’s Record
The model an d serial numbers are located on the rear of the unit. Record the serial num ber
in the space provided below. Refer to them whenever you call upon your Sony dealer
regarding this pr oduct.
Model No. ______________ Serial No. ______________
CMT-HP7
©2003 Sony Corporation
WARNING
To prevent fire or shock hazard, do not
expose the unit to rain or moisture.
To prevent fire, do not cover the ventilation of the
apparatus with news papers, table-cloths, curtains, etc.
And don’t place lighted candles on the apparatus.
To prevent fire or shock hazard, do not place objects
filled with liquids, such as vases, on the apparatus.
Do not install the app lianc e in a confined spac e,
such as a bookcase or built-in cabinet.
This appliance is
classified as a CLASS 1
LASER product. This
label is located on the
rear exterior.
Don’t throw aw ay the ba ttery with
general house waste, dispose of it
correctly as chemical waste.
NOTICE FOR THE CUSTOMERS IN THE
U.S.A.
This symbol is intended to alert the
user to the presence o f un in su lated
“dangerous voltage” within the
product’s enclosure that may be of
sufficient magnitude to constitute a
risk of electric shock to persons.
This sy m b o l is in te nded to a le rt the
user to the presence of important
operating and maintenance (servicing)
instruct ion s in the lite ra ture
accompanying the appliance.
CAUTION
The use of optical instruments with this product will
increase eye hazard.
WARNING
This equipment has been tested and found to comply
with the limits for a Class B digital device, pursuant to
Part 15 of the FCC Rules. These limits are designed to
provide reasonable protection against harmful
interference in a res id en tial installation. T h is
equipment generates, uses, and can radiate radio
frequency energy and, if not installed and used in
accordance with the instructions, may cause har mfu l
interference to radio communications. However, there
is no guarantee that interferen ce will not occur in a
particular installation. If this equip ment does c au se
harmful interference to radio or television reception,
which can be determined by turning the equipment off
and on, the user is enco u rag ed to try to correct the
interference by one or more of the following measures:
– Reorient or relocate the receiving antenn a.
– Increase the separation between the equipm e nt and
receiver.
– Connect the equipment into an outlet on a circuit
different from that to w h ich the receiv er is
connected.
– Consult the dealer o r an experienced radio/TV
technician for help.
CAUTION
You are cautioned that any changes or modifications
not expressly approved in this manual could void your
authority to operate this equipment.
Note to CATV system installer:
This re minde r is p ro v i de d to c al l th e C A TV sy s te m
installer’s attention to A rticle 8 2 0- 40 of the NEC that
provides guidelines for proper grounding and, in
particular, specifies that the cable ground shall be
connected to the grounding system of the building, as
close to the point of cab le entry as practical.
NOTICE FOR THE CUSTOMERS IN CANADA
CAUTION
TO PREVENT ELECTRIC SHOCK, DO NOT USE
THIS POLARIZED AC PLUG WITH AN
EXTENSION CORD, RECEPTACLE OR OTHER
OUTLET UNLESS THE BLADES CAN BE FULLY
INSERTED TO PREVENT BLADE EXPOSURE.
Except for European model
E
NERGY STAR
registered mark. As an E
®
S
TAR
has determined that this product
meets the E
®
is a U.S.
NERGY
partner, Sony Corporation
®
NERGY STAR
guidelines for energy efficiency.
GB
2

Table of Contents
How to use this manual...........................4
Playable discs..........................................4
Getting Started
Hooking up the system............................6
Setting the clock......................................8
CD/MP3 – Play
Loading a disc........................... ..............9
Playing a disc..........................................9
— Normal Play/Shuffle Play
Playing repeatedly.................................11
— Repeat Play
Creating your own program..................11
— Program Play
Tuner
Presetting radio stations........................13
Listening to the radio ............................ 14
— Preset Tuning
— Manual Tuning
Using the Radio Data System (RDS)....15
(European model onl y)
Tape – Play
Loading a tape................................... ....16
Playing a tape........................................16
Tape – Recording
Recording your favorite CD tracks on a
tape..................................................17
— CD-TAPE Sync hro Recording
Recording on a tape manually.............. .17
— Manual Recording
Timer
Falling asleep to music.........................20
— Sleep Timer
Waking up to music..............................20
— Daily Timer
Timer recording radio programs........... 21
Display
Turning off the display.........................22
— Power Saving Mode
Adjusting the brightness of the display’s
backlight.........................................23
Viewing information a b ou t th e disc in the
display ............................................ 23
Optional Components
Hooking up optional components.........25
Troubleshooting
Problems and remedies.........................27
Messages...............................................30
Additional Information
Precautions............................................31
Specifications........................................32
List of button locations and reference
pages...............................................34
Sound Adjustment
Adjusting the sound..............................18
Selecting the sound effect.....................18
Selecting the surround effect ................19
GB
3
How to use this manual
• This manual mainly explains operations using
the remote, but the same operations can also
be performed using the buttons on the unit
having the same or similar names.
• The following sy mbols are used in this
manual.
Symbol Meaning
Functions that can be used with
audio CDs
Functions that can be used with
MP3
Playable discs
You can play back the following discs on this
system. O the r di sc s cannot be p la yed back.
List of playable discs
Format of
discs
Audio C D s Audio
CD-R/CD-RW
(audio data)
CD-R/CD-RW
(MP3 files )
Disc logo Contents
Audio
Audio
Discs that this system cannot
play
•CD-ROMs
• CD -Rs/C D-R Ws ot her than those re corde d in
the follo wing formats :
– mu sic CD format
– M P3 format that conforms to ISO9660*
Level 1/Level 2, Jolie t*2, Romeo*2 or
Multi Session*
3
• A disc that has a non-standard shape (e.g.,
card, heart).
• A disc with paper or stickers on it.
• A disc that has the adhesive, cellophane tape,
or a stic ker still le ft o n it.
• When you eject a disc, ha nd le the disc by its
edge. Do no t touch the surface.
• Do not use discs with se als, protection rings
or other acc e ssories attached .
• Do not use adaptors that change the size of a
disc from 8 cm to standa rd size.
*1
A logical format of files and folders on CD-ROMs,
defined by ISO (International Standard
Organization)
*2
Up to 31 characters can be displayed.
*3
Multi Session
This is a recording method that enables adding of
data using the Track-At-Once method.
Conventional CDs begin at a CD control area called
the Lead-in and en d at an area called Lead-o u t. A
Multi Session CD is a CD having multiple sessions,
with each seg ment from L ead -in to Lead-out
regarded as a single se ssion .
CD-E xtra : This forma t records audio (audio CD
data) on the tracks in session 1 and data on the tracks
in session 2.
Mixed C D: This form at r eco rds data on the f irst
track and audio (audio CD data) on the second and
subsequent tracks of a session.
1
GB
4

Notes on CD-R and CD-RW
• This syst em can p la y C D-R/C D-RW discs
edited by the user. However, note that
playback of some discs may not be possible
depending on the recording device use d fo r
recording or th e disc co n dition.
• Discs recorded on CD-R /CD -RW drives ma y
not be played back because of scratches, dirt,
recording condition o r t h e drive r’s
characteristics.
• CD-R an d CD-RW discs that have n ot be e n
finalized (proce ssing to allow play by a
normal CD player) cannot be played.
• CD- R and CD-RW discs r ecorded in multi session that have no t en ded by “closing the
session” are not supp or ted.
• The system may be una ble to play MP3
format files that do not h ave the e xtende r
“.MP3”.
• Attempting to play non-MP3 format files that
have the extender “.M P3” m ay result in noise
or malfunction.
• With formats other than ISO 9660 level 1 and
2, folder names or file names may not be
displayed correctly.
• The following discs take a longer time to start
playback.
– a dis c reco rd ed w ith co m pl icated tree
structure.
– a disc recorded in Multi S ession.
– a disc to which data can be added (non-
finalized disc).
Music discs encoded with
copyright protection
technologies
This product is designed to playback discs that
conform to the Compact D i sc (C D) standard.
Recently, various music discs encoded with
copyright protection techno logies are mar keted
by some record companies. Please be aware that
among those discs, there are some th a t d o not
conform to the CD standard a nd may not be
playable by this product.
Cautions when playing a disc
that is recorded in Multi
Session
• If the d is c be g ins w ith a C D -DA se ssi on , it is
recognized as a CD-DA (audio) disc, and
playback continue s until an MP3 se ssion is
encountered.
• If the disc begin s with an MP 3 se ssion, it is
recognized as an MP3 disc, and playback
continues until a CD-DA (au dio) sess ion is
encountered.
• The playb ac k ra ng e of an MP 3 disc is
determ ined by the tree st ructure o f files
produced by analyzing of the disc.
• A disc with a mixed CD format will be
recogniz e d as a C D -D A (a ud io ) dis c.
GB
5
Getting Started
Hooking up the system
Perform the following procedu res 1 to 4 to hook up your system using the supplied cords and
accessories.
AM loop antenna
Right speaker Left speaker
FM lead antenna
1 Connect the speakers.
Connect the right and left speaker cords to
the SP EAKER terminals as shown below.
Insert only the stripped portion
Gray/Solid (3)
Black/Stripe (#)
3
4
2 Connect the FM and AM antennas.
Set up the AM loop antenna, then connect
it.
Extend the FM lead
antenna horizontally
AM loop
antenna
Note
Keep the antennas away from the spea ker cords.
GB
6
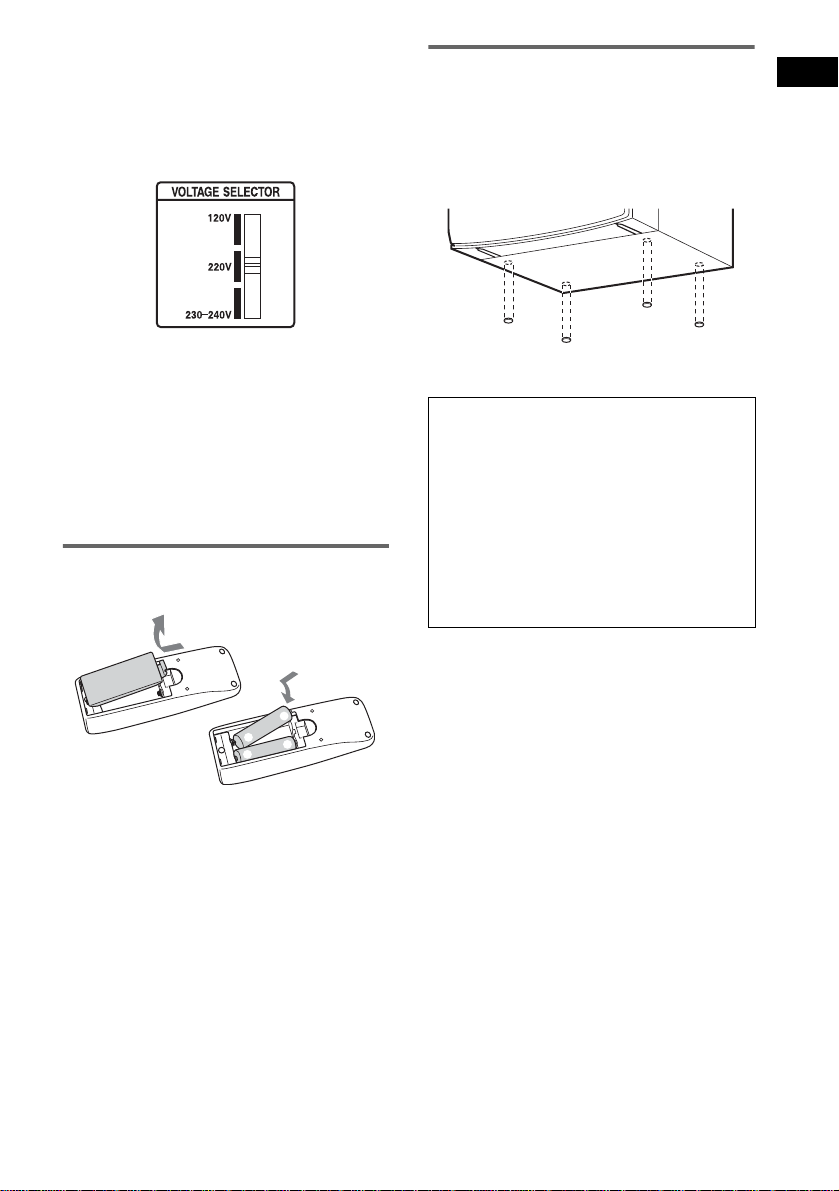
3 For models with a voltage selector, set
VOLTAGE SELECTOR to the local
power line voltage.
Refer to the print on your system’s
VOLTAGE SELEC TOR for available
settings.
4 Connect the power cord to a wall
outlet.
The demo nstra tion appe ars in the display.
When you pr ess ?/1, the system tu r ns on
and the dem onstrati o n automatical ly ends.
If the plug does not fit the wall socket,
detach the sup plied plu g adap to r (only for
models equipped with an adaptor).
Inserting two R6 (size AA)
batteries into the remote
Attaching the speaker pads
Attach the supp li e d front speaker p ads to th e
bottom of the sp eakers to stabilize the sp eakers
and prevent them from slipp ing .
Front spea ke r (L ef t (4)/R ig ht (4 ))
When carrying this system
Perform the following procedure to protect
the CD mechanism.
Make sure that all discs are removed
1
from the system.
Press ?/1 to turn off the sy stem.
2
“STANDBY” flashes for a few seconds,
and then disappears from the display.
Unplug the power cord.
3
Getting Started
e
E
E
e
Note
If you do not use the remote for a long period of time,
remove the batteries to avoid possible damage from
battery leakage and corrosion.
Tip
With normal use, the batteries should last for about six
months. When the remote no longer operates the
system, replace both batteries with ne w o ne s.
GB
7

Setting the clock
Use buttons on the remote for the operation.
Press ?/1 to turn on the system.
1
Press CLOCK/TIMER SET.
2
Press ./> repeatedly to set the
3
hour.
Press ENTER.
4
Press ./> repeatedly to set the
5
minute.
Press ENTER.
6
The clock starts working.
To adjust the clock
Press CLOCK/TIMER SE T.
1
Press ./> to select “CLOCK SET”,
2
then press ENTER.
Do the same procedures as step 3 to 6
3
above.
Note
The clock settings are canceled when you disconnect
the power cord or if a power failure occurs.
GB
8
CD/MP3 – Play
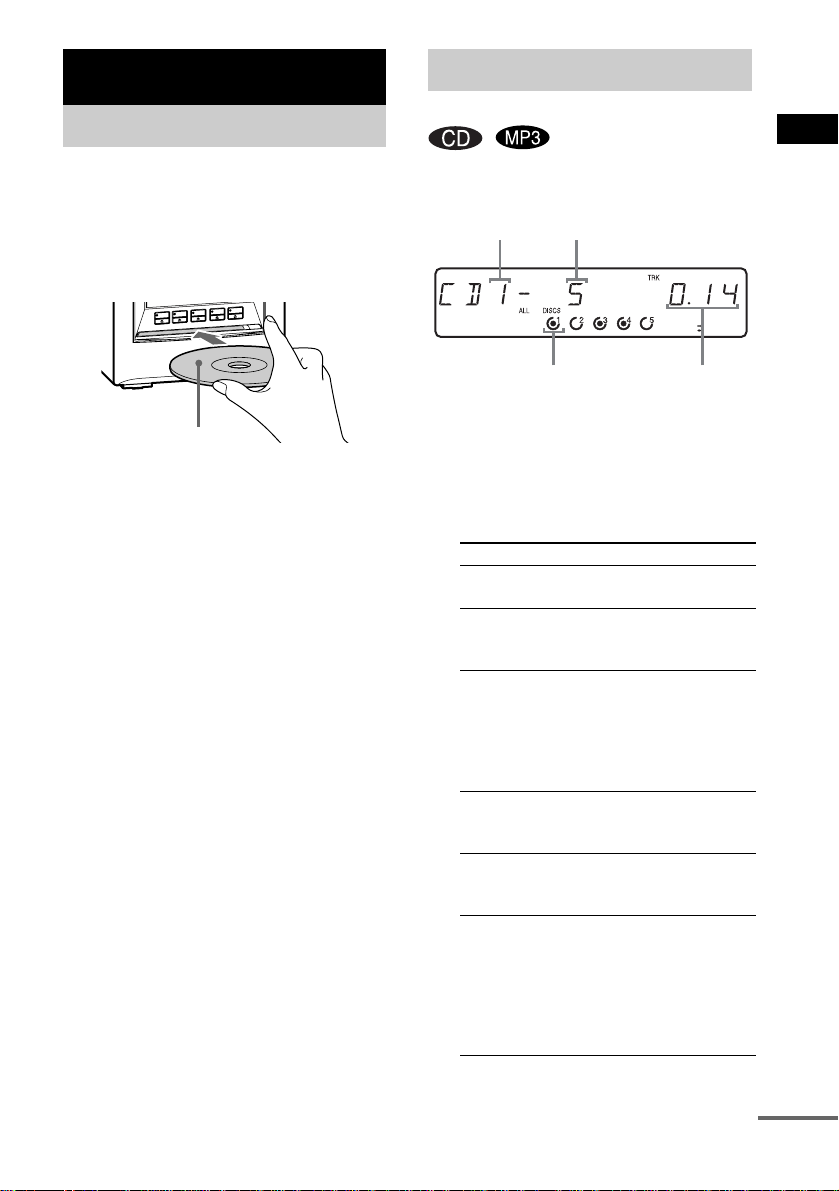
Loading a disc
Use b uttons o n the unit for the o p e r a tion.
Press any one of buttons (DISC 1 Z –
1
DISC 5 Z).
Insert a disc with the label side up.
2
The d i sc is drawn in au tomatically.
Playing a disc
— Normal Play/Shuffle Play
You can play audio CDs and discs with MP3
audio tracks.
Disc number
Track numb er
CD/MP3 – Play
With the label side up
To load another disc, eject a disc or press
one of the buttons (DISC 1 – 5) to select an
empty co m pa rt me n t (it is no t p ossi bl e to
select another c om p artm e nt, wh en an 8 cm
disc is load ed ).
Notes
• Do not use a disc with tape, seals or paste on it as this
may cause malfunction.
• You cannot store an 8 cm disc in any of the
compartments (DISC 1 – 5).
• Do not load an 8 c m disc with an adap to r. Doing so
may cause the system to malfun ction.
Disc indicator
Press CD on the remote (or FUNCTION
1
on the unit repeatedly) until “CD”
appears.
Press PLAY MODE in stop mode
2
repeatedly until the mode you want
appears in the display.
Select To play
ALL DISCS
(Norma l Pla y)
1 DISC
(Norma l Pla y)
ALBM
(Norma l Pla y)
ALL DISCS
SHUF (Sh uffle
Play)
1 DISC SHUF
(Shuffle Play )
ALBM SHUF
(Shuffle Play )
All discs in the system
continuously.
The tracks on the disc you
have selected in original
order.
All MP3 audio tracks in the
album on the disc you have
selec te d in o r ig i na l o r d er .
When playing a non-MP3
disc, Album Play becom es 1
DISC Play.
The tracks on all discs in
random order.
The tracks on the disc you
have selected in random
order.
The MP3 aud io tracks in the
album on the disc you have
selected in random order.
When playing a non-MP3
disc, Album Shuffle Play
becomes 1 DISC SHUF
Play.
Playing time
continued
GB
9

Select To play
PGM
(Program Play)
The tracks on a ll discs in the
order you want them to be
played (see “Creating your
own program” on page 11).
Press N on the remote (or CD N on
3
the unit).
Other operations
To Do this
Stop play Press x.
Pause Press X. Press again to resume
Select a track Press ./> repeatedly.
Select an album
1
of MP3*
Find a point in a
2
track*
Select a disc in
stop mode
Switch to CD
function from
another source
Remove a disc Press any one of the buttons
*1You ma y n ot b e able to search b etween multiple
files. Also, the time may not be displayed correctly
for some files.
2
*
except for M P3 au d io track s
3
*
DISC 1 – 5 on th e unit are no t available w hen “AL L
DISCS S HUF” is selected.
play.
Press ALBU M +/– repeatedly
after step 2.
Keep pressing m/ M during
playback and release it at the
desired point.
Press D. SKIP on the remote
repeatedly (or any one of the
buttons (DISC 1 – 5*
3
on the
unit)).
Press any one of the buttons
(DISC 1 – 5 on the unit)
(Automatic Source Selection).
(DISC 1 Z – DISC 5 Z on the
unit).
Notes
• For 8 cm discs, only playback is supported in this
system. Whe n an 8 cm disc is lo aded in the system, it
becomes imp o ssible to select o r play b ack another
disc.
• You cannot change the play mode during playback.
• Some time may be needed to start play ba ck o f d iscs
recorded in complex con figuration s such as m any
layers.
• When the d isc is inser ted, the p layer r ead s all th e
tracks on that disc. If there are many albums or nonMP3 audio tracks on the disc, it may take a long time
for play to begin or for the next MP3 audio track to
start play.
• Do not save unnecessary albums or tracks other than
MP3 ones in the disc to be used for MP3 listening.
We recommend that you do not save other types of
tracks or unnecessary albums on a disc that has MP3
audio tracks.
• An album that does not include an MP3 audio track
is skipped.
• Maximum album number: 150 (including root
folder)
• The maximum number of MP3 audio tracks and
albums that can be contained on a single disc is 300.
• Playback is possible up to 8 levels.
• MP3 audio tracks are played back in the order that
they are recorded on the disc.
• Depending on the encoding/writing software,
recording device, or the recording media used at the
time an MP3 audio track is recorded, you may
encounter such problems as disabled playback,
sound interruptions and noise.
10
GB
Playing repeatedly
Creating your own
— Repeat Play
You can play all the tracks or a single track on a
disc.
Press REPEAT/FM MODE repeatedly until
“REP” or “REP1” appears.
REP: For all the tracks on the disc(s), or all the
tracks in th e alb u m up to fiv e tim e s.
REP1: For a single track only.
To cancel Repeat Play
Press REPE AT/F M MODE repeatedly unti l
both “REP” and “REP1” disappear.
Notes
• You cannot select “REP” and “ALL DISCS SHUF”
at the same time.
• When you select “REP1”, that track is repeated
endlessly until “REP 1 ” is ca nc eled .
program
—Program Play
You can ma ke a prog ram of up to 25 steps f rom
all the discs in the order you want to play them.
You can synchro record the programed tracks
onto a c assette ta p e (page17).
Use buttons on th e re mote for the ope ration.
Press CD (or FUNCTION on the unit
1
repeatedly) until “CD” appears.
Press PLAY MODE in stop mode
2
repeatedly until “PGM” appears.
Press D. SKIP repeatedly (or any one of
3
the buttons (DISC 1 – 5 on the unit)) to
select a disc.
To pro g ram all th e tra ck s on a d is c at o n c e,
proceed to step 5 with “ALL” displayed.
Press ./> repeatedly until the
4
desired track number appears.
When programing an MP3, press ALBUM
+/– to select an album, then press ./
> repe a t e dly unti l t h e desired track
number appears.
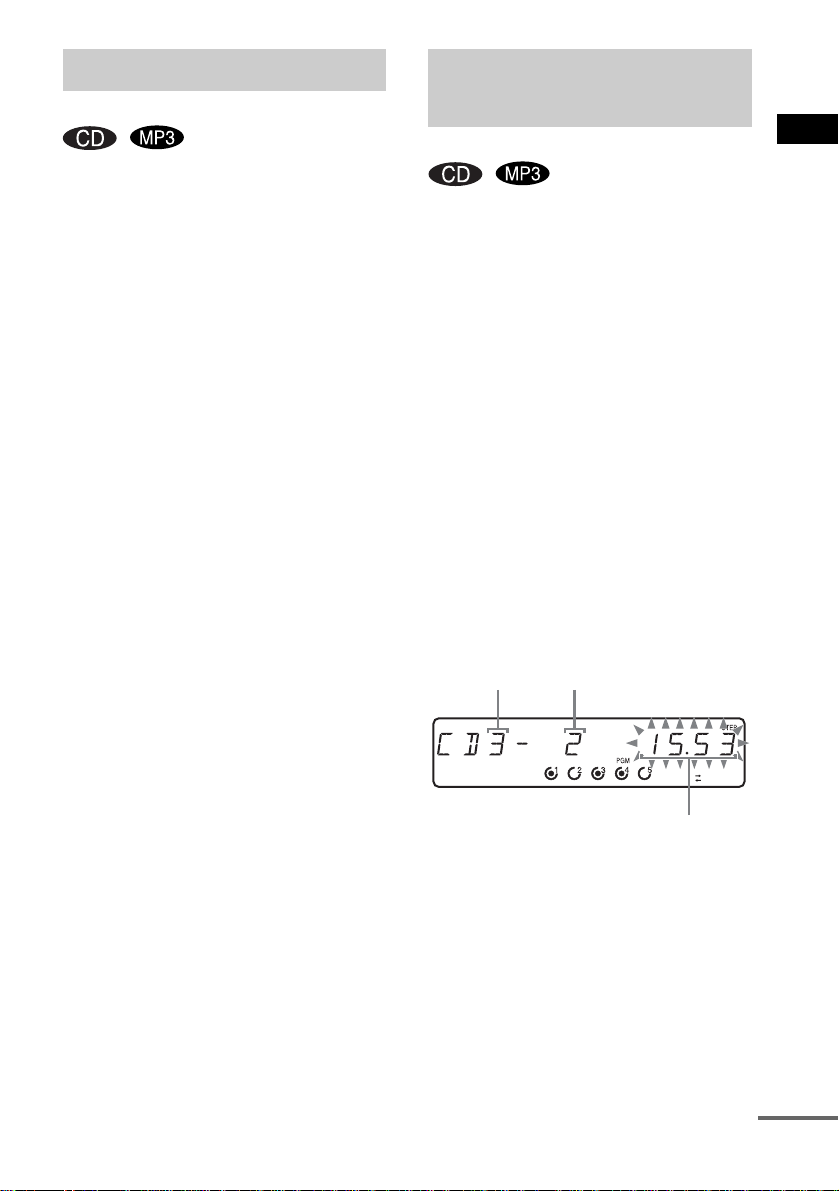
Disc number
Selected track number
CD/MP3 – Play
Total playing time
(including selected track)
Press ENTER (or PLAY MODE on the
5
unit).
The track is programed.
The program step number appears,
followe d by th e t o t a l p l a ying time.
continued
11
GB
 Loading...