

Page 1
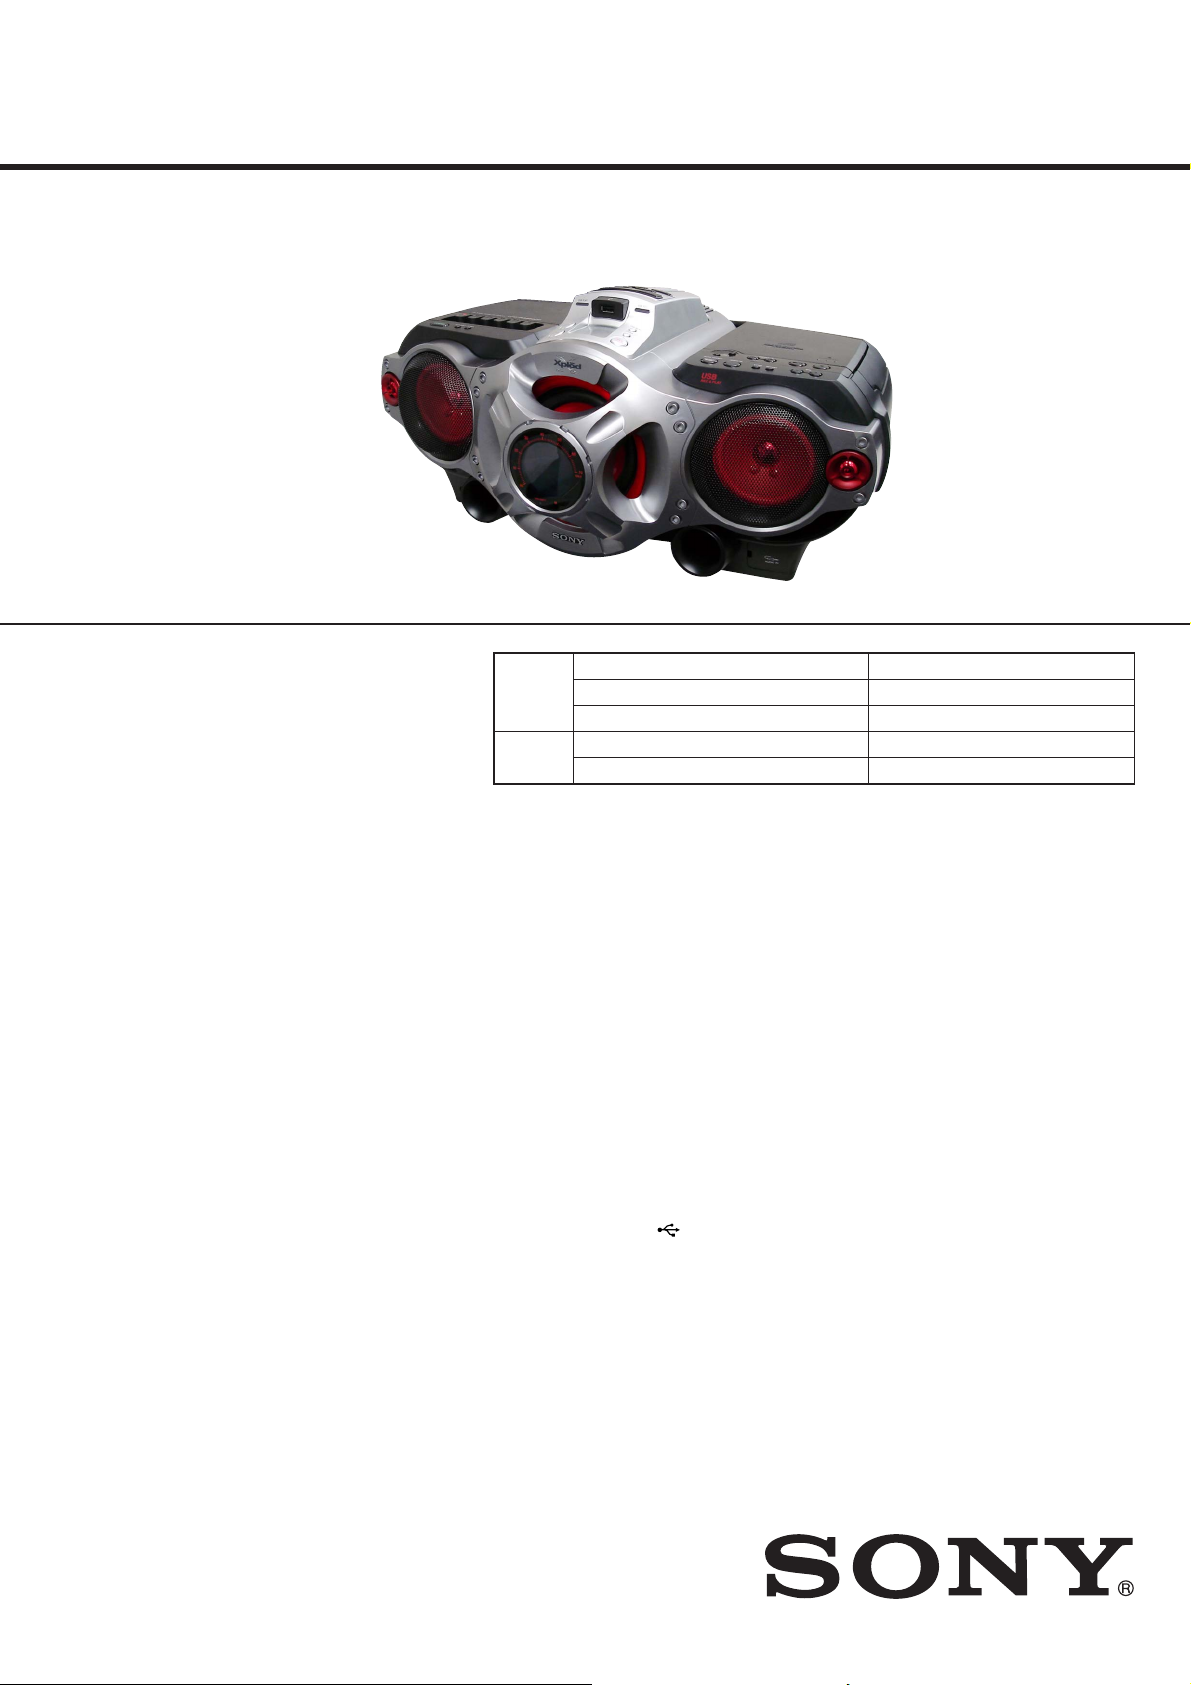
CFD-RG880CP
SERVICE MANUAL
Ver. 1.0 2009.01
CD
Section
TAPE
Section
Model Name Using Similar Mechanism CFD-G700CP/G770CP/G770CPK
CD Mechanism Type KSM-213CDP/C2NP
Optical Pick-up Name KSS-213C
Model Name Using Similar Mechanism CFD-G505
Tape Transport Mechanism Type MF-G505V
E Model
East European Model
Russian Model
CD player section
System
Compact disc digital audio system
Laser diode properties
Emission duration: Continuous
Laser output: Less than 44.6 μW
(This output is the value measured at a distance of
about 200 mm from the objective lens surface on the
optical pick-up block with 7 mm aperture.)
Number of channels
2
Frequency response
20 - 20 000 Hz +1/–2 dB
Wow and fl utter
Below measurable limit
Radio section
Frequency range
MX model:
FM: 87.5 - 108 MHz
AM: 530 - 1 710 kHz
BR, CET, E41, E92 model:
FM: 87.5 - 108 MHz
AM: 531 - 1 611 kHz (9 kHz step)
530 - 1 610 kHz (10 kHz step)
Antennas
FM: Telescopic antenna
AM: Built-in ferrite bar antenna
SPECIFICATIONS
Cassette-corder section
Recording system
4-track 2 channel stereo
Fast winding time
Approx. 150 s (sec.) with Sony cassette C-60
Frequency response
TYPE I (normal): 70 - 13 000 Hz
USB section
Supported bit rate
MP3 (MPEG 1 Audio Layer-3):
32 - 320 kbps, VBR
WMA:
16 - 320 kbps, VBR
Sampling frequencies
MP3 (MPEG 1 Audio Layer-3):
32/44.1/48 kHz
WMA:
32/44.1/48kHz
(USB) port
USB-A (Full Speed)
– Continued on next page –
9-889-387-01
2009A04-1
2009.01
©
CD RADIO CASSETTE-CORDER
Sony Corporation
Audio&Video Business Group
Published by Sony Techno Create Corporation
Page 2

CFD-RG880CP
General
Speaker
Full range: 10 cm (4 in.) dia., 3.2 Ω, cone type (2)
Woofer: 13 cm (5
Tweeter: 2 cm (13/16 in.) dia. (2)
Input
Built-in audio cable with stereo-mini plug:
Minimum input level 245 mV
AUDIO IN Jack (stereo minijack):
Minimum input level 245 mV
(USB) port: Type A, maximum current 500 mA
Outputs
Headphones jack (stereo minijack)
For 16 - 68 Ω impedance headphones
Power output
4 W + 4 W (at 3.2 Ω, 10% harmonic distortion)
Woofer:
12 W (at 4 Ω, 10% harmonic distortion)
Power requirements
For CD radio cassette-corder:
E91, MX model: 120 V AC, 60 Hz
BR model: 120 – 127/220 – 230 V AC, 50/60 Hz
CET, E41 model: 230 V AC, 50 Hz
12 V DC, 8 R20 (size D) batteries
For remote control:
3 V DC, 2 R6 (size AA) batteries
Power consumption
AC 28 W
Battery life
For CD radio cassette-corder:
FM recording
Sony R20P: approx. 6 h
Sony alkaline LR20: approx. 18 h
Tape playback
Sony R20P: approx. 1.5 h
Sony alkaline LR20: approx. 6 h
CD playback
Sony R20P: approx. 1 h
Sony alkaline LR20: approx. 5 h
Dimensions
Approx. 551 × 263 × 380 mm (w/h/d)
(incl. projecting parts)
Mass
Approx. 8.5 kg (incl. batteries)
Supplied accessories
AC power cord (1)
Remote control (1)
1/8 in.) dia., 4 Ω, cone type (1)
NOTES ON CHIP COMPONENT REPLACEMENT
• Never reuse a disconnected chip component.
• Notice that the minus side of a tantalum capacitor may be damaged by heat.
FLEXIBLE CIRCUIT BOARD REPAIRING
• Keep the temperature of soldering iron around 270 °C during
repairing.
• Do not touch the soldering iron on the same conductor of the
circuit board (within 3 times).
• Be careful not to apply force on the conductor when soldering
or unsoldering.
UNLEADED SOLDER
Boards requiring use of unleaded solder are printed with the leadfree mark (LF) indicating the solder contains no lead.
(Caution: Some printed circuit boards may not come printed with
the lead free mark due to their particular size)
: LEAD FREE MARK
Unleaded solder has the following characteristics.
• Unleaded solder melts at a temperature about 40 °C higher
than ordinary solder.
Ordinary soldering irons can be used but the iron tip has to be
applied to the solder joint for a slightly longer time.
Soldering irons using a temperature regulator should be set to
about 350 °C.
Caution: The printed pattern (copper foil) may peel away if
the heated tip is applied for too long, so be careful!
• Strong viscosity
Unleaded solder is more viscous (sticky, less prone to fl ow)
than ordinary solder so use caution not to let solder bridges
occur such as on IC pins, etc.
• Usable with ordinary solder
It is best to use only unleaded solder but unleaded solder may
also be added to ordinary solder.
Design and specifi cations are subject to change without
notice.
• Abbreviation
BR : Brazilian model
CET : East European & Russian model
E41 : 230V AC area in E model
E92 : 120V AC area in E model
MX : Mexican model
SAFETY-RELATED COMPONET WARNING!
COMPONENTS IDENTIFIED BY MARK 0 OR DOTTED LINE
WITH MARK 0 ON THE SCHEMATIC DIAGRAMS AND IN
THE PARTS LIST ARE CRITICAL TO SAFE OPERATION.
REPLACE THESE COMPONENTS WITH SONY PARTS
WHOSE PART NUMBERS APPEAR AS SHOWN IN THIS
MANUAL OR IN SUPPLEMENTS PUBLISHED BY SONY.
2
Page 3

TABLE OF CONTENTS
CFD-RG880CP
1. SERVICING NOTES ............................................. 4
2. GENERAL .................................................................. 5
3. DISASSEMBLY
3-1. Cabinet (Upper) Section-1 .............................................. 9
3-2. Cabinet (Upper) Section-2 .............................................. 9
3-3. Cabinet (Front) Section ................................................... 10
3-4. POWER KEY Board, HEADPHONE Board,
VOLUME KEY Board, AUDIO IN Board ..................... 10
3-5. Front Panel ...................................................................... 11
3-6. LCD Board ...................................................................... 11
3-7. LED Boards .................................................................... 12
3-8. Speaker (13 cm) .............................................................. 12
3-9. Speaker (10 cm) .............................................................. 13
3-10. POWER Board ................................................................ 13
3-11. TUNER Board ................................................................ 14
3-12. MAIN Board ................................................................... 14
3-13. FUNCTION KEY Board, CD KEY Board ..................... 15
3-14. SOUND KEY Board, USB Board .................................. 15
3-15. CD Block Section ........................................................... 16
3-16. Optical Pick-up ............................................................... 16
3-17. Tape Mechanism Deck .................................................... 17
3-18. Belt (Main), Belt (RF) .................................................... 17
3-19. TC Board ......................................................................... 18
4. TEST MODE ............................................................ 19
5. MECHANICAL ADJUSTMENTS ...................... 20
6. ELECTRICAL ADJUSTMENTS ........................ 21
7. DIAGRAMS
7-1. Block Diagram –CD Section– ........................................ 25
7-2. Block Diagram –TUNER Section– ................................. 26
7-3. Block Diagram –MAIN Section– ................................... 27
7-4. Block Diagram –POWER Section– ................................ 28
7-5. Printed Wiring Board –CD Section– .............................. 31
7-6. Schematic Diagram –CD Section– ................................. 32
7-7. Printed Wiring Board –TUNER Section– ....................... 33
7-8. Schematic Diagram –TUNER Section– ......................... 34
7-9. Printed Wiring Board –TC Section– ............................... 35
7-10. Schematic Diagram –TC Section– .................................. 36
7-11. Printed Wiring Board –MAIN Section– ......................... 37
7-12. Printed Wiring Boards –JACK Section– ........................ 38
7-13. Schematic Diagram –MAIN Section (1/3)– ................... 39
7-14. Schematic Diagram –MAIN Section (2/3)– ................... 40
7-15. Schematic Diagram –MAIN Section (3/3)– ................... 41
7-16. Printed Wiring Board –LCD Section– ............................ 42
7-17. Schematic Diagram –LCD Section– ............................... 43
7-18. Printed Wiring Boards –KEY Section– .......................... 44
7-19. Schematic Diagram –KEY Section– ............................... 45
7-20. Printed Wiring Boards –POWER Section– .................... 46
7-21. Schematic Diagram –POWER Section– ......................... 47
8. EXPLODED VIEWS
8-1. Overall Section ............................................................... 56
8-2. Cabinet (Front) Section ................................................... 57
8-3. Cabinet (Rear) Section .................................................... 58
8-4. Cabinet (Upper) Section-1 .............................................. 59
8-5. Cabinet (Upper) Section-2 .............................................. 60
8-6. Tape Mechanism Deck Section ....................................... 61
9. ELECTRICAL PARTS LIST .............................. 62
3
Page 4
CFD-RG880CP
SECTION 1
SERVICING NOTES
NOTES ON HANDLING THE OPTICAL PICK-UP
BLOCK OR BASE UNIT
The laser diode in the optical pick-up block may suffer electrostatic break-down because of the potential difference generated by the
charged electrostatic load, etc. on clothing and the human body.
During repair, pay attention to electrostatic break-down and also
use the procedure in the printed matter which is included in the
repair parts.
The fl exible board is easily damaged and should be handled with
care.
NOTES ON LASER DIODE EMISSION CHECK
The laser beam on this model is concentrated so as to be focused
on the disc refl ective surface by the objective lens in the optical
pickup block. Therefore, when checking the laser diode emission,
observe from more than 30 cm away from the objective lens.
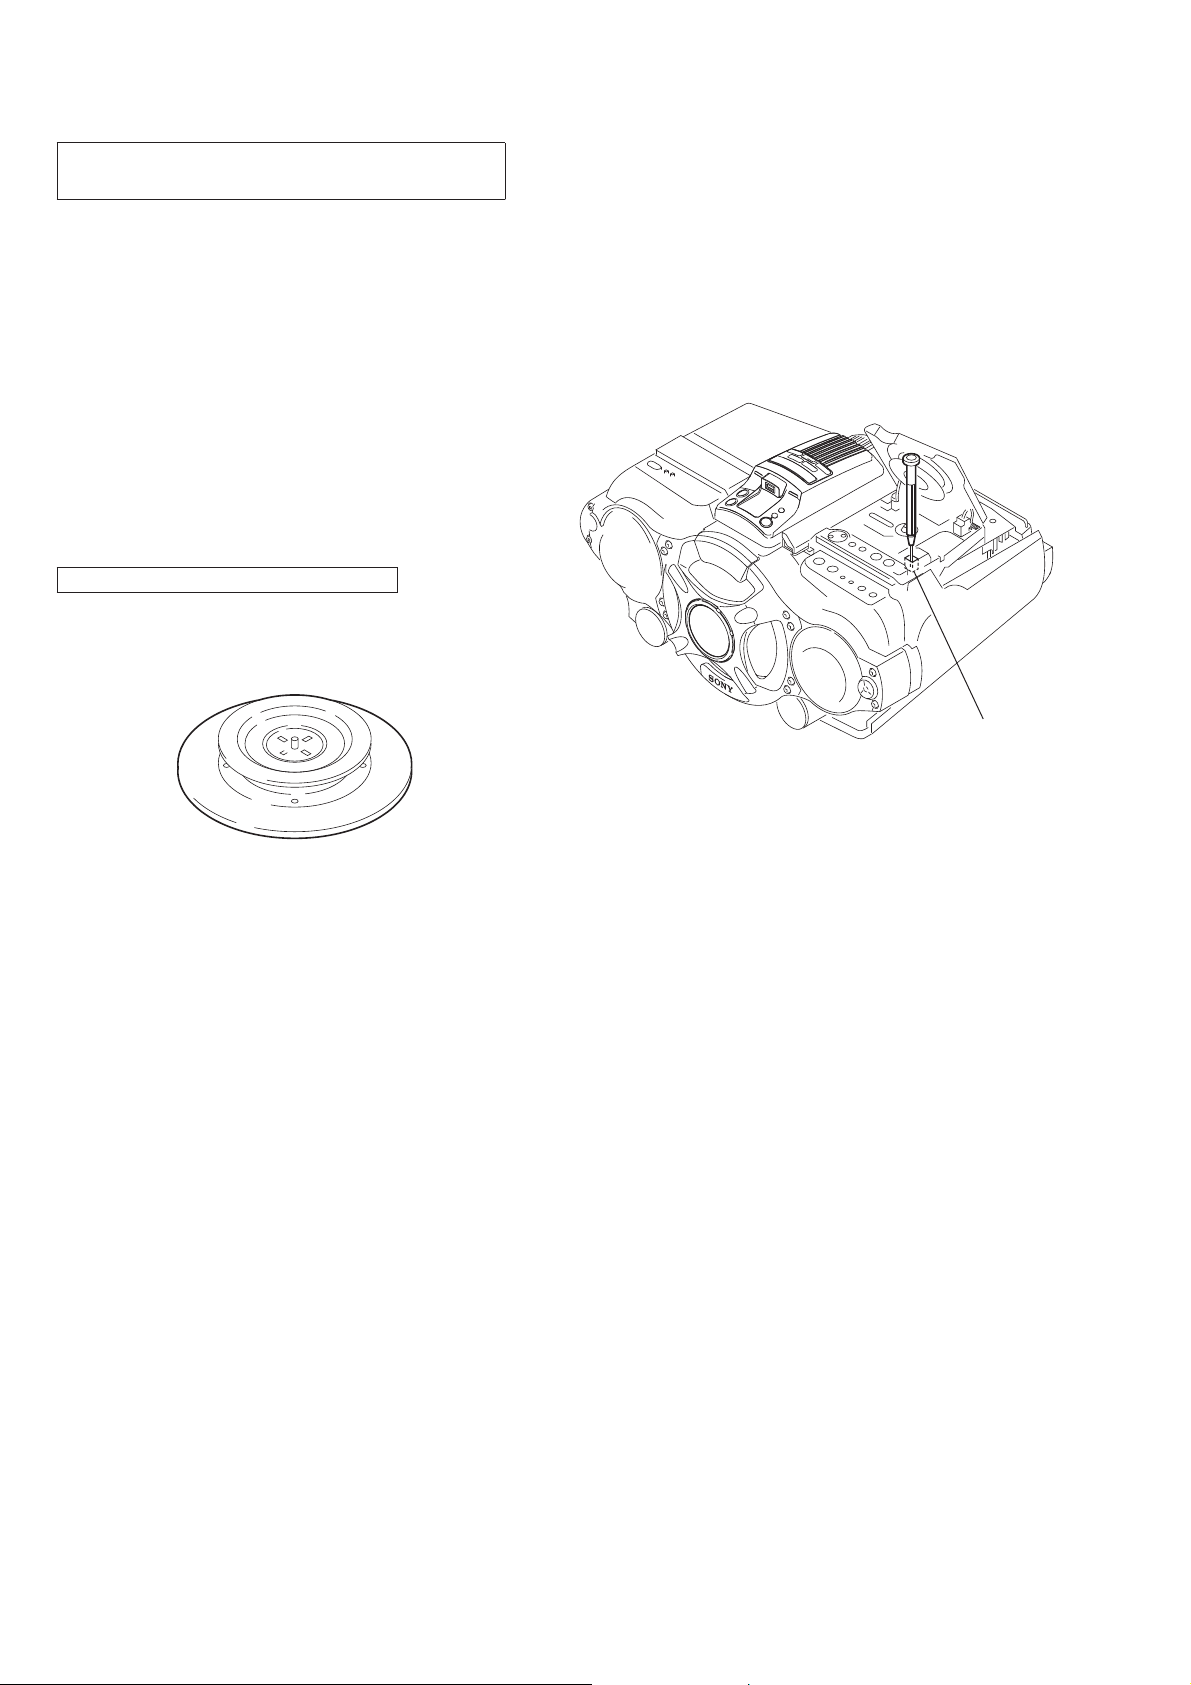
CHUCK PLATE JIG ON REPAIRING
On repairing CD section, playing a disc without the CD lid, use
Chuck Plate Jig.
• Code number of Chuck Plate Jig : X-4918-255-1
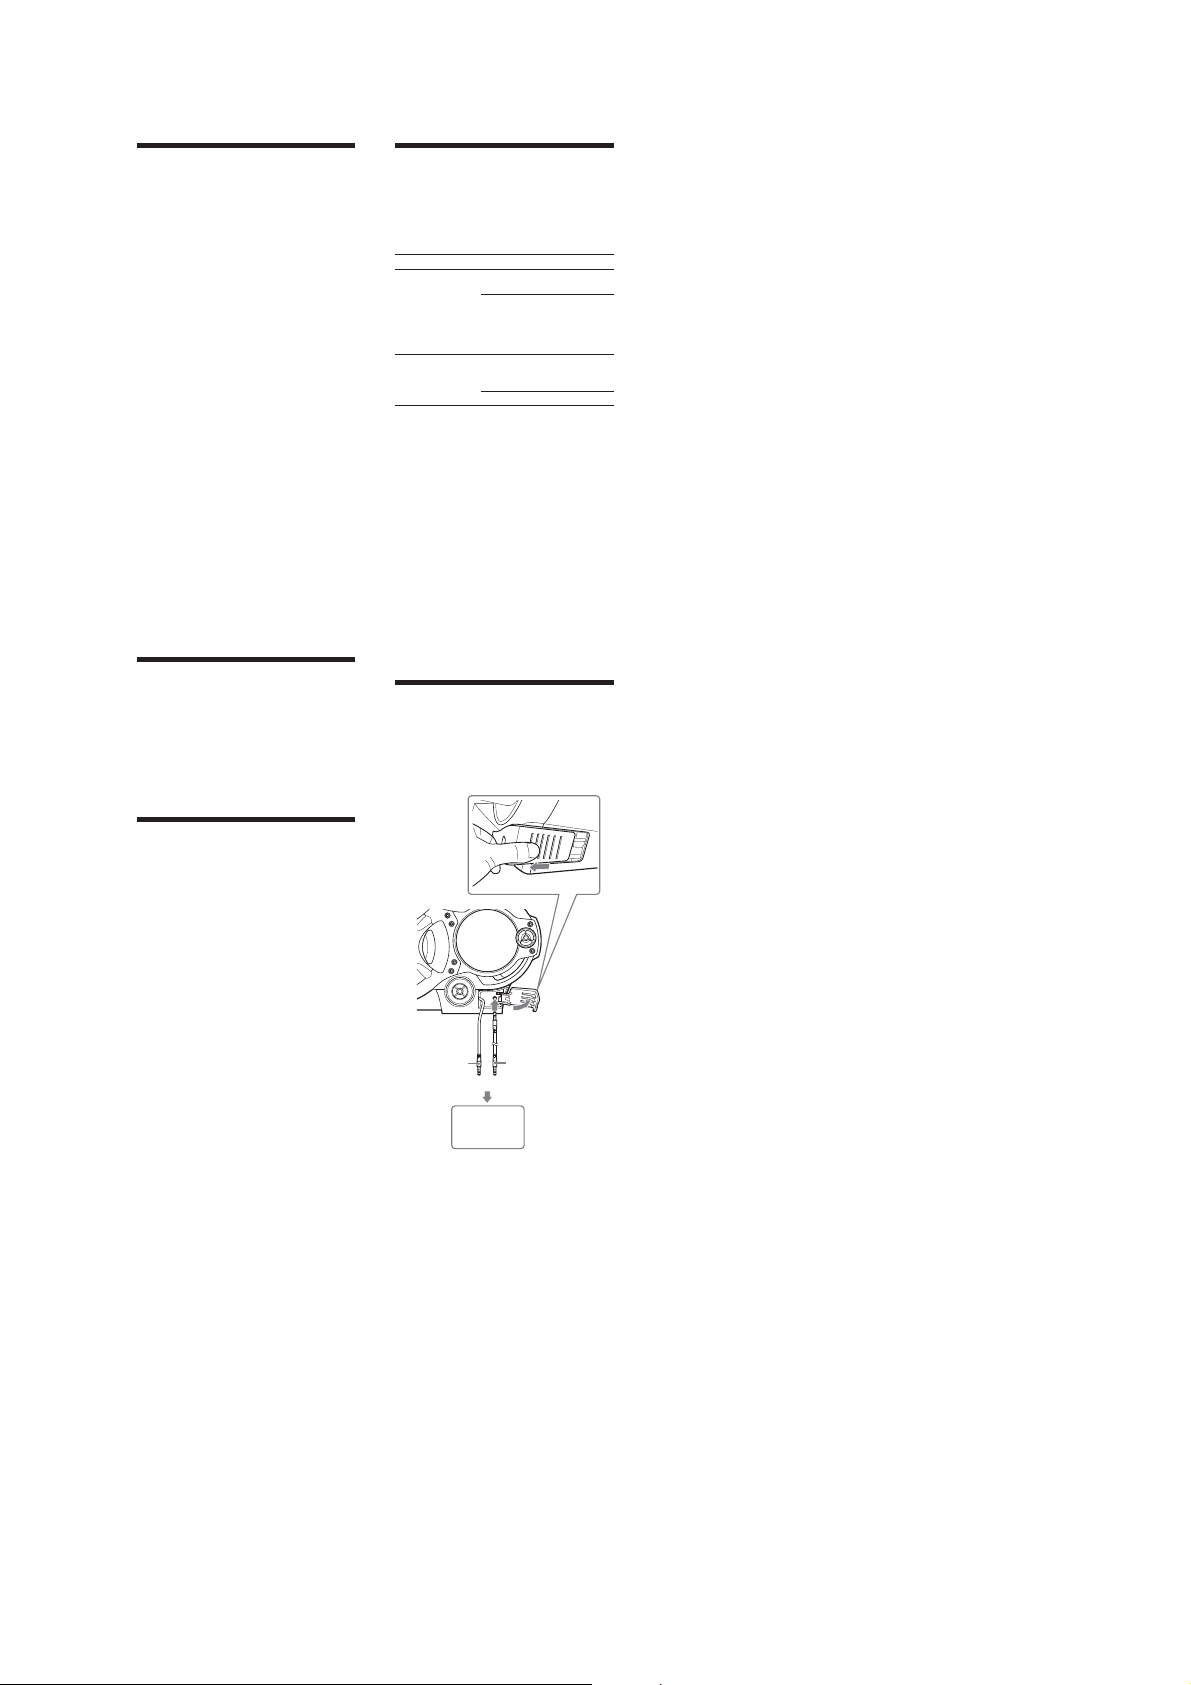
LASER DIODE AND FOCUS SEARCH OPERATION
CHECK
1. Turn ON the [POWER] button.
2. Open the CD lid.
3. Turn on SW2 with screwdriver, etc. as following fi gure.
4. Press the [
5. Confi rm the laser diode emission while observing the object-
ing lens. When there is no emission, Auto Power Control circuit or Optical Pick-up is broken.
Objective lens moves up and down eight times for focus
search.
] (CD) button.
u
SW2
4
Page 5
• Basic Operations
* VOL + (VOLUME + onthe remote), Vand / (on the
unit) have a tactile dot.
Before using the unit
To turn on/o the power
Press POWER.
To adjust the volume
Press VOL +, – (VOLUME +, – on the remote).
To listen through headphones
Connect the headphones to the J (headphones) jack XH.
To select the sound characteristic
Press ROCK, DANCE, SALSA, REGGAETON or FLAT
to select the kind of audio emphasis that you want.
(On the remote, press SOUND
e level meter in the display shows the sound signal
strength.
To reinforce the bass sound
Press POWER DRIVE WOOFER (WOOFERon the
RI
.
remote)
e eectiveness of the WOOFER function can be
changed as follows:
When the LIGHT SYNC function is on, the ring around
the woofer speaker lights up, in accordancewith the
sound signal strength.
Toreturn to normal s ound, presst he buttonrepeated ly
until the indication disappears fromthe display.
Notes
[
While the sleeping timer is on, the ring does not light, even if the
WOOFER function is used.
[
When you use the headphones, the WOOFER function does not
work.
To turn o the demo mode
When you connect the power cord to a wall outlet,the
demo mode will start automatically.To turn o the demo
mode, press POWER .
If you do not want to turn on the power oft he unit,
operate the following steps to turn o:
1 While holding down DSPL/ENT XG, press STOP .
Toresume the demo mod e, perform the same step again.
Note
When you operate the uniton batteries, the demo mode is not
activated.
Playing a CD/MP3/WMA disc
1 Press CD
on the unit.
(On the remote, press POWER
.)
2 Press ; PUSH OPEN/CLOSE
place a disc with the label side up into the CD
compartment.
Toclos e the CD compartment,press ; PUSH OPEN/
CLOSE
on the unit.
repeatedly.)
(o)
and then press CD
on the unit, and
SECTION 2
GENERAL
3 Press
on the unit (/ on the remote).
V
e unit plays all the tracks/MP3/WMA les once.
When you place MP3/WMA discs, “MP3” or “WMA”
appears in the display aer the unit reads the le
information.
Audio CD
Track number Playing time
MP3/WMA disc (Example:When you place MP3 disc)
MP3/WMA le number After the song title is displayed,
If the playing time is morethan 100 minutes, it appears as “--:--” in
*
the display.
To Press
Pause play back
Stop playback
Go to the next
track/MP3/WMA
le
Go back to the
previous track/
MP3/WMA le
Select a folder on
an MP3/WMA
disc
Locate a point
while listening to
the sound
Locate a point
while observing
the display
Remove the CD
Tips
[
Playback starts from the track/MP3/WMA le you last stopped
playing (Resume play). During stop,the track/MP3/WMA le
number to be played is displayed.
[
Tocancel the resume play (to start play from the beginning of the
rst track/MP3/WMA le), press
When you open the CD compartmentor turn o the unit, the
resume play is also canceled.
Note
Youcannot locate a specic track if “SHUF” or “PGM”is lit in the
display.
Press
, and then press MODERGrepeatedly until “SHUF ” and
Y
“PGM” disappearfromthe display.
Example of folder structure and playing order
e playing order of the folders and les is as follows:
Notes on MP3/WMA discs
[
When the disc is inserted, the unit reads all the les on that disc.
During this time, “READING” isdisplayed. If there are many folders
or non-MP3/WMA les on the disc, it may take a longtime for play
to begin or for the next MP3/WMA le to start play.
Werecommend that you do not save unnecessary folders or les
other than MP3/WMA ones in the disc to be used for MP3/WMA
listening.
[
A folder that does not include an MP3/WMA le is skipped.
[
Maximum number of les: 511
Maximum number offolders: 511 (including the root folder)
Maximum directory levels: 8
[
Folder names and le names can be displayedwith up to 32
characters including quotation marks.
[
e characters A - Z, 0 - 9, and _ can be displayedon this unit.
Other characters are displayedas “_”.
[
is unit conforms to Version 1.0, 1.1, 2.2, 2.3 and 2.4 of the ID3 tag
format. When the le has the ID3 tag information, “songtitle”,
“artist name”and “album name” can be displayed.If the le does not
have the ID3 tag information,“NO TITLE” appears instead of song
title, “NO ARTIST” appears insteadof artist name and “NO
ALBUM” appears insteadof album name. e ID3 tag information
can be displayed with up to 32 characters.
[
When naming, be sure to add the le extension “.mp3” or “.wma” to
the le name.
[
If you put the extension“.mp3” or “.wma”to a le other than an
MP3/WMA le, the unit cannot recognize the le properly andwill
generate random noise that could damageyour spe akers.
[
e le name does not correspond to the ID3 tag.
the playing time* will appear.
V on the unit (9 on the remote)
.Toresumeplay,pressitagain.
Y .
.
.
+ to go forward and – to go
.
backward
(forward) or (backward)
whileplayingandholdit until
you nd the point (
on the remote).
(forward) or (backward)
in pause and hold it until you
nd the point (
the remote).
; PUSH OPEN/CLOSE .
N or . XL on
while the CD is stopped.
Y
N or . XL
Folder
MP3/WMA le
Listening to the radio
1 Press RADIO/BAND
(RADIO/BAND
Each time you press the button, the indication
changesasfollows:
“FM” U “A M ”
2 Hold down TUNE + or –
digits begin to change in the display.
e unit automatically scans the radio frequencies
and stops when it nds a clear station.
If you cannot tune in a station, press
repeatedly to change the frequenc y step by step.
When an FM stereo broadcast is received, “ST”
appears.
Tip
If the FM broadcast is noisy,press MODERG until “Mono”appears in
the display and the radio will play in monaural.
Changing the AM tuning interval
(except for Mexican model)
If you need to change the AM tuning interval, do the
following:
1 Press RADIO/BAND•AUTO PRESET on the unit
until“AM” is displayed.
2 Hold down DSPL/ENT XG until the preset number
ashes in the display, then press RADIO/
BAND•AUTO PRESET on the unit for 2 seconds.
3 Press PRESET + or – on the unit to select “9K
STEP” for 9 kHz interval or“10K STEP” for 10 kHz
interval.
4 Press DSPL/ENT XG on the unit.
Aer changing the tuning interval, you need to reset
your preset radio stations.
[
AUTO PRESET on the unit
on the remote) repeatedly.
until the frequency
TUNE +or–
Playing a tape
Use the buttons ont he unitfor the operation.
1 Press Y;
2 Press /
To Press
Pause play back
Stop playback
Fast-forward or
rewind
Eject the cassette
on the unit, and insert the tape into
the tape compartment with the side you want to
play facing upward. UseT YPE I (normal) tape only.
Close the compartment.
Makesurethereisnoslack in thetapetoavoid
damaging the tape or the unit.
on the unit.
e unit starts playing.
9 on the unit. To resume play,
press it again.
on the unit.
Y;
(rewind or fast
Nor.
on the unit.
forward)
on the unit.
Y;
Recording on a tape
Use the buttonson the unit for the operation.
1
Press Y; on the unit to open the tape
compartment and insert a blank tape with the side
you want to record on facing upward. UseTYPE I
(normal) tape only. Close the compartment.
2 Select the program source you want to record.
Torecord from the CD player, press CD
unit and place a CD.
Torecord from a USB device, press USB
unit and connect the USB device.
Torecord from the radio, tune in the station you want
(see “Listening to the radio”).
3 Press [
on the unit to start recording (/ is
depressed automatically).
To Press
Pause reco rding
Stop recording
Tips
[
Adjusting the volumeor the audio emphasis will not aect the
recording level.
[
If the AM program makes a whistling sound aer youhave pressed
[
in step 3, press MODERGon the unit to select the position of
ISS (Interference Suppress Switch) that most decreas es the noise.
[
For the best results, use the AC power as a power source for
recording.
[
To erase a recording,proceed as follows:
1 Insert the tape whose recording you want to erase.
2Makesurethat“TAPE”is displayed. (If“TAPE”isnot displayed,
press /
until it appears in the display.)
3Press[
9 on the unit.
Press the button again to
resume recording.
Y; on the unit.
on the unit or press FUNCTIONXIon the remote
on the unit.
on the
XT
on the
CFD-RG880CP
This section is extracted
from instruction manual.
Listening to music of a USB device
Youcan listen to music stored on a USB device (digital
music player or USB storagemedia).
Music les in WMA and MP3 format* can be playedon
this unit.
See “Playable/Recordable USB devices”on the back page
for a list of USB devices that can be connected to this
unit.
* Files with copyrightprotection (Digital Rights Management) cannot
be played on this unit.
XT
1 Press USB
2 Connect the USB device to the (USB) port
3 Press
4 Press VOL + or – (or VOLUME + or – on the remote)
Other operations
To Press
Pause play back
Stop playback
Select a folder
Select a le
Find a point in a
le
Select Repeat Play REPEAT
Remove the USB
device
* When playing a VBR MP3 le, the unit mayresume playback from
Tips
[
[
Note
Always hold down Yandmakesurethat“NODEV”appears
before removing the USB device.R emovingthe USB device while
“NO DEV” is not displayedmay corrupt the data on the USB device
or damage the USB device itself.
To change the play mode
Press MODERGrepeatedly while the USB device is not
playing. You can select Normal Play (“
the folder on the USB device), Shue Play (“SHUF” or
“
Notes on the USB device
[
[
[
[
[
[
[
[
[
[
[
[
[
[
Recording from a disc to a USB device
By connecting a USB device (digital music player or USB
storagemedia)tothe (USB)port
can record music from a disc to the USB device.
is unit supports recording from CD-DAand MP3/
WMA discs only. Sound from this unit’s cassette player
or radio cannot be recorded to a USB device.
Audio les are recorded ont his unit in the MP3 or
WMA format.
e approximaterecording size is about 1 MB per
minute of recording time from a CD. ele size may be
larger for recordingsmade f roman MP3/WMA disc.
See “Playable/Recordable USB devices”on the back page
for a list of the USB devices that can be connected to this
unit.
Synchro Recording
is function allows you to easily record an entire disc
onto a USB device.
1 Connect a USB device with recording capability to
2 Press CD
on the unit.
e blue indicator lights up and “USB MEMORY”
appears in the display.
.
V
e unit starts playing.
File number After the le name is displayed,
the playing time will appear.
to adjust the volume.
. Toresume play, press the
V
button again*.
.
Y
+ or – .
or
Hold down
or
playback, and release the button at
the desired point (
on the remote).
RE
on the unit repeate dly
” or “ 1” appears.
until “
Hold down
Y
appears, then remove the USB
device.
a dierent point.
Playback starts from the MP3/WMA le you last stopped playing
(Resume play). During stop,the MP3/WMA le number and the
playingtimetobeplayedare displayed.
Tocancel resume play (to start play from the beginning of the rst
MP3/WMA le), press Y
.
.
Nor.
until “NO DEV”
X
.
during
XL
” for all les in
SHUF”), or Program Play (“PGM”).
Youcannotchangetheplaymodeduringplayback.
Some time may be needed before playback starts w hen:
– the folder structure is complex.
– the USB device is close to capacity.
When a USB device is connected, the unit reads all the les on the
device. If there are manyfolders or les on the device, it may take a
long time for the unit to nish reading them.
Do not connect a USB device to the unit through a USB hub.
In the case of some USB devices, when an operationis p erformed on
the USB device, there may be a delay beforeit is carried out on this unit.
is unit may not support all the functions providedon the
connected USB device.
Files recorded bythis unit are played back in the order of folder
creation. Files recordedby a device other than this unit (such as a
computer) maynot play back in the order in which they were recorded.
e playback order on this unit may dier from the playback order
on the connected USB device.
Do not save non-MP3/WMA les or unnecessary folders to a USB
device that contains MP3/WMA les.
During playback, folders that containno MP3/WMA les are
skipped.
is unit can play only MP3/WMA les thathave the “.mp3” or
“.wma” le extension.
If there are les on the disc that havethe “.mp3” or “.wma”le
extension, but are not MP3/WMA les, the unit mayproduce noise
or malfunction.
A maximum of 999 MP3/WMA les and 255 folders canb e
contained on a single USB device.
e maximum number of MP3/WMA les and foldersmay vary,
depending on the le and folder structure.
Compatibility with all MP3/WMA encoding/writing soware,
recording devices, and recordingmedia cannot be guaranteed. If
you use an incompatible USB device,the sound skipping or noise
may be produced, or the device may notplay at all.
X
on the unit, you
X
the (USB) port
If a USB cable is necessary, use the USB cable supplied
with the device to be connected.
Refer to the operation manual suppliedwith the USB
device for connection details.
record.
.
and insert the disc that you want to
5
Page 6
CFD-RG880CP
3 When the CD player is stopped, press MODE
repeatedly to select the play mode.
e play mode automatically changes to Norma l Play
if the unit is in Shue Play,Repeat Play or Program
Play (with no tracks or MP3/WMA les
programmed) at the star t of recording.
For details about play modes, see “Tochange the play
mode” in “Listening to music of a USB device”.
4 Press REC CD / USB
“REC” ashes and the display cycles through “CD
SYNC”, “FREExxxM”* (free space on the USB device),
and “PUSH ENT”.
e red indicator blinks.
e USB device changes to recording standby and the
unittoplaypause.
* If the amount off reespace is in the gigabyte range, “FREExxxG”
will be displayed as the unit.
5 Press ENTER
Recording starts. e red indicator stopsblinking and
turns on during the recording. e unit andt he USB
device automatically stop when the recordingis
completed.
REC1 Recording
is procedure allows youto easily record the currently
playing track or MP3/WMA le to a USB device.
1 Connect a USB device with recording capability to
(USB) port X.
the
2 Press CD and insert the disc with the track or
MP3/WMA le that you want to record.
3 Select the track or MP3/WMA le and start playing
it.
4 Press REC CD / USB RM on the unit while the
selected track or MP3/WMA le is playing.
“REC” ashes and the display cycles through “REC 1”,
“FREExxxM”* (free space on the USB device) and
“PUSH ENT”. e USB device changes to recording
standbyandthe unittoplaypause.
* If the unit of the free space capacityis giga-byte, “FREExxxG”
will be displayed.
5 Press ENTER RL on the unit.
Recording starts. When recordingis completed, the
CD player continues to play.
To stoprecording
Press YXT.
e red indicator turns o.
Toremove the USB device
1 Press USB
2 Hold down Y
appears.
RM
on the unit.
RL
on the unit.
XT
when the unit is stopped playing.
on the unit until“NO DEV ”
RG
3 Remove the USB device.
To erase MP3/WMA les or folders on a USB
device
Youcan erase MP3/WMA les or folders that are on a
USB device.
1 Connect a USB device with recording capability to
the (USB) port
2 Press USB
3 Press + or –
press
WMA le.
4 Press ERASE/MEMORY SELECT
“ERASE” appears on th e display.
When you erase a track, “TRACK” appears, followed
by “ERASE?”
When you erase a folder,“FOLDER” appears,
followed by “E RASE?”
Tocancel t he erase operation, pressY
5 Press ENTER
e red indicator blinks and the selected MP3/WMA
le or folder is erased.
e red indicator turns on while erasing and then
turns o when complete.
To select the recording destination on a USB
device
If a USB device has more than one memory (for example,
internal memory and a memory card), you can select
which memory to read to and then start recording.
1 Connect a USB device to the (USB) port
2 Press USB
3 Press ERASE/MEMORY SELECT
stop mode.
“SELECT?” appears. If an audio le or a folderis
selected, “ERASE?” appears instead. Press ERASE/
MEMORY SELECT
4 Press ENTER
e name of the memory appears.
e displayed name varies depending on the
specications of the USB device.
5 Press
memory.
Proceed to step 6 if only one memory can be selected.
Tocancel t his operation,press Y
6 Press ENTER
7 Start recording by following steps 2 to 5 of“Synchro
Recording” or“REC1 Recording.”
Folder and le generation rules
When a recording operation is rst performed on a USB
device, a “MUSIC” folder is created directly below the
“ROOT”. Folders and les are generated within this
“MUSIC” folder as follows, accordingto the recording
method.
X
XT
on the unit.
repeatedly to select a folder, or
or
RL
on the unit.
XT
on the unit.
RL
on the unit.
or
RL
on the unit.
.
repeatedly to select a MP3/
RK
on the unit.
.
RK
on the unit, in
RK
again to select “SELECT?”
repeatedly to select the
.
X
.
Synchro Recording
Recording
source
MP3/WMA Same as the recording source
CD-DA “FLDR001”3)“TRACK001”
REC1 recording
Recording
source
MP3/WMA
CD-DA “TRACK001”
1)
In Program Play,the folder name is “FLDRxxx”,and the le name
depends on the recording source (CD-DA discor MP3/WMA disc).
For details about playmodes, s ee “Tochange the play mode” in
“Listening to music on a USB device”.
2)
Up to 32 charactersof the name are assigned.
3)
Folder names are assigned in sequentialorder up to a maximum of
255 (including root and MUSIC).
4)
File names are assigned in sequential order.
5)
A new le is recorded to the “REC1” folder each time REC1
recording is performed.
Notes
[
Do not remove the USB device during recordingor erase
operations. Doing so may corruptthe data on the USB device or
damage the USB device itself.
[
Do not connect a USB device to the unit through a USB hub.
[
When recording from a CD,the tracks are recorded as MP3 les at
128 kbps. When recordingfrom an MP3/WMA disc, MP3/WMA
les are recorded with the same bit rateas the original MP3/WMA
les.
[
While recording from an MP3/WMA disc, no sound is outputand
“HI-SPEED”appears.
[
CD text information is not included in the MP3/WMA les.
[
If you cancel a recordingbefore it is completed, an MP3/WMA le
is created with the contentsup to the point the recording was
stopped.
[
Recording stops automatically if:
– the USB device runs out of space during recording, or
– the number of MP3/WMA les on the USB device reaches the
[
A maximum of 999 MP3/WMA les and 255 folders canb e
contained on a single USB device. (includingroot and MUSIC).
e maximum number of MP3/WMA les and foldersmay vary,
depending on the MP3/WMA le and folder structure.
[
Youcannot erase MP3/WMA les and folders in Shue Play or
Program Play.
[
If a folder to be erased contains non-MP3/WMAformat les or sub
folders, these are not erased.
[
If a folder or le with the same name as the one you are trying to
record already exists on the USB device, a sequentialnumber is
added aer the name for the newly recordedfolder or le to avoid
overwriting the existing one.
[
When recording tracks froman MP3/WMA disc to a USB device,
there is no sound output.
1)
Folder name File name
Folder name File name
5)
“REC1”
limit that the unit can recognize.
2)
4)
Same as the recording
2)
source
4)
• Other Operations
Using the display
Youcan check information about the CD using the
display.
Checking the information of an audio CD
To check the total track number and playing
time of the CD
Press Y whilethe CD isstopped,andyoucancheck
them in the display.
Total track number Total playing time
Checking the information of an MP3/WMA
disc
To check the totalfolder number and total le
number on the CD
Press Ywhile the CD is stopped, and you can check
them in the display.
MP3/WMA disc (Example:When you place MP3 disc)
Totalfolder number
To check le information
Press DSPL/ENTXGon the unit while playing an MP3/
WMA disc. e display changes as follows:
#
e song title ( ) *
S
e artist name (
e album name (
e current le number and playing time
* If the le does not have ID3 information, the le name or folder
name appears in the display.
**Artist name or album name will change to this in a few seconds.
Playing tracks/MP3/WMA les
repeatedly
Youcan play tracks/MP3/WMA les repeatedly in
normal, Shue or Program playmodes.
1 Press CD
“CD” appears in the display.
2 Proceed as follows.
Torepeat Do this
A single
track/MP3/
WMA le
All tracks/
MP3/
WMA les
on the CD
Aselected
folder
(MP3/
WMA disc
only)
Tracks/
MP3/
WMA les
in random
order
MP3/
WMA les
in a
selected
folder in
random
order
(MP3/
WMA disc
only)
Programed
tracks/
MP3/
WMA les
On the remote
Use
/
Tocancel Repeat Play
Press REPEATRE until “ ” disappears from the display.
)
S
S
) *
(Repeat Play)
.
1 Press REPEAT
2Press
3Press
1 Press REPEAT
2Press
1 Press MODE
2 Selectthefolderbypressing
3Press
1 Select ShuePlay (see “Playing tracks/
2 Press REPEAT
3Press
1 StartFolder Shue Play (see “Playing
2 Press REPEAT
3Press
1 Programtracks/MP3/WMA les (se e
2 Press REPEAT
3Press
instead of
RE
until “ 1” appears.
or
MP3/WMA le that you want to repeat.
V
V
then press REPEAT
appears.
.
V
MP3/WMA les in random order”).
”appear.
“
V
tracks/MP3/WMA les in random
order”).
“SHUF” and “
V
“Creating your own prog ram”).
appear.
V
V
to select the track/
on the unit.
RE
until “ ”appears.
on the unit.
RG until “ ”appears,and
RE until “ ”
on the unit.
RE
until “SHUF” and
on the unit.
RE
on the unit until “ ”,
”appear.
on the unit.
RE
until “ ”and“PGM”
on the unit.
.
**
+ or –
Playing tracks/MP3/WMA les in
random order
Youcan play tracks/MP3/WMA les in random order.
When playing an MP3/WMA disc, you can also play
MP3/WMA les in a selected folder in random order
(Folder Shue Play).
1 Press CD
“CD” appears in the display.
2 Press MODE
When you select Folder Shue Play (MP3/WMA disc
only), press MODE
“SHUF” appear in the display. en press
or –
3 Press V
On the remote
Use
/
Tocancel Shue Play
Stop playing rst. en press MODERG until “SHUF”
disappears from the display.
Tips
[
During Shue Play,you cannot select the previous track/MP3/
WMA le by pressing
[
e resume function does not work during Shue Play.
(Shue Play)
.
RG
until“SHUF” appears in the display.
RG
on the unit until “ ”and
on the unit to select a folder you want.
on the unit to start Shue Play.
instead of
.
V
.
TUNE +
Creating your own program (Program
Play)
Youcan arrange the playing order of up to 25 tracks/
MP3/WMA les on a CD.
1 Press CD
.
“CD” appears in the display.
2 Press MODE
3 Press
4 Press
On the remote
Use
Tocancel Program Play
Stop playing rst. en press MODERG until “PGM”
disappears fromthe display.
To delete the last track or le of the program
Press CLEAR XKon the remote while the CD is stopped.
To delete the current program
Press POWERtwice.
ecurrentprogramwillalsobeclearedwhenyoupush
the CD lid OPEN/CLOSE
en create a new program foll owing the programming
procedure.
Tips
[
[
[
[
RG
until“PGM” appears in the display.
or
then press DSPL/ENT XG on
XM
the unit (ENTER
MP3/WMA les you want to program in the order
you want.
For MP3/WMA les, press
and then press
(ENTERXM on the remote).
Aer programming the rst track, “STEP 1” appears,
followed by the selected track/MP3/WMA le.
Each time you add a track/MP3/WMA le, a step
number is added.
e total time of the program play will be displayed
up to “99:59” for the CD (If the total time count
becomes more than 99:59, “--:--” will be displayed.
For MP3/WMA, “--:--” will be always displayed.)
on the remote) for the tracks/
TUNE + or – rst
or
and DSPL/ENT
Audio CD (Program Play)
Programed track
number
Total playing time
MP3/WMA disc (Program Play) (Example:When you place MP3 disc)
Programed track
number
on the unit to start Program Play.
V
/
If you try to program 26 tracks/MP3/WMA les or more,“FULL”
will appear in the display.
Youcan play the same program again, since the program is saved
until you open the CD compartmentor turn o the power of the
unit.
Youcanrecordyourownprogram.Aeryouhave createdthe
program, insert a blank tape and press[
recording.
e resume function does not work during Program Play.
instead of
.
V
to open.
on the unit to start
XG
6
Page 7
CFD-RG880CP
Presetting radio stations
Youcan store radio stations into the unit’smemor y. You
can preset up to 30 radio stations, 20 for FM and 10 for
AM in any order.
1 Press RADIO/BAND
select the band.
2 Hold down RADIO/BAND
unit for 2 seconds until“AUTO” ashes in the display.
3 Press DSPL/ENT
e stations are stored in memory from the lower
frequencies to the higher ones.
If a station cannot be preset automatically
Youneed to preset a station with a weak signal manually.
1 Press RADIO/BAND
select the band.
2 Tune in a station you want.
3 Hold down DSPL/ENT
until the preset number ashes in the display.
4 Press PRESET + or –
number you want for the station ashes in the
display.
5 Press DSPL/ENT
e new station replaces the old one.
On the remote
1 Press RADIO/BAND
appears in the display.
2 Tune in a station you want.
3 Hold down ENTER
number ashes in the display.
4 Press PRESET + or –
want for the station ashes in the display.
5 Press ENTER
Tip
e preset radio stations remain in memory even if you unplugthe
AC power cordor remove the batteries.
[
AUTO PRESET on the unit to
[
AUTO PRESET on the
XG
on the unit.
[
AUTO PRESET on the unit to
XG
on the unit for 2 seconds
on the unit until the preset
XG
on the unit.
until the band you want
XM
for 2 seconds until the preset
until the preset number you
XM
.
Playing preset radio stations
1 Press RADIO/BAND
select the band.
2 Press PRESET + or –
stored station.
On the remote
1 Press RADIO/BAND
2 Press PRESET + or –
[
AUTO PRESET on the unit to
on the unit to tune in the
.
to tune in the stored station.
Playable/Recordable USB devices
Youcan use the following Sony USB devices on this unit.
Other USB devices are not playable/recordableon this
unit.
Veried Sony digital music players (as of
September 2008)
Product name Model name Series name
3
Wal k m an
Wal k m an
Check the websites below for the latest information
about compatible devices.
For customers in Europe:
<http://support.sony-europe.com/>
For customers in Latin America:
<http://www.sony-latin.com/pa/info>
For customers in Asia and Oceania:
<http://www.sony-asia.com/section/support>
Notes
[
When formatting the abovemodels, be sure to format using the
modelitselforthe dedicatedformattingsowareforthatmodel.
[
Do not use any other than these USB devices. Operationof models
not listed here is not guaranteed.
[
Operation may not alwaysb e ensuredeven when using these USB
devices.
[
Some of these USB devices may not be availablefor purchase in
certain areas.
[
Playback of WMA/AAC les with copyrightprotection is not
supported.
[
Files downloaded from a music downloadwebsite may not be
played.
[
Connection through a hub is not supported.
NWD- B100/B110F/
NWZ- A810/A820K/
3
Phone W880i/W850/
W710/W660/
W580
W910
E020F
B130F/E430F/
S510/S610F/
S630F/S710F/
S730F
Connecting optional components
Youcan enjoy the sound from an optional component
such as a portable digital music player through the
speakers of this unit.
Be sure to turn o t he power of each component before
making any connections.
For details, refer to the instruction manual oft he
component to be connected.
Falling asleep to music
1 Play the music source you want.
XE
2 Press SLEEP
3 Press SLEEP
goes o automatically.
Each time you press the button, the indication
changes as follows:
“AU TO * ” U “60MIN” U “30MIN” U “20MIN” U
“10MIN” U “OFF”.
* When you select “AUTO”, the CD, USBor tape stops playing in
If 4 seconds have passed aer you pressed SLEEPXE,
the minutes in the display are entered.
When the setting becomes eective, the LCD
backlight will be dimmer and the Woofer LED will
turn o.
When the preset time has passed, the unit goes o
automatically.
Tocancel the sleep func tion
Press POWERto turn o the p ower.
Note
When you are playing a tapeusing this function:
If the tape length of one side is longerthan the set time, the unit will
notgoo untilthetapereachesthe end.
to display“SLEEP ”.
XE
to select the minutes until the unit
90 minutes at most andthe unit goes o automatically. When
you are listening to the radio,the radio goes o in 90 minutes.
ToAUDIO IN jack
Built-in audio cable
with stereo-mini plug
or
audio connecting
cable (not supplied)
To the line output jack
(e.g.,portable digital
music player)
1 Connect the built-in audio cable with stereo-mini
RT
on the unit to the line output jack of the
plug
portable digital music player or other components*.
2 Turn the unit and the connected component on.
3 Press AUDIO IN
sound on the connected component.
e sound from the connected component is output
from the spe akers.
* To connectthe unit to a TV or VCR, use an extension cable (not
supplied) with a stereo-mini jack on one end (forthe built-in audio
cable) and two phono plugson the other end.
Recording the sound from the connected
component
1 Insert a blank tape.
2 Press AUDIO IN
3 Press
Recording starts.
4 Play the optional component connected to the unit.
Tip
Should the built-in audio cableRTbecome damaged, you can use the
AUDIO IN jack
Use an audio connectingcable (not supplied) with a stereo mini plug
on one end (for the AUDIO IN jack
other end is suited to the jack on the optional component;for
example, a stereo-mini plugfor a portable digital music player, or two
phono plugs for a TV or VCR.
Notes
[
Do not pull forciblyon the built-in audio cableRT.Doingsomay
cause the plugto rip o.
[
Connect the built-in audio cableRTor audio connecting cable (not
supplied) securely to prevent anymalfunc tion.
[
It is not possible to listen to two components connectedat the same
time through the built-in audio cable
(using an optional audio connectingcable). Connect one
component at a time.
RH
on the unit and start playing
RH
on the unit to display“AUDIO IN”.
on the unit.
[
RB
to connect an optional componentto the unit.
RB
). Make sure the plug on t he
RT
and the AUDIO IN jack
RB
7
Page 8
CFD-RG880CP
DISASSEMBLY
• This set can be disassembled in the order shown below.
SET
3-1. CABINET (UPPER) SECTION-1
(Page 9)
3-2. CABINET (UPPER) SECTION-2
(Page 9)
SECTION 3
3-3. CABINET (FRONT) SECTION
(Page 10)
3-5. FRONT PANEL
(Page 11)
3-6. LCD BOARD
(Page 11)
3-9. SPEAKER (10 cm)
(Page 13)
3-4. POWER KEY BOARD,
HEADPHONE BOARD,
VOLUME KEY BOARD,
AUDIO IN BOARD
(Page 10)
3-11. TUNER BOARD
(Page 14)
3-7. LED BOARDS
(Page 12)
3-8. SPEAKER (13 cm)
(Page 12)
3-10. POWER BOARD
(Page 13)
3-15. CD BLOCK SECTION
(Page 16)
3-16. OPTICAL PICK-UP
(Page 16)
3-12. MAIN BOARD
(Page 14)
3-13. FUNCTION KEY BOARD,
CD KEY BOARD
(Page 15)
3-14. SOUND KEY BOARD,
USB BOARD
(Page 15)
3-17. TAPE MECHANISM DECK
(Page 17)
3-18. BELT (MAIN),
BELT (RF)
(Page 17)
3-19. TC BOARD
(Page 18)
8
Page 9
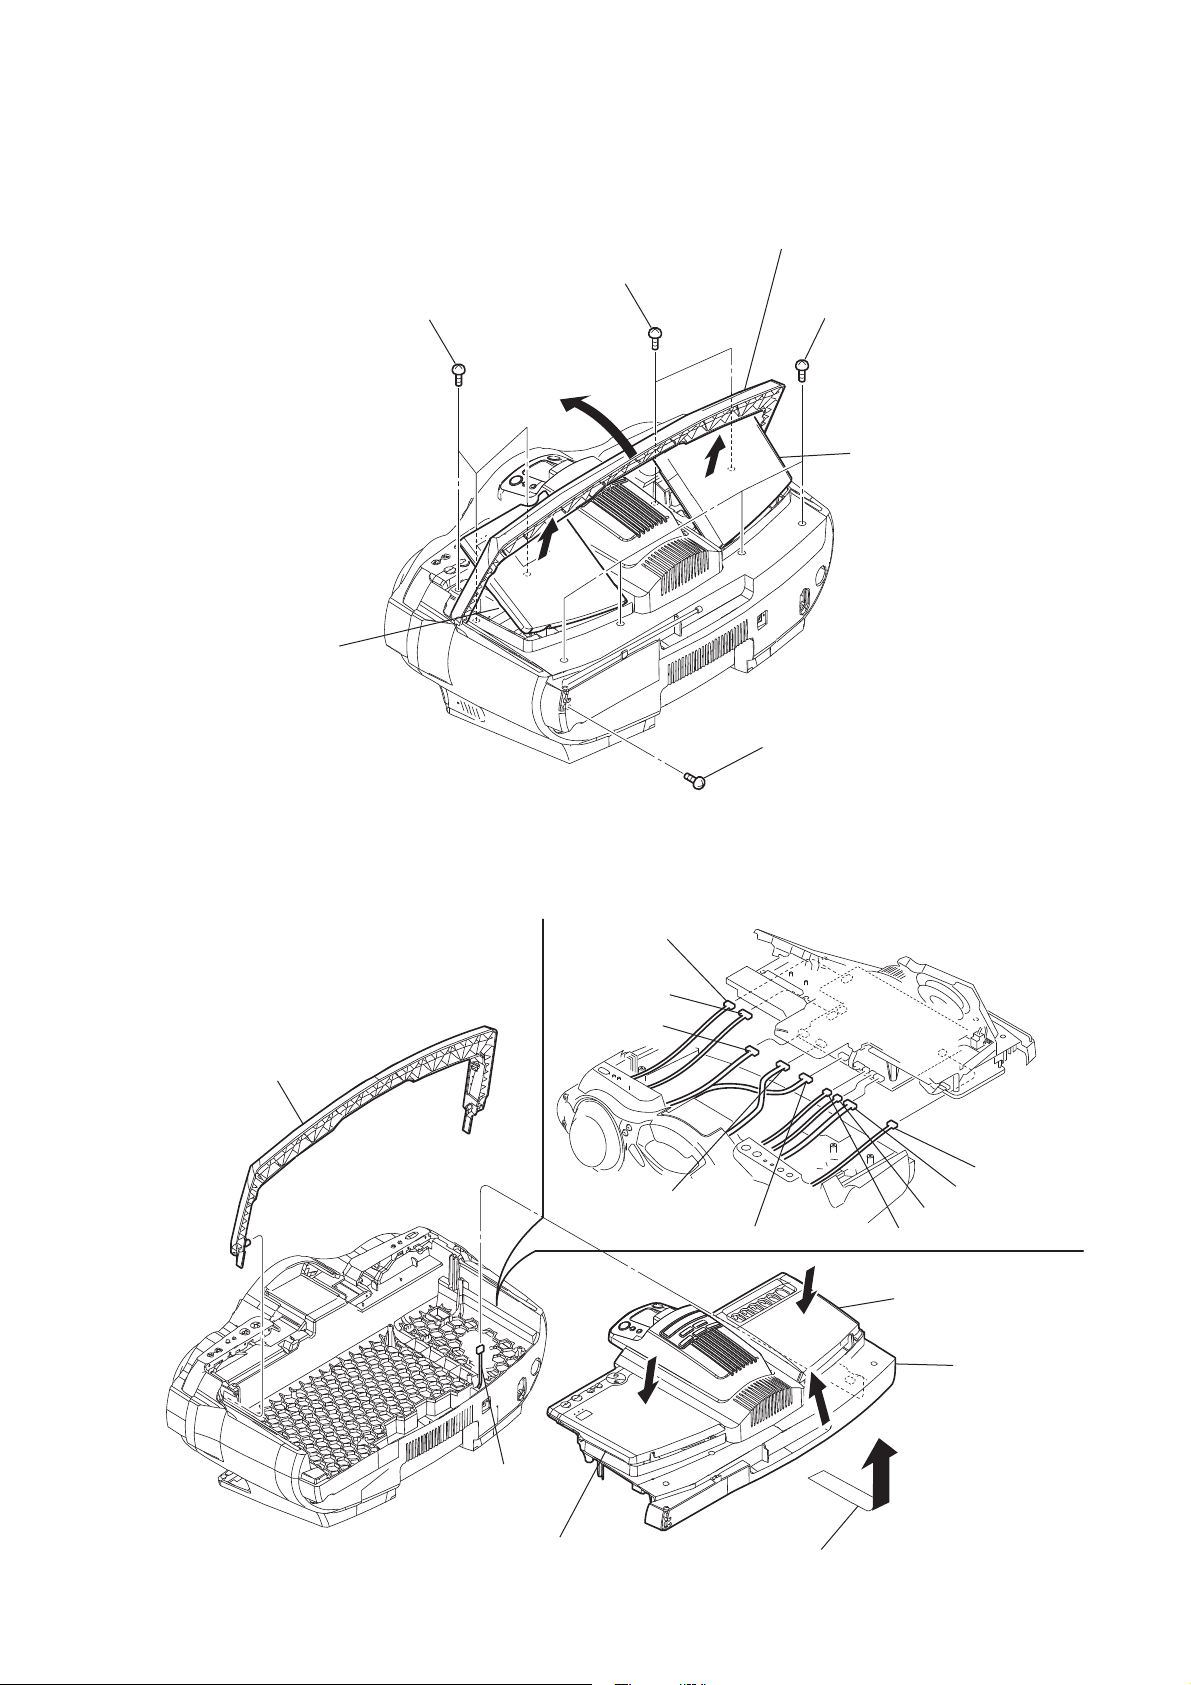
Note: Follow the disassembly procedure in the numerical order given.
3-1. CABINET (UPPER) SECTION-1
CFD-RG880CP
Open the CD lid.
three screws
(+BV tapping (B3))
two screws
(+BV tapping (B3))
Open the handle in the
direction of the arrow.
four screws
+
BV tapping (B3))
(
Open the cassette lid.
screws
+
BV tapping (B3))
(
3-2. CABINET (UPPER) SECTION-2
RI handle
RE CNP391 (5P)
RT CNP393 (4P)
RB CN804 (7P)
CN803 (6P)
CN802 (6P)
CNP392 (3P)
CN805 (5P)
CN809 (2P)
CN810 (2P)
Close the cassette lid.
RH cabinet (upper)
section
RG CNP901 (5P)
Close the CD lid.
Open the cabinet (upper) section.
9
Page 10
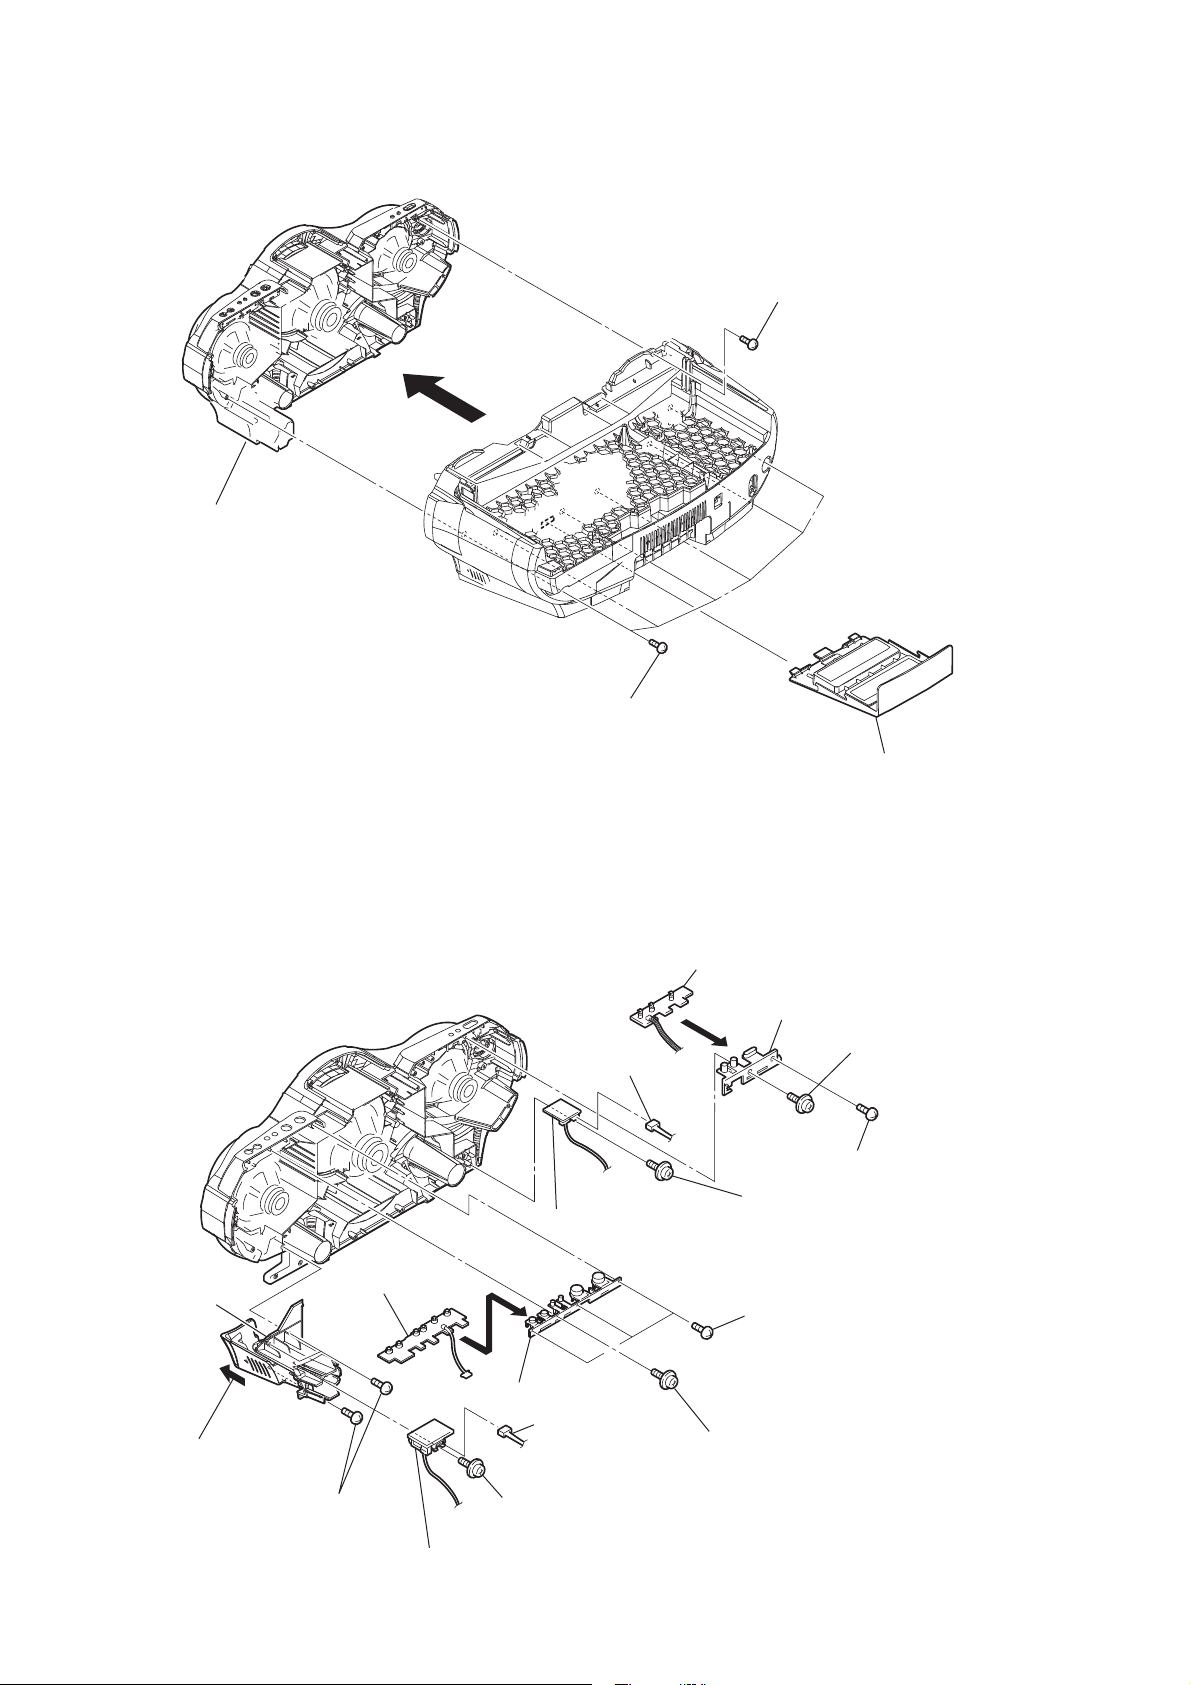
CFD-RG880CP
3-3. CABINET (FRONT) SECTION
cabinet (front) section
six
screws
(+
BV tapping (B3)
)
six
screws
(+
BV tapping (B3)
)
battery lid
3-4. POWER KEY BOARD, HEADPHONE BOARD, VOLUME KEY BOARD, AUDIO IN BOARD
POWER KEY board
button (power)
screw
(+PWH tapping (B2.6))
screw
(+BV tapping (B2.6))
screw
(+PWH tapping (B3))
three screws
(+BV tapping (B2.6))
RI cord case
CNP373 (4P)
HEADPHONE board
RE VOLUME KEY board
RT
RB button (tune)
10
RG Open the cord case lid.
RH three
(+
screws
BV tapping (B3)
)
RM AUDIO IN board
RK screw
(+PWH tapping (B2.6))
RL CNP372 (2P)
R screw
(+PWH tapping (B2.6))
Page 11
3-5. FRONT PANEL
CFD-RG880CP
front panel
four screws
(+BV tapping (B2.6))
3-6. LCD BOARD
five screws
(+BV tapping (B2.6))
three screws
(+BV tapping (B2.6))
panel (front) sub assy
LCD board
three screws
(+P tapping (B2.6))
panel cover
lug
three screws
(+P tapping (B2.6))
two screws
(+BV tapping (B2.6))
two screws
(+BV tapping (B2.6))
11
Page 12

CFD-RG880CP
3-7. LED BOARDS
four screws
(+BV tapping (B2.6))
ornamental ring
light guide ring
LED3 board
LED4 board
LED1 board
claw
3-8. SPEAKER (13 cm)
four screws
(+BV tapping (B3))
claw
speaker (13 cm)
LED2 board
claw
claw
12
Page 13
3-9. SPEAKER (10 cm)
speaker (10 cm)
two
screws
(+
BV tapping (B3)
speaker (10 cm)
)
Remove the solderings.
two
(+
two
screws
(+
BV tapping (B3)
CFD-RG880CP
screws
BV tapping (B3)
)
)
3-10. POWER BOARD
RB POWER board
four screws
(+BV tapping (B3))
screws
two
(+
BV tapping (B3)
sheet (rear)
)
screw
(+PWH tapping (B3))
ferrite core
CN942 (2P)
CN941 (2P)
two screws
(+BV tapping (B3))
transformer
holder
three screws
(+BV tapping (B3))
RT transformer
bracket
four screws
(+BV tapping (B3))
13
Page 14
CFD-RG880CP
3-11. TUNER BOARD
TUNER board
wire (flat type) (11 core)
(CNP1)
three
(+
BV tapping (B3)
screws
)
screw
(+
P (B3)
)
telescopic (FM) antenna
3-12. MAIN BOARD
wire (flat type) (11 core)
(CNP1)
CN808 (7P)
SW2 (2P)
three screws
(+BV tapping (B3))
MAIN board
wire (flat type) (13 core)
(CN303)
CNP303 (6P)
14
CN811 (2P)
wire (flat type) (21 core)
(CN805)
Page 15
3-13. FUNCTION KEY BOARD, CD KEY BOARD
four
screws
(+
CD KEY board
four
screws
(+
BV tapping (B2.6)
BV tapping (B2.6)
)
)
CFD-RG880CP
CD button
FUNCTION KEY board
3-14. SOUND KEY BOARD, USB BOARD
screw
(+
PWH tapping (B3)
USB board
two
screws
(+
BV tapping (B2.6)
USB holder
)
CNP403
CNP404
)
(5P)
(2P)
four
(+
screws
BV tapping (B2.6)
SOUND KEY board
ferrite core
two
screws
(+
BV tapping (B2.6)
)
)
USB holder
USB board
boss
15
Page 16
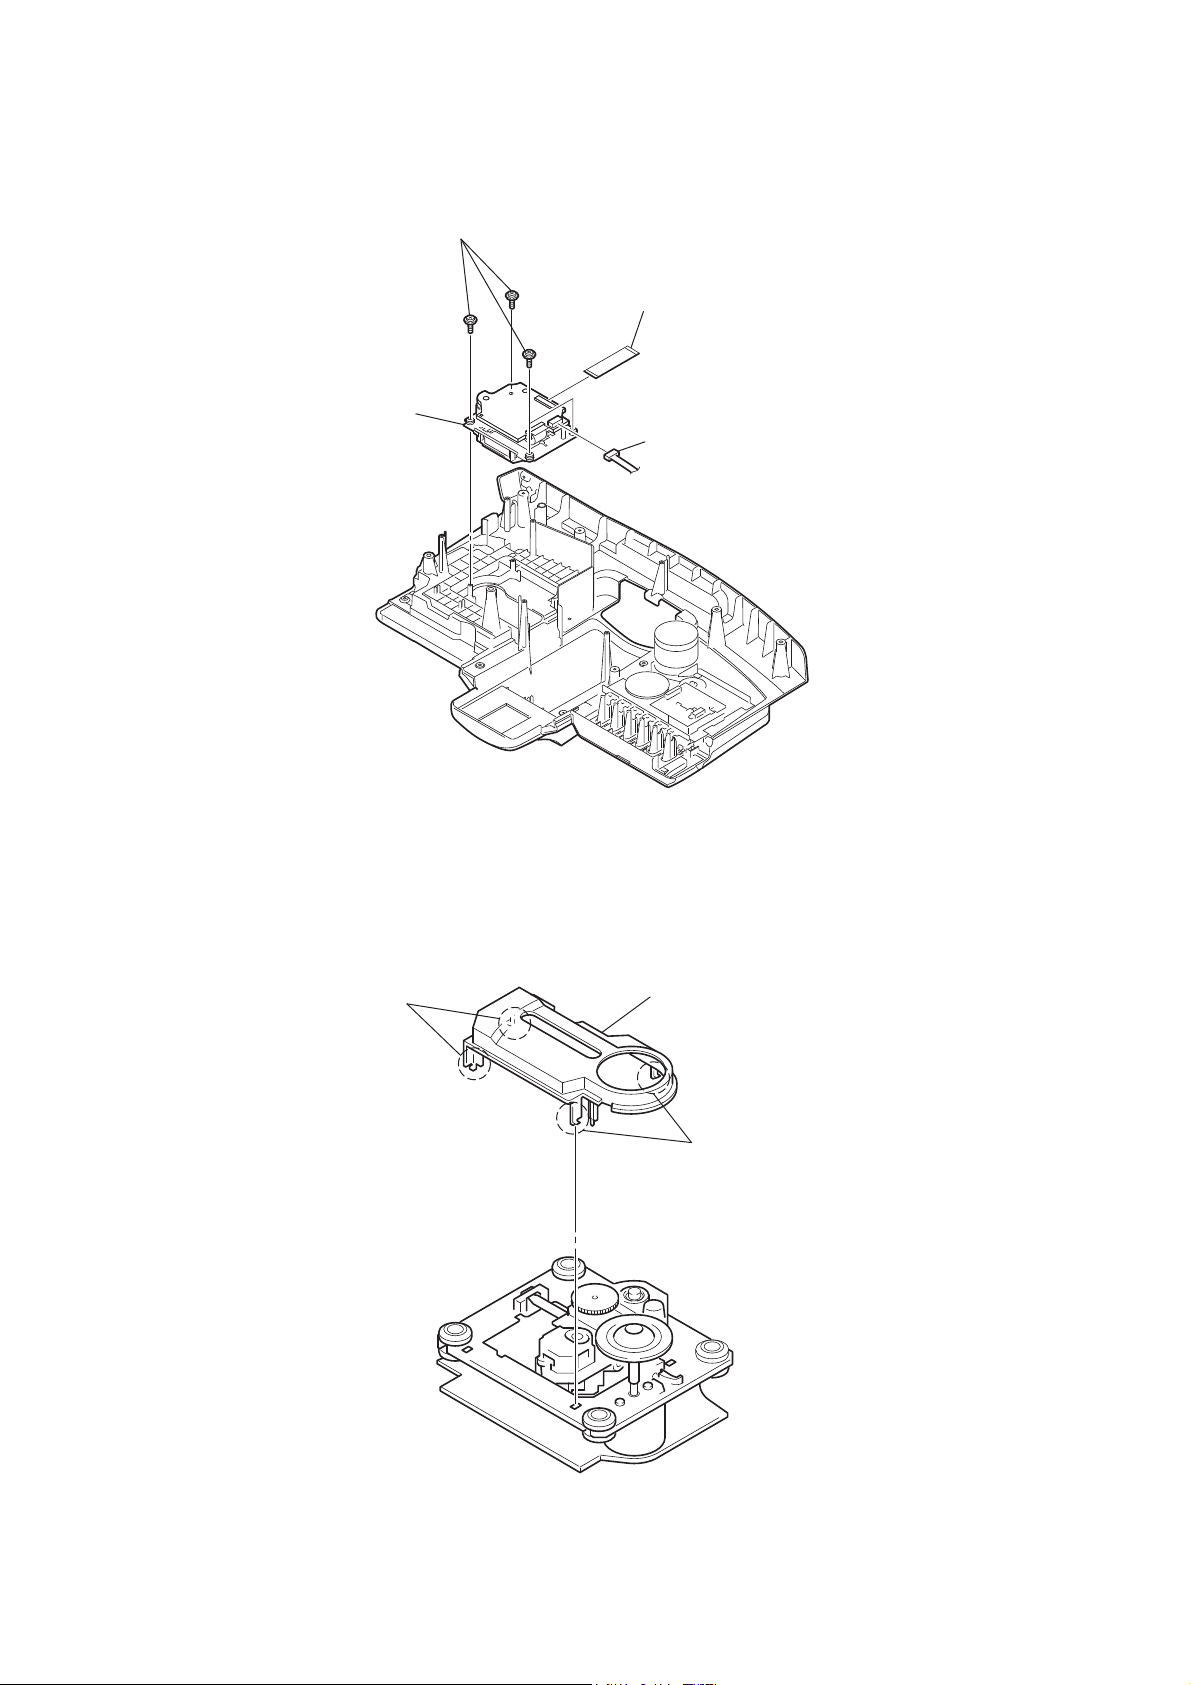
CFD-RG880CP
3-15. CD BLOCK SECTION
CD block section
four
screws
(+
PWH tapping (B2.6)
)
wire (flat type) (25 core)
(CN704)
CN705 (4P)
3-16. OPTICAL PICK-UP
two hooks
CD cover
two hooks
16
Page 17
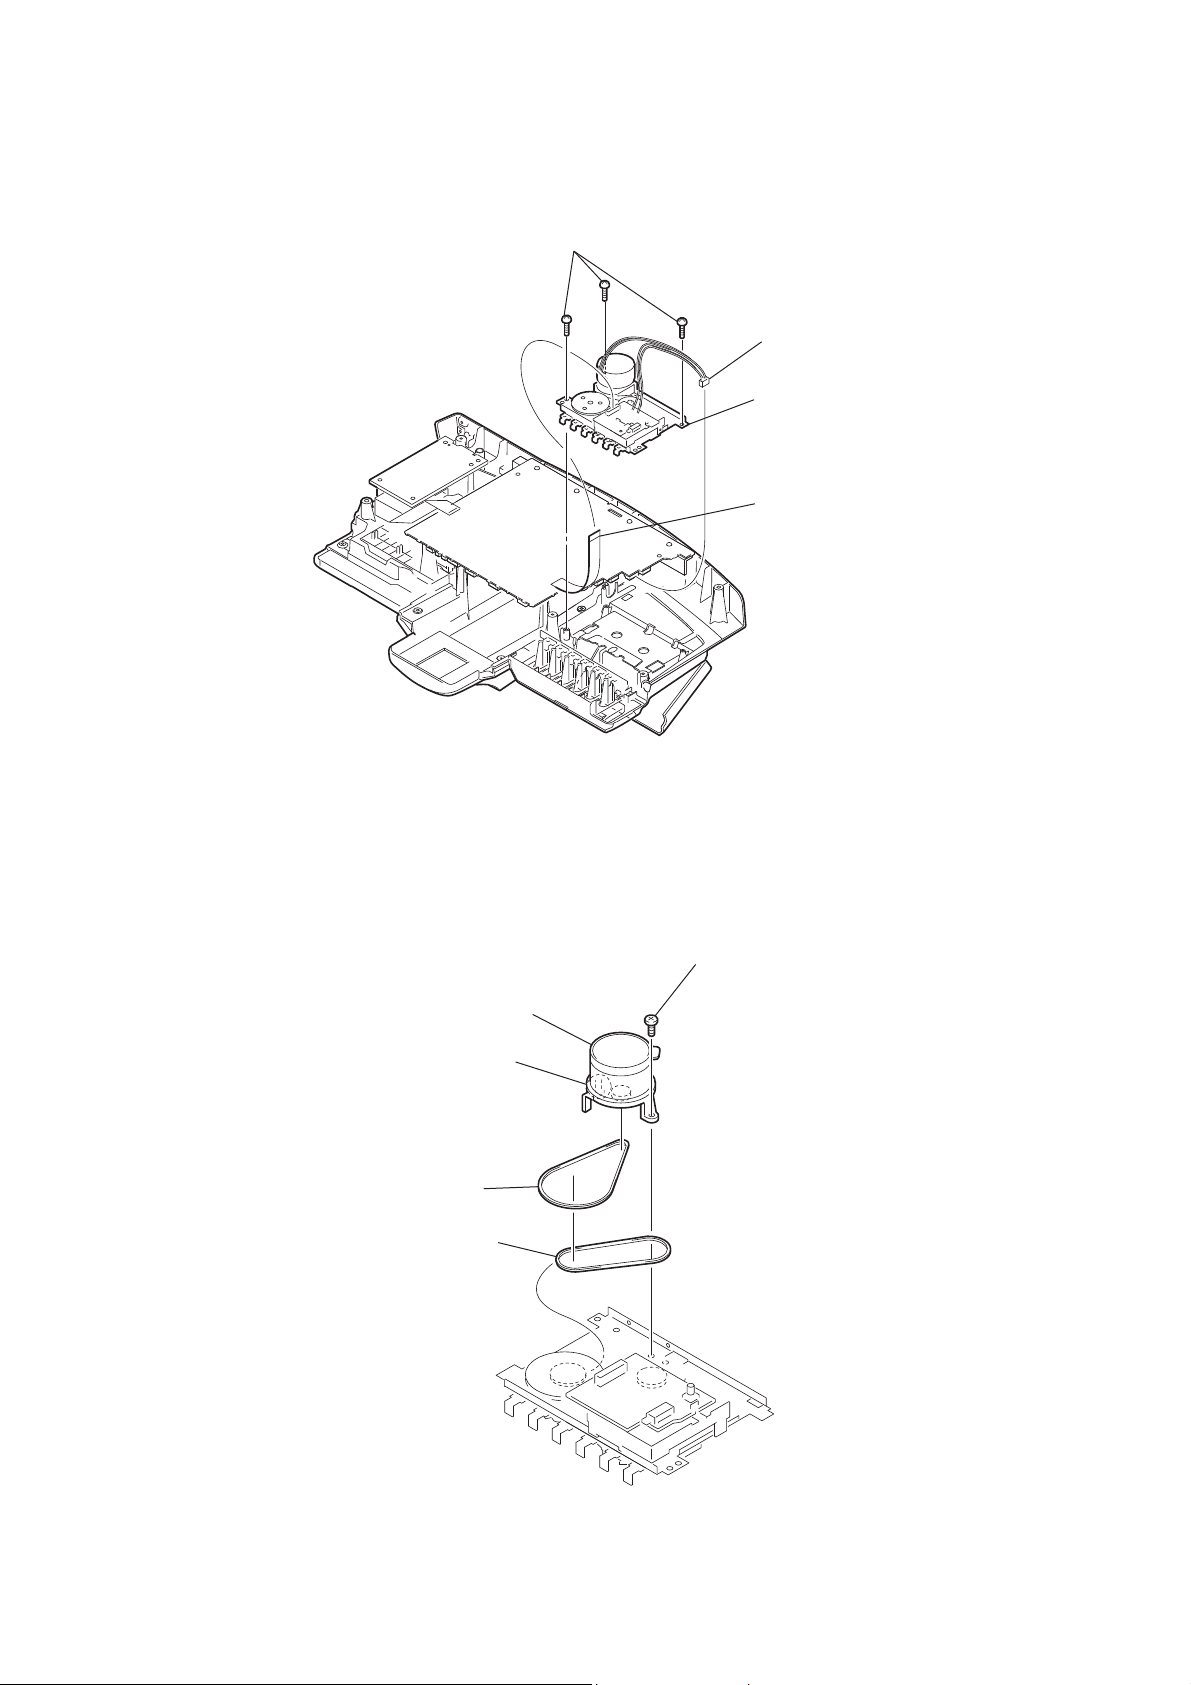
3-17. TAPE MECHANISM DECK
CFD-RG880CP
three
(+
BV tapping (B3)
screws
)
CNP303 (6 core)
tape mechanism deck
wire (flat type) (13 core)
(CN303)
3-18. BELT (MAIN), BELT (RF)
belt (main)
screw
(+BIND DT M2 × 6)
motor assy
(M971)
hook
belt (RF)
17
Page 18
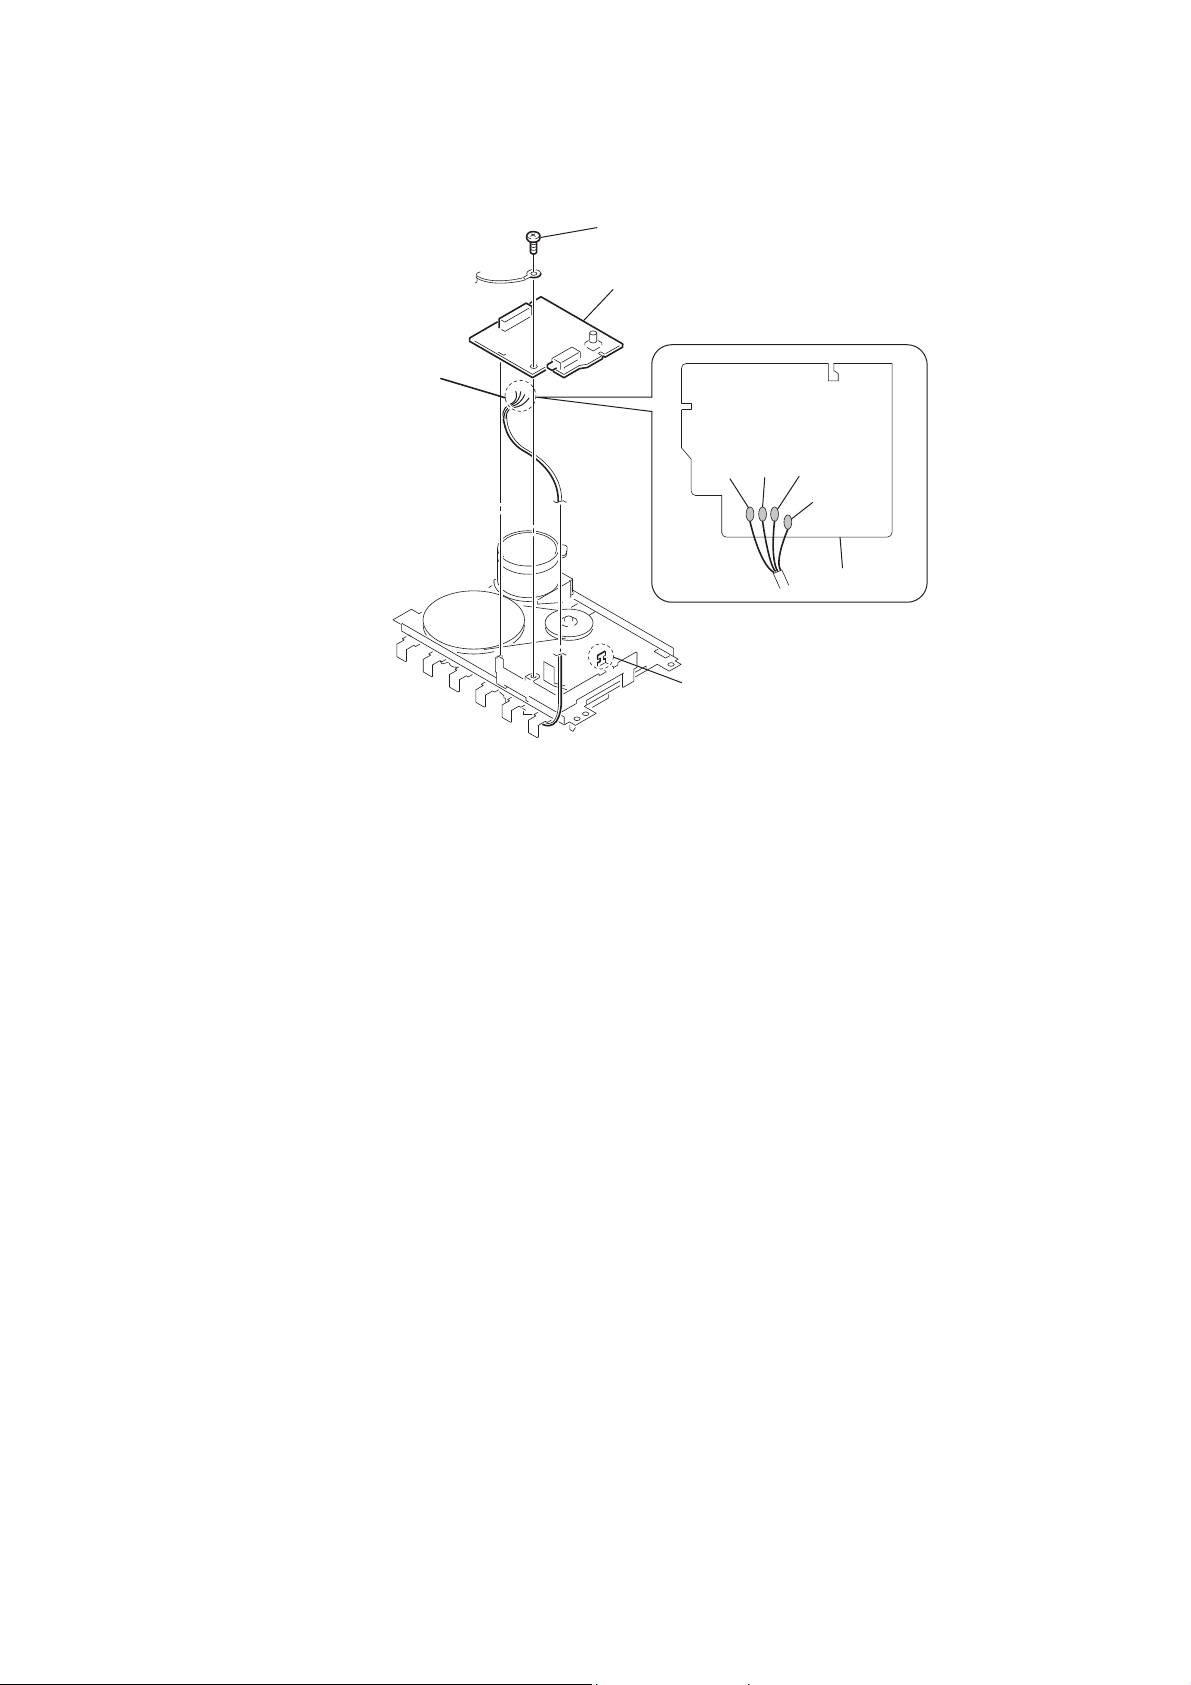
CFD-RG880CP
3-19. TC BOARD
Remove soldering from the four points.
screw
TC board
yellow
red
white
black
TC board
hook
18
Page 19

SECTION 4
TEST MODE
CFD-RG880CP
[MC COLD RESET]
The cold reset clears all data including preset data stored in the
memory to initial conditions. Execute this mode when returning
the set to the customer.
Procedure:
1. In the standby status, press the [POWER] button to turn the
power on.
2. Press three buttons of [x], [MODE] and at last [POWER] simultaneously.
3. When “RESET” appears, the machine enters standby status.
[PANEL TEST MODE]
Enter The Panel Test Mode
Procedure:
1. In the standby status, press the [POWER] button to turn the
power on.
2. Press three buttons of [REPEAT], [x], and [DSPL/ENT] simultaneously.
3. When the panel test mode is activated, LEDs and segments of
LCD are all turned on.
Version Check
Procedure:
1. In the panel test mode (all LEDs and segments of LCD are
turned on), press the [ROCK] button.
2. On the LCD, date and version are displayed “xxxxxxxx”. For
example, “0305V001”.
3. From this status, press the [DANCE] button, and the destination is displayed. For example, “1024 MX2”.
4. To release from this mode, press three buttons of [REPEAT],
[x], and [DSPL/ENT] simultaneously.
[CD SERVICE MODE]
This mode can move the SLED of the optical pick-up, and also can
turn the optical pick-up laser power on and off.
Procedure:
1. Press the [POWER] button to turn the power on.
2. Press the [CD] button to select the CD mode.
3. Press three buttons of [x], [VOL +], and [SALSA] simultaneously.
4. It enters the CD service mode and displays “SE MODE”.
5. To exit from this mode, press three buttons of [x], [VOL +],
and [SALSA] simultaneously.
Key Operation:
[PRESET+
Use these keys to move the SLED.
When [PRESET+
When [PRESET–
[MODE] : Use this key to turn the optical pick-up laser power on
], [PRESET– .]:
>
] is pressed in this mode, the
>
SLED moves to outer circumference and the message
“SL OUT” is displayed.
] is pressed in this mode, the
.
SLED moves to inner circumference and the message
“SL IN” is displayed.
and off. When the laser power is turned on, the message “LD ON” is displayed. When the laser power is
turned off, the message “LD OFF” is displayed.
[CHANGE-OVER THE AM TUNING INTERVAL]
The AM tuning interval can be changed over 9 kHz or 10 kHz.
Procedure:
1. Press the [POWER] button to turn the power on.
2. Press the [RADIO/BAND] button to select TUNER (AM)
function.
3. Select the AM BAND mode and press the [DSPL/ENT] button
for an extended time in the AM BAND state.
4. Then, press the [AUTO PRESET/RADIO/BAND] for an extended time.
5. Next, press the [PRESET +] [PRESET –] button select either
9k/10k.
6. Finally, press the [DSPL/ENT] button to set the selected step.
19
Page 20
CFD-RG880CP
SECTION 5
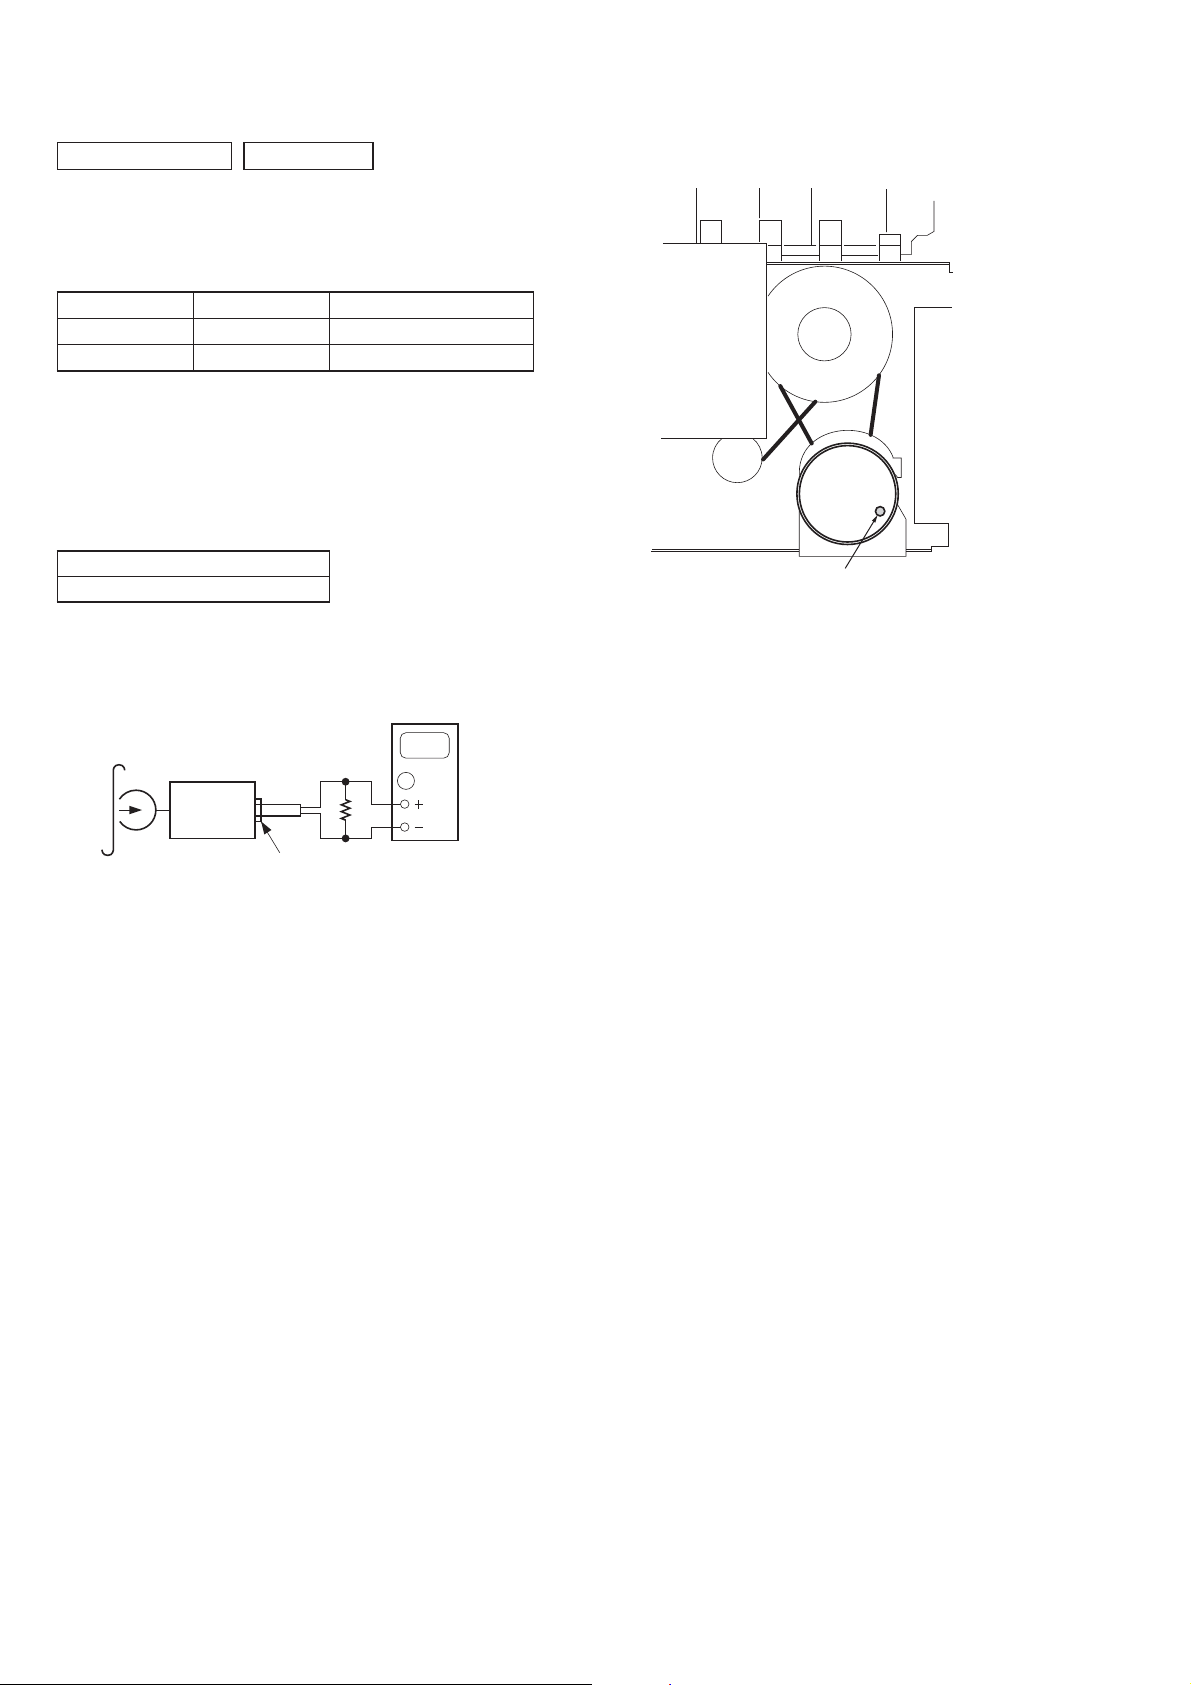
MECHANICAL ADJUSTMENTS
Precaution
1. Clean the following parts with a denatured alcohol-moistened
swab:
record/playback heads pinch rollers
erase head rubber belts
capstan idlers
2. Demagnetize the record/playback head with a head demagnetizer. (Do not bring the head magnetizer close to the erase
head.)
3. Do not use a magnetized screwdriver for the adjustments.
4. After the adjustments, appiy suitable locking compound to the
parts adjusted.
5. The adjustments should be performed with the rated power
supply voltage unless otherwise noted.
Torque Measurement
Mode Torque meter Meter reading
FWD CQ-102AS
FWD
back tension
FF CQ-201AS
REW CQ-201B
CQ-102C
2.95 – 6.86 mN • m
(30 – 70 g • cm)
(0.42 – 0.97 oz • inch)
0.15 – 0.53 mN • m
(1.5 – 5.5 g • cm)
(0.021 – 0.076 oz • inch)
more than 5.88 mN • m
(more than 60 g • cm)
(more than 0.83 oz • inch)
more than 5.88 mN • m
(more than 60 g • cm)
(more than 0.83 oz • inch)
Tape Tension Measurement
Mode Tension meter Meter reading
FWD CQ-403A
(more than 3.53 oz)
more than 100 g
20
Page 21
SECTION 6
ELECTRICAL ADJUSTMENTS
CD SECTION
CD section adjustments are done automatically in this set.
In case of operation check, confi rm that focus bias.
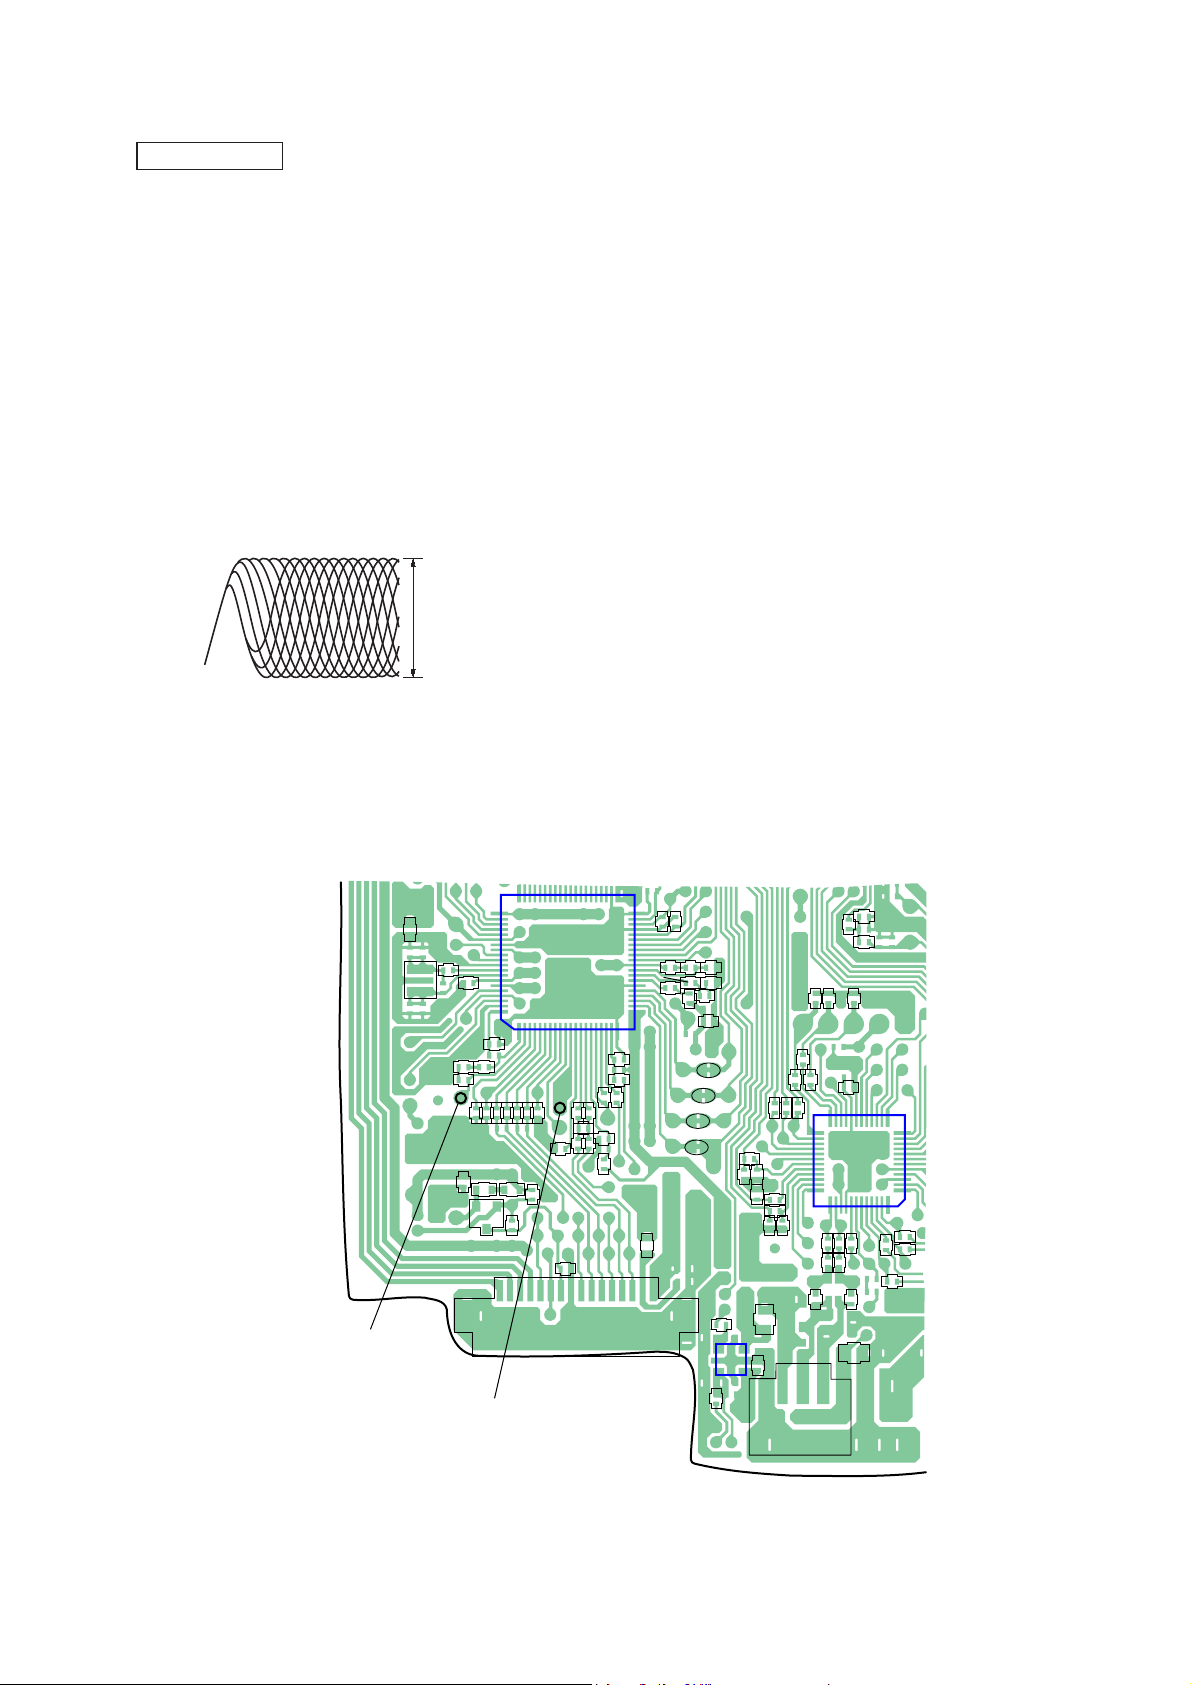
FOCUS BIAS CHECK
1. Connect the oscilloscope between IC701 pin 2 and pin qa (or
TP (RF OUT) and TP (VC)).
2. Insert the disc (PATD-012 (Tr 15)). (Part No. : 4-225-203-01)
3. Press the [
4. Confi rm that the oscilloscope waveform is as shown in the fi g-
ure below. (eye pattern)
A good eye pattern means that the diamond shape (◊) in the
center of the waveform can be clearly distinguished.
• RF signal reference waveform (eye pattern)
] (CD) button.
N X
VOLT/DIV : 50 mV (10 : 1 probe in use)
TIME/DIV : 500 nS
RF level :
1.0 ± 0.2 Vp-p
CFD-RG880CP
When observing the eye pattern, set the oscilloscope for AC range
and raise vertical sensitivity.
Test Point:
– CD BOARD (Conductor Side) –
C754
C759
R723
C715
EB
Q701
TP (VC)
C702
C
61
R701
C703
R706
16
60
80
R707
R533
1
R709
C714
R710
C709
C704
C708
C712
IC701
C764
CN701
R716
R717
R718
R719
FB702
TP (RF OUT)
X701
R702
C701
R755
41
20
C711
C710
R721
40
21
C716
R724
R731
R722
C726
R733
R727
R534
1
C725R728
R734
R780
R511
1
3
C722
C721
R732
C719
TP739
R513
TP738
C786
5
4
IC704
C787
R779
1
R773
R778
C785
R781
R782
TP742
TP741
C789
C788
TP740
FB705
C510
CN705
TP723
R772
TP737
R777
25
36
R514
R774
R775
R776
TP725
TP724
TP735
TP734
C781
R771
TP736
24 13
IC702
37
R791
R787R788
R783
R784
R798
4
C514
R517
TP726
TP733
48
TP743
R794
R799
FB706
TP732
TP731
TP730
12
1
R797
R795
R796
TP727
21
Page 22
CFD-RG880CP
TAPE SECTION
0 dB = 0.775V
1. Demagnetize the record/playback head with a head demagnetizer.
2. Do not use a magnetized screwdriver for the adjustments.
• Test Tape
Tape Signal Used for
P-4-A063 6.3 kHz, –10 dB Azimuth Adjustment
WS-48A 3 kHz, 0 dB Tape Speed Adjustment
Tape Speed Adjustment
Procedure:
Mode: playback
Adjust so that the value on the digital frequency counter is 3,000
Hz.
Specifi cation Value:
Digital frequency counter
2,940 to 3,060 Hz
Adjust so that the frequency at the beginning and that at the end of
tape winding are between 2,970 to 3,030 Hz.
test tape
WS-48A
(3 kHz, 0 dB)
digital frequency
counter
32 Ω
Adjustment Location:
Tape speed adjustment
control inside motor
(M971)
set
Jjack (J391)
22
Page 23

CFD-RG880CP
TUNER SECTION
0 dB = 1 μV
• AM Section
Setting:
RADIO BAND•AUTO PRESET button: AM
AM RF signal
generator
30% amplitude
modulation by
400 Hz signal
Output level:
as low as possible
Put the loop
antenna close to
the set.
set
level meter
32 Ω
+
–
J jack (J391)
• FM Section
Setting:
RADIO BAND•AUTO PRESET button: FM
FM RF signal
generator
0.01 μF
75 kHz frequency
deviation by 1 kHz
signal
Output level:
as low as possible
TUNER board
TP (CV)
TP (GND)
TUNER board
TP-ANT(JW2)
set
TUNER board
TP (GND)
digital voltmeter
100 k Ω
level meter
32 Ω
+
–
J jack (J391)
• Repeat the procedures in each adjustment several times, and
the tracking adjustments should be fi nally done by the trimmer
capacitors.
• Remove FM antenna in FM adjustment.
AM IF ADJUSTMENT
Adjust for a maximum reading on level meter.
T1
450 kHz
AM FREQUENCY COVERAGE ADJUSTMENT (EXCEPT MX)
Frequency Display 531 kHz 1,611 kHz
Reading on Digital voltmeter 1.0 ± 0.05 V 4.8 ± 0.6 V
Adjustment Part L4 <confi rmation>
AM FREQUENCY COVERAGE ADJUSTMENT (MX)
Frequency Display 530 kHz 1,710 kHz
Reading on Digital voltmeter 1.0 ± 0.05 V 5.2 ± 0.7 V
Adjustment Part L4 <confi rmation>
AM TRACKING ADJUSTMENT (EXCEPT MX)
Adjust for a maximum reading on level meter.
L3 CT3
621 kHz 1,404 kHz
AM TRACKING ADJUSTMENT (MX)
Adjust for a maximum reading on level meter.
L3 CT3
620 kHz 1,400 kHz
FM IF ADJUSTMENT
Adjust for a maximum reading on level meter.
T2
10.7 MHz
FM FREQUENCY COVERAGE ADJUSTMENT
Frequency Display 87.5 MHz 108 MHz
Reading on Digital voltmeter 1.3 ± 0.3 V 3.0 ± 0.2 V
Adjustment Part <confi rmation> L2
FM TRACKING ADJUSTMENT
Adjust for a maximum reading on level meter.
L1 CT1
87.5 MHz 108 MHz
• Abbreviation
MX : Mexican model
Adjustment Location: See page 24.
23
Page 24

CFD-RG880CP
Adjustment Location:
L1,CT1
FM TRACKNG
ADJUSTMENT
– TUNER BOARD (Component Side) –
L3
L3,CT3
AM TRACKING ADJUSTMENT
TP-ANT
(JW2)
T1
AM IF
ADJUSTMENT
T2
FM IF
ADJUSTMENT
TP-ANT
CT1
L2
CT3
L4
T1
T2
L1
IC1
L2
FM FREQUENCY
COVERAGE
ADJUSTMENT
– TUNER BOARD (Conductor Side) –
TP
(GND)
JW2
L4
AM FREQUENCY COVERAGE
ADJUSTMENT
TP
(CV)
24
Page 25

7-1. BLOCK DIAGRAM – CD Section –
CFD-RG880CP
SECTION 7
DIAGRAMS
RF OUT
2 1
A
C
B
D
E
F
PD
OPTICAL PICK-UP
BLOCK
(KSM-213CDP)
EFMIN
A
C
B
D
E
F
LDLD
MD
VR
VC
VC
LD POWER
CONTROLLER
Q701
VC
A IN
5
C IN
6
B IN
7
D IN
8
E IN
13
F IN
14
LDO
18
LDS
19
VREF
11
RF OUT
APC
RF SIGNAL PROCESSOR
SYNCHRONIZATION
EFM DEMODULATION
SERVO
CONTROL
DETECTION
TDO23FDO22SLDO24SPDO25CONT3
SYSTEM SERVO PROCESSOR,
DIGITAL SIGNAL PROCESSOR
CLOCK
GENERATOR
32
XIN
73 72
X701
16.9344MHz
IC701
XOUT
MCU I/F
D RESB47D CE43D CL44D DI45D DO
46
8FS
DIGITAL
FILTER
&
1-bit DAC
LCHO
RCHO
PCMDATA
PCMBCK
PCMLRSY
PCMREQ
STDATA
STCK
STREQ
76
CD L-CH
A
MAIN
SECTION
(Page 27)
RCH
78
USB I/F
IC702
P05/AN5/CK0/SDAT
64
63
62
65
56
55
54
26
P06/AN6/T60
27
P07/AN7/T70
28
P23/INT4/SI4/WR
32
P22/INT4/SO4/RD
31
P24/INT5/INT7/SCK4
33
P70/INT0/TOLCP/AN8
46
CF1
CF2
UHD+
UHD–
6
X702
12MHz
7
38
37
D+
D–
J1001
(USB)
TRACKING
COIL
FOCUS
COIL
M702
(SLED)
M701
(SPINDLE)
–
–
S701
(LIMIT)
MM
MM
SW2
;
PUSH
OPEN/
CLOSE
TD+
TD–
FD+
FD–
+
+
SL+
SL–
SP+
SP–
24 25
23
19
20
5
6
10
9
TRACKING
COIL
DRIVE
FOCUS
COIL
DRIVE
SLED
MOTOR
DRIVE
SPINDLE
MOTOR
DRIVE
SLED/SPINDLE
MOTOR DRIVER,
TRACKING/FOCUS
COIL DRIVER
IC703
MUTE
VREF
D DO
D DI
18
4
11
2
VC
27
40
93 94 8 6 7
D CL
D CE
D RESB
USB-TXD
USB-RXD
92
SLEEP
10091
VBUS
+5V
P11/SI
10
P10/SO
9
P12/SCK
11
P16/T1PWML/DE
15
RES
2
P31/URX1
44
P30/UTX1
45
P71/INT1/TOHCP/AN9
47
VBUS +5V
CONTROL
IC704
99
98
• R-CH is omitted due to same as L-CH.
• Signal Path
87
I-CD LID
M-MUTE
SYSTEM CONTROL
IC801 (1/4)
O-CD CE
O-CD RES
O-CD DO
O-CD CLK
I-CD DI
USB-TXD
USB-RXD
O-SW EN
I-SW FLG
: CD
: USB
CFD-RG880CP
2525
Page 26

CFD-RG880CP
7-2. BLOCK DIAGRAM – TUNER Section –
ANT1
TELESCOPIC
ANTENNA
D11
CT1,L1
FM
TRACKING
L2
FM
FREQUENCY
COVERAGE
CT3,L3
AM
TRACKING
L4
AM
FREQUENCY
COVERAGE
DET OUT
RADIO 6V
16
MPX-IN
15
FM
MPX
• R-CH is omitted due to same as L-CH.
• Signal Path
: FM
: AM
MUTE
B
(Page 27)
MAIN
SECTION
12
11
TU LCH
R-CH
FM/AM FRONT-END
IF AMP,DET,FM MPX
IC1
FM
14
12
11
T1
VDD
FM IN
AM IN
CF2
CF4
FM/AM PLL
IC2
7
6
FM IF-IN
AM IF-IN
14
MO/ST
18
ST IND
13
BAND
D10
MIX OUT
FM RF IN
2
RADIO 6V
L1
FERRITE-ROD
CT3
RADIO 6V
L2
D2
L3
ANTENNA
D1
CT1
D3
24
21
22
FM RF OUT
FM OSC
AM RF IN
FM
MIX
FM
OSC
AM
MIX
OSC
OUT
4
T1
AM IF
6V
19
FM IF
IF
BUFFER
IFOUT
17
T2
10
FM
DET
AM
DET
T2
QUAD
23 5
VCC1 VCC2
FM/AM
BUFFER
L4
RADIO 6V
RADIO 6V
20
AM OSC
U-COM(VDD)
AM
OSC
D909
X1
75kHz
20
19
18
17
16
XOUT
XIN
LP OUT
LP IN
PD
MO/ST
ST IND
BAND
IF IN
O-TU-MUTE
34
33
I-TU-COUNT
36
O-TU-DATA
35
O-TU-CLK
O-TU-CE
37
SYSTEM CONTROL
IC801(2/4)
13
8
7
MUTE
10
DO
4
DI
2
CL
3
CE
1
SWITCH
Q833
CFD-RG880CP
2626
Page 27

7-3. BLOCK DIAGRAM – MAIN Section –
CD
SECTION
(Page 25)
AUDIO IN
TUNER
SECTION
(Page 26)
TAPE MECHANISM DECK
RECORD/PLAYBACK
L-CH
R-CH
CD L-CH
A
J372
CNP2
TU L-CH
B
HRP301
HEAD
HE301
ERASE HEAD
R-CH
R-CH
PB
1
3
5
4
6
S301
REC/PB
IN L1
IN L2
L.IN
L.RO
REF
PB AMP
BUFFER
REC AMP
26dB
AU 6V
INPUT SELECT
IC301 (1/2)
MUTE
REC/PB PRE AMP
IC301
TAPETAPE
AMP
REC
LOGIC
TAPE
1521
LINE
17
7dB
SEL1 L
L.LINL.RAD
L.LO
R.LO
CFD-RG880CP
10
SP292
BUZZER (R-CH)
SP291
SPEAKER (R-CH)
POWER AMP
IC303
12
2422
SOUND/VOLUME
IC301 (2/2)
Q160
20
18
R-CH
IC351
R-CH
VOL1 L
11
TONE
SURROUND
MCU I/F
SDA
26
25
SCL
OUT1 L
23
R-CH
MUTE
Q101
AMP
Q301
GAIN
CONTROL
Q302
LPF
Q303
WOOFER AMP
12
13
10
11
VDD(SW)
3
STBY
8
VDD(SW)
IC302
3
5
STBY
8
R-CH
J391
J
SP191
SPEAKER (L-CH)
SP192
BUZZER (L-CH)
SP393
WOOFER
M971
CAPSTAN/REEL
MOTOR
S972
MOTOR
S971
PLAY
REC
M
TC+9V
T301
Q301
REC BIAS
OSC
65
64
TAPE REC
I-TAPE PLAY
63
62
O-TAPE
O-CD-SW
82
I-SPOUT-VOLTAGE
66
68
O-VOL-CLK
O-VOL-DATA
SYSTEM CONTROL
IC801(3/4)
79
O-P-MUTE
D303 D304
78
72
O-A-MUTE
WOOFER 1/2
AGC
Q306
73
WOOFER ON/OFF
HEADPHONE
DETECT SWITCH
AUDIO +6V
Q305
D305
D306
AGC
DRIVE
Q304
D307
D308
• R-CH is omitted due to same as L-CH.
• Signal Path
: FM
: CD
: TAPE PLAY
: TAPE REC
: LINE IN
: USB
CFD-RG880CP
2727
Page 28

CFD-RG880CP
7-4. BLOCK DIAGRAM – POWER Section –
VDD(SW)
TC+9V
CD/RADIO
/LED+6.2V
AUDIO+6V
SYSTEM CONTROL
IC801 (4/4)
O-LCD INH
O-LCD SCL
O-LCD DATA
I-AC CHECK
BACK LIGHT H
BACK LIGHT L
USB REC LED
EPROM SCL
EPROM SDA
O-CLOCK SHFT1
O-CLOCK SHFT2
I-REG 6.2V-CHK
81
2
462
O-LCD CE
563
364
I-RMC
29
88
56
57
USB LED
41
42
9
10
15
CF1
10MHz
16
CF2
18
19
I-VH-CHK
80
D903D902
CD/RADIO
/LED+6.2V
6
5
X802
EEPROM
SCL
SDA
CD+6V
AU+6V
DISPLAY CONTROL
IC601
61
INH
CE
CL
DI
REMOTE CONTROL
SIGNAL RECEIVER
IC602
AC CHECK
Q808
IC802
CLOCK
SHIFT
SWITCH
Q802,803
POWER
SWITCH
Q903,904
REG
Q906
REG
Q907
SEG1
1
I
I
SEG34
34
COM1
54
I
I
COM14
51
BACK LIGHT
LED CONTROL
SWITCH
Q809-812
23
TC+9V
REG
Q905
PROTECT
SWITCH
FUNCTION
SWITCH
S401-426
24
I-KEY0
I-KEY1
POWER
Q901
LCD601
LIQUID
CRYSTAL
ELEMENT
27
I-KEY225I-KEY326I-KEY4
74
D601,602
LCD
BACK
LIGHT
WAKE UP
SWITCH
O-POWER
VDD+3.3V
CD/RADIO
/LED+6.2V
Q801
28
VDD(SW)
I-WAKE UP
RESET
IC803
I-RES
11
1
2
D603
OPR/BATT
WOOFER LED
POWER CONTROL
SWITCH
Q813-816
43
+3.3V
(CD)
VDD+3.3V SWITCH
Q804,805
VDD+3.3V
SWITCH
Q806,807
CD/RADIO
/LED+6.2V
44
WOOFER LED1
WOOFER LED2
CD3.3V CHK
21
VDD+3.3VLCD+3.3V
USB LED
DRIVE
Q401-404
LED DRIVE
Q817-832
CD+3.3V
REG
Q912
U-COM(VDD)
VDD+3.3V REG
IC804
46 47 48 49 50 51 52 53
LED1
LED2
LED3
LED4
LED5
LED6
LED7
VBUS
+5V
L901
D906
D409
USB REC
D410
USB PLAY
(ILLUMINATION)
LED8
D401-408
VOUT2VIN
4
FB
76
5
O-5V-ON
VBUS+5V
IC901
CONT
D604
REG
VDD(SW)
• Abbreviation
BR: Brazilian model
BR MODEL
S981
VOLTAGE SELECTOR
F983
120-127V
T981
POWER
TRANSFORMER
D981—984
RECT
1
F981
F982
BATT
(IEC DESIGNATION R20)
220-230V
DRY BATTERY
SIZE "D"
8PCS, 12V
JW987,
988
JW985,
986
EXCEPT
BR MODEL
J981
AC IN
CFD-RG880CP
2828
Page 29

CFD-RG880CP
THIS NOTE IS COMMON FOR PRINTED WIRING BOARDS AND SCHEMATIC DIAGRAMS.
(In addition to this, the necessary note is printed in each block.)
For Printed Wiring Boards.
Note:
• X : Parts extracted from the component side.
• a : Through hole.
• f : internal component.
• : Pattern from the side which enables seeing.
(The other layers' patterns are not indicated.)
Caution:
Pattern face side:
(SIDE B)
Parts face side:
(SIDE A)
• Abbreviation
BR : Brazilian model
CET : East European & Russian model
E41 : 230V AC area in E model
E92 : 120V AC area in E model
MX : Mexican model
Parts on the pattern face side seen from
the pattern face are indicated.
Parts on the parts face side seen from
the parts face are indicated.
For Schematic Diagrams.
Note:
• All capacitors are in μF unless otherwise noted. (p: pF) 50
WV or less are not indicated except for electrolytics and
tantalums.
• All resistors are in Ω and 1/4 W or less unless otherwise
specifi ed.
• % : indicates tolerance.
• f : internal component.
• C : panel designation.
Note: The components identifi ed by mark 0 or dotted
line with mark 0 are critical for safety.
Replace only with part number specifi ed.
• A : B+ Line.
• H : adjustment for repair.
• Voltages and waveforms are dc with respect to ground
under no-signal conditions.
– CD Board –
no mark : CD PLAY
[ ] : USB
– TUNER Board –
no mark : FM
( ) : AM
– TC Board –
no mark : FM
( ) : PB
< > : REC
[ ] : CD PLAY
‹‹ ›› : USB
– MAIN (1/3), (2/3), (3/3) and Other Boards –
no mark : FM
( ) : AM
* : Impossible to measure
• Voltages are taken with VOM (Input impedance 10 MΩ).
Voltage variations may be noted due to normal production
tolerances.
• Waveforms are taken with a oscilloscope.
Voltage variations may be noted due to normal production
tolerances.
• Circled numbers refer to waveforms.
• Signal path.
F : FM
f : AM
J : CD PLAY
c : USB
E : TAPE PLAY
a : TAPE REC
d : LINE IN
• Abbreviation
BR : Brazilian model
CET : East European & Russian model
E41 : 230V AC area in E model
E92 : 120V AC area in E model
MX : Mexican model
• Circuit Boards Location
VOLTAGE SELECTOR board
LED4 board
FUNCTION KEY board
HEADPHONE board
TC board
POWER board
POWER KEY board
LED3 board
MAIN board
LCD board
LED2 board
SOUND KEY board
CD board
TUNER board
CD KEY board
USB board
BATTERY board
VOLUME KEY board
AUDIO IN board
LED1 board
CFD-RG880CP
2929
Page 30

CFD-RG880CP
• Waveforms
– CD Board –
(MODE: CD PLAY)
– TC Board – – MAIN Board –
IC701 (RF OUT)
1.1 ± 0.4 Vp-p
500 mV/DIV, 0.5 μsec/DIV
IC701 (RF MON (FE))
Approx. 100 mVp-p
100 mV/DIV, 2 msec/DIV
IC701 RI (TE)
1.6 V
1.6 V
IC701 VT (XOUT)
2.3 Vp-p
16.9344 MHz
1 V/DIV, 0.05 μsec/DIV
IC702 (CF1) (USB PLAY)
2.5 Vp-p
12 MHz
1 V/DIV, 50 μsec/DIV
Q301 $ REC
19.5 μsec
0.1 V/DIV, 5 μsec/DIV
T301, HRP301 (YEL)
19.5 μsec
10 V/DIV, 5 μsec/DIV
4 Vp-p
40 Vp-p
IC801 RH (CF1)
1.4 Vp-p
10 MHz
500 mV/DIV, 0.1 μsec/DIV
Approx. 100 mVp-p
100 mV/DIV, 2 msec/DIV
– TUNER Board –
IC2 X (XOUT)
13.3 μsec
500 mV/DIV, 5 μsec/DIV
1.5 Vp-p
CFD-RG880CP
3030
Page 31

CFD-RG880CP
7-5. PRINTED WIRING BOARD – CD Section –
1
234567891011121314
A
CD BOARD (SIDE A) CD BOARD (SIDE B)
C503
C505
R503
R510
R501
R509
R507
R502
B
C
D
C779
R770
R769
R767
C501
C799
R761
C797
C777
C766
R764
C794
R750
C782
C783
C784
C530
R790
E
F
G
H
C778C776
R768
C523
C524
C765
C798
I
R504
R508
C792
C791
R789
C790
R785
C741
C727
C707
R786
R505
C718
C502
R506
C734
C733
C732
C731
C730
R738
R726
R759
C740
R715
R743
C717
C749
C723
C528
C739
C737
C527
C735
C747
R757
C736
C742
C755
R712
R713
R760
• : Uses unleaded solder.• See page 29 for Circuit Boards Location.
C738
C746
C743
C744
C745
FB701
C757
R703
R705
R704
1-877-003-
• Semiconductor
Location
Ref. No. Location
IC701 E-10
IC702 G-12
IC703 B-11
IC704 H-11
C748
C756
C758
C706
C713
21
(21)
TP(RF OUT)
X701
FB702
X701
R702
C701
R754
R755
R748
R753
C754
C759
C715
R752
R751
R701
C703
C702
R723
EB
Q701
C
16
R747
R746
R745
R749
60
61
80
1
R710
R707
C709
R706
R709
C704
C708
R533
C712
C714
OPTICAL
PICK-UP
(KSM-213CDP)
M701
(SPINDLE)
C729
IC701
TP(VC)
R716
R717
C764
CN701
BLOCK
R718
R719
41
20
C711
C710
R721
R737
40
21
C716
R724
R731
R722
R736
C726
R733
R727
R534
1
C529
R744
R742
R741
R740
C728
14
C724
R735
C725R728
R734
C722
C721
R732
C719
TP738
TP739
R780
C786
C787
R511
1
5
4
IC704
3
1
R513
USB BOARD CN1001
TP723
R772
R773
R779
R778
C785
R781
R782
TP742
TP741
C789
C788
TP740
FB705
C510
CN705
B
(Page 46)
IC703
(LIMIT)
R514
R775
R776
TP724
TP737
R771
TP736
R777
24 13
25
IC702
36
37
R787R788
R783
R784
R798
4
C506
S701
R774
TP725
TP735
TP734
C781
R791
C514
R517
TP726
TP733
48
TP743
R794
R799
FB706
1
2815
R518
C519
R521
TP727
TP732
TP731
TP730
12
C773
R765
TP729
1
TP728
R797
R795
R796
1-877-003-
C504
C507
FB704
C768
R523
R525
FB703
X702
R763
21
(21)
R531
R522
R524
R526
R528
R529
R530
R532
X702
M702
(SLED)
CN704
1
MAIN
BOARD
A
CN801
(Page 37)
25
CFD-RG880CP
Q701 G-9
3131
Page 32

CFD-RG880CP
7-6. SCHEMATIC DIAGRAM – CD Section –
CN701
R534
C759
C706
R704
R717
R719
R724
C715
C702
C703
R706
R707
R709
R710
C704
C708
C709
C710
R705
R703
C707
C527
C716
R723
C718
R533
C506
C507
C504
C505
R721
C713 C712
M701
M702
S701
C764
R760
• See page 30 for waveforms. • See page 48 for IC Block Diagrams. • See page 53 for IC Pin Function Description of IC702.
R754
C745
C744
R751
C742
C728
C743
IC B/D
C734
C732
C731
C730
C738
C736
R738
R749
R745
C740
C741
C737
C739
R747
R746
C735
R743
C529
R744
R742
R741
R740
R737
R748
C733
C729
R750
R761
R764
FB703
FB704
C766
R768
C776
C777
C778
C768
R763
C773
R513
R511
C765
X702
R765
R767
R769
R759
R715
R713
R712
C528
R716
R718
C711
C714
Q701
R510
R509
R503
R504
R501 C503 R502
R722
C701
R702
R701
IC703
C758
C757
C717
C756
C755
R508
R507
R505
R506
X701
FB702
R757
C754
R727
R728
C719
R731
R732
C721
R734
R733
FB701
R755
IC701
C722
C723
R726
C724
R735
R753
R752
C746
C748
C749
C747
C726
C725
C727
R736
IC B/D
TP728
TP729
IC B/D
IC704
TP730
IC702
C519
R518
C514
R514
FB705
C510
R797
R796
C799
C501
TP731
TP732
C779 C781
R770
C798
R795
R521
R517
R522
R523
R524
R525
R526
R528
R529
R530
R531
R532
R794
C797
TP733
TP734
C794
R791
TP743
TP735
C523
C524
TP718
C502
C530
C791
C790
R783
C792
R787
TP736
TP737
CN704
TP701
TP702
TP703
TP704
TP705
TP706
TP707
TP708
TP709
TP710
TP711
TP712
TP713
TP714
TP715
TP716
TP717
TP719
TP720
TP721
TP722
CN705
FB706
R790
R786
R789
R785
R798
R784
R799
R788
TP742
TP741
TP740
R782
R781
R780
TP739
C785
TP738
C784
C783
C782
R772
R771 R774 R775 R776
R773
C789C788
R779
R778
R777
(Page 41)
(Page 47)
C787
C786
TP723
TP724
TP725
TP726
TP727
CFD-RG880CP
3232
Page 33

CFD-RG880CP
7-7. PRINTED WIRING BOARD – TUNER Section –
1
234567891011121314
A
B
R63
C
D
MAIN
BOARD
C
CNP1
C26
C27
JW14
C65
JW3
R10
JC1
R65
CN2
E
F
(Page 37)
R61
R60
R59
R58
JC33
L21
C62
C63
R94
R13
C60
JC34
G
C29
C61
C51
C68
R57
C52
IC2
C66
X1
JC2
R56
C59
C57
R4
R50
R53
C55
R52
C53
C95
TP
(CV)
R51
R54
R91
JW5
JW4
C37
C54
JC5
R55
• : Uses unleaded solder.• See page 29 for Circuit Boards Location.
AM FERRITE BAR ANTENNA
JC11
C47
R40
C41
JW6
C39
JC4
JW7
R11
TP
(GND)
L3
CT3
C49
C42
L4
C21
C43
JC3
R14
JC12
R30
JW9
D2
C30
C56
C22
D3
C31
JW10
L2
C23
R41
R24
C33
R31
C24
C20
JW8
R33
R92
C77
R32
JC24
C78
C32
CT1
IC1
C80
C14
C15
D1
C11
C34
C35
C12
R2
L1
C7
C9
C1
C18
C4
JW12
JW11
T2
JW13
JC13
T1
D10
C8
R3
CF4
C10
R5
CF2
D11
R1
JC6
1-863-438-
ANT1
FM TELESCOPIC
ANTENNA
JW2
11
(11)
CFD-RG880CP
• Semiconductor
Location
Ref. No. Location
D1 C-10
D2 D-8
D3 D-8
D10 C-12
D11 C-12
IC1 E-10
IC2 E-4
3333
Page 34

CFD-RG880CP
7-8. SCHEMATIC DIAGRAM – TUNER Section –
L3
CT3
JC11
0
R32
D1
CT1
US,CND,
MX,E92
C34
L1
C33
L2
R31
JC24
JC12
0
C32
C35
0
• See page 30 for waveform. • See page 49 for IC Block Diagrams.
D3
R41
C49 R40
R30
D2
C31
C30
R33
C41
C42
C43
C47
C80
JC3
0
R24
R14
C24
R11
C21
C23
C39
C37
C22
L4
C20
R91
C51 C52
X1
1
R50
C61 C62 C63
C53
R52
R51
C59
C54
R54
C95
R55
C55
R53
IC2
C56
C57
JC5
0
R4
IC B/D
R58
R59
R60R61
R92
R94
C60
C68
C66
R13
ANT1
JC4
0
IC1
R56
R57
L21
CNP1
IC B/D
JC2
0
JC33
0
C1
R2
R3
D11
D10
C4
C8
C10
JC13
T1
0
R1
R5
C11
CF4
JC6
0
CF2
C9
C12
C7
T2
C78
C77
C18
C15
C14
0.010.01
JC34
0
R10
C29
C26
JC1
0
R65
C27
R63
C65
no mark : FM
C
(Page 41)
(3/3)
CN2
( ) : AM
CFD-RG880CP
3434
Page 35

CFD-RG880CP
7-9. PRINTED WIRING BOARD – TC Section –
1
234567
A
T301
Q301
C305
B
C
S301
(REC/PB)
REC
PB
R305
S301
R308
C306
-1-2
R314
R315
R210
R306
C102
R202
C202
C304
R203
C302
C203
C204
R204
C207
R307
R212
C201
C307
C308
C310
IC301
R206
R201
C205
R106
JC306
JC308
R205
R211
R310
JC303
JC301
R311
JC304
R302
JC305
JC307
• : Uses unleaded solder.• See page 29 for Circuit Boards Location.
R303
Q302
Q303
CN303
JC309
D
MAIN
BOARD
CN1
(Page 37)
D
E
F
G
C104
R110
R102
R103
YEL
R-CH
RECORD/PLAYBACK
C107
C103
RED
HRP301
HEAD
C101
R104
L-CH
WHT
C105
R301
BLK
R101
R112
HE301
ERASE
HEAD
C301
R111
JC302
R304
R105
BLK
(CHASSIS)
R309
C303
1-866-573-
11
(11)
CFD-RG880CP
3535
Page 36

CFD-RG880CP
7-10. SCHEMATIC DIAGRAM – TC Section –
TAPE MECHANISM DECK
(1/2)
HRP301
• See page 30 for waveforms. • See page 50 for IC Block Diagram.
C103
R112
R104
C105
C302
C205
R301
C301
R110
C102
C104
C101
C107
R103
R102
R101
R201R210
IC301
TA2068NG
1.9
R111
<<0>>
JC302
JC306
<<5.9>>
JC308
<<3.1>>
R211
IC B/D
JC305
C303
JC307
R309
S301
C310
<<0>>
C207
C201
C202
C204
C308
R202
C305
Q303Q302
C203
R203
R308
R204
R212
T301
C306
1.9
R305
R306
R106
R206
R314 R315
<<0>>
1.9
<<2>>
Q301
<<0>>
<<0>>
R304
JC303
R105
R205
JC301
R303
R302
JC304
CN303
D
MAIN
BOARD
(3/3)
CN1
(Page 41)
CFD-RG880CP
R310
R311
C304
C307
R307
JC309
3636
Page 37

CFD-RG880CP
7-11. PRINTED WIRING BOARD – MAIN Section –
1
23456789101112
A
LCD
BOARD
CN602
(Page 42)
E
MAIN BOARD
B
C
D
E
F
G
H
TAPE
MECHANISM
DECK
(2/2)
CAPSTAN
REEL MOTOR
MOTOR
M971
S971
PLAY
S972
+
-
HEADPHONE
BOARD
CNP374
(Page 38)
(WOOFER)
CNP303
P
TC
BOARD
CN303
(Page 35)
SP393
POWER
BOARD
CN981
(Page 46)
6
1
JW140
CNP391
TP201
D
N
CNP303
6
1
5
TP102
R122
R222C223
1
C224
TP202
X802
CNP393
4
JW234
TP304
JW233
JW232
1
TP303
CNP901
5
C901
C902
C903
1
C922
C953
C952
TP101
C123
C122
C124
JW139
C222
C121
C221
IC303
115
R156
IC351
JW145
JW144
JW142
JW138
C335
C334
R225
R340
I
CN804
17
C
Q806
B E
C
Q807
B E
R563
R566
R582
JW240
JW241
JW242
R580
JW237
JW236
JW235
C256
R211
C208
C355
R155
R255
R353
R153
E B
D251
Q260
C151
R152
R262
C252
R254
R253
C351
C251
C352
JW297
R351
R352
C253
C353
JW143
JW135
JW131
JW136
R215
TP103
R217
R218
E B
Q201
C116
C216
C
JW132
R121
R125
R119
R219
R120
C119
C220
C120
JW137
R221
C153
R342
JW239
CN1
R581
R578
R579
JW238
1
13
D151
R154
C152
C154
R157
R151
1
4
8
5
R251
R257
C254
R252
R256
R341
TP203
C218
R220
C219
• : Uses unleaded solder.• See page 29 for Circuit Boards Location.
SW2
;
PUSH
OPEN/CLOSE
JC808
CN806
C160
C207
C206
JW130
JW246
JC806
R163
R162
R210
C107
C209
C211
C109
C118
TP902
R513
JW247
JW248
R521
R522
R518
E B
C886
Q808
C
R514
C881
R161
C B
Q160
C204
R110
14 1
C106
15 28
111
C
C213
R112
JW146
C114
W801
C907
R912
R911
R910
R909
R160
R913
R515
C882
JW231
C157
IC301
C113
JW147
B
R886
JW250
JW283
R516
R108
C104
D904
Q905
L811
R896
R899
C883
JW230
R159
C257
R208
C301
R302
JW148
JW129
C906
CE
JW252
JW2501
C884
JW229
D312
JW128
JW288
R889
R895
R898
R510
L812
R517
R523
R524
R525
JW228
R259
R205
R204
C201
TP301
C302
D311
JW127
JW249
R567
R565
R568
JW244
JW245
JW243
C156
C108
R111
R261
R263
JW298
R260
C
C260
JW296
R212
C214
JW133
JW134
R115
R117
R118
E B
Q101
C
C332
JC302
BOARD
CNJ405
JW254
JW255
JW286
R880
R883
JW285
R884
R533
R885
C869
C870
JW284
R894
R501
R897
R502
R505
R507
R503
R504
R506
R512
R508
R509
R511
C880
TP802
TP803
C887
R526
TP804
C888
TP805
JW226
JW227
JW225
C101
R104
C102
R109
R123
C202
C306
C305
TP302
R304
R303
JW150
JW149
CN811
2
JW126
JW124
JW125
LED3
LED4
BOARD
CNJ406
M
L
16
CN803
R879
R882
R887
R890
R891
R892
R893
80
81
C878
R527
R528
C889
R801
JW224
JW221
R105
R124
R224
R223
R209
JW153
JW123
1
C904
CC
Q819 Q817
B E
C
Q820
L810
B E
R877
R878
R875
R874
JW256
R876
C862
R881
C861
51
IC801
1
100
TP801
C801
R802
R807
C808
R805
R804
R803
C807
C802
C805
C806
C804
C803
JW290
JW220
JW222
JW223
JW280
JW279
JW155
JW154
JW119
JW121
JW120
JW122
TP902
B E
50
R808
R806
C
B E
Q818
R809
FB902
L902
JW118
R872
JW289
JW294
R873
R540
JW157
C912
FB901
JW117
Q823
B E
Q824
B E
R845
21
C833
34
IC803
C
CC
JC805
C824
C825
L802
3
C842
IC804
JW156
JW116
(Page 44)
LED2
BOARD
CNJ404
K
16
Q821
JC812
B E
C
Q827
C
B E
Q822
B E
C
Q828
B E B E
JW257
R871
R865
R866
JW258
31
30
JW259
C813
R840
X802
C828
C826
C830
C827
C829
C831
C
Q803
C
B E
C832
Q802
R841
B E
R843
C823
R810
R844
JW219
JW218
1
2
C838
C841
C840
C839
R850
R847
R848
JW159
IC901
C913
D906
15
C908
D905
JW115
TP906
R915
TP905
(Page 44)(Page 44) (Page 44)
LED1
BOARD
CNJ403
CN802
C
C
Q831
Q825
B E B E
C
C
Q832 Q830
Q826
B E B E
R869
R870
R864
R863
C849
R861
C848
C847
R860
R858
R859
C846
C845
CET,E41,E92 MODEL
E41,MX MODEL
CET,E92,BR MODEL
R811
L814
C812
R816
JW217
JW216
R838
R837
L804
C834
C835
C836
C837
Q804
C
R846
B E
Q805
C
JW161
B E
R849
R930
R924
R927
L901
JW114
JW113
C909
R917
R918
R919
R914
B
JC811
BR,MX
MODEL
C814
4
IC802
5
C915
R928
JW112
R916
R862
R854
R812
R815
L803
JW111
Q906
CE
C
Q829
B E
C
R868
R532
C
Q816
B E
CET,E92
MODEL
R853
C844
R856
C817
R819
R814
R813
R818
R817
C815
JW215
1
C822
8
JW165
JW168
C914
JW110
(Page 44)
FUNCTION
KEY
BOARD
CNP402
I
JW260
R562
R559
R560
Q815
B
E B
Q814
C
R852
R855
R821
R822
R820
JW214
JW170
D907
B
CN808
17
JW274
R556
R558
JW273
JW272
E
C
R531
R529
R530
Q813
BE
C
E41,BR,MX
MODEL
R857
C821
R826
R827
R825
R835
R836
R823
R824
C818
C816
JC802
JW212
C919
C918
R947
CE
Q912
JW109
C331
R831
R833
JW291
JW208
R945
R336
D307
B E
C820
R829
C819
R830
JW262
JW261
JW263
R832
JW210
JW211
JW206
JW205
JW204
JW171
C920
R946
E B
Q904
C
TP901
C905
R337
R338
R339
R334
R345
R335
D308
C330
JW108
C
Q801
JW282
JW209
JW203
JW177
R904
R903
JW173
JW107
C329
C327
C328
115
(Page 44)
POWER
KEY
BOARD
KH407
HJ
CN810
12
JW276
JW275
R834
R828
JW265
JW201
JW200
JW202
D303
JW178
JW179
JW175
JW176
R906
R905
R901
C
Q903
B E
D902
R333
C325
C324
C323
C326
(Page 44)
JW266
JW293
JW199
JW180
R907
C
Q901
B E
D903
R920
IC302
VOLUME
BOARD
KH405
12
JW198
JW181
JW174
JW105
JW106
C910
C322
R331
CN809
JW271
KEY
G
JW197
D815
JW183
E B
Q302
R327
JW267
L813
JW182
R310
C
R921
C321
C320
(Page 42)
E B E B
Q811
C
E B
CCC
D804
JW268
W802
R590
JW196
D814
JW185
JW184
R307
C308
Q907
B
C
LCD
BOARD
CN601
F
CN805
51
C501
JW277
Q809
C502R564
E B
Q810Q812
R552R554
JW269
JW270
JW194
FB803
FB802
R589
R575
R576
R577
JW191
JW195
FB804
25
C555
24 2
C539
FB807
C540
FB806
JW190
JW188
R214
R114
R344
R306
R343
R309
E B
C307
Q301
R308
R305
C
C314
R313
R312
R314
R318
R311
C310
C
R316
R315
Q303
C309
B E
C315
C311
C312
C313
R317
C316
R321
R324
C318
JW102
E
JC303
Q304
B
C
R325
C319
R328
C
Q305
B E
JW104
R326
JW103
FB805
R319
E
E
• Semiconductor Location
Ref. No. Location
D151 E-4
D251 E-4
D303 F-9
D304 G-10
D305 H-10
D306 H-10
D307 H-8
D308 H-8
D309 G-11
D310 G-11
R588
C550
C549
C548
E B
Q833
R585
R584
JW187
R320
R583
C
CN2
11
TUNER
BOARD
C
CNP1
A
Q
11
(11)
(Page 33)
CD
BOARD
CN704
(Page 31)
AUDIO IN
BOARD
CNP371
(Page 38)
1
D806
L809
D807
L808
C525
1
R158
R258
JW189
D810
D811
CNP392
VR102
1
3
VR202
JW278
D310
D309
C911
R923
D909
R922
JW101
JW101
1-878-321-
C551
R586
C552
R587
JW193
JW292
VR501
JW192
JC809
R571
R574
R572
R573
R569
R570
C527
CN801
D808
D809
R174
R274
JW186
D304
C
B
C317
Q306
D305
R323
R322
D306
D311 F-5
D312 F-5
D804 C-9
D806 D-11
D807 E-11
D808 F-10
D809 F-10
D810 F-11
D811 F-11
D814 E-9
D815 E-9
D902 G-9
D903 H-9
D904 H-5
D905 H-7
D906 G-7
D907 F-8
D909 G-11
IC301 F-5
IC302 H-9
IC303 H-3
IC351 F-4
IC801 C-6
IC802 D-7
IC803 E-7
IC804 E-7
IC901 G-7
Q101 H-4
Q160 E-5
Q201 H-4
Q260 E-4
Q301 G-10
Q302 G-9
Ref. No. Location
Q303 G-10
Q304 H-10
Q305 H-10
Q306 G-10
Q801 C-8
Q802 D-7
Q803 D-7
Q804 E-7
Q805 E-7
Q806 B-4
Q807 B-4
Q808 C-5
Q809 B-10
Q810 B-10
Q811 B-9
Q812 B-9
Q813 C-8
Q814 C-8
Q815 B-8
Q816 C-8
Q817 B-6
Q818 B-6
Q819 B-6
Q820 B-6
Q821 B-7
Q822 B-7
Q823 B-7
Q824 B-7
Q825 B-7
Q826 B-7
Q827 B-7
Q828 B-7
Q829 B-8
Q830 B-8
Q831 B-7
Q832 B-7
Q833 C-11
Q901 G-9
Q903 G-9
Q904 G-8
Q905 H-5
Q906 H-8
Q907 H-9
Q912 G-8
CFD-RG880CP
O
USB BOARD CN1003
(Page 46)
3737
Page 38

CFD-RG880CP
7-12. PRINTED WIRING BOARDS – JACK Section –
1
2345678910
A
HEADPHONE BOARD AUDIO IN BOARD
1
JW401
CNP373
L372
4
R180
CNP374
15
JW402
R175
R176
R177
B
C
D
P
SP191
(LCH)
SP291
(RCH)
MAIN
BOARD
CNP391
(Page 37)
SP192
(BUZZER)
SP292
(BUZZER)
• : Uses unleaded solder.• See page 29 for Circuit Boards Location.
JW301
FB101
L171
L371
FB301
R171
3
JC171
R271
CNP372
CNP371
1
L271
FB201
1-878-330-
3
1
3
1
11
(11)
Q
MAIN
BOARD
CNP392
(Page 37)
CNP2
AUDIO
IN
E
F
J391
J
R280
R279
R276
R275
1-878-329-
J371
AUDIO IN
11
(11)
CFD-RG880CP
3838
Page 39

CFD-RG880CP
7-13. SCHEMATIC DIAGRAM – MAIN Section (1/3) –
CN804
R568
R567
R566
R565
(Page 43)
(Page 43)
CN805
C502
R564
JC808
C501
SW2
CN806
CN808
TP801
TP802
TP803
TP804
TP805
Q806
R522
JC806 R521
C886
R513
R526
R518
R505R506
• See page 30 for waveform. • See page 50 for IC Block Diagram. • See page 54 for IC Pin Function Description of IC801.
R899
R898
L811
R502
R501
C806
R897
R896
R801
C801
R895
R802
C802
R803
C803
R894
R804
C804
R893
R805
C805
L810
R880
R812
C815
R879
R813
R878
R819
R817
R818
R814
R885
R886
R820
C862
C861
R877
R821
R874
R873
R875
R876
R872
R871
R870
R869
R868
R866
R865
R864
R863
R862
C844
R861
R860
R859
R858
R854
R853
R856
R852
R855
R835
R824
R836
R825
R826
R827
C821
C819
C817
C818
C816
Q801
R834
R828
D804
C820
R829
R830
R831
R832
R833
R822
R823
JC802
R857
C849
C848
C847
C846
C845
C870
R889
C869
R884
R883
R882
R881
R887
R533
R890
R892
R891
IC801
C813
R540
L814
R806
R807
R808
R809
C808
R810
R815
R816
C807
R811
C814
C812
R507
R510
R511
R512
Q807
C881
C882
C883
C884
R523
R524
R525
C887
C888
C889
Q808
R563
R503
R504
C880
R508
R509
C878
L812
R514
R515
R516
R517
R527
R528
R531
R532
Q831
Q832
Q815
Q816
(Page 40)
(Page 41)
Q809
R529
R556
Q813
R558
R530
Q814
R559R560
R562
Q823
Q824
Q821
Q822
Q829
Q827
Q830
Q828
Q819
Q820
Q810
Q812
Q825
Q817
Q826
Q818
Q811
R552
R554
JC811
JC812
CN803
(Page 45)
(Page 45)
CN802
(Page 45)
(Page 45)
(Page 45)
CFD-RG880CP
(Page 45)
(Page 45)
CN809
CN810
IC B/D
IC802
C822
R838
R837
C824 C825
Q802
C823
JC805
X802
C830
C826
C829
C827
C828
L802 C833
C831
Q803
C832
R840
R841
R843
R844
R845
IC803
IC804
Q804
L803
(Page 41)
C834
C835
L804
C840
C842
C841
R850
R846
C838
C837
C839
Q805
R847
R848
R849
C836
3939
Page 40

CFD-RG880CP
7-14. SCHEMATIC DIAGRAM – MAIN Section (2/3) –
R124
R224
R209R109
IC B/D
IC301
C306
C305
TP302
R304
TP301
R303
C302
C113
C301
D311
D312
C213
C111
R112
C109
C211
R212
C209
Q260Q160
R163
R161
R263
R261
R262
R260
C207
C104
C204
C206
C106
C107
R123
R223
C201 C101
R204
R205
C102 C202
R104
R105
R208
R108
R110 R210
C160 C260
R162
R160
• See page 51 for IC Block Diagram.
R311 R312
C309 C310
R302
R114
C307
R214
R343
R344
R308
R309
R305
C308
R313 R314
R315
Q301
R316
R307R306
R317
Q302
R310
C311
Q303
C312
C314
C313
C114
C214
D304
R319
R318
C315
C316
R337R336
R339
R345
TP303
TP304
VR102
CNP392
D309
CNP393
CNP391
D310
R174
R274
VR202
IC302
C122
D307
R335
C330
TP101
C124
C123
R122
R338
C331
D308
TP102
TP202
Q304
R322
R324
D305
R321
C318
R323
D306
R117
R217
C317
R320
R115
R118
R215
R218
C332
Q101
Q305
TP103
IC303
Q306
TP203
R325JC303
C116
C216
Q201
R328
R327
R119
R219
R120
C118
R125
C319
R121
C119
C320
C120
C219
R220
R225
C220
C321 C322 C323
R331R326
C334 C221 C121
R340
R342
R341
R221
C218
JC302
C324
C325
C335
C326
C327
C328
C329
R334R333
C222
C224
C223
R222
CNP374
CNP371
R175
R275
FB301
FB201
FB101
SP393
R271
R171
CNP372
JC171
CNP373
R280
R180
L372
L171
L371
L271
R276
R279
R176
R177
CNP2
J371
SP191
SP291
SP192
SP292
J391
(Page 39)
D303
(Page 41)
CFD-RG880CP
4040
Page 41

CFD-RG880CP
7-15. SCHEMATIC DIAGRAM – MAIN Section (3/3) –
(Page 39)
C108 C208
R211R111
R156
R256
C154
C254
R157
R257
R352
R351
• See page 51 for IC Block Diagrams.
IC B/D
IC351
C153
R152
R151
C353
R251
R252
C253
C151
R153
R253
C251
C352
C351
C152
R154
D151
D251
R254
C252
R155
R255
R353
C355
(Page 40)
C920
R947
C919
Q912
D907
R945
R946
C918
R928 R927 C915
R930
C914
IC B/D
IC901
L901
R924
D906
C913
FB901
L902
C912
C904
FB902
(Page 39)
TP902
Q907 Q906 Q905
R921
C910
D811
D810
D808
D809
R571
JC809
R572
R573
R589
FB802
R574
L809
L808
C527
C525
R569
R258
R158
R570
R590
FB803
R575
R576
D815
R577
D814
FB804
L813
C555
FB805
FB806 FB807
C539
C540
CN801
C953
C952
CNP303
C156
C256
R578
R580
R579
R581
R919
R918
TP906
R920
C909
VR501
D806
C157
R159
C257
R259
CN1 CN2
R582
R917
D905
R915
R916
D807
R914
TP904
TP905
C908 C907
C551
C550
C549
C548
R912
R913
TP903
D904
R583
R584
R585
R586
Q904
C905
R911
C906
R903
R904
R905
D902 D903
Q903
R906
R907
R910
R909
R901
Q901
CN811
(Page 47)
CNP901
C911
D909
R922
R923
R588
Q833
C552
R587
C901 C902
C903
C922
W801W802
(Page 47)
CFD-RG880CP
(Page 32)
S971 S972
M971
(Page 36)
4141
(Page 34)
Page 42

CFD-RG880CP
7-16. PRINTED WIRING BOARD – LCD Section –
1
2345678910
A
LCD BOARD
B
R651
D601
C
(LCD BACK LIGHT)
D
OPR/
BATT
D603
R665
R664
R662
R654
JW602
R660
R663
R661
R672
R653
D604
R658
R657
R659
123
IC602
R656
• : Uses unleaded solder.• See page 29 for Circuit Boards Location.
• Semiconductor
Location
Ref. No. Location
C610
JW601
D605
R655
D602
(LCD BACK LIGHT)
R652
C612
JW603
JW604
D601 C-3
D602 C-8
D603 B-5
D604 C-6
D605 C-7
IC601 F-5
IC602 C-6
E
F
G
H
L601
R646
R648
R649
R650
C614
CN602
17
BP601
R601
38 1
R602
R603
C605
R645
R604
R644
R605
R606
R607
C602
R608
R609
R639
R640
C601
64
1
R610
R611
R667
49
IC601
16
R612
R614
R616
R615
R613
LIQUID CRYSTAL ELEMENT
R617
LCD601
48
17
R668
R666
R618
R619
R620
R621
R622
R623
33
32
R624
R625
R626
R628
R627
R630
R629
R632
R631
R633
R634
R635
R636
R637
R638
C613
CN601
1
5
11
1-878-336-
(11)
CFD-RG880CP
E
I
MAIN BOARD CN804
(Page 37)
F
MAIN BOARD CN805
(Page 37)
4242
Page 43

7-17. SCHEMATIC DIAGRAM – LCD Section –
CFD-RG880CP
LCD601
D601
R651
R670
D602
R652
R671
(Page 39)
(Page 39)
CN601
CN602
R672
R658
R659
R661 R662
R663 R664
C613
C614
R660
R665
D603
D604
R657 R656
D605
C612
R655
R654
BP601 BP602
C610
TP605
L601
R653
R640
IC602
R639
R633
R634
R632
R635 R666
R636
R637
R638
C602C601
R646
R648
R649
R650
R667
R668
R669
C605 R645 R644
TP601
TP602
TP603
TP604
IC601
R631
R630
R629
R628
R627
R626
R625
R624
R623
R622
R621
R620
R619
R618
R617
CFD-RG880CP
R602
R601
R603
R605
R604
R606
R607
R608
R609
R610
R611
R612
R613
R614
R615
R616
4343
Page 44

CFD-RG880CP
7-18. PRINTED WIRING BOARDS – KEY Section –
234567891011121314
R425
S411
RADIO/
BAND
R426
R427
S412
AUDIO IN
KH405
2
R428
S404
MODE
1
A
1
VOLUME KEY BOARD
AUTO PRESET
B
G
MAIN BOARD CN809
C
D
E
F
H
MAIN
BOARD
CN810
(Page 37)
POWER KEY BOARD
KH407
2
1
DSPL
R424
/ENT
S403
SLEEP
S410
(Page 37)
R423
R422
R421
POWER
S408
1-878-328-
(11)
• : Uses unleaded solder.• See page 29 for Circuit Boards Location.
R429
S418
REPEAT
R430
S420
VOL-
R432
R431
1-878-327-
S407
VOL+
11
(11)
LED1 BOARD
CNJ403
1
3
R402
R401
D402
D401
(ILLUMINATION)
1-878-331-
J
MAIN
BOARD
CN802
11
-
(11)
(Page 37) (Page 37)
LED2 BOARD LED3 BOARD LED4 BOARD
CNJ404
3 13
R404
R406
CNJ405
1
R408
3
CNJ406
1
KLM
R403
D404
(ILLUMINATION)
D403
1-878-332-
(11)
MAIN
BOARD
CN802
11
-
R405
D406
(ILLUMINATION)
1-878-333-
D405
(11)
MAIN
BOARD
CN803
11
-
(Page 37) (Page 37)
R407
D408
(ILLUMINATION)
1-878-334-
D407
11
(11)
MAIN
BOARD
CN803
-
SOUND KEY BOARD
• Semiconductor
Location
Ref. No. Location
D401 B-8
D402 B-7
D403 B-10
D404 B-9
D405 B-12
D406 B-11
D407 B-14
D408 B-13
D409 D-10
D410 D-7
Q401 D-10
Q402 D-7
Q403 E-10
Q404 E-7
R441
C
BE
C
BE
S416
SALSA
D409
USB REC
D410
USB PLAY
11
Q402
Q404
C
BE
C
BE
S409
ROCK
R442
JW412
1
CNP401
5
REGGAETION
R433
PDW
POWER DRIVER WOOFER
S419
R440
R439
JW411
R437
R438
S421
S417
S415
R434
R435
DANCE
Q401
Q403
FLAT
R436
G
H
I
CFD-RG880CP
FUNCTION KEY BOARD
USB
S422 S424
CD
S423
R443
R444
R445
CNP403
5
1
(Page 37)
MAIN
BOARD
CN808
I
CNP402
CNP404
2
17
1
R446
R448
CD
CD # USB
R447
ENTER
S425
USB MENU
S426
1-878-325-
(11)
1-878-324-
11
(11)
CD KEY BOARD
PRESET
TUNE-
S413
R412
KH406
2
1
11
R413
TUNE+
R414
S414
S405
R415 R416
PRESET
+
S406
TP401
TP402
R409
S401
R410
YV
S402
11
1-878-326-
R411
(11)
4444
Page 45

7-19. SCHEMATIC DIAGRAM – KEY Section –
CFD-RG880CP
(Page 39)
(Page 39)
KH405
KH407
R426 R427
R425
S411
S412
R422 R423 R424
R421
S408
S410 S403
R428
R429 R430 R431 R432
S404
S418 S420 S407
(Page 39)
CNJ403
R402 R401
D402 D401
(Page 39) (Page 39)
CNJ404
R404 R403
D404 D403 D406 D405 D408 D407
R406 R405
CNJ405
(Page 39)
CNJ406
R408 R407
Q403
Q401
Q402
D409
R441
R442
D410
(Page 39)
CNP402
R444 R445
R443
S422
S423
R446
S424
R447
S425
R448
S426
CNP401
CNP403
CNP404
R434 R435
R433
S409
KH406
R436
S415
R409
S401
S416 S421
R410 R411 R412
S402 S413
R437 R438
S417
R413
S414
R414
S405
R439 R440
R415 R416
S406
TP402
Q404
S419
CFD-RG880CP
4545
Page 46

CFD-RG880CP
7-20. PRINTED WIRING BOARDS – POWER Section –
1
234567891011121314
A
POWER BOARD USB BOARD
B
C
D
J981
~ AC IN
3
1
EXCEPT
BR MODEL
JW988
JW977
1
CN985
EXCEPT
BR MODEL
1
12
2
BR MODEL
JW986
JW985
CN984
CN983
2
87
FH903
T981
POWER TRANSFORMER
12 14 1 21
*
4521
* Not Replaceable:
Built in Transformer
F982
FH904
C987
FH902
FH901
D982
C982
D984
C984
F981
CN982
JW982
JW984
• : Uses unleaded solder.• See page 29 for Circuit Boards Location.
JW981
JW983
1
CN981
C986
5
1
TP953
C981
C985
C988
C983
D981
1-878-323-
D983
11
(11)
N
MAIN
BOARD
CNP901
(Page 37)
CD
BOARD
CN705
(Page 31)
B
CN1002
21
FB1004
(Page 37)
MAIN BOARD CN811
O
CN1001
1
L1001
FB1006
FB1007
J1001
J1001
(USB)
4
21
CN1003
FB1001
D1005
1-878-335-
D1004
11
(11)
E
F
G
H
BR MODEL
VOLTAGE SELECTOR BOARD
CN992
CN993
CN991
2
1
2
1
2
1
1-878-337-
11
(11)
• Semiconductor
Location
Ref. No. Location
D981 C-7
D982 C-7
D983 C-8
D984 C-7
D1004 B-13
D1005 B-13
S981
VOLTAGE
SELECTOR
S981
120-127V
1
CN941
1
2
2
CN942
220-230V
BATTERY BOARD
FH905 F983 FH906
JW944
JW943
JW942
JW941
1-878-322-
I
DRY BATTERY
SIZE”D”
(IEC DESIGNATION R20)
8PCS,12V
11
(11)
CFD-RG880CP
4646
Page 47

7-21. SCHEMATIC DIAGRAM – POWER Section –
CFD-RG880CP
(Page 41)
FB1001
J981
CN983
JW985
JW986
CN984
JW987
JW988
FH903
CN985
F982
T981
FH904
F981
FH901 FH902
C987
D981
D982
D983
D984
C984
C981
C982
C983
JW981
JW983
C986
JW982
JW984
C985
TP953
C988
VR981
TP954
TP955
TP951
TP952
CN981
CN982
(Page 32)
(Page 41)
CN941
CN942
JW941
JW942
JW944
JW943
CN1001
CN1003
L1001
FB1004
TP1001
FB1006
FB1007
TP1002
D1004
D1005
CFD-RG880CP
CN991
FH906
FH905
S981
CN992
F983
CN993
4747
Page 48

CFD-RG880CP
• IC Block Diagrams
IC701 LC786950T-US-H (CD Board)
1
EFMIN
2
RF OUT
3
LPF
4
PHLPH
5
A IN
6
C IN
B IN
D IN
SLCISET
RFMON
VREF
JITTC
EIN
FIN
PCNCNT
TEIN
LDO
LDS
AVSS
7
8
9
10
11
12
13
14
15
16
TE
17
18
19
20
PROCESSOR
21
SLCO80LRVSS79RCHO78LRREF77LCHO76LRVDO75XVDD74XIN73XOUT72XVSS71CONT470DOUT69DVDD68DVSS67DVDD1566PCMREQ65PCMDATA64PCMBCK63PCMLRSY62DVDD
SLICE
LEVEL
CONTROL
RF
SIGNAL
MONITOR
VREF
TES, HFL,
DEFECT
JITTER
APC
D/A
A/D
22
AVD D
FDO
LPF
8FS DIGITAL FILTER/
1bit DAC
Audio Control
MUTE/DEEMPHASIS/
ATTENUATION CONTROL/
BASS/TREBLE/
HFC Filter
INTERPOLATION MUTE
ERROR CORRECTION
Synchronization
Detection
EFM
Demodulation
SERVO
CONTROL
CD PLL
23
24
25
26
TDO
SLDO
SPDO
VVSS1
PDOUT127PDOUT0
28
CLOCK
GENERATOR
29
30
PCDIST
VVDD1
DOUT Control
PORT CONTROL
32
CONT531CONT3
MP3, WMA, AAC
DECODER
Encoder
DECODER
DECODER
SUBCODE
DECODER
33
34
DEFECT
MP3
SRC
ROM
TEXT
FSEQ
35
C2F
MP3/PCM Output Control
Audio Output
Control
Stream Control/Audio Input
Memory I/F
36
37
38
39
DVSS
DVDD
DVDD15
Memory
1M Bit
MCU
I/F
PLL3
DVDD3
40
DVSS3
IC703 LA6548NHL-TE-L-E (CD Board)
VCC2
GND
28
VREF
27
VIN4
26
VG4
25
VO4+
24
VO4–
23
NC
22
FR
NC
21
VO3–
20
VO3+
19
VG3
18
VIN3
17
CD
16
RES
15
1
VCC1
GND
UVLO
THERMAL
SHUTDOWN
MUTE CONTROL
GATE
CONTROL
LEVEL
SHIFTER
LEVEL
SHIFTER
CURRENT
LIMIT
FLAG
DELAY
LEVEL
LEVEL
RESET3.3VREG
SHIFTER
SHIFTER
5OUT
4IN
2
MUTE
3
VIN1
4
61
LRCY
60
DATACK
59
DATA
58
TEST1
57
STDATA
56
STCK
55
STREQ
54
TEST0
53
CONT0
52
CONT1
51
CONT2
50
INTB1
49
INTB0
48
D RESB
47
D DO
46
D DI
45
D CL
44
D CE
43
DVSS
42
DVDD
41
VG1
5
VO1+
6
VO1–
7
NC
FR
8
NC
9
VO2–
10
VO2+
11
VG2
12
NC
13
REG-OUT
14
REG-IN
IC704 R5523N001B-TR-F (CD Board)
1EN
2GND
3FLG
CFD-RG880CP
4848
Page 49

IC1 TA2149BN (TUNER Board)
CFD-RG880CP
GND1
FM RF-IN
AM LOW CUT
MIX OUT
VCC2
AF IF-IN
FM IF-IN
GND2
AGC
QUAD
R-OUT
L-OUT
24
1
FM RF
2
3
4
5
6
FM IF
7
8
AGC
9
10
11
MUTE
12
AM IF
MIX
AM
MIX
FM
LEVEL
DET
AM
DET
FM
DET
ST/MO
FM/AM
FM
OSC
AM
OSC
BUFF
BUFF
IF BUFF
1/8
AF BUFF
VCO
DIVIDE
DECODE
ST
SW
IF REQ
1/1 OR
1/16
AF
FM RF-OUT
23
VCC1
AM RF-IN
22
FM OSC
21
AM OSC
20
19
OSC-OUT
ST-IND
18
IF-OUT
17
16
DET-OUT
15
14
LPF2/MO-ST
13
LPF1/BAND
MPX- IN
IC2 LC72137M-TLM-E (TUNER Board)
CE
1
DI
2
CCB
3
4
5
6
7
8
9
10
UNIVERSAL
COUNTER
I/F
PROGRAMMABLE
LATCH
DATA SHIFT REGISTER
12BITS
DIVIDER
UNLOCK
DETECTOR
SWALLOW
COUNTER
1/16,1/17
4BITS
CL
DO
MUTE
FM/AM
BAND
ST-IND
BAND
IF IN
REFERENCE
DIVIDER
PHASE
DETECTOR
CHARGE
PUMP
POWER ON
RESET
1/2
20
XOUT
XIN
19
18
LP-OUT
17
LP-IN
PD
16
VSS
15
14
VDD
MO/ST
13
FM IN
12
AM IN
11
49
Page 50

CFD-RG880CP
IC301 TA2068NG(5,HZ) (TC Board)
1
AGC
2
L.PO
L.NF
L.RO
L.IN
REF
GND
R.IN
R.RO
R.NF
R.PO
MIC.NF
3
4
5
6
REF
AMP
7
8
9
10
11
12
REC
AMP1
2.1
NAB
AMP2
26dB
REC
AMP2
26dB
MIC
AMP1
DET
NAB
AMP1
ALC2 ALC1
ON
BUF AMP
A1
MUTE
BUF AMP
A2
TAPE
BUF AMP
BUF AMP
TAPE
TAPE
B1
B2
TAPE
LINE
MUTE
MUTE
RADIO
LINE
RADIO
ON
ON
MONITOR
AMP
MONITOR
AMP
7dB
7dB
LOGIC
24
23
22
21
20
19
18
17
16
15
14
13
L.LIN
MIC I/EX
L.RAD
REC
L.LO
VCC
R.LO
LINE
R.RAD
TAPE
R.LIN
MIC
IC802 S-24CS02AFJ-TB-G (MAIN Board (1/3))
START/STOP
DETECT CIRCUIT
SERIAL CLOCK
CONTROL CIRCUIT
LOAD
GND
DEVICE
ADDRESS
COMPARATOR
1
A0
2
A1
3
A2
4
DIN
COMP
R/W
DOUT
LOAD
ADDRESS
COUNTER
Y DECODER
INC
HIGH VOLTAGE
GENERATOR
DATA
REGISTER
EEPROM
X DECODER
SELECTOR
DATA OUTPUT/
ACK OUTPUT/
CONTROL CIRCUIAT
5
SDA
6
SCL
7
WP
8
VCC
50
Page 51

IC301 BD3499FV-E2 (MAIN Board (2/3))
1IN L1
2IN R1
3IN L2
IN R2
VOL1 L
VOL2 R
4
INPUT
SELECTOR
5IN L3
6IN R3
7IN L4
8IN R4
9SEL2 R
INVERTER
10SEL1 L
11
VOLUME
12
13TC2 R
14TC1 L
INPUT
GAIN
TREBLE/
BASS
PC BUS
LOGIC
SURROUND
28 FIL
27 GND
26
SDA
25
SCL
24 VCC
23 OUT1 L
22 SB1 L
21 SR
20 SB2 L
19 OUT2 R
18 BCB2 L
17 BCA1 L
16 BCA2 R
15 BCB2 R
CFD-RG880CP
IC351 NJM14558V-TE2
(MAIN Board (3/3))
AOUT
1
A–IN
2
A+IN
3
4
V–
V+
8
BOUT
7
B–IN
6
5
B+IN
51
Page 52

CFD-RG880CP
IC901 PQ1CZ21H2ZPH (MAIN Board (3/3))
CONSTANT VOLTAGE
CIRCUIT
PWM
OVER HEAT
DETECT
FLIP-FLOP
1
VIN
2
VOUT
Q
R
S
OVER CURRENT
DETECT
COMPARATOR
OSCILLATOR
3
GND
ERROR AMP
VREF
ON/OFF
CIRCUIT
4
5
FB
CONT
52
Page 53

• IC Pin Function Description
CD BOARD IC702 LC87F1HC8AU-SQFP-E (USB I/F)
Pin No. Pin Name I/O Description
1 P73/INT3 — Not used. (Open)
2 RES I Reset signal input
3 XT1/AN10 — Not used. (Connected to ground.)
4 XT2/AN11 — Not used. (Open)
5 VSS1 — Ground pin
6 CF1 I Sub clock oscillation input (12MHz)
7 CF2 O Sub clock oscillation output (12MHz)
8 VDD1 — Power supply pin (+3.3 V)
9 P10/SO O CD DSP serial data signal output
10 P11/SI I CD DSP serial data signal input
11 P12/SCK O CD DSP serial transfer clock signal output
12 P13/SO1 — Not used. (Open)
13 P14/SI1/SB1 — Not used. (Open)
14 P15/SCK1 — Not used. (Open)
15 P16/T1PWML/CE O CD DSP chip enable signal output
16 P17/T1PWMH/BUZ — Not used. (Open)
17 PWM1/MCLKI — Not used. (Open)
18 PWM0/MCLKO — Not used. (Open)
19 VDD2 — Power supply pin (+3.3 V)
20 VSS2 — Ground pin
21 P00/AN0 — Not used. (Open)
22 P01/AN1 — Not used. (Open)
23 P02/AN2/DBGP0 I Not used. (Pull down)
24 P03/AN3/DBGP1 I Not used. (Pull down)
25 P04/AN4/DBGP2 I Not used. (Pull down)
26 P05/AN5/CK0/SDAT I Audio serial data signal input
27 P06/AN6/T60 I Audio serial data shift clock signal input
28 P07/AN7/T70 I Audio Lch/Rch data signal signal input
29 P20/INT4/INT6 — Not used. (Open)
30 P21/INT4 — Not used. (Open)
31 P22/INT4/SO4/RD O Stream data signal output
32 P23/INT4/SI4/WR O Audio data request signal output
33 P24/INT5/INT7/SCK4 O Stream data bit clock signal output
34 P25/INT5/SO9/RD9 — Not used. (Open)
35 P26/INT5/SI9/WR9 — Not used. (Open)
36 P27/INT5/SCK9 — Not used. (Open)
37 UHD– I/O USB data input/output
38 UHD+ I/O USB data input/output
39 VDD3 — Power supply pin (+3.3 V)
40 VSS3 — Ground pin
41 P34/UFILT — USB I/F PLL fi lter pin
42 P33/AFILT — Not used. (Open)
43 P32 — Not used. (Open)
44 P31/URX1 I USB I/F command serial data input
45 P30/UTX1 O USB I/F command serial data output
46 P70/INT0/TOLCP/AN8 I Stream data request signal input
47 P71/INT1/TOHCP/AN9 I USB host u-com control signal input
48 P72/INT2/TOIN — Not used. (Open)
CFD-RG880CP
53
Page 54

CFD-RG880CP
MAIN BOARD IC801 LC87F7DC8AU-QIP-E (SYSTEM CONTROL)
Pin No. Pin Name I/O Description
1 NC — Not used. (Open)
2 O-LCD-INH O LCD INH data signal output
3 O-LCD-DATA O LCD serial data signal output
4 O-LCD-CE O LCD chip enable signal output
5 O-LCD-SCL O LCD serial clock signal output
6 O-CD-DO O CD serial data signal output
7 I-CD-DI I CD serial data signal input
8 O-CD-CLK O CD serial clock signal output
9 EPROM-SCL O EEPROM serial clock signal output
10 EPROM-SDA I/O EEPROM serial data signal input/output
11 I-RES I Reset signal input
12 XT1 I Connect to VDD.
13 XT2 O Not used. (Open)
14 VSS1 — Ground pin
15 CF1 I Main system clock oscillation signal input (10MHz)
16 CF2 O Main system clock oscillation signal output (10MHz)
17 VDD1 — Power supply pin (+3.3V)
18 O-CLOCK SHIFT1 O Clock shift signal output 1
19 O-CLOCK SHIFT2 O Clock shift signal output 2
20 NC — Not used. (Open)
21 I-CD3.3V-CHK I CD +3.3V voltage check signal input
22 NC — Not used. (Open)
23 I-KEY0 I A/D key signal input 0
24 I-KEY1 I A/D key signal input 1
25 I-KEY2 I A/D key signal input 2
26 I-KEY3 I A/D key signal input 3
27 I-KEY4 I A/D key signal input 4
28 I-WAKE UP I Wake up key signal input “H”: Active
29 I-RMC I Remote control signal input
30 I-SUFFIX 1 I Suffi x distinction signal input 1
31 I-SUFFIX 2 I Suffi x distinction signal input 2
32 I-SUFFIX 3 I Suffi x distinction signal input 3
33 I-TU-COUNT I Tuner count signal input
34 O-TU-MUTE O Tuner mute signal output “H”: Tuner off, “L”: Tuner on
35 O-TC-CLK O Tuner serial clock signal output
36 O-TU-DATA O Tuner serial data signal output
37 O-TU-CE O Tuner chip enable signal output
38, 39 NC — Not used. (Open)
40 M-MUTE O Motor drive mute signal output
41 USB LED O USB memory with/without recognition LED control signal output “H”: With
42 USB REC LED O USB memory record confi rmation LED control signal output
43 WOOFER LED1 O Woofer LED turn on level setting signal output 1 (HIGH)
44 WOOFER LED2 O Woofer LED turn on level setting signal output 2 (MID)
45 NC — Not used. (Open)
46 LED1 O LED turn on control signal output 1
47 LED2 O LED turn on control signal output 2
48 LED3 O LED turn on control signal output 3
49 LED4 O LED turn on control signal output 4
50 LED5 O LED turn on control signal output 5
51 LED6 O LED turn on control signal output 6
52 LED7 O LED turn on control signal output 7
53 LED8 O LED turn on control signal output 8
54 VDD2 — Power supply pin (+3.3V)
55 VSS2 — Ground pin
56 BACKLIGHT H O LCD back light LED control signal output H “H”: LED on, “L”: LED off
54
Page 55

CFD-RG880CP
Pin No. Pin Name I/O Description
57 BACKLIGHT L O LCD back light LED control signal output L “H”: LED on, “L”: LED off
58, 59 NC — Not used. (Open)
60 O-ISS1 O Record bias frequency control signal output (Only AM recording)
61 O-ISS2 O Record bias frequency control signal output (Only AM recording)
62 O-CD SW O CD function switch change signal output “H”: CD/USB, AUDIO-IN, “L”: TAPE, TUNER
63 O-TAPE O TAPE function switch change control signal output
64 I-TAPE PLAY I TAPE play control signal input
65 I-TAPE REC I TAPE record control signal input
66 O-VOL DATA O Volume IC serial data signal output
67 NC — Not used. (Open)
68 O-VOL CLK O Volume IC serial clock signal output
69 to 71 NC — Not used. (Open)
72 WOOFER 1/2 O Sub woofer level change signal output
73 WOOFER ON/OFF O Sub woofer on/off control signal output
74 O-POWER O Power on control signal output
75 O-CD-ON O CD on control signal output
76 O-5V-ON O 5V on control signal output
77 NC — Not used. (Open)
78 O-A-MUTE O Audio mute signal output
79 O-P-MUTE O Power drive woofer mute signal output
80 I-VH-CHK I Main voltage check signal input
81 I-REG6.2V-CHK I REG +6.2V check signal input
82 I-SPOUT-VOLTAGE I SPOUT voltage check signal input
83 to 86 NC — Not used. (Open)
87 I-CD LID I CD lid check signal input
88 I-AC CHECK I AC/DC check signal input “H”: DC, “L”: AC
89 VSS3 — Ground pin
90 VDD3 — Power supply pin (+3.3V)
91 USB-TXD O UART transmission signal output
92 USB-RXD I UART receive signal input
93 O-CD RES O CD/USB reset signal output
94 O-CD CE O CD I/F chip enable signal output
95 SUB V3 — Flash write port 3
96 SUB V2 — Flash write port 2
97 SUB V1 — Flash write port 1
98 I-SW FLG I Hiside switch fl ag signal input
99 O-SW EN O Hiside switch enable signal output
100 O-USB SLEEP O USB sleep signal output
55
Page 56

CFD-RG880CP
Note:
• -XX and -X mean standardized parts, so
they may have some difference from the
original one.
• Items marked “*” are not stocked since
they are seldom required for routine service. Some delay should be anticipated
when ordering these items.
• The mechanical parts with no reference
number in the exploded views are not supplied.
8-1. OVERALL SECTION
SECTION 8
EXPLODED VIEWS
• Color Indication of Appearance Parts Example:
KNOB, BALANCE (WHITE) . . . (RED)
↑ ↑
• Accessories are given in the last of the
electrical parts list.
Parts Color Cabinet’s Color
The components identifi ed by mark 0
or dotted line with mark 0 are critical for
safety.
Replace only with part number specifi ed.
• Abbreviation
BR : Brazilian model
CET : East European & Russian model
E41 : 230V AC area in E model
E92 : 120V AC area in E model
MX : Mexican model
SP191
cabinet (upper) section
cabinet (rear) section
6
8
9
8
8
8
8
6
not supplied
SP291
4
5
7
2
CNP2
cabinet (front) section
10
1
Ref. No. Part No. Description Remark Ref. No. Part No. Description Remark
1 2-895-570-11 LID, CORD CASE
2 2-895-569-01 CASE, CORD
3 A-1602-058-A AUDIO IN BOARD, COMPLETE
4 3-252-827-01 SCREW (B2.6), (+) BV TAPPING
5 3-252-828-01 SCREW (B2.6), (+) PWH TAPPING
6 3-254-143-11 SCREW (B3), (+) BV TAPPING
7 2-895-573-01 LID, BATTERY
8 3-254-145-11 SCREW (B3), (+) BV TAPPING
9 2-895-574-02 HANDLE
10 3-211-597-01 CUSHION (B)
CNP2 1-833-922-11 CORD, CONNECTION (WITH PLUG) (AUDIO IN)
SP191 1-858-162-21 LOUD SPEAKER (L-CH) (FULL RANGE)
SP291 1-858-162-21 LOUD SPEAKER (R-CH) (FULL RANGE)
3
not supplied
56
Page 57

8-2. CABINET (FRONT) SECTION
CFD-RG880CP
53
56
LCD601
52
59
58
not supplied
(POWER KEY board)
70
70
51
57
57
not supplied
60
64
not supplied
54
70
55
55
SP393
61
62
55
71
71
72
not supplied
(LED3 board)
D406
73
73
73
61
not supplied
(LED4 board)
D407
D405
72
63
D408
D403
73
D401
65
64
61
not supplied
(VOLUME KEY board)
not supplied
(LED1 board)
D402
61
62
66
69
68
D404
not supplied
(LED2 board)
67
Ref. No. Part No. Description Remark Ref. No. Part No. Description Remark
51 X-2319-424-1 PANEL (FRONT) SUB ASSY
52 4-121-896-01 SHEET (LCD WINDOW), ADHESIVE
53 4-110-350-01 WINDOW, LCD
54 4-110-353-01 COVER, PANEL
55 3-252-827-01 SCREW (B2.6), (+) BV TAPPING
56 A-1602-060-A LCD BOARD, COMPLETE
57 3-254-151-01 SCREW (B2.6), (+) P TAPPING
58 A-1602-059-A HEADPHONE BOARD, COMPLETE
59 3-252-830-01 SCREW (B3), (+) PWH TAPPING
60 2-895-584-11 BUTTON, POWER (EXCEPT CET)
60 2-895-584-21 BUTTON, POWER (CET)
61 3-252-827-01 SCREW (B2.6), (+) BV TAPPING
62 3-252-828-01 SCREW (B2.6), (+) PWH TAPPING
63 X-2319-423-1 CABINET (FRONT) SUB ASSY
64 3-831-441-99 SHEET (1)
65 2-895-585-11 BUTTON, TUNE
66 2-895-579-01 HOLDER, RING
67 2-895-576-01 RING, LIGHT GUIDE
68 2-895-575-01 RING, ORNAMENTAL
69 3-254-140-01 SCREW (B2.6), (+) BV TAPPING
70 3-211-597-01 CUSHION (B)
71 3-198-219-01 CUSHION, CAP
72 3-831-441-99 CUSHION, STOPPER
73 3-243-076-01 WOVEN (90), FABRIC NON
D401 6-501-691-01 LED 1L434FV22D0TDF01 (ILLUMINATION)
D402 6-501-691-01 LED 1L434FV22D0TDF01 (ILLUMINATION)
D403 6-501-691-01 LED 1L434FV22D0TDF01 (ILLUMINATION)
D404 6-501-691-01 LED 1L434FV22D0TDF01 (ILLUMINATION)
D405 6-501-691-01 LED 1L434FV22D0TDF01 (ILLUMINATION)
D406 6-501-691-01 LED 1L434FV22D0TDF01 (ILLUMINATION)
D407 6-501-691-01 LED 1L434FV22D0TDF01 (ILLUMINATION)
D408 6-501-691-01 LED 1L434FV22D0TDF01 (ILLUMINATION)
LCD601 1-802-838-11 LIQUID CRYSTAL ELEMENT
SP393 1-826-683-11 SPEAKER (13cm) (WOOFER)
57
Page 58

CFD-RG880CP
8-3. CABINET (REAR) SECTION
not supplied
(POWER board)
103
101
F981
J981
F982
not supplied
101
T981
102
F983
103
103
103
103
103
115
103
115
112
104
117
101
109
111
106
105
107
109
108
117
103
103
103
110
not supplied
103
114
101
116
113
101
106
Ref. No. Part No. Description Remark Ref. No. Part No. Description Remark
101 3-254-143-11 SCREW (B3), (+) BV TAPPING
102 4-110-348-01 HOLDER, TRANSFORMER
103 3-198-219-01 CUSHION, CAP
104 3-096-719-01 SHEET (REAR)
105 1-500-868-11 CORE, FERRITE
106 3-252-830-01 SCREW (B3), (+) PWH TAPPING
107 3-254-145-11 SCREW (B3), (+) BV TAPPING
108 2-895-565-21 CABINET (REAR) (E92,MX)
108 2-895-565-31 CABINET (REAR) (CET,E41)
108 2-895-565-41 CABINET (REAR) (BR)
109 2-895-597-01 TERMINAL (+, –), BATTERY
110 A-1602-053-A BATTERY BOARD, COMPLETE
111 2-067-415-01 TERMINAL (+, –), BATTERY
112 4-233-372-02 FOOT (FELT)
113 3-238-135-01 TERMINAL (–), BATTERY
114 4-113-367-01 BRACKET (SWITCH) (BR)
115 3-252-827-01 SCREW (B2.6), (+) BV TAPPING (BR)
116 1-878-337-11 VOLTAGE SELECTOR BOARD (BR)
117 3-211-597-01 CUSHION (B)
0 F981 1-533-471-12 FUSE, GLASS TUBE (DIA. 5) (4A/250V)
0 F982 1-533-470-12 FUSE, GLASS TUBE (DIA. 5) (3.15A/250V)
0 F983 1-533-462-12 FUSE, GLASS TUBE (DIA. 5) (0.5A/250V) (BR)
0 J981 1-526-838-11 INLET, AC 2P (- AC IN) (CET,E41,BR)
0 J981 1-540-009-12 INLET, AC (- AC IN) (E92,MX)
0 T981 1-435-964-12 TRANSFORMER, POWER (E92,MX)
0 T981 1-435-965-12 TRANSFORMER, POWER (CET,E41)
0 T981 1-435-966-12 TRANSFORMER, POWER (BR)
58
Page 59

8-4. CABINET (UPPER) SECTION-1
CFD-RG880CP
168
S701
163
162
160
165
164
159
#1
163
161
168
167
172
158
not supplied
173
CN2
166
170
169
CN1
168
ANT1
171
tape mechanism deck
section
not supplied
157
156
155
154
cabinet (upper) section-2
172
173
153
151
Ref. No. Part No. Description Remark Ref. No. Part No. Description Remark
151 2-108-743-01 CUSHION, KEY CASSETTE
152 2-895-588-01 BUTTON, REC
153 2-895-589-01 BUTTON, PLAY
154 2-895-590-01 BUTTON, REW
155 2-895-591-01 BUTTON, FF
156 2-895-592-01 BUTTON, STOP
157 2-895-593-01 BUTTON, PAUSE
158 3-252-827-01 SCREW (B2.6), (+) BV TAPPING
159 3-923-736-01 COVER, CD
0 160 8-820-126-02 OPTICAL PICK-UP (KSM-213CDP/C2NP)
161 3-931-379-21 RUBBER, VIBRATION PROOF
162 3-931-379-31 RUBBER, VIBRATION PROOF
163 3-252-828-01 SCREW (B2.6), (+) PWH TAPPING
164 1-832-404-21 CABLE, FLEXIBLE FLAT (16 CORE)
165 A-1602-062-A CD BOARD, COMPLETE
152
167 A-1244-419-A TUNER BOARD, COMPLETE
168 3-254-143-11 SCREW (B3), (+) BV TAPPING
169 A-1602-050-A MAIN BOARD, COMPLETE (MX)
169 A-1633-759-A MAIN BOARD, COMPLETE (E41)
169 A-1633-761-A MAIN BOARD, COMPLETE (CET,E92)
169 A-1633-763-A MAIN BOARD, COMPLETE (BR)
170 2-895-061-01 TERMINAL, ANTENNA
171 3-252-833-01 SCREW (M3), (+) P
172 3-211-597-01 CUSHION (B)
173 3-831-441-99 CUSHION, STOPPER
ANT1 1-754-376-11 ANTENNA, TELESCOPIC (FM)
CN1 1-836-362-31 CABLE, FLEXIBLE FLAT (13 CORE)
CN2 1-832-425-31 CABLE, FLEXIBLE FLAT (11 CORE)
S701 1-572-085-21 SWITCH, LEAF (LIMIT)
#1 7-685-853-04 SCREW +BVTT 2X6 (S)
166 1-836-363-31 CABLE, FLEXIBLE FLAT (25 CORE)
59
Page 60

CFD-RG880CP
8-5. CABINET (UPPER) SECTION-2
201
204
203
228
220
216
228
216
228
224
222
221
not supplied
(SOUND KEY board)
220
216
not supplied
(FUNCTION KEY board)
216
229
223
227
225
218
216
226
205
218
217
220
202
207
211
216
216
206
208
205
210
209
212
213
214
SW2
215
216
219
220
not supplied
(CD KEY board)
216
Ref. No. Part No. Description Remark Ref. No. Part No. Description Remark
201 2-895-568-21 PANEL (UPPER)
202 2-895-060-01 SPRING, CASSETTE
203 2-895-572-31 LID, CASSETTE
204 2-895-571-02 LID, CD
205 3-210-713-01 CUSHION, RUBBER
206 1-452-899-11 MAGNET
207 3-019-395-01 PLATE, CHUCKING
208 3-253-143-01 SCREW (B2.6), (+) P TAPPING
209 2-895-059-01 SPRING, CD
210 3-212-679-01 CUSHION (C)
211 3-258-284-01 SHEET (CHUCK)
212 1-500-868-11 CORE, FERRITE
213 3-252-830-01 SCREW (B3), (+) PWH TAPPING
214 4-110-342-01 CABINET (UPPER)
215 3-047-468-11 DAMPER
216 3-252-827-01 SCREW (B2.6), (+) BV TAPPING
217 3-047-468-01 DAMPER
218 3-254-143-11 SCREW (B3), (+) BV TAPPING
219 2-895-586-01 BUTTON, CD
220 3-831-441-99 SHEET (1)
221 4-110-344-01 BUTTON, FUNCTION
222 4-110-347-01 HOLDER, USB
223 4-110-346-01 ILLUMINATION (R)
224 4-110-345-01 ILLUMINATION (L)
225 A-1602-158-A USB BOARD, COMPLETE
226 4-110-343-01 BUTTON, SOUND
227 3-831-441-11 CUSHION (B)
228 3-831-441-99 CUSHION, STOPPER
229 4-134-435-01 CUSHION (A)
SW2 1-692-960-11 SWITCH, PUSH (1 KEY) (Z PUSH OPEN/CLOSE)
60
Page 61

8-6. TAPE MECHANISM DECK SECTION
CFD-RG880CP
not supplied
not supplied
253
not supplied
256
HRP901
251
HE901
252
254
255
259
257
not supplied
258
260
257
Ref. No. Part No. Description Remark Ref. No. Part No. Description Remark
251 A-1602-047-A MD BLOCK ASSY
252 4-137-548-01 BELT (RF)
253 4-137-547-01 BELT (MAIN)
254 3-237-718-01 LEVER, REC
255 3-254-022-01 SCREW
256 3-211-597-01 CUSHION (B)
257 3-254-029-01 SCREW
258 A-1108-791-A TC BORD BOARD, COMPLETE
259 3-252-614-01 CHASSIS, TC
260 3-243-076-01 WOVEN (90), FABRIC NON
HE901 1-500-813-11 HEAD, ERASE (ERASE)
HRP901 3-266-053-01 HEAD, RP (REC/PB)
61
Page 62

CFD-RG880CP
SECTION 9
AUDIO IN
Note:
• Due to standardization, replacements in
the parts list may be different from the
parts specifi ed in the diagrams or the com-
ponents used on the set.
• -XX and -X mean standardized parts, so
they may have some difference from the
original one.
• Items marked “*” are not stocked since
they are seldom required for routine service. Some delay should be anticipated
when ordering these items.
• RESISTORS
All resistors are in ohms.
METAL: Metal-fi lm resistor.
METAL OXIDE: Metal oxide-fi lm resistor.
F: nonfl ammable
Ref. No. Part No. Description Remark Ref. No. Part No. Description Remark
A-1602-058-A AUDIO IN BOARD, COMPLETE
************************
< CONNECTOR >
CNP372 1-815-551-11 PIN, CONNECTOR (PWB) 3P
< FERRITE BEAD >
FB101 1-414-760-21 FERRITE, EMI (SMD) (1608)
FB201 1-414-760-21 FERRITE, EMI (SMD) (1608)
FB301 1-414-760-21 FERRITE, EMI (SMD) (1608)
< JACK >
J371 1-815-629-11 JACK (AUDIO IN)
< JUMPER RESISTOR >
JC171 1-216-864-11 SHORT CHIP 0
R171 1-216-864-11 SHORT CHIP 0
R271 1-216-864-11 SHORT CHIP 0
*************************************************************
BATTERY CD
ELECTRICAL PARTS LIST
• CAPACITORS
uF: μF
• COILS
uH: μH
• SEMICONDUCTORS
In each case, u: μ, for example:
uA. . : μA. . , uPA. . , μPA. . ,
uPB. . : μPB. . , uPC. . , μPC. . ,
uPD. . : μPD. .
• Abbreviation
BR : Brazilian model
CET : East European & Russian model
E41 : 230V AC area in E model
E92 : 120V AC area in E model
MX : Mexican model
C527 1-100-415-11 CERAMIC CHIP 0.47uF 10% 6.3V
C528 1-100-415-11 CERAMIC CHIP 0.47uF 10% 6.3V
C529 1-164-937-11 CERAMIC CHIP 0.001uF 10% 50V
C530 1-107-826-11 CERAMIC CHIP 0.1uF 10% 16V
C701 1-164-941-11 CERAMIC CHIP 0.0047uF 10% 16V
C702 1-164-943-81 CERAMIC CHIP 0.01uF 10% 16V
C703 1-125-777-11 CERAMIC CHIP 0.1uF 10% 10V
C704 1-125-777-11 CERAMIC CHIP 0.1uF 10% 10V
C706 1-128-995-21 ELECT CHIP 100uF 20% 10V
C707 1-128-995-21 ELECT CHIP 100uF 20% 10V
C708 1-164-943-81 CERAMIC CHIP 0.01uF 10% 16V
C709 1-107-819-11 CERAMIC CHIP 0.022uF 10% 16V
C710 1-125-777-11 CERAMIC CHIP 0.1uF 10% 10V
C711 1-164-943-81 CERAMIC CHIP 0.01uF 10% 16V
C712 1-112-717-11 CERAMIC CHIP 1uF 10% 6.3V
C713 1-128-994-21 ELECT CHIP 47uF 20% 10V
C714 1-164-937-11 CERAMIC CHIP 0.001uF 10% 50V
C715 1-125-777-11 CERAMIC CHIP 0.1uF 10% 10V
C716 1-125-777-11 CERAMIC CHIP 0.1uF 10% 10V
C717 1-125-777-11 CERAMIC CHIP 0.1uF 10% 10V
When indicating parts by reference number, please include the board name.
The components identifi ed by mark 0
or dotted line with mark 0 are critical for
safety.
Replace only with part number specifi ed.
A-1602-053-A BATTERY BOARD, COMPLETE
************************
3-238-135-01 TERMINAL (–), BATTERY
< CONNECTOR >
CN941 1-815-550-11 PIN, CONNECTOR (PWB) 2P
CN942 1-815-550-21 PIN, CONNECTOR (PWB) 2P
*************************************************************
A-1602-062-A CD BOARD, COMPLETE
*******************
< CAPACITOR >
C501 1-164-943-81 CERAMIC CHIP 0.01uF 10% 16V
C502 1-107-826-11 CERAMIC CHIP 0.1uF 10% 16V
C503 1-164-943-81 CERAMIC CHIP 0.01uF 10% 16V
C504 1-125-777-11 CERAMIC CHIP 0.1uF 10% 10V
C505 1-128-396-11 ELECT CHIP 470uF 20% 10V
C506 1-125-777-11 CERAMIC CHIP 0.1uF 10% 10V
C507 1-125-777-11 CERAMIC CHIP 0.1uF 10% 10V
C510 1-125-777-11 CERAMIC CHIP 0.1uF 10% 10V
C514 1-164-941-11 CERAMIC CHIP 0.0047uF 10% 16V
C519 1-164-941-11 CERAMIC CHIP 0.0047uF 10% 16V
C523 1-164-858-11 CERAMIC CHIP 22PF 5% 50V
C524 1-164-858-11 CERAMIC CHIP 22PF 5% 50V
C718 1-128-995-21 ELECT CHIP 100uF 20% 10V
C719 1-165-887-11 CERAMIC CHIP 0.22uF 10% 6.3V
C721 1-107-819-11 CERAMIC CHIP 0.022uF 10% 16V
C722 1-125-777-11 CERAMIC CHIP 0.1uF 10% 10V
C723 1-125-777-11 CERAMIC CHIP 0.1uF 10% 10V
C724 1-125-777-11 CERAMIC CHIP 0.1uF 10% 10V
C725 1-125-777-11 CERAMIC CHIP 0.1uF 10% 10V
C726 1-125-777-11 CERAMIC CHIP 0.1uF 10% 10V
C727 1-128-995-21 ELECT CHIP 100uF 20% 10V
C728 1-125-777-11 CERAMIC CHIP 0.1uF 10% 10V
C729 1-125-777-11 CERAMIC CHIP 0.1uF 10% 10V
C730 1-164-866-11 CERAMIC CHIP 47PF 5% 50V
C731 1-164-866-11 CERAMIC CHIP 47PF 5% 50V
C732 1-164-866-11 CERAMIC CHIP 47PF 5% 50V
C733 1-164-866-11 CERAMIC CHIP 47PF 5% 50V
C734 1-164-943-81 CERAMIC CHIP 0.01uF 10% 16V
C735 1-164-858-11 CERAMIC CHIP 22PF 5% 50V
C736 1-164-858-11 CERAMIC CHIP 22PF 5% 50V
C737 1-164-858-11 CERAMIC CHIP 22PF 5% 50V
C738 1-164-858-11 CERAMIC CHIP 22PF 5% 50V
C739 1-164-858-11 CERAMIC CHIP 22PF 5% 50V
C740 1-125-777-11 CERAMIC CHIP 0.1uF 10% 10V
C741 1-128-394-11 ELECT CHIP 220uF 20% 10V
C742 1-125-777-11 CERAMIC CHIP 0.1uF 10% 10V
C743 1-164-858-11 CERAMIC CHIP 22PF 5% 50V
62
Page 63

CFD-RG880CP
CD
Ref. No. Part No. Description Remark Ref. No. Part No. Description Remark
C744 1-164-858-11 CERAMIC CHIP 22PF 5% 50V
C745 1-164-858-11 CERAMIC CHIP 22PF 5% 50V
C746 1-164-858-11 CERAMIC CHIP 22PF 5% 50V
C747 1-125-777-11 CERAMIC CHIP 0.1uF 10% 10V
C748 1-128-995-21 ELECT CHIP 100uF 20% 10V
C749 1-125-777-11 CERAMIC CHIP 0.1uF 10% 10V
C754 1-125-777-11 CERAMIC CHIP 0.1uF 10% 10V
C755 1-125-777-11 CERAMIC CHIP 0.1uF 10% 10V
C756 1-128-394-11 ELECT CHIP 220uF 20% 10V
C757 1-125-777-11 CERAMIC CHIP 0.1uF 10% 10V
C758 1-128-995-21 ELECT CHIP 100uF 20% 10V
C759 1-119-923-11 CERAMIC CHIP 0.047uF 10% 10V
C764 1-125-777-11 CERAMIC CHIP 0.1uF 10% 10V
C765 1-128-394-11 ELECT CHIP 220uF 20% 10V
C766 1-125-777-11 CERAMIC CHIP 0.1uF 10% 10V
C768 1-164-943-81 CERAMIC CHIP 0.01uF 10% 16V
C773 1-125-777-11 CERAMIC CHIP 0.1uF 10% 10V
C776 1-164-866-11 CERAMIC CHIP 47PF 5% 50V
C777 1-164-866-11 CERAMIC CHIP 47PF 5% 50V
C778 1-164-866-11 CERAMIC CHIP 47PF 5% 50V
C779 1-164-866-11 CERAMIC CHIP 47PF 5% 50V
C781 1-125-777-11 CERAMIC CHIP 0.1uF 10% 10V
C782 1-164-858-11 CERAMIC CHIP 22PF 5% 50V
C783 1-164-858-11 CERAMIC CHIP 22PF 5% 50V
C784 1-164-858-11 CERAMIC CHIP 22PF 5% 50V
C785 1-164-858-11 CERAMIC CHIP 22PF 5% 50V
C786 1-164-858-11 CERAMIC CHIP 22PF 5% 50V
C787 1-164-858-11 CERAMIC CHIP 22PF 5% 50V
C788 1-164-858-11 CERAMIC CHIP 22PF 5% 50V
C789 1-164-858-11 CERAMIC CHIP 22PF 5% 50V
C790 1-164-850-11 CERAMIC CHIP 10PF 0.5PF 50V
C791 1-164-850-11 CERAMIC CHIP 10PF 0.5PF 50V
C792 1-125-777-11 CERAMIC CHIP 0.1uF 10% 10V
C794 1-126-601-11 ELECT CHIP 2.2uF 20% 50V
C797 1-164-866-11 CERAMIC CHIP 47PF 5% 50V
C798 1-164-866-11 CERAMIC CHIP 47PF 5% 50V
C799 1-164-858-11 CERAMIC CHIP 22PF 5% 50V
< CONNECTOR >
CN701 1-770-425-51 CONNECTOR, FFC/FPC 16P
CN704 1-784-875-51 CONNECTOR, FFC (LIF(NON-ZIF)) 25P
* CN705 1-750-005-11 PIN, CONNECTOR (PC BOARD) 4P
< FERRITE BEAD >
FB701 1-216-864-11 SHORT CHIP 0
FB702 1-216-864-11 SHORT CHIP 0
FB703 1-216-864-11 SHORT CHIP 0
FB704 1-216-864-11 SHORT CHIP 0
FB705 1-469-670-21 FERRITE, EMI (SMD) (2012)
FB706 1-216-295-11 SHORT CHIP 0
< IC >
IC701 (Not supplied) IC LC786950T-US-H
IC702 (Not supplied) IC LC87F1HC8AU-SQFP-E
IC703 6-713-078-01 IC LA6548NHL-TE-L-E
IC704 6-710-887-01 IC R5523N001B-TR-F
< RESISTOR >
R501 1-218-969-11 METAL CHIP 22K 5% 1/16W
R502 1-218-949-11 METAL CHIP 470 5% 1/16W
R503 1-218-965-11 METAL CHIP 10K 5% 1/16W
R504 1-218-957-11 METAL CHIP 2.2K 5% 1/16W
R505 1-218-961-11 METAL CHIP 4.7K 5% 1/16W
R506 1-218-953-11 METAL CHIP 1K 5% 1/16W
R507 1-218-961-11 METAL CHIP 4.7K 5% 1/16W
R508 1-218-957-11 METAL CHIP 2.2K 5% 1/16W
R509 1-218-961-11 METAL CHIP 4.7K 5% 1/16W
R510 1-218-957-11 METAL CHIP 2.2K 5% 1/16W
R511 1-218-965-11 METAL CHIP 10K 5% 1/16W
R513 1-218-977-11 METAL CHIP 100K 5% 1/16W
R514 1-218-945-11 METAL CHIP 220 5% 1/16W
R517 1-218-990-81 SHORT CHIP 0
R518 1-218-945-11 METAL CHIP 220 5% 1/16W
R521 1-218-990-81 SHORT CHIP 0
R522 1-218-990-81 SHORT CHIP 0
R523 1-218-990-81 SHORT CHIP 0
R524 1-218-990-81 SHORT CHIP 0
R525 1-218-990-81 SHORT CHIP 0
R526 1-218-990-81 SHORT CHIP 0
R528 1-218-953-11 METAL CHIP 1K 5% 1/16W
R529 1-218-953-11 METAL CHIP 1K 5% 1/16W
R530 1-218-953-11 METAL CHIP 1K 5% 1/16W
R531 1-218-953-11 METAL CHIP 1K 5% 1/16W
R532 1-218-953-11 METAL CHIP 1K 5% 1/16W
R533 1-216-789-11 METAL CHIP 2.2 5% 1/10W
R534 1-216-797-11 METAL CHIP 10 5% 1/10W
R701 1-218-941-81 METAL CHIP 100 5% 1/16W
R702 1-218-945-11 METAL CHIP 220 5% 1/16W
R703 1-218-965-11 METAL CHIP 10K 5% 1/16W
R704 1-218-957-11 METAL CHIP 2.2K 5% 1/16W
R705 1-218-977-11 METAL CHIP 100K 5% 1/16W
R706 1-218-990-81 SHORT CHIP 0
R707 1-218-990-81 SHORT CHIP 0
R709 1-218-990-81 SHORT CHIP 0
R710 1-218-990-81 SHORT CHIP 0
R712 1-218-969-11 METAL CHIP 22K 5% 1/16W
R713 1-218-973-11 METAL CHIP 47K 5% 1/16W
R715 1-216-864-11 SHORT CHIP 0
R716 1-218-990-81 SHORT CHIP 0
R717 1-218-945-11 METAL CHIP 220 5% 1/16W
R718 1-218-990-81 SHORT CHIP 0
R719 1-218-945-11 METAL CHIP 220 5% 1/16W
R721 1-218-969-11 METAL CHIP 22K 5% 1/16W
R722 1-218-990-81 SHORT CHIP 0
R723 1-218-446-11 METAL CHIP 1 5% 1/10W
R724 1-218-949-11 METAL CHIP 470 5% 1/16W
R726 1-216-864-11 SHORT CHIP 0
R727 1-218-949-11 METAL CHIP 470 5% 1/16W
R728 1-218-945-11 METAL CHIP 220 5% 1/16W
R731 1-218-949-11 METAL CHIP 470 5% 1/16W
R732 1-218-945-11 METAL CHIP 220 5% 1/16W
R733 1-218-969-11 METAL CHIP 22K 5% 1/16W
R734 1-218-973-11 METAL CHIP 47K 5% 1/16W
< TRANSISTOR >
Q701 6-551-696-01 TRANSISTOR ISA1235AC1TP-1EF
R735 1-218-973-11 METAL CHIP 47K 5% 1/16W
R736 1-216-864-11 SHORT CHIP 0
R737 1-218-941-81 METAL CHIP 100 5% 1/16W
R738 1-218-973-11 METAL CHIP 47K 5% 1/16W
6363
Page 64

CFD-RG880CP
CD CD KEY FUNCTION KEY HEADPHONE
Ref. No. Part No. Description Remark Ref. No. Part No. Description Remark
R740 1-218-941-81 METAL CHIP 100 5% 1/16W
R741 1-218-941-81 METAL CHIP 100 5% 1/16W
R742 1-218-941-81 METAL CHIP 100 5% 1/16W
R743 1-218-961-11 METAL CHIP 4.7K 5% 1/16W
R744 1-218-953-11 METAL CHIP 1K 5% 1/16W
R745 1-218-990-81 SHORT CHIP 0
R746 1-218-953-11 METAL CHIP 1K 5% 1/16W
R747 1-218-941-81 METAL CHIP 100 5% 1/16W
R748 1-218-941-81 METAL CHIP 100 5% 1/16W
R749 1-218-990-81 SHORT CHIP 0
R750 1-216-864-11 SHORT CHIP 0
R751 1-218-949-11 METAL CHIP 470 5% 1/16W
R752 1-218-941-81 METAL CHIP 100 5% 1/16W
R753 1-218-945-11 METAL CHIP 220 5% 1/16W
R754 1-218-953-11 METAL CHIP 1K 5% 1/16W
R755 1-218-990-81 SHORT CHIP 0
R757 1-216-864-11 SHORT CHIP 0
R759 1-216-864-11 SHORT CHIP 0
R760 1-218-990-81 SHORT CHIP 0
R761 1-216-864-11 SHORT CHIP 0
R763 1-218-961-11 METAL CHIP 4.7K 5% 1/16W
R764 1-218-941-81 METAL CHIP 100 5% 1/16W
R765 1-218-949-11 METAL CHIP 470 5% 1/16W
R767 1-218-941-81 METAL CHIP 100 5% 1/16W
R768 1-218-941-81 METAL CHIP 100 5% 1/16W
R769 1-218-941-81 METAL CHIP 100 5% 1/16W
R770 1-218-941-81 METAL CHIP 100 5% 1/16W
R771 1-218-941-81 METAL CHIP 100 5% 1/16W
R772 1-218-941-81 METAL CHIP 100 5% 1/16W
R773 1-218-941-81 METAL CHIP 100 5% 1/16W
R774 1-218-977-11 METAL CHIP 100K 5% 1/16W
R775 1-218-977-11 METAL CHIP 100K 5% 1/16W
R776 1-218-977-11 METAL CHIP 100K 5% 1/16W
R777 1-218-941-81 METAL CHIP 100 5% 1/16W
R778 1-218-941-81 METAL CHIP 100 5% 1/16W
R779 1-218-949-11 METAL CHIP 470 5% 1/16W
R780 1-218-941-81 METAL CHIP 100 5% 1/16W
R781 1-218-953-11 METAL CHIP 1K 5% 1/16W
R782 1-218-941-81 METAL CHIP 100 5% 1/16W
R783 1-220-803-81 METAL CHIP 4.7 5% 1/16W
CD KEY BOARD
*************
3-831-441-99 SHEET (1)
< RESISTOR >
R409 1-216-809-11 METAL CHIP 100 5% 1/10W
R410 1-216-813-11 METAL CHIP 220 5% 1/10W
R411 1-216-817-11 METAL CHIP 470 5% 1/10W
R412 1-216-821-11 METAL CHIP 1K 5% 1/10W
R413 1-216-821-11 METAL CHIP 1K 5% 1/10W
R414 1-216-825-11 METAL CHIP 2.2K 5% 1/10W
R415 1-216-821-11 METAL CHIP 1K 5% 1/10W
R416 1-216-825-11 METAL CHIP 2.2K 5% 1/10W
< SWITCH >
S401 1-786-726-11 SWITCH, TACTILE (u)
S402 1-786-726-11 SWITCH, TACTILE (x)
S405 1-786-726-11 SWITCH, TACTILE (PRESET . –)
S406 1-786-726-11 SWITCH, TACTILE (PRESET > +)
S413 1-786-726-11 SWITCH, TACTILE (TUNE –)
S414 1-786-726-11 SWITCH, TACTILE (TUNE +)
*************************************************************
FUNCTION KEY BOARD
*******************
3-831-441-99 SHEET (1)
< CONNECTOR >
CNP403 1-815-553-11 PIN, CONNECTOR (PWB) 5P
CNP404 1-815-550-11 PIN, CONNECTOR (PWB) 2P
< RESISTOR >
R443 1-216-809-11 METAL CHIP 100 5% 1/10W
R444 1-216-813-11 METAL CHIP 220 5% 1/10W
R445 1-216-817-11 METAL CHIP 470 5% 1/10W
R446 1-216-821-11 METAL CHIP 1K 5% 1/10W
R447 1-216-821-11 METAL CHIP 1K 5% 1/10W
R448 1-216-825-11 METAL CHIP 2.2K 5% 1/10W
R784 1-218-933-11 METAL CHIP 22 5% 1/16W
R785 1-218-965-11 METAL CHIP 10K 5% 1/16W
R786 1-218-961-11 METAL CHIP 4.7K 5% 1/16W
R787 1-220-803-81 METAL CHIP 4.7 5% 1/16W
R788 1-218-933-11 METAL CHIP 22 5% 1/16W
R789 1-218-965-11 METAL CHIP 10K 5% 1/16W
R790 1-218-961-11 METAL CHIP 4.7K 5% 1/16W
R791 1-218-990-81 SHORT CHIP 0
R794 1-218-941-81 METAL CHIP 100 5% 1/16W
R795 1-218-941-81 METAL CHIP 100 5% 1/16W
R796 1-218-957-11 METAL CHIP 2.2K 5% 1/16W
R797 1-218-961-11 METAL CHIP 4.7K 5% 1/16W
R798 1-218-990-81 SHORT CHIP 0
R799 1-218-990-81 SHORT CHIP 0
< VIBRATOR >
X701 1-813-975-21 VIBRATOR, CERAMIC (16.9344MHz)
X702 1-813-934-11 VIBRATOR, CERAMIC (12MHz)
*************************************************************
64
< SWITCH >
S422 1-786-726-11 SWITCH, TACTILE (USB)
S423 1-786-726-11 SWITCH, TACTILE (CD)
S424 1-786-726-11 SWITCH, TACTILE (REC CD N USB)
S425 1-786-726-11 SWITCH, TACTILE (ENTER)
S426 1-786-726-11 SWITCH, TACTILE (USB MENU)
*************************************************************
A-1602-059-A HEADPHONE BOARD, COMPLETE
***************************
< CONNECTOR >
CNP373 1-815-552-11 PIN, CONNECTOR (PWB) 4P
< JACK >
J391 1-794-016-11 JACK (i)
< COIL >
L372 1-410-509-11 INDUCTOR 10uH
Page 65

CFD-RG880CP
HEADPHONE LCD LED1
Ref. No. Part No. Description Remark Ref. No. Part No. Description Remark
< RESISTOR >
R175 1-216-821-11 METAL CHIP 1K 5% 1/10W
R176 1-216-813-11 METAL CHIP 220 5% 1/10W
R177 1-216-813-11 METAL CHIP 220 5% 1/10W
R180 1-216-864-11 SHORT CHIP 0
R275 1-216-821-11 METAL CHIP 1K 5% 1/10W
R276 1-216-813-11 METAL CHIP 220 5% 1/10W
R279 1-216-813-11 METAL CHIP 220 5% 1/10W
R280 1-216-864-11 SHORT CHIP 0
*************************************************************
A-1602-060-A LCD BOARD, COMPLETE
********************
3-252-827-01 SCREW (B2.6), (+) BV TAPPING
R618 1-216-833-11 METAL CHIP 10K 5% 1/10W
R619 1-216-833-11 METAL CHIP 10K 5% 1/10W
R620 1-216-833-11 METAL CHIP 10K 5% 1/10W
R621 1-216-833-11 METAL CHIP 10K 5% 1/10W
R622 1-216-833-11 METAL CHIP 10K 5% 1/10W
R623 1-216-833-11 METAL CHIP 10K 5% 1/10W
R624 1-216-833-11 METAL CHIP 10K 5% 1/10W
R625 1-216-833-11 METAL CHIP 10K 5% 1/10W
R626 1-216-833-11 METAL CHIP 10K 5% 1/10W
R627 1-216-833-11 METAL CHIP 10K 5% 1/10W
R628 1-216-833-11 METAL CHIP 10K 5% 1/10W
R629 1-216-833-11 METAL CHIP 10K 5% 1/10W
R630 1-216-833-11 METAL CHIP 10K 5% 1/10W
R631 1-216-833-11 METAL CHIP 10K 5% 1/10W
R632 1-216-833-11 METAL CHIP 10K 5% 1/10W
< CAPACITOR >
C601 1-107-826-11 CERAMIC CHIP 0.1uF 10% 16V
C602 1-107-826-11 CERAMIC CHIP 0.1uF 10% 16V
C605 1-162-964-11 CERAMIC CHIP 0.001uF 10% 50V
C610 1-115-156-11 CERAMIC CHIP 1uF 10V
C612 1-126-157-11 ELECT 10uF 20% 16V
C613 1-162-927-11 CERAMIC CHIP 100PF 5% 50V
C614 1-162-970-11 CERAMIC CHIP 0.01uF 10% 25V
< DIODE >
D601 6-501-691-21 LED 1L434FV22D0TD501 (LCD BACK LIGHT)
D602 6-501-691-21 LED 1L434FV22D0TD501 (LCD BACK LIGHT)
D603 8-719-059-97 LED L-34HD (OPR/BATT)
D604 6-500-335-01 DIODE MC2838-T112-1
D605 6-501-728-01 DIODE MAZ8051G0LS0
< IC >
IC601 6-710-490-01 IC LC75827E-E
IC602 6-600-349-21 IC NJL23H400A (IR)
< COIL >
L601 1-410-509-11 INDUCTOR 10uH
< LIQUID CRYSTAL ELEMENT >
LCD601 1-802-838-11 LIQUID CRYSTAL ELEMENT
< RESISTOR >
R601 1-216-833-11 METAL CHIP 10K 5% 1/10W
R602 1-216-833-11 METAL CHIP 10K 5% 1/10W
R603 1-216-833-11 METAL CHIP 10K 5% 1/10W
R604 1-216-833-11 METAL CHIP 10K 5% 1/10W
R605 1-216-833-11 METAL CHIP 10K 5% 1/10W
R606 1-216-833-11 METAL CHIP 10K 5% 1/10W
R607 1-216-833-11 METAL CHIP 10K 5% 1/10W
R608 1-216-833-11 METAL CHIP 10K 5% 1/10W
R609 1-216-833-11 METAL CHIP 10K 5% 1/10W
R610 1-216-833-11 METAL CHIP 10K 5% 1/10W
R611 1-216-833-11 METAL CHIP 10K 5% 1/10W
R612 1-216-833-11 METAL CHIP 10K 5% 1/10W
R613 1-216-833-11 METAL CHIP 10K 5% 1/10W
R614 1-216-833-11 METAL CHIP 10K 5% 1/10W
R615 1-216-833-11 METAL CHIP 10K 5% 1/10W
R633 1-216-833-11 METAL CHIP 10K 5% 1/10W
R634 1-216-833-11 METAL CHIP 10K 5% 1/10W
R635 1-216-833-11 METAL CHIP 10K 5% 1/10W
R636 1-216-833-11 METAL CHIP 10K 5% 1/10W
R637 1-216-833-11 METAL CHIP 10K 5% 1/10W
R638 1-216-833-11 METAL CHIP 10K 5% 1/10W
R639 1-216-809-11 METAL CHIP 100 5% 1/10W
R640 1-216-829-11 METAL CHIP 4.7K 5% 1/10W
R644 1-216-849-11 METAL CHIP 220K 5% 1/10W
R645 1-216-841-11 METAL CHIP 47K 5% 1/10W
R646 1-216-813-11 METAL CHIP 220 5% 1/10W
R648 1-216-813-11 METAL CHIP 220 5% 1/10W
R649 1-216-813-11 METAL CHIP 220 5% 1/10W
R650 1-216-813-11 METAL CHIP 220 5% 1/10W
R651 1-216-813-11 METAL CHIP 220 5% 1/10W
R652 1-216-813-11 METAL CHIP 220 5% 1/10W
R653 1-216-845-11 METAL CHIP 100K 5% 1/10W
R654 1-216-849-11 METAL CHIP 220K 5% 1/10W
R655 1-216-864-11 SHORT CHIP 0
R656 1-216-813-11 METAL CHIP 220 5% 1/10W
R657 1-216-813-11 METAL CHIP 220 5% 1/10W
R658 1-216-821-11 METAL CHIP 1K 5% 1/10W
R659 1-216-817-11 METAL CHIP 470 5% 1/10W
R660 1-216-829-11 METAL CHIP 4.7K 5% 1/10W
R661 1-216-821-11 METAL CHIP 1K 5% 1/10W
R662 1-216-821-11 METAL CHIP 1K 5% 1/10W
R663 1-216-821-11 METAL CHIP 1K 5% 1/10W
R664 1-216-821-11 METAL CHIP 1K 5% 1/10W
R665 1-216-813-11 METAL CHIP 220 5% 1/10W
R666 1-216-864-11 SHORT CHIP 0
R667 1-216-864-11 SHORT CHIP 0
R668 1-216-864-11 SHORT CHIP 0
R669 1-216-864-11 SHORT CHIP 0
R672 1-216-821-11 METAL CHIP 1K 5% 1/10W
*************************************************************
LED1 BOARD
***********
< RESISTOR >
R401 1-216-813-11 METAL CHIP 220 5% 1/10W
R402 1-216-813-11 METAL CHIP 220 5% 1/10W
*************************************************************
R616 1-216-833-11 METAL CHIP 10K 5% 1/10W
R617 1-216-833-11 METAL CHIP 10K 5% 1/10W
6565
Page 66

CFD-RG880CP
LED2 LED3 LED4 MAIN
Ref. No. Part No. Description Remark Ref. No. Part No. Description Remark
LED2 BOARD
***********
< RESISTOR >
R403 1-216-813-11 METAL CHIP 220 5% 1/10W
R404 1-216-813-11 METAL CHIP 220 5% 1/10W
*************************************************************
LED3 BOARD
***********
C207 1-162-966-11 CERAMIC CHIP 0.0022uF 10% 50V
C208 1-126-961-11 ELECT 2.2uF 20% 50V
C209 1-127-715-11 CERAMIC CHIP 0.22uF 10% 16V
C211 1-127-715-11 CERAMIC CHIP 0.22uF 10% 16V
C213 1-162-927-11 CERAMIC CHIP 100PF 5% 50V
C214 1-126-960-11 ELECT 1uF 20% 50V
C216 1-126-960-11 ELECT 1uF 20% 50V
C218 1-126-947-11 ELECT 47uF 20% 35V
C219 1-162-927-11 CERAMIC CHIP 100PF 5% 50V
C220 1-162-962-11 CERAMIC CHIP 470PF 10% 50V
< RESISTOR >
R405 1-216-813-11 METAL CHIP 220 5% 1/10W
R406 1-216-813-11 METAL CHIP 220 5% 1/10W
*************************************************************
LED4 BOARD
***********
< RESISTOR >
R407 1-216-813-11 METAL CHIP 220 5% 1/10W
R408 1-216-813-11 METAL CHIP 220 5% 1/10W
*************************************************************
A-1602-050-A MAIN BOARD, COMPLETE (MX)
A-1633-759-A MAIN BOARD, COMPLETE (E41)
A-1633-761-A MAIN BOARD, COMPLETE (CET,E92)
A-1633-763-A MAIN BOARD, COMPLETE (BR)
*********************
1-836-363-31 CABLE, FLEXIBLE FLAT (25 CORE)
3-252-827-01 SCREW (B2.6), (+) BV TAPPING
< CAPACITOR >
C101 1-126-961-11 ELECT 2.2uF 20% 50V
C102 1-126-960-11 ELECT 1uF 20% 50V
C104 1-162-927-11 CERAMIC CHIP 100PF 5% 50V
C106 1-162-968-11 CERAMIC CHIP 0.0047uF 10% 50V
C107 1-162-966-11 CERAMIC CHIP 0.0022uF 10% 50V
C108 1-126-961-11 ELECT 2.2uF 20% 50V
C109 1-127-715-11 CERAMIC CHIP 0.22uF 10% 16V
C111 1-127-715-11 CERAMIC CHIP 0.22uF 10% 16V
C113 1-162-927-11 CERAMIC CHIP 100PF 5% 50V
C114 1-126-960-11 ELECT 1uF 20% 50V
C116 1-126-960-11 ELECT 1uF 20% 50V
C118 1-126-947-11 ELECT 47uF 20% 35V
C119 1-162-927-11 CERAMIC CHIP 100PF 5% 50V
C120 1-162-962-11 CERAMIC CHIP 470PF 10% 50V
C121 1-104-658-11 ELECT 100uF 20% 10V
C122 1-126-926-11 ELECT 1000uF 20% 10V
C123 1-164-156-11 CERAMIC CHIP 0.1uF 25V
C124 1-164-156-11 CERAMIC CHIP 0.1uF 25V
C151 1-126-963-11 ELECT 4.7uF 20% 50V
C152 1-107-826-11 CERAMIC CHIP 0.1uF 10% 16V
C153 1-127-715-11 CERAMIC CHIP 0.22uF 10% 16V
C154 1-115-156-11 CERAMIC CHIP 1uF 10V
C156 1-126-963-11 ELECT 4.7uF 20% 50V
C157 1-126-960-11 ELECT 1uF 20% 50V
C160 1-126-961-11 ELECT 2.2uF 20% 50V
C201 1-126-961-11 ELECT 2.2uF 20% 50V
C202 1-126-960-11 ELECT 1uF 20% 50V
C204 1-162-927-11 CERAMIC CHIP 100PF 5% 50V
C206 1-162-968-11 CERAMIC CHIP 0.0047uF 10% 50V
C221 1-104-658-11 ELECT 100uF 20% 10V
C222 1-126-926-11 ELECT 1000uF 20% 10V
C223 1-164-156-11 CERAMIC CHIP 0.1uF 25V
C224 1-164-156-11 CERAMIC CHIP 0.1uF 25V
C251 1-126-963-11 ELECT 4.7uF 20% 50V
C252 1-107-826-11 CERAMIC CHIP 0.1uF 10% 16V
C253 1-127-715-11 CERAMIC CHIP 0.22uF 10% 16V
C254 1-115-156-11 CERAMIC CHIP 1uF 10V
C256 1-126-963-11 ELECT 4.7uF 20% 50V
C257 1-126-960-11 ELECT 1uF 20% 50V
C260 1-126-961-11 ELECT 2.2uF 20% 50V
C301 1-126-935-11 ELECT 470uF 20% 16V
C302 1-115-156-11 CERAMIC CHIP 1uF 10V
C305 1-126-964-11 ELECT 10uF 20% 50V
C306 1-107-826-11 CERAMIC CHIP 0.1uF 10% 16V
C307 1-126-960-11 ELECT 1uF 20% 50V
C308 1-104-658-11 ELECT 100uF 20% 10V
C309 1-164-227-11 CERAMIC CHIP 0.022uF 10% 25V
C310 1-165-176-11 CERAMIC CHIP 0.047uF 10% 16V
C311 1-162-927-11 CERAMIC CHIP 100PF 5% 50V
C312 1-164-227-11 CERAMIC CHIP 0.022uF 10% 25V
C313 1-162-970-11 CERAMIC CHIP 0.01uF 10% 25V
C314 1-104-658-11 ELECT 100uF 20% 10V
C315 1-126-964-11 ELECT 10uF 20% 50V
C316 1-126-923-11 ELECT 220uF 20% 10V
C317 1-104-662-11 ELECT 22uF 20% 25V
C318 1-162-927-11 CERAMIC CHIP 100PF 5% 50V
C319 1-104-658-11 ELECT 100uF 20% 10V
C320 1-107-826-11 CERAMIC CHIP 0.1uF 10% 16V
C321 1-104-658-11 ELECT 100uF 20% 10V
C322 1-104-658-11 ELECT 100uF 20% 10V
C323 1-104-658-11 ELECT 100uF 20% 10V
C324 1-127-715-11 CERAMIC CHIP 0.22uF 10% 16V
C325 1-127-715-11 CERAMIC CHIP 0.22uF 10% 16V
C326 1-162-970-11 CERAMIC CHIP 0.01uF 10% 25V
C327 1-104-658-11 ELECT 100uF 20% 10V
C328 1-127-715-11 CERAMIC CHIP 0.22uF 10% 16V
C329 1-127-715-11 CERAMIC CHIP 0.22uF 10% 16V
C330 1-104-662-11 ELECT 22uF 20% 25V
C331 1-126-961-11 ELECT 2.2uF 20% 50V
C332 1-135-834-11 CERAMIC CHIP 2.2uF 6.3V
C334 1-104-658-11 ELECT 100uF 20% 10V
C335 1-126-942-61 ELECT 1000uF 20% 25V
C351 1-126-960-11 ELECT 1uF 20% 50V
C352 1-107-826-11 CERAMIC CHIP 0.1uF 10% 16V
C353 1-126-960-11 ELECT 1uF 20% 50V
C355 1-115-156-11 CERAMIC CHIP 1uF 10V
C501 1-162-927-11 CERAMIC CHIP 100PF 5% 50V
C502 1-162-927-11 CERAMIC CHIP 100PF 5% 50V
C525 1-162-970-11 CERAMIC CHIP 0.01uF 10% 25V
66
Page 67

CFD-RG880CP
MAIN
Ref. No. Part No. Description Remark Ref. No. Part No. Description Remark
C527 1-162-970-11 CERAMIC CHIP 0.01uF 10% 25V
C539 1-162-970-11 CERAMIC CHIP 0.01uF 10% 25V
C540 1-135-834-11 CERAMIC CHIP 2.2uF 6.3V
C548 1-162-927-11 CERAMIC CHIP 100PF 5% 50V
C549 1-162-927-11 CERAMIC CHIP 100PF 5% 50V
C881 1-162-966-11 CERAMIC CHIP 0.0022uF 10% 50V
C882 1-162-966-11 CERAMIC CHIP 0.0022uF 10% 50V
C883 1-162-970-11 CERAMIC CHIP 0.01uF 10% 25V
C884 1-162-923-11 CERAMIC CHIP 47PF 5% 50V
C886 1-162-970-11 CERAMIC CHIP 0.01uF 10% 25V
C550 1-162-927-11 CERAMIC CHIP 100PF 5% 50V
C551 1-162-927-11 CERAMIC CHIP 100PF 5% 50V
C552 1-162-964-11 CERAMIC CHIP 0.001uF 10% 50V
C555 1-135-834-11 CERAMIC CHIP 2.2uF 6.3V
C801 1-162-927-11 CERAMIC CHIP 100PF 5% 50V
C802 1-162-927-11 CERAMIC CHIP 100PF 5% 50V
C803 1-162-927-11 CERAMIC CHIP 100PF 5% 50V
C804 1-162-927-11 CERAMIC CHIP 100PF 5% 50V
C805 1-164-230-11 CERAMIC CHIP 220PF 5% 50V
C806 1-162-962-11 CERAMIC CHIP 470PF 10% 50V
C807 1-162-923-11 CERAMIC CHIP 47PF 5% 50V
C808 1-107-826-11 CERAMIC CHIP 0.1uF 10% 16V
C812 1-104-658-11 ELECT 100uF 20% 10V
C813 1-107-826-11 CERAMIC CHIP 0.1uF 10% 16V
C814 1-162-927-11 CERAMIC CHIP 100PF 5% 50V
C815 1-162-927-11 CERAMIC CHIP 100PF 5% 50V
C816 1-162-970-11 CERAMIC CHIP 0.01uF 10% 25V
C817 1-162-970-11 CERAMIC CHIP 0.01uF 10% 25V
C818 1-162-970-11 CERAMIC CHIP 0.01uF 10% 25V
C819 1-162-970-11 CERAMIC CHIP 0.01uF 10% 25V
C820 1-162-970-11 CERAMIC CHIP 0.01uF 10% 25V
C821 1-162-927-11 CERAMIC CHIP 100PF 5% 50V
C822 1-107-826-11 CERAMIC CHIP 0.1uF 10% 16V
C823 1-162-970-11 CERAMIC CHIP 0.01uF 10% 25V
C824 1-162-915-11 CERAMIC CHIP 10PF 0.5PF 50V
C825 1-162-919-11 CERAMIC CHIP 22PF 5% 50V
C826 1-162-915-11 CERAMIC CHIP 10PF 0.5PF 50V
C827 1-162-910-11 CERAMIC CHIP 5PF 0.25PF 50V
C828 1-162-919-11 CERAMIC CHIP 22PF 5% 50V
C829 1-162-913-11 CERAMIC CHIP 8PF 0.5PF 50V
C830 1-162-923-11 CERAMIC CHIP 47PF 5% 50V
C831 1-162-919-11 CERAMIC CHIP 22PF 5% 50V
C832 1-162-970-11 CERAMIC CHIP 0.01uF 10% 25V
C833 1-115-156-11 CERAMIC CHIP 1uF 10V
C834 1-104-658-11 ELECT 100uF 20% 10V
C835 1-162-970-11 CERAMIC CHIP 0.01uF 10% 25V
C836 1-104-658-11 ELECT 100uF 20% 10V
C837 1-162-970-11 CERAMIC CHIP 0.01uF 10% 25V
C838 1-104-658-11 ELECT 100uF 20% 10V
C839 1-162-970-11 CERAMIC CHIP 0.01uF 10% 25V
C840 1-107-826-11 CERAMIC CHIP 0.1uF 10% 16V
C841 1-162-970-11 CERAMIC CHIP 0.01uF 10% 25V
C842 1-164-156-11 CERAMIC CHIP 0.1uF 25V
C844 1-162-960-11 CERAMIC CHIP 220PF 10% 50V
C845 1-164-230-11 CERAMIC CHIP 220PF 5% 50V
C846 1-162-964-11 CERAMIC CHIP 0.001uF 10% 50V
C847 1-162-968-11 CERAMIC CHIP 0.0047uF 10% 50V
C848 1-162-927-11 CERAMIC CHIP 100PF 5% 50V
C849 1-162-964-11 CERAMIC CHIP 0.001uF 10% 50V
C861 1-107-826-11 CERAMIC CHIP 0.1uF 10% 16V
C862 1-135-834-11 CERAMIC CHIP 2.2uF 6.3V
C869 1-162-927-11 CERAMIC CHIP 100PF 5% 50V
C870 1-162-927-11 CERAMIC CHIP 100PF 5% 50V
C878 1-107-826-11 CERAMIC CHIP 0.1uF 10% 16V
C880 1-107-826-11 CERAMIC CHIP 0.1uF 10% 16V
C887 1-162-970-11 CERAMIC CHIP 0.01uF 10% 25V
C888 1-162-970-11 CERAMIC CHIP 0.01uF 10% 25V
C889 1-162-927-11 CERAMIC CHIP 100PF 5% 50V
C901 1-126-964-11 ELECT 10uF 20% 50V
C902 1-164-156-11 CERAMIC CHIP 0.1uF 25V
C903 1-100-591-11 CERAMIC CHIP 1uF 10% 25V
C904 1-126-946-11 ELECT 6800uF 20% 25V
C905 1-126-964-11 ELECT 10uF 20% 50V
C906 1-164-227-11 CERAMIC CHIP 0.022uF 10% 25V
C907 1-126-934-11 ELECT 220uF 20% 16V
C908 1-126-923-11 ELECT 220uF 20% 10V
C909 1-164-227-11 CERAMIC CHIP 0.022uF 10% 25V
C910 1-126-923-11 ELECT 220uF 20% 10V
C911 1-104-666-11 ELECT 220uF 20% 25V
C912 1-104-666-11 ELECT 220uF 20% 25V
C913 1-164-156-11 CERAMIC CHIP 0.1uF 25V
C914 1-107-826-11 CERAMIC CHIP 0.1uF 10% 16V
C915 1-126-941-11 ELECT 470uF 20% 25V
C918 1-164-227-11 CERAMIC CHIP 0.022uF 10% 25V
C919 1-126-964-11 ELECT 10uF 20% 50V
C920 1-126-923-11 ELECT 220uF 20% 10V
C922 1-162-927-11 CERAMIC CHIP 100PF 5% 50V
C952 1-126-964-11 ELECT 10uF 20% 50V
C953 1-162-995-11 CERAMIC CHIP 0.022uF 50V
< CONNECTOR >
CN1 1-836-362-31 CABLE, FLEXIBLE FLAT (13 CORE)
CN2 1-832-425-31 CABLE, FLEXIBLE FLAT (11 CORE)
CN801 1-779-293-11 CONNECTOR, FFC (LIF(NON-ZIF)) 25P
CN802 1-815-554-11 PIN, CONNECTOR (PWB) 6P
CN803 1-815-554-21 PIN, CONNECTOR (PWB) 6P
CN804 1-815-555-21 PIN, CONNECTOR (PWB) 7P
CN805 1-815-553-11 PIN, CONNECTOR (PWB) 5P
* CN808 1-815-555-11 PIN, CONNECTOR (PWB) 7P
CN809 1-815-550-11 PIN, CONNECTOR (PWB) 2P
CN810 1-815-550-21 PIN, CONNECTOR (PWB) 2P
CN811 1-815-443-11 PIN, CONNECTOR (PWB) 2P
CNP303 1-815-554-11 PIN, CONNECTOR (PWB) 6P
CNP391 1-815-553-11 PIN, CONNECTOR (PWB) 5P
CNP392 1-815-551-11 PIN, CONNECTOR (PWB) 3P
CNP393 1-815-552-11 PIN, CONNECTOR (PWB) 4P
CNP901 1-815-553-21 PIN, CONNECTOR (PWB) 5P
< DIODE >
D151 8-719-058-24 DIODE RB501V-40TE-17
D251 8-719-058-24 DIODE RB501V-40TE-17
D303 6-500-335-01 DIODE MC2838-T112-1
D304 6-500-335-01 DIODE MC2838-T112-1
D305 6-501-817-01 DIODE MA2J1110GLS0
D306 6-501-817-01 DIODE MA2J1110GLS0
D307 6-501-817-01 DIODE MA2J1110GLS0
D308 6-501-817-01 DIODE MA2J1110GLS0
D309 8-719-991-33 DIODE 1SS133T-77
D310 8-719-991-33 DIODE 1SS133T-77
D311 8-719-991-33 DIODE 1SS133T-77
6767
Page 68

CFD-RG880CP
MAIN
Ref. No. Part No. Description Remark Ref. No. Part No. Description Remark
D312 8-719-991-33 DIODE 1SS133T-77
D804 6-501-817-01 DIODE MA2J1110GLS0
D806 8-719-991-33 DIODE 1SS133T-77
D807 8-719-991-33 DIODE 1SS133T-77
D808 8-719-991-33 DIODE 1SS133T-77
Q160 8-729-620-07 TRANSISTOR 2SC3052EF-T1-LEF
Q201 8-729-620-07 TRANSISTOR 2SC3052EF-T1-LEF
Q260 8-729-620-07 TRANSISTOR 2SC3052EF-T1-LEF
Q301 8-729-620-07 TRANSISTOR 2SC3052EF-T1-LEF
Q302 8-729-045-62 FET 2SK2158-T2B
D809 8-719-991-33 DIODE 1SS133T-77
D810 8-719-991-33 DIODE 1SS133T-77
D811 8-719-991-33 DIODE 1SS133T-77
D814 8-719-991-33 DIODE 1SS133T-77
D815 8-719-991-33 DIODE 1SS133T-77
D902 6-500-334-01 DIODE MC2836-T112-1
D903 6-500-334-01 DIODE MC2836-T112-1
D904 6-501-758-01 DIODE MAZ8100G0LS0
D905 6-501-740-01 DIODE MAZ8068G0LS0
D906 8-719-085-36 DIODE 11EQS04-TB5
D907 6-501-717-01 DIODE MAZ8039G0LS0
D909 6-501-817-01 DIODE MA2J1110GLS0
< FERRITE BEAD >
FB802 1-414-445-11 FERRITE, EMI (SMD) (1608)
FB803 1-414-445-11 FERRITE, EMI (SMD) (1608)
FB804 1-216-864-11 SHORT CHIP 0
FB805 1-216-864-11 SHORT CHIP 0
FB806 1-469-670-21 FERRITE, EMI (SMD) (2012)
FB807 1-469-670-21 FERRITE, EMI (SMD) (2012)
FB901 1-216-295-11 SHORT CHIP 0
FB902 1-216-295-11 SHORT CHIP 0
< IC >
IC301 6-712-055-01 IC BD3499FV-E2
IC302 8-759-426-51 IC BA5417
IC303 8-759-426-51 IC BA5417
IC351 6-702-945-01 IC NJM14558V-TE2
IC801 (Not supplied) IC LC87F7DC8AU-QIP-E
IC802 6-710-820-01 IC S-24CS02AFJ-TB-G
IC803 6-709-458-01 IC XC61CN2802NR
IC804 6-706-338-01 IC XC6202P332FR
IC901 6-702-472-01 IC PQ1CZ21H2ZPH
< JUMPER RESISTOR >
Q303 8-729-620-07 TRANSISTOR 2SC3052EF-T1-LEF
Q304 8-729-036-89 TRANSISTOR KTC3198GR-AT
Q305 6-551-443-01 TRANSISTOR RT1P436C-TP-1
Q306 8-729-036-86 TRANSISTOR KTC3203Y-AT
Q801 6-551-696-01 TRANSISTOR ISA1235AC1TP-1EF
Q802 8-729-620-07 TRANSISTOR 2SC3052EF-T1-LEF
Q803 8-729-620-07 TRANSISTOR 2SC3052EF-T1-LEF
Q804 6-551-067-01 FET RTF015P02TL
Q805 8-729-620-07 TRANSISTOR 2SC3052EF-T1-LEF
Q806 8-729-027-26 TRANSISTOR DTA114YKA-T146
Q807 8-729-027-46 TRANSISTOR DTC114YKA-T146
Q808 8-729-620-07 TRANSISTOR 2SC3052EF-T1-LEF
Q809 8-729-027-46 TRANSISTOR DTC114YKA-T146
Q810 8-729-027-26 TRANSISTOR DTA114YKA-T146
Q811 8-729-027-46 TRANSISTOR DTC114YKA-T146
Q812 8-729-027-26 TRANSISTOR DTA114YKA-T146
Q813 8-729-037-13 TRANSISTOR KTA1271Y
Q814 8-729-027-46 TRANSISTOR DTC114YKA-T146
Q815 8-729-037-13 TRANSISTOR KTA1271Y
Q816 8-729-027-46 TRANSISTOR DTC114YKA-T146
Q817 8-729-027-26 TRANSISTOR DTA114YKA-T146
Q818 8-729-027-46 TRANSISTOR DTC114YKA-T146
Q819 8-729-027-26 TRANSISTOR DTA114YKA-T146
Q820 8-729-027-46 TRANSISTOR DTC114YKA-T146
Q821 8-729-027-26 TRANSISTOR DTA114YKA-T146
Q822 8-729-027-46 TRANSISTOR DTC114YKA-T146
Q823 8-729-027-26 TRANSISTOR DTA114YKA-T146
Q824 8-729-027-46 TRANSISTOR DTC114YKA-T146
Q825 8-729-027-26 TRANSISTOR DTA114YKA-T146
Q826 8-729-027-46 TRANSISTOR DTC114YKA-T146
Q827 8-729-027-26 TRANSISTOR DTA114YKA-T146
Q828 8-729-027-46 TRANSISTOR DTC114YKA-T146
Q829 8-729-027-26 TRANSISTOR DTA114YKA-T146
Q830 8-729-027-46 TRANSISTOR DTC114YKA-T146
Q831 8-729-027-26 TRANSISTOR DTA114YKA-T146
JC302
JC303 1-216-864-11 SHORT CHIP 0
JC802 1-216-864-11 SHORT CHIP 0
JC805 1-216-864-11 SHORT CHIP 0
JC806 1-216-864-11 SHORT CHIP 0
JC808 1-216-864-11 SHORT CHIP 0
JC809 1-216-864-11 SHORT CHIP 0
JC811 1-216-864-11 SHORT CHIP 0
JC812 1-216-864-11 SHORT CHIP 0
< COIL >
L802 1-216-295-11 SHORT CHIP 0
L803 1-410-517-11 INDUCTOR 47uH
L813 1-414-142-61 INDUCTOR 1uH
L814 1-410-501-11 INDUCTOR 2.2uH
L901 1-481-245-11 COIL, CHOKE 220uH
L902 1-456-756-11 COIL, CHOKE 100uH
< TRANSISTOR >
Q101 8-729-620-07 TRANSISTOR 2SC3052EF-T1-LEF
1-216-295-11 SHORT CHIP 0
68
Q832 8-729-027-46 TRANSISTOR DTC114YKA-T146
Q833 8-729-027-46 TRANSISTOR DTC114YKA-T146
Q901 8-729-027-50 TRANSISTOR DTC123JKA-T146
Q903 6-551-276-01 TRANSISTOR RT1N431C-TP-1
Q904 6-551-696-01 TRANSISTOR ISA1235AC1TP-1EF
Q905 8-729-037-08 TRANSISTOR KTD2058Y
Q906 8-729-037-08 TRANSISTOR KTD2058Y
Q907 8-729-036-86 TRANSISTOR KTC3203Y-AT
Q912 8-729-037-08 TRANSISTOR KTD2058Y
< RESISTOR >
R104 1-216-833-11 METAL CHIP 10K 5% 1/10W
R105 1-216-829-11 METAL CHIP 4.7K 5% 1/10W
R108 1-216-864-11 SHORT CHIP 0
R109 1-216-833-11 METAL CHIP 10K 5% 1/10W
R110 1-216-833-11 METAL CHIP 10K 5% 1/10W
R111 1-216-864-11 SHORT CHIP 0
R112 1-216-829-11 METAL CHIP 4.7K 5% 1/10W
R114 1-216-833-11 METAL CHIP 10K 5% 1/10W
R115 1-216-829-11 METAL CHIP 4.7K 5% 1/10W
R117 1-216-833-11 METAL CHIP 10K 5% 1/10W
Page 69

CFD-RG880CP
MAIN
Ref. No. Part No. Description Remark Ref. No. Part No. Description Remark
R118 1-216-825-11 METAL CHIP 2.2K 5% 1/10W
R119 1-216-864-11 SHORT CHIP 0
R120 1-216-813-11 METAL CHIP 220 5% 1/10W
R121 1-216-817-11 METAL CHIP 470 5% 1/10W
R122 1-216-793-11 METAL CHIP 4.7 5% 1/10W
R308 1-216-825-11 METAL CHIP 2.2K 5% 1/10W
R309 1-216-817-11 METAL CHIP 470 5% 1/10W
R310 1-216-853-11 METAL CHIP 470K 5% 1/10W
R311 1-216-837-11 METAL CHIP 22K 5% 1/10W
R312 1-216-829-11 METAL CHIP 4.7K 5% 1/10W
R123 1-216-837-11 METAL CHIP 22K 5% 1/10W
R124 1-216-837-11 METAL CHIP 22K 5% 1/10W
R125 1-216-821-11 METAL CHIP 1K 5% 1/10W
R151 1-216-845-11 METAL CHIP 100K 5% 1/10W
R152 1-216-825-11 METAL CHIP 2.2K 5% 1/10W
R153 1-216-817-11 METAL CHIP 470 5% 1/10W
R154 1-216-845-11 METAL CHIP 100K 5% 1/10W
R155 1-216-864-11 SHORT CHIP 0
R156 1-216-833-11 METAL CHIP 10K 5% 1/10W
R157 1-216-845-11 METAL CHIP 100K 5% 1/10W
R158 1-216-864-11 SHORT CHIP 0
R159 1-216-821-11 METAL CHIP 1K 5% 1/10W
R160 1-216-845-11 METAL CHIP 100K 5% 1/10W
R161 1-216-841-11 METAL CHIP 47K 5% 1/10W
R162 1-216-825-11 METAL CHIP 2.2K 5% 1/10W
R163 1-216-821-11 METAL CHIP 1K 5% 1/10W
R174 1-216-864-11 SHORT CHIP 0
R204 1-216-833-11 METAL CHIP 10K 5% 1/10W
R205 1-216-829-11 METAL CHIP 4.7K 5% 1/10W
R208 1-216-864-11 SHORT CHIP 0
R209 1-216-833-11 METAL CHIP 10K 5% 1/10W
R210 1-216-833-11 METAL CHIP 10K 5% 1/10W
R211 1-216-864-11 SHORT CHIP 0
R212 1-216-829-11 METAL CHIP 4.7K 5% 1/10W
R214 1-216-833-11 METAL CHIP 10K 5% 1/10W
R215 1-216-829-11 METAL CHIP 4.7K 5% 1/10W
R217 1-216-833-11 METAL CHIP 10K 5% 1/10W
R218 1-216-825-11 METAL CHIP 2.2K 5% 1/10W
R219 1-216-864-11 SHORT CHIP 0
R220 1-216-813-11 METAL CHIP 220 5% 1/10W
R313 1-216-833-11 METAL CHIP 10K 5% 1/10W
R314 1-216-837-11 METAL CHIP 22K 5% 1/10W
R315 1-216-833-11 METAL CHIP 10K 5% 1/10W
R316 1-216-837-11 METAL CHIP 22K 5% 1/10W
R317 1-216-825-11 METAL CHIP 2.2K 5% 1/10W
R318 1-216-821-11 METAL CHIP 1K 5% 1/10W
R319 1-216-821-11 METAL CHIP 1K 5% 1/10W
R320 1-216-821-11 METAL CHIP 1K 5% 1/10W
R321 1-216-825-11 METAL CHIP 2.2K 5% 1/10W
R322 1-216-829-11 METAL CHIP 4.7K 5% 1/10W
R323 1-216-821-11 METAL CHIP 1K 5% 1/10W
R324 1-216-829-11 METAL CHIP 4.7K 5% 1/10W
R325 1-216-864-11 SHORT CHIP 0
R326 1-216-817-11 METAL CHIP 470 5% 1/10W
R327 1-216-821-11 METAL CHIP 1K 5% 1/10W
R328 1-216-833-11 METAL CHIP 10K 5% 1/10W
R331 1-216-864-11 SHORT CHIP 0
R333 1-216-797-11 METAL CHIP 10 5% 1/10W
R334 1-216-797-11 METAL CHIP 10 5% 1/10W
R335 1-216-825-11 METAL CHIP 2.2K 5% 1/10W
R336 1-216-857-11 METAL CHIP 1M 5% 1/10W
R337 1-216-857-11 METAL CHIP 1M 5% 1/10W
R338 1-216-817-11 METAL CHIP 470 5% 1/10W
R339 1-216-817-11 METAL CHIP 470 5% 1/10W
R340 1-216-821-11 METAL CHIP 1K 5% 1/10W
R341 1-216-829-11 METAL CHIP 4.7K 5% 1/10W
R342 1-216-821-11 METAL CHIP 1K 5% 1/10W
R343 1-216-833-11 METAL CHIP 10K 5% 1/10W
R344 1-216-837-11 METAL CHIP 22K 5% 1/10W
R345 1-216-821-11 METAL CHIP 1K 5% 1/10W
R221 1-216-817-11 METAL CHIP 470 5% 1/10W
R222 1-216-793-11 METAL CHIP 4.7 5% 1/10W
R223 1-216-837-11 METAL CHIP 22K 5% 1/10W
R224 1-216-837-11 METAL CHIP 22K 5% 1/10W
R225 1-216-821-11 METAL CHIP 1K 5% 1/10W
R251 1-216-845-11 METAL CHIP 100K 5% 1/10W
R252 1-216-825-11 METAL CHIP 2.2K 5% 1/10W
R253 1-216-817-11 METAL CHIP 470 5% 1/10W
R254 1-216-845-11 METAL CHIP 100K 5% 1/10W
R255 1-216-864-11 SHORT CHIP 0
R256 1-216-833-11 METAL CHIP 10K 5% 1/10W
R257 1-216-845-11 METAL CHIP 100K 5% 1/10W
R258 1-216-864-11 SHORT CHIP 0
R259 1-216-821-11 METAL CHIP 1K 5% 1/10W
R260 1-216-845-11 METAL CHIP 100K 5% 1/10W
R261 1-216-841-11 METAL CHIP 47K 5% 1/10W
R262 1-216-825-11 METAL CHIP 2.2K 5% 1/10W
R263 1-216-821-11 METAL CHIP 1K 5% 1/10W
R274 1-216-864-11 SHORT CHIP 0
R302 1-216-864-11 SHORT CHIP 0
R303 1-216-829-11 METAL CHIP 4.7K 5% 1/10W
R304 1-216-829-11 METAL CHIP 4.7K 5% 1/10W
R305 1-216-853-11 METAL CHIP 470K 5% 1/10W
R306 1-216-825-11 METAL CHIP 2.2K 5% 1/10W
R307 1-216-817-11 METAL CHIP 470 5% 1/10W
R351 1-216-833-11 METAL CHIP 10K 5% 1/10W
R352 1-216-833-11 METAL CHIP 10K 5% 1/10W
R353 1-216-857-11 METAL CHIP 1M 5% 1/10W
R501 1-216-833-11 METAL CHIP 10K 5% 1/10W
R502 1-216-864-11 SHORT CHIP 0
R503 1-216-821-11 METAL CHIP 1K 5% 1/10W
R504 1-216-864-11 SHORT CHIP 0
R505 1-216-864-11 SHORT CHIP 0
R506 1-216-837-11 METAL CHIP 22K 5% 1/10W
R507 1-216-833-11 METAL CHIP 10K 5% 1/10W
R508 1-216-821-11 METAL CHIP 1K 5% 1/10W
R509 1-216-821-11 METAL CHIP 1K 5% 1/10W
R510 1-216-845-11 METAL CHIP 100K 5% 1/10W
R511 1-216-845-11 METAL CHIP 100K 5% 1/10W
R512 1-216-841-11 METAL CHIP 47K 5% 1/10W
R513 1-216-864-11 SHORT CHIP 0
R514 1-216-821-11 METAL CHIP 1K 5% 1/10W
R515 1-216-821-11 METAL CHIP 1K 5% 1/10W
R516 1-216-821-11 METAL CHIP 1K 5% 1/10W
R517 1-216-817-11 METAL CHIP 470 5% 1/10W
R518 1-216-845-11 METAL CHIP 100K 5% 1/10W
R521 1-216-841-11 METAL CHIP 47K 5% 1/10W
R522 1-216-841-11 METAL CHIP 47K 5% 1/10W
R523 1-216-845-11 METAL CHIP 100K 5% 1/10W
R524 1-216-845-11 METAL CHIP 100K 5% 1/10W
6969
Page 70

CFD-RG880CP
MAIN
Ref. No. Part No. Description Remark Ref. No. Part No. Description Remark
R525 1-216-845-11 METAL CHIP 100K 5% 1/10W
R526 1-216-829-11 METAL CHIP 4.7K 5% 1/10W
R527 1-216-841-11 METAL CHIP 47K 5% 1/10W
R528 1-216-821-11 METAL CHIP 1K 5% 1/10W
R529 1-216-841-11 METAL CHIP 47K 5% 1/10W
R816 1-216-833-11 METAL CHIP 10K 5% 1/10W
R817 1-216-833-11 METAL CHIP 10K 5% 1/10W
R818 1-216-833-11 METAL CHIP 10K 5% 1/10W
R819 1-216-821-11 METAL CHIP 1K 5% 1/10W
R820 1-216-821-11 METAL CHIP 1K 5% 1/10W
R530 1-216-825-11 METAL CHIP 2.2K 5% 1/10W
R531 1-216-841-11 METAL CHIP 47K 5% 1/10W
R532 1-216-825-11 METAL CHIP 2.2K 5% 1/10W
R533 1-216-864-11 SHORT CHIP 0
R540 1-216-864-11 SHORT CHIP 0
R552 1-216-821-11 METAL CHIP 1K 5% 1/10W
R554 1-216-864-11 SHORT CHIP 0
R556 1-216-813-11 METAL CHIP 220 5% 1/10W
R558 1-216-864-11 SHORT CHIP 0
R559 1-216-813-11 METAL CHIP 220 5% 1/10W
R560 1-216-813-11 METAL CHIP 220 5% 1/10W
R562 1-216-864-11 SHORT CHIP 0
R563 1-216-821-11 METAL CHIP 1K 5% 1/10W
R564 1-216-864-11 SHORT CHIP 0
R565 1-216-864-11 SHORT CHIP 0
R566 1-216-864-11 SHORT CHIP 0
R567 1-216-864-11 SHORT CHIP 0
R568 1-216-864-11 SHORT CHIP 0
R569 1-216-864-11 SHORT CHIP 0
R570 1-216-864-11 SHORT CHIP 0
R571 1-216-864-11 SHORT CHIP 0
R572 1-216-864-11 SHORT CHIP 0
R573 1-216-864-11 SHORT CHIP 0
R574 1-216-864-11 SHORT CHIP 0
R575 1-216-864-11 SHORT CHIP 0
R576 1-216-864-11 SHORT CHIP 0
R577 1-216-864-11 SHORT CHIP 0
R578 1-216-821-11 METAL CHIP 1K 5% 1/10W
R579 1-216-821-11 METAL CHIP 1K 5% 1/10W
R580 1-216-864-11 SHORT CHIP 0
R581 1-216-864-11 SHORT CHIP 0
R582 1-216-864-11 SHORT CHIP 0
R583 1-216-864-11 SHORT CHIP 0
R584 1-216-864-11 SHORT CHIP 0
R585 1-216-864-11 SHORT CHIP 0
R586 1-216-864-11 SHORT CHIP 0
R587 1-216-864-11 SHORT CHIP 0
R588 1-216-821-11 METAL CHIP 1K 5% 1/10W
R589 1-216-864-11 SHORT CHIP 0
R590 1-216-864-11 SHORT CHIP 0
R801 1-216-821-11 METAL CHIP 1K 5% 1/10W
R802 1-216-821-11 METAL CHIP 1K 5% 1/10W
R803 1-216-809-11 METAL CHIP 100 5% 1/10W
R804 1-216-825-11 METAL CHIP 2.2K 5% 1/10W
R805 1-216-813-11 METAL CHIP 220 5% 1/10W
R806 1-216-813-11 METAL CHIP 220 5% 1/10W
R807 1-216-817-11 METAL CHIP 470 5% 1/10W
R808 1-216-864-11 SHORT CHIP 0
R809 1-216-821-11 METAL CHIP 1K 5% 1/10W
R810 1-216-821-11 METAL CHIP 1K 5% 1/10W
R811 1-216-813-11 METAL CHIP 220 5% 1/10W
R812 1-216-813-11 METAL CHIP 220 5% 1/10W
R813 1-216-833-11 METAL CHIP 10K 5% 1/10W
R814 1-216-833-11 METAL CHIP 10K 5% 1/10W
R815 1-216-833-11 METAL CHIP 10K 5% 1/10W
R821 1-216-821-11 METAL CHIP 1K 5% 1/10W
R822 1-216-821-11 METAL CHIP 1K 5% 1/10W
R823 1-216-821-11 METAL CHIP 1K 5% 1/10W
R824 1-216-821-11 METAL CHIP 1K 5% 1/10W
R825 1-216-821-11 METAL CHIP 1K 5% 1/10W
R826 1-216-821-11 METAL CHIP 1K 5% 1/10W
R827 1-216-841-11 METAL CHIP 47K 5% 1/10W
R828 1-216-841-11 METAL CHIP 47K 5% 1/10W
R829 1-216-829-11 METAL CHIP 4.7K 5% 1/10W
R830 1-216-829-11 METAL CHIP 4.7K 5% 1/10W
R831 1-216-829-11 METAL CHIP 4.7K 5% 1/10W
R832 1-216-829-11 METAL CHIP 4.7K 5% 1/10W
R833 1-216-829-11 METAL CHIP 4.7K 5% 1/10W
R834 1-216-853-11 METAL CHIP 470K 5% 1/10W
R835 1-216-845-11 METAL CHIP 100K 5% 1/10W
(CET,E92,BR)
R836 1-216-864-11 SHORT CHIP 0 (E41,MX)
R837 1-216-841-11 METAL CHIP 47K 5% 1/10W
R838 1-216-841-11 METAL CHIP 47K 5% 1/10W
R840 1-216-817-11 METAL CHIP 470 5% 1/10W
R841 1-216-833-11 METAL CHIP 10K 5% 1/10W
R843 1-216-821-11 METAL CHIP 1K 5% 1/10W
R844 1-216-864-11 SHORT CHIP 0
R845 1-216-845-11 METAL CHIP 100K 5% 1/10W
R846 1-216-857-11 METAL CHIP 1M 5% 1/10W
R847 1-216-837-11 METAL CHIP 22K 5% 1/10W
R848 1-216-837-11 METAL CHIP 22K 5% 1/10W
R849 1-216-833-11 METAL CHIP 10K 5% 1/10W
R850 1-216-853-11 METAL CHIP 470K 5% 1/10W
R852 1-216-845-11 METAL CHIP 100K 5% 1/10W
(E41,BR,MX)
R853 1-216-845-11 METAL CHIP 100K 5% 1/10W
(CET,E41,E92)
R854 1-216-821-11 METAL CHIP 1K 5% 1/10W
R855 1-216-864-11 SHORT CHIP 0 (CET,E92)
R856 1-216-864-11 SHORT CHIP 0 (BR,MX)
R857 1-216-841-11 METAL CHIP 47K 5% 1/10W
R858 1-216-821-11 METAL CHIP 1K 5% 1/10W
R859 1-216-821-11 METAL CHIP 1K 5% 1/10W
R860 1-216-821-11 METAL CHIP 1K 5% 1/10W
R861 1-216-821-11 METAL CHIP 1K 5% 1/10W
R862 1-216-821-11 METAL CHIP 1K 5% 1/10W
R863 1-216-821-11 METAL CHIP 1K 5% 1/10W
R864 1-216-821-11 METAL CHIP 1K 5% 1/10W
R865 1-216-821-11 METAL CHIP 1K 5% 1/10W
R866 1-216-821-11 METAL CHIP 1K 5% 1/10W
R868 1-216-821-11 METAL CHIP 1K 5% 1/10W
R869 1-216-821-11 METAL CHIP 1K 5% 1/10W
R870 1-216-821-11 METAL CHIP 1K 5% 1/10W
R871 1-216-821-11 METAL CHIP 1K 5% 1/10W
R872 1-216-821-11 METAL CHIP 1K 5% 1/10W
R873 1-216-821-11 METAL CHIP 1K 5% 1/10W
R874 1-216-821-11 METAL CHIP 1K 5% 1/10W
R875 1-216-821-11 METAL CHIP 1K 5% 1/10W
R876 1-216-821-11 METAL CHIP 1K 5% 1/10W
R877 1-216-821-11 METAL CHIP 1K 5% 1/10W
70
Page 71

CFD-RG880CP
MAIN POWER POWER KEY SOUND KEY
Ref. No. Part No. Description Remark Ref. No. Part No. Description Remark
R878 1-216-821-11 METAL CHIP 1K 5% 1/10W
R879 1-216-821-11 METAL CHIP 1K 5% 1/10W
R880 1-216-821-11 METAL CHIP 1K 5% 1/10W
R881 1-216-821-11 METAL CHIP 1K 5% 1/10W
R882 1-216-829-11 METAL CHIP 4.7K 5% 1/10W
R883 1-216-833-11 METAL CHIP 10K 5% 1/10W
R884 1-216-821-11 METAL CHIP 1K 5% 1/10W
R885 1-216-845-11 METAL CHIP 100K 5% 1/10W
R886 1-216-845-11 METAL CHIP 100K 5% 1/10W
R887 1-216-845-11 METAL CHIP 100K 5% 1/10W
R889 1-216-845-11 METAL CHIP 100K 5% 1/10W
R890 1-216-821-11 METAL CHIP 1K 5% 1/10W
R891 1-216-821-11 METAL CHIP 1K 5% 1/10W
R892 1-216-821-11 METAL CHIP 1K 5% 1/10W
R893 1-216-821-11 METAL CHIP 1K 5% 1/10W
R894 1-216-821-11 METAL CHIP 1K 5% 1/10W
R895 1-216-821-11 METAL CHIP 1K 5% 1/10W
R896 1-216-821-11 METAL CHIP 1K 5% 1/10W
R897 1-216-821-11 METAL CHIP 1K 5% 1/10W
R898 1-216-841-11 METAL CHIP 47K 5% 1/10W
R899 1-216-864-11 SHORT CHIP 0
R901 1-216-821-11 METAL CHIP 1K 5% 1/10W
R903 1-216-845-11 METAL CHIP 100K 5% 1/10W
R904 1-216-825-11 METAL CHIP 2.2K 5% 1/10W
R905 1-216-825-11 METAL CHIP 2.2K 5% 1/10W
R906 1-216-825-11 METAL CHIP 2.2K 5% 1/10W
R907 1-216-825-11 METAL CHIP 2.2K 5% 1/10W
R909 1-216-825-11 METAL CHIP 2.2K 5% 1/10W
R910 1-216-825-11 METAL CHIP 2.2K 5% 1/10W
R911 1-216-825-11 METAL CHIP 2.2K 5% 1/10W
POWER BOARD
*************
1-533-217-41 HOLDER, FUSE
< CAPACITOR >
C981 1-162-995-11 CERAMIC CHIP 0.022uF 50V
C982 1-162-995-11 CERAMIC CHIP 0.022uF 50V
C983 1-162-995-11 CERAMIC CHIP 0.022uF 50V
C984 1-162-995-11 CERAMIC CHIP 0.022uF 50V
C985 1-126-943-11 ELECT 2200uF 20% 25V
C986 1-100-591-11 CERAMIC CHIP 1uF 10% 25V
C987 1-100-162-11 CERAMIC CHIP 1uF 50V
C988 1-162-995-11 CERAMIC CHIP 0.022uF 50V
< CONNECTOR >
CN983 1-564-321-00 PIN, CONNECTOR (3.96mm PITCH) 2P (BR)
CN984 1-564-321-00 PIN, CONNECTOR (3.96mm PITCH) 2P (BR)
CN985 1-564-321-00 PIN, CONNECTOR (3.96mm PITCH) 2P (BR)
< DIODE >
D981 6-501-569-01 DIODE 1N5401-C352
D982 6-501-569-01 DIODE 1N5401-C352
D983 6-501-569-01 DIODE 1N5401-C352
D984 6-501-569-01 DIODE 1N5401-C352
*************************************************************
POWER KEY BOARD
****************
3-831-441-99 SHEET (1)
R912 1-216-825-11 METAL CHIP 2.2K 5% 1/10W
R913 1-216-864-11 SHORT CHIP 0
R914 1-216-797-11 METAL CHIP 10 5% 1/10W
R915 1-216-864-11 SHORT CHIP 0
R916 1-216-825-11 METAL CHIP 2.2K 5% 1/10W
R917 1-216-825-11 METAL CHIP 2.2K 5% 1/10W
R918 1-216-825-11 METAL CHIP 2.2K 5% 1/10W
R919 1-216-825-11 METAL CHIP 2.2K 5% 1/10W
R920 1-216-809-11 METAL CHIP 100 5% 1/10W
R921 1-216-797-11 METAL CHIP 10 5% 1/10W
R922 1-216-825-11 METAL CHIP 2.2K 5% 1/10W
R923 1-216-825-11 METAL CHIP 2.2K 5% 1/10W
R924 1-216-829-11 METAL CHIP 4.7K 5% 1/10W
R927 1-218-879-11 METAL CHIP 22K 0.5% 1/10W
R928 1-218-871-11 METAL CHIP 10K 0.5% 1/10W
R930 1-218-855-11 METAL CHIP 2.2K 0.5% 1/10W
R945 1-216-809-11 METAL CHIP 100 5% 1/10W
R946 1-216-809-11 METAL CHIP 100 5% 1/10W
R947 1-216-797-11 METAL CHIP 10 5% 1/10W
< VARISTOR >
VR102 1-801-862-11 VARISTOR, CHIP (1608)
VR202 1-801-862-11 VARISTOR, CHIP (1608)
VR501 1-801-862-11 VARISTOR, CHIP (1608)
< VIBRATOR >
< RESISTOR >
R421 1-216-809-11 METAL CHIP 100 5% 1/10W
R422 1-216-813-11 METAL CHIP 220 5% 1/10W
R423 1-216-817-11 METAL CHIP 470 5% 1/10W
R424 1-216-821-11 METAL CHIP 1K 5% 1/10W
< SWITCH >
S403 1-786-726-11 SWITCH, TACTILE (DSPL/ENT)
S408 1-786-726-11 SWITCH, TACTILE (POWER)
S410 1-786-726-11 SWITCH, TACTILE (SLEEP)
*************************************************************
SOUND KEY BOARD
****************
3-831-441-99 SHEET (1)
< DIODE >
D409 6-501-691-21 LED 1L434FV22D0TD501 (USB REC)
D410 6-502-342-11 LED 1L034FB22C0MA001 (USB PLAY)
< TRANSISTOR >
Q401 8-729-027-26 TRANSISTOR DTA114YKA-T146
Q402 8-729-027-26 TRANSISTOR DTA114YKA-T146
Q403 8-729-027-46 TRANSISTOR DTC114YKA-T146
Q404 8-729-027-46 TRANSISTOR DTC114YKA-T146
X802 1-814-180-21 VIBRATOR, CERAMIC (10MHz)
*************************************************************
< RESISTOR >
R433 1-216-809-11 METAL CHIP 100 5% 1/10W
R434 1-216-813-11 METAL CHIP 220 5% 1/10W
R435 1-216-817-11 METAL CHIP 470 5% 1/10W
7171
Page 72

CFD-RG880CP
SOUND KEY TC TUNER
Ref. No. Part No. Description Remark Ref. No. Part No. Description Remark
R436 1-216-821-11 METAL CHIP 1K 5% 1/10W
R437 1-216-821-11 METAL CHIP 1K 5% 1/10W
R438 1-216-825-11 METAL CHIP 2.2K 5% 1/10W
R439 1-216-821-11 METAL CHIP 1K 5% 1/10W
R440 1-216-825-11 METAL CHIP 2.2K 5% 1/10W
< TRANSISTOR >
Q301 8-729-901-81 TRANSISTOR 2SC2412K-T-146-R
Q302 8-729-907-00 TRANSISTOR DTC114EU
Q303 8-729-907-00 TRANSISTOR DTC114EU
R441 1-216-813-11 METAL CHIP 220 5% 1/10W
R442 1-216-813-11 METAL CHIP 220 5% 1/10W
< SWITCH >
S409 1-786-726-11 SWITCH, TACTILE (ROCK)
S415 1-786-726-11 SWITCH, TACTILE (DANCE)
S416 1-786-726-11 SWITCH, TACTILE (SALSA)
S417 1-786-726-11 SWITCH, TACTILE (FLAT)
S419 1-786-726-11 SWITCH, TACTILE
(PDW POWER DRIVE WOOFER)
S421 1-786-726-11 SWITCH, TACTILE (REGGAETION)
*************************************************************
A-1108-791-A TC BOARD, COMPLETE
*******************
< CAPACITOR >
C101 1-162-964-11 CERAMIC CHIP 0.001uF 10% 50V
C102 1-104-658-11 ELECT 100uF 20% 10V
C103 1-165-176-11 CERAMIC CHIP 0.047uF 10% 16V
C104 1-162-966-11 CERAMIC CHIP 0.0022uF 10% 50V
C105 1-162-923-11 CERAMIC CHIP 47PF 5% 50V
C107 1-162-962-11 CERAMIC CHIP 470PF 10% 50V
C201 1-162-964-11 CERAMIC CHIP 0.001uF 10% 50V
C202 1-104-658-11 ELECT 100uF 20% 10V
C203 1-165-176-11 CERAMIC CHIP 0.047uF 10% 16V
C204 1-162-966-11 CERAMIC CHIP 0.0022uF 10% 50V
< RESISTOR >
R101 1-216-835-11 METAL CHIP 15K 5% 1/10W
R102 1-216-807-11 METAL CHIP 68 5% 1/10W
R103 1-216-843-11 METAL CHIP 68K 5% 1/10W
R104 1-216-835-11 METAL CHIP 15K 5% 1/10W
R105 1-216-835-11 METAL CHIP 15K 5% 1/10W
R106 1-216-825-11 METAL CHIP 2.2K 5% 1/10W
R110 1-216-809-11 METAL CHIP 100 5% 1/10W
R111 1-216-829-11 METAL CHIP 4.7K 5% 1/10W
R112 1-216-827-11 METAL CHIP 3.3K 5% 1/10W
R201 1-216-835-11 METAL CHIP 15K 5% 1/10W
R202 1-216-807-11 METAL CHIP 68 5% 1/10W
R203 1-216-843-11 METAL CHIP 68K 5% 1/10W
R204 1-216-835-11 METAL CHIP 15K 5% 1/10W
R205 1-216-835-11 METAL CHIP 15K 5% 1/10W
R206 1-216-825-11 METAL CHIP 2.2K 5% 1/10W
R210 1-216-025-11 METAL CHIP 100 5% 1/10W
R211 1-216-829-11 METAL CHIP 4.7K 5% 1/10W
R212 1-216-827-11 METAL CHIP 3.3K 5% 1/10W
R301 1-216-857-11 METAL CHIP 1M 5% 1/10W
R302 1-216-829-11 METAL CHIP 4.7K 5% 1/10W
R303 1-216-829-11 METAL CHIP 4.7K 5% 1/10W
R304 1-216-821-11 METAL CHIP 1K 5% 1/10W
R305 1-216-817-11 METAL CHIP 470 5% 1/10W
R306 1-218-867-11 METAL CHIP 6.8K 0.5% 1/10W
R307 1-216-797-11 METAL CHIP 10 5% 1/10W
C205 1-162-923-11 CERAMIC CHIP 47PF 5% 50V
C207 1-162-962-11 CERAMIC CHIP 470PF 10% 50V
C301 1-104-658-11 ELECT 100uF 20% 10V
C302 1-104-658-11 ELECT 100uF 20% 10V
C303 1-104-658-11 ELECT 100uF 20% 10V
C304 1-126-947-11 ELECT 47uF 20% 35V
C305 1-162-962-11 CERAMIC CHIP 470PF 10% 50V
C306 1-162-970-11 CERAMIC CHIP 0.01uF 10% 25V
C307 1-162-964-11 CERAMIC CHIP 0.001uF 10% 50V
C308 1-162-927-11 CERAMIC CHIP 100PF 5% 50V
C310 1-164-230-11 CERAMIC CHIP 220PF 5% 50V
< CONNECTOR >
CN303 1-784-774-11 CONNECTOR, FFC 13P
< IC >
IC301 6-710-092-01 IC TA2068NG(5,HZ)
< JUMPER RESISTOR >
JC301
JC302 1-216-864-11 SHORT CHIP 0
JC303 1-216-864-11 SHORT CHIP 0
JC304 1-216-864-11 SHORT CHIP 0
JC305 1-216-864-11 SHORT CHIP 0
JC306 1-216-295-11 SHORT CHIP 0
JC307 1-216-864-11 SHORT CHIP 0
JC308 1-216-295-11 SHORT CHIP 0
JC309 1-216-864-11 SHORT CHIP 0
1-216-864-11 SHORT CHIP 0
R308 1-216-837-11 METAL CHIP 22K 5% 1/10W
R309 1-216-805-11 METAL CHIP 47 5% 1/10W
R310 1-216-857-11 METAL CHIP 1M 5% 1/10W
R311 1-216-857-11 METAL CHIP 1M 5% 1/10W
R314 1-216-817-11 METAL CHIP 470 5% 1/10W
R315 1-216-817-11 METAL CHIP 470 5% 1/10W
< SWITCH >
S301 1-786-126-11 SWITCH, SLIDE (REC/PB)
< TRANSFORMER >
T301 1-416-041-41 TRANSFORMER, BIAS OSCILLATION
*************************************************************
A-1244-419-A TUNER BOARD, COMPLETE
**********************
2-895-061-01 TERMINAL, ANTENNA
< CAPACITOR >
C1 1-162-923-11 CERAMIC CHIP 47PF 5% 50V
C4 1-162-964-11 CERAMIC CHIP 0.001uF 10% 50V
C7 1-162-910-11 CERAMIC CHIP 5PF 0.25PF 50V
C8 1-162-964-11 CERAMIC CHIP 0.001uF 10% 50V
C9 1-162-915-11 CERAMIC CHIP 10PF 0.5PF 50V
C10 1-126-960-11 ELECT 1uF 20% 50V
C11 1-107-826-11 CERAMIC CHIP 0.1uF 10% 16V
C12 1-126-963-11 ELECT 4.7uF 20% 50V
C14 1-162-970-11 CERAMIC CHIP 0.01uF 10% 25V
72
Page 73

CFD-RG880CP
TUNER
Ref. No. Part No. Description Remark Ref. No. Part No. Description Remark
C15 1-162-970-11 CERAMIC CHIP 0.01uF 10% 25V
C18 1-126-923-11 ELECT 220uF 20% 10V
C20 1-107-826-11 CERAMIC CHIP 0.1uF 10% 16V
C21 1-126-960-11 ELECT 1uF 20% 50V
C22 1-107-826-11 CERAMIC CHIP 0.1uF 10% 16V
C23 1-126-960-11 ELECT 1uF 20% 50V
C24 1-162-960-11 CERAMIC CHIP 220PF 10% 50V
C26 1-162-927-11 CERAMIC CHIP 100PF 5% 50V
C27 1-162-927-11 CERAMIC CHIP 100PF 5% 50V
C29 1-104-658-11 ELECT 100uF 20% 10V
C30 1-162-970-11 CERAMIC CHIP 0.01uF 10% 25V
C31 1-162-919-11 CERAMIC CHIP 22PF 5% 50V
C32 1-162-964-11 CERAMIC CHIP 0.001uF 10% 50V
C33 1-162-970-11 CERAMIC CHIP 0.01uF 10% 25V
C34 1-162-970-11 CERAMIC CHIP 0.01uF 10% 25V
C35 1-162-970-11 CERAMIC CHIP 0.01uF 10% 25V
C37 1-162-970-11 CERAMIC CHIP 0.01uF 10% 25V
C39 1-107-826-11 CERAMIC CHIP 0.1uF 10% 16V
C41 1-164-230-11 CERAMIC CHIP 220PF 5% 50V
C42 1-162-927-11 CERAMIC CHIP 100PF 5% 50V
< IC >
IC1 6-700-512-01 IC TA2149BN
IC2 8-759-483-40 IC LC72137M-TLM-E
< JUMPER RESISTOR >
JC1 1-216-864-11 SHORT CHIP 0
JC2 1-216-864-11 SHORT CHIP 0
JC3 1-216-864-11 SHORT CHIP 0
JC4 1-216-864-11 SHORT CHIP 0
JC5 1-216-864-11 SHORT CHIP 0
JC6 1-216-864-11 SHORT CHIP 0
JC11 1-216-864-11 SHORT CHIP 0
JC12 1-216-864-11 SHORT CHIP 0
JC13 1-216-864-11 SHORT CHIP 0
JC24 1-216-864-11 SHORT CHIP 0
JC33 1-216-864-11 SHORT CHIP 0
JC34 1-216-864-11 SHORT CHIP 0
< COIL >
C43 1-162-919-11 CERAMIC CHIP 22PF 5% 50V
C47 1-162-915-11 CERAMIC CHIP 10PF 0.5PF 50V
C49 1-161-051-00 CERAMIC 0.01uF 10% 25V
C51 1-162-919-11 CERAMIC CHIP 22PF 5% 50V
C52 1-162-915-11 CERAMIC CHIP 10PF 0.5PF 50V
C53 1-137-190-11 FILM 0.22uF 5% 50V
C54 1-126-923-11 ELECT 220uF 20% 10V
C55 1-162-927-11 CERAMIC CHIP 100PF 5% 50V
C56 1-162-964-11 CERAMIC CHIP 0.001uF 10% 50V
C57 1-162-964-11 CERAMIC CHIP 0.001uF 10% 50V
C59 1-162-927-11 CERAMIC CHIP 100PF 5% 50V
C60 1-162-964-11 CERAMIC CHIP 0.001uF 10% 50V
C61 1-162-927-11 CERAMIC CHIP 100PF 5% 50V
C62 1-162-927-11 CERAMIC CHIP 100PF 5% 50V
C63 1-162-927-11 CERAMIC CHIP 100PF 5% 50V
C65 1-126-963-11 ELECT 4.7uF 20% 50V
C66 1-162-927-11 CERAMIC CHIP 100PF 5% 50V
C68 1-162-927-11 CERAMIC CHIP 100PF 5% 50V
C77 1-162-968-11 CERAMIC CHIP 0.0047uF 10% 50V
C78 1-162-968-11 CERAMIC CHIP 0.0047uF 10% 50V
C80 1-162-970-11 CERAMIC CHIP 0.01uF 10% 25V
C95 1-162-964-11 CERAMIC CHIP 0.001uF 10% 50V
< FILTER >
CF2 1-760-235-81 FILTER, CERAMIC
CF4 1-781-962-21 FILTER, CERAMIC
L1 1-409-775-11 COIL, AIR-CORE
L2 1-416-509-11 COIL, AIR-CORE
L3 1-754-117-12 ANTENNA, FERRITE-ROD (AM)
L4 1-411-234-21 COIL, AM OSC
L21 1-410-509-11 INDUCTOR 10uH
< RESISTOR >
R1 1-216-817-11 METAL CHIP 470 5% 1/10W
R2 1-216-817-11 METAL CHIP 470 5% 1/10W
R3 1-216-833-11 METAL CHIP 10K 5% 1/10W
R4 1-216-833-11 METAL CHIP 10K 5% 1/10W
R5 1-216-821-11 METAL CHIP 1K 5% 1/10W
R10 1-216-805-11 METAL CHIP 47 5% 1/10W
R11 1-216-825-11 METAL CHIP 2.2K 5% 1/10W
R13 1-216-821-11 METAL CHIP 1K 5% 1/10W
R14 1-216-821-11 METAL CHIP 1K 5% 1/10W
R24 1-216-813-11 METAL CHIP 220 5% 1/10W
R30 1-216-837-11 METAL CHIP 22K 5% 1/10W
R31 1-216-829-11 METAL CHIP 4.7K 5% 1/10W
R32 1-216-845-11 METAL CHIP 100K 5% 1/10W
R33 1-216-833-11 METAL CHIP 10K 5% 1/10W
R40 1-216-849-11 METAL CHIP 220K 5% 1/10W
R41 1-216-833-11 METAL CHIP 10K 5% 1/10W
R50 1-216-821-11 METAL CHIP 1K 5% 1/10W
R51 1-216-833-11 METAL CHIP 10K 5% 1/10W
R52 1-216-864-11 SHORT CHIP 0
R53 1-216-829-11 METAL CHIP 4.7K 5% 1/10W
< CONNECTOR >
CNP1 1-568-854-11 CONNECTOR, FFC 11P
< TRIMMER >
CT1 1-141-227-00 TRIMMER, CERAMIC 20PF
CT3 1-141-304-21 CAP, CERAMIC TRIMMER 10PF
< DIODE >
D1 8-719-078-48 DIODE KV1471ETR-G
D2 8-719-078-48 DIODE KV1471ETR-G
D3 8-719-050-69 DIODE KV1520N
D10 8-719-988-61 DIODE 1SS355TE-17
D11 8-719-988-61 DIODE 1SS355TE-17
R54 1-216-817-11 METAL CHIP 470 5% 1/10W
R55 1-216-833-11 METAL CHIP 10K 5% 1/10W
R56 1-216-813-11 METAL CHIP 220 5% 1/10W
R57 1-216-809-11 METAL CHIP 100 5% 1/10W
R58 1-216-825-11 METAL CHIP 2.2K 5% 1/10W
R59 1-216-825-11 METAL CHIP 2.2K 5% 1/10W
R60 1-216-825-11 METAL CHIP 2.2K 5% 1/10W
R61 1-216-825-11 METAL CHIP 2.2K 5% 1/10W
R63 1-216-833-11 METAL CHIP 10K 5% 1/10W
R65 1-216-833-11 METAL CHIP 10K 5% 1/10W
R91 1-216-813-11 METAL CHIP 220 5% 1/10W
R92 1-216-813-11 METAL CHIP 220 5% 1/10W
R94 1-216-821-11 METAL CHIP 1K 5% 1/10W
7373
Page 74

CFD-RG880CP
TUNER USB VOLTAGE SELECTOR VOLUME KEY
Ref. No. Part No. Description Remark Ref. No. Part No. Description Remark
< TRANSFORMER >
T1 1-433-741-11 TRANSFORMER, IF
T2 1-419-465-11 COIL (DET)
< VIBRATOR >
S418 1-786-726-11 SWITCH, TACTILE (REPEAT)
S420 1-786-726-11 SWITCH, TACTILE (VOL –)
*************************************************************
MISCELLANEOUS
**************
X1 1-795-449-11 VIBRATOR, CRYSTAL (75kHz)
*************************************************************
A-1602-158-A USB BOARD, COMPLETE
********************
3-252-827-01 SCREW (B2.6), (+) BV TAPPING
4-110-347-01 HOLDER, USB
< DIODE >
D1004 8-719-991-33 DIODE 1SS133T-77
D1005 8-719-991-33 DIODE 1SS133T-77
< JUMPER RESISTOR >
FB1001 1-216-295-11 SHORT CHIP 0
FB1004 1-216-295-11 SHORT CHIP 0
FB1006 1-216-864-11 SHORT CHIP 0
FB1007 1-216-864-11 SHORT CHIP 0
< CONNECTOR >
J1001 1-794-990-11 CONNECTOR, USB (A) 5P (USB)
< COIL >
L1001 1-456-799-11 COIL, COMMON MODE CHOKE
*************************************************************
1-878-337-11 VOLTAGE SELECTOR BOARD (BR)
***********************
1-533-233-31 HOLDER, FUSE
< SWITCH >
105 1-500-868-11 CORE, FERRITE
0 160 8-820-126-02 OPTICAL PICK-UP (KSM-213CDP/C2NP)
164 1-832-404-21 CABLE, FLEXIBLE FLAT (16 CORE)
206 1-452-899-11 MAGNET
212 1-500-868-11 CORE, FERRITE
ANT1 1-754-376-11 ANTENNA, TELESCOPIC (FM)
CNP2 1-833-922-11 CORD, CONNECTION (WITH PLUG) (AUDIO IN)
D401 6-501-691-01 LED 1L434FV22D0TDF01 (ILLUMINATION)
D402 6-501-691-01 LED 1L434FV22D0TDF01 (ILLUMINATION)
D403 6-501-691-01 LED 1L434FV22D0TDF01 (ILLUMINATION)
D404 6-501-691-01 LED 1L434FV22D0TDF01 (ILLUMINATION)
D405 6-501-691-01 LED 1L434FV22D0TDF01 (ILLUMINATION)
D406 6-501-691-01 LED 1L434FV22D0TDF01 (ILLUMINATION)
D407 6-501-691-01 LED 1L434FV22D0TDF01 (ILLUMINATION)
D408 6-501-691-01 LED 1L434FV22D0TDF01 (ILLUMINATION)
0 F981 1-533-471-12 FUSE, GLASS TUBE (DIA. 5) (4A/250V)
0 F982 1-533-470-12 FUSE, GLASS TUBE (DIA. 5) (3.15A/250V)
0 F983 1-533-462-12 FUSE, GLASS TUBE (DIA. 5) (0.5A/250V) (BR)
HE901 1-500-813-11 HEAD, ERASE (ERASE)
HRP901 3-266-053-01 HEAD, RP (REC/PB)
0 J981 1-526-838-11 INLET, AC 2P (- AC IN) (CET,E41,BR)
0 J981 1-540-009-12 INLET, AC (- AC IN) (E92,MX)
S701 1-572-085-21 SWITCH, LEAF (LIMIT)
SP191 1-858-162-21 LOUD SPEAKER (L-CH) (FULL RANGE)
SP291 1-858-162-21 LOUD SPEAKER (R-CH) (FULL RANGE)
SP393 1-826-683-11 SPEAKER (13cm) (WOOFER)
SW2 1-692-960-11 SWITCH, PUSH (1 KEY) (Z PUSH OPEN/CLOSE)
0 T981 1-435-964-12 TRANSFORMER, POWER (E92,MX)
0 T981 1-435-965-12 TRANSFORMER, POWER (CET,E41)
0 T981 1-435-966-12 TRANSFORMER, POWER (BR)
*************************************************************
0 S981 1-786-870-11 SWITCH, POWER VOLTAGE CHANGE
(VOLTAGE SELECTOR)
*************************************************************
VOLUME KEY BOARD
*****************
3-831-441-99 SHEET (1)
3-831-441-11 CUSHION (B)
< RESISTOR >
R425 1-216-809-11 METAL CHIP 100 5% 1/10W
R426 1-216-813-11 METAL CHIP 220 5% 1/10W
R427 1-216-817-11 METAL CHIP 470 5% 1/10W
R428 1-216-821-11 METAL CHIP 1K 5% 1/10W
R429 1-216-821-11 METAL CHIP 1K 5% 1/10W
R430 1-216-825-11 METAL CHIP 2.2K 5% 1/10W
R431 1-216-821-11 METAL CHIP 1K 5% 1/10W
R432 1-216-825-11 METAL CHIP 2.2K 5% 1/10W
< SWITCH >
S404 1-786-726-11 SWITCH, TACTILE (MODE)
S407 1-786-726-11 SWITCH, TACTILE (VOL +)
S411 1-786-726-11 SWITCH, TACTILE (RADIO/BAND/AUTO PRESET)
S412 1-786-726-11 SWITCH, TACTILE (AUDIO IN)
ACCESSORIES
************
0 1-769-412-22 CORD, POWER (CET,E41)
0 1-834-027-12 CORD, POWER (E92,MX)
0 1-836-154-11 CORD SET, POWER (BR)
4-127-406-11 MANUAL, INSTRUCTION (ENGLISH) (E92,MX)
4-127-406-21 MANUAL, INSTRUCTION (SPANISH) (E92,MX)
4-127-406-31 MANUAL, INSTRUCTION (PORTUGUESE) (BR)
4-127-406-41 MANUAL, INSTRUCTION (ENGLISH) (CET,E41)
4-127-406-51 MANUAL, INSTRUCTION (FRENCH) (CET)
4-127-406-61 MANUAL, INSTRUCTION (GERMAN) (CET)
4-127-406-71 MANUAL, INSTRUCTION (DUTCH) (CET)
4-127-406-81 MANUAL, INSTRUCTION (SPANISH) (CET,E41)
4-127-406-91 MANUAL, INSTRUCTION (PORTUGUESE) (CET)
4-127-407-11 MANUAL, INSTRUCTION (RUSSIAN) (CET)
4-127-407-21 MANUAL, INSTRUCTION (UKRAINIAN) (CET)
7-685-103-19 SCREW +P 2X5 TYPE2 NON-SLIT
A-1609-671-A REMOTE COMANDER (RMT-CG880A)
(including BATTERY LID) (EXCEPT CET)
A-1609-672-A REMOTE COMANDER (RMT-CG880AD)
(including BATTERY LID) (CET)
74
Page 75

MEMO
CFD-RG880CP
75
Page 76

CFD-RG880CP
REVISION HISTORY
Checking the version allows you to jump to the revised page.
Also, clicking the version at the top of the revised page allows you to jump to the next revised page.
Ver. Date Description of Revision
1.0 2009.01 New
 Loading...