

Sony CFD-980 User Manual

3-861-066-32(1)
CD Radio
Cassette-Corder
Operating Instructions page 2
Manual de instrucciones página 2
EN
EN
ES
ES
CFD-980
1998 by Sony Corporation

Warning
To prevent fire or shock hazard, do
not expose the player to rain or
moisture.
Information
This Compact Disc player is classified as a
CLASS 1 LASER product.
The CLASS 1 LASER PRODUCT label is
located at the rear.
EN
Introduction2

Table of contents
Basic Operations
4 Playing a CD
6 Listening to the radio
8 Playing a tape
10 Recording on a tape
The CD Player
12 Using the display
13 Locating a specific point in a
track
14 Playing tracks repeatedly
(Repeat Play)
15 Playing tracks in random order
(Shuffle Play)
16 Creating your own program
(Program Play)
18 Preventing sound from skipping
(ESP)
Setting Up
25 Choosing the power sources
27 Selecting the audio emphasis
(Sound Mode/MEGA BASS)
Additional Information
28 Precautions
30 Troubleshooting
32 Maintenance
33 Specifications
34 Index
Basic Operations
EN
The Radio
19 Presetting radio stations
20 Playing preset radio stations
The Timer
21 Setting the clock
22 Waking up to music
24 Falling asleep to music
Introduction
EN
3
Basic Operations
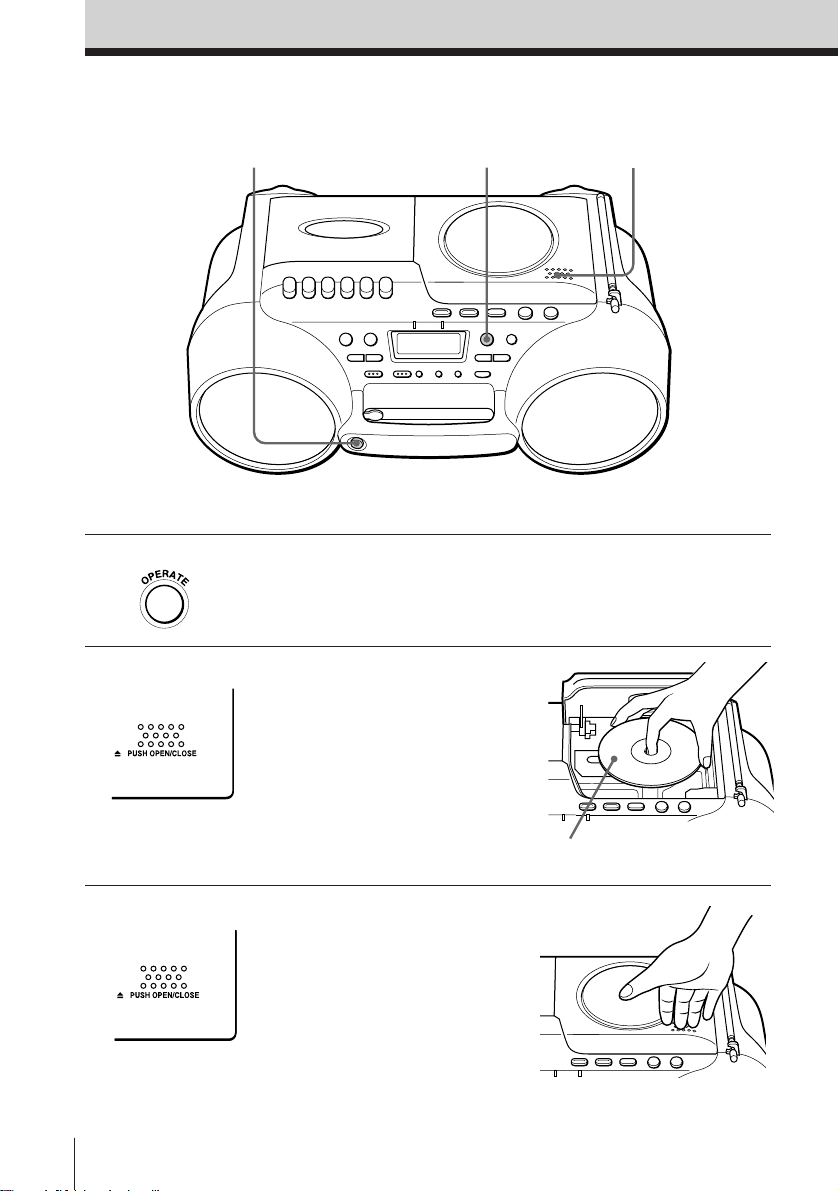
Playing a CD
14
Connect the supplied AC power adaptor (see page 25).
1 Press OPERATE to turn on the
player.
2 Press 6 PUSH OPEN/CLOSE
down to open the lid of the CD
compartment and place the CD
on the CD compartment.
2,3
3 Close the lid of the CD
compartment.
EN
Basic Operations4
With the label side up

4 Press ^.
The player plays all the tracks
once.
Display
Basic Operations
Note
You cannot open the lid
of the CD compartment
when the speakers are
facing upward. This is
to prevent the CD from
falling out of the CD
compartment.
CD compartment
Track number
Playing time
Use these buttons for additional operations
OPERATE
To Press
Adjust the volume VOLUME +/–
Stop playback p
Pause playback ^
Go to the next track +
Go back to the previous track =
Remove the CD 6 PUSH OPEN/CLOSE
Turn off the player OPERATE
6 PUSH OPEN/CLOSE
VOLUME +/–
^
p
=/+
Press again to resume play
after pause.
Basic Operations
EN
5

Listening to the radio
1
Connect the supplied AC power adaptor (see page 25).
2
3
1 Press OPERATE to turn on the
player.
2 Press BAND until the band you
want appears in the display.
Display
3 Hold down TUNING/TIME SET
+/– until the frequency digits
begin to change in the display.
The player automatically scans
the radio frequencies and stops
when it finds a clear station.
If you can't tune in a station,
press the button once at a time.
EN
Basic Operations6
Indicates an FM stereo
broadcast.

Use these buttons for additional operations
Tip
If the FM broadcast is
noisy, press
MODE•MONO/ST
until “Mono” appears in
the display and the
radio will play in
monaural.
Note
When carrying the
player, be sure to
telescope the antenna
completely and fold it
down to prevent
damaging it.
OPERATE
To Press
Adjust the volume VOLUME +/–
Turn off the radio OPERATE
MODE
MONO/ST
VOLUME +/–
To improve broadcast reception
Reorient the antenna for FM. Reorient the player itself
for AM.
Basic Operations
for FM for AM
Basic Operations
EN
7
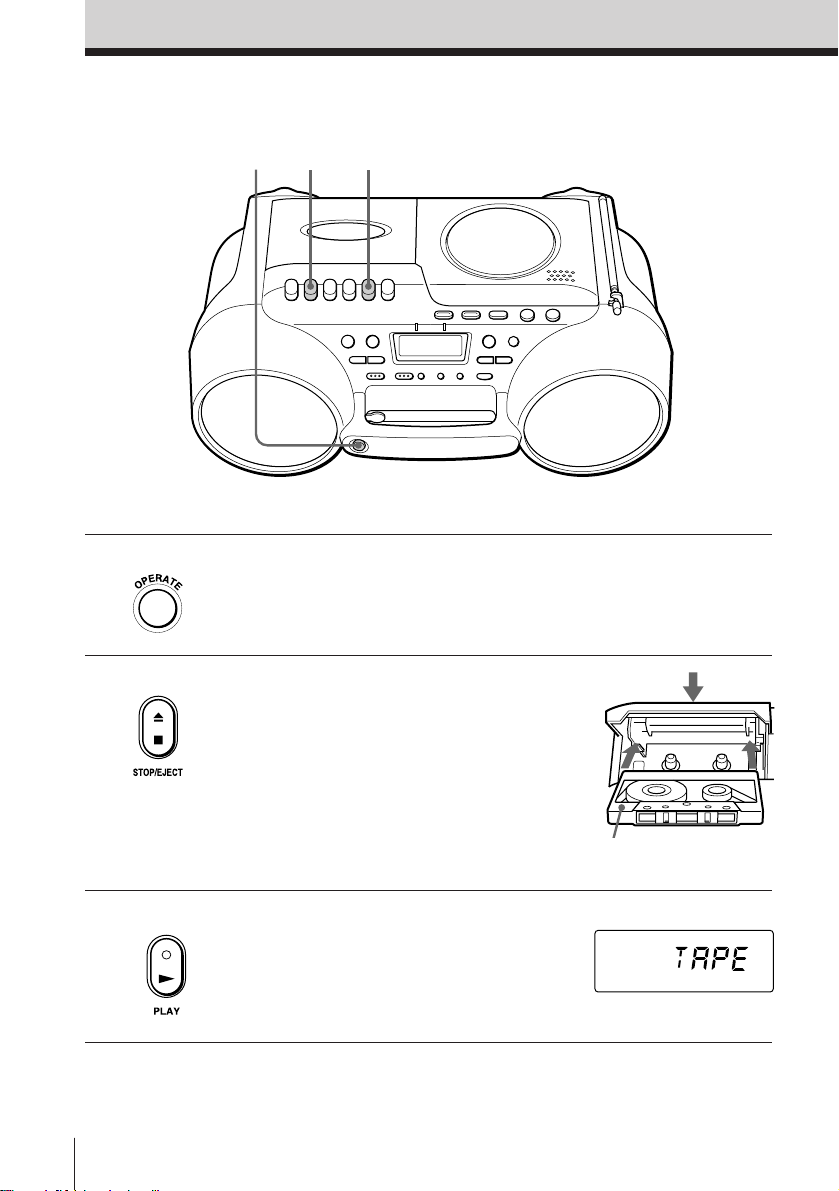
Playing a tape
1
3
2
Connect the supplied AC power adaptor (see page 25).
1 Press OPERATE to turn on the
player.
2 Press p6 to open the tape
compartment and insert a
recorded tape. Use TYPE I
(normal) tape only. Close the
compartment.
3 Press (.
The player starts playing.
EN
Basic Operations8
With the side you want
to play facing upward
Display

Use these buttons for additional operations
OPERATE
To Press
Adjust the volume VOLUME +/–
Stop playback p6
Fast-forward or rewind the tape ) or 0
Pause playback P
Eject the cassette p6
Turn off the player OPERATE
0/)
p6
P
VOLUME +/–
Press the button again to
resume play after pause.
Basic Operations
Basic Operations
EN
9
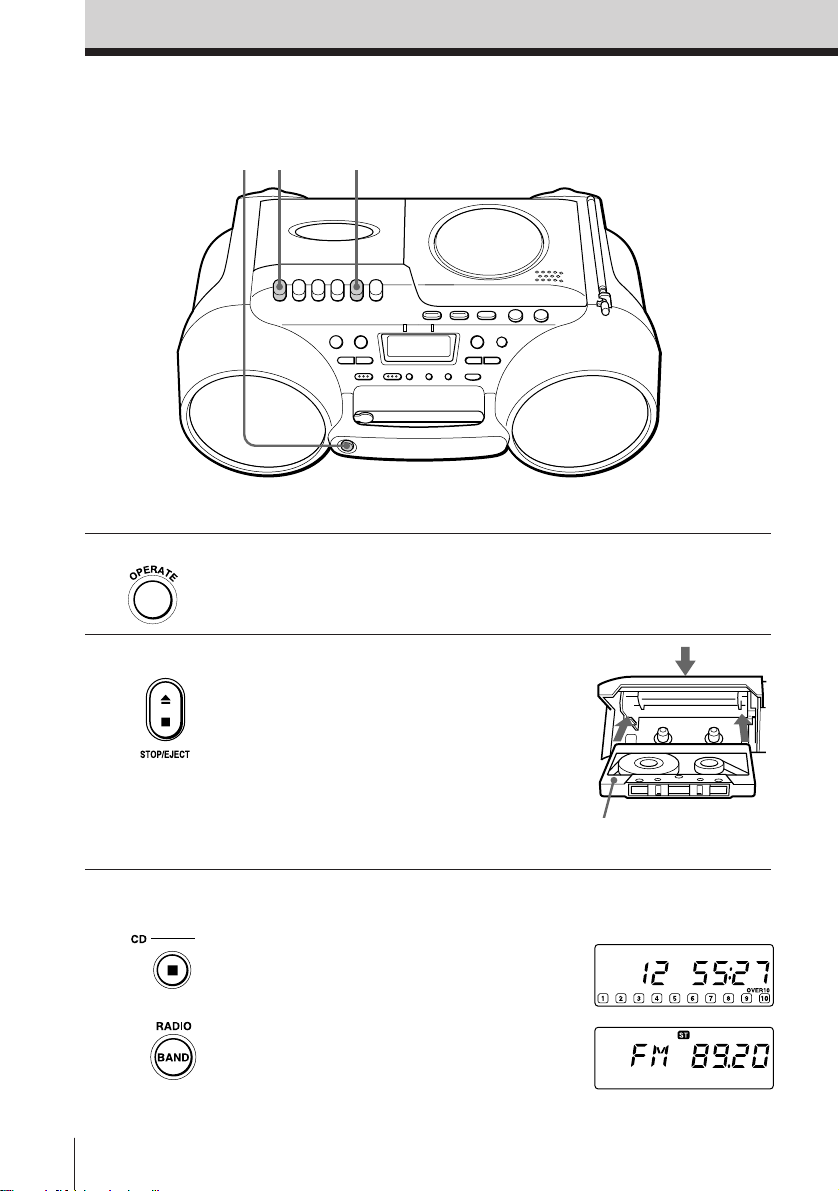
Recording on a tape
4
Connect the supplied AC power adaptor (see page 25).
21
1 Press OPERATE to turn on the
player.
2 Press p6 to open the tape
compartment and insert a blank
tape. Use TYPE I (normal) tape
only.
With the side you want to
record on facing upward
3
EN
Basic Operations10
Select the program source you
want to record.
To record from the CD player,
insert a CD (see page 4) and press
p on the CD section.
To record from the radio, press
BAND and tune in the station
you want (see page 6.)
Display

4 Press r to start recording.
(( is depressed automatically.)
Basic Operations
Tips
• Adjusting the volume or
the audio emphasis (see
page 27) will not affect
the recording level.
• To erase a recording,
proceed as follows:
1 Press OPERATE.
2 Press FUNCTION
repeatedly until
“TAPE” appears in
the display. Insert the
tape whose recording
you want to erase into
the tape compartment.
3 Press r.
Use these buttons for additional operations
OPERATE p6 P
To Press
Stop recording p6
Pause recording P
Press the button again to
resume recording.
Turn off the player OPERATE
Basic Operations
11
EN

The CD Player
Using the display
You can check information about the CD
using the display.
Checking the total track number and playing
time
Check the display in stop mode.
If the CD has more than 10 tracks, “OVER 10” appears
in the display.
DISPLAY/ENTER
MEMORY
Total playing time
Total track number
Music calendar
Checking the remaining time
Press DISPLAY/ENTER•MEMORY while playing a
CD.
The track numbers in the music calendar disappear
after they are played.
To display
The current track number Once
and the remaining time
on the current track*
Remaining time on the CD Twice
and the number of tracks left
The current track number Three times
and playing time
* For a track whose number is more than 20 the remaining
time appears as “– –:– –”.
EN
The CD Player12
Press DISPLAY/
ENTER•MEMORY

Locating a specific
point in a track
You can locate a specific point in a track
while playing a CD using + or =.
To locate Press
a point while listening to + (forward) or =
the sound (backward) while playing
a point while observing + (forward) or =
the display (backward) in pause and
= / +
The CD Player
and hold down until you
find the point.
hold down until you find
the point.
The CD Player 13
EN

Playing tracks
repeatedly
(Repeat Play)
You can play tracks repeatedly in
normal, shuffle or program play modes
(see page 16).
1 Press OPERATE to turn on the player.
2 Press p.
“Cd” appears in the display.
3 Press MODE•MONO/ST until the repeat mode
you want appears in the display.
To repeat Select
a single track “REP 1”
all the tracks “REP ALL”
tracks in random order “SHUF” “ REP”
programed tracks “PGM” “REP” and then
OPERATE
MODE
MONO/ST
progam tracks (see step 4 on
page 16).
^
=/+
p
4 Do either of the following to start repeat play:
• When you’ve selected “REP1”, select the track
by pressing = or + and press ^.
• When you’ve selected “REP ALL”, “SHUF”
“REP” or “PGM” “REP”, press ^ .
To cancel Repeat Play
Press MODE•MONO/ST until “REP” disappears
from the display.
EN
The CD Player14

Playing tracks in
random order
(Shuffle Play)
OPERATE
MODE
MONO/ST
^
p
You can play tracks in random order.
1 Press OPERATE to turn on the player.
2 Press p.
“Cd” appears in the display.
3 Press MODE•MONO/ST until “SHUF” appears in
the display.
4 Press ^ to start shuffle play.
To cancel Shuffle Play
Press MODE•MONO/ST until “SHUF” disappears
from the display.
The CD Player
The CD Player 15
EN

Creating your
own program
(Program Play)
You can make a program of up to 20
tracks in the order you want them to be
played.
OPERATE
MODE
MONO/ST
DISPLAY/ENTER
MEMORY
^
p
=/+
Tips
• You can play the same
program again, since
the program is saved
until you open the CD
compartment.
• You can record your
own program. After
you’ve created the
program, insert a blank
tape into the tape
compartment and press
r to start recording.
1 Press OPERATE to turn on the player.
2 Press p.
“Cd” appears in the display.
3 Press MODE•MONO/ST until “PGM” appears in
the display.
4 Press =/+ and press DISPLAY/ENTER•
MEMORY for the tracks you want to program in
the order you want. You can program up to 20
tracks.
Programed track
Playing order
5 Press ^ to start program play.
To cancel Program Play
Press MODE•MONO/ST until “PGM” disappears
from the display.
EN
The CD Player16

To check the order of tracks before play
Press DISPLAY/ENTER•MEMORY.
Every time you press the button, the track number
appears in the programed order.
To change the current program
Press p once if the CD is stopped and twice if the CD
is playing. The current program will be erased. Then
create a new program following the programing
procedure.
The CD Player
The CD Player 17
EN

Preventing sound
from skipping
(ESP)
The ESP (Electronic Shock Protection)
function prevents the sound from
skipping by using a buffer memory that
stores music data for about 10 seconds.
ESP indicatorOPERATE ESP
p
Notes
• Playing may stop when
the player gets a strong
shock even with the
ESP function on.
• You may hear a noise
or sound skip:
– when you listen to a
dirty or scratched
CD.
– when you listen to an
audio test CD.
– when the player
receives continuous
shock.
• Sound may drop for a
while if you press ESP
during play.
• During recording, you
cannot change the
setting of the ESP
function.
1 Press OPERATE to turn on the player.
2 Press p.
“Cd” appears in the display.
3 Press ESP.
The ESP indicator lights up.
To release the ESP function
Press ESP again.
EN
The CD Player18

The Radio
Presetting radio
stations
You can store radio stations into the
player’s memory. You can preset up to
20 radio stations, 10 for each band in any
order.
OPERATE DISPLAY/ENTER
BAND
MEMORY
The Radio
PRESET +/–
TUNING/TIME SET +/–
1 Press OPERATE to turn on the player.
2 Press BAND to select the band.
3 Tune in a station you want.
4 Hold down DISPLAY/ENTER•MEMORY for
about 2 seconds.
5 Press PRESET+/– until the preset number (1 to 10)
you want for the station flashes in the music
calendar.
6 Hold down DISPLAY/ENTER•MEMORY again.
The new station replaces the old one.
The Radio
19
EN

Playing preset
radio stations
Once you've preset the stations, use
PRESET +/– to tune in your favorite
stations.
1 Press OPERATE to turn on the player.
2 Press BAND to select the band.
3 Press PRESET +/– to tune in a stored station.
PRESET +/–OPERATE
BAND
Preset number
EN
The Radio20

The Timer
Setting the clock
Before you set the clock, connect the AC
power adaptor (see page 25.)
Before you set the clock, “0:00” flashes.
CLOCK DISPLAY/ENTER
TUNING/TIME
SET +/–
MEMORY
The Timer
Tip
The time display
system:
24-hour system
1 Press CLOCK for about 2 seconds until the hour
digit flashes.
2 Press TUNING/TIME SET +/– until you set the
current hour. Then press DISPLAY/ENTER•
MEMORY.
The minute digits flash. Set the minutes by
pressing TUNING/TIME SET +/– until the correct
minute is displayed.
/
3 Press DISPLAY/ENTER•MEMORY.
The clock starts from 00 seconds.
The Timer 21
EN
 Loading...