

Page 1
Troubleshooting
General
The power does not come on.
•Connect the AC power cord securely.
•Make sure the batteries are inserted
correctly.
•Replace all the batteries with new
ones if they are weak.
There is no audio.
•Make sure the FUNCTION selector is
set to the function you want to
operate.
•Adjust the volume.
•Unplug the headphones when
listening through speakers.
CD Player
The CD does not play/ “– –” lights
in the display even when a CD is
in place.
•Make sure that the CD compartment
is closed.
•Place the CD with the label surface
up.
•Clean the CD.
•Take out the CD and leave the CD
compartment open for about an hour
to dry moisture condensation.
•Make sure the FUNCTION selector is
set to CD.
The sound drops out.
•Reduce the volume.
•Clean the CD, or replace it if the CD
is badly damaged
•Place the player in a location free
from vibration.
•Cleans the lens with a commercially
available blower.
Radio
Audio is weak or has poor
quality.
•Replace all the batteries with new
ones if they are weak.
•Move the player away from the TV.
The picture of your TV becomes
unstable.
•If you are listening to an FM program
near the TV with an indoor antenna,
move the player away from the TV.
Tape player
The tape does not move when
you press an operation button.
•Close the cassette compartment
securely.
The r button does not function/
The tape does not play.
•Make sure the safety tab on the
cassette is in place.
•Make sure the FUNCTION selector is
set to CD, AM or FM.
The tape does not erase
completely.
•Clean the erasing heads.
•Replace all the batteries with new
ones if they are weak.
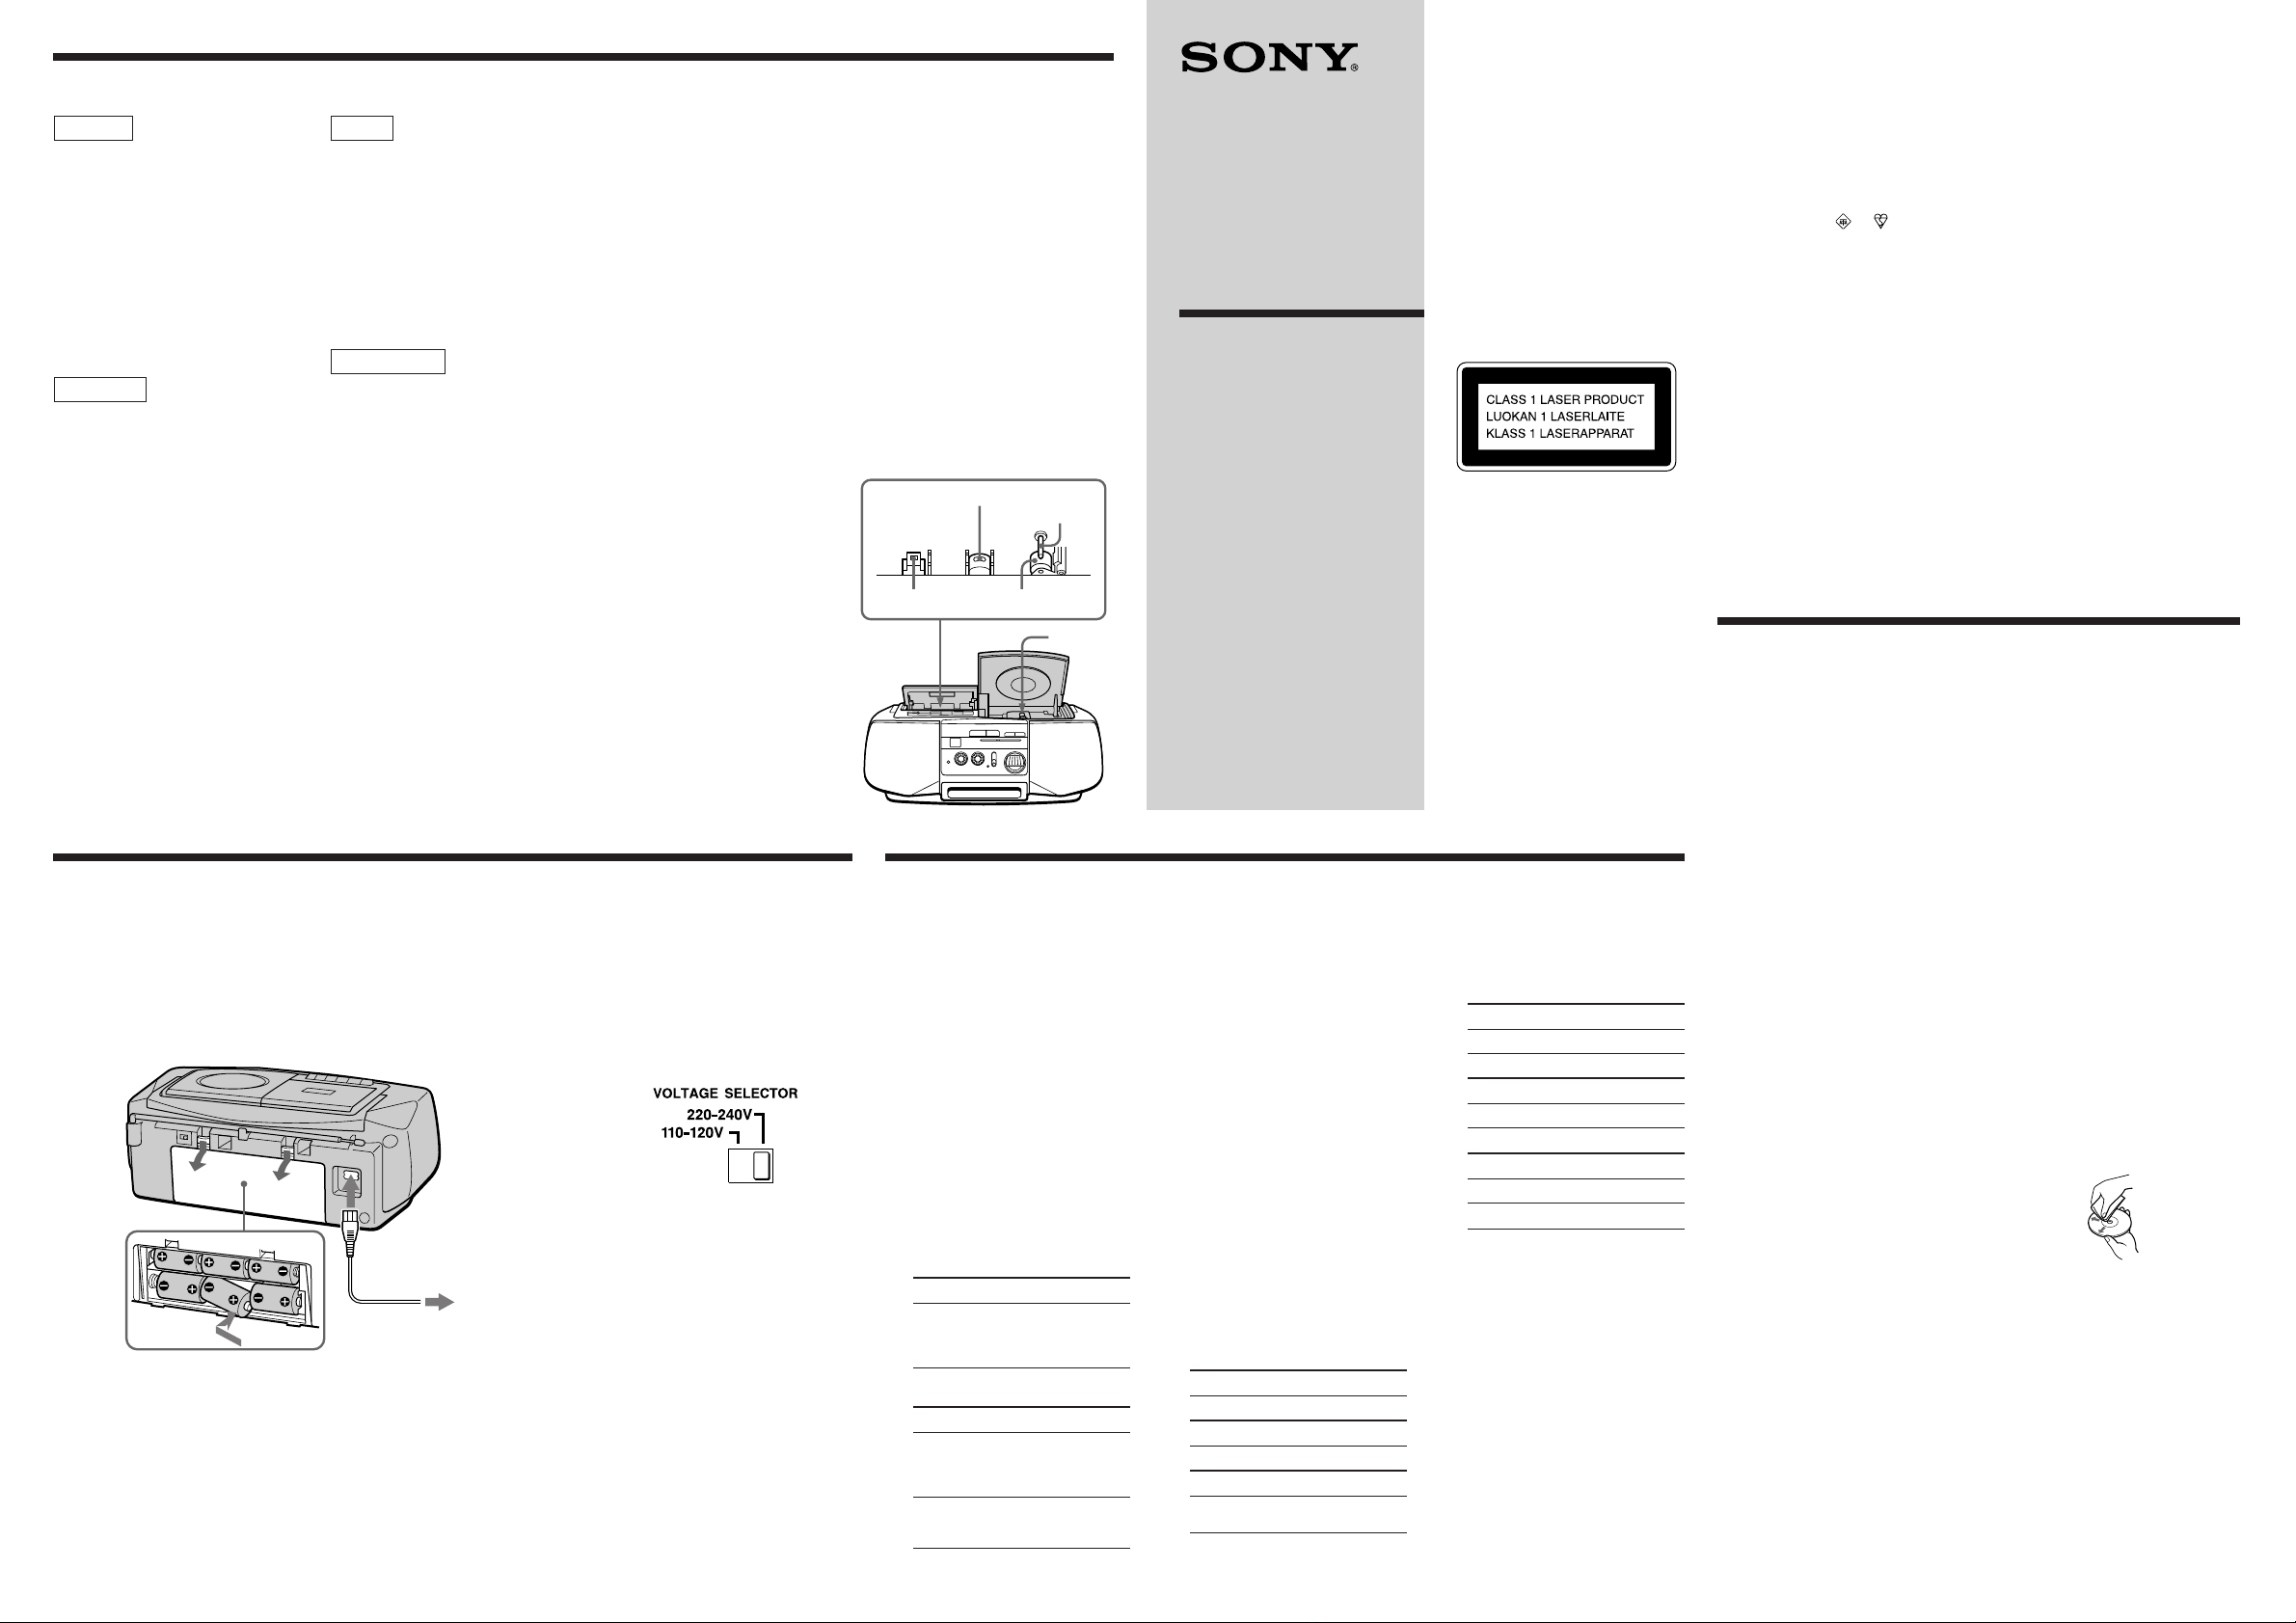
Choosing the power sources
Use the AC power source whenever you record since recording
consumes much power.
Connecting the AC power cord
Insert one end of the supplied AC power cord to the AC IN socket at the
rear of the player, and the other end to the wall outlet.
1 to AC IN
2 to a wall
outlet
Using the player on batteries
Insert six R20 (size D) batteries (not
supplied) into the battery compartment.
To use the player on batteries, disconnect
the AC power cord from the player.
Tip
Replace the batteries when the OPR/BATT indicator dims or when the
player stops operating. Replace all the batteries with new ones. Before you
replace the batteries, be sure to take out the CD from the player.
The tape does not record.
• Make sure the tape is inserted
properly.
• Make sure the safety tab of the
cassette is in place.
The audio is weak/The audio
quality is poor.
• Clean the heads, pinch roller and
capstan with a cotton swab slightly
moistened with cleaning fluid or
alcohol.
• Demagnetize the heads and all metal
parts in the tape path with a
commercially available tape head
demagnetizer.
The sound is distorted.
• The TYPE II (high position) or TYPE
IV (metal) tape is being used. Use
TYPE I (normal) tape only.
Adjusting the voltage (only
for the models equipped
with VOLTAGE SELECTOR at
the bottom)
Be sure to set the VOLTAGE
SELECTOR (at the bottom) to your
local power supply.
Tip
Only for the customers supplied
with an AC plug adaptor:
Use the supplied AC plug adaptor if
the plug of the AC power cord does
not match your outlet.
Record/playback head
Erase head
Capstan
Pinch roller
Lens
Specifications
CD player section
System
Compact disc digital audio system
Laser diode properties
Material: GaAlAs
Wave length: 780 nm
Emission duration: Continuous
Laser output: Less than 44.6 µW
(This output is the value measured at a
distance of about 200 mm from the
objective lens surface on the optical
pick-up block with 7 mm aperture.)
Spindle speed
200 r/min (rpm) to 500 r/min (rpm)
(CLV)
Number of channels
2
Frequency response
20 - 20,000 Hz +1/-2 dB
Wow and flutter
Below measurable limit
Radio section
Frequency range
Europe,Italy and Korea
FM
Europe and Korea
Italy 87.5 - 108 MHz
Central and 65 - 108 MHz
Eastern Europe
AM
Europe and Korea
Italy
Saudi Arabia and other countries
FM Saudi Arabia 87.6 - 107 MHz
Tourist model 76 - 108 MHz
Other countries 87.6 - 108 MHz
AM Tourist model 530 - 1,629 kHz
Other models 530 - 1,605 kHz
87.6 - 107 MHz
531 - 1,602 kHz
526.5 - 1,606.5 kHz
or 87.6 - 107 MHz
or 531 - 1,602 kHz
CD Radio
CassetteCorder
Operating Instructions
Bedienungsanleitung
(Siehe Rückseite.)
CFD-V10
CFD-910
©1996 by Sony Corporation
Printed in China
3-859-115-31(2)
IF
FM: 10.7 MHz
AM: 455 kHz
Aerials
FM: Telescopic aerial
AM: Built-in ferrite bar aerial
Cassette-corder section
Recording system
4-track 2 channel stereo
Fast winding time
Approx. 120 s (sec.) with Sony
cassette C-60
Frequency response
TYPE I (normal): 70 - 10,000 Hz
General
Speaker
Full range: 10 cm dia., 2.8 ohms, cone
type (2)
Outputs
Headphones jack (stereo minijack)
For 16 - 68 ohms impedance
headphones
Maximum power output
model)
2.5 W + 2.5 W
Power output (Korean model)
1.6 W + 1.6 W (at 2.8 ohm, 10 %
harmonic distortion in AC operation)
Power requirements
Europe
230 V AC, 50 Hz
Korea
220 V AC, 60 Hz
Other countries
110 - 120 V, 220 - 240 V AC selectable
50/60 Hz or 230 V AC, 50 Hz
9 V DC, 6 R20 (size D) batteries
(excluding Korean
Warning
To prevent fire or shock
hazard, do not expose the
player to rain or
moisture.
To avoid electrical shock,
do not open the cabinet.
Refer servicing to
qualified personnel only.
Information
For customers in Europe
This Compact Disc player is
classified as a CLASS 1 LASER
product.
The CLASS 1 LASER PRODUCT
label is located on the bottom
exterior.
Warning
Do not install the appliance in a
confined space, such as a bookcase
or built-in cabinet.
The FUNCTION selector is located
at the front.
When you turn on the player, the
OPR/BATT indicator lights up.
Power consumption
Korean model: AC 15 W
Other models: AC 20 W
Battery life
For CD radio cassette-corder:
FM recording
Sony R20P: approx. 13.5 h
Sony alkaline LR20: approx. 20 h
Tape playback
Sony R20P: approx. 7.5 h
Sony alkaline LR20: approx. 15 h
CD playback
Sony R20P: approx. 2.5 h
Sony alkaline LR20: approx. 7 h
Dimensions
Approx. 425 × 160 × 246 mm (w/h/d)
3
⁄4 × 6 3⁄8 × 9 3⁄4 inches) (incl.
(16
projecting parts)
Mass
Approx. 4 kg (8 lb. 13 oz) (incl.
batteries)
Supplied accessory
AC power cord (1)
Design and specifications are subject to
change without notice.
Optical accessories
Sony MDR headphone series
Notice for customers in the
United Kingdom
A moulded plug complying with BS
1363 is fitted to this equipment for
your safety and convenience.
Should the fuse in the plug supplied
need to be replaced, same rating fuse
approved by ASTA or BSI to BS 1362,
(i.e. marked with
or mark)
must be used.
If the plug supplied with this
equipment has a detachable fuse
cover, be sure to attach the fuse
cover after you change the fuse.
Never use the plug without the fuse
cover. If you should lose the fuse
cover, please contact your nearest
Sony service station.
Precautions
On safety
• As the laser beam used in the CD
player section is harmful to the eyes,
do not attempt to disassemble the
casing. Refer servicing to qualified
personnel only.
• Should any solid object or liquid fall
into the player, unplug the player,
and have it checked by qualified
personnel before operating it any
further.
On power sources
• For AC operation, check that the
player’s operating voltage is identical
with your local power supply (See
“Specifications”) and use the
supplied AC power cord; do not use
any other type. The voltage selector is
located at the bottom of the player
(only for the models equipped with
the VOLTAGE SELECTOR at the
bottom).
• The player is not disconnected from
the AC power source (mains) as long
as it is connected to the wall outlet,
even if the player itself has been
turned off.
• For battery operation, use six size D
(R20) batteries.
• When the batteries are not to be used,
remove them to avoid damage that
can be caused by battery leakage or
corrosion.
• The nameplate indicating operating
voltage, power consumption, etc. is
located at the bottom.
On placement
• Do not leave the player in a location
near heat sources, or in a place
subject to direct sunlight, excessive
dust or mechanical shock.
• Do not place the player on an inclined
or unstable place.
• Do not place anything within 10 mm
of the side of the cabinet. The
ventilation holes must be
unobstructed for the player to operate
properly and prolong the life of its
components.
• If the player is left in a car parked in
the sun, be sure to choose a location
in the car where the player will not be
subjected to the direct rays of the sun.
About this manual
The design of the speakers of CFDV10 and CFD-910 differs depending
on the area the model is marketed.
The one marketed in the UK and
Italy is the model used for
illustration purposes.
•Since a strong magnet is used for the
speakers, keep personal credit cards
using magnetic coding or springwound watches away from the player
to prevent possible damage from the
magnet.
On operation
•If the player is brought directly from
a cold to a warm location, or is placed
in a very damp room, moisture may
condense on the lenses inside the CD
player section. Should this occur, the
player will not operate properly. In
this case, remove the CD and wait
about an hour for the moisture to
evaporate.
•If the player has not been used for a
long time, set it in the playback mode
to warm it up for a few minutes
before inserting a cassette.
If you have any questions or problems
concerning your player, please consult
your nearest Sony dealer.
Notes on CDs
•Before playing, clean the CD with a
cleaning cloth. Wipe the CD from the
center out.
•Do not use solvents such as benzine,
thinner, commercially available
cleaners or anti-static spray intended
for vinyl LPs.
•Do not expose the CD to direct
sunlight or heat sources such as hot
air ducts, nor leave it in a car parked
in direct sunlight as there can be a
considerable rise in temperature
inside the car.
•Do not stick paper or sticker on the
CD, nor scratch the surface of the CD.
•After playing, store the CD in its case.
If there is a scratch, dirt or fingerprints
on the CD, it may cause tracking error
Page 2
Use TYPE I (normal) tape only.
Use TYPE I (normal) tape only.
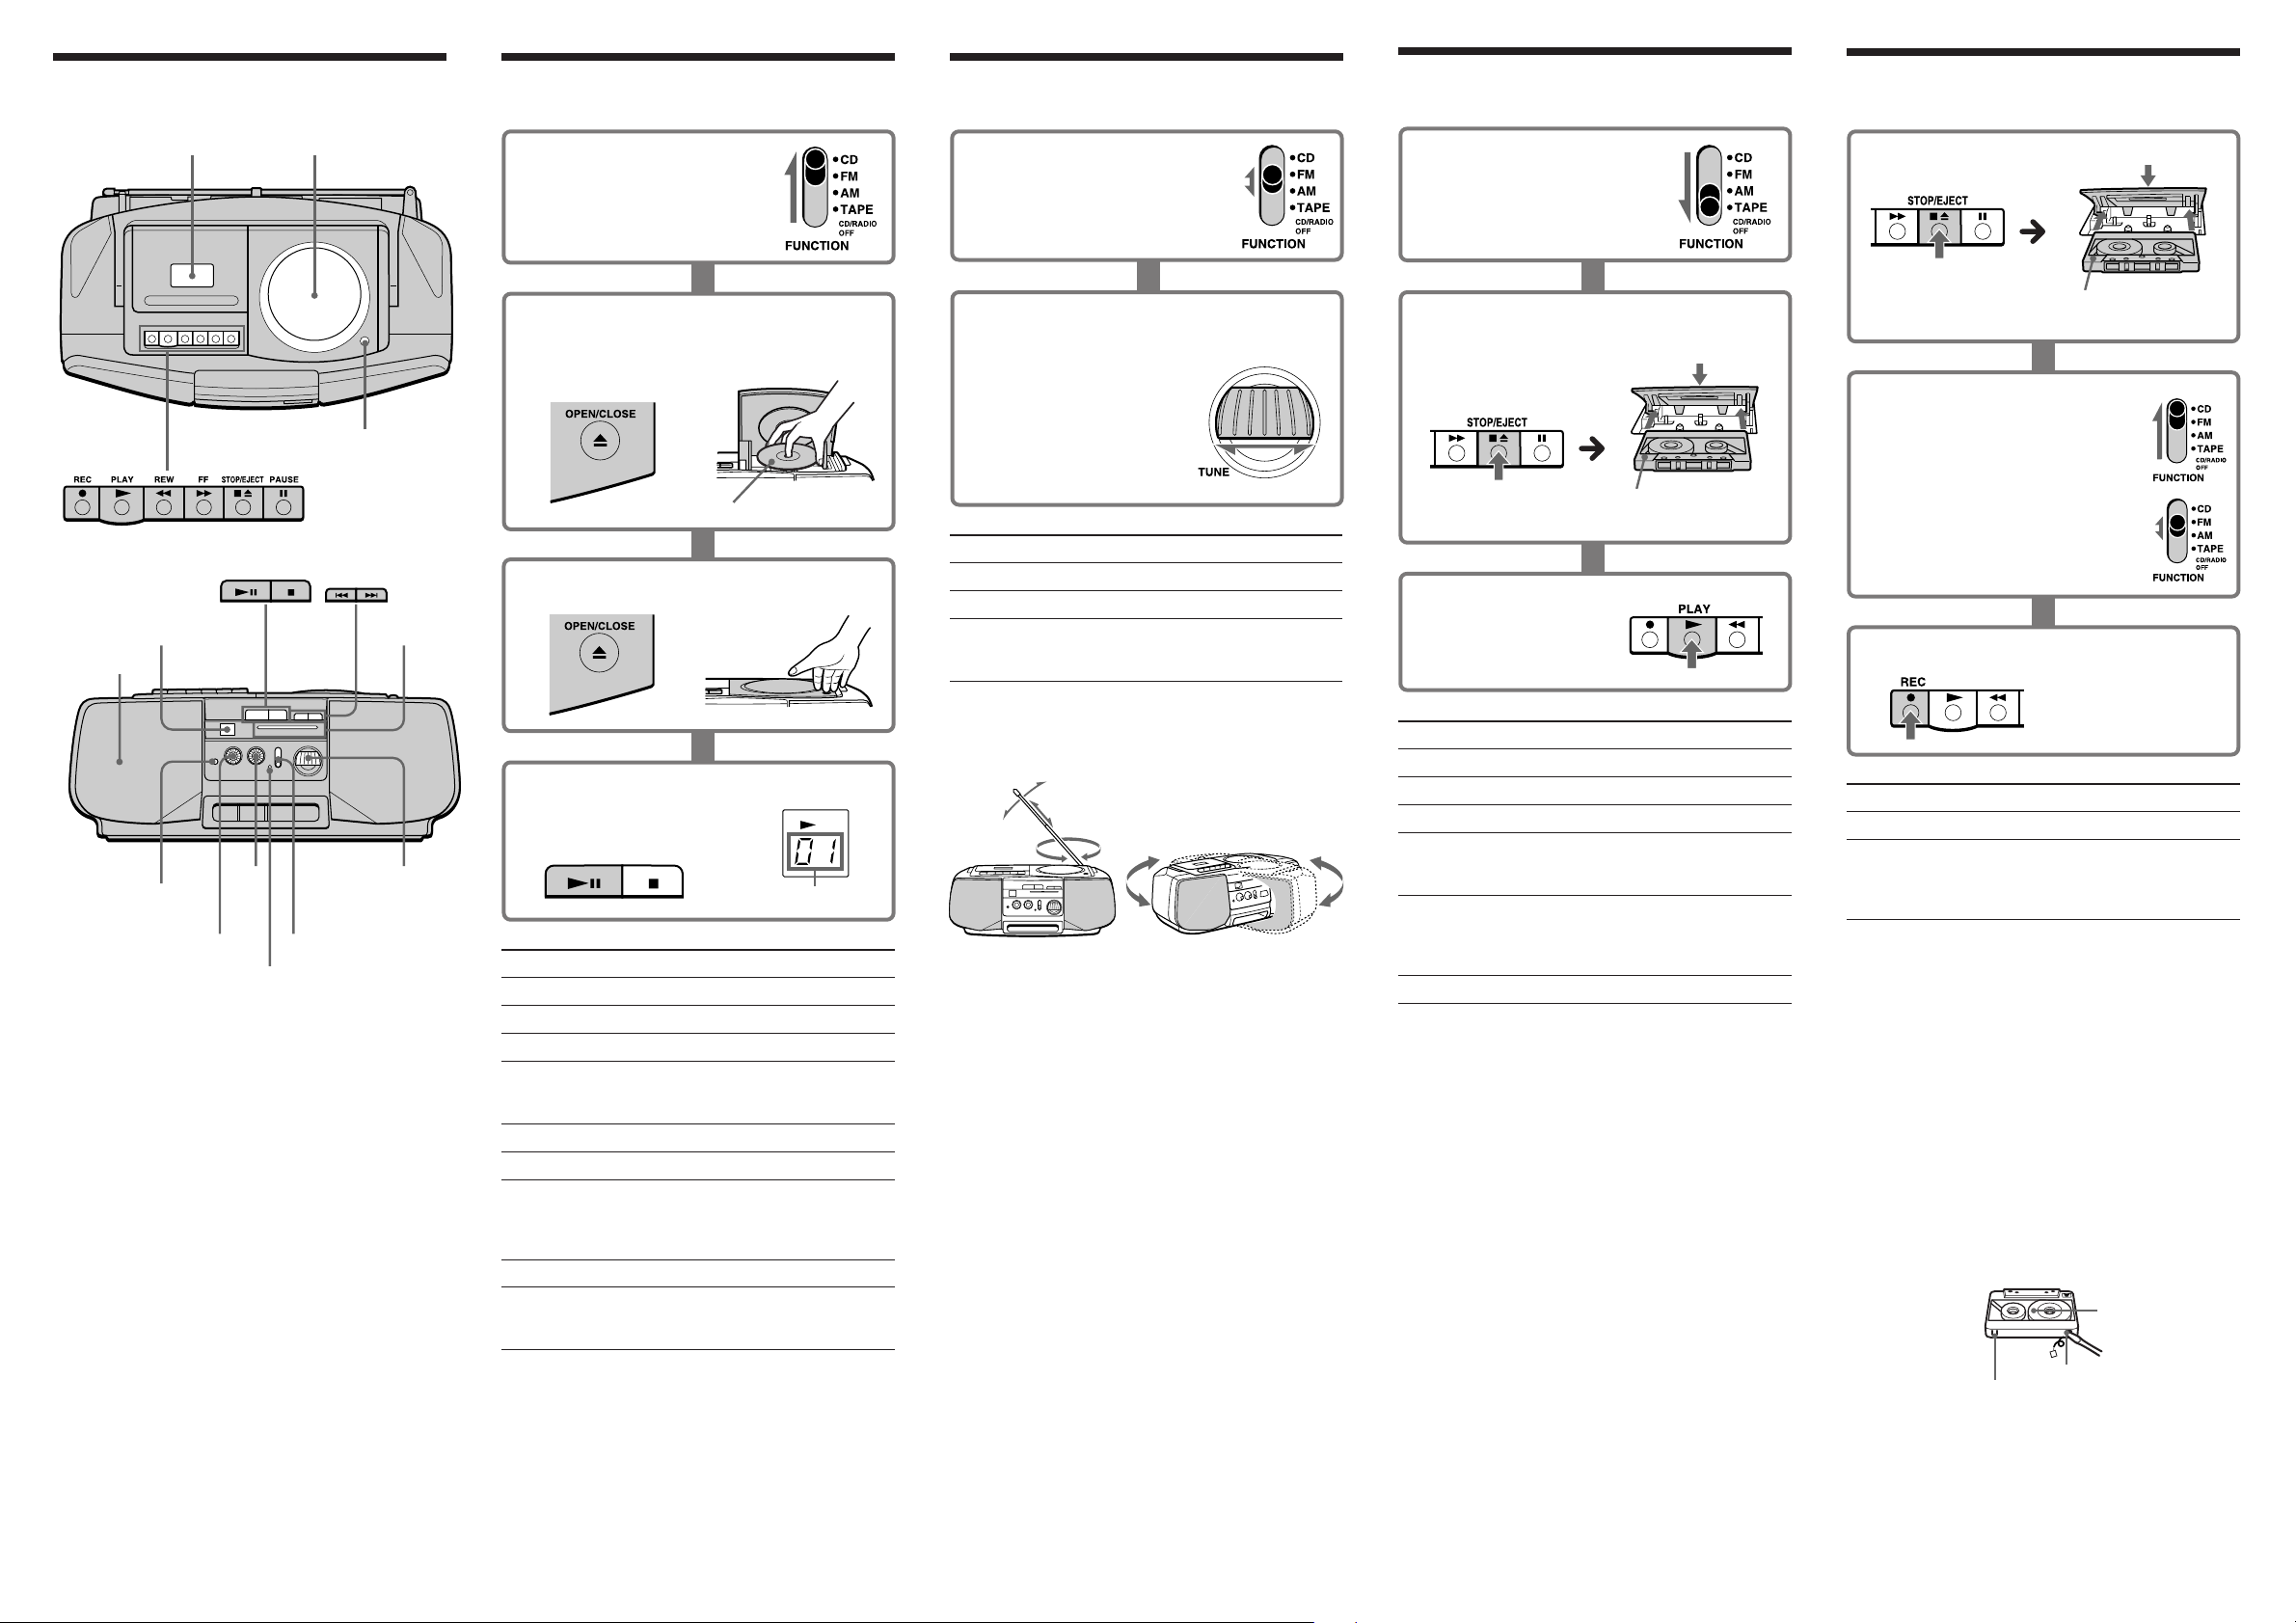
Location of controls
Tape compartment
Display window
Speaker
CD compartment
6 OPEN/CLOSE
Dial scale
Playing a CD
1 Set FUNCTION to CD.
2 Press 6OPEN/CLOSE down to open
the CD compartment and place a CD
on the CD compartment.
With the label side up
3 Close the compartment.
Listening to the radio
1 Set FUNCTION to FM or AM.
2 Turn TUNE to tune in a radio staton.
If the received FM stereo is too weak, the
reception becomes monaural.
To Do this
Adjust the volume Turn VOLUME.
Adjust the tone Turn TONE.
Turn off the radio Set FUNCTION to
TAPE (CD/RADIO
OFF).
Playing a tape
1 Set FUNCTION to TAPE
(CD/RADIO OFF).
2 Press p6 to open the tape compartment
and insert a recorded tape. Close the
compartment.
With the side you want to
play on facing upward.
3 Press (.
Recording
1 Insert a blank tape.
With the side you want to
record on facing upward.
2 Select the program source you
want to record.
To record from the CD player, set
FUNCTION to CD and insert a CD.
To record from the radio, set
FUNCTION to FM or AM and tune
in the station you want.
3 Press r (( is depressed automatically.)
2 (headphones)
TONE
VOLUME
OPR/BATT
FUNCTION
TUNE
4 Press ^.
The player plays all
the tracks once.
To Do this
Adjust the volume Turn VOLUME.
Adjust the tone Turn TONE.
Stop playback Press p.
Pause playback Press ^.
Go to the next track Press +.
Go back to the previous track Press =.
Locate a point while listening Press + (forward) or
to the sound = (backward) while
Remove the CD
Turn off the player Set FUNCTION to
Display
Track number
Press again to resume
play after pause.
playing and hold down
until you find the point.
Press 6 OPEN/CLOSE.
TAPE (CD/RADIO
OFF).
To improve broadcast reception
Reorient the antenna for FM. Reorient the player itself
for AM.
For FM For AM
Tip
To receive an FM stereo program (only for the models
equipped with FM MODE/ISS selector at the rear)
Set the FM MODE/ISS selector at the rear to STEREO. If the
FM broadcast is noisy, set the selector to MONO and the
radio will play in monaural.
To Do this
Adjust the volume Turn VOLUME.
Adjust the tone Turn TONE.
Stop playback Press p6 .
Fast-forward or rewind the Press ) or 0 for
tape the side facing
upward
Pause playback Press P.
Press the button again
to resume play after
pause.
Eject the cassette. Press p6.
To Press
Stop recording p6
Pause recording P
Press the button again
to resume recording
after pause.
Tips
•Adjusting the volume or the tone will not affect the
recording level.
•If the AM program makes a whistling sound after you’ve
pressed r in step 3, set the FM MODE/ISS (Interference
Suppress Switch) at the rear to the position that most
decreases the noise (only for the models equipped with
FM MODE/ISS selector at the rear).
•For best results, use the AC power as a power source for
recording.
•To erase a recording, proceed as follows:
1 Set FUNCTION to TAPE (CD/RADIO OFF).
2 Press r.
Notes on cassettes
•Break off the cassette tab from side A or B to prevent
accidental recording. If you want to reuse the tape for
recording, cover the broken tab with adhesive tape.
Side A
Tab for side B
•The use of a cassette with more than 90 minutes of play
time is not recommended except for long, continuous
recording or playback.
Tab for side A
Page 3

Störungsbehebung Sicherheitsmaßnahmen
Allgemeines
Das Gerät schaltet sich nicht ein.
•Schließen Sie das Netzkabel fest an.
•Sehen Sie nach, ob die Batterien
korrekt eingelegt sind.
•Tauschen Sie alle Batterien gegen
neue aus, wenn sie zu schwach sind.
Es ist kein Ton zu hören.
•Sehen Sie nach, ob der Wählschalter
FUNCTION auf die gewünschte
Funktion eingestellt ist.
•Stellen Sie die Lautstärke ein.
•Trennen Sie die Kopfhörer vom
Gerät, wenn die Wiedergabe über
Lautsprecher erfolgen soll.
CD-Player
Die CD wird nicht abgespielt,
oder “– –” leuchtet im Display,
•Stellen Sie das Gerät an einen Ort, an
dem es keinen Erschütterungen
ausgesetzt ist.
•Reinigen Sie die Linse mit einem
handelsüblichen Staubbläser.
Radio
Der Ton ist sehr leise oder von
geringer Qualität.
•Tauschen Sie alle Batterien gegen
neue aus, wenn sie zu schwach sind.
•Stellen Sie das Gerät weiter entfernt
vom Fernsehgerät auf.
Das Bild auf Ihrem Fernsehschirm
wird instabil.
•Wenn Sie einen UKW-Sender in der
Nähe eines Fernsehgeräts mit
Zimmerantenne empfangen, stellen
Sie das Gerät weiter entfernt vom
Fernsehgerät auf.
obwohl eine CD eingelegt ist.
•Sehen Sie nach, ob das CD-Fach
geschlossen ist.
•Legen Sie die CD mit der
Beschriftung nach oben ein.
•Reinigen Sie die CD.
•Nehmen Sie die CD heraus, und
lassen Sie das CD-Fach etwa eine
Stunde geöffnet, damit Feuchtigkeit
verdunsten kann.
•Sehen Sie nach, ob der Wählschalter
FUNCTION auf CD steht.
Der Ton setzt aus.
•Verringern Sie die Lautstärke.
•Reinigen Sie die CD, oder tauschen
Sie sie aus, wenn sie stark beschädigt
ist.
Kassettenrecorder
Das Band wird nicht
transportiert, wenn Sie eine
Bandfunktionstaste drücken.
•Schließen Sie das Kassettenfach
richtig.
Die Taste r funktioniert nicht./
Die Kassette wird nicht
wiedergegeben.
•Sehen Sie nach, ob die
Überspielschutzlasche der Kassette
intakt ist.
•Sehen Sie nach, ob der Wählschalter
FUNCTION auf CD, AM oder FM
steht.
Auswählen der Stromquellen
Schließen Sie das Gerät zum Aufnehmen immer an den Netzstrom an, da
dabei viel Strom verbraucht wird.
Anschließen des Netzkabels
Schließen Sie das mitgelieferte Netzkabel an die Netzeingangsbuchse AC
IN an der Rückseite des Geräts und an eine Netzsteckdose an.
1 an AC IN
2 an eine
Netzsteckdose
Betreiben des Geräts mit Batterien
Legen Sie sechs R20-Batterien der Größe D
(nicht mitgeliefert) in das Batteriefach ein.
Wenn Sie das Gerät mit Batterien betreiben
wollen, lösen Sie das Netzkabel vom Gerät.
Hinweis
Tauschen Sie die Batterien aus, sobald die Anzeige OPR/BATT dunkler wird
oder das Gerät nicht mehr funktioniert. Ersetzen Sie dann alle Batterien durch
neue. Achten Sie darauf, die CD aus dem Gerät zu nehmen, bevor Sie die
Batterien austauschen.
Die Kassette läßt sich nicht
vollständig löschen.
• Reinigen Sie die Löschköpfe.
• Tauschen Sie alle Batterien gegen
neue aus, wenn sie zu schwach sind.
Die Kassette läßt sich nicht
bespielen.
• Sehen Sie nach, ob die Kassette
korrekt eingelegt ist.
• Sehen Sie nach, ob die
Überspielschutzlasche der Kassette
intakt ist.
Der Ton ist sehr leise./Die
Tonqualität ist schlecht.
• Reinigen Sie Tonköpfe,
Andruckwalze und Kapstan mit
einem Wattestäbchen, das Sie leicht
mit einer Reinigungsflüssigkeit oder
Alkohol angefeuchtet haben.
• Entmagnetisieren Sie die Tonköpfe
und alle Metallteile des
Bandtransportwegs mit einer
handelsüblichen
Entmagnetisierungskassette.
Der Ton ist verzerrt.
• Sie verwenden eine Kassette des Typs
TYPE II (High Position) oder TYPE IV
(Metall). Verwenden Sie nur
Kassetten des Typs TYPE I (normal).
Einstellen der Spannung
(nur bei den Modellen mit
Spannungswählschalter
VOLTAGE SELECTOR an der
Unterseite)
Achten Sie darauf, den
Spannungswählschalter
VOLTAGE SELECTOR an der
Geräteunterseite gemäß der
lokalen Stromversorgung
einzustellen.
Tip
Nur für Kunden, bei denen ein
Netzsteckeradapter mitgeliefert
wurde:
Verwenden Sie den mitgelieferten
Adapter, wenn der Stecker des
Netzkabels nicht in die
Netzsteckdose paßt.
Aufnahme-/
Wiedergabekopf
Löschkopf
Kapstan
Andruckwalze
Linse
Technische Daten
CD-Player
System
Digitales CD-Audiosystem
Eigenschaften der Laserdiode
Material: GaAlAs
Wellenlänge: 780 nm
Emissionsdauer: Kontinuierlich
Laseremission: weniger als 44,6 µW
Gemessen im Abstand von etwa 200
mm von der Linsenoberfläche am
optischen Sensorblock mit einer
Apertur von 7 mm.
Rotationsgeschwindigkeit
200 U/min bis 500 U/min
(CLV)
Anzahl der Kanäle
2
Frequenzgang
20 bis 20.000 Hz +1/-2 dB
Gleichlaufschwankungen
Unterhalb der Meßgrenze
Radio
Frequenzbereich
Europa und Italien
UKW Europa 87,6 - 107 MHz
Italien 87,5 - 108 MHz
Mittel- und 65 - 108 MHz
Osteuropa
AM Europa 531 - 1.602 kHz
Italien 526,5 - 1.606,5 kHz
Saudi-Arabien und andere Länder
UKW
Saudi-Arabien 87,6 - 107 MHz
Touristenmodell 76 - 108 MHz
Andere Länder 87,6 - 108 MHz
AM
Touristenmodell 530 - 1.629 kHz
Andere Länder 530 - 1.605 kHz
oder 87,6 - 107MHz
oder 531 - 1.602 kHz
Achtung
Um Feuergefahr und die
Gefahr eines elektrischen
Schlags zu vermeiden,
setzen Sie das Gerät weder
Regen noch sonstiger
Feuchtigkeit aus.
Um einen elektrischen
Schlag zu vermeiden,
öffnen Sie das Gehäuse
nicht. Überlassen Sie
Wartungsarbeiten stets nur
qualifiziertem
Fachpersonal.
Informationen
Für Kunden in Europa
Dieser CD-Player wurde als LaserGerät der Klasse 1 (CLASS 1
LASER) klassifiziert.
Das entsprechende Etikett (CLASS
1 LASER PRODUCT) befindet sich
außen an der Unterseite des
Geräts.
IF
UKW: 10,7 MHz
AM: 455 kHz
Antennen
UKW: Teleskopantenne
AM: Eingebaute Ferritstabantenne
Kassettenrecorder
Aufnahmesystem
4 Spuren, 2 Kanäle, stereo
Spuldauer
ca. 120 Sek. mit C-60-Kassette von
Sony
Frequenzgang
TYPE I (normal): 70 - 10.000 Hz
Allgemeines
Lautsprecher
Vollständiger Bereich: 10 cm
Durchmesser, 2,8 Ohm, Konus (2)
Ausgänge
Kopfhörerbuchse (Stereominibuchse):
Kopfhörer für Impedanz von 16 - 68
Ohm
Maximale Leistungsabgabe
2,5 W + 2,5 W
Betriebsspannung
Europa
230 V Wechselstrom, 50 Hz
Andere Länder
110 - 120 V, 220 - 240 V Wechselstrom
wählbar, 50/60 Hz oder 230 V
Wechselstrom, 50Hz
9 V Gleichstrom, 6 R20-Batterien der
Größe D
VORSICHT
Stellen Sie das Gerät nicht an einem
Ort auf, an dem ausreichende
Luftzufuhr nicht gegeben ist, zum
Beispiel in einem engen Regalfach
oder in einem Einbauschrank.
Der Wählschalter FUNCTION
befindet sich an der Vorderseite.
Wenn Sie den Player einschalten,
leuchtet die Anzeige OPR/BATT auf.
Hinweis zu dieser Anleitung
Das Lautsprecher-Design bei den
Modellen CFD-V10 und CFD-910
variiert je nach Land. Die
Abbildungen in dieser
Bedienungsanleitung zeigen das
Modell für Großbritannien und
Italien.
Leistungsaufnahme
20 W Wechselstrom
Lebensdauer der Batterien
CD-Radio-Kassettenrecorder:
UKW-Aufnahme
R20P von Sony: ca. 13,5 Std.
LR20-Alkalibatterien von Sony: ca. 20
Std.
Kassettenwiedergabe
R20P von Sony: ca. 7,5 Std.
LR20-Alkalibatterien von Sony: ca. 15
Std.
CD-Wiedergabe
R20P von Sony: ca. 2,5 Std.
LR20-Alkalibatterien von Sony: ca. 7
Std.
Abmessungen
ca. 425 × 160 × 246 mm (B/H/T)
(einschl. vorstehender Teile)
Gewicht
ca. 4 kg (einschl. Batterien)
Mitgeliefertes Zubehör
Netzkabel (1)
Änderungen, die dem technischen
Fortschritt dienen, bleiben vorbehalten.
Sonderzubehör
MDR-Kopfhörerserie von Sony
Sicherheit
• Der Laser-Strahl, den dieser CDPlayer generiert, schädigt die Augen.
Versuchen Sie daher nicht, das Gerät
zu zerlegen. Überlassen Sie
Wartungsarbeiten stets nur
qualifiziertem Fachpersonal.
• Sollten Fremdkörper oder
Flüssigkeiten in das Gerät gelangen,
trennen Sie es von der Netzsteckdose.
Lassen Sie das Gerät von
qualifiziertem Fachpersonal
überprüfen, bevor Sie es wieder
benutzen.
Stromquellen
• Wenn Sie das Gerät mit Netzstrom
betreiben wollen, achten Sie darauf,
daß die Betriebsspannung des Geräts
der lokalen Stromversorgung
entspricht (siehe “Technische
Daten”), und verwenden Sie bitte
ausschließlich das mitgelieferte
Netzkabel. Andere Netzkabel sind
nicht geeignet. Der
Spannungswählschalter befindet sich
an der Geräteunterseite (nur bei den
Modellen mit Spannungswählschalter
VOLTAGE SELECTOR).
• Das Gerät bleibt auch in
ausgeschaltetem Zustand mit dem
Stromnetz verbunden, solange das
Netzkabel mit der Netzsteckdose
verbunden ist.
• Wenn Sie das Gerät über Batterien
betreiben möchten, verwenden Sie
sechs R20-Batterien der Größe D.
• Wenn die Batterien nicht benutzt
werden sollen, nehmen Sie sie heraus,
um Schäden durch auslaufende oder
korrodierende Batterien zu
vermeiden.
• Das Typenschild mit
Betriebsspannung,
Leistungsaufnahme usw. befindet
sich an der Geräteunterseite.
Aufstellung
• Stellen Sie das Gerät nicht in der
Nähe von Wärmequellen oder an
Orten auf, an denen es direktem
Sonnenlicht, außergewöhnlich viel
Staub oder mechanischen
Erschütterungen ausgesetzt ist.
• Stellen Sie das Gerät nicht auf eine
geneigte oder instabile Oberfläche.
• Lassen Sie an den Seiten des
Gehäuses jeweils 10 mm frei. Die
Lüftungsöffnungen dürfen nicht
blockiert werden, damit das Gerät
ordnungsgemäß arbeitet und die
Lebensdauer der Komponenten nicht
verkürzt wird.
• Wenn Sie das Gerät in einem in der
Sonne geparkten Auto lassen, wählen
Sie unbedingt eine Stelle im Auto, an
der das Gerät nicht dem direkten
Sonnenlicht ausgesetzt ist.
• Da für die Lautsprecher ein starker
Magnet verwendet wird, halten Sie
Kreditkarten mit Magnetcodierung
oder Zugfederuhren (mechanische
Uhren) vom Gerät fern, um mögliche
Schäden durch den Magneten zu
vermeiden.
Betrieb
•Wird das Gerät direkt von einem
kalten in einen warmen Raum
gebracht oder wird es in einem Raum
mit hoher Luftfeuchtigkeit
aufgestellt, kann sich auf den Linsen
im CD-Player Feuchtigkeit
niederschlagen. In diesem Fall
funktioniert das Gerät nicht korrekt.
Nehmen Sie die CD heraus, und
warten Sie ca. eine Stunde, bis die
Feuchtigkeit verdunstet ist.
•Wurde das Gerät längere Zeit nicht
benutzt, schalten Sie es in den
Wiedergabemodus, und warten Sie
einige Minuten, bis es sich erwärmt
hat, bevor Sie eine Kassette einlegen.
Sollten an Ihrem Gerät Probleme
auftreten oder sollten Sie Fragen haben,
wenden Sie sich bitte an Ihren SonyHändler.
Hinweise zu CDs
•Reinigen Sie die CD vor dem
Abspielen mit einem Reinigungstuch.
Wischen Sie dabei von der Mitte nach
außen.
•Verwenden Sie keine Lösungsmittel
wie Benzin oder Verdünner und
keine handelsüblichen
Reinigungsmittel oder AntistatikSprays für Schallplatten.
•Setzen Sie die CD weder direktem
Sonnenlicht noch Wärmequellen wie
zum Beispiel Warmluftauslässen aus.
Lassen Sie sie nicht in einem in der
Sonne geparkten Auto liegen, denn
die Temperaturen im Wageninneren
können sehr stark ansteigen.
•Kleben Sie kein Papier und keine
Aukleber auf die CD, und zerkratzen
Sie nicht die Oberfläche der CD.
•Bewahren Sie eine CD nach der
Wiedergabe immer in ihrer Hülle auf.
Bei Kratzern, Verschmutzungen oder
Fingerabdrücken auf der CD kann es
zu Spurführungsfehlern kommen.
Page 4

Verwenden Sie nur Kassetten des Typs TYPE I (normal).
Verwenden Sie nur Kassetten des Typs TYPE I (normal).
Lage und Funktion der
Teile und
Bedienelemente
Kassettenfach
Display
Lautsprecher
TONE
2 (Kopfhörer)
VOLUME
CD-Fach
6 OPEN/CLOSE
Frequenzskala
TUNE
TUNE
FUNCTION
OPR/BATT
Wiedergeben einer CD
1 Stellen Sie FUNCTION
auf CD.
2 Drücken Sie zum Öffnen des CD-Fachs
6 OPEN/CLOSE nach unten, und legen
Sie eine CD in das CD-Fach ein.
Mit der Beschriftung nach oben
3 Schließen Sie das CD-Fach.
4 Drücken Sie ^.
Der Player gibt alle
Titel einmal wieder.
Zum
Einstellen der Lautstärke
Einstellen des Klangs
Stoppen der Wiedergabe
Unterbrechen der
Wiedergabe
Weiterschalten zum
nächsten Titel
Zurückschalten zum
vorhergehenden Titel
Ansteuern einer Stelle
während der Wiedergabe
Herausnehmen der CD
Ausschalten des Players
Display
Titelnummer
Gehen Sie folgendermaßen
vor:
Drehen Sie den Regler
VOLUME.
Drehen Sie den Regler TONE.
Drücken Sie p.
Drücken Sie ^.
Drücken Sie diese Taste
nochmals, um die Wiedergabe
nach einer Pause fortzusetzen.
Drücken Sie +.
Drücken Sie =.
Drücken Sie während der
Wiedergabe + (vorwärts)
bzw. = (rückwärts), und
halten Sie die Taste gedrückt,
bis Sie die Stelle gefunden
haben.
Drücken Sie 6 OPEN/
CLOSE.
Stellen Sie FUNCTION auf
TAPE (CD/RADIO OFF).
Radioempfang
1 Stellen Sie FUNCTION auf FM
oder AM.
2 Drehen Sie TUNE, um einen Sender
einzustellen.
Wenn die Signale des
empfangenen UKWStereosenders zu schwach
sind, wird der Empfang
monaural.
Zum Gehen Sie
folgendermaßen vor:
Einstellen der Lautstärke Drehen Sie den Regler
VOLUME.
Einstellen des Klangs Drehen Sie den Regler
TONE.
Ausschalten des Radios Stellen Sie FUNCTION auf
TAPE (CD/RADIO OFF).
So verbessern Sie den Empfang
Richten Sie die Antenne für den UKW-Empfang aus.
Um den AM-Empfang zu verbessern, drehen Sie das
Gerät selbst.
Für UKW-Empfang Für AM-Empfang
TIP
So empfangen Sie einen UKW-Stereosender (nur bei den
Modellen mit Sie FM MODE/ISS an der Rückseite)
Stellen Sie den Wählschalter FM MODE/ISS an der
Rückseite auf STEREO. Wenn der UKW-Empfang
verrauscht ist, stellen Sie den Wählschalter auf MONO. Der
Radioempfang ist in diesem Fall monaural.
Wiedergeben einer
Kassette
1 Stellen Sie FUNCTION
auf TAPE (CD/RADIO
OFF).
2 Öffnen Sie mit p6 das Kassettenfach,
und legen Sie eine bespielte Kassette ein.
Schließen Sie das Kassettenfach.
Mit der wiederzugebenden
Seite nach oben
3 Drücken Sie (.
Zum Gehen Sie
folgendermaßen vor:
Einstellen der Lautstärke Drehen Sie den Regler
VOLUME.
Einstellen des Klangs Drehen Sie den Regler
TONE.
Stoppen der Wiedergabe Drücken Sie p6.
Vorwärts- oder Zurückspulen Drücken Sie für die nach
oben weisende Seite )
bzw. 0.
Unterbrechen der Wiedergabe Drücken Sie P.
Drücken Sie die Taste
erneut, um die
Wiedergabe nach der
Pause fortzusetzen.
Auswerfen der Kassette Drücken Sie p6.
Aufnahme
1 Legen Sie eine leere Kassette ein.
Mit der zu bespielenden
Seite nach oben
2 Wählen Sie die Tonquelle aus,
die Sie aufnehmen wollen.
Wollen Sie vom CD-Player
aufnehmen, stellen Sie FUNCTION
auf CD, und legen Sie eine CD ein.
Wollen Sie vom Radio aufnehmen,
stellen Sie FUNCTION auf FM oder
AM, und stellen Sie den
gewünschten Sender ein.
3 Drücken Sie r. ( wird dabei
automatisch auch gedrückt.
Zum Drücken Sie
Stoppen der Aufnahme p6
Unterbrechen der Aufnahme P
Tips
•Wenn Sie die Lautstärke oder den Klang einstellen, hat
dies keine Wirkung auf den Aufnahmepegel.
•Wenn bei AM-Sendungen ein Pfeifgeräusch zu hören ist,
nachdem Sie in Schritt 3 die Taste r gedrückt haben,
stellen Sie den Schalter FM MODE/ISS
(Interferenzunterdrückung) an der Rückseite in die
Position, in der das Geräusch am wenigsten zu hören ist
(nur bei den Modellen mit Sie FM MODE/ISS an der
Rückseite).
•Die besten Ergebnisse erzielen Sie, wenn Sie das Gerät
zum Aufnehmen an das Stromnetz anschließen.
•
Gehen Sie zum Löschen einer Aufnahme folgendermaßen vor:
1 Stellen Sie FUNCTION auf TAPE (CD/RADIO OFF).
2 Drücken Sie r.
Hinweise zu Kassetten
•Brechen Sie die Überspielschutzlasche von Seite A oder B
heraus, um ein versehentliches Überspielen zu
verhindern. Wenn Sie die Kassette später wieder
überspielen wollen, überkleben Sie die Aussparung mit
Klebeband.
Überspielschutzlasche
für Seite B
•Es empfiehlt sich, eine Kassette mit einer Spieldauer von
über 90 Minuten - wenn überhaupt - nur für langes,
ununterbrochens Aufnehmen oder Wiedergeben zu
verwenden.
Drücken Sie die Taste
erneut, um die
Aufnahme nach einer
Pause fortzusetzen.
Seite A
Überspielschutzlasche
für Seite A
 Loading...