

Page 1

Before using this product, carefully read all product documentation and retain it for future reference.
Instruction Manual
CECH-2006A CECH-2007A CECH-2012A
CECH-2006B CECH-2007B CECH-2012B
4-156-992-81(1)
Page 2
WARNING
CLASS 1 LASER PRODUCT
LASER KLASSE 1 PRODUKT
To avoid electrical shock, do not open the cabinet. Refer
servicing to qualified personnel only.
Caution
Use of controls or adjustments or performance of
procedures other than those specified herein may result in
hazardous radiation exposure.
The use of optical instruments with this product will
increase eye hazard.
This appliance is classified as a CLASS 1 LASER product under
IEC60825-1+A2:2001.
2
Photosensitivity/Epilepsy/Seizures
A very small percentage of individuals may experience epileptic seizures or
blackouts when exposed to certain light patterns or flashing lights. Exposure to
certain patterns or backgrounds on a television screen or when playing video
games may trigger epileptic seizures or blackouts in these individuals. These
conditions may trigger previously undetected epileptic symptoms or seizures in
persons who have no history of prior seizures or epilepsy. If you, or anyone in your
family, has an epileptic condition or has had seizures of any kind, consult your
physician before playing.
IMMEDIATELY DISCONTINUE use and consult your physician before resuming
gameplay if you or your child experience any of the following health problems or
symptoms:
dizziness,
altered vision,
eye or muscle twitches,
loss of awareness,
disorientation,
seizures, or
any involuntary movement or convulsion.
RESUME GAMEPLAY ONLY ON APPROVAL OF YOUR PHYSICIAN.
Use and handling of video games to reduce the likelihood of a
seizure
Use in a well-lit area and keep as far away as possible from the television
screen.
Avoid large screen televisions. Use the smallest television screen available.
Avoid prolonged use of the PS3™ system. Take a 15-minute break during each
hour of play.
Avoid playing when you are tired or need sleep.
Page 3

Radio waves
Radio waves may affect electronic equipment or medical devices (for example,
pacemakers), which may cause malfunctions and possible injuries.
If you use a pacemaker or other medical device, consult your physician or the
manufacturer of your medical device before using the wireless networking
feature (Bluetooth
Do not use the wireless networking feature in the following locations:
Areas where wireless network use is prohibited, such as in hospitals. Abide
–
by medical institution regulations when using the system on their premises.
–
Areas near fire alarms, automatic doors and other types of automated
equipment.
and wireless LAN).
®
System software
The System Software included within this product is subject to a limited license
from Sony Computer Entertainment Inc. Refer to
http://www.scei.co.jp/ps3-eula for further details.
About national export control
This product may fall within the scope of national export control legislation. You
must comply fully with the requirements of such legislation and of all other
applicable laws of any jurisdiction in relation to this product.
Notice about U.S. Export Administration Regulations
This product contains software that is subject to certain restrictions under the U.S.
Export Administration Regulations, and may not be exported or re-exported to
U.S. embargoed destinations. In addition this product may not be exported or
re-exported to persons and entities prohibited by the U.S. Export Administration
Regulations.
EN
WARNING
3
Page 4

Table of contents
WARNING .........................................................................................2
Precautions ....................................................................................... 5
Online information about the PS3™ system ................................... 10
XMB™ (XrossMediaBar) menu .......................................................11
Part names ............................................................................... 12
Getting started .......................................................................... 13
Connection methods ......................................................................13
Performing initial setup of the system software ..............................15
Video output on the PS3™ system ................................................16
Connecting digital audio devices ...................................................20
Turning the PS3™ system on and off ....................................... 21
Using the wireless controller ..................................................... 22
Playing content ......................................................................... 24
Blu-ray Disc (BD)/DVD/CD ............................................................. 24
Playing content on USB devices ....................................................25
File formats that can be played or viewed ......................................25
Playing games .......................................................................... 26
Game compatibility ........................................................................26
Playing games ...............................................................................26
Controller settings ..........................................................................26
Saved data for PlayStation®3 format software ...............................26
Saved data for PlayStation® format software .................................27
Adjusting network settings ........................................................28
Adjusting network settings (wired) ................................................. 29
Adjusting network settings (wireless) .............................................29
Adjusting custom settings .............................................................. 31
Connecting to the Internet ........................................................ 32
Using the Internet browser .............................................................32
Viewing the user's guide ................................................................ 32
Creating a PlayStation®Network account .......................................32
PS3™ system updates ............................................................. 33
Using the on-screen keyboard .................................................. 34
Parental control ........................................................................35
Replacing the hard disk ............................................................ 36
Backing up data ............................................................................. 36
Removing the hard disk ................................................................. 37
Replacing the hard disk .................................................................39
Reinstalling the system software ...................................................40
Restoring data that has been backed up ....................................... 41
Restoring the PS3™ system ....................................................42
Before disposing of or transferring the PS3™ system ...................42
Before requesting service .........................................................43
Specifications .................................................................................. 48
WARRANTY .................................................................................... 52
Copyright and trademarks ...............................................................53
4
Page 5
Precautions
Before using this product, carefully read all the precautions.
Safety
This product has been designed with the highest concern for safety. However, any
electrical device, if used improperly, has the potential for causing fire, electrical
shock or personal injury. To help ensure accident-free operation, follow these
guidelines:
Observe all warnings, precautions and instructions.
Regularly inspect the AC power cord for damage and for dust build-up around
the power plug or electrical outlet.
Stop use, unplug the AC power cord from the electrical outlet and disconnect
any other cables immediately if the device functions in an abnormal manner,
produces unusual sounds or smells or becomes too hot to touch.
Call the PS3™ customer service hotline at the number printed on the package
carton if the device does not operate properly.
Use and handling
Use in a well-lit area and keep a safe distance from the TV screen.
Avoid prolonged use of the PS3™ system. Take a 15-minute break during each
hour of play.
Avoid playing when you are tired or need sleep.
Stop using the system immediately if you begin to feel tired or if you experience
discomfort or pain in your hands or arms while operating the wireless controller
If the condition persists, consult a doctor.
If you experience any of the following health problems, discontinue use of the
system immediately. If symptoms persist, consult with your physician.
Dizziness, nausea, fatigue or symptoms similar to motion sickness
–
– Discomfort or pain in a part of the body, such as eyes, ears, hands or arms
Keep the system and accessories, including cable ties and fasteners, out of the
reach of small children.
Do not connect cables other than a USB cable while the AC power cord is
plugged into the electrical outlet.
Do not touch the system or connected cables or accessories during an
electrical storm.
Any TV or component connected to the system must be functioning properly
and free of defects. If a TV or component connected to the system is faulty or
defective, it may cause damage to the TV or component, or to the system itself.
As with all electrical products, connection to faulty or defective components, or
the failure to connect to a properly wired outlet, may cause sparking and pose
a fire hazard.
Do not use the system or accessories near water.
Do not allow liquid, small particles or other foreign objects to get into the
system or accessories.
Do not touch the connectors of the system or accessories.
Do not expose the system or accessories to dust, smoke or steam. Also, do not
place the system in an area subject to excessive dust or cigarette smoke. Dust
build-up or cigarette smoke residue on the internal components (such as the
lens) may cause the system to malfunction.
Do not expose the system or accessories to high temperatures, high humidity
or direct sunlight.
Do not place the system or accessories on surfaces that are unstable, tilted or
subject to vibration.
Do not set the system other than in the vertical or horizontal position. When
setting the system in the vertical position, use the vertical stand (sold
separately) for this model of the system. Also, do not change the position of the
system while the system is turned on.
Be careful when carrying the system. If you do not have a good grip, the
system may drop causing potential damage or injury.
Do not move or change the position of the system with a disc inserted. The
vibration may result in scratching of the disc or the system.
Do not turn off the system while data is being saved on or loaded from the hard
disk.
EN
Precautions
5
Page 6

Precautions
Do not stand on or put objects on the system, and do not stack the system with
other devices.
Do not place the system and connected accessories on the floor or in a place
where they may cause someone to trip or stumble.
Do not allow bodily contact with the system or air from the system vents for an
extended period of time while in use. Extended contact under these conditions
may cause low-temperature burns.
When connecting the system to a plasma or projection* TV, do not leave a still
image on the TV screen for an extended period of time, as this may leave a
faint image permanently on the screen.
* Except LCD screen types
Parents are encouraged to monitor children in online activities to ensure safe
and responsible Internet usage.
Notes on safety when using the DUALSHOCK®3
Wireless Controller*
Stop using the system immediately if you begin to feel tired or if you experience
discomfort or pain in your hands or arms while operating the DUALSHOCK
wireless controller. If the condition persists, consult a doctor.
The vibration function of the DUALSHOCK
injuries. Do not use the vibration function if you have any ailment or injury to the
bones, joints or muscles of your hands or arms. If you have an ailment or an
injury, do not play such titles using the DUALSHOCK
unless you have set the vibration function to [Off].
Avoid prolonged use of the DUALSHOCK
about 30-minute intervals.
Note that some software titles set the vibration function to "On" by default. To
disable the vibration function, press the PS button of the controller, and then
select [Controller Settings]
When using the motion sensor function of the wireless controller, be cautious of
the following points. If the controller hits a person or object, this may cause an
accident, injury or damage.
[Vibration Function] [Off].
3 wireless controller can aggravate
®
3 wireless controller
®
3 wireless controller. Take a break at
®
Before use, check that there is plenty of space around you.
–
– When using the controller, grip it firmly and make sure it cannot slip out of
your hand.
If using a controller that is connected to the PS3™ system with a USB cable,
–
make sure that the cable will not hit a person or object. Also take care to
avoid pulling out the cable from the PS3™ system.
* These notes also apply to other controllers.
Vents
Do not block any vents. To maintain good ventilation, follow the guidelines below:
Place the system at least 10 cm (4 in) away from a wall surface.
Do not place on a carpet or rug with long fibres.
Do not place in a narrow or cramped space.
Do not cover with cloth.
Do not allow dust to build up on the vents.
3
®
AC power cord use
To help ensure safe operation, regularly inspect the AC power cord. If
damaged, stop use immediately and contact the PS3™ customer service
hotline at the number printed on the package carton for assistance.
Do not use a power cord other than the supplied AC power cord. Do not modify
the cord.
Do not touch the plug of the AC power cord with wet hands.
Protect the AC power cord from being walked on or pinched particularly at
plugs, expansion receptacles and the point where the cord exits from the
system.
Do not place heavy items on the cord.
Do not place the AC power cord near heating equipment and do not expose
the cord to heat.
6
Page 7

Do not allow dust or foreign matter to build up around the AC IN connector.
Before connecting or plugging in the AC power cord, check that there is no
dust or foreign matter in or on the power plug or connecting end of the cord,
the electrical outlet or the AC IN connector on the system rear. If the plug or
connector becomes dirty, wipe off with a dry cloth before connecting.
Unplug the AC power cord from the electrical outlet before cleaning or moving
the system, or when you do not intend to use the system for an extended period
of time. When disconnecting, grasp the power cord by the plug and pull
straight out of the electrical outlet. Never pull by the cord and do not pull out at
an angle.
Do not connect the AC power cord to a voltage transformer or inverter.
Connecting the AC power cord to a voltage transformer for overseas travel or
an inverter for use in an automobile may cause heat to build up in the system
and may cause burns or a malfunction.
Never disassemble or modify the system or accessories
Use the PS3™ system and accessories according to the instructions in the
product documentation. No authorisation for the analysis or modification of the
system or accessories, or the analysis and use of its circuit configurations, is
provided. Unauthorized modification of the system or accessories will void your
warranty. There are no user serviceable components inside the PS3™ system (the
supplied hard disk may be removed but not disassembled or modified).
Additionally, there is a risk of exposure to laser radiation as well as to electrical
shock.
Network
A broadband Internet connection is required to connect to a network.
User is responsible for Internet service fees. For details, refer to the information
provided in your service contract or contact your Internet service provider.
Do not use a cord for a standard residential telephone line or cables of types
other than those mentioned here. Using the wrong type of cord or cable can
cause more electrical current than necessary to flow through the LAN
connector, which may lead to heat build-up, fire or malfunction.
Wireless networking feature
The 2.4 GHz range of radio waves used by the wireless networking feature of
this product is a range shared by various devices. This product has been
designed to minimize the effect of other devices using the same range.
However, in some cases interference from other devices may reduce the
connection speed, shorten the signal range or cause the connection to be
terminated unexpectedly.
When using the PS3™ system's scan function to select a wireless LAN access
point, access points that are not intended for public use may be displayed.
Only connect to an access point that you are authorized to use, or one that is
available through a public wireless LAN or hotspot service.
Moisture condensation
If the system or disc is brought directly from a cold location to a warm one,
moisture may condense on the lens inside the system or on the disc. Should this
occur, the system may not operate properly. In this case, remove the disc and
turn off and unplug the system. Do not put the disc back in until the moisture
evaporates (this may take several hours). If the system still does not operate
properly, contact the PS3™ customer service hotline at the number printed on the
package carton for assistance.
Cleaning
For safety reasons, before cleaning the system or connected accessories,
disconnect the AC power cord from the electrical outlet.
Exterior surfaces (plastic cover of system and Wireless
Controller)
Follow the instructions below to help prevent the product exterior from
deteriorating or becoming discolored.
Wipe with a soft, dry cloth.
EN
Precautions
7
Page 8
Precautions
Do not apply insecticides or other volatile substances.
Do not place any rubber or vinyl materials on the product exterior for an
extended period of time.
Do not use solvents or other chemicals. Do not wipe with a chemically-treated
cleaning cloth.
Vents
When dust accumulates in the system vents, remove the dust with a low-powered
vacuum cleaner.
Connectors
Do not use when the connectors of the system or the AC power cord are not
clean. If used when dirty, the flow of electrical current may be obstructed.
Remove the dirt with a dry cloth.
Discs
Note on compatibility
Some media may have region or territorial restrictions and may not work with your
system. See media packaging for details.
Handling
Do not touch the disc surface when handling a disc; hold it by the edges.
Do not stick paper or tape onto discs and do not write on discs.
Fingerprints, dust, dirt or scratches on the disc can distort the picture or reduce
sound quality. Always handle carefully and check that discs are clean before
use.
When discs will not be used for an extended period of time, store them in their
cases. Stacking uncased discs or storing them at an angle can cause them to
warp.
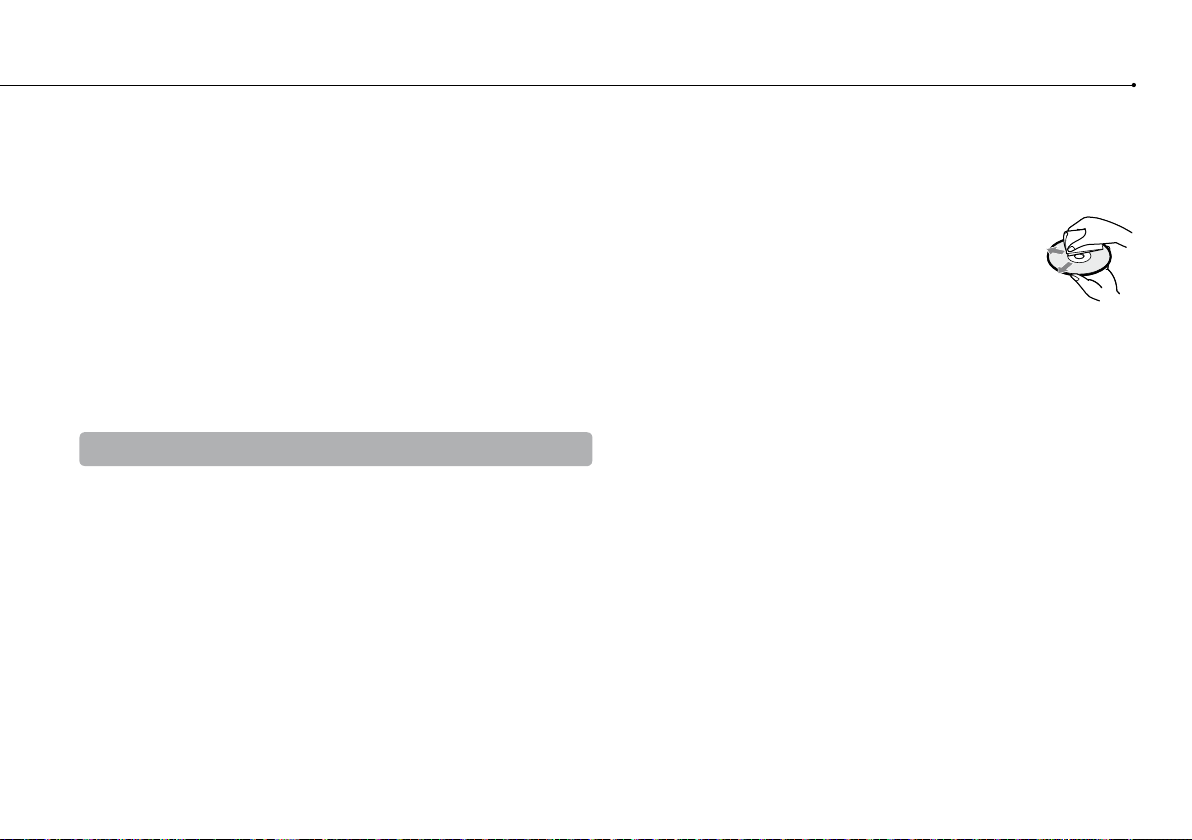
Cleaning method
Clean discs with a soft cloth, lightly wiping from the center
outwards.
Do not use solvents, record cleaners, anti-static spray or other
chemicals as these can damage the discs.
Storage
Do not expose discs to high temperatures, high humidity or direct sunlight.
8
Page 9

EN
Precautions
9
Page 10
Online information about the PS3™ system
This manual explains hardware features and provides basic information about how to
set up and operate the PS3™ system, including warnings and precautions for the safe
and proper use of the system. You can also access the following information available
on the Internet.
Online user's guide http://manuals.playstation.net/document/
This guide contains detailed information about using the PS3™ system.
PlayStation® official website http://asia.playstation.com
For the latest information of:
System software updates
PlayStation
PlayStation
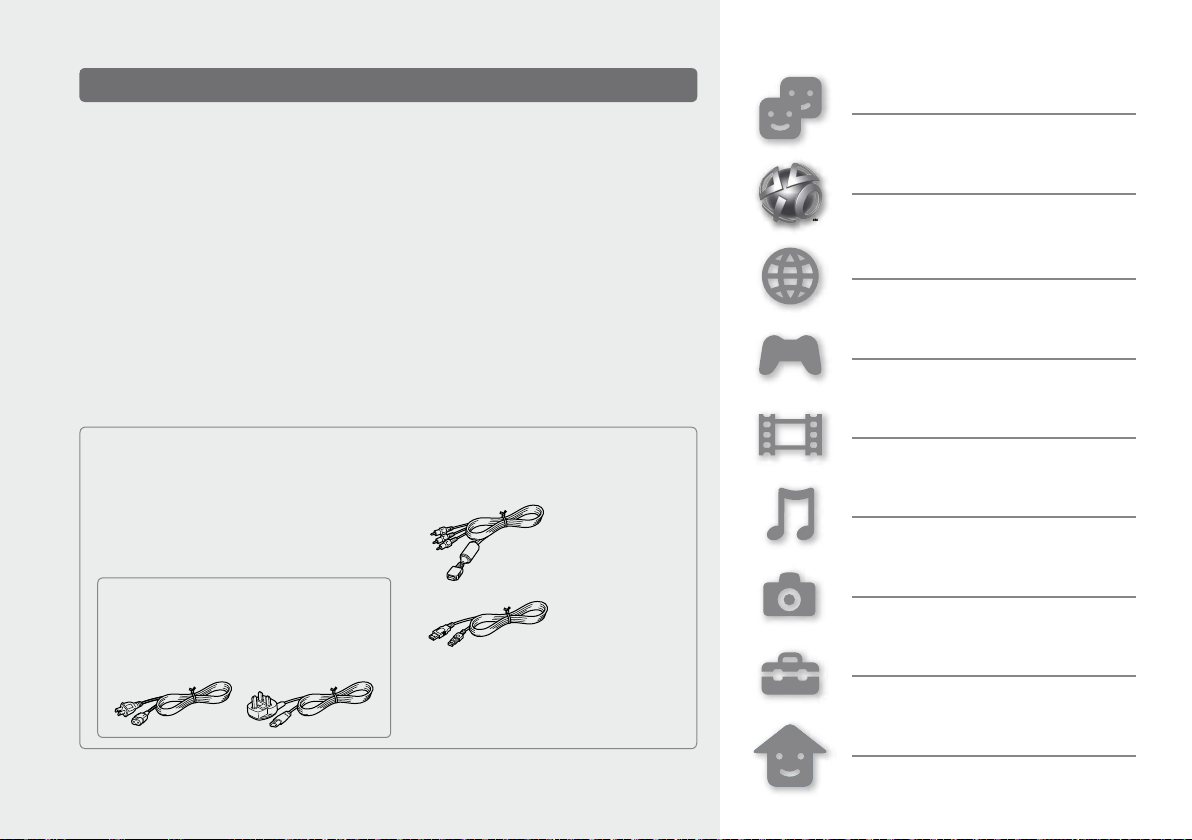
Check that you have all of the following items. If any items are missing, contact the
PS3™ customer service hotline at the number printed on the package carton for
assistance.
PlayStation
DUALSHOCK
Printed materials
3 products such as software titles and hardware accessories
®
product support including latest questions and answers about your product
®
3 system
®
3 Wireless Controller
®
AV Cable
AC Power Cord
One of the following two cable types is
supplied with the system. The plug
configuration varies depending on the
country or region.
USB Cable
Friends
Chatting and exchanging messages
PlayStation®Network
Using PlayStation®Network services
Network
Connecting to the Internet
Game
Playing games
Video
Playing video
Music
Playing music
Photo
Displaying images
Settings
Adjusting PS3™ system settings
Information about system functionality and images published in this document may vary from
those for your PS3™ system, depending on the system software version in use.
10
Users
Selecting users to log in to the PS3™
system
Page 11
Item
Category
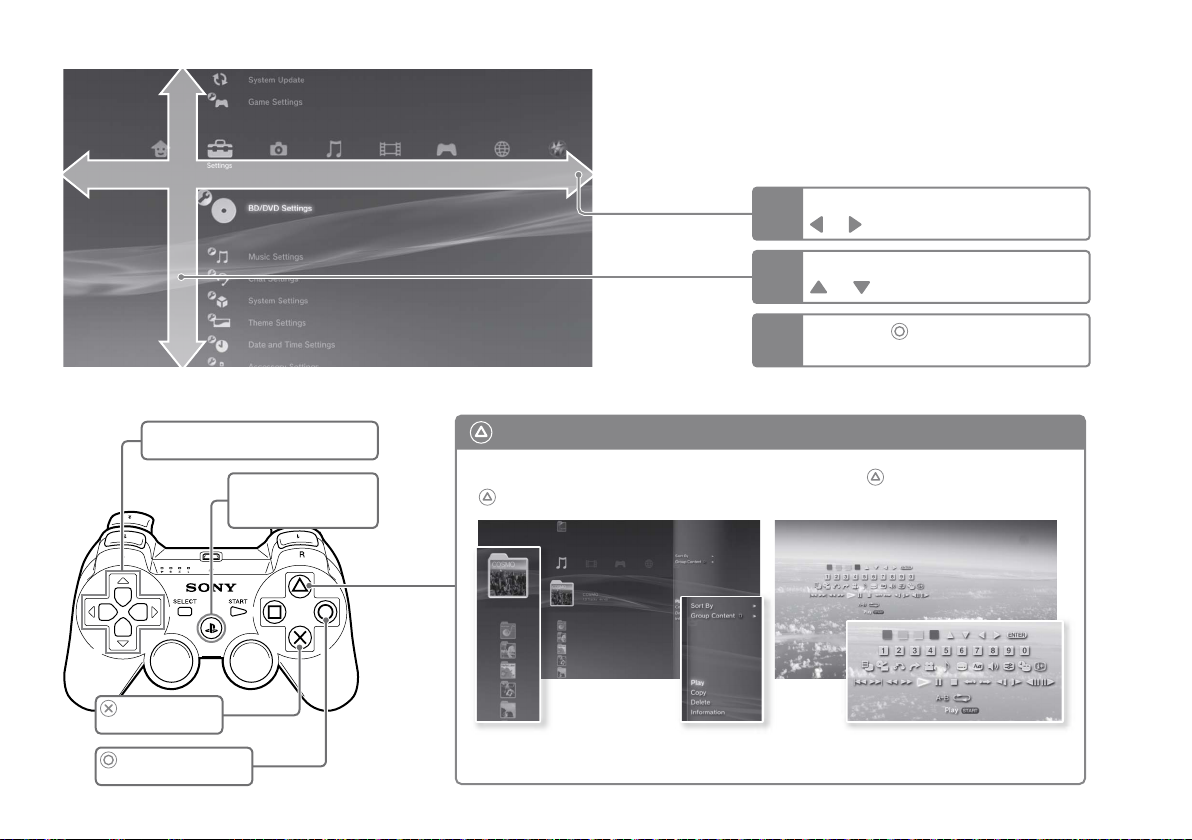
XMB™ (XrossMediaBar) menu
The PS3™ system includes a user interface called XMB™
(XrossMediaBar).
Select a category using the
1
or button.
Select an item using the
2
or button.
Directional buttons:
Used to select on-screen categories/items
PS button:
Displays the XMB™ menu
Turns the system on/off
button:
Cancels an operation
button:
Confirms the selected item
Press the
3
selected item.
button: Displays the options menu/control panel
Selecting an icon and pressing the
button will display the options menu.
Icons Options menu
Pressing the button during content
playback will display the control panel.
button to confirm the
Control panel
11
Page 12
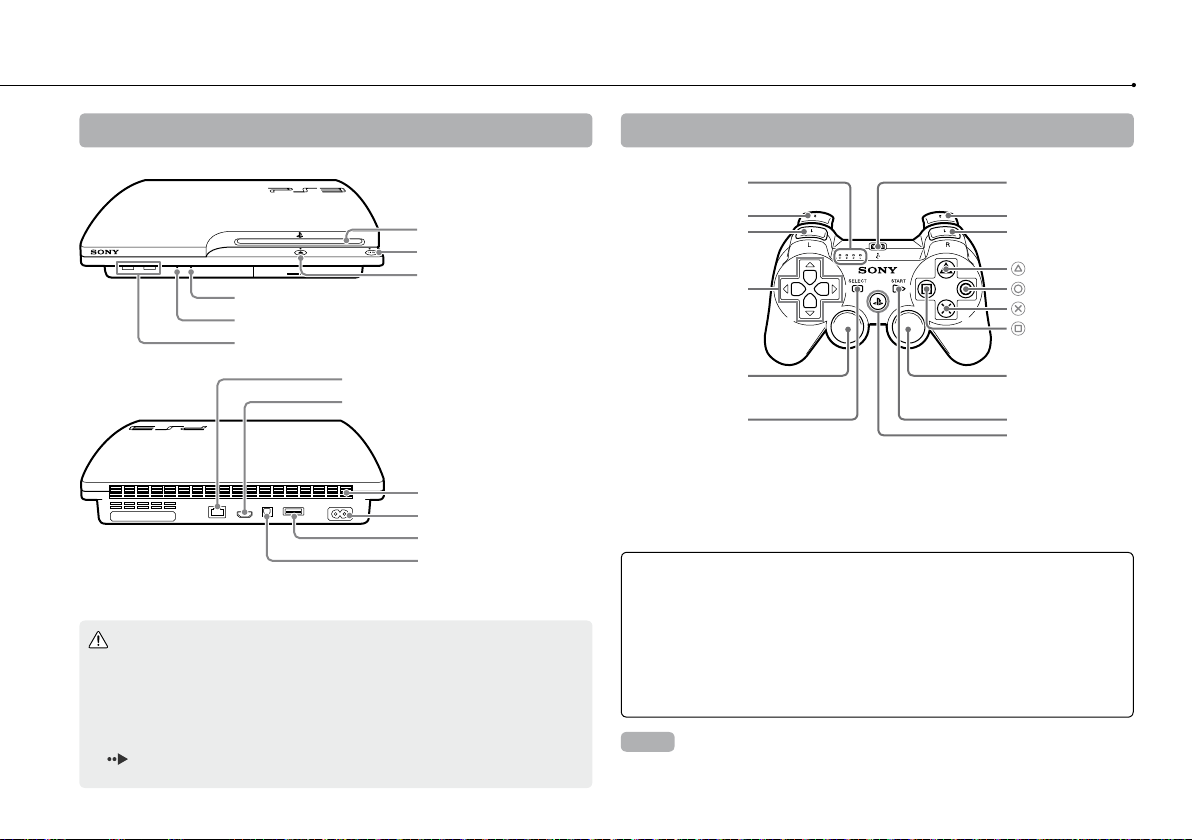
Part names
12
System front / rear
Disc slot
Power button
Eject button
WLAN access indicator
HDD access indicator
USB connectors
LAN connector
HDMI OUT connector
Vent
AC IN connector
AV MULTI OUT connector
DIGITAL OUT (OPTICAL)
connector
Caution
Do not use the system in a closed cabinet or other locations where heat may
build up. Doing so may cause the system to overheat and may lead to fire,
injury or malfunction.
If the system's internal temperature becomes elevated, the power indicator
will flash alternately in red and green. In this case, turn off the system
(
page 21) and leave it unused for a while. After the system cools down,
move it to a location with good ventilation, and then resume use.
DUALSHOCK®3 Wireless Controller
Port indicators
L2 button
L1 button
Directional
buttons
Left stick/
button*
L3
SELECT button
* The L3 and R3 buttons function when the sticks are pressed.
Notices
Do not place the system in an area subject to excessive dust or cigarette
smoke. Dust build-up or cigarette smoke residue on the internal
components (such as the lens) may cause the system to malfunction.
Do not move or change the position of the system while the power indicator
is lit solid green or flashing green. The vibration that occurs as a result of
moving the system may cause data loss or corruption, or damage to the
system.
Hint
When placing the system in the vertical position, use of the vertical stand (sold
separately) for this model of the system is required for stability.
USB connector
R2 button
R1 button
button
button
button
button
Right stick/
button*
R3
START button
PS button
Page 13

Getting started
VIDEO L
AUDIO
R
Y L R
P
R
/C
R
P
B
/C
B
COMPONENT VIDEO IN AUDIO IN
Connection methods
Connect your system to a TV
You can use any of the following methods to connect your system to a TV.
Video output in SD (Standard Definition) resolution
EN
Getting started
HDMI OUT
connector
AV MULTI OUT
connector
If video is not displayed on the screen
If you change the type of cable used to connect the
system to a TV, video may not appear on the screen. If
video does not appear, turn off the system and then
turn it on again by pressing the power button for at
least five seconds (until the system beeps twice). The
video output setting will be reset and video will be
output at standard definition (SD) resolution.
AV MULTI OUT
connector
AV Cable
VIDEO IN connector
Video output in HD (High Definition) resolution - component video
AV MULTI OUT
connector
Component AV Cable
(sold separately)
Component VIDEO IN
connector
Video output in HD (High Definition) resolution - HDMI
HDMI OUT
connector
Hints
For details about video output cable types and supported video modes, see "Video output on the
PS3™ system" (
You can connect audio devices that support digital audio playback, such as an AV receiver for home
entertainment use. For details, see "Connecting digital audio devices" (
HDMI Cable (sold separately)
HDMI IN connector
page 16) and "Video output cable types"( page 17).
page 20).
TV
TV
TV
13
Page 14

Getting started
Connect an Ethernet cable (sold separately)
Use an Ethernet cable to connect the system to the Internet.
14
LAN connector AC IN connector
Hint
You can use a wireless network connection to connect to the Internet without using an Ethernet cable.
For details, see "Adjusting network settings" (
Caution
Do not connect a standard telephone line or other types of cords or cables that are not compatible
with the system directly to the LAN connector on the system, as this may cause heat build-up, fire
or malfunction.
Connect the AC power cord
After plugging the AC power cord into the electrical outlet, the power indicator on the
PS3™ system will light up in solid red ( page 21).
Caution
Do not plug the AC power cord for the system into an electrical outlet until you have made all other
connections.
page 28).
Some regions and countries may use a
different electrical outlet plug from the
one illustrated.
Page 15
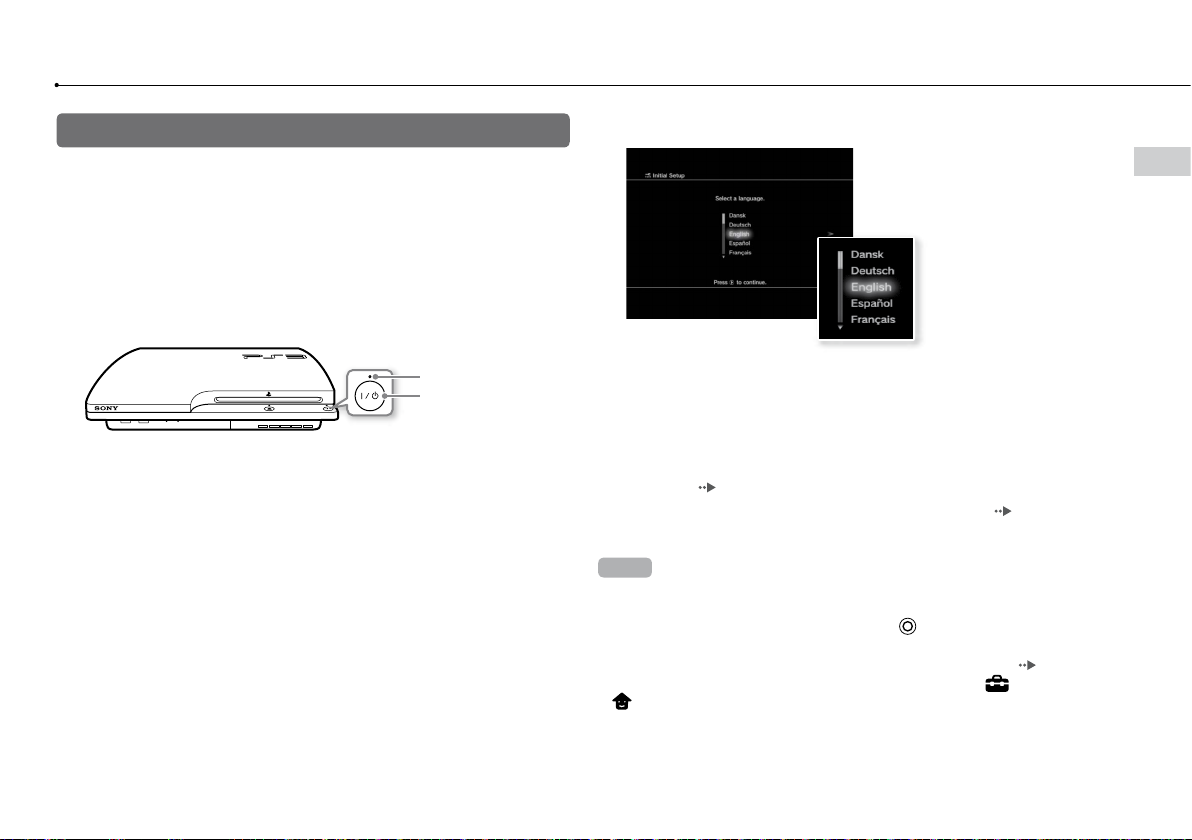
Performing initial setup of the system software
After turning on the system, perform initial setup.
1 Turn on the TV, and then switch the video input of the TV to
match the input connector used by the PS3™ system.
2 Press the power button.
The power indicator turns green and the picture is displayed on the TV
screen.
5 Perform initial setup.
EN
Getting started
Power indicator
Power button
3 Connect the wireless controller to the system using a USB
cable.
4 Press the PS button on the controller.
The system will recognize the controller. After it has recognized the controller,
the initial setup screen will be displayed.
Follow the on-screen instructions to enter settings for system language, time
zone, date and time, and user name.
The screen for setting up the Internet connection will be displayed. When
connecting using an Ethernet cable, basic settings will be selected
automatically if you follow the on-screen instructions. When connecting over
a wireless LAN, follow the instructions in "Adjusting network settings
(wireless)" (
After the settings have been completed, the XMB™ menu (
be displayed on the TV screen.
Hints
When using an HDMI cable to connect the system to the TV, a screen for
changing the video output resolution will be displayed during initial setup. If you
select [Yes] on the screen and then press the
resolution will be selected automatically.
For details on entering text, see "Using the on-screen keyboard" (
Settings entered during initial setup can be changed under (Settings) or
(Users). For details, refer to the online user's guide
(http://manuals.playstation.net/document/).
page 29) to set up the connection.
page 11) will
button, the optimal output
page 34).
15
Page 16
Getting started
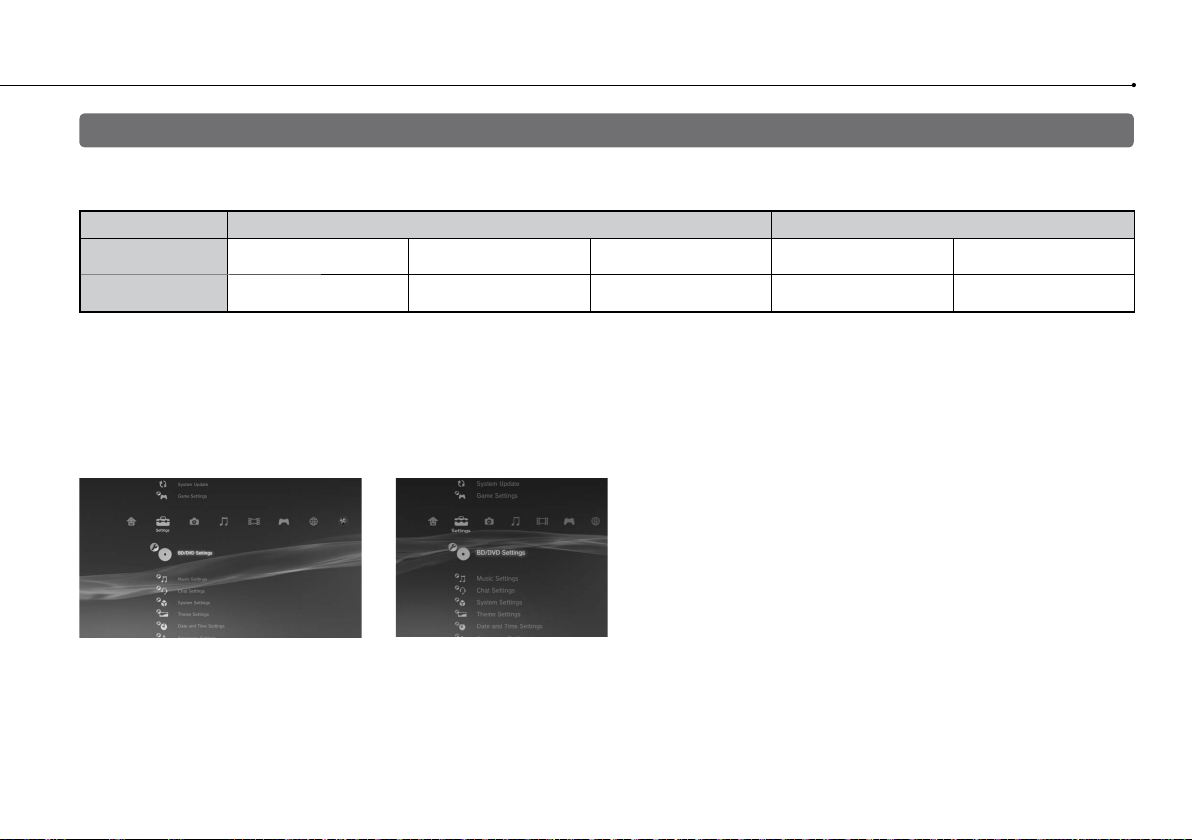
Video output on the PS3™ system
The PS3™ system can output two types of resolution: HD and SD. Refer to the instruction manual for the TV in use to check which video mode is
supported.
Video mode *
Aspect ratio
1
*
This number indicates the number of scan lines. Note that "i" stands for "interlace" and "p" stands for "progressive". Using progressive results in high-quality video with
minimal flickering.
2
*
SD resolution varies depending on the model of the PS3™ system in use and the content that is being played.
3
*
The video output setting on the system will display as [Standard (NTSC)].
4
*
The video output setting on the system will display as [Standard (PAL)].
1*2
1080p 1080i 720p
16:9 16:9 16:9
Screens showing the difference in resolution
HD screen SD screen
16
(High Definition)
HD
480p
576p
16:9
4:3
(Standard Definition)
SD
480i *
576i *
16:9
4:3
3
4
Page 17

Video output cable types
Y L RPR/CRPB/CB
COMPONENT VIDEO IN AUDIO IN
S VIDEO L-AUDIO-R
VIDEO L-AUDIO-R
The resolution displayed on the TV varies depending on the input connectors on the TV and the type of cable in use. Select a cable to match the TV
in use.
Cable type Input connector on the TV Supported video modes*¹
EN
Getting started
HDMI Cable*²
separately)
(sold
Component AV Cable
(sold separately)
S VIDEO Cable
(sold separately)
AV Cable
(supplied)
HDMI IN connector
Component VIDEO IN
connector
S VIDEO IN connector
VIDEO IN connector
(composite)
1080p, 1080i, 720p, 480p / 576p
1080p, 1080i, 720p, 480p /
480i *3 / 576i *
480i *3 / 576i *
*1 Depending on the type of TV or content to be played, some video modes may not be supported.
If a device that is not compatible with the HDCP (High-bandwidth Digital Content Protection) standard is connected to the system using an HDMI cable, video and/or
audio cannot be output from the system.
Copyright-protected Blu-ray video discs can only be output at 1080p using an HDMI cable connected to a device that is compatible with the HDCP (Highband-width
Digital Content Protection) standard.
2
*
Connect the system to the TV using an HDMI cable (sold separately). An HDMI cable can output both video and audio and enables you to enjoy digital-quality
video and audio.
3
*
The video output setting on the system will display as [Standard (NTSC)].
4
*
The video output setting on the system will display as [Standard (PAL)] .
576p, 480i *
3
/ 576i *
4
4
4
17
Page 18

Getting started
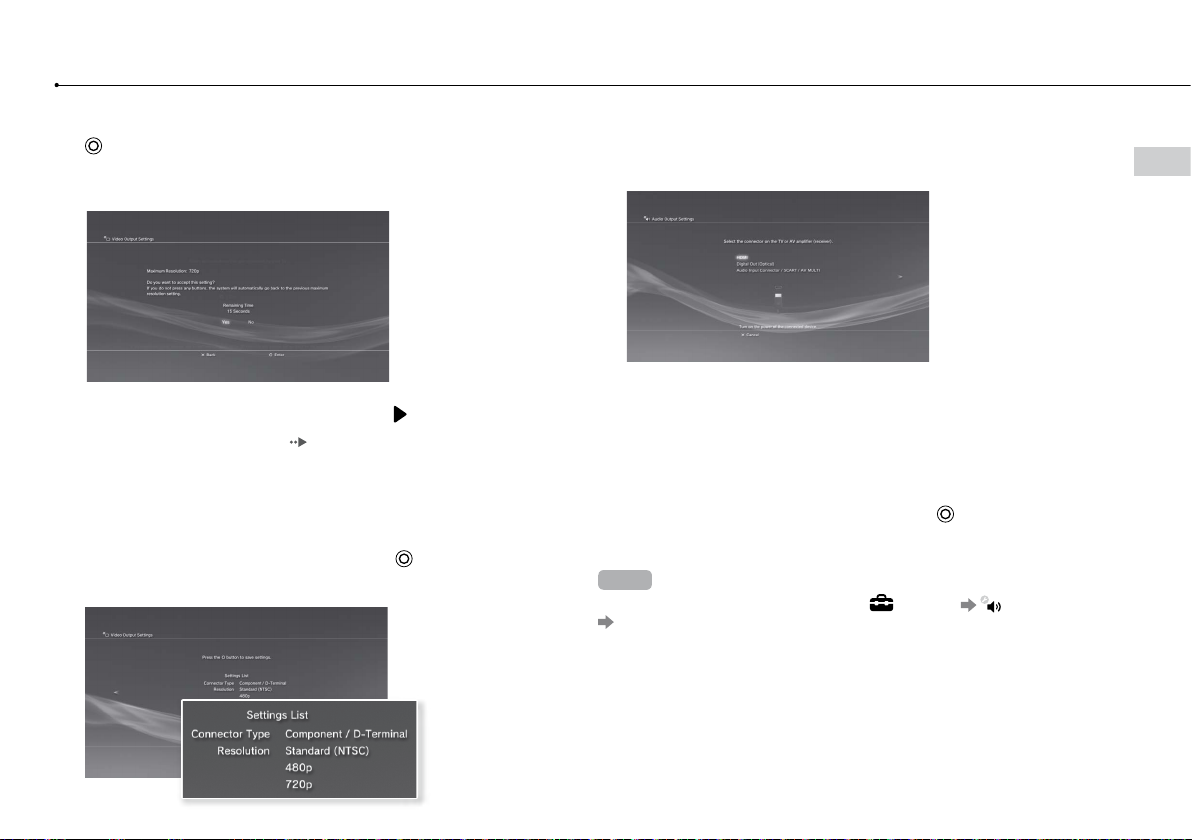
Adjusting video output settings
Depending on the type of cables and the connectors used, you may
need to adjust the PS3™ system's video output settings to display
video at HD resolutions ( page 16) on a TV.
If video is not displayed
Switch the video input of the TV to match the input connector used to
connect to the system.
Turn off the system, and then turn it on again by pressing the power button
for at least five seconds (until the system beeps twice). The video output
setting will be reset and video will be output at standard definition (SD)
resolution.
1 Select (Settings) (Display Settings) [Video Output
Settings], and then press the button.
2 Select the input connector ( page 17) in use on the TV, and
then press the button.
3 Confirm the screen, and then press the button.
If you changed the connector in step 2, a screen for confirming the change
will be displayed.
4 Confirm the settings, select [Yes], and then press the button.
If you changed the connector in step 2, a screen for confirming the settings
will be displayed.
5 Select the resolutions supported by the TV, and then press the
button.
The resolution displayed on the TV varies depending on the input connector
and the type of cable used (
selected will be used for video output.
Depending on the connector selected in step 2, this screen may not be
displayed.
page 17). The highest resolution you
18
If you select [HDMI], you will have the option to choose [Automatic] or
[Custom] on the next screen. In most cases, select [Automatic], and video
output settings will be completed automatically.
If you select [AV MULTI / SCART], you must choose the type of output signal
on the next screen. In most cases, select [Y Pb/Cb Pr/Cr].
Page 19
6 Confirm the settings, select [Yes], and then press the
button.
Depending on the connector selected in step 2 and the resolutions selected
in step 5, this screen may not be displayed.
7 Select the type of TV, and then press the button.
If you selected an SD resolution ( page 16) in step 5, a screen for selecting
the TV screen size will be displayed. Adjust the setting to match the TV in use.
If you selected [720p] or a higher resolution in step 5, the TV type will
automatically be set to 16:9 and the screen for selecting the TV screen size
will not be displayed.
8 Confirm the settings, and then press the button.
The video output settings will be saved on the system.
9 Adjust audio output settings.
Continue on to adjust audio output settings. Adjust settings to match the TV
or audio device in use.
If you select [HDMI], you will have the option to choose [Automatic] or
[Manual] on the next screen. In most cases, select [Automatic].
If using a cable other than an HDMI cable to output audio from the TV, select
[Audio Input Connector / SCART / AV MULTI]. If using an optical digital cable
to output audio, select [Digital Out (Optical)] and choose the output format
on the next screen.
10 Confirm the settings, and then press the button.
The audio output settings will be saved on the system.
Hint
You can adjust audio output settings under
[Audio Output Settings].
(Settings) (Sound Settings)
EN
Getting started
19
Page 20

Getting started
Connecting digital audio devices
You can connect audio devices that support digital audio playback,
such as an AV receiver for home entertainment use.
Audio output on the PS3™ system
The supported channels may vary depending on the output connector
to be used.
PS3™ system output connectors
AV MULTI OUT connector
DIGITAL OUT (OPTICAL) connector
HDMI OUT connector
Hints
When connecting a digital audio device to the system, go to
(Sound Settings) [Audio Output Settings], and then adjust the settings as
necessary for the audio device.
Normally, audio cannot be output simultaneously from multiple output
connectors. For example, if your PS3™ system is connected to a TV via an
HDMI cable and to an audio device via an optical digital cable and [Digital Out
(Optical)] is set under [Audio Output Settings], audio will no longer be output
from the TV and will only be output from the audio device.
The system can output both audio and video through an HDMI cable. If both
the TV and the audio device have HDMI connectors, you can output the TV
picture to the TV through a connected audio device.
If a device is connected to the PS3™ system via an HDMI cable, do not turn off
the device while the system is turned on (power indicator is lit solid green), as
doing so may cause sound distortion or produce abnormal sounds.
Channels that can be used for output
2 Ch. 5.1 Ch. 7.1 Ch.
(Settings)
Examples when connecting an audio device
An HDMI cable or optical digital cable can be used to connect an
audio device to the PS3™ system.
HDMI cable Optical digital cable
HDMI cable
(sold separately)
Digital audio device
HDMI cable
(sold separately)
Optical digital
cable for audio
(sold separately)
Video output cable for the
TV in use (
page 17)
20
TV TV
Page 21
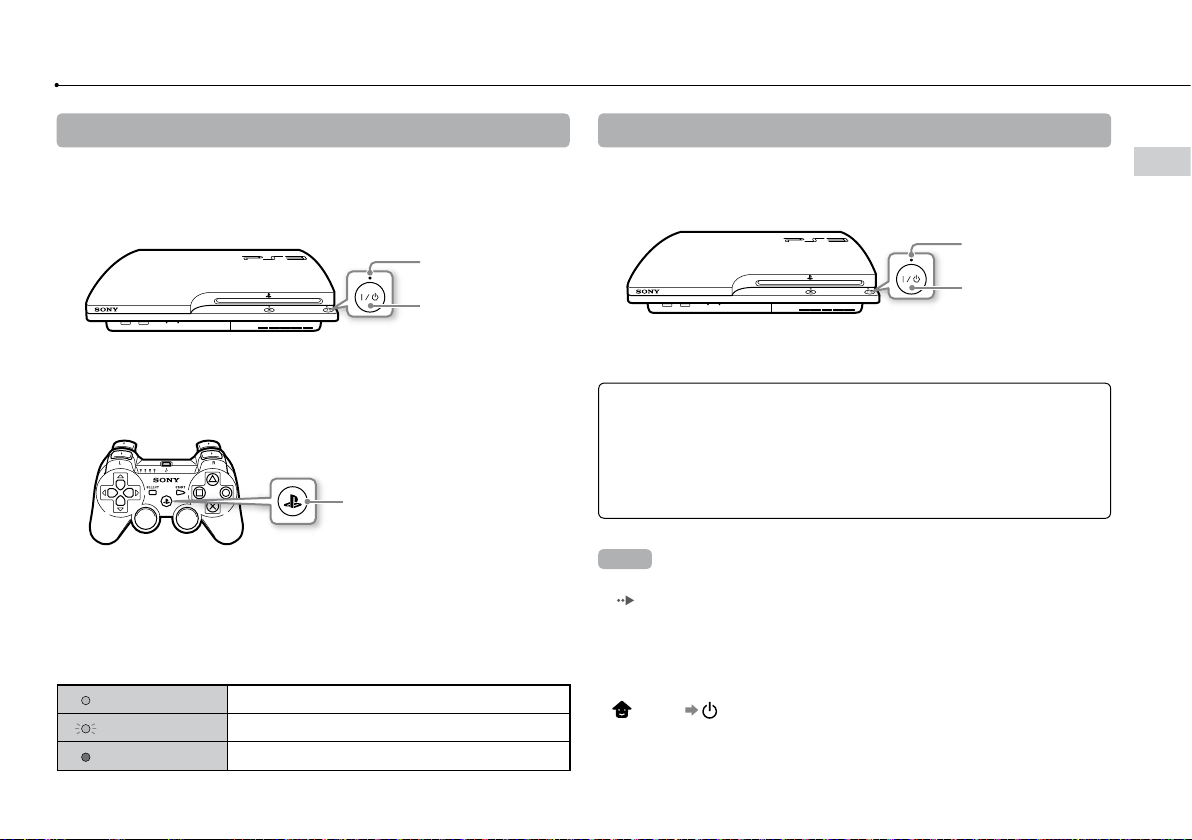
Turning the PS3™ system on and off
Turning on the system
1 Press the power button.
The power indicator lights up in solid green to indicate that the system is
turned on.
Power indicator:
solid green
Power button
2 Press the PS button on the controller.
After the controller number is assigned, you can use the controller to operate
the system.
PS button
Power indicator status
You can check the power indicator on the PS3™ system to see the
current status of the system.
Solid green
Flashing green
Solid red
System on
System turning off
System off (in standby mode)
Turning off the system
1 Press the power button.
The power indicator lights up in solid red.
Power indicator:
solid red
Power button
Notice
When the power indicator is lit solid green or flashing green, be sure to abide
by the notices below. If you do not, data loss or corruption, or damage to the
system may occur.
Do not unplug the AC power cord from the electrical outlet.
Do not move or change the position of the system.
Hints
Before using a wireless controller, you must first pair it with the system
page 22).
(
You can also turn the PS3™ system on and off using the PS button on the
wireless controller. If you use the PS button to turn on the system, the controller
number will be assigned at the same time. To turn off the system, press the PS
button for more than one second, and then follow the on-screen instructions.
You can also turn off the PS3™ system from the XMB™ menu. Select
(Users) (Turn Off System).
If you will not be using the system for a long period of time, check that the
power indicator is lit solid red, and then unplug the AC power cord from the
electrical outlet.
EN
Turning the PS3™ system on and off
21
Page 22
Using the wireless controller
1 2 3 4
1 2 3 4
112 3 4
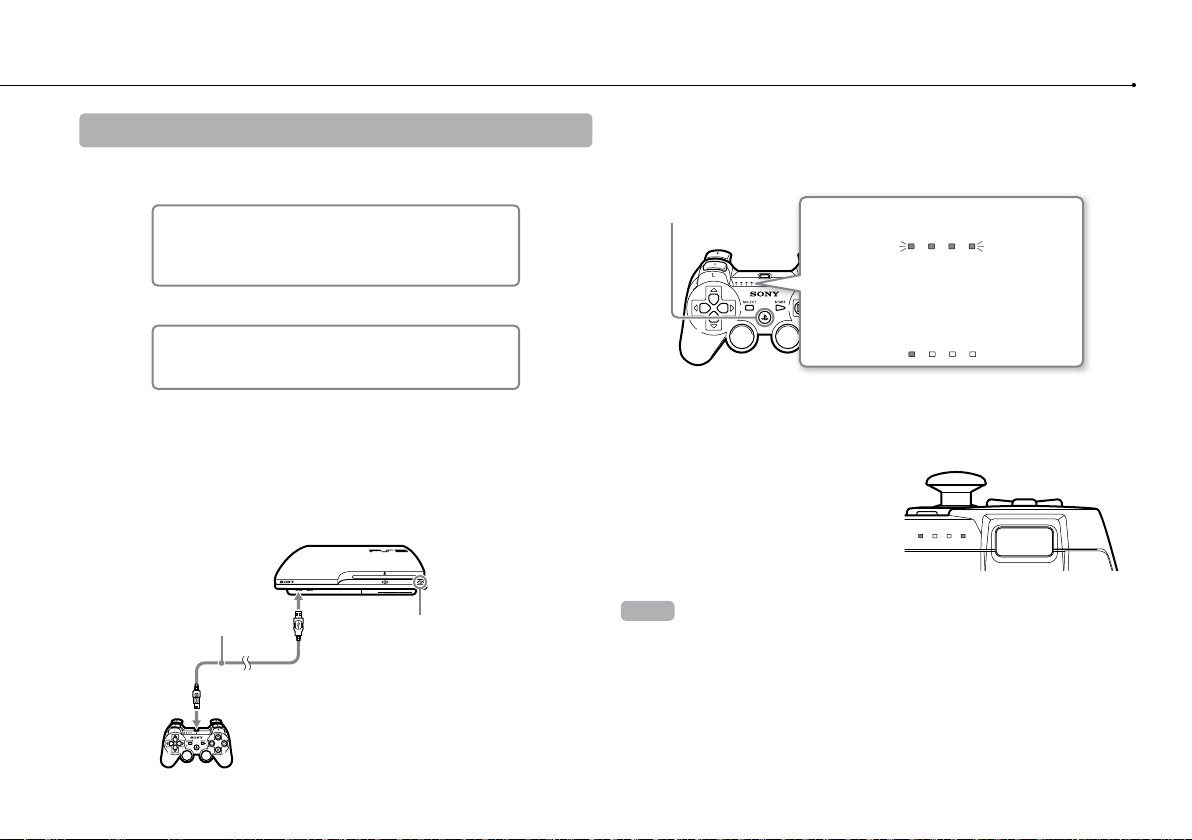
Preparing for use
To use a wireless controller, you must first register or "pair" the controller
with the PS3™ system and assign a number to the controller.
Step 1: Pair the system and the controller.
When using for the first time
When using with a different PS3™ system
Step 2: Assign a controller number.
Every time the system is turned on
Step 1: Pair the system and the controller
When using the controller for the first time or when using with a different
PS3™ system, you must first pair the devices. If you turn on the system
and connect the controller using a USB cable, the pairing will be
completed automatically.
USB cable (supplied)
Check that the system is turned on
(power indicator is lit solid green).
Step 2: Assign a controller number
Each time you turn on the system, a number must be assigned to the
controller.
Press the PS button.
All of the port indicators flash.
When the controller has been assigned a
number, the port indicators for the assigned
number turn solid red.
You can connect up to 7 controllers at one time. The controller number
is shown by the number above the port indicators. For numbers 5-7,
add the numbers of the lit indicators.
Example: Controller number 5 has been assigned.
Hints
Pairing and assigning controller numbers can only be done when the system is
turned on (power indicator is lit solid green).
When a paired controller is used with another PS3™ system, the pairing with
the original system is cleared. Pair the controller with the system again if the
controller has been used with another system.
If the controller or the system is turned off, the port indicators on the controller
will turn off and the assigned number will be cleared.
22
Page 23

Using the controller wirelessly
If you disconnect the USB cable, you can use the controller wirelessly.
To use it wirelessly, the controller's battery must be charged.
Hints
The USB cable can be connected or disconnected while the controller and the
system are turned on.
If the controller does not function, press the PS button, and then reassign the
controller number.
Battery charge level
If you press and hold down the PS button for more than one second,
you can check the battery charge level on the screen.
EN
Using the wireless controller
Charging the controller
With the system turned on (power indicator is lit solid green), connect
the controller to the system using a USB cable. The port indicators of
the controller flash slowly and charging begins.
When charging has completed, the port indicators stop flashing.
Hints
The controller can be used while charging.
Charge in an environment where the temperature range is between
10°C - 30°C (50°F - 86°F). Charging may not be as effective when performed in
other environments.
The controller cannot be charged when the system is off (in standby mode).
The battery has a limited life span. Battery charge duration will gradually
decrease with repeated usage and age.
Battery life also varies depending on the storage method, usage state,
environment and other factors.
Charge Level
The battery has plenty of charge.
The battery has started losing its charge.
The battery charge level is low.
The battery has no charge. The port indicators on the controller flash
rapidly. Charge the controller.
Hint
Depending on the environment or the conditions of use, the remaining charge
level may not display correctly and the battery duration may vary.
23
Page 24

Playing content
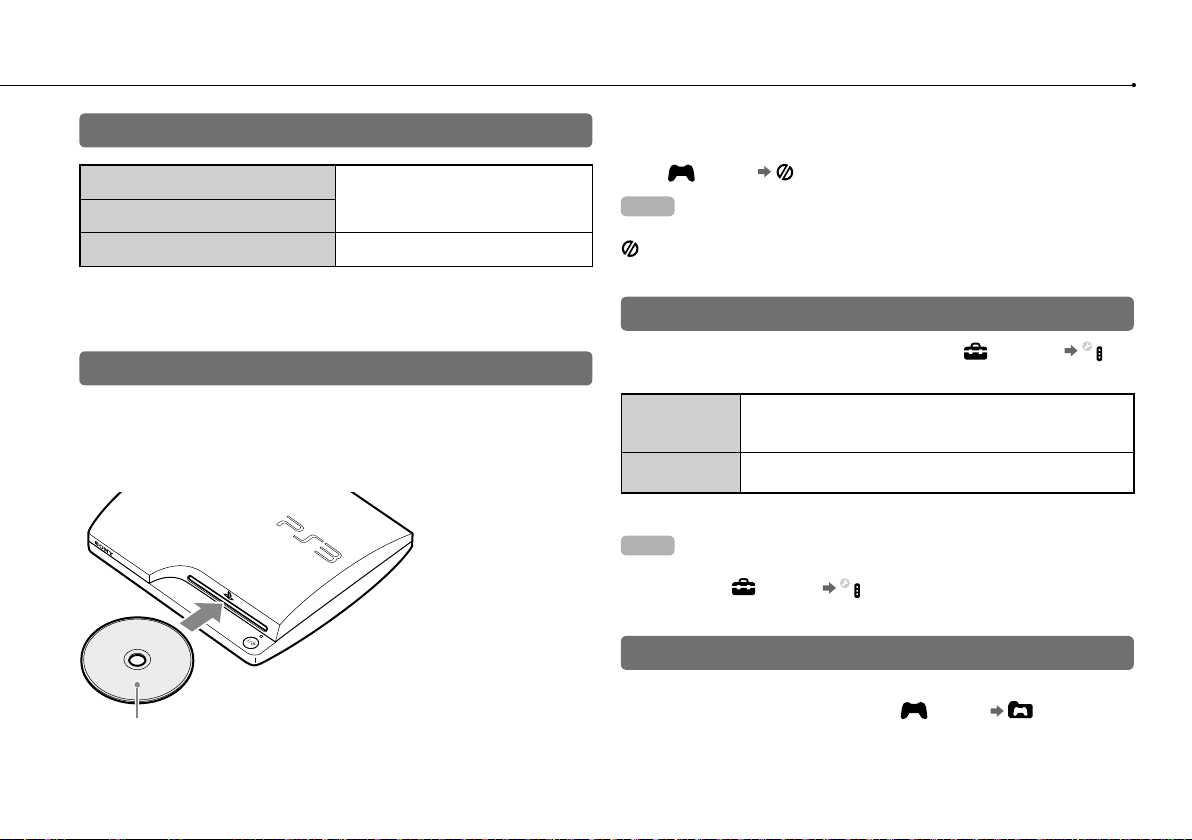
Blu-ray Disc (BD)/DVD/CD
1 Insert the disc.
The eject indicator turns solid blue to indicate that the disc
is inserted.
Insert the disc with the
label side facing up.
Notices
Discs that are not compatible with the system cannot be
played.
To play commercially available BD video software, in
some cases the encryption key* may need to be
renewed. The encryption key can be renewed when the
system software is updated (
* AACS (Advanced Access Control System) key
page 33).
2 An icon is displayed in the XMB
disc begins.
If the disc does not automatically start, select the icon for the disc from the
XMB™ menu, and then press the
Ejecting a disc
Stop playback, and then press the eject button.
menu, and playback of the
™
button.
Eject indicator
Eject button
24
Page 25

Playing content on USB devices
You can connect external devices, such as devices that are compatible
with USB Mass Storage Class, using a USB cable. Devices can be
connected while the system is turned on. Refer also to the instructions
supplied with the device.
1 Connect the USB device.
An icon is displayed on the screen.
External device such as a digital camera
2 Select the icon, and then press the button.
A list of playable content is displayed.
Notices
Do not remove USB devices or turn off the system while data is being
saved, loaded or deleted. Doing so may cause data loss or corruption.
When using a USB flash drive with a write-protect switch, do not operate
the switch when the device is connected to the system. Doing so may
cause data loss or corruption.
File formats that can be played or viewed
File formats that can be played or viewed on this system include
ATRAC™, MP3, AAC, JPEG and MPEG-4. For the latest information,
refer to the online user's guide
(http://manuals.playstation.net/document/).
Hints
Only files that are playable or viewable on the PS3™ system are displayed in
the column for the compatible category (Example: Image data is displayed
under
Depending on the storage media, only a subset of the folders on the media
may be displayed. If you select [Display All] from the options menu
(
Notice
You should where possible make periodic back-ups of data stored on the
hard disk drive as a precaution against possible loss or corruption. If for any
reason software or data loss or corruption occurs, it is not possible to restore
or repair the software or data. Note that Sony Computer Entertainment Inc.
and its subsidiaries and affiliates will not be liable for any loss or corruption of
data, files or software. For information on backing up files saved on the hard
disk, see “Backing up data” (
(Photo)).
page 11), all folders saved on the media will be displayed.
page 36).
EN
Playing content
25
Page 26
Playing games
Game compatibility
PlayStation®3 format software
PlayStation
PlayStation
*
Operation of all PlayStation
http://asia.playstation.com/status for the latest information on software that can
be played on this system.
format software
®
2 format software
®
format software titles is not guaranteed. Visit
®
Can be played on this system*
Cannot be played on this system
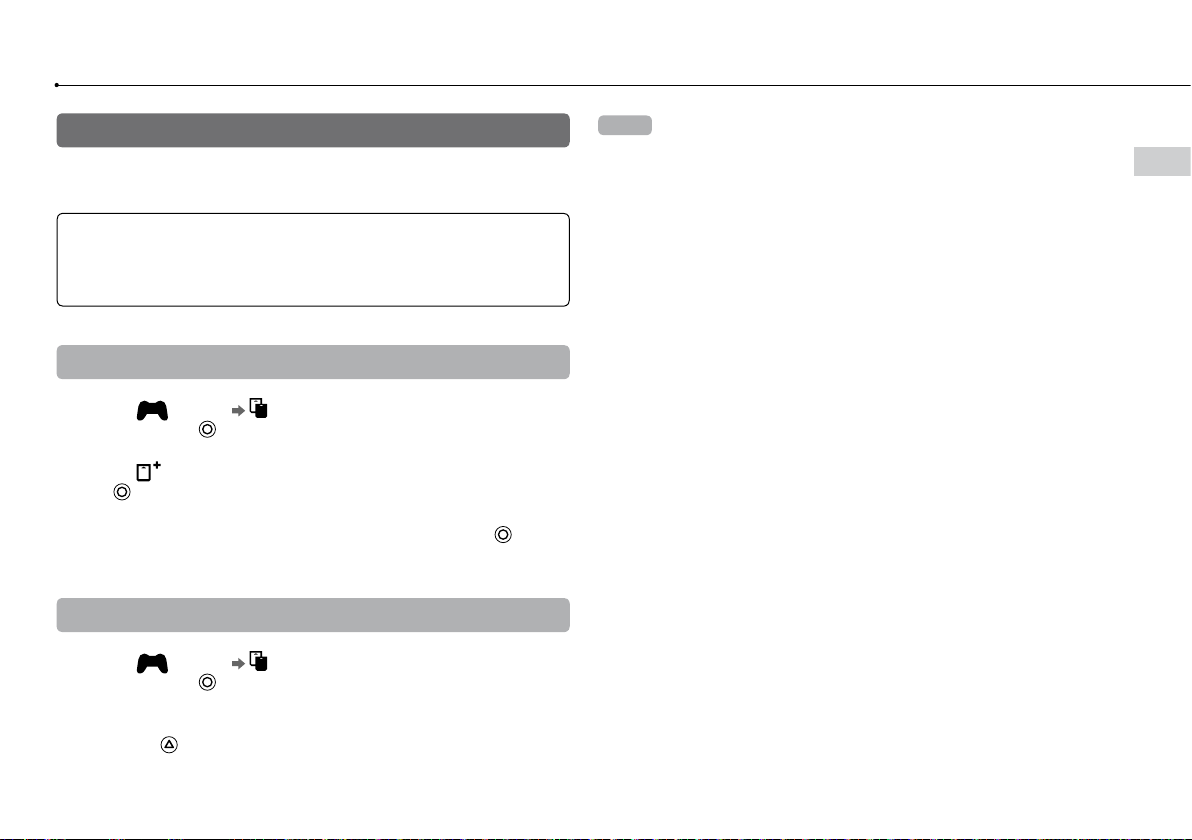
Playing games
PlayStation®2 format software titles do not perform on this system.
Starting a game
When you insert the disc, the game starts
Insert the disc with the
label side facing up.
automatically.
Quitting a game
During gameplay, press the PS button on the Wireless Controller. Then
select (Game) (Quit Game) to quit the game.
Hint
Depending on the type of software, such as PlayStation
(Quit Game) may not be displayed when the PS button is pressed. In this
case, select [Quit Game] from the screen that is displayed.
format software,
®
Controller settings
You can change controller settings by selecting (Settings)
(Accessory Settings).
Reassign
Controllers
Controller
Vibration Function
You cannot assign controller port 2-D using this system.
*
Hint
You can change settings for the controller during gameplay by pressing the
PS button. Select
or select [Controller Settings] from the screen that is displayed.
If a controller port or number is specified by the software,
you can use this setting to assign the appropriate controller
port or number.*
You can set the vibration function to on or off. It is set to [On]
by default.
(Settings) (Accessory Settings) in the XMB™ screen,
Saved data for PlayStation®3 format software
Saved data for PlayStation®3 format software is saved on the system's
hard disk. The data is displayed under (Game) (Saved Data
Utility).
26
Page 27
Saved data for PlayStation® format software
To save data from PlayStation® format software, you must create the
internal memory cards on the hard disk and assign the cards to slots.
Notice
This system does not support playback of PlayStation®2 format software. Even
if you create an internal memory card for PlayStation
will not be able to use it to play games.
2 format software, you
®
Creating internal memory cards
1 Select (Game) (Memory Card Utility (PS/PS2)), and
then press the button.
2 Select (Create New Internal Memory Card), and then press
the button.
3
Select [Internal Memory Card (PS)], and then press the button.
Follow the on-screen instructions to complete the operation.
Assigning slots
1 Select (Game) (Memory Card Utility (PS/PS2)), and
then press the button.
Hints
Depending on the software, slots may be preassigned. For details, refer to the
instructions supplied with the software.
You can assign slots during gameplay. Press the PS button on the wireless
controller, and then select [Assign Slots] from the screen that is displayed.
EN
Playing games
2 Select the internal memory card that you want to use, and then
press the button.
Select [Assign Slots], and then assign [Slot 1] or [Slot 2].
27
Page 28

Adjusting network settings
Example of a network configuration (wired)
A wired network configuration requires items , and .
Network gateway device
such as an ADSL modem*
To the Internet line
Ethernet cable
*1 The connection method may vary depending on the environment in use. For example, you may be able to connect Ethernet cables directly into the wall outlet in
housing complex units that have preinstalled LAN ports. If you are using such a network environment, you do not need a network gateway device.
2
*
A router is a device that enables multiple devices to be connected to one Internet line. A router is necessary if a PC and a PS3™ system will be connected to the
Internet at the same time using one Internet connection.
3
*
A wireless router is a device that adds access point functionality to a router.
1
Router*
PC
2
Example of a network configuration (wireless)
A wireless network configuration requires items and .
Network gateway device
such as an ADSL modem*
To the Internet line
1
PC
Wireless router
(access point) *
2*3
28
Page 29

Adjusting network settings (wired)
1 Connect an Ethernet cable (sold separately) to the system.
Adjusting network settings (wireless)
1 Check that an Ethernet cable is not connected to the system.
EN
Adjusting network settings
2 Select (Settings) (Network Settings) [Internet
Connection Settings], and then press the button.
A message stating that the Internet connection will be terminated is
displayed.
3 Select [Yes], and then press the button.
4 Select [Easy], and then press the button.
Basic settings are adjusted automatically, and a list of the settings is
displayed. If the list is not displayed, you must adjust custom settings. Refer
to the instructions supplied by your Internet service provider to adjust the
custom settings (
page 31).
5 Perform the Internet connection test.
If the connection is successful, you will be able to connect to the Internet.
2 Select (Settings) (Network Settings) [Internet
Connection Settings], and then press the button.
A message stating that the Internet connection will be terminated is
displayed.
3 Select [Yes], and then press the button.
4 Select [Easy], and then press the button.
Basic settings are adjusted automatically.
5 Select [Wireless], and then press the button.
29
Page 30

Adjusting network settings
6 Adjust wireless LAN settings.
Select the access point that you want to use. You can usually select [Scan]
and choose an access point within range of your system.
Scan
Enter Manually
Automatic
System scans for a nearby access point. Select the
access point that you want to use.
Specify the access point by entering its SSID manually.
Use the automatic setting feature of the access point.
You can follow the on-screen instructions to complete
the required settings automatically.
AOSS™
Buffalo, Inc.
7 Adjust the security settings for the wireless network.
Enter the encryption key for the access point. If you selected [Automatic] in
step 6, this screen will not be displayed.
None
WEP
WPA-PSK/
WPA2-PSK
Encryption key is not set.
Enter the encryption key. The encryption key field will
display an asterisk (*) for each character you enter.
8 Check the settings.
A list of the settings is displayed. If the list is not displayed, you must adjust
custom settings. Refer to the instructions supplied by your Internet service
provider to adjust the custom settings (
page 31).
9 Perform the Internet connection test.
If the connection is successful, you will be able to connect to the Internet.
Hints
SSID and WEP/WPA keys are types of security information that are required
when connecting to an access point. If you do not have this information,
contact the person who set up or maintains the access point.
Depending on the access point you use, you may need the MAC address for
the PS3™ system when connecting to the Internet. You can find the MAC
address for the PS3™ system by going to
Settings)
When connecting to the Internet wirelessly, signal interference may occur
depending on the usage condition of the wireless network devices. If the
Internet data transfer speed is decreased or the wireless controller does not
function properly, try using a wired Internet connection.
[System Information].
(Settings) (System
30
Page 31

Adjusting custom settings
In certain network environments, some settings may not be adjusted
automatically by selecting [Easy]. Refer to the information below and
also follow the on-screen instructions to adjust custom settings.
Ethernet operation mode
Specify the Ethernet data transfer rate and operation method. You can
usually select [Auto-Detect].
IP Address Setting
Specify the method for obtaining an IP address when connecting to the
Internet. The method varies depending on the Internet service provider
you use.
MTU
Specify the MTU value used when transmitting data. You can usually
select [Automatic].
Proxy Server
Specify the proxy server to be used. You can usually select [Do Not Use].
UPnP
Enable or disable UPnP (Universal Plug and Play). You can usually
select [Enable].
Hint
If [UPnP] is set to [Disable], online communication may be restricted when using
the voice / video chat feature or communication features in games.
EN
Adjusting network settings
Automatic
Manual
PPPoE
Use the IP address allocated by the DHCP server.
Enter the IP address manually.
Connect to the Internet using PPPoE. Enter the user name
and password supplied by your Internet service provider.
DHCP host name
Specify the DHCP server host name. You can usually select [Do Not Set].
DNS Setting
Specify the DNS server. The method varies depending on the Internet
service provider you use.
Automatic
Manual
System acquires the DNS server address automatically.
Enter the DNS server address manually. Enter the IP
addresses of the primary and secondary DNS servers that
are supplied by your Internet service provider.
31
Page 32

Connecting to the Internet
If network settings are already completed, the PS3™ system will
automatically connect to the Internet when the system is turned on. The
connection will remain active as long as the system is on.
Using the Internet browser
1 Select (Network) (Internet Browser), and then press
the button.
The Internet browser opens. A busy icon is displayed while the page is
loading.
Busy icon
Basic operations of the Internet browser
Directional buttons
Right stick
L1 button
START button
button
32
Move the pointer to a link.
Scroll in the desired direction.
Go back to the previous page.
Enter an address.
Switch between displaying and not displaying
the menu.
Viewing the user's guide
You can use the Internet browser to view the online user's guide for the
PS3™ system. Select (Network) (Online Instruction Manuals),
and then press the button.
Online user's guide http://manuals.playstation.net/document/
This guide contains detailed information about using the PS3™ system.
Creating a PlayStation®Network account
By creating a PlayStation®Network account, you can enjoy
communicating with your Friends or download games or videos from
(PlayStation®Store).
Select
PlayStation®Network), and then press the button. The screen for
creating an account will be displayed.
Hints
(PlayStation®Network) (Sign Up for
An Internet connection is required to create an account.
PlayStation
You can also create a PlayStation®Network account at
https://store.playstation.com/login.gvm by selecting [I want to create a new
account].
Network service content may vary depending on the region.
®
Page 33

PS3™ system updates
By updating the PS3™ system software, you can add features and/or
security patches. Frequently update your system to use the latest
version of the system software.
System software updates http://asia.playstation.com
This site provides the latest information about system software updates.
Use the update data to overwrite
the existing system software.
Notices
During an update, do not turn off the system or remove media. If an update
is cancelled before completion, the system software may become
damaged, and the system may require servicing or exchange.
During an update, the power button on the system and PS button of the
controller are inactive.
Depending on the content, you may not be able to play without first
updating the system software.
After you have updated the system software, you cannot go back to an
earlier version.
The system software is updated.
Checking the system software version
You can check system version information by selecting (Settings)
(System Settings) [System Information]. The current version is
displayed in the [System Software] field.
Update methods
You can perform an update in any of the ways described below.
Network update
You can update by downloading the update data from the Internet. The
latest update is automatically downloaded.
Select
(Settings) (System Update) [Update via Internet].
Update using storage media
You can update using the update data saved on a USB flash drive or
other media.
Select
Media].
(Settings) (System Update) [Update via Storage
Update using disc media
Update data may also be contained in some game discs and other
types of disc media. When you play a disc that contains update data, a
screen will be displayed to guide you through the update process.
Hint
If you cannot perform an update in any of the ways described above, contact the
PS3™ customer service hotline at the number printed on the package carton for
assistance.
EN
PS3™ system updates
33
Page 34

Using the on-screen keyboard
Cursor Displays predictive options
Operation keys Displays when
Text entry field
predictive mode is on
Input mode
display
Entering text
The following steps explain how to enter text, using the word "fun" as an
example.
1 Select [f] on the keyboard, and then press the button.
Repeat this step for the characters [u] and [n].
2 Select [Enter], and then press the button.
The characters you entered are confirmed.
3 Select [Enter], and then press the button again.
The text is entered and the keyboard closes.
Hints
For details about using the on-screen keyboard, refer to the online user's guide
(http://manuals.playstation.net/document/).
You can also enter text using a USB keyboard or Bluetooth
keyboard (both sold separately). With the on-screen keyboard displayed, press
any key on the connected keyboard to start entering text.
-compatible
®
List of keys
Keys that are displayed vary depending on the input mode and other
conditions.
Keys Explanation
Inserts a line break
Moves the cursor
Deletes the character to the left of the cursor
Inserts a space
Switches the input mode
Confirms characters that have been typed and
then closes the keyboard
Switches to the mini-size keyboard
/
/
Inserts a symbol or emoticon
Switches the type of characters to be entered
Pastes text that has been copied from the
Internet browser
34
Page 35

Parental control
The PS3™ system includes a parental control feature. You can use this
feature to set a password and limit the playback of content restricted by
a parental control level (games, videos and other content). By setting
the parental control level on the system, you can prevent the playback
of restricted content by children.
Changing the security settings
You can set a parental control level for games or Blu-ray Discs or other
content under (Settings) (Security Settings).
A password is required to change parental control settings. You can set
a password under
The password is set to "0000" in the default settings.
(Security Settings) [Change Password].
Parental control levels for games
You can set the parental control level for games under (Security
Settings) [Parental Control]. Select from [Off] or one of 11 levels.
Play any content regardless of parental control level.
Off
Set the parental control level based on the number. Note that the lower
11-1
the number, the tighter the restriction.
The combination of the parental control levels of both the PS3™ system
and the content determine whether the content can be played.
Example: If the parental control level of the system is set to [7], content
with a level from [1] to [7] can be played on the system.
For the latest information about ratings, call the PS3™ customer service
hotline at the number printed on the package carton for assistance.
Other security settings
You can set parental control limitations on content other than games
under (Security Settings), as described below.
When playing a BD with parental control settings, restrict
BD Parental Control
DVD parental control
Internet Browser
Start Control
playback based on the age you have set. The lower the
setting, the tighter the restriction.
When playing a DVD with parental control settings, restrict
playback based on the level you have set.
Select from [Off] or one of eight levels.
The lower the number, the tighter the restriction.
Restrict the ability to start the Internet Browser with a
password.
EN
Parental control
35
Page 36

Replacing the hard disk
You can replace the hard disk that is installed in the PS3™ system.
Caution
Remove the hard disk in a location out of the reach of small children to help
prevent accidental swallowing of small parts such as screws.
The inside of the system is hot directly after use. Allow time for the system to
cool down before starting to remove the hard disk.
Be careful not to injure yourself when removing or handling the screw cover
or the hard disk.
Be sure to reattach the screw cover and the HDD bay cover before turning
the PS3™ system on. If these covers are not attached, heat may build up
inside the system.
To attach or remove screws, use an appropriate crosshead screwdriver. If
the size does not match, the groove on the screw's head may be damaged.
Notices
All hard disks, including a PS3™ system’s hard disk, must be reformatted
before use in a PS3™ system.
It is recommended that you regularly back up data on the hard disk. If for
any reason software or data loss or corruption occurs, it may not be
possible to restore or repair the software or data. Sony Computer
Entertainment Inc. and its subsidiaries and affiliates will not be liable for
damage or injury related to software or data loss or corruption.
You can back up data stored on the hard disk to a USB mass storage
device and restore data that has been backed up. For details, see "Backing
up data" (
Improper removal or installation of a hard disk may cause damage to your
PS3™ system or loss of data, and may void your PS3™ system’s hardware
warranty. Sony Computer Entertainment Inc. and its subsidiaries and
affiliates shall not be liable for any resulting damages, including any
damages to your hard disk. User assumes all risks and liabilities associated
with using a replacement hard disk, including any incompatibility or
interoperability problems with the PS3™ system. Services will not be
provided on any non-PS3™ system hard disks.
To help protect your personal information, be sure to clear passwords for all
PlayStation
service. To clear a password, select
In), and then from the screen that is displayed, clear the [Save Password]
checkbox. Note that if [Sign In Automatically (Auto Sign-In)] is set, the icon
for
the auto sign-in option. To clear the auto sign-in option, select
button, and then select [Auto Sign-In Off] from the options menu. After the
auto sign-in option is turned off, proceed with the password clearing
process.
36 page).
Network accounts before submitting the PS3™ system for
®
(Sign In) will no longer be displayed. In that case, you must first clear
(PlayStation®Network) (Account Management), press the
(PlayStation®Network) (Sign
36
Backing up data
You can back up data that is saved on the hard disk using either of the
following methods.
Page 37

Notice
You should where possible make periodic back-ups of data stored on the
hard disk as a precaution against possible loss or corruption. If for any reason
software or data loss or corruption occurs or the hard disk must be formatted
during authorized service, it may not be possible to restore or repair the
software or data. Note that Sony Computer Entertainment Inc. and its
subsidiaries and affiliates will not be liable for any loss or corruption of data,
files or software.
Backing up data in a single operation
You can back up data that is saved on the hard disk to a USB mass
storage device in a single operation. Select (Settings)
(System Settings) [Backup Utility], and then follow the on-screen
instructions to perform this operation.
Hints
In some cases, you may not be able to use the backup utility feature to back up
the system correctly. It is recommended that you create a spare backup for files
that can be moved or copied separately. For details, refer to "Backing up
selected data".
For details on the backup utility feature, refer to the online user's guide
(http://manuals.playstation.net/document/).
Backing up selected data
The following file types saved on the system's hard disk can be copied
or moved to a USB device. Select the file, press the button, and then
select [Copy] or [Move] from the options menu. For some types of
video files, you may need to select [Back Up] instead.
File type Back up destination
Saved data from games; video, music
or photo files
USB mass storage device
(USB flash drive, etc.)
Hints
Some data cannot be copied, moved or backed up.
By using a card reader/writer (USB connector type, sold separately), you can
back up files saved on the hard disk to storage media such as a Memory
Stick™ or an SD Memory Card.
Removing the hard disk
Caution
For safety reasons, be sure to turn off and unplug the system before
attempting to remove the hard disk.
The system may not be stable when placed upside down. Be careful not to
injure yourself when removing the screw.
1 Press the power button to turn off the system.
The power indicator turns solid red and the system enters standby mode.
2 Unplug the AC power cord, and then disconnect the other
cables from the system.
For safety reasons, remove the plug for the power cord from the electrical
outlet, and then detach the other cables.
EN
Replacing the hard disk
37
Page 38

Replacing the hard disk
3 Place the system upside down on a soft, dry cloth, and then
open the screw cover.
Use the notch located above the screw cover to slightly pull up the cover.
Then rotate the cover as shown in the diagram. If the cover is hard to pull up,
insert a tool such as a flathead screwdriver in the notch and gently pull the
cover up.
Screw cover
4 Remove the screw that fastens the hard disk in place, and then
remove the HDD bay cover.
Remove the blue screw with an appropriate crosshead screwdriver.
Slide the HDD bay cover to the left, and then remove the cover.
5 Remove the hard disk.
Pull the handle upwards, and then pull out the hard disk from the system.
Notices
The hard disk is a sensitive piece of equipment and should be handled with
care at all times. To help prevent software or data loss or corruption, or
damage to the hard disk, carefully follow the precautions listed below:
Do not drop the system or hard disk, or subject either device to physical
shock or vibration.
Do not allow liquid or small particles to get into the system or hard disk.
Do not touch the connectors or insert foreign objects into the connectors.
Do not place the system or hard disk close to magnetic fields such as those
produced by magnets or loudspeakers. Also, do not place devices that
may be sensitive to magnetic forces (such as a wrist watch or a credit card)
near the hard disk.
Do not put heavy objects on the hard disk.
When handling the hard disk, hold it only by the edges or metal frame.
The hard disk is sensitive to static electricity. Ensure that proper handling
methods are used when installing the hard disk.
Store in a cool, dry location.
38
HDD bay cover
Page 39

Replacing the hard disk
Caution
For safety reasons, be sure to turn off and unplug the system before attempting
to replace the hard disk.
When replacing the hard disk, follow the procedure below to remove
the metal frame.
1 Using a crosshead screwdriver, remove the screws (4 places).
2 Hold the hard disk by the edges, and then turn it over.
Grasp firmly by the opening on
either side to prevent slipping.
3 Remove the hard disk from the metal frame.
4 Place the replacement hard disk on the metal frame for the
PS3™ system's hard disk, and then attach using the screws
(4 places).
Do not overtighten the screws.
5 Install the hard disk in the system.
Refer to the instructions in "Removing the hard disk" ( page 37) and follow
the steps in reverse order when installing. Be sure to fully insert the hard disk
in the HDD bay.
6 Reinstall the system software.
After the hard disk has been replaced, the system software must be
reinstalled (
Replacement hard disks
You can use hard disks of the following types with the PS3™ system.
Size
Interface format
*1 Proper operation is not guaranteed for all models.
2
*
Parallel ATA is not supported.
page 40).
2.5 inch (internal type) *
Serial ATA *
2
1
EN
Replacing the hard disk
39
Page 40

Replacing the hard disk
Hint
If you lose the HDD bay cover, screw cover, screws or the metal frame, contact
the PS3™ customer service hotline at the number printed on the package carton
for assistance.
Reinstalling the system software
If the system software does not start when the system is turned on
(such as when the hard disk has been replaced), a screen such as the
one shown below is displayed. In this case, you must reinstall the
system software using downloaded update data.
Downloading system software update data
Using a PC with Internet access, download the system software update
data from the website shown below. Follow the instructions available on
the website to copy the update data from the PC to storage media.
http://asia.playstation.com
Hints
Use the latest version of the update data available on the website. You cannot
reinstall the system software using a version that is earlier than the system
software version that had previously been used. If the appropriate update data
for your system is not available at the website, contact the PS3™ customer
service hotline at the number printed on the package carton for assistance.
If you have a game disc or other disc that contains update data, you may be
able to use that disc to reinstall the system software. If you insert the disc in the
PS3™ system and follow the on-screen instructions, you can verify whether the
update data can be used.
If you do not have Internet access from a PC, contact the PS3™ customer
service hotline at the number printed on the package carton for assistance.
The system software included within this product is subject to a limited license
from Sony Computer Entertainment Inc. Refer to http://www.scei.co.jp/ps3-eula
for further details.
Installing the system software
Turn on the PS3™ system, and then insert the storage media containing
the update data. Follow the on-screen instructions to reinstall the
system software.
Notices
Do not turn off the system or remove the storage media during the
installation. If the installation is cancelled before completion, the system
software may become damaged, and the system may require servicing or
exchange.
During the installation, the power button on the system and the PS button
on the wireless controller are not active.
40
Page 41

Restoring data that has been backed up
You can restore data that you backed up using either of the following
methods.
Restoring data in a single operation
You can restore data that you backed up in a single operation by
selecting (Settings) (System Settings) [Backup Utility].
Connect the USB mass storage device that contains the backup data,
and then follow the on-screen instructions to perform this operation.
Hints
In some cases, you may not be able to use the backup utility feature to restore
data correctly.
For details on the backup utility feature, refer to the online user's guide
(http://manuals.playstation.net/document/).
Restoring selected data
You can manually restore files using the options menu for the file.
Connect the USB mass storage device that contains the file, select the
file that you want to restore, and then press the button. Select [Copy]
or [Move] from the options menu.
Hint
Some data cannot be copied, moved or backed up.
EN
Replacing the hard disk
41
Page 42

Restoring the PS3™ system
Notices
If you restore the default settings or restore the PS3™ system, changes to
the settings cannot be undone. Data loss or corruption is the responsibility
of the user.
Do not turn off the PS3™ system during this operation. If the operation is
cancelled before completion, the system software may become damaged,
and the system may require servicing or exchange.
During this operation, the power button on the system and the PS button on
the wireless controller are not active.
You cannot use this feature to go back to an earlier version of the system
software.
Restoring default settings
You can restore from the current settings under (Settings) to the
default settings by selecting (Settings) (System Settings)
[Restore Default Settings].
After you complete the operation and restart the system, the initial
setup screen will be displayed. Follow the on-screen instructions to
perform initial setup of the system software (
page 15).
Deleting data on the hard disk drive
You can delete all data on the system's hard disk and restore from the
current setting under (Settings) to the default settings by selecting
(Settings) (System Settings) [Restore PS3™ System].
You can shorten the time required to perform this operation by selecting
[Quick Format] from the list of hard disk format options. It is
recommended that you select [Full Format] when formatting a hard disk
that contains important or sensitive data.
After you complete the operation and restart the system, the initial
setup screen will be displayed. Follow the on-screen instructions to
perform initial setup of the system software (
page 15).
Before disposing of or transferring the PS3™ system
Before disposing of the system, it is recommended that personal
information and other data of similar nature be deleted. To delete data,
go to (Settings) (System Settings) [Restore PS3™ System].
It is recommended that you select [Full Format] when the screen for
selecting hard disk format method is displayed during system
restoration. Although formatting time can be reduced by using [Quick
Format], it might be possible to restore erased data in some cases if a
special tool is used.
42
Page 43

Before requesting service
Go through this section if you experience difficulty in operating the
PS3™ system. Should any problem persist, call the PS3™ customer
service hotline at the number printed on the package carton for
assistance.
Power
The system does not turn on.
Check that the AC power cord is securely inserted in the system
and the electrical outlet.
Picture
There is no picture on the TV screen.
Check that the cable is securely inserted. Try disconnecting the
cable from the PS3™ system or TV and then reconnecting it.
There may be a problem with the AV cable in use. Try using another
cable that is compatible with the PS3™ system.
Adjust the video input on the TV to match the input connector that is
being used to connect to the PS3™ system.
If the video output settings on the system do not match those of the
cable or TV in use, there may be no picture. If the screen goes
blank, turn off the system. Then, with only the system and the TV
connected, press the system's power button for more than 5
seconds to turn the system back on. The video output settings will
automatically be reset to the standard definition (SD) resolution.
The picture is distorted.
Check that the cable is securely inserted. Try disconnecting the
cable from the PS3™ system or TV and then reconnecting it.
The Blu-ray Disc (BD) or DVD cannot be played, or the picture is
distorted.
When outputting DVD content or PlayStation
SD resolution, only discs recorded in the NTSC standard can be
played (Taiwan/Hong Kong models only).
If the system is connected to a VCR, copy protection encoding on
some BDs and DVDs may cause image distortion, or may cause the
image to become lighter or darker. In such cases, connect the
system to the TV directly. You may also see a similar occurrence if
using a combination TV/VCR unit.
If the BD or DVD does not match the region code set in the system,
it cannot be played. For details, see "Region codes" (
Some DVDs are preset with parental control restrictions. Enter the
password that was set in
increase the parental control level.
If you record video content on DVD-R, DVD-RW, DVD+R or
DVD+RW media using a device such as a DVD recorder, you must
finalize the media before playing it on the PS3™ system. Finalize the
media using the recording device.
Some BDs are preset with parental control restrictions. Enter the
password that was set in
parental control level.
The BD may be disc-locked. Enter the password that was set when
the disc was created.
See also the notices under "Playable discs" (
Certain BDs cannot be played.
To play commercially available BD video software, in some cases
the encryption key for AACS (Advanced Access Control System)
may need to be renewed. The encryption key can be renewed when
the system software is updated.
(Security Settings) to temporarily
(Security Settings) to change the
3 format software in
®
page 49).
page 49).
EN
Before requesting service
43
Page 44

44
Before requesting service
The size of the video image and the TV screen do not match.
The settings of the connected TV and the video output settings of
the system may not match. Check the following items:
Check that the system's settings under
(Display Settings) [Video Output Settings] are correct.
Check that the settings of the connected TV are correct. For
details, refer to the instructions supplied with your TV.
With some video content, the screen size cannot be changed.
The screen color does not seem right.
If set to the default setting, the background color changes as the
time, day and month changes.
(Settings)
Audio
There is no sound.
Check that the muting function on the TV or speakers is turned off.
Also check that the volume is at the appropriate level.
If an audio device is connected, check the settings of the device.
For details, refer to the instructions supplied with the audio device.
There may be a problem with the AV cable. Try using another cable
that is compatible with the PS3™ system.
Some software do not support digital audio output.
If the system's audio output settings do not match the cable or
device in use, the system may not produce sound. Check that the
system's settings under
[Audio Output Settings] are correct.
Some content that support Dolby Digital, DTS, and other formats
may not produce audio from all channels.
(Settings) (Sound Settings)
Music files do not play.
Playback methods may be limited for some music files that are
distributed via the Internet. In such cases, it may not be possible to
play the content on the PS3™ system.
Network
A connection to the network cannot be established.
If using a wired connection, check that the Ethernet cable is
securely connected.
Check that the network settings are correct. Refer to the instructions
supplied by your Internet service provider or in the software manual
to make the correct network settings.
The message [An error occurred during communication with the
server. This is a DNS error. (80710102)] is displayed during the
Internet connection test.
If you connect the system to a modem that does not have a router
feature (bridge modem), you may need to set PPPoE settings.
Select
Connection Settings]
connection. Continue adjusting settings until you see the IP address
setting screen. Select [PPPoE], and then enter the user name and
password provided by your Internet service provider.
If you connect your system to a router, complete initial settings on
the router first. After completing the settings on the router, try to
adjust the network settings again by selecting
(Network Settings)
For details about the router settings, refer to the instructions
supplied with your router.
(Settings) (Network Settings) [Internet
[Custom] to start configuring the Internet
(Settings)
[Internet Connection Settings] [Easy] again.
Page 45

The message [The attempt to obtain an IP address timed out.] is
displayed during the Internet connection test.
If you disconnected the Ethernet cable that is used to connect to a
device such as a PC, and then reconnected it to the system, you
must restart both your system and the modem. After restarting both
devices, update your network settings by selecting
(Network Settings) [Internet Connection Settings] [Easy].
For details about restarting your modem, refer to the instructions
supplied with your modem.
If you are using a wireless connection, the WEP key may be wrong.
Check that you have the correct WEP key, and then enter it again.
The message [The PPPoE user name or password is not correct.] is
displayed during the Internet connection test.
Enter the correct user name and password for PPPoE. If you do not
know the user name and password, contact your Internet service
provider.
The Web page does not display properly.
Certain content, such as content that requires specialized software,
may not display properly on some Web pages.
(Settings)
Disc Media and USB Devices
The system does not recognize the disc.
Remove the disc and reinsert it.
If the disc has a label, insert it with the label side up.
Check whether the disc is scratched or dirty. If dirty, wipe it gently
with a soft cloth.
See also the notices under "Playable discs" (
page 49).
The disc cannot be removed.
Press the eject button for 10 seconds or longer to force the disc to
eject. After removing and before reinserting a disc into the system,
turn off the system, and then turn on the system again to resume
use.
The system does not recognize the USB device, or the USB device
does not operate properly.
Check that the device is inserted correctly.
The connected device may not be usable with the system.
Try using a different USB connector on the PS3™ system. The
device may not be recognized depending on the combination of
USB connectors in use.
In some cases, the system may not recognize the device if an
external USB hub is used and more than the allotted number of
devices are connected. Try removing unused devices.
When connecting a USB device, the message [An unknown USB
device has been connected.] is displayed.
The connected device may not be compatible with the system or
software application.
The device may be compatible with specific software only. Use
software that is compatible with the device.
There may be too many USB hubs connected. Try removing a USB
hub.
EN
Before requesting service
45
Page 46

46
Before requesting service
Wireless controller
The wireless controller does not function.
When using the wireless controller, you must pair it with the system
and assign a controller number. With the system turned on (power
indicator is lit solid green), connect the system and the controller
using the USB cable, and then press the PS button on the controller.
The controller number may have been cleared. Press the PS button
on the controller to reassign the number.
With some software, you may need to use a specified controller
number. Refer to the manual for the software in use.
Check the charge level of the wireless controller battery. When the
controller is used in wireless mode, it will not function if the battery
does not have any charge left. Charge the battery by connecting
the controller to the system with the USB cable.
If you cannot use the controller even after checking the items
above, try resetting the wireless controller by pushing the reset
button on the controller rear with a thin-tipped object such as a pen.
Reset button
The wireless controller operates in an abnormal manner.
Try resetting the wireless controller by pushing the reset button on
the controller rear with a thin-tipped object such as a pen.
Select (Settings) (Accessory Settings) [Controller
Vibration Function], and then try setting [Vibration Function] to [On].
The software may not support the vibration function. Refer to the
instruction manual for the software. For software downloaded from
(PlayStation®Store), refer to the compatibility notice information
included in the software's online description.
The response to button operations is slow.
The response speed may be slow on an LCD display or PC display.
This is not a malfunction.
The battery does not charge or does not fully recharge.
The battery can only be charged when the system is turned on
(power indicator is lit solid green).
See "Wireless controller battery" (
The battery charge does not last long.
The battery may be wearing out. Battery duration will gradually
decrease with repeated usage and age. See "Wireless controller
battery" (
Even when the wireless controller is not being used, it loses its
charge over time.
The controller's battery slowly loses its charge even when the
controller is not in use. It is recommended that you charge the
controller frequently.
page 50).
page 50).
The wireless controller does not vibrate.
Check that you are using a DUALSHOCK
SIXAXIS
Wireless Controller does not vibrate.
®
3 Wireless Controller. The
®
Page 47

Other issues
The system makes noise.
When using the system in a location where heat can build up, such
as in an enclosed AV cabinet, on carpet or a cushion, or near a wall
(within 10cm of the wall), the internal fan will rotate rapidly to reduce
the system's temperature and this may generate increased noise.
Move the system to a location with good ventilation.
Depending on how a disc is being used, such as when copying an
audio CD to the hard disk or starting software from a disc, disc
noise may be louder than normal.
Furthermore, some software may cause more disc noise than
others.
You forgot your password for security settings.
If you restore the system using (Settings) (System Settings)
[Restore Default Settings], your password will return to "0000".
However, note that all settings other than the password will also be
reset. Once these settings are reset, they cannot be recovered.
The system is warm.
When the system is being used or is turned on, it may become
warm. This is not a malfunction.
The screen freezes during gameplay.
Check whether the disc is scratched or dirty. If dirty, wipe it gently
with a soft cloth.
If you have game data for PlayStation
try deleting the game data and reinstalling the software. Select
(Game) (Game Data Utility), press the button, and
then delete the game data from the options menu. Next, reinstall the
PlayStation
data for the game.
3 format software. Be careful not to delete the saved
®
3 format software installed,
®
The screen is frozen. The system does not operate.
Disconnect all accessories such as USB devices from the system,
and then restart the system. Pressing the power button for 15
seconds or longer will force the system to turn off (enter standby
mode). After the system turns off, turn it on again.
The power indicator is flashing red and green alternately.
The interior of the system has become hot. Check whether the
system is being used in a hot location or whether the vents are
blocked. Continuing to use the system in the above condition will
cause it to stop functioning. Turn the system off and leave it unused
until it cools down. After the system cools down, turn it on again.
The power indicator is flashing red and the system does not
operate.
The temperature inside the system may be too high. Check whether
the system is being used in a hot location or whether the vents are
blocked. Press the power button to stop the flashing, and then leave
the system turned off until it cools down. After it cools down, turn on
the system again.
The system does not recognize content.
The content may be of a format that is not supported by the system.
Content of types not supported by the system will not be
recognized. For information on supported formats, refer to the
online user's guide (http://manuals.playstation.net/document/).
EN
Before requesting service
47
Page 48

Specifications
Design and specifications are subject to change without notice. Information about
system functionality and images published in this document may vary from those
for your PS3™ system, depending on the system software version in use.
PlayStation®3 system
CPU
GPU
Audio output
Memory
Hard disk 2.5" Serial ATA
Inputs/
outputs*
Hi-Speed USB
2
(USB 2.0)
Networking
Controller
3
AV output
Resolution*
HDMI OUT connector*
AV MULTI OUT connector
Digital out (optical) connector
BD/DVD/
CD drive
Maximum read rate
(read only)
4
Cell Broadband Engine™
RSX™
LPCM 7.1ch, Dolby Digital,
Dolby Digital Plus, Dolby TrueHD, DTS,
(CECH-2006A / CECH-2007A / CECH-2012A)
(CECH-2006B / CECH-2007B / CECH-2012B)
DTS-HD, AAC
256 MB XDR Main RAM,
256 MB GDDR3 VRAM
120 GB*
1
250 GB*1
2
Ethernet (10BASE-T, 100BASE-TX,
1000BASE-T) × 1
IEEE 802.11 b/g
Bluetooth
Wireless Controller (Bluetooth
1080p, 1080i, 720p, 480p/576p,
2.0 (EDR)
®
480i/576i
)
®
1
1
1
BD × 2 (BD-ROM)
DVD × 8 (DVD-ROM)
CD × 24 (CD-ROM)
Type: Semiconductor, continuous
BD Wavelength: 400 - 410 nm
Power: Max. 17.5 mW
Laser
Wavelength: 655 - 664 nm
DVD
Power: Max. 2.6 mW
Wavelength: 770 - 800 nm
CD
Power: Max. 4.0 mW
Power
Power consumption
External dimensions
(excluding maximum projecting part)
Mass
Operating temperature
1
*
Hard disk capacity calculated using base 10 mathematics (1GB =
AC 110V/220-240V, 50 / 60 Hz*
Approx. 250 W
Approx. 290 × 65 × 290 mm
(11.5 × 2.6 × 11.5 in)
(width × height × length)
Approx. 3.2 kg (7.1 lb)
5°C - 35°C (41°F - 95°F)
1,000,000,000 bytes). The system software for this PS3TM system calculates
capacity using binary mathematics (1GB = 1,073,741,824 bytes) and
subsequently displays lower capacity and free space. The difference in
displayed values does not indicate a difference in the actual number of bytes.
2
*
Functionality of all connected devices is not guaranteed.
3
*
SD resolution varies depending on the model of the PS3™ system in use and
the content that is being played.
4
*
"Deep Color", "x.v.Color (xvYCC)" and "HD lossless audio format" defined by
HDMI ver1.3a are supported.
5
*
Varies depending on the country or region.
DUALSHOCK®3 Wireless Controller
Battery type
Voltage
Battery capacity
Mass
Built-in rechargeable
Lithium-Ion battery
DC 3.7 V
610 mAh
Approx. 180 g (6.4 oz)
5
48
Page 49

BRAVIA™ Sync
3
ALL
"BRAVIA™ Sync" is a Sony product feature that allows you to use the
remote controls of BRAVIA™ televisions (Sony Corporation products) to
operate various devices
cables. BRAVIA™ Sync uses the control signals that are transferred
through the HDMI connections.
To enable the BRAVIA™ Sync feature, go to (Settings) (System
Settings) [Control for HDMI], and set the option to [On]. For details,
refer to the online user's guide (http://manuals.playstation.net/document/)
and the instructions supplied with the BRAVIA™ products in use.
Hint
This feature can only be used on devices that support the BRAVIA™ Sync feature.
Compatibility with all devices that comply with the HDMI CEC specification is not
guaranteed.
that are connected to each other through HDMI
PlayStation
CD
1
*
Playback of BD-RE ver. 1.0 discs is not supported.
2
*
PlayStation®2 format software titles do not perform on this system.
3
*
This product has limited backward compatibility with PlayStation® format
software. Many PlayStation
is not guaranteed.
4
*
Playback of Super Audio CDs is not supported.
CD-DA (audio CD)*
CD-R/RW
format software titles operate, but full compatibility
®
format CD-ROM*2*
®
4
3
Region codes
Depending on the disc, a region code that is based on the geographic region
where the disc is distributed may be assigned. This system can play discs
marked with the following region codes.
Disc Region code
Blu-ray Disc (BD)
EN
Specifications
Playable discs
Blu-ray Disc (BD)
DVD
PlayStation
BD-ROM
BD-R
1
BD-RE*
DVD-ROM
DVD+R/RW
DVD-R/RW
AVCHD
DSD Disc
3 format BD-ROM
®
DVD
PlayStation®3 format BD-ROM
PlayStation® format CD-ROM
DVD and PlayStation®3 format software
When outputting DVD content or PlayStation
only discs recorded in the NTSC standard can be played (Taiwan/Hong Kong
models only).
3 format software in SD resolution,
®
49
Page 50

Specifications
When playing PlayStation
video playback at 59.94 Hz is required.
3 format software in HD resolution, a TV that supports
®
DVD-R/DVD-RW/DVD+R/DVD+RW discs
Discs that have not been finalized cannot be played.
Notices
Use only circular-shaped discs with the system. Do not use irregularly-shaped
discs (for example, heart- or star-shaped discs). Using irregularly-shaped discs
may cause a malfunction.
Do not use damaged, re-shaped or repaired discs. Use of such discs may
cause a malfunction.
When using an 8 cm disc, insert the disc in the system without an adaptor.
The audio CD playback feature of this system is designed to conform to the
Compact Disc (CD) standard. Some record companies have started marketing
music discs encoded with copyright protection technologies. Some of these
music discs do not conform to the CD standard and may not be playable on
this system.
A DualDisc is a dual-sided disc that combines a DVD side and an audio side.
Note that the audio side is not guaranteed to play because this type of disc
does not conform to the specifications required for an audio Compact Disc
(CD).
If a device that is not compatible with the HDCP (High-bandwidth Digital
Content Protection) standard is connected to the system using an HDMI cable,
video or audio cannot be output from the system.
Copyright-protected Blu-ray video discs can only be output at 1080p using an
HDMI cable connected to a device that is compatible with the HDCP
(High-bandwidth Digital Content Protection) standard.
When you use the AV MULTI OUT connector of the system to connect to a TV,
copyright-protected video from a BD or from video files may be output at
resolutions lower than 1080p. Also, these types of video will be output at
esolutions of 576p or lower if recorded at 1080i (50 Hz) or 720p (50 Hz).
r
When playing discs with content that was copied fraudulently, abnormal sounds
may be produced or the content may not play correctly.
To continuously enjoy playback of copyright-protected BDs, in some cases the
encryption key for AACS (Advanced Access Control System) may need to be
renewed. To renew the encryption key, the system must be updated.
Some discs may not be playable due to scratches, dust, the quality of
recording, or the characteristics of the recording device.
In rare instances, CDs, DVDs, BDs and other media may not operate properly
when played on the PS3™ system. This is primarily due to variations in the
manufacturing process or encoding of the software.
Wireless controller battery
Caution
If you come into contact with material from a leaking battery, take the
following actions:
If the material gets into the eyes, do not rub. Immediately flush the eyes
–
with clean water and seek medical attention.
–
If the material comes into contact with the skin or clothes, immediately
rinse the affected area with clean water. Consult your physician if
inflammation or soreness develops.
Do not allow the battery to come into contact with fire or subject it to extreme
temperatures such as in direct sunlight, in a vehicle exposed to the sun or
near a heat source.
Wireless controller battery life
The battery has a limited lifespan. Battery duration will gradually decrease with
repeated usage and age.
Battery life also varies depending on the storage method, usage state,
environment and other factors.
50
Page 51

Storage
When the wireless controller is not used for an extended period of time, it is
recommended that you fully charge it at least once a year in order to maintain
battery functionality.
When disposing of the wireless controller
The lithium-ion battery of the wireless controller is recyclable. When
disposing of the wireless controller, remove the battery and follow local
regulations regarding disposing of batteries.
Removing the battery
Caution
Remove the battery in a location out of the reach of small children to help
prevent accidental swallowing of small parts such as the screws.
Be careful not to hurt your nails or fingers when removing the controller
casing.
For safety reasons, attach tape or a seal on the metal part of the battery
before disposing.
Do not handle damaged or leaking Lithium-Ion batteries.
Notice
Other than when disposing of the wireless controller, never remove the screws
and never remove the battery from the wireless controller.
2 Using a crosshead screwdriver, remove the screws (5 places).
3 Remove the casing.
Push in the direction of the arrow.
Pull the casing apart.
4 After disconnecting the connector, remove the battery.
Connector
EN
Specifications
1 Disconnect the USB cable from the wireless controller.
Battery
51
Page 52

WARRANTY
For warranty terms and conditions of respective regions, please refer to following
official websites:
Hong Kong: http://asia.playstation.com/hk/warranty
Singapore: http://asia.playstation.com/sg/warranty
Taiwan: http://asia.playstation.com/tw/warranty
Other regions: http://asia.playstation.com
52
Page 53

Copyright and trademarks
" ", "PlayStation", "DUALSHOCK" and "SIXAXIS" are registered trademarks of
Sony Computer Entertainment Inc. "
same company.
"XMB" and "xross media bar" are trademarks of Sony Corporation and Sony
Computer Entertainment Inc.
"SONY" and "
"Memory Stick Duo", "
name and logo are trademarks or registered trademarks of Sony Corporation.
"
"AVCHD" and "AVCHD" logo are trademarks of Panasonic Corporation and Sony
Corporation.
" are registered trademarks of Sony Corporation. "Memory Stick",
" and AOSS™ are the trademarks of BUFFALO INC.
", "ATRAC", "BRAVIA" logo, "BRAVIA" and the "x.v.Color"
" and " " are trademarks of the
Contains Macromedia® Flash® Player technology by Adobe
Copyright © 1995-2008 Adobe Systems Incorporated. All rights reserved. Flash,
Macromedia, and Macromedia Flash are either trademarks or registered
trademarks of Adobe Systems Incorporated in the United States and/or other
countries.
© 2006 All Media Guide, LLC
Content and technology provided by All Media Guide
"Blu-ray Disc" and
Copyright © 2004-2006 Cambridge Silicon Radio Ltd.
The Bluetooth
any use of such marks by Sony Computer Entertainment Inc. is under license.
Other trademarks and trade names are those of their respective owners.
word mark and logos are owned by the Bluetooth SIG, Inc. and
®
are trademarks.
.
®
EN
Copyright and trademarks
53
Page 54

54
Copyright and trademarks
DivX, DivX Certified, and associated logos are trademarks of DivX, Inc. and are
used under license.
DLNA and DLNA CERTIFIED are trademarks and/or service marks of Digital
Living Network Alliance.
Manufactured under license under U.S. Patent #’s: 5,451,942; 5,956,674;
5,974,380; 5,978,762; 6,226,616; 6,487,535 & other U.S. and worldwide patents
issued & pending.
DTS is a registered trademark and the DTS logos, Symbol, DTS-HD and DTS-HD
Master Audio are trademarks of DTS, Inc.
© 1996-2008 DTS, Inc. All Rights Reserved.
Manufactured under licence from Dolby Laboratories. Dolby and the double-D
symbol are trademarks of Dolby Laboratories.
U.S. and foreign patents licensed from Dolby Laboratories.
The DVD logo is a trademark.
All of the Japanese fonts and some parts of the Latin fonts in this machine use
characters provided by Fontworks Japan, Inc.
HDMI, the HDMI logo and High-Definition Multimedia Interface are trademarks or
registered trademarks of HDMI Licensing, LLC.
ATOK is a registered trademark of JUSTSYSTEM CORP. in Japan and other
countries.
Page 55

This product incorporates copyright protection technology that is protected by
U.S. patents and other intellectual property rights. Use of this copyright protection
technology must be authorized by Macrovision, and is intended for home and
other limited viewing uses only unless otherwise authorized by Macrovision.
Reverse engineering or disassembly is prohibited.
Anti-Grain Geometry - Version 2.0
Copyright © 2002-2004 Maxim Shemanarev (McSeem)
Permission to copy, use, modify, sell and distribute this software is granted
provided this copyright notice appears in all copies.
This software is provided "as is" without express or implied warranty, and with no
claim as to its suitability for any purpose.
Java and all Java based trademarks and logos are trademarks or registered
trademarks of Sun Microsystems, Inc. in the U.S. and other countries.
EN
Copyright and trademarks
@(#)fdlibm.h 1.5 95/01/18
Copyright © 1993 by Sun Microsystems, Inc. All rights reserved
This product includes RSA BSAFE
Inc.
RSA, BSAFE are either registered trademarks or trademarks of RSA Security Inc.
in the United States and/or other countries.
RSA Security Inc. All rights reserved.
This product adopts S3TC texture compression technology under licence from S3
Graphics, Co., Ltd.
Cryptographic software from RSA Security
®
Developed at SunSoft, a Sun Microsystems, Inc. business.
Permission to use, copy, modify, and distribute this software is freely granted,
provided that this notice is preserved.
MPEG Layer-3 audio coding technology and patents licenced from Fraunhofer IIS
and Thomson.
Mp3Surround audio coding technology and patents licensed from Fraunhofer IIS,
Thomson, and Agere.
The USB-IF Logos are trademarks of Universal Serial Bus Implementers Forum,
Inc.
55
Page 56

Copyright and trademarks
eZiText® and Zi® are registered trademarks of Zi Corporation.
Portions of this software are copyright © 1996-2008 The FreeType Project
(www.freetype.org). All rights reserved.
This software is based in part on the work of the Independent JPEG Group.
Visit http://www.scei.co.jp/ps3-license/index.html for other licensees and
trademarks.
All other trademarks are the property of their respective owners.
56
Page 57

57
Page 58

警告
CLASS 1 LASER PRODUCT
LASER KLASSE 1 PRODUKT
為避免觸電,請勿打開外殼擅自分解。維修僅能由專業
的維修人員進行。
注意
非依指定方式而進行的操作、調整以及執行動作可能會
導致放射線洩漏。
使用本產品時若搭配光纖,可能會增加眼睛受損的危
險。
依據 IEC60825-1+A2:2001,本家電用品隸屬 CLASS 1 LASER 產品分類。
以下規定僅適用於台灣
依據低功率電波輻射性電機管理辦法
第十二條 經型式認證合格之低功率射頻電機,非經許可,公司、商號或使用者均不
得擅自變更頻率、加大功率或變更原設計之特性及功能。
第十四條 低功率射頻電機之使用不得影響飛航安全及干擾合法通信;經發現有干擾
現象時,應立即停用,並改善至無干擾時方得繼續使用。
前項合法通信,指依電信法規定作業之無線電通信。低功率射頻電機須忍受合法通
信或工業、科學及醫療用電波輻射性電機設備之干擾。
製造年份:請見產品本體標示
製造號碼:請見產品本體標示
光敏感/癲癇/突發性疾病
有極少數人,當看到某些亮光或閃光時,可能會有癲癇發作或暫時性眩暈的情形。
如果這些人看到電視螢幕上的某些圖案或背景,或者在遊玩遊戲時,可能會引發癲
癇或暫時性眩暈。某些從未有過癲癇的人,也可能在這些情況下被引發出來。如果
您或您的家人有癲癇狀況或任何突發性疾病,在遊玩遊戲前請先洽詢醫生。
如果您或您的孩子有以下任何一種健康問題或症狀,請立即停止使用,必須先洽詢
醫生,才能繼續遊玩遊戲:
頭暈,
視覺障礙,
眼睛或肌內抽動,
意識不清,
精神恍惚,
突發性疾病,或者
不自主的動作或肌肉抽動。
必須經醫生許可才能繼續遊玩遊戲。
減少發病可能性的遊戲使用和操作注意事項
請在光線良好的地方使用,並且盡量與螢幕保持遠距離。
避免使用大螢幕電視機。請使用尺寸最小的電視螢幕。
避免長時間使用 PS3™ 主機。每玩一小時請休息 15 分鐘。
避免在您疲勞或需要睡眠時遊玩。
58
Page 59

無線電波
無線電波可能會影響電子設備或醫療裝置(例如心律調整器),且可能會導致這些
設備或裝置故障或損壞。
若您有使用心律調整器或其他醫療裝置,請在使用無線網路機能(Bluetooth
無線 LAN)前,先詢問您的主治醫生或您身上之醫療裝置的製造廠商。
請勿在下列場所使用無線網路功能:
– 禁止使用無線網路的場所,如:醫院。在醫院中使用主機時,請遵守其規定。
– 接近火災警報器、自動門或其他類型之自動化設備的場所。
與
®
廢電池請回收
(僅適用於台灣)
系統軟件
本產品中內建的系統軟件乃受 Sony Computer Entertainment Inc. 限制授權。詳
情請閱覽以下網站:http://www.scei.co.jp/ps3-eula
關於國家出口控制
本產品可能因各國立法之規定而被列爲限制出口商品。請嚴格遵守相關法條及任何
與本產品之管轄權有關之法律規定。
美國出口管理規則之注意事項
本產品內建之軟件含有被認定為美國出口管理規則(Export Administration
Regulations) 之管制對象的加密技術,禁止出口或再出口至美國政府禁止出口的國
家。同時,亦禁止將本產品出口或再出口至美國禁止交易的個人或團體。
CT
警
告
59
Page 60

目錄
警告 ..................................................... 58
使用前須知事項 ........................................... 61
關於 PS3™ 主機的線上資訊 ................................ 66
XMBTM (XrossMediaBar) 選單 ................................ 67
零件名稱...............................................68
⼊門指南...............................................69
連接方式 ................................................. 69
執行系統軟件的初始設定 ................................... 71
PS3™ 主機的影像輸出 ..................................... 72
連接數位⾳響裝置 ......................................... 76
啟動和關閉 PS3™ 主機電源..............................77
使用無線控制器.........................................78
播放內容...............................................80
Blu-ray Disc (BD)/DVD/CD ................................. 80
播放 USB 裝置的內容 ...................................... 81
可播放或閱覽之檔案規格 ................................... 81
玩遊戲.................................................82
支援的遊戲 ............................................... 82
玩遊戲 ................................................... 82
控制器設定 ............................................... 82
PlayStation®3 規格軟件的保存資料 .........................82
PlayStation® 規格軟件的保存資料 ..........................83
調整網路設定...........................................84
調整網路設定(有線) ..................................... 85
調整網路設定(無線) ..................................... 85
調整自訂設定 ............................................. 87
連接網際網路(互聯網).................................88
使用網路瀏覽介⾯ ......................................... 88
閱覽用⼾指南 ............................................. 88
新建一個 PlayStation®Network 帳⼾ ........................88
PS3™ 主機更新.........................................89
使用螢幕鍵盤...........................................90
視聽年齡限制...........................................91
更換硬碟...............................................92
備份資料 ................................................. 92
移除硬碟 ................................................. 93
更換硬碟 ................................................. 94
重新安裝系統軟件 ......................................... 95
還原已備份的資料 ......................................... 96
重設 PS3™ 主機........................................97
丟棄或轉讓 PS3™ 主機前 .................................. 97
送修前.................................................98
規格 .................................................... 103
保用 .................................................... 107
版權與商標 .............................................. 108
60
Page 61

使用前須知事項
使用本產品之前,請先仔細閱讀所有使用前須知事項。
關於安全
本產品是在充分重視安全性能的情況下設計的。但如果使用不當,任何電器產品都
有可能引起火災觸電或人身傷害的潛在危險。爲確保安全操作,請遵循以下各項規
則:
遵守所有警告條文、注意事項及使用說明。
定期檢查交流電源線是否有損壞,以及電源插頭或電源插座周圍是否有堆積灰
塵。
如果裝置出現動作不正常,或者發出異常聲
請立即停止使用,並從電源插座中拔掉交流電源線插頭及所有的其他連接線。
如果 PS3™ 出現故障情形,請聯絡包裝盒上記載的 PS3™ 消費者服務中心,以
取得必要協助。
⾳或氣味,或因過熱而無法觸碰時,
使用和保養
請在光線良好的地方使用,並與電視螢幕保持一段安全距離。
避免長時間使用 PS3™ 主機。每玩一小時請休息 15 分鐘。
避免在您疲勞或需要睡眠時遊玩。
若您在操作無線控制器時忽然開始感覺疲勞,或手臂、手腕感覺不舒服或疼痛
時,請立即停止使用主機。如果不良症狀持續存在,請立即就醫。
若您有遭遇下列健康問題,請立即停止使用主機。如果不良症狀持續存在,請立
即就醫。
– 頭昏眼花,噁心、疲勞或類似暈船感覺
– 當眼睛、耳朵、手臂、手腕等,身體一部分感覺不舒服或疼痛時
請將主機與周邊機器(包括連接線之連接頭等零件)放置在幼童拿不到的地方保
管。
⼊
交流電源線插
請勿在雷雨天氣中,觸摸主機、連接線或附屬品。
插座時,請勿連接 USB 連接線以外的連接線。
與主機連接的任何電視機或配件,必須為操作正常且沒有任何損壞。若與主機連
接的電視機或配件有任何問題或損壞,可能會損壞電視機或配件、或主機本身。
所有的電子產品,若與任何有問題或損壞的配件連接,或所連接之電源插頭未有
正確連接線路,皆可能會導致出現火花,引起火災。
切勿在靠近水的場所使用主機或附屬品。
小
請勿讓液體、
請勿觸摸主機或附屬品的端子部分。
請勿將主機或附屬品暴露在灰塵、煙霧或蒸氣中。此外,請勿將主機放置在有很
多灰塵或香煙煙霧的場所。在內部零件(例如透鏡)中堆積的灰塵或香煙煙霧,
可能會導致主機故障。
請勿將主機或附屬品放在高溫、濕氣極重或受日光直射的地方。
請勿將主機或附屬品放在傾斜、不平穩或易受震動的地方。
請勿以垂直或水平以外的方式放置主機。以垂直方式放置主機時,請使用本主機
型號專用的直立架(另售)。此外,亦請勿於啟動主機電源後,變更主機的擺放
位置。
請小心搬運主機。若您未確實持有主機,可能會導致主機掉落並有造成損壞或人
身傷害的潛在性危險。
將光碟插
請勿在硬碟保存或載⼊
請勿於主機上站立或放置物品,且請勿在主機上堆放其他裝置。
請勿將主機和與其連接的附屬品放置在地板或可能絆倒人的地方。
請勿讓身體長時間接觸使用中的主機或從主機通風孔排出的氣體。長時間接觸這
些可能導致低溫灼傷。
主機與電漿電視(Plasma TV)或投影* 電視機連接時,切勿讓畫
態影像,否則可能會導致模糊影像的永久殘留。
* LCD 螢幕類型除外
建議雙親等監護人應於兒童連線遊玩時陪伴在旁,以確保網際網路(互聯網)使
用時的安全可靠。
零件或其他異物掉⼊主機或附屬品中。
⼊
主機時,請勿移動或改變主機位置。震動可能刮傷光碟或主機。
資料時關閉主機的電源。
長時間顯示靜
⾯
CT
使
用
前
須
知
事
項
61
Page 62

使用前須知事項
使用 DUALSHOCK®3 無線控制器時的注意事項*
若您在操作 DUALSHOCK
舒服或疼痛時,請立即停止使用主機。如果不良症狀持續存在,請立即就醫。
DUALSHOCK
骼、關節或肌肉有任何不適或受傷時,請勿使用震動機能。若您有任何不適或受
傷,請勿遊玩需使用 DUALSHOCK
為[關]。
避免長時間使用 DUALSHOCK
請注意,部份軟件會將震動機能預設為「開」。若要停用震動機能,請按下控制
器的 PS 按鈕,再選擇[控制器設定][震動機能][關]。
使用無線控制器的動態感測(Motion Sensor)機能時,請注意以下事項。控制器
若撞擊到人體或物品,可能會導致意外、傷害或損傷。
– 使用前,請檢查您周圍是否有足夠的空間。
– 使用控制器時,請確實握住並確認它不會從您手中滑出。
– 使用經由 USB 連接線與 PS3™ 主機相連的控制器時,請確認該連接線不會撞
* 此注意事項亦適用於其他控制器。
3 無線控制器的震動功能可能會令傷勢惡化。當您手臂、手腕的骨
®
擊到人體或物品。同時並確實避免該連接線忽然被從 PS3™ 主機強硬拔除。
3 無線控制器時忽然開始感覺疲勞,或手臂、手腕感覺不
®
3 無線控制器的遊戲,否則請先將震動機能設定
®
3 無線控制器。請每 30 分鐘休息一次。
®
通風孔
請勿阻塞任何通風孔。爲維持良好的通風,請遵循以下各項規則:
將主機放置在距離牆壁至少 10 cm 以上的場所。
切勿放置在有長纖維的地毯或毛毯上。
切勿放置在狹窄或擁擠的空間中。
請勿用布覆蓋。
切勿讓灰塵堆積在通風孔中。
使用交流電源線
請定期檢查交流電源線,以確保操作安全。若有損壞,請立即停止使用,並連絡
包裝盒上記載的的 PS3™ 消費者服務中心。
請勿使用隨附之交流電源線以外的其他電源線。且切勿改造該電源線。
請勿用濕手觸摸交流電源線的端子。
請避免誤踩或掐擠交流電源線,尤其是插頭、轉接用的插座與電源線等自主機延
伸出來的組件更需注意。
請勿在電線上放置重物。
請勿將交流電源線放置在靠近加熱設備的場所,且切勿讓電源線暴露於高溫中。
⼊
請勿讓灰塵或異物堆積於交流電源線的連接端周圍。在連接或插
前,需確認是否有灰塵或異物堆積於交流電源線插頭、連接線末端之端子部位、
電源插座或主機背⾯
擦拭。
當您準備開始清潔、移動,或打算長時間不使用主機時,請自電源插座中拔出交
流電源線。在拔下交流電源線時,請捉住電源插頭筆直地將插頭從電源插座拔
出。切勿拉扯連接線或強制朝特定方向拔取。
請勿將交流電源線插
壓器或汽車專用的反相器,可能會導致交流電轉換器發熱,並造成灼傷或故障。
的交流電源輸⼊端子。插頭或端子變髒時,請使用乾淨軟布
⼊
變壓器或反相器。將交流電源線插⼊海外旅行者使用的變
交流電源線
切勿分解、改造主機或附屬品
使用 PS3™ 主機與附屬品時務必請遵守產品基本文書記載的指示說明。嚴禁擅自分
解或改造主機、附屬品,並禁止分解和使用其電路結構。擅自分解主機或附屬品將
喪失所有保證權益。切勿擅自維修 PS3™ 主機內部的零件(可依需要移除標準配備
的硬碟但禁止分解或改裝),否則可能會有遭受雷射輻射或觸電的危險。
62
Page 63

網路
連接網路需先連接寬頻網際網路(互聯網)。
需支付與網路連線時的必要費用。詳細請參閱服務契約之提供內容或聯絡您
用⼾
的網路服務商。
切勿使用一般家庭的標準電話線或本說明書內所述類型以外的連接線。使用類型
錯誤之連接線連接,可能會造成超過 LAN 連接時需要量的電流通過,並可能會導
致過熱、火災或是故障。
無線網路功能
本產品之無線網路功能使用的 2.4 GHz 無線電波範圍乃屬各種裝置共用分享。本
產品的設計會降低使用相同範圍之其他裝置的作用。然而,來自其他裝置的干擾
仍可能會降低連線速度、縮短訊號範圍,或導致連線忽然意外中止。
使用 PS3™ 主機的掃描功能選擇無線 LAN 基地台(access point)時,可能會
顯示非提供公眾使用的基地台。您僅能使用經授權能合法使用的基地台或利用公
眾無線 LAN、熱點(hotspot)服務。
結露現象
若把 PS3™ 主機從寒冷的地方直接搬放到溫暖的場所,機內的透鏡或光碟可能會凝
結水氣。此種現象可能會導致主機無法正常運作。這時,請把光碟取出,關閉電
源,並拔掉主機電源插頭。在水氣尚未蒸發前,切勿再次插⼊
需要數小時)。如果主機仍無法恢復正常的話,請聯絡包裝盒上記載的 PS3™ 消費
者服務中心,以取得必要協助。
光碟(水氣蒸發可能
清潔
為了安全著想,請在開始清潔主機或已連接之附屬品前,先自電源插座中拔出交流
電源線。
外殼表⾯(主機和無線控制器的塑膠蓋)
請遵循以下使用說明,以免產品外殼變形或變色。
使用軟布輕柔擦拭。
切勿使用殺蟲劑或其他具揮發性的物質。
切勿在產品外殼上長時間放置任何橡膠或乙烯基材質。
切勿使用溶劑或其他化學藥劑。切勿使用經化學處理的擦布擦拭。
通風孔
當主機通風孔堆積灰塵時,使用低功率的吸塵器去除灰塵。
端子
主機或交流電源線的端子部位出現髒污時請勿繼續使用。未去除髒污前若繼續使
用,可能會阻塞電流通過。此時應使用乾淨軟布去除灰塵。
CT
使
用
前
須
知
事
項
63
Page 64

使用前須知事項
光碟
相容性的注意事項
部分媒體可能因地區或區域的限制而無法使用您的主機啟動。詳細請參閱媒體上的
包裝。
保養
請勿觸摸光碟光亮的讀寫⾯,持拿光碟時,請持其邊緣。
請勿在光碟上粘貼紙張或膠帶,以及在光碟上寫字。
⾳
光碟上的指印、灰塵、污垢或刮痕可能使圖像失真,或降低聲
保養,並且在使用前檢查光碟是否乾淨。
保管
請勿將光碟放在高溫、濕氣極重或受日光直射的地方。
若長時間不使用光碟,請將它們保管在光碟盒中。堆放未收納的光碟或傾斜放置
保管可能造成光碟彎曲。
清潔方式
用軟布清潔光碟,從中間往外輕輕地擦拭。
請勿使用溶劑、唱片清潔劑、防靜電噴霧劑或其他化學藥劑,否
則可能會損壞光碟。
品質。必須小心
64
Page 65

CT
使
用
前
須
知
事
項
65
Page 66

關於 PS3™ 主機的線上資訊
本使用說明書包含硬件機能的說明,並提供如何設置及操作 PS3™™主機的基本資訊,包
括關於安全和正確使用主機的警告條文和使用前須知事項。您亦可透過網際網路(互聯
網)取得以下資訊。
線上用⼾指南 http://manuals.playstation.net/document/
此用⼾指南包含了使用 PS3™ 主機時的相關詳細資訊。
PlayStation® 官方網站 http://asia.playstation.com
可取得關於以下各項的最新資訊:
系統軟件更新
PlayStation
PlayStation
3 產品,例如遊戲軟件及硬件周邊產品
®
產品支援,包括產品的最新常見問題及解答
®
好友
聊天與交換訊息
PlayStation®Network
使用 PlayStation®Network 服務
網路
連接網際網路(互聯網)
遊戲
玩遊戲
影像
請檢查和確認箱子內是否具備以下物品。如果⽋缺任何物品,請打電話給包裝盒上
記載的 PS3™ 消費者服務中心
PlayStation
DUALSHOCK
3 主機
®
3 無線控制器
®
說明書等
。
AV 連接線
交流電源線
本主機僅隨附以下的其中一種連接線。接
頭之形狀會因國家或區域而異。
USB 連接線
本文書中介紹的系統機能和使用的圖像可能因使用之系統軟件的版本先後,而與您持有之 PS3™ 主機
不同。
66
播放影像
⾳樂
播放⾳樂
相片
顯示圖像
設定
調整 PS3™ 主機設定
使用者
選擇登⼊ PS3™ 主機的使用者
Page 67

XMBTM (XrossMediaBar) 選單
PS3™ 主機含有稱為 XMBTM(交叉媒體廊)的使用者介⾯。
分類
1
使用 或 按鈕選擇分類。
2
項目
使用
或 按鈕選擇項目。
方向按鈕:
用於選擇畫⾯上的分類/項目
按鈕:
取消操作
按鈕:
確認選擇的項目
PS 按鈕:
顯示 XMBTM 選單
開啟/關閉主機電源
按鈕:顯示選項選單/操作介⾯
選擇圖示後按下
圖示 選項選單
按鈕會顯示選項選單。播放內容時按下 按鈕會顯示操作介
3
⾯。
按下
按鈕確認選擇的項目。
操作介⾯
67
Page 68

零件名稱
68
主機前⾯/背⾯
光碟槽
電源按鈕
退出按鈕
無線 LAN 讀取燈
HDD 讀取燈
USB 連接埠
LAN 連接埠
HDMI 輸出端子
通風孔
交流電源輸⼊端子
AV 多重輸出端子
光纖數碼輸出端子
注意
請勿放置在封閉的櫃子或其他可能積熱的場所中使用。否則可能會導致主機過
熱並引發火災、人身傷害或故障。
主機內部溫度逐漸昇高
立即關閉主機電源(
將主機搬移至通風良好的場所並繼續使用。
後,電源指示燈會紅、綠燈交互閃爍。遇此情形時,請
第 77 ⾴)並暫時中止使用。待主機確實冷卻後,才
DUALSHOCK®3 無線控制器
埠指示
燈
L2 按鈕
L1 按鈕
方向按鈕
左操作桿/
*
L3 按鈕
SELECT(選擇)
* L3 按鈕和 R3 按鈕僅會於按壓操作桿時發生作用。
按鈕
重要
請勿將主機放置在有很多灰塵或香煙煙霧的場所。在內部零件(例如透鏡)中
堆積的灰塵或香煙煙霧,可能會導致主機故障。
電源指示燈持續亮綠燈/閃爍綠燈時,請勿移動或變換主機的擺放位置,否則
產生的震動可能會導致資料遺失/毀損或主機故障。
提示
以垂直方式放置主機時,請使用本主機型號專用的直立架(另售),以維持主機平
穩。
USB 連接埠
R2 按鈕
R1 按鈕
按鈕
按鈕
按鈕
按鈕
右操作桿/
R3 按鈕*
START(開始)按鈕
PS 按鈕
Page 69

⼊門指南
Y L R
P
R
/C
R
P
B
/C
B
COMPONENT VIDEO IN AUDIO IN
VIDEO L
AUDIO
R
連接方式
連接主機與電視
您可使用以下任何一個方法,連接主機與電視。
以 SD(標準解析度)輸出影像
CT
⼊
門
指
南
HDMI
輸出端子
AV 多重
輸出端子
若螢幕上未顯示任何影像
若變換連接主機和電視機的連接線種類,螢幕上可能未
能顯示任何影像。若未顯示任何影像,可在關閉主機電
源後,按下電源按鈕超過 5 秒以上(直到主機發出兩次
嗶聲),以重新啓動電源。影像輸出設定隨後會恢復爲
標準(SD)解析度。
AV 多重輸出端子
AV 連接線
影像輸⼊端子
以 HD(高解析度)輸出影像 - 影像色差
AV 多重輸出端子
影像色差連接線(另售)
影像色差輸⼊端子
以 HD(高解析度)輸出影像 - HDMI
HDMI
輸出端子
提示
有關影像輸出連接線的種類及支援之影像模式的詳細資訊,請參閱 "PS3™ 主機的影像輸出"
第 72 ⾴)及 "影像輸出連接線的種類"( 第 73 ⾴)。
(
您可利用家庭娛樂用途之 AV 接收器(擴大機)等支援數碼(數位)聲⾳
詳細資訊,請參閱 "連接數位⾳響裝置"(
HDMI 連接線(另售)
HDMI 輸⼊端子
輸出的⾳響裝置連接。相關的
第 76 ⾴)。
電視
電視
電視
69
Page 70

⼊門指南
連接 LAN 連接線(另售)
使用 LAN 連接線讓主機與網際網路(互聯網)連線。
70
LAN 連接埠
交流電源
端子
輸⼊
提示
使用無線網路連接,即可不使用 LAN 連接線即直接與網路連線。相關的詳細資訊,請參閱 "調整網路設
定"(
第 84 ⾴)。
注意
切勿使用一般家庭的標準電話線或主機不支援的其他類型連接線直接插⼊主機的 LAN 連接埠,否則
可能會導致過熱、火災或是故障。
連接交流電源線
將交流電源線插⼊電源插座,PS3™ 的電源指示燈即會亮紅燈( 第 77 ⾴)。
部份地區及國家可能會使
用與圖示不同之電源插頭。
注意
請先進行所有其他連接後,再將主機的交流電源線插⼊電源插座。
Page 71

執行系統軟件的初始設定
啟動主機電源後,執行初始設定。
1 啟動電視機,並配合 PS3™ 主機使用之連接端,調整電視機的影像
輸⼊設定。
2 按下電源按鈕。
電源指示燈亮起綠燈,且電視螢幕上會顯示圖像。
5 執行初始設定。
CT
⼊
門
指
南
電源指示燈
電源按鈕
3 使用 USB 連接線將無線控制器連接至主機。
4 按下控制器的 PS 按鈕。
主機將會開始辨識無線控制器。辨識控制器後,即會顯示初始設定畫⾯。
遵循畫⾯上的指示輸⼊「系統語⾔」、「時區」、「日期與時間」和「使用者
名稱」。
螢幕會顯示
定,初始設定會被自動選擇。若使用無線 LAN,請遵循 "調整網路設定(無
線)"(
設定完成後,電視螢幕上會顯示 XMB
提示
使用
初期設定時顯示。選擇畫⾯上的[是]並按下
的輸出解析度。
有關輸⼊
進行
更。若您想確認相關的詳細資訊,請參閱線上用⼾指南
(http://manuals.playstation.net/document/)。
設定網路的畫⾯。當使用 LAN 連接線,若您遵循畫⾯指示正確設
第 85 ⾴)調整必需之設定。
選單( 第 67 ⾴)。
TM
HDMI 連接線連接主機和電視機時,變更影像輸出解析度的畫⾯將會於進行
字的詳細資訊,請參閱 "使用螢幕鍵盤"(
文
初始設定時改變的設定可於進⼊
按鈕後,即會自動選擇最適切
第 90 ⾴)。
(設定)或 (使用者)後自由變
71
Page 72

⼊門指南
PS3™ 主機的影像輸出
PS3™ 主機可以輸出「HD」和「SD」兩種解析度。請參閱電視的使用說明書,以確認支援何種影像模式。
(高解析度)
HD
影像模式*
縱橫⽐ 16:9 16:9 16:9
1
*
2
*
3
*
4
*
1*2
數字代表掃描線的數目。請注意,"i" 代表 "隔行",而 "p" 代表 "逐行"。使用逐行掃描可隨著最低程度的閃爍,呈現高水準的影像品質。
SD 解析度的變換可能因您使用之 PS3™ 機型和播放之內容而異。
主機的影像輸出設定會顯示為[標準(NTSC)]。
主機的影像輸出設定會顯示為[標準(PAL)]。
1080p 1080i 720p
480p
576p
16:9
4:3
(標準解析度)
SD
顯示解析度差異的畫⾯
HD 畫⾯ SD 畫⾯
480i*
576i*
16:9
4:3
3
4
72
Page 73

影像輸出連接線的種類
Y L RPR/CRPB/CB
COMPONENT VIDEO IN AUDIO IN
S VIDEO L-AUDIO-R
VIDEO L-AUDIO-R
電視顯示之解析度會因電視的輸⼊端子與使用之連接線種類而異。請選擇與您使用之電視相容的連接線。
連接線種類 電視的輸⼊端子
HDMI 連接線*2(另售)
HDMI 輸⼊端子
支援的影像模式*
1
1080p, 1080i, 720p, 480p / 576p
CT
⼊
門
指
南
影像色差連接線(另售)
影像色差輸⼊端子
S 視頻連接線(另售) S 影像輸⼊端子
AV 連接線(隨附) 影像輸⼊端子(一體化)
*1 部分影像模式可能因電視類型與播放內容而出現不支援的情形。
使用 HDMI 連接線連接主機時,若裝置並未符合 HDCP (High-bandwidth Digital Content Protection) 標準,則無法從主機輸出影像或聲⾳。
播放內建著作保護權的 Blu-ray 影像光碟時,必須使用 HDMI 連接線連接符合 HDCP (High-bandwidth Digital Content Protection) 標準的裝置,始可以 1080p 的解
析度輸出影像。
2
*
使用 HDMI 連接線(另售)將主機連接至電視。HDMI 連接線能同步輸出影像與聲⾳,讓您享受到數碼(數位)品質的影像與聲⾳。
3
主機的影像輸出設定會顯示為[標準(NTSC)]。
*
4
主機的影像輸出設定會顯示為[標準(PAL)]。
*
1080p, 1080i, 720p, 480p /
576p, 480i*
3
/ 576i*
480i*3 / 576i*
480i*3 / 576i*
4
4
4
73
Page 74

⼊門指南
調整影像輸出設定
您可能需要配合您連接的連接線和連接端類型,調整 PS3™ 主機的影像
輸出設定,才能讓電視機以 HD 解析度顯示影像( 第 72 ⾴)。
螢幕上未顯示任何影像時
配合跟主機連接之連接端,調整電視機的影像輸⼊設定。
關閉主機電源後,按下電源按鈕超過 5 秒鐘以上(直到主機發出兩次嗶
聲),以重新啓動電源。影像輸出設定隨後會恢復爲標準(SD)解析度。
1 選擇 (設定) (顯示器設定) [影像輸出設定]後,按
下 按鈕。
2 選擇電視機目前使用的輸⼊端子( 第 73 ⾴)後,按下 按
鈕。
選擇[HDMI]後,您可進⼊下一個畫⾯選擇[自動]或[手動]選項。通常請
選擇[自動],如此即會自動完成影像輸出設定。
選擇[AV MULTI / SCART]後,您可進⼊下一個畫⾯選擇輸出訊號的種類。通
常請選擇[Y Pb/Cb Pr/Cr]。
3 確認畫⾯後,按下 按鈕。
若於步驟 2 時改變了電視機的連接端,則此時會顯示確認變更的畫⾯。
4 確定設定後,選擇[是]並按下 按鈕。
若於步驟 2 時改變了電視機的連接端,則此時會顯示確認設定的畫⾯。
5 選擇電視機的解析度後,按下 按鈕。
電視機顯示的解析度會因輸⼊端子和使用的連接線種類而異
第 73 ⾴)。會適用影像輸出設定時選擇的最高解析度。
(
於步驟 2 選擇某些端子後,可能不會顯示此畫⾯。
74
Page 75

6 確認設定內容後,選擇[是]並按下 按鈕。
於步驟 2 選擇某些端子或於步驟 5 選擇特定解析度後,可能不會顯示此畫
⾯。
7 選擇電視機類型後按下 按鈕。
於步驟 5 選擇 SD 解析度( 第 72 ⾴)後,畫⾯上會顯示選擇電視機螢幕
尺寸的畫⾯。請配合您使用的電視機調整設定。
於步驟 5 選擇[720p]或更高解析度後,電視機類型將會自動設定為 16:9,
且不會顯示選擇電視機螢幕尺寸的這個畫⾯。
8 確認設定後,按下 按鈕。
影像輸出設定被保存至主機中。
9 調整聲⾳輸出設定。
接著能調整聲⾳輸出設定。請配合您使用的電視機或⾳響裝置調整設定。
選擇[HDMI]後,您可進⼊下一個畫⾯選擇[自動]或[手動]選項。通常請
選擇[自動]。
要使用 HDMI 連接線以外的連接線從電視機輸出聲⾳時,請選擇[聲⾳輸出端
子 / SCART / AV MULTI]。使
⼊下一個畫⾯選擇輸出格式。
用光纖數碼線輸出聲⾳時,請選擇[光纖]並進
10 確認設定後,按下 按鈕。
聲⾳輸出設定被保存至主機中。
提示
您可選擇
設定。
(設定) (聲⾳設定) [聲⾳輸出設定],以調整聲⾳輸出
CT
⼊
門
指
南
75
Page 76

⼊門指南
連接數位⾳響裝置
您可利用家庭娛樂用途之 AV 接收器(擴大機)等支援數碼(數位)聲⾳
播放的⾳響裝置連接。
PS3™ 主機的聲⾳輸出
支援聲道可能因使用之輸出端子而異。
PS3™ 主機的輸出端子
AV 多重輸出端子
光纖數碼輸出端子
HDMI 輸出端子
提示
將數碼(數位)⾳
定)
[聲⾳輸出設定],並配合⾳響裝置之需要調整設定。
聲⾳
一般無法同時透過多重輸出端子輸出。例如,當您的 PS3™ 主機透過 HDMI
連接線連接電視機並經由光纖數碼線連接⾳
[光纖],可能無法從電視機輸出並只能從⾳響裝置輸出聲⾳。
主機可透過 HDMI 連接線同步輸出影像與聲⾳
端子,您可透過⾳響裝置輸出電視圖像。
使用 HDMI 連接線連接裝置與 PS3™ 主機時,請勿於啟動主機電源時(電源指示
燈持續亮綠燈)關閉該裝置的電源。此舉可能會導致聲⾳
響裝置連接至主機時,需進⼊
可使用之聲道輸出
2 Ch. 5.1 Ch. 7.1 Ch.
(設定) (聲⾳設
響裝置,且[聲⾳輸出設定]調整為
。若電視機與⾳響裝置均備有 HDMI
失真或引發異常噪⾳。
⾳響裝置連接範例
您可使用 HDMI 連接線或光纖數碼線連接⾳響裝置與 PS3™ 主機。
HDMI 連接線 光纖數碼線
HDMI 連接線
(另售)
數碼(數位)⾳
HDMI 連接線
(另售)
光纖數碼聲⾳輸出
線(另售)
響裝置
電視機使用之影像輸出連
接線(
第 73 ⾴)
76
電視 電視
Page 77

啟動和關閉 PS3™ 主機電源
啟動主機電源
1 按下電源按鈕。
電源指示燈持續亮綠燈,主機啟動電源。
電源指示燈:
持續亮綠燈
電源按鈕
2 按下控制器的 PS 按鈕。
自動指定控制器的編號後,即可開始操作。
PS 按鈕
電源指示燈狀態
您可查看 PS3™ 主機的電源指示燈,以確認主機的狀態。
持續綠燈 主機電源打開
閃爍綠燈 主機電源正關閉中
持續紅燈 主機關閉(待機模式)
關閉主機電源
1 按下電源按鈕。
電源指示燈持續亮紅燈。
電源指示燈:
持續亮紅燈
電源按鈕
重要
電源指示燈亮綠燈/閃爍綠燈時,請遵守以下注意事項,否則可能會導致資料毀
損/流失或主機故障:
請勿從電源插座拔掉交流電源線。
請勿移動主機或變換主機的放置方式。
提示
開始使用前,需先配置控制器(
您亦可使用無線控制器的 PS 按鈕啟動和關閉 PS3™ 主機的電源。若使用 PS 按
鈕啟動主機的電源,會同時自動指定控制器的編號。若要關閉電源,可持續按住
PS 按鈕一秒以上,再遵循畫⾯
您亦可自 XMB
主機電源)。
若長時間不使用主機,請確認電源指示燈是否已亮紅燈,再從電源插座拔下交流
電源線。
選單關閉 PS3™ 主機的電源。選擇 (使用者) (關閉
TM
第 78 ⾴)。
指示,正確操作。
CT
啟
動
和
關
閉
主
機
電
源
77
Page 78

使用無線控制器
1 2 3 4
1 2 3 4
112 3 4
使用前的準備
使用無線控制器前,您必須先登錄或 "配置" 控制器至 PS3™ 主機上,
並替控制器設定一組編號。
步驟 1:配置主機與控制器。
第一次使用時
另一台 PS3™ 主機時
使用
步驟 2:指定一組控制器編號。
每次啓動主機時
步驟 1:配置主機與控制器
⾸次使用該控制器或在不同 PS3™ 主機上使用時,您必須先配置控制器。
假如您啓動主機電源時已使用 USB 連接線連接控制器,則主機將會自動
完成配置。
USB 連接線(隨附)
確認主機是否已啓動電源
(電源指示
燈持續亮綠燈)
步驟 2:指定一組控制器編號
每次啓動主機,都需替控制器指定一組編號。
按下 PS 按鈕。
所有埠指示燈不斷閃爍。
控制器已指定編號時,唯有該指定
編號之埠指示
您一次最多可連接 7 個控制器。控制器之編號將如埠指示燈顯示的編
號。編號爲 5~7 時,需相加亮紅燈之指示燈編號。
例: 控制器編號指定爲 5 時。
提示
配置和指定控制器編號只能在啟動主機電源後執行
在另一台 PS3™ 主機上使用
需要使用已在另一台主機上使用之控制器時,請再次進行與該主機間的控制器配
置。
控制器或主機電源關閉後,控制器之埠指示燈亦會熄滅並清除指定之編號。
已配置之控制器後,將會消除與原先主機之配置。當
燈會持續亮紅燈。
(電源指示燈持續亮綠燈)。
78
Page 79

使用無線控制器
您需先拔取 USB 連接線,才能使用無線控制器。且無線使用前,必先替
控制器的電池充飽電。
提示
控制器與主機的電源皆啓動時,亦可連接或拔取 USB 連接線。
控制器無法正常動作時,請按下 PS 按鈕並指定控制器編號。
替控制器充電
啟動主機電源(電源指示燈持續亮綠燈)時,始可使用 USB 連接線將控
制器連接至主機上。此時控制器上的埠指示燈會緩慢閃爍紅燈並逐漸充
電。充電結束後,埠指示燈即會停止閃爍。
提示
充電時亦可使用
僅能於 10℃~30℃ 的溫度範圍內替電池充電。若在其他環境中進行,可能會出
現充電情形不佳的現象。
主機電源關閉(待機模式)時,無法替控制器充電。
電池的壽命有限。電池續航力(使用時間)會因重複使用的次數與時間而不斷減
少。
電池的壽命會因保管方法、使用情形、環境以及其他要素而出現差異。
該控制器。
電池充電量
PS 按鈕持續按住一秒鐘以上後,即可從螢幕上確認電池的剩餘充電量。
剩餘充電量
電池電力充足。
電池的保有充電量開始逐漸減低。
電池殘餘充電量低。
電池電力已耗盡。埠指示燈不斷閃爍時,請替電池充電。
提示
環境或使用狀況可能會導致無法正確顯示剩餘充電量或電池續航力出現差異的現
象。
CT
使
用
無
線
控
制
器
79
Page 80

播放內容
Blu-ray Disc (BD)/DVD/CD
1 插⼊光碟。
退出指示燈持續亮藍燈,顯示已插⼊光碟。
插⼊光碟時需標籤⾯朝上。
注意
本主機無法播放不相容支援的光碟。
要播放市⾯上銷售的 BD Video 時,可能需要更新加密
鍵*。加密鍵會透過系統軟件的昇級而
(
第 89 ⾴)。
* AACS(Advanced Access Control System)鍵
不斷更新。
2 XMB
選單上顯示圖示後,即能開始播放該光碟。
TM
光碟無法自動啟動時,請選擇 XMB
退出光碟
停止播放後,按下退出按鈕。
選單上的光碟圖示,並按下
TM
按鈕。
退出指示燈
退出按鈕
80
Page 81

播放 USB 裝置的內容
您可使用 USB 連接線,連接符合 USB Mass Storage Class(USB MSC,
USB 大容量儲存等級)等外接裝置。此類裝置需於啓動主機電源時連接。
請同時參閱該裝置隨附的使用說明書。
1 連接 USB 裝置。
畫⾯顯示圖示。
數碼(數位)相機等外接裝置
2 選擇圖示後,按下 按鈕。
顯示可播放內容的目錄。
重要
請勿於保存、載⼊或刪除資料時拔取 USB 裝置或關閉主機電源,否則可能會
導致資料遺失或毀損。
使用
具防寫保護開關的 USB 隨身碟(Flash Drive)時,請勿在該隨身碟插
⼊ PS3™ 主機時調整開關。否則可能會導致資料遺失或毀損。
可播放或閱覽之檔案規格
可播放或閱覽之檔案規格包括 ATRAC™、MP3、AAC、JPEG 和 MPEG-4。若
您想確認最新資訊,請參閱線上用⼾指南
(http://manuals.playstation.net/document/)。
提示
示
唯有能在 PS3™ 主機上播放或閱覽之檔案始會顯
像資料會顯示於
部分儲存媒體僅會顯示
第 67 ⾴)並選擇了[全部顯示],則會顯示所有保存於媒體中的資料
(
夾。
(相片)中)。
媒體資料夾下的子集。若您進⼊選項選單
重要
建議您定期替儲存至硬碟內的資料預留備份,以預防資料遺失或毀損。無論理
由為何,遊戲或資料一旦遺失或毀損,即已無法復原或修理。Sony Computer
Entertainment Inc. 與其子公司、關係企業對於資料、檔案或遊戲的遺失、毀
損,概不承擔任何責任。有關替保存在硬碟的檔案預留備份的詳細資訊,請參
閱 "備份資料"(
第 92 ⾴)。
於相容類別之行列中(例:圖
CT
播
放
內
容
81
Page 82

玩遊戲
支援的遊戲
PlayStation®3 規格軟件
PlayStation
PlayStation
* 不保證所有 PlayStation
最新情形,請瀏覽以下網站:http://asia.playstation.com/status
規格軟件
®
2 規格軟件
®
規格軟件皆能正確動作。若想確認本主機目前支援的
®
能於本主機上遊玩*
不能於本主機上遊玩
玩遊戲
PlayStation®2 規格的軟件無法在本主機上執行。
開始遊戲
插⼊光碟後,會自動啟動遊戲。
退出遊戲
於遊玩途中,按下無線控制器的 PS 按鈕,再選擇 (遊戲)
(離開遊戲)結束遊玩。
提示
PlayStation
遊戲)。此時請選擇畫⾯上顯示的[離開遊戲]。
規格軟件等某些軟件,可能即使按下 PS 按鈕亦不會顯示 (離開
®
控制器設定
選擇 (設定) (設定周邊機器),即可調整控制器的相關設
定。
指定控制器
控制器震動機能 可選擇啟用
本主機時無法指定控制器編號為 2-D。
* 使用
提示
亦可於遊玩時按下 PS 按鈕調整控制器的設定。在 XMB
(設定周邊機器)或畫⾯顯示的[控制器設定],即可調整控制器的設定。
當軟件已指定控制器端子或編號時,可使用此機能適切指定控
制器端子或編號。*
/停用震動機能。最初的設定為[啟用]。
畫⾯選擇 (設定)
TM
PlayStation®3 規格軟件的保存資料
PlayStation®3 規格軟件的保存資料均被保存於主機的硬碟中。且此類資
料會顯示於 (遊戲) (保存資料管理)中。
插⼊光碟時需標籤⾯朝上。
82
Page 83

PlayStation® 規格軟件的保存資料
若要保存 PlayStation® 規格軟件的進度資料,您必須於硬碟中新建 "內
置記憶卡" 並為該虛擬記憶卡指定插口。
注意
本主機不支援或兼容 PlayStation®2 規格軟件。即使您已建立 PlayStation®2
規格軟件的內置記憶卡,仍無法使用它遊玩遊戲。
建立 "內置記憶卡"
1 選擇 (遊戲) (記憶卡管理(PS/PS2))後,按下 按
鈕。
2 選擇 (新建內置記憶卡)後,按下 按鈕。
3
選擇[內置認記憶卡(PS)]後,按下 按鈕。
請遵循畫⾯指示,正確完成操作。
指定 "插口"
1 選擇 (遊戲) (記憶卡管理(PS/PS2))後,按下 按
鈕。
2 選擇您想使用之 "內置記憶卡" 後,按下 按鈕。
選擇[指定插口],再指定[插口 1]或[插口 2]。
提示
部分軟件可能會預先指定插口
您可於遊玩時指定插口。按下無線控制器的 PS 按鈕,再選擇畫⾯上顯示的[指
定插口]。
。詳細請參閱軟件隨附之使用說明書。
CT
玩
遊
戲
83
Page 84

調整網路設定
網路設置範例(有線)
設置有線網路前,需準備物品 、 及 。
ADSL 數據機等網路裝置*
連接網路線
LAN 連接線
*1 連線方法可能因使用的網路環境而有所不同。例如在已預先安裝 LAN 埠的複合式大廈單位,您可將 LAN 連接線直接連接至牆壁的插座。如您正使用這種連線環境,則無
需準備網路裝置。
2
*
路由器(Router)乃是能讓數種裝置同時與同一條網路線連線的裝置。當電腦與 PS3™ 主機需要同時使用同一條網路線與網際網路(互聯網)連線時,即需要準備路由
器。
3
*
無線路由器是一種讓無線基地台搭載路由器機能的裝置。
1
個人電腦
路由器*
2
網路設置範例(無線)
設置無線網路前,需準備物品 及 。
1
個人電腦
連接網路線
ADSL 數據機等網路裝置*
無線路由器
(機地台)*
2*3
84
Page 85

調整網路設定(有線)
1 將 LAN 連接線(另售)與主機連接。
2 選擇 (設定) (網路設定) [網路連線設定],再按下
按鈕。
顯示網路連線將會切斷的訊息。
調整網路設定(無線)
1 確認主機並無連接 LAN 連接線。
2 選擇 (設定) (網路設定) [網路連線設定],再按下
按鈕。
顯示網路連線將會切斷的訊息。
CT
調
整
網
路
設
定
3 選擇[是],再按下 按鈕。
4 選擇[簡易],再按下 按鈕。
自動調整基本設定,並顯示設定清單。若未顯示清單,需手動調整自訂設定。
有關調整自訂設定的詳情,請參閱您的網路服務商提供的使用說明書
第 87 ⾴)。
(
5 執行網路連線測試。
若成功連線,您即可與網際網路(互聯網)連線。
3 選擇[是],再按下 按鈕。
4 選擇[簡易],再按下 按鈕。
自動調整基本設定。
5 選擇[無線],再按下 按鈕。
85
Page 86

調整網路設定
6 調整無線 LAN 設定。
選擇您要使用之無線基地台。您可選擇[掃描]來選擇主機的電波範圍內的無
線基地台。
掃描
手動輸⼊ 手動輸⼊無線基地台之 SSID,以使用特定的基地台。
基地台個別自動
設定
系統會掃描附近可利用之基地台。選擇您想使用之基地台。
使用基地台的自動設定機能。
⾯
請遵循畫
指示,正確完成自動設定。
AOSS™
Buffalo, Inc.
7 調整無線網路的加密設定。
輸⼊使用無線基地台之加密鍵。若您在步驟 6 選擇[基地台個別自動設定],
則不會顯示此畫⾯。
無 無設定加密鍵。
WEP
WPA-PSK/
WPA2-PSK
輸⼊
加密鍵。您輸⼊的每個加密鍵,都僅會於加密鍵輸⼊
欄位顯示星號(*)。
8 確認設定。
顯示設定清單。若未顯示清單,需手動調整自訂設定。有關調整自訂設定之詳
情,請參閱您的網路服務商提供的使用說明書(
第 87 ⾴)。
9 執行網路連線測試。
若成功連線,您即可與網際網路(互聯網)連線。
提示
SSID 及 WEP/WPA 鍵皆為與無線基地台連線時必需之加密資料。若您不清楚該等
資訊,請聯絡設置或維修無線基地台之人員。
您可能會需配合使用之無線基地台,於每次與網路連線時,輸⼊
MAC 位址。進⼊
PS3™
與網路無線連線時,訊號干擾情形之強弱可能會因無線網路裝置之使用狀況而
異。網路資料之傳輸速度逐漸降低或無線控制器無法正常動作時,請嘗試使用有
線的網路連線。
主機的 MAC 位址。
(設定) (主機設定) [系統資訊],即可確認
PS3™ 主機的
86
Page 87

調整自訂設定
部份網路環境可能無法選擇[簡易]來自動調整網路設定。請參閱以下資
訊並遵循畫⾯指示,手動調整自訂設定。
乙太網路啟動模式
設定乙太網路的通訊速度與啟動模式。通常選擇[自動檢測]。
IP 位址設定
設定與網路連線之 IP 位址的取得方式。取得方式因您使用之網路服務商
而異。
自動 使用 DHCP 伺服器分配的 IP 位址。
手動 手動輸⼊
PPPoE
IP 位址。
使用 PPPoE 與網路連線。請輸⼊
稱和密碼。
網路服務商提供的使用者名
DHCP Host Name(主機名稱)
設定 DHCP 伺服器主機名稱。通常選擇[不設定]。
DNS 設定
設定 DNS 伺服器。設定方式因您使用之網路服務商而異。
自動 系統自動取得 DNS 伺服器位址。
DNS 伺服器位址。手動輸⼊網路服務商提供之
手動
手動輸⼊
Primary DNS、Secondary DNS 的 IP 位址。
MTU
設定使用資料通訊時的 MTU 數值。通常選擇[自動]。
Proxy 伺服器
設定要使用的 Proxy 伺服器。通常選擇[不使用]。
UPnP
設定 UPnP(Universal Plug and Play)的啟用/停用。通常選擇[有
效]
。
提示
若[UPnP]設定為[停用],使用 AV 聊天或遊戲的通訊機能時,線上通訊機能可
能受限。
CT
調
整
網
路
設
定
87
Page 88

連接網際網路(互聯網)
網路設定已正確完成後,PS3™ 主機即會於主機電源啓動後,自動與網際
網路(互聯網)連線。此項連線僅會於主機電源啓動時有效。
使用網路瀏覽介⾯
1 選擇 (網路) (網路瀏覽介⾯),按下 按鈕。
開啓網路瀏覽介⾯。載⼊網⾴時會顯示忙碌圖示。
忙碌圖示
網路瀏覽介⾯的基本操作
方向按鈕 將指標移往超連結。
右操作桿 朝希望之方
L1 按鈕 回到上一
START(開始)按鈕 輸⼊網址。
按鈕
顯示/隱藏選單。
向捲動。
⾴。
閱覽用⼾指南
您可使用 "網路瀏覽介⾯",閱覽 PS3™ 主機的線上用⼾指南。選擇
(網路) (網上說明)後,按下 按鈕。
線上用⼾指南 http://manuals.playstation.net/document/
此指南包含了使用 PS3™ 主機時的相關詳細資訊。
新建一個 PlayStation®Network 帳⼾
新建 PlayStation®Network 帳⼾後,您可進⼊ (好友)享受聊天樂趣
或自 (PlayStation®Store)下載遊戲或影像。
選擇
後,按下 按鈕,螢幕上即會顯示新建帳⼾的畫⾯。
(PlayStation®Network) (登⼊ PlayStation®Network)
提示
需使用網路連線。
新建帳⼾
PlayStation
您亦可在 https://store.playstation.com/login.gvm 選擇[新建帳⼾
PlayStation
Network 服務之內容因區域而異。
®
Network 帳⼾。
®
]來新建
88
Page 89

PS3™ 主機更新
更新 PS3™ 的系統軟件,您可追加機能或彌補安全性漏洞。建議經常替
主機的系統軟件更新為最新版本。
系統軟件更新 http://asia.playstation.com
此網站提供系統軟件更新的最新資訊。
使用更新資料覆寫已存在的主機軟件。 主機軟件完成更新。
重要
進行更新時,請勿關閉主機電源或移除媒體。更新若遭到中斷,可能會導致
系統軟件毀損,且可能需維修或更換主機。
進行
更新時,主機的電源按鈕和控制器的 PS 按鈕會暫時失效。
若未事先更新系統軟件,您可能因內容限制而無法進行播放。
系統軟件一旦更新,即無法恢復為原先的早期版本。
確定系統軟件的版本
選擇 (設定) (主機設定)
本之相關資訊。
目
前之版本序號會標示於[系統軟件]之顯示欄位。
系統資訊],即可確認系統版
[
更新方法
您可透過以下任何一種方法執行更新。
網路更新
從網際網路(互聯網)下載更新資料後您即可執行更新。
如下述選擇項目後,即能自動下載最新的更新資料。
(設定) (系統更新)
透過網際網路更新]。
[
使用儲存媒體執行更新
如下述選擇項目後,您即能使用保存於 USB 快閃記憶體或其他儲存媒體
的更新資料執行更新。
(設定) (系統更新)
透過儲存媒體更新]。
[
經由光碟媒體更新
部份遊戲光碟以及其他種類的光碟媒體可能內建更新資料。當您要開始遊
玩內建更新資料的光碟時,螢幕上可能會顯示更新的相關導引資訊。
提示
若您無法執行上述任何更新方式,請聯絡包裝盒上記載的 PS3™ 消費者服務中心。
CT
主
機
更
新
89
Page 90

使用螢幕鍵盤
游標 顯示預測選項
文字輸⼊欄位
操作按鍵 僅於啟動預測
模式時顯示
輸⼊文字
以下將以單字 "fun" 為例子,說明輸⼊文字的步驟。
1 選擇鍵盤上的[f],並按下 按鈕。
重複此步驟以輸⼊[u]和[n]。
2 選擇[確定],並按下 按鈕。
確認您所鍵⼊的文字。
3 選擇[確定],並再度按下 按鈕。
輸⼊文字並關閉鍵盤。
示輸⼊模式
顯
提示
若您想了解螢幕鍵盤的詳細使用方法,請參閱線上用⼾
(http://manuals.playstation.net/document/)。
您亦可使用 USB 鍵盤或支援 Bluetooth
文字。顯示螢幕鍵盤時,只要按下已連接之鍵盤的任何按鈕,即可開始輸⼊文
字。
(藍芽)的鍵盤(兩者皆為另售)輸⼊
®
指南
按鍵一覽
各鍵之顯示與否會因輸⼊模式或其他狀況而異。
按鍵 說明
插⼊一行
移動游標
刪除游標左邊的字元
插⼊空格
更換輸⼊模式
確認已鍵⼊但尚未輸⼊的字元後,關閉鍵盤
更換為迷你小鍵盤
/
/
插⼊記號或表情符號
選擇輸⼊法
貼上在網路瀏覽介⾯複製的文字
90
Page 91

視聽年齡限制
PS3™ 主機具備視聽年齡限制機能。您可使用此機能設定密碼,並透過
(遊戲、影像與其他內容的)視聽年齡限制等級,限制內容的播放。經由
主機的視聽年齡限制設定,您可避免孩童擅自播放不適當的內容。
改變加密設定
選擇 (設定) (加密設定),您即可設定遊戲、BD 光碟或其他
內容的視聽年齡限制等級。
要變更視聽年齡限制前,需先輸⼊密碼。選擇
密碼],您即可設定
一
組密碼。最初設定的密碼為 "0000"。
(加密設定)
變更
[
遊戲的視聽年齡限制
選擇 (加密設定)
限制。請從[關]或 11 種等級中選擇。
關 不受視聽年齡限制影響,播放所有內容。
11-1 依據等級大小
PS3™ 主機與內容的視聽年齡限制組合會決定內容可否播放。
例如:當主機的視聽年齡限制為[7]時,此主機可播放等級設定為[1]
至[7]的內容。
若您想取得年齡分級的最新資訊,請聯絡包裝盒上記載的 PS3
服務中心
。
視聽年齡限制],您即可設定遊戲的視聽年齡
[
設定視聽年齡限制。數字愈小,代表限制愈嚴格。
™ 消費者
其他加密設定
選擇 (加密設定),您可如下述般,設定遊戲以外其他內容的視聽年
齡限制。
BD 視聽年齡限制
DVD 視聽年齡限制
網路瀏覽介⾯啟動
限制
播放內建視聽年齡限制的 BD 時,會隨您設定之年齡而限制
播放。數字愈小,代表限制愈嚴格。
播放內建視聽年齡限制的 DVD 時,會隨您設定之年齡而
制播放。請從[關]或 8 種等級中選擇。
數字愈小,代表限制愈嚴格。
透過密碼,限制網路瀏覽介⾯的啟動機能。
限
CT
視
聽
年
齡
限
制
91
Page 92

更換硬碟
您可更換安裝於 PS3™ 主機的硬碟。
注意
請在兒童無法靠近的場所移除硬碟,以避免誤吞螺絲等小零件。
使用後的主機會從內部直接發熱。請在開始移除硬碟前先暫時放置,以令主機
冷卻。
移除或處理螺絲蓋或硬碟時請小心以免受傷。
啟動 PS3™ 主機電源前請先確認螺絲蓋及 HDD 插槽蓋是否已確實重新插⼊
假若未插⼊螺絲蓋及 HDD 插槽蓋,可能會導致主機內部過熱。
要安裝或拔取螺絲時,請使用尺寸適切正確的十字頭螺絲起子。尺寸若不符,
可能會損壞螺絲頭的溝槽。
重要
所有硬碟,包括 PS3™ 的硬碟於 PS3™ 主機上使用前,必須先進行格式化。
建議您定期替保存至硬碟的資料預留備份。無論理由為何,遊戲或資料一旦
遺失或毀損,即已無法復原或修理。Sony Computer Entertainment Inc. 與
其子公司、關係企業對於資料、檔案或遊戲的遺失、毀損,概不承擔任何責
任。
您亦可將保存於硬碟的資料備份至 USB 大容量儲存裝置,並還原備份資料。
詳情請參閱 "備份資料"(
不正確移除或安裝硬碟,可能會導致主機故障或資料遺失,亦可能導致喪失
所有 PS3™ 硬件的保證權益。Sony Computer Entertainment Inc. 與其子公
司、關係企業對於因此而造成的任何損壞,包括對您的硬碟造成的任何損
壞,概不承擔任何責任。使用者需自行承擔使用替換硬碟所引起的一切風險
和責任,包括無法對應支援 PS3™ 主機或無法在 PS3™ 主機上操作的問題。
本公司概不對非 PS3™ 的硬碟提供維修服務。
為強化保護您的個人資訊,在將 PS3™ 主機送往消費者服務中心修理前,請
務必清除所有 PlayStation
(PlayStation®Network) (登⼊),再於顯示的畫⾯解除已點選的
[保存密碼]。請注意,若已預先設定[下次起自動登⼊],即不會顯示
(登⼊)。此時需先解除自動登⼊選項。選擇
(PlayStation®Network) (帳⼾管理),再按下 按鈕,然後
在選項選單選擇[關閉自動登⼊],即可解除自動登⼊。解除自動登⼊後,
請正確操作,清除密碼。
92
第 92 ⾴)。
Network 帳⼾的密碼。若要清除密碼,請選擇
®
備份資料
您可使用以下其中一種方法替保存於硬碟的資料預留備份。
重要
建議您定期替儲存至硬碟內的資料預留備份,以預防資料遺失或毀損。無論理
。
由為何,遊戲或資料一旦遺失或毀損,或者硬碟於維修時必須格式化,即已無
法復原或修理。Sony Computer Entertainment Inc. 與其子公司、關係企業對
於資料、檔案或遊戲的遺失、毀損,概不承擔任何責任。
一次過替所有資料預留備份
您可一次過將保存於硬碟的所有資料備份至 USB 大容量儲存裝置。請選
擇 (設定) (系統設定) [備份工具],遵循畫⾯指示正確
操作。
提示
可能會出現無法使用備份工具機能替系統正確預留備份的情形。建議您替可以個
別移動或複製的檔案預留備份。相關的詳細資訊,請參閱 "替特定資料預留備
份"。
若您想了解備份工具的詳細資料,請參閱線上用⼾
(http://manuals.playstation.net/document/)。
指南
替特定資料預留備份
保存於主機硬碟的下列檔案類型能複製或移動至 USB 裝置。選擇檔案並
按下 按鈕後,再選擇選項選單的[複製]或[移動]。部份影像檔案
可能需選擇 [備份]。
檔案類型 備份位置
從遊戲中保存的資料、影像、⾳樂、相
片檔案
USB 大容量儲存裝置
(USB 快閃裝置等)
Page 93

提示
部份資料可能無法複製、移動或備份。
使用讀卡機(USB 連接埠類型,另售),您即可將保存於硬碟的檔案備份至
Memory Stick™ 或 SD Memory Card 等儲存媒體。
3 將主機上下倒轉放置在乾淨的軟布上,再打開螺絲蓋。
使用螺絲蓋上的溝槽輕輕拉開螺絲蓋。然後按圖示轉動螺絲蓋。難以拉開螺絲
蓋時,可將平頭螺絲起子等工具插⼊溝槽,再輕輕拉開螺絲蓋。
CT
更
換
硬
碟
移除硬碟
注意
為您安全著想,請務必在嘗試移除硬碟前關閉電源並拔掉主機插頭。
主機在上下倒轉放置時可能會不穩定。拔除螺絲時請小心以免受傷。
1 按下電源按鈕,關閉主機電源。
電源指示燈持續亮紅燈,主機進⼊待機模式。
2 拔掉交流電源線之後,拔除插在主機上的其他連接線。
為您安全著想,請先將交流電源線從電源插座中拔出,再拔除其他連接線。
螺絲蓋
4 拔除固定硬碟位置的螺絲,再移除 HDD 插槽蓋。
使用適宜的十字頭螺絲起子,拔除藍色螺絲。
向左推動 HDD 插槽蓋,再移除插槽蓋。
HDD 插槽蓋
93
Page 94

更換硬碟
5 拿出硬碟
向上拉起把手,再從主機拉出硬碟。
重要
硬碟是架構非常靈敏的裝置,進行上述類似處理時務必隨時小心注意。為避免
遊戲或資料的遺失、毀損,且避免損傷硬碟,請務必遵守以下所列的注意事
項。
請勿掉落主機或硬碟,或對其施以劇烈撞擊或震動。
請勿讓液體或小零件掉
請勿觸摸或將異物插⼊連接線的連接端子部分。
請勿將主機或硬碟放置在磁鐵或喇叭(揚聲器)產生的磁場附近。且勿將對
磁力敏感的裝置(手錶或磁卡等)放置在硬碟附近。
請勿於硬碟上堆放沉重物品。
持拿硬碟時應僅小心握住金屬外盒的邊緣部份。
硬碟對靜電十分敏感。安裝硬碟時請務必確認處理方法等是否正確。
請放置在涼爽且乾燥的場所保管。
⼊主機或硬碟中。
更換硬碟
注意
為您安全著想,請務必在嘗試更換硬碟前關閉電源並拔掉主機插頭。
更換硬碟時,請先遵循以下步驟,卸除金屬外盒。
1 使用十字頭螺絲起子,取出螺絲(共 4 顆)。
2 握住硬碟的邊緣部份,再將硬碟反轉。
緊握住兩邊的凹位,
以防不慎滑落。
94
Page 95

3 從金屬外盒取出硬碟。
提示
若您遺失了 HDD 插槽蓋、螺絲蓋、螺絲或金屬外盒等必要零件,請聯絡包裝盒上記
載的 PS3™ 消費者服務中心。
CT
4 將硬碟放置在 PS3™ 主機硬碟的金屬外盒上,並轉動螺絲
(共 4 顆)。
注意螺絲切勿轉動過緊。
5 將硬碟安裝至主機中。
請參閱 "移除硬碟"( 第 93 ⾴)的詳細說明,按相反程序安裝硬碟。請務
必將硬碟完全插⼊ HDD 插槽。
6 重新安裝系統軟件。
硬碟被更換後,系統軟件必須重新安裝( 第 95 ⾴)。
替換硬碟
您可在 PS3™ 主機內使用以下類型的硬碟。
尺寸
介⾯規格
*1 不保證所有機型皆能正常操作。
2
不支援 Parallel ATA。
*
2.5 英吋(內接式)*
Serial ATA *
重新安裝系統軟件
當啟動主機後未開始執行系統軟件時(如硬碟已被更換時),螢幕將會出
現如下顯示。如遇此情況,您必須使用已下載資料重新安裝系統軟件。
換
硬
碟
下載系統軟件更新資料
使用能與網路連線的個人電腦,從以下網站下載系統軟件的更新資料。請
遵循網站內指示,使用個人電腦將更新資料複製至儲存媒體。
http://asia.playstation.com
1
2
更
95
Page 96

更換硬碟
提示
請使用該網站上提供之最新版本的更新資料。您無法重新安裝⽐
的系統軟件版本。若於網站無法下載適切版本的更新資料,請聯絡包裝盒上記載
的 PS3™ 消費者服務中心。
若您持有的遊戲光碟或其他光碟內含更新資料,您可使用其光碟重新安裝系統軟
件。若將光碟插⼊
料。
若您沒有能與網路連線的個人電腦,請聯絡包裝盒上記載的 PS3™ 消費者服務中
心。
本產品中內建的系統軟件乃受 Sony Computer Entertainment Inc. 限制授權。
詳情請閱覽以下網站:http://www.scei.co.jp/ps3-eula
PS3™ 主機並遵循畫⾯
上的指示,將可判別是否可使用更新資
之前使用過更早
安裝系統軟件
啟動 PS3™ 主機,插⼊儲存了更新資料的儲存媒體。請遵循畫⾯指示,
正確執行更新系統軟件。
重要
請勿於更新中關閉主機的電源或拔取儲存媒體。更新若遭到中斷,可能會導
致系統軟件毀損,且可能需維修或更換主機。
進行更新時,主機的電源按鈕和控制器的 PS 按鈕會暫時失效。
還原已備份的資料
您可使用以下其中一種方法還原您已備份的資料。
一次過還原全部資料
您可選擇 (設定) (系統設定) [備份工具],一次過還原
所有備份資料。請連接儲存了備份資料的 USB 大容量儲存裝置,再遵循
畫⾯指示正確執行操作。
提示
部份資料可能無法使用備份工具正確還原。
若您想了解備份工具的詳細機能,請參閱線上用⼾
(http://manuals.playstation.net/document/)。
指南
還原特定資料
您可使用檔案的選項選單,手動還原檔案。請連接儲存了備份資料的 USB
大容量儲存裝置,選擇您想還原的檔案並按下
[複製]或[移動]。
提示
部份資料可能無法複製、移動或備份。
按鈕。在選項選單選擇
96
Page 97

重設 PS3™ 主機
重要
若您讓 PS3™ 主機的設定恢復為初期設定或進行復原,資料即會完全消失。
資料一旦遺失或毀損,使用者需自行負責。
請勿於執行此項操作時關閉 PS3™ 主機的電源。操作若遭到中斷,可能會導
致系統軟件毀損,且可能需維修或更換主機。
執行此操作時,主機的電源按鈕和控制器的 PS 按鈕會暫時失效。
系統軟件不會因執行本操作而恢復為較早的版本。
恢復預設
您可選擇 (設定) (系統設定) [恢復預設],讓 (設
定)下的目前設定恢復為初期設定。
當您完成操作並重新啟動主機後,螢幕將顯示初期設定畫⾯。請遵循畫⾯
指示,進行系統軟件的初期設定(
第 71 ⾴)。
刪除硬碟機上的資料
您可選擇 (設定) (系統設定) [PS3™ 格式化],刪除系
統硬碟內的所有資料並將 (設定)下的目前設定恢復為初期設定。
您可在設定硬碟格式化選項時,選擇[快速格式化]來縮短格式化需要的
時間。建選您選擇[完整格式化],替內含重要或敏感資料的硬碟進行格
式化。
當您完成操作並重新啟動主機後,螢幕將顯示初期設定畫⾯
指示,進行系統軟件的初期設定(
第 71 ⾴)。
。請遵循畫⾯
丟棄或轉讓 PS3™ 主機前
丟棄主機前,建議先刪除個人資訊與其他性質類似的資料。若要刪除資
料,請進⼊ (設定)™ (系統設定) [PS3™ 格式化]。復
原主機系統時,若螢幕上顯示選擇硬碟格式化方法的詢問訊息,建議您選
擇[完整格式化]。選擇[快速格式化] 雖可縮短格式化需要的時間,
但若使用特殊工具等程式,已消除的資料可能會被復原。
CT
重
設
主
機
97
Page 98

送修前送修前
在使用 PS3™ 主機時,如果操作上遭遇到困難,請閱讀下⾯的文章,以
便找到問題的可能原因。如果仍無法解決問題,請聯絡包裝盒上記載的
PS3™ 消費者服務中心。
電源
主機無法接通電源。
確認交流電源線是否已確實插⼊主機和電源插座。
圖像
電視螢幕上未出現圖像。
確認連接線是否已確實插⼊。請試著拔除插⼊ PS3™ 主機或電視機的
連接線並重新插⼊。
您使用之 AV 連接線或許有問題。請嘗試使用其他與 PS3™ 主機相容
的連接線。
請配合 PS3™ 主機使用的輸
若主機之影像輸出設定不支援您使用之連接線或電視,即可能無法顯
示任何圖像。當螢幕呈現一片空白時,請關閉主機電源。之後,請在
僅連接主機與電視的情形下,至少 5 秒鐘內持續按住主機的電源按
鈕,以再度啟動主機。如此可讓影像輸出設定自動恢復為出廠時的標
準(SD)解析度。
圖像失真。
確認連接線是否已確實插⼊。請試著拔除插⼊ PS3™ 主機或電視機的
連接線並重新插⼊。
連接端,調整電視機的影像輸⼊設定。
⼊
無法播放 Blu-ray Disc(BD)、DVD,或圖像失真。
輸出標準(SD)解析度的 DVD 內容或 PlayStation®3 規格軟件時,
只能播放以 NTSC 標準錄製的光碟(僅限台灣/香港機型)。
當主機乃是透過錄放影機連接時,部分 BD 或 DVD 的防複製技術可
能會導致圖像失真,或導致圖像出現過亮或過暗的情形。遇此現象
時,需讓主機直接連接電視。使用電視/錄放影機一體型等器材時,
亦可能出現類似現象。
BD 或 DVD 的區域碼與主機之設定不相符時即無法播放。有關區域碼
的詳情,請參閱 "區碼"(
使用了某些有視聽年齡限制的 DVD。輸⼊原先選擇
時設定的密碼,暫時調高視聽年齡的限制等級。
若您使用 DVD 錄放影機等裝置將影像內容錄製至 DVD-R/DVD-RW/
DVD+R/DVD+RW 媒體,您必須先替媒體進行最終化處理,始可在 PS3™
主機上播放。請使用錄放裝置替媒體進行最終化處理。
使用了某些有視聽年齡限制的 BD。輸
設定的密碼,改變視聽年齡的限制等級。
此張 BD 可能設定了光碟鎖定。輸
參閱 "可播放的光碟"(
第 104 ⾴)。
⼊
原先選擇
燒製這張光碟時設定的密碼。
⼊
第 104 ⾴)中的注意事項。
(加密設定)時
(加密設定)
無法播放某些 BD。
要播放市⾯上銷售的 BD Video 時,可能需要更新 AACS(Advanced
Access Control System)加密鍵。該加密鍵會透過系統軟件的昇級
而不斷更新。
98
Page 99

影像尺寸與電視螢幕不符。
與主機連接的電視之設定可能與主機的影像輸出設定不相符。請確認
以下事項:
確認主機的
之設定是否正確。
確認與主機連接之電視的設定是否正確。詳細請參閱您府上電視機
的使用說明書。
部分影像內容可能無法調整螢幕尺寸。
(設定) (顯示器設定) [影像輸出設定]
螢幕顏色似乎出現問題。
若設定為初始設定,背景顏色會隨著時間及日期的變更而自動改變。
無法播放⾳樂檔案。
部份在網路上公開的⾳樂檔案可能有播放限制。遇此情形時,可能無
法使用 PS3™ 主機播放該內容。
網路
無法建立連線。
若正使用有線連接,請確認 LAN 連接線是否已經正確連接。
確認網路設定是否正確。請參考您的網路服務商或軟件說明書提供之
使用說明,建立正確的網路設定。
CT
送
修
前
聲⾳
無聲。
確認電視或喇叭的靜⾳功能是否已經關閉。亦請確認⾳量是否已調整
至適當等級。
當連接了其他
設備隨附的使用說明書。
AV 連接線或許有問題。請嘗試使用其他與 PS3™ 主機相容的連接
線。
部分軟件不支援數碼聲
若主機之聲⾳輸出設定不支援您使用之連接線或裝置,主機即可能無
法產生各種聲⾳。確認主機的
⾳輸出設定]之設定是否正確。
部分支援 Dolby Digital、DTS 或其他格式的內容可能無法透過全頻
道產生聲⾳
響設備時,請確認該裝置之設定。詳細請參閱該⾳響
⾳
輸出(digital audio output)。
⾳
(設定) (聲⾳設定) [聲
。
在進行網路連線測試時,畫⾯顯示[與伺服器間的通訊失敗。發
生 DNS 錯誤。(80710102)]的錯誤訊息。
若您將主機連接至沒有路由器機能的數據機(橋接數據機),您可能
需要調整 PPPoE 設定。選擇
路連線設定]
至顯示 IP 位址的設定畫⾯。選擇[PPPoE],再輸⼊您的網路服務
商提供的使用者 ID 及密碼。
若您將主機連接至路由器,請先完成路由器的初期設定。完成路由器
的設定後,請再度選擇
線設定]
閱您的路由器隨附的使用說明書。
[自訂],即可開始調整網路設定。繼續調整設定直
[簡易],調整網路設定。有關路由器設定的詳情,請參
(設定)
(設定) (網路設定) [網路連
(網路設定) [網
99
Page 100

送修前
在進行網路連線測試時,畫⾯顯示[IP 位址之取得已逾時。]的
錯誤訊息。
若您拔除原本用於連接如個人電腦等裝置的 LAN 連接線,再使用該
連接線連接主機,您必須重新啟動主機及數據機。重新啟動後,請選
擇
(設定) (網路設定) [網路連線設定] [簡易],
更新網路設定。有關重新啟動數據機的詳情,請參閱您的數據機隨附
的使用說明書。
若您正使用無線連接,則 WEP 鍵可能錯誤。請確認 WEP 鍵是否正
確,再重新輸
。
⼊
在進行網路連線測試時,畫⾯顯示[PPPoE 伺服器的使用者 ID
或密碼錯誤。]的錯誤訊息。
請正確輸⼊ PPPoE 伺服器的使用者 ID 及密碼。當您不知道使用者
ID 與密碼時,請詢問您的網路服務商。
網⾴無法正確顯示。
部分網站可能因內含需使用特別軟件的內容而無法正確顯示。
光碟和 USB 裝置
主機無法辨識光碟。
取出光碟並重新插⼊。
光碟有標籤時,請讓標籤⾯朝上插⼊。
確認光碟是否有刮傷或是否乾淨。若出現污痕,請使用軟布輕柔擦
拭。
參閱 "可播放的光碟"( 第 104 ⾴)中的注意事項。
無法取出光碟。
持續按住取出按鈕超過 10 秒鐘,即可強制取出光碟。強制取出並再
度將光碟插⼊主機前,請關閉主機電源,並於準備再度使用時重新啟
動電源。
主機無法辨識 USB 裝置或 USB 裝置無法正確動作。
檢查該裝置是否已正確插⼊。
確認您連接的裝置是否與主機不相容。
嘗試使用 PS3™ 主機上的其他 USB 連接端。裝置可能因 USB 連接端
的搭配而出現無法辨識的情形。
當使用外接 USB Hub(集線器)以及連接裝置數量過多時,主機可能
無法正確辨識 USB 裝置。請嘗試拔除一些不使用的 USB 裝置。
連接一組 USB 外接裝置,卻顯示[已連接一台不明的 USB 裝
置。]的錯誤訊息。
您連接之 USB 裝置不對應本主機或軟件程式。
該裝置僅兼容特定軟件(軟體)。請使用相容於該裝置之軟件。
可能連接了過多的 USB Hub(集線器)。請嘗試移除 USB Hub(集線
器)。
100
 Loading...