

Page 1
2-586-657-21 (1)
FM/MW/LW
Compact Disc Player
Operating Instructi on s
Bedienungsanleitung
Mode d’emploi
Istruzioni per l’uso
Gebruiksaanwijzing
Wichtig!
Bitte nehmen Sie sich etwas Zeit, um den Geräte-Pass vollständig
auszufüllen. Dieser befindet sich auf der hinteren Umschlagseite dieser
Bedienungsanleitung.
Si dichiara che l’apparecchio è stato fabbricato in conformità all’art. 2, Comma l del D.M. 28.08.
1995 n. 548.
For installation and connections, see the supplied installation/connections manual.
Zur Installation und zum Anschluss siehe die mitgelieferte Installations-/Anschlussanleitung.
En ce qui concerne l’installation et les connexions, consulter le manuel d’installation/
raccordement fourni.
Per l’installazione e i collegamenti, fare riferimento al manuale di istruzioni per
l’installazione e i collegamenti in dotazione.
Zie voor het monteren en aansluiten van het apparaat de bijgeleverde handleiding "Installatie
en aansluitingen".
GB
DE
FR
IT
NL
CDX-M7850
© 2005 Sony Corporation
Page 2

Welcome !
Thank you for purchas in g t hi s Sony Compact
Disc Player. You can enjoy your drive with the
following functions .
• CD playback
You can play CD-DA (also containing CD
TEXT*), CD-R/CD-RW (MP3 files also
containing Multi Session (
ATRAC CD (ATRAC3 and ATRAC3plus
format (
page 16)).
Type of dis c s Label on the disc
page 15)) and
Warning if your car’s ignition has no
ACC position
After turning the ignition off, be sure to press
and hold (OFF) on the unit until the display
disappears.
Otherwise, the display does not turn off and
this causes battery drain.
CD-DA
MP3
AT RAC CD
• Radio reception
–You can store up to 6 stations per band (FM1,
FM2, FM3, MW and LW).
–BTM (Best Tuning Memory): the unit selects
strong signal stations and stores them.
–You can assign a na m e t o each radio station,
store it in memory , and display station names
on the list.
• Sound adjustment
–EQ7: You can select an equalizer curve for 7
music types.
–DSO (Dynamic Soundstage Organizer):
creates a more ambient sound field, usin g
virtual speaker s ynthesis, to enhance the
sound of speakers , even if they ar e installed
low in the door .
–BBE MP: improves digitally compressed
sound such as MP 3. For detai ls, see the
following explan at io n.
• Image setti ng
You can set various disp la y i mages on the unit.
– Space Producer: creates animated on-screen
patterns in time with the music.
• Optional unit operation
Y ou can also control optional CD/MD changers
and optional Sony port able devices in addition
to playing with this unit.
* A CD TEXT disc is a CD-DA that includes
information such as disc, artist and track name.
This label is located on the bottom of the
chassis.
The BBE MP process
R
improves digitally
compressed sound, such as
MP3, by restoring and enhancing the higher
harmonics lost through compression. BBE MP
works by generating even-order harmonics from
the source material, effectively recovering
warmth, detail and nuance.
SonicStage and its l o go are trademarks of Sony
Corporation.
ATRAC, ATRAC3, ATRAC3plus and their logos
are trademarks of Sony Corporation.
2
Page 3

Table of Contents
Getting Started
Resetting the unit. . . . . . . . . . . . . . . . . . . . . . . . 4
Setting the clock . . . . . . . . . . . . . . . . . . . . . . . . 4
DEMO mode . . . . . . . . . . . . . . . . . . . . . . . . . . . 4
Detaching the front panel . . . . . . . . . . . . . . . . . 4
Attaching the front panel . . . . . . . . . . . . . . . 5
Inserting the disc in the unit . . . . . . . . . . . . . . . 5
Ejecting the disc . . . . . . . . . . . . . . . . . . . . . . 5
Adjusting the angle of the front panel. . . . . . . . 5
Location of controls and basic
operations
Main unit . . . . . . . . . . . . . . . . . . . . . . . . . . . 6
Card remote commander RM-X142 . . . . . . 6
CD
Display items . . . . . . . . . . . . . . . . . . . . . . . . 8
Repeat and shuffle play . . . . . . . . . . . . . . . . 8
Radio
Storing and receiving stations . . . . . . . . . . . . . . 8
Storing automatically — BTM . . . . . . . . . . 8
Storing manually . . . . . . . . . . . . . . . . . . . . . 8
Receiving the stored stations . . . . . . . . . . . . 8
Tuning automatically . . . . . . . . . . . . . . . . . . 9
Receiving a station through a list
— LIST . . . . . . . . . . . . . . . . . . . . . . . . . . . . 9
RDS . . . . . . . . . . . . . . . . . . . . . . . . . . . . . . . . . . 9
Overview . . . . . . . . . . . . . . . . . . . . . . . . . . . 9
Setting AF and TA/TP . . . . . . . . . . . . . . . . 10
Selecting PTY . . . . . . . . . . . . . . . . . . . . . . 10
Setting CT . . . . . . . . . . . . . . . . . . . . . . . . . 10
Other functions
Changing the sound settings. . . . . . . . . . . . . . 11
Adjusting the sound characteristics . . . . . . 11
Adjusting the eq ualizer curve
— EQ7 Tune . . . . . . . . . . . . . . . . . . . . . . . 11
Adjusting menu items — MENU. . . . . . . . . . 11
Using optional equipment. . . . . . . . . . . . . . . . 12
CD/MD changer . . . . . . . . . . . . . . . . . . . . 12
Rotary commander RM-X4S . . . . . . . . . . 14
Auxiliary audio equipment . . . . . . . . . . . . 14
Additional Information
Precautions . . . . . . . . . . . . . . . . . . . . . . . . . . . 15
Notes on discs . . . . . . . . . . . . . . . . . . . . . . 15
About MP3 files . . . . . . . . . . . . . . . . . . . . 1 5
About ATRAC CD . . . . . . . . . . . . . . . . . . 16
Maintenance . . . . . . . . . . . . . . . . . . . . . . . . . . 16
Removing the unit. . . . . . . . . . . . . . . . . . . . . . 17
Specifications . . . . . . . . . . . . . . . . . . . . . . . . . 17
Troubleshooting . . . . . . . . . . . . . . . . . . . . . . . 18
Error displays/Messages . . . . . . . . . . . . . . 19
3
Page 4
Getting Started
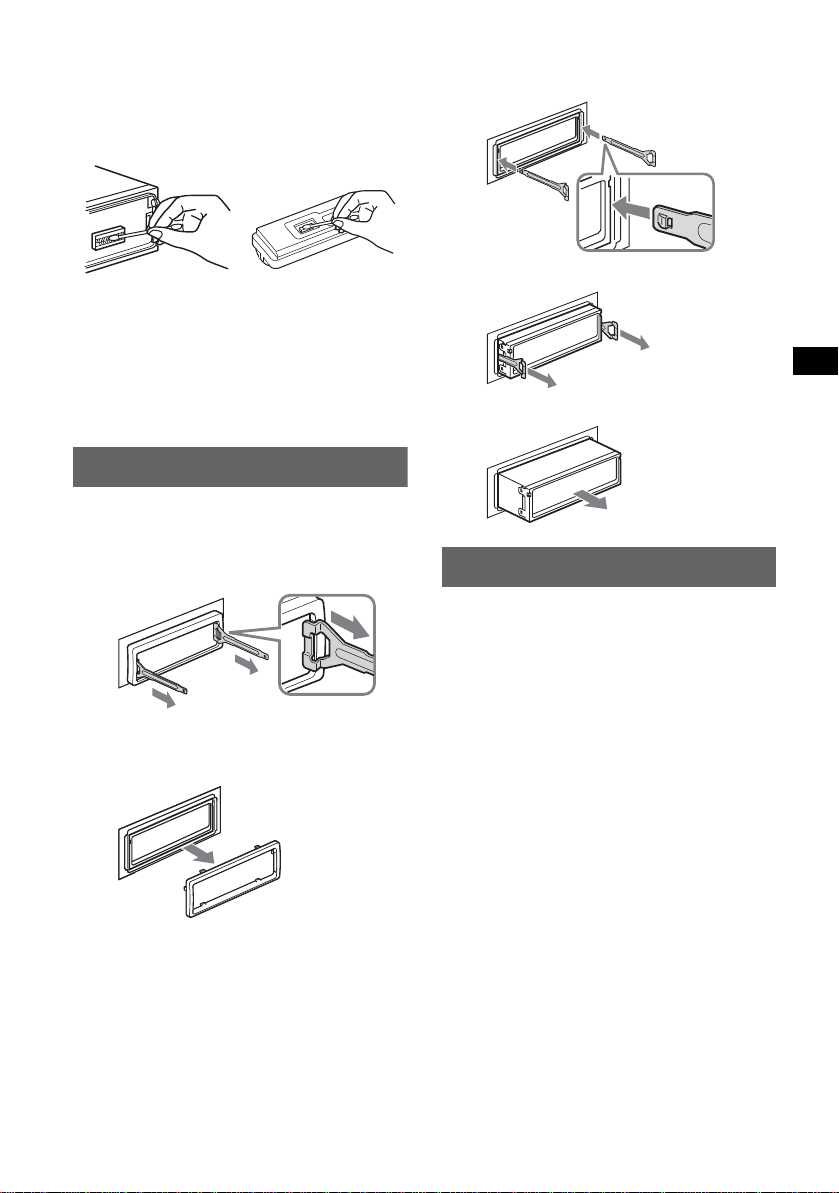
Detaching the front panel
Resetting the unit
Before operating the unit for the first time, or
after replacing the car battery or chan ging the
connections, you must reset the unit.
Detach the front panel and press the RESET
button with a pointed o bject, such as a ballpoint
pen.
Note
Pressing the RESET button will er ase the clock setting
and some stored contents.
RESET button
Setting the clock
The clock uses a 24-hour digital indication.
1 Press (MENU).
2 Rotate the SEEK control dial until
“Setup” appears, then press (ENTER).
3 Rotate the SEEK control dial until
“Clock Adjust” appears, then press
(ENTER).
The clock adjustment display appear s.
4 Rotate the SEEK control dial to set the
hour and minute.
To move the digital indication, press
(ENTER).
5 After setting the minute , p re ss
(ENTER).
The clock starts.
To display th e cl ock during playba ck/ reception,
set “Clock on” (
With the card remote commander
In steps 2 to 4: press M or m instead of the SEEK
control dial; in step 4: press < or , instead of
(ENTER).
Tip
You can set the clock automatically with the RDS
feature (
page 12).
page 10).
You can detach the front panel of this unit to
prevent theft.
Caution alarm
If you turn the ignition switch to the OFF
position without detaching the front panel, the
caution alarm will sound for a few seconds.
The alarm will only sound if the built-in
amplifier is used.
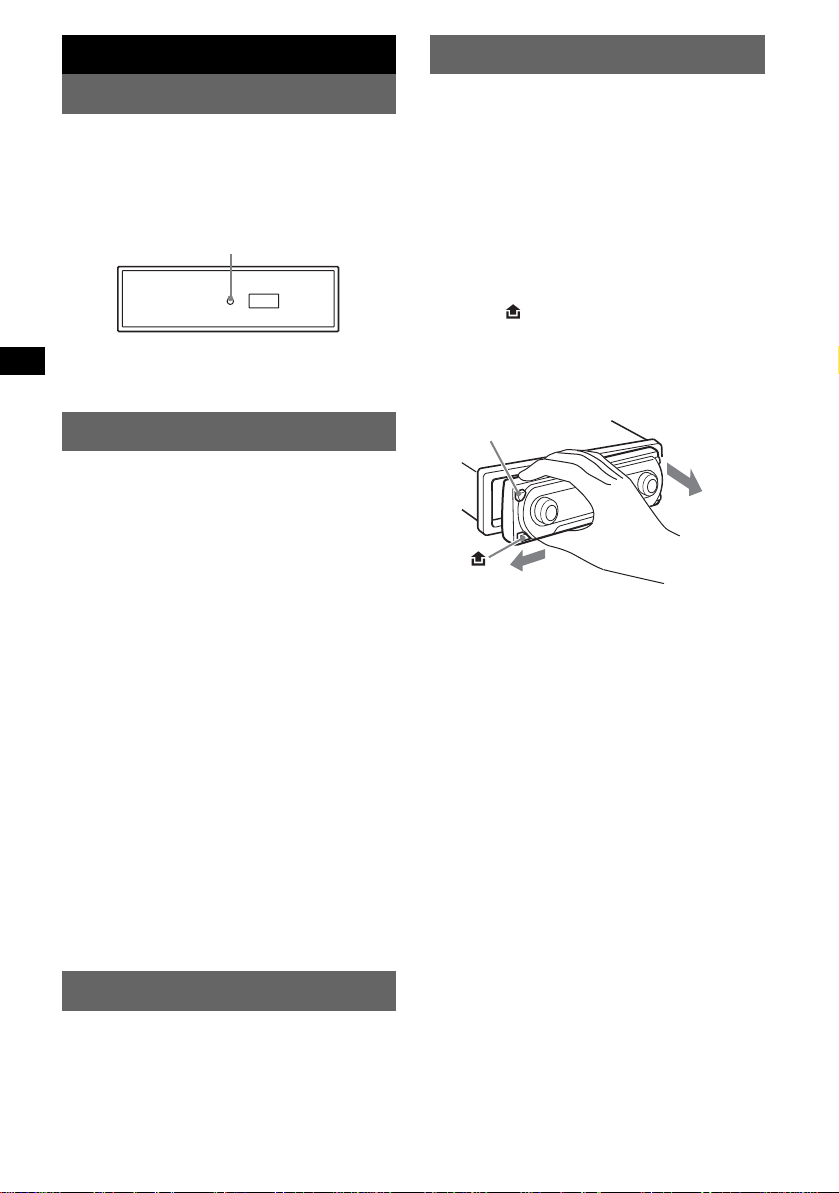
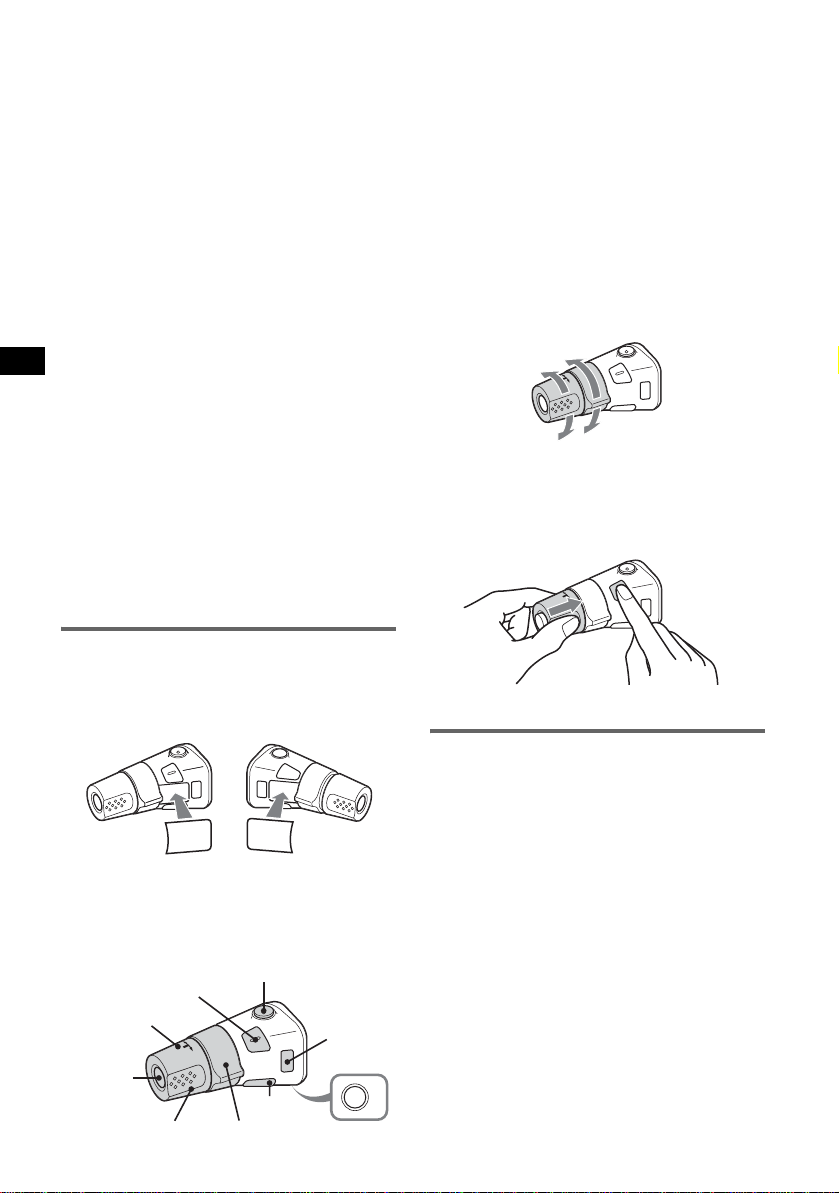
1 Press (OFF).
The unit is turned off.
2 Press .
The left side of front panel is released.
3 Slide the front panel to the left, then
gently pull out the front panel towards
you.
(OFF)
2
1
Notes
• Do not drop or put excessive pressure on the front
panel and display window.
• Do not subject the front panel to heat/high
temperature or moisture. Avoid leaving it in a parked
car or on a dashboard/rear tray.
Tip
When carrying the front panel, use the supplied front
panel case.
DEMO mode
When the unit is turned off, the clock is
displayed first, then demonstration (DEMO)
mode starts the demonstration display.
T o cancel the DEMO mode, set to “Demo off” in
menu (
page 12) while the unit is turned off.
4
Page 5
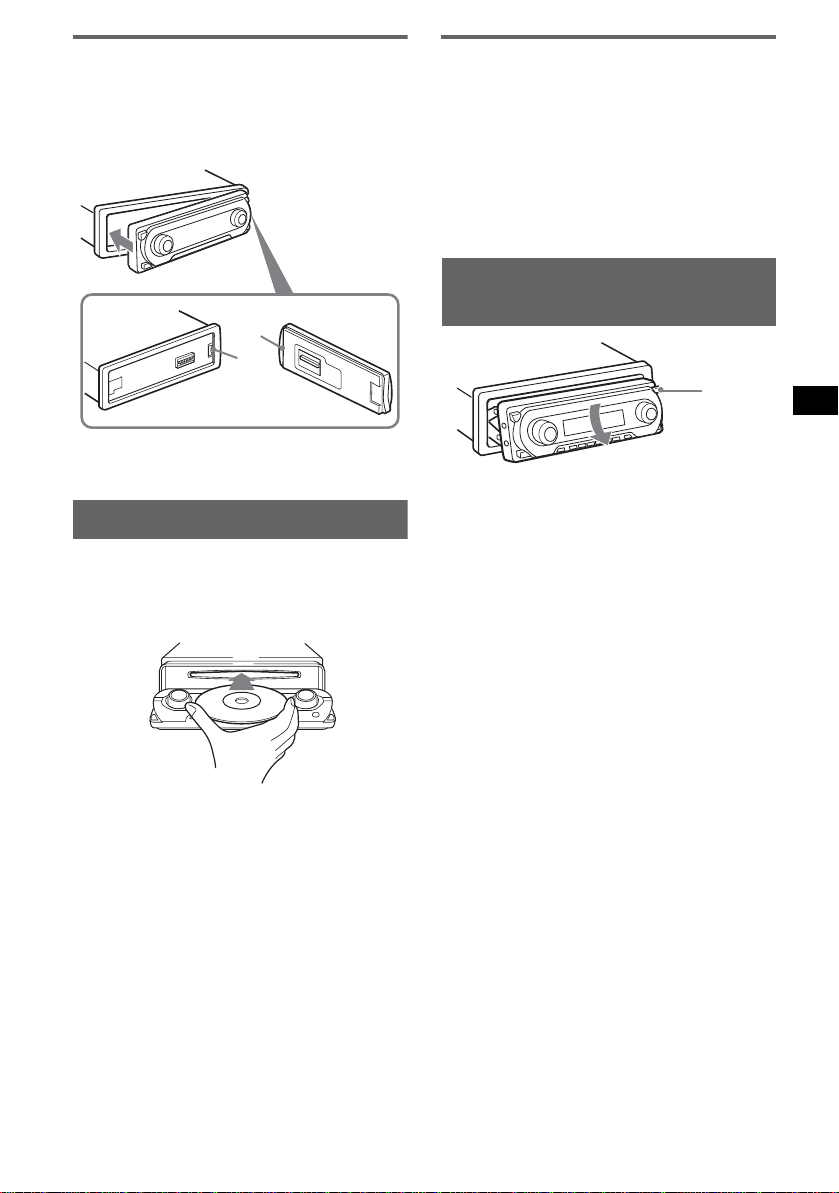
Attaching the front panel
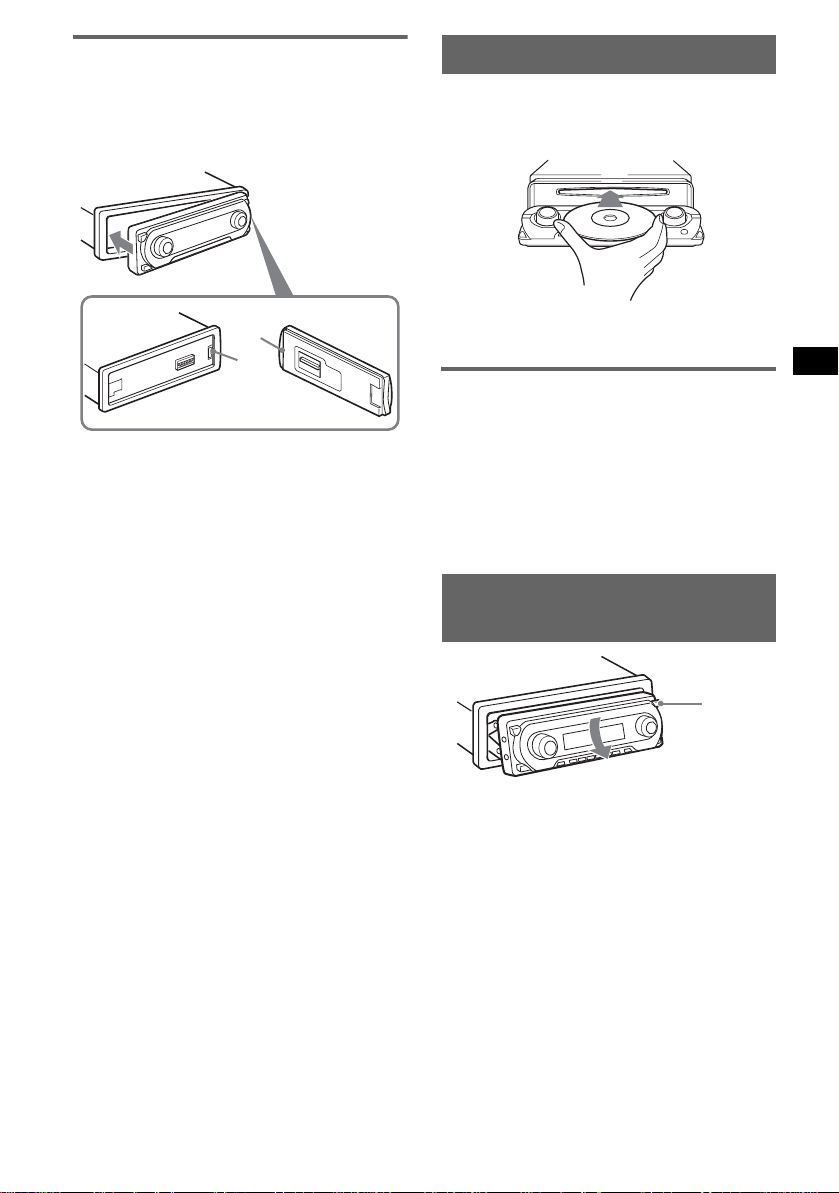
Place the hole A of th e front panel onto the
spindle B on the unit, then lightly push the left
side in.
Press (SOURCE) on the unit (or insert a disc) to
operate the unit.
Inserting the disc in the unit
1 Press Z.
The front panel slides down automatically.
2 Insert the disc (la bel si de u p).
A
B
Note
Do not put anything on the inner surface of the front
panel.
The front panel slides up automatically, then
playback starts automatically.
Ejecting the disc
1 Press Z.
The front panel slides down automatically,
then the disc is ejected.
2 Press Z to close the front panel.
Note
The front panel slides up automatically after 15
seconds of the front panel sliding down.
Adjusting the angle of the front
panel
ANGLE
1 Press and hold (ANGLE) repeatedly
until the front panel is angled
accordingly.
The front panel can be set to 3 positions.
To return the front panel to its default position,
press and hold (ANGLE) repeatedly until the
front panel is returned to its default position.
Tips
• After the front panel slides down (to insert the disc),
it returns to the position you set again automatically.
• The front panel angle you set is stored in the unit.
When turning the ignition off, the angle returns to its
default position, then turning the ignition on, the front
panel is angled you set.
5
Page 6
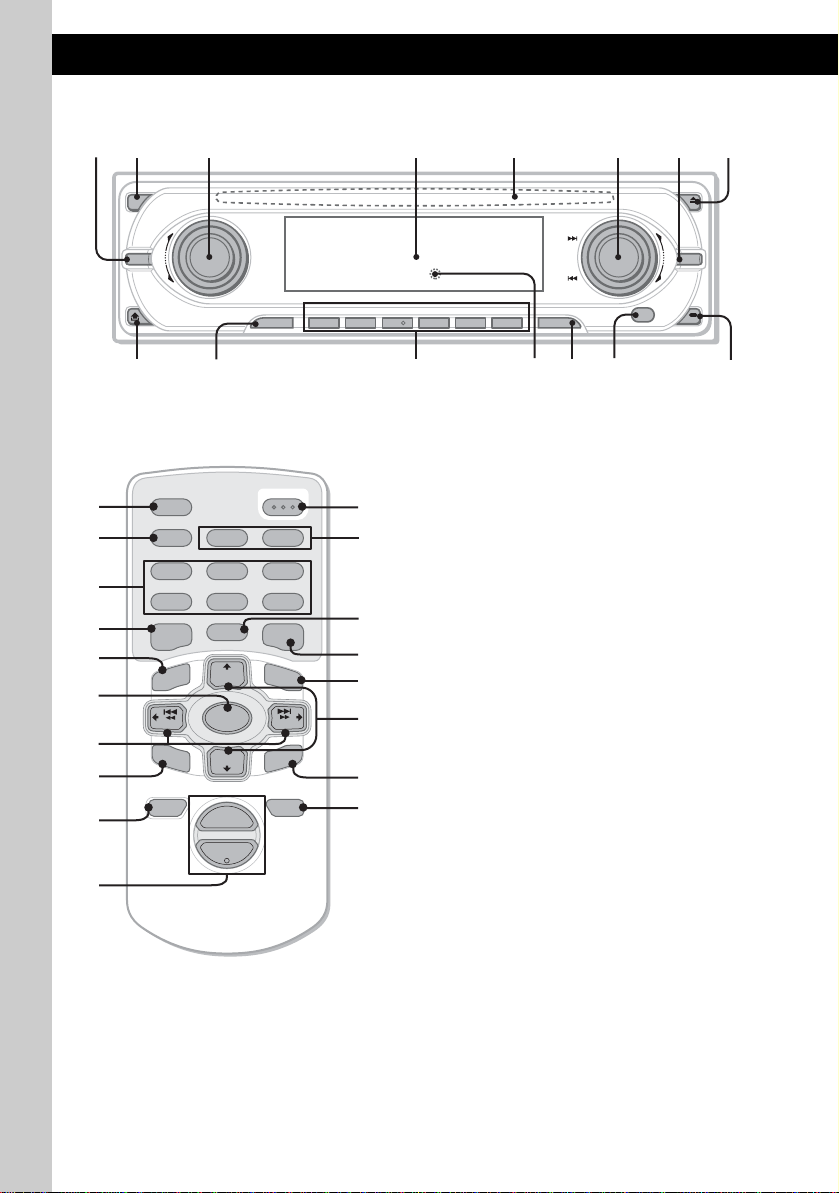
Location of controls and basic operations
Main unit
12 3 4 6578
OFF
MODE
VOL
PUSH SOUND PUSH ENTER
SOURCE AF/TA1
9
Card remote commander
RM-X142
AF TA
2
BBE MP
5
MODE
+
DISC
OPEN/CLOSE
PAUSE
LIST
qh
qj qd
qa
qk
SCRL
PTY
DSPL
REP SHUF
1
4
EQ7 DSO
7
MENU
q;
SOURCE
ql
–
SEEK
SOUND
DISC
SEEK
–
ENTER
w;
ATTOFF
+
2
VOL
–
wa
6
REP SHUF BBE MP PAUSE
2534
qaq; qs qd qf qg
ws
3
6
1
wd
wf
+
wg
6
wh
ANGLE
+
–
6
SEEK
MENU
IMAGE
CDX-M7850
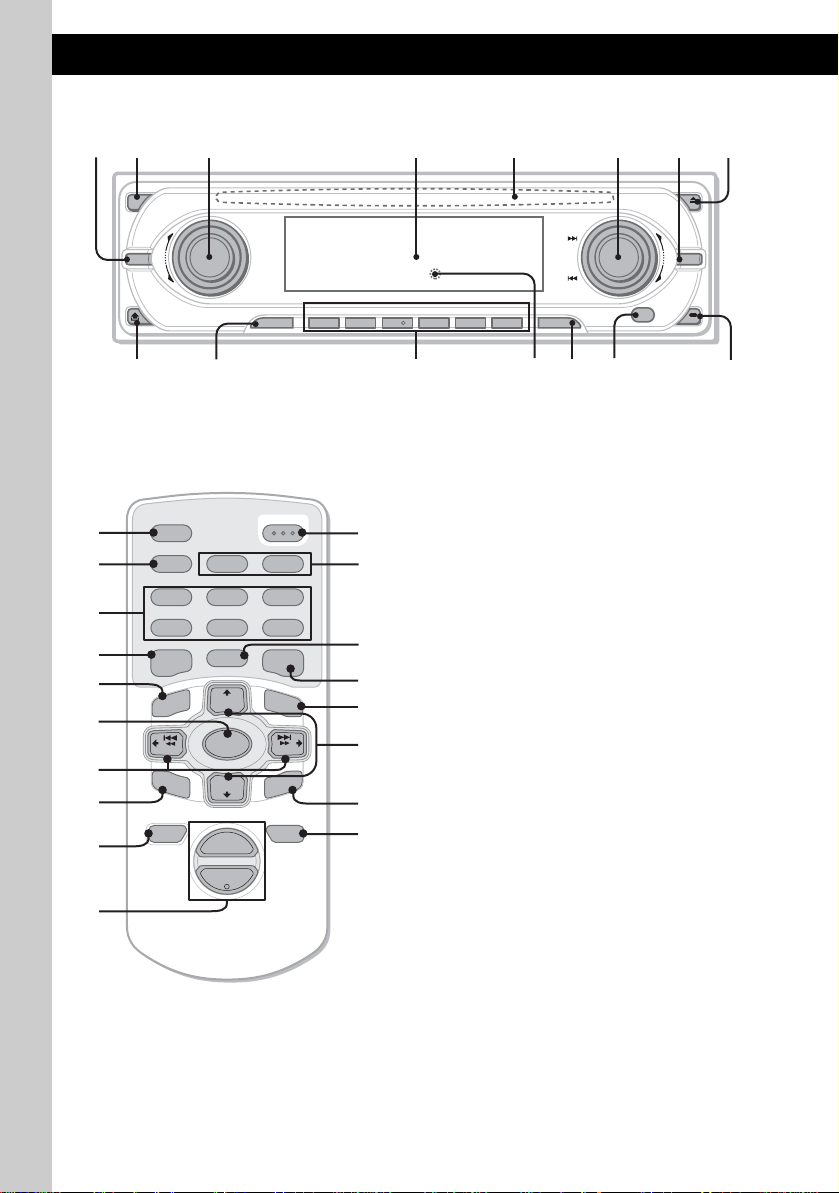
Refer to the pages listed for details. The
corresponding buttons on the card remote
commander control the same functions as those
on the un it.
A MODE button 8, 12
To select the radio band (FM/MW/LW)/
select the unit*
1
.
B OFF button
To power off/stop the source.
C VOL (volume) control dial/SOUND
button
11
To adjust volume (rotate); select sound items
(press).
D Display window
E Disc slot 5
To insert the disc.
F SEEK control dial/ENTER button
To select items (rotate); complete a setting
(press).
Radio:
To tune in stations: press (ENTER)
repeatedly to select “SEEK,” “MANUAL,”
or “PRESET,” then rotate the SEEK control
dial until the desi r ed station appears.
CD:
To skip tracks or groups: press (ENTER)
repeatedly t o select ./> or “GROUP,”
then rotate the SEEK control dial until the
desired track or group appears.
G MENU button
To enter menu.
H Z (eject)/ANGLE button 5
To eject the disc/slide down the front panel
(press); angle th e front panel in 3 positi ons
(press and hold).
Page 7

I (front panel release) button 4
J SOURCE button
To power on/chan ge the source (Radi o/ C D /
2
MD*
/AUX*3).
K Number buttons
Radio:
To receive stored stations (press); store
stations (press and hold).
CD/MD*2:
(1): REP 8
(2): SHUF 8
(5): BBE MP*4 2
To activate the BBE MP function, set “BBE
MP-on.” To cancel, set “BBE MP-off.”
(6): PAUSE*
4
To pause playback. To cancel, press again.
L RESET button 4
M AF (Alternative Frequencies)/TA
(Traffic Announcement) button 10
To set AF and TA/TP in RDS.
N Receptor
To receive signals from the card rem ote
commande r or wireless ro tary command er.
O IMAGE button 2
To select the display image.
Space Producer mo de t Movie mode 1-2
t Spectrum analyzer mode 1-5 t Wall
paper mode 1-3 t normal play/reception
mode
The following buttons on th e card remote
commander have also different buttons/functio ns
from the unit.
qh SCRL (scroll) button 8
To scroll the display item.
qj DSPL (display)/PTY (Pro g ramme
Type) button
8, 10, 13
To change display items; to select PTY in
RDS.
qk EQ7 (equalizer) button
To select an equalizer type (Xplod, Vocal,
Club, Jazz, New Age, Rock, Custom or off).
ql </, (SEEK –/+) buttons
Radio:
To tune in stati ons automatical ly (press); f ind
a station manuall y (press and hold).
CD:
To skip tracks (press); skip tracks
continuously (press, then press again within
about 1 second and hol d) ; fast-forward/
reverse a track (press and hold).
w; SOUND button 11
To select sound items.
wa VOL (volume) +/– button
To adjust volume.
ws OPEN/CLOSE button
To open/close the front panel.
wd DSO button 2
To select the DSO mode (1, 2, 3 or off). The
larger the number, the more enhanced the
effect.
wf LIST button 9, 14
To list up.
wg M/m (DISC +/–) buttons
To select preset stations/skip groups (pr es s);
skip groups continuously (press and hold).
wh ATT (attenuate) butto n
To attenuate the sound. To cancel, press
again.
*1 When a CD/MD changer is connected.
*2 When an MD changer is connected.
*3 When an optional Sony portable device is
connected.
*4 When playing back on this unit.
Note
If the unit is turned off and the display disappears, it
cannot be operated with the card remote commander
unless (SOURCE) on the unit is pressed, or a disc is
inserted to activate the unit first.
Tip
For details on how to replace the battery, see
“Replacing the lithium battery of the card remote
commander” on page 16.
7
Page 8
CD
For details on connecti ng to a CD/MD change r,
see
page 12.
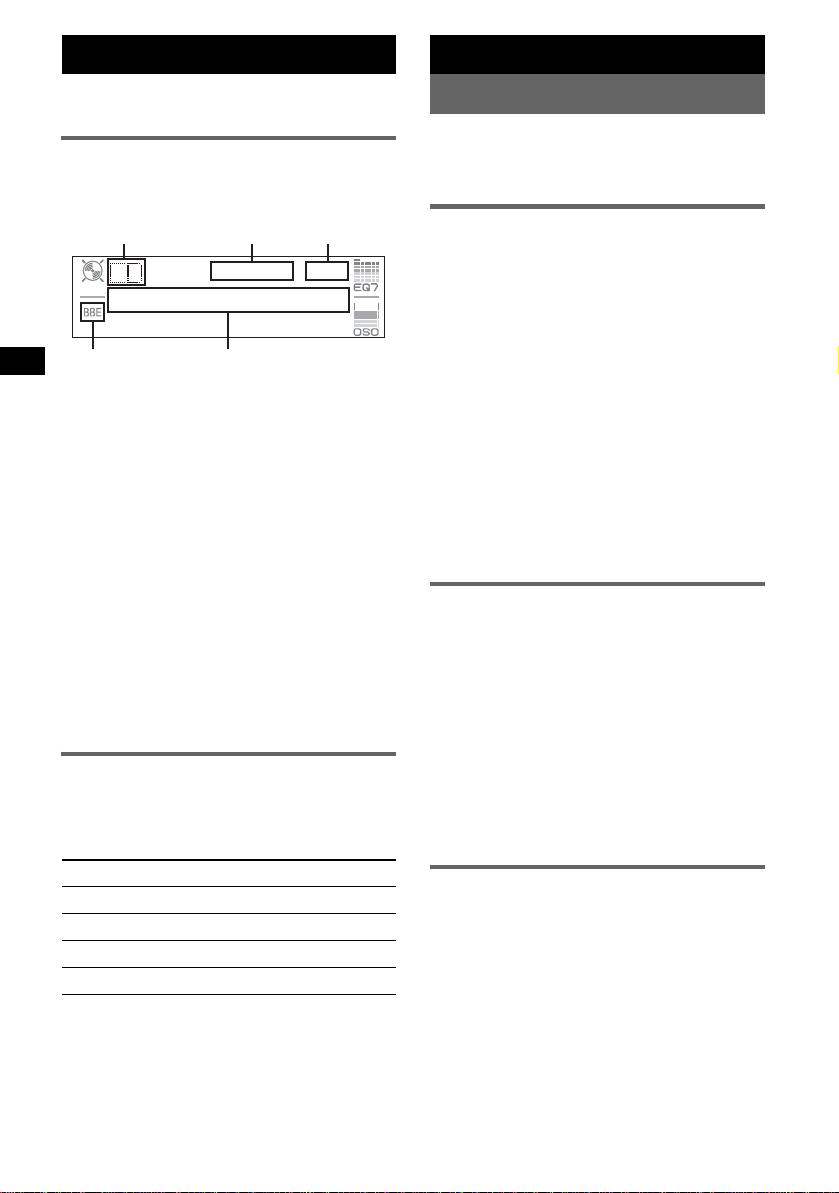
Display items
Example: wh en you select the normal play mode
by pressing (IMAGE) repeatedly (
ABC
D
A Source
B MP3/ATRAC3 plus indication
C Clock*
D BBE indication
E Group number/Track number /Elapsed
*1 When the clock mode is set to “on” (page 12).
*2 When playing an MP3, ID3 tag is displayed and
To change di splay items E, press (DSPL);
scroll display items E, press (SCRL) on the
card remote comm ander or set to “A.Scroll on”
(
page 12).
Tip
Displayed items will differ , de pending on the disc type,
recorded format and settings. For details on MP3, see
page 15; ATRAC CD, see page 16.
1
playing time, Disc/artist name, Group name,
Track na me, Text information*
when playing a ATRAC CD , te xt inf ormation written
by SonicStage, etc. is displayed.
E
Repeat and shuffle play
1 During playback, press (1) (REP) or
(2) (SHUF) repeatedly until the
desired setting app ears.
Select To play
REP-Track track repeate dly.
REP-Group* group repeatedly.
SHUF-Group* group in random orde r.
SHUF-Disc disc in random order.
* When an MP3/ATRAC CD is played.
To return to nor mal play mode, select “REP-off”
or “SHUF-off.”
page 7).
2
Radio
Storing and receiving stations
Caution
When tuning in stat i ons while driving, use Best
Tuning Memory (BTM) to prevent an accident.
Storing automatically — BTM
1 Press (SOURCE) repeatedly until
“TUNER” appears.
To change the band, press (MODE)
repeatedl y. You can sel ect from FM1, FM2,
FM3, MW or LW.
2 Press (MENU).
3 Rotate the SEEK control dial until
“Edit” appears, then press (ENTER).
4 Rotate the SEEK control dial until
“BTM” appears, then press (ENTER).
The unit stores stations in order of frequency
on the number buttons.
A beep sounds when the setting is stored.
With the card remote commander
In steps 3 and 4: press M or m instead of the SEEK
control dial.
Storing manually
1 While receiving the st at io n th at you
want to store, press and hold a
number button ((1) to (6)) until
“Memory” appears.
The number button indication appears in the
display.
Note
If you try to st or e a no t her s t at io n o n t he same n um be r
button, the previous stored station will be replaced.
Tip
When a RDS station is stored, the AF/TA setting is
also stored (
Receiving the stored stations
1 Select the band, then press a number
Tip
Another way to receive the stored stations is to press
(ENTER) repeatedly until “PRESET” a ppears, then
rotate the SEEK control dial until the desired preset
number appears.
page 10).
button ((1) to (6)).
8
Page 9
Tuning automatically
1 Select the band, then pre ss (ENTER)
repeatedly until “SEEK” appears, then
rotate the SEEK control dial to search
for the station.
Scanning stops when the unit receives a
station. Repeat t hi s procedure until the
desired station is received.
Tip
If you know the frequency of the station you want to
listen to, press (ENTER) repeatedly until “MANUAL”
appears, then rotate the SEEK control dial until the
desired frequency appears.
Receiving a station through a list
— LIST
You can list up the fr equency. For details on
labelling a station, see page 13.
1 Select the band, then pre ss (MEN U).
2 Rotate the SEEK control dial until
“List” appears, then pres s (ENTER).
The frequency appears.
3 Rotate the SEEK dial until the desired
station appears.
4 Press (ENTER) to receive the station.
The display returns to normal reception
mode.
With the card remote commander
Select the band, then press (LIST). Press M or m
repeatedly until the desired station appears, then
press (ENTER).
RDS
Overview
FM stations with Radio Data System (RDS)
service send in audible digital information along
with the regular radio programme signal.
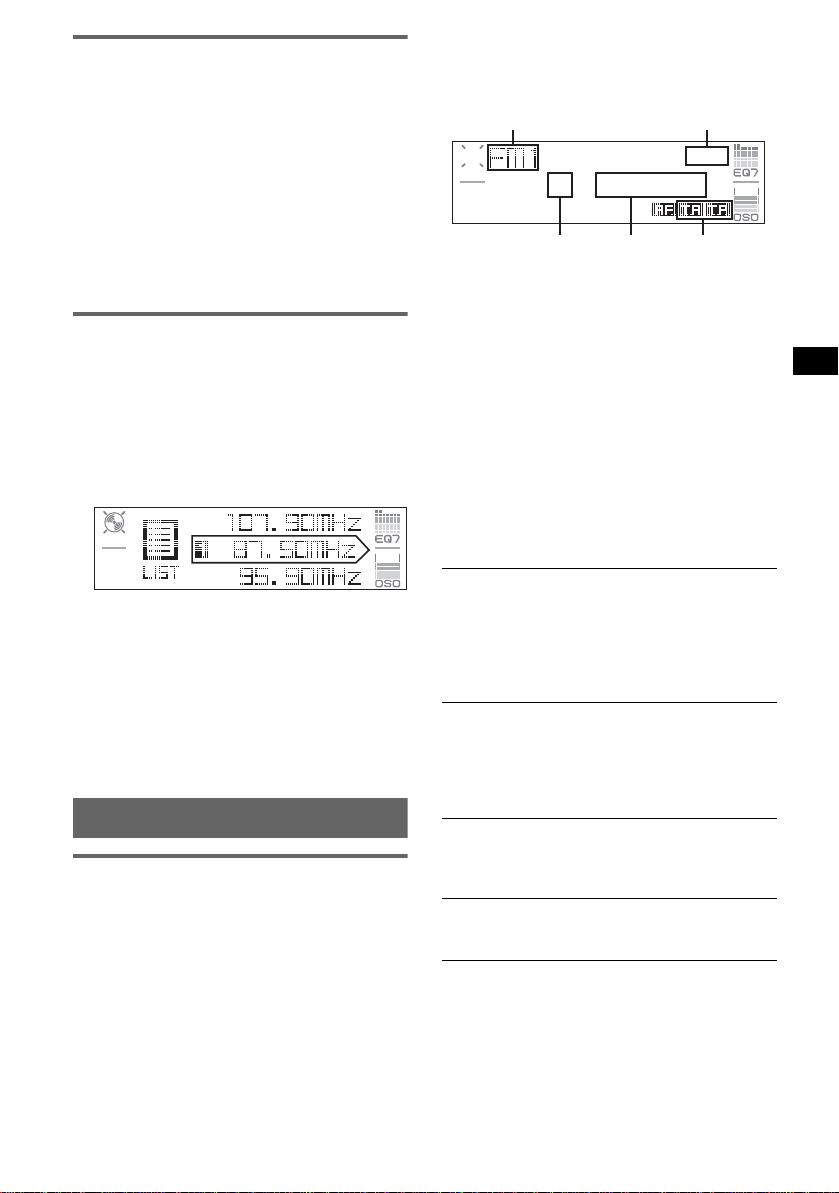
Display items
Example: when you select the normal play mode
by pressing (IMAGE) repeatedly (
A
CE
A Radio band, Function
B Clock*
C Preset number
D Frequency*
E TA/TP*
*1 When clock mode is set to “on” (page 12).
*2 While receiving the RDS station, “ *” is displayed
*3 “TA” flashes during traffic information. “TP” lights
1
2
(Station name), RDS data
3
on the left of the frequency indication.
up while such a station is received.
page 7).
B
D
To change display ite ms D, press (DSPL) on the
card remote commander.
RDS services
This unit automatically pro vides RDS serv ices as
follows:
AF (Alternative Freque nc ie s)
Selects and retunes the station with the
strongest signal in a network. By using this
function, you can continuousl y listen to the
same programme during a long-distance dri ve
without having to re tune the s a me statio n
manually.
TA (Traffic Announcement)/TP (Tra ffic
Programme)
Provides current traffic information/
programmes. Any information/pr ogramme
received, will inter ru pt the curr ently sel ec te d
source.
PTY (Programme Types)
Displays the cu rrently received progra m m e
type. Also searches your selected programme
type.
CT (Clock Time)
The CT data from the RDS transmission sets
the clock.
Notes
• Depending on the country/region, not all RDS
functions may be available.
• RDS will not work if the signal strength is too weak,
or if the station you are tuned to is not transmitting
RDS data.
continue to next page t
9
Page 10
Setting AF and TA/TP
1 Press (AF/TA) repeatedly until the
desired setting app ears.
Select To
AF on activate AF and de act ivate TA.
TA on activate TA and deactivate AF.
AF TA on activate both AF and TA.
AF TA off deactivate both AF and TA.
With the card remote commander
Press (AF) and/or (TA) instead of (AF/TA).
Storing RDS stations with the AF and
TA setting
You can preset RDS st ations along with th e A F/
TA setting. If you us e t he BTM function, only
RDS stations are stored with the same AF/TA
setting.
If you preset manually, you can preset both RD S
and non-RDS stations with t he AF/TA setting for
each.
1 Set AF/TA, then store the station with BTM or
manually.
Presetting the volume of traffic
announcements
You can preset the volume level of the traffic
announcements so as to not miss hearing them.
1 Rotate the volume control dial to adjust the
volume level.
2 Press and hold (AF/TA) until “TA VOL”
appears.
With the card remote commander
Press and hold (TA) instead of (AF/TA).
Receiving emergency
announcements
With AF or TA on, the emergency
announcements will automatically interrupt the
currently selected source.
Staying with one regional
programme — Regional
When the AF function is on: this unit’s factory
setting restricts reception to a specific region, so
you will not be switched to another regional
station with a stronger frequency.
If you lea ve this regional programme’s reception
area, set “Regional off” in menu (
Note
This function does not work in the UK and in some
other areas.
page 12).
10
Local Link function (UK only)
This function ena b les you to se lect other local
stations in the area, even if the y are not store d on
your number buttons.
1 During FM reception, press a number button
((1) to (6)) on which a local station is stored.
2 Withi n 5 s econ d s, pres s a g ain a num ber button
of the local station.
Repeat this procedure until the local station is
received.
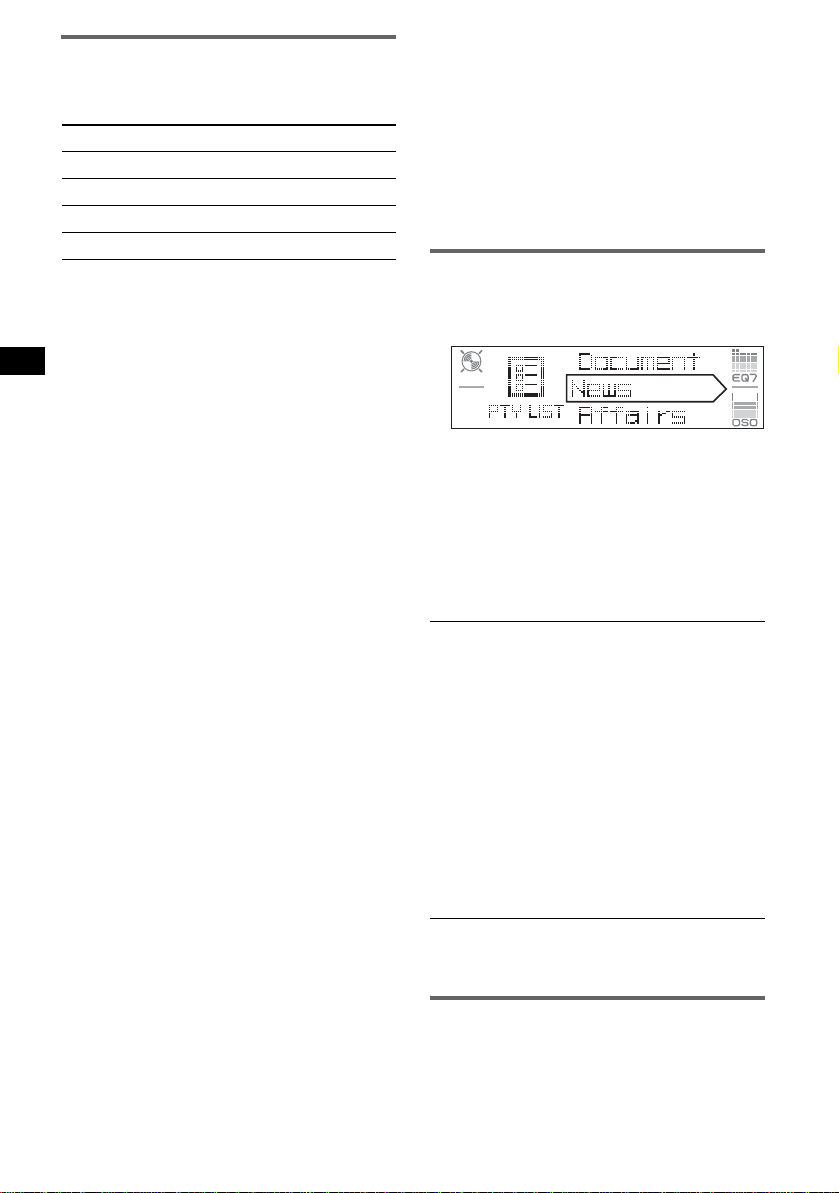
Selecting PTY
(With the card remote commander)
1 Press (PTY) during FM reception.
The current progra mme type name appea rs if
the station is transmitting PTY data.
2 Press M or m repeatedly until the
desired programme type appears.
3 Press (ENTER).
The unit start s to search for a station
broadcasting the selected programme type.
Type of programmes
News (News), Affairs (Current Affair s), Info
(Information), Sport (Sports), Educate
(Education), Drama (Drama), Culture
(Culture), Science (Scien ce ), Varied (Varied ),
Pop
M (Popular Music), Rock M (Rock
Music), Easy
(Light Classical), Classics (Classical),
Other
(Weather), Finance (Finance), Children
(Children’s Programmes), Social
Affairs), Religion (Religion), Phone
(Phone In), Travel (Travel), Leisure (Leisure),
Jazz (Jazz Music), Country (Country Music),
Nation
Music), Folk
(Documentary)
Note
You cannot use this function in countries/regions
where no PTY data is available.
M (Easy Listening), Light M
M (Other Music Type), Weather
A (Socia l
In
M (National Music), Oldies (Oldies
M (Folk Music), Document
Setting CT
1 Set “CT on” in menu (page 12).
Notes
• The CT function may not work even though an RDS
station is being received.
• There might be a difference between the time set by
the CT function and the actual time.
Page 11

Other functions
Changing the sound settings
Adjusting the sound
characteristics
You can adjust the equalizer, DSO, bass, treb le ,
balance, fader and s ubw oofer volume.
1 Select a source, then press (SOUND)
repeatedly to select the desired item.
The item changes as follows:
EQ7 t DSO t BAS (bas s) t
TRE (treble) t BAL (left-right) t
FAD (front-rear) t
SUB (subwoofer volume )*
* “ ∞” is displayed at the lowest setting, and can be
adjusted up to 20 steps.
2 Rotate the VOL control dial repeatedly
to adjust the selected item.
After 3 seconds, the setting is complete and
the display retur ns to normal play/reception
mode.
Note
Adjust within 3 seconds of selecting the item.
With the card remote commander
In step 2: press < or , instead of the VOL control
dial.
Adjusting the equalizer curve
— EQ7 Tune
You can adjust an d st ore the equalizer settings
for different tone ranges.
1 Select a source, then press (MENU).
2 Rotate the SEEK control dial until
“Sound” appears, then press (ENTER).
3 Rotate the SEEK control dial until
“EQ7 Tune” appears, then press
(ENTER).
4 Rotate the SEEK control dial to select
the desired equalizer type, then press
(ENTER).
5 Rotate the SEEK control dial to adjust
the desired volume level.
The volume level is adjusta bl e in 1 dB steps,
from –10 dB to +10 dB.
62Hz t 157Hz t 396Hz t 1.0kHz
t 2.5kHz t 6.3kHz t 16kHz
Repeat steps 5 and 6 to adjust the equalize r
curve.
The confirmation dialog appears after
adjusting “16kH z” and pressing (ENTER).
7 Rotate the SEEK control dial to select
“YES,” t hen press (ENTER).
The setting is complete and the display
returns to normal play/reception mode.
To restore the factory-set equali zer curve, press
and hold (ENTER) in step 5 or 6, then rotate the
SEEK control dial to select “YES.”
With the card remote commander
In steps 2, 3 and 5: press M or m instead of the SEEK
control dial; in steps 4 and 7: press < or , instead
of the SEEK control dial; in step 6: press < or ,
instead of (ENTER).
Adjusting menu items — MENU
1 Press (MENU).
2 Rotate the SEEK control dial until the
desired menu item appears, then
press (ENTER).
The items changes as fol l ows:
Setup y Display y Receiv e M ode
y Sound y Edit y List
3 Rotate the SEEK control dial until
desired setting item appears, then
press (ENTER).
The digital indication moves to the right
(setting selection) side.
4 Rotate the SEEK control dial to select
the setting, then press (ENTER).
The setting is complete.
5 Press (MENU).
The display returns to normal play/reception
mode.
Note
Displayed items will differ, depending on the source
and setting.
With the card remote commander
In steps 2 and 3: press M or m instead of the SEEK
control dial; in step 4, press < or , instead of the
SEEK control dial.
6 Press (ENTER) to move to the next
frequency.
The frequency changes as follows:
continue to next page t
11
Page 12
The following items can be set (follow the page
reference fo r details):
“z” indicates the default settings.
Setup
Clock Adjust (page 4)
CT (Clock Time)
To set “on” or “off” (z) (page 9, 10).
Beep
To set “on” (z) or “off.”
1
AUX-A*
T o turn the AUX source display “on” (
(AUX Audio)
z) or “off”
(page 14).
Display
Clock (Clock Information)
To display the clo ck and the display it ems/image
at the same time.
– “on”: to displ ay at the same time.
– “off” (
z): to not display at the same time.
A.IMG (Auto Image)
Auto Image mode automatically ste p s (every 10
seconds) thro ugh the display images.
– “off” (
z): to not change the im age
automatically.
– “SA”: to step repeatedly thro ugh the display
images of Spectrum analyzer.
–“Movie”: to step repeatedly through the
display images of Movie mode.
–“All”: to step repeatedly through the display
images in all display modes.
Info (Display Information)
To display the items (depending on the source,
etc.) at the middle of the display while a image
is displayed.
– “on” (
z): to display the items.
– “off”: to not displa y any i te ms.
Dimmer
To change the brightness of the display.
–“Auto” (
–“on”: to dim the display.
–“off”: to deactivate the dimmer.
Demo*1
To set “on” (z) or “off” (page 4).
A.Scroll (Auto Scroll)
To scroll long displayed item automatically
when the disc/group/track is ch anged.
–“on”: to scroll.
– “off” (
z): to dim the display automatically
when you turn li ghts on.
(Demonstration)
z): to not scroll.
Mono (Monaural mo de)
T o improve poor FM reception, select monaural
reception mode.
–“on”: to hear stereo broadcasts in monaural.
–“off” (
z): to hear stereo broadcast in stereo.
Regional*
2
T o set “on” (z) or “off” (page 10).
Sound
EQ7 Tune (page 11)
HPF (High Pass Filter)
To select the front/rear sp eaker cut-off
frequency: “off” (
z), “78Hz” or “125Hz.”
LPF (Low Pass Filter)
T o select the subwoofer cut-off frequency: “off”
(
z), “125Hz” or “78Hz.”
Loudness
To enhance bass and treble at lowe r volume.
–“on”: to reinforce bass and treble.
–“off” (
z): to not rein force bass and tr eble.
AUX Level
To adjust the volume level for each connec te d
auxiliary equipm ent (page 14). This sett i ng
negates the need to adjust the volume level
between sour ces.
Edit
Name Edit (page 13)
Name Delete (page 13)
BTM (page 8)
*1 When the unit is turned off.
*2 When FM is received.
Using optional equipment
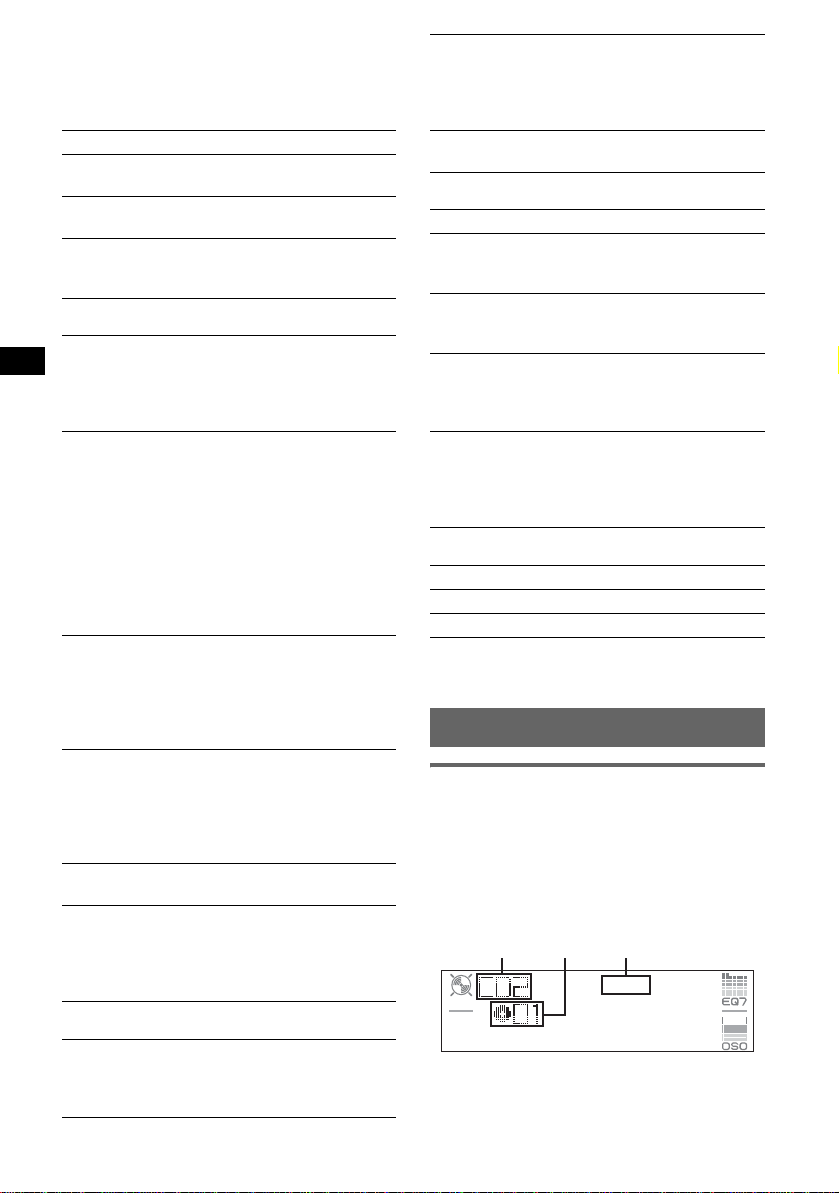
CD/MD changer
Selecting the changer
1 Press (SOURCE) repeatedly until “CD” or
“MD” appears.
2 Press (MODE) repeatedly until the desired
changer appears.
Unit
number
Disc
number
LP2/LP4
indication*
Receive Mode
Local (Local seek mode)
–“on”: to only tune into stations with stronger
signals.
– “off” (
z): to tune normal reception.
12
Playback starts.
* When MDLP disc is played.
Page 13
Skipping discs
1 During playback, pre ss (ENTER) until
“DISC” appears.
2 Rotate the SEEK control dial until the desired
disc appears.
Skipping groups and discs with the
card remote commander
1 During playback, pre ss M or m.
T o skip Press M or m.
group and release (h ol d for a
moment).
group
continuously
within 2 seconds of first
releasing.
discs repeatedly.
discs
continuously
then, press again w ithin 2
seconds and hold .
Repeat and shuffle play
1 During playback, pre ss (1) (REP) or (2)
(SHUF) repeatedly until the desired settin g
appears.
Select To play
REP-Disc*1disc repeatedly.
SHUF-
Changer*
SHUF-All*
tracks in the changer in random
1
order.
2
tracks in all units in random
order.
*1 When one or more CD/MD changers are
connected.
*2 When one or more CD changers, or two or more
MD changers are connected.
T o return to normal play mode, select “REP-off”
or “SHUF-off.”
Tip
“SHUF-All” will not shuffle tracks between CD units
and MD changers.
Labelling a disc
When you play a disc in a CD changer with the
CUSTOM FILE function, you can label each
disc with a custom name up to 8 characters (Disc
Memo).
If you label a disc, th e name appears on the list
(page 14).
1 While playing a disc that you want to label,
press (MENU).
2 Rotate the SEEK control dial until “Edit”
appears, then press (ENTER).
3 Rotate the SEEK control dial until “Name
Edit” appears, then press (ENTER).
4 Rotate the SEEK control dial until the desired
character appears.
The character changes as follows:
A y B y C ... y 0 y 1 y 2 ... y +
y – y
... y (blank space) y A
To move the digital in di cation, press
(ENTER).
Repeat this operation until the entire name is
entered.
The confirmation dialog appears after
entering the far right character and pressing
(ENTER).
5 Rotate the SEEK control dial to select “YES,”
then press (ENTER).
The setting is complete and the display
returns to the normal play mode.
To display the name, press (DSPL) on the card
remote commander during playback.
Tips
• To correct or erase a character, overwrite or enter
.”
“
• The Disc Memo always takes priority over any
prerecorded title.
• You can label a disc on the unit if a changer with the
CUSTOM FILE function is connected.
• “REP-T rack” and all shuffle play are suspended until
the labelling is complete.
With the card remote commander
In steps 2 to 4: press M or m instead of the SEEK
control dial; in step 4: press < or , to move the
digital indication; in step 5: press < or , instead of
the SEEK control dial.
Deleting the custom name
1 Select th e unit that has s tore d the cu stom n ame
you want to delete, the n press (MENU).
2 Rotate the SEEK control dial until “Edit”
appears, then pr es s (ENTER).
3 Rotate the SEEK control dial until “Name
Delete” appears, then press (ENTER).
The stored name wil l ap pear.
4 Rotate the SEEK control dial to select the
name you want to delete.
5 Press (ENTER).
The confirmation dialog appears.
6 Rotate the SEEK control dial to select “YES,”
then press (ENTER).
continue to next page t
13
Page 14
The name is deleted, and “Continue” appears
if the other names are stored. If you want t o
delete other names, rotate the SEEK control
dial to select “YES, ” then repeat ste ps 4 to 6.
7 Press (MENU).
The unit returns to normal pla y mode.
With the card remote commander
In steps 2 to 4: press M or m instead of the SEEK
control dial; in step 6: press < or , instead of the
SEEK control dial.
Locating a disc by name — LIST
You can select a disc from the list when
connecting a CD changer with the CUSTOM
FILE function or an MD changer.
If you assign a na m e t o a disc, the name appears
on the list. For details on labelling a disc, see
page 13.
1 During playback, press (MENU).
2 Rotate the SEEK control dial until “List”
appears, then press (ENTER).
The disc number or disc name appears.
3 Rotate the SEEK control dial until the desired
disc appears.
4 Press (ENTER) to play the disc.
The display returns to normal play mo de.
With the card remote commander
During playback, press (LIST). Press M or m
repeatedly until the desired disc appears, then press
(ENTER).
The following controls on the r ota ry comman der
require a different operation from the unit.
• PRESET/DISC control
To control radio/CD, the same as M or m on
card remote commander (push in and rotate).
• VOL (volume) control
The same as the volume cont rol di al on th e unit
(rotate).
• SEEK/AMS control
To control radio/CD, the same as < or , on
card remote commander (rotate, or rotate and
hold).
Changing the operative direction
The operative direction of the controls is factoryset as shown below.
To increase
To decrease
If you need to moun t t he r otary commander on
the right hand side of th e steering column, yo u
can reverse the operative direction.
1 While pushing the VOL control, press and
hold (SOUND).
Rotary commander RM-X4S
Attaching the label
Attach the indication label depending on h ow
you mount the rota ry commander.
D
S
D
N
U
O
S
E
D
O
M
PL
S
D
P
L
M
O
D
E
S
O
U
N
D
Location of controls
The correspo nd i ng buttons on the rotary
commander cont rol the same functi ons as those
on this unit or the card remote commander.
ATT
DSPL
SEEK/AMS
14
SOUND
PRESET/
DISC
SOURCE
VOL
MODE
OFF
Auxiliary audio equipment
You can connect op t io nal Sony portable devices
to the BUS AUDIO IN/AUX IN terminal on the
unit. If the changer or other device is not
connected to the ter m inal, the unit allows you to
listen to the portable device on your car speakers.
Note
When connecting a portable device, be sure BUS
CONTROL IN is not connected. If a device is
connected to BUS CONTROL IN, “AUX” cannot be
selected with (SOURCE).
Tip
When connecting both a portable device and a
changer, use the optional AUX-IN selector.
Selecting auxiliary equipment
1 Press (SOURCE) repeatedly until “AUX”
appears.
OFF
Operate by the portab le device itself.
To adjust the volume level of auxiliary
equipment, see “AUX Level” on
page 12.
Page 15
Additional Information
Precautions
• If your car has been parked in di rec t sunlight,
allow the unit to cool off before operating it.
• Power aerial will extend automatical ly w h ile the
unit is operating.
Moisture condensation
On a rainy day or in a very damp area, moisture
condensation may occur inside the lenses and
display of the unit. Should this occur, the unit will
not operate p roper l y. In such a ca se, remo ve the disc
and wait for about an hour un til th e moisture has
evaporated.
To maintain high sound quality
Be careful not to splash juice or othe r soft drinks
onto the unit or discs.
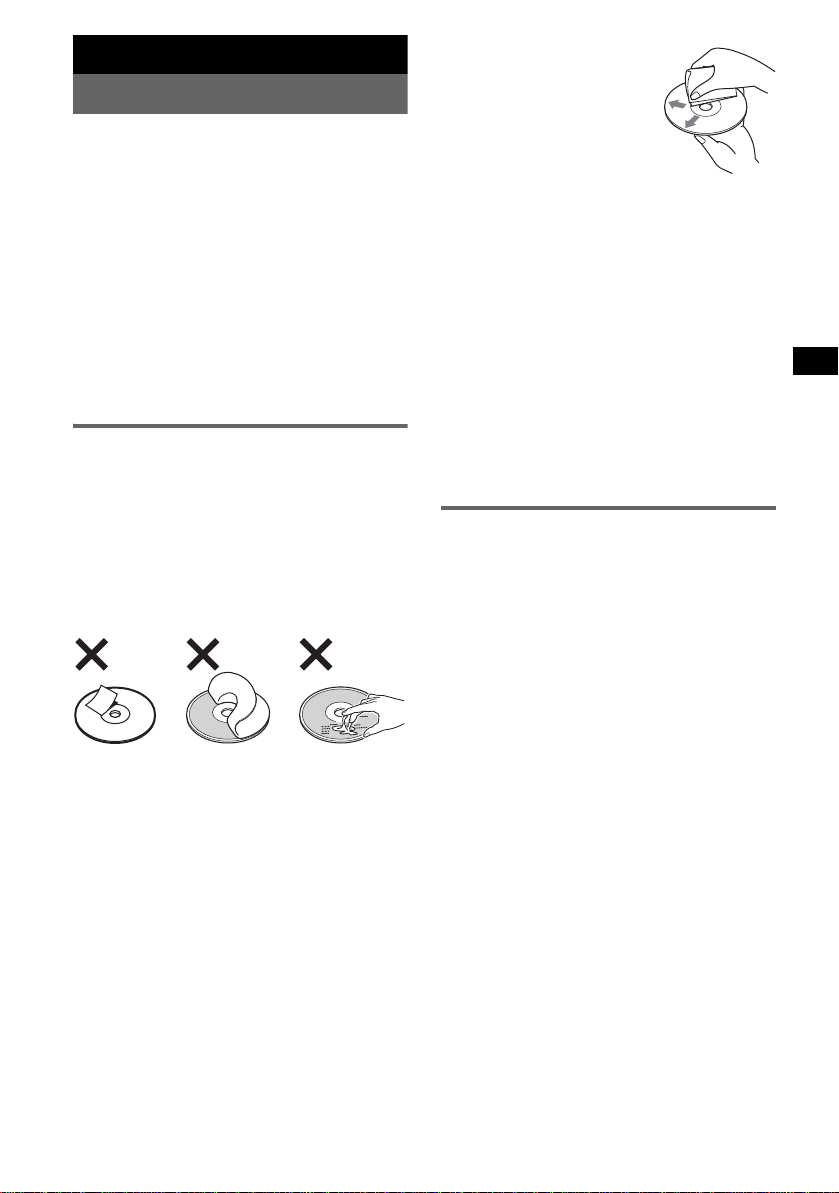
Notes on discs
• T o keep a disc clean, do no t touch its surface.
Handle the disc by its edge.
• Keep your discs in their cases or disc magazines
when not in u s e.
• Do not subject discs to heat/high temperature.
Avoid leaving them in a parke d ca r or on a
dashboard/rear tray.
• Do not attach labels, or use discs with sticky ink/
residue. Such discs may stop spinning when used,
causing a malfunction, or may ruin the disc .
• Do not use any discs with labels or stickers
attached.
The following ma lfuncti ons may resu lt from usin g
such discs:
– Inability to eject a disc (due to a label or sticker
peeling off and jammi ng the eject mechanism).
– Inability to read audio data correctly (e.g.,
playback skippin g, or no playback) due to heat
shrinking o f a sticker or label causing a disc to
warp.
• Discs with non-standard shapes (e.g., heart,
square, star) cannot be played on th is uni t.
Attempting to do so may damage the unit. Do not
use such discs.
• You cannot play 8 cm CDs.
• Before playing, cl ean the discs
with a commercially available
cleaning cloth. Wipe each disc
from the centre out. Do not use
solvents such as benzine,
thinner, commercially available
cleaners, or antistatic spray
intended for analogue discs.
Notes on CD-R/CD-RW discs
• Some CD-Rs/CD -RWs (depending on the
equipment used for its recording or the condition
of the disc) may not play on this un it .
• You cannot play a CD-R/a CD-RW that is not
finalized.
Music discs encoded with copyright
protection technologies
This product is designed to play back discs that
conform to the Compact Disc (CD) standa rd.
Recently, various music discs encoded with
copyright protection te chnologies are marketed by
some record c ompan ies. Pl ease b e a ware that among
those discs, there are some that do not conform to
the CD standard and may not be playable by this
product.
About MP3 files
MP3, which stands for MPEG-1 Audio Layer-3, is a
music file co mp ression format stan dard. It
compresses audio CD data to approximately 1/10 of
its original size.
• The unit is compatible with the ISO 9660 le vel 1/
level 2 format, Jol iet/Romeo i n the expansion
format, ID3 tag version 1.0, 1.1, 2.2, 2.3 and 2.4 ,
and Multi Session.
• The maximum number of:
– folders (groups): 150 (i nc luding root and empty
folders).
– MP3 files (track s) and folders containe d in a
disc: 300 (if a folder/file names contain many
characters, this number may become less than
300).
– displayable characters for a folder/file name is
32 (Jolie t), or 32/64 (Romeo); ID3 tag is 15/ 30
characters (1.0, 1.1, 2.2 and 2.3), or 63/126
characters (2.4).
continue to next page t
15
Page 16
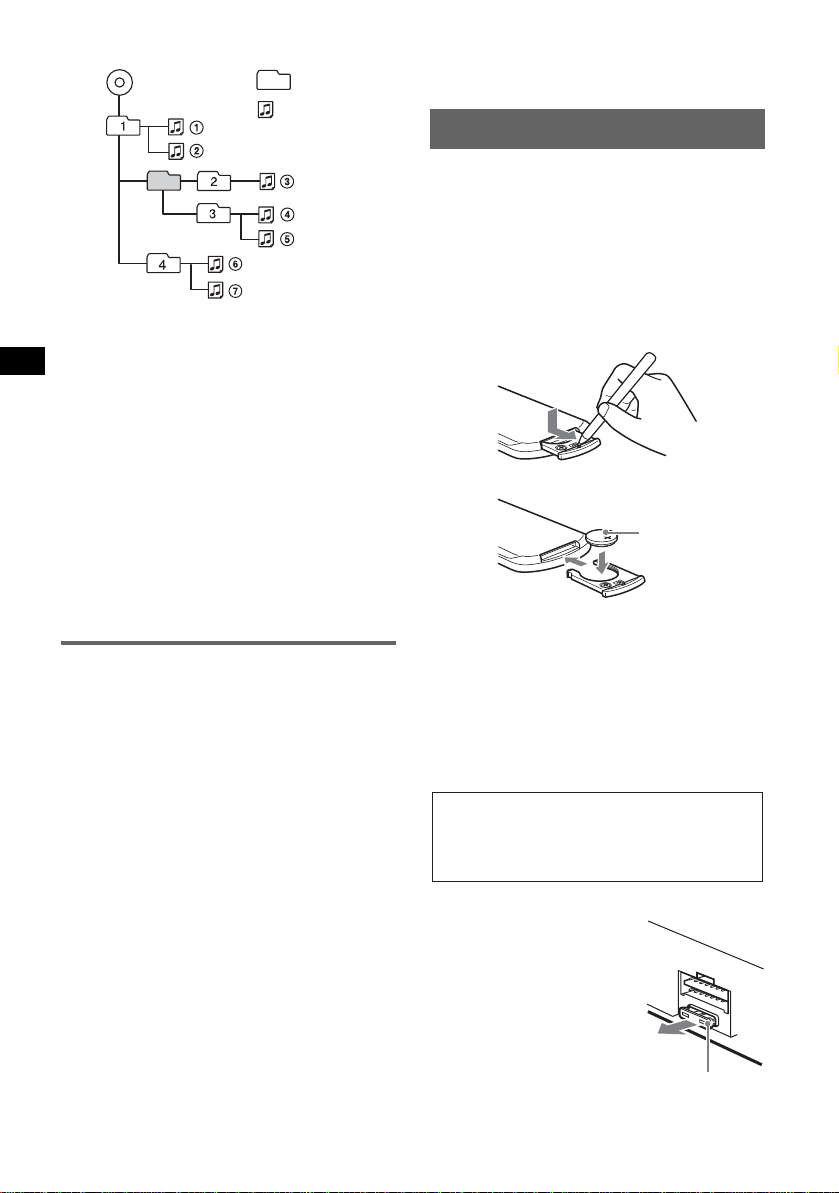
Playback order of MP3 files
MP3
Notes
• Be sure to finalize the disc before using on the unit.
• When naming an MP3 file, be sure to add the file
expansion “.mp3” to the file name.
• If you play a high-bit-rate MP3, such as 320 k bps,
sound may be intermittent.
• During playbac k of a V BR ( v a ria b l e bit r a t e) MP3 f il e
or fast-forward/reverse, elapsed playing time may
not display accurately.
• When the disc is recorded in Multi Session, only the
first track of the first session format is recognized
and played (any other format is skipped). The
priority of the format is CD-DA, ATRAC CD and
MP3.
– When the first track is a CD-DA, only CD-DA of the
first session is played.
– When the first track is not a CD-DA, an ATRAC CD
or MP3 session is played. If the disc has no data in
any of these formats, “NO Music” is displayed.
Folder
(group)
MP3 file
(track)
About ATRAC CD
ATRAC3plus format
ATRAC3, which stands for Adaptive Transform
Acoustic Coding3, is audio compression
technology. It compresses audio CD data to
approximately 1/10 of its original size.
ATRAC3plus, which is an extended format of
ATRAC3, compresses the audio CD data to
approximately 1/20 of its original size. The unit
accepts both ATRAC3 and ATRAC3plus format.
ATRAC CD
ATRAC CD is recorded audio CD data w hi ch is
compressed to ATRAC3 or ATRAC3plus format
using authorized software, such as SonicStage 2.0 or
later, or SonicStag e Simple Burne r.
• The maximum number of:
– folders (groups): 255
– files (tracks): 999
• The characters fo r a fo lder/file name and text
information written by SonicStage is displayed.
For details on ATRAC CD, see the Sonic Stage or
SonicStage Simple Burner ma nua l.
Note
Be sure to create the ATRA C CD using authorized
software, such as SonicStage 2.0 or later, or
SonicStage Simple Burner 1.0 or 1.1, which are
16
supplied with Sony Network products.
If you have any questions or problems concernin g
your unit that are not covered in this manual, consult
your nearest Sony dealer.
Maintenance
Replacing the lithium battery of the
card remote commander
Under normal conditi ons, the battery will last
approximately 1 year. (The service life may be
shorter, depending on the conditions of use.)
When the battery becomes weak, the range of the
card remote commander becomes shorter. Replace
the battery with a ne w CR2 02 5 lith ium battery. Use
of any other battery may presen t a risk of fire or
explosion.
x
+ side up
Notes on the lithium battery
• Keep the lithium battery out of the reach of children.
Should the battery be swallowed, immediately
consult a doctor.
• Wipe the battery with a dry cloth to assure a good
contact.
• Be sure to observe the correct polarity when
installing the battery.
• Do not hold the battery with metallic tweezers,
otherwise a short-circuit may occur.
WARNING
Battery may explode if mistreated.
Do not recharge, disassemble, or dispose of
in fire.
Fuse replacement
When replacing the fuse, be
sure to use one matching the
amperage rating stated on the
original fuse. If the fuse blows,
check the power connection and
replace the fuse. If the fuse
blows again after replacement,
there may be an internal
malfunction. In such a case,
consult your nearest Sony
dealer.
Fuse (10A)
Page 17
Cleaning the connectors
The unit may not function properly if the connectors
between the unit and the front panel are not clean. In
order to prevent this, detach the front panel (pag e 4)
and clean the connectors with a cotton swab dipped
in alcohol. Do not apply too much force. Otherwise,
the connectors may be dama ged.
2 Remove the unit.
1 Insert bot h release keys simulta neously
until they click.
Hook facing
inwards.
Main unit
Notes
• For safety, turn off the ignition before cleaning the
connectors, and remove the key from the ignition
switch.
• Never touch the connectors directly with your fingers
or with any metal device.
Back of the front
panel
Removing the unit
1 Remove the protection collar.
1 Detach the front panel (page 4).
2 Engage the release keys together with the
protection collar.
Orient the re lease
keys as shown.
3 Pull out the release keys to remove the
protection collar.
2 Pull the release keys to unseat the unit.
3 Slide the unit out of the mounting.
Specifications
CD Player section
Signal-to-noise ratio: 120 dB
Frequency response: 10 – 20,000 Hz
Wow and flu tter: Below measurable limit
Tuner section
FM
Tuning range: 87.50 – 108.00 MHz
Aerial terminal: External aerial connector
Intermediate frequency: 10.7 MHz/450 kHz
Usable sensitivity: 9 dBf
Selectivity: 75 dB at 400 kHz
Signal-to-noise ratio: 67 dB (stereo), 69 dB (mono)
Harmonic distortion at 1 kHz: 0.5 % (stereo),
0.3 % (mono)
Separation: 35 dB at 1 kHz
Frequency response: 30 – 15,000 Hz
MW/LW
Tuning range:
MW: 531 – 1,602 kHz
LW: 153 – 279 kHz
Aerial terminal: External aerial connector
Intermediate frequency: 10.7 MHz/450 kHz
Sensitivity: MW: 30 µV, LW: 40 µV
Power amplifier section
Outputs: Speaker outputs (sure se al connectors)
Speaker impedance: 4 – 8 ohms
Maximum power output: 52 W × 4 (at 4 ohms)
continue to next page t
17
Page 18

General
Outputs:
Audio outputs terminal (front/re ar)
Subwoofer output terminal (mono)
Power aerial relay control terminal
Power amplifier control terminal
Inputs:
Telephone ATT control terminal
Illumination control te rm inal
BUS control input terminal
BUS audio input/AUX IN terminal
Remote controll e r input terminal
Aerial input terminal
Tone controls:
Bass: ±8 dB at 100 Hz
Treble: ±8 dB at 10 kHz
Loudness:
+8 dB at 100 Hz
+2 dB at 10 kHz
Power requir ements: 12 V DC car battery
(negative earth )
Dimensions: Approx. 178 × 50 × 188 mm (w /h/d)
Mounting dimensions: Approx. 182 × 53 × 162 mm
(w/h/d)
Mass: Approx. 1.6 kg
Supplied accessori es :
Card remot e command er: RM-X1 4 2
Parts for installation and connections (1 set)
Front panel case (1)
Optional accessories/eq uipment:
Rotary commander: RM-X6S, RM-X4S
BUS cable (supplied with an RCA pin cord):
RC-61 (1 m), RC-62 (2 m)
CD changer (10 discs): CDX-757MX,
CDX-T70MX
CD changer (6 discs): CDX-T69
MD changer (6 discs): MDX-66XLP
Source selector: XA-C30
AUX-IN selector: XA-300
US and foreign patents licensed from Dolby
Laboratories.
Note
This unit cannot be connected to a digital preamplifier
or an equalizer which is Sony BUS system compatible.
Design and specifications are subject to change
without notice.
• Lead-free solder is used for soldering certain
parts. (more than 80 %)
• Halogenated flame retardants are not used in the
certain printed wiring boards.
• Halogenated flame retardants are not used in
cabinets.
• VOC (Volatile Organic Compound)-fr ee vegetable
oil based ink is used for printing the carton.
• Packaging cushions do not use polystyrene foam.
Troubleshooting
The following checklist will help you remedy
problems you may encounter with your unit.
Before going through the checklist below, check the
connection and opera t ing procedures.
General
No power is being supplied to the unit.
• Check the connection. If everything is in order, check
the fuse.
• If the unit is turned off and the display disappears, it
cannot be operated with the remote comm a nde r.
t Turn on the unit.
The power aerial does not extend.
The power aerial does not have a relay box.
No sound.
• The volume is too low.
• The ATT function is activated, or the Telephone ATT
function (when the interface cable of a car telephone
is connected to the ATT lead ) is activated.
• The position of the fader control ( FAD) is not set for
a 2-speaker system.
• The CD changer is incompatible with the disc format
(MP3/ATRAC CD).
t Play back with a Sony MP3 compatible CD
changer, or this unit.
No beep sound.
• The beep sound is cancelled (page 12).
• An optional power amplifier is connected and you are
not using the built-in amplifier.
The contents of the memory hav e b een erased.
• The RESET button has been pressed.
t Store again into the memory.
• The power connecting lead or batter y ha s be en
disconnected.
• The power connecting lead is not connected properly.
Stored stations and correct time are erased.
The fuse has blown.
Makes noise when the position of the ignition
key is switched.
The leads are not matched correctly with the car’s
accessory power connector.
The display disappears from/does not appear
in the display window.
• The dimmer is set “ D immer on” (page 12) .
• The angle of the front panel is not proper.
t Adjust the angle of the front pa nel by pressing
and hold (ANGLE) (page 6).
• The display disappe ars if you pr e ss a nd hold (OFF).
t Press and hold (OFF) again until the display
appears.
• The connectors are dirty (page 17).
DSO does not function.
Depending on the type of car interior or type of music,
DSO may not have a desirable effect.
18
Page 19

The image s ch a n ge automatically.
In Auto Image mode, the selected image cannot be
displayed.
tTo display selected image only, set to “A.IMG off”
(page 12).
Any display items do not display.
tSet to “Info on” (page 12).
CD/MD playback
The disc cannot be loaded.
• Another disc is already loaded.
• The disc has been forcibly inserted upside down or in
the wrong way.
The disc does not playback.
• Defective or dirty disc.
• The CD-Rs/CD-RWs are not for audio use (page 15).
MP3 files cannot be played back.
The disc is incompatib le with the MP3 format and
version (page 15).
MP3 files take longer to play back than others.
The following discs take a long e r ti me to sta rt
playback.
– a disc recorded with a complicated tree structure.
– a disc recorded in Multi Session.
– a disc to whic h da ta can be adde d.
The ATRAC CD cannot play.
• The disc is not created by authorized sof tware, such
as SonicStage or SonicStage Sim pl e Bu rn er.
• Tracks that are not incl uded in th e gr oup can not be
played.
The display items do not scroll.
• For discs with very many characters, those may not
scroll.
• “A.Scroll” is set to off.
t Set to “A.Scroll on” (page 12) or press (SCRL)
on the card remote commander.
The sound skips.
• Installation is not correct.
t Install th e uni t at an angle of less than 45° in a
sturdy part of the car.
• Defective or dirty disc.
The operation buttons do not function.
The disc will not eject.
Press the RESET button (page 4).
“MS” or “MD” does not appear on the source
display when both the optional MGS-X1 and
MD changer are connected.
This unit recognizes MGS-X1 as an MD unit.
tPress (SOURCE) until “MS” or “MD” appe ars,
then press (MODE) repeatedly.
Radio reception
The stations cannot be received.
The sound is hampered by noises.
• Connect a power aerial control lead (blue) or
accessory power supply lead (red) to the power
supply lead of a car’s aerial booster (only when your
car has built-in FM/MW/LW aerial in the rear/side
glass).
• Check the connection of the car aerial.
• The auto aeria l will not go up.
t Check the conne c tion of the power aerial control
lead.
• Check the frequency.
• When the DSO mode is on, the sound is sometimes
hampered by noises.
t Set the DSO mode to “off” (page 7).
Preset tuning is not possible.
• Store the correct frequency in th e memory.
• The broadcast si gna l is too weak.
Automatic tuning is not possible.
• The loca l seek mode is set to “on.”
t Set to “Local off” (page 12).
• The broadcast si gna l is too weak.
t Perform manua l tuni ng.
During FM reception, the “ST” indication
flashes.
• Tune in the frequency accurately.
• The broadcast si gna l is too weak.
t Set to “Mono on” (page 12).
An FM programme broadcast in stereo is heard
in monaural.
The unit is in monaural reception mode .
t Set to “Mono off” (page 12).
RDS
The SEEK starts after a few seconds of
listening.
The station is non-TP or has weak signal.
t Deactivate TA (page 10).
No traffic announcements.
• Activate TA (page 10).
• The station does not br oa dc as t any traffic
announcements despite bei n g TP.
t Tune in another station.
PTY displays “- - - - - - - -.”
• The current station is not an RDS station.
• RDS data has not been received.
• The station does not spe c if y the pr ogr amme type.
Error displays/Messages
1
Blank*
Tracks have not been recorded on the MD.*
t Play an MD with recorded tracks.
continue to next page t
2
19
Page 20

1
Error*
• The disc is dirty or inse rt ed upside down.*
tClean or insert the disc correctly.
• The disc cannot play because of some problem.
tInsert another disc.
Failure
The connection of speakers/ampl ifiers is inc or rec t .
t See the insta llation guide manual of this m odel to
check the connection.
Load
The changer is loading the d is c.
t Wait until loading is comple te .
Local Seek +/–
The local seek mode is on during autom a tic tuni ng.
NO AF
There is no alternative frequency for the current
station.
t Rotate < or , while the station name is flashing.
The unit starts searchin g for anothe r frequency with
the same PI (Programme Identification) data ( “P I
Seek” appears).
NO Data
All custom names have been deleted, or none are
stored.
NO Disc
The disc is not inserted in the CD/MD changer.
t Insert discs in the changer.
NO Disc Name
A disc name is not written in the track.
NO Group Name
A group name is not wri t ten in the track.
NO ID3 Tag
ID3 tag information is not wr it ten in the MP3 file.
NO Info
Text information is not written in the ATRAC3/
ATRAC3plus file.
NO Magazine
The disc magazine is not inserted in the CD c ha nge r.
t Insert the magazine in the changer.
NO Music
The disc is no t a music file.
t Insert a m u sic CD in this unit or MP3 playa ble
changer.
NO TP
The unit will continue searching for available T P
stations.
NO Track Name
A track name is not written in the track.
Not Read
The disc information has not been read by the unit.
t Loading the disc , then select it on the list.
Not Ready
The lid of the MD changer is open or the MDs are not
inserted properly.
t Close the lid or ins ert the M D s pr ope r ly.
2
Offset
There may be an internal malfuncti on.
t Check the connection. If the error indication
remains on in the display, consult your nearest
Sony dealer.
Read
The unit is reading all track and group information on
the disc.
t Wait until reading is co mplete and playback star ts
automatically. Depending on the disc structure , it
may take more than a mi nute.
Push Reset
The CD unit and CD/MD changer cannot be operated
because of some problem.
t Press the RESET button (page 4).
“ ” or “ ”
During fast-forward or reverse, you have reached the
beginning or the end of the disc and you cannot go any
further.
“s”
The character cannot be displayed with th e unit.
*1 If an error occurs during playback of a CD or MD,
the disc number of the CD or MD does not appear
in the display.
*2 The disc number of the disc causing the error
appears in the display.
If these solutions do not help improve the situation,
consult your nearest Sony dealer.
If you take the unit to be repaired because of CD
playback trouble, bring the disc that was used at the
time the problem began.
20
Page 21

Page 22
Willkommen!
Danke, dass Sie sich für diesen CD-Player von
Sony entschieden habe n. Mit diesem Gerät
stehen Ihnen i m Au to die folgenden Funkt ionen
zur Verfügung.
• CD-Wiedergabe
Wiedergabe von CD-DAs (auch solche mit CD
TEXT*), CD-Rs/CD-R Ws ( MP3-Dateien , auch
auf Multisession-CDs (
Seite 17)) sowie
ATRAC-CDs (ATRAC3- und ATRAC3plusForma t (
Seite 18)).
CD-Typ Beschriftung auf der CD
CD-DA
MP3
ATRAC-CD
• Radioempfang
–Für jeden Frequenzbereich (FM1 (UKW1),
FM2 (UKW2), FM3 (UKW3), MW und LW)
können Sie bis zu 6 Sender speichern.
–BTM (Best Tuning Memory -
Speicherbelegungsautomatik): Das Gerät
wählt die Sender mit de n stärksten Signalen
aus und speichert diese.
–Sie können jeden Radiosender mit einem
Namen verseh en, diesen speicher n und die
Sendernamen in einer Liste anzeigen.
• Klangeinstellungen
–EQ7: Sie können fü r 7 Musiktypen ein e
spezielle Equalizer-Kurve auswählen.
–DSO (Dynamic Soundstage Organizer):
Mithilfe virtueller Lautsprecher wird auch bei
niedrig in der Tür montierten Lautsprechern
eine bessere Raumklangwirkung erzeugt.
–BBE MP: Dient zum Verbessern digital
komprimierten Klangs, wie z. B. bei MP3Dateien. Erläuterungen dazu finden Sie im
Folgenden.
• Bildeinstellungen
Sie können im Display des Geräts verschiedene
Bilder anzeigen lassen.
– Space Producer (Klangraumeffekt): Im Takt der
Musik animierte Muster werden angezeigt.
• Bedienung eines gesondert erhältlichen
Geräts
Sie können nicht nur die Wiedergabe mit
diesem Gerät, so ndern auch geson dert
erhältliche CD/MD-Wechsler sowie tragbare
Geräte von S ony steuern.
2
* Eine CD mit CD TEXT ist eine CD-DA, die
Informationen wie den Namen der CD, den Namen
des Interpreten und die Namen der Titel enthält.
Warnhinweis, wenn die Zündung Ihres
Fahrzeugs nicht über eine
Zubehörposition (ACC oder I) verfügt
Nachdem Sie die Zündung ausgeschaltet
haben, halten Sie am Gerät unbedingt (OFF)
gedrückt, bis die Anzeige ausgeblendet wird.
Andernfalls wird die Anzeige nicht
ausgeschaltet und der Autobatterie wird
Strom entzogen.
Dieses Etikett befindet sich an der Unterseite
des Gehäuses.
Mithilfe von BBE MP lässt
R
sich die Klangqualität bei
digital komprimiertem Ton
wie z. B. MP3 verbessern, indem die bei der
Komprimierung verloren gegangenen
harmonischen Obertöne wiederhergestellt und
verstärkt werden. Mit BBE MP werden aus dem
vorhandenen Tonmaterial geradzahlige Obertöne
erzeugt, so dass der Klang wärmer, detailgetreuer
und nuancierter wiedergegeben wird.
SonicStage und das entsprechende Logo sind
Markenzeichen der Sony Corporation.
ATRAC, ATRAC3, ATRAC3plus und die
entsprechenden Logos sind Markenz ei chen der
Sony Corporation.
Page 23

Inhalt
Vorbereitungen
Zurücksetzen des Geräts . . . . . . . . . . . . . . . . . . 4
Einstellen der Uhr . . . . . . . . . . . . . . . . . . . . . . . 4
DEMO-Modus. . . . . . . . . . . . . . . . . . . . . . . . . . 4
Abnehmen der Frontplatte. . . . . . . . . . . . . . . . . 4
Anbringen der Frontplatte . . . . . . . . . . . . . . 5
Einlegen einer CD in das Gerät. . . . . . . . . . . . . 5
Auswerfen der CD . . . . . . . . . . . . . . . . . . . . 5
Anpassen des Winkels der Frontplatte . . . . . . . 5
Lage und Grundfunktionen der
Teile und Bedienelemente
Hauptgerät . . . . . . . . . . . . . . . . . . . . . . . . . . 6
Kartenfernbedienung RM-X142 . . . . . . . . . 6
CD
Informationen im Display . . . . . . . . . . . . . . 8
Repeat und Shuffle Play . . . . . . . . . . . . . . . 8
Radio
Speichern und Emp fa ngen von Sendern . . . . . . 9
Automatisches Spei chern von Sendern
— BTM . . . . . . . . . . . . . . . . . . . . . . . . . . . . 9
Manuelles Speichern von Sendern . . . . . . . . 9
Empfangen gespeicherter Sender . . . . . . . . . 9
Automatisches Einstelle n von Sendern . . . . 9
Einstellen eines Senders anhand einer L is t e
— LIST . . . . . . . . . . . . . . . . . . . . . . . . . . . . 9
RDS . . . . . . . . . . . . . . . . . . . . . . . . . . . . . . . . . 10
Übersicht . . . . . . . . . . . . . . . . . . . . . . . . . . 10
Einstellen von AF und TA/TP . . . . . . . . . . 10
Auswählen des Programmtyps (PTY) . . . . 11
Einstellen der Uhrzeit (CT) . . . . . . . . . . . . 11
Weitere Funktionen
Ändern der Klangeinstellungen . . . . . . . . . . . 12
Einstellen der Klangeigenschaften . . . . . . 1 2
Einstellen der Equa lizer-Kurve
— EQ7 Tune . . . . . . . . . . . . . . . . . . . . . . . 12
Einstellen von Menüoptionen — MENU . . . . 12
Verwenden gesondert erhältlicher Geräte. . . . 14
CD/MD-Wechsler . . . . . . . . . . . . . . . . . . . 14
Joystick RM-X4S . . . . . . . . . . . . . . . . . . . 16
Zusätzliche Audiogeräte . . . . . . . . . . . . . . 16
Weitere Informationen
Sicherheitsmaßnahmen. . . . . . . . . . . . . . . . . . 17
Hinweise zu CDs . . . . . . . . . . . . . . . . . . . . 17
MP3-Dateien . . . . . . . . . . . . . . . . . . . . . . . 17
ATRAC-CDs . . . . . . . . . . . . . . . . . . . . . . . 18
Wartung . . . . . . . . . . . . . . . . . . . . . . . . . . . . . 18
Ausbauen des Geräts. . . . . . . . . . . . . . . . . . . . 19
Technische Daten . . . . . . . . . . . . . . . . . . . . . . 20
Störungsbehebung. . . . . . . . . . . . . . . . . . . . . . 20
Fehleranzeigen/Meldungen . . . . . . . . . . . . 22
3
Page 24

Vorbereitungen
DEMO-Modus
Zurücksetzen des Geräts
Bevor Sie das Gerät zum ersten Mal benutzen
oder wenn Sie die Autobatterie ausge t auscht
oder die Verbindungen gewech selt haben,
müssen Sie das Ge rät zurücksetzen.
Nehmen Sie die Fron tp la tte ab und drücken Sie
die Taste RESET mit einem spitzen Gegenstand,
wie z. B. einem Kugelschreiber.
Taste RESET
Hinweis
Wenn Sie die Taste RESET drücken, werden die
eingestellte Uhrzeit und einige weitere gespeicherte
Einstellungen gelöscht.
Einstellen der Uhr
Die Uhr zeigt die Uhrzeit im 24-Stunden-Format
digital an.
1 Drücken Sie (MENU).
2 Drehen Sie den Steuerregler SEEK bis
„Setup“ angezeigt wird, und drücken
Sie anschließend (ENTER).
3 Drehen Sie den Steuerregler SEEK bis
„Clock Adjust“ angezeigt wird, und
drücken Sie anschließend (ENTER).
Die Anzeige zum Einstellen der Uhrzeit wird
angezeigt.
4 Drehen Sie den Steuerre gl er SEEK ,
um die Stunden und Minuten
einzustellen.
Drücken Sie (ENTER), um zur jeweils
nächsten Ziffer in der Di gi ta la nzeige zu
wechseln.
5 Drücken Sie (ENTER), nachdem Sie
die Minuten eingestellt haben.
Die Anzeige der U hrzeit beginnt.
Wenn die Uhrzeit während der Wiedergabe bzw.
beim Radioempfang angezeigt werden soll,
stellen Sie „Clock on“ ein (
Mit der Kartenfernbedienung
Drücken Sie in den Schritten 2 bis 4 M oder m anstelle
des Steuerreglers SEEK; drücken Sie in Schritt 4: <
oder , anstelle von (ENTER).
Tipp
Mithilfe der RDS-Funktion können Sie die Uhr auch
automatisch einstellen lassen (
Seite 13).
Seite 11).
W enn das Gerä t au sg eschaltet wird, erscheint
zunächst die Uhrzeit und danach beginnt di e
Demo (DEMO-Modus).
Zum Deakti vi eren de s DEMO -Modu s st el len Si e
bei ausgeschaltetem Gerät im Menü „Demo off“
ein (
Seite 13).
Abnehmen der Frontplatte
Um zu verhindern, da ss das Gerät gestoh le n
wird, können Sie die Frontplatte abnehmen.
Warnton
Wenn Sie den Zündschlüssel in die Position OFF
stellen, ohne die Frontplatte abzunehmen, ertönt
einige Sekunden l ang ein Warnton.
Der Warnton wird nur ausgegeben, wenn der
integrierte Verstärker verwendet wird.
1 Drücken Sie (OFF).
Das Gerät schaltet sich aus.
2 Drücken Sie .
Die linke S e ite der Fro ntplatte löst sich.
3 Schieben Sie die Frontplatte nach
links und ziehen Sie sie dan n
vorsichtig auf Sie zu heraus.
(OFF)
2
1
Hinweise
• Lasse n Sie die Frontplatte nicht fallen und drü cken
Sie nicht zu stark auf die Frontplatte und das
Display.
• Schützen Sie die Frontplatte vor Hitze bzw. hohen
Temperaturen und vor Feuchtigkeit. Lassen Sie sie
in geparkten Autos nicht auf dem Armaturenbrett
oder auf der Hutablage liegen.
Tipp
Bewahren Sie die Frontplatte im mitgelieferten
Behälter auf, wenn Sie sie bei sich tragen.
4
Page 25
Anbringen der Frontplatte
Setzen Sie die Auss par ung A an der Frontplatte
am Stift B am Gerät an, und drücken Sie dann
die linke Seite behutsam hinein.
Drücken Sie (SOURCE) am Gerät (ode r legen
Sie eine CD ein), um das Gerät einzusch al te n.
A
B
Hinweis
Legen Sie auf der Innenseite der Frontplatte nichts ab.
Einlegen einer CD in das Gerät
1 Drücken Sie Z.
Die Frontplatte fährt automatisch nach unten.
2 Legen Sie eine CD ein (mit der
beschrifteten Seite nach oben ).
Die Frontplatte fährt automatisch nach oben,
und die Wiedergabe beginnt automa tisch.
Auswerfen der CD
1 Drücken Sie Z.
Die Frontplatte fährt auto mati sc h n a ch un te n,
und die CD wird ausgeworfen.
2 Drücken Sie Z, um die Frontplatte zu
schließen.
Hinweis
Die Frontplatte fährt 15 Sekunden nach dem
Herunterfahren wieder nach oben.
Anpassen des Winkels der
Frontplatte
ANGLE
1 Drücken Sie mehrmals (ANGLE), und
halten Sie die Taste gedrückt, bis sich
die Frontplatte im gewünschten
Winkel befindet.
Die Fron tplatte kann in 3 Posi ti onen
eingestellt werde n .
Um die Frontplatte i n i h r e A us g angsposition zu
setzen, drücken Sie mehrmals (ANGLE), und
halten Sie die Taste gedrückt, bis si ch die
Frontplatte wieder in ihrer Ausgangsposition
befindet.
Tipps
• Nachdem die Frontplatte heruntergefahren ist (zum
Einlegen der CD ), f ährt dies e au tom atis ch in die vo n
Ihnen eingestellte Position zurück.
• Der zuletzt eingestellte Winkel der Frontplatte wird
im Gerät gespeichert. Wenn Sie die Zündung
ausschalten, wechselt die Frontplatte in die
Ausgangsposition. Wenn Sie die Zündung
einschalten, stellt sich die Frontplatte auf den
eingestellten Winkel ein.
5
Page 26
Lage und Grundfunktionen der Teile und Bedienelemente
Hauptgerät
12 3 4 6578
OFF
MODE
VOL
PUSH SOUND PUSH ENTER
SOURCE AF/TA1
9
Kartenfernbedienung RM-X142
AF TA
2
BBE MP
5
MODE
+
DISC
OPEN/CLOSE
3
PAUSE
6
LIST
qh
qj qd
qa
qk
SCRL
PTY
DSPL
REP SHUF
1
4
EQ7 DSO
7
MENU
q;
ql
–
SEEK
SOUND
SOURCE
DISC
+
SEEK
–
ENTER
w;
ATTOFF
+
2
VOL
–
wa
6
REP SHUF BBE MP PAUSE
2534
6
qaq; qs qd qf qg
Näheres finden Sie auf den angegebenen Seiten.
Die entsprechenden Tasten auf der
Kartenfernbedienung haben dieselbe Funktion
wie die Tasten am Gerät.
ws
1
wd
wf
wg
6
wh
A T aste MODE 9, 14
Auswählen des Radiofrequenzbereichs
(FM (UKW)/ MW/LW) bzw. Auswählen des
Geräts*
B T aste OFF
Ausschalten/St oppen der Tonquelle.
C Steuerregler VOL (Lautstärke)/Taste
SOUND
Einstellen der Lautstärke (drehen) bzw.
Auswählen von Klangoptionen (drücken).
D Display
E CD-Einschub 5
Einlegen der CD.
F Steuerregler SEEK/Taste ENTER
Zum Auswählen von Opti onen (drehen);
Bestätigen von Einst ellungen (drücken).
Radio:
Zum Einstellen der Se nder drücken Sie
mehrfach (ENTER), wählen Sie „SEEK“,
„MANUAL“ oder „PRESET“ aus, und
drehen Sie anschließend den Steuerregler
SEEK, bis der gewünschte Sender angezeigt
wird.
CD:
Zum Überspringen von Titeln oder G ruppen
drücken Si e mehrf ac h (ENTER), wählen Sie
./> oder „GROUP“ aus, und drehen
Sie anschließend den Steuerregler SEEK, bis
der gewünschte Titel oder die Gruppe
angezeigt wird.
G T aste MENU
Aufrufen des Menüs.
ANGLE
+
–
1
.
SEEK
MENU
IMAGE
CDX-M7850
12
Page 27

H Taste Z (Auswerfen)/ANGLE 5
Zum Auswerfen der CD/Herunterfahren der
Frontplatte (drücken); Aus ri chten des
Winkels der Frontplatte in 3 Positionen
(gedrückt halten).
I Taste (Lösen der Frontplatte) 4
J Taste SOURCE
Einschalten/Wechseln der Tonquelle (Radio/
CD/MD*
2
/AUX*3).
K Zahlentasten (Stationstasten)
Radio:
Einstellen gesp ei cherter Sender (drücken);
Speichern von Sendern (gedrückt halten).
CD/MD*2:
(1): REP 8
(2): SHUF 8
(5): BBE MP*4 2
Zum Aktivieren der BBE MP-Funkti on
wählen Sie „BBE MP-on“. Zum
Deaktivieren der Funktion wählen Sie „BBE
MP-off“.
(6): PAUSE*
4
Anhalten der Wiedergabe. Zum Beenden der
Funktion drücken Sie di e Taste erneut.
L Taste RESET 4
M Taste AF (Alternativfrequenzen)/
TA (Verkehrsdurchsagen) 10, 11
Einstellen von AF und TA/TP bei einem
RDS-Sender.
N Empfänger
Dient als Sensor für die Signale der
Kartenfernbedienung und des drahtlosen
Joysticks.
O Taste IMAGE 2
Auswählen des Anz ei g emodus für das
Display.
Space Producer-Modu s t Filmmodus 1-2
t Spektrumanalysatormodus 1-5 t
Hintergrundbildmodus 1-3 t normaler
Wiedergabemodus bzw. Empfa ngsmodus
Die folgenden Tasten auf der
Kartenfernb edienung unterscheiden sich
außerdem hinsichtlich ihres Namens bzw. ihrer
Funktion von denen am Gerät.
qh Bildlauftaste SCRL 8
Hiermit lassen Sie die Informationen im
Display durchl aufen.
qj Taste DSPL (Anzeige)/PTY
(Programmtypauswahl)
8, 11, 15
Wechseln der Informationen im Display bzw.
Auswählen von PTY bei einem RD S-Sender.
qk Taste EQ7 (Equ alizer)
Auswählen eine s Equalizer-Typs (Xplod,
Vocal, Club, Jazz, New Age, Rock, Custom
oder off).
ql Tasten </, (SEEK –/+)
Radio:
Automatisches Ei nstellen von Sendern
(drücken) bzw. manuelle Sender suche
(gedrückt halten).
CD:
Übersprin gen von Titeln (drücken),
Überspringen mehrerer Titel hintereinander
(drücken, dann innerhalb von 1 Sekunde
erneut drücken und gedrückt halten) bzw.
Vorwärts-/Rückwärtssuchen in einem Titel
(gedrückt halten).
w; Taste SOUND 12
Auswählen von Klangoptionen.
wa Lautstärketaste VOL +/–
Einstelle n der Lautstärke.
ws Taste OPEN/C LOSE
Öffnen/Schließen der Frontplatte.
wd Taste DSO 2
Auswählen de s D SO-Modus (1, 2, 3 od er
off). Je höher die Zahl, desto stärker ist die
Wirkung.
wf Taste LIST 9, 15
Auflisten.
wg Tasten M/m (DISC +/–)
Einstellen von gesp ei cherten Sendern/
Überspringen von Gruppen (drücken) bzw.
Überspringen mehrerer Gruppen
hintereinander (gedrückt halten).
wh Taste ATT (Dämpfen des Tons)
Dämpfen des Tons. Zum Beenden der
Funktion drücken Sie die Taste erneut.
*1 Wenn ein CD/MD-Wechsler angeschlossen ist.
*2 Wenn ein MD-Wechsler angeschlosse n ist.
*3 Wenn ein gesondert erhältliches tragbares Gerät
von Sony angeschlossen ist.
*4 Bei der Wiedergabe mit diesem Gerät.
Hinweis
Wenn Sie das Gerät ausschalten und die Anzeige
ausgeblendet ist, können Sie es nicht mit der
Kartenfernbedienung bedienen. Drücken Sie zunächst
(SOURCE) am Gerät oder legen Sie eine CD ein, um
das Gerät zu aktivieren.
Tipp
Einzelheiten zum Austauschen der Batterie finden Sie
„Austauschen der Lithiumbatterie der
unter
Kartenfernbedienung“ auf Seite 18.
7
Page 28

CD
Einzelheiten zum An schließen eines CD/M D Wechslers finden Sie auf
Informationen im Display
Beispiel: Wenn Sie durch wiederholtes Dr üc ken
von (IMAGE) den normalen Wiedergabemodus
auswählen (
A Tonquelle
B Anzeige MP3/ATRAC3 plus
C Uhrzeit*
D Anzeige BBE
E Gruppennummer/Titelnummer/Verstrichene
*1 Wenn der Uhrzeitmodus auf „on“ eingestellt ist
(Seite 13).
*2 Bei der Wiedergabe einer MP3-Datei wird das ID3-
Tag angezeigt. Bei der Wiedergabe einer ATRA CCD werden mit SonicStage usw. eingegebene
Textinformationen angezeigt.
Zum Wechseln der Informationen im Display E
drücken Sie (DSPL). Zum Durchlaufen der
Informationen im Displ ay E drücken Sie
(SCRL) auf der Kartenfernbedienung oder
stellen „A.Scroll
Tipp
Je nach CD-Typ, Aufnahmeformat und Einstellungen
werden unterschiedliche Informationen angezeigt.
Erläuterungen zu MP3 finden Sie auf
Erläuterungen zu ATRAC-CDs finden Sie auf Seite 18.
Seite 7).
ABC
D
1
Spieldauer, CD-/Interpretenname,
Gruppenname, Titelname,
Textinformationen*
on“ ein (Seite 13).
Seite 14.
E
2
Seite 17,
Repeat und Shuffle Play
1 Drücken Sie während der Wiedergabe
so lange (1) (REP) oder (2) (SHUF),
bis die gewünschte Einstellung im
Display angezeigt wird.
Einstellung Funktion
REP-Track Wiederholtes Wiedergeben
eines Titels.
REP-Group* Wieder ho l t es Wiedergeben
einer Gruppe.
SHUF-Group* Wiedergeben einer Gruppe in
willkürlicher Reihenfolge.
SHUF-Disc Wiedergeben einer CD in
willkürlicher Reihenfolge.
* Bei Wiedergabe einer MP3-Datei/ATRAC-CD.
Wenn Sie wieder in den normalen
Wiedergabemodus wechse l n möchten, wählen
Sie „REP-off“ bzw. „SHUF-off“.
8
Page 29

Radio
Speichern und Empfangen von
Sendern
Achtung
Wenn Sie während der Fahrt Sender einste ll en,
sollten Sie die BTM-Funktion (Best Tuning
Memory - Speicherbelegungsa ut omatik)
verwenden. Andernfalls besteht Unfallgefahr.
Empfangen gespeicherter Sender
1 Wählen Sie den Frequenzbereich aus,
und drücken Sie eine Stationstaste
((1) bis (6)).
Tipp
Die gespeicherten Sender können auch empfangen
werden, wenn Sie (ENTER) so oft drücken, bis
„PRESET“ angezeigt wird, und anschließend den
Steuerregler SEEK drehen, bis die gewünschte
Speichernummer angezeigt wird.
Automatisches Speichern von
Sendern — BTM
1 Drücken Sie (SOURCE) so oft, bis
„TUNER“ angezeigt wird.
Zum Wechseln des Frequenzbereichs drücken
Sie mehrmals (MODE). Sie können zwischen
FM1 (UKW1), FM 2 (UKW2), FM3
(UKW3), MW und LW wählen.
2 Drücken Sie (MENU).
3 Drehen Sie den Steuerregler SEEK bis
„Edit“ angezeigt wird, und drücken Sie
anschließend (ENTER).
4 Drehen Sie den Steuerregler SEEK bis
„BTM“ angezeigt wird, und drücken
Sie anschließend (ENTER).
Das Gerät speichert die Sender in der
Reihenfolge de r Frequenzen auf den
Zahlentasten (Stationstasten).
Ein Signalton ist zu hören, und die
Einstellung wird gespeichert.
Mit der Kartenfernbedienung
In Schritt 3 und 4: Drücken Sie M oder m anstelle des
Steuerreglers SEEK.
Manuelles Speiche rn von Sendern
1 Während des Empfangs de s zu
speichernden Senders halten Sie eine
Stationstaste ((1) bis (6)) so lange
gedrückt, bis „Memory“ ang ezeigt
wird.
Die Stationstastenanzeige wird im Display
angezeigt.
Hinweis
Wenn Si e auf der gleichen Stationstaste einen
anderen Sender speichern, wird der zuvor
gespeicherte Sender ersetzt.
Tipp
Wenn ein RDS-Sender ge speichert wird, wird auch
die AF/TA-Einstellung gespeichert (
Seite 10).
Automatisches Einstellen von
Sendern
1 Wählen Sie den Frequenzbereich aus,
drücken Sie (ENTER) so of t, bis
„SEEK“ angezeigt wird, und suchen
Sie anschließend durch Drehen des
Steuerreglers SEEK den gewünschten
Sender.
Der Suchlauf stopp t, w enn ein Sender
empfangen wird. Wiederholen Sie diesen
Vorgang, bis das Gerät den gewün schten
Sender empfängt.
Tipp
Wenn Sie die Frequenz des gewünschten Senders
kennen, drücken Sie (ENTER) so oft, bis „MANUAL“
angezeigt wird, und drehen Sie anschließend den
Steuerregler SEEK, bis die gewünschte Frequenz
angezeigt wird.
Einstellen eines Senders anhand
einer Liste — LIST
Sie können eine Lis t e der Senderfreque nzen
anzeigen lassen. Informationen zum Ben ennen
eines Senders finden Sie auf Seite 14.
1 Wählen Sie den Frequenzbereich aus,
und drücken Sie (MENU).
2 Drehen Sie d en St eu e rr eg le r S EEK bi s
„List“ angezeigt wird, und drücken Sie
anschließend (ENTER).
Die Frequenzen werden aufgelistet .
3 Drehen Sie den Steuerregler SEEK, bis
der gewünschte Sender angezeigt
wird.
4 Drücken Sie zum Empfangen de s
Senders (ENTER).
Die Anzeige wechselt wieder in den
normalen Empfangsmodus.
Fortsetzung auf der nächsten Seite t
9
Page 30
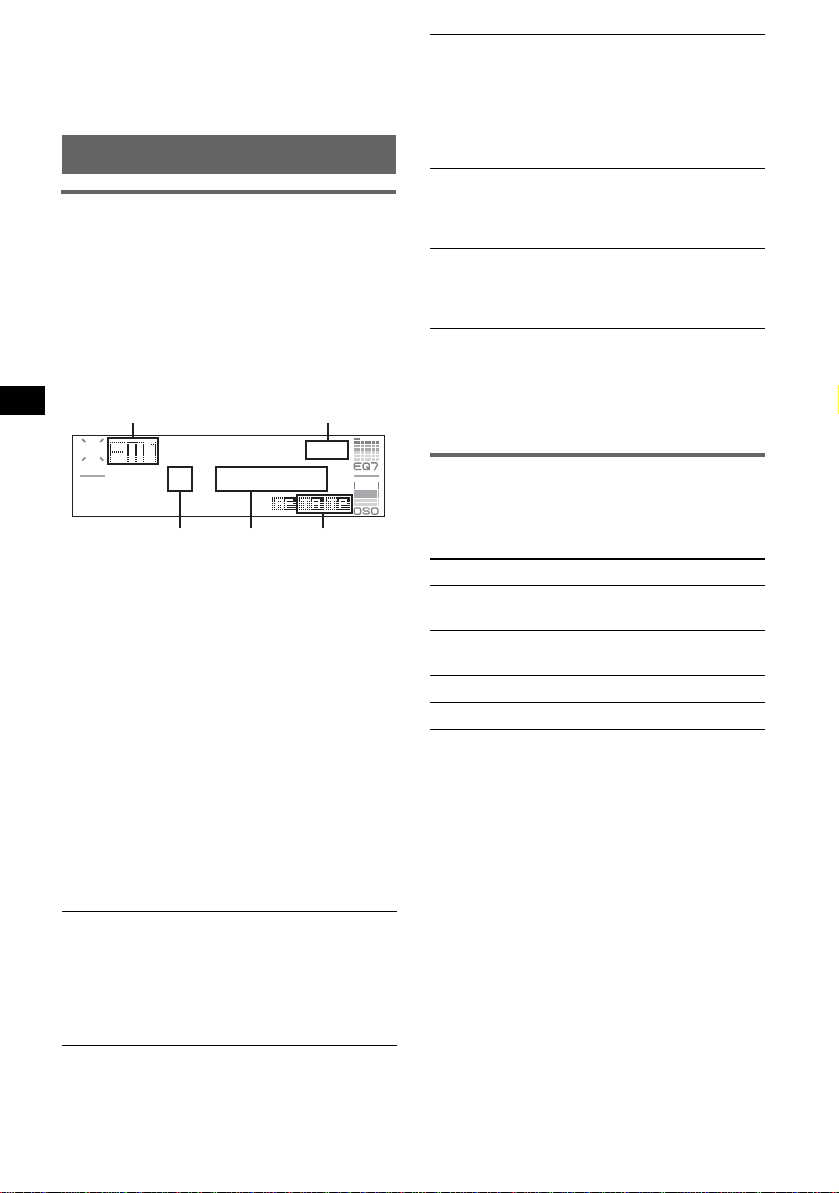
Mit der Kartenfernbedienung
Wählen Sie den Frequenzbereich aus, und drücken
Sie (LIST). Drücken Sie M oder m so oft, bis der
gewünschte Sender angezeigt wird, und drücken Sie
anschließend (ENTER).
RDS
Übersicht
UKW-Sender, die RDS (Radio Data System)
unterstützen, senden neben de n normalen
Radioprogrammsignalen nicht hörbare, digitale
Informationen.
Informationen im Display
Beispiel: Wenn Sie durch wiederholtes Dr üc ken
von (IMAGE) den normalen Wiedergabemodus
auswählen (
A Radiofrequenzbereich , Fu nktion
B Uhrzeit*
C Speichernummer
D Frequenz*
E TA/TP*
*1 Wenn der Uhrzeitmodus auf „on“ eingestellt ist
(Seite 13).
*2 Beim Empfang eines RDS-Senders wird „ *“ links
neben der Frequenz angezeigt.
*3 „TA“ blinkt während einer Verkehrsdurchsage. „TP“
leuchtet, wenn ein Sender mit Verkehrsdurchsagen
empfangen wird.
Zum Wechseln der angezeigten Informationen
D drücken Sie (DSPL) auf der
Kartenfernbedienung.
RDS-Funktionen
Mit diesem Gerä t s te h en folgende RDSFunktionen autom atisch zur Verfügung:
AF (Alternativfrequenzen)
In einem Netzwerk wird der Sender mit den
stärksten Signal en ausgewählt und neu
eingestell t. So könne n Sie auch bei ei ner la nge n
Fahrt über eine große Entfernung hinweg
ununterbrochen denselben Send er empfangen,
ohne ihn manuell neu einstellen zu müssen.
Seite 7).
A
CE
1
2
(Sendername ), R D S-Daten
3
D
B
TA (Verkehrsdurchsagen)/
TP (V erkehrsfunksender)
Aktuelle Verkehrsinformationen bzw.
Verkehrsfunk sender werden em pfangen. Wenn
solche Informationen bzw. Sendungen
empfangen werden, wird die gerade
ausgewählte Tonquelle unterbrochen.
PTY (Programmtypen)
Der gerade empfangene Programmtyp wird
angezeigt. Außerdem kann nach dem
ausgewählten Programmtyp gesucht werden.
CT (Uhrzeit)
Mit den CT-Daten (Uhrzeitdaten), die von
RDS-Sendern au sgestrahlt werden, lässt sich
die Uhr einstelle n.
Hinweise
• Je nach Land bzw. Region stehen möglicherweise
nicht alle RDS-Funktionen zur Verfügung.
• Die RDS-Funktion arbeitet möglicherweise nicht,
wenn die Sendesignale zu schwach sind oder wenn
der eingestellte Sender keine RDS-Daten ausstrahlt.
Einstellen von AF und TA/TP
1 Drücken Sie (AF/TA) so oft, bis die
gewünschte Einstellung angezeigt
wird.
Einstellung Funktion
AF on AF wird aktiviert und TA wird
TA on TA wird aktiviert und AF wird
AF TA on AF und TA werden aktiviert.
AF TA off AF und TA werden deaktiviert .
Mit der Kartenfernbedienung
Drücken Sie (AF) und/oder (TA) anstelle von
(AF/TA).
Speichern von RDS-Sendern
zusammen mit der AF- und TAEinstellung
Sie können zusammen mit den RDS-Sendern die
AF/TA-Einstellung speich ern. Mit der BTMFunktion werden nur RDS-Sender mit de rselben
AF/TA-Einstellung gespeichert.
Beim manuellen Speichern von Sendern können
Sie RDS- und Nicht-RDS-Sender mit
unterschiedlicher AF/TA-Einstellung speichern.
1 Stellen Sie AF/TA ein und speichern Sie die
Sender dann mit BTM oder manuell ab.
deaktiviert.
deaktiviert.
10
Page 31

Speichern der Lautstärke von
Verkehrsdurchsagen
Sie können die Lau tstärke für die
Verkehrsdurchsagen voreinstellen, sodass Sie sie
nicht überhören.
1 Stellen Sie durch Drehen des Lautstärkereglers
die Lautstärke ein.
2 Halten Sie (AF/TA) gedrückt, bis „TA VOL“
angezeigt wird.
Mit der Kartenfernbedienung
Halten Sie (TA) anstelle von (AF/TA) gedrückt.
Empfangen von
Katastrophenwarnungen
W e nn AF oder TA aktiviert ist , unter brec hen
Katastrophenwarnungen automatisch die
ausgewählte Tonquelle.
Unveränderter Empfang eines
Regionalsenders — Regional
Wenn die AF-Funktion aktiviert ist, wird der
Empfang dieses Geräts werkseitig auf eine
bestimmte Region beschränkt, sodass nicht zu
einem anderen Regionalsender mit einer
stärkeren Frequenz gewech selt wird.
Wenn Sie den Empfangsbereich des betreffenden
Regionalsenders verlas se n, wählen Sie
„Regional off“ im Menü (
Hinweis
Diese Funktion steht in Großbritannien und in einigen
anderen Regionen nicht zur Verfügung.
Seite 13).
Lokalsenderfunktion (nur
Großbritannien)
Mithilfe dieser Fun kt i on können Sie andere
Lokalsender ausw ählen, auch wenn di ese zuvor
nicht unter einer Stationstaste gespeichert
wurden.
1 Drücken Sie während des UKW-Empfangs
eine Stationstaste ((1) bis (6)), unter der ein
Lokalsender gespeichert ist.
2 Drücken Sie innerhalb von 5 Sekunden erneut
die Stationstaste de s Lokalsenders.
Wiederholen Sie diesen V organg, bis das Gerät
den Lokalsender empf ängt.
Auswählen des Programmtyps
(PTY)
(Mit der Kartenfernbedie nung)
1 Drücken Sie während des UKW-
Empfangs (PTY).
Der Name des aktuellen Programmtyps
erscheint, wenn de r Sender PTY-Daten
ausstrahlt.
2 Drücken Sie M oder m so oft, bis der
gewünschte Programmtyp erscheint.
3 Drücken Sie (ENTER).
Das Gerät beginnt, nac h ei nem Sender zu
suchen, der den a usgewählten Programmtyp
ausstrahlt.
Programmtypen
News (Nachrichten), Affairs (Aktuelles
Zeitgeschehen), Info (Informationen), Sport
(Sport), Educate (Erziehung und Bildun g) ,
Drama (Hörspiele), Culture (Kultur),
Science (Wissenschaft), Varied
(Verschiedenes), Pop
(Rock-Musik), Easy
Light
M (Leichte Klassi k), Classics (Klassik),
Other
M (Sonstige Mu s ik), Weather (Wetter),
Finance (Finanzberichte), Children
(Kinderprogramme), Social
(Magazinsendungen), Religion (Religion),
Phone
In (Hörertelefon), Travel
(Reiseinformationen), Leisure
(Freizeitprogramm), Jazz (Jazz), Country
(Country-Musik), Nation
Oldies (Oldies), Folk
Document (Dokumentarbeiträge)
Hinweis
Sie können diese Funktion in Ländern/Regionen, in
denen keine PTY-Daten zur Verfügung stehen, nicht
verwenden.
M (Pop-Musik), Rock M
M (Unterhaltungsmusik),
A
M (Volksmusik),
M (Folk-Musik) ,
Einstellen der Uhrzeit (CT)
1 Stellen Sie im Menü „CT on“ ein
(
Seite 13).
Hinweise
• Die CT-Funktion steht möglicherweise nicht zur
Verfügung, auch wenn ein RDS-Sender empfangen
wird.
• Die mit der CT-Funktion eingestellte Uhrzeit ist nicht
immer korrekt.
11
Page 32

Weitere Funktionen
Ändern der Klangeinstellungen
Einstellen der Klangeigenschaften
Sie können den Equalizer, DSO, die Bässe,
Höhen, Balan ce, den Fader und die Lautstärke
des Tiefsttonlautsprechers einstellen.
1 Wählen Sie eine Tonquelle aus, und
drücken Sie mehrfach (SOUND), um
die gewünschte Option auszu wähl en.
Die Anzeige wec h s el t folgendermaßen:
EQ7 t DSO t BAS (Bass) t
TRE (Höhen) t BAL (links-rechts) t
FAD (vorne-hinten) t
SUB (Lautstärke des
Tiefsttonlautsprechers)*
* „∞“ wird bei der niedrigsten Einstellung
angezeigt. Die Lautstärke lässt sich in 20 Stufen
einstellen.
2 Stellen Sie durch mehrfaches Drehen
des Steuerreglers VOL die
ausgewählte Option ein.
Nach 3 Sekunden ist die Einstellung
abgeschlossen und im Display erscheint
wieder die Anzei ge für den normalen
Wiedergabemodus bzw. Empfangsmodus.
Hinweis
Nachdem Sie eine Klangoption ausgewählt haben,
müssen Sie innerhalb von 3 Sekunden den
Einstellvorgang beginnen.
Mit der Kartenfernbedienung
In Schritt 2: Drücken Sie < oder , anstelle des
Steuerreglers VOL.
Einstellen der Equalizer-Kurve
— EQ7 Tune
Sie können die Equaliz er-Eins t el lu ngen für
verschiedene Freque nzbereiche vornehmen und
speichern.
1 Wählen Sie eine Tonquelle aus, und
drücken Sie (MENU).
2 Drehen Sie den Steuerregler SEEK bis
„Sound“ angezeigt wird, und drücken
Sie anschließend (ENTER).
3 Drehen Sie den Steuerregler SEEK bis
„EQ7 Tune“ angezeigt wird, und
drücken Sie anschließend (ENTER).
4 Wählen Sie durch Drehen des
Steuerreglers SEEK den gewünschten
Equalizer-Typ aus, und drücken Sie
(ENTER).
5 Wählen Sie durch Drehen des
Steuerreglers SEEK den gewünschten
Lautstärkepegel au s.
Die Lauts t ä rke lässt sich in Schritten von
1
dB auf einen Wert zwischen –10 dB und
+10 dB einstellen.
6 Drücken Sie (ENTER), um zur
nächsten Frequenz zu wechseln.
Die Frequenz wechselt folgendermaßen:
62Hz t 157Hz t 396Hz t 1.0kHz
t 2.5kHz t 6.3kHz t 16kHz
Gehen Sie wie in Schritt 5 und 6 erläutert vor,
wenn Sie weitere Frequenzbereiche der
Equalizer-Kurve einstellen möchten.
Die Bestätigungsm el dung wird nach
Einstellen von „16kHz“ und D rü cken von
(ENTER) angezeigt.
7 Wählen Sie durch Drehen des
Steuerreglers SEEK „YES“ aus, und
drücken Sie anschließend (ENTER).
Die Einstellung ist damit abgeschlossen und
im Display erscheint wieder die Anzeige für
den normalen Wiedergabemodus bzw.
Empfangsmodus.
Zum Wiederherstellen der werkseitig
eingestellten Equalizer-Kurve halten Sie in
Schritt 5 bzw. 6 (ENTER) gedrückt, und wählen
Sie anschließend durch Drehen des Steuerreglers
SEEK „YES“ aus.
Mit der Kartenfernbedienung
In den Schritten 2, 3 und 5: Drücken Sie M oder m
anstelle des Steuerreglers SEEK; in den Schritten 4
und 7: Drücken Sie < oder , anstelle des
Steuerreglers SEEK; in Schritt 6: Drücken Sie < oder
, anstelle von (ENTER).
Einstellen von Menüoptionen
— MENU
1 Drücken Sie (MENU).
2 Drehen Sie den Steuerregler SEEK, bis
die gewünschte Menüoption angezeigt
wird, und drücken Sie anschließend
(ENTER).
Die Anzeige wechselt folgendermaßen:
Setup y Display y Receive Mode
y Sound y Edit y List
12
Page 33
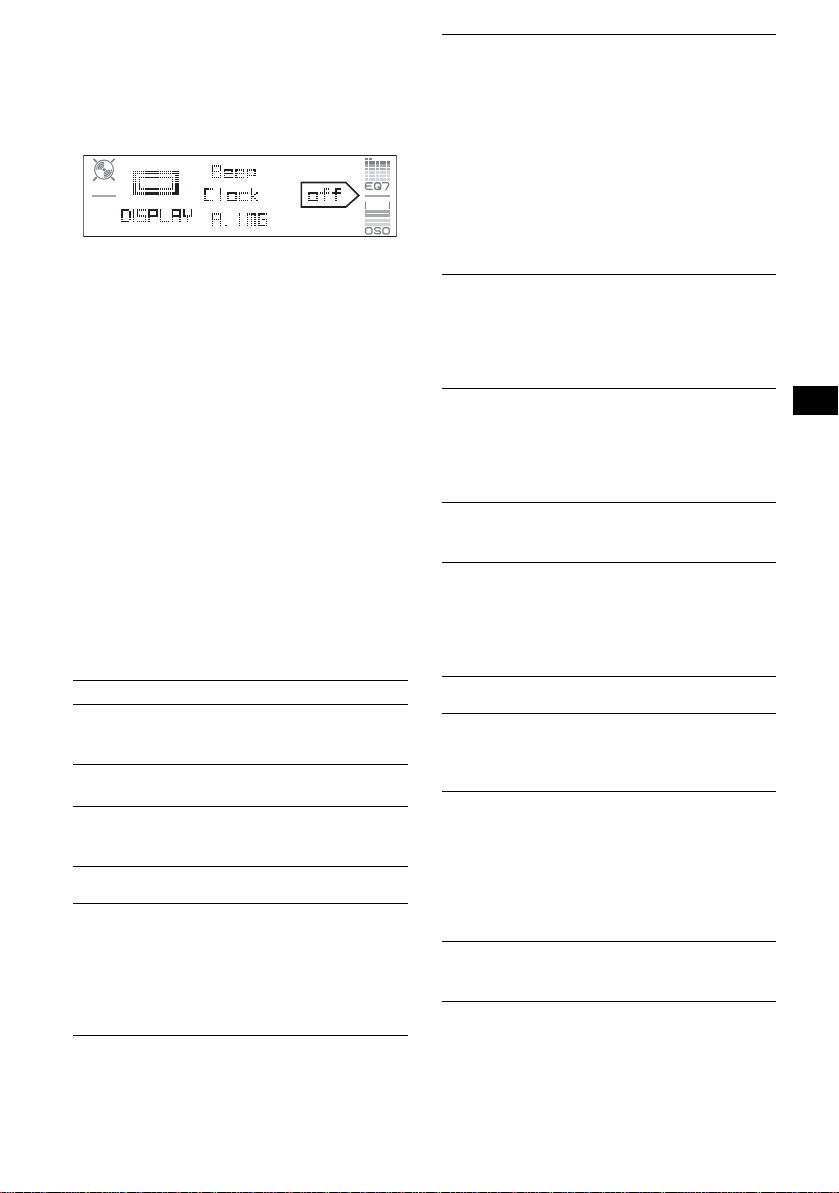
3 Drehen Sie den Steuerregler SEEK, bis
die gewüns chte Einste l loption
angezeigt wird, und drücken Sie
anschließend (ENTER).
Die digitale Anzeige verschiebt sich nach
rechts (Auswahl einstellen).
4 Wählen Sie durch Drehen des
Steuerreglers SEEK die Einstellung
aus, und drücken Sie anschließend
(ENTER).
Die Einstellung ist damit abgeschlossen.
5 Drücken Sie (MENU).
Die Anzeige wechselt wieder in den
normalen Wiedergabemodus bzw.
Empfangsmodus.
Hinweis
Die angezeigten Optionen unterscheiden sich je nach
Tonquelle und Einstellung.
Mit der Kartenfernbedienung
In den Schritten 2 bis 3: Drücken Sie M oder m
anstelle des Steuerreglers SEEK; in Schritt 4: Drücken
Sie < oder , anstelle des Steuerreglers SEEK.
Folgende Optionen können eingestellt w er d en
(Einzelheiten finden Sie jeweils auf den
angegebe nen Seiten):
„z“ gibt die Standa rdeinstellung an.
Setup (Konfiguration)
Clock Adjust (Einstellen der Uhrzeit) (Seite 4)
CT (Uhrzeit)
Zum Einstellen von „on“ oder „off“ (z)
(Seite 10, 11).
Beep (Signalton)
Zum Einstellen von „on“ (
1
AUX-A*
(AUX Audio)
Zum Einstellen der AUX-Tonquellenanzeig e auf
„on“ (
z) oder „off“ (Seite 16).
Display
Clock (Uhrzeitinformationen)
Zum Einstellen der Anzeige der Uhrz eit und der
Informationen/Bilder im Display.
–„on“: Die Anzeigen werden gleichzeitig
angezeigt.
–„off“ (
z): Die Anzeigen werden nicht
gleichzeitig angezeigt.
z) oder „off“.
A.IMG (Automatischer Bildwechsel)
Im automatischen Bildlaufmodus wechseln die
Anzeigenbilder fortlaufend (alle 10 Sekunden).
–„off“ (
z): Die Bilder wechseln nicht
automatisch.
–„SA“: Die Anzeigebilder des
Spektrumanalysators werden w i ederholt
nacheinander angezeigt.
–„Movie“: Die Anzeigebilde r des Filmmodus
werden wiederholt nacheinander angezeigt.
–„All“: Die Anzeigebilder in allen
Anzeigemodi w erden wied erholt nacheina nder
angezeigt.
Info (Anzeigen von Inform ationen)
Je nach Tonquelle usw. erscheinen in der Mitte
des Displays Informationen , wä hrend ein
Anzeigebild an gezeigt wird.
–„on“ (
z): Die Informationen werden angez eigt .
–„off“: Keine In fo rmat io ne n werden angeze ig t.
Dimmer
Zum Wechseln der Helligkeit im Display.
–„Auto“ (
z): Das Display wird dunkler, wenn
Sie die Beleuchtung einschalten.
–„on“: Das Display wird dunkler.
–„off“: Der Dimmer wird deaktiviert.
Demo*1
(Demo-Modus)
Zum Einstellen von „on“ (z) oder „off“
(Seite 4).
A.Scroll (Automatischer Bildlauf)
Zum Einstellen des automatischen Bildlaufs für
lange Informationen beim Wechseln der CD,
Gruppe oder des Titels.
–„on“: Bildlauf wird durchgeführt.
–„off“ (
z): Kein Bildlauf wird du rchgeführt.
Receive Mode (Empfangsmodus)
Local (Lokaler Suchmodus)
–„on“: Es werden nur Sender mit star ken
Signalen eingestellt.
–„off“ (
z): Normaler Empfang wird eingestellt.
Mono (Monauraler Modus)
Wählen Sie bei schlechtem UKW-Empfang den
monauralen Modus, um den Empfang zu
verbessern.
–„on“: Stereosender werden monaural
wiedergegeben.
–„off“ (
z): Stereosend er w erden in stereo
wiedergegeben.
Regional*
Zum Einstellen von „on“ (z) oder „off“
(Seite 11).
2
Fortsetzung auf der nächst en Seite t
13
Page 34

Sound
EQ7 Tune (Seite 12)
HPF (Hochpassfilter)
Zum Auswähl en der Grenzfrequ enz der
Lautsprecher vorne/hinten: “off” (
z), “78Hz”
oder “125Hz”.
LPF (Niedrigpassfilter)
Zum Auswähl en der Grenzfrequ enz des
Tiefsttonlautsprechers: “off” (
z), “125Hz” oder
“78Hz”.
Loudness
Zum Anheben der Bässe und Höhen bei
niedriger Lautstärke.
– „on“: Bässe und H öhen werden angeho ben.
– „off“ (
z): Bässe und Höhen w er den nicht
angehoben.
AUX Level
Zum Einstellen de r Lautstärke einzelne r
zusätzlich angeschlossener Geräte (Seite 16).
Wenn Sie diese Einstellung wählen, brauchen
Sie die Lautstärke der einzelnen Tonquellen
nicht einzustelle n .
Edit (Bearbeiten)
Name Edit (Namen eingeben) (Seite 14)
Name Delete (Namen lösche n) (Seite 15)
BTM (Speicherbelegungsautomatik) (Seite 9)
*1 Bei ausgeschalte tem Gerä t.
*2 Wenn ein UKW-Sender empfangen wird.
Verwenden gesondert
erhältlicher Geräte
CD/MD-Wechsler
Auswählen des Wechslers
1 Drücken Si e (SOURCE) so oft, bis „CD“ oder
„MD“ angezeigt wird.
2 Drücken Si e (MODE) so oft, bis der
gewünscht e Wechsl er angezeigt wird.
Gerätenummer
CD/MDNummer
Die Wiedergabe beginnt.
* Bei Wiedergabe einer MDLP.
Anzeige
LP2/LP4*
14
Überspringen von CDs/MDs
1 Drücken Sie während der Wiedergabe
(ENTER) so lange, bis „DISC“ an gezeigt
wird.
2 Drehen Sie den Steuerregler SEEK, bis die
gewünschte CD/MD angezeigt wird.
Überspringen von Gruppen und CDs/
MDs mit der Kartenfernbedienung
1 Drücken Sie während der Wiedergabe M oder
m.
Zum
Überspringen
Drücken Sie M oder m
einer Gruppe und lassen Sie die Taste nach
einem Moment los.
weiterer
Gruppen
innerhalb von 2 Sekunden nach
dem Loslassen erneut.
von CDs/MDs wiederholt.
mehrerer CDs/
MDs
hintereinander
und drücken Sie die Taste
innerhalb von 2 Sekunden
erneut und ha lten Sie sie dann
gedrückt.
Repeat und Shuffle Play
1 Drücken Sie während der Wiedergabe (1)
(REP) oder (2) (SHUF) so oft, bis die
gewünschte Einstellung im Display erscheint.
Einstellung Funktion
REP-Disc*1Wiederholte Wiedergabe einer
CD/MD.
SHUFChanger*
Wiedergabe der Titel im
1
Wechsler in willkürlicher
Reihenfolge.
SHUF-All*
2
Wiedergabe der Titel in allen
Geräten in willkürlicher
Reihenfolge.
*1 Wenn mindestens ein CD/MD-Wechsler
angeschlossen ist.
*2 Wenn mindestens ein CD-Wechsler bzw.
mindestens zwei MD-Wechsler angeschlossen
sind.
Wenn Sie wieder in den normalen
Wiedergabemodus wechse l n möchten, wählen
Sie „REP-off“ bzw. „SHUF-off“.
Tipp
Mit „SHUF-All“ werden Titel von CD-Geräten und MDWechslern nicht gemischt wiedergegeben.
Benennen einer CD
Wenn Sie CDs in einem CD-Wechsler mit
CUSTOM FILE-Funktion wiedergeben, können
Sie die CDs mit einem individuellen Namen aus
bis zu 8 Zeichen (Disc Memo) versehen.
Page 35

Wenn Sie eine CD benennen, wird der Name in
der Liste angezeigt (Seite 15).
1 Halten Sie während der Wiedergabe einer zu
benennenden CD (MENU) gedrückt.
2 Drehen Sie den Steuerregler SEEK bis „Edit“
angezeigt wird, u nd drücken Sie anschließend
(ENTER).
3 Drehen Sie den Steuerregler SEEK bis „Name
Edit“ angez e igt wird, und drücken Sie
anschließend (ENTER).
4 Drehen Sie den Steuerregler SEEK, bis das
gewünschte Zeichen angezeigt wird.
Die Zeichen wechseln folgendermaßen:
A y B y C ... y 0 y 1 y 2 ... y +
y – y
... y (Lee rzeichen) y A
Drücken Sie (ENTER), um zum jeweils
nächsten Eintrag i n de r D igitalanzeige zu
wechseln.
Wiederholen Sie diesen Schritt, bis der ganze
Name eingegeben is t.
Nach Eingeben des letzten Zeichens auf der
rechten Seite und D r ücken von (ENTER)
wird die Bestätigu ngsmeldung angezei gt .
5 Wählen Sie durch Drehen des Steuerreglers
SEEK „YES“ aus, un d dr ücken Sie
anschließend (ENTER).
Das Benennen ist damit abgeschlos se n, und
im Display wird wieder die Anzeige für den
normalen Wiedergabemodus angezeigt.
Zum Anzeigen des Namens drücken Sie während
der Wiedergabe (DSPL) auf der
Kartenfernbedienung.
Tipps
• Wenn Sie ein Zeichen korrigieren oder löschen
wollen, überschreiben Sie es oder geben „
• Das Disc Memo hat immer Vorrang vor
gespeicherte n Namen, falls vorhanden.
• Sie können eine CD im Gerät benennen, wenn ein
Wechsler mit CUSTOM FILE-Funktion
angeschlossen ist.
• „REP-Track“ und die Wiedergabe aller Titel in
willkürlicher Reihenfolge werden unterbrochen, bis
das Benennen abgeschlossen ist.
Mit der Kartenfernbedienung
In den Schritten 2 bis 4: Drücken Sie M oder m
anstelle des Steuerreglers SEEK; in Schritt 4: Drücken
Sie < oder ,, um die digitale Anzeige zu
verschieben; in Schritt 5: Drücken Sie < oder ,
anstelle des Steuerreglers SEEK.
“ ein.
Löschen des individuellen Namens
1 Wählen Sie das Gerät aus, in dem der zu
löschende individuelle Name gespeichert ist,
und drücken Sie dann (MENU).
2 Drehen Sie den Steu er regl er SEEK bis „Edit“
angezeigt wird, und drücken Sie anschli eßend
(ENTER).
3 Drehen Sie de n St euer re gl er SEEK bis „Name
Delete“ angezei gt wird, und drücken Sie
anschließend (ENTER).
Ein gespeicherter Name wird angezeigt .
4 Drehen Sie den Steuerregler SEEK, um den zu
löschenden Namen auszuwählen.
5 Drücken Sie (ENTER).
Die Bestätigungsmeldung wird angezeigt.
6 Wählen Sie durch D rehen des Steuerreglers
SEEK „YES“ aus, und drücken Sie
anschließend (ENTER).
Der Name wird gelöscht. Wenn weitere
Namen gespeich ert sind, wird „Contin ue“
angezeigt. Wenn weitere Namen gelöscht
werden sollen, wählen Sie mit dem
Steuerregler SEEK „YES“ aus, und
wiederholen Sie Schr i tt 4 bis 6.
7 Drücken Sie (MENU).
Das Gerät schaltet wieder in den normalen
Wiedergabemodus.
Mit der Karten fer nb ed ienung
In den Schritten 2 bis 4: Drücken Sie M oder m
anstelle des Steuerreglers SEEK; in Schritt 6: Drück en
Sie < oder , anstelle des Steuerreglers SEEK.
Ansteuern einer CD/MD anhand des
Namens — LIST
Sie können eine CD/MD aus einer Liste
auswählen, wenn Sie einen CD-Wechsler mit
CUSTOM FILE-Funktion oder einen MDWechsler anschließen.
Wenn Sie einer CD/MD einen Namen zuw eisen,
erscheint der Name in der Liste. Weitere
Informationen zum Benennen einer CD/MD
finden Sie auf Seite 1 4.
1 Drücken Sie während der Wiedergabe
(MENU).
2 Drehen Sie den Steu er regl er SEEK bis „List“
angezeigt wird, und drücken Sie anschli eßend
(ENTER).
Die Nummer oder der Name der CD/MD
erscheint.
3 Drehen Sie den Steu erregler SEEK, bis die
gewünschte CD/MD angezeigt wird.
4 Drücken Sie (ENTER), um die Wiedergabe
der CD/MD zu starte n.
Die Anzeige we chselt wieder in den normalen
Wiedergabemodus.
Fortsetzung auf der nächsten Seite t
15
Page 36

Mit der Kartenfernbedienung
Drücken Sie während der Wiedergabe (LIST).
Drücken Sie M oder m so oft, bis die gewünschte CD/
MD angezeigt wird, und drücken Sie anschließend
(ENTER).
Joystick RM-X4S
Wechseln der Drehrichtung
Die Drehrichtung der Regler ist werkseitig wie in
der folgenden Abbildung zu sehen eingestellt.
Erhöhen
Anbringen des Aufklebers
Bringen Sie den Aufkleber je nach Montage des
Joysticks an.
D
S
D
N
U
O
S
E
D
O
M
L
P
DS
P
L
M
O
D
E
S
O
U
N
D
Lage und Funktion der
Bedienelemente
Die entsprechen den Tasten auf dem Joystick
haben dieselben Fun kt ionen wie die Tasten an
diesem Gerät od er auf der Kartenfe rnbedienung.
SOUND
PRESET/
DISC
SOURCE
VOL
Bei folgenden Reglern auf dem Joystick müssen
Sie anders als mit dem Gerät vorgehen.
• Regler PRESET/DISC
Beim Steuern von Radio- und CD-Funktionen
entsprechen diese Tasten den Tasten M oder m
auf der Karten fernbedienung (drücken und
drehen).
• Lautstärkeregler VOL
Entspricht dem Lautstärkeregler am Gerät
(drehen).
• Regler SEEK/AMS
Beim Steuern von Radio- und CD-Funktionen
entsprechen diese Tasten den Tasten < or
auf der Karten fernbedienung (drücken und
drehen).
ATT
DSPL
SEEK/AMS
MODE
OFF
,
Verringern
Wenn Sie den Joystick rechts von der Lenksäule
anbringen, könne n Si e die Drehrichtung de r
Regler ändern.
1 Drücken Sie den Regler VOL nach innen, un d
halten Sie (SOUND) gedrückt.
Zusätzliche Audiogeräte
Sie können gesondert erhältliche tragbar e Geräte
von Sony an den Anschluss BUS AUDIO IN/
AUX IN am Gerät anschließ en. So können Sie
den Ton von einem tragbaren Gerät über die
Autolautsprecher wiedergeben, sofern kein
Wechsler oder ein anderes Gerät an den
OFF
Anschluss angeschlossen ist.
Hinweis
An BUS CONTROL IN darf nichts angeschlossen
sein, wenn Sie ein tragbares Gerät anschließen.
Wenn ein Gerät an BUS AUDIO IN angeschlossen ist,
kann „AUX“ nicht mit (SOURCE) ausgewählt werden.
Tipp
Wenn Sie ein tragbares Gerät und einen Wechsler
anschließen wollen, müssen Sie einen gesondert
erhältlichen AUX-IN-Signalquellenwähler verwenden.
Auswählen eines zusätzlichen
Geräts
1 Drücken Sie mehrmals (SOURCE), bis
„AUX“ angezeigt wird.
Bedienen Sie das tragbare Gerä t .
Informationen zum Einstellen der Lautstärke des
zusätzlich ange schlossenen Gerät s finden Sie
unter „AUX Level“ auf
Seite 14.
16
Page 37

Weitere Informationen
Sicherheitsmaßnahmen
• Wenn das Fahrzeug längere Zeit in direktem
Sonnenlicht geparkt war, lassen Sie das Gerät
etwas abkühlen, bevor Sie es einschalten.
• Motorantenne n w erden automatisch ausgefahren,
wenn das Gerät eingeschaltet wird.
Feuchtigkeitskondensation
Bei Regen oder bei sehr hoher Luftfeuchtigkeit kann
sich auf den Linsen im Inneren des Geräts und im
Display Feuchtigkeit niederschlagen. In diesem Fall
funktioniert das Gerät nicht mehr richtig. Nehmen
Sie die CD heraus und warten Sie etwa eine Stunde,
bis die Feuchtigkeit verdunstet ist.
So bewahren Sie die hohe
Tonqualität
Achten Sie darauf, keine Säft e oder andere
zuckerhaltige Geträ nke a u f da s Gerät oder die CDs
zu verschütten.
Hinweise zu CDs
• Berühren Sie nich t die Obe rfläch e v on CDs, d amit
diese nicht verschmutzt werden. Fassen Sie CDs
nur am Rand an.
• Bewahren Sie CDs in ihrer Hülle oder in den CDMagazinen auf, wenn sie nicht abgespielt werden.
• Schützen Sie CDs vor Hitze bzw. hohen
Temperaturen. Lassen Sie sie nicht in geparkten
Autos, auf dem Armaturenbrett oder auf der
Hutablage liegen.
• Bringen Sie keine Aufkleber auf CDs an und
verwenden Sie keine CDs mit Rück ständen von
Tinte oder Klebstoffen. Solche CDs drehen sich
beim Betrieb möglicherwe ise nic ht mehr und
führen zu einer Fehlfunktion oder können
beschädigt werden.
• Verwenden Sie keine CDs, an denen Etiketten
oder Aufkleber angebracht sind.
Bei Verwendung solcher CD s ka nn e s zu
folgenden F e hlfunktionen kommen:
– Die CD lässt sich nicht auswerfen, weil sich ein
Etikett oder Aufkleber gelöst hat und den
Auswurfmechanismus blockiert.
– Die Audiodate n w er d e n nic ht korrekt gelesen
(z. B. Tonsprünge bei der Wiedergabe, keine
Wiedergabe), weil ein Etikett oder Aufkleber
durch Wärmeeinwirku ng ge schrumpft ist und
die CD sich verzogen hat.
• CDs mit außergewöhnlichen Forme n (z . B.
herzförmige, quadratische oder sternförmige CDs)
können mit diesem Gerät ni cht wiedergegeben
werden. Falls Sie es doch versuchen, ka nn da s
Gerät beschädigt werden. Verwenden Sie solche
CDs nicht.
• Single - CDs (8-cm-CD s ) k ö nnen ebenfall s n icht
verwendet werden.
• Reinigen Sie CDs vor dem
Abspielen mit einem
handelsüblichen
Reinigung s t u ch. Wischen S i e
dabei von der Mitte nach außen.
Verwenden Sie keine
Lösungsmittel wie Benzin oder
Verdünner und keine
handelsüblichen
Reinigungsmitte l oder Antistatik-Sprays für
Schallplatten.
Hinweise zu CD-Rs/CD-RWs
• Je nach dem Gerät, mit dem die CD-R/CD-RW
bespielt wu r de, oder dem Zustand de r CD-R/CDRW selbst ist eine Wiedergabe mit diesem Gerät
nicht in jedem Fall möglich.
• Eine noch nicht abgeschlossene CD-R/CD-RW
kann nicht wiedergegeben w erden.
Musik-CDs mit
Urheberrechtsschutzcodierung
Dieses Gerät ist auf die Wiedergabe von CDs
ausgelegt, die dem Compact Disc-Standard (CD)
entsprechen.
Seit neuestem bringen einige Anbieter Musi k-CDs
mit Urheberrechtsschutzcodie rung auf den Markt.
Beachten Sie bitte, dass einige dieser CDs nicht dem
CD-Standard entspre c he n und mit diesem Produkt
möglicherweise nicht wiedergegeben werden
können.
MP3-Dateien
MP3 steht für MPEG-1 Audi o L ayer-3. Dabei
handelt es sic h um einen Formatst an dard zum
Komprimie ren von Musikdateien. Hierbei werden
Audio-CD-Daten auf etwa 1/10 ihrer ursprünglichen
Größe komprimiert.
• Das Gerät ist mit de m Format ISO 9660, Stufe 1/
Stufe 2, dem erweiterten Joli et - bzw. RomeoFormat, ID3-Tags der Version 1.0, 1.1, 2.2, 2.3
und 2.4 sowie dem Multisession-Format
kompatibel.
• Höchstzahl an:
– Ordnern (Gruppen): 150 (e inschließlich
Stammordner und leerer Ordner).
– MP3-Dateien (Titeln) und Ordnern auf einer
CD: 300 (Wenn ein Ordner-/Dateiname viele
Zeichen enthält, ist die maximale Anzahl
möglicherweise geringer als 300).
Fortsetzung auf der nächsten Seite t
17
Page 38

– anzeigbare n Ze ic hen für einen Ordner-/
Dateinamen: 32 (Jolie t), 32/64 (Romeo). Bei
einem ID3-Tag können 15/30 Zeichen (1.0, 1.1,
2.2 und 2.3) bzw. 63/126 Zeichen (2.4)
angezeigt werden.
Wiedergabereihenfolge von MP3Dateien
MP3
Hinweise
• Schließen Sie die CD unbedingt ab, bevor Sie sie
mit diesem Gerät verwenden.
• Fügen Sie beim Benennen einer MP3-Datei
unbedingt die Dateierweiterung „.mp3“ zum
Dateinamen hinzu.
• Wenn Sie eine MP3-Datei mit einer hohen Bitrate,
wie z. B. 320 Kbps, wiedergeben, kommt es
möglicherweise zu Tonaussetzern.
• Bei der Wiedergabe einer VBR-MP3-Datei (VBR =
Variable Bit Rate) bzw. beim Vorwärts-/
Rückwärtssuchen wird die verstrichene Spieldauer
möglicherweise nicht richtig angezeigt.
• Bei einer Multisession-CD wird nur das Format des
ersten Titels der ersten Session erkannt und
wiedergegeben (alle anderen Formate werden
übersprungen). Das CD-DA-Form at hat Vorrang vor
dem ATRAC-CD-Format und dieses hat Vorrang vor
dem MP3-Format.
– Wenn der erste Titel das CD-DA-Format aufweist,
werden nur die CD-DA-Titel der ersten Session
wiedergegeben.
– Wenn der erste Titel nicht das CD-DA-Format
aufweist, wird eine ATRAC-CD- oder MP3-Session
wiedergegeben. Wenn auf der CD keine Daten in
einem dieser Formate enthalten sind, wird „NO
Music“ angezeigt.
Ordner
(Gruppe)
MP3-Datei
(Titel)
ATRAC-CDs
ATRAC3plus-Format
ATRAC3 steht für „Adaptive sTransform Acoustic
Coding3“ und ist eine Komprimieru ngst ec hnologie
für Tonsignale. Hierbei werden Audio-CD-Daten
auf etwa 1/10 ihrer ursprünglichen Größe
komprimiert. Bei ATRAC3plus, einem erweiterten
ATRAC3-Format, werden Audio-C D -D a te n auf
etwa 1/20 ihrer ursprünglichen Größe komprimiert.
Dieses Gerät unterstützt das ATRAsC3- und das
ATRAC3plus-Format.
ATRAC-CD
Eine ATRAC-CD ist eine mit Audio-CD-Daten
bespielte CD, bei der die Date n mithilfe au torisierte r
Software, w i e z. B. SonicStage 2.0 oder höher bzw.
SonicStage Simple Burner, im ATRAC3- oder
ATRAC3plus-Format komprimiert wurden.
• Höchstzahl an:
– Ordnern (Gruppen): 255
– Dateien (Titeln): 999
• Die mit SonicStage eingegebenen Ordner- bzw.
Dateinamen und Textinformationen werden
angezeigt.
Weitere Informationen zu ATRAC-CD s f inden Sie
im Handbuch zu SonicStage bzw. SonicStage
Simple Burner.
Hinweis
Verwenden Sie zum Erstellen einer ATRA C-CD
unbedingt autorisierte Softwareprodukte wie
SonicStage 2.0 oder höher bzw. SonicStage Simple
Burner 1.0 oder 1.1, die mit Sony Network-Produkten
geliefert werden.
Sollten an Ihrem Gerät Probleme auftreten oder
sollten Sie Fragen haben, auf die in dieser Anleitung
nicht eingegangen wird, wenden Sie sich bitte an
Ihren Sony-Händler.
Wartung
Austauschen der Lithiumbatterie der
Kartenfernbedienung
Unter normalen Bedingu ngen hält die Batterie etwa
1 Jahr. Die Lebensdauer der Batterie kann je nach
Gebrauch des Geräts jedoch auch kürzer sein.
Wenn die Batterie schwächer wird, verkürzt sich die
Reichweite der Kart enfernbedienung. Tauschen Sie
die Batterie gegen eine neue CR2025Lithiumbatterie aus. Bei Verwendung einer anderen
Batterie besteht Feuer- oder Explosionsgefahr.
x
Mit der Seite +
nach oben
18
Page 39

Hinweise zur Lithiumbat te rie
• Bewahren Sie die Lithiumbatterie außerhalb der
Reichweite von Kindern auf. Sollte eine
Lithiumbatterie verschluckt werden, ist umgehend
ein Arzt aufzusuchen.
• Wischen Sie die Batterie mit einem trockenen Tuch
ab, um einen guten Kontakt zwischen den
Batteriepolen und -anschlüssen sicherzustellen.
• Achten Sie beim Einlegen der Batterie auf die
richtige Polarität.
• Halten Sie die Batterie nicht mit einer Metallpinzette.
Dies könnte zu einem Kurzschluss führen.
.
VORSICHT
Die Batterie kann bei falscher Handhabung
explodieren!
Auf keinen Fall darf sie aufgeladen,
auseinander g enommen od er ins Feuer
geworfen werden.
Entsorgungshinweis: Bitte werfen Sie nur
entladene Batter ien in die Sammelboxen beim
Handel oder den Kommunen. Entladen sind
Batterien in der Regel dann, wenn das Gerät
abschaltet und „Batterie leer“ signalisiert oder
nach längerer Gebrauchsdauer der Batte rien
nicht mehr einwandfrei funktioniert.
Um sicherzugehen, kleben Sie die Batteriepole
z. B. mit einem Klebestreifen ab oder geben Sie
die Batterien einzeln in einen Plastikbeutel.
Austauschen der
Sicherung
Wenn Sie eine Sicherung
austauschen, achten Sie darauf,
eine Ersatzsicherung mit dem
gleichen Ampere-Wert wie die
Originalsicherung zu
verwenden. Dieser ist auf der
Originalsicherung an gegeben.
Wenn die Sicherung
durchbrennt, überprüfen Sie
Sicherung ( 10 A)
den Stromanschluss und
tauschen die Sicherung aus. Brenn t di e ne ue
Sicherung ebenfalls durch, kann eine interne
Fehlfunktion vorliegen. Wenden Sie sich in einem
solchen Fall an Ihren Sony-Händler.
Reinigen der Anschlüsse
Das Gerät funktioniert möglicherweise nicht
ordnungsgemäß, wenn die Ansc hlüsse zwischen
dem Gerät und der Frontplatte verschmutzt sind.
Um dies zu vermeiden, nehm en Sie die Frontplatte
ab (Seite 4) und reinigen Sie die Anschlüsse mit
einem mit Alkohol angefeuchteten Wattestäbchen.
Drücken Sie dabei nicht zu fest auf die Anschlüsse.
Andernfalls können sie beschädigt werden.
Hauptgerät
Hinweise
• Schalten Sie aus Sicherheitsgründen vor dem
Reinigen der Anschlüsse die Zündung aus, und
ziehen Sie den Schlüssel aus dem Zündschloss.
• Be rü hre n Sie die Anschl ü sse unte r keinen
Umständen direkt mit den Händen oder einem
Metallgegenstand.
Rückseite der
Frontplatte
Ausbauen des Geräts
1 Entfernen Sie die Schutzumrandung.
1 Nehmen Sie die Frontplatte ab (Seite 4).
2 Setzen Sie beide Löseschlüssel an der
Schutzumrandung an.
Richten Sie die Löseschlüssel wie in
der Abbildung dargestellt aus.
3 Ziehen Sie die Schutzumrandung mithilfe
der Löseschlüssel heraus.
2 Nehmen Sie das Gerät her aus.
1 Setzen Sie beide Löse schlüssel
gleichzeitig so ein, dass sie mit einem
Klicken einrasten.
Der Haken
muss nach
innen weisen.
Fortsetzung auf der nächsten Seite t
19
Page 40
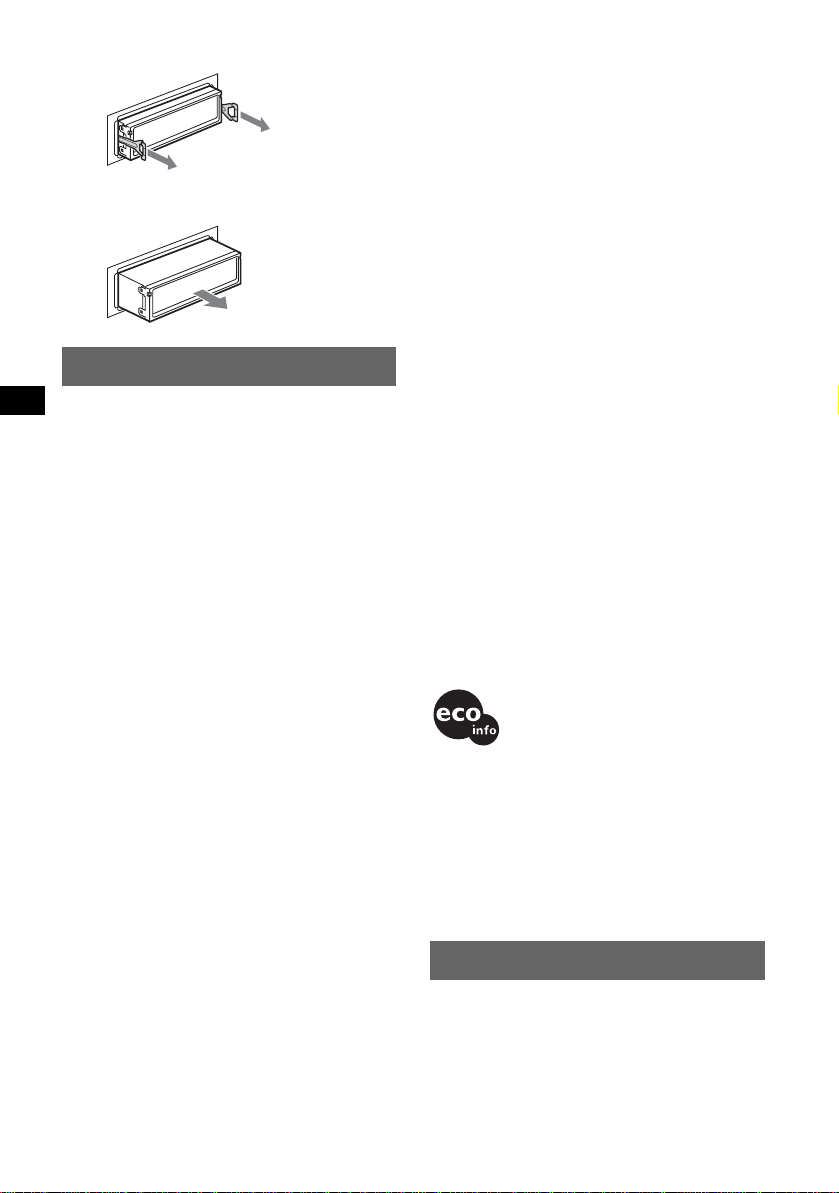
2 Ziehen S ie an den Löseschlüsseln, um das
y
Gerät zu lösen.
3 Ziehen S ie das G erät aus seiner Halter ung
heraus.
Technische Daten
CD-Player
Signal-Rauschabstand: 120 dB
Frequenzgang: 10 – 20.000 Hz
Gleichlaufschwankungen: Unterhalb der Messgrenze
Tuner
UKW
Empfangsbereich: 87,50 – 108,00 MHz
Antennenanschluss: Anschluss für Au ßenantenne
Zwischenfrequenz: 10,7 MHz/450 kHz
Nutzbare Empfindlichkeit: 9 dBf
Trennschärfe: 75 dB bei 400 kHz
Signal-Rauschabstand: 67 dB (stereo), 69 dB (mono)
Harmonische Verzerrung bei 1 kHz: 0,5 % (stereo),
0,3 % (mono)
Kanaltrennung: 35 dB bei 1 kHz
Frequenzgang: 30 – 15.000 Hz
MW/LW
Empfangsbereich:
MW: 531 – 1.602 kHz
LW: 153 – 279 kHz
Antennenanschluss: Anschluss für Au ßenantenne
Zwischenfrequenz: 10,7 MHz/450 kHz
Empfindlichkeit: MW: 30 µV, LW: 40 µV
Endverstärker
Ausgänge: Lautsprecherausgänge (v ersiegelte
Anschlüsse)
Lautsprecherimpedanz: 4 – 8 Ohm
Maximale Ausgangsleistung: 52 W × 4 (an 4 Ohm)
Allgemeines
Ausgänge:
Audioausgänge (vorne/hinten)
Ausgang für Tiefsttonlautsprecher (mono)
Motorantennen-Steueranschluss
Steueranschluss für Endverstärker
Eingänge:
Steueranschluss für Stummsc ha lt ung be im
Telefonieren
Steueranschluss für Beleuchtung
BUS-Steuereingang
BUS-Audioeingang/Anschluss AUX IN
Fernbedienungseingang
Antenneneingang
Klangregler:
Bässe: ±8 dB bei 100 Hz
Höhen: ±8 dB bei 10 kHz
Loudness:
+8 dB bei 100 Hz
+2 dB bei 10 kHz
Betriebsspannung: 12 V Gleichstrom, Autobat teri e
(negative Erdung)
Abmessungen: ca. 178 × 50 × 188 mm (B/H/T)
Einbaumaße: ca. 182 × 53 × 162 mm (B/H/T)
Gewicht: ca. 1,6 kg
Mitgeliefertes Zubehör:
Kartenfernbedienung: RM-X142
Montageteile und Anschlussz ube hör (1 Satz)
Behälter für Frontplatte (1)
Sonderzubehör/gesondert erhältliche Geräte:
Joystick: RM-X6S, RM-X4S
BUS-Kabel (mit einem Cinchkabel gelief ert):
RC-61 (1 m), RC-62 (2 m)
CD-Wechsler (10 CDs): CDX-757MX,
CDX-T70MX
CD-Wechsler (6 CDs): CDX-T69
MD-Wechsler (6 MDs): MDX-66XLP
Signalquellenwähler: XA-C30
AUX IN-Signalquellenwähler: XA-300
US-amerikanische Patente und Patente anderer
Länder lizenziert von Dolb
Hinweis
Dieses Gerät kann nicht an einen digitalen
Vorverstärker oder an einen Equalizer, der mit dem
Sony-BUS-System kompatibel ist, angeschlossen
werden.
Änderungen, die dem technischen Fortschritt dienen,
bleiben vorbehalten.
• Bleifreies Lötmetall wird zum Löten bestimmter
Teile verwendet. (mehr als 80 %)
• In bestimmten Leiterplatten wer den keine
halogenierten Flammschutzmittel verwendet.
• Im Gehäuse werden keine halogenierten
Flammschutzmittel verwendet.
• Die Druckfarbe basiert auf Pflanzenölen, frei von
leicht flüchtigen organischen Substa nzen.
• Es wird kein Polystyrolschaum als Füllmaterial in
der Verpackung verwendet.
Labororatories.
Störungsbehebung
Anhand der folgenden Checkliste können Sie die
meisten Probleme, die möglic he rw e ise an Ihr em
Gerät auftreten, selbst beheben.
Bevor Sie die folgende Checkliste durchgehen,
überprüfen Sie bitte zunächst, ob Sie das Gerät
richtig angeschlossen und bedient haben.
20
Page 41

Allgemeines
Das Gerät wird nicht mit Strom versorgt.
• Überprüfen Sie die Kabelverbindungen. Wenn die
Anschlüsse in Ordnung sind, überprüfe n Sie die
Sicherung.
• Wenn Sie das Gerät ausschalten und die Anzeige
ausgeblendet ist, können Sie es nich t mit der
Kartenfernbedienung bedienen.
t Schalten Sie das Gerät ein.
Die Motorantenne wir d nicht ausgefahren.
Die Motorantenne hat kein Relaiskästchen.
Es ist kein Ton zu hören.
• Die Lautstärke ist zu niedr ig.
• Die Funktion zum Dämp fen de s Tons oder die
Stummschaltfunktion zum Telefonieren (wenn das
Schnittstellenkabel eines Autotelefons mit der ATTLeitung verbunden ist) ist aktiviert.
• Der Fader-Regler (FAD) ist nicht für ein
2-Lautsprecher-System eingestellt.
• Der CD-Wechsler unterstützt das CD-Format (MP3- /
ATRAC-CD) nicht.
t Lassen Sie die CD mit einem MP3-kompatib le n
CD-Wechsler von Sony oder mit diesem Gerät
wiedergeben.
Kein Signalton ertönt.
• Der Signalton ist deaktiviert (Seite 13).
• Ein gesondert erhältlicher Endverstärker ist
angeschlossen und Sie verwenden nicht den
integrierten Verstärker.
Der Speicherinhalt wurde gelöscht.
• Die Taste RESET wurde gedrückt.
t Speichern Si e di e Einste llungen erneut.
• Das Stromversorgungskabel wurde gelös t ode r die
Verbindung zur Batterie besteht nicht mehr.
• Das Stromversorgungskabel ist nicht richtig
angeschlossen.
Gespeicherte Sender und die korrekte Uhrzeit
werden gelöscht .
Die Sicherung ist durchgebrannt.
Störgeräusche sind zu hören, wenn der
Zündschlüssel gedreht wird.
Die Leitungen sind nicht korrekt an den
Stromanschluss für Zube hörgerät e ange sc hlossen.
Die Anzeige wird ausgeblendet bzw. erscheint
nicht im Display.
• Der Dimmer ist auf „Dimmer on“ e inge stellt
(Seite 13).
• Der Winkel der Frontplatte ist nicht ordnung sge mä ß
ausgerichtet.
t Passen Sie den Winkel der Frontplatte an , indem
Sie (ANGLE) gedrückt halten (Seite 7).
• Die Anzeige wird ausgeblendet, wenn Sie (OFF)
gedrückt halten.
t Halten Sie (OFF) erneut gedrückt, bis die
Anzeige ein geblendet wir d .
• Die Anschlüsse sind verschm utzt (Seite 19).
Die DSO-Funktion hat keine Wirkung.
Je nach dem Innenraum des jeweiligen Fahrzeugs bzw.
dem Musiktyp hat die DSO-Funktion möglicherweise
nicht die gewünschte Wirkung.
Die Bilder wechseln autom atisch.
Im automatischen Bildwech se lmodus kann nicht ein
bestimmtes Bild für die Anzeige ausgewählt werden.
t Wenn Sie ein bestimmtes Bild anzeigen möchten,
stellen Sie „A.IMG off“ ein (Seite 13).
Im Display werden keine Informationen
angezeigt.
t Stellen Sie „Info on“ ein (Seite 13).
CD/MD-Wiedergabe
Es lässt sich keine CD/MD einlegen.
• Es ist bereits eine an de re CD/MD eingelegt.
• Die CD/M D w urde mit Gewalt falsch herum oder
falsch eingelegt.
Die CD/MD lässt sich nicht abspiel en .
• Die CD/MD ist beschädigt oder verschmutzt.
• Die CD-R/CD-RW ist nicht als Audio-CD konzipiert
(Seite 17).
MP3-Dateien können nicht wiedergegeben
werden.
Die CD ist nicht mit dem M P3 -For m at bzw. der
Version kompatibel (Seite 17).
Es dauert länger, bis die Wiedergabe von MP3Dateien beginnt.
Bei folgenden CDs dauert es länger, bis die
Wiedergabe beginnt:
– CDs mit einer komplizierten Datei-/Ordnerstruktur.
– Multisession-CDs.
– CDs, zu denen noc h Date n hinzuge f ügt werden
können.
Eine ATRAC-CD kann nicht abgespielt werden.
• Die CD wurde nicht mit autorisierter Software wie
SonicStage oder SonicStage Simple Burner erstellt.
• Titel, die nicht in einer Gruppe enth alten sind,
können nicht abgespielt wer de n.
Im Display ange zeigte Informat io n e n laufen
nicht automatisch durch.
• Bei CDs/MDs mit sehr viel Textinformationen laufen
diese im Display mögliche r we ise nic h t du rch.
• „A.Scroll“ ist auf „off“ einges tellt.
t Stellen Sie „A. Scr oll on“ ein (Seite 13), oder
drücken Sie (SCRL) auf der
Kartenfernbedienung.
Tonsprünge treten auf.
• Das Ger ät ist nicht richtig insta lliert.
t Installier e n Sie da s Gerä t in e ine m Winkel von
unter 45° an einem stabilen Teil des Fahrzeugs.
• Die CD/MD ist beschädigt oder verschmutzt.
Die Funktionstasten funktionieren nicht.
Die CD/MD lässt sich nicht ausw erfen.
Drücken Sie die Taste RESET (Seite 4).
Ein gesondert erhältlicher MGS-X1 und ein MDWechsler sin d angeschlossen, „MS“ bzw.
„MD“ wird jedoch nicht als Tonquelle
angezeigt.
Dieses Gerät erkennt den MGS-X1 als ein MD-Gerät.
t Drücken Sie (SOURCE) so of t, bis „M S “ oder
„MD“ angezeigt wird, und drücken Sie dann
mehrmals (MODE).
Fortsetzung auf der nächst en Seite t
21
Page 42

Radioempfang
Sender lassen sich nicht empfangen.
Der Ton ist stark gestört.
• Schließen Sie eine Motorantennen-Steuerleitung
(blau) oder eine Stromversorgungsleitung für
Zubehörgeräte (rot) an die Stromversorgungsleitung
für den Antennenverstärker des Fahrzeugs an (nur,
wenn das Fahrzeug mit einer in der Heck-/
Seitenfensterscheibe integrierten FM (UKW)/MW/
LW-Antenne ausgesta tte t ist).
• Prüfen Sie die Verbindung der Autoantenne.
• Die Autoantenne wird nicht ausgefahren.
tPrüfen Sie die Verbindung der Motorantennen-
Steuerleitung.
• Überprüfen Sie die Frequenz.
• Wenn der DSO-Modus aktiviert ist, ist der Ton
manchmal gestört.
tSetzen Sie DSO auf „off“ (Seite 7).
Gespeicherte Sender la ssen sich nicht
einstellen.
• Speichern Sie den/die Sender unter der korrekten
Frequenz ab.
• Das Sendesignal ist zu schwach.
Der automatische Sendersuchlauf funktioniert
nicht.
• Der lokale Senders uc hmodus ist auf „on“ eingestellt.
tStellen Sie „Local off“ ein (Seite 13).
• Das Sendesignal ist zu schwach.
tStellen Sie die Sende r ma nue ll ein.
Während des UKW-Empfangs blinkt die
Anzeige „ST“.
• Stellen Sie die Frequenz genau ein.
• Das Sendesignal ist zu schwach.
tStellen Sie „Mono on“ ein (Seite 13).
Eine UKW-Stereosendung ist nur monaural zu
hören.
Das Gerät ist in den monauralen Empfangsmodus
geschaltet.
t Stellen Sie „Mono off“ ein (Seite 13).
RDS
Der Sendersuchlauf (SEEK) startet nach ein
paar Sekunden Radioempfang.
Der Sender ist kein Verkehrsfunksender (TP) oder die
Sendesignale sind zu schwach.
t Deaktivieren Sie TA (Seite 10).
Es sind keine Verkehrsdurch sagen zu hören.
• Aktivieren Sie TA (Seite 10).
• Der Sender sendet keine Verkehrsdurchsagen,
obwohl es sich um einen Verkehrsfunksender (TPSender) handelt.
tStellen Sie einen anderen Send er ein.
Bei der PTY-Funktion wird „- - - - - - - -“
angezeigt.
• Der aktuelle Sender ist kein RDS-Sender.
• Es wurden keine RDS-Daten empfangen.
• Der Sender gibt den Progr a mm typ nicht an.
Fehleranzeigen/Meldungen
1
Blank*
Die MD enthält keine Titel.*
t Legen Sie eine MD ein, auf der Titel aufgezeichnet
sind.
1
Error*
• Die CD/MD ist ver schmutzt oder falsch h eru m
eingelegt.
t Reinigen Sie die CD/MD bzw. le g en Si e si e
• Die CD/MD kann aufgrund einer Störung nicht
wiedergegeben werden.
t Legen Sie eine andere CD/MD ein.
Failure
Die Lautsprecher-/Verstärkeranschlüsse sind nicht
korrekt.
t Schlagen Sie in der Installationsanleitung nach, wie
Load
Der Wechsler lädt die CD/MD.
t Warten Sie, bis der Ladevorgang abgeschlossen ist.
Local Seek +/–
Beim automatischen Send e rs uc hla uf ist de r loka le
Suchmodus aktivier t.
NO AF
Für den aktuellen Sender gibt es keine
Alternativfrequenz.
t Drehen Sie < oder ,, während der Sendername
NO Data
Alle individuellen Namen wurden gelöscht bzw. es
sind keine Namen gespeichert.
NO Disc
Im CD/MD-Wechsler befindet sich keine CD/MD.
t Legen Sie CDs/MDs in den Wechsler ein.
NO Disc Name
Für den Titel gibt es keinen CD/MD-Namen.
NO Group Name
Für den Titel gibt es keinen Gruppennamen.
NO ID3 Tag
Die MP3-Datei enthält keine ID3-Tag-Informationen.
NO Info
Die ATRAC3-/ATRA C3plus-Datei enthält keine
Textinformationen.
NO Magazine
Das CD-Magazin ist nicht in den CD-Wechsler
eingesetzt.
t Setzen Sie da s Ma ga zin in de n Wechsler ein.
NO Music
Die CD enthält keine Musikd at eien.
t Legen Sie eine Musik- CD in di es es Gerä t ode r den
2
*
korrekt ein.
die Anschlüsse korrekt vorgenommen werden
müssen.
blinkt. Das Gerät beginnt dann mit der Suche nach
einer Frequenz mit denselben P I-Da te n
(Programme Identification-Date n) und „ PI See k“
wird angezeigt.
MP3-kompatiblen Wechsler ein.
2
22
Page 43
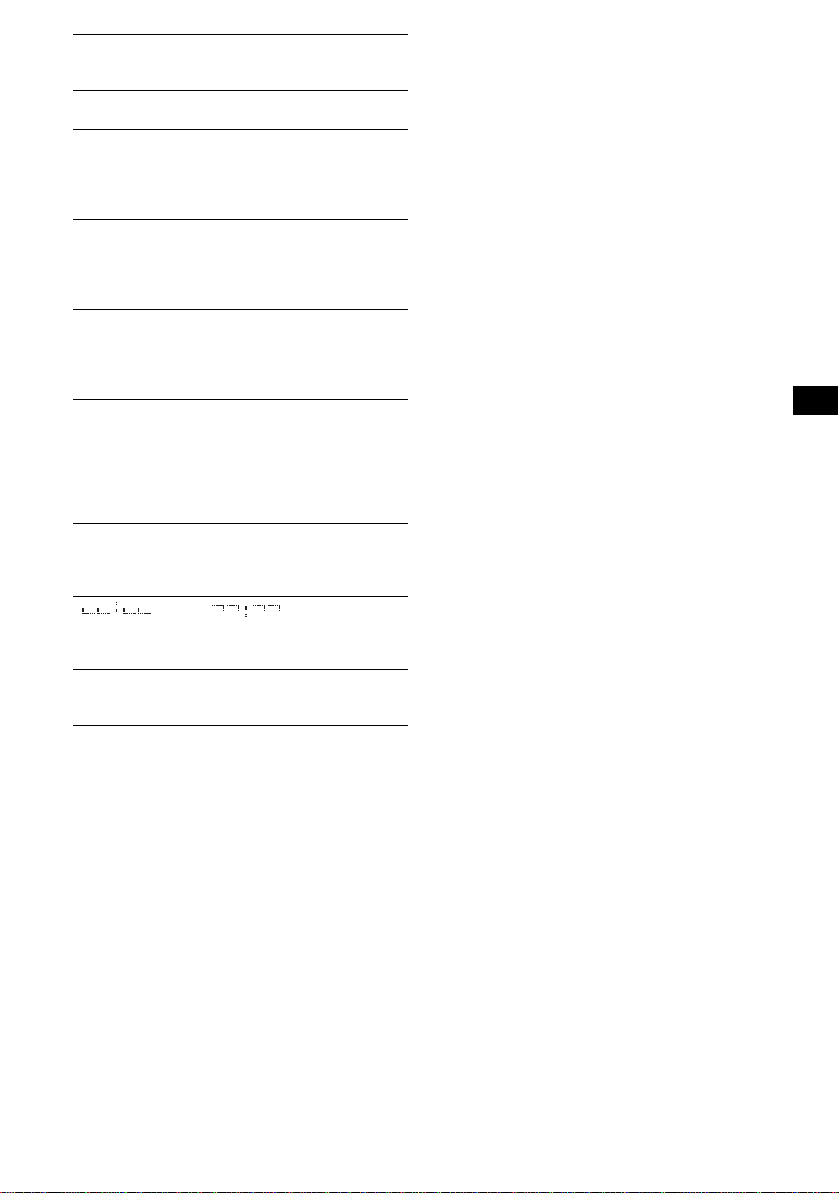
NO TP
Das Gerät sucht weiter nach verfügbaren
Verkehrsfunksendern.
NO Track Name
Für den Titel gibt es keinen Titelnamen.
Not Read
Die CD/MD-Info r ma tionen wurden vom Gerät nicht
eingelesen.
tLegen Sie die CD/MD ein und wählen Sie sie aus
der Liste aus.
Not Ready
Der Deckel des MD-Wechslers ist offen oder die MDs
wurden nicht korrekt einge legt.
tSchließen Sie den Deckel bzw. legen Sie die MDs
korrekt ein.
Offset
Es liegt möglicherweise eine int erne Fehlfunktion vor.
tÜberprüfen Sie die Kabelverbin dunge n. Wenn die
Fehleranzeige weiter hin im Display angezeigt wird ,
wenden Sie sich an einen Sony-Händler.
Read
Das Gerät liest ger a d e alle Titel- und
Gruppeninformation en von der CD/MD ein.
tBitte warten Sie, bis das Einlesen abgeschlossen ist.
Die Wiedergabe beginnt danach automatisch. Je
nach CD/MD-Struktur kann das Einlesen länger als
eine Minute dauern.
Push Reset
Das CD-Gerät bzw. der CD/MD-Wechsler kann wegen
einer Störung nicht bedient werden.
tDrücken Sie die Taste RESET (Seite 4).
„ “ oder „ “
Sie sind beim Vorwärts- oder Rückwärtssuchen am
Anfang bzw. Ende der CD angelangt und können nicht
weitersuchen.
„s“
Das Zeichen kann mit diesem Gerä t nic ht a nge zeigt
werden.
*1 Wenn während der Wiedergabe einer CD oder MD
ein Fehler auftritt, wird die Nummer der CD bzw.
MD nicht i m Display angezeigt.
*2 Die Nummer der CD/MD, die den Fehler
verursacht, erscheint im Display.
Wenn sich das Problem mit diesen
Abhilfemaßnahmen nicht beheben lässt, wenden Sie
sich an einen Sony-Händler.
Wenn Sie das Gerät aufgrund einer Störung bei der
CD-Wiedergabe zur Reparatur bring en , bri ngen Sie
bitte auch die CD m it, die eingelegt war, als das
Problem zum ersten Mal auftrat.
23
Page 44

Félicitations !
Nous vous remercions d’avoir fait l’acquisition
de ce lecteur de disq ues compacts Sony. Vous
pouvez profiter de cet appareil grâce aux
fonctions ci-de ssous.
• Lecture de CD
Possibilité de lecture de CD-DA (conte na nt
également des informations CD TEXT*), de
CD-R/CD-RW (fichiers MP3 contenant
également des multisessions (
CD ATRAC (format ATRAC3 et ATRAC3plus
(
page 18)).
Type de disque
CD-DA
MP3
CD ATRAC
Symbole indiqué sur le
• Réception radio
–Vous pouvez mémoriser jusqu’à 6 stations
pour chaque band e de fréquences (FM1,
FM2, FM3, MW (PO) et LW (GO)).
–BTM (mémorisation des meilleurs accords) :
l’appareil sélectionne les stations émettant
des signaux et le s mé morise.
–Vous pouvez attribuer un nom à chaque
station de radio, le sauvegarder en mémoire et
afficher les noms des radios dans la liste.
• Réglage du son
–EQ7 : vous pouvez sélectionner une courbe
d’égaliseur pour 7
types de musique.
–DSO (répartiteur dynamique du son émis) :
crée un champ sonore mieux réparti gr âce à
une synthèse de haut-parleurs virtuels, afin
d’améliorer le son des haut-parleurs même si
ceux-ci sont installés dans la partie inférieure
des portières.
–BBE MP : améliore les sons compressés
numériquement comme les fichiers MP3.
Pour plus de détails, reportez-vous à
l’explication suivante.
• Réglage de l’image
Vous pouvez régler différents mo t if s
d’affichage sur l’appareil.
– Space Producer : crée des motifs animés à
l’écran, en synchronisatio n avec la musique.
page 17)) et des
disque
• Fonctionnement de l’appareil en option
En plus de la lecture, cet appareil vous permet
aussi de commander des changeurs CD ou MD
en option ains i que de s ap par eil s po rt ati fs Son y
en option.
* Un disque CD TEXT est un CD-DA contenant des
informations, telles que le nom du disque, le nom de
l’artiste et le nom des plages.
Avertissement au cas où le contact de
votre voiture ne dispose pas d’une
position ACC
Après avoir coupé le moteur, n’oubliez pas de
maintenir la touche (OFF) de l’appareil
enfoncée jusqu’à ce que l’affichage
disparaisse.
Sinon, l’affichage n’est pas désactivé et la
batterie se décharge.
Cette étiquette est située sur la partie inférieure
du châssis.
Le procédé BBE MP
R
améliore le son compressé
numériquement, comme le
MP3, en restaurant et en optimisant les
harmoniques les plus élevées perdues au cours
de la compression. Le processus BBE MP est
fondé sur la génération d’harmoniques d’ordre
paire à partir du matériel source en leur restituant
leur richesse, leurs détails et leurs nuances.
SonicStage et son lo go sont des marques
commerciales de Sony Corporation.
ATRAC, ATRAC3, ATRAC3plus et leurs logos
sont des marques commerciale s de Sony
Corporation.
2
Page 45

Tables des matières
Préparation
Réinitialisation de l’appareil . . . . . . . . . . . . . . . 4
Réglage de l’horloge . . . . . . . . . . . . . . . . . . . . . 4
Mode DEMO. . . . . . . . . . . . . . . . . . . . . . . . . . . 4
Retrait de la façade . . . . . . . . . . . . . . . . . . . . . . 4
Installation de la façade . . . . . . . . . . . . . . . . 5
Insertion du disque dans l’appareil . . . . . . . . . . 5
Ejection du disque . . . . . . . . . . . . . . . . . . . . 5
Réglage de l’angle de la façade. . . . . . . . . . . . . 5
Emplacement des commandes et
opérations de base
Appareil principal . . . . . . . . . . . . . . . . . . . . 6
Mini-télécommande RM-X142 . . . . . . . . . . 6
CD
Rubriques d’affichage . . . . . . . . . . . . . . . . . 8
Lecture répétée et aléatoire . . . . . . . . . . . . . 8
Radio
Réception et mémorisation des stations . . . . . . 9
Mémorisation automatique — BTM . . . . . . 9
Mémorisation manuelle . . . . . . . . . . . . . . . . 9
Réception des stations mémorisées . . . . . . . 9
Recherche automatique des fréquences . . . . 9
Réception d’une station via une l i ste
— LIST . . . . . . . . . . . . . . . . . . . . . . . . . . . . 9
Fonction RDS . . . . . . . . . . . . . . . . . . . . . . . . . 10
Aperçu . . . . . . . . . . . . . . . . . . . . . . . . . . . . 10
Réglages AF et TA/TP . . . . . . . . . . . . . . . . 10
Sélection de PTY . . . . . . . . . . . . . . . . . . . . 11
Réglage de CT . . . . . . . . . . . . . . . . . . . . . . 11
Autres fonctions
Modification des caractéristiques du son . . . . 12
Réglage des caractéristiques du son . . . . . 12
Réglage de la courbe de l’égaliseur
— EQ7 Tune . . . . . . . . . . . . . . . . . . . . . . . 12
Réglages des paramètres de men u
— MENU . . . . . . . . . . . . . . . . . . . . . . . . . . . . 12
Utilisation d’un appareil en option . . . . . . . . . 1 4
Changeur CD/MD . . . . . . . . . . . . . . . . . . . 14
Satellite de commande RM-X4S . . . . . . . . 15
Appareil audio auxiliaire . . . . . . . . . . . . . . 16
Informations complémentaires
Précautions . . . . . . . . . . . . . . . . . . . . . . . . . . . 17
Remarques sur les disques . . . . . . . . . . . . 17
A propos des fichiers MP3 . . . . . . . . . . . . 17
A propos de CD ATRAC . . . . . . . . . . . . . 18
Entretien . . . . . . . . . . . . . . . . . . . . . . . . . . . . . 18
Démontage de l’appareil. . . . . . . . . . . . . . . . . 19
Spécifications . . . . . . . . . . . . . . . . . . . . . . . . . 19
Dépannage . . . . . . . . . . . . . . . . . . . . . . . . . . . 20
Affichage des erreurs et messages . . . . . . 22
3
Page 46
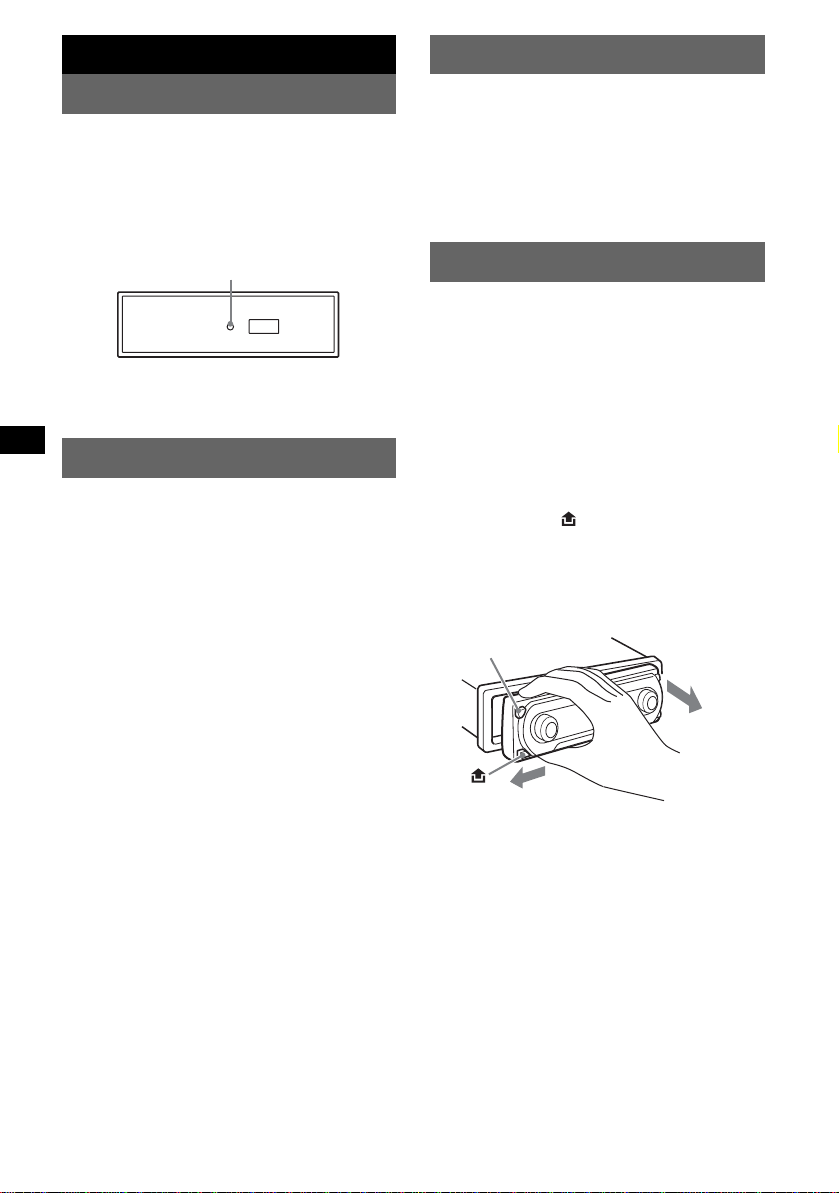
Préparation
Mode DEMO
Réinitialisation de l’appareil
Avant la p remière mise en service de l’app areil,
après avoir remplacé la batterie du véhicule ou
modifié les raccordements, vous devez
réinitialiser l’appareil.
Retirez la façade et appuyez sur la touche
RESET avec un objet pointu, comme un stylo à
bille.
To uche RESET
Remarque
Une pression sur la touche RESET remet l’heure à
zéro et efface certaines informations mémorisées.
Réglage de l’horloge
L ’horloge numérique fonctionne suivant un cycle
de 24 heures.
1 Appuyez sur (MENU).
2 Tournez la molette de sélection SEEK
jusqu’à ce que «
puis appuyez sur (ENTER).
3 Tournez la molette de sélection SEEK
jusqu’à ce que «
apparaisse, pui s appuyez sur
(ENTER).
La fenêtre de régl age de l’horloge s’affiche.
4 Tournez la molette de sélection SEEK
pour régler les heures et les minutes.
Appuyez sur (ENTER) pour déplacer
l’indication numérique.
5 Une fois les minutes réglées, ap puyez
sur (ENTER).
L’horloge démarre.
Réglez « Clock on » (page 13) pour afficher
l’heure pendant la le ct ure ou la réception.
Avec la mini-télécommande
Etapes 2 à 4 : appuyez sur M ou m au lieu de tourner
la molette de sélection SEEK. A l’étape
sur < ou , à la place de (ENTER).
Conseil
Vous pouvez régler l’horloge automatiquement au
moyen de la fonction RDS (
Setup » apparaisse,
Clock adjust »
4 : appuyez
page 11).
Lorsque l’appareil est mis hors tension, l’horloge
s’affiche en premier, puis le mode de
démonstration (DEMO) active l’écran de
démonstration.
Pour annuler le mode DEMO, réglez « Demo
off
» dans le menu (page 13) pendant qu e
l’appareil est hors tension.
Retrait de la façade
Vous pouvez retirer la façade de cet appareil pour
le protéger du vol.
Alarme d’avertissement
Si vous mettez la clé de contact en position OFF
sans ôter la façade , l’a larme d’avertissement
retentit pe ndant quelques secondes.
L’alarme est émise uniquement lorsque
l’amplificateur intégré est utilisé.
1 Appuyez sur (OFF).
L’appareil es t hors tension.
2 Appuyez sur .
Le côté gauche de la façade se détache.
3 Faites glisser la façade vers la gauche,
puis tirez doucement la façade vers
vous.
(OFF)
2
1
Remarques
• N’exercez pas de pression excessive sur la façade
ni sur la enêtre d’affichage et ne la laissez pas
tomber.
• N’exposez pas la façade à des températures
élevées ou à l’humidité. Evitez de la laisser dans un
véhicule en stationnement, sur le tableau de bord ou
la plage arrière.
Conseil
Lorsque vous transportez la façade, glissez-la dans
l’étui fourni à cet effet.
4
Page 47

Installation de la façade
Placez l’orifice A de la façade sur la tige B de
l’appareil, pu is poussez légèrem ent sur le côté
gauche pour l’enclencher.
Appuyez sur (SOURCE) de l’appareil (ou
insérez un disque) pour faire fonct io n ner
l’appareil.
Ejection du disque
1 Appuyez sur Z.
La façade bascule a ut o m atiquement vers le
bas et le disque est éjecté.
2 Appuyez sur Z pour fermer la façade.
Remarque
La façade rebascule automatiquement vers le haut
secondes lorsqu’elle est ouverte.
après 15
Réglage de l’angle de la façade
A
B
Remarque
Ne posez rien sur la face interne de la façade.
Insertion du disque dans
l’appareil
1 Appuyez sur Z.
La façade bascul e automatiquement vers l e
bas.
2 Insérez le disque (côté imprimé vers le
haut).
La façade bascul e vers le h aut et la lecture
démarre automatiquement.
ANGLE
1 Appuyez sur la touche (ANGLE) et
maintenez-la enfoncée, et ce de
manière répétée, jusqu’ à ce qu e la
façade soit inclinée comme vous le
souhaitez.
La façade peut prendr e 3 positions.
Pour replacer la façade à sa position par défaut,
appuyez sur la touche (ANGLE) et maintenez-la
enfoncée, et ce de ma nière répétée, jusq u’à ce
que la façade reprenne sa position par défaut.
Conseils
• Lorsque vous ouvrez la façade (pour insérer un
disque), elle revient automatiquement à la position
que vous avez choisie.
• L’angle de la façade défini est mémorisé dans
l’appareil. Lorsque vous coupez le contact, l’angle
revient à sa position par défaut et lorsque vous
mettez le contact ultérieurement, la façade est
réglée à l’angle défini.
5
Page 48

Emplacement des commandes et opérations de base
Appareil principal
12 3 4 6578
OFF
MODE
VOL
PUSH SOUND PUSH ENTER
SOURCE AF/TA1
9
Mini-télécommande
RM-X142
AF TA
2
BBE MP
5
MODE
+
DISC
OPEN/CLOSE
PAUSE
LIST
qh
qj qd
qa
qk
SCRL
PTY
DSPL
REP SHUF
1
4
EQ7 DSO
7
MENU
q;
SOURCE
ql
–
SEEK
SOUND
DISC
SEEK
–
ENTER
w;
ATTOFF
+
2
VOL
–
wa
6
REP SHUF BBE MP PAUSE
2534
qaq; qs qd qf qg
ws
3
6
1
wd
wf
+
wg
6
wh
ANGLE
+
–
6
SEEK
MENU
IMAGE
CDX-M7850
Pour plus de détails, reportez-vous aux numéros
de pages indiqués entre parenthèses. Les touches
correspondantes sur la mini-télécommande
commandent les mêmes fonctions que celles de
l’appareil.
A Touche MODE 9, 14
Permet de sélec tionner la bande radi o (FM/
MW (PO)/LW (GO)) ou l’appareil*
1
.
B Touche OFF
Permet de mettr e l ’appareil hors tens ion/
d’arrêter la source.
C Molette de sélection VOL (volume)/
touche SOUND 12
Permet de régler le volume (tournez) ;
sélection des pa ramètres du son (a ppuyez).
D Fenêtre d’affichage
E Fente d’insertion des disqu es 5
Permet d’insérer le disque.
F Molette de sélection SEEK/touche
ENTER
Permet de sélectionner des paramètres
(tournez) ; de valider un réglage (app uyez).
Radio :
Pour rechercher des stations : appuyez
plusieurs fois sur (ENTER) pour
sélectionner «
«
PRESET », puis tournez la m ol et te de
SEEK », « MANUAL » ou
sélection SEEK jusqu’à ce que vous
trouviez la station souhaitée.
CD :
Pour sauter des pl ages ou des groupes :
appuyez plusieurs fois sur (ENTER) pou r
sélectionner ./> ou «
GROUP », puis
tournez la molette de sélection SEEK
jusqu’à ce que vous arriviez sur la plage ou
le groupe souhaité .
Page 49

G Touche MENU
Permet de rentrer dans le menu.
H Touche Z (é je ction)/ANGLE 5
Permet d’éjecter le disque/de faire basculer
vers le bas la façade (appuyez). Permet aussi
d’incliner la façad e da ns l’une des
positions (appuyez et maintenez la to uche
3
enfoncée).
I Touche (déverrouillage de la
façade) 4
J Touche SOURCE
Permet de mettre l’appareil sous tension et
de changer de source (Radio/CD/MD*
3
).
AUX*
2
/
K Touches numériques
Radio :
Permet de recevoir les stations enregistrées
(appuyez) ; de mémoriser des stations
(appuyez et mainte nez la touche enfoncée).
CD/MD*2 :
(1): REP 8
(2): SHUF 8
(5): BBE MP*4 2
Pour activer la fonction BBE MP, réglez-la
BBE MP-on ». Pour la désactiver,
sur «
réglez-la sur «
(6): PAUSE*
BBE MP-off ».
4
Pour interrompre la lecture. Appuyez de
nouveau sur cette touche pour annuler.
L Touche RESET 4
M T ouche AF (fréque nces alternatives) /
TA (messages de radioguidage)
10, 11
Permet de régler A F et TA/TP en RDS.
N Récepteur
Permet de recevoir des signaux de la minitélécommande ou du satellite de commande
sans fil.
O Touche IMAGE 2
Permet de sélectionner le motif d’affichage.
Mode Space Producer t mode film 1 à 2
t mode analyseur d e spec tre 1 à 5 t mode
papier peint 1 à 3 t mode normal de
lecture/réception.
Les touches suivantes de la mini-télécommande
ont également des touches/fonctions différentes
de celles de l’appareil.
qh Touche SCRL (défilement) 8
Pour faire défiler les rubriques d’affichage.
qj Touche DSPL (affichag e)/PTY (ty p e
d’émission)
8, 11, 15
Permet de modifier les rubriques
d’affichage ; de sélectionner PTY en RDS.
qk Touche EQ7 (égaliseur)
Permet de sélect io nner un type d’égaliseur
(Xplod, Vocal, Club, Jazz, New Age, Rock,
Custom ou off).
ql Touches </, (SEE K –/+)
Radio :
Syntonisation automatique de stations
(appuyez) ; recherche manuelle d’une station
(appuyez et maintenez la touche enfoncée).
CD :
Saut de plages (appuyez) ; saut de plages en
continu (appuyez, puis appuyez d ans un
délai d’environ 1 seconde e t mai ntenez la
touche enfoncée) ; avance/retour rapide dans
une plage (appuyez et maintenez la touche
enfoncée).
w; Touche SOUND 12
Permet de sélectionner des paramètres du son.
wa Touche VOL (volume) +/–
Permet de régler le niveau du volume.
ws Touche OPEN/CLOSE
Permet d’ouvr ir ou de fermer la façad e.
wd Touche DSO 2
Permet de sélectionner le mode DSO (1, 2, 3
ou off). Plus la valeur est élevée, plus l’effet
est prononcé.
wf Touche LIST 10, 15
Permet d’afficher les titres automatiquement.
wg Touches M/m (DISC +/–)
Permettent de sélectionner des stations
présélectionnées ou de sauter des gr oupes
(appuyez) ; de sauter plusieurs groupes de
suite (appuyez et m a intenez la touche
enfoncée).
wh Touche ATT (atténuation du son)
Permet d’attén uer le son. Appuyez de
nouveau sur cette touche pour annuler.
*1 Lorsqu’un changeur CD/MD est raccordé.
*2 Lorsqu’un chan geur MD est racc ordé.
*3 Lorsqu’un appareil portatif Sony en option est
raccordé.
*4 Lors de la lecture sur cet appareil.
Remarque
Si vous mettez l’appareil hors tension et que
l’affichage est désactivé, il ne peut plus être utilisé
avec la mini-télécommande sauf si la touche
(SOURCE) de l’appareil est enfoncée ou si un disque
est inséré dans le lecteur pour l’activer.
Conseil
Pour obtenir des informations détaillées sur la façon
de remplacer la pile,
« Remplacement de la pile au lithium de la minitélécommande » à la page 18.
reportez-vous à la section
7
Page 50

CD
Pour obtenir des informations détaillées sur le
raccordement à un changeur CD/MD, reportezvous à la
Rubriques d’affichage
Par exemple : lorsque vous appuyez plusieurs
fois sur (IMAGE) (
mode de lecture no rmal.
A Source
B Indication MP3/ATRAC3 plus
C Horloge*
D Indication BBE
E Numéro de groupe/Num ér o de plage/Temps
*1 Lorsque le mode horloge est réglé sur « on »
*2 Lorsque vous lisez un MP3, l ’étiq uett e ID3 s’af fic he
Pour changer les rubriques d’affichage E,
appuyez sur (DSPL)
rubriques d’affichage E, appuyez sur (SCRL)
sur la mini-télécommande ou réglez «
on
Conseil
Les rubriques affichées diffèrent selon le type de
disque, le format d’enregistrement e t les réglages.
Pour plus de détails sur le format MP3, voir la
et voir la page 18 concernant le format CD ATRAC.
page 14.
page 7) pour sélectionner le
ABC
D
1
E
de lecture écoulé, Nom du disque/artiste,
Nom du groupe, No m de l a pl age,
Informations textuell e s*
(page 13).
et lorsque vous lisez un CD ATRAC, des
informations textuelles écrites par SonicStage, etc.
sont affichées.
2
; pour faire défiler les
A.Scroll
» (page 13).
page 17
Lecture répétée et aléatoire
1 En cours de lecture, appuyez
plusieurs fois sur (1) (REP) ou sur (2)
(SHUF) jusqu’à ce que le réglage
souhaité apparaisse.
Sélectionnez Pour lire
REP-Track une plage en boucle.
REP-Group* un groupe en bouc l e.
SHUF-Group* un groupe dan s u n or dr e
SHUF-Disc un disque dans un ordre
* Lors de la lecture d’un fichier MP3/CD ATRAC.
Pour revenir en mode de lecture normal,
sélectionnez «
aléatoire.
aléatoire.
REP-off » ou « SHUF-off ».
8
Page 51
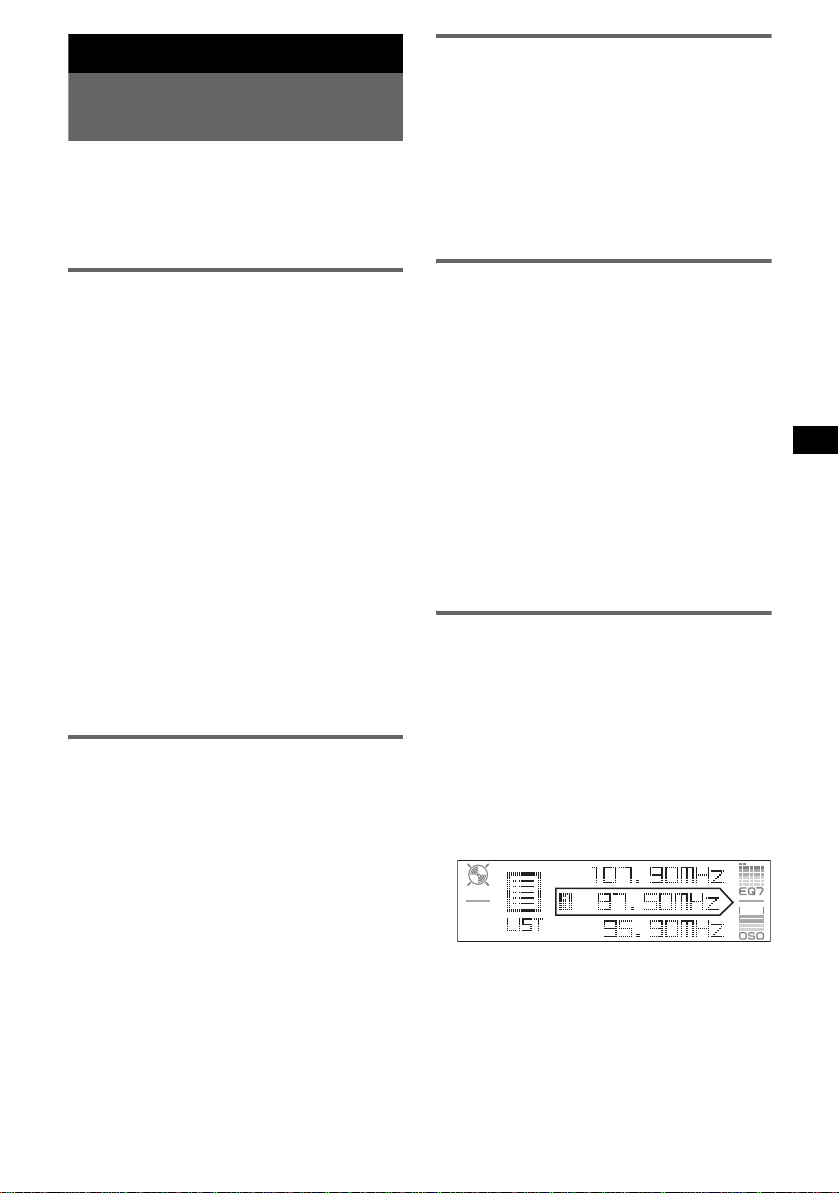
Radio
Réception et mémorisation des
stations
Attention
Pour syntoniser des stations pendant que vous
conduisez, utilisez la fonction de mémorisation
des meilleurs accords (BTM) afin d’éviter les
accidents.
Réception des stations
mémorisées
1 Sélectionnez la bande, puis appuyez
sur une touche numérique ((1) à (6)).
Conseil
Vous pouvez aussi recevoir les stations mémorisées
en appuyant sur (ENTER) plusieurs fois jusqu’à ce
PRESET » apparaisse, puis en tournant la
que «
molette de sélection SEEK jusqu’à ce que le numéro
présélectionné souhaité s’affiche.
Mémorisation automatique — BTM
1 Appuyez plusieurs fois sur (SOURCE)
jusqu’à ce que l’indication « TUNER »
apparaisse.
Appuyez plusieurs fois sur (MODE) pour
changer de bande. Vous pouvez sélectionner
FM1, FM2, FM3, MW (PO) ou LW (GO).
2 Appuyez sur (MENU).
3 Tournez la molette de sélection SEEK
jusqu’à ce que «
puis appuyez sur (ENTER).
Edit » apparaisse,
4 Tournez la molette de sélection SEEK
jusqu’à ce que «
puis appuyez sur (ENTER).
L’apparei l en registre les stations sur les
touches numéri ques dans l’ordre des
fréquences.
Un bip retentit lo rsque le réglage es t
mémorisé.
Avec la mini-télécommande
Etapes 3 et 4 : appuyez sur M ou m au lieu de tourner
la molette de sélection SEEK.
Mémorisation manuelle
BTM » apparaisse ,
1 Lorsque vous recevez la station que
vous souhaitez mémorise r, appuyez
sur une touche numérique ((1) à (6))
et maintenez-la enfoncée jusqu’à ce
que «
Memory » apparaisse.
Le numéro de la touche apparaît dans la
fenêtre d’affichage.
Remarque
Si vous essayez de mémoriser une autre station sur la
même touche numérique, la station mémorisée
précédemment est effacée.
Conseil
Lorsqu’une station RDS est mémorisée, le réglage
AF/TA est également mémorisé (
page 10).
Recherche automatique des
fréquences
1 Sélectionnez la bande, puis appuyez
sur (ENTER) plusieurs fois jusqu’à ce
que «
SEEK » apparaisse , pui s
tournez la molette de sélection SEEK
pour rechercher la station.
Le balayage s’interrompt lorsque l’appareil
capte une station. Répétez cette procéd ur e
jusqu’à ce que vous c aptiez la station
souhaitée.
Conseil
Si vous connaissez la fréquence de la station que
vous souhaitez écouter, appuyez sur (ENTER)
plusieurs fois jusqu’à ce que «
puis tournez la molette de sélection SEEK jusqu’à ce
que la fréquence voulue s’affiche.
MANUAL » apparaisse,
Réception d’une station via une
liste — LIST
Vous pouvez établir une lis te des fréquences.
Pour savoir comment att ribuer un nom à une
station, reportez-vous à la page 14.
1 Sélectionnez la bande, puis appuyez
sur (MENU).
2 Tournez la molette de sélection SEEK
jusqu’à ce que «
puis appuyez sur (ENTER).
La fréquence s’affiche.
List » apparaisse,
3 Tournez la molette de sélection SEEK
jusqu’à ce que la station souhaitée
apparaisse.
4 Appuyez sur (ENTER) pour recevoir la
station.
L’affichage revient au mode de réception
normal.
Suite à la page suivante t
9
Page 52

Avec la mini-télécommande
Sélectionnez la bande, puis appuyez sur (LIST).
Appuyez plusieurs fois sur M ou m jusqu’à ce que la
station souhaitée s’affiche, puis appuyez sur
(ENTER).
Fonction RDS
Aperçu
Les stations FM di sposant du systèm e RDS
(Radio Data System) transmettent des
informations numériques inaudibles en même
temps que le signal nor m al de leurs émissions
radio.
Rubriques d’affichage
Par exemple : lorsque vous appuyez plusieurs
fois sur (IMAGE) (
mode de lecture no rmal.
A
A Bande radio, fonctionnement
B Horloge*
C Numéro de présélection
D Fréquence*
RDS
E TA/TP*
*1 Lorsque le mode Horloge est réglé sur « on »
(page 13).
*2 Lorsque vous captez la station RDS, « * » est
affiché à gauche de l’indication de la fréquence.
*3 L’indication « TA » clignote pendant les messages
de radioguidage. L’indication « TP » s’allume
lorsqu’une de ces stations est captée.
Pour changer les rubriques d’affichage D,
appuyez sur (DSPL) sur la mini-télécommande.
Services RDS
Cet appareil propose automatiquement les
services RDS, comme suit :
AF (Fréquences alternatives)
Permet de sélec tionner et de régler d e nouveau
la station ayant le si gnal le plus fort sur un
réseau. Cette fonction vous p erme t d’ éc outer la
même émission en continu pendant un voyage
de longue distance sans avoir à ré gler de
nouveau cette statio n m anuellement.
page 7) pour sélectionner le
B
CE
1
2
(Nom de la station), données
3
D
TA (Messages de radioguidage)/
TP (Programmes de radi oguidage)
Propose les messages/programmes de
radioguidage dis ponibles à cet instant . Tout
message/programme reçu interrompt la source
sélectionnée en cours de diffusion.
PTY (Types d’émission)
Permet d’afficher le type de l’émission en cours
et de rechercher votre type d’émission
sélectionné.
CT (Heure)
Les données CT (heu re) accompagnant la
transmission RDS assurent un réglage de
l’horloge.
Remarques
• Selon le pays ou la région où vous vous trouvez, il
est possible que les services RDS ne soie nt pas
tous disponibles.
• La fonction RDS ne fonctionne pas correctement si
le signal de retransmission est faible ou si la station
syntonisée ne transmet pas de données RDS.
Réglages AF et TA/TP
1 Appuyez plusieurs fois sur (AF/TA)
jusqu’à ce que le réglage souhait é
apparaisse.
Sélectionnez Pour
AF on activer AF et désactiver TA.
TA on activer TA et désactiver AF.
AF TA on activer AF et TA .
AF TA off désactiver AF et TA.
Avec la mini-télécommande
Appuyez sur (AF) et/ou (TA) à la pl ace de la
(AF/TA).
touche
Mémorisation des stations RDS avec
les réglages AF et TA
Vous pouvez prérégler les stations RDS avec les
réglages AF et TA. Si vous utilisez la fonction
BTM, seules les stations RDS sont mémorisées
avec les mêmes réglages AF/TA.
Si vous effectuez un préréglage manuel, vous
pouvez prérégler à la fois des stations RDS et
non-RDS, avec leurs réglages AF/TA respectifs.
1 Réglez AF/TA, puis mémorisez la station à
l’aide de la fonction BTM ou manuellement.
Préréglage du volume sonore des
messages de radioguidage
Vous pouvez prérégler le niveau de volume des
messages de radioguidage de façon à ne manquer
aucune information.
10
Page 53

1 Tournez la mol et t e de réglage du volume pour
régler le niveau de volume.
2 Appuyez sur la touche (AF/TA) et
maintenez-la enfoncée jusqu’à ce que « TA
VOL » appa raisse.
Avec la mini-télécommande
Appuyez sur (TA) et maintenez-la enfoncée à la
place de la touche
(AF/TA).
Réception de messages d’urgence
Lorsque la foncti on AF ou TA est activée, les
messages d’urgenc e interrompent
automatiquement la source sélec tionné e en co urs
de diffusion.
Ecoute continue d’une émission
régionale — Regional
Lorsque la foncti on AF est activée : ce rég l age
par défaut restrein t l a réception à une rég ion
spécifique, afin qu’un e st ation régionale ayant
une fréquence plus puissante ne soit pas captée.
Si vous quittez la zone de récept i on de cette
émission régionale, réglez «
le menu (
Remarque
Cette fonction est inopérante au Royaume-Uni et dans
certaines autres rég i on s.
page 13).
Régional off » dans
Fonction de liaison locale (RoyaumeUni uniquement)
Cette fonction vous permet de sélectionner
d’autres stations locales de la région, même si
elles ne sont pas as sociées à vos touches
numériques.
1 En réception FM, appuyez sur une touche
numérique ((1) à (6)) sur laquelle une
station locale est mémorisée.
2 Dans les 5 secondes qui suivent, appuyez de
nouveau sur la touche num ér ique de la station
locale.
Répétez cette procédure jusqu’à ce que vous
captiez la station locale souhaitée.
2 Appuyez plusieurs fois sur M ou m
jusqu’à ce que le type d’émission
souhaité s’affiche.
3 Appuyez sur (ENTER).
L ’appareil commence à rechercher une station
diffusant le type d’ém is si on sélectionné.
Types d’émissions
News (nouvelles), Affairs (dossiers
d’actualité), Info (informations), Sport (sport),
Educate (progr am m es éducatifs), Dram a
(théâtre), Culture (culture), Science (science),
Varied (divers), Pop
Rock
M (rock), Easy M (musique légère),
Light
M (musique classique légère), Classics
(musique classique), Other
musique), Weather (météo), Finan ce
(finance), Children (émissions pour les
enfants), Social
(religion), Phone
ouverte), Travel (voyage), Leisure (loisirs ),
Jazz (musique jazz), Country (musique
country), Nation
Oldies (musique d’autrefois), Folk
(musique folk), Document (docum entaires)
Remarque
Cette fonction est inopérante dans certains pays ou
régions où les données PTY ne sont pas disponibles.
M (musique populaire),
M (autres styles de
A (affaires sociales), Religion
In (émissions en ligne
M (musique nationa l e),
M
Réglage de CT
1 Réglez « CT on » dans le menu
(
page 13).
Remarques
• Il est possible que la fonction CT ne fonctionne pas,
même si une station RDS est captée.
• Il peut y avoir une différence entre l’heure réglée par
la fonction CT et l’heure réelle.
Sélection de PTY
(Avec la mini-télécommande)
1 Appuyez sur (PTY) en cours de
réception FM.
Le nom du type d’émission diffusé apparaît si
la station transmet des données PTY.
11
Page 54

Autres fonctions
Modification des
caractéristiques du son
Réglage des caractéristiques du
son
Vous pouvez régler l’égal is eur, le répartiteur
dynamique du son émis (DSO), les graves, les
aigus, la balance gauche-droite, l’équ ilib re
avant-arrière, ainsi que le volum e du caisson de
graves.
1 Choisissez une source, puis appuyez
plusieurs fois sur (SOUND) pour
sélectionner un paramètre.
Le paramètre change comme suit :
EQ7 t DSO t BAS (graves) t
TRE (aigus) t BAL (gauche-droite) t
FAD (avant -arrière) t
SUB (volume du caisson de graves)*
* « ∞ » est affiché au réglage le plus bas et peut
être réglé par incréments de 20.
2 Tournez la molette VOL pour régler le
paramètre sélectionné.
Le réglage est term i n é après 3 secondes et la
fenêtre d’affichage revient au mode de
lecture/réception normal.
Remarque
Effectuez ce réglage dans les 3 secondes après avoir
sélectionné le paramètre.
Avec la mini-télécommande
A l’étape 2 : appuyez sur < ou , au lieu de tourner
la molette VOL.
Réglage de la courbe de l’égaliseur
— EQ7 Tune
Vous pouvez régler et mém oriser les paramètres
de l’égaliseur pour différentes gammes de
tonalité.
1 Sélectionnez une source, puis
appuyez sur (MENU).
2 Tournez la molette de sélection SEEK
jusqu’à ce que «
puis appuyez sur (ENTER).
3 Tournez la molette de sélection SEEK
jusqu’à ce que «
apparaisse, pui s appuyez sur
(ENTER).
4 Tournez la molette de sélection SEEK
pour choisir un type d’égaliseur, puis
appuyez sur (ENTER).
Sound » apparaisse ,
EQ7 Tune »
5 Tournez la molette de sélection SEEK
pour régler le volume au niveau
souhaité.
Le niveau de volume peut être régl é par
incréments de 1
dB, de – 10 dB à + 10 dB.
6 Appuyez sur (ENTER) pour passer à la
fréquence suivante.
La fréquence change comme suit :
62Hz t 157Hz t 396Hz t 1.0kHz
t 2.5kHz t 6.3kHz t 16kHz
Répétez les étapes 5 et 6 pour régler la courbe
de l’égaliseur.
La boîte de dial ogue de conf irmat ion s’ aff ic he
une fois que vous avez choisi «
appuyé sur (ENTER).
16kHz » et
7 Tournez la molette de sélection SEEK
pour sélectionner «
appuyez sur (ENTER).
Le réglage est terminé et la fenêtre
d’affichage revient en mode de lecture/
réception normal.
Pour restaurer la courbe par déf au t de l’ég aliseu r ,
à l’étape
5 ou 6, appuyez sur la touche (ENTER)
et maintenez-la enfoncée, puis to urnez la mole tte
de sélection SEEK po ur sélectionner «
Avec la mini-télécommande
Aux étapes 2, 3 et 5 : appuyez sur la touche M ou m
au lieu de tourner la molette de sélection SEEK
4 et 7 : appuyez sur < ou , au lieu de
étapes
tourner la molette de sélection SEEK
appuyez sur < ou , au lieu de (ENTER).
YES », puis
YES ».
; aux
; à l’étape 6 :
Réglages des paramètres de
menu — MENU
1 Appuyez sur (MENU).
2 Tournez la molette de sélection SEEK
jusqu’à ce que le menu souhaité
s’affiche, puis appuyez sur (ENTER).
Les paramètres changent comme suit :
Setup (réglage) y Display
(Fenêtre d’affichage) y Receive
Mode (mode de réception) y Sound
(son) y Edit (édition) y List (liste)
3 Tournez la molette de sélection SEEK
jusqu’à ce que le paramètre souhaité
s’affiche, puis appuyez sur (ENTER).
12
Page 55

L’indication numérique se déplace vers la
droite (sélection du paramètre).
4 Tournez la molette de sélection SEEK
pour sélectionner le paramètre, puis
appuyez sur (ENTER).
Le réglage est terminé.
5 Appuyez sur (MENU).
L’affichage revient au mode de lecture/
réception normal.
Remarque
Les rubriques affichées diffèrent selon la source et le
réglage.
Avec la mini-télécommande
Etapes 2 et 3 : appuyez sur M ou m au lieu de tourner
la molette de sélection SEEK. A l’étape
sur < ou , au lieu de tourner la molette de
sélection SEEK.
Les paramètres suivants peu ven t êt re réglés
(reportez-vous à la page indiquée pour plus de
détails) :
« z » indique les réglages par défaut.
Setup (Réglage)
Clock Adjust (réglage de l’horloge) (page 4)
CT (heure)
Pour régler « on » ou « off » (z) (page 10, 11).
Beep
Pour régler « on » (z) ou « off ».
AUX-A*1 (AUX Audio)
Pour régler l’affichage de la source AUX sur
« on » (z) ou « off » (page 16).
Display (Fenêtre d’affichage)
Clock (informations relatives à l’heure)
Pour afficher l’horloge et les rubriques
d’affichage ou les images simul tanément.
–« on » : pour les afficher simultanément.
–« off » (
A.IMG (image automatique)
Le mode d’image automatique p er met de passer
automatiquem ent d’un motif d’affichage à
l’autre (par in t ervalles de 10 secondes).
–« off » (
–« SA » : pour passer en continu d’un motif
–« Movie » : pour passer en continu d’un motif
–« All » : pour faire défiler plusieurs fois les
z) : pour ne pas les afficher
simultanément.
z) : pour ne pas changer l’image
automatiquement.
d’affichage à l’autre dans l e m ode analyseur
de spectre.
d’affichage à l’autre dans le m ode film.
images d’affichage de tous les modes
d'affichage.
4, appuyez
Info (informations relatives à l’affichage)
Pour afficher les rubrique s (en fonction de la
source, etc.) au milieu de l’écran d’affichag e
alors qu’une image est affichée.
–« on » (
z) : pour afficher les rubriques.
–« off » : pour ne pas afficher les rubriques.
Dimmer (régulateur de lum inosité)
Pour modifier la luminosité de l’affichage.
–« Auto » (
z) : pour réduire automatiquement la
luminosité de l’af fic hage lorsque vous allumez
les phares.
–« on » : pour réduire la luminosité de
l’affichage.
–« off » : pour désactiver le régu la teur de
luminosité.
Demo*1
(démonstration)
Pour régler « on » (z) ou « off » (page 4).
A.Scroll (défil em ent automatique)
Pour faire défile r automatiquement le s rubriques
d’affichage longues lorsque le groupe, le disque
ou la plage est modifié(e).
–« on » : pour faire défiler les rubriques.
–« off » (
z) : pour ne pas faire dé filer l es
rubriques.
Receive Mode (Mode de réception)
Local (mode de recherche locale)
–« on » : pour régler uniq uement les stations
dont les signaux sont plus puissants.
–« off » (
z) : pour syntoniser en r éception
normale.
Mono (mode mono)
Sélectionnez le mode de réception mono pour
améliorer une mauvaise réceptio n FM.
–« on » : pour écouter des émissions stéréo en
mode mono.
–« off » (
z) : pour écouter les émissions stéréo
en stéréo.
Regional*
2
Pour régler « on » (z) ou « off » (page 11).
Sound (Son)
EQ7 Tune (page 12)
HPF (filtre passe-haut)
Pour sélectionner la fréquence de coupure des
haut-parleurs avant/arrière : « off » (
« 78Hz » ou « 125Hz ».
LPF (filtre passe-bas)
Pour sélectionner la fréquence de coupure du
caisson de graves : « off » (
z), « 125Hz » ou
« 78Hz ».
Suite à la page suivante t
z),
13
Page 56

Louness (intensi t é sonore)
Pour améliorer les graves et les aigus à faible
volume.
– « on » : pour amplifier les graves et les aigus.
– « off » (
z) : pour ne pas amplifier les graves et
les aigus.
AUX Level
Permet de régler le volume de chaque apparei l
auxiliaire racc ordé (page 16). Ce rég lage per met
de ne plus régler le volume entre les sources.
Edit (Edition)
Name Edit (page 14)
Name Delete (page 15)
BTM (page 9)
*1 Lorsque l’appareil est hors tension.
*2 Lorsque FM est reçu.
Utilisation d’un appareil en
option
Changeur CD/MD
Sélection du changeur
1 Appuyez plusieurs fois sur (SOURCE)
jusqu’à ce l’indi ca ti on « CD » ou « MD »
apparaisse.
2 Appuyez plusieurs fois sur (MODE) jusqu’à
ce que le changeur souhaité s’affiche.
Numéro
de lecteur
La lecture commence.
* Lors de la lecture d’un disque MDLP.
Saut de disques
1 En cours de lecture, appuyez sur (ENTER)
jusqu’à ce que « D ISC » s’affiche.
2 Tournez la molette de sélection SEEK jusqu’à
ce que le disque so uhaité apparaisse.
Pour passer des groupes et des
disques à l’aide de la
mini-télécommande
1 En cours de lecture, appuyez sur M ou m.
Numéro
du disque
Indication
LP2/LP4*
Pour sauter Appuyez sur M ou m.
un groupe puis relâchez (maintenez la
touche enfoncée brièvement).
un groupe en
continu
dans les 2 secondes après avoir
relâché la touche p o u r la
première fois.
des disques de façon répétée.
des disques en
continu
et appuyez de nouveau sur la
touche dans les 2 secondes, puis
maintenez-la enfoncée.
Lecture répétée et aléatoire
1 En cours de lecture, appuyez plusieurs fois sur
(1) (REP) ou sur (2) (SHUF) jusqu’à ce que
le réglage souhai té apparaisse.
Sélectionnez Pour lire
REP-Disc*1un disque en boucle.
SHUF-
Changer*
SHUF-All*
des plages du changeur dans un
1
ordre aléatoire.
2
des plages de tous les appareils
dans un ordre aléatoire.
*1 Lorsqu’un ou plusieurs changeurs CD/MD sont
raccordés.
*2 Lorsqu’un ou plusieurs changeurs CD ou au moins
deux changeurs MD sont raccordés.
Pour revenir en mode de lecture normal,
sélectionnez «
Conseil
La fonction « SHUF-All » ne passera pas de façon
aléatoire des plages de lecteurs CD à des plages de
changeurs MD.
REP-off » ou « SHUF-off ».
Identification d’un disque
Vous pouvez lire un disqu e inséré dans un
changeur CD doté de la fonction CUSTOM
FILE, vous pouvez identifier chaque disque avec
un nom personnalisé (Mémo de disque) allant
jusqu’à 8 caract ères.
Lorsque vous identifiez un disque, le nom
s’affiche dans la liste (page 15).
1 Lors de la lecture d’un di s que que vous
souhaitez ident i fier, appuyez sur (MENU).
2 Tournez la molette de sélection SEEK jusqu’à
ce que « Edit » appar ai sse, puis appuyez sur
(ENTER).
3 Tournez la molette de sélection SEEK jusqu’à
ce que « Name Edit » apparaisse, puis appuyez
sur (ENTER).
14
Page 57

4 Tournez la mol et t e de sélection SEEK jusq u’à
ce que le caractère souhaité apparaisse.
Le caractère ch ange comme suit :
A y B y C ... y 0 y 1 y 2 ... y +
y – y
... y (espace) y A
Pour déplacer l’in dication numérique,
appuyez sur (ENTER).
Répétez cette opération jusqu’à ce que tout le
nom soit saisi.
La boîte de dialogue de confirmation s’affiche
une fois que le dernier caractère est entr é et
que vous avez appuyé sur (ENTER).
5 Tournez la mol et t e de sélection SEEK pour
sélectionner « YES », puis appuyez sur
(ENTER).
Le réglage est terminé et la fenêtre
d’affichage revient au mode de lecture
normal.
Pour afficher le nom, appuyez sur (DSPL) sur la
mini-télécommande pendant la lecture.
Conseils
• Pour corriger ou effacer un caractère, procédez par
réécriture ou saisissez «
• Le mémo de disque est toujours prioritaire sur tous
les titres préenregistrés éventuels.
• Vous pouvez identifier un disque sur l’appareil si un
changeur disposant de la fonction CUSTOM FILE
est raccordé.
• La fonction « REP-Track » et toutes les lectures
aléatoires sont interrompues jusqu’à ce que
l’identification soit terminée.
Avec la mini-télécommande
Etapes 2 à 4 : appuyez sur M ou m au lieu de tourner
la molette de sélection SEEK. Etape 4
< ou , pour déplacer l’indication numérique.
5 : appuyez sur < ou , au lieu de tourner la
Etape
molette SEEK.
».
: appuyez sur
Suppression du nom personnalisé
1 Sélectionnez l’appa re il où se trouve mémorisé
le nom personnalisé que vous souhaitez
supprimer, puis appuyez sur (MENU).
2 Tournez la mol et t e de sélection SEEK jusq u’à
ce que « Edit » appa raisse, puis appuye z su r
(ENTER).
3 Tournez la mol et t e de sélection SEEK jusq u’à
ce que « Name Delete » apparaisse, puis
appuyez sur (ENTER).
Le nom mémorisé apparaît.
4 Tournez la mol et t e de sélection SEEK pour
sélectionner le nom à supprimer.
5 Appuyez sur (ENTER).
6 La boîte de dialogue de confirmation s’affiche.
7 Tournez la mol et t e de sélection SEEK pour
sélectionner « YES », puis appuyez sur
(ENTER).
Le nom est supprimé et « Continue » apparaît
si d’autres noms sont enregistrés. Si vous
souhaitez supprimer d’autres noms, tourn ez la
molette SEEK pour sélectionner « Yes », puis
répétez les étap es 4 à 6.
8 Appuyez sur (MENU).
Le lecteur revient au mode de lecture normal.
Avec la mini-télécommande
Etapes 2 à 4 : appuyez sur M ou m au lieu de tourner
la molette de sélection SEEK. A l’étape
sur < ou , au lieu de tourner la molette de
sélection SEEK.
6, appuyez
Recherche d’un disque par son nom
— LIST
Vous pouvez sélectionn er un disque dans la list e
lorsque vous raccor dez un changeur CD
disposant de la fonction CU STOM FILE ou un
changeur MD.
Lorsque vous identi fiez un di sque, le nom
s’affiche dans la liste. Pour savoir comment
attribuer un nom à un d i sque, reportez-vous à la
page 14.
1 En cours de lecture, app uyez sur (MENU).
2 T o ur nez la molet te de sélectio n SEEK jusqu’à
ce que « List » apparaisse, puis appuyez sur
(ENTER).
Le numéro des dis ques ou le nom des disqu es
s’affichent.
3 T o ur nez la molet te de sélectio n SEEK jusqu’à
ce que le disque souhaité apparaisse.
4 Appuyez sur (ENTER) pour lire le dis que.
5 L’affichage revient au mode de lecture normal.
Avec la mini-télécommande
En cours de lecture, appuyez sur (LIST). Appuyez
plusieurs fois sur M ou m jusqu’à ce que le disque
souhaité s’affiche, puis appuyez sur (ENTER).
Satellite de commande RM-X4S
Apposition de l’étiquette
Apposez l’étiquette comportant les indications
en fonction de la position de montage du satellite
de commande.
D
S
D
N
U
O
S
E
D
O
M
PL
S
D
Suite à la page suivante t
P
L
M
O
D
E
S
O
U
N
D
15
Page 58

Emplacement des commandes
Les touches corres pondantes du satellite de
commande contr ôlent les mêmes fo nctions que
celles de la mini-télécommande et de l’appareil.
SOUND
PRESET/
DISC
SOURCE
VOL
ATT
DSPL
SEEK/AMS
MODE
OFF
Les commandes suivantes du satellite de
commande requièrent un fonctionnement
différ ent de l’appareil.
• Commande PRESET/DISC
Permet de comm ander la radio ou le C D .
Identique aux c om mandes M et m de la
mini-télécommande (enfoncez puis tournez).
• Commande VOL (volume)
Identique à la molette de réglage du volume de
l’appareil (tournez).
• Commande SEEK/AMS
Permet de comm ander la radio ou le C D .
Identique aux c om mandes < et , de la
mini-télécommande (tournez, ou tournez et
maintenez).
Modification du sens de
fonctionnement
Le sens de fonctionnem ent des commande s es t
réglé par défaut comme indiqué sur l’illustration
ci-dessous.
Pour a ugmenter
Appareil audio auxiliaire
Vous pouvez raccorder des appareils po rt atifs
Sony à la borne BUS AUDIO IN/AUX IN de
l’appareil. Si aucun changeur ou un autre
appareil n’est raccordé à la borne, l’appareil vous
permet d’écout er l’appareil port atif sur les hautparleurs de la voiture.
Remarque
Lorsque vous raccordez un appareil portatif, assurezvous que BUS CON TR OL I N n ’est pas r ac co rdé. S i un
appareil est branché sur BUS CONTROL IN, vous ne
OFF
pouvez pas sélectionner «
Conseil
Si vous raccordez un appareil portatif Sony et un
changeur en même temps, utilisez le sélecteur AUXIN en option.
AUX » avec (SOURCE).
Sélection d’un appareil auxiliaire
1 Appuyez plusieurs fois sur (SOURCE)
jusqu’à ce que « AUX » s’affiche.
Effectuez la commande sur l’appareil portatif
lui-même.
Pour régler le volume d’un appareil auxiliaire,
reportez-vous à « AUX Level » à la
page 14.
Pour diminuer
Si vous devez monter le satellite de commande
du côté droit de la colonne de direction, vous
pouvez inverser le sens de foncti onnement.
1 Appuyez sur la touche (SOUND) et
maintenez-la enfoncée tout en appuyant sur la
commande VOL.
16
Page 59
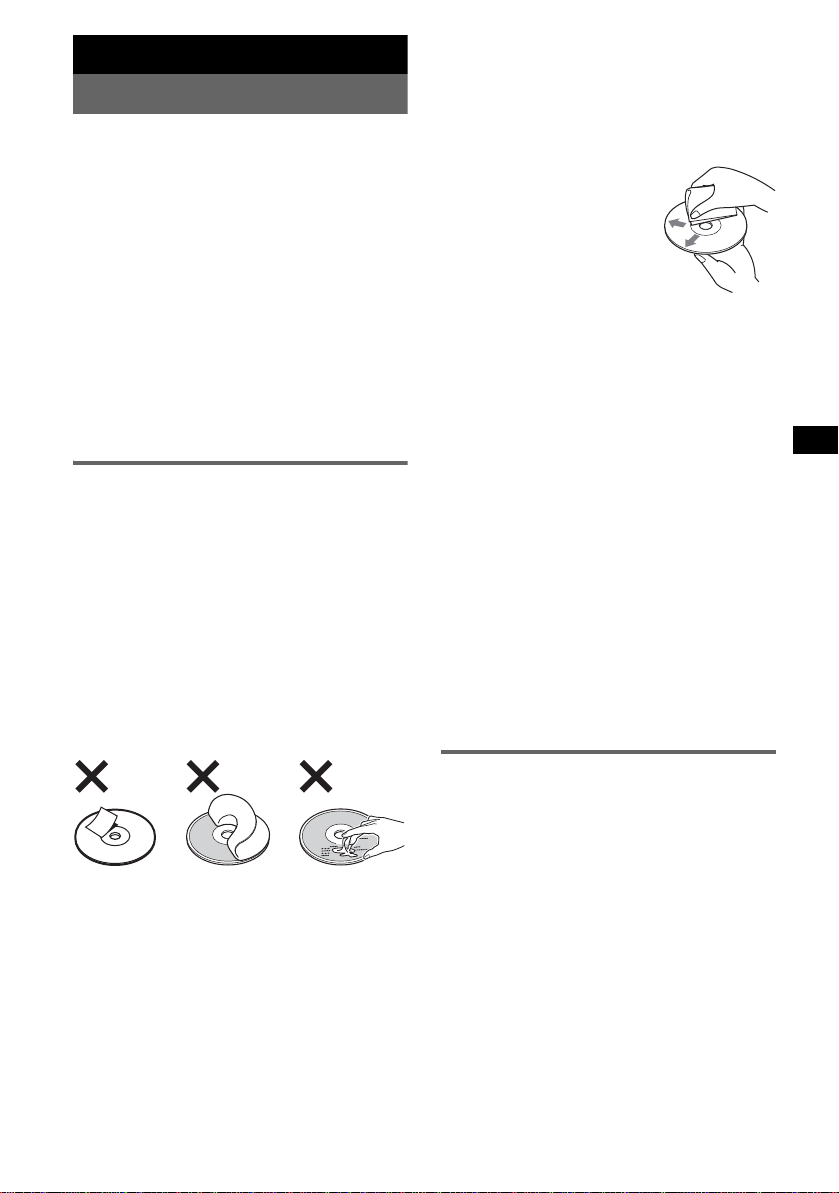
Informations complémentaires
Précautions
• Si votre véhicu le es t r esté stati onn é en plein sole il,
laissez l’appareil refroidir avant de l’utiliser.
• L’antenne électrique se déploie automatiquement
lorsque l’appareil est en foncti onnement.
Condensation
Par temps de pluie ou dans des régions très humides,
de l’humidité peut se condenser à l’intérieur des
lentilles et dans la fenêtre d’affichage de l’appareil.
Si cela se produit, l’appareil ne fonctionne pas
correctement. Dans ce cas, retirez le disque et
attendez environ une heure que l’humidité se soit
évaporée.
Pour conserver un son de haute
qualité
Veillez à ne pas renverser de jus de fruit ni d’autres
boissons sucrées sur l’appareil ou sur les disques.
Remarques sur les disques
• Pour que le disque reste propre, ne touchez pas sa
surface. Manipulez le disque en le tenant par les
bords.
• Rangez vos disques dans leurs boîtiers ou dans des
chargeurs lorsque vous ne vous en servez pas.
• Ne soumettez pas les disques à des températures
élevées. Evitez de les laisser dans un véhicule en
stationnement, sur le tableau de bor d ou la pla ge
arrière.
• Ne collez pas d’étiqu ettes sur les disques et
n’utilisez pas de disques rendus coll ants par de
l’encre ou des résidus. De tels disques peuvent
s’arrêter de tourner en cours de lecture et
provoquer des problèmes de fonctionnement ou
être endommagés.
• N’utilisez pas de disques sur lesquel s sont collé s
des étiquettes ou des autocolla nt s.
L’utilisation de tels disques peut entraîner les
problèmes de fonctionnement suivants :
– impossibilité d’éjecter un disque parce que
l’étiquette ou l’autocollant se décolle et bloque
le mécanisme d’éjection ;
– erreurs de lecture des données audio (p. ex. sauts
de lecture ou aucune lecture) provoquées par une
déformation du disque suite au rétrécissement de
l’étiquette ou de l’autocollant sous l’effet de la
chaleur.
• Les disques de forme non standard (p. ex. en
forme de cœur, de carré ou d’étoile) ne peuvent
pas être lus avec cet appareil. Vous risquez
d’endommager votre appareil si vous essayez de le
faire. N’utilisez pas de tels disques.
• Cet appareil ne pe rmet pas la lecture des CD de
8 cm.
• Avant la lecture, nettoyez les
disques avec un chiffon de
nettoyage disponible dans le
commerce. Essu yez chaque
disque en partant du centre vers
l’extérieur. N’utilis ez pas de
solvants tels q ue d e l’essence ,
du diluant, des nettoyants
disponibles dans le commerce
ou des vaporisateurs antistatiques destinés aux
disques vinyle.
Remarques sur les disques CD-R et
CD-RW
• Il est possible que cet appa re il ne pui sse pa s li re
certains CD-R ou CD-RW (en fonction de
l’appareil utilisé pour l’enregistrement ou de l’état
du disque).
• Cet appareil ne permet pas la lecture des CD-R ou
CD-RW non finalisés.
Disques de musique encodés à l’aide
d’une technologie de protection des
droits d’auteur
Cet appareil est conçu pour la lecture des disques
conformes à la norme Compact Disc (CD).
Dernièrement, certaine s maisons de disques ont
lancé sur le marché divers types de disques de
musique encodé s selon des te c hnologies de
protection des droits d’au te ur. Notez que, parmi ces
types de disques, certains ne sont pas conformes à la
norme CD. La lecture de ces disques avec cet
appareil peut être impossibl e.
A propos des fichiers MP3
MP3, qui est l’abréviati on de M P EG-1 Audio
Layer-3, est un format standard de compression de
fichiers musicaux. Il comprime le s données de CD
audio à environ 1/10 de leur taille initiale.
• L’appareil est compatible avec le format ISO 9660
niveau 1 ou 2, avec les extensions Joliet et Romeo,
l’étiquette ID3 version 1.0, 1.1, 2.2, 2.3 et 2.4 e t
les multisessions.
• Nombre maxim al de :
– dossiers (groupes) : 150 (y compris le répertoire
de base et les dossiers vides).
– Fichiers MP3 (plages) et dossiers contenus dans
un disque : 300 (lorsqu’un nom de fichier ou de
dossier contient un grand nombre de caractères,
ce nombre peut être inférieur à 300).
Suite à la page suivante t
17
Page 60

– caractère s po uvant êt re affichés pour un nom de
dossier ou de fichier : 32 (Joliet) ou 32/64
(Romeo) ; l’étiquette ID 3 pe ut contenir 15/30
caractères (1.0, 1.1, 2.2 et 2.3) ou 63/126
caractères (2.4).
Ordre de lecture des fichiers MP3
MP3
Remarques
• Assurez-vous de finaliser le disque avant de l’utiliser
sur l’appareil.
• Lors de l’identification d’un fichier MP3, veillez à
ajouter l’extension « .mp3 » au nom de chaque
fichier.
• Il est possible que le son soit intermittent lors de la
lecture d’un fichier MP3 à haut débit binaire (par
exemple 320 kbit/s).
• Lors de la lecture d’un fichier MP3 VBR (à débit
variable) ou pendant l’avance ou le retour rapide, le
temps de lecture écoulé qui s’affiche peut être
inexact.
• Lors de l’enregistrement d’un disque en
multisession, seule la première plage du premier
format de session est reconnue et lue (tout autre
format est ignoré). La priorité du format est CD-DA,
CD ATRAC et MP3.
– Lorsque la première plage est un CD-DA, seul le
CD-DA de la première session est lu.
– Lorsque la première plage n’est pas un CD-DA,
seule une session CD ATRAC ou MP3 est lue. Si
le disque ne contient aucune information dans ces
formats, l’indication « NO Music » apparaît.
Dossier
(groupe)
Fichier MP3
(plage)
A propos de CD ATRAC
Format ATRAC3plus
La norme ATRAC3 (Adapt ive Transform Aco ustic
Coding3) est une technologie de compression des
données audio. Il comprim e les do nné es de CD
audio à environ 1/10 de leur taille initia l e.
A TRA C3plus, qui est un format étendu de A TRAC3,
comprime les donnée s de CD a udio à environ 1/20
de leur taille initiale. L’a ppareil accepte le format
ATRAC3 et ATRAC3plus.
CD ATRAC
Les CD ATRAC sont enregistrés en données de CD
audio qui sont comprimées au format ATRAC3 ou
ATRAC3plus en utilisant un logiciel autoris é, tel
que SonicStage 2.0, ou une version ultérieure, ou
SonicStage Simple Burner.
18
• Nombre maximal de :
– dossiers (groupes) : 25 5
– fichiers (plages) : 999
• Les caractères d’un nom de dossier ou de fichier et
les informations textuelles écrites par SonicStage
sont affichés.
Pour plus d e d étails sur le f o r mat CD ATRAC,
reportez-vous au manuel SonicStage ou SonicStage
Simple Burner.
Remarque
Assurez-vous de créer le CD ATRAC à l’aide du
logiciel autorisé, tel que SonicStage 2.0, ou une
version ultérieure, ou SonicStage Sim ple Burner 1.0
ou 1.1, qui sont fournis avec les produits Sony
Network.
Si vous avez des questions ou des problèmes
concernant cet appareil qui ne sont pas abordés dans
ce mode d’emploi, con ta ctez votre revendeur Sony.
Entretien
Remplacement de la pile au lithium
de la mini-télécommande
Dans des conditions d’utilisation normales, la pile
dure environ 1 an. (En fonction des condition s
d’utilisation, sa durée de vi e peut être plus courte.)
Lorsque la pile est faible, la portée de la minitélécommande diminue. Remplacez la pile par une
nouvelle pile au lithium CR2025. L’utilisation de
tout autre type de pile pose un risque d’incendie ou
d’explosion.
x
pôle + vers
le haut
Remarques sur la pile au lithium
• Tenez la pile au lithium hors de la portée des
enfants. En cas d’ingestion de la pile, consultez
immédiatement un méd ecin .
• Essuyez la pile avec un chiffon sec pour assurer un
bon contact.
• Veillez à respecter la polarité lors de l’installation de
la pile.
• Ne tenez pas l a pile avec des pinces métallique s,
car cela po urrait entr aîner un court-circuit.
ATTENTION
Utilisée de façon incorrecte, la pile peut
exploser. Ne pas la recharger, la démonter ni
la jeter au feu.
Page 61
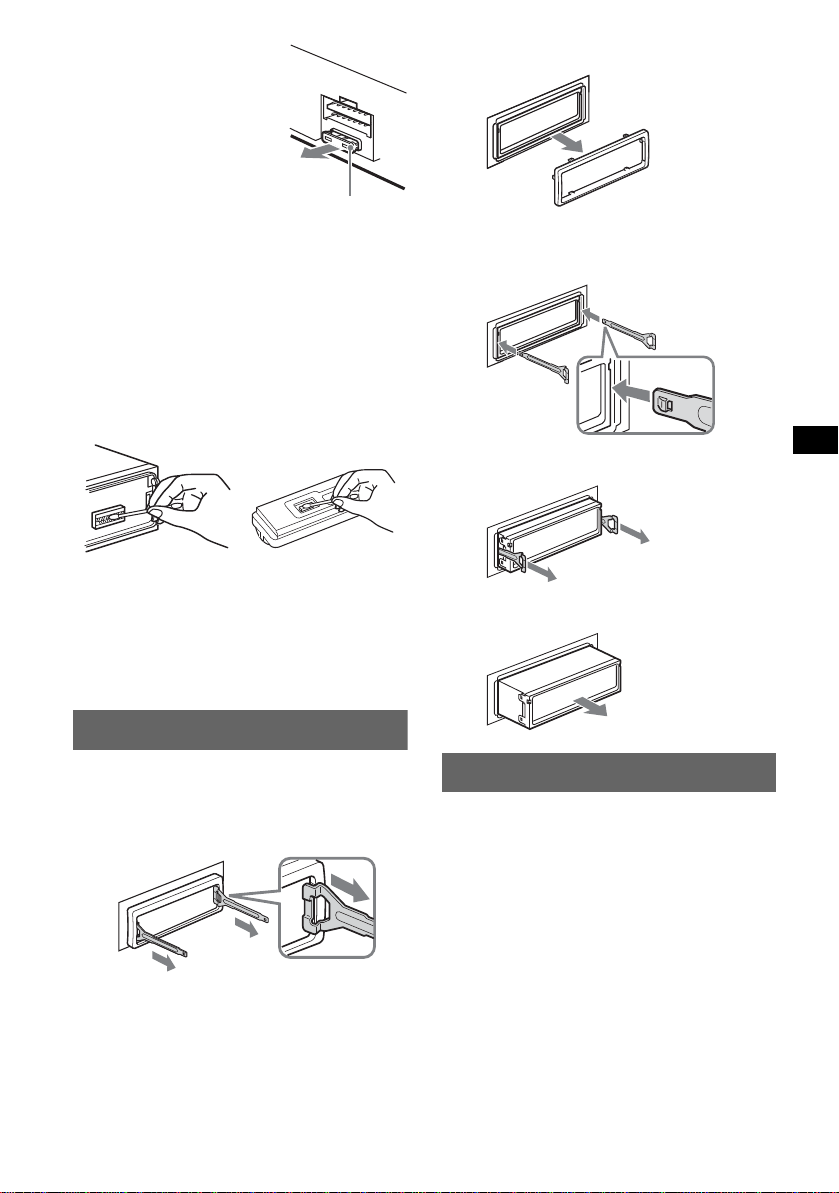
Remplacement du
fusible
Lorsque vous remplacez le
fusible, veillez à utiliser un
fusible dont la capacité, en
ampères, correspond à la valeur
indiquée sur l’ancien fusible. Si
le fusible fond, vérifiez le
branchement de l’alimentation
et remplacez l e fus i ble. Si le
nouveau fusible fond
également, il est possible que
l’appareil soit défectueu x. Dans c e ca s, consu lt ez
votre revendeur Sony le plus proche.
Fusible (10 A)
3 Tirez sur les clés de déblocage pour retirer
le tour de protection.
2 Retirez l’appareil.
1 Insérez simultanément deux clés de
déblocage j usqu’au déclic.
Nettoyage des connecteurs
L’appareil peut ne pas fonctionner correctement si
les connecteurs entre l’appareil et la façade sont
souillés. Pour éviter cette situation, enlevez la
façade (page 4) et nettoyez les connecteurs à l’aide
d’un coton-tige imbibé d’alcool. N’exercez pas une
pression trop forte, sinon les connecteurs peuvent
être endomma gés.
Appareil princ ipal
Remarques
• Pour plus de sécurité, coupez le moteur avant de
nettoyer les connecteurs et retirez la clé du contact.
• Ne touchez jamais les connecteurs directement
avec les doigts ou avec un objet métallique.
Arrièrze de la façade
Démontage de l’appareil
1 Retirez le tour de protection.
1 Retirez la façade (page 4).
2 Insérez les clés de déblocage dans le tour
de protection.
Tournez le
crochet vers
l’intérieur.
2 Tirez sur les clés de déblocage pour
extraire l’appa rei l.
3 Faites glisser l’appareil en dehors de son
support.
Spécifications
Lecteur CD
Rapport signal/bruit : 120 dB
Réponse en fréquence : 10 à 20 000 Hz
Pleurage et scintillement : en dessous du seuil
mesurable
Orientez correctement la clé de
déblocage comme illustré.
Radio
FM
Plage de syntonisation : 87,50 à 108,00 MHz
Borne de l’an t enne : connecteur d’antenne externe
Fréquence intermédiaire : 10,7 MHz/450 kHz
Sensibilité utile : 9 dBf
Sélectivité : 75 dB à 400 kHz
Rapport signal/bruit : 67 dB (stéréo), 69 dB (mono)
Distorsion harmonique à 1 kHz : 0,5 % (stéréo)
0,3 % (mono)
Séparation : 35 dB à 1 kHz
Réponse en fréquence : 30 à 15 000 Hz
Suite à la page suivante t
19
Page 62

MW (PO)/LW (GO)
y
Plage de syntonisation :
MW : 531 à 1 602 kHz
LW : 153 à 279 kHz
Borne de l’antenne : connecteur d’antenne externe
Fréquence intermédia ire : 10,7 MHz/450 kHz
Sensibilité : MW : 30 µV, LW : 40 µV
Amplificateur de puissance
Sorties : sorties de ha ut- pa r le ur s (connecteurs de
sécurité)
Impédance des haut-parleurs : 4 à 8 ohms
Puissance de sortie maxima le : 52 W × 4 (à 4 ohms)
Généralités
Sorties :
Borne de sorties audio (avant/arrière)
Borne de sortie du caisson de graves (mono)
Borne de commande de relais d’antenne électrique
Borne de commande d’amplificate ur de pui ssa nc e
Entrées :
Borne de commande ATT téléphone
Borne de commande de l’éclairage
Borne d’entrée de commande BUS
Borne d’entrée audio BUS/AUX IN
Borne d’en tr ée de comman d e à distance
Borne d’entrée de l’antenne
Commandes de tonalité :
Graves : ± 8 dB à 100 Hz
Aigus : ± 8 dB à 10 kHz
Intensité sonore :
+ 8 dB à 100 Hz
+2 dB à 10 kHz
Alimentation requise : batterie de véhicule 12 V CC
(masse négative)
Dimensions : environ 178 × 50 × 188 mm (l/h/p)
Dimensions du support : environ 182 × 53 × 162 mm
(l/h/p)
Poids : environ 1,6 kg
Accessoires fournis :
Mini-télécommande : RM-X142
Composants destinés à l’installation et au
raccordement (1 jeu)
Etui pour la façade (1)
Appareils / ac ces s oi r es de commande en option :
Satellite de commande : RM-X6S, RM-X4S
Câble BUS (fourni avec un cordon à broche
RCA)
: RC-61 (1 m), RC-62 (2 m)
Changeur de CD (10 disques) : CDX-757MX,
CDX-T70MX
Changeur C D (6 disques) : CDX-T69
Changeur de MD (6 disques) : MDX-66XLP
Sélecteur de source : XA-C30
Sélecteur AUX-IN : XA-300
Brevets américains et internationaux sous licence
de Dolb
Remarque
Cet appar eil ne peut pas être raccordé à u n
préamplificateur numérique ou à un égaliseur
compatible avec le système BUS de Sony.
La conception et les spécifications sont sujettes à
modification sans préavis.
Laboratories.
• De la soudure sans plomb est utilisée pour le
soudage de certaines pièces. (plus de 80 %)
• Aucun retardateur de flamme halogéné n’est
utilisé dans certaines cartes à circuits imprimés.
• Aucun retardateur de flamme halogéné n’est
utilisé dans la composition des coques.
• Imprimée avec de l’encre à base d’huile végétale
sans COV (composés organiques volatils).
• Du polystyrène expansé pour cales d’emballage
n’est pas utilisé pour l’emballage.
Dépannage
La liste de c ont rôl es suivante v ous aid e ra à r emédi er
aux problèmes que vous pourriez rencontrer avec cet
appareil.
Avant de passer en revue la liste de contrôles cidessous, vérifiez les procédures de racc ordement et
d’utilisation.
Généralités
L’appareil n’est pas alimenté.
• Vérifiez le raccor dement. Si tout es t en ord re, vérif iez
le fusible.
• Si vous mettez l’appareil hors tension et que
l’affich ag e di s p araî t, vous ne pouvez pas le
commander avec la mini-télécommande.
t Mettez l’a ppa reil sous tension.
L’antenne électrique ne se déploie pas.
L’antenne électrique ne di spose pas d’un boîtier de
relais.
Aucun son.
• Le volume est trop f aible.
• La fonction ATT est activée ou la fonction ATT
téléphone (lorsque le câble d’interface d’un
téléphone embarqué est raccordé au fil ATT) est
activée.
• La position de la commande de balance avant-arrière
(FAD) n'est pas réglée pour un système à 2 enceintes.
• Le changeur CD est incompatible avec le format du
disque (MP3/CD ATRAC).
t Lecture avec un changeur CD compatible MP3 de
Sony, ou cet appareil.
Aucun bip n’est émis.
• Le bip est désactivé (page 13).
• Un amplificateur de puissan ce en o ption est raccordé
et vous n’utilisez pas l’amplificateur intégré.
Le contenu de la mémoire a été effacé.
• La touche RESET a été enfoncée.
t Recommencez la procédure d’enregistrement
dans la mémoire.
• Le cordon d’alimentation ou la b atterie a été
déconnecté.
• Le cordon d’alimentation n’est pas raccordé
correctement.
20
Page 63

Les stations mémorisées et l’heure sont
effacées.
Le fusible a fondu.
Emission de bruit lorsque la position de la clé
de contact est modifiée.
Les fils ne sont pas raccordés correctement au
connecteur d’alimenta tion du véhicule destiné aux
accessoires.
L’affichage disparaît de la fenêtre d’afficha ge
ou il ne s’affiche pas.
• Le régulateur de luminosité est réglé sur « Dimmer
on » (page 13).
• L’angle de la façade n’est pas correct.
t Ajustez l’a ngle de la façad e en app uya nt sur la
touche (ANGLE) et en la maintenant enfoncée
(page 7).
• L’affichage est désactivé si vous maintene z la to uche
(OFF) enfoncée.
t Maintenez de nouveau la touche (OFF) enfoncée
jusqu’à ce que l’affichage apparaisse.
• Les connecteurs sont sales (page 19).
Le mode DSO ne fonctionne pas.
Selon l’intérieur de la voiture ou le type de musique, le
mode DSO peut avoir un effet indésirable.
Les images changent automatiquement.
En mode d’image automa tique (Auto Image), l’image
sélectionnée ne peut pas être affichée.
tPour afficher l’image sélec tionnée uniquement,
réglez l’appareil sur « A.IMG off » (page 13).
Aucune rubrique d’affichage ne s’affiche.
tRéglez « Info on » (page 13).
Lecture de CD ou de MD
Impossible d’introduire le disque.
• Un autre disque est déjà en place.
• Le disque a été introduit de force à l’envers ou dans le
mauvais sens.
La lecture du disque ne commen ce pas.
• Le disque est défectueu x ou sa le .
• Les CD-R/CD-RW ne sont pas destinés à un usage
audio (page 17).
Impossible de lire des fichiers MP3.
Le disque n’est pas compatible avec le format MP3 ni
la version (page 17).
Certains fichiers MP3 exigent un délai plus
long que d’autres avant le début de la lecture.
La lecture des types de disques suivants exige un délai
de démarrage plus long :
– disque s co mportant une hiérarchie de dossiers
complexe ;
– disque s en registr é s e n mult ise ssion ;
– disque s au xque ls il est possible d’ajouter des
données.
La lecture du CD ATRAC ne commence pas.
• Le disque n’a pas été créé par un logiciel autori sé, tel
que le logiciel SonicStage ou SonicS ta ge Si mpl e
Burner.
• Les plages qui ne sont pas incluses dans le groupe ne
peuvent pas être lues.
Les rubriques d’affichage ne défilent pas.
• Pour les disques c onte na nt un grand nom br e de
caractères, le défilement peut être inopérant.
• « A.S cr o ll » est désactivé.
t Réglez « A.Scroll on » (page 13) ou appuyez sur
(SCRL) sur la mini-télécomma nde .
Le son saute.
• L’installation est incorrecte.
t Installez l’ a ppa r e il suivant un angle de moins de
45° dans un endroit stable de la voiture.
• Le disque est défe c tue ux ou sa le .
Les touches de commande sont inopérantes.
Le disque ne s’éjecte pas.
Appuyez sur la touche RESET (page 4).
« MS » ou « MD » n’apparaît pas sur l ’affi c hage
de la source lorsque le changeur MD et le
MGS-X1 en option sont tous les deux
raccordés.
Cet appareil recon na ît le MGS-X1 comme é ta nt un
appareil MD.
t Appuyez sur (SOURCE) jusqu’à ce que « MS » ou
« MD » apparaisse, puis appuyez plusieurs fois sur
(MODE).
Réception radio
Impossible de capter des stations.
Le son comporte des parasites.
• Raccordez un fil de commande d’antenne électrique
(bleu) ou un fil d’alimentation d’a cce ssoire (rouge)
au câble d’alimentation de l’amplificateur d’antenne
de la voiture (uniquement si votre voiture est équipée
d’une antenne FM/MW (PO)/LW (GO) intégrée dans
la vitre arrière/latérale.)
• Vérifiez le raccorde me nt de l’antenne du véhicule.
• L’antenne automatique ne se déploie pas.
t Vérifiez le raccordeme nt du c âb le de comm a nde
de l’antenne électrique.
• Vérifiez la fréquence.
• Lorsque le mode DSO est activé, le son peut parfois
comporter des parasites.
t Réglez le mode DSO sur « off » (page 7).
Impossible de capter une présélection.
• Enregistrez la fréquence correcte dans la mémoire.
• Le signal capté est trop faible.
Le réglage automatique des stations est
impossible.
• Le mode de recher che locale est réglé sur « on ».
t Réglez « Local off » (page 13).
• Le signal capté est trop faible.
t Réglez manu el le me nt la fréquence.
En cours de réception FM, l’indication « ST »
clignote.
• Réglez la fréquence correctement.
• Le signal capté est trop faible.
t Réglez « Mono on » (page 13) .
Un programme FM émis en stéréo est entendu
en mono.
L’appareil est en mode de réc ept ion mono.
t Réglez « Mono off » (page 13).
Suite à la page suivante t
21
Page 64

Fonction RDS
Une recherche (SEEK) commence après
quelques secondes d’écoute.
La station ne diffuse pas de programmes de
radioguidage (fonction TP désa ct ivée) ou le signal
capté est faible.
t Désactivez TA (page 10).
Aucun message de radioguidage.
• Activez TA (page 10).
• La station n’émet pas de me ssages de radioguidage,
malgré l’indication TP.
tRéglez la fréquence pour capter une autre station.
PTY affiche « - - - - - - - - ».
• La station actuellement captée n’est pas une station
RDS.
• Les données RDS n’ont pas été reçues.
• La station ne spécifie pas le ty pe d’ém ission.
Affichage des erreurs et messages
1
Blank*
Le MD ne contient aucune plage enregistré e.*
t Insérez un MD contenan t des plag es enregis tré es .
1
Error*
• Le disque est sale ou inséré à l’envers.*
tNettoyez le disque ou insérez-le correctement.
• Le disque ne peut pas être lu en raison de certains
problèmes.
tInsérez-en un autre.
Failure
Les haut-parleurs ou les amplificateurs ne sont pas
raccordés correctement.
t Reportez-vous au m anu el d’in st al la tion de ce
modèle pou r vérifier les r a c cordements.
Load
Le changeur est en train de charger le disque.
t Attendez que cette opération soit terminée.
Local Seek +/–
Le mode de recherche locale est activé en cours de
recherche automatique des fréquences.
NO AF
Il n’existe aucune fréquence alternative pour la station
actuelle.
t Appuyez sur < ou , tandis que le nom de la
station clignote. L’appareil commence à rechercher
une autre fréquence avec les mêmes données
d’identification de programme (PI) (l’indication
« PI Seek » apparaît).
NO Data
Tous les noms personnalisés ont été supprimés ou
aucun nom personnalisé n’est enregis tré .
NO Disc
Le disque n’est pas inséré dans le changeur CD ou
MD.
t Insérez un disque dan s le cha nge ur.
NO Disc Name
Aucun nom de disque n’est écrit dans la pla ge .
NO Group Name
Aucun nom de groupe n’est écrit dans la plage.
22
NO ID3 Tag
Les informations de l’étiquette ID3 ne sont pas écrites
dans le fichier MP3.
NO Info
Les informations textuelles ne sont pas écrites dans le
fichier ATRAC3/ATRAC3plus.
NO Magazine
Le chargeur n’a pas été inséré da ns le ch an g eu r CD .
t Insérez le chargeur dans le changeur.
NO Music
Le disque n’est pas un fichier audio.
t Insérez un CD audio dans cet appareil ou un
changeur compatible MP3.
NO TP
L’appareil conti nue à reche r ch er les stations diffusant
des messages de radioguidage.
NO Track Name
Aucun nom de plage n’est écrit dans la plage.
Not Read
Les informations du disque n’ont pas encore été lues
par l’appareil.
2
t Chargez le disque, puis sélectionnez-le dans la liste.
Not Ready
Le couvercle du ch angeu r MD es t o uver t ou l es M D ne
2
sont pas insérés correcte ment.
t Fermez le couvercle ou insérez correctement les
MD.
Offset
Il est possible qu’il y ait un problème de
fonctionnement.
t Vérifiez le raccordement. Si le message d’erreur
reste affiché, contactez votre revendeur Sony le
plus proche.
Read
L’appareil lit toute s le s informations de plage et de
groupe sur le disque.
t Attendez que la lecture soit terminée et la lec tur e
commence automatiquement. Selon la structure du
disque, cette opération peut pren dr e plus d’ une
minute.
Push Reset
Le lecteur CD et le changeur CD/MD ne peuvent pas
être utilisés en raison de certains problè mes.
t Appuyez sur la touche RESET (page 4).
« » ou « »
Pendant l’avance rapide ou le retour rapide, vous avez
atteint le début ou la fin du disque et vous ne pouvez
pas aller plus loin.
« s »
Le caractère ne peut pas être affiché.
*1 Si une erreur se produit lors de la lecture d’un CD
ou d’un MD, le numéro de disque du CD ou du MD
ne s’affiche pas.
*2 Le numéro du disque qui a provoqué l’erreur
apparaît dans la fenêtre d’affichage.
Si ces solutions ne permettent pas d’améliorer la
situation, contactez votre revendeur Sony le plus
proche.
Si vous portez l’appareil à réparer en raison d’un
problème de lecture de CD, apportez le disque
utilisé au moment où le problèm e s’e st produit.
Page 65

Page 66

Congratulazioni!
Complimenti per l’acquisto del presente letto re
CD Sony. Durante la guida, è possibile utilizzare
le funzioni riportate di seguito .
• Riproduzione di CD
È possibile riprodurre CD-DA (contenenti
inoltre CD TEXT*), CD-R/CD-RW (file MP3
contenenti inoltre registrazioni in multisessione
(
pagina 17)) e CD ATRAC (in formato
ATRAC3 e ATRAC3plus (pagina 18)).
Tipo di disco Etichetta sul disco
CD-DA
MP3
CD ATRAC
• Funzionamento di apparecchi opzionali
Oltre alla funzione di riproduzione , co n il
presente apparecchio è possibile utilizzare
cambia CD/MD e dispositivi portatili Sony
opzionali.
* Un disco CD TEXT è un CD-DA che include
informazioni quali nome del disco, dell’artista e del
brano.
Avvertenza relativa all’installazione su
un’auto sprovvista della posizione
ACC (accessoria) sul blocchetto di
accensione
Dopo avere spento il motore, assicurarsi di
tenere premuto (OFF) sull’apparecchio
finché il display non scompare.
Diversamente, il display non viene disattivato
causando lo scaricamento della batteria.
• Ricezione radiofonica
–È possibile mem orizzare fino a 6 stazi oni per
banda (FM1, FM2, FM3, MW e LW).
–BTM (Best Tuning Memo ry , memorizza zione
automatica delle emittenti con sintonia
migliore): l’apparecchio seleziona le stazioni
con il segnale più potente e le memorizza.
–È possibile assegna re un nom e a ogni st azio ne
radio, memorizzarli e visualizzare questi
nomi nell’elenco.
• Regolazione audio
–EQ7: è possibile selezionare un tipo di curva
dell’equalizzatore per 7 tipi di musica.
–DSO (Dynamic Soundstage Organizer): crea
un effetto audio più realistico, mediante
sintesi di diffusori virt uali, per enfatizzare
l’audio dei diffusori, anche se questi sono
installati nella p a rte inferio re dello sportello.
–BBE MP: consente di migliorare la qualità
dell’audio compresso digitalmente, ad
esempio dei file MP3. Pe r ulteriori
informazioni, consultare le informazioni
riportate di seguito.
• Impostazione delle immagini
È possibile impos tare vari tipi di
visualizzazione delle immagini nel display
dell’apparecchio.
– Space Prod ucer (generatore di s pazi): consente
di creare modelli a schermo animati che
cambiano al ritmo della musica.
Questa etichetta è posta nella parte inferiore
esterna.
Il processo BBE MP
R
consente di migliorare la
qualità dell
’
audio compresso
digitalmente, ad esempio in formato MP3,
ripristinando e potenziando i suoni più acuti
persi a seguito della compressione. Grazie al
processo BBE MP, vengono generati suoni di
pari altezza a partire dal materiale sorgente,
recuperando in mode efficace una qualità più
naturale, realistica e sfumata.
SonicStage e il relativo logo sono marchi di
fabbrica di Sony Corporation.
ATRAC, ATRAC3, ATRAC3plus e i rispettivi
loghi sono marchi di fabbrica di Sony
Corporation.
2
Page 67

Indice
Operazioni preliminari
Azzeramento dell’apparecchio . . . . . . . . . . . . . 4
Regolazione dell’orologio. . . . . . . . . . . . . . . . . 4
Modo DEMO. . . . . . . . . . . . . . . . . . . . . . . . . . . 4
Rimozione del pannello anteriore . . . . . . . . . . . 4
Installazione del pannello anteriore . . . . . . . 5
Inserimento del disco nell’apparecchio. . . . . . . 5
Estrazione del disco . . . . . . . . . . . . . . . . . . . 5
Regolazione dell’ang ol azione del pannello
anteriore. . . . . . . . . . . . . . . . . . . . . . . . . . . . . . . 5
Posizione dei comandi e operazioni
di base
Unità principale . . . . . . . . . . . . . . . . . . . . . . 6
Telecomando a scheda RM-X142 . . . . . . . . 6
CD
Voci del display . . . . . . . . . . . . . . . . . . . . . . 8
Riproduzione ripetuta e in ordine
casuale . . . . . . . . . . . . . . . . . . . . . . . . . . . . . 8
Radio
Memorizzazi one e ricezione delle st azioni . . . . 9
Memorizzazione automatica — BTM . . . . . 9
Memorizzazione manuale . . . . . . . . . . . . . . 9
Ricezione delle stazioni memorizzate . . . . . 9
Sintonizzazione automatica . . . . . . . . . . . . . 9
Ricezione di una stazione tramite un elenco
— LIST . . . . . . . . . . . . . . . . . . . . . . . . . . . . 9
RDS . . . . . . . . . . . . . . . . . . . . . . . . . . . . . . . . . 10
Panoramica . . . . . . . . . . . . . . . . . . . . . . . . . 10
Impostazione dei modi AF e TA/TP . . . . . 10
Selezione di PTY . . . . . . . . . . . . . . . . . . . . 11
Impostazione di CT . . . . . . . . . . . . . . . . . . 11
Altre funzioni
Modifica delle impostazioni audio . . . . . . . . . 12
Regolazione delle c ar at t er is tiche
dell’audio . . . . . . . . . . . . . . . . . . . . . . . . . . 12
Regolazione della curva dell’equalizzatore
— EQ7 Tune . . . . . . . . . . . . . . . . . . . . . . . 12
Regolazione delle voci di menu
— MENU . . . . . . . . . . . . . . . . . . . . . . . . . . . . 12
Uso di apparecchi opzionali . . . . . . . . . . . . . . 14
Cambia CD/MD . . . . . . . . . . . . . . . . . . . . 14
Telecomando a rotazione RM-X4S . . . . . . 16
Apparecchio audio ausiliare . . . . . . . . . . . 16
Informazioni aggiuntive
Precauzioni . . . . . . . . . . . . . . . . . . . . . . . . . . . 17
Note sui dischi . . . . . . . . . . . . . . . . . . . . . . 17
Informazioni sui file MP3 . . . . . . . . . . . . . 17
Informazioni sui CD ATRAC . . . . . . . . . . 18
Manutenzione . . . . . . . . . . . . . . . . . . . . . . . . . 18
Rimozione dell’apparecchio. . . . . . . . . . . . . . 19
Caratteristiche tecniche. . . . . . . . . . . . . . . . . . 19
Guida alla soluzione dei problemi . . . . . . . . . 20
Messaggi e indicazioni di errore . . . . . . . . 22
3
Page 68

Operazioni preliminari
Modo DEMO
Azzeramento dell’apparecchio
Prima di utilizzare l’apparecchio per la prima
volta, dopo la sostituzione della batteria dell’auto
o dopo avere effettuato modifiche ai
collegamenti, è necessario azzerare l’apparecchio
stesso.
Rimuovere il pannello ante riore, quindi preme re
il tasto RESET utilizzando un oggetto appuntito,
quale una penna a sfer a.
Tasto RESET
Nota
Premendo il tasto RESET verranno cancellate le
impostazioni dell’orologio e alcune funzioni
memorizzate.
Regolazione dell’orologio
L’orologio mos tr a l ’indicazione digital e dell’ora
in base al sistema de l le 24 ore.
1 Premere (MENU).
2 Ruotare la manopola di controllo
SEEK fino a che non viene visualizzato
“Setup”, quindi premere (ENTER).
3 Ruotare la manopola di controllo
SEEK fino a che non viene visualizzato
“Clock Adjust”, quindi premere
(ENTER).
Viene visualizzato il display per la
regolazione dell’orologio.
4 Ruotare la manopola di controllo
SEEK per impostare l’ora e i minuti.
Per passare da una cifra all’altra
dell’indicazio ne digitale, premere (ENTER).
5 Dopo avere impostato i minuti,
premere (ENTER).
L’orologio viene attivato.
Per visualizzare l’ or ologio durante la
riproduzione/ricezione, impostare “Clock on”
(
pagina 13).
Con il telecomando a scheda
Nei punti da 2 a 4: premere M o m al posto della
manopola di controllo SEEK; nel punto 4: premere <
o , al posto di (ENTER).
Suggerimento
È possibile regolare l’orologio automaticamente
tramite la funzione RDS (
pagina 11).
Quando l’apparecchio viene spento, appare
innanzitutto l’orol ogi o, quindi il modo di
dimostrazione ( D EMO) attiva la visualizzazione
della dimostrazione.
Per disattiv are il modo DEMO, impostare “Demo
off” nel menu (
spento.
pagina 13) mentre l’apparecchio è
Rimozione del pannello
anteriore
Per evitare il furto dell’apparecchio, è possibile
estrarne il pannello anteriore.
Segnale di avvertimento
Se la chiave di accensione viene impostata sulla
posizione OF F senz a che i l pann ello anter iore sia
stato rimosso, viene emesso per alcuni secondi
un segnale acustico di avvertimento.
Tale segnale viene emesso solo se è in uso
l’amplificatore incorp or at o.
1 Premere (OFF).
L’apparecc hio si spegne.
2 Premere .
L’estremità sinistra del pann el lo anteriore
fuoriesce.
3 Fare scorrere il pannello anteriore
verso sinistra, quindi estrarlo
prestando attenzione.
(OFF)
2
1
Note
• Non fare cadere il pannello anteriore né esercitare
eccessiva pressione su quest’ultimo e sulla finestra
del display.
• Non esporre il pannello anteriore a calore,
temperature elevate o umidità. Evitare di lasciarlo
all’interno di auto parcheggiate e su cruscotti o
ripiani posteriori.
Suggerimento
Durante il trasporto, inserire il pan nello anteriore
nell’apposita custodia in dotazione.
4
Page 69

Installazione del pannello anteriore
Posizionare il for o A del pannello ante ri ore nel
mandrino B dell’apparecchio, quindi spingere il
lato sinistro verso l’ inte rno e vita ndo di ese rcita re
eccessiva pressione.
Per attivare l’apparecchio, premere (SOURCE)
sull’apparecchio (o inserire un disco).
A
B
Nota
Non collocare alcun oggetto sulla superficie interna
del pannello anteriore.
Inserimento del disco
nell’apparecchio
1 Premere Z.
Il pannello ante riore si abbassa
automaticamente.
2 Inserire il disco (lato etichetta verso
l’alto).
Estrazione del disco
1 Premere Z.
Il pannello anter i ore si abbassa
automaticamente, quindi il disco viene
espulso.
2 Premere Z per chiudere il pannello
anteriore.
Nota
Il pannello anteriore si alza automaticamente 15
secondi dopo essersi abbassato.
Regolazione dell’angolazione
del pannello anteriore
ANGLE
1 Tenere premuto (ANGLE)
ripetutamente finché il pannello
anteriore non raggiunge l’angolazione
desiderata.
È possibile impostare il pannello anteriore in
3 posizioni.
Per riportare il pannello anteriore nella posizione
predefinita, tenere premuto (ANGLE)
ripetutamente fino a impostare nuovamente tale
posizione.
Suggerimenti
• Dopo essersi abbassato per consentire di inserire il
disco, il pannello anteriore ritorna automaticamente
alla posizione impostata.
• L’angolazione impostata per il pannello anteriore
viene memorizzata nell’apparecchio. Quando il
motore dell’auto viene spento, il pannello torna sulla
posizione con l’angolazione originale; all’accensione
del motore dell’auto, il pannello torna sulla posizione
con l’angolazione impostata.
Il pannello anteriore si alza automaticamente,
quindi la riproduzione viene avviata
automaticamente.
5
Page 70

Posizione dei comandi e operazioni di base
Unità principale
12 3 4 6578
OFF
MODE
VOL
PUSH SOUND PUSH ENTER
SOURCE AF/TA1
9
Telecomando a scheda
RM-X142
AF TA
2
BBE MP
5
MODE
+
DISC
OPEN/CLOSE
3
PAUSE
6
LIST
qh
qj qd
qa
qk
SCRL
PTY
DSPL
REP SHUF
1
4
EQ7 DSO
7
MENU
q;
SOURCE
ql
–
SEEK
SOUND
DISC
SEEK
–
ENTER
w;
ATTOFF
+
2
VOL
–
wa
6
REP SHUF BBE MP PAUSE
2534
qaq; qs qd qf qg
Per ulteriori informazioni, fare riferimento alle
pagine indic ate. I tasti del telecomando a scheda
corrispondenti a quelli dell’apparecchio
controllano le stesse funzioni.
A Tasto MODE 9, 14
ws
B Tasto OFF
1
C Manopola di controllo VOL (volume)/
wd
wf
+
wg
D Finestra del display
E Alloggiamento del disco 5
6
wh
F Manopola di controllo SEEK/Tasto
G Tasto MENU
ANGLE
+
–
6
Per selezionare la banda radio (FM/MW/
LW)/selezionare l’unità*
CDX-M7850
1
.
SEEK
MENU
IMAGE
Per disattivare l’alimentazione/arrestare la
riproduzione della sorgente.
Tasto SOUND 12
Per regolare il volume (ruotare); per
selezionare le voci relative all’audio
(premere).
Per inserire il disco.
ENTER
Per selezionare le voci (ruotare); compl etare
un’impostazione (premere).
Radio:
Per sintonizzare le stazioni: pre mer e
(ENTER) ripetutamente per sel ez io nare
“SEEK”, “MANUAL” o “PRESET”, quindi
ruotare la man opola di contr ollo SEEK fi no a
visualizzare la stazione desiderata.
CD:
Per saltare i brani o i gruppi: premere
(ENTER) ripetutamente per sel ez io nare
./> o “G ROUP”, quindi ruotare la
manopola di contr ol lo SEEK fino a
visualizzare il brano o il gruppo desiderato.
Per accedere ai menu.
Page 71

H Tasto Z (espulsione)/ANGLE 5
Per estrarre il disco/abbassare il pannello
anteriore (premere); i mpostare l’ angolazione
del pannello anteriore in 3 posi zioni (tenere
premuto).
I Tasto (rilascio pannello anteriore)
4
J Tasto SOURCE
Per attivare l’alimentazione/cambiare
sorgente (radio/CD/MD*
2
/AUX*3).
K Tasti numerici
Radio:
Per ricevere le stazioni memorizzate
(premere); per memorizzare le stazioni
(tenere premu t o).
CD/MD*2:
(1): REP 8
(2): SHUF 8
(5): BBE MP*4 2
Per attivare la funzione BBE MP, impostare
“BBE MP-on”. Per disattivarla, impostare
“BBE MP-off”.
(6): PAUSE*
4
Per effet tuare una pausa durante la
riproduzione. Per disattivare l’attenuazione,
premere di nuovo il tasto.
L Tasto RESET 4
M Tasto AF (frequenze alternative)/
TA (notiziari sul traffico) 10
Per impostare AF e TA/TP nel modo RDS.
N Ricettore
Per ricevere i segnali provenienti dal
telecomando a scheda o dal telecomando a
rotazione senza filo.
O Tasto IMAGE 2
Per selezionare l’immagine del display.
Modo Space Producer (generatore di spazi)
t Modo film 1-2 t Modo analizzato re
spettrale 1-5 t Modo sfondo 1-3 t Modo
riproduzione/ri cezione normale
I tasti del telecomando a scheda ripo rt at i di
seguito corrispondono inoltre ad altri tasti/altre
funzioni dell’apparecchio.
qh Tasto SCRL (scorrimento) 8
Per scorrere le voci del display.
qj T asto DSPL (display)/PTY (tipo di
programma)
8, 11, 15
Per cambiare le voci del display; per
selezionare PTY nel modo RDS.
qk Tasto EQ7 (equalizzatore)
Per selezion are un ti po equali zzatore (Xplod ,
V ocal, Club, Jazz, New Age, Rock, Custom o
off).
ql Tasti </, (SEEK –/+)
Radio:
Per sintonizzare le stazioni in modo
automatico ( p remere); per ricercare una
stazione manu al m ente (tenere premuto).
CD:
Per saltare i br ani (premere); p er saltare i
brani in modo continuo (premere, quindi
premere di nuovo entro 1 secondo e tenere
premuto); per fare avanzare o fare
retrocedere ra pi damente un brano (te nere
premuto).
w; Tasto SOUND 12
Per selezionare le voci relative all’audio.
wa Tasto VOL (volume) +/–
Per regolare il volume.
ws Tasto OPEN/CLOSE
Per aprire/chi udere il pannello an te riore.
wd Tasto DSO 2
Per selezionar e i l mo do DSO (1, 2, 3 o off).
Maggiore è il numero, più enfatiz zato sarà
l’effetto.
wf Tasto LIST 9, 15
Per utilizzare l a funzione di elenco .
wg Tasti M/m (DISC +/–)
Per selezionar e l e stazioni preselez i onate/
saltare i gruppi (premere); per saltare i
gruppi in modo continuo (tenere pr em uto).
wh Tasto ATT (attenuazione a udio)
Per attenuare l ’a udio. Per disattivare
l’attenuazione, premere di nuovo il tasto.
*1 Se è collegato un cambia CD/MD.
*2 Se è collegato un cambia MD.
*3 Se è collegato un dispositivo portatile Sony
opzionale.
*4 Durante la riproduzione mediante il presente
apparecchio.
Nota
Se l’apparecchio viene spento e il display disattivato,
non è possibile controllarlo mediante il telecomando a
scheda a meno che non venga premuto (SOURCE)
sull’apparecchio o inserito un disco per accendere
l’apparecchio stesso.
Suggerimento
Per ulteriori informazioni sulle modalità di sostituzione
della batteria,
litio del telecomando a scheda” a pagina 18.
vedere “Sostituzione della batteria al
7
Page 72
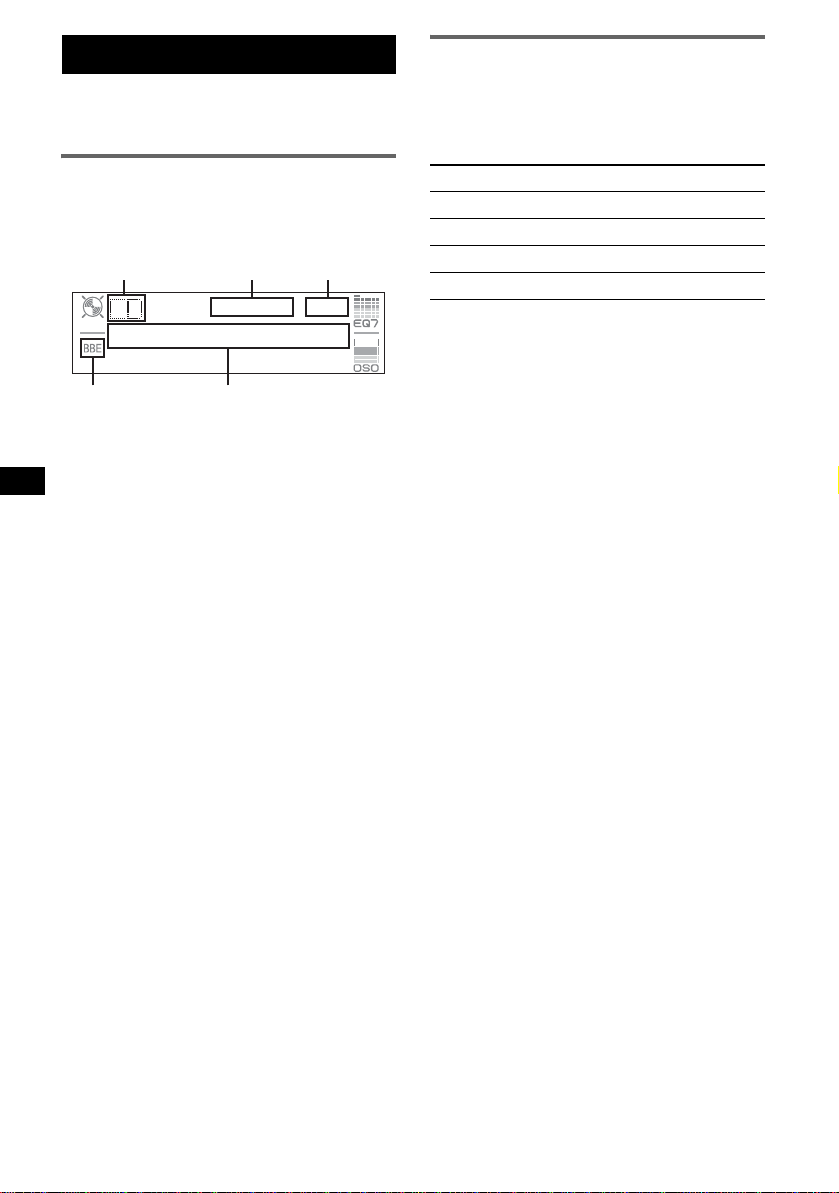
CD
Per ulteriori informazioni sulle modalità di
collegamento a un cambia CD/MD, vedere a
pagina 14.
Voci del display
Esempio: selezione del modo di riproduzione
normale premendo più volte (IMAGE)
(
pagina 7).
ABC
Riproduzione ripetuta e in ordine
casuale
1 Durante la riproduzione, premere più
volte (1) (REP) o (2) (SHUF) fino a
visualizzare l’impostazione desiderata.
Selezionare Per riprodurre
REP-Track un brano in modo ripetut o.
REP-Group* un gruppo in modo ripetuto.
REP-Group* un gruppo in modo casuale.
SHUF-Disc un disco in modo casual e.
* Durante la riproduzione di MP3/CD ATRAC.
Per tornare al modo di riproduzione normale,
selezionar e “REP-off” o “SHUF-off”.
D
E
A Sorgente
B Indica zione MP3/ATRA C3 plus
C Orologio*
1
D Indica zione BBE
E Numero del gruppo/numero del brano/tempo
di riproduzione tr ascorso, titolo del disco/
nome dell’artista, nome del gruppo, titolo del
brano, informazioni di testo*
*1 Se il modo orologio è impostato su “on”
(pagina 13).
*2 Durante la riprodu zi one di un MP3, viene
visualizzato il tag ID3, mentre durante la
riproduzione di un CD ATRAC, vengono
visualizzate le informazioni di testo create
mediante SonicStage e simili.
2
Per cambiare le voci del display E, premere
(DSPL); scorrere le vo ci del disp lay E, premere
(SCRL) sul telecomando a scheda o impostare
“A.Scroll o n” (
Suggerimento
Le voci visualizzate potrebbero non corrispondere, a
seconda del tipo di disco, del formato di registrazione
e delle impostazioni effettuate. Per ulteriori
informazioni sui file MP3, vedere
ATRAC, vedere pagina 18.
pagina 13).
pagina 17; su CD
8
Page 73

Radio
Memorizzazione e ricezione
delle stazioni
Attenzione
Per la sintonizz azi one delle stazioni durante la
guida, utilizzare l a funzione BTM (Be st Tuning
Memory, memorizzazione automatica delle
emittenti con sintonia migliore) per evitare
incidenti.
Memorizzazione automatica
— BTM
1 Premere pi ù volte (SOURCE) fino a
visualizzare “TUNER”.
Per cambiare banda, premere più volte
(MODE). È possibile selezionare FM1, FM2,
FM3, MW o LW.
2 Premere (MENU).
3 Ruotare la manopola di controllo
SEEK fino a che non viene visualizzato
“Edit”, quindi premere (ENTER).
4 Ruotare la manopola di controllo
SEEK fino a che non viene visualizzato
“BTM”, quindi premere (ENTER).
L’apparecchio memorizza le stazioni in
corrispondenz a de i t as ti numerici in base
all’ordine delle frequenze.
Quando l’imp ostazione è stata m em orizzata,
viene emesso un segnale acustico .
Con il telecomando a scheda
Nei punti 3 e 4: premere M o m al posto della
manopola di controllo SEEK.
Memorizzazione manuale
1 Durante la ricezione della stazione che
si desidera memorizzare, tenere
premuto un tasto numerico (da (1) a
(6)) fino a visualizzare “Memory”.
L’indicazi one del tasto numeric o appare nel
display.
Nota
Se un’altra stazione viene memorizzata in
corrispondenza dello stesso tasto numerico, la
stazione memorizzata precedentemente viene
sostituita.
Suggerimento
Se viene memorizzata una stazione RDS, viene
inoltre memorizzata l’impostazione AF/TA (
pagina 10).
Ricezione delle stazioni
memorizzate
1 Selezionare la banda, quindi premere
un tasto numerico (da (1) a (6)).
Suggerimento
Un altro modo per ricev ere le stazioni memorizzate è
premere (ENTER) ripetutament e fino a visualizzare
“PRESET”, quindi ruotare la manopola di controllo
SEEK finché non viene visualizzato il numero di
preselezione desiderato.
Sintonizzazione automatica
1 Selezionare la banda, quindi premere
(ENTER) ripetutamente fino a
visualizzare “SEEK”, quindi ruotare la
manopola di controllo SEEK per
ricercare la stazione.
La ricerca si arr esta non ap pena l’ap parec chio
riceve una stazione. Ripetere questa
procedura fino alla ricezione della stazione
desiderata.
Suggerimento
Se si conosce la frequenza della stazione che si
desidera ascoltare, premere (ENTER) ripetutamente
fino a visualizzare “MANUAL”, quindi ruotare la
manopola di controllo SEEK finché non viene
visualizzata la frequenza desiderata.
Ricezione di una stazione tramite
un elenco — LIST
Per elencare le frequenze. Per ulteriori
informazioni sull’assegnazione del nome a una
stazione, vedere pagina 14.
1 Selezionare la banda, quindi premere
(MENU).
2 Ruotare la manopola di controllo
SEEK fino a che non viene visualizzato
“List”, q uindi pre mere (ENTER).
Viene visualizzata la frequenza.
3 Ruotare la manopola di controllo
SEEK fino a visualizzare la stazione
desiderata.
4 Premere (ENTER) per ricevere la
stazione.
Il display torna al modo di ricezione norm ale.
Con il telecomando a scheda
Selezionare la banda, quindi premere (LIST).
Premere M o m ripetutamente fino a visualizzare la
stazione desiderata, quindi premere (ENTER).
9
Page 74

RDS
Panoramica
L’RDS (sistema dati radio) è un servizio che
consente alle stazioni radio FM di trasmettere
informazioni digitali aggiuntive oltre al normale
segnale in radiofrequenza.
Voci del display
Esempio: selezione del modo di riproduzione
normale premendo più volte (IMAGE)
(
pagina 7).
A
CE
A Banda radio, funzione
B Orologio*
C Numero di preselezione
D Frequenza*
E TA/TP*
*1 Se il modo orologio è impostato su “on”
(pagina 13).
*2 Durante la ricezione della stazione RDS, “ *” è
visualizzato a sinistra dell’indicazione della
frequenza.
*3 “TA” lampeggia durante la ricezione di notiziari sul
traffico. “TP” si illumina durante la ricezione di una
stazione che trasmette programmi sul traffico.
1
2
(nome della stazione), dati RDS
3
D
Per cambiare le voci del display D, premere
(DSPL) sul telecomando a s cheda.
Servizi RDS
Il presente apparecchio fornisce i servizi RDS in
modo automatico come segue:
AF (frequenze alternative)
Consente di selezionare e sintonizzare di nuovo
la stazione con il segnale più potente.
Utilizzando questa funzione, è possibile
riprodurre in modo continuo lo stesso
programma durante un viaggio di lunga durata,
senza la necess ità di sintonizzar e di nuovo la
stessa stazione manualmente.
TA (notizia ri sul traffico)/TP (programma sul
traffico)
Fornisce le informazioni/i programmi correnti
relativi al traffico. Qualsiasi informazione/
programma ricevuta/o interrompe la
riproduzione de lla sorgente selezionat a.
B
PTY (tipi di programma)
Consente di visualizzare il tipo di programma
in fase di ricezione, nonché di ricercare il tipo
di programma sele zi onato.
CT (ora)
L’orologio viene regolato mediante i dati CT
della trasmissione RDS.
Note
• È possibile che non tutte le funzioni RDS siano
disponibili, a seconda del paese/della regione.
• La funzione RDS non è disponibile quando il
segnale è troppo debole o se la stazione
sintonizzata non trasmette dati RDS.
Impostazione dei modi AF e TA/TP
1 Premere più volte (AF/TA) fino a
visualizzare l’impostazione desiderata.
Selezionare Per
AF on attivare AF e disattivare TA.
TA on attivare TA e disattivare AF.
AF TA on attivare entrambi i modi AF e
AF TA off disattivare entrambi i modi AF
Con il telecomando a scheda
Premere (AF) e/o (TA) al posto di (AF/TA).
Memorizzazione di stazioni RDS con
impostazione AF e TA
È possibile preselezionare le stazioni RDS
insieme all’impostazione AF/TA. Se viene
utilizzata la funzione BTM, vengono
memorizzate solo le stazioni RDS con la stessa
impostazione AF/TA.
Se si utilizza il mod o di preselezione manu al e, è
possibile preselezionare le stazioni RDS e non
RDS con impostazioni AF/TA distinte.
1 Impostare AF/TA, quindi memorizzare la
stazione mediante la funzione BTM o
manualmente.
Preimpostazione del volume dei
notiziari sul traffico
È possibile preimpostare il li v e llo del v olume dei
notiziari sul traffico in modo da poterli udire
chiaramente.
1 Ruotare la manopola di controllo del volume
per regolare il livello di volume.
2 Tenere premuto (AF/TA) fino a visualizzare
“TA VOL”.
Con il telecomando a scheda
Tenere premuto (TA) al posto di (AF/TA).
TA.
e TA.
10
Page 75

Ricezione dei notiziari di emergenza
Se è attivato il modo AF o TA, gli annunci di
emergenza interrompono automaticamente la
riproduzione della sorgente se le zio n ata .
Mantenimento di un programma
regionale
Quando la funzion e AF è attivata, l e
impostazioni predefinite di questo appare cchio
limitano la ricezione a una regione specifica, in
modo che la stazi one sintonizzata non venga
sostituita da una stazione regionale dal segnale
più potente.
Se si inte nd e lasciare tale area di ricezio n e
regionale, impostare “Regional off” nel menu
(
pagina 13).
Nota
Questa funzione non è disponibile nel Regno Unito e
in altre aree.
— Regional
Funzione Local Link (solo per il
Regno Unito)
Questa funzione consente di selezionare altre
stazioni locali della stessa area, anche se non
sono memorizzate in corrispondenza dei tasti
numerici.
1 Durante la ricezione FM, premere un tasto
numerico (da (1) a (6)) in corrispondenza
del quale è memori zzata una stazione lo cale.
2 Entro 5 secondi, premere nuovamente il tasto
numerico della stazione locale.
Ripetere questa procedura fino alla ricezione
della stazione locale desiderata.
Tipi di programma
News (Notiziario), Affairs (Attualità), Info
(Informazioni), Sport (Sport), Educate
(Istruzione), Drama (Teatro), Culture
(Cultura), Science (Scienza), Varied (Vari),
Pop
M (Musica pop), Rock M (Musica ro ck),
Easy
M (Musica leggera), Light M (Classica
leggera), Classics (Classica), Other
tipi di musica), Weather (Bollettino
meteorologico), Finance (Finanza), Children
(Programmi per bambini), Social
Religion (Religione), Phone
Travel (Viaggi), Leisure (Div e rtimento ), Jazz
(Musica jazz), Country (Musica country),
Nation
M (Musica nazionale), Oldies (Musica
degli anni ‘50/’60), Folk
Document (Documentari)
Nota
Non è possibile utilizzare questa funzione in paesi/
regioni in cui non sono disponibili i dati PTY.
M (Musica fo lk),
M (Altri
A (Sociale),
In (Chat show),
Impostazione di CT
1 Impostare “CT on” nel menu
(
pagina 13).
Note
• La funzione CT potrebbe non essere disponibile
anche durante la ricezione di una stazione RDS.
• L’ora impostata mediante la funzione CT e l’ora
corrente potrebbero non corrispondere.
Selezione di PTY
Con il telecomando a scheda
1 Premere (PTY) durante la ricezione
FM.
Se la stazione sta trasmettendo dati PTY,
viene vi sualizzato il nome del tipo di
programma corrente.
2 Premere pi ù volte M o m fino a
visualizzare il tipo di programma
desiderato.
3 Premere (ENTER).
L ’a pp are cc hi o a v via l a r ic erc a di un a s ta zi one
che trasmette il tipo di programma
selezionato.
11
Page 76

Altre funzioni
Modifica delle impostazioni
audio
Regolazione delle caratteristiche
dell’audio
È possibile regolare l’equalizzatore, il modo
DSO, i bassi, gli acuti, il bilanciamento,
l’attenuazione e il volum e del subwoofer.
1 Selezionare una sorgente, quindi
premere pi ù volte (SOUND) per
selezionare la voce desiderata.
La voce cambia come rip or ta to di seguito:
EQ7 t DSO t BAS (bassi) t
TRE (acuti) t BAL (sinistra-destra) t
FAD (a nt er iore-posteriore ) t
SUB (volume del subwoo fer)*
* “ ∞” viene visualizzato con il valore minimo e può
essere regolato fino a un massimo di 20
incrementi.
2 Ruotare la manopola di controllo VOL
ripetutamente per regolare la voce
selezionata.
Dopo 3 secondi, l’impostazione è completata
e il display torna al m odo di riproduzio ne/
ricezione norm ale.
Nota
Effettuare la regolazione entro 3 secondi dalla
selezione della voce.
Con il telecomando a scheda
Nel punto 2: premere < o , al posto della
manopola di controllo VOL.
Regolazione della curva
dell’equalizzatore — EQ7 Tune
È possibile regolare e memorizzare le
impostazioni per differenti gamme dei toni
dell’equalizzatore.
1 Selezionare una sorgente, quindi
premere (MENU).
2 Ruotare la manopola di controllo
SEEK fino a che non viene visualizzato
“Sound”, quindi premere (ENTER).
3 Ruotare la manopola di controllo
SEEK fino a che non viene visualizzato
“EQ7 Tune”, quindi premere (ENTER).
4 Ruotare la manopola di controllo
SEEK per selezionare il tipo di
equalizzatore desiderato, quindi
premere (ENTER).
5 Per impos tare il livello del volume
desiderato, ruotare la manopola di
controllo SEEK.
Il livello del volume può essere regolato per
unità di 1 dB da –10 dB a +10 dB.
6 Premere (ENTER) per passare alla
frequenza successiva.
La frequenza cambia c o m e ri por t at o di
seguito:
62Hz t 157Hz t 396Hz t 1.0kHz
t 2.5kHz t 6.3kHz t 16kHz
Ripetere i punti 5 e 6 per regolare la curva
dell’equalizzatore.
Dopo avere regolato “16kHz” e premuto
(ENTER), viene visualizzata la f inestra di
dialogo di conferm a.
7 Ruotare la manopola di controllo
SEEK fino a che non viene visualizzato
“YES”, quindi premere (ENTER).
L ’impostazi one è completata e il d isplay torna
al modo di riproduzione/ricezione normale.
Per ripristi nare l’impostazione di fabbrica della
curva dell’equalizzatore, tenere premuto
(ENTER) nei punti 5 o 6, quindi ru ot ar e l a
manopola di controllo SEEK per selezionare
“YES”.
Con il telecomando a scheda
Nei punti 2, 3 e 5: premere M o m al posto della
manopola di controllo SEEK; nei punti 4 e 7: premere
< o , al posto della manopola di controllo SEEK;
nel punto 6: premere < o , al posto di (ENTER).
Regolazione delle voci di menu
— MENU
1 Premere (MENU).
2 Ruotare la manopola di controllo
SEEK fino a visualizzare la voce di
menu desiderata, quindi premere
(ENTER).
Le voci cambiano come riportato di seguito:
Setup y Display y Receive Mode
y Sound y Edit y List
12
Page 77

3 Ruotare la manopola di controllo
SEEK fino a visualizzare la voce di
impostazione desiderata, quindi
premere (ENTER).
L’indicazione digitale si sposta sul lato destro
(selezione dell’impostazione).
4 Ruotare la manopola di controllo
SEEK per selezionare l’impostazione,
quindi premere (ENTER).
L’impostazione è completata.
5 Premere (MENU).
Il display torna al modo di riproduzione/
ricezione norma le .
Nota
Le voci visualizzate sono diverse, a seconda della
sorgente e dell’impostazione.
Con il telecomando a scheda
Nei punti 2 e 3: premere M o m al posto della
manopola di controllo SEEK; nel punto 4: premere <
o , al posto della manopola di controllo SEEK.
È possibile impostare le seguenti voci (p er
ulteriori informazioni, consultare la pagina di
riferimento):
“z” indica l’impostazione predefinita.
Setup (Impostazione)
Clock Adjust (regolazione dell’orologio)
(pagina 4)
CT (ora)
Consente di impostare “on” o “off” (
(pagina 10, 11).
Beep (segnale acustico)
Consente di imp os tare “on” (
1
AUX-A*
(audio AUX)
Consente di impostare il display della sorgente
AUX su “on” (
z) o su “off” (pagina 16 ) .
Display
Clock (informazioni orologio)
Consente di visualizzare cont em poraneamente
l’orologio e le voci/l’immagi ne del display.
–“on”: per visualizzare i dati
contemporaneamente.
–“off” (
z): per non visu al izzare i dati
contemporaneamente.
z)
z) o “off”.
A.IMG (immagine automatica)
Il modo immagine automatica consente di
cambiare automaticamente (ogni 10 secondi) le
immagini del display .
–“off” (
z): per non cambi are l’immagin e
automaticamente.
–“SA”: per cambiare ripe tutamente le immagini
del display nel modo analizzatore spettrale.
–“ Movie”: per cambiare ripetutamente le
immagini del display nel modo film.
–“All”: per ripete re la visualizzazione delle
immagini del display in tutte le modalità.
Info (informazioni display)
Per visualizzare le voci (a seconda della
sorgente, ecc.) nella parte centrale del display
durante la visuali zzazione di un’immagine.
–“on” (
z): per visualizzare le voci.
–“off”: per non visualizzare alcuna vo ce.
Dimmer (attenuat o re di luminosità)
Consente di modificare la luminosità del
display.
–“Auto” (
z): per ridurre automaticamente la
luminosità del dis pl ay quando vengono acces i
i fari.
–“on”: per attenuare la luminosità del display.
–“off”: per disattivare l’att enuatore di
luminosità.
Demo*1
(dimostrazione)
Consente di impostare “on” (z) o “off”
(pagina 4).
A.Scroll (scorrimento automatico)
Consente di fare scorrere automaticamente le
voci visualizzate compost e da molti cara tteri
quando si cambia disco/gruppo/bran o.
–“on”: per attivare lo scorrimento.
–“off” (
z): per disattivare lo scorrimento.
Receive Mode (Modo di ricezione)
Local (modo di ricerca locale)
–“on”: per sintonizzare solo le stazioni con
segnali più forti.
–“off” (
z): per eseguire la ri cezione normal e.
Mono (modo monofoni co)
per migliorare la qualità di ricezione FM,
selezionare il modo di ricezione monofonico.
–“ on”: per ascoltare le trasmissioni stereo in
monofonia.
–“off” (
z): per ascoltare le trasmissio ni stereo in
stereofonia.
Regional*2 (regionale)
Consente di impostare “on” (z) o “off”
(pagina 11).
continua alla pagina successiva t
13
Page 78

Sound (Audio)
EQ7 Tune (pagina 12)
HPF (filtro passa alto)
Consente di selezi onare la frequenza di tag lio
dei diffusori anteriore/p os teriore: “off” (
“78Hz” o “125Hz”.
LPF (filtro passa bass o)
Consente di selezi onare la frequenza di tag lio
del subwoofer: “off” (
z), “125Hz” o “78Hz ”.
Loudness (enfatizzazione dei bassi)
Consente di enfatizzare i bassi e gli acuti a basso
volume.
–“on”: per enfatizzare i bassi e gli acuti.
– “off” (
z): per non enfatizzare i bassi e gli acuti.
AUX Level (livello AUX)
Consente di regolare il livello di volume di
ciascun apparecchio ausiliare collegato
(pagina 16). Questa impostazione evita la
necessità di regolare il livello di volume tra le
sorgenti.
Edit (Modifica)
Name Edit (modifica nome) (pagina 14)
Name Delete (eliminazione nome) (pagina 15)
BTM (pagina 9)
*1 Se l’apparecchio è spento.
*2 Durante la ricezio ne FM .
Uso di apparecchi opzionali
Cambia CD/MD
Selezione del cambia dischi
1 Premere più volte (SOURCE) fino a
visualizzare “CD” o “MD”.
2 Premere più volte (MODE) fino a visualiz za re
il cambia dischi desiderato.
Numero
dell’apparecchio
Numero
del disco
Viene avviata la riproduzione.
* Durante la riproduzione di un disco MDLP.
Come saltare i dischiz
1 Durante la riproduzione, premere (ENTER)
fino a visualizzare “DISC”.
2 Ruotare l a m anopola di cont rollo SEEK fino a
visualizzare il disco desiderato.
14
Indicazione
LP2/LP4*
z),
Come saltare gruppi e dischi con il
telecomando a scheda
1 Durante la riprod uzione, premere M o m.
Per saltare Premere M o m.
un gruppo (tenere premuto un istante) e
rilasciare.
gruppi in modo
continuo
entro 2 secondi dal momento in
cui viene rilasciato la prima
volta.
dischi più volte.
dischi in modo
continuo
quindi premere di nuovo entro 2
secondi e tenere pr em uto.
Riproduzione ripetuta e in ordine
casuale
1 Durante la riprod uzione, premere più volte
(1) (REP) o (2) (SHUF) fino a visualizzare
l’impostazione desiderata.
Selezionare Per riprodurre
REP-Disc*1un disco in modo ripetuto.
SHUF-
Changer*
SHUF-All*
i brani nel cambia dischi in
1
ordine casuale.
2
i brani in tutti gli apparecchi in
ordine casuale.
*1 Se sono collega ti uno o più cambia CD/MD.
*2 Se sono collegati uno o più cambia CD oppure due
o più cambia MD.
Per tornare al modo di riproduzione normale,
selezionar e “REP-off” o “SHUF-off”.
Suggerimento
L’opzione “SHUF-All” non consente di riprodurre in
ordine casuale i brani contenuti nelle unità CD insieme
a quelli contenuti nei cambia MD.
Assegnazione di un nome a un disco
Se un disco in un cambia CD viene riprodotto
utilizzando la funzion e CU STOM FILE, ad ogni
disco è possibile a ss egnare un nome
personalizzato composto da un massimo di 8
caratteri (funzi one di promemoria di sco).
Se a un disco viene as segnato un nome, quest o
appare nell’elenco (pagina 15).
1 Durante la riprod uzione di un disco a cu i si
desidera assegnare un nome, premer e
(MENU).
2 Ruotare la manopola di controllo SEEK fino a
che non viene visua li zzato “Edit”, quindi
premere (ENTER).
Page 79

3 Ruotare la manopola di co ntrollo SEEK fino a
che non viene visual i zzato “Name Edit”,
quindi premere (ENTER).
4 Ruotare la manopola di co ntrollo SEEK fino a
visualizzare il carattere desiderato.
Il carattere cambia come riportato di seguito:
A y B y C ... y 0 y 1 y 2 ... y +
y – y
... y (spazio vuoto) y A
Per passare da una cifra all’altra
dell’indi cazione digital e, premere (ENTER).
Ripetere l’operazione fino al completamento
dell’immissione del nome.
Dopo avere immesso l’ultimo carattere e
premuto (ENTER), viene visualizzata la
finestra di dialogo di conferma.
5 Ruotare la manopola di co ntrollo SEEK fino a
che non viene visual izzato “YES”, quin di
premere (ENTER).
L ’impostazione è completata e il display torna
al modo di riproduzione normale.
Per visualizzare il nome, premere (DSPL) sul
telecomando a sc heda durante la riproduzione.
Suggerimenti
• Per correggere o cancellare un carattere,
sovrascrivere o inserire “
• Il promemoria disco ha sempre la priorità rispetto a
qualsiasi titolo preregistrato.
• Se è collegato un cambia dischi dotato della
funzione CUSTOM FILE, è possibile assegnare un
nome a un disco inserito nell’apparecchio.
• Le funzioni “REP-Track” e tutte quelle di
riproduzione in ordine casuale vengono sospese
finché l’assegnazione del nome non è stata
completata.
Con il telecomando a scheda
Nei punti da 2 a 4: premere M o m al posto della
manopola di controllo SEEK; nel punto 4: premere <
o , per spostare l’indicazione digitale; nel punto 5:
premere < o , al posto della manopola di controllo
SEEK.
”.
Eliminazione del nome
personalizzato
1 Selezionare l’appa recchio su cui è
memorizzato il nome personalizzato che si
desidera eliminare, quindi prem ere (MENU).
2 Ruotare la manopola di co ntrollo SEEK fino a
che non viene visual izzato “Edit”, quin di
premere (ENTER).
3 Ruotare la manopola di co ntrollo SEEK fino a
che non viene visualizzato “Name De lete”,
quindi premere (ENTER).
Viene vi su ali zz at o il nome memoriz zato.
4 Ruotare la manopola di controllo SEEK per
selezionare il nome che si desidera eliminare.
5 Premere (ENTER).
Viene visualizzata la finestra di dialogo di
conferma.
6 Ruotare la manopola di controllo SEEK fino a
che non viene vi su al izzato “YES”, quindi
premere (ENTER).
Il nome viene eliminato e viene visualizzato
“Continue” se sono memorizzati altri n omi. Se
si desidera eliminare altri nomi, ruotare la
manopola di controllo SEEK per selezionare
“YES”, quindi ripetere i punti da 4 a 6.
7 Premere (MENU).
L’apparecchio torna al modo di ri pr oduzione
normale.
Con il telecomando a scheda
Nei punti da 2 a 4: premere M o m al posto della
manopola di controllo SEEK; nel punto 6: premere <
o , al posto della manopola di controllo SEEK.
Ricerca di un disco in base al nome
— LIST
Se viene collegato un cam bia CD dotato della
funzione CUSTOM FILE o un cambia MD, è
possibile selezionare un disco dall’elenco.
Se a un disco viene assegnato un nome, questo
appare nell’elenco. Per ulteriori informazioni
sull’assegnazione del nome a un disco, veder e
pagina 14.
1 Durante la ripro duzione, premere (MENU).
2 Ruotare la manopola di controllo SEEK fino a
che non viene visualizzato “List”, quindi
premere (ENTER).
Vengono visualizzati il numero o il nome del
disco.
3 Ruotare la manopola di controllo SEEK fino a
visualizzare il disco desiderato.
4 Premere (ENTER) per riprodurre il disco.
Il display torn a al m odo di riproduzio ne
normale.
Con il telecomando a scheda
Durante la riproduzione, premere (LIST). Premere M
o m ripetutamente fino a visualizzare il disco
desiderato, quindi premere (ENTER).
continua alla pagina successiva t
15
Page 80

Telecomando a rotazione RM-X4S
Applicazione dell’etichetta
Applicare l’etichetta delle indicazioni in base al
modo in cui si deside ra monta re il telec omando a
rotazione.
D
S
D
UN
O
S
E
D
O
M
L
P
S
D
P
L
M
O
D
E
S
O
U
N
D
Individuazione dei comandi
I tasti del telecomando a rotazi one corrispondent i
a quelli dell’apparecchio o del telecomando a
scheda contro l lano le stesse funzioni.
SOUND
PRESET/
DISC
SOURCE
VOL
I comandi riportati di seguito del telecomando a
rotazione controllano operazioni diverse da
quelle dell’apparecchio.
• Comando PRESET/DISC
Per controllare la radio/il CD. Stessa funzione
dei tasti M o m sul telecomando a scheda
(premere e ruotare).
• Comando VOL (volume)
Stessa funzione della manopola di co ntrollo del
volume dell’apparecchio (ruotare).
• Comando SEEK/AMS
Per controllare la radio/il CD. Stessa funzione
dei tasti < o , sul telecomando a sc heda
(ruotare oppure ruotare e mantenere in
posizione).
ATT
DSPL
SEEK/AMS
MODE
OFF
OFF
1 Durante la pressione del comando VOL, tenere
premuto (SOUND).
Apparecchio audio ausiliare
È possibile collegare dispositivi portatili Sony
opzionali al terminale BUS AUDI O IN/AUX IN
dell’apparecchio. Se il cambia dischi o un altro
dispositivo non è collegato al terminale,
l’apparecchio consente di ascoltare l’audio del
dispositivo portatile mediante i diffusori
dell’auto.
Nota
Per il collegamento di un dispositivo portatile,
assicurarsi che BUS CONTROL IN non sia collegato.
Se un dispositivo è collegato a BUS CONTROL IN,
non è possibile selezionare “AUX” mediante
(SOURCE).
Suggerimento
Se vengono collegati sia un dispositivo portatile che
un cambia dischi, utilizzare il selettore AUX-IN
opzionale.
Selezione dell’apparecchio ausiliare
1 Premere più volte (SOURCE) fino a
visualizzare “AUX”.
Utilizzare il dispositivo portatile mediante i
relativi comandi.
Per regolare il livello di volume dell’apparecchio
ausiliare, vedere “AUX Level” a
pagina 14.
Modifica della direzione operativa
La direzione operativa dei comandi è impostata
in fabbrica come illustrato di seguito.
Per aumentare
Per diminuire
Se si desidera montare il telecomando a
rotazione sul lato destro del piantone di guida, è
possibile invertire la direzion e operativa dei
comandi.
16
Page 81

Informazioni aggiuntive
Precauzioni
• Se l’auto è stata parcheggiata in un luogo esposto
a luce solar e di re tta, a tt ende re c he l ’ap par ec chio si
raffreddi prima di utilizzarlo.
• L’antenna elettrica si estende au to maticamen te
durante il funzionamento dell’apparecchio.
Formazione di condensa
Nei giorni di pioggia o in zone estremamente umide,
è possibile che all’interno delle lenti e del display
dell’apparecchio si formi della condensa. Di
conseguenza, l’apparecc hio potrebbe non
funzionare corrett amente. In tal caso, rimuovere il
disco e attendere per circa un’ora fino a quando
l’umidità no n sia evaporata completamente.
Per mantenere una qualità audio
elevata
Prestare attenzione a no n versare bibite o altri
liquidi sull’apparecchio o sui dischi.
Note sui dischi
• Per mantener e puliti i dischi, non toccarne la
superficie. Afferrare i dischi dal bordo.
• Riporre i dischi nell’apposita custodia o
’apposito contenitore qua ndo non vengono
nell
utilizzati.
• Non esporre i dischi a calore o a temperature
elevate. Evitare di lasciarli all’interno di auto
parcheggiate e su cruscotti/ripiani posteriori.
• Non incollare etichette né utilizzare dischi con
residui di colla o inchiostro. Se vengo no utilizzati
questi tipi di disco, i residui possono causare
l’arresto del disco, provocando pro ble m i di
funzionamento o rovinando il disco stesso.
• Non utilizzare dischi su cui sono applicati
etichette o adesivi.
Utilizzando tali disch i, è possibil e che si
verifichino i seguenti problemi di funzionamento:
– Impossibilità di estrarre il disco (staccandosi da l
disco, l’etic hetta o l’adesivo causano
l’inceppamento del meccanismo di espulsione).
– Impossibilità di leggere cor re ttamente i dati
audio (ad esempio, la ripro duz io ne salta oppure
è impossibile riprodurre ) poi ché il
restringimento dovuto al calore del l’etichetta o
dell’adesivo ha provocato la deformazione del
disco.
• Non riprodurre di schi dalla forma irregolare (ad
esempio a forma di cuore, quadrato o stella) con
questo apparecchio, onde evitare problemi di
funzionamento all’apparecchio stesso. Non
utilizzare questo genere di disc hi .
• Non è possibile riprodurre CD da 8 cm.
• Prima della riproduzione, pulire
i dischi con un panno apposito
disponibile in commercio.
Pulire il disco procedendo dal
centro verso l’esterno. Non
utilizzare solv enti quali
benzene, acquaragia, detergenti
disponibili in commercio o
spray antistatici per dischi
analogici.
Note sui dischi CD-R/CD-RW
• È possibile che al cuni CD-R/CD-RW (a seconda
dell’apparecc hio utilizzato per la registrazione o
delle condizioni del disco) non possano essere
riprodotti mediante il pre s ente apparecchio.
• Non è possibile riprodurre disc hi CD-R/CD-RW
non finalizzati.
Dischi audio codificati mediante
tecnologie di protezione dei diritti
d’autore
Questo prodotto è stato proge ttat o per la
riproduzione di disch i conformi allo standard CD
(Compact Disc).
Recentemente, alcune case discografiche hanno
lanciato sul mercato vari dischi audio codificati
mediante tecnolog ie di pr ote zione dei diritti
d’autore. Si noti che alcuni di questi dischi non sono
conformi allo standard CD e pertanto non è
possibile riprodurli utilizzand o il presente prodotto.
Informazioni sui file MP3
MP3, l’acronimo di MPEG-1 Audio Layer-3, è un
formato stand ard di compressione dei file musicali
che consente di comprimere i dati audio di un CD
fino a circa 1/10 delle dimensioni ori ginali.
• Il presente apparecchio è compatibile con il
formato ISO 9660 livello 1/livello 2, con il
formato di espansione Joliet/Romeo, con i tag ID3
versione 1.0, 1.1, 2.2, 2.3 e 2.4 e con i dischi
registrati in multisessio n e.
• Numero massimo di:
– cartelle (gruppi) : 150, incluse la cartella radice e
le cartelle v u ote.
– file MP3 (brani) e cartelle cont enuti in un disco:
300 (se il nome di una cartella/di un file contiene
molti caratteri, è possibile che tale numero sia
inferiore a 300).
– caratteri che è possibile visualizzare per un
nome di cartella/file: 32 (Joliet) o 32/6 4
(Romeo); per i tag ID3: 15/30 (1.0, 1.1, 2.2 e
2.3) o 63/126 (2.4).
continua alla pagina successiva t
17
Page 82

Ordine di riproduzione di file MP3
MP3
Note
• Assicurarsi di finalizzare il disco prima di utilizzarlo
con l’apparecchio.
• Durante l’assegnazione di un nome a un file MP3,
assicurarsi di aggiungere al nome del file
l’estensione “.mp3”.
• Se viene riprodotto un file MP3 ad alta velocità di
trasmissione, ad esempio 320 kbps, è possibile che
l’audio sia soggetto a interruzioni.
• Durante la riproduzione di un file MP3 VBR (velocità
di trasmissione variabile) o mentre si procede
rapidamente in avanti/all’indietro, è possibile che il
tempo di riproduzione trascorso non venga
visualizzato correttamente.
• Se il disco è registrato in multisessione, viene
riconosciuto e riprodotto solo il primo brano nel
formato della prima sessione (tutti gli altri formati
vengono ignorati). La priorità del formato è CD-DA,
CD ATRAC e MP3.
– Se il primo brano è un CD-DA, solo il CD-DA della
prima sessione viene riprodotto.
– Diversamente, viene riprodotta una sessione CD
ATRAC o MP3. Se il disco non contiene dati nei
formati di cui sopra, viene visualizzato “NO Music”.
Cartella
(gruppo)
File MP3
(brano)
Informazioni sui CD ATRAC
Formato ATRAC3plus
ATRAC3, l’acronimo di Adaptive Transform
Acoustic Coding3, è una tecnol ogia di
compressione audio che consen te di comprimere i
dati audio di un CD fino a circa 1/10 de lle
dimensioni originali. ATRAC3plus, un formato
esteso di ATRAC3, comprime i dati di un CD audio
fino a circa 1/20 delle dimensioni originali. Il
presente apparecchio accetta entrambi i forma ti
ATRAC3 e ATRAC3plus.
CD ATRAC
I CD ATRAC sono dati di CD audio registrati che
vengono compressi nel forma to ATRAC3 o
ATRAC3plus utilizzando un software autorizzato,
ad esempio SonicStage 2.0 o successivo oppure
SonicStage Simple Burner.
• Numero massimo di:
– cartelle (gr uppi ): 255
– file (brani): 999
• Vengono visualizzati i caratteri relativi al nome di
una cartella/di un file e le informazioni di testo
create mediante SonicStage.
Per ulteriori informazioni su CD ATRAC,
consultare il manuale di SonicStage o di SonicStage
Simple Burner.
Nota
Assicurarsi di creare un CD ATRAC utilizzando il
software autorizzato, quale ad esempio SonicStage
2.0 o successivo oppure SonicStage Simple Burner
1.0 o 1.1, che vengono forniti con i prodotti Sony
Network.
Per eventuali domande o problemi rigua rda nti
l’apparecchio non trattati nel presente ma nuale,
rivolgersi al più vicino rivenditore Sony.
Manutenzione
Sostituzione della batteria al litio del
telecomando a scheda
In condizioni normali, la batteria dura circa 1 anno.
Il ciclo di vita può risultare più breve in funzione
delle condizioni di utilizzo.
Quando la batteria si scarica, il raggio d’azione del
telecomando a scheda risulta ridotto. Sostituire la
batteria con una batter i a al li ti o CR2025 nuova.
L’uso di batterie diverse potrebbe comportare il
rischio di incendi o esplosioni.
x
Lato + verso
l’alto
Note sulla batteria al litio
• Tenere la batteria al litio fuori dalla portata dei
bambini. Se la batteria viene ingerita, consultare
immediatamente un medico.
• Pulire la batteria con un panno asciutto per
assicurare un perfetto contatto.
• Assicurarsi di rispettare la corretta polarità durante
l’inserimento della batteria.
• Non afferrare la batteria con pinze di metallo, in
quanto potrebbe verificarsi un corto circuito.
AVVERTENZA
La batteria può esplodere se usata
scorrettamente. Pertanto, non deve essere
ricaricata, smontata o gettata nel fuoco.
18
Page 83

Sostituzione del
fusibile
Per la sostituzione del fusibile,
assicurarsi di utilizzare un
fusibile dello stesso
amperaggio di quello indic ato
sull’originale. Se il fusibile si
brucia, controlla r e i
collegamenti
dell’alimentazione e sostituire
il fusibile. Se dopo la
sostituzione il fusibile si brucia
di nuovo, è possibile che si tratti di un proble ma
interno. In tal caso, rivolgersi al più vicino
rivenditore Sony.
Fusibile (10 A)
3 Estrarre le chiavi di rilascio per rimuovere
la cornice di protezione.
2 Rimuovere l’apparecchio.
1 Inseri re contemporaneamente entrambe le
chiavi di rilascio fino a farle scattare in
posizione.
Pulizia dei connettori
Se i connettori tra l’a pp ar ecchio e il pannello
anteriore sono sporchi, l’apparecchio potrebbe non
funzionare corret tamente. Per evitare questo
problema, aprire il pannello anteriore, rimuoverlo
(pagina 4), quindi pulire i connettori con un
bastoncino di cotone imb evuto di alc ol . Non
esercitare forza eccessiva. Diversamente, i
connettori potrebbero venire danneggiati.
Unità principale
Note
• Per motivi di sicurezza, spegnere il motore prima di
pulire i connettori e rimuovere la chiave dal
blocchetto di accensione.
• Non toccare mai direttamente i connettori con le dita
o con oggetti di metallo.
Lato posteriore del
pannello anteriore
Rimozione dell’apparecchio
1 Rimuovere la cornice di protezione.
1 Rimuovere il pannello anteriore
(
pagina 4).
2 Inserire le chiavi di rilasc io nella corni ce di
protezione.
Orientare le chiavi d i
rilascio come illustrato.
Gancio rivolto
verso l’interno.
2 Estrarre le chiavi di rilascio per sbloccare
l’apparecchio.
3 Rimuovere l’apparecchio dalla struttura
facendolo scorrere.
Caratteristiche tecniche
Lettore CD
Rapporto segnale-rumore: 120 dB
Risposta in frequenza: 10 – 20.000 Hz
Wow e flutter: al di sotto del limite misurabile
Sintonizzatore*
FM
Gamma di frequenze: 87.50 – 108.00 MHz
Terminale dell’antenna: connettore antenna esterna
Frequenza intermedi a: 10.7 MHz/450 kHz
Sensibilità ut ilizzabile: 9 dBf
Selettività: 75 dB a 400 kHz
Rapporto segnale-rumore: 67 dB (ste r eo),
69 dB (mono)
Distorsione armonica a 1 kHz: 0,5 % (stereo),
0,3 % (mono)
Separazione: 35 dB a 1 kHz
Risposta in frequenza: 30 – 15.000 Hz
continua alla pagina successiva t
19
Page 84

MW/LW
g
y
Gamma di frequenze:
MW: 531 – 1.602 kHz
LW: 153 – 279 kHz
Terminale dell’antenna: connettore antenna esterna
Frequenza intermedia: 10.7 MHz/450 kHz
Sensibilità: MW: 30 µV, LW: 40 µV
*
di cui al par. 3 dell’Allegato A al D.M. 25/06/85 e al
par. 3 dell’Alle
ato 1 al D.M. 27/08/87
Amplificatore di potenza
Uscite: uscite diffusori (connettori a tenuta)
Impedenza diffusori: 4 – 8 ohm
Uscita di potenza massima: 52 W × 4 (a 4 ohm)
Generali
Uscite:
Terminali di uscita audio (anteriori/posteriori)
Terminale di uscita subwoofer (mono)
Terminale di controllo del relè dell’antenna
elettrica
Terminale di controllo dell’amplificatore di
potenza
Ingressi:
Terminale di controllo ATT del telefono
Terminale di controllo dell’illuminazione
Terminale di ingresso controllo BUS
Terminale di ingresso audio BUS/AUX IN
Terminale di ingresso del telecomando
Terminale di ingresso dell’antenna
Comandi relativi al tono:
Bassi: ±8 dB a 100 Hz
Acuti: ±8 dB a 10 kHz
Enfatizzazione dei bassi:
+8 dB a 100 Hz
±2 dB a 10 kHz
Requisiti di alimentazione: batter ia auto da 12 V CC
(massa negativa)
Dimensioni: circa 178 × 50 × 188 mm (l/a/p)
Dimensioni di montaggio: circa 182 × 53 × 162 mm
(l/a/p)
Peso: circa 1,6 kg
Accessori in dotazione:
Telecomando a scheda: RM-X142
Elementi per l’ins tallazione e i collegamenti (1 set)
Custodia pannello anteriore (1)
Accessori/apparecchi opzionali:
Telecomando a rotazione: RM-X6S, RM-X4S
Cavo BUS (in dotazione con un cavo a piedini
RCA): RC-61 (1 m), RC-62 (2 m)
Cambia CD (10 dischi): CDX-757MX,
CDX-T70XM
Cambia CD (6 dischi): CDX-T69
Cambia MD (6 dischi): MDX-66XLP
Selettore di so rgente: XA-C30
Selettore AUX-IN: XA-300
Brevetti degli Stati Uniti d America e di altri
Paesi concessi su licenza dai Dolb
Nota
Il presente apparecchio non può essere collegato a un
preamplificatore digitale o a un equalizzatore
compatibili con il sistema BUS Sony.
Il design e le caratteristiche tecniche sono soggetti a
modifiche senza preavviso.
20
,
Laboratories.
• Leghe saldanti prive di piombo, sono utilizzate per la
saldatura di determinati componenti. (oltre l’80 %)
• Determinati circuiti stampati non contengono
ritardanti alla fiamma alogenati.
• Le parti estetiche non contengono ritardanti alla
fiamma alogenati.
• La stampa del cartone è realizzata con inchiostro a
base di olio vegetale e privo di Composti organici
volatili (VOC).
• Come materiale di riampimento per l’imballaggio
non viene utilizzato polistirolo espanso.
Guida alla soluzione dei
problemi
Fare riferimento alla seguente lista di verifica per
risolvere la maggior parte dei problemi che si
potrebbero verificare durante l’uso di questo
apparecchio.
Prima di esaminare l’elenco che segue, verificare le
procedure di collegamento e d’uso dell’apparecchio.
Generali
L’apparecchio non ri ceve alimentazione.
• Verificare i collegamenti. Se questi sono cor r etti,
controllare il fusibile.
• Se l’apparecchio viene spento e il display disattivato,
non è possibile utilizzarlo mediante il telecomando.
t Accendere l’apparecchio.
L’antenna elettrica non si estende.
L’antenna elettr ic a non dispone di scatola a relè.
L’audio non viene emesso.
• Il volume è troppo basso.
• È attivata la funzione ATT o la funzione ATT del
telefono (se il cavo di interfaccia di un telefono per
auto è collegato al cavo ATT).
• La posizione del comando di attenuazione (FAD) non
è appropriata per un sistema a 2 diffusori.
• Il cambia CD non è comp at ibile con il formato del
disco (MP3/CD ATRAC).
t Effettuare la riproduzione mediante un cambia
CD Sony compatibile con il formato MP3 o
mediante il presente apparecchio.
Non viene emesso alcun segnale acustico.
• Il segnale acustico è disattivato (pagina 13).
• Un amplificatore di potenza opzionale è collegato e
l’amplificatore incorporato non viene utilizzato.
Il contenuto della memo ria è stato cancellato.
• È stato premuto il tasto RESET.
t Reinse ri r e i da ti in memoria.
• Il cavo di alimentazione o la batte r ia sono stati
scollegati.
• Il cavo di alimentazione non è collegato
correttamente.
Page 85

Le stazioni memorizzate e l’ora esatta sono
cancellate.
Si è bruciato il fusibile.
Quando si cambia la posizione della chiave di
accensione, viene emesso un di sturbo.
I cavi non sono collegati correttamente al connettore di
alimentazione access o ria dell’auto.
Il display viene disattivato/non viene
visualizzato nella relativa finestra.
• L’attenuatore di luminosità è impos tato su “Dimmer
on” (pagina 13).
• L’angolazione del pannello anteriore non è corretta.
t Regolare l’angola z ione del pannello anteriore
tenendo premuto (ANGLE) (pagina 7).
• Il display scompare tenendo premuto (OFF).
t Tenere di nuovo premuto (OFF) fino a
visualizzare il display.
• I connettori sono sporchi (p a gina 19).
La funzione DSO non è disponibile.
A seconda del tipo di interni del l’auto o del tipo di
musica, è possibile che la funzione DSO non pro duc a
l’effetto desiderato.
Le immagini cambiano automaticamente.
Nel modo immagine automatic a, non è possibile
visualizzare l’immagine selezionata.
tPer visualizzare solo l’immagine selezionata,
impostare “A.IMG off” (pagina 13).
Non viene visualizzata alcuna voce del display.
tImpostare “Info on” (pag ina 13).
Riproduzione di CD/MD
Non è possibile inserire un disco.
• Nell’alloggiamen to è prese nt e un a lt ro disc o.
• Il disco è stato inserito f or zata mente in senso
contrario o nel modo sbagliato.
Il disco non viene riprodotto.
• Il disco è difettoso o sporco.
• I CD-R/CD-RW non sono per uso audio (pagina 17).
Non è possibile riprodurre file in formato MP3.
Il disco non è compatibile con il f or mato e la versi one
MP3 (pagina 17).
I file MP3 necessitano di un tempo maggiore
prima di poter essere riprodotti.
Per i dischi indicati di seguito, l’avvio della
riproduzione necessita di un tempo maggiore:
– dischi registrati con una struttura ad albero
complessa.
– dischi registrati in multisessione.
– disch i ai qual i è possibile aggiungere dati.
Non è possibile riprodurre il CD ATRAC.
• Il disco non è stato creato me dia nte un software
autorizzato, quale SonicSt ag e o So nic S ta ge Sim pl e
Burner.
• I brani che non sono inclusi nel gruppo non possono
essere riprodotti.
Le voci del display non scorrono.
• Per i dischi che presentano mo lti caratteri, tali voci
potrebbero non scorrere.
• La funzione “A.Scroll” è disattivata.
t Imposta re “A.Scroll on” (pagina 13) o premer e
(SCRL) sul telecomando a sche da .
L’audio salta.
• L’installazione non è corretta.
t Installare l’ a ppa r ecc h io con un’angolazione
inferiore a 45° in una parte stabile dell’ a uto.
• Il disco è difettoso o sporco.
I tasti per le operazioni non funzionano.
Il disco non viene espulso.
Premere il tasto RESET (pagina 4).
L’indicazione “MS” o “MD” non viene
visualizzata nel display della sorgente quando
sono collegati sia un lettore MGS- X1 opziona le
che un cambi a M D.
Questo apparecchio riconosce l’MGS -X1 co me unità
MD.
t Premere (SOURCE) fino a visualizzare “MS” o
“MD”, quindi premere più volte (MODE).
Ricezione radiofonica
Non è possibile ricevere le stazioni.
L’audio è disturbato.
• Collegare il cavo di controllo dell ’ ant e nna elettrica
(blu) o il cavo di alimentazion e accessoria ( rosso) al
cavo di alimentazione di un preampli ficato re di
antenne per auto (solo se l’au to di spone di antenna
FM/MW/LW incorporata sul vetro posteriore/
laterale).
• Verificare il collegamento dell’antenna dell’ auto.
• L’antenna dell’auto non si estende.
t Verificare il collegamento del cavo di controllo
dell’antenna elettrica.
• Verificare la frequenza.
• Quando il modo DS O è attivato, talvolta l’audio
risulta disturbato.
t Disattivare il modo DSO su “of f” (p ag in a 7 ).
Non è possibile effettuare la sintonizzazione
preselezionata.
• Memorizzare la frequenza corretta.
• Il segnale di trasmissione è eccessivame nt e d e b ol e.
La sintonizzazione automatica non funziona.
• Il modo di ricerca loca le è im post at o su “o n” .
t Impostare “Local off” (pagina 13).
• Il segnale di trasmissione è eccessivame nt e d e b ol e.
t Eseguire la sintonizzazione manuale.
Durante la ricezione FM, l’indicazione “ST”
lampeggia.
• Sintonizzare la frequenza in modo corretto.
• Il segnale di trasmissione è eccessivame nt e d e b ol e.
t Impostare “Mono on” (pagina 13).
Un programma FM trasmesso in stereofonia
viene ricevuto in monofonia.
L’apparecchio è impost at o sul modo di ricezione
monofonico.
t Impostare “Mono off” (pagina 13).
continua alla pagina successiva t
21
Page 86

RDS
Dopo alcuni secondi di ascolto, si avvia la
ricerca.
La stazione non è TP oppure il segnale è debole.
t Disattivare il modo TA (pagina 10).
Non viene trasmesso alcun notiziario sul
traffico.
• Attivare il modo TA (pagina 10).
• La stazione non trasmette notiziari sul traffico pur
essendo una stazione TP.
tSintonizzarsi su un’altra stazione.
PTY visualizza “- - - - - - - -”.
• La stazione corrente non è un a st azione RDS.
• I dati RDS non vengono ricevuti.
• La stazione non specifica il tipo di programma.
Messaggi e indicazioni di errore
1
Blank*
Sull’MD non sono stati registrati bra ni. *
t Riprodurre un MD co nte nente brani registrati.
1
Error*
• Il disco è sporco o è stato inse ri to in se nso
contrario.
tPulire il disco o inserirlo correttamente.
• Il disco non viene riprodotto per un problema non
specificato.
tInserire un altro disco.
Failure
I collegamenti di diffusori/ampli ficato ri non sono
corretti.
t Consultare la gui da all’installazione del presente
Load
Il cambia dischi sta caricando il disc o.
t Attendere che il disco venga caricato.
Local Seek +/–
Il modo di ricerca locale è attivato durante la
sintonizzazione autom a t ica.
NO AF
Non esiste alcuna frequenza alterna tiva per la stazione
corrente.
t Ruotare < o , mentre il nome della stazi one
NO Data
Tutti i nomi personalizzati sono stati eliminati oppure
non ne è stato memorizzato alcuno.
NO Disc
Nel cambia CD/MD non sono inseri ti di sc hi.
t Inserire i dischi ne l cambia dischi.
NO Disc Name
Il brano non include il nome del disco.
NO Group Name
Il brano non include il nome del gruppo.
NO ID3 Tag
Il file MP3 non include informazioni tag ID3.
2
*
modello per verificare i collegamenti.
lampeggia. L’apparecchio avvia la ricerca di
un’altra frequenza con gli stessi dati PI
(Programme Id entification, identific a tivo
programma) (viene visualizzato “PI Seek”).
22
NO Info
Nel file ATRAC3/ATRAC3plus non sono presenti
informazioni di test o.
NO Magazine
Il contenitore di dischi non è inserito nel cambia CD.
t Inserire il c ontenitore di dischi nel cambia disc hi.
NO Music
Il disco inserito non contiene file mu sic a li.
t Inserire un CD musicale nel pr esente app arecch io o
in un cambia dischi compatibile con il for ma to
MP3.
NO TP
L’apparecchio continua la ricerca di stazioni TP
disponibili.
NO Track Name
Il brano non include il relativo nome.
Not Read
Le informazioni sul disco non sono state lette
dall’apparecchio.
2
t Caricare il dis co , qui ndi se le z ionarlo dall’elenco.
Not Ready
Il coperchio del cambia MD è aperto o gli MD non
sono inseriti correttamente.
t Chiudere il coper c hio o inserire gli MD
correttamente.
Offset
Potrebbe essersi verificato un problema inte r no.
t Verificare i collegamen ti . Se l’indicazione di errore
rimane visualizzata, rivolgersi al più vicino
rivenditore Sony.
Read
È in corso la lettura di tutte le informazioni relative ai
brani e ai gruppi del disco.
t Una volta terminata l’ope r a zione , la ri pr oduz i one
viene avviata automaticamente. Potrebbe essere
necessario attendere alcuni minuti, a seconda della
struttura del disco.
Push Reset
L’unità CD e il cambia CD/MD non funzionano a
causa di un problema non specificato.
t Premere il tasto RESET (pagina 4).
“ ” o “ ”
Mentre si procede rapidamen te in avanti/all’ indietro,
sono stati raggiunti l’in iz io o la fine del dis co e non è
possibile andare oltre.
“s”
L ’apparecchio non supporta la visualizzazione di un
determinato car a tte re.
*1 In caso di errori durante la riproduzione di un CD o
di un MD, nel display non viene visualizzato il
numero di disco del CD o dell’MD.
*2 Il numero del disco che causa l’errore viene
visualizzato nel display.
Se le soluzioni riportate non risolvono il problema,
rivolgersi al più vicino rivenditore Sony.
Se l’apparecchio viene portato in un centro di
assistenza a causa di un problema relativ o all a
riproduzione di un CD, assicurarsi di portare il disco
utilizzato al momento in cui si è verificato il
problema.
Page 87

Page 88

Welkom!
Dank u voor de aankoop van deze Sony Compact
Disc Player. U kunt tijdens het rijde n genieten
van de volgende functies.
• CD's afspelen
U kunt CD-DA's (met CD TEXT*), CD-R's/
CD-RW's (ook MP3-bestanden die in meerdere
sessies zijn opgenomen (
ATRAC CD's (ATRAC3- en ATRAC3plusindeling (
Soorten discs Label op de disc
pagina 18)) afspelen.
pagina 17)) en
Waarschuwing als het contactslot van
de auto geen ACC-positie heeft
Als de motor is uitgeschakeld, moet u op
(OFF) drukken en deze toets ingedrukt
houden tot het display verdwijnt.
Als u dit niet doet, wordt het display niet
uitgeschakeld en raakt de accu uitgeput.
CD-DA
MP3
AT RAC CD
• Radio-ontvangst
–U kunt maximaal 6 zenders per band ops la an
(FM1, FM2, FM3, MW en LW).
–BTM (Best Tuning Memory): met het
apparaat worden zenders met sterke signalen
geselecteerd en opgeslagen.
–U kunt aan elke radiozender een naam
toewijzen, deze in het geheugen opslaan en
zendernamen in de lijst weergeven.
• Geluid regelen
–EQ7: u kunt een equaliz er curve voor 7
soorten muziek kiezen.
–DSO (Dynamic Soundstage Organizer): het
geluid van de luidsprekers wordt met virtuele
luidsprekersynthese verbeterd, zelfs al s de
luidsprekers onder in de deur zijn
geïnstalleerd.
–BBE MP: verbetert digi ta al gecomprimeerd
geluid, zoals MP3. Lees de volgende uitleg
voor meer informatie.
• Beeldinstelling
U kunt verschillende be el den op het apparaat
weergeven.
– Space Prod ucer: hiermee worden geanimeerde
patronen op het scherm gemaakt die gelijklopen
met de muziek.
• Bediening van optionele apparaten
Naast afspelen m et d i t ap paraat kunt u ook
optionele CD/MD - wisselaars en opt i onele,
draagbare apparaten van Sony bedienen.
* Een CD TEXT disc is een CD-DA die informatie
bevat, zoals discnamen, artiestennamen en
tracknamen.
Dit label bevindt zich onderaan op het toestel.
Met het BBE MP-proces
R
wordt digitaal gecomprimeerd
geluid, zoals MP3, verbeterd.
Tijdens dit proces worden namelijk de hogere
boventonen die zijn verloren door de compressie,
hersteld en versterkt. Met het BBE MP-proces
worden gelijkmatige boventonen gegenereerd uit
hat bronmateriaal, waardoor warmte, detail en
nuance worden hersteld.
SonicStage en het bijbehorende logo zijn
handelsmerken van Sony Corporation.
ATRAC, ATRAC3, ATRAC3plus en de
bijbehorende logo's zijn handelsmerken van
Sony Corporation.
2
Page 89

Inhoudsopgave
Aan de slag
Het apparaat opnieuw instellen . . . . . . . . . . . . . 4
De klok instellen . . . . . . . . . . . . . . . . . . . . . . . . 4
De stand DEMO . . . . . . . . . . . . . . . . . . . . . . . . 4
Het voorpaneel verwijderen. . . . . . . . . . . . . . . . 4
Het voorpaneel bevestigen . . . . . . . . . . . . . . 5
De disc in het apparaat plaatsen . . . . . . . . . . . . 5
De disc uitwerpen . . . . . . . . . . . . . . . . . . . . 5
De hoek van het voorpaneel aanpasse n . . . . . . . 5
Bedieningselementen en algemene
handelingen
Hoofdeenheid . . . . . . . . . . . . . . . . . . . . . . . . 6
Kaartafstandsbediening RM-X142 . . . . . . . 6
CD
Display-items . . . . . . . . . . . . . . . . . . . . . . . . 8
Herhaaldelijk en willekeurig afspelen . . . . . 8
Radio
Zenders opslaan en ontvangen. . . . . . . . . . . . . . 9
Automatisch opslaan — BTM . . . . . . . . . . . 9
Handmatig opslaan . . . . . . . . . . . . . . . . . . . 9
De opgeslagen zenders ontvangen . . . . . . . . 9
Automatisch afstemmen . . . . . . . . . . . . . . . 9
Een zender in een lijst ontvangen
— LIST . . . . . . . . . . . . . . . . . . . . . . . . . . . . 9
RDS . . . . . . . . . . . . . . . . . . . . . . . . . . . . . . . . . . 9
Overzicht . . . . . . . . . . . . . . . . . . . . . . . . . . . 9
AF en TA/TP instellen . . . . . . . . . . . . . . . . 10
PTY selecteren . . . . . . . . . . . . . . . . . . . . . . 11
CT instellen . . . . . . . . . . . . . . . . . . . . . . . . 11
Andere functies
De geluidsinstellingen wijzigen . . . . . . . . . . . 12
De geluidskenmerken wijzigen . . . . . . . . . 12
De equalizercurve aanpassen
— EQ7 Tune . . . . . . . . . . . . . . . . . . . . . . . 12
Menu-items aanpassen — MENU . . . . . . . . . 12
Optionele apparaten gebruiken. . . . . . . . . . . . 14
CD/MD-wisselaar . . . . . . . . . . . . . . . . . . . 14
Bedieningssatelliet RM-X4S . . . . . . . . . . . 15
Extra audioapparatuur . . . . . . . . . . . . . . . . 16
Aanvullende informatie
Voorzorgsmaatregelen . . . . . . . . . . . . . . . . . . 1 7
Opmerkingen over discs . . . . . . . . . . . . . . 17
Informatie over MP3-bestanden . . . . . . . . 17
Informatie over ATRAC CD's . . . . . . . . . 18
Onderhoud . . . . . . . . . . . . . . . . . . . . . . . . . . . 18
Het apparaat verwijderen . . . . . . . . . . . . . . . . 19
Technische gegevens . . . . . . . . . . . . . . . . . . . 19
Problemen oplossen . . . . . . . . . . . . . . . . . . . . 20
Foutmeldingen/berichten . . . . . . . . . . . . . . 22
3
Page 90

Aan de slag
De stand DEMO
Het apparaat opnieuw instellen
Voordat u het apparaat voor het eerst gaat
gebruiken of na het vervangen van de accu of het
wijzigen van de aansluitingen, moet u het
apparaat opn i euw instellen.
Maak het voorpaneel los en druk met een puntig
voorwerp, zoals een balpe n, op de RESET toets.
RESET toets
Opmerking
Als u op de RESET toets drukt, worden de
klokinstelling en bepaalde opgeslagen gegevens
gewist.
De klok instellen
De digitale klok werkt met het 24-uurssysteem.
1 Druk op (MENU).
2 Draai de SEEK regelknop tot "Setup"
verschijnt en druk vervolgens op
(ENTER).
3 Draai de SEEK regelknop tot "Clock
Adjust" verschijnt en druk vervolgens
op (ENTER).
Het instelscherm voo r de kl ok verschijnt.
4 Draai de SEEK regelknop om de uren
en minuten in te stellen.
Als u de digitale aanduiding wilt verplaatsen,
drukt u op (ENTER).
5 Na het instellen van de minuten drukt
u op (ENTER).
De klok begint te lopen.
Als u de klok tijdens het afspelen of ontvangen
wilt weergeve n, stelt u "Clock on" (
Met de kaartafstandsbediening
Druk in stap 2, 3 en 4 op M of m in plaats van op de
SEEK regelknop. Druk in stap 4 op < of , in plaats
van op (ENTER).
Tip
U kunt de klok automatisch instellen met de RDS-
pagina 11).
functie (
pagina 13) in.
Wanneer u het apparaat uitschakelt, wor dt eer st
de klok weergegeven. Vervolgens wordt de
demonstratieweergave (DEMO) gestart.
Als u de DEMO stand wilt annuleren, moet u
"Demo off" instellen in he t menu (
terwijl het apparaat is uitgeschakeld.
pagina 13)
Het voorpaneel verwijderen
U kunt het voorpaneel van het apparaat
verwijderen om diefstal te voorkomen.
Waarschuwingstoon
Wanneer u het contact in de stand OFF zet
zonder het voorpaneel te verwijderen, hoort u de
waarschuwingst oon enkele seconden.
U hoort de waarschuwingstoon alleen a ls de
ingebouwde versterker wordt gebruikt.
1 Druk op (OFF).
Het apparaat wordt ui tgeschakeld.
2 Druk op .
De linkerzijde van het voorpaneel wor dt
ontgrendeld.
3 Schuif het voorpaneel naar links en
trek het voorpaneel voorzichtig naar u
toe.
(OFF)
2
1
Opmerkingen
• Laat het voorpaneel niet vallen en druk niet te hard
op het voorpaneel en het display.
• Stel het voorpaneel niet bloot aan hitte/hoge
temperaturen of vocht. Laat het voorpaneel niet
achter in een geparkeerde auto of op het
dashboard/de hoede npla nk.
Tip
Neem het voorpaneel mee in de bijgeleverde
beschermhoes.
4
Page 91

Het voorpaneel bevestigen
Plaats opening A van het voorpaneel op pin B
van het apparaat en druk de linkerzijde
voorzichtig naar binnen.
Druk op (SOURCE) op het apparaat (of plaats
een disc) om het apparaat te activeren.
A
B
Opmerking
Plaats niets op de binnenkant van het voorpaneel.
De disc in het apparaat
plaatsen
1 Druk op Z.
Het voorpaneel schuift automatisch naar
beneden.
2 Plaats de disc (met het label naar
boven).
De hoek van het voorpaneel
aanpassen
ANGLE
1 Druk lang op (ANGLE) en herhaal dit
net zo lang tot de juiste hoek van het
voorpaneel is bereikt.
Het voorpaneel kan in 3 st anden worden
ingesteld.
Als u het voorpaneel weer op de standaardstand
wilt instellen, drukt u lang op (ANGLE) en
herhaalt u dit totdat het voorpaneel zich weer in
de standaardst and bevindt.
Tips
• Nadat het voorpaneel naar beneden is geschoven
(om de disc te plaatsen), keert het automatisch
terug naar de stand die u hebt ingesteld.
• De hoek waarin u het voorpaneel zet, wordt
opgeslagen in het apparaat. Wanneer u het contact
uitschakelt, wordt de standaardhoek van het
voorpaneel weer hersteld. Schakelt u het contact
weer in, dan wordt het voorpaneel weer in de hoek
gezet die u hebt ingesteld.
Het voorpaneel schuift automatisch naar
boven en het afspelen wor dt automatisch
gestart.
De disc uitwerpen
1 Druk op Z.
Het voorpaneel schuift automatisch naar
beneden en de dis c wo rdt uitgeworpen.
2 Druk op Z om het voorpaneel te
sluiten.
Opmerking
15 seconden nadat het voorpaneel naar beneden is
geschoven, schuift het automatisch weer naar boven.
5
Page 92

Bedieningselementen en algemene handelingen
Hoofdeenheid
12 3 4 6578
OFF
MODE
VOL
PUSH SOUND PUSH ENTER
REP SHUF BBE MP PAUSE
SOURCE AF/TA1
9
Kaartafstandsbediening
RM-X142
AF TA
2
BBE MP
5
MODE
+
DISC
OPEN/CLOSE
3
PAUSE
6
LIST
qh
qj qd
qa
qk
SCRL
PTY
DSPL
REP SHUF
1
4
EQ7 DSO
7
MENU
q;
ql
–
SEEK
SOUND
SOURCE
DISC
+
SEEK
–
ENTER
w;
ATTOFF
+
2
VOL
–
wa
+
–
2534
6
CDX-M7850
qaq; qs qd qf qg
Zie de volgende pagina's voor mee r inf or m at i e.
De overeenkomstige toetsen op de
kaartafstandsbediening bedienen dezelfde
functies als die op het apparaat.
A MODE toets 9, 14
ws
1
wd
wf
wg
6
wh
De radioband selecteren (FM/MW/LW)/het
apparaat select eren*
1
.
B OFF toets
De bron uitschakelen/ stoppen.
C VOL (volume) re gelknop/SOU ND toets
12
Het volume regelen (draaien); geluidsitems
selecteren (indrukken).
D Display
E Discsleuf 5
De disc plaatsen.
F SEEK regelknop/ENTER toets
Items selecteren (draaien); een instelling
voltooien (indrukken).
Radio:
Afstemmen op zenders: druk herhaaldelijk
op (ENTER) om "SEEK", "MANUAL" of
"PRESET" te select er en en draai de SEEK
regelknop tot de gewenst e zender verschijnt.
CD:
Tracks of groepen overslaan: druk
herhaaldelijk op (ENTER) om ./> of
"GROUP" te selecteren en dr aai vervolgens
de SEEK regelknop to t de gewen ste t rack of
groep verschijnt.
G MENU toets
Het menu openen .
SEEK
ANGLE
MENU
IMAGE
6
Page 93

H Z (uitwerpen)/ANGLE toets 5
De disc uitwerpen/het voorpaneel naar
beneden schuiven (indrukken); de hoek van
het voorpaneel op een van de 3 standen
instellen (ingedrukt houden) .
I (voorpa neel losmaken) to ets 4
J SOURCE toets
De bron inschakelen/wijzigen (radio/CD/
2
MD*
/AUX*3).
K Cijfertoetsen
Radio:
De opgeslagen zenders ontvangen
(indrukken); zend er s opslaan (ingedrukt
houden).
CD/MD*2:
(1): REP 8
(2): SHUF 8
(5): BBE MP*4 2
Als u de functie BBE MP wilt activeren, stelt
u "BBE MP-on" in. Wilt u de func tie
annuleren, dan st el t u "BBE MP-off" in.
(6): PAUSE*
4
Afspelen on derb re ke n. Dru k nogma al s o p d e
toets om te annuleren.
L RESET toets 4
M AF (alternatieve frequenties)/TA
(verkeersinformatie) toets 10
AF en TA/TP in RDS i n stellen.
N Ontvanger
Voor het on t vangen va n si gnalen van de
kaartafstandsbe d i eni ng of de draadloze
afstandsbediening.
O IMA G E t oets 2
De displayafbeelding selectere n.
Space Producer stand t Movie stand 1-2
t Spectrum analyzer stand 1-5 t Wall
paper stand 1-3 t normale weergave-/
ontvangststand
De volgende toetsen op de
kaartafstandsbediening verschillen van de
toetsen op he t ap para at of hebbe n ander e fu nctie s
dan de toetsen op het apparaat.
qh SCRL (scroll) toets 8
Het displayitem rollen.
qj DSPL (display)/PTY (programmatype)
toets 8, 11, 15
Displayitems wijzigen; PTY in RDS
selecteren.
qk EQ7 (equalizer) toets
Een equalize rt ype selecteren (Xplod, Vocal,
Club, Jazz, New Age, Rock, Custom of off).
ql </, (SEEK –/+) toetsen
Radio:
Automatisch afstemmen op zenders
(indrukken); handmatig zoeken naar zenders
(ingedrukt houden).
CD:
Tracks overslaan (indrukken); tracks blijven
overslaan (indrukken, vervolgens binnen 1
seconde nogmaals indrukken en
vasthouden); een track snel vooruit-/
terugspoelen ( in gedrukt houden).
w; SOUND toets 12
Geluidsitems selecteren.
wa VOL (volume) +/– toets
Het volume aanpassen.
ws OPEN/CLOSE toets
Het voorpaneel openen/sluiten.
wd DSO toets 2
De DSO-stand selecteren (1, 2, 3 of off). Hoe
groter het getal, des te duidelijker het effect.
wf LIST toets 9, 15
De lijst openen.
wg M/m (DISC +/–) toetsen
Voorkeurzenders selecteren/groepen
overslaan (indrukken); groepen blijven
overslaan (ingedrukt houden).
wh ATT (dempen) toets
Het geluid dempen. Druk nogmaals op de
toets om te annu le ren.
*1 Als een CD/MD-wisselaar is aangesloten.
*2 Als een MD-wisselaar is aangesloten.
*3 Wanneer een optioneel draagbaar apparaat van
Sony is aangesloten.
*4 Wanneer met dit apparaat wordt afgespeeld.
Opmerking
Als het apparaat wordt uitgeschakeld en het display
verdwijnt, kan het apparaat niet worden bediend met
de kaartafsta ndsbediening, tenzij op (SOURCE) op
het apparaat wordt gedrukt of er een disc wordt
geplaatst om het apparaat eerst te activeren.
Tip
Zie "De lithiumbatterij van de kaartafstandsbediening
vervangen" op pagina 18 voor meer informatie over
het vervangen van de batterij.
7
Page 94

CD
Zie pagina 14 voor informatie over het aansluiten
van een CD/MD-wisselaar.
Displayitems
Voorbeeld: wanneer u de normale weergavestand
selecteert door he r haaldelijk op (IMAGE) te
drukken (
A Bron
B MP3/ATRAC3 plus-aanduiding
C Klok*
D BBE-aanduiding
E Groepsnummer/tracknummer/verstreken
*1 Wanneer de klokstand op "on" staat (pagina 13).
*2 Wanneer u een MP3 afspeelt, wordt ID3 tag
Als u de displayitems wilt wijzigen E, drukt u
op (DSPL). Wilt u de displayitems rollen E,
dan drukt u op (SCRL) op de
kaartafstandsbediening of stelt u "A.Scroll on" in
(
Tip
De weergegeven items zijn afhankelijk van het
disctype, de opname-indeling en de instellingen. Zie
pagina 17 voor meer informatie over MP3 en
pagina 18 voor meer informatie over ATRAC CD's.
pagina 7).
ABC
D
1
speelduur , na am va n disc/ artie st, groe psnaa m,
tracknaam, tekstinf ormatie*
weergegeven en wanneer u een ATRAC CD
afspeelt, worden tekstgegevens weergegeven die
met SonicStage, enzovoort zijn geschreven.
E
2
pagina 13).
Herhaaldelijk en willekeurig
afspelen
1 Druk tijdens het afspelen herhaaldelijk
op (1) (REP) of (2) (SHUF) tot de
gewenst e instellin g wordt
weergegeven.
Selecteer Actie
REP-Track Track herhaaldelijk afspelen.
REP-Group* Groep herhaald elijk afspelen.
SHUF-Group* Groep in willekeurige
volgorde afspelen .
SHUF-Disc Disc in willekeurige volgorde
afspelen.
* Bij het afspelen van een MP3/ATRAC CD.
Als u wilt terugkeren naar de normale
weerga vestand, selecteert u "REP-off" of
"SHUF-off".
8
Page 95

Radio
Zenders opslaan en ontvangen
Let op
Als u afstemt op zenders tijdens het rijden, moet
u de BTM-functie (B es t Tuning Mem or y)
gebruiken om ongelukken te vermijden.
Automatisch opslaan — BTM
1 Druk herhaaldelijk op (SOURCE) tot
"TUNER" wordt weergegeven.
Druk herhaaldel ijk op (MODE) om de band
te wijzigen. U kunt FM1, FM2, FM3, MW of
LW selecteren.
2 Druk op (MENU).
3 Draai de SEEK regelknop tot "Edit"
verschijnt en druk vervolgens op
(ENTER).
4 Draai de SEEK regelknop tot "BTM"
verschijnt en druk vervolgens op
(ENTER).
Het apparaat slaat de zenders in de volgor de
van frequentie op on der de cijfertoets en.
Er klinkt een piept oon wanneer de instelling
is opgeslagen .
Met de kaartafstandsbediening
Druk in stap 3 en 4 op M of m in plaats van op de
SEEK regelknop.
Automatisch afstemmen
1 Selecteer de band, druk vervolgens
herhaaldelijk op (ENTER) tot "SEEK"
verschijnt en draai vervolgens de
SEEK regelknop om de zender te
zoeken.
Het zoeken stopt zodr a een zender wordt
ontvangen. Herhaal dez e pr ocedure tot de
gewenste zender word t on t vangen.
Tip
Als u de frequentie weet van de zender waarnaar u
wilt luisteren, drukt u herhaaldelijk op (ENTER) tot
"MANUAL" verschijnt. Daarna draait u de SEEK
regelknop tot de gewenste frequentie verschijnt.
Een zender in een lijst ontvangen
— LIST
U kunt de frequentie in e en l ijst opnemen. Zie
pagina 14 voor meer informatie over het
benoemen van een zender.
1 Selecteer de band en druk vervolgens
op (MENU).
2 Draai de SEEK regelknop tot "List"
verschijnt en druk vervolgens op
(ENTER).
De frequentie verschijnt.
Handmatig opslaan
1 Als u de zender ontvangt die u wilt
opslaan, houdt u een cijfertoets ((1)
tot en met (6)) ingedrukt tot "Memory"
wordt weergegeven.
De aanduiding voor de ci j fertoets verschijnt
in het display.
Opmerking
Als u een andere zender opslaat onder dezelfde
cijfertoets, wordt de eerder opgeslagen zender
vervangen.
Tip
Als een RDS-zender wordt opgeslagen, wordt de AF-/
TA-instelling ook opgeslagen (
pagina 10).
De opgeslagen zenders ontvangen
1 Selecteer de band en druk vervolgens
op een cijfertoets ((1) tot en met (6)).
Tip
U kunt de opgeslagen zenders ook op een andere
manier ontvangen: druk herhaaldelijk op (ENTER) tot
"PRESET" verschijnt en draai dan de SEEK regelknop
tot het gewenste voorinstelnummer verschijnt.
3 Draai de SEEK regelknop tot de
gewenste zender verschi jn t.
4 Druk op (ENTER) om de zender te
ontvangen.
Het apparaat keer t terug naar de normale
ontvangststand.
Met de kaartafstandsbediening
Selecteer de band en druk vervolgens op (LIST). Druk
herhaaldelijk op M of m tot de gewenste zender
verschijnt en druk vervolgens op (ENTER).
RDS
Overzicht
FM-zenders met de RDS-dienst (Radio Data
System) sturen on wa ar neembare digitale
informatie mee met het gewone
radioprogrammasignaal.
vervolg op volgende pagina t
9
Page 96

Displayitems
Voorbeeld: wanneer u de normale weergavestand
selecteert door he r haaldelijk op (IMAGE) te
drukken (
pagina 7).
A
CE
A Radioband, functie
B Klok*
C Voorinstelnummer
D Frequentie*
E TA/TP*
*1 Wanneer de klokstand op "on" staat (pagina 13).
*2 Als u de RDS-zender ontvangt, wordt " *" links van
*3 "TA" knippert tijdens de verkeersinformatie. "TP"
1
2
(zendernaam), RDS-gegevens
3
de frequentieaanduiding weergegeven.
gaat branden als dergelijke zenders worden
ontvangen.
D
Als u displayitems D wilt wijzigen, drukt u op
de kaartafstandsbediening op (DSPL).
RDS-diensten
Dit apparaat biedt op de volgende manier
automatisch RDS-diensten:
AF (alternatieve frequenties)
Hiermee wordt de zender met het ster kste
signaal in een ne t w erk geselecteerd of w ordt
opnieuw op deze zender afgestemd. A l s u deze
functie gebruikt, kunt u onafgebroken naa r
hetzelfde programma luister en tijdens een lange
rit zonder dat u stee ds handmatig op dezelfde
zender hoeft af te st em men.
TA (verkeersinformatie)/
TP (verkeersprogram m a)
Hiermee ontvangt u de hui d i ge
verkeersinformatie/-programma's. De huidige
bron wordt onde rbroken door eventuele
verkeersinformatie/-programma's.
PTY (programmatypen)
Hiermee geeft u het ontvangen programmatype
weer. Hiermee zoekt u ook naar het
geselecteerde programmatype.
CT (kloktijd)
Met de CT-gegevens van de RDS-uitz ending
wordt de klok ingest eld.
Opmerkingen
• In bepaalde landen/regio's zijn wellicht niet alle
RDS-functies beschikbaar.
• RDS functioneert wellicht niet als het
ontvangstsignaal zwak is of als de zender waarop u
hebt afgestemd, geen RDS-gegevens verzendt.
10
B
AF en TA/TP instellen
1 Druk herhaaldelijk op (AF/TA) tot de
gewenst e instellin g wordt
weergegeven.
Selecteer Actie
AF on AF inschakelen en TA
TA on TA inschakelen en AF
AF TA on AF en TA inschakelen.
AF TA off AF en TA uitschakelen.
Met de kaartafst an ds be die nin g
Druk op (AF) en/of (TA) in plaats v a n op (AF/TA).
RDS-zenders met de AF- en TAinstelling opslaan
U kunt RDS-zenders vooraf instellen met de AFen TA-instelling. Als u de BTM-functie gebruikt,
worden alleen RD S-zenders met dezelfde AF-/
TA-instelling opgeslagen.
Als u handmatig vooraf instelt, kunt u zowel
RDS- als niet-RDS-zenders instellen met de AF-/
TA-instelling.
1 Stel AF/TA in en sla de zender vervolgens met
BTM of handmatig op.
Het volume van de
verkeersinformatie instellen
U kunt het volume van de verkeersin fo rm atie
vooraf instellen, zodat u geen enkel bericht m i s t.
1 Draai de volumeknop o m het gewenste volume
te regelen.
2 Houd (AF/TA) ingedrukt tot "TA VOL" wordt
weergegeven.
Met de kaartafst an ds be die nin g
Houd (TA) ingedrukt in plaats van (AF/TA).
Noodberichten ontvangen
Als AF of TA is ingeschakeld, wordt de
geselecteerde bron automatisch onderbroken
door de noodberichten.
Een regionaal programma
beluisteren — Regional
Als de AF-functie is ingeschakeld: de
fabrieksinstelling van het apparaat beperkt de
ontvangst tot een bepaalde regio, zodat er niet
wordt overgeschakeld naar e en andere regionale
zender met een st erkere frequentie.
Wanneer u het ontvangstgebied van het regionale
programma verlaat, stelt u "Regional off" in het
menu in (
uitschakelen.
uitschakelen.
pagina 13).
Page 97

Opmerking
Deze functie werkt niet in het Verenigd Koninkrijk en
bepaalde andere gebie den .
Local Link-functie (alleen voor het
Verenigd Koninkrijk)
Met deze functie ku nt u andere lokale zenders in
het gebied selecteren, ook als deze nie t zijn
opgeslagen onde r de cijfertoetsen .
1 Druk tijdens FM-ontvangst op een cijfertoets
((1) tot en met (6)) wa aronder een lokale
zender is opgeslagen.
2 Druk binnen 5 second e n nogmaals op de
cijfertoets van de lokale zender.
Herhaal dit tot de lokale zender wordt
ontvangen.
PTY selecteren
(Met de kaartafstandsbediening)
1 Druk op (PTY) tijdens FM-ontvangst.
De naam van het huidige programmatype
verschijnt als de zender PTY-gegevens
uitzendt.
2 Druk herhaaldelijk op M of m totdat het
gewenste programmatype verschijnt.
3 Druk op (ENTER).
Het apparaat ga at zoeken naar een zender die
het geselecteerde programmatype uitzendt.
CT instellen
1 Stel "CT on" in het menu in
(
pagina 13).
Opmerkingen
• Het is mogelijk dat de CT-functie niet werkt, ook al
wordt er wel een RDS-zender ontvangen.
• Er kan een verschil bestaan tussen de tijd van de
CT-functie en de werkelijke tijd.
Programmatypen
News (Nieuws), Affairs (Actualiteiten), Info
(Informatie), Sport (Sport), Educate
(Educatieve program m a’s), Drama (Toneel),
Culture (Cultuur), Science (Wetenschap) ,
Varied (Diversen), Pop
Rock
M (Rock-muziek), Easy M (Easy
Listening), Light
(Klassiek), Other
Weather (Weerberichten), Finance
(Financiën), Children (Kinderprogramma’s),
Social
A (Sociale zaken), Religion (Rel igie),
Phone
In (Phone In), Travel (Reizen),
Leisure (Ontspanning), Jazz (Jazz-muziek),
Country (Country-muziek), Nation
(Nationale muzie k ), Oldies (Oldies), Folk
(Folk-muziek), Document (Documentaires)
Opmerking
U kunt deze functie niet gebruiken in bepaalde landen/
regio's waar geen PTY-gegevens beschikbaar zijn.
M (Populaire muzek),
M (Licht klassiek), Classics
M (Ander type muziek),
M
M
11
Page 98

Andere functies
De geluidsinstellingen wijzigen
De geluidskenmerken wijzigen
U kunt de equalizer, DSO-functie, hoge en lage
tonen, balans, fad er en het subwoofervolume
regelen.
1 Selecteer een bron en druk
herhaaldelijk op (SOUND) om het
gewenste item te selecter en.
Het item wordt als volgt gewijzigd:
EQ7 t DSO t BAS (lage tonen) t
TRE (hoge tonen) t BAL (links-rechts) t
FAD (voor-ac ht er) t
SUB (subwoofervolume)*
* " ∞" wordt weergegeven bij de laagste instelling
en u kunt deze instelling maximaal 20 stappen
aanpassen.
2 Draai herhaaldelijk de VOL regelknop
om het gekozen item te regelen.
Na 3 seconden is he t i ns te ll en voltooid en
keert het display terug naar de normale
weergave-/ontvangststand.
Opmerking
Pas het item aan binnen 3 seconden nadat u het hebt
geselecteerd.
Met de kaartafstandsbediening
Druk in stap 2 op < of , in plaats van op de VOL
regelknop.
De equalizercurve aanpassen
— EQ7 Tune
U kunt de equalizerinstellingen voor
verschillende toonbereiken aanpassen en
opslaan.
1 Selecteer een bron en druk vervolgens
op (MENU).
2 Draai de SEEK regelknop tot "Sound"
verschijnt en druk vervolgens op
(ENTER).
3 Draai de SEEK regelknop tot "EQ7
Tune" verschijnt en druk vervolgens
op (ENTER).
4 Draai de SEEK regelknop om het
gewenste type equalizer te selecteren
en druk vervolgens op (ENTER).
5 Draai de SEEK regelknop om het
gewenste volume te regelen.
Het volume kan worden aangepast in stappen
van 1 dB, van –10 dB tot +10 dB.
6 Druk op (ENTER) om naar de v olgen de
frequentie te gaan.
De frequentie wordt als volgt gewijzigd:
62Hz t 157Hz t 396Hz t 1.0kHz
t 2.5kHz t 6.3kHz t 16kHz
Herhaal stap 5 en 6 om de equalizercurve aan
te passen.
Nadat u "16kHz" he bt aangepast en op
(ENTER) hebt gedrukt, wordt het
bevestigingsvenster weergegeven.
7 Draai de SEEK regelknop tot "YES"
verschijnt en druk vervolgens op
(ENTER).
Het instellen is voltooid en het display keert
terug naar de normale weergave-/
ontvangststand.
Als u de fabrieksinstelling voor de
equalizercurve wilt herstellen, houdt u in stap 5
en 6 (ENTER) ingedrukt en draait u de SEEK
regelknop om "YES" te selecteren.
Met de kaartafst an ds be die nin g
Druk in stap 2, 3 en 5 op M of m in plaats van op de
SEEK regelknop. Druk in stap 4 en 7 op < of , in
plaats van op de SEEK regelknop. Druk in stap 6 op
< of , in plaats van op (ENTER).
Menu-items aanpassen
— MENU
1 Druk op (MENU).
2 Draai de SEEK r egelknop tot het
gewenste menu-item verschijnt en
druk vervolgens op (ENTER).
Het item wordt als volgt gewijzigd:
Setup y Display y Receive Mode
y Sound y Edit y List
3 Draai de SEEK r egelknop tot het
gewenste instelitem verschijnt en druk
vervolgens op (ENTER).
De digitale aanduiding wordt naar rechts
verplaatst (selec ti e instellen).
12
Page 99

4 Draai de SEEK regelknop om de
instelling te selecteren en druk
vervolgens op (ENTER).
Het instellen is voltooid.
5 Druk op (MENU).
Het apparaat kee rt te rug naar de normale
weergave-/ontvangststand.
Opmerking
De weergegeven items zijn afhankelijk va n de bron en
de instelling.
Met de kaartafstandsbediening
Druk in stap 2 en 3 op M of m in plaats van op de
SEEK regelknop. Druk in stap 4 op < of , in plaats
van op de SEEK regelknop.
De volgende instellingen zijn mogelijk (vol g de
paginaverwijzing voor meer inf or m atie):
"z" geeft de standaar dinstellingen aan.
Setup (Instellingen)
Clock Adjust (pagina 4)
CT (kloktijd)
Instellen op "on" of " off" (z) (pagina 10, 11).
Beep
Instellen op "on" (z) of "off".
AUX-A*1 (AUX Audio)
Het AUX-brondisplay instelle n op "on" (z) of
"off" (
pagina 16).
Display
Clock (klokgegevens)
De klok en de disp la yitems/afbeeld in g t egelijk
weergeven.
–"on": om tegelijkertijd weer te geven.
–"off" (
z): om niet tegelijkertijd weer te geven.
A.IMG (automatisch beeld)
In de Auto Image stand worden de
displaybeelden automatisch opeenvolgend (om
de 10 seconden) weergegeven.
–"off" (
z): om het beeld niet automatisch te
wijzigen.
–"SA": om de displaybe elden van de Spectrum
analyzer stand herhaaldelijk opeenvolgend
weer te geven.
–"Movie": om de displa ybeelden van de Movie
stand herhaaldelijk opeenvolgend weer te
geven.
–"All": om herhaaldelijk de displaybeelden in
alle displaystand en weer te geven.
Info (displayinformatie)
De items (afhan kelijk van de bron, enzovoort)
weergeven in het midden van het display terwijl
een beeld wordt weergegeven.
–"on" (
z): om de items weer te geven.
–"off": om geen items wee r t e geven.
Dimmer
De helderheid van het display regelen.
–"Auto " (
z): om het display automatisch te
dimmen wanneer u de lichten inschakelt.
–"on": om het display te dimmen.
–"o ff": om de dimmer uit te schakelen.
Demo*1
(demonstratie)
Instellen op "on" (z) of "off" (pagina 4).
A.Scroll (auto scrol l )
Lange displayitems automatisch laten rollen als
de disc/groep/t r ack wordt gewijzigd.
–"on": om items te rollen.
–"off" (
z): om items niet te rollen.
Receive Mode (Ontvangstmodus)
Local (lokale zoekfunctie)
–"on": om alleen af te stemmen op kr achtige
zenders.
–"off" (
z): om af te stemmen met normale
ontvangst.
Mono (monostand)
Als u een slechte FM-ontvangst wilt verbeteren,
selecteert u de monostand.
–"on": om stereo-uitzendingen in mo no te
horen.
–"off" (
z): om stereo-ui t zendingen in stereo te
horen.
Regional*
2
Instellen op "on" (z) of "off" (pagina 10).
Sound (Geluid)
EQ7 Tune (pagina 12)
HPF (hoogdoorlaat filte r)
Hiermee select eert u de kantelfrequentie van de
voor-/achterluidsprekers: "off" (
"125Hz".
LPF (laagdoorlaatfilter)
Hiermee select eert u de kantelfrequentie van de
subwoofer: "off" (
z), "125Hz" of "78Hz".
Loudness
Hiermee v erbe tert u de ho ge en de lage tonen bij
een lager volume.
–"on": om hoge en lage tonen te v ersterken.
–"off" (
z): om hoge en lag e to nen niet te
versterken.
AUX Level
Hiermee past u het volumeniveau van
aangesloten randapparatuur aan (pagina 16).
Met deze instellin g hoeft u niet het
volumeniveau tussen de bronnen te regelen.
vervolg op volgende pagina t
z), "78Hz" of
13
Page 100
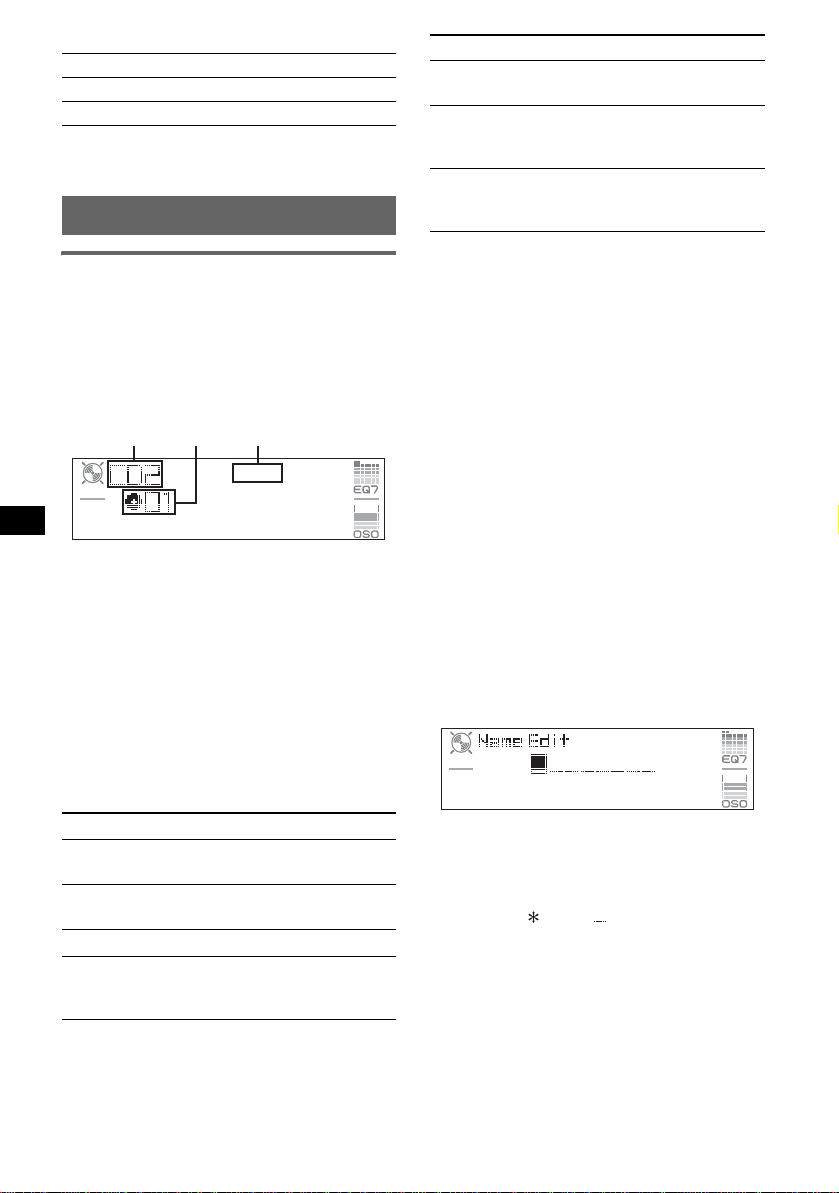
Edit (Bewerken)
Name Edit (pagina 14)
Name Delete (pagina 15)
BTM (pagina 9)
*1 Als het apparaat is uitgeschakeld.
*2 Als FM wordt ontvangen.
Optionele apparaten gebruiken
CD/MD-wisselaar
De wisselaar selecteren
1 Druk herhaaldelijk op (SOURCE) tot "CD" of
"MD" wordt weergegeven.
2 Druk herhaaldelijk op (MODE) tot de
gewenste wisselaar wordt weer g e g Geven.
Apparaatnummer
Discnummer
Het afspelen word t ge st art.
* Wanneer een MDLP-disc wordt afgespeeld.
Discs overslaan
1 Druk tijdens het afspelen op (ENTER) tot
"DISC" verschijnt.
2 Draai de SEEK regelknop tot de gewenste disc
verschijnt.
LP2/LP4aanduiding*
Selecteer Actie
REP-Disc*1Een disc herhaaldelijk
afspelen.
SHUFChanger*
Tracks in de wisselaar in
1
willekeurige volgorde
afspelen.
SHUF-All*
2
Tracks in alle apparaten in
willekeurige volgorde
afspelen.
*1 Als er een of meer CD/MD-wisselaars zijn
aangesloten.
*2 Als een of meer CD-wisselaars of twee of meer
MD-wisselaars zijn aangesloten.
Als u wilt terugkeren naar de normale
weerga vestand, selecteert u "REP-off" of
"SHUF-off".
Tip
Met "SHUF-All" worden tracks op CD-apparaten en
MD-wisselaars niet tegelijkertijd in willekeurige
volgorde afgespeeld.
Een disc benoemen
Als u een disc afspeelt in een CD-wisselaar met
de functie CUSTOM FILE, kun t u elke disc
benoemen met ee n ei gen naam van maximaal 8
tekens (Disc Memo).
Als u een disc benoemt, wordt de naam in de lijst
weerge geven (pagina 15).
1 Druk op (MENU) wanneer u een disc afspeelt
die u wilt benoemen.
2 Draai de SEEK regelknop tot "Edit" verschijnt
en druk vervolgens op (ENTER).
3 Draai de SEEK regelknop tot "Name Edit"
verschijnt en druk vervolgens op (ENTER).
Groepen en discs overslaan met de
kaartafstandsbediening
1 Druk tijdens het afspelen op M of m.
Actie Druk op M of m.
Groep
overslaan
Groepen blijven
overslaan
en laat los (kort inge dr ukt
houden).
binnen 2 seconden nadat u deze
hebt losgelate n.
Discs overslaan herhaaldelijk.
Discs blijven
overslaan
en druk binnen 2 seconden
weer op de toets en houd deze
ingedrukt.
Herhaaldelijk en willekeurig afspelen
1 Druk tijdens het afspe len he rhaald elijk op (1)
(REP) of (2) (SHUF) tot de gewenste
instelling wordt weergegeven.
14
4 Draai de SEEK regelknop tot he t gewens te
teken verschijnt.
Het teken wordt als volgt gewijzigd:
A y B y C ... y 0 y 1 y 2 ... y +
y – y
... y (spatie) y A
Als u de digit al e aanduiding wilt verplaatsen,
drukt u op (ENTER).
Herhaal deze handeling tot de volledige naam
is ingevoerd.
 Loading...