

Page 1
FM/MW/LW Compact-/Mini- Disc Player
3-230-448-21 (1)
FM/MW/LW
Compact Disc Player
CDX-M770 CDX-M670
FM/MW/LW
Mini Disc Player
MDX-M690
Operating Instructions
Manual de instrucciones
Bruksanvisning
Manual de instruções
Oδηγίες Λειτουργίας
Инструкция по эксплуатации
For installation and connections, see the supplied installation/connections manual.
Para obtener información sobre la instalación y las conexiones, consulte el manual de
instalación/conexiones suministrado.
Vi hänvisar till det medföljande häftet angående montering/anslutningar.
Para a instalação e as ligações, consulte o manual de instalação/ligações fornecido.
Για την εγκατάσταση και τις συνδέσεις, δείτε το συνοδευτικ εγχειρίδιο
Εγκατάσταση/Συνδέσεις.
Перед установкой и подсоединениями прочитайте прилагаемую инструкцию по
установке и подсоединению.
GB
ES
SE
PT
GR
RU
© 2001 Sony Corporation
Page 2

Welcome !
Thank you for purchas in g t hi s Sony Compact
Disc Player/Mini Disc Player. You can enjoy its
various features even more with:
• Display language*
German, French, Italian, Dutch, Spanish,
Portuguese, Swedi sh, Polish, Czech, or
Turkish.
• Optional CD/MD units (both changers and
players)*
2
• MDLP (MiniDisc Long Play) playback.
(MDX-M690 only)
• Optional DAB tuner.
• CD TEXT in formation (displayed when a C D
TEXT disc*
• Supplied controller accessory
Card remote commander RM-X111
Wireless rotary commander RM-X5S (CDXM770)
• Optional controller accessories
Wireless rotary commander RM-X5S (CDXM670, MDX-M690)
Wired rotary comm ander RM-X4S (C D X M670, MDX-M690)
*1 Some display indications do not appear in the
language you select.
*2 This unit works with Sony products only.
*3 A CD TEXT disc is an audio CD that includes
information such as the disc name, artist name,
and track names. This information is recorded on
the disc.
.
3
is played).
1
choice from English,
This label is located on the bottom of the chassis.
CAUTION INVISIBLE
VIEW DIRECTLY WITH OPTICAL INSTRUMENTS
LASER RADIATIONWHEN OPEN
DO NOT STARE INTO BEAM OR
This label is located on the drive unit’s internal
chassis.
2
Page 3

Table of Contents
Location of controls. . . . . . . . . . . . . . . . . . . . 4
Precautions . . . . . . . . . . . . . . . . . . . . . . . . . . 6
Notes on CDs. . . . . . . . . . . . . . . . . . . . . . . . . 7
Notes on MDs . . . . . . . . . . . . . . . . . . . . . . . . 8
Getting Started
Resetting the unit. . . . . . . . . . . . . . . . . . . . . . 9
Detaching the main display window . . . . . . . 9
Setting the clock . . . . . . . . . . . . . . . . . . . . . 10
CD/MD
Playing a disc. . . . . . . . . . . . . . . . . . . . . . . . 11
Display items. . . . . . . . . . . . . . . . . . . . . . . . 12
Playing tracks repeatedly
— Repeat Play . . . . . . . . . . . . . . . . . . . . 12
Playing tracks in ra ndom order
— Shuffle Play . . . . . . . . . . . . . . . . . . . . 12
Labelling a CD
— Disc Memo*. . . . . . . . . . . . . . . . . . . . 13
Locating a di sc by name
— List-up* . . . . . . . . . . . . . . . . . . . . . . . 14
Selecting specific tracks for playback
— Bank*. . . . . . . . . . . . . . . . . . . . . . . . . 14
* Functions available with optional CD/MD unit
Radio
Storing stations automatically
— Best Tuning Memory (BTM). . . . . . . 15
Receiving the stored stations. . . . . . . . . . . . 16
Storing only the desired stations . . . . . . . . . 16
Tuning in a station through a list
— List-up . . . . . . . . . . . . . . . . . . . . . . . . 17
RDS
Overview of RDS . . . . . . . . . . . . . . . . . . . . 17
Automatic retuning for best receptio n results
— AF function . . . . . . . . . . . . . . . . . . . . 18
Receiving traffic announcements
— TA/TP . . . . . . . . . . . . . . . . . . . . . . . . 19
Presetting RDS stations with AF and TA
setting . . . . . . . . . . . . . . . . . . . . . . . . . . . 19
Tuning in stations by pr ogramme type
— PTY . . . . . . . . . . . . . . . . . . . . . . . . . . 20
Setting the clock automatically
— CT . . . . . . . . . . . . . . . . . . . . . . . . . . . 21
DAB (optional)
Overview of DAB . . . . . . . . . . . . . . . . . . . . 21
Basic operations of DAB . . . . . . . . . . . . . . 22
Presetting DAB services automatically
— BTM . . . . . . . . . . . . . . . . . . . . . . . . . 23
Presetting DAB services manually
— Preset Edit . . . . . . . . . . . . . . . . . . . . . 23
Tuning in DAB programme through
a list . . . . . . . . . . . . . . . . . . . . . . . . . . . . 24
Switching mul t i -channel audio and
DRC . . . . . . . . . . . . . . . . . . . . . . . . . . . . 25
Locating a DAB service by programme type
(PTY) . . . . . . . . . . . . . . . . . . . . . . . . . . . 25
Tuning up for your best sound
Setting the equalizer (EQ7). . . . . . . . . . . . . 26
Setting the soun ds ta ge menu
— Dynamic Sound st age Organizer
(DSO). . . . . . . . . . . . . . . . . . . . . . . . . . . 27
Listening to each programme source in its
registered DSO
— Source Sound Memory (SSM) . . . . . 28
Adjusting the sound characteristics . . . . . . 28
Selecting the listening position
(CDX-M770 only) . . . . . . . . . . . . . . . . . 29
Adjusting the balance
(BAL). . . . . . . . . . . . . . . . . . . . . . . . . . . 29
Adjusting the bass
(CDX-M670, MDX-M690 only) . . . . . . 29
Adjusting the treble
(CDX-M670, MDX-M690 only) . . . . . . 30
Adjusting the balance (FAD)
(CDX-M670, MDX-M690 only) . . . . . . 30
Adjusting the front and rear volume
(CDX-M770 only) . . . . . . . . . . . . . . . . . 30
Adjusting the vol ume of
the subwoofer(s). . . . . . . . . . . . . . . . . . . 31
Other adjustable items
(CDX-M670, MDX-M690 only) . . . . . . 31
Other Functions
Using the rotary commander. . . . . . . . . . . . 32
Quickly attenuating the sound . . . . . . . . . . 33
Selecting the spectrum analyzer. . . . . . . . . 33
Changing the sound and display setting s
— Menu . . . . . . . . . . . . . . . . . . . . . . . . . 3 4
Labelling a Motion Display . . . . . . . . . . . . 35
Connecting auxiliary audio equipment
(CDX-M770 only) . . . . . . . . . . . . . . . . . 35
Additional Information
Maintenance . . . . . . . . . . . . . . . . . . . . . . . . 36
Removing the unit. . . . . . . . . . . . . . . . . . . . 37
Specifications . . . . . . . . . . . . . . . . . . . . . . . 38
Troubleshooting . . . . . . . . . . . . . . . . . . . . . 39
Error displays/Messages. . . . . . . . . . . . . . . 41
3
Page 4
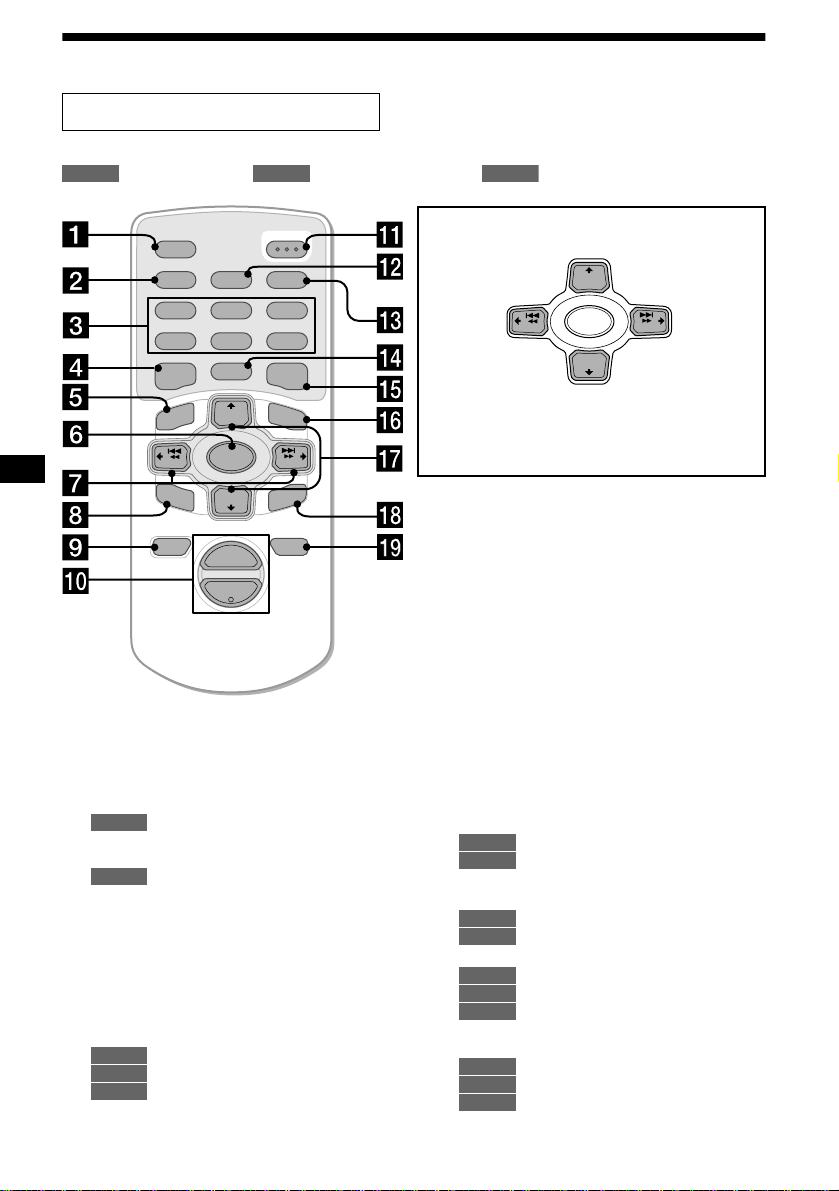
Location of controls
Card remote commander RM-X111
Refer to the pages listed for details.
: During Playback : During radio reception : During menu mode
CD/MD
RADIO MENU
AF
2
5
MODE
+
DISC
SOURCE
–
DISC
+
VOL
OPEN/CLOSE
TA
3
6
LIST
SEEK
ENTER
ATTOFF
SCRL
PTY
DSPL
REP SHUF
1
4
EQ7 DSO
MENU
–
SEEK
SOUND
–
a SCRL (scroll) button 12
b DSPL/PTY (display mode change/
programme type) button 12, 13, 17,
20, 25, 35
c Number buttons
CD/MD
(1) REP 12
(2) SHUF 12
RADIO
15, 16, 18, 19, 22, 24
d EQ7 button 26
e MENU button 10, 13, 14, 15, 19, 21,
23, 25, 26, 27, 28, 30, 31, 33, 34 , 35
f SOURCE (Power on/Radio/CD/MD)
button 10, 11, 13, 15, 16, 19, 22, 26,
27, 29, 30, 31, 33, 35
g </, SEEK +/– buttons 10, 28, 29,
30, 31
11
CD/MD
16, 18, 22
RADIO
10, 13, 14, 15, 21, 23, 25, 26,
MENU
27, 28, 30, 31, 33, 34, 35
h SOUND button 28, 29, 30, 31
4
M (DISC)
(+): to select upwards
< (SEEK)
(–): to select
leftwards/
.
In menu mode, the currently selectable button (s) of
+
these four are indicated with a “ v” in the display.
Note
If the unit is turned off by pressing (OFF) for 2
seconds, the unit cannot be operated with the card
remote commander unless (SOURCE) on the unit is
pressed, or a disc is inserted to activate the unit first.
Tip
Refer to “Replacing the lithium battery” for deta ils on
how to replace the batteries (page 36).
SEEK
(–): to select downwards
–
m (DISC)
+
DISC
SOURCE
–
DISC
+
SEEK
, (SEEK)
(+): to select
rightwards/
>
i OFF (Stop/Power off) button 11, 35
j VOL +/ – buttons 19
k OPEN/CLOSE button 11, 37
l AF button 18, 19
m TA button 19
n MODE button
CD/MD
11, 13
RADIO
15, 16, 19, 22
o DSO button 27
p LIST button
CD/MD
13, 14
RADIO
17, 24
q M/m DISC +/– buttons
11, 14
CD/MD
16, 17, 20, 22, 23, 24, 25
RADIO
10, 13, 14, 15, 19, 21, 23, 25,
MENU
26, 27, 28, 30, 31, 33, 34, 35
r ENTER button
CD/MD
14
RADIO
17, 20, 23, 24, 25
MENU
10, 13, 14, 15, 19, 21, 23, 25,
26, 27, 30, 31, 33, 34, 35
s A TT button 33
Page 5
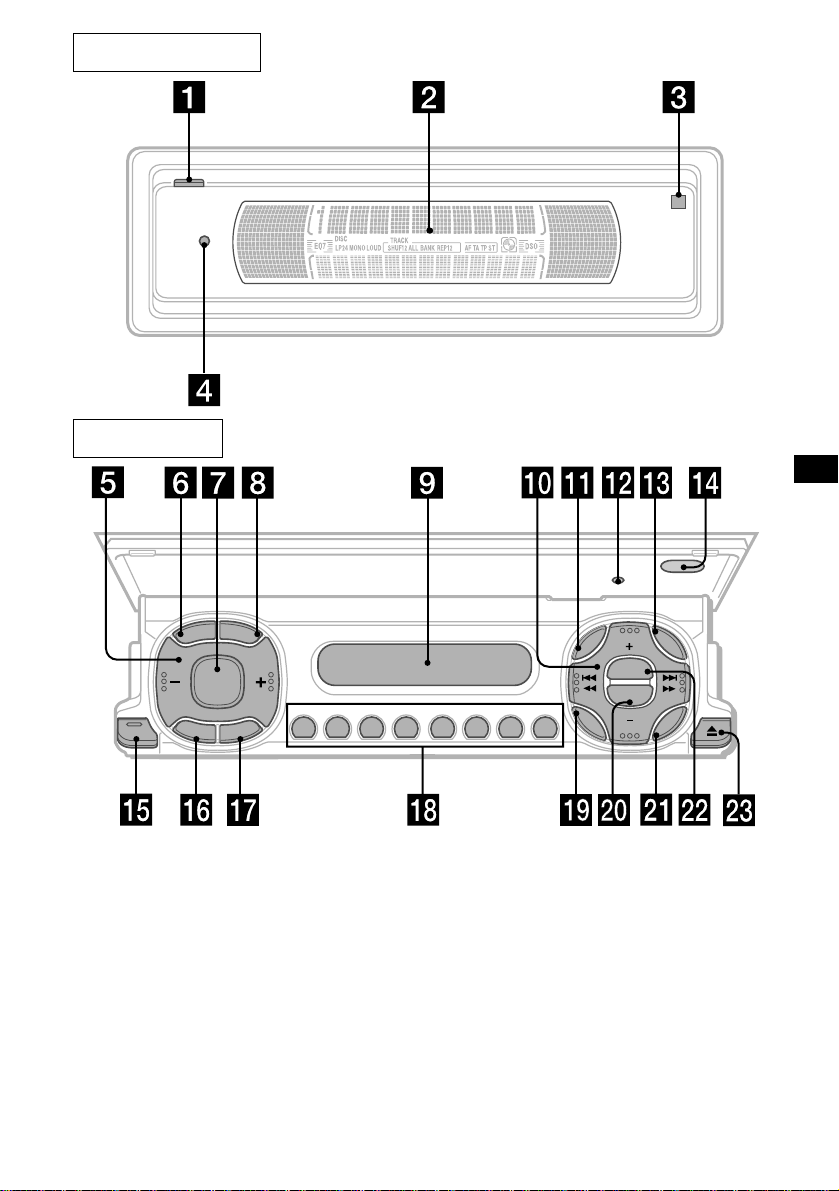
Main display panel
Operation side
D
S
L
R
C
S
SOURCE
O
F
CLOSE
F
M
RESET
P
P
L
T
Y
E
D
O
REP SHUF
AF TA
123456
MENU
SOUND
DISC
DSO
EQ7
DISC
LIST
ENTER
The corresponding buttons of the unit
control the same functions as those on
the card remote comm ander.
a OPEN button 9, 11, 37
b Main display window
c qf Receptor for the car d re mo te
commander
d qs Reset button 9
e Volume adjust buttons
f SCRL (scroll) button
g SOURCE button
h DSPL/PTY (display mode change/
programme type) button
i Sub display window
CDX-M770/CDX-M670
/MDX-M690
j DISC +/– (cursor up/down) buttons
SEEK –/+ (cursor left/right) buttons
k MENU button
m LIST button
o
CLOSE (front panel close) button
9, 11
p OFF (Sto p/Power off) button*
q MODE button
r Number buttons
s SOUND button
t EQ7 button
u ENTER button
v DSO button
w Z (eject) button 11
continue to next page t
5
Page 6
* Warning when installing in a car without
an ACC (access
switch
After turning off the ignition, be sure to press
the power on/
turn off the clo
Otherwise, the cl ock display does not t ur n off
and this causes batt er y dr ai n.
ory) position on the igniti on
off button on the unit for 2 seconds to
ck display.
Precautions
• If your car was parked in direct sunlig ht , all ow
the unit to cool off before operating it.
• Power aerials will extend automatically while
the unit is operating.
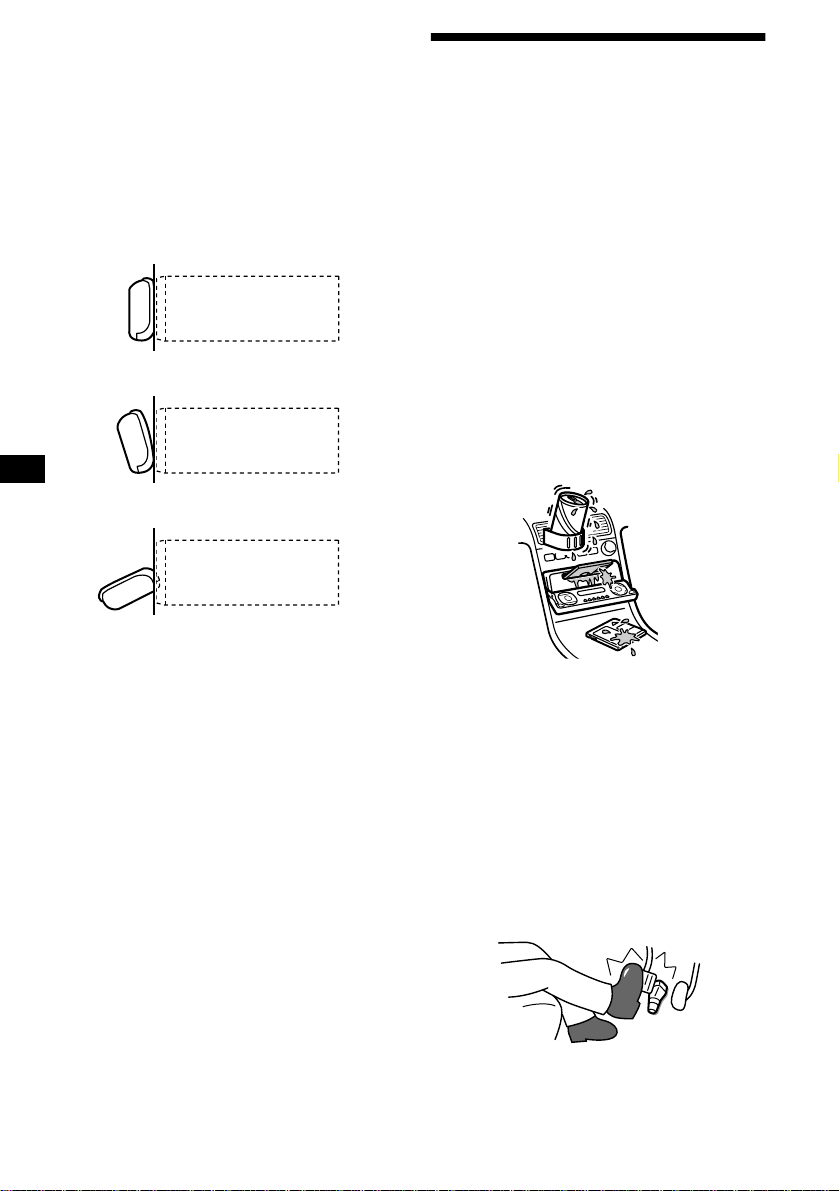
Concerning the front panel positions
This unit has 3 front panel open modes.
• Main display position
unit
• Detaching position
unit
• Sub-display posi t io n
unit
If you have any questions or prob le ms
concerning your unit that are not covered in this
manual, please co ns ult your nearest Sony dealer.
Moisture condensation
On a rainy day or in a very dam p area, moisture
condensation may occur inside the lenses and
display of the unit. Should this occur, the unit
will not operate properly. In such a case, remove
the disc and wait for about an hour until the
moisture has evaporated.
To maintain high sound quality
Be careful not to splash juice or other soft drinks
onto the unit or discs.
To prevent the wireless rotary
commander RM-X5S from falling off
(supplied with CDX-M770 only)
If the wireless commander falls off, it could
cause an accident .
• Be sure to attach the supplied strap when
installing the rotary commander near the
steering wheel.
• Be sure that the strap does not get caught on the
car controls (gear, shifter, etc.).
• Be sure to tighten the stopper of the s tr ap after
hanging the strap on the indicator switch, etc.
6
Page 7
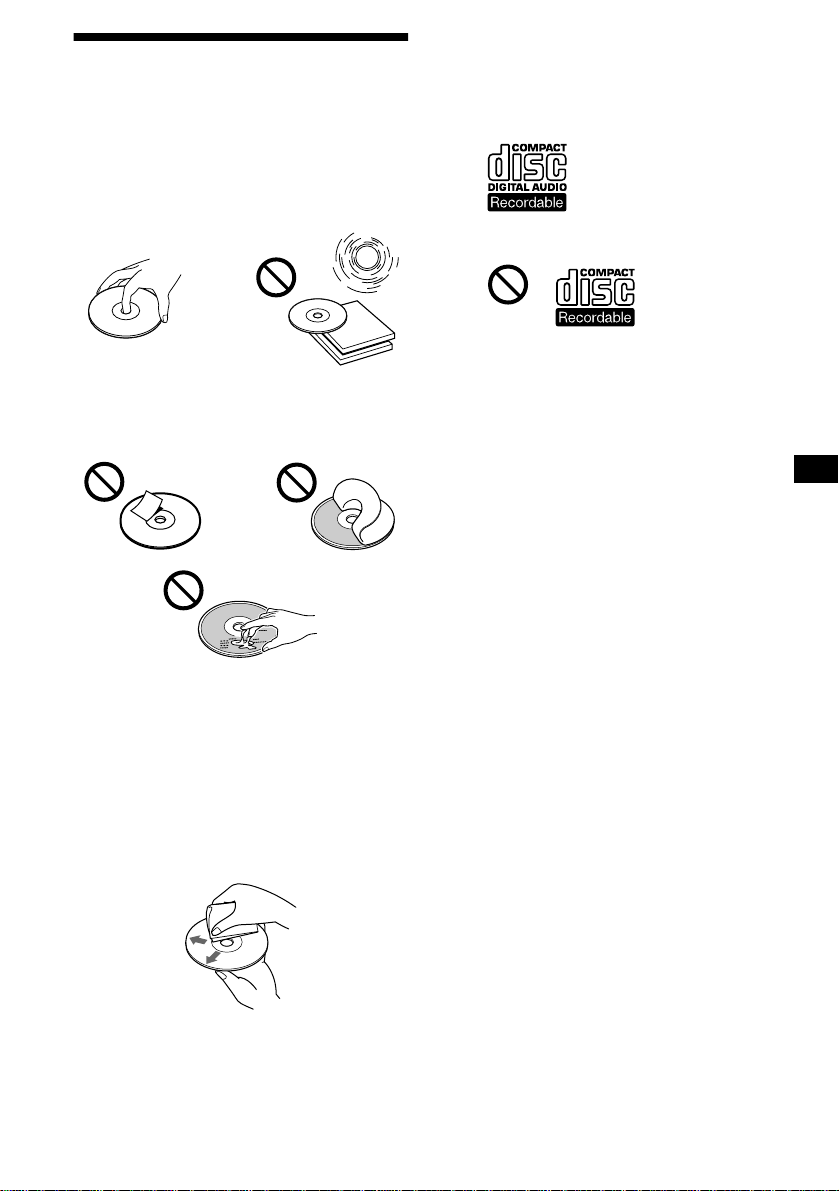
Notes on CDs
• T o keep th e disc cl ean, do no t touch th e surf ace.
Handle the disc by its edge.
• Keep your discs in the ir cases or disc
magazines when not in use.
Do not subject the discs to heat/high
temperature. Avoid leaving them in parked cars
or on dashboard s/ rear trays.
• Do not attach labels, or use discs with sticky
ink/residue. Such discs may stop spinning
when used, causing a malfunction, or may ruin
the disc.
Notes on CD-R/CD-RW discs
• You can play CD-Rs (recor dable CDs)
designed for audio use on this unit.
Look for this mark to distinguish CD-Rs for
audio use.
This mark denotes that a disc is not for audio use.
• Some CD-Rs (depending on the equipment
used for its recording or the condition of the
disc) may not play on this unit.
• You cannot play a CD-R that is not finalized*.
* A process necessary for a recorded CD-R disc to
be played on the audio CD player.
• You cannot play CD-RWs (rewritable CDs) on
this unit .
• Discs with non-standard shapes (e.g., heart,
square, star) cannot be played on this uni t.
Attempting to do so may damage the unit. Do
not use such discs.
• You cannot play 8 cm CDs.
• Before playin g, clean the discs with a
commercially available cleaning cloth. Wipe
each disc from the centre out. Do not use
solvents such as ben zine, thinner , co mmercially
available cleaners, or antistatic spray intended
for analog discs.
7
Page 8
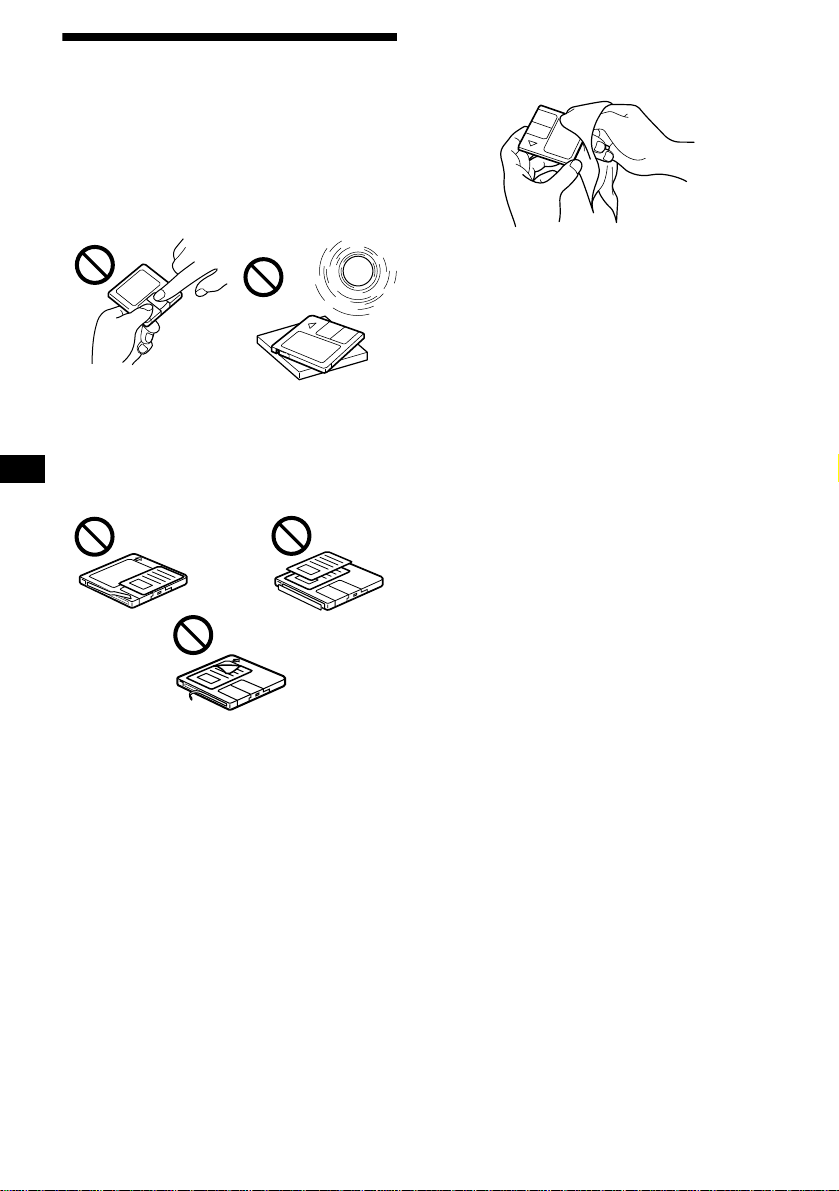
Notes on MDs
• Do not open the shutter of the cartridge
to expose the MD. Close immediately if
the shutter opens.
• Never touch the surface of the di sc inside.
• Do not subject the discs to heat/high
temperature. Avoid leaving them in parked cars
or on dashboards/rear trays.
Notes on attaching labels
To avoid MDs becoming stuck in the unit:
– Attach the label in a suitable position.
– Remove old labels before put tin g new ones on.
– Replace labels that are peeling away.
Cleaning
Wipe the surface of the cartridge from time to
time with a soft, dry cloth.
8
Page 9
Getting Started
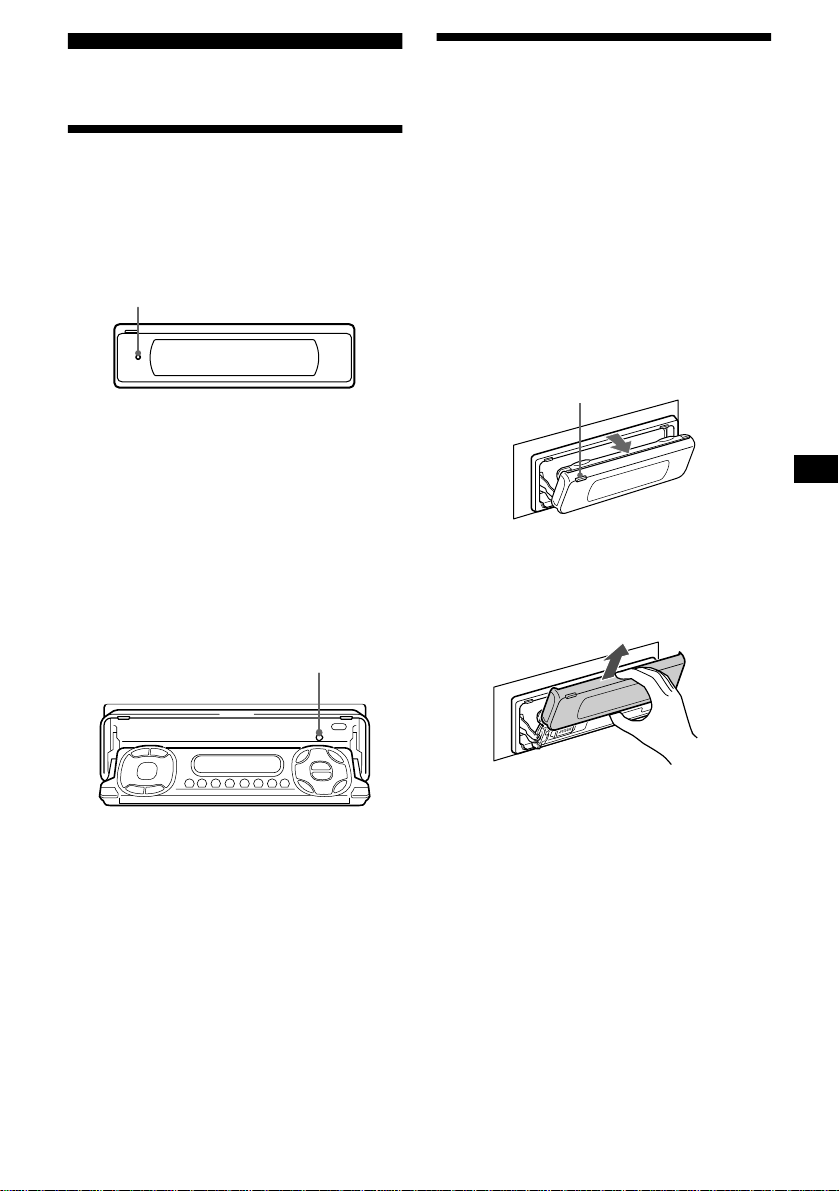
Resetting the unit
Detaching the main display window
You can detach the main display window of this
unit to protect the unit from being stolen.
Before operating the unit for the first time, or
after replacing the car battery or changing the
connections, you must reset the unit.
Press the reset button on the front panel with a
pointed object, such as a ball point pen.
Reset button
Notes
• After resetting the unit in the closed position, be sure
to press (OPEN) once before operating further. If a
disc is in the unit, the disc will be ejected
automatically. Insert the disc again.
• Pressing the reset button will erase the clock setting
and some stored contents.
Resetting the unit during use in subdisplay position
Press th e reset button by t h e disc-slo t w ith a
pointed object, such as a ball point pen.
Reset button
Caution alarm
If you turn the ignition switch to the OFF
position without removing the front panel, the
caution alarm wi ll beep for a few seconds.
1 Press (OPEN) on the unit for 2
seconds.
CD/MD playback or radio reception stops,
and the front panel automatically tilts at an
angle of 30°.
(OPEN)
2 Detach the main display window as
illustrated.
After the main display window detaching is
complete, the front panel clo s es
automatically.
Notes
• If you detach the main display window while the unit
is still turned on, the power will turn off automatically
to prevent the speakers from being damaged.
• Do not drop or put excessive pressure on the display
window.
• Do not subject the main display window to heat/high
temperature or moisture. Avoid leaving it in parked
cars or on dashboards/rear trays.
Tips
• If you want to detach the main display window, when
the front panel is in the sub-display position, press
(CLOSE) for 2 seconds. If a disc is partially inserted,
load the disc correcty or remove the disc from the
unit.
• When carrying the main display window with you,
use the supplied front panel case.
continue to next page t
9
Page 10
Attaching the main display window
Place the main display window on the front side
of the unit as illustrated, then lightly push the
front panel into position until it clicks.
Press (SOURCE) (or insert a disc) to operate the
unit.
Note
Do not put anything on the inner surface of the main
display window.
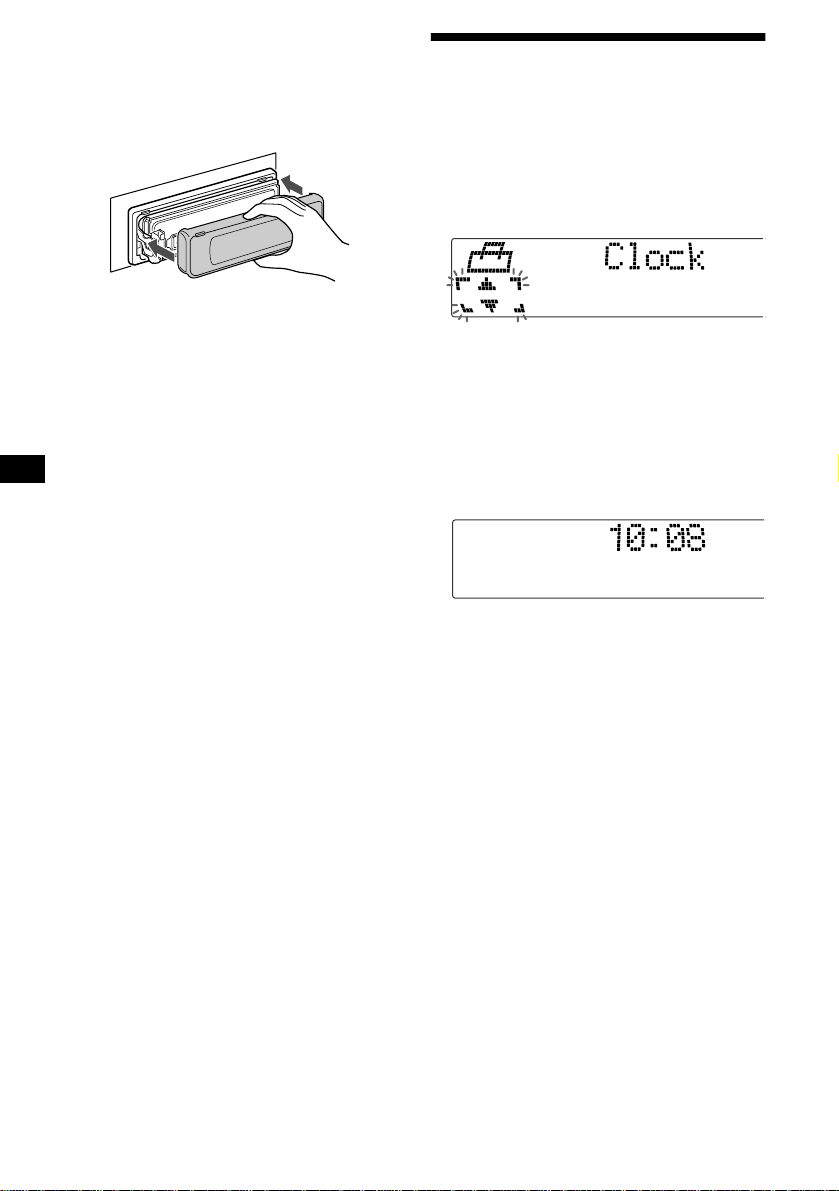
Setting the clock
The clock uses a 24-hour digital indicati on.
Example: To set the clock to 10:08
1 Press (MENU), th en press M or m (the
either (+/–) side of (DISC)) repeatedly
until “Clock” appears.
1Press (ENTER).
The hour indica tion flashes.
2Press M or m t o set the hour.
3Press , (the (+) side of (SEEK)).
The minute indi cation flashes.
4Press M or m t o set th e minute.
2 Press (ENTER).
10
The clock starts. Aft er th e cl ock setting is
completed, the display retu rn s to normal play
mode.
Tips
• You can set the clock automatically with the RDS
feature (page 21).
• When D.Info mode is set to on, the time is always
displayed (page 34).
Page 11
CD/MD
CDX-M770/M670:
In addition to playing a CD with this unit, you
can also control ext ernal CD/MD units.
MDX-M690:
In addition to playing an MD with this unit, you
can also control ext ernal CD/MD units.
Note
If you connect an optional CD unit with the CD TEXT
function, the CD TEXT information will appear in the
display when you play a CD TEXT disc.
Playing a disc
(With this unit)
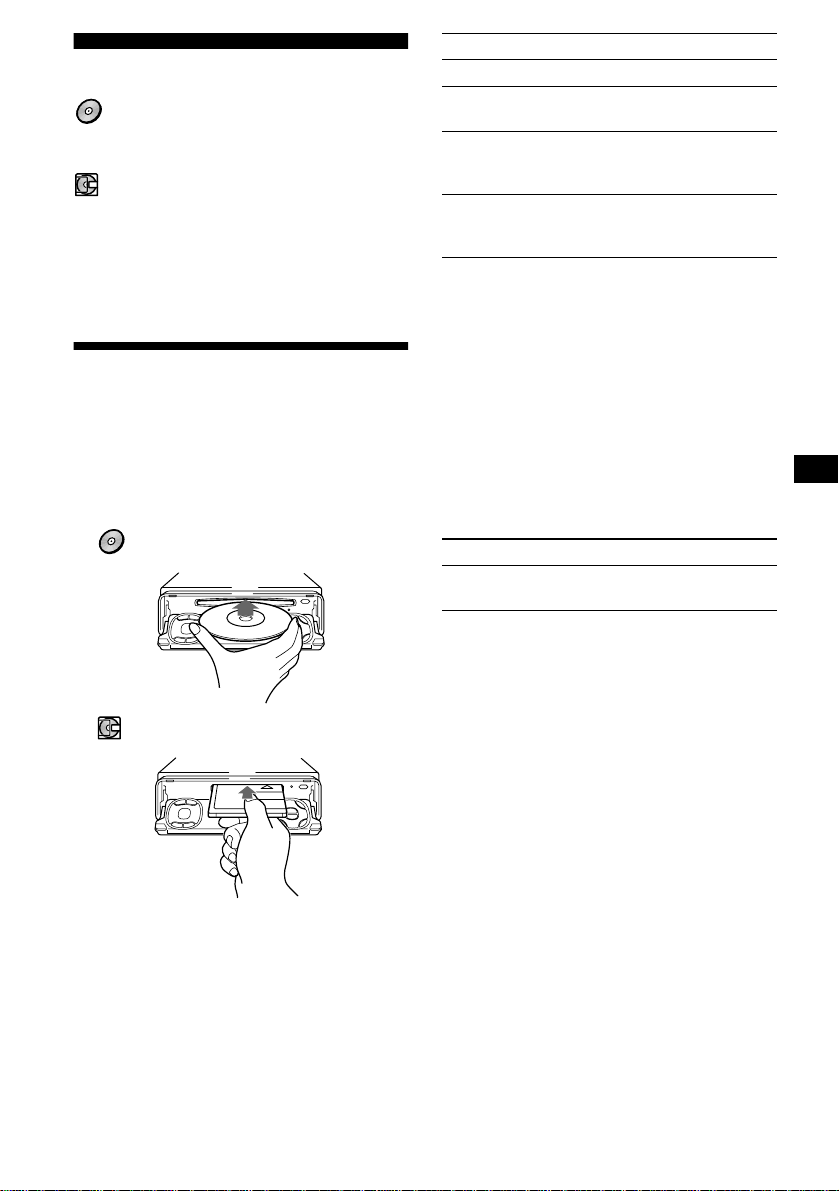
1 Press (OPEN/CLOSE) or (OPEN) on the
unit and insert the disc (labelled side
up).
Playback starts automatically.
To Press
Stop playback (OFF)
Eject the disc (OPEN/CLOSE), or
Skip tracks
– Automatic
Music Sensor
Fast-forward/
reverse
– Manual Search
Notes
• When the last track on the disc is over, playback
restarts from the first track of the disc.
• With optional unit connected, playback of the same
source will continue on to the optional CD/MD unit.
(OPEN) then Z
</, (SEEK) (
[once for each track]
</, (SEEK) (
[hold to desired point]
./>)
m/M)
(With optional unit)
1 Press (SOURCE) repeatedly to select
“CD” or “MD.”
2 Press (MODE) repeatedly until the
desired un it appears.
Playback starts.
CDX-M770/M670:
MDX-M690:
2 Press (OPEN/CLOSE) or (CLOSE) on
the unit to close the front panel.
If a disc is already inserted, press (SOURCE)
repeatedly unti l “CD” or “MD” appears to start
playback.
To Press
Skip discs
– Disc selection
M/m (DISC) (+/–)
11
Page 12
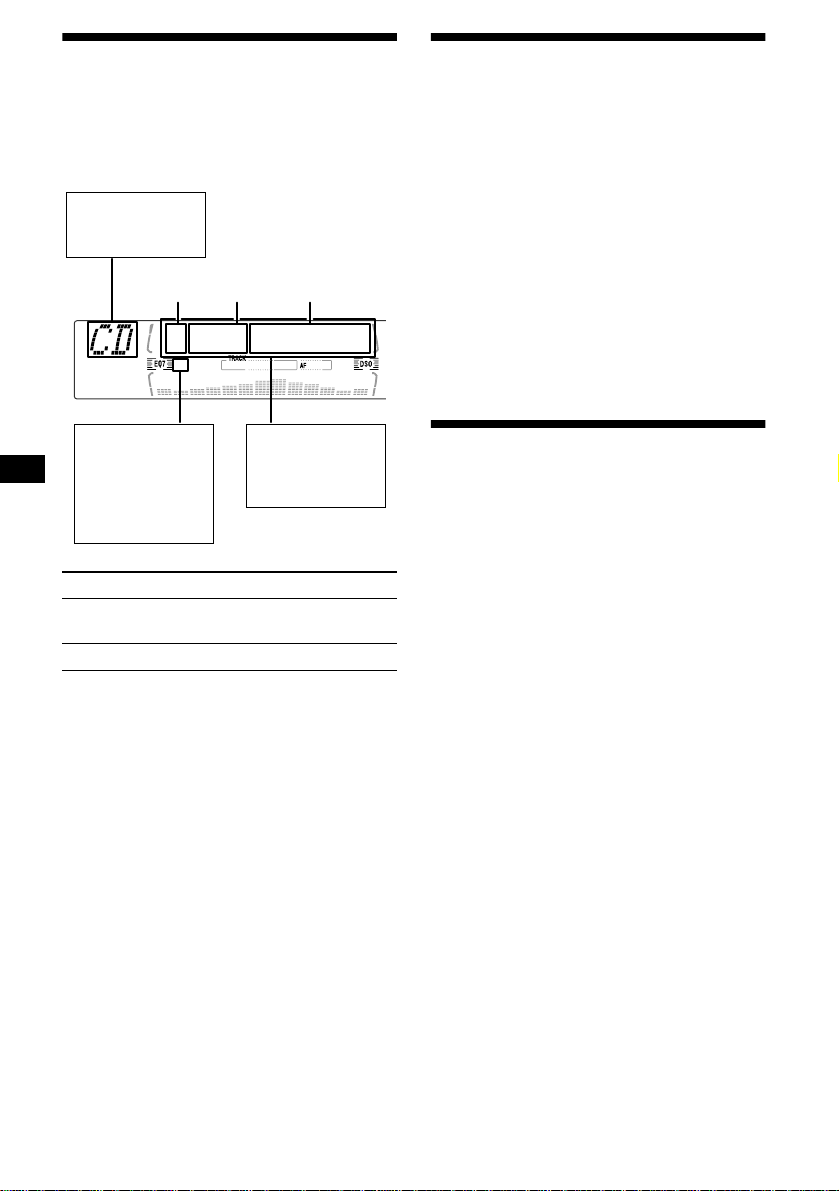
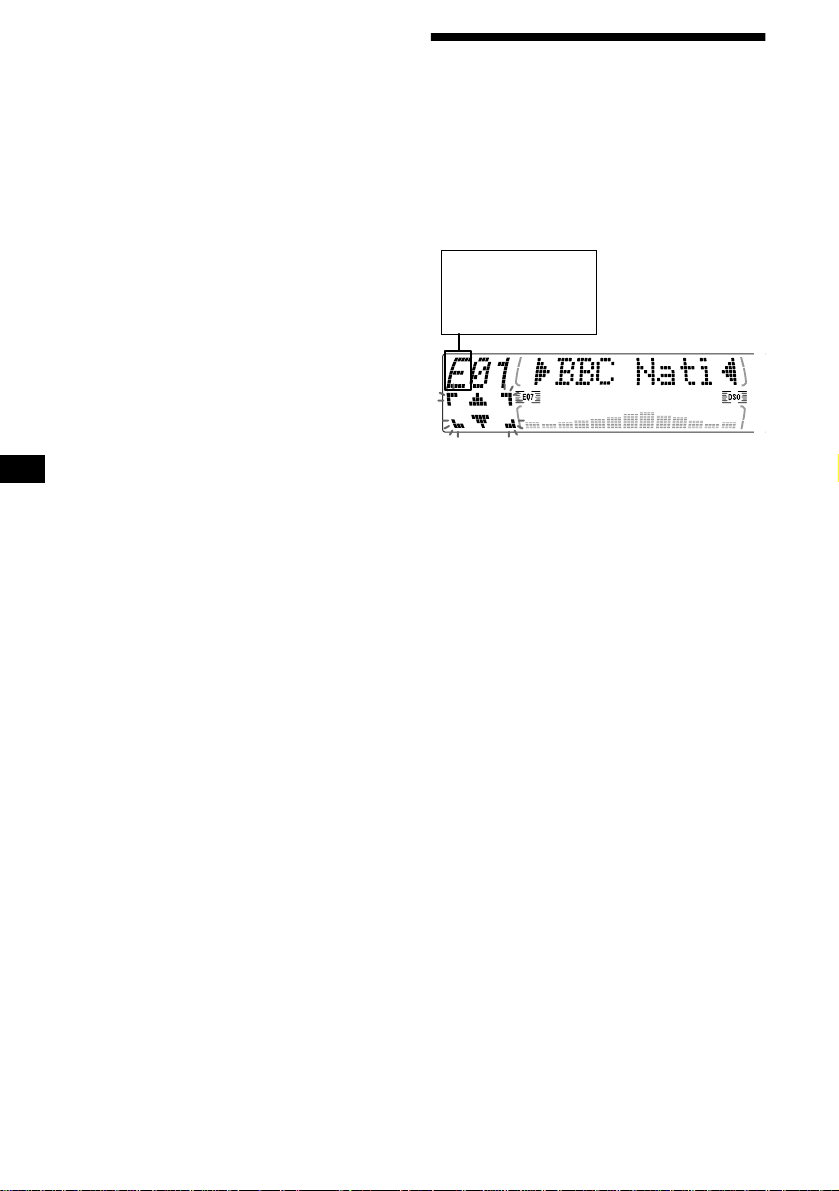
Display items
When the disc/track changes, any prerecorded
1
title*
of the new disc/track is automatically
displayed (if the A u t o Scroll function is set to
“on,” names exceeding 9 characters will be
scrolled (page 34)).
Displayable items
• Music source
• Clock
Disc
number
Track
number
Elapsed
playing tim e
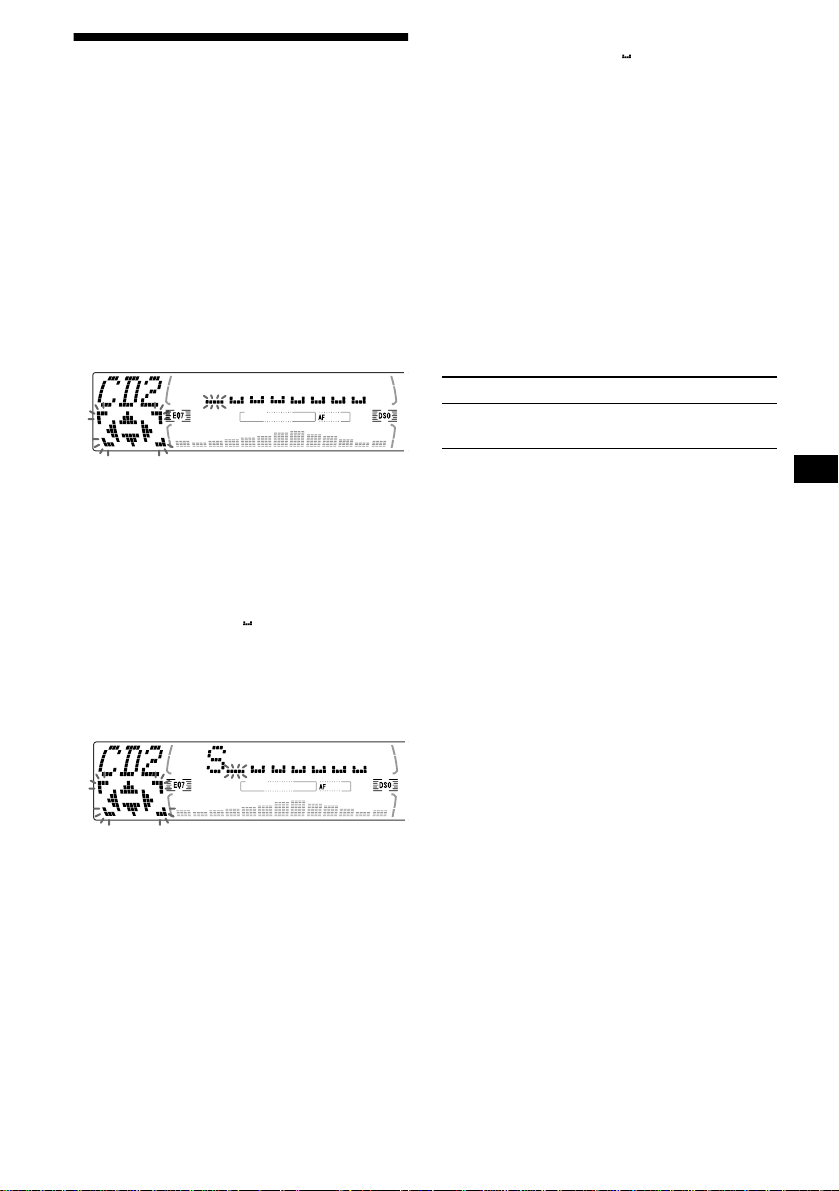
Playing tracks repeatedly
— Repeat Pla y
The disc in the main unit will repeat a track or
the entire disc when it reach es the end. F or repea t
play, you can select:
• Repeat 1 — to repeat a track.
• Repeat 2* — to re peat a disc.
* Available only when one or more optional CD/MD
units are connected.
During playback, press (1) (REP)
repeatedly until the desired setting
appears in the display.
Repeat Play starts.
To return to normal play mode, select “Repeat
off.”
MDLP display
(MDX-M690 only)
LP2: LP2
playback
Displayable items
• Disc name*
artist name*
• Track title*
1
1
/
2
LP4: LP4
playback
To Press
Switch display
(DSPL/PTY)
item
Scroll display item (SCRL)
*1 When pressing (DSPL/PTY), “NO D.Name” or “NO
T.Name” indicates that there is no Disc Memo
(page 13) or prerecorded name to display.
*2 Only for CD TEXT discs with the artist name.
Notes
• Some charact ers can not be di splayed.
• For some CD TEXT discs with very many
characters, information may not scroll.
• This unit cannot display the artist name for each
track of a CD TEXT disc.
Tip
When Auto scroll is set to off, and the disc/track is
changed, the disc/track name does not scroll.
Playing tracks in random order
— Shuffle Play
You can select:
• Shuf 1 — to play the tracks on the current disc
in random order.
• Shuf 2*
• Shuf All*
*1 Available only when one or more optional CD (MD)
*2 Available only when one or more optional CD units,
To return to normal play mode, select “Shuf off.”
Note
“Shuf All” will not shuffle tracks between CD units and
MD units.
1
— to play the tracks in the current
optional CD (MD) unit in random order.
2
— to play all the tracks in all the
connected CD (M D ) units (including this un it)
in random order.
units are connected.
or two or more optional MD units are connected
(CDX-M770/M670).
Available only when one or more optional MD units,
or tow or more optional CD units are connected
(MDX-M690).
During playback, press (2) (SHUF)
repeatedly until the desired setting
appears in the display.
Shuffle Play starts.
12
Page 13
Labelling a CD
— Disc Memo (For a CD unit with the CUSTOM FILE function)
You can label each disc wit h a custom name
(Disc Memo). You can enter up to 8 characters
for a disc. If you label a CD, you can locate th e
disc by name (page 14).
1 Start playing the disc you want to label
in a CD unit with the CUSTOM FILE
function.
2 Press (MENU), then press M or m
repeatedly until “Name Edit” appears.
3 Press (ENTER).
Tips
• Simply overwrite or enter “” to correct or erase a
name.
• There is another way to start labelling a CD: Press
(LIST) for 2 seconds instead of performing steps 2
and 3. You can also complete the operation by
pressing (LIST) for 2 seconds instead of step 5.
• You can label CDs on a unit without the CUSTOM
FILE function if that unit is connected along with a
CD unit that has the function. The Disc Memo will be
stored in the memory of the CD unit with the
CUSTOM FILE function.
Note
Repeat/shuffle play is suspended until the Name Edit
is complete.
Viewing the Disc Memo
As a display item, the Disc Memo always takes
priority over any origin al CD TEXT information.
To Press
View (DSPL/PTY) during CD/CD
TEXT disc playback
The unit will repe at the disc during the
labelling proced ure.
4 Enter the characters.
1
1 Press M*
desired character.
repeatedly to select the
A t B t C ... t 0 t 1 t 2 ... t +
t – t
*1 For reverse order, press x.
*2 (blank space)
2 Press , after lo cating the desired
character.
If you press < (the (–) side of (SEEK)),
you can move back to the le ft .
3 Repeat steps 1 and 2 to enter the
entire name.
... t *2 t A
*
5 To return to normal CD play mode,
press (ENTER).
Tip
To find out about other items that can be displayed,
see page 12.
Erasing the Disc Memo
1 Press (SOURCE) repeatedly to select
“CD.”
2 Press (MODE) repeatedly to select the
CD unit storing the Disc Memo.
3 Press (MENU), then press M or m
repeatedly until “Name Del” appears.
4 Press (ENTER).
The stored names w i l l a ppear.
5 Press M or m repeatedly to select the
disc name you want to erase.
The stored names w i l l a ppear.
6 Press (ENTER) for 2 secon ds.
The name is erased.
Repeat steps 5 and 6 if you wa nt to era se
other names.
7 Press (ENTER).
The unit returns to normal C D play mode.
Notes
• When the Disc Memo for a CD TEXT disc is erased,
the original CD TEXT information is displayed.
• If you cannot find the Disc Memo you want to erase,
try selecting a different CD unit in step 2.
13
Page 14
Locating a disc by name
— List-up (For a CD unit with the CD TEXT/ CUSTOM FILE function, or an MD unit)
Y ou can use this function for discs that have been
assigned custom names*
2
discs*
.
*1 Locating a disc by its custom name: when you
assign a name for a CD (page 13) or an MD.
*2 Locating discs by the CD TEXT information: when
you play a CD TEXT disc on a CD unit with the CD
TEXT function.
1 Press (LIST).
The name assigned to the current disc appears
in the display.
2 Press M or m repeatedly until you find
the desired disc.
3 Press (ENTER) to play the disc.
Note
Some letters cannot be displayed (exception: Disc
Memo).
1
or for CD TEX T
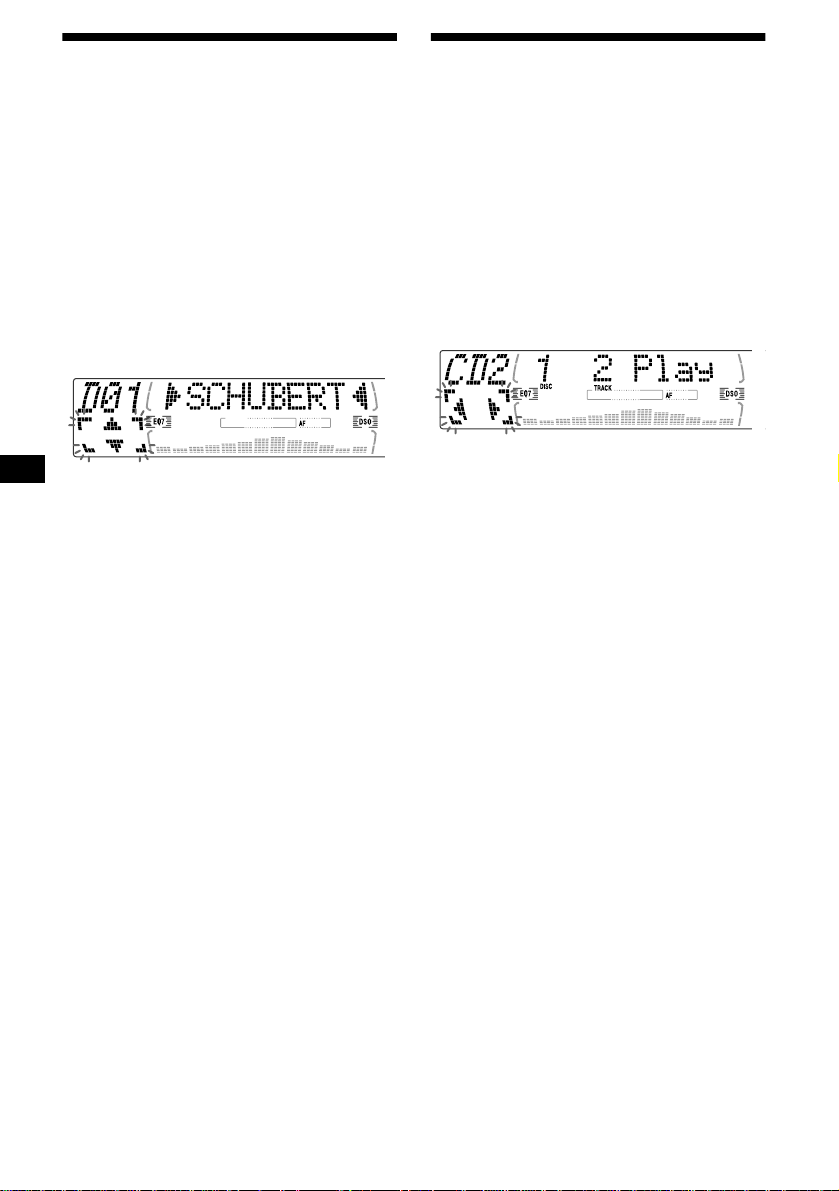
Selecting specific tracks for playback
— Bank (For a CD unit with the CUSTOM FILE function)
If you label the disc , y ou can set the unit to skip
or play the tracks of your choice.
1 Start play i ng the disc you want to
label.
2 Press (MENU), th en press M or m
repeatedly until “Bank Sel” appears.
3 Press (ENTER).
4 Label the tracks.
1Press < or , r epe at edly to sel ec t
the track you want to label.
2Press (ENTER) repeatedly to select
“Play” or “Skip.”
5 Repeat step 4 to set “Play” or “Skip”
for all the track s .
6 Press (ENTER).
The unit returns to normal CD play mode.
Notes
• You can set “Play” and “Skip” for up to 24 tracks.
• You cannot set “Skip” for all the tracks on a CD.
14
Page 15

Playing specific tracks only
You can select:
• Bank on — to play the tracks with the “Play”
setting.
• Bank inv (Inverse) — to play the tracks with
the “Skip” setting.
1 During playback, press (MENU), then
press M or m repeatedly until “Bank
on,” “Bank inv,” or “Bank off”
appears.
2 Press , repeatedly until the desired
setting appears.
3 Press (ENTER).
Playback starts from the track following the
current one.
T o retu rn to norma l pla y mode, se lect “Bank of f ”
in step 2.
Radio
The unit can store up to 6 stations per band
(FM1, FM2, FM3, MW, and LW).
Caution
When tuning in stations while driving, use Best
Tuning Memory to prevent accidents.
Storing stations automatically
— Best Tuning Memory (BTM)
The unit selects the stations with the strongest
signals within the selected band, and stores them
in the order of their frequency.
1 Press (SOURCE) repeatedly to select
the radio.
2 Press (MODE) repeatedly to select the
band.
3 Press (MENU), then press M or m
repeatedly until “BTM” appears.
4 Press (ENTER).
A beep sounds whe n th e setting is stored.
Notes
• If only a few stations can be received due to weak
signals, some number buttons will retain their former
settings.
• When a number is indicated in the display, the unit
starts storing stations from the one currently
displayed.
15
Page 16

Receiving the stored stations
1 Press (SOURCE) repeatedly to select
the radio.
2 Press (MODE) repeatedly to select the
band.
3 Press the number button ((1) to (6))
on which the desired station is stored.
Tip
Press M or m to receive the stations in the order they
are stored in the memory (Preset Search function).
If preset tuning does not work
Press either side of (SEEK) to search
for the station (automatic tun ing).
Scanning stops when the unit receives a
station. Repeat until the desired station is
received.
Tips
• If automatic tuning stops too frequently, turn on the
Local Seek to limit seek to stations with stronger
signals (see “Changing the sound and disp lay
settings” on page 34).
• If you know the frequency of the station you want to
listen to, press and hold either side of (SEEK) to
locate the approximate frequency, then press
(SEEK) repeatedly to fine adjust to the desired
frequency (manual tuning).
If FM stereo reception is poor
Select monaural reception mode
(see “Changing the sound and di splay
settings” on page 34).
The sound improves, but bec om es monaural
(“ST” disappears).
Storing only the desired stations
You can manually prese t th e desired stations on
any chosen number butto n.
1 Press (SOURCE) repeatedly to select
the radio.
2 Press (MODE) repeatedly to select the
band.
3 Press either side of (SEEK) to tune in
the station that you want to store.
4 Press the desired number button ((1)
to (6)) for 2 secon ds until “MEM”
appears.
The number button indication appears in the
display.
Note
If you try to st or e a no t her s t at io n o n t he same n um be r
button, the previously stored station will be erased.
16
Page 17
Tuning in a station through a list
— List-up
1 During radio reception, press (LIST)
momentarily.
The frequency or the name assigned to the
current station appears in the display.
RDS
Overview of RDS
FM stations with Ra di o D ata System (RDS)
service send ina udible digital informa tion along
with the regular radio programme signal. For
example, one of the following will be displaye d
upon receiving a station w i th RD S capability.
2 Press M or m repeatedly until you find
the desired station.
If no name is assigned to the selected st at ion,
the frequency appears in th e di splay.
3 Press (ENTER) to tune in the desired
station.
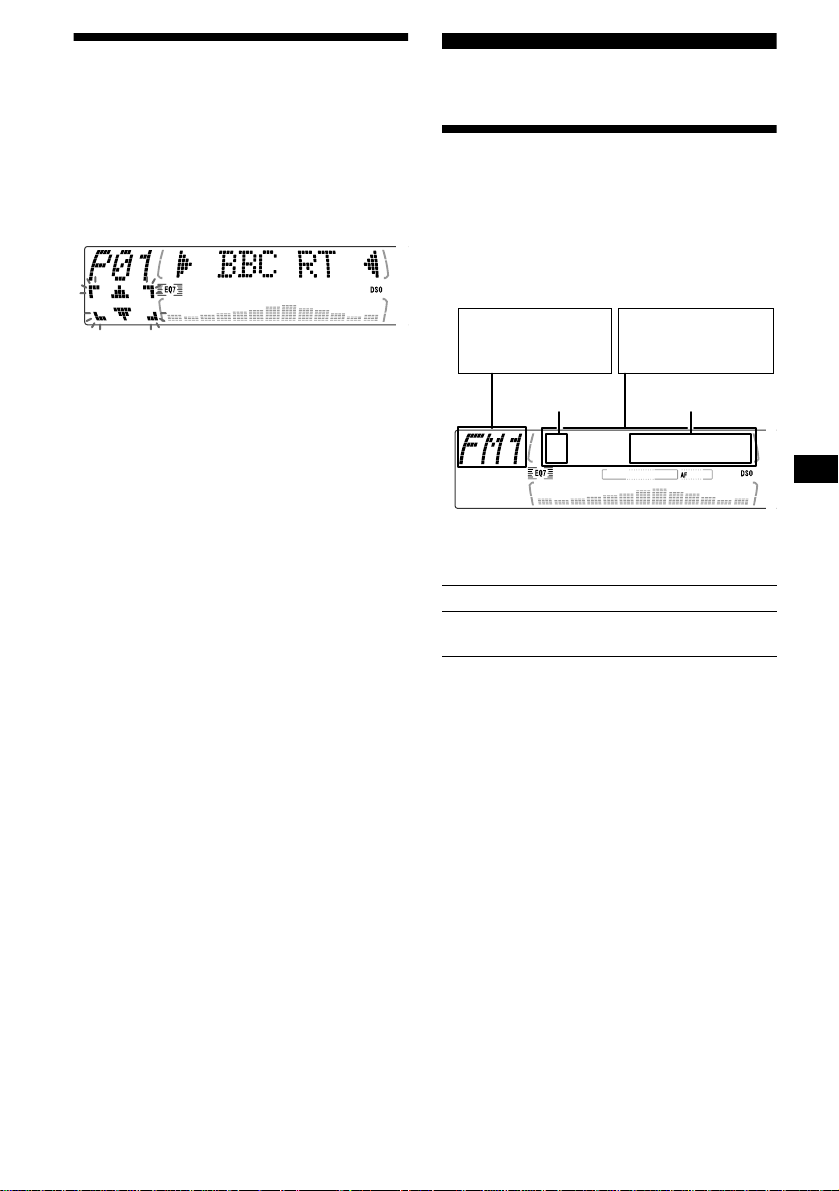
Displayable ite m s
• Radio band
• Clock
Preset
number
* see “Tuning in stations by programme type” on
page 20.
To Press
Switch display
item
Displayable items*
• Station name
• Programme type
Frequency
(DSPL/PTY)
RDS services
RDS data offers you other conveniences, such as:
• Automatic ret uning of a programme, helpful
during long-distance drives. — AF t page 18
• Receiving traffic announcements, even
when enjoying another programme/sour ce. —
TA t page 19
• Selecting stations by the type of programme
it broadcasts. — PTY t page 20
• Automatic clock time setting. — CT t page
21
Notes
• Depending on the country or region, not all of the
RDS functions are available.
• RDS may not work properly if the signal strength is
weak or if the station you are tuned to is not
transmitting RDS data.
17
Page 18
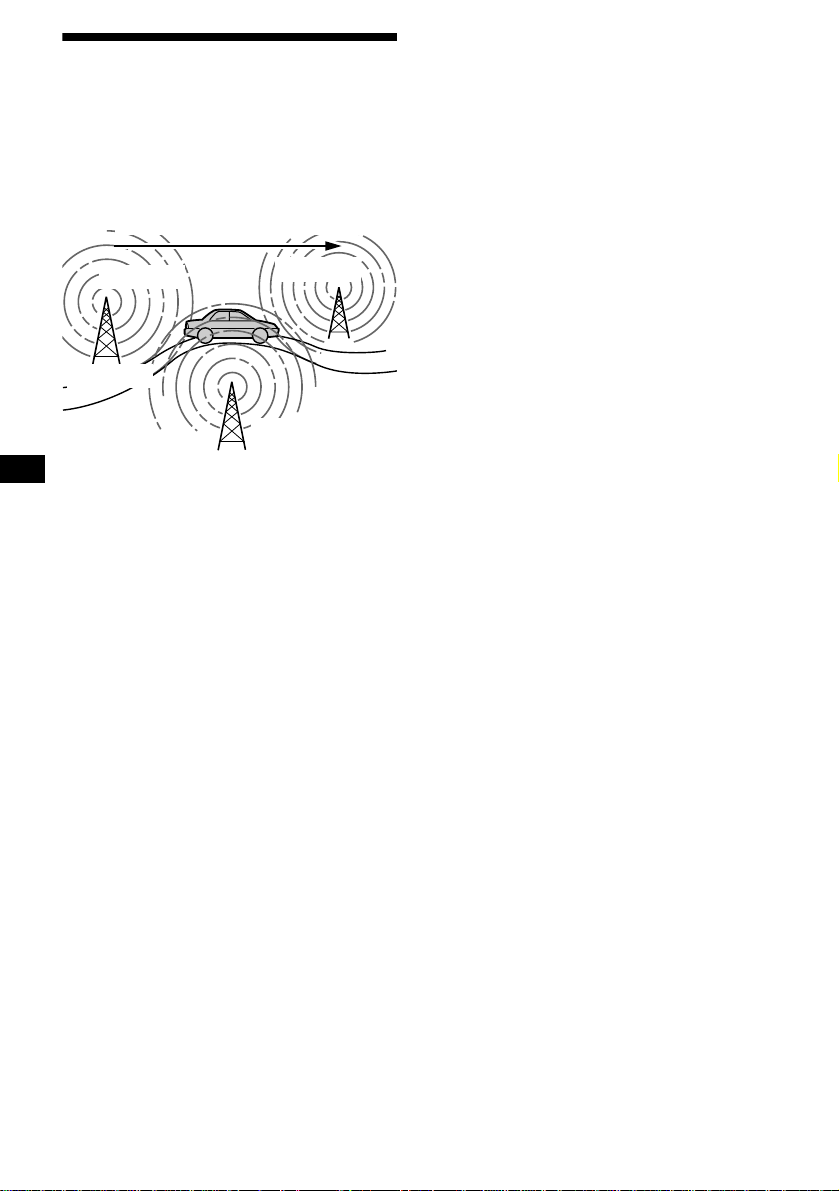
Automatic retuning for best reception results
— AF function
The alternative frequencies (AF) function allows
the radio to always tune in to the area’s strongest
signal for the sta ti on you are listening to.
Frequencies change automatically.
For stations without alternative
frequencies
Press eith er side of (SEEK) while the
station name is flashing (within 8
seconds).
The unit starts searching for another
frequency with the same PI (Programme
Identification) data (“PI Seek” appears).
If the unit cannot find the same PI, the unit
returns to the previously selected frequency.
98.5 MHz
Station
96.0 MHz
102.5 MHz
1 Select an FM station (page 15) .
2 Press (AF) repeate dly until “AF on”
appears.
The unit starts searching for an alternative
frequency with a stronger signal in the same
network.
If “NO AF” flashes, the currently tuned into
station does not have an alternative frequency.
Note
When there is no alternative frequency in the area or
when you do not need to search for one, turn the AF
function off by selecting “AF
off.”
Staying with one regional programme
When AF function is on: this unit’s factory-set
setting restr ic ts reception to a specific regi on, so
you won’t be switched to an othe r re gion al st ati on
with a stronger fr equency.
If you leave this regional programm e’s reception
area or would like to take advantage of the whole
AF function, select “REG off” from t he MENU
(page 34).
Note
This function does not work in the United Kingdom
and in some other areas.
Local Link function
(United Kingdom only)
This function enab les you to se lect other local
stations in the area, even if the y are not store d on
your number buttons.
1 Press a number button ((1) to (6))
that has a local station stored on it.
2 Within 5 seconds, pre ss the number
button of the local station again.
3 Repeat this procedure until the
desired local station is received.
18
Page 19

Receiving traffic announcements
— TA/TP
By activating the Traffic Announcement (TA)
and Traffic Programme (TP), you can
automatically tune in an FM st ation b roadcast ing
traffic announcements. These settings function
regardless of the current FM programme/source,
CD/MD; the unit switches back to the original
source when the bull et in is over.
Press (TA) repeatedly until “TA
appears.
The unit starts searching for traffic
information stations.
“TP” indicates reception of such stations , and
“TA” flashes during an actual tr affic
announcement. The unit will continue
searching for stations available with TP if
“NO TP” is indi c ated.
To cancel all traffic announcements, select
“TA
off.”
To Press
Cancel current
announcement
Tip
You can also cancel the current announcement by
pressing (SOURCE) or (MODE).
(TA)
Presetting the volume of traffic
announcements
You ca n preset the volume level of the traffic
announcements s o you won’t miss hearing them.
on”
Presetting RDS stations with AF and TA setting
When you preset RDS stations, the unit stores
each station’s AF/TA setting (on/off) as well as
its frequency. You can select a different setting
(for AF, TA, or both ) for individual preset
stations, or the same setting for all preset
stations. If you preset stations with “AF on,” the
unit automatically stores stations with the
strongest radio signal.
Presetting the same setting for all
preset stations
1 Select an FM band (page 15).
2 Press (AF) and/or (TA) to select
“AF
on” and/or “TA on.”
Note that selecting “AF off” or “TA off”
stores not only RDS sta t io ns, but also nonRDS stations.
3 Press (MENU), then press M or m
repeatedly until “BTM” appears.
4 Press (ENTER) until “BTM” flashes.
Presetting different settings for each
preset station
1 Select an FM band, and tune in the
desired station (page 16).
2 Press (AF) and/or (TA) to select
“AF
on” and/or “TA on.”
3 Press the desired number button ((1)
to (6)) until “MEM” appears.
1 Press (VOL) to adjust the desired
volume level.
2 Press (TA) for 2 seconds.
“TA” appears and the setting is stored.
Receiving emergency annou nce men ts
If either AF or TA is on, the unit will switch to
emergency announceme nt s, if one comes in
while listening to an FM station or CD/MD.
Repeat from ste p 1 t o pr eset other stations.
19
Page 20

Tuning in stations by programme type
— PTY
You can tu ne in a station by selecting the t ype of
programme you would like to listen to.
Programme types Display
News News
Current Affairs Affairs
Information Info
Sports Sport
Education Educate
Drama Drama
Culture Culture
Science Science
Varied Varie d
Popular Music Pop M
Rock Music Rock M
Easy Listening Easy M
Light Classical Light M
Classical Classics
Other Music Type Other M
Weather Weather
Finance Finance
Children’s Pr og ra mmes Children
Social Affairs Social A
Religion Religion
Phone In Phone In
Travel Travel
Leisure Leisure
Jazz Music Jazz
Country Musi c Country
National Music Nation M
Oldies Music Oldies
Folk Music Folk M
Documentary Document
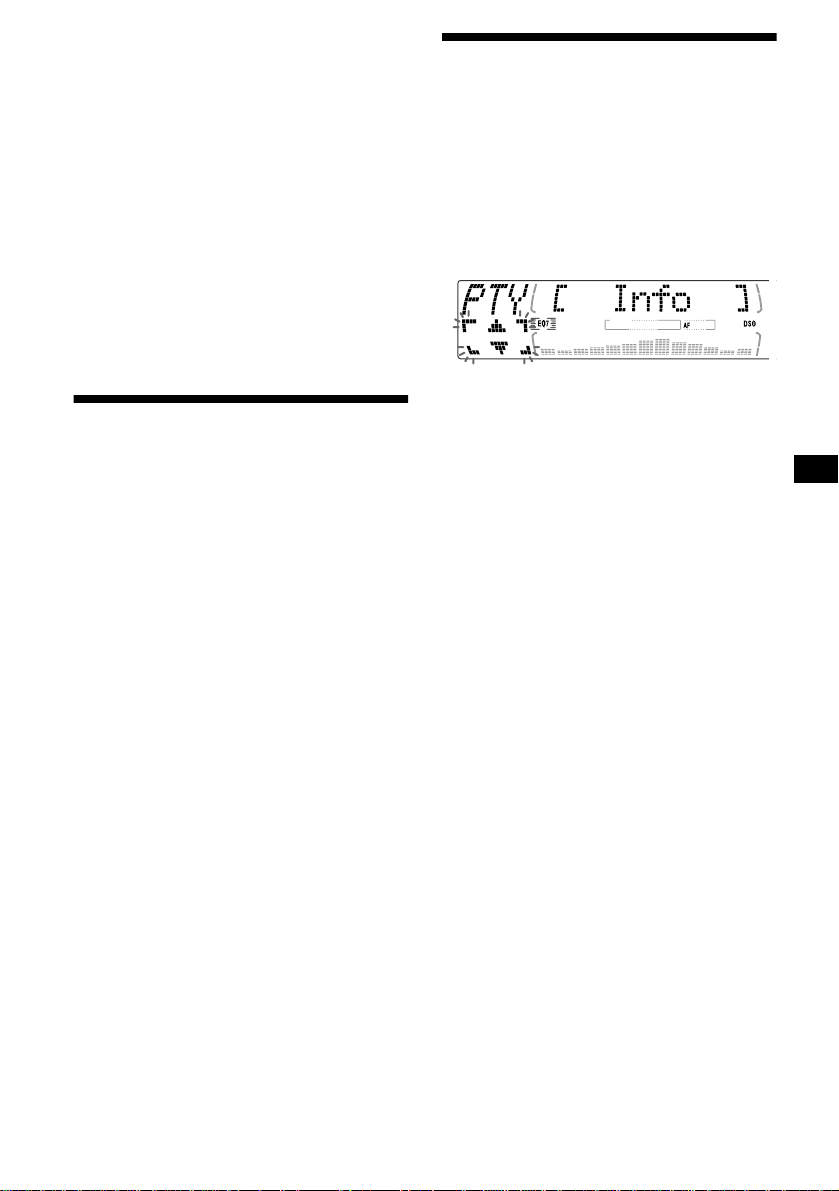
1 Press (DSPL/PTY) during FM reception
until “PTY” appears.
The current progra mme type name appears if
the station is transmitting the PTY data.
“--------” appears if the received sta t i on is not
an RDS station, or if the RDS data is not
received.
2 Press M or m repeatedly until the
desired programme type appears.
The programme types appear in the order
shown in the table.
“--------” appears if the pro gramme type is not
specified in the RDS data.
3 Press (ENTER).
The unit starts searching for a station
broadcasting the selected programme type.
Note
You cannot use this function in some countries where
no PTY (Programme Type selection) data is available.
20
Page 21
Setting the clock automatically
— CT
The CT (Clock Time) data from the RDS
transmis sion sets th e c lock autom atically.
DAB (optional)
You can connect an optional DAB tuner to this
unit.
1 During radio reception, press (MENU),
then press M or m repeatedly until “CT
off” appears.
2 Press , repeatedly until “CT on”
appears.
The clock is set .
3 Press (ENTER) to return to the normal
display.
T o cancel the CT functio n, select “CT
2.
Notes
• The CT function may not work even though an RDS
station is being received.
• There might be a difference between the time set by
the CT function and the actual time.
off” in step
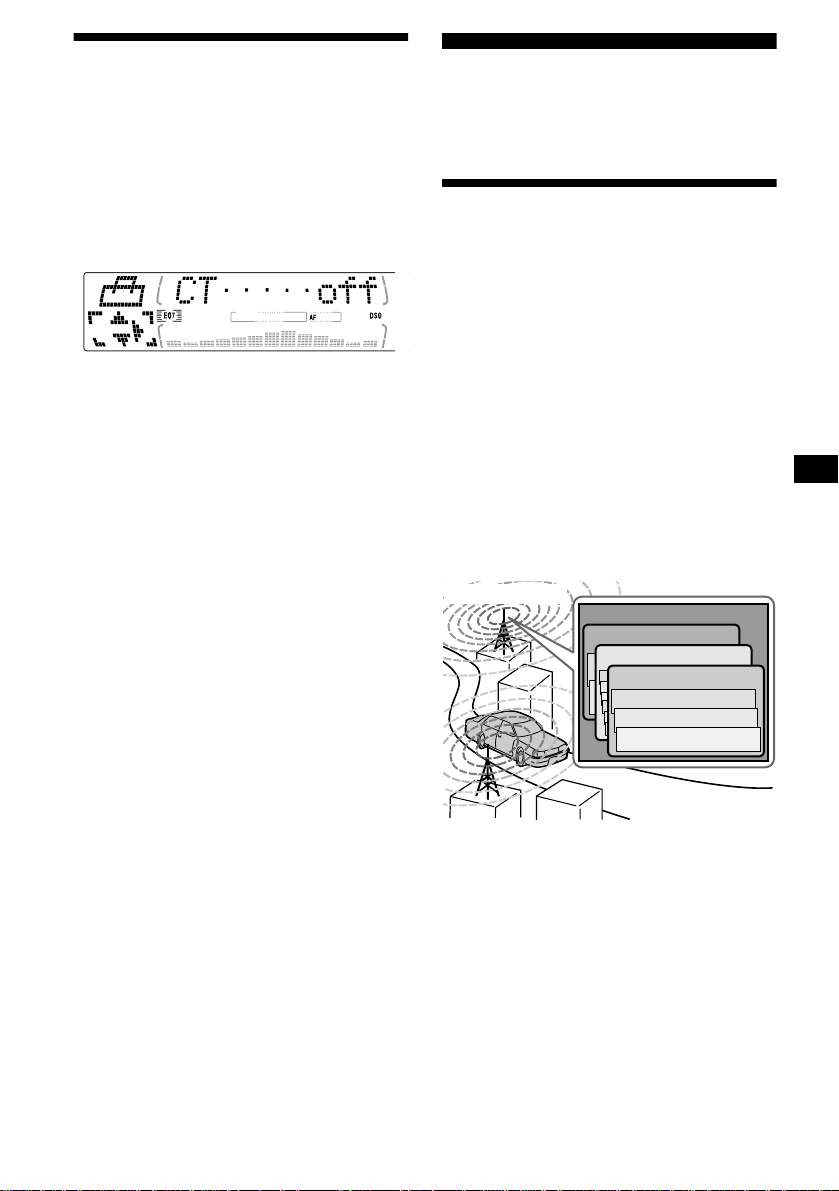
Overview of DAB
DAB (Digital Audio Broadcasting) is a new
multimedia broadcasting system that transmits
audio progra mme s w it h a quality com parable to
that of CDs. This is made possible by the use of a
microcomputer in the DAB tuner which uses the
radio signals s ent from multiple a er ials and
multi-path signals (reflected radio waves) to
boost the strength of the main signal. This ma kes
DAB almost immune to radio interference e ven
in a moving obje ct such as a car.
Each DAB station bundles radio programmes
(services) into an ensemble which it then
broadcasts. Each service contains one or more
components. All ensembles, se rvices, and
components are identified by name, so you can
access any of them without having to know their
frequencies.
DAB programme
Ensemble
Service
Service
Service
Component
Component
Component
Notes
• The DAB system is still in a testing phase. Some
services have not been sufficiently defined or are
presently being tested. At present, such services are
not supported by the optional DAB tuner unit XT100DAB.
• DAB programmes are broadcast in Band-III (174 to
240 MHz) and L-Band (1,452 to 1,492 MHz), with
each band divided into channels (41 in Band-III and
23 in L-Band). One ensemble is broadcast per
channel by each DAB station.
21
Page 22
Basic operations of DAB
Searching for the ensemble and
service
— Automatic Tuning
1 Press (SOURCE) repeatedly to select
the radio.
2 Press (MODE) repeatedly to select
“DAB.”
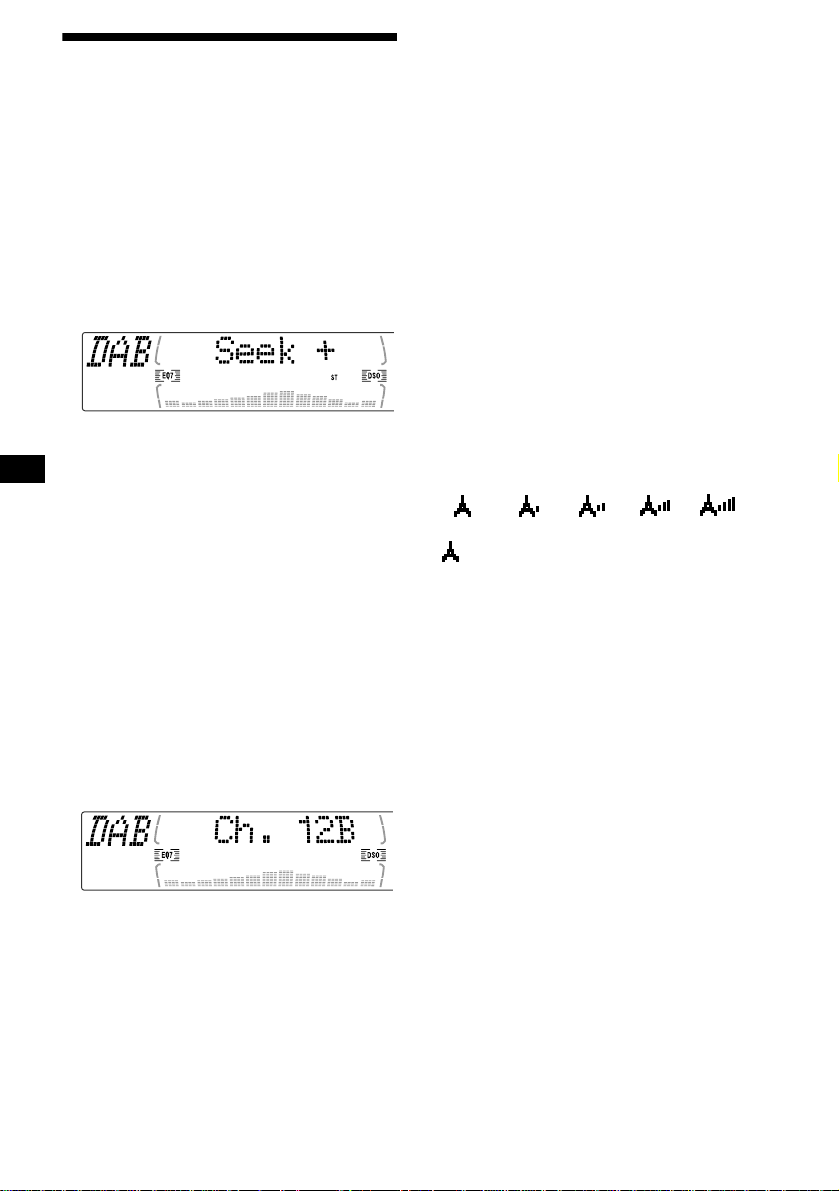
3 Press and hold either side of (SEEK)
until “Seek +” or “Seek –” appears.
The unit will stop seeking when an ensemble
is located. The unit will then a utomatically
select the first service and display its name,
and the display indi cator will change fr om
“Seek +”/“Seek –” to the service name.
4 Press either side of (SEEK) to select
the desired service.
Selecting the ensemble
— Manual Tuning
If you know the channel number of ensemble,
follow the procedure bel ow to tune in.
Receiving the preset services
Following procedure is available after presetting
the service. For detai ls on presett ing the serv ices,
refer to “Presetting D AB services automati cally ,”
(page 23) and “Presetting DAB services
manually” (page 23).
1 Press (SOURCE) repeatedly to select
the radio.
2 Press (MODE) repeatedly to select
“DAB.”
3 Press M or m repeatedly to select the
preset service.
Tip
There is another way to receive the preset service
(preset on numbers 1 to 6).
Press the number button ((1) to (6)) on which the
desired service is stored.
Refer to the level indication to check the
receiving condition of the DAB programme.
The level indication increases as the
strength of the receiving signal increases.
level 0
“” will flash in the display if the reception is
poor.
Note
To display the level indication, select the spectrum
analyzer pattern A-1 or A-2 (page 33).
level 1 level 2 level 3 level 4
1 Press (SOURCE) repeatedly to select
the radio.
2 Press (MODE) repeatedly to select
“DAB.”
3 Press M or m until “Ch. XXX” appears.
4 Press M or m repeatedly until the
desired channel number appears.
22
Page 23

Presetting DAB services automatically
— BTM
The BTM (Best Tuning Memory) function picks
out DAB ensembles and automaticall y assig ns
the services within th e ensembles to preset
service numbers. The unit can preset up to 40
services.
If services have been previously set, the BTM
function operates under the following conditions:
• If you activate the BTM function w hi l e
listening to a pres et service, the unit will store
detected services (by overwriting) only to
preset numbers hi gher than that of the curr ent
present servi ce.
• If you activate the functio n whil e lis tenin g to a
service that is not preset, the unit will replace
the contents of all preset numbers.
• In both cases above, if the unit detects a service
that is identical to one a lready preset, the
previously stored service remains unchanged
and the newly detected service is not prese t.
1 While listening to a DAB programme,
press (MENU).
2 Press M or m repeatedly until “BTM”
appears.
3 Press (ENTER).
A beep sounds w hen the service is stor ed.
After activating the BTM function, the unit
tunes the service assigned in the last smallest
preset memory No. automatically.
Note
If the unit can only tune in a few services, the BTM
function may not assign services to all the preset
service numbers.
Presetting DAB services manually
— Preset Edit
You can also preset DA B se rv i ces manually or
delete a service which is a lready prese t. Note that
up to 40 services (preset either by the BTM
function or manually) can be preset to the unit’s
memory.
1 While listening to a DAB programme,
press (MENU).
2 Press M or m repeatedly until “PRS
Edit” appears, then press (ENTER).
3 Select the servic e and the preset
number you want to preset.
1 Press either side of (SEEK) to select
the service.
2 Press M or m to select the preset
number.
3 Press (ENTER).
The Preset Edit commands will appear in
the display.
4 Press M or m to select the desired
command.
5 Press (ENTER).
To edit other serv ic es, repeat steps 3 and 4.
continue to next page t
23
Page 24
Replacing the services in preset
memories
Press M or m to select “Over Wrt” in step 4, then
press (ENTER).
Tip
There is another way to preset the service (on
numbers 1 to 6).
After receiving the service, press the desired number
button ((1) to (6)) until a beep sounds.
Adding the services in preset
memories
Press M or m to select “Insert” in step 4, then
press (ENTER).
Note
“Insert” does not appear if the maximum number of
services (40) is already preset in memory.
Erasing the services in preset
memories
Press M or m to select “Delete” in step 4, then
press (ENTER).
Tuning in DAB programme through a list
Follow the procedure below to tune in a DAB
programme manually.
1 While listening to a DAB programme,
press (LIST) repeatedly until “E”
(ensemble list) appears.
E: ensemble list
S: service list
C: component list
P: preset list
All available ensembles will be listed.
2 Press M or m until the desired
ensemble appears, then press
(ENTER).
The first service for the ensemble is selecte d
automatically.
3 Press (LIST) repeatedly until “S”
(service list) appears.
All services av ailable for the ensemble will be
listed.
4 Press M or m repeatedly until the
desired service appears, th en press
(ENTER).
The first component for the servic e is selected
automatically.
5 Press (LIST) repeatedly until “C”
(component list) appears.
All component s available for the service will
be listed.
6 Press M or m until the desired
component appears, then pres s
(ENTER).
24
Page 25
Automatic updating of the ensemble
list
When you perform the BTM function for the first
time, all the ensembles available in your area are
automatically stored. When you perform the
BTM function again, the contents of these lists
are updated in accordance with the conditions
described on pag e 23.
An ensemble is added to th e respective list when
it is received during Automatic Tuning or
Manual Tuning but is unlisted.
An ensemble is also deleted from the respec tive
list when:
• you select an ensemble from the list, but it
cannot be received.
• you perform Automatic Tuning or Manual
Tuning to receive a listed ensemble, service, or
the component, but it cannot be receive d.
Switching multi-channel audio and DRC
DAB can contain multi-channel a udio. You can
select main or sub-channel for reception. Als o, if
you turn on the DRC (Dy namic Range Control)
function, the dynamic range on the service which
supports DRC can auto m at i cally be extended.
The following items can be set:
• BLGL — to select the channel from either
“Main” (main-channel) or “Sub” (sub-
channel).
• DRC — to turn on or off the function.
Locating a DAB service by programme type (PTY)
Y ou can use the PTY (Programme type selection)
function to tune in th e programme you want.
1 While listening to a DAB programme,
press (DSPL/PTY).
2 Press M or m repeatedly to select the
programme type.
The programme t ypes appear in the order
shown on page 20.
3 Press (ENTER).
Searching for a ser v i ce of the selected
programme type begins automatically.
1 While listening to a DAB programme,
press (MENU).
2 Press M or m repeat edl y unti l “DRC” or
“BLGL” appears.
3 Press either side of (SEEK) to select
the desired setting (Example: “on” or
“off”).
4 Press (ENTER).
Note
“BLGL” appears in the menu only when the unit is
receiving a multi-channel pro gramm e.
25
Page 26
Adjusting the equalizer curve
Tuning up for your best sound
The unit provides the various functions to adjust
the sound so that you can enjoy the best sounding
music.
Setting the equalizer (EQ7)
You can select an equalizer curve for 7 music
types (Vocal, Club, Jazz, New Age, Rock,
Custom, and Xplod).
You can store and adjust the equalizer settings
for frequency and level.
Selecting the equalizer curve
1 Press (SOURCE) to select a source
(radio, CD, or MD).
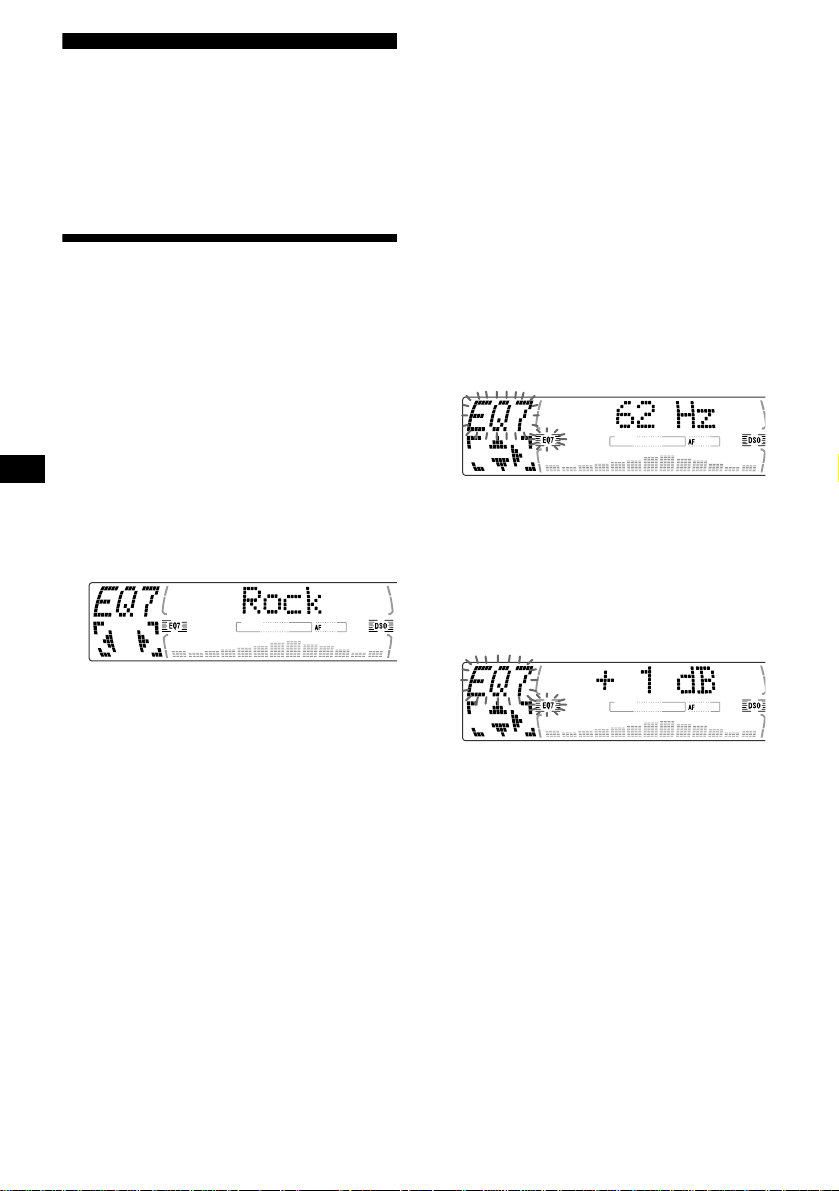
2 Press (EQ7) repeatedly until the
desired equalizer curve.
Each time you press (EQ7), th e item
changes.
1 Press (MENU).
2 Press M or m repeatedly until “EQ7
Tune” appears, then press (ENTER).
3 Press < or , to select the desired
equalizer curve , th en press (ENTER).
Each time you press < or ,, the item
changes.
4 Select the desired frequency and level.
1Press < or , to select the des ir ed
frequency.
Each time you pre ss < or ,, the
frequency changes as follows:
62 Hz y 157 Hz y 396 Hz y 1.0 kHz
y 2.5 kHz y 6.3 kHz y 16 kHz
2Press M or m t o adj ust the desired
volume level.
(CDX-M770)
The volume level is adjustable by 1 dB
steps from –12 dB to +12 dB.
(CDX-M670, MDX-M690)
The volume level is adjusta b le by 1dB
steps from –10 dB to +10 dB.
To cancel the equalizing effect, select “off.”
After 3 seconds, the d isplay returns to the
normal playback mode.
26
To restore the factory-set equali zer curve,
press (ENTER) for 2 seconds.
5 Press (ENTER).
After the effec t setting is complete, the
display returns to the normal playback mode.
Page 27
Setting the soundstage menu
— Dynamic Soundstage Organizer (DSO)
If your speakers are installed into the lower part
of the doors, the so und will come from below
and may not be clear.
The DSO (Dynamic So undstage Organizer)
function creates a more ambient sound as if there
were speakers in the dashboard (virtual
speakers).
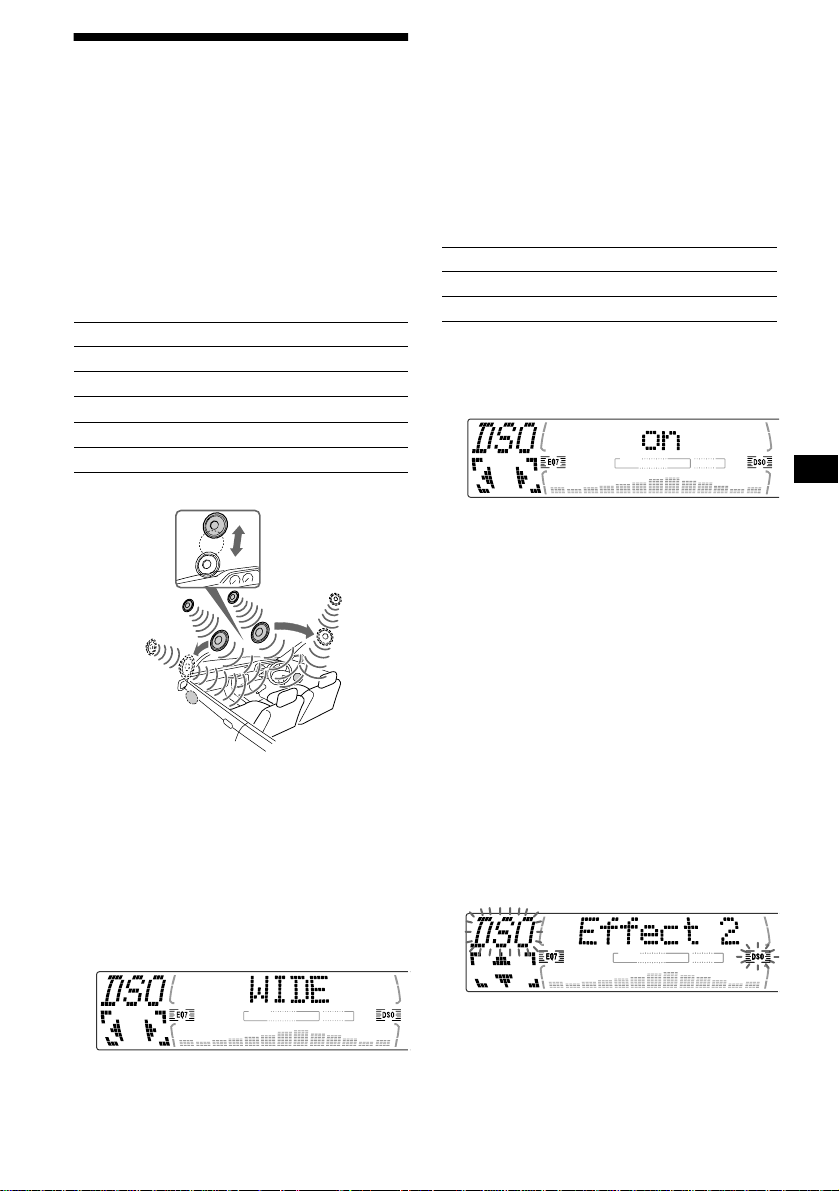
Selecting the DSO mode (CDX-M770)
DSO mode of CDX-M770
Display window Meaning
STD
WIDE
STD-SP
WIDE-SP
off
Image of virtual speakers
*4
*1 STD
*2 Wide
*3 STD+depth
*4 Wide+depth
*5 Actual speakers position (lower part of the front
doors)
1 Press (SOURCE) to select a source
(tuner, CD, or MD).
2 Press (DSO) repeatedly to select the
desired DSO mode.
Virtual speakers (Standard)
Virtual speakers (Wide)
Standard+depth
Wide+depth
Cancel
Effect 3
Effect 1
*3
*2
*5
*3
*1
*4
*1
*2
*5
Tips
• The DSO effect may be hard to discern depending
on the type of car you are driving and the music you
are listening to.
• When DSO setting is "WIDE," the FM reception is
inaudible. In this case, reset the DSO setting to
"STD."
Turning the DSO mode on (off) (CDXM670, MDX-M690)
DSO mode of CDX-M670 MDX-M690
Display window Meaning
on
off
Virtual speakers
Cancel
1 Press (SOURCE) to select a source
(tuner, CD, or MD).
2 Press (DSO) to select “on” or “off.”
To cancel the DSO mode, select “DSO off.”
After 3 seconds, the di splay returns to the
normal playback mode.
Adjusting the DSO mode (CDX-M770)
1 Press (SOURCE) to select a source
(tuner, CD, or MD).
2 Press (MENU).
3 Press M or m repeatedly until “DSO
tune” appears, then press (ENTER).
4 Press < or , to select the d es ired
DSO mode, then pres s (ENTER).
5 Select the effect level.
You can select the desired effect from 3 effect
lebels for each DSO mode.
Press M or m repeatedly to select
desired effect.
To cancel the DSO mode, select “off.”
After 3 seconds, the disp lay returns to the
normal playba ck m ode.
To restore the effect, press (ENTER) for 2
seconds.
6 Press (ENTER).
continue to next page t
27
Page 28

If the sound from the tweeter is too
shrill (CDX-M770)
1 While the unit is operating, press
(MENU).
2 Press M or m repeatedly until “DSO
norm” appears.
3 Press , to select “DSO soft.”
4 Press (MENU).
To restore the sound, select “DSO norm.”
Listening to each programme source in its registered DSO
— Source Sound Mem ory (SSM)
Each time you return to the sa me so urce, y ou ca n
hear the same DSO menu and equalizer curve
registered for that source, even after changing the
programme source or turning the unit off and
then on again.
Adjusting the sound characteristics
You ca n adjust the sound char acteristics.
The bass and treble le v els and s ubwoofe r volume
can be stored independently for each source.
1 Select the item you want to adjust by
pressing (SOUND) repeatedly.
Each time you press (SOUND), the item
changes as follows:
(CDX-M770)
POS (position) t BAL (left-right)
t F (front volume) t R (rear volume)
t SUB (subwoofer volume)
(CDX-M670, MDX-M690)
BAS (bass)
t BAL (left-right) t FAD (front-rear)
t SUB (subwoofer volume)
2 Adjust the selected item by pres si ng
< or ,.
When adjusting w i th the rotary comman der,
press (SOUND) and rotate the VOL control.
Note
Adjust within 3 seconds after selecting the item.
t TRE (treble)
28
Page 29
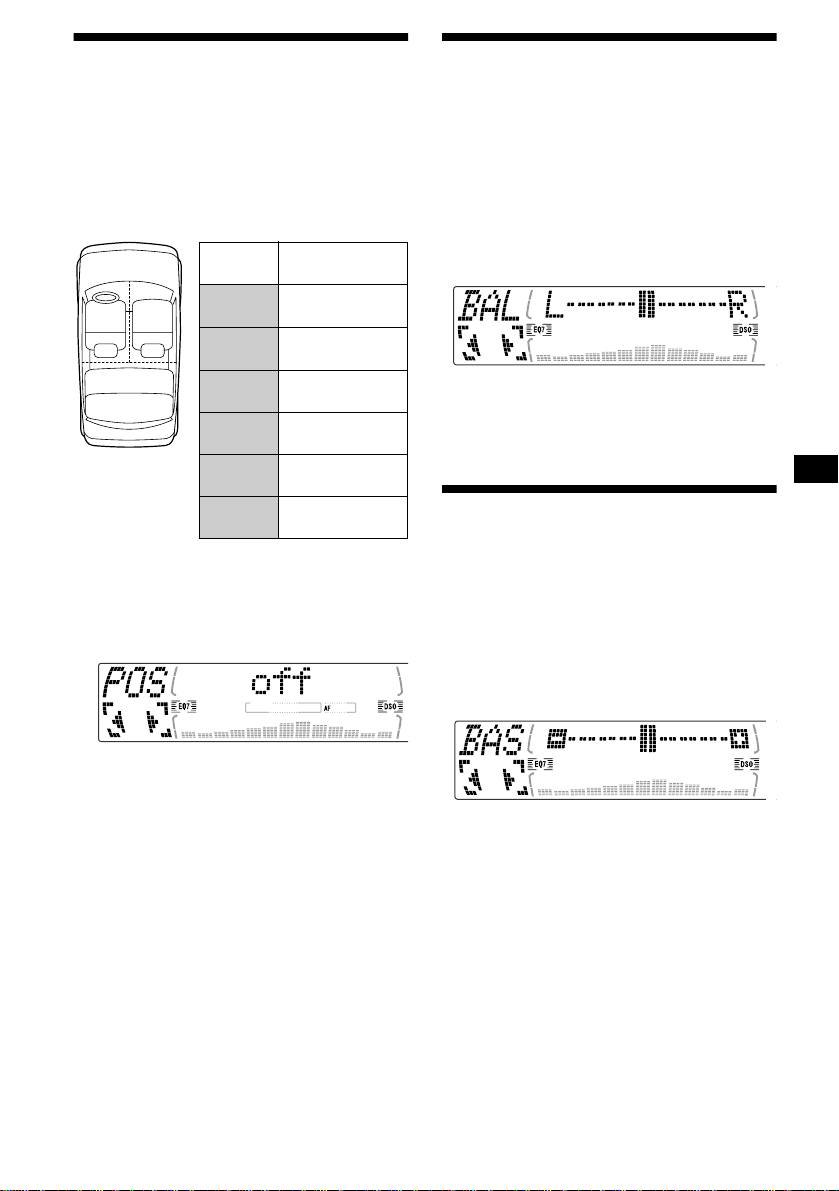
Selecting the listening position (CDX-M770 only)
Adjusting the balance (BAL)
You can set a delayed t ime for the so und t o re ach
the listeners from the speakers.
In this way, the unit can simulate a natural sound
field so that you feel as if you are in the center of
the sound field no ma tte r wh er e y o u s it in the car.
1
3
2
Display
window
POS
ALL
POS
Front
POS
Front-R
POS
Front-L
POS
Rear
POS
off
Centre of sound
field
Normal setting
(1 + 2 + 3)
Front part
(1 + 2)
Right front (2)
Left front (1)
Rear part (3)
Cancel
1 Press (SOURCE) to select a source
(tuner, CD, or MD).
2 Press (SOUND) repe ated ly unti l “POS”
appears.
You can adjust the sound bala nce from the left
and right speakers.
1 Press (SOURCE) to select a source
(tuner, CD, or MD).
2 Press (SOUND) repeat edl y u nti l “BAL”
appears.
3 Press < or , to adjust the balance.
After 3 seconds, the di splay returns to the
normal playback mode.
Adjusting the bass (CDXM670, MDX-M690 only)
You can adjust the bass from the s pe akers.
1 Press (SOURCE) to select a source
(tuner, CD, or MD).
2 Press (SOUND) repeatedly until “BAS”
appears.
3 Press < or , to selec t th e desired
listening position.
All y Front y Front-R y
Front-L y Rear y off y All
The listening positions appear in the order
shown above.
To cancel the POS mode, select “off.”
After three seconds, the display returns to the
normal playba ck m ode.
3 Press < or , to adjust the balance.
After 3 seconds, the di splay returns to the
normal playback mode.
29
Page 30
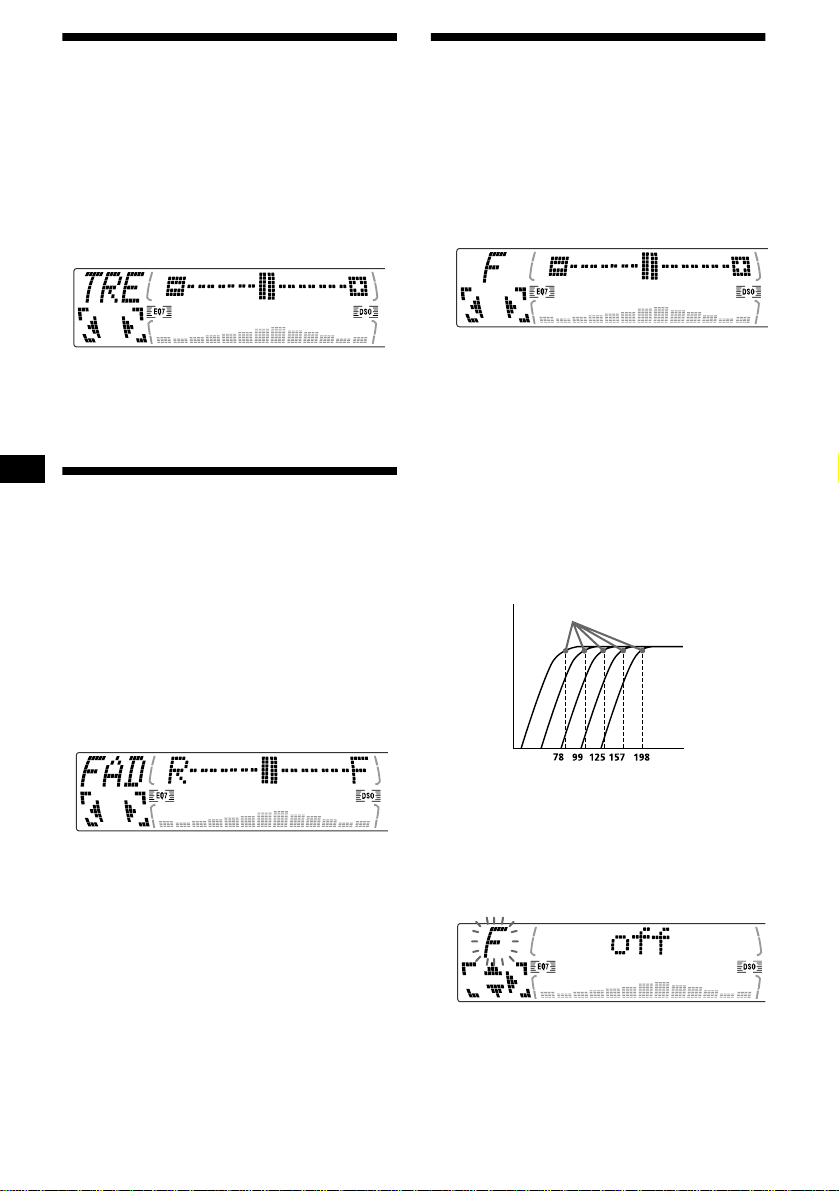
Adjusting the treble (CDXM670, MDX-M690 only)
Adjusting the front and rear volume (CDX-M770 only)
You can adjust the treble from the spe akers.
1 Press (SOURCE) to select a source
(tuner, CD, or MD).
2 Press (SOUND) repeat edly until “TRE”
appears.
3 Press < or , to adjust the balance.
After 3 seconds, the d isplay returns to the
normal playback mode.
Adjusting the balance (FAD) (CDX-M670, MDX-M690 only)
You can adjust the sound balance from the front
and rear speakers .
1 Press (SOURCE) to select a source
(tuner, CD, or MD).
2 Press (SOUND) repeatedly until “FAD”
appears.
1 Press (SOURCE) to select a source
(tuner, CD, or MD).
2 Press (SOUND) repeatedly to select
the “F” for the front speakers or “R”
for the rear speaker s.
3 Press < or , to adjust t he v o l ume o f
front/rear speakers.
After 3 seconds, the display returns to the
normal playback mo de.
Adjusting the cut-off frequenc y and the
output volume level for the front/rear
speakers
To match the characteristics of th e installed
speaker system, you can adjust the output
volume level an d se lect the cut -o ff frequency of
the speakers.
Cut-off frequency
Level
3 Press < or , to adjust the balance.
After 3 seconds, the d isplay returns to the
normal playback mode.
30
Frequency (Hz)
1 Press (MENU).
2 Press M or m repeatedly to select
“Front HPF” or “Rear HPF.”
3 Press (ENTER).
4 Press < or , to select the cut-off
frequency.
Each time you press < or ,, the frequency
changes as follows:
off y 78 Hz y 99 Hz y 125 Hz y
157 Hz y 1 98 H z
Page 31

5 Press M or m to adjust the volume
level.
The volume level is adjustable by 1 dB st eps
from –12 dB to +12 dB.
Tip
When you lower the volume all the way down,
∞ dB” appears and the cut-off frequency is
“–
disabled.
6 Press (ENTER).
After the effect setting is complete, the
display returns to the normal playback mode.
Adjusting the volume of the subwoofer(s)
1 Press (SOURCE) to select a source
(tuner, CD, or MD).
2 Press (SOUND) repeatedly until “SUB”
appears.
2 Press M or m repeatedly until “Sub
LPF” appears.
3 Press (ENTER).
4 Press < or , to select the d es ired
cut-off frequency.
Each time you press < or ,, the frequency
changes as follows:
62 Hz y 78 Hz y 99 Hz y 125 Hz
y 157 Hz y off
5 Press M or m to adjust the volume.
The volume level is adjustable by 1 dB steps
from –12 dB to +1 2 dB.
Tip
When you lower the volume all the way down,
∞ dB” appears and the cut-off frequency is
“–
disabled.
6 Press (ENTER).
After the frequency setting is complete, the
display returns to the nor m al playback mode.
3 Press < or , to adjust the volume.
After 3 seconds, the disp lay returns to the
normal playba ck m ode.
Tip
When you press < repeatedly to adjust the volume
all the way down, “–
frequency of the subwoofer is disabled.
Adjusting the frequency of the
subwoofer(s) (CDX-M770 only)
To match the characteristics of the connected
subwoofer(s), you can cut out the unwanted high
and middle frequency signals entering th e
subwoofer(s). By setting the cut-off frequency
(see the diagra m below), the subwoofer(s ) w i ll
output only low frequency signals so you can get
a clearer sound image.
∞ dB” appears and the cutout
Cut-off frequency
Level
Frequency (Hz)
1 Press (MENU).
Other adjustable items (CDXM670, MDX-M690 only)
The following items can be adjusted:
• HPF (High pass filter) — to select the cut-off
frequency to “off,” “78 Hz,” or “125 Hz.”
• LPF (Low pass filter) — to select the cut-off
frequency to “78 Hz,” “125 Hz,” or “off.”
• Loud (Loudne ss) — to enjoy bass and treble
even at low volumes. The bass and trebl e w i ll
be reinforced.
1 Press (MENU).
To set A.Scrl, press (MENU) duri ng CD/MD
playback.
2 Press M or m repeatedly until the
desired item appears.
3 Press , to select the desired setting
(Example: “on” or “off”).
4 Press (ENTER).
After the mode setting is completed, the
display returns to normal play mode.
Note
The displayed item will differ depending on the source.
Tip
Y ou can easily switch among categories by pressing M
or m for 2 seconds.
31
Page 32

Other Functions
You can also control the unit (and optional CD/
MD units) with a optional rotary commander.
RM-X5S (supplied with CDX-M770 only)
RM-X4S (optional)
The illustrations in this manual are of the RM-X5S.
The explanations are the same for the RM-X4S.
By pressing buttons
Turn the dial to change the
direction of infrared rays.
(RM-X5 only)
(ATT)
(SOUND)
(SOURCE)
(MODE)
Using the rotary commander
First, attach the appropriate label depending on
how you want to mou nt the rotary commander.
The rotary commander works by pressing
buttons and/or rotatin g con tro ls.
SOUND
MODE
DSPL
Inserting the supplied lithium battery
(RM-X5S only)
x
DSPL
MODE
SOUND
+ side up
(DSPL)
Rotate the VOL control
to adjust the volume.
OFF
(OFF)
Press To
(SOURCE) Change source
(radio/CD/MD*
(MODE) Change operation
(radio band/D AB*
1
MD*
unit)
1
)
1
/CD unit/
(ATT) Attenuate sound
(OFF)*
2
Stop playback or ra dio
reception
(SOUND) Adjust the sound menu
(DSPL) Change the display item*
*1 Only if the corresponding optional equipment is
connected.
*2 If your car has no ACC (accessory) position on the
ignition key switch, be sure to press (OFF) for 2
seconds to turn off the clock indication after turning
off the ignition.
*3 When using the RDS function, you can press
(DSPL) to show “PTY” in the displa y. Then you can
only use your master unit or card remote
commander to receive the PTY data (Only
European models).
3
By rotating the control
Tip
For information or lithium battery, refer to “Notes on
32
lithium battery” (page 36)
SEEK/AMS
control
Rotate and release to:
– Skip tracks.
– Tune in stations automatically.
Page 33

Rotate, hold, and release to:
– Fast-forward/reverse a track.
– Find a station manually.
By pushing in and rotating the control
E
C
R
U
O
S
PRESET/DISC
control
Push in and rotate the control to:
– Receive preset stations.
– Change the di sc*.
* When an optional CD/MD unit is connected.
Tip
You need to push in and rotate the control each time
you select a preset station and a disc.
Changing the operative direction
The operative direction of controls is factory-set
as shown below.
To increase
To decrease
If you need to mount the rotary commander on
the right hand side of the steering column, you
can rev erse the operative direction.
RM-X5S
RM-X4S
Press (SOUND) for 2 seconds while
pushing the VOL control.
Quickly attenuating the sound
(With the rota ry commander or the card
remote commander)
Press (ATT) on the rotary commander
or card remote commande r.
“ATT on” appears in the display momen tar ily.
To restore the previous volume level, press
(ATT) again.
Tip
When the interface cable of a car telephone is
connected to the ATT lead, the unit decreases the
volume automatically when a telephone call comes in
(Telephone ATT function).
Selecting the spectrum analyzer
The sound signal level is displayed on a spectrum
analyzer. You can select a display for 5 pat t erns
(A-1, A-2, B-1 to B-3), or the automatic display
mode and “OFF” where all the patterns appear.
Rev Nor
Set the Rev/Nor-select switch to “Rev.”
1 Press (SOURCE) to select a source
(radio, C D, o r MD).
2 Press (MENU).
3 Press M or m repeatedly until “SA”
appears.
4 Press < or , repeated ly t o sel ect t he
desired setting.
5 Press (ENTER).
33
Page 34

Changing the sound and display settings
— Menu
The following items ca n be set:
Set Up
• Clock (page 10)
• CT (Clock Time) (page 21)
• Beep — to turn the beeps on or off.
• Multi language (language selection) — to
change the displa y la nguage to English,
German, French, Italian, Dutch, Spanish,
Portuguese, Swedi sh, Polish, Czech, or
Turkish.
• P .Out 4.0V/5.5V — to change the pre-ou t of the
power amplifier to 4.0V or 5.5V. Selectable
only when the unit is turned off. (CDX-M770
only)
Display
• D.Info (Dual Information) — to displa y the
clock and the play mode at the same time (on).
Functions only when SA is not set to B-1 – B- 3.
• SA (Spectrum Analyzer) (page 33) — to
change the displa y pattern of the equalizer
display.
• M.Dspl (Motion Display) — to turn the Moti on
Display mode on or off.
– Select “on” to show d ecoration p atterns in the
display and ac t ivate Demo display.
– Select “off” to deactivate the Motion Display.
The Demo display i n th e M.Dspl will appear
about 10 seconds after the unit is turned off.
• Dimmer — to change the brightness of the
display.
– Select “Auto” to dim the display only when
you turn the lights on.
– Select “on” to dim the display.
– Select “off” to deactivate the Dimmer.
• Contrast — to adjust the contrast if the
indications on the dis pl ay are not recognisable
because of the unit’s installation position.
• A.Scrl (Auto Scroll)
– Select “on” to scroll all automatically
displayed names exceeding 8 charac ters.
– When Auto scroll is set to off and the disc/
track name is changed, the disc/track name
does not scrol l.
Sound (CDX-M670, MDX-M690 only)
• HPF (High pass filter) (page 31)
• LPF (Low pass filter) (page 31)
• Loud (Loudness ) ( page 31)
Play Mode
• Local on/off (Local seek mode) (page 16)
– Select “on” to only tune into stations with
stronger signals.
• Mono on/off (Monaural mode) (page 16)
– Select “on” to hear FM stereo broadcast in
monaural. Select “off” to return to normal
mode.
• REG on/off (Region al) (page 18)
1 Press (MENU).
To set A.Scrl, press (MENU) during CD/MD
playback.
2 Press M or m repeatedly until the
desired item appears.
3 Press , to select the desired setting
(Example: “on” or “off”).
4 Press (ENTER).
After the mode setting is completed, the
display returns to n ormal play mode.
Note
The displayed item will differ depending on the source.
Tip
Y ou can easily switch among categories by pressing M
or m for 2 seconds.
34
Page 35

Labelling a Motion Display
You ca n la bel a Motion Display with up t o 64
characters to appear when the unit is turned off.
Labels will scroll in the display in the M.Dspl 1
mode (the display remains lit even when the
power is off).
1 Press (OFF).
CD/MD playback or radio reception stops
(the key illumination and display remain on).
2 Press (MENU), then press M or m
repeatedly until “Name Input”
appears.
3 Press (ENTER).
Connecting auxiliary audio equipment (CDX-M770 only)
You can connect auxiliary audio equipment to
this unit with the AUX IN connector.
Selecting auxiliary equipment
Press (SOURCE) repeatedly to select
“AUX.”
Adjusting the volume level
You can adjust the volume for ea ch connected
audio equipment.
4 Enter the characters.
1 Press (DSPL/PTY) to sel ect th e
character type.
A t a t 0 t A
2 Press M*1 repeatedly to select the
desired character.
A t B t C t ... x t y t z t 0 t 1
t 2 ... t ! t “ t # ... t *
*1 For reverse order, press m.
*2 (blank space)
3 Press , after lo cating the desired
character.
If you press <, you can move back to the
left.
4 Repeat steps 1 to 3 to enter t h e
entire sentence.
2
t A
5 Press (ENTER).
Tips
• Simply overwrite or enter “” to correct or erase a
sentence.
• To erase all sentences, press (ENTER) for 2
seconds after step 4- 2.
1 Press (MENU).
2 Press M or m repeatedly until “AUX
Lebel” appears, then press (ENTER).
3 Press M or m to select the desired
volume level, then press (ENTER).
The volume level is adjustable in 1 dB steps
from –6 dB to +6 dB.
4 Press (ENTER).
To deactivate “AUX-A” in the music
source display
1 Press (OFF).
CD/MD playback o r ra di o reception stops
(the key illumination and display remain on ).
2 Press (MENU).
3 Press M or m repeatedly until “AUX-A
on” appears.
4 Press < or , to select “AUX-A off.”
5 Press (MENU).
To restore the indi c ation, select “AUX-A on.”
35
Page 36
Additional Information
Notes
• For safety, turn off the ignition before cleaning the
connectors, and remove the key from the ignition
switch.
• Never touch the connectors directly with your fingers
or with any metal device.
Maintenance
Fuse replacement
When replacing th e fuse, be sure to use one
matching the amperage rating stated on the
original fuse. I f t he fuse blows, check the power
connection and replace the fuse. If the fuse blows
again after replacement, there may be an internal
malfuncti on . In such a case, consult your ne arest
Sony dealer.
Fuse (10 A)
Warning
Never use a fuse with an amperage rating
exceeding the one supplied with the unit as this
could damage the un it.
Cleaning the connectors
The unit may not functi on pr operly if the
connectors between the unit and the front panel
are not clean. In order to prevent this, detach the
front panel (page 9 ) and clean the connect or s
with a cotton swab dipped in alcohol. Do not
apply too much fo rce. Otherwise, the connectors
may be damaged.
Main unit
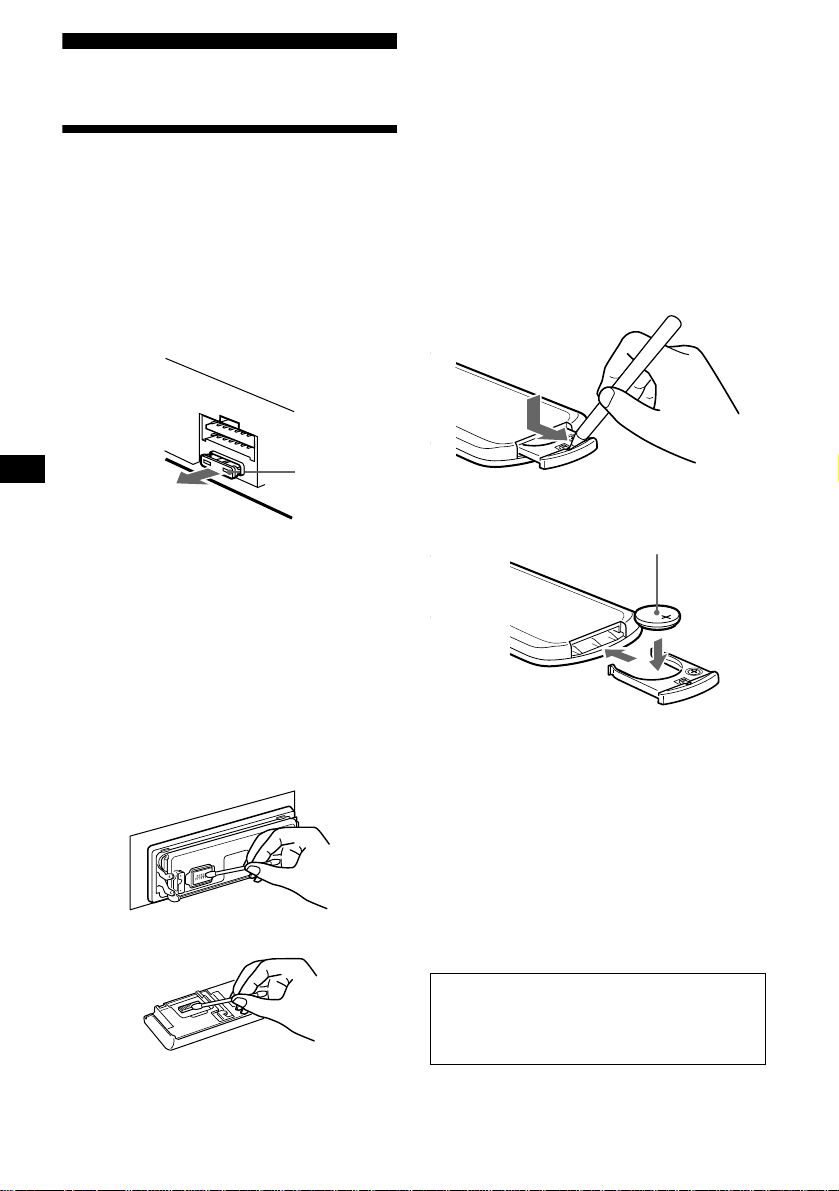
Replacing the lithium battery
Under normal conditions, batteries will last
approximately 1 y ear. (The servi ce life may be
shorter, depending on the conditions of use.)
When the batt ery bec omes wea k, the range o f the
card remote commander becomes shorter.
Replace the battery with a new CR2025 lithium
battery.
x
+ side up
Notes on lithium battery
• Keep the lithium battery out of the reach of
children. Should the battery be swallowed,
immediately consult a doctor.
• Wipe the battery with a dry cloth to assure a
good contact.
• Be sure to observe the correct polarity when
installing the battery.
• Do not hold the battery with metallic tweezers,
otherwise a short-circuit may occur.
36
WARNING
Battery may explode if mistreated.
Do not recharge, disassemble, or dispose of
in fire.
Back of the front panel
Page 37

Removing the unit
If the front panel does not open
because of a blown fuse
With the front panel open
1 Remove the front cover
1 Press (OPEN/CLOSE) or (OPEN) of
the unit, then press the clip insid e
the front cover with a thin
screwdri ver , an d gentl y pry the fr ont
cover free.
2 Repeat step 1 on t he lef t side.
The front cover is removed.
2 Remove the unit
1 Use a thin screwdriver to push in
the clip on the left side of the unit,
then pull out the left side of the unit
until the catch clears the mounting.
1 Remove the front cover
1 Press the clip inside the front cover
with a release key (supplied), and
pry the front cover free.
Release key (supplied)
Note
To protect the surface of the unit, put thin cloth
between release key and the unit by inserting the
release key.
2 Repeat step 1 on the left sid e.
The front cover is removed.
2 Remove the unit
1 Use a release key to push in the cl i p
on the left side of the unit, then pull
out the left side of the unit until the
catch clears the mounting.
2 Repeat step 1 on the right side.
3 Slide the unit out of the mounting.
2 Repeat step 1 on the right side.
3 Slide the unit out of the mounting.
37
Page 38

Specifications
CD/MD Player section
Signal-to-noise ratio 90 dB
Frequency response 10 – 20,000 Hz
Wow and flutter Below measurable limit
Tuner section
FM
Tuning range 87.5 – 108.0 MHz
Aerial terminal External aerial connector
Intermediate frequency 10.7 MHz/450 kHz
Usable sensitivity 8 dBf
Selectivity 75 dB at 400 kHz
Signal-to-noise ratio 66 dB (stereo),
Harmonic distortion at 1 kHz
Separation 35 dB at 1 kHz
Frequency response 30 – 15,000 Hz
72 dB (mono)
0.6 % (stereo),
0.3 % (mono)
MW/LW
Tuning range MW: 531 – 1,602 kHz
Aerial terminal External aerial connector
Intermediate frequency 10.7 MHz/450 kHz
Sensitivity MW: 30 µV
LW: 153 – 279 kHz
LW: 40 µV
Power amplifier section
Outputs Speaker outputs
Speaker impedance 4 – 8 ohms
Maximum power output 52 W × 4 (at 4 ohms)
(sure seal connectors)
General
Outputs Audio outputs (front/rear)
Inputs Telephone ATT control lead
Subwoofer output (mono)
Power aerial relay control
lead
Power amplif ier control lead
Illumination control lead
BUS control input
connector
BUS audio input connector
Remote controller input
connector (CDX-M670,
MDX-690)
Aerial input connector
AUX IN connector (CDXM770 only)
Tone controls (CDX-M670, MDX-M690 only)
Loudness (CDX-M670, MDX-M690 only)
Power requirements 12 V DC car battery
Dimensions Approx. 178 × 50 × 182
Mounting dimensions Approx. 182 × 53 × 160
Mass Approx. 1.5 kg
Supplied accessories Parts for installation and
Optional accessories Rotary commander
Optional equipment CD changer (10 discs)
Note
This unit cannot be connected to a digital preamplifier
or an equalizer.
US and foreign patents licensed from Dolby
Laboratories.
Design and specifications are subject to chan ge
without notice.
Bass ±8 dB at 100 Hz
Treble ±8 dB at 10 kHz
+8 dB at 100 Hz
+2 dB at 10 kHz
(negativ e eart h )
mm (w/h/d)
mm (w/h/d)
connections (1 set)
Front panel case (1)
Card remote commander
RM-X111
Rotary commander
RM-X5S (CDX-M770)
RM-X5S (CDX-M670,
MDX-M690)
RM-X4S
BUS cable (supplied with
an RCA pin cord)
RC-61 (1 m), RC-62 (2 m)
CDX-848X, CDX-646
CD changer (6 discs)
CDX-T68X, CDX-T67
MD changer (6 discs)
MDX-65
Source selector
XA-C30
DAB tuner unit
XT-100DAB
38
Page 39

Troubleshooting
The following checklist will help you remedy
problems you may encounter with your unit.
Before going t hrough the checklist below, check
the connection and operating procedur es .
General
No sound.
• Press the (+) side of (VOL) to adjust the
volume.
• Cancel the ATT function.
• Set the fader control to the centre positio n for
a 2-speaker system.
The message “LP” appears in the display.
MDLP tracks cannot be played back. (MDXM690 only)
An optional MD unit does not conform to
MDLP play back.
t Use this unit to playback the MDLP tracks.
The contents of the memory have been
erased.
• The reset button has be en pressed.
• Store again into the memory.
• The power cord or battery h as been
disconnected.
• The power connecting cor d i s not connected
properly.
No beep sound.
The beep sound is cancelled (page 34).
Indications disappear from/do not appear in
the display.
• The clock display dis appears if you press
(OFF) for 2 seconds.
t Press (OFF) again for 2 seconds to
display the clock.
• Remove the front panel and clean the
connectors. See “Cleaning the connectors”
(page 36) for details.
Stored stations and correct time are erased.
The fuse has blown.
Makes noise when the ignition key is in the
ON, ACC, or OFF position.
The leads are not matched correctly with the
car’s accessory power connecto r.
No power is being supplied to the unit.
• Check the connect i on. If everything is in
order, check the fuse.
• The car does not have an ACC position.
t Press (SOURCE) (or insert a disc) to turn
on the unit.
The power is continuously supplied to the
unit.
The car does not have an ACC position.
The power aerial does not extend.
The power aerial does not have a relay box.
The rotary commander RM-X5S cannot be
operated.
Rotate the dial at the bottom of the rotary
commander unt i l it can be operated.
CD/MD playback
A disc cannot be loaded.
• Another CD/MD is already loaded.
• The CD/MD is forcibly inserted upside down
or in the wrong way.
Playback doe s not begin.
• Dirty or defec tive disc.
• CD-R that is not finalized, or a CD-RW.
• You tried to playback a CD-R not designed
for audio use.
• Some CD-Rs may not play due to its
recording equipment or the disc cond ition.
A disc is automatically ejected.
The ambient temp erature exceeds 50°C.
CD will not be ejected.
The operation buttons do not function.
Press the reset button.
The sound skips from vibration.
• (CDX-M770, CDX-M670)
The unit is installed at an angle of mo re than
60°.
(MDX-M690)
The unit is installed at an angle of mo re than
20°.
• The unit is not installed in a sturdy part of
the car.
The sound skips.
Dirty or defective disc.
Cannot turn off the “--------” indication.
You entered the name edit mode.
t Press (LIST) for 2 seconds.
Radio reception
Preset tuning is not possible.
• Store the correct frequency in the memory.
• The broadcast signal is too weak.
continue to next page t
39
Page 40

The stations cannot be received.
The sound is hampered by noises.
• Connect a power aerial co ntrol le ad (blu e) or
accessory power suppl y lead (red) to the
power supply lead of a car’s aerial booster.
(Only when your car has built-in FM/MW/
L W ae rial in the rear/side glass.)
• Check the connection of the car aerial.
• The auto aerial will not go up.
t Chec k t he connection of the power aerial
control lead.
• Check the frequency.
• When the DSO mo de is on, the sound is
sometimes hampered by noises.
t Set the DSO mode to off (page 27)
(CDX-M770), (page 27) (CDX-M670,
MDX-M690).
Automatic tuning is not possible.
• The local seek mode is set to “on.”
t Set the local seek mode to “off” (page
34).
• The broadcast sign al is to o w eak.
t Perform manual tuning.
The “ST” indication flashes.
• Tune in the frequency accurately.
• The broadcast sign al is to o w eak.
t Set to the monaural reception mode (page
34).
A programme broadcast in stereo is heard
in monaural.
• The unit is in monaural reception mode.
t Canc el m onaural reception mo de ( page
34).
DSP functions (CDX-M770 only)
No sound, or sound is too low.
The volume of the speakers m ay have been
automatically lowered in order to maximize
the effect of the listening position adjustment.
t Press < or , to adjust th e balance. The
speaker balanc e can be set separatel y for
DSP on mode and DSP off mode (page 29).
RDS
The Seek starts after a few seconds of
listening.
The station is non- TP or has weak signal.
t Press (AF) or (TA) repeatedly until “AF
off” or “TA off” appears.
No traffic announcements.
• Activate “TA.”
• The station does not br oadcast any traffic
announcements de spite being TP.
t Tune in another station.
PTY displays “--------.”
• The current station is not an RDS station.
• RDS data has not bee n received.
• The station does no t sp ecify the programm e
type.
40
Page 41

Error displays/Messages
Error displays
(For this unit and optional CD/MD changers)
The following indications will flash for about 5
seconds, and an a la rm sound will be heard.
1
Blank*
No tracks have been recorde d on an MD*2.
t Pla y an MD with recorded tracks on it.
1
Error*
• A CD is dirty or inserted up si de down*2.
t Clean or insert the CD correctly.
• A CD/MD cannot play because of some
problem*
t Insert another CD/MD.
High Temp
The ambient temperature is more than 50°C.
t Wait until the temperature goes down
NO Disc
No disc is inserted in the CD/MD u n i t.
t Insert discs in the CD/MD unit.
NO Mag
The disc magazine is not inserted in the CD/
MD unit.
t Insert the magazine in the CD/MD unit.
Not Ready
The lid of the MD unit is open or the MDs are
not inserted proper ly.
t Close the lid or insert the MDs properly.
Push Reset
The CD/MD unit ca nnot be operated because
of some problem.
t Press the reset button on the unit.
2
.
below 50°C.
If these solution s do not help improve the
situation, consul t y our nearest Sony dealer.
Messages
LCL Seek +/–
The Local Seek mode is on during automatic
tuning (page 16).
NO AF
There is no alternative frequency for the
current station.
“” or “”
You h ave reache d t he beginning or the end of
the disc and you ca nnot go any further.
*1 When the CD/MD changer is connected to the unit,
the disc number of the CD or MD appears in the
display.
*2 The disc number of the disc causing the error
appears in the display.
41
Page 42

¡Bienvenido!
Gracias por adquir ir este reproductor de dis cos
compactos/minidiscos Sony. Disfrutará incluso
más de sus distinta s f unciones con:
• Selección del idioma de las indicaciones *
entre inglés, alem án, francés, itali ano,
holandés, español, portugués, sueco, polaco,
checo o turco.
• Unidades opcion al es de CD/MD (cambiadores
y reproductores)*
2
.
• Reproducción MDLP (Reproducción de larga
duración de mini di s cos). (sólo MDX-M6 90)
• Sintonizador DAB opcion al .
• Información CD TEXT (mostrada al reproducir
discos CD TEXT*
3
).
• Accesorio de controlador suministrado
Mando a distancia de tarjeta RM-X111
Mando rotativo inalámbrico RM-X5S (CDXM770)
• Accesorios de controlador opcionales
Mando rotativo inalámbrico RM-X5S (CDXM670, MDX-M690)
Mando rotativo alámbrico RM-X4S (CDXM670, MDX-M690)
*1 Algunas indicaciones del visor no aparecen en el
idioma que seleccione.
*2 Esta unidad funciona solamente con productos
Sony.
*3 Un disco CD TEXT es un CD de audio que incluye
información, como el nombre del disco, el nombre
del artista y los nombres de las pistas. Esta
información está grabada en el disco.
1
Esta etiqueta está situa da en la parte inferior del
chasis.
CAUTION INVISIBLE
VIEW DIRECTLY WITH OPTICAL INSTRUMENTS
LASER RADIATIONWHEN OPEN
DO NOT STARE INTO BEAM OR
Esta etiqueta está situada en el chasis interno de
la unidad de activación.
2
Page 43

Índice
Ubicación de los controles. . . . . . . . . . . . . . . 4
Precauciones . . . . . . . . . . . . . . . . . . . . . . . . . 6
Notas sobre los discos co mpactos . . . . . . . . . 7
Notas sobre minidiscos . . . . . . . . . . . . . . . . . 8
Procedimientos iniciales
Restauración de la unidad . . . . . . . . . . . . . . . 9
Extracción del visor principal . . . . . . . . . . . . 9
Ajuste del reloj . . . . . . . . . . . . . . . . . . . . . . 10
CD/MD
Reproducción de discos. . . . . . . . . . . . . . . . 11
Elementos del visor. . . . . . . . . . . . . . . . . . . 12
Reproducción repetida de pistas
— Reproducción repetida . . . . . . . . . . . . 12
Reproducción de pistas en orden aleat or io
— Reproducción aleatoria . . . . . . . . . . . 12
Etiquetado de CD
— Memorando de discos* . . . . . . . . . . . 13
Localización de discos por nom br e
— Listado* . . . . . . . . . . . . . . . . . . . . . . . 14
Selección de pistas específica s para su
reproducción
— Banco* . . . . . . . . . . . . . . . . . . . . . . . . 14
* Funciones disponibles con una unidad opcional de
CD/MD
Radio
Almacenamiento automático de emisoras
— Memoria de la mejor sintonía
(BTM). . . . . . . . . . . . . . . . . . . . . . . . . . . 15
Recepción de las emisoras almacenadas. . . 15
Almacenamiento de las emisoras
deseadas . . . . . . . . . . . . . . . . . . . . . . . . . 16
Sintonización de emisoras mediante lista
— Listado . . . . . . . . . . . . . . . . . . . . . . . . 16
RDS
Descripción general de RDS . . . . . . . . . . . . 16
Resintonización au to mática para mejorar la
recepción
— Función AF . . . . . . . . . . . . . . . . . . . . 17
Recepción de anuncios de tr áfico
— TA/TP . . . . . . . . . . . . . . . . . . . . . . . . 18
Memorización de emisoras RDS con los
ajustes AF y TA . . . . . . . . . . . . . . . . . . . 18
Sintonización de emisoras mediante tipo de
programa
— PTY . . . . . . . . . . . . . . . . . . . . . . . . . . 19
Ajuste automático del reloj
— CT . . . . . . . . . . . . . . . . . . . . . . . . . . . 19
DAB (opcional)
Descripción general de DAB . . . . . . . . . . . 2 0
Operaciones básicas de DAB . . . . . . . . . . . 20
Memorización automática de servicios DAB
— BTM . . . . . . . . . . . . . . . . . . . . . . . . . 21
Memorización manual de servicios DAB
— Edición de programación . . . . . . . . . 22
Sintonización d e pr ogramas DAB medi ante
una lista . . . . . . . . . . . . . . . . . . . . . . . . . 22
Cambio de audio multicanal y DRC. . . . . . 23
Localización de servicios DA B m ediante el
tipo de programa (PTY). . . . . . . . . . . . . 23
Ajuste del mejor sonido
Ajuste del ecualizador (EQ7) . . . . . . . . . . . 24
Ajuste del menú de sonido de baja frecuencia
— Organizador de sonido de baja frecuencia
dinámico (DSO) . . . . . . . . . . . . . . . . . . . 25
Audición de cada fuente d e pr ograma con su
DSO registrado
— Memoria de sonido fuente (S SM) . . . 26
Ajuste de las características de sonido . . . . 2 6
Selección de la posición de audición
(sólo CDX-M770) . . . . . . . . . . . . . . . . . 27
Ajuste del balance (BAL). . . . . . . . . . . . . . 27
Ajuste de los grav es
(sólo CDX-M670, MDX-M690) . . . . . . 27
Ajuste de los agudos
(sólo CDX-M670, MDX-M690) . . . . . . 28
Ajuste del balance (FAD)
(sólo CDX-M670, MDX-M690) . . . . . . 28
Ajuste del volumen frontal y posterior
(sólo CDX-M770) . . . . . . . . . . . . . . . . . 28
Ajuste del volumen de los altavoces
potenciadores de graves. . . . . . . . . . . . . 29
Otros elementos ajustables
(sólo CDX-M670, MDX-M690) . . . . . . 30
Otras funciones
Uso del mando rotativo. . . . . . . . . . . . . . . . 30
Atenuación rápida del sonido . . . . . . . . . . . 32
Selección del analizador de espectros. . . . . 32
Cambio de los ajustes de sonido y
visualización
— Menú . . . . . . . . . . . . . . . . . . . . . . . . . 33
Asignación de nombre a una indicación del
visor . . . . . . . . . . . . . . . . . . . . . . . . . . . . 34
Conexión de equipo s auxiliares de audio
(sólo CDX-M770) . . . . . . . . . . . . . . . . . 34
Información complementaria
Mantenimiento . . . . . . . . . . . . . . . . . . . . . . 35
Extracción de la unidad. . . . . . . . . . . . . . . . 36
Especificaciones . . . . . . . . . . . . . . . . . . . . . 37
Solución de problemas . . . . . . . . . . . . . . . . 38
Mensajes/Indicaciones de error . . . . . . . . . 40
3
Page 44

Ubicación de los controles
Mando a distancia de tarjeta RM-X111
Consulte las páginas indicadas para obtener información detallada.
: Durante la reprod ucción : Durante la recepción de la radio
CD/MD
: Durante el modo de menú
MENU
SCRL
PTY
DSPL
EQ7 DSO
MENU
SEEK
SOUND
AF
REP SHUF
1
4
MODE
DISC
SOURCE
–
DISC
+
VOL
2
5
+
–
–
a Botón SCRL (desplazamiento) 12
b Botón DSPL/PTY (cambio del modo
de indicación/tipo de programa) 12,
13, 16, 19, 23, 34
c Botones numéricos
CD/MD
(1) REP 12
(2) SHUF 12
RADIO
15, 16, 17, 18, 21, 22
d Botón EQ7 24
e Botón MENU 10, 13, 14, 15, 18, 19, 21,
22, 23, 24, 25, 26, 28, 29, 30, 32 , 33 , 34
f Botón SOURCE (Activación de la
alimentación/Radio/CD/MD) 10, 11,
13, 15, 16, 18, 20, 21, 24, 25, 27, 28, 29,
32, 34
g </, Botones SEEK +/– 10, 26, 27,
28, 29
11
CD/MD
15, 16, 17, 20
RADIO
10, 13, 14, 19, 22, 23, 24, 25,
MENU
26, 28, 29, 30, 32, 33, 34
h Botón SOUND 26, 27, 28, 29
4
OPEN/CLOSE
TA
3
6
LIST
+
SEEK
ENTER
ATTOFF
RADIO
< (SEEK)
(–): para seleccionar
En el modo d e men ú, el botón o botones que pueden
seleccionarse actualmente de estos cuatro se
indican con “ v” en el visor.
Nota
Si la unidad se apaga pulsando (OFF) durante 2
segundos, no podrá utilizarse con el mando a
distancia de tarjeta a menos que se pulse (SOURCE)
en la unidad, o que se inserte un disco para que
dicha unidad se active primero.
Sugerencia
Consulte “Sustitución de la pila de litio” para obtener
información detallada sobre cómo sustituir las pilas
(página 35).
i Botón OFF (Parada/Desactivación de
j Botones VOL +/– 18
k Botón OPEN/CLOSE 11, 36
l Botón AF 17, 18
m Botón TA 18
n Botón MODE
o Botón DSO 25
p Botón LIST
q Botones M/m DISC +/–
r Botón ENTER
s Botón ATT 32
SEEK
–
M (DISC)
+
DISC
SOURCE
–
DISC
m (DISC)
+
SEEK
, (SEEK)
(+): para seleccionar
hacia la
derecha/>
(+): para seleccionar hacia arriba
hacia la
izquierda/
.
(–): para seleccionar hacia abajo
la alimentación) 11, 34
CD/MD
11, 13
RADIO
15, 16, 18, 20, 21
CD/MD
13, 14
RADIO
16, 22
11, 14
CD/MD
15, 16, 19, 20, 21, 22, 23
RADIO
13, 14, 15, 18, 19, 21, 22, 23,
MENU
24, 25, 26, 28, 29, 30, 32, 33, 3 4
CD/MD
14
RADIO
16, 19, 21, 22, 23
MENU
10, 13, 14, 15, 18, 19, 21, 22,
23, 24, 25, 26, 28, 29, 30, 32, 33, 34
Page 45
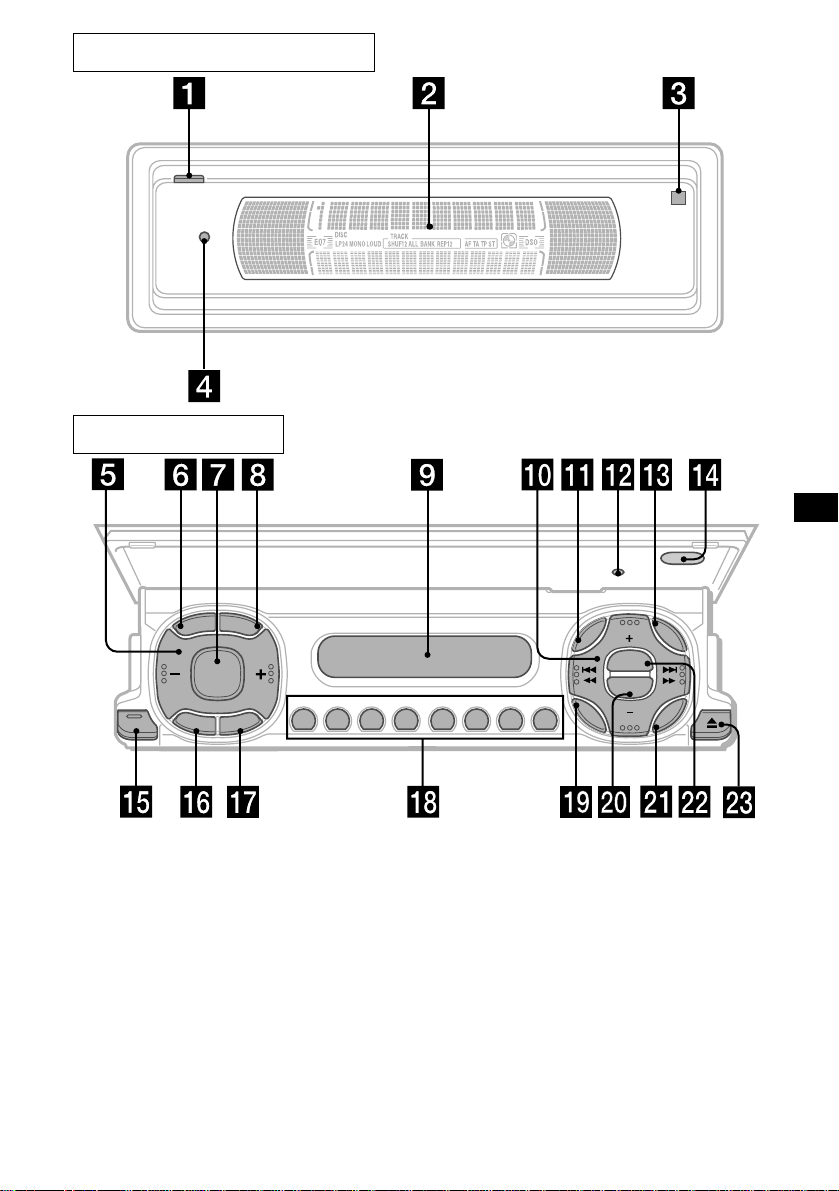
Panel de visualización principal
Cara de operaciones
D
S
P
L
P
R
L
T
CLOSE
C
S
O
SOURCE
F
F
Y
E
D
O
M
REP SHUF
AF TA
123456
RESET
MENU
SOUND
DISC
DSO
EQ7
DISC
LIST
ENTER
Los botones correspondientes de la
unidad controlan las mismas funciones
que los del mando a distancia de tarjeta.
a Botón OPEN 9, 11, 36
b Visor principal
c qf Receptor para el mando a
distancia de tarjeta
d qs Botón de restauración 9
e Botones de ajuste de volumen
f Botón SCRL (desplazamiento)
g Botón SOURCE
h Botón DSPL/PTY (cambio del modo
de indicación/tipo de programa)
i Visor secundario
CDX-M770/CDX-M670
/MDX-M690
j Botones DISC +/– (cu rsor arriba/ abajo)
Botones SEEK –/+ (cursor izquierda/
derecha)
k Botón MENU
m Botón LIST
o Botón CLOSE (cierre del panel
frontal) 9, 11
p Botón OFF (Parada/Desactivación de
la alimentación)*
q Botón MODE
r Botones Numéricos
s Botón SOUND
t Botón EQ7
u Botón ENTER
v Botón DSO
w Botón Z (expulsión) 11
5
Page 46

* Advertencia sobre la instalación en un
automóvil que no disponga de posición
ACC (auxiliar) en el interruptor de
encendido
Después de apagar el encendido, asegúrese de
pulsar el botón de activación/desactivación de la
alimentación de la unidad durante 2 segundos para
desactivar la indicación del reloj.
En caso contrario, la indicación del reloj no se
desactivará y causará el desga st e de la batería.
Precauciones
• Si aparca el automóvil bajo la luz solar directa,
permita que la uni dad se enfríe antes de
utilizarla.
• Las antenas motoriza da s se extenderán
automáticamente mientras la unidad se
encuentra en funcionamiento.
Acerca de las posiciones del panel
frontal
Esta unidad dispone de 3 modos de aper tu ra del
panel frontal.
• Posición de visualización principal
unidad
• Posición de extracción
unidad
• Posición de visualización secundaria
unidad
Si desea realiza r al guna consulta o solucionar
algún problema relativo a la unidad que este
manual no trate, cons ulte con el proveedor Sony
más próximo.
Condensación de humedad
En días lluviosos o en zonas muy húmedas, es
posible que se condense humedad dentro de las
lentes y visor de la unidad. Si esto ocurre, ésta no
funcionará correctamente. En este caso, extraiga
el disco y espere un a hora aproximadamente
hasta que se haya evaporado la humedad.
Para mantener una alta calidad de
sonido
Asegúrese de no derramar z um os ni demás
bebidas suaves sobre la unidad o los discos.
Para evitar que el mando rotativo
inalámbrico RM-X5S se caiga
(suministrado con CDX-M770 solamente)
Si el mando inalámbrico se cae, podría causar un
accidente.
• Asegúrese de adherir la co rrea suministrada
cuando instale el mando rotativo cerca del
volante.
• Cerciórese de que la correa no qu eda atrapada
en los controles del automóvil (mecanism os,
palanca de camb i os, etc.).
• Asegúrese de apretar el tope de la correa
después de colgar ésta en el interruptor
indicador, etc.
6
Page 47

Notas sobre los discos compactos
• Para mantener los discos limpios, no toque la
superficie. Agarre los discos por los bordes.
• Guarde los discos en sus cajas o en los
cargadores de discos cuando no los utilice.
No someta los discos al calor ni a alt as
temperaturas. Evite dejarlos en automóviles
aparcados o en sa lpicaderos o bandeja s
traseras.
• No adhiera etiquetas, ni utilice discos con
residuos/tinta pegajosos. Tales discos pueden
dejar de gira r duran te el us o, cau sando fall os de
funcionamiento, o pueden dañarse.
Notas sobre discos CD-R/CD-RW
• Puede reproducir discos CD-R (discos
compactos grabab le s) diseñados para uso de
audio en esta unidad
Busque esta marca con el fin de distinguir los
discos CD-R para uso de audio.
Esta marca indi ca que el disco no es para u so de
audio.
• Determinados discos CD-Rs (d ependiendo del
equipo utilizado para su grabación o la
condición del disco) puede n n o re pr oduc ir se en
esta unidad.
• No es posible re pr oducir discos CD-R que no
estén finalizados*.
* Proceso nec esario para reproducir en el
reproductor de CD de audio discos CD-R
grabados.
• No es posible re pr oducir discos CD-RW
(discos compa c t os reescribibles) en esta
unidad.
• Los discos con fo rmas no estándar (p.ej.,
corazón, cuadrado, estrella) no pueden
reproducirse en esta unidad. Si lo intenta,
puede dañar la unidad. No utilice tales discos.
• No es posible reproducir discos compactos de
8 cm.
• Antes de realiz ar la reproducción, limpie los
discos con un paño de limpieza disponible en el
mercado. Hágalo desde el centro hacia los
bordes. No utilice disolventes como bencina,
diluyente, limpiadores disponibles en el
mercado ni aerosoles antiestáticos para discos
analógicos.
7
Page 48
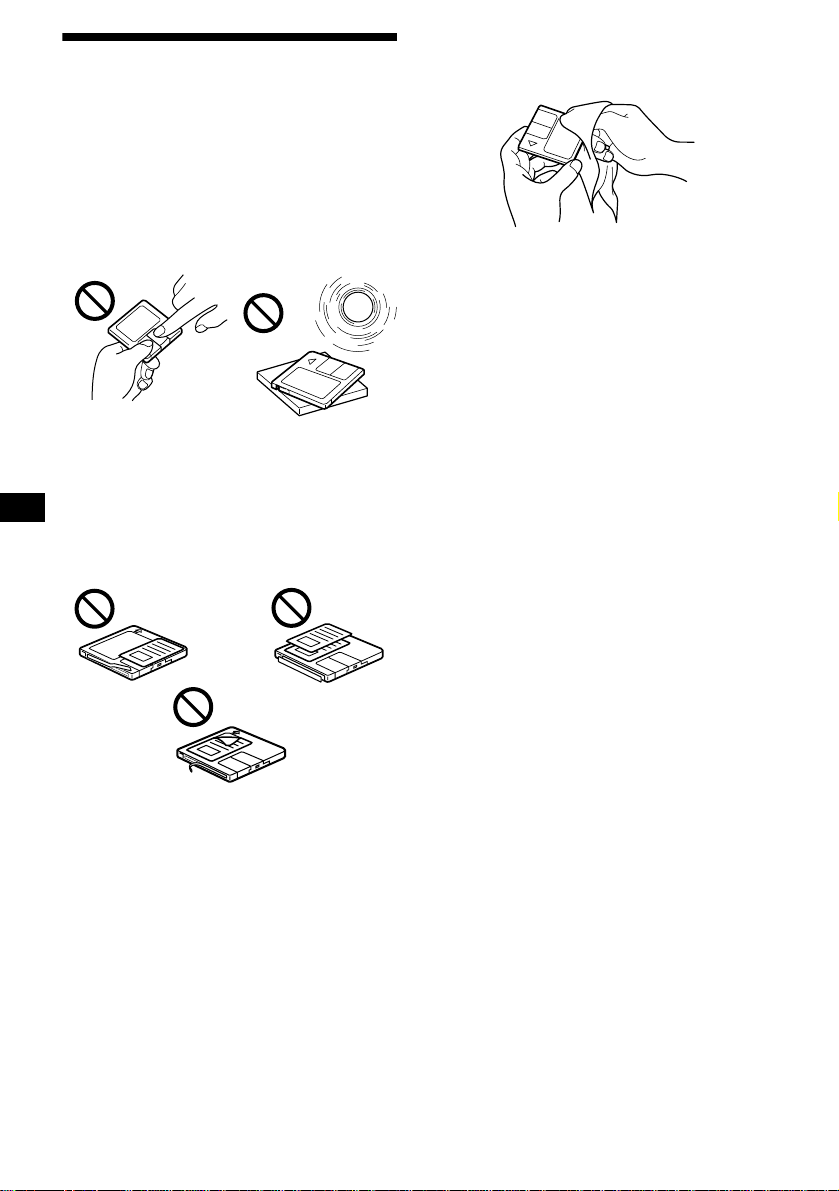
Notas sobre minidiscos
• No abra el obturador del car tucho de
forma que el MD quede expuesto. Cierre
inmediatamente el obturador si se abre.
• No toque nunca la superficie del disco del
interior.
• No someta los discos al c alor ni a altas
temperaturas. Evite dejarlos en automóviles
aparcados o en salpicaderos o bandejas
traseras.
Notas sobre la adhesión de etiquetas
Para evitar que los minidiscos se atasquen en la
unidad:
– Adhiera la etiqueta en una posición adecuada.
– Retire las etiquetas a ntiguas antes de adherir
nuevas.
– Sustituya las etiq uetas que estén despegándose.
Limpieza
Limpie regularmente la su perficie del cartucho
con un paño seco y su ave.
8
Page 49

Procedimientos iniciales
Extracción del visor principal
Puede extraer el viso r principal de esta unidad
para evitar su robo .
Restauración de la unidad
Antes de utilizar la unidad por primera vez, o
después de sustitu ir la batería del automóvil o de
cambiar las conexiones, es preciso resta urar
dicha unidad .
Pulse el botón de r estauración del panel fro nt al
con un objeto puntiagudo, como un bolígrafo.
Botón de restauración
Notas
• Tras restaurar la unidad en la posición de cerrado,
asegúrese de pulsar (OPEN) una vez antes de
seguir utilizándola. Si hay un disco en la unidad,
dicho disc o se expulsará automáticamente. Inserte
el disco de nuevo.
• Al pulsar el botón de restauración, se borrará el
ajuste del reloj y algunos contenidos memorizados.
Restauración de la unidad durante el
uso en la posición de visualización
secundaria
Pulse el botón de r estauración situado po r la
ranura de discos con un objeto puntiagudo, como
un bolígrafo.
Botón de restauración
Alarma de precaución
Si gira el inte rruptor de encendido hasta la
posición OFF sin haber extraído el panel frontal,
la alarma de precauc ión emitirá pitidos durante
unos segundos.
1 Pulse (OPEN) en la unidad durante
2 segundos.
La reproducc ión de CD/MD o la recepción de
la radio se detiene , y e l pa nel frontal se
inclina automáticamente en un ángulo de 30°.
(OPEN)
2 Extraiga el visor principa l co m o se
ilustra.
Tras extraer el visor princip al, el panel fronta l
se cierra automáticamente.
Notas
• Si extrae el visor principal con la unidad encendida,
la alimentación se desactivará automáticamente
para evitar que los altavoces se dañen.
• No deje caer el visor ni ejerza excesiva presión
sobre él.
• No someta el visor principal al calor ni a altas
temperaturas o humedad. Evite dejarlo en
automóviles aparcados o en salpica de ros o
bandejas traseras.
Sugerencias
• Si desea extraer el visor principal con el panel
frontal en la posición de visualización secundaria,
pulse (CLOSE) durante 2 segundos. Si un disco se
encuentra parcialmente insertado, cárguelo
correctamente o extráigalo de la unidad.
• Cuando lleve el visor principal consigo, utilice el
estuche suministrado para el mismo.
continúa en la página siguiente t
9
Page 50

Fijación del visor principal
Coloque el visor prin ci pal sobre el lado frontal
de la unidad como se ilustra y, a continuación,
ejerza una ligera presión sobre el pan el frontal
hasta encajarlo e n su sitio.
Pulse (SOURCE) (o inserte un disco) para
utilizar la unidad.
Nota
No coloque nada sobre la superficie interior del visor
principal.
Ajuste del reloj
El reloj utiliza una indicación digital de 24 horas.
Ejemplo: Para ajustar el reloj a las 10:08
1 Pulse (MENU) y , a continuación, M o m
(lado + o – de (DISC)) varias veces
hasta que aparezca “Clock”.
1Pulse (ENTER).
La indicación de hora parpadea.
2Pulse M o m para ajustar la hora.
3Pulse , (lado (+) de (SEEK)).
La indicación de minutos parpadea.
4Pulse M o m para ajustar los
minutos.
2 Pulse (ENTER).
10
El reloj se pone en funcionamiento. Al
finalizar el ajuste del reloj, el visor vuelve al
modo de reproducción normal.
Sugerencias
• Puede ajustar el reloj automáticamente con la
función RDS (página 19).
• Si el modo D. Inf o est á activado, siempre se mostrará
la hora (página 33).
Page 51
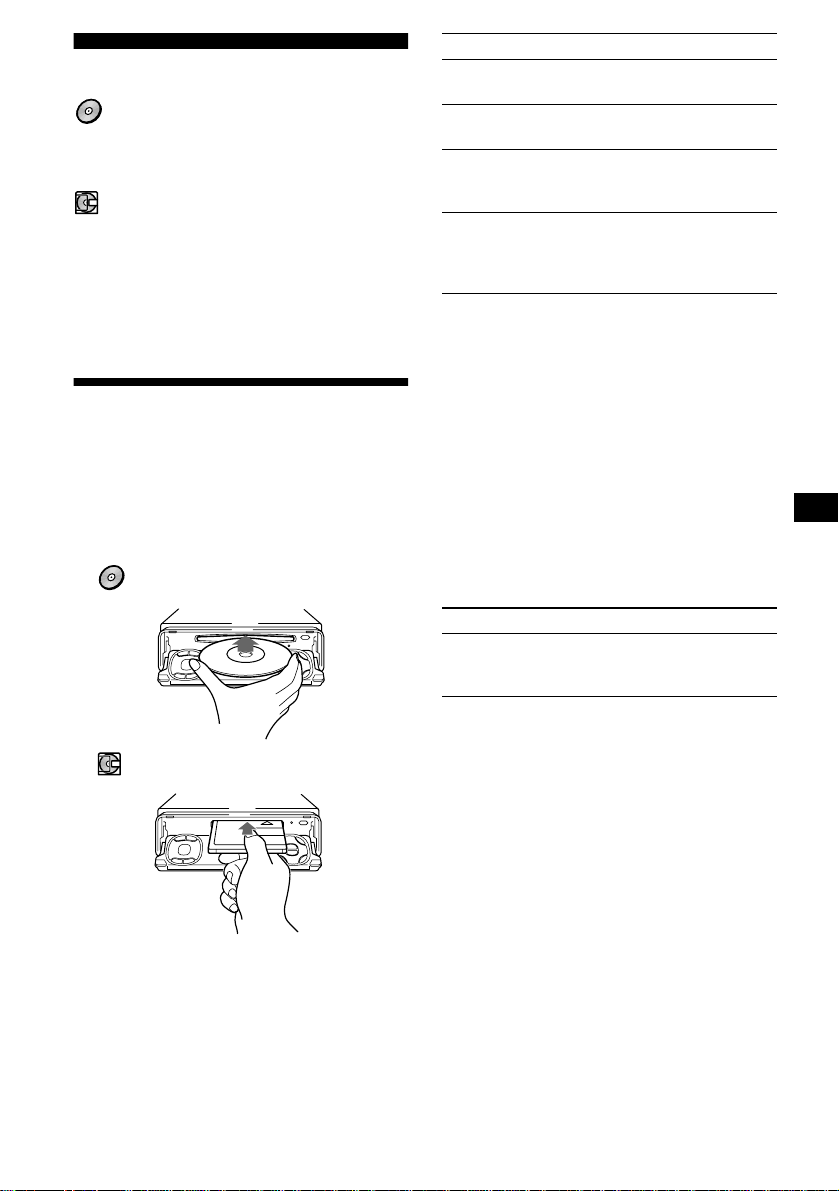
CD/MD
CDX-M770/M670:
Además de reproducir el C D con esta unidad,
también puede controlar las unidades externas de
CD/MD.
MDX-M690:
Además de reproducir el MD con esta unidad,
también puede controlar las unidades externas de
CD/MD.
Nota
Si conecta una unidad opcional de CD con función CD
TEXT, la información CD TEXT aparecerá en el visor
al reproducir discos CD TEXT.
Reproducción de discos
Para Pulse
Detener la
reproducción
Expulsar el disc o (OPEN/CLOSE) o (OPEN)
Omitir pistas
– Sensor de música
automático
Avanzar/retroceder
rápidamente
– Búsqueda
manual
Notas
• Cuando finalice la última pista del disco, la
reproducción se reiniciará a partir de la primera
pista del disco.
• Con una unidad opcional conectada, la
reproducción de la misma fuente continuará en la
unidad opcional de CD/MD.
(OFF)
y, a continuación, Z
</, (SEEK) (
[una vez por pista]
</, (SEEK) (
[manténgalo pulsado hasta
alcanzar el punto deseado]
./>)
m/M)
(Con esta unidad)
1 Pulse (OPEN/CLOSE) o (OPEN) en la
unidad e inserte el disco (cara
etiquetada hacia arriba).
La reproducci ón se inicia automáticamente.
CDX-M770/M670:
MDX-M690:
2 Pulse (OPEN/CLOSE) o (CLOSE) en la
unidad para cerrar el panel frontal.
Si ya hay un disco insertado, pulse (SOURCE)
varias veces hasta que ap ar ezca “CD” o “MD”
para iniciar la reproducción.
(Con unidad opcional)
1 Pulse (SOURCE) varias veces para
seleccionar “CD” o “MD”.
2 Pulse (MODE) varias veces hasta que
aparezca la unidad deseada.
Se inicia la reproducción.
Para Pulse
Omitir discos
– Selección de
discos
M/m (DISC) (+/–)
11
Page 52

Elementos del visor
Al cambiar el disc o/pista, el título pregrabado*1
del nuevo disco/pista aparece automáticamente
(si la función de desplazamiento automático está
ajustada en “on”, los nombres con más de 9
caracteres se desp la zarán ( página 33)).
Elementos vi sualizables
• Fuente de música
• Reloj
Número
del disco
Número
de pista
Indicación MDLP
(sólo MDX-M690)
LP2: reproducción
LP2
LP4: reproducción
LP4
Para Pulse
Cambiar el
(DSPL/PTY)
elemento del visor
Que el elemento se
(SCRL)
desplace por el
visor
*1 Al pulsar (DSPL/PTY), “NO D.Name” o “NO
T.Name” indica que no hay ningún memorando de
discos (página 13) o nombre pregrabado para
mostrarse.
*2 Sólo para discos CD TEXT con nombre del artista.
Notas
• Algunos caracteres no pueden mostrarse.
• Con algunos discos CD TEXT que contengan
muchos caracteres, la información puede no
desplazarse.
• Esta unid ad no pue de mostrar el nombre del artista
de cada pista de un disco CD TEXT.
Sugerencia
Con el desplazamiento automático desactivado y al
cambiar el disco/pista, el nombre del disco/pista no se
desplaza.
Tiempo de
reproducción
transcurrido
Elementos
visualizables
• Nombre del
• Título de la
disco*
artista*
pista*
1
/
2
1
Reproducción repetida de pistas
— Reproducción repetida
Se repetirá una pista o el disco complet o de la
unidad principa l c u ando llegue al final. Para la
reproducción repetida, es posible seleccionar:
• Repeat 1 — para repetir una pista.
• Repeat 2* — para repetir un disco.
* Disponible solamente cuando hay conectada una o
más unidades opcionales de CD/MD.
Durante la reproducción, pulse (1)
(REP) varias veces hasta que el ajuste
deseado aparezca en el visor.
Se inicia la reproducción repetida.
Para recuperar el modo de reproducción normal,
seleccione “Repeat off”.
Reproducción de pistas en orden aleatorio
— Reproducción aleatoria
Es posible seleccionar:
• Shuf 1 — para reproducir las pistas d el di sco
actual en orden aleato rio.
• Shuf 2*
• Shuf All*
*1 Disponible solamente cuando hay conectada una o
*2 Disponible solamente cuando hay conectada una o
Para recuperar el modo de reproducción normal,
seleccione “Shuf off”.
Nota
“Shuf All” no establecerá las pistas en orden aleatorio
entre unidades de CD y de MD.
1
— para reproduci r las pistas de la
unidad opcional de CD ( MD) actual en orden
aleatorio.
2
— para reproducir todas las pistas
de todas las unidades de CD (MD) conectadas
(incluida esta un idad) en orden aleatori o.
más unidades opcionales de CD (MD).
más unidades opcionales de CD, o dos o más
unidades opcionales de MD (CDX-M770/M670).
Disponible solamente cuando hay conectada una o
más unidades opcionales de MD, o dos o más
unidades opcionales de CD (MDX-M690).
Durante la reproducción, pulse (2)
(SHUF) varias veces hasta que el
ajuste deseado aparezc a en el visor.
Se inicia la reproducción aleatoria .
12
Page 53
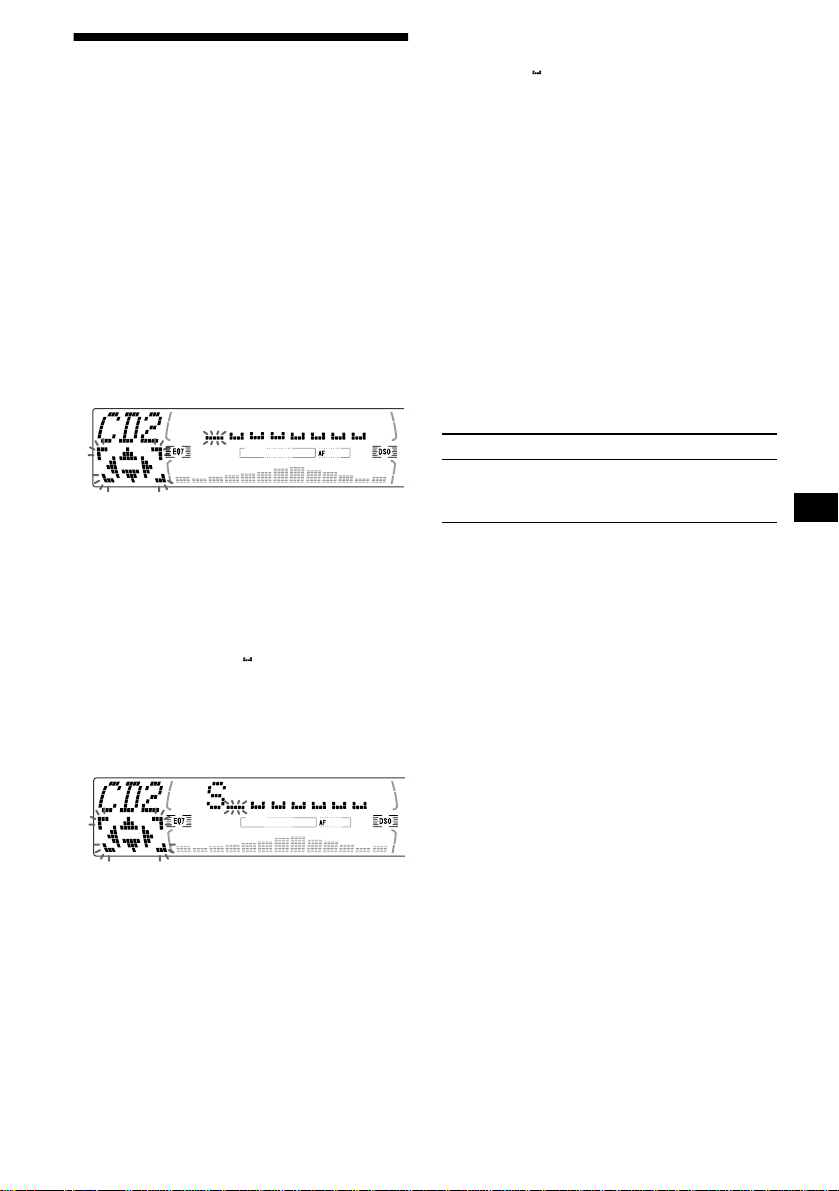
Etiquetado de CD
— Memorando de discos (Para una unidad de CD con función CUSTOM FILE)
Puede etiquetar l os discos con un nombre
personalizado ( Memorando de discos) . Puede
introducir hasta 8 caracteres por disco. Si asigna
nombre a un CD, podrá localizar el disco
mediante di ch o nombre (página 14).
1 Comience a reproducir el disco que
desee etiquetar en una unidad de CD
con función CUSTOM FILE.
2 Pulse (MENU) y , a continuación, M o m
varias veces hasta que apar ezca
“Name Edit”.
3 Pulse (ENTER).
La unidad repetirá el disc o du rante el
procedimiento de asignación de nombre.
4 Introduzca los caracteres.
1
1 Pulse M*
seleccionar el carácter deseado.
A t B t C ... t 0 t 1 t 2 ... t +
t – t
*1 Para el orden inverso, pulse x.
*2 (espacio en blanco)
2 Pulse , tras localizar el carácter
deseado.
Si pulsa < (lado (–) de ( SEEK) ), podrá
desplazarse h aci a atrás a la izqu ierda.
3 Repita los pasos 1 y 2 para
introducir el nombre completo.
5 Para recuperar el modo normal de
reproducción de CD, pulse (ENTER).
varias veces para
... t *2 t A
*
Sugerencias
• Para corregir o borrar un nombre, sobrescríbalo o
introduzca “”.
• Existe otro método para comenzar a etiquetar el CD:
Pulse (LIST) durante 2 segundos en lugar de
realizar l os pas os 2 y 3. También puede completar la
operación pulsando (LIST) durante 2 segundos en
lugar de re alizar el paso 5.
• Podrá etiquetar discos compactos en una unidad sin
función CUSTOM FILE, si está conectada junto con
una unidad de CD que disponga de dicha función. El
memorando de discos se almacenará en la memoria
de la unidad de CD con la función CUSTOM FILE.
Nota
La reproducción repetida/aleatoria se suspende hasta
completarse la edición de nombres.
Visualización del memorando de
discos
Como elemento de visualización, el memorando
de discos siempre tiene prioridad sobre cualquier
información CD TEXT original.
Para Pulse
Ver (DSPL/PTY) durante la
Sugerencia
Para conocer otros elementos que pueden
visualizarse, consulte la página 12.
reproducción de discos CD/
CD TEXT
Borrado del memorando de discos
1 Pulse (SOURCE) varias veces para
seleccionar “CD”.
2 Pulse (MODE) varias veces para
seleccionar la unidad de CD que
contenga el memorando.
3 Pulse (MENU) y, a continuación, M o m
varias veces hasta que aparezc a
“Name Del”.
4 Pulse (ENTER).
Aparecerán los n ombres almacenados.
5 Pulse M o m varias vece s par a
seleccionar el nombre de disco que
desee borr ar.
Aparecerán los n ombres almacenados.
6 Pulse (ENTER) durante 2 segundos.
El nombre se borra.
Si desea borrar otros nombres, repita los
pasos 5 y 6.
7 Pulse (ENTER).
La unidad vuelve al modo de reproducción
normal de CD.
continúa en la página siguiente t
13
Page 54

Notas
• Cuando se borra el memorando de un disco CD
TEXT, aparece la información CD TEXT original.
• Si no puede encontrar el memorando que desea
borrar, inténtelo seleccionando una unidad diferente
de CD en el paso 2.
Localización de discos por nombre
— Listado (Para un a unidad de CD con la función CD TEXT/CUSTOM FILE o una unidad de MD)
Esta función puede utilizarse con discos a los que
se han asig nado nombres personalizados*
discos CD TEXT*
*1 Localización de discos por su nombre
personalizado: al asignar un nombre a un CD
(página 13) o MD.
*2 Localización de discos por la información CD
TEXT: si reproduce un disco CD TEXT en una
unidad de CD con la función CD TEXT.
2
.
1 Pulse (LIST).
El nombre asig nado al d isco act ual apar ece en
el visor.
2 Pulse M o m varias veces hasta que
encuentre el disco deseado.
3 Pulse (ENTER) par a reproducir el
disco.
Nota
No es posible visualizar ciertas letras (excepción:
memorando de discos).
Selección de pistas específicas para su reproducción
— Banco (Para una unidad de CD con función CUSTOM FILE)
Si asigna nombres a los discos, podrá programar
la unidad para que omita pistas o r eproduzca sólo
las que desee.
1 Inicie la reproducción del disco que
desee etiquetar.
14
1
o con
2 Pulse (MENU) y , a continuación, M o m
varias veces hasta que apare zca
“Bank Sel”.
3 Pulse (ENTER).
4 Asigne nombre a las pistas.
1Pulse < o , varias veces para
seleccionar la pista a la que desea
asignar nombre.
2Pulse (ENTER) vari as ve ces para
seleccionar “Play” o “Skip”.
5 Repita el paso 4 para esta blec er el
modo “Play” (reproducción) o “Skip”
(omisión) en toda s l as pist as.
6 Pulse (ENTER).
La unidad vuelve al modo de reproducción
normal de CD.
Notas
• Puede establecer “Play” y “Skip” para un máximo de
24 pistas.
• No es posible establecer “Skip” para todas las pistas
de un CD.
Reproducción sólo de pistas
específicas
Es posible seleccionar:
• Bank on — para reproducir las pist as con el
ajuste “Play”.
• Bank inv (Inverso) — para reproducir las pistas
con el ajuste “Skip”.
1 Durante la reproducción, pulse
(MENU) y, a continuación, M o m
varias veces hasta que apare zca
“Bank on”, “Bank inv” o “Bank off”.
2 Pulse , varias veces hasta que
aparezca el ajuste deseado.
3 Pulse (ENTER).
La reproducción se inicia a partir de la pista
siguiente a la actual.
Para volver al modo de reproducción norma l,
seleccione “Bank off” en el paso 2.
Page 55

Radio
La unidad puede almacenar hasta 6 emisoras por
banda (FM1, FM2, FM3, MW y LW).
Precaución
Para sintonizar emisoras mientras conduce,
utilice la función Memoria de la mejor sintonía
para evitar accidentes.
Almacenamiento automático de emisoras
— Memoria de la mejor sintonía (BTM)
La unidad selecciona las emisoras de señal más
intensa dentro de la banda seleccionada y las
almacena por o rd en de frecuencia.
1 Pulse (SOURCE) varias veces para
seleccionar la radio.
2 Pulse (MODE) varias veces para
seleccionar la banda.
3 Pulse (MENU) y , a continuación, M o m
varias veces hasta que apar ezca
“BTM”.
4 Pulse (ENTER).
La unidad emite un pitido al almacenar el
ajuste.
Notas
• Si se reciben pocas emisoras debido a que las
señales son débiles, algunos botones numéricos
conservarán sus valores anteriores.
• Si el visor muestra un número , l a un id ad c ome nz a r á
a almacenar emisoras a partir del actualmente
mostrado.
Recepción de las emisoras almacenadas
1 Pulse (SOURCE) varias veces para
seleccionar la radio.
2 Pulse (MODE) varias veces para
seleccionar la banda.
3 Pulse el botón numérico ((1) a (6)) en
el que esté almacenada la emisor a
deseada.
Sugerencia
Pulse M o m para recibir las emisoras en el orden en
el que están almacenadas en la memoria (Función de
búsqueda programada).
Si la sintonización programada no
funciona
Pulse cual quier lado de (SEEK) para
buscar la emisora (sintonización
automática).
La exploración se detiene cuando la unid ad
recibe una emisora. Repita la operación hasta
recibir la emisora deseada.
Sugerencias
• Si la sintoniza ción automática se detiene con
demasiada frecuencia, active la búsqueda local para
buscar solamente emisoras de señal más intensa
(consulte “Cambio de los ajustes de sonido y
visualización” en la página 33).
• Si sabe cuál es la frecuencia de la emisora que
desea escuchar, pulse y mantenga pulsado
cualquier lado de (SEEK) para localizar la
frecuencia aproximada. A continuación, pulse
(SEEK) varias veces para ajustar con precisión la
frecuencia deseada (sintonización manual).
Si la recepción de FM en estéreo es de
mala calidad
Seleccione el modo de recepción
monofónica
(consulte “Cambio de los ajustes de sonido y
visualización” en la página 33).
El sonido mejorará, aunque será monofónico
(“ST” desaparece).
15
Page 56

Almacenamiento de las emisoras deseadas
Puede memorizar manualmente las emisoras que
desee en cualquier botón numérico.
1 Pulse (SOURCE) varias veces para
seleccionar la radio.
2 Pulse (MODE) varias veces para
seleccionar la banda.
3 Pulse cualquier lado de (SEEK) para
sintonizar la emisora que desee
almacenar.
4 Pulse el botón numérico que dese e
((1) a (6)) durante 2 segundos hasta
que aparezca “MEM”.
La indicación de botón numérico a par ece en
el visor.
Nota
Si intenta almacenar otra emisora en el mism o botón
numérico, se borrará la emisora anteriormente
almacenada.
Sintonización de emisoras mediante lista
— Listado
1 Durante la recepción de la radio, pulse
(LIST) momentáneamente.
La frecuencia o el nombre asignado a la
emisora actual aparece en el visor.
2 Pulse M o m varias veces hasta que
encuentre la emisora deseada.
Si la emisora seleccionada no tiene un
nombre asignado, el visor mostrará la
frecuencia corr espondiente.
3 Pulse (ENTER) par a sint on izar la
emisora deseada.
RDS
Descripción general de RDS
Las emisoras de FM con servicio RDS (Sistema
de datos de radio) envían información digital
inaudible junto con la señal normal de programa
de radio. Por ejemplo, aparecerá una de las
siguientes indicaciones al recibirse una emisora
con capacidad RDS.
Elementos
Elementos
Elementos
visualizables
visualizables
• Banda de radio
• Banda de radio
• Reloj
• Reloj
Número de
Número de
memorización
memorización
* consulte “Sintonización de emisoras mediante
tipo de programa” en la página 19.
Para Pulse
Cambiar el
elemento del visor
Servicios RDS
Los datos RDS ofrecen otras funciones útiles,
como:
• Resintonización automática de un
programa, que resulta útil durante un largo
viaje. — AF t página 17
• Recepción de anuncios de tráfico, incl us o
mientras se re ci be ot ro pr ogra ma/f ue nt e. — TA
t página 18
• Selección de emisoras mediante el tipo de
programa que se emita. — PTY t página 19
• Ajuste automático del reloj. — CT t página
19
Notas
• La disponibilidad de todas las funciones RDS
depende del país o región.
• RDS puede no funcionar correctamente si la señal
es débil o si la emisora que sintoniza no transmite
datos RDS.
visualizables*
• Nombre de la
emisora
• Tipo de
programa
Frecuencia
(DSPL/PTY)
16
Page 57

Resintonización automática para mejorar la recepción
— Función AF
La función de frecuencias alternativas (A F)
permite que la radio sin tonice siempre la señal
más intensa de la emisora que escuche dentro de
una zona.
Las frecuencias cambian automáticamente.
Para emisoras sin frecuencias
alternativas
Pulse cual quier lado de (SEEK)
mientras el nombre de la emisora
parpadea (antes de 8 segundos).
La unidad comienza a buscar otra frecuencia
con los mismos datos PI (Identificación de
programa) (a par ece “PI Seek”).
Si la unidad no puede encontrar los mismos
datos PI, volverá a la frecuencia
anteriormente seleccionada.
98,5 MHz
Emisora
96,0 MHz
102,5 MHz
1 Seleccione una emisora de FM (página
15).
2 Pulse (AF) varias veces hasta que
aparezca “AF
La unidad comienza a buscar una frecuencia
alternativa con la señal más intensa de la
misma red.
Si “NO AF” parpadea, significa que la
emisora actualmente sintonizada no dispone
de frecuencia al ternativa.
Nota
Si no hay frecuencias alternativas en la zona o si no
es necesario buscar una, desactive la función AF
seleccionando “AF
on”.
off”.
Permanencia en un programa regional
Cuando la función AF está activada: el ajuste de
fábrica de esta unidad limita la recepción a una
región específica, por lo que no cambi ar á a ot ra
emisora regiona l de fr ecuencia más intensa.
Si desea permanecer en la zona de re cepción de
este programa regional o si desea obtener el
máximo rendimiento de la función AF,
seleccione “REG off” en el MENU (página 33).
Nota
Esta función no se activa en el Reino Unido ni en
algunas zonas.
Función Enlace local
(sólo Reino Unido)
Esta función permite seleccionar otras emisoras
locales de la zona, aunque no estén almacenadas
en los botones num éricos.
1 Pulse el botón numérico ((1) a (6)) en
el que haya almacenado una emisora
local.
2 Antes de 5 segundos, pulse de nuevo
el botón numérico de la emisora local.
3 Repita este procedimiento hasta
recibir la emisora local deseada.
17
Page 58

Recepción de anuncios de tráfico
— TA/TP
La activación de las funcione s Anuncios de
tráfico (TA) y Programas de tráfico (TP) permite
sintonizar automáticamente anuncios de tráfico
de una emisora de FM que los emita. Estos
ajustes funcionan i ndependientemente de la
fuente (CD/MD) o programa de FM actual; la
unidad vuelve a la fuent e original al finalizar el
anuncio.
Pulse (TA) varias veces hasta que
aparezca “TA
La unidad comien za a busc ar em i soras de
información sobre el tráfico.
“TP” indica la recepción de tales emisoras, y
“TA” parpadea durante el anuncio de tr áfico
existente. La unidad continuará bu scando
emisoras disponibles con TP si se indica “NO
TP”.
Para cancelar todos lo s anuncios de tráfico,
seleccione
“TA
off”.
Para Pulse
Cancelar el
anuncio actual
on”.
(TA)
Memorización de emisoras RDS con los ajustes AF y TA
Al memorizar emisoras RDS, la uni dad almacena
el ajuste AF/TA (activado/desactivado) de cada
emisora, así como su frecuencia. Puede
seleccionar un ajuste diferente (para AF, TA o
ambos) para determina da s emisoras
memorizadas, o el mismo ajus te para todas. Si
memoriza emisoras con “AF on”, la unidad
almacenará automáticamente las emisoras de
señal más intensa.
Memorización del mismo ajuste para
todas las emisoras memorizadas
1 Seleccione una banda de FM (página
15).
2 Pulse (AF) y/o (TA) para seleccionar
“AF
on” y/o “TA on”.
T enga en cuenta que al se lecc ionar “AF off” o
“TA off” se almacenan las emisor as RDS y
las que no lo son.
3 Pulse (MENU) y , a continuación, M o m
varias veces hasta que apare zca
“BTM”.
4 Pulse (ENTER) hasta que “BTM”
parpadee.
Sugerencia
También puede cancelar el anuncio actual pulsando
(SOURCE) o (MODE).
Programación del volumen de los
anuncios de tráfico
Puede programar el nivel de volumen de los
anuncios de tráfico para que no pasen
inadvertidos.
1 Pulse (VOL) para ajustar el nivel de
volumen que desee.
2 Pulse (TA) durante 2 s egun dos.
Aparece “TA” y el ajuste se almacena.
Recepción de avisos de emergencia
Si AF o TA está activado, la unidad cambiará a
los avisos de emergencia, si se p roduce uno
mientras escucha una emisora de FM o un CD/
MD.
18
Memorización de ajustes diferentes
para cada emisora memorizada
1 Seleccione una banda de FM y
sintonice la emisora deseada (página
16).
2 Pulse (AF) y/o (TA) para seleccionar
“AF
on” y/o “TA on”.
3 Pulse el botón numérico que desee
((1) a (6)) hasta que aparezca “MEM”.
Repita la operación a partir del paso 1 para
programar ot ras emisoras.
Page 59

Sintonización de emisoras mediante tipo de programa
— PTY
Puede sintonizar em i soras mediante la selección
del tipo de program a que desee escuchar.
Tipos de programa Indicación
Noticias News
Tema s de actua lid ad Affairs
Información Info
Deportes Sport
Educación Educate
Drama Drama
Cultura Culture
Ciencia Science
Variada Varied
Música popular Pop M
Música “rock” Rock M
Música fácil de escuchar Easy M
Clásica ligera Light M
Clásica Classics
Otro tipo de músic a Othe r M
Partes meteorológicos Weather
Finanzas Finance
Programas infantiles Children
T emas sociales So cial A
Religión Religion
Conversación telefónica Phone In
Viajes Travel
Ocio Leisure
Música “jazz” Jazz
Música “country” Country
Música del país N a tion M
Melodías de ayer Oldies
Música folklórica Folk M
Documentales Document
Nota
No es posible utilizar esta función en países en los
que no haya datos PTY (selección de tipo de
programa) disponibles.
1 Pulse (DSPL/PTY) durante la recepción
de FM hasta que aparezca “PTY”.
El nombre del tipo de programa actual
aparecerá si la emisora transmite datos PTY.
Aparecerá “--------” si la emisora recibida no
es RDS o si los datos RDS no se reciben.
2 Pulse M o m varias veces hasta que
aparezca el ti po de pr o gr am a des e ado .
Los tipos de progra ma aparecen en el orde n
mostrado en la tabla.
Aparecerá “--------” si el tipo de programa no
se especifica en lo s datos RDS.
3 Pulse (ENTER).
La unidad c omien za a bu sca r una emis ora qu e
emita el tipo de programa seleccionado.
Ajuste automático del reloj
— CT
Los datos CT (Hora del reloj) de las
transmisiones RDS ponen el reloj en hora
automáticamente.
1 Durante la recepción de la radio, pulse
(MENU) y , a continuación, M o m varias
veces hasta que aparezca “CT off”.
2 Pulse , varias veces hasta que
aparezca “CT
El reloj se pone en ho ra.
3 Pulse (ENTER) para recuperar la
indicación normal.
Para cancelar la función CT, seleccione “CT
en el paso 2.
Notas
• La función CT puede no activarse aunque se reciba
una emisora RDS.
• Puede haber cierta diferencia entre la hora ajustada
mediante la función CT y la hora real.
on”.
off”
19
Page 60

DAB (opcional)
Operaciones básicas de DAB
Es posible conectar un sintonizador DAB
opcional a esta unidad.
Descripción general de DAB
DAB (Radiodifusión de audio digital) es un
nuevo sistema multimedia de radiodifusión que
transmite programas de audio con una calidad
comparable a la de los discos compactos. Esto se
posibilita mediante el uso de un microprocesador
en el sintonizador DAB que utiliza las señales de
radio enviadas a través de múltiples antenas y
señales multitrayectoria (ondas de radio
reflejadas) para potenciar la intensidad de la
señal principal . De esta forma, el sistema DAB
apenas se ve afectado por interferencias de radio,
incluso en medios móv iles como un automóvil.
Cada emisora D AB ag rupa pro gramas (s ervici os)
de radio en un conjunto que emite a
continuación. Cada s er vi ci o c ont i ene uno o más
componentes. Todos los conjuntos, servicios y
componentes se identifican por nombre, por lo
que es posible acceder a cualquiera de el l os sin
tener que conocer sus frecuencias.
Programa DAB
Conjunto
Servicio
Servicio
Servicio
Componente
Componente
Componente
Búsqueda del conjunto y se rvicio
— Sintonización automática
1 Pulse (SOURCE) varias veces para
seleccionar la radio.
2 Pulse (MODE) varias veces para
seleccionar “DAB”.
3 Pulse y mantenga pulsado cualquier
lado de (SEEK) hasta que aparezca
“Seek +” o “Seek –”.
La unidad deja de buscar cu ando localiza un
conjunto. Después la unidad selecciona
automáticamente el primer servicio y muestra
su nombre; el indicador del visor cambia de
“Seek +”/“Seek –” al nombre del servicio.
4 Pulse cualquier lado de (SEEK) para
seleccionar el servici o deseado.
Selección del conjunto
— Sintonización manual
Si sabe cuál es el número de canal del conjunto,
realice el siguiente pr ocedimiento para realiz ar la
sintonización.
1 Pulse (SOURCE) varias veces para
seleccionar la radio.
2 Pulse (MODE) varias veces para
seleccionar “DAB”.
3 Pulse M o m hasta que aparez ca “Ch.
XXX”.
Notas
• El sistema DAB se encuentra en periodo de prueba.
Ciertos servicios no se han defi nido su fic ien tem ente
o se encuentran en periodo de prueba. En la
actualidad, la unidad opcional de sintonización DAB
XT-100DAB no admite tales servicios.
• Los programas DAB se transmiten en la banda III
(174 a 240 MHz) y en la banda L (1.452 a 1.492
MHz), con cada banda dividida en canales (41 en la
banda III y 23 en la banda L). Cada emisora DAB
transmite un conjunto por canal.
20
4 Pulse M o m varias veces hasta q ue
aparezca el número de canal deseado.
Page 61
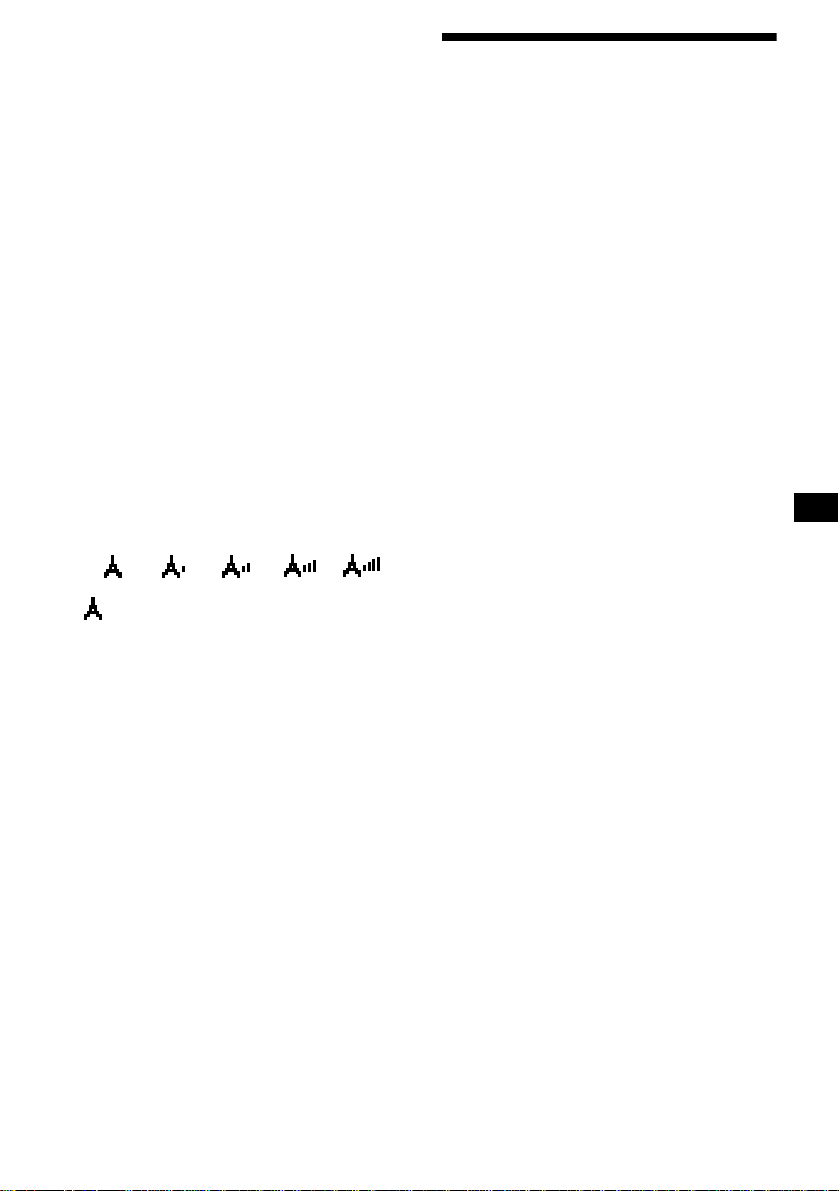
Recepción de los servicios
memorizados
El siguiente proced imiento está disponible tras
memorizar el servicio. Para obtener información
detallada so bre la memoriza ción de los servicios,
consulte “Memorización automática de servicios
DAB” (página 21) y “Memorización manual de
servicios DAB” (página 22).
1 Pulse (SOURCE) varias veces para
seleccionar la radio.
2 Pulse (MODE) varias veces para
seleccionar “DAB”.
3 Pulse M o m varias veces para
seleccionar el ser vi ci o m emorizado.
Sugerencia
Existe otra forma para recibir el servicio memorizado
(en los números 1 a 6).
Pulse el botón numérico ((1) a (6)) en el que esté
almacenado el servicio deseado.
Consulte la indicación de nivel para
comprobar la condic ión de recepción del
programa DAB. Dicha indicación aumenta al
incrementarse la intensidad de la señal de
recepción.
nivel 0
“” parpadeará en el visor si la recepción es de
mala calidad.
Nota
Para mostrar la indicación de nivel, seleccione el
patrón de analizador de espectros A-1 o A-2 (página
32).
nivel 1 nivel 2 nivel 4
nivel 3
Memorización automática de servicios DAB
— BTM
La función BTM (Memoria de la mejor sintonía)
recoge conjuntos DAB y asigna automáticamente
los servicios de los conjuntos para memoriz ar
números de servicios. La unidad puede
memorizar hasta 40 servicios.
Si los servicios s e han establecido previamente,
la función BTM se activará en las siguientes
condiciones:
• Si activa la función BTM mientras escucha un
servicio memorizado, la unidad almacenará los
servicios detectados (mediante sobrescritura)
sólo para memorizar números superiores al del
servicio a ctual.
• Si activa la función mientras escucha un
servicio no memorizado, la unidad sustituirá el
contenido de todos los números de
memorización.
• En los dos casos anteriores, si la unidad detecta
un servicio idéntico a uno ya memorizado, el
servicio p reviamente almacenado no cambia rá
y el recién detectado no se memori zará.
1 Mientras escucha un programa DAB,
pulse (MENU).
2 Pulse M o m varias veces hasta que
aparezca “BTM”.
3 Pulse (ENTER).
La unidad emite un pitido al almacenar el
servicio.
Una vez activada la función BTM, la unidad
sintoniza automáticamente el servicio
asignado en el último número infe rior de la
memoria predefinida.
Nota
Si la unidad sintoniza pocos servicios, la función BTM
puede no asignar servicios a todos los números de
memorización.
21
Page 62

Memorización manual de servicios DAB
— Edición de programación
También puede memorizar servicios DAB
manualmente o eliminar uno que ya esté
memorizado. Tenga en cuenta que pue den
memorizarse un máximo de 40 servicios
(mediante l a f unci ón BTM o manualment e) en la
memoria de la unidad.
1 Mientras escucha un program a DAB,
pulse (MENU).
2 Pulse M o m varias veces hasta que
aparezca “PRS Edit” y, a continuación,
pulse (ENTER).
3 Seleccione el servicio y el número que
desee memorizar.
1 Pulse cualquier lado de (SEEK) para
seleccionar el servicio.
2 Pulse M o m para selecciona r el
número de memorización.
Adición de los servicios en las
memorias predefinidas
Pulse M o m para seleccion ar “Insert” en el paso
4 y, a continuación, pulse (ENTER).
Nota
“Insert” no aparecerá si la memoria ya contiene el
número máximo de servicios (40).
Borrado de los servicios de las
memorias predefinidas
Pulse M o m para seleccionar “Delete” en el paso
4 y, a continuación, pulse (ENTER).
Sintonización de programas DAB mediante una lista
Realice el siguiente procedimiento para
sintonizar programas DAB manualmente.
1 Mientras escucha un programa DAB,
pulse (LIST) varias veces hasta que
aparezca “E” (lista de conjuntos).
E: lista de conjuntos
S: lista d e servic ios
C: lista de componentes
P: lista de memorización
3 Pulse (ENTER).
Los comandos de edición de programación
aparecen en el visor.
4 Pulse M o m para seleccionar el
comando deseado.
5 Pulse (ENTER).
Para editar otros serv icios, repita los pasos 3 y
4.
Sustitución de los servicios de las
memorias predefinidas
Pulse M o m para seleccionar “Over Wrt” en el
paso 4 y, a continuación, pulse (ENTER).
Sugerencia
Existe otra forma para memorizar el servicio (en los
números 1 a 6).
Tras recibir el servicio, pulse el botón numérico ((1) a
(6)) que desee hasta que oiga un pitido.
22
Aparecerán enumerados todos los conjunt o s
disponibles.
2 Pulse M o m hasta que aparez ca el
conjunto deseado y, a continuación,
pulse (ENTER).
El primer servicio del conjunto se selecciona
automáticamente.
3 Pulse (LIST) varias veces hasta que
aparezca “S” (lista de servicios).
Aparecerán enumerados todos los servici os
disponibles para el conjunto.
4 Pulse M o m varias veces hasta q ue
aparezca el servicio deseado y, a
continuación, pulse (ENTER).
El primer componente del servicio se
selecciona automáticamente.
5 Pulse (LIST) varias veces hasta que
aparezca “C” (lista de componentes).
Aparecerán enumerados todos los
componentes disponibles para el servicio.
Page 63

6 Pulse M o m hasta qu e aparezca el
componente deseado y, a
continuación, pulse (ENTER).
Actualización automática de la lista de
conjuntos
Al realizar la función BTM por primera vez,
todos los conjunt o s disponibles en la zon a se
almacenan de forma automática. Al realizar de
nuev o la función BTM, el contenido de esta s
listas se actualiza de ac uerdo c on las condic iones
descritas en la página 21.
Se añade un conjunto en la lista correspon di ente
cuando se recibe dur ante la sintonización
automática o la manual sin incluirse en la lista.
Un conjunto se elimina también de la lista
correspondient e cuando:
• se selecciona uno en la lista, pero no puede
recibirse.
• se realiza la sintonización automática o la
manual para recibir un conjunto, servicio o
componente enumerado, pero no puede
recibirse.
Cambio de audio multicanal y DRC
El sistema DAB puede cont ener audio
multicanal. Es posible seleccionar el canal
principal o el secundario para la recepción.
Igualmente, si activa la función DRC (Control de
gama dinámica), la gama dinámica del servicio
que admita DRC puede ampliarse de forma
automática.
Es posible ajustar los siguientes elementos:
• BLGL — para seleccionar el canal entre
“Main” (canal principal) o “Sub” (canal
secundario).
• DRC — para activar o desactivar la función.
Localización de servicios DAB mediante el tipo de programa (PTY)
Puede utilizar la fu nción P TY (Selec ción del tipo
de programa) para sintonizar el programa que
desee.
1 Mientras escucha un programa DAB,
pulse (DSPL/PTY).
2 Pulse M o m varias vece s par a
seleccionar el tipo de programa.
Los tipos de progra ma aparecen en el orde n
mostrado en la página 19.
3 Pulse (ENTER).
Se inicia automáticamente la búsqueda del
servicio del tipo de programa selecc io nado.
1 Mientras escucha un progra m a DAB,
pulse (MENU).
2 Pulse M o m varias veces hasta que
aparezca “DRC” o “BLGL”.
3 Pulse cualquier lado de (SEEK) par a
seleccionar el ajuste deseado (por
ejemplo: “on” u “off”).
4 Pulse (ENTER).
Nota
“BLGL” aparece en el menú solam en te cuan do la
unidad recibe un programa multica nal.
23
Page 64

Ajuste de la curva de ecualizador
Ajuste del mejor sonido
La unidad proporciona distintas funciones para
ajustar el sonido par a que pueda disfrutar de
música con el mejor sonido.
Ajuste del ecualizador (EQ7)
Puede seleccionar una curva de ecualizador para
7 tipos de mús i ca ( Vocal, Club, Jazz, New Age,
Rock, Custom y Xplod).
Puede almacenar y definir los ajuste s del
ecualizador de frecuencia y nivel.
Selección de la curva de ecualizador
1 Pulse (SOURCE) para seleccionar una
fuente (radio, CD o MD).
2 Pulse (EQ7) varias veces hasta
seleccionar la curva de ecualizador
que desee.
Cada vez que pul se (EQ7), el element o
cambiará.
Para cancelar el efecto de ecualización,
seleccione “off”. Transcurridos 3 segundos, el
visor vuelve al modo de reproducción normal.
1 Pulse (MENU).
2 Pulse M o m varias veces hasta q ue
aparezca “EQ7 Tune” y, a
continuación, pulse (ENTER).
3 Pulse < o , para s eleccio n a r la
curva de ecualizador que desee y, a
continuación, pulse (ENTER).
Cada vez que pulse < o ,, el elemento
cambiará.
4 Seleccione la frecuencia y nivel que
desee.
1Pulse < o , para seleccionar la
frecuencia que desee.
Cada vez que pulse < o ,, la frecuencia
cambiará de la sig uiente forma:
62 Hz y 157 Hz y 396 Hz y 1.0 kHz
y 2.5 kHz y 6.3 kHz y 16 kHz
2Pulse M o m para ajustar el nivel de
volumen deseado.
(CDX-M770)
El nivel de volumen puede ajustarse en
intervalos de 1 dB entre –12 dB y +12 dB.
(CDX-M670, MDX-M690)
El nivel de volumen puede ajustarse en
intervalos de 1 dB entre –10 dB y +10 dB.
24
Para restaurar la curva de ecualizador
ajustada en fábr ic a, pulse (ENTER)
durante 2 se gundos.
5 Pulse (ENTER).
Una vez compl e tado el ajuste de efecto, el
visor vuelv e al m odo de re prod uc ci ón normal.
Page 65

Ajuste del menú de sonido de baja frecuencia
— Organizador de sonido de baja frecuencia dinámico (DSO)
Si los altavoces están instalados en la parte
inferior de las puer tas, el soni do se recib irá desd e
abajo y puede no ser nítido.
La función DSO (Organ iz ador de sonido de baja
frecuencia dinámico) crea un soni do más
ambiental como s i hu biera altavoces en el
salpicadero (altavoces virtuales).
Selección del modo DSO (CDX-M770)
Modo DSO de CDX-M770
Visor Significado
STD
WIDE
STD-SP
WIDE-SP
off
Imagen de altavoces virtuales
*4
Altavoces virtuales
(Estándar)
Altavoces virtuales
(Grandes)
Estándar+profundidad
Grandes+profundidad
Cancelar
*3
*1
*2
*5
Efecto 3
Efecto 1
*3
*4
*1
*2
*5
2 Pulse (DSO) varias veces para
seleccionar el modo DSO que desee.
Para cancelar el modo DSO, seleccione “off”.
Transcurridos 3 segundos, el vis o r vuelve al
modo de reproducción normal .
Sugerencias
• El efecto DSO puede ser difícil de apreciar en
función del tipo de automóvil y de la música que
escuche.
• Cuando el ajuste de DSO es "WIDE", la recepción
de FM es inaudible. En este caso, establezca de
nuevo el ajuste de DSO en "STD".
Activación (desactivación) del modo
DSO (CDX-M670, MDX-M690)
Modo DSO de CDX-M670 MDX-M690
Visor Significado
on
off
Altavoces virtuales
Cancelar
1 Pulse (SOURCE) para seleccionar una
fuente (sintonizador, CD o MD).
2 Pulse (DSO) para seleccionar “on” u
“off”.
Para cancelar el modo DSO, seleccione “off”.
Transcurridos 3 segundos, el vis o r vuelve al
modo de reproducción normal .
*1 STD
*2 Grandes
*3 STD+profundidad
*4 Grandes+profundidad
*5 Posición de los altavoces reales (parte inferior de
las puertas delanteras)
1 Pulse (SOURCE) para seleccionar una
fuente (sintonizador, CD o MD).
Ajuste del modo DSO (CDX-M770)
1 Pulse (SOURCE) para seleccionar una
fuente (sintonizador, CD o MD).
2 Pulse (MENU).
3 Pulse M o m varias veces hasta que
aparezca “DSO tune” y, a
continuación, pulse (ENTER).
4 Pulse < o , para seleccionar el
modo DSO que desee y, a
continuación, pulse (ENTER).
continúa en la página siguiente t
25
Page 66

5 Seleccione el nivel de efecto.
Puede seleccionar el efecto desead o entre 3
niveles para cada modo DSO.
Pulse M o m varias veces para
seleccionar el efecto desea do.
Para restaurar el efecto, pulse (ENTER) durante
2 segundos.
6 Pulse (ENTER).
Si el sonido del altavoz de agudos es
demasiado estridente (CDX-M770)
1 Mientras la unidad se encue nt ra en
funcionamiento, pulse (MENU).
2 Pulse M o m varias veces hasta que
aparezca “DSO
norm”.
3 Pulse , para seleccion ar “DSO soft”.
4 Pulse (MENU).
Para restaurar el sonido, seleccione “DSO norm”.
Ajuste de las características de sonido
Puede ajustar la s características de sonido.
Los niveles de graves y agudos y el volumen de l
altavoz potenciador de graves pue den
almacenarse por separado para ca da fuente.
1 Seleccione el elemento que desee
ajustar pulsando (SOUND) varias
veces.
Cada vez que pulse (SOUND), el elemento
cambiará de la siguiente forma:
(CDX-M770)
POS (posición) t BAL (izquie rdoderecho) t F (volumen frontal) t
R (volumen posterior) t SUB (volumen
del altavoz potenciador de graves )
(CDX-M670, MDX-M690)
BAS (graves)
t
BAL (izquierdo-derecho) t
FAD (frontal-posterior) t SUB
(volumen del altavoz potenciador de
graves)
2 Ajuste el elemento s el eccionado
pulsando < o ,.
Al realizar el ajuste con el mando rotativo,
pulse (SOUND) y gire el control VOL.
Nota
Realice el ajuste antes de que transcurran 3
segundos después de seleccionar el elemento.
t TRE (agudos)
Audición de cada fuente de programa con su DSO registrado
— Memoria de so nido fuente (SSM)
Cada vez que recupere la misma fuente, podrá
escuchar el mismo menú DSO y curva del
ecualizador registrados para esa fuente, incluso
después de cambiar la fuente de programa o de
apagar la unidad y ence nderla de nuevo.
26
Page 67

Selección de la posición de audición (sólo CDX-M770)
Ajuste del balance (BAL)
Es posible ajustar un tiempo de demora para que
el sonido de los altavoces llegue al oyente.
De esta manera, la unidad puede simular un
campo de sonido natural, de forma que el oyente
obtenga la sensación de encontrarse en el centro
del campo de sonido i ndependientemente del
lugar en el que se encuentre dentro del
automóvil.
Centro del
campo de
sonido
Ajuste normal
(1 + 2 + 3)
Parte frontal
(1 + 2)
Frontal derecho
(2)
Frontal izquierdo
(1)
Parte post erior
(3)
Cancelar
1
3
2
Visor
POS
ALL
POS
Front
POS
Front-R
POS
Front-L
POS
Rear
POS
off
1 Pulse (SOURCE) para seleccionar una
fuente (sintonizador, CD o MD).
2 Pulse (SOUND) varias veces hasta que
aparezca “POS”.
Es posible ajustar el balance de sonido entre los
altavoces izquierdos y derechos.
1 Pulse (SOURCE) para seleccionar una
fuente (sintonizador, CD o MD).
2 Pulse (SOUND) varias veces hasta que
aparezca “BAL”.
3 Pulse < o , para ajustar el balance.
Transcurridos 3 segundos, el vis o r vuelve al
modo de reproducción normal .
Ajuste de los graves (sólo CDX-M670, MDX-M690)
Puede ajustar los graves de los altavoces.
1 Pulse (SOURCE) para seleccionar una
fuente (sintonizador, CD o MD).
2 Pulse (SOUND) varias veces hasta que
aparezca “BAS”.
3 Pulse < o , para se lecci onar la
posición de audición que desee.
All y Front y Front-R y
Front-L y Rear y off y All
Las posiciones de audición aparecen en el
orden mostrado anterior mente.
Para cancelar el modo POS, seleccione “off”.
Transcurridos tres segundos, el visor volverá
al modo de reproducción normal.
3 Pulse < o , para ajustar el balance.
Transcurridos 3 segundos, el vis o r vuelve al
modo de reproducción normal .
27
Page 68

Ajuste de los agudos (sólo CDX-M670, MDX-M690)
Ajuste del volumen frontal y posterior (sólo CDX-M770)
Puede ajustar los agudos de los al tavoces.
1 Pulse (SOURCE) para seleccionar una
fuente (sintonizador, CD o MD).
2 Pulse (SOUND) varias veces hasta que
aparezca “TRE”.
3 Pulse < o , para ajustar el bala nce.
Transcurridos 3 segundos, el visor vuelve al
modo de reproducción normal.
Ajuste del balance (FAD)
(sólo CDX-M670, MDXM690)
Es posible ajustar el balance de sonido entre los
altavoces frontales y posteriores.
1 Pulse (SOURCE) para seleccionar una
fuente (sintonizador, CD o MD).
2 Pulse (SOUND) varias veces hasta que
aparezca “FAD”.
1 Pulse (SOURCE) para seleccionar una
fuente (sintonizador, CD o MD ).
2 Pulse (SOUND) varias veces con el fin
de seleccionar “F” para los altavoces
frontales o “R” para los posteriores.
3 Pulse < o , para ajustar el volumen
de los altavoces frontales/posteriores.
Transcurridos 3 segundos, el visor vuelve al
modo de reproducción normal.
Ajuste de la frecuencia de corte y del
nivel de volumen de salida de los
altavoces frontales/posteriores
Es posible ajustar el nivel de volumen de salida y
seleccionar la frecuencia de corte de los
altavoces para adaptarlos a las caract erísticas del
sistema de altavoces instalado.
Frecuencia de corte
Nivel
3 Pulse < o , para ajustar el bala nce.
Transcurridos 3 segundos, el visor vuelve al
modo de reproducción normal.
28
Frecuencia (Hz)
1 Pulse (MENU).
2 Pulse M o m varias veces para
seleccionar “Front HPF” o “Rear
HPF”.
3 Pulse (ENTER).
4 Pulse < o , para s eleccio n a r la
frecuencia de corte.
Cada vez que pulse < o ,, la frecuenci a
cambiará de la siguiente forma:
off y 78 Hz y 99 Hz y 125 Hz y
157 Hz y 1 98 H z
Page 69

5 Pulse M o m para ajustar el nivel de
volumen.
El nivel de volumen puede ajustarse en
intervalos de 1 dB en tr e –12 dB y +12 dB.
Sugerencia
Si disminuye el volumen por completo,
∞ dB” aparecerá y la frecuencia de corte se
“–
desactivará.
6 Pulse (ENTER).
Una vez completado el ajuste de efecto, el
visor vuelve al modo de reproducción normal.
Ajuste del volumen de los altavoces potenciadores de graves
1 Pulse (SOURCE) para seleccionar una
fuente (sintonizador, CD o MD).
2 Pulse (SOUND) varias veces hasta que
aparezca “SUB”.
3 Pulse < o , para ajustar el volumen .
Transcurridos 3 segund os , e l vi sor vuelve al
modo de reproducción normal.
Sugerencia
Si pulsa < varias veces para disminuir el volumen
por completo, aparecerá “–
corte del altavoz potenciador de graves se
desactivará.
∞ dB” y la frecuencia de
Ajuste de la frecuencia de los
altavoces potenciadores de graves
(sólo CDX-M770)
Con el fin de adaptarse a las características del
altavoz o altavoces potenciadores de graves
conectados, puede eliminar las señales de
frecuencia alta y media que no desee que reciben
dichos alta v oce s. Al ajus tar la fr ecue ncia d e c orte
(consulte el diagrama que aparec e a
continuación), el altavoz o altavoces
potenciadores de graves sólo emitirán señales de
baja frecuenci a de forma que pueda obtenerse
una imagen de sonido más nítida.
Frecuencia de corte
Nivel
Frecuencia (Hz)
1 Pulse (MENU).
2 Pulse M o m varias veces hasta que
aparezca “Sub LPF”.
3 Pulse (ENTER).
4 Pulse < o , para seleccionar la
frecuencia de corte que desee.
Cada vez que pulse < o ,, la frecuencia
cambiará de la siguie n t e forma:
62 Hz y 78 Hz y 99 Hz y 125 Hz
y 157 Hz y off
5 Pulse M o m para ajustar el volumen.
El nivel de volumen puede ajustarse en
intervalos de 1 dB e ntre –12 dB y +12 dB.
Sugerencia
Si disminuye el volumen por completo,
∞ dB” aparecerá y la frecuencia de corte se
“–
desactivará.
6 Pulse (ENTER).
Una vez completado el ajuste de frecuencia,
el visor vuelve al modo de reproducción
normal.
29
Page 70

Otros elementos ajustables (sólo CDX-M670, MDX-M690)
Es posible ajus tar los siguientes elementos:
• HPF (Filtro de paso alto) — para ajustar la
frecuencia de corte en “off”, “78 Hz” o “125
Hz”.
• LPF (Filtro de paso bajo) — para ajustar la
frecuencia de corte en “78 Hz”, “125 Hz” u
“off”.
• Loud (Sonoridad) — para disfrutar de graves y
agudos incluso con el volumen bajo. Los graves
y los agudos se potenciarán.
Otras funciones
También puede controlar la unidad (y uni d ades
opcionales de CD /M D ) con un mando rotat ivo
opcional.
RM-X5S (suministrado con CDX-M770
solamente)
RM-X4S (opcional)
Las ilustrac io ne s de est e m anua l co rres po nd en al
modelo RM-X5S. Las descripciones son las
mismas para el modelo RM-X4S.
1 Pulse (MENU).
Para ajustar A.Scrl, pulse (MENU) durante la
reproducción de CD/MD.
2 Pulse M o m varias veces hasta que
aparezca el elemen to deseado.
3 Pulse , para seleccion ar el ajuste
que desee (ejemplo: “on” u “off”).
4 Pulse (ENTER).
Al finalizar el ajuste del modo, el visor vuelve
al modo de reproducción normal.
Nota
El elemento mostrado varía en función de la fuente.
Sugerencia
Puede cambiar fácilmente las categorías pulsando M
o m durante 2 segundos.
Uso del mando rotativo
En primer lugar, adhiera la et i queta apropiada
dependiendo de cómo desee montar el mando
rotativo.
El mando rotativo funciona mediante la
pulsación de botones y/o el giro de controles .
SOUND
MODE
DSPL
MODE
SOUND
DSPL
30
Page 71
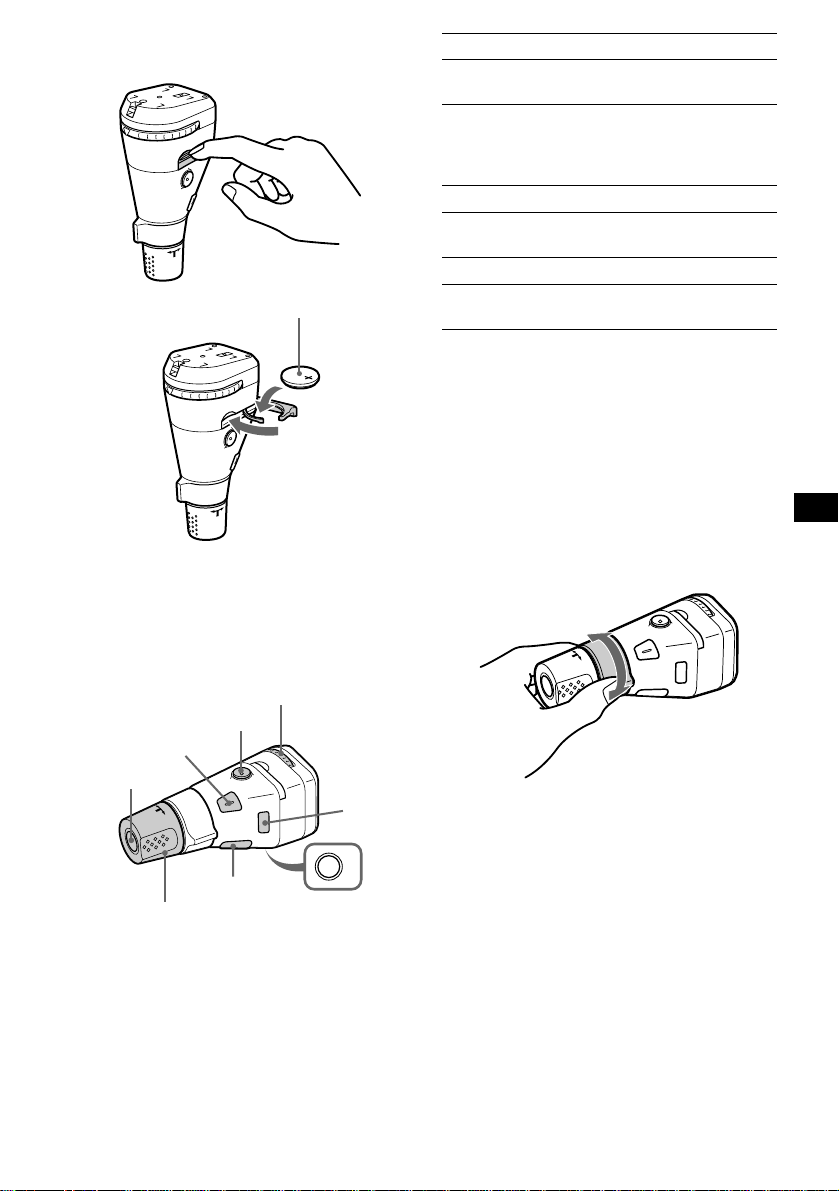
Inserción de la pila de litio
suministrada (sólo RM-X5S)
x
Lado + hacia arriba
Sugerencia
Para obtener información sobre la pila de litio,
consulte las “Notas sobre la pila de litio” (página 35).
Pulse Para
(SOURCE) Cambiar la fuente
(radio/CD/MD*
(MODE) Cambiar el funcionamiento
(banda de radio/DAB*
unidad de CD/unidad de
1
MD*
)
1
)
1
/
(ATT) Atenuar el sonido
(OFF)*
2
Detener la reproducción o la
recepción de la radio
(SOUND) Ajustar el menú de sonido
(DSPL) Cambiar el elemento del
*1 Sólo si el equipo opcional correspondiente está
conectado.
*2 Si el automóvil no dispone de posición ACC
(auxiliar) en el interruptor de la llave de encendido,
asegúrese de pulsar (OFF) durante 2 segundos
para desactivar la indicación del reloj después de
apagar el encendido.
*3 Cuando utilice la función RDS, podrá presionar
(DSPL) para hacer que en el visualizador
aparezca “PTY”. Después solamente podrá utilizar
su unidad principal o mando a distancia de tarjeta
para recibir datos de PTY (Modelos para Europa
solamente).
visor*
3
Giro del control
Pulsación de botones
Gire el dial para cambiar la
dirección de los rayos
infrarrojos. (sólo RM-X5)
(ATT)
(SOUND)
(SOURCE)
(DSPL)
Gire el control VOL para
ajustar el volumen.
(OFF)
(MODE)
OFF
Control
SEEK/AMS
Gírelo y suéltelo para:
– Omitir pistas.
– Sintonizar emisoras automáticamente.
Gírelo, manténgalo en esa posición y
suéltelo para:
– Avanzar/retroceder rápidamente una pista.
– Encontrar una emi sora manualmente .
continúa en la página siguiente t
31
Page 72

Presión y giro del control
E
C
R
U
O
S
Control
PRESET/DISC
Presione y gire el cont rol para:
– Recibir emisoras memorizadas.
– Cambiar el disco*.
Sugerencia
Con una unidad opcional de CD/MD conectada. Debe
presionar y girar el control siempre que seleccione
una emisora memorizada y un disco.
Cambio del sentido de funcionamiento
El sentido de funcionamiento de los controles
está ajustado de fábrica como se muestra a
continuación.
Para aumentar
Para disminuir
Si necesita montar el mando rotativo en el lado
derecho de la columna de dirección, puede
invertir el sentido de funcionamiento.
RM-X5S
RM-X4S
Pulse (SOUND) durante 2 segundos
mientras presiona el control VOL.
Atenuación rápida del sonido
(Con el mando rotativo o el mando a
distancia de tarjeta)
Pulse (ATT) en el mando rotativo o en
el mando a distancia de tarjeta.
“ATT on” aparece en el visor
momentáneamente.
Para recuperar el nivel anter ior de volumen,
pulse (ATT) de nuevo.
Sugerencia
Si el cable de interfaz de un teléfono para automóvil
está conectado al cable ATT, la unidad disminuirá el
volumen automáticamente cuando se reciba una
llamada telefónica (Función ATT de teléfono).
Selección del analizador de espectros
Rev Nor
Ajuste el interruptor de selección Rev/
Nor en “Rev”.
32
El nivel de señal de sonido se muestra en un
analizador de espectros. Puede selecciona r una
visualización para 5 patrones (A-1, A-2, B-1 a
B-3) o el modo de visualización automática y
“OFF” en el que aparecen todos los patrones.
1 Pulse (SOURCE) para seleccionar una
fuente (radio, CD o MD).
2 Pulse (MENU).
3 Pulse M o m varias veces hasta q ue
aparezca “SA”.
4 Pulse < o , varias veces par a
seleccionar el ajuste que desee.
5 Pulse (ENTER).
Page 73

Cambio de los ajustes de sonido y visualización
— Menú
Es posible ajustar los siguientes elementos:
Configuración
• Clock (página 10)
• CT (Hora del reloj) (página 19)
• Beep — para activar o desactivar los pitidos.
• Multi language (selección de idioma) — para
cambiar el idioma de las indicaciones del visor
a inglés, alemán, francés, italiano, holandés,
español, portugués, sueco, polaco, checo o
turco.
• P.Out 4,0V/5,5V— para cambiar la presalida
del amplificador de potencia a 4,0V o 5,5V.
Sólo puede selecc io nars e cuan do la u ni dad e st á
apagada. (sólo CDX-M770)
Visor
• D.Info (Información dual) — para mostrar
simultáneamente el reloj y el modo de
reproducción (activado). Funciona sólo cuando
SA no está ajus t ado en B-1 – B-3.
• SA (Analizador de espect ros) (página 32) —
para cambiar el patrón de visualización de la
indicación del ecualizador.
• M.Dspl (Desplazamiento de indicaciones) —
para activar o desactivar el modo de
desplazamiento de indicaciones.
– Seleccione “on” para visualizar patr ones de
decoración en el visor y activar la indicación
de demostración.
– Seleccione “off” para desactivar el
desplazamiento de indicaciones.
La indicación de demostración del modo
M.Dspl aparecerá transcurridos unos 10
segundos después de apagar la unidad.
• Dimmer — para cambiar el brillo del visor.
– Seleccione “Auto” para que el visor se atenúe
sólo al encender las luces.
– Seleccione “on” para que el visor se at enúe.
– Seleccione “off” para desactivar el atenuador.
• Contrast — para ajustar el contraste cuando las
indicaciones del visor no pueden reconocerse
debido a la posición de instalac ión d e la uni da d.
• A.Scrl (Desplazamiento automático)
– Seleccione “on” para que se desplacen
automáticamente todos los nombres
mostrados de más de 8 caracteres.
– Con el desplazami ent o automático
desactivado y al cambiar el nombre del disco/
pista, dicho nom bre no se desplaza.
Sonido (sólo CDX-M670, MDX-M690)
• HPF (Filtro de paso alto) (página 30)
• LPF (Filtro de paso bajo) (página 30)
• Loud (Son or idad) (página 30)
Modo de reproducción
• Local on/off (Modo de búsqueda local ) ( página
15)
– Seleccione “on” para que se sintonicen
solamente emisoras de señal más intensa.
• Mono on/off (Modo monofónico) (página 15)
– Seleccione “on” para escuchar emisiones
estéreo de FM en monofónico. Seleccione
“off” para recuperar el mod o normal.
• REG on/off (Regional) (página 17)
1 Pulse (MENU).
Para ajustar A.Scrl, pulse (MENU) durante la
reproducción de CD/MD.
2 Pulse M o m varias veces hasta que
aparezca el elemento deseado.
3 Pulse , para selec ci onar el ajuste
que desee (ejemplo: “on” u “off”).
4 Pulse (ENTER).
Al finalizar el ajuste del modo, el visor vuelv e
al modo de reproducción normal.
Nota
El elemento mostrado varía en función de la fuente.
Sugerencia
Puede cambiar fácilmente las categorías pulsando M
o m durante 2 segundos.
33
Page 74
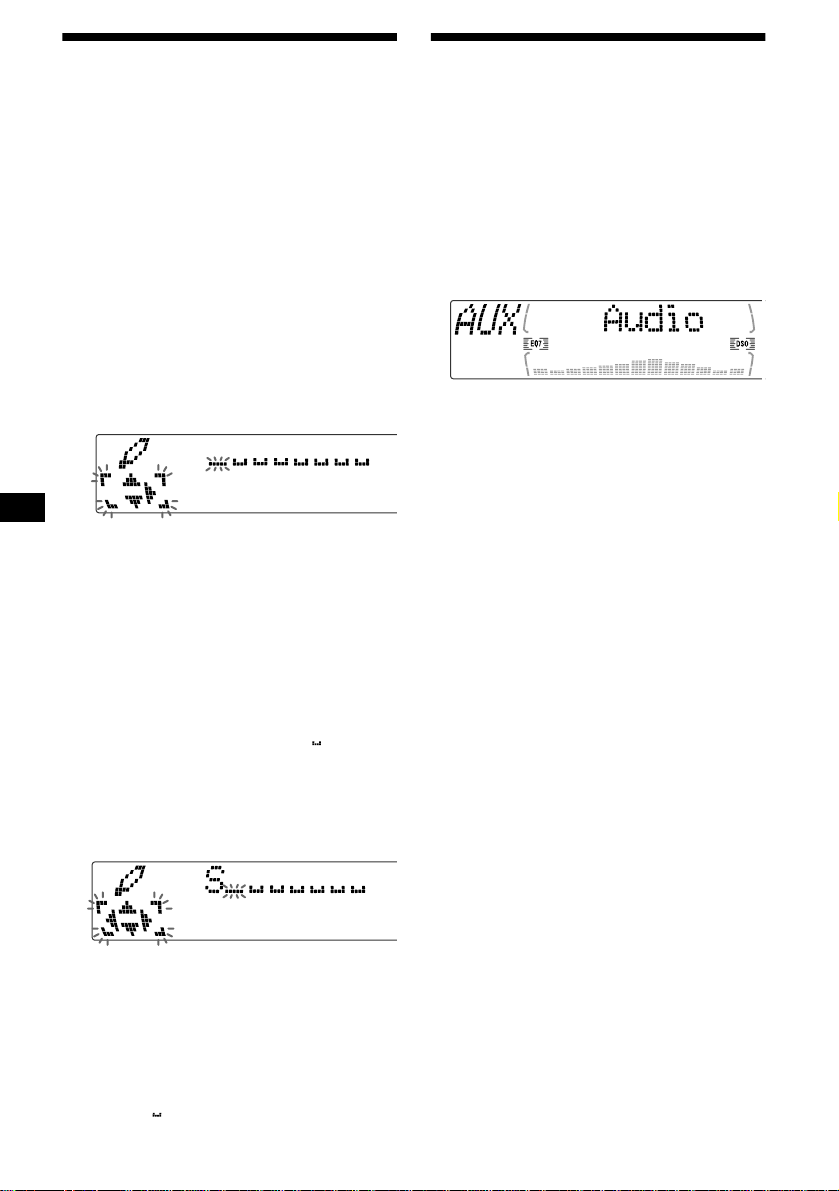
Asignación de nombre a una indicación del visor
Puede asigna r un nombre a una indicación del
visor con un máximo de 64 caracteres para que
aparezca cuando la unidad se apaga. Los
nombres se desplazarán por el visor con el modo
M.Dspl 1 (la indi cación permanece ilumi nada
aunque la alimentación esté desactivada).
1 Pulse (OFF).
La reproducci ón de CD/MD o l a rece pción de
la radio se detiene (la iluminación de las
teclas y el visor permanecen activados).
2 Pulse (MENU) y, a continuación, M o m
varias veces hasta que apar ezca
“Name Input”.
3 Pulse (ENTER).
4 Introd uzca los caracteres.
1 Pulse (DSPL/PTY) para seleccionar
el tipo de caracteres.
A t a t 0 t A
2 Pulse M*1 varias veces para
seleccionar el carácter deseado.
A t B t C t ... x t y t z t 0 t 1
t 2 ... t ! t “ t # ... t *
*1 Para el orden inverso, pulse m.
*2 (espacio en blanco)
3 Pulse , tras lo calizar el carácter
deseado.
Si pulsa <, podrá desplazarse hacia atrás
a la izquierda.
4 Repita los pasos 1 a 3 para
introducir la frase completa.
5 Pulse (ENTER).
Sugerencias
• Para corregir o borrar una frase, sobrescríbala o
introduzca “”.
• Para borrar todas las frases, pulse (ENTER) durante
34
2 segundos después del paso 4- 2.
2
t A
Conexión de equipos auxiliares de audio (sólo CDX-M770)
Puede conectar equipos auxiliares de audio a esta
unidad con el conector AUX IN.
Selección del equipo auxiliar
Pulse (SOURCE) varias veces para
seleccionar “AUX”.
Ajuste del nivel de volumen
Puede ajustar el volumen de cada uno de los
equipos de audio conectados.
1 Pulse (MENU).
2 Pulse M o m varias veces hasta q ue
aparezca “AUX Lebel” y, a
continuación, pulse (ENTER).
3 Pulse M o m para seleccio nar el nivel
de volumen que desee y, a
continuación, pulse (ENTER).
El nivel de volumen puede ajustarse en
intervalos d e 1 dB entre –6 dB y +6 dB.
4 Pulse (ENTER).
Para desactivar “AUX-A” de la
indicación de fuente de música
1 Pulse (OFF).
La reproducción de CD/MD o la recepción de
la radio se detiene (la iluminación de las
teclas y el visor pe rm anecen activados).
2 Pulse (MENU).
3 Pulse M o m varias veces hasta q ue
aparezca “AUX-A
4 Pulse < o , para selecc io nar “AUX-
A
off”.
5 Pulse (MENU).
Para restaura r l a indicación, seleccione “AUX-A
on”.
on”.
Page 75

Información complementaria
Mantenimiento
Sustitución del fusible
Cuando sustituya el fusible, asegúrese de utilizar
uno cuyo ampera je sea el mismo al especificado
en el fusible original. Si el fusible se funde,
compruebe la con exión de alimentación y
sustitúyalo. Si el fusible se funde de nuevo
después de sustituirlo, e s posibl e que ex ista a lgún
fallo de funcionamiento interno. En tal caso,
consulte con el proveedo r Sony más próximo.
Fusible (10 A)
Advertencia
No utilice nunc a un fusi ble cuyo am peraj e supere
al del suministrado con la unidad, ya que ésta
podría dañarse.
Limpieza de los conectores
La unidad puede no funcionar correctamente si
los conectores entr e di cha unidad y el panel
frontal están sucios. Con el fin de evitarlo,
extraiga el visor principal (página 9) y limpie los
conectores con un bastoncillo de algodón
humedecido en alcohol. No aplique demasiada
fuerza. En caso contrario, los conectores podrían
dañarse.
Notas
• Por razones de seguridad, apague el encendido
antes de limpiar los conectores y extraiga la llave del
interruptor de encendido.
• No toque nunca los conectores directamente con los
dedos o con algún dispositivo metálico.
Sustitución de la pila de litio
En condiciones normales, las pilas duran
aproximadamen te 1 año. (La duración puede ser
menor en funci ón de las condiciones de uso.)
Cuando la pila dispone de poc a energía, el
alcance del mando a distancia de tarj et a se
reduce. Sustituy a la pila por una nueva de litio
CR2025.
x
Lado + hacia arriba
Notas sobre la pila de litio
• Mantenga la pila de lit io fuera del alcance de
los niños. Si la pila se ingiere, póngase en
contacto inmediatamente con un médico.
• Limpie la pila con un paño seco para garantizar
un contacto óptimo.
• Asegúrese de observar la po l aridad correcta
cuando instale la pila.
• No agarre la pila con pinzas metálicas, ya que
si lo hace puede producirse un cortoci rc u i to .
Unidad principal
Parte trasera del visor principal
PRECAUCIÓN
La pila puede explotar si la trata mal.
No la recargue, desarme, ni la tire al fuego.
35
Page 76

Extracción de la unidad
Si el panel frontal no se abre debido a
que el fusible se ha fundido
Con el panel frontal abierto
1 Extraiga la cubierta frontal
1 Pulse (OPEN/CLOSE) o (OPEN) en la
unidad y, a continuación, ejerza
presión sobre el clip del interior de
la cubierta frontal con un
destornillador fino, y haga palanca
cuidadosamente par a liberar dicha
cubierta.
2 Repita el paso 1 en el la do
izquierdo.
La cubierta frontal se extrae.
2 Extraiga la unidad
1 Utilice un destornillador fino para
ejercer presión sobre el clip del lado
izquierdo de la unidad, y después
tire de dicho lado hasta que el retén
libere la fijación.
1 Extraiga la cubierta frontal
1Ejerza presión s obr e el clip del
interior de la cubierta frontal con la
llave de liberación (suministrada), y
libere dicha cubierta .
Llave de liberación (suministrad a)
Nota
Para proteger la superficie de la unidad, coloque un
paño fino entre la llave de liberación y la unidad al
insertar dicha llave.
2Repita el paso 1 en el lado
izquierdo.
La cubie rta frontal se extrae.
2 Extraiga la unidad
1Utilice la llave de liberación para
ejercer presión sobre el clip del lado
izquierdo de la unidad, y después
tire de dicho lado hasta que el retén
libere la fijación.
2 Repita el paso 1 en el la do
derecho.
3 Deslice la unidad para extraerla del
marco.
36
2Repita el paso 1 en el lado
derecho.
3Deslice la unidad para extraerla del
marco.
Page 77

Especificaciones
Sección del reproductor de CD/MD
Relación señal- ruido 90 dB
Respuesta de frecuencia 10 – 20.000 Hz
Fluctuación y trémolo Inferior al límite medible
Sección del sintonizador
FM
Margen de sintonización 87,5 – 108,0 MHz
Terminal de antena C one ctor de a nte na extern a
Frecuencia intermedia 10,7 MHz/450 kHz
Sensibilidad útil 8 dBf
Selectividad 75 dB a 400 kHz
Relación señal- ru ido 66 dB (estéreo),
Distorsión armónica a 1 kHz
Separación 35 dB a 1 kHz
Respuesta de frecuencia 30 – 15.000 Hz
72 dB (mono)
0,6 % (estéreo),
0,3 % (mono)
MW/LW
Margen de sintonización MW: 531 – 1.602 kHz
Terminal de antena C one ctor de a nte na extern a
Frecuencia intermedia 10,7 MHz/450 kHz
Sensibilidad MW: 30 µV
LW: 153 – 279 kHz
LW: 40 µV
Sección del amplificador de potencia
Salidas Salidas de altavoz
Impedancia de altavoz 4 – 8 ohmios
Salida máxima de potencia 52 W × 4 (a 4 ohmios)
(conectores de sellado
seguro)
Generales
Salidas Salidas de audio (frontal/
Entradas Cable de control ATT para
posterior)
Salida de altavoz
potenciador de graves
(mono)
Cable de control de relé de
antena motorizada
Cable de control de
amplificador de potencia
teléfono
Cable de control de
iluminación
Conector de entrada de
control BUS
Conector de entrada de
audio BUS
Conector de entrada de
controlador remoto (CDXM670, MDX-690)
Conector de entrada de
antena
Conector AUX IN (sólo
CDX-M770)
Controles de tono (sólo CDX-M670, MDX-M690)
Sonoridad (sólo CDX-M670, MDX-M690)
Requisitos de alimentación Batería de automóvil de
Dimensiones Aprox. 178 × 50 × 182 mm
Dimensiones de montaje Aprox. 182 × 53 × 160 mm
Peso Aprox. 1,5 kg
Accesorios suministrados Componentes de instalación
Accesorios opcionales Mando rotativo
Equipo opcional Cambiad or de CD (10
Nota
Esta unidad no puede conectarse a un
preamplificador digital o a un ecualizador.
Patentes de los Estados Unidos y de otros países con
licencia de Dolby Laboratories.
El diseño y las especificaciones están sujetos a
cambios sin previo aviso.
Graves ±8 dB a 100 Hz
Agudos ±8 dB a 10 kHz
+8 dB a 100 Hz
+2 dB a 10 kHz
12 V CC
(tier ra negativa)
(an/al/prf)
(an/al/prf)
y conexiones (1 juego)
Estuche para el panel frontal
(1)
Mando a distancia de tarjeta
RM-X111
Mando rotativo
RM-X5S (CDX-M77 0)
RM-X5S (CDX-M670,
MDX-M690)
RM-X4S
Cable BUS (suministrado
con un cable de pines RCA)
RC-61 (1 m), RC-62 (2 m)
discos)
CDX-848X, CDX-646
Cambiador de CD (6 discos)
CDX-T68X, CDX-T67
Cambiador de MD
(6 discos)
MDX-65
Selector de fuente
XA-C30
Unidad de sintonización
DAB
XT-100DAB
37
Page 78

Solución de problemas
La siguiente lista de comprobaciones le ayudará
a solucionar los problemas que puedan
producirse con la unidad.
Antes de consultar la siguiente lista, compruebe
los procedimient os d e conexión y empleo.
Generales
No se oye el sonido.
• Pulse el lado (+) de (VOL) para ajustar el
volumen.
• Cancele la función ATT.
• Ajuste el co ntrol de equilibrio en la posición
central para un si st ema de 2 altavoces.
El mensaje “LP” aparece en el visor. Las
pistas MDLP no pueden reproducirse. (sólo
MDX-M690)
Una unidad opcional de MD no es compatible
con la reproducción MDLP.
t Utilice esta unidad para reproducir las
pistas MDLP.
El contenido de la memoria se ha bor r a do.
• Ha pulsado el botón de restauración.
• Realice el almacenamiento de nuevo en la
memoria.
• Ha desconectado el cable de alimen tación o
la batería.
• El cable de conexión de la alimentación no
está correctamente conectado.
No se oyen los pitidos.
El sonido de los pitidos está cancelado (página
33).
Las indicaciones desaparecen del visor o
no aparecen en éste.
• La indicación del reloj desaparecer á si pulsa
(OFF) durante 2 segundos.
t Pulse (OFF) de nuevo durante 2
segundos para visualizar el reloj.
• Extraiga el panel frontal y limpie los
conectores. Consul te “Limpieza de los
conectores” (página 35) para obten er
información detallada.
Las emisoras almacenadas y la hora
correcta se han borrado.
El fusible se ha fundido.
Se oye ruido cuando la llave de encendido
se encuentra en la posición ON, ACC o OFF.
Los cables no co inciden correctamente con el
conector de alimentación auxiliar del
automóvil.
No se suministra alimentación a la unidad.
• Compruebe la conexión. Si todo está en
orden, compruebe el fusible.
• El automóvil no dispone de posición ACC.
t Pulse (SOURCE) (o inserte un disco)
38
para que se encienda la unidad.
Se suministra alimentación a la unidad de
forma continua.
El automóvil no dispone de posición ACC.
La antena motorizada no se extiende.
La antena motorizada no dispone de caja de
relé.
No es posible utilizar el mando rotativo RMX5S.
Gire el dial de la parte inferior del mando
rotativo hasta que pueda uti li zarlo.
Reproducción de CD/MD
No es posible insertar un disco.
• Ya hay un CD/MD insertado.
• El CD/MD se ha insertado a la fuerza al
revés o de forma incorrecta.
La reproducción no se inicia.
• Disco sucio o defectuoso.
• CD-R no finalizado o CD-RW.
• Ha intentado repr oducir un CD-R no
diseñado para uso de audio.
• Ciertos discos CD-R pueden no reproducirse
debido al equ ipo de grabac ión o al estado del
disco.
El disco se expulsa automáticamente.
La temperatura ambiente es superior a 50°C.
El CD no se expulsa.
Los botones de operación no funcionan.
Pulse el botón de restauración.
Se producen pérdidas de sonido debido a
vibraciones.
• (CDX-M770, CDX-M670)
La unidad está instalada en un ángulo
superior a 60°.
(MDX-M690)
La unidad está instalada en un ángulo
superior a 20°.
• La unidad no está inst al ada en una parte
segura del automóvil.
Se producen saltos de sonido.
Disco sucio o defectuoso.
No es posible desactivar la indicación
“--------”.
Ha entrado en el modo de edición de nombres.
t Pulse (LIST) durante 2 segundos.
Page 79

Recepción de la radio
No es posible utilizar la sintonización
programada.
• Almacene la frecuencia correcta en la
memoria.
• La señal de emisión es demasiado débil.
No es posible recibir las emisoras.
Los ruidos obstaculizan el sonido.
• Conecte un cable de control de antena
motorizada (azul) o un cable de fuente de
alimentación auxiliar (rojo) al cable de
suministro de alimentación del amplificador
de antena del automóvil. (Sólo si el
automóvil dispon e de una antena de FM/
MW/LW incorporada en el cristal trasero/
lateral.)
• Compruebe la conexión de la antena del
automóvil.
• La antena automática no se extiende.
t Compruebe la conexión del cable de
control de antena motorizada.
• Compruebe la frecuenc ia .
• Cuando el modo DSO está activado, el
sonido se oye ocasio nal mente con ruido.
t Desactive el modo DSO (página 25)
(CDX-M770), (página 25) (CDX-M670,
MDX-M690).
No es posible utilizar la sintonización
automática.
• El modo de búsqueda local está ajustado en
“on”.
t A juste el modo de búsqueda local en
“off” (página 33).
• La señal de emisión es demasiado débil.
t U tilice la sintonización manual.
La indicación “ST” parpadea.
• Sintonice la frecuencia con precisión.
• La señal de emisión es demasiado débil.
t Realice el ajuste en el modo de recepción
monofónica (página 33).
Un programa emitido en estéreo se oye en
monofónico.
• La unidad se encuentra en el modo de
recepción monofónica.
t Cancele el modo de re cepción
monofónica (página 33).
RDS
La función Seek (Búsqueda) se inicia tras
unos segundos de audición.
La emisora no es TP o su señal es débil.
t Pulse (AF) o (TA) varias veces hasta que
aparezca “AF off” o “TA off”.
No se oyen los anuncios de tráfico.
• Active “TA”.
• La emisora no emite anuncios de tráfico a
pesar de ser TP.
t Sintonice otra emisora.
PTY muestra “--------”.
• La emisora ac tual no es RDS.
• No se reciben dat os RDS.
• La emisora no especifica el tipo de
programa.
Funciones DSP (sólo CDX-M770)
No se oye el sonido, o éste es demasiado
bajo.
El volumen de los altavoces puede haberse
reducido automáticamente con el fin de
potenciar el efecto del ajuste de posición de
audición.
t Pulse < o , para ajustar el bal ance. El
balance de los altavoces puede ajustarse
por separado para los modos DSP activado
y desactivado (página 27).
39
Page 80

Mensajes/Indicaciones de error
Indicaciones de error
(Para esta unidad y cambiadores
opcionales de CD/MD)
Las siguientes indi caciones parpadear án durante
unos 5 segundos y se oirá una alarma.
1
Blank*
No hay pistas grabadas en el MD.*
t Reproduzca un MD que tenga pistas
grabadas.
1
Error*
• El CD está sucio o inse rt ado al revés.*
t Límpielo o insértelo correctament e.
• El CD/MD no se reproduce debido a algún
problema.*
2
t Inserte otro CD/MD.
High Temp
La temperatur a am biente es superior a 50°C.
t Espera hasta que la temper atura descienda
por debajo de 50°C.
NO Disc
No hay ningún disco insertado en la unidad de
CD/MD.
t Inser te di scos en la unidad de CD/MD .
NO Mag
El cargador de discos no es t á insertado e n la
unidad de CD/MD.
t Inserte el cargador en la unidad de CD/
MD.
Not Ready
La tapa de la unidad de MD está abierta o los
minidiscos no están insertados correctam ente.
t Cierre la tapa o inserte los minidiscos
correctamente.
Push Reset
La unidad de CD/MD no puede utilizarse
debido a algún problema.
t Pulse el bot ón de restauración de la unidad.
*1 Cuando el cambiador de CD/MD está conectado a
la unidad, el número del CD o MD aparece en el
visor.
*2 El visor muestra el número del disco que causa el
error.
2
2
Si estas soluciones no ayudan a mejorar la
situación, consulte con el proveedor Sony más
próximo.
Mensajes
LCL Seek +/–
El modo de búsqueda local está activado
durante la sintonización automática (página
15).
NO AF
No hay frecuenci as alternativas para la
emisora actual.
“” o “”
Ha llegado al principio o al final del disco y no
es posible avanzar más.
40
Page 81

Page 82

Välkommen!
Tack för att du valde denn a C D /MD-spelare från
Sony. Du kan ta del av ännu fler funktioner om
du har följande:
• Olika visningsspråk*
franska, italienska, nederländska, spanska,
portugisiska, svenska , polska, tjeckiska eller
turkiska.
• Extra CD/MD- enheter (både CD- växlare och
CD-spelare)*
• MDLP-uppspelni ng ( MiniDisc Long Play).
(endast MDX-M690)
• DAB-tuner (tillval).
• CD TEXT-information (visas när du spelar en
CD TEXT-skiva *
• Kontrolltillbehör som medföljer
Kortfjärrkontroll RM-X111
Trådlös Rotary Commander RM-X5S (CDXM770)
• Kontrolltillbehör (tillval)
Trådlös Rotary Commander RM-X5S (CDXM670, MDX-M690)
Trådlös Rotary Commander RM-X4S (CDXM670, MDX-M690)
*1 Alla angivelser och alternativ kanske inte kan visas
i det språk du väljer.
*2 Denna enhet fungerar bara tillsammans med andra
Sony-produkter.
*3 En CD TEXT-skiva är en ljud-CD som bl.a.
innehåller information om namnen på skivan,
artisten och de olika spåren. Uppgifterna är
inspelade på skivan.
2
.
3
).
1
: engelska, tyska,
Den här etiketten finner du på undersidan av
enhetens chassi.
CAUTION INVISIBLE
VIEW DIRECTLY WITH OPTICAL INSTRUMENTS
LASER RADIATIONWHEN OPEN
DO NOT STARE INTO BEAM OR
Den här etiketten finner du på enheten s i nterna
chassi.
2
Page 83

Innehållsförteckning
Kontrollernas placering. . . . . . . . . . . . . . . . . 4
Säkerhetsföreskrifter . . . . . . . . . . . . . . . . . . . 6
Råd om CD-skivor. . . . . . . . . . . . . . . . . . . . . 7
Råd om MD-skivor . . . . . . . . . . . . . . . . . . . . 8
Komma igång
Återställa enheten . . . . . . . . . . . . . . . . . . . . . 9
Ta bort huvuddisplayen. . . . . . . . . . . . . . . . . 9
Ställa klockan . . . . . . . . . . . . . . . . . . . . . . . 10
CD/MD
Spela en skiva . . . . . . . . . . . . . . . . . . . . . . . 11
Displayalternativ . . . . . . . . . . . . . . . . . . . . . 12
Spela spår upprepade gånger
— Repeat Play . . . . . . . . . . . . . . . . . . . . 12
Spela spår i slumpvis ordningsföljd
— Shuffle Play . . . . . . . . . . . . . . . . . . . . 12
Namnge en CD
— Disc Memo*. . . . . . . . . . . . . . . . . . . . 13
Söka skivor efter namn
— List-up* . . . . . . . . . . . . . . . . . . . . . . . 14
Välja att spela upp vissa spår
— Bank*. . . . . . . . . . . . . . . . . . . . . . . . . 14
* Functions available with optional CD/MD unit
Radio
Lagra stationer automatiskt
— BTM (Best Tuning Memory). . . . . . . 15
Ta emot lagrade stationer . . . . . . . . . . . . . . 16
Lagra endast önskade stationer . . . . . . . . . . 16
Ta in en station från en lista
— List-up . . . . . . . . . . . . . . . . . . . . . . . . 17
RDS
Översikt av RDS . . . . . . . . . . . . . . . . . . . . . 17
Automatisk sökning för bästa
mottagningsresultat
— AF-funktion . . . . . . . . . . . . . . . . . . . . 18
Ta emot trafikinformation
— TA/TP . . . . . . . . . . . . . . . . . . . . . . . . 19
Ställa in RDS-stationer med AF/TA-
inställning . . . . . . . . . . . . . . . . . . . . . . . . 19
Ta in stationer efter pr ogramtyp
— PTY . . . . . . . . . . . . . . . . . . . . . . . . . . 20
Ställa klockan autom at i skt
— CT . . . . . . . . . . . . . . . . . . . . . . . . . . . 21
DAB (tillval)
Översikt av DAB . . . . . . . . . . . . . . . . . . . . 21
DAB-grundfunktioner. . . . . . . . . . . . . . . . . 22
Ställa in DAB-tjänster automatiskt
— BTM . . . . . . . . . . . . . . . . . . . . . . . . . 23
Ställa in DAB-tjänster manuellt
— Preset Edit . . . . . . . . . . . . . . . . . . . . . 23
Ställa in DAB-program med hjälp
av en lista . . . . . . . . . . . . . . . . . . . . . . . . 24
Växla flerkanals audio och DRC . . . . . . . . 25
Söka efter en DA B -tjänst efter programtyp
(PTY) . . . . . . . . . . . . . . . . . . . . . . . . . . . 25
Finjustera för bästa ljud
Ställa in equalizer (EQ7). . . . . . . . . . . . . . . 26
Ställa in Soundstage-menyn
— Ställa in DSO (Dynamic Soundstage
Organizer) . . . . . . . . . . . . . . . . . . . . . . . 27
Lyssna på varje programkälla i dess
registrerade DSO
— SSM (Source Sound Memory) . . . . . 28
Justera tonkontrollerna . . . . . . . . . . . . . . . . 28
Välja lyssningsläge (endast CDX-M770). . 29
Justera balans
(BAL). . . . . . . . . . . . . . . . . . . . . . . . . . . 29
Justera bas
(endast CDX-M670, MDX-M690) . . . . 29
Justera diskant
(endast CDX-M670, MDX-M690) . . . . 30
Justera balans (FAD)
(endast CDX-M670, MDX-M690) . . . . 30
Justera volym för främre och bakre högtalare
(endast CDX-M770). . . . . . . . . . . . . . . . 30
Justera volymen för subwoofer(s). . . . . . . . 31
Andra alternativ som kan justeras
(endast CDX-M670, MDX-M690) . . . . 31
Andra funktioner
Använda fjärrkontrollen Rotary
Commander . . . . . . . . . . . . . . . . . . . . . . 32
Snabbdämpa ljudet . . . . . . . . . . . . . . . . . . . 33
Välja Spectrum Analyzer . . . . . . . . . . . . . . 33
Ändra inställningarna för ljud och disp l ay
— Meny . . . . . . . . . . . . . . . . . . . . . . . . . 34
Namnge en Motion Display . . . . . . . . . . . . 35
Ansluta extra ljudutrustning
(endast CDX-M770). . . . . . . . . . . . . . . . 35
Ytterligare information
Underhåll . . . . . . . . . . . . . . . . . . . . . . . . . . 36
Ta ut enheten. . . . . . . . . . . . . . . . . . . . . . . . 37
Tekniska data . . . . . . . . . . . . . . . . . . . . . . . 38
Felsökning. . . . . . . . . . . . . . . . . . . . . . . . . . 39
Felindikationer/Meddelanden . . . . . . . . . . . 40
3
Page 84
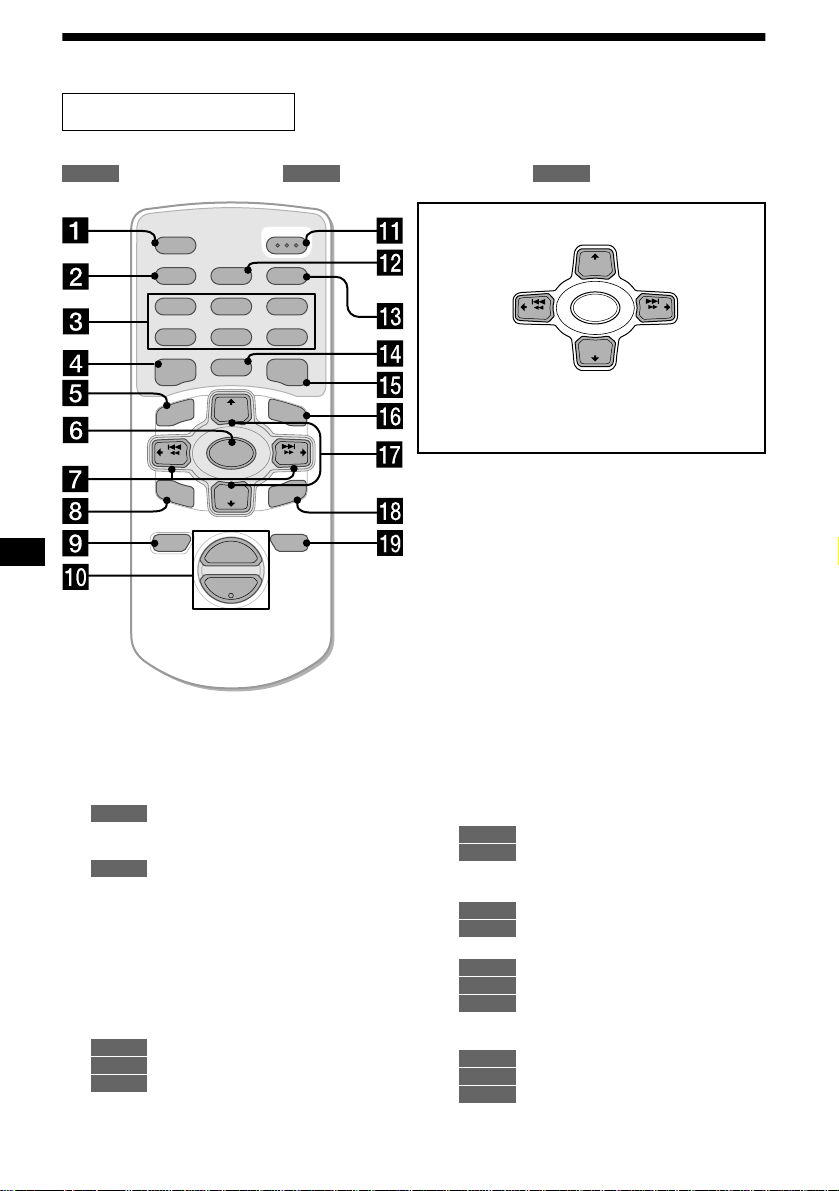
Kontrollernas placering
Fjärrkontrollen RM-X111
Se angivna sidor för mer i nformation.
: Under uppspelning : Under radio m ot t agning : Under menyläget
CD/MD
RADIO MENU
AF
2
5
MODE
+
DISC
SOURCE
–
DISC
+
VOL
OPEN/CLOSE
TA
3
6
LIST
+
SEEK
ENTER
ATTOFF
SCRL
PTY
DSPL
REP SHUF
1
4
EQ7 DSO
MENU
–
SEEK
SOUND
–
a SCRL-knapp (bläddra) 12
b DSPL/PTY-knapp (ändra
visningsläge/programtyp) 12, 13, 17,
20, 25, 35
c Nummerknappar
CD/MD
(1) REP 12
(2) SHUF 12
RADIO
15, 16, 18, 19, 22, 24
d EQ7-knapp 26
e MENU-knapp 10, 13, 14, 15, 19, 21, 23,
25, 26, 27, 28, 30, 31, 33, 34, 35
f SOURCE-knapp (På/Radio/CD/MD)
10, 11, 13, 15, 16, 19, 22, 26, 27, 29, 30,
31, 33, 35
g </, SEEK +/–
-knapparna 10, 28,
29, 30, 31
11
CD/MD
16, 18, 22
RADIO
10, 13, 14, 15, 21, 23, 25, 26,
MENU
27, 28, 30, 31, 33, 34, 35
h SOUND-knapp 28, 29, 30, 31
4
M (DISC)
(+): om du vill välja uppåt
< (SEEK)
(–): o m du vil l
välja åt
vänster/
.
I menyläget visas de knappar som går att välja för
dessa fyra alternativ med ett “ v” i displayen.
Obs!
Om du stänger av enheten genom att hålla knappen
(OFF) intryckt under 2 sekunder, går den int e att
styra med fjärrkontrollen s åvida du inte trycker på
(SOURCE) på enheten, eller aktiverar den genom att
mata in en skiva.
Tips!
Information om hur du byter batterier finns i “Byta
litiumbatterier” (sid 36) .
SEEK
(–): om vill välja nedåt
–
m (DISC)
+
DISC
SOURCE
–
DISC
+
SEEK
, (SEEK)
(+): om du vill
välja åt
höger/>
i OFF-knapp (Stopp/Av) 11, 35
j VOL +/ –
-knapparna 19
k OPEN/CLOSE-knapp 11, 37
l AF-knapp 18, 19
m TA - kna pp 19
n MODE-knapp
CD/MD
11, 13
RADIO
15, 16, 19, 22
o DSO-knapp 27
p LIST-knapp
CD/MD
13, 14
RADIO
q M/m DISC +/–
17, 24
-knapparna
11, 14
CD/MD
16, 17, 20, 22, 23, 24, 25
RADIO
10, 13, 14, 15, 19, 21, 23, 25,
MENU
26, 27, 28, 30, 31, 33, 34, 35
r ENTER-knapp
CD/MD
14
RADIO
17, 20, 23, 24, 25
MENU
10, 13, 14, 15, 19, 21, 23, 25,
26, 27, 30, 31, 33, 34, 35
s ATT-knapp 33
Page 85
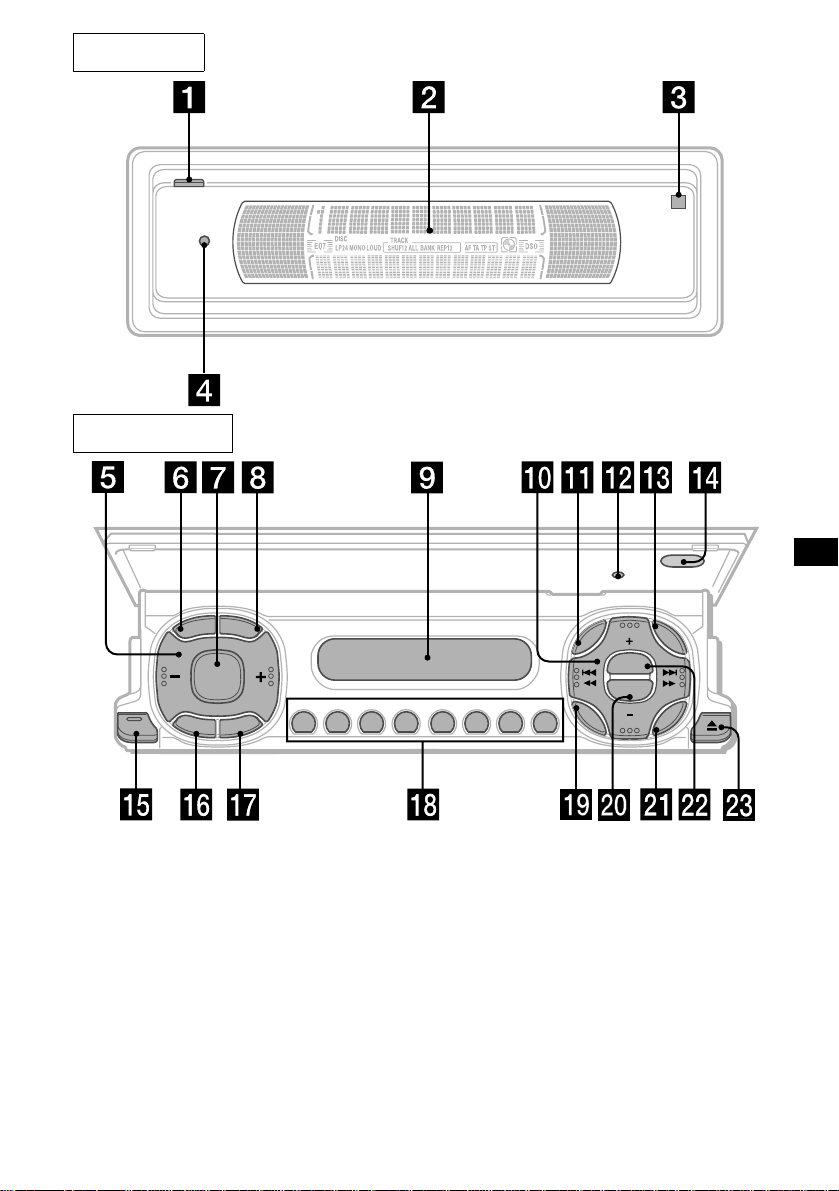
Huvudpanel
Operationssida
R
C
S
SOURCE
O
CLOSE
F
RESET
D
S
P
L
P
L
T
Y
E
D
O
F
M
REP SHUF
AF TA
123456
MENU
SOUND
DISC
DSO
EQ7
DISC
LIST
ENTER
Enhetens knappar styr samma funktioner
som motsvarande knappar på
fjärrkontrollen.
a OPEN-knapp 9, 11, 37
b Huvuddisplay
c qf Mottagare för fjärrkontrollen
d qs Reset-knapp 9
e Volymknappar
f SCRL-kn app (bläddra)
g SOURCE-knapp
h DSPL/PTY-knapp (ändra
visningsläge/programtyp)
i Underdisplay
j DISC +/–
-knapparna (markör upp/ned)
SEEK –/+-knapparna (markör vänster/
höger)
CDX-M770/CDX-M670
/MDX-M690
k MENU-knapp
m LIST-knapp
o CLOSE-knapp (stäng frontpanel) 9,
11
p OFF-knapp (Stopp/Av)*
q MODE-knapp
r Nummerknappar
s SOUND-knapp
t EQ7-knapp
u ENTER-knapp
v DSO-knapp
w Z-knapparn a (u tmatningsknapp) 11
fortsätt till nästa sida t
5
Page 86

* Tänk på följande om du instal lerar enhe ten
i en bil som inte har ACC-läge (tillbehör) i
tändningslåset:
När du stänger av tändningen ska du hålla
strömbrytaren nedtryckt under 2 sekunder så
att klockan försvinner från displayen.
Om klockan inte stängs av kan batteriet ladda s
ur.
Frontpanelens positioner.
Denna enhet har 3 olika lägen för frontpanelen.
• Huvuddisplayläge
enhet
• Borttagningsläge
enhet
• Underdisplayläge
enhet
Säkerhetsföreskrifter
• Om bilen har stått i direkt solsken ska du l åta
enheten svalna innan den tas i bruk.
• El-antenner skjuts ut automatisk t när enheten
slås på.
Om du har några frågor, eller om några problem
kvarstår sedan du har gått igeno m
bruksanvisningen, kontak t ar du närmaste Sonyåterförsäljare.
Fuktbildning
Vid regn, eller om det är mycket fuktigt, kan
imma uppstå på insidan av enhetens linser och
display. Om detta inträffar fungerar in t e enheten
tillfredsställande. Ta då ut skivan och vänta en
timme tills imman har försvunnit.
Så här bibehåller du hög ljudkvalitet
Var noga med att inte spilla drycker av olika slag
på enheten eller skivorna.
Så här undviker du att den trådlösa
Rotary Commander RM-X5S ramlar av
(medföljer endast CDX-M770)
Om den trådlösa fjärrkontrollen ramlar av kan
den vålla en olycka.
• Använd den med följande remmen när du
installerar din Rotary Commander i närheten av
ratten.
• Kontrollera att remmen inte fa st nar någonstans
i bilens instrument (växelspaken, kopplingen ,
etc.).
• Kontrollera att du dra r åt spännet på remmen
när du har hängt upp den, etc.
6
Page 87

Råd om CD-skivor
• Undvik att ta på skivans spelyta. Håll skivan i
kanterna.
• Förvara skivorna i fodralen eller i skivmagasin
när de inte spelas.
Utsätt inte skivorna för höga temperaturer.
Lämna inte skivorna i parker ad e bil ar elle r
ovanpå bilens instrumentpanel.
Råd om CD-R/CD-RW-skivor
• Du kan spela CD-R - skivor (inspelningsbara
CD-skivor) avsedda för audiob ruk på denna
enhet.
Försäkra dig om att skivorna är märkta på
följande sätt.
Denna märkning innebär att en skiva inte är
avsedd för ljudbr uk.
• Sätt inte på etikett er och an vänd inte skivo r som
har rester av pa pper eller tusch. Sådana skivor
kan sluta snur ra när de används, orsaka andra
fel eller förstöras.
• Specialformade skivor (t ex hjärtformade,
fyrkantiga eller stjärnformade skivor) går inte
att spela på denna enhet. Om du försöker spela
sådana skivor kan enheten skadas. Använd
därför inte sådana skivor.
• Det går inte att spela CD-skivor med måttet
8 cm (3 tum).
• Torka av skivan med en rengöringsduk innan
du spelar den. Torka från skivans centrum och
ut mot kanten. Använd inte lösningsmedel som
tvättbensin, thinner, i handeln förekommande
rengöringsmedel eller a ntistatspray avsedd för
vinylskivor.
• Vissa CD-R-skivor (beroend e p å utrustningen
som använts vid inspel ningen eller skivans
skick) går inte att spel a på denna enhet.
• Det går inte att spela en CD-R-skiva som inte är
slutbehandlad*.
* En inspelad CD-R-skiva måste vara slutbehandlad
(“finalized”) på CD-brännaren innan den kan
spelas på andra CD-spelare.
• Du kan spela CD-RW-skivor (återanvändbara
CD-skivor) avsedda för ljudbruk på denna
enhet.
7
Page 88

Råd om MD-skivor
• Öppna inte kassettens lock så att MDskivan exponeras. Stäng omedelbart
locket om det öppnas.
• Vidrör aldrig skivans inneryta.
• Utsätt inte skivorna för höga temperaturer.
Lämna inte skivorna i parkerade bilar eller
ovanpå bilens instrumentpanel.
Råd om etiketter
För att undvika att MD-skivor fastnar i enheten:
– Sätt fast etike tten på passande plats.
– Ta bort gamla etikette r i nnan du sätter på nya.
– Byt ut etiketter som börja r gå sönder.
Rengöring
Rengör regelbundet kasset t ens yta med en mjuk,
torr duk.
8
Page 89
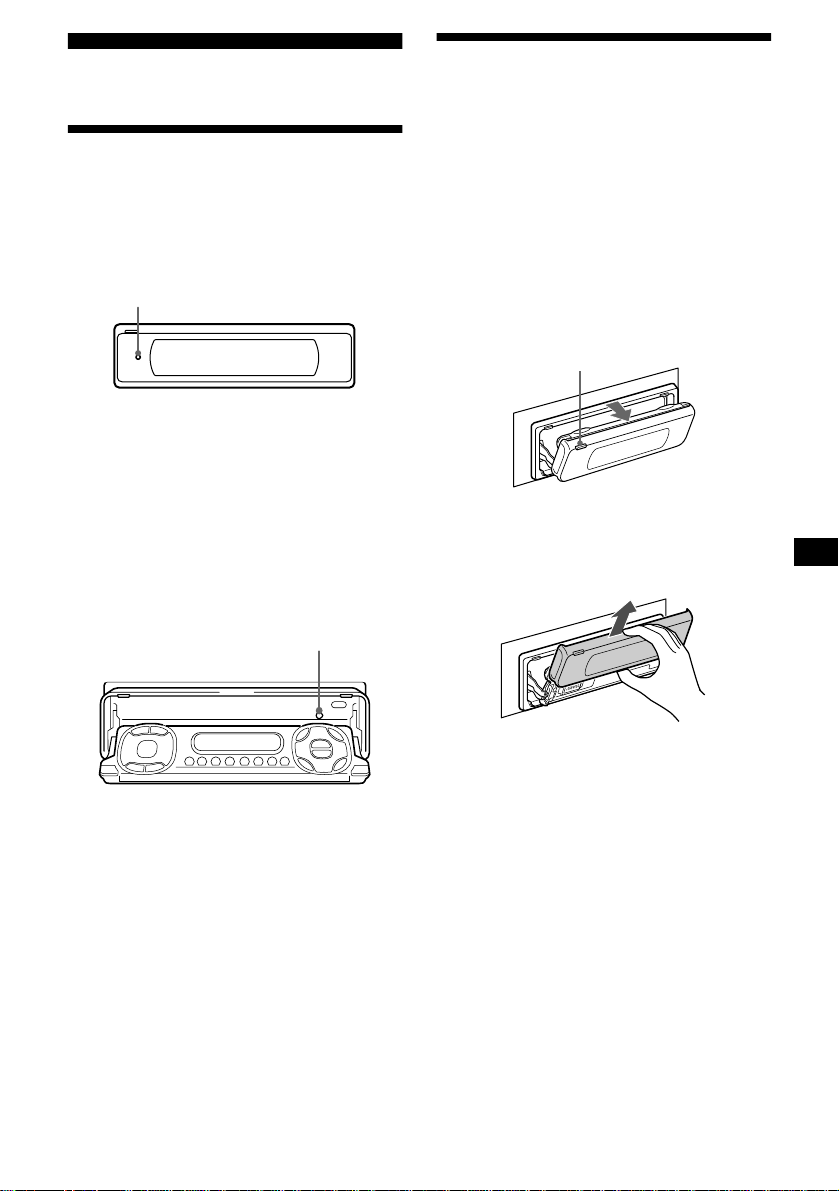
Komma igång
Ta bort huvuddisplayen
Du kan ta bort huvuddisplayen från enheten så
att enheten inte blir stulen.
Återställa enheten
Innan du an vänder enheten första gången, eller
efter att du kopplar ifrån bilbatteriet eller ändrar
kopplingar, måste du återställa den.
Tryck på Reset-knappen med ett spetsigt
föremål, t ex en kulspetspen na.
Reset-knapp
Obs!
• När du har återställt enheten i stängd position måste
du trycka på (OPEN) en gång innan du fortsätter.
Om det finns en skiva i enheten matas den ut
automatiskt. Stoppa in skivan igen.
• När du trycker på Reset raderas klockans inställning
och viss lagrad information.
Återställa enheten i underdisplayläge
Tryck på Reset-knappen br edvid skivöppningen
med ett spetsigt föremål, t ex en kulspetspenna.
Reset-knapp
Varningslarm
Om du ställer tändningslåset i läget OFF utan att
ta bort frontpanelen pi per varningslarmet i några
sekunder.
1 Tryck på (OPEN) på enheten i
2 sekunder .
CD/MD-uppspe ln in g el l er radiomottagning
stoppas och frontpanelen går ut i en vinnkel
på 30°.
(OPEN)
2 Ta bort huvuddisplayen enligt
exemplet.
När du har tagit bort huvuddisplayen stängs
frontpanelen automatiskt.
Obs!
• Om du tar bort huvuddisplayen medan enheten är
påslagen stängs strömmen av automatiskt för att
undvika att högtalarna skadas.
• Huvuddisplayen får inte utsättas för tryck eller stötar.
• Utsätt inte huvuddisplayen för höga temperaturer
eller fukt. Lämna den inte i parkerade bilar eller
ovanpå bilens instrumentpanel.
Tips!
• Om du vill ta loss huvudfönstret när frontpanelen är i
läget för sidodisplayen, trycker du på (CLOSE)
under 2 sekunder. Om en skiva är halvvägs insatt,
tar du först bort den eller sätter in den ordentligt.
• När du tar med dig huvuddisplayen ska du använda
medföljande förvaringslåda.
fortsätt till nästa sida t
9
Page 90

Sätta fast huvuddisplaye n
Placera huvuddisplayen på framsidan av enheten
som i bilden, och tryck sedan försiktigt in
frontpanelen tills den klickar.
Tryck på (SOURCE) (eller stoppa in en skiva)
för att börja använda enheten.
Obs!
Lägg inte något på huvuddisplayens inneryta.
Ställa klockan
Klockan har 24-timmars digita l indikering.
Exempel: Så här ställer du klockan ti ll 10:08
1 Tryck på (MENU), och sedan på M eller
m ((+/–) på (DISC)) upprepade gånger
tills “Clock” visas.
1Tryck på (ENTER).
Timindikatorn blinkar i di splayen.
2Tryck på M eller m för att ställa in
timmen.
3Tryck på , ((+ ) på (SEEK)).
Minutindikatorn blinkar i displayen.
4Tryck på M or m för att ställa in
minuter.
2 Tryck på (ENTER).
10
Klockan star tas. När inställningen är utförd
återgår displayen till normalt spelläge.
Tips!
• Du kan ställa klockan automatiskt med RDSfunktionen (sid 21).
• När D.Info-läget är aktiverat visas tiden alltid (sid
34).
Page 91

CD/MD
CDX-M770/M670:
Förutom att du kan spela CD-skivor med denna
enhet kan du också st yr a ex te rna CD/MDenheter.
MDX-M690:
Förutom att du kan spela MD-skivor med denna
enhet kan du också st yr a ex te rna CD/MDenheter.
Obs!
Om du ansluter en annan CD-enhet med CD TEXTfuntionen visas CD TEXT-informationen när du spelar
en CD TEXT-skiva.
Om du vill... ...trycker du på
Stoppa
uppspelning
Ta ut sk ivan (OPEN/CLOSE), or
Hoppa över spår
– Automatic
Music Sensor
Snabbspola fr am åt
eller bakåt
– Manuell sökning
Obs!
• När skivans sista spår har spelats, spelas skivan om
från början.
• När en tillvalsenhet är ansluten går uppspelningen
av samma källa över till denna CD/MD-enhet.
(OFF)
(OPEN) sedan Z
</, (SEEK) (
[en gång för varje spår]
</, (SEEK) (
[håll till önskad punkt]
./>)
m/M)
Spela en skiva
(Med denna enhet)
1 Tryck på (OPEN/CLOSE) eller (OPEN)
på enheten och stoppa in skivan (med
etiketten uppåt).
Uppspelningen startas automatiskt.
CDX-M770/M670:
MDX-M690:
2 Tryck på (OPEN/CLOSE) eller (CLOSE)
på enheten för att stänga
frontpanelen.
(Med tillvalsenhet)
1 Tryck på (SOURCE) upprepade gång er
om du vill välja CD eller MD.
2 Tryck på (MODE) upprepade gånger
tills den önskade enheten visas.
Uppspelningen startar.
Om du vill... ...trycker du på
Hoppa över skivor
– Skivsortiment
M/m (DISC) (+/–)
Om det redan ligger en skiva i enheten trycker du
på (SOURCE) upprepade gånger tills CD eller
MD visas för att st arta uppspelningen.
11
Page 92

Displayalternativ
När skiva/ sp år ändras kan vilken förinspelad titel
som helst*
automatiskt visas (om funktionen Auto Scroll är
aktiverad visas namn med fler än 9 tecken (sid
34)).
Information som kan
visas i displayen
• Musikkälla
• Klocka
1
på den nya skivan eller det nya spåret
Skivnu
mmer
Spårnu
mmer
Uppspelnings
tid
Spela spår upprepade gånger
— Repeat Play
Ett spår på skivan eller hela skivan spelas igen.
Du kan välja mellan:
• Repeat 1 — om du vill spela om ett spår.
• Repeat 2* — om du vill spela om hela skivan.
* Fungerar endast om en eller flera valfria CD/MD-
enheter är anslutna.
Tr yck upprepade gånger på (1) (REP)
under uppspelningen tills den
önskade inställningen visas i
displayen.
Repeat Play startar.
När du vill återgå till normal upps pelning väljer
du “Repeat off”.
MDLP-display
(endast MDX-M690)
LP2: LP2-
uppspelning
LP4: LP4-
uppspelning
Om du vill... ...trycker du på
Växla
Information som
kan visas i
displayen
• Skivans
namn*
artistens
namn*
• Spårets titel*
(DSPL/PTY)
1
/
2
1
visningsalternativ
Växla
(SCRL)
visningsalternativ
*1 När du trycker på (DSPL/PTY) anger “NO D.Name”
eller “NO T.Name” att det inte finns Disc Memo (sid
13) eller förinspelat namn att visa.
*2 Endast för CD TEXT-skivor med artistens namn.
Obs!
• Vissa tecken kan inte visas.
• För vissa CD TEXT-skivor med många tecken visas
ingen information.
• Den här enheten kan inte visa artistens namn för
vart och ett av spåren på en CD TEXT-skiva.
Tips!
När Auto Scroll är inaktiverat och skiv/spår-namnet är
ändrat, visas inte namnet.
Spela spår i slumpvis ordningsföljd
— Shuffle Play
Du kan välja:
• Shuf 1 — om du vill spela skivans spår i
slumpmässig ordningsföljd.
• Shuf 2*
• Shuf All*
*1 Fungerar endast om en eller flera valfria CD- eller
*2 Fungerar endast om en eller flera valfria CD-
När du vill återgå till normal upps pelning väljer
du “Shuf off”.
Obs!
Shuf All blandar inte spår mellan en CD-enhet och en
MD-enhet.
1
enhetens sp år i slumpmässig ordningsföljd.
— om du vill spela CD- el ler MD-
2
— om du vill spela alla spår i
samtliga inkopplade enheter i slumpmässig
ordningsföljd.
MD-enheter är anslutna.
enheter, eller om två eller fler valfria MD-enheter är
anslutna (CDX-M770/M670).
Fungerar endast om en eller flera valfria MDenheter, eller om två eller fler v a lf ri a CD- e nhe te r är
anslutna (MDX-M690).
Tr yck upprepade gånger på
(2) (SHUF) under uppspelningen tills
den önskade inställningen visas i
displayen.
Shuffle Play startar.
12
Page 93

Namnge en CD
— Disc Memo (För en CD-enhet med funktionen CUSTOM FILE)
Du kan ge varje skiva ett eget namn (Di sc
Memo). Du kan skriva in upp till 8 tecken för en
skiva. Om du namnger en skiva kan du söka efter
den på namnet (sid 14).
1 Börja spela en skiva som du vill
namnge på en CD-enhet som har
funktionen CUSTOM FILE.
2 Tryck på (MENU) och tryck sedan på M
eller m upprepade gånger tills “Name
Edit” visas .
3 Tryck på (ENTER).
Skivan spelas om under namngivningen.
4 Ange tecknen.
1
1 Tryck på M*
att välja önskat tecken.
A t B t C ... t 0 t 1 t 2 ... t +
t – t
*1 För motsatt riktning, tryck på x.
*2 (mellanslag)
2 Tryck på , när du har hittat önsk at
tecken.
Om du trycker på < ((–) på (SEEK)) kan
du flytta bakåt till vänster.
3 Om du vill skriva in hela namnet
upprepar du steg 1 och 2.
5 Tryck på (ENTER) om du vill återgå till
normal uppspelning.
upprepade gånger för
... t *2 t A
*
Tips!
• Skriv över eller ange “” om du vill rätta till eller
radera ett namn.
• Det fi nns ett ann at sätt att starta namngivningen av
en CD: Tryck på (LIST) under 2 sekunder istället för
att utföra steg 2 och 3. Du kan även slutföra
namngivningen genom att trycka på (LIST) under
2 sekunder istället för att utföra steg 5.
• Du kan namnge CD-skivor på en enhet som inte har
funktionen CUSTOM FILE om enheten är ansluten
tillsammans med en CD-enhet som har denna
funktion. Disc Memo lagras i minnet i den CD-enhet
som har funktionen CUSTOM FILE.
Obs!
Repeat/shuffle fungerar inte förrän Name Edit är
utfört.
Visa Disc Memo
Disc Memo är ett visningsalternativ i displayen
och har därmed företräde framför all CD TEXTinformation.
Om du vill... ...trycker du på
Visa (DSPL/PTY) under
Tips!
Gå till sid 12 om du vill veta mer om visningsalternativ
i displayen.
uppspelni ng av CD/CD
TEXT-skivor
Radera Disc Memo
1 Tryck på (SOURCE) upprepade gång er
om du vill välja CD.
2 Tryck på (MODE) upprepade gånger
om du vill välja den CD-enhet som
lagrar Disc Memo.
3 Tryck på (MENU) och sedan på M eller
m upprepade gånger tills “Name Del”
visas.
4 Tryck på (ENTER).
De namn som är lagrade visas.
5 Tryck på M eller m upprepade gånger
för att välja skivnamnet som du vill
radera.
De namn som är lagrade visas.
6 Håll knappen(ENTER) intryckt under
2 sekunder.
Namnet rade ras.
Upprepa ste g 5 och 6 om du vill rade ra andra
namn.
7 Tryck på (ENTER).
Enheten återgår då till normal uppspe lning.
Obs!
• När Disc Memo för en CD TEXT-skiva har raderats
visas den ursprungliga CD TEXT -informationen.
• Om du inte kan hitta det Disc Memo du vi ll radera
kan du välja en annan CD-enhet i steg 2.
13
Page 94
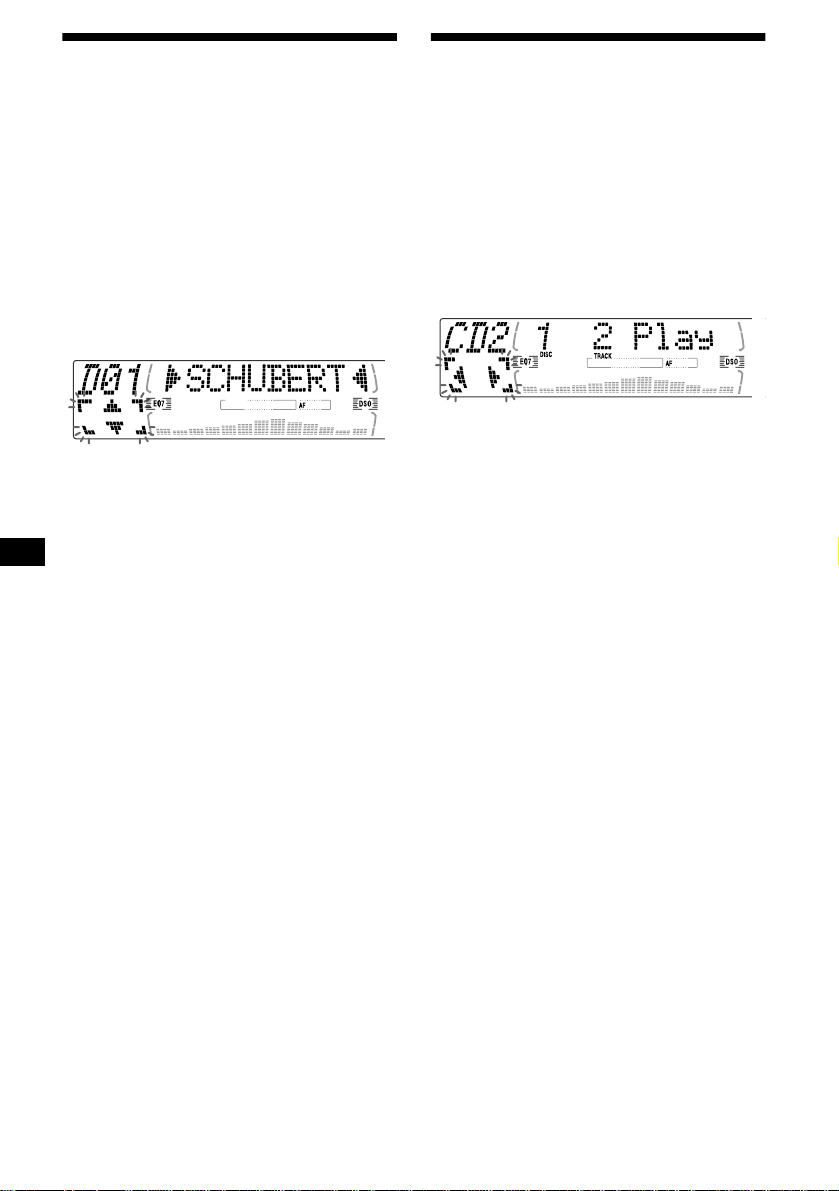
Söka skivor efter namn
— List-up (För en CD-enhet med funktionen CD TEXT/CUSTOM FILE eller en MD-enh et)
Den här funktionen kan du använda för skivor
som du har namngivit*
2
skivor.*
*1 Söka efter skivor på namnet: När du namnger en
CD (sid 13) eller en MD.
*2 Söka efter skivor på CD TEXT-informationen: När
du spelar en CD TEXT-skiva på en CD-enhet som
har funktionen CD TEXT.
1 Tryck på (LIST).
Det angivna namnet visas i displayen.
2 Tryck på M eller m upprepade gånger
tills du hittar önskad skiva.
3 Tryck på (ENTER) när du vil l sp el a
skivan.
Obs!
Vissa bokstäver kan inte visas (undantag: Disc
Memo).
1
eller för CD TEXT-
Välja att spela upp vissa spår
— Bank (För en CD-enhet med funktionen CUSTOM FILE)
Om du namnger s kivan kan d u st älla in enheten
så att den spelar de spår du vill höra.
1 Börja spela skivan du vill namnge.
2 Tryck på (MENU) och tryck sedan på M
eller m upprepade gånger tills “Bank
Sel” visas.
3 Tryck på (ENTER).
4 Namnge spåren.
1Tryck upprepade gånger på < eller
, för att få fram det spår som du
vill namnge.
2Tryck på (ENTER) upprepade
gånger om du vill välja “Play” eller
“Skip”.
5 Upprepa steg 4 om du vill ställa in
“Play” eller “Skip” för alla spår.
6 Tryck på (ENTER).
Enheten återgår då till normal uppspelnin g.
Obs!
• Du kan ställa in “Play” och “Skip” för upp till 24 spår.
• Det går inte att ställa in “Skip” för alla spår på en CD.
14
Page 95

Spela utvalda spår
Du kan välja:
• Bank on — om du vill spela spåren med
inställningen “Play”.
• Bank inv (Inverse) — om du vill spela spåren
med inställningen “Skip”.
1 Under uppspelning, tryck på (MENU)
och sedan på M eller m upprepade
gånger tills “Bank on”, “Bank inv”
eller “Bank off” visas.
2 Tryck på , upprepade gånger tills
den önskade inställningen visas.
Radio
Radioenheten kan lagra upp till 6 stationer per
band (FM1, FM2, FM3, MW och LW).
Varning
Använd dig av BTM (Best Tuning Memory)
under körning för att undvika olyckor.
Lagra stationer automatiskt
— BTM (Best Tuning Memory)
Radioenheten väljer ut de stationer som har
starkast signal inom valt band och lagrar dem
efter frekvens .
3 Tryck på (ENTER).
Uppspelninge n st artar efter det pågående
spåret.
När du vill återgå till normal uppspelning väljer
du “Bank off” i steg 2.
1 Tryck på (SOURCE) upprepade gång er
för att välja radio.
2 Tryck på (MODE) upprepade gånger
om du vill välja band.
3 Tryck på (MENU) och sedan på M eller
m upprepade gånger tills “BTM ” visas.
4 Tryck på (ENTER).
När inställningen är lagrad hörs ett pip.
Obs!
• Om svaga signaler medger att endast ett fåtal
stationer kan tas emot, behåller vissa.
nummerknappar sina ursprungliga inställningar.
• När ett numm er anges i disp layen börjar
radioenheten lagra stationer från det nummer som
för tillfället visas.
15
Page 96

Ta emot lagrade st ati one r
1 Tryck på (SOURCE) upprepade gånger
för att välja radio.
2 Tryck på (MODE) upprepade gånge r
om du vill välja band.
3 Tryck på nummerknappen ((1) till (6))
där den önskade statio nen är lagrad.
Tips!
Tryck på M or m när du vill ta emot stationerna i den
ordning de är lagrade i minnet (Funktionen Preset
Search).
Om den förinställda inställningen inte
fungerar
Tryck på någon av sidorna av (SEEK)
när du vill söka efter stationen
(automati sk inställning).
Sökningen avbryts när radioenheten hittar en
station. Fortsätt tills den önskade stationen
hittas.
Tips!
• Gå till Local Seek för att begränsa sökningen till
stationer med starkare signaler om den automatiska
inställningen stannar för ofta (se “Ändra
inställningarna för ljud och display” på sid 34).
• Om du känner till frekvensen på den station som du
vill lyssna på ska du hålla någon av sidorna på
(SEEK) intryckt för att hitta den ungefärliga
frekvensen och sedan trycka på (SEEK) upprepade
gånger för att fininställa den önskade frekvensen
(manuell inställning).
Lagra endast önskade stationer
Du kan ställa in önskade stationer manuellt på
alla valda nummerknappar.
1 Tryck på (SOURCE) upprepade gånger
för att välja radio.
2 Tryck på (MODE) upprepade gånger
om du vill välja band.
3 Tryck upprepade gånger på någon av
sidorna av (SEEK) för att ställa in
stationen du vill lagra.
4 Håll önskad nummerknapp ( (1) till
(6)) intryckt under 2 sekunder tills
MEM visas.
Nummerknappe n vi sas i displayen.
Obs!
Om du försöker lagra en annan station på samma
nummerknapp raderas den tidigare lagrade stationen.
Om FM-stereomottagningen är dålig
Välj monomottagning
(se “Ändra inställningarna för ljud och
display” på sid 34).
Ljudet förbättras men återges i mono (“ST”
försvinner).
16
Page 97

Ta in en station från en lista
— List-up
1 Håll knappen (LIST) intryckt en kort
stund under radiomottagning.
Frekvensen eller namnet på stationen som
tagits in blinkar.
RDS
Översikt av RDS
FM-stationer med tjänsten RDS (Radio Data
System) sänder ohörbar digital information
tillsammans med den regu ljära
radioprogram signalen. Exempelvis k om m er
något av följande att visas när en station med
RDS tas in.
2 Tryck på M eller m upprepade gånger
tills du hittar önskad station.
Om den valda stationen inte har namngivits,
visas frekvensen i displayen.
3 Tryck på (ENTER) när du vill ta in
önskad station.
Informatio n som kan
visas i displaye n
• Radioband
• Klocka
Förinställ
t nummer
* se “Ta in stationer efter programtyp” på sid 20.
Om du vill... ...trycker du på
Växla
visningsalternativ
Information som ka n
visas i displayen*
• Stationsnamn
• Programtyp
Frekvens
(DSPL/PTY)
RDS-tjänster
RDS-informationen ger dig också tillgång till
bl.a:
• Automatisk sökning av kanaler - praktiskt
under långa bilfärder. — AF t sid 18
• Ta emot trafikmeddelanden, även när du
lyssnar på andra pr ogram/källor. — TA t sid
19
• Välja station efter typen av program den
sänder. — PTY t sid 20
• Automatisk inställning av klockan. — CT t
sid 21
Obs!
• Vissa av RDS-tjänste r n a fi nns inte i alla länder.
• RDS fungerar inte om signalstyrkan är för dålig eller
om den inställda stationen inte har RDS-tjänster.
17
Page 98

Automatisk sökning för bästa mottagningsresultat
— AF-funktion
Funktionen AF (Alternative Frequencies) gör att
radion hela tiden tar in den starkaste signalen för
stationen du lyssnar på.
Frekvenserna änd r as au to ma tis kt.
Stationer som saknar alternativa
frekvenser
Tryck på någon sida av (SEEK) medan
stationsnamnet blinka r ( ino m 8
sekunder).
Radion börjar då söka efter en annan frekvens
med samma PI-information (PI –
Programidentifikation ) (“PI Seek” visas).
Om radion inte hittar samma PI, återgår den
till den senast valda frekvens en.
98,5 MHz
Station
96,0 MHz
102,5 MHz
1 Välja en FM-station (s i d 1 5).
2 Tryck på (AF) upprepade gång e r tills
“AF
on” visas.
Radion börjar då söka efter en alternativ
frekvens med starkare signal i samma
sändarnät.
Om NO AF börjar blinka finns ingen
alternativ frekvens för stationen.
Obs!
Om det inte finns alternativa frekvenser, eller om du
inte behöver söka efter någon, stänger du av AFfunktionen genom att välja “AF
off”.
Lyssna på en och samma
regionalkanal
När AF-funkt io nen är på: Fabriksinställningen
för radion gör att mottagningen begränsas till en
specifik region.
Radion tar då inte in någon annan regionalstation
med starkare si gnal.
När du lämnar region al s tationens
sändningsområde, eller om du vill utnyttj a hela
AF-funktione n, ska du välja “REG off” på
menyn (sid 34).
Obs!
Funktionen går inte att använda i Storbritannien och i
vissa andra områden.
Funktionen Local Link
(Endast i Storbritannien)
Funktionen gör att d u kan välja andra lokala
stationer i området även om de inte är lagrade på
dina nummerknappar.
1 Tryck på en nummerknapp ((1) till
(6)) som har en lokal st at ion lagr ad.
2 Tryck på nummerknappen med
lokalstationen igen inom 5 sekunder.
3 Fortsätt tills den önskade
lokalstationen hittas.
18
Page 99

Ta emot trafikinformation
— TA/TP
Genom att aktive ra TA (Tra ffic Announcement)
och TP (Traffic Programme) kan du automatiskt
ställa in en FM-station som sänder
trafikmeddelanden. Dessa inställningar fungerar
oberoende av vilken FM-ka nal / källa eller CD/
MD-enhet som du lyssnar p å. Efter
trafikmeddelandet återgår enheten till käl la n du
lyssnar på.
Tryck p å (TA) upprepade gånger till s
“TA
on” visas.
Enheten börjar nu söka efter stationer m ed
trafikinformation.
TP indikerar mottagning av sådana stationer,
medan TA blinkar under ett
trafikmeddelande. Så länge NO TP indikeras
fortsätter enheten att söka ef t er stationer med
TP.
Om du inte vill ha trafikinformation väljer du
“TA
off”.
Om du vill... ...trycker du på
Avbryta pågående
meddelande
Tips!
Du kan också avbryta pågående meddelanden genom
att trycka på (SOURCE) eller (MODE).
Ställa in volymen för
trafikmeddelanden
Du kan ställa in volymnivån för
trafikm eddelanden så att du inte riskerar att
missa dem.
1 Tryck på (VOL) för att just era volymen.
2 Håll knappen (TA) intryckt under
2 sekunder.
TA visas och inställningen lagras.
(TA)
Ställa in RDS-stationer med AF/TA-inställning
När du ställer in RDS-stationer lagras varje
stations AF/TA-inställning (on/off) och fre kvens
på enheten. Du kan välja olika inställning (för
AF, TA, eller båda) för individuellt förinställda
stationer, eller samma inställning för alla
förinställda stationer. Om du ställer in stationer
med “AF on” lagras automatiskt de stationer som
ger starkast radiosignal.
Ange samma inställning för alla
stationer
1 Välja ett FM-band (sid 15).
2 Tryck på (AF) oc h/eller (TA) för att
välja “AF
Observera a t t när du väljer “AF on” eller “TA
off” lagras både stationer som har RDS och
stationer som saknar RDS.
3 Tryck på (MENU) och sedan på M eller
m upprepade gånger tills “BTM ” visas.
4 Tryck på (ENTER) tills “BTM” blinkar.
Ange olika inställningar för varje
station
1 Välj ett FM-band och ta in önskad
station (sid 16).
2 Tryck på (AF) oc h/eller (TA) för att
välja “AF
3 Håll önskad nummerknapp ((1) till
(6)) intryckt tills MEM visas.
Upprepa från steg 1 när du ska ställa in andra
stationer.
on” och/eller “TA on”.
on” och/eller “TA on”.
Ta emot brådskande meddelanden
Om det kommer ett brådskande meddelande när
du lyssnar på en FM-station eller CD/MD och
inte har AF eller TA på, växlar enheten till
brådskande meddelande.
19
Page 100

Ta in stationer efter programtyp
— PTY
Du kan ta in en station genom att välja den t yp a v
program du vill lyssn a på.
Programtyper Display
Nyheter News
Aktuella frågor Affairs
Information Info
Sport Sport
Utbildning Educate
Drama Drama
Kultur Culture
Vetenskap Science
Blandat Varied
Populärmusik Pop M
Rockmusik Rock M
Lättlyssnat Easy M
Lättlyssnat klassiskt Light M
Klassiskt Classics
Andra typer av musik Other M
Väder Weather
Ekonomi Finance
Barnprogram Children
Sociala frågor Social A
Religion Religion
Ring till programmet Phone In
Resor Travel
Fritid Leisure
Jazz Jazz
Countrymusik Country
Lokal musik Nation M
Gamla godingar Oldies
Folkmusik Folk M
Dokumentärer Document
1 Tryck på (DSPL/PTY) under FM-
mottagning tills PTY visas.
Om stationen sänder PTY-information visas
den aktuella program t ypens namn.
Om den mottagna stationen inte har RDS
eller om R D S -informationen inte tas emot,
visas “--------” i displayen.
2 Tryck på M eller m upprepade gånger
tills önskad programtyp visas.
Programtyp erna visas i den ordning de står i
tabellen.
Om programtypen in te är specificerad i RDSinformationen, visas “--------” i displayen.
3 Tryck på (ENTER).
Enheten börjar nu söka efter en station som
sänder den valda programtypen.
Obs!
Funktionen kan inte användas i länder där PTY
(Programme Type) saknas.
20
 Loading...