

Page 1

SONY
3-758-436-21 (1)
Compact Disc Changer System
CDX-65RF
Operating Instructions page 2
Before operatin>; the unit, please read this manual thoroughly and
retain it for future reference.
Owner's Record
The model and serial numbers are located at the rear of the CD changer
unit.
Record the serial number in the space provided below. Refer to these
numbers whenever you call upon your Sony dealer regarding this
product.
Model No. CDX-65RF Serial No.
Mode d'emploi
Avant la mise en service de cet appareil, prière de lire attentivement c
mode d'emploi que l’on conservera pour toute référence ultérieure.
For installation and connections, see the supplied installation/
connections manual.
Pour l'installation et les connexions, consultez le manuel
d'installation ! < onnexions fourni.
____
_______
pag« 28
OIGmU. AUDIO
© 1994 by Sony Corporation
Page 2
|^Englisi|^
WARNING
This equipment has been tested and found to
comply with the limits for a Class B digital
device, pursuant to Part 15 of theFCC Rules.
These limits are designed to provide reastmable
protection against harmful interference in a
residential installation. This equipment
generates, uses, and can radiate radio frequency
energy and, if not installed and used in
accordartce with the instructions, may cause
harmful interference to radio communications.
However, there is no guarantee that
interference will not occur in a particular
installation. If this equipment does cause
harmful interference to radio or television
reception, which can be determined by turning
the equipment off and on, the user is
encouraged to try to correct the interference by
one or more of the following measures:
— Reorient or relocate the receiving antenna.
— Increase the separation between the
equipment and receiver.
— Connect the equipment into an outlet on a
circuit different from that to which the
receiver is connected.
— Consult the dealer or an experienced
radio/TV technician for help.
You are cautioned that any changes or
modifications not expressly approved in this
manual could void your authority to operate
this equipment-
The shielded interface cable recommended j
in this manual must be used with this
equipment in order to comply with the !
limits for a digital device pursuant to '
Subpart B of Part 15 of FCC Rules.
Features
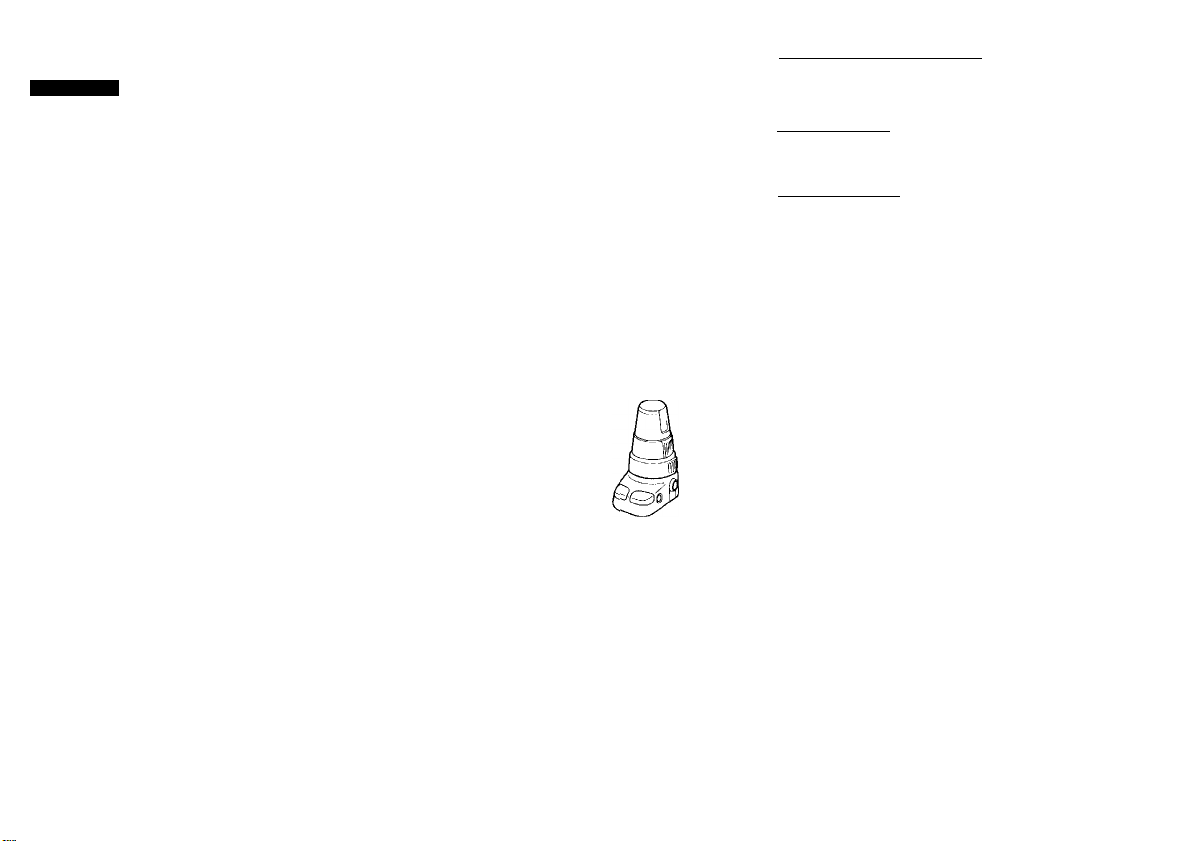
The CDX-65RF is a compact disc changer
system comprised of the display unit, the
hideaway (modulator) unit and the CD changer
unit. The hideaway unit modulates the audio
signal from the CD changer unit into the RF
(Radio Frequency) signal at 88.3 MHz,
88.7 MHz, 89.7 Ml Iz or 89,9 MHz so that it can
be received by the existing FM tuner of yt)ur car
audio. Therefore you will be able to enjoy CD
play with your car audio even if it has no input
terminals tor a compact disc player.
i
• Compact and space saving CD changer unit
for vertical, horizontal or suspended
installation in your car,
• Supplied remote commander enables you to
control the CD changer unit installed in the
trunk room of your car.
• Several optional CD changers can be
connected and controlled by the use of the
Sony source selector (not supplied).
• Intro scan function for playing the first 10
seconds of each track on every disc.
• Repeat play function for playing a track, a
disc or a changer repeatedly.
• Shuffle play function for playing tracks in
random order
• Custom file function for putting and
displaying the title of each disc, and setting
the PLAY/SKIP mode on each track.
• Switchable two color illumination (amber
and green).
• Provided with a digital 12'hour ciock.
• The optional rotary commander designed for
on-the-move control which enables you to
operate the system more easily.
Table of Contents
Precautions
........................................................
Location and Function of Controls................... h
Initial Settings
CD Changer Operation
Preparations..................................................... 12
Listening to the CD Play ................................. 1.3
Playing in Other Modes................................... 1.3
CD Custom File Function
Displaying the Title of Each Disc
Playing Selected Tracks on a Disc
Setting the CliK'k.............................................. 23
Maintenance..................................................... 24
Specifications................................................... 2.5
Troubleshooting Guide
...................................................
__________________
________________
— Disc Memo Function............................... 18
— Bank Function
..........................................
.....................................
4
ID
21
26
CAUTION
I he use of I'plical instruments with this
product will increase eve hazard.
Page 3
Precautions
• This system cannot be used with a car audio
without the facility to receive FM.
• Before operating the unit for the first time or
after replacing the car battery, press the reset
button on the display unit with a bail-point
pen etc., and then start operating the system.
• If your car was parked in direct sunlight
resulting in a considerable rise in temperature
inside the car, allow the system to cool off
before operating it.
• If no power is being supplied to the system,
check the connections first. If everything is in
order, check the fuse.
• Avoid installing the system in places:
— subject to temperatures exceeding 55®C
n.3!°F)
— subject to direct sunlight.
— near heal sources (such as heaters).
— exposed to rain or moisture.
— exposed to excessive dust or dirt.
— subject to excessive vibration.
• As the laser beam used in this compact disc
changer is harmful to the eyes, do not attempt
to disassemble the cabinet. Refer servicing to
qualified personnel only.
Moisture condensation
On a rainy day or in a very damp area,
moisture may condense on the lenses inside the
CD changer unit. Should this occur, the unit
will not operate properly. In this case, remove
the disc and wait for about an hour until the
moisture has evaporated.
If you have any questions or problems
concerning your system that are not covered in
this manual, please a)nsult your nearest Sonv
dealer,
_________________
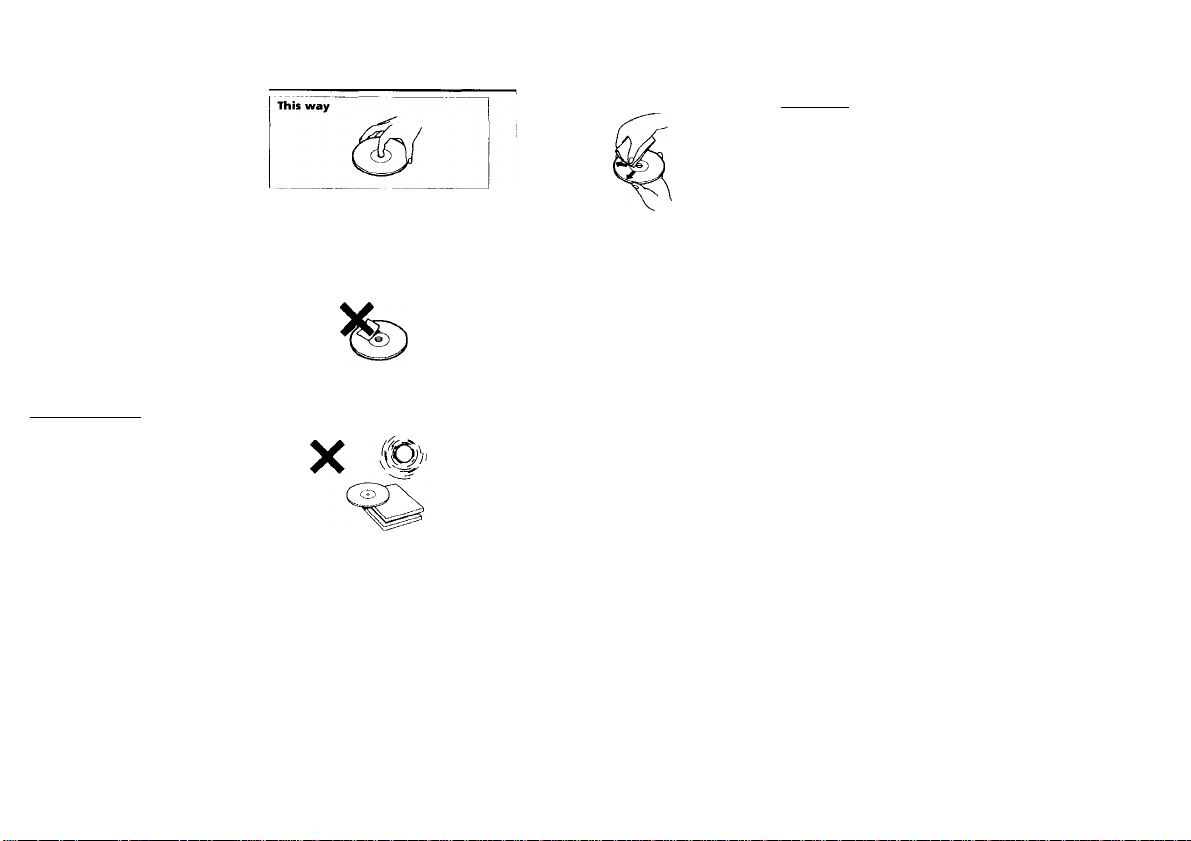
Notes on Compact Discs
A dirty or defective disc may cause sound
drop-outs in playing. To enjoy optimum
sound, handle the disc as follows.
Handle the disc by its edge, and to keep the
disc clean, do not touch the surface.
Not this way
Do not stick paper or tape on the labeled
surface.
Not this way
Do not expose the discs to direct sunlight or
heat soiirces such as hot air-ducts, or leave
them in a car parked in direct sunlight where
there can be a amsiderable rise in the
temperature inside the car.
This way
Before playing, clean the discs with an optional
cleaning cloth. Wipe each disc from the center
of the disc outward.
Do not use solvents such as benzine, thinner,
commercially available cleaners or antistatic
spray intended for analog discs.
Notes on the Disc Magazine
• Do not leave the disc magazine in locations
• I“)!) not insert more than (*ne disc at a time int(’
• Do not drop the disc magazine or subject it to
_________
with high-temperalure.s and high-lumiidity,
such as on a dashboard or by the rear window
where Ihe disc inaga/ino will be subjected tc'
direct sunlight.
a slot, otherwise the changer and the discs
may be damaged.
a violent shock.
Page 4
Location and Function of Controls
[Display Unit
tHtti ■
4vi_d-c
il
B
] s a i, j’ '
Refer to the pages in # for details-
[T] CD (CD Changer number) indication 9
[2] BANK (bank function) indication ®
[3] INTRO (intro scan) indication
S] REP (repeat play) indication ®
[5] SHUF (shuffle play) indication O
d] POWER switch
Press to turn on and off the system.
(T] (Uumination color select switch (rear)
For changing the color of the display
illumination (amber and green).
\amo\ IflB’l Igiftfl
5f TiTcl
_< i_ u J
!çf!
[8] DISC (disc number) indication ®
[H TRACK (track number) indication <{)
IjS Elapsed playing time indication (|l
ill] Reset button
Press this button with a ball-point pen etc.
when the operation buttons fail to function,
m Infrared receptor for the remote
commander
PO rER
m
LlJ
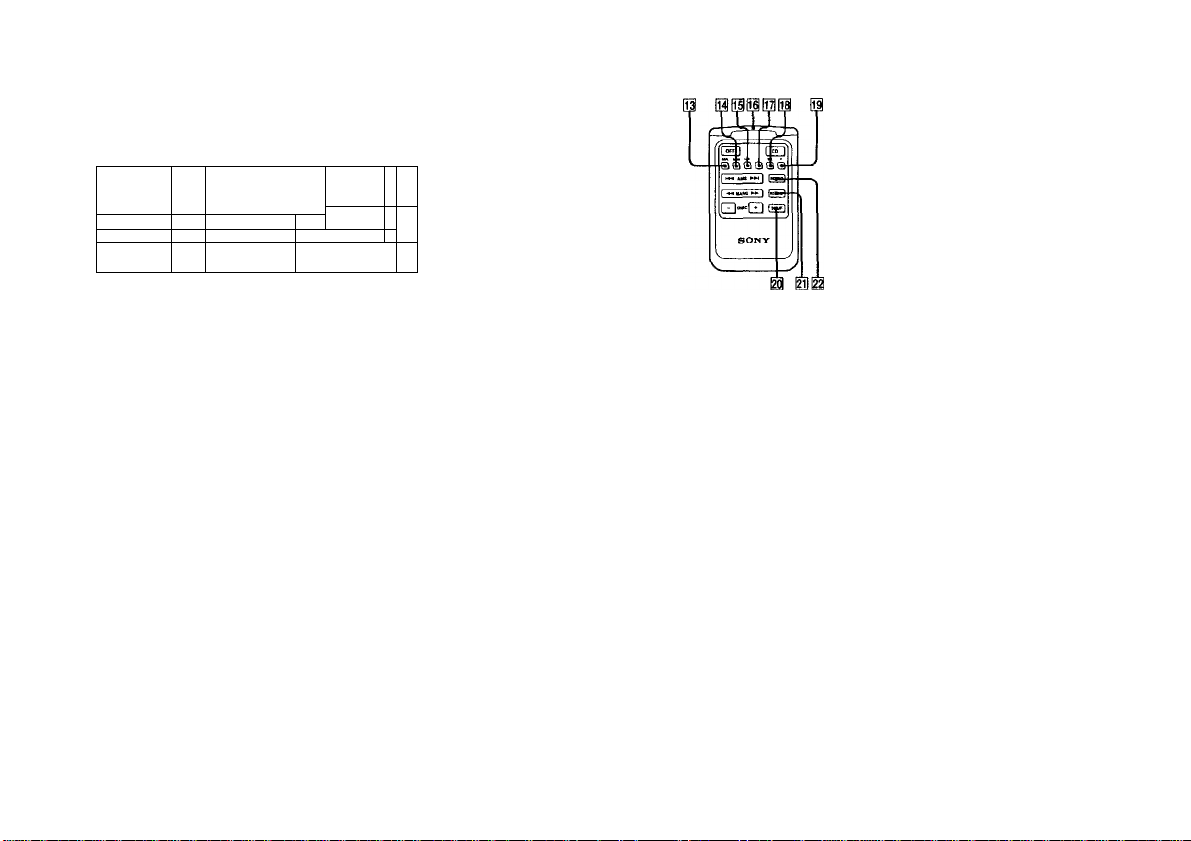
Remote Commander
IS
IDSPL (display mode change/time set)
button ®
Each time the button is pressed during CD
play, the display mode changes cyclically as
follows;
Disc number, track number and
elapsed playing time
I
Disc title*
Clock
* It is necessary to put titles onto the discs in
advance. See page IH for details.
If the title of a disc is not registered, "
will come on the display window- ¡ind the .syslcio
will enter the elapsed playing linn- display modi'
[i^ BANK (bank function) button ®
li| LIST (custom file mode select) button (D®
01 Infrared emitter
0- (control mode select/custom file
character select) button
01SEL (control mode set/character set)
button Odid)
01 + (control mode select/custom file
character select) button Qd)
^ SHUF (shuffle play) button dl
^ REPEAT (repeat play) button (H
m INTRO (intro scan) button O
.........
"
Page 5
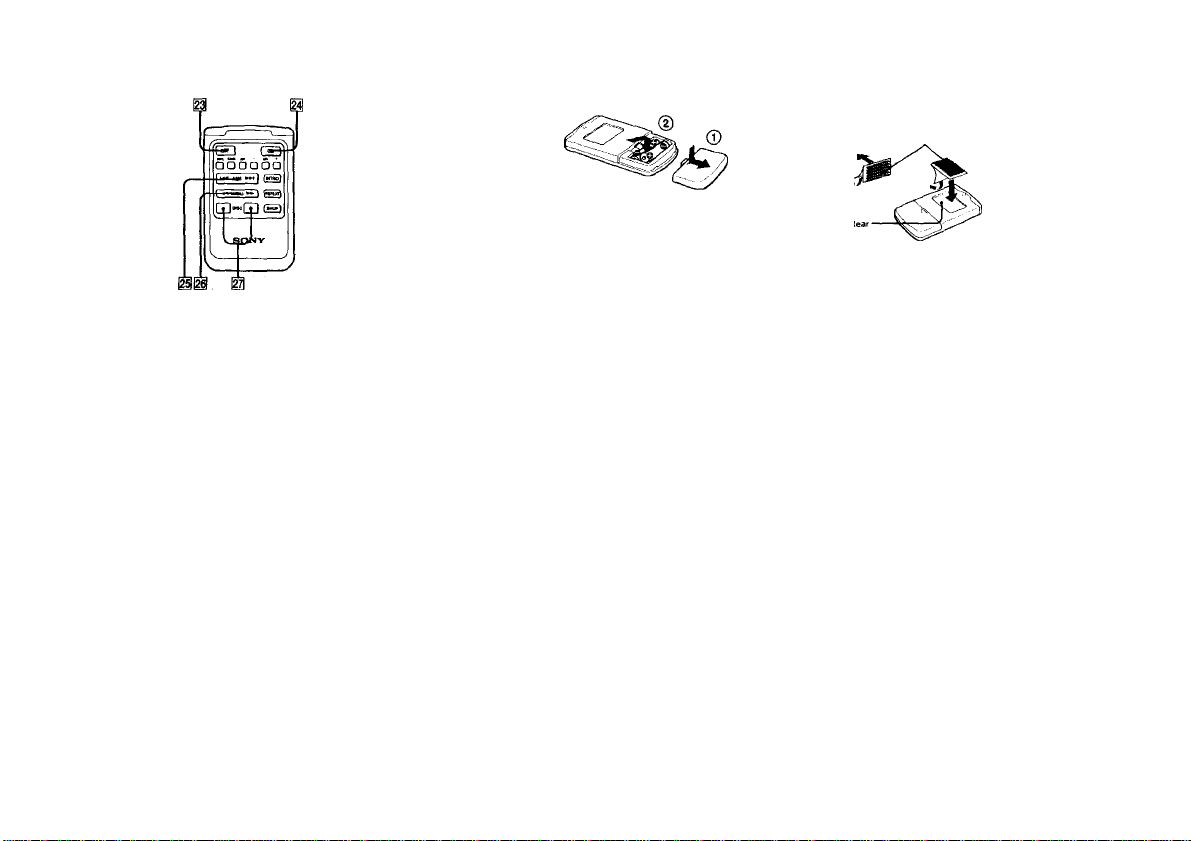
Location and Function of Controls
OFF button
^ CD (CD play/CD changer select) button
ee
When iwo or more CD changers are
connected, press this button to select a
desired CD changer. Every time you press
the button, the CD changer number on the
display unit will change.
AMS (automatic music sensor) button
Press either side of the button once during
CD play to search the beginning of a track
(AMS function).
►W side: To locale the beginning of the next
track
side- To locate the beginning of the
currently playing track
If you keep (he button pressed, the
beginnings of either the succeeding or the
previous (racks will be IcKated. However, if
the K'ginning or the end of the dis<- is
reached, you will not be able to go any
further.
IMANU (manual search) button
Press and hold either side of the button
during CD play to search a desired point of
a track►► side: To fast forward
side: To fast reverse
The elapsed playing time of the track will be
displayed on the display unit during the
manual search
S -D1SC+ (disc select) buttons
Press either the - or + button during CD
play to search a desired disc quickly.
- button; To search the previous disc
number
+ button: To search the succeeding disc
number
You can search a desired disc by displaying
the titles of the discs registered with the
custom file function. See page 18 for details.
Installing the Batteries
Two si2e AA (R6) batteries
Battery life
When the batteries become weak, you will not
be able to operate the unit with the remote
commander. Battery life is approx, .six months
although it depends on the way of use.
Notes on batteries
To avoid damage from battery leakage and
subsequent corrosion:
— insert the batteries by matching the + and -
on the batteries to the + and - in the battery
compartment
— do not use an old battery with a new one, or
different types of batteries together
— remove the batteries when y<>u do not u.se
the unit for a long period of time
— do not charge the batteries.
If any battery leakage occurs, replace the
batteries with new ones after cleaning the
battery compartment.
Installing the Remote Commander
to the place you
wish to install
Install the remote commander with velcro
tape in a desired place.
Notes
• Ui> not Install or leave the remote comm.iiuier in ,i
location near any heat s^^vlrces, or in a place subjer
direct sunlight (cspcci.illv on (ho dashboard in
summer etc.).
• When you park your car iti ditiii sunlight, dotai h
the remote commaiKtei aivi place it in a loialion
where it will not Ih' siib|eck-d (o direct sunlight su
as the glove-tx'x.
•ttefore installing the i
check whether you c,
from the place when
comm.Mnler.
• Clean the .surface belore aitai hing the
Page 6

Initial Settings
POWER SELECT Switch
The display on Ihe display unit is factory-set to
come on when the ignition key of your car is
turned on. However, this setting may cause
some car battery wear if used in a car which has
no ACC (accessory) position on the ignition key
panel. To avoid battery wear when used in
such a car, set the TOWER SELECT switch
Iwated on the side of the hideaway unit to the
OFF position*.
When the ignition key is turned off, the display
on the display unit will go off as welt. When
you change the setting of the TOWER SELECT
switch, be sure to press the reset button on the
display unit.
• When the IX^WER SELECT switch is set to the OFF
position, you will not be able to start CD play with
the remote commander while the system is in the off
mode, that is to say when there is no display on the
display unit. Therefore press the POWER switch on
the display unit before operating the remote
commander.
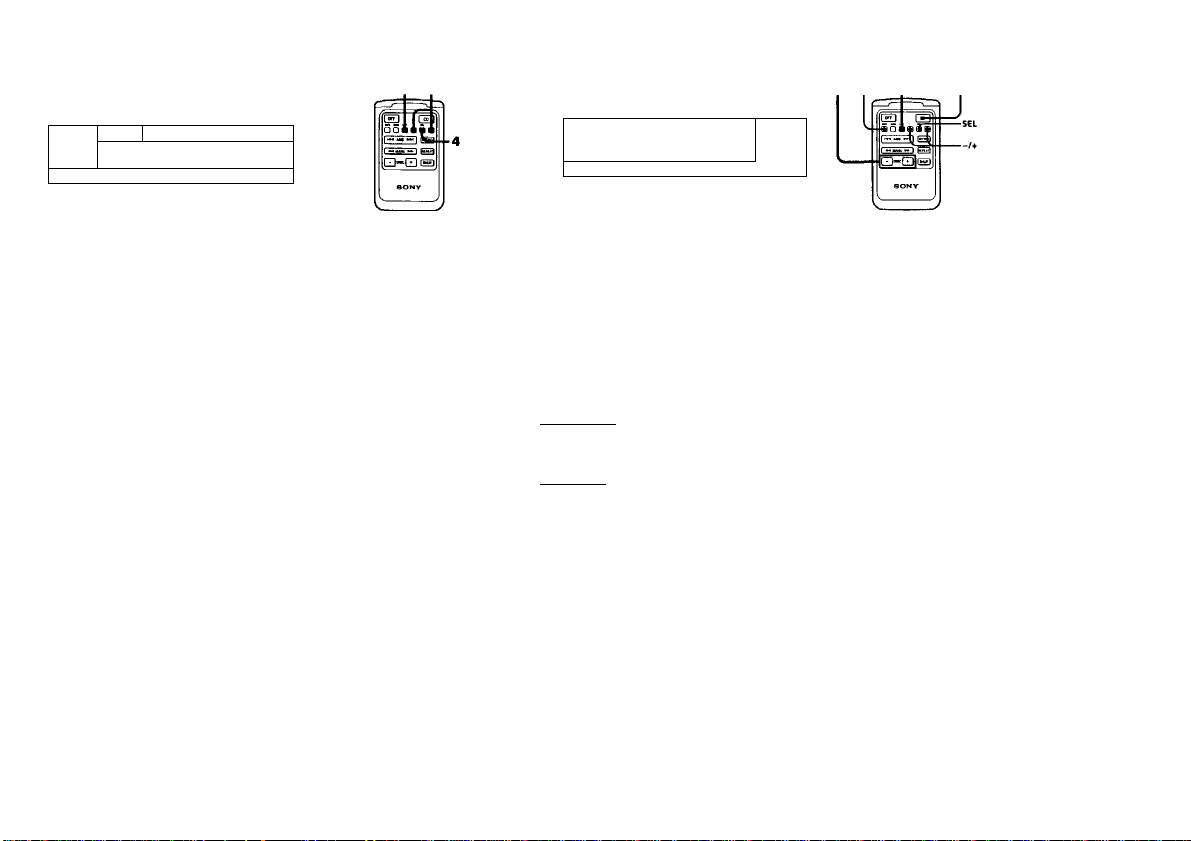
Changing the Ti-ansmitting
Frequency
You can select the frequency of the modulated
RF signal being transmitted from the hideaway
unit according to the level of interference noise.
1. Press the SEL button for approx. 2
seconds.
The system will enter the frequency selecting
mode. The initial setting is 88.3 MHz.
2. Press either the 6 or 6 button to select
the frequency.
At each pressing, the buttons will change the
frequency as follows;
Q : 88.3 MHz-»89.9 MHz-*89.7 MHz
-♦S8.7MH7 -*88.3 MHz
3. Press the SEL button again for approx. 2
seconds.
c to sot the froquor
wly selected frequt
Changing the Output Level
You can select the output level from the Cl)
changer unit. Normally the system is used in
the initial output level, change the level if
necessary.
1. Press the SEL button for approx. 2
seconds.
The system will enter the frequency selecting
mode
2. Press the SEL button again.
The system will enter the output level
selecting mode. The indication is as follows:
To decrease the output level
Initial setting
□ -► P'' -- U . .
To increase the output level
□ “*■ • • '■
3. Press the SEL button once again for
approx. 2 seconds.
10
11
Page 7

Preparations
Note
To listen to an 8 cm CD, use the
separately sold Sony CD
adaptor CSA-8. Be sure to
always use the specified
adaptor, as failing to do so may
cause a malfunction of the unit.
If you use any other adaptor, the
unit may not operate properly.
When usitrg the Sony CD
adaptor, make sure that three
catches on the adaptor are firmly
latched onto the 8 cm CD.
Listening to the CD Play
Use the unit with the door closed
Oihi’rwisf, fiirt'ign m.iltor niav ooUt fhi.' unit, and r
lt^'■ide the changve
I2
Note
If the disc magazine is not
locked into place properly inside
the CD changer unit, remove the
magazine. Press the EJECT
button first, then insert the
magazine into the CD changer
unit again.
Note
When a disc magazine is
inset ted into the Cl) changei or
the n-M'S Unlion ol tlu- 1 i.mie. led
car .nidio IS pressed, tin' system
will be autonialiially .utiv.ited
and read the information ol the
CDs. When the information of
all tile CDs in the disc magazine
h.is bs'On road, the unit will
.uilomaticallv stop the
opera
Turn on the FM tuner of your car audio and select
the frequency from 88.3 MHz, 88.7 MHz. 89.7 MHz
or 89.9 MHz whichever has been selected by the
procedure described in "Changing the Transmitting
Frequency" (page 11). See the operation manual of
your car audio about the FM tuning as weii.
Press either the POWER switch on the display unit or
the CP button* on the remote commander. The CD
play will start.
POWER
□ orCïD
Adj'ust the volume with the volume control on the
car audio.
•If the I’OWER SELECT switch on the hideaway unit jssel I
position and the display on the display unit is liiriK'si s'ff, v
able to start CD plav wdlh the remote eonimandi r In this i
I’OWER swifehoii the display unit.
If the system is in the norma!
playing mode, after the end ol a
disc, the disc with the next
number shown on the display
unit will automatically be
played. If two or more (.'!.)
changers are conneeted, alter the
end of the last disc jn the first
th.angCT, the lirst disc in the CD
changer with the next nuniK'r
shown will be played. I he
order of disc play c,an K'
rearranged by changing the
playing modes. See "I'laving in
Other Modi-s" (or details (p.ige
13
Page 8
Listening to the CD Piay
9 0
"^'5 i 3DS
G
Stopping CD Play
Press either the POWER switch on the display unit or the OFF
button on the remote commander.
To resume CD play, press the POWER switch on the display unit or
the CD button on the remote commander.
Notes
•When CD play is stopped, you may hear some noise trom the speakers To
prevent this from happening, turn the volume down before stopping CD
play.
•If you turn off the ignition of your car without stopping CD play, it will
automatically resume CD play from where it was stopped the i\ext time you
turn on the ignition.
Listening to the Radio
Press the POWER switch on the display unit or the OFF button on
the remote commander to stop CD play before tuning in a radio
station
Be sure to stop CD piay before you start listening to the radio.
Otherwise there may be some interference in the radio reception.
To restart CD play, .set the frcc|ueney of the FM tuner to the
frequency previously selected in "Changing the Transmitting
Frequency" (page 11) and press the POWER switch on the display
unit or the CD button on the remote commander.
Tape Piayback
Press the POWER switch on the display unit or the OFF button on
the remote commander to stop CD play before starting tape
playback.
lb restart CD play, turn on the FM tuner and set the FM frequency
to the one previou.sly scitvted in "Changing the Transmitting
Frequency" (page 11) and press the POWER switch (<n the display
unit or the CD button on the remt'te commander.
14
Playing in Other Modes
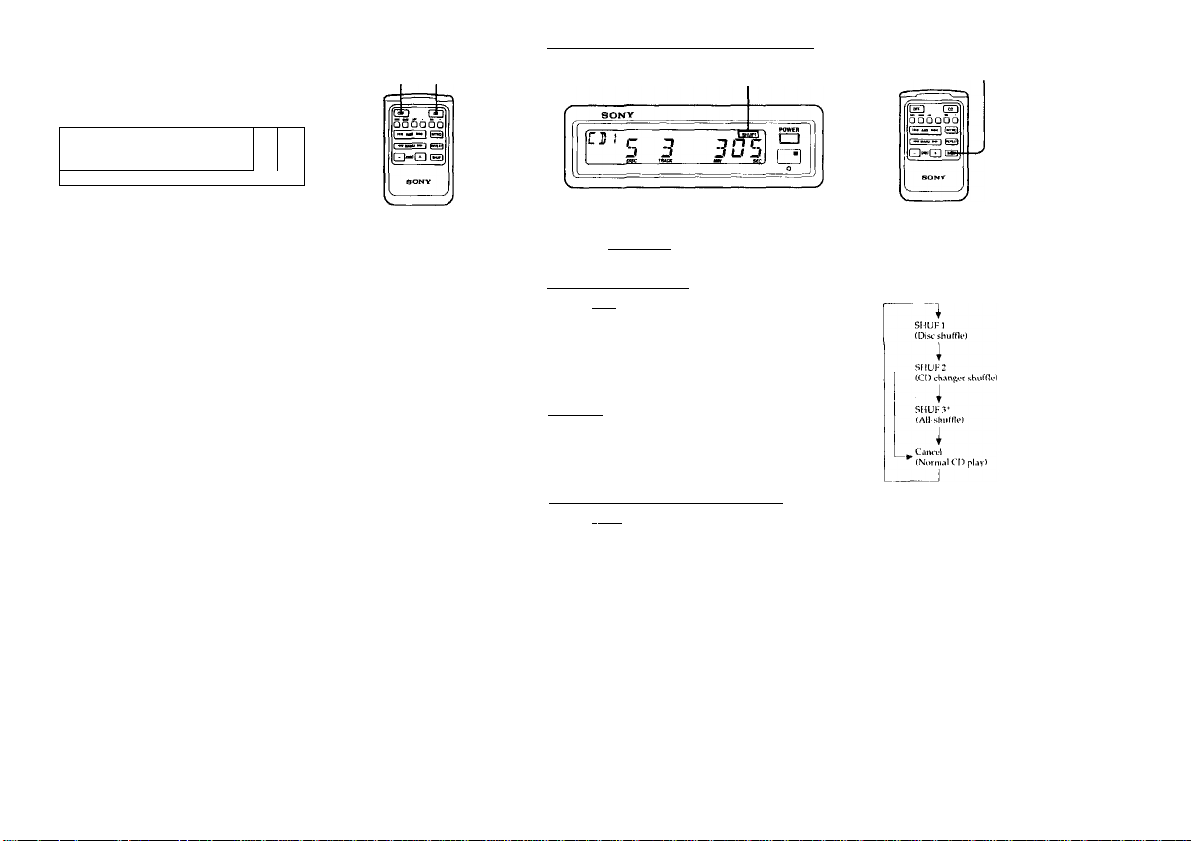
SHUF Indication
3
0
Playing the Discs Randomly
— Shuffle Play Functions______________________________
Th« function of th« SHUF
button changes cyclically as
folfovvs:
All-shuincplav
niiH.)«' lions only 1.011 Umi
oi motcili.ingc
connoc tod to Ih,
Whon link Olio ch.ingo ns
connixloil, iho ■
IIKlUiltlon will 1
disnl.ivod. Inthiso.iso . It VOll
l.iossilu’Slllil I'lllloli
u lull' Ilio '"'III.' 1 ?" ill'
i~ being displ.n
(SIU)l
rs .iro
.• syslor
■gliLT
uil bo
cd. Ibo
■1)
T
,l)',.llll
du’.l.on
sin,UK-
15
Nots
When this system is used with
your car audio, the reception of
the tuner may become slightly
worse than usual.
Playing the tracks on the currently selected disc
randomly — Pise shuffle play___________________________
Press the l*Hurl button to get the "SMUF 1" indication during CD
play.
When all the tracks on a disc have been played, the shuffle play will
move on to the next disc.
Playing every track on every disc in the currently
selected CD changer randomly — CD changer
shuffle play_________________________________________
Press the button to get the "SHUF 2" indication during CD
play.
Playing every track on every disc in all the CD
changers connected randomly — All shuffle play
(when two or more CD changers are connected)
I’ress the I »hufi button to get the "SHUF 3" indication during CD
play.
Page 9

Playing in Other Modes
r 71 • C
L il » ^
S J
INTRO indication
CËD ED
•eJ
H
n
er
u ^
OOOOQO
SONV
5 3
r T» « (k
“^305
3
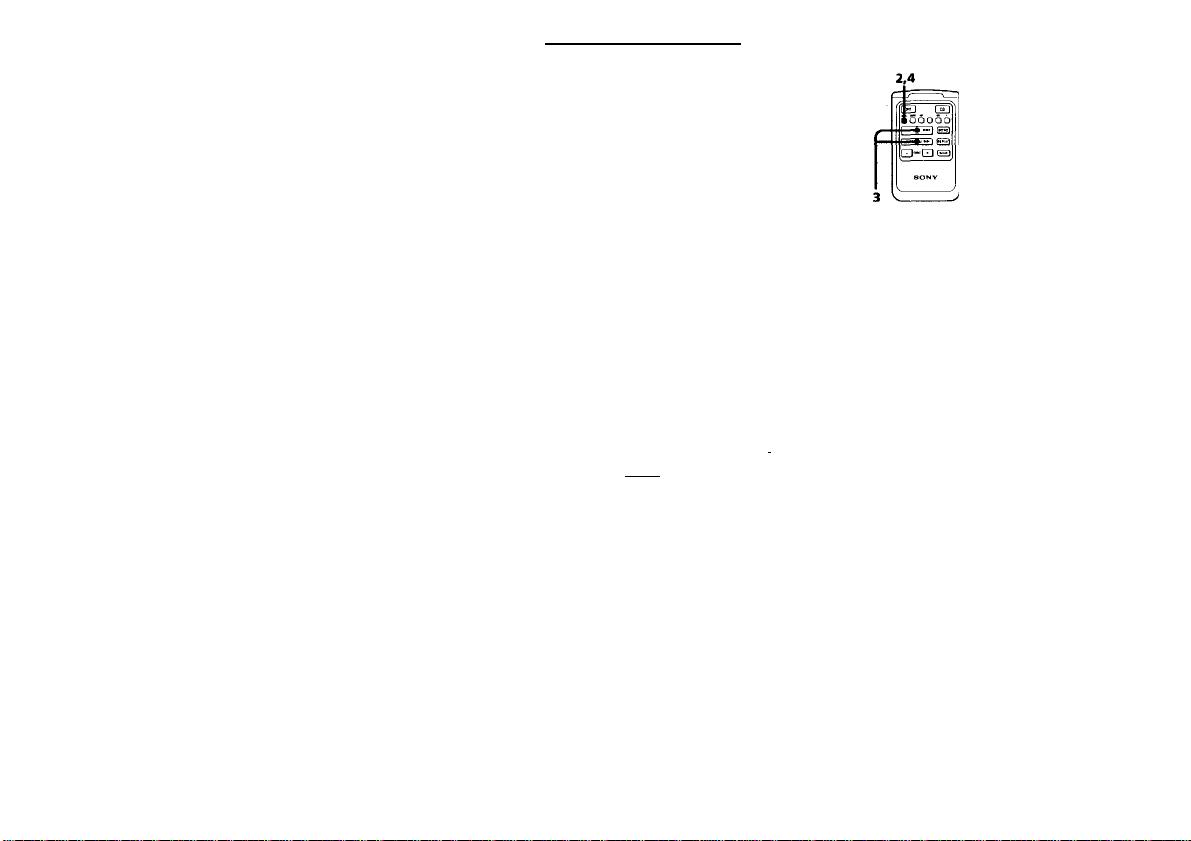
Playing a Disc Repeatedly
— Repeat Play Functions
Playing the currently selected track repeatedly
— Track repeat______________________________________
Press the button to gel the "REP 1 ” indication during CD play.
When the track is over, CD play will be repeated from the
beginning of that track.
Playing the currently selected disc repeatedly
— Disc repeat___________
Press the button to get the "REP 2" indication during CD play.
When the last track of the currently selected disc is over, CD play
will be repeated from the beginning of that disc.
Playing the discs in dte currently selected CD
changer repeatedly
— CD changer repeat (when two or more CD
changers are connectedJ
Press the button to get the "REP .1" indication during CD plav.
When the last disc of the currently selected CD changer is m er, CD
play will K‘ repeateti from the first disc in the currently selected CD
changer.
_________________________
16
________
Th« function of the REPEAT
button changes cyclically as
folionvs:
REP I
(Track repeat)
i
REP 2
(Disc repeat)
REP 3*
(CD changer repeat)
i
^ Cancel
(Normal CD play)
J
•CD changer repeat (REP 3)
mode functions onlv when tw
or more changers arc
connected to the unit. When
only one changer is.onnecled
tire -REI- T- indic.ilion will n.
K- displayed In this case, it
you pres-, the RKI'liA I hutinii
.igain while fhe Rl.l’ 2"
indication is being displayed,
the repeat play will K'
canceled.
Searching for a Desired Track by Listening to the First 10 Seconds of Each Track
— Intro Scan Function
Press the fwwoi button during CD play.
The first 10 seconds of all the tracks on the currently selected disc
will be played in order.
When the first 10 seconds of the last track on the disc has been
played, the intro scan will move on the next disc.
When the first 10 seconds of the last disc in the first CD changer has
been played, the first disc in the next CD changer will be played
(only when two or more CD changers are connected).
When you find the desired
track
Press the INTRO button once
again. The intrc'scan funcliun
will be canceled and you can
continue to listen to that track
17
Page 10
Displaying the Title of Each Disc
— Disc Memo Function
CS !
SCHUBERT ^
.. nowrn
Putting Your Personalized Titles onto the Discs
Play the disc that you wish to title. See page 13 for
details.
Press the LIST button for more than two seconds to
enter the name edit mode.
□
Press either the □ or q button to select the
desired characters.
pT77
Name eWit mode
EH
Each time you press the n or D button, characters
will come on in the following order:
□ ■
If you keep the button pressed, the characters will
change rapidly
Press the SEL button after locating a desired
' character.
□
The flashing part will move to the next sp.ue c'n the
right. Repeat steps 3 and 4 to enter the entire titles l.'p
to eight characters can be used per disc.
18
f +-►g,
2 3
You can put a title of your
own choice to a disc (one
title per disc). The title can
be displayed on the display
window while the disc is
being loaded and played.
Maximum of eight letters
can be used per title.
Notes
•Itvnu press Ih,. SVI.hii
when tlu <'ip,ht)i ch.ir.ii
(l.irlhe'.l right th.ir.iitei
ll.ishing, Ihe flashing p,
hack III Ihe first iharacl
(tarlhesi left i haraUer)
ish I.
e sUet
put .
•II V
SCHUBERT
^ ® To reenter the CD play mode
L«T Press the I.IST button for more than
□ two seconds.
(D To continue to put titles onto the discs
E]"“CD Press the -DISC+ button.
Changing a title
Play the disc whose title you wish to change and repeat steps 2 to 5.
_____________________________________
o
['"'■ 'I
Erasing a title_______________________________________
1 Select the CD changer and play any disc.
2 Press the LIST button for more than two seconds to enter the
name edit mode.
3 Press the DSPL button for more than two seconds.
4 Press either the □ or □ button to select the title that you
wish to erase.
5 Press the SEL button for more than two seconds.
Repeat step 4 and 5 if necessary.
6 Press the DSPL button for more than two seconds.
7 Press the LIST button for more than two seconds.
Now the title and the PLAY/SKIP settings are erased.
The system returns to the norma! CD pl.iy mode.
5® DSPL 5®(UST) CD
If you press the CÜ button, (lie
next CD changer will be selected
and the system will reenter the
normal CD pl.ay mode.
(When two or more CD
changers are connected.)
When you ch.ingr the title, Ihe
I’LAY/SKIP soilings of the bank
function will not be erased al Ihe
same time
VVhen you erase Ihe title, Ihe
I’l.AY/SKlP settings of the bank
functicHi will N' er.ised as well
The alternative method to
erase a title
You can erase a lille bv selei ling
described in slep lol -I'
Your l’ers()it,ili/ed title-
Ihe Disis". Il’.ige IH)
ling
19
Page 11

Displaying the Title of Each Disc
Playing
— Bank Function
SONY
Selected Tracks on a Disc
PLAY/SKIP indication
\
SCHUBEPT
Displaying the title
Press the DSPL button.
Title display modes
While loading the discs, whatever display mode the system is in,
the indication on the display unit automatically changes as follows:
The title of the disc (two seconds) -♦ Disc and track numbers (two
seconds) Currently selected display mode (two seconds)
Custom file function
You can register the customized titles and the PLAY/SKIP settings
to the maximum of 110 discs* per CD changer (custom file
function). These settings will be stored in the memory of the CD
changer. Therefore, even if you take a custom-filed disc out of the
CD changer, you can still use the same custom file function the next
time you play that disc in the same CD changer. Furthermore, if
your system has several CD changers connected, you can play that
disc in another CD changer and still use the same custom tile
function, provided that the CD changers are inter-connected with
the Ihis (Unilink) cables.
lo rt’pi‘'liT more Ilian 110 discs, tho display un
idu.ilion and will mil ,iacii| tiu- comin.ind ini
a
vili display tl
stdin-filint;.
Note
The registered titles of the discs
may not come on the display
window immediately while it is
being loaded inside the CD
changer.
' 5 !
FLf
ij
Setting the Play and Skip Modes on the Discs
Play the disc to which you wish to set these modes.
Press the LIST button for more than two seconds and
put the titles onto the discs.
u»' See page 18 for details about putting
□ on a title. If the title has already been
^ Press the LIST button lightly to enter the PLAY/SKIP
edit mode.
□
Press the AMS button to select the track number you
' wish to skip then press the SEL button.
registered, go lo step 3.
PLR^l
D-*5 r's 3
The indication changes from "['l.AY" to "SKII’". It you
wish to return to "PLAY", press the SI'I. Initton again
Repeal (in- operation in tliis step lo set eilliet llie 'Tl A\'
or 'SKIP ' mode on all the Irai V'-
You can listen to only the
desired tracks by using this
function.
Notes
• Wlu'ii till' lidi- is not registered,
yuii (..miiul enter the
n.AY/SKir edit mode even it
yi'U press the LIST tnitlon.
• You can only sellile SKII*"
mode onto up to 24 tracks. II a
discli.is more th.in 24 track-.
uks.in
ento'all ol the Ir.ix ks <
20
21
Page 12
Playing Selected Ti-acks on a Disc
Setting the Clock
CJT
Press the LIST button for more than two seconds.
The system reenters the normal CD play mode.
5
/
□
Playing with the Bank Function
□
Each time the BANK button is pressed, the indication on the
display unit will change cyclically as follows:
I
--------
► No indication
-----------------
(Normal CD play mode) "/in'“
If the “BANK" indication is on the display unit, only the tracks with
the PLAY settings will be played.
If the "BANK" indication is flashing on the display unit, only the
tracks with the 5K1I’ settings will be played.
Each lime you press the BANK button, the display on the display
unit will change to "BANK ON", "BANK INV" or "BANK OH-" for
a second before returning to the previous display.
► BANK------------------------^-BANK— —
Even when you play a disc with
the PLAY/SKIP settings, if the
"BANK" indication has not
come on the display unit, the
disc will not be played
according to the settings.
I n-n n
I u.u u
The clock has a 12-hour digital indication.
For example, set it to T0:08.
Turn the ignition key to the ON position.
Press the DSPL button for more than two seconds.
□
(to go back) (to go forward)
Press the | ** m*nu button to set the minute digits.
(to go back) (to go forward)
Press the DSPL button.
I
______
The indication starts flashing.
I button to set the hour digits.
□
2i'n rr'
I u.u u
t \ V-^-
JTi n-n
J U.U Ü
I n-n n
I u-u u
n-n
Note
When (he I’OWEK Shl .lC I'
swilch on llie hiile.iw.iv miil is
S4.( lo Ih,- OH' ' posilioii, III.'
ckx'k display will not come on
the display unit even if the
ignition of your car is turned on
In such a case, pres.s the I’UWliK
switch of the display iinii and
play a disc. Then press the
liSFI. button of the remote
commander twice to have the
clock display on the display unit
and follow steps 2 to 4.
22
23
Page 13

Maintenance
Fuse Replacement
If the fuse blows, check the power connection
and replace the fuse. If the fuse blows again
after replacement, there may be an internal
malfunction. In this case, consult your nearest
Sony dealer
Warning
Use the specified amperage fuse.
Usc of a higher amperage fuse may cause
serious damage.
Specifications
CD changer unit
System t.'ompact disc digital aiidii>
l.asor DiiKle I’rn^terlics
Material GaAlAs
Wavelength 780 nm
Knii-S.sion duration Continuous
Laser out-pul power Less than 44.8 pW*
FrC'ijm.'ricy respi«>se
Wow and flutter
Signai-to-noise ratio More than 92 dB
Output terminals Bus (Uiulmk) corxtrol output
Current drain
Operational temperature
Dimensions Approx. 305 * 90 v 174 mm
Mass Approx. 2 5 kg (5 lb. 8 i>?.)
Hideaway unitIRemote commanderl
Display unit
Frequency 88.3 MHz/88 7 MHz/
Dimensions Hideaway unit:
Ma.ss I licieawav unit
system
’ Thi-s output is the value
measured at a distance of
2fX) mm from the objective
Ions surface on the Optical
I’kk-up Block.
5 -lOAXXIIlz
Less than measurable limit
terminal (8 pin)
Analog audio output terminal
(RCA pin)
800 mA (at playback)
800 mA (at disc loading/
ejecting)
-10°C to +55*C (14°F- 13t'’D
a2'/8x35/„x87/„in.)
(w/h/d)
89.7 MHz/89,9MIl7
(swilchahle)
Approx. 126 X 30 X 81 mm
(5xlVu.x-tl/4 in.)(w/h/dl
Remote commander'.
Approx. 66 X 108 X 20 mm
(2.Vsx4V8x 'Vif,
m.Hw/U/dl
Display unit:
Approx. 12(1 X 37 X IH mm
(4V4 ^ I '/: X ’/■! in Hw.'h/d)
Approx. 40'x g (14 *1/ I
g '2
Apr
Supp/f'ed accessories
Disc magazine (1)
Bus (Uniiink) cable (II
RC A pin cord (U
Mounting hardware (I --et'
Optional accessories
Kotarv commander RM-X32
CD cleaning kit C()M-21BK
CD single adaptor C SA-H
Disc m.ig.i/me XA H'B
Souree selector XA Li:0, XA ll-lll
Bus (LInilmk) .able (-.upplied with ,
RC-6I (I in), KC-62(2in)
KCA pin cord
RC-63(1 m), RC-64 (2 m)
Design ,md spe
without notice.
ific.it
24
25
Page 14

Troubleshooting Cuide
The following check will assist in the correction of most
problems which you may encounter with your unit.
Before going through the check list below, refer back to the
connection and operating procedures.
The operation buttons do not function.
The sound skips due to vibration. • The CD changer unit is installed in an unstable
Error displays
The following indication will flash for about five seconds and an alarm sound will be heard.
Display
NO tm
wo nsc
EPROP
PE5ET
if the above mentioned solutions do not help to improve the
dealer.
Problem Cause/sotution
The disc magazine is not inserted in
the CD changer.
No disc is inserted in the disc
magazine.
The disc is dirty. Clean the disc.
The disc is inserted upside down.
The CD changer cannot be operated
because of some problem.
Cause Solution '
• The built-in micro computer has malfunctioned.
-> Press the reset button on the display unit.
• The connecting cords are not connected
properly.
• The batteries in the remote commander are
worn.
• The distance between the remote commander
and the display unit is too far.
location.
-* Re-install it in a stable location.
• Dirty or defective disc(s)
-* Clean or replace it/them.
Insert the disc magazine with discs
into the CD changer.
Take out the magazine and insert the
discs.
Insert the disc correctlv.
Press the reset button of the display
unit-
situation, consult your nearest Sony
26
27
 Loading...