

Sony CDX-636 Service manual

CDX-601/636
SERVICE MANUAL
Ver 1.1 2000. 08
Photo: CDX-636
SPECIFICATIONS
US Model
Canadian Model
CDX-601/636
AEP Model
UK Model
CDX-601
E Model
CDX-636
Model Name Using Similar Mechanism NEW
CD Drive Mechanism Type MG-251A-137
Optical Pick-up Name KSS-720A/K1NP
System Compact disc digital audio system
Frequency response
Wow and flutter Below the measurable limit
Signal-to-noise ratio
Outputs BUS control output (8 pins)
Current drain 800 mA (during CD playback)
Operating temperature
Dimensions Approx. 262 × 90 × 181.5 mm
Mass Approx. 2.1 kg
Power requirement
Supplied accessories
Design and specifications are subject to change without notice.
10 – 20,000 Hz
94 dB
Analog audio output (RCA pin)
800 mA (during loading or ejecting a disc)
–10°C to +55°C
(w/h/d) not incl. projecting parts and
controls
12 V DC car battery (negative ground)
Disc magazine (1)
Parts for installation and connections
(1 set)
COMPACT DISC CHANGER

TABLE OF CONTENTS
1. SERVICING NOTES ................................................ 3
2. GENERAL ................................................................... 3
Installation....................................................................... 4
Connections ..................................................................... 4
3. DISASSEMBLY ......................................................... 5
4. MECHANISM DECK ASSEMBLY.................... 11
5. MECHANICAL ADJUSTMENT.......................... 13
6. ELECTRICAL CHECK .......................................... 14
7. DIAGRAMS
7-1. Block Diagram – RF SERVO/
DA CONVERTER Section – .......................................... 15
7-2. Block Diagram – BUS CONTROL/
POWER SUPPLY Section – ........................................... 16
7-3. Note for Printed Wiring Boards and
Schematic Diagrams ....................................................... 17
7-4. Printed Wiring Boards – RF Section – .......................... 18
7-5. Schematic Diagram – RF Section –............................... 19
7-6. Printed Wiring Boards – MAIN Section (1/2) – ........... 20
7-7. Printed Wiring Board – MAIN Section (2/2) –............. 21
7-8. Schematic Diagram – MAIN Section (1/2) –................ 22
7-9. Schematic Diagram – MAIN Section (2/2) –................ 23
7-10. Printed Wiring Boards – JACK/SWITCH Section – .... 24
7-11. Schematic Diagram – JACK/SWITCH Section – .......... 24
7-12. IC Pin Function Description ........................................... 29
8. EXPLODED VIEWS ................................................ 32
9. ELECTRICAL PARTS LIST ............................... 37
SAFETY-RELATED COMPONENT WARNING!!
COMPONENTS IDENTIFIED BY MARK 0 OR DOTTED
LINE WITH MARK 0 ON THE SCHEMA TIC DIAGRAMS
AND IN THE PARTS LIST ARE CRITICAL TO SAFE
OPERATION. REPLACE THESE COMPONENTS WITH
SONY PARTS WHOSE PART NUMBERS APPEAR AS
SHOWN IN THIS MANUAL OR IN SUPPLEMENTS PUBLISHED BY SONY.
ATTENTION AU COMPOSANT AYANT RAPPORT
À LA SÉCURITÉ!
LES COMPOSANTS IDENTIFIÉS P AR UNE MARQUE 0
SUR LES DIAGRAMMES SCHÉMATIQUES ET LA LISTE
DES PIÈCES SONT CRITIQUES POUR LA SÉCURITÉ
DE FONCTIONNEMENT. NE REMPLACER CES COMPOSANTS QUE PAR DES PIÈCES SONY DONT LES
NUMÉROS SONT DONNÉS DANS CE MANUEL OU
DANS LES SUPPLÉMENTS PUBLIÉS PAR SONY.
2

Ver 1.1 2000. 08
L
SECTION 1
SERVICING NOTES
SECTION 2
GENERAL
This section is extracted from
instruction manual.
NOTES ON HANDLING THE OPTICAL PICKUP BLOCK OR BASE UNIT
The laser diode in the optical pick-up block may suffer electrostatic breakdown because of the potential difference generated by
the charged electrostatic load, etc. on clothing and the human body .
During repair, pay attention to electrostatic breakdown and also
use the procedure in the printed matter which is included in the
repair parts.
The flexible board is easily damaged and should be handled with
care.
Laser Diode Properties
• Material: GaAlAs
• Wavelength: 780 nm
• Emission Duration: continuous
• Laser Output Power: less than 44.6 µW*
* This output is the value measured at a distance of 200 mm
from the objective lens surface on the Optical Pick-up Block.
CAUTION
Use of controls or adjustments or performance of procedures
other than those specified herein may result in hazardous radiation exposure.
US/Canadian model:
If the optical pick-up block is defective, please replace the whole
optical pick-up block.
Never turn the semi-fixed resistor located at the side of optical
pick-up block.
OPTICA
PICK-UP
BLOCK
Flexible Circuit Board Repairing
• Keep the temperature of the soldering iron around 270 ˚C during repairing.
• Do not touch the soldering iron on the same conductor of the
circuit board (within 3 times).
• Be careful not to apply force on the conductor when soldering
or unsoldering.
Notes on chip component replacement
• Never reuse a disconnected chip component.
• Notice that the minus side of a tantalum capacitor may be damaged by heat.
DISC MAGAZINE GETTING OUT PROCEDURE
ON THE POWER SUPPLY IS OFF
Remove the COVER (LOWER T) beforehand
1) Press the lever (ML.S) assy to arrow direction.
2) Removal the magazine assy.
Note: T ak e out the magazine only w hen the tray is completely within the
magazine. If the disk or tray is sticking out, turn on the power and
eject the magazine.
Lever (ML.S)
Magazine ass’y
Precautions
Moisture condensation
On a rainy day or in a very damp area, moisture may condense
on the lenses inside the unit. Should this occur, the unit will not
operate properly. In this case, remove the disc magazine and
wait for about an hour until the moisture has evaporated.
Inserting a disc
With the arrow side facing up
Con el lado de la flecha hacia arriba
1
Med pilsidan vänd uppåt
Com a face com a seta virada para cima
Labeled surface up
Con la superficie de la etiqueta hacia arriba
Etikettsidan vänd uppåt
Superfície com a etiqueta virada para cima
c
Tab
Lengüeta
Flik
Patilha
Use the supplied disc magazine or the disc magazine XA-250. The
disc magazine XA-10B can not be used with this unit. If you use
any other magazine, it may cause a malfunction.
Emplee el cargador de discos suministrado o el XA-250. El
cargador de discos XA-10B no puede utilizarse con esta unidad.
Si emplea otro tipo de cargador, puede producir fallos de
funcionamiento.
Disc magazine
3
Cargador de discos
Skivmagasin
Carregador de discos
If the disc magazine does not lock properly
Take out the magazine, and after pressing the Z (EJECT) button, re-insert it.
Si el cargador de discos no encaja adecuadamente.
Extraiga el cargador y, después de presionar el botón Z (EJECT), vuelva a
insertarlo.
När skivmagasinet inte kommer på plats ordentligt
Ta ut skivmagasinet. Tryck därefter på Z (EJECT) och sätt i det igen.
Se o carregador de discos não fechar bem
Retire o carregador, carregue na tecla Z (EJECT) e volte a introduzi-lo.
Notes on the disc magazine
• Do not leave the disc magazine in locations with high
temperatures and high humidity such as on a car dashboard
or in the rear window where the disc magazine will be
subjected to direct sunlight.
• Do not place more than one disc at a time onto one tray,
otherwise the changer and the discs may be damaged.
• Do not drop the disc magazine or subject it to a violent shock.
When the tray comes out
Normally, the trays will not come out of
the magazine. However, if they are pulled
out of the magazine, it is easy to re-insert
them.
Si
la bandeja se sale
Normalmente, las bandejas no se salen del
cargador. No obstante, si esto ocurre,
pueden volver a insertarse con facilidad.
10 discs, one in each tray
10 discos, uno en cada bandeja
10 CD-skivor, med en CD-skiva i varje skivfack
10 discos, um em cada tabuleiro
Använd medföljande skivmagasin eller skivmagasinet XA-250.
Skivmagasinet XA-10B kan användas med denna enhet. Använd
inget annat magasin, eftersom det kan orsaka fel.
Utilize o carregador de discos fornecido ou o carregador XA-250.
Não pode utilizar o carregador de discos XA-10B com este
aparelho. Se utilizar outro carregador qualquer pode provocar
uma avaria.
När skivfacket kommer ut
Vanligen kommer inte skivfacken ut ur
magasinet. Om de emellertid skulle råka tas ur
magasinet är det enkelt att sätta i dem igen.
Se o tabuleiro sair para fora do
carregador
Normalmente, os tabuleiros não saiem do
carregador. No entanto, se os puxar para fora
do carregador, é fácil voltar a colocá-los.
Precauciones
Condensación de humedad
En los días lluviosos o en zonas muy húmedas, puede
condensarse humedad en las lentes del interior de la unidad. Si
esto ocurre, ésta no funcionará correctamente. En este caso,
extraiga el cargador de discos y espere durante una hora
aproximadamente hasta que la humedad se evapore.
Notes
• To listen to an 8 cm CD, use the separately sold Sony CD adapter CSA-8. Be sure to always use
the specified adapter, as failing to do so may cause a malfunction of the unit. If you use any other
adapter, the unit may not operate properly. When using the Sony CD adapter, make sure the three
catches on the adapter are firmly latched onto the 8 cm CD.
• Do not insert the Sony CD adapter CSA-8 in the magazine without a disc, malfunction may
result.
Notas
• Para reproducir un disco compacto de 8 cm, utilice un adaptador para discos compactos CSA-8
Sony vendido aparte. Cerciórese de utilizar siempre el adaptador especificado, ya que de lo
contrario la unidad podría funcionar mal. Si utilizase otro adaptador, es posible que la unidad no
funcionase adecuadamente. Cuando utilice el adaptador para discos compactos Sony, cerciórese de
que las tres uñas del mismo hayan quedado firmemente enganchadas en el disco compacto de 8 cm.
• No inserte el adaptador de discos compactos Sony CSA-8 en el cargador sin discos, ya que pueden
producirse fallos de funcionamiento.
Observera
• Använd Sonys skivadapter CSA-8 (tillval) för att spela upp 8-centimeters CD-singlar. Använd
alltid den föreskrivna adaptern, eftersom det annars kan uppstå fel i CD-spelaren. Det kan
dessutom uppstå fel vid skivspelning när en annan typ av adapter används. När du fäster en
Sony-skivadapter på CD-singeln måste du kontrollera att de tre spärrhakarna på adaptern låses
fast ordentligt på CD-singeln.
• Sätt inte i Sony CD-adapter CSA-8 i magasinet utan en CD-skiva eftersom det då kan uppstå
driftsstörningar.
Notas
• Para a audição de discos compactos de 8 cm, utilize o adaptador de discos compactos Sony CSA-8
que se vende separadamente. Certifique-se de que está a utilizar o adaptador especificado, pois caso
contrário poderá causar mau funcionamento do aparelho. Caso utilize qualquer outro tipo de
adaptador, o aparelho. poderá não funcionar adequadamente. Quando utilizar o adaptador de CD
da Sony, verifique se os três ganchos do adaptador estão bem agarrados ao CD de 8 cm.
• Não coloque o adaptador para CD CSA-8 da Sony no carregador sem um disco. Se o fizer pode
provocar uma avaria.
To remove
Extracción
Urtagning
Para retirar
Z (EJECT)
Notas sobre el cargador de discos
• No deje el cargador de discos en lugares con
temperatura y humedad altas, como en el salpicadero o en la
bandeja trasera del automóvil, donde podría quedar sometido
a la luz solar directa.
• No inserte más de un disco en una bandeja de una vez, ya que
en caso contrario el cambiador y los discos pueden dañarse.
• No deje caer el cargador de discos ni lo someta a golpes
violentos.
With the cut-away portion of the tray facing you, insert the right
corner of the tray in the slot, then push in the left corner until it
clicks.
Note
Do not insert the tray upside down or in the wrong direction.
Con la parte de corte de la bandeja hacia afuera, inserte la
esquina derecha de dicha bandeja en la ranura y, a continuación,
ejerza presión en la esquina izquierda hasta oír un chasquido.
Nota
No inserte la bandeja al revés o en la dirección incorrecta.
Säkerhetsföreskrifter
Att observera angående fuktbildning
Om det regnar eller är mycket fuktigt ute kan fukt kondenseras
på linserna inuti enheten. När detta sker fungerar inte enheten
som den ska. Ta då bort skivmagasinet och vänta i ungefär
en timme tills fukten har avdunstat.
Sätta i en en CD-skivaInserción de discos
4
Use the unit with the door closed
Otherwise, foreign matter may enter the unit and
contaminate the lenses inside the changer.
Emplee la unidad con la puerta cerrada.
De lo contrario podrían entrar objetos extraños y
contaminar las lentes del interior del cambiador.
Kom ihåg att stänga locket till skivmagasinsfacket
För att förhindra främmande föremål från att tränga in i
CD-växlare och smutsa ned de inbyggda linserna.
Utilize o aparelho com a porta fechada
Caso contrário, objectos estranhos poderão penetrar no
aparelho e sujar as lentes no interior do permutador.
Att observera angående
skivmagasinet
• Lämna inte skivmagasinet på en plats där det utsätts för
extrem värme och/eller fukt, som t ex ovanpå
instrumentbrädan eller på hatthyllan längst bak i bilen,
eftersom den då kan ligga i direkt solljus.
• Sätt inte i mer än en CD-skiva i taget i varje skivfack, annars
kan CD-växlaren och CD-skivorna skadas.
• Tappa inte skivmagasinet. Utsätt det inte heller för stötar.
Precauções
Condensação de humidade
Num dia chuvoso ou numa zona muito húmida, pode ocorrer
uma condensação de humidade nas lentes do interior do
aparelho o que provocará um funcionamento deficiente do
aparelho. Se isso acontecer, retire o carregador de discos e
aguarde cerca de uma hora até que a humidade se evapore.
Introduzir um disco
Unlock
2
Desbloqueo
Lås upp
Destranque
Release, and slide open.
Suelte y deslice para abrir.
Lossa och skjut åt sidan.
Solte e abra.
Note
When a disc magazine is inserted into the CD changer or the reset button
of the connected car audio is pressed, the unit will automatically be
activated and read the information on the CDs. When the information on
all the CDs in the disc magazine has been read, the unit will automatically
stop operation.
Nota
Cuando inserte un cargador de discos en el cambiador de discos compactos
o presione el botón de reposición del sistema de audio del automóvil, la
unidad se activará automáticamente y leerá la información de los discos
compactos. Cuando se haya leído la información de todos los discos
compactos del cargador de discos, la unidad se parará automáticamente.
Obsevera
När du skjuter in ett skivmagasin i CD-växlaren eller trycker på
återställningsknappen på den anslutna bilstereon kommer växlaren att
automatiskt aktiveras och läsa informationen på CD-skivorna, och slås
sedan automatiskt av igen.
Nota
Quando se introduz um carregador de discos no permutador Cd ou se
carrega na tecla de reinicialização do autorádio ligado, o aparelho é
automaticamente activado e reproduz os CDs. Terminada a leitura de todos
os CDs do carregador, o aparelho pára automaticamente.
Notas sobre o carregador de discos
• Não deixe o carregador de discos em locais demasiado
quentes ou húmidos como, por exemplo, no tablier ou na
prateleira traseira do automóvel, onde estará sujeito à
incidência directa dos raios solares.
• Não coloque mais do que um disco ao mesmo tempo em cada
um dos tabuleiros pois, se o fizer, pode danificar tanto o
carregador como os discos.
• Não deixe cair, nem sujeite o carregador a choques violentos.
Håll skivfacket med hålet mot dig och skjut in dess högra hörn
i springan i magasinet. Tryck sedan in det vänstra hörnet tills
ett klick hörs.
Obsevera
Sätt inte i skivfacket upp och ner eller åt fel håll.
Com a parte cortada do tabuleiro voltada para si, introduza o
canto direito do tabuleiro na ranhura e, em seguida, empurre
o canto esquerdo até ouvir um clique.
Nota
Não coloque o tabuleiro ao contrário ou na direcção errada.
x
SEMI-FIXED
AEP/UK model:
RESISTOR
When replacing the chassis (U.S) sub assy of mechanism deck
which have the “CAUTION LABEL” attached, please be sure to
put a new CA UTION LABEL (3-223-913-11) to the chassis (U.S)
sub assy.
Notes on compact discs
A dirty or defective disc may cause sound drop-outs during
playback. To enjoy optimum sound, handle the disc as follows.
• Handle the disc by its edge, and to keep the disc clean, do
not touch the unlabeled surface. (fig. A)
• Do not stick paper or tape on the disc. (fig. B)
• Do not expose discs to direct sunlight or heat sources such
as hot air-ducts. Do not leave discs in a car parked in
direct sunlight where there can be a considerable rise in
the temperature inside the car. (fig. C)
• Before playing, clean the discs with an optional cleaning
cloth. Wipe each disc in the direction of the arrows.
(fig. D)
Do not use solvents such as benzine, thinner, commercially
available cleaners or antistatic spray intended for analog
discs.
Notes on discs
If you use the discs explained below, the sticky residue can
cause the CD to stop spinning and may cause malfunction or
ruin your discs.
Do not use second-hand or rental CDs that have a sticky residue
on the surface (for example from peeled-off stickers or from ink,
or glue leaking from under the stickers).
• There are paste residue. Ink is sticky. (fig. E)
Do not use rental CDs with old labels that are beginning to
peel off.
• Stickers that are beginning to peel away, leaving a sticky
residue. (fig. F)
Do not use your CDs with labels or stickers attached.
• Labels are attached. (fig. G)
Notas sobre los discos compactos
Un disco sucio o defectuoso causará la pérdida de sonido
durante la reproducción. Para obtener un óptimo nivel de
sonido, tome los discos como se indica a continuación.
• Maneje el disco por los bordes. Para mantenerlo limpio,
no toque la superficie sin etiqueta. (fig. A)
• No adhiera papeles ni cinta sobre el disco. (fig. B)
• No exponga los discos a la luz solar directa ni a fuentes
térmicas, como conductos de aire caliente. No deje los
discos en un automóvil aparcado bajo la luz solar directa
donde pueda producirse un considerable aumento de
temperatura en el interior de dicho automóvil. (fig. C)
• Antes de reproducir un disco, límpielo con un paño
limpiador opcional. Hágalo en el sentido de las flechas.
(fig. D)
No emplee disolventes tales como bencina, diluyente de
pintura, ni limpiadores o aerosoles destinados a discos
analógicos.
Notas sobre los discos
Si emplea los discos descritos a continuación, el residuo
adherente puede causar que el CD deje de girar y producir
fallos de funcionamiento o dañar los discos.
No utilice discos compactos de segunda mano o de alquiler que
tengan residuos adherentes en la superficie (por ejemplo, de
adhesivos despegados o tinta, o de restos de pegamento de los
adhesivos).
• Residuos adherentes. Tinta adherente. (fig. E)
No utilice discos compactos de alquiler con etiquetas viejas
que estén comenzando a despegarse.
• Adhesivos que empiezan a despegarse, dejando un
residuo adherente. (fig. F)
No emplee discos compactos con etiquetas o adhesivos
fijados.
• Etiquetas adheridas. (fig. G)
Att observera angående CD-skivor
En smutsig eller skadad CD-skiva kan orsaka ljudbortfall vid
uppspelning. För att undvika detta hanterar du CD-skivan
enligt följande.
• Undvik att smutsa ned CD-skivan genom att hålla i den
endast i kanten och undvika att vidröra den oskyddade
ytan. (ill. A)
• Klistra inte fast etiketter eller dylikt på CD-skivan. (ill. B)
• Utsätt inte CD-skivor för direkt solljus eller värmekällor
som varmluftsventiler. Lämna inte CD-skivor i bilen om
den står parkerad i direkt solljus, eftersom kraftiga
temperaturstegringarär kan skada skivorna. (ill. C)
• Torka CD-skivan med en rengöringsduk (medföljer inte)
innan du spelar den. Torka från mitten ut mot kanten
(i pilarnas riktning). (ill. D)
Använd inte lösningsmedel som bensin och thinner, eller
rengöringsmedel och antistatspray avsedda för vinylskivor.
Om diskar
Om du använder diskar av det slag som beskrivs nedan, kan
limresterna göra så att CD-skivan slutar rotera och du kan få
driftstörningar och skivorna förstörda.
Använd aldrig CD-skivor som du köpt eller hyrt begagnade om
de har limrester på ytan (t.ex. från klistermärken eller etiketter)
eller rester av bläck eller lim som krypt fram längs
etikettkanterna.
• Limrester och bläck som kan kladda av sig. (ill. E)
Använd aldrig hyrda CD-skivor med gamla etiketter som är
på väg att lossna.
• Etiketter som är på väg att lossna och efterlämnar
kladdiga rester. (ill. F)
Använd inte CD-skivor med klistermärken eller etiketter.
• Etiketter som fästs på skivan. (ill. G)
Notas sobre os discos compactos
Discos sujos ou defeituosos podem causar perdas de som
durante a leitura. Para obter de um som excelente, pegue nos
discos como ilustrado a seguir.
• Para não sujar o disco pegue-lhe pelas bordas e não toque
no lado que não tem etiqueta. (fig. A)
• Não cole papel ou fita adesiva no disco. (fig. B)
• Não exponha os discos à luz solar directa ou a fontes de
calor como condutas de ar quente. Não deixe os discos
dentro de um automóvel estacionado ao sol pois pode
ocorrer um aumento considerável de temperatura no seu
interior. (fig. C)
• Antes de iniciar a reprodução, limpe os discos com um
pano de limpeza (venda avulsa). Limpe o disco no sentido
indicado pelas setas. (fig. D)
Não utilize solventes tais como benzina, diluentes, produtos
de limpeza disponíveis no mercado ou aerosóis anti-estáticos
destinados a discos de gravação analógica.
Notas sobre os discos
Se utilizar os discos descritos abaixo, o resíduo pegajoso pode
fazer parar a rotação do CD e provocar uma avaria ou danificar
os discos.
Não utilize CDs em segunda mão ou alugados que tenham um
resíduo pegajoso na superfície (por exemplo, restos de etiquetas
retiradas ou de tinta ou cola a sair de etiquetas ainda existentes).
• Há resíduos de cola. A tinta está pegajosa. (fig. E)
Não utilize CDs alugados com etiquetas velhas já meio
descoladas.
• As etiquetas meio descoladas deixam resíduos pegajosos.
(fig. F)
Não utilize CDs com etiquetas ou autocolantes.
• Há etiquetas coladas. (fig. G)
AB C D EFG
This way
Asi
Så här
Sim
Not this way
Asi no
Inte så här
Não
Not this way
Asi no
Inte så här
Não
This way
Asi
Så här
Sim
33
Installation
Precautions
• Choose the mounting location carefully, observing the following:
— The unit is not subject to temperatures exceeding 55°C (such as in a car
parked in direct sunlight).
— The unit is not subject to direct sunlight.
— The unit is not near heat sources (such as heaters).
— The unit is not exposed to rain or moisture.
— The unit is not exposed to excessive dust or dirt.
— The unit is not subject to excessive vibration.
— The fuel tank should not be damaged by the tapping screws.
— There should be no wire harnesses or pipes under the place where you are
going to install the unit.
— The spare tire, tools or other equipment in or under the trunk should not be
interfered with or damaged by the screws or the unit itself.
• Be sure to use only the supplied mounting hardware for a safe and secure
installation.
• Use only the supplied screws.
• Make holes of ø 3.5 mm only after making sure there is nothing on the other
side of the mounting surface.
Instalación Montering
Precauciones
• Elija cuidadosamente el lugar de montaje, teniendo en cuenta lo siguiente:
— La unidad no queda sometida a temperaturas superiores a los 55°C (como
en un automóvil aparcado a la luz solar directa).
— La unidad no queda sometida a la luz solar directa.
— La unidad no queda cercana a fuentes térmicas (como aparatos de
calefacción).
— La unidad no queda expuesta a la lluvia o a la humedad.
— La unidad no queda expuesta a polvo o suciedad excesivos.
— La unidad no queda sometida a vibraciones excesivas.
— El depósito de combustible no deberá dañarse con los tornillos
autorroscantes.
— No deberá haber mazos de conductores ni tubos debajo del lugar donde
vaya a instalar la unidad.
— La rueda de repuesto, las herramientas, u otros equipos situados dentro o
debajo del portaequipajes no deberán verse interferidos ni dañados por los
tornillos ni por la propia unidad.
• Para realizar una instalación segura, emplee solamente la ferretería de
montaje suministrada.
• Utilice sólo los tornillos suministrados.
• Antes de hacer los orificios de ø 3,5 mm, compruebe que no haya nada en el
otro lado de la superficie de montaje.
Säkerhetsföreskrifter
• Var noga vid monteringslägets val. Observera följande:
— Utsätt inte enheten för temperaturer som överstiger 55°C (som t ex i en bil
parkerad i direkt solljus).
— Utsätt inte enheten för direkt solljus.
— Placera inte enheten i närheten av värmekällor (som varmluftsventiler
m.m.).
— Undvik att enheten utsätts för regn eller fukt.
— Undvik att enheten utsätts för mycket damm eller smuts.
— Undvik att enheten utsätts kraftiga vibrationer eller skakningar.
— Att bränsletanken inte skadas när du drar åt de självgängande skruvarna.
— Att det inte finns några kabelhärvor, rör, ledningar eller slangar under
platsen där CD-skivväxlaren monteras.
— Att reservdäcket, verktyg eller annan utrustning i eller under
bagageutrymmet inte skadas av monteringen.
• Var noga med att endast använda de medföljande monteringstillbehören för
att vara säker på att CD-skivväxlaren monteras ordentligt och på ett korrekt
sätt.
• Använd endast medföljande skruvar.
• Kontrollera först att det inte finns något på andra sidan monteringsytan som
kan ta skada när du borrar hålen (ø 3,5 mm).
Instalação
Precauções
• Seleccione cuidadosamente o local de montagem, observando os seguintes pontos:
— O aparelho não está sujeito a temperaturas superiores a 55°C (tal como no interior
de automóveis estacionados sob a luz solar directa);
— O aparelho não está sujeito à luz solar directa;
— O aparelho não está próximo de fontes de calor (tais como aquecedores);
— O aparelho não está sujeito à chuva ou humidade;
— O aparelho não está exposto a muito pó ou sujidade;
— O aparelho não está sujeito a vibrações excessivas.
— Verificar se os parafusos de fixação não vão danificar o depósito de combustível
— Verificar se não existem feixes de cabos ou tubos no local onde será instalado o
aparelho.
— Verificar se o aparelho ou os parafusos de fixação não vão danificar ou interferir
com os pneus sobresselentes, as ferramentas ou outros equipamentos colocados no
porta-bagagens.
• Para que a instalação fique bem feita e seja segura, utilize unicamente o material
fornecido para a montagem.
• Utilize apenas os parafusos fornecidos.
• Certifique-se de que não existe nada no lado de trás da superfície de montagem e faça
furos com um diâmetro de 3,5 mm.
Connections/Conexiones/
Anslutningar/Ligações
For details, refer to the Installation/
Connections manual of each product.
Con respecto a los detalles, consulte el
manual de instalación/conexiones de cada
producto.
Connection diagram/Diagrama de conexión/Kopplingsdiagram/
Diagrama de ligação
Sony BUS compatible car audio
Sistema de audio de automóvil compatible con BUS Sony
Sonys bilstereo kompatibel med Sonys överföringssystem BUS
Autorádio estéreo compativel com o sistema Sony BUS
Mer information finns i de anvisningar för
montering och anslutning som medföljer de
olika komponenterna.
Para maiores detalhes, consulte o manual
de instalação/ligação de cada produto.
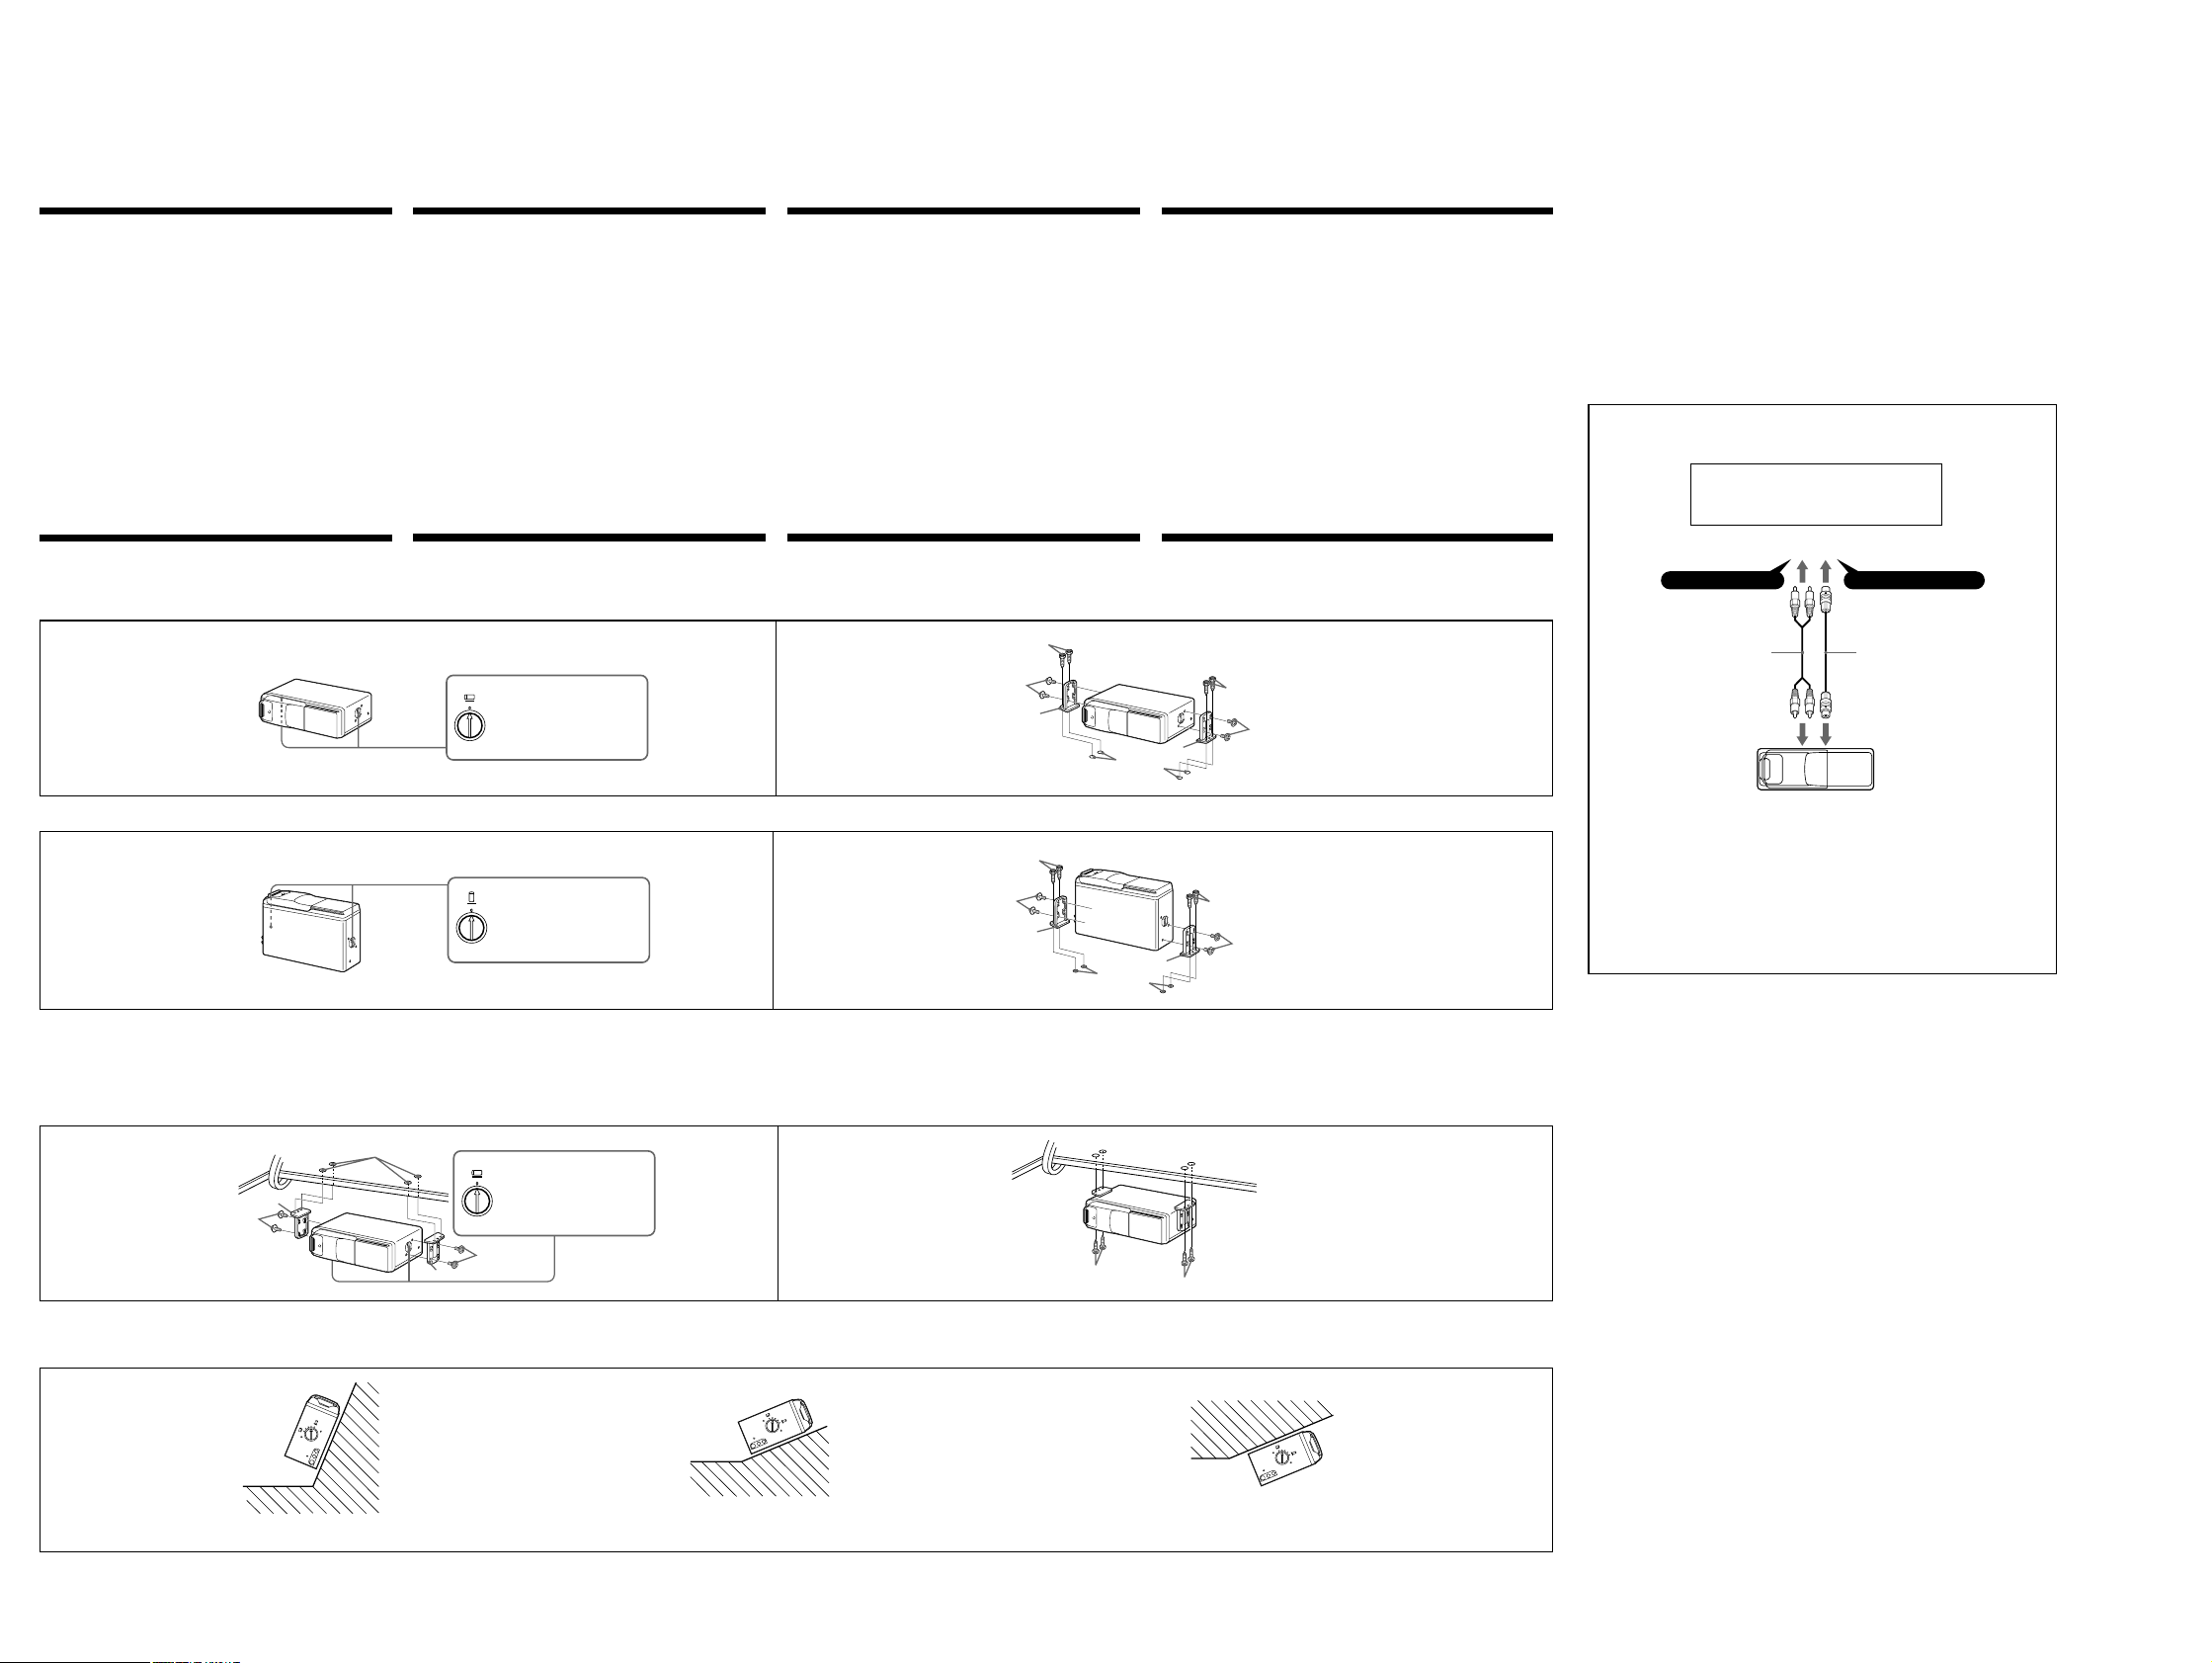
How to install the unit
The brackets 1 provide two positions for mounting, high and low. Use the
appropriate screw holes according to your preference.
Horizontal installation
1
Vertical installation
1
Suspended installation
When the unit is to be installed under the rear tray etc. in the trunk
compartment, make sure the following provisions are made.
• Choose the mounting location carefully so that the unit can be installed
horizontally.
• Make sure the unit does not hinder the movement of the torsion bar spring
etc. of the trunk lid.
Forma de instalar la unidad
Los soportes 1 proporcionan dos posiciones de montaje, alta y baja. Utilice los
orificios para tornillo apropiados según sus preferencias.
Instalación horizontal
Align with the marked position.
HORIZONTAL
Alinee en la posición marcada.
Anpassa till det markerade läget.
Alinhe com o ponto marcado.
Align with the marked position.
VERTICAL
Alinee en la posición marcada.
Anpassa till det markerade läget.
Alinhe com o ponto marcado.
Instalación suspendida
Cuando desee instalar la unidad debajo de la bandeja trasera, etc. en el interior
del portaequipajes, tenga en cuenta lo siguiente:
• Elija cuidadosamente el lugar de montaje de forma que la unidad pueda
instalarse horizontalmente.
• Cerciórese de que la unidad no impida el movimiento del resorte de la barra
de torsión, etc., de la tapa del portaequipajes.
Montering
Fästena 1 kan användas i två monteringslägen, högt eller lågt. Använd de
skruvhål som passar bäst.
Liggande i horisontellt läge
2
3
2
1
Stående i vertikalt lägeInstalación vertical
2
3
2
1
ø 3.5 mm
Hängande montering
Observera följande när CD-växlare monteras i bagageutrymmet, under
hatthyllan längst bak i bilen osv:
• var noga när du väljer monteringsläge för att vara säker på att CD-
skivväxlaren kan monteras liggande i horisontell ställning,
• var noga med att kontrollera att CD-växlaren inte hindrar fjäderns rörelser i
torsionsarmen eller liknande i bakluckan.
Como instalar o aparelho
Os suportes 1 permitem duas posições de montagem; em cima e em baixo. Coloque os
parafusos na posição pretendida.
Instalação horizontal
3
2
1
ø 3.5 mm
Instalação vertical
3
2
1
Instalação suspensa
Se for instalar o aparelho por baixo da prateleira traseira, no porta-bagagens, etc., tome
as seguintes precauções:
• escolha um local de instalação que permita que o aparelho seja montado na horizontal;
• certifique-se de que o aparelho não atrapalhará o movimento da mola do fecho da
porta do porta bagagens, etc.
BUS AUDIO IN
4
BUS CONTROL IN
5
CDX-601/636
Note
For connecting two or more changers, the XA-C30 source selector (optional) is necessary.
Nota
Si desea conectar dos o más cambiadores, es preciso utilizar un selector de fuente XA-C30 (opcional).
Observera
Om du vill ansluta två eller fler växlare måste du ha en XA-C30-väljare (tillval).
Nota
Para ligar dois ou mais permutadores, é necessário o selector de fonte XA-C30 (opcional).
1
ø 3.5 mm
1
2
Inclined installation
After installing the unit, align the dials with one of the marks so that the arrows
are as vertical as possible.
V
E
R
T
IC
A
L
HORIZONTAL
Note
Be sure to align the left and right dials with the same mark.
Align with the marked position.
HORIZONTAL
Alinee en la posición marcada.
Anpassa till det markerade läget.
Alinhe com o ponto marcado.
2
1
Instalación sobre una superficie inclinada
Después de instalar la unidad, alinee los diales con una de las marcas, de forma
que la flecha quede orientada en posición vertical tanto como sea posible.
Nota
Asegúrese de alinear los diales derecho e izquierdo con la misma marca.
2
Placera på lutande underlag
När du har placerat enheten där du vill ha den, justerar du vridreglaget till den
markering som gör att pilen är så nära lodrät position som möjligt.
L
A
T
N
O
Z
I
R
V
O
H
E
R
T
I
C
A
L
Observera
Kom ihåg att justera både det vänstra och det högra vridreglaget till samma markering.
3
3
Instalação inclinada
Depois de ter instalado o aparelho, alinhe os selectores com uma das marcas para que a
seta fique o mais próximo possível da posição vertical.
V
HORIZONTAL
E
R
T
I
C
A
L
Nota
Alinhe os selectores do lado direito e do lado esquerdo com a mesma marca.
44
SECTION 3
)
)
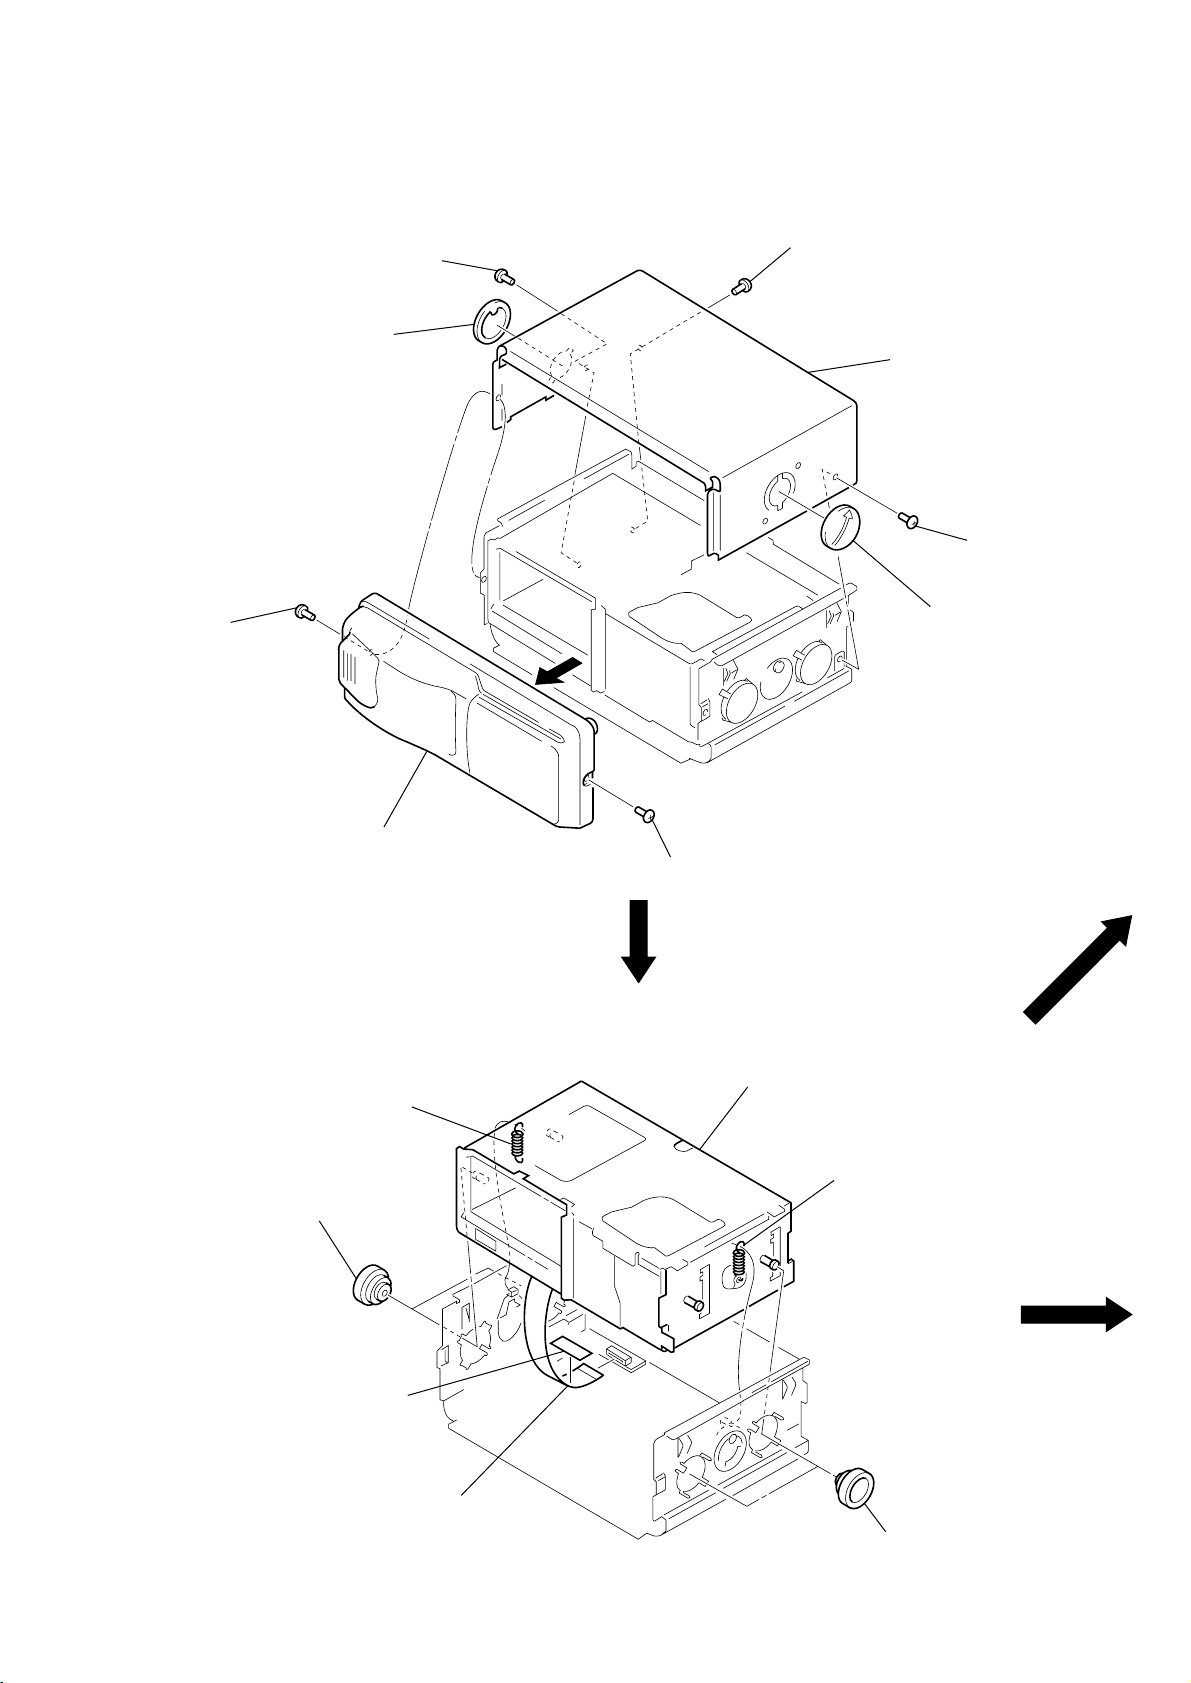
DISASSEMBLY
Note: Follow the disassembly procedure in the numerical order given.
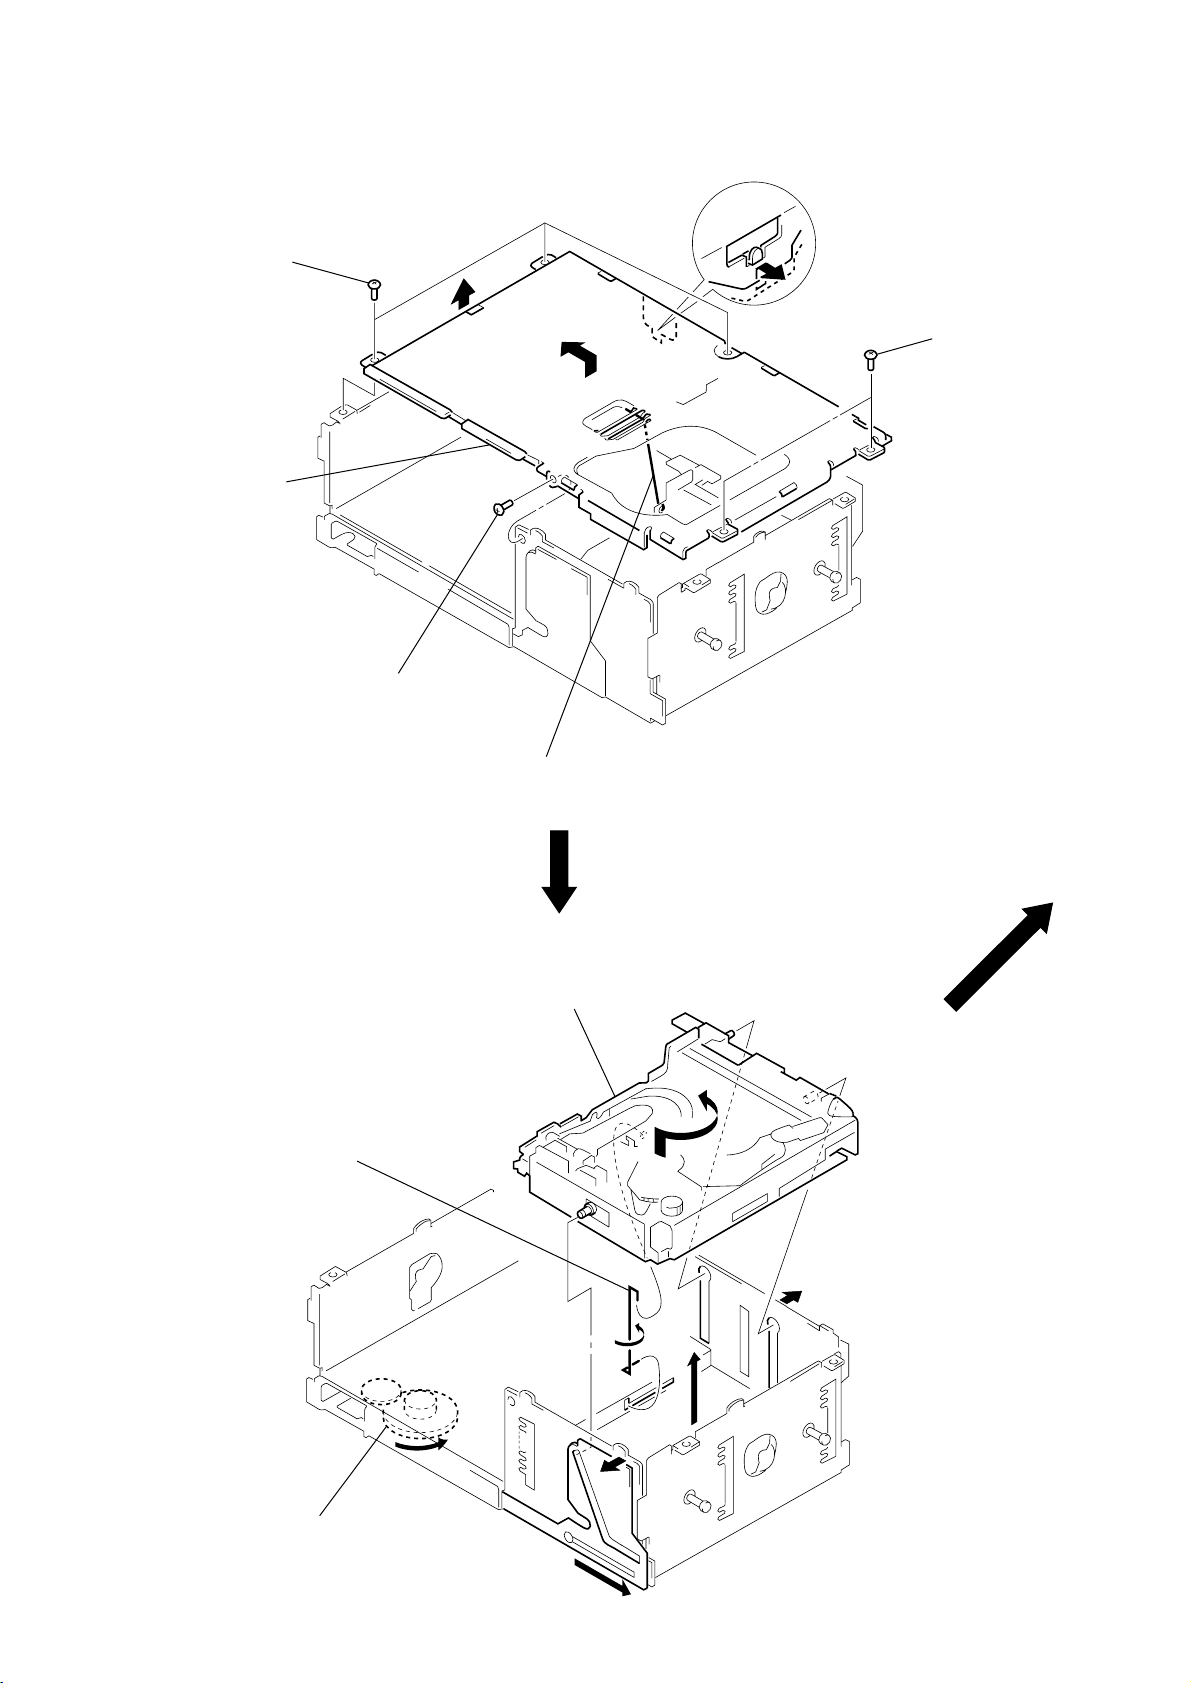
COVER (UPPER T), FRONT PANEL ASS’Y
1 screw
(PTT2.6 × 6)
1 screw
(PTT2.6 × 6)
3 lever (FLT)
1 screw (PTT2.6 × 6)
2 cover (upper T)
1 screw (PTT2.6 × 6
3 lever (FLT)
4 front panel ass’y
MECHANISM DECK (MG-251A-137)
2 tension coil spring (FL)
1 two dampers (250T)
filament tape
1 screw (PTT2.6 × 6)
4 mechanism deck (MG-251A-137)
2 tension coil spring (FL)
3 jack flexible board
(CNJ901)
1 two dampers (250T
5
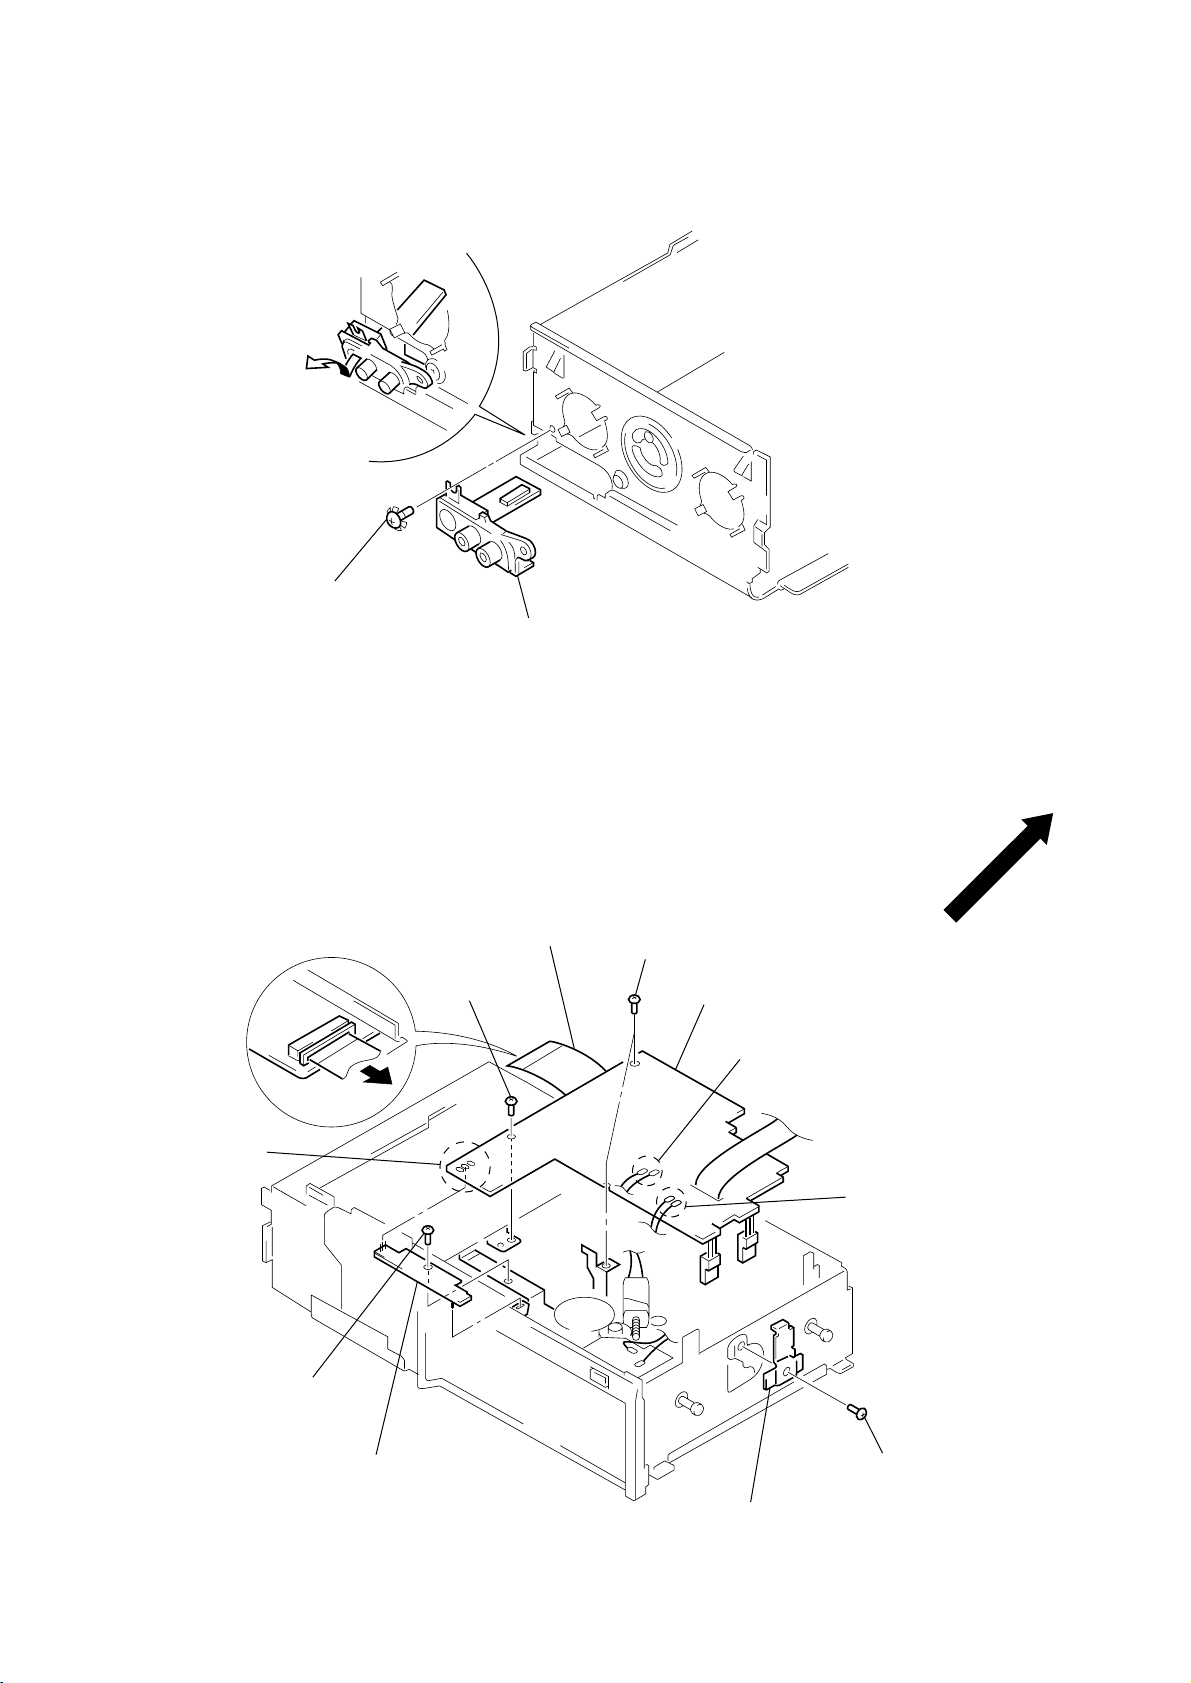
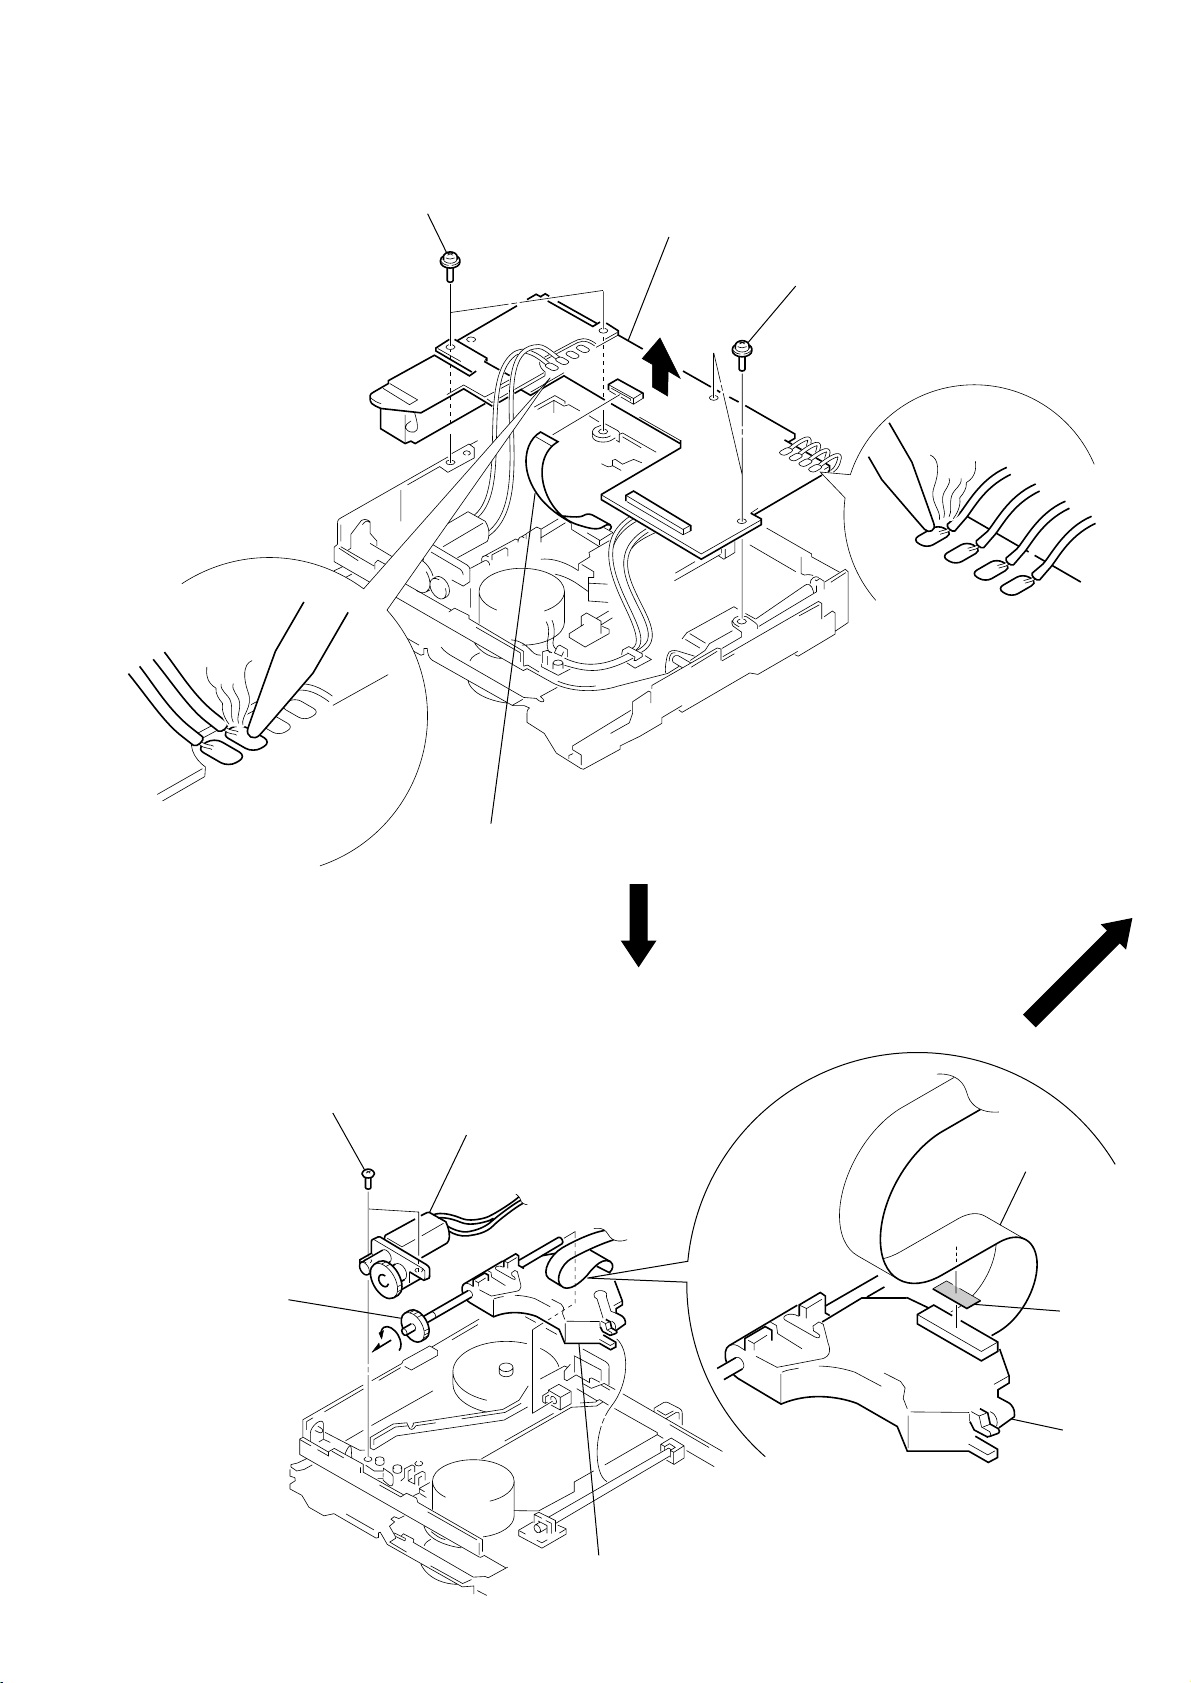
JACK BOARD
Remove the jack board of
the arrow.
1 ground point screw
(PTT2.6 × 6)
2 jack board
MAIN BOARD, SLIDE VARIABLE RESISTOR (ELEVATOR HEIGHT SENSOR) (RV202)
1 main flexible board
(CNJ101)
5 screw (FP)
2 Remove three solders of
the slide variable resistor
(RV202).
7 screw
(PTT2 × 4)
5 two screws (FP)
6 main board
2 Remove two solders of
the elevator motor leads (M104).
2 Remove two solders of
the switch board leads.
8 slide variable resistor
(elevator height sensor)
(RV202)
4 heat sink (T)
3 screw (PTT2 × 4)
6
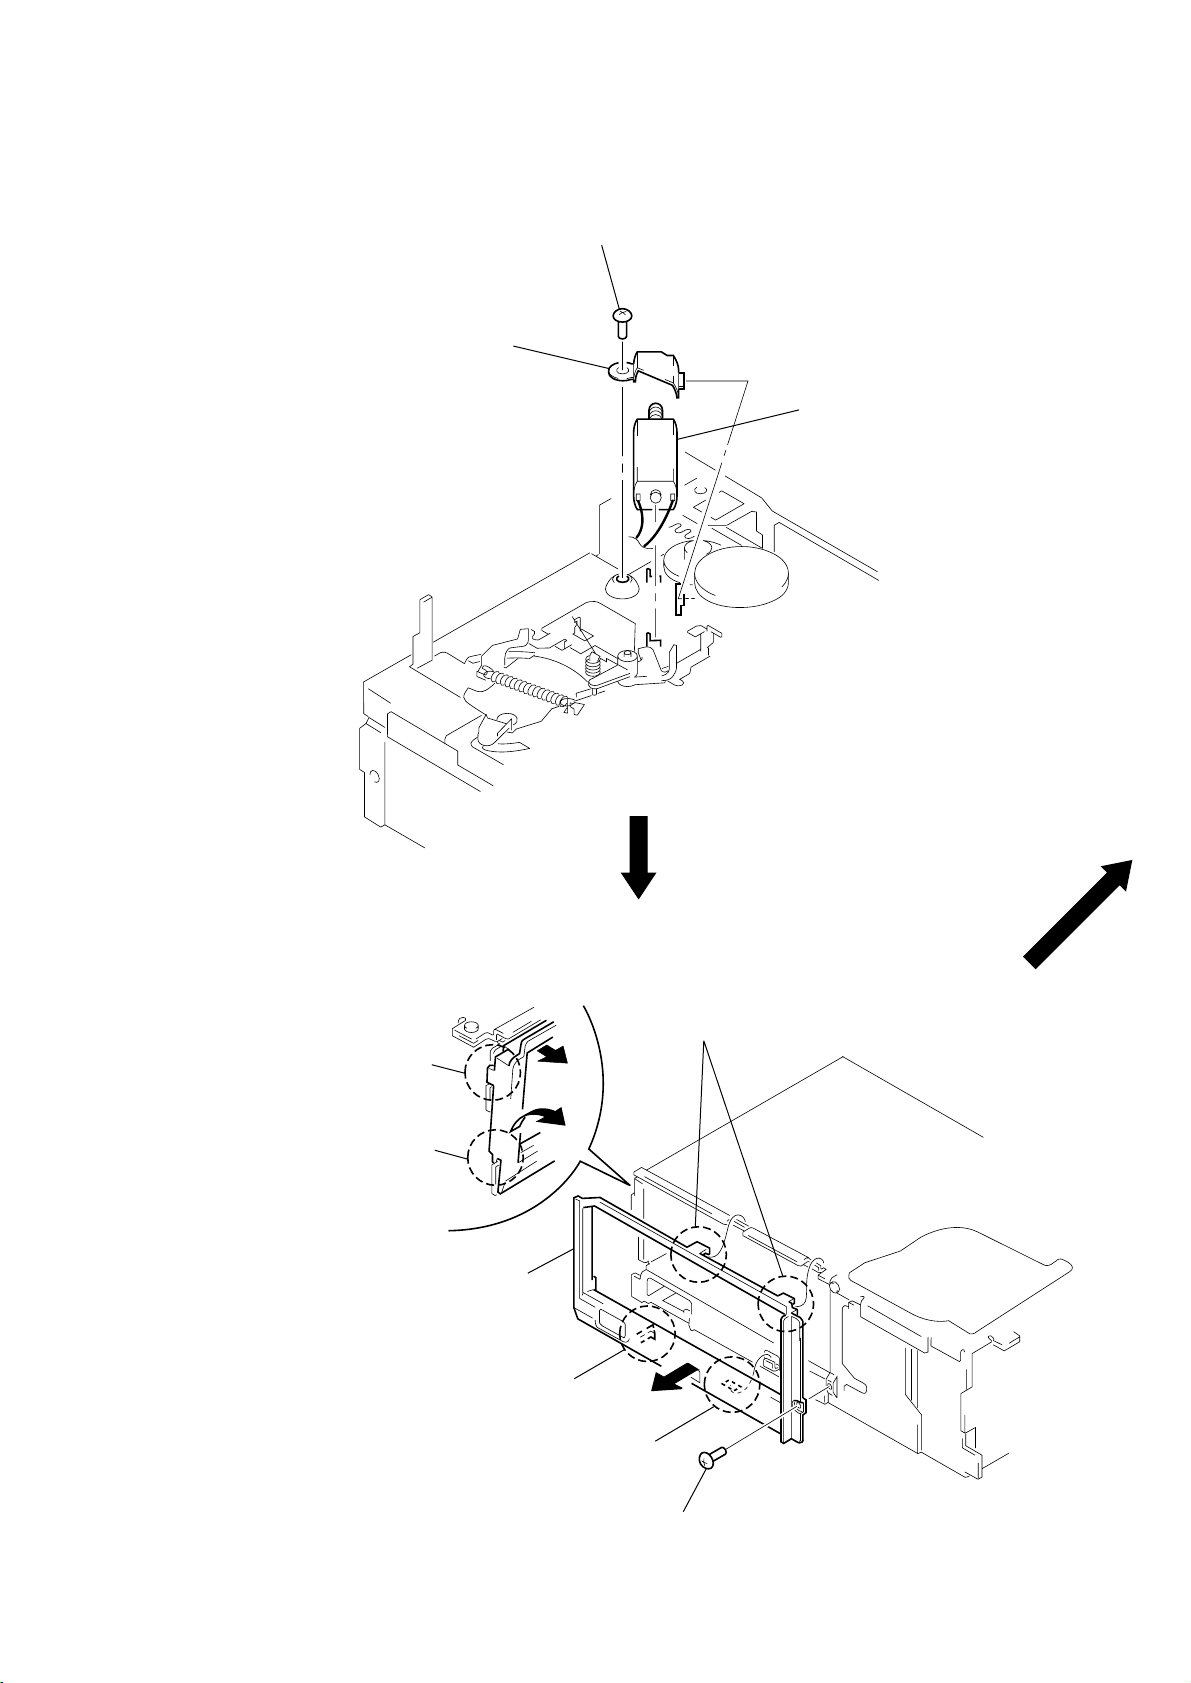
ELJ MOTOR ASS’Y (ELEVATOR) (M104)
2 bracket (EVM.S)
1 screw
(PTT2 × 4)
3 ELJ motor ass’y (elevator)
(M104)
ESCUTCHEON (T)
2 Remove the claw
in the direction of the arrow A.
4 Remove the ditch
in the direction of the arrow B.
3 two claws
A
B
5 Remove the escutcheon (T)
in the direction of the arrow C.
3 claw
C
4 ditch
1 screw (T)
7
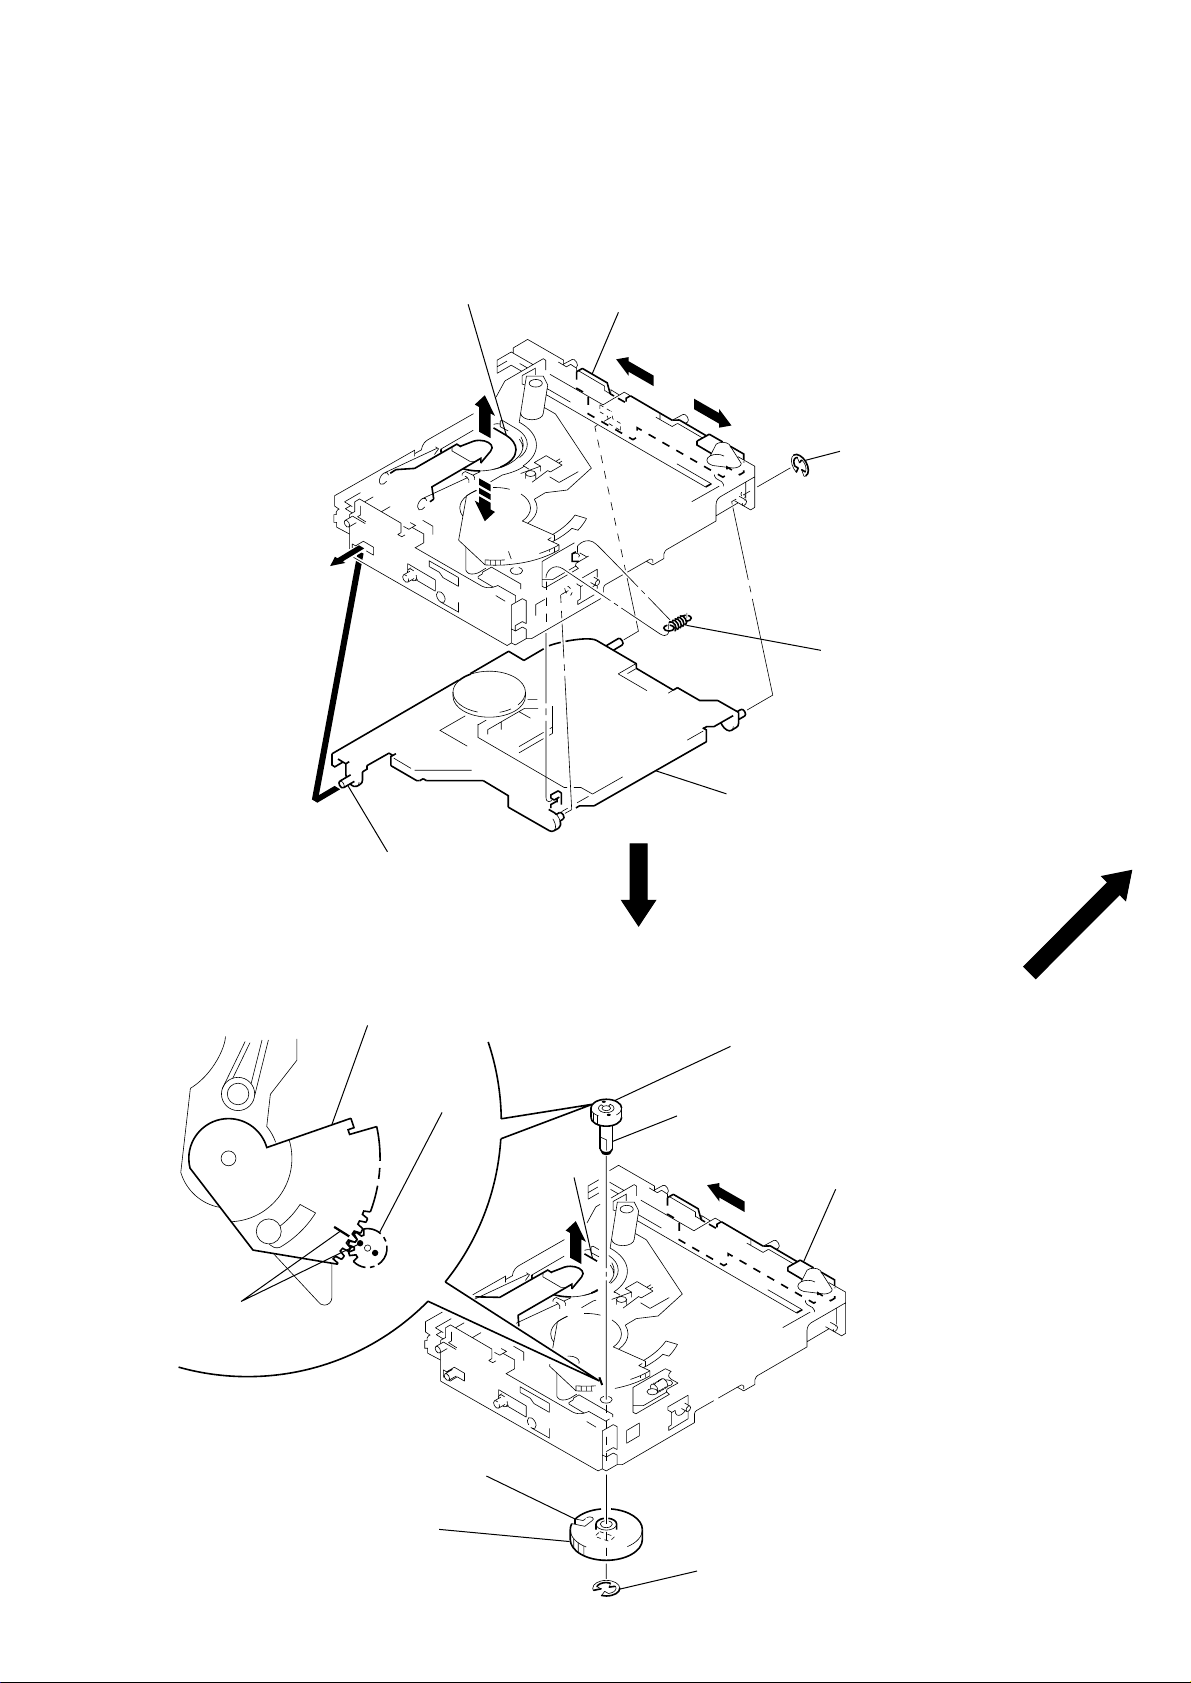
CHASSIS (U.S) SUB ASS’Y
1 three screws
(PTT2 × 4)
2
3 Remove the edge
in the direction
A
of the arrow A.
4 Remove the chassis (U.S)
sub ass’y in the direction
of the arrow B.
1 screw
(PTT2 × 4)
B
5 spring (SUT)
1 two screws
(PTT2 × 4)
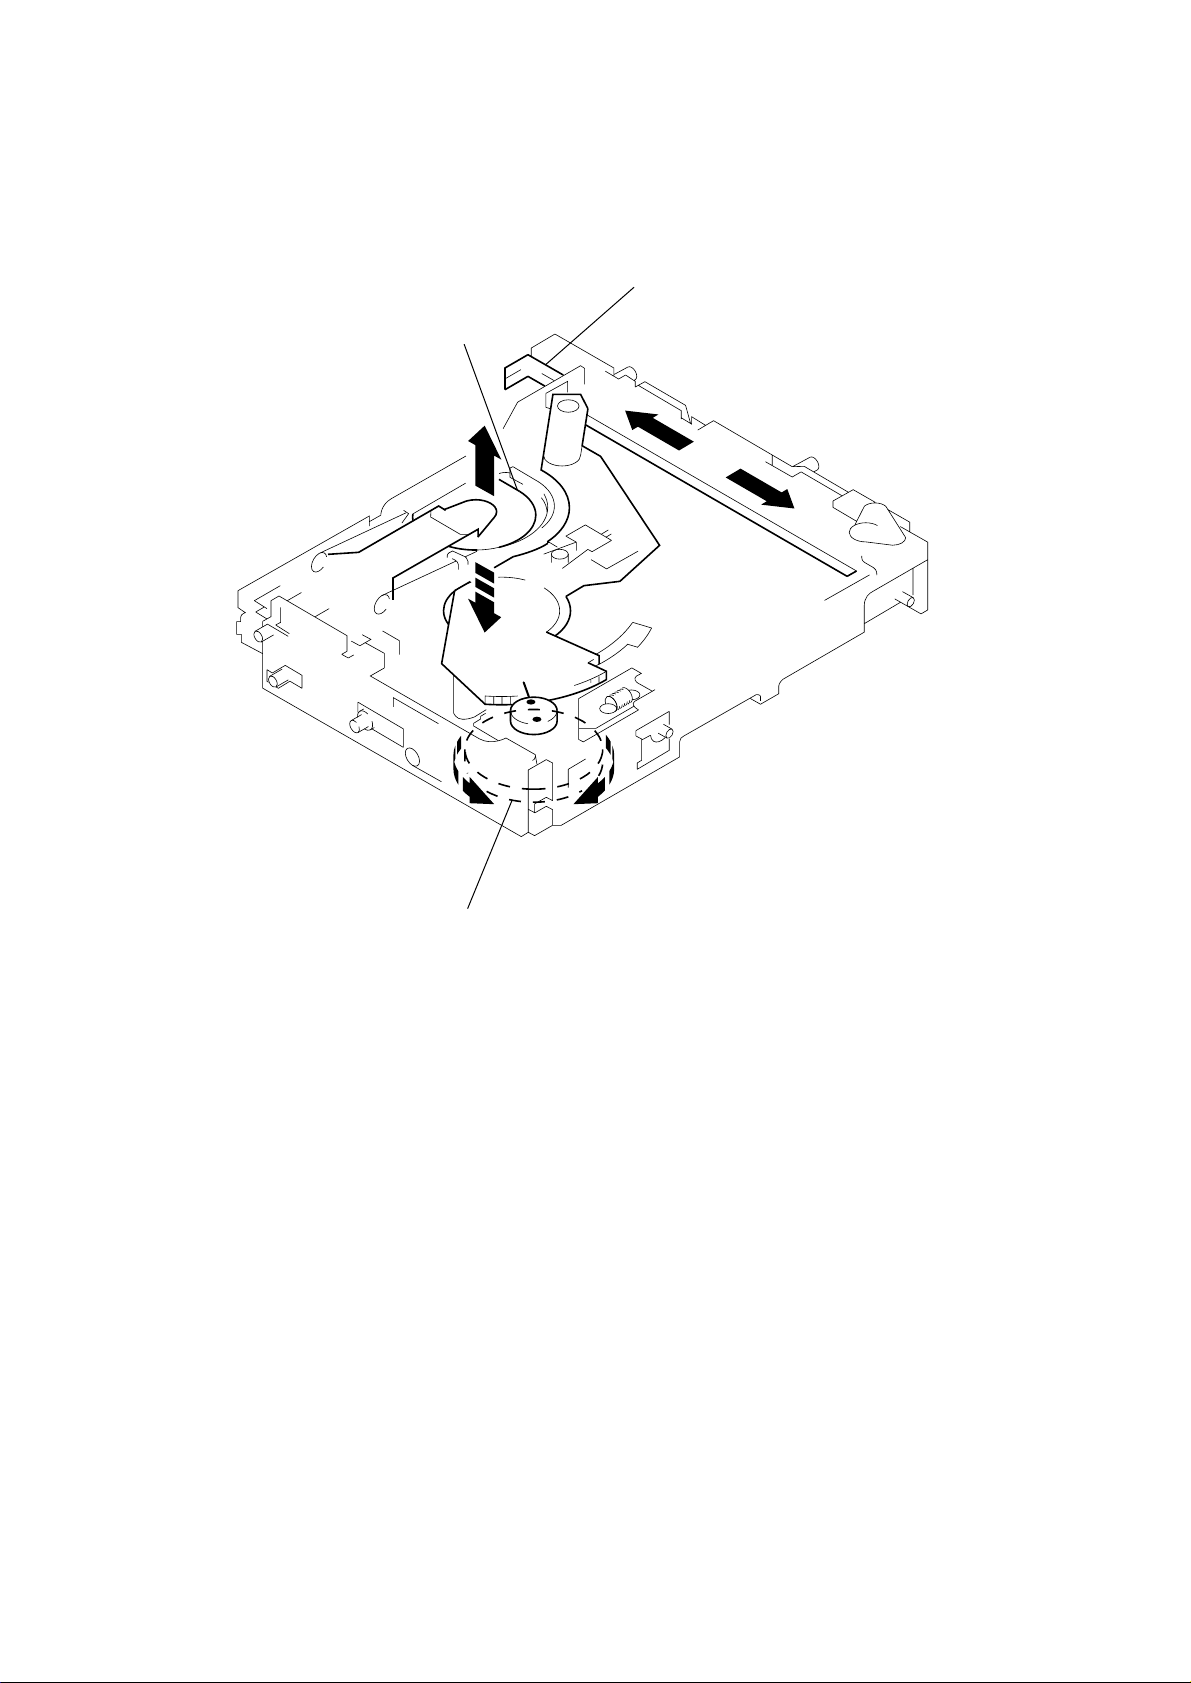
CHASSIS ASS’Y
4 Remove the chassis ass’y
in the direction of the arrow B.
B
5 spring (stopper.lower)
3
2
A
3
1 Turn the gear (EVD.S) fully
in the direction of the arrow A.
8
RF BOARD
3 two screws
(PS2 × 4)
3 two screws
(PS2 × 4)
2 Remove four solders
of the LSW board leads
and spindle motor leads (M102).
2 Remove two solders
of the sled motor leads
(M101).
1 OP flexible board (CN102).
4 RF board
SLED MOTOR ASS’Y (251) (M101), OPTICAL PICK-UP (KSS-720A/K1NP)
4 Turn shaft (feed) ass’y
in the direction
of the arrow,
then remove it.
1 two precision screws
(P2 × 3)
2 sled motor ass’y (251)
(M101)
3 optical pick-up
(KSS-720A/K1NP)
OP flexible board
Note: After connecting OP flexible board,
fix it with adhesive sheet
to optical pick-up.
adhesive
sheet
optical
pick-up
9

LSW BOARD, SPINDLE MOTOR (S) SUB ASS’Y (M102)
)
w
8 two precision screws
(P1.7 × 2.2)
7
3 spring (chucking)
6 retainer (disc
1 precision screw
(P2 × 2.5)
2 LSW board
ELJ MOTOR ASS’Y (CHUCKING) (M103)
2 two screws
(PTT2 × 4)
4 precision scre
5 bracket (CP)
9 Remove the spindle motor (S) sub ass’y (M102)
in the direction of the arrow.
1 Remove two solders of
the chucking motor leads (M103).
(P2 × 2.2)
10
3 retainer (CHM)
4 ELJ motor
ass’y
(chucking)
(M103)
SECTION 4
)
gear (LOAD 2)
gear (LOMINI)
marking
Fig. A
chuck plate
2 Attach the gear (LOMINI) at the position
shown in Fig. A.
shaft (rotary prevention C)
1 Move the lever (LOCK 3A)
fully in the direction of the arrow B
to move the chuck plate up.
B
4 stop ring 1.5 (E type)
3 Attach the gear (LOAD 1) ass’y
with its facing inside.
slit
MECHANISM DECK ASSEMBLY
Note: Follow the assembly procedure in the numerical order given.
OPTICAL PICK-UP COMPLETE ASS’Y
1 Move the lever (LOCK 3A) in the direction of the arrow A,
chuck plate
and return it a little in the direction of arrow B
from the position where the chuck plate is moved
down to the lower limit.
B
A
3 stop ring 2.0 (E type
4 tension spring (DH)
shaft (A)
GEAR (LOMINI)/(LOAD 1) ASS’Y
2 optical pick-up complete ass’y
Note: Insert the shaft (A) first.
11
OPERATION CHECK
1
Confirm that the slider moves in the direction of the arrow C to move
down the chuck plate if the gear (LOAD 1) is rotated in the direction of the
arrow A or the chuck plate moves up and the slider moves in the direction of the arrow D if the gear is rotated in the direction of the arrow B.
chuck plate
slider
D
C
A
gear (LOAD 1) ass’y
B
12
 Loading...