

Page 1

FM/MW/LW
Compact Disc
Player
3-861-912-42 (1)
Operating Instructions
Manual de instrucciones
Manual de instruções
Bruksanvisning
For installation and connections, see the supplied installation/connections
manual.
Para obtener información sobre la instalación y las conexiónes, consulte el manual
de instalación/conexiones suministrado.
Para a instalação e as ligações, consulte o manual de instalação/ligações
fornecido.
Vi hänvisar till det medföljande häftet angående montering/anslutningar.
CDX-4180R
EN
ES
P
S
CDX-4180RV
1998 by Sony Corporation
Page 2

Welcome !
Thank you for purchasing the Sony Compact
Disc Player. This unit lets you enjoy a variety
of features. You can use an optional rotary
commander (RM-X4S).
EN
2
Page 3

Table of Contents
Location of controls ................................................. 4
Getting Started
Resetting the unit ................................................ 5
Detaching the front panel .................................. 5
Setting the clock .................................................. 6
CD Player
Listening to a CD ................................................ 6
Playing a CD in various modes ........................ 7
Radio
Memorising stations automatically
— Best Tuning Memory (BTM) ................... 8
Memorising only the desired stations.............. 8
Receiving the memorised stations .................... 9
Additional Information
Precautions ......................................................... 17
Maintenance ....................................................... 18
Dismounting the unit ....................................... 19
Attaching the label to
the rotary commander ................................ 19
Specifications ..................................................... 20
Troubleshooting guide ..................................... 21
RDS
Overview of the RDS function ........................ 10
Displaying the station name ............................ 10
Re-tuning the same programme automatically
— Alternative Frequencies (AF) ................ 10
Listening to traffic announcements ................ 11
Presetting the RDS stations
with the AF and TA data ............................ 12
Locating a station by programme type .......... 13
Setting the clock automatically ....................... 14
Other Functions
Using the rotary commander .......................... 14
Adjusting the sound characteristics ............... 16
Attenuating the sound ..................................... 16
Changing the sound and display settings ..... 16
EN
3
Page 4
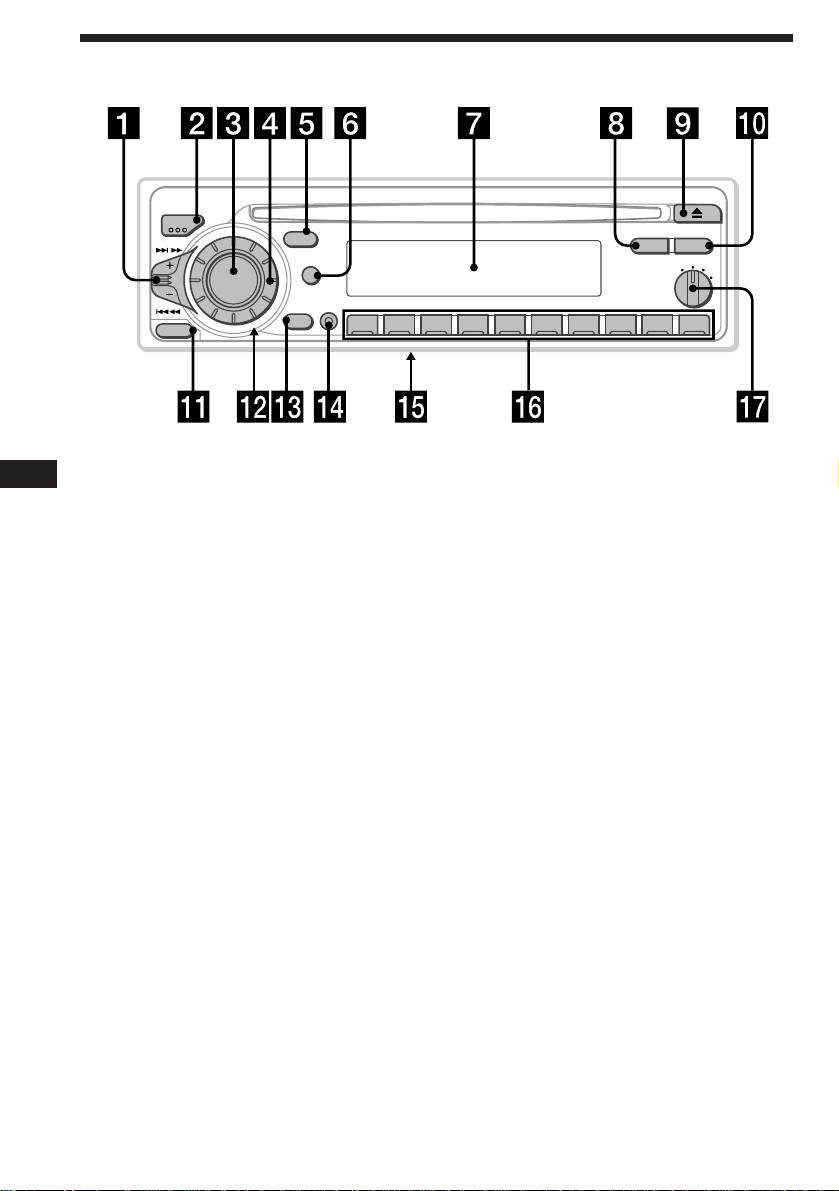
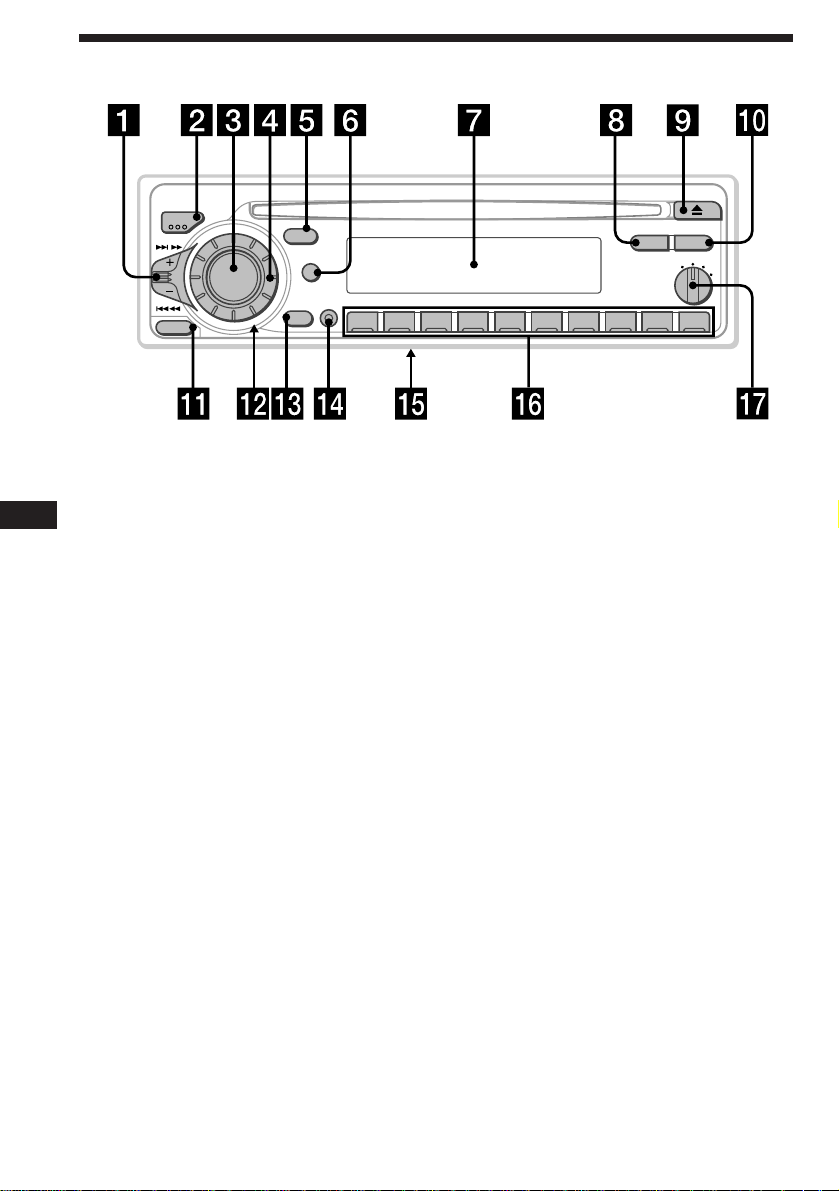
Location of controls
MODE
SEEK/AMS
SOURCE
RELEASE
Refer to the pages for details.
EN
1 SEEK/AMS (seek/Automatic Music
Sensor/manual search) control 7, 8, 9,
11, 13
2 MODE (band select) button 8, 9
3 SOURCE (source select) button 6, 8, 9
4 Dial (volume/bass/treble/left-right/
front-rear) 6, 16
5 SOUND button 16
6 DSPL (display mode change) button
6, 9, 10
7 Display window
8 PTY button
RDS Programme 13
9 6 (eject) button 6
!º AF/TA button 10, 11, 12
!¡ RELEASE (front panel release) button
5, 18
SOUND
DSPL
D
OFF
SHIFT
PTY
AF/TA
1
OFF
2
D - BASS
2 3 4 5 6 7 8 9110
3
CDX-4180R
!™ Reset button (located on the front side
of the unit behind by the front panel) 5
!£ OFF button 5, 6
!¢ SHIFT button
PLAY MODE 7, 8, 9, 11, 12
REP 7
SET UP 6, 14, 16
SHUF 7
!∞ POWER SELECT switch (located on the
bottom of the unit)
See “POWER SELECT Switch” in the
Installation/Connections manual.
!§ During radio reception:
Number buttons 8, 9
!¶ D-BASS dial 17
4
Page 5
Getting Started
Resetting the unit
Before operating the unit for the first time or
after replacing the car battery, you must reset
the unit.
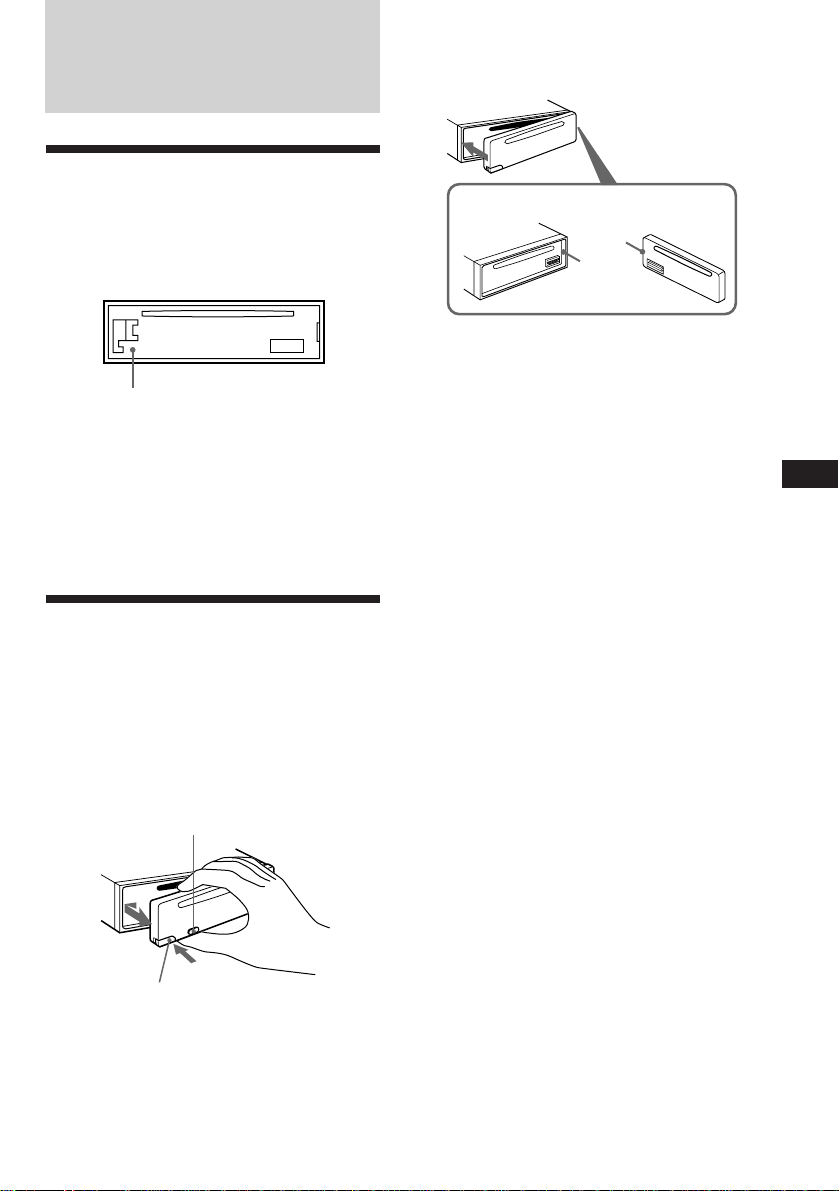
Press the reset button with a pointed object,
such as a ballpoint pen.
Reset button
Notes
• Pressing the reset button will erase the clock and
some memorized functions.
• When you connect the power supply cord to the
unit or reset the unit, wait for about 10 seconds
before you insert a disc. If you insert a disc within
these 10 seconds, the unit will not be reset, and
you will have to press the reset button again.
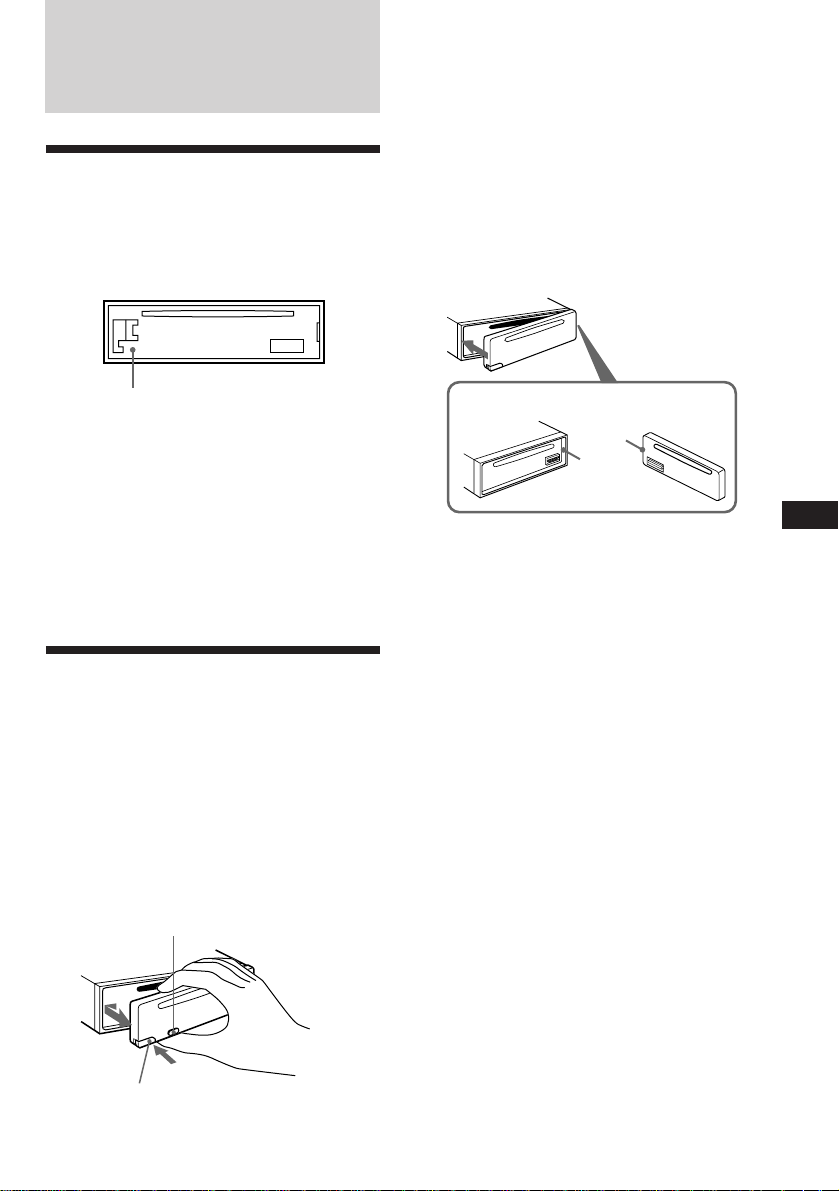
Detaching the front panel
You can detach the front panel of this unit to
prevent the unit from being stolen.
1 Press (OFF).
2 Press (RELEASE) to open up the front
panel. Then slide the front panel a little
to the left, and pull it off towards you.
(OFF)
Attaching the front panel
Align part A of the front panel to part B of
the unit as illustrated, and push until it clicks.
A
B
Notes
• Be sure not to attach the front panel upside
down.
• Do not press the front panel hard against the
unit when attaching it. Press it lightly against the
unit.
• Do not press hard or put excessive pressure on
the display windows of the front panel.
• Do not expose the front panel to direct sunlight,
heat sources such as hot air ducts, and do not
leave it in a humid place. Never leave it on the
dashboard of a car parked in direct sunlight
where there may be a considerable rise in
temperature.
Caution alarm
If you turn the ignition key switch to the OFF
position without removing the front panel, the
caution alarm will beep for a few seconds
(only when the POWER SELECT switch is set
to the A position).
If you connect an optional power amplifier and
do not use the built-in amplifier, the beep tone
will be disabled.
EN
Getting Started
(RELEASE)
Notes
• Be sure not to drop the panel when detaching it
from the unit.
• If you press (RELEASE) to detach the panel while
the unit is still on, the unit will turn off
automatically to prevent the speakers from
being damaged.
• When you carry the front panel with you, put it
in the supplied front panel case.
5
Page 6
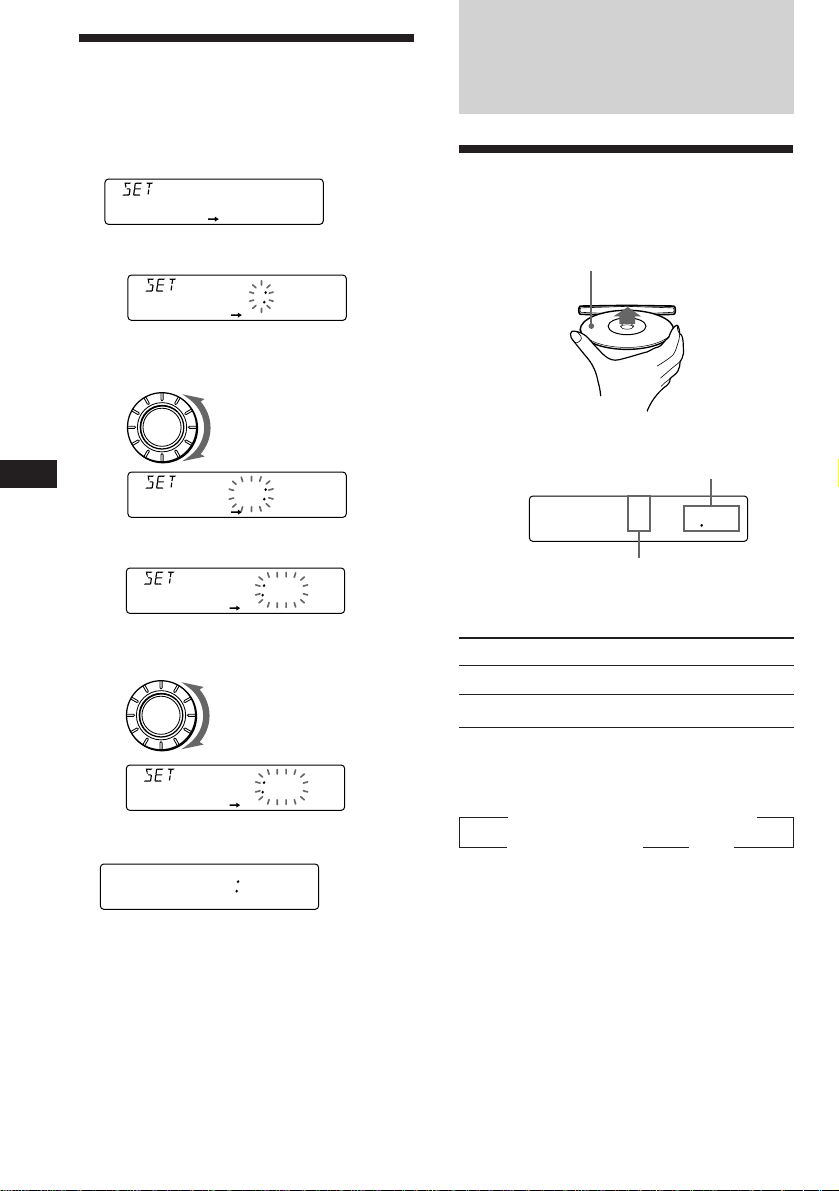
Setting the clock
5 215
TRACK
CD
The clock uses a 24-hour digital indication.
Example: Set the clock to 10:08
1 Press (SHIFT), then press (2) (SET UP).
CLOCK
SETUP
1 Press (4) (n).
1OO
SETUP
The hour digit flashes.
2 Set the hour.
CD Player
Listening to a CD
Simply insert the CD.
Playback starts automatically.
Labelled side up
EN
2 Press (SHIFT).
3 Press (SHIFT).
SOURCE
3 Press (4) (n).
The minute digits flash.
4 Set the minute.
SOURCE
1OO8
SETUP
The clock starts.
After the mode setting is complete, the
display goes back to normal playback
mode.
to go backward
to go forward
1OOO
SETUP
1OOO
SETUP
to go backward
to go forward
1OO8
SETUP
If a CD is already inserted, press (SOURCE)
repeatedly until “CD” appears.
Elapsed playing time
Track number
Note
To play back an 8 cm CD, use the optional Sony
compact disc single adapter (CSA-8).
To Press
Stop playback 6 or (OFF)
Eject the CD 6
Changing the displayed item
Each time you press (DSPL), the item changes
as follows:
z Elapsed playing time/ Track number
MOTION DISPLAY* Z Clock Z
* All the items above are scrolled in the display
one by one in order.
Note
If the POWER SELECT switch on the bottom of the
unit is set to the B position, turn the power on
first, then set the clock.
6
Page 7
Locating a specific track
SETUP PLAYMODE
REP SHUF
REP1
REP1
CD
SETUP PLAYMODE
REP SHUF
1SHUF
CD
— Automatic Music Sensor (AMS)
During playback, push the SEEK/AMS
control up or down momentarily.
To locate succeeding
tracks
To locate preceding
tracks
SEEK/AMS
Locating a specific point in a track
— Manual Search
During playback, push the SEEK/AMS
control up or down and hold. Release
the button when you have found the
desired point.
To search forward
To search backward
SEEK/AMS
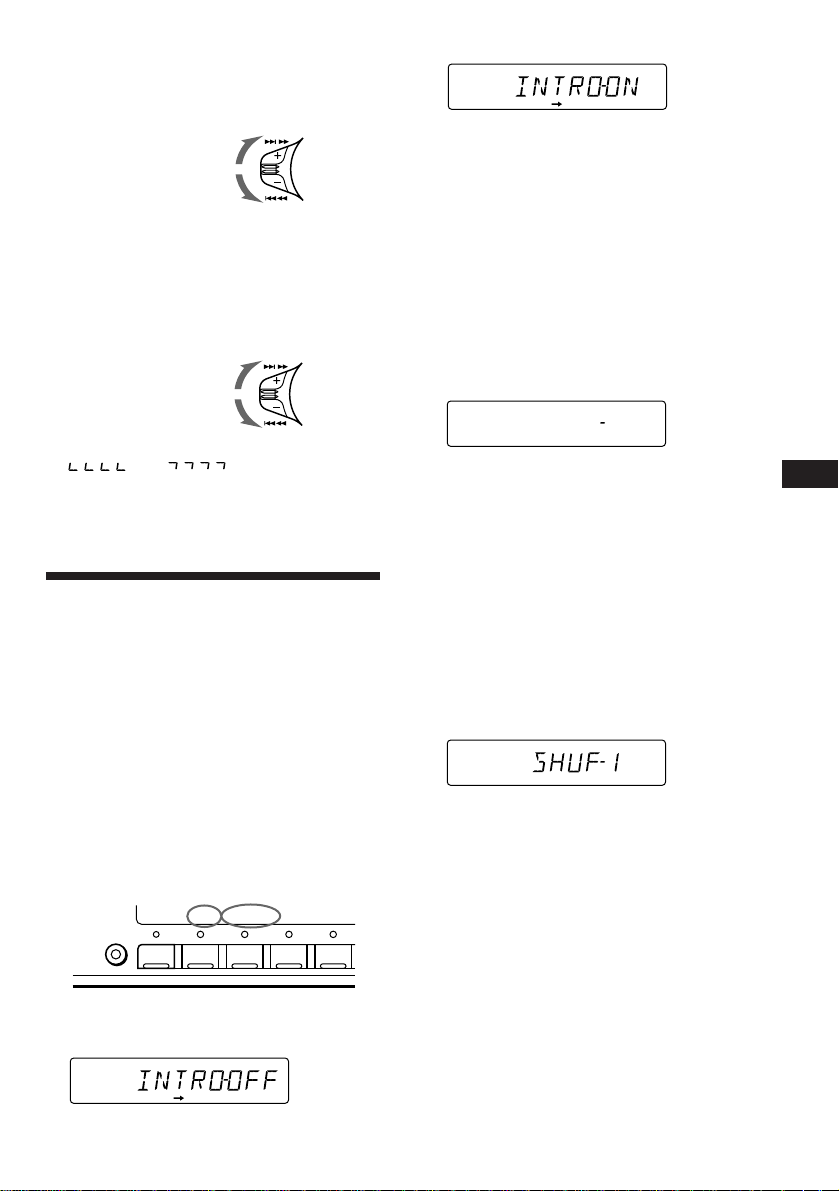
3 Press (4) (n) to select “INTRO-ON.”
CD
PLAYMODE
Intro Scan starts.
4 Press (SHIFT).
To go back to normal playback mode, select
“INTRO-OFF” in step 3 above.
Playing tracks repeatedly
— Repeat Play
1 During playback, press (SHIFT).
2 Press (6) (REP) repeatedly until ”REP-1“
appears.
Note
If “
display, that means you have reached the
beginning or the end of the disc and you cannot
go any further.
” or “ ” appears in the
Playing a CD in various
modes
You can play CDs in various modes:
•INTRO (Intro Scan) lets you play the first 10
seconds of all the tracks.
•REP (Repeat Play) repeats the current track.
•SHUF (Shuffle Play) plays all the tracks in
random order.
Searching for the desired track
— Intro scan
1 Press (SHIFT).
Every time you press (SHIFT), only the
items you can select light up.
SETUP PLAYMODE
SHIFT
2 Press (3) (PLAY MODE) repeatedly until
“INTRO” appears.
CD
PLAYMODE
2 3 4 51
Repeat Play starts.
3 Press (SHIFT).
To go back to normal playback mode, select
“REP-OFF” in step 2 above.
Playing tracks in random order
— Shuffle Play
1 During playback, press (SHIFT).
2 Press (7) (SHUF) repeatedly until ”SHUF-
1“ appears.
Shuffle Play starts.
3 Press (SHIFT).
To go back to normal playback mode, select
“SHUF-OFF” in step 2 above.
EN
Getting Started/CD Player
7
Page 8

Radio
Memorising stations
automatically
— Best Tuning Memory (BTM)
The unit selects the stations with the strongest
signals and memorises them in the order of
their frequencies. You can store up to 10
stations on each band (FM1, FM2, MW and
LW).
Caution
When tuning in stations while driving, use
Best Tuning Memory to prevent accidents.
1 Press (SOURCE) repeatedly to select the
EN
tuner.
Each time you press (SOURCE), the source
changes as follows:
CD ˜ TUNER
2 Press (MODE) repeatedly to select the
band.
Each time you press (MODE), the band
changes as follows:
z FM1 z FM2 z MW z LW
Memorising only the
desired stations
You can store up to 10 stations on each band
(20 for FM1 and FM2, 10 for each MW and
LW) in the order of your choice.
1 Press (SOURCE) repeatedly to select the
tuner.
2 Press (MODE) repeatedly to select the
band (FM1, FM2, MW or LW).
3 Push the SEEK/AMS control up or down
to tune in the station you want to store
on the number button.
4 Keep the desired number button ((1) to
(10)) pressed for two seconds until
“MEM” appears.
The number button indication appears in
the display.
Note
If you try to store another station on the same
number button, the previously stored station will
be erased.
3 Press (SHIFT), then press (3) (PLAY
MODE) repeatedly until “B.T.M” appears.
4 Press (4) (n).
The unit stores stations in the order of their
frequencies on the number buttons.
A beep sound and the setting is stored.
5 Press (SHIFT).
Notes
• The unit does not store stations with weak
signals. If only a few stations are received, some
number buttons will retain heir former setting.
• When a number is indicated in the display, the
unit starts storing stations from the one currently
displayed.
8
Page 9

Receiving the memorised
stations
1 Press (SOURCE) repeatedly to select the
tuner.
2 Press (MODE) repeatedly to select the
band (FM1, FM2, MW or LW).
If FM stereo reception is poor
— Monaural Mode
1 Press (SHIFT), then press (3) (PLAY
MODE) repeatedly until “MONO”
appears.
2 Press (4) (n) repeatedly until “MONO-
ON“ appears.
The sound improves, but becomes
monaural (“ST” disappears).
3 Press the number button ((1) to (10))
momentarily where the desired station is
stored.
If you cannot tune in a preset
station
Push the SEEK/AMS control up or down
momentarily to search for the station
(automatic tuning).
Scanning stops when the unit receives a
station. Push the SEEK/AMS control up or
down repeatedly until the desired station is
received.
Note
If the automatic tuning stops too frequently, press
(SHIFT), then press (3) (PLAY MODE) repeatedly
until “LOCAL” (local seek mode) is displayed. Then
press (4) (n) to select “LOCAL-ON”. Press (SHIFT).
Only the stations with relatively strong signals will
be tuned in.
Tip
If you know the frequency of the station you want
to listen to, push the SEEK/AMS control up or
down and hold until the desired frequency
appears (manual tuning).
3 Press (SHIFT).
To go back to normal mode, select “MONOOFF” in step 2 above.
Changing the displayed items
Each time you press (DSPL), the item changes
as follows:
z Frequency z Clock
MOTION DISPLAY* Z
* All the items above are scrolled in the display
one by one in order.
EN
Radio
9
Page 10
RDS
Overview of the RDS
function
Radio Data System (RDS) is a broadcasting
service that allows FM stations to send
additional digital information along with the
regular radio programme signal. Your car
stereo offers you a variety of services. Here are
just a few: re-tuning the same programme
automatically, listening to traffic
announcements and locating a station by
programme type.
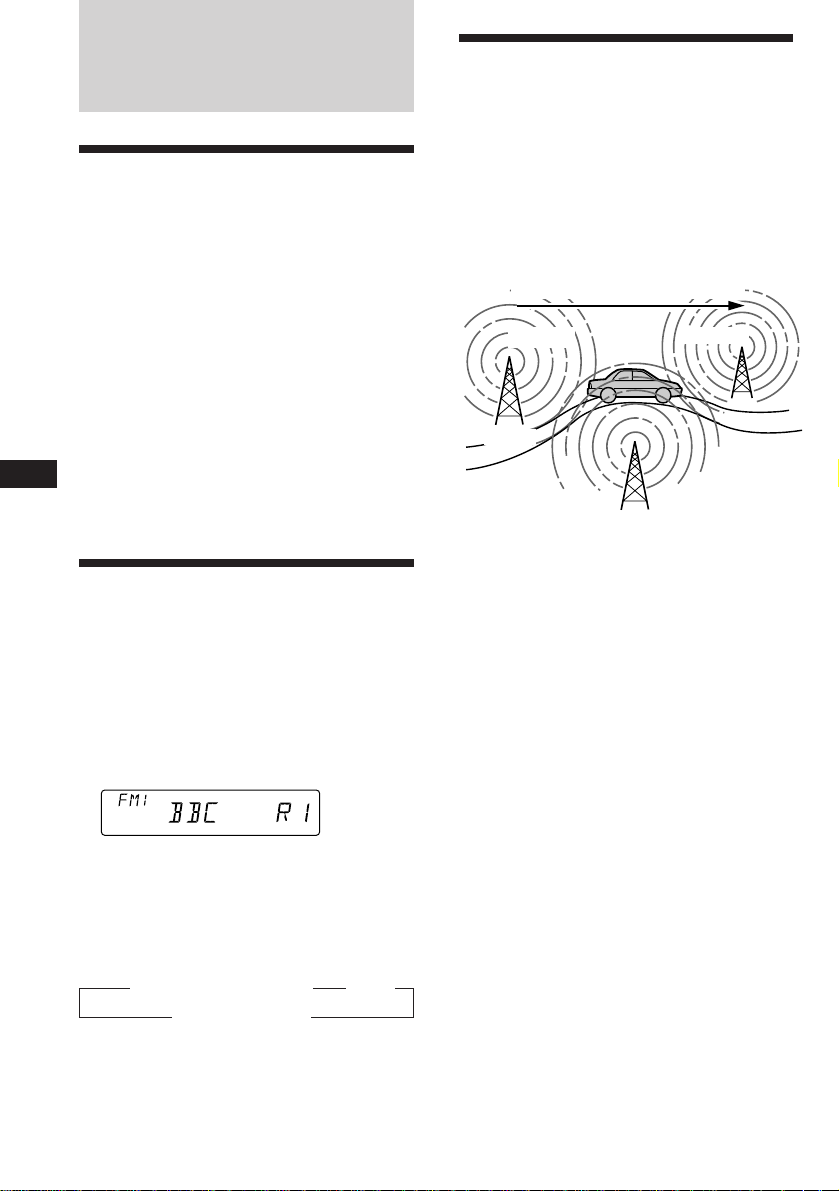
Re-tuning the same
programme automatically
— Alternative Frequencies (AF)
The Alternative Frequencies (AF) function
automatically selects and re-tunes the station
with the strongest signal in a network. By
using this function, you can continuously
listen to the same programme during a longdistance drive without having to re-tune the
station manually.
Frequencies change automatically.
98.5MHz
96.0MHz
Notes
• Depending on the country or region, not all of
the RDS functions are available.
• RDS may not work properly if the signal strength
EN
is weak or if the station you are tuned to is not
transmitting RDS data.
Displaying the station
name
The name of the current station lights up in the
display.
Select an FM station (page 8).
When you tune in an FM station that
transmits RDS data, the station name
appears in the display.
Note
The “*” indication means that an RDS station is
being received.
Changing the displayed item
Each time you press (DSPL), the item changes
as follows:
z Station name (Frequency) z Clock
* All the items above are scrolled in the display
one by one in order.
MOTION DISPLAY* Z
Station
102.5MHz
1 Select an FM station (page 8).
2 Press (AF/TA) repeatedly until “AF-ON”
appears.
The unit starts searching for an alternative
station with a stronger signal in the same
network.
Note
When there is no alternative station in the area
and you do not need to search for an alternative
station, turn the AF function off by pressing
(AF/TA) repeatedly until “AF.TA-OFF” appears.
Note
“NO NAME” appears if the received station does
not transmit RDS data.
10
Page 11

Changing the displayed item
Each time you press (AF/TA), the item changes
as follows:
” AF-ON ” TA-ON ” AF.TA-ON*
AF.TA-OFF “
* Select this to turn on both the AF and TA
functions.
Notes
• “NO AF” and the station name flash alternately,
if the unit cannot find an alternative station in
the network.
• If the station name starts flashing after selecting
a station with the AF function on, this indicates
that no alternative frequency is available. Push
the SEEK/AMS control up or down while the
station name is flashing (within eight seconds).
The unit starts searching for another frequency
with the same PI (Programme Identification) data
(“PI SEEK” appears and no sound is heard). If the
unit cannot find another frequency, “NO PI”
appears, and the unit returns to the originally
selected frequency.
Listening to a regional programme
The “REG-ON” (regional on) function lets you
stay tuned to a regional programme without
being switched to another regional station.
(Note that you must turn the AF function on.)
The unit is factory preset to “REG-ON,” but if
you want to turn off the function, do the
following.
1 Press (SHIFT), then press (3) (PLAY
MODE) repeatedly until “REG” appears.
2 Press (4) (n) repeatedly until “REG-OFF”
appears.
Local link function (United
Kingdom only)
The Local Link function lets you select other
local stations in the area, even though they are
not stored on your number buttons.
1 Press a number button that has a local
station stored on it.
2 Within five seconds, press the number
button of the local station again.
3 Repeat this procedure until the desired
local station is received.
Listening to traffic
announcements
The Traffic Announcement (TA) and Traffic
Programme (TP) data let you automatically
tune in an FM station is broadcasting traffic
announcements even though you are listening
to other programme sources.
Press (AF/TA) repeatedly until “TA-ON”
or “AF.TA-ON” appears.
The unit starts searching for traffic
information stations. “TP” appears in the
display when the unit finds a station
broadcasting traffic announcements.
When the traffic announcement starts,
“TA” flashes. The flashing stops when the
traffic announcement is over.
EN
RDS
3 Press (SHIFT).
Note that selecting “REG-OFF” might cause
the unit to switch to another regional
station within the same network.
To go back to regional on, select “REG-ON” in
step 2 above.
Note
This function does not work in the United
Kingdom and in some other areas.
Tip
If the traffic announcement starts while you are
listening to another programme source, the unit
automatically switches to the announcement and
goes back to the original source when the
announcement is over.
Notes
• “NO TP” flashes for five seconds if the received
station does not broadcast traffic
announcements. Then, the unit starts searching
for a station that broadcasts traffic
announcements.
• When “EON” appears with “TP” in the display,
the current station makes use of broadcast traffic
announcement of other stations in the same
network.
11
Page 12

To cancel the current traffic
announcement
Press (AF/TA) or (SOURCE) momentarily.
To cancel all traffic announcements, turn off
the function by pressing (AF/TA) until
“AF.TA-OFF” appears.
Presetting the volume of traffic
announcements
You can preset the volume level of the traffic
announcements beforehand so you won’t miss
the announcement. When a traffic
announcement starts, the volume will be
automatically adjusted to the preset level.
1 Select the desired volume level.
2 Press (AF/TA) for two seconds.
“TA” appears and the setting is stored.
Receiving emergency
EN
announcements
If an emergency announcement comes in while
you are listening to the radio, the programme
will be automatically switched to the
announcement. If you are listening to a source
other than the radio, the emergency
announcements will be heard if you set AF or
TA to on. The unit will then automatically
switch to these announcements no matter what
you are listening to at the time.
Presetting the same setting for all
preset stations
1 Select an FM band (page 8).
2 Press (AF/TA) repeatedly to select either
“AF-ON”, “TA-ON” or “AF.TA-ON” (for
both AF and TA functions).
Note that selecting “AF.TA-OFF” stores not
only RDS stations, but also non-RDS
stations.
3 Press (SHIFT), then press (3) (PLAY
MODE) repeatedly until “BTM” appears.
4 Press (4) (n).
5 Press (SHIFT).
Presetting different settings for
each preset station
1 Select an FM band, and tune in the
desired station (page 9).
2 Press (AF/TA) repeatedly to select either
“AF-ON”, “TA-ON” or “AF.TA-ON” (for
both AF and TA functions).
3 Press the desired number button until
“MEM” appears.
Repeat from step 1 to preset other stations.
Presetting the RDS
stations with the AF and
TA data
When you preset RDS stations, the unit stores
each station’s data as well as its frequency, so
you don’t have to turn on the AF or TA
function every time you tune in the preset
station. You can select a different setting (AF,
TA, or both) for individual preset stations, or
the same setting for all preset stations.
12
Tip
If you want to change the AF and/or TA setting
after you tuned in the preset station, you can do
so by turning the AF or TA function on or off.
Page 13
Locating a station by
PORT
INFO
programme type
You can locate the station you want by
selecting one of the programme types shown
below.
Programme types Display
News NEWS
Current Affairs AFFAIRS
Information INFO
Sports SPORT
Education EDUCATE
Drama DRAMA
Culture CULTURE
Science SCIENCE
Varied VARIED
Popular Music POP M
Rock Music ROCK M
Middle of the Road Music M.O.R. M
Light Classical LIGHT M
Classical CLASSICS
Other Music Type OTHER M
Weather WEATHER
Finance FINANCE
Children’s programmes CHILDREN
Social Affairs SOCIAL A
Religion RELIGION
Phone In PHONE IN
Travel TRAVEL
Leisure LEISURE
Jazz Music JAZZ
Country Music COUNTRY
National Music NATION M
Oldies Music OLDIES
Folk Music FOLK M
Documentary DOCUMENT
Not specified NONE
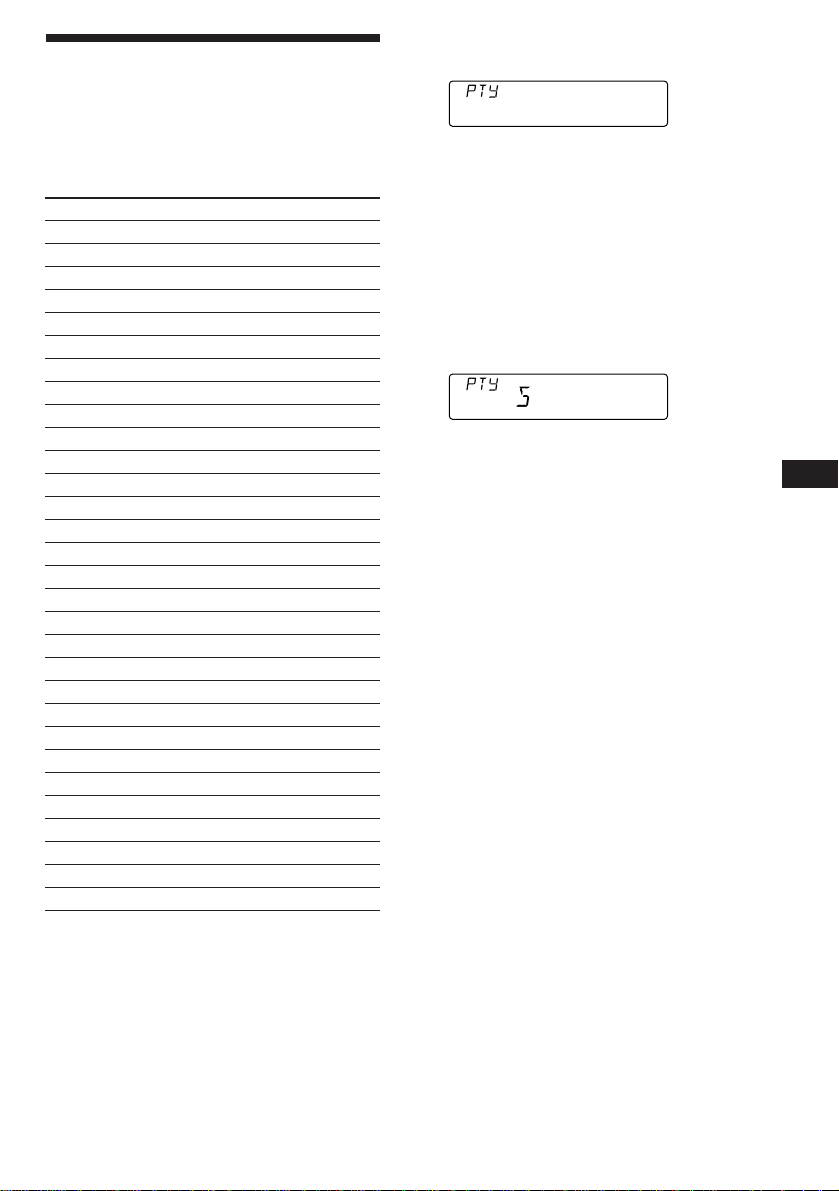
1 Press (PTY) during FM reception until
“PTY” appears.
The current programme type name appears
if the station is transmitting the PTY data.
“- - - - -” appears if the received station is
not an RDS station, or if the RDS data has
not been received.
2 Press (PTY) repeatedly until the desired
programme type appears.
The programme types appear in the order
shown in the above table. Note that you
cannot select “NONE” (Not specified) for
searching.
3 Push the SEEK/AMS control up or down.
The unit starts searching for a station
broadcasting the selected programme type.
When the unit finds the programme, the
programme type appears again for five
seconds.
“NO” and the programme type appear
alternately for five seconds if the unit
cannot find the programme type. It then
returns to the previous station.
EN
RDS
Note
You cannot use this function in some countries
where no PTY (Programme Type selection) data is
available.
13
Page 14
Setting the clock
automatically
The CT (Clock Time) data from the RDS
transmission sets the clock automatically.
1 Press (SHIFT), then press (2) (SET UP)
repeatedly until “CT” appears.
ET
CTOFF
SETUP
2 Press (4) (n) repeatedly until “CT-ON”
appears.
The clock is set.
ET
CTON
CT
SETUP
3 Press (SHIFT) to return to the normal
EN
display.
To cancel the CT function
Select “CT-OFF” in step 2 above.
Notes
• The CT function may not work even though an
RDS station is being received.
• There might be a difference between the time
set by the CT function and the actual time.
Other Functions
You can connect an optional rotary
commander (RM-X4S) with this unit.
Using the rotary
commander
The rotary commander works by pressing
buttons and/or rotating controls.
By pressing buttons (the SOURCE
and MODE buttons)
(SOURCE)
(MODE)
Each time you press (SOURCE), the
source changes as follows:
TUNER ˜ CD
14
Pressing (MODE) changes the operation
in the following ways;
Tuner: FM1 n FM2 n MW n LW
Tip
When the POWER SELECT switch is set to position
B, you can turn on this unit by pressing (SOURCE)
on the rotary commander.
Page 15
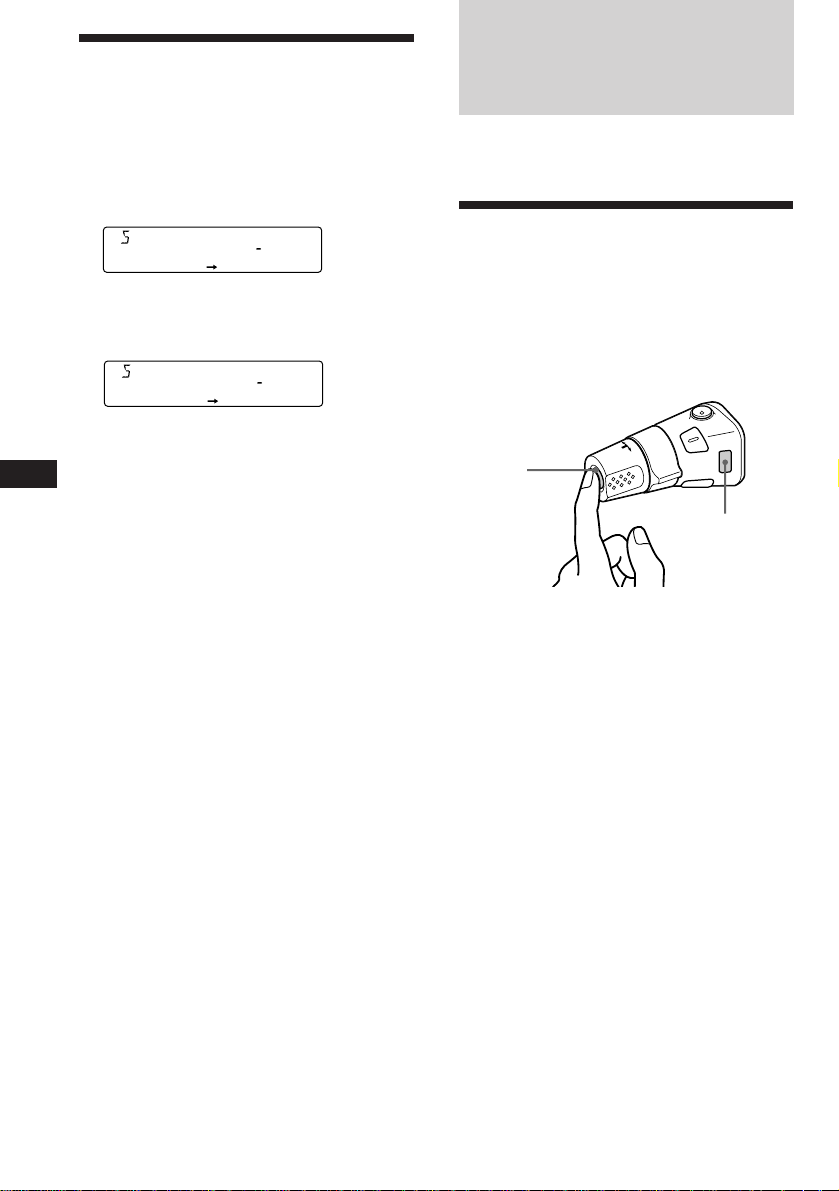
By rotating the control (the SEEK/
AMS control)
Rotate the control momentarily and
release it to:
•Locate a specific track on a disc. Rotate
and hold the control until you locate the
specific point in a track, then release it to
start playback.
•Tune in stations automatically. Rotate and
hold the control to tune in a specific
station.
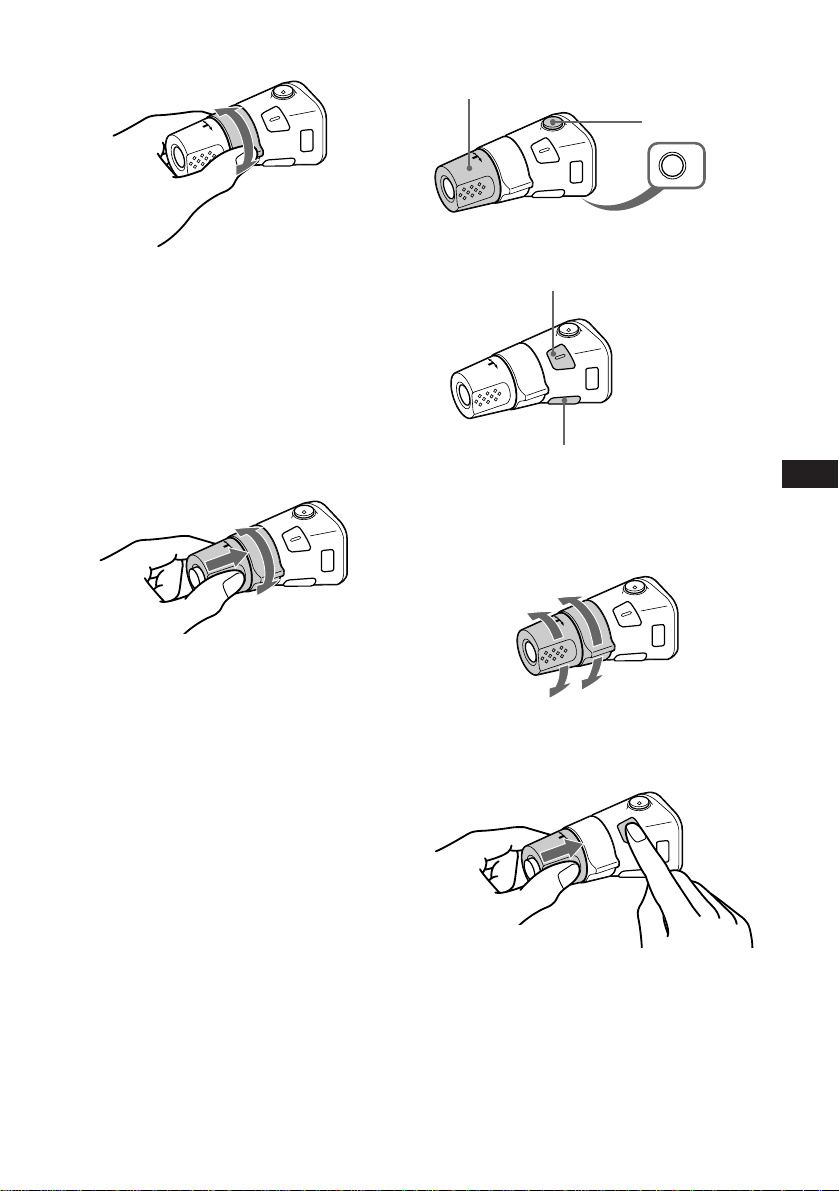
By pushing in and rotating the
control (the PRESET/DISC control)
Other operations
Rotate the VOL control to
adjust the volume.
Press (SOUND) to adjust the
volume and sound menu.
Press (DSPL) to change the
displayed items.
Press (ATT) to
attenuate
the sound.
OFF
Press (OFF) to turn
off the unit.
Changing the operative direction
The operative direction of controls is factoryset as in the illustration below.
To increase
EN
RDS/ Other Functions
Push in and rotate the control to:
Receive the stations memorised on the
number buttons.
To decrease
If you need to mount the rotary commander on
the right side of the steering column, you can
reverse the operative direction.
Press (SOUND) for two seconds while
pushing the VOL control.
15
Page 16

Adjusting the sound
characteristics
You can adjust the bass, treble, balance and
fader.
Each source can store the bass and treble levels
respectively.
1 Select the item you want to adjust by
pressing (SOUND) repeatedly.
VOL (volume) n BAS (bass) n
TRE (treble) n BAL (left-right) n
FAD (front-rear)
2 Adjust the selected item by rotating the
dial.
Adjust within three seconds after selecting
the item. (After three seconds, the dial
functions as the volume control.)
EN
Attenuating the sound
Press (ATT) on the rotary commander.
“ATT-ON” flashes momentarily.
To restore the previous volume level, press
(ATT) again.
Tip
The unit decreases the volume automatically when
a telephone call comes in (Telephone-ATT
function).
Changing the sound and
display settings
You can set:
•CLOCK (page 6).
•CT (Clock Time) (page 14).
•D.INFO (Dual Information) to display the
clock and the play mode at the same time
(ON) or to display the information
alternately (OFF).
•BEEP to turn on or off the beeps.
•RM (Rotary Commander) to change the
operative direction of the controls of the
rotary commander.
— Select “NORM” to use the rotary remote
as the factory-set position.
— Select “REV” when you mount the rotary
remote on the right side of the steering
column.
1 Press (SHIFT).
2 Press (2) (SET UP) repeatedly until the
desired item appears.
Each time you press (2) (SET UP), the item
changes as follows:
CLOCK n CT n D.INFO* n BEEP n RM
* When you have not tune the station or there
is no CD being played, these items will not
appear.
Note
The displayed item will differ depending on
the source.
3 Press (4) (n) to select the desired
setting (for example: ON or OFF).
16
4 Press (SHIFT).
After the mode setting is complete, the
display goes back to normal playback
mode.
Page 17
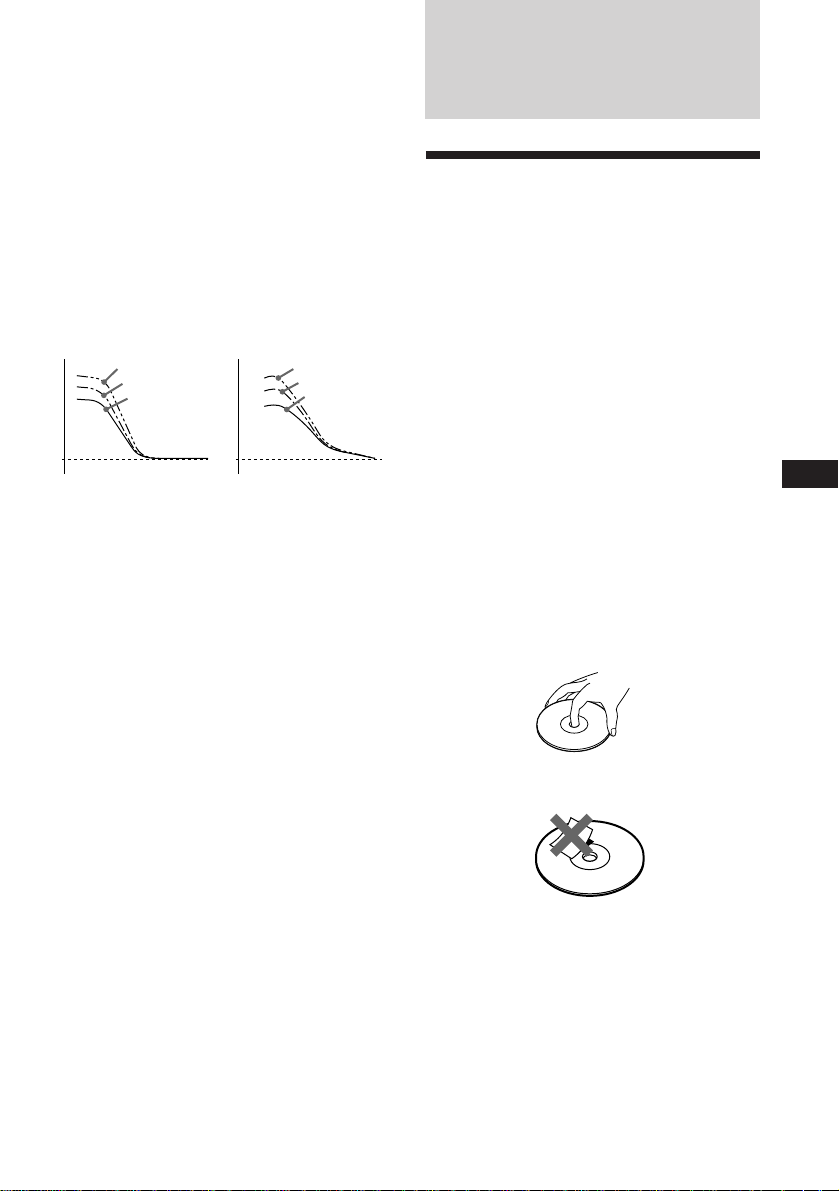
Boosting the bass sound — D.bass
You can enjoy clear and powerful bass sound.
The D-bass function boosts the low frequency
signal with a sharper curve than conventional
bass boost.
You can hear the bass line more clearly even if
the vocal sound is the same volume. You can
emphasize and adjust the bass sound easily
with the D-bass control. This effect is similar to
the one you get when you use an optional
subwoofer system.
Moreover, the Digital D-bass* function creates
even sharper and more powerful bass sound
than Analog D-bass.
* Digital D-bass is available during CD playback.
Digital D-BASS
Level
0dB
D-BASS 3
D-BASS 2
D-BASS 1
Analog D-BASS
Level
0dB
Frequency (Hz)Frequency (Hz)
D-BASS 3
D-BASS 2
D-BASS 1
Adjusting the bass curve
Turn the D-BASS dial to adjust the bass
level (1, 2 or 3).
“D-BASS” appears in the display.
During CD playback, “DIGITAL D-BASS”
appears in the display.
To cancel, turn the dial to the OFF position.
Note
If the bass sound becomes distorted, adjust the Dbass dial or volume control.
Additional
Information
Precautions
• If your car was parked in direct sunlight
resulting in a considerable rise in
temperature inside the car, allow the unit to
cool off before operating it.
• If no power is being supplied to the unit,
check the connections first. If everything is in
order, check the fuse.
• If no sound comes from the speakers of
two-speaker systems, set the fader control to
the centre position.
•If your car is equipped with a power aerial, it
will extend automatically while the unit is
operating.
If you have any questions or problems
concerning your unit that are not covered in
this manual, please consult your nearest Sony
dealer.
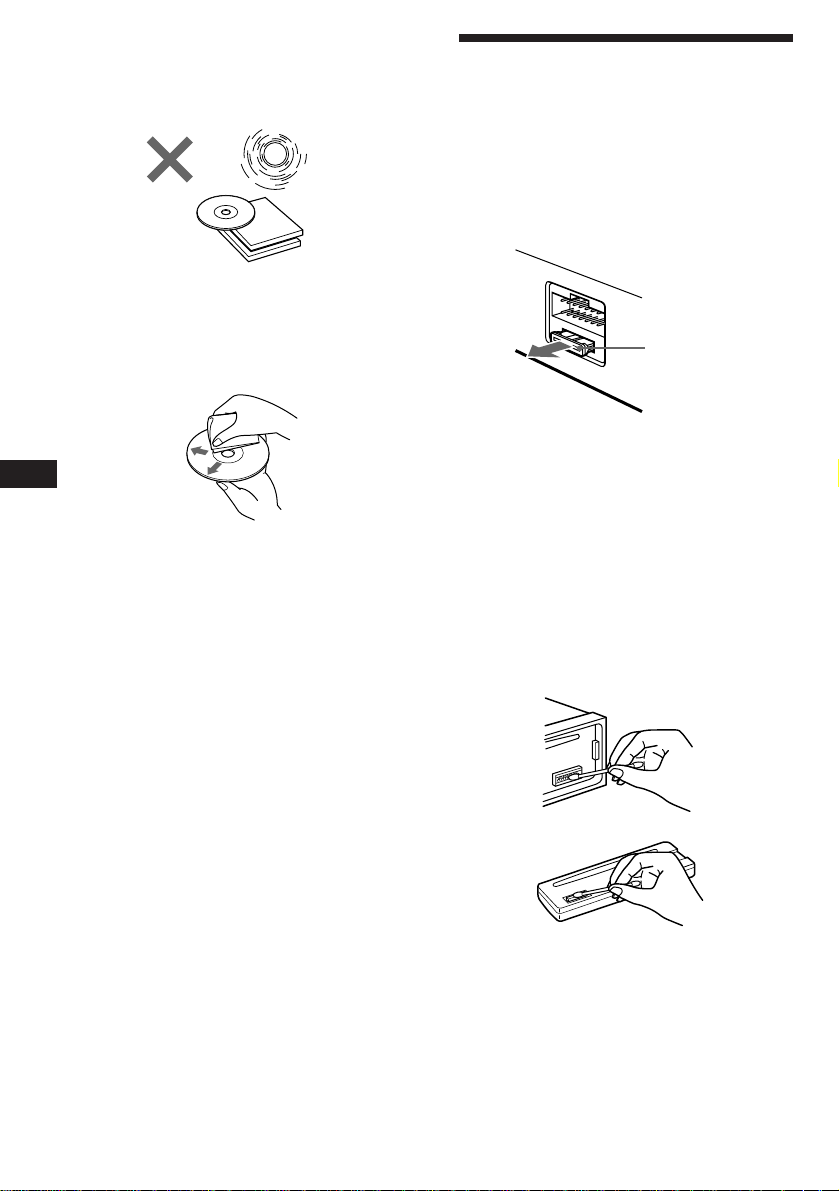
Notes on handling CDs
A dirty or defective disc may cause sound
dropouts while playing. To enjoy optimum
sound, handle the disc as follows.
Handle the disc by its edge. To keep the disc
clean, do not touch the surface.
EN
Other Functions/Additional Information
Do not stick paper or tape on the labelled
surface.
17
Page 18
Do not expose the discs to direct sunlight or
heat sources such as hot air-ducts, or leave
them in a car parked in direct sunlight where
there can be a considerable rise in the
temperature inside the car.
Before playing, clean the discs with an optional
cleaning cloth. Wipe each disc from the centre
out.
Do not use solvents such as benzine, thinner,
commercially available cleaners or antistatic
spray intended for analog discs.
EN
Maintenance
Fuse replacement
When replacing the fuse, be sure to use one
that matches the amperage described on the
fuse. If the fuse blows, check the power
connection and replace the fuse. If the fuse
blows again after replacement, there may be an
internal malfunction. In such a case, consult
your nearest Sony dealer.
Fuse (10 A)
Warning
Never use a fuse with an amperage rating
exceeding the one supplied with the unit as
this could damage the unit.
Notes on moisture condensation
On a rainy day or in a very damp area,
moisture may condense on the lenses inside
the CD player. Should this occur, the unit will
not operate properly. In this case, remove the
disc and wait for about an hour until the
moisture evaporates.
When you play 8 cm CDs
Use the optional Sony compact disc single
adapter (CSA-8) to protect the CD player from
being damaged.
Cleaning the connectors
The unit may not function properly if the
connectors between the unit and the front
panel are not clean. To prevent this, open the
front panel by pressing (RELEASE), then
detach it and clean the connectors with a
cotton swab dipped in alcohol. Do not apply
too much force. Otherwise, the connectors may
be damaged.
Main unit
Back of the front panel
18
Page 19
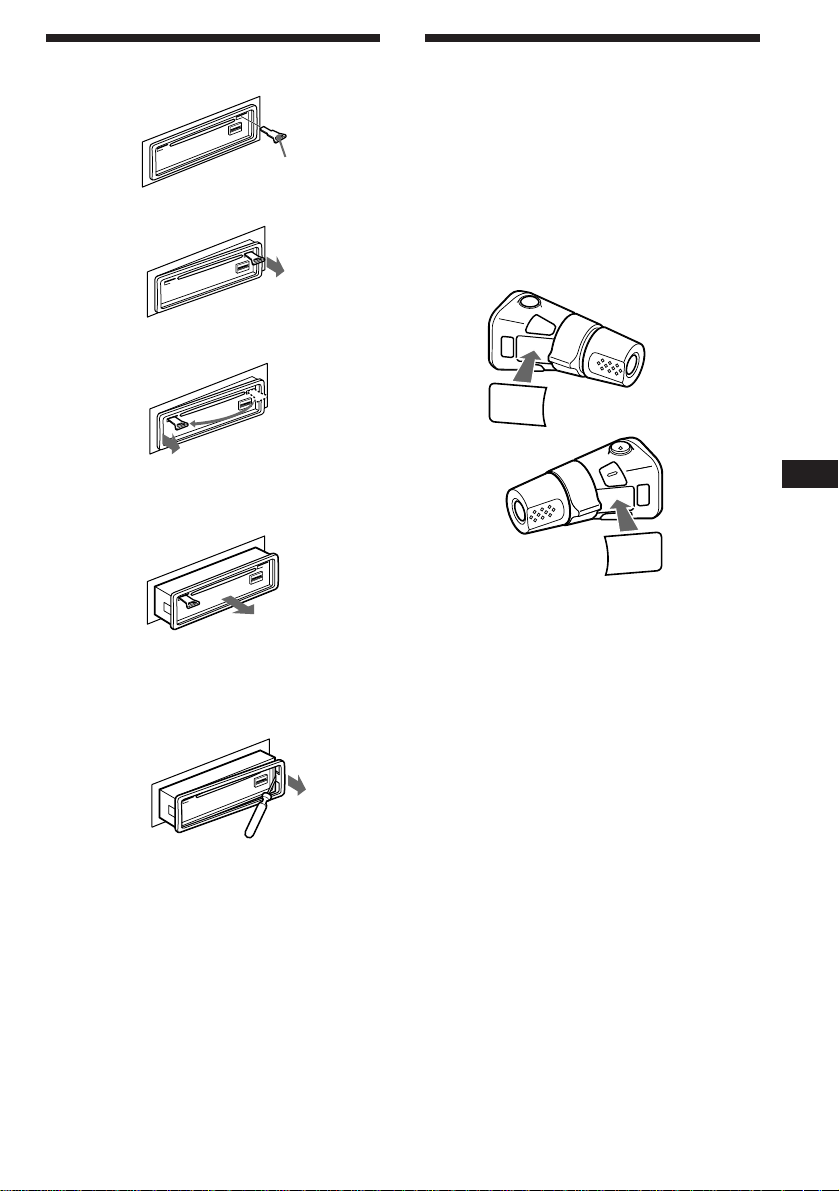
Dismounting the unit
Release key
(supplied)
µ
µ
Attaching the label to the
rotary commander
You can control this unit with the optional
rotary commander (RM-X4S).
Several labels are supplied with the rotary
commander. Attach the label that matches the
functions of this unit and the mounting
position of the rotary commander.
After you mount the rotary commander, attach
the label in the illustration below.
DSPL
MODE
SOUND
µ
Pull the unit out while the release key is inserted.
µ
Press the clip inside the front cover with a thin
screwdriver, and lever the front cover free.
SOUND
MODE
DSPL
EN
Additional Information
19
Page 20

Specifications
CD player section
System Compact disc digital audio
Signal-to-noise ratio 90 dB
Frequency response 10 – 20,000 Hz
Wow and flutter Below measurable limit
system
Tuner section
FM
Tuning range 87.5 – 108.0 MHz
Aerial terminal External aerial connector
Intermediate frequency 10.7 MHz
Usable sensitivity 9 dBf
Selectivity 75 dB at 400 kHz
Signal-to-noise ratio 65 dB (stereo),
Harmonic distortion at 1 kHz
Separation 35 dB at 1 kHz
Frequency response 30 – 15,000 Hz
MW/LW
EN
Tuning range MW: 531 – 1,602 kHz
Aerial terminal External aerial connector
Intermediate frequency 10.71 MHz/450 kHz
Sensitivity MW: 30 µV
68 dB (mono)
0.7 % (stereo),
0.4 % (mono)
LW: 153 – 281 kHz
LW: 50 µV
Power amplifier section
Outputs Speaker outputs
Speaker impedance 4 – 8 ohms
Maximum power output 40 W × 4 (at 4 ohms)
(sure seal connectors)
General
Outputs Line outputs (2)
Power aerial relay control
lead
Power amplifier control
lead
Telephone ATT control
lead
Tone controls Bass ±8 dB at 100 Hz
Treble ±8 dB at 10 kHz
Power requirements 12 V DC car battery
(negative ground)
Dimensions Approx. 178 × 50 × 185 mm
(w/h/d)
Mounting dimensions Approx. 182 × 53 × 162 mm
(w/h/d)
Mass Approx. 1.2 kg
Supplied accessories Parts for installation and
connections (1 set)
Front panel case (1)
Optional accessories Rotary Commander
RM-X4S
Compact disc single
adapter CSA-8
Design and specifications are subject to change
without notice.
20
Page 21

Troubleshooting guide
The following checklist will help you remedy the problems you may encounter with your unit.
Before going through the checklist below, check the connection and operating procedures.
General
Problem
No sound.
The contents of the memory
have been erased.
Indications do not appear in the
display.
No beep tone.
CD playback
Problem
CD cannot be loaded.
Play does not begin.
CD is automatically ejected.
CD will not eject.
The operation buttons do not
function.
The sound skips due to
vibration.
Cause/Solution
•Cancel the ATT function.
•Set the fader control to the centre position for two-speaker
systems.
•Rotate the dial in a clockwise direction to adjust the volume.
• The power cord or battery has been disconnected.
• The reset button has been pressed.
n Store again into the memory.
Remove the front panel and clean the connectors. See “Cleaning
the connectors” (page 18) for details.
•An optional power amplifier is connected and you are not
using the built-in amplifier.
• The beep tone is attenuated (page 16).
Cause/Solution
• Another CD is already loaded.
• The CD was forcibly inserted upside down.
Dusty disc.
The ambient temperature is more than 50°C.
Press 6 for two seconds.
Press the reset button.
• The unit is installed at an angle of more than 60°.
• The unit is not installed in a sturdy part of the car.
EN
Additional Information
Radio reception
Problem
Preset tuning is not possible.
Automatic tuning is not
possible.
The “ST” indication flashes.
Cause/Solution
• Memorise the correct frequency.
• The broadcast signal is too weak.
The broadcast signal is too weak.
n Use manual tuning.
•Tune in the frequency accurately.
•The broadcast signal is too weak.
n Set to the MONO mode (page 9).
21
Page 22

RDS
Problem
A SEEK starts after a few
seconds of listening.
No traffic announcements.
PTY displays “NONE.”
Cause/Solution
The station is non-TP or the signal is weak.
n Press (AF/TA) until “AF.TA-OFF” appears.
•Activate “TA.”
•The station does not broadcast any traffic announcements
despite being TP.
n Tune to another station.
The station does not specify the programme type.
Error displays
The following indications will flash for about five seconds, and an alarm sound will be heard.
Display
ERROR
RESET
EN
If the above-mentioned solutions do not help improve the situation, consult your nearest Sony
dealer.
Cause
A CD is dirty or inserted upside
down.
The CD player cannot be operated
because of some problem.
Solution
Clean or insert the CD correctly.
Press the reset button of the this unit.
22
Page 23

EN
23
Page 24

¡Bienvenido!
Enhorabuena por la adquisición del
reproductor de discos compactos Sony. Esta
unidad le permitirá disfrutar de una serie de
funciones. Podrá usar un mando a distancia
rotativo (RM-X4S) opcional.
ES
2
Page 25

Indice
Localización de los controles ................................. 4
Procedimientos iniciales
Restauración de la unidad ................................. 5
Extracción del panel frontal............................... 5
Ajuste del reloj..................................................... 6
Reproductor de discos compactos
Reproducción de discos compactos ................. 6
Reproducción de discos compactos en
diversos␣ modos .............................................. 7
Radio
Memorización automática de emisoras
— Memorización de la mejor sintonía
(BTM) ............................................................... 8
Memorización de las emisoras deseadas......... 8
Recepción de emisoras memorizadas .............. 9
Información complementaria
Precauciones ...................................................... 17
Mantenimiento .................................................. 18
Desmontaje de la unidad ................................. 19
Adhesión de la etiqueta al
mando rotativo ............................................. 19
Especificaciones ................................................. 20
Guía de solución de problemas ...................... 21
RDS
Descripción general de la función RDS ......... 10
Visualización del nombre de la emisora........ 10
Resintonización automática del mismo
programa
— Frecuencias alternativas (AF) ................ 10
Recepción de anuncios de tráfico ................... 11
Programación de emisoras RDS con los datos
AF y TA ......................................................... 12
Localización de emisoras mediante el tipo de
programa ....................................................... 13
Ajuste automático del reloj .............................. 14
Otras funciones
Uso del mando rotativo ................................... 14
Ajuste de las características de sonido........... 16
Atenuación del sonido ..................................... 16
Cambio de los ajustes de sonido y
visualización ................................................. 16
ES
3
Page 26
Localización de los controles
MODE
SEEK/AMS
SOURCE
RELEASE
SOUND
DSPL
D
OFF
SHIFT
2 3 4 5 6 7 8 9110
Consulte las páginas indicadas para obtener más información
1 Botón SEEK/AMS (búsqueda/sensor de
ES
música automático/búsqueda manual)
7, 8, 9, 11, 13
2 Botón MODE (selección de banda) 8, 9
3 Botón SOURCE (selección de fuente)
6, 8, 9
4 Dial (control de volumen/graves/
agudos/izuquierdo-derecho/delanterotrasero) 6, 16
5 Botón SOUND 16
6 Botón DSPL (cambio del modo de
indicación) 6, 9, 10
7 Visor
8 Botón PTY
Programa RDS 13
9 Botón 6 (expulsión) 6
!º Botón AF/TA 10, 11, 12
PTY
AF/TA
1
OFF
2
D - BASS
3
CDX-4180R
!¡ Botón RELEASE (liberación del panel
frontal) 5, 18
!™ Botón de restauración (situado en el
lado frontal de la unidad, oculto por el
panel frontal) 5
!£ Botón OFF 5, 6
!¢ Botón SHIFT
PLAY MODE 7, 8, 9, 11, 12
REP 7
SET UP 6, 14, 16
Shuf 7
!∞ Selector POWER SELECT (situado en la
parte inferior de la unidad)
Consulte “Selector POWER SELECT” en el
manual de instalación y conexiones.
!§ Durante la recepción de radio:
Botones numéricos 8, 9
!¶ Control D-BASS 17
4
Page 27
Procedimientos
iniciales
Restauración de la unidad
Antes de utilizar la unidad por primera vez o
después de sustituir la batería del automóvil,
es necesario restaurar dicha unidad.
Pulse el botón de restauración con un objeto
puntiagudo, como un bolígrafo.
Botón de restauración
Notas
• Al pulsar el botón de restauración se borrarán los
ajustes del reloj y algunas funciones
memorizadas.
• Cuando conecte el cable de suministro de
alimentación a la unidad o restaure ésta, espere
unos 10 segundos antes de insertar un disco. Si
inserta un disco antes de que transcurran los 10
segundos, la unidad no se restaurará y será
necesario volver a pulsar el botón de
restauración.
Extracción del panel
frontal
Es posible extraer el panel frontal de esta
unidad con el fin de evitar su robo.
1 Pulse (OFF).
2 Pulse (RELEASE) para abrir el panel
frontal. A continuación, deslícelo
ligeramente hacia la izquierda y
extráigalo tirando hacia fuera.
(OFF)
Notas
• Procure no dejar caer el panel al extraerlo de la
unidad.
• Si pulsa (RELEASE) para extraer el panel
mientras la unidad se encuentra encendida, ésta
se desactivará automáticamente para evitar que
se dañen los altavoces.
• Cuando lleve consigo el panel, guárdelo en el
estuche suministrado.
Fijación del panel frontal
Alinee la parte A del panel con la parte B de
la unidad como muestra la ilustración y, a
continuación, ejerza presión hasta oír un
chasquido.
A
B
Notas
• Asegúrese de no fijar el panel frontal al revés.
• No ejerza excesiva presión sobre el panel al
fijarlo a la unidad. Presiónelo ligeramente.
• No sujete con demasiada fuerza ni presione
excesivamente sobre el visor del panel frontal.
• No exponga el panel frontal a la luz solar directa,
a fuentes térmicas, como conductos de aire
caliente, ni lo deje en un lugar húmedo. No lo
deje nunca sobre el salpicadero de un automóvil
aparcado bajo la luz solar directa, ya que podría
producirse un considerable aumento de
temperatura.
Alarma de precaución
Si gira el interruptor de la llave de encendido a
la posición OFF sin haber extraído el panel
frontal, la alarma de precaución emitirá pitidos
durante unos segundos (sólo si el selector
POWER SELECT está ajustado en la posición
A).
Si conecta un amplificador opcional de
potencia y no utiliza el incorporado, los pitidos
se desactivarán.
ES
Procedimientos iniciales
(RELEASE)
5
Page 28

Ajuste del reloj
5 215
TRACK
CD
El reloj dispone de una indicación digital de 24
horas.
Ejemplo: Para ajustar el reloj a las 10:08
1 Pulse (SHIFT) y, a continuación, (2) (SET
UP).
CLOCK
SETUP
1 Pulse (4) (n).
1OO
SETUP
Los dígitos de la hora parpadean.
2 Ajuste la hora.
SOURCE
ES
3 Pulse (4) (n).
para retroceder
para avanzar
1OOO
SETUP
Reproductor de
discos compactos
Reproducción de discos
compactos
Basta con insertar el CD.
La reproducción se iniciará de forma
automática.
Con el lado de la etiqueta hacia arriba
Si ya hay un CD insertado, pulse (SOURCE)
varias veces hasta que aparezca “CD”.
Tiempo de reproducción transcurrido
4 Ajuste los minutos.
2 Pulse (SHIFT).
El reloj se pone en funcionamiento.
3 Pulse (SHIFT).
Una vez finalizado el ajuste de modo, el
visor vuelve a la indicación de modo de
reproducción normal.
Nota
Si el selector POWER SELECT de la parte inferior de
la unidad se ajusta en la posición B, active primero
la alimentación y, a continuación, ajuste el reloj.
6
1OOO
SETUP
Los dígitos de los minutos parpadean.
SOURCE
1OO8
SETUP
para retroceder
para avanzar
1OO8
SETUP
Número de tema
Nota
Si desea reproducir un CD de 8 cm, utilice el
adaptador sencillo opcional de discos compactos
Sony (CSA-8).
Para Pulse
Detener la reproducción 6 o (OFF)
Expulsar el CD 6
Cambio de los elementos mostrados
Cada vez que pulse (DSPL), los elementos
cambiarán de la siguiente forma:
z z Reloj
Tiempo de reproducción
transcurrido/Número de tema
MOTION DISPLAY* Z
* Todos los elementos anteriores se desplazan por
el visor uno por uno en orden.
Page 29

Localización de un tema específico
SETUP PLAYMODE
REP SHUF
REP1
REP1
CD
SETUP PLAYMODE
REP SHUF
1SHUF
CD
— Sensor de música automático (AMS)
Durante la reproducción, desplace el
control SEEK/AMS hacia arriba o abajo
momentáneamente.
Para localizar temas
posteriores
Para localizar temas
anteriores
SEEK/AMS
Localización de un punto específico
de un tema — Búsqueda manual
Durante la reproducción, desplace el
control SEEK/AMS hacia arriba o abajo y
manténgalo en esa posición.
Suelte el botón cuando encuentre el
punto que desee.
Para buscar hacia
delante
Para buscar hacia
atrás
Nota
Si “
significa que ha alcanzado el principio o el final
del disco y no será posible pasar al siguiente.
” o “ ” aparece en el visor
SEEK/AMS
Reproducción de discos
compactos en diversos
modos
Es posible reproducir discos compactos en los
siguientes modos:
•INTRO (Exploración de introducción), que
permite reproducir los 10 primeros segundos
de todos los temas.
•REP (Reproducción repetida), que permite
repetir el tema actual.
•SHUF (Reproducción aleatoria), que permite
reproducir todos los temas en orden
aleatorio.
2 Pulse (3) (PLAY MODE) varias veces
hasta que aparezca “INTRO”.
CD
PLAYMODE
3 Pulse (4) (n) para seleccionar “INTRO-
ON”.
CD
PLAYMODE
Se inicia la exploración de introducciones.
4 Pulse (SHIFT).
Para volver al modo de reproducción normal,
seleccione “INTRO-OFF” en el paso 3.
Reproducción repetida de temas
— Reproducción repetida
1 Durante la reproducción, pulse (SHIFT).
2 Pulse (6) (REP) varias veces hasta que
aparezca “REP-1”.
Se inicia la reproducción repetida.
3 Pulse (SHIFT).
Para volver al modo normal de reproducción,
seleccione “REP-OFF” en el anterior paso 2.
Reproducción de temas en orden
aleatorio — Reproducción aleatoria
1 Durante la reproducción, pulse (SHIFT).
2 Pulse (7) (SHUF) varias veces hasta que
aparezca “SHUF-1”.
ES
Procedimientos iniciales/Reproductor de discos compactos
Búsqueda de temas determinados
— Exploración de introducciones
1 Pulse (SHIFT).
Cada vez que pulse (SHIFT), se iluminarán
sólo los elementos que pueden
seleccionarse.
SETUP PLAY MODE
SHIFT
2 3 4 51
Se inicia la reproducción aleatoria.
3 Pulse (SHIFT).
Para volver al modo normal de reproducción,
seleccione “SHUF-OFF” en el anterior paso 2.
7
Page 30

Radio
Memorización automática
de emisoras
— Memorización de la mejor sintonía (BTM)
Esta unidad selecciona las emisoras de señal
más intensa y las memoriza por orden de
frecuencia. Es posible almacenar hasta 10
emisoras de cada banda (FM1, FM2, MW y
LW).
Precaución
Para sintonizar emisoras durante la
conducción, utilice la función de
memorización de la mejor sintonía para evitar
accidentes.
1 Pulse (SOURCE) varias veces para
ES
seleccionar el sintonizador.
Cada vez que pulse (SOURCE), la fuente
cambia de la siguiente forma:
CD ˜ TUNER
2 Pulse (MODE) varias veces para
seleccionar la banda.
Cada vez que pulse (MODE), la banda
cambia de la siguiente forma:
z FM1 z FM2 z MW z LW
Memorización de las
emisoras deseadas
Es posible almacenar un máximo de 10
emisoras de cada banda (20 de FM1 y FM2 y 10
de cada MW y LW) en el orden que desee.
1 Pulse (SOURCE) varias veces para
seleccionar el sintonizador.
2 Pulse (MODE) varias veces para
seleccionar la banda (FM1, FM2, MW o
LW).
3 Desplace el control SEEK/AMS hacia
arriba o abajo para sintonizar la emisora
que desee almacenar en el botón
numérico.
4 Pulse el botón numérico que desee (de
(1) a (10)) durante dos segundos hasta
que aparezca “MEM”.
En el visor aparecerá la indicación del
botón numérico.
Nota
Si almacena otra emisora en el mismo botón
numérico, la emisora previamente almacenada se
borrará.
3 Pulse (SHIFT) y, a continuación, (3)
(PLAY MODE) varias veces hasta que
aparezca “B.T.M”.
4 Pulse (4) (n).
La unidad almacena en los botones
numéricos las emisoras por orden de
frecuencia.
La unidad emite un pitido y el ajuste se
almacena.
5 Pulse (SHIFT).
Notas
• La unidad no almacena emisoras de señales
débiles. Si se reciben pocas emisoras, algunos
botones numéricos conservarán sus parámetros
anteriores.
• Si el visor muestra algún número, la unidad
almacenará las emisoras a partir del mostrado en
el visor.
8
Page 31

Recepción de emisoras
memorizadas
1 Pulse (SOURCE) varias veces para
seleccionar el sintonizador.
2 Pulse (MODE) varias veces para
seleccionar la banda (FM1, FM2, MW o
LW).
Si la recepción de FM en estéreo es
de mala calidad — Modo monofónico
1 Pulse (SHIFT) y, a continuación, (3)
(PLAY MODE) varias veces hasta que
aparezca “MONO”.
2 Pulse (4) (n) varias veces hasta que
aparezca “MONO-ON”.
El sonido mejorará, aunque será monofónico
(la indicación “ST” desaparecerá).
3 Pulse durante un instante el botón
numérico ((1) a (10)) en el que esté
almacenada la emisora que desee.
Si no puede sintonizar una emisora
programada
Desplace momentáneamente el control
SEEK/AMS hacia arriba o abajo para
buscar la emisora (sintonización
automática).
La exploración se detiene al recibirse una
emisora. Desplace el control SEEK/AMS
hacia arriba o abajo varias veces hasta
recibir la emisora que desee.
Nota
Si la sintonización automática se detiene con
demasiada frecuencia, pulse (SHIFT) y, a
continuación, (3) (PLAY MODE) varias veces hasta
que el visor muestre “LOCAL” (modo de búsqueda
local). A continuación, pulse (4) (n) para
seleccionar “LOCAL-ON”. Pulse (SHIFT).
Sólo se sintonizarán las emisoras de señal
relativamente intensa.
Consejo
Si conoce la frecuencia de la emisora que desea
escuchar, desplace el control SEEK/AMS hacia
arriba o abajo y manténgalo en esa posición hasta
que aparezca la frecuencia que desee
(sintonización manual).
3 Pulse (SHIFT).
Para volver al modo normal, seleccione
“MONO-OFF” en el paso 2.
Cambio de la indicación del visor
Cada vez que pulse (DSPL), los elementos
cambiarán de la siguiente forma:
z Frecuencia z Reloj
MOTION DISPLAY*Z
* Todos los elementos anteriores se desplazan por
el visor uno por uno en orden.
ES
Radio
9
Page 32

RDS
Descripción general de la
función RDS
El sistema de datos de radio (RDS) es un
servicio de radiodifusión que permite a las
emisoras de FM transmitir información digital
complementaria junto con las señales normales
de programas de radio. Este sistema estéreo
para automóvil ofrece, entre otros, los
siguientes servicios: resintonización
automática del mismo programa, recepción de
anuncios de tráfico y localización de emisoras
mediante el tipo de programa.
Notas
• La disponibilidad de todas las funciones RDS está
determinada por el país o la región.
• La función RDS puede no activarse
correctamente si la señal es débil o si la emisora
ES
sintonizada no transmite datos RDS.
Visualización del nombre
de la emisora
El nombre de la emisora actual se ilumina en el
visor.
Cambio de los elementos
mostrados
Cada vez que pulse (DSPL), los elementos
cambiarán de la siguiente forma:
z Nombre de la emisora (Frecuencia)
MOTION DISPLAY*Z Reloj Z
* Todos los elementos anteriores se desplazan por
el visor uno por uno en orden.
Nota
Aparecerá “NO NAME” si la emisora recibida no
transmite datos RDS.
Resintonización
automática del mismo
programa
— Frecuencias alternativas (AF)
La función de frecuencias alternativas (AF)
selecciona y resintoniza automáticamente la
emisora de señal más intensa dentro de una
red. Mediante el uso de esta función, es posible
escuchar continuamente el mismo programa
durante un largo viaje sin necesidad de volver
a sintonizar la emisora manualmente.
Las frecuencias cambian automáticamente.
96,0MHz
98,5MHz
96,0MHz
Seleccione una emisora de FM (página 8).
Al sintonizar una emisora de FM que
transmita datos RDS, el nombre de la
misma se ilumina en el visor.
Nota
La indicación “*” significa que se recibe una
emisora RDS.
10
Emisora
102,5MHz
1 Seleccione una emisora de FM (página 8).
2 Pulse (AF/TA) varias veces hasta que
aparezca “AF-ON”.
La unidad comienza a buscar una emisora
alternativa de señal más intensa dentro de
la misma red.
Nota
Si no existe ninguna emisora alternativa en la zona
y no es necesario buscarla, desactive la función AF
pulsando (AF/TA) varias veces hasta que “AF.TAOFF” se ilumine.
Page 33

Cambio de la indicación del visor
Cada vez que pulse (AF/TA), los elementos del
visor cambiarán de la siguiente forma:
” AF-ON ” TA-ON ” AF.TA-ON*
AF.TA-OFF “
Función de enlace local (sólo Reino
Unido)
Esta función permite seleccionar otras
emisoras locales de la zona, aunque no estén
almacenadas en los botones numéricos.
* Seleccione este elemento para activar las
funciones AF y TA.
Notas
• La indicación “NO AF” y el nombre de la emisora
parpadean alternativamente si la unidad no
encuentra una emisora alternativa en la red.
• Si el nombre de la emisora comienza a parpadear
después de seleccionar una emisora con la
función AF activada, significa que no hay
disponible ninguna frecuencia alternativa.
Desplace el control SEEK/AMS hacia arriba o
abajo mientras el nombre de la emisora
parpadea (sin superar un espacio de ocho
segundos). La unidad inicia la búsqueda de otra
frecuencia con los mismos datos PI (Identificación
de programa) (se muestra “PI SEEK” y no se
recibe sonido). Si la unidad no consigue
encontrar otra frecuencia, se muestra “NO PI” y
la unidad vuelve a la frecuencia originalmente
seleccionada.
Recepción de programas regionales
La función de activación regional (“REG-ON”)
de esta unidad permite permanecer en la
sintonía de un programa regional sin cambiar
a otra emisora. (Observe que es necesario
activar la función AF.) El ajuste de fábrica de la
unidad es “REG-ON”. No obstante, si desea
desactivar la función, realice lo siguiente:
1 Pulse (SHIFT) y, a continuación, (3)
(PLAY MODE) varias veces hasta que
aparezca “REG”.
2 Pulse (4) (n) varias veces hasta que
aparezca “REG-OFF”.
3 Pulse (SHIFT).
Observe que la selección de “REG-OFF”
podría causar que la unidad cambie a otra
emisora regional de la misma red.
Para volver a la activación regional, seleccione
“REG-ON” en el anterior paso 2.
Nota
Esta función no se activa en el Reino Unido ni en
determinadas zonas.
1 Pulse un botón numérico en el que haya
almacenada una emisora local.
2 En un intervalo de cinco segundos,
vuelva a pulsar el botón numérico de la
emisora local.
3 Repita este procedimiento hasta recibir
la emisora local que desee.
Recepción de anuncios de
tráfico
Los datos de anuncios de tráfico (TA) y de
programas de tráfico (TP) permiten sintonizar
automáticamente una emisora de FM que esté
emitiendo anuncios de tráfico, aunque esté
escuchando otras fuentes de programa.
Pulse (AF/TA) varias veces hasta que “TAON” o “AF.TA-ON” se ilumine en el visor.
La unidad comienza a buscar emisoras que
emitan información sobre tráfico. “TP” se
ilumina en el visor al encontrar una emisora
que emita anuncios de tráfico.
Al iniciarse el anuncio de tráfico, “TA”
parpadea. Esta indicación deja de
parpadear cuando el anuncio finaliza.
Consejo
Si el anuncio de tráfico comienza mientras escucha
otra fuente de programa, la unidad cambia
automáticamente al anuncio y vuelve a la fuente
original al finalizar éste.
Notas
• “NO TP” parpadea durante cinco segundos si la
emisora recibida no emite anuncios de tráfico. A
continuación, la unidad comienza a buscar una
emisora que emita dichos anuncios.
• Si la indicación “EON” aparece en el visor con
“TP”, la emisora actual utiliza anuncios de tráfico
emitidos por otras emisoras de la misma red.
ES
RDS
11
Page 34

Para cancelar el anuncio de tráfico
actual
Pulse (AF/TA) o (SOURCE) durante un
instante.
Para cancelar todos los anuncios de tráfico,
desactive la función pulsando (AF/TA)
hasta que “AF.TA-OFF” se ilumine.
Programación del volumen de los
anuncios de tráfico
Es posible programar previamente el nivel de
volumen de los anuncios de tráfico, de forma
que éstos no pasen inadvertidos. Al comenzar
un anuncio, el volumen se ajustará
automáticamente al nivel programado.
Programación del mismo ajuste para
todas las emisoras programadas
1 Seleccione una banda de FM (página 8).
2 Pulse (AF/TA) varias veces para
seleccionar “AF-ON”, “TA-ON” o “AF.TAON” (tanto para la función AF como para
la TA).
Observe que si selecciona “AF.TA-OFF” se
almacenarán tanto las emisoras RDS como
las que no lo son.
3 Pulse (SHIFT) y, a continuación, (3)
(PLAY MODE) varias veces hasta que
aparezca “BTM”.
1 Seleccione el nivel de volumen que
desee.
2 Pulse (AF/TA) durante dos segundos.
Se muestra “TA” y se almacena el ajuste.
Recepción de anuncios de urgencia
Si se emite un anuncio de urgencia mientras
ES
escucha la radio, el programa cambiará
automáticamente al anuncio. Si escucha una
fuente que no sea la radio, es posible recibir
anuncios de urgencia si activa la función AF o
TA. En este caso, la unidad cambiará
automáticamente a dichos anuncios
independientemente de lo que esté escuchando
en ese momento.
Programación de emisoras
RDS con los datos AF y TA
Al programar las emisoras RDS, la unidad
almacena los datos de cada emisora, así como
su frecuencia, de forma que no sea necesario
activar la función AF o TA cada vez que
sintonice la emisora programada. Es posible
seleccionar un ajuste diferente (AF, TA o
ambos) para cada emisora programada, o bien
el mismo para todas.
4 Pulse (4) (n).
5 Pulse (SHIFT).
Programación de ajustes diferentes
para cada emisora programada
1 Seleccione una banda de FM y sintonice
la emisora que desee (página 9).
2 Pulse (AF/TA) varias veces para
seleccionar “AF-ON”, “TA-ON” o “AF.TAON” (tanto para la función AF como para
la TA).
3 Pulse el botón numérico deseado hasta
que aparezca “MEM”.
Repita el procedimiento a partir del paso 1
para programar otras emisoras.
Consejo
Si desea modificar el ajuste AF y/o TA predefinido
después de sintonizar la emisora programada,
active o desactive la función AF o TA.
12
Page 35

PORT
INFO
Localización de emisoras
mediante el tipo de
programa
Es posible localizar la emisora que desee
mediante la selección de uno de los tipos de
programa que aparecen a continuación.
1 Pulse (PTY) durante la recepción de FM
hasta que “PTY” se ilumine en el visor.
El nombre del tipo de programa actual
aparece si la emisora transmite datos PTY.
Aparece “- - - - -” si la emisora recibida no
es RDS o si no se reciben los datos RDS.
Tipos de programa Indicación
Noticias NEWS
Temas de actualidad AFFAIRS
Información INFO
Deportes SPORT
Educación EDUCATE
Drama DRAMA
Cultura CULTURE
Ciencia SCIENCE
Variedades VARIED
Música pop POP M
Música rock ROCK M
Música fácil de escuchar M.O.R. M
Clásica ligera LIGHT M
Clásica CLASSICS
Otros tipos de música OTHER M
Información meteorológica WEATHER
Economía FINANCE
Programas infantiles CHILDREN
Asuntos sociales SOCIAL A
Religión RELIGION
Conversación telefónica PHONE IN
Viajes TRAVEL
Ocio LEISURE
Música jazz JAZZ
Música country COUNTRY
Música nacional NATION M
Melodías de ayer OLDIES
Música folk FOLK M
Documentales DOCUMENT
Sin especificar NONE
2 Pulse (PTY) varias veces hasta que
aparezca el tipo de programa que desee.
Los tipos de programa aparecen en el orden
mostrado en la anterior tabla. Observe que
no es posible seleccionar “NONE” (sin
especificar) para realizar la búsqueda.
3 Desplace el control SEEK/AMS hacia
arriba o abajo.
La unidad comienza a buscar una emisora
que transmita el tipo de programa
seleccionado. Al encontrarla, el tipo de
programa vuelve a aparecer durante cinco
segundos.
Si la unidad no encuentra el tipo de
programa, “NO” y dicho tipo de programa
aparecen alternativamente durante cinco
segundos. A continuación, la unidad vuelve
a la emisora anterior.
ES
RDS
Nota
No es posible utilizar esta función en los países en
los que no se disponga de datos PTY (selección de
tipo de programa).
13
Page 36

Ajuste automático del
reloj
Los datos de hora (CT) de las transmisiones
RDS ajustan el reloj automáticamente.
1 Pulse (SHIFT) y, a continuación, (2) (SET
UP) varias veces hasta que aparezca
“CT”.
ET
CTOFF
SETUP
Otras funciones
Puede conectar un mando opcional rotativo
(RM-X4S) con esta unidad.
Uso del mando rotativo
Este mando funciona mediante la pulsación de
botones y/o el giro de controles.
2 Pulse (4) (n) varias veces hasta que
aparezca “CT-ON”.
El reloj se ajusta.
ET
CTON
CT
SETUP
3 Pulse (SHIFT) para volver a la indicación
normal.
Para cancelar la función CT
ES
Seleccione “CT-OFF” en el anterior paso
2.
Notas
• La función CT puede no activarse aunque se
reciba una emisora RDS.
• Es posible que la hora real y la ajustada mediante
la función CT no coincidan.
Mediante la pulsación de los
botones SOURCE y MODE
(SOURCE)
(MODE)
Cada vez que pulse (SOURCE), la fuente
cambiará de la siguiente forma:
TUNER ˜ CD
Al pulsar (MODE), el funcionamiento
cambiará de la siguiente forma;
Sintonizador: FM1 n FM2 n MW n LW
Consejo
Si el selector POWER SELECT se ha ajustado en la
posición B, podrá activar la unidad pulsando
(SOURCE) en el mando rotativo.
14
Page 37

Mediante el giro del control SEEK/
AMS
Gire el control momentáneamente y
suéltelo para:
•Localizar un tema específico de un disco.
Gire y mantenga girado el control hasta
localizar el punto específico de un tema y,
a continuación, suéltelo para iniciar la
reproducción.
•Sintonizar emisoras automáticamente.
Gire y mantenga girado el control para
sintonizar una determinada emisora.
Otras operaciones
Gire el control VOL para
ajustar el volumen.
Pulse (SOUND) para ajustar el menú
de sonido y el volumen.
Pulse (ATT) para
atenuar el
sonido.
OFF
Pulse (OFF)
para desactivar
la unidad.
Mediante la presión y giro del
control PRESET/DISC
Presione y gire el control para:
Recibir emisoras memorizadas en los
botones numéricos.
Pulse (DSPL) para cambiar los
elementos mostrados.
Cambio de la dirección de
funcionamiento
La dirección de funcionamiento de los
controles está ajustada de fábrica como se
muestra en la siguiente ilustración.
Para aumentar
Para disminuir
Si necesita montar el mando rotativo en el lado
derecho de la columna de dirección, puede
invertir la dirección de funcionamiento.
Pulse (SOUND) durante dos segundos al
tiempo que presiona el control VOL.
ES
RDS/Otras funciones
15
Page 38

Ajuste de las
características de sonido
Es posible ajustar los graves, los agudos, el
balance y el equilibrio entre altavoces e,
igualmente, almacenar para cada fuente un
nivel de graves y agudos.
1 Pulse (SOUND) varias veces para
seleccionar el elemento que desee ajustar.
VOL (volumen) n BAS (graves) n
TRE (agudos) n BAL (izuquierdoderecho) n FAD (delantero-trasero)
2 Gire el dial para ajustar el elemento
seleccionado.
Realice el ajuste antes de que transcurran
tres segundos después de seleccionar el
elemento. (Transcurridos tres segundos, la
función del dial vuelve a ser la de control
de volumen.)
Cambio de los ajustes de
sonido y visualización
Es posible seleccionar diversos modos.
•CLOCK (Reloj) (página 6).
•CT (Hora del reloj) (página 14).
•D.INFO (información dual), que permite
mostrar simultáneamente el reloj y el modo
de reproducción (ON) o la información de
forma alternativa (OFF).
•BEEP, que permite activar o desactivar los
pitidos.
•RM (Mando rotativo), que permite cambiar la
dirección de funcionamiento de los controles
del mando rotativo.
— Seleccione “NORM” para utilizar el
mando rotativo en la posición ajustada de
fábrica.
— Seleccione “REV” si monta el mando
rotativo en el lado derecho de la columna
de dirección.
1 Pulse (SHIFT).
ES
Atenuación del sonido
Pulse (ATT) en el mando rotativo.
La indicación “ATT-ON” parpadea
momentáneamente.
Para restaurar el nivel de volumen anterior,
vuelva a pulsar (ATT).
Consejo
La unidad reducirá automáticamente el volumen
cuando entre una llamada telefónica (función de
atenuación para teléfono).
2 Pulse (2) (SET UP) varias veces hasta que
aparezca el elemento que desee.
Cada vez que pulse (2) (SET UP), los
elementos cambian de la siguiente forma:
CLOCK n CT n D.INFO* n BEEP n RM
* Si no ha sintonizado la emisora o no ha
reproducido ningún CD, no aparecerán estos
puntos.
Nota
El elemento mostrado variará en función de la
fuente.
3 Pulse (4) (n) para seleccionar el ajuste
que desee (por ejemplo, ON u OFF).
4 Pulse (SHIFT).
Una vez finalizado el ajuste de modo, el
visor vuelve a la indicación de modo de
reproducción normal.
16
Page 39

Refuerzo de los graves — D-bass
Es posible disfrutar de graves intensos y
nítidos. La función D-bass refuerza la señal de
frecuencias bajas con una curva más marcada
que la del refuerzo de graves convencional.
Es posible escuchar la línea de graves con
mayor nitidez aunque el sonido vocal se
encuentre al mismo nivel. Igualmente, es
posible enfatizar y ajustar los graves
fácilmente con el dial D-BASS. Este efecto es
similar al obtenido cuando se utiliza un
sistema opcional de altavoces potenciadores de
graves.
Además, la función D-bass digital* crea graves
incluso más intensos y nítidos que la función
D-bass analógica.
* La característica D-bass digital se encuentra
disponible durante la reproducción de discos
compactos.
D-BASS digital D-BASS analógico
D-BASS 3
D-BASS 2
D-BASS 1
Nivel
D-BASS 3
D-BASS 2
D-BASS 1
Nivel
Información
complementaria
Precauciones
• Si aparca el automóvil bajo la luz solar
directa y se produce un considerable
aumento de temperatura en su interior, deje
que la unidad se enfríe antes de utilizarla.
• Si la unidad no recibe alimentación,
compruebe las conexiones en primer lugar. Si
todo está en orden, examine el fusible.
•Si los altavoces no emiten sonido con un
sistema de 2 altavoces, ajuste el control de
equilibrio entre altavoces en la posición
central.
•Si el automóvil dispone de antena
motorizada, ésta se extenderá
automáticamente mientras la unidad se
encuentre en funcionamiento.
0dB
Frecuencia (Hz)
0dB
Frecuencia (Hz)
Ajuste de la curva de graves
Gire el dial D-BASS para ajustar el nivel
de graves (1, 2 o 3).
“D-BASS” aparece en el visor.
Durante la reproducción de discos
compactos, la indicación “DIGITAL DBASS” aparece en el visor.
Para cancelar esta acción, gire el dial hasta la
posición OFF.
Nota
Si los graves se distorsionan, ajuste el dial D-BASS o
el control de volumen.
Si desea realizar alguna consulta o solucionar
algún problema referentes a la unidad que no
aparezcan en este manual, póngase en contacto
con el proveedor Sony más próximo.
Notas sobre el manejo de discos
compactos
Si el disco está sucio o es defectuoso, puede
producirse pérdida de sonido durante la
reproducción. Para disfrutar de buena calidad
de sonido, maneje el disco como se explica a
continuación.
Cójalo por los bordes. Para mantenerlo limpio,
no toque la superficie.
No adhiera papel ni cinta adhesiva en la
superficie de la etiqueta.
ES
Otras funciones/Información complementaria
17
Page 40

No exponga los discos a la luz solar directa ni
a fuentes de calor, como conductos de aire
caliente, ni los deje en un automóvil aparcado
a la luz solar directa, ya que puede producirse
un considerable aumento de temperatura en su
interior.
Antes de realizar la reproducción, limpie los
discos con un paño opcional de limpieza desde
el centro hacia los bordes.
No utilice disolventes, como bencina,
diluyentes o productos de limpieza
disponibles en las tiendas del ramo, ni
aerosoles antiestáticos destinados a discos
analógicos.
ES
Notas sobre condensación de
humedad
En los días lluviosos o en zonas muy húmedas,
puede condensarse humedad en las lentes del
interior del reproductor de discos compactos.
Si esto ocurre, la unidad no funcionará
correctamente. En este caso, extraiga el disco y
espere una hora aproximadamente hasta que
la humedad se evapore.
Mantenimiento
Sustitución del fusible
Cuando sustituya el fusible, compruebe que
utiliza uno con el amperaje especificado en el
fusible. Si éste se funde, compruebe la
conexión de alimentación y sustitúyalo. Si una
vez sustituido vuelve a fundirse, es posible
que exista un funcionamiento defectuoso
interno. En este caso, póngase en contacto con
el proveedor Sony más próximo.
Fusible (10 A)
Advertencia
No utilice nunca un fusible de amperaje
superior al del suministrado con la unidad, ya
que ésta podría dañarse.
Limpieza de los conectores
La unidad puede no funcionar correctamente
si los conectores de la misma y del panel
frontal están sucios. Con el fin de evitarlo, abra
el panel frontal pulsando (RELEASE); a
continuación, sepárelo y limpie los conectores
con un bastoncillo humedecido en alcohol. No
aplique demasiada presión, ya que los
conectores podrían dañarse.
Reproducción de discos compactos
de 8 cm
Utilice el adaptador sencillo de discos
compactos opcional de Sony (CSA-8) para
evitar que el reproductor de discos compactos
se dañe.
18
Unidad principal
Parte posterior del panel frontal
Page 41

Desmontaje de la unidad
Llave de
liberación
(suministrada)
µ
µ
µ
Tire de la unidad hacia fuera mientras la llave de
liberación se encuentra insertada.
Adhesión de la etiqueta al
mando rotativo
Esta unidad puede controlarse con el mando
rotativo opcional (RM-X4S).
Con el mando rotativo se suministra una serie
de etiquetas. Adhiera la etiqueta que
corresponda a las funciones de esta unidad y a
la posición de montaje del mando rotativo.
Después de montar el mando rotativo, adhiera
la etiqueta como se muestra en la ilustración
siguiente.
DSPL
MODE
SOUND
SOUND
MODE
DSPL
ES
Información complementaria
µ
Presione el clip del interior de la cubierta frontal
con un destornillador fino, y haga palanca para
liberar dicha cubierta.
19
Page 42

Especificaciones
Sección del reproductor de discos
compactos
Sistema Audiodigital de discos
Relación señal-ruido 90 dB
Respuesta de frecuencia 10 – 20.000 Hz
Fluctuación y trémolo Inferior al límite medible
compactos
Sección del sintonizador
FM
Gama de sintonización 87,5 – 108,0 MHz
Terminal de antena Conector de antena externa
Frecuencia intermedia 10,7 MHz
Sensibilidad utilizable 9 dBf
Selectividad 75 dB a 400 kHz
Relación señal-ruido 65 dB (estéreo),
Distorsión armónica a 1 kHz
Separación 35 dB a 1 kHz
Respuesta de frecuencia 30 – 15.000 Hz
68 dB (mono)
0,7 % (estéreo),
0,4 % (mono)
MW/LW
Gama de sintonización MW: 531 – 1.602 kHz
ES
Terminal de antena Conector de antena externa
Frecuencia intermedia 10,71 MHz/450 kHz
Sensibilidad MW: 30 µV
LW: 153 – 281 kHz
LW: 50 µV
Sección del amplificador de
potencia
Salidas Salidas de altavoz
Impedancia de altavoz 4 – 8 ohmios
Salida máxima de potencia
(conectores de sellado
seguro)
40 W × 4 (a 4 ohmios)
Generales
Salidas Salidas de línea (2)
Cable de control de relé de
antena motorizada
Cable de control de
amplificador de potencia
Cable de control de
atenuación para teléfono
Controles de tono Graves ±8 dB a 100 Hz
Agudos ±8 dB a 10 kHz
Requisitos de alimentación
Batería de automóvil de
12␣ V CC (toma a tierra
negativa)
Dimensiones Aprox. 178 × 50 × 185 mm
(an/al/prf)
Dimensiones de montaje Aprox. 182 × 53 × 162 mm
(an/al/prf)
Masa Aprox. 1,2 kg
Accesorios suministrados
Componentes para
instalación y conexiones
(1 juego)
Estuche para el panel
frontal (1)
Accesorios opcionales Mando a distancia rotativo
RM-X4S
Adaptador sencillo de
discos compactos CSA-8
Diseño y especificaciones sujetos a cambios sin
previo aviso.
20
Page 43

Guía de solución de problemas
La siguiente lista de comprobaciones resulta útil para solucionar los problemas que puedan
producirse al utilizar la unidad.
Antes de consultar la lista que aparece a continuación, compruebe los procedimientos de conexión y
funcionamiento.
Generales
Problema
Ausencia de sonido.
Se ha borrado el contenido de
la memoria.
El visor no muestra
indicaciones.
Ausencia de pitidos.
Reproducción de CD
Problema
No es posible cargar un CD.
No se inicia la reproducción.
El CD se expulsa
automáticamente.
El CD no se expulsa.
Los botones de funcionamiento
no se activan.
El sonido se omite debido a
vibraciones.
Causa/Solución
•Cancele la función ATT.
•Ajuste el control de equilibrio entre los altavoces en la posición
central para sistemas de 2 altavoces.
•Gire el dial en sentido de las agujas del reloj para ajustar el
volumen.
•Ha desconectado el cable de alimentación o la batería.
•Ha pulsado el botón de restauración.
n Vuelva a realizar el almacenamiento en la memoria.
Retire el panel frontal y limpie los conectores. Para obtener más
información, consulte el apartado “Limpieza de los conectores”
(página 18).
•Ha conectado un amplificador opcional de potencia y no
utiliza el incorporado.
•Ha atenuado los pitidos (página 16).
Causa/Solución
• Ya se ha cargado otro CD.
• Se ha forzado el CD al introducirlo al revés.
El disco está sucio.
La temperatura ambiente es superior a 50°C.
Pulse 6 durante dos segundos.
Pulse el botón de restauración.
•Ha instalado la unidad en un ángulo superior a los 60°.
•No ha instalado la unidad en una parte segura del automóvil.
ES
Información complementaria
Recepción de radio
Problema
No es posible realizar la
sintonización de programación.
No es posible realizar la
sintonización automática.
La indicación “ST” parpadea.
Causa/Solución
• Memorice la frecuencia correcta.
• La emisión es demasiado débil.
La emisión es demasiado débil.
n Utilice la sintonización manual.
•Sintonice la frecuencia con precisión.
•La emisión es demasiado débil.
n Realice el ajuste en el modo monofónico MONO (página 9).
21
Page 44

Funciones RDS
Problema
La búsqueda se inicia después
de unos segundos de escucha.
Ausencia de anuncios de tráfico.
PTY muestra “NONE”.
Causa/Solución
La emisora no es TP o se trata de una señal débil.
n Pulse (AF/TA) hasta que aparezca “AF.TA-OFF”.
•Active “TA”.
•La emisora no emite anuncios de tráfico a pesar de ser TP.
n Sintonice otra emisora.
La emisora no especifica el tipo de programa.
Indicaciones de error
Las siguientes indicaciones parpadearán durante cinco segundos aproximadamente y se oirá una
alarma.
Indicación
ERROR
RESET
Si el problema no se soluciona con las sugerencias anteriormente enumeradas, póngase en contacto
con el proveedor Sony más próximo.
ES
Causa
Un CD está sucio o insertado al
revés.
El reproductor de CD no funciona
debido a algún problema.
Solución
Limpie el CD o insértelo
correctamente.
Pulse el botón de restauración de la
unidad.
22
Page 45

ES
23
Page 46

Bem vindo!
Obrigado por ter adquirido o Leitor de discos
compactos da Sony. Este aparelho está
equipado com uma vasta gama de funções que
podem ser controladas através de um
comando rotativo (RM-X4S) opcional.
P
2
Page 47

Índice
Localização das teclas ............................................. 4
Como começar
Reinicializar o aparelho...................................... 5
Retirar o painel frontal ....................................... 5
Acertar o relógio.................................................. 6
Leitor de CDs
Ouvir um CD ....................................................... 6
Reproduzir um CD em vários modos .............. 7
Rádio
Memorização automática de estações
— Memória da Melhor Sintonia (BTM) ...... 8
Memorização das estações pretendidas .......... 8
Recepção das estações memorizadas ............... 9
RDS
Panorâmica da função RDS ............................. 10
Visualização do nome da estação ................... 10
Re-sintonização automática do mesmo
programa
— Frequências Alternativas (AF) .............. 10
Ouvir informações sobre a situação do
trânsito........................................................... 11
Pré-programação dos dados AF e TA nas
estações RDS ................................................. 12
Localização de uma estação através do
tipo de programa ......................................... 13
Acerto automático do relógio.......................... 14
Informação adicional
Precauções .......................................................... 17
Manutenção ....................................................... 18
Desmontagem do aparelho ............................. 19
Colar a etiqueta no comando rotativo ........... 19
Especificações .................................................... 20
Guia de resolução de problemas .................... 21
P
Outras funções
Utilização do comando rotativo ..................... 14
Regulação das características de som ............ 16
Redução do som ao mínimo ............................ 16
Alteração das programações do visor e
do som ........................................................... 16
3
Page 48

Localização das teclas
MODE
SEEK/AMS
SOURCE
RELEASE
SOUND
DSPL
D
OFF
SHIFT
Para mais informações, consulte as respectivas páginas.
1 Tecla SEEK/AMS (procura/Sensor de
Música Automático/pesquisa manual)
7, 8, 9, 11, 13
P
2 Tecla MODE (seleccionar banda) 8, 9
3 Tecla SOURCE (selecção da fonte) 6, 8, 9
4 Botão (volume/graves/agudos/
esquerda-direita/controlo à frenteatrás)) 6, 16
5 Tecla SOUND 16
6 Tecla DSPL (alteração do modo do visor)
6, 9, 10
7 Visor
8 Tecla PTY
RDS Programme 13
9 Tecla 6 (ejectar) 6
!º Tecla AF/TA 10, 11, 12
PTY
AF/TA
1
OFF
2
D - BASS
2 3 4 5 6 7 8 9110
3
CDX-4180R
!¡ Tecla RELEASE (libertação do painel
frontal) 5, 18
!™ Tecla de reincialização (localizada na
parte da frente do aparelho, por trás do
painel frontal) 5
!£ Tecla OFF 5, 6
!¢ Tecla SHIFT
PLAY MODE 7, 8, 9, 11, 12
REP 7
SET UP 6, 14, 16
SHUF 7
!∞ Interruptor POWER SELECT (localizado
na base do aparelho)
Consulte “Interruptor POWER SELECT”
no manual Instalação/Ligações.
!§ Durante a recepção de rádio:
Teclas numéricas 8, 9
!¶ Anel rotativo D-BASS 17
4
Page 49

Como começar
Reinicializar o aparelho
O aparelho tem que ser reinicializado antes de
ser utilizado pela primeira vez ou após a
substituição da bateria do automóvel.
Para fazê-lo, carregue na tecla reinicialização
com um objecto ponteagudo (por exemplo,
uma esferográfica).
Notas
• Não deixe o painel cair no chão quando o retirar
do aparelho.
• Se carregar em (RELEASE) para retirar o painel
com o aparelho ligado, este desliga-se
automaticamente para não provocar danos nos
altifalantes.
• Se quiser levar o painel frontal consigo, coloque-
o na caixa para transporte fornecida.
Colocar o painel frontal
Encaixe a parte A do painel frontal na parte B
como mostra a figura. Depois, faça pressão até
ouvir um estalido.
Tecla de reinicialização
Notas
• Quando carregar no botão de reinicialização
desactiva o relógio e algumas das funções
memorizadas.
• Quando ligar o cabo de alimentação ou
reinicializar o aparelho, aguarde cerca de 10
segundos antes de introduzir um disco. Se
introduzir um disco nestes 10 segundos, o
aparelho não é reinicializado e é necessário
carregar novamente no botão de reinicialização.
Retirar o painel frontal
Pode retirar o painel deste aparelho para evitar
que seja roubado.
1 Carregue em (OFF).
2 Carregue em (RELEASE) para retirar o
painel frontal. Depois faça deslizar o
painel um pouco para a esquerda e puxeo para si.
(OFF)
A
B
Notas
• Quando colocar o painel frontal no aparelho,
certifique-se de que o mesmo se encontra na
posição correcta.
• Não faça muita pressão sobre o painel frontal
quando o colocar no aparelho. Para o encaixar,
basta uma leve pressão.
• Não carregue nem faça demasiada pressão sobre
o visor do painel frontal.
• Não exponha o painel frontal à incidência directa
dos raios solares, a fontes de calor como
condutas de ar quente nem à humidade. Nunca o
deixe sobre o tablier de um automóvel
estacionado ao sol, porque pode ocorrer um
aumento considerável da temperatura no
interior do automóvel.
Alarme de advertência
Se rodar a chave de ignição para a posição
OFF, sem retirar o painel frontal, o alarme de
advertência é activado e ouve-se um sinal
sonoro durante alguns segundos (só quando o
interruptor POWER SELECT estiver na
posição A).
Se ligar um amplificador de potência opcional
e não utilizar o amplificador integrado, o som
do sinal sonoro será desactivado.
P
Como começar
(RELEASE)
5
Page 50

Acertar o relógio
5 215
TRACK
CD
O relógio tem uma indicação digital de 24
horas.
Por exemplo: acerte-o para as 10:08
1 Carregue em (SHIFT) e depois em (2)
(SET UP).
CLOCK
SETUP
1 Carregue em (4) (n).
1OO
SETUP
Os algarismos das horas começam a piscar.
Leitor de CDs
Ouvir um CD
Introduza um CD.
A reprodução inicia-se automaticamente.
Etiqueta virada para cima
2 Acerte a hora.
SOURCE
1OOO
P
3 Carregue em (4) (n).
4 Acerte os minutos.
SETUP
1OOO
SETUP
Os algarismos dos minutos começam a piscar.
SOURCE
1OO8
SETUP
2 Carregue em (SHIFT).
1OO8
SETUP
O relógio começa a funcionar.
sentido regressivo
sentido progressivo
sentido regressivo
sentido progressivo
Se já tiver introduzido um CD, carregue várias
vezes em (SOURCE) até que a indicação “CD”
apareça no visor.
Tempo de reprodução decorrido
Número da faixa
Nota
Para reproduzir um CD de 8 cm, utilize o adaptador
opcional para discos compactos da Sony (CSA-8).
Para Carregue em
Parar a reprodução 6 ou (OFF)
Ejectar o CD 6
Alterar os elementos no visor
Sempre que carregar em (DSPL), o elemento
altera da seguinte maneira:
Tempo de reprodução
z z Relógio
decorrido/Número da faixa
MOTION DISPLAY* Z
* Todos os elementos apresentados acima desfilam
um a um e por ordem no visor.
3 Carregue em (SHIFT).
Quando terminar a programação, o visor
volta ao modo de reprodução normal.
Nota
Se o interruptor POWER SELECT que se encontra
na parte inferior do aparelho estiver regulado
6
para a posição B, ligue primeiro a corrente e
depois acerte o relógio.
Page 51

Localizar uma faixa específica
SETUP PLAYMODE
REP SHUF
REP1
REP1
CD
SETUP PLAYMODE
REP SHUF
1SHUF
CD
— Sensor de Música Automático (AMS)
Durante a reprodução, carregue
levemente no controlo SEEK/AMS para
cima ou para baixo.
Para localizar as
faixas seguintes
Para localizar as
faixas anteriores
SEEK/AMS
Localizar um ponto específico
numa faixa — Pesquisa Manual
Durante a reprodução, carregue no
controlo SEEK/AMS para cima ou para
baixo sem soltar. Solte o controlo
quando localizar o ponto pretendido.
Para localizar as
faixas seguintes
Para localizar as
faixas anteriores
Nota
Se a indicação “
aparecer no visor, isso significa que chegou ao
início ou ao fim do disco e que não pode avançar
mais.
SEEK/AMS
” ou “ ”
2 Carregue várias vezes em (3) (PLAY
MODE) até que a indicação “INTRO”
apareça no visor.
CD
PLAYMODE
3 Carregue em (4) (n) para seleccionar
“INTRO-ON”.
CD
PLAYMODE
O aparelho inicia a reprodução Intro Scan
4 Carregue em (SHIFT).
Para voltar ao modo de reprodução normal,
seleccione “INTRO-OFF” no passo 3.
Reproduzir faixas repetidamente
— Reprodução repetitiva
1 Durante a reprodução, carregue em
(SHIFT).
2 Carregue várias vezes em (6) (REP) até
que a indicação “REP-1” apareça no visor.
P
Como começar/Leitor de CDs
Reproduzir um CD em
vários modos
Pode reproduzir os CDs em vários modos:
• INTRO (Pesquisa Sequencial) permite
reproduzir os primeiros 10 segundos de
todas as faixas.
• REP (Reprodução Repetitiva) repete a faixa
actual.
• SHUF (Reprodução Aleatória) reproduz
todas as faixas por ordem aleatória.
Pesquisa da faixa pretendida
— Intro scan
1 Carregue em (SHIFT).
Sempre que carregar em (SHIFT), só os
elementos que é possível seleccionar
aparecem iluminados no visor.
SETUP PLAY MODE
SHIFT
2 3 4 51
O aparelho inicia a reprodução repetitiva.
3 Carregue em (SHIFT).
Para voltar ao modo de reprodução normal,
seleccione “REP-OFF” no ponto 2 acima.
Reproduzir faixas por ordem
aleatória — Reprodução aleatória
1 Durante a reprodução, carregue em
(SHIFT).
2 Carregue várias vezes em (7) (SHUF) até
que a indicação “SHUF-1” apareça no
visor.
O aparelho inicia a reprodução aleatória.
3 Carregue em (SHIFT).
Para voltar ao modo de reprodução normal,
seleccione “SHUF-OFF” no ponto 2 acima.
7
Page 52

Rádio
Memorização automática
de estações
— Memória da Melhor Sintonia (BTM)
O aparelho selecciona as estações com os sinais
mais fortes e memoriza-as por ordem de
frequências. Pode memorizar um máximo de
10 estações em cada banda (FM1, FM2, MW e
LW).
Cuidado
Quando quiser sintonizar uma estação durante
a condução, utilize a memória de melhor
sintonia para evitar acidentes.
1 Carregue várias vezes em (SOURCE) para
seleccionar o sintonizador.
Sempre que carregar em (SOURCE), a fonte
muda pela ordem seguinte:
P
2 Carregue várias vezes em (MODE) para
seleccionar a banda.
Sempre que carregar em (MODE), a banda
muda pela ordem seguinte:
z FM1 z FM2 z MW z LW
CD ˜ TUNER
Memorização das estações
pretendidas
Pode memorizar um máximo de 10 estações
em cada banda (20 para FM1 e FM2, 10 para
MW e LW) pela ordem pretendida.
1 Carregue várias vezes em (SOURCE) para
seleccionar o sintonizador.
2 Carregue várias vezes em (MODE) para
seleccionar a banda (FM1, FM2, MW ou
LW).
3 Carregue no controlo SEEK/AMS para
cima ou para baixo, para sintonizar a
estação que pretende memorizar na tecla
numérica.
4 Carregue sem soltar na tecla numérica
pretendida (de (1) a (10)) durante dois
segundos até apparecer a indicação
“MEM”.
A indicação da tecla numérica aparece no
visor.
Nota
Se tentar memorizar mais do que uma estação na
mesma tecla numérica, o aparelho apaga a estação
memorizada anteriormente.
3 Carregue em (SHIFT) e, em seguida,
carregue várias vezes em (3) (PLAY
MODE) até que a indicação “B.T.M”
apareça no visor.
4 Carregue em (4) (n).
O aparelho memoriza as estações nas teclas
numéricas, pela ordem das respectivas
frequências.
O aparelho memoriza um sinal sonoro e a
programação.
5 Carregue em (SHIFT).
Notas
• O aparelho não memoriza estações com sinais
fracos. Se o aparelho estiver a receber poucas
estações, algumas das teclas numéricas mantêm
as suas regulações originais.
• Se aparecer um número no visor, o aparelho
começa a memorizar estações, a partir da estação
indicada.
8
Page 53

Recepção das estações
memorizadas
1 Carregue várias vezes em (SOURCE) para
seleccionar a o sintonizador.
Se a recepção FM estéreo for
deficiente — Modo Mono
1 Carregue em (SHIFT) e depois carregue
várias vezes em (3) (PLAY MODE) até
que a indicação “MONO” apareça no
visor.
2 Carregue várias vezes em (MODE) para
seleccionar a banda (FM1, FM2, MW ou
LW).
3 Carregue na tecla numérica ((1) a (10))
onde está memorizada a estação
pretendida.
Se não conseguir sintonizar uma
estação pré-programada
Carregue levemente no controlo
SEEK/AMS para cima ou para baixo, para
localizar a estação pretendida
(sintonização automática).
O varrimento pára quando o aparelho
sintonizar uma estação. Carregue várias
vezes no controlo SEEK/AMS para cima ou
para baixo, até encontrar a estação
pretendida.
Nota
Se a sintonização automática parar
frequentemente, carregue em (SHIFT) e depois
carregue várias vezes em (3) (PLAY MODE) até
que a indicação “LOCAL” (modo de pesquisa local)
apareça no visor. Em seguida, carregue em (4)
(n) para seleccionar “LOCAL-ON”. Carregue em
(SHIFT).
O aparelho sintoniza apenas estações com sinais
relativamente fortes.
Sugestão
Se souber a frequência da estação que quer ouvir,
carregue no controlo SEEK/AMS para cima ou para
baixo até aparecer a frequência pretendida
(sintonização manual).
2 Carregue várias vezes em (4) (n) até
que a indicação “MONO-ON” apareça no
visor.
A qualidade do som melhora, mas passa a
ser um som mono (a indicação “ST”
desaparece do visor).
3 Carregue em (SHIFT).
Para voltar ao modo de reprodução normal,
seleccione “MONO-OFF” no passo 2.
Alterar os elementos no visor
Sempre que carregue em (DSPL), o elemento
muda da seguinte maneira:
z Frequência z Relógio
MOTION DISPLAY* Z
* Todos os elementos apresentados acima desfilam
um a um e por ordem no visor.
P
Rádio
9
Page 54

RDS
Panorâmica da função
RDS
O Sistema de Dados de Rádio (RDS) é um
serviço de difusão que permite às estações FM
enviar informação digital adicional juntamente
com a onda de rádio normal. O aparelho
estéreo do seu automóvel permite-lhe utilizar
uma série de serviços. Pode, por exemplo,
voltar a sintonizar o mesmo programa
automaticamente, ouvir informações sobre o
trânsito e localizar estações pelo tipo de
programa.
Notas
• A disponibilidade de todas as funções RDS
depende do país ou da região.
• Se o sinal for fraco ou se a estação sintonizada
não estiver a transmitir dados RDS, a função RDS
pode não funcionar correctamente.
P
Re-sintonização
automática do mesmo
programa
— Frequências Alternativas (AF)
A função Frequências Alternativas (AF)
selecciona e volta a sintonizar
automaticamente a estação com o sinal mais
forte numa rede. Se utilizar esta função, pode
ouvir continuamente o mesmo programa
durante uma viagem para um local distante,
sem ter que voltar a sintonizar a estação
manualmente.
As frequências mudam automaticamente.
98,5MHz
Estação
96,0MHz
102,5MHz
Visualização do nome da
estação
O nome da estação actual acende-se no visor.
Seleccione uma estação FM (página 8).
Se sintonizar uma estação FM que
transmite dados RDS, o nome da estação
aparece no visor.
Nota
A indicação “*” significa que está a receber uma
estação RDS.
Alterar os elementos no visor
Sempre que carregar em (DSPL), o elemento
muda da seguinte maneira:
z Nome da estação(Frequência)
MOTION DISPLAY* Z Relógio Z
* Todos os elementos apresentados acima desfilam
um a um e por ordem no visor.
Nota
A indicação “NO NAME” aparece no visor, se a
estação que está a receber não transmitir dados
RDS.
10
1 Seleccione uma estação FM (página 8).
2 Carregue várias vezes em (AF/TA) até
que a indicação “AF-ON” apareça no
visor.
O aparelho começa a procurar uma estação
alternativa com um sinal mais forte na
mesma rede.
Nota
Se não houver uma estação alternativa na área e
não precisar de procurar uma estação alternativa,
desactive a função AF carregando várias vezes em
(AF/TA) até que a indicação “AF.TA-OFF” apareça
no visor.
Page 55

Alterar os elementos no visor
Sempre que carregar em (AF/TA), o elemento
muda da seguinte forma:
” AF-ON ” TA-ON ” AF.TA-ON*
AF.TA-OFF “
* Seleccione esta opção para activar as funções AF
e TA.
Notas
• Se o aparelho não encontrar uma estação
alternativa na rede, a indicação “NO AF” e o
nome da estação piscam alternadamente no
visor.
• Se o nome da estação começar a piscar depois de
seleccionar uma estação com a função AF
activada, isso significa que não existe uma
frequência alternativa disponível. Carregue em
SEEK/AMS enquanto o nome da estação estiver a
piscar (durante 8 segundos). O aparelho começa
a procurar outra frequência com os mesmos
dados PI (Identificação do Programa). Aparece a
indicação “PI SEEK” e não se ouve som. Se o
aparelho não conseguir encontrar outra
frequência, aparece a indicação “NO PI” e o
aparelho volta à frequência anteriormente
seleccionada.
Ouvir um programa regional
A função “REG-ON” (regional on) deste
aparelho permite continuar a receber um
programa regional sem ter que mudar para
outra estação regional (não se esqueça de
activar a função AF). A pré-definição de
fábrica deste aparelho é “REG-ON”, mas se
quiser desactivar esta função proceda da
seguinte maneira.
1 Carregue em (SHIFT) e depois carregue
várias vezes em (3) (PLAY MODE) até
que a indicação “REG” apareça no visor.
2 Carregue várias vezes em (4) (n) até
que a indicação “REG-OFF” apareça no
visor.
3 Carregue em (SHIFT).
Se seleccionar “REG-OFF”, o aparelho pode
mudar para outra estação regional da
mesma rede.
Para voltar para a estação regional anterior,
seleccione “REG-ON” no passo 2 descrito
acima.
Nota
Esta função não funciona no Reino Unido nem
noutras áreas.
Função Ligação Local (só para o
Reino Unido)
A função Ligação Local permite-lhe seleccionar
outras estações locais na área, mesmo que não
estejam memorizadas nas teclas numéricas.
1 Carregue numa tecla numérica onde
esteja memorizada uma estação local.
2 Passados cinco segundos, volte a
carregar na mesma tecla numérica.
3 Repita este procedimento até encontrar
a estação local pretendida.
Ouvir informações sobre a
situação do trânsito
Os dados Informações sobre o Trânsito (TA) e
Programas de Trânsito (TP) permitem-lhe
sintonizar automaticamente uma estação FM
que esteja a transmitir informações sobre o
trânsito, mesmo durante a reprodução de
outras fontes.
Carregue várias vezes em (AF/TA) até
aparecer a indicação “TA-ON” ou “AF.TAON” no visor.
O aparelho começa a procurar estações que
transmitam informações de trânsito. A
indicação “TP” aparece no visor se o
aparelho encontrar uma estação que
transmita informações de trânsito. Quando
as informações de trânsito começarem a ser
transmitidas, a indicação “TA” pisca no
visor. A indicação “TA” pára de piscar
quando terminar a transmissão das
informações sobre o trânsito.
Sugestão
Se a transmissão das informações sobre o trânsito
começar enquanto estiver a ouvir outra fonte, o
aparelho muda automaticamente para a referida
transmissão. Quando a transmissão terminar, o
aparelho volta a reproduzir a fonte original.
Notas
• Se a estação que está a receber não transmitir
informações sobre o trânsito, a indicação “NO
TP” pisca durante cinco segundos. Depois, o
aparelho começa a procurar uma estação que
transmita informações sobre o trânsito.
• Se as indicações “EON” e “TP” aparecerem no
visor, a estação actual utiliza as informações de
trânsito transmitidas por outras estações da
mesma rede.
P
RDS
11
Page 56

Para cancelar as informações de
trânsito recebidas
Carregue em (AF/TA) ou (SOURCE)
levemente.
Para cancelar todas as informações sobre o
trânsito, desactive a função carregando em
(AF/TA) até que a indicação “AF.TA-OFF”
apareça no visor.
Pré-regulação do volume das
informações sobre o trânsito
Se não quiser perder as informações sobre o
trânsito, pode pré-regular o respectivo nível do
volume. Quando começa a transmissão das
informações sobre o trânsito, o aparelho regula
automaticamente o volume para o nível préprogramado.
1 Seleccione o nível de volume pretendido.
2 Carregue em (AF/TA) durante dois
segundos.
A indicação “TA” aparece e a definição fica
memorizada.
Recepção de informações de
P
emergência
Se transmitirem informações de emergência
enquanto estiver a ouvir o rádio, o aparelho
muda automaticamente para a estação onde
estão a ser transmitidas essas informações. Se
estiver a ouvir qualquer outra fonte, pode
ouvir as informações de emergência se activar
as funções AF ou TA. O aparelho muda
automaticamente para a estação que está a
transmitir as referidas informações,
independentemente da fonte que esteja a
ouvir.
Pré-programação dos
dados AF e TA nas
estações RDS
Quando efectua a pré-programação das
estações RDS, o aparelho memoriza os dados e
a frequência de cada estação para que não
tenha de activar a função AF ou TA sempre
que sintonizar a estação pré-programada. Pode
seleccionar uma programação diferente (AF,
TA ou ambas) para cada estação préprogramada ou a mesma programação para
todas as estações pré-programadas.
Pré-selecção da mesma
programação para todas as
estações pré-programadas
1 Seleccione uma banda de FM (página 8).
2 Carregue várias vezes em (AF/TA) para
seleccionar “AF-ON”, “TA-ON” ou “AF.TAON” (para as funções AF e TA).
Se seleccionar “AF.TA-OFF” memoriza as
estações que transmitem dados RDS e as
estações que não transmitem dados RDS.
3 Carregue em (SHIFT) e depois carregue
várias vezes em (3) (PLAY MODE) até
que a indicação “BTM” apareça no visor.
4 Carregue em (4) (n).
5 Carregue em (SHIFT).
Pré-selecção de programações
diferentes para cada estação préprogramada
1 Seleccione uma banda FM e sintonize a
estação pretendida (página 9).
2 Carregue várias vezes em (AF/TA) para
seleccionar “AF-ON”, “TA-ON” ou “AF.TAON” (para as funções AF e TA).
3 Carregue na tecla numérica pretendida
até que a indicação “MEM” apareça no
visor.
Para pré-programar outras estações, repita
este procedimento a partir do passo 1.
Sugestão
Se quiser alterar a programação AF e/ou TA préseleccionada depois de sintonizar a estação préprogramada, active/desactive a função AF ou TA.
12
Page 57

PORT
INFO
Localização de uma
estação através do tipo de
programa
Pode localizar a estação pretendida
seleccionando um dos tipos de programa
apresentados abaixo.
Tipos de programas Visor
Noticiários NEWS
Actualidades AFFAIRS
Informações INFO
Desporto SPORT
Educação EDUCATE
Teatro DRAMA
Cultura CULTURE
Ciência SCIENCE
Variados VARIED
Pop POP M
Rock ROCK M
Música popular M.O.R. M
Música clássica ligeira LIGHT M
Música clássica erudita CLASSICS
Outros tipos de música OTHER M
Meteorologia WEATHER
Finanças FINANCE
Programas para crianças CHILDREN
Assuntos sociais SOCIAL A
Religião RELIGION
Programas com chamadas PHONE IN
dos ouvintes
Viagens TRAVEL
Lazer LEISURE
Jazz JAZZ
Música “country” COUNTRY
Música nacional NATION M
Música nostálgica OLDIES
Música “folk” FOLK M
Documentários DOCUMENT
Não especificado NONE
1 Carregue em (PTY) durante a recepção
de FM até que a indicação “PTY” apareça
no visor.
Se a estação estiver a transmitir dados PTY,
o nome do tipo de programa actual aparece
no visor. Se a estação sintonizada não for
uma estação RDS ou se os dados RDS não
forem recebidos, a indicação “- - - - -”
aparece no visor.
2 Carregue várias vezes em (PTY) até
aparecer o tipo de programa pretendido.
Os tipos de programa aparecem pela ordem
indicada na tabela acima. Não se esqueça
que não pode seleccionar “NONE” (não
especificado) para pesquisa.
3 Carregue levemente no controlo SEEK/
AMS para cima ou para baixo.
O aparelho começa a procurar uma estação
que esteja a transmitir o tipo de programa
seleccionado. Quando o aparelho encontrar
o programa, o tipo de programa volta a ser
mostrado no visor durante cinco segundos.
Se o aparelho não conseguir encontrar o
tipo de programa pretendido, a indicação
“NO” e o tipo de programa aparecem
alternadamente no visor durante cinco
segundos. Depois, o aparelho volta a
sintonizar a estação anterior.
P
RDS
Nota
Não pode utilizar esta função nos países que não
transmitam dados PTY (selecção do tipo de
programa).
13
Page 58

Acerto automático do
relógio
Os dados CT (Hora do Relógio) da transmissão
RDS acertam o relógio automaticamente.
1 Carregue em (SHIFT) e depois carregue
várias vezes em (2) (SET UP) até que a
indicação “CT” apareça no visor.
ET
CTOFF
SETUP
2 Carregue várias vezes em (4) (n) até
aparecer a indicação “CT-ON” no visor.
O aparelho acerta o relógio.
ET
CTON
CT
SETUP
Outras funções
Pode ligar um comando rotativo opcional
(RM-X4S) a este aparelho.
Utilização do comando
rotativo
O comando rotativo funciona se carregar nas
teclas e/ou nos controlos rotativos.
Se carregar nas teclas (SOURCE e
MODE)
3 Carregue em (SHIFT) para voltar ao visor
normal.
Para cancelar a função CT
Seleccione “CT-OFF” no ponto 2 acima.
P
Notas
• A função CT pode não funcionar mesmo que
esteja a receber uma estação RDS.
• Podem existir diferenças entre a hora
programada pela função CT e a hora real.
(SOURCE)
(MODE)
Sempre que carregar em (SOURCE), a
fonte muda da seguinte forma:
TUNER ˜ CD
Se carregar em (MODE), o
funcionamento muda da seguinte forma;
Memorizados FM1 n FM2 n MW n LW
Sugestão
Se o interruptor POWER SELECT estiver regulado
para a posição B, pode ligar o aparelho
carregando em (SOURCE) no comando rotativo.
14
Page 59

Rodar o controlo (controlo SEEK/
AMS)
Rode o controlo durante um momento e
depois liberte-o para:
•Localizar uma faixa específica num disco.
Rode e segure o controlo até localizar o
ponto específico numa faixa, e depois
liberte-o para iniciar a reprodução.
•Sintonizar as estações automaticamente.
Rode o controlo até sintonizar a estação
pretendida.
Se rodar e carregar no controlo
(controlo PRESET/DISC)
Outras operações
Rode o controlo VOL para
regular o volume.
Carregue em (SOUND) para regular o
volume e o menu de controlo do som.
Carregue em (DSPL) para mudar os
elementos que aparecem no visor.
Carregue em
(ATT) para
reduzir o som
ao mínimo.
OFF
Carregue em
(OFF) para desligar
o aparelho.
Alteração da direcção de
funcionamento
A direcção de funcionamento dos controlos
vem predefinida de fábrica como se mostra na
ilustração abaixo.
Para aumentar
P
RDS/Outras funções
Carregue e rode o controlo para:
Receber as estações memorizadas nas teclas
numéricas pré-programadas.
Para diminuir
Se tiver que montar o comando rotativo no
lado direito do volante, pode inverter a
direcção de funcionamento dos controlos.
Carregue em (SOUND) e no controlo VOL
sem soltar durante dois segundos.
15
Page 60

Regulação das
características de som
Pode regular os graves, os agudos, o balanço e
o fader. Cada fonte de som pode memorizar o
nível de graves e de agudos respectivo.
1 Seleccione o elemento que pretende
regular carregando várias vezes em
(SOUND).
VOL (volume) n BAS (graves) n
TRE (agudos) n BAL (esquerda-direita) n
FAD (controlo frente-atrás)
2 Regule o elemento seleccionado,
rodando o botão rotativo.
Efectue a regulação nos três segundos
seguintes à selecção do elemento
(decorridos os três segundos, o botão
rotativo funciona como o controlo do
volume).
Alteração das
programações do visor e
do som
Pode programar:
•CLOCK (Relógio) (pàgina 6).
•CT (Hora do Relógio) (pàgina 14).
•D.INFO (informação dupla) para visualizar,
simultaneamente, o relógio e o modo de
reprodução (ON) ou para visualizar cada
uma das informações, alternadamente (OFF).
•BEEP para activar/desactivar os sinais
sonoros.
• RM (Telecomando rotativo) para alterar a
direcção de funcionamento dos controlos no
telecomando rotativo.
— seleccione “NORM” para utilizar o
comando rotativo com a posição prédefinida de fábrica.
— Seleccione “REV” quando instalar o
comando rotativo no lado direito do
volante.
1 Carregue em (SHIFT).
P
Redução do som ao
mínimo
Carregue em (ATT) no comando rotativo.
A indicação “ATT-ON” acende-se durante
breves instantes.
Para restabelecer o nível de volume anterior,
volte a carregar em (ATT).
Sugestão
O aparelho reduz automaticamente o volume
durante uma chamada telefónica (Função
Telephone-ATT).
2 Carregue várias vezes em (2) (SET UP)
até que o elemento pretendido apareça
no visor.
Sempre que carreger em (2) (SET UP), os
elementos no visor mudam da seguinte
maneira:
CLOCK n CT n D.INFO* n BEEP n RM
* Se não tiver sintonizado a estação nem
estiver a ouvir nenhum CD, estes elementos
não aparecem no visor.
Nota
O elemento mostrado no visor difere,
dependendo da fonte.
3 Carregue em (4) (n) para seleccionar a
programação pretendida (por exemplo:
ON ou OFF).
4 Carregue em (SHIFT).
Quando terminar a programação, o visor
volta ao modo de reprodução normal.
16
Page 61

Intensificar o som dos graves
— D-bass
Pode obter graves com um som nítido e
potente. A função D-bass intensifica o sinal das
baixas frequências criando uma curva mais
precisa do que a da curva convencional de
intensificação dos graves.
Pode ouvir a linha dos graves com maior
nitidez mesmo se o som das vozes tiver o
mesmo volume. Pode realçar e regular o som
dos graves com facilidade utilizando o botão
rotativo D-BASS. Este efeito é semelhante ao
obtido quando está a utilizar um sistema
opcional de “sub-woofer”.
Para além disso, a função D-Bass digital* cria
um som de graves mais potente e ainda mais
nítido do que o obtido com a função D-Bass
analógico.
* Pode utilizar a função Digital D-bass durante a
reprodução de um CD.
D-BASS digital D-Bass analógico
D-BASS 3
Nível
0dB
D-BASS 2
D-BASS 1
Frequência (Hz)
Nível
0dB
Regular a curva dos graves
Rode o anel D-BASS para regular o nível
dos graves (1, 2 ou 3).
A indicação D-BASS aparece no visor.
Durante a reprodução do CD, a indicação
“DIGITAL D-BASS” aparece no visor.
Para cancelar, rode o anel para a posição OFF.
D-BASS 3
D-BASS 2
D-BASS 1
Frequência (Hz)
Informação adicional
Precauções
• Se o seu automóvel estiver estacionado ao
sol, fazendo com que a temperatura no seu
interior aumente consideravelmente, deixe o
aparelho arrefecer antes de utilizá-lo.
• Se o aparelho não estiver a receber corrente,
verifique primeiro as ligações. Se estiver tudo
em ordem, verifique o fusível.
• Se o sistema de 2 altifalantes não reproduzir
som, regule o controlo fader para a posição
central.
• Se o automóvel estiver equipado com uma
antena eléctrica, não se esqueça de que esta
estica automaticamente enquanto o aparelho
está a funcionar.
Se tiver alguma dúvida ou problema
relacionado com o aparelho que não esteja
abrangido neste manual, contacte o agente
Sony mais próximo.
Notas sobre o manuseamento dos
CD
Um disco sujo ou defeituoso pode provocar
cortes de som durante a reprodução. Para que
o som seja o melhor possível, manuseie o disco
da seguinte maneira.
Segure no disco pela extremidade. Se quiser
manter o disco limpo, não toque na respectiva
superfície.
P
Outras funções/Informação adicional
Nota
Se o som dos graves ficar distorcido, regule-o com
o botão D-BASS ou com o botão de controlo do
volume.
Não cole papel nem fita adesiva na superfície
com etiqueta.
17
Page 62

Não exponha os discos à incidência directa dos
raios solares, a fontes de calor como condutas
de ar quente nem os deixe dentro de um
automóvel estacionado ao sol porque pode
ocorrer um aumento considerável da
temperatura no seu interior.
Antes de reproduzir os discos, limpe-os com
um pano de limpeza opcional. Limpe os discos
a partir do centro.
Não utilize dissolventes como benzina,
diluente, produtos limpeza disponíveis no
mercado ou sprays anti-estáticos próprios para
discos analógicos.
P
Notas sobre a condensação da
humidade
Num dia chuvoso ou num local muito húmido,
é possível que a humidade se condense ne
lente que se encontram no interior do leitor de
CD. Se isto acontecer, o aparelho não funciona
correctamente. Neste caso, retire o disco e
aguarde cerca de uma hora até que a
humidade se evapore.
Manutenção
Substituição do fusível
Quando substituir o fusível, utilize um fusível
com a amperagem correcta. Se o fusível
rebentar, verifique a ligação à corrente e
substitua o fusível. Se o fusível rebentar
novamente, pode tratar-se de uma avaria
interna. Neste caso, consulte o agente Sony
mais próximo.
Fusível (10 A)
Advertência
Nunca utilize um fusível com uma amperagem
superior à especificada no aparelho. Se o fizer,
corre o risco de danificar o aparelho.
Limpeza dos conectores
Se os conectores entre o aparelho e o painel
frontal estiverem sujos, o aparelho pode não
funcionar correctamente. Para evitar esta
situação, abra o painel frontal carregando em
(RELEASE), retire-o e limpe os conectores com
um cotonete humedecido em álcool. Não faça
muita pressão para não danificar os
conectores.
Para reproduzir CD de 8 cm
Utilize o adaptador de discos compactos single
opcional da Sony (CSA-8) para proteger o
leitor de CD de possíveis danos.
18
Unidade principal
Parte posterior do painel frontal
Page 63

Desmontagem do aparelho
Chave de
libertação
(fornecida)
µ
Colar a etiqueta no
comando rotativo
Pode controlar o aparelho com o comando
rotativo opcional (RM-X4S).
Com o comando rotativo são fornecidas
diversas etiquetas. Cole a etiqueta
correspondente às funções do aparelho e à
posição de montagem no comando rotativo.
Depois de montar o comando roativo, cole a
etiqueta mostrada na figura abaixo.
µ
µ
Com a chave de libertação introduzida, puxe a
unidade para fora.
µ
Para libertar a tampa da frente, carregue no
grampo existente dentro da tampa com uma
chave de parafusos.
MODE
SOUND
DSPL
SOUND
MODE
DSPL
P
Informação adicional
19
Page 64

Especificações
Secção do leitor de CD
Sistema Sistema audio digital de
Relação sinal/ruído 90 dB
Resposta em frequência 10 – 20.000 Hz
Oscilação e vibração abaixo do limite
discos compactos
mensurável
Secção do sintonizador
FM
årea de sintonização 87,5 – 108,0 MHz
Terminal de antena Conector da antena externa
Frequência intermédia 10,7 MHz
Sensibilidade utilizável 9 dBf
Selectividade 75 dB a 400 kHz
Relação sinal/ruído 65 dB (estéreo),
Distorção harmónica a 1 kHz
Separação 35 dB a 1 kHz
Resposta em frequência 30 – 15.000 Hz
68 dB (mono)
0,7 % (estéreo),
0,4 % (mono)
MW/LW
Area de sintonização MW: 531 – 1.602 kHz
Terminal de antena Conector da antena externa
Frequência intermédia 10,71 MHz/450 kHz
P
Sensibilidade MW: 30 µV
LW: 153 – 281 kHz
LW: 50 µV
Secção do amplificador de potência
Saídas Saídas dos altifalantes
Impedância dos
altifalantes 4 – 8 ohms
Saída de potência máxima
(conectores vedantes)
40 W × 4 (a 4 ohms)
Geral
Saídas Saídas de linha (2)
Fio de controlo do relé da
antena eléctrica
Fio de controlo do
amplificador de potência
Carga de controlo ATT do
telefone
Controlos de som Graves ±8 dB at 100 Hz
Agudos ±8 dB at 10 kHz
Requisitos de alimentação
Bateria do automóvel com
12 V CC (negativo à massa)
Dimensões aprox. 178 × 50 × 185 mm
(l/a/p)
Dimensões de montagem aprox. 182 × 53 × 162 mm
(l/a/p)
Peso aprox. 1,2 kg
Acessórios fornecidos Peças para instalação e
ligações (1 conjunto)
Caixa do painel frontal (1)
Acessórios opcionais Comando rotativo
RM-X4S
Adaptador de discos
compactos CSA-8
O design e as especificações estão sujeitos a
alterações sem aviso prévio.
20
Page 65

Guia de resolução de problemas
A lista de verificação seguinte ajuda a resolver os problemas que possam ocorrer no aparelho.
Antes de consultar a lista apresentada abaixo, verifique os procedimentos de funcionamento e de
ligação.
Geral
Problema
Sem som.
O conteúdo da memória foi
apagado.
Não aparecem indicações no
visor.
Não se ouve o sinal sonoro.
Causa/Solução
•Cancele a função ATT.
•Nos sistemas de 2 altifalantes, regule o controlo fader para a
posição central.
•Rode o anel no sentido dos ponteiros do relógio para regular o
volume.
•O cabo de alimentação ou a bateria estão desligados.
•Carregou na tecla reset.
n Volte a memorizar o conteúdo.
Retire o painel frontal e limpe os conectores. Para mais
informações, consulte “Limpeza dos conectores” (página 18).
• Está ligado um amplificador de potência opcional e não está a
utilizar o amplificador integrado.
• O sinal sonoro está atenuado (página 16).
Reprodução de CD
Problema
Impossível introduzir o CD.
A leitura não se inicia.
O CD é ejectado
automaticamente.
O CD não é ejectado
As teclas de funcionamento não
funcionam.
Há cortes de som por causa das
vibrações.
Recepção de rádio
Problema
Não consegue efectuar a
sintonização pré-programada.
Não consegue efectuar a
sintonização automática.
A indicação “ST” está a piscar.
Causa/Solução
• Já existe um CD introduzido.
• O CD foi introduzido ao contrário.
CD sujo.
A temperatura ambiente é superior a 50°C.
Carregue em 6 durante dois segundos.
Carregue na tecla de reincialização.
• Instalou o aparelho num ângulo superior a 60°.
• Não instalou o aparelho numa superfície dura do automóvel.
Causa/Solução
•Memorize a frequência correcta.
•O sinal da transmissão é muito fraco.
O sinal de transmissão é muito fraco.
n Utilize a sintonização manual.
•Sintonize a frequência de forma correcta.
•O sinal da transmissão é muito fraco.
n Regule para o modo MONO (página 9).
P
Informação adicional
21
Page 66

Funções RDS
Problema
A função SEEK é activada
poucos segundos depois de
começar a ouvir o rádio.
Não consegue sintonizar
estações com informações sobre
o trânsito.
PTY mostra “NONE”.
Causa/Solução
Não se trata de uma estação TP ou o sinal é muito fraco.
n Carregue em (AF/TA) até aparecer a indicação “AF.TA-OFF”.
•Active “TA”.
•A estação não transmite informações sobre o trânsito embora
seja TP.
n Sintonize outra estação.
A estação não especifica o tipo de programa.
Mensagens de erro no visor
As indicações mencionadas abaixo piscam durante cinco segundos.
Visor
ERROR
RESET
Se as soluções acima mencionadas não o ajudarem a resolver o problema, contacte o agente Sony
mais próximo.
Causa
O CD está sujo ou foi introduzido ao
contrário.
Impossível utilizar o leitor de CD
devido a um problema.
Solução
Limpe ou introduza o CD
correctamente.
Carregue na tecla de reinicialização.
P
22
Page 67

P
23
Page 68

Välkommen !
Vi gratulerar dig till köpet av Sony CD-spelare.
Vridkontrollen (RM-X4S) ger dig tillgång till
en mängd olika funktioner på CD-spelaren.
S
2
Page 69

Innehållsförteckning
Reglagens placering ................................................ 4
Komma igång
Återställa enheten ............................................... 5
Ta bort frontpanelen ........................................... 5
Ställa klockan ....................................................... 6
CD-spelare
Lyssna på en CD-skiva ....................................... 6
Spela en CD-skiva i olika lägen ........................ 7
Radio
Lagra kanaler automatiskt
— BTM-funktionen ........................................ 8
Lagra endast de önskade kanalerna................. 8
Motta de lagrade kanalerna............................... 9
RDS
Översikt av RDS-funktionen ........................... 10
Visa kanalnamnet.............................................. 10
Ställa in samma program automatiskt
— Alternativa frekvenser (AF) .................. 10
Lyssna på trafikmeddelanden......................... 11
Förinställa RDS-kanalerna med AF och
TA data .......................................................... 12
Söka en kanal efter programtyp ..................... 13
Ställa klockan automatiskt............................... 14
Ytterligare information
Säkerhetsföreskrifter ......................................... 17
Underhåll ........................................................... 18
Demontera enheten........................................... 19
Fästa etiketten på vridkontrollen .................... 19
Tekniska data ..................................................... 20
Felsökning .......................................................... 21
S
Övriga funktioner
Använda vridkontrollen .................................. 14
Ljudjustering...................................................... 16
Snabbdämpa ljudet ........................................... 16
Ändra ljud- och teckeninställningarna .......... 16
3
Page 70

Reglagens placering
MODE
SEEK/AMS
SOURCE
RELEASE
SOUND
DSPL
D
OFF
SHIFT
Mer information finns på sidorna.
1 SEEK/AMS-knappen (sök/AMS-
funktionen/manuell sökning) 7, 8, 9, 11,
13
2 MODE-knappen (band-växlare) 8, 9
3 SOURCE-knappen (source-select) 6, 8, 9
S
4 Ratt (volym/bas/diskant/vänster-högen/
uttoningskontroll) 6, 16
5 SOUND-knappen 16
6 DSPL-knappen (visningsläge) 6, 9, 10
7 Teckenfönster
8 PTY-knappen
RDS-program 13
9 6 Utmatningsknapp 6
!º AF/TA-knappen 10, 11, 12
!¡ RELEASE-knappen (ta bort frontpanelen)
5, 18
PTY
AF/TA
1
OFF
2
D - BASS
2 3 4 5 6 7 8 9110
3
CDX-4180R
!™ Återställningsknappen (på enhetens
framsida bakom frontpanelen) 5
!£ OFF-knappen 5, 6
!¢ SHIFT-knappen
PLAY MODE 7, 8, 9, 11, 12
REP 7
SET UP 6, 14, 16
SHUF 7
!∞ POWER SELECT-omkopplare (finns
längst ned på enheten)
Se “POWER SELECT-omkopplaren” i
installations-/anslutningshandboken.
!§ Under radionmottagningen:
Förinställda snabbvalsknappar 8, 9
!¶ D-BASS-ratt 17
4
Page 71

Komma igång
Återställa enheten
Innan du använder enheten för första gången
eller när du har bytt bilbatteri, måste du
återställa enheten.
Tryck på återställningsknappen med ett
spetsigt föremål, exempelvis en kulspetspenna.
Observera
• Var försiktig så att du inte tappar panelen när du
tar bort den från enheten.
• Om du trycker på (RELEASE) för att ta bort
panelen när enheten är på, stängs strömmen av
automatiskt så att högtalarna inte skadas.
• Om du bär frontpanelen med dig kan du lägga
den i det medföljande fodralet.
Sätta fast frontpanelen
Sätt del A på frontpanelen mot del B på
enheten enligt bilden och tryck till tills det
säger klick.
Återställningsknapp
Observera
• Genom att trycka på återställningsknappen
raderar du inställningarna för klockan samt vissa
minnesinställda funktioner.
• När du ansluter nätkabeln till enheten eller
återställer enheten bör du vänta ca 10 sekunder
innan du sätter i en skiva. Om du inte väntar 10
sekunder innan du sätter i skivan återställs inte
enheten och du måste då trycka på
återställningsknappen igen.
Ta bort frontpanelen
Enhetens frontpanel kan tas bort för att
förhindra att enheten stjäls.
1 Tryck på (OFF).
2 Tryck på (RELEASE) när du vill lossa
frontpanelen, dra den sedan lite till
vänster och ta bort panelen genom att
dra den mot dig.
(OFF)
A
B
Observera
• Kontrollera att frontpanelen är vänd åt rätt håll
när du sätter fast den på enheten.
• Tryck inte frontpanelen hårt mot enheten när du
sätter fast den. Tryck fast den lätt mot enheten.
• Tryck inte hårt eller bruka våld mot
frontpanelens teckenfönster.
• Utsätt inte frontpanelen för direkt solljus,
värmekällor som tex varmluftstrummor och
lämna den inte i en fuktig miljö. Lämna den
aldrig på instrumentbrädan i en bil som står
parkerad i direkt solljus där temperaturen kan
stiga drastiskt.
Varningslarm
Om du vrider tändlåset till läge OFF utan att ta
bort frontpanelen, kommer varningslarmet att
ljuda under några sekunder (endast när
POWER SELECT-omkopplaren är i läge A).
Om du ansluter en effektförstärkare (tillval)
och inte använder den inbyggda förstärkaren
deaktiveras ljudsignalen.
S
Komma igång
(RELEASE)
5
Page 72

Ställa klockan
5 215
TRACK
CD
Klockan visar en 24-timmars digital
tidsangivelse.
Exempel: Ställ klockan på 10:08
1 Tryck på (SHIFT) och sedan på (2) (SET
UP).
CLOCK
SETUP
1 Tryck på (4) (n).
1OO
SETUP
Siffrorna för timmar blinkar.
2 Ställ in timmarna.
Flytta bakåt
Flytta framåt
1OOO
SETUP
1OOO
Flytta bakåt
Flytta framåt
1OO8
3 Tryck på (4) (n).
S
Siffrorna för minuter blinkar.
4 Ställ in minuterna.
2 Tryck på (SHIFT).
SETUP
SOURCE
SETUP
SOURCE
SETUP
1OO8
CD-spelare
Lyssna på en CD-skiva
Sätt i CD:n.
Uppspelningen startas automatiskt.
Sidan med etiketten vänd uppåt
Om du redan har satt i en CD-skiva trycker du
på (SOURCE) flera gånger tills “CD” visas.
Förfluten speltid
Spårnummer
Observera
Om du vill spela upp en 8 cm CD-skiva, använder
du Sony CD-adaptern (CSA-8) (medföljer inte).
Funktion Tryck på
Avbryta uppspelningen 6 eller (OFF)
Ta ur CD-skivan 6
Ändra de visade alternativen
Varje gång du trycker på (DSPL) ändras
visningen på följande sätt:
” Förfluten speltid/Spårnummer
MOTION DISPLAY* Z Klocka Z
* Alla ovanstående alternativ visas i teckenfönstret
en i taget.
Klockan aktiveras.
3 Tryck på (SHIFT).
När inställningen är klar visas det normala
uppspelningsläget i teckenfönstret.
Observera
Om POWER SELECT-omkopplaren på enhetens
undersida är i läge B måste du slå på strömmen
innan du ställer klockan.
6
Page 73

Hitta ett visst spår
SETUP PLAYMODE
REP SHUF
REP1
REP1
CD
SETUP PLAYMODE
REP SHUF
1SHUF
CD
— Automatisk musiksökning (AMS)
Under uppspelningen, trycker du lätt på
valfri sida av SEEK/AMS.
Hitta efterföljande
spår
Hitta föregående
spår
SEEK/AMS
Hitta en viss punkt i ett spår
— Manuell sökning
Under uppspelningen, trycker du på
valfri sida av SEEK/AMS och håller den
nedtryckt. Släpp upp knappen när du har
hittat den önskade punkten.
Söka framåt
Söka bakåt
SEEK/AMS
2 Tryck på (3) (PLAY MODE) flera gånger
tills “INTRO” visas.
Varje gång du trycker på (3) (PLAY
MODE) ändras alternativen enligt följande:
CD
PLAYMODE
3 Tryck på (4) (n) så att “INTRO-ON”
väljs.
CD
PLAYMODE
Sökningen påbörjas.
4 Tryck på (SHIFT).
Om du vill återgå till normalt
uppspelningsläge väljer du “INTRO-OFF” i
steg 3 ovan.
Observera
Om “
teckenfönstret, innebär detta att du har kommit
till början eller slutet på skivan och inte kan gå
längre.
” eller “ ” visas i
Spela en CD-skiva i olika
lägen
Du kan spela CD-skivor i olika lägen:
•Med INTRO (Snabbsökning) kan du spela de
10 första sekunderna på alla spår.
•Med REP (Upprepad spelning) upprepas det
aktuella spåret.
•Med SHUF (Slumpmässig spelning) spelas
alla spår i slumpmässig ordningsföljd.
Söka effer ett visst spår
— Intro scan
1 Tryck på (SHIFT).
Varje gång du trycker på (SHIFT) tänds de
alternativ som du kan välja.
SETUP PLAY MODE
SHIFT
2 3 4 51
Spela upp spår upprepade gånger
— Upprepad uppspelning
1 Tryck på (SHIFT) under uppspelning.
2 Tryck på (6) (REP) flera gånger tills
“REP-1” visas.
S
Komma igång/CD-spelare
Den upprepade uppspelningen börjar.
3 Tryck på (SHIFT).
Du återgår till normalt uppspelningsläge
genom att välja “REP-OFF” i steg 2 ovan.
Spela upp spår i slumpmässig
ordning — Shuffle Play
1 Tryck på (SHIFT) under uppspelning.
2 Tryck på (7) (SHUF) flera gånger tills
“SHUF-1” visas.
Den slumpmässiga uppspelningen börjar.
3 Tryck på (SHIFT).
Du återgår till normalt uppspelningsläge
genom att välja “SHUF-OFF” i steg 2 ovan.
7
Page 74

Radio
Lagra kanaler automatiskt
— BTM-funktionen
Enheten väljer ut kanalerna med de starkaste
signalerna och lagrar dem efter frekvens. Du
kan lagra upp till 10 kanaler på varje band
(FM1, FM2, MW och LW).
Varning
För att undvika olyckor bör du använda BTMfunktionen om du tar in en kanal under
körning.
1 Tryck på (SOURCE) flera gånger för att
välja önskad radiokanal.
Varje gång du trycker på (SOURCE) växlas
källorna på följande sätt:
CD ˜ TUNER
2 Tryck på (MODE) flera gånger för att
välja band.
Varje gång du trycker på (MODE) växlas
S
banden på följande sätt:
” FM1 ” FM2 ” MW ” LW
Lagra endast de önskade
kanalerna
Du kan lagra upp till 10 kanaler per band (20
för FM1 och FM2, 10 för vardera MW och LW)
i önskad ordning.
1 Tryck på (SOURCE) flera gånger för att
välja tunern.
2 Tryck på (MODE) flera gånger för att
välja band (FM1, FM2, MW eller LW).
3 Tryck på valfri sida av SEEK/AMS när du
vill ställa in en kanal som ska lagras på
sifferknappen.
4 Tryck på önskad sifferknapp ((1) till
(10)) i två sekunder tills “MEM” visas.
Snabbvalsknappens nummer visas i
teckenfönstret.
Observera
Om du försöker lagra en annan kanal på samma
förinställda nummerknapp raderas den tidigare
lagrade kanalen.
3 Tryck på (SHIFT), och tryck sedan på (3)
(PLAY MODE) flera gånger tills “B.T.M”
visas.
4 Tryck på (4) (n).
Kanalerna lagras i enheten efter frekvens på
sifferknapparna.
En ljudsignal hörs när inställningen lagras.
5 Tryck på (SHIFT).
Observera
• Du kan inte lagra kanaler med svaga signaler.
Om bara ett fåtal kanaler kan tas emot behåller
vissa snabbvalsknappar den tidigare
inställningen.
• När ett nummer visas i teckenfönstret lagras
kanalerna från och med detta nummer.
8
Page 75

Motta de lagrade
kanalerna
1 Tryck på (SOURCE) flera gånger för att
välja önskad radiokanal.
2 Tryck på (MODE) flera gånger för att
välja band (FM1, FM2, MW eller LW).
Om FM stereo-mottagningen är
dålig — Enkanaligt läge
1 Tryck på (SHIFT) och sedan på (3) (PLAY
MODE) flera gånger tills “MONO” visas.
2 Tryck på (4) (n) flera gånger tills
“MONO-ON” visas.
Ljudet förbättras i och med att det blir
enkanaligt (“ST”-indikeringen försvinner).
3 Tryck på den förinställda
nummerknappen ((1) till (10)) som den
önskade kanalen lagrats på.
Om du inte kan ställa in en
förinställd kanal
Tryck lätt på valfri sida av SEEK/AMS när
du vill söka efter kanalen (automatisk
sökning).
Avsökningen avbryts när en kanal
påträffas. Tryck på valfri sida av
SEEK/AMS flera gånger tills önskad kanal
har mottagits.
Observera
Om den automatiska sökningen avbryts för ofta
trycker du på (SHIFT) och därefter på (3) (PLAY
MODE) flera gånger tills “LOCAL” (lokalt sökläge)
visas. Tryck därefter på (4) (n) när du vill välja
“LOCAL-ON”. Tryck på (SHIFT).
Bara de kanaler som har relativt starka signaler
kan ställas in.
Tips
Om du vet vilken frekvens radiokanalen har,
trycker du på valfri sida av SEEK/AMS och håller
den nedtryckt. tills den önskade kanalen har
mottagits (manuell sökning).
3 Tryck på (SHIFT).
Om du vill gå tillbaka till normalt läge väljer
du “MONO-OFF” i steg 2 ovan.
Ändra de visade alternativen
Varje gång du trycker på (DSPL) ändras
visningen på följande sätt:
z Frekvens z Klocka
MOTION DISPLAY* Z
* Alla ovanstående alternativ visas i teckenfönstret
en i taget.
S
Radio
9
Page 76

RDS
Översikt av RDSfunktionen
RDS (Radio Data System) är en radiotjänst som
gör att FM-kanalerna kan sända ytterligare
digital information tillsammans med den
vanliga radioprogramsignalen. Bilstereon
erbjuder dig en mängd olika tjänster. Här är
några: söka efter samma program automatiskt,
lyssna på trafikmeddelanden och hitta kanal
efter programtyp.
Ställa in samma program
automatiskt
— Alternativa frekvenser (AF)
AF-funktionen väljer automatiskt och ställer in
den station som har den starkaste signalen i
nätverket. Om du använder den här
funktionen kan du lyssna på samma program
under en långkörning utan att behöva ställa in
kanalen manuellt igen.
Frekvenserna ändras automatiskt.
98,5MHz
96,0MHz
Observera
• Landet eller regionen avgör vilka RDS-funktioner
som finns tillgängliga.
• RDS fungerar inte ordentligt om signalen är för
svag eller om den inställda kanalen inte överför
RDS-data.
Visa kanalnamnet
S
Den aktuella kanalens namn tänds i
teckenfönstret.
Välj en FM-kanal (sidan 8).
När du ställer in en FM-kanal som överför
RDS-data tänds kanalnamnet i
teckenfönstret.
Observera
Beteckningen “*” innebär att en RDS-kanal
mottas.
Ändra de visade alternativen
Varje gång du trycker på (DSPL) ändras
visningen på följande sätt:
z Kanalnamn (Frekvens) z Klocka
MOTION DISPLAY* Z
* Alla ovanstående alternativ visas i teckenfönstret
en i taget.
Observera
“NO NAME” visas om den mottagna kanalen inte
sänder RDS-data.
Kanal
102,5MHz
1 Välj en FM-kanal (sidan 8).
2 Tryck på (AF/TA) upprepade gånger tills
“AF-ON” tänds i teckenfönstret.
Enheten börjar söka efter en alternativ kanal
med en starkare signal i samma nätverk.
Observera
När det inte finns någon alternativ kanal i området
och du inte vill söka efter en alternativ kanal,
stänger du av AF-funktionen genom att trycka på
(AF/TA) upprepade gånger tills “AF.TA-OFF” tänds.
10
Page 77

Ändra de visade alternativen
Varje gång du trycker på (AF/TA) ändras
alternativen enligt följande:
” AF-ON ” TA-ON ” AF.TA-ON*
AF.TA-OFF “
* Välj det här alternativet när du vill sätta på både
AF- och TA-funktionerna.
Observera
• “NO AF” och kanalnamnet blinkar omväxlande
om enheten inte kan hitta den alternativa
kanalen i nätverket.
• Om kanalnamnet börjar blinka när en kanal har
valts med AF-funktionen, innebär detta att det
inte finns någon alternativ frekvens. Tryck på
SEEK/AMS medan kanalnamnet blinkar (inom 8
sekunder). Enheten börjar söka efter en annan
frekvens med samma PI-data
(programidentiferingsdata). (“PI SEEK” visas men
inget ljud hörs). Om enheten inte kan hitta en
alternativ frekvens, visas “NO PI”, och enheten
återgår till den ursprungsinställda frekvensen.
Lyssna på ett regionalt program
Funktionen “REG-ON” (regional on) på
enheten gör att du kan bibehålla inställningen
till ett regionalt program utan att kopplas om
till en annan regional kanal. (Observera att du
måste sätta på AF-funktionen.) Enheten är
fabriksinställd på “REG-ON”, men om du vill
stänga av funktionen gör du något av följande.
1 Tryck på (SHIFT) och sedan på (3) (PLAY
MODE) flera gånger tills “REG” visas.
2 Tryck på (4) (n) flera gånger tills “REG-
OFF” visas.
3 Tryck på (SHIFT).
Observera att om du trycker på “REG-OFF”
kanske enheten kopplas om till en annan
regional kanal inom samma nätverk.
Du återgår till regional avlyssning genom att
välja “REG-ON” i steg 2 ovan.
Observera
Den här funktionen fungerar inte i Storbritannien
och i några andra områden.
Funktionen lokal länk (endast
Storbritannien)
Med funktionen lokal länk kan du välja andra
lokala kanaler i området, fastän de inte finns
lagrade på dina förinställda nummerknappar.
1 Tryck på en förinställd nummerknapp
där en lokal kanal har lagrats.
2 Inom fem sekunder trycker du på den
förinställda nummerknappen för den
lokala kanalen igen.
3 Upprepa detta tills den önskade lokala
kanalen mottas.
Lyssna på
trafikmeddelanden
Uppgifterna om trafikmeddelandena (TA) och
trafikprogrammet (TP) gör så att du
automatiskt kan ställa in FM-kanaler som
sänder trafikmeddelanden samtidigt som du
lyssnar på andra programkällor.
Tryck på (AF/TA) upprepade gånger tills
“TA-ON” eller “AF.TA-ON” tänds i
teckenfönstret.
Enheten börjar söka efter
trafikinformationskanaler. “TP” tänds i
teckenfönstret när enheten hittar en kanal
som sänder trafikmeddelanden.
När trafikmeddelandet startas, börjar “TA”
blinka. När trafikmeddelandet är klart
upphör blinkningen.
Tips
Om trafikmeddelandet startar när du lyssnar på en
annan programkälla, kopplas enheten automatiskt
till meddelandet och återgår till originalkällan när
meddelandet är klart.
Observera
• “NO TP” blinkar i fem sekunder om den
mottagna kanalen inte sänder
trafikmeddelanden. Sedan börjar enheten söka
efter en kanal som sänder trafikmeddelanden.
• När indikeringen “EON” visas med “TP” i
teckenfönstret, sänder den aktuella kanalen
trafikmeddelanden från andra kanaler i samma
nätverk.
S
RDS
11
Page 78

Avbryta pågående
trafikmeddelanden
Tryck lätt på (AF/TA) eller (SOURCE).
Om du vill avbryta alla trafikmeddelanden
stänger du av funktionen genom att trycka
på (AF/TA) tills “AF.TA-OFF” tänds.
Förinställa volymen på
trafikmeddelandena
Du kan förinställa volymnivån på
trafikmeddelandena i förväg så att du inte
missar meddelandet. När trafikmeddelandet
startar, justeras volymen automatiskt till den
förinställda nivån.
Förinställa samma inställning för
varje förinställda kanaler.
1 Välja ett FM-band (sidan 8).
2 Tryck på (AF/TA) flera gånger när du vill
välja antingen “AF-ON”, “TA-ON” eller
“AF.TA-ON” (för både AF och TAfunktioner).
Observera: om du väljer “AF.TA-OFF”
lagras inte bara RDS-kanalerna, utan också
de som inte är-RDS-kanaler.
3 Tryck på (SHIFT) och sedan på (3) (PLAY
MODE) flera gånger tills ”BTM“ visas.
1 Välj önskad volymnivå.
2 Tryck på (AF/TA) under två sekunder.
“TA” visas när inställningen lagras.
Motta viktigt meddelande
Om ett viktigt meddelande kommer in medan
du lyssnar på radion, kopplas programmet
automatiskt över till meddelandet. Om du
lyssnar på en annan källa än radion, hörs det
viktiga meddelandet om du ställer in AF eller
TA. Enheten växlar då automatiskt till dessa
meddelanden oberoende om vad du lyssnar på
S
för tillfället.
Förinställa RDS-kanalerna
med AF och TA data
När du förinställer RDS-kanalerna, lagrar
enheten alla uppgifter om kanalen samt
frekvensen så att du inte behöver sätta på AF
och TA-funktionerna varje gång du ställer in
en förinställd kanal. Du kan välja olika
inställningar (AF, TA eller båda två) för en
förinställd kanal, eller samma inställning för
alla förinställda kanaler.
4 Tryck på (4) (n).
5 Tryck på (SHIFT).
Förinställa olika inställningar för
alla förinställd kanal
1 Välj ett FM-band och ställ in önskad
kanal (sidan 9).
2 Tryck på (AF/TA) flera gånger när du vill
välja antingen “AF-ON”, “TA-ON” eller
“AF.TA-ON” (för både AF och TAfunktioner).
3 Tryck på önskad snabbvalsknapp tills
“MEM” visas.
Upprepa från steg 1 när du vill förinställa
andra kanaler.
Tips
Om du vill ändra på de förinställda AF och/eller
TA-inställningarna efter det att du har ställt in den
förinställda kanalen, kan detta göras genom att
stänga av/sätta på AF- eller TA-funktionen.
12
Page 79

PORT
INFO
Söka en kanal efter
programtyp
Du kan söka efter valfri kanal genom att välja
en av de programtyper som visas nedan.
Programtyper Teckenfönster
Nyheter NEWS
Aktuella händelser AFFAIRS
Information INFO
Sport SPORT
Utbildning EDUCATE
Drama DRAMA
Kultur CULTURE
Vetenskap SCIENCE
Diverse VARIED
Popmusik POP M
Rockmusik ROCK M
Populärmusik M.O.R. M
Lättare klassiskt LIGHT M
Klassiskt CLASSICS
Andra musiktyper OTHER M
Väder WEATHER
Finansinformation FINANCE
Barnprogram CHILDREN
Samhällsinformation SOCIAL A
Religion RELIGION
Ring in PHONE IN
Resor TRAVEL
Nöjen LEISURE
Jazzmusik JAZZ
Country-musik COUNTRY
Nationell musik NATION M
Gamla godingar OLDIES
Folkmusik FOLK M
Dokumentärer DOCUMENT
Inte angiven NONE
Observera
Du kan inte använda den här funktionen i vissa
länder där PTY-data inte är tillgängliga.
1 Tryck på (PTY) under FM-mottagningen
tills “PTY” visas i teckenfönstret.
Det aktuella namnet på programtypen visas
om kanalen överför PTY-data. “- - - - -”
visas om den mottagna kanalen inte är en
RDS-kanal eller om RDS-data inte har tagits
emot.
2 Tryck på (PTY) flera gånger tills den
önskade programtypen visas.
Programtyperna visas i den ordning som
anges i tabellen. Observera att du inte kan
välja “NONE” (inte angiven) vid sökning.
3 Tryck lätt på valfri sida av SEEK/AMS.
Enheten börjar söka efter en kanal för den
valda programtypen. När enheten hittar
programmet, visas programtypen igen i
ungefär fem sekunder.
“NO” och programtypen visas omväxlande
i fem sekunder om enheten inte kan hitta
programtypen och återgår sedan till
föregående kanal.
S
RDS
13
Page 80

Ställa klockan
automatiskt
Med CT-data (Clock Time) från RDSöverföringen ställs klockan automatiskt.
1 Tryck på (SHIFT) och sedan på (2) (SET
UP) flera gånger tills “CT” visas.
ET
CTOFF
SETUP
2 Tryck på (4) (n) flera gånger tills
“CT-ON” visas.
Klockan är ställd.
ET
CTON
CT
SETUP
3 Tryck på (SHIFT) för att återgå till det
normala teckenfönstret.
Avbryta CT-funktionen
Välj “CT-OFF” i steg 2 ovan.
Övriga funktioner
Du kan inte ansluta en valfri vridkontroll
(RM-X4S) med den här enheten.
Använda vridkontrollen
Vridkontrollen använder du genom att trycka
på knapparna och/eller vrida på reglagen.
Genom att trycka på knapparna
(SOURCE och MODE-knapparna)
(SOURCE)
(MODE)
Observera
• CT-funktionen kanske inte fungerar trots att en
RDS-kanal mottas.
S
• Det kan vara skillnad på tiden som ställts in av
CT-funktionen och den verkliga tiden.
Varje gång du trycker på (SOURCE)
ändras funktionen på följande sätt:
TUNER ˜ CD
När du trycker på (MODE) ändras
funktionen på följande sätt;
Tuner: FM1 n FM2 n MW n LW
Tips
När POWER SELECT-omkopplaren är i läge B kan
du sätta på enheten genom att trycka på
(SOURCE) på vridkontrollen.
14
Page 81

Genom att vrida kontrollen (SEEK/
AMS-kontrollen)
Vrid kontrollen helt kort och släpp upp
den för att:
•Hitta ett visst spår på en skiva. Vrid och
håll kontrollen nere tills du hittar den
önskade punkten i spåret, och släpp sedan
upp kontrollen för att starta
uppspelningen.
•Ta in kanaler automatiskt. Vrid och håll
kontrollen för att ta in den speciella kanalen.
Genom att trycka in och vrida
kontrollen (PRESET/DISCkontrollen)
Övriga funktioner
Vrid kontrollen VOL för att
justera volymen.
Tryck på (SOUND) när du vill
justera volymen och ljudmenyn.
Tryck på (DSPL) för att
ändra det som visas.
Tryck på (ATT)
för att dämpa
ljudet.
Tryck på (OFF)
för att stänga
av enheten.
Byta styrriktning
Kontrollens styrriktning är fabriksinställd
enligt bilden nedan.
öka
OFF
S
RDS/Övriga funktioner
Tryck in och vrid kontrollen för att:
Ta in kanalerna som är lagrade på
snabbvalsknapparna.
minska
Om du monterar vridkontrollen på höger sida
av ratten kan du växla styrriktning för
kontrollerna.
Tryck på (SOUND) under två sekunder
medan du trycker på VOL-reglaget.
15
Page 82

Ljudjustering
Du kan justera basen, diskanten, balansen och
uttoningen. Alla källorna kan lagra nivån på
basen och diskanten.
1 Välj vilka egenskaper du vill justera
genom att flera gånger trycka på
(SOUND).
VOL (volym) n BAS (bas) n
TRE␣ (diskant) n BAL (vänster-höger) n
FAD␣ (främre-bakre)
2 Justera den egenskap du valt genom att
vrida på reglaget.
Justera inom tre sekunder efter det att du
har valt egenskap. (Efter tre sekunder
fungerar knappen som volymknapp igen.)
Snabbdämpa ljudet
Tryck på (ATT) på vridkontrollen.
“ATT-ON” brinkar till.
S
Återgå till tidigare ljudnivå genom att trycka
på (ATT) en blinkar till.
Tips
Enheten minskar volymen automatiskt när ett
telefonsamtal kommer in (Funktionen TelephoneATT).
Ändra ljud- och
teckeninställningarna
Du kan välja:
•CLOCK (Klockan) (sidan 6).
•CT (Clock Time) (sidan 14).
•D.INFO (Dubbel information) när du vill visa
klockan och uppspelningsläget samtidigt
(ON) eller visa informationen omväxlande
(OFF).
•BEEP när du vill sätta på eller stänga av
ljudsignalen.
• RM (Vridkontroll) när du vill byta
styrriktning på vridkontrollens reglage.
— Välj “NORM” om du vill använda
vridkontrollens fabriksinställningar.
— Välj “REV” om du vill montera
vridkontrollen på rattens högra sida.
1 Tryck på (SHIFT).
2 Tryck på (2) (SET UP) flera gånger tills
den önskade inställningen visas.
Varje gång du trycker på (2) (SET UP)
ändras alternativen enligt följande:
CLOCK n CT n D.INFO* n BEEP n RM
* Ovanstående alternativ visas inte om du inte
har ställt in kanalen eller inte spelar en CD.
Observera
Visningen i teckenfönstret beror på källan.
3 Tryck på (4) (n) när du vill välja önskad
inställning (till exempel ON eller OFF).
16
4 Tryck på (SHIFT).
När inställningen är klar visas det normala
uppspelningsläget i teckenfönstret.
Page 83

Höja basljudet — D.bass
Ger dig ett tydligare och starkare basljud. Dbass-funktionen höjer den lågfrekventa
signalen med en skarpare kurva än den
vanliga basförstärkaren. Du kan höra basen
tydligare även om talljudet har samma volym.
Du kan enkelt framhäva och justera basljudet
med D-BASS-ratten. Effekten påminner om
den som du får när du använder ett valfritt
subwoofer-system.
Med den digitala D-bass-funktionen* får du ett
ännu skarpare och starkare basljud än med
analog D-bass.
* Digital D-bass går att få under CD-uppspelning.
Digital D-BASS Analog D-BASS
D-BASS 3
Nivå
0dB
D-BASS 2
D-BASS 1
Nivå
0dB
Justera baskurvan
Vrid på D-BASS-ratten när du vill justera
basnivån (1, 2 eller 3).
“D-BASS” visas i teckenfönstret.
Under CD-uppspelning visas “DIGITAL DBASS” i fönstret.
Avbryt genom att vrida ratten till OFF-läge.
Observera
Om basljudet förvrängs, justera det via D-BASSratten eller volymknappen.
D-BASS 3
D-BASS 2
D-BASS 1
Frekvens(Hz)Frekvens(Hz)
Ytterligare
information
Säkerhetsföreskrifter
•Om du har parkerat bilen i direkt solljus så
att temperaturen i bilen har stigit markant,
bör du låta CD-spelaren svalna innan du
använder den.
•Kontrollera anslutningarna först om ingen
ström tillförs enheten. Kontrollera säkringen
om allt i övrigt är i sin ordning.
•Om inget ljud kommer från högtalare i
2-högtalarsystemet, ställer du
uttoningskontrollen i mittenläget.
•Om bilen har en motorantenn, fälls den
automatiskt ut när enheten är påslagen.
Om du har några frågor eller problem som rör
CD-spelaren och som inte tas upp i
bruksanvinsningen, tar du kontakt med din
närmaste Sony-återförsäljare.
Viktigt om CD-skivor
En smutsig eller defekt skiva kan leda till att
ljudet försvinner då och då under
uppspelning. Om du vill ha bästa möjliga ljud,
gör då följande.
Ta endast i skivans kanter. Om du vill hålla
skivan ren ska du inte vidröra ytan.
S
Övriga funktioner/Ytterligare information
Sätt inte papper eller tejp på ytan.
17
Page 84

Utsätt inte skivan för direkt solljus eller
värmekällor, t ex element. Förvara den inte
heller i en bil som står parkerad i direkt solljus
där temperaturen kan stiga dramatiskt.
Innan du spelar, rengör du skivorna med en
torr, mjuk trasa. Rengör skivan från mitten och
utåt.
Använd inte bensin, thinner eller andra
lösningsmedel som finns att köpa i handeln,
och inte heller antistatspray avsedd för LPskivor av vinyl.
Att observera angående
fuktkondensering
Om det regnar eller är fuktigt, kan fukten
S
skapa kondens på CD-spelarens lins. Om detta
inträffar fungerar inte CD-spelaren. Ta i så fall
bort skivan och vänta en timme tills fukten har
avdunstat.
Underhåll
Byta säkring
När du byter säkring, se till att använda en
med rätt ampere. Om säkringen går,
kontrollera anslutningen och byt säkring. Om
säkringen går igen kan det bero på internt fel. I
så fall ska du kontakta din Sony-återförsäljare.
Säkring (10 A)
Varning
Använd aldrig en säkring med högre
strömstyrka än den som medföljer enheten
eftersom denna kan skadas.
Rengöra anslutningarna
Enheten fungerar inte ordentligt om
anslutningarna mellan enheten och
frontpanelen är smutsiga. Om du vill hindra
detta, öppnar du frontpanelen genom att
trycka på (RELEASE) och släpper sedan upp
den och rengör anslutningen med en
bomullstopp doppad i alkohol. Ta inte i för
mycket. Annars kan anslutningarna skadas.
När du spelar en 8 cm CD
Använd den valfria adaptern (CSA-8) för att
skydda CD-spelaren från skada.
18
Huvudenheten
Baksidan på frontpanelen
Page 85

Demontera enheten
Nyckel
(medföljer)
µ
Fästa etiketten på
vridkontrollen
Enheten kan manövreras med vridkontrollen
(RM-X4S). Flera olika etiketter medföljer
vridkontrollen. Fäst den etikett som
överensstämmer med funktionen på enheten
och på avsedd plats på vridkontrollen. Fäst
etiketten enligt bilden när vridkontrollen
monterats.
µ
µ
Dra ut enheten när demonteringsnyckeln sitter i.
µ
Tryck på hållaren på frontpanelens insida med en
smal skruvmejsel och bänd försiktigt loss
frontpanelen.
MODE
SOUND
DSPL
SOUND
MODE
DSPL
S
Ytterligare information
19
Page 86

Tekniska data
CD-spelaren
System Digitalt ljudsystem för CD
Signal/brus-förhållande 90 dB
Frekvensgång 10 – 20.000 Hz
Svaj och fladder Under mätbar gräns
Tuner
FM
Tuningintervall 87,5 – 108,0 MHz
Antennterminal Extern antennanslutning
Mellanfrekvens 10,7 MHz
Känslighet 9 dBf
Selektivitet 75 dB vid 400 kHz
Signal/brus-förhållande 65 dB (stereo),
Harmonisk distortion vid 1 kHz
Separation 35 dB vid 1 kHz
Frekvensgång 30 – 15.000 Hz
MW/LW
Tuningintervall MW: 531 – 1.602 kHz
Antennterminal Extern antennanslutning
Mellanfrekvens 10,71 MHz/450 kHz
Känslighet MW: 30 µV
S
Effektförstärkare
Utgångar Högtalarutgångar
Högtalarimpdans 4 – 8 ohm
Maximal uteffekt 40 W × 4 (vid 4 ohm)
68 dB (mono)
0,7 % (stereo),
0,4 % (mono)
LW: 153 – 281 kHz
LW: 50 µV
(Plomberade uttag )
Allmänt
Utgångar Linjeutgångar (2)
Styrkabel för motorantenn
Styrkabel för
effektförstärkare
Telefondämpningskontrollsladd
Tonklangreglering Bas ±8 dB vid 100 Hz
Diskant ±8 dB vid 10 kHz
Strömförsörjning 12 V DC bilbatteri
(negativt jordat)
Mått Ca 178 × 50 × 185 mm
(b/h/d)
Monteringsmått Ca 182 × 53 × 162 mm
(b/h/d)
Vikt Ca 1,2 kg
Medföljande tillbehör Delar för installation och
anslutningar (1 set)
Fodral för löstagar
frontpanel (1)
Valfria tillbehör Vridkontroll RM-X4S
CD-adapter CSA-8
Rätt till ändringar förbehålles.
20
Page 87

Felsökning
Följande checklista hjälper dig att lösa de flesta problem som du kan råka ut för med enheten.
Innan du går igenom checklistan nedan, ska du läsa anslutnings- och driftsinformationen.
Allmänt
Fel
Ljudbortfall.
Innehållet i minnet har raderats.
Information visas inte i
teckenfönstret.
Ingen ljudsignal.
CD-uppspelning
Problem
CD-skivan dras inte in i
skivfacket.
Skivspelningen sätts inte igång.
CD-skivan matas automatiskt ut
ur skivfacket.
CD-skivan matas inte ut.
Reglagen fungerar inte.
Ljudbortfall på grund av
vibrationer.
Orsak/åtgärd
•Avbryt ATT-funktionen.
•Ställ in uttoningskontrollen i mittläget för 2-högtalarsystemet.
•Vrid på ratten medurs när du vill justera volymen.
• Strömkabeln eller batteriet har kopplats ifrån.
• Reset-knappen har trycks in.
n Lagra i minnet igen.
Ta bort frontpanelen och rengör anslutningarna. Se “Rengöra
anslutningarna” (sidan 18).
• En effektförstärkare (tillval) har anslutits och du använder inte
den inbyggda förstärkaren.
• Ljudsignalen är dämpad (sidan 16).
Orsak/Åtgärd
• Det ligger redan en CD-skiva i skivfacket.
• CD-skivan har med våld skjutits in upp och ned i skivfacket.
CD-skivan är dammig.
Den omgivande temperaturen överstiger +50°C.
Tryck på 6 i två sekunder.
Tryck på återställningsknappen.
• Enheten har installerats i en vinkel över 60°.
• Enheten har inte installerats på en stabil plats i bilen.
S
Ytterligare information
Radiomottagning
Fel
Det går inte att förinställa en
radiokanal.
Den automatiska sökningen
fungerar inte.
“ST”-indikatorn blinkar.
Orsak/åtgärd
• Lagra rätt frekvens.
• Utsändningen är för svag.
Utsändningen är för svag.
n Använd manuell sökning.
•Ställ in rätt frekvens.
•Utsändningssignalen är för svag.
n Ställ in i enkanaligt läge (MONO) (sidan 9).
21
Page 88

RDS-funktioner
Fel
En sökning påbörjas efter några
sekunders lyssning.
Inga trafikmeddelanden tas
emot.
“NONE” visas.
Orsak/åtgärd
Kanalen är inte en TP-kanal eller har en svag signal.
n Tryck på (AF/TA) för att gå in i “AF.TA-OFF”-läge.
•Aktivera “TA”.
•Kanalen sänder inte några trafikmeddelanden trots att den är
TP. n Ställ in en annan kanal.
Kanalen anger inte programtyp.
Fel visas
Följande indikeringar blinkar ungefär fem sekunder.
Teckenfönster
ERROR
RESET
Om ovannämnda lösningar inte hjälper dig att förbättra situationen, ta kontakt med din närmaste
Sony-återförsäljare.
Orsak
En CD är smutsig eller har satts in upp
och ned.
CD-spelaren fungerar inte pga av
något problem.
Åtgärd
Rengör och sätt i CD:n korrekt.
Tryck på återställningsknappen.
S
Sony Corporation Printed in France
22
 Loading...