

Sony CDX-3900, CDX-3800 User Manual
FM/AM
Compact Disc
Player
Operating Instructions
Manual de instrucciones
¤ˇ¥˛»¡'œfi
For installation and connections, see the supplied installation/connections
manual.
Con respecto a la instalación y las conexiónes, consulte el manual de Instalación/
conexiones suministrado.
ƒw‚¸⁄˛– ‰ufi ¡A‰— \' ·£¤ “”ƒw‚¸¡B– ‰u⁄ ¥U¡C
GB
ES
CT
CDX-3900
CDX-3800
2000 Sony Corporation
Welcome !
Thank you for purchasing the Sony Compact
Disc Player. This unit lets you enjoy a variety
of features.
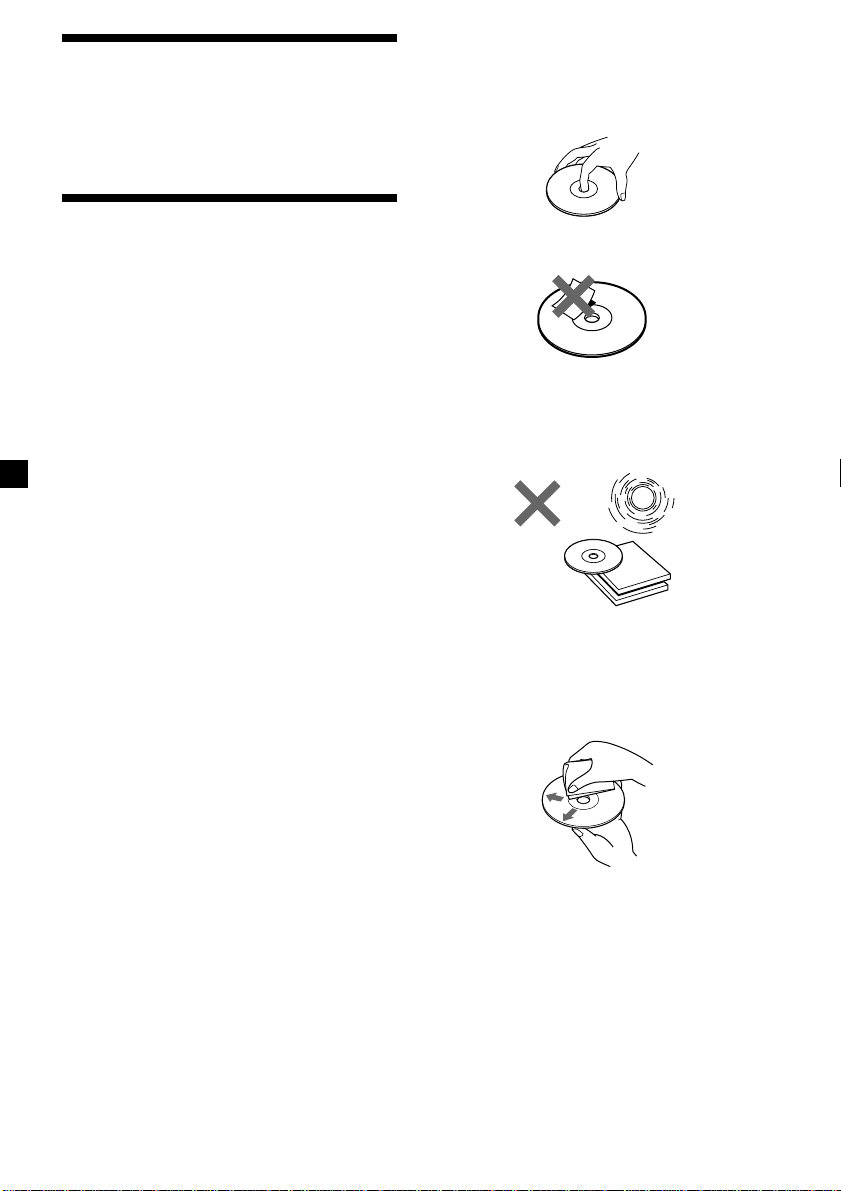
Notes on handling CDs
A dirty or defective disc may cause sound
dropouts while playing. To enjoy optimum
sound, handle the disc by its edge. To keep the
disc clean, do not touch the surface.
Precautions
•If your car was parked in direct sunlight
resulting in a considerable rise in
temperature inside the car, allow the unit to
cool off before operating it.
•If no power is being supplied to the unit,
check the connections first. If everything is in
order, check the fuse.
•If no sound comes from the speakers of a
two-speaker system, set the fader control to
the centre position.
•If your car is equipped with a power aerial, it
will extend automatically while the unit is
operating.
If you have any questions or problems
concerning your unit that are not covered in
this manual, please consult your nearest Sony
dealer.
Do not stick paper or tape on the labelled
surface.
Do not expose the discs to direct sunlight or
heat sources such as hot air-ducts, or leave
them in a car parked in direct sunlight where
there can be a considerable rise in temperature
inside the car.
Before playing, clean the discs with an optional
cleaning cloth. Wipe each disc from the centre
out.
Do not use solvents such as benzine, thinner,
commercially available cleaners, or antistatic
spray intended for analog discs.
2
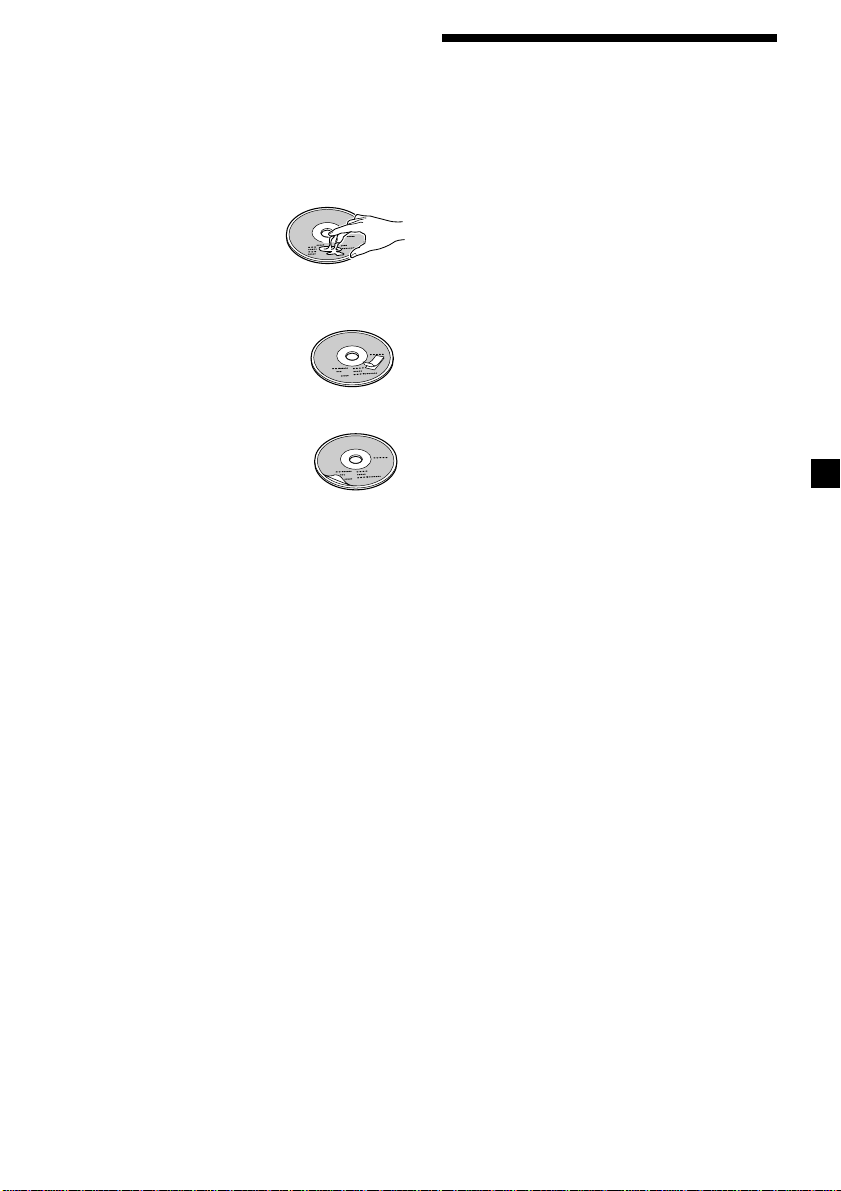
Notes on discs
If you use the discs explained below, the sticky
residue can cause the CD to stop spinning and
may cause malfunction or ruin your discs.
Table of Contents
Location of controls ................................................. 4
Do not use second-hand or rental CDs that
have a sticky residue on the surface (for
example from peeled-off stickers or from ink,
or glue leaking from under the stickers).
There are paste residue
Ink is sticky
Do not use rental CDs with old labels that are
beginning to peel off.
Stickers that are beginning
to peel away, leaving a
sticky residue
Do not use your CDs with labels or stickers
attached.
Labels are attached
Notes on CD-R discs
•You can play CD-Rs (recordable CDs) on this
unit. However depending on the conditions
of the recording equipment or the CD-R disc
itself, some CD-Rs cannot be played on this
unit.
•You cannot play a CD-R that is not finalized
(Finalization is necessary for a recorded CDR disc to be played on the audio CD player).
•You cannot play CD-RWs (rewritable CDs)
on this player.
Getting Started
Resetting the unit ................................................ 6
Detaching the front panel .................................. 6
Setting the clock .................................................. 7
CD Player
Listening to a CD ................................................ 7
Playing a CD in various modes ........................ 8
Radio
Memorising stations automatically
— Best Tuning Memory (BTM) ................... 8
Memorising only the desired stations.............. 9
Receiving the memorised stations .................... 9
Other Functions
Adjusting the sound characteristics ............... 10
Cancel the beep sound ..................................... 10
Boosting the bass sound
— D-bass ....................................................... 10
Attenuating the sound ..................................... 10
Additional Information
Maintenance....................................................... 11
Dismounting the unit ....................................... 11
Specifications ..................................................... 12
Troubleshooting guide ..................................... 13
Notes on moisture condensation
On a rainy day or in a very damp area,
moisture may condense on the lenses inside
the CD player. Should this occur, the unit will
not operate properly. In this case, remove the
disc and wait for about an hour until the
moisture evaporates.
When you play 8 cm CDs
Use the optional Sony compact disc single
adapter (CSA-8) to protect the CD player from
damage.
3
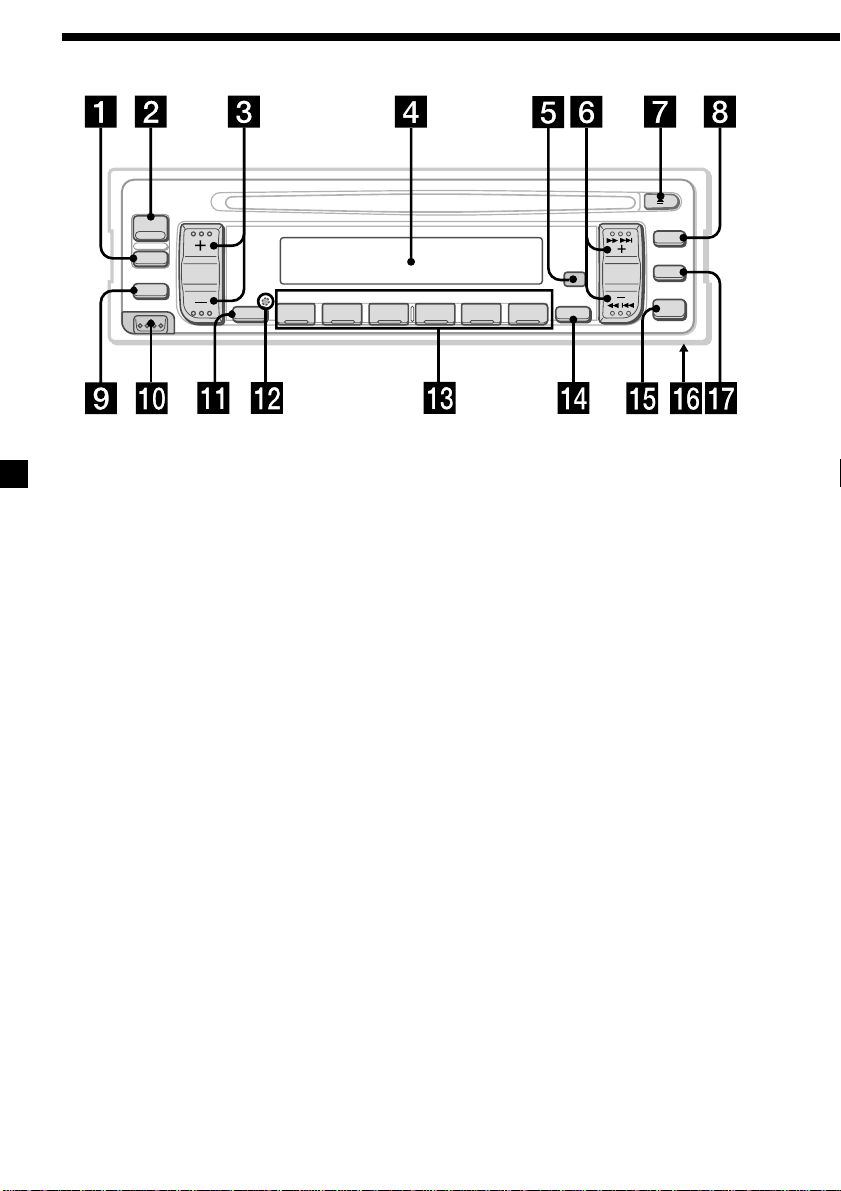
Location of controls
SOURCE
MODE
D-BASS
RELEASE
REPEAT SHUF
SOUND
1 263 4 5
Refer to the pages for details.
1 MODE (band select) button 8, 9
2 SOURCE (source select) button 7, 8, 9
3 (+) (-) (volume/bass/treble/left-right/
front-rear control) buttons 7, 10
4 Display window
5 Sensor for the card remote commander
(CDX-3900 only)
6 SEEK/AMS (seek/Automatic Music
Sensor/manual search) control 8, 9
7 Z (eject) button 7
8 SENS/BTM (sensitivity adjust/Best
Tuning Memory) button 8, 9
9 D-BASS button 10
0 RELEASE (front panel release) button
6, 11
qa SOUND button 7, 10
qs Reset button (located on the front side
of the unit hidden by the front panel) 6
BTM
SENS
SEEK
ATT
AMS
DSPL
CDX-3900/CDX-3800
OFF
qd During radio reception:
Number buttons 9
During CD playback:
(1) REPEAT button 8
(2) SHUF button 8
qf DSPL (display mode change/time set)
button 7, 9
qg OFF button* 6, 7
qh Frequency select switch (located on the
bottom of the unit)
See “Frequency select switch” in the
Installation/Connections manual.
qj ATT (attenuate) button 10
*Warning when installing in a car
without ACC (accessory) position
on the ignition key switch
Be sure to press (OFF) on the unit for two
seconds to turn off the clock display after
turning off the engine.
When you press (OFF) momentarily, the
clock display does not turn off and this
causes battery wear.
4
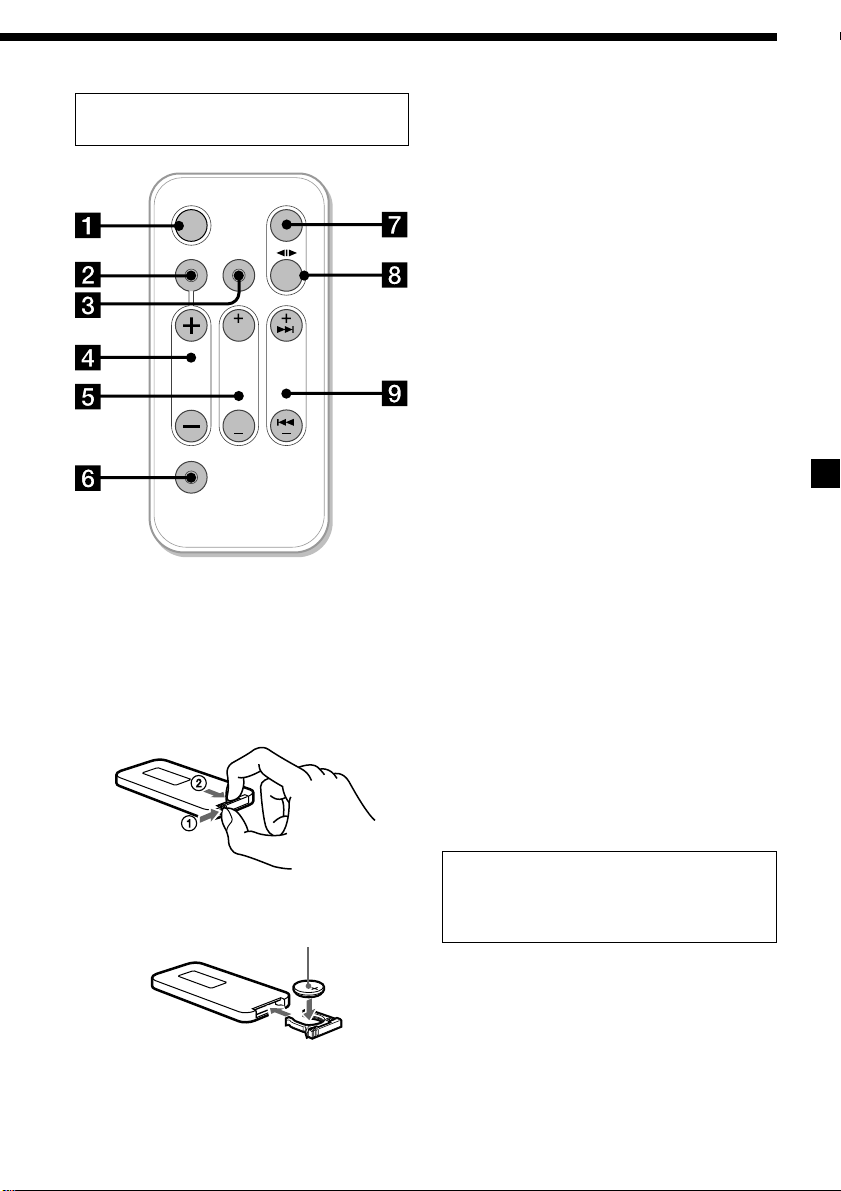
Card remote commander RM-X49
(CDX-3900 only)
SOURCE
OFF
DSPL
SOUND
MODE
FF
SEEK
PRST
VOL
ATT
DISC
REW
AMS
Replacing the lithium battery
When the battery becomes weak, the range of
the card remote commander becomes shorter.
Replace the battery with a new CR2025 lithium
battery.
The corresponding buttons of the card
remote commander control the same
functions as those on this unit.
1 OFF button
2 SOUND button
3 DSPL button
4 VOL (volume/bass/treble/left-right/
front-rear control) button
5 PRST/DISC button
6 ATT button
7 SOURCE button
8 MODE button
9 SEEK/AMS button
Note
A unit turned off by pressing (OFF) for two
seconds cannot be operated with the card remote
commander unless (SOURCE) on the unit is
pressed or a disc is inserted to activate the unit
first.
Notes on lithium battery
•Keep the lithium battery out of the reach of
children. Should the battery be swallowed,
immediately consult a doctor.
•Wipe the battery with a dry cloth to assure a
good contact.
•Be sure to observe the correct polarity when
installing the battery.
•Do not hold the battery with metallic
tweezers, otherwise a short-circuit may
occur.
x
+ side up
WARNING
The battery may explode if mistreated.
Do not recharge, disassemble, or dispose of
in fire.
5

Getting Started
Resetting the unit
Before operating the unit for the first time or
after replacing the car battery, you must reset
the unit.
Remove the front panel and press the reset
button with a pointed object, such as a
ballpoint pen.
Notes
• Be sure not to drop the panel when detaching it
from the unit.
• If you detach the panel while the unit is still
turned on, the power will turn off automatically
to prevent the speakers from being damaged.
• When carrying the front panel with you, use the
supplied front panel case.
Attaching the front panel
Attach part A of the front panel to part B of
the unit as illustrated and push the left side
into position until it clicks.
Reset button
Notes
• Pressing the reset button will erase the clock
setting and some memorised functions.
• When you connect the power supply cord to the
unit or reset the unit, wait for about 10 seconds
before you insert a disc. If you insert a disc within
these 10 seconds, the unit will not be reset, and
you will have to press the reset button again.
Detaching the front panel
You can detach the front panel of this unit to
prevent the unit from being stolen.
1 Press (OFF).
2 Press (RELEASE), then slide the front
panel a little to the left, and pull it off
towards you.
(OFF)
A
B
Notes
• Be sure not to attach the front panel upside
down.
• Do not press the front panel too hard against the
unit when attaching it.
• Do not press too hard or put excessive pressure
on the display window of the front panel.
• Do not expose the front panel to direct sunlight
or heat sources such as hot air ducts, and do not
leave it in a humid place. Never leave it on the
dashboard of a car parked in direct sunlight or
where there may be a considerable rise in
temperature.
Caution alarm
If you turn the car ignition off without
removing the front panel, the caution alarm
will beep for a few seconds.
If you connect an optional power amplifier and
do not use the built-in amplifier, the beep
sound will be deactivated.
(RELEASE)
6
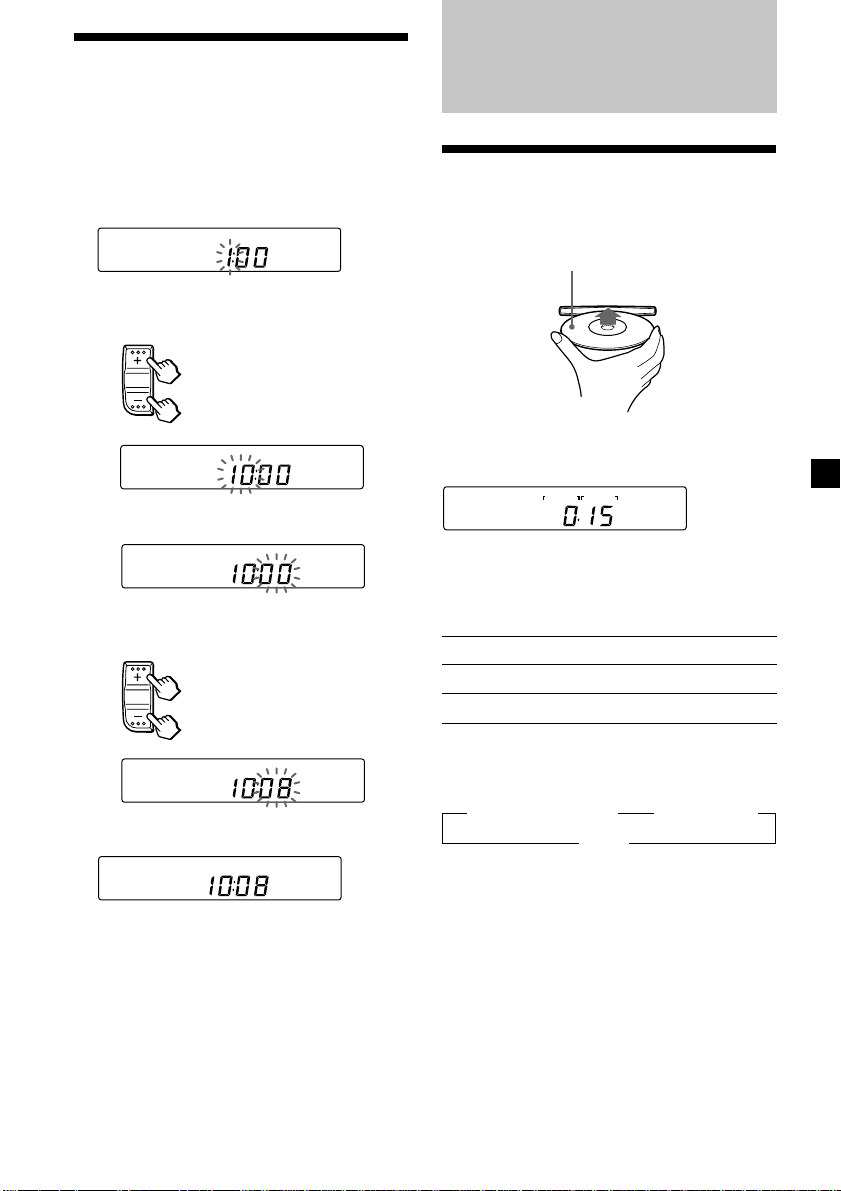
Setting the clock
The clock has a 12-hour digital indication.
Example: To set the clock to 10:08
1 Press (DSPL) during operation.
2 Press (DSPL) for two seconds.
The hour indication flashes.
1 Set the hour.
To go forward
To go backward
2 Press (SOUND).
The minute indication flashes.
CD Player
Listening to a CD
Insert a CD.
Playback starts automatically.
Label side up
If a CD is already inserted, press (SOURCE)
repeatedly until “CD” appears to start
playback.
MINCDSEC
Elapsed playing time
Note
To play back an 8 cm CD, use the optional Sony
compact disc single adapter (CSA-8).
3 Set the minute.
To go forward
To go backward
3 Press (DSPL).
The clock is starts.
Note
If the car has no accessory position on the ignition
key switch, the clock cannot be set unless the
power is turned on. Set the clock after you have
turned on the radio, or started CD playback.
To Press
Stop playback Z or (OFF)
Eject the CD Z
Changing the display item
Each time you press (DSPL) during CD
playback, the item changes as follows:
B Elapsed playing time B Track number
Clock b
7
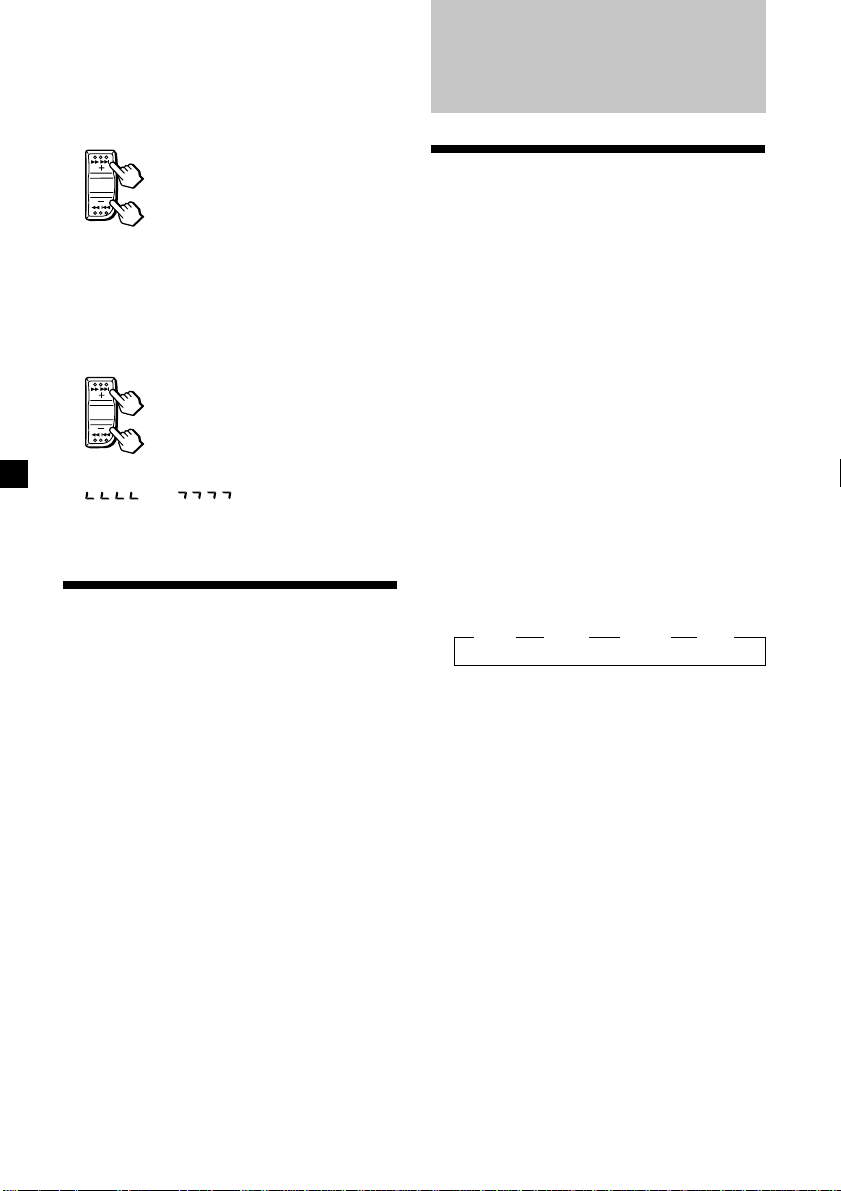
Locating a specific track
— Automatic Music Sensor (AMS)
During playback, press either side of
(SEEK/AMS) for each track you want to
skip.
Radio
SEEK
To locate succeeding tracks
AMS
To locate preceding tracks
Locating a specific point in a track
— Manual Search
During playback, press and hold either
side of (SEEK/AMS) for about two
seconds. Release when you have found
the desired point.
SEEK
Note
If “
you have reached the beginning or the end of the
disc and you cannot go any further.
To search forward
AMS
To search backward
” or “ ” appears in the display,
Playing a CD in various
modes
Playing tracks repeatedly
— Repeat Play
Press (1) during playback.
“REPEAT” appears in the display.
When the current track is over, it will play
again from the beginning.
To return to normal mode, press again.
Playing tracks in random order
— Shuffle Play
Press (2) during playback.
“SHUF” appears in the display.
To return to normal mode, press again.
Memorising stations
automatically
— Best Tuning Memory (BTM)
This unit selects the stations with the strongest
signals and memorises them in the order of
their frequencies. You can store up to 6 stations
on each band (FM I, FM II, FM III, and AM).
Caution
When tuning in stations while driving, use
Best Tuning Memory to prevent accidents.
1 Press (SOURCE) repeatedly to select the
tuner.
Each time you press (SOURCE), the mode
changes as follows:
CD y TUNER
2 Press (MODE) repeatedly to select the
band.
Each time you press (MODE), the band
changes as follows:
B FM I B FM II B FM III B AM
3 Press (SENS/BTM) for two seconds.
The unit stores stations in the order of their
frequencies on the number buttons.
“BTM” flashes while the stations are stored
and a beep sounds when the setting is
stored.
Notes
• The unit does not store stations with weak
signals. If only a few stations can be received,
some number buttons will retain their former
setting.
• When a number is indicated in the display, the
unit starts storing stations from the one currently
displayed.
• If a CD is not in the unit, only the tuner band
appears even if you press (SOURCE).
8

Memorising only the
desired stations
You can store up to 6 stations on each band (a
total of 18 for FM I, FM II, and FM III, and 6 for
AM) in the order of your choice.
1 Press (SOURCE) repeatedly to select the
tuner.
2 Press (MODE) repeatedly to select the
band.
3 Press and hold either side of (SEEK/AMS)
to tune in the station that you want to
store on the number button.
4 Press and hold the desired number
button ((1) to (6)) until “MEM” appears.
The number button indication appears in
the display.
Note
If you try to store another station on the same
number button, the previously stored station will
be erased.
Receiving the memorised
stations
1 Press (SOURCE) repeatedly to select the
tuner.
If you cannot tune in a preset
station
Press either side of (SEEK/AMS) to search
for the station (automatic tuning).
Scanning stops when the unit receives a
station. Press either side of (SEEK/AMS)
repeatedly until the desired station is
received.
Note
If the automatic tuning stops too frequently, press
(SENS/BTM) repeatedly until “LOCAL” (local seek
mode) is displayed. Only the stations with
relatively strong signals will be tuned in.
Tip
If you know the frequency of the station you want
to listen to, press and hold either side of
(SEEK/AMS) to locate the frequency
approximately, then press (SEEK/AMS) repeatedly
to fine adjust to the desired frequency (manual
tuning).
If FM stereo reception is poor
— Monaural Mode
Press (SENS/BTM) repeatedly until
“MONO” appears.
The sound improves, but becomes
monaural (“STEREO” disappears).
To return to normal mode, press again until
“MONO” disappears.
Changing the display item
Each time you press (DSPL), the item changes
as follows:
Frequency y Clock
2 Press (MODE) repeatedly to select the
band.
3 Press the number button ((1) to (6)) on
which the desired station is stored.
9
 Loading...