

Sony CDX-3180 Installation Guide
Instalación InstalaçãoInstallation
Montering
Precautions
•Do not tamper with the four holes on the upper
surface of the unit. They are for tuner
adjustments to be made only by service
technicians.
•Choose the installation location carefully so the
unit will not hamper the driver during driving.
•Avoid installing the unit where it would be
subject to high temperatures, such as from direct
sunlight or hot air from the heater, or where it
would be subject to dust, dirt or excessive
vibration.
•Use only the supplied mounting hardware for a
safe and secure installation.
Mounting angle adjustment
Adjust the mounting angle to less than 60°.
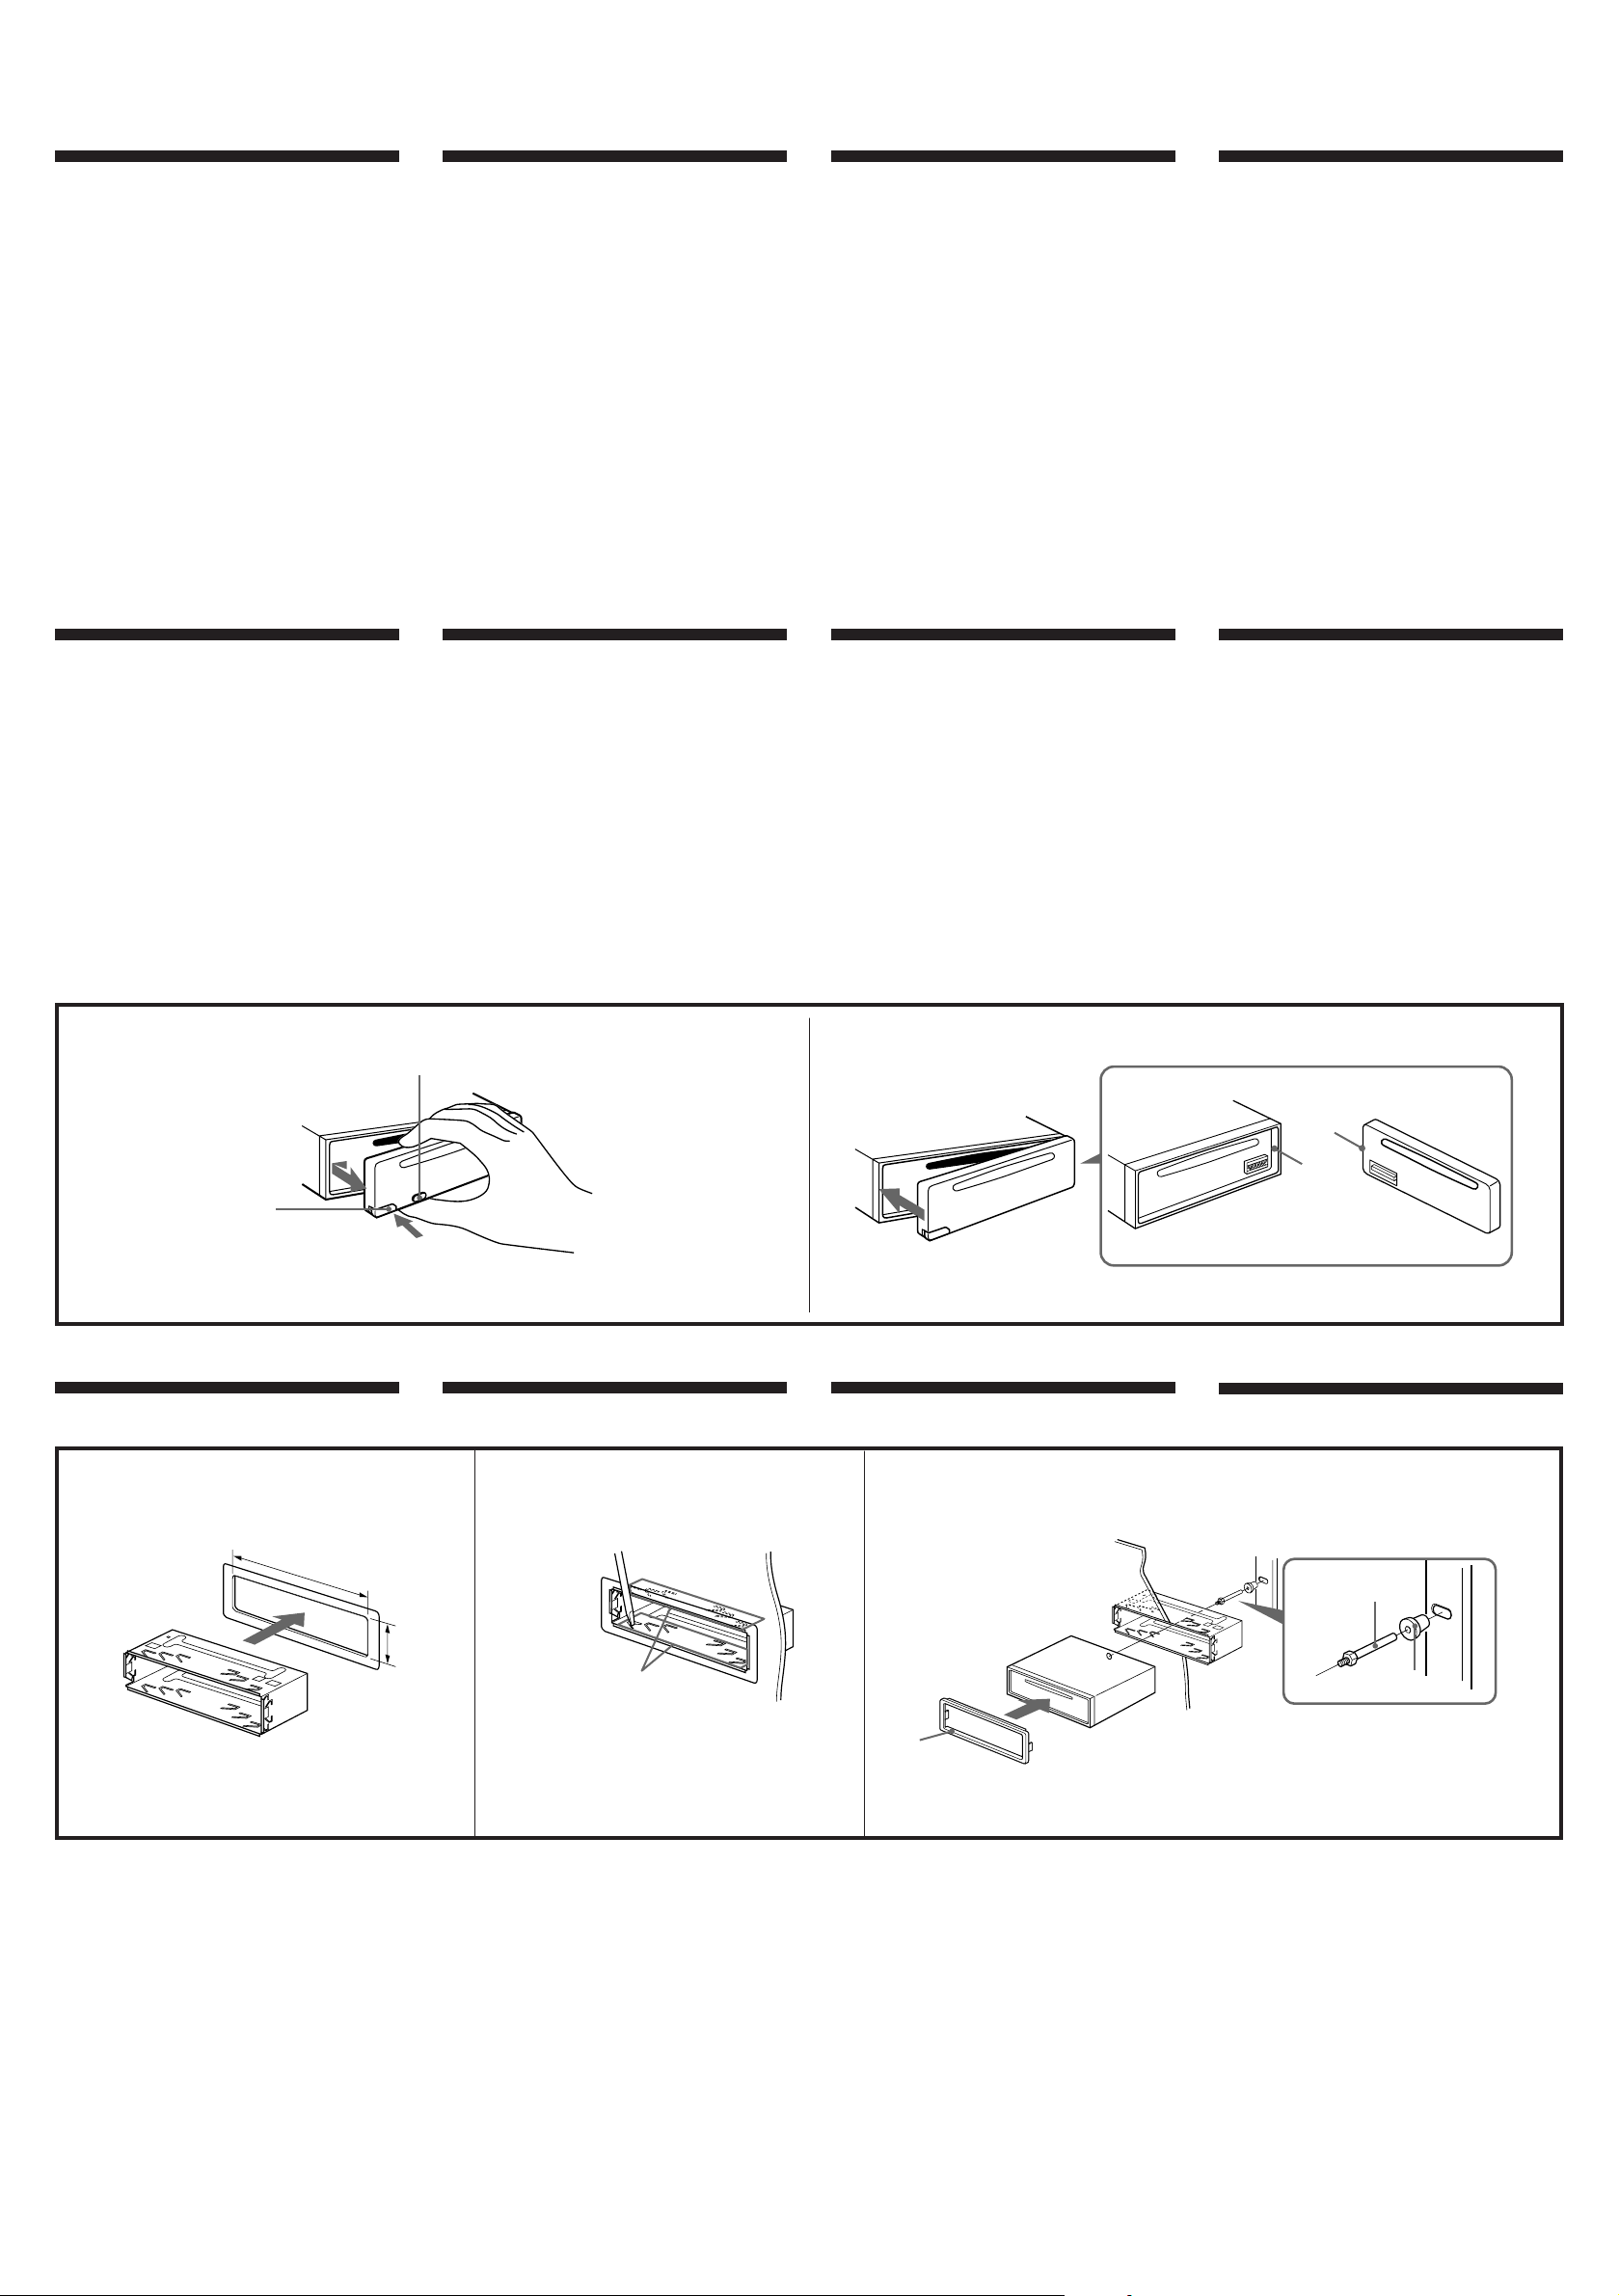
How to detach and attach the
front panel
Before installing the unit, detach the front
panel.
To detach A
Before detaching the front panel, be sure to press
(OFF) to turn off the unit. Then press (RELEASE),
slide the front panel a little to the left, and pull it
off toward you.
To attach B
Align parts A and B, and push the front panel
until it clicks.
Precauciones
•No toque los cuatro orificios de la superficie
superior de la unidad. Estos orificios son para
realizar ajustes del sintonizador que solamente
deberán realizar técnicos de reparación.
•Elija cuidadosamente el lugar de instalación de
forma que la unidad no interfiera en las
funciones normales de conducción.
•Evite instalar la unidad donde pueda quedar
sometida a altas temperaturas, como a la luz
solar directa o al aire de calefacción, o a polvo,
suciedad, o vibraciones excesivas.
•Para realizar una instalación segura y firme,
utilice solamente la ferretería de montaje
suministrada.
Ajuste del ángulo de montaje
Ajuste el ángulo de montaje a menos de 60°.
Forma de extraer e instalar el
panel frontal
Antes de instalar la unidad, extraiga el panel
frontal.
Para extraerlo A
Antes de extraer el panel frontal, cerciórese de
presionar (OFF) para desactivar la unidad.
Después, presione (RELEASE), desplace
ligeramente el panel frontal hacia la izquierda y
tire de él hacia usted.
Para instalarlo B
Alinee las partes A y B, y presione el panel
frontal hasta que chasquee.
Precauções
•Não altere indevidamente os quatro orificios da
superficie da parte superior do aparelho. Estes
servem para regulações do sintonizador que
devem ser efectuadas somente por técnicos
qualificados.
•Escolha com cuidado um local apropriado para
a montagem do aparelho, para que este não
interfira com as manobras necessárias à
condução do veículo.
•Evite instalar o aparelho onde possa estar sujeito
a altas temperaturas, tais como em locais
expostos directamente à luz do sol, ao ar quente
dos aquecimentos, ou sujeitos a pó, sujidade ou
vibração excessiva.
•Para efectuar uma instalação segura utilize
unicamente o material de montagem fornecido .
Ajuste do ângulo de montagem
Ajuste o ângulo de montagem a menos de 60°.
Para retirar e colocar o painel
frontal
Retire o painel frontal antes de iniciar a
instalação do aparelho.
Para retirar A
Antes de retirar o painel frontal, carregue em
(OFF) para desligar o aparelho. A seguir,
carregue em (RELEASE), deslize o painel frontal
um pouco para a esquerda e retire-o puxando
para fora.
Para colocar B
Alinhe as partes A e B, e fixe o painel frontal
pressionando-o até que encaixe.
Säkerhetsföreskrifter
•Låt de fyra hålen på bilstereons ovansida vara.
De är till för radiojusteringar som endast får
utföras av fackkunniga tekniker.
•Var noga när du väljer var i bilen du monterar
bilstereon, så att den inte sitter i vägen när du
kör.
•Montera inte bilstereon där den utsätts för
värme, t ex solsken eller varmluft, eller där den
utsätts för damm, smuts och/eller vibrationer.
•Använd endast de medföljande
monteringstillbehören för att vara säker på att
bilstereon monteras på ett säkert och korrekt
sätt.
Tillåten monteringsvinkel
Monteringsvinkeln får inte vara större än 60
grader.
Ta loss/fästa frontpanelen
Ta loss frontpanelen innan du monterar
bilstereon.
Ta loss frontpanelen A
Tryck på (OFF) för att slå av strömmen innan du
tar loss frontpanelen. Tryck därefter på
(RELEASE) för att öppna frontpanelen. Ta loss
frontpanelen genom att lätt skjuta den åt vänster
och sedan dra den mot dig.
Fästa frontpanelen B
Lägg A och B mot varandra, kant i kant, och
tryck tills du hör ett klickljud.
AB
2
(OFF)
A
B
(RELEASE)
3
1
1
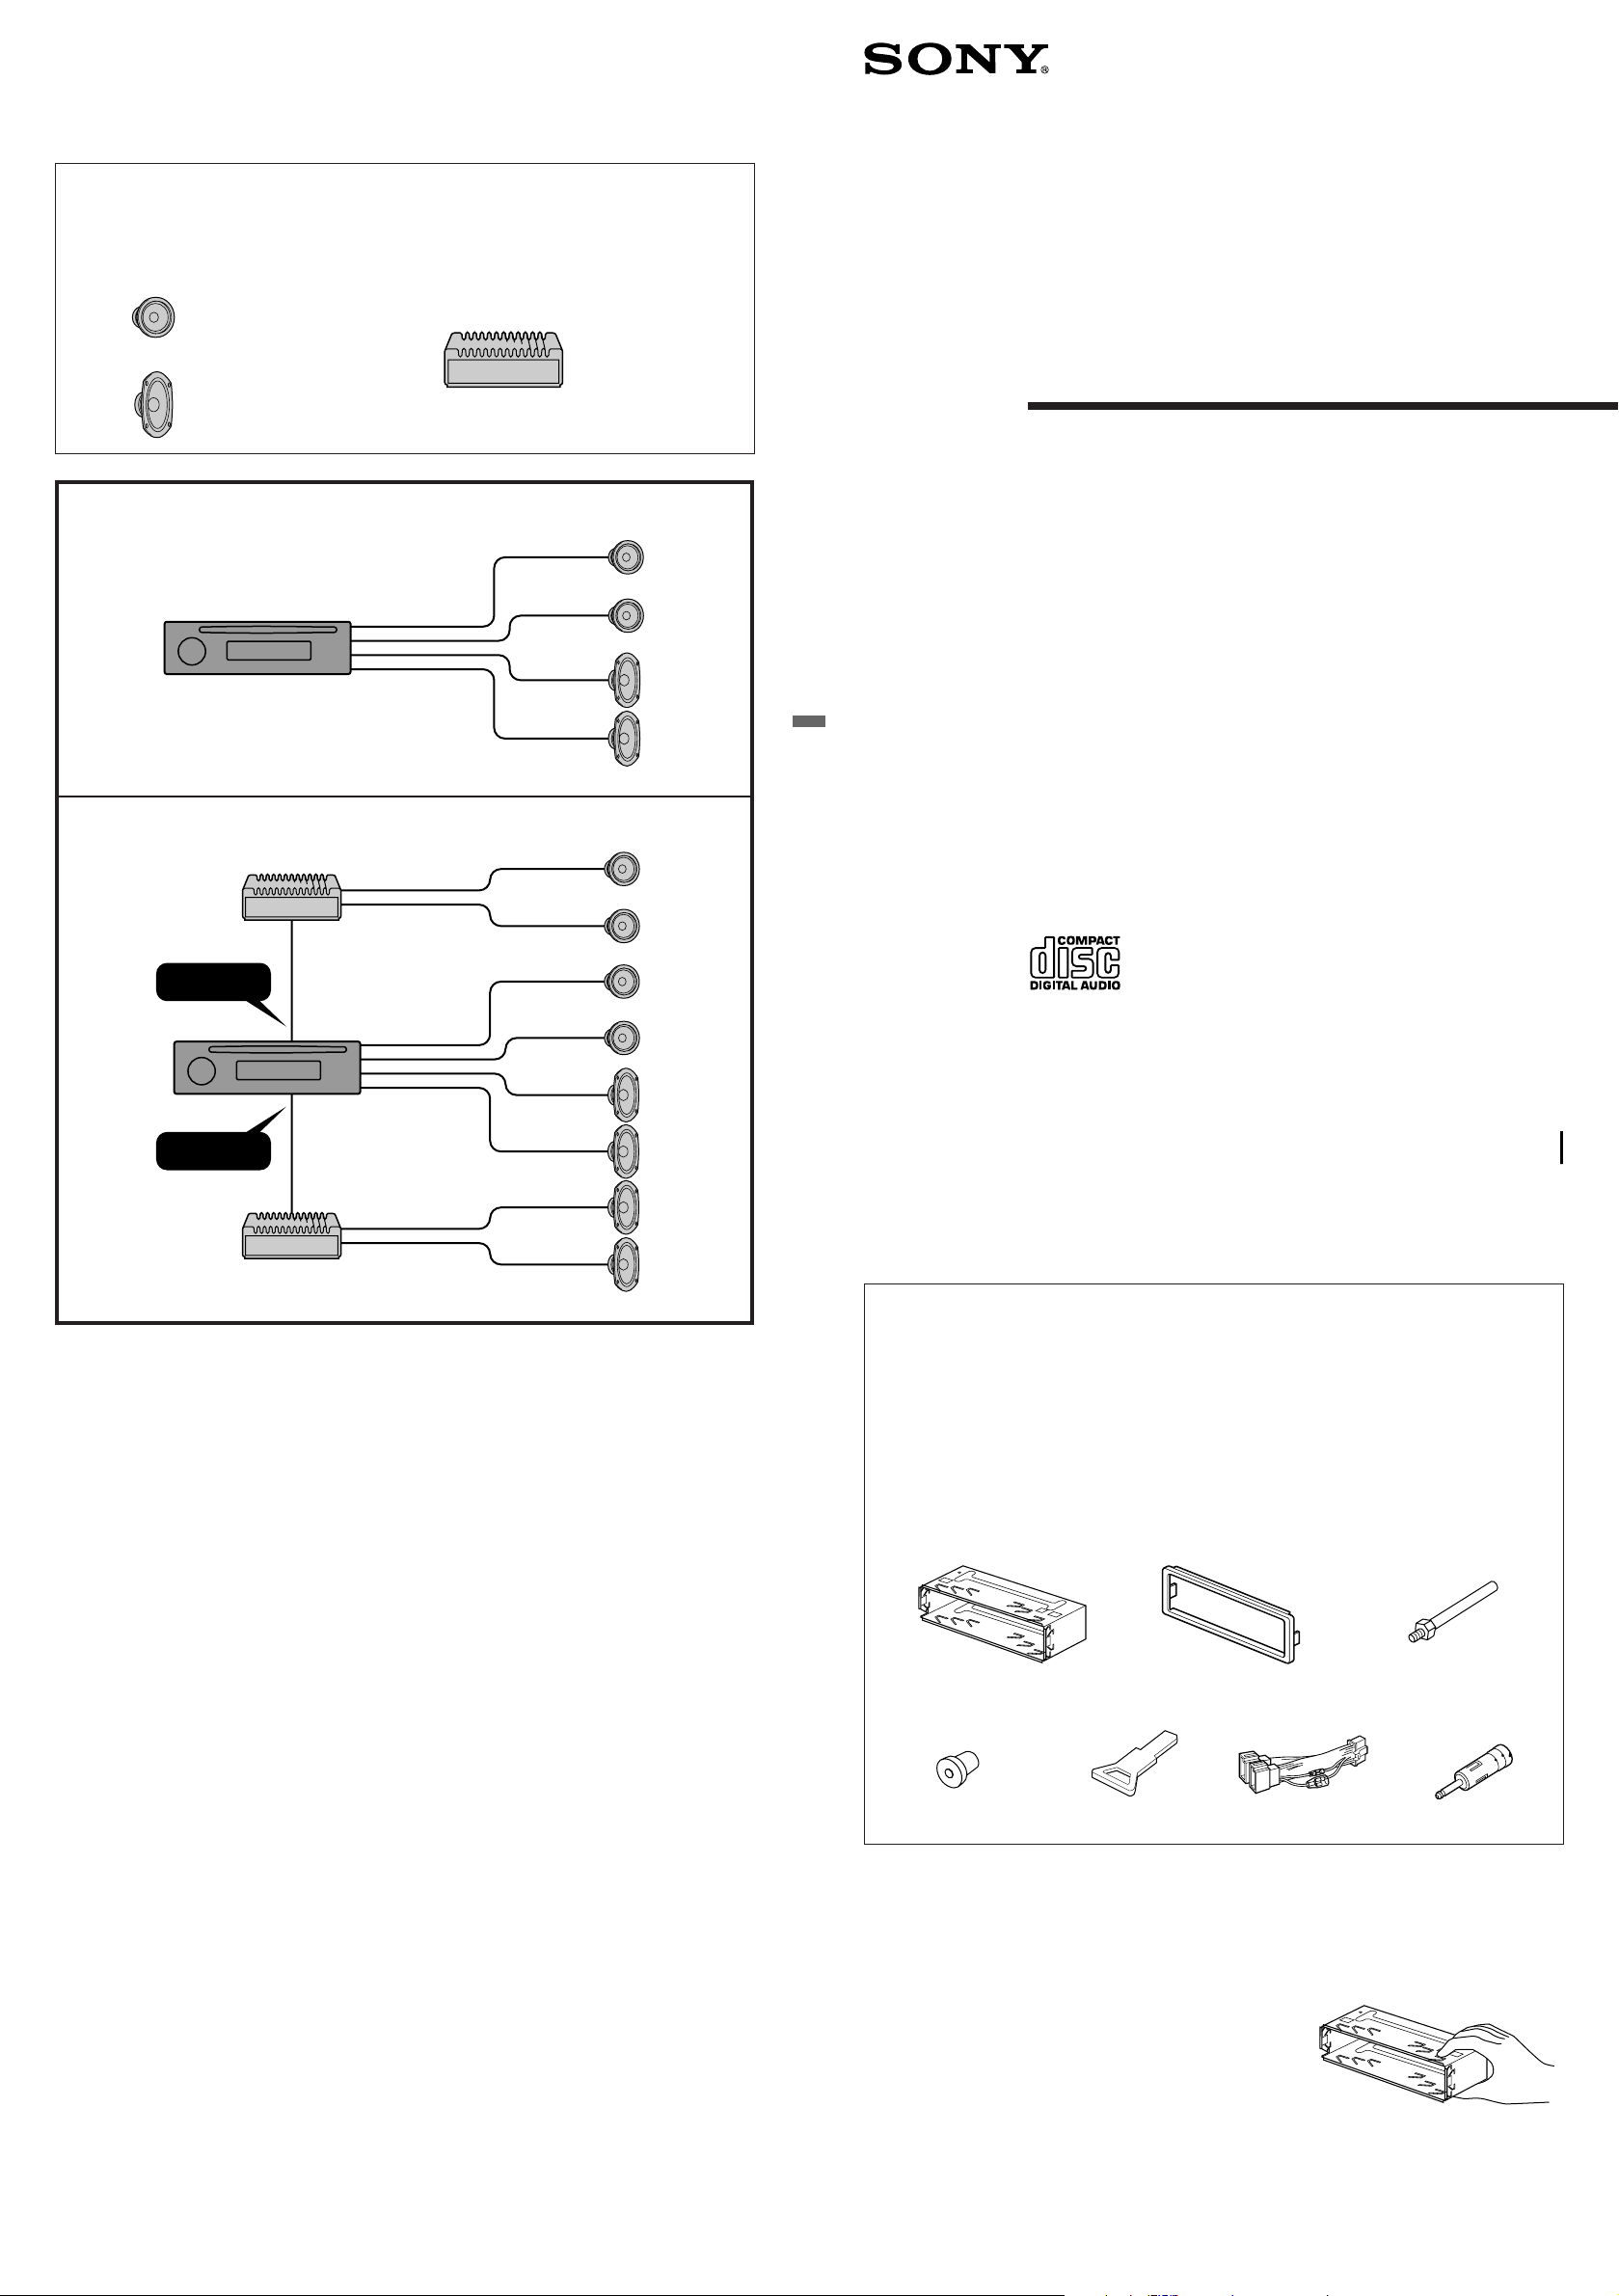
182 mm
Instalación en el salpicadero Instalação no tablierInstallation in the dashboard
2
3
Dashboard
Salpicadero
Tablier
Instrumentbräda
Montera på instrumentbrädan
Fire wall
Panel cortafuegos
Painel corta-fogo
Brandsäker mellanvägg
3
1
53 mm
Bend these claws, if necessary.
Si es necesario, doble estas uñas.
Dobre as unhas se necessário.
Böj dessa flikar vid behov.
2
1
First attach 2 to the unit, then insert the unit into 1.
En primer lugar, fije 2 a la unidad y, a conginuación, inserte ésta en 1.
Primeiro, fixe 2 no aparelho e depois introduza-0 em 1.
Sätt först fast 2 på enheten och skjut sedan in bilstereon i 1.
4
Connection diagram
Diagrama de conexiones
Diagrama de ligações
Kopplingsschema
Equipment used in illustrations (not supplied)
Equipo utilizado en las ilustraciones (no suministrado)
Equipamento utilizado nas ilustrações (não fornecido)
Utrustning som visas i illustrationer (medföljer inte)
Front speakers
Altavoces delanteros
Altifalantes dianteiros
Främre högtalare
Rear speakers
Altavoces traseros
Altifalantes traseiros
Bakre högtalare
A
Power amplifier
Amplificador de potencia
Amplificador de poténcia
Slutsteg
3-861-770-11 (1)
FM/MW/LW
Compact Disc
Player
Installation/Connections
Instalación/Conexiones
Instalação/Ligações
Montering/Anslutning
B
LINE OUT
FRONT
CDX-3180
Sony Corporation 1998 Printed in Thailand
LINE OUT
REAR
Parts for installation and connections
Componentes de instalación y conexiones
Peças para instalação e ligações
Medföljande monteringsdelar
The numbers in the list are keyed to those in the instructions.
The release key 5 is used for dismounting the unit. See the operating instructions manual for
details.
Los números de la lista se corresponden a los de las instrucciones.
La llave de apertura 5 se utiliza para desmontar la unidad. Para obtener información detallada,
consulte el manual de instrucciones.
Os números dos componentes de montagem na lista correspondem aos números das instruções.
A chave de liberação 5 é necessária, caso deseje desmontar o aparelho. Consulte o manual de
instruções para obter mais informações.
Siffrorna nedan hänvisar till de siffror som nämns i texten i detta häfte.
Använd den medföljande nyckeln 5 för bilstereons demontering ur instrumentinfattningen. Vi
hänvisar till bilstereons bruksanvisning angående detaljer.
123
45
Caution
Cautionary notice for handling the bracket 1.
Handle the bracket carefully to avoid injuring your fingers.
Precaución
Advertencia sobre la manipulación del soporte 1.
Tenga mucho cuidado al manipular el soporte para evitar
posibles lesiones en los dedos.
Cuidado
Aviso sobre as precauções a tomar no manuseamento do
suporte 1.
Pegue no suporte com cuidado para não magoar os dedos.
Varning
Att observera angående konsolen 1 .
Hantera konsolen med största aktsamhet så att du inte skadar
fingrarna.
6
7
 Loading...