

Page 1

SONY
3-750-455-21{1)
(kmyjactDisc
Player
Operating Instructions
(o]D§(§
DIGITAL AUDIO
© 1989 by Sony Corporation
Page 2
Owner's Record
The model and serial numbers are located at the rear.
Record these numbers in the spaces provided below. Refer
to these numbers whenever you call upon your Sony dealer
regarding this product.
Model No. Serial No.,
WARNING
To prevent fire or shock hazard, do not
expose the unit to rain or moisture.
CAUTION
RISK OF ELECTRIC SHOCK
DO NOT OPEN
CAUTION : TO REDUCE THE RISK OF ELECTRIC SHOCK,
DO NOT REMOVE COVER (OR BACK).
NO USER-SERVICEABLE PARTS INSIDE.
REFER SERVICING TO QUALIFIED SERVICE PERSONNEL.
This symbol is intended to alert the user to
the presence of uninsulated “dangerous
voltage” within the product’s enclosure
that may be of sufficient magnitude to
constitute a risk of electric shock to
persons.
This symbol is intended to alert the user to
the presence of important operating and
maintenance (servicing) instructions in the
literature accompanying the appliance.
INFORMATION
This equipment generates and uses radio frequency energy
and if not installed and used properly, that is, in strict
accordance with the manufacturer’s instructions, may cause
interference to radio and television reception. It has been
type tested and found to comply with the limits for a Class B
computing device in accordance with the specifications in
Subpart J of Part 15 of FCC Rules, which are designed to
provide reasonable protection against such interference in a
residential installation. However, there is no guarantee that
interference will not occur in a particular installation. If this
equipment does cause interference to radio or television
reception, which can be determined by turning the
equipment off and on, the user is encouraged to try to
correct the interference by one or more of the following
measures:
Reorient the receiving antenna
Relocate the equipment with respect to the receiver
Move the equipment away from the receiver
Plug the equipment into a different outlet so that
equipment and receiver are on different branch circuits.
If necessary, the user should consult the dealer or an
experienced radio/television technician for additional
suggestions. The user may find the following booklet
prepared by the Federal Communications Commission
helpful:
“How to Identify and Resolve Radio-TV Interference
Problems”. This booklet is available from the U.S.
Government Printing Office, Washington, DC 20402, Stock
No. 004-000003454.
Page 3

Table of Contents
Features ......................................................................................................... 4
Precautions ..................................................................................................... 4
Installation ....................................................................................................... 5
Getting Started
Using Your Compact
Disc Player
Connection ...................................................................................................... 6
Notes on connection ................................................................................................................................ 6
Connection diagram .................................................................................................................................. 6
Parts Identification........................................................................................... 7
Basic operations
Playing discs ..................................................................................................10
Selecting a particular disc.......................................................................................................................12
Locating a particular selection .............................................................................................................12
Locating a particular point in a selection
Playing one disc at a time.......................................................................................................................13
Fading in/fading out ................................................................................................................................13
Advanced operations
Piaying in the desired order—Program play
Playing in random order—Shuffle play ............................................................16
Playing repeatedly—Repeat play
.........................................................................................
...................................................
....................................................................
12
14
18
MMMiring^Kour
UrM
Getting into the
Details
Troubleshooting
Maintenance
Specifications .
Troubleshooting guide
..19
..19
. back cover
Page 4

Features Precautions
The compact disc player is equipped with an automatic
disc changer which allows you to play up to 10 disos in a
row. You oan choose from a large number and wide variety
of selecfions.
A variety of playing modes:
• Program play allows you to play up to 32 selections or the
whole disc, in any desired order (page 14).
• Shuffle play for playing selecfions in random order (page
16).
• Repeat play for repeating individual discs, all the discs in a
magazine, program and shuffle play (page 18).
Fading in/Fading out
You can begin a selection fading in and end it fading out
(page 13).
High quality playback sound with:
• 8-times oversampling 18-bit digital filter
• Dual D/A converter system
The optical digital output
Allows direct connection to a D/A converter or to a digital
amplifier having an optical digital input connector.
The easy-to-use disc magazine
Allows you to play a particular set of discs at any time simply
by inserting the disc magazine into the CD player.
Additional magazines (optional) allow you to create a wide
variety of sets.
Differences between the CDP-C9ESD and the CDP-C900
This instruction manual covers the CDP-C9ESD and the
CDP-C900. Their operation is identical. They differ only
in the internal circuit specifications and the type of the
HEADPHONES jack. A gold-plated jack is used for the
CDP-C9ESD, while a standard jack is used for that of the
CDP-C900.
On Safety
• Operate the unit only on 120 V AC, 60 Hz.
• Should any solid object or liquid fall into the cabinet, unplug
the unit and have it checked by qualified personnel before
operafing it again.
• Unplug the unit from the wall outlet if it will not be used for
a long fime. To disconnect the cord, pull it out by grasping
the plug. Never pull the cord itself.
• As the laser beam used in this compact disc player is
harmful fo the eyes, do not attempt to disassemble the
cabinet. Refer servicing to qualified personnel only.
On operation
When fhe unif is not used, turn the power off, to conserve
energy and to extend the useful life of your unit.
Important
Since the CD system boasts a wide dynamic range, the
peaks of high level inputs are recorded with high fidelity,
and the noise level is very low.
Do not turn up the volume while listening to a portion with
no audio signals or very low level inputs. If you do, fhe
speakers may be damaged when a peak level portion is
played.
For detailed safety precautions, see the leaflet “IMPORTANT
SAFEGUARDS”.
If you have any quesfions or problems concerning your unit,
please contact your nearest Sony dealer.
Page 5
Installation
Notes on Installation
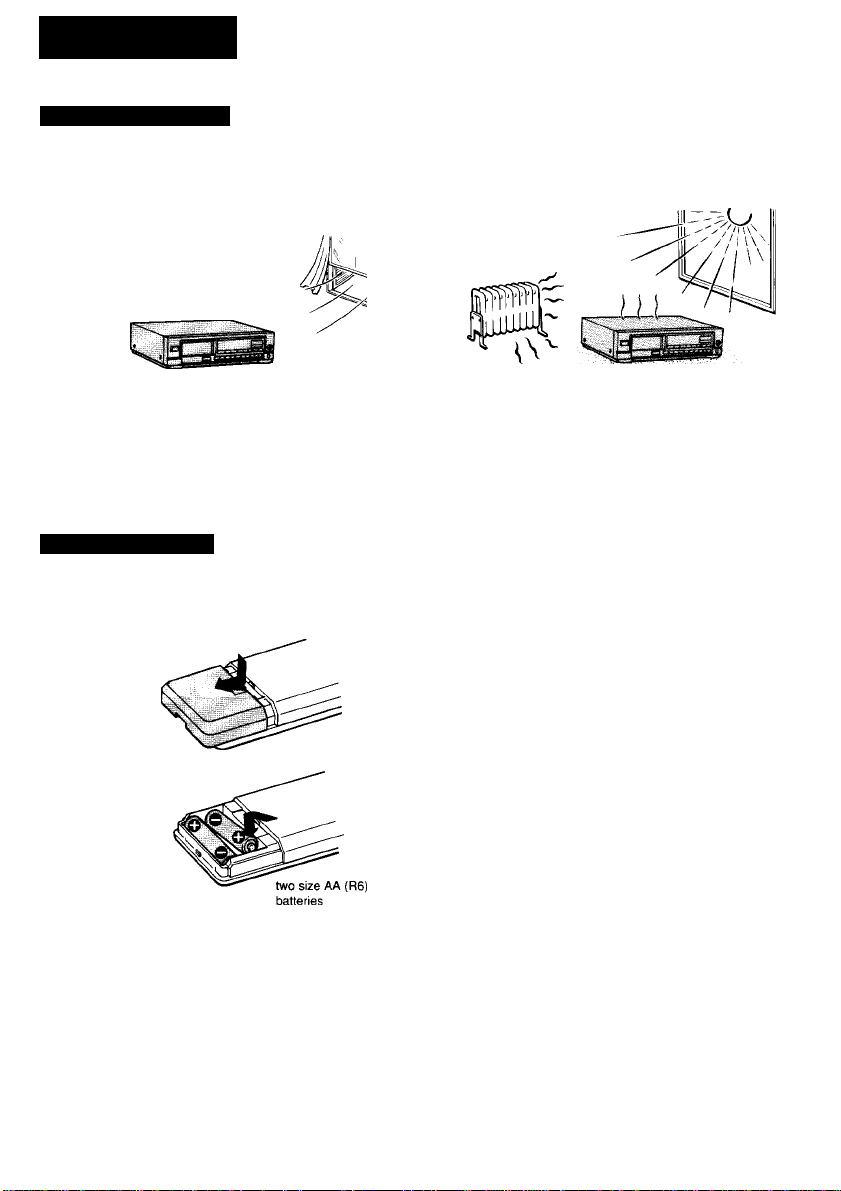
Place the unit in a location with adequate air circulation
to prevent internal heat build-up in the unit.
This way.
• Do not install the unit:
— near heat sources such as radiators or air ducts.
— in a place subject to direct sunlight, excessive dust, mechanical vibration or shock.
■ Do not move the unit while the disc magazine is inside, otherwise the discs may fall out of the magazine and you will be
unable to remove them.
Installing Batteries
Install the batteries In the supplied remote commander
for remote control operation.
Do not place the unit on a soft surface, such as a rug
that would block the ventilation holes on the bottom.
Not this way.
On moisture condensation
If the player is brought directly from a cold to a warm
location, or is placed in a very damp room, moisture may
condense on the lens inside the unit.
Should this occur, the player will not operate. In this
case, remove the disc and leave the player turned on for
about an hour until the moisture evaporates.
Do not throw away the carton and the packing material
It will be an ideal container in which to transport.
To avoid damage caused by battery leakage and corrosion
When the commander will not be used for a long time, remove the
batteries.
On battery life
About half a year of normal operation can be expected when using
Sony SUM-3 (NS) batteries.
When the batteries are low, the remote commander will not operate
the unit. In this case, replace both batteries with new ones.
Page 6
Connection
Notes on Connection
• Turn off the amplifier before making connections.
• Be sure to insert the plugs firmly into the jacks. Loose connections may cause hum and noise.
■ Leave a little slack in the connecting cord to allow for inadvertent shock or vibration.
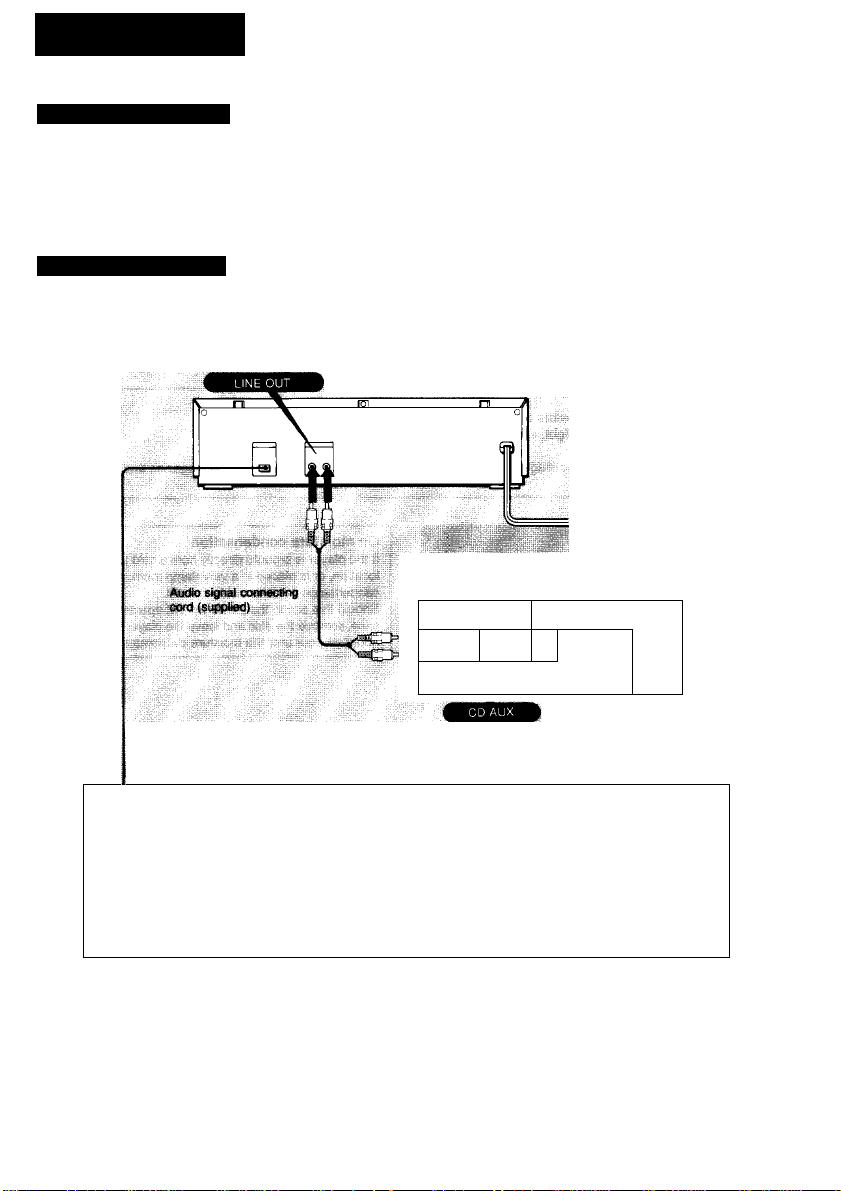
• Connect the red plug of the supplied connecting cord to the right-channel jack (R) of the amplifier and the white plug to the
left-channel jack (L). Otherwise, the right and left channels will be reversed.
Connection Diagram
Connecting the directly
COP-C9ESD/COP-C900
to an AC outlet
Using the DIGITAL OUT jack
Detach the cap.
Note on the DIGITAL OUT jack
Connect the DIGITAL OUT jack to the amplifier or D/A converter
with the optical digital input only. When you connect, use the
optional optical cable POC-15. When only the optical out is
connected, you cannot use fade out and in function.
1 ® ®
1 ® ®
Optical cable (optional)
r^l to an amplifier or a D/A converter
®®
®®
e<p#ped wiB» an t^Blcal Input jack.
loobol
bolool '
Amplifier
1
to an AC outlet
-
Page 7
Parts Identification
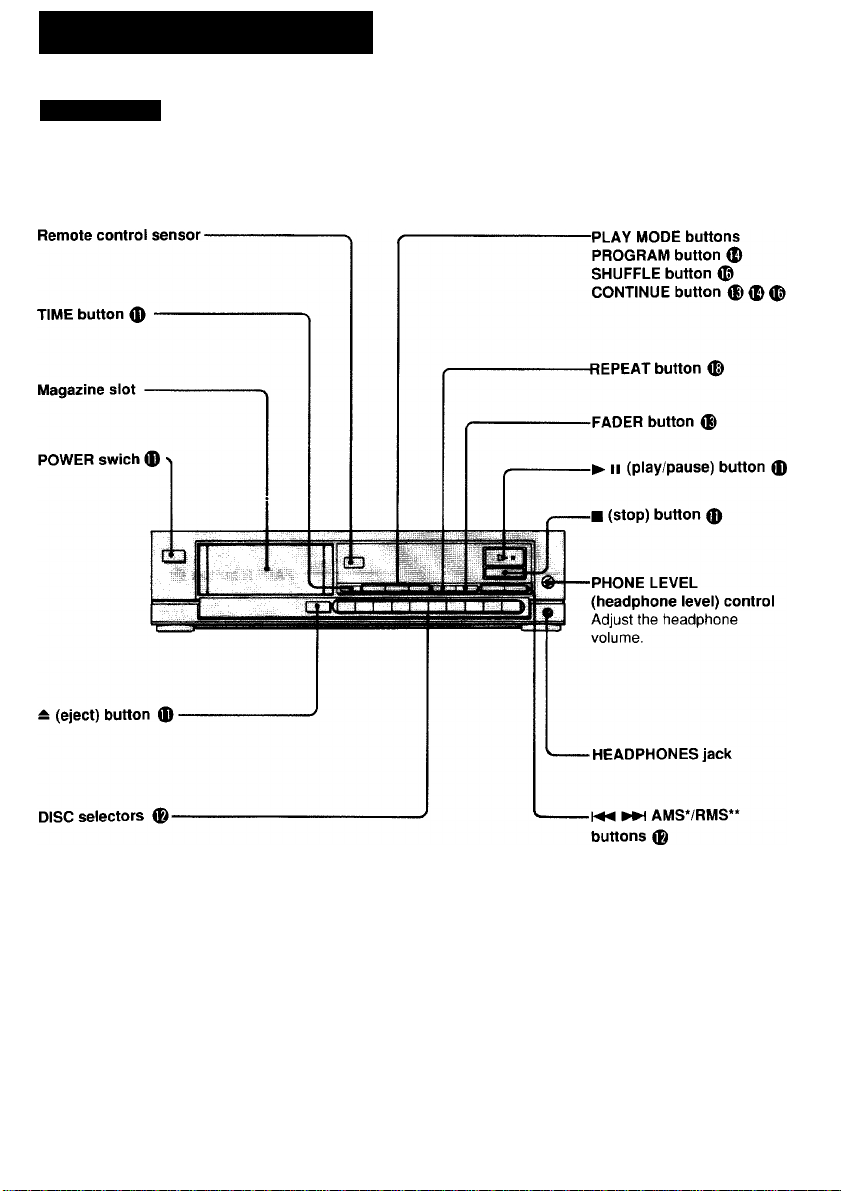
Front Panel
Refer to the pages indicated in • for details.
AMS is an abbreviation of Automatic Music Sensor.
*RMS is an abbreviation of Random Music Sensor.
7
Page 8

Remote Commander
PLAY MODE buttons---------------PGM (program) button ({)
SHUFFLE button ®
CONTINUE button ® (D 0
DISC selectors ®
TRACK selectors '
. 20 (over 20) button ® '
► (play) button 0---------------
II (pause) button
(stop) button 0
) i
------
> I
-----
1 \—1
tzumacnizi
:□ □□ □ (Z3
..
I
ju Jog
ryi
-CHECK (program check) button 0
-CLEAR (program clear) button 0
-TIME button 0
- REPEAT button 0
^ AMS buttons 0
-«4 »■ (manual search) buttons (
-FADER button 0
8
Page 9

Remote Control Operation
Once the POWER is turned on, you can control the various functions of the player from a distance using the supplied remote
commander.
Operations which cannot be performed with the remote commander include:
• Turning the power on and off.
• Ejecting the disc magazine.
The following operations can only be performed with the remote commander:
• Locating a selection by track number
• Manual search
• Checking the programmed selections
• Clearing the last selection or a specific selection in the program
Notes on the remote commander and remote control operation
• Keep the commander away from extremely hot or humid places.
• Avoid dropping any foreign objects into the commander casing,
particularly when replacing the batteries.
• To avoid a malfunction, do not simultaneously depress two or
more buttons.
• Avoid exposure of the remote control sensor to direct sunlight or
any strong artificial light.
9
Page 10
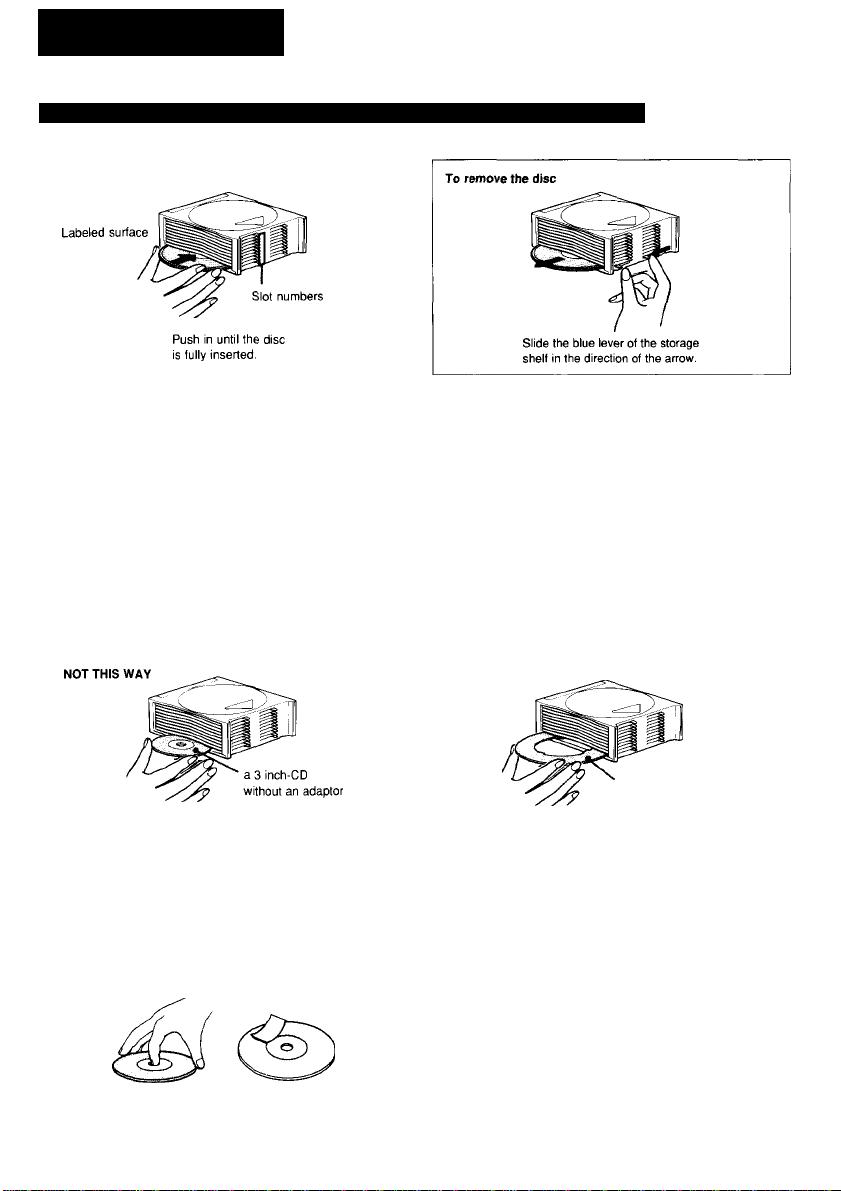
Playing Discs
Inserting Discs into the Disc Magazine (up to 10 discs, one in each slot)
Notes
* Do not insert more than one disc into a slot.
• Each slot number corresponds to a disc number that is
selected by the DISC selector. If you select the empty slot
using the DISC selector, the circle and the selected disc
number in the display will disappear.
Note on 3-inch CDs
3-inch CDs can be played in this unit provided that either
a Sony CSA-8 adaptor, one that complies with CD
standard specifications, or one that has mark is
used. Without an adaptor, or if an adaptor not
recommended above is used, the unit and disc may be
damaged.
Notes on discs
Handle the disc by its edge, and
to keep the disc clean, do not
touch the surface.
This way
Do not stick paper or tape. Do not expose the disc to direct sunlight or heat sources such as
Not this way
10
Do not insert an empty adaptor as it will become
lodged in the unit and cannot be removed without special
equipment.
NOT THIS WAY
an empty adaptor
hot air ducts, or leave it in a car parked in direct sunlight where
there can be a considerable rise in the temperature.
Page 11
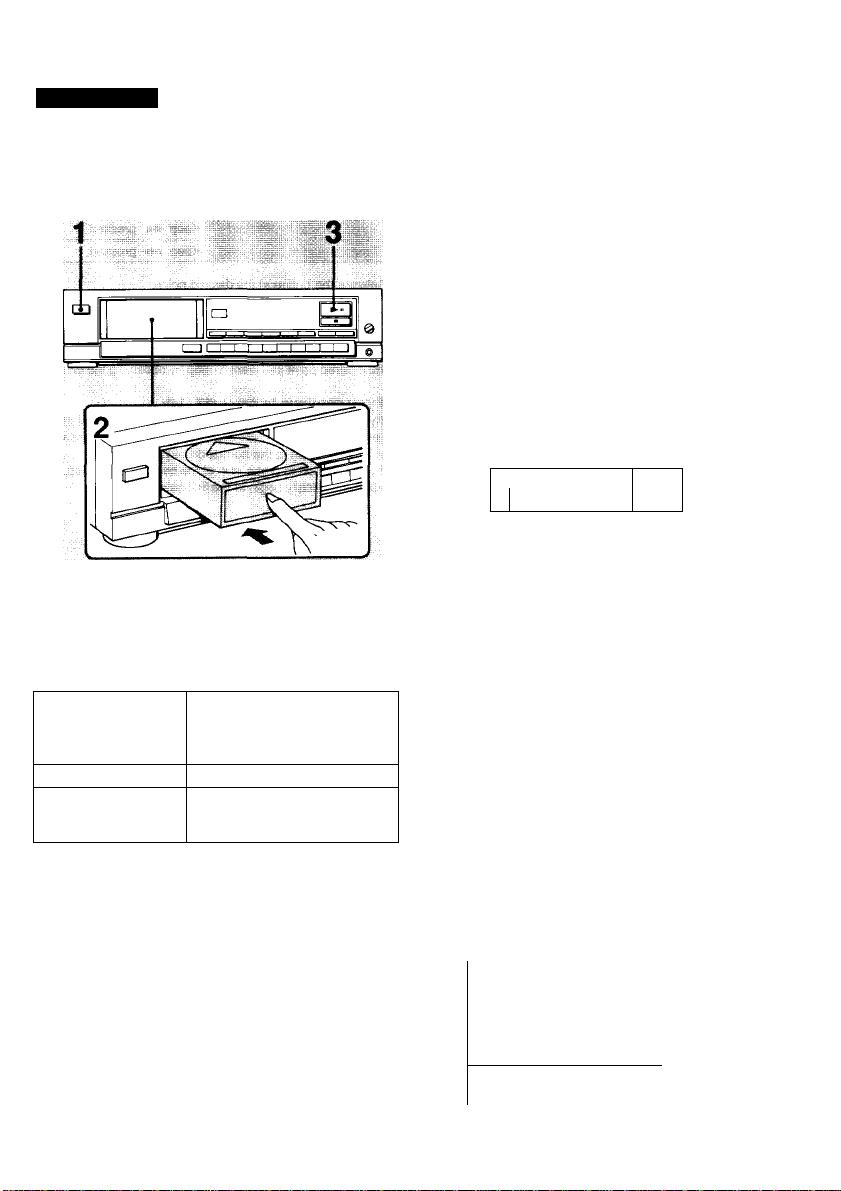
Starting Play
Before playing a disc, turn on the amplifier and set the input seiector to the CD player position.
1 Depress POWER.
2 Insert the disc magazine firmly into the
magazine slot.
3 Press ^11 (or ► on the remote
commander).
Play will begin from the beginning of the disc
No. 1.
Track No. being piayed calendar’
►
©©©'©© '
^®®®® ETTrfn
Appears under the number of the disc
* fn Music Calendar, the track numbers of selections on a disc
are c^layed to 20).
being played
t
.
Elapsed playing time
stopping play
To stop for a moment
during play
To stop play
To stop play and
remove the disc
magazine
To pause play instead of starting play
Press ► II twice, or press il on the remote commander. The
player enters the pause mode at the beginning of the disc No. 1.
To start play, press ►!! (or ll ) again.
Indications
“-------------” indication appears on the display window instead of the
numbers, il a track number higher than 20 is selected.
This also happens when TIME is pressed to check the remaining
time of the 21st or succeeding selection.
Press ► II (or II on the
remote commander).
To start play again, press ► II
(or II ) again.
Pressa.
Press —.
To start ALL DISCS CONTINUE play
When the power is turned on, the player is always set to the
ALL DISCS CONTINUE play mode. During use, if “1 DISC”,
“PROGRAM" or “SHUFFLE” is dispiayed, press CONTINUE
until "ALL DISCS" and “CONTINUE" appear.
To change the display during play or pause
Each time the TIME button is pressed, the display changes as
follows:
_____
0 © ® © ® ’ « ’ 6 « «
1*“ o®ОО О '
ZL
I*“ ©©(T®® ' «'»5»
_______ _____
5'. ce'"’ ¡
-ee.3 ’ I
© ® ©®© j
Playback indicator
L
Elapsed playing time
Remaining time of
the current selection
Current disc and
track numbers
11
Page 12
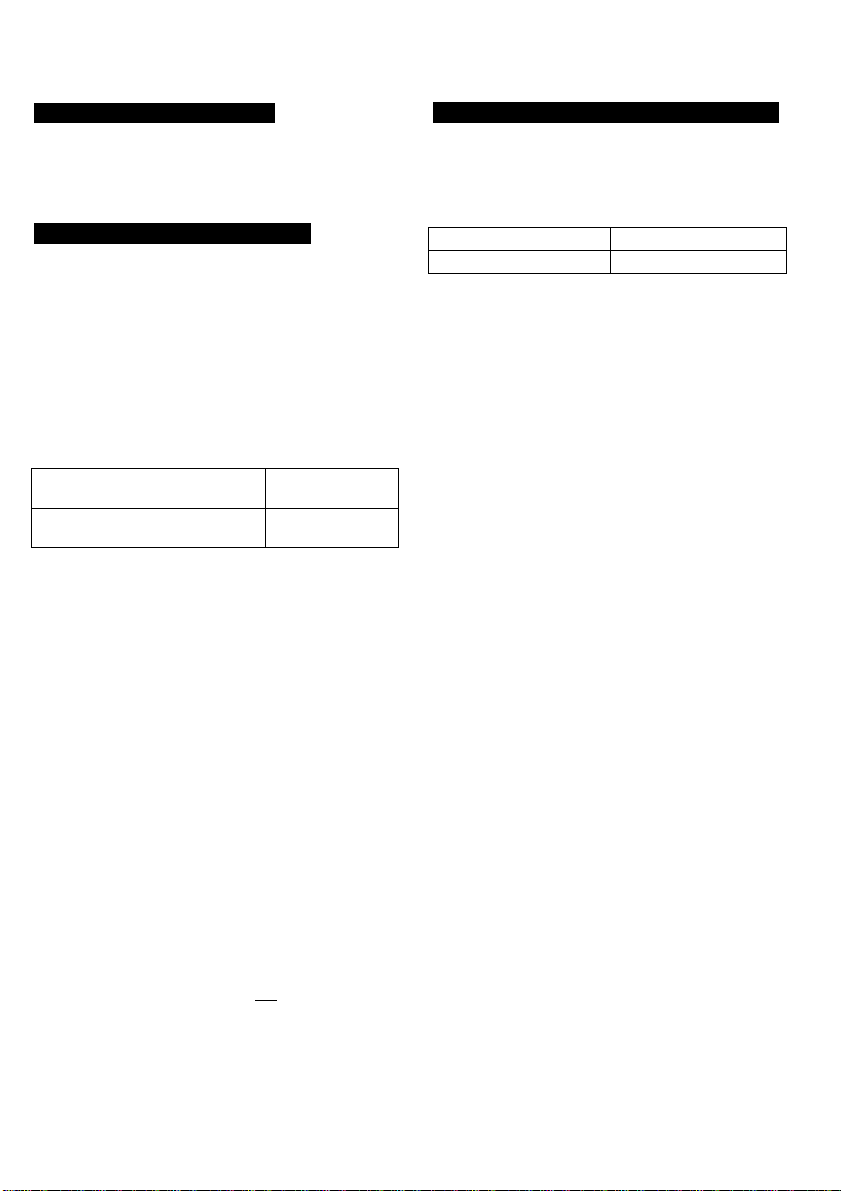
Selecting a Particular Disc
Locating a Particular Point in a Selection
Press one of the DISC selectors (1 to 10) to select the
disc you want.
Play will begin from the first selection on that disc.
Locating a Particular Selection
Locating a selection by track number
This operation is possible only with the remote commander.
Press the TRACK selector (1 to 20) which corresponds to
the selection you want to piay. (To choose a number greater
than 20, see the note below.)
Play will begin from the beginning of the selection.
Locating a selection in sequence (Automatic Music
Sensor)
You can locate the beginning of a desired selection during
play.
To locate the beginning of the
selection being played
To locate the beginning of the next
selection
Continue to press either button to continue to move forward
or backwards through the seiection list without stopping.
You cannot, however, skip to the next disc.
Press Kd once.
Press once.
While in stop mode, it is also possible to move forward or
backwards through the selection list by using Wd or .
Locating a point within a selection (Manual Search)
You can locate a particular point in a selection during play by
monitoring the high-speed sound. This operation is possible
only with the remote commander.
To go back at high speed
To go ahead at high speed
Release the button at the desired point.
To locate at high speed
Press or ►► in the pause mode. The search speed
will increase by three times, but there will be no sound. Find
the desired point you want to stop by observing the display.
If you continue to press-*d / ►►
If you continue to press ►► once the end of the disc has
been reached. will appear in the window. Press
or to return to the normal display.
If you continue to press -♦* at the beginning of a disc, play
will automatically begin at the first selection.
Keep pressed.
Keep ►► pressed.
To choose a selection whose number is greater than 20
This operation is possible only with the remote commander.
Use the ^^0 button and the Jj to ^ buttons.
Ex. to play track No.32
1 Press >20.
2 Press 3 , then [2,
Ex. To play track No.30.
1 Press >20!.
2 Press 3 , then To .
12
To display the total number of selections and time on a disc
Select the disc with the DISC selector.
Press ■ while the cursor (J blinks under the selected disc number.
(It blinks while the disc is being pulled out from the magazine.)
The total number of selections and the total amount of playing time
will be displayed for a few seconds after the disc is pulled out. To
display this again, press TIME twice in the stop mode.
Page 13

Playing One Disc at a Time—1 DISC Play Fading in/Fading out
If you want to play only one disc in the disc magazine, press
CONTINUE.
“1 DISC" will appear in the display window and play will stop
after all the selections on the current disc have been played.
To listen to another disc
Press the DISC selector which corresponds to the disc you
want.
To return to normal play
Press CONTINUE again.
“ALL DISCS” will appear in the display window.
You can have the play fade in and fade out for 5 seconds.
To end the play fading out
Press FADER when you want to start fading out.
II blinks in the window, and play fades out for 5 seconds
and enters the pause mode.
To restart the play fading in
Press FADER.
► blinks in the window, and play fades in for 5 seconds.
During 1 DISC play
Only the number of the disc being played is circled in the display
window.
If FADER is pressed close to the end of the disc
If FADER is pressed when the total remaining time of the current
disc is less than 5 seconds, play does not enter the pause mode,
but continues for the next disc. If it is the case tor the 10th disc,
play stops at the end of the disc.
13
Page 14
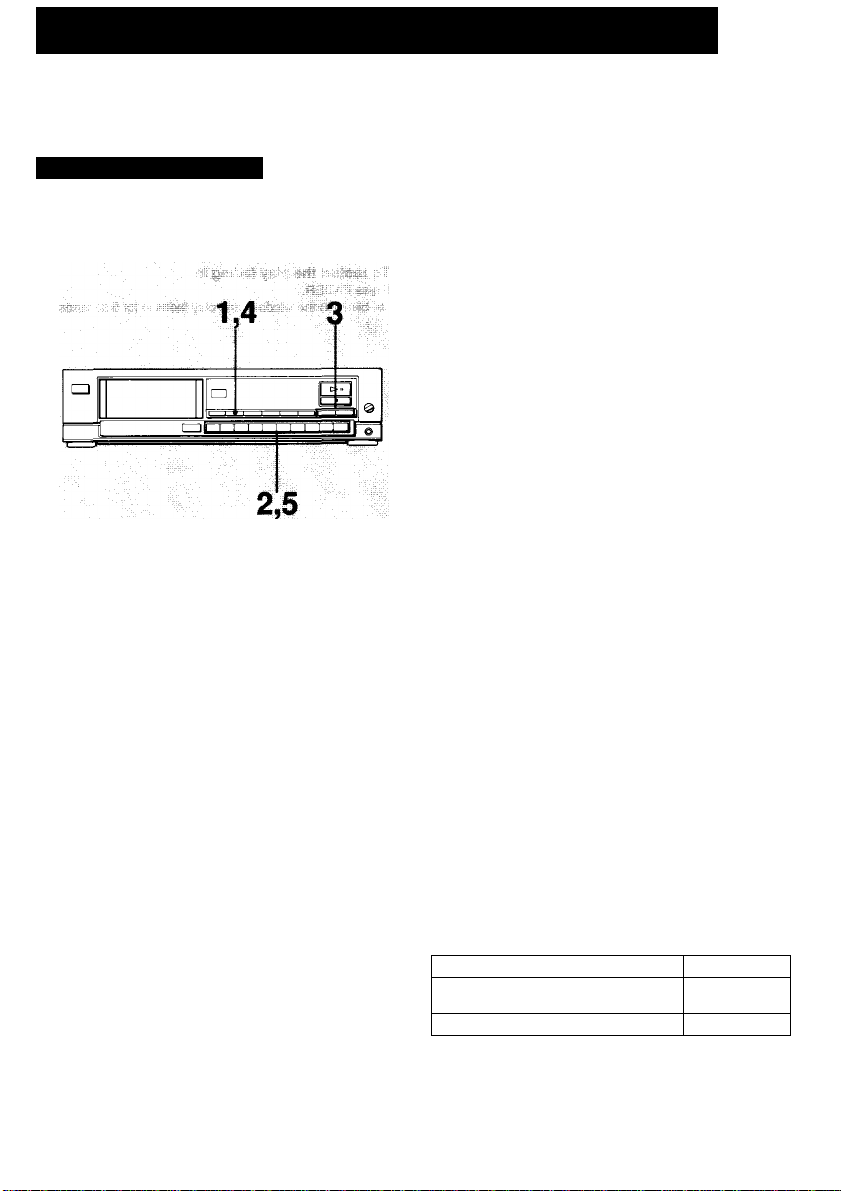
Playing in the Desired Order- Program Play
Up to 32 selections (a whole disc can count as one selection), chosen from any of the 10 discs in the disc magazine, can be
used to create a program.
Programming Selections
1 Press PROGRAM. 2 Press the DISC selector which corresponds
to the disc you want.
3 Press m so that the track number
corresponding to the selection you want
blinks in the music calendar.
Disc No.
Blinks.
© •
Track No. Program No.
Press PROGRAM.
The track number lights up steadily.
To add additional selections from the same
disc, repeat steps 3 and 4.
To add additional selections from other discs,
repeat steps 2, 3 and 4.
To program an entire disc under one
program number’, see the note below.
To program an entire disc under one ‘program number’
Press the DISC selector which corresponds to the disc you want to
add to your program. " Я t_ ’ will appear in the display window. To
add additional selections, follow the above steps.
When each selection ends during program play
The number of that selection will disappear from the display, but the
program itself will remain. If you press ► ll , you can play the
same program again.
14
To play the programmed selections
Press ► II (or ► on the remote commander).
To return to normal play
Press CONTINUE.
The following operations are possible during program play
To s^p to ^ rwxt
To go back to the beginning of the selection
being played
To skip to tf№ pre^us ^^stion Press .
When a whole disc has been programmed under a single program
number, you can skip from the last selection on that disc to the next
by pressing , and from the first selection on that disc to the
previous one by .
Press .
Press .
Page 15

Programming Selections Using Remote Commander
1 Press PROGRAM.
2 Press the DISC selector which corresponds to the disc
you want.
3 Press the TRACK selector which corresponds to the
selection you want.
The selected number lights up in the music calendar.
4 To add additional selections from the same disc, repeat
step 3.
To add additional selections from other discs, repeat
steps 2 and 3,
To program an entire disc under one ‘program number',
see the note in the previous page.
To play the programmed selections, press ► .
Checking the Programmed Selections
Press CHECK.
The disc, track, and program numbers of the first selection in
your program will be displayed.
Each time you press CHECK, the program will move forward
by one selection. When the last selection is reached, “Ed ”
(end) will appear in the display window.
When your program has the 21st selection and after
The numbers for selections over 20 cannot be displayed in
the music calendar, but the track and program number will
be shown in the display window.
To return to the normal display
Press CHECK one more time after “ f q' ” appears in the
display window.
Programming while Checking the Total
Playing Time of the Programmed
Selections
When a selection (or an entire disc) is added to the program
(after step 4 in the previous page, or after step 3 above),
press TIME. While the total playing time is checked, the
time display blinks. The total playing time of the selections
currently included in the program will then be displayed.
® < ®
The total playing time is
1 hour 16 minutes 8 seconds.
The total time will disappear after approx. 4 seconds. You
can then continue programming, or you can also continue
programming even while the total time is still displayed.
When 21st or succeeding track on a disc is programmed,
however, the total time will not be calculated any longer, and
"
------
” will be displayed.
To add selections to a program during play
Use the remote commander.
Follow the same procedures as “Programming Selections" using
Remote Commander, step 4".
Note
If you press PROGRAM during the continuous play {ALL DISCS or
1 DISC) or shuffle play (page 16), the selection currently being
played will be programmed as the first selection in the program.
Clearing the Programmed Selections
This operation is possible only with the remote commander.
Clearing the whole program
Press ■ once during stop, or twice during play.
All the selections will be cleared.
Clearing the last selections in the program
Press CLEAR during stop.
The last selection is cleared each time CLEAR is pressed.
Clearing a specific selection
1 Press CHECK repeatedly until the number of the
selection you want to clear appears in the display.
2 Press CLEAR while the number is displayed.
The selection will be cleared from the program. You
cannot clear a selection which is being played.
Program will be cleared from memory in the following cases
• ■ is pressed twice during program play.
• CONTINUE. SHUFFLE or ^ is pressed.
Spacing between selections in a program
When consecutive selections from one disc are programmed in
sequence, the original interval between selections will be retained.
When the program must change from one disc to another, there will
be a pause of a few seconds.
15
Page 16
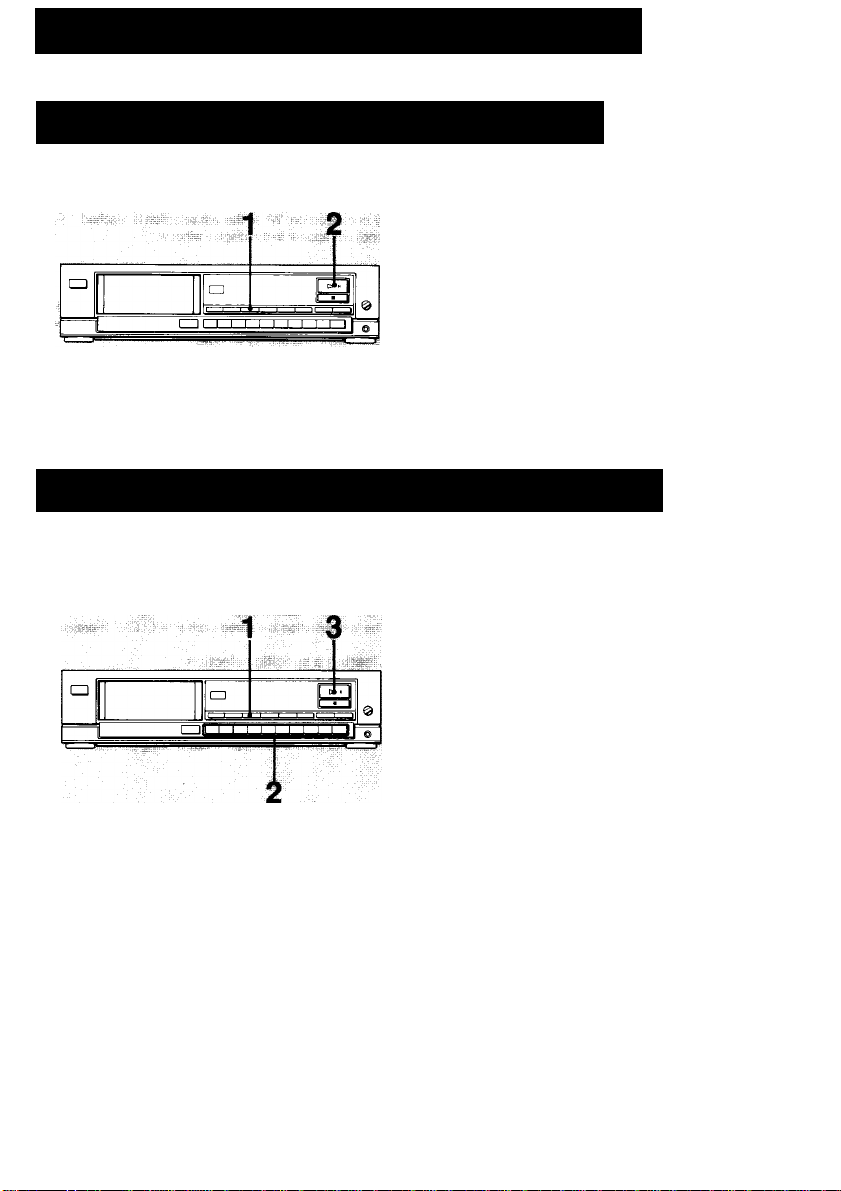
Playing in Random Order-shuffiePiay
Shuffling the Selections on All the Discs - All DISCS Shuffle Play
(up to 32 selections on each disc)
1 Press SHUFFLE until “SHUFFLE” and “ALL
DISCS” appear in the display window.
2 Press ► II (or ► on the remote
commander).
All the discs and selections on them will be
played in random order.
To cancel shuffle play mode
Press CONTINUE.
Shuffling the Selections on the Desired Discs - Select DISC Shuffle Play
(up to 32 selections on each disc)
1 Press SHUFFLE until “SHUFFLE" and “ALL
DISCS” appear in the display window.
If you press SHUFFLE during normal or program play
Shuffle play begins from the selection being played.
If there is a disc containing more than 32 selections
During ALL DISCS or select DISC shuffle play, the 33th and
succeeding selections on a disc are not played.
16
2 Press DISC selectors that correspond to the
discs you want to play.
The selected disc numbers are circled in the
display window.
3 Press >■ II (or ► on the remote
commander).
The selections on the selected discs will be
played in random order.
To cancel shuffle play mode
Press CONTINUE.
During ALL DISCS shuffle play and select DISC shuffle play
The following buttons do not operate:
• The DISC selectors on the main unit and the remote commander
• The TRACK selectors on the remote commander
• The [>201 button on the remote commander
Page 17
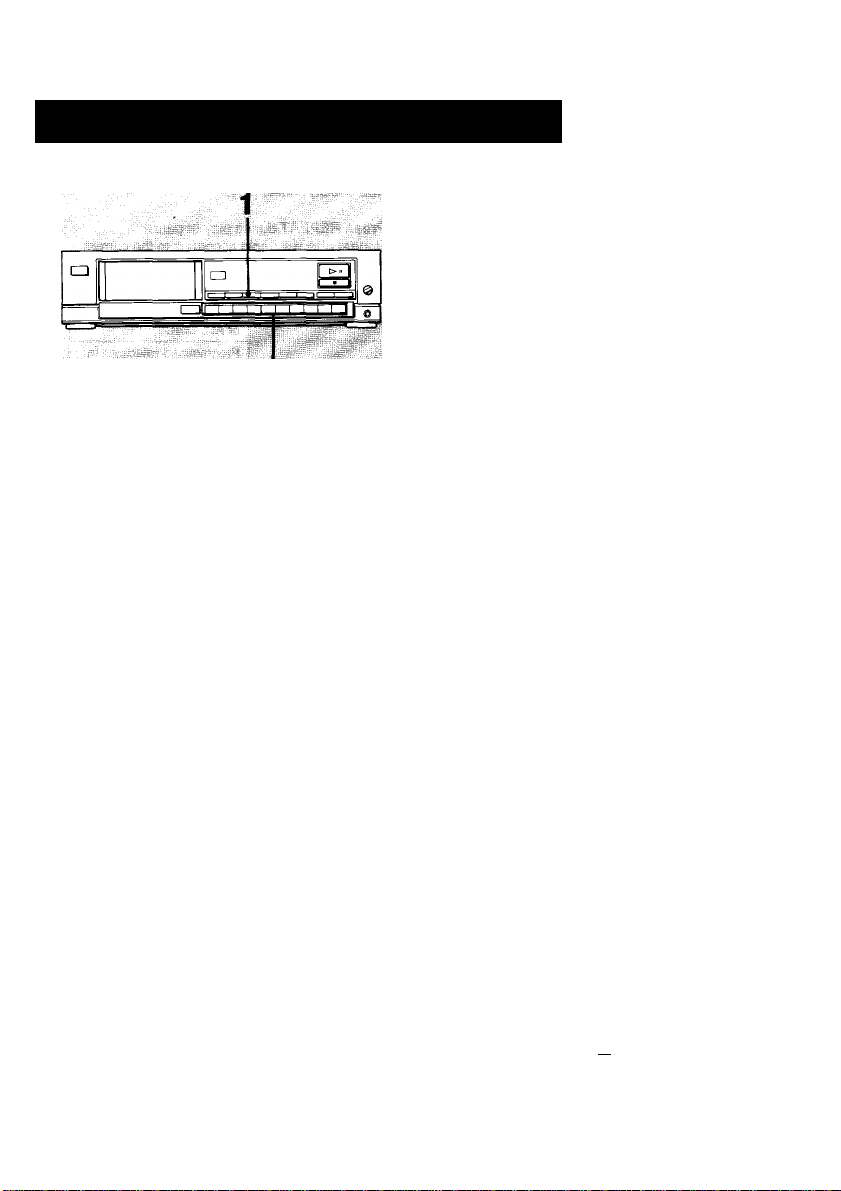
Shuffling Selections on Only One Disc -1 DISC Shuffle Play
(up to 99 selections on the selected disc)
1 Press SHUFFLE until "SHUFFLE" and
“1 DISC” appear in the display window.
2 Press the DISC selector which corresponds
to the disc you want.
All the selections on the disc will be played
once In random order.
To cancel shuffle play mode
Press CONTINUE.
Notes on the shuffle play
• When all the selections are played once, the shuffle play
stops. The repeat play function allows to repeat the shuffle
play endlessly. (See next page.)
• When a selection is played during the shuffle play, this
selection will not be played back again until the shuffle play
stops.
What is this indication?
This indication appears while the player is "shuffling” the
(r -I
selections.
In the ALL DISCS and select DISC shuffle play, the red
circles also light up one after another successively while
"shuffling.”
To skip the selection
To skip to the next selection, press the button.
To return to the beginning of the selection being played, press the
button.
During shuffle play, you cannot return to the previous selections.
During 1 DISC shuffle play
The TRACK selectors and the '>^| button on the remote
commander do not operate. To change a disc, press the DISC
selector which corresponds to the disc you want. Shuffle of that
disc will begin automatically.
17
Page 18

Playing Repeated! y—Repeat Play
You can repeat a single disc, all the discs, the
programmed selections, 1 DISC, select DISC, or
ALL DISCS shuffle play.
Press REPEAT during play or pause.
Repeat play will begin according to the current
play mode.
PtavmoderiHf lliwg
Continue
Program
REPEAT
1 DISC shuffle
Select DISC shuffle/
ALL DISC shuffle
When the select DISC shuffle mode is repeated,
the selected discs remain unchanged each time
shuffling takes place.
To cancel repeat play mode
Press REPEAT again.
Selections to be repeated
All the selections (1 DISC
or ALL DISCS)
Programmed selections in
the programmed order
All the selections, reshuffled
each time (up to 99
selections)
All the selections, reshuffled
each time (up to 32
selections for each disc)
18
Page 19

Maintenance
Cleaning the cabinet
Clean the cabinet, panel and controls with a soft cloth lightly
moistened with a mild detergent solution. Do not use any
type of abrasive pad, scouring powder or solvent such as
alcohol or benzine.
Specifications
System
Disc
Laser
Emission duration
Laser output
Frequency response
Signal to noise ratio
Dynamic range
Harmonic distortion
Channel separation
Wow and flutter
Output jacks
LINEOUT
DIGITAL OUT
(OPTICAL) (optical
output connector)
HEADPHONES
(stereo phone jade)
Compact disc digital audio system
Compact disc
Semiconductor laser (X = 780 nm)
Continuous
Less than 44.6 |iW
* This output is the value measured through the aperture of 7
mm diameter at a distar>ce of 200 mm from the objective
lens surface on the Optical Pickup Block.
2 - 20,000 Hz ± 0.3 dB
More than 105 dB
More than 95 dB
Less than 0.004%
More than 98 dB (1 kHz)
Below measurable limit
Output level 2 V (at 50 kilohms)
ja^)
Load impedance over 10 kilohms
Wave length 660 nm
Output level -18 dBm
Output level max. 15 mW
Load impedance 32 ohms
Cleaning discs
Before Inserting the discs into the disc magazine, clean the
discs with the cleaning cloth. Wipe the disc from the center
out and along the
Do not use solvents such as benzine, thinner, commercially
available cleaners or anti-static spray intended for analog
discs.
Discs should be cleaned once every 6 months.
Power requirements 120 V AC, 60 Hz
Power consumption 11 W
Dimensions
Weight
Supplied accessories
Remote commander (1)
Disc magazine (1)
Audio signal connecting cord
(phono plug X 2 phono plug x 2) (1 )
Sony SUM-3 (NS) batteries (2)
Remote commander RM-D905
Remote control system
Power requirements 3 V DC with two size AA (R6) batteries
Dimensions Approx. 67 x 20 x 175 mm (w/h/d)
Weight Approx. 130g (5 oz.) incl. batteries
Design and specifications subject to change without notice.
Approx. 430 X 115 X 370 mm (w/h/d)
(17 X 4Va X 1 4Vb inches)
including projecting parts and controls
Approx. 6.5 kg (14 lb 6 oz.), net
Infrared control
(2^4 X ' Vi6 X 7 inches)
19
Page 20
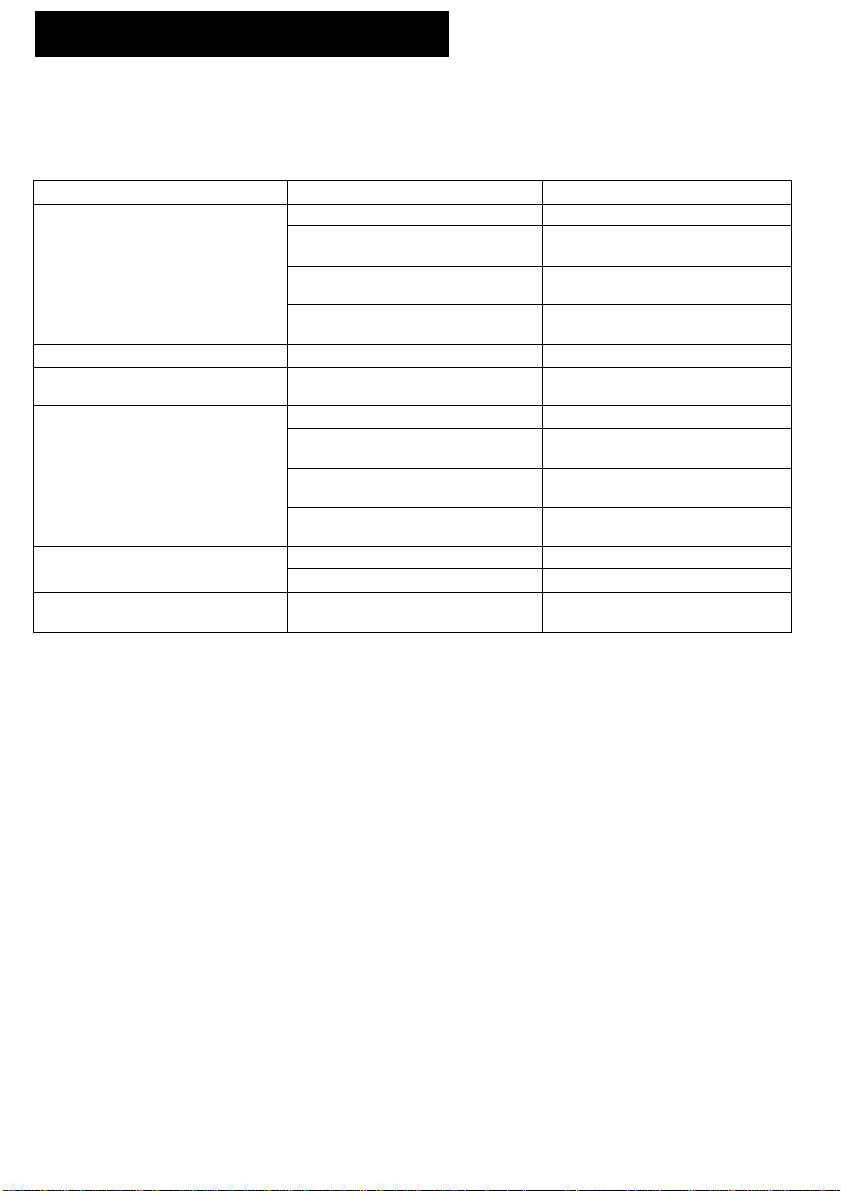
Troubleshooting Guide
The following checks will help you correct most problems which you may encounter with your unit.
Before going through the check list below, refer to the connections and operating procedures.
Should any problem persist after you have made these checks, consult your nearest Sony service facility.
Symptom Cwim
Play does not start.
No sound
Display window does not illuminate
even when the power is turned on.
Remote commander does not operate
the unit.
The disc magazine cannot be removed
even if the ^ button is pressed.
Any operation is not possible.
Dirty disc
The disc is inserted with the label
surface downward.
The unit is in the pause mode.
Moisture condensation
Loose connection
The AC power cord is disconnected.
The batteries are exhausted.
The remote commander is not pointed
at the remote control sensor.
There is an obstacle between the
remote commander and the unit.
The remote commander is too far from
the unit.
The power of the unit is not turned on.
The ^ button is not pressed firmly.
The internal control program may not
run.
Remedy
Clean the disc.
Insert the disc with the label surface
up.
Press the ► II button again to release
pause.
Wait for approx, one hour after turning
on the unit then start play.
Connect the cords firmly.
Connect the AC power cord firmly.
Replace both batteries.
Point the remote commander to the
sensor.
Remove the obstacle.
Move closer.
Depress the POWER switch {= ON).
Press the button again.
Turn off the power and turn it on again.
Sony Corporation Printed in Japan
 Loading...