

Page 1

3-754-820-21 (2)
Compact Disc
Player
Operating Instructions
nCOMMICT
OtOITAL AUOtO
CDP-C425
CDP-C325
CDP-C225
® 1992 by Sony Corporalion
Page 2
Warning
INFORMATION
To prevent fire or shock hazard, do not
expose the unit to rain or moisture.
CAUTION
Risk of eiECTRiC Shock
00 NOT OPEN
CAUTION TO REDUCE THE RISK OF ELECTRIC SHOCK.
DO NOT REMOVE COVER (OR BACK)
NO USER-SERVICEABLE PARTS INSIDE.
REFER SERVICING TO QUALIFIED SERVICE PERSONNEL.
This symbol is intended to alert the user
to the presence of uninsulated “dangerous
voltage” within the product’s enclosure
that may be of sufficient magnitude to
constitute a risk of electric shock to
persons.
This symbol is intended to alert the user
to the presence of important operating and
maintenance (servicing) instructions in the
literature accompanying the appliance.
For the customers in Australia
This Compact Disc player
is classified as a CLASS 1
LASER product.
The CLASS 1 LASER
PRODUCT label is located
on the rear exterior.
Owner’s Record
The model and serial numbers are located at the rear.
Record these numbers in the spaces provided below.
Refer to these numbers whenever you call upon your Sony
dealer regarding this product.
t
This equipment has been tested and found to comply with
the limits for a Class B digital device, pursuant to Part 15
of the F(X Rules. These limits are designed to provide
reasonable protection against harmful interference in a
residential installation. This equipment generates, uses,
and can radiate radio frequency energy and, if not installed
and used in accordance with the instructions, may cause
harmful interference to radio communications. However,
there is no guarantee that interference will not occur in a
particular installation. If this equipment does cause harmful
interference to radio or television reception, which can be
determined by turning the equipment off and on. the user
is encouraged to try to correct the interference by one or
more of the following measures:
- Reorient or relocate the receiving antenna.
- Increase the separation between the equipment and
receiver.
- Connect the equipment into an outlet on a circuit
different from that to which the receiver is connected.
- Consult the dealer or an experienced radio/TV
technician for help.
You are cautioned that any changes or modifications not
expressly approved in this manual could void your
authority to operate this equipment.
For the customers in Canada
r-CAUTION:----------------------------------------------------------------
TO PREVENT ELECTRIC SHOCK. DO NOT USE THIS
POLARIZED AC PLUG WITH AN EXTENSION CORD.
RECEPTACLE OR OTHER OUTLET UNLESS THE
BLADES CAN BE FULLY INSERTED TO PREVENT
BLADE EXPOSURE.
THIS APPARATUS COMPLIES WITH THE CUSS B
LIMITS FOR RADIO NOISE EMISSIONS SET OUT IN
RADIO INTERFERENCE REGUUTIONS.
Model No.
Serial No.
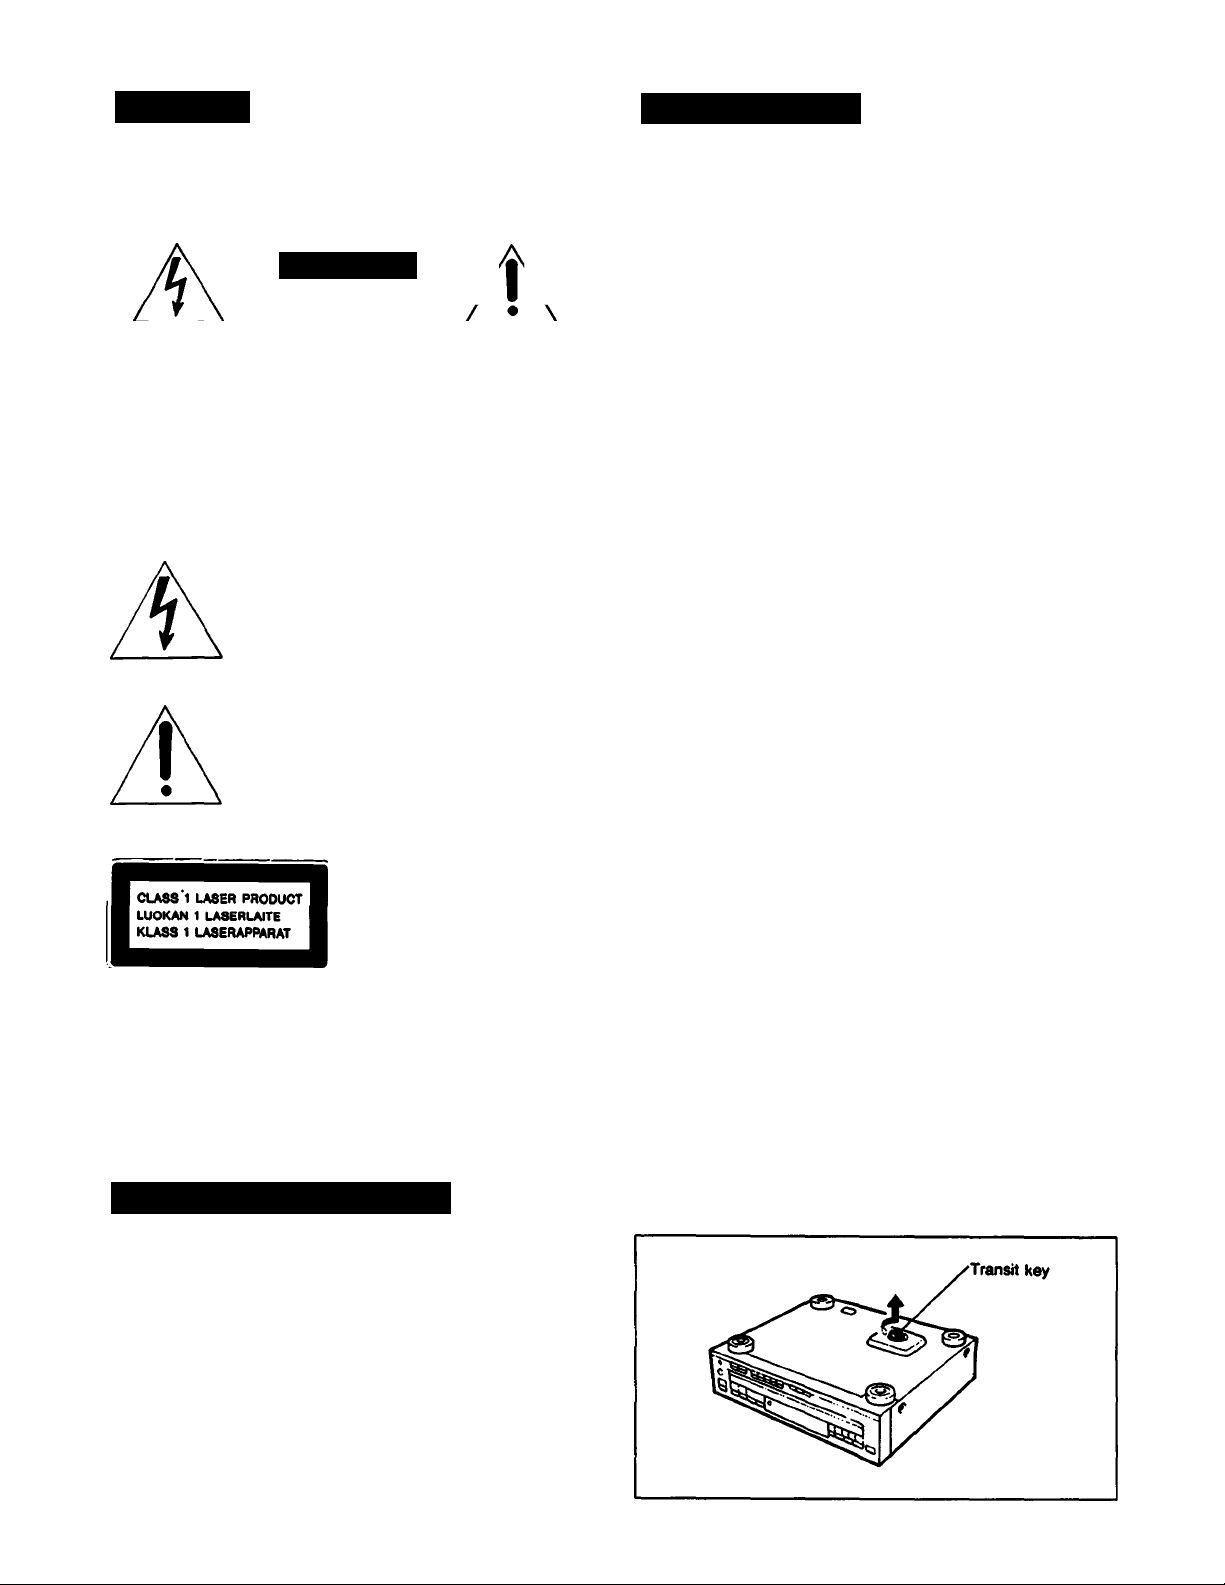
Note on the Transit Key
The transit key on the bottom exterior of the unit protects
the optical system against shock during transportation.
Before operating the CD player, be sure to remove the key
by following the instructions on the label, and store it in a
safe place.
When transporting the unit replace the key in its original
hole and lock it in place.
Page 3
Table of Contents Introduction
Introduction
Precautions......
_______
_______
....
_____
.....
......
---------
----------------...
--------
...
-----------------
...
-------
...— 3
.... 4
Installation ...........—.....................—.......—.......--------------------.... 4
Connections ........—......
Location of controls
Front panel.................................................................................6
Remote commander................................................................... 7
-------------
___ __
.......
....
____
--------
.....
....
____
------
....
.....—...... 5
------
....
------
Installing batteries in the remote commander .....-----------------7
Playing a disc - Continuous play-------------------------------------8
Information display..................................................................... 9
Selecting a desired disc.............................................................10
Locating a particular selection
Locating a particular point in a selection
Playing in a random order - Shuffle play
To play only the desired discs in a random order
-Select shuffle play................................................................... 11
Playing in a desired order - Program play
Designating the playing time - Program edit
..................................................
....................................
_________
------------------
..............................
......
__ _
........ 12
Designating the total playing time - Time edit........... 14
Playing repeatedly - Repeat play —.....-----------------......
Scanning selections - Music scan
Tips on editing tapes ..........
Fading in/Fading out..................................................................17
Fading out after a desired duration - Time fade
Locating the loudest portion of the disc
-Peak search............................................................................. 18
Maintenance —....
Cleaning the cabinet..................................................................19
Cleaning discs ..........................................................................19
Specifications ....
------------------------
----------
.....
Troubleshooting guide .....
------------
------
______
___ _
___
.......—.......— 16
.....
--------
..........................
...
--------------------------
......
-------
...
-------
......
____
....
....—.....— 17
___
-------
...
------------
back cover
11
12
16
19
19
This unit is equipped with 5 disc trays which allow you to
choose from a large number and wide variety of selections.
Any disc at any time can be played using the DISC 1 to 5
buttons.
6
10
10
Enjoy listening in various playing modes
You can select the playing modes among the following:
Continuous play
(page 8)
Shuffle play (page 11)
Program play (page 12)
Repeat play (page 16)
- The entire disc(s) is played
once.
- Selections are played in a
random order.
- Selections are played in your
desired order.
- Single selection or disc(s) are
played repeatedly.
_________________
Editing your own tapes
You can fade the play in or out when making your own
tape recording. - Fade in/Fade out (page 17)
• You can confirm the total playing time while choosing
the selections to be programmed. - Program edit
(page 12)
• The player can program selections automatically to fit in
a desired duration.-Time edit (page 14)
• You can stop the play, fading out at the time desired.
17
-Time fade (page 17)
• The loudest portion of the disc will be determined and
played repeatedly. - Peak search (page 18)
You can play a beginning of each selection
- Music scan
You can check the selections by scanning the beginning
of each selection in the disc. You can use this function in
any play mode, (page 16)
______________________________________
Easy-to-see display
The selection number, the playing time, the remaining time
are displayed by pressing the TIME button. And also
playing modes like repeat, shuffle, program are displayed
in the display window, (page 9.)
Differences by Model
This instruction manual covers the CDP-C425, the CDPC325 and the CDP-C225. Their performance and operation
are identical except for the following:
CDP-C225
Not
supplied*
Not
provided
Remote
Commander
Numeric
buttons on the
main unit
CDP-C426 CDP-C325
Supplied
Provided
Supplied
Not
provided
They do not have those functions activated only by
remote commander, which are indicated with 111 mark in
this instruction manual.
Page 4
Precautions
Installation
On safety
• Check the unit’s operating voltage before operation.
It must be identical with that of your local power supply.
• Should any liquid or solid object fall into the cabinet.
Unplug the unit and have it checked by qualified
personnel before operating it any further.
• Unplug the unit from the wall outlet if it will not be used
for a long time. To disconnect the cord, pull it out by
grasping the plug. Never pull the cord itself.
• As the laser beam used in tNs compact disc player is
harmful to the eyes, do not attempt to disassemble the
cabinet. Refer servicing to qualified personnel only.
On operation
When the unit is not used, turn the power off, to conserve
energy and to extend the useful life of your unit.
For the customers in the U.S.A.
For detailed safety precautions, see the leaflet
“IMPORTANT SAFEGUARDS”.
If you have any questions or problems concerning your
unit, please contact you nearest Sony dealer.
Placing Your Unit
• Place the unit in a location with adequate air circulation
to prevent internal heat buildup in the unit.
• Do not place the unit on a soft surface, such as a rug
that would block the ventilation holes on the bottom.
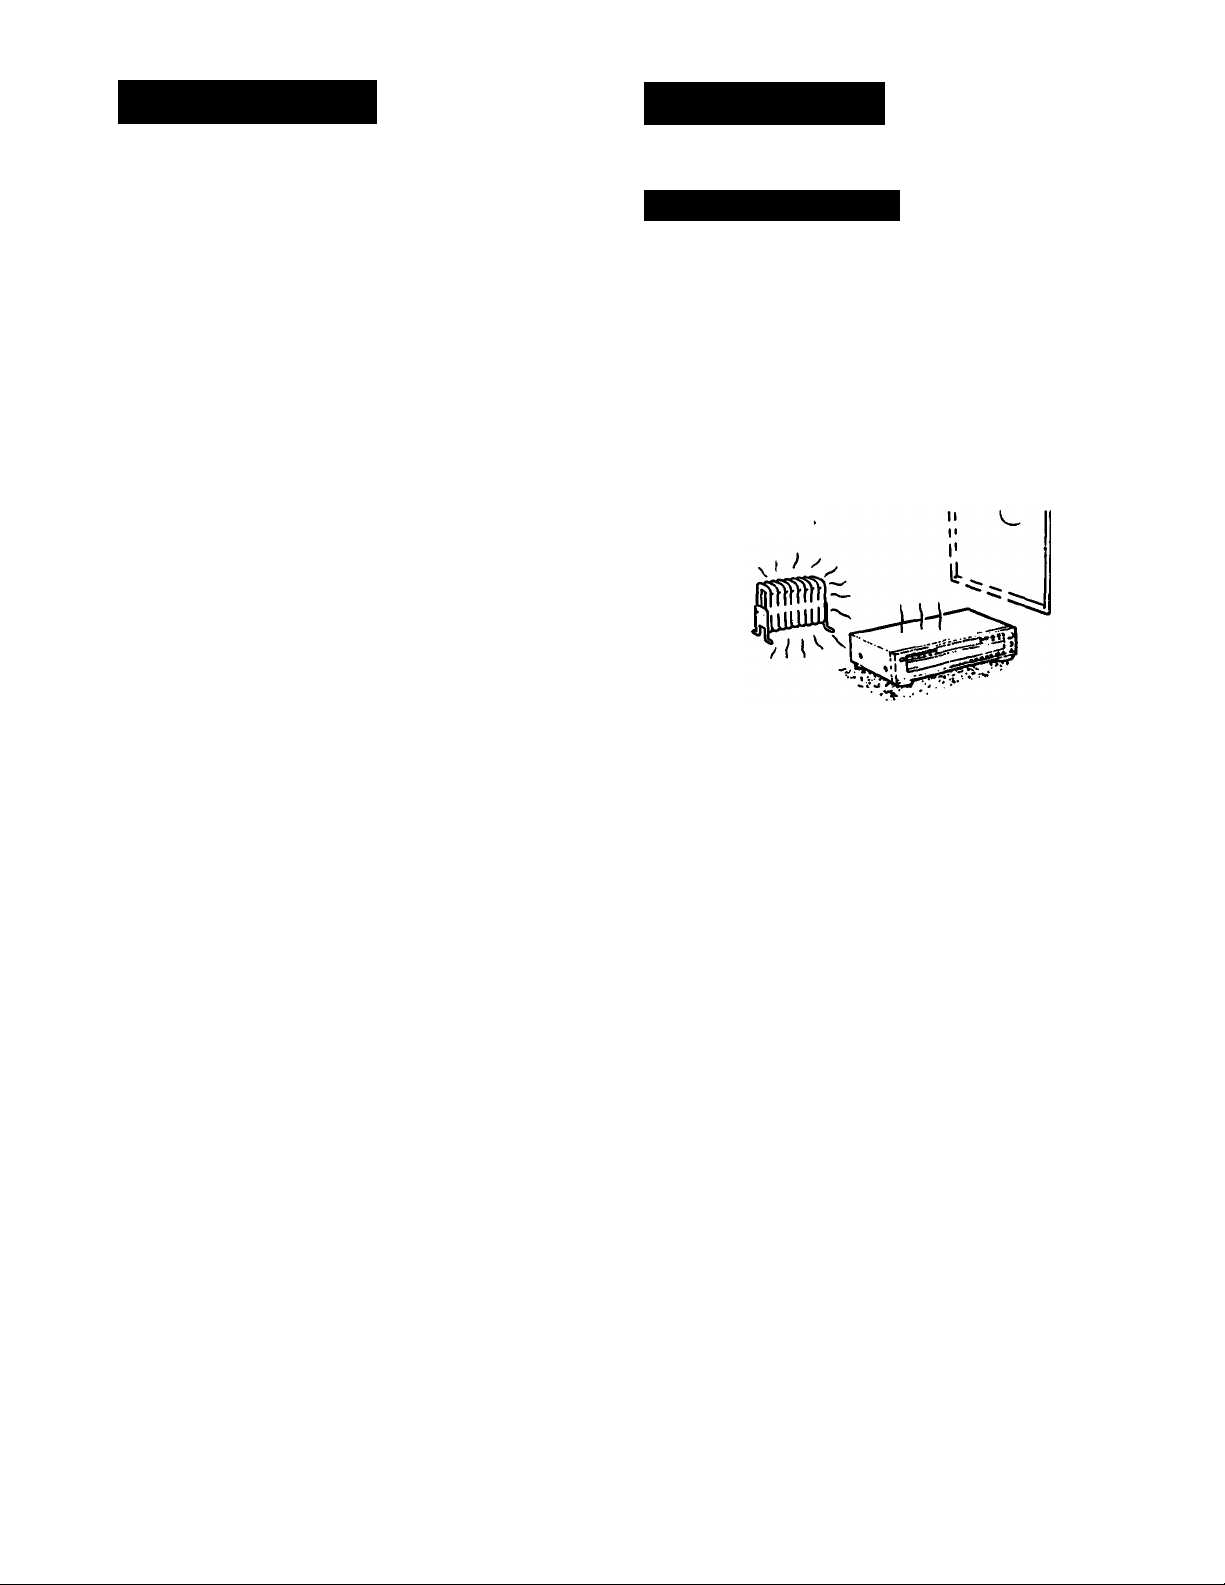
• Do not install the unit
- near heat sources such as radiators or air ducts.
- in a place subject to direct sunlight, excessive dust
mechanical vibration or shock.
Not this way.
On moisture condensation
If the unit is brought directly from a cold to a warm
location, or is placed in a very damp room, moisture
may condense on the lens inside the unit. Should this
occur, the player wrill not operate. In this case, remove
the disc and leave the player turned on for about an
hour until the moisture evaporates.
Page 5
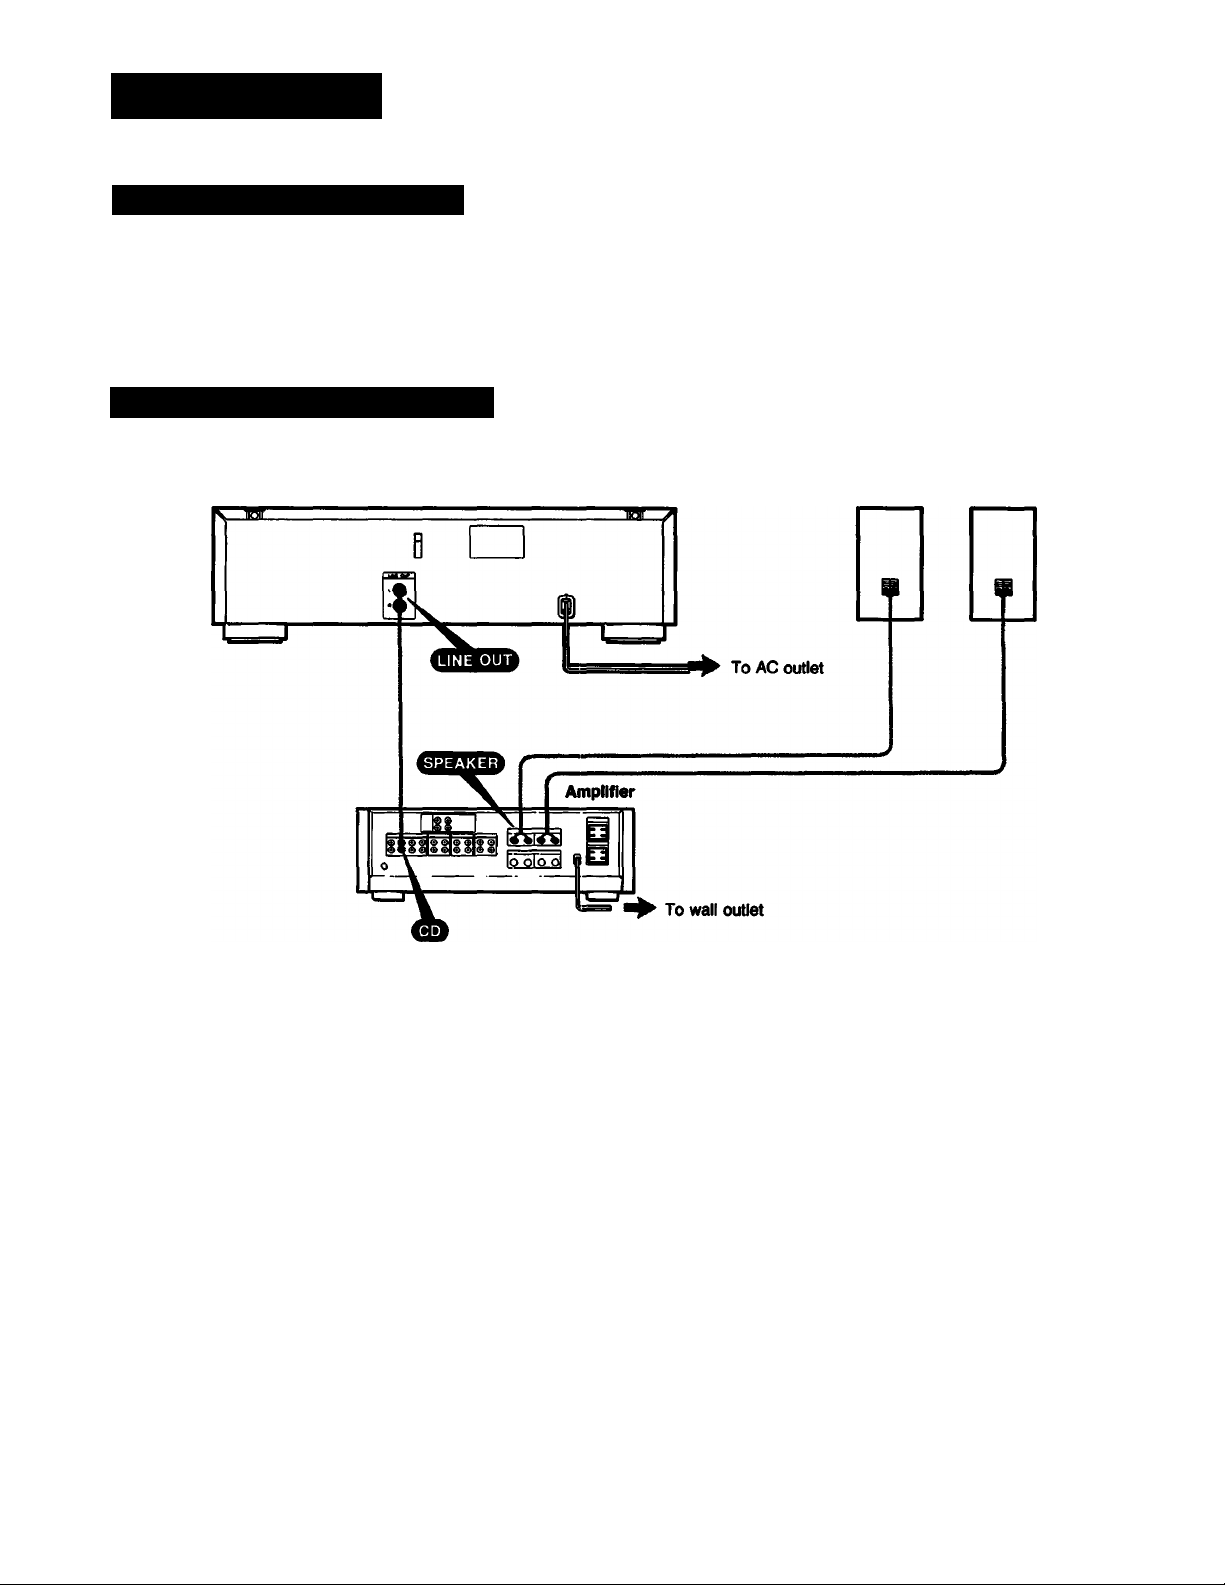
Connections
For Correct Connections
• Turn off the power of each unit before making
connections.
• Connect the AC power cord last.
• Be sure to insert the plugs firmly into the jacks. Loose
connection may cause hum and noise.
To Connect to an Amplifier
• Leave a little slack in the connecting cord to allow for
inadvertent shock and vibration.
• Cord plugs and jacks are color coded: Red plugs and
jacks are for the right channel (R) and white ones for the
left channel (L).
Speaker system
Page 6

Location of Controls
Front Panel
CDP^25
CDP-C325/C225
n mEEIXI ITl ITI ECIII ® [TT] [S
80
0
— ......
............
Sad
■ l-™l
® (a1f24ll23l
BBc
"»«—**~l
pt' t dia
EE] IQ IQ
J
=a
M-
G 3-
[aoiri9ri^|Í7l QD
Refer to the pages indicated in ( ) for details.
1 POWER switch (page 8) 15
_2_ CONTINUE button (page 8)
SHUFFLE button (page 11) u PHONES (Headphones) jack
_4_ PROGRAM button (page 12) 18
_S_REPEAT button (page 16) 19
A OPEN/CLOSE button (page 8)
16 PHONE LEVEL (Headphones) control (page 8)
CHECK (program check) button (page 13)
CLEAR (program clear) button (page 13)
6 Remote sensor 20 >10 (OVER 10) button (page 10)
7 Display window 21
8
TIME button (page 9) 22
_9_
^ (play) button (page 8)
10 144/^M (AMS*) buttons (page 10) 24
u. (manual search) buttons (page 10) 25 MUSIC SCAN button (page 16)
■ (stop) button (page 8)
Ji.
II (pause) button (page 8) 27
14 DISC SKIP button (page 8)
* AMS is the abbreviation of Automatic Music Sensor.
EDIT/TIME FADE button (page 14)
Numeric buttons (1-10) (page 10)
23 FADER button (page 17)
PEAK SEARCH button (page 18)
26 Disc tray (page 8)
DISC 1-5 buttons (page 8)
6
Page 7

Remote Commander
<CDP^425/C325 only)
Refer to the pages indicated in ( ) for details.
PROGRAM button (page 12)
DISC SKIP button (page 8)
>10 (over 10) button (page 10)
REPEAT button (page 16)
I
(stop) button (page 8)
M.SCAN (Music scan) button (page 16)
FADER button (page 17)
(manual search) buttons (page 10)
M (AMS) buttons (page 10)
(play) button (page 8)
II (pause) button (page 8)
Numeric buttons (1-10) (page 10)
DISC 1-5 buttons (page 8)
CONTINUE button (page 8)
SHUFFLE button (page 11)
Installing Batteries in the Remote Commander
On battery life
1
two size-
AA(R6)
batteries
• About half a year of normal operation can be expected
when using the Sony SUM-3(NS) batteries.
• When the batteries are run down, the remote
commander will not operate the unit. In this case,
replace both batteries with new ones.
Notes on the remote commander and remote control
operation
• Keep the commander away from extremely hot or humid
places.
• Avoid dropping any foreign objects into the commander
casing, paiUcuiarly when replacing the batteries.
• Avoid exposing the remote sensor to direct sunlight or
lighting apparatus. Such exposure can cause a
malfunction.
• To avoid damage caused by battery leakage and
corrosion, remove the batteries when the commander
will not be used for a long time.
Page 8

Playing a Disc
- Continuous Play
CDP-C425
14
•catv
D
Tri
-------------
• 18 1 1-
n
5 3 2
•0
PHONE LEVEL
Before playing a disc, turn on the amplifier
and set the input selector to the CD player
position.
or
(5
When all selections ofa disc have been
played, the semi circle
on the tray number
goes off.
Selection number Elapsed playing time
=r
-----------------
L r J’ < ■ »■
~T\
nber Elat
Music calendar
...cv
é
r.
COP-C325/C225
•< tv X
mfTf
¡133 0 p 111 r»
1
I PONMER I
IT
Label
To play more than one disc, place up to 4 more
discs in the tray.
u
PHONE LEVEL
To stop play
To stop for a moment during play, press II
Press ^ or II to resume paly.
To stop play, press ■.
To stop play and open the tray, press
To start playing from the immediate beginning of a
selection.
Press II in the stop mode. The unit enters the pause
mode at the immediate beginning of the selection.
Press ^ or II to start playing the selection from the
immediate beginning. This function is convenient when
recording, as it eliminates the seconds prior to the start of
selections. You cannot use this function in the program
play mode.
Caution on adjusting volume
Do not turn up the volume while listening to a portion
with very low level inputs or no audio signals. If you do
the speakers may be damaged when a peak level
portion is played.
To listen with the headphones
Connect the headphones and control the volume with the
PHONE LEVEL control.
Note
The tray number of an empty tray will be displayed until the empty
tray number is set to play. Once it is recognized as empty, it will
disappear.
Notes on handling discs
• To keep the disc clean, handle the disc by its edge. Do
not touch the surface.
• Do not stick paper or tape on the disc.
15
Choose whether to play one disc (1 DISC) or all
discs (ALL DISCS).
I CONTMUC I
n
u
8
i^s >;a!s
Im'o'o »•
••‘«.«I* s]
• Do not expose the disc to direct sunlight or heat sources
such as hot air ducts, or leave it in a car parked in direct
sunlight as temperature may rise considerably.
•
• After playing, store the disc in its case.
To play an 8 cm (S-inch) CD
Place it on the inner circle of the tray. If the disc is
provided with an adaptor, first remove it. Do not put a
normal CD (12 cm/5-inch) on top of an 8 cm CD.
Page 9

Shows that disc is selected to play.
When either all the selections on a
disc have been played, or the disc
is not selected to play, the semi
circle is unlit.
-Music calendar
Information Display
If you press B or the compartment itself to close the
compartment, the total number of selections and the total
playing time of the disc to be played are displayed for a
few seconds.
If you press TIME during stop, you can choose either
combination for the display data.
Appears under the
tray number where
the disc currently
being played.
otal playing time
'^-Total number of selections
in the disc
Each time you press TIME during play, the display
changes to give you the following information.
Elapsed time in a selection (automatically displayed
when play begins)
Remaining time in the selection
indication will appear in the display window
instead of the actual time, if a selection numbered 21
or higher is selected.
Remaining time of the disc
Notes
• Total remaining time is only available during continuous mode. It
will not be displayed by pressing the TIME button during
program or shuffle mode.
• Total remaining time will be displayed, if time fade is set during
program or shuffle mode.
What Is this Indication?
n O cl
This indication appears when there is no disc at all in the tray.
C
D L
Page 10

CDP-C425
Selecting a Desired Disc
By using the DISC 1 to 5 buttons or the DISC SKIP button
during play, you can locate the beginning of any disc.
To select a particular disc Press the corresponding
DISC 1 to 5 button.
To move to the disc tray
next to the current one
Press DISC SKIP button.
Locating a Particular Selection
CDP-C32S/C225
CDP-C42S/C325 only
Locating a selection in sequence (Automatic Music
Sensor)
You can locate the beginning of a selection on the disc
being played.
To locate the beginning of
the selection being played
To locate the beginning of
the next selection
Continue to press until the selection you want is located.
To locate directly
(Except for CDP-C225. For the CDP-C325, this function
can be operated with the remote commander only.)
Press one of the numeric buttons ( Q] to QÜ] ) to enter the
desired selection number.
If a selection number is greater than 10, use the I ^lOl
and [H to QÜ] buttons. functions as the figure 0.
e.g. To play from selection No. 22 Press I > I0l[g][l]
To play from selection No. 30 Press I >lbin?HT01
Press Wq once.
Press once.
Locating a Particular Point In a Selection
_____
10
Locating a point in sequence (Manual Search)
You can locate a particular point during play by monitoring
the high-speed sound.
To go back at high speed Keep « pressed.
To go ahead at high speed Keep »■ pressed.
Release the button when you reach the point you want.
To locate at higher speed
Press « or ►► in the pause mode. Search speed will
increase three times, but there will be no sound. Find the
desired point by watching the number in the display.
Page 11

Playing in a Random Order - Shuffle Play
You can have the selections (up to 99) played in a random
order. The unit will play all the discs or just one disc you
desire.
Once a selection is played, it will not be played again until
the random order is completed.
To stop playing
Press ■.
To cancel shuffle play
Press CONTINUE and return to the continuous playing
mode.
To change from program or continuous play to shuffle
play
Press SHUFFLE during program or continuous play. The
program mode will be cleared and shuffle play will begin
from the current selection being played.
What Is this Indication?
fp This indication appears while the player is “shuffling”
l_ ^ the selections.
To Play only the Desired Discs in a Random Order-Select Shuffle Play
Select the desired discs during stop mode (ALL DISCS
mode).
To select the desired discs
Press the DISC 1-5 buttons.
A circle will appear around the selected disc number. To
choose another disc, press the desired disc number
button.
To delete a disc which you have selected, press the
DISC 1-5 button for that disc. A circle will disappear
around the selected disc number.
To put back ail discs which you have deleted, press ■
during stop mode.
Note
During shuffle play in ALL DISCS mode, DISC 1-5, MUSIC SCAN,
EDIT/TIME FADE, and PEAK SEARCH buttons do not function.
Page 12

- Program Play
MM m
«Mflf UdillnT^*M I
Chosen selections
iolgl
desired order according to the length of
your tape. You can also make a program for
both side A and B of the tape at one time.
Press selection number in the desired order.*
• For the CDP-C325, this step can be operated
with the remote commander only.
• For the CDP-C225, go on to “Designating the
Playing Time - Program Edit”.
Ç $ y •
s:*- ^ -
Current selection
To choose a selection number over 10, see page
10.
c
■Total playing time
Designating the Playing Time
- Program Edit
□ Choose selection and check the time.
<b
Press repeatedly to choose an appropriate
selection.
5
---------
Current selection '—^Total time
Q A satisfactory selection has been chosen.
J I
» wc '— rn * •
f' f i 4 S
m m
S !8 I'i
12
The selection is stored, and the flashing numbers in
the window light up.
To program additional selections from the same
disc, repeat step 4.
To program additional selections from another disc,
repeat steps 3 and 4.
Page 13

If you program the selections for side B, insert a
pause. .3.. lights up.
* f-l F
-«*“ if kS. CC/M
I Total time will return
Pause to “0.00”.
A pause is counted as one programming step.
^ Program the selections for side B.
ff Repeat steps 3 to 4.
The selections for side A will
8U-
start playing.
To check your program
Press CHECK. The first selection in the program will be
displayed when CHECK is pressed during play, the selection
rn
•1
•
1
being played is displayed.
Each time you press CHECK, the next selection in the
program will be displayed. When CHECK is pressed after
the last selection, “End” appears and then the display
returns to the initial display.
To change your program
You can make the following changes before starting play.
To erase the last selection, press CLEAR during stop
mode.
Each time you press CLEAR, the last selection in the
program will be erased.
b
To program a whole disc
• Using the DISC 1 to 5 buttons
After steps 1 and 2:
1 Press the DISC 1 to 5 button to select the disc.
2 Go to step 5.
• Using the DISC SKIP button.
After steps 1 and 2:
1 Press DISC SKIP. “AL” is displayed in the window.
2 Press PROGRAM.
3 Go to step 5.
The whole disc is programmed as one step.
To program while observing the disc labels
You can program the selections with the disc compartment
open.
To play the selections for side B
When the selections for side A have been played, the unit
will pause. (“B” lights up.)
Set the tape to the beginning of side B, then press ^ or
II.
The selections for side B will start playing.
To stop program play
Press ■. The last selection number programmed is
displayed.
To resume play, press >■. Play begins from the beginning
of the program.
You can play the same program repeatedly as long as you
do not cancel program play or erase the program.
To add a selection to the end of the program, just
press the numeric button for that selection. You can add a
selection also during play or pause.
To delete a selection, press CHECK repeatedly until the
undesired selection is displayed. Then press CLEAR.
To erase the entire program
Press ■ once during stop; twice during play.
The program win be erased In the following attuadona
• ± is pressed during program play.
• Power is turned off.
To check the step of programmed selections
Press TIME during stop mode.
The number of programmed selections will be displayed for a few
seconds in the window.
To check the remaining time
Press TIME once to see the remaining time of the selection being
played; twice to return to the initial display.
The total remaining time cannot be displayed.
If you have programmed a selection number over 20, numeric of
STEP is displayed instead of the remaining time.
Note
When selections have been programmed for sides A and B, the total
playing time displayed during stop mode will show the selections
programmed for side B and the total playing time for side B.
___________________________
To cancel program play
Press CONTINUE and return to the continuous playing
mode. The program will be erased.
Skipping to the next selection programmed
Press during play.
Going back to the beginning of the selection being played
Press during play.
13
Page 14

esignatmg the Total Playing Time
-Time Edit
CDP-C425
•OHV
CDP-C325/C225
1
ü±nj
________________
____
.
■> 3-a) 1
LjBBJJ®
c=K=.B=ss=a5
S-fi-
2,4,5
Example: a 54 minute tape
¿ 3? j?-i?
f ■ s s
After 1 second.
A 42 3>-3 3'3 4*s.
b) When you specify a free tape length:
• For the CDP-C325, this step can be operated
with the remote commander only.
• This step cannot be operated by the CDP-
C225.
Use numeric buttons dTl-fiol).
Press Qo] for “0”.
You need not press keys for seconds, unless
required.
Example: a 46 minute tape
(23 minutes per side)
‘•EDIT*’ lights up and ’’A** blinks.
íAot
xl/_
____
Blinking
Specify a desired recording time.
a) When you specify a commercially available
tape length:
You can designate the tape length easily with the
buttons. Each time you press a button,
the time changes in the following way.
• Press Press PM -
090(45.00 mm.)-
C
074 (37.00 mm.) — C40 (30.00 mm.) — 054 (27.00 mm.)
To set the seconds, press The time
increases or decreases by 10 seconds.
14
♦ »
r«Ml t
' 046 (23.00 man.)
D
au, O
;o r»r» c#6i*T . .
yC :> uuy
Time
____
I Ji
___
_
4
The program for side A is completed.
If “LINK” blinks, see “To add selection(s)''
Chosen selections
Í ’ * : áf-ESSI
in y '■“«1 —"
c
Last of programmed
selection
Press EDIT/TIME FADE once more, to make a
program for the other side of your tape. If “LINK”
5
blinks, see “To add selection(s)”.
Note
Total playing time can be set up to 59 minutes 59 seconds.
(For the CDP-C225, total playing time can be set up to 59 minutes
50 seconds.)
-Total playing time
Page 15

You can designate a time and the unit will make 2
different programs of selections each fitting within that
period. Use this function, by designating the length of your
tape, for editing both sides of a tape.
To add seiectionfs) — LINK —
After all selections on the disc have been programmed, if
there is selection(s) within the remaining time, “LINK” and
the selection number(s) will blink.
» J 4 * AiSSi
I'u 18. S'8 M
To add selection, press the numeric button for the
selection number (Except for CDP-C225) or press
EOIT/TIME FADE again. When pressing EDIT/TIME
FADE, a program will be made automatically to fit the
playing time as close as possible to the remaining time.
If the remaining time can contain other selection(s),
“LINK” and the selection number keep blinking. When
“LINK” blinks, if the disc is changed by another disc, the
new selection numberfs) on the new disc that fit in the
remaining time will blink.
“EDIT’ disappears when the playing time becomes equal
to the designated time. Whether “LINK” is blinking or not,
you can change the disc by another disc and choose
selection(s) to fit the remaining time.
To disappear “EDIT” in the window, press ■.
To include desired selections In the program
1 Make your own program of the desired selections.
See page 12 for instructions.
2 Follow the procedure as shown on the preceding page.
Just designate the length of your tape; you need not
subtract the length of your program. The unit will place
your selections at the beginning of its program and add
other selections to fit the remaining time.
To check the program
See page 13.
To de^gnate a different time for each aide
Execute steps 1 to 4 and press II Then repeat steps 2 and 4.
Do not execute step 5.
If your disc has more than 20 aelectlona
Selections over 20 cannot be programmed with the time edit
function; program desired selections before using the time edit
function. See page 12 for details.
_______________________________
______________
To play the program
Press ►.
The selections for side A will be played and then the unit
will pause. “B” lights up in the tape side indicator. Set the
tape to the beginning of side B, then press ^ or II.
The selections for side B will be played.
Note
Playback can be performed when "EDIT’ is displayed.
To stop playing
Press ■.
You can play the same program repeatedly as long as you
do not cancel time edit or erase the program.
To cancel time edit
Press CX)NTINUE and return to the continuous playing
mode.
The program will be erased.
To erase the entire program
Press ■ once during stop; twice during play.
The program is also erased, when you turn off the unit.
Page 16

Playing Repeatedly - Repeat Play
Press before or during play.
“REPEAT” appears. The unit repeats the current
playing mode.
To repeat a single selection in the continuous play
mode, press REPEAT again, “REPEAT 1” appears.
You can repeat a single disc or all the discs.
You can repeat a single selection during continuous play.
You can use repeat play in any play mode.
To cancel repeat play
Press REPEAT again. “REPEAT” disappears.
To cancel repeat play in continuous play mode, press
REPEAT until “REPEAT” disappears.
Scanning Selections - Music Scan
Press during stop.
^ blinks, and each selection plays for approximately 10
seconds and fades out, scanning play starts the next
disc or selection.
You can check the selections by scanning the beginning
of each selection on the disc. When “ALL DISCS” is
selected in the continuous play mode, the first selection of
each disc will be scanned.
You can use this function in any play mode.
Starting play at the selection being played during
music scan
Press ►.
To stop music scan play
Press ■.
16
Notes
• Programmed pauses in program mode will be disregarded during
music scan play.
• If you press the button, music scan will be canceled.
• Pressing the MUSIC SCAN button while the beginning of
selection is being scanned will extend the playing time for 10
more seconds.
Page 17

Tips on Editing Tapes
The following functions are convenient for editing your own
tapes.
Fading in/Fading out
You can have the play fade in and fade out between 2-10
seconds.
When no time is specified, the play will fade in and fade
out for 5 seconds.
To set the fade time
1 Press!.
2 Press FADER.
3 Press to select fade time between 2-10
seconds.
4 Press FADER again.
To end the play fading out
Press FADER when you want to start fading out.
Ill- flashes in the window, and play fades out and unit
enters the pause mode.
To restart the play fading in
Press FADER in the pause mode.
-•II flashes in the window, and play fades in.
_________________________________
Fading out after a desired duration - Time Fade
You can have the play fade out at the end by designating
the play duration. Once time fade is set, it functions twice
for editing both sides of a tape. You can change discs
without canceling this function. The fade time is preset to
5 seconds, but you can change it between 2-10 seconds.
To set time fade____________________________________
1 Press EDIT/TIME FADE twice during stop.
(¿«1 is displayed in the window.
2 Specify desired fade time,
a) When you specify a commercially available tape
length:
You can designate the tape length easily with the
buttons. Each time you press a button, the
time changes in the following way.
Press Ke Press PW-
C-90 (45.00 mln.)-
C
C-74 (37.00 min.) -
Ceo (30.00 min.) — C-54 (27.00 min.)
C-46 (23.00 min.) —V
lin.) —'
To set the seconds, press The time
increases or decreases by 10 seconds.
b) When you specify a free tape length:
• For the CDP-C325, this step can be operated with
the remote commander only.
• This step cannot be operated by the CDP-C225.
Use numeric buttons ([i|-[l3). Press for "0”.
You need not press keys for seconds, unless
required.
Example: To set to 27 minutes, press [2] 0 [jO] Rol
Note
Total playing time can be set up to 59 minutes 59 seconds.
(For the CDP-C225, total playing time can be set up to 59 minutes
50 seconds.)
3 To start play, press
After the designated time, play fades out and pauses.
Tape side B lights up. Press II or ^ to resume playing
for the other side of the tape. If you press FADER, fade
in will start. When the play fades out for the second
time, the unit pauses and the time fade function is
canceled.
17
Page 18

When playback of a disc ended before the designated playing time
The time fade function wili remain effective even for a new
disc(s) added for the remaining piaying time originaiiy
designated, and the fade out starts in accordance with the
initiaiiy set fade time.
To cancel time fade
Time fade wiii be canceied when
-EDIT/TiME FADE is pressed once again.
(manual search) is pressed during play.
To illsplay the tíme remaining until the time set
Press TIME twice.
If the PEAK SEARCH is pressed after setting time
fade, time fade is reieased but peak search is kept active.
Locating the Loudest Portion of
the Disc - Peak Search ri
The unit wili scan a disc from beginning to end and
determine the ioudest portion (peak ievei) of the disc, and
then play that portion repeatedly. This function wiil make it
easier for you to adjust to the optimum ievei when
recording on tape. You can use this function in the
continuous or shuffie play mode only for a disc which is in
play position currentiy, and in the program play mode for
the selections of the entire program.
To set peak search
Press PEAK SEARCH in the stop mode. "PEAK” flashes
in the window. The entire tracks in a disc or program wili
be searched automaticaliy. "PEAK" iights up and the
loudest portion will be played repeatedly for 4 seconds.
Adjust the recording level on your tape deck according to
the peak level.
Note
To go to another disc press DISC SKIP button dunng stop.
To stop peak search
Press ■.
Press II to pause at the first selection.
To start play immediately
Press ►.
Note on peak search function
The unit determines the loudest portion (peak level) of a disc
by searching it at fixed intervals. As a result, the portion
searched may differ from the actual peak level. In addition, this
function may determine different portions as the peak level for
the same disc. However, the difference between the portion
searched and the actual peak level is insignificant aixf will not
present any problem in adjusting the recording level.
18
Page 19

Maintenance Specifications
Cleaning the CABINET
Clean the cabinet, panel and controls with a soft cloth
lightly moistened with mild detergent solution. Do not use
any type of abrasive pad scouring powder or solvent such
as alcohol or benzine.
Cleaning DISCS
Before playing, clean the disc with the cleaning cloth.
Wipe the disc from the center out.
Do not use solvents such as benzine, thinner,
commercially available cleaners or einti-static spray
intended for analog discs.
After playing, store the disc in its case.
System
Laser
Laser output
Frequency response
Signal to noise ratio
Dynamic range
Harmonic distortion
Channel separation
Wow and flutter
Outputs
General
Power requirements
Power consumption
Dimensions
Weight
Compact disc digital audio system
Semiconductor laser (\=780 nm)
Emission duration: continuous
Max. 44.6 jLiW*
* This output is the value
measured at a distance of
about 200 mm from the
objective lens surface on the
Optical Pick-up Block.
2 Hz - 20 kHz (±0.5 dB)
More than 100 dB
More than 98 dB
Less than 0.005% (1 kHz)
More than 100 dB (1 kHz)
Below measurable limit
LINE OUT (phono jacks)
Output level 2 V (at 50 kilohms)
Load impedance over 10
kilohms
PHONES (stereo phone jack)
Output level 0-10 mW
(variable) (at 32 ohms)
Model for USA and Canada
120 V AC, 60Hz
Model for Australia
240 V AC, 50/60 Hz
12 W
Approx. 430 X 125 X 385 mm
(w/h/d) (17 X 5 X 15% inches)
including projecting parts and
controls
Approx. 5.6 kg (12 lbs 6 oz), net
Remote commander RM-D325 (CDP-C425/C325 only)
Remote control system Infrared control
Power requirements 3 V DC with two batteries size AA
(lEC designation R6)
Supplied accessories
Audio signal connecting cord
(phono plug X 2*-* phono plug x 2) (1)
Remote commander (1) (CDP-C425/C325 only)
Sony SUM-3 (NS) batteries (2) (CDP-C425/C325 only)
Operating Manual (1)
Design and specifications subject to change without
notice.
19
Page 20

Troubleshooting Guide
The following checks will assist in the correction of most problems which you may encounter with your unit.
Shouid any problem persist after you have made these checks, consult your nearest Sony service facility.
Before going through the check list below, first refer back to the connection an operating procedures.
Trouble
No audio from one or both channels
Play does not begin. No disc in the disc compartment
Remote commander does not operate the
unit (For CDP-C425/C325 only)
Any operation is not possible.
Incorrect operation of the amplifier
Loose connection
The player is in the pause mode.
Moisture condensation
The disc is set upside down.
The disc is tilted.
The disc is extremely dirty.
The batteries are exhausted.
The remote commander is not pointed at
the remote control sensor.
There is an obstacle between №e remote
commander and the unit
The remote commander is too far from the
unit
The internal control program may not run. Turn off the power and turn it on again.
Causes
Remedy
Operate correctly.
Connect the cords firmly.
Put disc(s) in the compartment
Press ^ or II to release pause.
Leave the player turned on for about an
hour.
Set the disc with the label side up.
Set the disc correctly.
Clean the disc.
Replace both batteries.
Point the remote commander to the sensor.
Remove the obstacle.
Move closer.
 Loading...