

Page 1
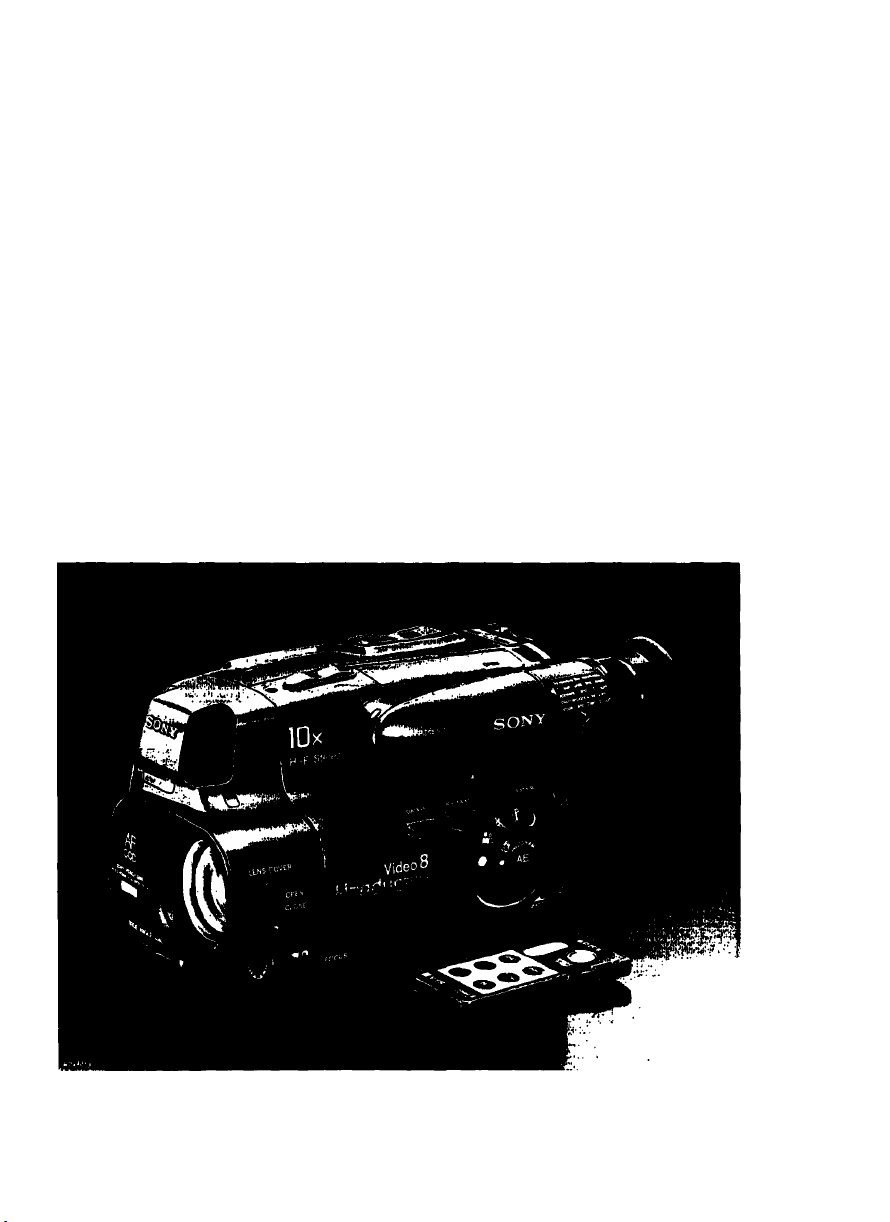
Video Camera Recorder
CCI>TR61 ITR65
AC Power Adaptor
AC-V25 I V25A
Operation Manual
Before operating the unit, piease read this manual thoroughly
and retain it for future reference.
Owner’s Record
The model and serial numbers are located on
the bottom. Record the serial number in the
space provided on the right hand. Refer to
these numbers whenever you call upon your
Sony dealer regarding this product.
Model No. CCD-TR61/TR65 Serial No.
Model No. AC-V25A/2SA Serial No..
3-757-525-23 (1)
Videos Handycam
©1993 by Sony Corporation
(Photo: CCD-TR61)
Page 2
WARNING
To prevent fire or shock hazard,
do not expose the unit to rain or
moisture.
CAUTION
«•SK Of €l€CTaiC Shock
A
CAUTION TO REDUCE THE RISK OF ELECTRIC SHOCK.
REFER SERVICING TO QUAUFIEO SERVICE PERSONNEL
A
RECYCLING NICKEL-CADMIUM
BATTERIES
NICKEL-CADMIUM BATTERY.
MUST BE DISPOSED OF PROPERLY.
Nickei-Cadmium batteries are
recyclable. You can help preserve our
Ni-Cd
Note: In some areas the disposal of nickel-
For the Sony Service Center nearest you call
1-8(W-222-SONY (United States only)
For the Factory Service Center nearest you cali
416-499-SONY (Canada only)
environment by returning your
unwanted batteries to your nearest
Sony Service Center or Factory
Service Center for coilection. recycling
or proper disposal.
cadmium batteries in househoid or business
trash may be prohibited.
Caution; Do not handle damaged or leaking
nickel-cadmium batteries.
00 NO* OPf N
00 NOT REMOVE COVER lOR BACK)
NO USER-SERViCEAeLE PARTS iNSlOE
This symbol is intended to alert
the user to the presence oi
uninsulated "dangerous voltage"
within the product's enclosure that
may be of sufficient magnitude to
constitute a risk of electric shock
to persons.
This symbol is intended to alert
the user to the presence of
important operating and
maintenance (servicing)
instructions in the literature
accompanying the appliance.
For the Customers in the U-S.A-
WARNING
This equipment has been tested and found to
comply with the limits for a Class B digital device,
pursuant to Part IS of the FCC Rules. These limits
are designed to provide reasonable protection
against harmful interference in a residential
installation. This equipment generates, uses, and
can radiate radio frequency energy and. if not
installed and used in accordance with the
instructions, may cause harmful interference to
radio communications. However, there is no
guarantee that interference will not occur in a
particuiar installation if this equipment does cause
harmful interference to radio or television
reception, which can be determined by turning the
equipment off and on. the user is encouraged to tr>
to correct the interference by one or more of the
following measures:
- Reorient or reiocate the receiving antenna.
- Increase the separation between the equipment
and receiver.
- Connect the equipment into an outlet on a circuit
different from that to which the receiver is
connected.
- Consult the dealer or an experienced radio TV
technician for help.
This device complies with Part IS of the FCC Rules
Operation is subject to the following two conditions
(f) This device may not cause harmfui interference,
and (2) this device must accept any interference
received, including interference that may cause
undesired operation.
I CAUTION I
You are cautioned that any changes or
modifications not expressly approved in this
manual could void your authority to operate this
equipment.
For the Customers in CANADA
Notice for the customers In Canada
This apparatus complies with the Class B limits
lor radio noise emissions set out in Radio
Interference Regulations.
I CAUTION I
TO PREVENT ELECTRIC SHOCK. 00 NOT USE THIS
POLARIZED AC PLUG WITH AN EXTENSION CORO.
RECEPTACLE OR OTHER OUTLET UNLESS THE
BLADES CAN BE FULLY INSERTED TO PREVENT
BLADE EXPOSURE.
Page 3

Welcome to Video 8
Congratulations on your purchase of this Sony Handycam® camcorder. With your
Handycam you can capture life’s precious moments with superior picture and
sound quality. Your Handycam is loaded with advanced features, but at the same
time it is very easy to use. You will soon be producing home video that you can
enjoy for years to come.
Table of Contents
Before You Begin
About This Manual 4
Checking Supplied Accessories 5
Getting started
Charging and Installing the Battery Pack 6
Tips for Using the Battery Pack 8
Inserting the Lithium Battery 10
Setting the Date and Time 12
Inserting a Cassette 13
Adjusting the Viewfinder Lens 14
BEEP Feature IS
Hints for Better Shooting IS
Basic Operations
Camera Recording 16
Using the Zoom Feature 18
Using the WIDE ANGLE 19
Recording the Date or Time 20
Checking the Recorded Picture in the Viewfinder 21
Connections for Playback 22
Connecting to a TV with AudioAfideo Input Jacks or VCR 22
Connecting to a TV without Audio/Video Input Jacks 22
Playing Back a Tape 23
Advanced Operations
Using Alternate Power Sources 2S
Using House Current 2S
Focusing Manually 26
Using the PROGRAM AE Function 28
Fade-in and Fade-out 30
Using the World Clock 31
Editing onto Another Tape 33
Additional Information
Playback Modes 34
Maintenance Information and Precautions 34
Using Your Camcorder Abroad 39
Identifying the Parts 40
Remote Commander 43
Specifications 4S
Trouble Check 46
indkicftfors in the Viewfinder 49
Index SI
Page 4

About This Manual
If you want to shoot as soon г» possible, read the chapters "Getting Started” and "Basic Operations"
first. As you read through this manual, buttons and settings on the camcorder are shown in capital
letters.
e.g. Set the POWER switch to CAMERA.
Note on TV Color Systems
TV color systems differ from country to country. To view your recordings on a TV, you need an NTSC
system based TV. When you want to use a PAL-M system based TV, you will need an NTSC/PAL-M
transcoder (as this is an NTSC system based camcorder). Please check the list on page 39 to see the TV
color system of your country.
Note on the Supplied RRJ Adaptor
Since each country has its own electricity and TV color system, you may not be able to use the RFU
adaptor when you use the camcorder abroad.
Precaution on Copyright
Television programs, films, video tapes, and other materials may be copyrighted. Unauthorized
recording of such materials may be contrary to the provision of the copyright laws.
Page 5

Checking Supplied Accessories
Check that the following accessories are supplied with your camcorder.
m
d
»
V
(S
©
m (E
pri Wlrel««s Remote Commander (1) (p. 43)
[2] Remote Commander holder (1) (p. 44)
[T| Battery pack NP>SS (1) (p. 6)
|T| AC power adaptor AC-V2S/V2SA (1) (p. 6.48)
[S] Lithium Battery CR2025 (2) (p. 10)
(One is for the camcorder and the other is for the Remote Commander)
[§1 A/V connecting cable (1) (p. 22)
[T1 RFU adaptor RFU40UC (1) (p. 22)
[¥] Shoulder strap (1) (p. 44)
m
^^
o
&
-I
y
»
s:
9
o
CO
c
I
Page 6
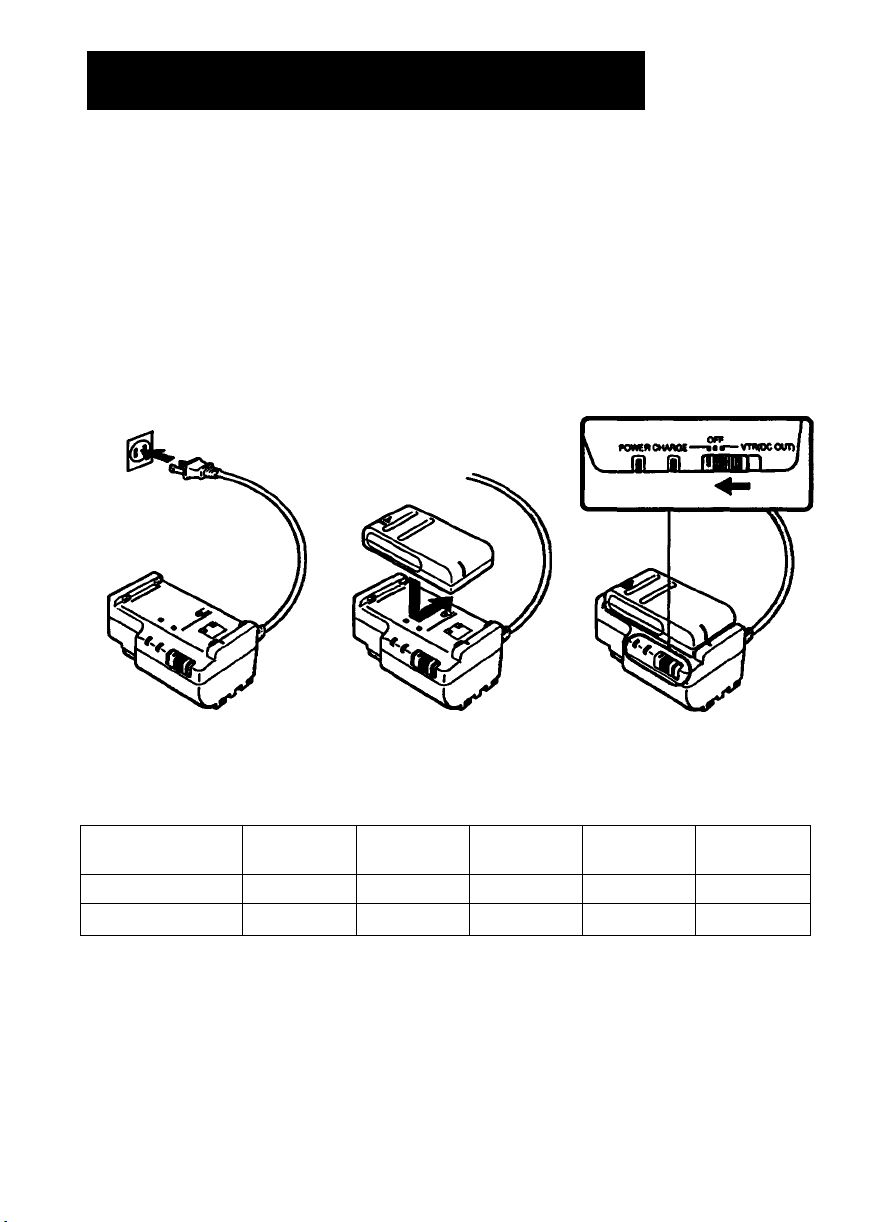
Charging and installing the Battery Pack
Before using your camcorder, you first need to charge and install the battery pack. To charge the battery
pack, use the supplied AC-V2S/V2SA AC power adaptor.
Charging the Battery Pack
Charge the battery pack on a flat place without vibration. (1) Connect the power cord to a wall outlet.
(2) Align the right side of the battery pack with the white line on the AC power adaptor, then slide the
battery pack in the direction of the arrow. (3) Set the selector to CHARGE. The POWER lamp (green) and
the CHARGE lamp (orange) light up. Charging begins.
When charging is completed, the CHARGE lamp goes out. Set the selector to OFF and unplug the unit
from the wall outlet. Then remove the battery pack and install it on the camcorder. To stop charging, set
the selector to OFF.
1
Charging Time and Battery Life
When the battery life of a color viewfinder is different from that of a monochrome viewfinder, the battery
life of a color viewfinder is indicated in the parenthesis.
Battery pack
Charging time’
Battery life”
Approximate charging time to charge an empty battery pack using the AC-V25/V2SA (Lower
temperatures require a longer charging time.)
■ Approximate continuous recording time indoors
NP-55
(supplied)
70
SO 135 (125)
Important!
Use the battery completely before re-cbarglng!
Before you recharge the battery, make sure the battery has been used up (discharged) completely
Repeated charging while some capacity remains causes a lowering of battery capacity. However, the
original battery capacity can be recovered if you use the battery completely and charge it fully again.
To use up the battery, remove the cassette and slide the POWER switch to CAMERA with the battery
attached, and leave the camcorder until the indicator and the red lamp flash in the viewfinder.
NP-77H
NP-77HD
160 140 120
NP-77 NP-66H NP-55H
105(95) 100(90)
80
60(55)
Page 7
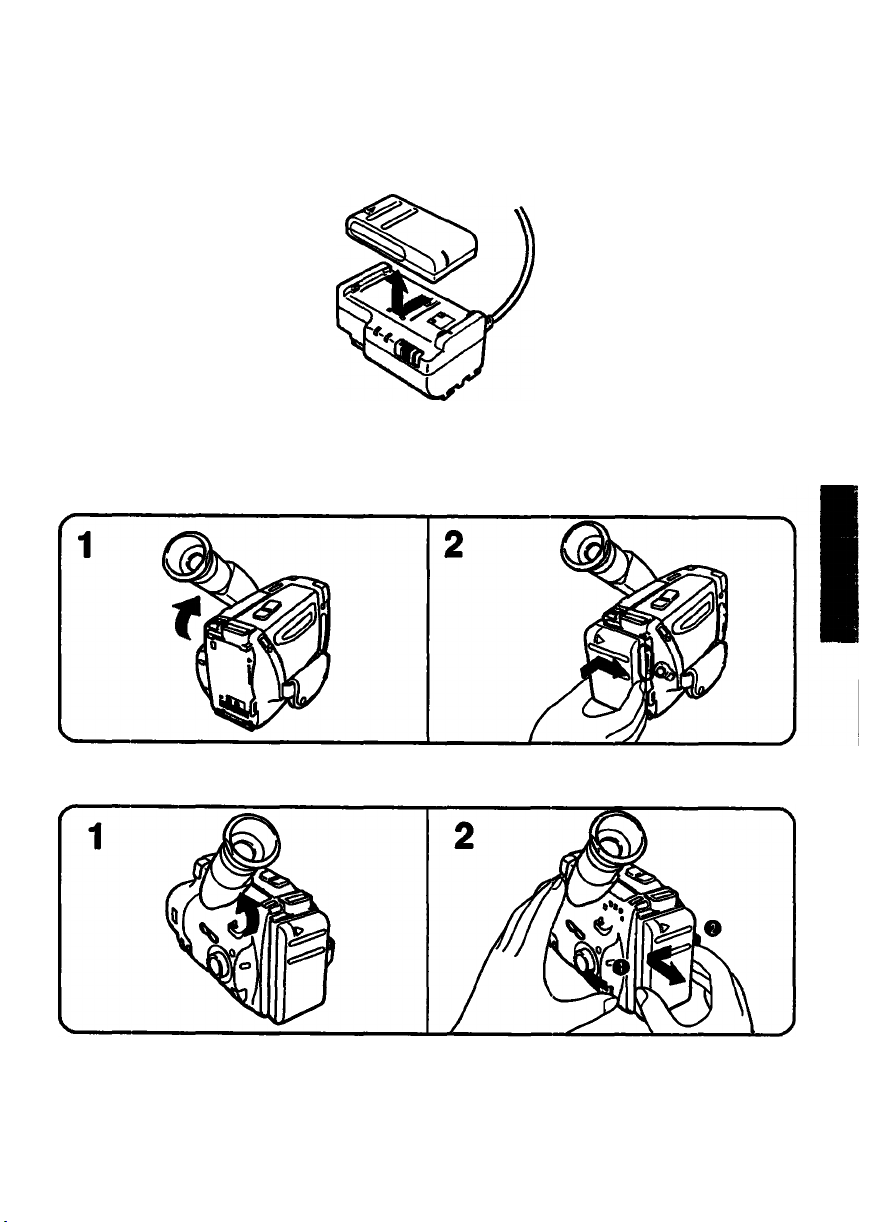
Removing the Battery Pack
Slide the battery pack in the direction of the arrow (see drawing).
Installing the Battery Pack
(1) Lift up the viewfinder. (2) Align the right side of the battery pack with the white ilne on the camcorder,
and slide the battery pack to the right.
0
S'
Ш
<o
3*
<o
tt
Э
a
5*
1
Ш
I
•3
Removing the Battery Pack
(1) Lift up the viewfinder. (2) While pressing ВАТТ, slide the battery pack to the left.
Note on charging the battery pack
e The POWER lamp will remain lit for a while even if the battery pack is removed and the power cord is
unplugged after charging the battery pack. This is normal,
a tt ttte POVIER lamp does not light, set the selector to OFF and disconnect the power cord. After about
one minute, reconnect the power cord and set the selector to CHARGE again,
e You cannot operate the camcorder using the AC power adaptor while charging the battery pack.
Page 8

Tips for Using the Battery Pack
This section shows you how you can get the most out of your battery pack.
Preparing the Battery Pack
Always Carry Additional Batteries
Have sufficient battery pack power to do 2 to 3 times as much recording as you have planned
"Battery life" indicated in this manual is measured by the continuous recording time of the camcorder,
placed at room temperature using a fully-charged battery.
Battery Life is Shorter in Cold Environment
Battery efficiency is decreased and the battery will be used up more quickly if you are recording in cold
environment.
To Save Battery Power
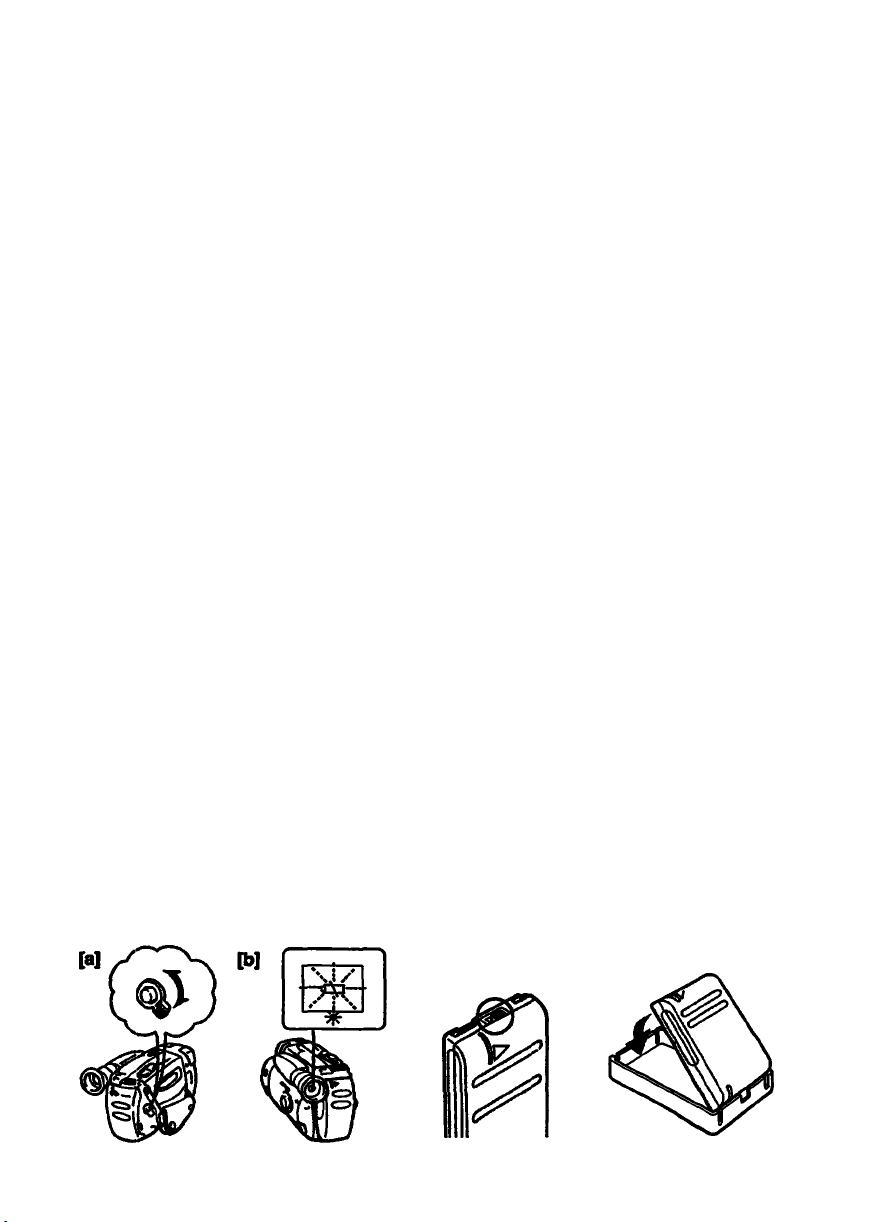
Turn the STANDBY switch on the camcorder down when not recording to save battery power (a]
A smooth transition between scenes can be made even if recording is stopped and started again. While
positioning the subject, selecting an angle, or looking through the viewfinder lens, the lens moves
automatically and the battery is used. The battery is also used when a tape is inserted or removed.
When to Replace the Battery Pack
While you are using your camcorder, the remaining battery indicator decreases gradually as battery
power is used up.
When the remaining battery indicator reaches the lowest point, the <Xl indicator appears and starts
flashing in the viewfinder, [b]
When the <Xl indicator in the viewfinder changes from slow flashing to rapid flashing while you are
recording, slide the POWER switch to OFF on the camcorder and replace the battery pack. Leave the
tape in the camcorder to obtain smooth transition between scenes after the battery pack is replaced
Note on the remaining battery Indicalor
The remaining battery indicator of the camcorder may indicate a different remaining capacity from that of
the NP-77HD battery pack (not supplied). The indicator of NP-77HD is more accurate.
Note on the Rechargeable Battery Pack
The Battery Heats Up
During charging or recording, the battery pack heats up. This is caused by energy that has been
generated and a chemical change that has occurred inside the battery pack. This is not cause lor
concern.
Battery Care
e Remove the battery pack from the camcorder after using the battery pack, and keep it in a cool place.
When the battery pack is attached to the camcorder, a small amount of current flows to the camcorder
even if the POWER switch is set to OFF, which shortens battery life,
e The battery pack is always discharging even when it is not in use after charging. Therefore, you
should charge the battery right before using the camcorder.
How to Use the Switch on the Battery Pack
This switch is provided so that you can mark the charged battery. Set the switch to the "no mark"
position when charging is completed. Set the switch to the "red mark" position when the battery is used
up (or in whichever direction you want to remind yourself), [c]
Page 9
The Life of the Battery Pack
The battery pack can be fully charged and discharged about SOO times under normal temperatures. If the
battery indicator flashes rapidly just after turning on the camcorder with a fully charged battery pack, the
battery pack should be replaced with a new fully charged one.
Charging Tentperature
You should charge batteries at temperatures from 10*C to 30*C (from SO'F to 86*F). Lower
temperatures require a longer charging time.
Note on Charging
A Brand>new Battery
A brand-new battery pack is not charged. Before using the battery pack, charge it completely.
Before Recharging a Used Battery Pack
e Make sure to use up the battery before recharging.
e If recording is completed before the <Xl indicator appears in the viewfinder, you should remove the
tape, slide the POWER switch to CAMERA, turn up the STANDBY switch, and leave the camcorder until
the battery indicator flashes rapidly.
• When you use the AC-S10 power adaptor, the OC-S10 car battery charger or BC-S10 portable battery
charger, you can use the discharging function.
• Charging the usable battery causes a lowering ol battery capacity. Battery capacity can be recovered
if you fulfy discharge and charge the battery again.
After Long Storage
Recharge the battery pack after a long period of storage. If the battery pack is charged fully but not used
for a long time (about 1 year), it becomes discharged. Charge it again, but in this case the battery life
will be shorter than normal. After several charging and discharging cycles, the battery life will recover
its original capacity.
Note on the Terminals
If the terminals (metal parts on the back) are not clean, the battery duration will be shortened.
When the terminals are not clean or when the battery pack has not been used for a long time, repeat
installing and removing the battery pack. This improves the contact condition. Also, wipe the and terminals with a soft cloth or paper.
Be Sure to Observe the Following
e To prevent an accident caused by a short circuit, dc not allow metal oblects such as a necklace to
touch the battery terminals. Carry the battery pack attaching to the terminal cover, [d]
0 Keep the battery pack away from fire,
a Keep the battery pack dry.
a Do not open nor convert the battery pack.
0 Do not expose the battery pack to any mechanical shock
<o
•2
5
0
Q)
1
[C] «q
Page 10
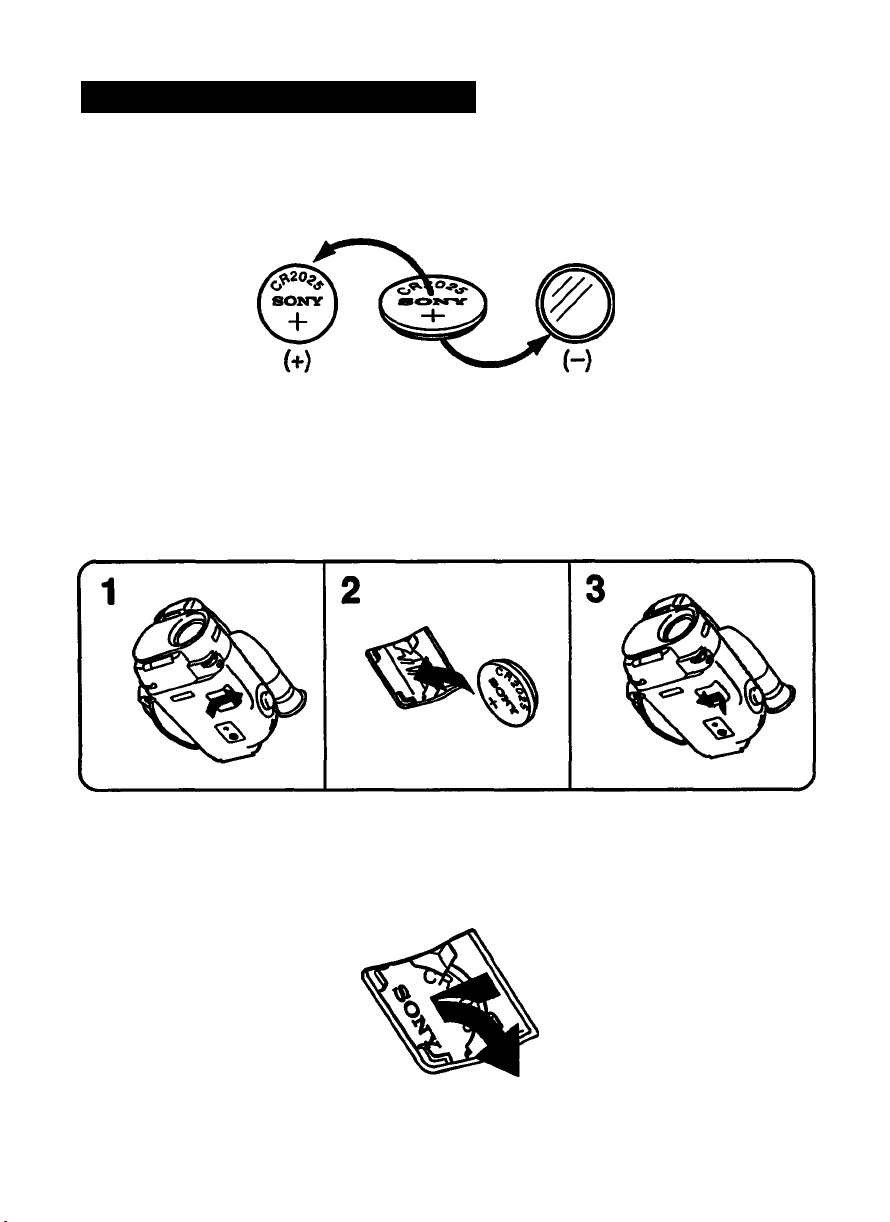
Inserting the Lithium Battery
Your camcorder is supplied with two lithium batteries. One is for the camcorder, and the other is lor the
Remote Commander. The lithium battery has a positive (+) side and a negative (-) side as illustrated
below. Be sure to install the lithium battery with the positive side facing out
Inserting the Lithium Battery Into the Camcorder
To activate the clock and the world clock, you must insert a iithium battery. (1) Detach the lid of the
lithium battery compartment on the bottom of the camcorder. (2) Install the lithium battery with the
positive (■•■) side facing out. (3) Replace the lid.
To Remove the Lithium Battery
Push the Battery down once and pull it out from the holder.
When replacing the lithium battery, keep the battery pack or other power source attached. Otherwise,
you will need to reset the date and time.
Page 11
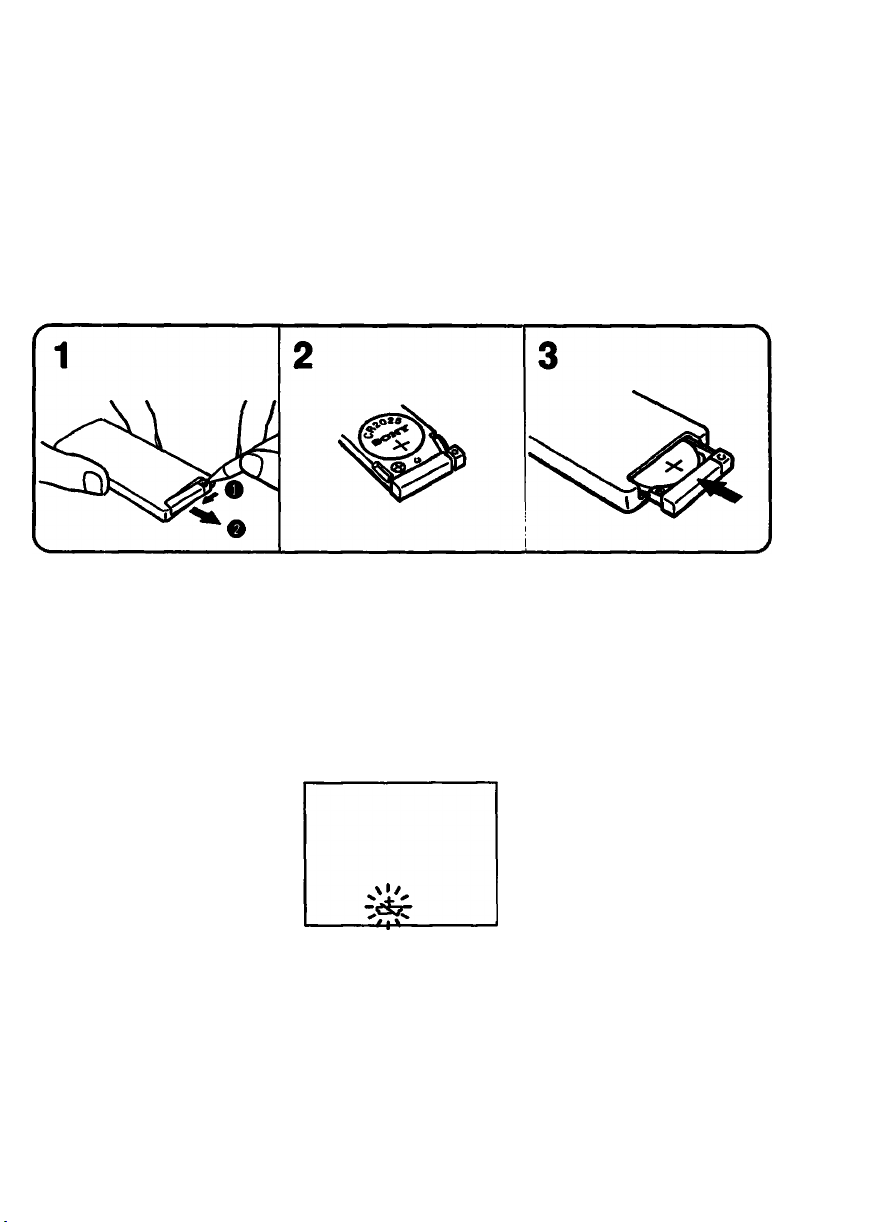
Inserting the Lithium Battery into the Remote Commander
To use the Remote Commander, you must insert the lithium battery. Use one of the suppiied CR202S
iithium baneries. (1) Puil out the lithium battery holder from the Remote Commander. (2) Insert the
lithium battery with the positive (+) side facing upward. (3) Put the lithium battery holder back into the
Remote Commander.
Lithium Battery Life
The lithium battery for the camcorder lasts for about 1 year under normal operation. When the battery
becomes weak or dead, the ^ indicator flashes in the viewfinder for about S seconds when you set the
POWER switch to CAMERA.
The lithium battery for the Remote Commander lasts about 6 months under normal operation. When the
battery becomes weak or dead, the Remote Commander does not work.
In either case, replace the battery with a Sony CR202S or Duracell DI.-2028 IHhlum battery. Use of any
other battery may present a risk of lire or explosion.
WARNING
The battery may explode if mistreated. Do not recharge, disassemble, or dispose of in fire.
Caution
Keep the lithium battery out of the reach of children.
Should the battery be swallowed) consult a doctor immediately.
Page 12
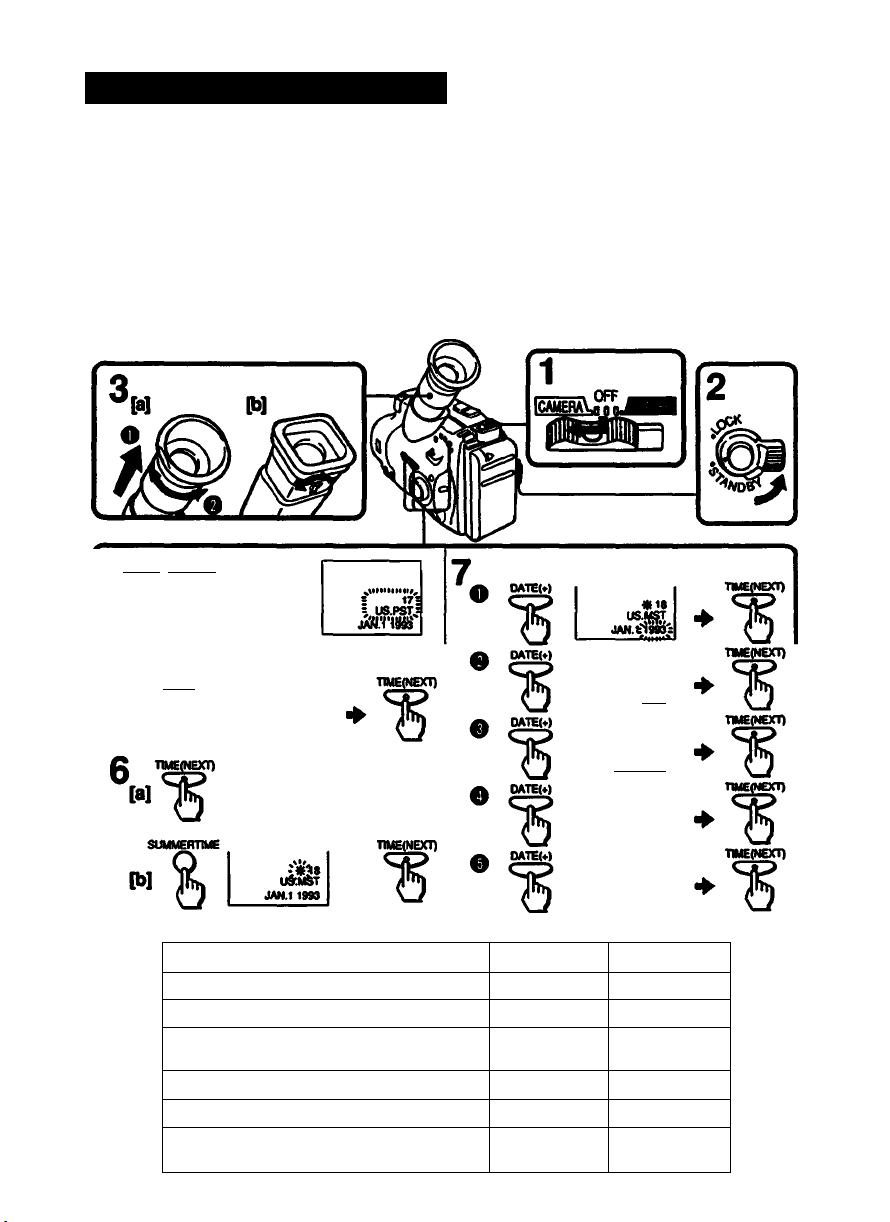
Setting the Date and Time
You need to set the camcorder's date and time to record the correct ones onto your video. Before setting
the clock, make sure a power source and lithium battery are installed. (1) While pressing the small
green button on the POWER switch, slide it to CAMERA. (2) Turn the STANDBY switch to STANDBY.
(3) Adjust the viewfinder lens: [a] When using a monochrome viewfinder, pull out the viewfinder until it
clicks and turn the vievrfinder lens adjustment ring so that the indicators in the viewfinder come into
sharp focus, [b] When using a color viewfinder, move the viewfinder lens adjustment lever so that the
indicators in the viewfinder come into sharp focus. (4) Press DATE (+) and TIME (NEXT) simultaneously
until the area name and number appear in the viewfinder. (5) Press DATE (+) to set your home area.
(See the table below.) (6) Set the Time:
Saving Time, press DST and then press TIME (NEXT). (7) Adjust the flashing digits of the year, month,
day and hour and minutes by pressing DATE (■•■) and TIME (NEXT). Note that when you keep DATE (+)
pressed, the digits advance faster.
A OWEt«) •nMEINEXt)
[a] For standard time, press TIME (NEXT), [b] For Daylight
12
DATE(4)
z 10:
"E
Jt<.4|se3
Time^one Area Name
Hawaii Standard Time HAWAII IS
Alaska Standard Time ANCHRGE
Pacific Standard Time
Western Canada
Mountain Standard Time
Central Standard Time
Eastern Standard Time
Eastern Canada
US. PST
US. MST
US.CST
US. EST 20
Area Number
«IS
19S3
«IS
«IS
.(ISitST
IS
16
17
18
19
Page 13
To Correct the Date and Time Settings
Press TIME (NEXT) repeatedly until the minute digits stop flashing. Then repeat steps 4 to 7.
To Check the Preset Date and Time
Press DATE (+) or TIME (NEXT). When you press the same button again, the indicator goes off.
To Reset to Standard Time
Press DST. The ^ indicator goes off.
Note on the setting of the year
When you set the year, each time you press DATE (-t-) the digits change as follows.
1993
Í
Note on the time indicator
The internal clock of this camcorder operates on a 12-hour cycle.
12:00 AM stands for midnight.
12:00 PM stands for noon.
1994 2020
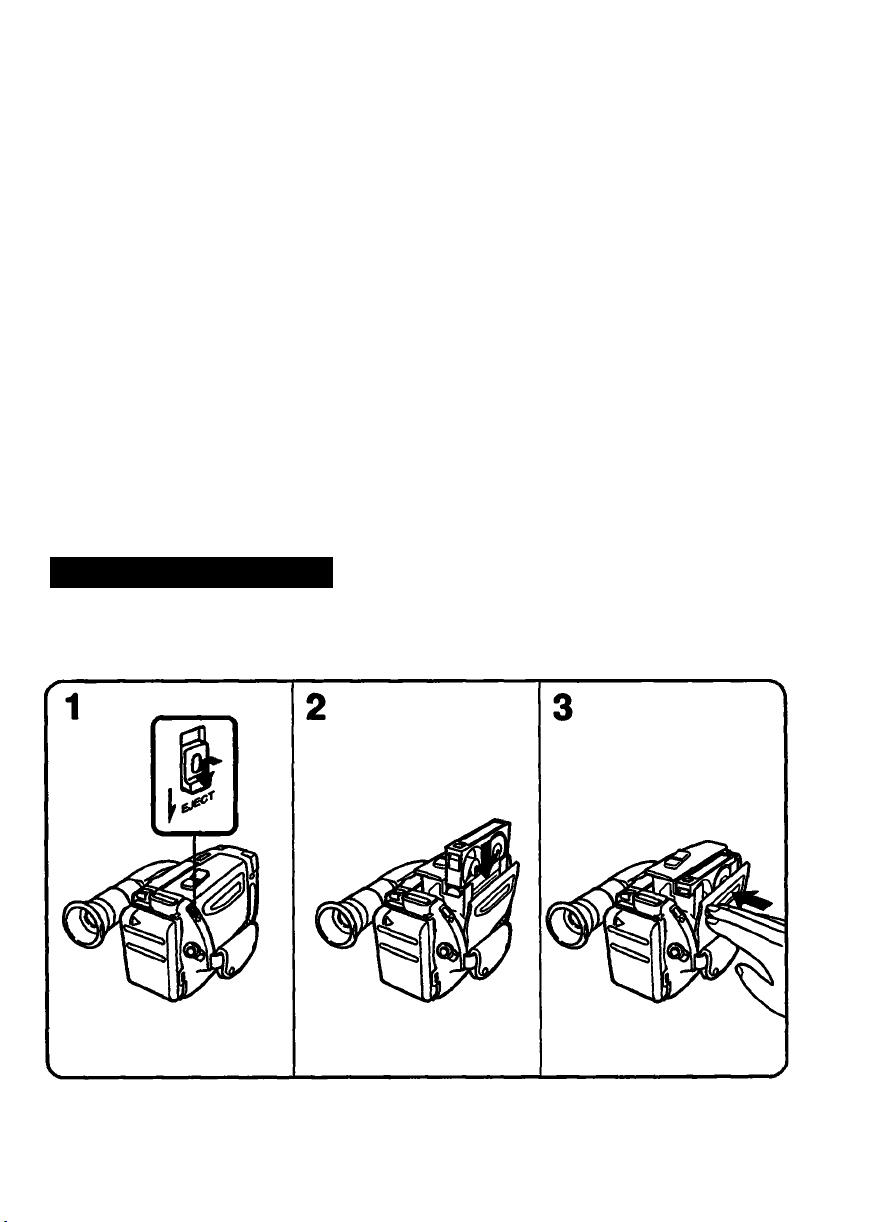
Inserting a Cassette
Make sure that the power source is installed. (1) While pressing the small blue button on the EJECT
knob, slide it down. The cassette holder automatically lifts up and opens. (2) Insert a tape with the
window facing out. (3) Close the cassette holder by pressing the "PUSH" mark on the cassette holder.
To Elect the Cassette
While pressing the small blue button on №e EJECT knob, slide it down.
Page 14
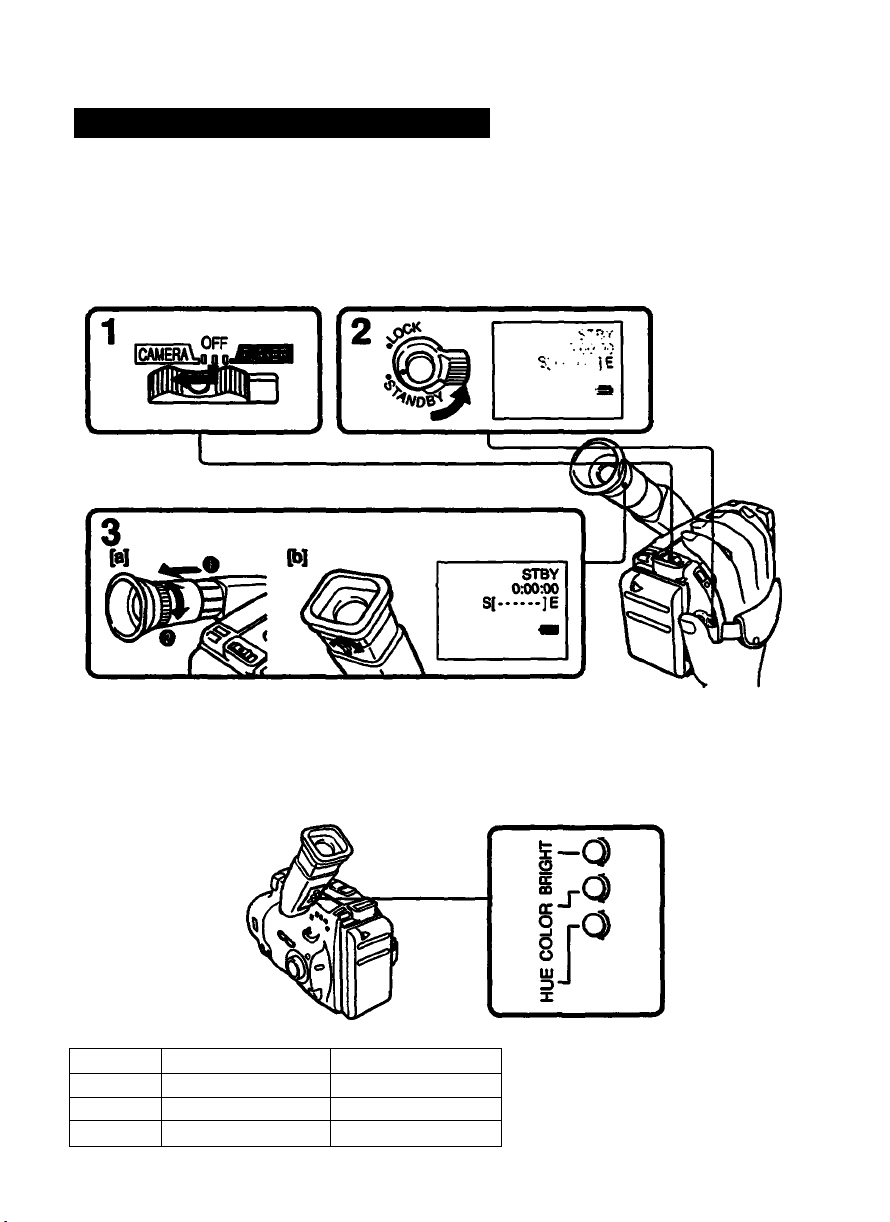
Adjusting the Viewfinder Lens
Before you use the camcorder for the first time or after someone else has used it, focus the vievyfinder
lens. Make sure that the power source is attached to the camcorder. (1) While pressing the small green
button on the POWER switch, slide it to CAMERA. (2) Turn the STANDBY switch to STANDBY. (3) Focus
on the indicators: [a] When using a monochrome viewfinder, pull out the vievrfinder until it clicks, and
turn the viewfinder lens adjustment ring so that the indicators in the viewfinder come into sharp focus.
P>] When using a coior viewfinder, move the viewfinder lens adjustment lever so that the indicators in
the viewfinder come into sharp focus.
When Using a Color Viewfinder
To adjust the picture quality
If you want to change hue, color and brightness of the picture displayed on the viewfinder screen, turn
the screws on the viewfinder slowly using a screwdriver (not supplied). You do not need to adjust them
in everyday operation.
Turn clockwise Turn counterclockwise
BRIGHT
COLOR
HUE
More brightness
More color intensity Less color intensity
Greenish skin tones Reddish skin tones
Less brightness
Page 15
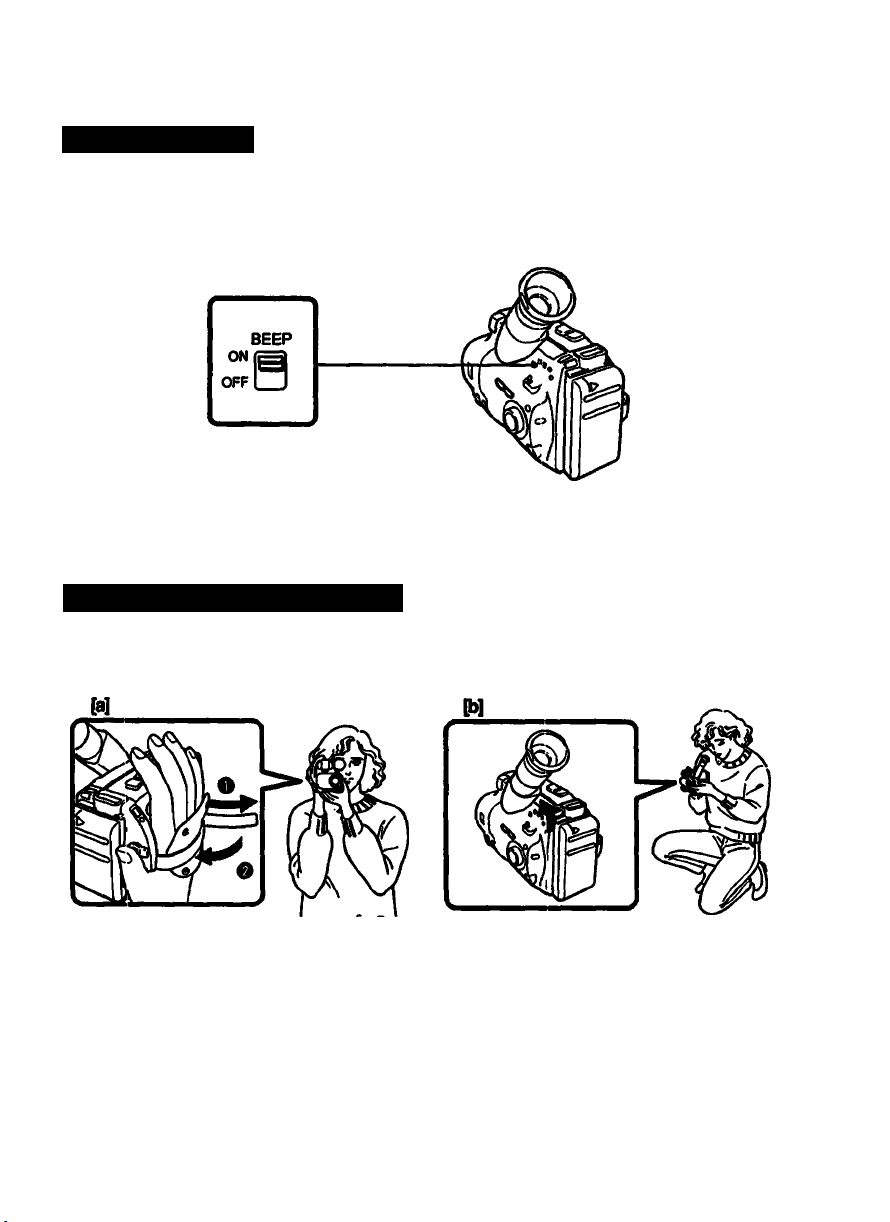
BEEP Feature
A beep sounds when you start recording and two beeps sound when you stop recording, cordirming the
operation.
sieveral beeps also sound as a warning of any unusual condition of the camcorder. Note that the beep
sound is not recorded on the tape. If you do not want to hear the beep sound, set BEEP to OFF.
Hints for Better Shooting
For hand-held shots, you'll get better results by holding the camcorder according to the following
suggestions:
1
• Hold the camcorder firmly and secure it with the grip strap so that you can easily manipulate the
controls with your thumb, [a]
• Place your right elbow against your side.
• Place your left hand urtder the camcorder to support it.
e Place your eye firmly against the viewfinder eyecup.
e Use the viewfinder frame as a guide to determine the horizontal plane.
• You can also record in a low position to get an interesting recording angle. Turn the viewfinder up for
recording from a low position. p>]
Place the camcorder on a flat surface or use a tripod
Try piacing the camcorder on a tabie top or any other flat surface of suitable height. If you have a tripod
lor a still camera, you can also use it with the camcorder (p. 41). Make sure the tripod screw is shorter
than 6.S mm (9/32 in).
<;
I
3
a
o
QD
m
m
*0
7
s.
C
3
CD
o
Page 16
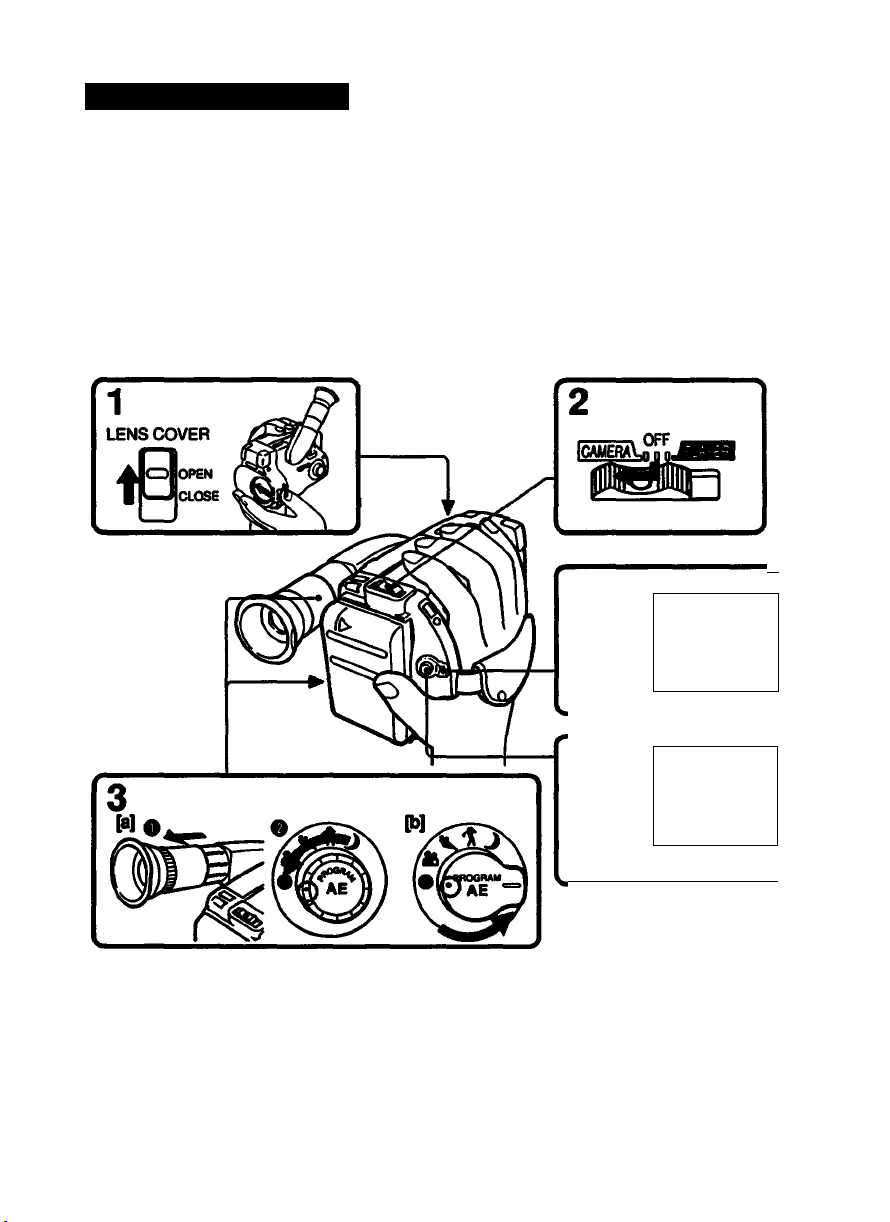
■ Basic Operations
Camera Recording
Make sure that the power source is installed and a cassette is inserted. If you set the date (p. 12). the
date is automatically recorded tor 10 seconds after you start recording (AUTO DATE feature) This
feature works only once a day. You can use the Remote Commander to record yourself with your friends
or family. When you use the Remote Commander, make sure that the REMOTE COMMANDER switch on
the camcorder is set to ON (p. 43).
Before you record one-time events, you may want to make a trial recording to make sure that the
camcorder is working perfectly. (1) Slide the LENS COVER switch to OPEN. (2) While pressing the small
green button on the POWER switch, slide it to CAMERA. (3) Set the PROGRAM AE dial: [a] When using a
monochrome viewfinder, pull out the viewfinder until it clicks, and set the white mark of the PROGRAM AE
dial to the green position, [b] When using a color viewfinder, set the white mark of the PROGRAM AE
dial to the green position. (4) Turn the STANDBY switch to STANDBY. Adjust the viewfinder lens so that
the indicators in the viewfinder come into sharp focus (p. 14). (S) Press START/STOP. The camcorder
starts recording and the red lamp lights up in the viewfinder.
4
AUTO DATE
5
JUL41993
To Stop Recording Momentarily
Press START/STOP again. The "STBY" indicator appears in the viewfinder (Standby moda).
To Finish Recording
Turn the STANDBY switch to LOCK and slide the POWER switch to OFF. Slide the LENS COVER switch to
CLOSE and eject the tape (p. 13).
Notes on Standby mode
If you leave the camcorder in Standby mode lor 5 minutes, the camcorder goes off automatically. This
prevents wearing down the battery and wearing out the tape. To resume Standby mode, turn the
STANDBY switch to LOCK once and turn it to STANDBY again. To start recording, press START/STOP.
STBY
O.'OO.'OO
S(
...
|E
REC
0:00:01
SI
...
IE
T'
Page 17
Note on the tape counter
The tape counter indicates the recording or playback time. Use it as a guide. There will be a time lag of
several seconds from the actual time. To set the counter to zero, press COUNTER RESET.
Note on the AUTO DATE feature
The AUTO DATE leature works once a day. However, the date may automatically appear more than once
a day when:
e you reset the date and time,
e you eject and insert the tape again,
a you stop recording within 10 seconds.
If you wear glasses
When using a monochrome viewfinder, you can bend back the eyecup to get a better view of the
viewfinder.
When using a color viewfinder, you cannot bend back the eyecup.
When moving from indoors to outdoors (or vice versa)
Turn the STANDBY switch to STANDBY and point the camcorder at a white object for about IS seconds
so that the white balance is properly adjusted.
Note on recording
When you record from the beginning of a tape, run the tape for about IS seconds before starting the
actual recording. This will ensure that you won’t miss any start-up scenes when you playback the tape.
You can record tapes in SP (standard play) mode only.
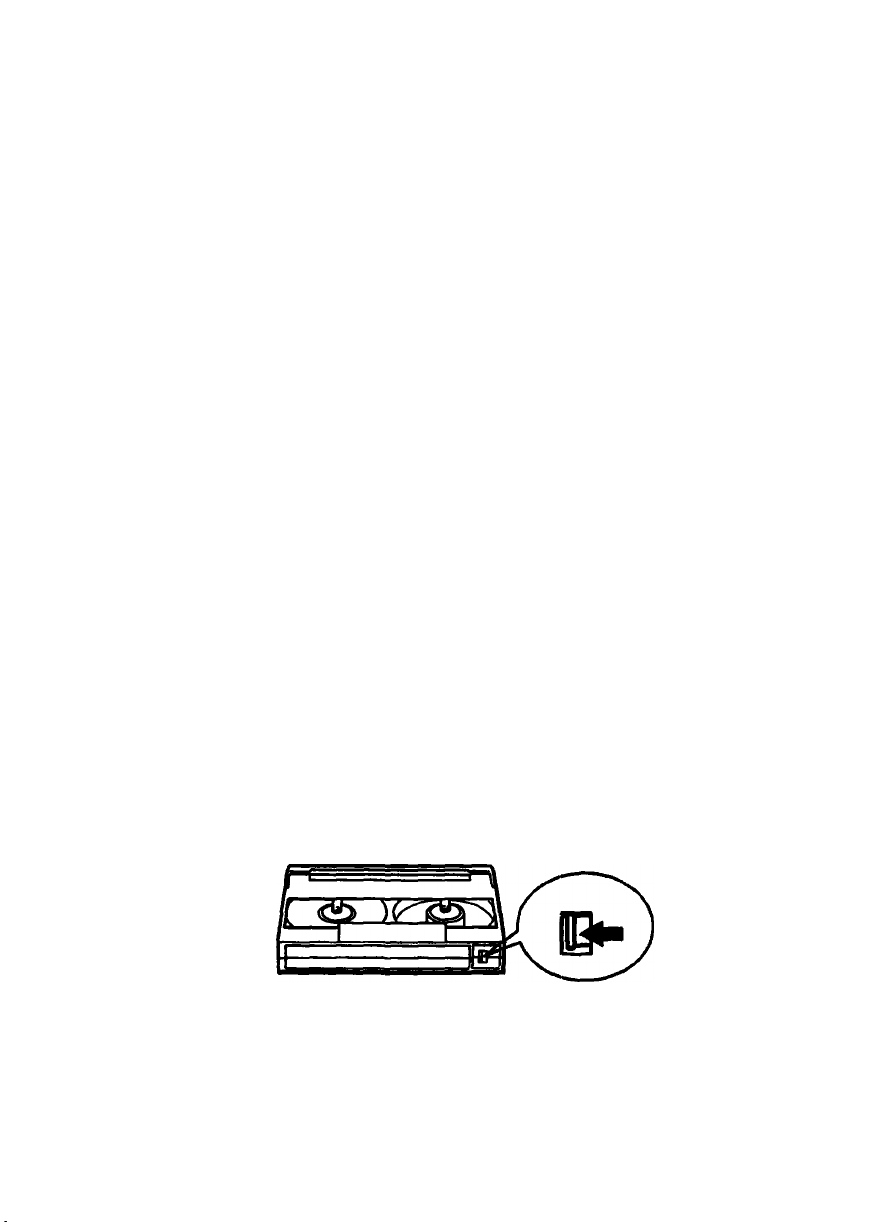
Preventing Accidental Erasure
To prevent accidental erasure, slide the Ud) on the cassette to expose the red mark. If you try to record
with the red mark exposed, the ES and ^ indicators flash in the viewfinder, and you cannot record.
To re-record on this tape, slide the tab back out covering the red mark.
3
a
5
?
8
Page 18
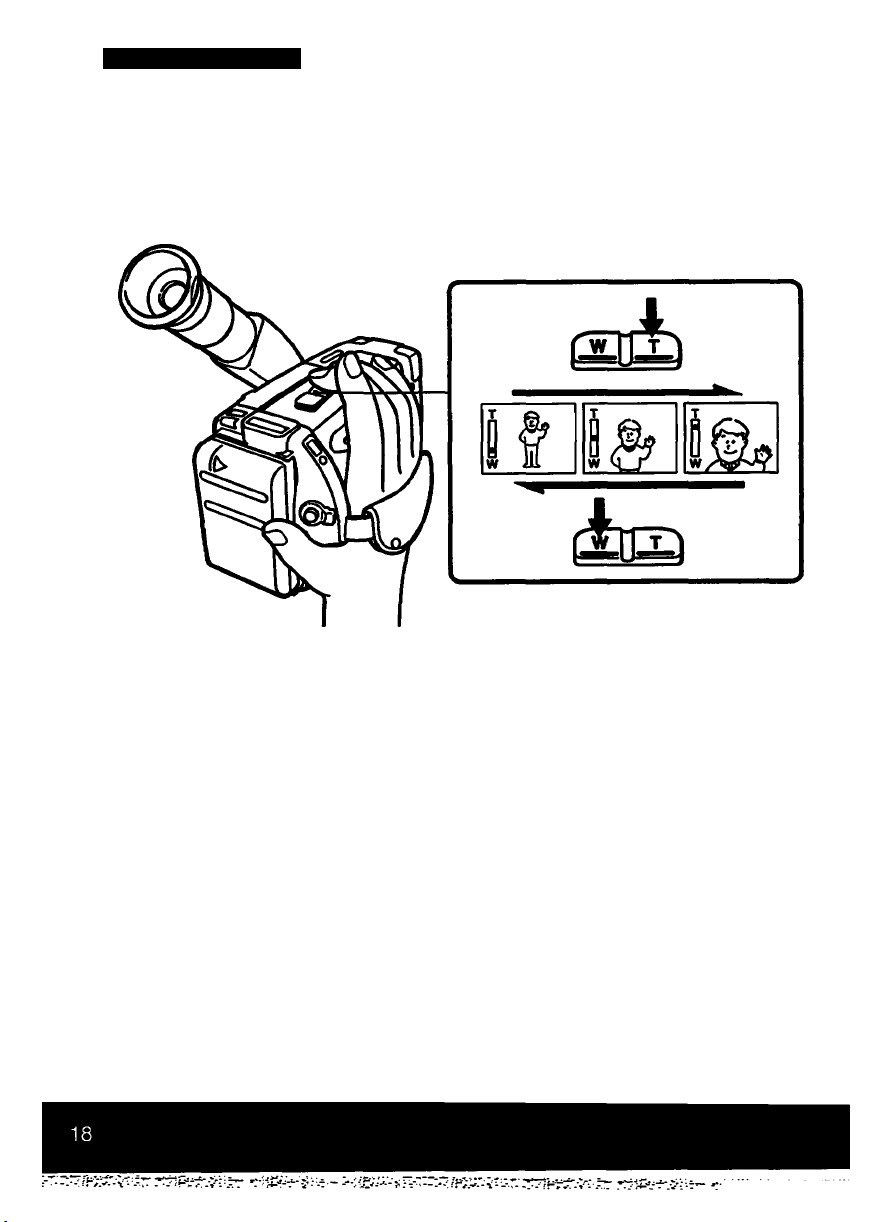
Camera Recording
Using the Zoom Feature
Zooming is a recording technique that lets you change the size of the subject in the scene. You can also
use the zoom to focus manually or to decide on a shooting angle before you start recording.
For more professional-looking recordings, use the zoom function sparingly.
"T" side; for telephoto (subject appears closer)
"W” side: for wide-angle (subject appears farther away)
Zooming Speed (Dual speed zooming)
Press the power zoom button firmly for a high-speed zoom, press it softly for a relatively slow zoom.
When you shoot a sub|ed using a telephoto zoom
If you cannot get a sharp focus while in extreme telephoto zoom, press the "W" side of the power zoom
button until the focus is sharp. You can shoot a subject that is at least 80 cm (about 31 1/2 inches) away
from the lens surface in the telephoto position, or 1 cm (about 1/2 inches) in the wide-angle position.
Manual focusing In macro
You can also shoot with manual focus while doing close-ups (p. 27).
Page 19
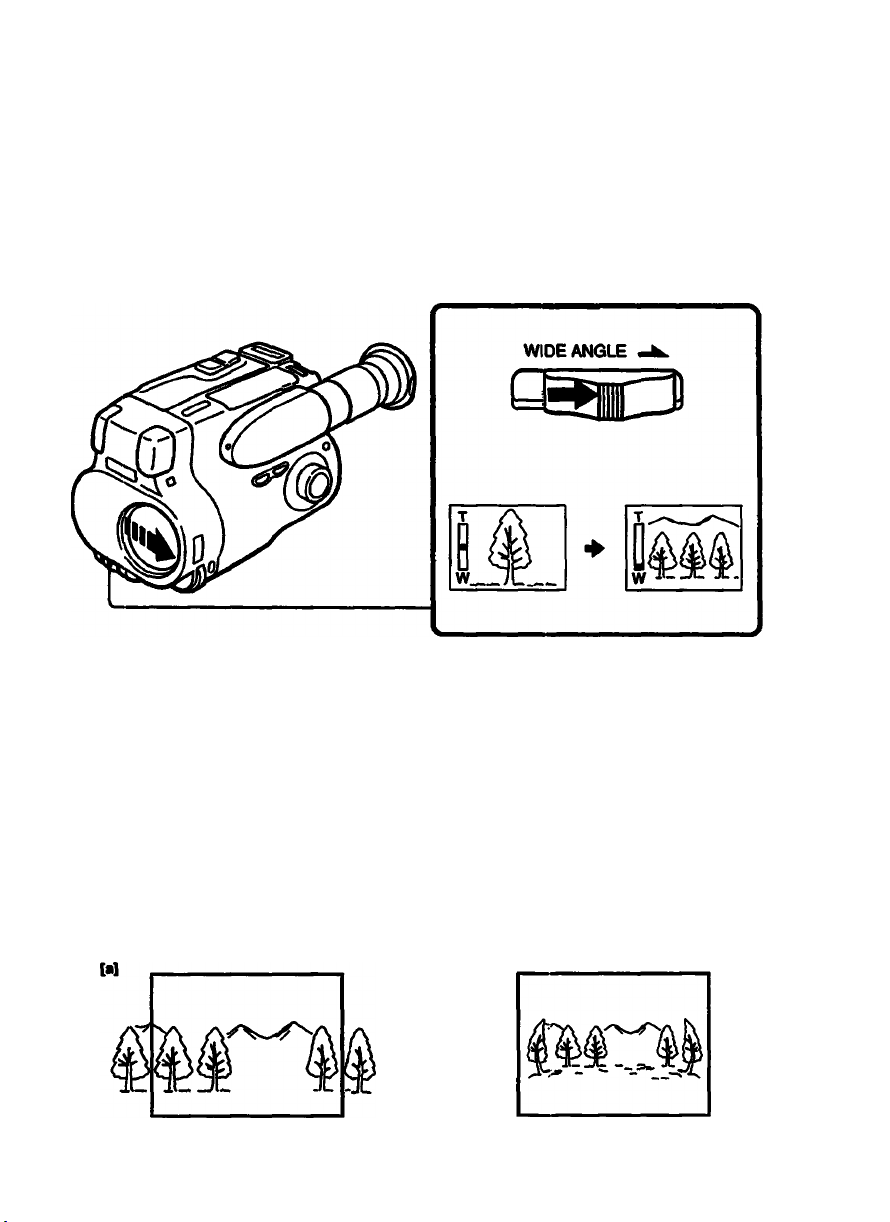
Using the WIDE ANGLE
The WIDE ANGLE delivers wide-angle pictures easily. Set the WIDE ANGLE switch in the direction of the
arrow.
Note on using the WIDE ANGLE
o When you use the WIDE ANGLE, the power zoom button does not function.
• When you use the WIDE ANGLE, zooming is automatically set to the maximum wide-angle setting. The
power zoom indicator stays at the end of the "W” side.
• The frame of the picture through the WIDE ANGLE changes [a] and the picture has slightly lower
quality.
o Men you use the WIDE ANGLE together with the auto-focus function in the following types of
situations, the camera will focus not on the subject but on the light source. In this event, either orient
the camera so that light does not enter the frame directly, or else use focus the shot manually.
- When shooting into the light
-When shooting a subject that gives off a large amount of light
e If there is dust between the regular lens and the WIDE ANGLE, the subjects may become out of focus.
Remove the dust by using a blower,
e You cannot use any optional lens or filter with the WIDE ANGLE.
s
I
5
3
Page 20
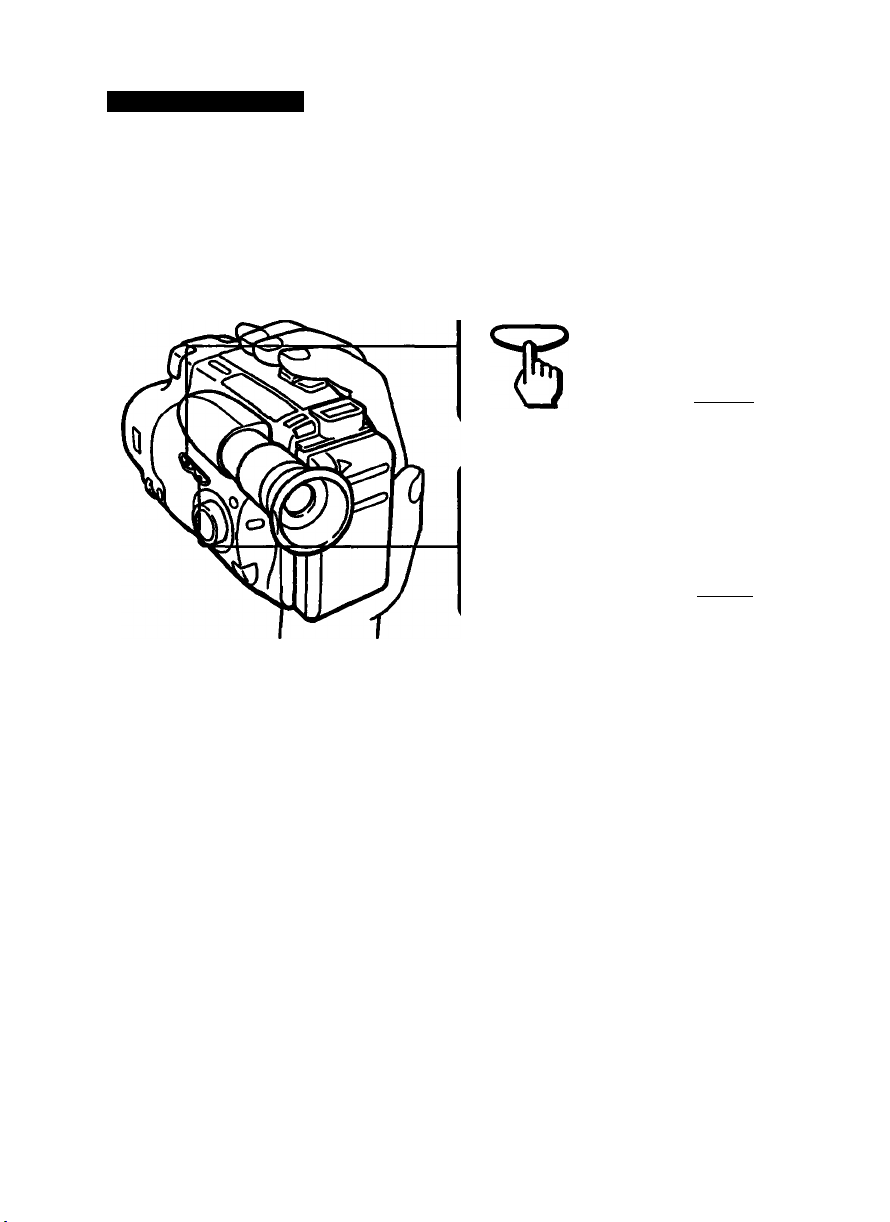
Camera Recording
Recording the Date or Time
While you are recording, press DATE (■•■) or TIME (NEXT). The date or time displayed in the viewfinder is
recorded with the picture. You cannot record the date ar^ time at the same time. Except lor the date or
time indicator, no indicator in the viewfinder is recorded.
DATE(+)
T)ME(NE)CT)
To Stop Recording with the Date and Time
Press DATE (+) or TIME (NEXT) again. The date or time indicator disappears. The recording continues.
JUL41993
saoooPM
20
Page 21
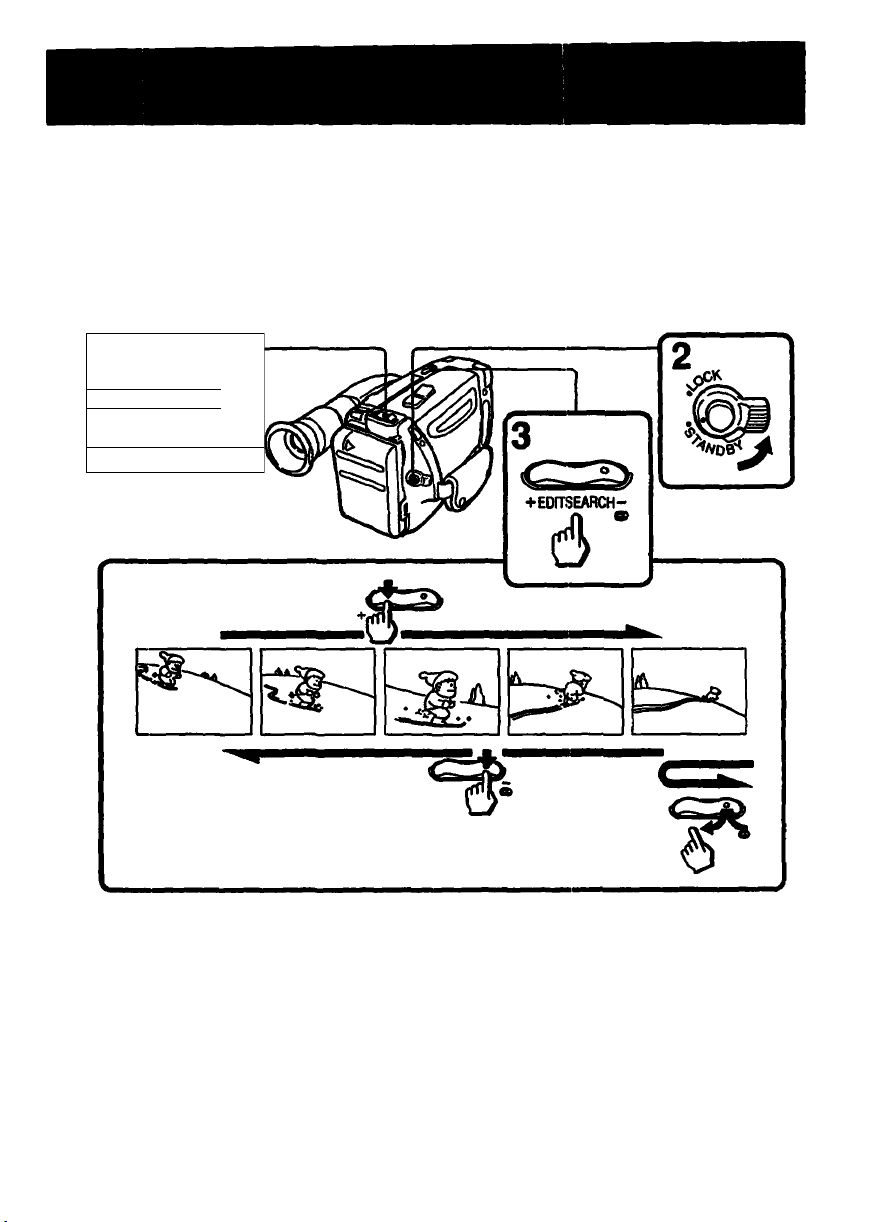
Checking the Recorded Picture in the Viewfinder
Using EDITSEARCH, you can review the last recorded scene or check the recorded picture in the
viewfinder. (1) While pressing the small green button on the POWER switch, slide it to CAMERA.
(2) Turn the STANDBY switch to STANDBY. (3) Press the - (@ ) side of EDITSEARCH momentarily; the
last few seconds of the recorded portion plays back (Rec Review).
Keep pressing EOfTSEARCH to play back the last recorded portion (Edit Search).
+ side: to view the forward pla^ack picture
- side: to view the reverse playback picture
1
ICAMERAU^^
ACC _
=1
I
9
5
3)
i
s.
To Stop Playback
Release EDITSEARCH.
To Begin Re-recording
Press START/STOP. Re-recording begins from the point you released EDITSEARCH. Provided you do not
eject the tape, the transition between the last scene you recorded and the next scene you record will be
smooth.
21
Page 22
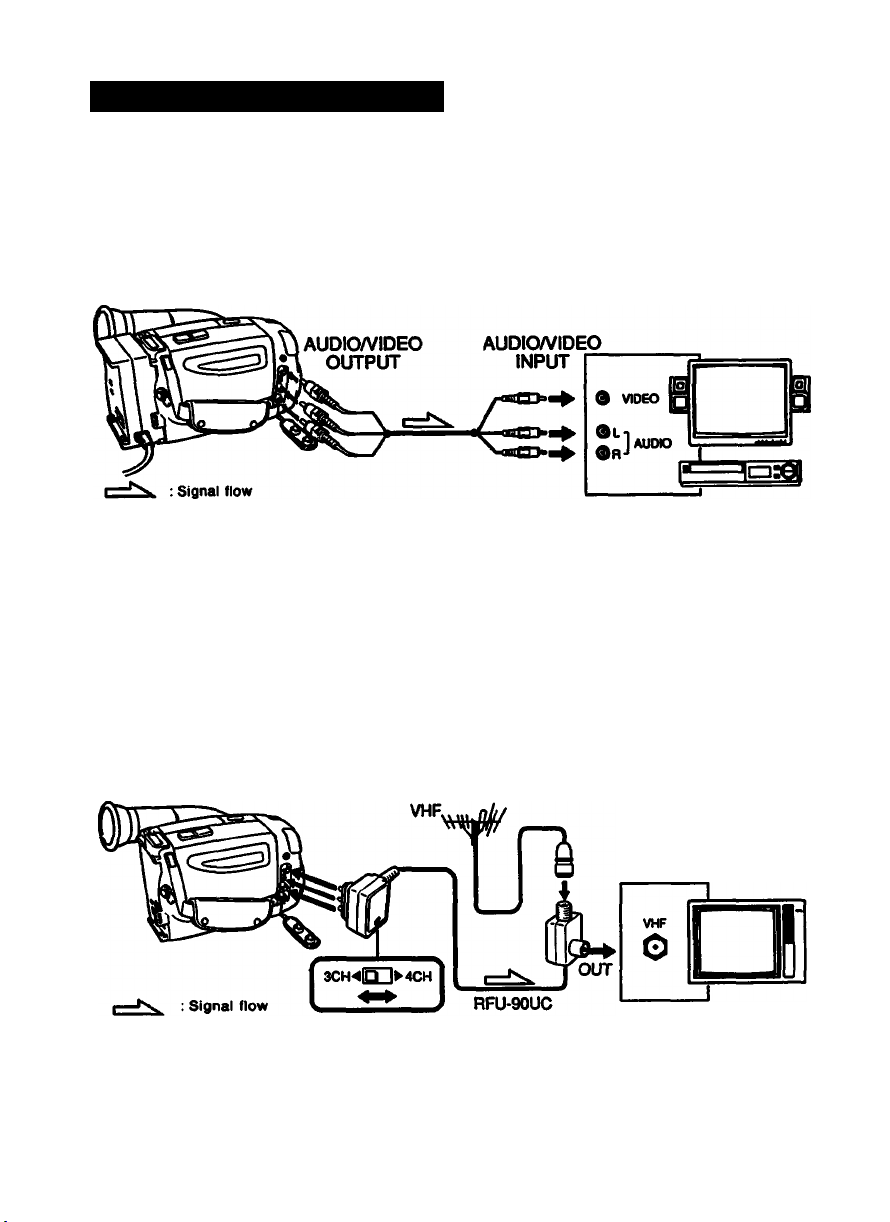
Connections for Playback
You can use this camcorder as a VCR by connecting it directly to your TV tor playback There are
several ways to connect the camcorder to your TV.
Connecting to a TV with Audlo/VIdeo Input Jacks or VCR
Connect the camcorder to the TV using the supplied A/V connecting cable. Set the TV/VCR selector on
the TV to VCR.
If your TV or VCR Is a Monaural Type
Connect only the white plug for audio on both the camcorder and the TV or the VCR. With this
connection, the sound is in monaural.
Note on playing back a bilingual tape
You can listen to the main sound (only) by connecting the L ch plug. If you connect both L ch and R ch.
the sound from both channels is mixed.
Connecting to a TV without Audlo/VIdeo Input Jacks
Connect the camcorder to the TV using the supplied RFU adaptor. Make sure that the TV is turned off to
prevent speaker damage before hooking up your camcorder. Set the channel selector on the RFU
adaptor and your TV to VHF CH 3 or CH 4. whichever is not active in your area. With this connection, the
sound is in monaural.
Page 23
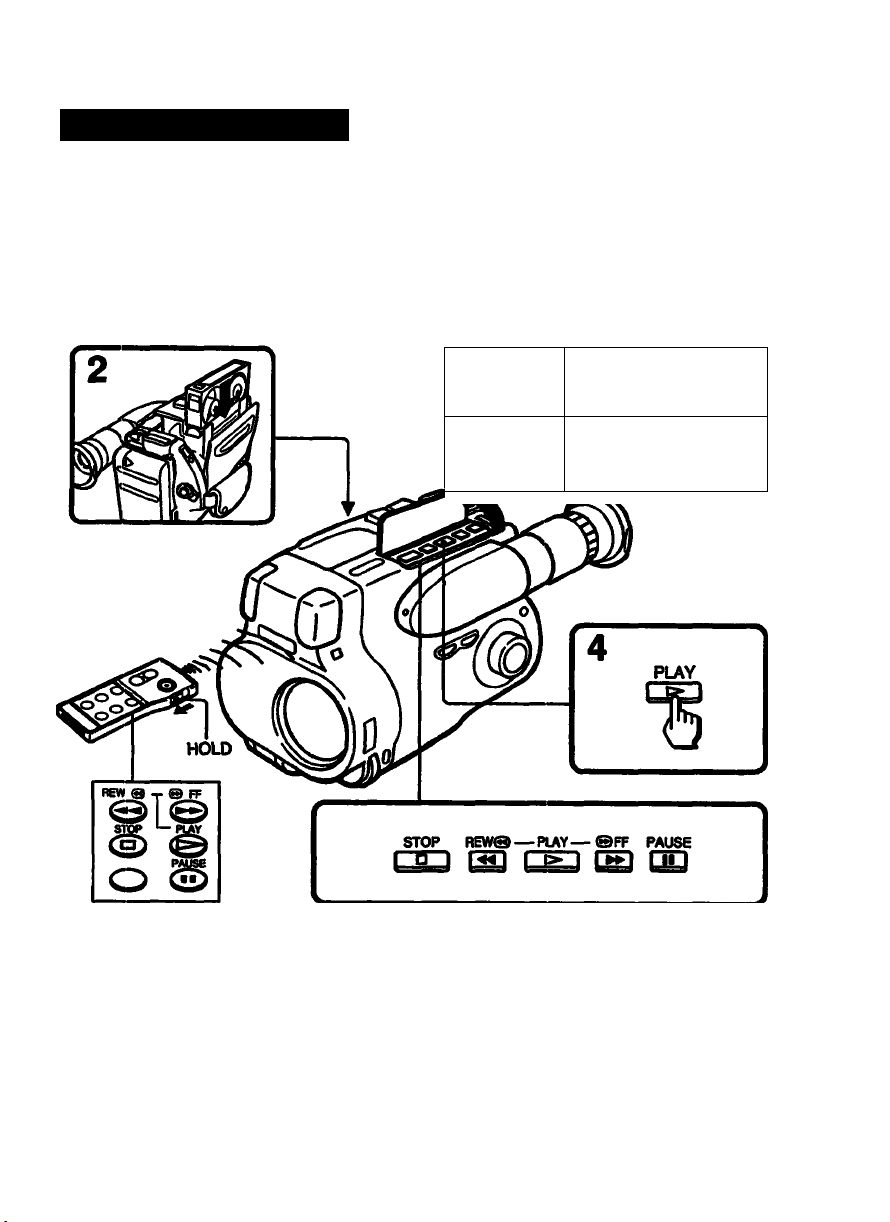
Playing Back a Tape
Playing Back a Tape
You can monitor the playback picture in the viewflnder. You can also monitor the picture on a TV screen,
after connecting the camcorder to a TV or VCR (p. 22). You can use the supplied Remote Commander to
control playback, if you want Before using the Remote Commander, slide the HOLD switch in the
opposite direction of the arrow. (1) While pressing the small green button on the POWER switch, slide it
to PLAYER. (2) Insert the recorded tape with the window facing out. (3) Open the lid of the control panel.
(4) Press l>. Playback starts.
To slop playback, press □ .
To rewind the tape, press
To fastforward the tape, press I
1
i=IIIIl]ISIOIII
o
(See next page for further information.)
a
a
■c
OD
s
Page 24

Playing Back a Tape
Various Playback Modes
To view 8 «till picture
Press II during playback. To resume playback, press || or o.
To locate a scene (Picture search)
Keep pressing -44 or during playback. To resume normal playback, release the button.
To monitor the high-speed picture during fastlorward or rewind (Skip scan)
Keep pressing '44 while rewinding or while advancing the tape. To resume normal playback,
press
To view the picture in a sequence of stop-motion Images
Press EDITSEARCH in playback pause mode. If you keep pressing EOITSEARCH. you can view the
picture playback in the forward (■•■) or reverse (-) direction.
Note on playback
e Streaks appear and the sound is muted in the various playback modes,
e When still picture mode lasts for S minutes, the camcorder automatically enters stop mode.
To display the viewfinder screen indicators on the TV
Press DATA SCREEN/DISPLAY on the Remote Commander. To erase the indicators, press it again.
24
Page 25
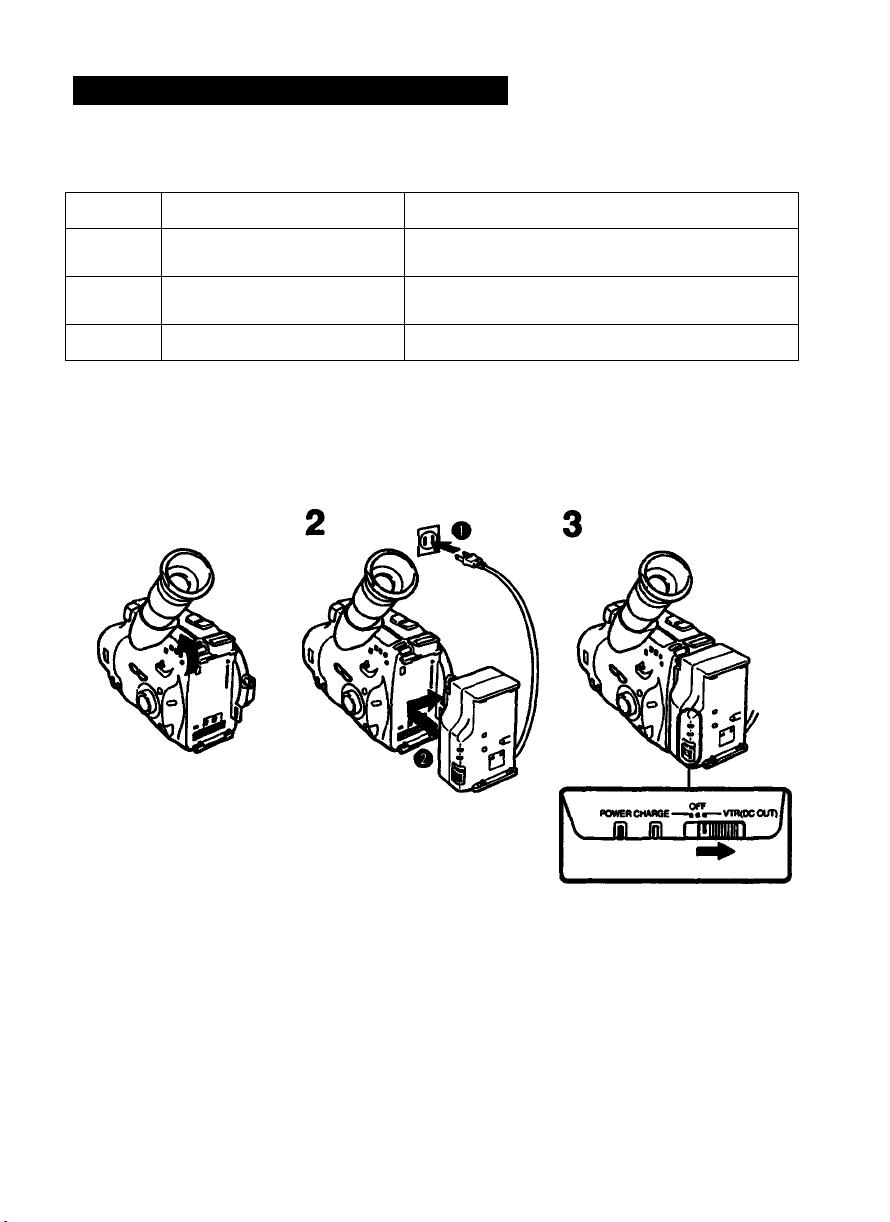
[Advanced Operations!
Using Alternate Power Sources
You can choose any ot the following power sources for your camcorder battery pack (p. 7), house
current and 12/24 V car battery. Choose the appropriate power source depending on where you want to
use your camcorder.
Place Power source
Indoors House current
Outdoors
In the car
Battery pack
12 V or 24 V car battery
AC power adaptor AC-V25A/2SA (supplied). AC-S10,
AC-V55
Battery pack NP-SS (supplied), NP-77HD, NP-77H,
NP-77, NP-66H, NP-S5H
DC pack DCP-77
Accessory to be used
Using House Current
To use the supplied AC-V25/V25A AC power adaptor: (1) Lift up the viewfinder. (2) Connect the AC power
cord to a wall outlet The POWER lamp (green) lights up. Connect the bottom of the AC power adaptor to
the batter>* mounting surface of the camcorder. (3) Set the selector to VIR (OC OUT).
1
I
I
00
s
I*
o
Note on the POWER lamp
e The POWER lamp will remain lit for a while even if the unit is unplugged after use. This is normal.
• If the POWER lamp does not light, set the selector to OFF and disconnect the power cord. After about
one minute, reconnect the power cord and set the selector to VTR (DC OUT) again.
To remove the adaptor
The adaptor is removed in the same way as the battery pack. (p. 7)
Page 26
Using Alternate Power Sources
Using a Car Battery
Use the DCP-77 DC pack (not supplied). Connect the cord oi the DC pack to the cigarette lighter socket of
the car (12 V or 24 V). Connect the DC pack to the battery mounting surface of the camcorder.
To remove the DC pack
The DC pack is removed in the same way as the battery pack. (p. 7)
Options for Charging the Battery Pack
e AC-S10 AC power adaptor:
You can charge a battery pack whether it is used up or not with this adaptor because it has a
discharging function.
e BC-S10 portable battery charger (ideal for travel):
You can charge a battery pack on 100 — 240 V AC current.
Focusing Manually
When to Use Manual Focus
In the following ce»es you should obtain better results by adjusting the focus manually.
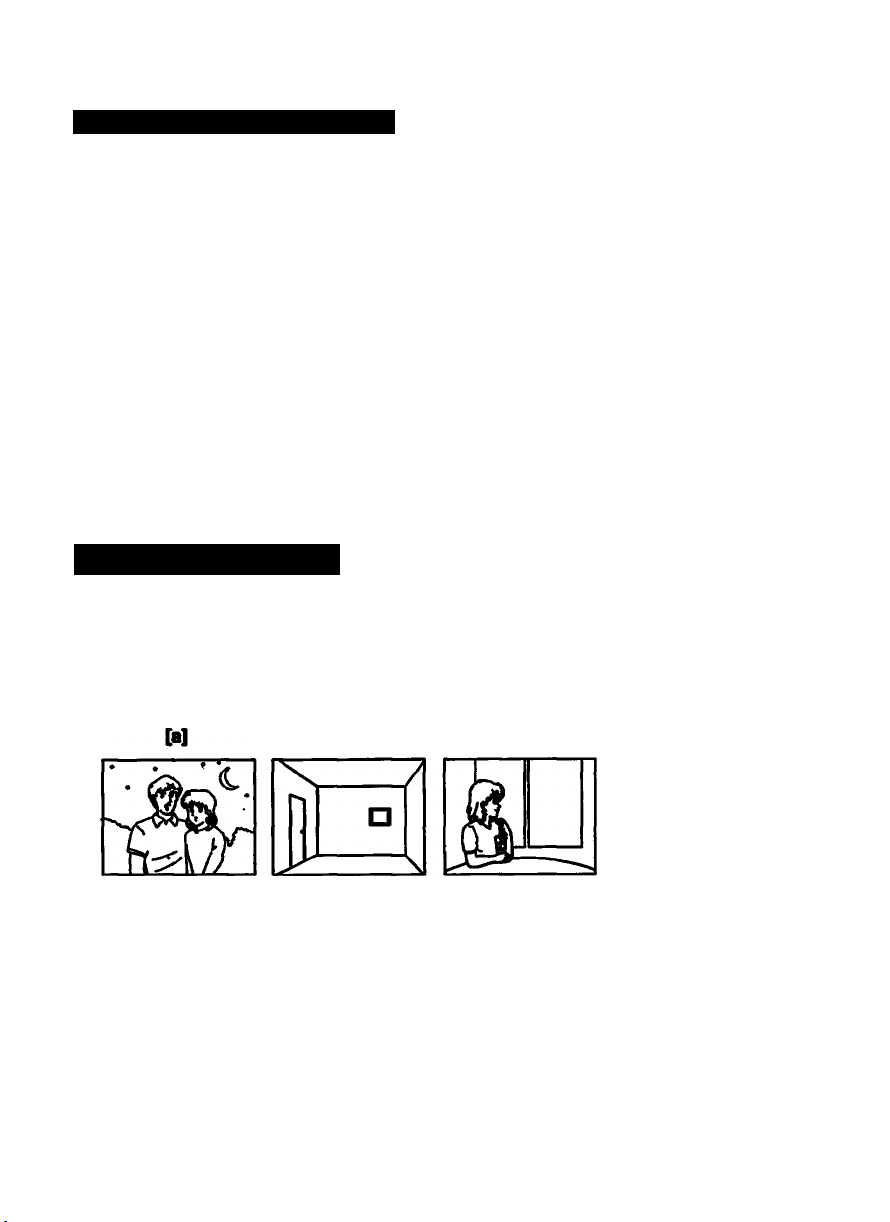
[c]
e Insufficient light [a]
e Subjects with little contrast — walls, sky, etc. [b]
e Too much brightness behind the subject [c]
• Horizontal stripes [d]
e Subject through frosted glass
e Subjects beyond nets, etc.
e Bright subject or subject reflecting light
e Shooting a stationary subject when using a tripod
Note on using the WIDE ANGLE
Readjust the focus if, while using manual focusing, you have switched to the WIDE ANGLE or if you have
switched from the WIDE ANGLE to the normal lens.
[dl
Page 27
Focusing Manually
Focusing Manually
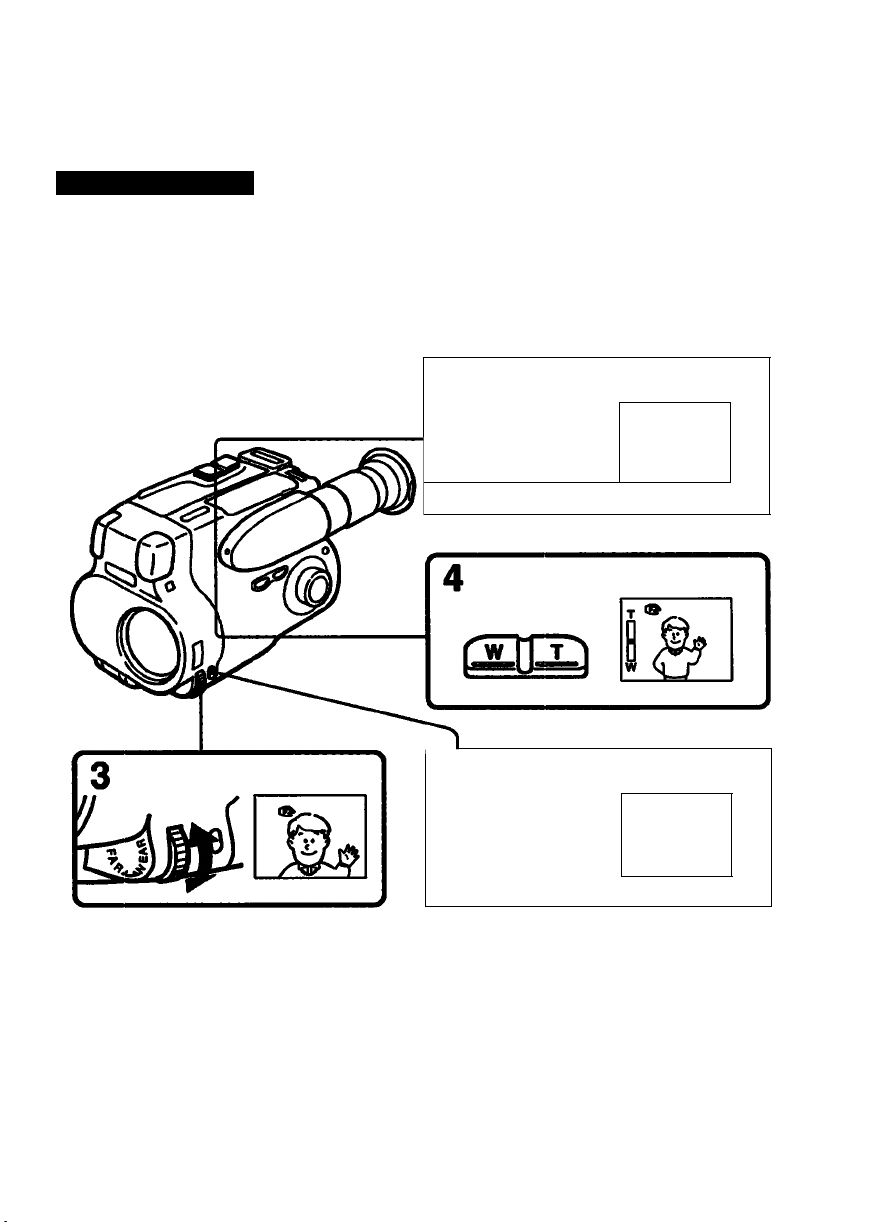
When focusing manually, first focus in telephoto before recording, and then reset the shot length.
(1) Press FOCUS. The indicator appears in the viewfinder. (2) Keep pressing the *T‘* (telephoto) side
of the power zoom button until the zooming stops. (3) Turn the focus dial to achieve a sharp focus.
(4) Set the desired shot length.
2
T
n i’-f
ism
1 p.
y
n>
' "A
c
09
>
*0
0
1
0>
o
c
S
s
To Reactivate Autofocusing
Press FOCUS until the indicator in the viewfinder disappears.
Shooting in retativeiy dark ptaces
Shoot at wide-angle after focusing in the teiephoto position.
Note on the locus dial
The focus dial does not have a stoo oosition.
,
Page 28
Using the PROGRAM AE Function
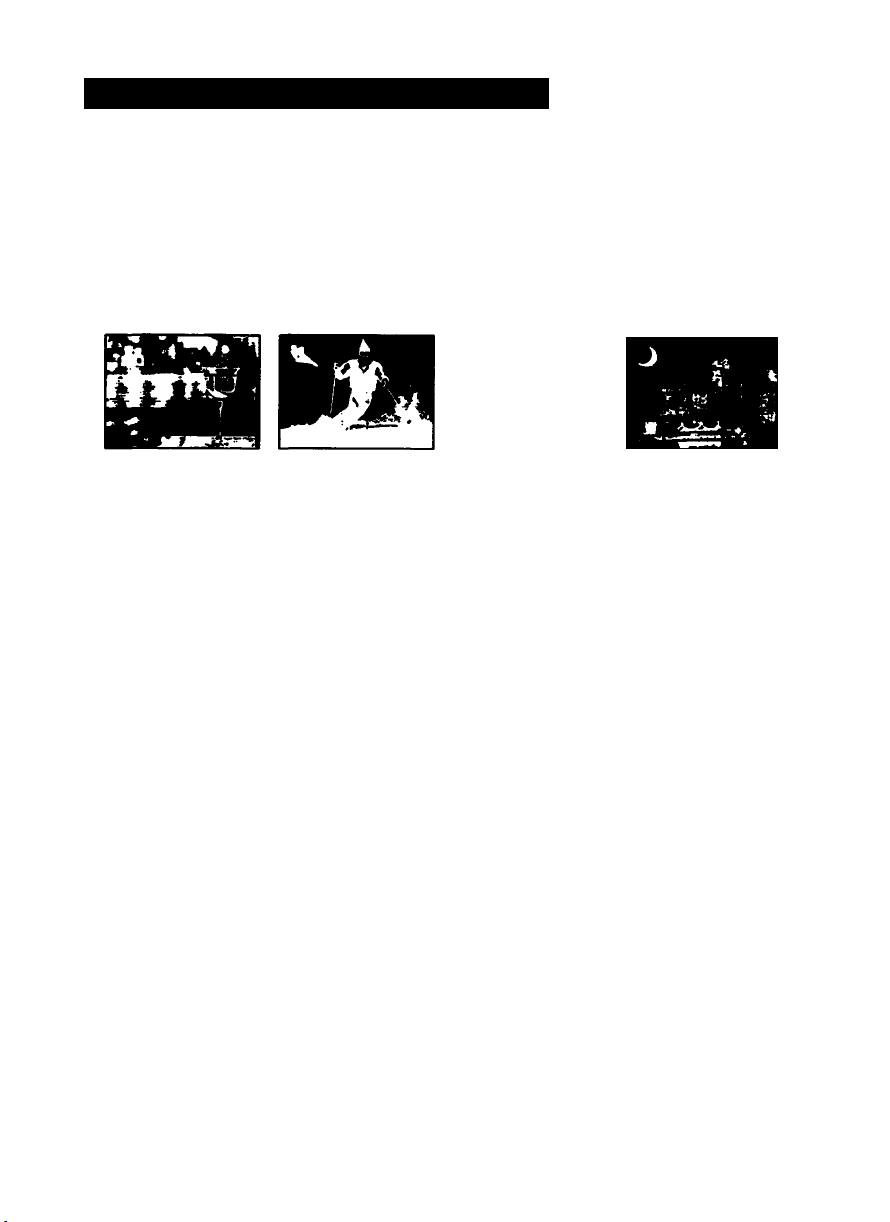
You can select from lour PROGRAM AE (Auto Exposure) modes to suit your shooting situation. When you
use PROGRAM AE. you can get a Portrait effect (the subject is in focus and the background Is out of
focus) or capture high-speed action or record night views.
Selecting the Best Mode
Select one of four modes, referring to the following.
t
Portrait mode JK
• A still subject such as a person or a flower
e Zooming in on a subject in the telephoto mode
• A subject behind an obstacle such as a net
Sports mode ^
e Outdoor sports scene such as football, tennis, golf or skiing
• A landscape in a moving car
High speed shutter mode ^
e A golf swing or a tennis match in fine weather with the ball captured clearly
• Playing back certain scenes with high-speed movements in a clear, sharp picture
Twilight mode
• Recording night views, neon signs or fireworks
Page 29
Using the PROGRAM AE Function
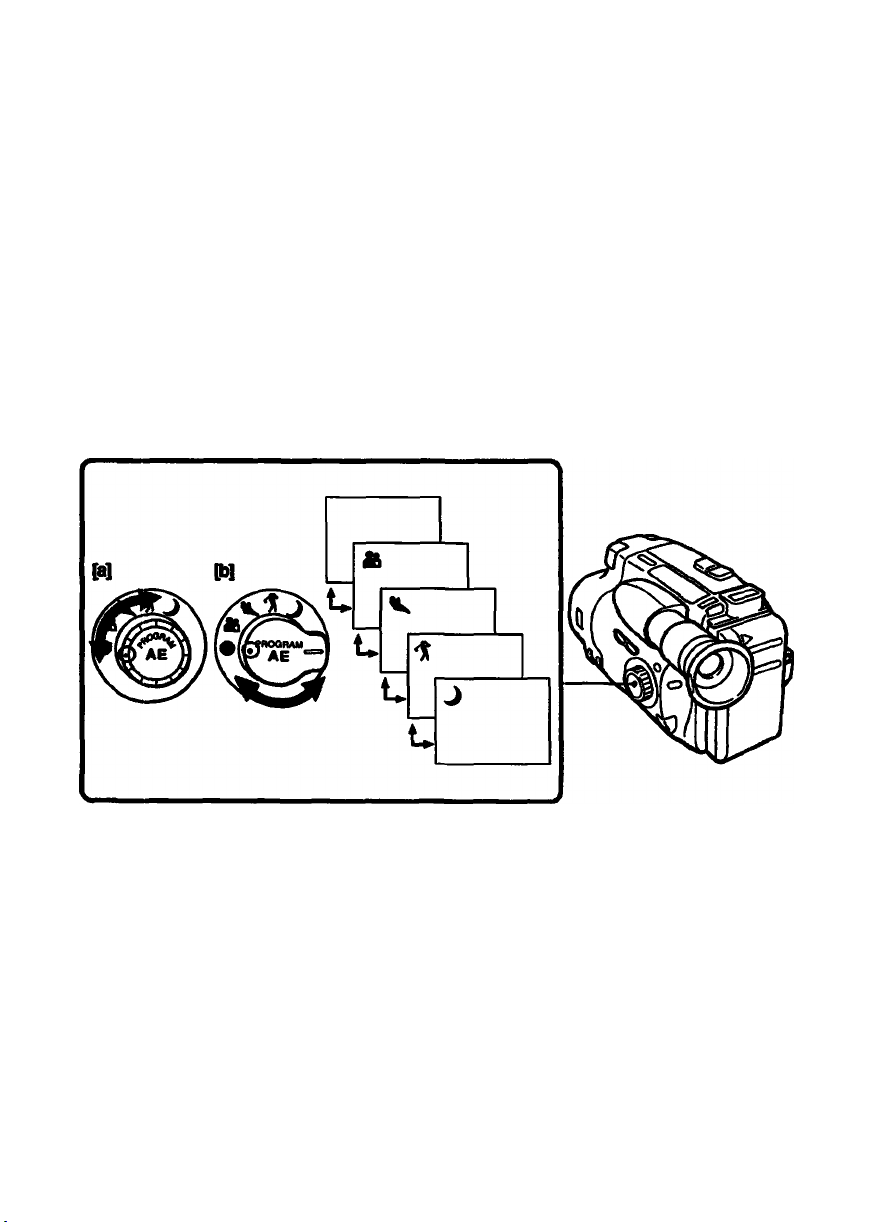
Set the white mark of the PROGRAM AE dial to the desired PROGRAM AE mode ([a] When using a
monochrome viewfinder [b] When using a color viewfinder). The indicator of the selected PROGRAM AE
mode appears in the viewfinder.
Note on shutter speed
The shutter speed in each PROGRAM AE mode is as follows:
Portrait mode — between 1/60 to 1/2000
Sports mode — between 1/60 to 1/500
High-speed shutter mode — 1/4000
Twilight mode —1/60
c
«0
3"
<Q
■D
39
O
G)
39
>
s
>
m
Page 30
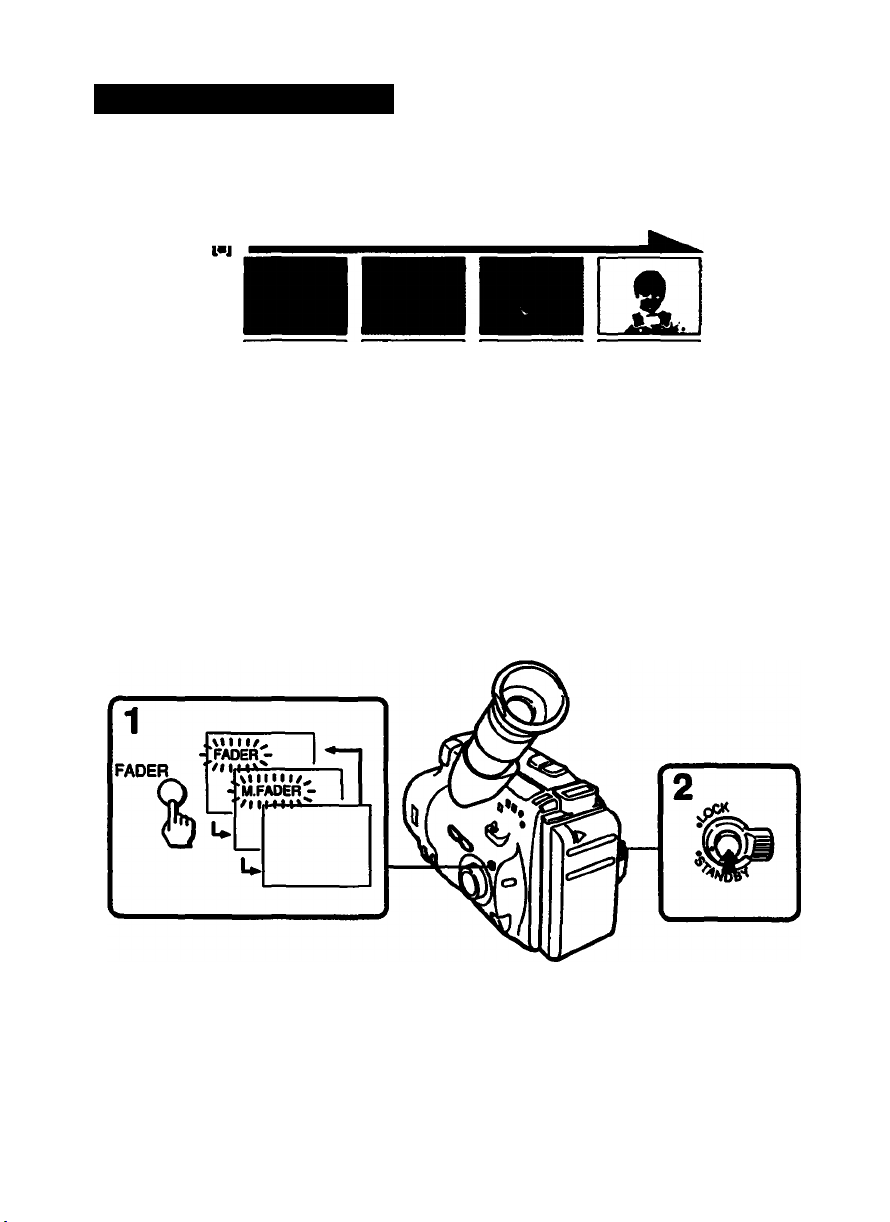
Fade-in and Fade-out
You can fade a picture in or out with sound to give your recording a professional appearance.
When fading in, you can make the picture gradually appear from black or mosaic while increasing the
sound M. When lading out. you can make the picture gradually fade to black or mosaic while
decreasing the sound p>].
STBY REG
FADER
M.FADER
___
^ STBY REC
When Fading in
(1) During the camcorder is in Standby mode, press FADER. (2) Press START/STOP. The fade indicator
stops flashing and the recording starts fading in.
When Fading out
(1) During recording, press FADER. (2) Press START/STOP. The fade indicator stops flashing and the
picture fades out. Then, recording stops.
To Cancel the Fade-in/Fade-out Function
Before pressing START/STOP, press FADER until the fade indicator disappears.
Page 31
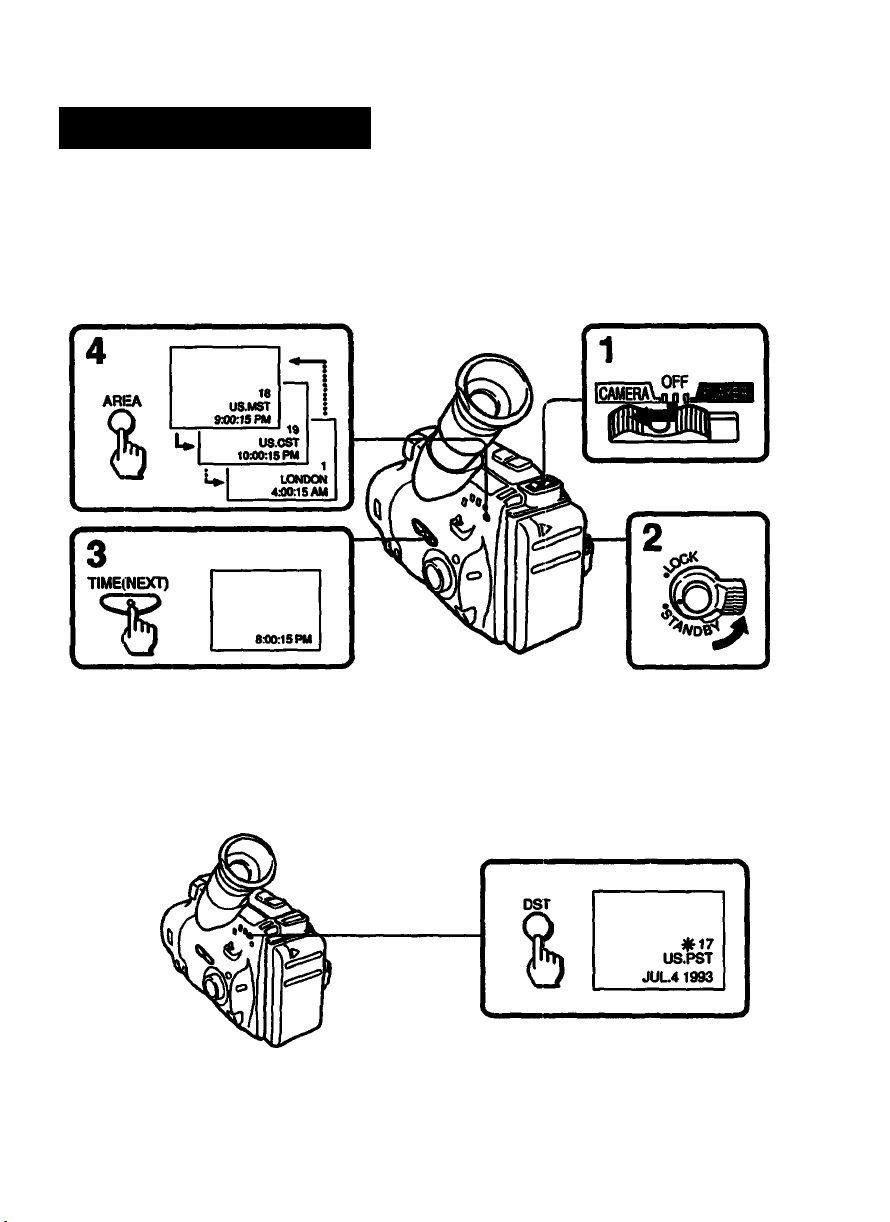
Usin^ the World Clock
Before using the world clock, you need to set the date and time in your home area (p. 12). Reset the
clock according to the local time zone by pressing AREA. First, find the area name in the "Time Zone
Chart" on page 32.
(1) While pressing the small green button on the POWER switch, slide it to CAMERA. (2) Turn the
STANDBY switch to STANDBY. (3) Press TIME (NEXT). The setting of time appears. (4) Press AREA to
select the area name where you will use the camcorder.
To Check the Date
Press DATE (+). To turn off the date indicator, press DATE (+) again.
To Adjust to Daylight Savings Time
Press DST. The ^ indicator appears and the time changes to daylight savings tinte. To reset to
standard time, press DST again.
To Reset to Your Home Area Time again
Press AREA until your home area name appears.
Page 32
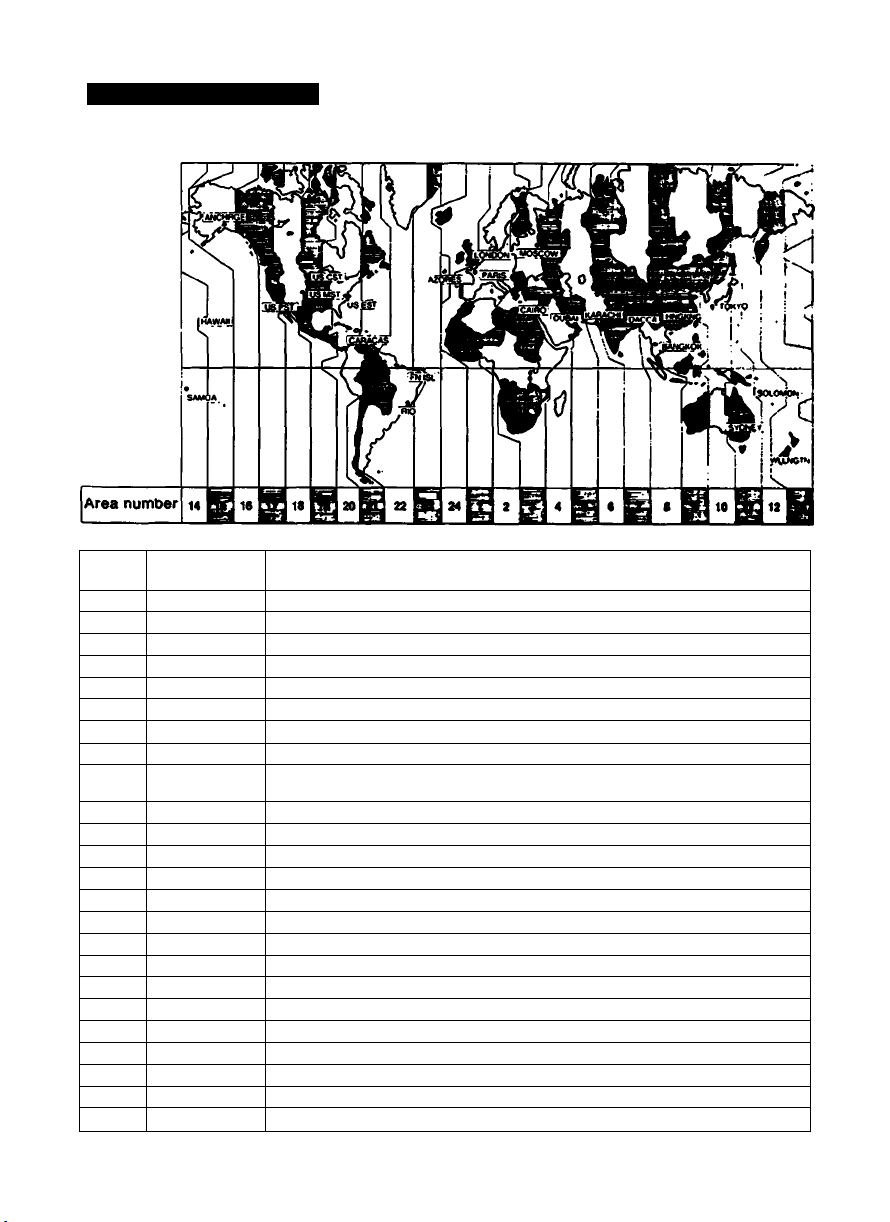
Using the World Clock
Time Zone Chart
Area
number
S DUBAI United Arab Emirates
10
11 SYDNEY
12
13
14 SAMOA
IS HAWAII
16 ANCHRGE
17 US. PST
18 US. MST
19 US. CST
20 US. EST
21
22 RIO
23 FN ISL.
24
' These are common names. They may be different from formal country names.
Area name Nations or area*
1
LONDON England. Morocco, Portugal. GMT (Greenwich Mean Time)
2
PARIS
CAIRO
3
4
MOSCOW Ethiopia, Iraq. Kenya, Mauritius, Saudi Arabia, former Soviet Union (Moscow)
6 KARACHI
7
DACCA Bangladesh, India, Myanmar
8
BANGKOK Cambodia. Indonesia (Jakarta), Thailand, Vietnam
9
HN6KNG Australia (Perth). China, Hong Kong, Indonesia (Bali. Borneo), Malaysia,
TOKYO
SOLOMON
WLLNGTN Fiji, New Zealand
CARACAS Chile, Dominica, Venezuela
AZORES Azores Islands
Austria, France, (Germany, Italy, Netherlands. Spain. Sweden. Switzerland, CET
Egypt, Finland, Greece, Israel. Turkey
Maldives, Pakistan
Philippines, Singapore. Taiwan
Japan, Korea
Australia (Sydney). Guam, Saipan
New Caledonia
Western Samoa
HST (Hawaii standard time), Tahiti
AST (Alaska standard time)
PST (Pacific standard time)
MST (Mountain standard time)
CST (Central standard time), Mexico
EST (East standard time), Canada (Montreal), Jamaica, Peru
Argentina, Brazil, Uruguay
Fernando de Noronha
Page 33
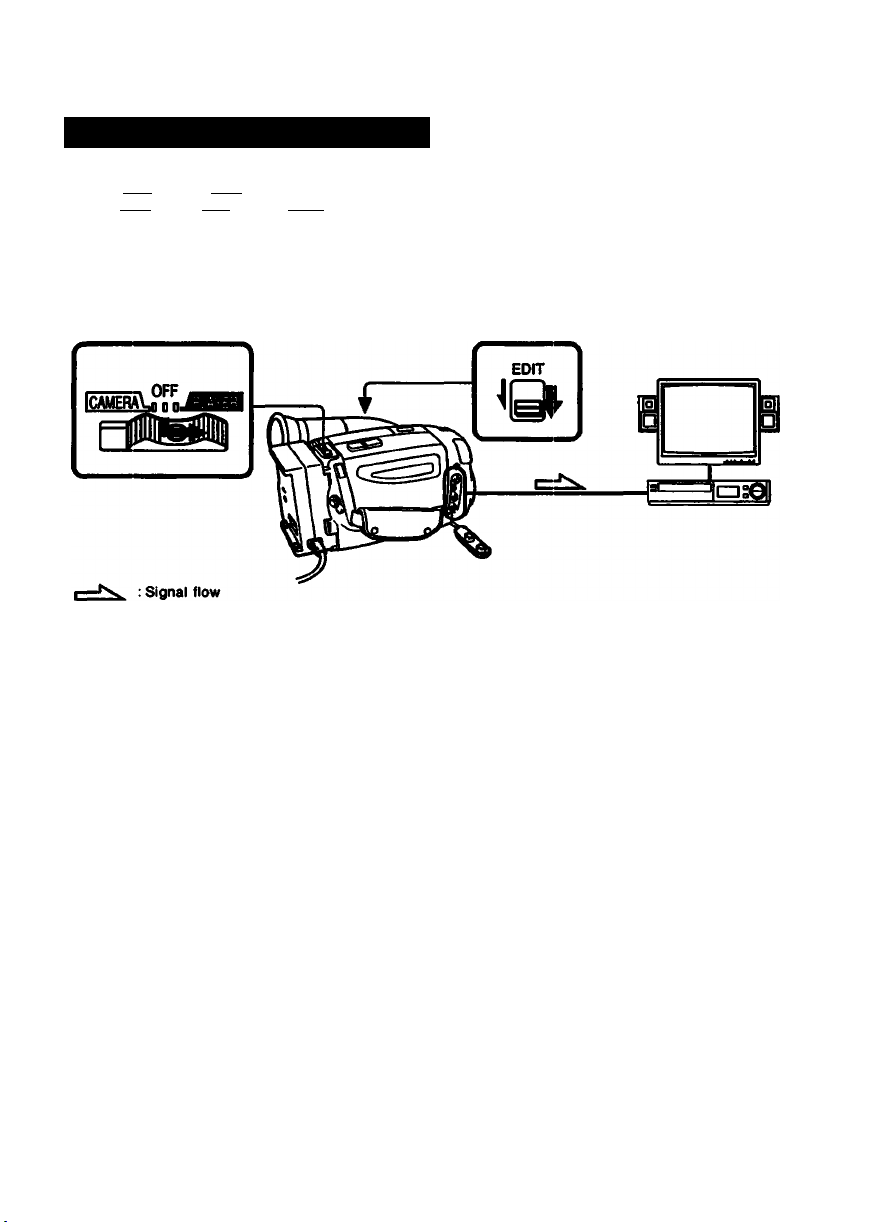
Editing onto Another Tape
You can create your own video program by editing with any other H 8 rnm, MB Hi8, |B Betamax.
imS VHS, MViri' S-VHS, iwisiil VHSC or MlilKItl S-VHSC VCR that has audio/video inputs.
Before Editing
Connect the camcorder to the VCR using the supplied A/V connecting cable, (p. 22)
Set the input selector on the VCR to LINE, if available. Set EDIT on the camcorder in the direction of the
arrow. Set the POWER switch to PLAYER.
Starting Editing
(1) Insert a blank tape (or a tape you want to record over) into the VCR. .And insert your recorded tape
into the camcorder. (2) Play back the tape on the camcorder until you locate the point where you want to
start editing, then set the camcorder in the playback pause mode. (3) On the VCR, locate the recording
start point and set the VCR in the recording pause mode. (4) Press ||on the camcorder and VCR
simultaneously to start editing.
To Edit More Scenes
Repeat steps 2 to 4.
To Stop Editing Momentariiy
Press II on the VCR.
To Stop Editing
Press □ on both the camcorder and the VCR.
Use of the EDITSEARCH button
You can playback the tape in normal/reverse direction by keep pressing EDITSEARCH during Standby or
playback pause mode. You can also playback still pictures successively at specific intervals by pressing
EDITSEARCH intermittently.
Note on the EDIT switch
When you set EDIT in the direction of the arrow, you can keep picture deteriorations resulting from
editing to a minimum. However, when you edit or copy to another VCR, avoid using the edited tape for
multiple generations of editing. After editing, be sure to set this switch in the opposite direction of the
arrow.
Note on the DATA SCREEN/DISPLAY function
If you have displayed the viewfinder screen Indicators on the TV, erase the indicators by pressing
DATA SCREEN/DISPLAY on the Remote Commander so that they will not be superimposed on the edited
taoe.
c
C9
<D
I
a
O
8
(Û
O
3
s
>
3
o
Page 34
[Additional Information |
Playback Modes
The playback mode (SP or LP) is selected automatically according to the format in which the tape has
been recorded. The quality of the recorded picture in LP mode, however, wili not be as good as that in
SP mode.
Note on AFM HI-FI stereo
When you playback a tape, the sound is in monaural if:
e You record the tape using this camcorder, then play it back on an AFM Hi-Fi monaural video
recorder/player.
e You record the tape on an AFM Hi-Fi monaurai video recorder, then play it back on this camcorder.
LP (tong play) mode
When you playback a tape recorded in LP mode, the LP indicator lights up in the viewfinder.
This camcorder cannot record a tape in LP mode.
Foreign 8 mm video
You cannot playback the software recorded on a different TV color system. Because the TV color
systems differ from country to country, you may not be able to playback foreign pre-recorded software
Refer to page 39 to check the TV color system of foreign countries.
Maintenance Information and Precautions
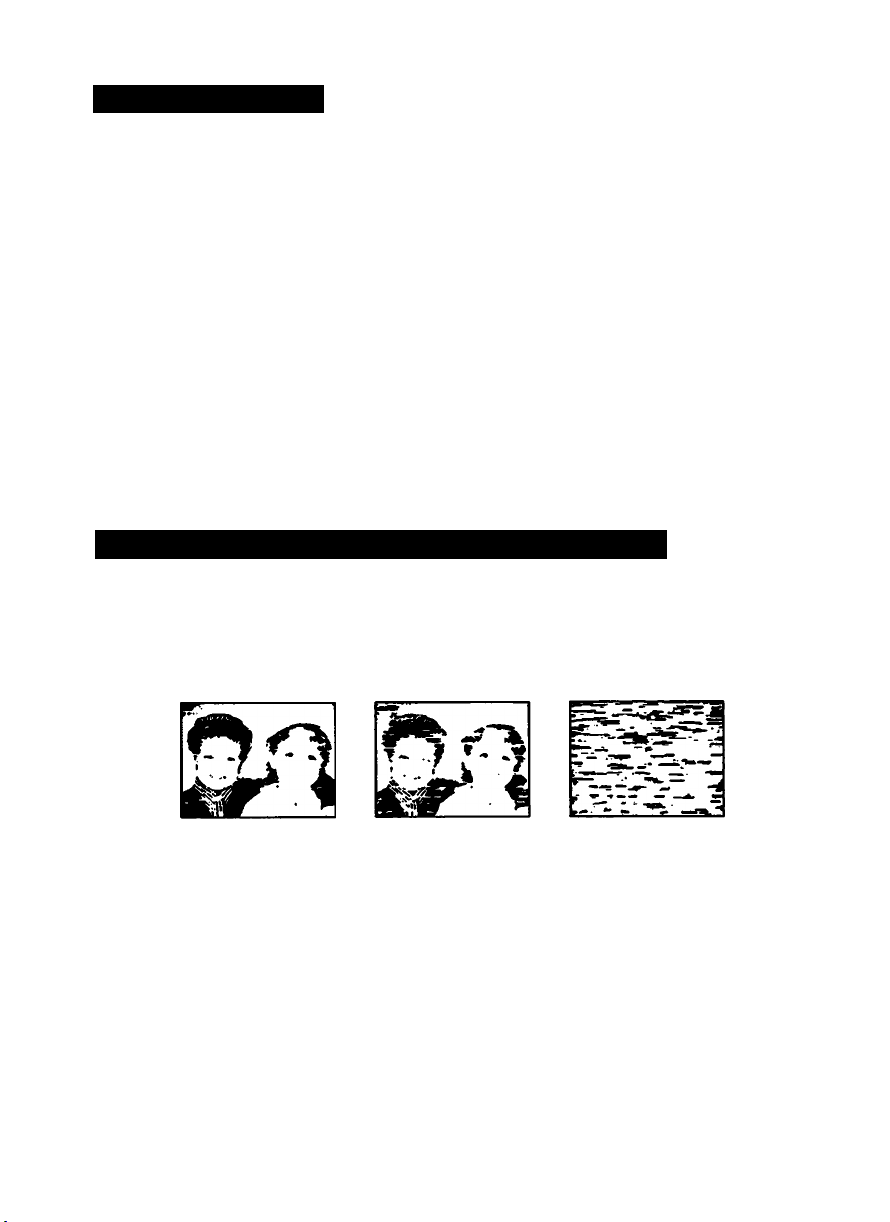
Video Head Cleaning
To ensure clear pictures, clean the video heads periodically. When playback pictures are "noisy" or
hardly visible, the video heads may be contaminated.
[a] [b]
[a] Slight contamination
p>] Critical contamination
If this happens, clean the video heads with the Sony V8-25CLH cleaning cassette (not supplied). After
checking the picture, if it is still "noisy", repeat the cleaning. (Do not repeat cleaning more than S times.)
Caution
Do not use a commercially available wet-type cleaning cassette. It may damage the video heads.
Note
if the V8-2SCLH cleaning cassette is not available in your area, consult your Sony service facility.
Page 35
Maintenance Information and Precautions
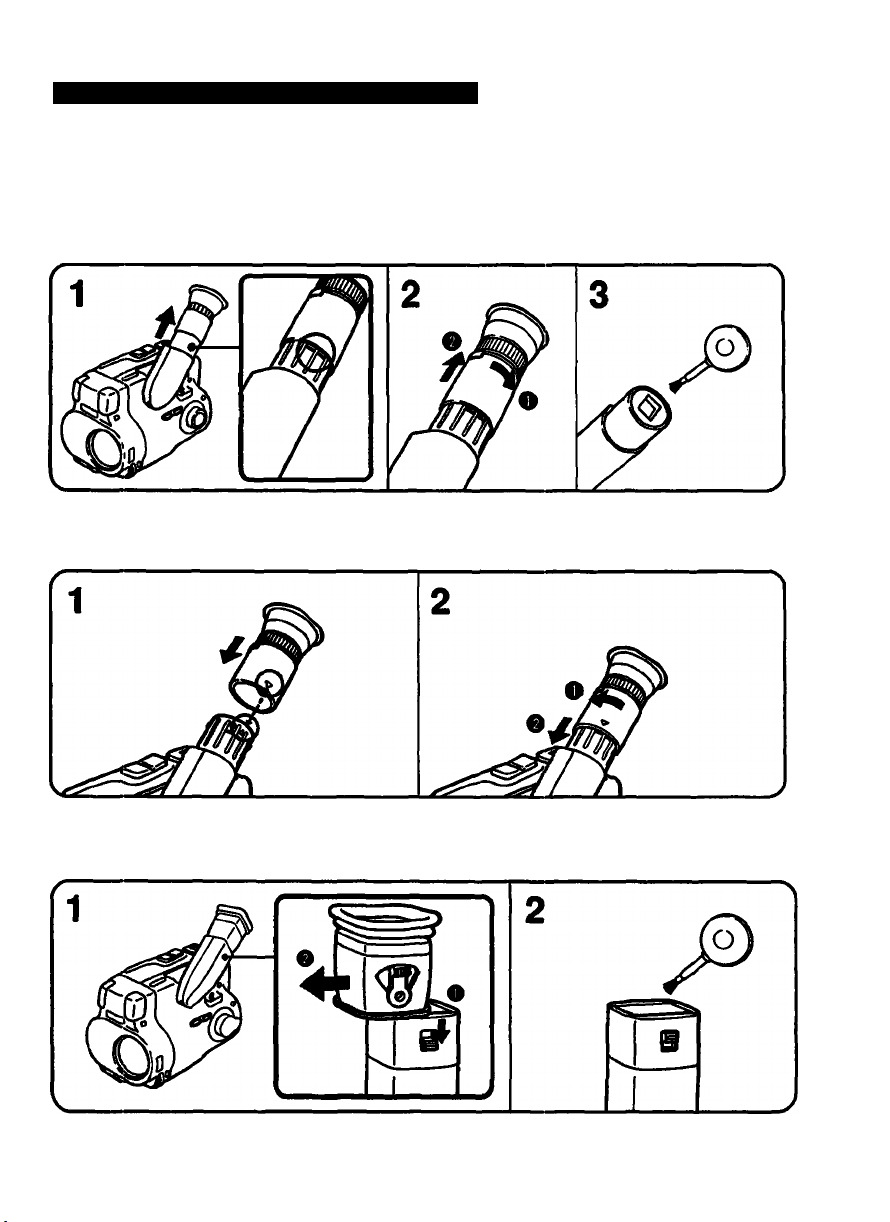
Removing Dust from Inside the Viewfinder
When Using a Monochrome Viewfinder
(1) Pull out the viewfinder barrel until the Illustrated mark appears. (2) Turn the viewfinder
counterclockwise until it stops, and pull it out. (3) Clean the surface with a commercially available
blower.
To reattach the viewfinder barrel
(1) Align the mark on the viewfinder barrel with the mark on the viewfinder and push in the viewfinder
barrel until it clicks. (2) Turn it ciockwise untii it stops and push it in.
O'
s
7C
s
a
When Using a Coior Viewfinder
(1) While pressing down the hook, slide the viewfinder barrel in the direction of the arrow and remove it
from the viewfinder. (2) Clean the surface with a commercially available blower.
To reattach the viewnnder barrel
Slide the v ewfinder barrel in the opposite direction of the arrow in the above illustration.
s
3
3
i
fs.
Page 36
Maintenance Information and Precautions
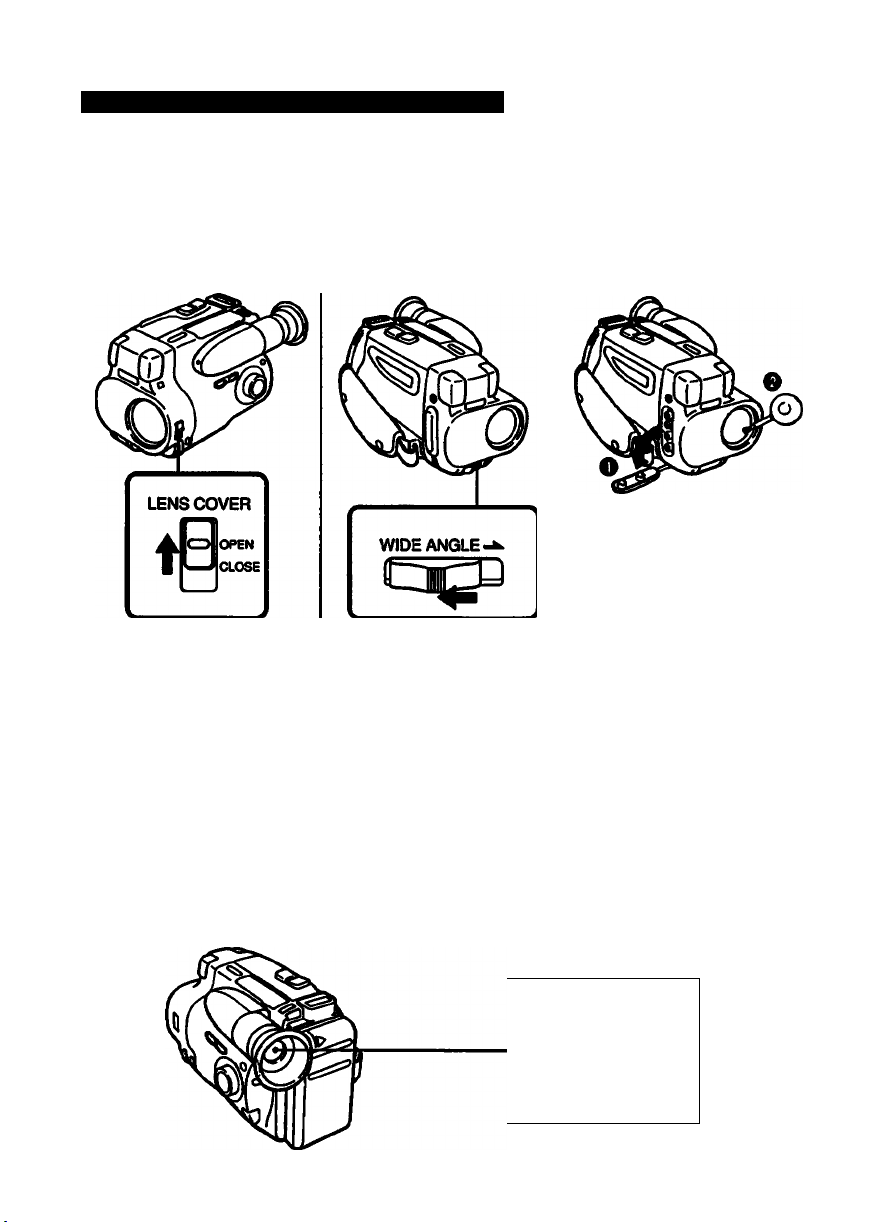
Removing Dust from inside the WIDE ANGLE
(1) Slide the LENS COVER switch to OPEN. (2) Slide the WIDE ANGLE switch in the opposite direction of
the arrow. (3) Detach the jack cover. Remove the dust by using a blower.
1
Moisture Condensation
If the camcorder is brought directly from a cold place to a warm place, moisture may condense inside
the camcorder, on the surface of the tape, or on the lens. In this condition, the tape may stick to the
head drum and be damaged or the unit may not operate correctly. To prevent possible damage under
these circumstances, the camcorder is furnished with moisture sensors. However, take the following
precautions.
Inside the Camcorder
When the and ^ indicators flash In the viewfinder, moisture has condensed inside the camcorder.
If this happens, no other functions except for tape ejection will work.
Eject the tape, turn off the camcorder and leave R wHh the cassette holder open for at least one hour In
a dry place.
The camcorder can be used again if the [S indicator does not appear when the power is turned on
again.
\t/ \»/
Page 37
On the Surface of the Tape
If there is moisture on the surface of the tape, when the cassette is inserted and a tape transport button
is pressed, the ^ indicator in the viewfinder flashes.
In this case, no other functions except for tape ejection wiil work. Eject the tape, turn off the camcorder
and leave it with the cassette holder open tor at least one hour in a dry place. The camcorder can be
used again if the A indicator does not appear when you insert the cassette and press one of the tape
transport buttons.
On the Lens
If moisture condenses on the lens, no indicator appears, but the picture becomes dim. Turn off the power
and do not use the camcorder for about one hour.
How to Prevent Moisture Condensation
When bringing the camcorder from a coid piace to a warm place, put the camcorder in a plastic bag and
allow it to adapt to room conditions over a period of time.
(1) Be sure to tightly seal the plastic bag containing the camcorder.
(2) Remove the bag when the air temperature inside it has reached the temperature surrounding it (after
about one hour).
Precautions
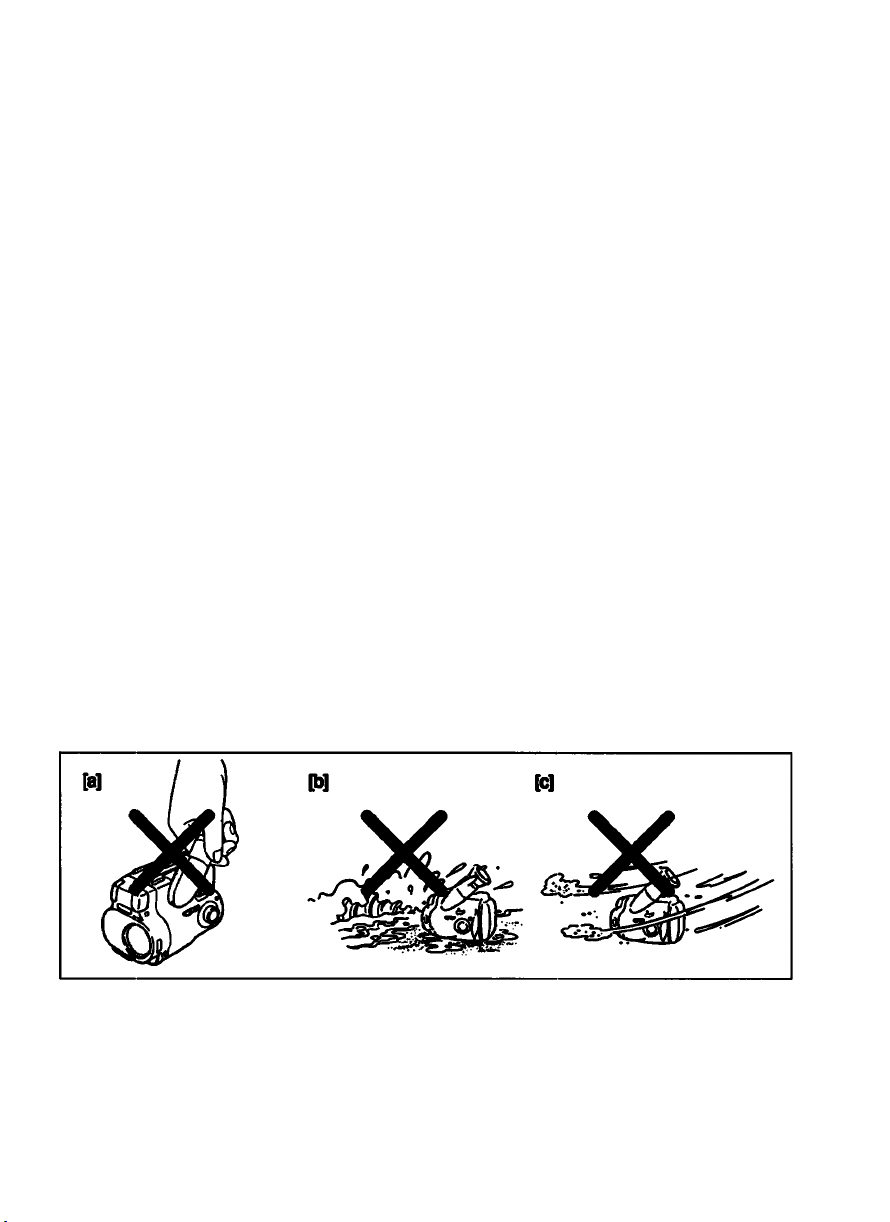
Camcorder Operation
e Operate the camcorder on 6.0 V (battery pack) or 7.5 V (AC power adaptor),
e For DC or AC operation, use the accessories recommended in this manual,
e Should any solid object or liquid fall into the casing, unplug the camcorder and have it checked by
qualified personnel before operating it any further,
e Do not pick up the camcorder by the viewfinder [a].
e Avoid rough handling or mechanical shock. Be particularly careful of the lens,
e Keep the LENS COVER switch set to CLOSE when not using the camera,
e Do not wrap up the camcorder and operate it since heat may build up internally,
e Keep the camcorder away from strong magnetic fields or mechanical vibration,
e Do not let sand get Into the camcorder. When you use the camcorder on a sandy beach or dusty
place, protect It from the sand or dusL Sand or dust may cause the unit to malfunction and sometimes
the malfunction cannot be repaired p>].
e Do not let the camcorder get wet. Keep the camcorder away from rain or sea water. It may cause the
unit to malfunction and sometimes the maHundton cannot be repaired [c].
S
a>
o
3
fl»
o
3
fl»
K
D
o
s
Page 38

Maintenance Information and Precautions
On Handling Tapes
Do not insert anything in the small holes on the rear of the cassette. These holes are used to sense the
type, thickness of tape, or if the tab is out or in, etc.
Camcorder Care
e Never leave the camcorder under temperatures above 60*C (140*F), such as in a car parked in the
sun or under direct sunlight.
• When the camcorder is not to be used for a long time, disconnect the power source and remove the
tape. Periodically turn on the power, operate the camera and player sections and play back a tape for
about 3 minutes.
• Clean the lens with a soft brush to remove dust. If there are fingerprints on it. remove them with a soft
cloth.
e Clean the camcorder body with a dry soft cloth, or a soft cloth lightly moistened with a mild detergent
solution. Do not use any type of solvent which may damage the finish.
AC Power Adaptor
Charging
• Repeated charging while some capacity remains causes a lowering of battery capacity. However, the
original battery capacity can be recovered if you use the battery completely and charge It fully again.
0 Charge the battery on a flat place without vibration,
a The battery will get hot during charging. But this is normal.
Do not continuously recharge a charged battery pack as that will cause Ihe battery pack efllclancy to
deteriorate.
Charging temporahire
The temperature range for charging is S*C to 3S*C (41 *F to 9S‘F). However, to provide maximum
battery efficiency, the recommended temperature range when charging is 10'C to 30’C (S0‘F to 86‘F).
Others
a The model for USA or Canada: One blade of the plug is wider than the other for the purpose of safety
and will lit into the power outlet only one way. If you are unable to insert the plug fully into the outlet,
contact your dealer.
a Unplug the unit from the wall outlet when not in use for a long time. To disconnect the cord (mains
lead), pull it out by the plug. Never pull the cord itself,
a Do not operate the unit with a damaged cord or if it has been dropped or damaged,
a Do not bend the AC power cord forcibly, or put a heavy object on it. This will damage the cord and
may cause a fire or an electrical shock.
a Be sure that nothing metallic comes into contact with the metal parts of the connecting plate. If it does.
a short may occur and the unit may be damaged,
a Always keep the metal contacts clean,
a Do not disassemble the unit,
a Do not apply mechanical shock or drop the unit.
a While the unit is in use. particularly during charging, keep it away from AM receivers and video
equipment because it will disturb AM reception and video operation,
a While the unit is in use. it gets hot. But this is normal,
a Do not place the unit in locations where it is:
- Extremely hot or cold
- Dusty or dirty
- Very humid
- Vibrating
If any difficulty should arise, unplug the unit and contact your nearest Sony dealer.
Page 39
Using Your Camcorder Abroad
Each country has its own electricity and TV color system. Before using ycur camcorder abroad, check
the following points.
Power Sources
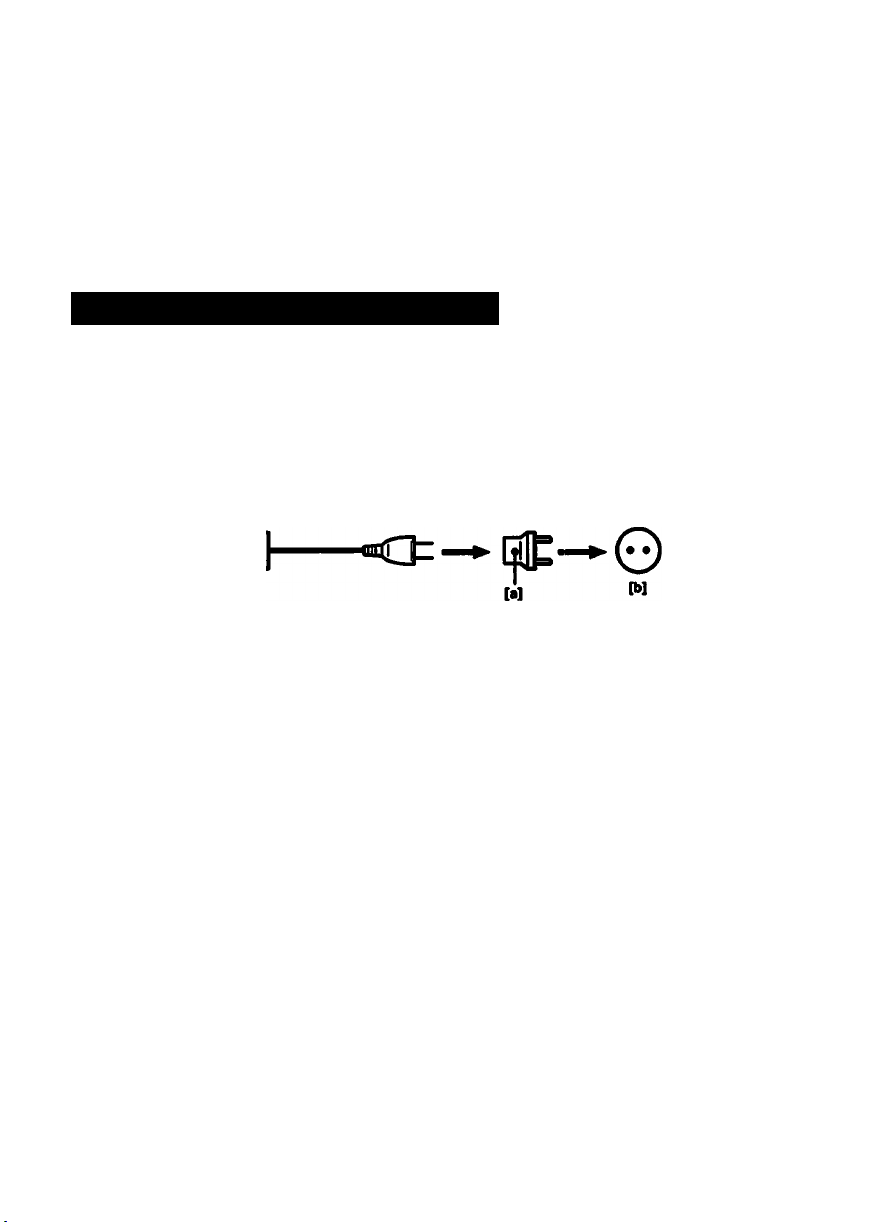
You can use your camcorder in any country with the supplied AC power adaptor within 110 V to 240 V
AC. SOfOO Hz.
Use a commercially available AC plug adaptor [a], if necessary, depending on the design of the wall
outlet p>].
AC-V25/V25A
To View the Playback Picture
This camcorder is an NTSC system based camcorder. If you want to view the playback picture on a TV, it
must be an NTSC system based TV or a PAL-M system based TV with an NTSC/PAL-M transcoder.
Check the following list.
NTSC system countries
Bahama Islands, Bolivia, Canada, Central America, Chile, Colombia, Ecuador, Jamaica, Japan, Korea,
Mexico, Peru, Surinam, Taiwan, the Philippines, the U.S.A., Venezuela, etc.
PAL system countries
Australia, Austria, Belgium, China, Denmark, Finland, former West Germany, Great Britain, Holland,
Hong Kong, Italy, Kuwait, Malaysia, New Zealand, Norway, Portugal, Singapore, Spain, Sweden,
Switzerland, Thailand, etc.
PAL-M system country
Brazil
PAL>N system countries
Argentina, Paraguay, Uruguay
SECAM system countries
Bulgaria, France, Guiana, Hungary, Iran, Iraq, Monaco, Poland, former Soviet Union, etc.
£
2.
3‘
s
I
3
fi.
o
Page 40
Identifying the Parts
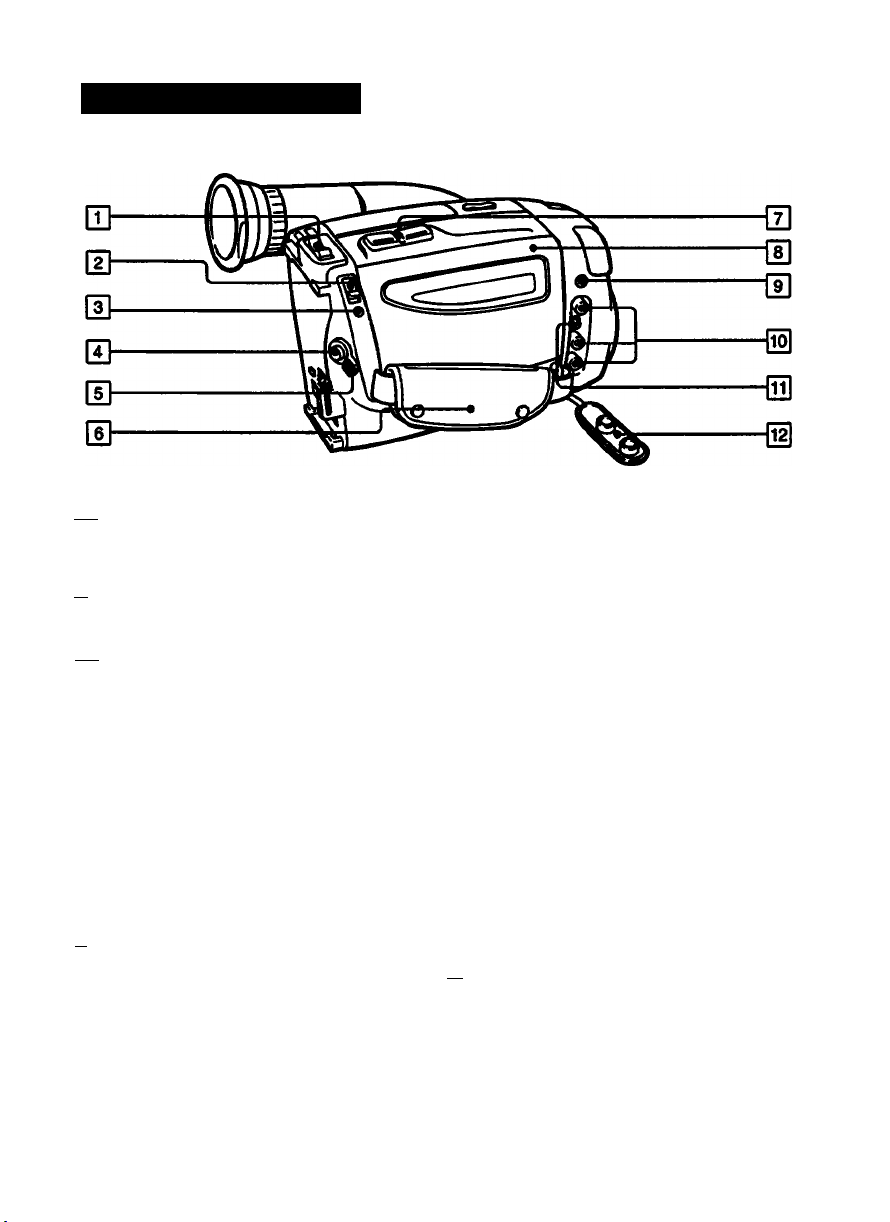
(T| POWER twitch (p. 16.23) HI
CAMERA; for camera recording
PLAYER: for playing back or editing a tape
OFF: power off
[Tl EJECT knob (p. 13)
Slide it to insert a cassette into the cassette [tJ
holder or to eject the cassette.
[Tl REMOTE tt (LANC) control Jack
Connect the LANC tt connecting cable to a
wired remote control unit such as an editing
controller. In this case, set the REMOTE
COMMANDER switch to OFF.
it stands for Local Application Control Bus
System. The tt controt Jack Is used tor
controlling the tape transport of video
equipment and peripherals connected to It. [9j
This Jack has the same function as the Jack
Indicated as CONTROL L or REMOTE.
[T] START/8TOP button (p. 16)
To start recording, press it after setting the
POWER switch to CAMERA and turn the
STANDBY switch to STANDBY. To stop
recording momentarily, press it again.
[si STANDBY switch (p. 16)
STANDBY; To set the camcorder to recording
LOCK: To stop recording or to prevent
standby mode. pm
from accidentally recording and
wearing down the battery.
___________
____
Grip strap (p. IS)
Put your hand through the grip strap lo hold
the cantcorder. Adjust the length of the strap
so that your thumb can easily touch
START/STOP.
Power zoom button (p. 18)
Press it to change the size of the subject in
the scene.
T side: for telephoto (subject appears closer)
W side: lor wide-angle (subject appears
further away)
Cassette holder (p. 13)
When you slide the EJECT knob, this holder
lifts up and opens automatically.
MIC Jack (PLUG IN POWER)
Connect an optional external microphone
(stereo or monaural). This jack also accepts a
"plug-in-power" microphone.
AudlofVIdeo output Jacks (p. 22)
To view the recorded picture on the TV or to
rerecord onto another tape, connect these
jacks and the Audio/Video input Jacks on the
TV or VCR using the supplied A/V connecting
cable.
RFU DC OUT (RFU adaptor DC output) Jack
(P 22)
To view the recorded picture on a TV that has
only an antenna input, connect the RFU
adaptor here.
l12 Jack cover
Page 41
STOP
REW®
— PLAY—
IsssJ
®FF PAUSE
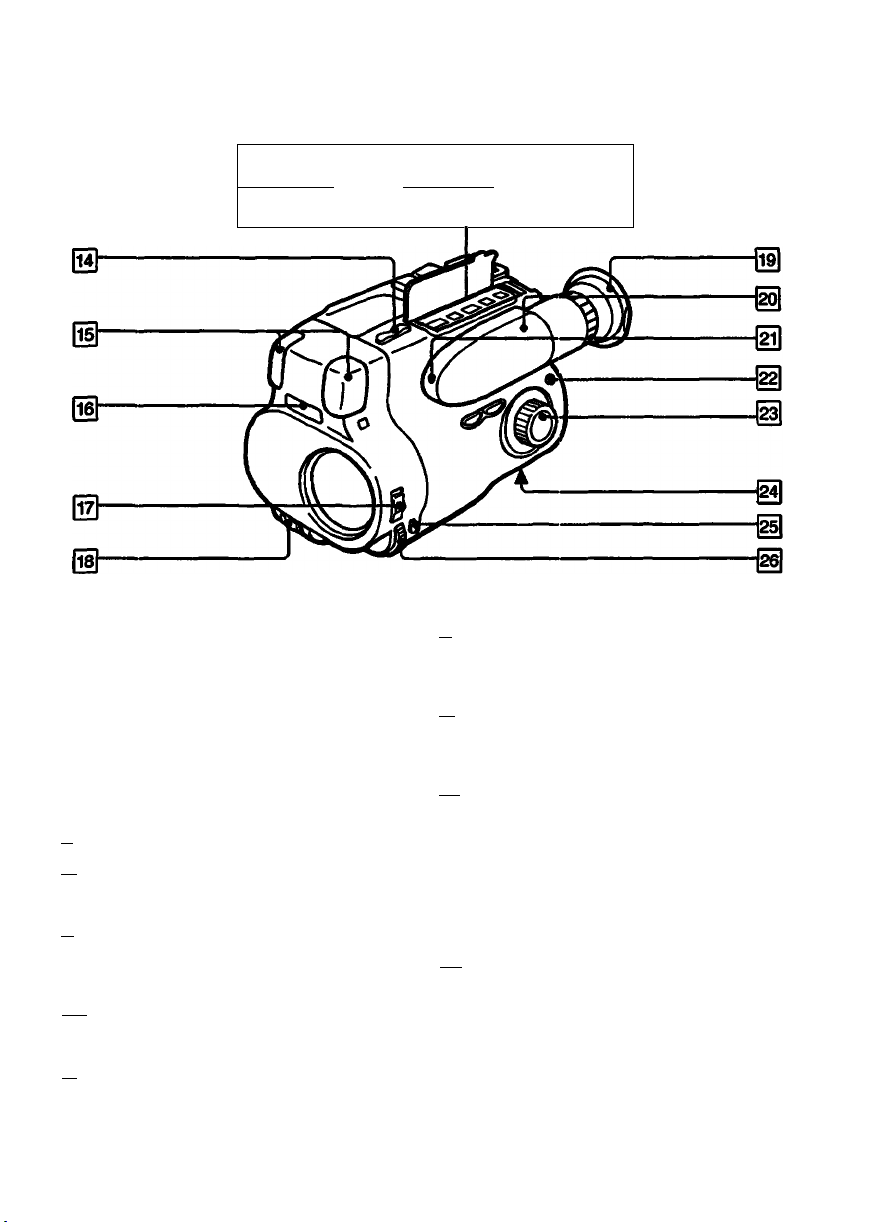
Tape transport buttons (p. 23)
□ STOP
■*4 REW (rewind)
O PLAY (playback)
►► FF (fasttorward)
II PAUSE
EOITSEARCH button (p. 21)
0
Press it to check the recorded scene in the
viewfinder in Standby mode.
+ side: to view the forward playback picture
- side; to view the reverse playback picture
[l^ Built-in microphone (stereo)
[is] Remote sensor (p. 44)
Aim the Remote Commander here for remote
control.
[rfl LENS COVER switch
Before recording, slide it to OPEN. When you
finish recording, slide it to CLOSE to protect
the lens.
[is] WIDE ANGLE switch
Slide it in the direction of the arrow to get the
wide-angle picture.
|l9| Eyecup
To achieve better camera recording, place
your eye firmly against it. If you wear
glasses, bend it back to get a better view of
the viev^inder. (You cannot bend back the
eyecup of a color viewfinder.)
1^ Viewfinder (p. 14. 21)
You can monitor the picture being recorded
or played back. For details on the indicators
in the viewfinder, see page 50.
|2l] Camera recording/battery lamp
This red lamp lights up during camera
recording. Wnen it flashes, the battery is
dead.
[22] FADER button
When fading-in, press this switch during
Standby mode and then press START/STOP.
When fading out, press this switch during
recording and then press START/STOP.
PROGRAM AE dial (p. 29)
Set it to select from four PROGRAM AE
modes (Portrait/Sports/High-Speed Shutter/Twilight mode) to tit the shooting situation.
[24) Tripod receptacle (p. 15)
Attach a tripod (not supplied) here.
When attaching a non-SONY tripod, make
sure that the length of the camera mounting
screw is shoider than 6.5 mm (9/32 inches).
Otherwise, the screw might damage №e
internal components of the camcorder.
0 FOCUS button (p. 27)
Press it to set the camcorder in manual focus.
1^ Focus dial (p. 27)
Turn it to adjust the focus manually and to
achieve a sharp focus in manual focus.
•?
3
Page 42
Identifying the Parts
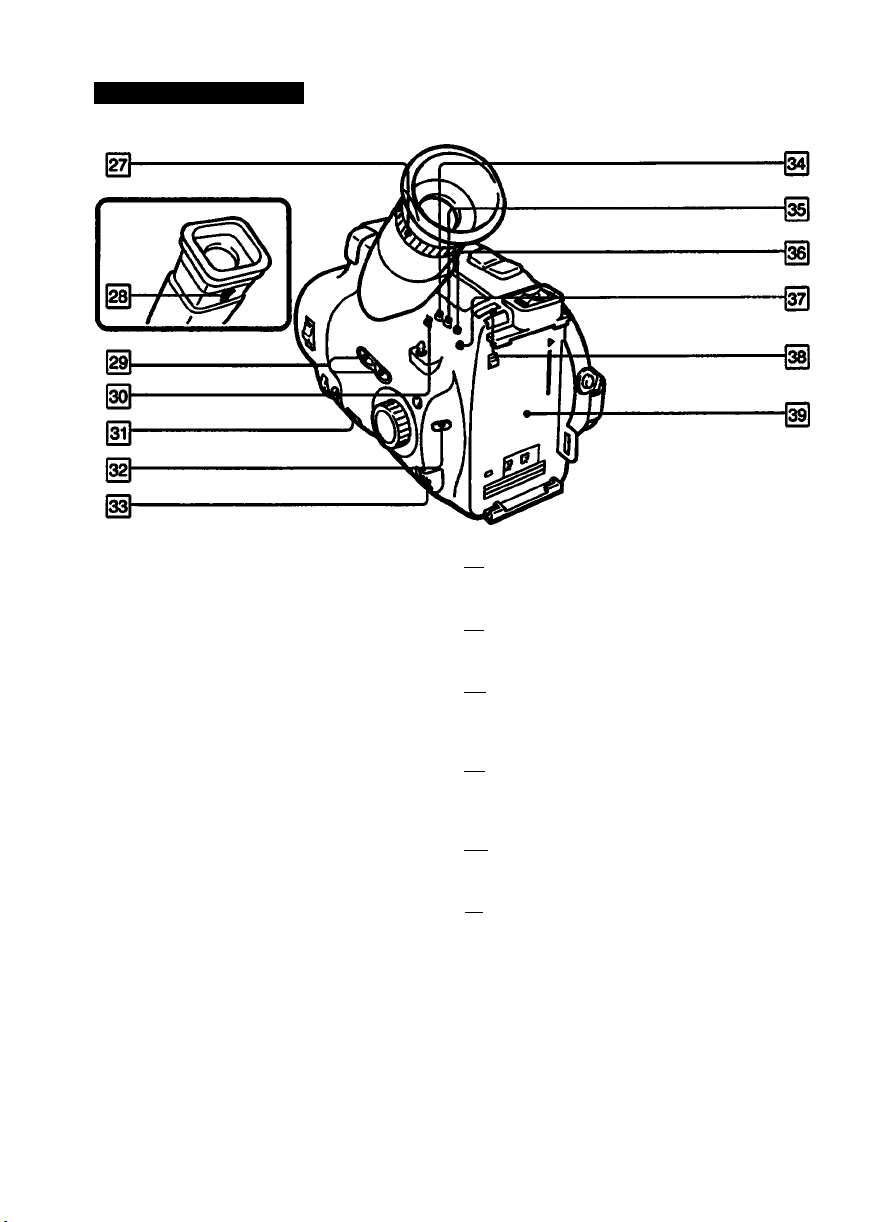
Viewfinder lene ad|uetonent ring (p. 14)
To locus the viewfinder lens, turn this ring
until the indicator in the viewfinder comes
into sharp focus.
Viewfinder iens ad|ustment iever (p. 14)
To focus the viewfinder lens, move this lever
until the indicator in the viewfinder comes
into sharp focus.
DATE (-I-) and TtME (NEXT) buttons (p. 12)
Press them to set the clock or to display or
turn off the date and time in the viewfinder.
When setting the date and time, press
DATE <+) button to advance numbers and
press TIME (NEXT) button to set the next
factor.
BEEP swilch (p. 15)
To hear the beep sound, set this switch to
ON.
Lithium battery compartment (bottom of the
Camcorder) (p. 10)
Insert a lithium battery here to activate the
clock.
COUNTER RESET button (p. 17)
Press it to reset the tape counter to zero.
|Ю| ВАТТ (battery eject) knob (p 7)
While pressing this knob, eject the battery
pack.
|34| REMOTE COMMANDER switch (p 43)
To use the Remote Commander, set this
switch to ON.
|3S| EDIT switch (p. 33)
To edit the recorded picture onto another tape
on VCR. set this switch in the direction of the
arrow.
|3б] DST (Daylight Saving Time) button (p 12.31)
Press it to change the time to daylight saving
time. To reset to standard time, press it
again.
[ЭТ] AREA button
Press it to reset the clock according to the
required time zone.
[ssl Hooks for shoulder strap (p. 44)
[39I Battery mounting surface (p 7)
Page 43
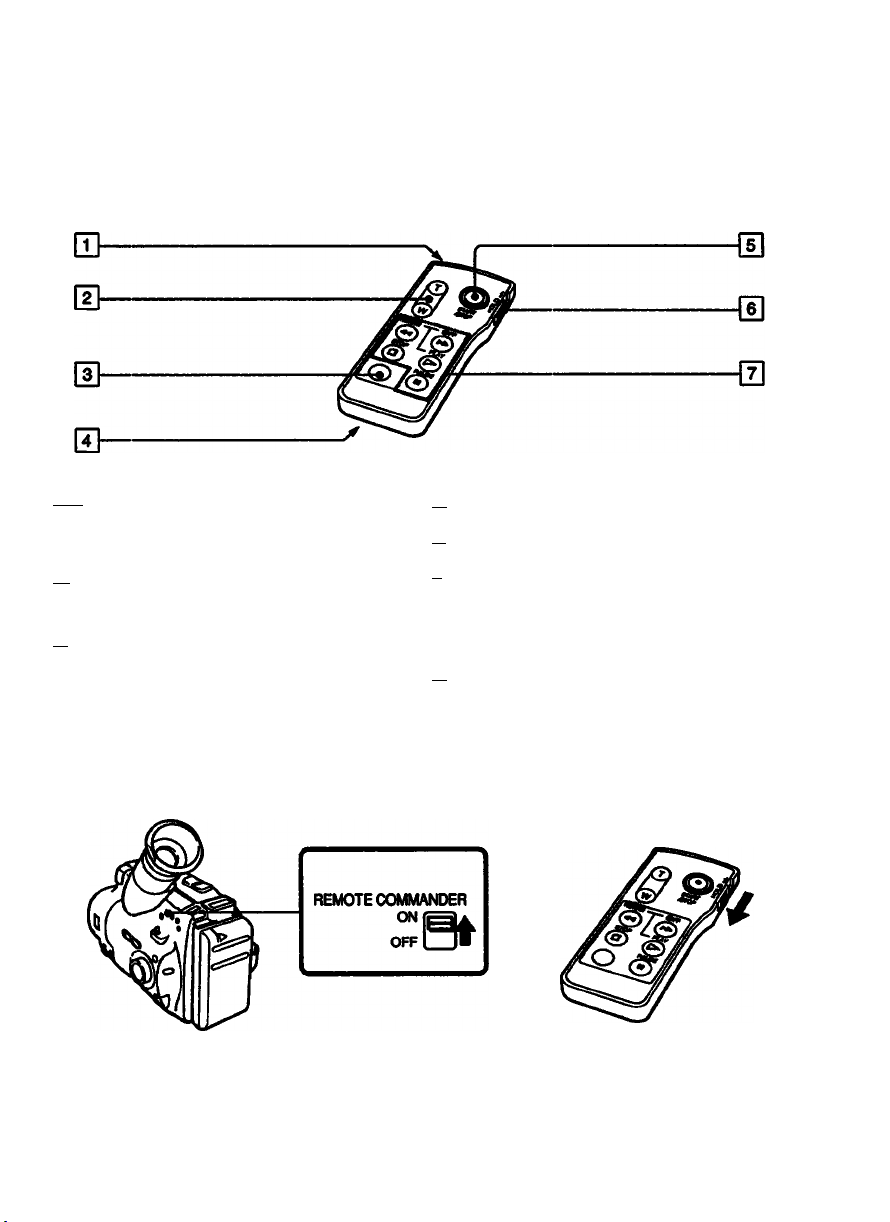
Remote Commander
The buttons that have the same name on the Remote Commander and on the camcorder function
identically.
pT| Transmitter
Point toward the remote sensor to control the
camcorder after turning on the POWER switch
on the camcorder.
[T] Power zoom button
The zooming speed is unchangeable in the
Remote Commander.
|T| DATA SCREEN/DI8PLAY
Press to display the viewfinder screen
indicators on the TV when you connect the
camcorder to a TV. To erase the indicators,
press again.
[Tj Lithium battery holder (p. 11)
[si START/STOP button
[il HOLD Switch
Slide it in the direction of the arrow to prevent
any misoperation. Before using this Remote
Commander, slide it in the opposite direction
of the arrow.
[yi Tape transport buttons
Using the Remote Commander
Make sure that the REMOTE COMMANDER switch on the camcorder is set to ON and that the HOLD
switch on the Remote Commander is not working.
3
(Û
Page 44
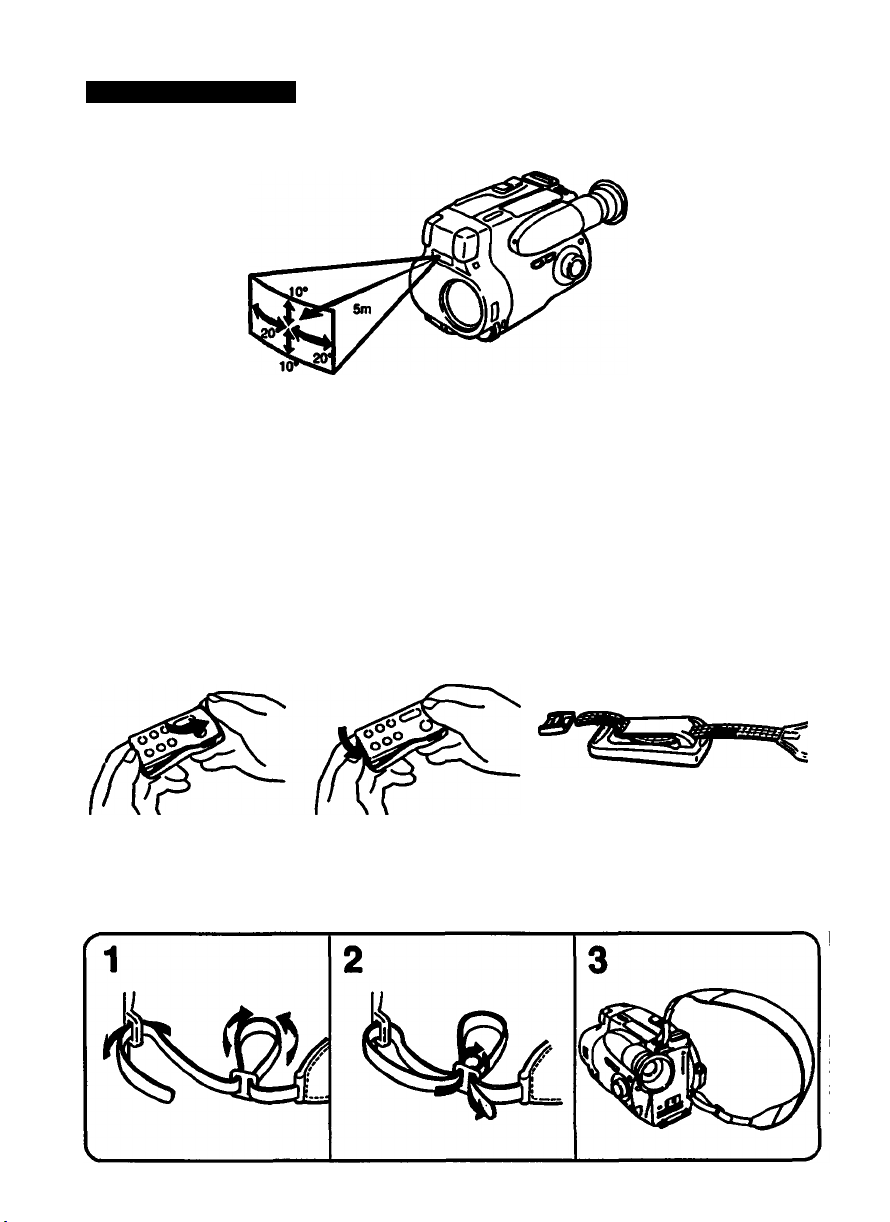
Identifying the Parts
Remote Control Direction
Note on the Remote Commander
e Keep the remote sensor away from strong light sources such as direct sunlight or illumination.
Otherwise, the remote control may not be effective,
e Be sure that there is no obstacle between the remote sensor and the Remote Commander,
e This camcorder works at commander mode VTR 2. The commander modes (1,2 and 3) are used to
distinguish this camcorder from other Sony VCRs to avoid remote control misoperation. If you use
another Sony VCR at commander mode VTR 2, we recommend you change the commander mode or
cover the remote sensor of the VCR with black paper.
Using the Remote Commander Holder
You can clip the Remote Commander holder on your coat pocket or belt, or slide it onto the shoulder
strap before attaching the Remote Commander to it.
Attaching the Shoulder Strap
Attach the supplied shouider strap to the hooks for the shoulder strap (p. 42).
Page 45

Specifications
Video Camera Recorder
System
Video recording system
Audio recording system
Video signai NTSC coior, EIA standards
Usable cassette
Tape speed SP mode: Approx. 1.43 cm (19/32
Recording time
Piayback time SP mode: 2 h (P6-120)
Fastforward/rewind time
image device CCD (Charge Coupied Device)
Viewfinder Eiectronic viewfinder:
Lens Combined 10 x Power zoom iens
Coior temperature
Minimum iliumination
iiiumination range
Recommended iiiumination
Input and output connectors
Video output
Audio output
RFU DC OUT
Remote jack
MIC jack
Two rotary heads, Helicai scanning
FM system
Two rotary heads, FM system
8 mm video format cassette
(standard 8 mm)
inches)/s
LP mode: Approx. 0.72 cm (S/16
inches)/s (playback only)
SP mode: 2 h (P6-120)
LP mode: 4 h (P6-120)
Approx. 6 min 30 s (P6-120)
monochrome (CCD-TR61)
color (CCD-TR6S)
f = 6.2 to 62 mm
(1/4 to 2 7/16 inches)
F 1.6 to 2.9 (45 to 450 mm when
converted to a 35 mm stili camera)
Attached 0.7 x Wide Angie iens
f = 4.4 mm
F 1.6 (32 mm when converted to a
35 mm stiii camera)
TTL autofocus system
inner focus wide macro system
Auto
1 ix (F 1.6)
1 ix to 100,000 ix
More than 100 Ix
Phono jack, 1 Vp-p, 75 Q,
unbalanced, sync negative
Phono jacks -7.5 dBs (2:stereo L
and R), (at load impedance 47 kO)
impedance less than 2.2 k(2
Special minijack, DC 5 V
Stereo mini-minijt№k (e 2.5 mm)
Stereo minijack, - 66 dBs low
impedance with 2.5 to 3 V DC,
output impedance 6.8 kft (e 3.5 mm)
General
Power requirements
Average power consumption
Installation Vertically, Horizontally
Operating temperature
Storage temperature
Dimensions CCD-TR61:
Mass About 790 g (1 lb 11 oz) excluding
Microphone Electric condenser microphone,
Supplied accessories
On battery mounting surface
6.0 V (battery pack)
7.5 V (AC power adrqjtor)
6.0W(CCD-TR61)
6.4W(CCD-TR65)
(camera recording) including the
viewfinder
0*C to 40*C (32*F to 104*F)
-20*C to +60*C (-4*F to +140*F)
Approx. 109 X 109 X 188 mm (w/h/d)
(4 3/8x4 3/8x7 1/2 inches)
CCD-TR65:
Approx. 109 X 109 X 197 mm (w/h/d)
(4 3/8x4 3/8 X 7 7/8 inches)
the battery pack, lithium battery,
cassette, and shoulder strap
About 1,010 g (2 lb 4 oz) including
the battery pack NP-55, lithium
battery CR2025, cassette P6-120,
and shoulder strap
stereo type
See page 5.
AC power adaptor
Power requirements
Power consumption
Output voltage DC OUT; 7.5 V, 1.2 A (AC-V25)
Application Sony battery packs NP-55/55H,
Operating temperature
Storage temperature
Dimensions Approx. 103 x 49 x 63 mm (w/h/d)
Weight Approx. 290 g (10 oz) (AC-V25)
* Canadian Standard Association (CSA) certifies
120 VAC only.
110 — 240 V AC*, 50/60 Hz
16W(AC-V25)
17W(AC-V25A)
7.5 V, 1.5 A (AC-V25A)
Battery charge terminal; 10 V, 1.1 A
in charge mode
NP-66/66H, NP-77/77H/77HD
0'Cto40*C (32*Fto 104*F)
-20*C to +60*C (-4*F to +140*F)
(4 1/8 X 1 15/16 X 2 1/2 inches)
including projecting parts and
controls
Approx. 320 g (11 oz) (AC-V25A)
in operating mode
<o
!
Design and specifications are subject to change
without notice.
Page 46
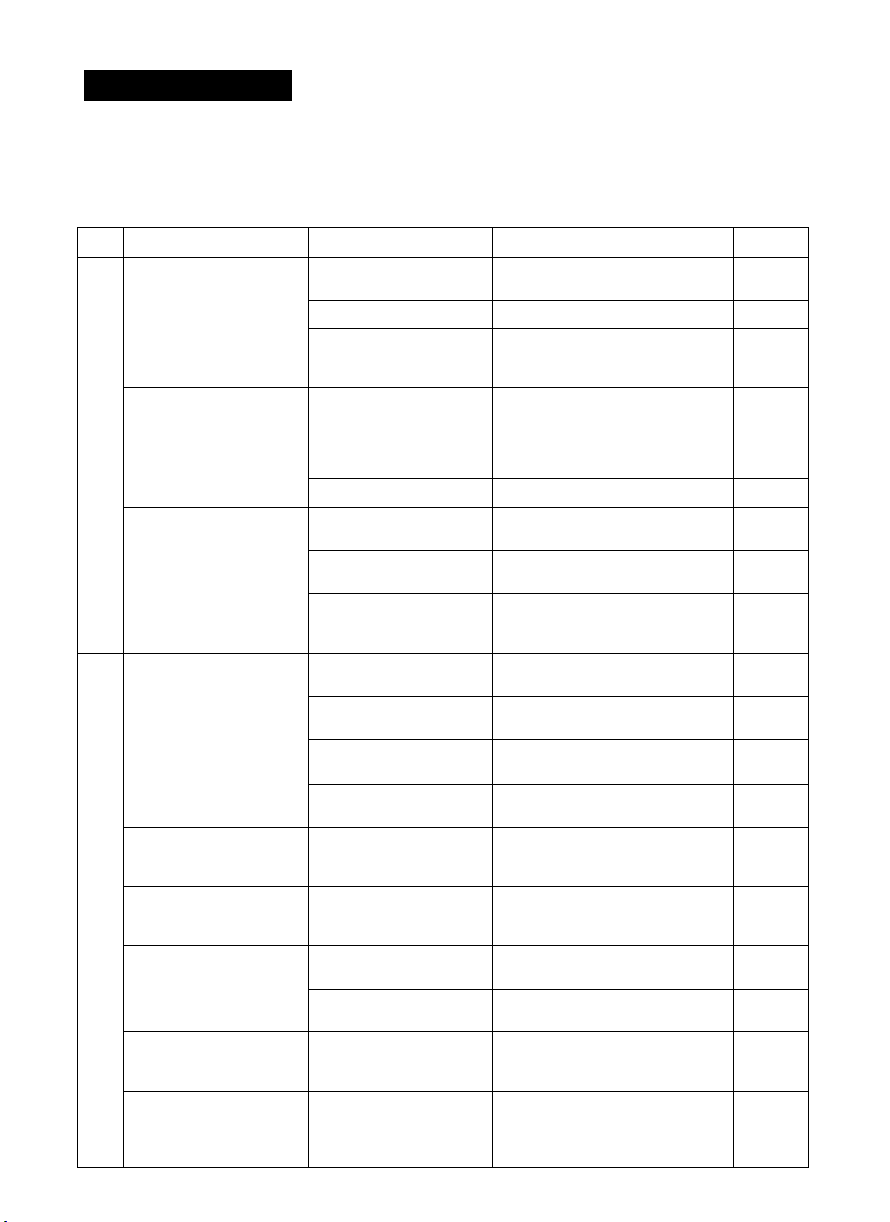
Trouble Check
If you run into any problem using the camcorder, use the following table to troubleshoot the problem
Should the difficulty persist, disconnect the power source and contact your Sony dealer or local
authorized Sony service facility.
Camcorder
Symptom
The power is not on. The battery is not
The power goes off. While being operated in
1
The battery pack is
quickiy discharged.
START/STOP does not
operate.
The cassette cannot be
removed from the
holder.
No function except for
cassette ejection works.
1
o
The tape does not move
when a tape transport
button is pressed.
The autofocusing
function does not work.
The power zoom button
does not work.
attached.
The battery is dead.
The AC power adaptor is
not connected to a wali
outlet.
CAMERA mode, the
camcorder has been in
the Standby mode for
more than 5 minutes.
The battery is dead. Use a charged battery. 6
The ambient
temperature is too low.
The battery pack has not
been charged fully.
The battery pack is
completely dead, and
cannot be recharged.
The tape is stuck to the
drum.
The tape has run out. Rewind the tape or use a new
The POWER switch is
set to PLAYER.
The tab on the cassette
is out (red).
The battery is dead. Use a charged battery or the AC
Moisture condensation
has occurred.
The POWER switch is
set to CAMERA or OFF.
The tape has run out. Rewind the tape or use a new
Shooting conditions are
not suitable for
autofocusing operation.
WIDE ANGLE is working.
Cause
Corrective Actions page
Attach the battery.
Use a charged battery. 6
Connect the AC power adaptor to
a wail outlet.
Turn the STANDBY switch to
LOCK once and turn it to
STANDBY again.
—
Charge the battery pack again.
Use another battery pack.
Eject the tape.
one.
Set it to CAMERA.
Use a new tape or slide the tab.
power adaptor. 6. 25
Remove the cassette and leave
the camcorder for at least an
hour.
Set it to PLAYER
one.
Adjust the focus manually.
This is not the malfunction.
Siide the WiDE ANGLE switch in
the opposite direction of the
arrow.
7
25
16
8
6
9
13
23
16
17
36
23
23
27
19
Page 47
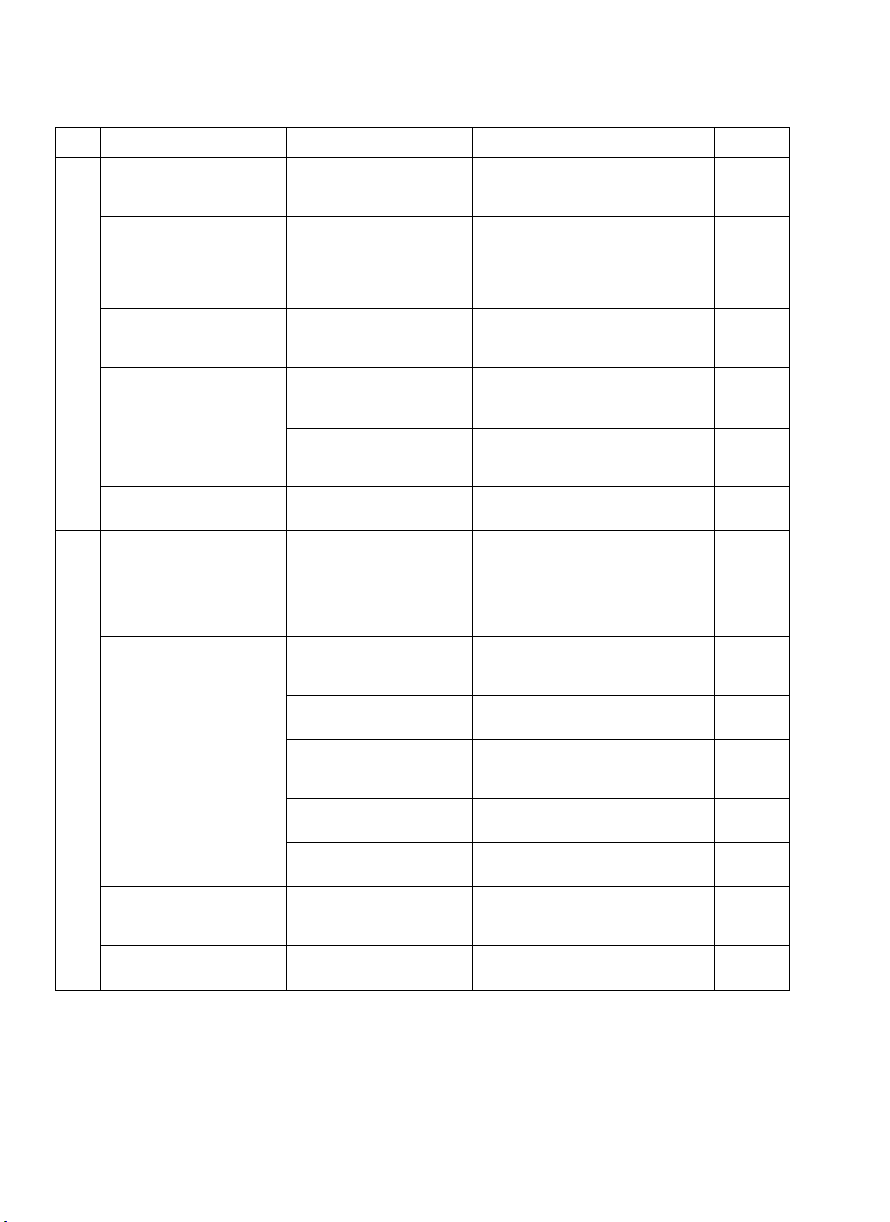
Symptom
The image on the
viewfinder screen is not
clear.
A vertical band appears
when a subject such as
lights or a candle flame
Is shot against a dark
background.
The color of the
t
playback picture is not
appropriate.
1
a.
The playback picture is
not clear.
The picture is "noisy". The video heads may be
When you adjust the
clock while viewing the
picture on the connected
TV, the area name and
area number do not
appear on the screen.
The supplied Remote
Commander does not
work.
1
There is dust in the
viewfinder.
There is dust inside the
WIDE ANGLE.
The viewfinder lens is
not adjusted.
The contrast between
the subject and
background is too high.
A PROGRAM AE mode
is selected.
The EDIT switch is set in
the direction of the
arrow.
The channel or input for
the camcorder is not
selected on the TV.
dirty.
The DATA SCREEN-
/DISPLAY function is
turned off.
The REMOTE
COMMANDER switch is
set to OFF.
Something interrupts the
infrared rays.
The lithium battery is not
inserted with the correct
polarity.
The lithium battery is
dead.
The HOLD switch is
working.
Cause
—
—
Corrective Actions
Adjust the viewfinder lens.
The camcorder Is not
malfunctioning.
Change locations.
Set PROGRAM AE to the green
position.
Set it in the opposite direction of
the arrow.
Make the correct.
Clean the heads using the Sony
V8-2SCLH cleaning cassette.
Press DATA SCREEN/DISPLAY
on the Remote Commander.
Set it to ON.
Remove the obstacles.
Insert the lithium battery with the
correct polarity.
Insert a new one.
Set the switch in the opposite
direction of the arrow.
Remove the viewfinder barrel
and clean the viewfinder screen
or viewfinder lens.
Remove the dust by using the
blower.
page
14
—
29
33
22
34
24
43
—
11
11
43
35
35
O
c
2
9
O
Page 48
Trouble Check
AC Power Adaptor
Symptom Cause
The POWER lamp does
not light.
1
1
1
The CHARGE lamp
flashes.
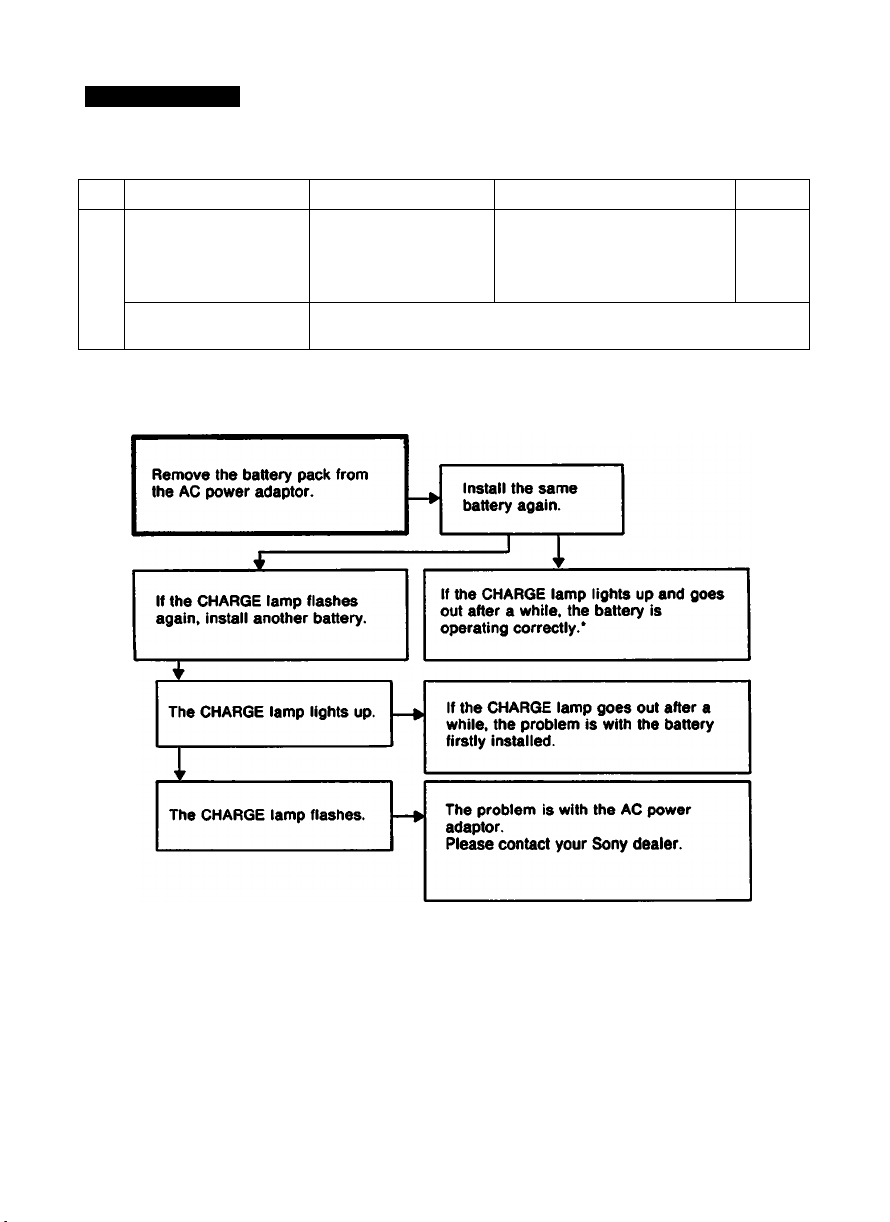
When the CHARGE Lamp Rashes
Check through the following chart.
Corrective Actions
Set the selector to OFF and
disconnect the power cord. After
—
about one minute, reconnect the
power cord and set the selector
to CHARGE again.
See the following chart.
P«0*
7
If you use a battery pack which you have just bought or which has been left unused for a long time,
the CHARGE lamp may flash at the first charging. But this is not a problem. Repeat again to charge
with the same battery pack.
Page 49
Indicators in the Viewfinder
Warning Indicators
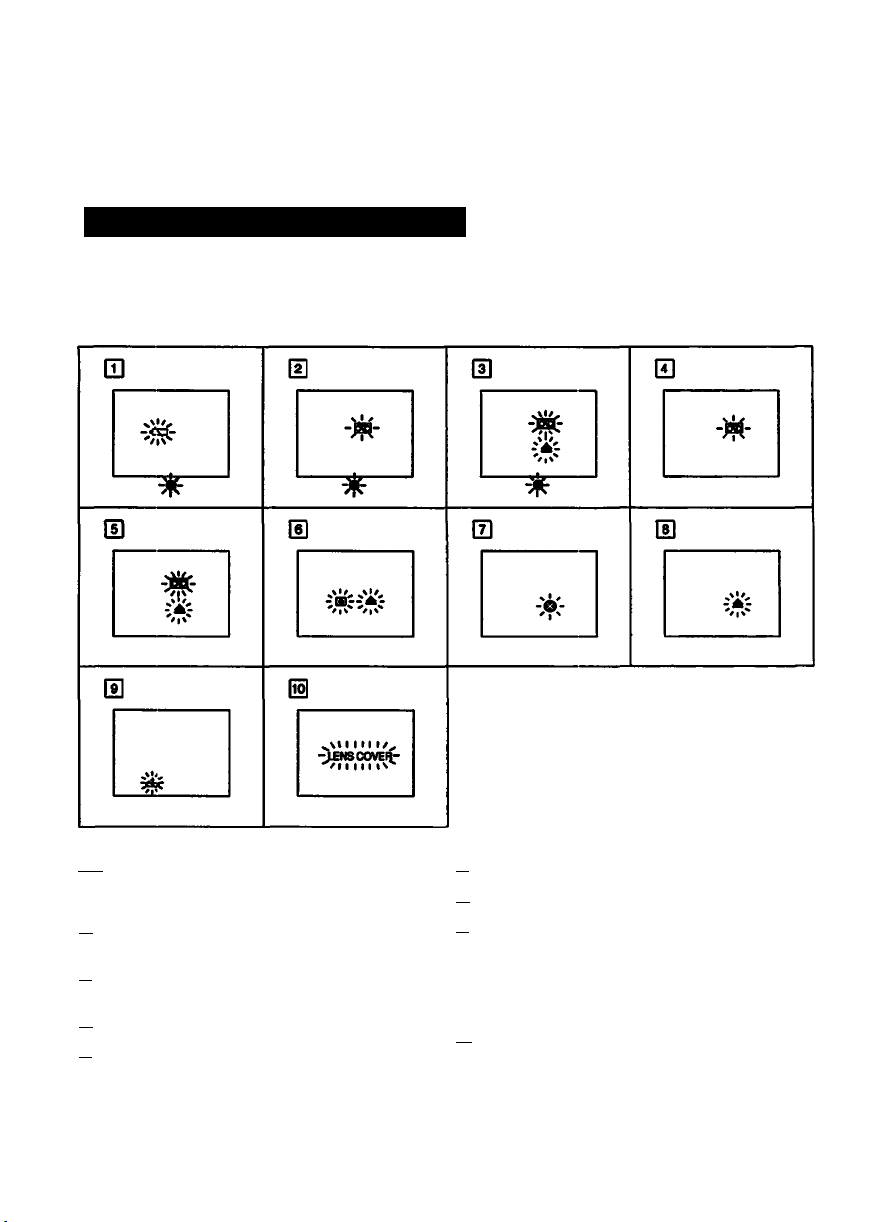
If Indicators flash in the viewfinder or a caution lamp on the camcorder flashes, check the following:
[T| The battery is weak or dead.
Slow flashing: The battery is weak.
Fast flashing: The battery is dead.
[T| The tape is near the end.
The flashing is slow.
[Tl The tape has run out.
The flashing becomes rapid.
[T| No tape has been inserted.
fs] The tab on the tape is out (red).
fs] Moisture condensation has occurred, (p. 36)
pf] The video heads may be contaminated, (p. 34)
fs] Some other troubie has occurred.
Disconnect the power source and contact your
Sony dealer or local authorized facility.
fsl The lithium battery is weak or is not installed,
(p. 11)
[io| The LENS COVER switch is set to CLOSE.
Page 50
Indicators in the Viewfinder
Operation Indicators
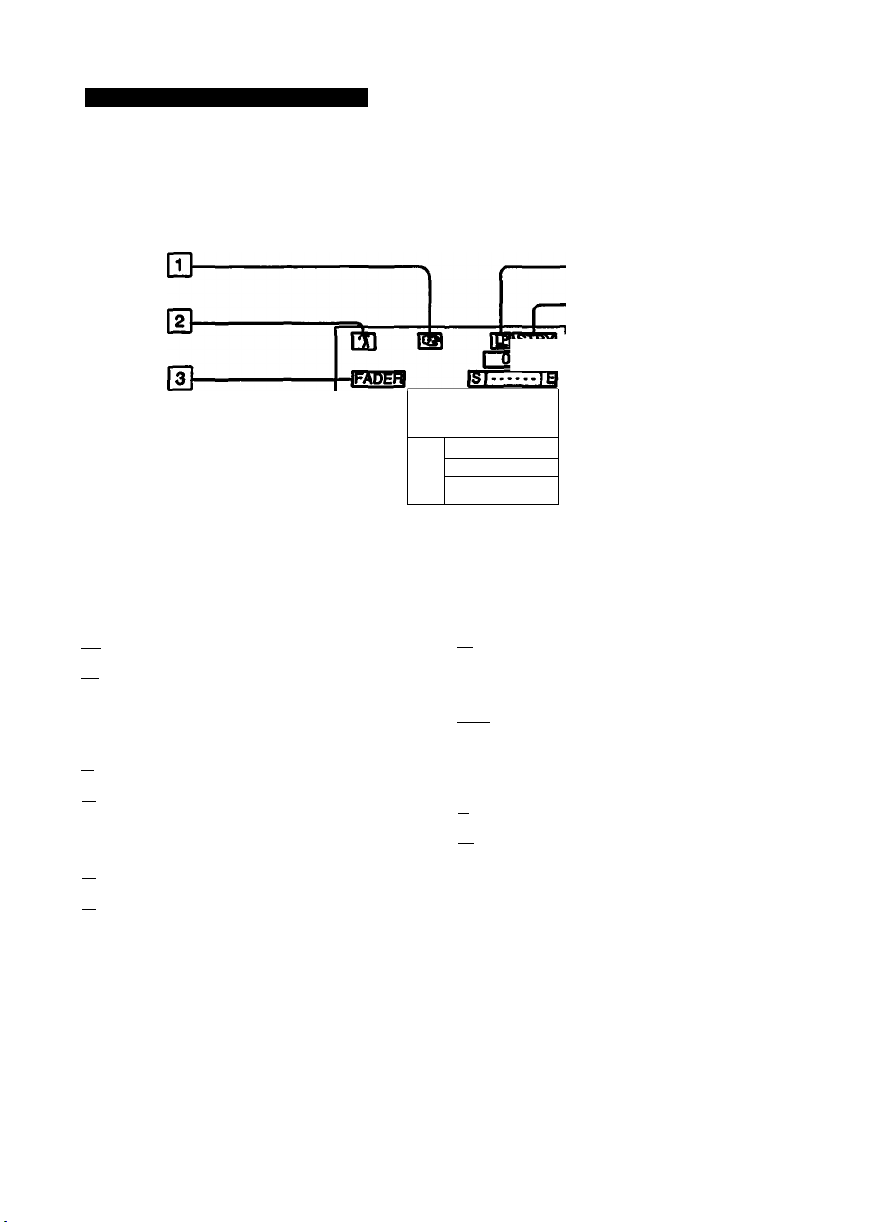
For details on each indicator, refer to the pages indicated in the parenthesis.
■0
lOoaxit-—^
&
m-
H]-
pi~| Manual focusing (p. 27)
|T1 PROGRAM AE indicator (p. 28)
FAOER indicator (p. 30)
0
Power zoom indicator (p. 18)
fs] Warning indicators (p. 49}
IT] Recording lamp/Battery lamp
Q Lights up when playing back a tape recorded
in LP mode
[T| Tape transport mode (p. 16.23)
[T| Tape counter (p. 17)
I
m OAl ran?)
IÙS. PST
1 AUTO DATE
I12.-M.-MAM
t
[io] Remaining tape length indicator
$1
......
»scsc—>-*C
[TT| Remaining battery indicator (p. 8)
|i^ World clock indicator (p. 31)
[i3| AUTO DATE indicator (p. 16)
pt^ Date or Time (p. 12)
HI
-0
Page 51

Index
AC power adaptor
Adjusting viewfinder ....................14
AFM Hi-Fi Sound
AUTO DATE
A/V connecting cable
Battery pack
BEEP
.............
Camera recording
Car battery..................................26
Charging battery
Cleaning video heads
Clock set
Connection
COUNTER RESET
...................
.......................
............................
...................
.......................
..........................
....................................
.................................
..................
.....................
6, 25
34
17
...6
. 15
D.E
DATA SCREEN/DISPLAY
DATETTIME .............................12
EDIT switch
Editing ......................................33
EDITSEARCH ..........................21
EJECT......................................13
Eyecup .................................... 17
...............................
...........
33
FADER.....................................30
Fade-in/Fade-out
Fastforward
High speed shutter mode
HOLD.......................................43
22
...............................
I. J. K. L
LANC
.......................................
Lithium battery ...........................10
LOCK.......................................16
M, N, O, P
16
Manual focus
6
M. FADER ................................30
34
MIC (microphone) Jack
12
Playback on TV..........................22
22
PLAYER
17
Portrait mode
Power sources
Power zoom
PROGRAM AE
24
.............................
..............................
.............................
...........................
..............................
Q.R
Rec review
Remote Commander
REMOTE control Jack ................40
Rewind
RFU adaptor..............................22
................................
.....................................
........................
............
...............
23, 33
.........................
.................
Shoulder strap
30
Skip scan ..................................24
23
Sports mode
28
STANDBY
Standby mode
Still picture .................................24
Supplied accessories
40
T.u.v
Tape counter
Tripod mounting .........................15
Trouble check
Twilight mode.............................28
26
W, X, Y, Z
40
WIDE ANGLE ...........................19
World clock
Zoom........................................18
28
25
18
28
21
43
23
...........................
..............................
................................
...........................
.............................
............................
...............................
....................
44
28
16
16
5
17
46
31
5
0
<
1
a
o.
«
I
51
Page 52
II you have any question about this product, call:
Sony Customer tnlormalton Center
East Coast: 201-930-7669 (SONY) NJ
Central: 708-250-7669 (SONY) IL
West Coast: 714-821-7669 (SONY) CA
or write to:
Sony Customer Information Center
Sony Drive, Mail Drop ttT1-11,
Park Ridge, NJ 07656
Sony Corporation Printed in Japan
 Loading...