

Page 1
SONY®
Video Camera Recorder B
CCD-F301
Operating Instructions
Before operating the unit, please read this manual thoroughly
and retain it for future reference.
3-752-959-21 (1)
Video 8 Handycam
I 1991 by Sony Corporation
Page 2

Owner’s Record
The model and serial numbers are located on the bottom. Record the serial number m the space provided
below Refer to these numbers whenever you call upon your Sony dealer regarding this product
Model No. CCD F301 Serial No
To prevent fire or shock hazard, do not expose the unit to rain or moisture.
This symbol IS intended to
alert the user to the presence
of uninsulated "dangerous
voltage" within the product's
enclosure that may be of
sufficient magnitude to
constitute a nsk of electric
shock to persons.
This symbol is intended to
alert the user to the presence
of important operating and
maintenance (servicing)
instructions in the literature
accompanying the appliance.
For the customers in Canada
This apparatus complies with the Class B limits for radio noise emissions set out m Radio
Interference Regulations
INFORMATION FOR THE CUSTOMERS IN
THE U.S.A.
This equipment generates and uses radio
frequency energy and if not installed and used
properly, that is, in strict accordance with the
manufacturer s instructions, may cause
inlerierence to radio and television reception. It
has been type tested and found to comply with
the limits for a Class B computing device m
accordance with the specifications in Subpart J of
Part 15 of FCC Rules, which are designed to
provide reasonable protection against such
interference in a residential installation. However,
there IS no guarantee that interference will not
occur in a particular installation. If this equipment
does cause interference to radio or television
reception, which can be determined by turning
the equipment off and on, the user is encouraged
to try to correct the interference by one or more of
the following measures:
Reorient the receiving antenna
Relocate the equipment with respect to the
receiver
Move the equipment away from the receiver
Plug the equipment into a different outlet so
that equipment and receiver are on different
branch circuits
If necessary, the user should consult the dealer
or an experienced radio/television technician for
additional suggestions. The user may find the
following (»Oklet prepared by the Federal
Communications Commission helpful.
" How to Identity and Resolve Radio-TV
Interference Problems ".
This booklet is available from the U.S.
Government Printing Office. Washington. DC
20402, Stock No. 004-000-00345-4
Table of Contents
Getting Started
Introduction
..................
Identifying the parts ...................................
Preparing your camcorder
Connecting the power sources
Setting the date and lime ...........................
Inserting tapes
Adjusting the viewfinder lens ..................... 21
Optnrting th* Camera Section
Recording a picture using automatic
adjustments
To record the date and lime
Playing back the picture instantly
Recording a picture using manual
adjustments
Selecting the automafic'manual adjustment
Manual focusing ..............................................
Ad|usting the white balance
Selling shutter speed .................................
Shooting with backlighting
Zooming ....
Close ups (Auto-focusing in macro) .. . .
Fade in and lade-out
Recording the age of your child
Operating the VCR Saetton
Connections tor playback . .
Playing back a tape
Editing onto another VCR................
Recording from another VCR o' a
Insert recording
Using the tape counter
Olhara
Hints for better shooting ... .... 52
Notes and precautions . . 54
Using your camcorder abroad . 56
Specifications........................................ ... 57
Trouble'check
Indications inside the viewfinder
List of beeps
.... 4
................
........................
................
................
....................
.........................
....................
...............
.............. .....................
..........................................
.............
.........
back cover
back cover
5
11
12
18
20
58
Page 3

Introduction
How the Manual is Organized How this Manual Works
The tirsi section of the manual explains ihe
preliminary steps necessary to prepare lor
shooting and playing back
Other sections include shooting procedures that
show how to use the features and functions of
your camcorder II you are a beginner, slan with
"Recording a picture using automatic
ad|ustmenis If you are very tamiliar with
camcorders, try to shoot your picture with mat\ual
ad|ustmenis as well as automatic adjustment
If you want to record right away, see pages 11.
22. and 28
The manual also includes how to play back a
picture on a TV how to edit your original 8mm
tape onto another uideo tape, and how to record
a picture from another video tape or TV
If you have any problems during operation, see
the Trouble check section.
Use the information below to help you follow the
instructions in this manual.
• Controls and settings on the camcorder are
shown in capital letters.
ex. Sel POWER to CAMERA.
• The letter in an illustration corresponds to the
letter in the text:
ex. (A.1)of(B)
• The step number in an illustration corresponds
to the step number m the text.
• Notes and cautions are enclosed with lines:
Note on battery life
Battery will not last as long in cold places
Supplied Accessories
The camcorder is packed together with Ihe
following accessories. Check to see that
everything is corrtained in the package.
• Remote Commander HMT-506 (1)
• Size AA {R6) battery for Remote
Commander (2)
. Battery pack NP-66H(1)
• AC power adaptor AC-V60Af60A (1)
• Lithium battery CR2025 (1)
. RFU adaptor RFU-90UC (1)
• Lens cap (1)*
• Shoulder strap (1)
‘Atfached to the camcorder
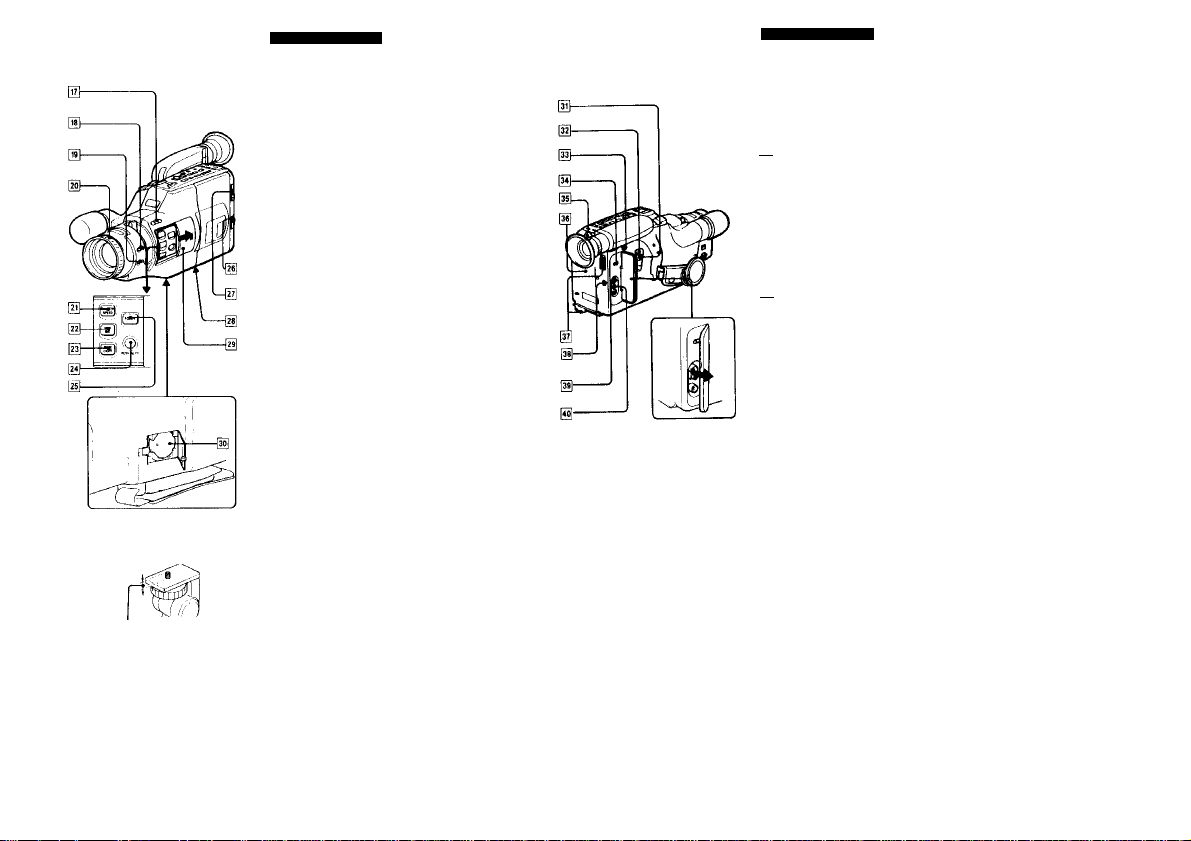
Identifying the Parts
For details on the use of each part, refer to the
pages indicated m the circle
(A-1)
[]] Eyecup
[~2l Viewfinder lens adjustment ring ф
|~з] Viewfinder (back cover)
The picture being recorded or played back
can be monitored in black and white here
Also, indicators which shows caution and
function mode appear here
[7] Power zoom button ф
|Т| Accessory shoe
Attach a video light, external microphone,
etc (not supplied)
[T] Zoom lever ф
DATA SCREEN button Ф
(TJ BEEP switch ФФ
Normally sel to "ON to activate the
recording starVstop and warning beep.
To deactivate the beep, sel the switch to
"OFF".
[fj EDIT switch Ф
Щ POWER switch
CAMERA, for camera recording
VTR. for playing back or editing tapes
OFF: power off
[IT] Tape transport buttons ф ф
>-'II^FRAME (forward direclion/trame-by-
frame in forward direcfionj
!► SLOW
L (stop)
REW (rewind)
i (playback)
Mf FF (fast forward)
II PAUSE
[T^ • REC switch Ф
DATE {«) and TIME (NEXT) buttons ф
AOE'EVENT button Ф
Qs] ZERO MEM (zero memory) button ф ф
[Тб] COUNTER RESET button ФФ ^
Page 4
m 6 5 mm (П.32 inches)
Identifying the Parts
[uj EDITSEARCH (and ©recording review)
button Ф
[l8j FADER button ф
MACRO AF (AutO'focusing in macro)
button Ф
Press to record close-ups with automatic
focusing.
[2^ Lens hood (Focus ring) ф
SHUTTER SPEED button Ф
WHT BAL (while balance) button ф
[2^ BACK LIGHT button ф
PUSH AUTO button Ф
FOCUS button Ф
[2^ ВАТТ (battery eject) knob ф
EJECT (cassette eject) кпоЬф
[is] Tripod receptacle (bottom)
AUTO LOCK cover ф
To adjust the control such as focus, white
balance, back light, or shutter speed
manually, slide open this cover so that the
buttons inside can be seen.
Lithium battery compartment (bottom) ф
Note on attaching a tripod (A-3)
When atlaclimg n iripod olhei ihan Sony s make si
iiiat the length oi the camera mounting screw is les
man 6.5 mm ¡9 .32 inchest Otherwise, the screw m
damage Um inner parts oi the camcorder
Identifying the Parte
(A-4)
[Ji] START/STOP button ®
Press to start and stop camera recording
STANDBY switch $
Slide up to set the camcorder to the
recording standby mode
[33] PUSH/SLIDE button (tor adjusting the
viewfinder)
Slide the viewfinder to a suitable position.
IN/OUT (video and audio input/oulpul)
selector ®
Select the (unction of the VIDEO«AUDIO IN/
OUT lacks, input or output.
Camera recording/battery lamp
Lights up during recording and blinks when
the battery becomes weak
[36| Battery mounting surface 9
Hooks for shoulder strap
B REMOTE COMMANDER ON/OFF switch
e
Set to ' ON' when using the supplied wireless
Remote Commander When you do not use
the Commander, set to "OFF" to keep the
unit from being operated incorrectly by
another Commander etc
VIDEO*AUOIO IN/OUT (input/output) jacks
(phono jacks) ®
RFU DC OUT (RFU adaptor DC output)
jack (special minijack)
•S'
Page 5
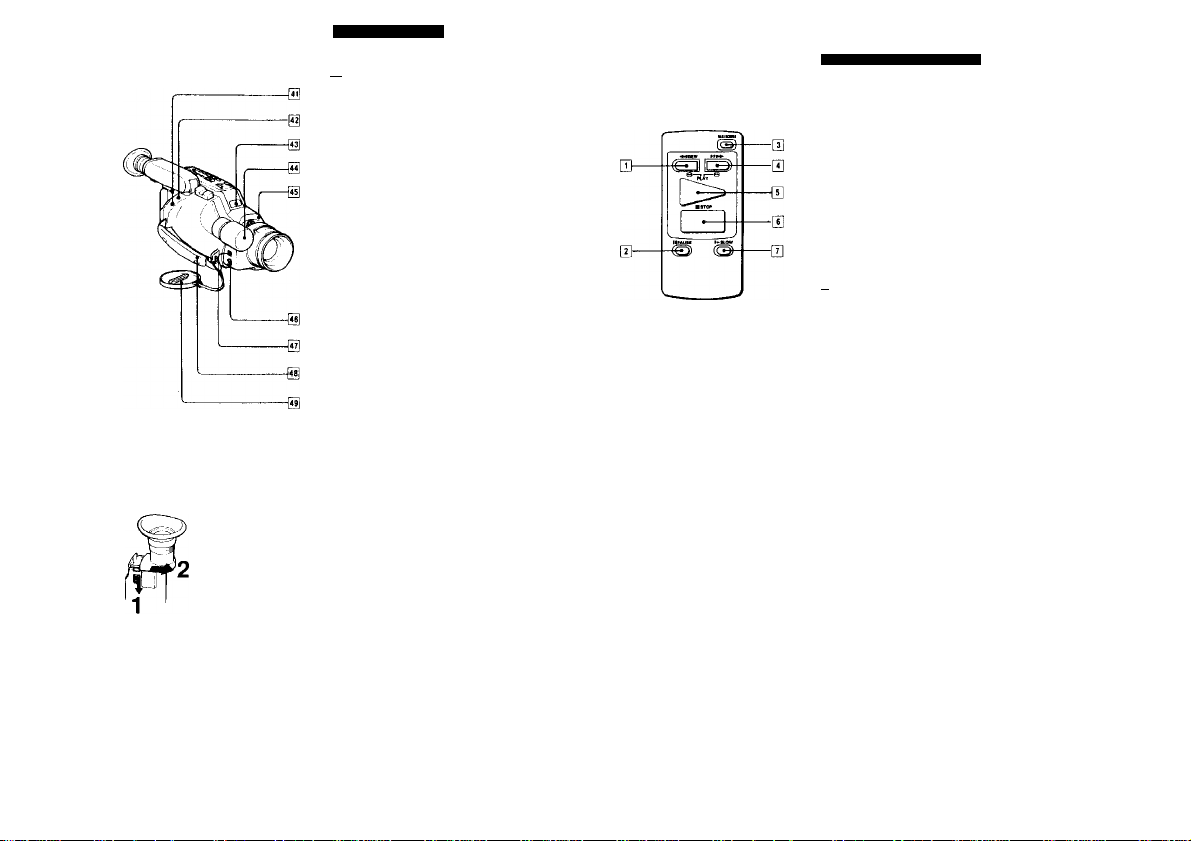
Identifvina th« Parts
(A-5)
!*1| <9 (earphone) jack (minijack) 9
C REMOTE control connector (stereo mini-minijack)
Conned a wired remote control unit or a
editing controller, etc here.
Remote sensor 0
Built-In microphone (monaural)
Camera recording/battery lamp 0
Lights up during recording and blinks when
the battery becomes weak.
REC START/STOP button (for
low-position shooting)
Use this button for easier low-position
recording.
BUILT-IN MIC (microphone) switch 0
Set to "WIND when recording m a strong
Grip strap
Lens cap
About <r (LANC)
U stands lor Local Application Control Bus System
The U connector is used lor controlling the tape
transport of video equipment and peripherals connected
to It This connector has the same function as the
connectors indicated as CONTROL L or REMOTE
To remove dust from inside the viewfinder (A-6)
Delach the eyecup as illustrated and dean the surface
oi the screen with a blower
0
0
0
(A-7)
Wireless Remote Commander
You can play back a tape from a distance The
buttons on the Commander with the same name
or mark as those on the canicordet have the
same function
When you use the Commander
Be sure to set the REMOTE COMMANDER ON/
OFF switch on the camcorder to ON . and then
start operation ol the camcorder, with the
Commander pointing towards the remote sensor.
(See page lOl
(A-7)
[T] -44 REW (rewind) button 0. 0
[T] II PAUSE button 0,0
[3] DATA SCREEN button
r*| FF (fast forward) button 0.0
[5] I PLAY button 0
■ STOP button 0
¡Tj t* SLOW button 0
0
Page 6
Idantitvina the Parte
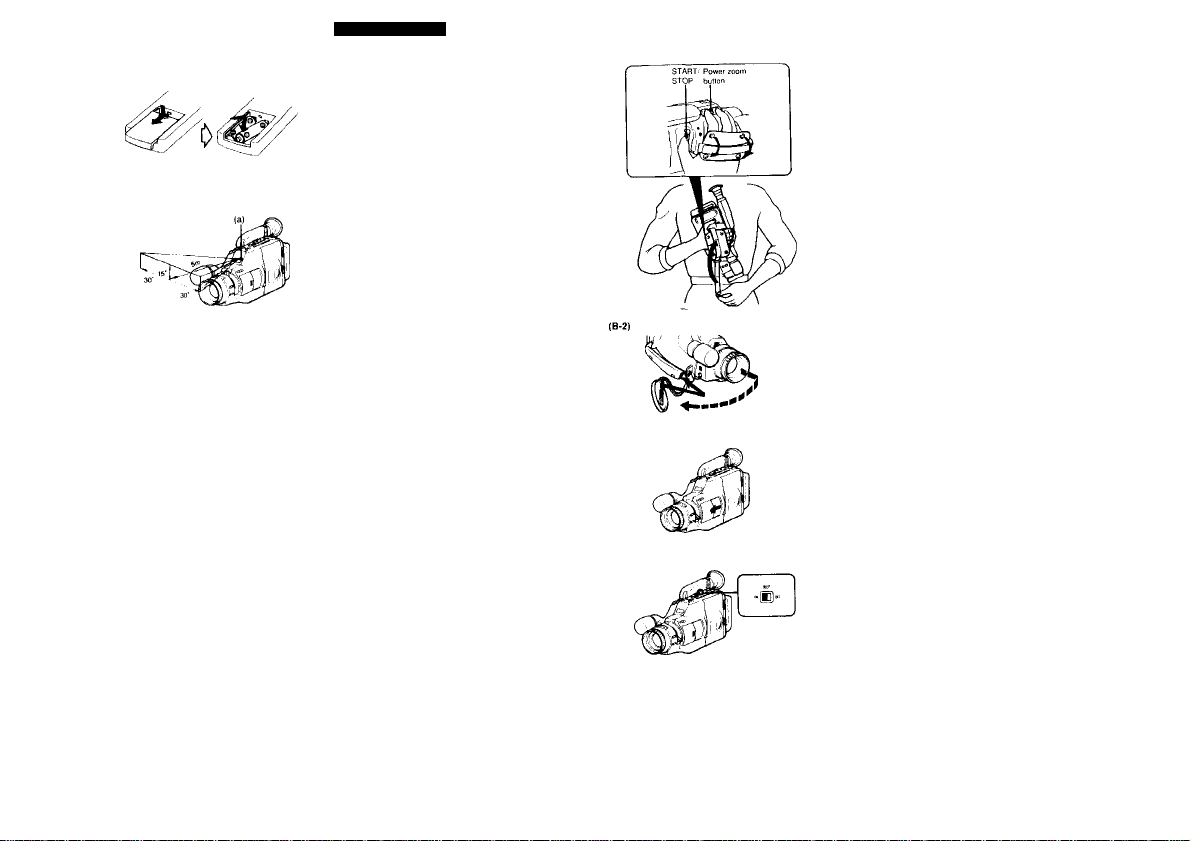
Inserting {»tieries (A-8)
Insert two size AA (R6) ballenes with polarity
positioned correctly
Remotely controllable area (A-9J
Point the Commander towards the remote sensor
Note on batteries
With normal operation, batteries will last lor about si<
months However, it the commander will not be used tor
a long period, remove the batteries to avoid possible
damage from battery leakage
Notes on the Remote Commander
• Keep the remote sensor away from the strong light
source such as direct sunlight or illumination. Remote
control with the Commander may not be effective
• Be sure that there is no obstacle between the remote
sensor and Commander
• The command mode ol the Commander is VTR2
Avoid to use the Sony VCRs with the same command
mode at the same time
• Be sure to set the REMOTE COMMANDER ON,OFF
switch on the camcorder to OFF when you conned
the receiver ol a remote control kit (not supplied) to
the REMOTE C control conneclor
(B-1)
Before recording, prepare your camcorder
following the steps below.
1 Conned a power source, »see page 12
2 Set the dale and time .see page 18
3 Insert a tape. -* see page 20
4 Adjust the viewfinder lens. -* see page 21
5 Adiust the length of the grip strap (B-1)
6 Take off fhe lens cap and attach it to the grip
strap (B-2)
7 Close me AUTO LOCK cover (B-3)
The locus, white balance, back light, and
shutter speed will be adjusted automatically.
II you warn to adjust them manually, see
page 28
Using the BEEP switch
Normally, the BEEP switch should be set to ON
Beep will sound when you start and slop recording, and
it any dilfiruUy should arise during operation
II you want to deadivaie tiie beep, sei ihe BEEP switch
to OFF (B-4)
Note
• Beeps are not recorded on the lape
• For warning beep. See page 58
When you have completed these preparations, go
to page 22.
10
Page 7
First, Choose the Power Sources
Accessory to be used
Battery par.k MP-66H
(supplied).
NP 77H, NP.77, or NP 55
Battery case EBP 55
AC power adaptor AC V6O1
V60A (supplied). AC V30. or
AC V55
DC pack DCP-77, or AC power
adaptor AC V55 and car battery
cord DCC 16AW
Note on power sources
Disconnecting the power source or removing the battery
pack during recording or playback may damage the
inserted tape II disconnected, supply the power again
(C-2)
I Preparing your camcorder 1
Connecting the Power Sources
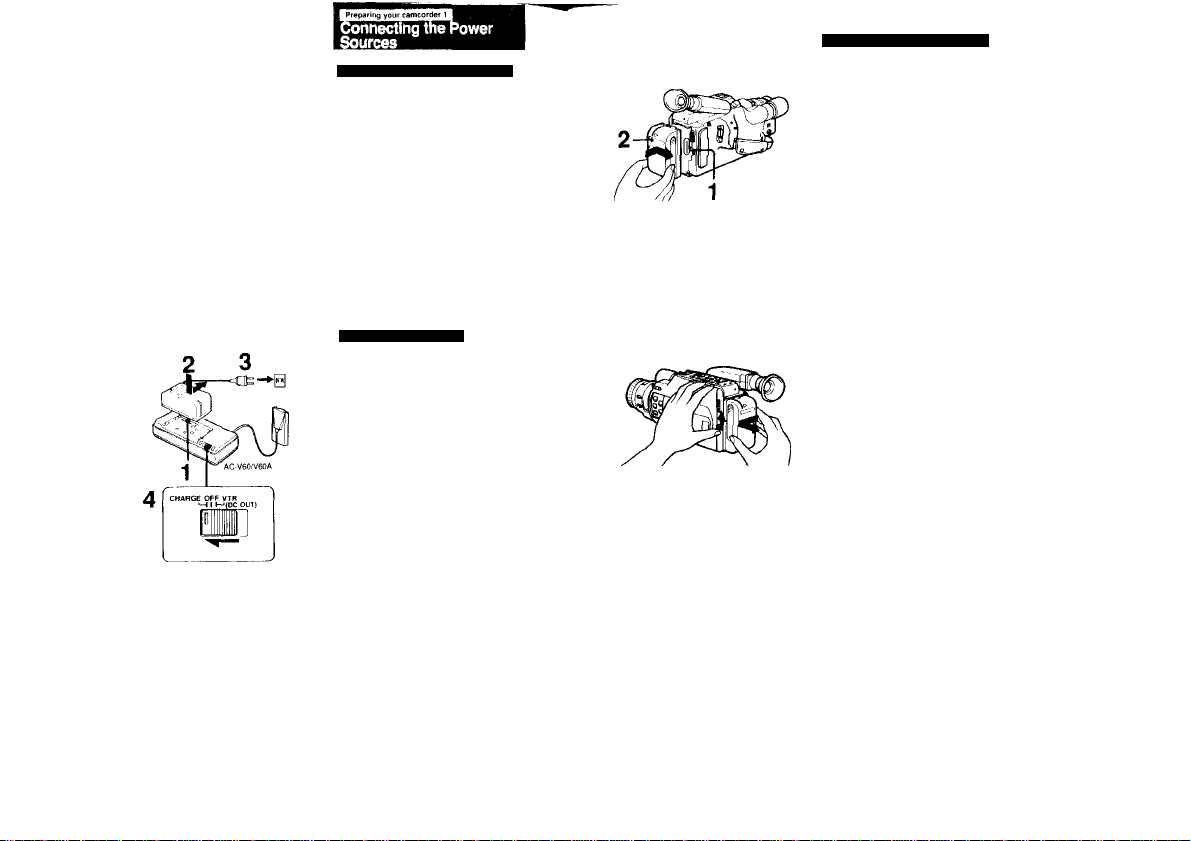
Mount the battery pack on the camcorder. (C-2)
1 Align the right side of the battery pack
with the tine on the camcorder.
2 Slide in the battery pack to the right.
Notes
» Make sure the battery fils completely on the
mour^ting surface of the camcorder
Imperfect fit may damage the projections
on the camcorder
• If your nose touches the battery pack,
adjust the position of the viewfinder by
sliding it while pressing PUSH SLIDE.
Battery life
A fully charged battery pack lasts for
Using the Battery Pack
Charge the battery pack. (C-1)
1 Align the right side of the battery pack
with the line on the AC power adaptor.
2 Slide in the battery pack in the direction of
the arrow.
3 Connect the AC power adaptor to a wall
outlet.
4 Set the CHARGE/VTR selector on the
adaptor to CHARGE.
Required
charging
See the instruction manual ot the AC power
adaptor lor details
12
When (he baffery becorrres weak. Ihe C\i
indication and red lamp blink in the viewfinder
(C-3)
Also the camera recording-battery lamps on the
camcorder blmk
Replace the battery with a lully charged one
To remove the battery pack (C-4)
While sliding BATT up. slide out the battery pack
to the left
Other options for charging
• AC V55 AC powei adaptor
You can charge two battery packs simultaneously
• BC 55. BC 77 portable battery charger.
You can charge a battery pack on 100 - 2A0V AC
• DC V30 car battery charger
You can charge a battery pack by connecting the car
battery charger to the cigarette lighter socket
13
Page 8
(C-5)
[ Preparing your camcorder 1
ConnMtlng the Power Sources
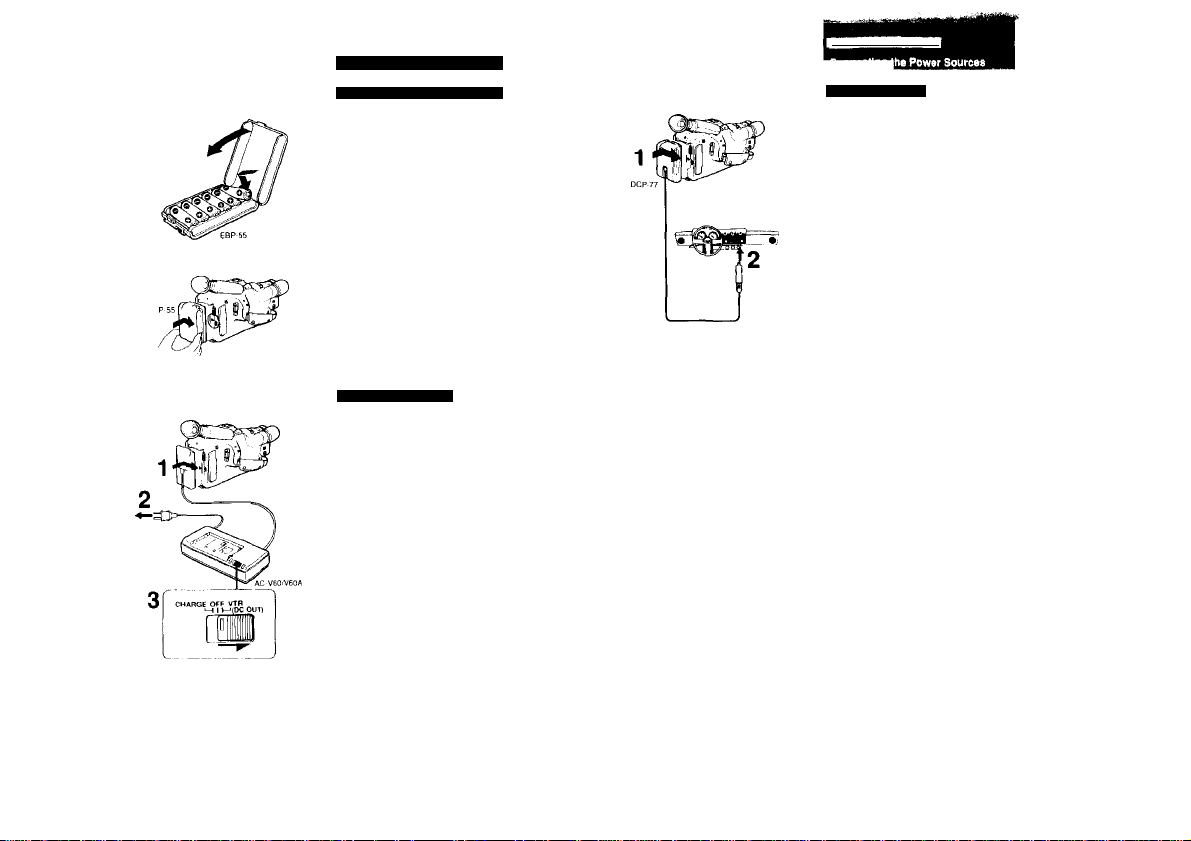
Using Alkaline Batteries
(C-5)
1
The EBP-55 battery case is required (not
supplied).
1 Insert the size AA (R6) alkaline batteries
Into the battery case.
2 Attach the case in the same way as the
battery pack.
Battery life (When using Sony alkaline
batteries); approx. *«5 minutes
(continuous recording when used indoors)
To remove the battery case
Proceed in the same way as the battery pack.
See page 13
Notes on battery Mfe
• Batteries will not last as long in cold places
• No indication appears in the viewlmder to wai
weak battery
Using House Current
(C-6)
The supplied AC-V60.'V60A AC power adaptor is
required.
1 Align the right side of the connecting plate
with the line on the camcorder, and slide It
in to the right.
2 Connect the AC power adaptor to a wall
outlet.
3 Set the CHARGE/VTR selector to VTR (DC
OUT).
See the instruction manual of the AC power
adaptor lor details.
To remove the connecting plate
Proceed in the same way as the battery pack
See page 13
The AC V30 01 AC-V55 AC power adaploi can also be
(C-7)
Using Car Battery
(C-7)
The DCP-77 DC pack is required (not supplied)
1 Align the right side of the DC pack with
the line on the camcorder, and slide It in to
the right.
2 Connect the cord to the cigarette tighter
socket of a car (12 V or 24 V).
To remove the DC pack
While pressing the ВАТТ knob on the camcorder,
slide the DC pack to the left and pull out
other options
• The AC V55 AC power adaptor and the DCC I6AW
car battery cord cati also be used to operate this
camcorder on a 12 V or 24 V car battery
• The DCP 55 DC pack can also be used to operate
this camcorder on a 12 V or 24 V car battery
14
15
Page 9
Page 10
(D-1)
Setting the Date and Time
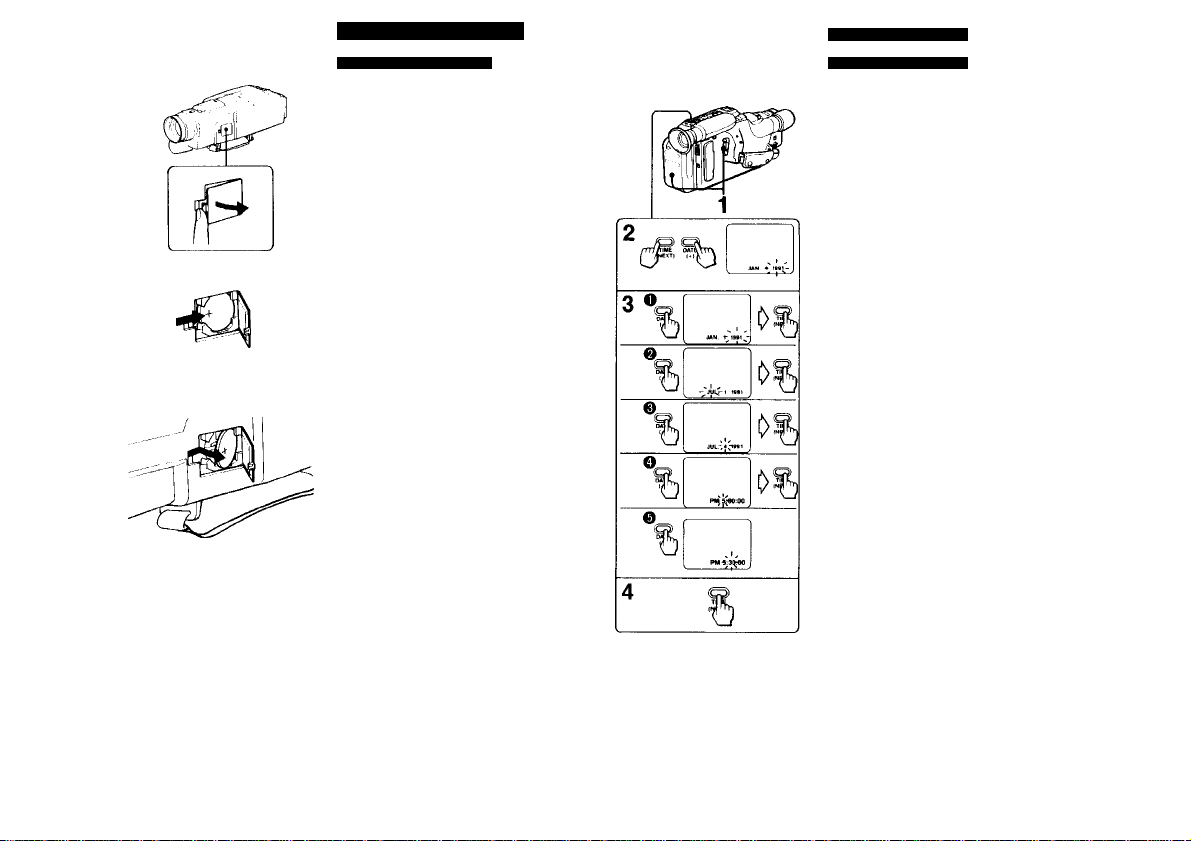
Inserting the Lithium Battery
(D-1)
1
This camcorder uses a lithium battery to activate
the clock, and to keep birthdays/anniversary in
memory Before operating it for the first time,
install the supplied lithium battery.
1 Open the cover of the lithium battery
compartment on the bottom of the
2 Install the supplied CR202S lithium battery
with the + side facing out.
3 Close the cover.
To remove the lithium battery (D-2)
Press the side of the battery in the direction as
indicated for installation
Note on lithium battery life
The battery will last for approximately 1 year m
When the lithium battery becomes weak, the c\-7
indication will blink in the viewfinder screen tor about 5
seconds (when POWER is set lo CAMERA). (D-3)
In this case replace the battery with a Sony CR2025
or a Duracell DL-2025 lithium battery. Use of
another battery may present a risk ot tire or
explosian. While replacing the lithium battery, keep the
battery pack or other power source attached II ihe
battery pack or other power source was not attached
while replacing, readiusiments of the date. time,
birthdays and anniversary are necessary
Cautions
• Keep the lithium battery out ol the reach of children
Should the battery be swallowed, immedialely consult
• Wipe Ihe battery with a dry doth lo assure a good
contact
• Be sure to observe the correct polaniy when mstallrng
I WARNING
I Battery may enplode it mistreated Do not recharge.
I disassemble, or dispose of in lire
Setting the Date and Time
Setting the Date and Time
(0-4)
1
Make sure that a power source Is
connected, set POWER to CAMERA, and
slide STANDBY up.
Press DATE (f) and TIME (NEXT)
simultaneously for more than 1.5 seconds
until the date Indication blinks In the
viewfinder screen.
DATE now functions as + (lo advance
numbers) and TIME functions as NEXT (to
execute).
If you missed Ihe number you wanted, keep <-
pressed. The digit will return lo the original
3 Adjust the year, month, day, hour, and
minute, in that order.
First ad|usl Ihe blinking digits with and then
press NEXT
4 Press NEXT to set the second to “OO".
The dock starts operating
To correct dale and time setting
Repeat steps 2 to 4
To advance the digits faster
Keep + pressed.
To check the preset date and time
Press DATE or TIME. When you press the same
button again, the indication goes oh '
I Preparing your camcorder 2
19
Page 11

Inserting Tapes
1 Make sure a power source is connected. 2 While pressing the small button, slide
EJECT.
The cassede holder will automatically open
Do not puli the cassette holder forcibly when it
IS moving.
3 Insert a tape with the window facing
outside.
4 Press the PUSH mark to close the cassette
holder.
Ejecting the Tape
1 Make sure thaï a power source is connected
2 While pressing the small button, slide EJECT.
3 The cassette holder will automatically open.
4 Take out the tape and press the PUSH mark to
close the cassette holder.
Preventing Accidental Erasure
(E-2)
Slide the tab in exposing the red mark on the
cassette, this will prevent recording To re-record
on this tape, slide the tab back out covering the
red mark
It you intend to start camera recordig with the red
mark exposed, the and ± indications blink in
the viewfinder and beeps sound tor about 5
seconds
Notes on handling tapes
• Never insert anything rn the small hote.s on the
rear ol the cassette. These holes are used to
sense the type and thickness of the tape, or if
the red mark is exposed or covered, etc.
• Store tapes m their cases and keep them in an
upright position to prevent intrusion ol dust and
uneven winding.
Adjusting the Viewfinder Lens
The position ol the viewfinder lens lor optimum
vision vanes depending on the person Adjust it
when using the camcorder lor the first time, or
when using it after someone else. (F)
1 Make sure a power is connected.
2 White pressing the green button, set
POWER to CAMERA.
3 Insert a tape, (page 20)
4 Slide STANDBY up.
5 Turn the viewfinder lens adjustment ring
so that the “STBY" displayed In the
viewfinder screen comes into sharp locus.
20
21
Page 12

Recording a Picture Using
Automatic Adjustment
Make Sure liie preparations on page 11 are
complete belore recording
Start Recording
(G-1)
Before recording once-only ' events, we strongly
recomrrend making a trial recording and
checking that everything is working perfectly.
Make sure BEEP is set to ON. Beep will sound
when you start and slop recording.
1 Hold the camcorder as in the figure.
Put your hand through the grip strap and
make sure that your thumb can easily touch
START.STOP.
2 Remove the lens cap and attach it to the
grip strap.
3 While pressing the green button, set
POWER to CAMERA.
4 Close the AUTO LOCK cover and turn the
zoom lever downwards.
5 Slide STANDBY up.
STBY appears in the viewfinder The
camcorder is now in the standby mode, and
focus IS adjusted automatically inside the
dotted frame m the illustration (auto-focus
adjusting range! Do not turn or stop the focus
ring forcibly
■ The dolled frame is not displayed in the
viewfinder.
6 Press START STOP.
A beep sounds. REC appears and the red
lamp lights up in the viewfinder and the
camera recording battery lamps light on the
camcorder The camcorder is now recording
To pause (to stop momentarily)
Press START STOP again.
Two beeps sound and STBY appears m the
viewfinder The camcorder is m standby mode
again
To stop
Slide STANDBY down and set POWER to OFF
Recording a Picture Using
Automatic Adjustment
For tow-positlon shooting (G-2)
The viewfinder can be turned up 90 degrees.
Use the REC START STOP button on the front
right of the camcorder
1 Press REC START STOP to start recording.
2 Press It again to stop recording
If the tape reaches near the end during recording
Ttie E?t3 indication in the viewfinder and the camera
recording battery lamps on the camcorder blink slowly
When the tape reaches Us end blinking becomes rapid
and beeps sound lor about 5 seconds (it the BEEP
witch IS
loONi
Notes on recording
• To record from the beginning of the tape, run the lap
lor about 15 seconds before recording Tbis will avon
missing the starling poinl when the tape is played
• If POWER IS moved during recording, the tape will
• When moving from indoors to outdoors, or vice vers;
slide STANDBY up and point the camcorder at a
while object for about 15 seconds so lhal Ihe white
balance is properly adjusted
Note on standby mode
If you leave the camcorder m the standby mode tor 5
minutes or more, the camcorder will be automatically
luined off To resume the standby mode, slide
STANDBY down once and slide it up agam To start
recording, press START STOP directly.
Note on light sources
If you are shooting a subject under bright condiiions jus
alter shooting m a dark place, the picture may not
appear in the viewfinder In this case point the
camcorder to another direchon
This camcorder records in the SP (approilmaiely
1.43 cm/$ecoryd) and can play back in the SP mode
and the LP mode (apprexlmateiy 0.72 cm/second).
The quality of the playback picture In thé LP mode,
however, will not be as good as that In the SP mode.
PCM recording or playback is irei possible wfth this
camcorder.
The PDM sound recorded or after-recorded with
another video recorder cannot be played back with
this eamcoidèr
?2
23
Page 13

Recording a Picture Using
Automatic Adjustment
To Record Date and Time
(G-3)
Press DATE for the date indication or TIME lor
the time indication during camera recording or
when in recording pause mode.
The date or time displayed m the viewfinder is
recorded with the picture
To stop recording date or time
Press DATE or TIME again.
The picture recording continues
When There is a Strong Wind
(G-4)
Set BUILT-IN MIC to WIND.
The noise from the wind wiii be reduced.
After recording, set ¡1 to the upper position (green
mark).
To Check the Last Portion of the Previous Recording
(G-5)
1 Set the camcorder in the recording pause
mode by pressing the START/STOP
button.
2 Press-side of EDITSEARCH(gl)
momentarily.
The last few seconds of the recorded portion
are rewound and then the recorded picture
appears in the viewfinder After a tew
seconds of playback, the camcorder goes
back to recording pause mode
If the picture has not been recorded
The video heads may be contammaled Clean the
heads using the Sony V8-25CI.H video head cleaning
cassette or equivalent
To Re-record a Previously Recorded
Portion
1 Slide STANDBY up to set the camcorder to
the standby mode.
2 Look in the viewfinder and find the point
from where you want to begin the
recording;
Keep pressing the * side ol EDITSEARCH to
advance the picture at a normal playback
speed, or the - side to reverse the picture
3 At the desired point, release EDIT
SEARCH.
4 Press START/STOP,
A beep sounds and the recording begins
To pause
Press START/STOP again.
To stop
Slide STANDBY down
The picture is connected smoothly after the pre
recorded portion even if STANDBY is slid down
and slid up, or even if the power is turned off and
on again, provided that the tape is not removed
24
•25
Page 14

(G-7)
Recording a Picture Using
Automatic Ad)ustment
To Re-record a Picture in the Middle
of a Recorded Tape (Insert
Recording)
(G-7)
1 While pressing the green button, set
POWER to CAMERA.
2 Slide STANDBY up to set the camcorder to
standby mode.
3 While looking in the viewfinder, keep
pressing the or - side of EDITSEARCH
and release the button where you want to
end the insertion.
The camcorder is set to standby mode again.
4 Press COUNTER RESET.
The counter is reset to zero.
5 While looking In the viewfinder, keep
pressing the - side of EDITSEARCH and
release the button at the point where you
want to start the Insertion.
6 Press ZERO MEM.
The insert ending point is stored m memory.
7 Press START'STOP.
A beep sounds and insert recording begins.
Then the recording stops automatically near
the counter zero point.
To cancel the ZERO MEM
Press ZERO MEM.
Playing Back the Picture Instantly
(G-8)
You can check the recorded picture in the
viewfinder Sound is not heard
1 While pressing the green button, set
POWER to CAMERA.
2 Slide STANDBY up.
3 Keep pressing the «or - side of EDIT-
SEARCH to play back the picture.
r side to view the playback picture
- side to view the playback picture in reverse
To slop playback
Release EDITSEARCH
To monitor the sound while viewing the playback
picture in the viewfinder
Connect an earphone to the ® lack
1 While pressing the green button, set POWER to VTR
2 Press MM to rewind the tape and press i where you
3 Press to Stan playback
26
27
Page 15

Selecting the Automatic/ Manual Adjustment
When you clost^ the AUTO LOCK cover, ihe
locus, white balance, and iris are adjusted
autoniaiically and Ihe shutter speed is set to l '60
The automatic (unction offers you worry-free
operation under most shooting conditions. But
under certain circumstances, manual adjustment
IS better for effective recording. For manual
adjustment, open the AUTO LOCK cover and
select an appropriate setting
Looking Over Each Button
(H-1)
FOCUS:
Press to set Ihe camcorder in Ihe manual focusing
mode.
Once the focus is adjusted, the setting is locked
(See page 29)
PUSH AUTO:
Keep pressing to achieve autofocusing
temporarily in Ihe manual (ocusing mode.
(See page 30 )
WHT BAL:
Press to lock the white balance in the •
(outdoors). (indoors), or HOLD mode The tone
of colors IS fiired regardless of the lighting
condition (See page 3t .)
SHUTTER SPEED:
Press to increase the shutter speed to record a
last moving sub|ect. such as golf or tennis swing,
dearly (See page 33 )
BACK LIGHT:
Press when a subject appears dark against a
bright background (See page 34)
Even if you open the AUTO LOCK cover
The setting ol each function is the same as the
automatic adtustmenl gntil /ou change it
Notes
• Even when you set POWER to OFF. previous settings
ate retained They are cancelled if the power source is
disconnected lo' more than 5 minutes
• It you Close the AUlO LOCK cover alter you have
made manual ad|ustment anti then open it again the
previous settings for manual adjustment wilt be
Manual Focusing
When you dose the AUTO LOCK cover, the
autofocusing functions and you can easily get a
focused picture under most shooting conditions
Bui manual focusing is recommended in the
following cases
|aj lo [i] correspond lo the illustrations (1-1)
|a] Insufficient light
|bj Too much brightness behind the subieci
[c] Subjects with little contrast -- wall, sky, elc.
[d) One subject is close: the other is in the
center, but at a distance
[ej Subjects beyond nets, etc., or another subject
passes in front of the camcorder
|f] Horizontal stripes
[g] Subject through frosted glass
[h] Bright subject or subject reflecting light
(i| High contrast behind the subject (The
background may be focused )
[j) Under the following circumstances
• When using conversion lenses or effect filters
• When shooting a stationary sub)ect using a
tripod
• To save battery wear
Autofocusing does not lurfction momentarily when:
• The selling ol the shutter speed is changed.
• Back fight IS adjusted manually
• Lighting conditions change quickly.
• Zooming is done from wide-range lo
This camcorder keeps m locus by referring ic
picture contrast, which is weak in the above s
* •
29
Page 16

Manual Focusing
Focusing Manually
1 Slide open the AUTO LOCK cover.
2 Press FOCUS.
The indication appears m the viewfinder,
3 Turn the manual zoom lever fully to the
telephoto position.
4 Turn the focus ring to achieve sharp
focus.
5 Set the desired shot length using the
manual zoom lever while pressing the
button on it.
Shooting with autofocusing momentarily (I-3)
While shooting with manual focusing, press
PUSH AUTO.
The aulofocus functions while you are pressing
the button. When you release the button, manual
focusing will be resumed. Use this button when
you change the focus from one subject to
another. The focusing performs naturally.
The previous settings of the shutter speed, white
balance, and back light are retained.
Some helpful hints
• When shooting in relatively dark places such as
indoors, the depth ol field in proper locus is very
shallow For best results, shoot at wide angles atter
focusing in telephoto
♦ When shooting a scene with tots of movement in
bright light set the zoom lever to the wide-angle
position and the locus ring to 2 m
(J-1)
Adjusting the White Balance
When you close the AUTO LOCK cover, the auto
white balance function of this camcorder adjusts
the picture to natural colors under most shooting
conditions. However, in the conditions listed
below, adjust the white balance manually.
[a] to [f] correspond to the illustrations, (d-1)
Cor>dilions
Lighting conditions change
[a]
Too bright, such as in
|b]
photograph studios
Monochromatic subject or
[cl
background
Under a sodium lamp
id)
Under a mercury lamp
Under a color matching
Ituorescent lamp
Recording outdoors, a night
|e|
view, neon signs, or fireworks
Recording outdoors scenes
(f)
after sunset or before sumse
Adjusting the White Balance Manually
Indication in
the viewfinder
a.
HOLD
-A-
1 Slide open the AUTO LOCK cover.
2 Select the desired white balance mode by
pressing WHT BAL.
Each time you press the button, the indication
changes as follows.
No indication (auto) -* HOLD ^ m
Note on manual adjustment
When moving from indoo's to outdoors or vice VI
close the AUTO LOCK cover and open it again
31
Page 17

Fluorescent lamp (aayiigtii)
t suoligOI
Fluorescent lamp (dayligtil)
Adjusting the White Balance
What is the HOLD mode?
In the HOLD mode, the camcorder aulomaiically
adjusts to the color temperature of the subject s
light source and keeps that temperature during
recording When recording some sub|ects with
different color temperatures, use the HOLD mode
to set a color temperature. You can achieve a
recording with natural colors without being
affected by the surroundings.
To set Into the HOLD mode
1 Close the AUTO LOCK cover.
The while balance will be set to the automatic
mode.
2 Point at and record a white, flat object such as
a white wall or paper.
3 Open the AUTO LOCK cover.
4 Press WHT BAL to display the HOLD mark in
the viewfinder
When you change the battery pack or when the
light source is changed, follow this procedure
again.
Color Temperature and White
Balance
(J-3)
The color temperature indicates a property ot
light and is measured in K (Kelvin). It increases
as the light source gets bluer and decreases as
the light source gets redder. It has no direct
relationship with brightness. The camcorder
automatically adjusts the while balance within the
range shown below
When a fast moving subieci is recorded al normal
shutter speed, it may not be seen clearly when
played back m the pause mode (still piclure) This
can be improved by increasing the shutter speed.
Six shutter speeds can be selected 1 60 (normal
speed), I 'lOO U250. I TOOO, 1.2000, or 1 4000
of a second (K-1)
When recording at a high-speed shutter
setting, record in a brighter place than usual.
Also, the depth ot (leld m proper focus becomes
shallow at a higher shutter speed This is
effective to record the main subieci m sharp locus
and (he surroundings out of focus
Recommended setting for your situation
Choose an appropriate shutter speed according
to the situation, referring to the chart below tor
examples
Example use
• On clear days, recording golt or
tennis swing (To view the hit ball
clearly in the still picture mode, set
• Recording skiers
• On overcast days recording a
moving merry go-round or roller
• Recording outdoors from mside a
vehicle (lo' slable shooting)
• Instead of the ND? Iilter iTo reduce
the exposure level to about a hail)
♦ Recording mdooi soods dor stable
shooting)
When playing back the picture recorded at
certain speeds
Use 8 mm video equipment with the dean still
function to obtain the noiseless sun picture
shutter speed
1 ЛППП
1 2000
t-1000 or
1 too
32
33
Page 18

Setting Shutter Speed
Selecting the Shutter Speed
(K-2)
1 Slide open the AUTO LOCK cover. 2 Press SHUTTER SPEED repeatedly until
the desired shutter speed indication
appears.
Each lime you press the button, the indication
changes as follows.
. . No mOicalion (1.'60) .100(1.'100) >250(1/250)—,
I 4000 (1/4000) < 2000 (l'2000). 1000 (1/1000) • I
Notes
« When you select shutter speed 1 '250 ot taster,
record under sunlight or use a video light
• When you record a TV screen with certain shutter
speeds, the brightness ol the recorded pictur
vary
• When you shoot a very bright subject at a taster
shutter speed, a light vertical, bell like line (smear)
may appear on the screen.
• When you record al certain shutter speeds under a
light discharged tube, such as a fluorescent lamp,
sodium lamp, or mercury lamp, the brightness ot the
recorded picture may vary
Shooting with
Backlighting
In this camcorder, the ins is automatically
controlled However, when shooting a sub|ect that
IS backlit, that is, it the light source is coming in
trom behind the subieci, use the BACK LIGHT
button. (L)
lay
w
- iii
Zooming
The size ot the subject in tlie screen can be
changed Use "zoom in' for dramatic dose ups
Use zoom-out' for panoramic long shots Also
use zooming to focus manually or to decide the
shooting angle. (M-1)
Power Zooming
— for smooth and constant zooming (M-2)
Press the T side of the power zoom button for
telephoto (subject appears closer) and the W side
for wide-angle (subject appears farther away).
Zooming Manually
— for creating a dramatic effect (M*3)
Turn the manual zoom lever upward lor telephoto
and downward for wide-angle.
Be sure to keep pressing the button on the lever
when turning it downward
Focal length of (his camcorder
The local length is 8 5 mm to 68 mm ('it to 2'. inches
This means apprommately 46 mm to 368 mm (1 "/■•, t<
14'/? inches) converted into the local length ol a 35-m
1 Slide open the AUTO LOCK cover.
2 Press BACK LIGHT.
The n indication appears
After shooting
Be sure to release this adjuslmeni setting by
pressing BACK LIGHT again (The П indication
goes out |
Otherwise, the recorded picture will be too bright
34
35
Page 19

(N-2)
Powe' zoom button
Close-up (Auto-focusing In Macro)
Even liny subjects such as flowers, insects,
photographs, can literally fill the screen with auto-
focusing in macro
(N-1)
1 Bring the camcorder as close as
necessary to obtain the desired subject
size.
The subject can be as dose as a minimum of
10 mm (13/32 inches) from the lens surface.
2 Press MACRO AF.
|1)The MACRO indication blinks in the
viewfinder and the zoom lever turns
automatically to the MACRO range.
(2) The MACRO indication lights steadily and
indication appears when sharp focus is
achieved automatically.
To release this adjustment setting
Press the T side of the power zoom button or turn
the zoom lever, to return the lever to the ordinary
range.
(N-2)
If the MACRO indication lights steadily before
focusing sharply
The MACRO indication lights steadily if sharp
focus cannof be achieved within 30 seconds. In
this case, press MACRO AF again to re-lunction
aulolocusmg in macro.
If you still do not get a sharp focus, manual
focusing is recommended (page 37). Adjust it
after the MACRO indication lights steadily.
To keep autofocus functioning
Keep MACRO AF pressed.
Contrary to the normal auto-focusing (page 22).
aulofocusing in macro is released each time the
sharp focus IS achieved.
(N-3)
Notes
• This lunchon has no connpction with tlie AUTO
LOCK cover You can use aulolocusmg m macro
while manually adjusting ihe ordinary locus, eic
• Do not press the power zoom button while the zoorr
lever IS moving lo' autolocusmg m macro Otherwisi
autolocusing is released
Manual focusing in macro
1 Turn the zoom lever to the MACRO range without
pressing the button on it
The MACRO indication lights up m the viewfinder
2 Turn the zoom lever wiihrn the MACRO range to
focus sharply
II the lens hood touches the subject
Remove the lens hood Hold the focus nng and turn th
hood by pressing it with your palm. (N-3)
Do Ihe same when attaching removing a filter or
conversion lens (not supplied)
Recommended accessory
When shooting m macro, the depth of field is very
shallow, so pay attention to locusing To keep the
subiect in focus, use a tnpod
36
37
Page 20

(0-1)
(0-2)
Fade-In and Fade-out
When fading-in, the picture will gradually appear
from a black screen. The sound will also
gradually increase. (0-1)
When fading-out. the picture will gradually
disappear to a black screen The sound will also
gradually decrease (0-2)
This function will give your recording a
professional appearance.
1 Slide STANDBY up to set the camcorder in
the standby mode.
2 Press FADER. 3 Press START/STOP.
Fade-in is performed and recording will start
(0-4)
1 While recording, press FADER. 2 Press START/STOP to stop the recording.
Fade-out is performed and then recording
stops
To cancel the fade-ln/fade-out function before it is performed
Press FADER again bclore pressing START'STOP
If you want to use the fade-in/lade-out function repeatedly
Slart Irom step 1 each lime.
When the daleUme (page 24) or age (page 41) is displayed
The dale time or age does not fade-in or fade-out
(P-1)
Recording the Age of Your Child
You can record the age (in years and months) of
your child, by presetting his'her birth date.
Once you preset your child s dale ol birth, your
child's current age can be automalicaiiy displayed
by pressing a single button This allows you to
make a record of your child s development
Besides age. you can also preset the date of a
specific event, and record how many years and
months have passed since then
You can record up to three ages or events
Presetting the Birth Date Event Date
Preparations
1 Connect the power source.
2 Set POWER to CAMERA while pressing the
green button and slide STANDBY up.
You can see the display in the viewfinder.
Make sure that the date and time are set
correctly, (page 19)
Othenivise, the birth date/eveni date cannot be
preset correctly.
Opreration (P-i)
Example: Preset AUG 3 1987 as the birth date
of the second person
1 Press AGE/EVENT and TIME (NEXT)
simultaneously for more than 1.5 seconds
until the " [T] BIRTHDAY' Indication
appears and [j] blinks in the viewfinder.
2 Press DATE (-f) to select d].
Each lime you press DATE (-*), the display
changes as follows:
Li! BIRTHDAY *[T] BIRTHDAY
1-f3] EVENT.
--------------
1
Although "EVENT" is displayed on [1], you
can use it for age as well. [T] and Qj can also
be used tor event.
Ó Press TIME (NEXT).
Thè "1900" indication blinks.
4 Adjust the year, month, and day.
First adjust the blinking digits with DATE (-r),
and then press TIME (NEXT).
The age is displayed when all the items are
39
Page 21

Reeordtng the Age of Your Child
If you missed the desired number with DATE (+)
Keep pressing DATE (*). The number changes
as follows:
year: 1900 -♦ 1901
current year-1999«-- current year
month; JAN.-* FEB.
---. *- DEC.
day; 1 * 2
■
To correct/change the setting
Follow the procedure from step i again.
To advance the digits faster
Keep DATE (*-) pressed.
To preset the year before 1900
1 After step 3 on page 39. keep pressirrg DATE (+) until
the current year is displayed
2 Press DATE (•*) again
The year goes back 99 years
(e*:ample: 1991 * 1692)
3 Go to step 4.
When In 2000
......
1901" is displayed in step 3 on page 39. After
that, it advarrces every year as ''1902.1903
...
Recording the Age
1 Press START/STOP at the point where you
want to insert the age indication.
The camcorder is sel m the standby mode
2 Press AGE/EVENT to select the indication
you want to record.
Each time you press AGE/EVENT. the
indication changes as follows.
No irrdication-* [f| The first age — - ,
I
G] Anniversary <- [jJThe second age <
An item with no presetting is skipped.
The 1 'i ]. [J ], or [T] indication goes out
3 Press START/STOP.
Recording starts again.
The age displayed in the viewfinder is
recorded with the picture
To slop recording the age
Press AGE/EVENT until the indication goes out.
To change the display while recording
Press AGE/EVENT until the indication you want
to record IS displayed. Recording of the indication
you selected starts when fT], ft], or goes out.
To cancel the stored birth date/event dale
1 Proceed steps l and 2 ol Presetting the Birth
Date/Eveni Date and select the item you want
to cancel
2 Press TIME (NEXT) twice.
"Month blinks.
3 Press DATE (*) to display
4 Press TIME (NEXT).
The birth dale.'event date is deleted Irom the
memory and is not displayed when you press
AGE/EVENT
41
Page 22

Connections for Playback
If you do not record Ihe age while recording
You cannot add it later during playing back or editing.
Be Sure to lollow the procedure ' Recording the Age"
while recording
About memory back-up
The camcorder uses the lithium battery on Ihe bottom to
keep the birth dale event dale in memory On Mhium
battery life, see page
When you connect Ihe camcorder to a TV
If you da not use Ihe data screen function, the age
indication will appear on the TV screen when the [ 1]. [i],
or 131 indication goes out in the viewtmder and recording
18
42
You can easily make a proper connection ol Ihe
camcorder and TV by using the supplied AC V60'
V60A AC power adaptor
Check Ihe type of your TV, and go to the
appropriate section.
You can also connect the camcorder directly to
the TV, using the VIDEO AUDIO (and RFU DC
OUT) jacks. In this case, set the IN/OUT selector
to OUT.
Connecting a TV without Video Audio Jacks (0-i)
Connecting iho AC power edaptor end a TV
The supplied RFU-90UC RFU adaptor and AC
power adaptor are required.
Make sure that the TV is turned off to prevent the
speaker being damaged.
1 Connect the antenna and TV to Ihe RFU
adaptor.
2 Connect Ihe RFU adaptor to the AC power
adaptor.
3 Connect the AC power adaptor to a wall
outlet.
4 If you have connected your TV using only
the antenna socket, set the channel
selector on Ihe RFU adaptor to 3CH or
4CH of Ihe VHF channel, whichever Is not
active In your area.
One ot the TV channels will be adjusted to
receive the camcorder s playback signal
Usually keep the AC power adaptor and the TV
connected
Whenever pleying beck a tape
Proceed only the following two steps
5 Attach the connecting plate of the AC
power adaptor to the camcorder.
6 Set the CHARGE/VTR selector on Ihe AC
power adaptor to VTR (DC OUT).
When you watch a TV program
Set Ihe CHABGEA/TR selector on the AC power
adaptor to OFF or turn oM the power o( the camcorder.
43
Page 23

Connttctions for Playback
K your TV Is connftcted with a VCR (Q-2)
Dr-,connecl llie anlenna connochon of iho TV
VCR nnd insert the RFU adaptor between ih(
The supplied AC-V60/V60A AC power adaptor is
required.
Make sure that the TV is turned oil to prevent the
speaker being damaged.
1 Connect the AC power adaptor to the TV.
Use a commercially available audio'video
cable (like Sony VMC-710M/72OM for
monaurai TV, or VMC-910MS/920MS for
stereo TV)
2 Connect the AC power adaptor to a wall
outlet.
Usually keep the AC power adaptor and the TV
connected
Whenever playing back a tape
Proceed only the following two steps
3 Attach the connecting plate of the AC
power adaptor to the camcorder.
4 Set the CHARGE/VTR selector on the AC
power adaptor to VTR (DC OUT).
The supplied wireless Remote Commander is
useful to control the camcorder from a distance
When using it, be sure to set the REMOTE
COMMANDER ON'OFF switch to ON
(R-1)
1 Set CHARGE/VTR on the AC power adaptor
to VTR.
Set POWER to VTR while pressing the
green button.
Insert a tape.
4 Turn on the TV (or the VCR).
For a TV with video/audto input jacks;
Sei the TV/VIDEO selector to VIDEO.
For a TV without video/audio input jacks
Select the channel for playing back the
camcorder.
5 Press T'.
Playback begins.
You can also use l
To stop playback, press ri.
To rewind the tape, press 44.
To advance the tape rapidly, press
To make the same Indications in the viewfinder
appear on the TV
Press DATA SCREEN.
To clear the indications, press DATA SCREEN
again.
After playing back
Set the POWER switch on the camcorder and
CHARGE/VTR selector on the AC power adaptor
to OFF.
Notes
• When the stiH picture lasts for 5 minutes or more, the
camcorder automatically enters the stop mode.
• Streaks appear in the still picture. They are wider when
playing back an IP-recorded tape
• on the camcorder.
* •
45
Page 24

EDITSE
Playing Back a Tape
Various Playback Modes
(R-2)
To view the still picture (playback pause)
Press II PAUSE during playback
II appears in the viewtmder
To resume normal playback, press or ii
To view the picture at 1/5 speed (slow
playback)
Press SLOW during playback
I* appears in the viewfinder
When slow playback lasts tor i minute or more,
playback at the normal speed starts
automatically.
To resume normal playback, press
To view the picture frame-by-frame
In the still picture mode, press >on the
camcorder. Each time you press, the picture
appears by a frame.
!!► appears in the viewfinder.
If you keep pressing playback at 1/30
speed starts.
To resume normal playback, press P-
To locate the desired scene (picture search)
Keep pressing or ^ dunng playback or in
the still picture mode or w appears m the
viewfinder To resume normal playback,
release the button
To locate the desired scene quickly
(skip scan)
Press during rewinding or ►► during
advancing the tape rapidly t“' or appears m
the viewfinder
To resume normal pJayhacV, p.'ess
Playing Back a Tape
About the playback sound
In the various playback modes streaks appear and thu
sound can be heard during playback m forward
Jiteciion. but is
If Ihe stiff picture, frame-by-frame picture, or slow
playback picture Is itoisy
Set the camcorder in slow playback mode, and press
Ihe * or - Side ol EDiTSEARCH until me leasl noisy
picture appears
lOISy
46
47
Page 25

Editing onto Another VCR
You can create your own video program by
editing with any other 8-mm, Betamax. or VHS
format VCR. Also you can superimpose and
record a title.
Before You Begin
(S)
• Make connections using the supplied AC power
adaptor and a commercially available audio/
video cable (like Sony VMC-710M/720M for
monaural equipment, or VMC 910MS'920MS
lor stereo equipment)
• Set the input selector of the VCR 1o LINE, it
• Set EDIT on the camcorder to the direction ot
the arrow
Recording from Another
VCR or a TV
You can record a TV program from the TV or;
tape from another VCR equipped with audio
video outputs
Before You Begin
• Set the IN OUT selector on the camcorder to
IN.
• Make conneclions usmg a commercially
available audio video cable iiike Sony VMC-
710M/720M lor monaural equipment, or VMC-
910MS.'920MS lor stereo equipment)
> Disconnect the RFU adaptor from the AC
power adaptor, if it is connected
When disconnecting, turn oft the power of the
adaptor. (OFF)
1 Insert a tape for recording into the
recording VCR.
2 Set POWER of the camcorder to VTR and
insert the recorded tape.
3 Play back the tape on the camcorder and
locate the point where you want to start
editing and set the camcorder to the
playback pause mode.
4 On the recording VCR, locate the
recording start point and set the VCR to
the recording pause mode.
5 Press H of both units simultaneously to
start editing
To stop editing momentarily, press II on the
recording VCR
To edit more scenes, repeal steps 3 to 5.
To slop editing, press ■ on both units.
I) you use the DATA SCREEN function
Trie inaicatioii' ctispia/ea or ire IV screen
1 Turn on the TV or VCR.
2 Select the TV channel or play back the
tape to 6e recorded.
3 Set the POWER of the camcorder to VTR. 4 Insert a tape and slide • REC.
Recording will slart.
You can monitor the picture being recorded in
the viewfinder screen
48
Page 26

Insert Recording
You can insert a new scene from a VCR or
TV onto your originally recorded tape. (U)
Before You Begin
• Connection IS Itie same as m "Recording from
Another VCR or a TV".
• Set the VCR in the playback pause mode at the
beginning of the scene to be recorded.
• Set the POWER of the camcorder to VTR and
display the counter in the viewfinder.
Using the Tape Counter
(V)
During recording or playback, the digits on the
counter indicate the recording or playback lime
To Index the Whole Tape
Press COUNTER RESET at the beginning of the
tape so that the counter shows "0 00 00 Write
down the counter reading at a particular point so
that you can easily find that point later by
referring to the tape counter.
To Return to a Pre-Registered Point
1 Locate the end point where the insert
should end by pressing '44 or during
playback.
2 At the end point, press COUNTER RESET.
The counter is reset to "0.00:00".
3 Locate the start point where the insert
should begin.
4 At the start point, set the camcorder into
recording pause mode.
5 Press ZERO MEM.
The end point of the insert is stored m
memory.
6 Press II of both units to start Insert
recording.
You can monitor the picture being inserted in
the viewfinder screen
The insert recording will slop automatically near
the zero point on the counter.
To change the end point
Press ZERO MEM so that the ZERO MEM
indicator disappears, and operate again from
step 1
1 During playback, press COUNTER RESET
at the point you want to locate later.
2 Press I when the playback is finished, as
usual.
3 Press ZERO MEM.
The "ZERO MEM indication blinks in the
viewfinder.
4 Press -44 or
The tape rewinds or advances and stops
automatically when the counter reaches
approximately "0.00 00
Notes on the tape counter and ZERO MEM button
• The counter reading and the point of Ihe lape may
nol correspond exactly Use Ihn counter as a guide
There will be a tune l.ig ol several seconds nspHiCially
when you repeat fast forward running rewinding or
when you play back a lape recorded m both
SP modes mixed
• Be sure to press ZERO MEM afiei you slop the lape
II does nol lu'iclion during playback
• The ZERO MEM mode is canceled auiomatically
once the lape is rewound or sent forward to the pomt
where you pre registered
lp and
50
Page 27

Hints for Better Shooting
Shooting Stable Pictures
Assume a good posture for shooting (W-1)
For hand held shots. ii is important to hold the
camcorder properly.
• Hold the camcorder firmly and secure it with
the grip strap so that you can easily manipulate
the camcorder with your thump
• Place you right elbow against your side.
• Place your lefi hand under the camcorder to
support it. When adjusting the locus manually,
make sure the camcorder does not move.
• Place your eye firmly against the viewfinder
eyecup.
Use a tripod
If you have a tripod for a stilt camera, it can also
be used with the camcorder. If a tripod is not
available, try placing the camcorder on a table top
or any other Hat surface of suitable height.
Keep the horizontal plane level <W*2)
The horizontal plane can be easily determined by
using the viewlindei trame as a reference
Planning Beforehand
If you are going to edit the tape rfter recording
Shoot the scene a little longer to make the editing
easier
Hints tor Better Shooting
Shoot with the sun behind you
When the light source is behind the sub|ect. or in
the following situations, the subiect will be
recorded too dark and the background loo light
• The subject is indoors and there is a window
behind the subject.
• Bright sources such as fluorescent or
incandescent lamps are included m the scene
• You are shooting a person wearing white or
shiny clothes in front of a white background tn
this case, the lace will be recorded loo dark.
Use video lights in the dark
To gel the best colors, a sufficient light level must
be maintained. Photography lamps or halogen
lamps are recommended. For best results, use of
Sony video lights are recommended since their
weight and low heal output levels allow safe,
direct connection to the camcorder
Do not point the light at the camcorder. The high
heat from the light can warp the casing ol the
camcorder
And do not place your lace or hair too dose to the
light during low position shooting (page 23)
For detailed instructions on proper use ol the
light, read its instruction manual.
Brightness levels
Using the following chart as a reference, take a
few minutes to familiarize yourself with brightness
levels to improve your recording technique
52
Page 28

Notes on Moisture Condensation
If the camcorder is brought directly from a cold
place 10 a wanri place, moisture may condense
inside the camcorder, on the surface o( the tape,
or on the lens In this condition, the tape may
slick to the head drum and be damaged or the
unit may not operate correctly. To prevent
possible damage under these circumstances, the
camcorder is furnished with moisture sensors.
However, take the following precautions.
(X-1)
Moisture is present inside the camcorder.
• When the IS indication in the viewfinder blinks
When the tape is inserted, the ± indication also
blinks.
• When the BEEP switch is set to ON and the
tape is inserted, several beeps will also sound
continuously tor about 5 seconds
In this case, no function except for tape ejection
will work
Eject the tape, turn off the camcorder, and
leave it with the cassette holder open for at
least 1 hour.
The camcorder can be used again If the SI
indication does not appear when the power is
turned on again.
It moisture condenses on the surface of the
tape
(X-2)
If moisture is present on the surface of the tape:
• When the tape is inserted and a tape transport
button (( . •«. etc ) is pressed, the *
indication blinks inside the viewtinder.
• When the BEEP switch is set to ON. several
beeps will also sound continuously tor about 5
seconds.
In such case, no tunclion except for tape ejection
will work
Eject the tape and let it sit lor at least 1 hour.
The tape can be used again if the £ indication
does not appear when the tape is inserted and a
tape transport button is pressed.
No caution indications will appear, but the picture
becomes dim.
Turn off the power and leave the camcorder
unused for at least 1 hour.
Notes end Precautions
Notes on Video Head Cleaning
To ensure clear picture, clean the video heads
periodically.
When playback pictures are noisy or hardiy
visible, the video heads may be contaminated.
(X-3)
(a| Slight contamination
(bj Critical contamination
In such cases.
1 Clean the video heads with the Sony V8-
25CLH cleaning cassette (not supplied),
referring to its instructions
2 After cleaning, check if the picture is dear by
recording or playing back with an ordinary tape
3 If the picture is still noisy, repeat cleaning (Do
not repeat cleaning more than 5 times.)
Caution
Do not use a commercially available wet type
cleaning cassette It may damage the video heads
Note
If the V8 25CLH cleaning cassette is not available m
your area consult your Sony service facility
54
Page 29

On operation
• Operate the camcorder on 6 0 V (battery pack),
7.5 V (AC power adaptor), or 9 0 V (alkaline
batteries).
• For DC or AC operation, use the accessories
recommended in this manual.
• Should any solid ob)ect or liquid tall into the
casing, unplug the camcorder and have it
checked by qualified personnel before
operating it any further.
• Do not hold the camcorder by the viewfinder or
the microphone.
• Avoid rough handling or mechanical shock. Be
particularly careful of the lens.
• Keep the lens cap on the lens when not using
the camera.
• Do not wrap the camcorder and operate it
because heat may build up internally.
• Keep the camcorder away from strong
magnetic fields or mechanical vibration.
• Do not put the camcorder on the sand.
On care
• When the unit will not be used for a long time,
disconnect the power source and remove the
tape. Periodically turn on the power, operate
the camera section and player section, and
play back a tape for about 3 minutes.
• Clean the lens with a soft brush to remove
dust. If there áre fingerprints on it, wipe them
off with a soft doth.
Clean the camcorder body with a dry, soft
cloth, or a soft cloth lightly moistened with a
mild detergent solution Do not use any type of
solvent which may damage the finish.
Note on copyright
Television programs, films, video tapes, and other
materials may be copyrighted. Unauthorized recording
ot such materials may be contrary to the provision of
the copyright laws.
abroad, check the following points.
Power Sources
You can use your camcorder in any country with
the supplied AC power adaptor within 110 V to
240VAC.50/60H2.
Difference in Color Systems
You can view the playback picfure in the
viewfinder. However, if you want to view the
playback picture on a TV, it must be an NTSC
system-based TV. Check the following list, (in
alphabetical order)
NTSC system countries
Bahama Islands, Bolivia, Canada, Central
America, Chile, Colombia, Ecuador, Jamaica,
Japan, Korea, Mexico, Peru, Surinam, Taiwan.
The Philippines, U.S.A., Venezuela, etc.
PAL system countries
Argentina. Australia, Austria, Belgium, Brazil,
China, Denmark, Finland, Germany (Former
West Germany), Great Britain, Holland, Hong
Kong, Italy, Kuwait, New Zealand, Norway,
Paraguay, Portugal. Singapore. Spam, Sweden,
Switzerland, Thailand, Urguay, etc.
SECAM system countries
Bulgaria, France, Guiana, Hungary. Iran, Iraq,
Monaco, Poland, Soviet Union, etc.
Specifications
Video recording system
Audio recording system
Video signal
Usable cassette
Tape speed
Recording lii
Fast lofward/rewmd time
Image device CCD (Charge Coupled Device)
Viewlirxter Electronic viewfir>der
Auto focus system TTL
Color temperature Automatic, HOLD,
Minimum illumination
Illumination range 2 lux to 100.000 lux
Recommended illumination
Aperture correction Automatic
Input And output ooniwctor
Video input/output* Phono |ack, 1 Vp-p. 75 ohms
Audio input/oulpul’ Phono )ack.
RFU DC OUT Special minijack, 5 V DC
Earphone )ack Minijack, 8 ohm impedance
Remote jack Stereo mini-mimjack
Rotary two head. Helical scanning
FM system
Rotary head, FU system
NTSC color. EIA standards
m video formal cassette
SP mode: Approx 1 43 cm
(1/16 irch)/sec
LP mode: Approx 0 72 cm
(1/32 inch)/sec
(playback only)
SP mode 2 hours (P6-120)
SP mode: 2 hours (P6 120)
LP mode 4 hours (P$-120)
Approx 6.5 min. (P6-120)
(black and while)
Combined 8 x power zoom lens
1=8.5 to 68 mm (11/32 to 2’/.
inches), FI.6 wilh macro
Filter diameter: 46 mm
(1 ”/i6 inches)
.4 (intjooi) 3.200K,
• (outdoor) 5.800K
2 lux
(0.2 lo 9294 foolcarxfies)
More than 100 lux
(9 lootcandies)
With back light adjustment
unbalanced, sync negative
Input- -7.5 dBs, input impedance
more than 47 kilohms
Output. -7.5 dBs, at Output
impedance less than
1 kilohms
:h the IN/
Gancral
Power requirements
Power consumptioi
Installation Vertically, horizontally
Operating temperature
Storage temperature
Dimensions Approx 111 - 139'32t mm
Weight Approx i .i kg (2 lb 3 oz| excluding
Microphone Electret condenser microphone.
Supplied accessories
Remote control system
Command mode VTR 2
Power requirements
Dimensions Approx 60 « 25 X 123 mm (w/h/d)
On battery mounting surface
6.0 V (battery pack)
7 5V (AC power adaptor)
V (alkaline batteries)
6 2 W (camera recording) including
the viewfinder
0"C to 40"C (32 "F IO104 F)
-20’C lo *60'C (-4’Fto *140°F)
(w/h/d) (4>/i « 5'/?. 12=/. inches)
including the lens hood
the battery and cassette
uni directional monaural type
See page 4.
n*met* Commander RMT-8M
Infrared control
3 V DC, 2 size AA batteries
(2-’/b X 1 X 47« inches)
56
57
Page 30

Trouble Check
H any dillicully should arise during operation, go through the following table Should the ditficuHy persist,
unplug the unii and coniact your Sony dealer or local authorized Sony facility.
last blinking
stow blinking
Warning
Cause and corrective actions
beep
. The POWER switch is not set to CAMERA
• The tape is aftwed to the drum. Remove the
tape with the cassette e|ect button ipage 20)
• The tape is at its end
B«,ps
• The red mark on thè cassette is exposed
Beeps
(red) (page 20)
• No cassette • Inserì a cassette.
-
• The tape is near its end
-
• The video head may be contaminated
Clean the heads using me Sony V8-25CLH
cleaning cassette (page 55)
• The camcorder has been m the recording
pause mode lor more than 5 minutes
(page 23)
♦ The viewfinder Inns IS not adjusted (page2i)
_
. The AUTO LOCK cover IS not closed
completely, (page 28)
• Shoofirig conditions are not suilade lor
acjiolncusmg operation Adjust the locus
manually (page 29)
• The lithium battery IS not
installed
• the lithium battery IS
• The POWER switch IS not spto VTR
--
• The contrast between Ihe subiect and
background is loo high the camera is not
. the AUTO LOCK cover IS not closed
cornptetely. (page 28)
♦ Shooting conditions are not suitable lor auto
while balance operation Adjust the white
balance manually (page3i)
Symptom
Tlie START STOP
operate
automatically
The image on the
The autolncu'ing
-
appears when a
subiect Such as lights
slid ag,tinsi a dark
background
playback IS 1101
appropriate
Indication in the
viewfinder
4. battery lamp
W. slow blinking
('-‘M. battery lamp
® blinking
tip blinking
When both the
VIDEO*AUDIO lacks
and the AC power
adaptor are used to
conned signals, the
picture on the TV is not
The tape cannoi
removed from tk
compartment.
blinking
blinking
Warning
Cause and corrective actions
beep
« The channel or input for ihe camcorder is
noi selected on the TV (page 4!ii
• The EDIT switch IS set m the direction of the
arrow (page 48)_____________
> The video heads may be contaminated
Clean the I'eads usirrg the Sony VS 25CLH
cleaning cassette (page 55)
■ The IN OUT selector is set to OUT
> The battery is used up
• The battery is weak
« The AC power adaptor is not connected to a
1 The CHARGE VTR selector on the AC
power adaptor is noi set to VTR (DC OUT)
' The ambient temperature is too low
■ The battery pack hjs not been charged fully
■ The capacity oi the battery pack iiseti is
shortened (page'7)
• Moisture condensation has
(page 54)
• Other trouble may have oc
your nearest Sony dealer
— Attach a
' ► charged
battery
58 59
Page 31

n] Auto-focjsiog in macro range
5 BUILT-IN MIC SELECT is set to WIND.
T BACK LIGHT IS pressed.
[T White balance mode | •* HOLD}
FT] Shutter speed
[e] FADER is pressed.
iP Exchange battery. " CD
[IT Moisture has condensed. 3)
[?j Shows up during recording.
When blinking. Exchange battery.' 3 "Replace lithium battery." <Pb’
Playback mode (LP)
jv Tape transport mode
^ Tape counter
Qj] ZERO MEM is pressed.
@ Manual focusing
"Exchange tape." eta
jT "Clean video heads."'"Trouble
[iv Age or anniversary
® Date or time
List of Beeps
Seep souncti when: Beep
Camera recording starts.
Camera recording stops.
The tape IS at Its end
The red mark on the cassette is exposed.
Moisture condensation has occurred.
Other trouble has occured.
1
It
IIIIIIIIIIIIIIMapprox 5sec.|
IIIIIIIIIMfllKapprox Ssec)
millimilMMapprox.Ssec.)
IIIHIIIIMIIliiapprox. Ssec.)
 Loading...