

Page 1

SONY.
3-864-023-41 (1)
Video Camera
Recorder
Operating Instructions.
Mode d'emploi
Owner's record
The model and serial numbers are located on the bottom. Record the «erial
number m (he space provided below. Refer to these numbers whenever you
call upon your Sony dealer regarding this product.
Model No. CCD-CRl Model No. AC-VF10
Serial No
Ri_i
_________________
_______
Serial No.
___________________
CCD-CR1
©1998 by Sony Corporation
Page 2
English
Welcome!
Citngr.itiiliifions on \'oiir purchiisc of tin's Si>n\' cnmcordcr. With your c.imcin'dor \'oi
call capture life's precious moments u ith superior picture and s{)und quality.
WARNING
To prevent fire or shock hazard, do not expose the unit to rain or moisture.
CAUTION TO REDUCE THE RISK OF ElECTBlC SHOCK
DO NOT REMOVE COVER :0R BACKI
NO USEH*SERV1CEARLE PARTS INSIDE
REFER SERVICING TO QUALIFIED SERVICE PERSONNEL
t his is intendect to alert the
user ti) the presence uninsulated
"dan^eri'us \ r'lta^e" within the
product's I'lTc losure that ma\- he ot
siifheit'iTt mat;nitude to constitute a
risk of electric sliock to persons.
This s\'nihol IS intendi'd t(' alert the
user to the presence of impiirtant
operating; and rnaintenance
(scr\ icin^) instructions in thl'
IitiTature aecompan\'in^ tlie
.nppli.ina-.
DISPOSAL OF LITHIUM ION BATTERY.
LITHIUM ION BATTERY.
DISPOSE OF PROPERLY.
'I'tui can return vour unwanted lithium ion batteries
t(» your ni'orest Son\' Ser\ ice C enter or Factory
SL'r\'ice Center.
Note: in sonic areas the Lfisposal <if (ithiiim ion
hatteries in household or business trash may
be priiiiibitcLl
Inir the Sony Sc'r\ ice Center nearest you call
l-H(K)-222-SO\Y (United Slates only)
I'or tlie Sony [-actor\’ Serv ice Center nearest you call
416-4MS-SONV (Canada only)
For the customers in the U.S.A.
CAUTION
'I'ou are cautioned that any changes or modifications
not expressly approx'ed in this manual could \'oid
\ <Hir authoritN' to operate this equipment.
Note;
Tliis equipment has been ti'sted and fuiind to comply
with the limits for a Class li digital device, pursuant
tu Part 15 of the FCC Rules. These limits are designed
to prox'ide reasonable protection against harmful
interference in a residential installation. This
equipment generates, uses, and can radiate radio
frequency energy and, if not installed and usc'd in
accordance with the instructions, may cause harmful
inti-rference to radio comiminications. I lowe\-L'r,
tliere I-' no guarantee that interference will not tK'cur
in a particular installation. If this equipment dtvs
caLise harmful interference to radic' tir television
reception, which can be determined by turning the
equipment off and on, the user is encouraged to try to
correct the interference by one or more t>f flu'
following measures:
— Reorient or relocate the receiving antenna
— - Increase the separation between the equipment
and receiver.
— Connect the equipment into an outlet on a circuit
different from that to which the receiver is
connected.
— Consult the dealer or an experienced radii> H
teclinician for help.
For the customers in CANADA
CAUTION
TO PREVENT ELECTRIC SHOCK, DO NOT
USE THIS POLARIZED AC PLUG WITH AN
EXTENSION CORD, RECEPTACLE OR
OTHER OUTLET UNLESS THE BLADES
CAN BE FULLY INSERTED TO PREVENT
BLADE EXPOSURE,
Caution: L)n not h.indlo orTo.ikinj;
lithium ion b.ittor\'
Page 3

Table of contents
Before you begin
Identifying the parts.................................5
Getting started
Installing the batteries
Using house current
Charging the battery pack......................11
Shooting
Camera recording
Photo recording.....................................14
Advanced operations
.....................................
........
.................
.............................
...............................
................................
..................................
.............................
12
Playing back...........................20
Playing back
Watching on a TV screen
Editing
Editing onto another tape
..........................................
......................
...................................
......................
24
3
Additional information
Resetting the date and time
Tips for using batteries
8
8
10
12
15
20
23
24
Precautions
Trouble check
Warning indicators
Self-diagnosis display............................35
Using your camcorder abroad
Specifications.........................................37
Index......................................................38
...........
...................
..........................
............................................
.......................................
...............................
..............
25
25
27
30
32
34
36
Before you begin
Before operating the unit, please read this manual thoroughly, and retain it for future
reference.
About the recording system
•The picture and sound are recorded onto the video cartridge for this camcorder.
• The video cartridge for this camcorder is installed already You can only use the VDCRl video cartridge.
•The video cartridge can-be recorded for about 30 minutes camera recording and about
350 still pictures per about 5 seconds.
• It is recommended to edit the recorded pictures onto another tape for saving.
Page 4

Before you begin
Using this manuai
As vou read throiij;h this manna], buttons and settings on the camcorder are shown in
capital letters.
c,g„ Press START/STOP.
Vou can hear the beep sound to confirm vour operation.
Note on TV color systems
TV color systems differ from country to ccnintry. To view your recordings on a TV, you
need a NTSC system-based TV.
Precaution on copyright
Television programs, films, video tapes, and other materials may be copyrighted.
Unauthorized recording of such materials may be contrary to the provision of the
copyright laws.
Contents (T’ the recording cannot be compensated if recording or playback is not made
due to a malfunction of the camcorder, video cartridge, etc.
Precautions on camcorder care
•The LCD screen is manufactured using high-precision technology. However, there
may be some tiny black points and/or bright points (red, blue or green in color)
that constantly appear on the LCD screen. These points are normal in the
manufacturing process and do not affect the recorded picture in any way. Over
99.99% are operational for effective use.
• Dt) not let the camcorder get wet. Keep the camcorder away from rain and sea water.
lA'tting the camcorder get wet may cause the unit to malfunction, and sometimes this
malfunction cannot be repaired [a].
• Ne\ er leave the camcorder exposed to temperatures above 140°F (60°C), such as in a
car parked in the sun or under direct sunlight [b].
• Do not let sand get into the camcorder. When you use the camcorder on a sandy
beach or in a dusty place, protect it from the sand or dust. Sand or dust may cause the
unit to malfunction, and sometimes this malfunction cannot be repaired.
[b]
Page 5

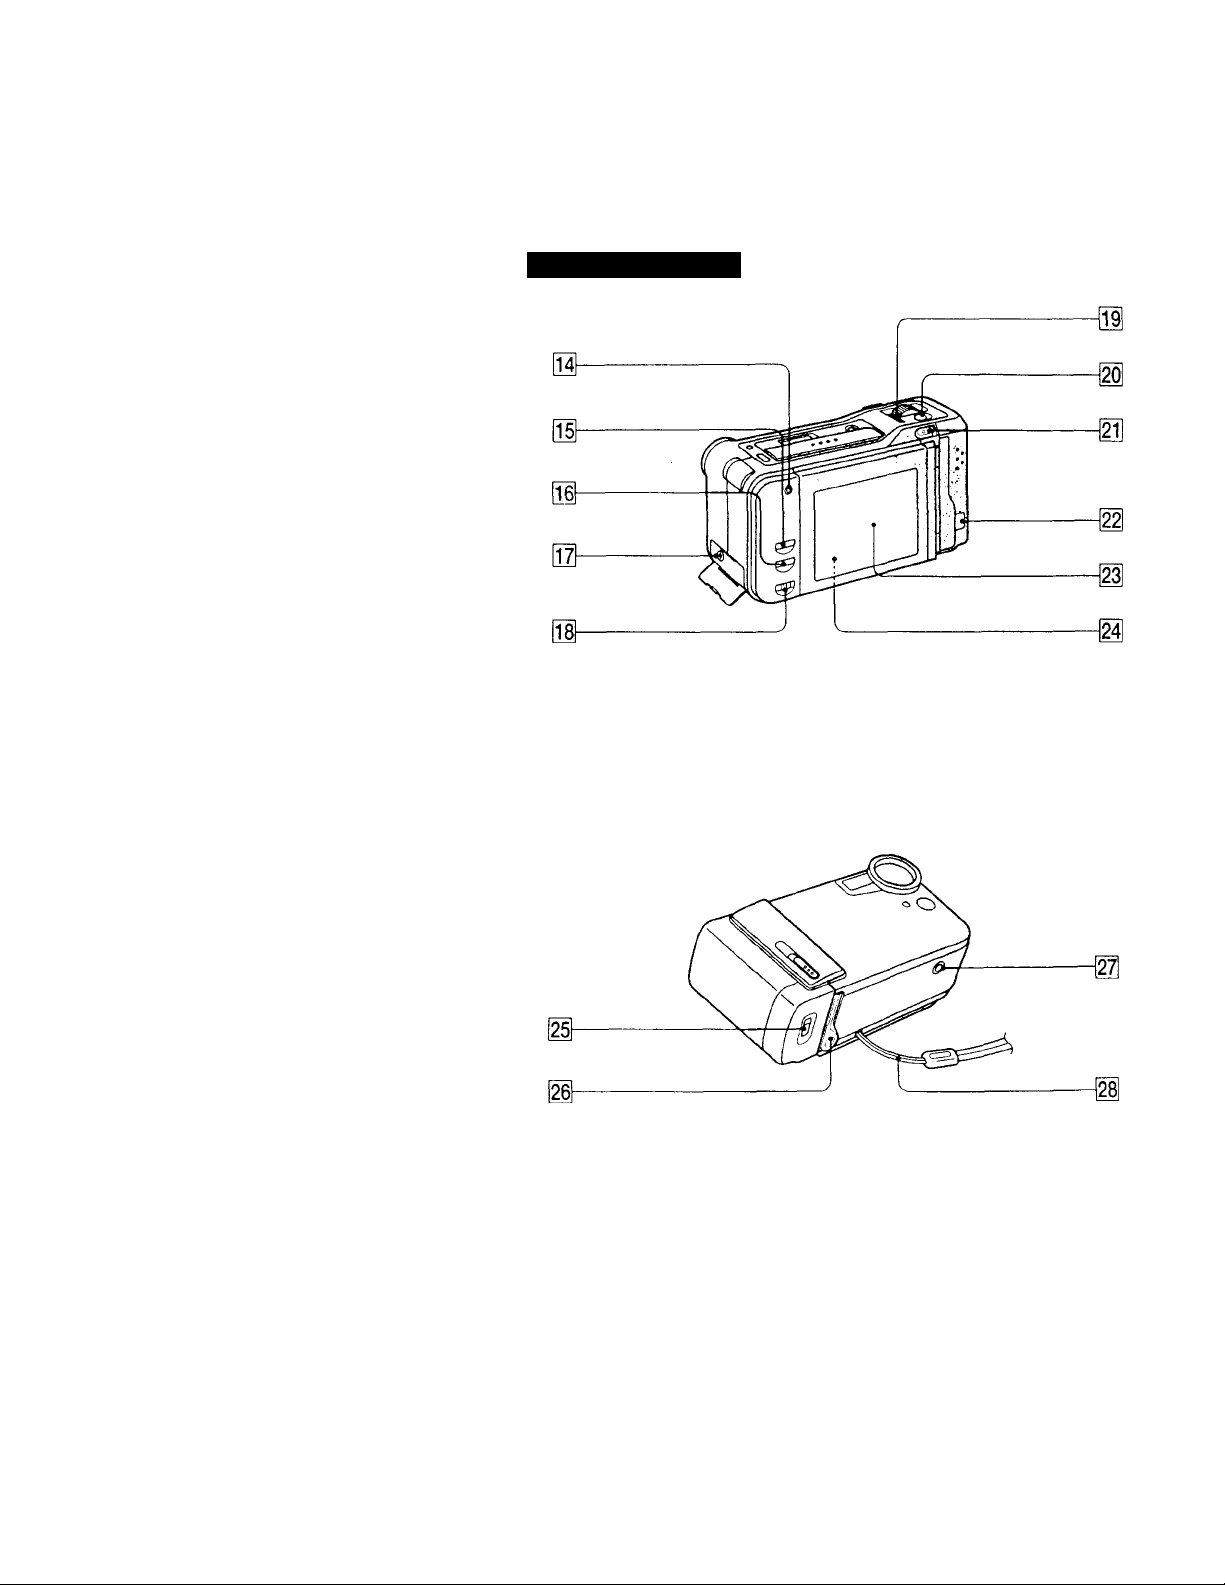
Identifying the parts
[T] slide cover (p. 20)
[2] Zoom lever (p. 15)
[3] START/STOP button (p. 12)
[4l Open knob for video cartridge
compartment (p. 31)
[U END SEARCH button (p, 18, 22)
lU PHOTO SCAN button (p. 21,22)
[T1 Lens
[§] Remote sensor
You can use the remote commander
supplied with other Sony camcorders or
VCRs. Set the command mode to
VTR 2. See the instruction manual
supplied with the VCR about the
command mode.
Recording lamp
Microphone
START/STOP MODE switch (p. 13)
BACK LIGHT button (p. 17)
Video control buttons (p. 22)
■ STOP (stop)
« REW (rewind)
► PLAY (playback)
►► FF (fast-forward)
II PAUSE (pause)
Page 6
Identifying the parts
IT4) Recording lamp
m DATE button (p. 19, 23)
01 TIME button (p. 19, 25)
07) A/V OUT jack (p. 23)
01 SPEAKER ON/OFF switch (p. 20)
0i MACRO lock switch (p. 15)
OPEN (ВАТТ) release lever (p 8)
Cartridge eject lever {p 31)
Tripod receptacle (p 15)
iM.ike sure th.it the length of the tripod
screw is less then 9/32 in (6 5 mm).
PHOTO button (p. 14)
POWER ON/OFF switch (p. 12, 14)
Cord cover (p. 10)
LCD screen (p. 12,14, 20)
Speaker (p. 20)
"otherwise you cannot attach the tripod
securely and the screw may damage the
camcorder.
Hand strap
The hand strap is already attached.
Page 7
Identifying the parts
Operation indicators
ffl
-------------------------------------
Ic3 40minl l@l RECI 0:00:00
sv
-lalMACROffil
m Video control mode (p. 22)
Mirror mode indicator (p. 16)
[3j Remaining battery time indicator
4k<l I
[4] Warning indicators (p. 34)
[5] Backlight indicator (p. 17)
[FI MACRO indicator (p. 15)
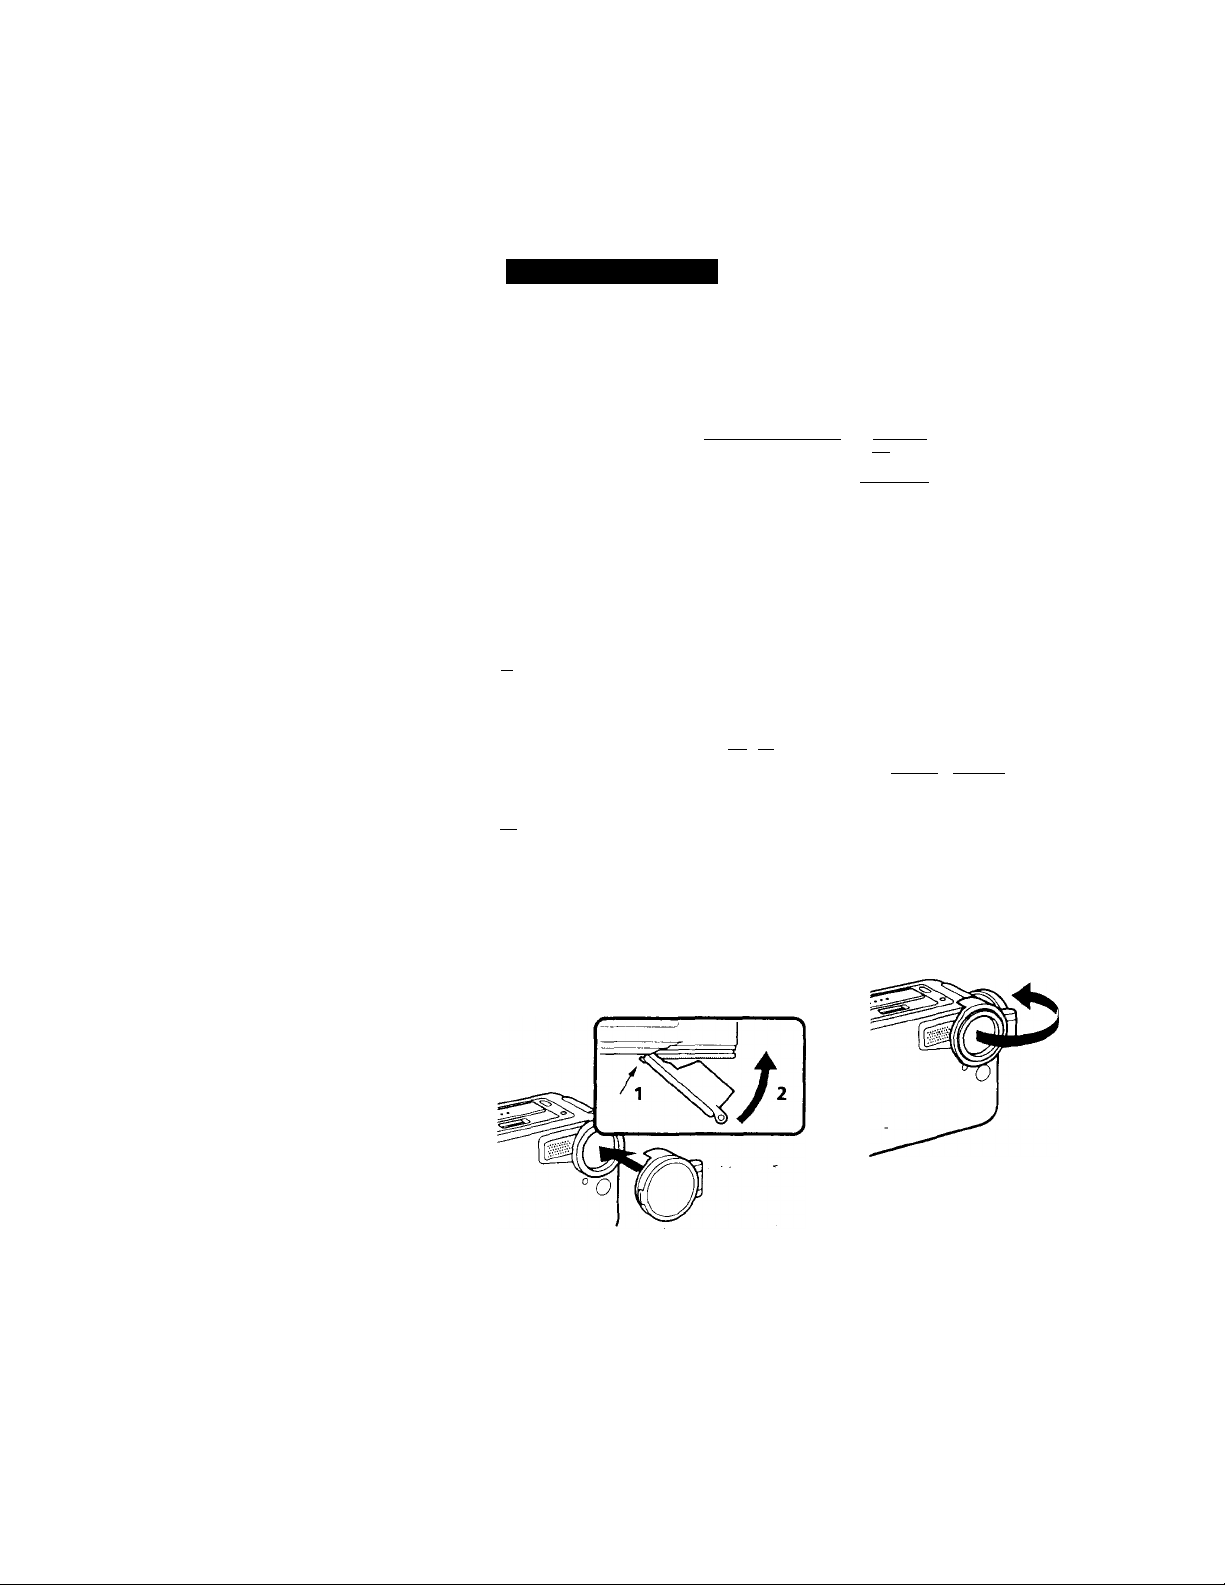
Attaching the lens cap
Attach the supplied lens cap t(i the lens.
(1) Fit the edge of the lens cdp to the hollow.
(2) Push the lens enp until it clicks.
1
|q^
END
ISEARCH
JUL.4.1998
12:00:00PM
[7] Tape counter (p. l2)/Self-diagnosis
functions indicator (p. 35)/5SEC mode
indicator (p. 13)/Photo recording
indicator (p. 14)
[8] Remaining tape indicator
0 |p=g~~— ♦ ioT< fl ♦ 5mii -Omin^-
END SEARCH indicator (p. 18, 22)/
PHOTO SCAN indicator (p. 21, 22)
Date and time indicator (p 19, 25)
When you shtxot, open the lens cap.
I I
''/mix''
Page 8
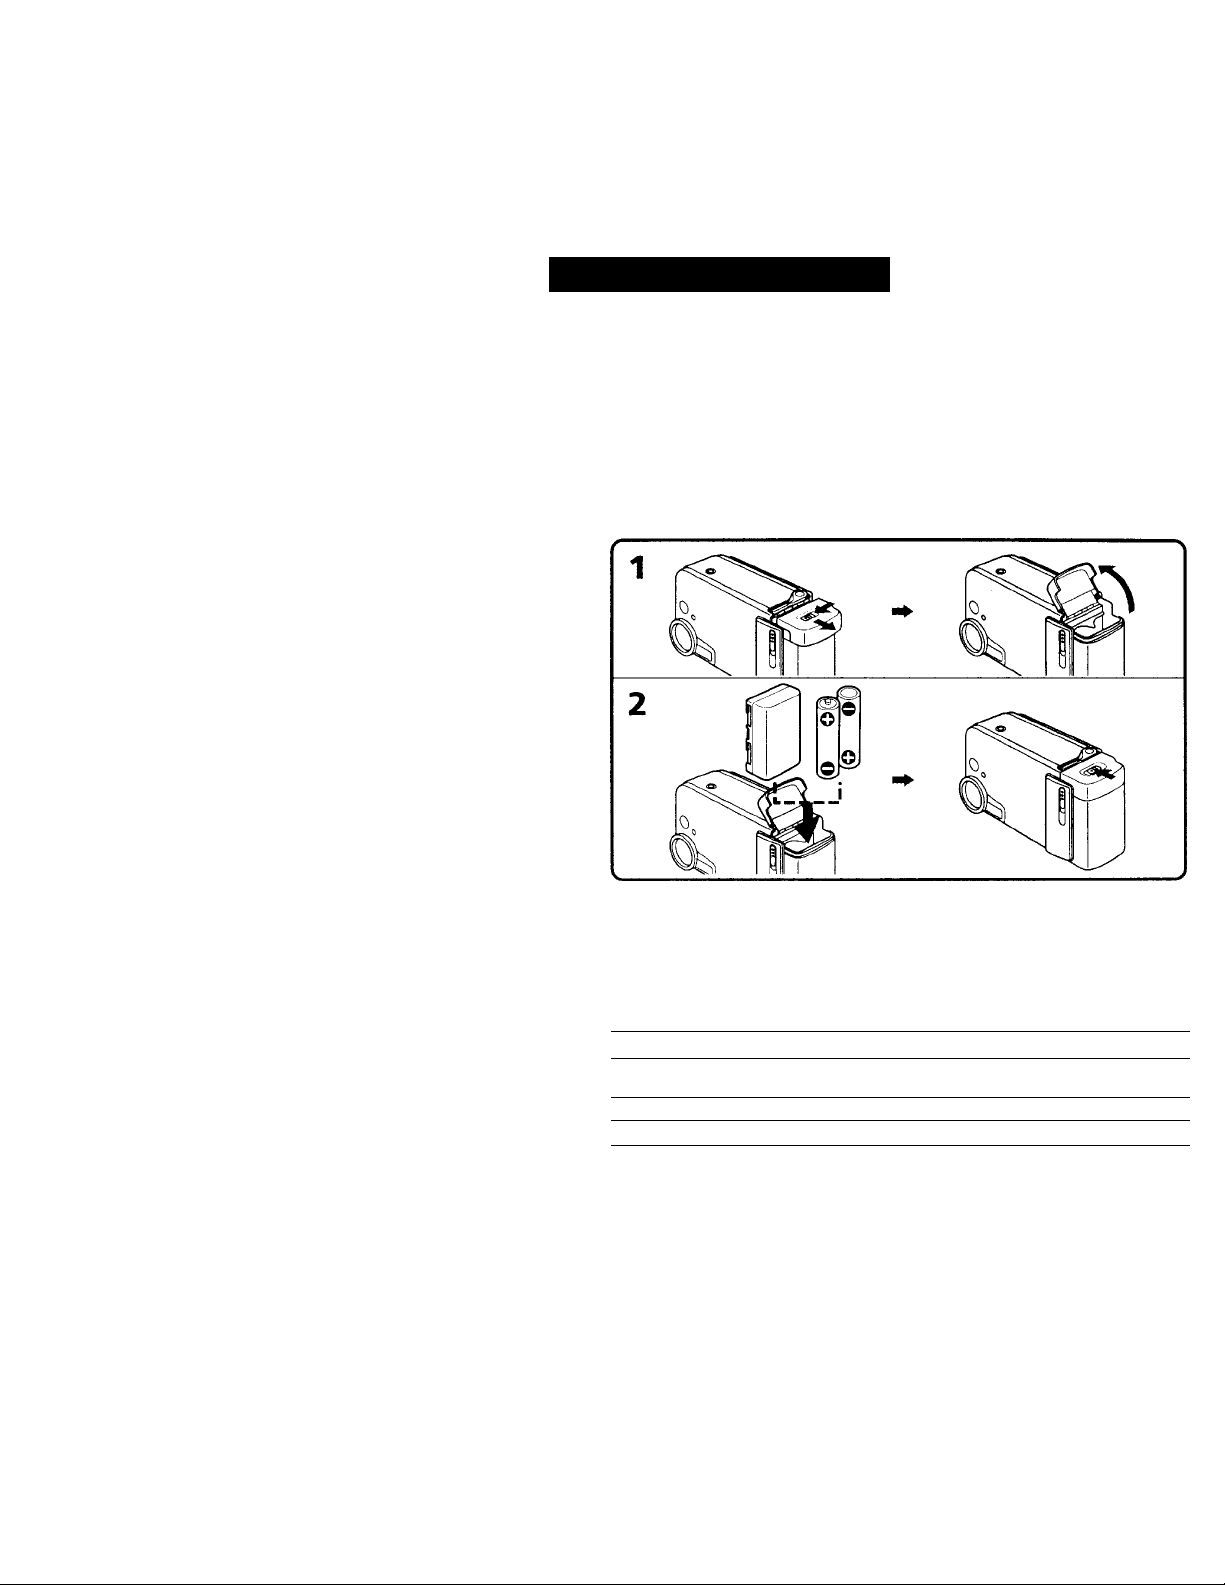
Installing the batteries
Before using your camcorder, you first need to install two size AA (LR6) Sony batteries
or the charged battery pack. Use the supplied size AA (LR6) Sony batteries or the NPI'lO "InfoLlTHlUM ' battery pack {S seríese).
When vou install or remove the batteries, be sure to turn off the camcorder to prevent
misoperation of the camcorder.
Vou can also use house current as a power source. (P. 10)
(1) To opon the lid of the battery compartment, slide the OPEN (ВАТТ) release
lever at the bottom of the camcorder to the left, then slide it toward you and
release.
(2) install two size AA (LR6) batteries or the battery pack in the direction of the
arrow. Then close the lid and slide it until it clicks.
Note on size AA (LR6) batteries
• Ik’ sure to install two si/e AA (LR6) batteries with correct polarity.
• Vou can not use si/i’ AA (LRh) batteries in a cold environment. Use the NP-RO battery
pack .
Battery life
When using two size AA (LRh) Sony batteries or the NP-FIO rechargeable battery pack:
Battery Size AA (LR6) batteries
Continuous recording W) miniitt.-^
time*
Typical recording time**
Playing time on LCD hO iTumik'''
.'^0 mnuitt's
\umbors in parentheses of NP-RO indicate the time when you use a normaffy charged
batterw
* Approximate cc>ntinuous recording time at 77°F (25°C). Battery life will be shorter if
you use the camcorder in a cold environment.
Approximate minutes when recording while you repeat recording start/stop and
turning the power on/off. The actual battery life may be shorter.
NP-FIO
40 {80} minutes
.SO (4.S) minutes
90 (80) minutes
Page 9

Installing the batteries
Note on remaining battery time Indication during recording
When using the "InfoLITHIUM" battery, remaining battery time is displayed on the
LCD screen. However, the indication may not be displayed properly, depending on the
conditions and circumstances of use.
To remove batteries
Open the lid of the battery compartment and remove the batteries.
When removing batteries
Always turn the camcorder upside down .so that batteries do not fall out when you
open the lid.
D
3
Page 10

Using house current
When you install or remos'e the battery shaped block of the connecting cord, turn off
the camcorder to prevent misoperation of the camcorder.
(1) To open the lid of the battery compartment, slide the OPEN (ВАТТ) release
lever at the bottom (T the camcorder to the left, then slide it toward you and
release.
(2) Install the battorv shaped block oi the DC connecting cord in the direction of
the arrow. Open the cord cover and pass the cord through. Then close the lid
and slide it until it clicks.
(3) Connect the LXi connecting cord to the AC adaptor/charger.
(4) Connect the power cord to the AC adaptor/charger and a wall outlet.
10"
WARNING
The power eori.1 must bi’ changed only at a qualified service shop.
Note
Ket.’p the .AC .ul.iptor/ch.lrger .u\ a\' from the camcordr'r if the picture is affected.
Page 11

Charging the battery pack
Charge the battery pack on a flat surface without vibration. The supplied battery pack
NP-FIO is charged a little at the factory. To charge the battery pack, use the supplied
AC-VFIO AC adaptor/chargcr.
(1) Fit and slide the battery pack in the direction of the arrow,
(2) Connect the power cord to the AC adaptor/charger and a wall outlet. The
CHARGE lamp (orange) lights up. Charging begins.
When the CHARGE lamp goes out, normal charge is completed. For full charge,
which allows you to use the battery longer than usual, leave the battery pack attached
for about 1 hour after normal charge is completed.
To remove the battery pack
Slide the battery pack in the direction of the arrow.
o
Charging time
When using the NP-FIO rechargeable battery pack:
Charging time* 143 (H.'t) minuk's
The number in parentheses indicates the time when you use a normally charged
battery.
* Approximate minutes to charge an empty battery pack using the supplietl charger.
(Lower temperatures require a longer charging time.)
ir
Page 12

Camera recording
Beforo vtni rca^rd one-timc events, you mny want to make a trial recording to make
sure that the cama>rder Is working correctly.
(1) Make sure that the power source is installed, (p. 8, 10)
(2) While pressing the small button on the POWER switch, slide it in the direction
of the arrow. I'he small button lights up green.
(3) Press START/STOP. The camcorder records for about 5 seconds and stops.
The tape a>unter disappears and five dots appear. The dots disappear at a rate
iT one per second. The red lamps light up.
To extend the recording time in 55EC mode, press START/STOP again before
all the dots disappear. Recording cemtinues for about 5 seconds from the
m<iment you press START/STOIh
rari POWER
B--llJ ON.'OFF,.*
. A .«rW.r.
i5So 00 01
@1
12"
Adjusting the LCD panel angle
Adjust the LCD panel to the angle ytm want.
Note
To save battery ptnver and prevent the battery and tape from wearing down, the power
turns off automatically if you do not operate the camcorder for S minutes while the
video cartridge is inserted and the power is on. To start recording, turn the power on
again and press SI AR'I /STOIV
Page 13

Camera recording
Selecting the START/STOP mode
Your camcorder has three camera recording modes. These modes enable you to take a
series of quick shots resulting in a lively video.
Set START/STOP MODE to the desired mode.
5SEC: When you press START/STOP, the camcorder records for about 5 seconds
and then stops automatically (factory setting).
ANTI GROUND SHOOTING A : The camcorder records only while you press
down START/STOP so that you can avoid recording unnecessary scenes.
A : Recording starts when you press START/STOP, and stops when you press it
again.
13"
Page 14

Photo recording
You can record a still picture like a photograph for about five seconds. Photo recording
is useful when vou want to enjoy a picture such as a photograph or when you print a
picture using a video printer.
(1) Make sure that the power source is installed, (p. 8, 10)
(2) While pressing Ihe small button on the POWER switch, slide it in the direction
of the .arrow. The small button lights up green.
(3) Keep pressing PHOTO lightly until a still picture and "O CAPTURE" appear
on the LCD screen. To change the still picture, release PHOTO, select still
picture again, and keep pressing PHOTO lightly again.
(4) P ress PHOTO deeper. The still picture on the LCD screen is recorded for
about five seconds. The tape counter disappears and five dots appear. The
dots disappear at a rate iT one per second. The red lamps light up. The sound
during those fiv e seconds is also recorded.
140
Adjusting the LCD panel angle
Adjub-l the LCD panel to thi* angle vou want.
To prevent camera-shake
When shooting a still picture, the slightest movement of the camcorder is noticeable. To
prevent camera-shake, hold the camcorder firmly or use a tripod.
Page 15

Advanced operations
Using the zoom feature
Zooming is a recording technique that lets you change the size of the subject in the
scene.
For more professional-looking recordings, use the zoom function sparingly.
"T” side: for telephoto (subject appears closer)
"W" side; for wide-angle (subject appears farther away)
When you shoot a subject using the telephoto zoom
If you cannot get a sharp focus while in extreme telephoto zoom, move the zoom lever
to the "W" side until the focus is sharp. You can shoot a subject that is at least about 55
1 /8 in. (140 cm) away from the lens surface in the telephoto position, or about 15 3/4 in.
(40 cm) away in the wide-angle position. When you shoot a subject closer than about 15
3/4 in. (40 cm), we recommend you shoot in macro.
Shooting a subject closer - Macro
Even small subjects, such as flowers, insects, and images in photographs, can literally
fill the screen in macro. You can shoot a subject that is at least about 10 cm (4 in.) away
from the lens surface in macro.
We recommend you to use a tripod when shooting in macro.
(1) Bring the camcorder as close as necessary to obtain the desired subject size.
(2) Slide the MACRO lock switch in the direction of the arrow.
(3) Move the zoom lever to the "W" side end. The MACRO© indicator appears
on the LCD screen.
15"
Page 16

Advanced operations
Letting the subject monitor the shot (Mirror mode)
You cnn lurn the IX'I) p.infl over so that it faces the other way you can let the
subject me>nitor the shot.
(1) Turn the LCD panel up vertically. The O indicator (Mirror mode) appears
and the date and remaining tape indicators disappear,
(2) Start recording.
[a]
[a] LCD screen image.
[b] Recording iniage.
To cancel mirror mode
Turn the l.CD panel d(>vvn toward the camcorder body.
Notes on mirror mode
•The picture on the LCD appears as a mirror-image while recording in mirror mode.
The RKC indicateur appears as •. The other indicators may not appear in mirror
mode
• While recording in mirrtir mode, you cannot operate the DATE and TIME,
16"
Page 17

Advanced operations
Shooting with backlighting
When you shoot a subject with the light source behind the subject or a subject with a
light background, use the BACK LIGHT function.
Press BACK LIGHT. The E3 indicator appears on the LCD screen.
[a] Subject is too dark because of backlight.
[b] Subject becomes bright with backlight compensation.
After shooting
Be sure to release this adjustment condition by pressing BACK LIGHT again. The 0!
indicator disappears. Otherwise, the picture will be too bright under normal lighting
conditions.
This function is also effective under the following conditions:
• A subject with a light source nearby or a mirror reflecting light.
• A white subject against a white background. Fspecially when you shoot a person
wearing shiny clothes made of silk or synthetic fiber, his or her face tends to become
dark if you do not use this function.
17^
Page 18

Advanced operations
Searching for the end of the picture
Press END SEARCH during stop.
The tope starts rewinding or fast-forwarding and the last 5 seconds of the recorded
portion play hack Then the tape stops at the end of the recorded picture.
If you start recording after using END SEARCH
Occasionailv, the transitu'n between the last scene you recorded and the next scene may
n(^t be smooth
18
Page 19

Advanced operations
Recording with the date/time
Before you start recording or during recording, press DATE and/or TIME. You can
record the date and/or time displayed on the LCD screen with the picture. Press DATE
(or TIME), then press TIME (or DATE) to display the date and time together. Except for
the date and/or time indicator, no indicator on the LCD screen is recorded.
The clock is set at the factory to London time for the United Kingdom and Paris time for
the other European countries. You can reset the clock, (p.25)
Press DATE and/or TIME before you start recording or during recording.
Note on recording with the date and/or time
Chace you record the date and/or time, you cannot erase it.
To stop recording with the date análor time
Press DATE and/or TIME again. The date and/or time indicator disappears. Ihe
recording continues.
To finish recording
While pressing the small button on the POWER switch, slide it to turn off the
camcorder. And remove the batteries.
We recommend you turn off the camcorder t(^ prevent wearing down the battery while
vou do not use the camcorder.
19"
Page 20

Playing back
You c<in monitor the pLivbiick picture on the LCD screen,
(1) Make sure that the power source is installed, (p. 8, 10)
(2) While pressing the small button on the POWER switch, slide it in the direction
of the arrow. The small button lights up green.
(3) Press MM to rewind the tape.
(4) Press ► to start playback.
You can also monitor the picture on a TV screen, after connecting the camcorder to a TV
or VCR.
Adjusting the LCD panel angle
Adjust the LCD panel to the angle you want.
When playing back in the dark
You may find it difficult to v iew the LCD screen in the dark. Wc recommend you to
moniti'r the playback picture on the LCD screen where there is more light.
To turn off the speaker
Slide the SPISAKId< ON/OI'l' switch to OI-F. I’o turn on the speaker, slide it to ON.
20
Page 21

Playing back
Searching for still pictures
You can search for still pictures one after another and display each picture for about 8
seconds automatically (Photo Scan).
(1) Make sure that the power source is installed, (p. 8, 10)
(2) While pressing the small button on the POWER switch, slide it in the direction
of the arrow. The small button lights up in green.
(3) Press •« to rewind the tape to the beginning.
(4) Press PHOTO SCAN during stop.
Photo scan indicator appears on the LCD screen. Each still picture is displayed for about
8 seconds automatically. The number of the displayed picture and total number of the
still pictures are displayed.
To stop searching
Press PHOTO SCAN or ■.
Notes on Photo Scan
•Thesound is muted.
•The camcorder starts searching from where you pressed PHOTO SCAN.
2r
Page 22

Playing back
Various playback modes
To stop playback
I Voss ■-
To view a still picture (playback pause)
I’ross II urin^ playback. To resume playback, press II or ►,
To fast-forward the tape rapidly
Press To resume playback, press
To rewind the tape
Press To a'sumo playback, press
To locate a scene (picture search)
Keep pressing or ►► during playback. To resume normal playback, release the
button.
To monitor the high-speed picture while advancing the tape or
rewinding (skip scan)
Keep pressing while rewinding or ►► while advancing the tape. To resume
rewinding or advancing, release the button. To resume normal playback, press ►.
To search for the end of the picture (End Search)
Press END SEARCH during stop. The tape starts rewinding or fast-forwarding and the
last 5 .sc'conds of the rmirded portion play back. Then the tape stops at the end of the
ri'cordc'd picture.
To search for still pictures (Photo Scan)
IVi'ss PHOTO SCAN during stop. Each picture is displayed for about 8 seconds
automatically. Then the tape stops at the end of the resrorded still picture.
Notes on playback
•The following may (Kcur in the various playback mtxles.
- Streaks appear and the picture jitters.
- The sound is muted.
• When playback pause miKie lasts for S minutes, the camcorder automatically turns off
to .save battery power and prevent the battery and tape from wearing down. To start
viewing a still picture, turn the power on again and press II during playback.
22
Page 23

Watching on a TV screen
Connect the camcorder to your TV or VCR to watch the playback picture on the TV
screen. Use the supplied A/V connecting cable. When monitoring the playback picture
by connecting the camcorder to your TV, we recommend you to use house current for
the power source.
Cònnéctinig directly td a fV/VCR Witfi Vnidei£^ÀU(dÌò itiplMÌackis
Open the jack cover. Connect the yellow plug of the A/V connecting cable to video
input on the TV or VCR connected to the TV. And connect the black plug of the A/V
connecting cable to audio input on the TV or VCR connected to the TV.
Set the TV/VCR selector on the TV to VCR. When connecting to the VCR, set the input
selector on the VCR to LINE.
: Signal flow
If your TV or VCR is a stereo type
Connect only the black plug for audio L (left) on the TV or the VCR. With this
connection, the sound is monaural even in stereo model.
When acoustic feedback (howling) occurs
Move the camcorder away from the TV or turn down the volume of the TV.
23^
Page 24

Editing onto another tape
You can save the recorded picture and create your own video program by editing with
any other 0 8 mm, HI0 Hi8, VMS. VHS, SVMS' S-VHS, iVtKH VHSC, SMKH S-VHSC, fD
Betamax VCR or IX’ DV that has video/audio inputs.
Before editing
Connect the camcorder to the VCR using the supplied A/V connecting cable.
Set the input selector on the VCR to LINE, if available.
If your VCR is a stereo type
Connect only the black plug for audio L (left) on the VCR. With this connection, the
sound is monaural even in stereo models
starting editing
Turn off the speaker of the camcorder while editing. Otherwise, picture distortion may
(.Kcur.
(1) Insert a blank tape (or a tape you want to record over) into the VCR.
(2) Play back the recorded video cartridge on the camcorder until you locate the
point just before where you want to start editing, then press II to set the
camcorder in playback pause mode.
(3) On the VCR, locate the recording start point and set the VCR in recording
pause mode.
(4) First press II on the camcorder, and after a few seconds press II on the VCR
when ycHi want to start editing.
To edit more scenes
Repeat stops 2 to 4.
To stop editing
Press ■ on both the camcc^rder and the VCR.
24
Page 25

Additional information
I
Resetting the date and time
The DATE and/or TIME can be recorded with the picture. The date and time are set at
the factory to London time for the United Kingdom and to Paris time for the other
European countries. Set the time according to the local time in your country.
(1) While pressing the small button on the POWER switch, slide it in the direction
of the arrow. The small button lights up green.
(2) Press DATE and TIME simultaneously for more than 2 seconds until the year
flashes on the LCD screen.
(3) Set the year.
Adjust the flashing year digits with DATE and then press TIME.
(4) Set the month:
Adjust the flashing month digits with DATE and then press TIME.
(5) Set the day and hour by the same way as setting the year and month.
(6) Set the minute and second.
Adjust the flashing minute digits with DATE and then press TIME. The clock
starts operating.
25^
Page 26

Resetting the date and time
About the lithium battery
Your camcorder is supplied with a rechargeable lithium battery installed so as to retain
the date and lime, regardless of the setting of the power. The lithium battery is always
charged as long as you are using the camcorder. The battery, however, will discharge
gradually if you use the camcorder for a short time. It will be completely discharged in
about a half year if you do not use the camcorder for a long period. Even if the lithium
battery is not charged, it will not affect the camcorder operation, To retain the date and
time, charge the battery if the battery is discharged. The following are charging
methods:
• Connect the camcorder to the house current using the supplied AC adaptor/charger,
and leave the camcorder with the power turned off for more than 24 hours.
• Install the fully charged battery pack in the camcorder, and leave the camcorder with
the power turned off for more than 24 hours.
To check the preset date and time
Press DATE to display the date indicator.
Press TIME to display the time indicator.
When you press the same button again, the indicator goes off.
The year changes as follows:
1998 •-> 1999 . — 2029
L
Note on the time indicator
The internal clock of this camcorder operates on a 12-hour cycle.
•12;00;00 AM stands for midnight. •12:iK):iW PM stands for noon.
J
26
Page 27

Tips for using batteries
This section shows you how you can get the most out of your batteries.
Preparing the batteries
Always carry additional batteries
Have sufficient battery power to do 2 to 3 times as much recording as you have
planned.
Battery life is shorter in a cold environment
You cannot use size AA (LR6) batteries in a cold environment. Use the battery pack NPFIO.
Battery efficiency is decreased, and the battery pack will be used up more quickly, if
you are recording in a cold environment.
To save battery power
Turn off the camcorder when not recording to save battery power.
A smooth transition between scenes can be made even if recording is stopped and
started again. While you are positioning the subject, selecting an angle, or looking on
the LCD screen, the battery is used.
When to replace the battery
While you are using your camcorder, the remaining battery indicator decreases
gradually as battery power is used up. When you use the "InfoLITHIUM” battery pack,
remaining time in minutes appears.
*1—.^1’»'!
When the remaining battery indicator reaches the lowest point, the <Xi indicator may
appear and start flashing on the LCD screen.
When the <X) indicator changes from slow flashing to rapid flashing while you are
recording, turn off the camcorder replace the battery pack or size AA (LR6) batteries.
Leave the video cartridge in the camcorder to obtain a smooth transition between
scenes after the battery pack has been replaced.
IT
Page 28

Tips for using batteries
Notes on the "InfoLITHIUM" battery pack
What is "InfoLITHIUM"
Th\s cixmcordcT or»\y wdh Ihe "lnioL\THUJM" bi^Uery pack (NP-FTiO).
"InfoLITHIUM" is a trademark of Semy Corporation.
The "InfoLITHIUM" is a lithium ion battery pack which can exchange data with
compatible video equipment about its battery consumption.
To obtain more accurate remaining battery indication
Turn on the camcorder and point towards a stationary object. Do not move the
camcorder for 30 seconds or more.
Caution
Never leave the battery pack in temperatures above 140°F (60^C), such as in a car
parked in the sun or under direct sunlight.
The battery pack heats up
During charging or recording, the battery pack heats up. This is caused by energy that
has been generated and a chemical change that has occurred inside the battery pack.
This is normal and is not cause for concern.
Be sure to observe the following
• Keep the battery pack away from fire.
• Keep the battery pack dry.
• Do not open nor try tti disassemble the battery pack.
• D(5 not expose the battery pack to any mechanical shock.
The life of the battery pack
If the battery indicator flashes rapidly just after turning on the camcorder with a fully
charged battery pack, the battery pack should be replaced with a new fully charged
Charging temperature
You should charge batteries at temperatures from 50”F to 86°F (from to 30°C).
Lower temperatures require a longer charging time.
28
Page 29

Tips for using the batteries
Notes on size AA (LR6) batteries
To avoid possible damage from battery leakage or corrosion, observe the following.
• Be sure to insert the batteries in the correct direction.
• Dry batteries are not rechargeable.
• Do not use a combination of new and old batteries.
• Do not use different types of batteries.
• The batteries slowly discharge while not in use.
• Do not use a battery that is leaking.
If battery leakage occurred
• Wipe off the liquid in the battery case carefully before replacing the batteries.
• if you touch the liquid, wash it off with water.
• If the liquid get into your eyes, wash your eyes with a lot of water and then consult a
doctor.
Notes on AC adaptor/charger
• Unplug the unit from the wall outlet when ncit in use for a long time. To disconnect
the power cord, pull it out by the plug. Never pull the power cord itself.
• Do not operate the unit with a damaged cord or if the unit has been dropped or
damaged.
• Do not bend the power cord forcibly, or put a heavy object on it. This will damage the
cord and may cause a fire or electrical shock.
• Be sure that nothing metallic comes into contact with the metal parts of the connecting
plate. If this happens, a short may occur and the unit may be damaged.
• Always keep the metal contacts clean,
• Do not disa.ssemble the unit.
• Do not apply mechanical shock or drop the unit.
• While the unit is in use, particularly during charging, keep it away from AM receivers
and video equipment because it will disturb AM reception and video operation.
• The unit becomes warm while in use. This is normal.
• Do not place the unit in locations that are:
- Extremely hot or cold
- Dusty or dirty
- Very humid
- Vibrating
If any difficulty should arise, unplug the unit and contact local authorized Sony service
facility.
290
 Loading...