

Page 1
3-072-221-12(1)
BC-VC10
English Français
Español
Battery Charger
Operating Instructions
Mode d'emploi
Manual de instrucciones
Owner’s Record
The model and serial numbers are located on the bottom of the unit.
Record the serial number in the space provided below.
Refer to these numbers whenever you call upon your Sony dealer
regarding this product.
Model No. BC-VC10 Serial No.
Before operating the unit, please read this manual thoroughly and retain it
for future reference.
The BC-VC10 Battery charger can be used as follows:
• to charge a lithium ion “InfoLITHIUM” (C type) type battery pack for
such a digital still camera
• to charge two battery packs at once
What is the “InfoLITHIUM”?
The “InfoLITHIUM” is a lithium ion battery pack which can exchange data
with compatible electronic equipment about its battery consumption. Sony
recommends that you use the “InfoLITHIUM” battery pack with electronic
equipment having the mark.
“InfoLITHIUM” is a trademark of Sony Corporation.
WARNING
To prevent fire or shock hazard, do not expose the unit to rain or moisture.
To avoid electrical shock, do not open the cabinet.
Refer servicing to qualified personnel only.
AC power cord must be changed only at the qualified service shop.
For the customers in Canada
CAUTION
TO PREVENT ELECTRIC SHOCK, MATCH WIDE BLADE OF PLUG TO
WIDE SLOT, FULLY INSERT.
Avant d’utiliser cet appareil, veuillez lire attentivement ce manuel et le
conserver pour toute référence future.
Le chargeur de batteries BC-VC10 peut être utilisé pour :
• recharger une batterie au lithium-ion “InfoLITHIUM” (type C) pour un
appareil photo numérique de ce type
• recharger deux batteries en même temps
Qu’est-ce que ”InfoLITHIUM” ?
L’”InfoLITHIUM” est une batterie au lithium-ion qui peut échanger des
données avec des équipements électroniques compatibles concernant sa
consommation. Sony vous recommande d’utiliser la batterie
“InfoLITHIUM” avec des équipements électroniques portant le repère
.
“InfoLITHIUM” est une marque de Sony Corporation.
AVERTISSEMENT
Afin d’éviter tout risque d’incendie ou d’électrocution, ne pas exposer cet
appareil à la pluie ou à l’humidité.
Afin d’écarter tout risque d’électrocution, garder le coffret fermé. Ne confier
l’entretien de l’appareil qu’à un technicien qualifié.
Le cordon secteur doit être changé par un professionnel uniquement.
Pour les utilisateurs au Canada
ATTENTION
Afin d'écarter tout risque d'électrocution, insérez complètement la lame
large de la fiche dans la fente la plus large.
Antes de utilizar la unidad, lea detenidamente este manual, y consérvelo
para futuras referencias.
El cargador de baterías BC-VC10 podrá utilizarse para lo siguiente:
• Cargar un paquete de baterías de iones de litio “InfoLITHIUM” (tipo C)
para una cámara digital.
• Cargar dos paquetes de baterías simultáneamente.
¿Qué es ”InfoLITHIUM”?
”InfoLITHIUM” es una batería de iones de litio capaz de intercambiar datos
acerca del consumo con aparatos electrónicos compatibles. Sony
recomienda usar la batería ”InfoLITHIUM” con aparatos electrónicos que
presenten la marca .
”InfoLITHIUM” es una marca registrada de Sony Corporation.
ADVERTENCIA
Para evitar incendios o el riesgo de electrocución, no exponga la unidad a la
lluvia ni a la humedad.
Para evitar descargas eléctricas, no abra la unidad.
En caso de avería, solicite los servicios de personal cualificado solamente.
El cable de alimentación de CA solamente deberá ser cambiado en un
taller de reparaciones cualificado.
Notas sobre la utilización
BC-VC10
Sony Corporation © 2001 Printed in Japan
WARNING
To prevent fire or shock hazard, do not
expose the unit to rain or moisture.
NOTICE FOR THE CUSTOMERS IN THE UNITED STATES AND
CANADA
This symbol is intended to alert the user to the presence
of uninsulated “Dangerous voltage” within the
product’s enclosure that may be of sufficient magnitude
to constitute a risk of electric shock to persons.
This symbol is intended to alert the user to the presence
of important operating and maintenance (servicing)
instructions in the literature accompanying the
appliance.
CAUTION
You are cautioned that any changes or modifications not expressly
approved in this manual could void your authority to operate this
equipment.
Note:
This equipment has been tested and found to comply with the limits for a
Class B digital device, pursuant to Part 15 of the FCC Rules. These limits
are designed to provide reasonable protection against harmful
interference in a residential installation. This equipment generates, uses,
and can radiate radio frequency energy and, if not installed and used in
accordance with the instructions, may cause harmful interference to radio
communications.
However, there is no guarantee that interference will not occur in a
particular installation. If this equipment does cause harmful interference
to radio or television reception, which can be determined by turning the
equipment off and on, the user is encouraged to try to correct the
interference by one or more of the following measures:
– Reorient or relocate the receiving antenna.
– Increase the separation between the equipment and receiver.
– Connect the equipment into an outlet on a circuit different from that to
which the receiver is connected.
– Consult the dealer or an experienced radio/TV technician for help.
NOTICE FOR THE CUSTOMERS IN THE UNITED KINGDOM
A moulded plug complying with BS 1363 is fitted to this equipment for
your safety and convenience.
Should the fuse in the plug supplied need to be replaced, a 5 AMP fuse
approved by ASTA or BSI to BS 1362, (i.e., marked with or mark)
must be used.
If the plug supplied with this equipment has a detachable fuse cover,
be sure to attach the fuse cover after you change the fuse. Never use
the plug without the fuse cover. If you should lose the fuse cover,
please contact your nearest Sony service station.
Notes on Use
AC power cord plug
The BC-VC10 comes in two models, differentiated by the shape of the AC
power cord plug.
Model Shape of the plug
Model for USA/Canada Polarized
Model for other countries Non polarized
• The model for USA and Canada: One blade of the plug is wider than the
other for the purpose of safety and will fit into the power outlet only one
way. If you are unable to insert the plug fully into the outlet, contact your
dealer.
Warranty for Recorded Content
Contents of the recording cannot be compensated if recording or playback
is not made due to a malfunction of the battery pack, Battery charger, etc.
Charging
• Use only a “InfoLITHIUM” ( C type ) lithium ion type battery pack. This
unit cannot be used to charge a Ni-cd type battery pack.
• Attach the battery pack firmly.
• Charge the battery pack on a flat surface without vibration.
Charging temperature
The temperature range for charging is 0°C to 40°C (32°F to 104°F).
However, to provide maximum battery efficiency, the recommended
temperature range when charging is 10°C to 30°C (50°F to 86°F).
Others
• This unit is not disconnected from the wall outlet if the CHARGE lump
goes out. Should any problem occur, disconnect the Battery Charger from
the wall outlet as soon as possible to cut off the power.
• The nameplate indicating operating voltage, input rating, etc., is located
on the bottom of the unit.
• Attach the battery pack to the unit firmly when you charge.
• Power consumption of the charger is negligible when connected to a wall
outlet.
• Unplug the unit from the wall outlet if it will not be used for an extended
period of time. Disconnect by pulling the plug, never the cord itself.
• Charge the battery pack in an ambient temperature of between 10°C to
30°C (50°F to 86°F). Outside this range, the battery may not charge
efficiently.
We recommend charging the battery pack after approximately 1 hour, the
CHARGE lamp goes out. (approx. 2 hours for 2 batteries.)
• Do not operate the unit with a damaged cord or if it has been dropped or
damaged.
• Be sure that nothing metallic comes into contact with the metal parts of
the unit. If it does, a short may occur and the unit may be damaged.
• Always keep the metal contacts clean.
• Do not install the battery pack at an angle during use. Incorrect
installation of the battery pack can damage the Battery charger’s
connector.
• Do not disassemble or convert the unit.
• Do not apply mechanical shock or drop the unit.
• While the unit is in use, it gets warm. But this is normal.
• Keep the unit away from AM receivers, because it will disturb AM
reception.
• Do not place the unit in a location where it is:
— Extremely hot or cold
— Dusty or dirty
— Very humid
— Vibrating
If any difficulty should arise, unplug the unit and contact your nearest Sony
dealer.
Specifications
Input rating AC 100 - 240 V , 50/60 Hz
5 W
Output rating DC 4.2 V, 600 mA
Application Sony battery pack NP-FC10
Operating temperature 0°C to 40°C (32°F to 104°F)
Storage temperature –20°C to 60°C (–4°F to 140°F)
Dimensions Approx. 47 × 33 × 98 mm
(w/h/d) (1 7/8 × 1 5/16 × 3 7/8 inches)
including projecting parts
Mass Approx. 100 g (3.53 oz)
Cord length AC power cord: Approx. 2 m (78 3/4 inches)
Supplied accessories AC power cord (1)
Design and specifications are subject to change without notice.
Use a commercially available AC plug adaptor, if necessary, depending on
the design of the wall outlet.
Wall outlet
BC-VC10
AC plug adaptor
Remarques sur l’utilisation
Fiche du cordon d’alimentation secteur
Le modèle BC-VC10 existe en deux versions, différenciés par la fiche du
cordon d’alimentation secteur.
Modèle Configuration de la fiche
Modèle pour les Etats-unis Polarisée
et le Canada
Modèle pour les autres pays Non polarisée
• Modèle pour les Etats-unis ou le Canada : Une des lames de la fiche est
plus large que l’autre pour des raisons de sécurité et ne peut s’insérer que
dans un sens. Si vous ne parvenez pas à insérer complètement la fiche
dans la prise, contactez votre revendeur.
Garantie des données enregistrées
Le contenu de l’enregistrement ne peut en aucun cas donner droit à un
quelconque dédommagement en cas de défaut d’enregistrement ou de
lecture suite au dysfonctionnement de la batterie, du chargeur, etc.
Recharge
• N’utilisez que des batteries au lithium-ion “InfoLITHIUM” (type C). Cet
appareil ne peut pas être utilisé pour charger une batterie au nickelcadmium.
• Bien fixer la batterie.
• Chargez la batterie sur une surface plane et sans vibrations.
Température de recharge
La batterie peut être rechargée à une température comprise entre 0°C et
40°C (32°F et 104°F). Cependant, pour que son efficacité soit optimale, il
est conseillé de la recharger entre 10°C et 30°C (50°F et 86°F).
Divers
• Cet appareil n’est pas débranché de la prise murale si le témoin CHARGE
s’éteint. En cas de problème, débranchez très rapidement le chargeur de la
prise murale pour couper l’alimentation.
• La plaque signalétique indiquant la tension de fonctionnement, la
consommation électrique et d’autres informations électriques se trouve
sous l’appareil.
• Fixez bien la batterie rechargeable à l’appareil lors du rechargement.
• La consommation électrique du chargeur est négligeable s’il est branché à
la prise secteur.
• Débranchez l’appareil de la prise secteur si vous n’avez pas l’intention de
l’utiliser pendant un certain temps. Débranchez le cordon secteur en tirant
sur la fiche et non sur le cordon proprement dit.
• Rechargez la batterie à une température ambiante comprise entre 10 °C et
30 °C (50 °F à 86 °F). Hors de cette plage, il se peut que la batterie ne se
recharge pas bien.
Il est recommandé de recharger la batterie pendant 1 heure environ, le
témoin CHARGE s’éteint (environ 2 heures pour 2 batteries.)
• N’utilisez pas l’adaptateur lorsque le cordon est endommagé, ou s’il est
tombé ou a été endommagé.
• Evitez que des objets métalliques ne touchent les parties métalliques de
l’appareil. Un court-circuit pourrait se produire et l’endommager.
• Veillez à ce que les contacts soient toujours propres.
• N’installez pas la batterie rechargeable en biais lorsque vous l’utilisez.
Une installation incorrecte de la batterie peut endommager le connecteur
du chargeur de batterie.
• Ne pas démonter ni modifier l’appareil.
• Ne pas appliquer de chocs mécaniques à l’appareil ni le laisser tomber.
• Quand l’appareil est utilisé, il devient chaud. C’est tout à fait normal.
• Ne pas laisser l’adaptateur près d’un récepteur AM, car il perturbera la
réception AM.
• Ne pas entreposer l’adaptateur dans les endroits suivants :
— extrêmement chauds ou froids
— poussiéreux ou sales
— très humides
— exposés à des vibrations.
En cas de problème, débranchez l’adaptateur secteur et contactez votre
revendeur Sony.
Spécifications
Puissance en entrée Secteur 100 - 240 V , 50/60 Hz
Puissance en sortie CC 4,2 V, 600 mA
Application Batterie rechargeable Sony NP-FC10
Température de fonctionnement
Température d’entreposage
Dimensions hors tout 47 × 33 × 98 mm
Poids Env. 100 g (3,53 on.)
Longueur du cordon Cordon secteur : 2 m (Env. 78 3/4 pouces)
Accessoires fournis Cordon secteur (1)
La conception et les spécifications peuvent être modifiées sans préavis.
Utilisez, au besoin, un adaptateur de fiche secteur vendu dans le commerce
selon la configuration de la prise murale.
5 W
0°C à 40°C (32°F à 104°F)
–20°C à 60°C (–4°F à 140°F)
(Env. 1 7/8 × 1 5/16 × 3 7/8 pouces (l/h/p))
Parties saillantes comprises.
Prise murale
Garantía del contenido grabado
El contenido de la grabación no puede ser objeto de compensación si la
grabación o la reproducción no pudieron realizarse a causa de un
funcionamiento defectuoso del paquete de baterías, el cargador de baterías,
etc.
Carga
• Utilice sólo una batería de tipo iones de litio “InfoLITHIUM” (tipo C).
Esta unidad no se puede utilizar para cargar una batería de tipo Ni-cd.
• Fije firmemente la batería.
• Cargue la batería sobre una superficie plana exenta de vibraciones.
Temperatura de carga
El rango/el rango de temperaturas para carga es de 0 a 40°C. Sin
embargo, para obtener la máxima eficacia de la batería, el rango/el
rango de temperaturas recomendado para la carga es de 10 a 30°C.
Otros
• Esta unidad no se desconecta de la toma mural si la lámpara CHARGE se
apaga. Si ocurre algún problema desconecte el cargador de baterías de la
toma mural tan pronto como sea posible para cortar la alimentación.
• La placa de características en la que se indica la tensión de alimentación,
el consumo, etc., se encuentra en la base.
• Fije firmemente el paquete de baterías a la unidad en el momento de
realizar la carga.
• El consumo eléctrico del cargador es prácticamente nulo durante la
conexión a la toma de corriente.
• Desenchufe la unidad de la toma de corriente si no tiene previsto
utilizarla durante un largo período de tiempo. Para hacerlo, tire del
enchufe. Nunca tire del cable.
• Cargue el paquete de baterías a una temperatura ambiente que oscile
entre 10°C y 30°C (50°F y 86°F). Una temperatura fuera de este rango
podría causar problemas en la carga.
Le recomendamos cargar el paquete de baterías dejando transcurrir 1
hora, aproximadamente, desde el apagado de la lámpara CHARGE.
(aprox. 2 horas para 2 baterías.)
• No utilice la unidad con un cable dañado, cuando se haya caído, ni
cuando esté dañada.
• Cerciórese de que ningún objeto metálico entre en contacto con las partes
metálicas de la unidad. Si lo hiciera podría producirse un cortocircuito y
la unidad se dañaría.
• Mantenga siempre limpios los contactos metálicos.
• Cuando utilice el paquete de baterías, no lo instale en posición inclinada.
Una instalación incorrecta podría dañar el conector del Cargador de
baterías.
• No desarme ni modifique la unidad.
• No golpee ni deje caer la unidad.
• Cuando utilice la unidad, se calentará. Sin embargo, esto es normal.
• Mantenga la unidad alejada de receptores de AM, porque podría afectar a
la recepción de AM.
• No coloque la unidad en un lugar:
— Extremadamente cálido o frío
— Polvoriento o sucio
— Muy húmedo
— Sometido a vibraciones
Si tiene alguna dificultad, desenchufe la unidad y póngase en contacto con
su proveedor Sony.
Especificaciones
Valor nominal de entrada CA 100 - 240 V , 50/60 Hz
5 W
Valor nominal de salida CC 4,2 V, 600 mA
Aplicación Batería NP-FC10 Sony
Temperatura de funcionamiento
0 a 40°C
Temperatura de almacenamiento
–20 a 60°C
Dimensiones Aprox. 44 × 33 × 98 mm (an/al/prf), incluyendo
partes y controles salientes
Masa Aprox. 100 g
Longitud del cable Cable de alimentación de CA: Aprox. 2 m
Accesorios suministrados Cable de alimentación de CA (1)
El diseño y las especificaciones están sujetos a cambio sin previo aviso.
Adaptateur de fiche secteur
Page 2
English Français
Veuillez contacter votre revendeur Sony et lui apporter l’appareil qui ne
fonctionne pas.
Retirez la batterie de l’adaptateur secteur, puis remettez-la en place.
Si le témoin CHARGE
clignote encore :
Installez une autre batterie
rechargeable.
Si le témoin CHARGE s’allume mais
ne clignote pas de nouveau :
Le chargement est terminé et il n’y a
aucun problème.
Si le témoin CHARGE
clignote de nouveau :
Le problème vient de
l’appareil.
Si le témoin CHARGE s’allume mais
ne clignote pas de nouveau :
Un problème est survenu avec la
batterie installée précédemment.
Póngase en contacto con su proveedor Sony más cercano en relación con
el producto afectado.
Retire la batería de esta unidad y, a continuación, vuelva a instalar la
misma batería.
Si la lámpara CHARGE
vuelve a parpadear :
Instale otra batería.
Si la lámpara CHARGE se ilumina y
no vuelve a parpadear :
El tiempo de carga se ha completado
sin incidentes.
Si la lámpara CHARGE
vuelve a parpadear :
El problema reside en este
cargador.
Si la lámpara CHARGE se ilumina y
no vuelve a parpadear :
Ha surgido un problema con la
batería instalada anteriormente.
Español
A
B
1
2
CHARGE lamp
(orange)
Témoin CHARGE
(orange)
Lámpara CHARGE
(anaranjada)
Battery charger
Chargeur de batterie
Cargador de baterías
Battery pack
Batterie
Batería
Battery pack
Batterie
Batería
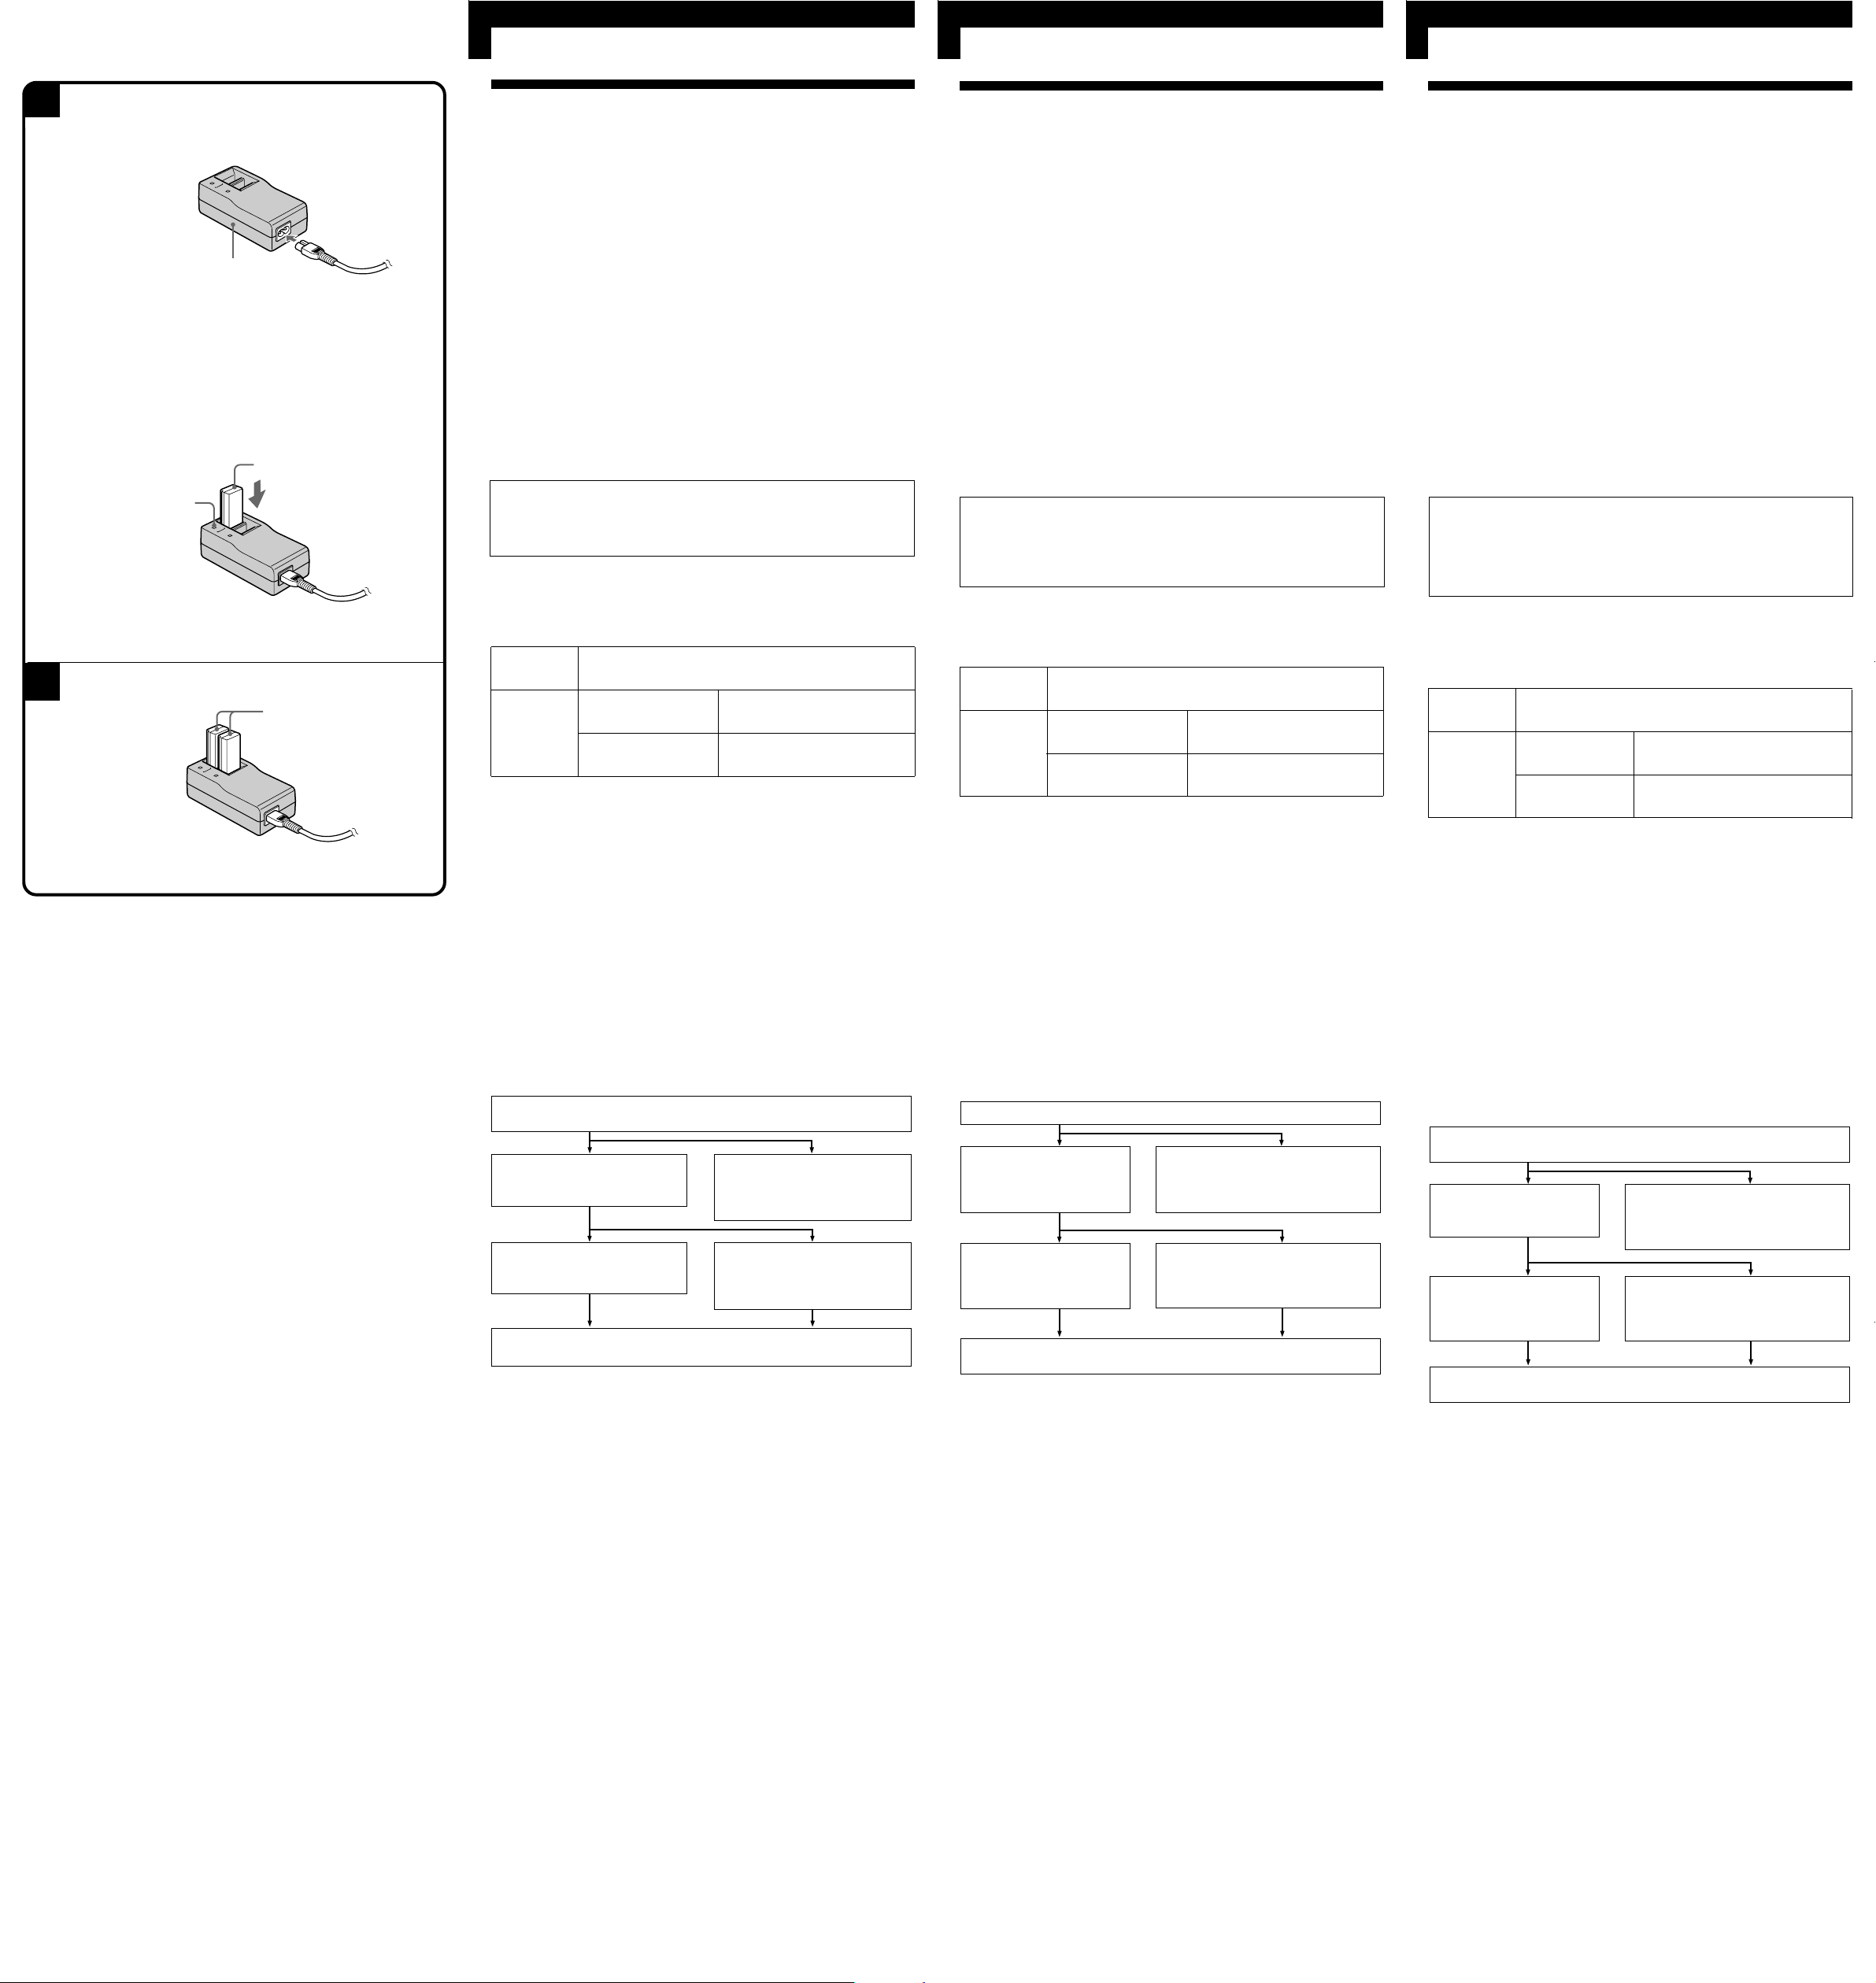
To Charge the Battery Pack
Charging by Attaching the Battery Pack to This
unit
See illustration A.
1 Connect the power cord to the Battery charger and then
connect to a wall outlet.
2 Install the battery pack.
To attach the battery pack, press the battery pack down until the
CHARGE lamp lights up.
The CHARGE lamp (orange) will light up and charging will begin.
When the CHARGE lamp goes out, normal charge is completed (Normal
charge). For a full charge, which allows you to use the battery longer than
usual (Full charge) leave the battery pack for a while.
Remove the battery pack when required. It can be used even if charging is
not completed.
Install two battery packs at once.
See illustration B.
You can install two battery packs.
The battery charger can charge two battery packs at once. However, it takes
twice as long to charge.
Attach only one battery pack if you need to recharge quickly.
Charging time of full charge differs depending on the number of battery
packs.
One battery pack : Approximately one hour after CHARGE lamp goes out
Two battery packs : Approximately two hours after CHARGE lamp goes out
Charging time
The following table shows the charging time for a battery pack which is
discharged completely.
Battery Full charge (Nomal chaege)
One battery pack Approximatery 140 minits
NP-FC10
Two battery packs Approximatery 280 minits
• Approximate minutes to charge an empty battery pack fully (Full charge).
• Numbers in parentheses indicate the time required to charge normally
(Normal charge).
• To ascertain the battery life, refer to the instruction manual of such a
digital still camera which you use.
• The charging time may differ depending on the condition of the battery
pack or the temperature of the environment.
Notes
• If the CHARGE lamp does not light or flash, check that the battery pack is
correctly attached to the Battery charger. If it is not attached it will not be
charged.
• When a fully charged battery pack is installed, the CHARGE lamp will
once light, then go out.
When the CHARGE lamp flashes
Check through the following chart.
Remove the battery pack from this unit, then install the same battery
pack again.
(Approximatery 80 minits)
(Approximatery 160 minits)
Pour charger une batterie
Recharge avec la batterie sur l’appareil
Voir l’illustration A.
1 Raccordez le cordon d’alimentation au chargeur, puis branchez-
le à une prise murale.
2 Installez la batterie rechargeable.
Pour fixer la batterie, enfoncez-la dans le chargeur jusqu’à ce que le
témoin CHARGE s’allume.
Le témoin CHARGE (orange) s’allume et le chargement commence.
Quand le témoin CHARGE s’éteint, le recharge normale est terminée
(Recharge normale). Pour une recharge complète, qui vous permettra
d’utiliser la batterie plus longtemps, utilisez (Recharge complète).
Enlevez la batterie rechargeable quand nécessaire. Elle peut être utilisée
même si elle n’est pas complètement rechargée.
Installation de deux batteries rechargeables
en même temps.
Voir l’illustration B.
Vous pouvez installer deux batteries rechargeables.
Le chargeur peut recharger deux batteries en même temps. Toutefois, cela
prend deux fois plus de temps.
Installez une seule batterie rechargeable si vous souhaitez une recharge
rapide.
La durée d’une recharge complète diffère selon le nombre de batteries.
Batterie unique : environ une heure après extinction du témoin
Batterie double : environ deux heures après extinction du témoin
Temps de recharge
Le tableau suivant indique le temps de recharge quand la batterie est
complètement déchargée.
Batterie Recharge complète (Recharge normale)
NP-FC10
• Temps de recharge approximatif en minutes pour recharger
complètement une batterie vide (Recharge complète).
• Les chiffres entre parenthèses indiquent le temps normal (Recharge
normale).
• Pour vérifier la durée de vie de la batterie, reportez-vous au mode
d’emploi de l’appareil photo numérique que vous utilisez.
• Le temps de recharge varie selon l’état de la batterie et la température
ambiante.
Remarques
• Si le témoin CHARGE ne s’allume ni ne clignote, vérifiez que la batterie
est correctement fixée au chargeur. Si elle ne l’est pas, elle ne sera pas
rechargée.
• Quand vous installez une batterie entièrement rechargée, le témoin
CHARGE s’allume une fois, puis s’éteint.
Si le témoin CHARGE clignote
Consultez le tableau suivant.
CHARGE
CHARGE
Une batterie 140 minutes environ
rechargeable (80 minutes environ)
Deux batteries 280 minutes environ
rechargeables (160 minutes environ)
Para cargar la batería
Carga fijando la batería a esta unidad
Consulte la ilustración A.
1 Conecte el cable de alimentación al Cargador de baterías y, a
continuación, conéctelo a una toma de corriente.
2 Instale la batería.
Para unir el paquete de baterías, presione el paquete de baterías hasta
que se encienda la lámpara CHARGE.
El indicador CHARGE (anaranjado) se iluminará y se iniciará la carga.
Cuando la lámpara CHARGE se apague, se habrá completado la carga
normal (Carga normal). Para una carga completa, que le permitirá utilizar
las baterías más tiempo del habitual (Carga completa).
Extraiga la batería cuando lo requiera. Podrá utilizarse incluso aunque no
se haya completado la carga.
Instalación de dos paquetes de baterías
simultáneamente.
Vea la ilustración B.
Puede instalar dos paquetes de baterías.
El cargador de baterías puede cargar dos paquetes de baterías
simultáneamente. Sin embargo, esto provocará que el tiempo de carga sea el
doble del normal de lo normal.
Si necesita realizar una recarga rápida, conecte sólo un paquete de baterías.
El tiempo de carga completa es distinto dependiendo del número de
paquetes de baterías.
Un paquete de baterías : Aproximadamente una hora tras el apagado
Dos paquetes de baterías : Aproximadamente dos horas tras el apagado
Tiempo de carga
En la tabla siguiente se muestra el tiempo de carga para una batería
completamente descargada.
Batería Carga total (Carga normal)
Un paquete de Aproximadamente 140 minutos
NP-FC10
• Minutos aproximados para cargar completamente una batería vacía
(carga completa).
• Los números entre paréntesis indican el tiempo cuando la cargue
normalmente (carga normal).
• Para asegurar la vida de las baterías, consulte el manual de instrucciones
de la cámara fija digital que utilice.
• El tiempo de carga puede diferir dependiendo de la condición de la
batería o de la temperatura ambiental.
baterías (aproximadamente 80 minutos)
Dos paquetes Aproximadamente 280 minutos
de baterías (aproximadamente 160 minutos)
Notas
• Si la lámpara CHARGE no se ilumina o parpadea, compruebe que el
paquete de baterías está correctamente unido al Cargador de baterías. Si
no se encuentra unido no se cargará.
• Cuando se instala un paquete de baterías cargado, la lámpara CHARGE
se encenderá una vez y después de apagará.
Cuando parpadee la lámpara CHARGE
Compruebe el organigrama siguiente.
de la lámpara CHARGE
de la lámpara CHARGE
If the CHARGE lamp flashes
again:
Install another battery pack.
If the CHARGE lamp flashes
again:
The problem is with this unit.
Please contact your nearest Sony dealer in connection with the product
with the problem.
If the CHARGE lamp lights and
does not flash again:
Charging time is complete and
there is no problem.
If the CHARGE lamp lights and
does not flash again:
There was a problem with the
previously installed battery.
 Loading...