

Sony BC-U1 Operating Instructions Manual
3-215-975-03(1)
Battery Charger
取扱説明書2ページ JP
Operating Instructions Page 9 GB
Manuel d’installation Page 15 FR
Installationsanleitung Seite 20 DE
Istruzioni per l’installazione Pagina 25 IT
Instrucciones de instalación Pagina 30 ES
CS
KR
お買い上げいただきありがとうございます。
電気製品は安全のための注意事項を守らないと、
火災や人身事故になることがあります。
この取扱説明書には、事故を防ぐための重要な注意事項と製品の
取り扱いかたを示してあります。この取扱説明書をよくお読みの
うえ、製品を安全にお使いください。お読みになったあとは、い
つでも見られるところに必ず保管してください。
BC-U1
© 2007 Sony Corporation
安全のために
日本語
安全のために
ソニー製品は安全に十分に配慮して設計されています。しかし、電気製品はすべて、
まちがった使いかたをすると、火災や感電などにより死亡や大けがなど人身事故につ
ながることがあり、危険です。
事故を防ぐために次のことを必ずお守りください。
安全のための注意事項を守る
3 〜 5 ページの注意事項をよくお読みください。
定期点検を実施する
長期間安全に使用していただくために、定期点検を実施することをおすすめします。
点検の内容や費用については、お買い上げ店にご連絡ください。
故障したら使用を中止する
すぐに、お買い上げ店にご連絡ください。
万一、異常が起きたら
• 異常な音、におい、煙りが出たら
• 落下させたら
m
a AC 電源コードや DC 接続コードを抜く。
b お買い上げ店にご相談ください。
警告表示の意味
この取扱説明書および製品では、次の
ような表示をしています。表示の内容
をよく理解してから本文をお読みくだ
さい。
この表示の注意事項を守らないと、火
災や感電などにより死亡や大けがなど
人身事故につながることがあります。
この表示の注意事項を守らないと、感
電やその他の事故によりけがをしたり
周辺の物品に損害を与えたりすること
があります。
注意を促す記号
行為を禁止する記号
• 炎が出たら
m
c すぐに AC 電源コードや DC 接続コードを抜き、消火する。
安全のために
2
行為を指示する記号
下記の注意を守らないと、 火災や
感電により死亡や大けがにつな
がることがあります。
外装を外さない、改造しない
外装を外したり、改造したりすると、感電の
原因となります。
雨の当たる場所や、油煙、湯気、湿気、ほ
こりの多い場所では使用しない
上記のような場所やこの取扱説明書に記され
ている使用条件以外の環境に設置すると、火
災や感電の原因となることがあります。
コード類は正しく配置する
AC 電源コードや DC 接続ケーブルは、足に
引っかけると本機の落下や転倒などによりけ
がの原因となることがあります。
充分注意して接続・配置してください。
指定のバッテリーパック以外の充電には使
用しない
取扱説明書に指定されているバッテリーパッ
ク以外のものを充電すると、火災や感電の原
因となります。
直射日光の当たる場所や熱器具の近くに設
置・保管しない
内部の温度が上がり、火災や故障の原因とな
ることがあります。
真夏の、窓を閉め切った自動車内では 50 ℃を
超えることがありますので、ご注意ください。
AC 電源コードや DC 接続コードを傷つけ
ない
AC 電源コードや DC 接続コードを傷つける
と、火災や感電の原因となります。
• コードを加工したり、傷つけたりしない。
• 重いものをのせたり、引っ張ったりしない。
• 熱器具に近づけたり、加熱したりしない。
• コードを抜くときは、必ずプラグを持って
抜く。
万一、コードが傷んだら、ソニーのサービス
窓口に交換をご依頼ください。
ぬれた手で電源プラグをさわらない
ぬれた手で電源プラグを抜き差しすると、感
電の原因となることがあります。
AC 電源コードのプラグ及びコネクターは
突き当たるまで差し込む
真っ直ぐに突き当たるまで差し込まないと、
火災や感電の原因となります。
JP
警告
3
注意
専用ブレーカーまたはスイッチを設ける
本機は電源スイッチを備えていません。万一、
異常が起きた場合は火災や感電の原因となる
ことがあります。ご使用の際は、本機の近く
の容易に接近できる屋内配線内に専用ブレー
カーまたはスイッチを設けるか、または本機
の使用中でも容易に抜き差しできるコンセン
トに AC 電源コードを接続してください。
下記の注意を守らないと、 けがを
したり周辺の物品に
損害を与える
ことがあります。
安定した場所に設置する
製品が倒れたり、搭載した機器が落下してけ
がをすることがあります。
十分な強度がある水平な場所に設置してくだ
さい。
付属の AC 電源コードを使う
付属の AC 電源コードを使わないと、火災や
感電の原因となることがあります。
運搬時には、AC 電源コードや DC 接続
ケーブルを取り外す
本機を運搬する際には、AC 電源コードおよ
び DC 接続ケーブルを必ず取り外してくださ
い。AC 電源コードや DC 接続ケーブルに
引っ掛かると、転倒や落下の原因となること
があります。
注意
4
その他の安全上のご注意
目次
その他の安全上のご注意/目次
警告
本機は電源スイッチを備えていません。
設置の際には、容易にアクセスできる固定配線内に専用遮断
装置を設けるか、使用中に、容易に抜き差しできる、機器に
近いコンセントに電源プラグを接続してください。
万一、異常が起きた際には、専用遮断装置を切るか、電源プ
ラグを抜いてください。
警告
直射日光の下や火気の近くなど、高温のところにバッテリー
を置かないでください。
ご注意
本機に接続される機器の消費電力によっては、本機が熱くな
ることがありますが、これは故障ではありません。発熱部に
長時間触れないようにご注意ください。
重要
機器の名称と電気定格は、底面に表示されています。
警告 .......................................................................3
注意 .......................................................................4
その他の安全上のご注意 .............................................. 5
概要................................................................................. 6
各部の名称と働き.......................................................... 6
バッテリーを充電する.................................................. 7
主な仕様 ......................................................................... 8
その他の安全上のご注意/目次
5
概要/各部の名称と働き
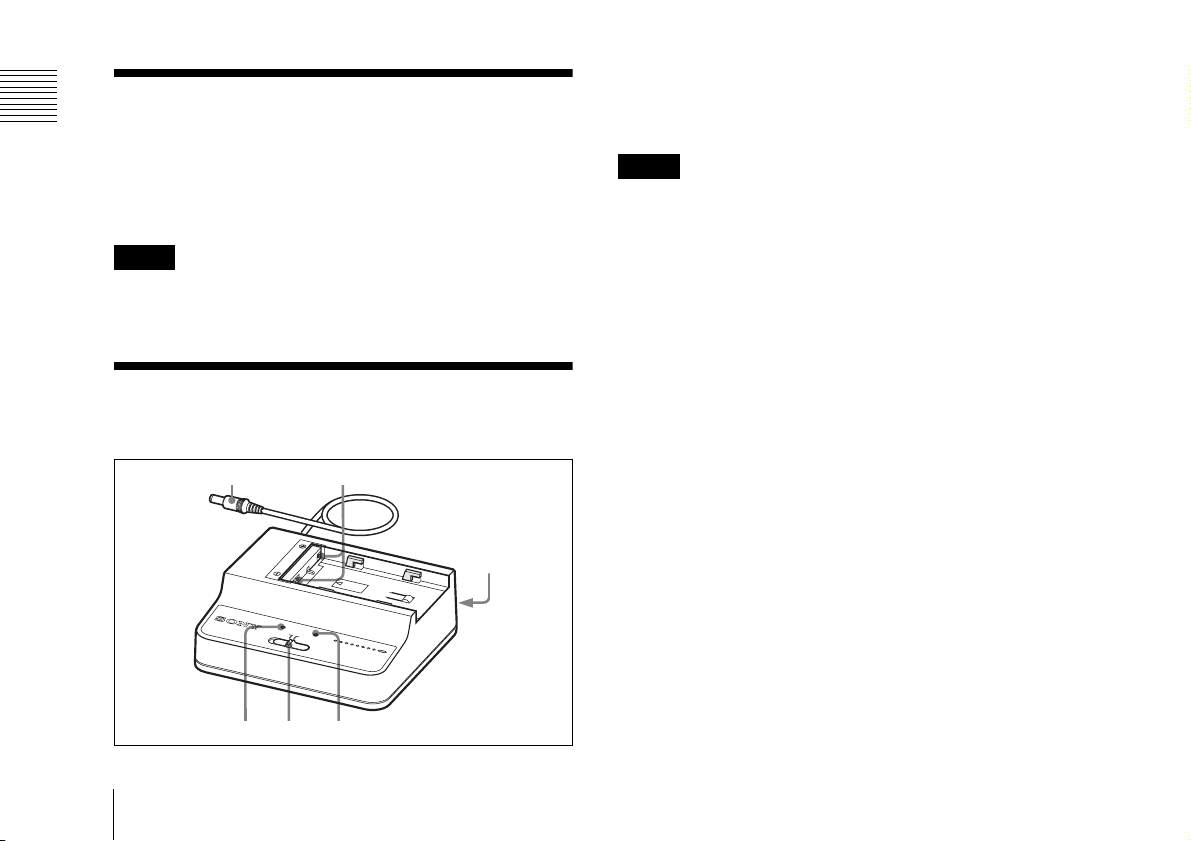
概要
a DC 電源出力ケーブル
モード切換スイッチが DCOUT に設定されているとき、DC
電源を供給します。
バッテリーチャージャー BC-U1 は、ソニーリチウムイオン
バッテリーパック BP-U30/U60/U90 用の充電器です。スイッ
チの切り換えで DC 電源を供給することもできます。
ご注意
本機をご使用中に不具合が生じたときは、すぐにコンセント
から AC 電源コードを抜いて電源を遮断してください。
各部の名称と働き
ab
c
D
C
O
U
T
C
H
A
R
G
E
0
%
8
B
0
A
T
T
E
B
R
1
C
0
Y
0
-
U
C
1
H
A
R
G
E
R
def
ご注意
定格以上の機器と接続しないでください。
b 充電端子
リチウムイオンバッテリーパックを充電するとき、電源を供
給します。リチウムイオンバッテリーパック以外を充電しよ
うとしたときは、通電しません。
c AC 電源入力端子
AC 電源コード(付属)で AC 電源に接続します。
d CHARGE ランプ
モード切換スイッチを CHARGE に設定して、リチウムイオ
ンバッテリーパックを充電しているときに点滅または点灯し
て、充電状態を示します。
◆ 詳しくは、 「バッテリーを充電する」(7 ページ)をご覧ください。
e モード切換スイッチ
CHARGE:リチウムイオンバッテリーパックを充電します。
DCOUT:DC 電源を供給します。
f DCOUT ランプ
モード切換スイッチを DCOUT に設定して、DC 電源を供給
しているとき、緑色に点灯します。
異常を検出すると消灯します。
概要/各部の名称と働き
6
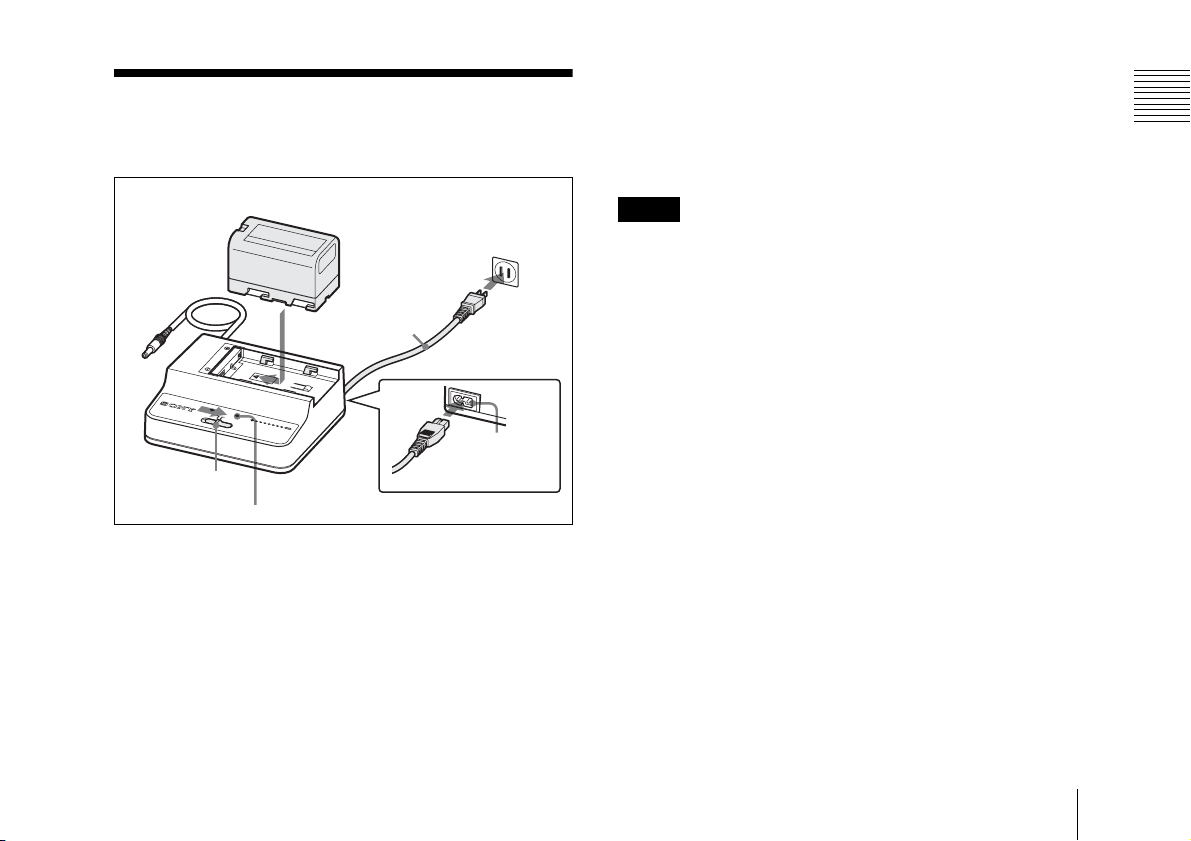
バッテリーを充電する
リチウムイオンバッテリーパック
BP-U30/U60/U90
AC 電源コンセントへ
2-2
3
AC 電源コード
(付属)
充電が始まり、CHAEGE ランプが充電の状態を表示し
ます。
オレンジ色の点滅:充電 0% 〜 80%
緑色の点滅:充電 80% 以上
緑色の点灯:充電完了
ご注意
本機で充電可能なバッテリーパック以外を取り付けても、充
電は始まりません。指定のバッテリーをお使いください。
バッテリーパックを取りはずす
バッテリーパックを取り付けたときと反対の方向にスライド
させて、上に持ち上げます。
バッテリーを充電する
1
DC OUT
CHARGE
モード切換スイッチ
CHARGE ランプ
BATTER
BC-U1
0% 80
100
Y CHARGER
2
-1
AC 電源
入力端子
1 モード切換スイッチを CHARGE にする。
2 AC電源コードでAC電源入力端子とAC電源コンセント
を接続する。
3 バッテリーパックを取り付ける。
バッテリーパックの▲マークを充電端子のほうに向けて
置き、矢印の方向にバッテリーをスライドさせます。
カチッとはまるまで、しっかり押し込んでください。
バッテリーの充電時間
完全に放電したバッテリーパックのフル充電までの所要時間
は、以下のとおりです。
BP-U30:約 130 分
BP-U60:約 170 分
BP-U90:約 220 分
異常を検出すると
充電中に下記の異常を検出すると、CHAEGE ランプがオレ
ンジ色と緑色に交互に点滅して異常を示します。
• 充電開始後、急速充電に移行しないとき
• 規定時間内に充電が完了しないとき
• 充電電圧が上がりすぎたとき
• 内部電圧が上がりすぎたとき
• 内部電圧が下がりすぎたとき
バッテリーを充電する
7
主な仕様
主な仕様
電源 AC100V 〜 240V、50/60Hz
消費電力 38W
定格入力容量 充電時:70VA(100V)、88VA(240V)
定格出力 充電時:16.4V、1.9A/1.5A
DC 出力時:12V、2.0A
動作温度 充電時:0 ℃〜 45 ℃
DC出力時:−5℃〜+45℃
保存温度 − 20 ℃〜+ 60 ℃
最大外形寸法 約128×45×98mm(幅/高さ/奥行き)
質量 330g
付属品
AC 電源コード(部品番号:1-790-732-1x)(1)
取扱説明書(1)
保証冊子(1)
仕様および外観は、改良のため予告なく変更することがあります
が、ご了承ください。
お使いになる前に、必ず動作確認を行ってください。故障その
他に伴う営業上の機会損失等は保証期間中および保証期間経
過後にかかわらず、補償はいたしかねますのでご了承くださ
い。
8
主な仕様
English
Before operating the unit, please read this manual thoroughly
and retain it for future reference.
Important Safety Instructions
• Read these instructions.
• Keep these instructions.
• Heed all warnings.
• Follow all instructions.
• Do not use this apparatus near water.
• Clean only with dry cloth.
• Do not block any ventilation openings. Install in accordance
with the manufacturer’s instructions.
• Do not install near any heat sources such as radiators, heat
registers, stoves, or other apparatus (including amplifiers)
that produce heat.
• Do not defeat the safety purpose of the polarized or
grounding-type plug. A polarized plug has two blades with
one wider than the other. A grounding type plug has two
blades and a third grounding prong. The wide blade or the
third prong is provided for your safety. If the provided plug
does not fit into your outlet, consult an electrician for
replacement of the obsolete outlet.
• Protect the power cord from being walked on or pinched
particularly at plugs, convenience receptacles, and the point
where they exit from the apparatus.
• Only use attachments/accessories specified by the
manufacturer.
• Use only with the cart, stand, tripod,
bracket, or table specified by the
manufacturer, or sold with the apparatus.
When a cart is used, use caution when
moving the cart/apparatus combination to
avoid injury from tip-over.
• Unplug this apparatus during lightning storms or when
unused for long periods of time.
WARNING
To reduce the risk of fire or electric shock, do not
expose this apparatus to rain or moisture.
To avoid electrical shock, do not open the
cabinet.
WARNING
This unit has no power switch.
When installing the unit, incorporate a readily accessible
disconnect device in the fixed wiring, or connect the power
plug to an easily accessible socket-outlet near the unit. If a
fault should occur during operation of the unit, operate the
disconnect device to switch the power supply off, or
disconnect the power plug.
GB
9
WARNING
Batteries shall not be exposed to excessive heat such as
sunshine, fire or the like.
Plug Cap Parallel blade
(NEMA 1-15P Configuration)
Cord Type NISPT-2 or SPT-2, two 16 or 18 AWG wires
Length Minimum 1.5 m (4 ft.11in.), Less than 2.5 m (8 ft.
3 in.)
Rating Minimum 7 A, 125 V
This symbol is intended to alert the user to the
presence of uninsulated “dangerous voltage”
within the product’s enclosure that may be of
sufficient magnitude to constitute a risk of electric
shock to persons.
This symbol is intended to alert the user to the
presence of important operating and maintenance
(servicing) instructions in the literature
accompanying the appliance.
WARNING: THIS WARNING IS APPLICABLE FOR USA
ONLY.
If used in USA, use the UL LISTED power cord specified
below.
DO NOT USE ANY OTHER POWER CORD.
Using this unit at a voltage other than 120V may require the
use of a different line cord or attachment plug, or both.
WAR NING: THIS WARNING IS APPLICABLE FOR OTHER
COUNTRIES.
1. Use the approved Power Cord (2-core mains lead) /
Appliance Connector / Plug that conforms to the safety
regulations of each country if applicable.
2. Use the Power Cord (2-core mains lead) / Appliance
Connector / Plug conforming to the proper ratings (Voltage,
Ampere).
If you have questions on the use of the above Power Cord /
Appliance Connector / Plug, please consult a qualified service
personnel.
CAUTION
The apparatus shall not be exposed to dripping or splashing.
No objects filled with liquids, such as vases, shall be placed on
the apparatus.
IMPORTANT
The nameplate is located on the bottom.
10

For the customers in the U.S.A.
This equipment has been tested and found to comply with the
limits for a Class B digital device, pursuant to Part 15 of the
FCC Rules. These limits are designed to provide reasonable
protection against harmful interference in a residential
installation. This equipment generates, uses, and can radiate
radio frequency energy and, if not installed and used in
accordance with the instruction manual, may cause harmful
interference to radio communications. However, there is no
guarantee that interference will not occur in a particular
installation. If this equipment does cause harmful interference
to radio or television reception, which can be determined by
turning the equipment off and on, the user is encouraged to try
to correct the interference by one or more of the following
measures:
— Reorient or relocate the receiving antenna.
— Increase the separation between the equipment and
receiver.
— Connect the equipment into an outlet on a circuit different
from that to which the receiver is connected.
— Consult the dealer or an experienced radio/TV technician
for help.
You are cautioned that any changes or modifications not
expressly approved in this manual could void your authority to
operate this equipment.
For the customers in Europe
This product with the CE marking complies with both the EMC
Directive and the Low Voltage Directive issued by the
Commission of the European Community.
Compliance with these directives implies conformity to the
following European standards:
•EN60065 : Product Safety
•EN55103-1 : Electromagnetic Interference (Emission)
•EN55103-2 : Electromagnetic Susceptibility (Immunity)
This product is intended for use in the following
Electromagnetic Environments:
E1 (residential), E2 (commercial and light industrial), E3
(urban outdoors), E4 (controlled EMC environment, ex. TV
studio)
For the customers in Europe
The manufacturer of this product is Sony Corporation, 1-7-1
Konan, Minato-ku, Tokyo, Japan.
The Authorized Representative for EMC and product safety is
Sony Deutschland GmbH, Hedelfinger Strasse 61, 70327
Stuttgart, Germany. For any service or guarantee matters
please refer to the addresses given in separate service or
guarantee documents.
11
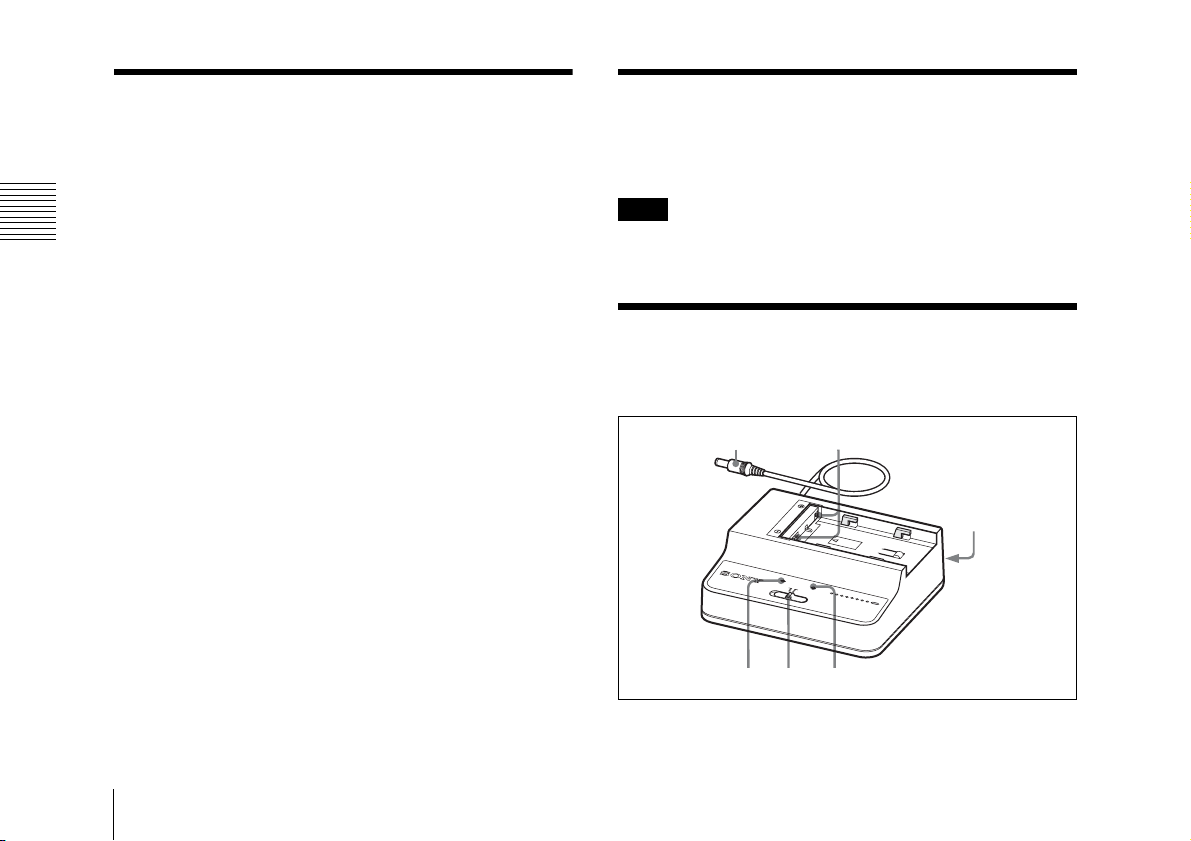
Table of Contents
Overview
Overview .....................................................................12
Location and Function of Parts ...............................12
Table of Contents / Overview / Location and Function of Parts
Charging a Battery Pack .......................................... 13
Specifications ............................................................. 14
The BC-U1 Battery Charger charges the Sony BP-U30/U60/U90
Lithium-ion Battery Pack. It can supply DC power to a device.
Note
If some trouble occurs when operating this unit, disconnect the AC
power cord from the AC power source to shut off power supply.
Location and Function of Parts
ab
c
D
C
O
U
T
C
H
A
R
G
E
0
%
8
B
0
A
T
T
E
B
R
1
C
0
Y
0
-
C
U
1
H
A
R
G
E
R
def
a DC power output cord
Supplies DC power when the Mode select switch is set to DC OUT.
Table of Contents / Overview / Location and Function of Parts
12
Note
Do not connect a device with power requirements higher than the
specified values.
b Charge connectors
Supplies power for charging a lithium-ion battery pack.
The charging current is automatically blocked when a battery pack
other than a lithium-ion battery pack has been mistakenly attached.
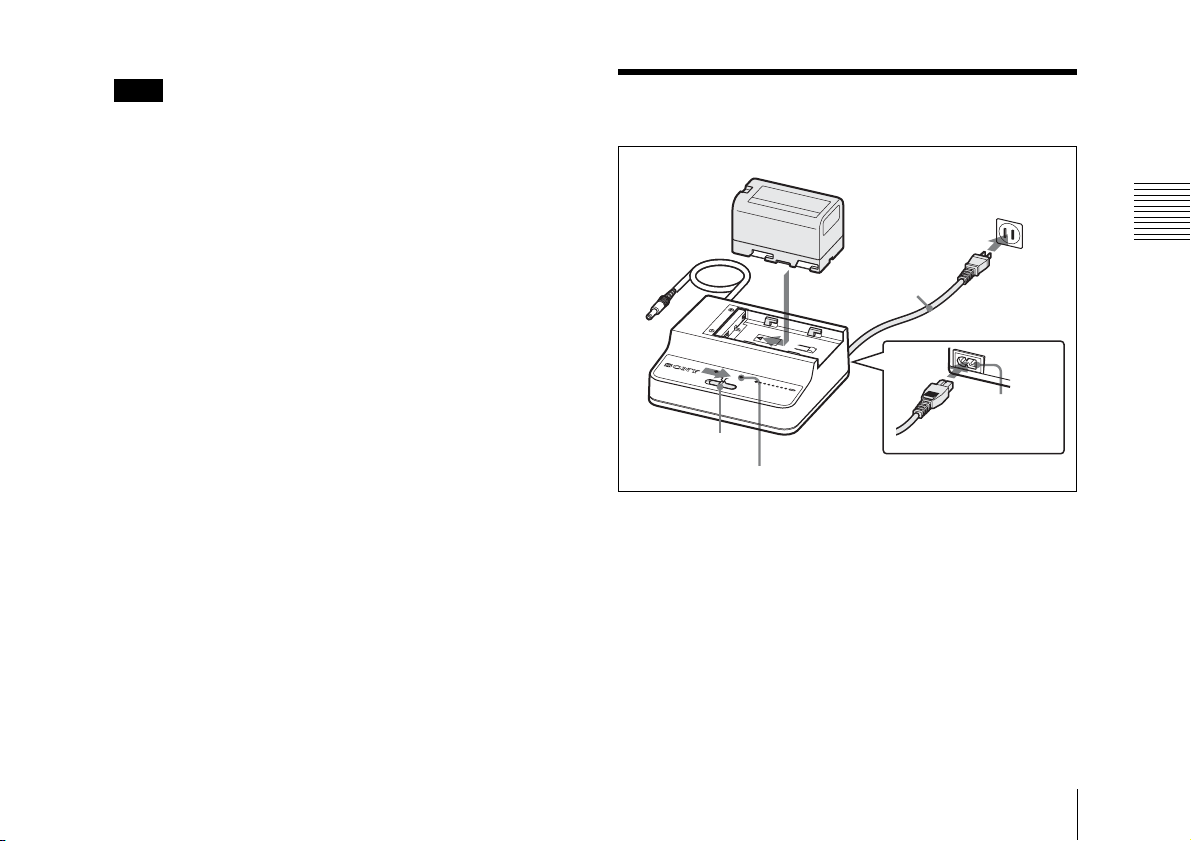
Charging a Battery Pack
BP-U30/U60/U90 Lithium-ion Battery Pack
AC power source
2-2
Charging a Battery Pack
c AC input connector
Connects to an AC power source via the AC power cord.
d CHARGE indicator
Shows the charging status of the attached battery pack during
charging of a battery pack with the Mode select switch set to
CHARGE.
For details, see “Charging a Battery Pack” on page 13.
e Mode select switch
CHARGE: For charging a lithium-ion battery pack
DC OUT: For supplying DC power
f DC OUT indicator
Lights in green when the Mode select switch is set to DC OUT and
DC power is being supplied.
If some trouble is detected, the indicator goes dark.
100
AC power cord
2
-1
AC input
connector
1
DC OUT
Mode select switch
3
CHARGE
0% 80
BATTER
BC-U1
Y CHARGER
CHARGE indicator
1 Set the Mode select switch to CHARGE.
2 Connect the AC input connector on the BC-U1 and the AC
power source using the AC power cord.
3 Attach the battery pack.
Place the battery pack with the triangle mark facing the charge
connectors and slide it in the direction indicated by the arrow.
Be sure to push the battery pack to engage the charge
connectors until it clicks.
Charging begins, and the CHARGE indicator shows the
charging status.
Charging a Battery Pack
13
Flashing in orange: Charged between 0 to 80%
Flashing in green: Charged over 80%
Lit in green: Fully charged
Note
The charging current is automatically blocked if a battery pack other
than a lithium-ion battery pack is attached. Be sure to charge a
Specifications
designated battery pack only.
Detaching a battery pack
Slide the attached battery pack in the opposite direction to that when
attaching then pull it up.
Charging time
The time to charge a completely exhausted battery pack to its full
capacity is shown below.
BP-U30: approximately 130 minutes
BP-U60: approximately 170 minutes
BP-U90: approximately 220 minutes
When an abnormality is detected
When one of the following conditions is detected during charging,
the CHARGE indicator flashes in orange and green alternately:
• After the start of charging, quick charging does not begin.
• Charging does not finish within a specified period.
• The voltage for battery charging has exceeded the specified level.
• The internal voltage has exceeded the specified level.
• The internal voltage has dropped below the specified level.
Specifications
Voltage source 100 to 240 V AC, 50/60 Hz
Power consumption 38 W
Current drain Charging: 70 VA (100 V), 88 VA (240 V)
Output Charging: 16.4 V, 1.9 A/1.5 A
DC output: 12 V, 2.0 A
Peak inrush current (1) Power ON, current probe method: 28 A
(100 V)/62 A (240 V)
(2) Hot switching inrush current, measured
in accordance with European standard
EN55103-1: 15 A (230 V)
Operating temperature Charging: 0°C to 45°C (32°F to 113°F)
DC output: −5°C to +45°C (23°F to 113°F)
Storage temperature −20°C to +60°C (−4°F to +140°F)
Dimensions (w/h/d) Approx. 128 × 45 × 98 mm
(5 1/8 × 1
projecting parts)
Mass Approx. 330 g (12 oz)
Supplied accessories
Operating Instructions (1)
Warranty Booklet (1)
Design and specifications are subject to change without notice.
Note
Always verify that the unit is operating properly before use. SONY WILL
NOT BE LIABLE FOR DAMAGES OF ANY KIND INCLUDING, BUT
NOT LIMITED TO, COMPENSATION OR REIMBURSEMENT ON
ACCOUNT OF THE LOSS OF PRESENT OR PROSPECTIVE PROFITS
DUE TO FAILURE OF THIS UNIT, EITHER DURING THE
WARRANTY PERIOD OR AFTER EXPIRATION OF THE
WARRANTY, OR FOR ANY OTHER REASON WHATSOEVER.
13
/16 × 3 7/8 inches) (excluding
14
Specifications
 Loading...