

Sony BC-L90 Operation Manual
BATTERY CHARGER
BC-L90
電気製品は、安全のための注意事項を守らないと、
火災や人身事故になることがあります。
このオペレーションマニュアルには、事故を防ぐための重要な注意事項と
製品の取り扱いかたを示してあります。このオペレーションマニュアルをよく
お読みのうえ、製品を安全にお使いください。お読みになったあとは、
いつでも見られるところに必ず保管してください。
OPERATION MANUAL
[Japanese/English/French/German/Italian/Spanish/Chinese/Korean]
1st Edition
日本語 JP
安全のために
ソニー製品は安全に充分配慮して設計されています。し
かし、電気製品は、まちがった使いかたをすると、火災
や感電などにより死亡や大けがなど人身事故につながる
ことがあり、危険です。
事故を防ぐために次のことを必ずお守りください。
安全のための注意事項を守る
4 〜 8 ページの注意事項をよくお読みください。製品全
般の注意事項が記されています。
定期点検をする
長期間、安全にお使いいただくために、定期点検をする
ことをおすすめします。点検の内容や費用については、
ソニーのサービス担当者または営業担当者にご相談くだ
さい。
故障したら使わない
ソニーのサービス担当者または営業担当者にご連絡くだ
さい。
万一、異常が起きたら
• 煙が出たら
• 異常な音、においがしたら
• 内部に水、異物が入ったら
• 製品を落としたり、キャビネットを破損したときは
警告表示の意味
オペレーションマニュアル
および製品では、次のよう
な表示をしています。表示
の内容をよく理解してから
本文をお読みください。
この表示の注意事項を守ら
ないと、破裂・発火・発熱・
液漏れにより、死亡や大け
がになることがあります。
この表示の注意事項を守ら
ないと、火災や感電などに
より死亡や大けがなど人身
事故につながることがあり
ます。
この表示の注意事項を守ら
ないと、感電やその他の事
故によりけがをしたり周辺
の物品に損害を与えたりす
ることがあります。
注意を促す記号
m
a 電源を切る。
b バッテリーパックをはずし、電源コードを抜く。
c ソニーのサービス担当者または営業担当者に連絡す
る。
安全のために
2
行為を禁止する記号
行為を指示する記号
目次
警告................................................................................. 4
注意................................................................................. 5
電池についての安全上のご注意
その他の安全上のご注意 ........................................................7
概要 ..........................................................................................9
各部の名称と働き....................................................................9
バッテリーを充電する ..........................................................11
主な仕様.................................................................................14
.............................................6
JP
目次
3
警告
指定のバッテリーパッ
ク以外の充電はしない
指定以外のバッテリーパッ
クを充電すると、発火、発
煙、感電の原因となること
があります。
AC 電源コードや DC
分解や改造をしない
分解や改造をすると、火災
や感電、けがの原因となる
ことがあります。内部の点
検や修理は、お買い上げ店
またはソニーのサービス窓
口およびサービス担当者に
ご依頼ください。
内部に水や異物を入れ
ない
水や異物が入ると火災や感
電の原因となることがあり
ます。万一、水や異物が
入ったときは、すぐに電源
を切り、電源コードや接続
コードを抜いて、お買い上
げ店またはソニーのサービ
ス窓口およびサービス担当
者にご相談ください。
表示された電源電圧で
使用する
機器に表示されたものと異
なる電源電圧で使用する
と、火災や感電の原因とな
ります。
ケーブルを傷つけない
AC 電源コードや DC ケー
ブルを傷つけると、火災や
感電の原因となります。
• コードやケーブルを加工
したり、傷つけたりしな
い。
• 重いものをのせたり、
引っ張ったりしない。
• 熱器具に近づけたり、加
熱したりしない。
• コードやケーブルを抜く
ときは、必ずプラグを
持って抜く。
万一、コードが傷んだら、
ソニーのサービス担当者に
交換をご依頼ください。
ぬれた手で電源プラグ
をさわらない
ぬれた手で電源プラグを抜
き差しすると、感電の原因
となることがあります。
電源コードのプラグ及
びコネクターは突き当
たるまで差し込む
真っ直ぐに突き当たるまで
差し込まないと、火災や感
電の原因となります。
4
警告

注意
通風孔をふさがない
通風孔をふさぐと内部に熱
がこもり、火災や故障の原
因となることがあります。
風通しをよくするために次
の項目をお守りください。
• 壁から 10cm 以上離して
設置する。
安定した場所に設置す
る
製品が倒れたり、搭載した
機器が落下してけがをする
ことがあります。
十分な強度がある水平な場
所に設置してください。
付属の電源コードを使
う
付属以外の電源コードを使
うと、火災や感電の原因と
なることがあります。
高温下では使用しない
高温の場所で本機を使用す
ると、火災、発火、発煙の
原因となることがありま
す。周囲の温度は 40 ℃以
下で使用してください。
長時間、直射日光のあたる
場所に放置しないでくださ
い。
定格出力を超えないよ
う、接続する機器の消
費電力を確認する
出力電圧を超えて使用する
と高温になり、故障の原因
となることがあります。
• 密閉された狭い場所に押
し込めない。
• 毛足の長い敷物(じゅう
たんや布団など)の上に
設置しない。
• 布などで包まない。
• あお向けや横倒し、逆さ
まにしない。
雨の当たる場所や、油
煙、湯気、湿気、ほこ
りの多い場所では使用
しない
上記のような場所やこの取
扱説明書に記されている使
用条件以外の環境に設置す
ると、火災や感電の原因と
なることがあります。
コード類は正しく配置
する
電源コードや接続ケーブル
は、足に引っかけると本機
の落下や転倒などによりけ
がの原因となることがあり
ます。
充分注意して接続・配置してく
ださい。
注意
5
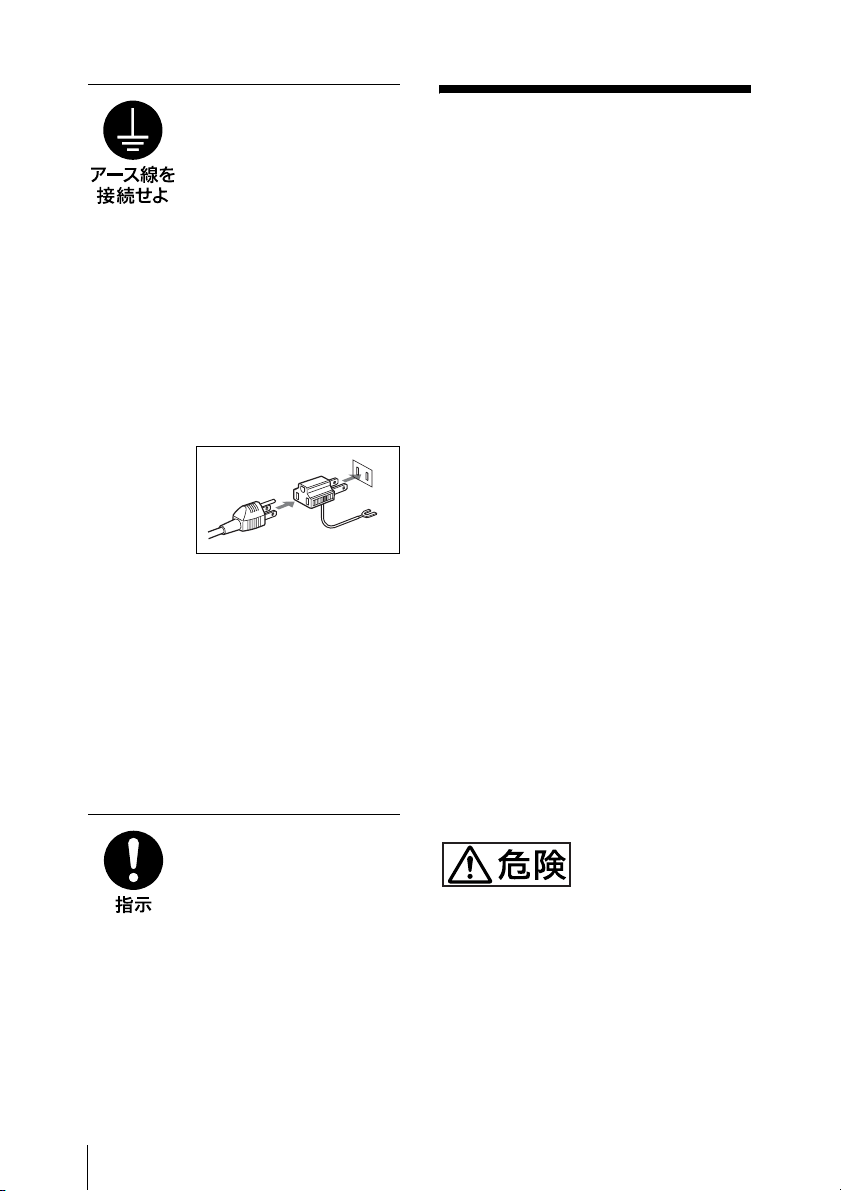
安全アースを接続する
安全アースを接続しない
と、感電の原因となること
があります。次の方法で
アースを接続してくださ
い。
• 電源コンセントが 3 極の
場合
付属の電源コードを使用
することで安全アースが
接続されます。
• 電源コンセントが 2 極の
場合
変換プラグ
アース線
付属の 3 極 t2 極変換プ
ラグを使用し、変換プラ
グから出ているアース線
を建物に備えられている
アース端子に接続してく
ださい。
安全アースを接続できない
場合は、ソニーのサービス
担当者または営業担当者に
ご相談ください。
運搬時には、接続ケー
ブルを取り外す
本機を運搬する際には、
AC 電源コードおよび接続
ケーブルを必ず取り外して
ください。接続ケーブルに
引っ掛かると、転倒や落下
の原因となることがありま
す。
電池についての安 全上のご注意
電池の使い方を誤ると、液漏れ・発熱・
破裂・発火・誤飲による大けがや失明の
原因となるので、次のことを必ず守って
ください。
万一、異常が起きたら
• 煙が出たら
a 機器の電源スイッチを切るか、バッ
テリーチャージャーの電源プラグを
抜く。
b ソニーのサービス窓口に連絡する。
• 電池の液が目に入ったら
すぐきれいな水で洗い、直ちに医師の
治療を受ける。
• 電池の液が皮膚や衣服に付いたら
すぐにきれいな水で洗い流す。
• バッテリー収納部内で液が漏れたら
よくふきとってから、新しい電池を入
れる。
ここでは、本機で使用可能なソニー製リ
チウムイオン電池についての注意事項を
記載しています。
• 充電には、ソニーの専用バッテリー
チャージャーを使用する。
• 火の中に投げ入れたり、加熱、半田付
け、分解、改造をしない。
• 直射日光の当たるところ、炎天下の車
内、ストーブのそばなど高温の場所
で、使用・放置・充電をしない。
電池についての安全上のご注意
6
• ハンマーでたたくなどの強い衝撃を与
えたり、踏みつけたりしない。
• 接点部や3 極と #極をショートさせた
り、金属製のものと一緒に携帯・保管
をしない。
• 所定の充電時間を超えても充電が完了
しない場合は、充電をやめる。
• 電池使用中や充電、保管時に異臭がし
たり、発熱・液漏れ・変色・変形など
があったときは、すぐに使用や充電を
やめる。
• 水や海水につけたり、濡らしたりしな
い。
充電のしかたについてはバッテリー
チャージャーの取扱説明書をよく読む。
その他の安全上の ご注意
警告
• 本機は電源スイッチを備えていませ
ん。
設置の際には、容易にアクセスできる
固定配線内に専用遮断装置を設ける
か、使用中に、容易に抜き差しでき
る、機器に近いコンセントに電源プラ
グを接続してください。
万一、異常が起きた際には、専用遮断
装置を切るか、電源プラグを抜いてく
ださい。
• アースの接続は、必ず電源プラグを電
源コンセントへ接続する前に行ってく
ださい。
アースの接続を外す場合は、必ず電源
プラグを電源コンセントから抜いてか
ら行ってください。
• 直射日光の下や火気の近くなど、高温
のところにバッテリーを置かないでく
ださい。
注意
• 指定以外の電池に交換すると、破裂す
る危険があります。
必ず指定の電池に交換してください。
使用済みの電池は、国または地域の法
令に従って処理してください。
• 付属の電源コードは本機の専用品で
す。
他の機器には使用できません。
• 機器を水滴のかかる場所に置かないで
ください。また水の入った物、花瓶な
どを機器の上に置かないでください。
その他の安全上のご注意
7

重要
機器の名称と電気定格は、底面に表示さ
れています。
その他の安全上のご注意
8
概要
BC-L90 は、ソニーリチウムイオンバッ
テリーパックを 2 本同時に充電できる
バッテリーチャージャーです。
バッテリーパック BP-FL75 を充電する
場合、約 65 分での急速充電が可能です。
また、外部機器へ DC 電源を供給するこ
とができます。
ご注意
本機をご使用中に不具合が生じたとき
は、すぐにコンセントから AC 電源コー
ドを抜いて電源を遮断してください。
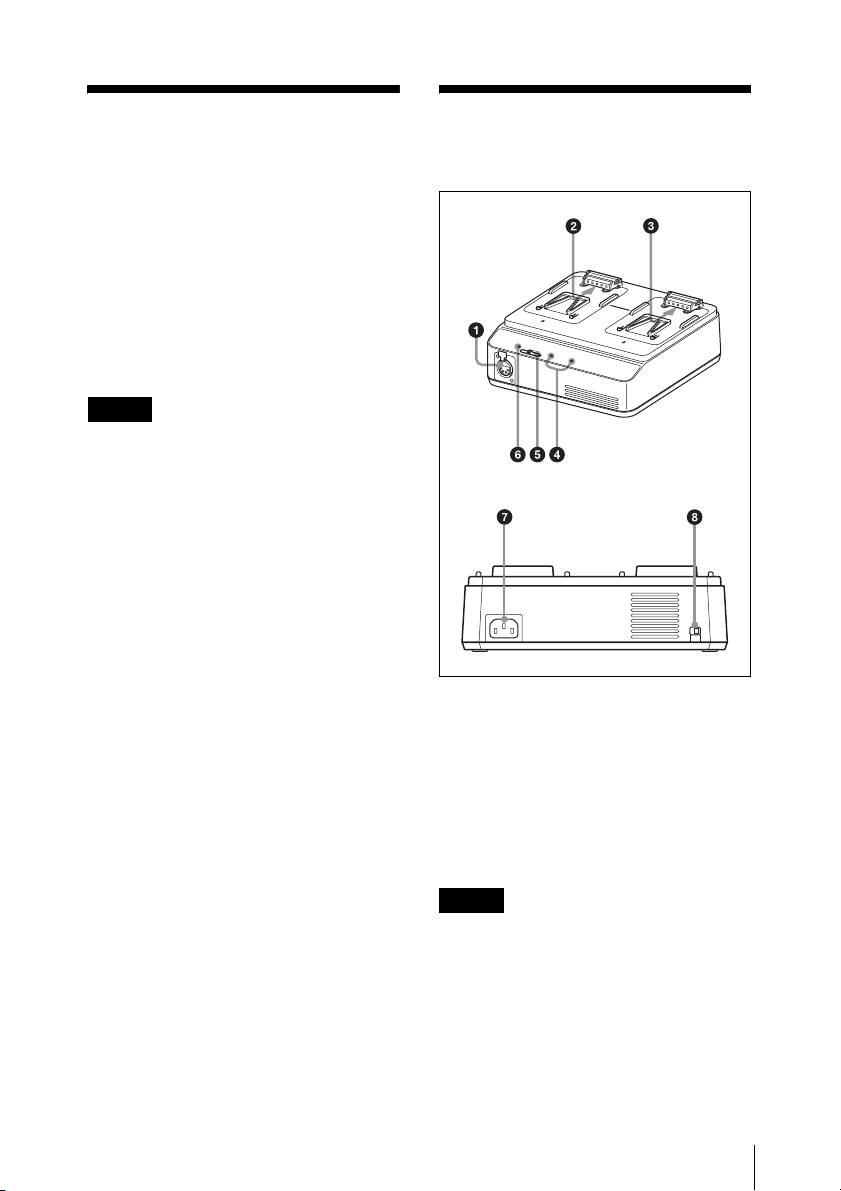
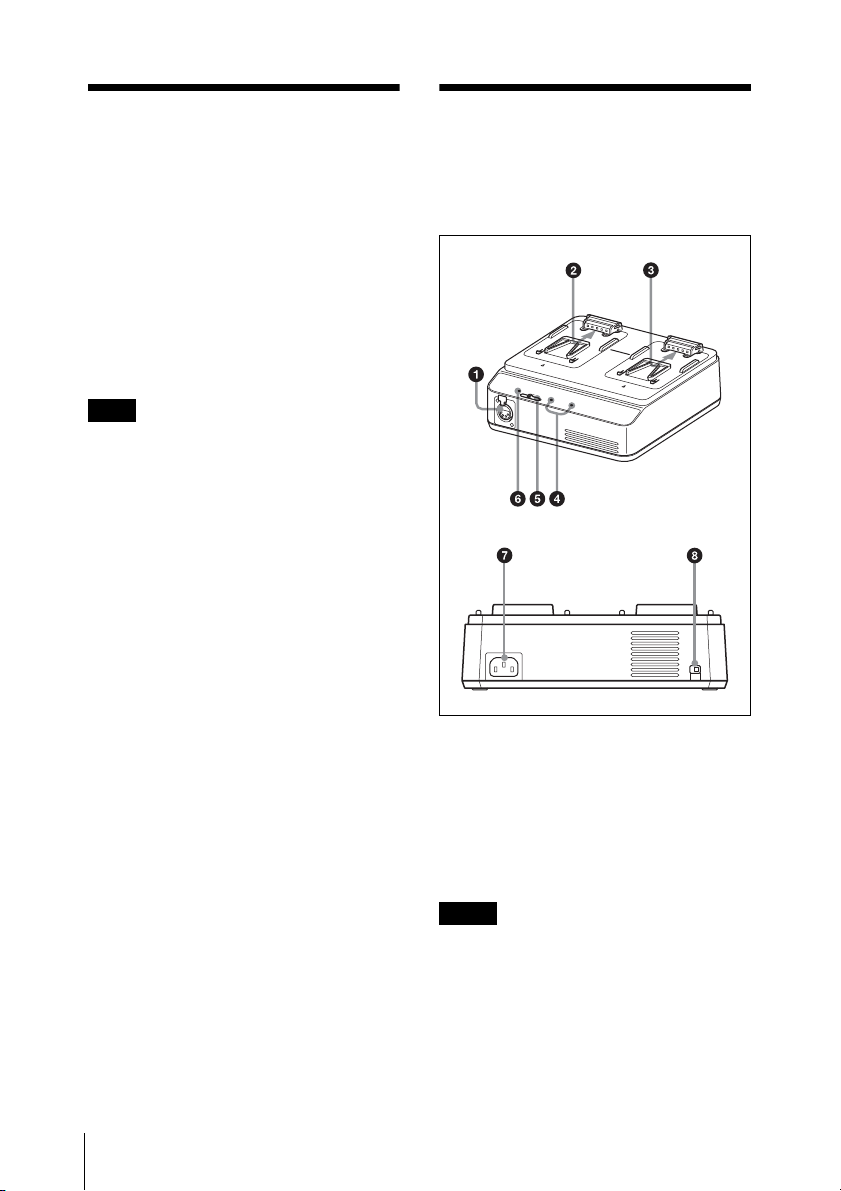
各部の名称と働き
1
2
A
C
A
D
A
P
T
O
R
/
C
H
A
R
G
E
R
B
C
L
9
0
背面
D
C
O
U
T
C
H
A
R
G
E
1
12
a DCOUT 端子(XLR4 ピン)
モード切換スイッチが DCOUT に設定
されているとき、DC 電源コード(別売)
を介して機器に DC 電源を供給します。
ピンの極性は、4 番がプラス(+)、1 番
がマイナス(−)です。
ご注意
• 定格以上の機器と接続しないでくださ
い。
• 本機に接続される機器の消費電力に
よっては、本機が熱くなることがあり
ますが、これは故障ではありません。
発熱部に長時間触れないようにご注意
ください。
概要/各部の名称と働き
9
b チャンネル 1 充電端子
モード切換スイッチが CHARGE1 に設定
されているとき、電源を供給します。リ
チウムイオンバッテリーパック以外を充
電しようとしたときは、通電しません。
c チャンネル 2 充電端子
モード切換スイッチの設定にかかわらず
電源を供給します。リチウムイオンバッ
テリーパック以外を充電しようとしたと
きは、通電しません。
d CHARGE ランプ
リチウムイオンバッテリーパックを充電
しているときに点滅または点灯して、充
電状態を示します。
◆ 詳しくは、 「バッテリーを充電する」(11
ページ)をご覧ください。
e モード切換スイッチ
CHARGE1:チャンネル 1 およびチャ
ンネル 2 に取り付けたリチウムイオ
ンバッテリーパックを充電します。
DCOUT:DCOUT 端子から DC 電源
を供給すると同時に、チャンネル 2
に取り付けたリチウムイオンバッテ
リーパックを充電します。(チャン
ネル 1 に取り付けたバッテリーパッ
クは充電されません。)
h 充電モード切換スイッチ
BP-FL75 以外のリチウムイオンバッテ
リーパックの充電時に有効になります。
BP-FL75 の充電時には無効になります。
スイッチの位置充電モード
H フル充電する。
L フル充電時に比べて充電量は
減るが、バッテリーパックの
寿命を延ばすことが可能。
f DCOUT ランプ
モード切換スイッチを DCOUT に設定
して、DC 電源を供給しているとき、緑
色に点灯します。
異常を検出すると消灯します。
g AC 電源入力端子
AC 電源コード(付属)で AC 電源に接
続します。
各部の名称と働き
10

バッテリーを充電する
安全のため、下記ソニー純正以外のバッ
テリーを使用しないでください。
• リチウムイオンバッテリーパック:
BP-FL75
BP-GL95A/GL65A
BP-L80S/L60S
バッテリーの充電時間
完全に放電したバッテリーパックのフル
充電までの所要時間は、以下のとおりで
す。(気温 25℃のとき。1 個のみ充電、2
個同時充電、異なる種類のバッテリー
パックの混在充電にかかわらず、充電時
間は変わりません。)
BP-FL75:約65分
BP-GL95A:約145分
BP-GL65A:約155分
BP-L80S:約210分
BP-L60S:約150分
ご注意
モード切換スイッチが DCOUT になっ
ているときは、チャンネル 2 充電端子に
取り付けたリチウムイオンバッテリー
パックの充電に、上記の約 2 倍の時間が
掛かります。
バッテリーを充電する
11
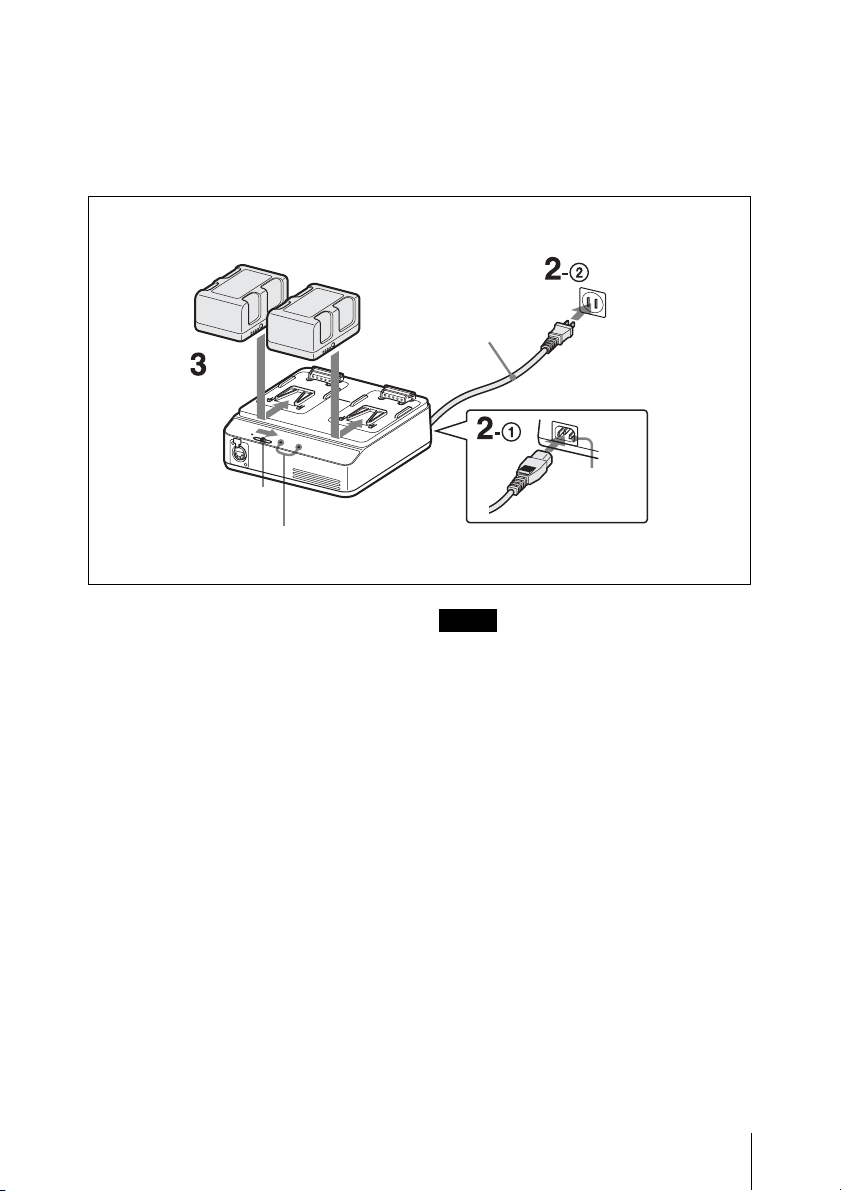
CHARGE モードで充電する
バッテリー 2 個(同じ機種、または異な
る機種のバッテリー 2 個)を同時に充電
できます。
リチウムイオンバッテリーパック AC 電源コンセントへ
AC 電源コード
(付属)
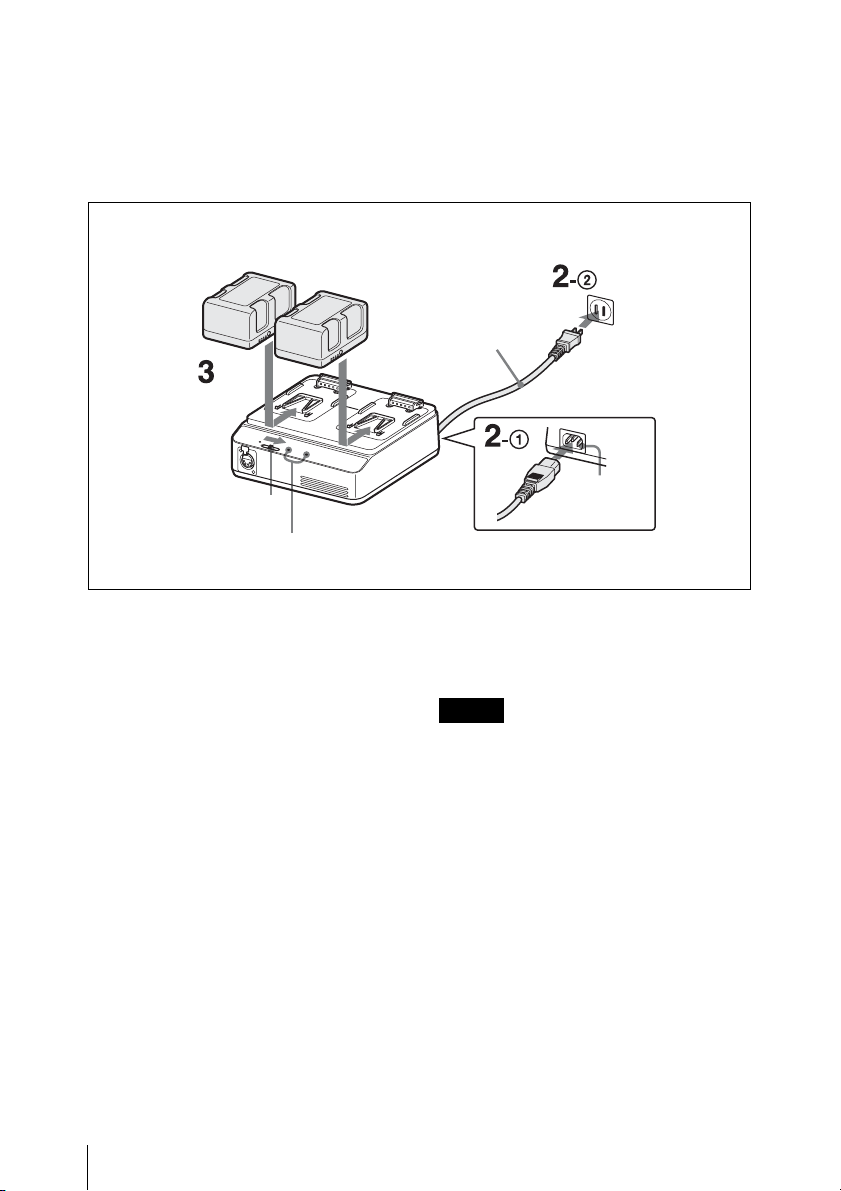
1
DC OUT
CHA
RGE1
12
モード切換
スイッチ
1
モード切換スイッチを CHARGE1 に
CHARGE ランプ
する。
2
AC 電源コード(付属)を、1AC 電
源入力端子に接続し、2AC 電源コ
ンセントに差し込む。
3
バッテリーパックを取り付ける。
バッテリーパックのコネクター側を
充電端子のほうに向けて置き、矢印
の方向にバッテリーをスライドさせ
ます。
カチッとはまるまで、しっかり押し
込んでください。
充電が始まり、CHARGE ランプが
光ることを確認してください。
CHARGE ランプは充電の状態を表
示します。
オレンジ色の点滅:充電 0% 〜 80%
2
A
C
A
D
A
P
T
O
R
/
C
H
A
R
G
E
R
B
C
L
9
0
AC 電源
入力端子
緑色の点滅:充電 80% 以上
緑色の点灯:充電完了
ご注意
• 本機で充電可能なバッテリーパック以
外を取り付けても、充電は始まりませ
ん。指定のバッテリーをお使いくださ
い。
• 本機にバッテリーを取り付けた状態
で、輸送や移動はしないでください。
バッテリーを充電する
12

DCOUT モードで充電する
機器に給電しながらチャンネル 2 でバッ
テリーパックを充電できます。
DC 電源を供給する機器へ
DC 電源
コード(別売)
1
12
モード切換スイッチ
DCOUT ランプ
1
モード切換スイッチを DCOUT にす
る。
2
DC 電源コード(別売)を、1DC
OUT 端子に接続し、2DC 電源を
供給する機器に接続する。
3
AC 電源コード(付属)を、1AC 電
源入力端子に接続し、2AC 電源コ
ンセントに差し込む。
手順 2 で接続した機器に DC 電源が
供給され、DCOUT ランプが緑色に
点灯します。
リチウムイオン
バッテリーパック
2
A
C
A
D
A
P
T
O
R
/C
H
A
R
G
E
R
B
C
L
9
0
CHARGE ランプ
4
バッテリーパックを取りはずす
バッテリーパックを取り付けたときと反
対の方向にスライドさせて、上に持ち上
げます。
ご注意
バッテリーパックの取り付けは、簡易
ロックとなっています。取りはずしの際
は、バッテリーパックを落とさないよう
にご注意ください。
AC 電源コンセントへ
AC 電源コード
(付属)
AC 電源入力
端子
チャンネル 2 にバッテリーパックを
取り付ける。
◆ 取り付け方については、前記
「CHARGE モードで充電する」の手順
をご覧ください。
3
バッテリーを充電する
13

異常を検出すると
CHARGE モードまたは DCOUT モード
で充電中に下記の異常を検出すると、
CHARGE ランプがオレンジ色と緑色に
交互に点滅します。
• 充電開始後、急速充電に移行しないと
き
• 規定時間内に充電が完了しないとき
• 充電電圧が上がりすぎたとき
• 充電器の内部電圧が上がりすぎたとき
• 充電器の内部電圧が下がりすぎたとき
• 故障したバッテリーが接続されたとき
• 充電器の内部温度が上がりすぎたとき
• 冷却ファンが故障したとき
異常検出時の処置
すぐにコンセントから AC 電源コードを
抜いて電源を遮断し、バッテリーパック
を取りはずして、お買い上げ店にご相談
ください。
主な仕様
電源 AC100V、50/60Hz
消費電力 220 W
定格入力容量 充電時:205VA
出力定格 充電時:16.8V/5A、
14.2V/5.7A
DC 出力時:16.8V、
6A
動作温度 充電時:0℃〜 +45℃
DC 出力時:− 5℃〜
+ 45℃
保存温度 − 20℃〜+ 60℃
最大外形寸法 227 × 74 × 199.5mm
(幅/高さ/奥行き)
(DCOUT レバーを
含めると奥行きは
204mm)
質量 約 1.8kg
付属品
オペレーションマニュアル(1)
AC 電源コード(1)
3 極→ 2 極変換プラグ(1)
14
別売りアクセサリー
DC 電源コード
仕様および外観は、改良のため予告なく
変更することがありますが、ご了承くだ
さい。
本機は「高調波電流規格 JISC61000-32適合品」です。
主な仕様

お使いになる前に、必ず動作確認を
行ってください。故障その他に伴う営
業上の機会損失等は保証期間中および
保証期間経過後にかかわらず、補償は
いたしかねますのでご了承ください。
主な仕様
15

16
主な仕様
English
Before operating the unit, please read
this manual thoroughly and retain it for
future reference.
Important Safety
Instructions
• Read these instructions.
• Keep these instructions.
• Heed all warnings.
• Follow all instructions.
• Do not use this apparatus near water.
• Clean only with dry cloth.
• Do not block any ventilation openings.
Install in accordance with the
manufacturer’s instructions.
• Do not install near any heat sources
such as radiators, heat registers,
stoves, or other apparatus (including
amplifiers) that produce heat.
• Do not defeat the safety purpose of
the polarized or grounding-type plug.
A polarized plug has two blades with
one wider than the other. A
grounding-type plug has two blades
and a third grounding prong. The wide
blade or the third prong are provided
for your safety. If the provided plug
does not fit into your outlet, consult an
electrician for replacement of the
obsolete outlet.
• Protect the power cord from being
walked on or pinched particularly at
plugs, convenience receptacles, and
the point where they exit from the
apparatus.
• Only use attachments/accessories
specified by the manufacturer.
• Use only with the cart,
stand, tripod, bracket,
or table specified by
the manufacturer, or
sold with the
apparatus. When a cart is used, use
caution when moving the cart/
apparatus combination to avoid injury
from tip-over.
• Unplug this apparatus during lightning
storms or when unused for long
periods of time.
• Refer all servicing to qualified service
personnel. Servicing is required when
the apparatus has been damaged in
any way, such as power-supply cord or
plug is damaged, liquid has been
spilled or objects have fallen into the
apparatus, the apparatus has been
exposed to rain or moisture, does not
operate normally, or has been
dropped.
WARNING
To reduce the risk of fire or
electric shock, do not expose
this apparatus to rain or
moisture.
To avoid electrical shock, do not
open the cabinet. Refer
servicing to qualified personnel
only.
THIS APPARATUS MUST BE
EARTHED.
CAUTION
Danger of explosion if battery is
incorrectly replaced.
Replace only with the same or
equivalent type recommended by the
manufacturer.
When you dispose of the battery, you
must obey the law in the relative area or
country.
GB
17
WARNING
This unit has no power switch.
When installing the unit, incorporate a
readily accessible disconnect device in
the fixed wiring, or connect the power
plug to an easily accessible socketoutlet near the unit. If a fault should
occur during operation of the unit,
operate the disconnect device to switch
the power supply off, or disconnect the
power plug.
This symbol is intended to
alert the user to the presence
of uninsulated “dangerous
voltage” within the product’s
enclosure that may be of
sufficient magnitude to
constitute a risk of electric
shock to persons.
This symbol is intended to
alert the user to the presence
of important operating and
maintenance (servicing)
instructions in the literature
accompanying the appliance.
WARNING: THIS WARNING IS
APPLICABLE FOR USA ONLY.
If used in USA, use the UL LISTED
power cord specified below.
DO NOT USE ANY OTHER POWER
CORD.
Plug Cap Parallel blade with ground
pin
(NEMA 5-15P Configuration)
Cord Type SJT, three 16 or 18
AWG wires
Length Minimum 1.5 m (4 ft 11 in),
Less than 2.5 m (8 ft 3 in)
Rating Minimum 10A, 125V
Using this unit at a voltage other than
120V may require the use of a different
line cord or attachment plug, or both.
To reduce the risk of fire or electric
shock, refer servicing to qualified
service personnel.
WARNING: THIS WARNING IS
APPLICABLE FOR OTHER
COUNTRIES.
1. Use the approved Power Cord (3-
core mains lead) / Appliance
Connector / Plug with earthingcontacts that conforms to the safety
regulations of each country if
applicable.
2. Use the Power Cord (3-core mains
lead) / Appliance Connector / Plug
conforming to the proper ratings
(Voltage, Ampere).
If you have questions on the use of the
above Power Cord / Appliance
Connector / Plug, please consult a
qualified service personnel.
CAUTION
The apparatus shall not be exposed to
dripping or splashing. No objects filled
with liquids, such as vases, shall be
placed on the apparatus.
Never place the set in a confined space,
such as a bookcase, or built-in cabinet,
unless proper ventilation is provided.
18

IMPORTANT
The nameplate is located on the
bottom.
WARNING
Batteries shall not be exposed to
excessive heat such as sunshine, fire or
the like.
For kundene i Norge
Dette utstyret kan kobles til et ITstrømfordelingssystem.
Apparatet må tilkoples jordet stikkontakt
Suomessa asuville asiakkaille
Laite on liitettävä
suojamaadoituskoskettimilla
varustettuun pistorasiaan
För kunderna i Sverige
Apparaten skall anslutas till jordat uttag
For the customers in the U.S.A.
This equipment has been tested and
found to comply with the limits for a
Class B digital device, pursuant to Part
15 of the FCC Rules. These limits are
designed to provide reasonable
protection against harmful interference
in a residential installation. This
equipment generates, uses, and can
radiate radio frequency energy and, if
not installed and used in accordance
with the instructions, may cause
harmful interference to radio
communications. However, there is no
guarantee that interference will not
occur in a particular installation. If this
equipment does cause harmful
interference to radio or television
reception, which can be determined by
turning the equipment off and on, the
user is encouraged to try to correct the
interference by one or more of the
following measures:
—Reorient or relocate the receiving
antenna.
—Increase the separation between the
equipment and receiver.
—Connect the equipment into an outlet
on a circuit different from that to
which the receiver is connected.
—Consult the dealer or an experienced
radio/TV technician for help.
You are cautioned that any changes or
modifications not expressly approved in
this manual could void your authority to
operate this equipment.
All interface cables used to connect
peripherals must be shielded in order to
comply with the limits for a digital device
pursuant to Subpart B of Part 15 of FCC
Rules.
This device complies with Part 15 of the
FCC Rules. Operation is subject to the
following two conditions: (1) this device
may not cause harmful interference,
and (2) this device must accept any
interference received, including
interference that may cause undesired
operation.
For the customers in Canada
This Class B digital apparatus complies
with Canadian ICES-003.
For the customers in Europe
This product with the CE marking
complies with the EMC Directive issued
by the Commission of the European
Community.
Compliance with this directive implies
conformity to the following European
standards:
19

• EN55103-1 : Electromagnetic
Interference(Emission)
• EN55103-2 : Electromagnetic
Susceptibility(Immunity)
This product is intended for use in the
following Electromagnetic
Environments: E1 (residential), E2
(commercial and light industrial), E3
(urban outdoors), E4 (controlled EMC
environment, ex. TV studio).
The manufacturer of this product is
Sony Corporation, 1-7-1 Konan,
Minato-ku, Tokyo, 108-0075 Japan.
The Authorized Representative for
EMC and product safety is Sony
Deutschland GmbH, Hedelfinger
Strasse 61, 70327 Stuttgart, Germany.
20

Table of Contents
Overview ................................................................................22
Location and Function of Parts ...........................................22
Charging Battery Packs ....................................................... 24
Specifications .........................................................................27
Table of Contents
21
Overview
The BC-L90 is a battery charger that can
charge two Sony lithium-ion battery packs
simultaneously.
High-speed charging is possible for
BP-FL75 Battery Packs with a charging
time of approximately 65 minutes.
The charger can also supply DC power to an
external device.
Note
If some trouble occurs when operating this
unit, disconnect the AC power cord from
the AC power source to shut off power
supply.
Location and Function of Parts
1
2
A
C
A
D
A
P
T
O
R
/
C
H
A
R
G
E
R
B
C
L
9
0
Rear
D
C
O
U
T
C
H
A
R
G
E
1
12
Overview / Location and Function of Parts
22
a DC OUT connector (XLR 4-pin)
Supplies DC power to a connected device
via a DC power cord (not supplied) when
the mode select switch is set to DC OUT.
Pin 4 is the positive (+) polarity while pin 1
is the negative (–).
Notes
• Do not connect a device with power
requirements higher than the specified
values.
• Depending on the power consumed by
the connected device, the apparatus may
become warm. This is not a malfunction.
Avoid prolonged contact with the
apparatus if it should become warm.

b Channel 1 charge connectors
Supplies power when the mode select
switch is set to CHARGE1.
The charging current is automatically
blocked when a battery pack other than a
lithium-ion battery pack has been
mistakenly attached.
c Channel 2 charge connectors
Supplies power regardless of the setting of
the mode select switch.
The charging current is automatically
blocked when a battery pack other than a
lithium-ion battery pack has been
mistakenly attached.
d CHARGE indicators
Shows the charging status of the attached
battery packs during charging of battery
packs.
For details, see “Charging Battery Packs” on page
24.
e Mode select switch
CHARGE1: Supplies power to lithium-ion
battery packs connected to channel 1
and channel 2.
DC OUT: Supplies DC power from the DC
OUT connector, and at the same time
supplies power to a lithium-ion battery
pack connected to channel 2.
(A battery pack connected to channel 1
is not charged.)
h Charge mode switch
Use this switch when charging lithium-ion
battery packs other than the BP-FL75. This
switch is disabled when charging BP-FL75
battery packs.
Switch
position
H Batteries are charged to
L Charges batteries to less
Charge mode
their full capacity.
than their full capacities to
extend the life of the
batteries.
f DC OUT indicator
Lights in green when the mode select
switch is set to DC OUT and DC power is
being supplied.
If some trouble is detected, the indicator
goes dark.
g AC input connector
Connects to an AC power source via an AC
power cord (not supplied).
Location and Function of Parts
23

Charging Battery Packs
For safety, do not use batteries other than
genuine Sony batteries of the following
models.
• Lithium-ion battery packs:
BP-FL75
BP-L80S
Charging time
The time to charge a completely exhausted
battery pack to its full capacity is shown
below. (When the temperature is 25 °C
(77 °F). The charging time is not affected
by whether one or two battery packs are
being charged, or by combinations of
different battery models.)
BP-FL75: approx. 65 minutes
BP-L80S: approx. 210 minutes
Note
When the mode select switch is set to DC
OUT, the charge time for the lithium-ion
battery pack attached to the channel 2
charge connector will be about twice as
long as the above times.
Charging Battery Packs
24
Charging in CHARGE mode
You can charge two battery packs
simultaneously (two batteries of the same
model or two batteries of different models).
Lithium-ion battery packs to AC power source
AC power cord
(not supplied)
1
D
C OUT
CHARGE1
12
A
C
A
Mode select switch
CHARGE indicators
1
Set the mode select switch to
CHARGE1.
2
Connect an AC power cord (not
supplied) to the AC input connector 1
and to an AC power source 2.
3
Attach the battery packs.
Place the battery packs with their
connectors facing the charge
connectors, and slide them in the
direction indicated by the arrows.
Be sure to push the battery packs to
engage the charge connectors until
they click.
Check that the CHARGE indicators
light when charging begins. The
CHARGE indicators show the
charging status.
Flashing in orange: Charged between
0 to 80%
Flashing in green: Charged over 80%
Lit in green: Fully charged
2
D
A
P
T
O
R
/C
H
A
R
G
E
R
B
C
L
9
0
AC input
connector
Notes
• The charging current is automatically
blocked if a battery pack other than a
lithium-ion battery pack is attached. Be
sure to charge designated battery packs
only.
• Do not move or transport the charger with
the battery packs attached.
Charging Battery Packs
25
Charging in DC OUT mode
You can charge a battery pack on channel 2
while supplying power to a connected
device.
to DC powered device
DC power cord
(not supplied)
1
12
CHARGE indicator
Mode select switch
DC OUT indicator
1
Set the mode select switch to DC OUT.
2
Connect a DC power cord (not
supplied) to the DC OUT connector 1
and to the DC powered device 2.
3
Connect an AC power cord (not
supplied) to the AC input connector 1
and to an AC power source 2.
DC power is supplied to the device
connected in step 2, and the DC OUT
indicator lights in green.
4
Attach a battery pack to channel 2.
See step 3 in “Charging in CHARGE mode”
for information about how to attach a battery
pack.
Lithium-ion
battery pack
2
A
C
A
D
A
P
T
O
R
/C
H
A
R
G
E
R
B
C
L
9
0
to AC power source
AC power cord
(not supplied)
AC input
connector
Detaching a battery pack
Slide the attached battery pack in the
opposite direction to that when attaching
then pull it up.
Note
The battery packs are attached via a simple
locking mechanism. Be careful not to drop
the battery packs when detaching them.
When an error is detected
When one of the following conditions is
detected during charging in CHARGE
mode or DC OUT mode, the CHARGE
indicator flashes in orange and green
alternately:
Charging Battery Packs
26

• After the start of charging, quick
charging does not begin.
• Charging does not finish within a
specified period.
• The voltage for battery charging has
exceeded the specified level.
• The internal voltage on the charger has
exceeded the specified level.
• The internal voltage on the charger has
dropped below the specified level.
• A defective battery is connected.
• The internal temperature on the charger is
excessively high.
• The cooling fan is malfunctioning.
Action to take if an error is
detected
Immediately disconnect the AC power cord
from the AC power source, remove the
battery packs, and contact the vendor from
whom you purchased the apparatus.
Specifications
Power supply 100 V to 240 V AC,
50/60 Hz
Power consumption 220 W
Input capacity Charging: 205 VA
Inrush current (1) Maximum
possible inrush
current at initial
switch-on (Voltage
changes caused by
manual switching):
48 A peak, 11 A
r.m.s. (240 V AC)
(2) Inrush current
after a mains
interruption of five
seconds (Voltage
changes caused at
zero-crossing): 4.8 A
peak, 1.1 A r.m.s.
(240 V AC)
Output Charging: 16.8 V /
5 A, 14.2 V / 5.7 A
DC output: 16.8 V,
6A
Operating temperature
Charging: 0 °C to
45 °C (32 °F to
113 °F)
DC output: –5 °C to
+45 °C (23 °F to
113 °F)
Storage temperature –20 °C to +60 °C
(–4 °F to +140 °F)
Dimensions (w/h/d) 227 × 74 × 199.5 mm
(9 × 3 × 7
(depth of 204 mm
(81/8 in.) including
DC OUT lever)
Mass Approx. 1.8 kg (3 lb.
15 oz.)
7
/8 in.)
Specifications
27
 Loading...