

Page 1
3-082-391-12 (1)
Battery Charger
Operating Instructions
Mode d’emploi
Owner’s Record
The model and serial numbers are located on the bottom of the unit.
Record the serial number in the space provided below.
Refer to these numbers whenever you call upon your Sony dealer regarding this
product.
Model No. BC-CSQ2 Serial No.
BC-CSQ2
Sony Corporation C 2003 Printed in Japan
Printed on 100% recycled paper using
VOC (Volatile Organic Compound)-free
vegetable oil based ink.
A
1
2
B
a
English
Before operating the unit, please read this manual thoroughly and retain it for future
reference.
WARNING
To prevent fire or shock hazard, do not expose the
unit to rain or moisture.
For the customers in the USA
CAUTION
You are cautioned that any changes or modifications not expressly approved in this
manual could void your authority to operate this equipment.
Note:
This equipment has been tested and found to comply with the limits for a Class B
digital device, pursuant to Part 15 of the FCC Rules. These limits are designed to
provide reasonable protection against harmful interference in a residential installation.
This equipment generates, uses, and can radiate radio frequency energy and, if not
installed and used in accordance with the instructions, may cause harmful interference
to radio communications.
However, there is no guarantee that interference will not occur in a particular
installation. If this equipment does cause harmful interference to radio or television
reception, which can be determined by turning the equipment off and on, the user is
encouraged to try to correct the interference by one or more of the following measures:
– Reorient or relocate the receiving antenna.
– Increase the separation between the equipment and receiver.
– Connect the equipment into an outlet on a circuit different from that to which the
receiver is connected.
– Consult the dealer or an experienced radio/TV technician for help.
For the customers in the USA and Canada
RECYCLING NICKEL METAL HYDRIDE BATTERIES
Nickel Metal Hydride batteries are recyclable.
You can help preserve our environment by returning your used
rechargeable batteries to the collection and recycling location nearest you.
For more information regarding recycling of rechargeable batteries,
call toll free 1-800-822-8837, or visit http://www.rbrc.org/
Caution: Do not handle damaged or leaking Nickel Metal Hydride batteries.
NOTICE FOR THE CUSTOMERS IN THE UNITED KINGDOM
A moulded plug complying with BS 1363 is fitted to this equipment for your safety
and convenience.
Should the fuse in the plug supplied need to be replaced, a 5 AMP fuse approved
by ASTA or BSI to BS 1362, (i.e., marked with
If the plug supplied with this equipment has a detachable fuse cover, be sure to
attach the fuse cover after you change the fuse. Never use the plug without the fuse
cover. If you should lose the fuse cover, please contact your nearest Sony service
station.
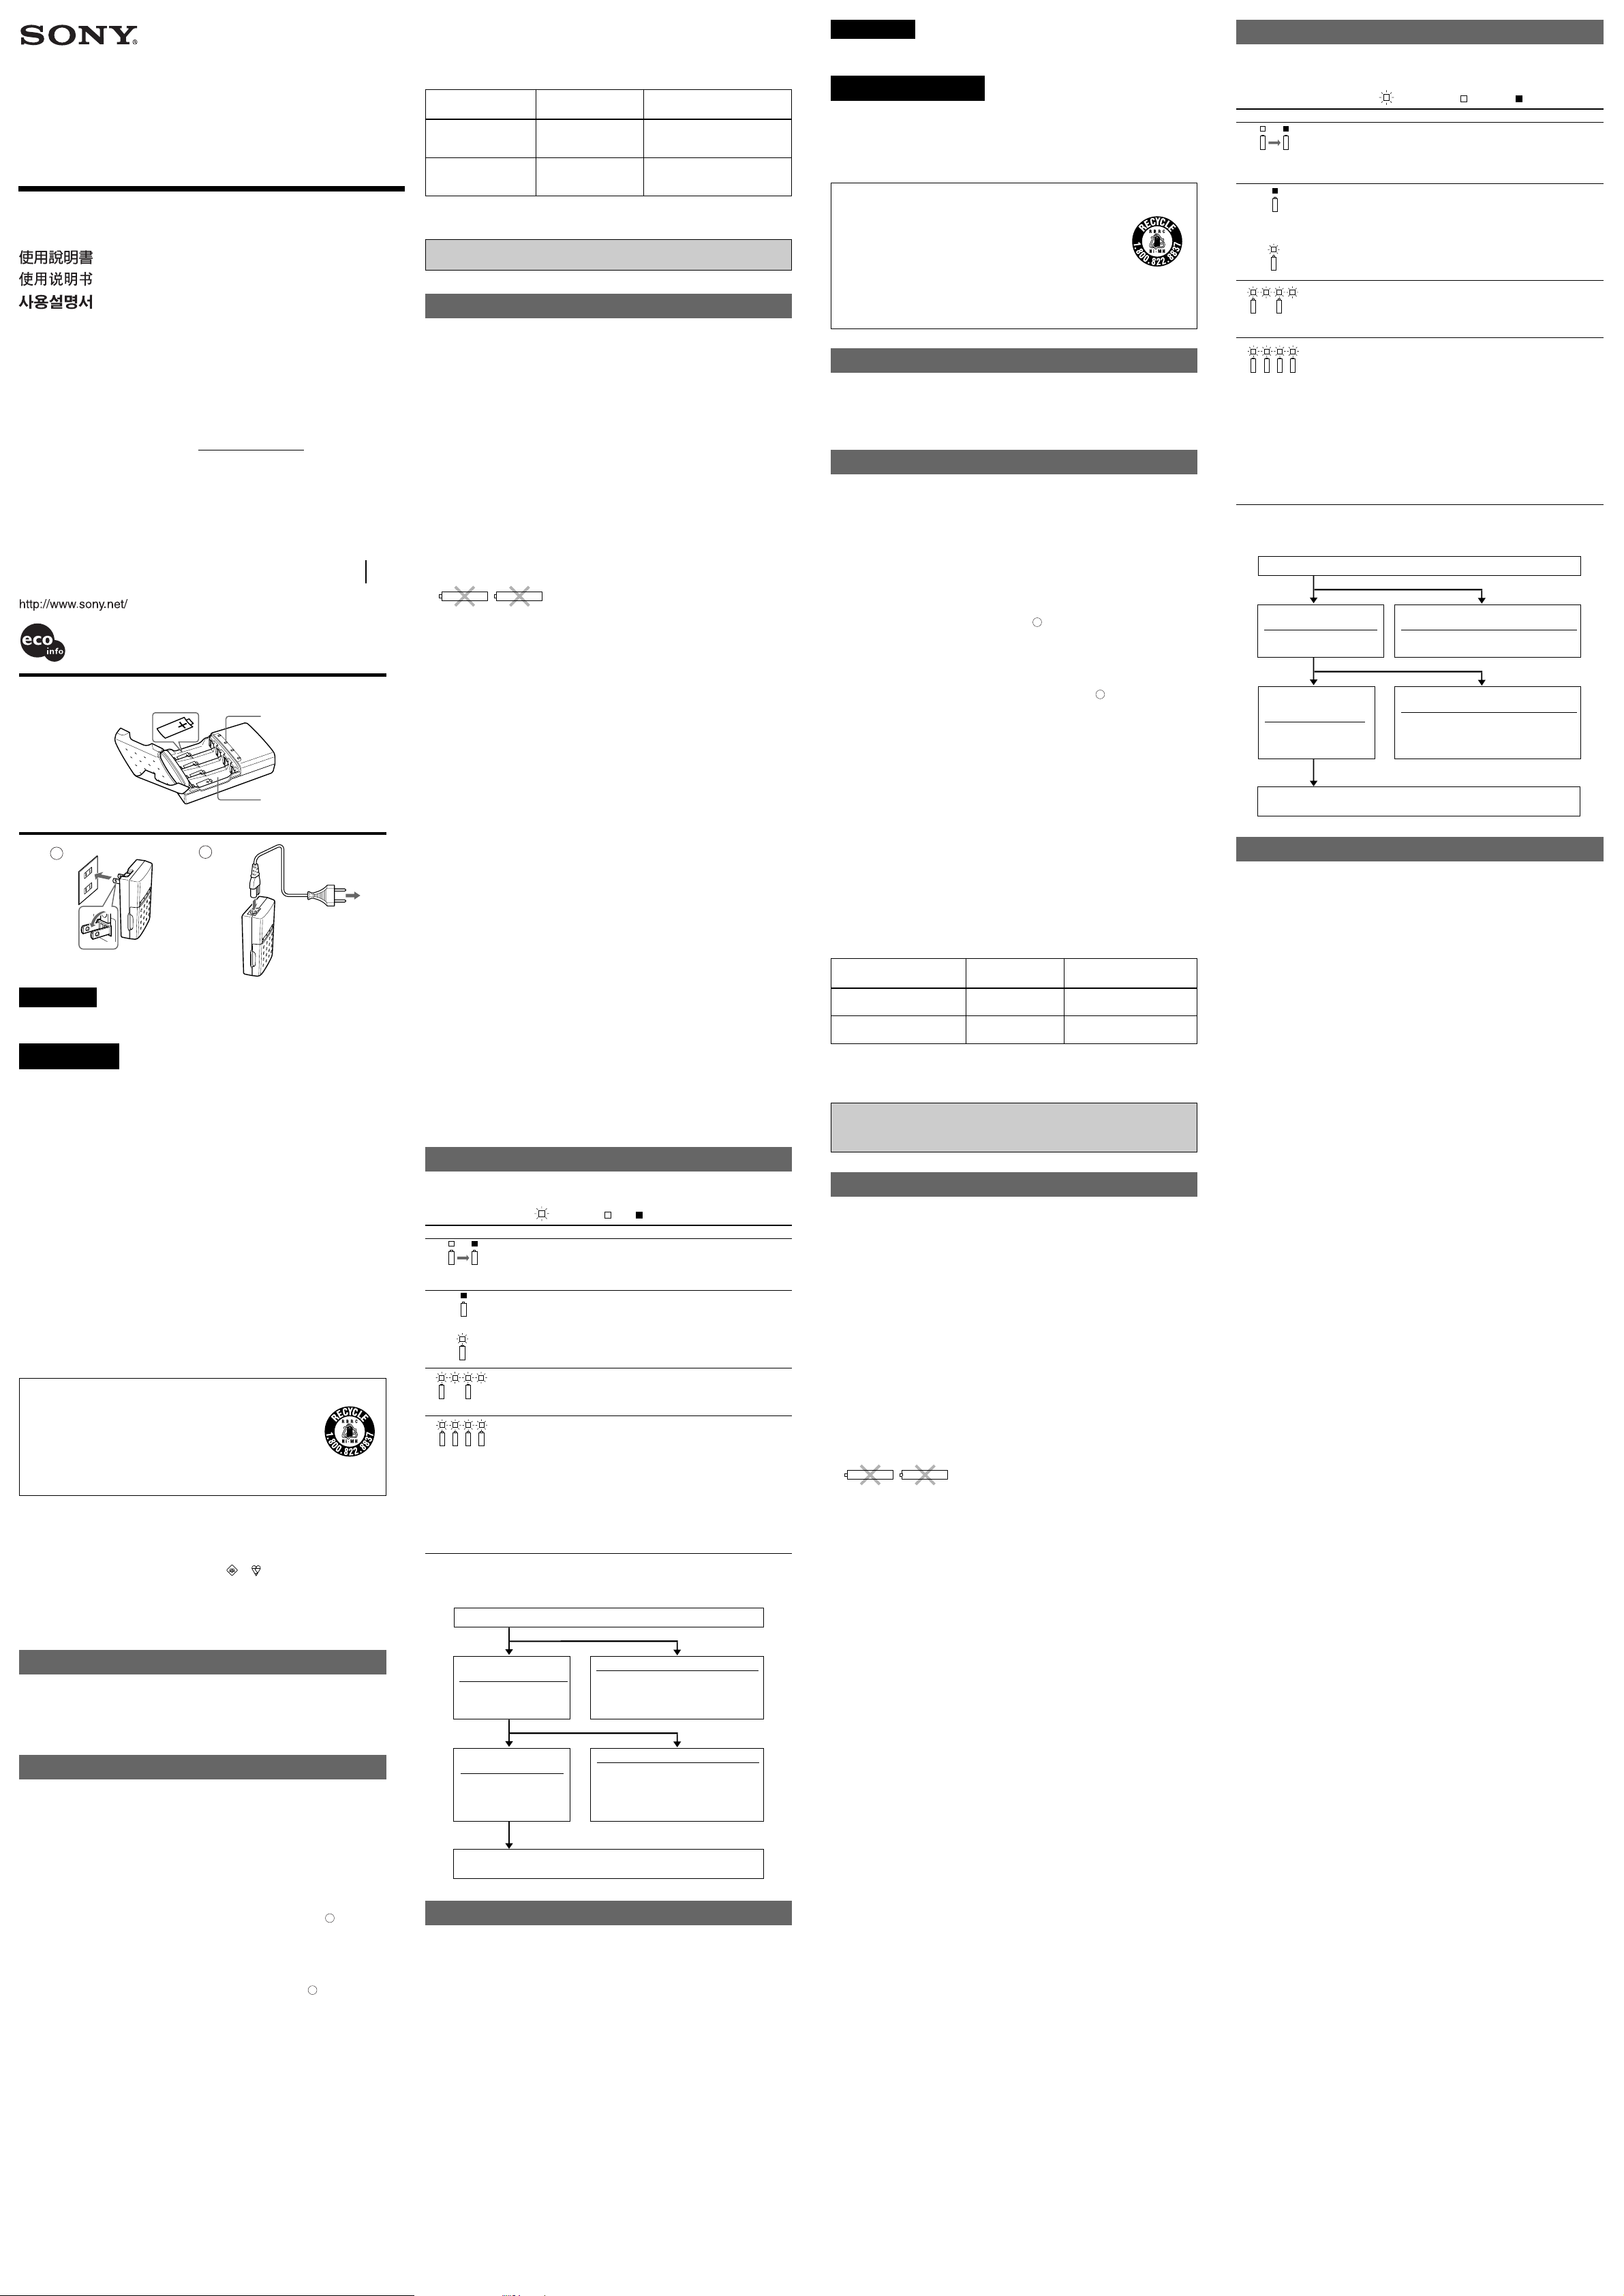
Identifying the parts
(Fig. A)
1 CHARGE lamp
2 Battery compartment
Charging the batteries
1 Insert Sony HR15/51, HR6 (size AA), NH-AA or Sony HR11/45, HR03 (size AAA),
NH-AAA Nickel-Metal Hydride batteries ensuring that the +/– indicators on
the batteries are aligned with the +/– indicators on the charger, and close the
cover.
You can charge up to four Sony HR15/51, HR6 (size AA), NH-AA Nickel-Metal
Hydride or Sony HR11/45, HR03 (size AAA), NH-AAA Nickel-Metal Hydride
batteries in this charger.
2 Charge the batteries.
– For the customers in the USA, Canada and Japan:
Flip up the power plug and insert it into the wall outlet. (Fig. B – a)
– For the customers in the other countries/regions:
The shape of the plug on the end of the power cord may differ from the
illustration, depending on the country/region where you purchased the unit.
Plug the appropriate end of the power cord into the battery charger, then plug
the other end of the power cord into the wall outlet. (Fig. B –
When charging begins, the CHARGE lamp of the compartments containing
batteries will light up; the CHARGE lamps will go out when charging is finished.
When the CHARGE lamp does not light, or when it flashes on and off, refer to
“Troubleshooting.”
3 After the batteries are fully charged, unplug the power plug, open the cover,
and remove the batteries.
– For the customers in the USA, Canada and Japan:
When charging is completed, fold the power plug and store inside the unit.
– For the customers in the other countries/regions:
When unplugging the power plug, be sure to hold the plug. Do not pull on the
cord.
b
or mark) must be used.
b
)
Quick charge
This charger allows quick charging when either one or two Sony HR15/51, HR6 (size
AA), NH-AA or Sony HR11/45, HR03 (size AAA), NH-AAA Nickel-Metal Hydride
batteries are inserted.
Charging times
Quick charge Normal charge
(one or two batteries) (three or four batteries)
Sony HR15/51, HR6
(size AA), NH-AA approx. 2 h 30 min approx. 5 h 00 min
batteries
Sony HR11/45, HR03
(size AAA), NH-AAA approx. 1 h 25 min approx. 2 h 50 min
batteries
The times indicated are for batteries with the capacities listed below.
Sony HR15/51, HR6 (size AA), NH-AA: 2,100 mAh (typ.)
Sony HR11/45, HR03 (size AAA), NH-AAA: 800 mAh (typ.)
Do not connect the battery charger to a voltage adaptor (travel converter) for
overseas travel. This may result in overheating or other malfunction.
Precautions
• Use the charger near the wall outlet. Even if the CHARGE lamp is not turned on, the
charger is still connected to the power. If the charger malfunctions, unplug the
power plug from the wall outlet.
• Be careful not to jar, crush, drop or otherwise damage the battery charger.
• Do not disassemble or modify the battery charger.
• Do not let water get on the battery charger. Do not put any foreign objects into the
charger.
• Do not place the charger near water.
• Do not leave a battery that is charging near small children.
• Do not use the battery charger in environments with excessive humidity, oily smoke
or steam.
• Use only the correct type of battery.
• Make sure your hands are completely dry before touching the battery charger.
• Place the battery charger on a stable foundation.
• Do not touch the battery charger or the batteries while the charger is charging.
• Do not cover the battery charger, for example with a cloth or a cushion.
• Do not charge fully charged batteries.
• Do not charge the battery by reversing the polarities.
Notes on using the battery charger
• Charging
–Do not use batteries that have not been approved for use by Sony. Unapproved
batteries may leak or explode.
manganese
–Insert the batteries into the battery charger compartment properly.
• Temperature of the charging environment
To maximizing charging capability, charge the batteries where the ambient
temperature is between 10°C to 30°C (50°F to 86°F). The lower the temperature, the
longer it will take to charge.
• Locations
Do not install or store the battery charger in locations with the following conditions:
–Locations with extremes of temperature
In direct sunlight or in closed automobiles during the summer months, the ambient
temperature may be very hot, causing deformation or malfunction of the unit.
–Locations in direct sunlight or near heaters
–Locations subject to vibration
–Locations subject to strong magnetism
–Locations subject to dust or sand
If you use the battery charger, for example, on a beach or in a desert, make sure that
you keep the battery charger away from any sand. A battery charger that is covered
with sand may malfunction.
• Usage
–Do not use the battery charger in locations that are subject to strong magnetism or
radio waves.
–When the battery charger finishes charging, remove the batteries to protect them.
–Do not jar or drop the battery charger.
–Because the battery charger may cause noise, do not use it near televisions or AM
radio tuners.
–Do not allow metal to come in contact with the connecting part of the battery
charger. A short may occur.
–Make sure the batteries are properly seated in the compartment so that the
connecting part of the unit does not become damaged.
• Care and maintenance
–To clean the battery charger, use a soft cloth or tissue paper.
–If needed, use a soft cloth dampened with diluted mild detergent, then wipe the
unit with dry cloth.
–Do not use alcohol, thinner, benzine, etc. to clean the battery charger. Using these
chemicals may damage the battery charger.
–If you use a chemically treated cleaning cloth, follow the instructions.
–Do not spray volatile material such as pesticide on the battery charger. Do not let
rubber or vinyl touch the battery charger. Doing so may damage the charger.
alkaline
Notes on the power plug
• Do not touch the power plug during thunderstorms.
• Make sure to insert the power plug in the wall outlet properly.
• If you are not going to be using the battery charger, unplug the power plug.
• When you service the battery charger, unplug the power plug.
If any difficulty should arise, unplug the unit and contact your nearest Sony dealer.
Troubleshooting
If you run into any problem using this unit, use the following table to troubleshoot the
problem. If the problem persists, contact your Sony dealer.
Charge lamp status: ( : Flashing, : Lit, : Off)
Symptom Remedy
Operating normally.
Charging
Charg-
complete.
ing.
Lamps do not light when
batteries first inserted.
Lamps for slots with
batteries inserted flash.
Lamps for slots with or
without batteries flash.
Lamps for all four inserted
batteries flash.
t Remove one battery.
• All lamps flash.
• The lamp where the
battery was removed
goes out.
• Something is wrong with either
the batteries or the charger.
tFollow the troubleshooting
procedures below to
determine the problem.
• The ambient temperature is
inappropriate for charging.
tCharge the batteries in a more
appropriate environment.
• The ambient temperature is
inappropriate for charging.
tCharge the batteries in a more
appropriate environment.
• Something is wrong with either
the batteries or the charger.
tFollow the troubleshooting
procedures below to
determine the problem.
Troubleshooting procedures
Use the flow chart below to find the problem.
Remove the batteries, and then re-insert the same batteries into the charger.
If the lamp flashes again, or
does not light.
Insert a different set of
batteries.
If the lamp flashes again,
or does not light.
There may be a problem
with the charger.
Contact your nearest Sony dealer when you think there is a problem with
the charger itself.
If the lamp does not flash after it lights.
If, when the charging time has been
exceeded, the lamp goes out, there is no
problem.
If the lamp does not flash after it lights.
If the lamp goes out when the charging
time is exceeded, there is a problem with
the first set of batteries, or they have
exceeded their normal useable battery life.
Specifications
Input rating AC 100 – 240 V, 50/60 Hz
Output rating DC 1.2 V, 460 mA × 4 / 920 mA × 2
Operating temperature 0°C to +40°C (32°F to 104°F)
Storage temperature –20°C to +60°C (–4°F to 140°F)
Dimensions Approx. 65 × 32 × 106 mm (w/h/d)
Mass Approx. 120 g (4 oz)
Applicable batteries Sony Nickel-Metal Hydride rechargeable batteries
Design and specifications are subject to change without notice.
7 W
5
/8 × 1 5/16 × 4 1/4 inches)
(2
HR15/51, HR6 (size AA), NH-AA
HR11/45, HR03 (size AAA), NH-AAA
Français
Avant d’utiliser cet appareil, lisez attentivement ce mode d’emploi et conservez-le
pour toute référence ultérieure.
AVERTISSEMENT
Pour éviter tout risque d’incendie ou
d’électrocution, n’exposez pas cet appareil à la
pluie ni à l’humidité.
Pour les utilisateurs aux Etats-Unis et au Canada
RECYCLAGE DES ACCUMULATEURS À HYDRURE
MÉTALLIQUE DE NICKEL
Les accumulateurs à hydrure métallique de nickel sont recyclables.
Vous pouvez contribuer à préserver l’environnement en rapportant les
piles usées dans un point de collection et recyclage le plus proche.
Pour plus d’informations sur le recyclage des accumulateurs,
téléphonez le numéro gratuit 1-800-822-8837 (Etats-Units et Canada uniquement),
ou visitez http://www.rbrc.org/
Avertissement: Ne pas utiliser des accumulateurs à hidrure métallique de nickel qui
sont endommagées ou qui fuient.
Identification des composants
(Fig. A)
1 Voyants CHARGE (chargement)
2 Compartiment à piles
Chargement des piles
1 Insérez des piles nickel-hydrure métallique HR15/51, HR6 (type AA), NH-AA de
Sony ou HR11/45, HR03 (type AAA), NH-AAA de Sony, en vous assurant que
les marques de polarité +/– présentes sur les piles sont alignées avec les
marques +/– du chargeur. Refermez ensuite le couvercle.
Ce chargeur peut charger en même temps jusqu’à quatre piles nickel-hydrure
métallique HR15/51, HR6 (type AA), NH-AA de Sony ou HR11/45, HR03 (type
AAA), NH-AAA de Sony.
2 Rechargez les piles.
– Pour les utilisateurs aux Etats-Unis, au Canada et au Japon :
Faites sortir en la basculant la fiche d’alimentation intégrée à l’appareil et
insérez-la dans la prise secteur. (Fig. B –
a
)
– Pour les utilisateurs des autres pays ou régions :
Selon le pays ou la région d’achat de l’appareil, la forme de la fiche à l’extrémité
du cordon d’alimentation peut différer de celle présentée dans l’illustration.
Branchez l’extrémité appropriée du cordon d’alimentation sur le chargeur, puis
branchez l’autre extrémité sur la prise secteur. (Fig. B –
Au début de la charge, les voyants CHARGE des compartiments contenant des
piles s’allument ; les voyants CHARGE s’éteignent lorsque la charge est terminée.
Si le voyant CHARGE ne s’allume pas ou s’il clignote, reportez-vous à la section
« Dépannage ».
b
)
3 Une fois les piles totalement chargées, débranchez le cordon d’alimentation,
ouvrez le couvercle et retirez les piles.
– Pour les utilisateurs aux Etats-Unis, au Canada et au Japon :
Lorsque le chargement est terminé, repliez la fiche d’alimentation vers l’intérieur
du boîtier.
– Pour les utilisateurs des autres pays ou régions :
Débranchez le cordon d’alimentation en tirant sur la fiche. Ne tirez pas sur le
cordon d’alimentation.
Charge rapide
Ce chargeur peut charger rapidement une à deux piles nickel-hydrure métallique
HR15/51, HR6 (type AA), NH-AA de Sony ou HR11/45, HR03 (type AAA),
NH-AAA de Sony, en même temps.
Temps de charge :
Charge rapide Charge normale
(une ou deux piles) (trois ou quatre piles)
Piles HR15/51, HR6
(type AA), NH-AA
Piles HR11/45, HR03
(type AAA), NH-AAA de Sony
Les durées de charge indiquées ci-dessus sont valables pour les piles dont la capacité
correspond à l’une de celles indiquées ci-dessous.
Piles HR15/51, HR6 (type AA), NH-AA de Sony : 2 100 mAh (type)
Piles HR11/45, HR03 (type AAA), NH-AAA de Sony : 800 mAh (type)
de Sony
Si vous voyagez à l’étranger, n’utilisez pas le chargeur avec un
adaptateur de tension (adaptateur portatif). Cela peut provoquer une
surchauffe et des dysfonctionnements.
Précautions d’emploi
• Utilisez le chargeur près de la prise murale. Le chargeur reçoit l’alimentation secteur
même lorsque le voyant CHARGE n’est pas allumé. Si le chargeur présente des
dysfonctionnements, débranchez le cordon d’alimentation de la prise secteur.
• Evitez de heurter, de comprimer, de laisser tomber ou d’endommager le chargeur.
• Ne démontez pas et ne modifiez pas le chargeur.
• Evitez de projeter de l’eau sur le chargeur. N’introduisez pas de corps étranger dans
le chargeur.
• Ne placez pas le chargeur près de l’eau.
• Ne laissez pas une pile en cours de chargement près d’enfants en bas âge.
• N’utilisez pas le chargeur dans une atmosphère chargée d’humidité, de graisse, de
fumée ou de vapeur.
• N’utilisez que les types de piles conseillés.
• Assurez-vous que vos mains sont sèches avant de toucher le chargeur.
• Placez le chargeur sur une surface stable.
• En cours de chargement, ne touchez ni le chargeur ni les piles.
• Ne couvrez pas le chargeur (par exemple avec du tissu ou un coussin).
• Ne rechargez pas des piles déjà chargées.
• Ne rechargez pas les piles en inversant la polarité.
Remarques sur l’utilisation du chargeur
• Chargement
–N’utilisez pas de piles qui ne sont pas approuvées par Sony. Les piles qui ne sont
pas approuvées peuvent fuir ou exploser.
manganèse
–Insérez correctement les piles dans le compartiment du chargeur.
• Température de l’environnement de charge
Pour optimiser la capacité de chargement du chargeur, chargez les piles dans une
pièce où la température se situe entre 10°C et 30°C (50°F et 86°F). Plus la température
est basse, plus le chargement est long.
• Lieux d’utilisation
N’installez et ne rangez pas le chargeur dans les endroits suivants :
–Lieux surchauffés ou trop froids
L’appareil peut souffrir de déformations ou de dysfonctionnements si vous le
laissez dans une atmosphère surchauffée comme au soleil ou en été dans une
voiture fermée.
–Lieux exposés au soleil ou près de radiateurs
–Lieux sujets à des vibrations
–Lieux sujets à des champs magnétiques puissants
–Lieux exposés à la poussière ou au sable
Si vous utilisez le chargeur sur une plage ou dans un désert, évitez qu’il n’entre en
contact avec du sable. Si le chargeur est recouvert de sable, il peut présenter des
dysfonctionnements.
• Utilisation
–N’utilisez pas le chargeur dans des lieux sujets à des ondes radio ou des champs
magnétiques puissants.
–Lorsque le chargement est terminé, retirez les piles pour les protéger.
–Ne heurtez pas et ne laissez pas tomber le chargeur.
–N’utilisez pas le chargeur à proximité de postes de télévision ou de récepteurs
radio car il peut provoquer des parasites.
–Ne laissez pas d’objets métalliques en contact avec les bornes de chargement du
chargeur. Cela peut provoquer un court-circuit.
–Assurez-vous que les piles sont correctement installées dans le compartiment afin
que les bornes de chargement du boîtier ne soient pas endommagées.
• Entretien
–Nettoyez le chargeur à l’aide d’un chiffon doux ou d’un mouchoir en papier.
–Si nécessaire, utilisez un chiffon doux humidifié avec un détergent dilué, puis
séchez soigneusement le boîtier avec un chiffon sec.
–N’utilisez pas d’alcool, de diluant, d’essence, etc. pour nettoyer le chargeur. Ces
produits peuvent endommager le chargeur.
–Si vous utilisez un chiffon de nettoyage contenant des produits chimiques,
reportez-vous aux instructions qui l’accompagnent.
–Ne vaporisez pas sur le chargeur de substances volatiles telles que des pesticides.
Ne laissez pas de matières caoutchoutées ou vinyles en contact avec le chargeur.
Cela peut endommager le chargeur.
Remarques sur le cordon d’alimentation
• En cas d’orage, ne touchez pas la fiche d’alimentation.
• Assurez-vous toujours que la fiche d’alimentation est correctement insérée dans la
prise murale.
• Lorsque vous n’avez plus besoin du chargeur, débranchez la fiche d’alimentation de
la prise murale.
• Débranchez la fiche d’alimentation avant de nettoyer le chargeur.
En cas de problème, débranchez la fiche d’alimentation et contactez votre revendeur
Sony le plus proche.
alcaline
env. 2 h 30 min env. 5 h 00 min
env. 1 h 25 min env. 2 h 50 min
Dépannage
Si un problème se présente lors de l’utilisation de cet appareil, utilisez le tableau
suivant pour remédier à ce problème. Si le problème persiste, contactez votre
revendeur Sony.
Etat du voyant de charge : ( : Clignotant, : Allumé, : Eteint)
Symptômes Solutions
Fonctionnement normal :
Charge-
Charge-
ment
ment en
terminé.
cours.
Les voyants ne s’allument
pas lors de la première
insertion des piles.
Les voyants des fentes
contenant des piles
clignotent.
Les voyants des fentes
contenant ou non des piles
clignotent.
Les voyants de chacune des
quatre fentes contenant des
piles clignotent.
t Retirez l’une des piles.
• Tous les voyants
clignotent.
• Le voyant de la fente
dont la pile a été
retirée s’éteint.
• Les piles ou le chargeur sont
défectueux.
t Pour identifier le problème,
suivez les procédures de
dépannage indiquées cidessous.
• La température ambiante ne
convient pas pour la charge.
t Chargez les piles dans un
environnement plus
approprié.
• La température ambiante ne
convient pas pour la charge.
t Chargez les piles dans un
environnement plus
approprié.
• Les piles ou le chargeur sont
défectueux.
t Pour identifier le problème,
suivez les procédures de
dépannage indiquées cidessous.
Procédures de dépannage
Pour identifier le problème, utilisez l’organigramme ci-dessous.
Retirez les piles, puis réinsérez-les dans le chargeur.
Si le voyant clignote de
nouveau ou ne s’allume pas :
Insérez un autre jeu de piles.
Si le voyant clignote de
nouveau ou ne s’allume
pas :
Il se peut qu’il y ait un
problème au niveau du
chargeur.
Contactez votre revendeur Sony le plus proche si vous estimez que le
chargeur est défectueux.
Si le voyant ne clignote pas après s’être
allumé :
Si le voyant s’éteint à la fin de la période de
charge, l’appareil fonctionne correctement.
Si le voyant ne clignote pas après s’être
allumé.
Si le voyant s’éteint à la fin du temps de
charge, il y a un problème au niveau du
premier jeu de piles, ou elles ont atteint la fin
de leur durée de vie normale.
Spécifications
Caractéristiques d’entrée 100 – 240 V CA, 50/60 Hz
Caractéristiques de sortie 1,2 V CC, 460 mA × 4 / 920 mA × 2
Température de fonctionnement
Température d’entreposage –20°C à +60°C (–4°F à 140°F)
Dimensions Approx. 65 × 32 × 106 mm (l/h/p)
Poids Approx. 120 g (4 oz)
Piles acceptées Piles rechargeables Sony au nickel-hydrure
La conception et les spécifications du chargeur sont sujettes à modification sans
préavis.
7 W
0°C à +40°C (32°F à 104°F)
5
/8 × 1 5/16 × 4 1/4 pouces)
(2
métallique
HR15/51, HR6 (type AA), NH-AA
HR11/45, HR03 (type AAA), NH-AAA
Page 2
 Loading...