

Sony Acid Music Studio Quick Start Manual


Revised July 12, 2012
This quick start manual provides you with a brief introduction to ACID® Music Studio™ software. For more details on using the
software, see the online help. To access the online help, choose Contents and Index from the Help menu, or press F1.
After ACID Music Studio software is installed and you start it for the first time, the registration wizard appears. This wizard offers
easy steps that allow you to register the software online with Sony Creative Software Inc.
Registering your product will provide you with access to a variety of technical support options, notification of product updates, and
special promotions exclusive to registered ACID Music Studio users.
Registration assistance
Registration assistance is available online at http://www.sonycreativesoftware.com/reg/faq, or by fax at (608) 250-1745.
Customer service/sales
For a detailed list of customer service options, we encourage you to visit http://www.sonycreativesoftware.com/support/custserv.asp.
Use the following numbers for telephone support during normal weekday business hours:
Tel ep ho ne /F ax Country
(800) 577-6642 (toll-free) US, Canada, and Virgin Islands
(608) 203-7620 for all other countries
(608) 250-1745 (Fax) All countries
Technical support
For a detailed list of technical support options, we encourage you to visit http://www.sonycreativesoftware.com/support/default.asp.
To listen to your support options by telephone, please call (608) 256-5555.
About your rights in ACID software
ACID software is licensed to you under the terms of the End User License Agreement. The End User License Agreement is first
presented to you when you install the software. Please review the End User License Agreement carefully as its terms affect your
rights with respect to the software. For your reference, a copy of the End User License Agreement for ACID software is located at
http://www.sonycreativesoftware.com/corporate/eula.
About your privacy
Sony Creative Software Inc. respects your privacy and is committed to protecting personal information. Your use of the software is
governed by the Software Privacy Policy. A copy of this policy is incorporated into the registration process and you are asked to
agree to its terms prior to accepting the terms of the End User License Agreement. Please review its contents carefully as its terms
and conditions affect your rights with respect to the information that is collected by the software. For your reference, a copy of the
Software Privacy Policy is located at
http://www.sonycreativesoftware.com/corporate/privacy.asp.
Proper use of software
ACID software is not intended and should not be used for illegal or infringing purposes, such as the illegal copying or sharing of
copyrighted materials. Using ACID software for such purposes is, among other things, against United States and international
copyright laws and contrary to the terms and conditions of the End User License Agreement. Such activity may be punishable by
law and may also subject you to the breach remedies set forth in the End User License Agreement.

Legal notices
ACID, ACIDized, ACIDplanet.com, ACIDplanet, the ACIDplanet logo, ACID XMC, Artist Integrated, the Artist Integrated logo, Beatmapper, Cinescore,
CD Architect, DVD Architect, Jam Trax, Perfect Clarity Audio, Photo Go, Sound Forge, Super Duper Music Looper, Transparent Technology, Vegas,
Vision Series, and Visual Creation Studio are the trademarks or registered trademarks of Sony Creative Software Inc. in the United States and other
countries. All other trademarks or registered trademarks are the property of their respective owners in the United States and other countries.
Sony Creative Software Inc. may have patents, patent applications, trademarks, copyrights, or other intellectual property rights covering subject
matter in this document. Except as expressly provided in any written license agreement from Sony Creative Software Inc., the furnishing of this
document does not give you any license to these patents, trademarks, copyrights, or other intellectual property.
Apple Macintosh Audio Interchange File Format (AIFF) file format
Apple® Macintosh® Audio Interchange™ File Format (AIFF) is a trademark of Apple, Inc. in the United States and other countries.
Apple QuickTime
Apple® QuickTime® application is a trademark of Apple, Inc. in the United States and other countries.
AT RA C
“ATR AC,” “AT RAC3,” “ATRAC 3pl us,” “AT RAC Advanc ed L oss les s,” and the ATRAC logo are trademarks of Sony Corporation. http://www.sony.net/
Products/ ATRAC3/
Dolby, Dolby Digital AC-3, and AAC encoding
This product contains one or more programs protected under international and U.S. copyright laws as unpublished works. They are confidential and
proprietary to Dolby Laboratories. Their reproduction or disclosure, in whole or in part, or the production of derivative works therefrom without the
express permission of Dolby Laboratories is prohibited. Copyright 1992 – 2009 Dolby Laboratories. All rights reserved.
Dolby®, the double-D symbol, AC-3®, and Dolby Digital® are registered trademarks of Dolby Laboratories. AAC™ is a trademark of Dolby Laboratories.
élastique Pro
Portions of this product use zplane élastique Pro V2 audio time-stretching technology.
Gracenote
CD and music-related data from Gracenote, Inc., copyright © 2000-2009 Gracenote. Gracenote Software, copyright 2000-2009 Gracenote. This
product and service may practice one or more of the following U.S. Patents: #5,987,525; #6,061,680; #6,154,773, #6,161,132, #6,230,192, #6,230,207,
#6,240,459, #6,330,593, and other patents issued or pending. Services supplied and/or device manufactured under license for following Open
Globe, Inc. United States Patent 6,304,523.
Gracenote and CDDB are registered trademarks of Gracenote. The Gracenote logo and logotype, MusicID, and the “Powered by Gracenote” logo are
trademarks of Gracenote.
Macromedia Flash
Macromedia and Flash are trademarks or registered trademarks of Macromedia, Inc. in the United States and/or other countries.
Main Concept encoder
Main Concept® plug-in is a trademark of registered trademark of Main Concept, Inc. in the United States or other countries. All rights reserved.
Microsoft DirectX programming interface
Portions utilize Microsoft® DirectX® technologies. Copyright © 1999 – 2009 Microsoft Corporation. All rights reserved.
Microsoft Windows Media 9
Portions utilize Microsoft Windows Media® technologies. Copyright © 1999 – 2009 Microsoft Corporation. All rights reserved.
Ogg Vorbis
Ogg, Vorbis, Xiph.org Foundation and their logos are trademarks (tm) of the Xiph.org Foundation. All rights reserved.
PNG file format
Copyright © 2009. World Wide Web Consortium (Massachusetts Institute of Technology, European Research Consortium for Informatics and
Mathematics, Keio University). All rights reserved. This work is distributed under the W3C Software License in the hope that it will be useful, but
WITHOUT ANY WARRANTY; without even the implied warranty of MERCHANTIBILITY or FITNESS FOR A PARTICULAR PURPOSE.
Consortium/Legal/2002/copyright-software-20021231
Real, RealMedia, RealAudio, and RealVideo applications
2009 RealNetworks, Inc. Patents Pending. All rights reserved. Real®, Real Media®, RealAudio®, RealVideo®, and the Real logo are trademarks or
registered trademarks of RealNetworks, Inc. in the United States and other countries.
Steinberg Media Technologies
Cubase®, VST®, and Nuendo® are registered trademarks of Steinberg Media Technologies GmbH.
ASIO™ is a trademark of Steinberg Media Technologies GmbH.
Tagged Image File Format (TIFF)
Adobe Tagged Image™ File Format is a registered trademark of Adobe Systems Incorporated in the United States and other countries. All rights
reserved.
Targa file format
The Targa™ file format is a trademark of Pinnacle Systems, Inc.
http://www.w3.org/

Thomson Fraunhofer MP3
MPEG Layer-3 audio coding technology licensed from Fraunhofer IIS and Thomson.
Supply of this product does not convey a license nor imply any right to distribute content created with this product in revenue generating broadcast
systems (terrestrial, satellite, cable and/or other distribution channels), streaming applications (via internet, intranets and/or other networks), other
content distribution systems (pay-audio or audio on demand applications and the like) or on physical media (compact discs, digital versatile discs,
semiconductor chips, hard drives, memory cards and the like).
An independent license for such use is required. For details, please visit: http://mp3licensing.com.

Sony Creative Software Inc.
8215 Greenway Blvd.
Suite 400
Middleton, WI 53562
USA
The information contained in this manual is subject to change without notice and does not represent a guarantee or commitment
on behalf of Sony Creative Software Inc. in any way. All updates or additional information relating to the contents of this manual will
be posted on the Sony Creative Software Inc. web site, located at
http://www.sonycreativesoftware.com/. The software is provided to
you under the terms of the End User License Agreement and Software Privacy Policy, and must be used and/or copied in
accordance therewith. Copying or distributing the software except as expressly described in the End User License Agreement is
strictly prohibited. No part of this manual may be reproduced or transmitted in any form or for any purpose without the express
written consent of Sony Creative Software Inc.
Copyright 2012. Sony Creative Software Inc.
Program Copyright 2012. Sony Creative Software Inc. All rights reserved.

Table of
Contents
Introduction . . . . . . . . . . . . . . . . . . . . . . . . . . . . . . . . . . . . . . . . . . . . . . . . . . . . . . . . . . . . . . . . . . . . . . . . 3
Welcome to ACID Music Studio software . . . . . . . . . . . . . . . . . . . . . . . . . . . . . . . . . . . . . . . . . . . . . . . 3
System requirements. . . . . . . . . . . . . . . . . . . . . . . . . . . . . . . . . . . . . . . . . . . . . . . . . . . . . . . . . . . . . . . . . . 3
Installing ACID Music Studio software . . . . . . . . . . . . . . . . . . . . . . . . . . . . . . . . . . . . . . . . . . . . . . . . . . 3
Using online help . . . . . . . . . . . . . . . . . . . . . . . . . . . . . . . . . . . . . . . . . . . . . . . . . . . . . . . . . . . . . . . . . . . . . 4
Online help . . . . . . . . . . . . . . . . . . . . . . . . . . . . . . . . . . . . . . . . . . . . . . . . . . . . . . . . . . . . . . . . . . . . . . . . . . . . . . . . . 4
Show Me How tutorials . . . . . . . . . . . . . . . . . . . . . . . . . . . . . . . . . . . . . . . . . . . . . . . . . . . . . . . . . . . . . . . . . . . . . 4
Help on the Web . . . . . . . . . . . . . . . . . . . . . . . . . . . . . . . . . . . . . . . . . . . . . . . . . . . . . . . . . . . . . . . . . . . . . . . . . . . . 4
Learning the ACID Window . . . . . . . . . . . . . . . . . . . . . . . . . . . . . . . . . . . . . . . . . . . . . . . . . . . . . . . . .5
Overview of ACID Music Studio software . . . . . . . . . . . . . . . . . . . . . . . . . . . . . . . . . . . . . . . . . . . . . . . 5
Main window . . . . . . . . . . . . . . . . . . . . . . . . . . . . . . . . . . . . . . . . . . . . . . . . . . . . . . . . . . . . . . . . . . . . . . . . . . . . . . . 5
Toolbar . . . . . . . . . . . . . . . . . . . . . . . . . . . . . . . . . . . . . . . . . . . . . . . . . . . . . . . . . . . . . . . . . . . . . . . . . . . . . . . . . . . . . 6
Track list . . . . . . . . . . . . . . . . . . . . . . . . . . . . . . . . . . . . . . . . . . . . . . . . . . . . . . . . . . . . . . . . . . . . . . . . . . . . . . . . . . . . 7
Timeline . . . . . . . . . . . . . . . . . . . . . . . . . . . . . . . . . . . . . . . . . . . . . . . . . . . . . . . . . . . . . . . . . . . . . . . . . . . . . . . . . . . . 7
Window docking area . . . . . . . . . . . . . . . . . . . . . . . . . . . . . . . . . . . . . . . . . . . . . . . . . . . . . . . . . . . . . . . . . . . . . . . 8
Starting Projects . . . . . . . . . . . . . . . . . . . . . . . . . . . . . . . . . . . . . . . . . . . . . . . . . . . . . . . . . . . . . . . . . . .11
Getting started . . . . . . . . . . . . . . . . . . . . . . . . . . . . . . . . . . . . . . . . . . . . . . . . . . . . . . . . . . . . . . . . . . . . . . .11
Setting project properties . . . . . . . . . . . . . . . . . . . . . . . . . . . . . . . . . . . . . . . . . . . . . . . . . . . . . . . . . . . . . . . . . . 11
Opening existing projects . . . . . . . . . . . . . . . . . . . . . . . . . . . . . . . . . . . . . . . . . . . . . . . . . . . . . . . . . . . . . . . . . . 12
Getting media files . . . . . . . . . . . . . . . . . . . . . . . . . . . . . . . . . . . . . . . . . . . . . . . . . . . . . . . . . . . . . . . . . . . 13
Previewing media from the Explorer window . . . . . . . . . . . . . . . . . . . . . . . . . . . . . . . . . . . . . . . . . . . . . . . 13
Adding media to the project . . . . . . . . . . . . . . . . . . . . . . . . . . . . . . . . . . . . . . . . . . . . . . . . . . . . . . . . . . . . . . . 13
Working with Projects. . . . . . . . . . . . . . . . . . . . . . . . . . . . . . . . . . . . . . . . . . . . . . . . . . . . . . . . . . . . . .17
Adding and editing events . . . . . . . . . . . . . . . . . . . . . . . . . . . . . . . . . . . . . . . . . . . . . . . . . . . . . . . . . . .17
Painting events . . . . . . . . . . . . . . . . . . . . . . . . . . . . . . . . . . . . . . . . . . . . . . . . . . . . . . . . . . . . . . . . . . . . . . . . . . . . 17
Changing the length of events . . . . . . . . . . . . . . . . . . . . . . . . . . . . . . . . . . . . . . . . . . . . . . . . . . . . . . . . . . . . . 19
Erasing sections of events . . . . . . . . . . . . . . . . . . . . . . . . . . . . . . . . . . . . . . . . . . . . . . . . . . . . . . . . . . . . . . . . . . 19
Moving events . . . . . . . . . . . . . . . . . . . . . . . . . . . . . . . . . . . . . . . . . . . . . . . . . . . . . . . . . . . . . . . . . . . . . . . . . . . . . 19
Making selections . . . . . . . . . . . . . . . . . . . . . . . . . . . . . . . . . . . . . . . . . . . . . . . . . . . . . . . . . . . . . . . . . . . . 20
Selecting an event . . . . . . . . . . . . . . . . . . . . . . . . . . . . . . . . . . . . . . . . . . . . . . . . . . . . . . . . . . . . . . . . . . . . . . . . . 20
Selecting multiple events . . . . . . . . . . . . . . . . . . . . . . . . . . . . . . . . . . . . . . . . . . . . . . . . . . . . . . . . . . . . . . . . . . 20
Working with events . . . . . . . . . . . . . . . . . . . . . . . . . . . . . . . . . . . . . . . . . . . . . . . . . . . . . . . . . . . . . . . . .20
Copying events . . . . . . . . . . . . . . . . . . . . . . . . . . . . . . . . . . . . . . . . . . . . . . . . . . . . . . . . . . . . . . . . . . . . . . . . . . . . 20
Pasting events . . . . . . . . . . . . . . . . . . . . . . . . . . . . . . . . . . . . . . . . . . . . . . . . . . . . . . . . . . . . . . . . . . . . . . . . . . . . . 20
Cutting events . . . . . . . . . . . . . . . . . . . . . . . . . . . . . . . . . . . . . . . . . . . . . . . . . . . . . . . . . . . . . . . . . . . . . . . . . . . . . 21
Deleting events . . . . . . . . . . . . . . . . . . . . . . . . . . . . . . . . . . . . . . . . . . . . . . . . . . . . . . . . . . . . . . . . . . . . . . . . . . . . 21
Working with tracks . . . . . . . . . . . . . . . . . . . . . . . . . . . . . . . . . . . . . . . . . . . . . . . . . . . . . . . . . . . . . . . . . . 21
Understanding clip types . . . . . . . . . . . . . . . . . . . . . . . . . . . . . . . . . . . . . . . . . . . . . . . . . . . . . . . . . . . . . . . . . . 21
Reordering tracks . . . . . . . . . . . . . . . . . . . . . . . . . . . . . . . . . . . . . . . . . . . . . . . . . . . . . . . . . . . . . . . . . . . . . . . . . . 22
Renaming tracks . . . . . . . . . . . . . . . . . . . . . . . . . . . . . . . . . . . . . . . . . . . . . . . . . . . . . . . . . . . . . . . . . . . . . . . . . . . 22
Duplicating tracks . . . . . . . . . . . . . . . . . . . . . . . . . . . . . . . . . . . . . . . . . . . . . . . . . . . . . . . . . . . . . . . . . . . . . . . . . 22
Deleting tracks . . . . . . . . . . . . . . . . . . . . . . . . . . . . . . . . . . . . . . . . . . . . . . . . . . . . . . . . . . . . . . . . . . . . . . . . . . . . 22
Copying, cutting, and pasting tracks . . . . . . . . . . . . . . . . . . . . . . . . . . . . . . . . . . . . . . . . . . . . . . . . . . . . . . . . 23
Adjusting the mix . . . . . . . . . . . . . . . . . . . . . . . . . . . . . . . . . . . . . . . . . . . . . . . . . . . . . . . . . . . . . . . . . . . . . . . . . . 23
TABLE OF CONTENTS | 1

Working with tracks (continued)
Muting tracks . . . . . . . . . . . . . . . . . . . . . . . . . . . . . . . . . . . . . . . . . . . . . . . . . . . . . . . . . . . . . . . . . . . . . . . . . . . . . 23
Soloing tracks . . . . . . . . . . . . . . . . . . . . . . . . . . . . . . . . . . . . . . . . . . . . . . . . . . . . . . . . . . . . . . . . . . . . . . . . . . . . . 23
Working with groups of tracks . . . . . . . . . . . . . . . . . . . . . . . . . . . . . . . . . . . . . . . . . . . . . . . . . . . . . . . . . . . . . 24
Using undo and redo . . . . . . . . . . . . . . . . . . . . . . . . . . . . . . . . . . . . . . . . . . . . . . . . . . . . . . . . . . . . . . . . 24
Using undo . . . . . . . . . . . . . . . . . . . . . . . . . . . . . . . . . . . . . . . . . . . . . . . . . . . . . . . . . . . . . . . . . . . . . . . . . . . . . . . 24
Undoing all edits . . . . . . . . . . . . . . . . . . . . . . . . . . . . . . . . . . . . . . . . . . . . . . . . . . . . . . . . . . . . . . . . . . . . . . . . . . 24
Using redo . . . . . . . . . . . . . . . . . . . . . . . . . . . . . . . . . . . . . . . . . . . . . . . . . . . . . . . . . . . . . . . . . . . . . . . . . . . . . . . . 24
Clearing the undo history . . . . . . . . . . . . . . . . . . . . . . . . . . . . . . . . . . . . . . . . . . . . . . . . . . . . . . . . . . . . . . . . . . 24
Playing the project. . . . . . . . . . . . . . . . . . . . . . . . . . . . . . . . . . . . . . . . . . . . . . . . . . . . . . . . . . . . . . . . . . . 25
Using the transport bar . . . . . . . . . . . . . . . . . . . . . . . . . . . . . . . . . . . . . . . . . . . . . . . . . . . . . . . . . . . . . . . . . . . . 25
Using playback options . . . . . . . . . . . . . . . . . . . . . . . . . . . . . . . . . . . . . . . . . . . . . . . . . . . . . . . . . . . . . . . . . . . . 25
Using the metronome . . . . . . . . . . . . . . . . . . . . . . . . . . . . . . . . . . . . . . . . . . . . . . . . . . . . . . . . . . . . . . . . . . . . . 25
Using the Mixing Console . . . . . . . . . . . . . . . . . . . . . . . . . . . . . . . . . . . . . . . . . . . . . . . . . . . . . . . . . . . . 26
Viewing the Mixing Console window . . . . . . . . . . . . . . . . . . . . . . . . . . . . . . . . . . . . . . . . . . . . . . . . . . . . . . . 26
Mixing Console toolbar . . . . . . . . . . . . . . . . . . . . . . . . . . . . . . . . . . . . . . . . . . . . . . . . . . . . . . . . . . . . . . . . . . . . 26
Channel List pane . . . . . . . . . . . . . . . . . . . . . . . . . . . . . . . . . . . . . . . . . . . . . . . . . . . . . . . . . . . . . . . . . . . . . . . . . 27
View pane . . . . . . . . . . . . . . . . . . . . . . . . . . . . . . . . . . . . . . . . . . . . . . . . . . . . . . . . . . . . . . . . . . . . . . . . . . . . . . . . 27
Channel strips . . . . . . . . . . . . . . . . . . . . . . . . . . . . . . . . . . . . . . . . . . . . . . . . . . . . . . . . . . . . . . . . . . . . . . . . . . . . . 29
Recording . . . . . . . . . . . . . . . . . . . . . . . . . . . . . . . . . . . . . . . . . . . . . . . . . . . . . . . . . . . . . . . . . . . . . . . . .31
Recording audio . . . . . . . . . . . . . . . . . . . . . . . . . . . . . . . . . . . . . . . . . . . . . . . . . . . . . . . . . . . . . . . . . . . . . 31
Preparing to record . . . . . . . . . . . . . . . . . . . . . . . . . . . . . . . . . . . . . . . . . . . . . . . . . . . . . . . . . . . . . . . . . . . . . . . 31
Recording into an empty track . . . . . . . . . . . . . . . . . . . . . . . . . . . . . . . . . . . . . . . . . . . . . . . . . . . . . . . . . . . . . 31
Monitoring audio levels . . . . . . . . . . . . . . . . . . . . . . . . . . . . . . . . . . . . . . . . . . . . . . . . . . . . . . . . . . . . . . . . . . . 32
Recording MIDI . . . . . . . . . . . . . . . . . . . . . . . . . . . . . . . . . . . . . . . . . . . . . . . . . . . . . . . . . . . . . . . . . . . . . . 33
Setting up a MIDI controller for recording into a track . . . . . . . . . . . . . . . . . . . . . . . . . . . . . . . . . . . . . . 33
Recording MIDI in real time . . . . . . . . . . . . . . . . . . . . . . . . . . . . . . . . . . . . . . . . . . . . . . . . . . . . . . . . . . . . . . . . 33
Using MIDI step recording . . . . . . . . . . . . . . . . . . . . . . . . . . . . . . . . . . . . . . . . . . . . . . . . . . . . . . . . . . . . . . . . . 34
Saving and Rendering Projects . . . . . . . . . . . . . . . . . . . . . . . . . . . . . . . . . . . . . . . . . . . . . . . . . . . . .35
Saving a project. . . . . . . . . . . . . . . . . . . . . . . . . . . . . . . . . . . . . . . . . . . . . . . . . . . . . . . . . . . . . . . . . . . . . . 35
Specifying locations for saved media files . . . . . . . . . . . . . . . . . . . . . . . . . . . . . . . . . . . . . . . . . . . . . . . . . . 35
Rendering projects. . . . . . . . . . . . . . . . . . . . . . . . . . . . . . . . . . . . . . . . . . . . . . . . . . . . . . . . . . . . . . . . . . . 36
Index . . . . . . . . . . . . . . . . . . . . . . . . . . . . . . . . . . . . . . . . . . . . . . . . . . . . . . . . . . . . . . . . . . . . . . . . . . . . . . . .i
2 | TABLE OF CONTENTS

Chapter
1
Introduction
Welcome to ACID Music Studio software
Congratulations on purchasing ACID® Music Studio™, a revolutionary software application for Microsoft® Windows®.
With ACID Music Studio, you can create great music by simply picking, painting, and playing.
System requirements
The following lists the minimum system requirements for using ACID Music Studio software:
• Windows Vista® (Service Pack 2) or Windows 7
• 1 GHz processor
• 200 MB hard-disk space for program installation
•1 GB RAM
• Windows-compatible sound card
• DVD-ROM drive (for installation from a DVD only)
• Supported CD-recordable drive (for CD burning only)
• Microsoft DirectX® 9.0c or later
• Internet connection (for Gracenote MusicID Service)
You must provide your registration information to Sony Creative Software Inc. to activate the software.
Installing ACID Music Studio software
1.
Insert the DVD-ROM. The setup screen appears (if DVD-ROM AutoPlay is enabled).
If DVD-ROM AutoPlay is not enabled, click the Start button and choose Run. In the Run dialog that appears, type
the DVD-ROM drive’s letter and add :\setup.exe. Click OK to start the installation.
2.
Click Install. The installation process begins.
3.
Follow the on-screen prompts to install the appropriate version of the software for your computer.
Note:
Windows Installer is used for all versions of the Windows operating system. Windows Installer is installed and
then you are asked to restart your system.
INTRODUCTION | 3
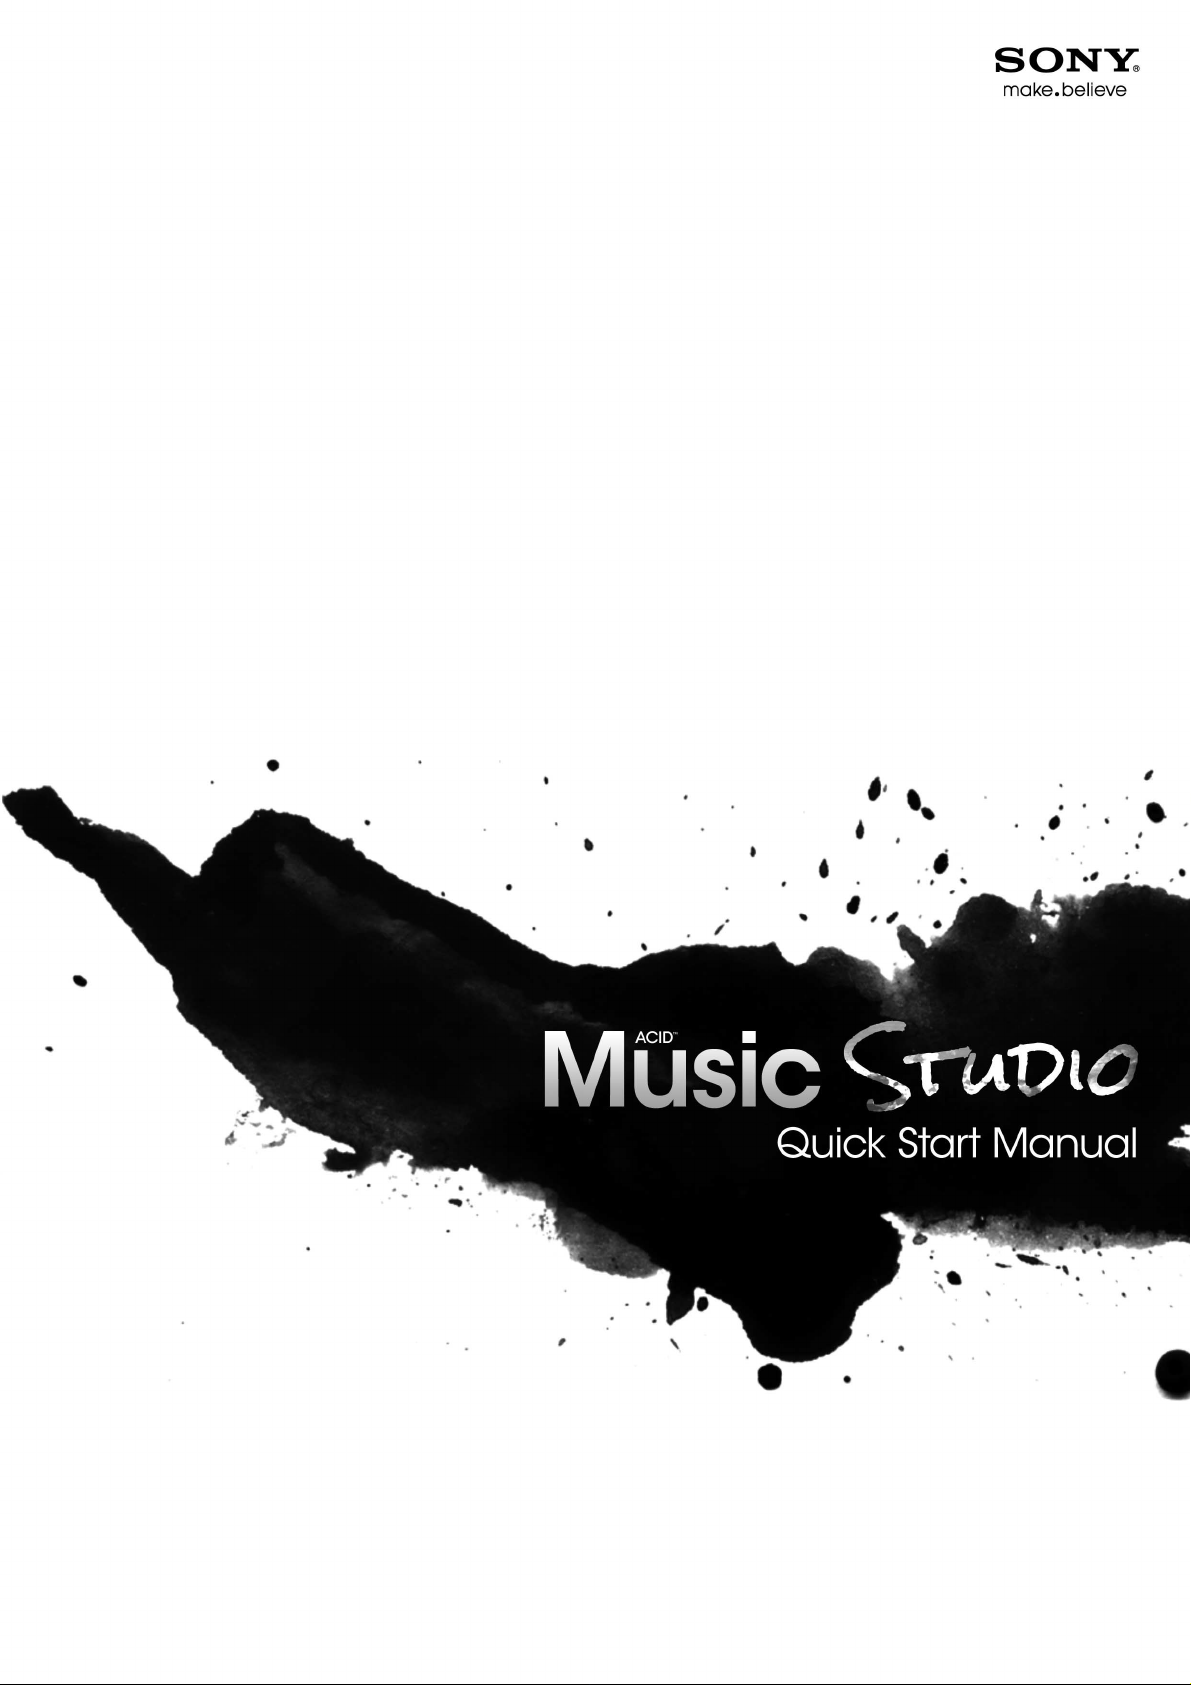
Using online help
Toolbar
Tab s
Information pane
For the most extensive information on the ACID application, please refer to the help. You can access two varieties of help within the
application:
• Online help
• Show Me How tutorials
Online help
To access online help, choose Contents and Index from the Help menu or press F1.
The online help window has four tabs that you can use to find the information you need.
Tab Description
Contents
Index Provides a complete listing of the help topics available. Scroll through the list of
Search Allows you to enter a keyword and display all of the topics in the online help that
Favo rite s Allows you to keep topics that you revisit often in a separate folder. To add a topic to
Provides a list of available help topics. Double-click a closed book ( ) to open the
pages, and then click a topic page ( ) to view it.
available topics or type a word in the Type in the keyword to find box to quickly
locate topics related to that word. Select the topic and click the Display button to
view it.
contain the keyword you have entered. Type a keyword in the Type in the word(s) to
search for box and click the List Topics button. Select the topic from the list and click
the Display button to view it.
your favorites, click Add on the Fa vorit es tab.
Show Me How tutorials
You can learn more about many of the features in ACID Music Studio by using the interactive Show Me How tutorials installed with
the software.
By default, Show Me How tutorials display upon startup of the application. However, you can access them at any time from the Help
menu by choosing Show Me How.
Tip:
To turn off automatic display of the Show Me How tutorials, clear the Show at Startup check box at the bottom of the tutorial
window.
Help on the Web
Additional information is available on the Sony Creative Software Inc. Web site. From the Help menu, choose Sony on the Web, and
choose the desired location from the submenu. The software starts your system’s Web browser and attempts to connect to the
appropriate page on the Sony Web site.
4 | CHAPTER 1

Chapter
Track list
Explorer, Track Properties, and
Chopper windows
Dividers
Toolbar
Timeline
Transport bar
Marker bar
Mixing Console and
Video Preview windows
Window
docking area
2
Learning the ACID Window
Overview of ACID Music Studio software
ACID® Music Studio™ music creation software is designed to be powerful and flexible, yet easy to use. Many of the
ACID Music Studio operations, commands, and shortcut keys are common to other Sony Creative Software Inc.
applications.
The following sections provide a tour of the ACID Music Studio work area.
Main window
The ACID Music Studio workspace includes three main areas: the track list, the timeline, and the window docking
area. The other parts of the interface are tools and features used while creating and working with your project. You
can resize the track list, timeline, and window docking area by dragging the dividers between them.
LEARNING THE ACID WINDOW | 5
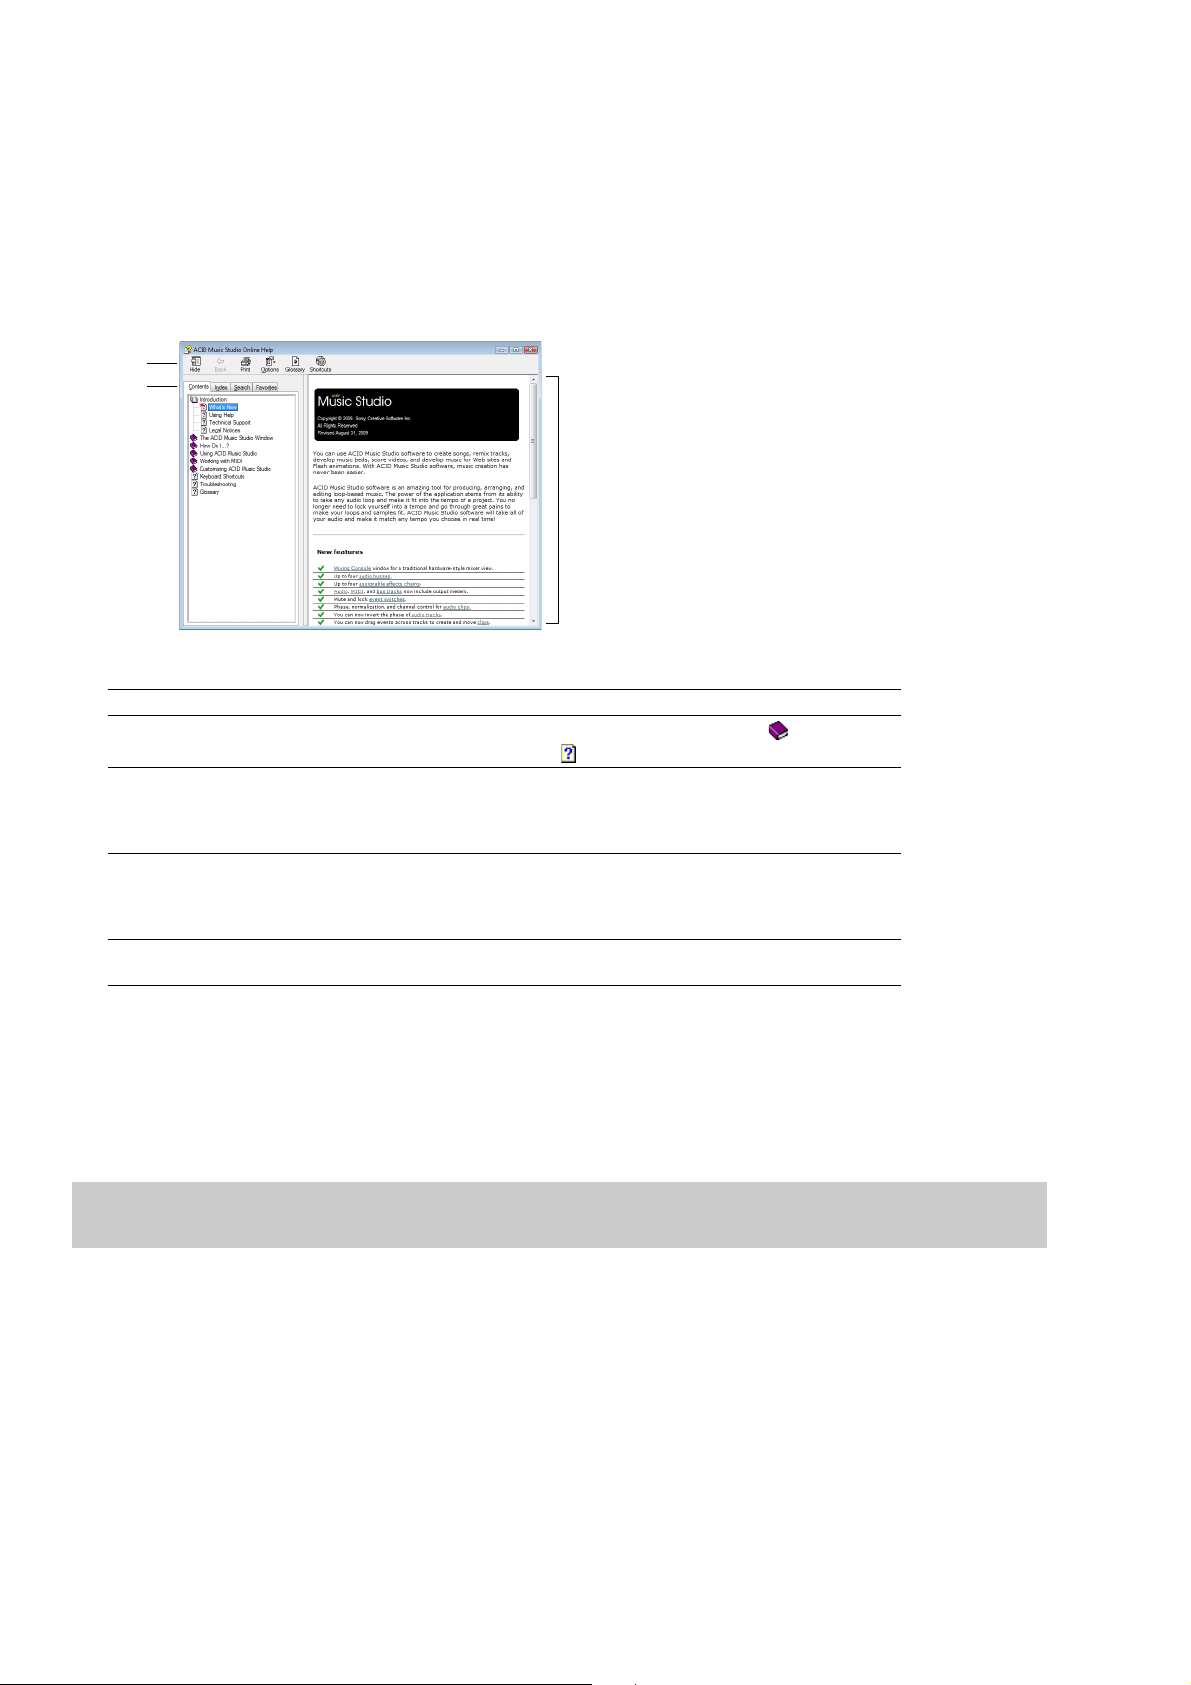
Toolbar
The toolbar allows you to quickly access commonly used functions and features in ACID Music Studio software.
New Opens a new project. You will be
prompted to save any changes to the
current project.
Open Displays the Open dialog. From this
dialog, you can browse all of the available
drives to select an ACID project or audio
file to open.
Save Saves any changes to the current
project. The first time you save a project,
the Save As dialog appears.
Publish Opens the Publish wizard so you
can share your ACID creation on the Web.
ACIDplanet Profile Opens your profile on
the ACIDplant Web site.
Get Media from the Web Opens a dialog
where you can download media from the
Internet.
Cut Clears the selected items from the
timeline and places them on the ACID
clipboard. You can then paste them to a
new location.
Copy Creates a copy of the selected items
from the timeline on the ACID clipboard.
You can then paste them to a new
location.
Paste Inserts the contents of the ACID
clipboard at the current cursor position.
The pasted items cover any existing
events. To make room for pasted events,
choose Paste Insert from the Edit menu.
Undo Reverses the last action performed.
ACID supports unlimited undos, allowing
you to restore the project to any state
since the last save.
Redo Reverses an undo. Context-Sensitive Help Activates context-
Enable Snapping Turns the snapping
feature on or off. With snapping enabled,
you can decide whether to snap to the
grid or to all elements, such as markers
and regions.
Automatic Crossfades Allows you to
automatically create crossfades when you
overlap two events.
Lock Envelopes to Events Locks envelope
points so they move with an event when it
is moved along the timeline.
Enable Inline MIDI Editing Allows editing
of MIDI events directly on the timeline. In
this mode, you can draw and erase notes
in a piano roll or drum grid view.
Draw Tool Activates the Draw tool to add
and edit events.
Selection Tool Activates the Selection
tool to select multiple events.
Paint Tool Activates the Paint tool to
insert events across multiple tracks. When
used in conjunction with the Ctrl key, the
Paint tool can paint an entire one-shot,
MIDI, or Beatmapped media file to an
event with one click.
Erase Tool Activates the Erase tool to
erase events or parts of events. When
used in conjunction with the Ctrl key, the
Erase tool can erase an entire one-shot,
MIDI, or Beatmapped media file to an
event with one click.
Envelope Tool Activates the Envelope
tool to select and modify envelope points.
Time Selection Tool Activates the Time
Selection tool to quickly select all events
within a range of time.
Show Me How Starts an interactive guide
that shows you each part of the ACID
Music Studio interface and teaches you
how to create a project.
sensitive help to obtain information about
a specific option, menu, or part of the
ACID Music Studio window.
6 | CHAPTER 2
Track list
Track nameTrack number
Pan slider
Track FX
Mute
Solo
Volume slider
Arm for Record
Paint Clip Selector
MIDI Input
MIDI Output
Minimize Track Height
Maximize Track Height
Marker bar
Transport bar Time ruler (if displayed)
Loop bar
Zoom
controls
Beat ruler
This list identifies the track order in your project and contains the track’s controls.
Audio tracks
MIDI tracks
Timeline
In the timeline, you can view and edit the events in a track.
Marker bar
The marker bar runs the length of your project and contains the tags for markers and regions positioned along the project’s
timeline.
Beat ruler
The beat ruler allows you to place events in reference to the musical time of bars and beats. This ruler is fixed and is not updated
when you change the tempo. This allows the events in the tracks to maintain their size when you adjust the tempo.
Time ruler
The time ruler provides a timeline for your project. This ruler can show real time in many different formats. The ruler changes with
tempo, because the number of beats and beats per second of real time changes with tempo.
LEARNING THE ACID WINDOW | 7
Trans por t bar
Click a tab to view
a window.
Click the handle to drag a
window to a different
location or dock.
Click the Maximize/
Minimize button to
control the size of the
window in the window
docking area.
Click the Close button to
remove a window from a
floating dock or the
window docking area.
The transport bar contains the playback and cursor positioning buttons frequently used while working on your project.
Zoom controls
To the right of the horizontal scroll bar are the time zoom controls. Clicking the Zoom In Time button ( ) increases the horizontal
magnification of the project. To decrease the level of magnification, click the Zoom Out Time button ( ).
Directly below the vertical scroll bar are the dedicated track height zoom controls. Clicking the Zoom In Track Height button ( )
increases the vertical magnification of the project. To decrease the level of magnification, click the Zoom Out Track Height button
(
).
Note:
Double-clicking the horizontal or vertical scroll bars adjusts the magnification so that as much of the project (either
horizontally or vertically) is displayed as possible.
Click the Zoom Tool button ( ) in the corner of the timeline to temporarily change the cursor into the Zoom tool. After you select
an area of the timeline to magnify, the cursor reverts to the previously active tool.
Note:
Double-clicking the Zoom tool adjusts both the horizontal and vertical magnification so that as much of the project is
displayed as possible.
Window docking area
This area allows you to keep frequently used windows available while working on a project. Windows can be docked side by side or
in stacks in the window docking area.
The default windows are displayed in the window docking area when you start ACID Music Studio for the first time. Additional
windows can be displayed by clicking the window’s tab or by choosing the desired window from the View menu.
Tip:
You can quickly hide or show the window docking area by pressing F11.
The available windows can be docked anywhere at the bottom of the ACID window or floated over the ACID window or on a
secondary monitor (this setup requires a dual-monitor video card). You can also create floating docks anywhere by dragging more
than one window to the same area.
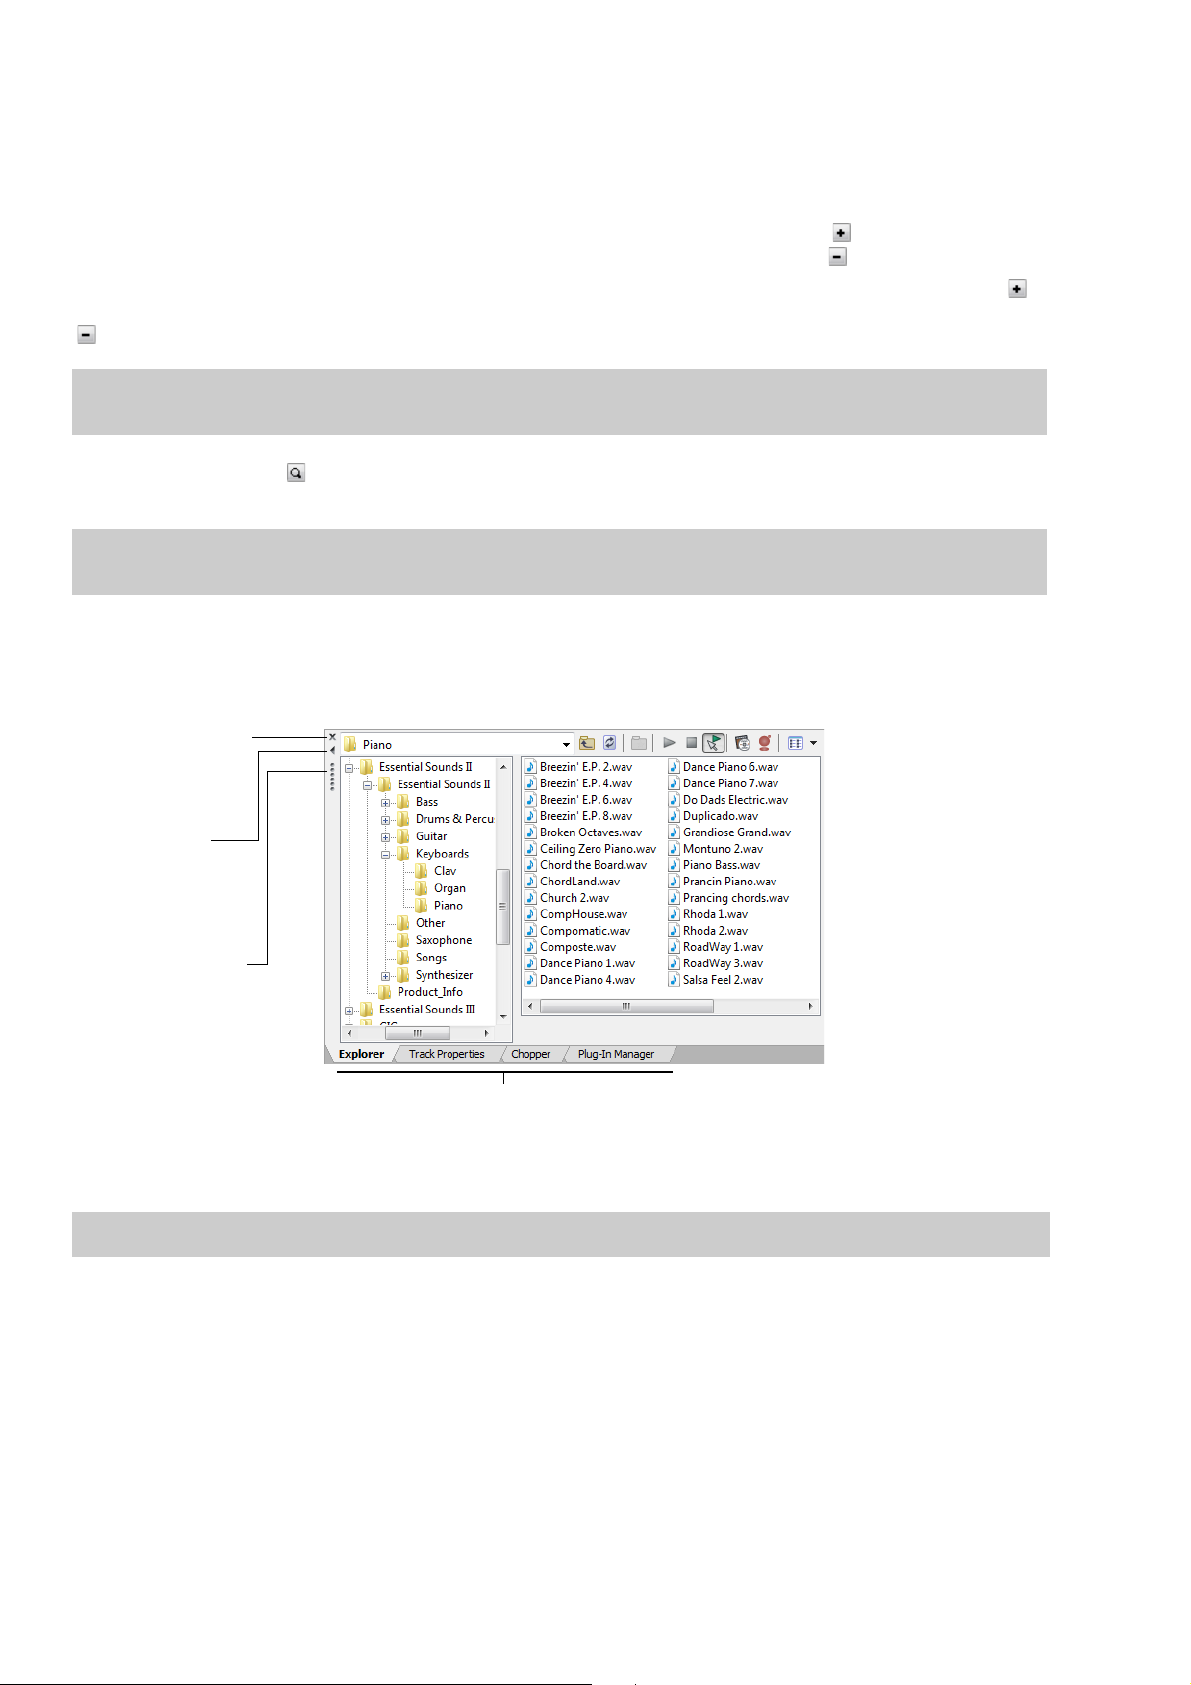
Explorer
The Explorer window works similarly to the Windows® Explorer. You can use the Explorer window to locate, preview and select
media files to be added to your project. You can also use the Explorer window to perform common file management tasks, such as
renaming files or creating folders. Display the Explorer by choosing Explorer from the View menu or pressing Alt+1. For more
information, see Getting media files on page 13.
8 | CHAPTER 2
 Loading...