

Sony A3880112 User Manual
Copying contacts registered in
Google account to docomo
account
On the "docomoアカウントへコ
1
ピー (Copy to account)" tab
screen, tap a Google account you
want to copy.
Tap [ 上書き (Overwrite)]/
2
[追加 (Add)].
・ You can also copy the Contacts data
saved in "Phone contact" to docomo
account as well as Google account.
Using Phonebook backup
You can back up contacts to the Phonebook
back up center automatically on a regular
basis and restore the contacts in case of
losing the FOMA terminal or erasing the
contacts accidentally.
For details on Phonebook backup, refer to
"ご利用ガイドブック (spモード < スマート
フォン> 編) Mobile Phone User's Guide [sp-
mode <Smartphone>] (in Japanese only)".
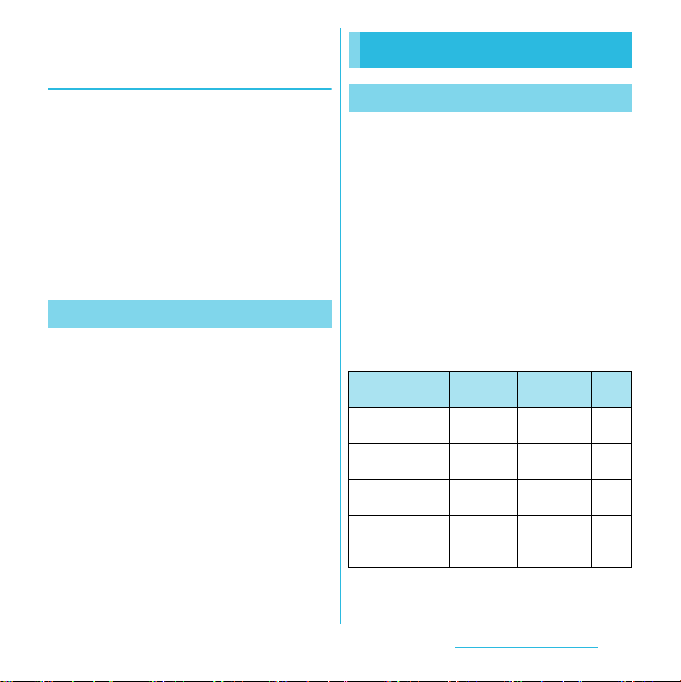
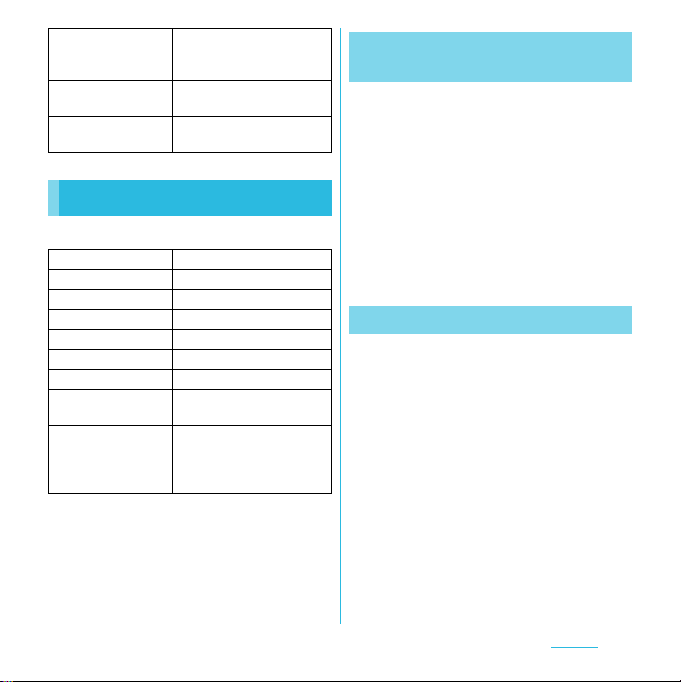
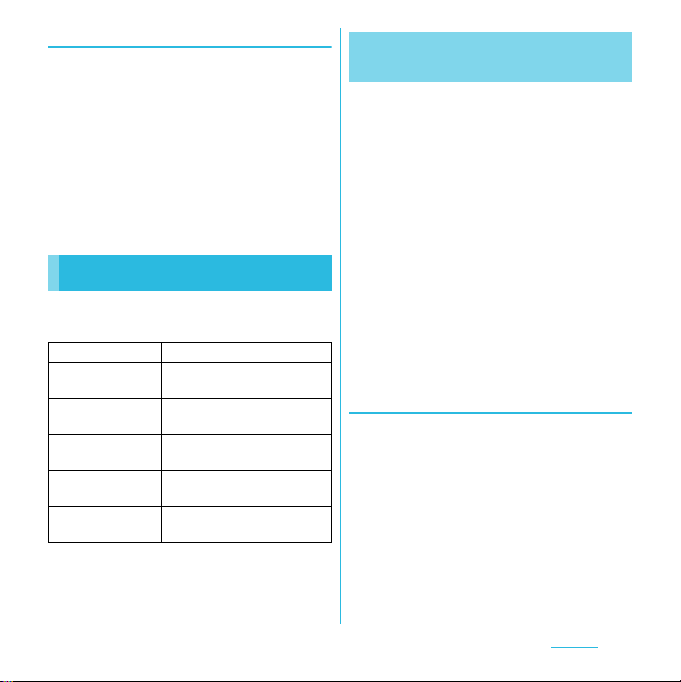
Network Services
Available Network Services
You can use the following DOCOMO network
services on the FOMA terminal. For details on
the outline and how to use each service, see
the relevant pages indicated in the following
table.
・ You cannot use the network services when
you are outside of the service area or in a
location without the radio wave.
・ For details, see the "Mobile Phone User's
Guide [Network Services]".
・ For subscription and inquiry, contact
"General Inquiries" on the last page of this
manual.
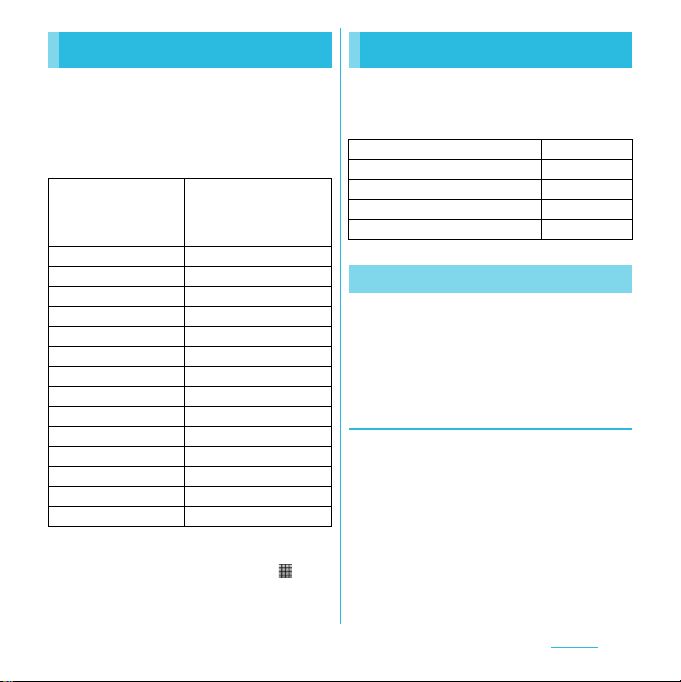
Service name
Voi ce M ai l
Service
Call Waiting
Service
Call Forwarding
Service
Caller ID
Notification
Service
Monthly
Application Page
charge
Paid Required P.72
Paid Required P.74
Free Required P.76
Free Not required P.77
Calling/Network Services
Continued on next page
71
❖Information
・ In this manual, the outlines of each network service
are described with menu operations.
Voice Mail Service
The Voice Mail Service takes messages for
you, as long as it answers a call with the
answering message, if there is an incoming
call when you are in a location without the
radio wave, while the FOMA terminal is
powered off, or when you cannot answer a
call within the preset ring time.
・ When the Voice Mail Service is set to
"Activate" and if you do not answer an
incoming call, the call is saved in "Call log"
as a "Missed call" and (Missed call)
appears in the status bar.
・ The FOMA terminal does not support Voice
Mail service of videophone call. Call "1412"
to set "Not support".
❖Information
・ This FOMA terminal does not have Record
message function which records voice messages
on internal memory. Use the Voice Mail Service.
・ The message can be recorded up to 3 minutes for
1 message, up to 20 messages, and stored up to
72 hours.
・ The number of Voice Mail messages appears until
you have played all messages.
Basic flow of the Voice Mail
Service
Activate the Voice Mail Service.
▼
Your FOMA terminal receives a call.
▼
If you do not answer the call, it is
connected to the Voice Mail service
center.
▼
The caller leaves a message.
If you are in a hurry and wish to leave a
message without listening to the Voice
Mail answering message, you can
interrupt the answering message and
switch to message recording mode
immediately by tapping [Dialpad]
▼
The receiver is notified that the Voice
Mail service center has taken the voice
message.
▼
Play the voice message.
→
[#].
Calling/Network Services
72
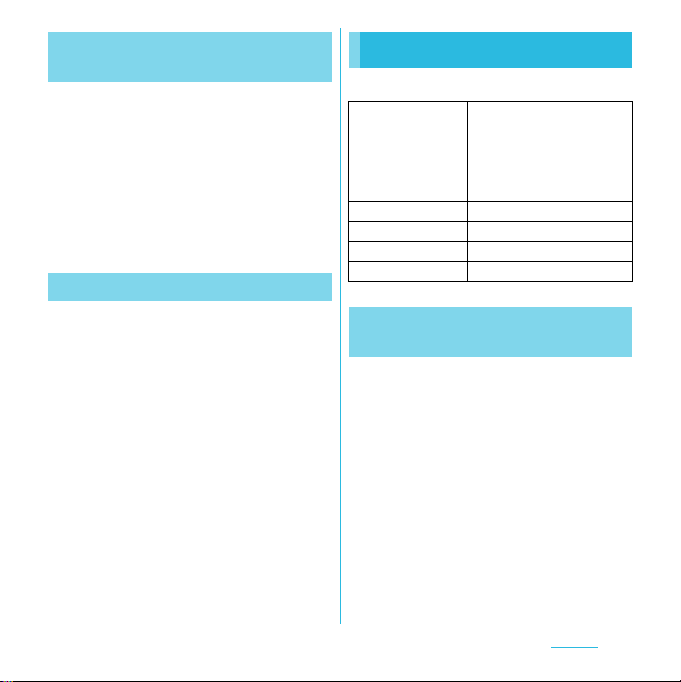
Setting Voice Mail Service
From the Home screen, press t
1
and tap [Settings].
Tap [Call settings] X [Network
2
service setting].
Tap [Voicemail].
3
・ Select items you want to use from the
following.
Activate
Voi ce ma il
Set ring time Enter the ring time (0 to 120
Deactivate
Voi ce ma il
Check Voicemail
setting
Play messages* Tap [OK] to call the Voice Mail
Voicemail
setting*
Check messages* Check if a new message is
Tap [OK] to activate the Voice
Mail Service.
seconds).
It changes only the ring time.
Tap [OK] to deactivate the
Voice Mail Service.
Check the current service
settings.
service center. After this step,
follow the voice prompts to play
the message.
Tap [OK] to change the Voice
Mail setting with the voice
prompts. The call is connected
to the Voice Mail service center.
After this step, follow the voice
prompts to operate.
stored. After checking, the
completion message appears.
Notification
settings
Activate Missed
Call Notification
Deactivate
Missed Call
Notification
Check setting Check the notification settings.
* After operation is finished, you receive the "NTT
DoCoMo VM:XX" SMS.
Set whether to alert you of a
new message with the tone or
vibration.
When it is received while the
FOMA terminal is powered off
or outside of the service area,
an SMS is sent to notify you of
the information about the call
(date, time and the caller ID)
once you turn the FOMA
terminal back on or move back
in to the service area.
Select [All calls] to notify you of
all received calls.
Select [Calls with Caller ID] to
notify you of only the calls with
the caller ID.
While starting the notification,
tap this item to deactivate the
notification.
❖Information
・ If you have the recorded messages stored at the
Voice Mail service center, (New SMS
message) and (Voice Mail message) appear
on the status bar. (Voice Mail message)
disappears when you delete all messages.
・ The notification setting and notifications (message
(SMS) reception) are not charged.
Calling/Network Services
73
Playing the voice message
When the SMS notification "NTT
1
DoCoMo VM:XX" appears, tap
[New message] from the
notification panel (P.34).
・ A recorded message plays.
Follow the voice prompts to
2
operate.
Call Waiting
When there is another incoming call while you
are on a call, the in-call ring tone notifies you
of the second call. You can answer the
second call by putting the first call on hold.
You can also put your current call on hold and
place a call to another party.
❖Information
・ Even when the call is on hold, the caller is charged
for a call fee.
Setting Call Waiting
From the Home screen, press t
1
and tap [Settings].
Tap [Call settings] X [Network
2
service setting].
Tap [Call Waiting].
3
You can select the following operations.
Activate Call
Waiting
Deactivate Call
Waiting
Check settings You can check the current
Tap [OK] to activate the Call
Waiting Service.
Tap [OK] to deactivate the Call
Waiting Service.
service settings.
Putting the current call on hold and
answering an incoming call
When you hear the beep during a
1
call, tap [Answer].
The first call is put automatically on hold
and the incoming call is received.
・ The FOMA terminal does not support
Conference call. When you tap to
the upper right of the screen, "Unable
to conference calls" appears.
・ Tap [Busy] to connect the incoming
call to the Voice Mail service center.
Activating Voice Mail service is
required beforehand.
Calling/Network Services
Continued on next page
74
Switch to the first call.
2
・ To end the later call, tap [End call].
The later call is terminated and
switched to the first call.
・ To put the later call on hold, tap
[Switch to this call].
The later call is put on hold and
switched to the first call. Tapping
[Switch to this call] switches to the
other party.
Ending the current call and
answering an incoming call
When you hear the beep during a
1
call, tap [End current call and
answer].
・ The first call is terminated and the
incoming call is received.
Putting the current call on hold and
making a call to another party
During a call, tap [Contacts]/
1
[Dialpad].
Enter the other party's phone
2
number, then tap .
・ The first call is automatically on hold
and switched to the new call you
made. You can also search for a
contact by tapping [Contacts] and
[Call log].
Switch to the first call.
3
・ To terminate the new call, tap [End
call].
The new call is terminated and
switched to the first call.
・ To put the new call on hold, tap
[Switch to this call].
The new call is put on hold and
switched to the first call. Tapping
[Switch to this call] switches to the
other party.
Calling/Network Services
75
Call Forwarding Service
The Call Forwarding Service forwards a voice
call to a preset forwarding number when you
are in a location without the radio wave, the
FOMA terminal is powered off, or you do not
answer the call within the preset ring time.
・ When the Call Forwarding Service is set to
"Activate Call Forwarding" and if you do not
answer an incoming voice call, the call is
saved in "Call log" as a "Missed call" and
(Missed call) appears in the status bar.
Basic flow of the Call Forwarding
Service
Save the forwarding number.
▼
Activate the Call Forwarding Service.
▼
Your FOMA terminal receives a call.
▼
If you do not answer the call, it is
automatically forwarded to the specified
forwarding number.
Call charge for the Call Forwarding
Service
Caller
The caller is charged for a call fee.
Call Forwarding Service subscriber
The Call Forwarding Service
subscriber is charged for a call
fee.
Forwarding party
Information
❖
・ Even when the Call Forwarding Service is set to
"Activate Call Forwarding", you can answer the call
during a ringtone sounds.
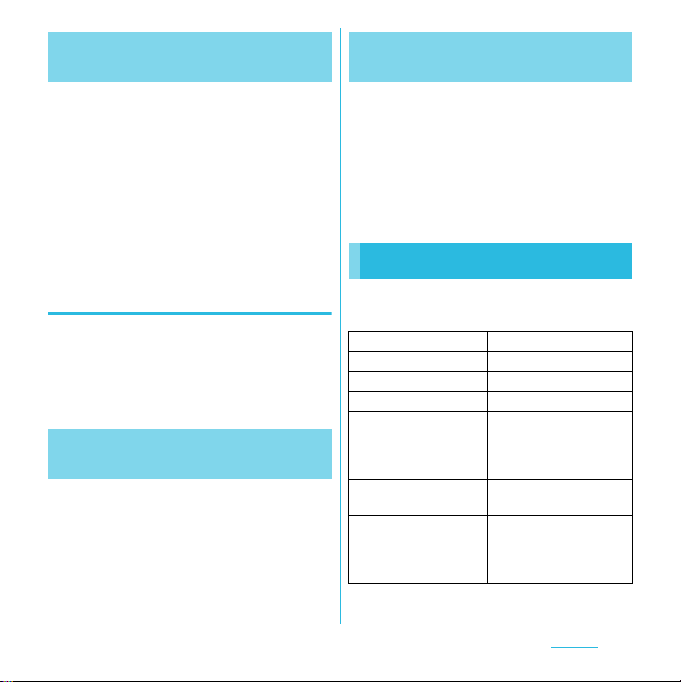
Setting Call Forwarding Service
From the Home screen, press t
1
and tap [Settings].
Tap [Call settings] X [Network
2
service setting].
Calling/Network Services
Continued on next page
76
Tap [Call Forwarding].
3
・ Select items you want to use.
Activate Call
Forwarding
Change
forwarding
number
Register
ring time
Deactivate Call
Forwarding
Register The
Forwarding
Number
Activate Call
Forwarding
Setting if
forwarding
number is
busy*
Check setting You can check the current service
* A subscription of Voice Mail service is required.
Enter the forwarding number and
ring time, then tap [OK] to
activate the Call Forwarding
Service.
Mark the checkbox and enter the
forwarding number.
Mark the checkbox and enter the
ring time (0 to 120 seconds).
If the ring time is set to 0
seconds, an incoming call is not
saved in "Call log".
While the Call Forwarding Service
is activated, tap this item and
[OK] to deactivate the Call
Forwarding Service.
Change the forwarding number.
Enter the forwarding number and
tap [OK].
Mark the checkbox to change the
forwarding number and to
activate the Call Forwarding
Service simultaneously.
When the forwarding number is
busy, an incoming call is
connected to the Voice Mail
service center. Tap [Connect] to
turn on the setting; tap [Do not
connect] to turn off the setting.
settings.
Setting on/off of the Call
Forwarding guidance
From the Home screen, tap
1
[Phone].
[1] [4] [2] [9] X Tap [Call].
2
・ Follow the voice prompts to operate.
For details, see the "Mobile Phone
User's Guide [Network Services]".
Caller ID Notification
When making a call, your phone number can
be shown in the display of the recipient's
phone you are calling. The caller ID is
important personal information. Carefully
decide whether you notify a recipient of your
caller ID.
・ You cannot set the Caller ID notification
where the FOMA terminal indicates the
outside of service area ( ).
・ The setting is available only the other party's
phone can display the caller ID.
・ If an announcement requesting caller ID is
heard when making a call, set Caller ID
notification or add prefix "186" to the phone
number to call again.
From the Home screen, press t
1
and tap [Settings].
Calling/Network Services
Continued on next page
77
Tap [Call settings] X [Network
2
service setting].
Tap [Caller ID Notification].
3
・ Select items you want to use.
Activate Caller
ID Notification
Deactivate
Caller ID
Notification
Check
settings
Enter the Network security code,
then tap [OK].
Your phone number is notified to
the other party.
Enter the Network security code,
then tap [OK].
The caller ID notification is
deactivated.
Check the current settings.
Calling/Network Services
78
Settings
Viewing the setting menu
From the Home screen, press
1
t.
Tap [Settings].
2
■ Setting menu
Sony Ericsson Connect the FOMA
Wireless & networks P. 7 9
Call settings P. 8 6
Sound P. 8 7
Display P. 8 9
Location & security P.9 0
Applications P.9 5
Accounts & sync P. 9 7
Privacy P. 1 0 0
Storage P. 1 01
Language & keyboard P. 1 0 2
Voice input & output P. 1 0 2
Accessibility P. 1 03
Date & time P. 1 03
About phone P. 10 4
terminal to another device
or PC via USB connection
or Wi-Fi. (P.144)
❖Information
・ Alternatively, from the Home screen, tap , then
tap [Settings].
Wireless & networks
The FOMA terminal automatically switches
between 2G and 3G networks depending on
availability.
Airplane mode P. 81
Wi-Fi/Wi-Fi settings P. 82
Bluetooth/Bluetooth settings P. 14 9
VPN settings P. 85
Mobile networks P.79, P.177
Setting an access point
An access point for connecting to the Internet
(sp-mode, mopera U) is already registered.
You can add or change it if necessary.
By default, sp-mode (P.80) is set for the usual
access point.
Checking the access point you use
From the Settings screen (P.79),
1
tap [Wireless & networks] X
[Mobile networks] X [Access Point
Names].
・ Available access points (APN)
appear.
Continued on next page
Settings
79

❖Information
・ If you have several available connections, a
marked radio button to the right indicates the
active network connection.
Setting an access point
additionally
From the Settings screen (P.79),
1
tap [Wireless & networks] X
[Mobile networks] X [Access Point
Names].
Press t.
2
Tap [New APN].
3
Tap [Name], enter a name and tap
4
[OK].
Tap [APN] and enter the access
5
point name and tap [OK].
Tap and enter all other information
6
required by your network operator.
Press t, then tap [Save].
7
❖Information
・ Do not change the MCC/MNC. If you change MCC/
MNC to other than the default value (440/10), the
settings do not appear on the APNs screen. When
the MCC/MNC settings do not appear on the APNs
screen, make APN settings with [Reset to default]
or [New APN] again.
・ Note that, when using the prediction conversion by
one-byte alphabet entry mode (English mode) with
mark in [Auto space] checkbox on Japanese
keyboard settings screen (P.55), spaces may be
entered automatically. In this case, delete spaces.
Initializing an access point
By initializing an access point, the default
state is restored.
From the Settings screen (P.79),
1
tap [Wireless & networks] X
[Mobile networks] X [Access Point
Names].
Press t, then tap [Reset to
2
default].
sp-mode
sp-mode is ISP for NTT DOCOMO
smartphone. In addition to accessing
Internet, you can use the mail service using
the same address as i-mode mail
(@docomo.ne.jp), etc. sp-mode is a service
requiring subscription. For details on
sp-mode, refer to NTT DOCOMO website.
Settings
80

mopera U Airplane mode
mopera U is ISP of NTT DOCOMO's Internet
connection. If you have subscribed to
mopera U, you can use Internet after making
the simple settings. mopera U is a service
requiring subscription.
Setting mopera U
From the Settings screen (P.79),
1
tap [Wireless & networks] X
[Mobile networks] X [Access Point
Names].
Mark [mopera U (スマートフォン定
2
額)]/[mopera U設定] radio button.
・ Return to the Home screen and open
the Browser. You can enjoy the nice
Internet access.
❖Information
・ "mopera U 設定" is an access point for setting
mopera U. When you use the access point for
setting mopera U, packet communication charges
for setting do not apply. Note that you can set only
the initial setting screen or the change setting
screen. For details on mopera U settings, refer to
mopera U website.
・ Subscription to packet flat-rate service is required
for using "mopera U (スマートフォン定額 )". For
details on mopera U (スマートフォン定額), refer to
NTT DOCOMO website.
In this mode, the functions of using radio
wave transmissions such as calling,
accessing to the Internet (including sending/
receiving mails), etc. are disabled. It can be
useful when you want to operate the FOMA
terminal with no interruption of incoming calls
or mails.
Turning on Airplane mode
From the Settings screen (P.79),
1
tap [Wireless & networks].
Mark [Airplane mode] checkbox.
2
・ When you unmark [Airplane mode]
checkbox, the Airplane mode turns
off.
❖Information
・ You can also switch ON/OFF of the Airplane mode by
pressing and holding p for over a second to switch
to the Phone options menu, then tapping [Airplane
mode].
・ Even if Airplane mode is ON, Wi-Fi can be tur ned
ON. Be careful not to use Wi-Fi in a place where
the use is prohibited such as in airplane or
hospital.
Settings
81
About Wi-Fi Turning o n W i - F i
Using Wi-Fi, you can access the Internet via
Wi-Fi network with your FOMA terminal.
・ Even when Wi-Fi is ON, packet
communication is available. However, while
you connect Wi-Fi network, Wi-Fi comes
first.
・ When a Wi-Fi network is disconnected,
connection is automatically switched to a
3G/GPRS network. Note that packet
communication fee applies for using 3G/
GPRS network.
Before using Wi-Fi
To use Wi-Fi, turn on Wi-Fi and search
available Wi-Fi network, then connect it.
・ To access the Internet using Wi-Fi, connect
to Wi-Fi network in advance.
❖Information
・ Make sure to receive enough signal strength for
using Wi-Fi. The signal strength of the Wi-Fi
network varies by the location of the FOMA
terminal. Moving closer to the Wi-Fi router might
enhance the signal strength.
From the Settings screen (P.79),
1
tap [Wireless & networks].
Mark [Wi-Fi] checkbox.
2
・ The FOMA terminal scans for
available Wi-Fi networks.
❖Information
・ It may take a few seconds before the Wi-Fi
connection is ON.
Connecting to a Wi-Fi network
From the Settings screen (P.79),
1
tap [Wireless & networks] X [Wi-Fi
settings].
・ Available Wi-Fi networks are
displayed under [Wi-Fi networks]. The
available networks may be open or
secured. This is indicated by or
next to the Wi-Fi network name.
Select Wi-Fi network you want to
2
connect, tap [Connect]
・ If you are trying to connect to a
protected Wi-Fi network, you are
asked to enter the security key for that
Wi-Fi network before you can connect
to it.
Continued on next pageContinued on next page
Settings
82
❖Information
・ The next time you connect to a Wi-Fi network, the
security key is saved in the FOMA terminal.
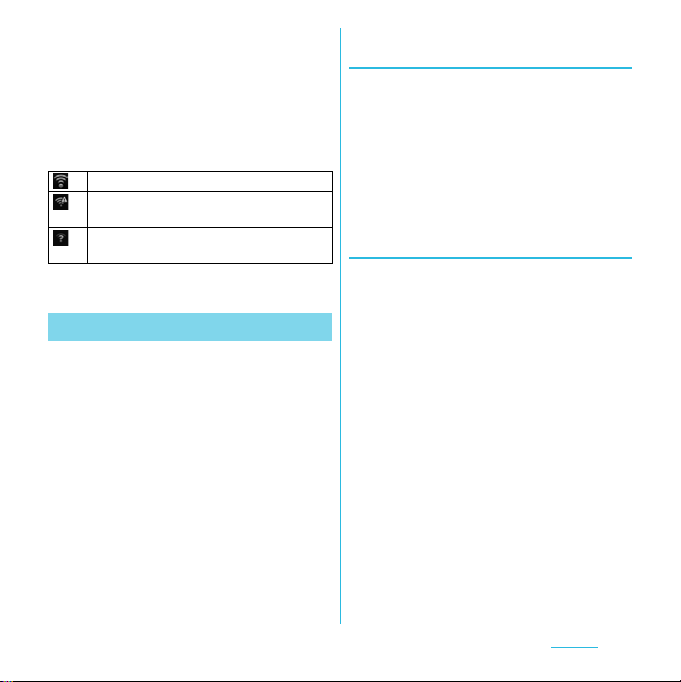
■ Wi-Fi network status icons on status
bar
The following icons appear according to
the Wi-Fi network connection status.
Appears when connected to Wi-Fi network.
Appears when connected to Wi-Fi network
using AutoIP function.
Appears when any open network within the
service area is detected*.
* Without connected to Wi-Fi network, you need to set Wi-
Fi Network notification to ON beforehand. (P.83)
Wi-Fi network status
When you are connected to a Wi-Fi network
or when there are Wi-Fi networks available in
your vicinity, you can see the status of these
Wi-Fi networks. You can also enable the
FOMA terminal to notify you wherever a Wi-Fi
network is detected.
Setting the Wi-Fi network
notification to ON
Confirm that Wi-Fi is turned on,
1
and then on the Settings screen
(P.79), tap [Wireless & networks] X
[Wi-Fi settings].
Mark [Network notification]
2
checkbox.
Scanning for Wi-Fi networks
manually
From the Settings screen (P.79),
1
tap [Wireless & networks] X [Wi-Fi
settings].
Press t.
2
Tap [ Sca n ].
3
・ Scanning for Wi-Fi networks is started,
and they are displayed under "Wi-Fi
networks".
Tap a Wi-Fi network in the list to
4
connect to it.
Settings
83

Advanced Wi-Fi settings
Before you add a Wi-Fi network manually, you
need to turn on the Wi-Fi setting. (P.82)
Adding a Wi-Fi network manually
From the Settings screen (P.79),
1
tap [Wireless & networks] X [Wi-Fi
settings].
Tap [Add Wi-Fi network].
2
Enter [Network SSID] name of the
3
Wi-Fi network you want to add.
Tap [Security] field, then mark a
4
radio button of security type for
the Wi-Fi network you want to add.
If required, enter security
5
information for the Wi-Fi network
you want to add.
Tap [ Sav e].
6
Viewing detailed information on a
connected Wi-Fi network
From the Settings screen (P.79),
1
tap [Wireless & networks] X [Wi-Fi
settings].
Tap the Wi-Fi network that you are
2
currently connected to.
・ The detailed network information is
displayed.
Wi-Fi sleep policy
By changing a Wi-Fi sleep policy, you can
choose to disable the Wi-Fi function in the
FOMA terminal when the screen turns off. You
can also set the FOMA terminal to always turn
on the Wi-Fi function or to turn it on when the
FOMA terminal is charged.
❖Information
・ When a Wi-Fi network is disconnected, connection
is automatically switched to a 3G/GPRS network.
Adding a Wi-Fi sleep policy
From the Settings screen (P.79),
1
tap [Wireless & networks] X [Wi-Fi
settings].
Press t.
2
Tap [ Adv an c ed] .
3
Continued on next page
Settings
84

Tap [Wi-Fi sleep policy].
4
Tap any of [When screen turns off]/
5
[Never when plugged in]/[Never].
Using a static IP address
You can set up the FOMA terminal to connect
to a Wi-Fi network using a static IP address.
Setting up a static IP address
From the Settings screen (P.79),
1
tap [Wireless & networks] X [Wi-Fi
settings].
Press t.
2
Tap [ Adv an c ed] .
3
Mark [Use static IP] checkbox.
4
・ Item of IP settings can be selected.
Tap an item to enter necessary
5
information.
・ Enter "IP address", "Gateway",
"Netmask", "DNS1" to use a static IP
address.
Press t.
6
Tap [ Sav e].
7
Connecting to a VPN (Virtual
Private Network)
Virtual Private Network (VPN) is a technology
to connect to the information in a protected
local network from another network.
Generally, VPNs are provided to companies,
schools and other facilities. A user can
access to the information in the local network
from outside of the premises.
To set up a VPN access from the FOMA
terminal, you need to retrieve the information
related to security from your network
administrator. For details, refer to
http://www.sonyericsson.co.jp/support/
・ This FOMA terminal supports the following
VPNs:
- PPTP VPN
- L2TP VPN
- L2TP/IPSec PSK VPN
- L2TP/IPSec CRT VPN
Adding a VPN
From the Settings screen (P.79),
1
tap [Wireless & networks] X [VPN
settings].
Tap [ Add VPN ] .
2
Tap a VPN type to add.
3
Continued on next page
Settings
85
If a setting screen appears, follow
4
the instruction of the network
administrator to set required items
of VPN settings.
Press t, then tap [Save].
5
・ A new VPN is added in the list on VPN
settings screen.
❖Information
・ Added VPNs can be edited or deleted.
To edit VPNs, touch and hold a desired VPN, then
tap [Edit network]. Change the VPN settings, as
required, press t and tap [Save].
To delete, touch and hold a VPN to be removed,
then tap [Delete network] X [OK].
Connecting to a VPN
From the Settings screen (P.79),
1
tap [Wireless & networks] X [VPN
settings].
・ Added VPNs are displayed in the list
on the VPN setting screen.
Tap a VPN to connect to.
2
If the dialog box appears, enter the
3
desired authentication information
and tap [Connect].
・ When you are connected to a VPN,
the connecting notification appears in
the status bar. When you are
disconnected, the notification
indicating to return to the VPN setting
screen appears, so that you can
reconnect to. For details, see "Status
bar" (P.32).
Disconnecting a VPN
Open the Notification panel, tap
1
the VPN connecting notification.
・ Tap a connecting VPN to disconnect.
Call settings
You can use the network services and search
for available networks.
Network service
setting
Network operators When you start using
P. 71
overseas or move out of
your operator's network, the
FOMA terminal searches
another available network
and reconnects to it.
Continued on next page
Settings
86
Noise suppression Makes the other party's
Accounts Set Internet phone (SIP)
Use Internet calling Set Internet phone (SIP) call
voice clear to hear during a
call.
account.
method.
Sound
Set ringtones, operation sound, vibrator, etc.
Silent mode P. 87
Vibrate P. 87
Vol um e P. 8 8
Phone ringtone P. 88
Notification ringtone P. 8 9
Audible touch tones P.8 9
Audible selection P.8 9
Screen lock sounds Set sound ON/OFF while the
Haptic feedback Set whether to vibrate for
screen is locked.
some operations such as
specified software key
operation.
Setting the FOMA terminal to
silent mode
Press p for over a second.
1
・ Phone options menu appears.
Tap [Silent mode].
2
❖Information
・ Alternatively, from the Settings screen (P.79), tap
[Sound] X [Silent mode].
・ Setting the phone to silent mode does not mute
sounds (playback of video or music, alarm, etc.)
other than the ringtone, operation sound, and
notification sounds.
Setting the vibrator
From the Settings screen (P.79),
1
tap [Sound] X [Vibrate].
Tap any of [Always]/[Never]/[Only
2
in Silent mode]/[Only when not in
Silent mode].
Settings
87

Adjusting the volume Adjusting the ringer volume
From the Settings screen (P.79),
1
tap [Sound] X [Volume].
・ Adjust the volume of following items.
-Ringtone
- Media (sounds of the music player,
Gallery and FM radio)
-Alarm
- Notification
Drag the slider left or right to
2
adjust the level.
・ Drag the slider to the left for volume
down, or to the right for volume up.
Tap [OK].
3
❖Information
・ By default, Notification volume is adjusted to the
same as Ringtone volume. To adjust Ringtone and
Notification separately, unmark [Use incoming call
volume for notifications] in Step 1. Ringtone and
Notification volume adjustment sliders appear,
then drag each slider to the right or left to adjust
volume.
with the volume key
From the Home screen, press up
1
or down of m.
・ The volume adjustment bar appears,
you can adjust the volume up or
down.
❖Information
・ You can also press m or p to mute the
ringtone for an incoming call.
Setting a ringtone
From the Settings screen (P.79),
1
tap [Sound] X [Phone ringtone].
Select a ringtone and tap [Done].
2
・ You can set voice file in ".wav", ".m4a"
or in other format which is transferred
from Media Go (P.148) or downloaded
from the Internet as a ringtone. (P.142)
❖Information
・ To set a ringtone other than the ones stored by
default, you can also set from [Music library].
Settings
88
Selecting a notification
ringtone
From the Settings screen (P.79),
1
tap [Sound] X [Notification
ringtone].
Select a ringtone and tap [Done].
2
❖Information
・ To set a notification sound other than the ones
stored by default, you can also set from [Music
library].
Setting touch tones to ON
From the Settings screen (P.79),
1
tap [Sound].
Mark [Audible touch tones] or
2
[Audible selection].
・ If you unmarked them, any operation
tone does not sound when you touch
or tap.
❖Information
・ "Audible touch tones" is a tone for numeric key
operations. "Audible selection" is a tone when
selecting menu item.
・ To set the key sound of software keyboard, from
the Settings screen (P.79), tap [Language &
keyboard], and select a type of software keyboard.
Display
Set brightness, orientation of the screen, etc.
Mobile BRAVIA
Engine
Brightness P.8 9
Auto-rotate screen P. 90
Animation P. 90
Screen timeout P.9 0
Adjusting the screen
brightness
From the Settings screen (P.79),
1
tap [Display] X [Brightness].
Drag the slider to the right or left.
2
・ Drag the slider to the left for dimmer
screen, or to the right for brighter
screen.
Tap [OK].
3
To view photos or movies
colorfully and beautifully, set
image quality improving
procedure (Mobile BRAVIA
Engine). It adjusts contrast,
color shade, etc.
Settings
89
Changing orientation of the
screen
You can set the screen orientation to change
automatically between landscape and
portrait view when you turn the FOMA
terminal sideways/paleways.
❖Information
・ Even when you change the orientation of the
FOMA terminal, the screen may not change to
landscape view depending on the screen such as
Home screen, etc.
Setting to change to landscape
view
From the Settings screen (P.79),
1
tap [Display].
Mark [Auto-rotate screen]
2
checkbox.
Setting animation effect to
transition
Set animation effect which shows transition of
screen smoothly.
From the Settings screen (P.79),
1
tap [Display] X [Animation].
Select an animation option.
2
Adjusting the idle time before
the screen turns off
From the Settings screen (P.79),
1
tap [Display] X [Screen timeout].
Select a time option before the
2
screen turns off.
❖Information
・ To turn the screen off immediately, press p.
Location & security
Set options related to location information
and security.
Use wireless networks P.1 6 1
Use GPS satellites P. 1 6 1
Set up screen lock P. 9 3
Set up SIM card lock P. 9 2
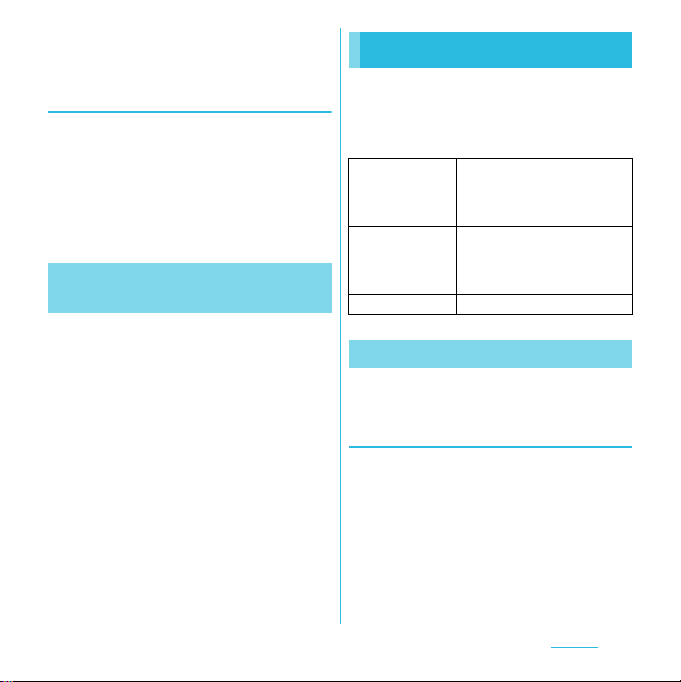
Visible passwords Set whether to show the
Select device
administrators
Use secure credentials Allow applications to
input character before
"・" appears on the
password entry screen.
Add or remove available
device administrators.
access secure
certificates and other
credentials.*
1
Continued on next page
Settings
90
Install from SD card Install encrypted
Set password Set or change the
Clear storage Delete all certificates and
*1 Set the password to the credential storage in advance.
*2 Save certificates and credential information in the
credential storage.
certificates from microSD
card.
credential storage*
password.
credential information
from the credential
storage*2 and reset its
password.
2
Protecting the UIM
Some functions provided for convenient use
of the FOMA terminal require the security
code to use them. Besides the security code
for locking the FOMA terminal, the network
security code necessary for the network
services etc. are available. Make use of the
FOMA terminal using an appropriate security
code according to the purpose.
■ Notes on the security codes
・ Avoid using a number that is easy to
guess, such as "birth date", "part of your
phone number", "street address number
or room number", "1111", and "1234".
Make sure to make a note of the security
code you set lest you should forget it.
・ Be very careful not to let others know
your security code. If your security code
is known by anyone else, DOCOMO
shall have no liability for any loss due to
any unauthorized use of it.
・ If you forget any of your security codes,
you must bring your official identification
(such as driver's license), the FOMA
terminal, and UIM with you to the nearest
docomo Shop. For details, contact the
"General Inquiries" on the last page of
this manual.
・ The PUK code is written on the
subscription form (copy for customer)
handed at the subscription in the
docomo Shop. If you did not subscribe
other than docomo Shop, you must
bring your official identification (such as
driver's license), the UIM with you to the
nearest docomo Shop or contact the
"General Inquiries" on the last page of
this manual.
Settings
91

Network security code
The network security code is a 4-digit number
necessary for identification or using the
docomo Network Services at reception of
your request in docomo Shop or at docomo
Information Center. It can be set any number
at the subscription and also changed later by
yourself.
You can change your network security code
to the new one using the PC if you have the
"docomoID"/"Password" for the "My docomo"*
General support site for PC.
* For information on "My docomo", see the
previons page of the last page of this
manual.
PIN code
You can set a security code called PIN code
to the UIM. The code is set to "0000" at the
time of subscription. It can be changed by
yourself.
PIN code is a 4- to 8-digit number (code) that
must be entered for user confirmation to
prevent unauthorized use by a third party
every time you insert the UIM into the FOMA
terminal or when the FOMA terminal is
powered on. Entering the PIN code enables
making/receiving calls and terminal
operation.
・ When you purchase a new FOMA terminal
and use the UIM that you have used on the
current FOMA terminal by inserting to the
new one, use the set PIN code on the former
terminal. If you did not change the setting,
the code is "0000".
・ If you enter a wrong PIN code 3 times
consecutively, the PIN code is locked and
cannot be used anymore. In this case,
unlock with "PUK". (P.92)
PUK code
The PUK code is an 8-digit number for
canceling the locked PIN1/PIN2 code. The
PUK code cannot be changed by yourself.
・ If you enter a wrong PUK code 10 times
consecutively, the UIM is locked. Please
contact a docomo Shop.
Enabling the UIM PIN
By setting PIN (security code) and enter PIN1
code when powered on, you can protect the
UIM from improper use.
From the Settings screen (P.79),
1
tap [Location & security] X [Set up
SIM card lock] X [Lock SIM card].
Enter the PIN code of the UIM and
2
tap [OK].
Settings
92

Entering the PIN code when
powered on
On the PIN code entry screen,
1
enter the PIN code of the UIM.
Tap [OK].
2
Changing the PIN code
・ You can change the PIN code when the UIM
PIN is enabled.
From the Settings screen (P.79),
1
tap [Location & security] X [Set up
SIM card lock] X [Change SIM PIN].
Enter the current PIN code of the
2
UIM and tap [OK].
Enter the new PIN code of the UIM
3
and tap [OK].
Enter the new PIN code and tap
4
[OK].
Unblocking the locked UIM
On the PUK code entry screen,
1
enter the PUK code and tap [OK].
Enter the new PIN code of the UIM
2
and tap [OK].
Enter the new PIN code and tap
3
[OK].
Screen lock
You can secure your data by requiring a
screen unlock pattern every time the FOMA
terminal is turned on or every time it is
activated from sleep mode.
There are 3 types of screen lock settings:
"Pattern", "PIN" and "Password". (P.93)
❖Information
・ You can use Key lock (P.30) to prevent unintended
operation or save the power consumption of the
FOMA terminal without setting screen lock.
Setting screen unlock pattern
From the Settings screen (P.79),
1
tap [Location & security] X [Set up
screen lock].
Tap [Pattern]/[PIN]/[Password].
2
・ When you tap [Pattern], follow the
onscreen instructions to enter screen
unlock pattern.
Set security question and answer in
case you forget the pattern.
・ When you tap [PIN], follow the
onscreen instructions to enter 4 or
more numbers.
・ When you tap [Password], follow the
onscreen instructions to enter 4 or
more characters including alphabets.
Settings
93

Changing the screen unlock
method
From the Settings screen (P.79),
1
tap [Location & security] X
[Change screen lock].
・ Enter current screen unlock pattern,
PIN or password.
・ If you should fail 5 times when you
enter the unlock pattern, wait
30 seconds and then try again.
Tap [Pattern]/[PIN]/[Password].
2
・ Select items you want to change into.
For setting procedure, see Step 2
(P.93) of "Setting screen unlock
pattern".
Locking the screen
Once screen unlock pattern (P.93) is set,
keys and screen are locked when the
terminal enters in the sleep mode or when
p is pressed.
Unlocking the screen
Press y or p to activate the
1
FOMA terminal.
Unlock the key lock, then enter the
2
screen unlock pattern.
・ Enter preset screen unlock pattern,
PIN or password.
❖Information
・ Even if you do not unlock the screen lock, you can
make an emergency call from the screen unlocking
screen after unlocking the key lock. (P.58)
If you forget how to unlock
■ If you set "Pattern"
"Incorrect pattern" appears when you
enter incorrect unlock pattern 5 times
consecutively.
・ Tap [N e x t] X [Answer question] and
then answer the question that you set
the unlock pattern to unlock.
・ If you registered Google account, on the
"Incorrect pattern" screen, tap [Next] X
[Enter Google account details], and then
enter Google account and password to
unlock.
❖Information
・ Tap [Try again] to retry entering pattern in 30
seconds.
・ Alternatively, when you tap [Try again] X [Forgot
pattern?], the question screen that you set unlock
pattern appears.
・ You can set multiple Google accounts. To unlock
the screen with Google account and password,
enter one of those accounts.
■ If you set "PIN"/"Password"
Please contact a docomo Shop.
Settings
94
Canceling screen lock
You can cancel screen lock pattern after you
set.
From the Settings screen (P.79),
1
tap [Location & security] X
[Change screen lock].
・ Enter preset screen unlock pattern,
PIN or password.
Tap [ Non e].
2
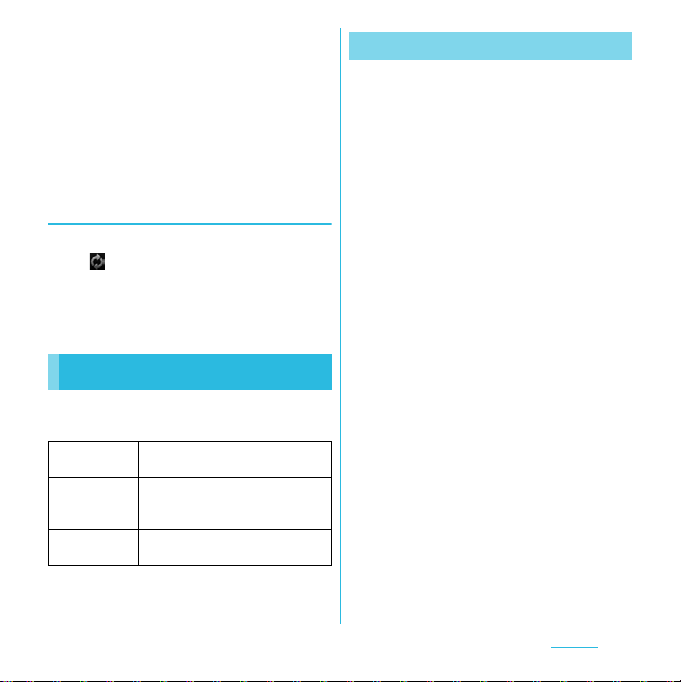
Applications
You can set options related to application
display and management.
Unknown sources P. 9 5
Manage
applications
Running services Display/Manage the currently
Storage use Display size of all applications,
Battery use Display operations which has
Development Set options for application
P. 9 6
running services.
usage condition, etc.
been using the battery.
development.
Permitting downloading
unknown source's application
Before you can download unknown source's
applications, set the FOMA terminal to enable
downloading.
Applications you download may be of
unknown origin. To protect your FOMA
terminal and personal data, only download
applications from trusted sources such as the
Android Market etc.
From the Settings screen (P.79),
1
tap [Applications].
Mark [Unknown sources]
2
checkbox.
Read the cautions appeared, tap
3
[OK].
Checking downloaded applications
From the Home screen, tap
1
[Browser].
Press t, tap [More] X
2
[Downloads].
❖Information
・ Applications downloaded from Android Market do
not appear.
Settings
95
Managing your applications
You can view installed applications' names,
memory usage condition, etc. or change the
settings.
Viewing permitted operation of the
applications in the FOMA terminal
From the Settings screen (P.79),
1
tap [Applications] X [Manage
applications].
Tap an application to view.
2
Scroll down the screen to view
3
permitted operations.
・ If all permitted operations do not
appear, tap [All].
Shutting down an application
A pop-up window that indicates
1
the application does not reply
appears, tap [Force stop].
❖Information
・ If you do not want to shut down the application, tap
[Cancel] and wait for a reply of the application.
❖Note
・ If you cancel the status bar forcibly, operations
may not be performed correctly.
Deleting all data of the application
・ Before deleting all installed application
data, back up contents related to the
application that you want to save including
data saved in the application.
From the Settings screen (P.79),
1
tap [Applications] X [Manage
applications].
Tap an application to delete the
2
data.
Tap [Clear data].
3
Tap [OK].
4
Deleting an installed application
・ Before deleting installed application, back
up contents related to the application that
you want to save including data saved in the
application.
・ Some applications cannot be deleted.
From the Settings screen (P.79),
1
tap [Applications] X [Manage
applications].
Tap an application to be deleted.
2
Tap [Uninstall].
3
Tap [OK].
4
Continued on next page
Settings
96
❖Information
・ You may not uninstall the applications pre-installed
in the FOMA terminal.
Deleting cache of the application
From the Settings screen (P.79),
1
tap [Applications] X [Manage
applications].
Tap an application to delete cache.
2
Tap [Clear cache].
3
Keeping the screen on while
charging
From the Settings screen (P.79),
1
tap [Applications] X
[Development].
Mark [Stay awake] checkbox.
2
Accounts & sync
You can manage (add or delete) online
service accounts or synchronize contacts,
messages, etc. saved in online services with
the FOMA terminal.
Background data All the applications installed to
Auto-sync Synchronize online information
Manage accounts P. 9 7
Managing accounts
You can add or delete an online service
account.
Setting Google account
You can create a Google account on your
FOMA terminal and use Google services
such as Gmail, Google Talk, Google
Calendar, Android Market, etc.
You can set multiple Google accounts on the
FOMA terminal.
the FOMA terminal perform
automatic data
communications.
such as your Gmail, calendar,
contacts, etc. automatically.
(P.99)
Continued on next page
Settings
97

From the Settings screen (P.79),
1
tap [Accounts & sync] X [Add
account] X [Google].
Follow the registration wizard, set
2
a Google account.
・ If you have no Google account, create
an account.
・ If you have already the Google
account, sign in.
❖Information
・ You can use the FOMA terminal without creating
your Google account, however the services such
as Google Talk, Gmail, Android Market, etc. are not
available.
・ To sign in, you need a Google account and a
password.
・ Make sure to check if the data connection is
available (3G/GPRS) before sign-in to the Google
account. For checking the data connection status,
see "Status icons" (P.32).
Setting Facebook account
When you register or sign in Facebook, you
can synchronize (register/update) profile
information published online to Contacts.
❖Information
・ If you do not have a Facebook account, you can
also create a new account at
http://www.facebook.com.
From the Settings screen (P.79),
1
tap [Accounts & sync] X [Add
account] X [Facebook].
Enter your login information.
2
・ If you have no Facebook account,
register an account.
・ If you have Facebook account, login.
❖Information
・ To display updates of Facebook on the Contacts
screen, from the Settings screen (P.79), tap
[Accounts & sync] X [Add account] and register
or sign in an account to "Facebook" application.
・ To display updates of Facebook on Timescape,
registering or signing in from Timescape is
required. (P.156)
Settings
98

Setting other account
■ Exchange Active Sync account
・ If you have Exchange Active Sync
account, on the settings screen (P.79),
tap [Accounts & sync] X [Add account]
X [Exchange Active Sync], and then set
the settings according to the onscreen
instructions.
■ docomo account
docomo account is set by default.
Deleting a service account
From the Settings screen (P.79),
1
tap [Accounts & sync] and select a
service account you want to
delete.
Tap [Remove account] X [Remove
2
account].
❖Information
・ The first se t Google account cannot be removed
from "Remove account". To remove the first set
Google account, reset the FOMA terminal. For
details on how to reset, see "Resetting the FOMA
terminal" (P.100).
Data synchronization
Synchronize online information such as your
Gmail, calendar, contacts, etc. to the FOMA
terminal. You can display and edit information
on the FOMA terminal or a PC.
❖Information
・ You need to set your online service account such
as Google account, etc. on the FOMA terminal to
synchronize. You can set to synchronize manually
or automatically through use of background data.
Setting automatic synchronization
From the Settings screen (P.79),
1
tap [Accounts & sync].
Mark [Background data] checkbox.
2
Mark [Auto-sync] checkbox.
3
Tap an online service whose
4
account is set.
Tap an item for automatic
5
synchronization.
Continued on next page
Settings
99
❖Note
・ If you mark [Background data], all the applications
installed to the FOMA terminal are permitted
automatic data communications to online services
whose accounts are set. And, if you mark [Autosync], your Gmail, calendar, contacts, and profile
information published by "Friend" are permitted
automatic data communications by Google
account. These communications may cause you to
pay packet communications char ges.
Canceling synchronization
During synchronization
1
( appears in the status bar),
press t.
Tap [Cancel sync].
2
Privacy
You can set application backup and reset the
FOMA terminal.
Back up my
data
Automat ic
restore
Factory data
reset
Back up application settings and
data to Google servers.
Restore backed up settings and
data when reinstalling an
application.
P. 1 00
Resetting the FOMA terminal
Resetting the FOMA terminal deletes all data,
including downloaded applications and
Google accounts, and resets the FOMA
terminal back to the initial (default) state.
Make sure to back up important data you
have on the FOMA terminal before you reset
the FOMA terminal.
For the initial settings, see "Initial settings
(Setup guide)" (P.31).
From the Settings screen (P.79),
1
tap [Privacy] X [Factory data reset]
X [Reset phone].
・ Mark [Erase SD card] checkbox to
delete all contents on the microSD
card.
・ Enter your screen unlock method as
required.
Tap [Erase everything].
2
・ By tapping [Erase everything], the
FOMA terminal restarts automatically.
❖Note
・ While restarting or resetting the FOMA terminal,
wait for a while. Note that, if you remove the battery
pack while restarting or resetting, it may cause
malfunction of the FOMA terminal.
Settings
100
 Loading...