

Sony A3880065 User Manual
Elm
™
User guide
Important information
Please read the Important information leaflet before you
use your mobile phone.
Experience more. Discover
how.
Fill it with pop and let it rock. Share your life in pictures. Or
why not go online for the latest updates? Your new phone is
the key to a wider world. And it's just around the corner.
Get started with this User guide. And join us online to get the
full picture. Music, games, apps, updates, downloads,
support and more. All in one place:
www.sonyericsson.com/Elm
Don't forget to update your phone software. See
Updating your phone on page 28.
User guide in the phone
An extended User guide is available in your phone.
To access the User guide in your phone
•
Select Menu > Settings > User help > User guide.
2
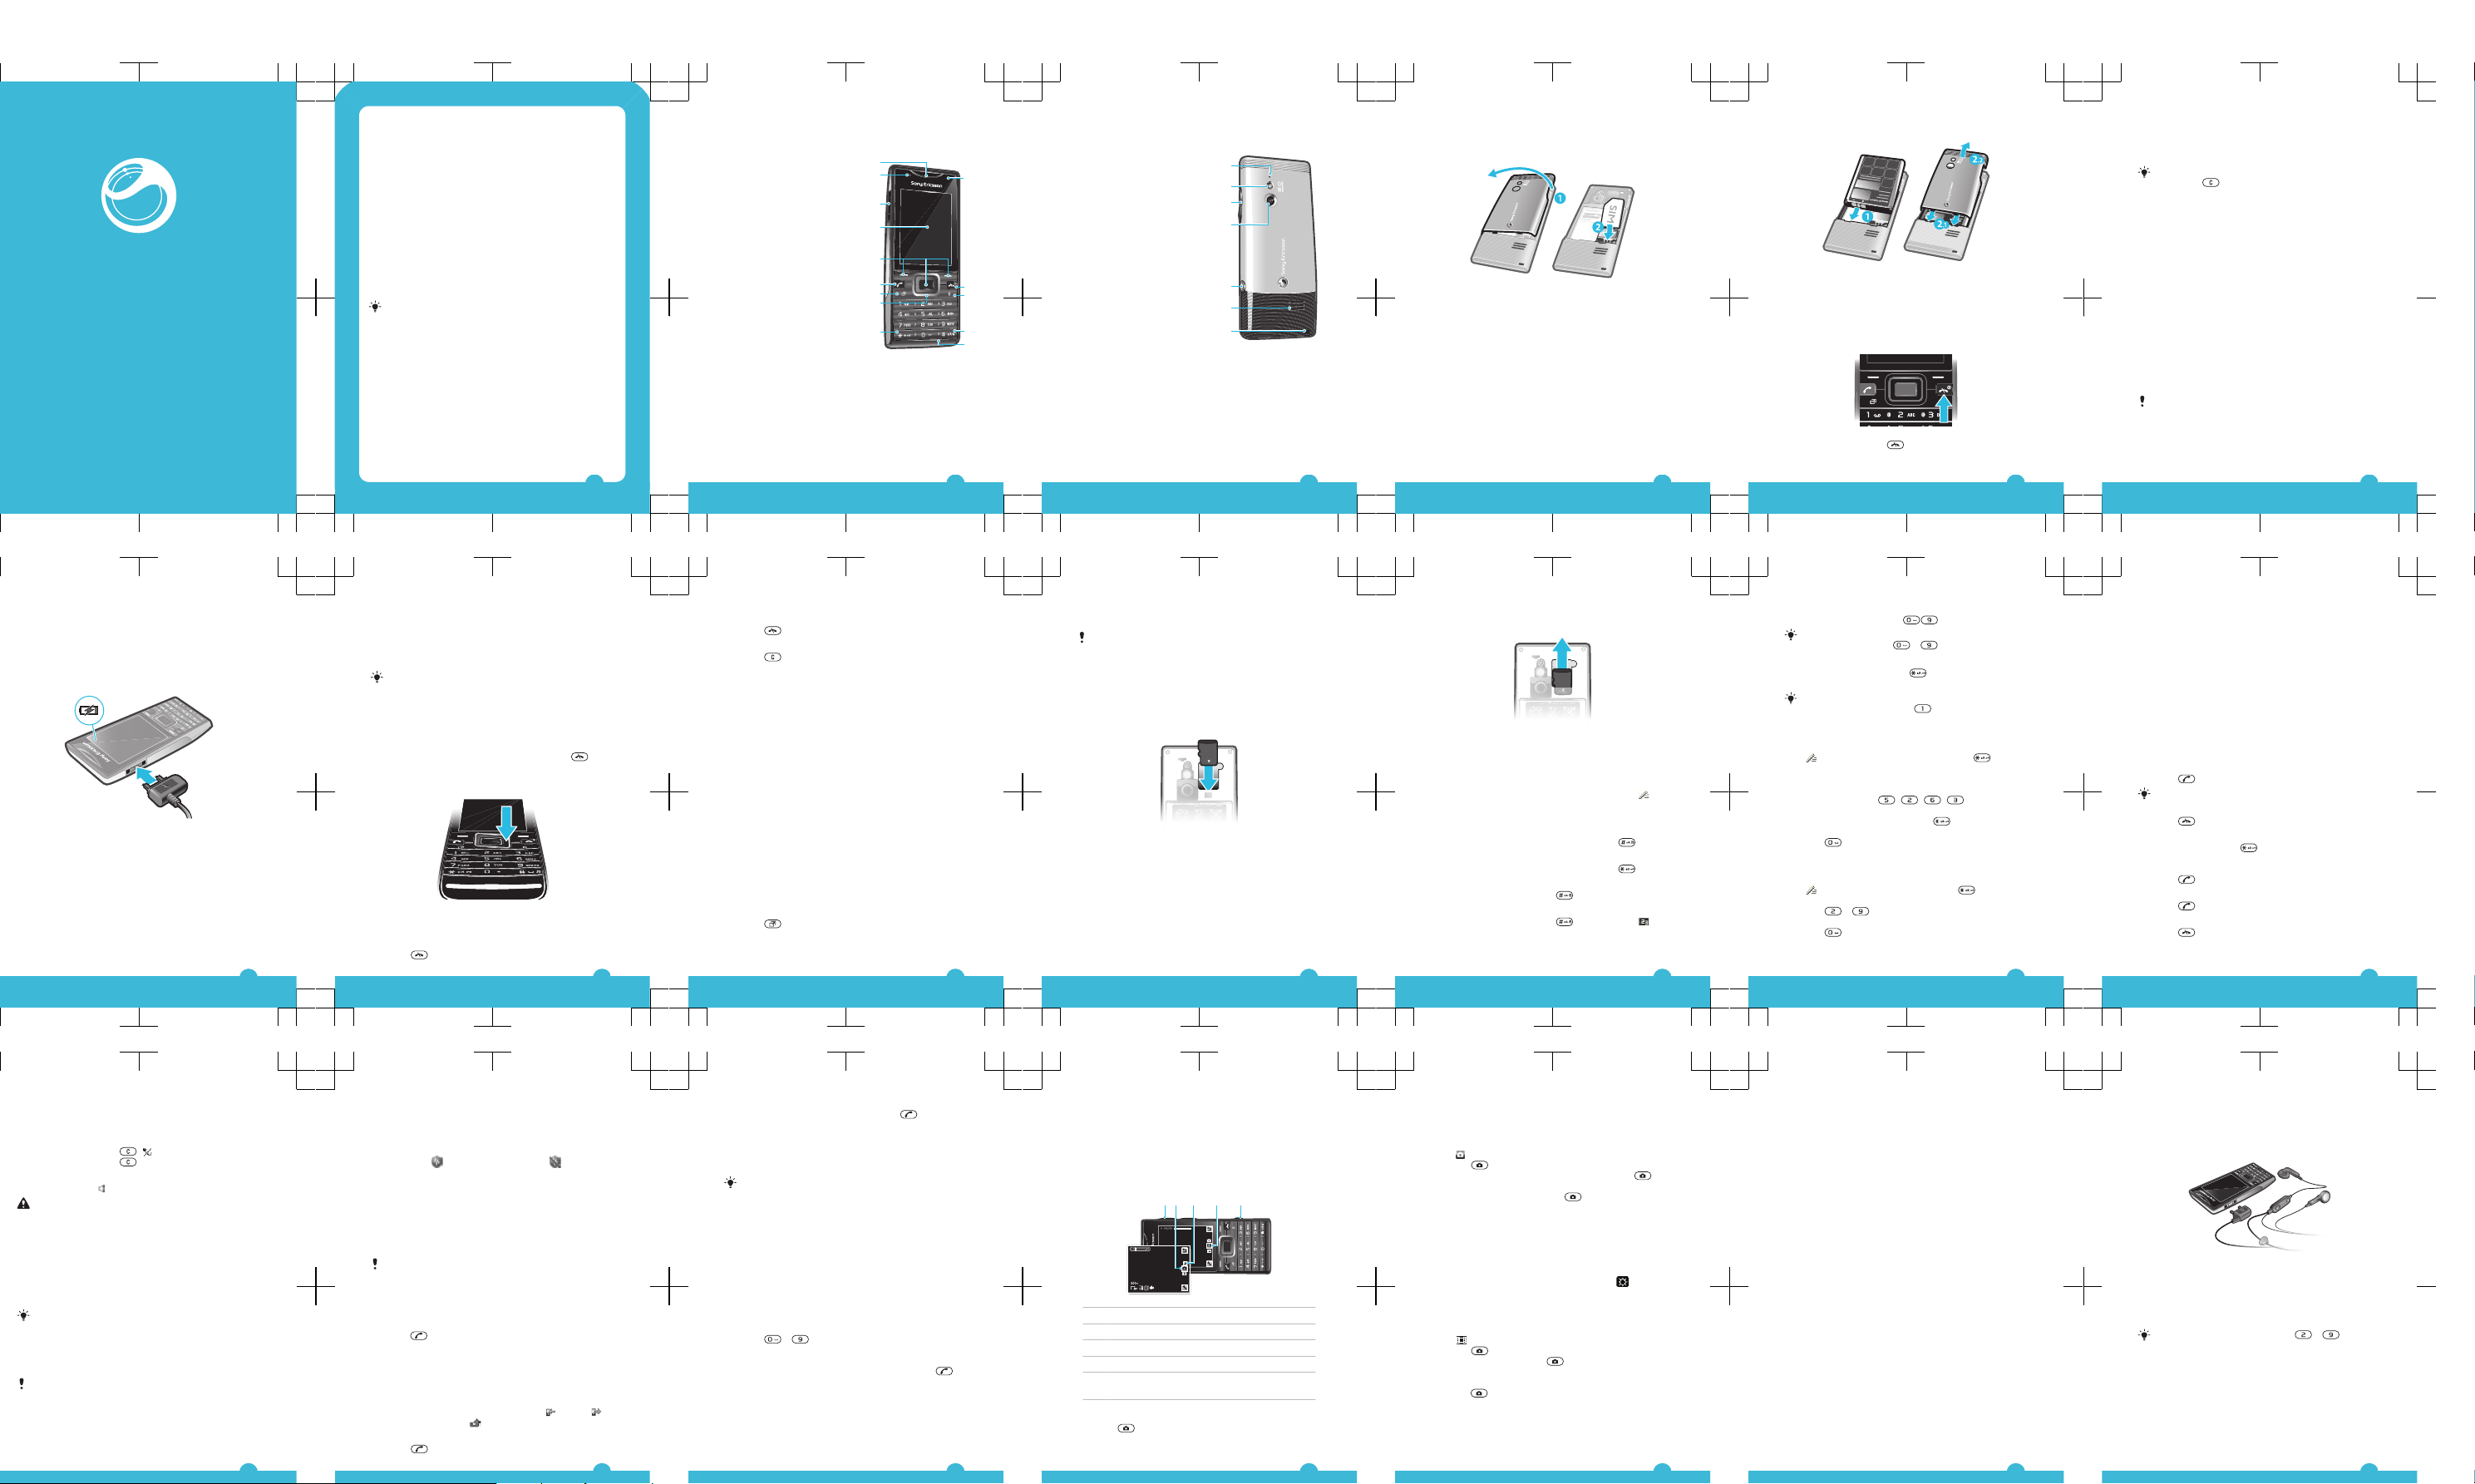
Phone overview
1 Ear speaker
1
11
10
12
13
14
2
3
4
5
6
7
9
8
2 Light sensor
3 Connector for charger, handsfree,
and USB cable
4 Screen
5 Selection keys
6 Call key
7 Activity menu key
8 Navigation key
9 Keylock key
10 Video call camera*
11 End key, On/off key
12 C key (Clear)
13 Silent key
14 Microphone
3
15 Microphone
15
17
16
18
19
20
21
16 Flash light
17 Volume, digital zoom key
18 Main camera lens
19 Camera key
20 Speaker
21 Strap hole
* The video call camera may not be available in your phone.
4
Getting started
To insert the SIM card
1
Remove the battery cover.
2
Slide the SIM card into its holder with the gold-coloured
contacts facing down.
5
To insert the battery
1
Insert the battery with the label side up and the
connectors facing each other.
2
Attach the battery cover.
Turning on the phone
To turn on the phone
1
Press and hold down .
6
2
Enter your SIM card PIN (Personal Identification Number),
if requested, and select OK.
3
Select a language.
4
Follow the instructions that appear.
If you want to correct a mistake when you enter your
PIN, press .
Help
In addition to this User guide, Feature guides and more
information are available at
www.sonyericsson.com/support.
There are also help functions in your phone. See the
following instructions on how to access them.
To view tips and tricks
•
Select Menu > Settings > User help > Tips and
tricks.
To view information about functions
•
Scroll to a function and select Info, if available. In some
cases, Info appears under Options.
To view the phone status
•
Press the volume key. Phone, memory and battery
information is shown.
Supported services and features
Some of the services and features described in this
User guide are not supported by all networks and/or
service providers in all areas. Without limitation, this
applies to the GSM International Emergency Number
112. Please contact your network operator or service
provider to determine availability of any specific
7
service or feature and whether additional access or
usage fees apply.
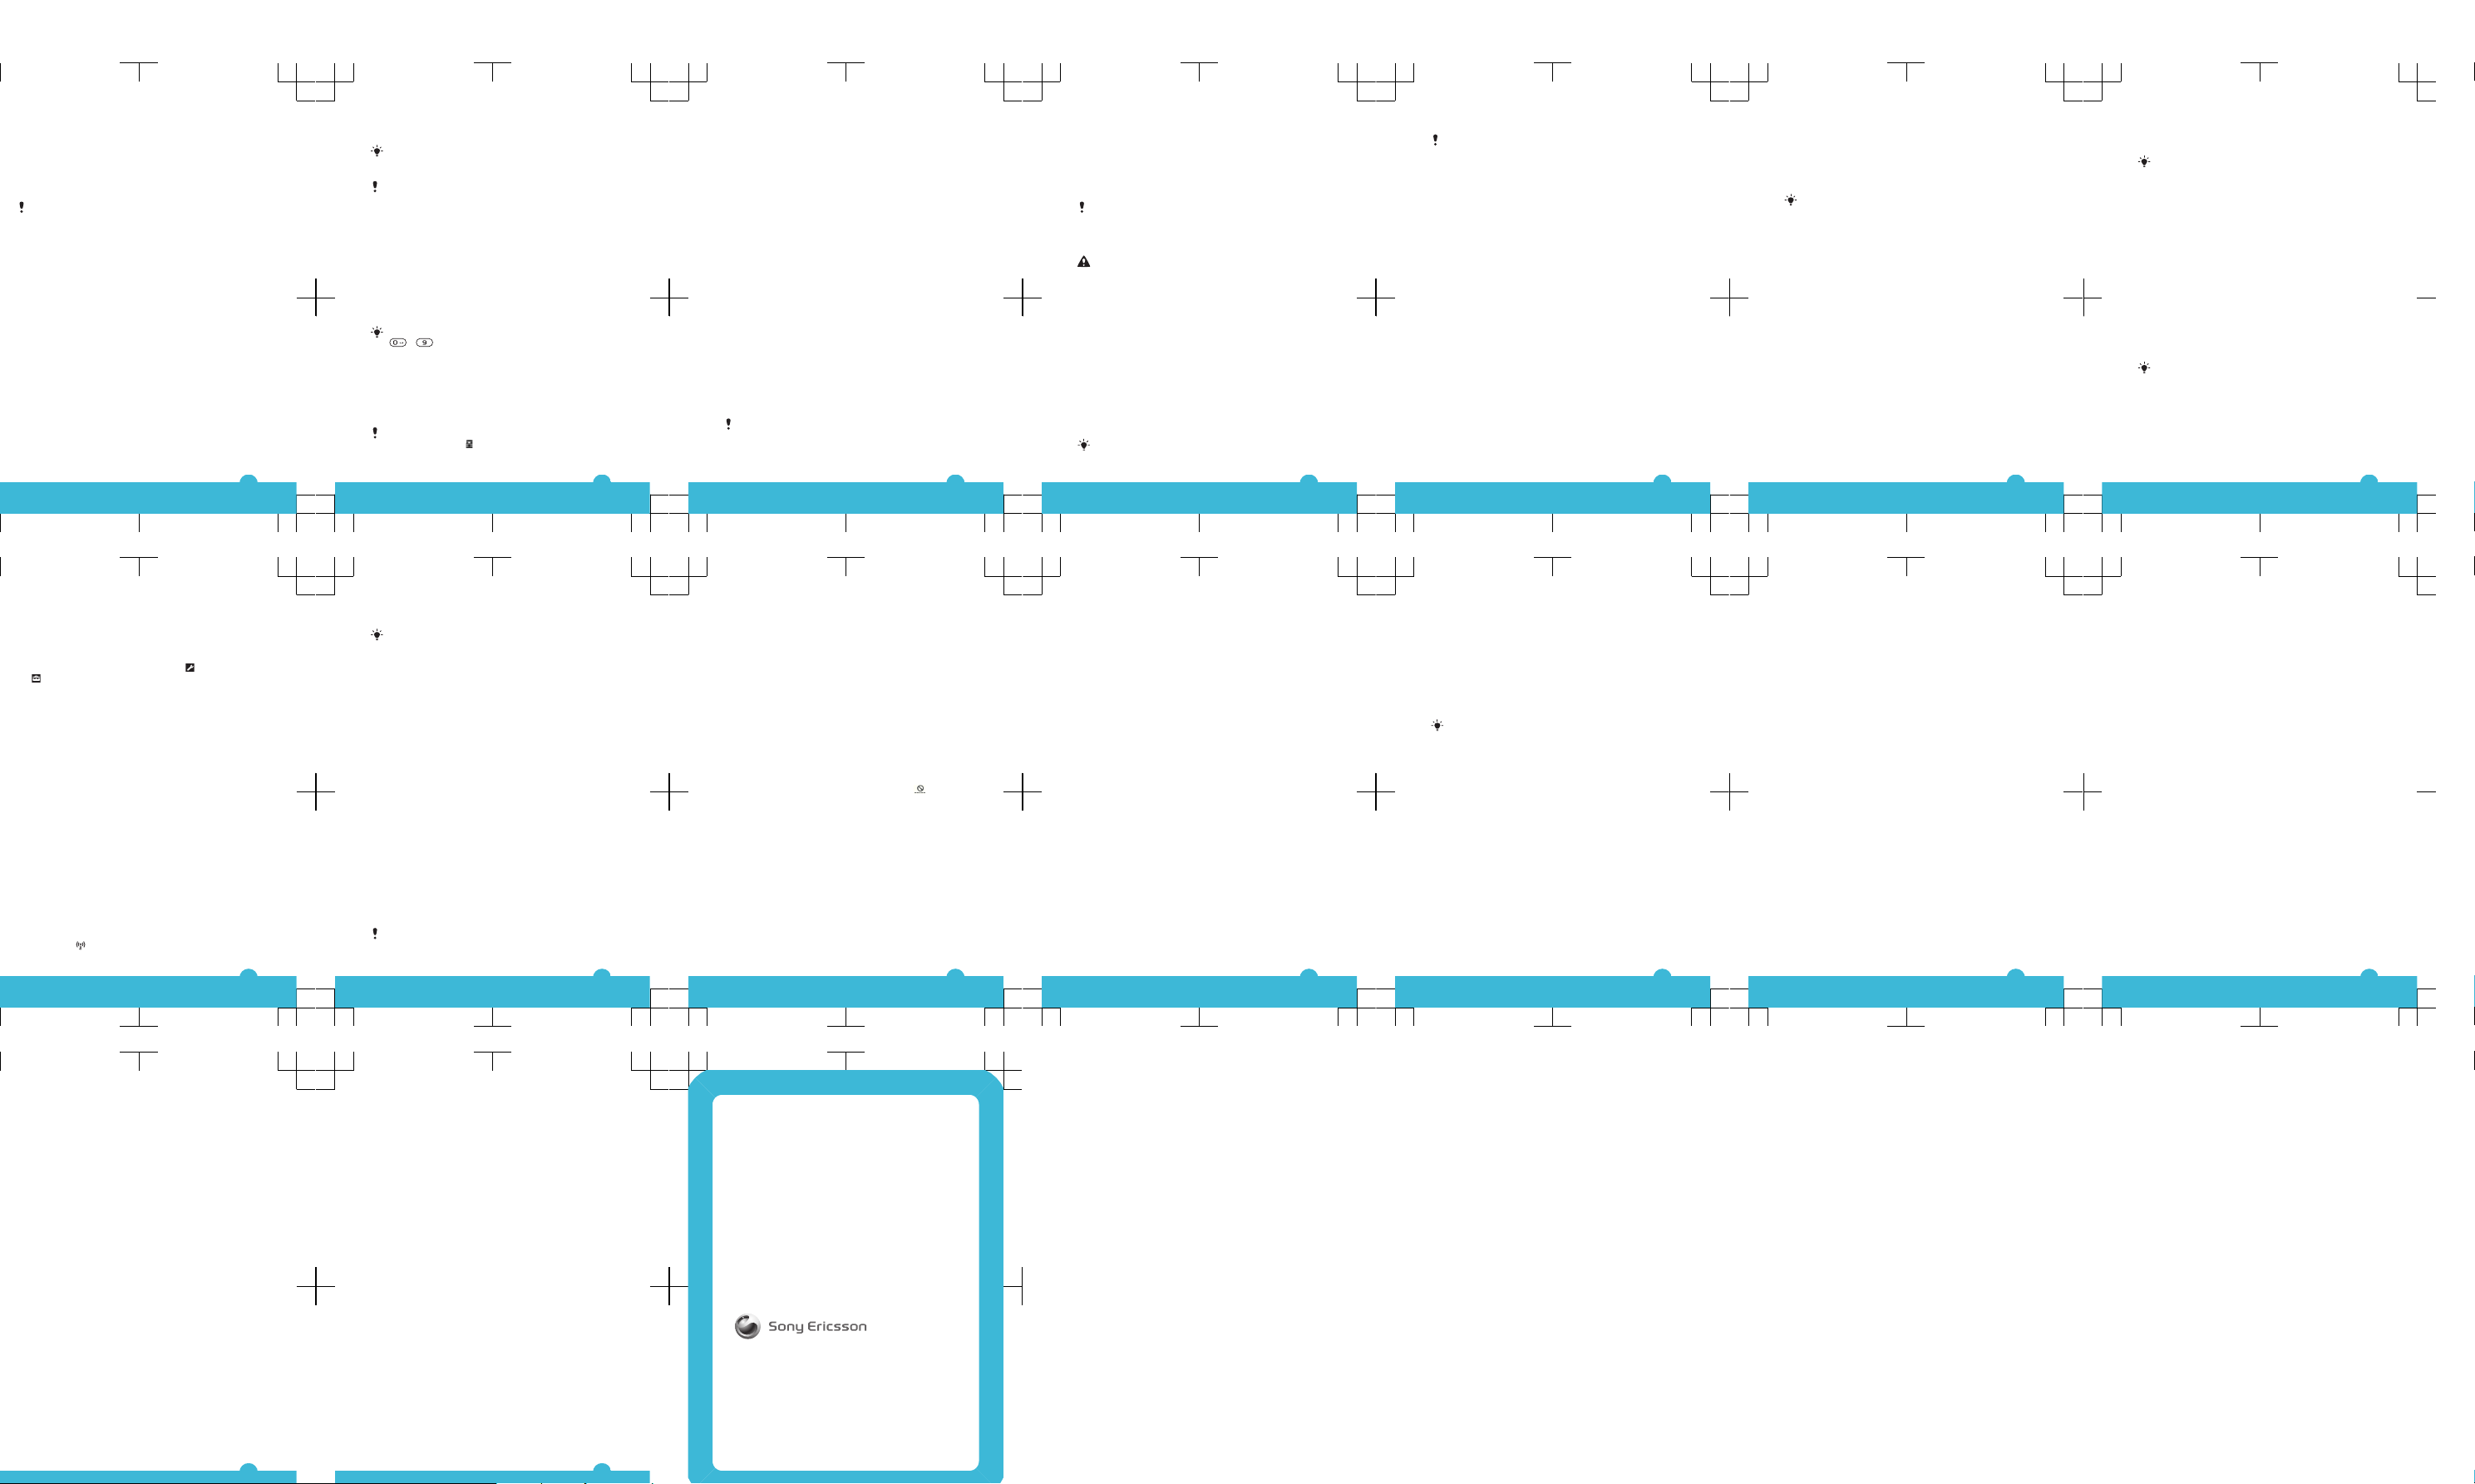
Charging the battery
The phone battery is partly charged when you buy it.
To charge the battery
1
Connect the charger to the phone.
2
Remove the charger by tilting the plug upwards.
Maximising battery performance
•
Charge your phone often. The battery lasts longer if you
charge it frequently.
•
If you are in an area with no coverage, your phone
repeatedly scans for available networks. This consumes
power. If you cannot move to an area with better
coverage, turn off your phone temporarily.
8
•
Turn off 3G, Bluetooth™ wireless technology, any active
Wi-Fi™ connection, and GPS when you do not need
these functions.
•
Do not cover the phone antenna when you are engaged
in a call.
Go to
www.sonyericsson.com/support
to learn more
about how to maximise the battery performance.
Navigation
To access the main menu
•
When Menu appears on the screen, press the centre
selection key to select Menu.
•
If Menu does not appear on the screen, press
, and
then press the centre selection key to select Menu.
To navigate the phone menus
•
Press the navigation key upwards, downwards, left or
right to move through the menus.
To end a function
•
Press
.
9
To return to standby
•
Press .
To delete items
•
Press to delete items such as numbers, letters,
pictures and sounds.
Shortcuts
You can use the navigation key shortcuts to go directly to
functions from standby.
To use navigation key shortcuts
•
Press the navigation key upwards, downwards, left or
right to go directly to a function.
To edit a navigation key shortcut
1
Select Menu > Settings > General > Shortcuts.
2
Scroll to an option and select Edit.
3
Scroll to a menu option and select Shortc..
Activity menu
The activity menu gives you quick access to:
•
New events – missed calls and new messages.
•
Running apps – applications that are running in the
background.
•
My shortcuts – add your favourite functions to access
them quickly.
•
Internet – connect conveniently to the Internet.
To open the activity menu
•
Press
.
10
Memory card
You may have to purchase a memory card separately.
Your phone supports a microSD™ memory card, adding
more storage space to your phone. This type of card can
also be used as a portable memory card with other
compatible devices.
You can move content between a memory card and the
phone memory.
To insert a memory card
•
Remove the battery cover and insert the memory card
with the gold-coloured contacts facing down.
11
To remove a memory card
•
Remove the battery cover and slide the memory card to
remove it.
Entering text
You can use multitap text input or Quick text input to
enter text. The Quick text input method uses a dictionary
application in your phone.
To change the writing language
•
When you enter text, press and hold down
.
To change the text input method
•
When you enter text, press and hold down .
To shift between upper- and lower-case letters or numbers
•
When you enter text, press
.
To enter numbers
1
When you enter text, press repeatedly until
appears at the top of the screen.
12
2
To enter a number, press .
To enter a number from text input mode, you can
press and hold down – .
To enter punctuation marks and symbols
1
When you enter text, press briefly.
2
Scroll to a symbol and select Insert.
To select from the most commonly used punctuation
marks, you can also press .
To enter text using Quick text input
1
Select, for example, Menu > Messaging > Write new >
Message.
2
If is not displayed, press and hold down to
change to Quick text input.
3
Press each key only once, even if the letter you want is
not the first letter on the key. For example, to write the
word “Jane”, press
, , , . Write the
whole word before looking at the suggestions.
4
To view word suggestions, press
or press the
navigation key downwards.
5
Press to accept a suggestion and add a space.
To enter text using the multitap method
1
Select, for example, Menu > Messaging > Write new >
Message.
2
If
is displayed, press and hold down to change
to multitap text input.
3
Press – repeatedly until the desired letter
appears.
4
Press
to add a space.
13
To add words to the phone dictionary
1
When you enter text using Quick text input, select
Options > Spell word.
2
Write the word using multitap input and select Save.
Calling
You need to turn on your phone and be within range of a
network.
Making and answering calls
To make a call
1
Enter a phone number (with international country code
and area code, if applicable).
2
Press
.
You can call numbers from your contacts and call list.
To end a call
•
Press .
To make international calls
1
Press and hold down until a “+” sign appears.
2
Enter the country code, area code (without the first zero)
and phone number.
3
Press
.
To answer a call
•
Press
.
To reject a call
•
Press .
14
To change the ear speaker volume during a call
•
Press the volume keys up or down.
To mute the microphone during a call
1
Press and hold down . appears.
2
Press and hold down again to resume.
To turn on the loudspeaker during a call
•
Select Spkr on. appears.
Do not hold the phone to your ear when using the
loudspeaker. This could damage your hearing.
Background music
You can add background music to an ongoing call. When
activated, background music can be heard by all
participants. When the microphone is muted, the
background music continues to play.
To start playing background music during a call
•
During the call, select Music.
See To play music on page 21.
To stop playing background music during a call
•
Press the centre selection key.
To change the background music volume during a call
•
Press the volume key up or down.
Only the music volume can be changed when the
music is playing.
Call sound quality
The Noise shield filters out sound around you that can make
it difficult for the other party to hear your voice, while the
Clear Voice function helps you hear better in a crowded
15
environment. You can enable or disable these functions
during a call.
To turn off the Noise shield
•
During a call, select Options > Noise shield off. The
status icon on the screen changes to .
To turn on Clear Voice
•
During a call, select Options > Clear Voice on.
Emergency calls
Your phone supports international emergency numbers, for
example, 112 or 911. You can normally use these numbers
to make emergency calls in any country, with or without the
SIM card inserted, if you are within range of a network.
In some countries, other emergency numbers may also
be promoted. Your network operator may therefore
have saved additional local emergency numbers on the
SIM card.
To make an emergency call
•
Enter 112 (the international emergency number) and
press .
To view your local emergency numbers
1
Select Menu > Contacts.
2
Scroll to New contact and select Options > Special
numbers > Emergency numbers.
Call list
You can view information about answered
, dialled
and missed or rejected calls.
To call a number from the call list
1
Press
and scroll to a tab.
16
2
Scroll to a name or a number and press .
Contacts
You can save names, phone numbers and personal
information in Contacts. Information can be saved in the
phone memory or on the SIM card.
You can synchronise your contacts using the
Sony Ericsson PC Suite.
To add a phone contact
1
Select Menu > Contacts.
2
Scroll to New contact and select Add.
3
Enter the name and select OK.
4
Scroll to New number: and select Add.
5
Enter the number and select OK.
6
Select a number option.
7
Scroll between the tabs and add information to the fields.
8
Select Save.
Calling contacts
To make a call using Smart search
1
Press
– to enter a sequence of (at least two)
digits. All entries that match the sequence of digits, or
corresponding letters, are shown in a list.
2
Scroll to a contact or a phone number and press
.
To turn on or off Smart search
1
Select Menu > Settings > Calls > Smart search.
2
Select an option.
17
Imaging
You can take photos and record videos to view, save or
send. You can find saved photos and videos in Media and
in File manager.
Viewfinder and camera keys
12 3 4 5
1 Zoom in or out
2 Indicates photo mode
3 View photos and video clips
4 Indicates video mode
5 Activate the camera/Take photos/Record video
clips
To activate the camera
•
Press
.
18
Using the still camera
To take a photo
1
Activate the camera and press the navigation key to scroll
to .
2
Press
halfway down to use auto focus.
3
When the dot and focus frame are green, press fully
down to take a photo. The photo is automatically saved.
4
To take another photo, press to return to the
viewfinder.
To use zoom
•
Press the volume key.
To adjust brightness
•
Press the navigation key left to decrease the brightness.
Press the navigation key right to increase the brightness.
The level of brightness appears beside the
.
Using the video camera
To record a video
1
Activate the camera and press the navigation key to scroll
to
.
2
Press fully down to start recording.
3
To stop recording, press fully down. The video is
saved automatically.
4
To return to the viewfinder and to record another video,
press
.
Working with photos
You can view, enhance and organise photos and videos on
your computer by installing the Adobe™ Photoshop™
19
Album Starter Edition application. It is available for
download at www.sonyericsson.com/support.
Use theMedia Go™ application to transfer content to and
from your phone.
Using photos
You can add a photo to a contact, use the photo during
phone startup, as a wallpaper in standby, or as a screen
saver.
To use photos
1
Select Menu > Media > Photo > Camera album.
2
Select a month.
3
Scroll to a photo and select View.
4
Select Options > Use as.
5
Select an option.
Accessing videos in your phone
You can browse and play videos using the video player from
Media and File manager. You can find videos you
recorded using the camera under Camera album. You can
access other videos from Videos.
To play videos
1
Select Menu > Media > Video > Videos or Camera
album.
2
Scroll to a title and select Play.
Music
You can listen to music, audio books and podcasts. Use
the Media Go™ application to transfer content to and from
20
your phone. For more information, see Transferring content
to and from a computer on page 27.
Stereo portable handsfree
Music player
To play music
1
Select Menu > Media > Music.
2
Browse by category using the navigation key.
3
Scroll to a title and select Play.
Within a category, you can press – to go to
entries beginning with a specific letter.
To stop playing music
•
Press the centre selection key.
To fast forward and rewind
•
Press and hold down the navigation key right or left.
To move between tracks
•
Press the navigation key right or left.
To change the volume
•
Press the volume keys up or down.
21
PlayNow™ application
When you open the PlayNow™ application, you enter
PlayNow™, where you can download music, games,
ringtones, themes and wallpapers. You can preview or listen
to content before you purchase and download it to your
phone. If you cannot use the PlayNow™ application, see I
cannot use Internet-based services on page 33.
This service is not available in all countries.
For extended functionality, you can also access the
PlayNow™ web shop on a computer from
www.sonyericsson.com/playnow. For more information, go
to www.sonyericsson.com/support to read the
PlayNow™ Feature guide.
To use the PlayNow™ application
1
Select Menu > PlayNow™.
2
Scroll through PlayNow™ and follow the instructions to
preview and purchase content.
TrackID™ application
TrackID™ technology is a music recognition service. You
can search for the title, artist and album name of a track you
hear playing through a loudspeaker or on the radio in your
phone. If you cannot use the TrackID™ application, see I
cannot use Internet-based services on page 33.
To search for track information
•
When you hear a track playing through a loudspeaker,
select Menu > Entertainment > TrackID™ > Start.
22
•
When you hear a track playing on your phone radio, select
Options > TrackID™ > TrackID™.
For best results, use TrackID™ in a quiet area.
Radio
Do not use your phone as a radio in places where this
is prohibited.
To turn on the radio
1
Connect a handsfree to the phone.
2
Select Menu > Entertainment > Radio.
Saving channels
You can save up to 20 preset channels.
To save channels automatically
•
Select Options > Channels > Auto save.
To switch between saved channels
•
Press the navigation key upwards or downwards.
You can also select a saved channel by pressing
- .
Transferring and handling
content
You can transfer and handle content such as pictures and
music.
You are not allowed to exchange some copyrightprotected material.
identifies a protected item.
23
Handling content in the phone
You can use File manager in your phone, to handle content
saved in the phone memory or on a memory card. Tabs and
icons in File manager show where the content is saved. If
the memory is full, delete some content to create space.
To select more than one item in a folder
1
Select Menu > Organiser > File manager.
2
Scroll to a folder and select Open.
3
Select Options > Mark > Mark several.
4
For each item you want to mark, scroll to the item and
select Mark.
To move items between the phone memory and the
memory card
1
Select Menu > Organiser > File manager.
2
Find an item and select Options > Manage file >
Move.
3
Select Memory card or Phone.
4
Scroll to a folder and select Open.
5
Select Paste.
Sending content to another phone
You can send content using different transfer methods, for
example, Messages or Bluetooth wireless technology.
To send content
1
Scroll to an item and select Options > Send.
2
Select a transfer method.
Make sure the receiving device supports the transfer
method you select.
24
Using a USB cable
You can connect your phone to a computer using a USB
cable, wait until the computer recognizes your phone. If you
are using a computer running a Microsoft® Windows
®
operating system and you have not already installed the
necessary USB software, you are asked to install PC
Companion.
You may have to purchase a USB cable separately.
Only use a USB cable supported by your phone. Check
that Autoplay functionality is enabled on your PC.
To disconnect the USB cable safely
Do not disconnect the USB cable when transferring
content as this may corrupt the content.
1
Computer: Right-click the Safely Remove Hardware icon
in the Microsoft® Windows® Explorer application.
2
Select the drives you want to disconnect. Select Stop.
3
Wait until you are notified that it is safe to remove the
drive. Disconnect the USB cable.
PC Companion
PC Companion lets you:
•
Explore content in your phone.
•
Use your phone as a modem.
•
Install PC software used to synchronise, transfer and
back up phone content.
For more information, including Feature guides, go to
www.sonyericsson.com/support.
To download Mac® compatible software, go to
www.sonyericsson.com/support.
25
To install PC Companion
If the necessary USB software has not been installed
on your PC, you need to install PC Companion. Also,
Autoplay functionality needs to be enabled on your PC.
1
Using a USB cable supported by your phone, connect
the phone to a computer that runs a Microsoft®
Windows® operating system.
2
Computer: Follow the on-screen instructions.
Dragging and dropping content
You can drag and drop content between your phone, a
memory card and a computer using the Microsoft
®
Windows® Explorer application.
To drag and drop content
1
Connect your phone to a computer using a USB cable
supported by the phone.
2
Computer: Wait until the phone memory and memory
card appear as external disks in the Microsoft®
Windows® Explorer application.
3
Drag and drop selected files between the phone and the
computer.
Required operating systems
You need one of these operating systems to use Sony
Ericsson PC software:
•
Microsoft® Windows® 7
•
Microsoft® Windows Vista™
•
Microsoft® Windows® XP, Service Pack 2 or higher
26
Transferring content to and from a
computer
You can use the Media Go™ application to transfer media
content between your phone and a computer. The Media
Go™ application is available for download through PC
Companion or from www.sonyericsson.com/support.
Mac® compatible software is also available for
download at www.sonyericsson.com/support.
To transfer content using Media Go™
1
Connect your phone to a computer using a USB cable
supported by your phone.
2
Computer: When the Portable Device dialog box
appears, select Transfer to or from Device using Media
Go and click OK. The Media Go™ application opens.
3
Computer: Wait until your device appears in the
Library navigation pane on the left of the Media Go™
window. You can now select and transfer files between
the phone and computer.
4
Move files between your phone and the computer using
the Media Go™ application.
Backing up and restoring
You can back up and restore your contacts, calendar,
tasks, notes and bookmarks using the Sony Ericsson PC
Suite, which is available through PC Companion or from
www.sonyericsson.com/support
27
You can also back up and restore contacts in your phone
by moving content between the memory card and the
phone memory. .
Back up your phone content regularly to make sure
you do not lose it.
To make a backup using the Sony Ericsson PC Suite
1
Computer: Start the Sony Ericsson PC Suite from Start/
Programs/Sony Ericsson/Sony Ericsson PC Suite.
2
Follow the instructions in the Sony Ericsson PC Suite on
how to connect.
3
Go to the backup and restore section in the
Sony Ericsson PC Suite and make a backup of your
phone content.
Updating your phone
You can update your phone to the most recent software for
optimal performance and to get the latest enhancements.
You need a USB cable and an Internet-connected PC.
To learn how, go to
www.sonyericsson.com/update
.
Remember to back up your phone content before
updating. See Backing up and restoring on page 27.
Internet
If you cannot use the Internet, see I cannot use Internetbased services on page 33.
To start browsing
1
select Menu > Internet.
28
2
Enter a web address, a search phrase or the name of a
bookmark.
3
Scroll to an item in the list and select Go to or Search.
To exit the browser
1
When you are browsing the web, select and then select
.
2
Select Exit browser.
Wi-Fi™
Using a Wi-Fi™ connection, you can access the Internet
wirelessly with your phone. You can browse the Internet
using personal (home) networks and hot spots (public
access zones).
Personal networks are usually protected by a pass phrase
or key. Hot spots are usually not protected, but often require
you to log on to an operator's service before you get Internet
access.
Using Wi-Fi™
To be able to browse the Internet using Wi-Fi you need to
search for and connect to an available network and then
open the Internet browser.
To turn on Wi-Fi™
•
Select Menu > Settings > Connectivity > Wi-Fi > Turn
on.
To connect to a network
1
Select Menu > Settings > Connectivity > Wi-Fi.
2
Scroll to a network and select Connect.
To start browsing using Wi-Fi™
1
Make sure
is showing in the status bar.
29
2
Select Menu > Internet.
Often used networks can be saved as favourites. If
you turn on Auto connect for one of these networks,
your phone will connect automatically to that network
when it is within range.
PIN codes
SIM protection
This lock only protects your subscription. Your phone will
work with a new SIM card. If the lock is on, you have to enter
a PIN (Personal Identity Number).
If you enter your PIN incorrectly three times in a row, the SIM
card is blocked and you need to enter your PUK (Personal
Unblocking Key). Your PIN and PUK are supplied by your
network operator.
To unblock the SIM card
1
When PIN blocked appears, enter your PUK and select
OK.
2
Enter a new four-to-eight-digit PIN and select OK.
3
Re-enter the new PIN and select OK.
To edit the PIN
1
Select Menu > Settings > General > PIN codes > SIM
protection > Change PIN.
2
Enter your PIN and select OK.
3
Enter a new four-to-eight-digit PIN and select OK.
4
Re-enter the new PIN and select OK.
If Codes do not match appears, you entered the new
PIN incorrectly. If Incorrect PIN appears, you entered
the old PIN incorrectly.
30
Flight mode
In Flight mode the network and radio transceivers are
turned off to prevent disturbance to sensitive equipment.
When the flight mode menu is activated you are asked to
select a mode the next time you turn on your phone:
•
Normal mode – full functionality
•
Flight mode – limited functionality
To activate the flight mode menu
•
Select Menu > Settings > General > Flight mode >
Continue > Show at startup.
To select flight mode
1
When the flight mode menu is activated, turn off your
phone.
2
Turn on your phone and select Flight mode.
appears.
Troubleshooting
Some problems can be fixed using Update Service. Using
Update Service on a regular basis will optimise the phone’s
performance. See Updating your phone on page 28.
Some problems will require you to call your network
operator.
For more support go to www.sonyericsson.com/support.
31
Common questions
I have problems with memory capacity or the phone
is working slowly
Restart your phone every day to free memory or do a
Master reset.
Master reset
If you select Reset settings, the changes that you have
made to settings will be deleted.
If you select Reset all, your settings and content, such as
contacts, messages, pictures, sounds and downloaded
games, will be deleted. You may also lose content that was
in the phone at purchase.
To reset the phone
1
Select Menu > Settings > General > Master reset.
2
Select an option.
3
Follow the instructions that appear.
I cannot charge the phone or battery capacity is low
The charger is not properly connected or the battery
connection is poor. Remove the battery and clean the
connectors.
The battery is worn out and needs to be replaced. See
Charging the battery on page 8.
No battery icon appears when I start charging the
phone
It may take a few minutes before the battery icon appears
on the screen.
Some menu options appear in grey
A service is not activated. Contact your network operator.
32
I cannot use Internet-based services
Your subscription does not include data capability. Settings
are missing or incorrect.
You can download settings using the Settings download
or from www.sonyericsson.com/support.
To download settings
1
Select Menu > Settings > User help > Settings
download.
2
Follow the instructions that appear.
This feature might not be available in all markets.
Contact your network operator or service provider for
more information.
I cannot send messages from my phone
To send messages, you need to set a service centre
number. The number is supplied by your service provider
and is usually saved on the SIM card. If the number of your
service centre is not saved on your SIM card, you must enter
the number yourself.
To send most picture messages, you must set an MMS
(Multimedia Messaging Service) profile and the address of
your message server. If no MMS profile or message server
exists, you can receive all the settings automatically from
your network operator, using the Settings download, or go
to www.sonyericsson.com/support.
To enter a service centre number
1
Select Menu > Settings > Connectivity > Message
settings > Text message and scroll to Service centre.
The number is shown if it is saved on the SIM card.
2
If there is no number shown, select Edit.
3
Scroll to New service centre and select Add.
33
4
Enter the number, including the international “+” sign and
country code.
5
Select Save.
To select an MMS profile
1
Select Menu > Settings > Connectivity > Message
settings > Multim. message.
2
Select an existing profile or create a new one.
To set the message server address
1
Select Menu > Settings > Connectivity > Message
settings > Multim. message.
2
Scroll to a profile and select Options > Edit.
3
Scroll to Message server and select Edit.
4
Enter the address and select OK > Save.
I cannot synchronise or transfer content between
my phone and the computer, when using a USB
cable.
The software or the USB drivers have not been properly
installed. Go to www.sonyericsson.com/support to read
Feature guides which contain detailed installation
instructions and troubleshooting sections.
Error messages
Insert SIM
There is no SIM card in your phone or you may have inserted
it incorrectly.
See To insert the SIM card on page 5.
The SIM card connectors need cleaning. If the card is
damaged, contact your network operator.
34
Insert correct SIM card
Your phone is set to work only with certain SIM cards.
Check if you are using the correct operator SIM card.
Incorrect PIN/Incorrect PIN2
You have entered your PIN or PIN2 incorrectly.
Enter the correct PIN or PIN2 and select OK.
PIN blocked/PIN2 blocked
You have entered your PIN or PIN2 code incorrectly three
times in a row.
To unblock, see SIM protection on page 30.
No netw. coverage
•
Your phone is in flight mode. See Flight mode on
page 31.
•
Your phone is not receiving any network signal, or the
received signal is too weak. Contact your network
operator and make sure that the network has coverage
where you are.
•
The SIM card is not working properly. Insert your SIM
card in another phone. If this works, it is probably your
phone that is causing the problem. Please contact the
nearest Sony Ericsson service location.
Emergency calls only
You are within range of a network, but you are not allowed
to use it. However, in an emergency, some network
operators allow you to call the international emergency
number 112. See Emergency calls on page 16.
35
Legal information
Sony Ericsson J10i2
This User guide is published by Sony Ericsson Mobile Communications
AB or its local affiliated company, without any warranty. Improvements
and changes to this User guide necessitated by typographical errors,
inaccuracies of current information, or improvements to programs and/
or equipment, may be made by Sony Ericsson Mobile Communications
AB at any time and without notice. Such changes will, however, be
incorporated into new editions of this User guide.
All rights reserved.
©Sony Ericsson Mobile Communications AB, 2009
Publication number: 1230-3297.1
Your mobile phone has the capability to download, store and forward
additional content, e.g. ringtones. The use of such content may be
restricted or prohibited by rights of third parties, including but not limited
to restriction under applicable copyright laws. You, and not
Sony Ericsson, are entirely responsible for additional content that you
download to or forward from your mobile phone. Prior to your use of any
additional content, please verify that your intended use is properly
licensed or is otherwise authorized. Sony Ericsson does not guarantee
the accuracy, integrity or quality of any additional content or any other
third party content. Under no circumstances will Sony Ericsson be liable
in any way for your improper use of additional content or other third party
content.
Bluetooth is a trademark or a registered trademark of Bluetooth SIG Inc.
and any use of such mark by Sony Ericsson is under license.
The Liquid Identity logo, PlayNow, SensMe and TrackID are trademarks
or registered trademarks of Sony Ericsson Mobile Communications AB.
Sony and "make.believe" are trademarks or registered trademarks of
Sony Corporation.
Media Go is a trademark or registered trademark of Sony Media Software
and Services.
PlayStation is a trademark or registered trademark of Sony Computer
Entertainment, Inc.
Skype is a trademark or a registered trademark of Skype Limited.
microSD is a trademark or a registered trademark of SanDisk
Corporation.
36
Ericsson is a trademark or registered trademark of Telefonaktiebolaget
LM Ericsson.
Adobe Photoshop Album Starter Edition is a trademark or registered
trademark of Adobe Systems Incorporated in the United States and/or
other countries.
Mac is a trademark of Apple Computer, Inc., registered in the U.S. and
other countries.
Microsoft, Windows, Outlook, Windows Vista, Windows Server,
Exchange ActiveSync, and MSN are registered trademarks or
trademarks of Microsoft Corporation in the United States and/or other
countries.
This product is protected by certain intellectual property rights of
Microsoft. Use or distribution of such technology outside of this product
is prohibited without a license from Microsoft.
Other product and company names mentioned herein may be the
trademarks of their respective owners.
Any rights not expressly granted herein are reserved.
All illustrations are for illustration only and may not accurately depict the
actual phone.
37
www.sonyericsson.com
Sony Ericsson Mobile Communications AB
SE-221 88 Lund, Sweden
1230-3297.1
FCC Statement
Declaration of Conformity
Sony Ericsson J10i2
UMTS HSPA 1 8 GSM GPRS/EDGE 850/900/1800/1900

English
Radio wave exposure and Specific
Absorption Rate (SAR) information
Thi s mob ile phon e mod el J1 0i2 h as been designe d to comply with
app licab le safet y req uir ement s for expo sure to r adio wave s. Th ese
req uirem ent s are base d on scienti fic g uidel ine s tha t inc lude safety
mar gins desi gned to a ssure the safe ty of al l per sons, rega rdl ess o f
age and hea lth.
The radi o w ave e xposu re guide lines empl oy a uni t of
mea surem ent know n as the Spec ific Absor pti on Ra te, o r S AR.
Tes ts fo r SAR ar e con ducte d usi ng stand ardiz ed methods w ith t he
pho ne tr ans mitti ng at it s hig hest certi fie d pow er le vel in a ll us ed
fre quenc y b ands.
Whi le th ere may be di ffe rence s bet ween the SAR level s o f
var ious pho ne mo dels, th ey ar e all desi gne d to meet the rele vant
gui delin es for e xposu re to ra dio w aves.
For more informat ion on SAR, pleas e refer t o the safet y chapter
in the U ser ’s Gu ide.
SAR data in forma tion for resi dents in c oun tries that ha ve
ado pted the SAR limit re comme nded by th e I ntern ation al
Com missi on of Non-I oni zing Rad iatio n Protec tio n (IC NIR P), whic h
is 2 W/k g a verag ed ov er ten ( 10) g ram o f t issue (for ex ample
Eur opean Un ion, Japan , B razil and New Z eal and):
The high est SAR value fo r thi s mod el ph one when test ed by
Son y Eri css on fo r use at the ear i s 1.2 4 W /kg ( 10g).
2
FCC Statement
Thi s dev ice comp lies wit h Par t 15 of th e F CC ru les.
Ope ratio n i s sub ject to the f ollow ing t wo condi tions : ( 1)
Thi s dev ice may not c aus e har mful inter fer ence, and (2)
Thi s dev ice must acce pt any i nterf erenc e r eceiv ed, i ncl uding
int erfer enc e tha t may ca use u ndesi red o per ation .
Any chan ge or mo dific ati on no t exp ressl y a pprov ed by So ny
Eri csson ma y voi d the us er's autho rity to opera te th e e quipm ent.
Thi s equ ipm ent h as be en teste d and foun d t o com ply w ith the
lim its f or a Cla ss B dig ital devic e, pu rsu ant t o Par t 1 5 of the F CC
Rul es. Thes e l imi ts are desi gne d to provid e reason abl e protec tion
aga inst har mful inter fer ence in a resid ent ial i nstal lat ion. This
equ ipmen t gene rates , uses and can ra diate radi o f reque ncy e nergy
and , if not install ed an d u sed i n a ccord anc e wit h t he in str uctio ns,
may caus e h armfu l int erf erenc e to radio co mmuni catio ns.
How ever, ther e i s no guar antee that inte rfe rence will not occu r in a
par ticul ar insta llati on.
If this equ ipmen t doe s c ause harmf ul in ter feren ce to ra dio o r
tel evisi on recep tion, wh ich c an be dete rmi ned b y tur nin g the
equ ipmen t off and on , the use r is enco ura ged to try t o correc t the
int erfer enc e by one o r m ore o f the foll owi ng me asure s:
•
Reo rient or relo cate the rece iving ante nna .
•
Inc rease th e sep arati on betwe en th e equ ipm ent a nd re cei ver.
•
Con nect the equi pme nt in to an ou tlet on a cir cui t dif feren t f rom
tha t to whi ch th e rec eiv er is conn ected .
•
Con sult the deal er or an expe rienc ed ra dio /TV t echni cia n for
hel p.
19
Industry Canada Statement
Thi s dev ice comp lies wit h RSS -210 of In dus try C anada .
Ope ratio n i s sub ject to the f ollow ing t wo condi tions : ( 1) th is
dev ice m ay no t c ause interf ere nce, and (2 ) thi s d evice must acce pt
any inte rfe rence , inc lud ing i nterf erenc e t hat m ay ca use unde sired
ope ratio n o f the devi ce.
Thi s Cla ss B dig ital app aratu s com plies wi th Ca nadia n
ICE S-003 .
Cet appa rei l num ériqu e d e la class e B e st confo rme à la norm e
NMB -003 du Canad a.
20
Declaration of Conformity for J10i2
We, Sony Er icsso n Mob ile C omm unica tions AB of
Nya Vatt ent ornet
SE- 221 8 8 L und, Swede n
dec lare und er ou r sol e r espon sibil ity t hat our produ ct
Son y Eri css on ty pe AA D-3 88006 5-BV
and in c ombin ati on wi th ou r acc ess ories , to whic h t his d eclar ation
rel ates is in co nform ity with the appro pri ate s tanda rds EN 3 01
511 :V9.0 .2, EN 3 01 90 8-1 :V3.2 .1, E N 301 90 8-2:V 3.2.1 , E N 300
328 :V1.7 .1, EN 3 00 44 0-1 :V1.4 .1, E N 300 44 0-2:V 1.2.1 , E N 301
489 -7:V1 .3. 1, EN 301 489 -17:V 2.1.1 , EN 301 489- 24:V1 .4. 1, EN
301 489- 3:V 1.4.1 , EN 60 950-1 :2006 foll owi ng th e pro vis ions of,
Rad io Eq uip ment and T ele commu nicat ion T erm inal Equip men t
dir ectiv e 1999/5 /EC.
Lun d, Ja nua ry 20 10
Rik ko Sa kag uchi,
Exe cutiv e V ice P resid ent and Chief Crea tio n Off icer
We fulfi l t he re quire men ts of the R&TTE Di recti ve (1 999 /5/EC ).
R&TTE (1999/5/EC).
Biz R&TT E T əlima tları nın tələ bləri ni ye rin ə yet iriri k ( 1999 /5/
EC) .
Ние изп ълня ваме изис кван ията на Дире ктива та R &TTE (19 99 /5/ EC) .
Mi ispun jav amo z ahtje ve R&TTE Dire ktive (199 9/5 /EC).
Com plim els requ isits de la d irect iva R &TT E (1999 /5/ EC).
21

Výr obek spl ňuje požad avk y smě rnice R&TT E ( 1999/5/EC) .
Vi opfyl der krav ene i R& TTE-d irekt ivet (1999 /5/ EC).
Die Anfo rde runge n der Ri chtli nie f ür Fu nk- und Fernm eld egerä te
(19 99/5/ EG) werd en er füllt .
Πλη ρούμ ε τι ς απ αιτήσ εις της Οδηγ ίας R &TTE (19 99 /5/ ΕΚ) .
Cum plimo s l os re quisi tos de l a Dir ectiv a R &TTE (1999/5/EC ).
Vas tab d ire ktiiv i R&T TE Direc tive (1999 /5/EC ) nõu etele .
R&T TE (1 999/5 /EC ) art eztar auare n b aldin tzak bet etzen ditu gu.
R&TTE )1999/5/EC(
.
Täy tämme radi o- ja telepä äte laite direk tii vin (199 9/5 /EY) ase tta mat
vaa timuk set .
Ce produ it est c onfor me à la direc tive R&T TE (199 9/5 /EC).
Son y Eri css on cu mpre cos requ isito s esi xid os po la di rec tiva
R&T TE (1 999/5 /EC ).
Mun cika sh araɗi n bay ani n R&T TE (99/5/E C).
Mi ispun jav amo z ahtje ve R&TTE Dire ktive (199 9/5 /EC).
Tel jesít jük az R &TTE irá nyelv (199 9/5/E C) kö vetel mén yeit.
Kam i mem enu hi pe rsyar ata n yan g dit etapk an Petun juk R &TT E
(19 99/5/ EC) .
Við uppf yll um R& TTE t ils kipun ina (1999/ 5/EB) .
Il prodo tto sodd isfa i r equis iti d ella Dir ettiv a R&T TE (1999/5 /EC ).
ונא םידמוע לכב תושירדה תייחנהבש ה-R&TTE )1999/5/EC(.
Mes vykd ome R&TT E dir ekt yvos (1999 /5/EC ) rei kalav imu s.
Mēs izpi ldā m R&T TE di rek tīvas (199 9/5/E K) pr asība s.
Ние ги испо лнув аме б арањ ата на R &TTE Dire ctiv e (1 99 9/5 /EC ).
We vold oen a an de vere isten di e in de R&TTE-r ich tlijn (199 9/5/E G)
wor den g est eld.
Vi oppfy lle r kra vene i R &TTE- direk tivet (199 9/5 /EC).
22
Ate ndemo s a os re quisi tos da D iretr iz R& TTE (1999/ 5/E C).
Spe łniam y w ymaga nia d yre ktywy R&TT E (19 99/5/ WE).
São cump rid os os requ isi tos d a Dir ectiv a R &TTE (1999/5/EC ).
Înd eplin im cerin ţele Dir ectiv ei R& TTE ( 1999/ 5/EC) .
Изд елие удо влет воряе т тр ебов ания м Ди ректи вы R &TTE (19 99 /5/ EC) .
Výr obok spĺ ňa po žiada vky smer nice R&TTE (199 9/5 /EC).
Izp olnju jem o zah teve dir ektiv e za radij sko in t eleko mun ikaci jsko
ter minal sko opre mo (1 999/5 /ES).
Ne përmb ush im kë rkesa t e dire ktivë s R&T TE (1999/5/EC ).
Mi ispun jav amo z ahtev e d irekt ive R &TTE (1999 /5/EC ).
Re pheth isa ditl hoko tsa Tael o ya R&TTE (199 9/5 /EC).
Vi uppfy lle r kra ven i R& TTE-d irekt ivet (1999 /5/ EC).
เรา ปฏิบัติต ามขอกำห นดของขอ บังคั บ R &TTE (1999 /5/ EC )
R&T TE Ka rar names inin (1999 /5/EC ) gerekl ilikl eri ni ye rine
get irmek tey iz.
Цей Вир іб в ідпо відає вим огам Дир екти ви R& TTE (199 9/ 5/E C).
Chú ng tôi đ áp ứng các y êu cầ u c ủa Chỉ thị R&T TE (1999 /5 /EC ).
A t i mu awọ n ibe ere I lan a ti R&TTE ṣẹ ( 99/5/ EC).
我們符 合 R&TTE 規程中的要 求 (1999/ 5/EC) 。
本公司 符合 R&TTE Dire cti ve (1999/5 /EC) 中的規 定。
我们符 合 R&TTE 指令 (1 999/5 /EC ) 的要求 。
Siy azife za izidi ngo z eMi yalel o ye- R&TTE (199 9/5 /EC).
23
 Loading...