

Sony A3880059 User Manual
Vivaz
™
User guide
Please read the Important information before you use your
mobile phone.
Experience more. Discover how.
Fill it with pop and let it rock. Share your life in pictures. Or
why not go online for the latest updates? Your new phone is
the key to a wider world. And it’s just around the corner.
Get started with this User guide. And join us online to get the
full picture. Music, games, apps, updates, downloads,
support and more.
All in one place: www.sonyericsson.com/Vivaz
Don’t forget to update your phone software. See
Updating your phone on page 8.
2
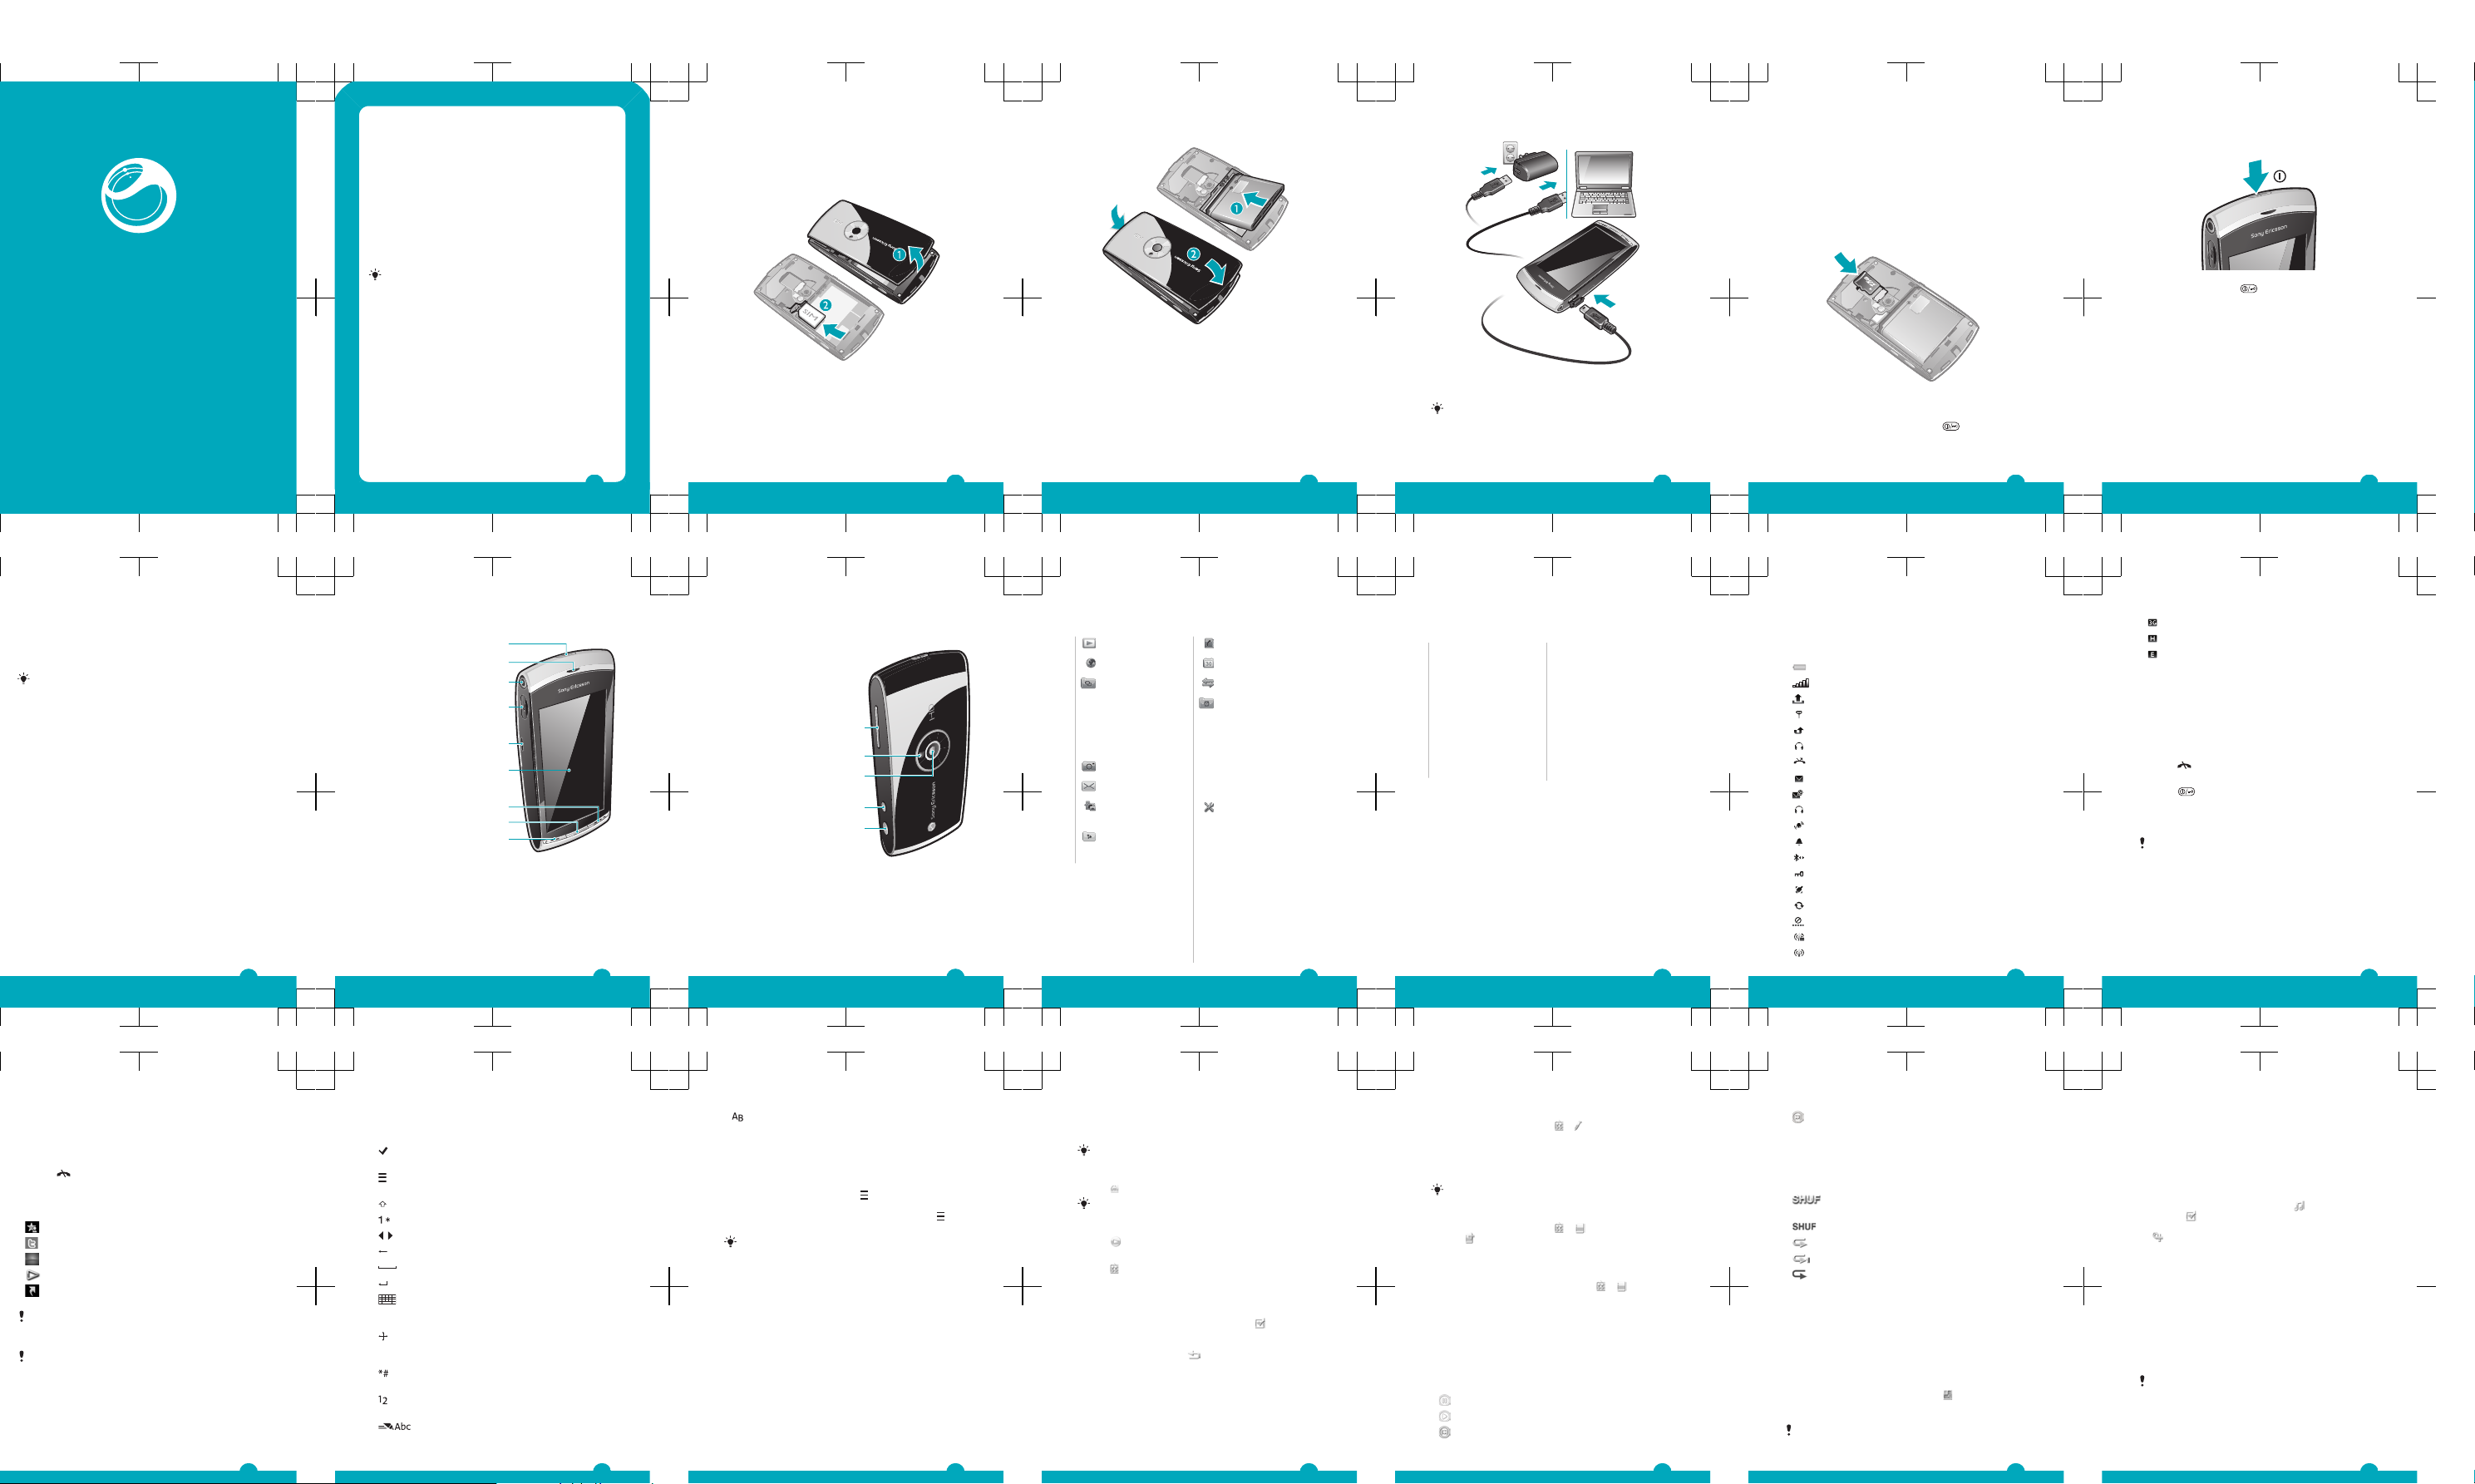
Getting started
Assembly
Before you start using your phone, you need to insert a SIM
(Subscriber Identity Module) card and the battery.
To insert the SIM card
1
Remove the battery cover.
2
Put the SIM card into its holder with the gold-coloured
contacts facing down.
3
To insert the battery
1
Insert the battery with the label side up and the
connectors facing each other.
2
Put the battery cover into place.
4
To charge the phone using the power adapter
•
Connect the phone to a power outlet using the USB cable
provided and the power adapter.
You can use your phone while it is charging. You can
charge the battery at any time and for more or less
than 3 hours using the power adapter. You can
interrupt the charging without damaging the battery.
5
To charge the phone using a computer
•
Connect the phone to a USB port on a computer using
the USB cable provided.
Memory card
Your phone supports memory cards, adding more storage
space to your phone. A memory card used in your phone
can also be used with other compatible devices.
You can move content between your memory card and the
phone memory.
To insert or remove a memory card
1
Insert the memory card with the gold-coloured contacts
facing down.
2
To remove the memory card, press
and select
Remove memory card, then press your finger down on
the card and slide it out.
6
Turning on the phone
To turn on the phone
1
Press and hold down .
2
Enter your SIM card PIN, if requested, and select OK.
3
The first time you turn on the phone, follow the
instructions to use the setup wizard for basic settings and
useful tips.
Help
You can find Help on most applications in Organiser or you
can access Help from within a specific application by
selecting Options.
To access the general Help in your phone
•
Select Menu > Organiser > Help.
To view Help when you are in an application
•
Select Options > Help.
7
Updating your phone
You can update your phone to the most recent software for
optimal performance and to get the latest enhancements.
You need a USB cable and an Internet-connected PC.
To learn how, go to
www.sonyericsson.com/update
.
Remember to back up your phone content before
updating. To see how to back up your phone content,
see the Extended User guide on the memory card.
You can also access this document at
www.sonyericsson.com/support
.
8
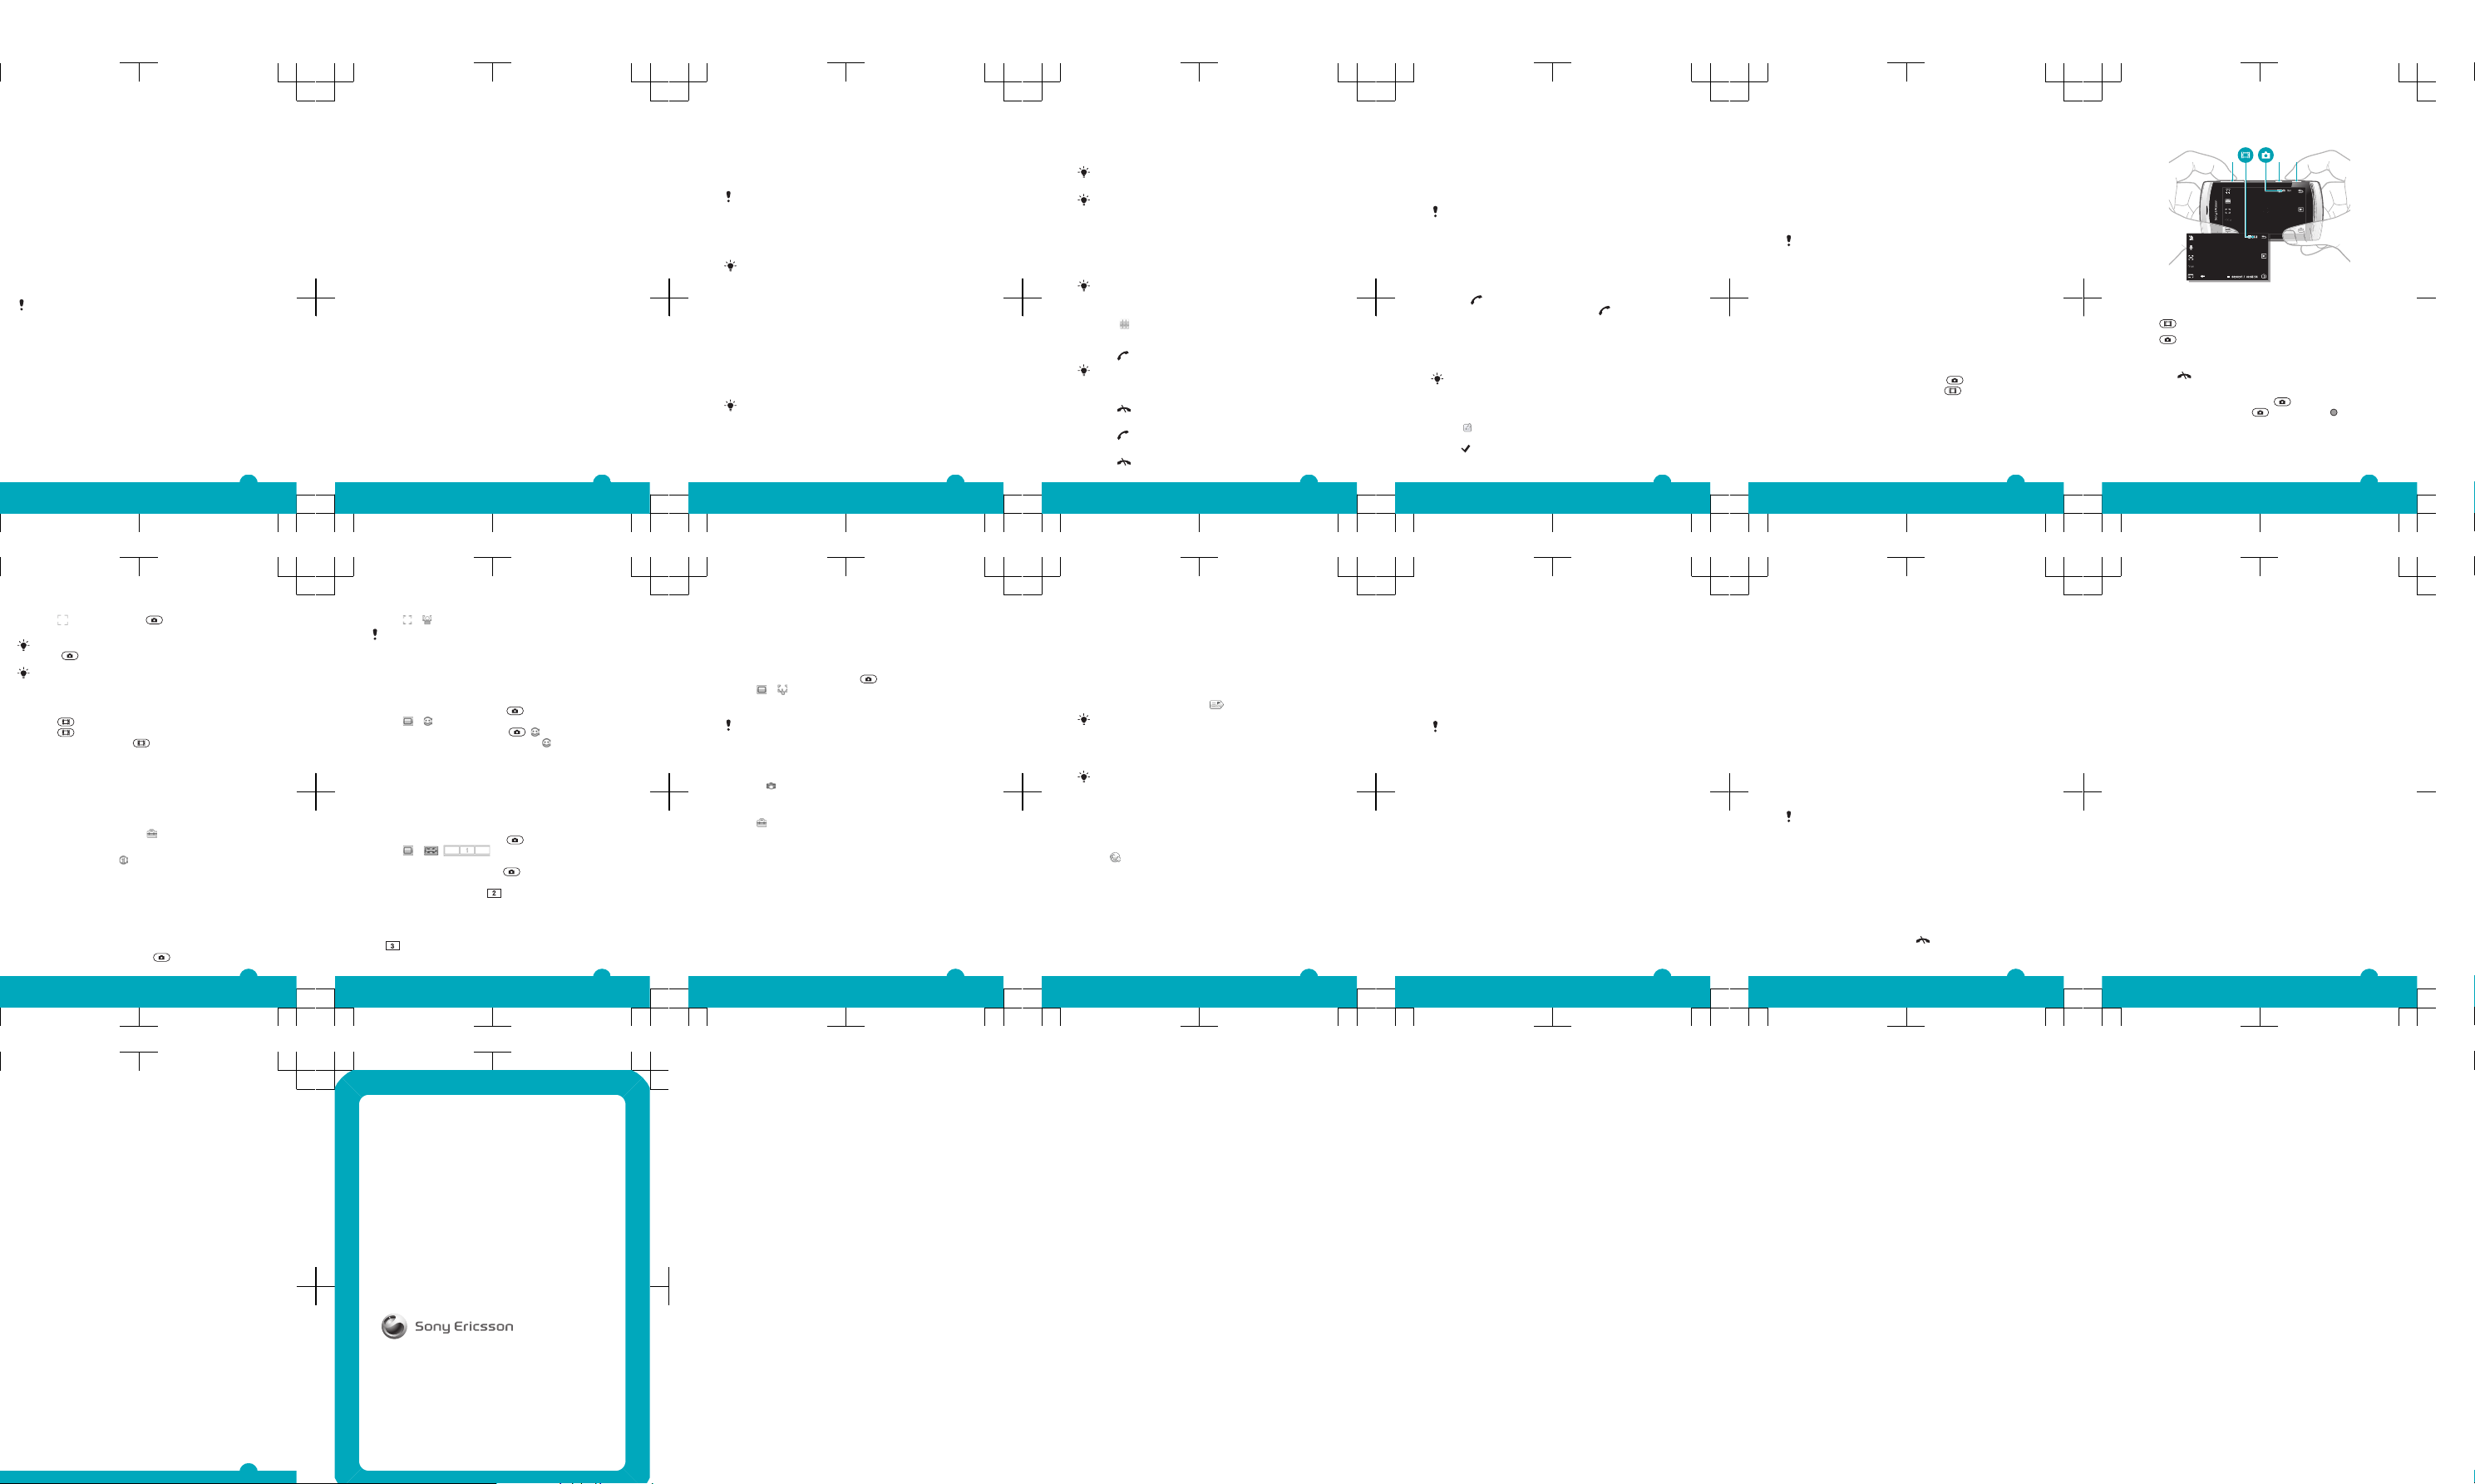
Phone overview
3
4
5
6
1
2
9
7
8
1 On/off key, lock key
2 Ear speaker
3 3.5 mm headset connector
4 Connector for USB cable
5 Loud speaker
6 Touch screen
7 End key
8 Main menu key
9 Call key
9
10 Volume, digital zoom keys
10
11
12
13
14
11 Camera light
12 Camera
13 Video key
14 Photo key
10
Menu overview*
PlayNow™
Internet
Applications
Radio, TrackID™,
Media server, Downl.
chat apps, IM,
Conversations, Web
publishing, Record
sound
Camera
Messaging
Media
Photo, Music, Video
Location services
Google Maps,
Location, Wisepilot
Contacts
Calendar
Log**
Organiser
File manager, Clock,
RoadSync,
SonyEricsson Sync,
Google, Search,
Notes, Dictionary,
Converter, Calculator,
Adobe PDF,
Quickoffice, Help
Settings
Personal
Profiles, Themes,
Standby
Phone
Date and time,
Language, Display,
Download settings,
Sensor settings,
Touch input,
Accessories,
Application sett.,
Phone mgmt.
Application mgr
11
Installed apps.,
Installation files, Install
settings
Calling
Call, Speed dialling,
Voicemail, Divert calls,
Call barring
Connectivity
Network, Wi-Fi,
Bluetooth, USB,
Destinations,
Connection mgr, Data
transfer, Remote
drives, Admin.
settings
* Some menus are
operator-, network- and
subscription-dependent.
** You can use touch
functionality to scroll
between tabs in
submenus. For more
information, see
Navigation on page 14.
12
Status icons
Status icons appear at the top of the screen. You can tap
status icons to view more information or change settings.
Battery fully charged
Network signal strength
Messages in the outbox
GSM available
Missed call
Handsfree connected
Call diverted
Text message received
New email received
Headphone inserted
GPS connected
Alarm activated
Bluetooth™ connected
Keylock activated
USB data transferring
Data synchronising
Flight mode activated
Secure Wi-Fi™ network connected
Wi-Fi™ network connected
13
3G available
HSDPA available
EGPRS available
Navigation
You can move through menus with your fingertips or with a
stylus. Tap or double-tap an item to select or open it. You
can also switch between running applications.
To access the main menu
•
Press the main menu key.
To unlock the phone manually
•
Press
and select Unlock.
To lock the phone manually
•
Press
twice.
To view running applications
1
Press and hold down the main menu key.
2
To switch to a running application, tap it.
Leaving applications running in the background
increases the demand on battery power and reduces
the battery life.
To end a function
•
In most cases, select Options > Exit.
To delete items
•
In most applications, to delete items such as files, folders,
messages, or media files, select an item, and then select
Options > Delete.
14
Standby
After you have turned on your phone and entered your PIN,
the name of the network operator appears. This view is
called standby. Your phone is now ready to use.
To return to standby
•
Press
.
Default standby screen
The default standby screen provides five different views:
Favourite contacts view
Social networking view
Flow view
Album view
Shortcuts view
The icon for some views, for example, the Album view,
may change according to the content displayed on the
standby screen.
These five views are only available when Sony
Ericsson is selected as the default standby theme.
Entering text
You can enter letters, numbers and special characters using
the on-screen keyboard, alphanumeric keypad or
handwriting recognition. You can switch between these
input methods.
15
Text input icons
These icons may appear in the text input window.
Tap to accept the text in the input window and
close the on-screen keyboard view
Tap to open the input options menu to change,
for example, the Writing language, or view Help
Tap to switch character cases
Tap to display numbers and symbols
, Tap to move the cursor left or right
Tap to delete a character
Tap to enter a space
Tap to insert a carriage return
Tap to change to another input method: Mini
QWERTY keyboard, Full QWERTY keyboard,
Alphanumeric keypad or Handwriting
When using Mini QWERTY keyboard, touch
and hold to move the input window around the
screen
When using handwriting recognition, tap to open
the symbol table
When using handwriting recognition, tap to
switch to number input mode
Tap to turn predictive text input modes on or off,
change the character case, and switch between
letter and number modes
16
When using handwriting recognition, tap to
switch character case
To copy and paste text
1
Tap to place the cursor at the beginning of the text you
want to select for copying. Then drag your fingertip or
stylus to the end of the text.
2
To copy the selected text, tap and select Copy.
3
To paste the text within the same text field, move the
cursor to where you want the text be inserted, tap
and
select Paste.
To paste the text to another text field, go to that text
field, move the cursor to where you want to insert the
text and select Options > Paste.
Media
You can manage media files in your phone or on your
memory card. You can also manage photos and video clips
in albums on the web.
Viewbar and touchbar
You can use the viewbar and touchbar to navigate through
different views and manage your media files.
•
Viewbar – a bar that appears at the top of the screen (in
portrait view) after you select an application in Media.
Using this bar, you can navigate to play view, to various
list views within the same application, or to the main
Media menu.
17
•
Touchbar – a bar at the bottom of the screen where you
can manage your media files or go back to the previous
level.
To get tips for an icon in the bars, touch and hold the
icon.
To update media libraries manually
•
Tap in the touchbar.
Your media libraries update automatically when you
use Media for the first time.
To go to the play view
•
Tap at the top of the screen.
To view more commands in the touchbar
•
Tap in the touchbar.
Mark mode
You can mark several files and manage them in batches.
To mark media files
1
When the files are in list or grid view, tap
in the
touchbar.
2
Tap the files to highlight them as marked.
3
To exit mark mode, tap
.
Photo
You can view, send and manage photos in your phone. You
can also edit and arrange your online photo albums.
To view a photo in full screen
1
Select Menu > Media > Photo.
2
Select a view option and tap a thumbnail to view the
photo.
3
To view the next or previous photo, flick left or right.
18
To edit a photo
1
When viewing a photo, tap > .
2
Select Options and select an item.
Photo tags
You can manage your photos easily by creating tags for
them.
Only photos with EXIF (Exchangeable Image File
Format) info can be tagged.
To create a tag
1
When viewing a photo, tap > .
2
Tap
, enter a new name and select OK.
3
Select a tag icon.
4
Select the created tag to add it to your photo.
To tag a photo
1
When in play view or mark mode, tap
> .
2
Select a tag.
Music
You can listen to music, audiobooks, podcasts and your
recordings.
Playback controls
The following playback controls may appear in your music
player and video player:
Pause
Play
Touch and hold to rewind. Tap to go to the previous
track
19
Touch and hold to fast forward. Tap to go to the next
track
Additional music controls
The following music controls may appear in your music
player:
Turn on shuffle to play tracks in the current playlist
in a random order
Turn off shuffle
Repeat all tracks in the current playlist
Repeat the current track several times
Disable repeating tracks
To play music or other audio tracks
1
Select Menu > Media > Music.
2
Browse for tracks in Artists, Albums, Tracks, Playlists,
Audiobooks, Podcasts and My recordings.
3
Tap a track.
To change the volume
•
Press the volume key up or down.
To minimise the music player
1
When the music player is open, tap
.
2
To restore the music player on the screen, tap the
minimised album artwork.
When you minimise the music player, the album
artwork is also minimised.
20
Playlists
You can create playlists to organise your music. You can
add tracks and folders to a playlist. It may take a few minutes
for the phone to create a playlist.
To create a playlist
1
Select Menu > Media > Music > Playlists.
2
Tap New playlist.
3
Enter a name and select OK.
4
To add tracks, select, for example,
from the viewbar
and tap .
5
Select the tracks you want to add to the playlist and tap
.
6
Select the playlist.
Video
You can browse and play video clips saved in your phone.
To play a video clip
1
Select Menu > Media > Video.
2
Select an option.
3
Tap a video clip.
Transferring and handling content
You can transfer and handle your content such as pictures
and music.
You are not allowed to exchange some copyrightprotected material.
Using a USB cable
You can connect your phone to a computer using a USB
cable to synchronise, transfer and back up phone content,
and to use your phone as a modem.
21
Before using a USB cable
Only use a USB cable supported by your phone. Do not
remove the USB cable from your phone or computer during
transfer as this may corrupt the memory card or the phone
memory.
To use mass storage
1
Connect the USB cable to the phone and the computer.
2
Phone: Select Mass storage.
3
Computer: Wait until your memory card appears as the
external disk in Microsoft® Windows® Explorer.
4
Computer: On the computer desktop, double-click the
My Computer icon.
5
Computer: To view the memory card folders, double-
click the icon representing your memory card.
6
Copy and paste your file, or drag and drop it, into a folder
on your computer or on your memory card.
You cannot view the transferred files in your phone
until you remove the USB cable from the phone.
PC Companion
PC Companion lets you:
•
Explore content in your phone.
•
Use your phone as a modem.
•
Install PC Software used to synchronise, transfer and
back up phone content.
For more information, go to
www.sonyericsson.com/support.
To install PC Companion
1
Connect your phone to a PC using a USB cable
supported by your phone.
2
Computer: Select Mass storage.
22
3
Computer: Wait until the memory card in your phone
appears as the external disk in Microsoft® Windows
®
Explorer.
4
Computer: On the computer desktop, double-click the
My Computer icon.
5
Computer: To launch the PC Companion installer from
the memory card, double-click the icon representing your
memory card and double-click Startme.exe under the
folder pccompanion.
6
Computer: Follow the instructions that appear.
Required operating systems
You need one of these operating systems to use Sony
Ericsson PC software:
•
Microsoft® Windows Vista™
•
Microsoft® Windows XP, Service Pack 3 or higher
Transferring media files
You can use Media Go™ to transfer media files from CDs
or from your computer to the memory card in your phone.
Media Go™ computer software and USB drivers are
available for download at
www.sonyericsson.com/support
.
Sending content to another phone
You can send content, for example, using Messaging or
using Bluetooth™ wireless technology.
File manager
You can use File manager in your phone to handle content
saved in the phone memory or on a memory card. If the
memory is full, delete some content to create space.
23
PlayNow™ application
When you select the PlayNow™ application, you enter
PlayNow™ online service, where you can download music,
games, ringtones, themes and wallpapers. You can preview
or listen to content before you purchase and download it to
your phone.
This service is not available in all countries.
For extended functionality, you can also access the
PlayNow™ web shop on a computer from
www.playnow-arena.com. For more information, go to
www.sonyericsson.com/support.
Before you use the PlayNow™ application, you must
have the required Internet connection settings in your
phone.
To use the PlayNow™ application
1
Select Menu > PlayNow™.
2
Search through the PlayNow™ online service and follow
the instructions to preview and purchase content.
TrackID™ application
The TrackID™ application is a music recognition service.
You can search for the title, artist and album name of a track
you hear playing through a loudspeaker.
Before you use the TrackID™ application, you must
have the required Internet connection settings in your
phone.
24
To search for track information
•
When you hear a track through a loudspeaker outside
your phone, select Menu > Applications > TrackID™ >
Start.
For best results, use the TrackID™ application in a
quiet area.
You get a vibrating alert when the recording is finished
or if the recording fails.
Calls
Making and receiving calls
You need to turn on your phone and be within range of a
network.
The touch screen is disabled automatically during
calls when you place your phone next to your ear.
To make a call
1
Select to open the dialler and enter a phone number
(with international country code and area code, if
applicable).
2
Press
.
You can call numbers from your contacts and call
lists.
To end a call
•
Press
.
To answer a call
•
Press .
To reject a call
•
Press
.
25
To change the ear speaker volume during a call
•
Press the volume key up or down.
Emergency calls
Your phone supports international emergency numbers, for
example, 112 or 911. You can normally use these numbers
to make emergency calls in any country, with or without the
SIM card inserted, if you are within range of a network.
In some countries, other emergency numbers may also
be promoted. Your network operator may therefore
have saved additional local emergency numbers on the
SIM card.
Call list
You can view information about recent calls.
To call a number from the call list
1
Press and select a tab.
2
Select a name or a number and press
.
Contacts
You can save names, phone numbers and personal
information in Contacts. Information can be saved in the
phone memory or on the SIM card.
You can synchronise your contacts using the
Sony Ericsson PC Suite.
To add a new contact
1
Select Menu > Contacts.
2
Tap
.
3
Add contact information. To close the text input window,
tap .
4
Select Done.
26
To select which contacts to display
•
Select Menu > Contacts > Options > Settings >
Contacts to display.
To copy contacts between the memory card and SIM card
1
Select Menu > Contacts.
2
Select a contact and then select Options > Mark/
Unmark > Mark.
3
To mark more than one contact, repeat step 2.
4
Select Options > Copy.
5
Select an option.
When you copy contacts from the Phone memory to
the SIM memory, only the contact name and phone
number will be saved to the SIM card.
To find a contact
•
In the search field, enter the first letters of the contact
name. The matching contact or contacts appear.
Using the camera
Your phone has a 8.1 megapixel camera and a 3.2 nHD
touch display with touch capture, face detection, smile
detection, light and image stabiliser functions.
To activate the camera
•
To activate the photo camera, press
.
•
To activate the video camera, press .
27
Viewfinder
1 32
1 Zoom in or out
2 Enter video mode and shoot video clips
3 Enter photo mode and take photos
To turn off the camera
•
Press .
To take a photo
1
To activate the camera, press
.
2
To use auto focus, press halfway down. begins to
blink.
28
3
When turns green, press fully down to take the
photo. The photo is saved automatically.
To take a photo more quickly, you can skip step 2 and
press fully down.
Do not take photos when there is a strong light source
in the background. Use a support or the self timer to
avoid blurred photos.
To record a video clip
1
Press
.
2
Press fully down to start recording.
3
To stop recording, press fully down. The video is
saved automatically.
More camera features
You can touch a point on the screen to choose where the
camera should focus. The image stabiliser reduces the
impact from vibrations.
To change settings
•
Activate the camera and tap
.
To view information about a setting
•
Tap a setting and tap .
Face detection
You can use face detection to bring an off-centre face into
focus. The camera automatically detects one face,
indicated by a white frame. The frame becomes green when
focus is locked. Focus is set to the face closest to the
camera.
To set face detection
1
To activate the camera, press
.
29
2
Tap > .
Face detection is not available in Landscape,
Document or Twilight landscape scenes.
Smile detection
Smile detection is a technology that detects a person’s
smile and automatically takes the photo.
To use smile detection
1
To activate the camera, press .
2
Tap > .
3
To start smile detection, press
. blinks.
4
When the face in the viewfinder smiles, stops blinking
and the photo is taken automatically.
Panorama
The panorama feature helps you take wide panorama
photos automatically. Three photos are taken sequentially
in a row and connected to each other to form a seamless
wide photo.
To take a panorama photo
1
To activate the camera, press
.
2
Tap > . appears at the top of the
screen.
3
To take the first photo, press
.
4
To take the second photo, move the camera left or right
until the indicator fits into and becomes fully green.
The photo is taken automatically and the direction of the
panorama is now fixed.
5
To take the third photo, move the camera in the same
direction as the previous shot until the indicator fits into
and becomes fully green. The photo is taken
automatically.
30
Touch capture
In touch capture mode, you can touch the screen to focus
and capture a photo. A white border in the viewfinder
indicates the touchable area.
To take a photo in touch capture mode
1
To activate the camera, press
.
2
Tap > .
3
Tap within the white border to select the focus point. A
photo is then taken automatically.
Do not touch the viewfinder until you want to take a
photo.
Image stabiliser
The image stabiliser compensates for small movements of
the hand to ensure steady photos. When you turn on this
function,
appears in the viewfinder.
To activate the image stabiliser
1
Activate the camera.
2
Tap .
3
Select Photo > Image stabiliser > On.
Messaging
Text and multimedia messages
Messages can contain text, pictures, sound effects, video
clips and presentations. You can also create and use
templates for your messages.
When sending messages, the phone automatically selects
the most suitable method to use (either a text or multimedia
message) for sending the message.
31
To create and send a message
1
Select Menu > Messaging > New message.
2
Tap the To field and select a contact name from
Contacts.
3
Tap OK.
4
Tap the text field and enter your text.
5
Select Options > Add content and add a picture, video
clip or sound.
6
To send the message, select
.
When you enter the phone numbers of multiple
recipients manually, use a semicolon to separate their
numbers.
Internet
Before you use the Internet, you may need to define
an access point. To see how to create a new access
point, see the Extended User guide on the memory
card. You can also access this document at
www.sonyericsson.com/support
.
To start the Internet browser
1
Select Menu > Internet.
2
Tap
, and enter a web address.
3
Select Go to.
Location services
Your phone has a GPS receiver that uses satellite signals to
calculate your location. You can get help to find your way
to a destination and save your favourite locations. With
information from mobile towers near you, you may be able
to view your approximate location on a map.
32
To access location services
•
Select Menu > Location services, and select an
application.
Using GPS
Your location can be found when you have a clear view of
the sky. If your location is not found after a few minutes,
move to another location. To help the search, stand still and
do not cover the GPS antenna, which is located in the upper
right part of the phone.
Some GPS features use the Internet. Data rates and
charges may apply.
Locks
SIM card lock
This lock only protects your subscription. Your phone will
work with a new SIM card. If the lock is on, you have to enter
a PIN.
The PIN2 is required to access some network services, and
your SIM card must support these services.
If you enter your PIN incorrectly three times in a row, the SIM
card is blocked and you need to enter your PUK (Personal
Unblocking Key). Your PIN, PIN2 and PUK are supplied by
your network operator.
To unblock your SIM card
1
When PIN blocked. Enter PUK: appears, enter your
PUK and select OK.
2
Enter a new four-to-eight-digit PIN and select OK.
3
Re-enter the new PIN and select OK.
33
To turn on the SIM card lock
1
Select Menu > Settings > Phone > Phone
management > Security > Phone and SIM card > PIN
code request > On.
2
Enter your PIN and select OK.
To edit your PIN
1
Select Menu > Settings > Phone > Phone
management > Security > Phone and SIM card > PIN
code.
2
Follow the instructions to enter your old PIN once and
new PIN twice.
Phone lock
You can stop unauthorised use of your phone. The default
phone lock code is 0000. You can change the phone lock
code to any four-to-eight-digit personal code.
When the touch screen and keys are locked, the touch
screen and the keys are inactive.
It is important that you remember your new code. If you
forget it, you need to take your phone to your local
Sony Ericsson retailer.
To turn on the phone lock
1
Select Menu > Settings > Phone > Phone
management > Security > Phone and SIM card >
Phone autolock period > User defined.
2
To automatically lock your phone when you do not use it
for a defined time, tap the text input field under Lock after
(minutes): and enter the time-out period.
3
Enter your phone lock code and select OK.
4
To unblock the phone, press
and follow the
instructions that appear.
34
To edit your phone lock code
1
Select Menu > Settings > Phone > Phone
management > Security > Phone and SIM card > Lock
code.
2
Follow the instructions to enter your old lock code once
and your new lock code twice.
Legal information
Sony Ericsson Vivaz™ phone U5i/U5a
This User guide is published by Sony Ericsson Mobile Communications
AB or its local affiliated company, without any warranty. Improvements
and changes to this User guide necessitated by typographical errors,
inaccuracies of current information, or improvements to programs and/
or equipment, may be made by Sony Ericsson Mobile Communications
AB at any time and without notice. Such changes will, however, be
incorporated into new editions of this User guide.
All rights reserved.
©Sony Ericsson Mobile Communications AB, 2009
Publication number: 1232-2180.1
Your mobile phone has the capability to download, store and forward
additional content, e.g. ringtones. The use of such content may be
restricted or prohibited by rights of third parties, including but not limited
to restriction under applicable copyright laws. You, and not
Sony Ericsson, are entirely responsible for additional content that you
download to or forward from your mobile phone. Prior to your use of any
additional content, please verify that your intended use is properly
licensed or is otherwise authorized. Sony Ericsson does not guarantee
the accuracy, integrity or quality of any additional content or any other
third party content. Under no circumstances will Sony Ericsson be liable
in any way for your improper use of additional content or other third party
content.
Bluetooth is a trademark or a registered trademark of Bluetooth SIG Inc.
and any use of such mark by Sony Ericsson is under license.
The Liquid Identity logo, Vivaz™, PlayNow and TrackID are trademarks
or registered trademarks of Sony Ericsson Mobile Communications AB.
TrackID™ is powered by Gracenote Mobile MusicID™. Gracenote and
Gracenote Mobile MusicID are trademarks or registered trademarks of
Gracenote, Inc.
35
SyncML is a trademark or registered trademark of the Open Mobile
Alliance, Ltd
Sony is a trademark or registered trademark of Sony Corporation.
Media Go is a trademark or registered trademark of Sony Media Software
and Services.
Wi-Fi is a trademark or a registered trademark of the Wi-Fi Alliance.
DLNA is a trademark or registered trademark of the Digital Living Network
Alliance.
Google™, Google Maps™, YouTube and the YouTube logo are
trademarks or registered trademarks of Google, Inc.
Ericsson is a trademark or registered trademark of Telefonaktiebolaget
LM Ericsson.
Microsoft, Windows and Vista are registered trademarks or trademarks
of Microsoft Corporation in the United States and/or other countries.
microSD is a trademark or a registered trademark of SanDisk
Corporation.
RoadSync is a trademark or registered trademark of DataViz, Inc.
Quickoffice is a registered trademark of Quickoffice, Inc.
Wisepilot is a registered trademark of Appello Systems AB.
Adobe is a trademark or registered trademark of Adobe Systems
Incorporated in the United States and/or other countries.
This product is protected by certain intellectual property rights of
Microsoft. Use or distribution of such technology outside of this product
is prohibited without a license from Microsoft.
Other product and company names mentioned herein may be the
trademarks of their respective owners.
Any rights not expressly granted herein are reserved.
All illustrations are for illustration only and may not accurately depict the
actual phone.
36
www.sonyericsson.com
Sony Ericsson Mobile Communications AB
SE-221 88 Lund, Sweden
1232-2180.1
FCC Statement
Declaration of Conformity
Sony Ericsson U5a
UMTS HSPA 1 2 5 GSM GPRS/EDGE 850/900/1800/1900
Important Information
United States & Canada
THI S PHO NE MODEL HAS BEE N CER TIFIE D IN COM PLIAN CE
WIT H THE GO VERNM ENT’S RE QUIRE MENTS FOR EXP OSURE
TO RADIO WA VES.
The U5a Ser ies m obile ph ones have been des igned to c omp ly
wit h app lic able safet y r equir ement s for ex posur e to rad io wa ves.
You r wir ele ss ph one i s a radi o tra nsmit ter and recei ver . It is
des igned to not exc eed the lim its* of expos ure to r adi o fre que ncy
(RF ) ene rgy set by g overn menta l autho ritie s. Th ese l imi ts es tabli sh
per mitte d l evels of R F e nergy for the g ene ral p opula tio n. Th e
gui delin es are b ased on stand ards that wer e dev elope d b y
int ernat ion al sc ienti fic orga nizat ions thr ough perio dic and
tho rough ev aluat ion o f s cient ific studi es. The stand ard s inc lude a
saf ety m arg in de signe d t o ass ure t he sa fet y of all i ndi vidua ls,
reg ardle ss of ag e and he alth.
The radi o w ave e xposu re guide lines empl oy a uni t of
mea surem ent know n as the Specifi c Abs orpti on Rate (SAR ). Test s
for SAR are cond ucted us ing s tanda rdize d m ethod s wit h t he
pho ne tr ans mitti ng at it s hig hest certi fie d pow er le vel in a ll us ed
fre quenc y bands. While there may be di ffere nce s bet ween the SA R
lev els o f v ariou s pho ne model s, th ey ar e a ll de signe d t o mee t the
rel evant gu ideli nes f or expos ure t o rad io waves . For mo re
inf ormat ion on S AR, p lea se re fer t o the sa fe an d eff ici ent u se
cha pter in the U ser G uid e.
The high est SAR value as repo rted to th e a uthor ities fo r thi s
pho ne mo del when test ed for u se by the ear is 1 .49 W /kg *, an d
whe n wor n o n the bo dy is 0. 47 W/ kg* for spe ech a nd 0.59 W/k g*
for data call s. Body w orn meas ureme nts a re ma de while the phone
is in us e a nd wo rn on th e bod y wit h a S ony Eric sson acc essor y
sup plied wi th or des ign ated for use w ith this phone . I t is ther efo re
rec ommen ded that only Er icsso n and Sony Er icsso n ori gin al
acc essor ies be u sed i n c onjun ction with So ny Er icsso n p hones .
**B efore a phone mode l i s ava ilabl e for sa le to the pub lic i n the
US, it m ust b e t ested and cert ified by t he Fe der al Co mmuni catio ns
Com missi on (FCC) that it d oes not exceed the limit esta blish ed by
2

the gove rnm ent-a dopte d r equir ement for saf e exp osure *. The
tes ts ar e per for med i n pos ition s and lo catio ns (i.e ., by the ear and
wor n on the bo dy) a s r equir ed by the FCC fo r eac h m odel. The FCC
has gran ted an E quipm ent A uthor iza tion for this phon e m odel with
all repo rte d SAR leve ls ev aluat ed as in comp lia nce w ith t he FC C RF
exp osure gu ideli nes. Whi le th ere m ay be di ffere nces bet ween the
SAR leve ls of va rious ph ones, all mobil e p hones gran ted an F CC
equ ipmen t a uthor izati on meet the g overn men t req uirem ent for
saf e exp osu re. S AR in for matio n on this pho ne mo del i s o n fil e at
the FCC and can be fo und unde r the Disp lay Gran t sec tio n of
htt p://w ww. fcc.g ov/oe t/f ccid after sear chi ng on FCC
ID PY7 A3880 059. Add iti onal inf ormat ion on SAR can be found o n
the Cell ula r Tel ecomm uni catio ns & Inter net Asso ciati on (CTIA )
web site at http: //www .phon efa cts.n et.
* I n the Un ited State s a nd Ca nada, the SAR limi t for mo bile
pho nes u sed by t he pu bli c is 1.6 w atts/ kil ogram (W/k g) avera ged
ove r one gr am of tiss ue. The stand ard i nco rpora tes a ma rgin of
saf ety t o g ive a dditi ona l pro tecti on fo r t he pu blic and to a ccoun t
for any var iatio ns in me asure ments .
**T his p aragr aph is o nly a pplic abl e to auth ori ties and custome rs
in the U nit ed St ates.
3
FCC Statement
Thi s dev ice comp lies wit h Par t 15 of th e F CC ru les.
Ope ratio n i s sub ject to the f ollow ing t wo condi tions : ( 1)
Thi s dev ice may not c aus e har mful inter fer ence, and (2)
Thi s dev ice must acce pt any i nterf erenc e r eceiv ed, i ncl uding
int erfer enc e tha t may ca use u ndesi red o per ation .
Any chan ge or mo dific ati on no t exp ressl y a pprov ed by So ny
Eri csson ma y voi d the us er's autho rity to opera te th e e quipm ent.
Thi s equ ipm ent h as be en teste d and foun d t o com ply w ith the
lim its f or a Cla ss B dig ital devic e, pu rsu ant t o Par t 1 5 of the F CC
Rul es. Thes e l imi ts are desi gne d to provid e reason abl e protec tion
aga inst har mful inter fer ence in a resid ent ial i nstal lat ion. This
equ ipmen t gene rates , uses and can ra diate radi o f reque ncy e nergy
and , if not install ed an d u sed i n a ccord anc e wit h t he in str uctio ns,
may caus e h armfu l int erf erenc e to radio co mmuni catio ns.
How ever, ther e i s no guar antee that inte rfe rence will not occu r in a
par ticul ar insta llati on.
If this equ ipmen t doe s c ause harmf ul in ter feren ce to ra dio o r
tel evisi on recep tion, wh ich c an be dete rmi ned b y tur nin g the
equ ipmen t off and on , the use r is enco ura ged to try t o correc t the
int erfer enc e by one o r m ore o f the foll owi ng me asure s:
•
Reo rient or relo cate the rece iving ante nna .
•
Inc rease th e sep arati on betwe en th e equ ipm ent a nd re cei ver.
•
Con nect the equi pme nt in to an ou tlet on a cir cui t dif feren t f rom
tha t to whi ch th e rec eiv er is conn ected .
•
Con sult the deal er or an expe rienc ed ra dio /TV t echni cia n for
hel p.
11
Industry Canada Statement
Thi s dev ice comp lies wit h RSS -210 of In dus try C anada .
Ope ratio n i s sub ject to the f ollow ing t wo condi tions : ( 1) th is
dev ice m ay no t c ause interf ere nce, and (2 ) thi s d evice must acce pt
any inte rfe rence , inc lud ing i nterf erenc e t hat m ay ca use unde sired
ope ratio n o f the devi ce.
Thi s Cla ss B dig ital app aratu s com plies wi th Ca nadia n
ICE S-003 .
Cet appa rei l num ériqu e d e la class e B e st confo rme à la norm e
NMB -003 du Canad a.
12
Declaration of Conformity for U5a
We, Sony Er icsso n Mob ile C omm unica tions AB of
Nya Vatt ent ornet
SE- 221 8 8 L und, Swede n
dec lare und er ou r sol e r espon sibil ity t hat our produ ct
Son y Eri css on ty pe AA D-3 88005 9-BV
and in c ombin ati on wi th ou r acc ess ories , to whic h t his d eclar ation
rel ates is in co nform ity with the appro pri ate s tanda rds EN 3 01
511 :V9.0 .2, EN 3 01 90 8-1 :V3.2 .1, E N 301 90 8-2:V 3.2.1 , E N 300
440 -2:V1 .3. 1, EN 300 328 :V1.7 .1, E N 301 48 9-7:V 1.3.1 , E N 301
489 -17:V 2.1 .1, E N 301 48 9-2 4:V1. 4.1, EN 301 489- 3:V1. 4.1 and
EN 60 95 0-1 :2006 foll owi ng th e pro visio ns of, R adio Equ ipmen t
and Tele com munic ation Term inal Equipme nt di rec tive 1999 /5/ EC.
Lun d, Ja nua ry 20 10
Rik ko Sa kag uchi,
Exe cutiv e V ice P resid ent and Chief Crea tio n Off icer
We fulfi l t he re quire men ts of the R&TTE Di recti ve (1 999 /5/EC ).
Ce produ it est c onfor me aux d irect ives de R&TTE (1999/5/E C).
Cum plimo s c on lo s req uis itos de la Dire cti va R& TTE – No rmas
sob re eq uipos de term inale s de radi o y t eleco munic aci ones (1999/
5/E C).
Ate ndemo s a os re quisi tos da D iretr iz R& TTE (1999/ 5/E C).
13
www.sonyericsson.com
Sony Ericsson Mobile Communications AB
SE-221 88 Lund, Sweden
1236-0715.1
 Loading...