

Page 1
User guide
Naite
Thank you for purchasing a Sony Ericsson Naite
J105i/J105a.
For additional phone content, go to
www.sonyericsson.com/fun. Register now to get free online
storage and special offers at
www.sonyericsson.com/myphone.
For an extended User guide and product support, go to
www.sonyericsson.com/support
Please read the Important information before you use
your mobile phone.
Instruction symbols
These symbols may appear in the User guide:
Note
Tip
Warning
> Use a selection or navigation key to scroll and select.
See Navigation on page 10.
2
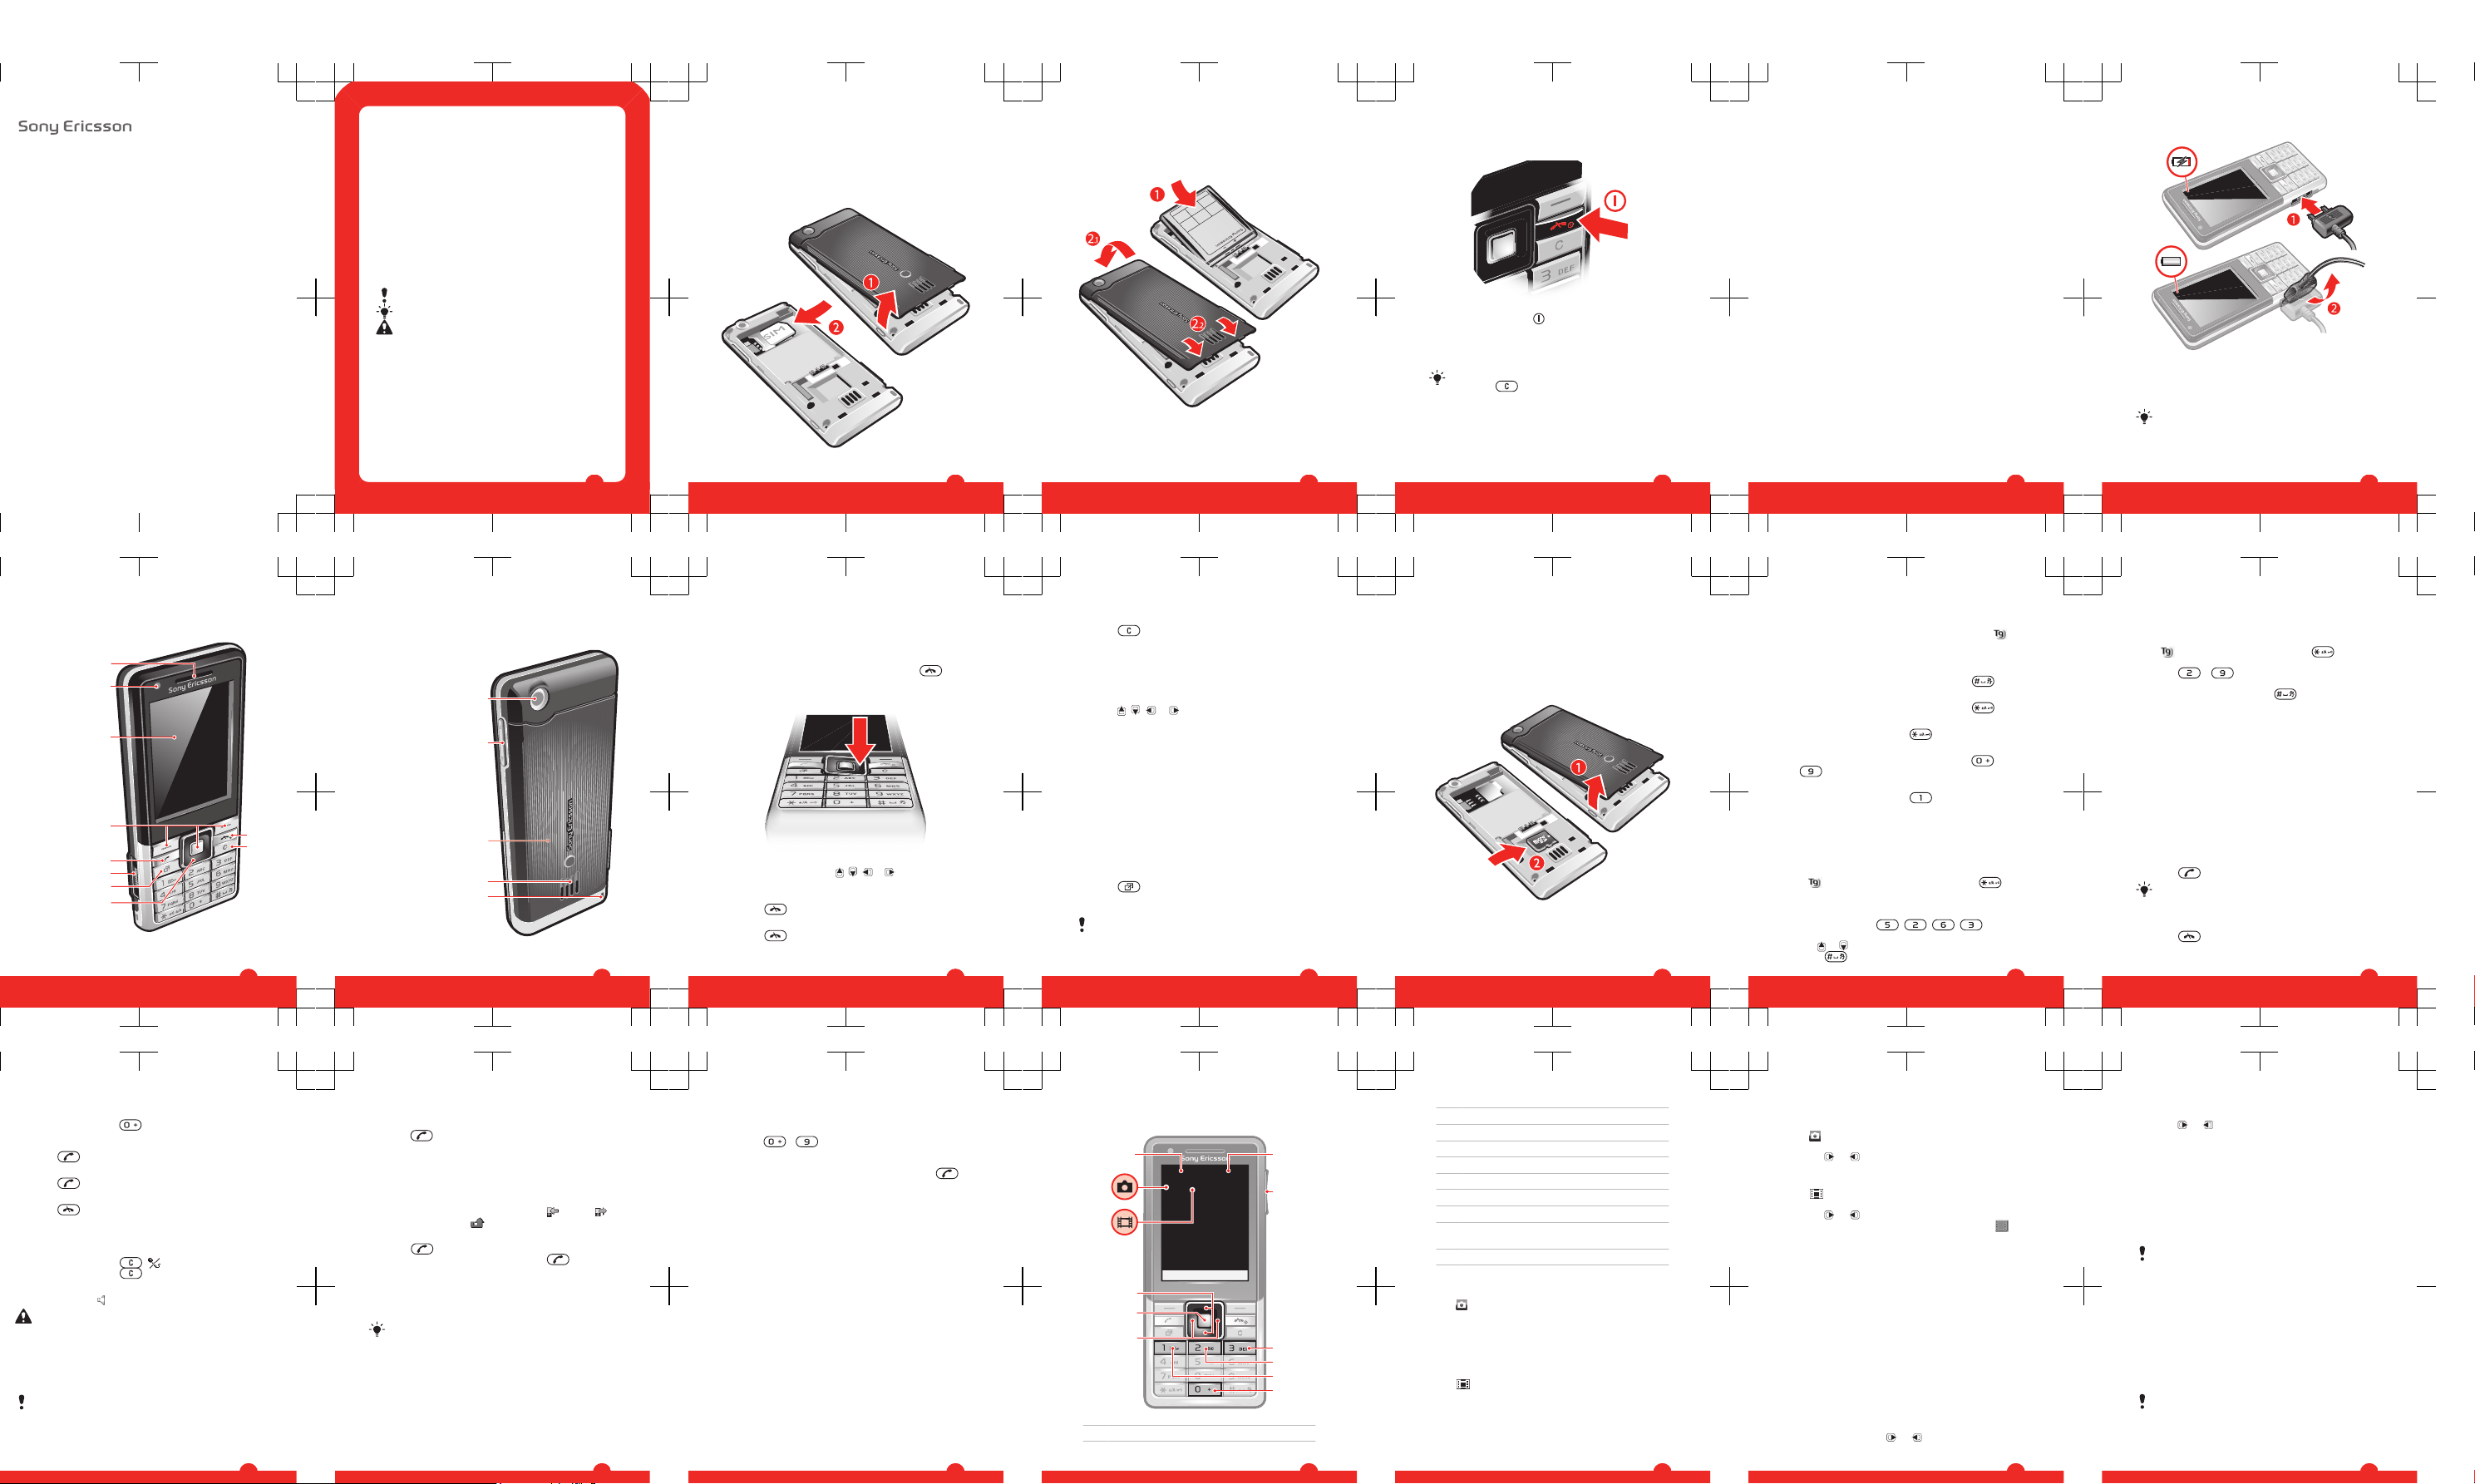
Getting started
Assembly
Before you start using your phone, you need to insert a SIM
card and the battery.
To insert the SIM card
3
1
Remove the battery cover.
2
Slide the SIM card into its holder with the gold-coloured
contacts facing down.
To insert the battery
1
Insert the battery with the label side up and the
connectors facing each other.
2
Attach the battery cover.
4
Turning on the phone
To turn on the phone
1
Press and hold down .
2
Enter your SIM card PIN (Personal Identification Number),
if requested, and select OK.
3
Select a language.
4
Follow the instructions that appear.
If you want to correct a mistake when you enter your
PIN, press
.
Help
In addition to this User guide, an extended User guide,
Feature guides and more information are available at
www.sonyericsson.com/support.
Help and information are also available in your phone.
5
To access the User guide
•
Select Menu > Settings > User help > User guide.
To view tips and tricks
•
Select Menu > Settings > User help > Tips and tricks.
To view information about functions
•
Scroll to a function and select Info, if available. In some
cases, Info appears under Options.
To view the phone status
•
Press the volume key. Phone, memory and battery
information is shown.
Charging the battery
The phone battery is partly charged when you buy it.
6
To charge the battery
1
Connect the charger to the phone. It takes approximately
2.5 hours to fully charge the battery. Press a key to view
the screen.
2
Remove the charger by tilting the plug upwards.
You can use your phone while it is charging. You can
charge the battery at any time and for more or less
than 2.5 hours. You can interrupt the charging without
damaging the battery.
7
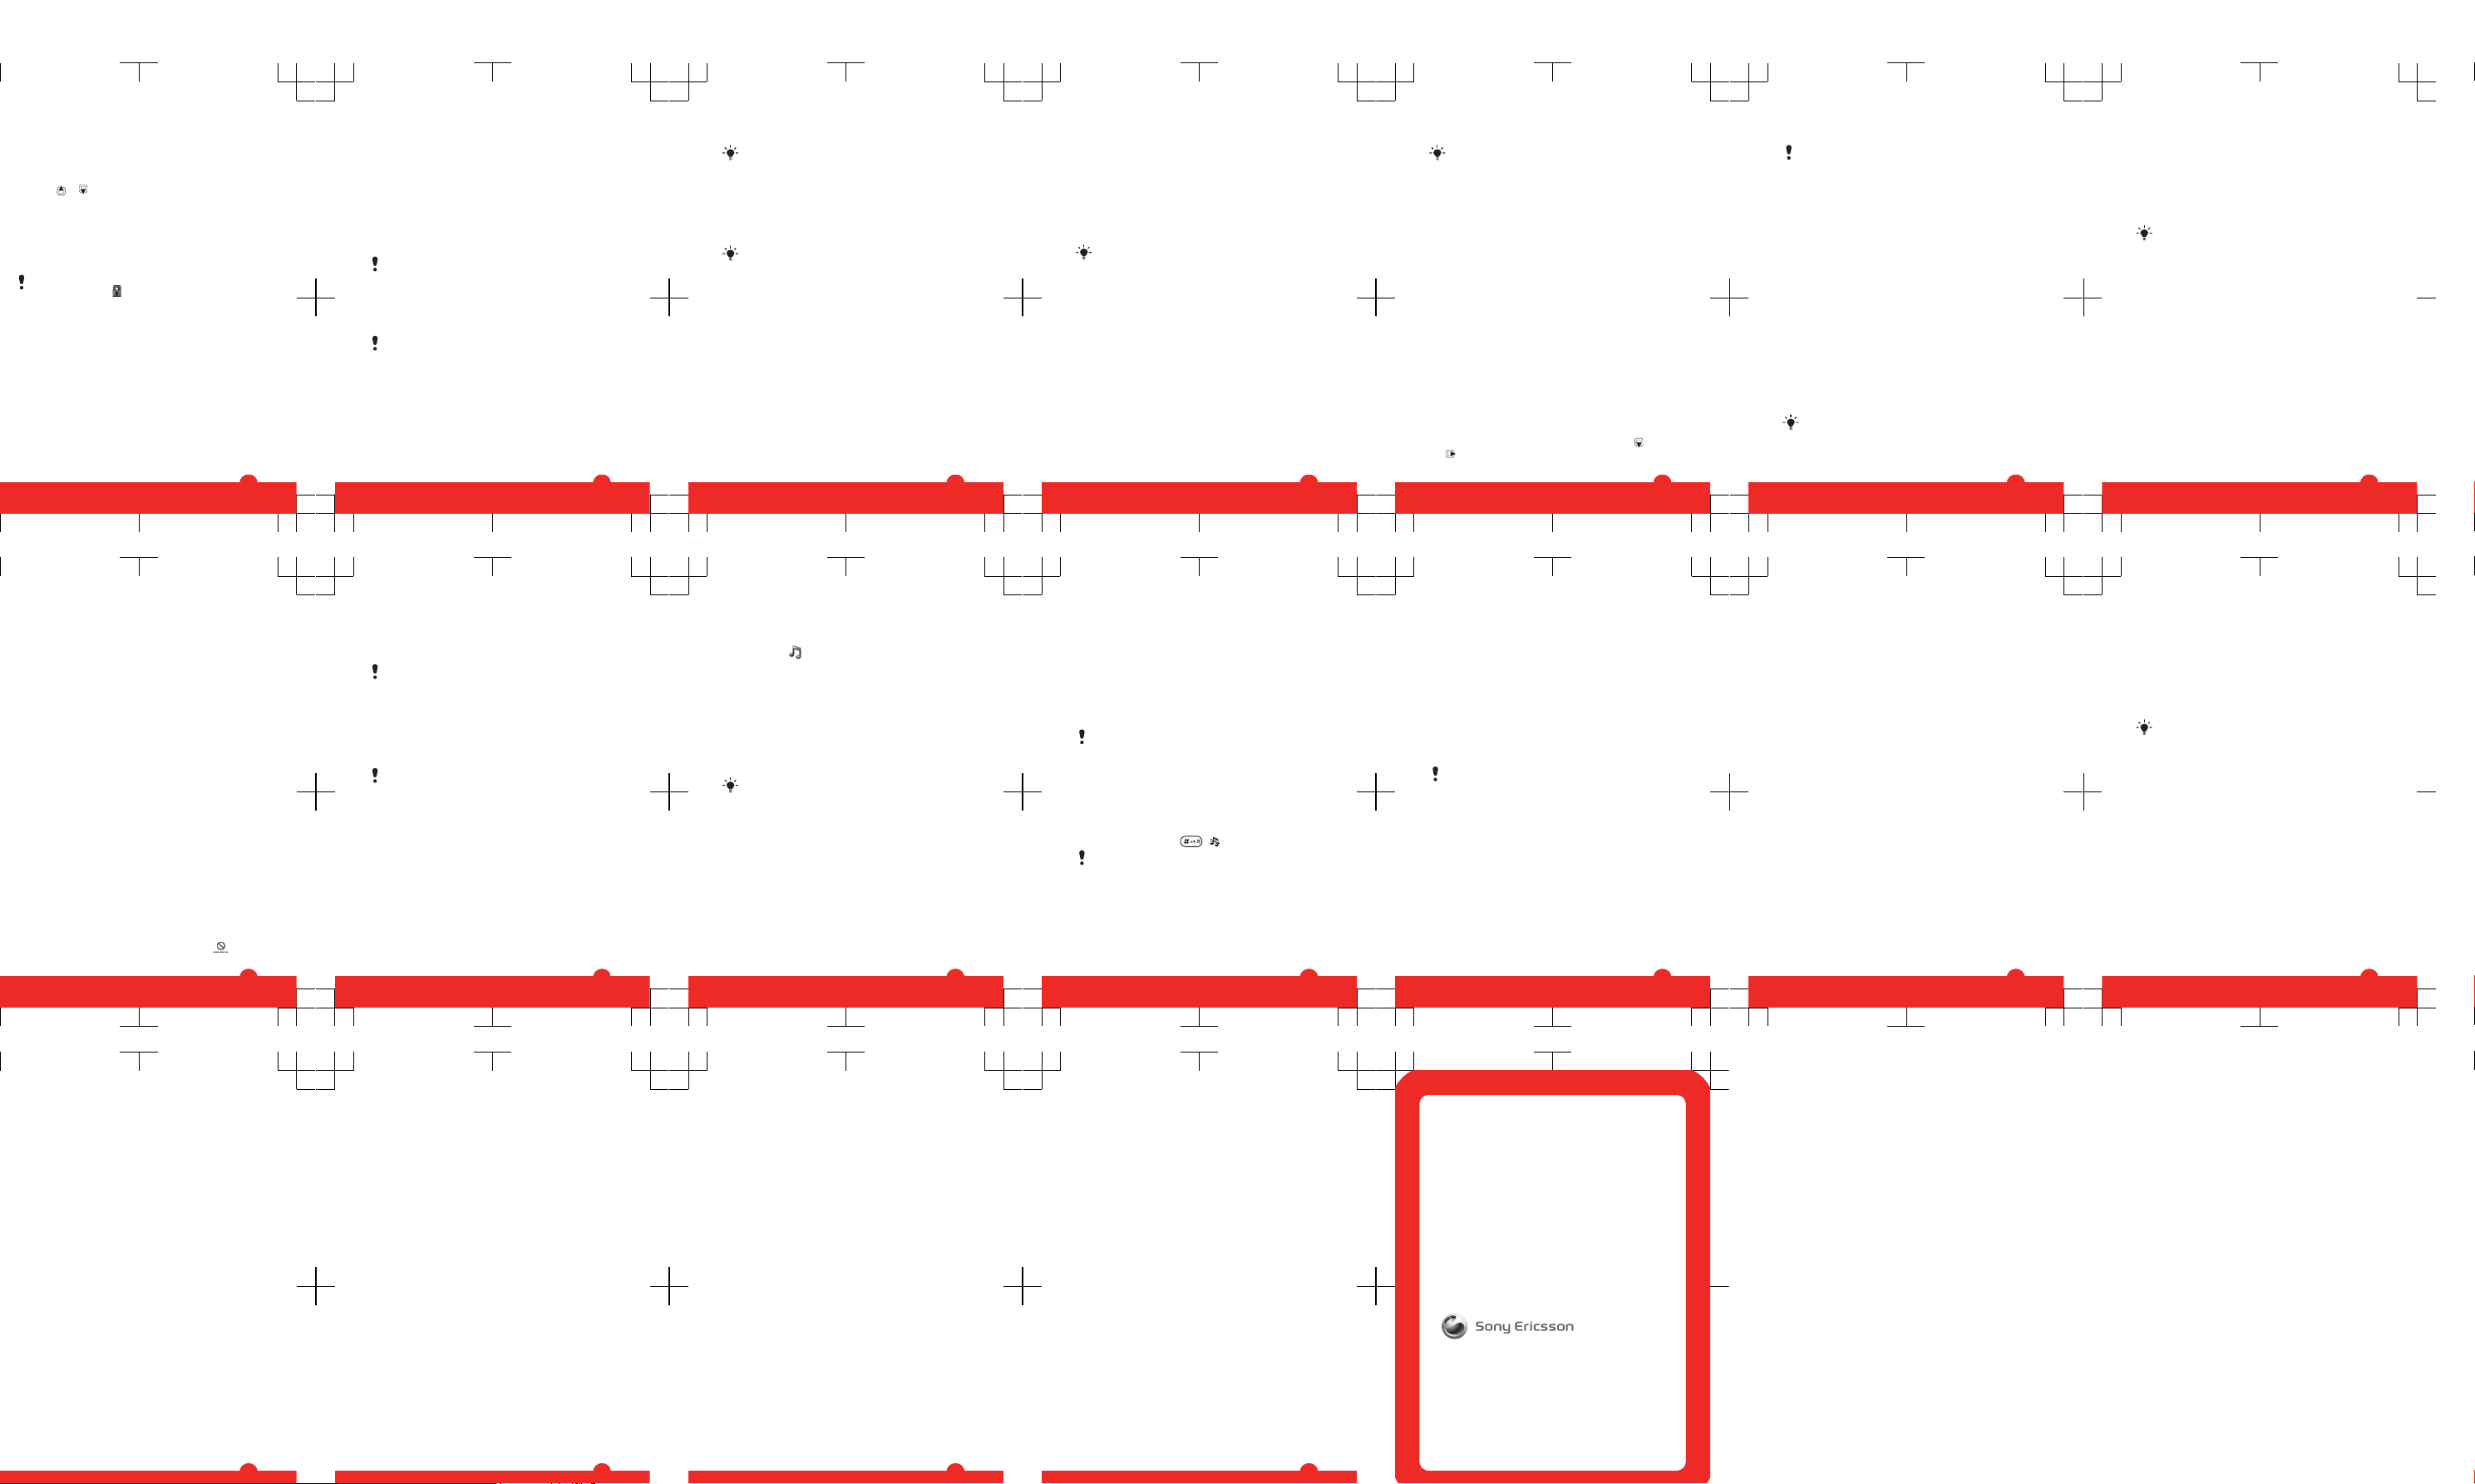
Phone overview
1 Ear speaker
3
6
5
2
1
8
7
4
9
10
2 Video call camera
3 Screen
4 Selection keys
5 Call key
6 Connector for
charger,
handsfree and
USB cable
7 Activity menu key
8 Navigation key
9 End key, On/off
key
10 C key (Clear)
8
11 Main camera
11
12
14
15
13
12 Volume keys
13 Memory card slot
(under the cover)
14 Loudspeaker
15 Strap hole
9
Navigation
To access the main menu
•
When Menu appears on the screen, press the centre
selection key to select Menu.
•
If Menu does not appear on the screen, press
, and
then press the centre selection key to select Menu.
To navigate the phone menus
•
Press the navigation key , , or to move through
the menus.
To end a function
•
Press
.
To return to standby
•
Press
.
10
To delete items
•
Press to delete items such as numbers, letters,
pictures and sounds.
Shortcuts
You can use keypad shortcuts to go directly to functions
from standby.
To use navigation key shortcuts
•
Press
, , or to go directly to a function.
To edit a navigation key shortcut
1
Select Menu > Settings > General > Shortcuts.
2
Scroll to an option and select Edit.
3
Scroll to a menu option and select Shortc..
Activity menu
The activity menu gives you quick access to:
•
New events – missed calls and new messages.
•
Running apps – applications that are running in the
background.
•
My shortcuts – add your favourite functions to access
them quickly.
•
Internet – quick access to the Internet.
To open the activity menu
•
Press
.
Memory card
You may have to purchase a memory card separately.
11
Your phone supports a microSD™ memory card adding
more storage space to your phone. It can also be used as
a portable memory card with other compatible devices.
You can move content between a memory card and the
phone memory. See Handling content in the phone on
page 22.
To insert a memory card
•
Remove the battery cover and insert the memory card
with the gold-coloured contacts facing down.
12
Entering text
You can use multitap text input or T9™ Text Input to
enter text. The T9 Text Input method uses a built-in
dictionary.
To change writing language
•
When you enter text, press and hold down
.
To change text input method
•
When you enter text, press and hold down .
To shift between capitals and lower-case letters
•
When you enter text, press .
To enter numbers
•
When you enter text, press and hold down
–
.
To enter full stops and commas
•
When you enter text, press
.
To enter a symbol
1
When you enter text, select Options > Add symbol.
2
Scroll to a symbol and select Insert.
To enter text using T9™ Text Input
1
Select, for example, Menu > Messaging > Write new >
Message.
2
If
is not displayed, press and hold down to
change to T9 Text Input.
3
Press each key only once, even if the letter you want is
not the first letter on the key. For example, to write the
word “Jane”, press
, , , . Write the
whole word before looking at the suggestions.
4
Use
or to view suggestions.
5
Press
to accept a suggestion and add a space.
13
To enter text using multitap text input
1
Select, for example, Menu > Messaging > Write new >
Message.
2
If is displayed, press and hold down to change
to multitap text input.
3
Press – repeatedly until the desired letter
appears.
4
When a word is written, press to add a space.
To add words to the built-in dictionary
1
When you enter text using T9 Text Input, select
Options > Spell word.
2
Write the word using multitap text input and select
Insert.
Calling
Making and receiving calls
You need to turn on your phone and be within range of a
network.
To make a call
1
Enter a phone number (with international country code
and area code, if applicable).
2
Press
.
You can call numbers from your contacts and call list.
See Contacts on page 16, and Call list on
page 16.
To end a call
•
Press .
14
To make international calls
1
Press and hold down until a “+” sign appears.
2
Enter the country code, area code (without the first zero)
and phone number.
3
Press .
To answer a call
•
Press .
To reject a call
•
Press
.
To change the ear speaker volume during a call
•
Press the volume key up or down.
To mute the microphone during a call
1
Press and hold down
. appears.
2
Press and hold down again to resume.
To turn on the loudspeaker during a call
•
Select SpkrOn.
appears.
Do not hold the phone to your ear when using the
loudspeaker. This could damage your hearing.
Emergency calls
Your phone supports international emergency numbers, for
example, 112 or 911. You can normally use these numbers
to make emergency calls in any country, with or without the
SIM card inserted, if you are within range of a network.
In some countries, other emergency numbers may also
be promoted. Your network operator may therefore
have saved additional local emergency numbers on the
SIM card.
15
To make an emergency call
•
Enter 112 (the international emergency number) and
press .
To view your local emergency numbers
1
Select Menu > Contacts.
2
Scroll to New contact and select Options > Special
numbers > Emergency nos..
Call list
You can view information about answered , dialled
and missed or rejected calls.
To call a number from the call list
1
Press
and scroll to a tab.
2
Scroll to a name or a number and press .
Contacts
You can save names, phone numbers and personal
information in Contacts. Information can be saved in the
phone memory or on the SIM card.
You can synchronise your contacts using the
Sony Ericsson PC Suite.
To add a phone contact
1
Select Menu > Contacts.
2
Scroll to New contact and select Add.
3
Enter the name and select OK.
4
Scroll to New number: and select Add.
5
Enter the number and select OK.
6
Select a number option.
7
Scroll between the tabs and add information to the fields.
8
Select Save.
16
Calling contacts
To call with Smart search
1
Press – to enter a sequence of (at least two)
digits. All entries which match the sequence of digits or
corresponding letters are shown in a list.
2
Scroll to a contact or a phone number and press
.
To turn on or off Smart search
1
Select Menu > Settings > Calls > Smart search.
2
Select an option.
Imaging
You can take photos and record video clips to view, save
or send. You find saved photos and video clips in Media
and in File manager.
Using the camera
To activate the camera
•
Select Menu > Camera.
17
Viewfinder and camera keys
5
6
1
8
9
7
10
3
4
2
1 Zoom indicator
18
2 Zoom in or out
3 Take photos/Record video
4 Select still camera or video camera
5 Brightness indicator
6 Brightness
7 Self-timer
8 Night mode
9 Camera: Shoot mode
Video: Video length
10 Camera key guide
To take a photo
1
Activate the camera and press the navigation key to scroll
to
.
2
Press the centre selection key to take a photo. The photo
is automatically saved.
3
Press Back to return to the viewfinder to take another
photo.
To record a video clip
1
Activate the camera and press the navigation key to scroll
to
.
2
Press the centre selection key to start recording.
3
To stop recording, press the centre selection key. The
video clip is automatically saved.
4
Press Back to return to the viewfinder to record another
video clip.
19
To view photos
1
Activate the camera and press the navigation key to scroll
to .
2
Select Options > View all photos
3
Press or to scroll to a photo.
To view video clips
1
Activate the camera and press the navigation key to scroll
to .
2
Select Options > View all clips.
3
Press
or to scroll to a video clip and press the
centre selection key. Video clips are indicated by in
the upper left corner.
Music
You can listen to music, audio books and podcasts. Use
the Media Go™ application to transfer content to and from
your phone. For more information, see Transferring content
to and from a computer on page 25.
Music player
To play music
1
Select Menu > Media > Music.
2
Browse by category using the navigation key.
3
Scroll to a title and select Play.
To stop playing music
•
Press the centre selection key.
To fast forward and rewind
•
Press and hold down
or .
20
To move between tracks
•
Press or .
To change the volume
•
Press the volume key up or down.
PlayNow™
When you select PlayNow™ you enter PlayNow™ arena,
where you can download music, games, ringtones, themes
and wallpapers. You can preview or listen to content before
you purchase and download it to your phone. If you cannot
use PlayNow™ and PlayNow™ arena, see I cannot use
Internet-based services on page 35.
This service is not available in all countries.
For extended functionality, you can also access the
PlayNow™ arena Web shop on a computer from
www.playnow-arena.com. For more information, go to
www.sonyericsson.com/support to read the PlayNow™
arena Feature guide.
To use PlayNow™
1
Select Menu > PlayNow™.
2
Scroll through PlayNow™ arena and follow the
instructions to preview and purchase content.
Radio
Do not use your phone as a radio in places where this
is prohibited.
To turn on the radio
1
Connect a handsfree to the phone.
2
Select Menu > Entertainment > Radio.
21
Page 2
Saving channels
You can save up to 20 preset channels.
To save channels automatically
•
Select Options > Auto save.
To switch between saved channels
•
Press
or .
Transferring and handling
content
You can transfer and handle content such as pictures and
music.
You are not allowed to exchange some copyrightprotected material. identifies a protected item.
Handling content in the phone
You can use File manager to handle content saved in the
phone memory or on a memory card. Tabs and icons in File
manager show where the content is saved. If the memory
is full, delete some content to create space.
To select more than one item in a folder
1
Select Menu > Organiser > File manager.
2
Scroll to a folder and select Open.
3
Select Options > Mark > Mark several.
4
For each item you want to mark, scroll to the item and
select Mark.
To move items between the phone memory and the
memory card
1
Select Menu > Organiser > File manager.
22
2
Find an item and select Options > Manage file >
Move.
3
Select Memory card or Phone.
4
Scroll to a folder and select Open.
5
Select Paste.
Sending content to another phone
You can send content, for example, in messages or using
Bluetooth™ wireless technology.
To send content
1
Scroll to an item and select Options > Send.
2
Select a transfer method.
Make sure the receiving device supports the transfer
method you select.
Using a USB cable
You can connect your phone to a computer with a USB
cable. If you are using a PC, you are asked to install PC
Companion the first time you connect.
You may have to purchase a USB cable separately.
Only use a USB cable supported by your phone.
PC Companion
PC Companion lets you:
•
Explore content in your phone.
•
Use your phone as a modem.
23
•
Install PC Software used to synchronise, transfer and
back up phone content.
For more information, go to
www.sonyericsson.com/support to read Feature
guides.
To install PC Companion
1
Connect your phone to a PC with a USB cable supported
by your phone.
2
Computer: Follow the instructions.
To disconnect the USB cable safely
Do not disconnect the USB cable when transferring
content as this may corrupt the content.
1
Computer: Right-click the Safely Remove Hardware icon
in Windows Explorer.
2
Select the drives you want to disconnect. Select Stop.
3
Wait for Windows to notify you that it is safe to remove
the drive. Disconnect the USB cable.
Required operating systems
You need one of these operating systems to use Sony
Ericsson PC software:
•
Microsoft® Windows Vista™
•
Microsoft® Windows XP, Service Pack 2 or higher
Drag and drop content
You can drag and drop content between your phone, a
memory card and a computer in Microsoft Windows
Explorer.
24
To drag and drop content
1
Connect your phone to a computer using a USB cable.
2
Computer: Wait until the phone memory and memory
card appear as external disks in Windows Explorer.
3
Drag and drop selected files between the phone and the
computer.
Transferring content to and from a
computer
You can use Media Go™ to transfer media content between
your phone and a computer.
Media Go™ is available for download through PC
Companion or from www.sonyericsson.com/support.
To transfer content using Media Go™
1
Connect the phone to a computer with a USB cable
supported by your phone.
2
Computer: Select Start/Programs/Sony/Media Go™.
3
Select Transfer to or from Device using Media Go™ and
click OK.
4
Wait until the phone appears in Media Go™.
5
Move files between your phone and the computer in
Media Go™.
Backing up and restoring
You can back up and restore contacts, the calendar, tasks,
notes and bookmarks using the Sony Ericsson PC Suite.
Before backing up and restoring, you need to install the
Sony Ericsson PC Suite which is available through PC
Companion or from www.sonyericsson.com/support.
You can back up and restore contacts in your phone using
a memory card. You can move content between the
25
memory card and the phone memory. See Handling
content in the phone on page 22.
Back up your phone content regularly to make sure
you do not lose it.
To make a backup using the Sony Ericsson PC Suite
1
Computer: Start the Sony Ericsson PC Suite from Start/
Programs/Sony Ericsson/Sony Ericsson PC Suite.
2
Follow the instructions in the Sony Ericsson PC Suite for
how to connect.
3
Go to the backup and restore section in the
Sony Ericsson PC Suite and make a backup of your
phone content.
Messaging
To view a message from the inbox
1
Select Menu > Messaging > Messages > Inbox.
2
Scroll to the message and select View.
Sending messages
You can send messages from your phone. The maximum
size of a standard text message is 160 characters including
spaces if no other items are added to the message. If you
enter more than 160 characters, a second message is
created. Your messages are sent as one concatenated
message.
To create and send a message
1
Select Menu > Messaging > Write new > Message.
2
Enter text. To add items to the message, press
, scroll
and select an item.
26
3
Select Continue > Contacts look-up.
4
Select a recipient and select Send.
If you send a message to a group, you may be charged
for each member. Contact your service provider for
details.
Conversations
You can choose whether to view your messages in
Conversations or Inbox. A messaging conversation shows
all messaging communication between you and one of your
contacts.
To view messages in Conversations
•
Select Menu > Messaging > Inbox > the
Conversations tab.
•
Select Menu > Messaging > Conversations and select
a conversation.
To send a message from Conversations
1
Select Menu > Messaging.
2
Select Conversations, or select Inbox > the
Conversations tab.
3
Select a conversation.
4
Write a message and select Send.
Email
You can use standard email functions and your computer
email address in your phone.
You can synchronise your email using Microsoft®
Exchange ActiveSync® application.
27
Before using email
You can use the Basic setup to check if settings are
available for your email account or you can enter them
manually. You can also receive settings at
www.sonyericsson.com/support.
To create an email account for the first time
1
To start the basic setup, select Menu > Messaging >
Email.
2
Follow the instructions to create the account.
If you enter settings manually, you can contact your
email provider for more information. An email provider
could be the company that supplied your email
address.
To write and send an email message
1
Select Menu > Messaging > Email > Write new.
2
Select Add > Enter email address. Enter the email
address and select OK.
3
To add more recipients, scroll to To: and select Edit.
4
Scroll to an option and select Add > Enter email
address. Enter the email address and select OK. When
you are ready, select Done.
5
Select Edit and enter a subject. Select OK.
6
Select Edit and enter the text. Select OK.
7
Select Add and choose a file to attach.
8
Select Continue > Send.
To receive and read an email message
1
Select Menu > Messaging > Email > Inbox > Options
> Check new email.
2
Scroll to the message and select View.
28
Internet
If you cannot use the Internet, see I cannot use Internetbased services on page 35.
To start browsing
1
Select Search.
2
Enter a Web address, a search phrase or the name of a
bookmark.
3
Scroll to an item in the list and select Go to or Search.
To exit the browser
•
Select Options > Exit browser.
More features
Flight mode
In Flight mode the network and radio transceivers are
turned off to prevent disturbance to sensitive equipment.
When the flight mode menu is activated you are asked to
select a mode the next time you turn on your phone:
•
Normal mode – full functionality
•
Flight mode – limited functionality
To activate the flight mode menu
•
Select Menu > Settings > General > Flight mode >
Continue > Show at startup.
To select flight mode
1
When the flight mode menu is activated, turn off your
phone.
2
Turn on your phone and select Flight mode.
appears.
29
Update Service
Your phone has software which you can update in order to
improve performance. You can access Update Service
using your phone or a PC with an Internet connection.
Accessing Update Service using your phone is not
possible in all countries/regions.
To view the current software in the phone
1
Select Menu > Settings > General > Update service.
2
Select Software version.
Update Service using a PC
You can update your phone using a USB cable and an
Internet-connected PC.
Make sure all personal data in your phone memory is
backed up before you perform an update using a PC.
See Backing up and restoring on page 25.
To use Update Service using a PC
•
Go to
www.sonyericsson.com/updateservice
.
Alarms
You can set a sound or the radio as an alarm signal. The
alarm sounds even if the phone is turned off. When the alarm
sounds you can silence it or turn it off.
To set the alarm
1
Select Menu > Alarms.
2
Scroll to an alarm and select Edit.
3
Scroll to Time: and select Edit.
4
Enter a time and select OK > Save.
30
To set the alarm signal
1
Select Menu > Alarms.
2
Scroll to an alarm and select Edit.
3
Scroll to the tab.
4
Scroll to Alarm signal: and select Edit.
5
Find and select an alarm signal. Select Save.
To silence the alarm
•
When the alarm sounds, press any key.
•
To repeat the alarm, select Snooze.
To turn off the alarm
•
When the alarm sounds, press any key, then select Turn
off.
Calendar
You can synchronise your calendar with a computer
calendar, with a calendar on the web or with a
Microsoft® Windows Server® (Outlook®)
application.
Appointments
You can add new appointments or reuse existing
appointments.
To add an appointment
1
Select Menu > Organiser > Calendar.
2
Select a date.
3
Scroll to New appointment and select Add.
4
Enter the information and confirm each entry.
5
Select Save.
To edit an appointment
1
Select Menu > Organiser > Calendar.
31
2
Select a date.
3
Scroll to an appointment and select View.
4
Select Options > Edit.
5
Edit the appointment and confirm each entry.
6
Select Save.
To set when reminders should sound
1
Select Menu > Organiser > Calendar.
2
Select a date.
3
Select Options > Advanced > Reminders.
4
Select an option.
A reminders option set in calendar affects a reminders
option set in tasks.
Ringtones
To set a ringtone
1
Select Menu > Settings > Sounds & alerts >
Ringtone.
2
Find and select a ringtone.
To turn off the ringtone
•
Press and hold down
. appears.
The alarm signal is not affected.
Locks
SIM card lock
This lock only protects your subscription. Your phone will
work with a new SIM card. If the lock is on, you have to enter
a PIN (Personal Identity Number).
If you enter your PIN incorrectly three times in a row, the SIM
card is blocked and you need to enter your PUK (Personal
32
Unblocking Key). Your PIN and PUK are supplied by your
network operator.
To unblock the SIM card
1
When PIN blocked appears, enter your PUK and select
OK.
2
Enter a new four-to-eight-digit PIN and select OK.
3
Re-enter the new PIN and select OK.
To edit the PIN
1
Select Menu > Settings > General > Security >
Locks > SIM protection > Change PIN.
2
Enter your PIN and select OK.
3
Enter a new four-to-eight-digit PIN and select OK.
4
Re-enter the new PIN and select OK.
If Codes do not match appears, you entered the new
PIN incorrectly. If Wrong PIN appears, followed by Old
PIN:, you entered your old PIN incorrectly.
Troubleshooting
Some problems can be fixed using Update Service. Using
Update Service on a regular basis will optimise the phone’s
performance. See Update Service on page 30.
Some problems will require you to call your network
operator.
For more support go to www.sonyericsson.com/support.
33
Common questions
I have problems with memory capacity or the phone
is working slowly
Restart your phone every day to free memory or do a
Master reset.
Master reset
If you select Reset settings, the changes that you have
made to settings will be deleted.
If you select Reset all, your settings and content, such as
contacts, messages, pictures, sounds and downloaded
games, will be deleted. You may also lose content that was
in the phone at purchase.
To reset the phone
1
Select Menu > Settings > General > Master reset.
2
Select an option.
3
Follow the instructions that appear.
I cannot charge the phone or battery capacity is low
The charger is not properly connected or the battery
connection is poor. Remove the battery and clean the
connectors.
The battery is worn out and needs to be replaced. See
Charging the battery on page 6.
No battery icon appears when I start charging the
phone
It may take a few minutes before the battery icon appears
on the screen.
Some menu options appear in grey
A service is not activated. Contact your network operator.
34
I cannot use Internet-based services
Your subscription does not include data capability. Settings
are missing or incorrect.
You can download settings using the Settings download
or from www.sonyericsson.com/support.
To download settings
1
Select Menu > Settings > User help > Settings
download.
2
Follow the instructions that appear.
Contact your network operator or service provider for
more information.
I cannot send messages from my phone
To send messages, you need to set a service centre
number. The number is supplied by your service provider
and is usually saved on the SIM card. If the number to your
service centre is not saved on your SIM card, you must enter
the number yourself.
To send most picture messages, you must set an MMS
profile and the address of your message server. If no MMS
profile or message server exists, you can receive all the
settings automatically from your network operator,
download settings using the Basic setup or at
www.sonyericsson.com/support.
To enter a service centre number
1
Select Menu > Settings > Connectivity > Message
settings > Text message and scroll to Service centre.
The number is shown if it is saved on the SIM card.
2
If there is no number shown, select Edit.
3
Scroll to New ServiceCentre and select Add.
35
4
Enter the number, including the international “+” sign and
country code.
5
Select Save.
To select an MMS profile
1
Select Menu > Settings > Connectivity > Message
settings > Picture message.
2
Select an existing profile or create a new one.
To set the message server address
1
Select Menu > Settings > Connectivity > Message
settings > Picture message.
2
Scroll to a profile and select Options > Edit.
3
Scroll to Message server and select Edit.
4
Enter the address and select OK > Save.
I cannot synchronise or transfer content between
my phone and my computer, when using a USB
cable.
The cable or software has not been properly installed. Go
to www.sonyericsson.com/support to read Feature guides
which contain detailed installation instructions and
troubleshooting sections.
Error messages
Insert SIM
There is no SIM card in your phone or you may have inserted
it incorrectly.
See To insert the SIM card on page 3.
The SIM card connectors need cleaning. If the card is
damaged, contact your network operator.
36
Insert correct SIM card
Your phone is set to work only with certain SIM cards.
Check if you are using the correct operator SIM card.
Wrong PIN/Wrong PIN2
You have entered your PIN or PIN2 incorrectly.
Enter the correct PIN or PIN2 and select Yes.
PIN blocked/PIN2 blocked
You have entered your PIN or PIN2 code incorrectly three
times in a row.
To unblock, see SIM card lock on page 32.
No netw. coverage
•
Your phone is in flight mode. See Flight mode on
page 29.
•
Your phone is not receiving any network signal, or the
received signal is too weak. Contact your network
operator and make sure that the network has coverage
where you are.
•
The SIM card is not working properly. Insert your SIM
card in another phone. If this works, it is probably your
phone that is causing the problem. Please contact the
nearest Sony Ericsson service location.
Emerg. calls only
You are within range of a network, but you are not allowed
to use it. However, in an emergency, some network
operators allow you to call the international emergency
number 112. See Emergency calls on page 15.
37
Legal information
Sony Ericsson Naite J105i/J105a
This User guide is published by Sony Ericsson Mobile Communications
AB or its local affiliated company, without any warranty. Improvements
and changes to this User guide necessitated by typographical errors,
inaccuracies of current information, or improvements to programs and/
or equipment, may be made by Sony Ericsson Mobile Communications
AB at any time and without notice. Such changes will, however, be
incorporated into new editions of this User guide.
All rights reserved.
©Sony Ericsson Mobile Communications AB, 2009
Publication number: 1229-4186.1
Attention: Some of the services and features described in this User
guide are not supported by all networks and/or service providers in all
areas. Without limitation, this applies to the GSM International
Emergency Number 112. Please contact your network operator or
service provider to determine availability of any specific service or
feature and whether additional access or usage fees apply.
Your mobile phone has the capability to download, store and forward
additional content, e.g. ringtones. The use of such content may be
restricted or prohibited by rights of third parties, including but not limited
to restriction under applicable copyright laws. You, and not
Sony Ericsson, are entirely responsible for additional content that you
download to or forward from your mobile phone. Prior to your use of any
additional content, please verify that your intended use is properly
licensed or is otherwise authorized. Sony Ericsson does not guarantee
the accuracy, integrity or quality of any additional content or any other
third party content. Under no circumstances will Sony Ericsson be liable
in any way for your improper use of additional content or other third party
content.
Bluetooth is a trademark or a registered trademark of Bluetooth SIG Inc.
and any use of such mark by Sony Ericsson is under license.
The Liquid Identity logo and PlayNow, are trademarks or registered
trademarks of Sony Ericsson Mobile Communications AB.
Sony is a trademark or registered trademark of Sony Corporation.
Media Go is a trademark or registered trademark of Sony Media Software
and Services.
38
microSD is a trademark or a registered trademark of SanDisk
Corporation.
Ericsson is a trademark or registered trademark of Telefonaktiebolaget
LM Ericsson.
Microsoft, Windows, Outlook, Windows Vista, Windows Server and
ActiveSync are registered trademarks or trademarks of Microsoft
Corporation in the United States and/or other countries.
T9™ Text Input is a trademark or a registered trademark of Tegic
Communications. T9™ Text Input is licensed under one or more of the
following: U.S. Pat. Nos. 5,818,437, 5,953,541, 5,187,480, 5,945,928,
and 6,011,554; Canadian Pat. No. 1,331,057, United Kingdom Pat. No.
2238414B; Hong Kong Standard Pat. No. HK0940329; Republic of
Singapore Pat. No. 51383; Euro.Pat. No. 0 842 463(96927260.8) DE/DK,
FI, FR, IT, NL, PT, ES, SE, GB; and additional patents are pending
worldwide.
This product is protected by certain intellectual property rights of
Microsoft. Use or distribution of such technology outside of this product
is prohibited without a license from Microsoft.
Other product and company names mentioned herein may be the
trademarks of their respective owners.
Any rights not expressly granted herein are reserved.
All illustrations are for illustration only and may not accurately depict the
actual phone.
39
www.sonyericsson.com
Sony Ericsson Mobile Communications AB
SE-221 88 Lund, Sweden
1229-4186.1
Page 3

FCC Statement
Declaration of Conformity
Sony Ericsson J105a
UMTS HSPA Band 1 2 5 GSM GPRS/EDGE 850/900/1800/1900
Page 4

English
Radio wave exposure and Specific
Absorption Rate (SAR) information
Thi s mob ile phon e mod el J1 05a h as been desi gned to comply with
app licab le safet y req uir ement s for expo sure to r adio wave s. Th ese
req uirem ent s are base d on scienti fic g uidel ine s tha t inc lude safety
mar gins desi gned to a ssure the safe ty of al l per sons, rega rdl ess o f
age and hea lth.
The radi o w ave e xposu re guide lines empl oy a uni t of
mea surem ent know n as the Spec ific Absor pti on Ra te, o r S AR.
Tes ts fo r SAR ar e con ducte d usi ng stand ardiz ed methods w ith t he
pho ne tr ans mitti ng at it s hig hest certi fie d pow er le vel in a ll us ed
fre quenc y b ands.
Whi le th ere may be di ffe rence s bet ween the SAR level s o f
var ious pho ne mo dels, th ey ar e all desi gne d to meet the rele vant
gui delin es for e xposu re to ra dio w aves.
For more informat ion on SAR, pleas e refer t o the safet y chapter
in the U ser ’s Gu ide.
SAR data in forma tion for resi dents in c oun tries that ha ve
ado pted the SAR limit re comme nded by th e I ntern ation al
Com missi on of Non-I oni zing Rad iatio n Protec tio n (IC NIR P), whic h
is 2 W/k g a verag ed ov er ten ( 10) g ram o f t issue (for ex ample
Eur opean Un ion, Japan , B razil and New Z eal and):
The high est SAR value fo r thi s mod el ph one when test ed by
Son y Eri css on fo r use at the ear i s 1. 22 W/kg (10g) .
2
Page 5
FCC Statement
Thi s dev ice comp lies wit h Par t 15 of th e F CC ru les.
Ope ratio n i s sub ject to the f ollow ing t wo condi tions : ( 1)
Thi s dev ice may not c aus e har mful inter fer ence, and (2)
Thi s dev ice must acce pt any i nterf erenc e r eceiv ed, i ncl uding
int erfer enc e tha t may ca use u ndesi red o per ation .
Any chan ge or mo dific ati on no t exp ressl y a pprov ed by So ny
Eri csson ma y voi d the us er's autho rity to opera te th e e quipm ent.
Thi s equ ipm ent h as be en teste d and foun d t o com ply w ith the
lim its f or a Cla ss B dig ital devic e, pu rsu ant t o Par t 1 5 of the F CC
Rul es. Thes e l imi ts are desi gne d to provid e reason abl e protec tion
aga inst har mful inter fer ence in a resid ent ial i nstal lat ion. This
equ ipmen t gene rates , uses and can ra diate radi o f reque ncy e nergy
and , if not install ed an d u sed i n a ccord anc e wit h t he in str uctio ns,
may caus e h armfu l int erf erenc e to radio co mmuni catio ns.
How ever, ther e i s no guar antee that inte rfe rence will not occu r in a
par ticul ar insta llati on.
If this equ ipmen t doe s c ause harmf ul in ter feren ce to ra dio o r
tel evisi on recep tion, wh ich c an be dete rmi ned b y tur nin g the
equ ipmen t off and on , the use r is enco ura ged to try t o correc t the
int erfer enc e by one o r m ore o f the foll owi ng me asure s:
•
Reo rient or relo cate the rece iving ante nna .
•
Inc rease th e sep arati on betwe en th e equ ipm ent a nd re cei ver.
•
Con nect the equi pme nt in to an ou tlet on a cir cui t dif feren t f rom
tha t to whi ch th e rec eiv er is conn ected .
•
Con sult the deal er or an expe rienc ed ra dio /TV t echni cia n for
hel p.
19
Page 6
Industry Canada Statement
Thi s dev ice comp lies wit h RSS -210 of In dus try C anada .
Ope ratio n i s sub ject to the f ollow ing t wo condi tions : ( 1) th is
dev ice m ay no t c ause interf ere nce, and (2 ) thi s d evice must acce pt
any inte rfe rence , inc lud ing i nterf erenc e t hat m ay ca use unde sired
ope ratio n o f the devi ce.
Thi s Cla ss B dig ital app aratu s com plies wi th Ca nadia n
ICE S-003 .
Cet appa rei l num ériqu e d e la class e B e st confo rme à la norm e
NMB -003 du Canad a.
20
Page 7
Declaration of Conformity for J105a
We, Sony Er icsso n Mob ile C omm unica tions AB of
Nya Vatt ent ornet
SE- 221 8 8 L und, Swede n
dec lare und er ou r sol e r espon sibil ity t hat our produ ct
Son y Eri css on ty pe AA D-3 88005 3-BV
and in c ombin ati on wi th ou r acc ess ories , to whic h t his d eclar ation
rel ates is in co nform ity with the appro pri ate s tanda rds EN 3 01
511 :V9.0 .2, EN 3 01 90 8-1 :V3.2 .1, E N 301 90 8-2:V 3.2.1 , E N 300
328 :V1.7 .1, EN 3 01 48 9-7:V 1.3.1 , EN 301 489- 17: V2.1. 1, EN 301
489 -24:V 1.4 .1 an d E N 6 0 950-1: 200 6 fol low ing the pro visio ns of,
Rad io Eq uip ment and T ele commu nicat ion T erm inal Equip men t
dir ectiv e 1999/ 5/EC .
Lun d, Au gus t 200 9
Rik ko Sa kag uchi,
Cor porat e V ice P resid ent and Head of Cr eat ion & Deve lop ment
We fulfi l t he re quire men ts of the R&TTE Di recti ve (1 999 /5/EC ).
R&TTE (1999/5/EC).
Biz R&TT E T əlima tları nın tələ bləri ni ye rin ə yet iriri k ( 1999 /5/
EC) .
Ние изп ълня ваме изис кван ията на Дире ктива та R &TTE (19 99 /5/ EC) .
Mi ispun jav amo z ahtje ve R&TTE Dire ktive (199 9/5 /EC).
Com plim els requ isits de la d irect iva R &TT E (1999 /5/ EC).
Výr obek spl ňuje požad avk y smě rnice R&TT E ( 1999/5/EC) .
21
Page 8

Vi opfyl der krav ene i R& TTE-d irekt ivet (1999 /5/ EC).
Die Anfo rde runge n der Ri chtli nie f ür Fu nk- und Fernm eld egerä te
(19 99/5/ EG) werd en er füllt .
Πλη ρούμ ε τι ς απ αιτήσ εις της Οδηγ ίας R &TTE (19 99 /5/ ΕΚ) .
Cum plimo s l os re quisi tos de l a Dir ectiv a R &TTE (1999/5/EC ).
Vas tab d ire ktiiv i R&T TE Direc tive (1999 /5/EC ) nõu etele .
R&T TE (1 999/5 /EC ) art eztar auare n b aldin tzak bet etzen ditu gu.
R&TTE )1999/5/EC(
.
Täy tämme radi o- ja telepä äte laite direk tii vin (199 9/5 /EY) ase tta mat
vaa timuk set .
Ce produ it est c onfor me à la direc tive R&T TE (199 9/5 /EC).
Son y Eri css on cu mpre cos requ isito s esi xid os po la di rec tiva
R&T TE (1 999/5 /EC ).
Mun cika sh araɗi n bay ani n R&T TE (99/5/E C).
Mi ispun jav amo z ahtje ve R&TTE Dire ktive (199 9/5 /EC).
Tel jesít jük az R &TTE irá nyelv (199 9/5/E C) kö vetel mén yeit.
Kam i mem enu hi pe rsyar ata n yan g dit etapk an Petun juk R &TT E
(19 99/5/ EC) .
Við uppf yll um R& TTE t ils kipun ina (1999/ 5/EB) .
Il prodo tto sodd isfa i r equis iti d ella Dir ettiv a R&T TE (1999/5 /EC ).
ונא םידמוע לכב תושירדה תייחנהבש ה-R&TTE )1999/5/EC(.
Mes vykd ome R&TT E dir ekt yvos (1999 /5/EC ) rei kalav imu s.
Mēs izpi ldā m R&T TE di rek tīvas (199 9/5/E K) pr asība s.
Ние ги испо лнув аме б арањ ата на R &TTE Dire ctiv e (1 99 9/5 /EC ).
We vold oen a an de vere isten di e in de R&TTE-r ich tlijn (199 9/5/E G)
wor den g est eld.
Vi oppfy lle r kra vene i R &TTE- direk tivet (199 9/5 /EC).
22
Page 9
Ate ndemo s a os re quisi tos da D iretr iz R& TTE (1999/ 5/E C).
Spe łniam y w ymaga nia d yre ktywy R&TT E (19 99/5/ WE).
São cump rid os os requ isi tos d a Dir ectiv a R &TTE (1999/5/EC ).
Înd eplin im cerin ţele Dir ectiv ei R& TTE ( 1999/ 5/EC) .
Изд елие удо влет воряе т тр ебов ания м Ди ректи вы R &TTE (19 99 /5/ EC) .
Výr obok spĺ ňa po žiada vky smer nice R&TTE (199 9/5 /EC).
Izp olnju jem o zah teve dir ektiv e za radij sko in t eleko mun ikaci jsko
ter minal sko opre mo (1 999/5 /ES).
Ne përmb ush im kë rkesa t e dire ktivë s R&T TE (1999/5/EC ).
Mi ispun jav amo z ahtev e d irekt ive R &TTE (1999 /5/EC ).
Re pheth isa ditl hoko tsa Tael o ya R&TTE (199 9/5 /EC).
Vi uppfy lle r kra ven i R& TTE-d irekt ivet (1999 /5/ EC).
เรา ปฏิบัติต ามขอกำห นดของขอ บังคั บ R &TTE (1999 /5/ EC )
R&T TE Ka rar names inin (1999 /5/EC ) gerekl ilikl eri ni ye rine
get irmek tey iz.
Цей Вир іб в ідпо відає вим огам Дир екти ви R& TTE (199 9/ 5/E C).
Chú ng tôi đ áp ứng các y êu cầ u c ủa Chỉ thị R&T TE (1999 /5 /EC ).
A t i mu awọ n ibe ere I lan a ti R&TTE ṣẹ ( 99/5/ EC).
我們符 合 R&TTE 規程中的要 求 (1999/ 5/EC) 。
本公司 符合 R&TTE Dire cti ve (1999/5 /EC) 中的規 定。
我们符 合 R&TTE 指令 (1 999/5 /EC ) 的要求 。
Siy azife za izidi ngo z eMi yalel o ye- R&TTE (199 9/5 /EC).
23
Page 10

www.sonyericsson.com
Sony Ericsson Mobile Communications AB
SE-221 88 Lund, Sweden
1230-6078.1
Page 11

Important information
Page 12

Sony Ericsson Consumer Web site
At www.s ony erics son .com/ sup port there is a su pport sect ion
whe re he lp and t ips a re only a few clic ks away. Here yo u wil l fin d
the late st compu ter s oft ware updat es an d t ips o n how to use your
pro duct mor e eff icien tly .
Service and support
You have ac cess to a por tfoli o of exclu siv e ser vice adv antag es
suc h as:
•
Glo bal a nd local Web sit es pr ovidi ng su ppo rt.
•
A g lobal ne twork of c all cent res.
•
An exten siv e net work of Sony Erics son s erv ice p artne rs.
•
A w arran ty perio d. Le arn more abou t the wa rrant y con dit ions in
the Impo rta nt in forma tio n.
At www.s ony erics son .com/ sup port, you can f ind the lates t
sup port too ls an d inf orm ation . For oper ato r-spe cific se rvice s and
fea tures , p lease cont act your netw ork o per ator.
You can als o con tact our call cent res. If your count ry/ regio n is
not repr ese nted in th e l ist b elow, plea se conta ct yo ur local deal er.
(Ca lls a re charg ed ac cor ding to na tiona l r ates, incl udi ng lo cal
tax es, u nle ss th e pho ne numbe r is a tol l-f ree n umber .)
If your pro duct needs se rvice , ple ase c ont act t he de ale r fro m
who m it was purc hased , o r one of o ur se rvi ce pa rtner s. For
war ranty cl aims, save pr oof o f pur chase .
Guidelines for Safe and Efficient Use
Ple ase f oll ow th ese g uid eline s. Fa ilure to do s o mig ht
ent ail a po tenti al he alt h ris k or produ ct malfu nctio n. If in
dou bt as to its prope r f uncti on, h ave t he produ ct
che cked by a cer tifie d s ervic e par tner bef ore c hargi ng or
usi ng it .
Recommendations for care and safe use of our products
•
Han dle w ith care and kee p in a cle an an d d ust-f ree p lac e.
•
War ning! Ma y exp lode if dispo sed o f i n fir e.
2
Page 13

•
Do not e xpo se to liqu id or mo istur e or exc ess h umidi ty.
•
For opti mum perf orman ce, the produ ct sh oul d not be
ope rated in temp eratu res belo w -10 °C(+1 4°F ) or
abo ve +4 5°C (+113 °F). Do not e xpose the bat tery to
tem perat ure s abo ve +6 0°C (+140 °F).
•
Do not e xpo se to flam es or li t tob acco pro ducts .
•
Do not d rop , thr ow or tr y to bend the p rod uct.
•
Do not p ain t or attem pt to di sasse mble or modif y the
pro duct. On ly So ny Er ics son a uthor ised per sonne l
sho uld p erf orm s ervic e.
•
Con sult wit h aut horis ed medic al st aff a nd the
ins truct ion s of the m edi cal d evice manu fac turer
bef ore u sin g the prod uct near pace maker s o r oth er me dic al
dev ices or equip ment.
•
Dis conti nue use of el ect ronic devi ces, or disab le th e r adio
tra nsmit tin g fun ction ali ty of the devic e, where requ ire d or
req ueste d t o do so.
•
Do not u se where a po ten tiall y exp losiv e a tmosp here exi sts.
•
Do not p lac e the prod uct , or insta ll wi rel ess e quipm ent , in the
are a abo ve an ai r bag in a ca r.
•
Cau tion: Cr acked or b rok en di splay s m ay cr eate sha rp ed ges o r
spl inter s t hat c ould be harmf ul up on co nta ct.
•
Do not u se the B lueto oth Head set i n pos iti ons w here it is
unc omfor tab le or will be subj ect t o pre ssu re.
Children
War ning! Ke ep ou t of the reac h of chi ldren . Do not allo w
chi ldren to play with mo bile phone s or acc essor ies. The y
cou ld hu rt thems elves or othe rs. P roduc ts may c ontai n
sma ll pa rts that coul d b ecome deta ched and crea te a cho king
haz ard.
Power supply (Charger)
Con nect the char ger t o p ower sourc es as ma rked on th e p roduc t.
Do not u se outdo ors o r i n dam p are as. D o n ot al ter o r s ubjec t the
cor d to dam age o r str ess . Unp lug t he un it befor e cle ani ng it .
Nev er al ter the plug. If it d oes n ot fi t i nto t he ou tle t, ha ve a pro per
3
Page 14

out let i nst alled by a n e lectr ician . Whe n a powe r sup ply is
con necte d t here is a sma ll dr ain o f pow er. To a void thi s sma ll
ene rgy w ast e, di sconn ect the power supp ly when the p rod uct i s
ful ly ch arg ed. U se of ch argin g dev ices tha t are not Son y Eri csson
bra nded may pose incr eas ed sa fety risks .
Battery
New or i dle batt eries ca n hav e sho rt-te rm reduc ed ca pac ity. Fully
cha rge t he batte ry be for e ini tial use. Use for the i nte nded purpo se
onl y. Ch arg e the batt ery in t emper ature s b etwee n +5° C(+ 41°F)
and +45° C(+ 113°F ). Do no t put the batte ry into your mou th. D o
not let the batt ery c ont acts touch anot her meta l obj ect . Tur n off
the prod uct befo re re mov ing t he ba ttery . P erfor mance de pends
on tempe rat ures, sign al stren gth, usage pa ttern s, fe atu res
sel ected an d voi ce or da ta tr ansmi ssion s. Only Sony Eri csson
ser vice par tners shou ld remov e or repla ce built -in b att eries . Use
of batte rie s tha t are no t Son y Eri csson br anded may pos e
inc rease d s afety risk s. Repla ce th e bat ter y onl y wit h a nothe r Son y
Eri csson ba ttery that ha s bee n qua lifie d w ith t he pr odu ct pe r the
sta ndard IE EE-17 25. U se of an unqu alifi ed batte ry ma y p resen t a
ris k of fir e, ex plosi on, leak age o r oth er hazar d.
Personal medical devices
Mob ile p hon es ma y aff ect impl anted medi cal equi pment . R educe
ris k of int erfer ence by keepi ng a minim um dista nce o f
15 cm(6 inc hes) betwe en the p hone and t he devic e. Us e t he
pho ne at yo ur ri ght e ar. Do n ot ca rry t he phone in y our brea st
poc ket. Tur n off the pho ne if you suspe ct inter feren ce. For all
med ical dev ices, cons ult a ph ysici an an d t he ma nufac tur er.
Driving
Som e veh icl e man ufact ure rs fo rbid the u se of ph ones in their
veh icles un less a han dsf ree k it wi th an ex terna l ant enn a sup ports
the inst all ation . Che ck with the v ehicl e m anufa cture r's
rep resen tat ive t o be sur e tha t the mobi le phone or B lue tooth
han dsfre e w ill n ot af fec t the elec troni c s ystem s in the vehi cle. Ful l
att entio n s hould be g ive n to drivi ng at al l tim es an d l ocal laws and
4
Page 15

reg ulati ons rest ricti ng the u se of wire les s dev ices whi le dr iving
mus t be obs erved .
GPS/Location based functions
Som e pro duc ts pr ovide GP S/Loc ation base d f uncti ons. Loc ation
det ermin ing func tiona lit y is provi ded “ As is” a nd “W ith all fault s”.
Son y Eri css on do es no t m ake a ny re prese nta tion or wa rra nty a s
to the a ccu racy of su ch locat ion i nform ati on.
Use of l oca tion- based in forma tion by th e d evice may not be
uni nterr upt ed or erro r f ree a nd ma y add iti onall y be dep enden t on
net work ser vice avail abi lity. Plea se no te that funct ion ality may be
red uced or preve nted in certa in en viron men ts su ch as bu ildin g
int erior s o r are as ad jac ent t o bui lding s.
Cau tion: Do not use G PS funct ional ity i n a mann er wh ich
cau ses d ist racti on fr om drivi ng.
Emergency calls
Cal ls ca nno t be guara nte ed un der a ll co ndi tions . Nev er rely solel y
upo n mob ile phon es fo r e ssent ial c ommun ica tion. Call s m ay no t
be possi ble in a ll ar eas , on all n etwor ks, or w hen c ert ain n etwor k
ser vices an d/or phone fe ature s are used .
Antenna
Use of a nte nna d evice s n ot ma rkete d by Son y Eri csson co uld
dam age t he phone , red uce perf orman ce, a nd produ ce SA R l evels
abo ve th e e stabl ished li mits. Do n ot co ver the anten na with your
han d as thi s aff ects cal l qua lity, powe r l evels and can shor ten t alk
and stan dby time s.
Radio Frequency (RF) exposure and Specific Absorption
Rate (SAR)
Whe n the ph one o r Blu eto oth h andsf ree i s t urned on, it emits low
lev els o f r adio frequ enc y ene rgy. Inter nat ional safe ty guide lines
hav e bee n d evelo ped t hro ugh p eriod ic an d t horou gh ev alu ation of
sci entif ic studi es. T hes e gui delin es es tab lish permi tte d lev els o f
rad io wa ve expos ure. The guid eline s inc lud e a s afety ma rgin
5
Page 16

des igned to assu re th e s afety of a ll pe rso ns an d to acc ount for
any vari ati ons i n mea sur ement s.
Spe cific Ab sorpt ion R ate (SAR ) is used to measu re ra dio
fre quenc y e nergy abso rbe d by the b ody w hen usin g a m obi le
pho ne. T he SAR v alue is deter mined at t he highe st ce rti fied power
lev el in la borat ory c ond ition s, bu t bec aus e the phon e i s des igned
to use t he minim um po wer nece ssary to a cce ss th e cho sen
net work, th e act ual S AR level can be we ll below this va lue. There
is no pr oof of d iffer enc e in safet y bas ed on di ffere nce in S AR
val ue.
Pro ducts wi th ra dio t ran smitt ers s old i n t he US must be
cer tifie d b y the Fede ral Comm unica tions Co mmiss ion ( FCC ).
Whe n req uir ed, t ests are perf ormed when th e pho ne is pl aced at
the ear and when worn on the body. For bod y-wor n ope rat ion, the
pho ne ha s b een t ested wh en po sitio ned a mi nimum of 1 5 m m
fro m the bo dy wi thout an y met al pa rts i n t he vi cinit y o f the phon e
or when pro perly used wi th an appr opria te Sony Erics son
acc essor y a nd wo rn on th e bod y.
For more in forma tion abo ut SA R and radi o f reque ncy e xpo sure,
go to: w ww . sonye ric sson. com /heal th.
Flight mode
Blu etoot h a nd WL AN fu nct ional ity, if av ail able in th e d evice , can
be enabl ed in Fl ight mod e but may be pr ohi bited onbo ard airc raft
or in ot her area s whe re radio tran smiss ion s are proh ibi ted. In
suc h env iro nment s, pl eas e see k pro per a uth orisa tion bef ore
ena bling Bl uetoo th or WL AN fu nctio nalit y e ven i n Fli ght mode .
Malware
Mal ware (sh ort f or ma lic ious softw are) is softw are t hat can harm
the mobi le phone or o the r com puter s. Ma lwa re or harm ful
app licat ion s can incl ude viru ses, worms , s pywar e, an d o ther
unw anted pr ogram s. Wh ile the devic e doe s e mploy secu rit y
mea sures to resi st su ch effor ts, S ony E ric sson does not warr ant
or repre sen t tha t the de vice will be im per vious to t he intro ducti on
of malwa re. You can h owe ver r educe the ris k of malwa re attac ks
by using ca re wh en do wnl oadin g con tent or accep ting
6
Page 17

app licat ion s, re frain ing from open ing o r r espon ding to messa ges
fro m unk now n sou rces, us ing t rustw orthy se rvice s to acc ess t he
Int ernet , a nd on ly do wnl oadin g con tent to the m obile ph one f rom
kno wn, r eli able sourc es.
Accessories
Use only So ny Er icsso n b rande d ori ginal ac cesso ries and cert ified
ser vice par tners . Son y E ricss on do es no t t est t hird- par ty
acc essor ies . Acc essor ies may influ ence RF expos ure, rad io
per forma nce , lou dness , e lectr ic sa fety and othe r are as. Thir dpar ty ac ces sorie s and pa rts m ay po se a ris k to your hea lth o r
saf ety o r d ecrea se pe rfo rmanc e.
Accessible Solutions/Special Needs
In the U S, compa tible So ny Er icsso n pho nes may offer
com patib ili ty wi th TT Y t ermin als ( with use of n ecess ary
acc essor y). For more inf ormat ion c all t he Sony Erics son Spec ial
Nee ds Ce nte r on 877 8 78 1996 (TTY) or 8 77 207 2 056 ( voi ce), or
go to ww w. s onyer ics son-s nc. com.
Disposal of old electrical and electronic
equipment
Ele ctron ic equip ment and batt eries shou ld not b e
inc luded as hous ehold wa ste b ut sh ould be left at an
app ropri ate coll ectio n p oint for r ecycl ing . Thi s hel ps preve nt
pot entia l n egati ve co nse quenc es fo r the en viron ment and huma n
hea lth. Che ck lo cal r egu latio ns by co ntact ing y our loca l c ity o ffice ,
you r hou seh old w aste dis posal serv ice, the shop wher e y ou
pur chase d t he pr oduct or call ing a Sony Er icsso n cal l c entre . Do
not atte mpt to r emove in terna l bat terie s. Inter nal b att eries shal l b e
rem oved onl y by a was te treat ment facil ity or t raine d s ervic e
pro fessi ona l.
Disposing of the battery
Che ck lo cal regu latio ns or ca ll a Sony Eri csson call
cen tre f or infor matio n. Never use munic ipa l was te.
7
Page 18

Memory card
If the p rod uct c omes com plete with a re mov able memor y c ard, it
is gener all y com patib le with the h andse t p urcha sed b ut may n ot
be compa tib le wi th ot her devi ces o r the ca pabil ities of thei r
mem ory c ard s. Ch eck o the r dev ices for c omp atibi lity bef ore
pur chase or use. If t he produ ct is equi ppe d wit h a m emo ry ca rd
rea der, che ck me mory car d com patib ility be fore purch ase or u se.
Mem ory c ard s are gene ral ly fo rmatt ed pr ior to s hippi ng. To
ref ormat th e mem ory c ard , use a co mpati ble devi ce. D o n ot us e
the stan dar d ope ratin g s ystem form at wh en forma tting th e
mem ory c ard on a PC. For deta ils, refer to the opera tin g
ins truct ion s of the d evi ce or cont act c ust omer suppo rt.
Warning!
If the d evi ce re quire s a n ada pter for i nse rtion into th e han dset or
ano ther dev ice, do no t i nsert the card dir ectly with out the
req uired ad apter .
Precautions on memory card use
•
Do not e xpo se th e mem ory card to m oistu re.
•
Do not t ouc h ter minal co nnect ions with you r han d or any meta l
obj ect.
•
Do not s tri ke, b end, or drop the m emory ca rd.
•
Do not a tte mpt t o dis ass emble or m odify th e mem ory c ard .
•
Do not u se or st ore t he memor y car d in hum id or corr osi ve
loc ation s o r in exces siv e hea t suc h as a c losed car in summe r,
in direc t s unlig ht or ne ar a heate r, et c.
•
Do not p res s or bend the end of th e mem ory card adap ter with
exc essiv e f orce.
•
Do not l et dirt, dust , o r for eign objec ts get i nto t he inser t por t o f
any memo ry card adapt er.
•
Che ck yo u h ave i nsert ed the m emory card co rrect ly.
•
Ins ert t he memor y car d a s far as i t wil l g o int o any me mory card
ada pter nee ded. The m emo ry ca rd ma y not op erate prop erl y
unl ess f ull y ins erted .
8
Page 19

•
We recom men d tha t you ma ke a backu p cop y o f imp ortan t d ata.
We are n ot respo nsibl e f or an y los s or dam age t o con ten t you
sto re on th e mem ory c ard .
•
Rec orded da ta ma y be dam aged or lo st wh en you r emove th e
mem ory c ard or m emory ca rd ad apter , tur n o ff th e pow er while
for matti ng, read ing o r w ritin g dat a, or us e the memo ry card in
loc ation s s ubjec t to sta tic e lectr icity or high elec tri cal f ield
emi ssion s.
Protection of personal information
Era se pe rso nal d ata b efo re di sposi ng of th e pro duct. To dele te
dat a, pe rfo rm a maste r r eset. Dele ting dat a fro m the ph one
mem ory d oes not ensur e t hat i t can not b e r ecove red.
Son y Eri css on do es no t w arran t aga inst rec overy of i nfo rmati on
and does no t ass ume r esp onsib ility for dis closu re of an y
inf ormat ion even afte r a mast er re set.
Loudness warning!
Avo id vo lum e lev els t hat may be ha rmful to your hear ing .
End User Licence Agreement
Sof tware de liver ed wi th this devic e and it s med ia is ow ned b y
Son y Eri css on Mo bile Com munic ation s AB, an d/or its a ffi liate d
com panie s a nd it s sup pli ers a nd li censo rs.
Son y Eri css on gr ants you a no n-exc lusiv e l imite d lic enc e to use
the Soft war e sol ely i n c onjun ction with th e Dev ice o n w hich it is
ins talle d o r del ivere d. Owner ship of th e S oftwa re is no t sol d,
tra nsfer red or o therw ise conv eyed.
Do not u se any m eans to disco ver t he so urc e cod e or any
com ponen t o f the Soft war e, re produ ce an d d istri bute the
Sof tware , o r mod ify t he Softw are. You a re entit led t o t ransf er
rig hts a nd oblig ation s t o the Soft ware to a thi rd pa rty , sol ely
tog ether wi th th e Dev ice with whic h you re ceive d the So ftwar e,
pro vided th e thi rd pa rty agre es in writ ing to b e bou nd by th e
ter ms of th is Li cence .
9
Page 20

Thi s lic enc e exi sts t hro ughou t the usef ul life of th is Devic e. It
can be t erm inate d by tra nsfer ring your rig hts t o the De vice to a
thi rd pa rty in w ritin g.
Fai lure to compl y wit h a ny of thes e ter ms and c ondit ion s wil l
ter minat e t he li cence im media tely.
Son y Eri css on an d its th ird p arty suppl ier s and lice nso rs re tain
all righ ts, titl e and in teres t in and t o t he So ftwar e. To th e ext ent
tha t the So ftwar e con tai ns ma teria l or cod e of a thi rd party , suc h
thi rd pa rti es sh all b e b enefi ciari es of th ese t erms.
Thi s lic enc e is gover ned by t he la ws of Sw eden. When
app licab le, the foreg oin g app lies to st atu tory consu mer righ ts.
In the e ven t Sof tware ac compa nying or p rov ided in co nju nctio n
wit h you r d evice is p rov ided with addit ion al te rms a nd condi tions ,
suc h pro vis ions shall al so go vern your pos sessi on an d u sage of
the Soft war e.
Limited Warranty
Son y Eri css on Mo bile Com munic ation s AB, SE -221 88 Lu nd,
Swe den, (So ny Er icsso n) or it s loc al af fil iated comp any , pro vides
thi s Lim ite d War ranty fo r you r mob ile p hon e, or igina l a ccess ory
del ivere d w ith y our m obi le ph one, and/o r y our m obile co mputi ng
pro duct (he reina fter ref erred to a s “Pr odu ct”).
Sho uld y our Prod uct n eed warr anty servi ce, plea se re tur n it to
the deal er from whom it was p urcha sed, or conta ct yo ur local
Son y Eri css on Ca ll Ce nte r (na tiona l rat es may a pply) or visi t
www .sonyeri csson.co m to get furt her i nform ati on.
Our warranty
Sub ject to the c ondit ion s of this Limit ed Warra nty, Son y Eri csson
war rants th is Pr oduct to be f ree f rom d efe cts i n des ign , mat erial
and work man ship at th e t ime o f its orig ina l pur chase by a
con sumer . T his L imite d W arran ty wi ll la st for a peri od of tw o (2)
yea rs as fr om th e ori gin al da te of purc has e of the P rod uct f or yo ur
mob ile p hon e, an d for a perio d of one ( 1) year follo win g the
ori ginal pu rchas e dat e o f the Prod uct f or all o rigin al acces sorie s
10
Page 21

(su ch as th e bat tery, ch arger or h andsf ree kit) whic h m ay be
del ivere d w ith y our m obi le ph one.
What we will do
If, duri ng the w arran ty perio d, th is Pr odu ct fa ils t o o perat e und er
nor mal u se and s ervic e, due t o def ects in desig n, ma ter ials or
wor kmans hip , Son y Eri css on au thori sed d ist ribut ors o r s ervic e
par tners , i n the coun try /regi on* w here you purc hased th e
Pro duct, wi ll, a t the ir optio n, ei ther rep air o r rep lac e the Prod uct
in accor dan ce wi th th e t erms and c ondit ion s sti pulat ed herei n.
Son y Eri css on an d its se rvice part ners res erve the r igh t to
cha rge a ha ndlin g fee if a re turne d Pro duc t is found no t to be
und er wa rra nty a ccord ing to t he co nditi ons belo w.
Ple ase n ote that some of your pers onal set tings , dow nlo ads
and othe r i nform ation ma y be lost when you r Son y Eri css on
Pro duct is repai red o r r eplac ed. A t pre sen t, So ny Er ics son m ay
be preve nte d by appli cab le la w, ot her r egu latio n or tec hnica l
res trict ion s fro m mak ing a ba ckup copy of certa in do wnl oads.
Son y Eri css on do es no t t ake a ny re spons ibi lity for a ny lost
inf ormat ion of a ny ki nd and w ill n ot re imb urse you f or any s uch
los s. Yo u s hould alwa ys make backu p cop ies of a ll th e
inf ormat ion stor ed on yo ur So ny Er icsso n P roduc t suc h a s
dow nload s, calen dar a nd conta cts b efore ha nding in y our
Son y Eri css on Pr oduct fo r rep air o r rep lac ement .
Conditions
1.
Thi s Lim ite d War ranty is vali d onl y if the orig inal pro of of
pur chase fo r thi s Pro duc t iss ued b y a S ony Eric sson aut horis ed
dea ler s pec ifyin g the da te of purc hase and seri al nu mbe r**, is
pre sente d w ith t he Pr odu ct to be r epair ed or re place d.
Son y Eri css on re serve s t he ri ght t o ref use warr anty ser vice if
thi s inf orm ation has bee n rem oved or ch ang ed af ter t he origi nal
pur chase of the Produ ct from the d ealer .
2.
If Sony Eri csson repa irs or r eplac es th e P roduc t, th e r epair for
the defe ct conce rned, or the repla ced P rod uct s hall be
war rante d f or th e rem ain ing t ime o f the or igina l war ran ty pe riod
or for n ine ty (9 0) da ys from the d ate o f r epair , whi che ver i s
11
Page 22

lon ger. Rep air o r rep lac ement may invol ve the u se of fu nctio nally
equ ivale nt recon ditio ned unit s. Re place d p arts or co mpo nents
wil l bec ome the prope rty of S ony E ricss on.
3.
Thi s war ran ty do es no t c over any f ailur e o f the Prod uct due to
nor mal w ear and tear, or due to mi suse, in cludi ng bu t n ot
lim ited to use i n oth er than the n ormal an d cus tomar y m anner ,
in accor dan ce wi th th e S ony E ricss on in str uctio ns fo r u se an d
mai ntena nce of t he Pr odu ct. N or do es th is warra nty c ove r any
fai lure of the P roduc t d ue to acci dent, so ftwar e or har dware
mod ifica tio n or adjus tme nt, a cts o f God or dama ge re sul ting
fro m liq uid .
A r echar gea ble b atter y c an be char ged a nd disch arged mo re
tha n a h und red t imes. Ho wever , it will eve ntual ly we ar out – this
is not a de fect and c orr espon ds to norm al wear and t ear . Whe n
the talk -ti me or stan dby time is n otice abl y sho rter, it is t ime t o
rep lace the batt ery. Son y Eri csson reco mme nds t hat y ou use
onl y bat ter ies a nd ch arg ers a pprov ed by So ny Er icsso n.
Min or va ria tions in d isp lay b right ness and colo ur ma y o ccur
bet ween pho nes. There ma y be tiny brigh t o r dar k dot s o n the
dis play. Th ese a re ca lle d def ectiv e pix els and occur wh en
ind ividu al dots have mal funct ioned and can not be ad jus ted.
Two defe cti ve pi xels are deem ed ac cepta ble .
Min or va ria tions in c ame ra im age a ppear anc e may occu r
bet ween pho nes. This is nothi ng un commo n a nd is not reg arded
as a def ect ive c amera mo dule.
4.
Sin ce th e c ellul ar sy ste m on which the Pro duct is to op erate is
pro vided by a ca rrier in depen dent from Son y Eri csson ,
Son y Eri css on wi ll no t b e res ponsi ble f or the o perat ion ,
ava ilabi lit y, co verag e, servi ces o r ran ge of th at sy ste m.
5.
Thi s war ran ty do es no t c over Produ ct fa ilu res c aused by
ins talla tio ns, m odifi cat ions, or r epair or open ing o f t he Pr oduct
per forme d b y a n on-So ny Erics son a uthor ise d per son.
6.
The warr ant y doe s not co ver P roduc t fai lur es wh ich h ave been
cau sed b y u se of acce sso ries or ot her p eri phera l dev ice s whi ch
are not Son y Eri csson br anded orig inal acc essor ies i nte nded for
use with th e Pro duct.
12
Page 23

Son y Eri css on di sclai ms any a nd al l war ran ties, whet her
exp ress or impli ed, f or failu res c aused to the Produ ct or
per ipher al devic es as a resul t of virus es, troj an ho rse s, sp yware ,
or other ma licio us so ftw are. Sony Erics son stro ngly
rec ommen ds that you i nst all a pprop riate vi rus p rotec tio n
sof tware on your Prod uct and any p eriph era l dev ices con necte d
to it, a s a vaila ble, and upda te it regu lar ly, t o bet ter prot ect y our
dev ice. It is un derst ood , how ever, that su ch so ftwar e w ill n ever
ful ly pr ote ct yo ur Pr odu ct or its perip her al de vices an d
Son y Eri css on di sclai ms all w arran ties, wh ether expr ess or
imp lied, in case of f ail ure b y suc h ant ivi rus s oftwa re to fu lfil its
int ended pu rpose .
7.
Tam perin g w ith a ny of th e sea ls on the Pro duct will voi d the
war ranty .
8.
THE RE AR E N O EXP RESS WAR RANTI ES, W HETHE R W RITTE N
OR ORAL, OT HER T HAN T HIS PRIN TED L IMITE D W ARRAN TY.
ALL IMPL IED WARR ANTIE S, INCLU DING WITHO UT LIMIT ATION
THE IMPL IED WARR ANTIE S O F MER CHANT ABILI TY OR
FIT NESS FOR A PA RTICU LAR PURP OSE, ARE L IMI TED T O THE
DUR ATION OF THIS LIMI TED WARR ANTY. IN N O E VENT SHALL
SON Y ERI CSS ON OR ITS LIC ENSOR S BE LIABL E F OR
INC IDENT AL OR CO NSEQU ENT IAL D AMAGE S OF ANY NATU RE
WHA TSOEV ER, INCL UDING BU T NOT LIMI TED T O L OST
PRO FITS OR COMME RCIAL LO SS TO THE FULL EXT ENT
THO SE DA MAG ES CA N BE DIS CLAIM ED BY LAW.
Som e cou ntr ies/s tates do not allow the exc lusio n or lim itati on of
inc ident al or co nsequ ent ial d amage s, or li mitat ion o f t he du ratio n
of impli ed warra nties , s o the prec eding li mitat ions or exclu sions
may not app ly to you.
The warr ant y pro vided do es no t aff ect t he consu mer’s st atuto ry
rig hts u nde r app licab le legis latio n in for ce, n or th e c onsum er’s
rig hts a gai nst t he de ale r ari sing from the ir sa les / pu rchas e
con tract .
*Geographical scope of the warranty
If you h ave purc hased yo ur Pr oduct in a co untry memb er of th e
Eur opean Ec onomi c Are a ( EEA) or in Swit zer land or th e R epubl ic
13
Page 24

of Turke y, and s uch P rod uct w as in tende d f or sa le in th e EEA or
in Switz erl and o r in Tur key, you c an ha ve your Produ ct servi ced i n
any EEA cou ntry or in Sw itzer land or in Tu rkey, unde r t he
war ranty co nditi ons p rev ailin g in the c oun try i n whi ch you r equir e
ser vicin g, provi ded t hat an i denti cal P rod uct i s sol d i n suc h
cou ntry by an au thori sed Sony Eric sson dis tribu tor. To find out i f
you r Pro duc t is sold in the c ountr y you ar e in, plea se call the l oca l
Son y Eri css on Ca ll Ce nte r. Pl ease obser ve that certa in servi ces
may not be avail able out side the c ountr y o f ori ginal pu rchas e, fo r
exa mple, du e to the f act that your Prod uct may have an inter ior o r
ext erior wh ich i s dif fer ent f rom e quiva len t mod els s old in o ther
cou ntrie s. Pleas e not e i n add ition that it may somet ime s not be
pos sible to repa ir SI M-l ocked Prod ucts.
** In so me count ries/ reg ions addit ional in forma tion (su ch as a
val id wa rra nty c ard) may be r eques ted.
Trademarks and acknowledgements
The Liqu id Ident ity l ogo and Xperi a are tr adema rks o r r egist ered
tra demar ks of So ny Er ics son M obile Comm uni catio ns AB .
Son y is a t radem ark o r a regi stere d tra dem ark o f Son y
Cor porat ion .
Eri csson is a tr adema rk or re giste red t rad emark of
Tel efona kti ebola get L M E ricss on.
Blu etoot h i s a t radem ark or a regi stere d t radem ark o f B lueto oth
SIG Inc. an d any use of such mark by So ny Erics son i s u nder
lic ense.
Oth er pr odu ct an d com pan y nam es me ntion ed herei n may be the
tra demar ks of th eir r esp ectiv e own ers.
Any righ ts not e xpres sly gran ted h erein ar e res erved .
14
Page 25

Support
Ang uilla 1-8 00-080- 9518
Ant igua an d
Bar buda
Arg entina 080 0-333-7 427
Aus tralia 130 0 650-0 50
The Bahama s 1-8 00-20 5-60 62
Bar bados 1-80 0-082 -9518
Bel gique/
Bel gië
Bel ize AN 815, PI N 559 7
Ber muda 1-80 0-083 -951 8
Bol ivia 800 -100-54 2
Bra sil 400 1-0444
Can ada 1 8 66 766 9374
Cay man
Isl ands
Cen tral an d
Sou thern
Afr ica
Čes ká
rep ublika
Chi le 800 -646-42 5
Col ombia 018 00-09 66-080
Cos ta Rica 0 8 00 01 1 04 00
Dan mark 333 1 282 8 quest ions. DK@supp ort.s onyeric sson. com
(To ll Free )
1-8 00-081- 9518
(To ll Free )
(nú mero gr atuit o)
(To ll Free )
(To ll Free )
(To ll Free )
02- 0745 16 11 que stion s.BE@ supp ort.s onyeric sson. com
(To ll Free )
(To ll Free )
(nú mero gr atuit o)
(li gação g ratui ta)
(To ll Free / sa ns
fra is)
1-8 00-084- 9518
(To ll Free )
+27 11 506 0123 qu estio ns.CF @sup port. sonyeri csson .com
084 4 550 0 55 qu estio ns.C Z@sup port. sony erics son.com
(nú mero gr atuit o)
(nú mero gr atuit o)
(nú mero gr atuit o)
que stions. CO@su pport.s onyer icsson. com
que stions. CO@su pport.s onyer icsson. com
que stions. CO@su pport.s onyer icsson. com
que stions. AU@su pport.s onyer icsson. com
que stions. CO@su pport.s onyer icsson. com
que stions. CO@su pport.s onyer icsson. com
que stions. CO@su pport.s onyer icsson. com
que stions. CO@su pport.s onyer icsson. com
que stions. CO@su pport.s onyer icsson. com
que stions. BR@su pport.s onyer icsson. com
que stions. CA@su pport.s onyer icsson. com
que stions. CO@su pport.s onyer icsson. com
que stions. CO@su pport.s onyer icsson. com
que stions. CO@su pport.s onyer icsson. com
que stions. CO@su pport.s onyer icsson. com
15
Page 26

Deu tschlan d 0 180 5 34 20 20
Dom inica 1- 800- 085-9 518
Ecu ador 1-80 0-01 02-50
Ees ti 06 0 32 03 2 que stions. EE@su pport.s onyer icss on.co m
Egy pt/ مصر
Ελλ άδα
El Salvado r 800- 6323 (núme ro
Esp aña 902 180 57 6
Fra nce 09 69 32 21 21
Gua temala 1- 800-3 00-0057
Haï ti/Ayit i AN 193, PI N 559 8
Hon duras AN 8 00012 2, PI N
Hon g Kong/ 香港+85 2 8203 8863 quest ions. HK@supp ort.s onye ricss on.co m
Hrv atska 062 000 0 00 qu estio ns.H R@sup port. sony erics son.com
Ind ia/ 180 0 11 1800 (Tol l
Ind onesia 021 2701388 que stions. ID@su pport.s onyer icsson. com
Ire land 18 50 5 45 88 8
Ita lia 06 4889520 6
Jam aica 1-80 0-44 2-347 1
(or tsüblic he
Geb ühren)
(To ll Free )
(nú mero gr atuit o)
167 27 que stions. EG@su pport.s onyer icsson. com
801 11 810 810
+30 210 89 9 19
19 (από κι νητ ό
τηλ έφωνο )
gra tuito)
(ta rifa lo cal)
09 69 32 2 1 22
(Xp eria™
uni quement )
(nú mero gr atuit o)
(nu méro gr atuit /
nim ewo gra tis)
559 9 (núme ro
gra tuito)
Fre e)
+91 (011)
390 11111
(Lo cal rat e)
(ta riffa l ocale )
(To ll Free )
que stions. DE@su pport.s onyer icsson. com
que stions. CO@su pport.s onyer icsson. com
que stions. CO@su pport.s onyer icsson. com
que stions. GR@su pport.s onyer icsson. com
que stions. CO@su pport.s onyer icsson. com
que stions. ES@su pport.s onyer icsson. com
que stions. FR@su pport.s onyer icsson. com
que stions. CO@su pport.s onyer icsson. com
que stions. CO@su pport.s onyer icsson. com
que stions. CO@su pport.s onyer icsson. com
que stions. IN@su pport.s onyer icsson. com
que stions. IE@su pport.s onyer icsson. com
que stions. IT@su pport.s onyer icsson. com
que stions. CO@su pport.s onyer icsson. com
16
Page 27

Κύπ ρος/
Kıb rıs
Lat vija 67 21 43 01 ques tions .LV@ suppo rt.sony erics son.com
Lie tuva 8 700 5503 0 q uesti ons.LT@ suppo rt.s onyer icsso n.co m
Mag yarorsz ág 01 880 47 47 ques tions .HU@ suppo rt.so nyer icsso n.com
Mal aysia 1800 -88-990 0
Mar oc/
Méx ico 0 18 00 00 0 472 2
Ned erland 0900 89 98318 que stio ns.NL @supp ort. sonye ricsson .com
Ned erlands e
Ant illen
New Zealan d 080 0-10 0-150
Nic aragua AN 1800- 0166,
Nor ge 815 00 840
Öst erreich 0810 20 0 245 que stio ns.AT @supp ort. sonye ricsson .com
Pak istan/
Pan amá 00 800-7 87-00 09
Par aguay 00 9 800 5 4 200 32
Per ú 0800- 532-3 8
Phi lippine s/
Pil ipinas
Pol ska + 48 22 22 77 444 quest ions. PL@supp ort.s onye ricss on.co m
Por tugal 8 08 20 4 46 6
Rep ública
Dom inicana
Rom ânia +4 0 21 40 1 040 1 que stions. RO@su pport.s onyer icsson. com
Sai nt Kitt s
and Nevis
080 0 90 90 9 quest ions. CY@supp ort.s onye ricss on.co m
(To ll Free / be bas
tol )
+21 2 2 295 8 344 que stions. MA@su pport.s onyer icsson. com
المغرب
(nú mero gr atuit o)
001 -866-50 9-866 0
(gr atis nu mmer)
(To ll Free )
PIN 5600 ( númer o
gra tuito)
(lo kaltaks t)
021 - 111 22 55 7 3 que stions. PK@su pport.s onyer icss on.co m
پاکستان
(nú mero gr atuit o)
(nú mero gr atuit o)
(nú mero gr atuit o)
+63 2 7891 860 ques tions .PH@sup port. sonyeri csson .com
(ch amada l ocal)
1-8 00-751- 3370
(nú mero gr atuit o)
1-8 00-087- 9518
(To ll Free )
que stions. MY@su pport.s onyer icsson. com
que stions. MX@su pport.s onyer icsson. com
que stions. CO@su pport.s onyer icsson. com
que stions. NZ@su pport.s onyer icsson. com
que stions. CO@su pport.s onyer icsson. com
que stions. NO@su pport.s onyer icsson. com
que stions. CO@su pport.s onyer icsson. com
que stions. CO@su pport.s onyer icsson. com
que stions. CO@su pport.s onyer icsson. com
que stions. PT@su pport.s onyer icsson. com
que stions. CO@su pport.s onyer icsson. com
que stions. CO@su pport.s onyer icsson. com
17
Page 28

Sai nt Vinc ent
and the
Gre nadines
Sch weiz/
Sui sse/
Svi zzera
Sin gapore +65 67 44 07 33 que stions. SG@su pport.s onyer icss on.co m
Slo vensko 02 5 443 6 443 q uest ions. SK@su ppor t.son yericss on.co m
Sou th Afri ca 0861 63222 2 q uesti ons.Z A@su pport .sony eric sson. com
Sou th Κore a/
대한민 국
Suo mi 0 9 299 200 0 qu estio ns.FI @sup port. sonye rics son.c om
Sve rige 0 13 2 4 45 00
Tri nidad a nd
Tob ago
Tür kiye + 90 21 2 473 77 7 7 q uesti ons.TR@ suppo rt.sony erics son. com
Uni ted
Kin gdom
Uni ted Sta tes 1 866 766 9374 ques tions .US@s uppo rt.so nyeri csso n.com
Uru guay 000- 401-7 87-01 3
Ven ezuela 0-800- 1-00- 2250
Việ t Nam 1900 15 25 (m iễn
Бел арусь
Бъл гария
Рос сия
Укр аїна
中国
台灣
ไทย
1-8 00-088- 9518
(To ll Free )
084 8 824 0 40 ques tions.C H@sup port.so nyeri csson.c om
(+8 2) 1588 4170 quest ions. KO@supp ort.s onye ricss on.co m
(lo kal tax a)
1-8 00-080- 9521
(To ll Free )
087 05 237 237
(Lo cal rat e)
(nú mero gr atuit o)
(nú mero gr atuit o)
phí )
8 8 2 00 36 1 000 1 qu estio ns.BY @sup port. sonye rics son.c om
080 0 1 877 8 ques tion s.BG@ suppo rt.s onyer icsso n.co m
+7 (495) 7 87098 6 ques tion s.RU@ suppo rt.s onyer icsson. com
(+3 80) 44 590
151 5
+97 1 4 391 9 880 qu estio ns.J O@sup port. sony erics son.com
الأردن
+97 1 4 391 9 880
الإمارات
(UA E)
العربية
المتحدة
+97 1 4 391 9 880 qu estions .KW@s upport. sonye rics son.c om
الكويت
800 -8200-7 27 que stions. SA@su pport.s onyer icsson. com
المملكة
العربية
السعودية
+86 400 81 0 000 0 que stion s.CN@ supp ort.s onyeric sson. com
+88 6 2 256 25511 q uesti ons.TW@ suppo rt.sony erics son.com
02 2483 03 0 q uesti ons.TH@ suppo rt.sony erics son.com
que stions. CO@su pport.s onyer icsson. com
que stions. SE@su pport.s onyer icsson. com
que stions. CO@su pport.s onyer icsson. com
que stions. GB@su pport.s onyer icsson. com
que stions. CO@su pport.s onyer icsson. com
que stions. CO@su pport.s onyer icsson. com
que stions. VN@su pport.s onyer icsson. com
que stions. UA@su pport.s onyer icsson. com
que stions. AE@su pport.s onyer icsson. com
18
Page 29

Page 30

www.sonyericsson.com
Sony Ericsson Mobile Communications AB
SE-221 88 Lund, Sweden
1222-9269.1
 Loading...