

Sony A1021062 User Manual
J210-UG-EN.book Page 1 Tuesday, June 28, 2005 1:32 PM

J210-UG-EN.book Page 1 Tuesday, June 28, 2005 1:32 PM
Contents
Getting to know your phone . . . . . . . . . . . . . . . . . . . 4
Icons . . . . . . . . . . . . . . . . . . . . . . . . . . . . . . . . . 9
Menu overview . . . . . . . . . . . . . . . . . . . . . . . . 11
Calling . . . . . . . . . . . . . . . . . . . . . . . . . . . . . . . . . . 15
Messaging . . . . . . . . . . . . . . . . . . . . . . . . . . . . . . . 31
Personalizing your phone . . . . . . . . . . . . . . . . . . . 38
Internet . . . . . . . . . . . . . . . . . . . . . . . . . . . . . . . . . 47
More features . . . . . . . . . . . . . . . . . . . . . . . . . . . . . 57
Security . . . . . . . . . . . . . . . . . . . . . . . . . . . . . . . . . 61
Troubleshooting . . . . . . . . . . . . . . . . . . . . . . . . . . . 64
Additional information . . . . . . . . . . . . . . . . . . . . . . 67
Index . . . . . . . . . . . . . . . . . . . . . . . . . . . . . . . . . . . 78
1

J210-UG-EN.book Page 2 Tuesday, June 28, 2005 1:32 PM
Sony Ericsson
GSM 900/1800/1900
This user guide is published by Sony Ericsson Mobile
Communications AB, without any warranty. Improvements
and changes to this user guide necessitated by
typographical errors, inaccuracies of current information,
or improvements to programs and/or equipment, may be
made by Sony Ericsson Mobile Communications AB at any
time and without notice. Such changes will, however, be
incorporated into new editions of this user guide.
All rights reserved.
Sony Ericsson Mobile Communications AB, 2005
©
Publication number: AE/LZT 108 7897 R2A.
Please note:
Some of the services in this user guide are not supported by
all networks. This also applies to the GSM International
Emergency Number 112.
Please contact your network operator or service provider if
you are in doubt whether you can use a particular service
or not.
Please read the Guidelines for safe and efficient use and
the Limited warranty chapters before you use your mobile
phone.
T9™ Text Input is a trademark or a registered trademark of
Tegic Communications.
T9™ Text Input is licensed under one or more of the
following:
U.S. Pat. Nos. 5,818,437, 5,953,541, 5,187,480, 5 ,945,928,
and 6,011,554;
Canadian Pat. No. 1,331,057;
2

J210-UG-EN.book Page 3 Tuesday, June 28, 2005 1:32 PM
United Kingdom Pat. No. 2238414B;
Hong Kong Standard Pat. No. HK0940329;
Republic of Singapore Pat. No. 51383;
Euro. Pat. No. 0 842 463 (96927260.8) DE/DK, FI, FR, IT,
NL, PT, ES, SE, GB; and additional patents are pending
worldwide.
Your mobile phone has the capability to download, store
and forward additional content, e.g. ringtones. The use of
such content may be restricted or prohibited by rights of
third parties, including but not limited to restriction under
applicable copyright laws. You, and not Sony Ericsson, are
entirely responsible for additional content that you
download to or forward from your mobile phone. Prior to
your use of any additional content, please verify that your
intended use is properly licensed or is otherwise authorized.
Sony Ericsson does not guarantee the accuracy, integrity or
quality of any additional content or any other third party
content. Under no circumstances will Sony Ericsson be
liable in any way for your improper use of additi onal cont ent
or other third party content.
Other product and company names may be the trademarks
of their respective owners.
Any rights not expressly granted herein are reserved.
3
O
k
J210-UG-EN.book Page 4 Tuesday, June 28, 2005 1:32 PM
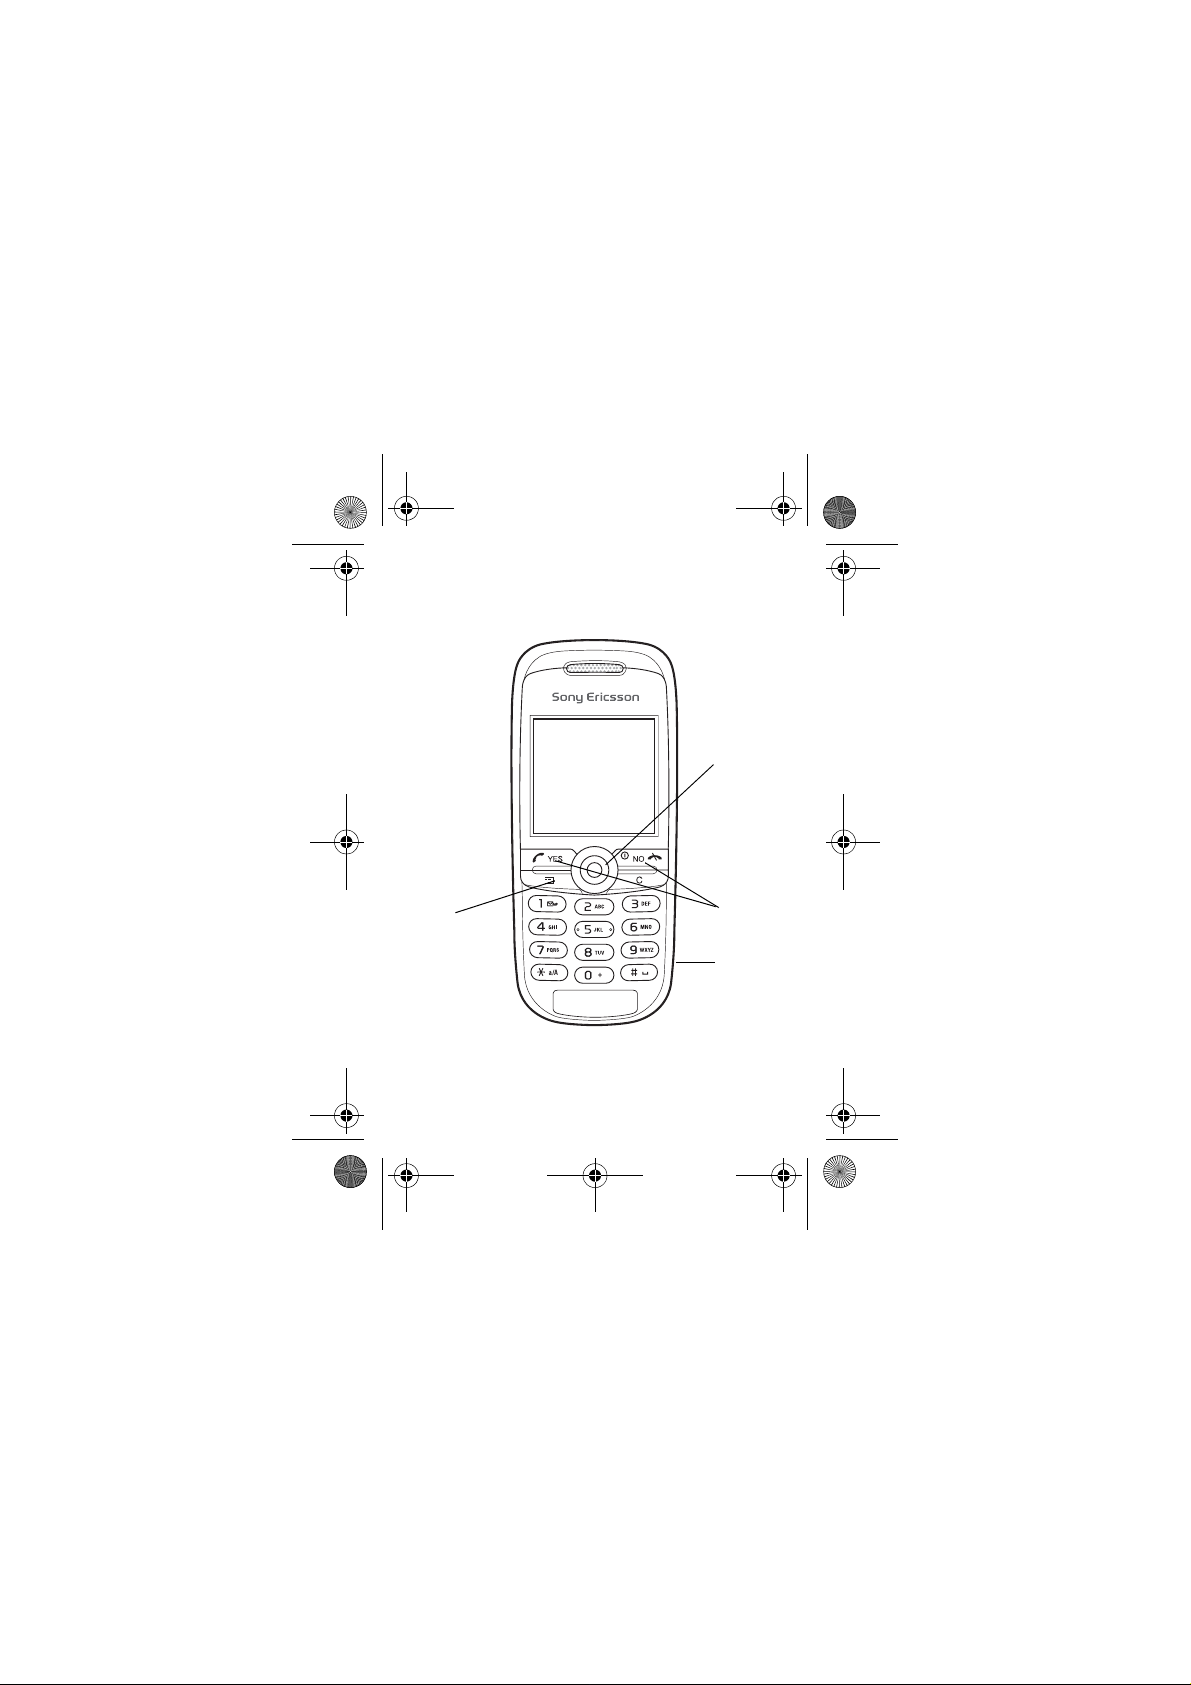
Getting to know your phone
Navigation
key
ey
4
ption
YES and
NO keys
Infrared
port

J210-UG-EN.book Page 5 Tuesday, June 28, 2005 1:32 PM
Assembling your phone
Before you can use your phone you need to:
• Insert the SIM card.
• Attach and charge the b attery.
User guide symbols
The following symbols appear in this user guide:
} Use the navigation key to scroll and select.
% See also page.xx
Important
Note
This symbol indicates that a service o r function is
network – or subscription-dependent. Because of this,
all menus may not be available in your phone. Please
consult your network operator for more information.
SIM card and battery information
The SIM (Subscriber Identity Module) card , which you get
from your network operat or, cont ains infor mation abo ut yo ur
subscription and phonebook. Alway s turn of f the phone and
detach the charger before you insert or remove a SIM card.
If you have been using a SIM card in another phone,
make sure that your information is saved to the SIM
card before you remove it from the other phone.
% 17 Phonebook.
5
J210-UG-EN.book Page 6 Tuesday, June 28, 2005 1:32 PM
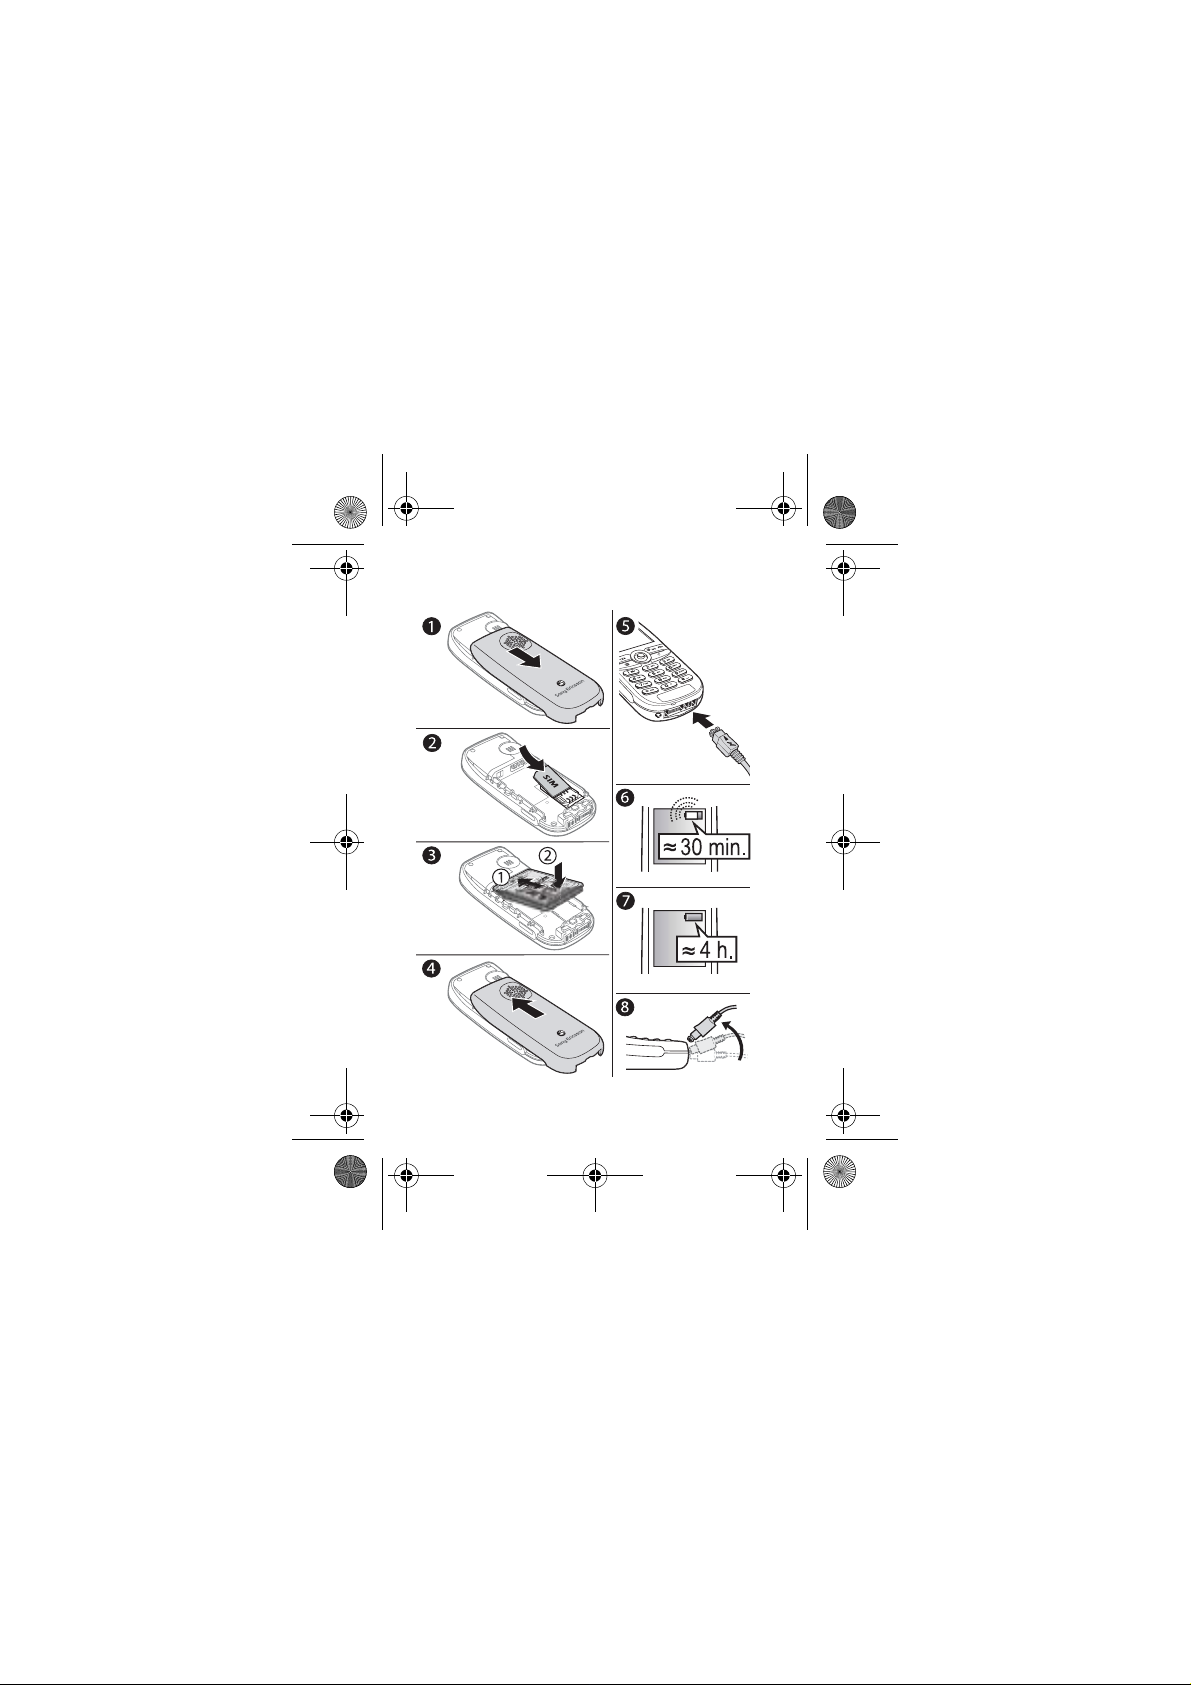
To insert the SIM card and charge the
battery
6

J210-UG-EN.book Page 7 Tuesday, June 28, 2005 1:32 PM
1 Remove the battery cover as shown in the picture.
2 Insert the SIM card. Make sure the SIM card is placed
under the silvery holders.
3 Place the battery on the back of the phone with the label
side up and the connectors facing each other.
4 Place the battery cover as sho wn in the picture and slide
it into place.
5 Connect the charger to the phone at the flash symbol.
The flash symbol on the charger plug must face upwards.
6 It may take up to 30 minutes before t he battery icon
appears on the screen.
7 Wait approximately 4 hours or until the battery icon
indicates that the battery is fully charged. If you do not
see the battery icon after this time, press any key to
activate the screen.
8 Remove the charger by tilting the plug upwards.
Y ou mu st reset the time and date whe n you remove the
battery.
PIN
You may need a PIN (Personal Id entity Number) to activate
the services in your phone. Your PIN is provided by your
network operator.
If you make a mistake while entering your PIN, delete the
number by pressing .
If you enter the wrong PIN three times in a row, the
SIM card is blocked and the message PIN blocked
appears. To unblock it, you need to enter your PUK
(Personal Unblocking Key), % 61 SIM card lock.
7
J210-UG-EN.book Page 8 Tuesday, June 28, 2005 1:32 PM
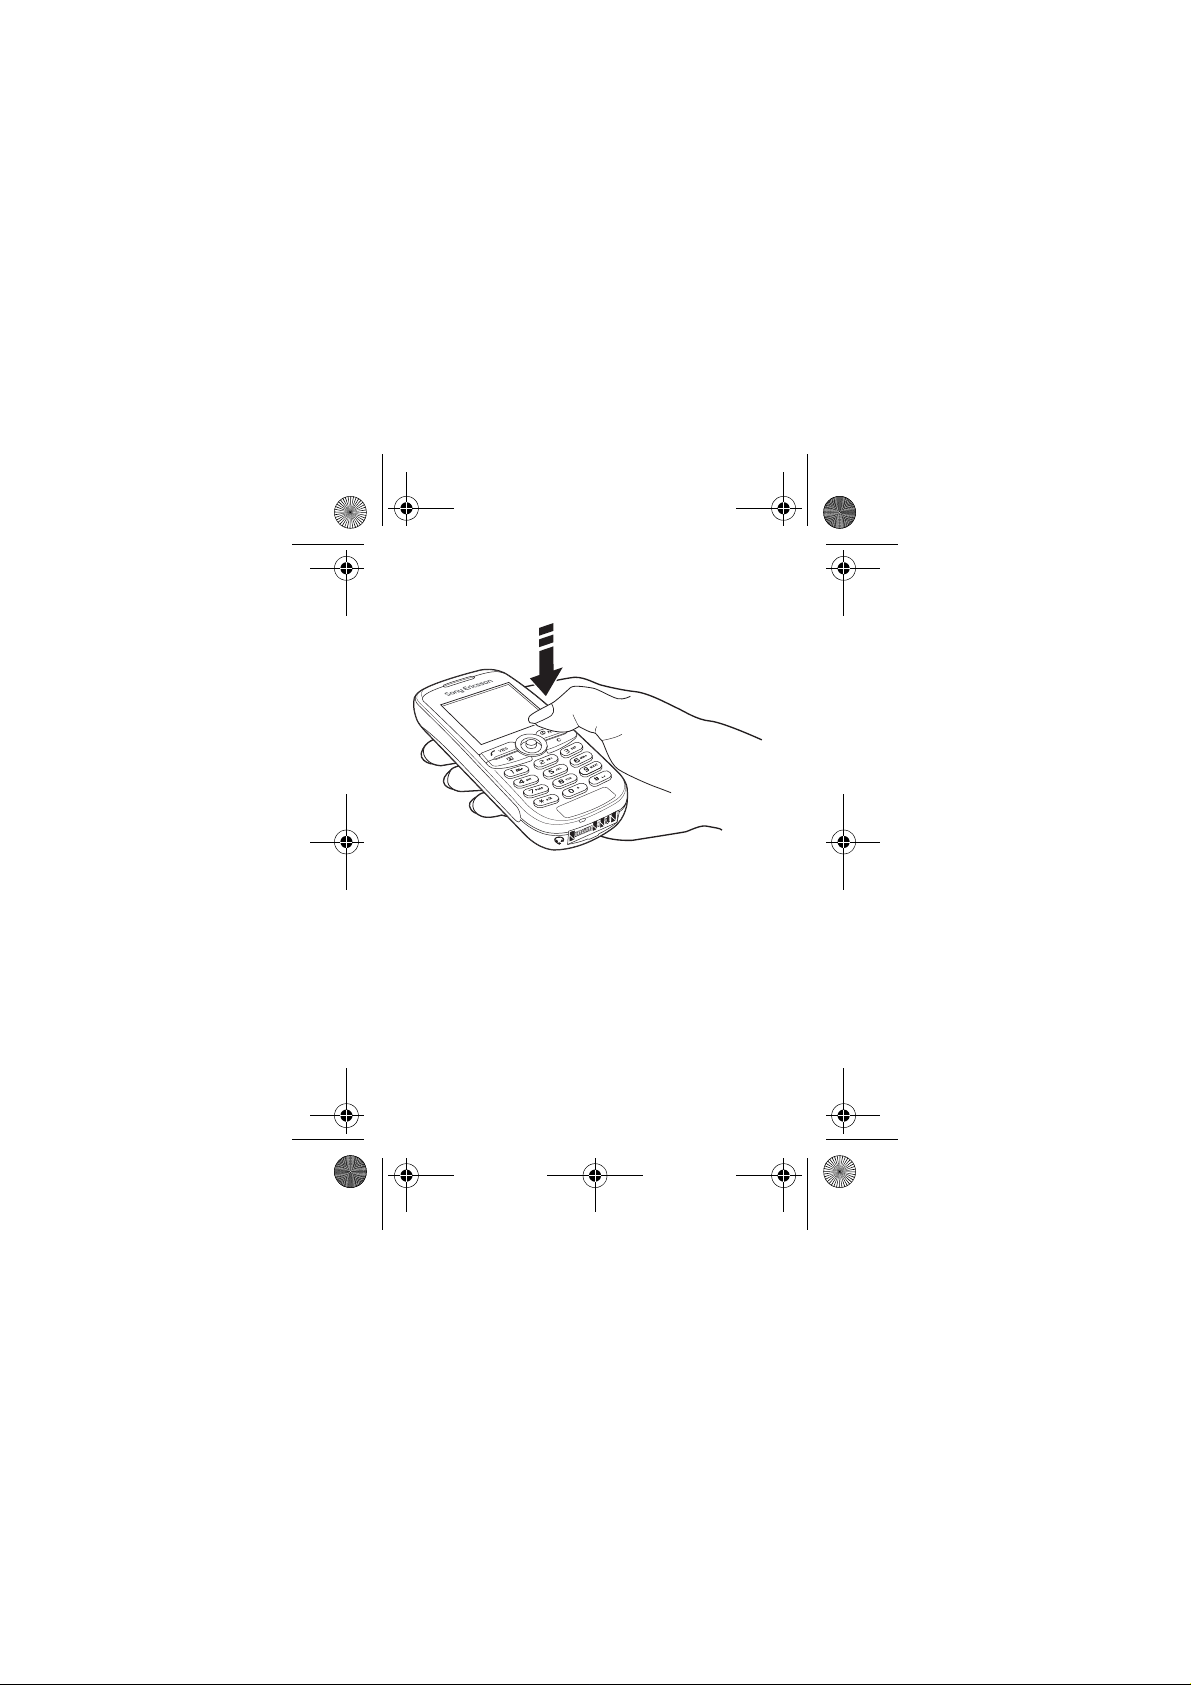
To turn the phone on and off
• Press and hold
• Enter your PIN, if requested.
• Press and hold NO to turn off the phone.
To make and receive calls
• Enter the area code and pho ne number } YES to make the
call. } NO to end the call.
• When the phone rings }
NO.
YES.
8

J210-UG-EN.book Page 9 Tuesday, June 28, 2005 1:32 PM
Icons
The following icons appear on the desktop and in standby.
Tells yo u the status of the battery.
Tells you the strength of the GSM network s i gnal.
Calls – handling of call time, call cost information
and ongoing calls.
Internet services – gives you access to Internet
services.
My shortcuts – create your own menu for the
functions you use most often.
Fun & Games – games and applications.
Messaging – handling of text (SMS), p icture
(MMS) and voice messages.
Organizer – calendar, events, alarm clock and other
extras.
Connectivity – networks and data communication
settings, receive items via infrared.
Phonebook – your personal phonebook.
Settings – personal settings including profiles,
display, language, time and locks.
9

J210-UG-EN.book Page 10 Tuesday, June 28, 2005 1:32 PM
Navigating the menus
The main menus are shown as icons on the desktop.
•Press (navigation key) to go to the desktop or to select
highlighted items.
•Press to move through the menus.
•Press NO to go back one level in the menus.
• Press and hold NO to return to standby.
Shortcuts
From standby, you can use to go directly to a
function.
To edit a standby shortcut
1 } My shortcuts } YES and select an existing shortcut you
want to edit } YES .
2 Scroll to and select a shortcut } YES.
10

J210-UG-EN.book Page 11 Tuesday, June 28, 2005 1:32 PM
Menu overview
1.Calls
Missed calls
Call list
Manage calls
Time and cost
Next call
Options
4.Fun & Games
Games
My pictures
More pictures
My sounds
More sounds
Themes
Composer
7.Connectivity
Infrared port
GSM Networks
Data comm.
2.Internet services
Sony Ericsson
Bookmarks
Push inbox
Enter address
Resume
Select profile
Advanced
Options
5.Messaging
Text message
Picture message
Call voicemail
Area info
Options
8.Phonebook
Find and call
Add number
Find and edit
Picture
Personal rings
Groups
Email addresses
Options
Memory status
Special numbers
3.My shortcuts
Navigation key up
Nav.key down
Navigation key left
Navigation key right
6.Organizer
Calendar
Alarms
Timer
Stopwatch
Calculator
9.Settings
Sounds & alerts
Profiles
Display
Language
Time and date
Locks
Handsfree
Status
Master reset
11

J210-UG-EN.book Page 12 Tuesday, June 28, 2005 1:32 PM
Phone language
Most SIM cards automatically set the language used in the
menu to the language of the country where you bought your
SIM card. If this is not the case, the predefined lang uage
is English.
You can always choose Automatic by pressing 8888
in standby mode.
You can always choose English by pressing 0000
in standby.
To change the phone language
1 } Settings } YES } Language } YES } Menus } YES.
2 Select a language }YES.
You can press instead of the YES key to select
an item.
More options
Press to enter a list of options. There are different
alternatives in the list of options depending on where you are
in the menus.
Delete and edit items
Two ways to delete items
• Select an item and press .
• Select an item, press } Delete.
To edit items
Select an item, press } Edit.
12
J210-UG-EN.book Page 13 Tuesday, June 28, 2005 1:32 PM
Entering letters and characters
When writing messages and notes there are two ways to enter
letters and characters:
• Multitap text input
• T9™ Text Input
To enter letters using multitap input
• Press - until the desired character appears on th e
screen.
• Press to shift between capital and lower-case letters.
• Press and hold - to enter numbers.
• Press to delete letters and numbers.
• Press for the most common punctuation marks.
• Press to add a space.
T9™ Text Input
The T9™ Text Input method uses a built-in dictionary to
recognize the most commonly used word for each sequence
of key presses. This way, you press each key only once, even
if the letter you want is not the first letter o n the key.
To enter letters using T9 Text Input
1 For example, if you want to write the word “Jane”, press
, , , .
2 If the word shown is the one you want, press to
accept and add a space. To accept a wo rd withou t addin g
a space, press . If the word shown is not the one you
want, press or repeatedly to view alternative
words. Accept a word and add a space by pressing .
3 Continue writing your message. To enter a full stop or
other punctuation marks, press and then or
repeatedly. Accept by pressing .
13

J210-UG-EN.book Page 14 Tuesday, June 28, 2005 1:32 PM
To switch between writing methods
Before, or while entering l etters, press and hold to
switch between writing methods.
Options list
Press to enter a list of options that offers different
alternatives when writing a message.
14

J210-UG-EN.book Page 15 Tuesday, June 28, 2005 1:32 PM
Calling
Making and receiving calls
Before you can make or receive calls, you must turn on the
phone and be within range of a network, % 8 To turn the
phone on and off.
If your subscription includes the Calling Line
Identification service and the calle r’s number is identified,
the number is displayed. If you have saved the number in the
phonebook, the name and number are displayed. If the
number is a restricted number, Withheld is displayed.
To make a call
Enter the area code and phone number } YES to make the call.
} NO to end the call.
To re-dial a number
If the connection failed and Retry? is displayed } YES.
Do not hold the phone to your ear while waiting .
When the call is connected, the phone gives a
loud signal.
To answer or reject a call
} YES to answer a call. } NO to reject a call.
To change the speaker volume during a call
Press or .
To check your missed calls
1 When Missed calls: is displayed, }
missed calls.
2 To call a number, scroll to the number }
YES to display the
YES.
15

J210-UG-EN.book Page 16 Tuesday, June 28, 2005 1:32 PM
To make international calls
1 Press and hold until a + sign appears on the screen.
2 Enter the country code, area code (without the leading
zero) and phone number }
YES.
Emergency calls
Your phone supports the inter national emergency numbers,
112, 911 and 08. These numbers can normally be used to
make an emergency call in any country, with or without a
SIM card inserted, if a GSM network that supports these
numbers is within range. Your network operator may have
saved additional local emergency numbers on the SIM card.
To make an emergency call
Enter, for example, 112 (the international emergency
number) } YES.
Some network operators may require that a SIM card
is inserted, and in some cases that the PIN has been
entered as well.
To view your local emergency numbers
} Phonebook } YES }Special numbers } YES } Emergency
nos. } YES.
Call list
The numbers of the last calls that you have made or received
are saved in the call list.
To call a number from the call list
YES from standby and scroll to the name or number you
}
want to call }
YES.
16

J210-UG-EN.book Page 17 Tuesday, June 28, 2005 1:32 PM
To clear the call list
} Calls }
YES } Options } YES } Clear call list } YES.
Phonebook
Your phone has a phonebook in which you can save numbers
and accompanying names (an entry).
To save a number together with a name
1 } Phonebook }YES } Add number } YES.
2 Select Add new? or select any of the numbers from the
list by pressing YES.
3 Enter the phone number that you want to save } YES.
4 Enter a name that you want to associate with the phone
number } YES, %13 Entering letters and characters.
5 } YES again to save the entry in the suggested position.
Pictures and personal rings
You can add a picture and a ringtone to phonebook entries.
To add a picture to a phonebook entry
1 } Phonebook }YES } Picture } YES.
2 } Add new? } YES.
3 } YES to go to the phonebook } YES.
4 This takes you to Pictures. Select a picture } YES.
To add a ringtone to a phonebook entry
1 } Phonebook }
2 } Add new? }
3 Press to go to the phonebook }
4 This takes you to Personal rings. Select a ringtone } YES.
YES } Personal rings } YES.
YES.
YES.
17

J210-UG-EN.book Page 18 Tuesday, June 28, 2005 1:32 PM
To call a number saved in the phonebook
1 } Phonebook }
2 Enter the name or the first letter of the name }YES.
3 If the name displayed is not the on e you want, press
or until you find the correct name and number.
4 } YES to make the call.
YES } Find and call } YES.
Speed dialling
You can save the phone numbers that you wish to reach
easily in positions - in your phone.
To speed dial
From standby, enter the position number } YES.
Shortcuts to phonebook entries
When in standby, press and hold the keys - to find
an entry beginning with the first letter on that key, or the
closest following.
Ask to save
If Ask to save is on, you are asked if you want to save any
called or answered number that is not already saved in your
phonebook.
Your subscription must support the Calling Line
Identification Service, if you want to save answered
numbers.
To turn the Ask to save function on or off
} Phonebook }
YES } Options } YES } Ask to save } YES
select On or Off } YES.
18

J210-UG-EN.book Page 19 Tuesday, June 28, 2005 1:32 PM
To edit an entry in the phonebook
1 } Phonebook }
2 Enter the name or the first letter of the name }YES.
3 } YES to select the entry.
4 } Edit } YES.
5 When you have finished editing }YES to save your
YES } Find and edit } YES.
changes.
To delete an entry from the phonebook
1 } Phonebook }YES } Find and edit }YES.
2 Enter the name or the first few letter s of the na me }YES.
When the entry you want to delete is highlighted }YES.
3 } Delete } YES.
Sort order
You may change the sort orde r of your phon ebo ok en tries , so
that they are sorted according to their position number instead
of the name.
To choose a sort order
1 } Phonebook }YES } Options }YES } Sort order }YES.
2 Select a sort order } YES.
Phonebook memories
Phonebook entries are saved on your SIM card. The number
of entries you can save depends on your SIM card. You can
still access them if you use the card with another phone.
You can also save your entries in the phon e memory when
all SIM positions are occupied.
19

J210-UG-EN.book Page 20 Tuesday, June 28, 2005 1:32 PM
Choosing where to save an entry
• To sav e the number in the position suggested }
• To save the number in another position, press to
delete the position number, enter a new position number
} YES.
• To sav e the number in the phone me mory, you first need to
know how many positions you have got on your SIM card.
You can check this in the Memory status menu.
YES.
To check the status of the memories
} Phonebook } YES }Memory status } YES.
Replacing entries
If you try to save a phone number in a position which already
contains a phone number, the message Replace? appears.
Press YES to replace the number or press NO if you do not
want to replace the old number.
To delete all entries from the phone memory
1 } Phonebook }YES } Options }YES } Delete all } YES.
2 } YES again. If you delete all entries from the phone
memory, the entries on your SIM card are not deleted.
Copy phonebook entries
You can copy phonebook entries between your phone
memory and the SIM card.
To copy entries to the SIM card
} Phonebook }
YES } Options } YES } Copy all to SIM } YES.
To copy entries to the phone
} Phonebook } YES }Options } YES } Copy from SIM } YES.
20

J210-UG-EN.book Page 21 Tuesday, June 28, 2005 1:32 PM
Groups
You can create a group of phonebook entries. You can then
send a text message to all members of that group at the same
time % 31 Text messages.
To create a new group
1 } Phonebook }YES } Groups } YES } Add new? } YES.
2 Enter a name for the group } YES.
3 } Add new? } YES.
4 Select an entry in your phonebook } YES.
5 To add the next member, repeat steps 3 and 4.
6 } NO to leave the menu.
To add a member to an existing group
Select the group you want }Edit } YES } Add new? } YES.
Voicemail
If your subscription includes an answering service, callers
can leave a voicemail mess age when you cannot answer
acall.
Calling your voicemail service
You can easily call your voicemail service by pressing and
holding , if you have saved your voicemail nu mber in the
phone. You can get the number from your service provider.
To enter a voicemail number
} Messaging } YES } Options } YES }Voicemail no. } YES.
Call time
During a call, the duration of the call is shown in the display.
You can check the duration of your last call, outgoing calls
and the total time.
21

J210-UG-EN.book Page 22 Tuesday, June 28, 2005 1:32 PM
To check the call time and reset timer
1 } Calls }
2 Select an option } YES.
YES } Time and cost } YES } Call timers } YES.
3 Select Reset timers to reset the call time meter.
Call cost and cost information
Check with your network ope rator or service provider for
information about these services.
If you subscribe to cost information, you must ent er
your PIN2 to clear the cost or time counter,
% 61 Security for information about PIN2.
To check the call cost and reset cost meter
1 } Calls } YES } Time and cost } YES } Call costs } YES.
2 Select an option } YES.
3 Select Clear total cost to reset the call cost meter.
Setting the call cost
You can use the tariff function to specify the price per call
unit. If you do not specify a price p er call u nit , the nu mbe r of
call units is displayed.
To enter the price per call unit
1 } Calls } YES } Time and cost } YES } Call costs } YES
} Set tariff } YES.
2 Enter your PIN2 }
3 Select Change tariff }
4 Enter the code for the currency you want, (for example
GBP for Pounds Sterling) }
5 Enter the price per call unit }
point, press .
YES.
YES.
YES.
YES. To enter a decimal
22

J210-UG-EN.book Page 23 Tuesday, June 28, 2005 1:32 PM
Credit limit for calls
You can enter a total amount of money that can be used for
making calls. When the amount reaches zero, no more calls
can be made. Please note that the credit limi t is only an
estimated value.
To set a credit limit
1 } Calls }
2 Enter your PIN2 } YES.
3 Select Change } YES.
4 Enter an amount } YES.
YES } Time and cost } YES } Call costs } YES
} Set credit } YES.
Diverting calls
If you cannot answer incoming voice or data calls, you can
divert them to another number.
When the Restrict calls function is on, some Divert calls
options cannot be activated.
For voice calls, you can choose between the following divert
alternatives:
• All line 1 calls – divert all line 1 calls.
• All line 2 calls – divert all line 2 calls.
• When busy – divert calls if you are already on the phone.
• Not reachable – divert calls if you are unreachable.
• No reply – divert calls that you do not answer within a
specified time limit (operator-dependent).
To turn on a call divert
1 } Calls }
2 Select a call category and then a divert alternative }
3 Select Activate }
YES } Manage calls } YES } Divert calls } YES.
YES.
YES.
23

J210-UG-EN.book Page 24 Tuesday, June 28, 2005 1:32 PM
4 Enter the phone number to which you want your calls to
be diverted }
To turn off a call divert
1 } Calls } YES } Manage calls } YES } Divert calls } YES.
YES, or retrieve it from the phonebook.
2 Select a divert alternative }Cancel.
To check the status of a call divert
1 } Calls } YES } Manage calls } YES } Divert calls } YES.
2 Select a call type }YES.
3 Select the divert }YES } Get status } YES.
To check the status of all call diverts
} Calls } YES } Manage calls } YES } Divert calls } YES
} Check all } YES.
More than one call
You can handle more than one call simultaneously. For
example, you can put an ongoing call on hold, while you
make or answer a second call, and then switch between the
two calls. You cannot answer a third call without ending one
of the first two calls.
During a call the Ongoing call menu replaces the
Calls menu.
24
 Loading...