

Page 1

3-869-357-11 (1)
Network Camera
Recorder
User’s Guide
Software Version 1.0
© 2004 Sony Corporation
Page 2

Copyright Notice
©2004 Sony Corporation. All rights reserved. This
manual may not be reproduced, translated or reduced to
any machine readable form in whole or in part, without
prior written approval from Sony Corporation.
SONY CORPORATION PROVIDES NO
WARRANTY WITH REGARD TO THIS MANUAL
OR INFORMATION CONTAINED HEREIN AND
HEREBY EXPRESSLY DISCLAIMS ANY IMPLIED
WARRANTIES OF MERCHANTABILITY OR
FITNESS FOR ANY PARTICULAR PURPOSE WITH
REGARD TO THIS MANUAL OR SUCH
INFORMATION. IN NO EVENT SHALL SONY
CORPORATION BE LIABLE FOR ANY
INCIDENTAL, CONSEQUENTIAL OR SPECIAL
DAMAGES, WHETHER BASED ON TORT,
CONTRACT, OR OTHERWISE, ARISING OUT OF
OR IN CONNECTION WITH THIS MANUAL OR
INFORMATION CONTAINED HEREIN OR THE
USE THEREOF.
Sony Corporation reserves the right to make any
modification to this manual or the information contained
herein at any time without notice.
Microsoft and Windows are registered trademarks of
Microsoft Corporation.
Intel and Pentium are registered trademarks of Intel
Corporation.
All other brands and product names are trademarks or
registered trademarks of their respective owners.
2
Page 3

Table of Contents
Introduction
Features .................................................................. 4
System Configuration ............................................4
System Requirements ............................................ 5
Installing Network Camera Recorder ................. 5
Let’s Use Network Camera Recorder .................. 7
1.Start the Program ............................................. 7
2.Register the Camera ........................................8
3.Assign a Camera to the Monitor Window ....... 9
4.Control the Camera ....................................... 10
5.Record the Camera Image ............................. 10
6.Play the Recorded Image ............................... 10
Operations
Main Window of Network Camera Recorder ... 12
Monitoring ........................................................... 13
Using the Pop-up Menu in the Monitor Window
......................................................................... 13
Controlling the Camera ...................................... 15
Panning, Tilting and Digital Zooming
(SNC-M3/M3W only) .................................... 15
Panning & Tilting Using the Preset Function of the
Camera (SNC-M3/M3W only) ...................... 15
Recording the Camera Image (Manual Recording)
................................................................................ 17
Recording Using the Recorder Toolbar ............ 17
Playing Back Recorded Images .......................... 17
Searching for Recordings ................................. 17
Displaying a Preview Image .............................20
Playing Back the Located Recording ............... 20
Deleting Recordings .........................................21
Exporting to an AVI File .................................. 22
Setups
Setting a Camera ..................................................24
Camera Manager Window ................................24
Registering a Camera ........................................24
Setting the Camera Properties ...........................25
Changing the Camera Properties ......................27
Deleting a Camera ............................................27
Assigning a Camera to the Monitor Window ....28
Selecting a Layout ............................................28
Assigning a Camera to the Monitor Window ...29
Assigning a Storage Location ..............................29
Scheduling Recordings ........................................30
Schedule Editor .................................................30
Creating Recording Schedules ..........................31
Others
Troubleshooting ....................................................33
Glossary ................................................................34
34
Index ......................................................................35
Table of Contents
3
Page 4
Introduction
Introduction
Features
Network Camera Recorder is software exclusively
designed for use with Sony SNC-M1/M1W/M3/M3W
Network Cameras. Network Camera Recorder allows
you to monitor images of the cameras, record them and
play back the recorded data.
Monitoring of up to four cameras
This application allows simultaneous viewing of up to 4
cameras, as well as recording and playback. It also
provides for the control of the pan/tilt, and digital zoom.
Additionally, monitoring of the audio from the built-in
or connected microphone is possible.
Recording of camera image
This application allows recording of the image as well as
audio from the camera. A recording schedule can be set
by day, or by week at preset times, on each camera.
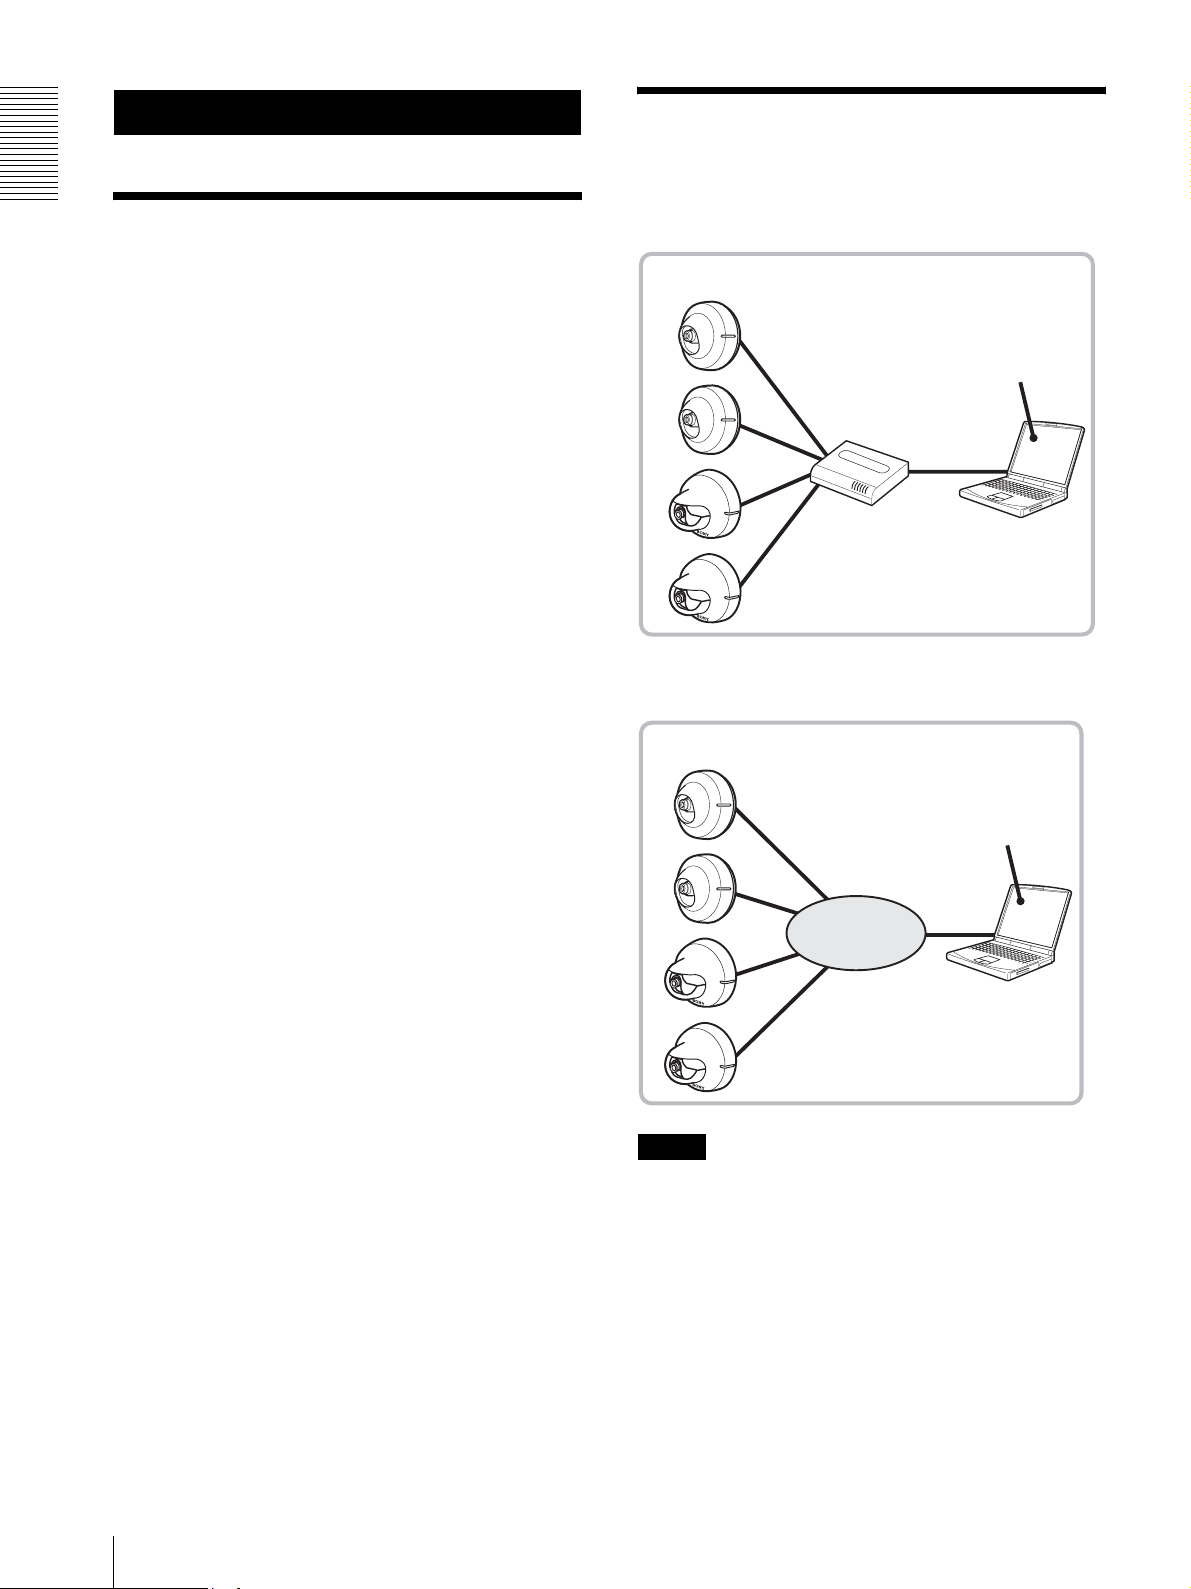
System Configuration
Cameras are connected to a network and controlled by a
computer with Network Camera Recorder installed.
LAN
Network Camera
SNC-M1/M1W/M3/M3W
Network Camera
Wired or
wireless*
Router or Hub
* Wireless LAN connection is available for the SNC-M1W and
SNC-M3W only.
Recorder
Computer
Playback of recorded data
This application allows various playback modes of the
recorded data, such as fast-forward, rewind, frame
playback, slow playback and cue to the point where
playback started.
Internet
Network Camera
SNC-M1/M1W/M3/M3W
Network Camera
Recorder
Internet
Computer
Note
Do not access the camera via Network Camera Recorder
or the Web browser while it is accessed by another
Network Camera Recorder.
4
Features / System Configuration
Page 5
System Requirements
Installing Network
OS
Windows 2000 Service Pack 4,
Windows XP Home Edition Service Pack 2,
Windows XP Professional Service Pack 2
Processor
Intel Pentium III, 1 GHz or higher
Memory
256 MB or more
Network
10 BaseT or more
Disk space required for installation
150 MB or more
Disk space required for recording (for one
hour)
JPEG (images only, frame rate: 10fps)
Image Quality QQVGA QVGA VGA
Level 1 110 MB 310 MB 960 MB
Level 5 170 MB 490 MB 1,500 MB
MPEG4 (images only)
Camera Recorder
To install Network Camera Recorder, open the software
package and perform the following procedure.
For installation, you should log in the computer as the
Power User or Administrator.
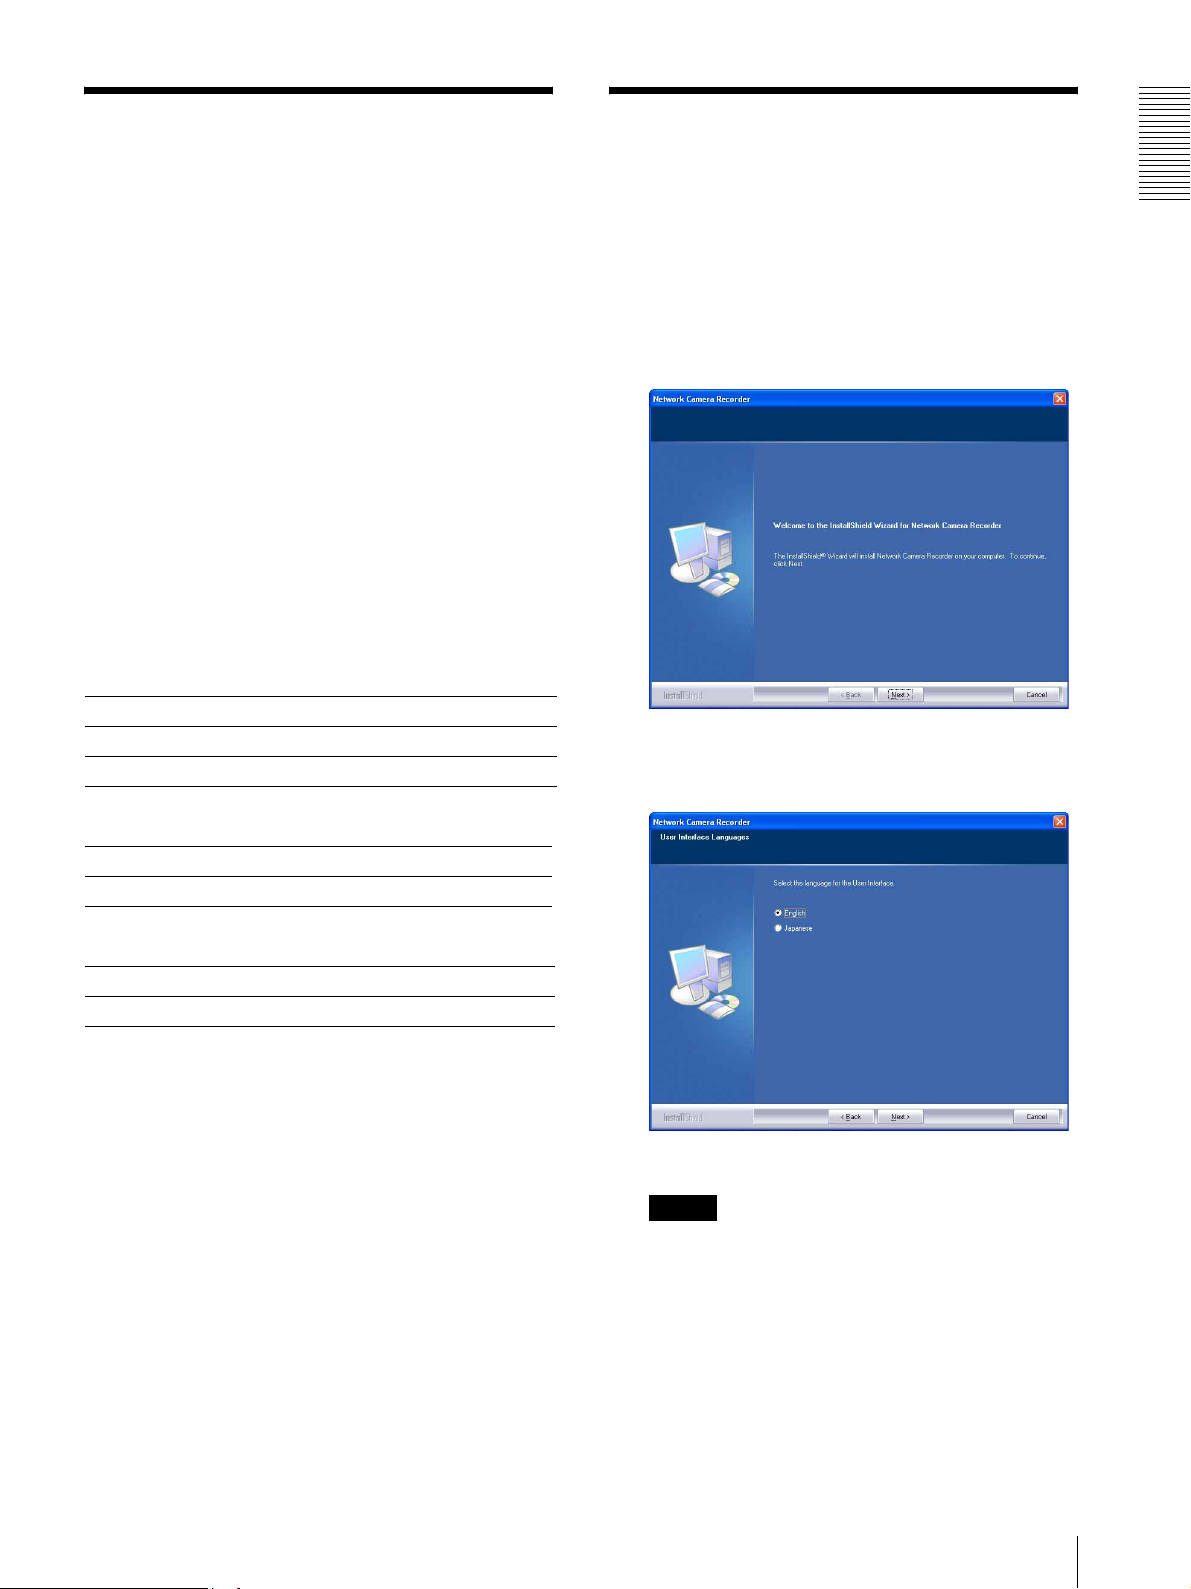
1
Double-click NCR_Setup.exe of the package.
The installation wizard appears on the screen.
2
Click Next.
The User Interface Languages dialog appears.
Introduction
64 kbps 2048 kbps
30 MB 900 MB
Audio
16 kbps 24 kbps 32 kbps 40 kbps
7 MB 11 MB 14 MB 18 MB
The required disk space depends on the settings,
recording scenes, status of communication line, etc. The
above are reference values.
Select the language you want to install.
Note
Once you have selected and installed the language,
you need to reinstall the program to change the
language.
System Requirements / Installing Network Camera Recorder
5
Page 6
Introduction
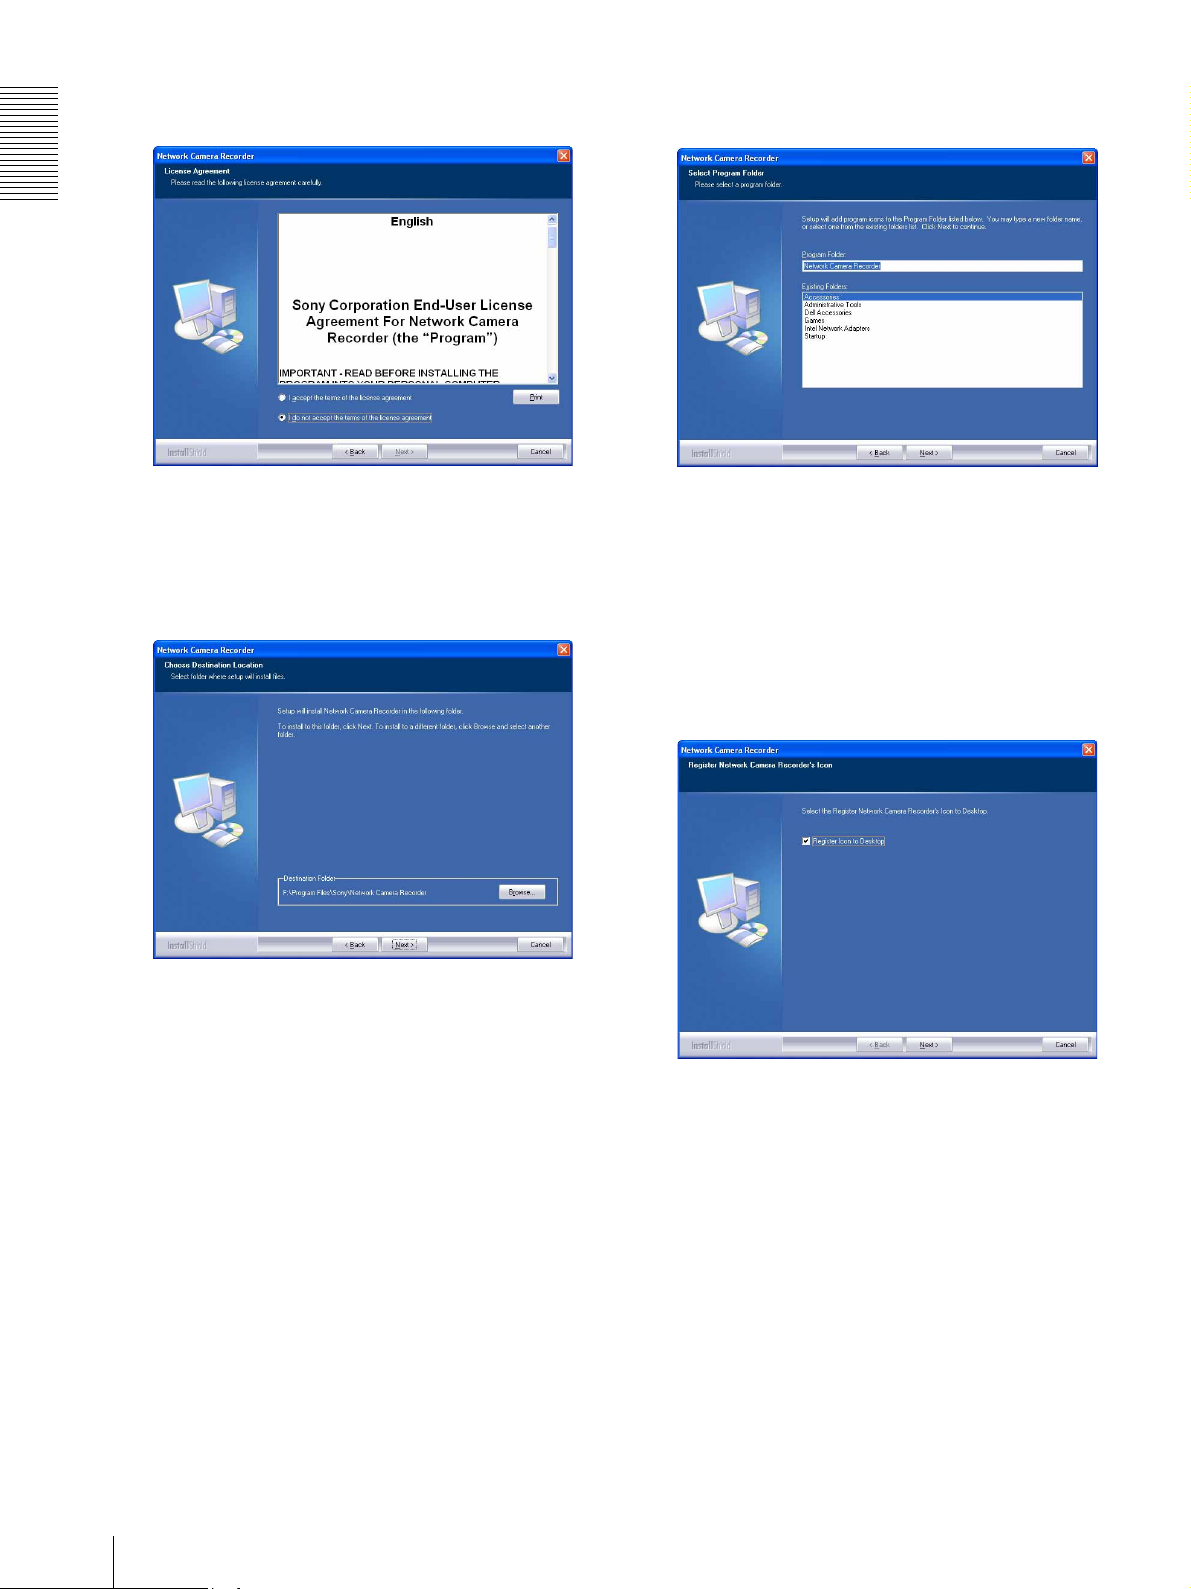
3
Click Next.
The License Agreement dialog appears.
5
Click Next.
The Select Program Folder dialog appears.
Read the License Agreement carefully, and if you
accept the agreement, select I accept the terms of
the license agreement. You cannot continue the
installation if you do not accept the agreement.
4
Click Next.
The Choose Destination Location dialog appears.
The default destination location is set to
“C:\...\Sony\Network Camera Recorder”.
To change to another location, click Browse... ,
navigate to a folder in which to install the program,
and click OK. Then click Next to display the Select
Program Folder dialog.
The default folder is set to “Network Camera
Recorder.”
To change to another folder name, enter your
preferred name in the text box.
6
Click Next.
Installation of the program starts.
When installation is finished, the Register
Network Camera Recorder's Icon dialog
appears.
To create the icon on the desktop, select Register
Icon to Desktop.
7
Click Next.
6
Installing Network Camera Recorder
Page 7
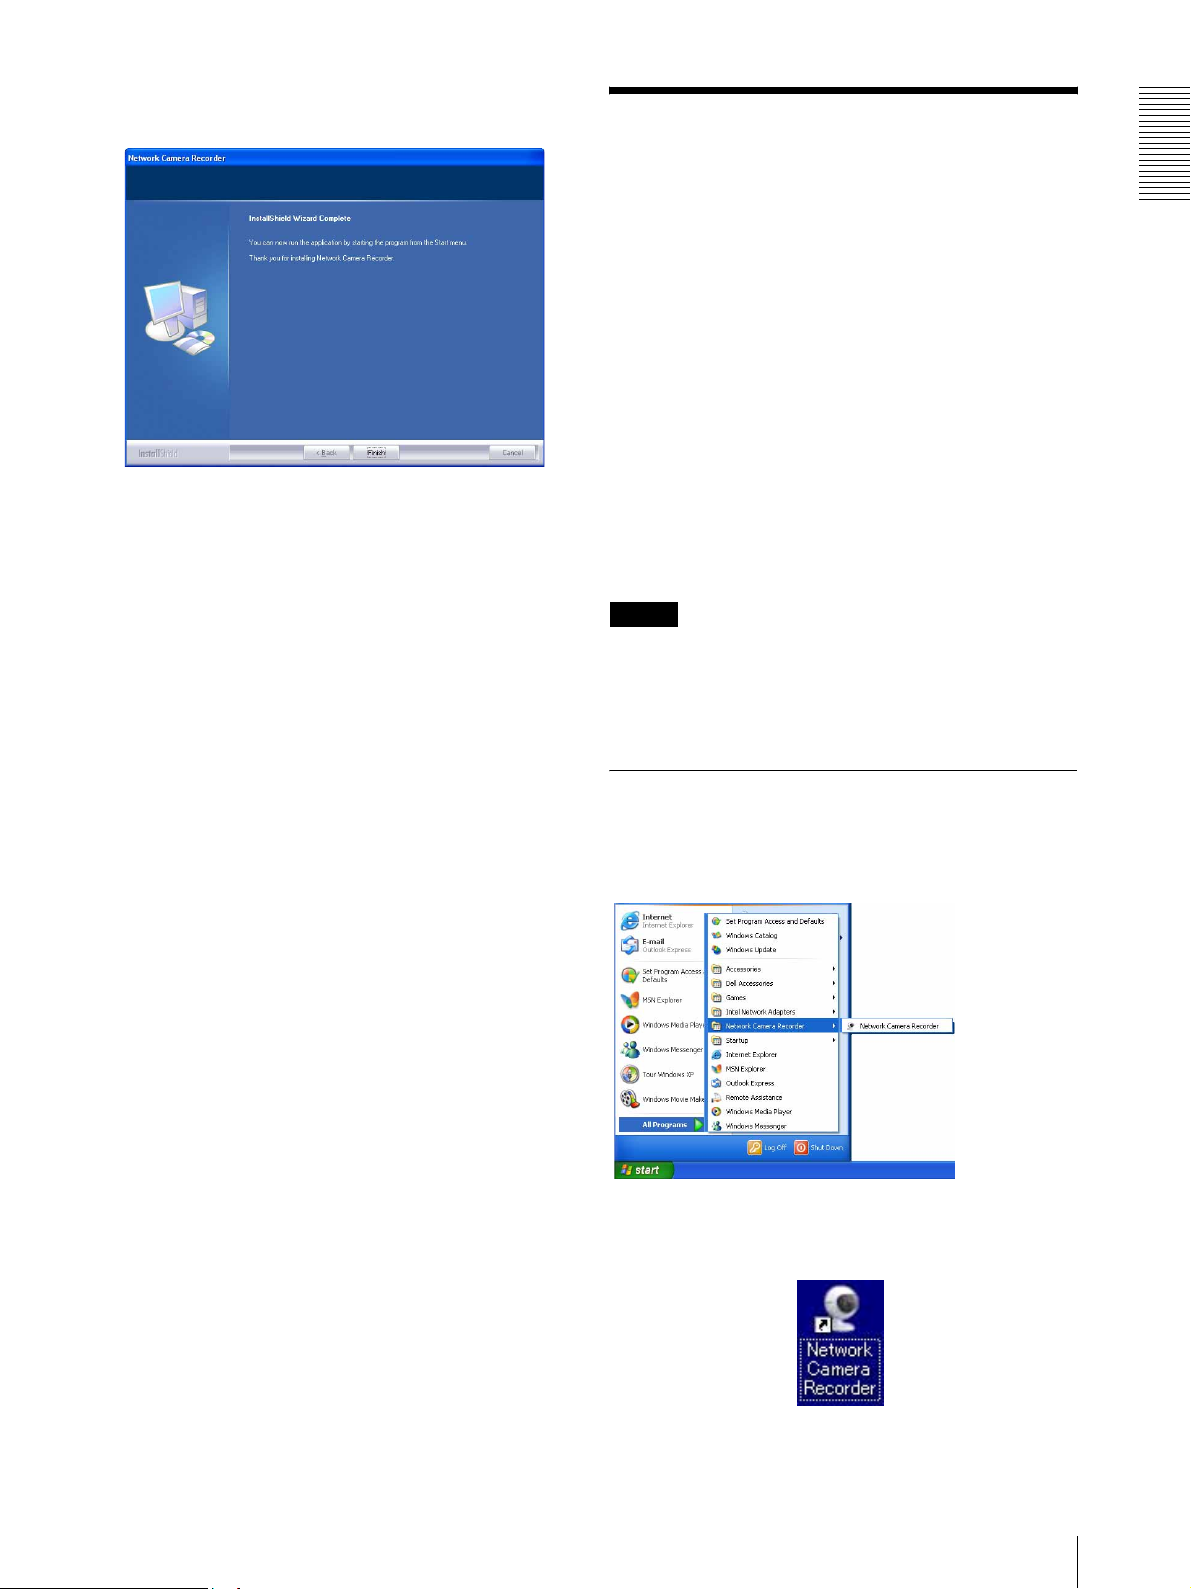
The InstallShield Wizard Complete dialog
appears.
Let’s Use Network Camera Recorder
Click Finish to complete installation.
If the message requiring restarting appears, restart
the computer.
To uninstall Network Camera Recorder
To uninstall Network Camera Recorder, follow the
normal uninstall procedure for Windows.
Even if Network Camera Recorder has been uninstalled,
the setup and recorded data are not deleted. To delete
these data, delete the installation folder and the path
specified for the storage location manually.
This section introduces the basic operations of Network
Camera Recorder step by step for a user using the
software for the first time after installation.
For detailed operations, read the “Operations” and
“Setups” chapters on pages 12 and after.
Operation procedures
1. Start the program.
To view the image of the camera…
2. Register the camera.
3. Assign a camera to the monitor window.
After the image of the camera is displayed…
4. Control the camera.
5. Record the camera image.
6. Play the recorded image.
Notes
• Before using, connect the camera to the network and
turn ON the power.
• For using Network Camera Recorder, you should log
in the computer as the Power User or Administrator.
1. Start the Program
Introduction
Select All Programs from the Windows start menu,
then select Network Camera Recorder and Network
Camera Recorder in sequence.
You can start the program by double-clicking the
Network Camera Recorder icon on the desk top, if
provided.
Let’s Use Network Camera Recorder
7
Page 8
Introduction
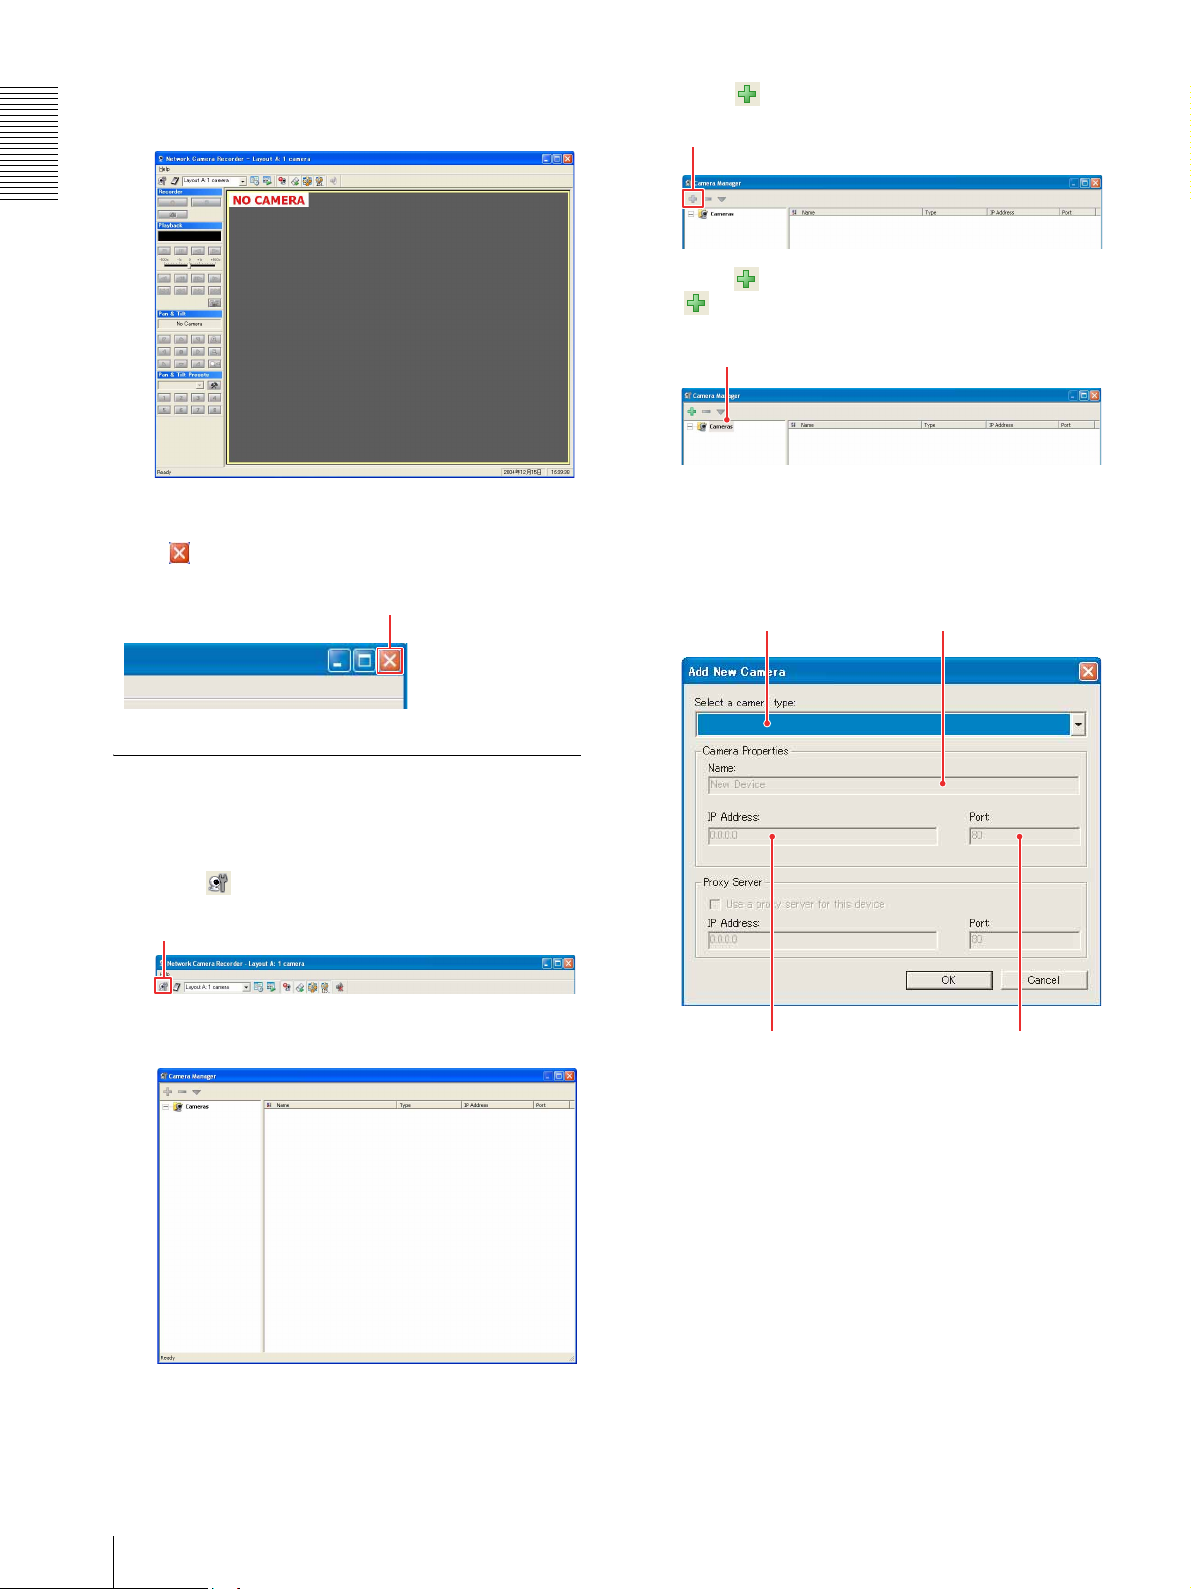
Network Camera Recorder starts and the main
window appears.
To exit the program
Click in the upper right corner of the main window.
Click
2
Click (Add Camera).
Add Camera
If the icon is not green, click Cameras. The
(Add Camera) icon turns green and is enabled.
Cameras
The Add Camera dialog appears.
3
Select or enter the parameters in the Add Camera
dialog.
Select a camera type. Camera name
2. Register the Camera
To monitor the image of the camera, first you need to
register the camera on Network Camera Recorder.
1
Click (Camera Manager) in the main window.
Camera Manager
The Camera Manager window appears.
Camera IP address Port number
• Enter the same IP address as that used for
monitoring the camera using Web brower.
• The port number is 80 by default. For details on
the port number, refer to the User's Guide of the
Network Camera.
For details on the settings, see “Registering a
Camera” in the “Setups” chapter (page 24).
8
Let’s Use Network Camera Recorder
Page 9

4
Click OK,
The camera is now registered.
2
Click Select Camera... in the pop-up menu.
The Select Camera dialog appears.
Registered
camera name
5
Click in the upper right corner to close the
Camera Manager window.
Tip
For registration of two or more cameras and the setting
of camera properties, see “Setting a Camera” in the
“Setups” chapter (page 24).
Properties of the
registered camera
3
Click on the name of the camera you want to
monitor.
Click on the camera name.
Introduction
3. Assign a Camera to the Monitor Window
As the second step for monitoring, you need to assign
the registered camera to the monitor window.
As no camera has been assigned by default, “NO
CAMERA” is displayed on the monitor screen.
1
Right-click on the monitor window of the main
window.
A pop-up menu appears.
Pop-up menu
Let’s Use Network Camera Recorder
9
Page 10
Introduction
4
Click OK.
The image of the camera appears in the monitor
window.
Image of the camera
Tip
You can simultaneously display the images of two or
more cameras in the monitor window. For details, see
“Assigning a Camera to the Monitor Window” in the
“Setups” chapter (page 28).
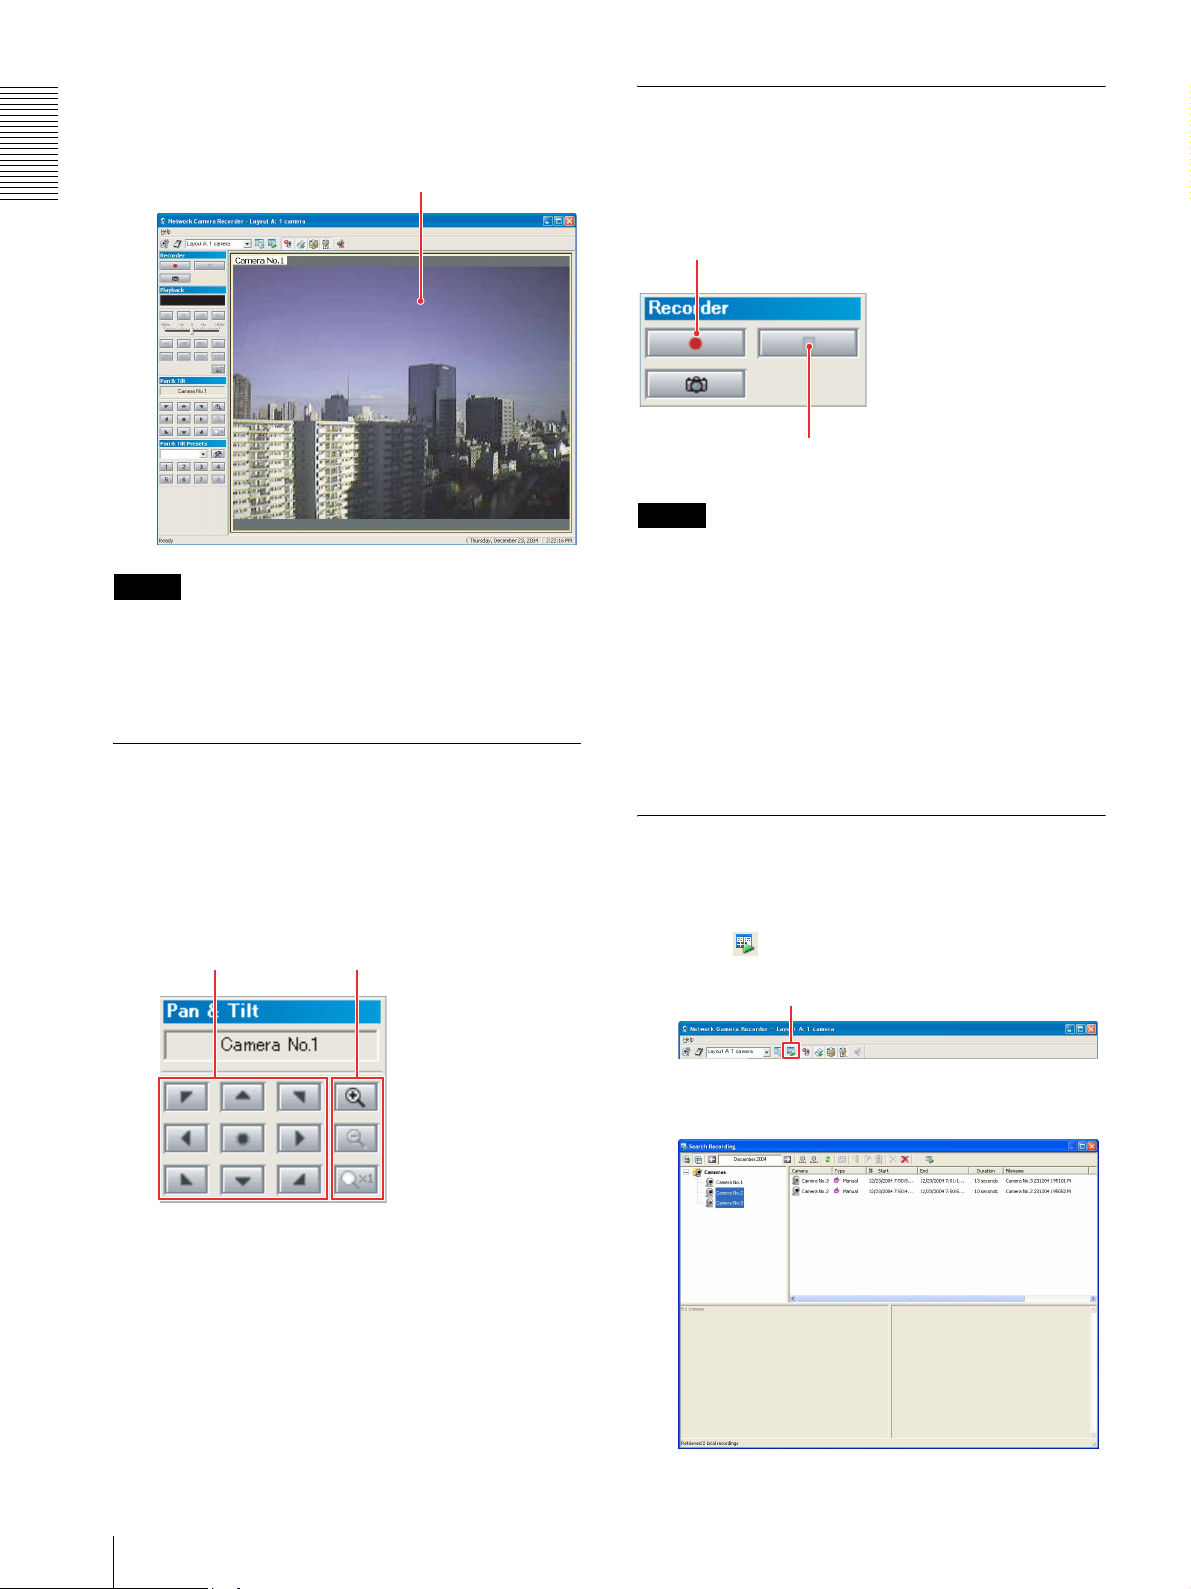
4. Control the Camera
5. Record the Camera Image
You can record the image of the camera you are
monitoring.
For recording, use the buttons on the Recorder toolbar.
To start recording
To stop recording
Tips
• You can preset a recording schedule such as the date
or the days of the week and perform the recording
automatically according to the schedule. For details,
see “Scheduling Recordings” in the “Setups” chapter
(page 30).
• The default storage location of recordings is set to
“C:\Program Files\Sony\Network Camera
Recorder\Recordings\”. For changing the storage
location, see “Assigning a Storage Location” in the
“Setups” chapter (page 29).
After monitoring is achieved, you can control the
camera angle (pan and tilt) and digital zoom. (Pan and
tilt are operable on the SNC-M3 and SNC-M3W only.)
For these operations, use the buttons on the Pan & Tilt
toolbar.
Pan & tilt
control buttons
Digital zoom control
buttons
For details on the function of each button, see
“Controlling the Camera” in the “Operations” chapter
(page 15).
6. Play the Recorded Image
You can search for the recording stored in the computer
and play back the recorded image.
1
Click (Search Recording) in the main window.
Search Recording
The Search Recording window appears.
10
Let’s Use Network Camera Recorder
Page 11
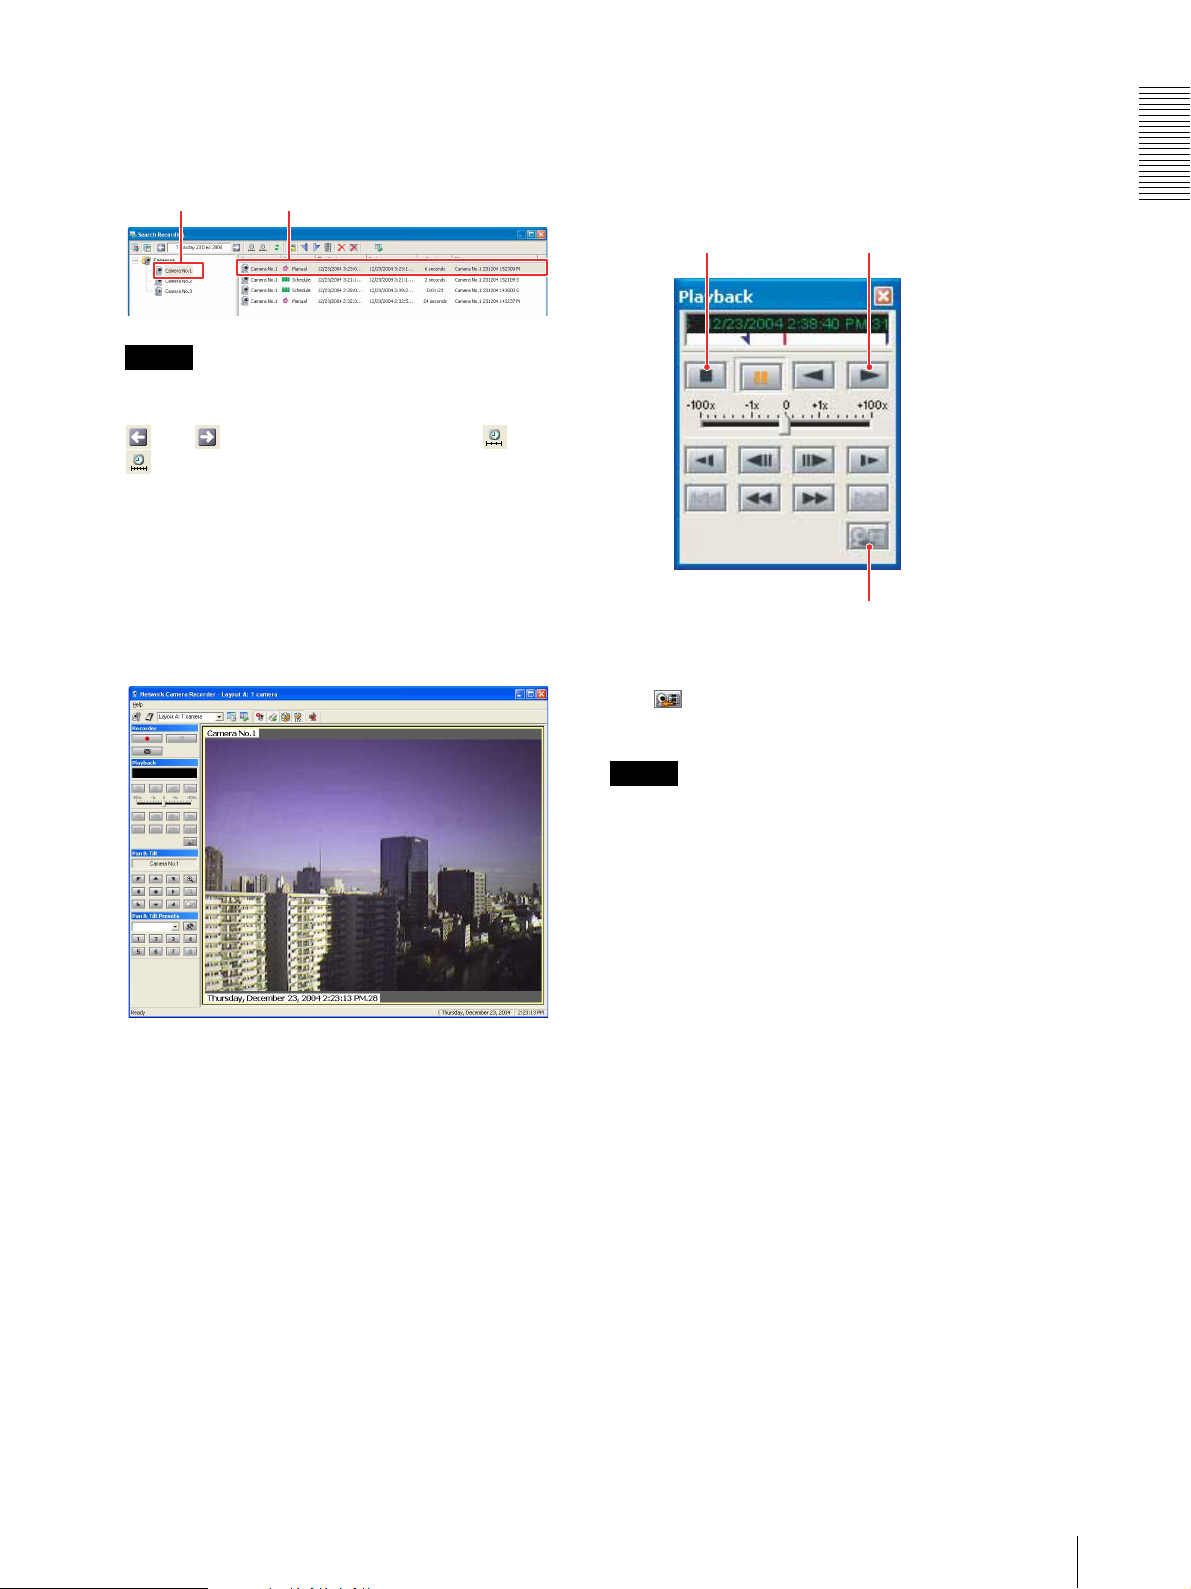
2
Click on the camera name on the camera tree.
The properties of the recordings are displayed in the
list view.
Properties of the recordingCamera name
Tip
If the properties of the recording you want to play
back do not appear in the list, search for it using the
and buttons. You can also use the and
buttons for searching recordings. For details,
see “Searching for Recordings” in the “Operations”
chapter (page 17).
3
Double-click on the recording data you want to play
back.
The display goes back to the main window and the
image of the selected recording appears in the
monitor window.
4
Click N (Play) on the Playback toolbar.
Playback starts.
By clicking x (Cue to Begin), the display goes
back to the image at the beginning of the recording
and playback stops.
To stop playback
5
To return to monitoring the camera image, click
(Return to Camera(s)) on the Playback
toolbar.
To start playback
To return to the camera image
Introduction
Tips
• The buttons on the Playback toolbar allow various
playback modes such as fast-forward, rewind, frame
playback, slow playback, and cue to the beginning.
For details, see “Playing Back the Located Recording”
in the “Operations” chapter (page 20).
• You can also view the playback in the preview window
of the Search Recording window and control it using
the Playback toolbar displayed in the Search
Recording window.
Let’s Use Network Camera Recorder
11
Page 12
Operations
Main Window of Network Camera Recorder
Toggle Pan & Tilt Presets Toolbar (page 15)
Audio Mute (page 14)
3 Functional Toolbars
Allows control of the camera.
The display of each functional toolbar is enabled or
disabled by the specific toggle button on the main
toolbar.
Operations
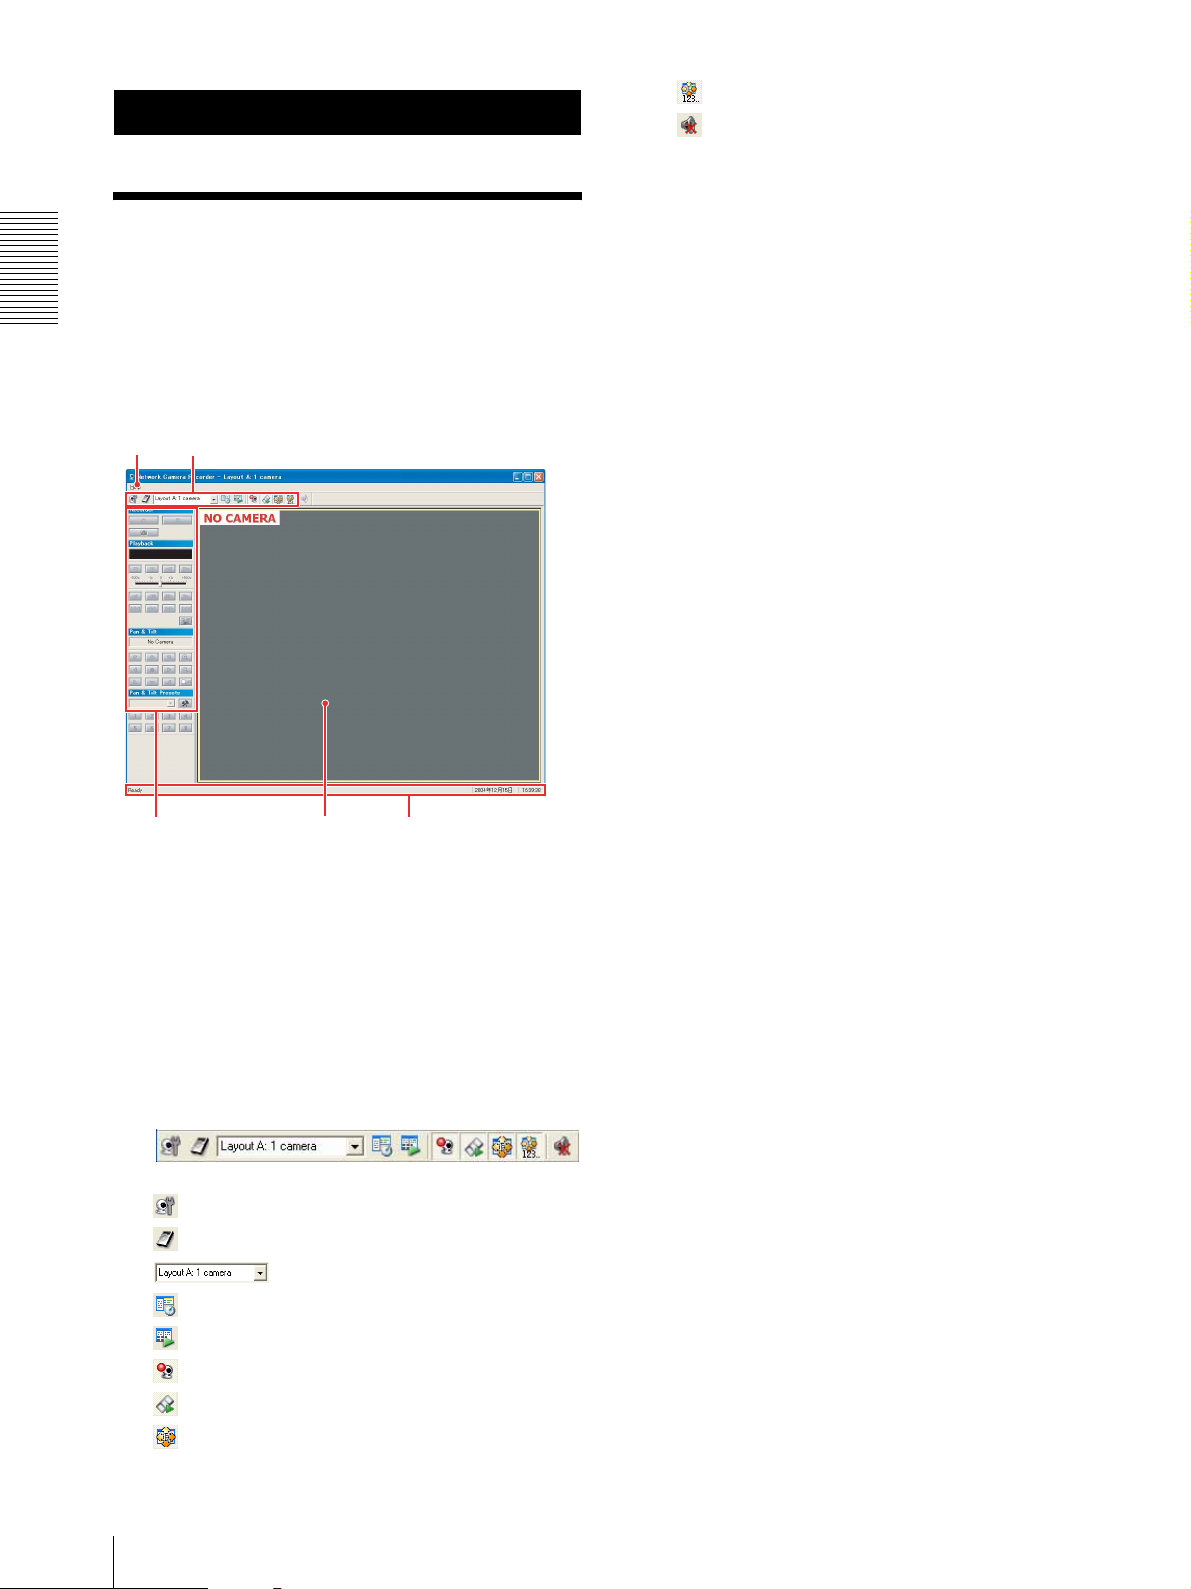
When you launch Network Camera Recorder for the
first time, the following main window is displayed.
This section explains the configuration of the main
window.
1
2
3
1 Help menu
Provides version information on the application of
Network Camera Recorder.
4
5
Recorder Toolbar (page 17)
Playback Toolbar (page 20)
Pan & Tilt Toolbar (page 15)
Pan & Tilt Presets Toolbar (page 15)
4 Monitor window
Displays the image of the camera or the playback
image. There is no image by default.
5 Status bar
Gives a summary of the current activities of the
application and error messages.
2 Main toolbar
Provides access to the major functions of the
Network Camera Recorder application.
For the function of each button, see the explanation
page for each function.
Camera Manager (page 24)
Storage Location (page 29)
Select Layout box (page 28)
Schedule Editor (page 30)
Search Recording (page 17)
Toggle Recorder Toolbar (page 17)
Toggle Playback Toolbar (page 20)
Toggle Pan & Tilt Toolbar (page 15)
12
Main Window of Network Camera Recorder
Page 13

Monitoring
This section explains the procedure of monitoring from
the selected camera.
Before monitoring, you need to register the camera(s) in
the Network Camera Recorder application and assign
the camera(s) to the monitor window.
For registration of cameras and assignment to the
monitor window, see the “Setups” chapter on page 24.
1
Start Network Camera Recorder to display the main
window.
For starting, see “1. Start the Program” on page 7.
The image(s) of the camera(s) appear(s) in the
monitor window according to the selected layout.
Using the Pop-up Menu in the Monitor Window
Right-clicking in the monitor window with a camera
image displays a pop-up menu. The pop-up menu allows
you to change the monitoring camera and the display
items in the monitor window, etc.
To change the camera in the monitor
window
1
Select Select Camera… from the pop-up menu.
The Select Camera dialog appears.
Operations
2
Control the camera using the Pan & Tilt toolbar
and Pan & Tilt Presets toolbar.
For details, see “Controlling the Camera” on page
15.
To monito r a ud i o
When a microphone is connected to the selected camera,
you can monitor the audio together with the camera
image.
If you are monitoring multiple cameras, click on the
monitor window showing the image of the camera
whose you want to monitor. The audio of the selected
camera is heard.
2
Select the camera you want to monitor, then click
OK.
The image in the monitor window changes to the
image of the selected camera.
Note
If the application cannot establish communication with
the selected camera, the message “NO CONNECTION”
appears in the monitor window. Check the registered
data of the camera and the network status.
Monitoring
13
Page 14

Operations
To turn off the image of the camera from
the monitor window
Select Remove Camera(s) from the pop-up menu. The
image of the selected camera disappears from the
monitor window and the message “NO
CONNECTION” appears.
To return to monitoring the camera image
To change the display in the monitor window from
playback of the recorded image to camera monitoring,
select Return to Camera(s) from the pop-up menu.
To select the items to be displayed in the
monitor window
The camera name and the date and time can be displayed
in the monitor window.
1
Right-click in the monitor window to display the
pop-up menu.
2
Select View from the pop-up menu, then right-
click.
The View submenu is displayed.
Display in the monitor window
Camera name
Date & time
To scale the monitoring image to fit the
monitor window
You can scale the image in the monitor window using
Scale to Window and Keep Aspect in the pop-up menu.
3
From the submenu, click on the item you want to
show in the monitor window to make the
checkmark visible.
To hide the item, click on it again to clear the
checkmark.
Scale to Window: Click on this item to make the
checkmark visible to enable scaling of the camera
image according to the size of the monitor
window.
Click on it again to clear the checkmark, and the
image size is fixed to that set by the camera. In this
position, the camera image may be larger than the
monitor window, and the portion of the image
beyond the monitor window cannot be seen.
Keep Aspect: Click on this item to make the checkmark
visible to keep the aspect ratio of the scaled image.
This item is enabled only when Scale to Window
is selected. When Scale to Window is cleared, the
image is displayed in the size set by the camera,
always keeping its aspect ratio.
To mute the sound
Clicking the (Audio Mute) button on the main
toolbar mutes the monitoring or playback sound.
Click on again to cancel muting.
14
Monitoring
Page 15

Controlling the Camera
3
You can control pan, tilt and digital zoom of the camera
during monitoring, or move the camera to the preset
position.
Note
During digital zooming, the pan & tilt function of the
camera does not operate properly. The camera only pans
and tilts within the ×1 image area using the pan and tilt
direction buttons.
Panning, Tilting and Digital Zooming (SNC-M3/M3W only)
Use the Pan & Tilt toolbar to control the camera.
To display or hide the Pan & Tilt toolbar, click the
(Toggle Pan & Tilt Toolbar) button on the main toolbar.
1
4
5
6
2
1 Camera name box
Displays the name of the camera to be controlled.
Click the box to display the Select Camera dialog
for changing the camera to be controlled.
Panning & Tilting Using the Preset Function of the Camera (SNC-M3/ M3W only)
The SNC-M3/M3W is equipped with the preset function
to store up to 8 camera positions.
You can move the camera to the preset position specified
in the camera using the buttons on the Pan & Tilt
Presets tool bar. Storing new positions is also possible.
To pan & tilt using the Pan & Tilt Presets
toolbar
To display the Pan & Tilt Presets toolbar or hide the
display, click the (Toggle Pan & Tilt Presets
Toolbar) button on the main toolbar.
13
Operations
2 Pan & Tilt direction buttons
Click the button to move the camera in the direction
shown on the button.
3 Pan & Tilt center button
Click the button to move the camera to the center
position.
4 Digital zoom in button
Click the button to zoom in.
× 1.25, × 2, × 2.5, × 3, × 4, × 5, × 6, × 7, × 8, × 9, ×
10, × 15, × 20 and × 25 are available.
5 Digital zoom out button
Click the button to zoom out.
6 Digital zoom cancel button
Click the button to cancel digital zoom and return to
normal monitoring (× 1).
2
1 Preset select box
Select the preset name indicating the preset position
to which you want to move the camera from the
drop-down list, and the camera moves to the
selected position.
2 Preset number buttons
Click the button indicating the preset position to
which you want to move the camera, and the
camera moves to the selected position.
The buttons without the preset position stored are
grayed out.
3 Customize Presets button
When you want to change a preset position or store
a new preset position, click this button to display
the Pan & Tilt Presets dialog.
For details, see “To store new preset positions” on
page 16.
Controlling the Camera
15
Page 16

Operations
To store new preset positions
You can store up to 8 preset positions.
1
Click the (Customize Presets) button on the
Pan & Tilt Presets toolbar.
The Pan & Tilt Presets dialog appears.
4
2
Select the camera from the drop-down list of the
Select Camera box.
3
Observing the preview image, move the camera to
your preferred position using the pan & tilt control
buttons.
526
To edit or delete a preset position
1
Click the (Customize Presets) button on the
Pan & Tilt Presets toolbar.
The Pan & Tilt Presets dialog appears.
3 254-a 4-c 4-b3
73
2
Select the camera from the drop-down list of the
Select Camera box.
3
Select the preset position you want to change or
delete and click the (Move Camera to
Selected Preset) button.
The camera moves to the selected preset position.
4
Click the preset position number in the list to which
you want to store the current position.
5
Enter the preset name in the Preset Name box
within 32 characters.
6
Click the (Update Selected Preset Position)
button.
The current position is stored as a preset position.
To store other preset positions, repeat steps 2 to 5.
7
Click the Close button to close the dialog.
4
Change the required item(s).
a. To change the preset name: Ent er a new name
in the Preset Name box, then click the
(Update Selected Preset Position) button to
store the new name.
b. To change the position of the camera: Move
the camera to the preferred position using the
pan & tilt control buttons, then click the
(Update Selected Preset Position) button to
store the new position.
c. To delete the preset position: Click the
(Clear Selected Preset Position) button.
Note
Clicking the button saves the current camera
position, and the preset name if entered. Therefore,
you need to move the camera to the preset position
even when you want to change the preset name
only.
5
Click the Close button to close the dialog.
16
Controlling the Camera
Page 17

Recording the Camera
5
Playing Back Recorded
Image (Manual
Recording)
You can record the current images during monitoring or
take a snapshot.
This section explains how to record manually using the
buttons on the Recorder toolbar.
For a scheduled recording, see “Scheduling Recordings”
on page 30.
Recording Using the Recorder Toolba r
To display or hide the Recorder toolbar, click the
(Toggle Recorder Toolbar) button on the main toolbar.
Record: Click the button to start recording.
Stop: Click the button to stop recording.
Snapshot: Click the button to take a snapshot
of the current image and store it in the bmp
(bitmap) format.
Tips
Images
You can search for recorded data and view playback
either in the preview window of the Search Recording
window or in the monitor window of the main window.
Searching for Recordings
For searching for a file of recorded data, use the Search
Recording window.
To display the Search Recording window, click the
(Search Recording) button on the main toolbar.
Notes
• To view the playback image on the monitor window,
you need to click on the monitor window to select it
(to be framed in yellow) before displaying the Search
Recording window. If it is not selected, the located
recording will not be displayed in the monitor
window.
•When the Search Recording window is displayed, the
audio of the image displayed in the monitor window of
the main window cannot be heard. Only the audio of
the image being played back in the Search Recording
window is heard.
• Snapshots cannot be searched for.
Search Recording window
1
2
3
Operations
• The recorded images and snapshots are stored in the
previously specified location of the computer.
For specifying the storage location, see “Assigning a
Storage Location” on page 29.
• To search for a record, see “Searching for Recordings”
on page 17.
4
1 Search Recording toolbar
The buttons on this toolbar are used to search for
recordings.
View Recording TimeLine
Recording the Camera Image (Manual Recording) / Playing Back Recorded Images
17
Page 18

Operations
View Recording List
Previous Date
Date Picker box
Next Date
Zoom In Date & Time
Zoom Out Date & Time
Refresh Recordings
Preview Selected Recording
Mark In for Exporting
Mark Out for Exporting
Export Recording
Delete Recording
Cleanup Recordings
Open Recording File
2 Camera tree
Displays the cameras registered in Network
Camera Recorder in a tree configuration.
Select the camera to limit the recordings to be
searched for by the camera.
3 List view or Timeline view
The recordings are listed or shown on the timeline.
4 Thumbnails of recording
Thumbnails of the selected recording file are
shown.
5 Preview window
Displays the image of the selected recording.
To search by date and time
To search for a recording made on a specified date and
time, select the date and time with the calendar or date
picker. The data recorded on the specified date and time
are shown on the list view or timeline in the Search
Recording window.
To specify the date and time with the calendar
Click on the date picker box, and the calendar appears.
Click the date you want to specify on the calendar. You
can also specify the time by selecting it from the Time
box under the calendar. Then click OK.
To go back to the calendar of previous months, click the
button. To go to the calendar of upcoming months,
click the button.
To limit/expand the searching range
Note
The searched data is not updated during recording. To
update the file list, click the (Refresh Recordings)
button on the Search Recording toolbar.
To search by camera
To search for a recording made with the specified
camera, select the camera from the camera tree.
To select multiple cameras, hold the <Shift> key and
left-click the mouse.
The data recorded by the selected camera(s) are shown
on the list view or timeline in the Search Recording
window.
To search for a recording using a time scale more precise
than the current one, click the (Zoom In Date &
Time) button on the Search recording toolbar. To use a
time scale less precise than the current one, click the
(Zoom Out Date & Time) button.
Examples of searching range
2004: recordings in 2004 (year)
December 2004: recordings in December, 2004
Week 50 2004: recordings in the 50th week of 2004
Wednesday 15 Dec 2004: recordings on Wednesday,
December 15, 2004
15 Dec 2004 13:31:19: recordings at 13:31:19 on
December 15, 2004
18
Playing Back Recorded Images
Page 19

To select the previous or next timeline
To search for a recording using the
timeline
To move forward the date and time displayed in the date
picker box, click the (Next Date) button. To move
backward the date and time, click the (Previous
Date) button.
The display moves forward or backward in units of the
selected time scale.
To search for a recording from the list
view
1
2
3
1
Click the (View Recording List) button on the
Search Recording toolbar.
The recordings made by the selected camera(s) or
within the selected searching range are displayed in
the list.
2
Show the recording you want to play back in the
list.
To sort the recordings, click on the header item.
1 2-a
2-b
Indicator (red line)
3
1
Click the (View Recording TimeLine) button
on the Search Recording toolbar.
The recordings made by the selected camera(s) or
within the selected search range are displayed on
the timeline.
2
Scroll the timeline to show the recording you want
to play back.
a. Click the or button. The timeline is
zoomed in or out around the indicator (red line).
b. Double-click the yellow header section.
Double-click the left button to zoom in the
timeline, or double-click the right button to
zoom it out.
For example, if you double-click the left button
on Wednesday when a week is displayed, the
timeline is zoomed in to display only 24 hours
of Wednesday.
Operations
3
Double-click on the recording.
The playback image appears in the monitor
window.
Items in the list view
Camera: Displays the name of the camera used for
recording.
Type: Displays the type of recording: or
.
Start: Displays the recording start date and time.
End: Displays the recording end date and time.
Duration: Displays the recording duration.
Filename: Displays the file name of the recording.
# Files: Displays the number of files into which the
recording is separated.
Start Available: The available playback start time is
displayed here, because some files at the
beginning of the recording may have been
overwritten by the “Old file overwriting” function
and the start time has changed.
For details on the “Old file overwriting” function,”
see “Assigning a Storage Location” on page 29.
3
Double-click on the recording.
The playback image appears in the monitor
window.
Playing Back Recorded Images
19
Page 20

Displaying a Preview Image
Playing Back the Located
Operations
You can display a preview image of the selected
recording in the preview window of the Search
Recording window. You can also view the playback in
the preview window.
34
Preview image
1
Search for the recording you want to preview.
For details on searching, see “Searching for
Recordings” on page 17.
Recording
You can play back the located recording using the
Playback toolbar.
For searching for the recording, see “Searching for
Recordings” on page 17.
Playback toolbar
To display the Playback toolbar, click the (Toggle
Playback Toolbar) button on the main toolbar.
2
Click to select the recording.
3
Click the (Preview Selected Recording) button
on the Search Recording toolbar.
The first frame of the selected recording appears in
the preview window and the Playback toolbar is
displayed.
4
To play back, use the buttons on the Playback
toolbar.
To return to monitoring the camera image
Click the (Return to Camera(s)) button on the
Playback toolbar.
Date/time and timeline
Indicator (red line)
The date and time of the recording is displayed on the
upper part of the timeline. The header “M” indicates
manual recording, and “S” indicates scheduled
recording.
If you click the indicator (red line) on the timeline or
click and drag it, playback starts from the indicator
position.
Note
When some part of the recording has been deleted by the
“Old file overwriting” function, the arrow indicating the
export start position is displayed on the timeline of the
Playback toolbar. The arrow shows the beginning of the
recording that remains and there is no data to the left of
the arrow.
For details on the "Old file overwriting" function and
export, see “Assigning a Storage Location” on page 29.
20
Playing Back Recorded Images
Page 21

Normal playback, reverse playback, pause and
cue
Use the following buttons.
x Cue to Begin: Play from the beginning
X Pause: Pause of play
n Reverse: Reverse play at normal speed
N Play: Normal play at normal speed
Tip
To play the previous or next recording
If more than one recording is located, it is possible to
play between recordings.
Click the . (Previous Recording) button on the
Playback toolbar to start play at the beginning of the
recording previously made on the timeline.
Click the > (Next Recording) button to start play at
the beginning of the next recording on the timeline.
Note
The . and > buttons are disabled on the Playback
toolbar in the Search Recording window. Use these
buttons on the Playback toolbar in the main window.
Operations
You can start playback from the beginning of the
recording by clicking a thumbnail shown in the Search
Recording window.
Shuttle slider
To navigate quickly through the recorded images, leftclick the shuttle slider and hold and drag it.
Moving the shuttle slider to the left or right accelerates
the playback speed within 0 (normal) to 100 times for
either fast-forward or rewind.
Fast-forward, rewind, various-speed playback
You can play back recordings at various speeds using the
following buttons.
t Slow Rewind: Reverse play at ×
1
/5 play speed
Deleting Recordings
You can delete recording(s) by specifying the camera or
the storage duration.
Note
The recording being made cannot be deleted.
To delete a selected recording
Select the recording you want to delete in the Search
Recording window, then click the (Delete
Recording) button on the Search Recording toolbar.
To delete recordings by specifying the
condition
1
Click the (Cleanup Recordings) button on the
Search Recording toolbar.
The Cleanup Recordings dialog appears.
2
Set the parameters in the Cleanup Recordings
dialog.
c Previous Frame: Moves one frame back.
C Next Frame: Moves one frame forward.
1
T Slow Forward: Play at ×
. Previous Recording: Play of the recording
previously made with the same camera
m Rewind: Rewind at ×5 play speed
M Fast-forward: Fast-forward at ×5 play speed
> Next Recording: Play of the next recording made
with the same camera
Note
For MPEG4 recordings, reverse playback is disabled.
Images will be distorted if you perform reverse playback
using the shuttle slider.
/5 play speed
Cleanup for: Select All cameras to delete all the
recordings made with all the cameras. Select
Only the selected cameras to delete the
recordings made with the cameras selected
from the camera tree.
Playing Back Recorded Images
21
Page 22

Cleanup all recording older than/until: Set the
storage duration of recordings (days). The
recordings older than the set days will be
deleted automatically.
File conversion starts. Watch the progress bar to
monitor the conversion.
8
When the conversion is completed, click Close.
Operations
3
Click OK.
To close the dialog without deleting, click Cancel.
Exporting to an AVI File
You can export a recorded file to the AVI format.
1
Search for and select the recording you want to
export in the Search Recording window.
For searching for the recording, see “Searching for
Recordings” on page 17.
2
Display the preview image of the selected recording
by clicking the (Preview Selected Recording)
button on the Search Recording toolbar.
3
Play back the recording using the buttons on the
Playback toolbar.
4
Specify the part of the recording you want to export
while observing the playback image.
Click the (Mark In for Exporting) button on the
search recording toolbar at the scene you want to
start export.
Click the (Mark Out for Exporting) button on
the search recording toolbar at the scene you want
to finish export.
Tips
• Set the export start and end positions immediately
before exporting, because they are not stored in
memory.
• The arrows indicating the export start and end
positions are displayed on the timeline of the
Playback toolbar. (The arrows are displayed at
the recording start and end points by default.)
5
Click the (Export Recording) button on the
search recording toolbar.
The Export Recording dialog appears.
6
Set the parameters in the Export Recording
dialog.
For details on each parameter, see “Export
Recording dialog” on page 22.
Note
Audio data cannot be converted into an AVI file.
Export Recording dialog
Recording Properties
Displays information on the recording.
Camera: Name of the camera used for recording
Start Time: Recording start date and time
End Time: Recording end date and time
Duration: Recording duration
Frame Rate: Frame rate for recording
Image Size: Image size for recording
Export Settings
Displays export information. Set parameters relating to
exporting.
Mark In Time: Export start time set in the Search
Recording window
Mark Out Time: Export end time set in the Search
Recording window
Duration: Export duration
Frame Rate: Enter the frame rate for exporting.
Image Size: Enter the image size for exporting.
Quality (%): Enter the image quality for exporting
between 0 to 100%. Maximum image quality is
obtained with the 100% setting.
Text B ur n In : Select the Camera Name and Time
Code checkboxes if you want to include
information in text format. Select the Use
Smooth Font checkbox if you want to use
Smooth Font.
7
Click Export.
22
Playing Back Recorded Images
Page 23

Export
Set the parameters relating to export execution.
Video Codec: Enter the video codec used for export. If
necessary, click the Settings… button to modify
the properties of video codec.
Show all available codecs: By selecting this checkbox,
a wide choice of video codecs among from all the
ones available for your computer is possible.
Output File: Enter the path of the destination of
export. Click the Browse… button to browse and
select the destination folder.
Note
You cannot play back the exported AVI file if your
computer is not equipped with the codec used for
exporting.
Operations
Playing Back Recorded Images
23
Page 24

Setups
42
Registering a Camera
When you connect a new camera to the network, register
the camera using the following procedure. Up to four
cameras can be registered.
Setups
Setting a Camera
To set up a camera, display the Camera Manager
window by clicking the (Camera Manager) button.
Camera Manager Window
1
3
1
Click the (Add Camera) button on the Camera
Manager toolbar.
The Add New Camera dialog appears.
Note
If the button is grayed out, click on Cameras in
the camera tree. The button turns green and is
enabled.
2
Set the parameters in the Add New Camera dialog.
1 Camera Manager toolbar
Add Camera
Delete Camera(s)
Edit Camera(s)
2 Camera tree
Displays the cameras registered in Network
Camera Recorder in a tree configuration.
3 Camera list
Displays the information of the cameras registered
in Network Camera Recorder in list view.
4 Camera Properties dialog
Set up the properties of the camera.
Select a camera type: Select the model name of
the camera from the drop-down list.
Name: Enter the name of the camera.
IP address: Enter the IP address or host name of
the camera.
Port: Enter the port number of the camera.
Proxy Server: If you access the camera via a proxy
server, select the Use a proxy server for this
device checkbox and enter the IP address or
host name of the proxy server and the port
number.
3
Click OK.
Registration of the camera is completed, and the
camera information is displayed in the camera tree
and camera list.
To register the another camera(s), repeat steps 1 to
3.
24
Setting a Camera
Page 25

Setting the Camera Properties
After registration of the camera in the Camera
Manager window, set the properties of the camera.
To start the setting, select the camera from the camera
tree or the camera list. Then set the parameters on the
Camera Properties dialog. The Camera Properties
dialog has four tabs.
Note
It will take about 30 seconds maximum to apply the
modified settings on the Camera Properties dialog to
the camera.
Network Settings – General tab
Displays the port name in the Name box.
General tab
Displays the basic information on the camera.
Name
Displays the camera name. To change the camera name,
enter a new name in this box.
Type
Displays the camera model name.
Network
Displays TCP/IP.
Network edit button
To change the network settings, click this button. The
Network Settings dialog appears.
For details, see “Network Settings dialog” below.
Network Settings dialog
Use this dialog to modify the network settings made
when the camera has been registered.
The Network Settings dialog has two tabs.
Setups
Network Settings – TCP/IP tab
IP Address
Enter the IP address or host name of the camera.
Port
Enter the port number of the camera.
Proxy Server
If you access the camera via a proxy server, select the
Use a proxy server for this port checkbox and enter the
IP address or host name of the proxy server and the port
number.
To save the settings, click OK.
Setting a Camera
25
Page 26

Setups
Camera tab
Perform the settings relating to communication, etc.
Mount Angle
Select the angle at which the camera is mounted.
0, 90, 180 and 270 degrees are available.
Administrator
Enter the user name and the password of the
Administrator of the registered camera.
Note
Be sure to enter the Administrator's user name and
password. Network Camera Recorder does not operate
properly with a user other than Administrator.
Picture tab
Perform the settings relating to the image of the camera.
Video Codec
Select the video codec, MPEG4 or JPEG.
Frame Rate
Select the frame rate.
1, 2, 3, 4, 5, 6, 8, 10, 15, 20, 25 and 30 fps are available.
Notes
• Maximum frame rate is 15 fps when the Image Size is
640 x 480 (VGA) and the Video Codec is JPEG.
• For JPEG images, 1, 2, 3 and 4 ftp cannot be set via
the Web browser, because these parameters are
included in the Network Camera. Even if you select
30 ftp when 1 to 4 ftp has been set on the Network
Camera, the setting in Network Camera Recorder does
not change from 1 to 4 ftp when it is restarted. Setting
a value other than 30 ftp via the Web browser allows
change in the setting in Network Camera Recorder.
The changed value will be applied when Network
Camera Recorder is next restarted.
Bit Rate
Set this parameter when MPEG4 is selected.
64, 128, 256, 384, 512, 768, 1024, 1536 and 2048 kbps
are available.
Frame Rate Priority
Set this parameter when MPEG4 is selected. If you
select On, the bit rate is automatically adjusted to keep
a stable frame rate even if the frame rate of image
transmission becomes lower due to the network
condition.
Image Quality
Set the image quality of JPEG images between Level 1
and Level 5 when JPEG is selected. Maximum image
quality is obtained with the Level 5 setting.
Image Size
Select the size of the camera image.
160 ×120 (QQVGA), 320 × 240 (QVGA) and 640 ×
480 (VGA) are available.
Sharpness
Select the sharpness of the camera image.
Select between 3 and -3. Maximum sharpness is
obtained with the 3 setting.
Bandwidth Control
Limits the network bandwidth with which the camera
outputs the signal when JPEG is selected.
0.5, 0.6, 0.7, 0.8, 0.9, 1.0, 2.0, 3.0 and 4.0 Mbps and
Unlimited are available
26
Setting a Camera
Page 27

Audio tab
Perform the settings relating to the microphone
connected to the camera.
Deleting a Camera
To delete the registered camera, proceed as follows:
1
Select the camera you want to delete from the
camera tree or the camera list in the Camera
Manager window.
2
Click the (Delete Camera(s)) button on the
Camera Manager toolbar.
A confirmation dialog appears.
3
Click Ye s .
The selected camera is deleted.
Microphone
Select ON to transmit the audio signal input from the
microphone connected to the camera.
Bit Rate
Select the bit rate to transmit the audio signal input from
the microphone connected to the camera.
G.726 (16kbps), G.726 (24kbps), G.726 (32kbps) and
G.726 (40kbps) are available.
Note
When 16 kbps is selected, audio may delay to image in
about three seconds maximum during monitoring.
Audio and video are almost synchronized when they are
played back.
Mic Volume
Set the volume input from the microphone connected to
the camera. Maximum volume is obtained with the 10
setting.
Note
The recordings associated with the camera will remain,
but cannot be displayed. If you want to delete the
recordings, delete them before deleting the camera.
Setups
Changing the Camera Properties
1
Select the camera whose properties you want to
change from the camera tree or the camera list in
the Camera Manager window.
The Camera Properties dialog appears.
2
Change the parameters in the Camera Properties
dialog.
For details on each parameter, see “Setting the
Camera Properties” on page 25.
3
Click the Apply button in the Camera Properties
dialog to save the changed settings.
Note
The camera properties cannot be changed while the
camera is in recording mode.
Setting a Camera
27
Page 28

Setups
Layout C: 2 cameras
Assigning a Camera to the Monitor Window
Network Camera Recorder provides eight types of
monitor window layouts. Select one of the layouts
according to the number of cameras you want to monitor
and assign the camera(s) to the monitor window.
Layout D: 3 cameras
Selecting a Layout
Select Layout box
Layout F: 3 cameras
Click on the Select Layout box on the main toolbar and
select a layout from the drop-down list.
The monitor window changes to the selected layout.
Layout types
The following eight layouts are available.
Layout A: 1 camera
Layout B: 2 cameras
Layout G: 4 cameras
Layout H: 4 cameras
Layout I: 4 cameras
28
Assigning a Camera to the Monitor Window
Page 29

Assigning a Camera to the Monitor Window
Assign a camera to each monitor window of the selected
layout as follows.
1
Right-click on the monitor window to which you
want to assign a camera.
The pop-up menu appears.
2
Select Select Camera….
The Select Camera dialog appears.
Assigning a Storage Location
You can specify the storage location for recorded video
files and for snapshots.
1
Click the (Storage Locations) button on the
main toolbar.
The Storage Location dialog appears.
2
Set the parameters in the Storage Location dialog.
Setups
3
Select the camera you want to monitor, then click
OK.
The image of the selected camera is displayed in the
monitor window.
To assign two or more cameras, repeat steps 1 to 3.
Note
If the camera is not connected to the network correctly,
the message “NO CONNECTION” appears and alarm
beeps sound.
Recordings: Enter the full path of the storage
location. Click the Browse … button to
browse and select the folder.
Capacity: Displays information of the drive
specified in the path.
Remaining capacity: Set the capacity remaining
to trigger the recording cleanup task in either
% or MB.
If the remaining capacity is lower than the set
value, the following error message appears:
“Storage Location Manager Cannot record :
Free disk space is only aaa - 50 (work area) =
bbb MB (ccc %)?
aaa: Current remaining capacity
bbb: Capacity required for recording
ccc: The proportion that bbb occupies in the
drive
The error message appears when the size
“bbb” is lower than the value set on
Remaining capacity.
To perform recording, delete unnecessary
data.
Assigning a Storage Location
29
Page 30

Setups
42
Old file overwriting: This function automatically
overwrites and deletes old files to secure a
recording capacity. By selecting this
checkbox, an old file is automatically
overwritten by a new file when the remaining
capacity becomes lower than the set value. If
the checkbox is cleared, recording stops and
an error message appears when the remaining
capacity reaches the set value.
A recording is stored in multiple files. As this
“Old file overwriting” function overwrites file
by file, portions of a recording may be deleted
file by file from the beginning.
Snapshot directory: Enter the full path of the
storage location for snapshots. Click the
Browse… button to browse and select the
folder.
Notes
• To secure a recording capacity, the "Old file
overwriting" function is always active while
Network Camera Recorder is running, even when
no recording is carried out. Therefore, old files
will be deleted if another application program
uses a disk space and the remaining capacity of
the drive becomes lower than the value specified
on Remaining capacity.
• The “Old file overwriting” function is activated
for the path currently specified. If you change the
path, data in the old path cannot be overwritten.
• If overwriting of an old file failed, the following
error message appears:
“Storage Location Manager Cannot overwrite
the oldest file : cannot access the oldest file.
Recording will be stopped. [file name]...”
After [file name], the path and the file name are
displayed.
This error message appears when the recording to
be overwritten is being played back, etc.
Stop playback or delete unnecessary data, then
start recording again.
Scheduling Recordings
Network Camera Recorder allows recording of camera
images according to the predetermined schedule for
each camera.
This section explains how to create a schedule.
For manual recording using the Recorder toolbar
buttons during monitoring, see “Recording the Camera
Image (Manual Recording)” on page 17.
Schedule Editor
The Schedule Editor is used for creating a recording
schedule.
To display the Schedule Editor window, click the
(Schedule Editor) button on the main toolbar.
Schedule Editor
1
1 Schedule Editor toolbar
3
3
To save the changed settings, click OK.
To close the dialog without saving the changed
settings, click Cancel.
30
Scheduling Recordings
View as Week
View as List
Insert Date/Time Item
Insert Recurrent Item
Copy Schedule
Paste Schedule
Remove Item
Apply Schedule
Page 31

2 Camera tree
Displays the cameras registered in Network
Camera Recorder in a tree configuration.
3 Week view or list view
Displays the created schedules on a weekly
calendar along the timeline or in the list of
information.
4 Schedule Properties dialog
Set the properties of a schedule.
Creating Recording Schedules
4
Set the parameters of the schedule in the Schedule
Properties dialog.
For details of the setting, see “To set the schedule
parameters” on page 31.
The set event is displayed on the timeline and recording
is activated according to the schedule.
To set the schedule parameters
Set the following parameters in the Schedule Properties
dialog.
There are two types of scheduled events: An event that
occurs on a specific date and time, and a recurrent event
that occurs every week.
The week view is used for creating recurrent events, and
the list view is used for creating both date/time events
and recurrent events.
To create a recurrent event using the
week view
321
Setups
Weekdays
For a recurrent event, select the days of the week on
which recording is to be performed.
Name
Enter the name of the schedule.
Start Time or Start Date
Set the start time (for a recurrent event) or the start date
and time (for a date/time event).
End Time or End Date
Set the end time (for a recurrent event) or the end date
and time (for a date/time event).
Duration
For a recurrent event, set the duration of recording.
4
1
Select the camera for which you want to create a
schedule from the camera tree.
2
Click the (View as Week) button on the
Schedule Editor toolbar.
The timeline of the week view appears in the right
window.
3
Click the (Insert Recurrent Item) on the
Schedule Editor toolbar.
A dummy event is displayed as a green square on
the timeline and the Schedule Properties dialog is
enabled.
To create a date/time event, use the list view.
Scheduling Recordings
31
Page 32

To create a date/time event using the list
view
21
3
Duration: Displays the recording duration (day, hours,
minutes or seconds)
Weekdays: Displays the abbreviations of the days of
the week for a recurrent event.
M Monday
TTuesday
W Wednesday
T Thursday
FFriday
SSaturday
S Sunday
Setups
4
1
Select the camera for which you want to create a
schedule from the camera tree.
2
Click the (View as List) button in the Schedule
Editor toolbar.
The list view appears in the right window.
3
Click the (Insert Date/Time Item) on the
Schedule Editor toolbar.
A dummy event is displayed in the list and the
Schedule Properties dialog is enabled.
To create a recurrent event, use the week view.
4
Set the parameters of the schedule in the Schedule
Properties dialog.
For details of the setting, see “To set the schedule
parameters” on page 31.
The set event is displayed in the list and recording is
activated according to the schedule.
Items in the list view
The items that configure a schedule are displayed in the
list view.
To save the schedule
Click the (Apply Schedule) button on the Schedule
Editor toolbar.
Then click OK in the confirmation dialog.
To change the schedule
Select the event you want to change in the list view or
week view, and change the parameters in the Schedule
Properties dialog.
To delete the schedule
Select the event you want to delete in the list view or
week view, and click the (Remove Item) button on
the Schedule Editor toolbar. The selected schedule is
deleted. You can delete schedules one by one.
To copy the schedule
To copy the schedule for one camera to another camera,
use the (Copy Schedule) and (Paste Schedule)
buttons on the Schedule Editor toolbar.
1
Select the camera with the original event from the
camera tree in the Schedule Editor window.
2
Click the (Copy Schedule) button on the
Schedule Editor toolbar.
3
Select the destination camera from the camera tree
in the Schedule Editor window.
Type of event: Displays the (recurrent event) or
(date/time event) icon.
Name: Displays the name of the schedule.
Actions: Displays the (recording) icon.
Start: Displays the start date and time (day, month,
year, hour:minutes:seconds) for the event.
End: Displays the end date and time (day, month, year,
hour:minutes:seconds) for the event.
32
Scheduling Recordings
4
Click the (Paste Schedule) button on the
Schedule Editor toolbar.
The event is now copied to the destination camera.
Note
This function copies all the schedule events created for
one camera to another camera. You cannot select one of
the schedule events and copy/paste it.
Page 33

Others
Troubleshooting
If Network Camera Recorder does not function
correctly, check the following:
Symptom Cause and solution
The image of the
Network Camera cannot
be displayed.
“NO CONNECTION”
appears even if the
camera is connected.
The recording cannot be
located.
No sound is heard. • Click the audio mute button on the
Poor monitoring sound Change the audio bit rate to a higher
Audio and video are not
synchronized.
Exported data cannot be
viewed on another
computer.
No sound is heard
during playback of the
data exported to an AVI
file.
Network Camera
Recorder operates
normally, but an error
message is displayed at
the bottom of the
window.
Confirm that the image of the
camera is displayed using the Web
browser. Then, set up Network
Camera Recorder using the data
registered for the Web browser
(page 25).
For monitoring via the Web browser,
refer to the User's Guide of the
Network Camera.
The communication may be affected
by network conditions or ambient
wave conditions (for a wireless
connection).
For details on wireless connection,
refer to the User's Guide of the
Network Camera.
Try to change the time scale and
search again (page 18).
main toolbar of the main window
to cancel audio muting (page 14).
• Click on the monitor window to
select it (to be framed in yellow).
Sound will not be heard if no
monitor window is selected.
•Adjust Mic Volume on the Audio
tab of the Camera Properties dialog
(page 27).
value such as G.726 (40kbps)
(page 27).
It is possible that audio and video
data may not be synchronized. This
is not a failure.
The codec used for export must be
installed on the computer.
Audio data cannot be exported to the
AVI file.
The display of the last error message
is held at the bottom of the window.
It will disappear by restarting
Network Camera Recorder.
Symptom Cause and solution
The frame rate or the
image quality decreases
when the camera or the
computer is used with
wireless connection.
The camera properties
cannot be changed and
the following error
message appears:
“xxxx (camera name)
Unknown Flow
Controller
Administrator User
name and the Password
are incorrect. Please
check them.: Received
HTTP status code 401
Unauthorized.”
The wireless connection may
provide a lower communication
speed than that for the wired
connection, causing a lower frame
rate, image quality and audio quality.
Try to select a smaller image size or
select MPEG4 in the Camera
Properties dialog (page 25).
The error message appears when you
did not enter the user name and the
password of the Administrator
registered in the Network Camera in
the Camera tab of the Camera
Properties dialog. Correct the user
name and the password on
Administrator (page 26). For the
registration of Administrator on the
Network Camera, refer to the User’s
Guide of the Network Camera.
Others
Troubleshooting
33
Page 34

TCP/IP
Glossary
AVI (Audio Video Interleave)
The format developed by Microsoft Corporation to store
a moving image and audio in a file.
The data in the AVI file can easily be managed using
Microsoft Windows. Various CODECs can be applied
to the AVI data.
Bit rate
The rate at which data bits are transmitted.
CODEC (COmpressor DECompressor)
Software/hardware for coding/decoding video and audio
data.
fps (frame per second)
The unit of frame rate, indicating the number of frames
transmitted from the camera per second.
Others
Frame
A moving image is composed of multiple still images. A
frame is one still image.
TCP is an abbreviation for Transmission Control
Protocol. A standard protocol used for the Internet
connection.
Frame rate
The number of frames of a moving image that can be
transmitted per second.
JPEG
Abbreviation for Joint Photographic Expert Group. The
still image compression technology or standards of the
ISO (International Organization for Standardization)
and ITU-T. Popularly used as image compression format
on the Internet, etc.
MPEG4
Abbreviation for Moving Picture Experts Group4. One
of the MPEG standards for image compression format
aiming to transmit images at a high compression rate
with lower picture quality.
Pan & tilt
Pan is horizontal movement of the camera head. Tilt is
vertical movement of the camera head.
Proxy server
A server or software that acts as an intermediary
between a local network and the Internet so that it can
connect to the Internet in place of a computer on a local
network
Snapshot
A still image captured from a moving image of the
camera
34
Glossary
Page 35

Index
A
Add Camera dialog .......................... 8
Add New Camera dialog................ 24
Administrator ................................. 26
Assigning a Camera..............9
Assigning a Storage Location ........ 29
Audio Mute .................................... 14
Audio tab........................................ 27
AVI File..........................................22
B
Bandwidth Control......................... 26
Bit Rate .................................... 26
C
Calendar ......................................... 18
Camera list ..................................... 24
Camera Manager.............................. 8
Camera Manager Window ............. 24
Camera Properties dialog......... 24
Camera tab ..................................... 26
Camera tree .................................... 24
Capacity ......................................... 29
Changing the Camera Properties ... 27
Cleanup Recordings....................... 21
Control the Camera........................ 10
Controlling the Camera.................. 15
Creating Recording Schedules....... 31
Cue ................................................. 21
D
Deleting a Camera .........................27
Deleting Recordings ...................... 21
Digital Zooming............................. 15
Displaying a Preview Image .......... 20
E
Exit the program .............................. 8
Exporting to an AVI File................ 22
, 28, 29
, 27
, 25
F
Fast-forward................................... 21
Frame Rate..................................... 26
Frame Rate Priority........................ 26
Functional Toolbars........................12
G
General tab..................................... 25
Glossary ......................................... 34
H
Help menu......................................12
I
Image Quality.................................26
Image Size......................................26
Installing Network Camera Recorder
....................................................... 5
IP Address......................................25
K
Keep Aspect
.................................................. 14
L
Layout types................................... 28
List view................................... 19
, 32
M
Main toolbar................................... 12
Main Window.................................12
Manual Recording.......................... 17
Mark In for Exporting.................... 22
Mark Out for Exporting .................22
Mic Volume....................................27
Microphone.................................... 27
Monitor window............................. 12
Monitoring ..................................... 13
Mount Angle .................................. 26
N
Name ..............................................25
Network.......................................... 25
Network Settings dialog................. 25
Next Date .......................................19
O
Old file overwriting........................30
P
Pan & Tilt Presets toolbar ........ 15, 16
Pan & Tilt toolbar..................... 10
Panning...........................................15
Path of the storage location............ 29
Pause ..............................................21
Picture tab ......................................26
Play the Recorded Image ...............10
Playback.........................................21
Playback toolbar....................... 11
Playing Back the Located Recording
.....................................................20
Pop-up menu ........................ 9
Port.................................................25
Preset Function...............................15
Preview window....................... 18
Previous Date .................................19
Proxy Server...................................25
, 15
, 20
, 13, 29
, 20
R
Record the Camera Image.............. 10
Recorder toolbar.............................10
Recording the Camera Image.........17
Register a Camera ............................ 8
Registering a Camera.....................24
Remaining capacity........................ 29
Remove Camera(s).........................14
Return to Camera(s)................. 14
Reverse playback ...........................21
Rewind ...........................................21
, 20
S
Scale to Window ............................14
Schedule Editor..............................30
Schedule parameters ......................31
Search by camera ...........................18
Search by date and time .................18
Search Recording window .............17
Searching for Recordings............... 17
Searching range..............................18
searching range ..............................18
Select Camera ...................... 9
Select Camera dialog ........... 9
Select Layout..................................28
Selecting a Layout..........................28
Setting the Camera Properties........ 25
Sharpness .......................................26
Shuttle slider ..................................21
Snapshot.........................................17
, 13, 29
, 13, 29
Others
Index
35
Page 36

Start Available ................................19
Start the Program..............................7
Status bar........................................12
Storage Location ............................29
System Configuration.......................4
System Requirements.......................5
T
TCP/IP tab......................................25
The Search Recording window ...... 10
Thumbnails.....................................18
Tilting.............................................15
Timeline..........................................19
timeline...........................................19
To create a date/time event.............32
To create a recurrent event .............31
To edit or delete a preset position...16
To mute the sound ..........................14
To scale the monitoring image .......14
To store new preset positions .........16
Troubleshooting..............................33
Type................................................25
Others
U
Uninstall Network Camera Recorder
........................................................7
V
Various-speed playback..................21
Video Codec ............................. 23
View ...............................................14
, 26
W
Week view......................................31
Z
Zoom In Date & Time....................18
Zoom Out Date & Time .................18
36
Index
Page 37

Sony Corporation
 Loading...