

Page 1
About the User Guide
Most operation descriptions are based on default settings.
Unless noted otherwise, descriptions are for Home Screen. Some operation
descriptions may be omitted.
Before You Begin
Data Communication
Screenshots & Key Labels
Other Notations
Before You Begin
Read "Safety Precautions" and this guide thoroughly beforehand for proper usage.
Accessible services may be limited by contract conditions.
Unauthorized copying of any part of this guide is prohibited.
Guide content subject to change without prior notice.
Data Communication
Handset is designed to be always connected to the Internet. Some functionality, such as data
syncing, initiate transmission automatically.
Large-volume data communication (application downloads, video viewing, etc.) incur expensive
transmission fees. Subscription to a flat-rate data plan is strongly recommended.
Depending on applications and services used, transmission fees may be incurred even while
connected by Wi-Fi®.
Screenshots & Key Labels
Screenshots and Key labels are provided for reference only. Actual handset windows, menus, etc.
may differ in appearance.
xperia_00_Introduction.docx
1
Page 2

Other Notations
Xperia is referred to as "handset" in this guide.
In this guide, microSD
In this guide and on handset, "abroad" means "outside Japan" with regard to handset/service
usage.
TM
/microSDHCTM/microSDXCTM Card is referred to as "SD Card."
xperia_00_Introduction.docx
2
Page 3
Parts & Functions
Part
Description
while charging.
etc.) from here.
call.
yourself, etc.
Display.
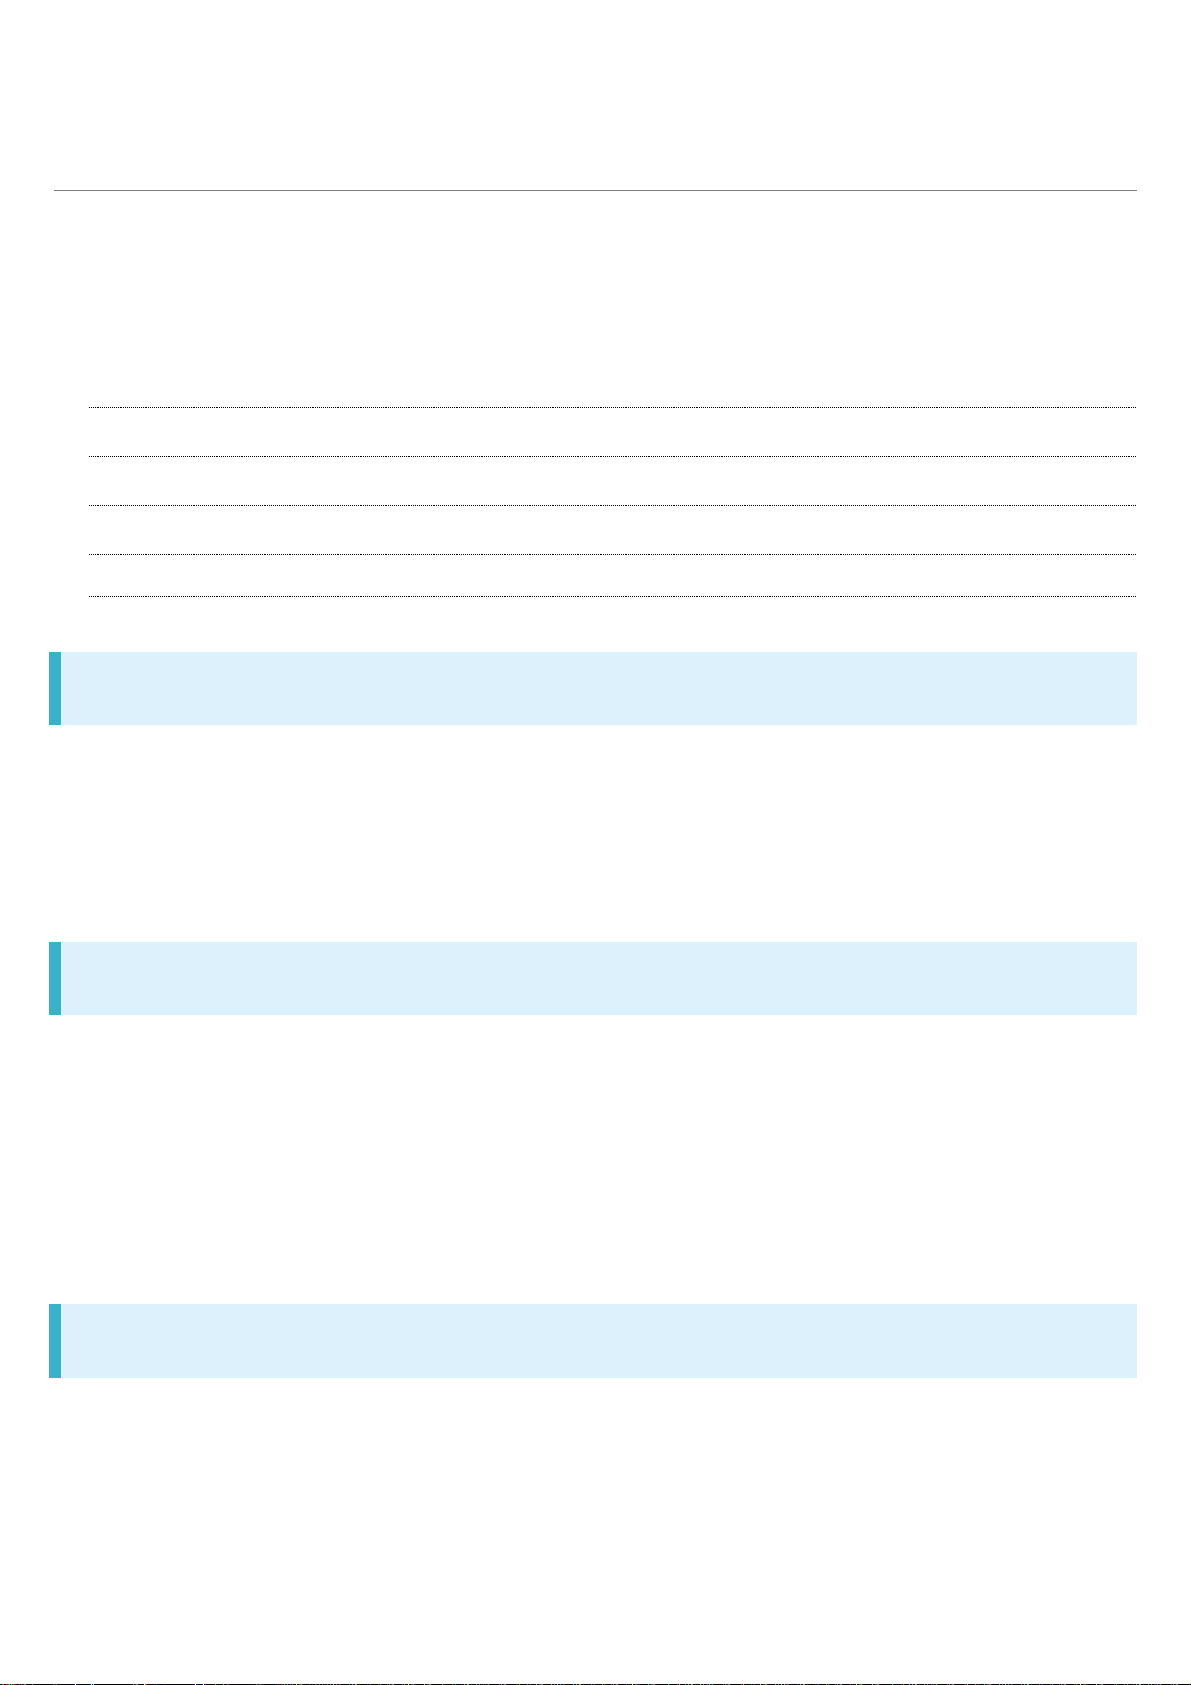
Handset (Front)
Handset (Back/Side)
Handset Keys
FCC ID
Available radio frequencies
Handset (Front)
Notification Lamp Flashes for
notifications while
Display is off. Lights
Earpiece/Speaker Hear the other party's
voice here.
Also, hear sound
(music, videos, TV,
Proximity/Light
Sensor
Front Camera Use to shoot still
Detects surrounding
brightness to
automatically adjust
Display or backlight
and prevent
Touchscreen
misoperation during a
xperia_01_Getting Started.docx
1
images, videos of
Display Touchscreen-type
display, operate with
your fingers on
Page 4
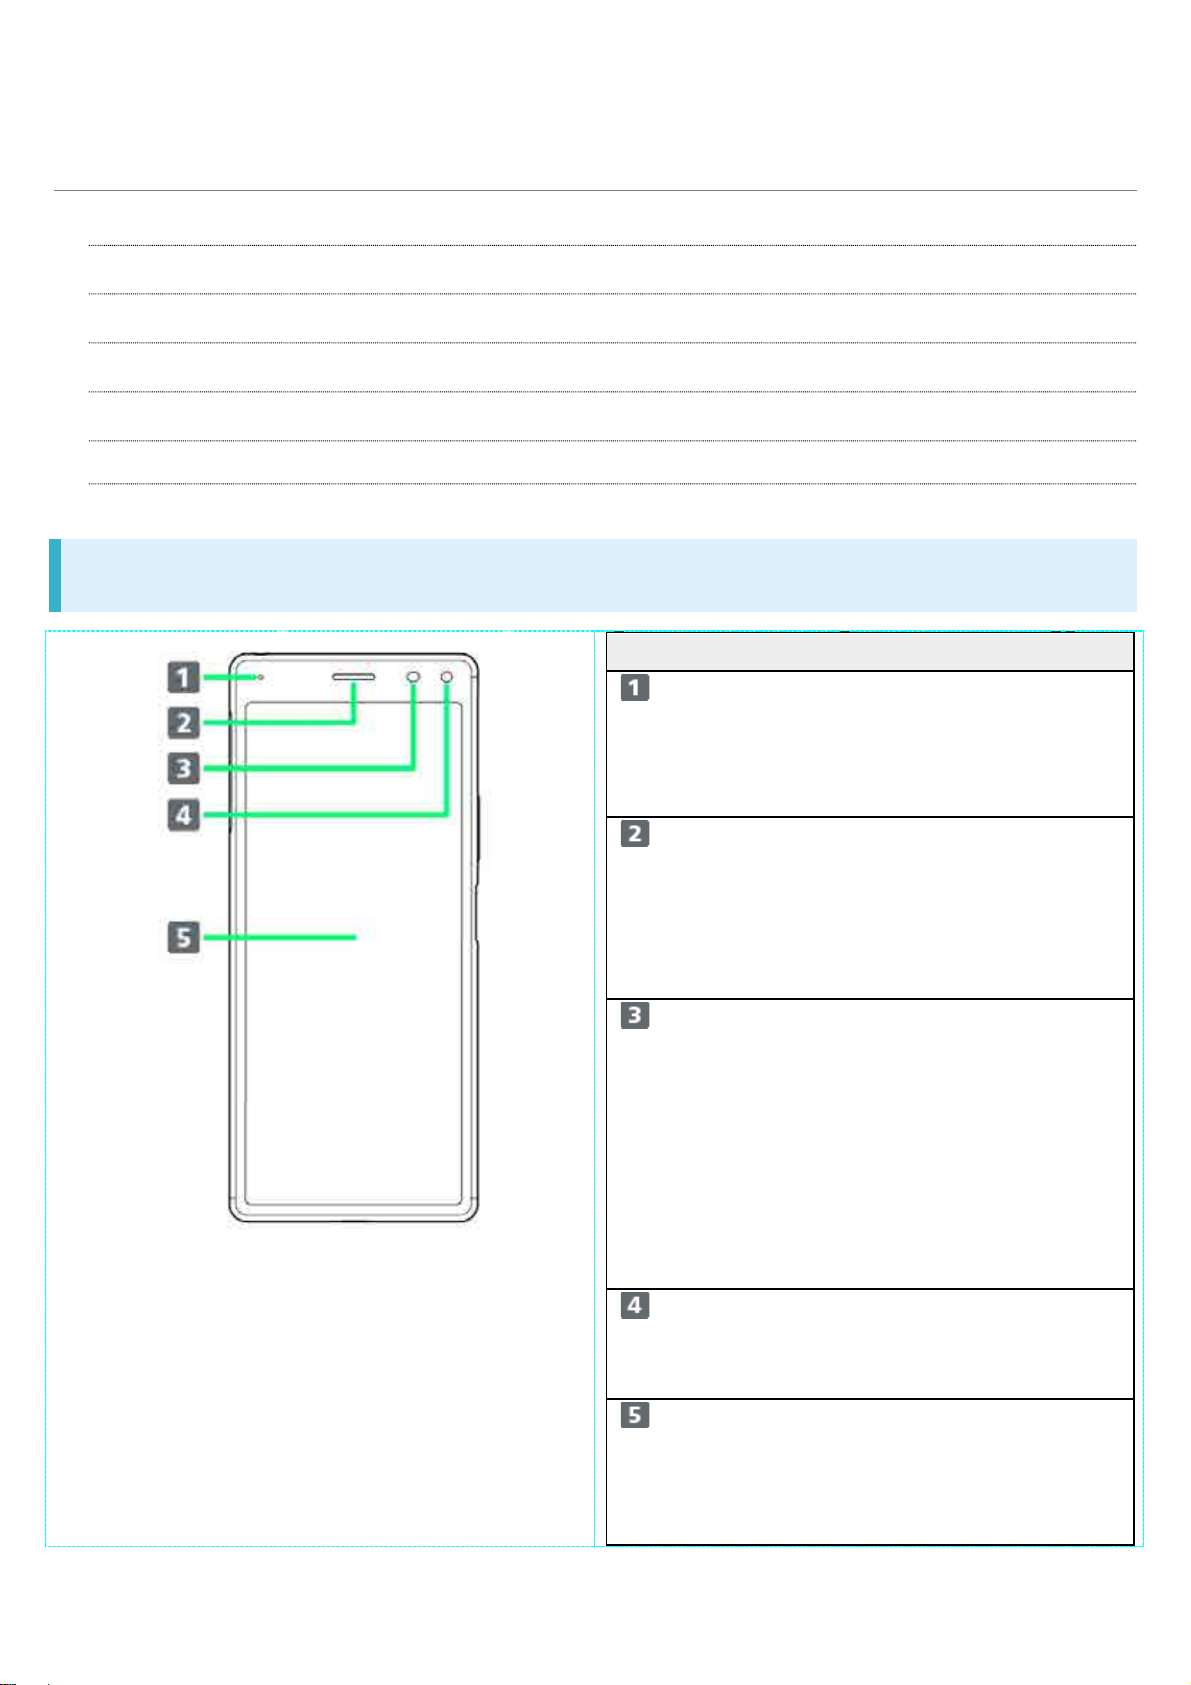
Handset (Back/Side)
Part
Description
Detection Area
Slot
Mic
Second Mic Reduces noise for
calling.
Headphone Port Connect commercially
available headphones.
Internal
Antenna/GPS
Antenna Area
Wi-Fi/Bluetooth®
Antenna Area
Camera Capture still images
NFC /
Osaifu-Keitai®
Internal Antenna
Area
Flash/Photo Light Use as camera flash
Internal Antennas for
calls, data
communication, and
GPS.
Internal Antenna for
Wi-Fi, and Bluetooth®
features.
and videos.
Hold up to a
reader/writer to use
NFC / Osaifu-Keitai®.
Internal Antenna for
calls and data
communication.
xperia_01_Getting Started.docx
2
when taking photos,
etc.
SIM Card/SD Card
Speaker Listen to music as well
USB Type-CTM
Port
Insert SIM Card/SD
Card.
as video, TV, etc.
audio.
Connect USB Type-C
cable (commercially
available), etc.
Speak here.
Page 5
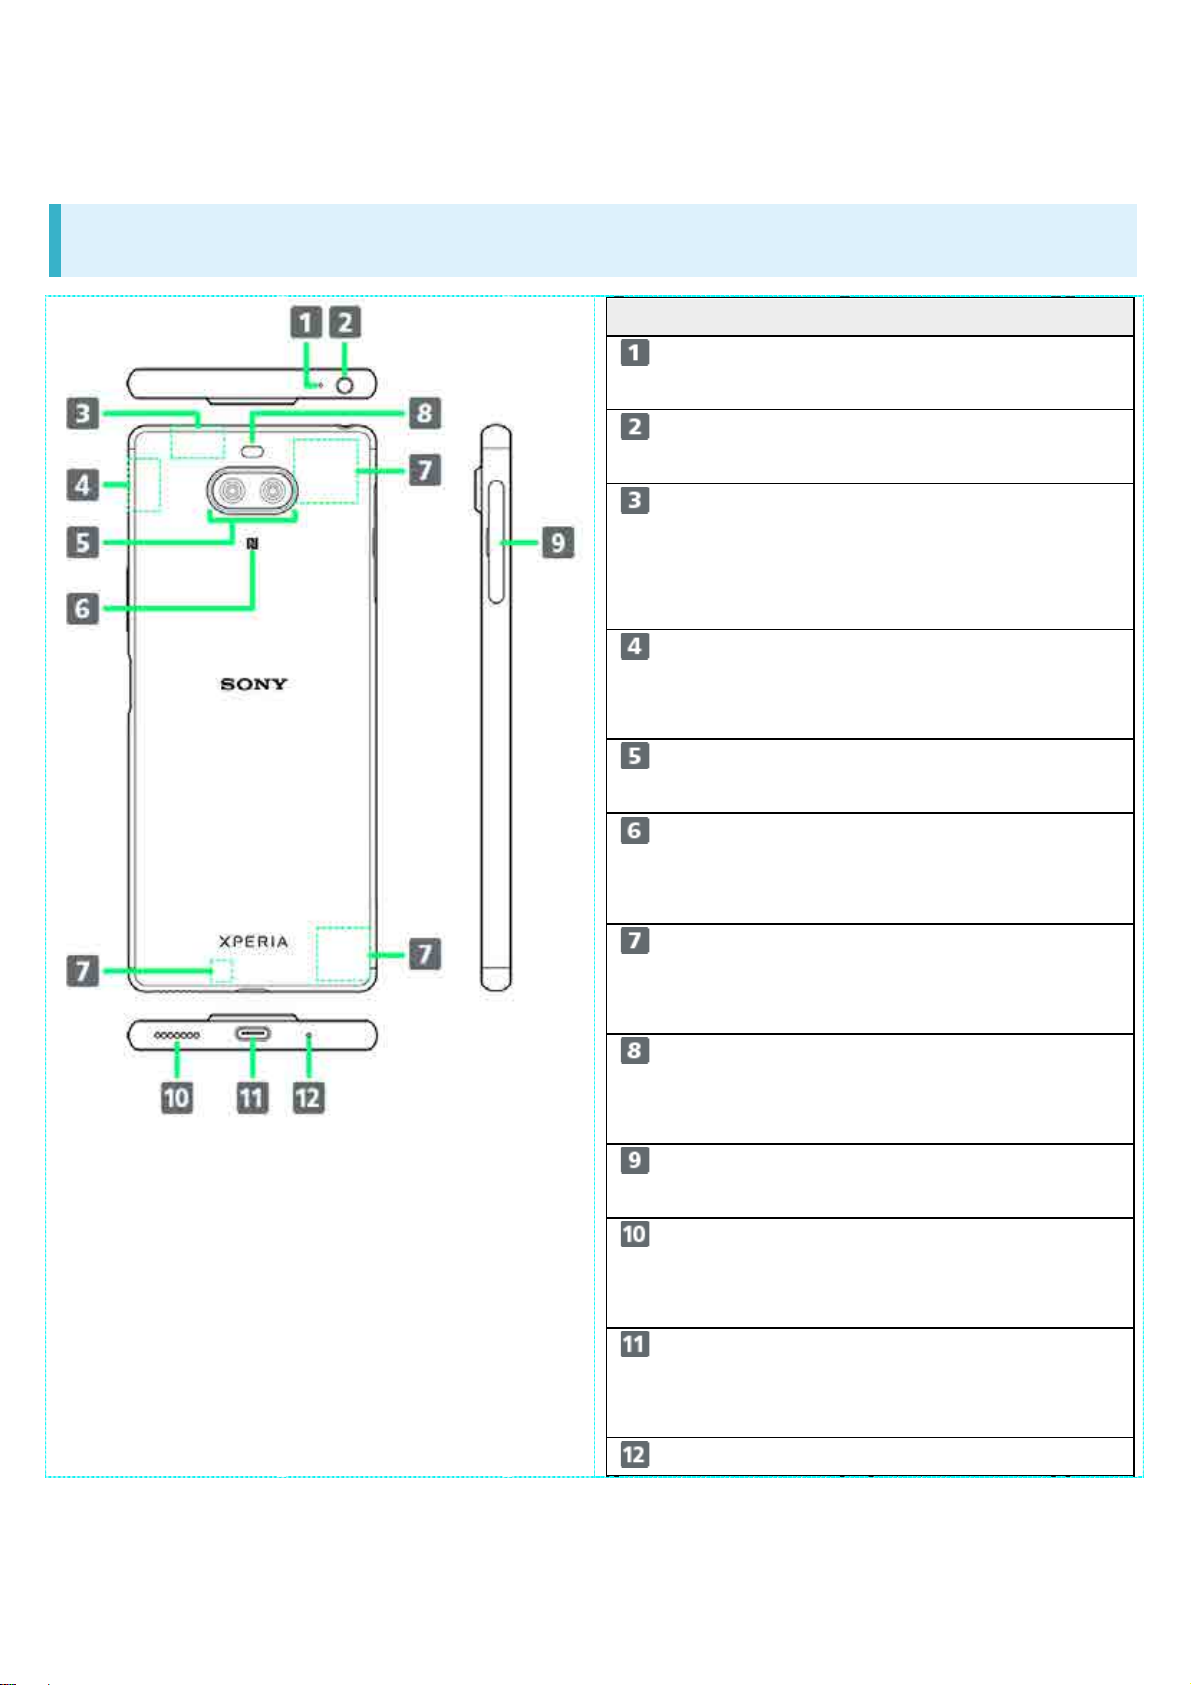
Handset Keys
Part
Description
Volume/Zoom
Up/Down Key
Power
Key/Screen Lock
Key/Fingerpr int
Sensor
Adjust Volume.
Adjust Zoom while
using Camera.
Long Press for power
on/off.
Turn Display on/off.
Or, use Fingerprint
authentication.
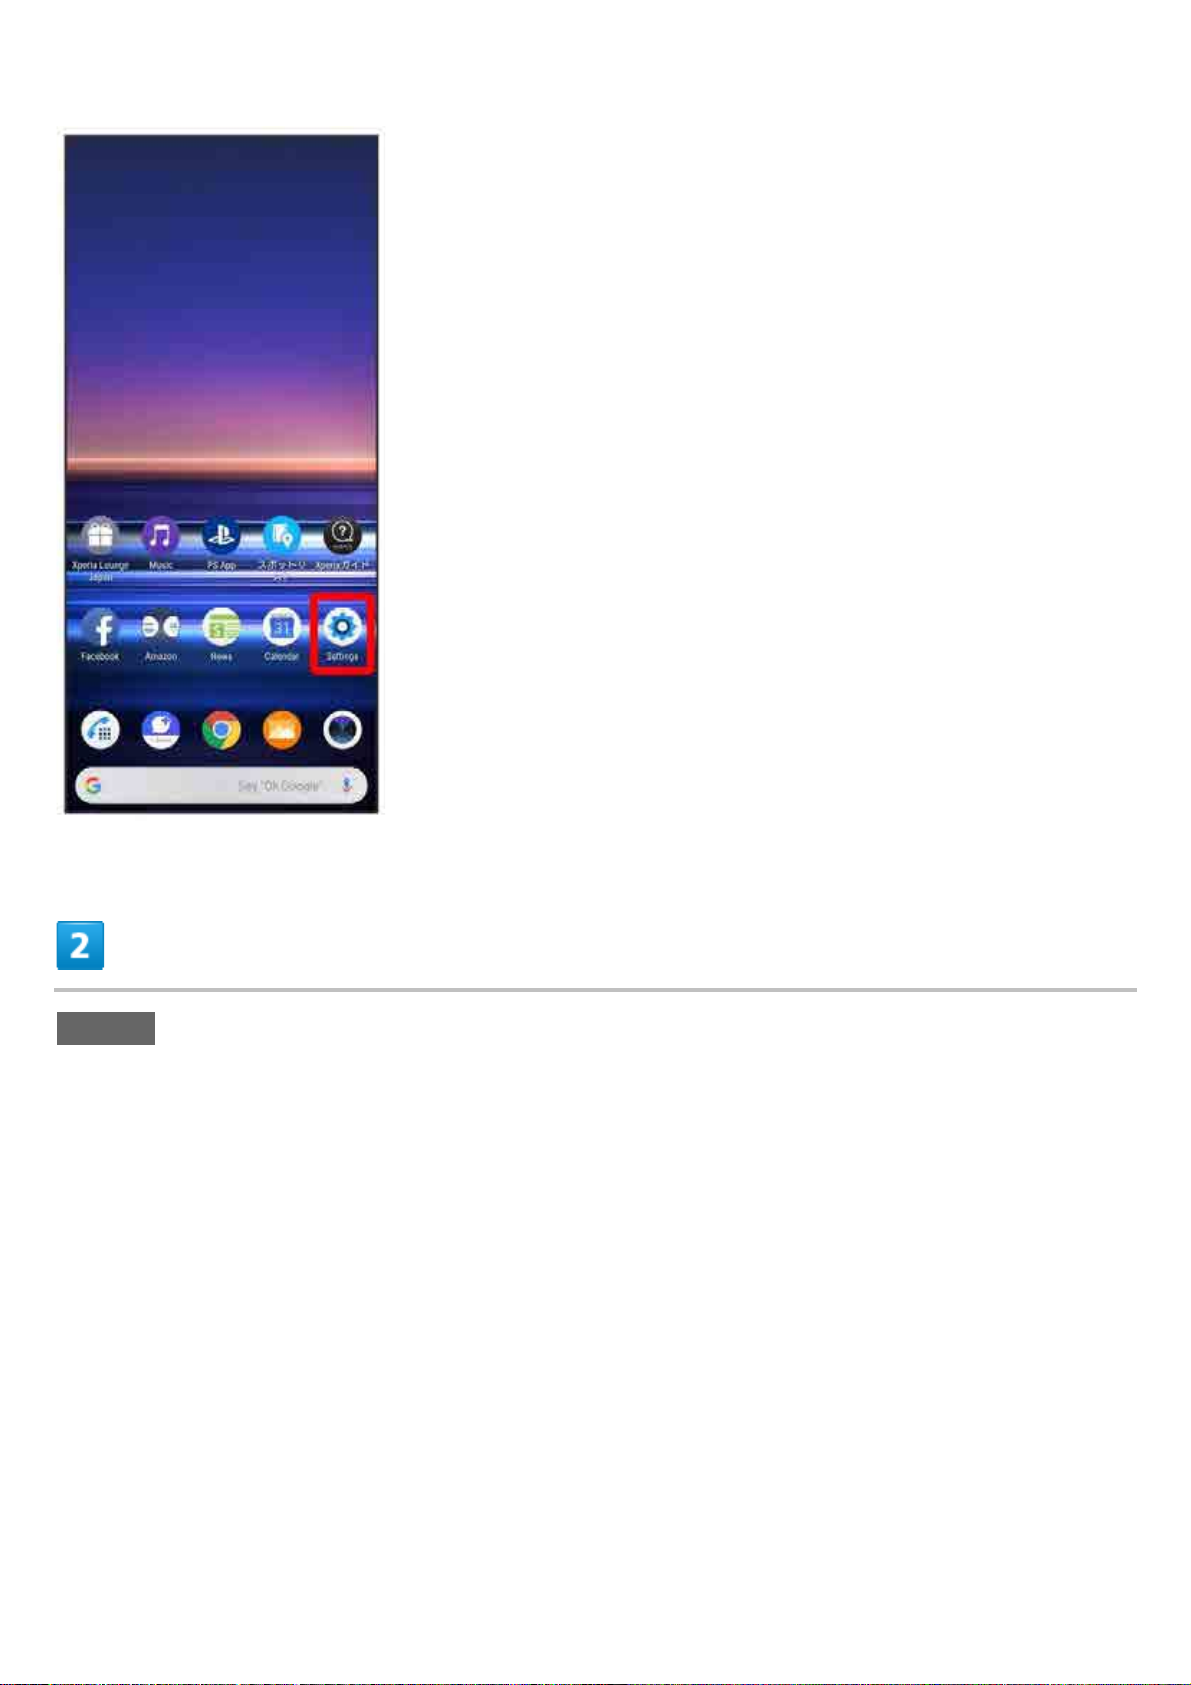
FCC ID
To view the regulatory compliance mark
Find and tap Settings System Certificates
Regulatory compliance mark such as FCC ID is displayed on the screen.
Available radio frequencies
GSM/GPRS/EDGE : 850, 900, 1800, 1900MHz
UMTS : 2100 (Band I), 1700 (Band IV), 900 (Band VIII)MHz
LTE : Bands 1, 3, 4, 8, 12, 17, 38, 41
WLAN 2.4G/5G
NFC
GSM 850/900 : 33dBm
DCS (1800)/PCS (1900) : 30dBm
UMTS : 24dBm
xperia_01_Getting Started.docx
3
Page 6

LTE : 23dBm
WLAN : 2.4GHz<100mW,
5.15-5.35GHz<200mW,
5.47-5.725GHz<200mW,
5.735-5.835GHz<25mW
NFC 13.56MHz
xperia_01_Getting Started.docx
4
Page 7
SIM Card
SIM Card is an IC card containing phone number and other customer information.
Inserting SIM Card
Removing SIM Card
SIM-Unlocking Handset
Handling SIM Card
For SIM Card handling, see following items.
① IC chip
For SIM Card handling, see xxxx Website.
https://www.xxxx.jp/
Always keep the IC chip clean.
Wipe clean with a dry, soft cloth.
Avoid applying labels. May damage SIM Card.
SIM Card Cautions
Observe the following when using SIM Card.
Customer is responsible for any damage caused by inserting SIM Card in an other-brand IC card
reader, etc. xxxx. is not responsible in such case.
SIM Card is the property of xxxx.
SIM is replaceable (at cost) in case of loss/damage.
Return SIM Card to xxxx. when cancelling subscription.
Returned SIM Cards are recycled for environmental purposes.
Note that SIM Card specifications and performance may change without notice.
xperia_01_Getting Started.docx
5
Page 8

It is recommended that you keep a separate copy of information that is stored on SIM Card.
xxxx. is not responsible for damages from stored information that is lost.
Always follow emergency procedures to suspend service if your SIM Card or handset (SIM Card
inserted) is lost/stolen. For details, contact Customer Service.
Inserting SIM Card
Always unmount SD Card beforehand.For details, see "Unmounting SD Card."
Pull Tray out from handset
Pull SIM Card/SD Card Slot Cover out straight using fingernail in groove.
Set SIM Card into Tray with IC chip facing up
xperia_01_Getting Started.docx
6
Page 9
Check SIM Card orientation by notch.
Make sure SIM Card is in Tray securely.
Holding handset held level, press Tray in straight
SIM Card is inserted.
Check Tray orientation.
Press firmly where circled ○, and make sure there is no gap between handset and SIM Card/SD
Card Slot Cover.
Removing SIM Card
Always unmount SD Card beforehand.For details, see "Unmounting SD Card."
xperia_01_Getting Started.docx
7
Page 10
Pull Tray out from handset
Pull SIM Card/SD Card Slot Cover out straight using fingernail in groove.
Remove SIM Card from Tray
Holding handset held level, press Tray in straight
xperia_01_Getting Started.docx
8
Page 11
SIM Card is removed.
Check Tray orientation.
Press firmly where circled ○, and make sure there is no gap between handset and SIM Card/SD
Card Slot Cover.
SIM-Unlocking Handset
Handset can be SIM-unlocked. SIM-unlocking handset allows other-carrier SIM cards to be used
with it.
Some services, functions, etc. may have restrictions when an other-carrier SIM card is used.
xxxx does not guarantee operation whatsoever.
For details, see xxxx Website.
xperia_01_Getting Started.docx
9
Page 12
SD Card
Handset supports SD Cards up to 512 GB. Some SD Cards may not operate properly.
When using a new SD Card for the first time, always format it on handset.
Inserting SD Card
Formatting SD Card
Unmounting SD Card
Removing SD Card
SD Card Cautions
Data
Information stored on SD Card can become lost or changed accidentally or as a result of damage. It is
recommended that you keep a separate copy of important data. xxxx is not responsible for
damages from data that is lost or changed.
Reading/Writing Data
Never power off while reading or writing data.
Battery Level
A low battery charge may prevent reading/writing to SD Card.
Handling SD Card
Use/store SD Cards away from the reach of infants. May cause choking if swallowed.
Inserting SD Card
Pull Tray out from handset
xperia_01_Getting Started.docx
10
Page 13
Pull SIM Card/SD Card Slot Cover out straight using fingernail in groove.
Set SD Card into Tray with terminals facing up
Make sure SD Card is in Tray securely.
Holding handset held level, press Tray in straight
xperia_01_Getting Started.docx
11
Page 14
SD Card is inserted.
Check Tray orientation.
Press firmly where circled ○, and make sure there is no gap between handset and SIM Card/SD
Card Slot Cover.
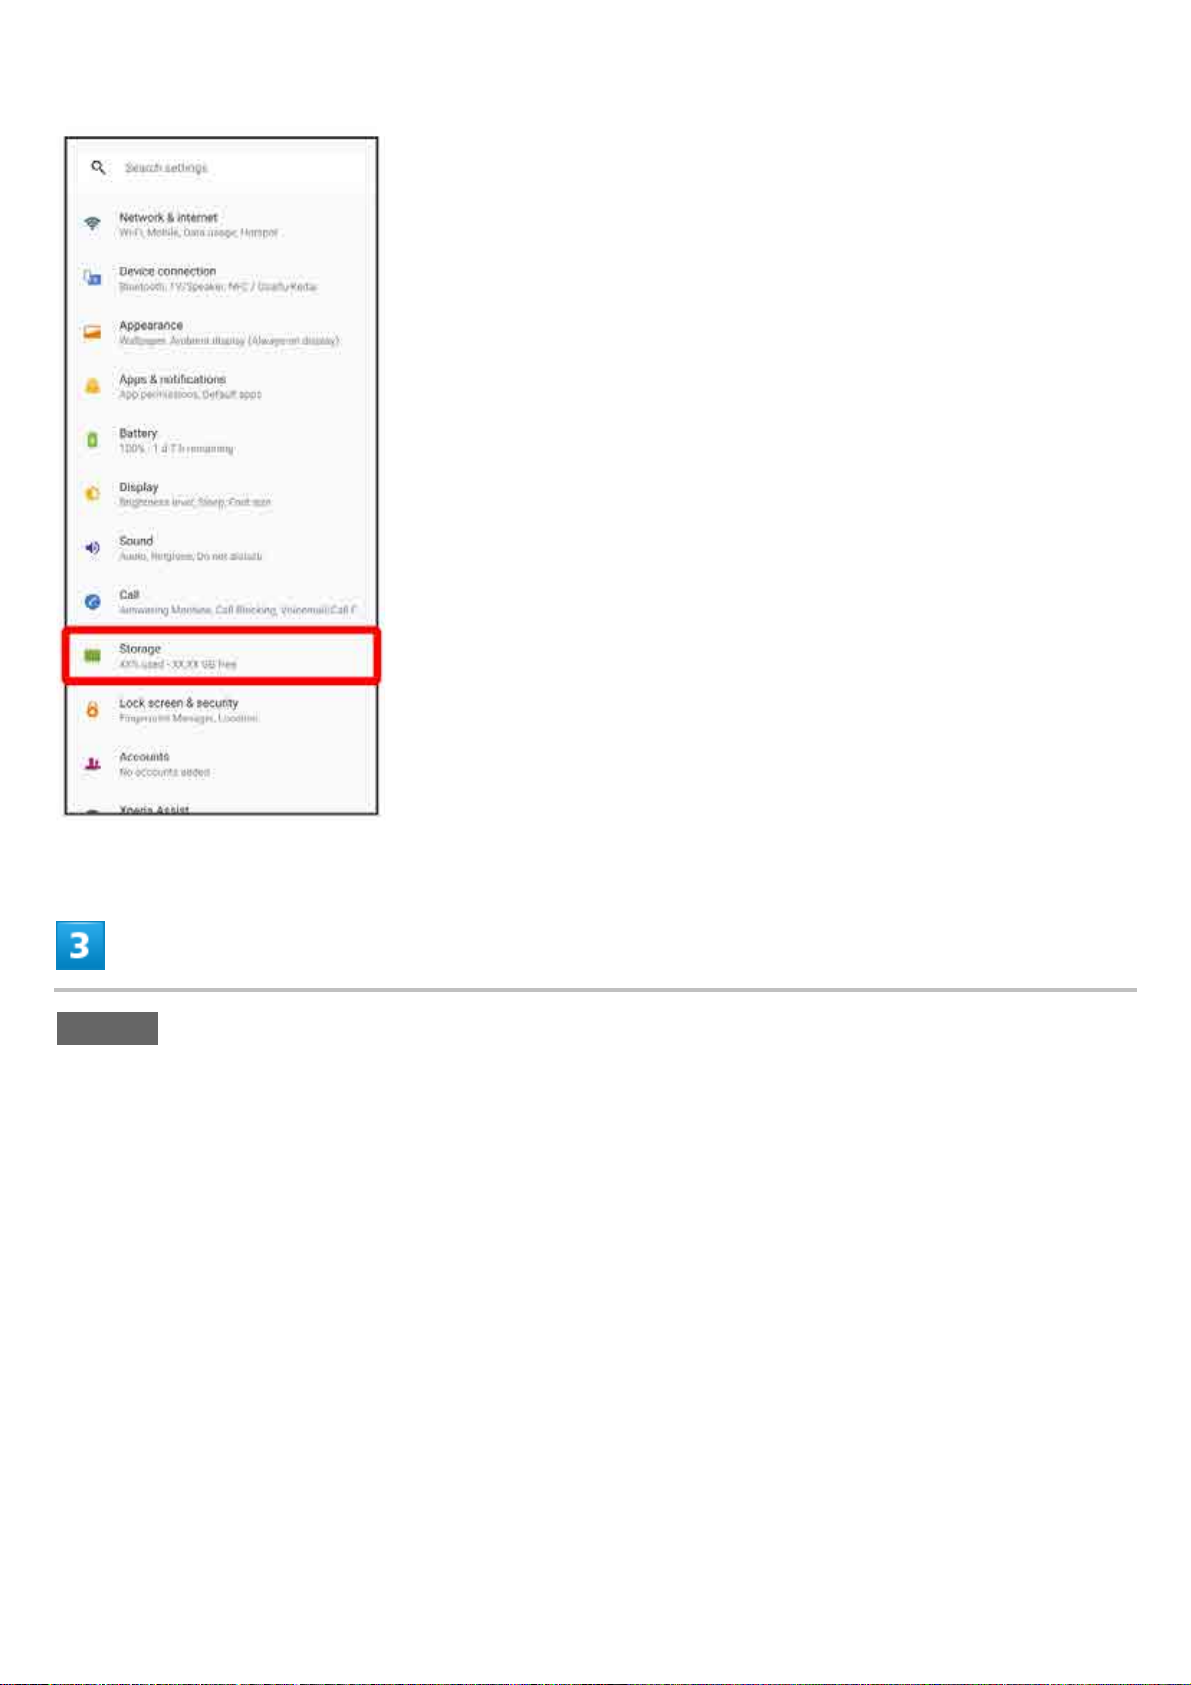
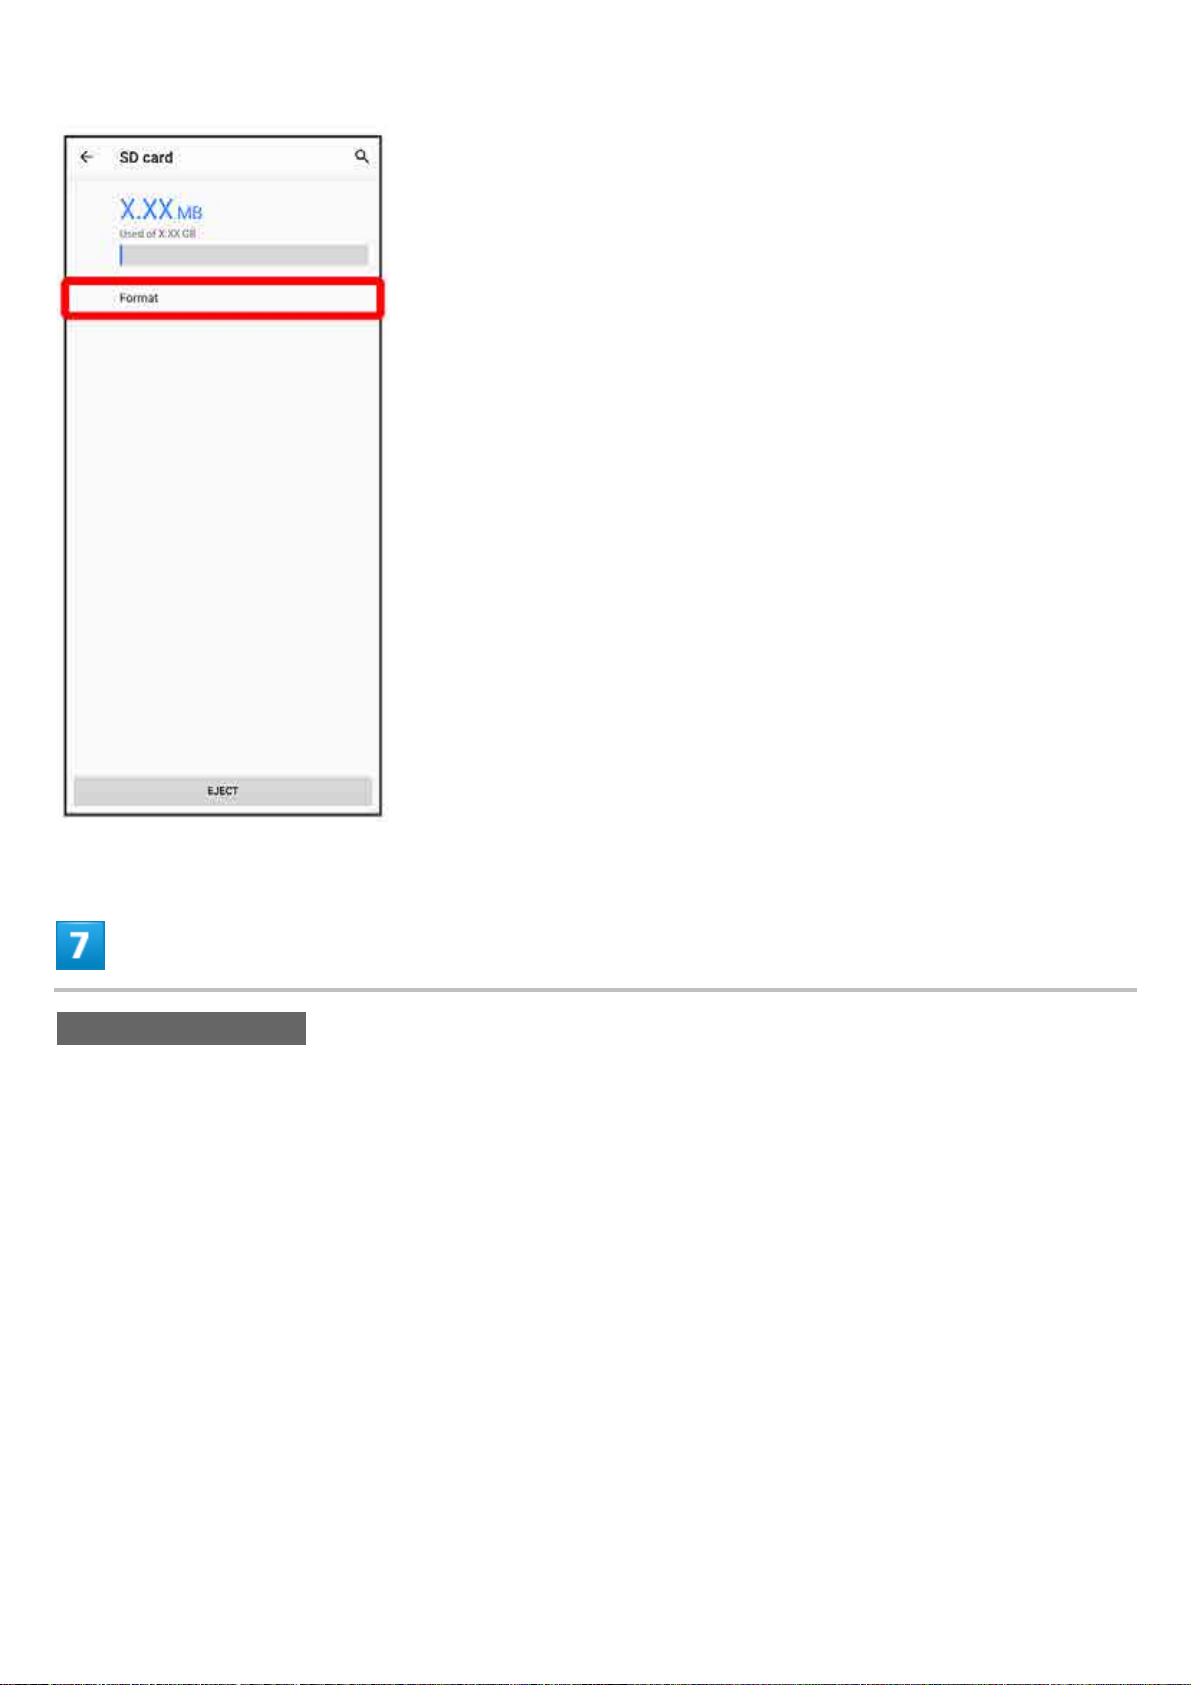
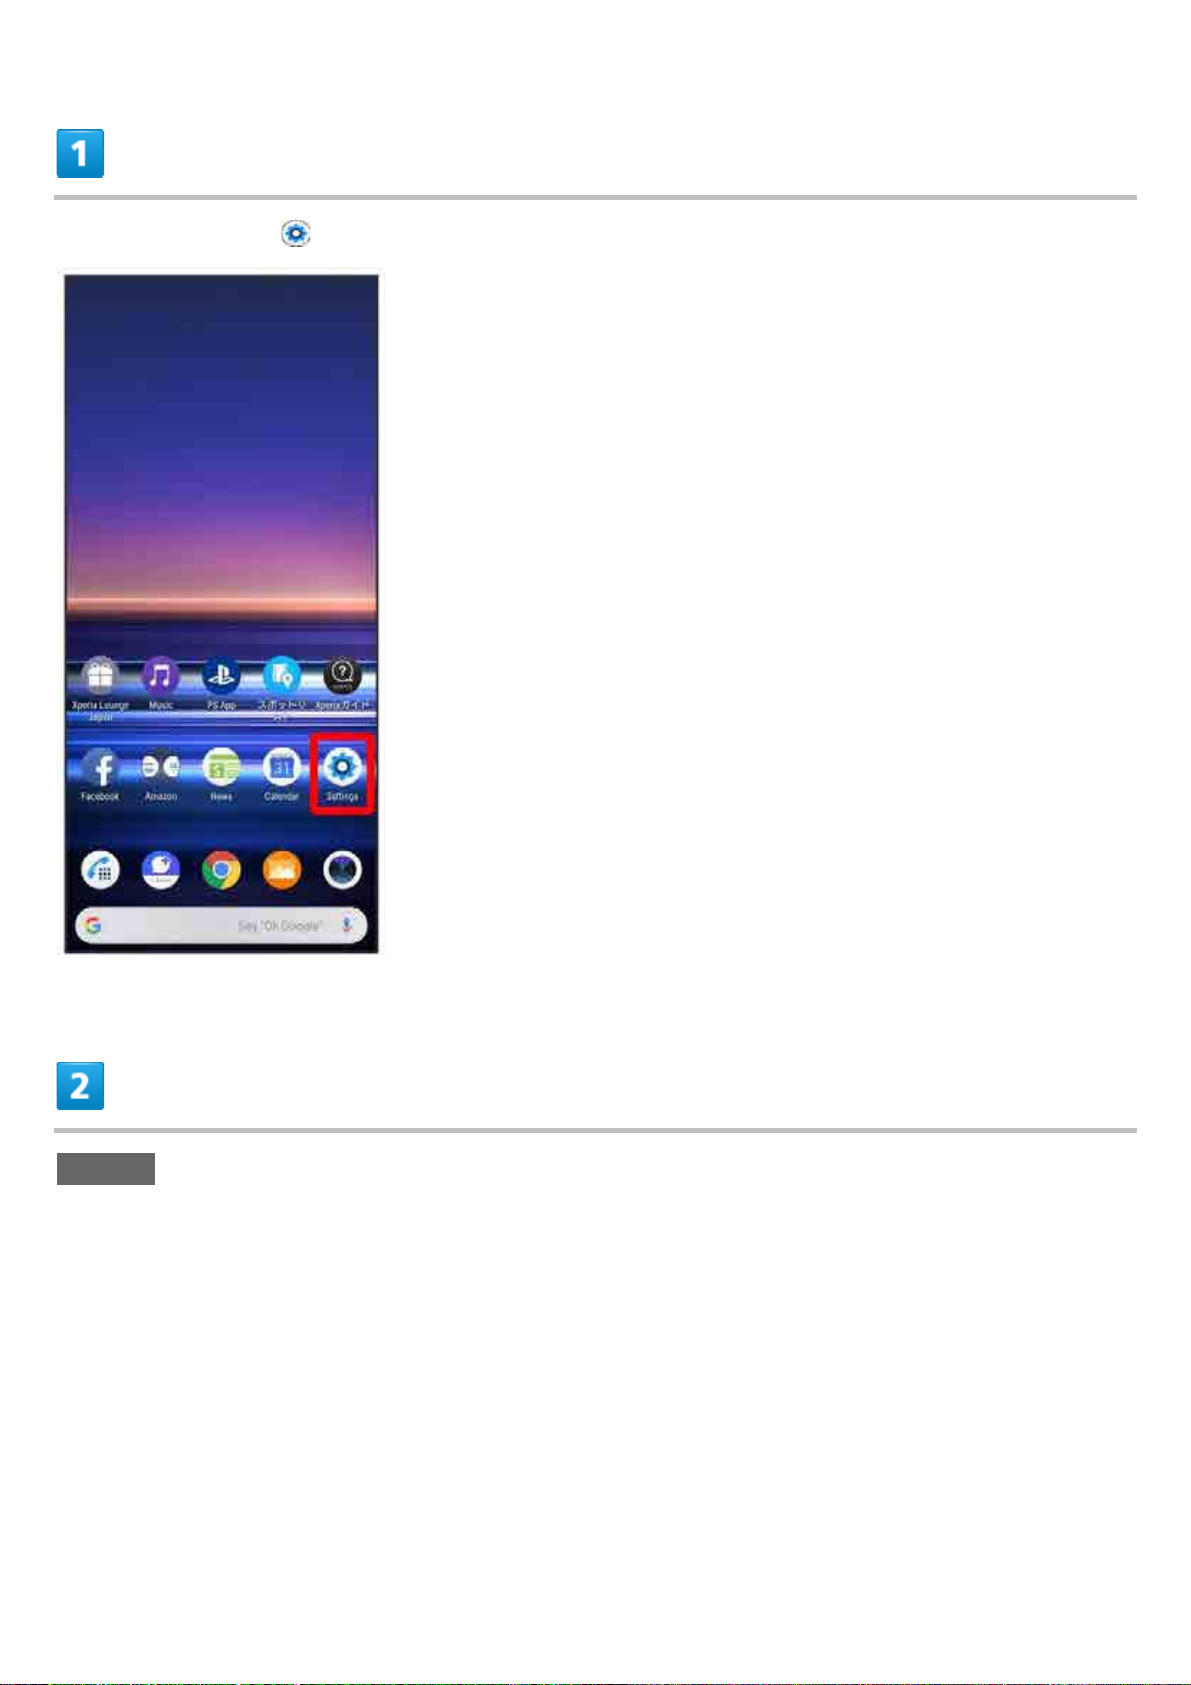
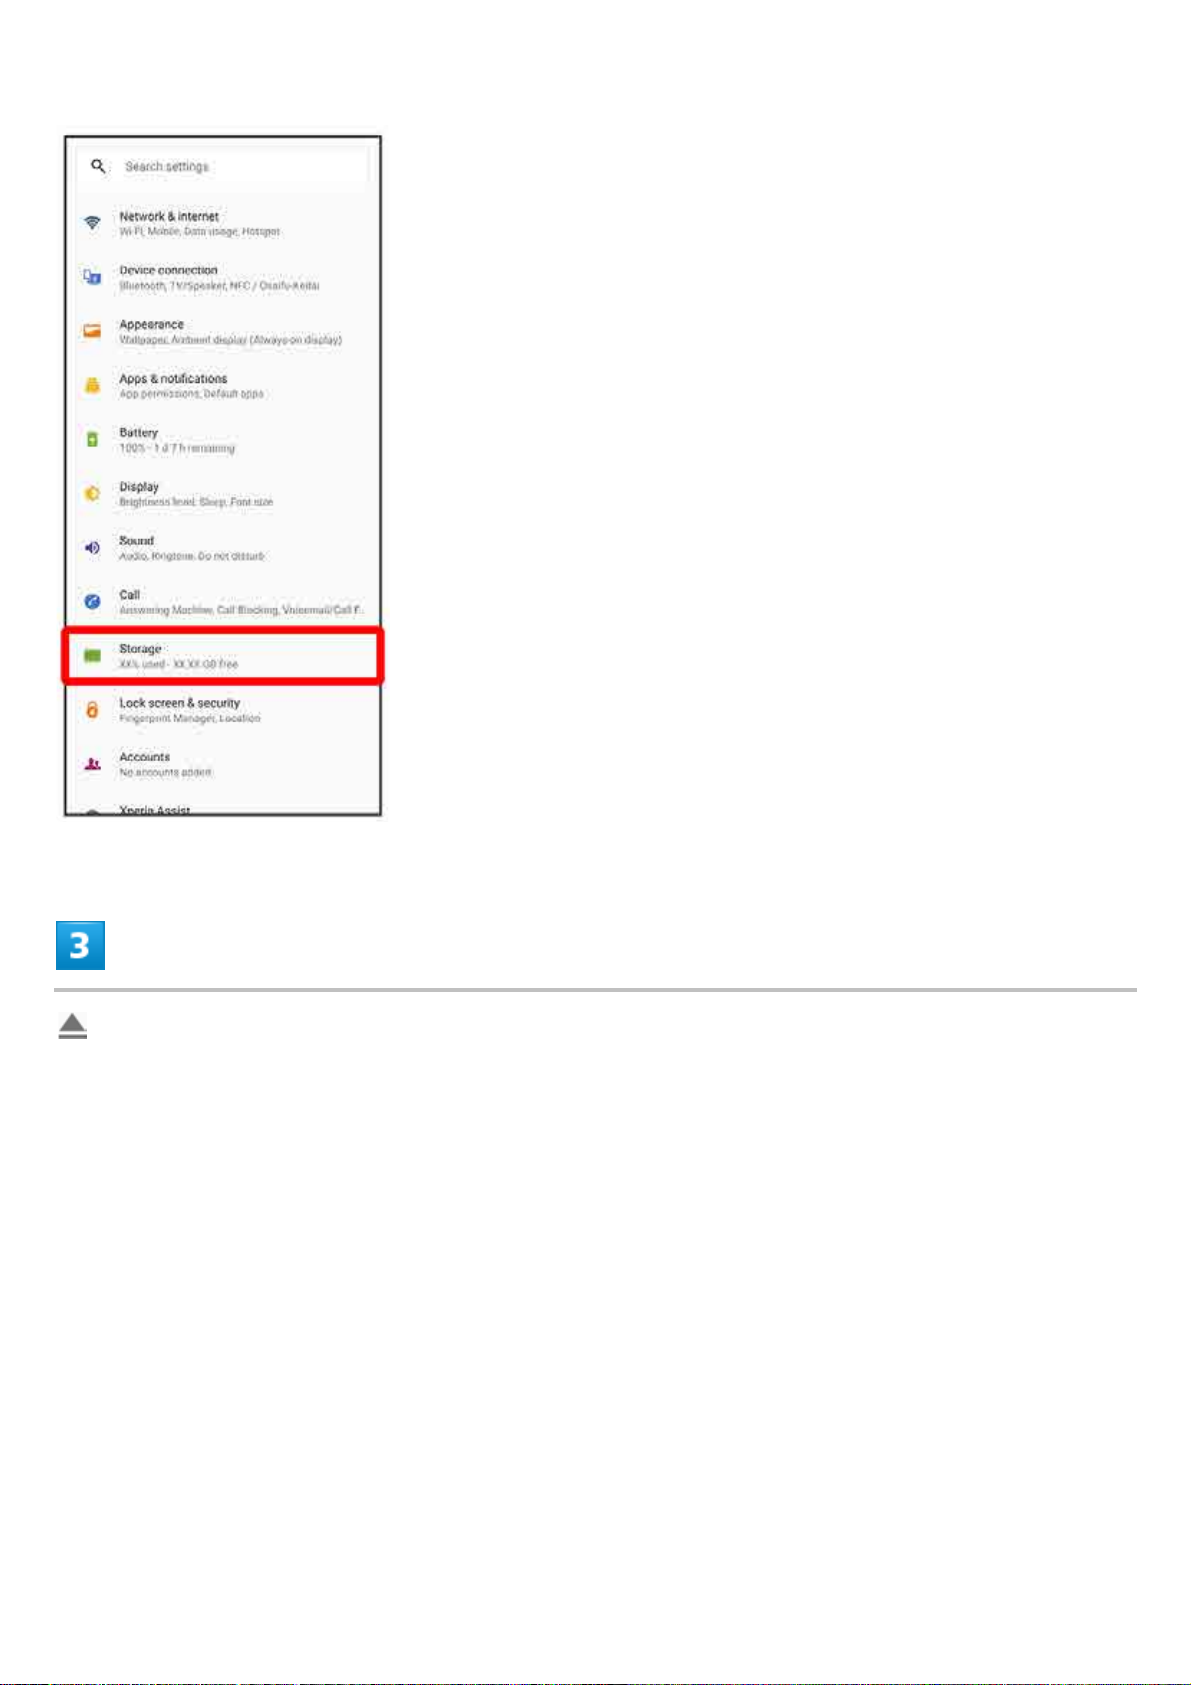
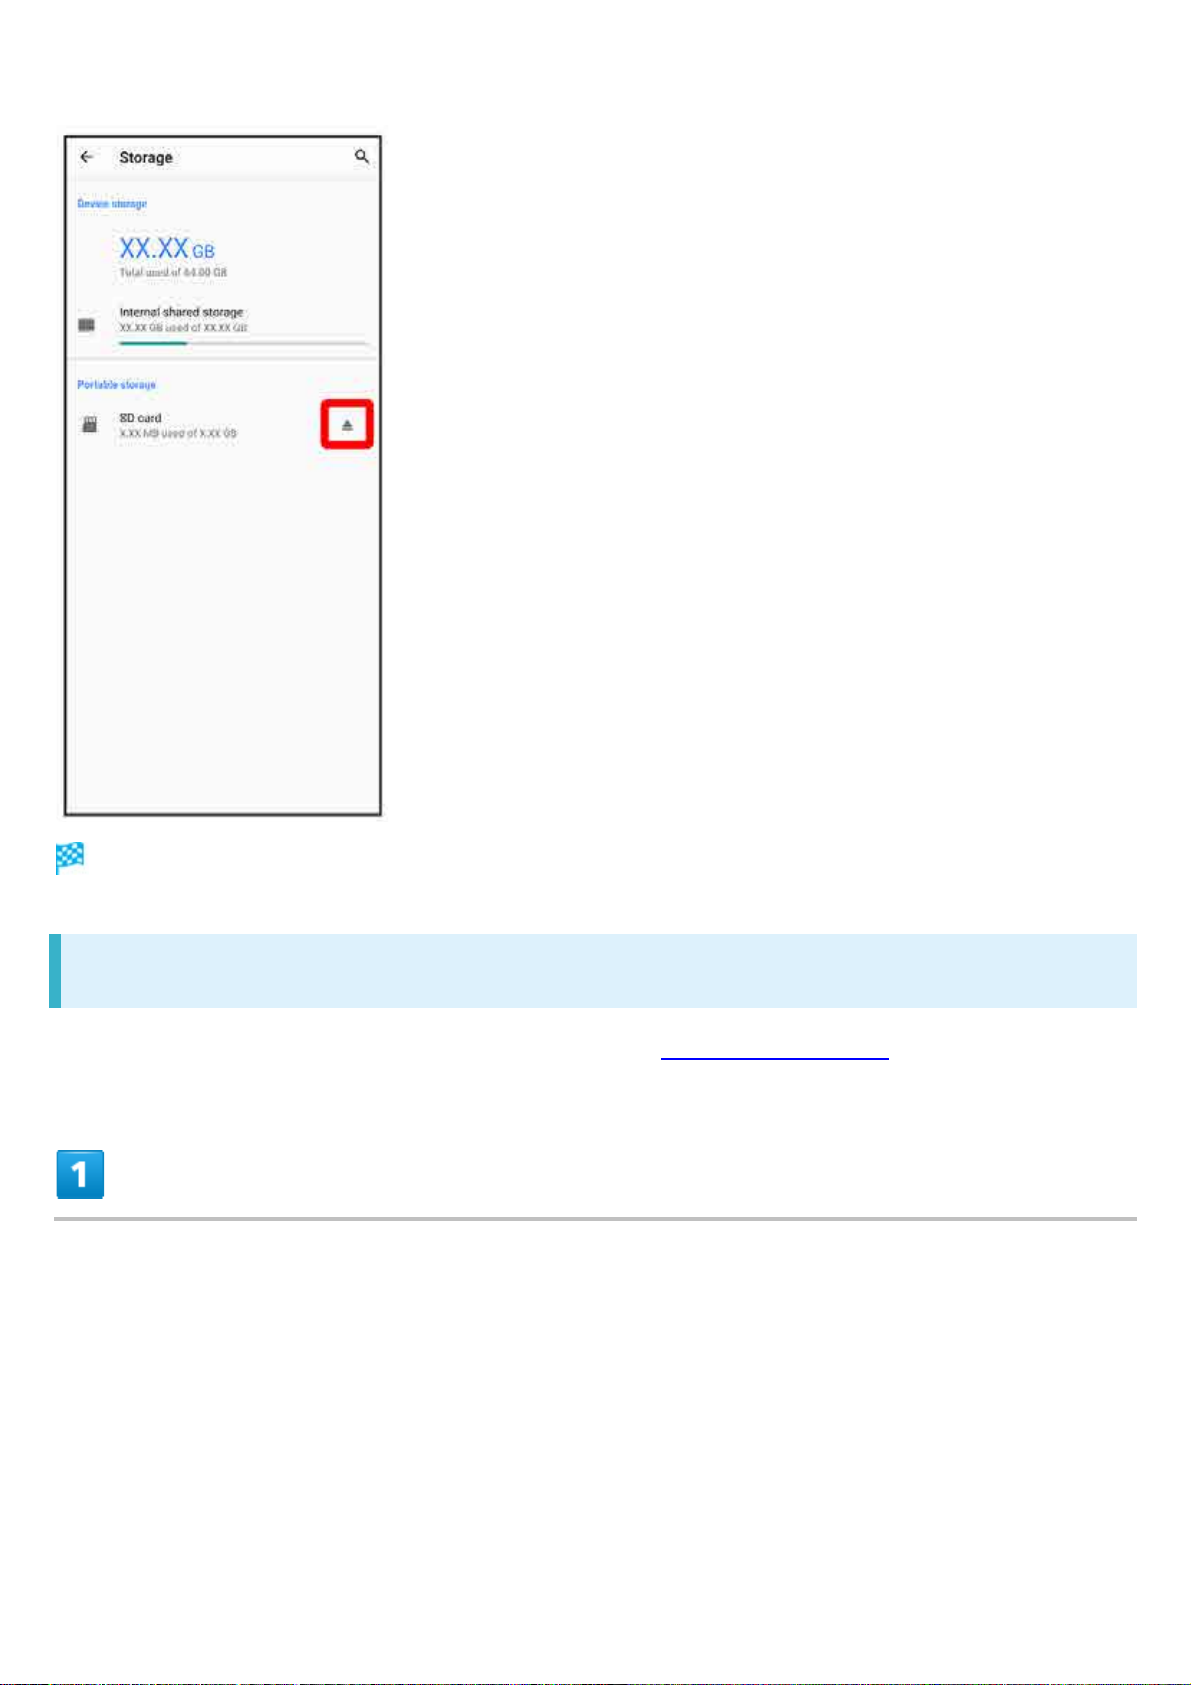
Formatting SD Card
In Home Screen, (Settings)
xperia_01_Getting Started.docx
12
Page 15
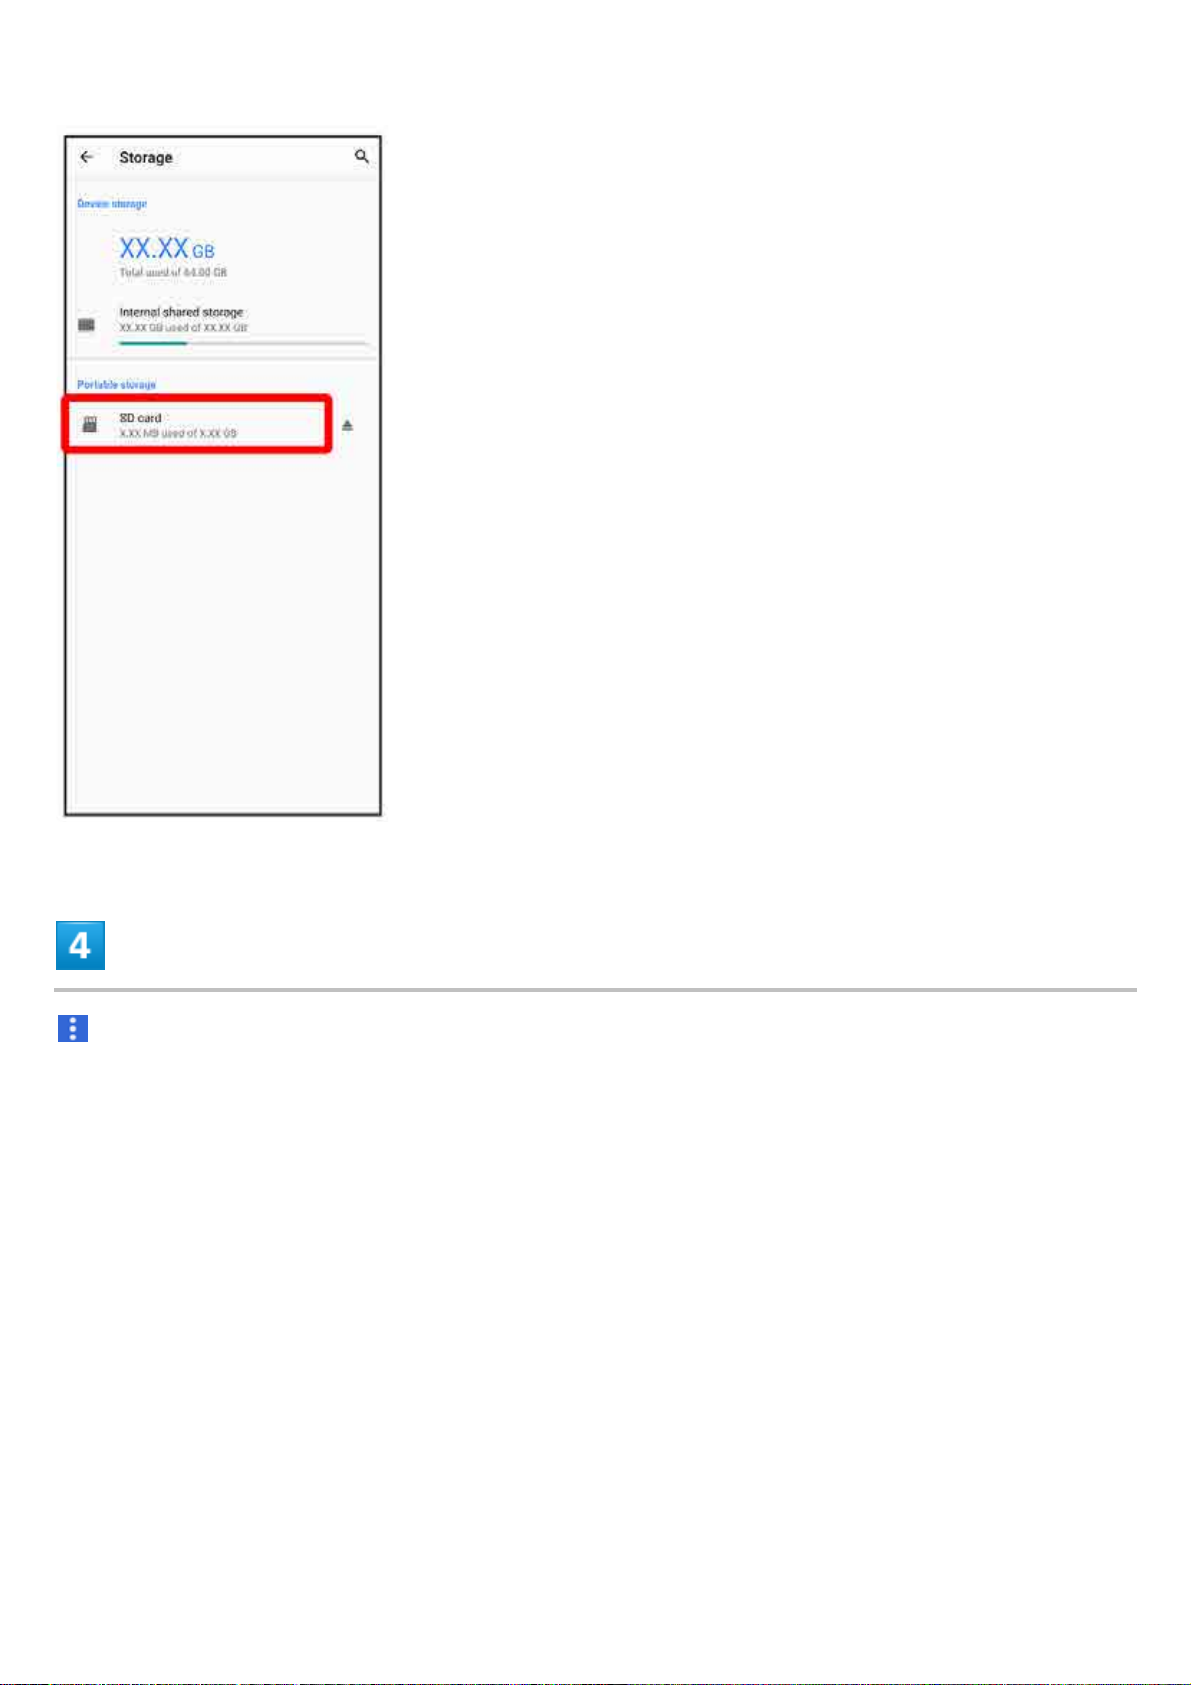
Storage
xperia_01_Getting Started.docx
13
Page 16
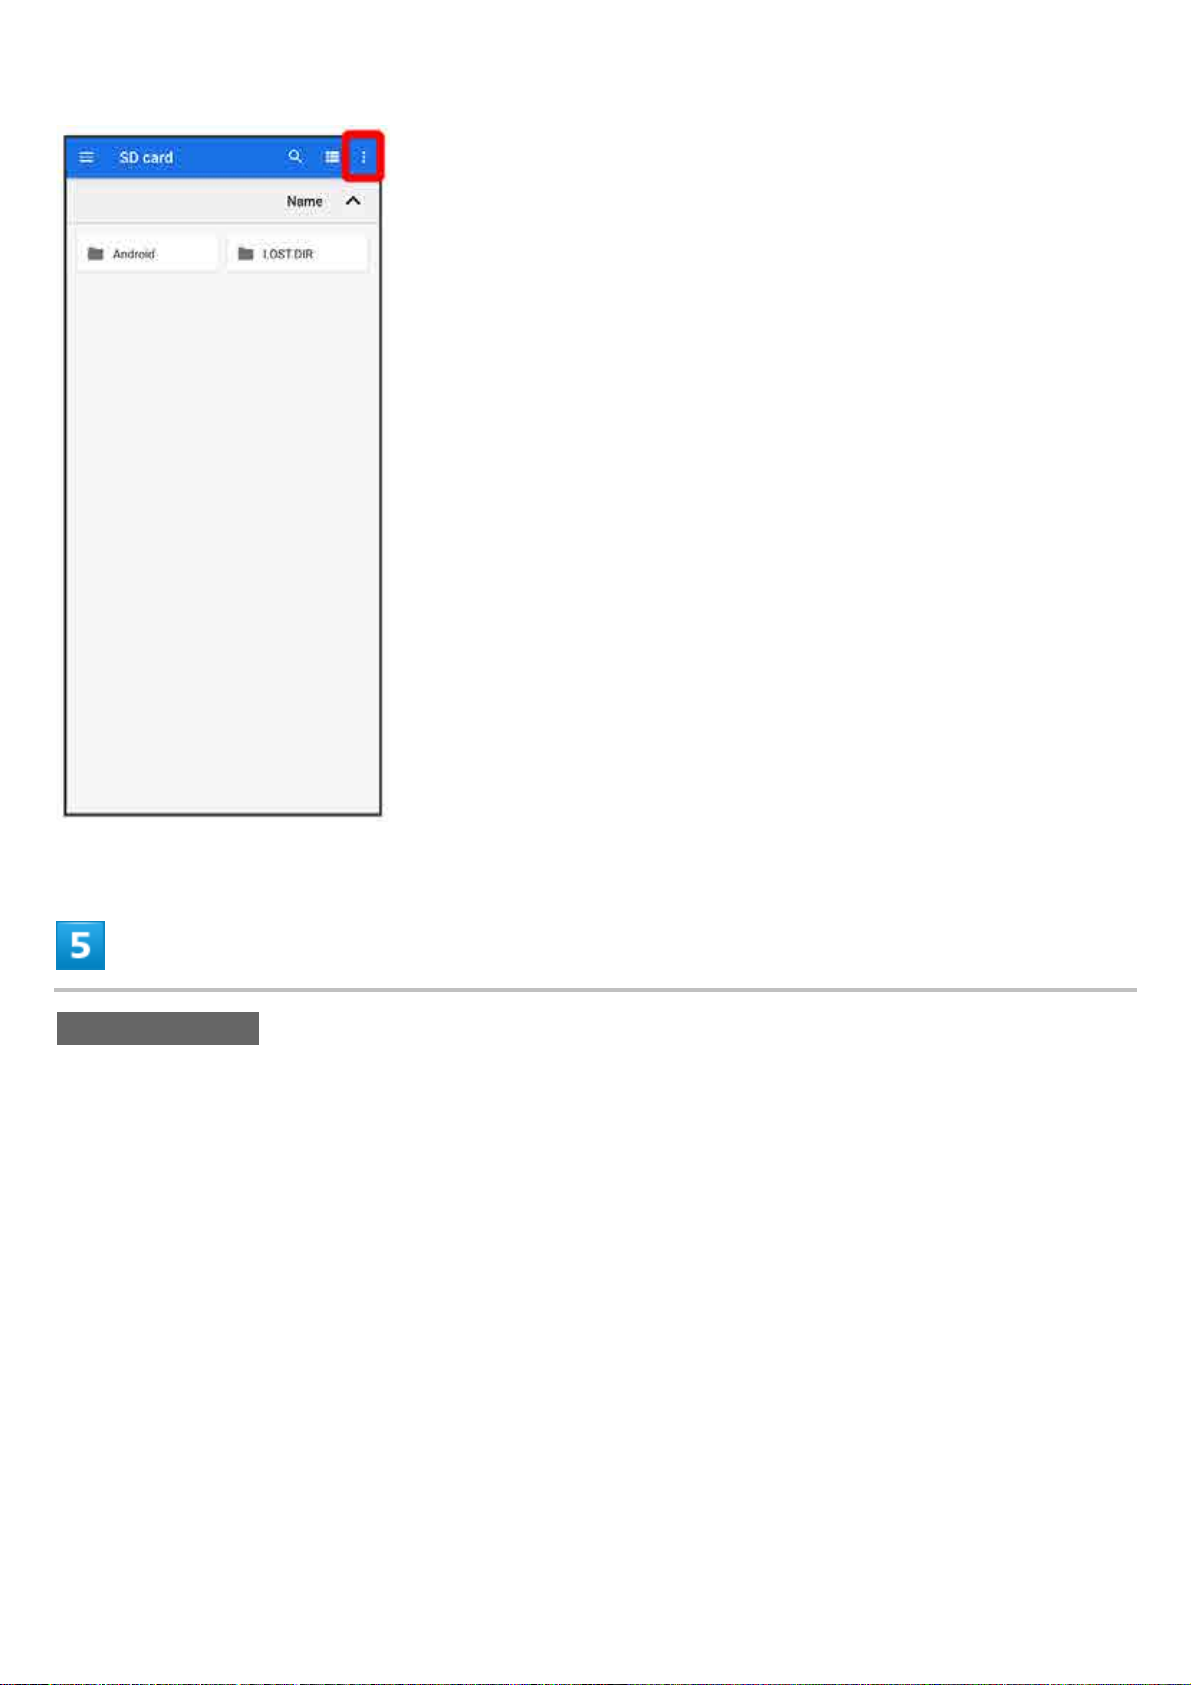
SD card
xperia_01_Getting Started.docx
14
Page 17
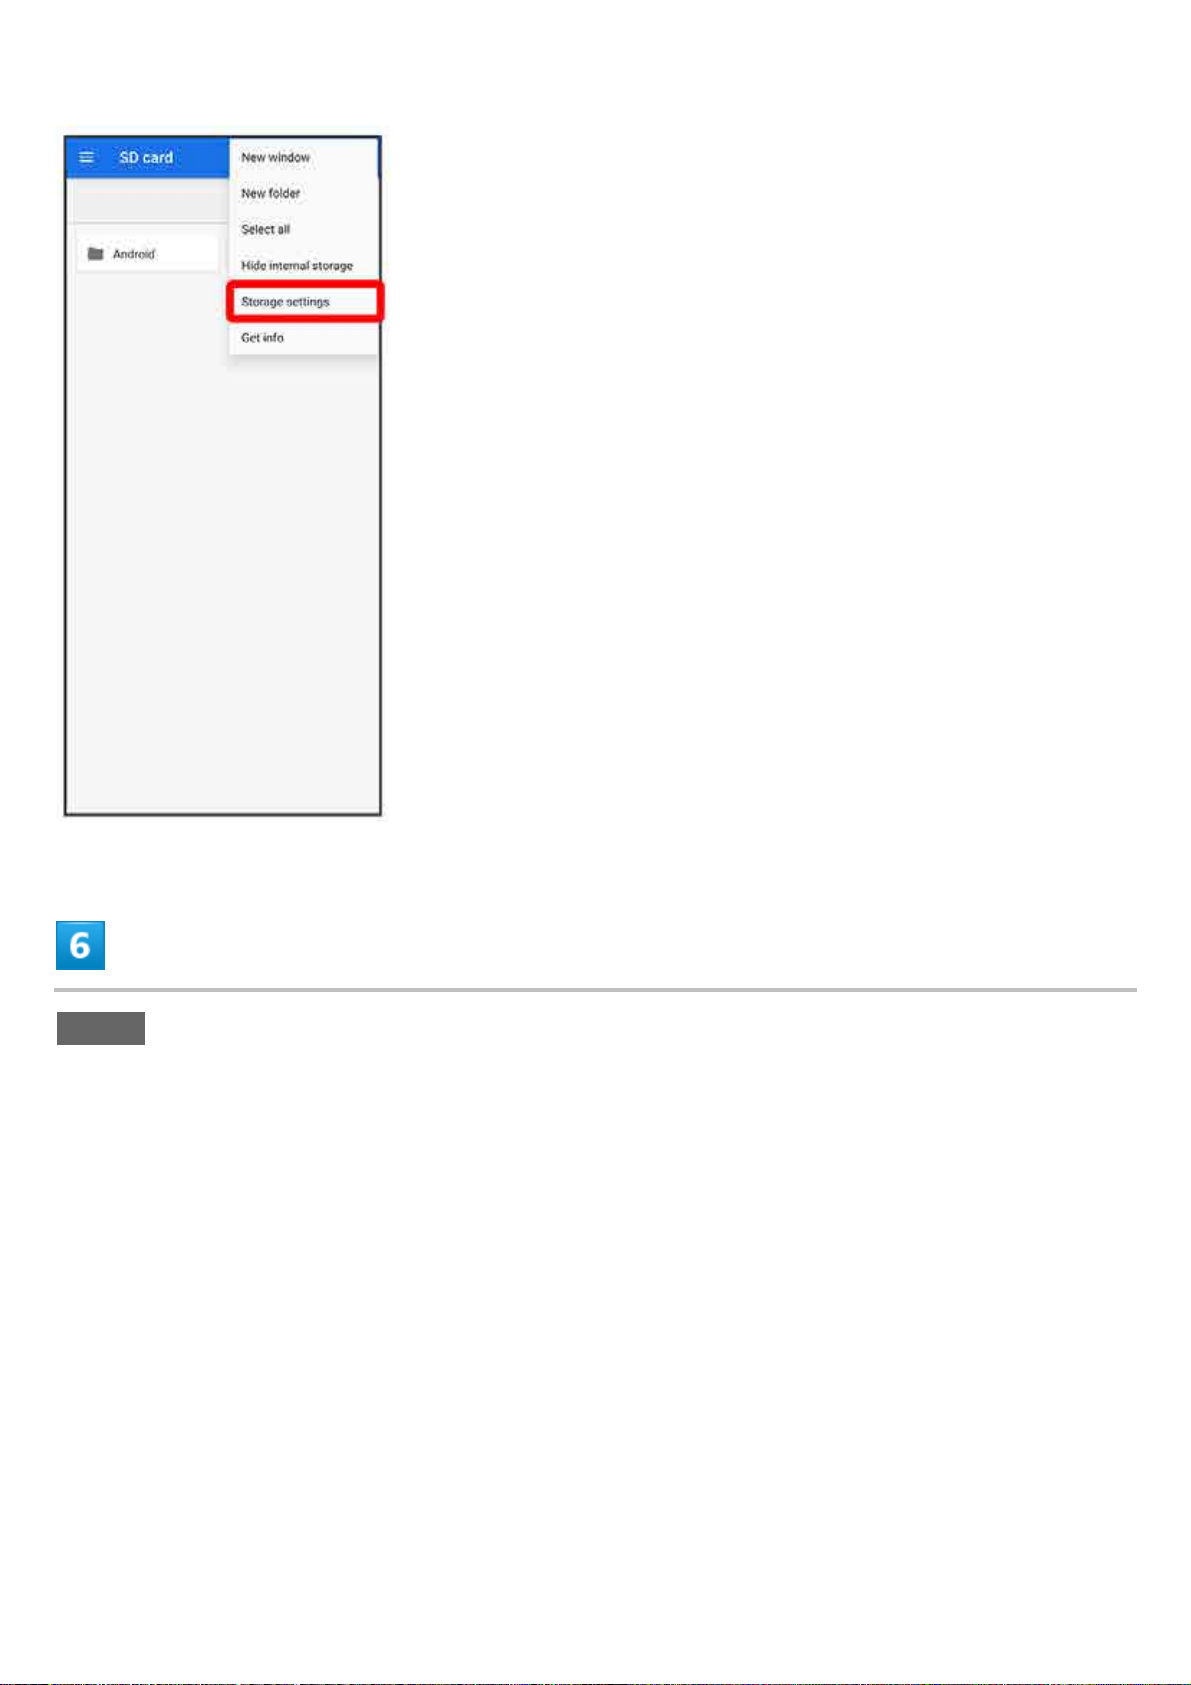
xperia_01_Getting Started.docx
15
Page 18
Storage settings
xperia_01_Getting Started.docx
16
Page 19
Format
xperia_01_Getting Started.docx
17
Page 20
FORMAT SD CARD
xperia_01_Getting Started.docx
18
Page 21
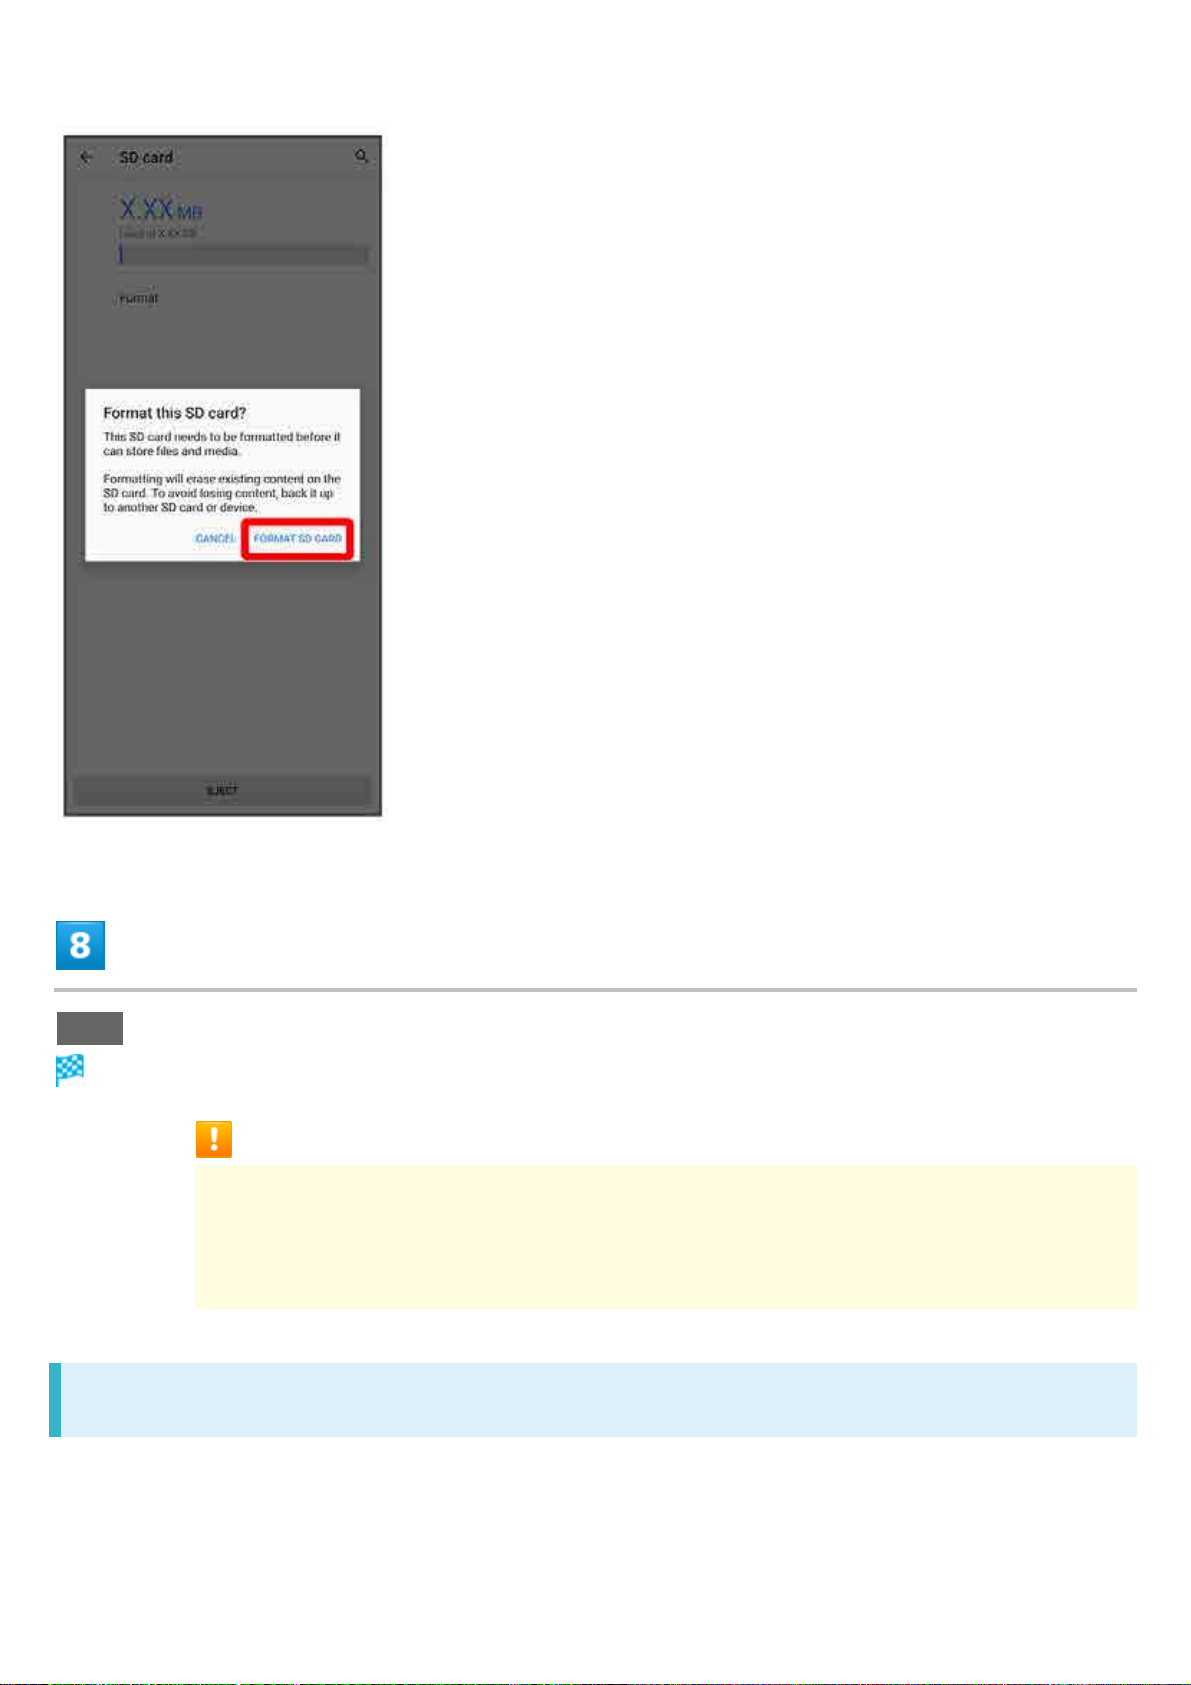
Done
All data on SD Card is erased.
Cautions when Formatting SD Card
Observe the following when formatting SD Card.
Formatting erases all data on SD Card. Carefully check any SD Card that was used on
another device before formatting.
Charge Internal Battery while formatting, or format with adequate battery charge.
Unmounting SD Card
Always unmount SD Card before removing.
xperia_01_Getting Started.docx
19
Page 22
In Home Screen, (Settings)
Storage
xperia_01_Getting Started.docx
20
Page 23
for "SD card"
xperia_01_Getting Started.docx
21
Page 24
"SD card is safely ejected" appears. SD Card is unmounted.
Removing SD Card
Always unmount SD Card beforehand.For details, see "Unmounting SD Card."
Pull Tray out from handset
xperia_01_Getting Started.docx
22
Page 25
Pull SIM Card/SD Card Slot Cover out straight using groove.
Remove SD Card from Tray
Holding handset held level, press Tray in straight
xperia_01_Getting Started.docx
23
Page 26
SD Card is removed.
Check Tray orientation.
Press firmly where circled ○, and make sure there is no gap between handset and SIM Card/SD
Card Slot Cover.
xperia_01_Getting Started.docx
24
Page 27
Charging Internal Battery
Charging with AC Charger
Charging Cautions
Never connect USB Type-C plug while handset or peripheral equipment is wet.
Charging with AC Charger
Be sure to use an AC Charger specified by xxxx For information on AC Charger and other
peripheral devices, see xxxx Website.
Charging with AC Charger (USB Type-C
[ZSDBAS] (SB-AC20-TCPD)) is described as an example.
TM
rapid charging AC Charger with USB PD capability
Insert USB Type-C connector of AC Charger straight into USB Type-C Port
Unfold power plug of AC Charger and plug into household AC
xperia_01_Getting Started.docx
25
Page 28
Charging start sound sounds and Notification Lamp on handset lights up when charging starts.
When charging is complete, unplug AC Charger and remove USB Type-C connector of
AC Charger straight from handset
Charging ends.
xperia_01_Getting Started.docx
26
Page 29
Power On/Off
Powering On
Powering Off
Powering On
Long Press Power Key until handset vibrates once
Lock Screen appears.
For details on unlocking screen, see "Unlocking Screen."
Startup wizard appears for the first time handset is powered on. Follow onscreen instructions.
Battery level is not sufficient if low battery indicator appears when Power Key is Pressed with
handset powered off. Charge Internal Battery.
Powering Off
xperia_01_Getting Started.docx
27
Page 30
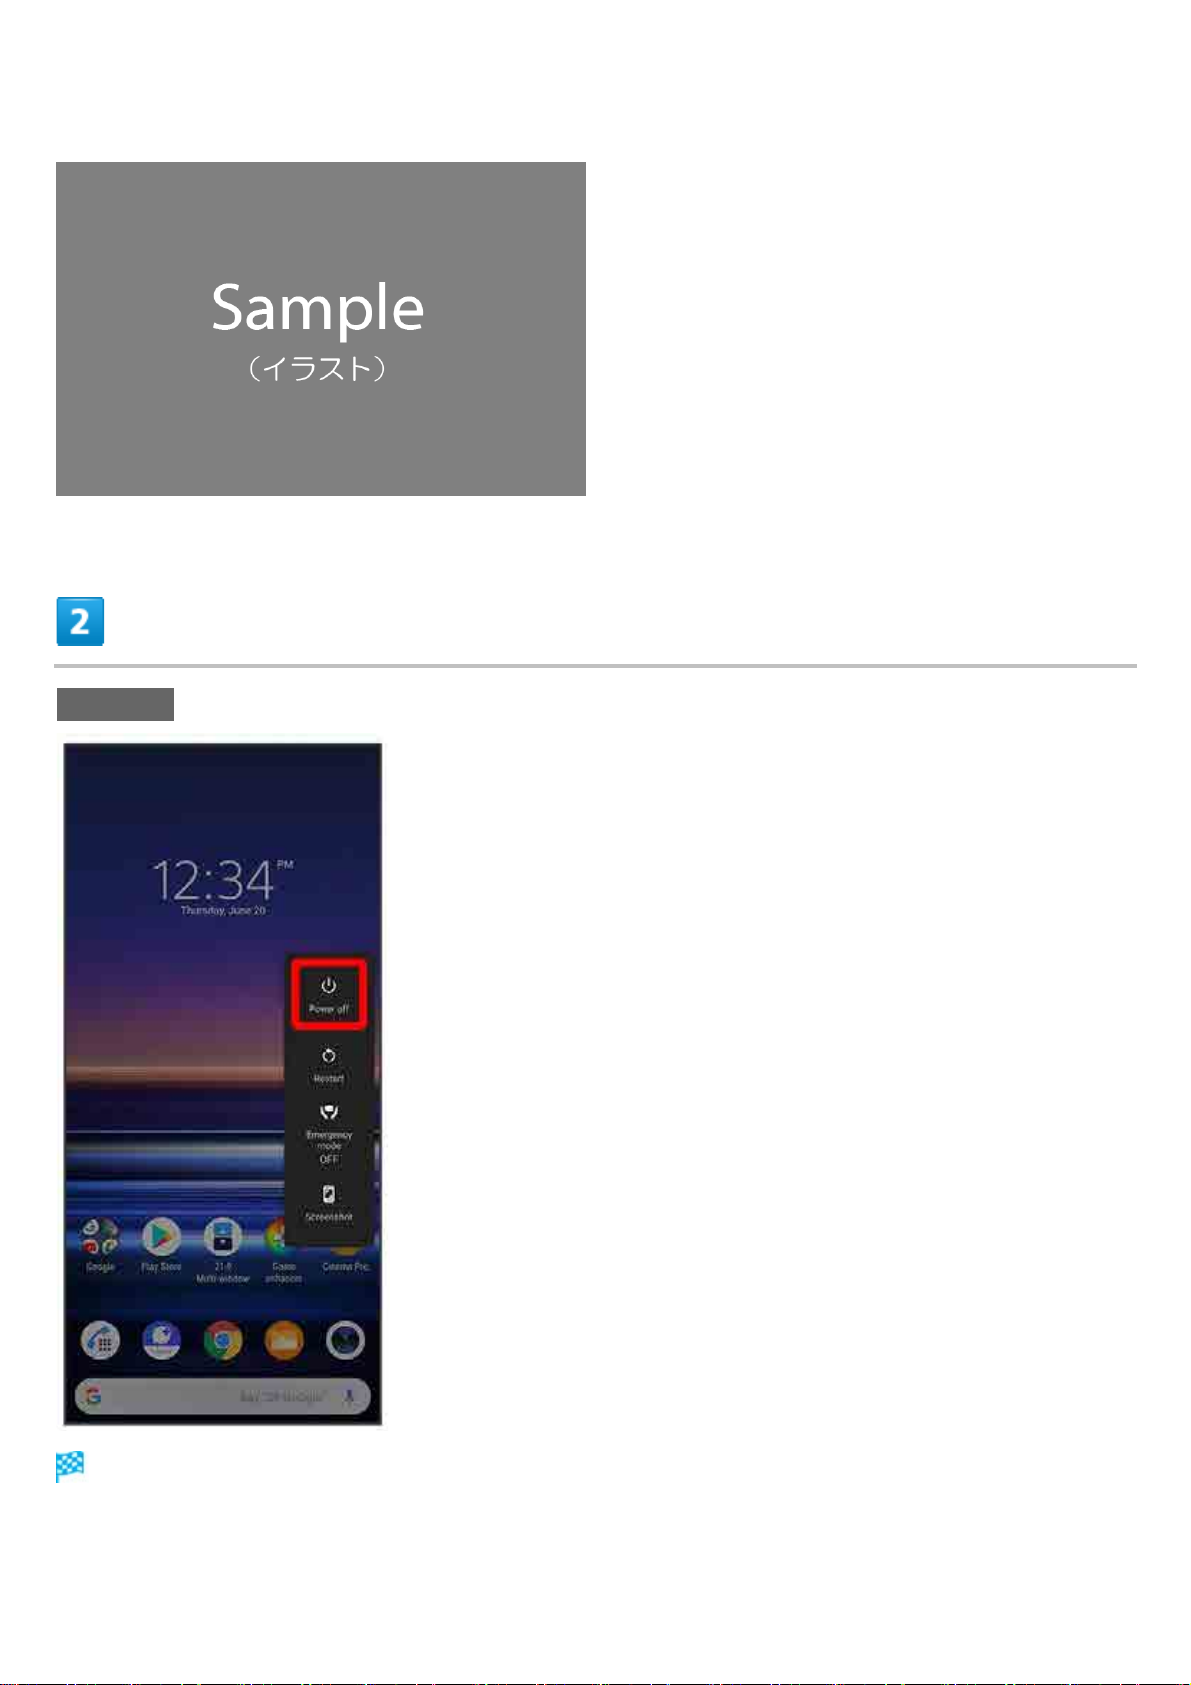
Long Press Power Key
Power off
Handset powers off.
xperia_01_Getting Started.docx
28
Page 31

Making Initial Settings
When powering on the first time, an initial settings wizard appears for optionally making
Wi-Fi, GoogleTM account, and other settings. Follow onscreen instructions to set items.
Making Initial Settings
Making Initial Settings
日本語 English United States GET STARTED
xperia_01_Getting Started.docx
29
Page 32

Set Important information ACCEPT
xperia_01_Getting Started.docx
30
Page 33

Select Wi-Fi network to connect to
xperia_01_Getting Started.docx
31
Page 34

To skip Wi-Fi settings, Tap Use mobile network for setup. Continue by following onscreen
instructions.
Follow onscreen instructions to set Wi-Fi
xperia_01_Getting Started.docx
32
Page 35

Follow onscreen instructions to transfer data
xperia_01_Getting Started.docx
33
Page 36

To set up handset new, Tap DON'T COPY.
To copy data from another handset on which a Google account is set, Tap NEXT, then follow
onscreen instructions.
Follow onscreen instructions to set a Google account
xperia_01_Getting Started.docx
34
Page 37

For details on Google accounts, see "Setting a Google Account."
If not making Google account settings, Tap Skip.
Select items to set ACCEPT
xperia_01_Getting Started.docx
35
Page 38

Follow onscreen instructions to set unlocking using fingerprint
xperia_01_Getting Started.docx
36
Page 39

To not save a fingerprint, Tap SKIP.
A backup screen lock is required after restarting handset, fingerprint is not recognized, etc. Do not
forget to set.
Follow onscreen instructions to set Google Assistant/Google Pay
xperia_01_Getting Started.docx
37
Page 40

If not making Google Assistant settings, Tap No Thanks, if not making Google Pay settings, Tap
Skip.
OK
xperia_01_Getting Started.docx
38
Page 41

Follow onscreen instructions make other settings
xperia_01_Getting Started.docx
39
Page 42

To not make other settings, Tap NO THANKS.
FINISH
xperia_01_Getting Started.docx
40
Page 43

Settings are complete.
xperia_01_Getting Started.docx
41
Page 44

Setting a Google Account
Use a Google account and get more convenience with Google services. A Google
account is required to use some services or fully use some applications.
Creating a Google Account
Logging In with a Google Account
Google Account Cautions
Be careful not to forget your Google account mail address or password.
Creating a Google Account
In Home Screen, (Settings)
xperia_01_Getting Started.docx
42
Page 45

Accounts
xperia_01_Getting Started.docx
43
Page 46

Add account
xperia_01_Getting Started.docx
44
Page 47

Google
xperia_01_Getting Started.docx
45
Page 48

Window for logging in to a Google account opens.
Create account
xperia_01_Getting Started.docx
46
Page 49

For myself
xperia_01_Getting Started.docx
47
Page 50

To create a child's account, Tap For my child then follow onscreen instructions.
Enter First name Last name Next
xperia_01_Getting Started.docx
48
Page 51

If confirmation appears, follow onscreen instructions.
Enter date of birth Select gender Next
xperia_01_Getting Started.docx
49
Page 52

Select Gmail address Next
xperia_01_Getting Started.docx
50
Page 53

To create a Gmail address, Create a different Gmail address Enter username (mail address)
Next.
Enter password Enter password again (for confirmation) Next
xperia_01_Getting Started.docx
51
Page 54

Yes, I'm in
xperia_01_Getting Started.docx
52
Page 55

To not add a phone number, Tap Skip.
To add a phone number only for security protection, Tap More options. Continue by following
onscreen instructions.
Check the privacy policy and terms of usage, I agree
xperia_01_Getting Started.docx
53
Page 56

A Google account is created.
Next
xperia_01_Getting Started.docx
54
Page 57

Set Google service ACCEPT
xperia_01_Getting Started.docx
55
Page 58

Account is created.
Logging In with a Google Account
In Home Screen, (Settings)
xperia_01_Getting Started.docx
56
Page 59

Accounts
xperia_01_Getting Started.docx
57
Page 60

Add account
xperia_01_Getting Started.docx
58
Page 61

Google
xperia_01_Getting Started.docx
59
Page 62

Window for logging in to a Google account opens.
In window for logging in to Google account, enter mail address Next
xperia_01_Getting Started.docx
60
Page 63

Enter password Next
xperia_01_Getting Started.docx
61
Page 64

Follow onscreen instructions
xperia_01_Getting Started.docx
62
Page 65

You are logged in to your Google account.
xperia_01_Getting Started.docx
63
Page 66

Locking Screen
Screen Lock
Unlocking Screen
Screen Lock
Display goes out after a set period of inactivity to save battery power (screen lock).
This also prevents accidental Touchscreen operation.
While Display is off (screen is locked), Press Power Key for Lock Screen.
To activate Screen lock manually, Press Power Key when Display is turned on.
When Screen Locks during Music Playback
Music playback continues. While Display is off (screen is locked), Press Power Key for
music panel in Lock Screen. Use pause, next song, etc. (operation may differ with
application).
Unlocking Screen
While Display is off (screen is locked), Press Power Key
xperia_01_Getting Started.docx
64
Page 67

Lock Screen appears.
Alternatively, if Ambient display is enabled, Double-Tap Ambient screen or Press Power Key.
Flick screen up
xperia_01_Getting Started.docx
65
Page 68

Screen is unlocked.
The method for unlocking the screen can be changed.
For fingerprint authentication, Touch Fingerprint Sensor with authentication finger to unlock
screen.
xperia_01_Getting Started.docx
66
Page 69

Basic Operation
Selecting Options and Navigating Screens
Menu Operations
Selecting Options and Navigating Screens
Tap items, icons, onscreen keys, etc. to open assigned items.
Tap to go back to previous screen.
xperia_02_Basic Operations.docx
1
Page 70

Menu Operations
Tap for available settings and items.
Screens may also have settings and items that are available by Touching & Holding
Display.
xperia_02_Basic Operations.docx
2
Page 71

xperia_02_Basic Operations.docx
3
Page 72

Using Touchscreen
Handset uses a touchscreen-type Display. Operate with your fingers on Display.
Tap
Touch & Hold
Drag
Swipe/Flick
Pinch/Spread
Tap
Contact Display lightly and briefly.
Touch & Hold
Touch screen lightly and hold it for a while. When the screen changes, release finger.
xperia_02_Basic Operations.docx
4
Page 73

Drag
Touch icon or other item lightly, move it where desired, and release finger.
Swipe/Flick
Contact Display lightly, then brush screen up/down or left/right.
Pinch/Spread
Contact Display lightly, then close/widen fingers.
xperia_02_Basic Operations.docx
5
Page 74

xperia_02_Basic Operations.docx
6
Page 75

Silent Mode
Set ringtone, operation sounds, etc. not to sound to avoid disturbing others around you.
Entering Silent Mode (Vibrate)
Entering Silent Mode (No Vibrate)
Silent Mode Cautions
Camera shutter, video start/stop tones, Alarm, etc. sound even in Silent mode.
Entering Silent Mode (Vibrate)
Press Volume Up or Down Key
xperia_02_Basic Operations.docx
7
Page 76

Icon changes to , and handset enters Silent mode (vibrate).
Tap Silent mode icon to toggle between , , and .
Entering from Quick Settings
Also use Quick Settings to enter Silent mode (vibrate).
Drag Status Bar down Drag Notifications Window down Silent mode (off)
Entering Silent Mode (No Vibrate)
Press Volume Up or Down Key
xperia_02_Basic Operations.docx
8
Page 77

Icon changes to , and handset enters Silent mode (vibrate).
xperia_02_Basic Operations.docx
9
Page 78

While volume adjustment bar is shown,
Icon changes to , and handset enters Silent mode (no vibrate).
Tap Silent mode icon to toggle between , , and .
xperia_02_Basic Operations.docx
10
Page 79

Airplane Mode
Disable all functions that emit signals. Handset stays powered on.
Using Airplane Mode
Using Airplane Mode
Drag Status Bar down
xperia_02_Basic Operations.docx
11
Page 80

Handset is in Airplane mode.
Use same operation again while in Airplane mode to cancel.
xperia_02_Basic Operations.docx
12
Page 81

Text Entry
Keyboards
QWERTY Keyboard Layout
Switching Character Types (Entry Modes)
Keyboards
Enter text with onscreen QWERTY keyboard by Tapping each character individually, or by using
Glide typing feature and sliding finger from character to character (on by default). Touch & Hold each
character for extended characters.
Tap to hide keyboard.
Input method is set to International keyboard (Gboard) by default. To input Japanese, Tap to
change keyboard to Xperia Japanese keyboard.
xperia_02_Basic Operations.docx
13
Page 82

QWERTY Keyboard Layout
① Use the keyboard option menu.
② Show the search bar.
③ Enter a character. Touch & Hold character to show variant options.
④ Switch between all lower case and sentence case. Double-Tap for all upper
case.
⑤ Toggle entry modes.
⑥ Show emoji / stickers / GIFs / emoticons.
⑦ Use voice input.
⑧ Delete a character before cursor.
⑨ , , , , or appears depending on application. Confirm text input
or enter line break.
⑩ Enter a space.
xperia_02_Basic Operations.docx
14
Page 83

Switching Character Types (Entry Modes)
In QWERTY keyboard, Tap
Entry mode is changed to number and symbol mode.
To enter more symbols, Tap .
Tap to back to alphabet mode.
xperia_02_Basic Operations.docx
15
Page 84

Updating Software
Steps to update software depend on what is being updated in the software.
Updating Software Automatically
Updating Software Manually
Software Update Cautions
Signal Reception
Operate handset where signal reception is good and without changing location. Also operate with
adequate battery charge. Signal becoming weak or Internal Battery becoming low during an update
may cause an update failure. An update failure may disable handset.
Saved Data/Settings
Saved data may be lost depending on condition of handset (malfunctioning, damaged, water exposure,
etc.). xxxx is not responsible for damages from loss of data.
Updating software may revert some settings to their defaults.
SIM PIN
If SIM PIN is enabled, a SIM PIN entry window appears after software is updated. Enter SIM PIN.
Updating Software Automatically
Update software automatically.
When the update is complete, Tap the notification in the Notifications Window and restart handset.
Updating Software Manually
Tap the software update notification in the Notifications Window and follow onscreen instructions.
Alternatively:
In Home Screen, (Settings) System Advanced
xperia_02_Basic Operations.docx
16
Page 85

System update
xperia_02_Basic Operations.docx
17
Page 86

Follow onscreen instructions
xperia_02_Basic Operations.docx
18
Page 87

Software update starts.
xperia_02_Basic Operations.docx
19
Page 88

Item
Description
Customize Area
Place application shortcuts, folders, widgets freely.
Handset Screens
Layout
Toggling Home Screen Sheets
Navigation Bar
Portrait Orientation & Landscape Orientation
Layout
Status Bar
Dock
Navigation Bar Tap Key icon to operate. For Navigation Bar, see "Navigation Bar."
xperia_03_Handset Interface.docx
1
Drag down for Notifications Window. Drag Notifications Window down to
open Quick Settings.
Place shortcuts (applications), folders, etc. Appears even when Home
Screen sheets toggled.
Page 89

Quick Search Box
Search for applications, contacts, etc., or search (Google) with entered
words and phrases.
Toggling Home Screen Sheets
Customize each Home Screen sheet with application shortcuts, widgets, etc. to make handset more
convenient. Flick Home Screen left/right to toggle sheets.
In any Home Screen sheet, Tap to return to Home Screen top sheet.
Navigation Bar
Tap icons on Navigation Bar (Display bottom) for the following functions/operations.
xperia_03_Handset Interface.docx
2
Page 90

Item
Description
(Keyboard)
Change keyboard.
and for vertical orientation.
used applications to activate/exit them.
(Back) Return to previous screen. Appears as for
onscreen keyboard; Tap to close keyboard.
(Home) Tap for Home Screen.
Touch & Hold for Google Assistant.
(To landscape orientation) / (to portrait
orientation)
Navigation Bar Flick Navigation Bar to right to activate the
Appears when handset and screen orientations
are different. Tap for horizontal orientation,
previously used application.
In Home Screen or in any application being used,
Flick Navigation Bar up for thumbnails of recently
xperia_03_Handset Interface.docx
3
Page 91

Portrait Orientation & Landscape Orientation
appears on Navigation Bar when handset is rotated sideways. Tap to change screen to
landscape orientation. To change to portrait orientation, rotate handset vertically and Tap
Set "Auto-rotate screen" to on to change screen to landscape orientation automatically when
handset is rotated horizontally. For details on Auto-rotate screen, see "Display Settings."
Depending on the current screen, the orientation may not change even by changing handset
orientation.
.
xperia_03_Handset Interface.docx
4
Page 92

Status Bar
Status Bar appears at the top of Display. Notification Indicators for new mail, etc. and
Status Indicators for handset appear here.
Status Bar Layout
Main Notification Indicators
Main Status Indicators
Status Bar Layout
① Notification Indicators
② Status Indicators
Main Notification Indicators
Notification Indicators appearing in Status Bar include the following.
xperia_03_Handset Interface.docx
5
Page 93

Indicator
Description
Missed Call
Call Arriving/Calling/Dialing
Call on Hold
New Recorded Message
New Voicemail
New Gmail
New Email
New Text Message (SMS) / S! Mail / +Message
Urgent News, Etc.
Wi-Fi Open Network Available
USB Device Connected/Moisture Detected in USB Type-C Port
Sharing File via Bluetooth®
Data Uploading
Data Downloading
Application Update Available
Application Installation Complete
Screenshot Saved
Viewing TV1/Scheduled Viewing Started
Recording TV1/Scheduled Recording Started
Linked to Dynamic Vibration
Playing Back Play Music
Calendar Event Reminder
Alarm Sounding/Snoozing/Unchecked Alarm/Next Alarm
Stopwatch in Use
Timer in Use
NFC / Osaifu-Keitai® Locked
Low Battery Alert (15% or less)
SD Card Detected/Mounting
Software Update Notice, Downloading Complete, Stopped
Indicator
Description
Battery Full (100%)
1 Appears when switching to other window such as Home Screen.
Main Status Indicators
Status Indicators appearing in Status Bar include the following.
xperia_03_Handset Interface.docx
6
Page 94

Battery Charging
Battery Low (5% or less)
Signal Strength
4G LTE/4G Data in Use1
3G Data in Use
No Signal
Airplane Mode
Wi-Fi Connected
Wi-Fi Connected without Internet Accessibility, or Unstable Wi-Fi Signal
Bluetooth® Connected
Silent Mode (vibrate)
Silent Mode (no vibrate)
Do not disturb2 On
Obtaining Current Location
1 Handset supports FDD-LTE (xxxx 4G LTE) and AXGP (xxxx 4G); indicator appears when
handset is connected to either. Handset connects to xxxx 4G first.
2 For details on Do not disturb, see "Sound."
xperia_03_Handset Interface.docx
7
Page 95

Using Notifications Window
Check Notification Indicators and the details in Notifications Window.
Opening Notifications Window
Notifications Window Layout
Opening Notifications Window
Drag Status Bar down
Notifications Window opens.
xperia_03_Handset Interface.docx
8
Page 96

Closing Notifications Window
Drag Notifications Window up
Alternatively, Tap to close Notifications Window.
Notifications Window Layout
① Show portion of Quick Settings
② Show notifications (incoming calls,
etc.) and active functions
③ Use notification details
④ Manage notifications
⑤ Delete all notifications
1
2
3
1 Available applications depend on notification. Example:with call notification, dial/send SMS to
phone number that call was from.
2 Notification may not be manageable depending on application or function.
3 Deletion may not be possible depending on notification details.
xperia_03_Handset Interface.docx
9
Page 97

Using Quick Settings
Drag Notifications Window down to access Quick Settings. Tap icons to toggle functions
on/off, etc.
Opening Quick Settings
Quick Settings Layout
Opening Quick Settings
Drag Status Bar down
Notifications Window opens.
xperia_03_Handset Interface.docx
10
Page 98

Drag Notifications Window down
Quick Settings opens.
Alternatively, Drag Status Bar down using two fingers.
Quick Settings
Closing Quick Settings
Drag Quick Settings up
Alternatively, Tap to close Quick Settings.
Arranging Quick Settings
Add, delete, and change order of functions in Quick Settings.
In Quick Settings, Follow onscreen instructions and Drag icon
xperia_03_Handset Interface.docx
11
Page 99

Quick Settings Layout
① Show current alarm setting, Silent
mode, etc.
② Adjust brightness
③ Wi-Fi on/off
④ Bluetooth
®
on/off
⑤ Enter/exit Airplane mode
⑥ Auto-rotate screen on/off
⑦ Location on/off
⑧ Tethering on/off
⑨ Silent mode (vibrate) / Silent mode
(no vibrate) / Silent mode (off)
⑩ Flashlight on/off
⑪ STAMINA mode on/off
⑫ NFC / Osaifu-Keitai
®
on/off
⑬ Show handset screen on Google
Cast-capable device
⑭ Set mobile data communication
⑮ Add, delete, and change order of
Quick Settings
⑯ Show handset settings
xperia_03_Handset Interface.docx
12
Page 100

Placing/Answering Calls
Placing Calls
Answering Calls
In-Call Screen Layout/In-Call Operations
Phone Function
Emergency Location Report
Making emergency calls (110, 119 or 118) automatically reports handset location to corresponding
agency (police, etc.). This system is referred to as Emergency Location Report, and notifies location
based on positioning from base stations.
Location Report does not incur registration/transmission fees.
Location/signal conditions affect positioning accuracy. Always provide location and call purpose.
Hiding Caller ID (using 184, etc.) cancels Location Report. However, corresponding agency may
obtain location information in life threatening situations.
Location Report is not sent for calls made while outside Japan.
VoLTE/VoLTE (HD+) and HD Voice
Handset supports VoLTE/VoLTE (HD+) and HD Voice for higher voice call quality.
Hints
Q Difficulty during call
A It may not be possible to make a call properly in a noisy location.
A When calling using Speaker, check the call volume. Raising the call volume may make calling
difficult.
Q Sound pops momentarily during a call
A Are you changing location while calling? Sound pops when signal is weak and handset switches
to a different area.
Emergency Call Cautions
Areas Where Usable
Emergency calls from handset can be made only in xxxx service areas.
Airplane Mode
Note that Airplane mode disables Emergency calls.
xperia_04_Phone.docx
1
 Loading...