

Page 1
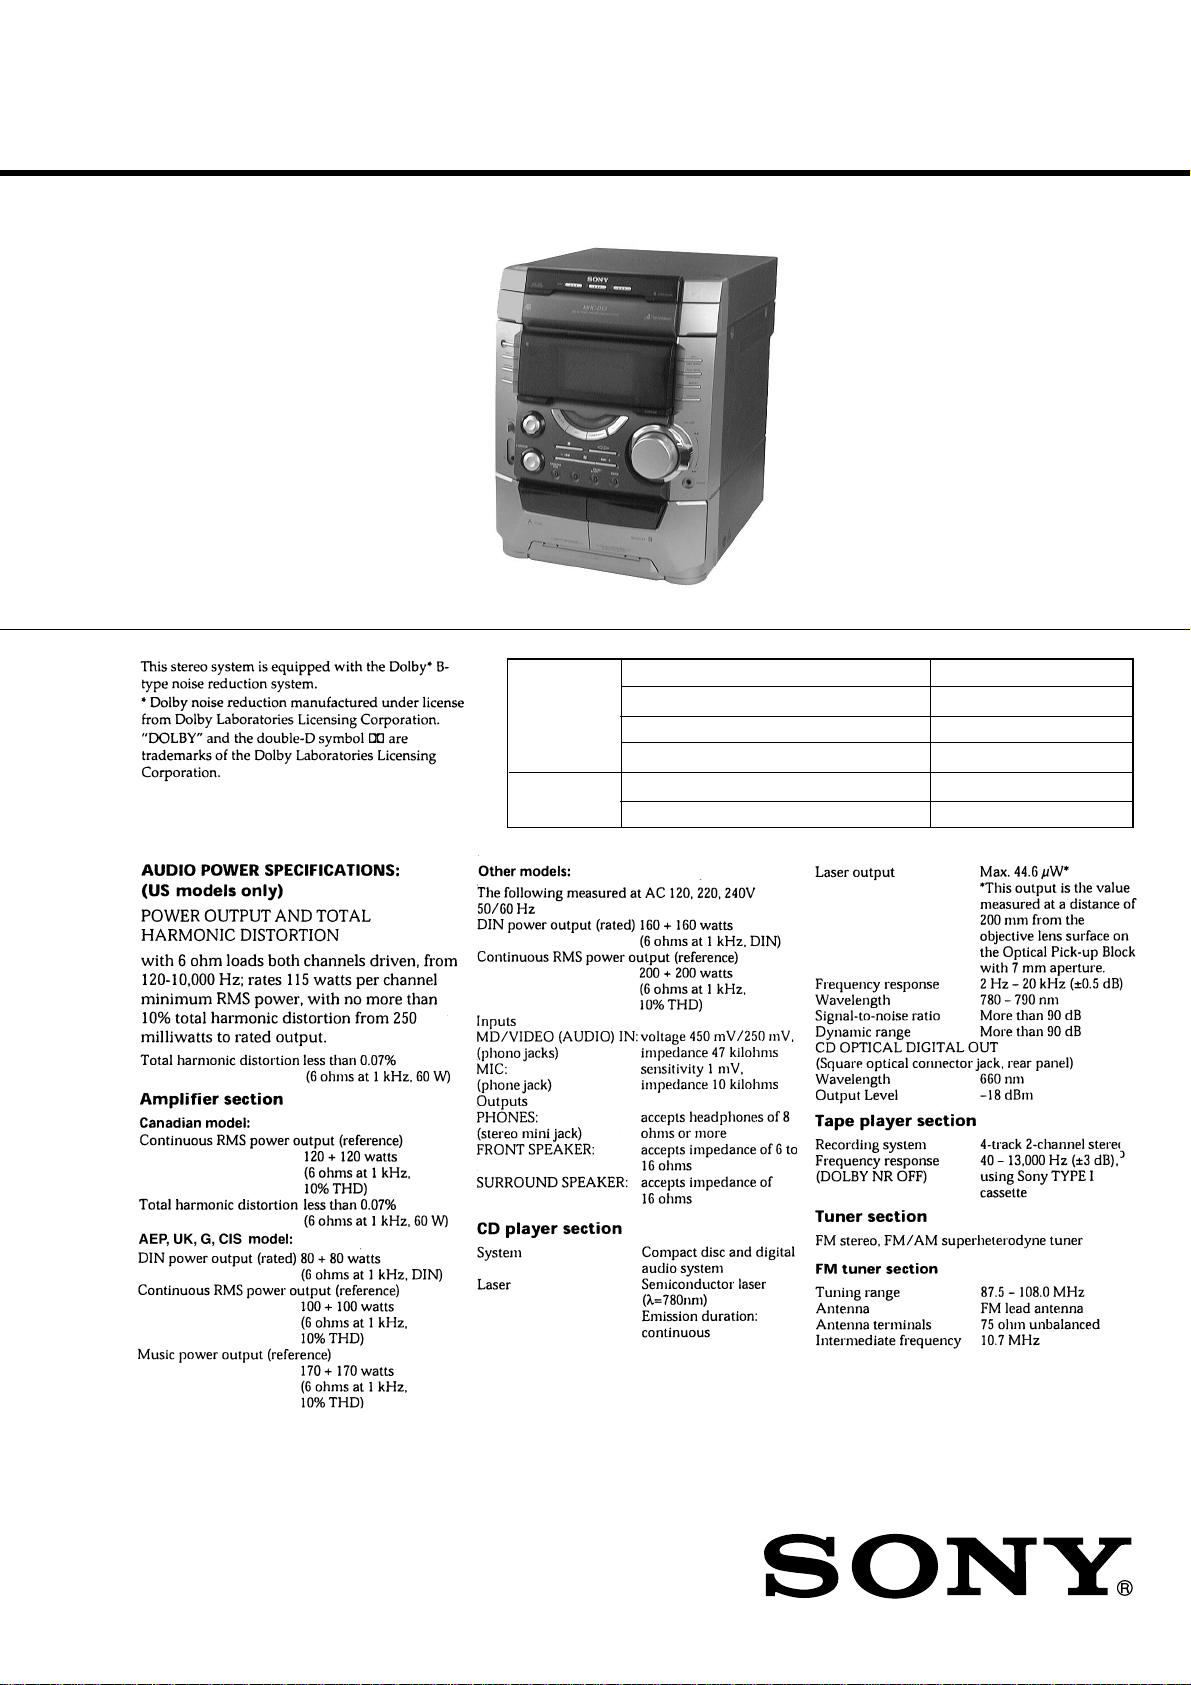
HCD-BX7/DX7/DX7J
SERVICE MANUAL
Ver 1.4 2003.12
HCD-BX7/DX7/DX7J is the tuner, deck, CD and
amplifier section in MHC-BX7/DX7/DX7J.
Photo: HCD-DX7
CD
SECTION
TAPE DECK
SECTION
Model Name Using Similar Mechanism NEW
CD Mechanism Type CDM58-K2BD38
Base Unit Type BU-K2BD38
Optical Pick-up Type KSM-213DAP
Model Name Using Similar Mechanism NEW
Tape Transport Mechanism Type TCM-230MWR11
US Model
Canadian Model
AEP Model
UK Model
HCD-BX7
E Model
HCD-DX7/DX7J
Australian Model
HCD-DX7
SPECIFICATIONS
— Continued on next page —
9-929-079-15
2003L02-1
© 2003.12
COMPACT DISC DECK RECEIVER
Sony Corporation
Home Audio Company
Published by Sony Engineering Corporaton
1
Page 2
SAFETY CHECK-OUT
(US model only)
After correcting the original service problem, perform the
following safety checks before releasing the set to the customer:
Check the antenna terminals, metal trim, “metallized” knobs, screws,
and all other exposed metal parts for A C leakage. Check leakage as
described below.
LEAKAGE
The A C leakag e from any exposed metal part to earth g round and
from all exposed metal parts to any exposed metal part having a
return to chassis, must not exceed 0.5 mA (500 microampers).
Leakage current can be measured by any one of three methods.
1. A commercial leakage tester, such as the Simpson 229 or RCA
WT -540A. Follo w the manufacturers’ instructions to use these
instruments.
2. A battery-operated AC milliammeter. The Data Precision 245
digital multimeter is suitable for this job.
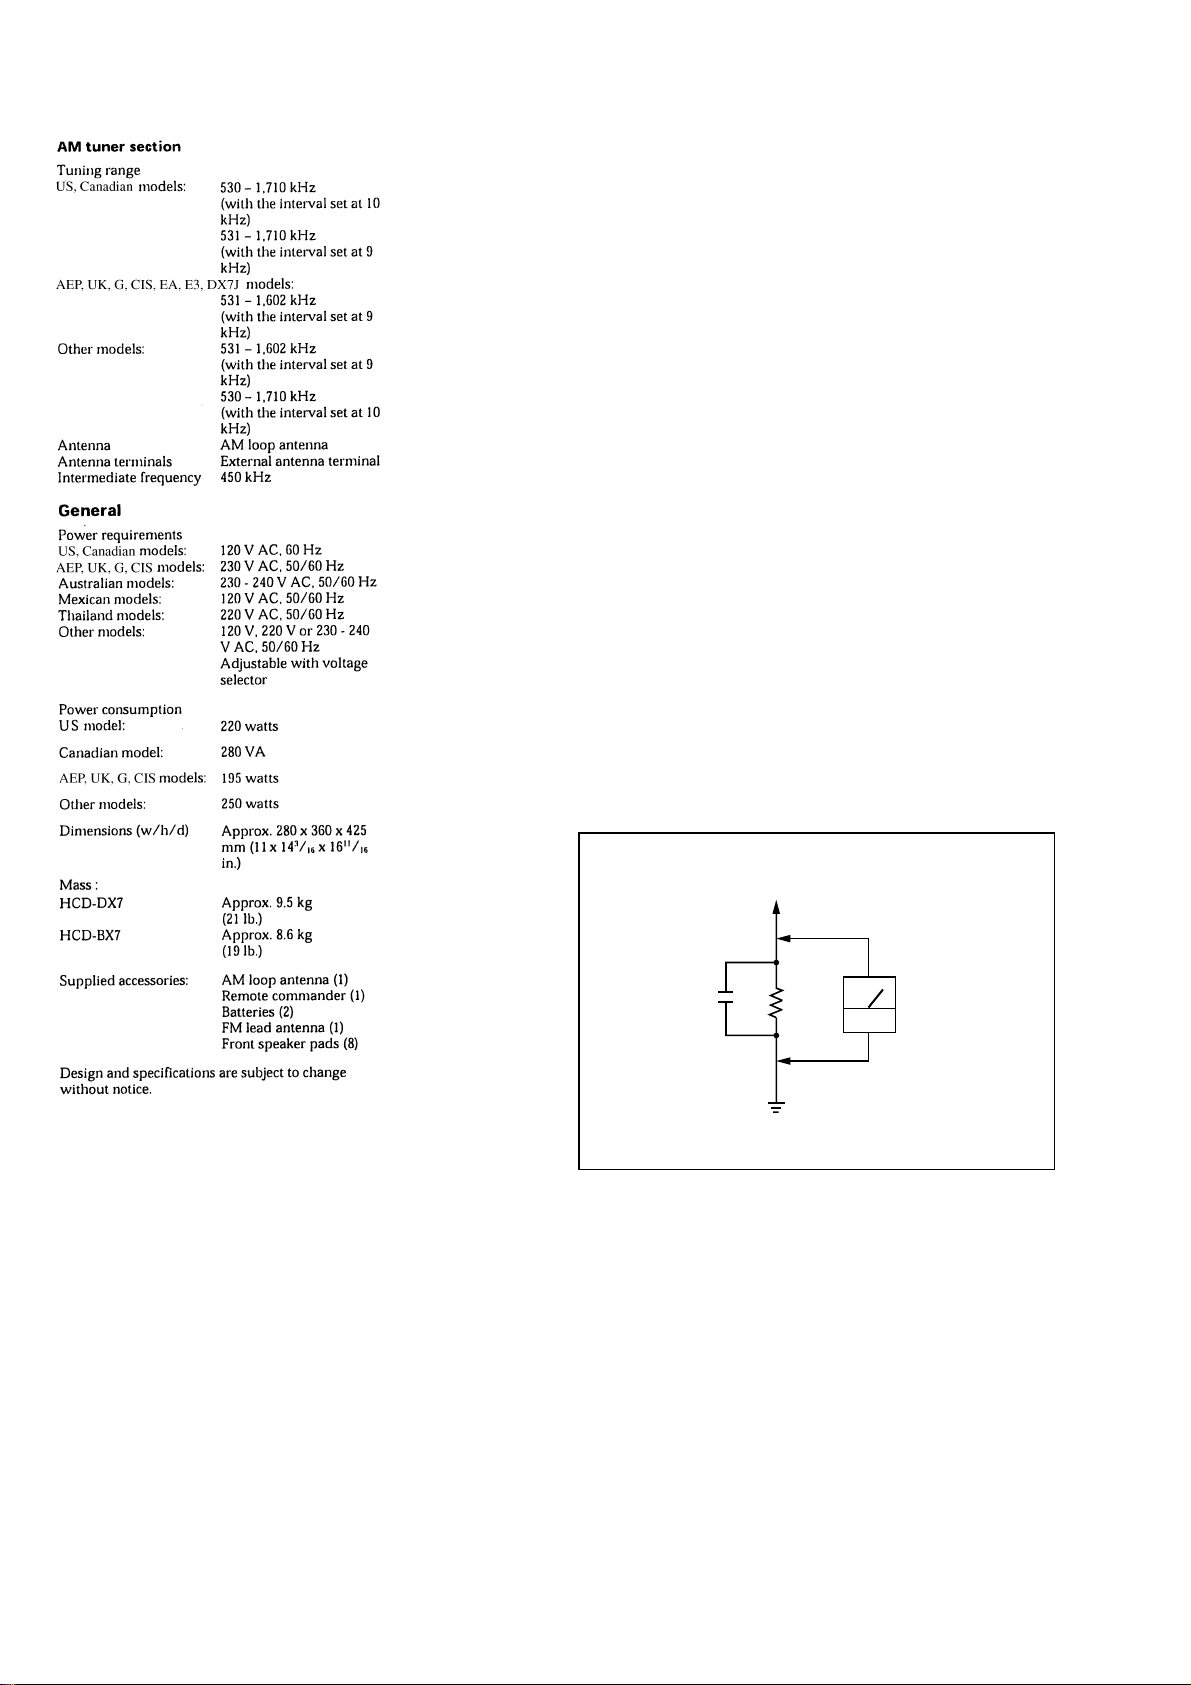
3. Measuring the voltage drop across a resistor by means of a
VOM or battery-operated A C voltmeter . The “limit” indication
is 0.75 V, so analog meters must ha ve an accur ate lo w-v oltage
scale. The Simpson 250 and Sanwa SH-63Trd are e xamples of
a passive VOM that is suitable. Nearly all battery operated
digital multimeters that have a 2V AC range are suitable. (See
Fig. A)
To Exposed Metal
Parts on Set
0.15µF
1.5kΩ
Earth Ground
AC
voltmeter
(0.75V)
Fig. A. Using an AC voltmeter to check AC leakage.
2
Page 3
Ver 1.2 2001.08
NOTES ON HANDLING THE OPTICAL PICK-UP
BLOCK OR BASE UNIT
The laser diode in the optical pick-up block may suffer electrostatic
break-down because of the potential difference generated by the
charged electrostatic load, etc. on clothing and the human body.
During repair, pay attention to electrostatic break-down and also
use the procedure in the printed matter which is included in the
repair parts.
The flexible board is easily damaged and should be handled with
care.
NOTES ON LASER DIODE EMISSION CHECK
The laser beam on this model is concentrated so as to be focused on
the disc reflective surface by the objective lens in the optical pickup block. Therefore, when checking the laser diode emission,
observe from more than 30 cm away from the objective lens.
Laser component in this product is capable
of emitting radiation exceeding the limit for
Class 1.
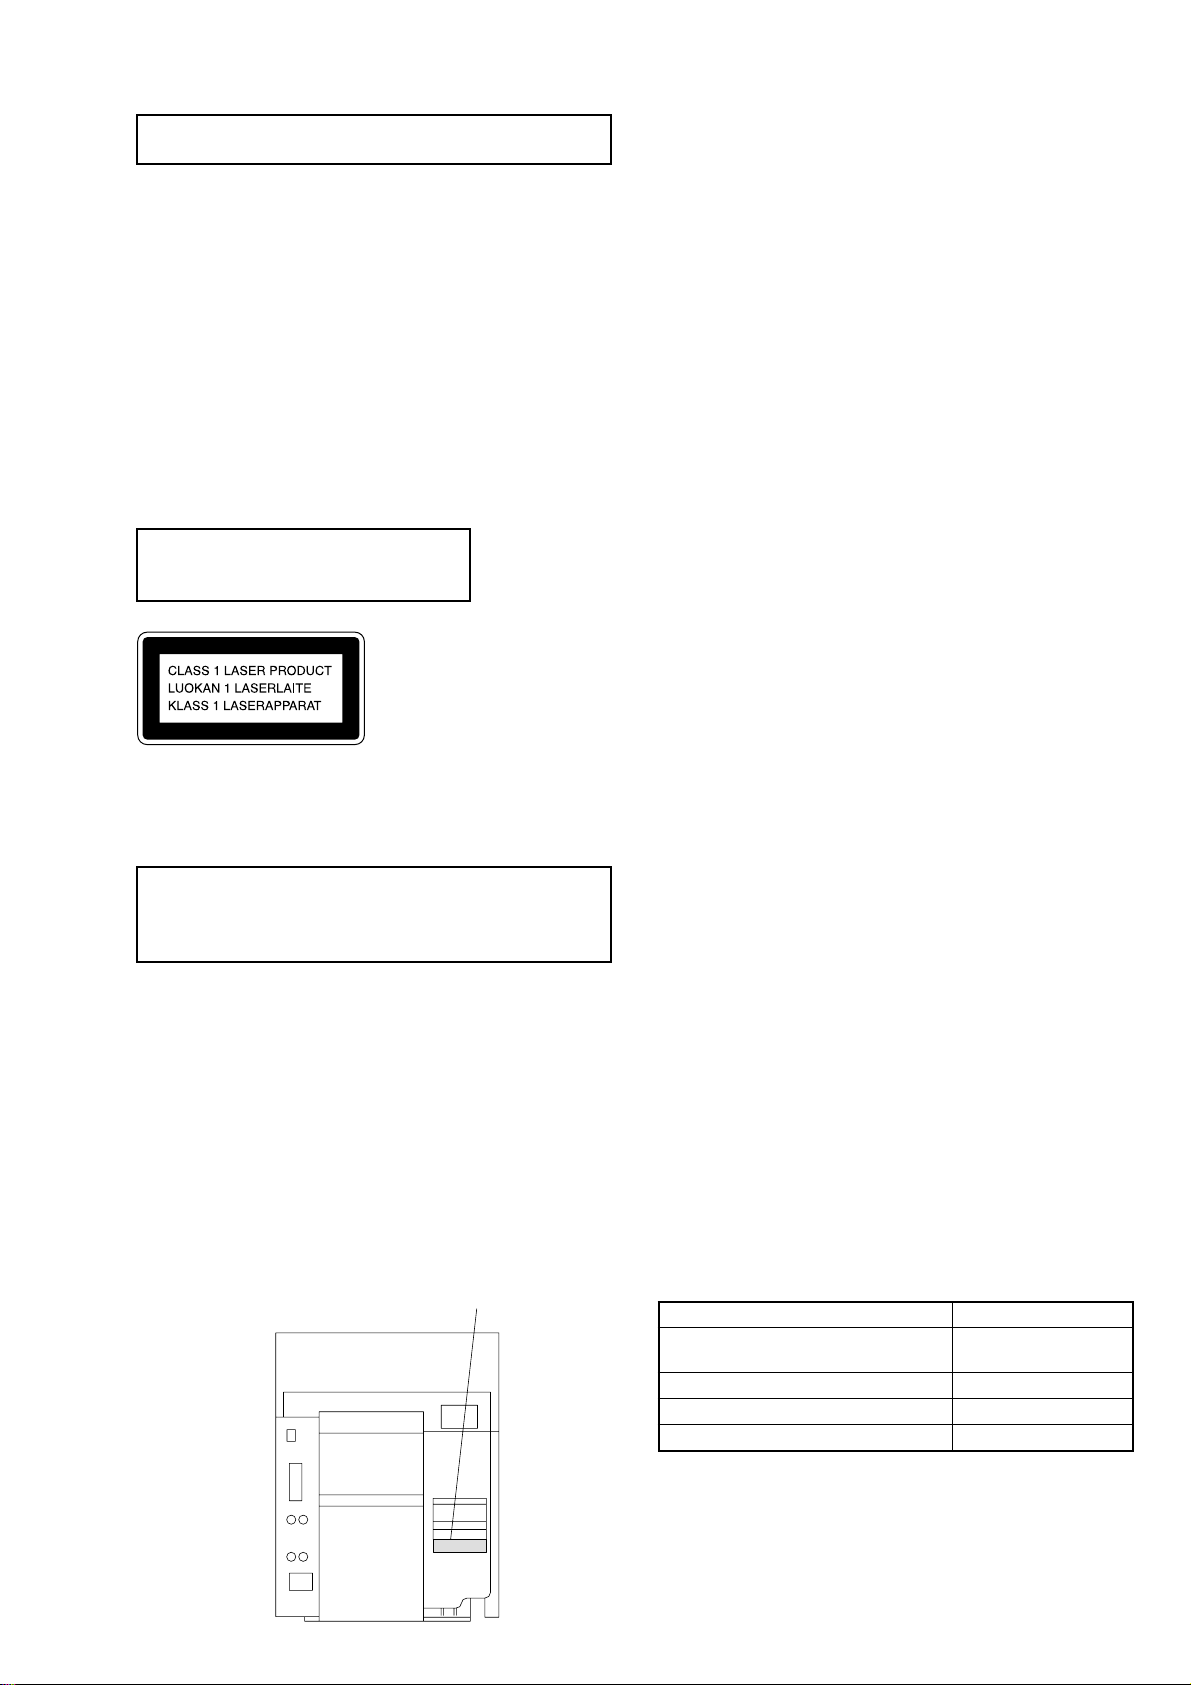
This appliance is classified as a CLASS 1 LASER product. The
CLASS 1 LASER PRODUCT MARKING is located on the rear
exterior.
CAUTION
Use of controls or adjustments or performance of procedures
other than those specified herein may result in hazardous radiation
exposure.
Notes on chip component replacement
• Never reuse a disconnected chip component.
• Notice that the minus side of a tantalum capacitor may be
damaged by heat.
Flexible Circuit Board Repairing
• Keep the temperature of soldering iron around 270˚C
during repairing.
• Do not touch the soldering iron on the same conductor of the
circuit board (within 3 times).
• Be careful not to apply force on the conductor when soldering
or unsoldering.
MODEL IDENTIFICATION
— BACK PANEL —
PARTS No.
TABLE OF CONTENTS
1. SERVICE NOTE ······························································· 4
2. GENERAL ·········································································· 5
3. DISASSEMBLY ································································ 7
4. TEST MODE ···································································· 12
5. MECHANICAL ADJUSTMENTS ····························· 16
6. ELECTRICAL ADJUSTMENTS ······························· 16
7. DIAGRAMS
7-1. Circuit Board Location ····················································· 21
7-2. Block Diagrams ································································ 22
7-3. Printed Wiring Board – BD Section – ······························ 24
7-4. Schematic Diagram – BD Section – ································· 25
7-5. Printed Wiring Board – Main Section – ··························· 26
7-6. Schematic Diagram – Main (1/3) Section – ····················· 27
7-7. Schematic Diagram – Main (2/3) Section – ····················· 28
7-8. Schematic Diagram – Main (3/3) Section – ····················· 29
7-9. Printed Wiring Board – Power AMP Section –
(BX7 model) ····································································· 30
7-10. Schematic Diagram – Power AMP Section –
(BX7 model) ····································································· 31
7-11. Printed Wiring Board – Power AMP Section –
(DX7, DX7J model) ························································· 32
7-12. Schematic Diagram – Power AMP Section –
(DX7, DX7J model) ························································· 33
7-13. Printed Wiring Board – Panel Section –··························· 34
7-14. Schematic Diagram – Panel Section – ····························· 35
7-15. Printed Wiring Board – Leaf SW Section – ···················· 36
7-16. Schematic Diagram – Leaf SW Section – ························ 37
7-17. Printed Wiring Board – Driver Section – ························· 38
7-18. Schematic Diagram – Driver Section – ···························· 39
7-19. Printed Wiring Board – Trans Section –
(BX7 model) ····································································· 40
7-20. Schematic Diagram – Trans Section –
(BX7 model) ····································································· 41
7-21. Printed Wiring Board – Trans Section –
(DX7, DX7J model) ························································· 42
7-22. Schematic Diagram – Trans Section –
(DX7, DX7J model) ························································· 43
7-23. IC Pin Function Description ············································· 44
7-24. IC Block Diagrams ··························································· 46
8. EXPLODED VIEWS
8-1. Main Section····································································· 49
8-2. Panel Section ···································································· 50
8-3. Main Board Section ·························································· 51
8-4. Tape Mechanism Deck Section-1 ····································· 52
8-5. Tape Mechanism Deck Section-2 ····································· 53
8-6. CD Mechanism Section ···················································· 54
8-7. Base unit Section ······························································ 55
9. ELECTRICAL PARTS LIST ······································· 56
MODEL
AED, AEP, CIS, UK, G, AUS,
KR, MX, TH models
AR, E, EA, SP, TW, MY models
US, CND models
DX7J model
• Abbreviation
CND : Canadian model
AUS : Australian model
G : German model
EA : Saudi Arabia model
MY : Malaysia model
SP : Singapore model
TH : Thai model
KR : Korea model
MX : Mexican model
AR : Argentina model
E2 : Central and
E3 : Middle and Near East
PARTS No.
4-225-040-1s
4-225-040-2s
4-225-040-3s
4-228-592-3s
South AMERICA
3
Page 4
SECTION 1
SERVICE NOTE
2
Panel board
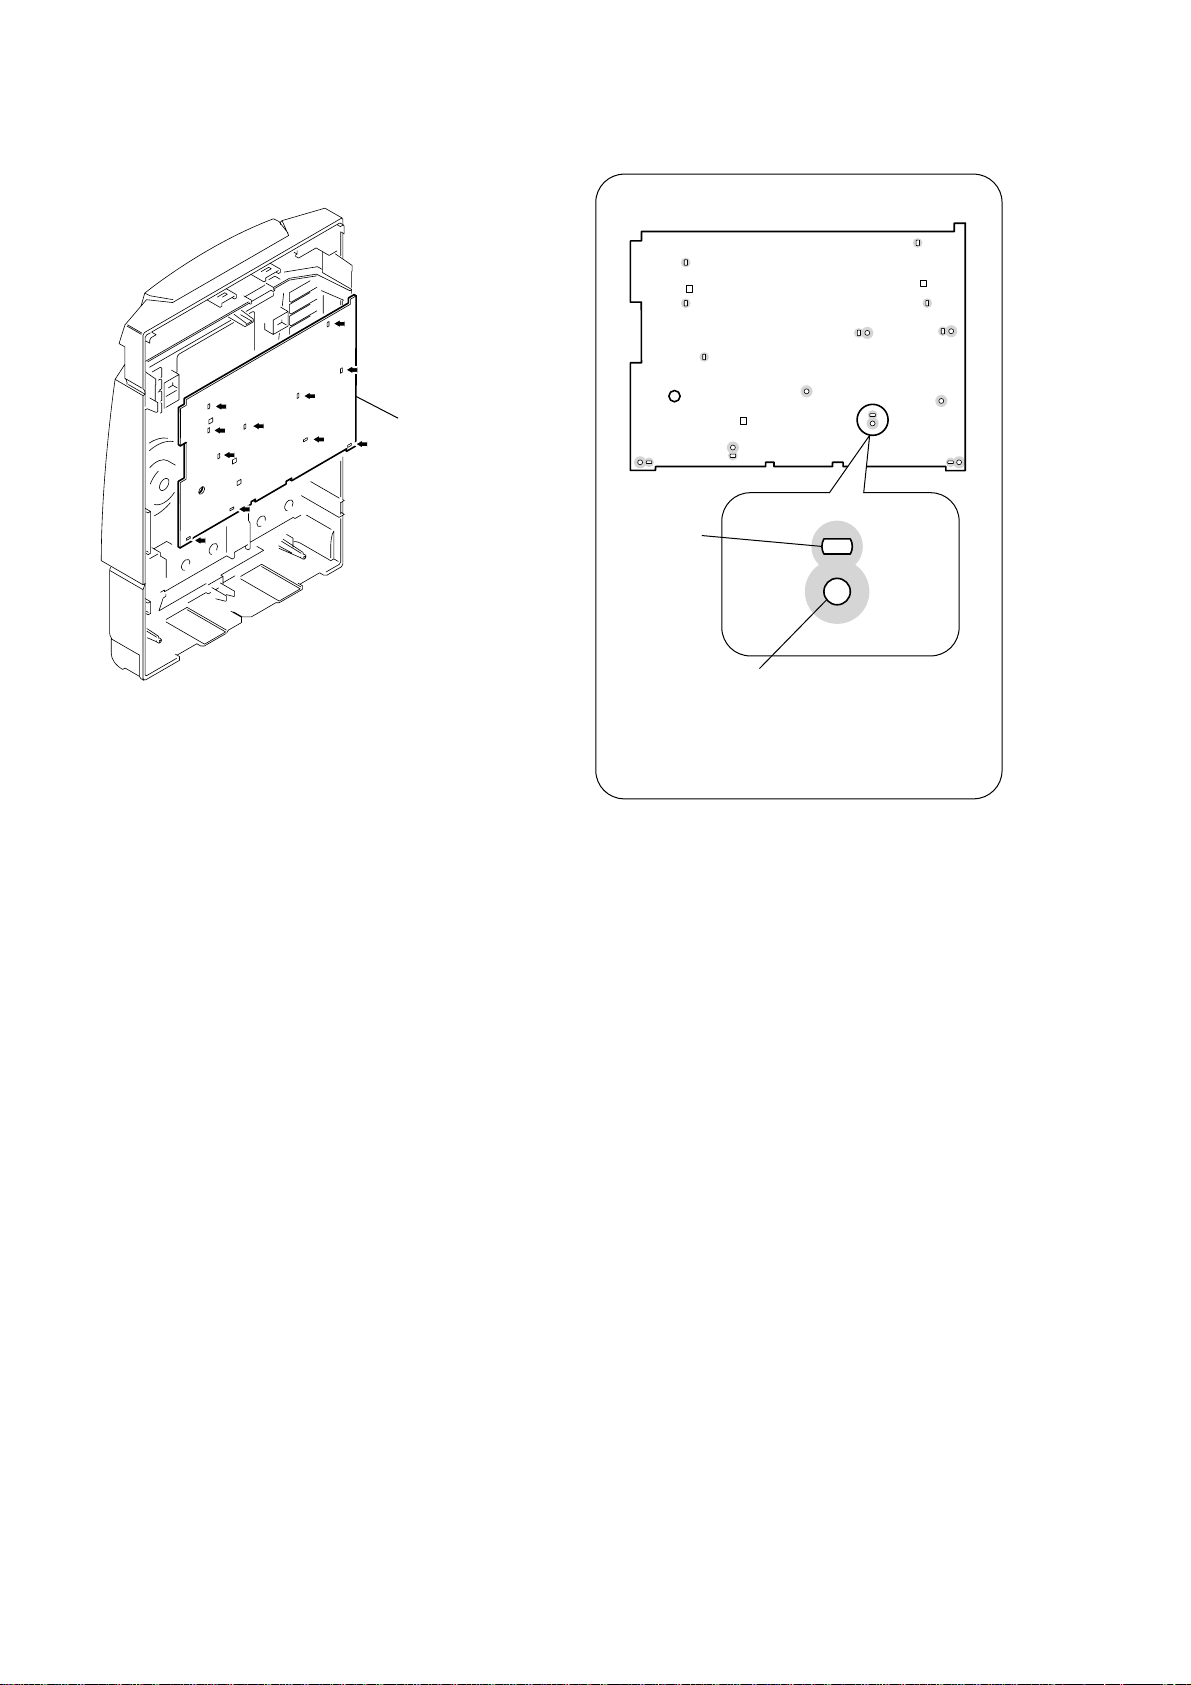
Note for installing the panel board
Hot melt
1
Cut the eleven melted-connection points with a cutting plier.
Screw hole
Attach the panel board with
six screws (
after the board is removed once.
Do not tighten the screws excessively.
+BVTP 2.6 × 8
)
4
Page 5
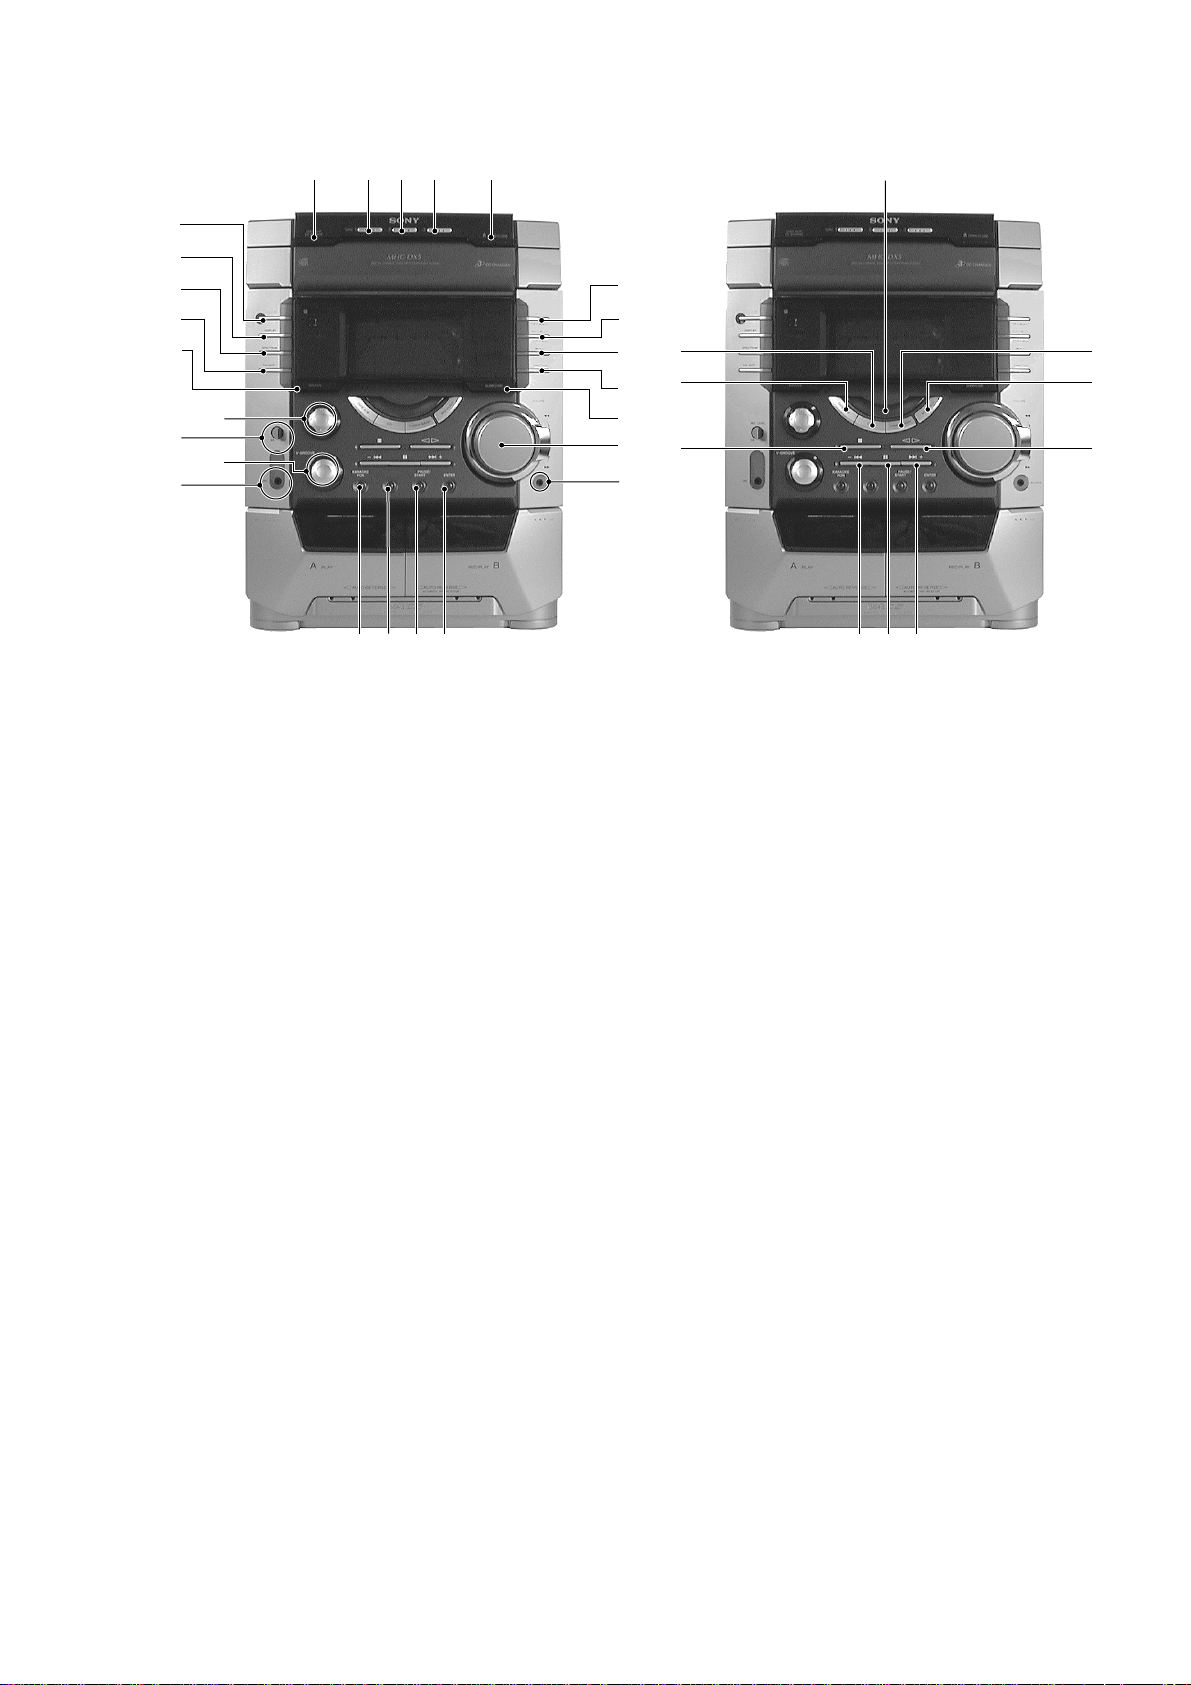
SECTION 2
12345
6
7
8
qa
qs
qdqfqgqh
w;
ws
ed
ef
wh
wj
wk
wl
e;
ea
9
q;
wa
ql
wd
wf
wg
es
qk
qj
eg
GENERAL
1 DISC SKIP EX-CHANGE button
2 DISC 1 button and indicator
3 DISC 2 button and indicator
4 DISC 3 button and indicator
5 Z OPEN/CLOSE button
6 EDIT, TUNER MOMERY button
7 PLAY MODE, STEREO/MONO button
8 REPEAT, DOLBY NR button
9 DIRECTION knob (EXCEPT AEP, G, UK, CIS)
DIRECTION, PTY knob (AEP, G, UK, CIS model)
q; SURROUND button
qa VOLUME knob
qs PHONES jack
qd ENTER button
qf REC PAUSE/START button and indicator
qg CD SYNC HI-DUB button
qh LOOP button (BX7 model)
LOOP, KARAOKE PON button (DX7, DX7J model)
Photo: HCD-BX7
qj MIC jack (DX7, DX7J model)
qk MIC LEVEL knob (DX7, DX7J model)
ql V-GROOVE button and indicator
w; CURSOL button and indicator
wa GROOVE button
ws EQ EDIT button
wd SPECTRUM button
wf DISPLAY button
wg ?/1 button and indicator
wh TUNER/BAND button
wj MD (VIDEO) button
wk Y button
wl > + button
e; X button
ea – . button
es x button
ed TAPE A/B button
ef CD button
eg Function indicator
5
Page 6
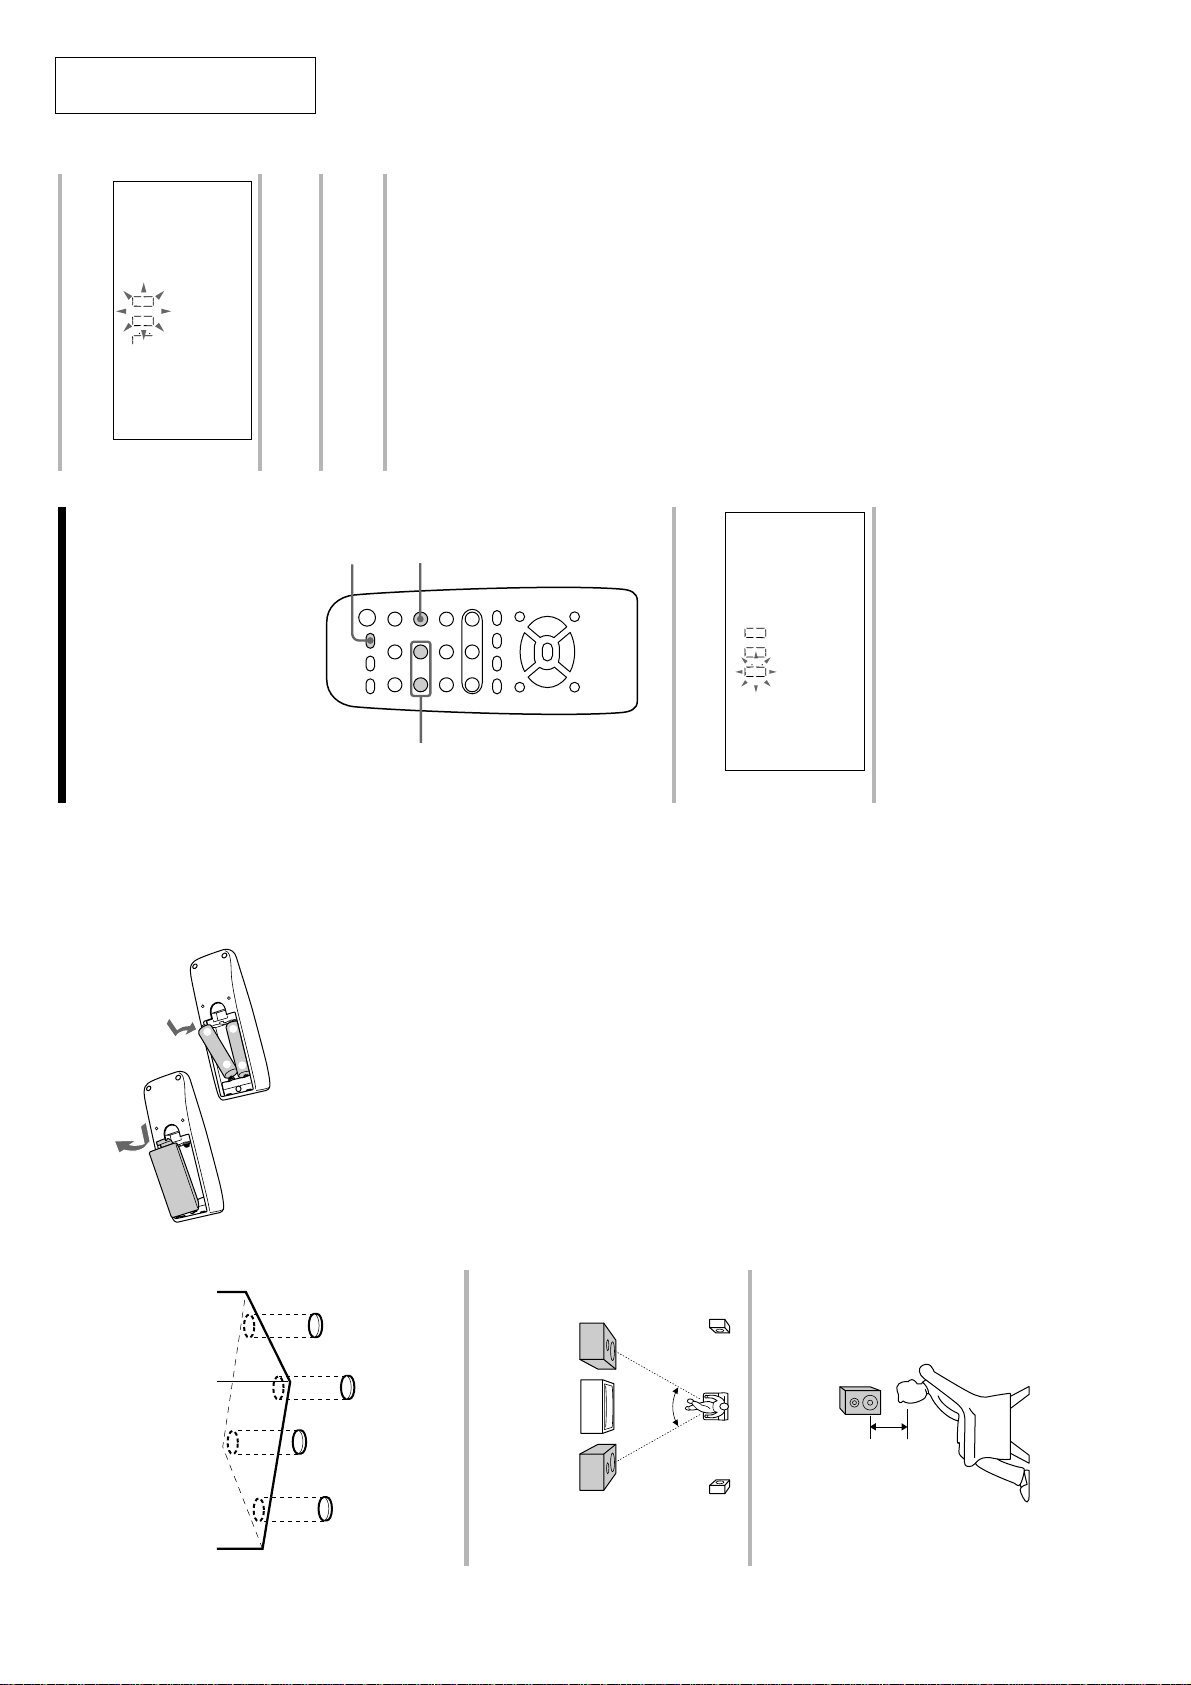
This section is extracted from
instruction manual.
Press ENTER.
The minute indication flashes.
3
Press . or > repeatedly to set
4
Press ENTER.
the minute.
5
The clock starts working.
Tip
If you’ve made a mistake, start over from step 1.
To change the time
The previous explanation shows you how to set the
time while the power is off. To change the time
SET CLOCK.
while the power is on, do the following:
1 Press CLOCK/TIMER SET.
2 Press . or > repeatedly to select
3 Press ENTER.
4 Perform steps 2 through 5 above.
Note
The clock settings are canceled when you disconnect
the power cord or if a power failure occurs.
7
ou must set the time before using the timer
ime
Step 2: Setting the
he clock is on a 24-hour system for the
uropean model and a 12-hour system for
he 24-hour system model is used for
ther models.
unctions.
e
E
llustration purposes.
E
e
1
YX x
.>
3,5
x
mM
2,4
NX
Press CLOCK/TIMER SET.
The hour indication flashes.
1
Press . or > repeatedly to set
the hour.
2
Inserting two size AA (R6)
batteries into the remote
Step 1: Hooking up the system
(continued)
To attach the front speaker pads
Attach the supplied front speaker pads to the
bottom of the speakers to stabilize the
speakers and prevent them from slipping.
6
Tip
With normal use, the batteries should last for about
six months. When the remote no longer operates
the system, replace both batteries with new ones.
Note
If you do not use the remote for a long period of
time, remove the batteries to avoid possible damage
from battery leakage.
When carrying this system
Do the following to protect the CD
mechanism.
1 Make sure that all discs are removed from
of 45 degrees from your listening
Positioning the speakers
Before you connect them, determine the best
location for your speakers.
1 Place the front speakers at an angle
the unit.
“LOCK” appears in the display.
2 Hold down CD and then press ?/1 so that
3 Unplug the AC power cord.
Front
speaker
(R)
position.
Front
speaker
(L)
Surround
45º
Surround
speaker
(R)
speaker
(L)
Surround
speaker
60 to 90 cm
each other at about 60 to 90 cm
above your listening position.
2 Place the surround speakers facing
6
Page 7
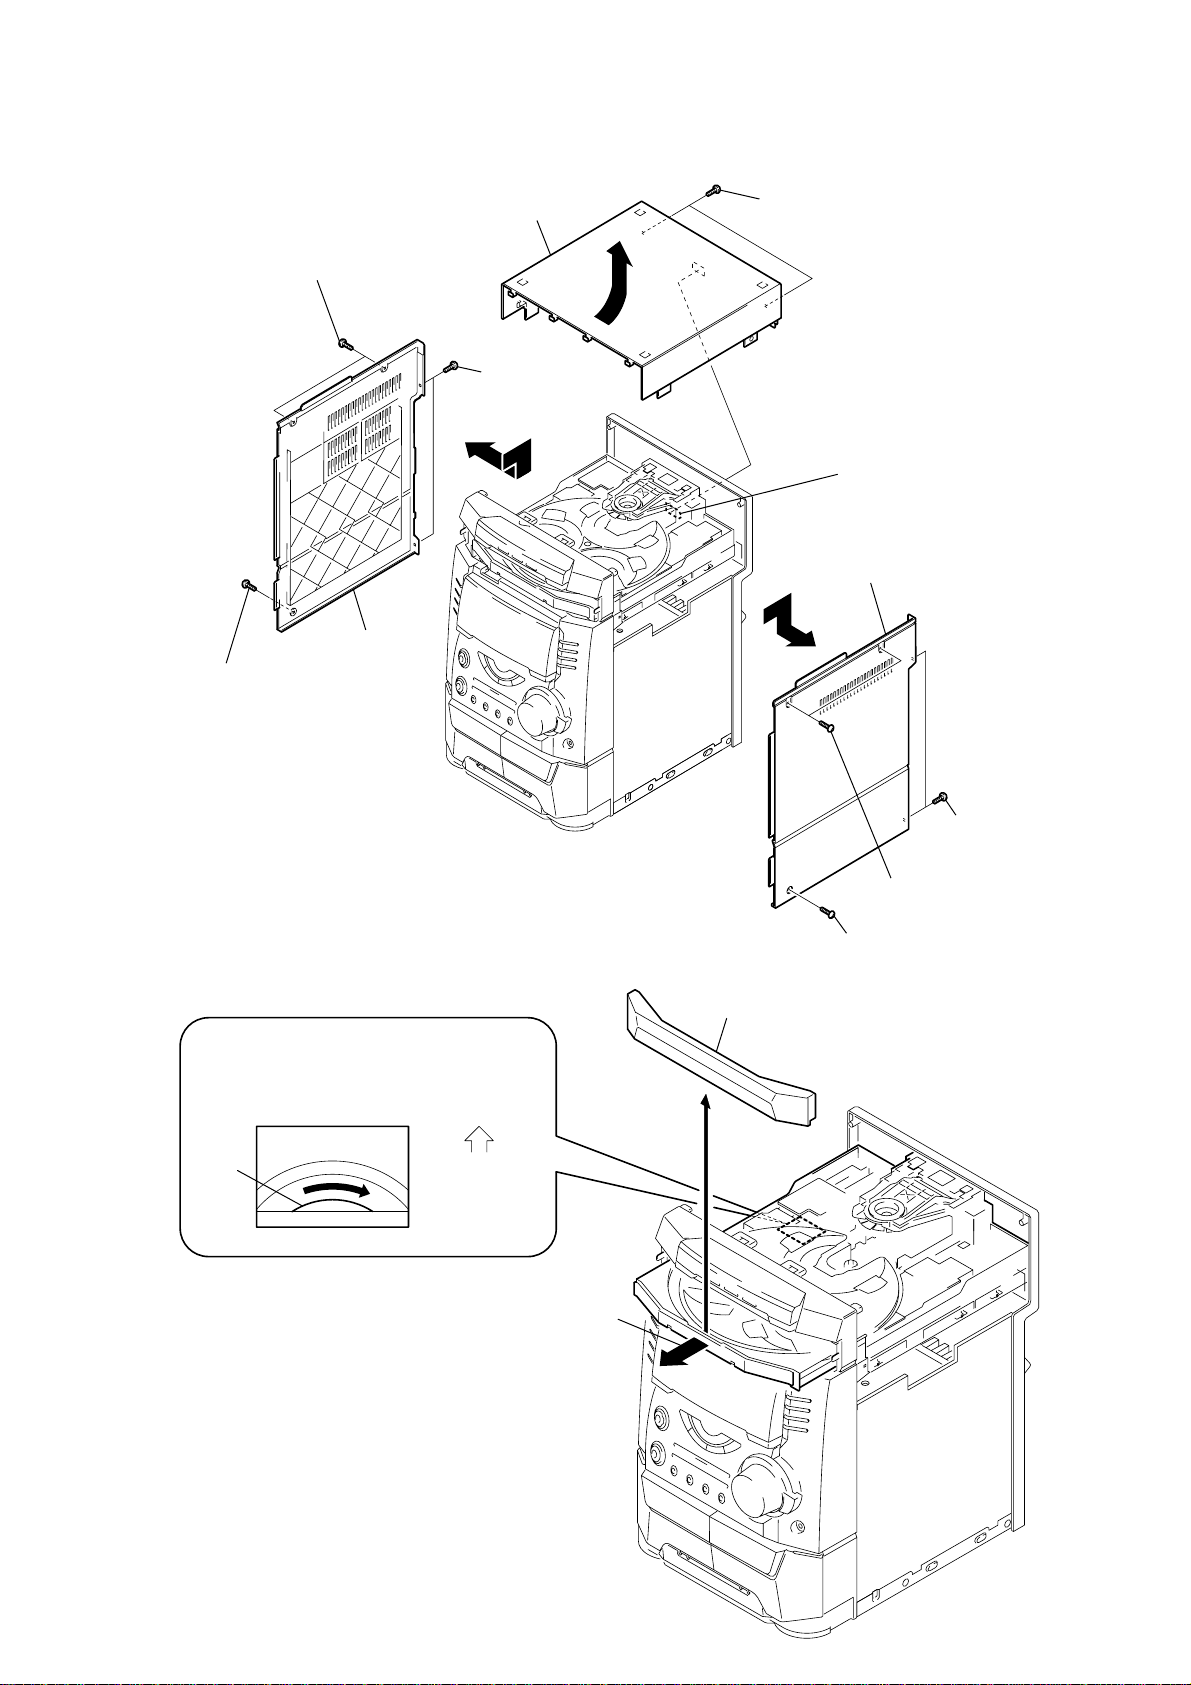
SECTION 3
DISASSEMBY
Note : Follow the disassembly procedure in the numerical order given.
3-1. UPPER CASE (TOP)
Upper case (Top)
9
Two screws (+BVTP 3
×
10)
6
Screw (Case)
5
Two screws (Case)
Side panel L
7
Two screws
(+BVTP 3
8
×
10)
q;
4
Claw
Side panel R
3
Two screws
(+BVTP 3
×
10)
3-2. LOADING PANEL ASSY
CD mechanism deck (CDM58)
1
Turn the pulley to the direction of arrow.
pulley
Front panel side
2
Pull-out the disc tray.
Loading panel assy
3
1
Two screws (Case)
2
Screw (Case)
7
Page 8
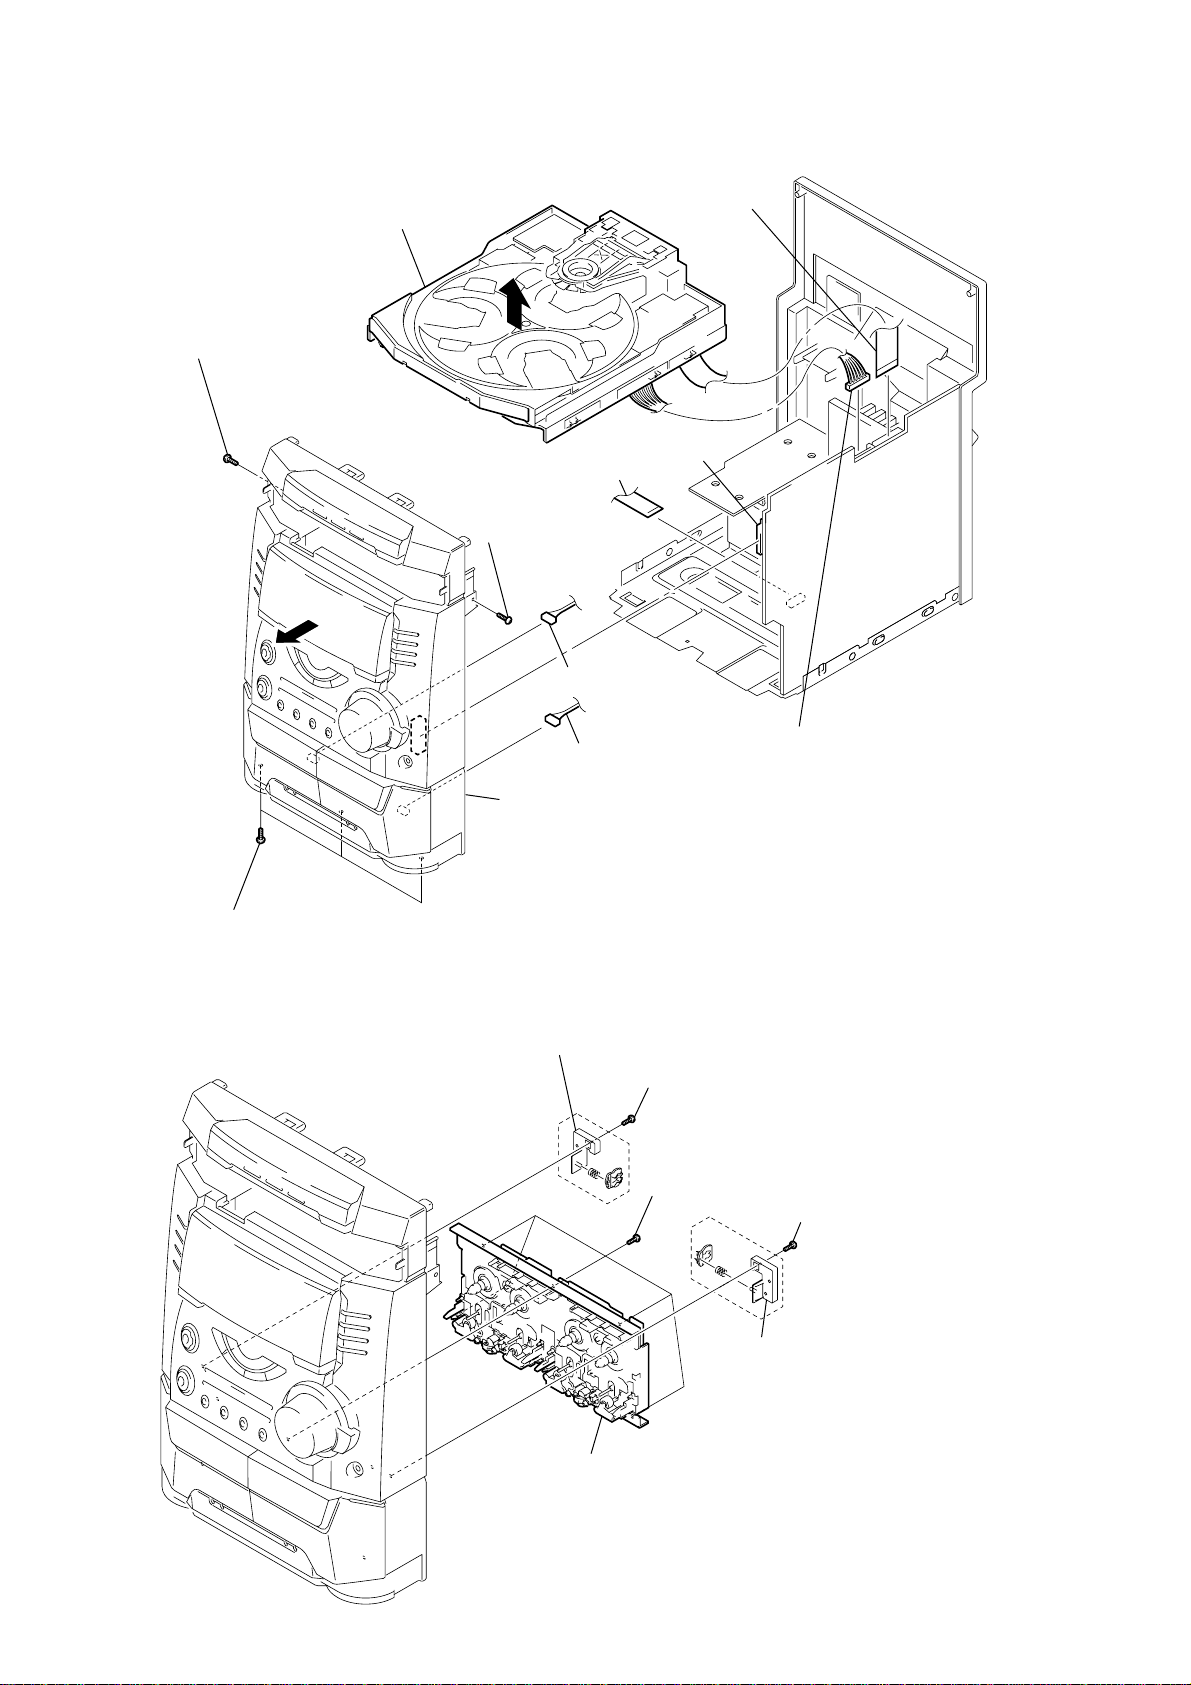
)
3-3. FRONT PANEL SECTION
CD mechanism deck (CDM58)
4
Screw (+BVTP 3
×
7
10)
0
1
Flat type wire (CN304)
5
Screw (+BVTP 3
2
Connector (CN1)
8
Connector (CN201)
Connector
(CN601)
×
10)
6
Three screws (+BVTT 3
3-4. TAPE MECHANISM DECK
×
9
3
Connector (CN2)
Front panel section
6)
4
Bracket (Heart cam L)
3
Screw (+BVTP 2.6
5
Five screws (+BVTP 2.6
Connector (CN202)
×
8)
×
8)
1
Screw (+BVTP 2.6
×
8
2
Bracket (Heart cam R)
6
Tape mechanism deck
8
Page 9
d
)
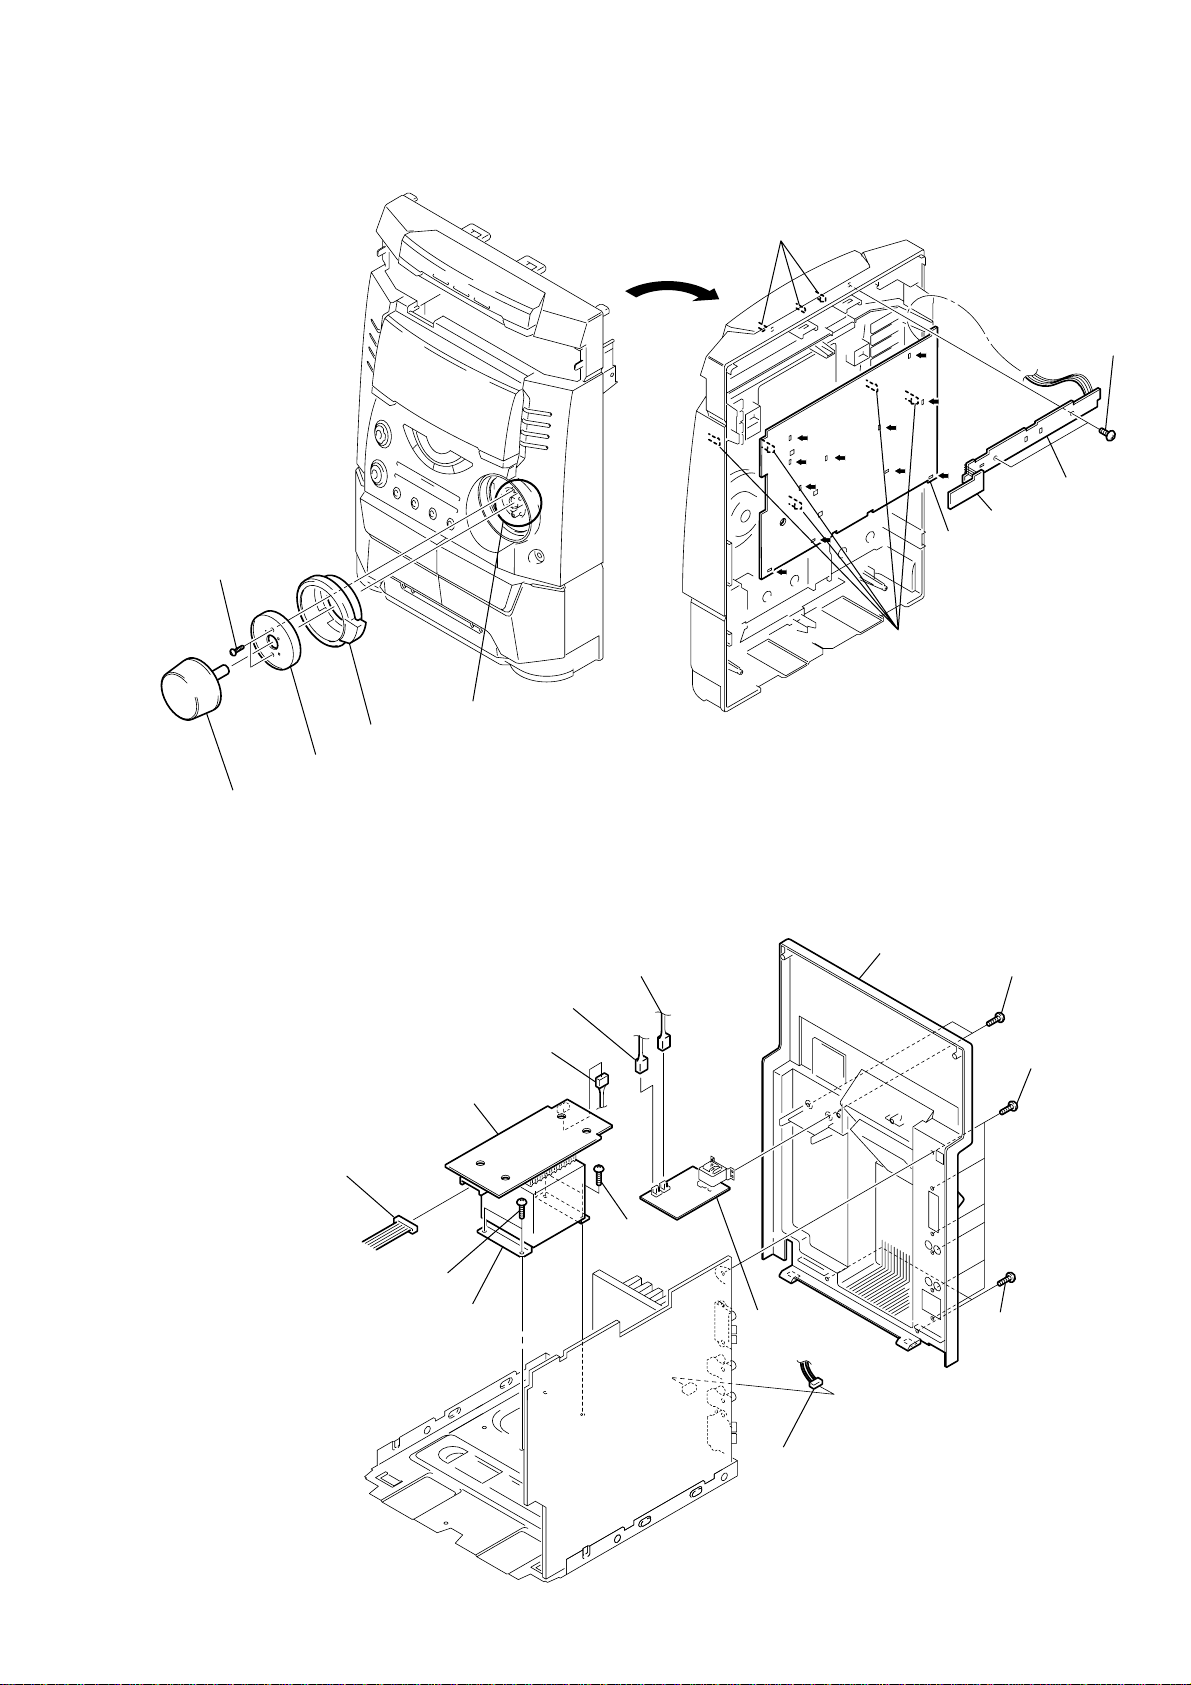
3-5. PANEL BOARD
2
Two screws
(+BVTP 2.6
×
8)
1
Knob (Volume)
4
5
FR knob
Bracket (FR)
3
Two bosses & four pins
8
Three claws
6
7
Two screws
(+BVTP 2.6
9
CD Switch boar
VCD Switch board
qs
Panel board
qa
Five claws
q;
Cut the eleven melted-connection points with a cutting plier.
Note: When attching the panel board,
refer to "Service Note" on page 4.
×
8)
3-6. SUB-TRANS BOARD AND TRANS BOARD
1
Connector (CN975)
9
Connector (CN975)
qf
Trans board
0
Connector (CN977)
qa
Two screws (+BVTT 4
×
qd
8)
Trans
2
Connector (CN974)
qs
Two screws
(+BVTT 4
×
8
Panel, back
3
Two screws
(+BVTP 3
6
(+BVTP 3
8)
4
Sub-trans
board
7
Connector (CN891)
5
Two screws
(+BVTP 3
×
Six screws
×
10)
8)
×
10
9
Page 10
)
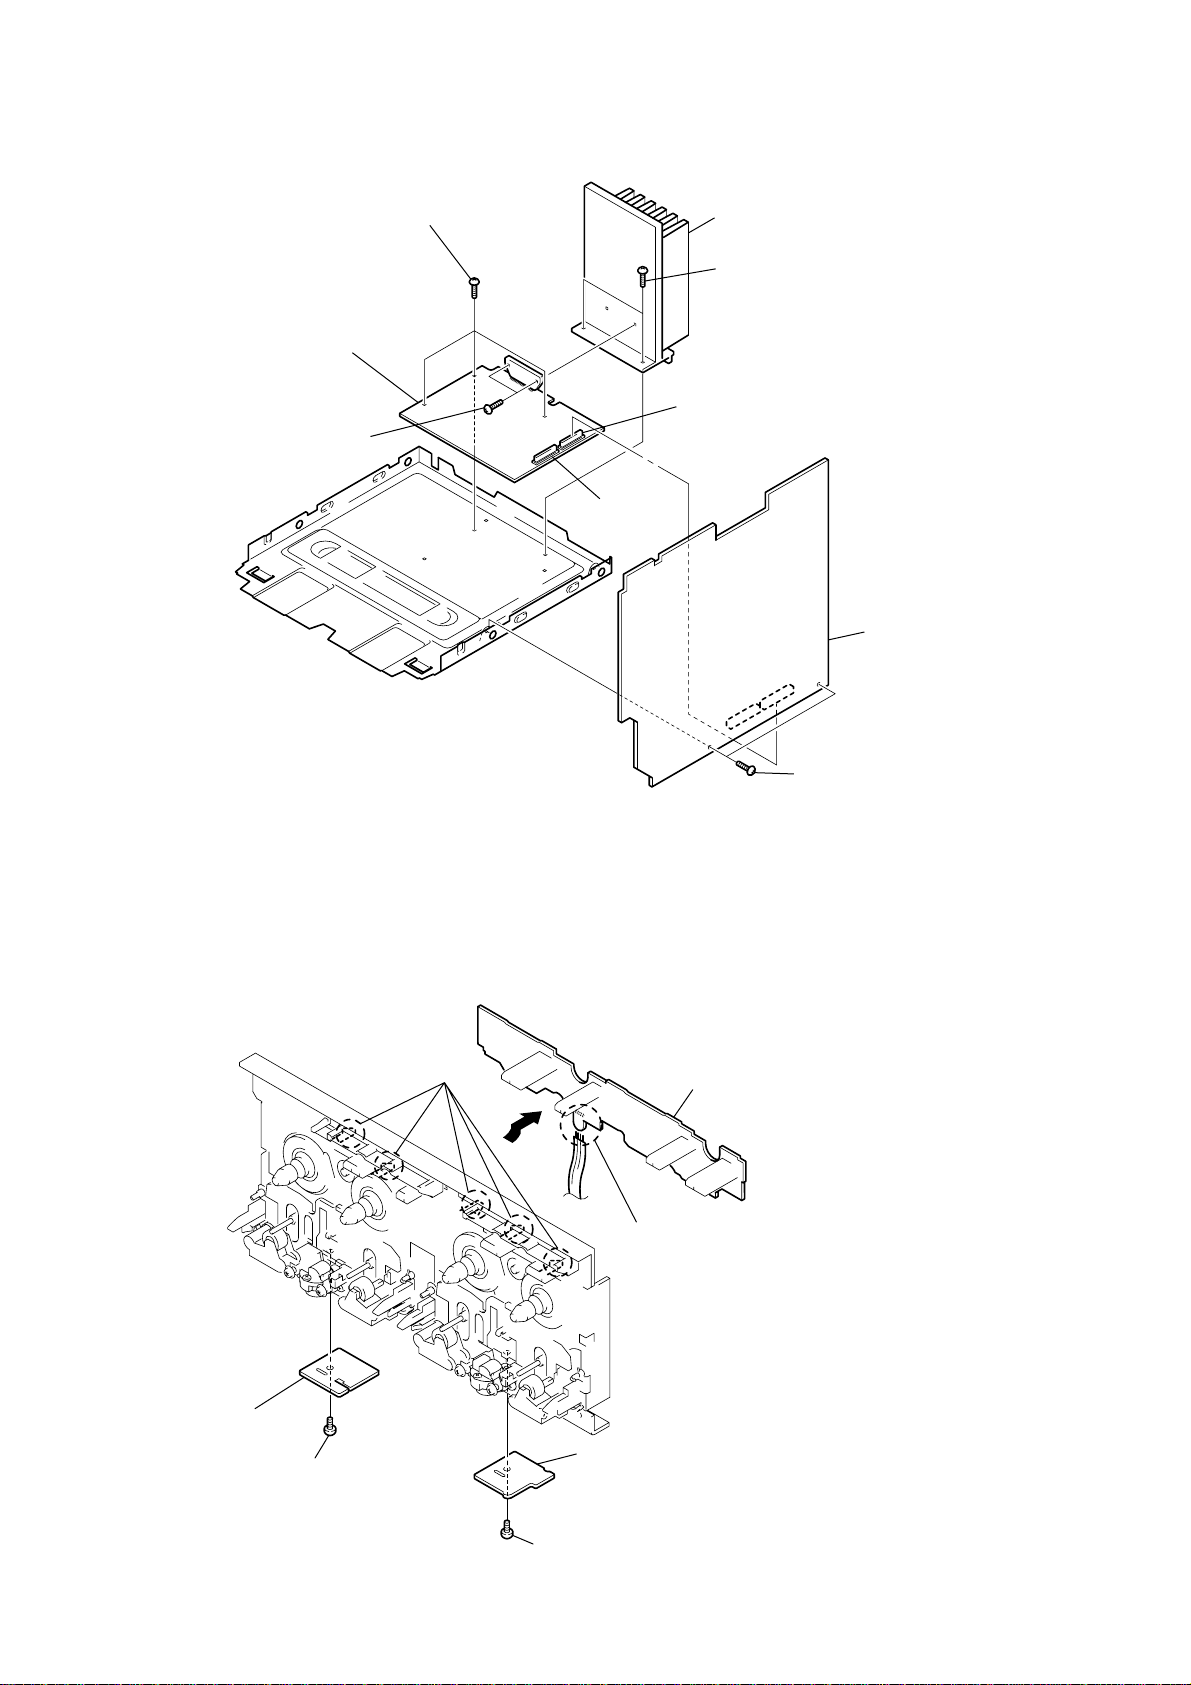
3-7. MAIN BOARD AND AMP BOARD
4
Three screws (+BVTP 3
×
8)
7
Heat sink
6
Two screws (+BVTP 3
×
8)
5Power
3
Two screws (+BVTP 3
AMP board
×
16)
Connector
(CN503)
Connector(CN502)
2
Main board
1
Two screws (+BVTP 3
×
8
3-8. LEAF SW BOARD, HEAD (A) BOARD AND HEAD (B) BOARD
1
Five claws
6
Remove the four solderings.
4
Head (A) board
5
3
Screw (+PS 2.6
×
5)
Head (B) board
2Leaf
SW board
10
6
Screw (+PS 2.6
×
5)
Page 11
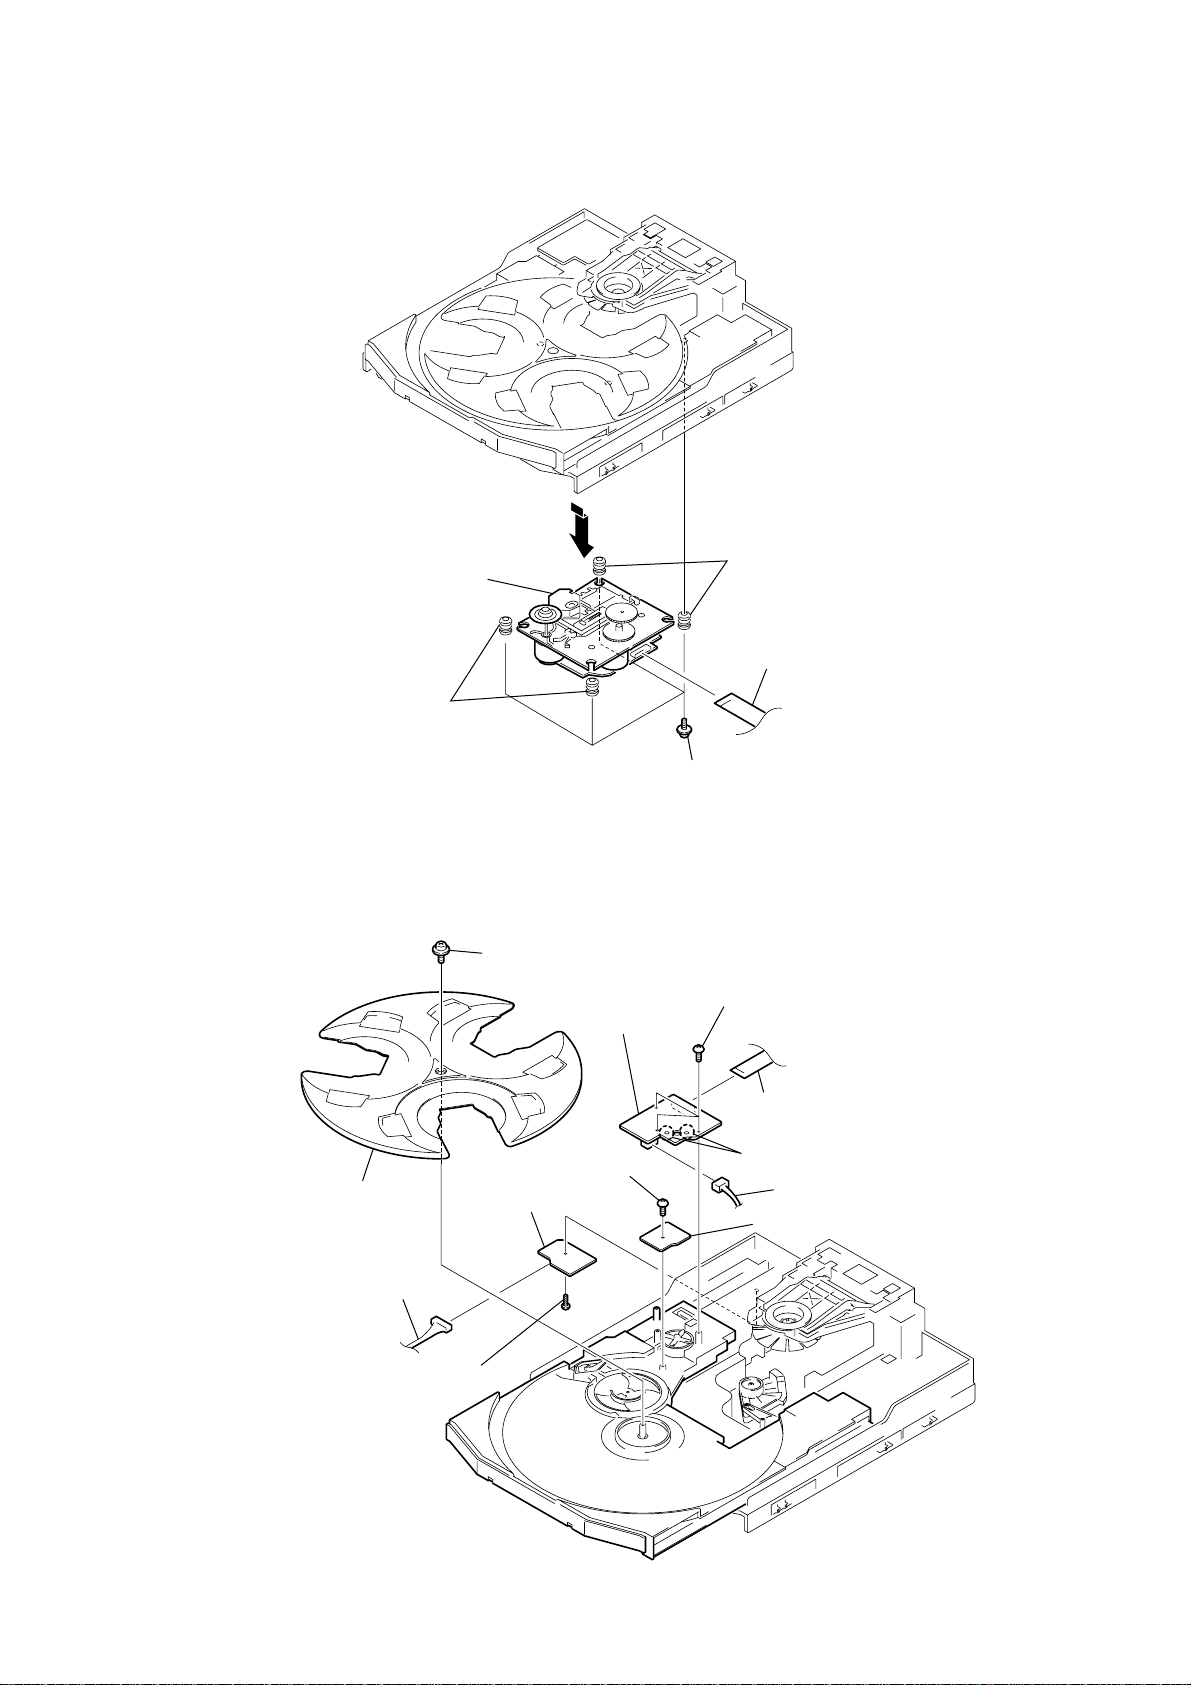
3-9. BASE UNIT
5
Two insulators
Base unit
3
4
Two insulators
1
Flat type wire (CN101)
2
Four screws (+PTPWH 2.6)
3-10. DRIVER BOARD, MOTOR BOARD AND ADDRESS SENSOR BOARD
9
q;
Tray
3
Connector (CN701)
Screw (+PTPWH 2.6
qa
Screw (+BVTP 2.6
2
Driver board
6
Motor board
×
×
8)
8)
4
Three screws (+BVTP 2.6
7
Flat type wire (CN721)
5
Remove the two solderings of motor.
8
Connector(CN722)
qs
Address Sensor board
×
8)
1
Screw (+BVTP 2.6
×
8)
11
Page 12
SECTION 4
TEST MODE
[MC Cold Reset]
• The cold reset clears all data including preset data stored in the
RAM to initial conditions. Execute this mode when returning
the set to the customer.
Procedure:
1. Press three buttons x , ENTER , and ?/1 simulta-neously.
2. The fluorescent indicator tube displays “COLD RESET” and
the set is reset.
[CD Ship Mode]
• This mode moves the pickup to the position durable to vibration. Use this mode when returning the set to the customer after
repair.
Procedure:
1. Press ?/1 button to turn the set ON.
2. Press CD button and ?/1 button simultaneously.
3. After the "STANDBY" display blinks six times, a message
“LOCK” is displayed on the fluorescent indicator tube, and the
CD ship mode is set.
[MC Hot Reset]
• This mode resets the set with the preset data kept stored in the
memory. The hot reset mode functions same as if the power
cord is plugged in and out.
Procedure:
1. Press three buttons x , ENTER , and DISC 1 simultaneously .
2. The fluorescent indicator tube becomes blank instantaneously,
and the set is reset.
[CD Service Mode]
• This mode can run the CD sled motor freely . Use this mode, for
instance, when cleaning the pickup.
Procedure:
1. Press ?/1 button to turn the set ON.
2. Select the function “CD”.
3. Press three buttons x , ENTER , and OPEN/CLOSE simul-
taneously.
4. The CD service mode is selected.
5. With the CD in stop status, turn the shuttle knob clockwise to
move the pickup to outside track, or turn the shuttle knob
counter-clockwise to inside track.
6. To exit from this mode, perform as follows:
1) Move the pickup to the most inside track.
2) Press three buttons in the same manner as step 2.
Note: • Always move the pickup to most inside track when exiting from
this mode. Otherwise, a disc will not be unloaded.
• Do not run the sled motor excessively , otherwise the gear can be
chipped.
[Change-over of MW Tuner Step between 9 kHz and
10 kHz]
• A step of MW channels can be changed over between 9 kHz
and 10 kHz.
Procedure:
1. Press ?/1 button to turn the set ON.
2. Select the function “TUNER”, and press TUNER/BAND
button to select the BAND “MW”.
3. Press ?/1 button to turn the set OFF.
4. Press ENTER and ?/1 buttons simultaneously, and the display
of fluorescent indicator tube changes to “MW 9 k STEP” or
“MW 10 k STEP”, and thus the channel step is changed over.
[GC Test Mode]
• This mode is used to check the software version, FL tube, LED,
keyboard and VACS.
Procedure:
1. Press three buttons x , ENTER , and DISC2 simultaneously .
2. LEDs and fluorescent indicator tube are all turned on.
3. When you want to enter the software version display mode,
press DISC 1 . The model number and destination are displayed.
4. Each time DISC 1 is pressed, the display changes starting
from MC version, GC version, VC version, CD version, CM
version, ST version, TC version, TA version, TM version and
BR version in this order, and returns to the model number and
destination display.
5. When DISC 3 is pressed while the version numbers are being
displayed except model number and destination, year, month
and day of the software creation appear. When DISC 3 is
pressed again, the display returns to the software version display .
When DISC 1 is pressed while year, month and day of the
software creation are being displayed, the year, month and day
of creation of the software versions are displayed in the same
order of version display.
6. Press DISC 2 button, and the key check mode is activated.
7. In the key check mode, the fluorescent indicator tube displays
“KEY0 VOL0”. Each time a button is pressed, “KEY” value
increases. However, once a button is pressed, it is no longer
taken into account.
“VOL” value increases like 1, 2, 3 ... if rotating VOLUME
knob in “+” direction, or it decreases like 0, 9, 8 ... if rotating in
“–” direction.
8. Also when DISC 3 is pressed after lighting of all LEDs and FL
tubes, value of VACS appears.
9. T o e xit from this mode, press three b uttons in the same manner
as step 1, or disconnect the power cord.
[VACS ON/OFF Mode]
• This mode is used to switch ON and OFF the VACS (Variable
Attenuation Control System).
Procedure:
Press the ENTER and SPECTRUM buttons simultaneously. The
message “VACS OFF” or “VACS ON” appears.
12
Page 13
[MC Test Mode]
• This mode is used to check operations of the respective sections
of Amplifier, Tuner, CD and Tape.
Procedure:
1. Press the ?/1 button to turn on the set.
2. Press the three buttons of x , ENTER and DISC 3
simultaneously.
3. A message “TEST MODE” appears on the FL display tube.
4 When f (CURSOR UP) button is pressed, GEQ increases to
its maximum and a message “GEQ ALL MA” appears.
5. When F (CURSOR DOWN) button is pressed, GEQ decreases
to its minimum and a message “GEQ ALL M1” appears.
6. When g (CURSOR LEFT) or G (CURSOR RIGHT) button
is pressed, GEQ is set to flat and a message “GEQ FLAT”
appears.
7. When the VOLUME control knob is turned clockwise even
slightly, the sound volume increases to its maximum and a
message “VOLUME MAX” appears for two seconds, then the
display returns to the original display.
8. When the V OLUME control knob is turned counter-clockwise
even slightly, the sound volume decreases to its minimum and
a message “VOLUME MIN” appears for two seconds, then
the display returns to the original display.
9. In the test mode, the default-preset channel is called even when
the TUNER is selected and an attempt is made to call the preset
channel that has been stored in memory, by oper ating the Shuttle
knob. (It means that the memory is cleared.)
10. When CD is selected and the EDIT button is pressed, the disc
that is being chucked at this moment becomes the default
setting. It means that the default disc only is accessed when
any other discs are selected even though the display indication
changes accordingly. At the same time, the DISC SKIP EXCHANGE and OPEN/CLOSE cannot be accepted. (It means
that the tray motor and the turntable motor are disabled of their
operation.)
11. When a tape is inserted in Deck B and recording is started, the
input source function selects VIDEO automatically.
12. When x button is pressed to stop recording, the Tape (Deck)
B is selected and tape is rewound using the Shuttle knob, tape
is rewound, tape is stops at around the record-starting position
and playback of the recorded portion of the tape is started. If
P A USE is inserted even once during recording, ta pe is rewound
to the position around the P AUSE position and is played back.
13. When the CD SYNC HI-DUB Button is press during playback
of Deck B, either normal speed or high speed can be selected
by this button.
14. Select the desired loop by pressing the PLAY MODE b utton.
Insert a test tape AMS-110A or AMS-RO to Deck A.
15. Press the SPECTRUM button to enter the AMS test mode.
16. After a tape is rewound first, the FF AMS is checked, and the
mechanism is shut off after detecting the AMS signal twice.
17. Then the REW AMS is checked and the mechanism is shut off
after detecting the AMS signal twice.
18. When the check is complete, a message of either OK or NG
appears.
19. When you want to exit this mode, press the ?/1 button twice.
The cold reset is enforced at the same time.
13
Page 14
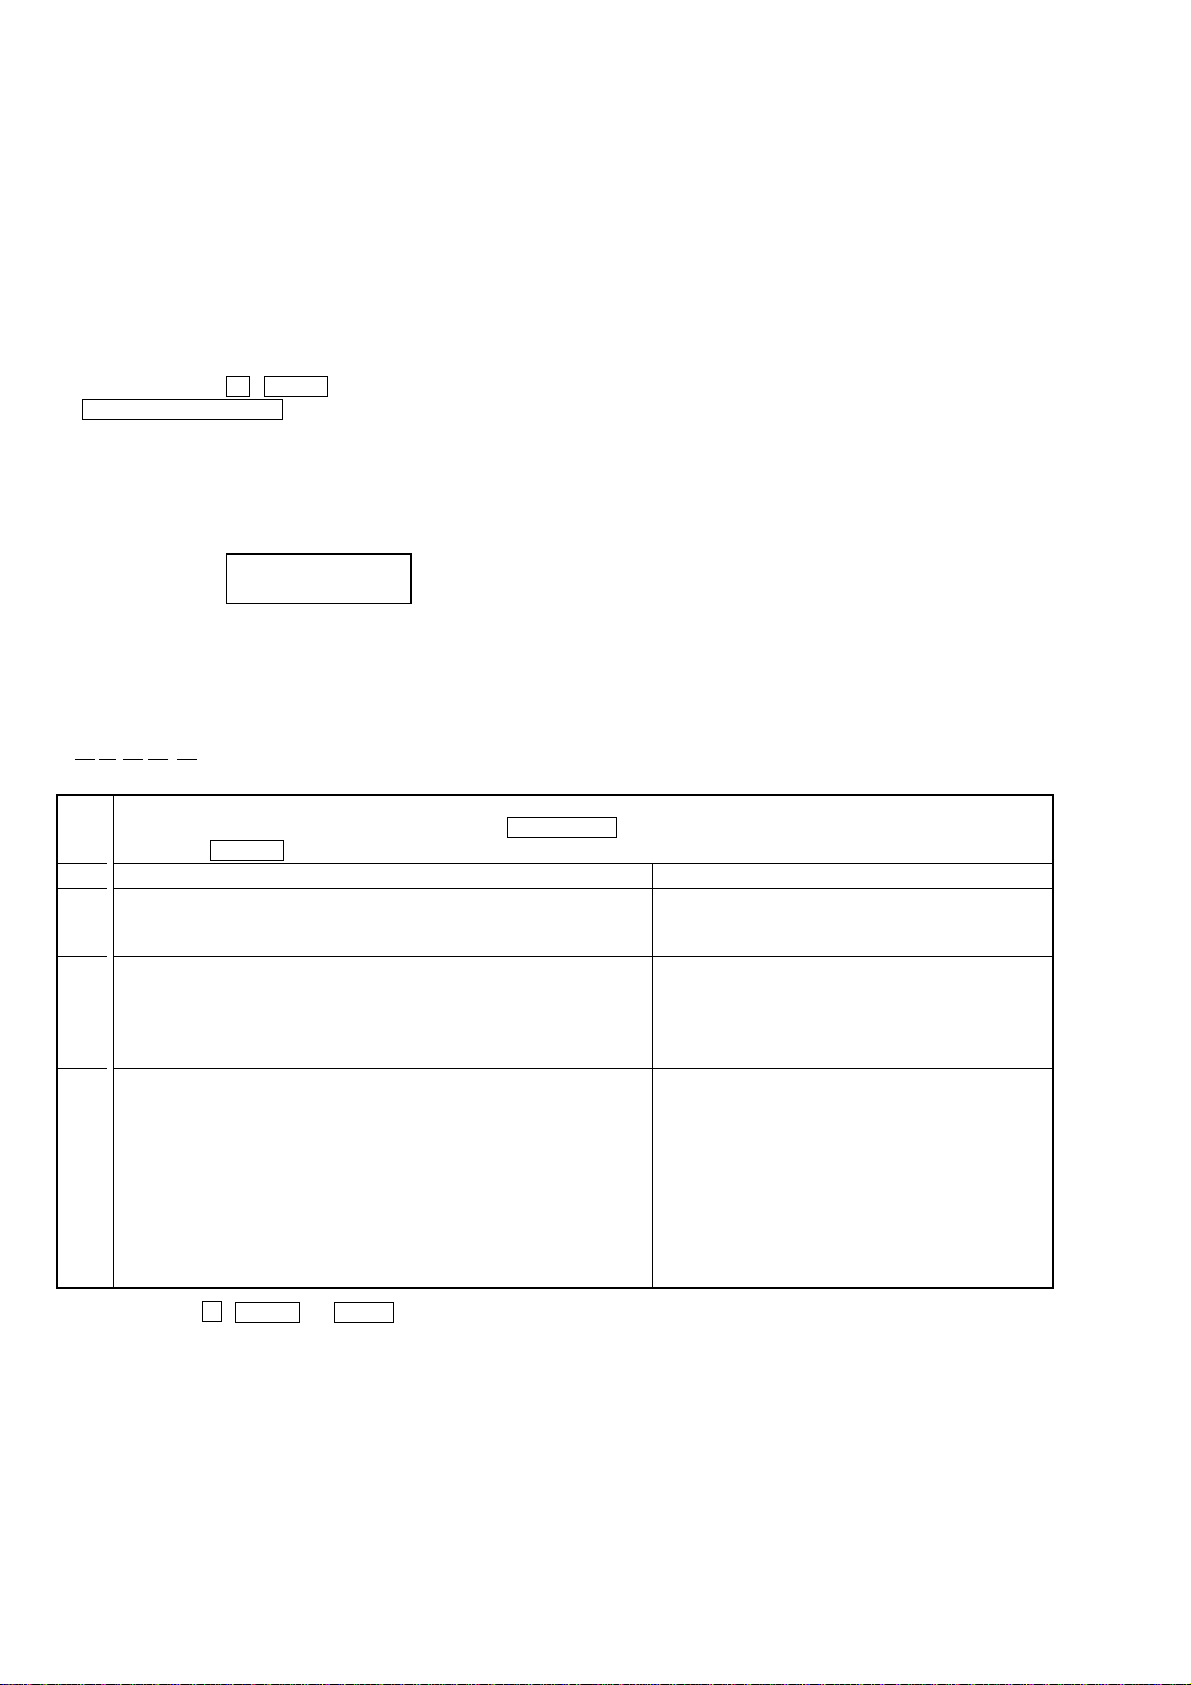
[Aging Mode]
This mode can be used for operation check of CD section and tape deck section.
• If an error occurred:
The aging operation stops and display status.
• If no error occurs:
The aging operation continues repeatedly.
1. Operating method of Aging Mode
Turn on the main power and select “CD” of the function.
1) Set a disc in DISC1 tray. Select ALL DISC CONTINUE, and REPEAT OFF.
2) Load the tapes recording use into the decks A and B respectively.
3) Press three buttons x , ENTER , and
DISC SKIP/EX-CHANGE simultaneously.
4) Aging operations of CD and tape are started at the same time.
5) To exit the aging mode, perform [MC Cold Reset].
3. Aging Mode in CD section
1) Display state
• No error occurs
Display
AGING[*][*][*][*]
Note:
[*][*][*][*]
Error display
E ** s ## $$ %%
12 34 5
1 **
2 s
3 ##
4 $$
5 %%
: Number of aging operations
The error No. 00 indicates the newest error. As the error No. increases, it means the older error.
When you want to retrieve the error history, press the PLAY MODE button in the case of mechanism error.
Or press the REPEAT button in the case of NO DISC error.
M: Mechanism error
Don’t care
High order digits only
D: Stopped during closing due to problems other than mechanism.
E: Stopped during opening due to problems other than mechanism.
C: Stopped during chucking due to problems other than mechanism.
F: Stopped during EX-opening due to problems other than mechanism.
Emergency related errors (High order digits only)
1: Stopped during chuck-up
2: Stopped during chuck-down
3: Time out by EX-OPEN
5: Time out by EX-CLOSE
D: No disc error
01: FOCUS ERROR
02: GFS ERROR
03: SETUP ERROR
01: NO DISC judgment without chucking retry
02: NO DISC judgment after chucking retry
Status at the time of NO DISC judgment
(High order digits only)
1: STOP
2: SETUP
3: TOC READ
4: ACCESS
5: PLAY BACK
6: PAUSE
7: MANUAL SEARCH (PLAY)
8: MANUAL SEARCH (PAUSE)
• When the buttons x , ENTER and DISC 1 are pressed simultaneously, number of time of the mechanism error and the NO DISC error
can be checked.
Display: EMC**EDC** **: Number of times of error (Maximum three times)
EMC: Mechanism error
EDC: NO DISC error
• When aging operation is complete, be sure to perform the MC Cold Reset to reset the error history.
14
Page 15
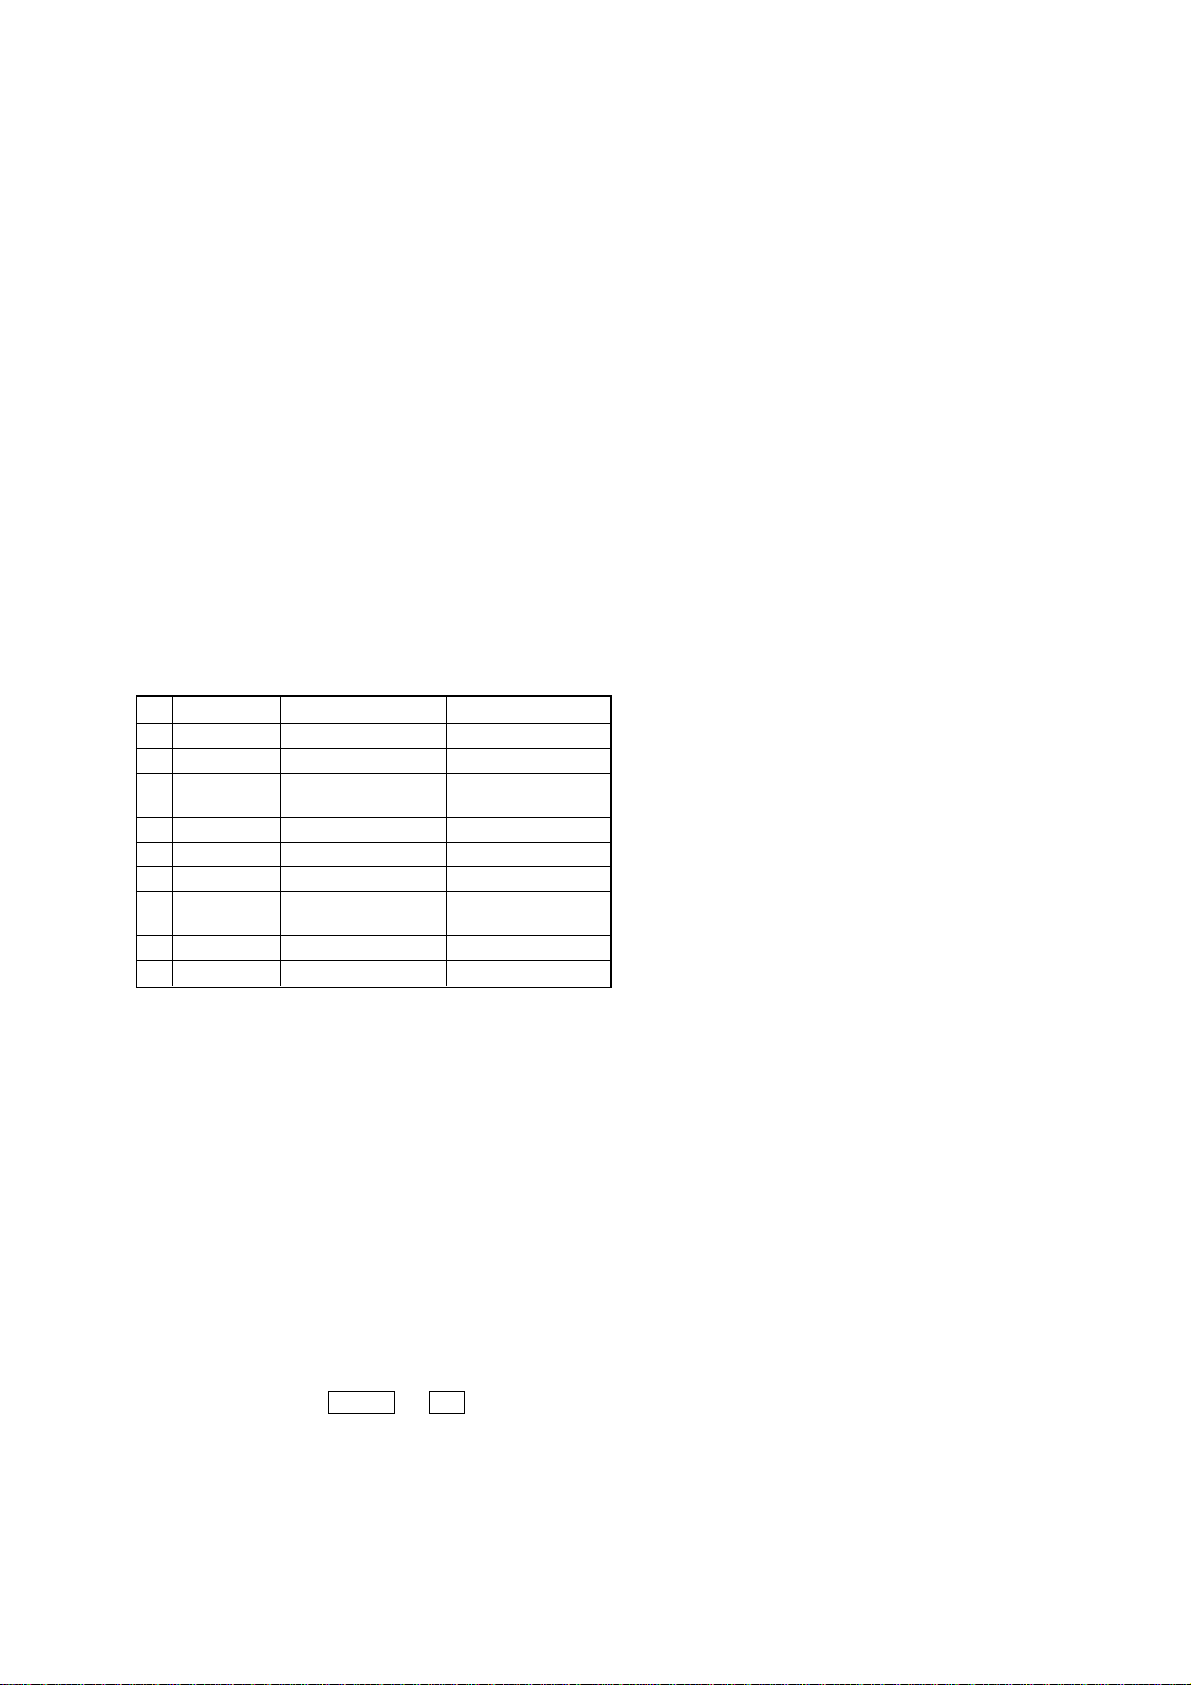
2) Operation during aging mode
In the aging mode, the program is executed in the following
sequence.
(1) The disc tray opens and closes.
(2) The mechanism accesses DISC 2 and makes an attempt to
read TOC. However, since there are no discs, a message
“CD2 NO DISC” appears.
(3) The mechanism accesses DISC 3 and a message “CD3 NO
DISC” appears.
(4) The disc tray turns to select a disc1.
(5) A disc is chucked.
(6) TOC of disc is read.
(7) The pickup accesses to the track 1, and playing 2 seconds.
(8) The pickup accesses to the last track, and playing 2 seconds.
(9) Every time when an aging operation of step 1 to step 8 is
complete, the display “ AGING[*][*][*][*]” v alue increases
as the number of aging operations is counted up.
(10) Returns to step 1.
3. Aging Mode in Tape Deck section
1) Display state
• No error occurs
Display action now
• Error occurred
Display action last time
NO. Display action Action contents Final timing
1 TAPE A AG-1 Rewind the TAPE A, B The top of tape
2 TAPE A AG-2 FWD play the TAPE A 2 minutes playing
3 TAPE A AG-3 F.F. the TAPE A 20 second FF or the end
4 TAPE A AG-4 REV play the TAPE A 2 minutes playing
5 TAPE A AG-5 Rewind the TAPE A The top of tape
6 TAPE B AG-2 FWD play the TAPE B 2 minutes playing
7 TAPE B AG-3 F.F . the TAPE B 20 second FF or the end
8 TAPE B AG-4 REV play the TAPE B 2 minutes playing
9 TAPE B AG-5 Rewind the TAPE B The top of tape
of tape
of tape
2) Operation during aging mode
In the aging mode, the program is executed in the following
sequence.
(1) Rewind is executed up to the top of tape A and B.
(2) A tape on FWD side is played for 2 minutes.
(3) FF is executed up to either made for 20 second or the end of
tape.
(4) A tape is reversed, and the tape on REV side is played for 2
minutes.
(5) Rewind is executed up to the top of tape.
(6) Returns to step 2, and repeat steps from 2 to 5.
[Function Change Mode]
* elect either VIDEO or MD of the external FUNCTION input.
Procedure:
1. Turn on the power.
2. Press the two buttons ENTER and ?/1 at the same time.
The main power is turned on and the other function of the
previous function is selected and displayed. “MD” or
“VIDEO”.
15
Page 16
SECTION 5
r
MECHANICAL ADJUSTMENTS
SECTION 6
ELECTRICAL ADJUSTMENTS
Precaution
1. Clean the following parts with a denatured alcohol-moistened
swab:
record/playback heads pinch rollers
erase head rubber belts
capstan idlers
2. Demagnetize the record/playback head with a head
demagnetizer.
3. Do not use a magnetized screwdriver for the adjustments.
4. After the adjustments, apply suitable locking compound to the
parts adjusted.
5. The adjustments should be performed with the rated power
supply voltage unless otherwise noted.
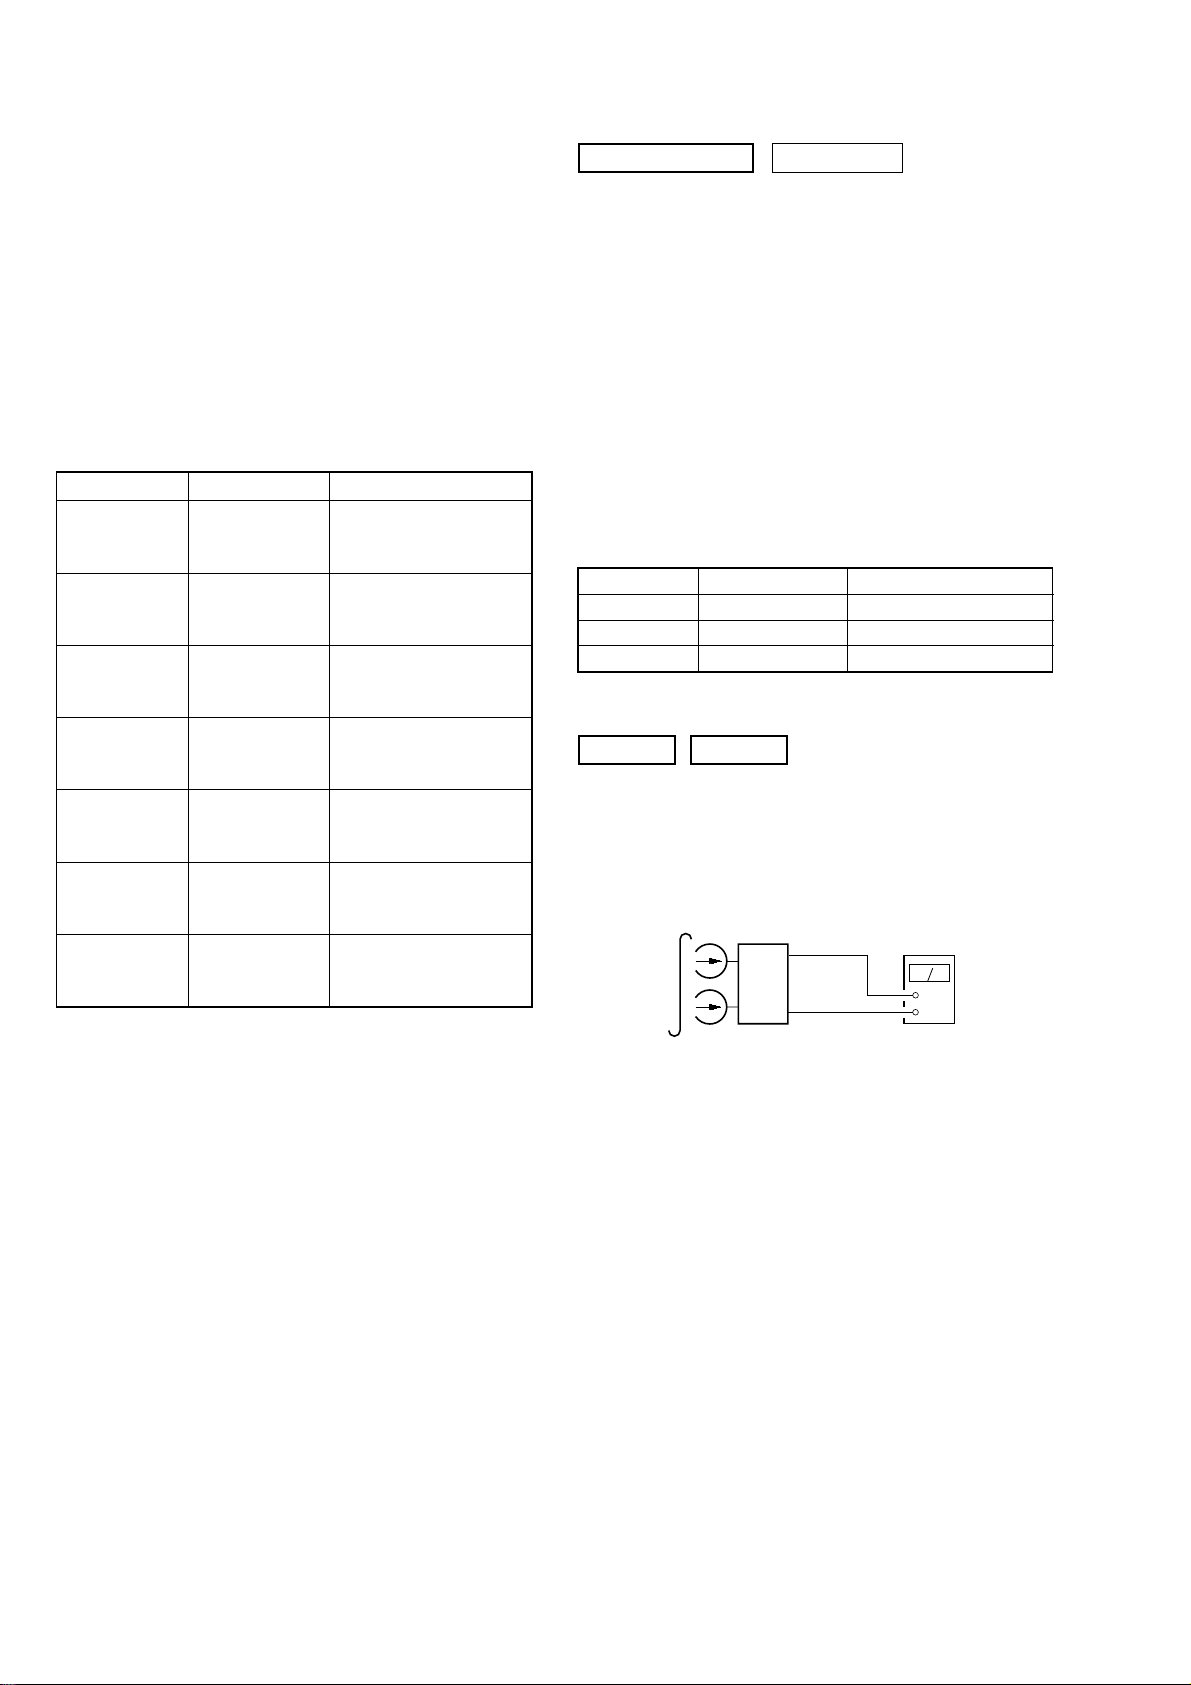
Torque Measurement
Mode
FWD
FWD
back tension
REV
REV
back tension
FF/REW
FWD tension
REV tension
Torque meter
CQ-102C
CQ-102C
CQ-102RC
CQ-102RC
CQ-201B
CQ-403A
CQ-403R
Meter reading
3.06 N • m to 6.96 N • m
31 to 71 g • cm
(0.43 – 0.98 oz • inch)
0.19 N • m to 0.58 N • m
2 to 6 g • cm
(0.02 – 0.08 oz • inch)
3.06 N • m to 6.96 N • m
31 to 71 g • cm
(0.43 – 0.98 oz • inch)
0.19 N • m to 0.58 N • m
2 to 6 g • cm
(0.02 – 0.08 oz • inch)
6.96 N • m to 14.02 N • m
71 to 143 g • cm
(0.98 – 1.99 oz • inch)
9.80 N • m
100 g or more
(3.53 oz or more)
9.80 N • m
100 g or more
(3.53 oz or more)
DECK SECTION
1. Demagnetize the record/playback head with a head
demagnetizer.
2. Do not use a magnetized screwdriver for the adjustments.
3. After the adjustments, apply suitable locking compound to the
parts adjust.
4. The adjustments should be performed with the rated power
supply voltage unless otherwise noted.
5. The adjustments should be performed in the order given in this
service manual. (As a general rule, playback circuit adjustment
should be completed before performing recording circuit
adjustment.)
6. The adjustments should be performed for both L-CH and RCH.
7. Switches and controls should be set as follows unless otherwise
specified.
• T est Tape
Tape Signal Used for
P-4-A100 10 kHz, –10 dB Azimuth Adjustment
WS-48B 3 kHz, 0 dB Tape Speed Adjustment
P-4-L300 315 Hz, 0 dB Level Adjustment
Record/Playback Head Azimuth Adjustment
0 dB=0.775 V
DECK A DECK B
Note: Perform this adjustments for both decks
Procedure:
1. Mode: Playback
test tape
P-4-A100
(10 kHz, –10 dB)
main board
CN301
Pin 3 (L-CH)
Pin 1 (R-CH)
set
main board
CN301
Pin 2 (GND)
level mete
+
–
16
Page 17
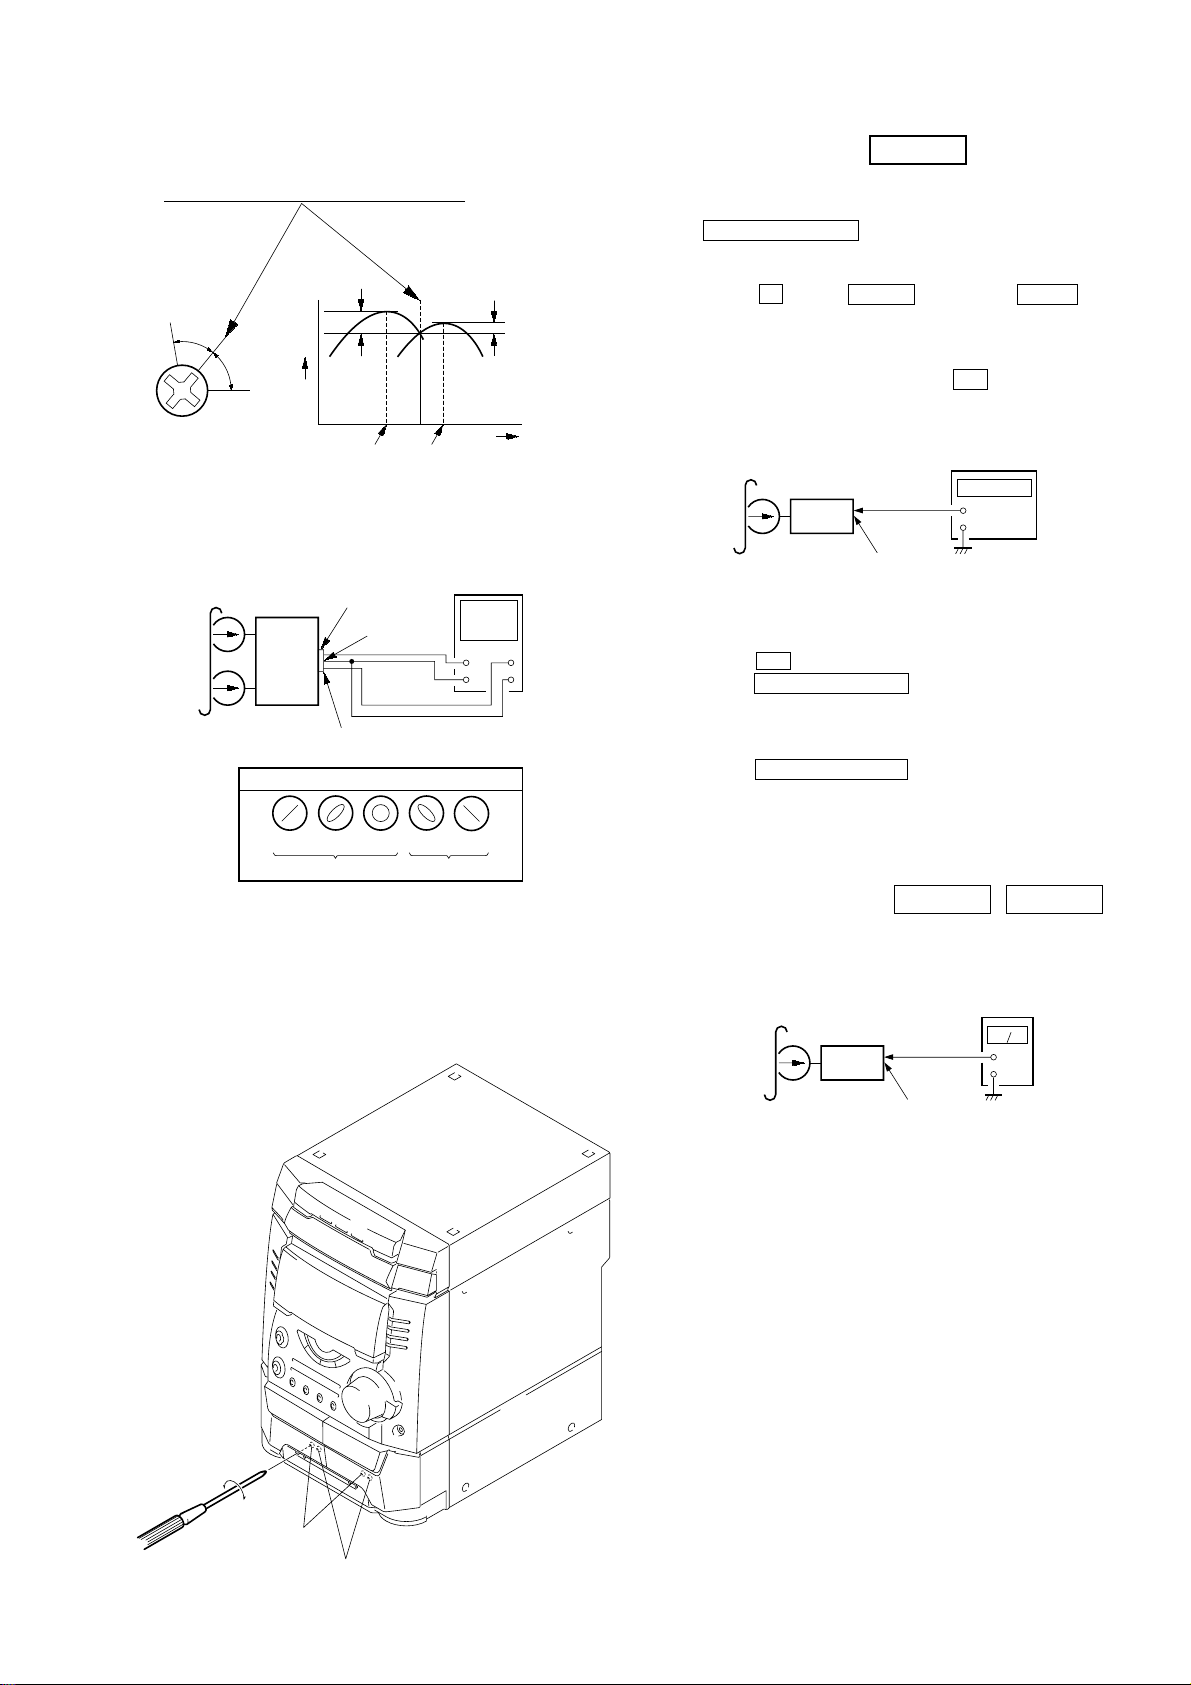
2. Turn the adjustment scre w and check output peaks. If the peaks
e
r
+
–
set
test tape
P-4-L300
(315 Hz, 0 dB)
main board
CN301 (Pin 3 : L-CH)
(Pin 1 : R-CH)
level meter
do not match for L-CH and R-CH, turn the adjustment screw
so that outputs match within 1dB of peak.
Output
level
within
1dB
L-CH
peak
R-CH
peak
within
1dB
Screw
position
L-CH
peak
Screw
position
R-CH
peak
Tape Speed Adjustment
Note: Start the Tape Speed adjustment as below after setting to the test
mode.
In the test mode, the tape speed is high during pressing the
DECK B
CD SYNC HI-DUB button.
Procedure:
1. Turn the power switch on.
2. Press the x button, ENTER button and DISC 3 button
simultaneously.
(The “TEST MODE” on the fluorescent indicator tube display
while in the test mode.)
To exit from the test mode, press the ?/1 button.
Mode: Playback
test tape
WS-48B
(3 kHz, 0 dB)
frequency counte
3. Mode: Playback
test tape
P-4-A100
(10 kHz, –10 dB)
L-CH
MAIN
board
CN301
set
R-CH
waveform of oscilloscope
in phase 45° 90° 135° 180°
pin 3
pin 2
L
R
pin 1
good
oscilloscop
V
wrong
H
4. After the adjustments, apply suitable locking compound to the
pats adjusted.
Adjustment Location: Playback Head (Deck A).
Record/Playback/Erase Head (Deck B).
set
main board
CN301 (Pin 3 : L-CH)
(Pin 1 : R-CH)
+
–
1. Insert the WS-48B into the deck B.
2. Press the gG button on the deck B.
3. Press the CD SYNC HI-DUB button in playback mode.
Then at HIGH speed mode.
4. Adjust RV1001 on the LEAF SW board do that frequency
counter reads 6,000 ± 30 Hz.
5. Press the CD SYNC HI-DUB button.
Then back to NORMAL speed mode.
6. Adjust RV1002 on the LEAF SW board so that frequency
counter reads 3,000 ± 15 Hz.
Adjustment Location: LEAF SW board
Playback level Adjustment
DECK A DECK B
Procedure:
Mode: Playback
forward
reverse
Deck A is RV302 (L-CH) and RV352 (R-CH), Deck B is RV303
(L-CH) and RV353 (R-CH) so that adjustment within adjustment
level as follows.
Adjustment Level:
CN301 PB level: 301.5 to 338.3 mV (–8.2 to –7.2 dB) level
difference between the channels: within ±0.5 dB
Adjustment Location: MAIN board
Sample Volue of Wow and Flutter: 0.3% or less W. RMS
(WS-48B)
17
Page 18
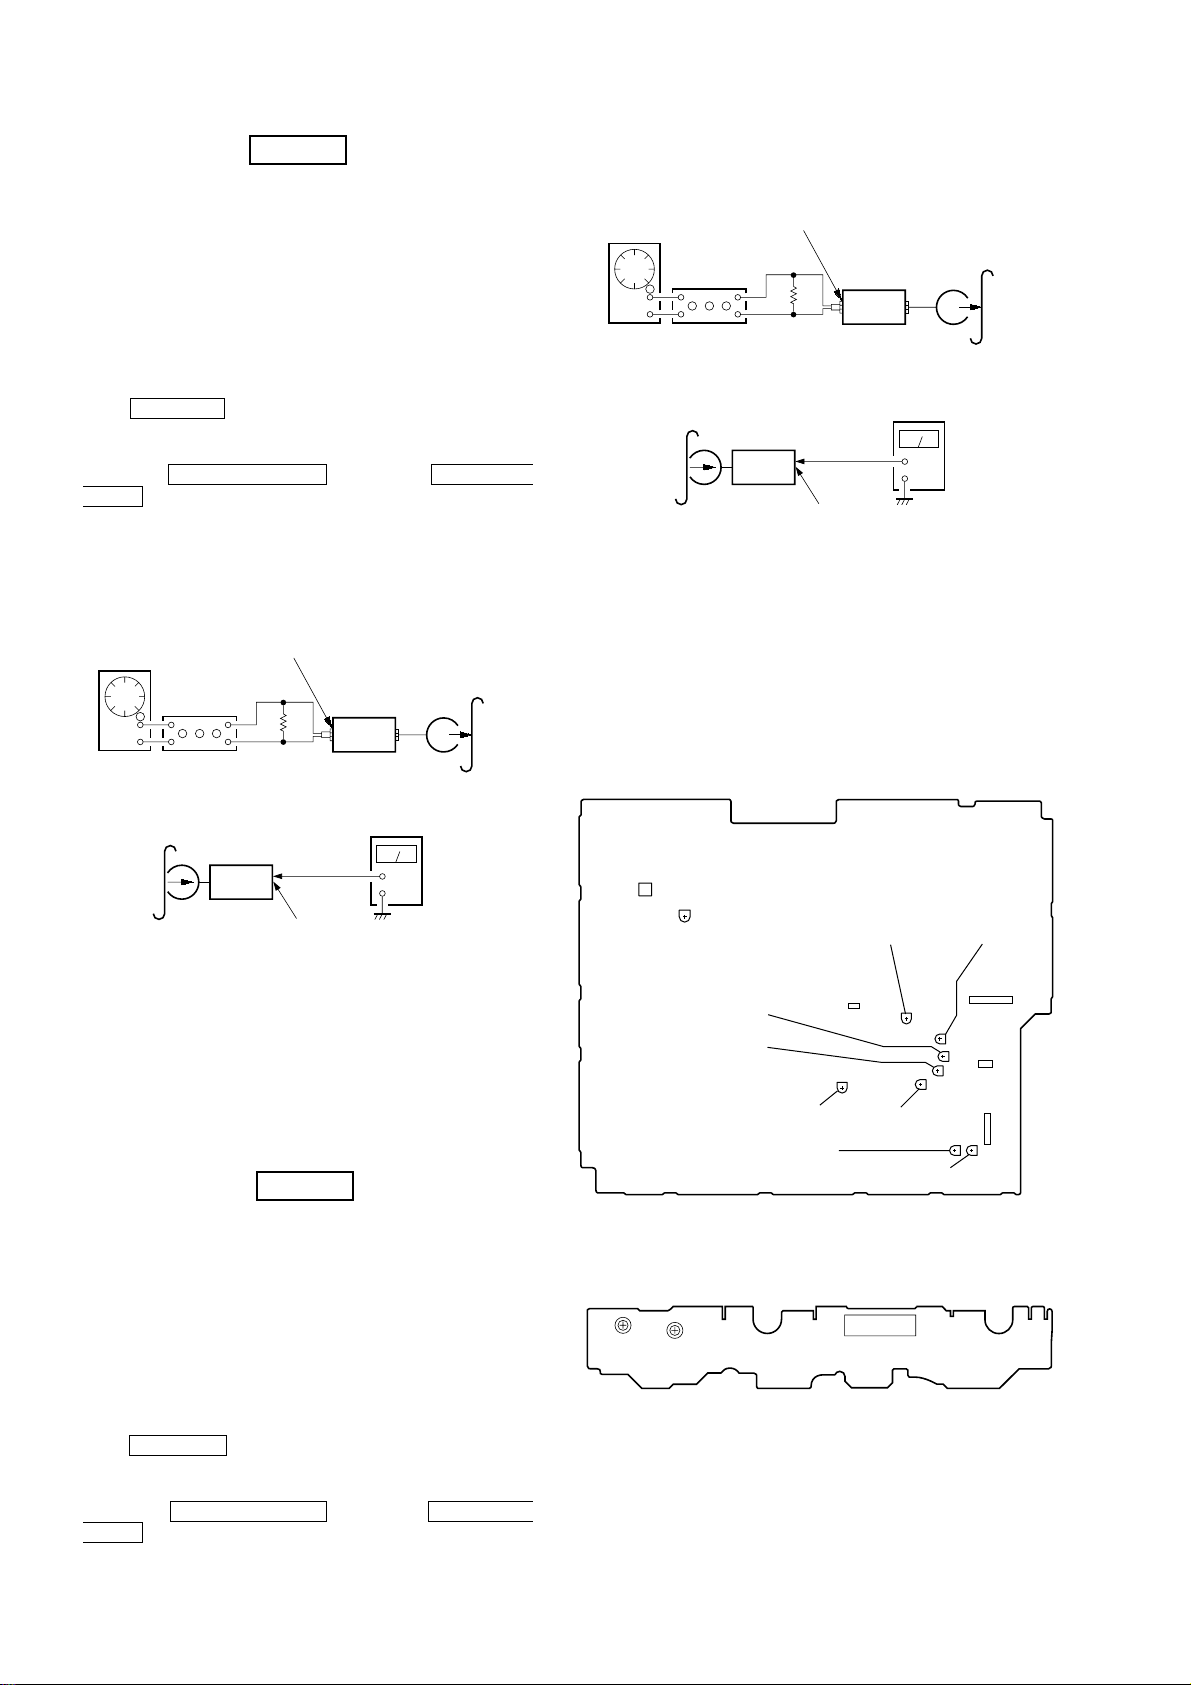
REC Bias Adjustment DECK B
e
r
r
Procedure:
INTRODUCTION
When set to the test mode performed in Tape Speed Adjustment,
when the tape is rewound after recording, the “REC memory mode”
which rewinds only the recorded portion and playback is set.
This “REC memory mode” is convenient for performing this
adjustment. During recording, the input signal FUNCTION will
automatically switch to VIDEO.
(If do not operation of stopped from recording complete, and rotette
of shuttle knob then rewind to recording start position.)
4. Mode: Record
MD/VIDEO (AUDIO) IN
AF OSC
315 Hz, 50 mV (–23.8 dB)
attenuator
5. Mode: Playback
600 Ω
blank tape
CS-123
set
1. Press MD/VIDEO button to select VIDEO. (This step is not
necessary if the above test mode has already been set.)
2. Insert a tape into deck B.
3. After press REC PAUSE/START button, press REC PAUSE/
START button, then recording start.
4. Mode: Record
MD/VIDEO (AUDIO) IN
1) 315 Hz
2) 10 kHz
AF OSC
attenuator
50 mV (–23.8 dB)
600 Ω
blank tap
CN-123
set
5. Mode: Playback
recorded
portion
set
CN301 (Pin 3 : L-CH)
(Pin 1 : R-CH)
level mete
+
–
recorded
portion
set
level mete
+
–
CN301 (Pin 3 : L-CH)
(Pin 1 : R-CH)
6. Confirm playback the signal recorded in step 3 become
adjustable level as follows.
If these levels do not adjustable level, adjustment the RV301
(L-CH) and R V351 (R-CH) on the MAIN board to repeat steps
4 and 5.
Adjustable level:
CN301 PB level: 47.2 to 53.0 mV (–24.3 to –23.3 dB)
Adjustment Location: MAIN board
[MAIN BOARD] (Component Side)
T601
RV611
REC LEVEL (L)
(B)
PB LEVEL (L)
(A)
6. Confirm playback the signal recorded in step 3 become
adjustable level as follows.
If these levels do not adjustable level, adjustment the RV304
(L-CH) and RV354 (R-CH) on the A UDIO board to repeat steps
4 and 5.
Adjustable level: Playback output of 315 Hz to playback output
of 10 kHz: ±1.0 dB
Adjustment Location: MAIN board
REC Level Adjustment
DECK B
Procedure:
INTRODUCTION
When set to the test mode performed in Tape Speed Adjustment,
when the tape is rewound after recording, the “REC memory mode”
which rewinds only the recorded portion and playback is set.
This “REC memory mode” is convenient for performing this
adjustment. During recording, the input signal FUNCTION will
automatically switch to VIDEO.
(If do not operation of stopped from recording complete, and rotate
of shuttle knob then rewind to recording start position.)
1. Press MD/VIDEO button to select VIDEO. (This step is not
necessary if the above test mode has already been set.)
2. Insert a tape into deck B.
3. After press REC PAUSE/START button, press REC PAUSE/
START button, then recording start.
PB LEVEL (R)
(A)
PB LEVEL (R)
(B)
REC LEVEL (R)
(B)
REC LEVEL (L)
(A)
CN301
RV351
PB LEVEL (L)
REC LEVEL (R)
[LEAF SW BOARD] (Component Side)
TAPE SPEED
(NORMAL) (HIGH)
RV1002
RV1001
13
RV303
(B)
(A)
CN1001
RV302
RV352
RV353
CN304
RV301
CN302
CN303
RV304
RV354
18
Page 19
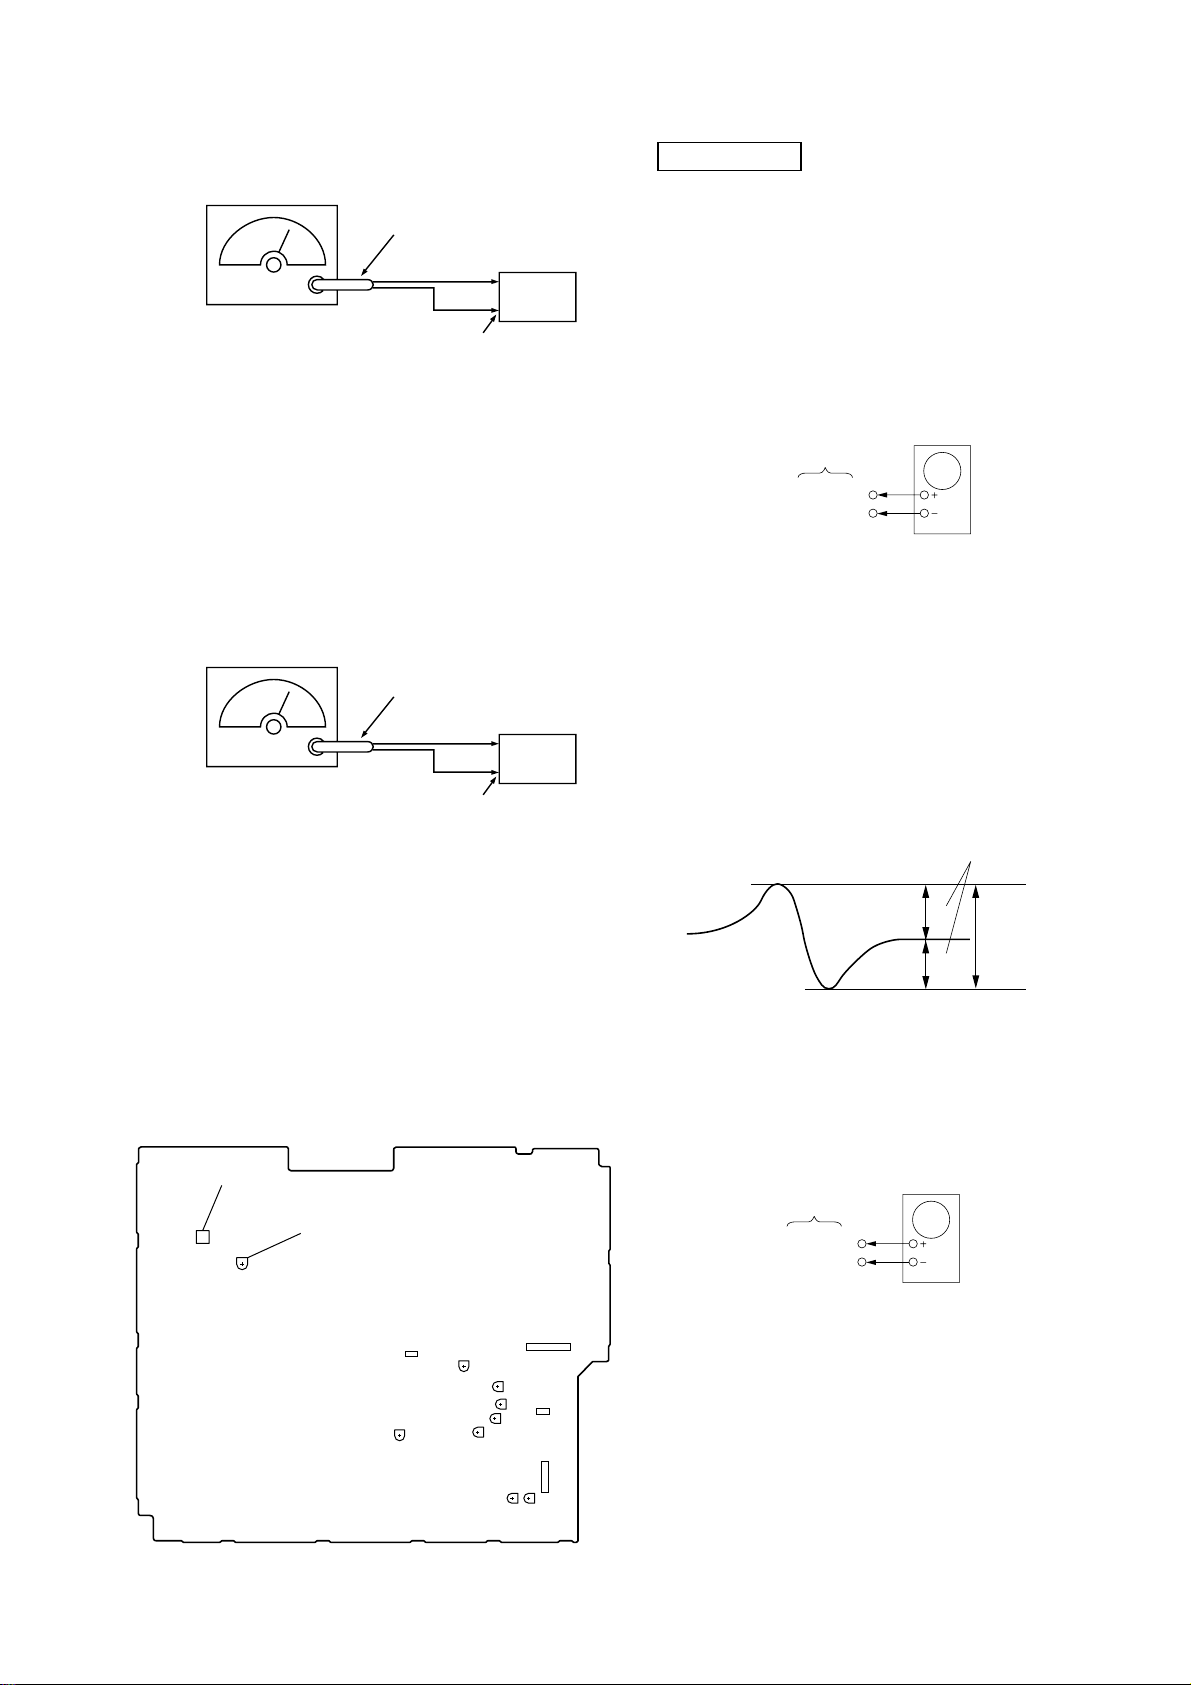
FM Tuned Level Adjustment
FM RF SSG
75 Ω coaxial
Carrier frequency : 98 MHz
Modulation : AUDIO 1 kHz, 75 kHz
deviation (100%)
Output level : 28 dB (at 75 W open)
set
FM ANTENNA terminal
(TM601)
CD SECTION
Note :
1. CD Block is basically designed to operate without adjustment.
Therefore, check each item in order given.
2. Use YEDS-18 disc (3-702-101-01) unless otherwise indicated.
3. Use an oscilloscope with more than 10MΩ impedance.
4. Clean the object lens by an applicator with neutral detergent
when the signal level is low than specified value with the
following checks.
S-Curve Check
Procedure:
1. Supply a 28 dB 98 MHz signal from the ANTENN A terminal.
2. Tune the set to 98 MHz.
3. Adjust RV611 to the point (moment) when the TUNED
indicator will change from going off to going on.
Adjustment Location: MAIN board
Null Adjustment
FM RF SSG
75 Ω coaxial
set
Carrier frequency : 98 MHz
Modulation : AUDIO 1 kHz, 75 kHz
deviation (100%)
Output level : 60 dB (at 75 W open)
FM ANTENNA terminal
(TM601)
Procedure:
1. Supply a 60 dB 98 MHz signal from the ANTENN A terminal.
2. Tune the set to 98 MHz.
3. Measure voltage between pin 21 of IC 601. Adjust T601 ubtil
the voltage becomes 0 V.
Oscilloscope
BD board
TP(FEO)
TP(VC)
Procedure :
1. Connect oscilloscope to TP (FEO).
2. Connect between TP (FEI) and TP (VC) by lead wire.
3. Connect between TP (AGCCON) and TP (GND) by lead wire.
4. Turn Power switch on.
5. Load a disc (YEDS-18) and actuate the focus search. (In
consequence of open and close the disc tray, actuate the focus
search)
6. Confirm that the oscilloscope waveform (S-curve) is
symmetrical between A and B. And confirm peak to peak lev el
within 4 ±1 Vp-p.
S-curve waveform
symmetry
A
within 4 ±1Vp-p
B
Adjustment Location: MAIN board
Adjustment Location
[MAIN BOARD] Component side
NULL
T601
RV611
FM TUNED LEVEL
CN301
RV351
7. After check, remove the lead wire connected in step 2 and 3.
Note : • Try to measure several times to make sure than the ratio
of A : B or B : A is more than 10 : 7.
• Take sweep time as long as possible and light up the
brightness to obtain best waveform.
RF Level Check
oscilloscope
BD board
TP(RF)
TP(VC)
Procedure :
CN304
13
RV301
RV303
RV302
RV352
RV353
CN302
CN303
RV304
RV354
1. Connect oscilloscope to TP (RF).
2. Connect between TP (AGCCON) and TP (GND) by lead wire.
3. Turned Power switch on.
4. Load a disc (YEDS-18) and playback.
5. Confirm that oscilloscope waveform is clear and check RF signal
level is correct or not.
6. After check, remove the lead wire connected in step 2.
19
Page 20

MEMO
20
Page 21
SECTION 7
DIAGRAMS
THIS NOTE IS COMMON FOR PRINTED WIRING BOARDS AND SCHEMATIC DIAGRAMS.
(In addition to this, the necessary note is printed in each block.)
Note on Schematic Diagram:
• All capacitors are in µF unless otherwise noted. pF: µµF
50 WV or less are not indicated except for electrolytics
and tantalums.
• All resistors are in Ω and 1/
specified.
f
•
• C : panel designation.
• U : B+ Line.
• V : B– Line.
• H : adjustment for repair.
• Voltages and waveforms are dc with respect to ground
• Voltages are taken with a VOM (Input impedance 10 MΩ).
• Waveforms are taken with a oscilloscope.
• Circled numbers refer to waveforms.
• Signal path.
• Abbreviation
: internal component.
Note:
The components identified by mark ! or dotted
line with mark ! are critical for safety.
Replace only with part
number specified.
under no-signal (detuned) conditions.
Voltage variations may be noted due to normal produc-
tion tolerances.
Voltage variations may be noted due to normal produc-
tion tolerances.
F : FM
f : AM
E : PB (DECK A)
d : PB (DECK B)
G : REC (DECK B)
J : CD
c : digital out
CND : Canadian model
AUS : Australian model
G : German model
EA : Saudi Arabia model
MY : Malaysia model
SP : Singapore model
TH : Thai model
KR : Korea model
MX : Mexican model
AR : Argentina model
E2 : Central and South AMERICA
E3 : Middle and Near East
4
W or less unless otherwise
Note:
Les composants identifiés par
une marque ! sont critiques
pour la sécurité.
Ne les remplacer que par une
piéce portant le numéro
spécifié.
Note on Printed Wiring Boards:
• X : parts extracted from the component side.
• b : Pattern from the side which enables seeing.
• Indication of transistor.
C
These are omitted.
Q
B
CE
These are omitted.
Q
B
HCD-BX7/DX7/DX7J
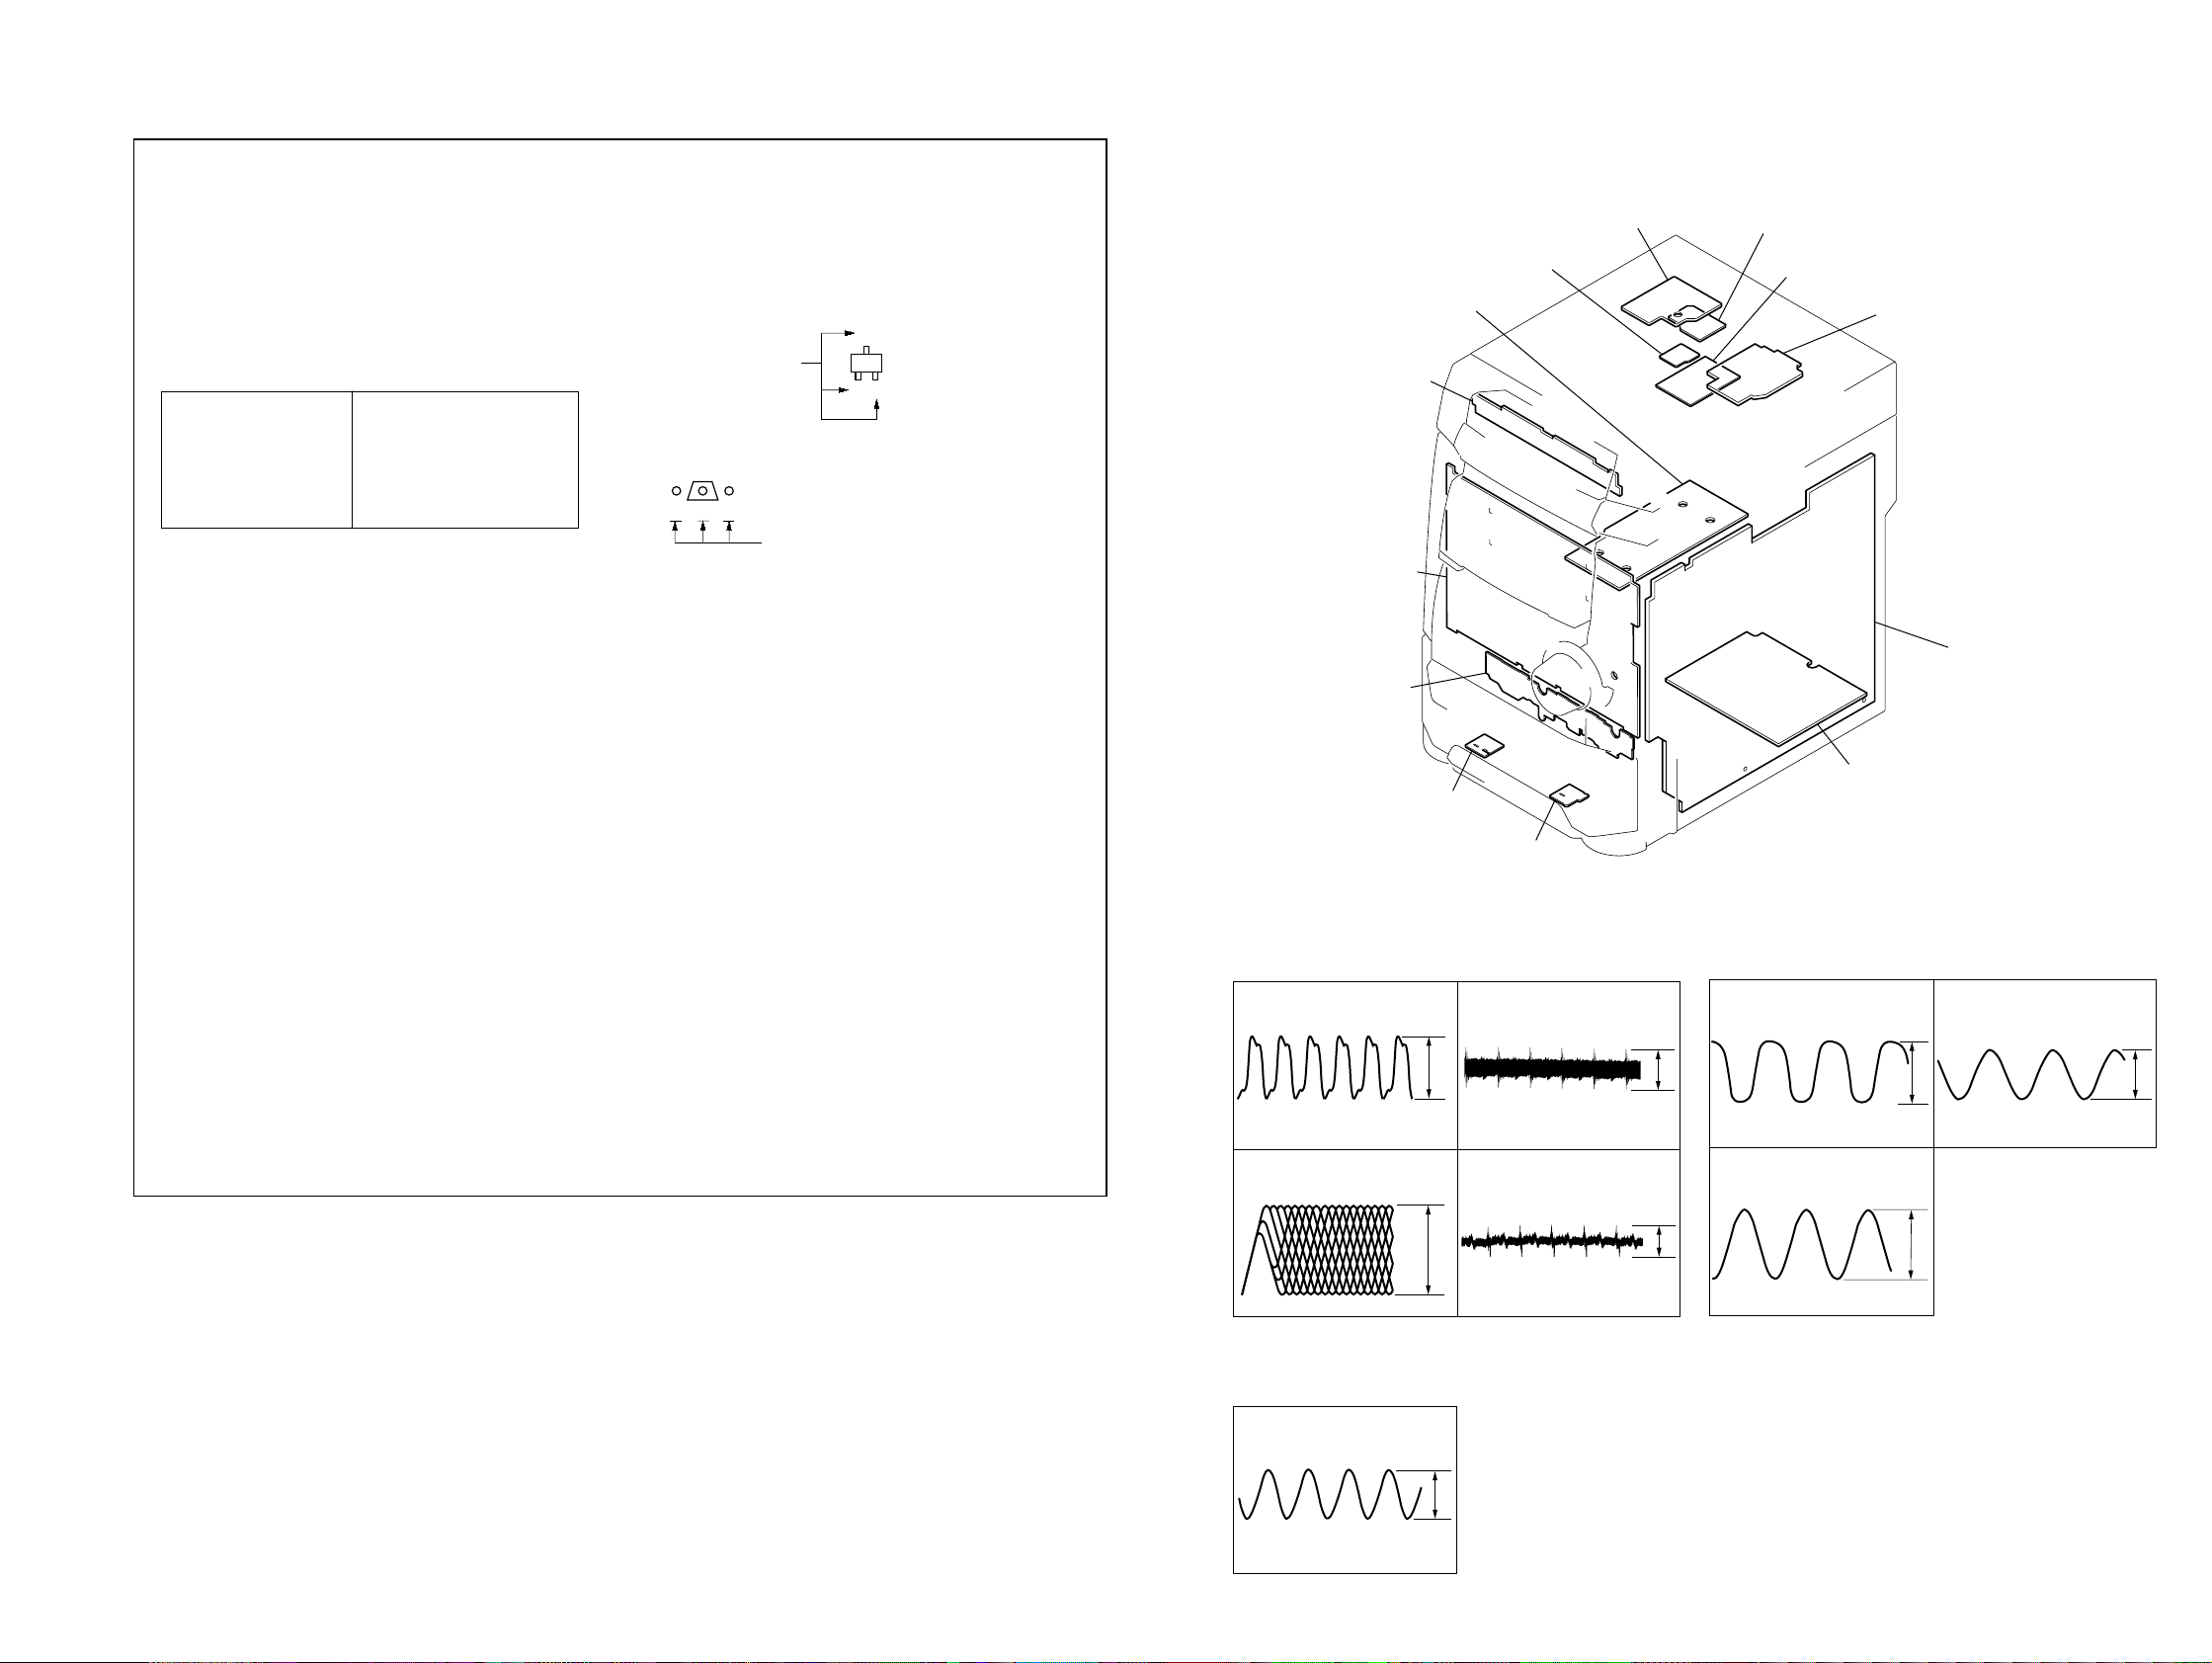
7-1. CIRCUIT BOARD LOCATION
MOTOR Board
SENSOR Board
TRANS Board
E
CD SWITCH Board
PANEL Board
LEAF SW Board
HEAD (A) Board
HEAD (B) Board
• WA VEFORMS
– BD BOARD –– MAIN BOARD –
1
IC101 yj
CD PLAY MODE
16.9344MHz
2
IC101 ta
CD PLAY MODE
3
CD PLAY MODE
6.4Vp-p
4
CD PLAY MODE
IC101 ra
approx 200mVp-p
IC101 el
DRIVER Board
SUB-TRANS Board
1
IC401 qa
STOP MODE
32.768kHz
2
IC401 qd
STOP MODE
BD Board
MAIN Board
POWER AMP Board
3
TAPE B REC MODE
3.0Vp-p
T301 4
80.7kHz
120Vp-p
400nsec/div
– PANEL BOARD –
1
IC601 oa
STOP MODE
12.5MHz
2121
1.2Vp-p
4.8Vp-p
approx 170mVp-p
16MHz
3.4Vp-p
Page 22
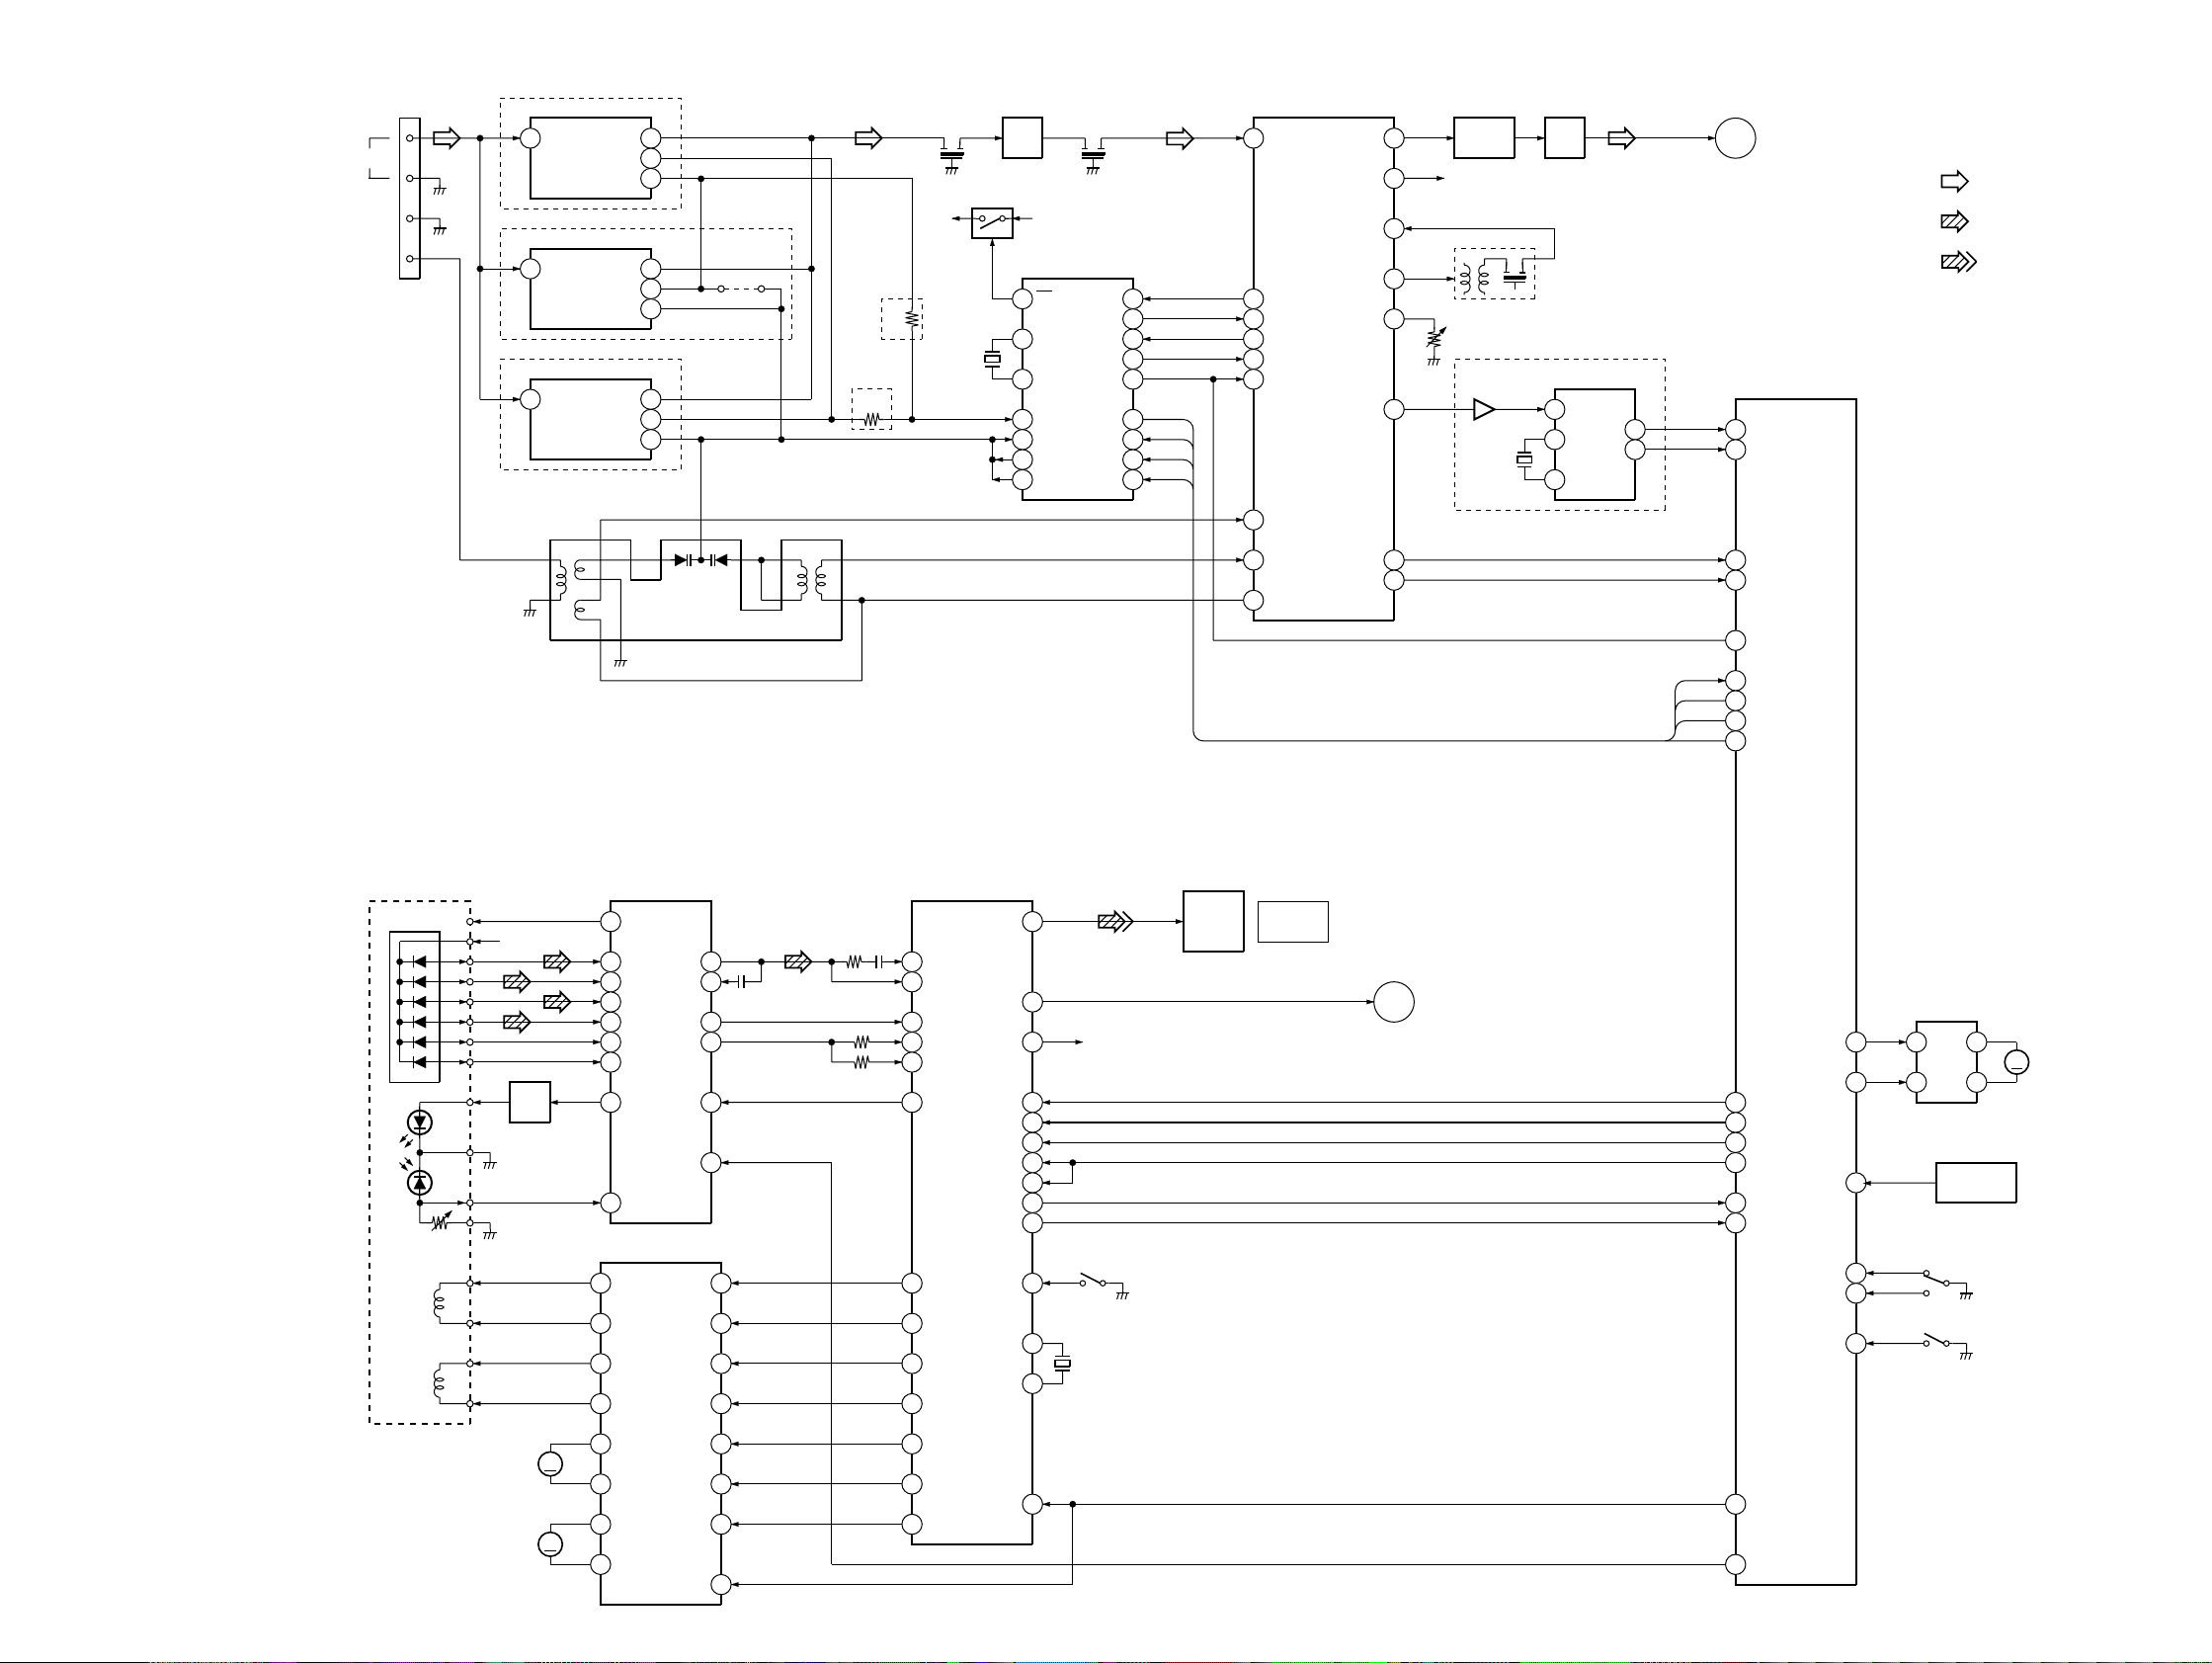
HCD-BX7/DX7/DX7J
7-2. BLOCK DIAGRAMS
– TUNER/CD SECTION –
FM 75Ω
AM
G
TM601
DX7,DX7J MODEL
FE601
1
8
AEP,UK,G,CIS MODEL
1
1
3
IF OUT
ANT IN
OSC OUT
US,CND MODEL
FE602
IF OUT
ANT IN
FE603
ANT IN
13
RB641
F OUT
1
FM IF
9
IF OUT
12
AM/IF
24
AM OSC
13
VCO STOP
8
IF REQ MUTE
20
AM RF IN
22
AM OSC
23
V REG
AM/FM IF MPX
IC601
AM MIX OUT
FM SD ADJ
FM/AM DET
TUNED
STEREO
L OUT
R OUT
11
10
18AM IF IN
19
3
16
6
17
BUFFER
Q611
R-CH
IFT601
RV611
IC681
31
XT681
4.332MHz
Q602
Q602
RF IF
AMP
10
1
24
15
18
17
19
FM
XIN
XOUT
FM OSC
VT1 IN
VT1
PD1
PLL
IC651
FM/AM IF
AM OSC
12
FM
7
14
2VCO STOP
8IF REQ
DO
6DO
DI
DI
4DI
CL
CE
CL
5
CE
3
7
8
VT
5
1
3
VT
4
7IF OUT
8OSC OUT
5VT
4
55
122
JR609
14
1511
67
US,CND
MODEL
EXCEPT
US,CND
R601
9
CF601 CF602
+B A+12V
R609
X651
4.5MHz
LPF601
LPF
4
14
13
MUX
XO
XI
AEP,UK,G,CIS
MODEL
RDS
IC682
DATA
INT
L-CH
A
MAIN
SECTION
• RCH is omitted
• Signal Path
: FM
(Page 23)
: CD
: DIGITAL OUT
MASTER CONTROL
IC401(1/2)
2
16
21
RDS DATA
20
RDS INT
24
TUNED
23
STEREO
22
ST MUTE
DO
27
26
28
25
ST DIN
ST DOUT
ST CLK
ST CE
DI
CL
CE
OPTICAL PICK-UP
BLOCK
(KSS-213F)
VC
A
B
C
D
E
F
LD
GND
PD
VR
F+
FOCUS
09
COIL
TRACKING
COIL
F-
T+
T-
+5V
DRIVE
M102
SLED
MOTOR
M101
SPINDLE
MOTOR
Q101
LD
DIGITAL SERVO
DIGITAL SIGNAL PROC.
RF AMP
IC103
12
VC
5
A
6
B
7
C
8
D
11
E
10
F
3
LD
4
PD
IC102
MOTOR/COIL DRIVE
13
CH1RO
14
CH1FO
11
CH2RO
12
CH2FO
18
CH3RO
RFO
RFI
FE
TE
CH1RI
CH1FI
CH2RI
CH2FI
CH3RI
16
17
14
13
22LD ON
21HOLD SW
3
2
6
5
23
D/A CONV.
IC101
D OUT
60
51
RFAC
43
RFDC
L OUT
R OUT
SCLK
SCOR
SQSO
SSTP
XTAI
XTAO
72
75
20
27
66
67
R-CH
5DATA
7CLOK
6XLAT
2SQCK
9
1
X101
16.9344MHz
39
FE
41
TE
40
SE
14
XLON
32
FFDR
33
FRDR
30
TFDR
31
TRDR
29
SRDR
S101
LIMIT
IN SW
IC201
OPTICAL
DIGITAL
OUT
CD
DIITAL OUT
L OUT
B
MAIN
SECTION
(Page 23)
33
CD DATA
37
CD CLK
42
XLT
33
SQ CLK
19
SCOR
32
SQ DATA
BU UP/DOWN SW
MTR CNT2
T SENS
IC701
44
45MTR CNT1
49
46OPEN SW
47CLOSE SW
48
9
MOTOR
DRIVE
7
TBL ADDRESS
4
2
IC711
SENSOR
OPEN/CLOSE
S701
S711
BU UP/
DOWN
M721
M
TURN
MOTOR
M
17
16
CH3FO
CH4RO
24CH3FI
25CH4INS
28
SFDR
26
MDP
3XRST
43
XRST
M
15
CH4FO
MUTE
20
41
HOLD
22
22
Page 23
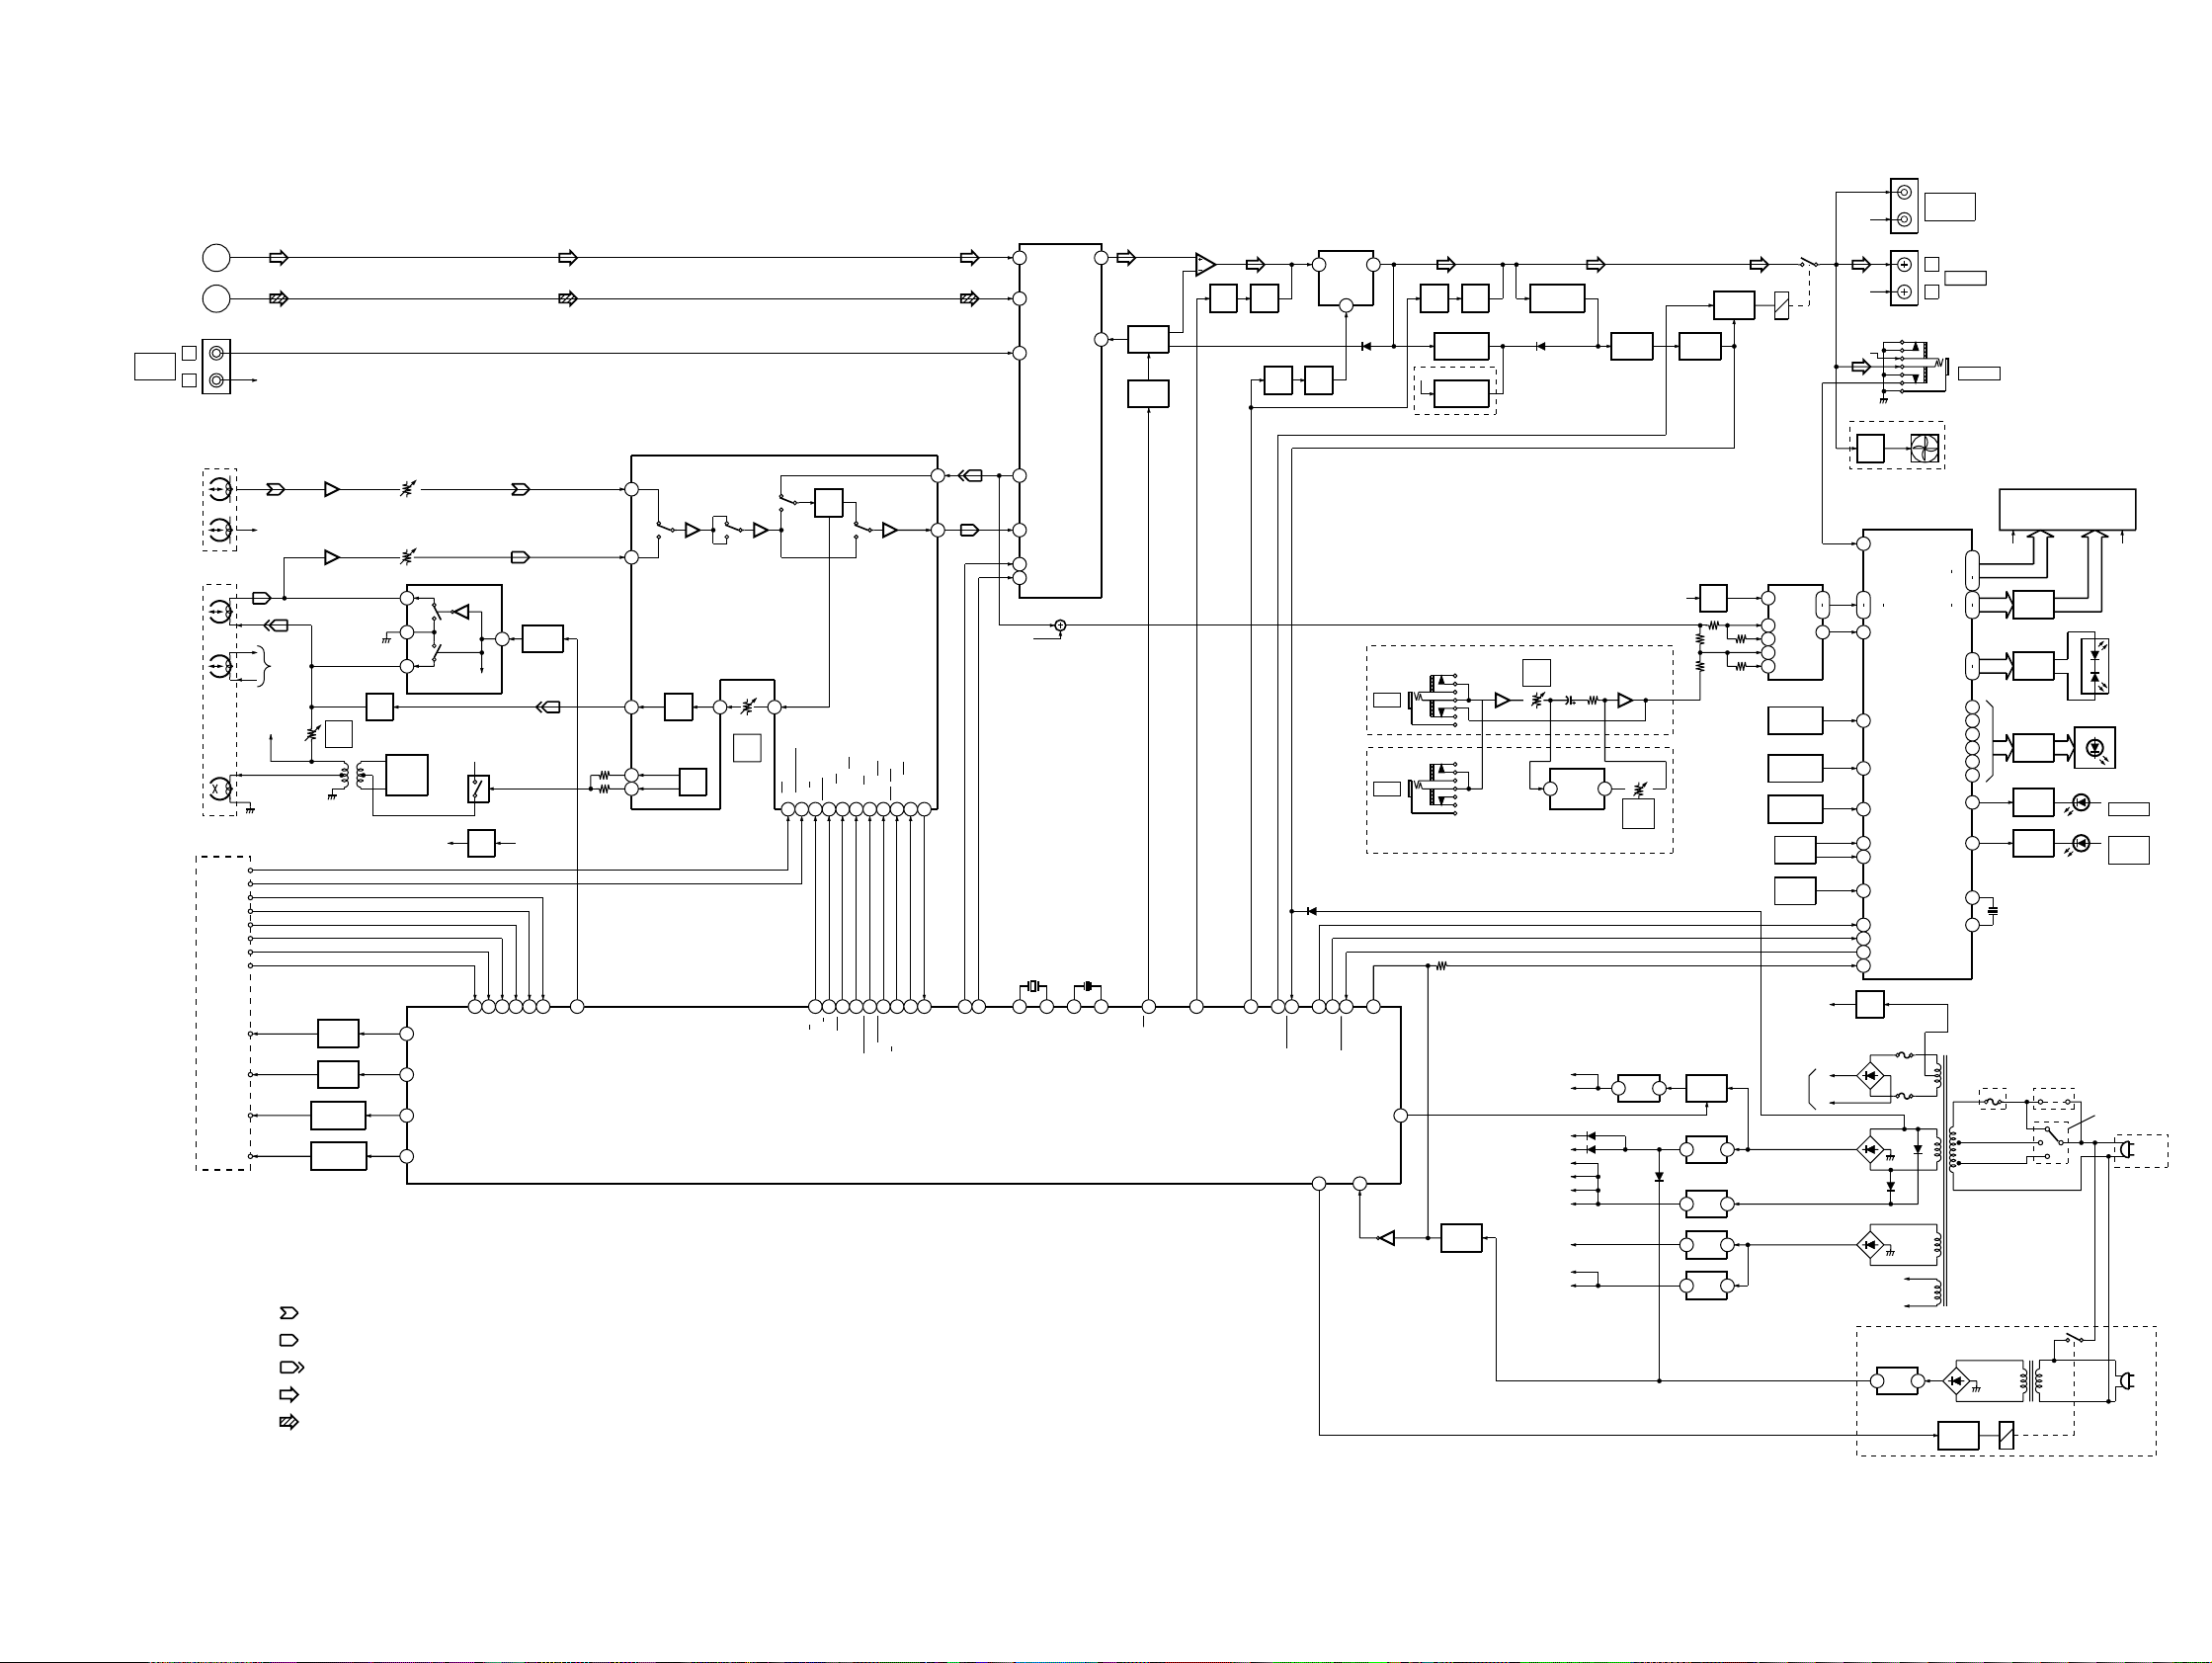
– MAIN SECTION –
TUNER
SECTION
(Page 22)
CD
SECTION
(Page 22)
MD/VIDEO
(AUDIO)
REC/PB
HEAD
HEAD
ERASE
HEAD
09
R
PB
L
DECK-A
DECK-B
TC BLOCK
CAP M H/L
A
B
J101
A120/70
B120/70
A HALF
B HALF
A PLAY
B PLAY
A SHUT
B SHUT
A TRG M+
B TRG M+
CAP M+
L-CH
LOUT
L-CH
R-CH
R-CH
R-CH
R-CH
PB EQ
AMP
IC303
PB EQ
AMP
IC304
RV304
REC
BIAS
Q393,394
A TRIG
DRIVE
Q391,392
B TRIG
DRIVE
Q395
CAP MOTOR
SPEED CONT
Q396,397
CAP MOTOR
DRIVE
• RCH is omitted
• Signal Path
: PB (DECK A)
: PB (DECK B)
: REC (DECK B)
: FM
: CD
T301
C332,L301
BIAS
TRAP
RV302
RV303
1
2
3
BIAS
OSC
Q302,303
57
58
59
60
REC/PB SWITCH
IC302
Q301
+6V
A TRIG
B TRIG
CAP M H/L
CAP M CONT
R CH
TA+12V
Q141
BIAS
91
DC
B SHUT90A SHUT
4
69
B PLAY68A PLAY
Q304,305
A+12V
93
SWITCH
B HALF67A HALF
79
TC RELAY
HCD-BX7/DX7/DX7J
J102
SURROUND
SPEAKER
TM801
L
R
FAN
DISPLAY CONTROL
IC601
PLAY1-3
EXIST1-3
GROOVE LED
FILE LED
BASS SHIFT LED
FUNCTION LED
TIMER LED
F974
F975
F1
F2
IC971
+5.6V
1
REG
SPEAKER
P1
P35
G1
G17
XIN
XOUT
T971
D972-975
Q971
RELAY
DRIVE
J631
PHONS
F1 F2
50
.
52
85
Q606-614
49
LED
DRIVER
33
Q630-635
10
LED
DRIVER
5
11
12
Q621-626
13
LED
14
DRIVER
15REC/PAUSE LED
16SURROUND LED
Q604
LED
28POWER LED
DRIVER
Q605
LED
27
DRIVER
89
X601
12.5MHz
90
EA,SP,MY,
EA,SP,MY,E2,E3,AR
E2,E3,AR
MODEL
F973
BX7 MODEL
T972
RY971
FL601
FLOURESCENT
INDICATOR TUBE
D611-615
D617,618
EXCEPT
MODEL
JW901
S951
D630-632
D601
POWER
D602
TIMER
SELECT
EA,SP,MY,E2,E3,AR
MODEL
AC
IN
DX7,DX7J
MODEL
AC
IN
17
12
11
-B
+B
-B
EVER +5.6V
R CH
R CH
R CH
US,CND,DX7,DX7J ONLY
Q891,892
FAN
DRIVE
3
HEADPHONE
20
BPF 0
25
BPF 5
ALL BAND
26
17
KEY0
18
KEY1
19
KEY2
VOL A
1
VOL B
2
SIRCS
100
I2C DATA
97
I2CCLOCK
98
WAKE UP
96
RESET
92
Q941
-V
REG
D541
D901-904
D906-909
3
INPUT SELECT
TONE/VOL CONT
IC101
40
VOL OUT2
IN2A
38
IN2C
37
IN2D
DECK PROC.
IC301
48
A
B
46
REC
36
EQ
NORM
33
BIAS
CROM
SW
32
REC
DOLBY
39
A120/70
17
19
B
DOL
PAS
PB A/B
NORM/HIGH
ALC ON/OFF
B NORM/CROM/METAL
15
16
18
77
76
78
ALC
PB A/B
EQ H/N
MASTER CONTROL
70
PB
120
38
RV301
REC(L)
LEVEL
RM ON/OFF
BIAS ON/OFF
20
22
75
74
BIAS
IC401(2/2)
NR ON/OFF
23
24
73
72
REC MUTE
NR ON/OFF
REC
43
PB
LM ON/OFF
MS OUT
REC /PB/PASS
25
26
71
70
AMS IN
TC MUTE
R/PB PAS
35
INVOL OUT2
40
39
IN2B
21
DATA
22
CLOCK
R-CH
X401
32.768kHz
4
5
10
CLK
DATA
XC IN
11
XC OUT
15
REF
X402
16MHz
X IN
24
Q101,102
1
Q503
SWITCH
13
X OUT
DBFB
CONT
DBFB
83
DBFB ON/OFF
IC102
5
6
84
7
Q504,505
MUTE
CONT
LINE MUTE
MUTE
Q103
100
STK MUTE
Q503,504
MUTE
CONT
87
82
RELAY H
PROTECT
D822
MUTE
Q581
15
POWER
30
29
IIC DATA
STBY RELAY
81
IC501
AMP
12
18
IIC CLK
11
D841
DX7,DX7J MODEL
EA,DX7J MODEL
7
WAKE UP
CD POWER
RESET
12
J721
MIC 1
J722
MIC 2
AC CUT
Q501
85
Q861
MUTE
MUTE
Q862
CONT
Q551
OVER LOAD
DETECTOR
Q506,506+B
OVER HEAT
DETECTOR
DX7,DX7J MODEL
IC501
RESET
Q821,822
PROTECT
DETECTOR
D502
RV722
MIC
VOL
IC722 IC722
2
CD D+5V
CD A+5V
RDS D+5V UNSW
AUDIO +5V
A+12V
TC A+12V
MIC A+12V
ST A+12V
TC M+9V
CD M+7V
LED +7V
IC721
ECHO
LEVEL
6
D952
D953
PROTECT
3
Q823
CONT
Q828,829
PROTECT
SWITCH
+7V
RV721
ECHO
LEVEL
IC911 Q911,912
+5V
CD POWER
1
REG
SWITCH
3
D511
3
3
3
IC951
IC921
+12V
REG
IC961
REG
IC931
REG
+5V
REG
+9V
+7V
Q615
+5.6V
REG
Q824,825
RELAY
DRIVE
1
1
1
1
RY801
IC602
10
SPEANA
BPF
6
5
4
3
S617,618
S623-628,630-636
FUCTION
KEY
S611-616
S619-621,626,629
FUCTION
KEY
S637-646
FUCTION
KEY
S601
VOLUME
SIRCS
IC603
POWER
AMP
2323
Page 24
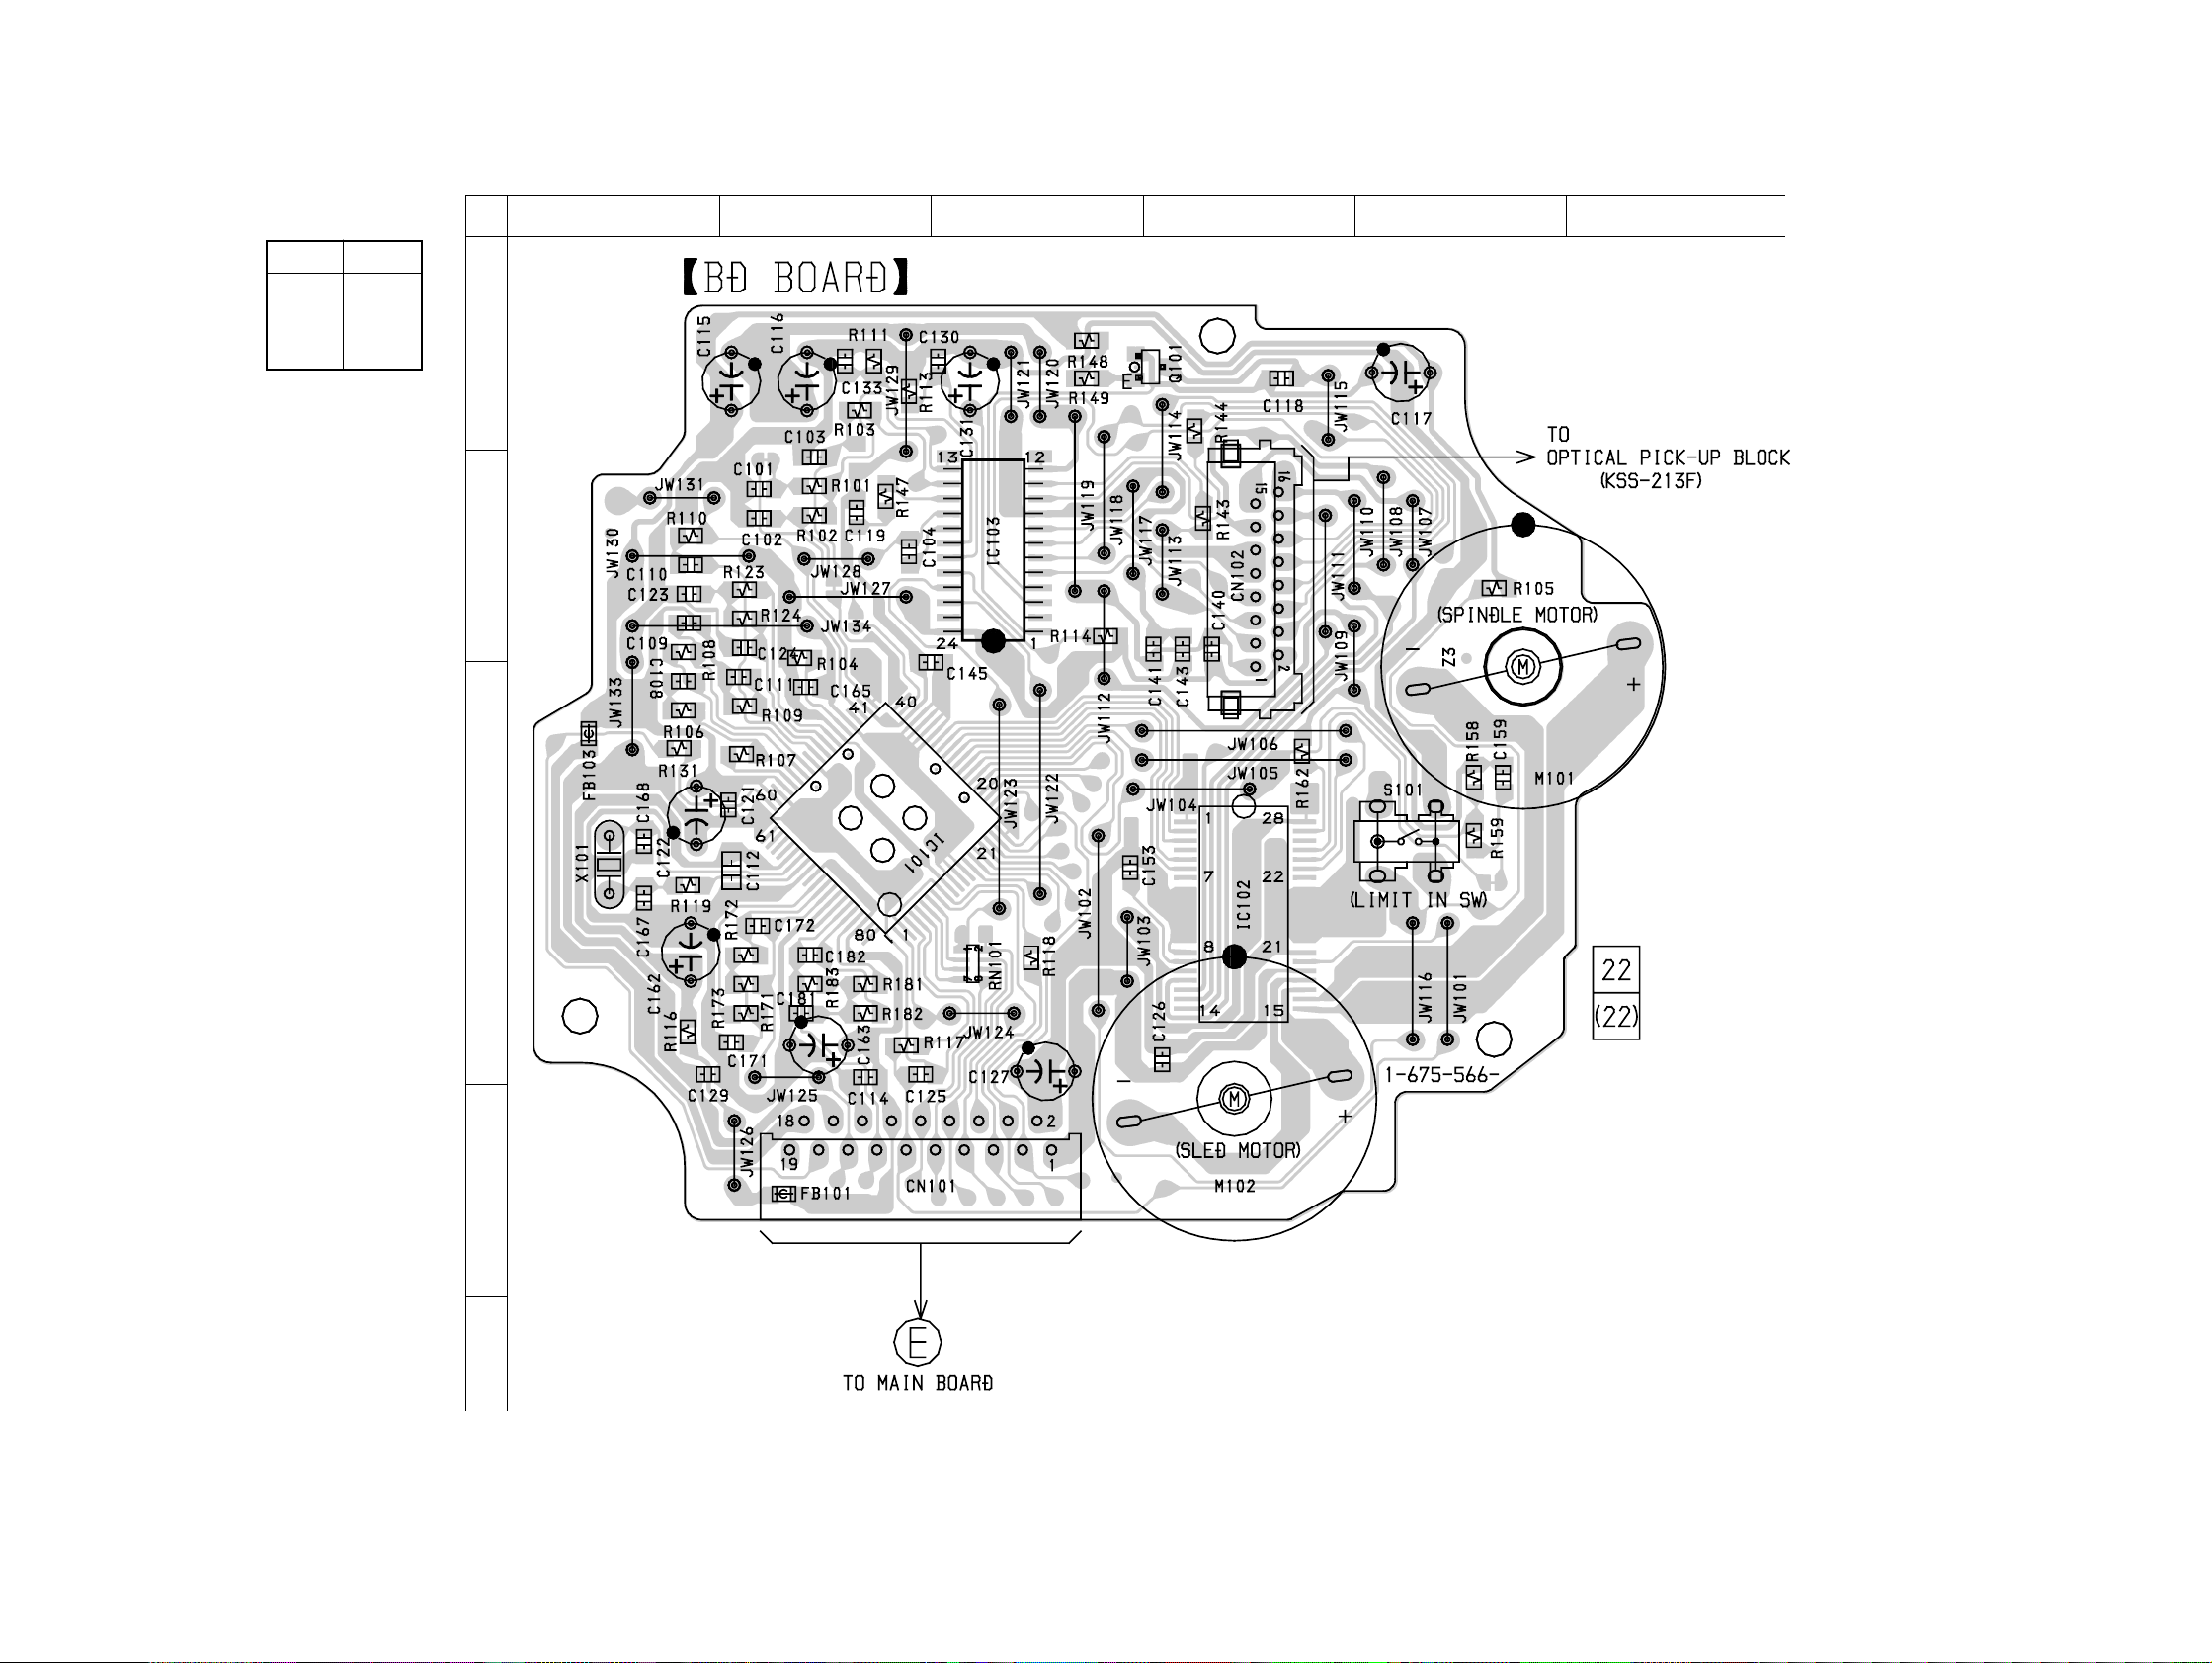
HCD-BX7/DX7/DX7J
7-3. PRINTED WIRING BOARD – BD SECTION –
• See page 21 for Circuit Boards Location.
• Semiconductor
Location
Ref. No. Location
IC101 D-2
IC102 C-4
IC103 B-3
Q101 A-4
A
B
C
12
3456
D
E
F
09
(Page 26)
24
24
Page 25
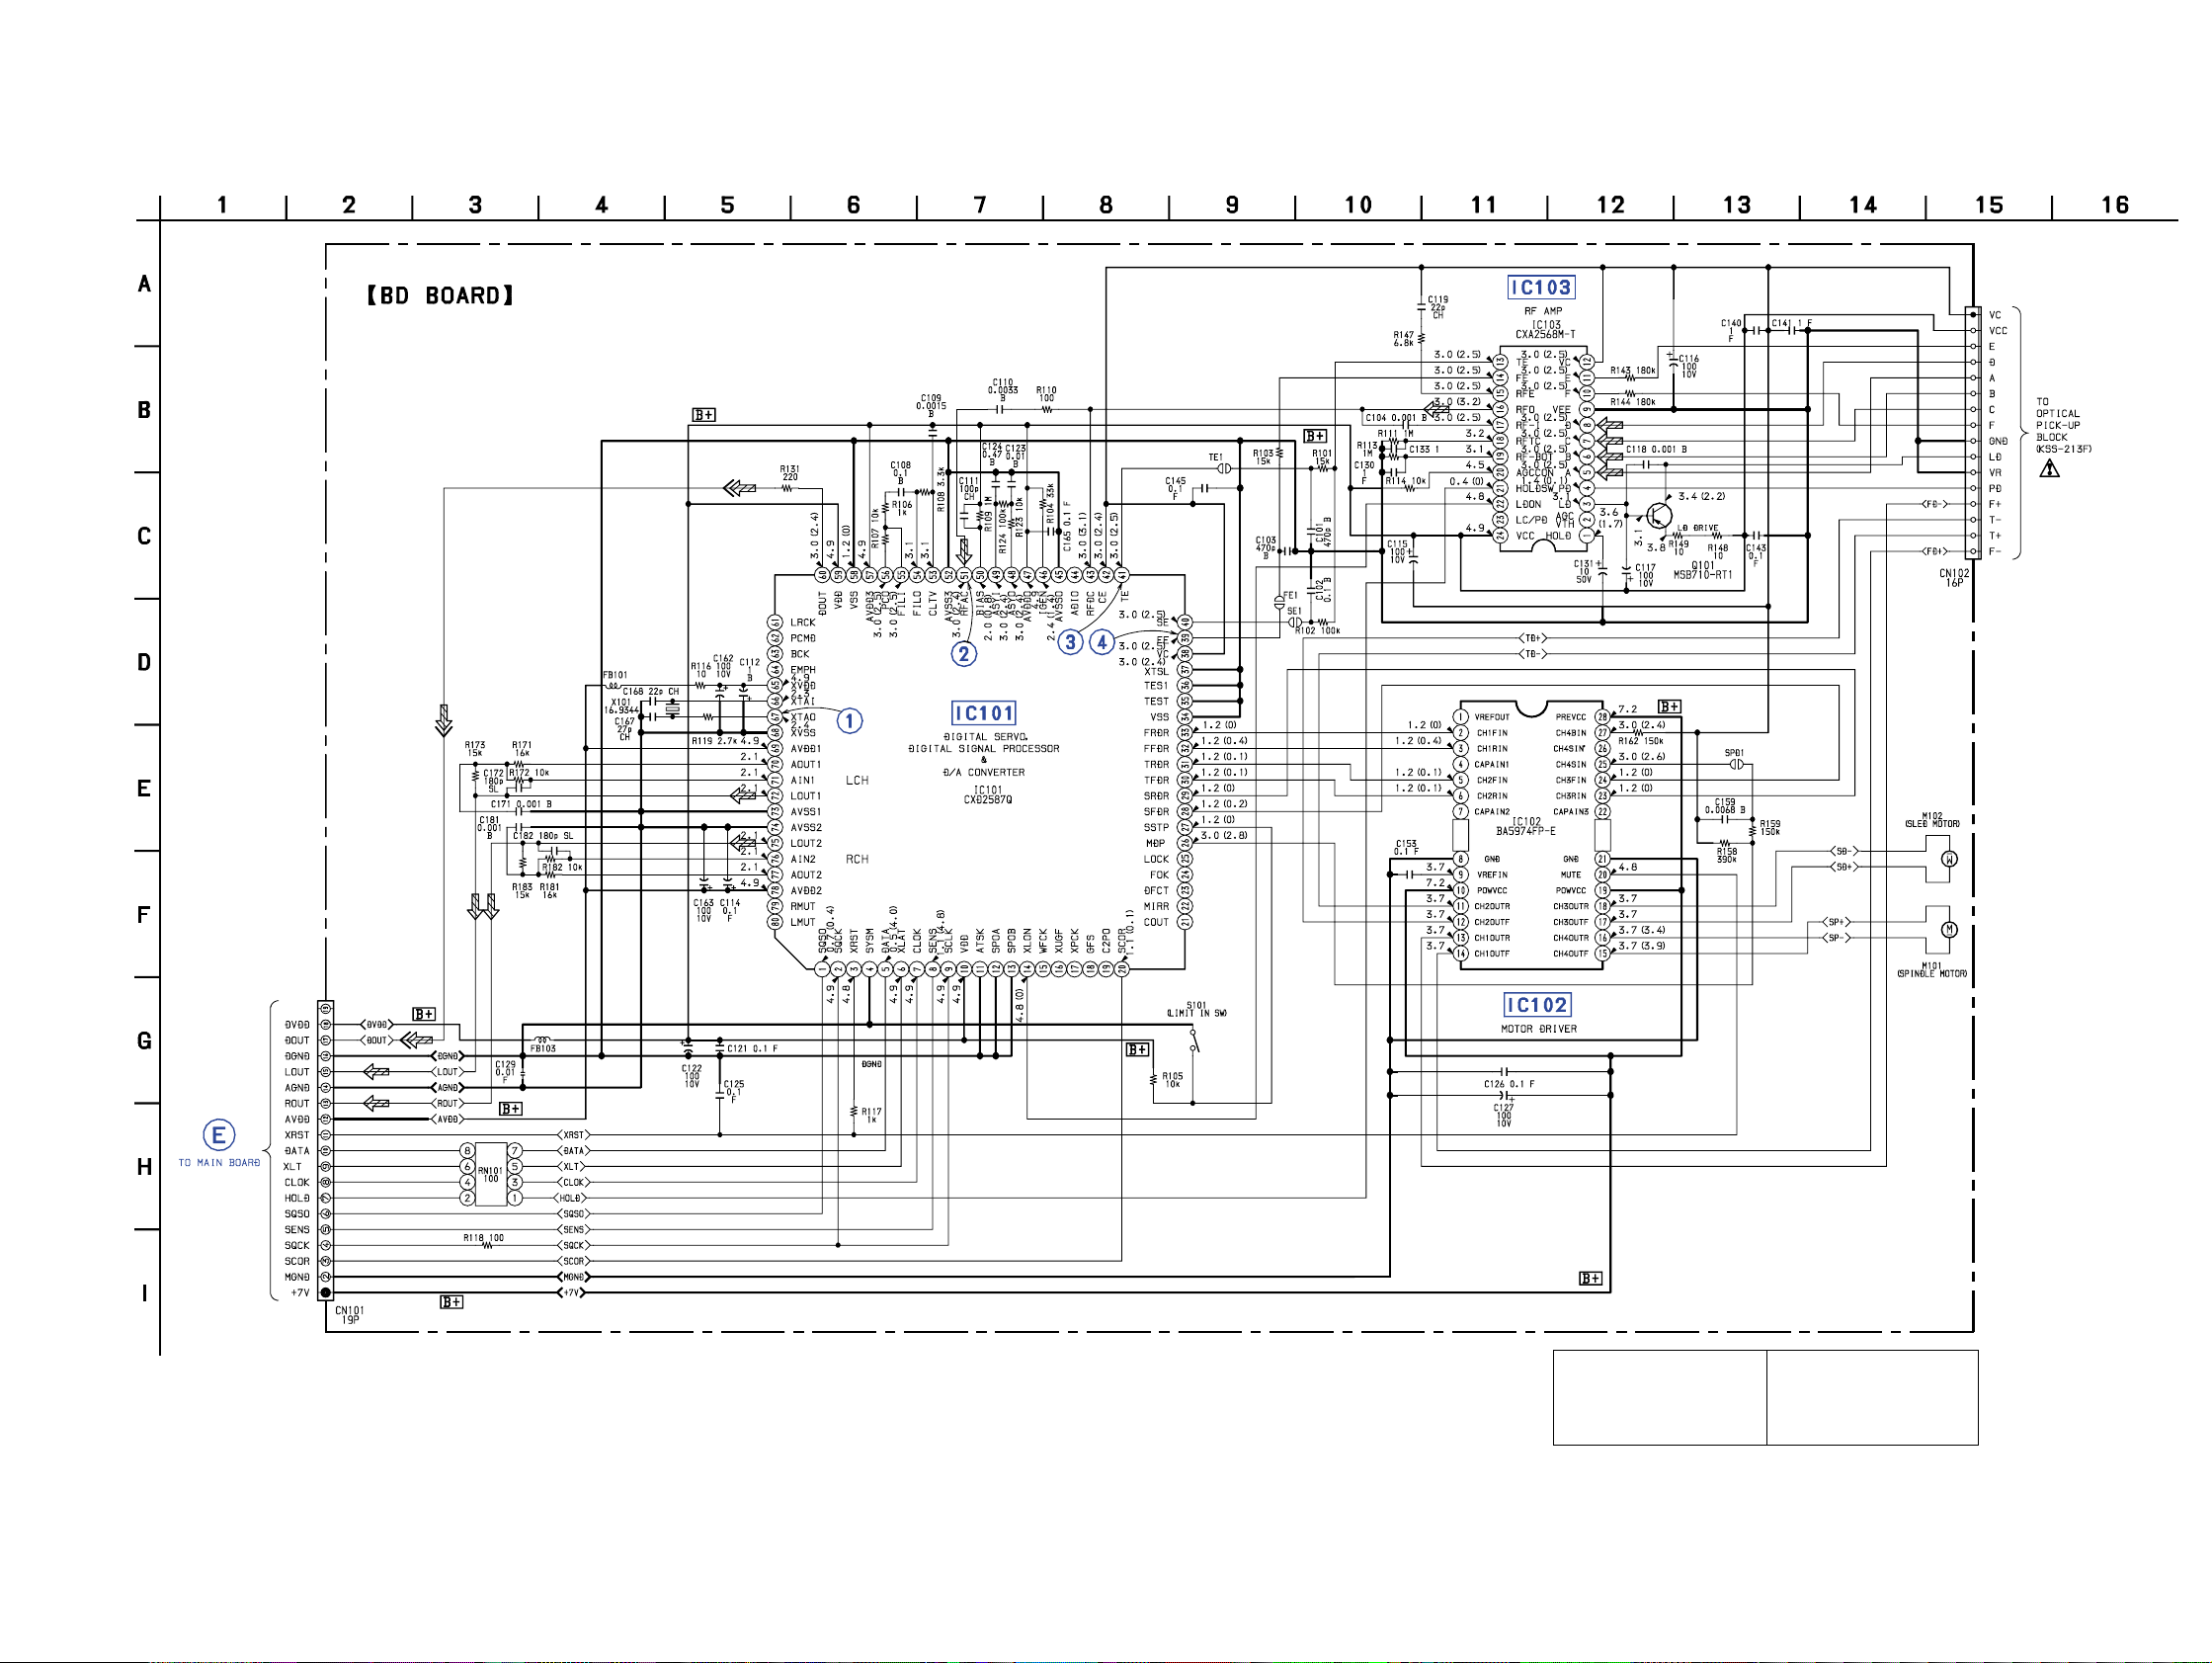
7-4. SCHEMATIC DIAGRAM – BD SECTION –
• See page 21 for Wavefoms.
• See page 46 for IC Block Diagrams.
HCD-BX7/DX7/DX7J
(Page 29)
09
The components identified by
mark 0 or dotted line with mark
0 are critical for safety.
Replace only with part number
specified.
Les composants identifiés par
une marque 0 sont critiques
pour la sécurité.
Ne les remplacer que par une
pièce portant le numéro spécifié.
2525
Page 26
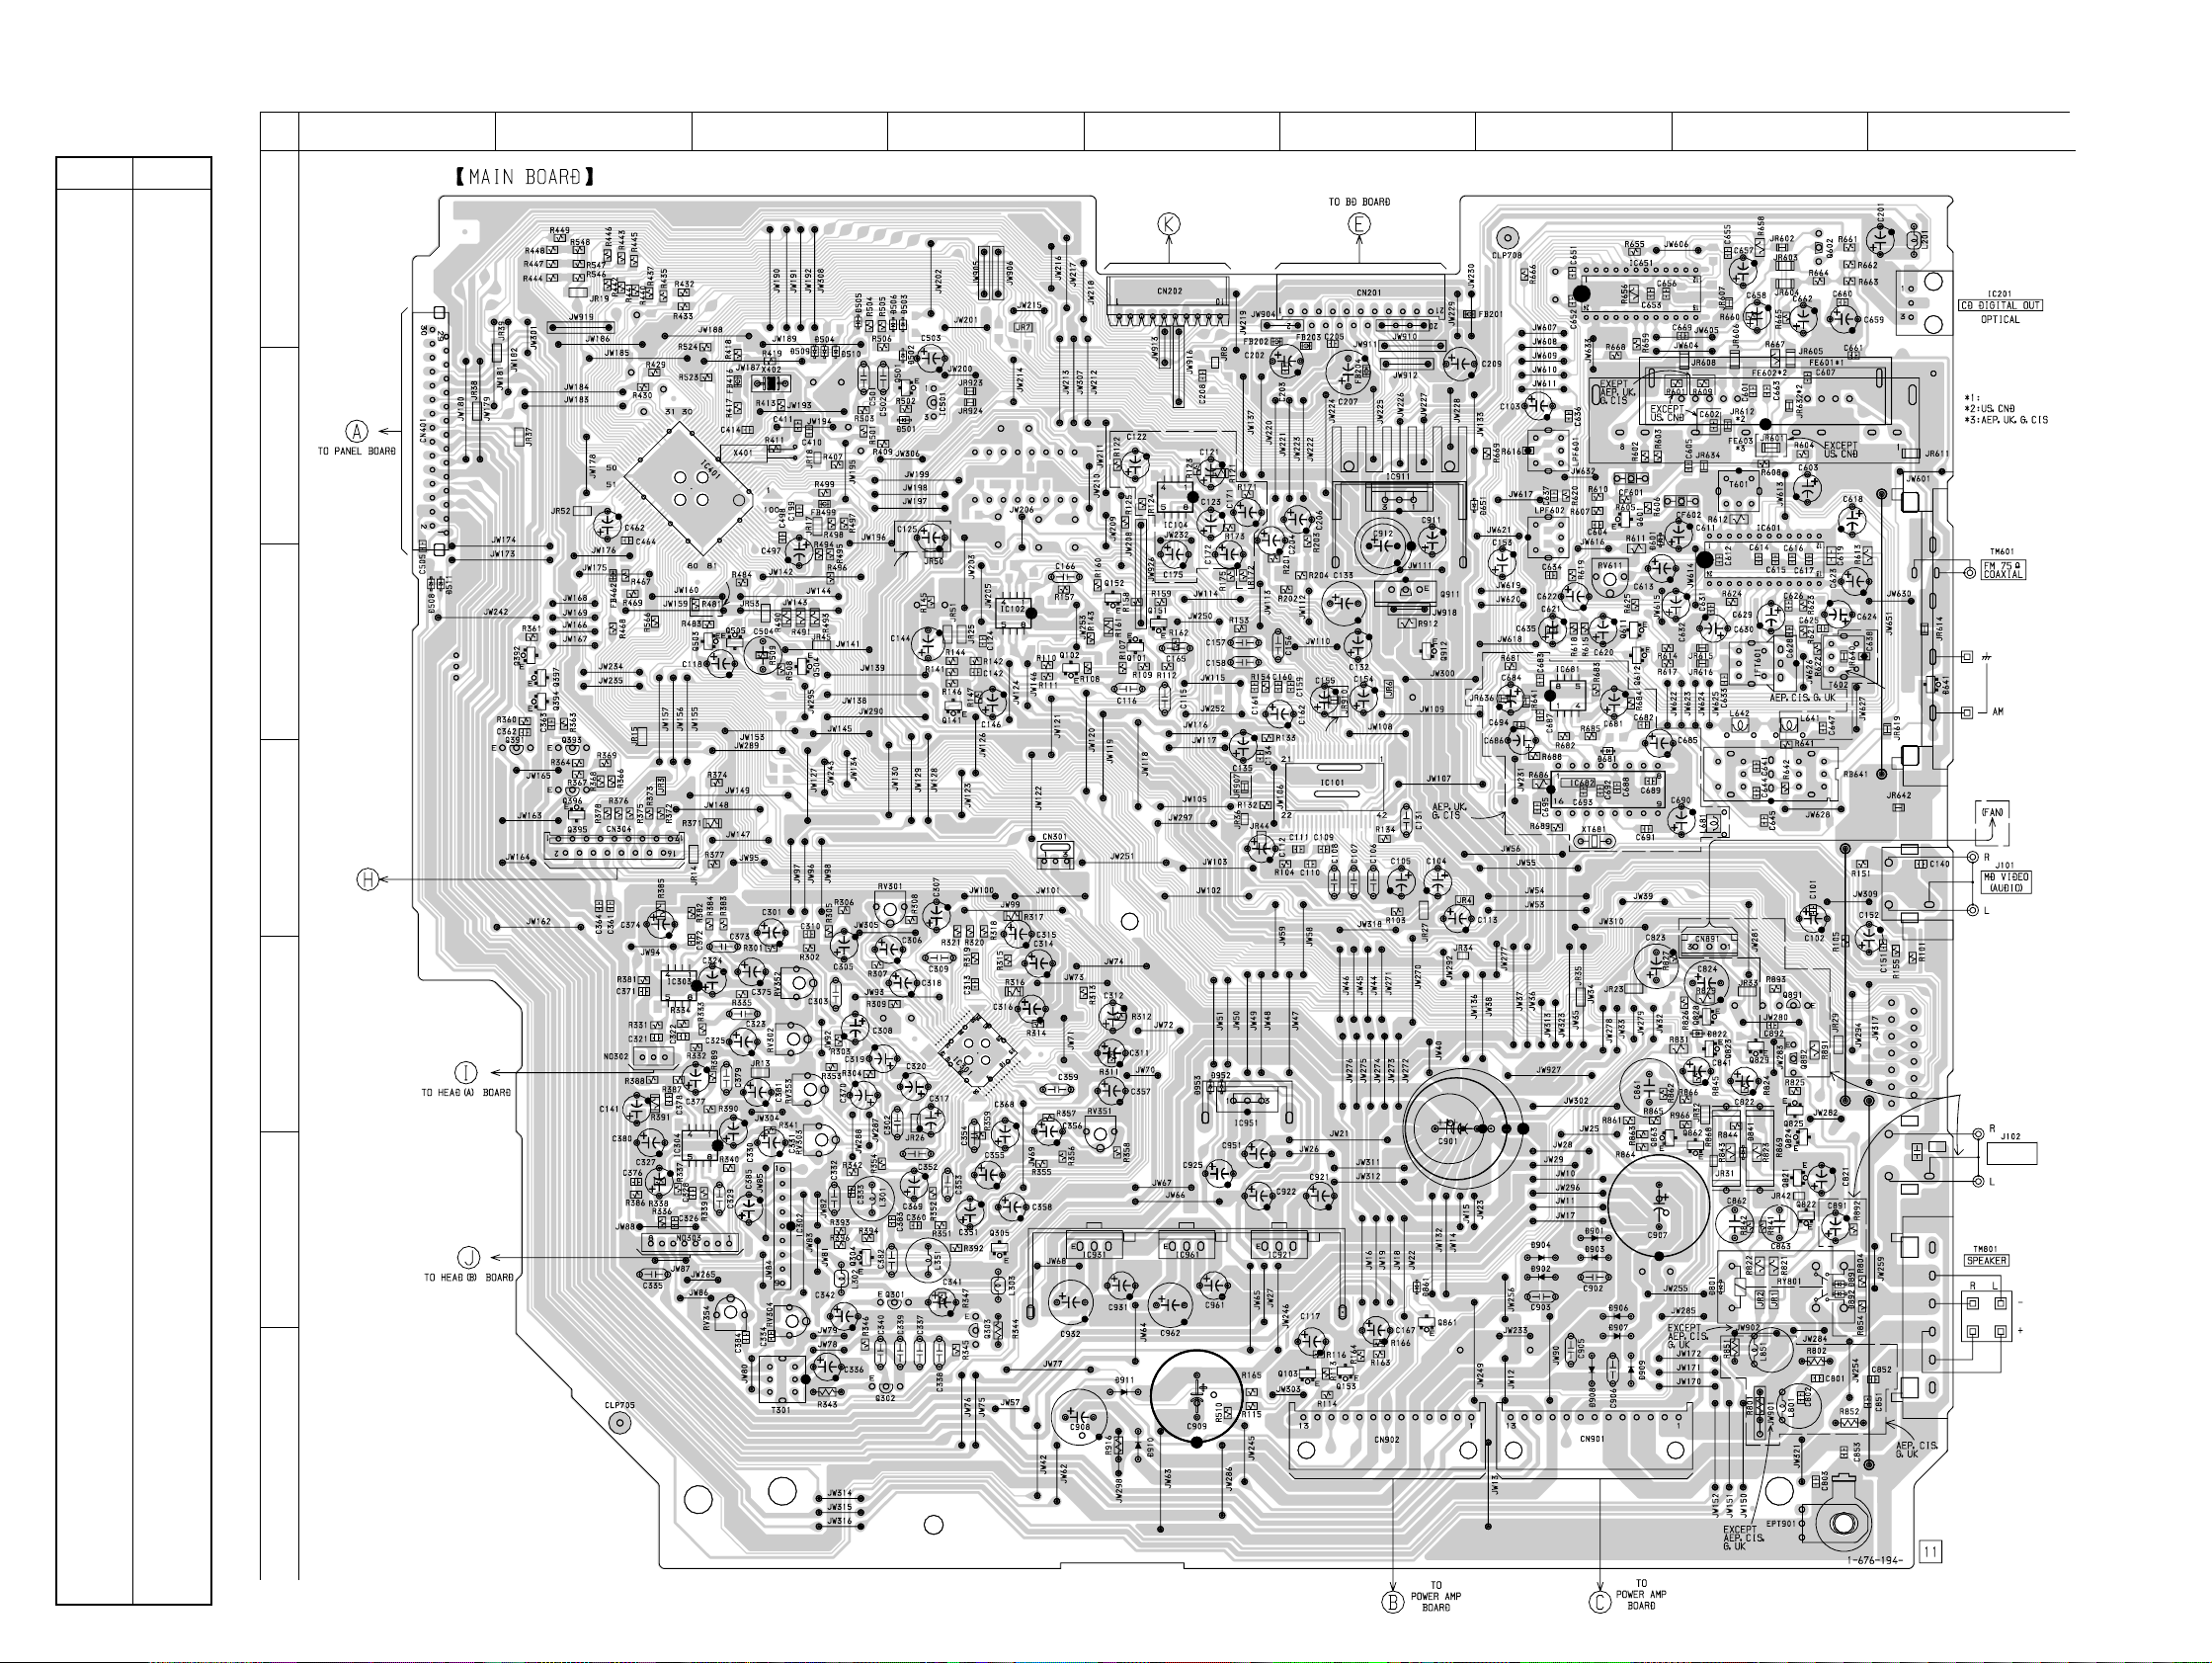
HCD-BX7/DX7/DX7J
7-5. PRINTED WIRING BOARD – MAIN SECTION – • See page 21 for Circuit Boards Location.
• Semiconductor
Location
Ref. No. Location
D501 B-3
D502 B-4
D503 A-4
D504 B-3
D505 A-3
D506 A-4
D508 C-1
D509 B-3
D510 B-3
D511 C-1
D601 B-7
D641 C-9
D651 B-7
D681 C-7
D801 F-8
D822 E-8
D861 F-6
D891 F-8
D892 F-8
D901 F-7
D902 F-7
D903 F-7
D904 F-7
D906 G-7
D907 G-7
D908 G-7
D909 G-7
D910 G-5
D911 G-5
D952 E-5
D953 E-5
D957
IC104 B-5
IC101 D-6
IC102 C-4
IC302 F-3
IC303 E-2
IC304 F-3
IC301 E-4
IC401 B-3
IC501 B-4
IC601 C-8
IC651 A-7
IC681 C-7
IC682 D-7
IC911 B-6
IC951 E-5
IC961 F-6
Q101 C-5
Q102 C-4
Q103 G-6
Q141 C-4
Q151 C-5
Q152 C-5
Q153 G-6
Q301 G-4
Q302 G-3
Q303 G-4
Q304 F-3
Q305 F-4
Q391 D-2
Q392 D-2
Q393 D-2
Q394 C-2
Q395 D-2
Q396 D-2
Q397 C-2
Q501 B-4
Q503 C-3
Q504 C-3
Q505 C-3
Q601 B-7
Q602 A-8
Q611 C-7
Q612 C-7
Q821 F-8
Q822 F-8
Q823 E-8
Q824 E-8
Q825 E-8
Q828 E-8
Q829 E-8
Q861 F-6
Q862 F-8
Q863 E-7
Q891 E-8
Q892 E-8
Q911 C-6
Q912 C-6
A
B
C
D
E
F
G
(Page 34)
TO LEAF SW BOARD
(Page 36)
12
BX7 MODEL
(Page 36)
(Page 36)
09
3456789
(Page 24)
BX7 MODEL
(Page 30, 32) (Page 30, 32)
EXCEPT
AEP, UK, G, CIS
JR917
C143
DX7, DX7J
US, CND, DX7, DX7J
MODEL
US, CND, DX7, DX7J
MODEL
SURROUND
SPEAKER
DX7, DX7J MODEL
26
26
(Page 38)
TO DRIVER BOARD
DX7, DX7J MODEL
BX7 MODEL
Page 27
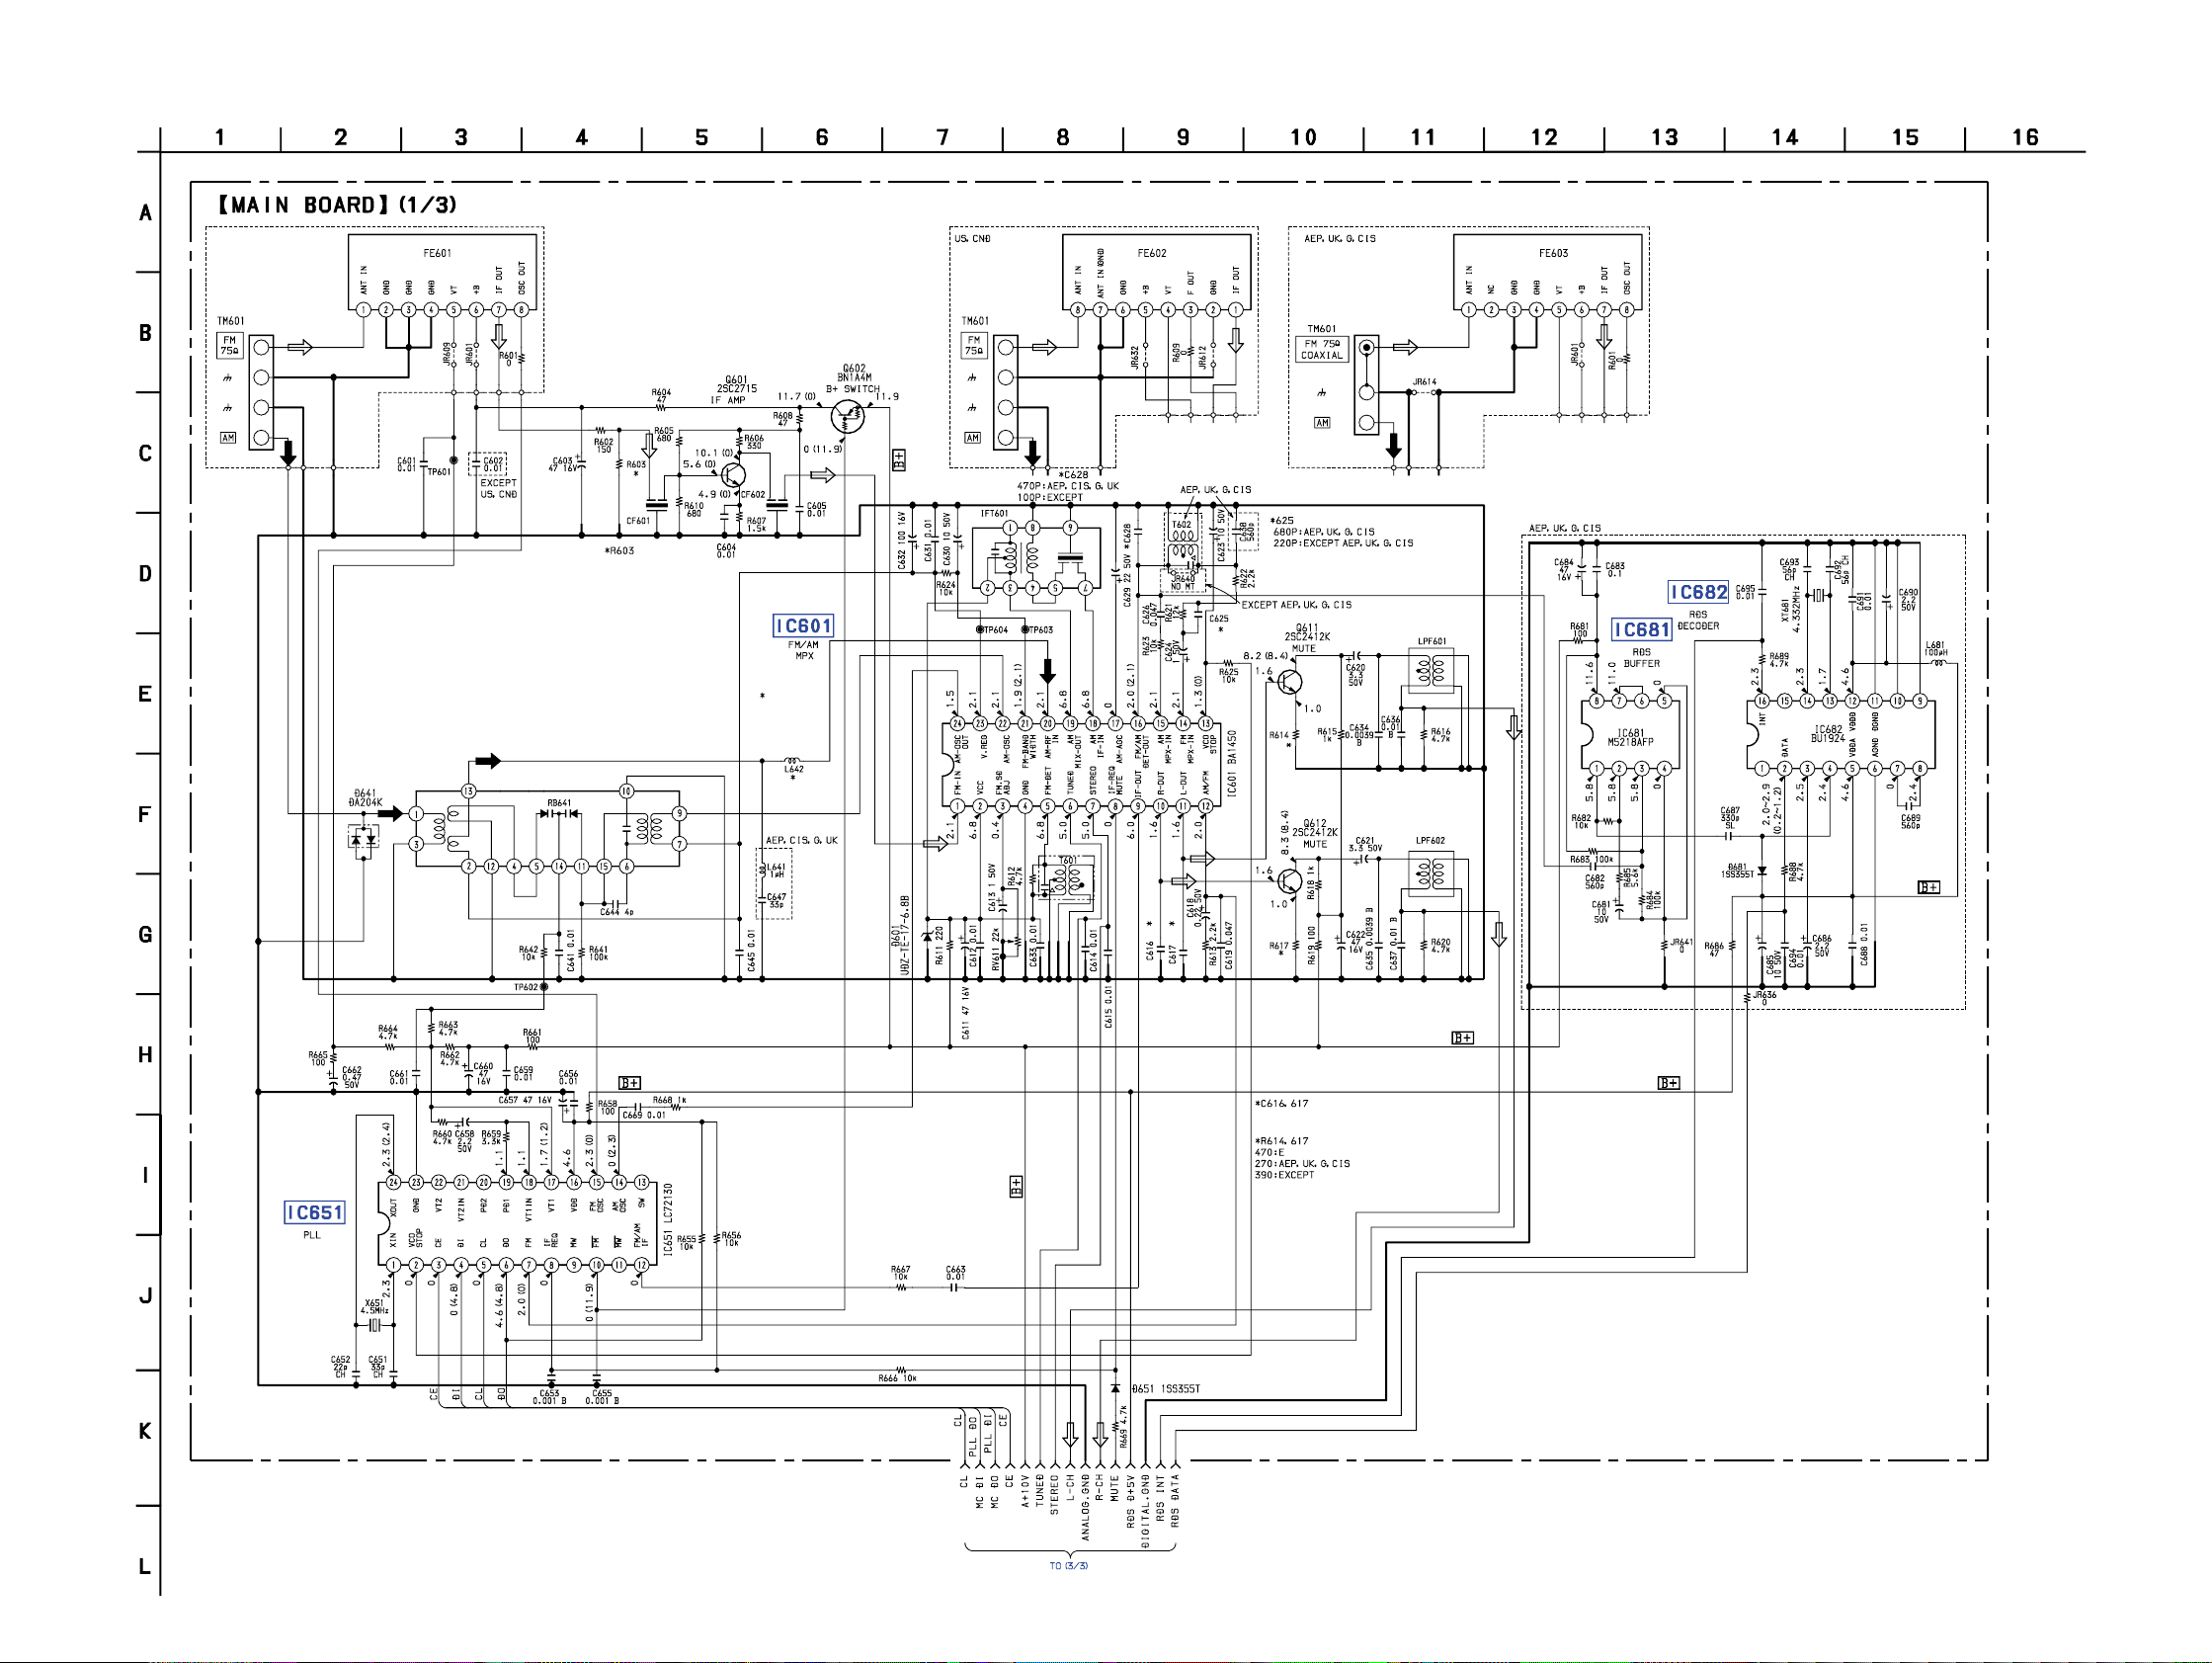
7-6. SCHEMATIC DIAGRAM – MAIN (1/3) SECTION –
(Page 29)
09
DX7, DX7J MODEL
680 : BX7
330: EXCEPT BX7
L642
33uH : AEP,CIS
G, UK
0 : EXCEPT AEP,
UK, G, CIS
0.015 : BX7
0.01 : EXCEPT BX7
• See page 48 for IC Block Diagrams.
HCD-BX7/DX7/DX7J
2727
Page 28
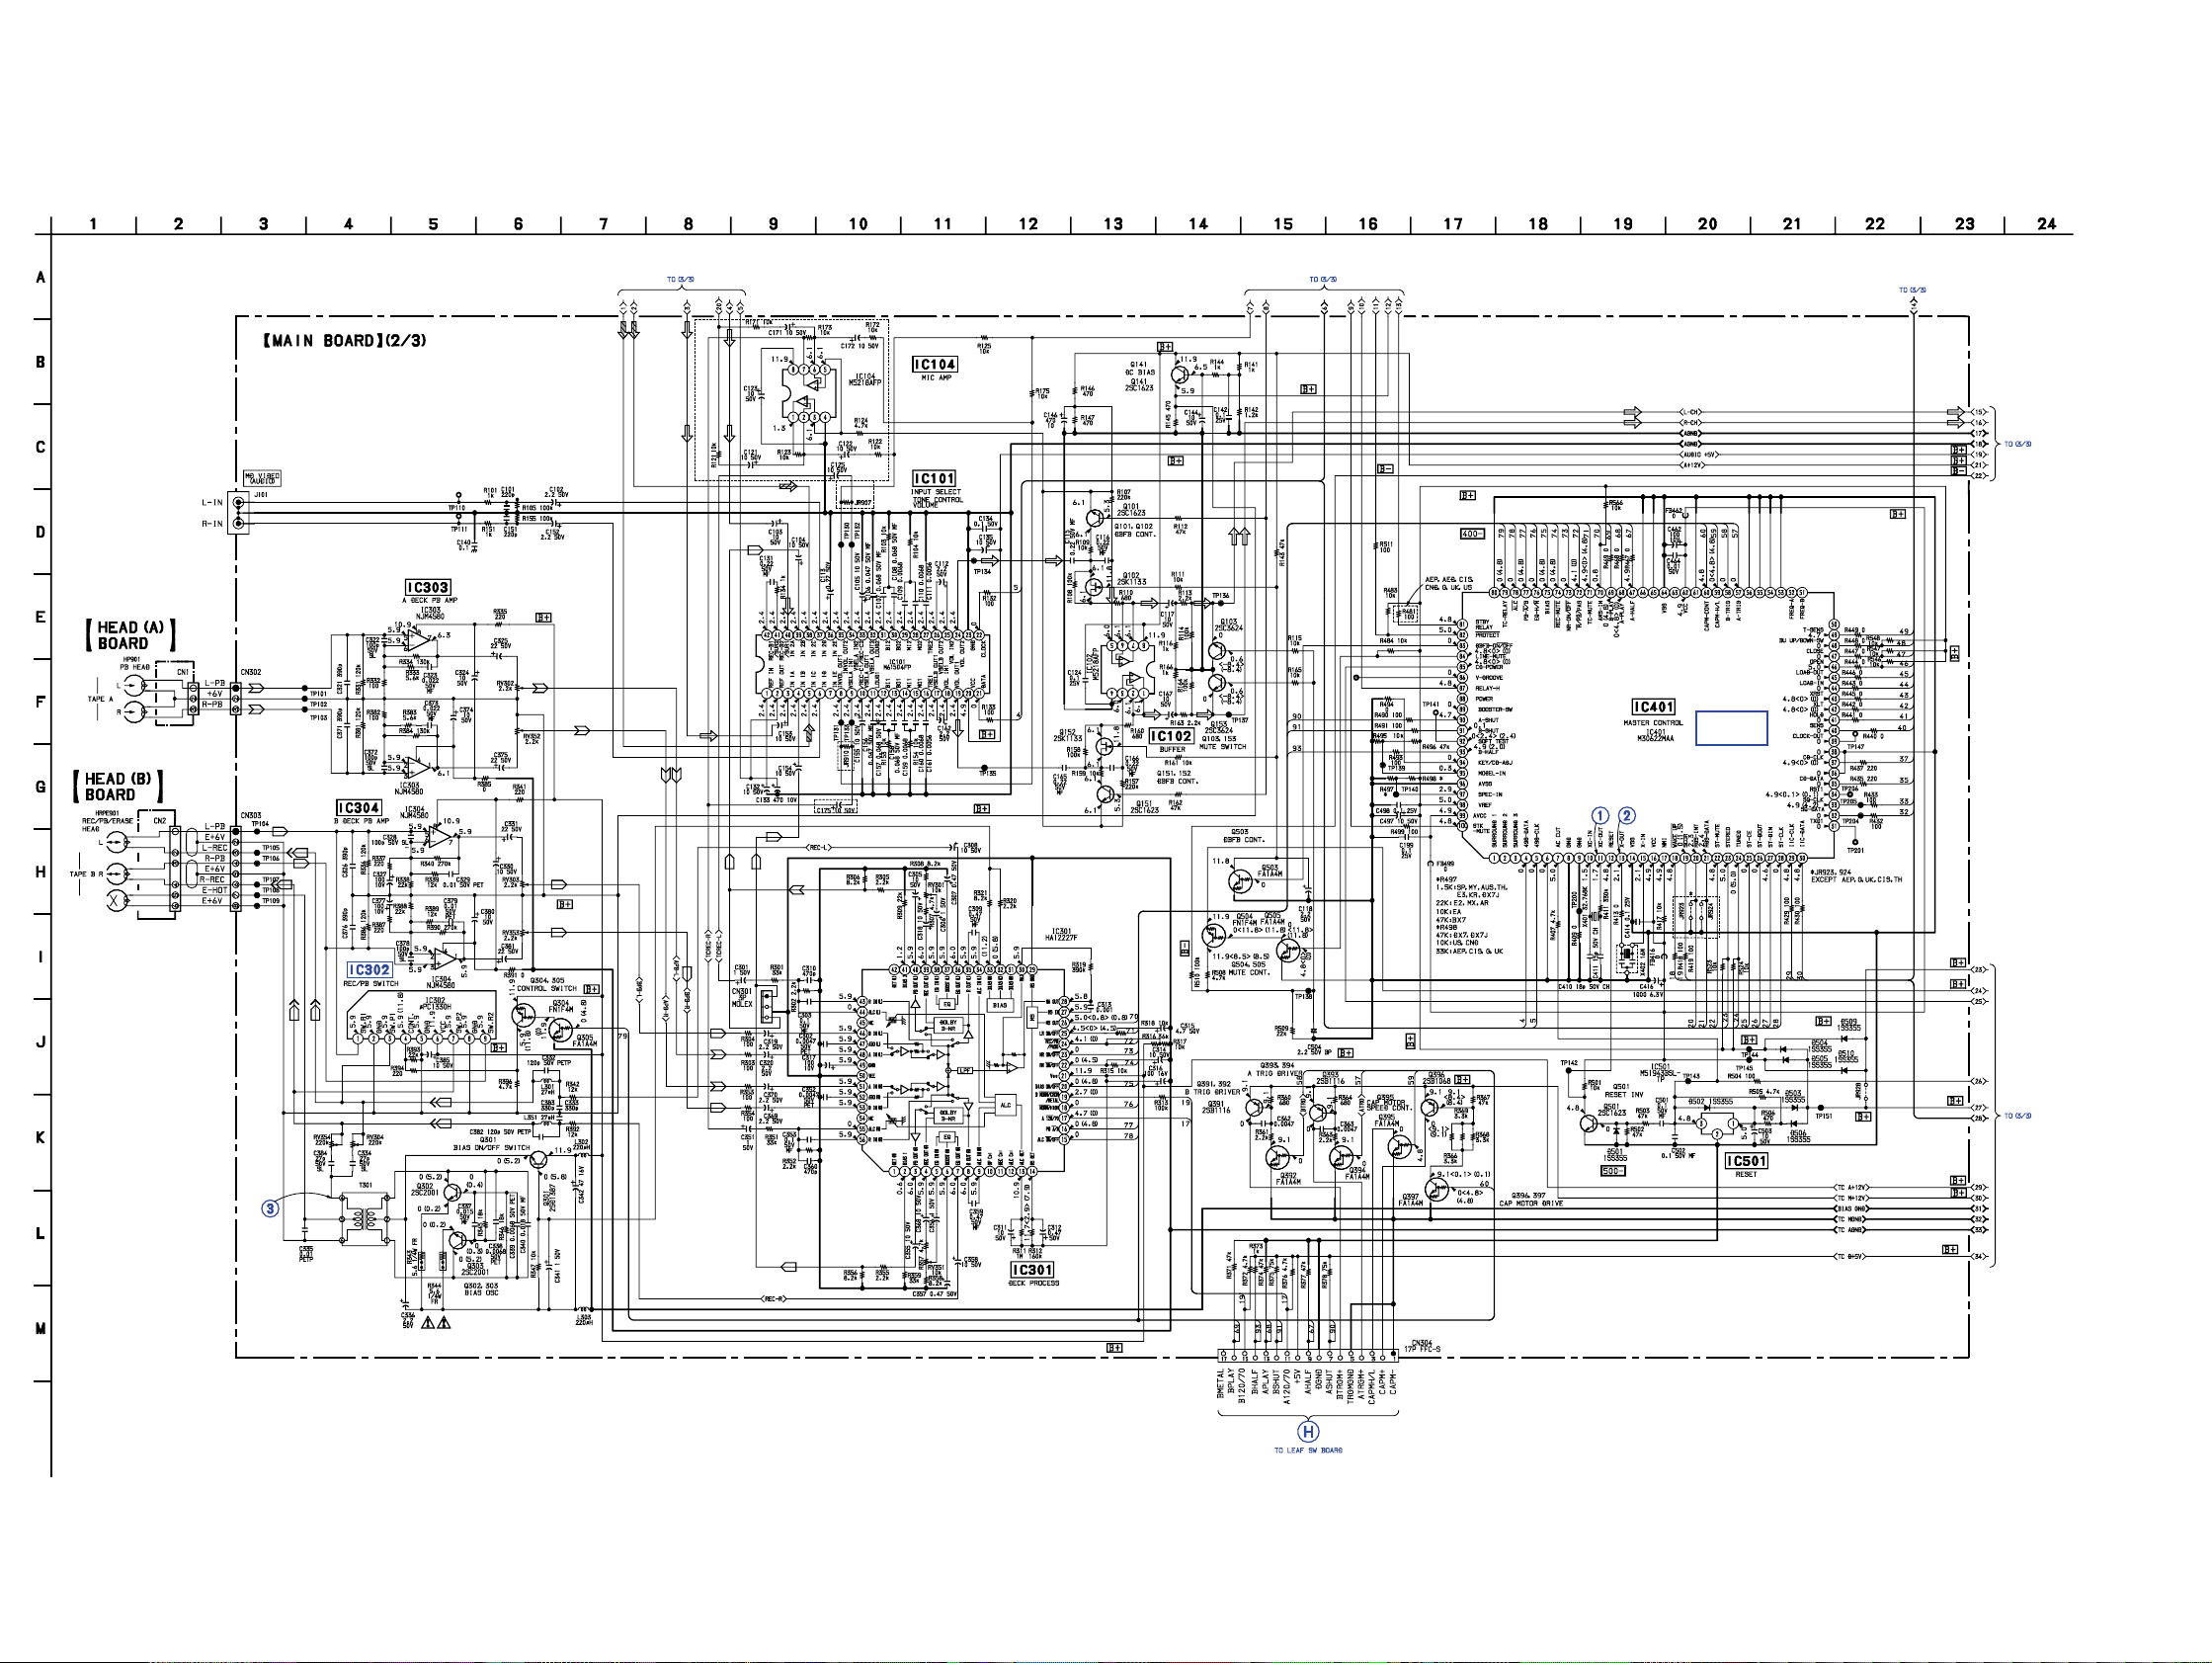
HCD-BX7/DX7/DX7J
7-7. SCHEMATIC DIAGRAM – MAIN (2/3) SECTION –
• See page 21 for Wavefoms.
• See page 44 for IC Pin Function Description.
• See page 48 for IC Block Diagrams.
(Page 29)
BX7
MODEL
DX7, DX7J MODEL
BX7
MODEL
DX7, DX7J MODEL
(Page 29)
PIN
FUNCTION
(Page 29)
(Page 29)
(Page 29)
09
N
(Page 37)
28
28
Page 29
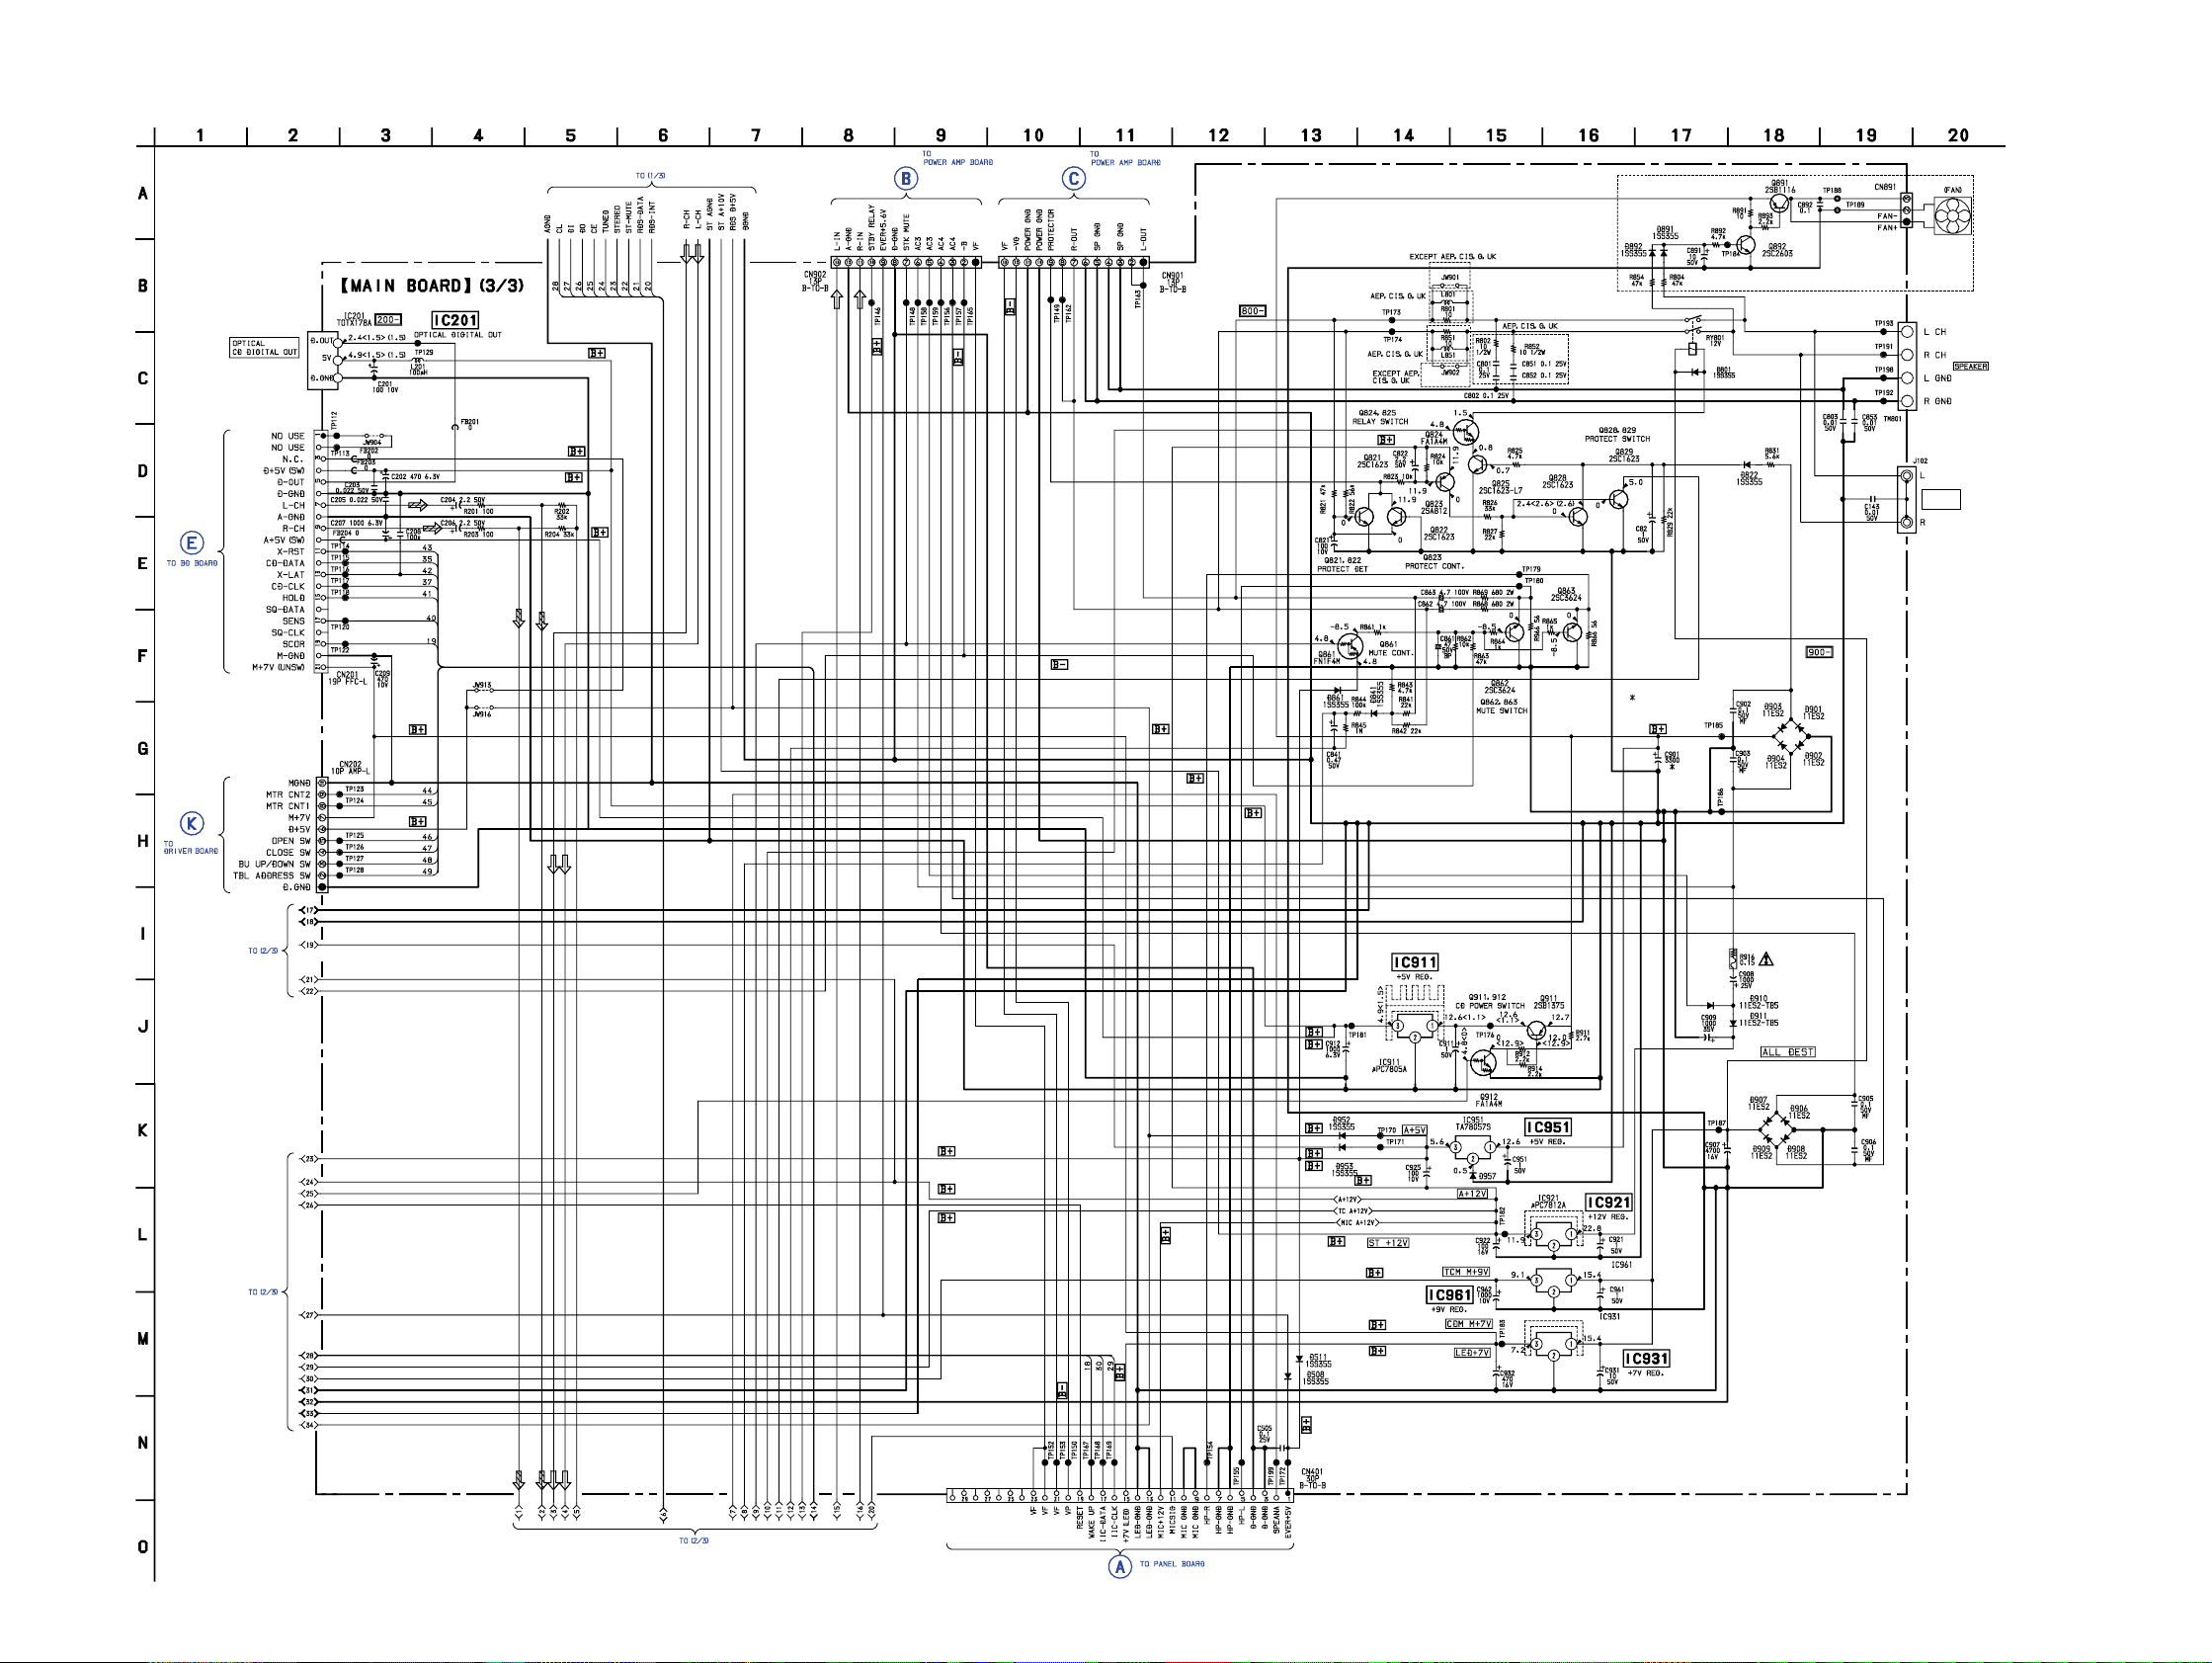
7-8. SCHEMATIC DIAGRAM – MAIN (3/3) SECTION –
HCD-BX7/DX7/DX7J
(Page
25)
(Page 27)
(Page 31, 33)
(Page 31, 33)
US, CND, DX7, DX7J MODEL
C901
DX7/DX7J: 3300 25V
BX7: 3300 16V
SURROUND
SPEAKER
(Page
39)
(Page 28)
(Page 28)
M5F7809L
M5F7807L
09
(Page 28)
(Page 35)
2929
Page 30
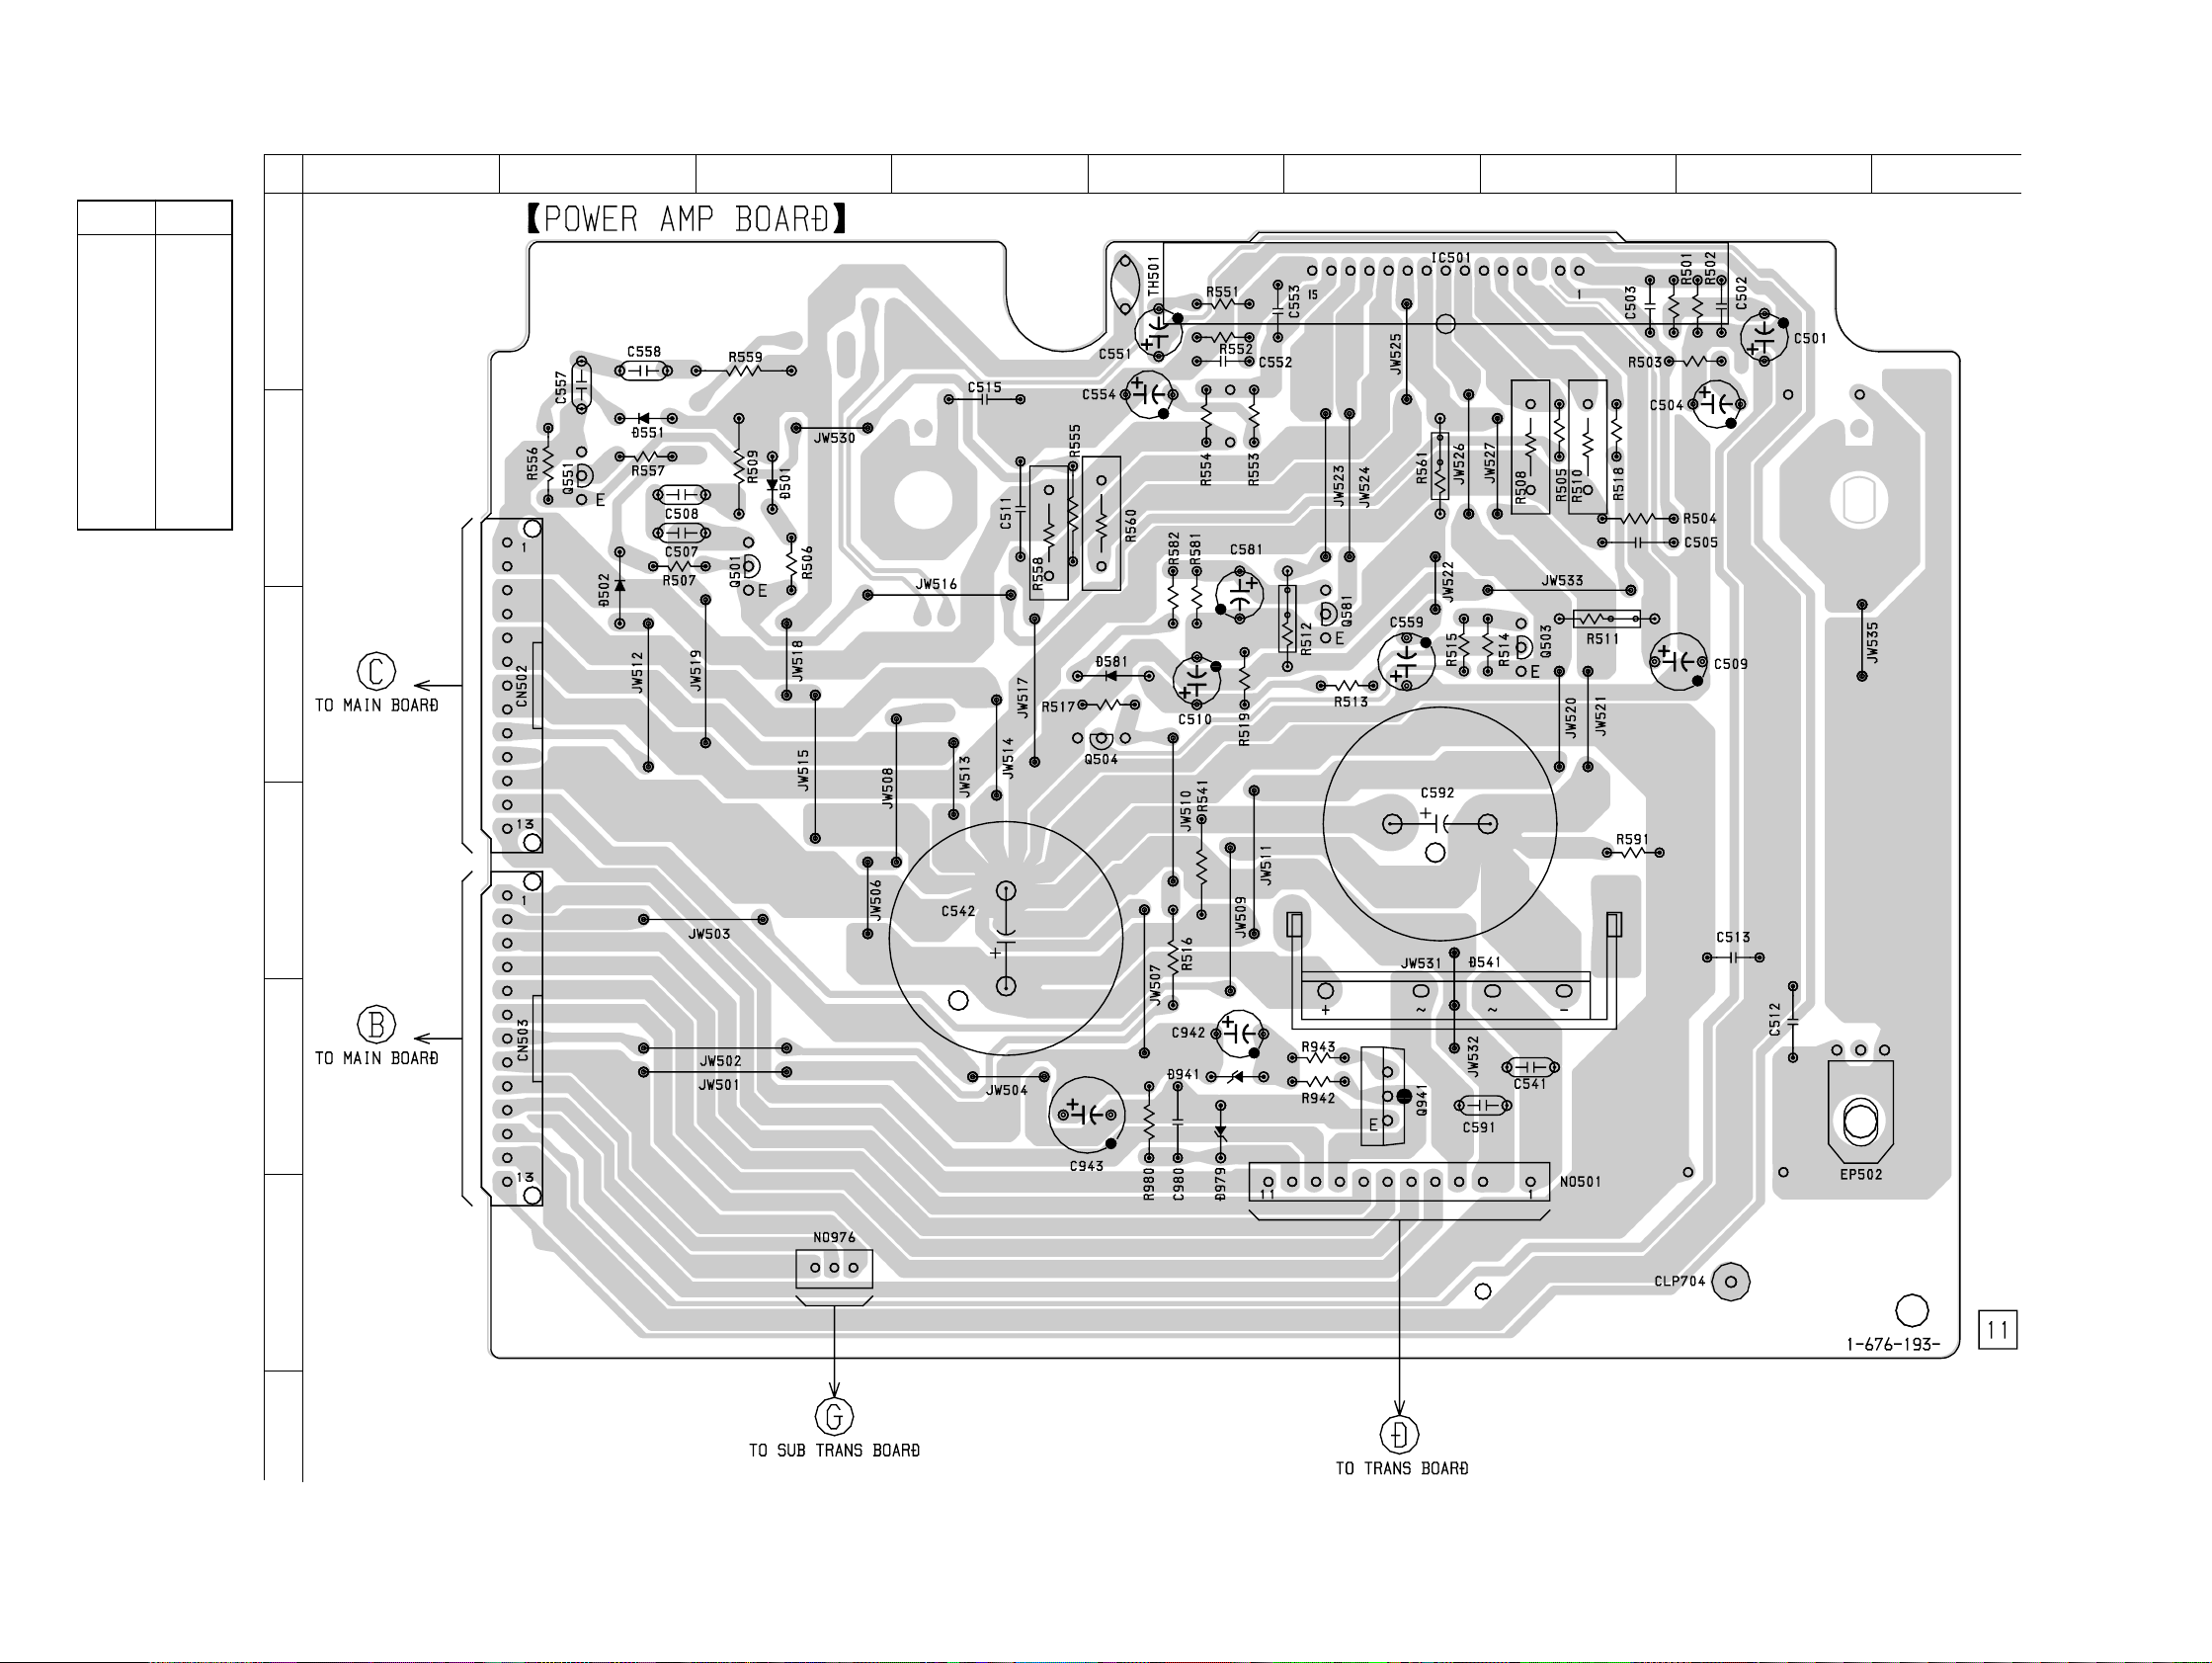
HCD-BX7/DX7/DX7J
7-9. PRINTED WIRING BOARD – POWER AMP SECTION – (BX7 MODEL)
• See page 21 for Circuit Boards Location.
• Semiconductor
Location
Ref. No. Location
D501 B-3
D502 C-2
D541 D-6
D551 B-2
D581 C-5
D941 E-5
D979 E-5
IC501 A-6
Q501 B-3
Q503 B-7
Q504 C-5
Q551 B-2
Q581 C-6
Q941 E-6
A
B
C
12
(Page 26)
3456789
D
E
F
(Page 26)
09
G
(Page 40)
30
(Page 40)
30
Page 31
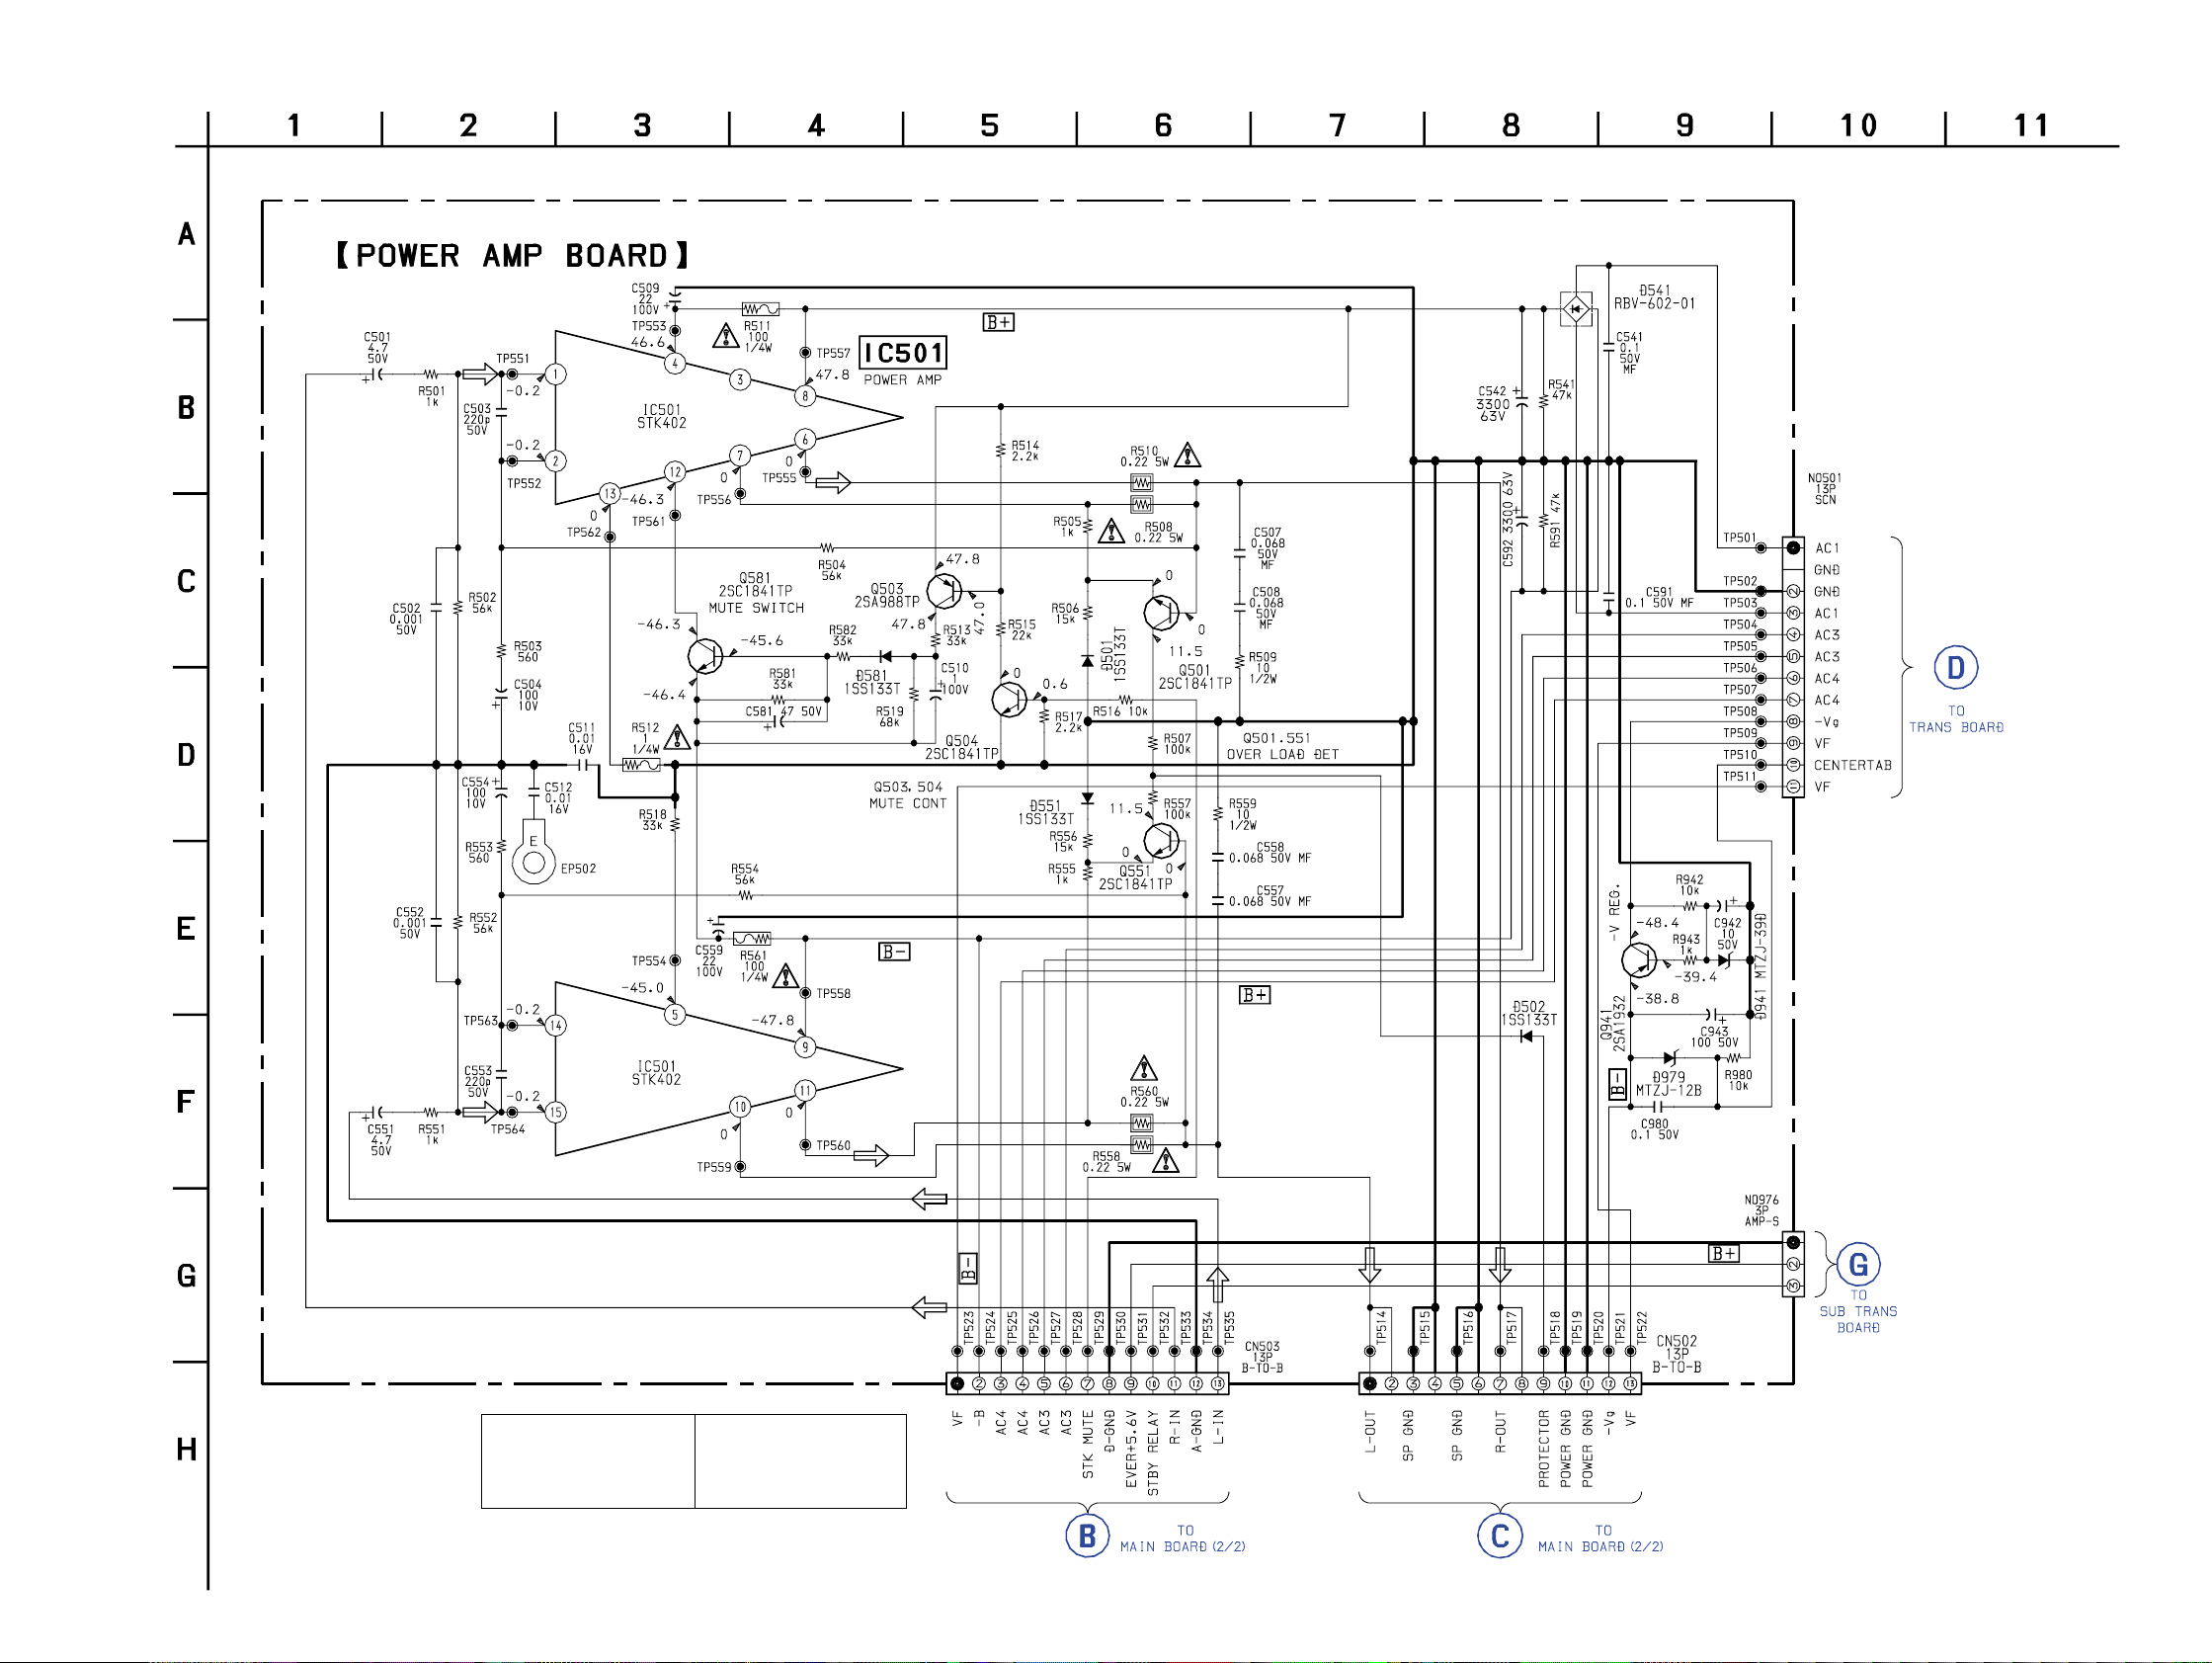
7-10. SCHEMATIC DIAGRAM – POWER AMP SECTION – (BX7 MODEL)
HCD-BX7/DX7/DX7J
(Page 41)
09
The components identified by
mark 0 or dotted line with mark
0 are critical for safety.
Replace only with part number
specified.
Les composants identifiés par
une marque 0 sont critiques
pour la sécurité.
Ne les remplacer que par une
pièce portant le numéro spécifié.
(Page 29)
(Page 41)
(Page 29)
3131
Page 32
HCD-BX7/DX7/DX7J
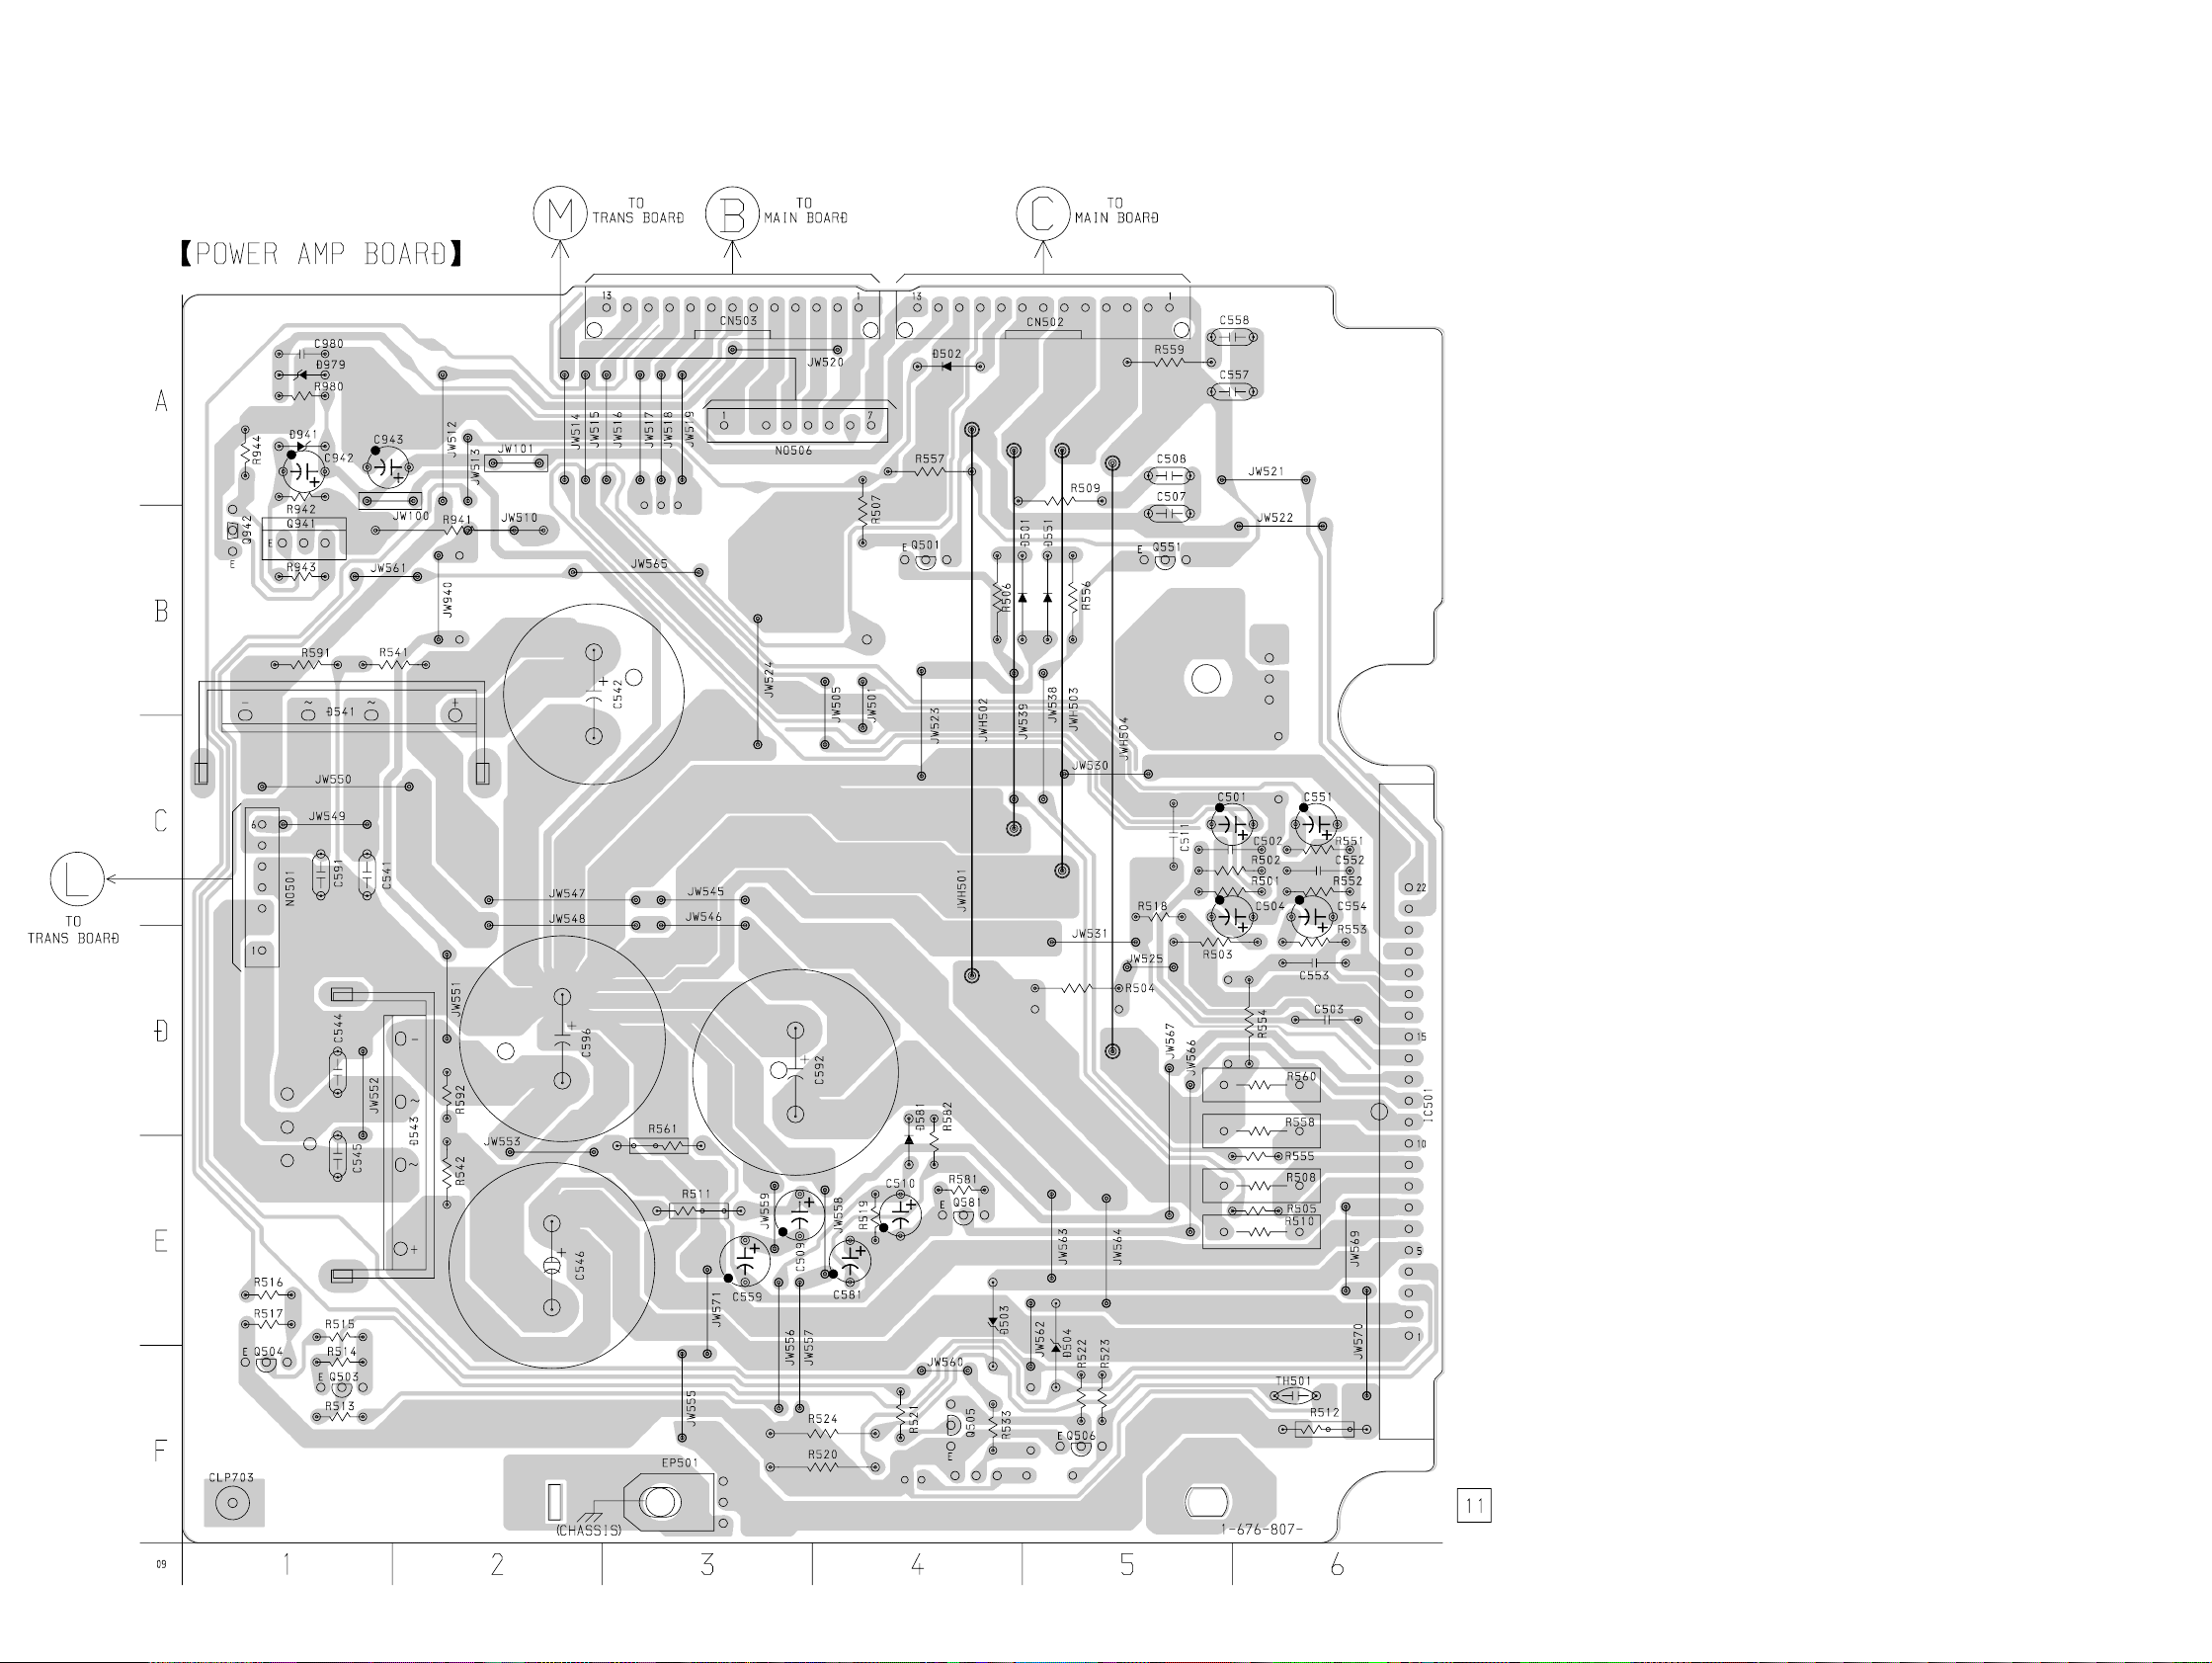
7-11. PRINTED WIRING BOARD – POWER AMP SECTION – (DX7, DX7J MODEL)
• See page 21 for Circuit Boards Location.
(Page 42) (Page 26) (Page 26)
(Page 42)
32
32
Page 33
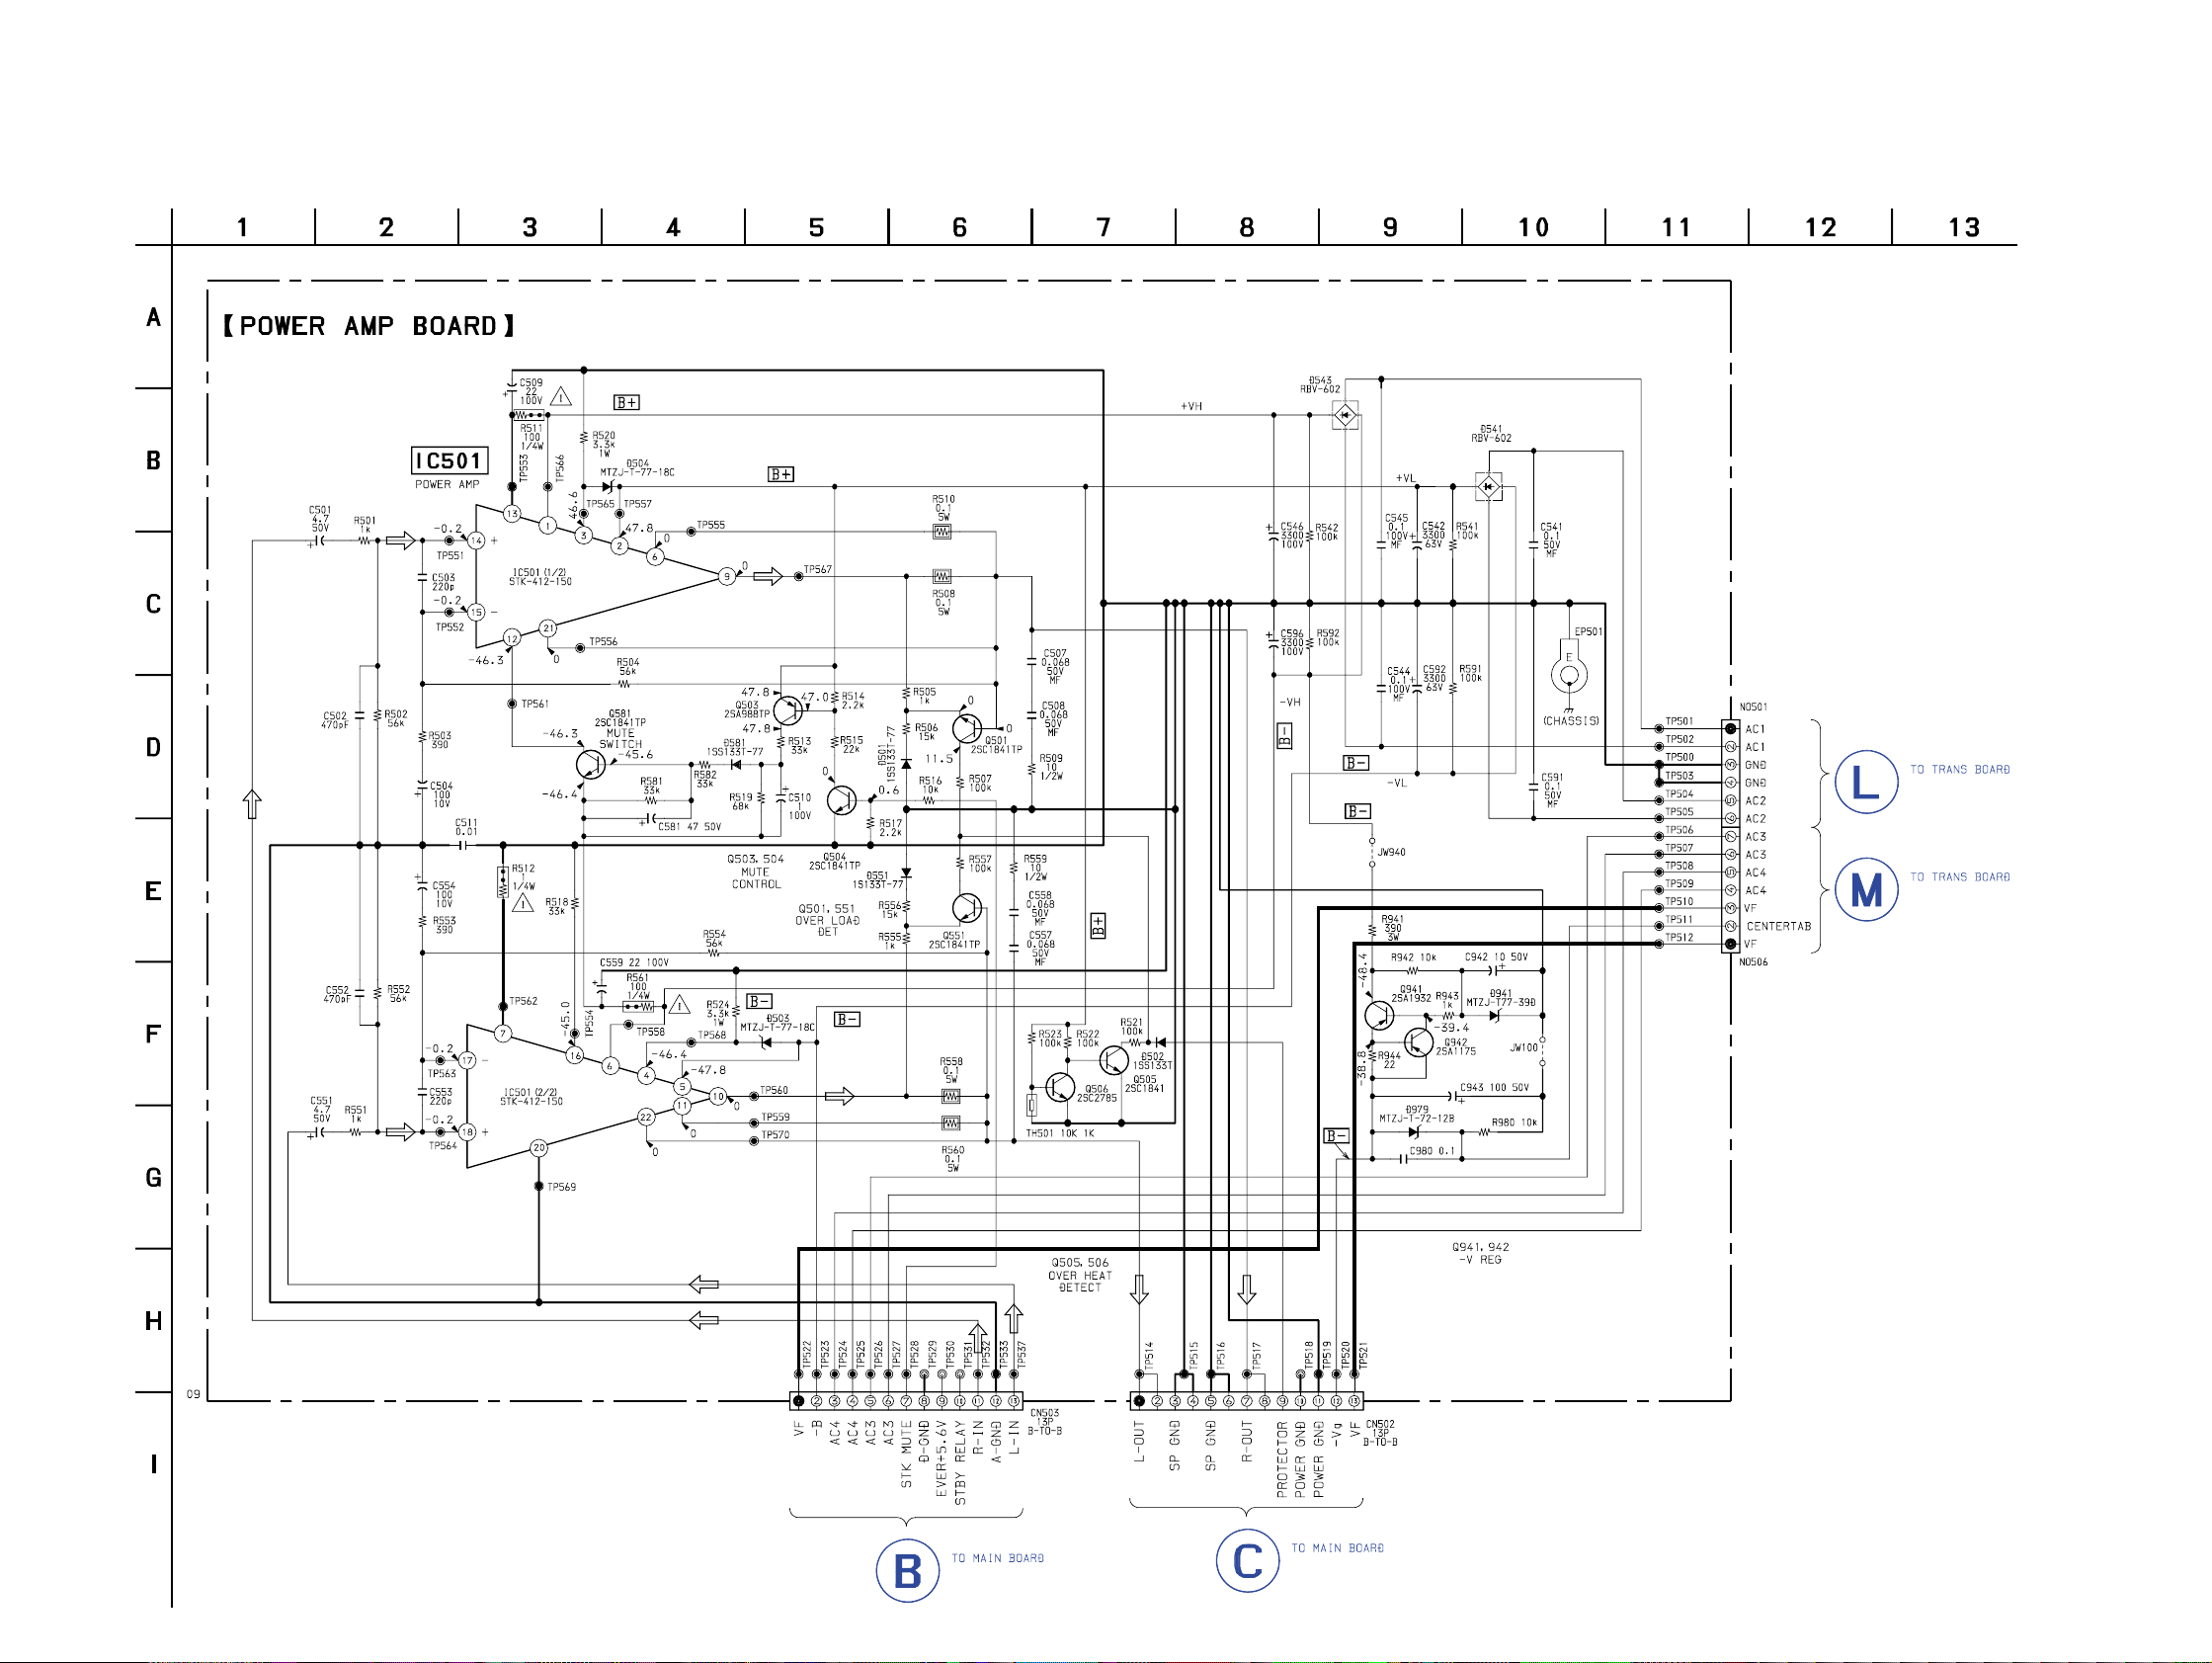
7-12. SCHEMATIC DIAGRAM – POWER AMP SECTION – (DX7, DX7J MODEL)
HCD-BX7/DX7/DX7J
(Page 43)
(Page 43)
(Page 29)
(Page 29)
3333
Page 34
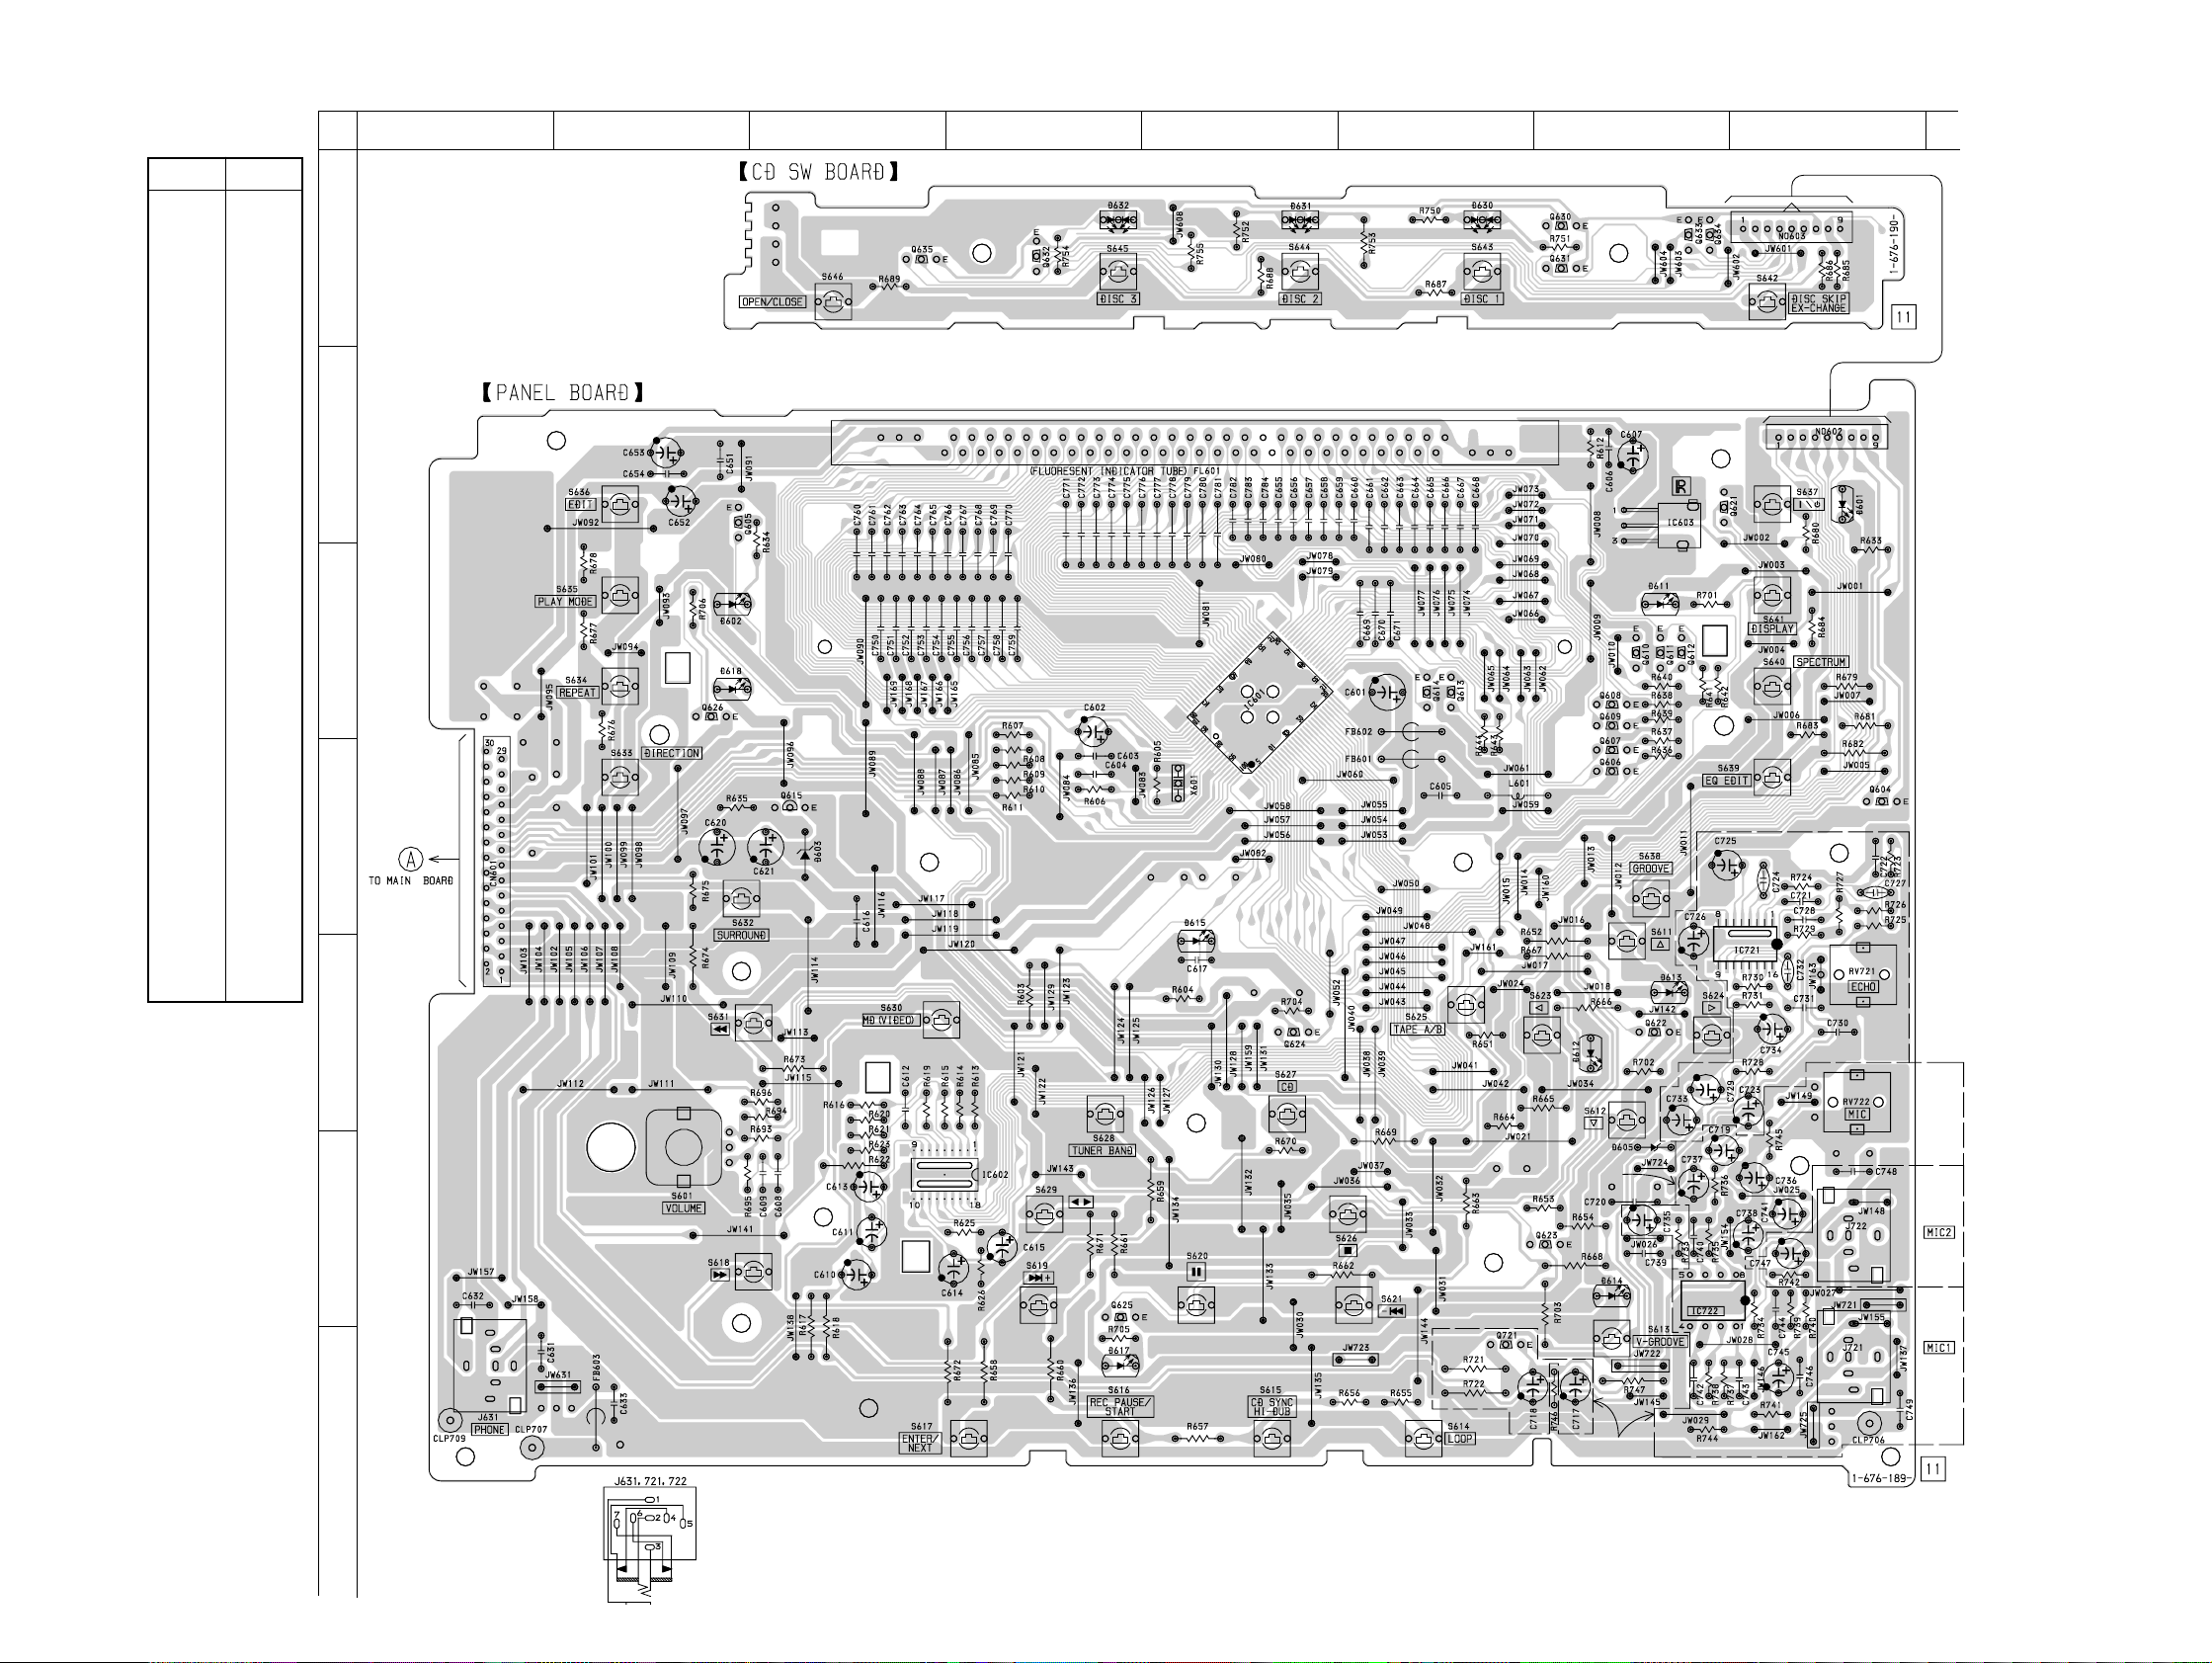
HCD-BX7/DX7/DX7J
7-13. PRINTED WIRING BOARD – PANEL SECTION – • See page 21 for Circuit Boards Location.
• Semiconductor
Location
Ref. No. Location
D601 B-8
D602 C-2
D603 D-3
D611 C-7
D612 E-7
D613 E-7
D614 F-7
D615 D-5
D617 G-4
D618 C-2
D630 A-6
D631 A-5
D632 A-4
IC601 C-5
IC602 F-4
IC603 B-7
IC721 E-8
IC722 F-8
Q604 D-8
Q605 B-2
Q606 D-7
Q607 D-7
Q608 C-7
Q609 C-7
Q610 C-7
Q611 C-7
Q612 C-7
Q613 C-6
Q614 C-6
Q615 D-3
Q621 B-7
Q622 E-7
Q623 F-7
Q624 E-5
Q625 F-4
Q626 C-2
Q630 A-7
Q631 A-7
Q632 A-4
Q633 A-7
Q634 A-7
Q635 A-3
Q721 G-6
A
B
C
D
(Page 26)
12
345678
EA, DX7J
MODEL
E
F
G
EA, DX7J
MODEL
DX7, DX7J
09
MODEL
EA, DX7J
MODEL
34
34
Page 35
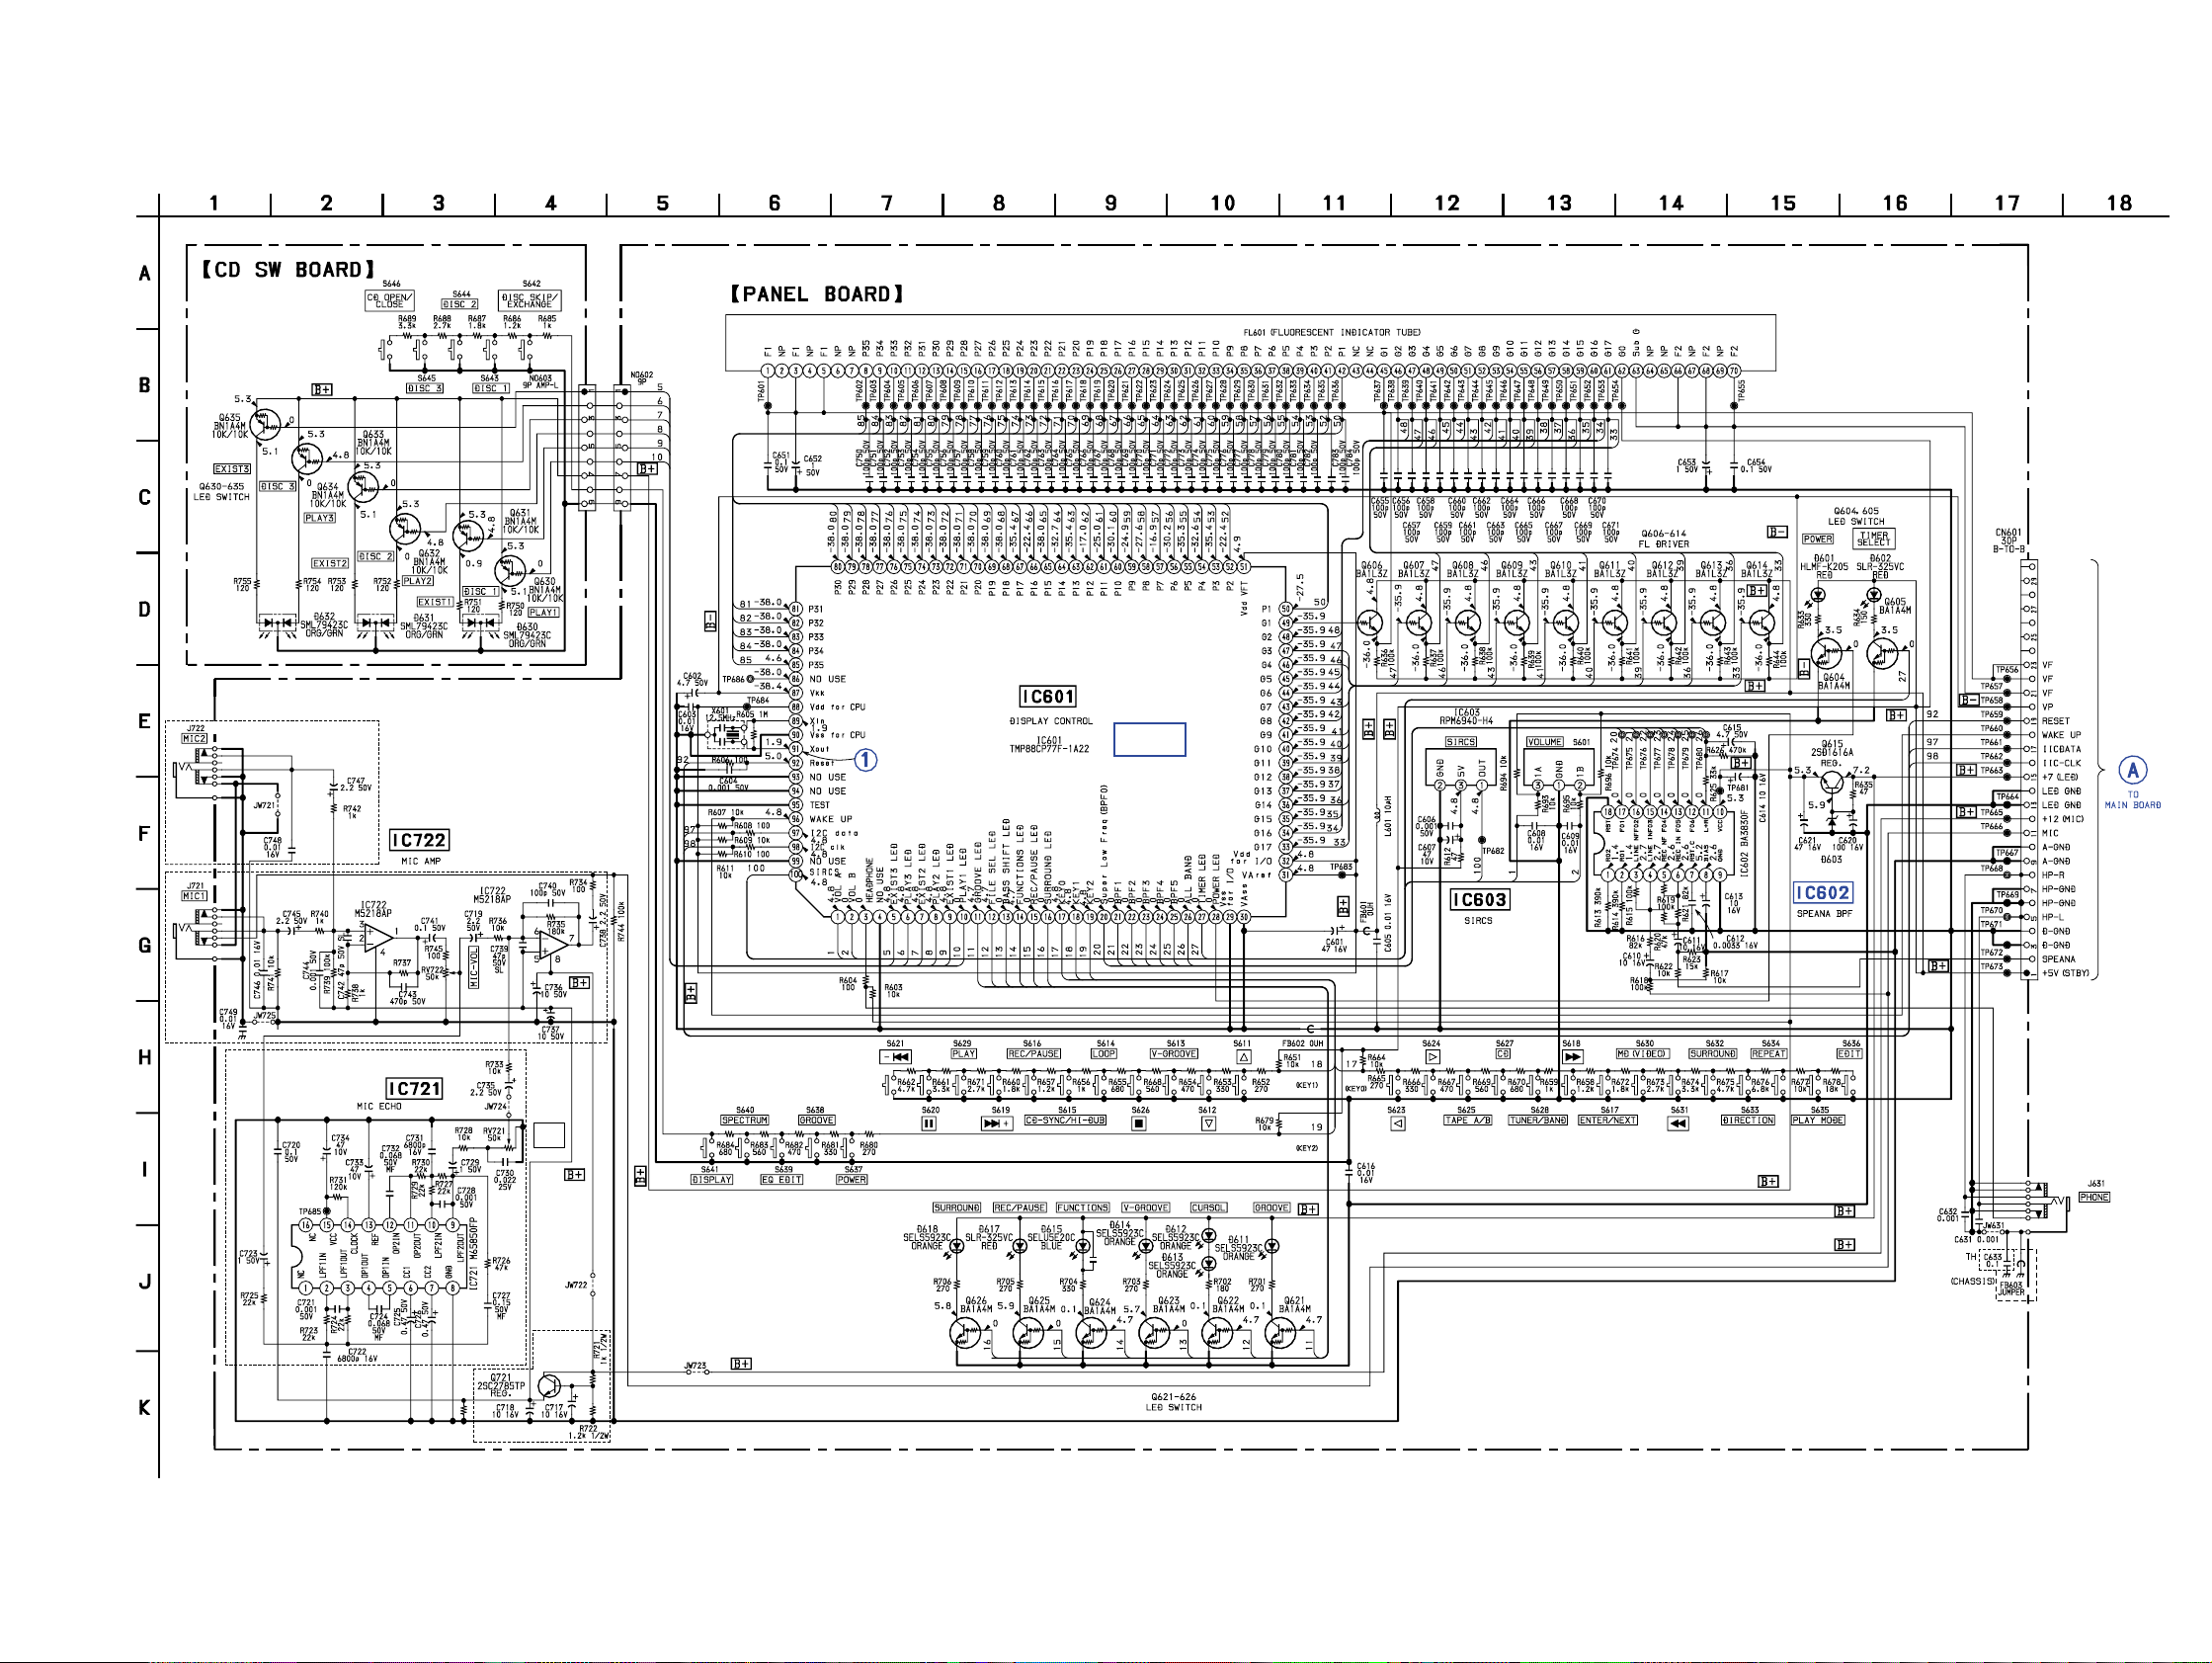
7-14. SCHEMATIC DIAGRAM – PANEL SECTION –
• See page 21 for Wavefoms.
• See page 45 for IC Pin Function Description.
• See page 47 for IC Block Diagrams.
HCD-BX7/DX7/DX7J
EA, DX7J MODEL
PIN
FUNCTION
R737
*
47k : EA, DX7J
22k : SP, MY, E2, MX, AR, AUS, TH, E3, KR
DX7, DX7J MODEL
*
ECHO
LEVEL
C617
0.001
MTZJ-T-77-5.6C
(Page 29)
EXCEPT TH
EA, DX7J
MODEL
R746
09
1k
DX7, DX7J MODEL
3535
Page 36
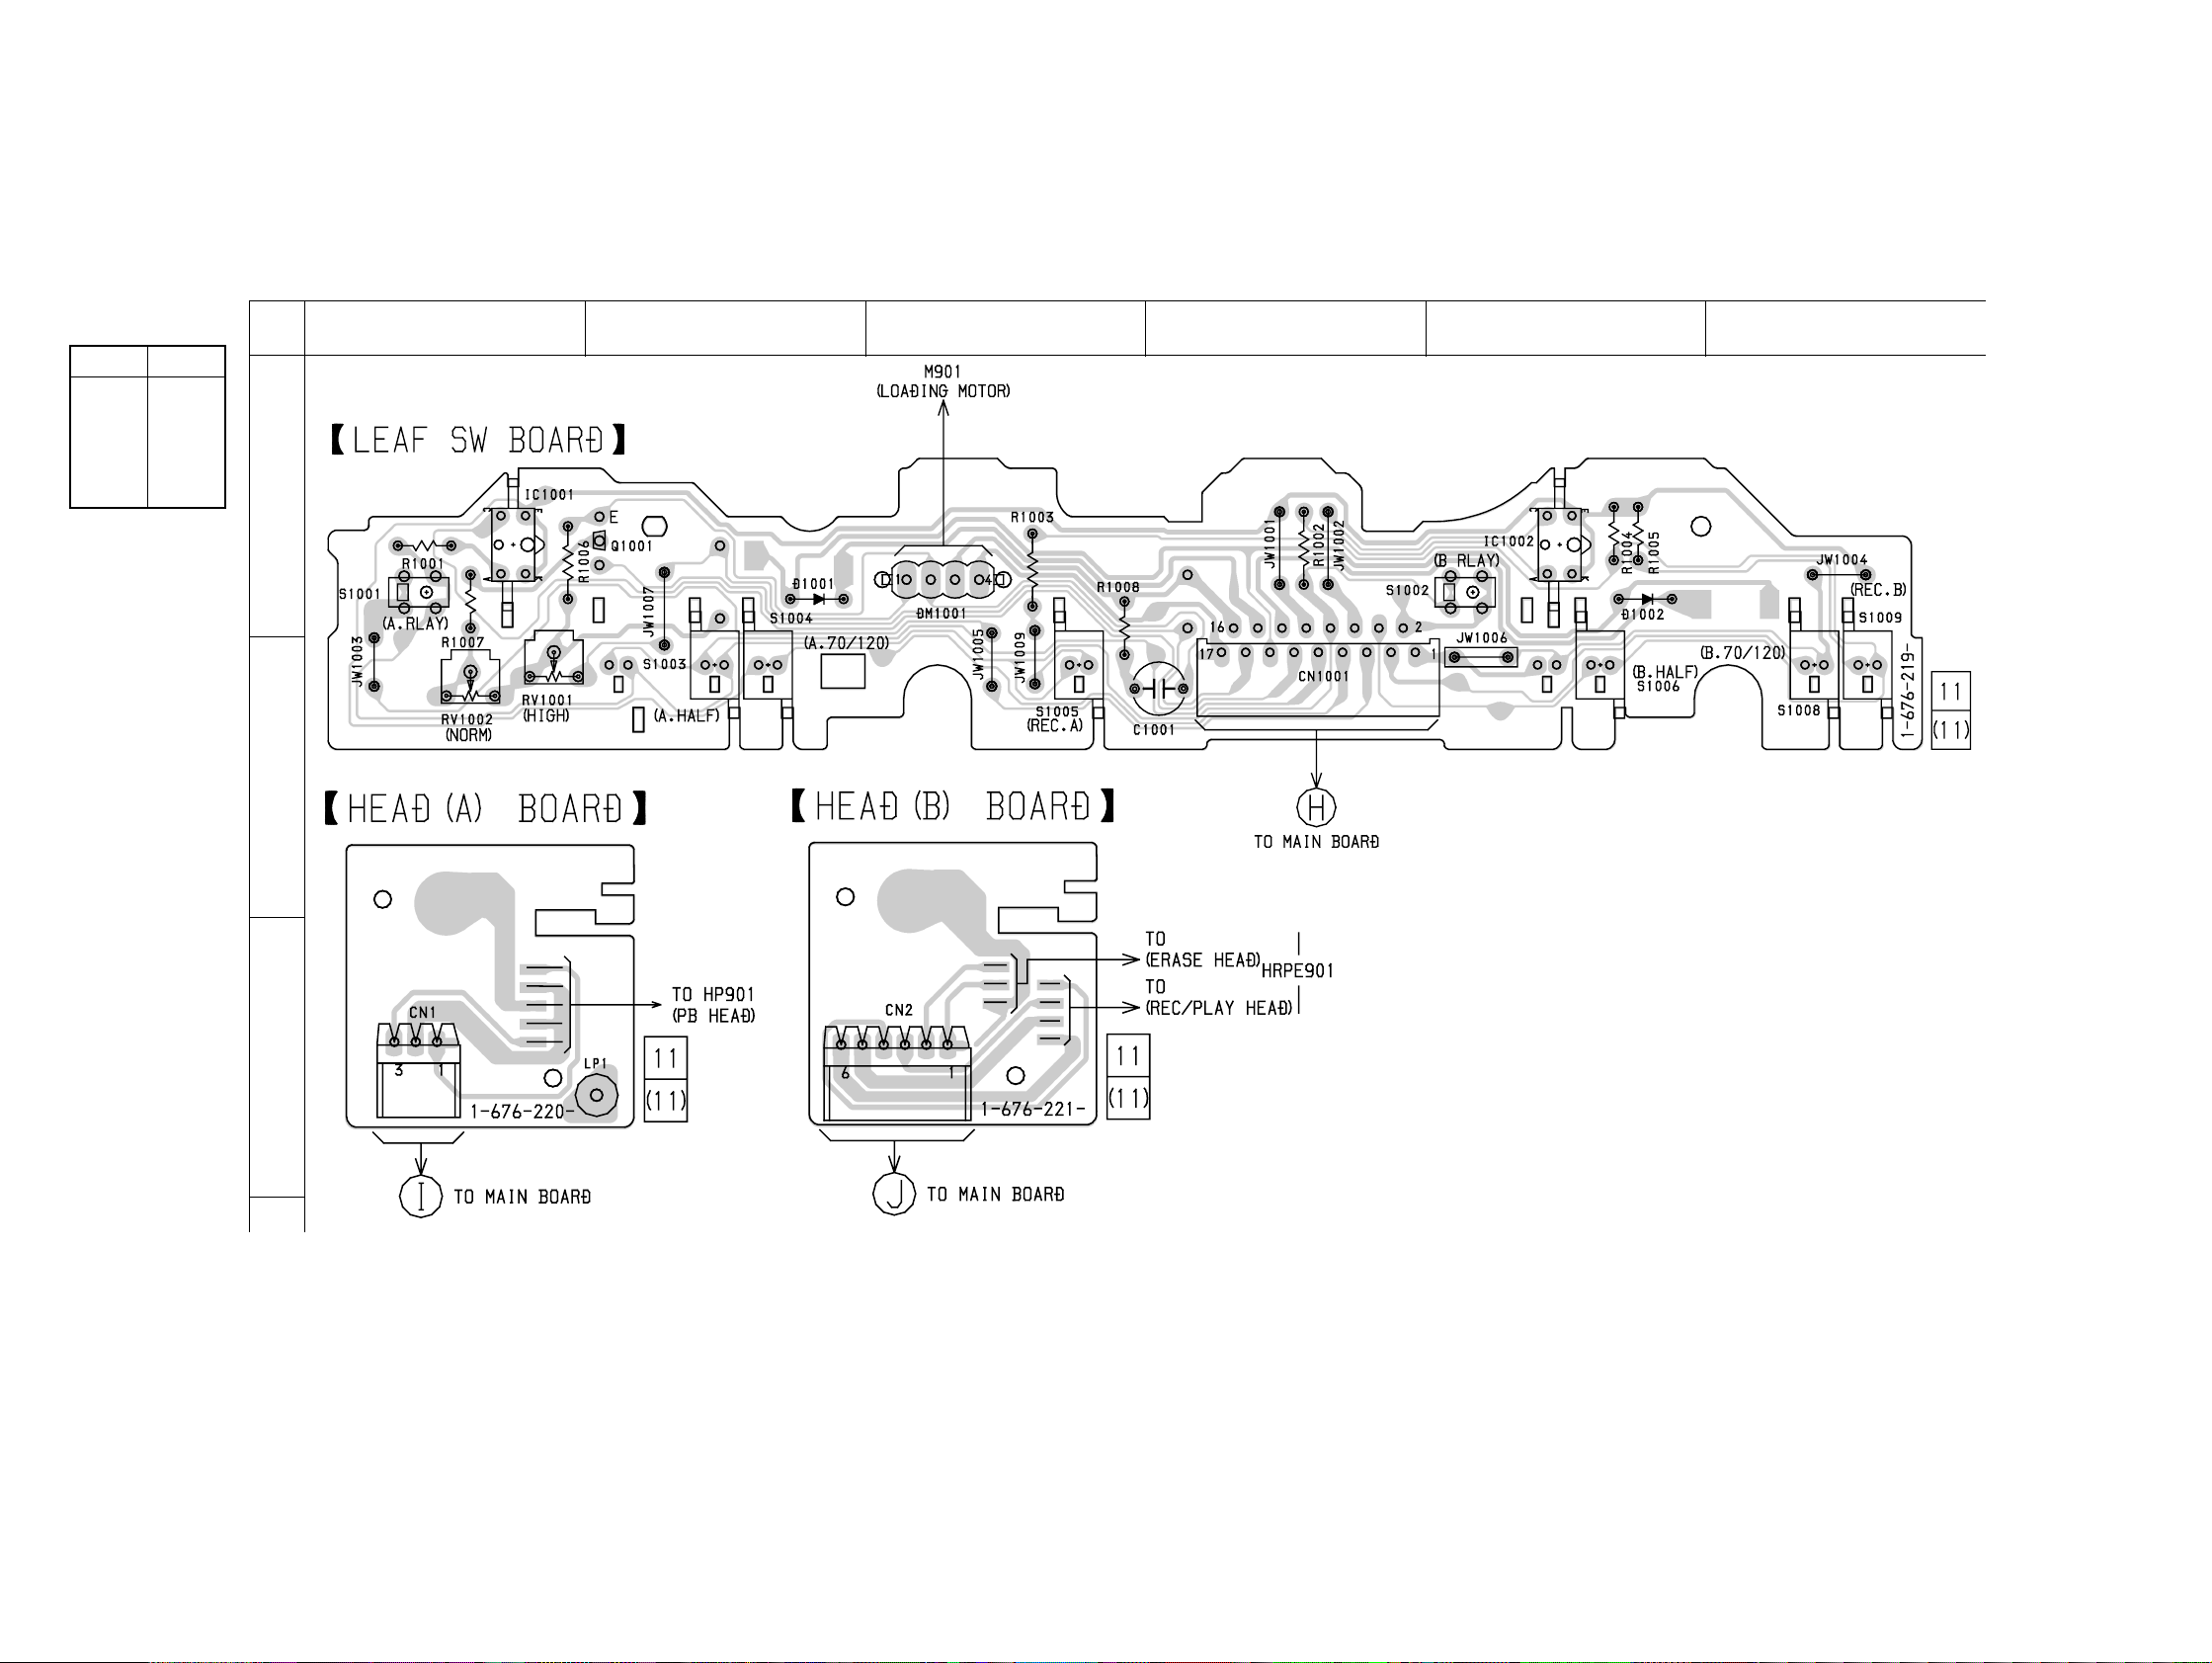
HCD-BX7/DX7/DX7J
7-15. PRINTED WIRING BOARD – LEAF SW SECTION – • See page 21 for Circuit Boards Location.
• Semiconductor
Location
Ref. No. Location
D1001 A-2
D1002 A-5
IC1001 A-1
IC1002 A-5
12
3456
Q1001 A-2
A
B
(Page 26)
C
09
(Page 26)
(Page 26)
36
36
Page 37
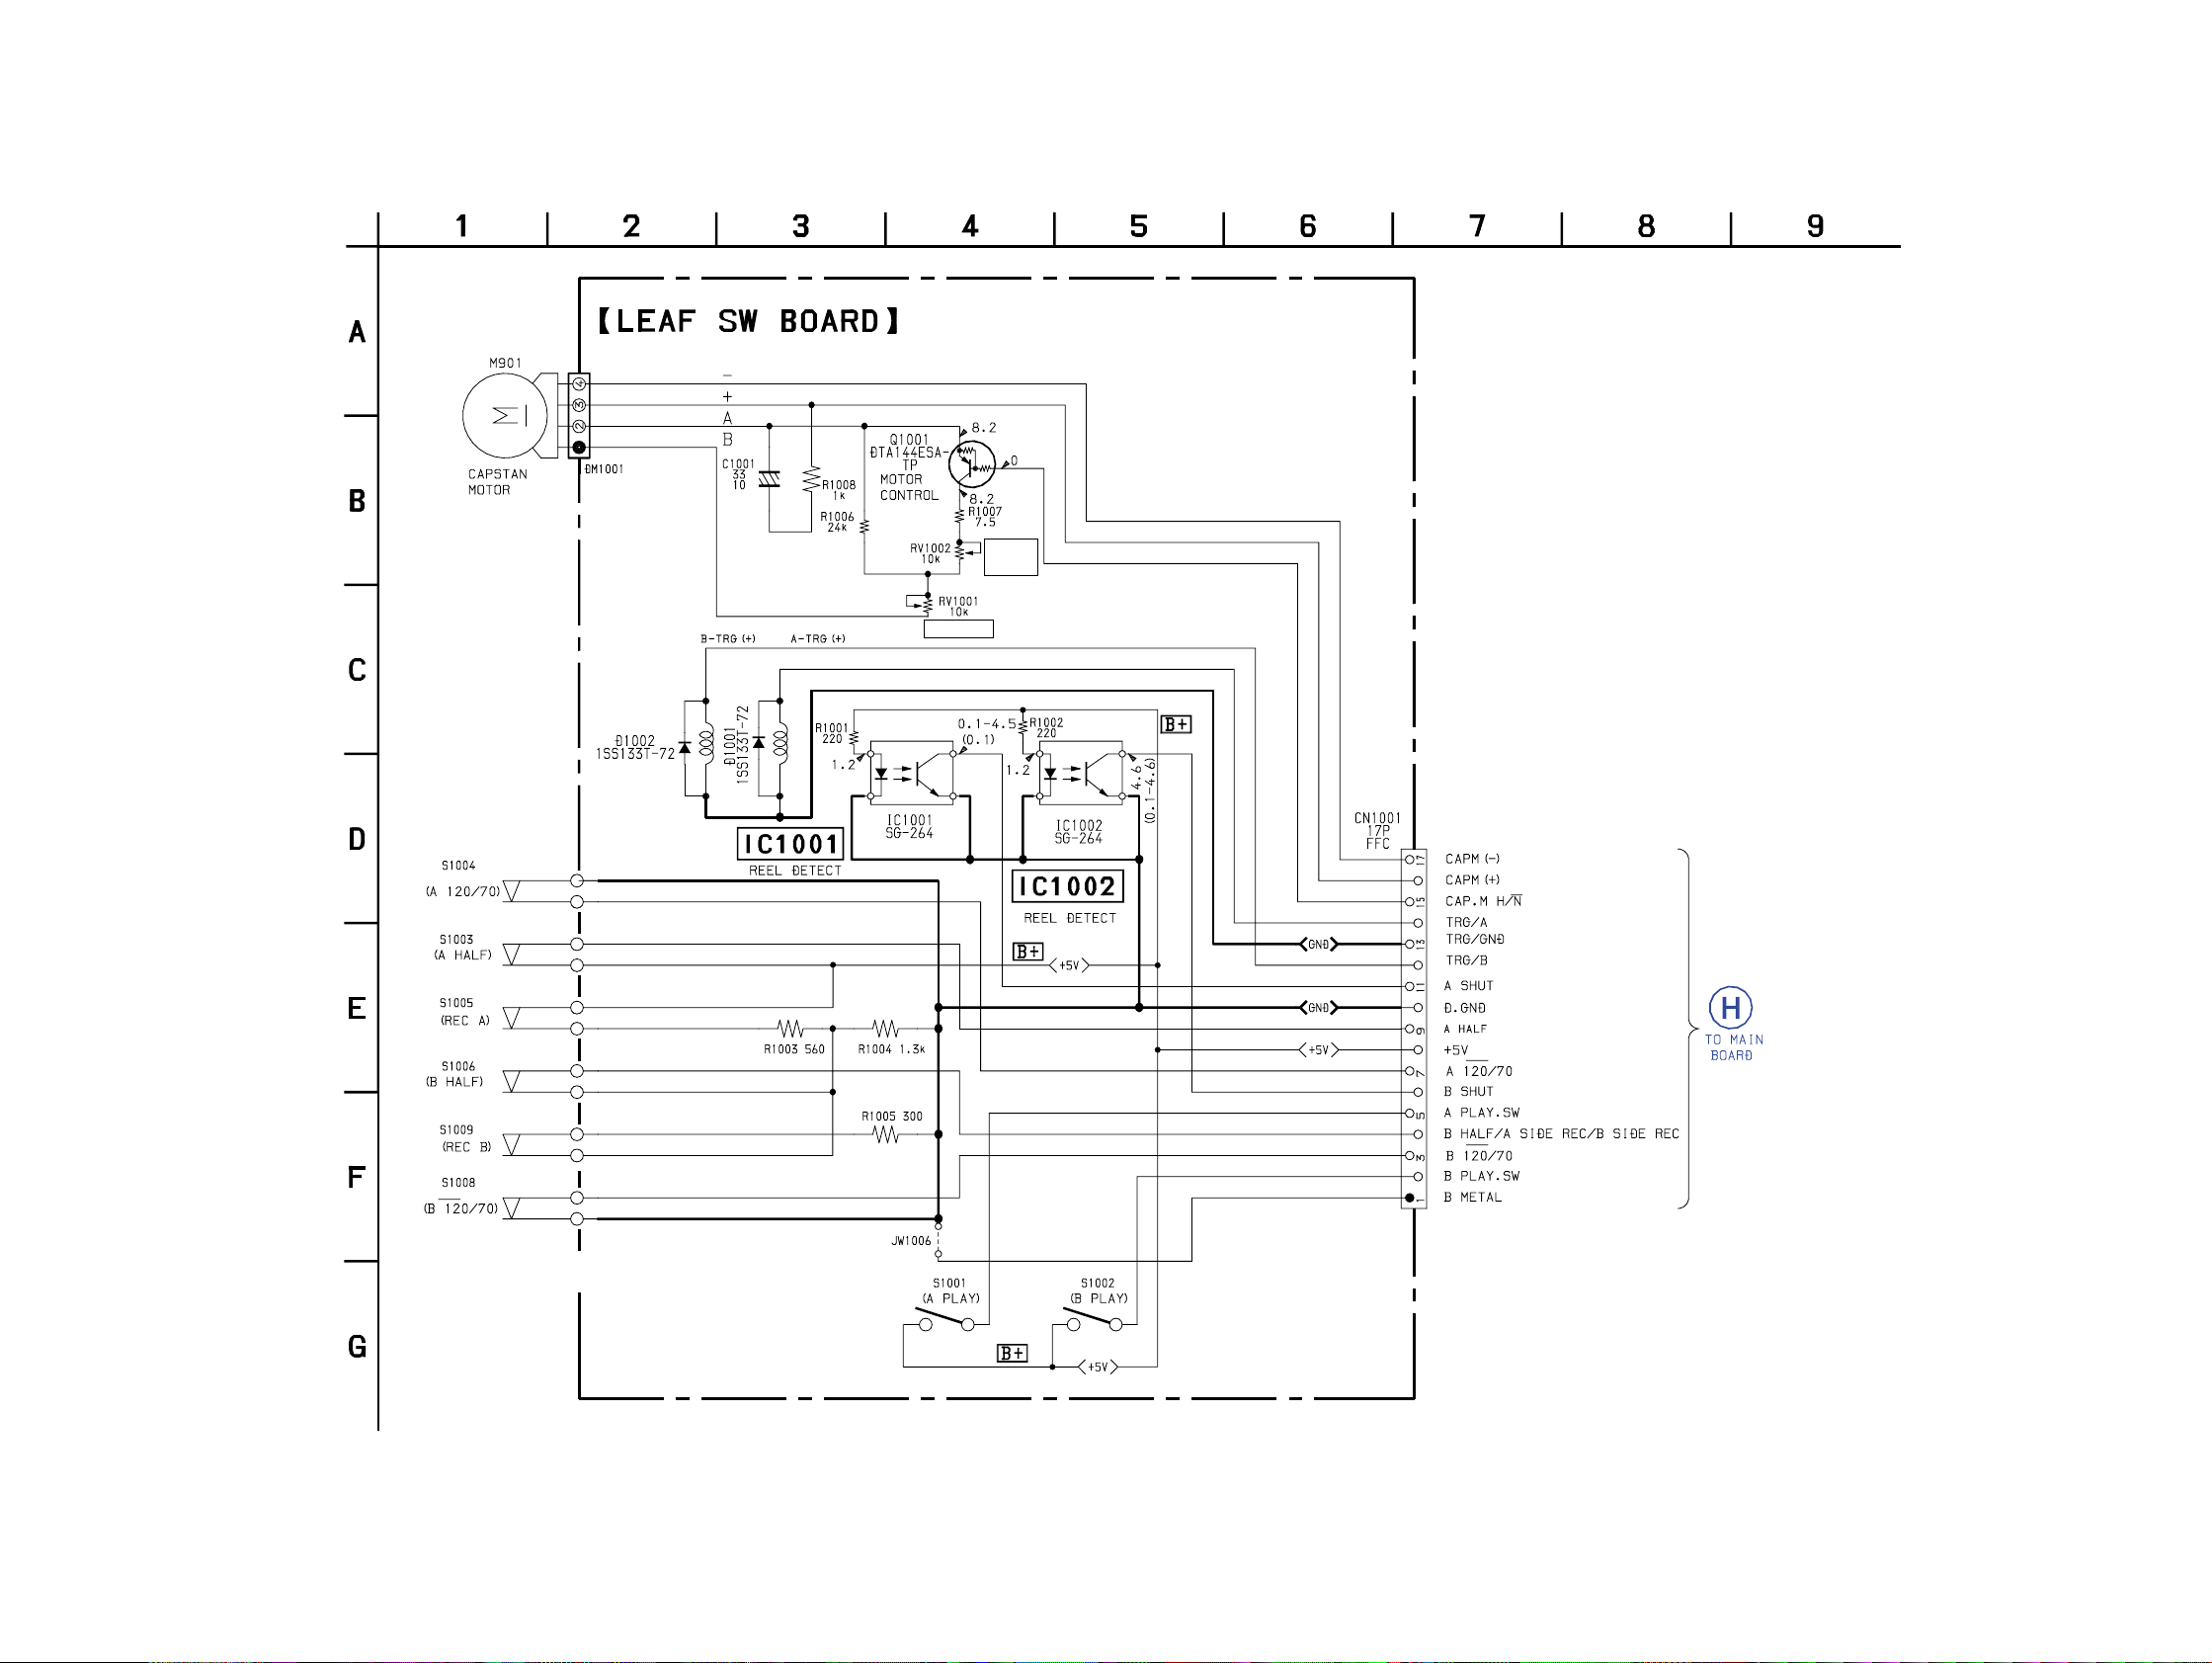
7-16. SCHEMATIC DIAGRAM – LEAF SW SECTION –
HCD-BX7/DX7/DX7J
NORMAL
SPEED
HIGH SPEED
(Page 28)
09
3737
Page 38
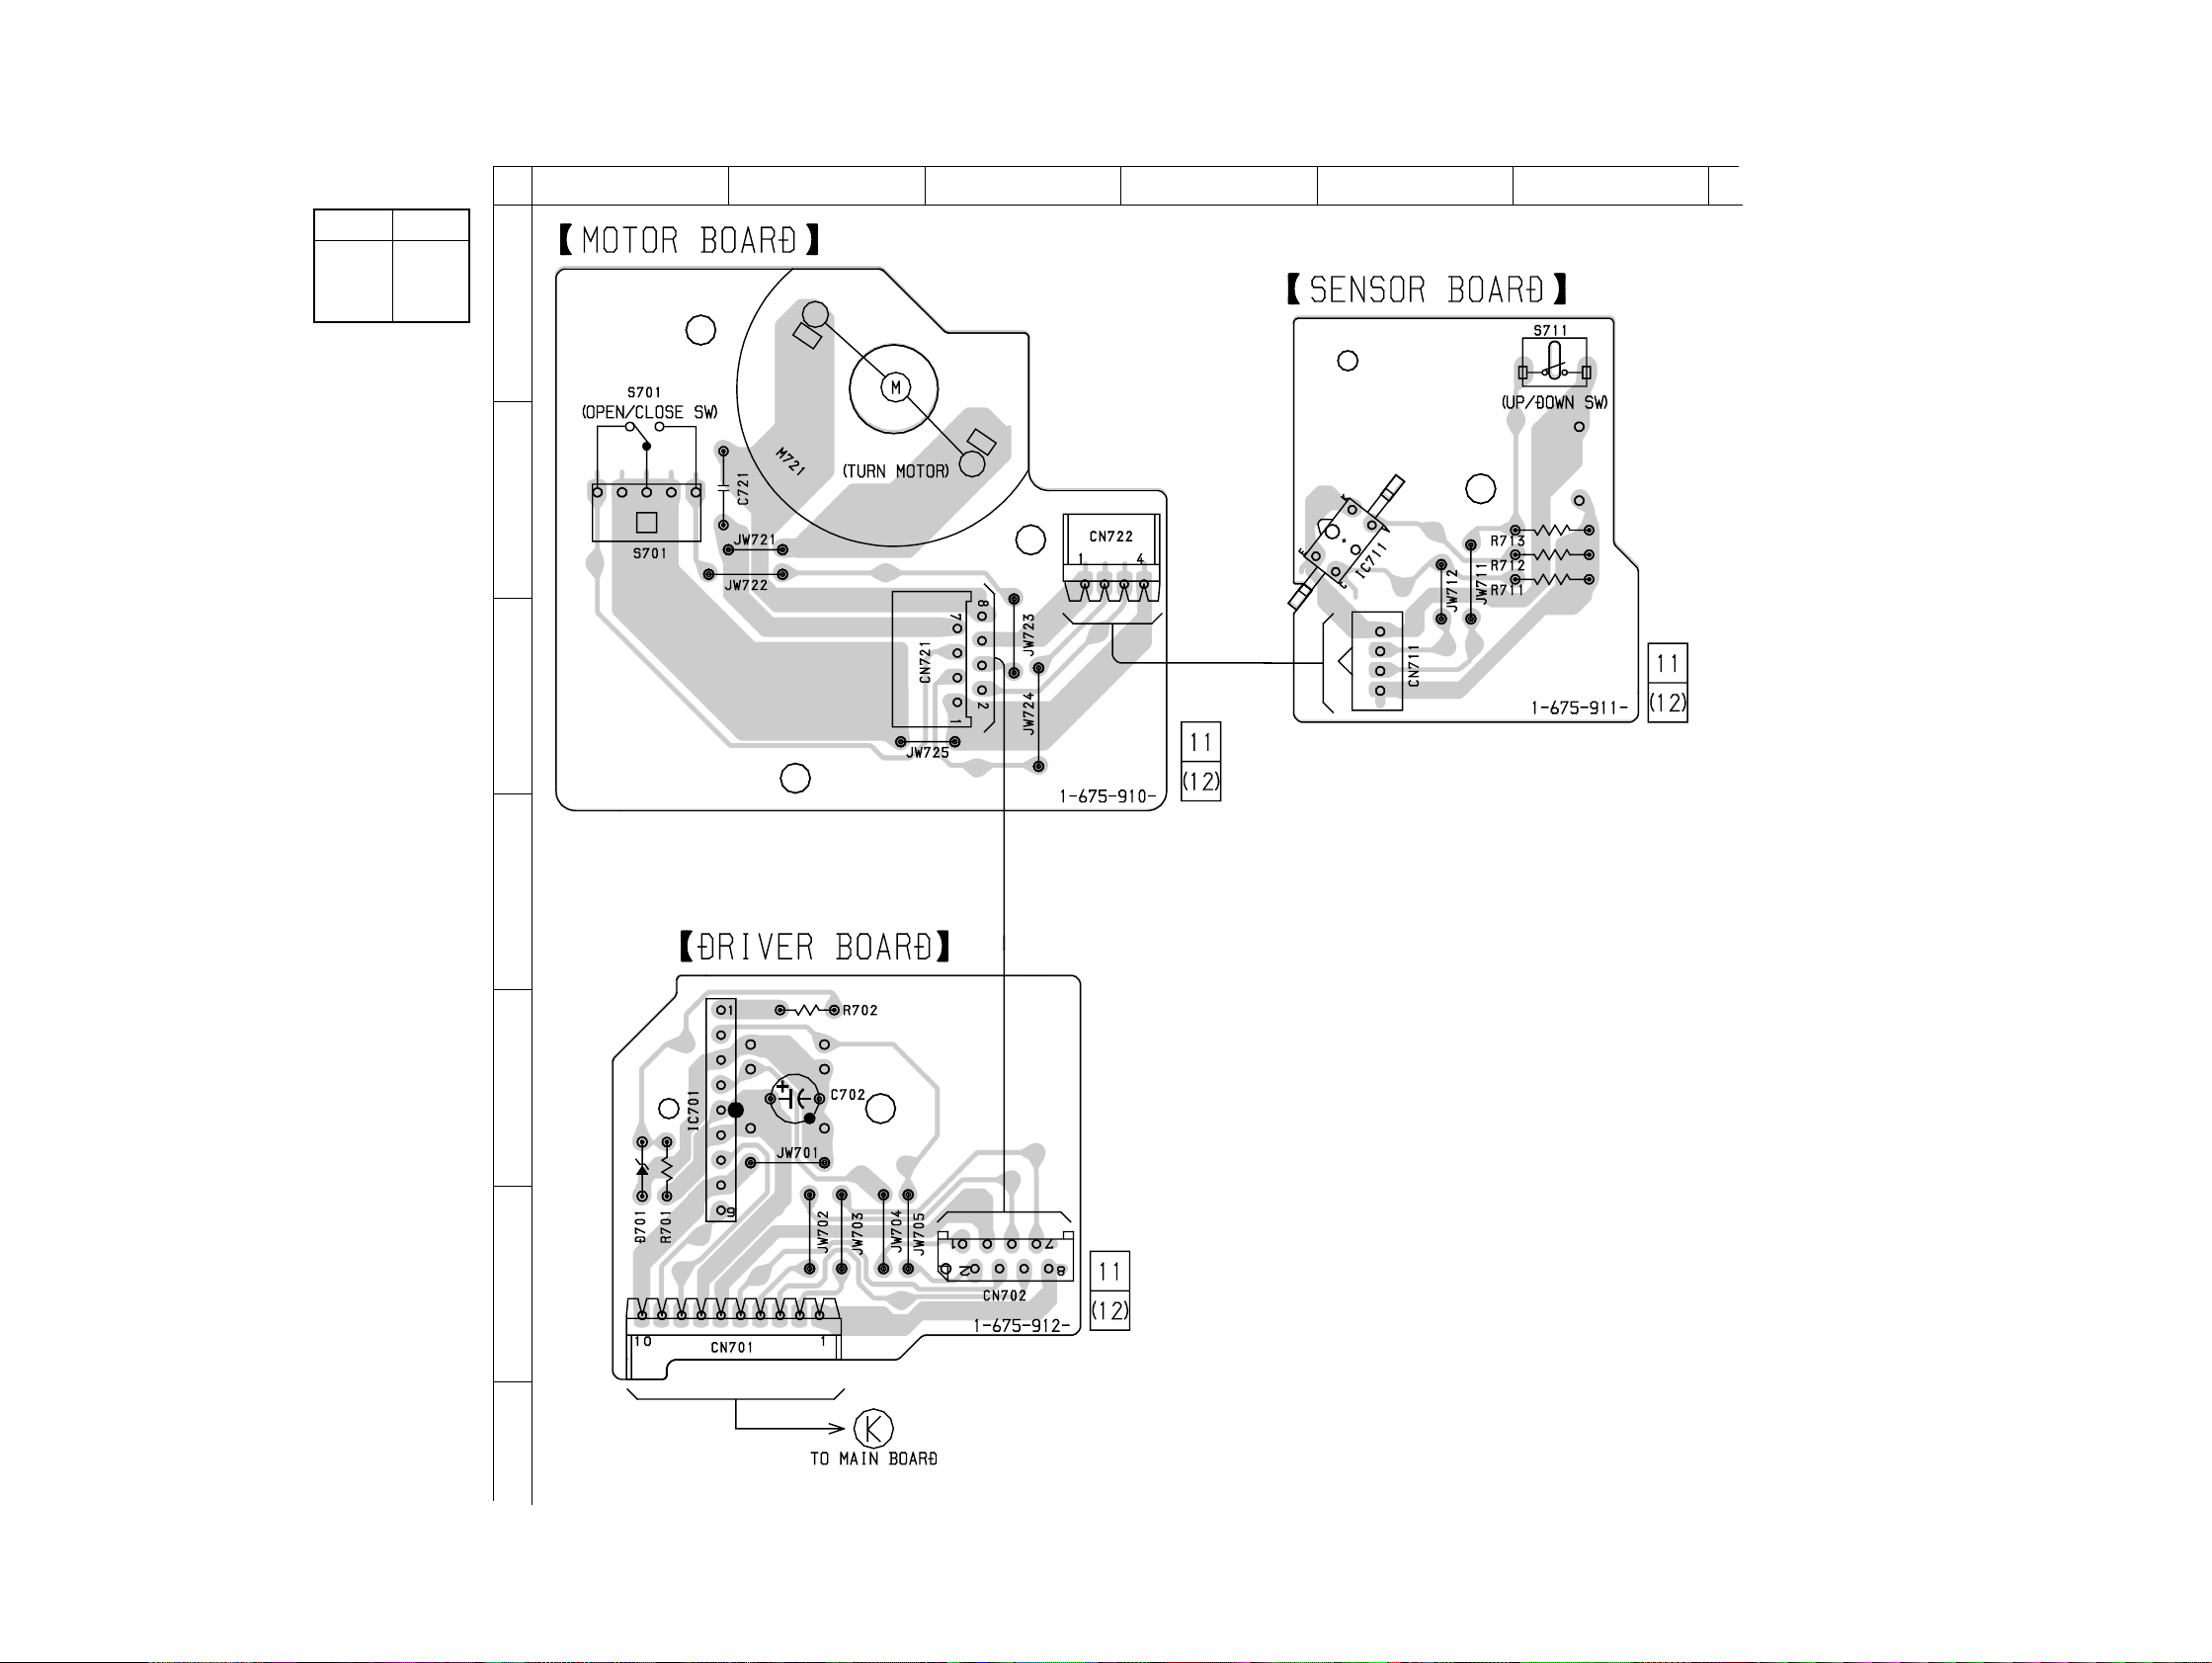
HCD-BX7/DX7/DX7J
7-17. PRINTED WIRING BOARD – DRIVER SECTION –
• Semiconductor
Location
Ref. No. Location
D701 E-1
IC701 E-1
IC711 B-5
A
B
C
12
3456
D
E
F
09
G
(Page 26)
38
38
Page 39
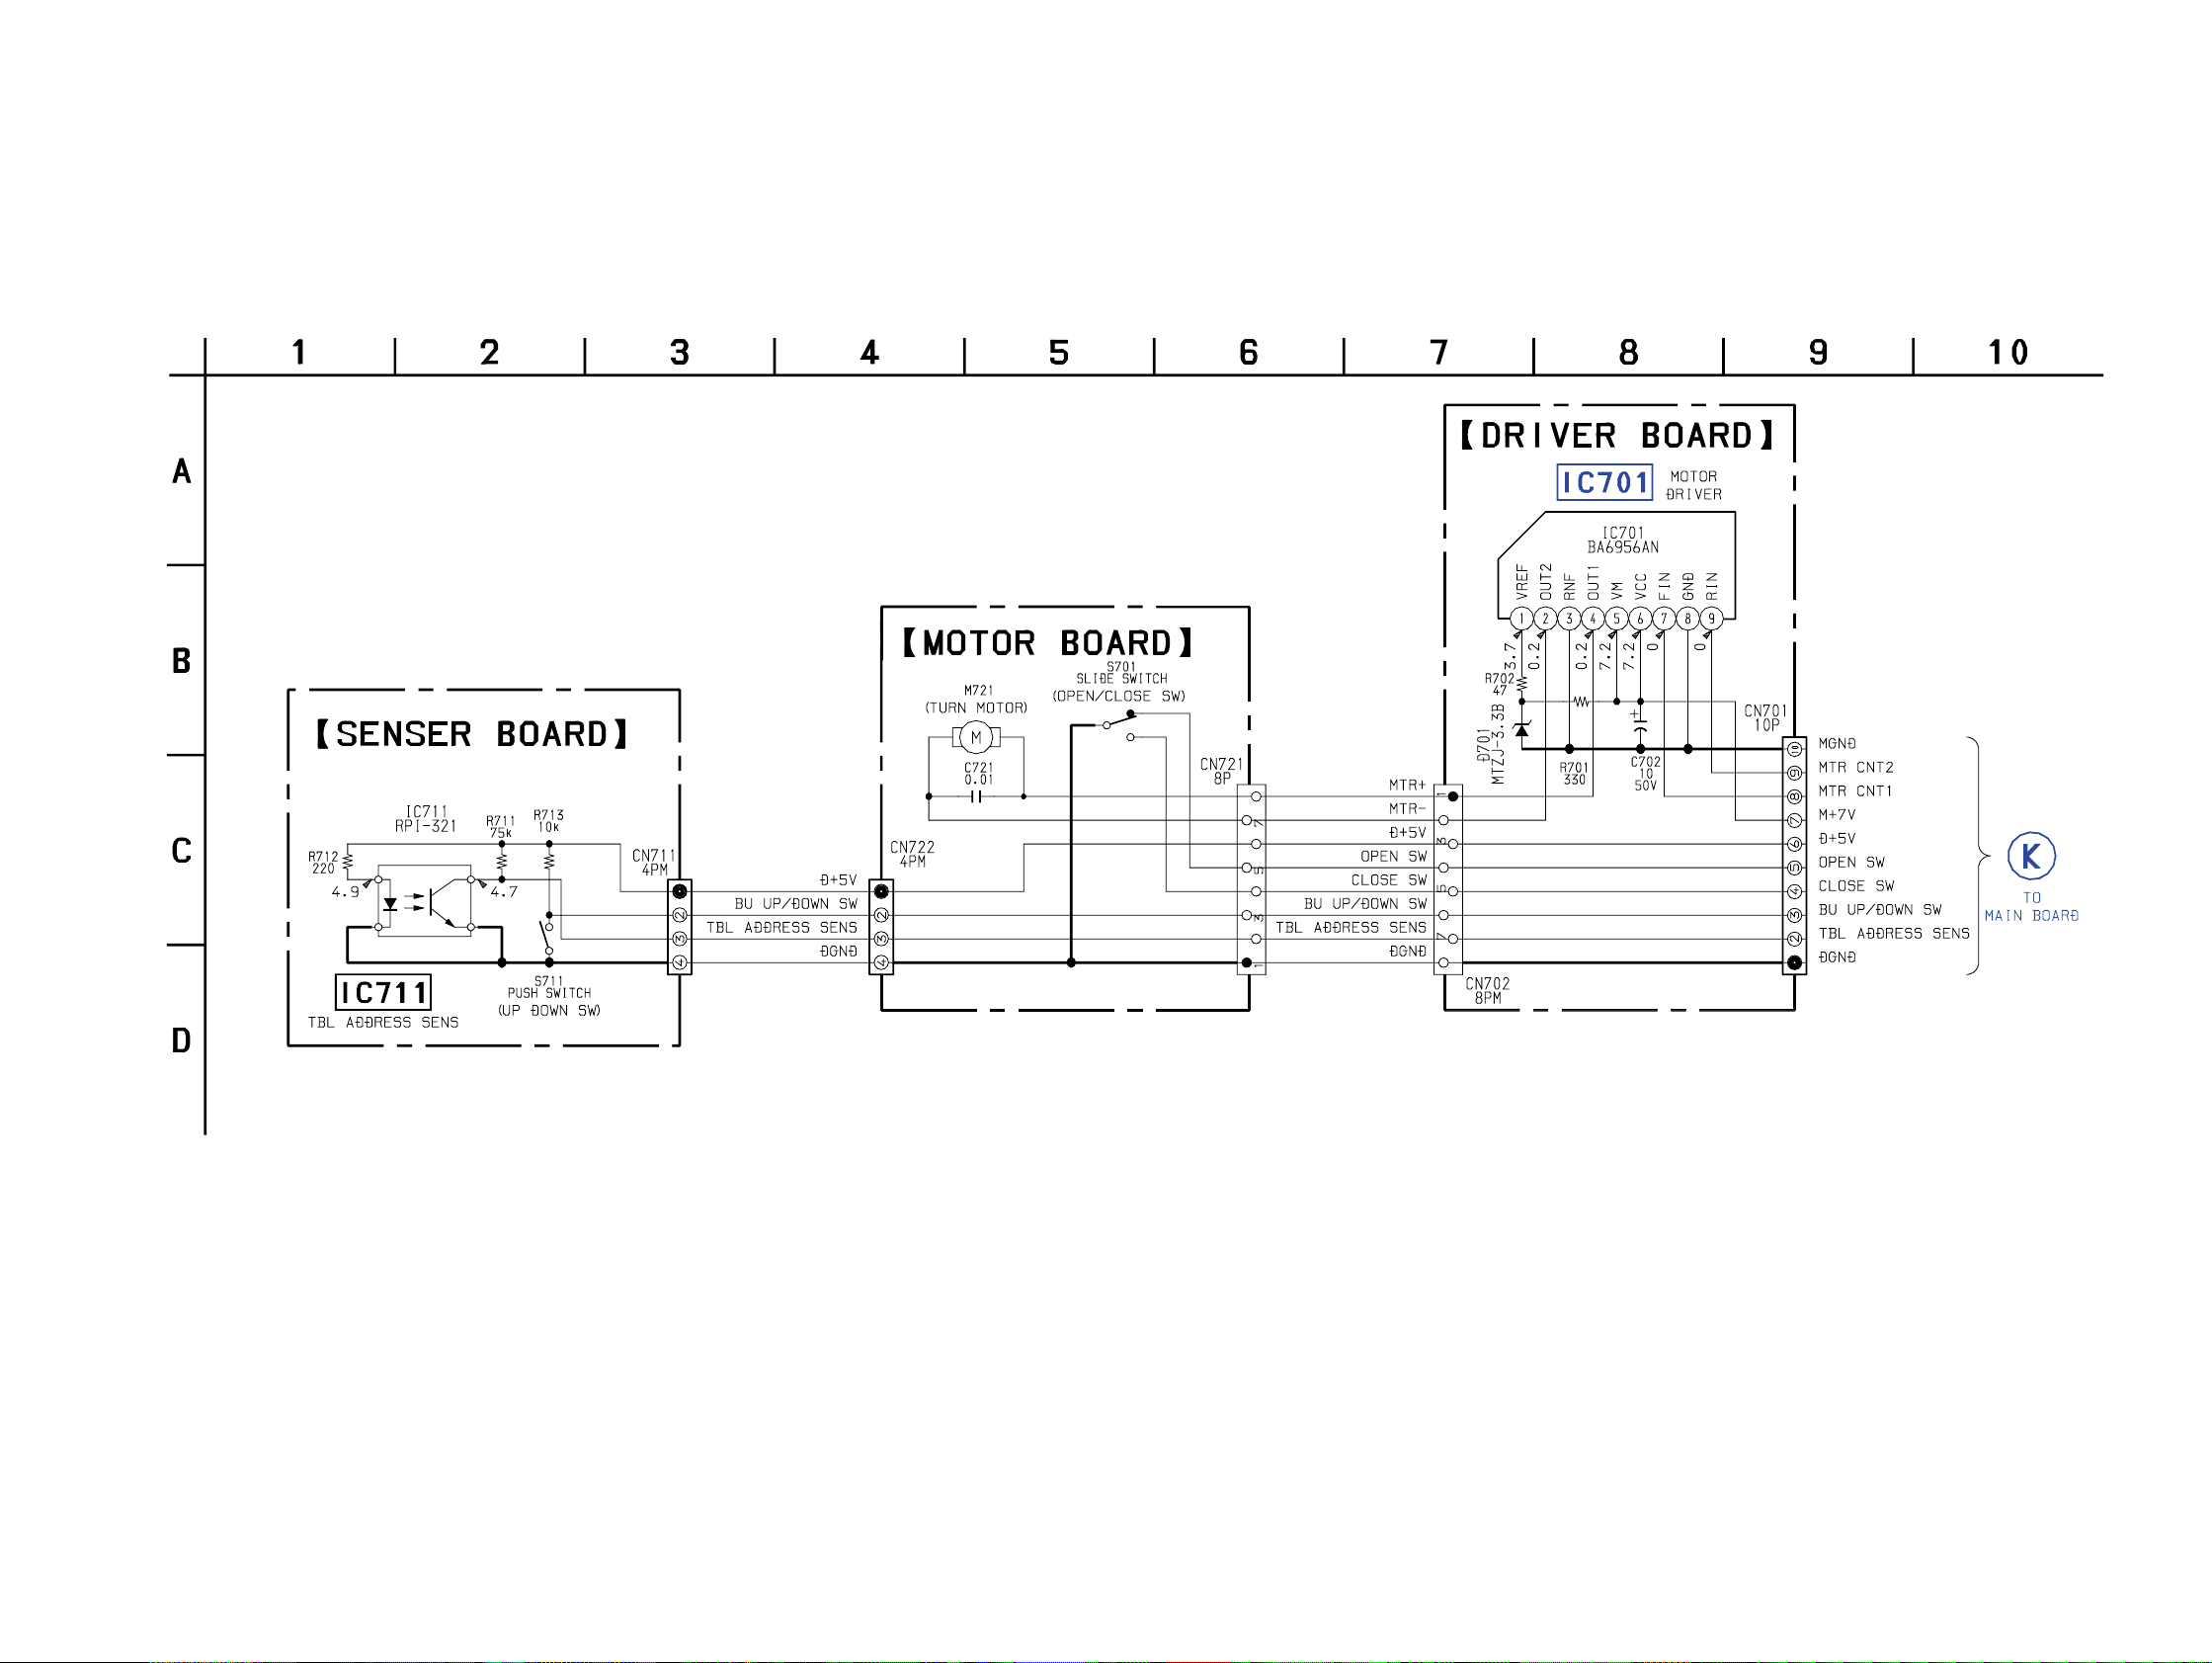
7-18. SCHEMATIC DIAGRAM – DRIVER SECTION –
HCD-BX7/DX7/DX7J
09
(Page 29)
3939
Page 40
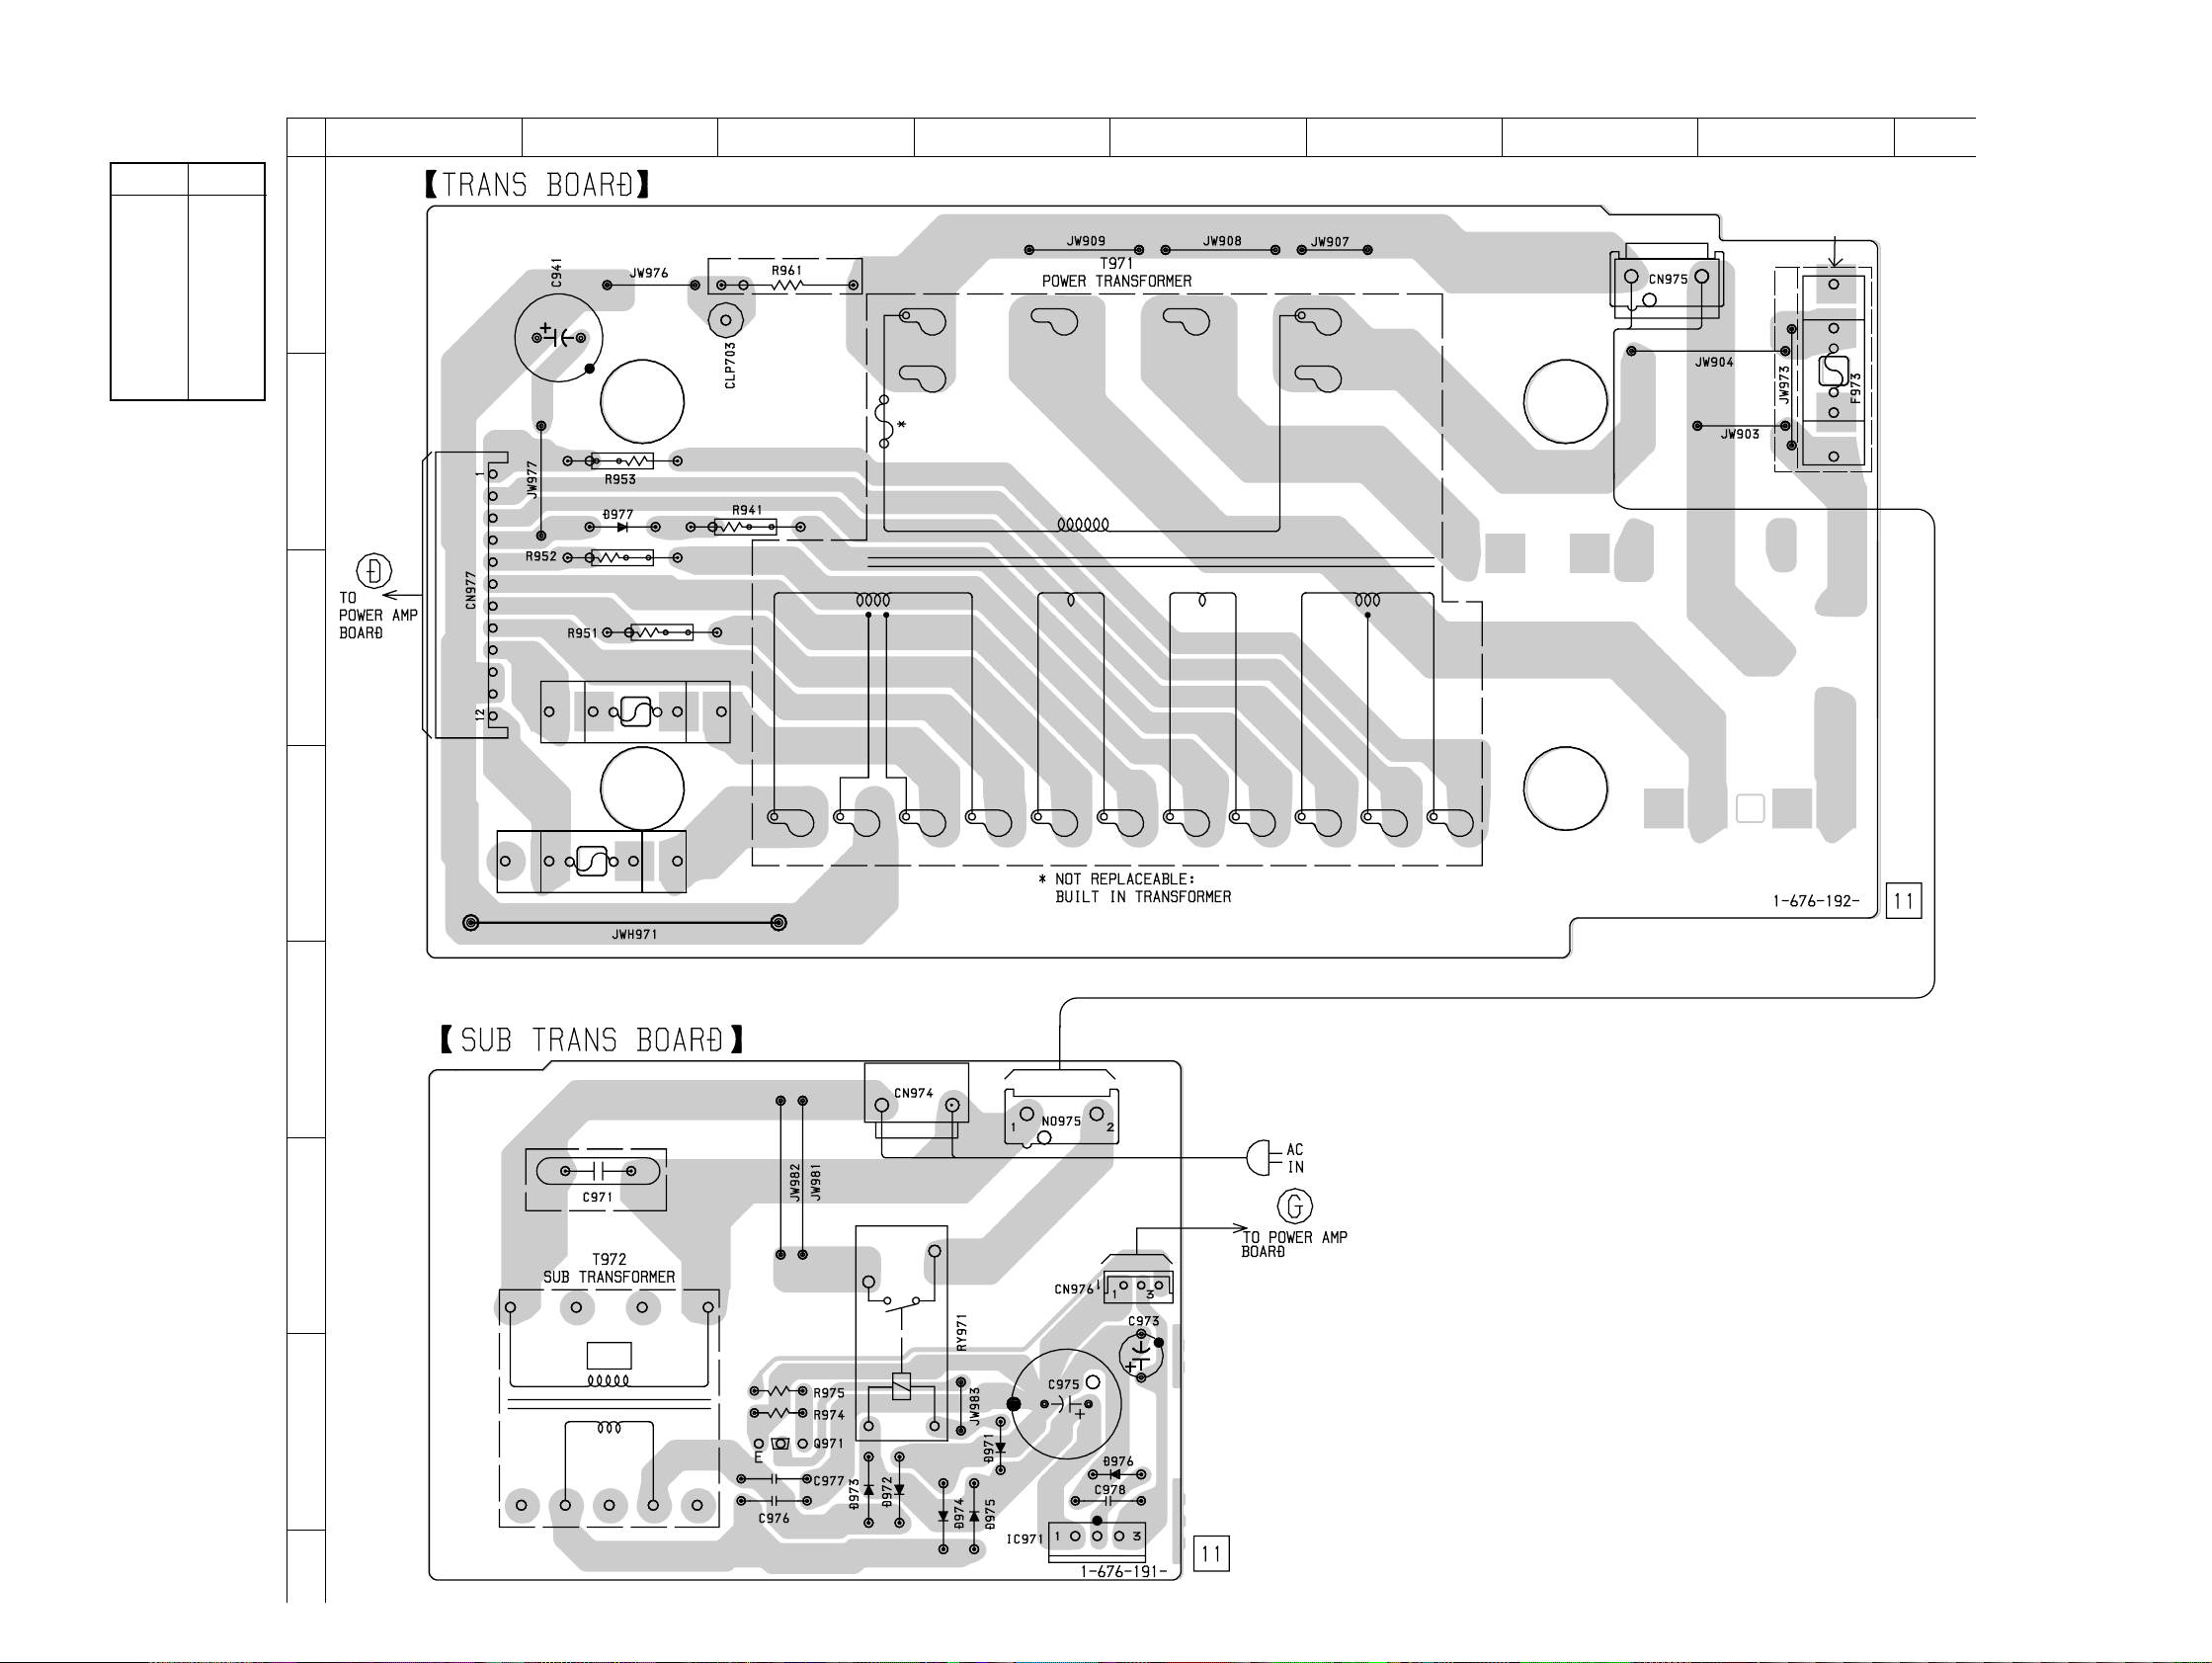
HCD-BX7/DX7/DX7J
7-19. PRINTED WIRING BOARD – TRANS SECTION – (BX7 MODEL) • See page 21 for Circuit Boards Location.
• Semiconductor
Location
Ref. No. Location
D971 G-4
D972 G-3
D973 G-3
D974 G-4
D975 G-4
D976 G-5
D977 B-2
IC971 G-4
Q971 G-3
A
12
US MODEL
3456789
B
US, CND
MODEL
EXCEPT
US, CND
C
D
E
(Page 30)
F975
F974
US MODEL
F
G
H
(Page 30)
09
40
40
Page 41
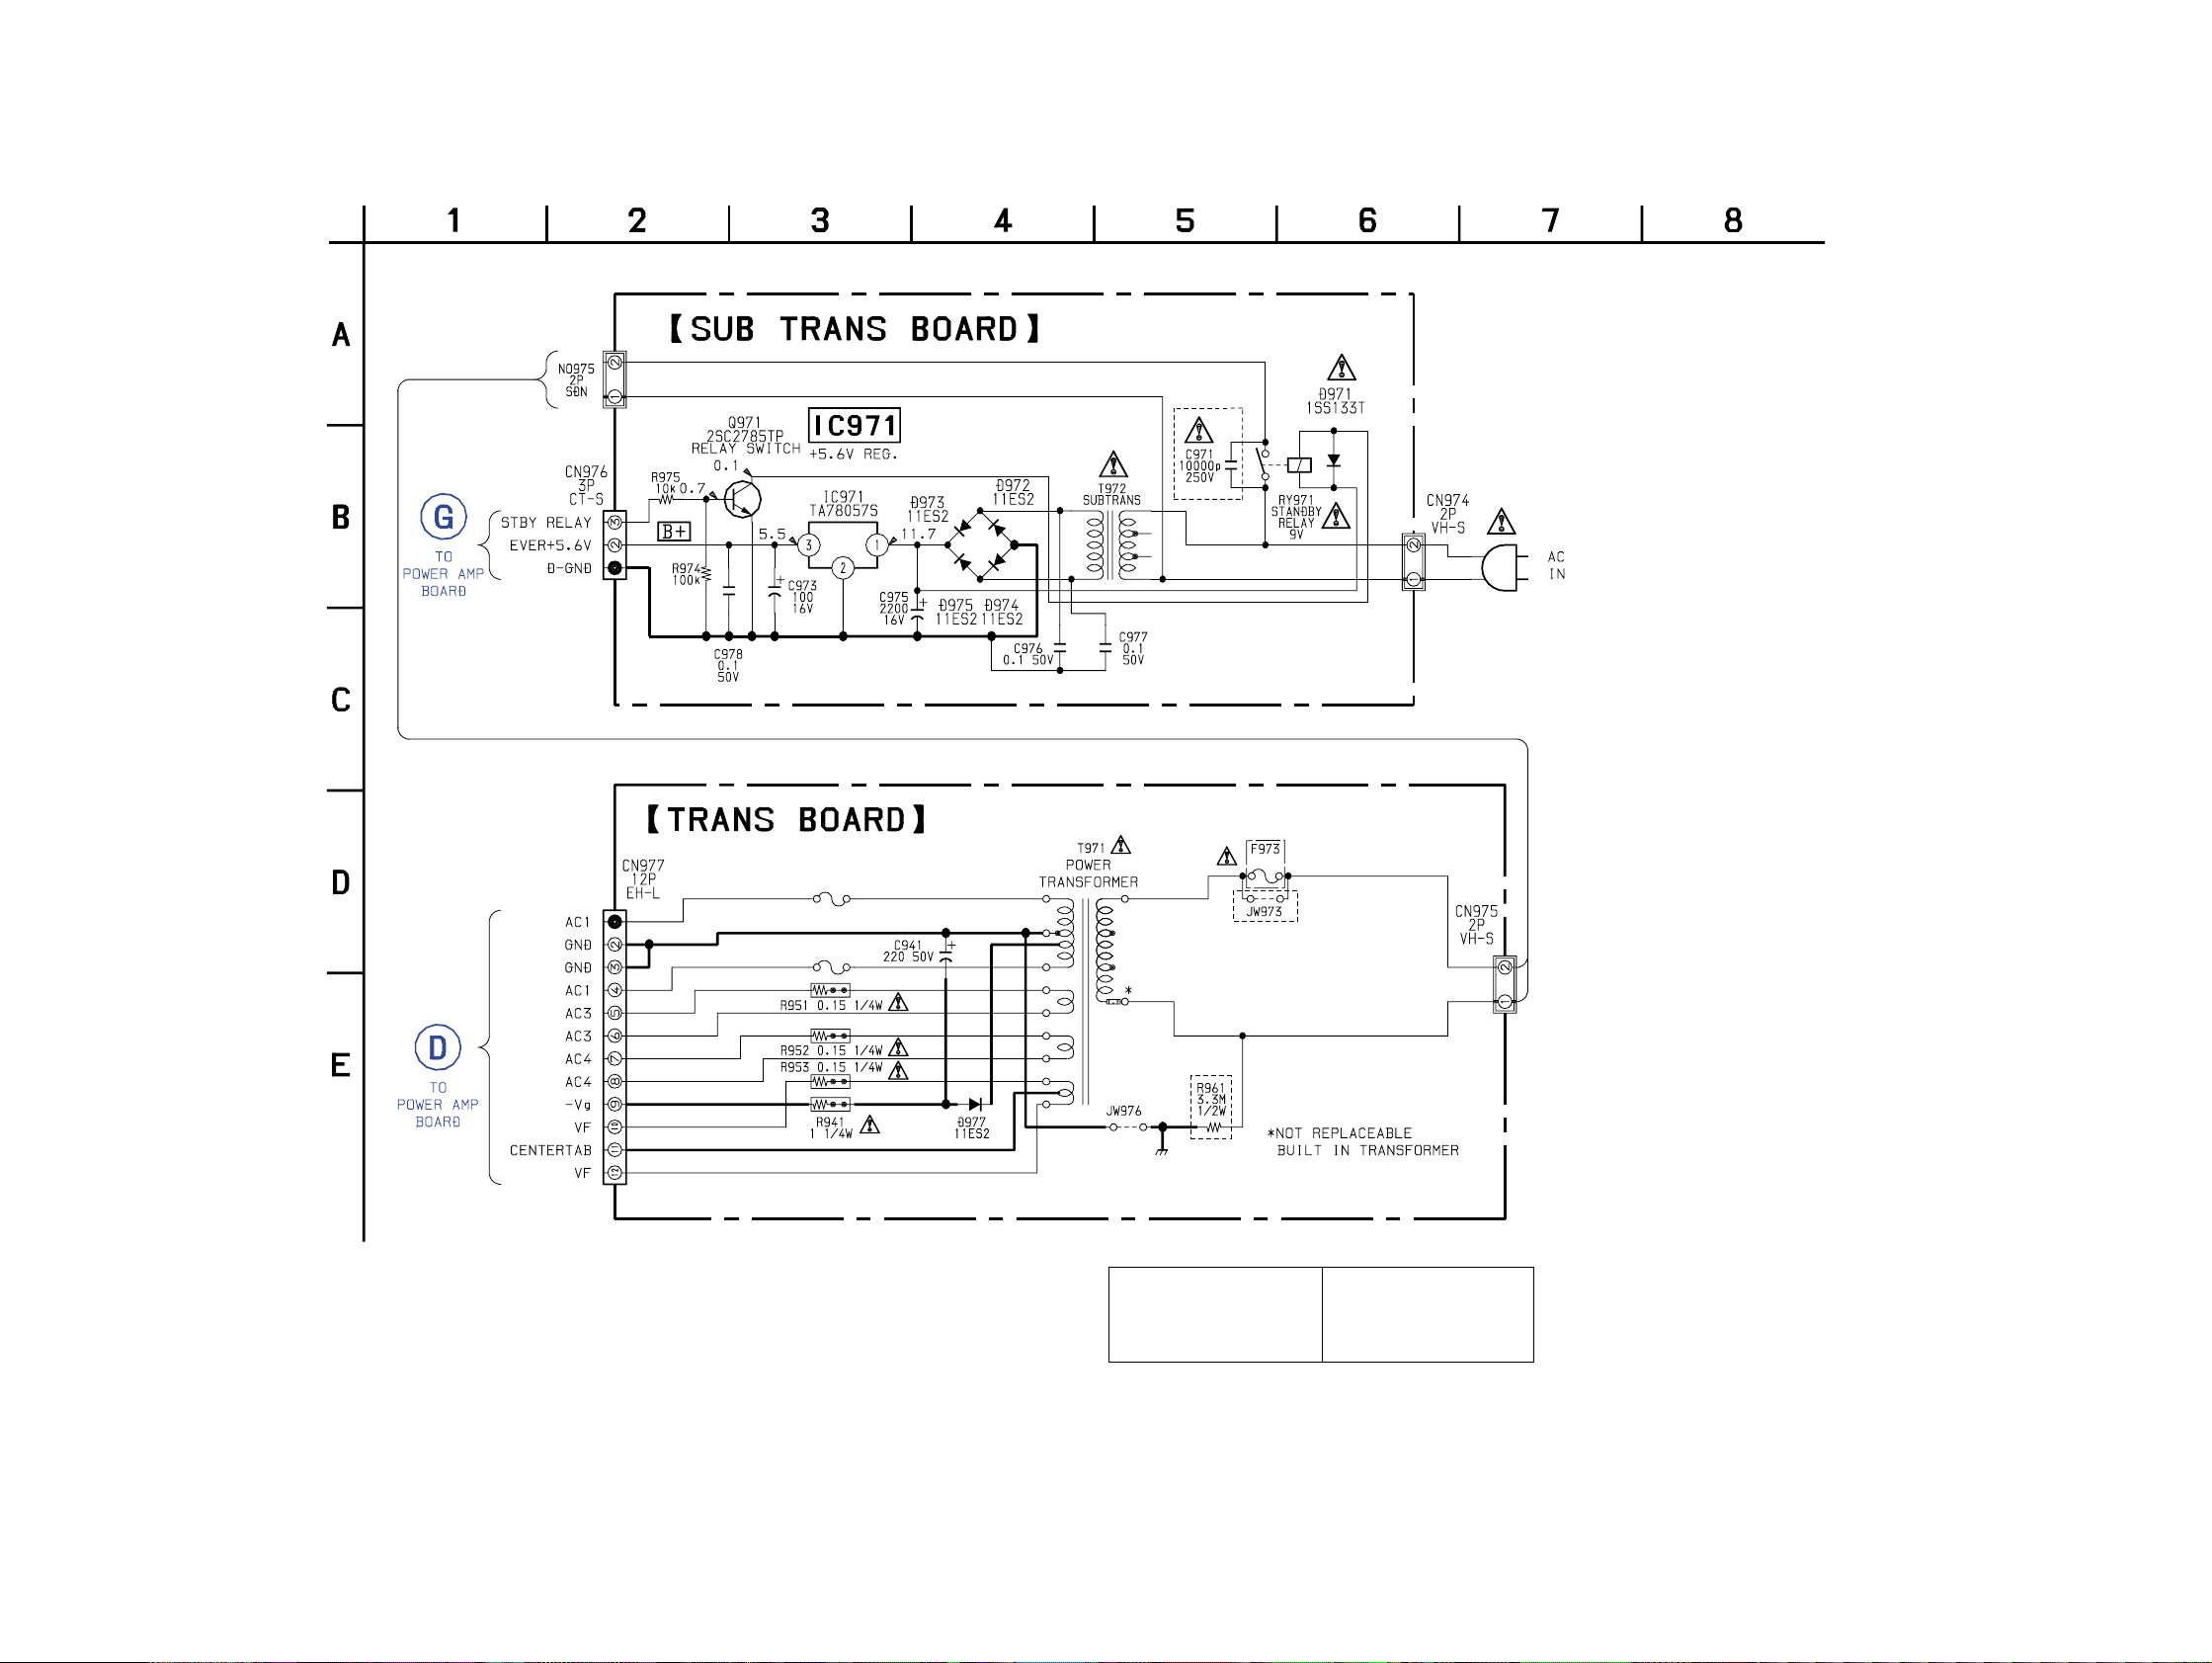
7-20. SCHEMATIC DIAGRAM – TRANS SECTION – (BX7 MODEL)
(Page 31)
HCD-BX7/DX7/DX7J
US MODEL
(Page 31)
09
*F974, F975
6.3A/125V : US, CND
T6.3AL/250V
*F974
*F975
: EXCEPT US, CND
US, CND MODEL
6.3A
EXCEPT US, CND
US MODEL
The components identified by
mark 0 or dotted line with mark
0 are critical for safety.
Replace only with part number
specified.
Les composants identifiés par
une marque 0 sont critiques
pour la sécurité.
Ne les remplacer que par une
pièce portant le numéro spécifié.
4141
Page 42
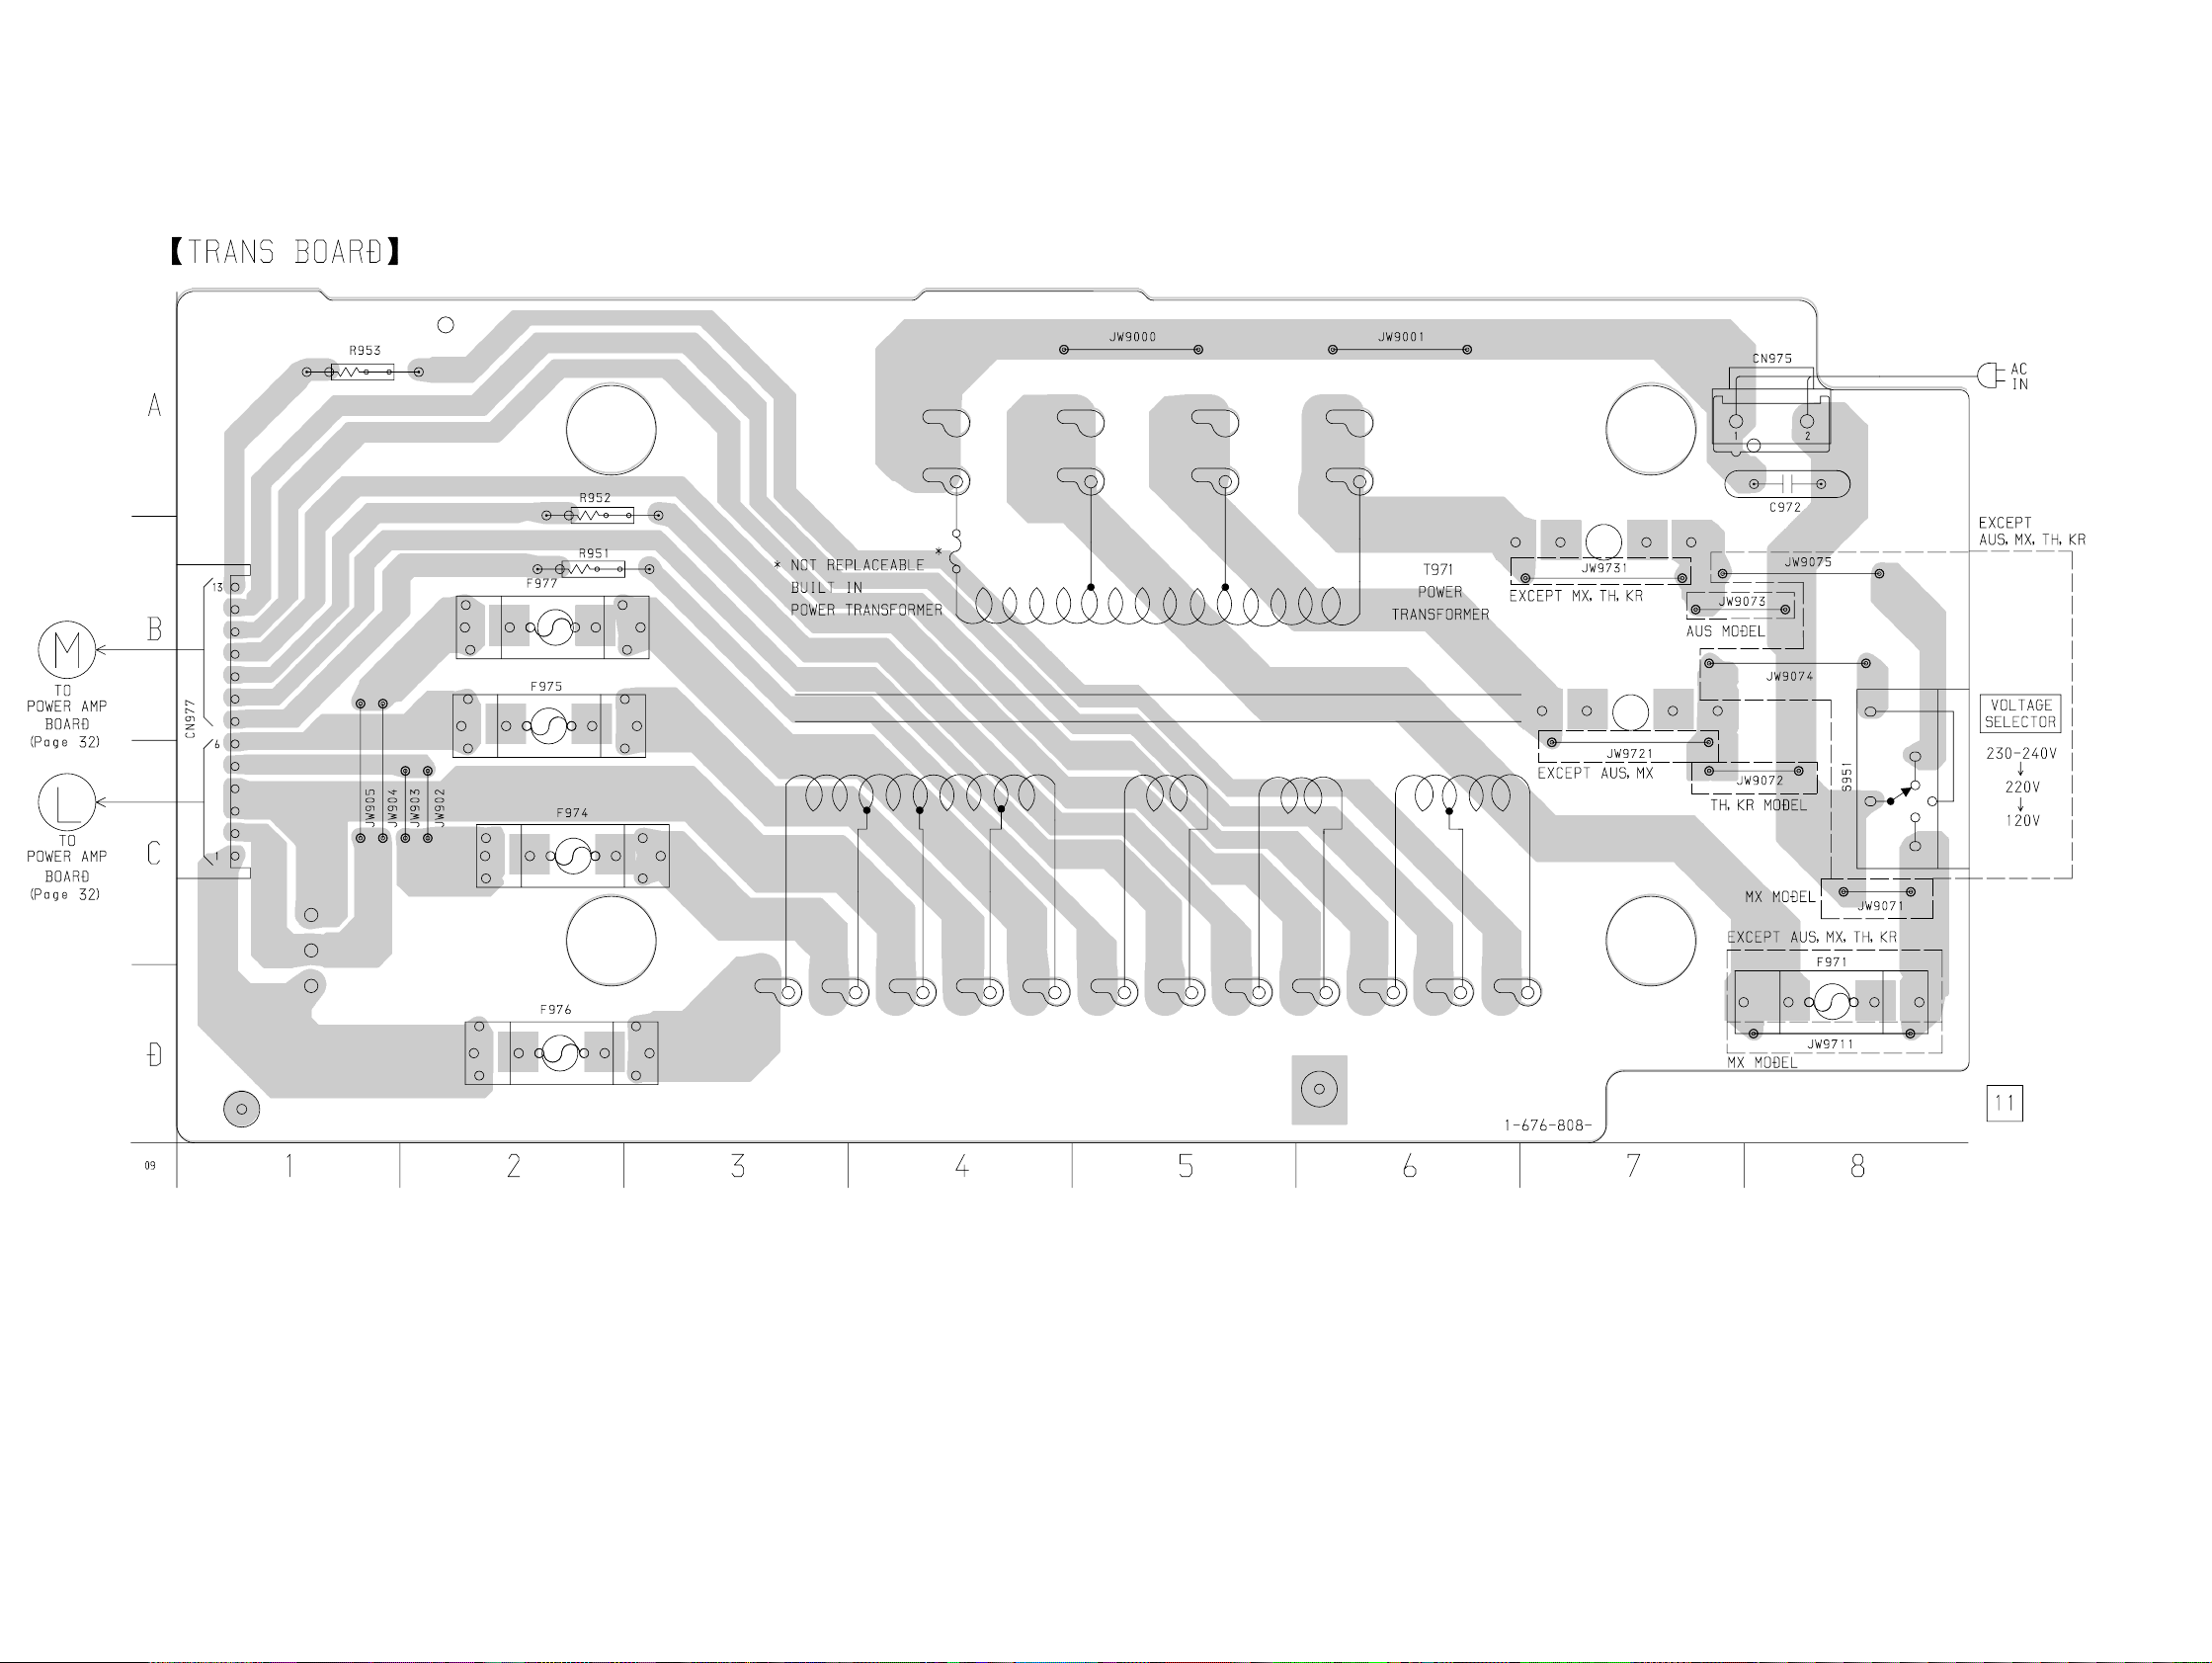
HCD-BX7/DX7/DX7J
7-21. PRINTED WIRING BOARD – TRANS SECTION – (DX7, DX7J MODEL)
• See page 21 for Circuit Boards Location.
42
42
Page 43
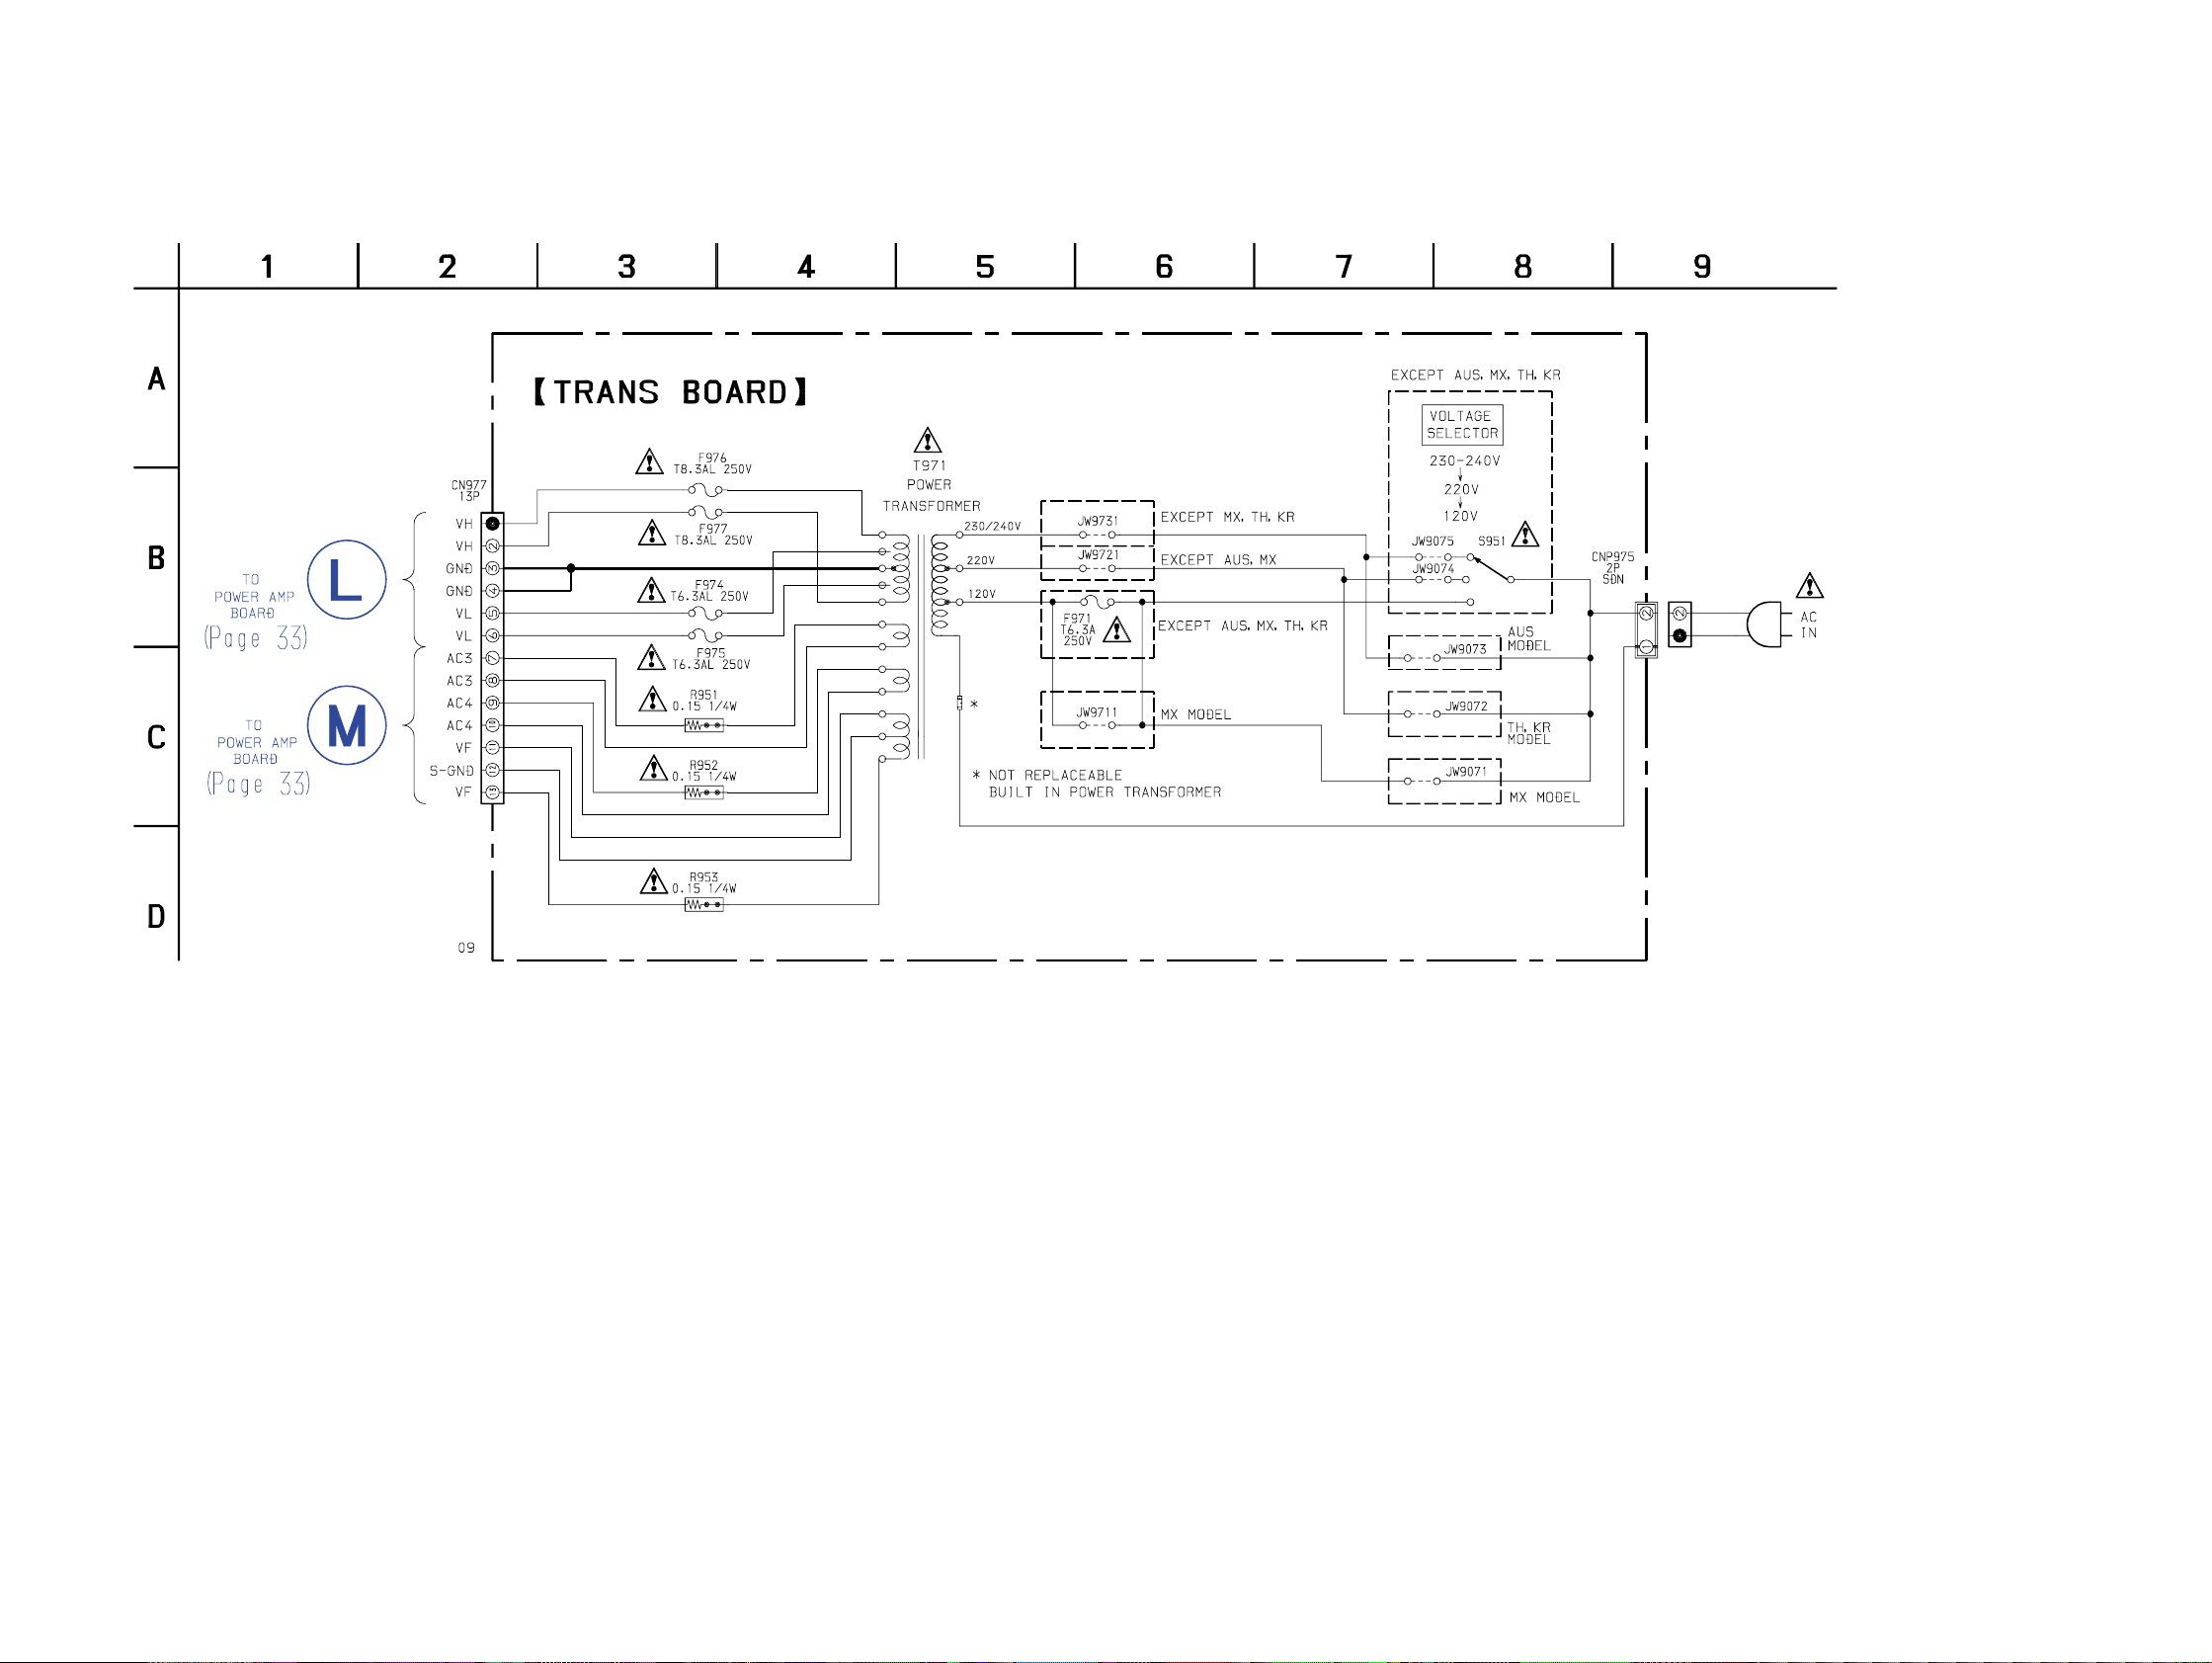
7-22. SCHEMATIC DIAGRAM – TRANS SECTION – (DX7, DX7J MODEL)
HCD-BX7/DX7/DX7J
4343
Page 44
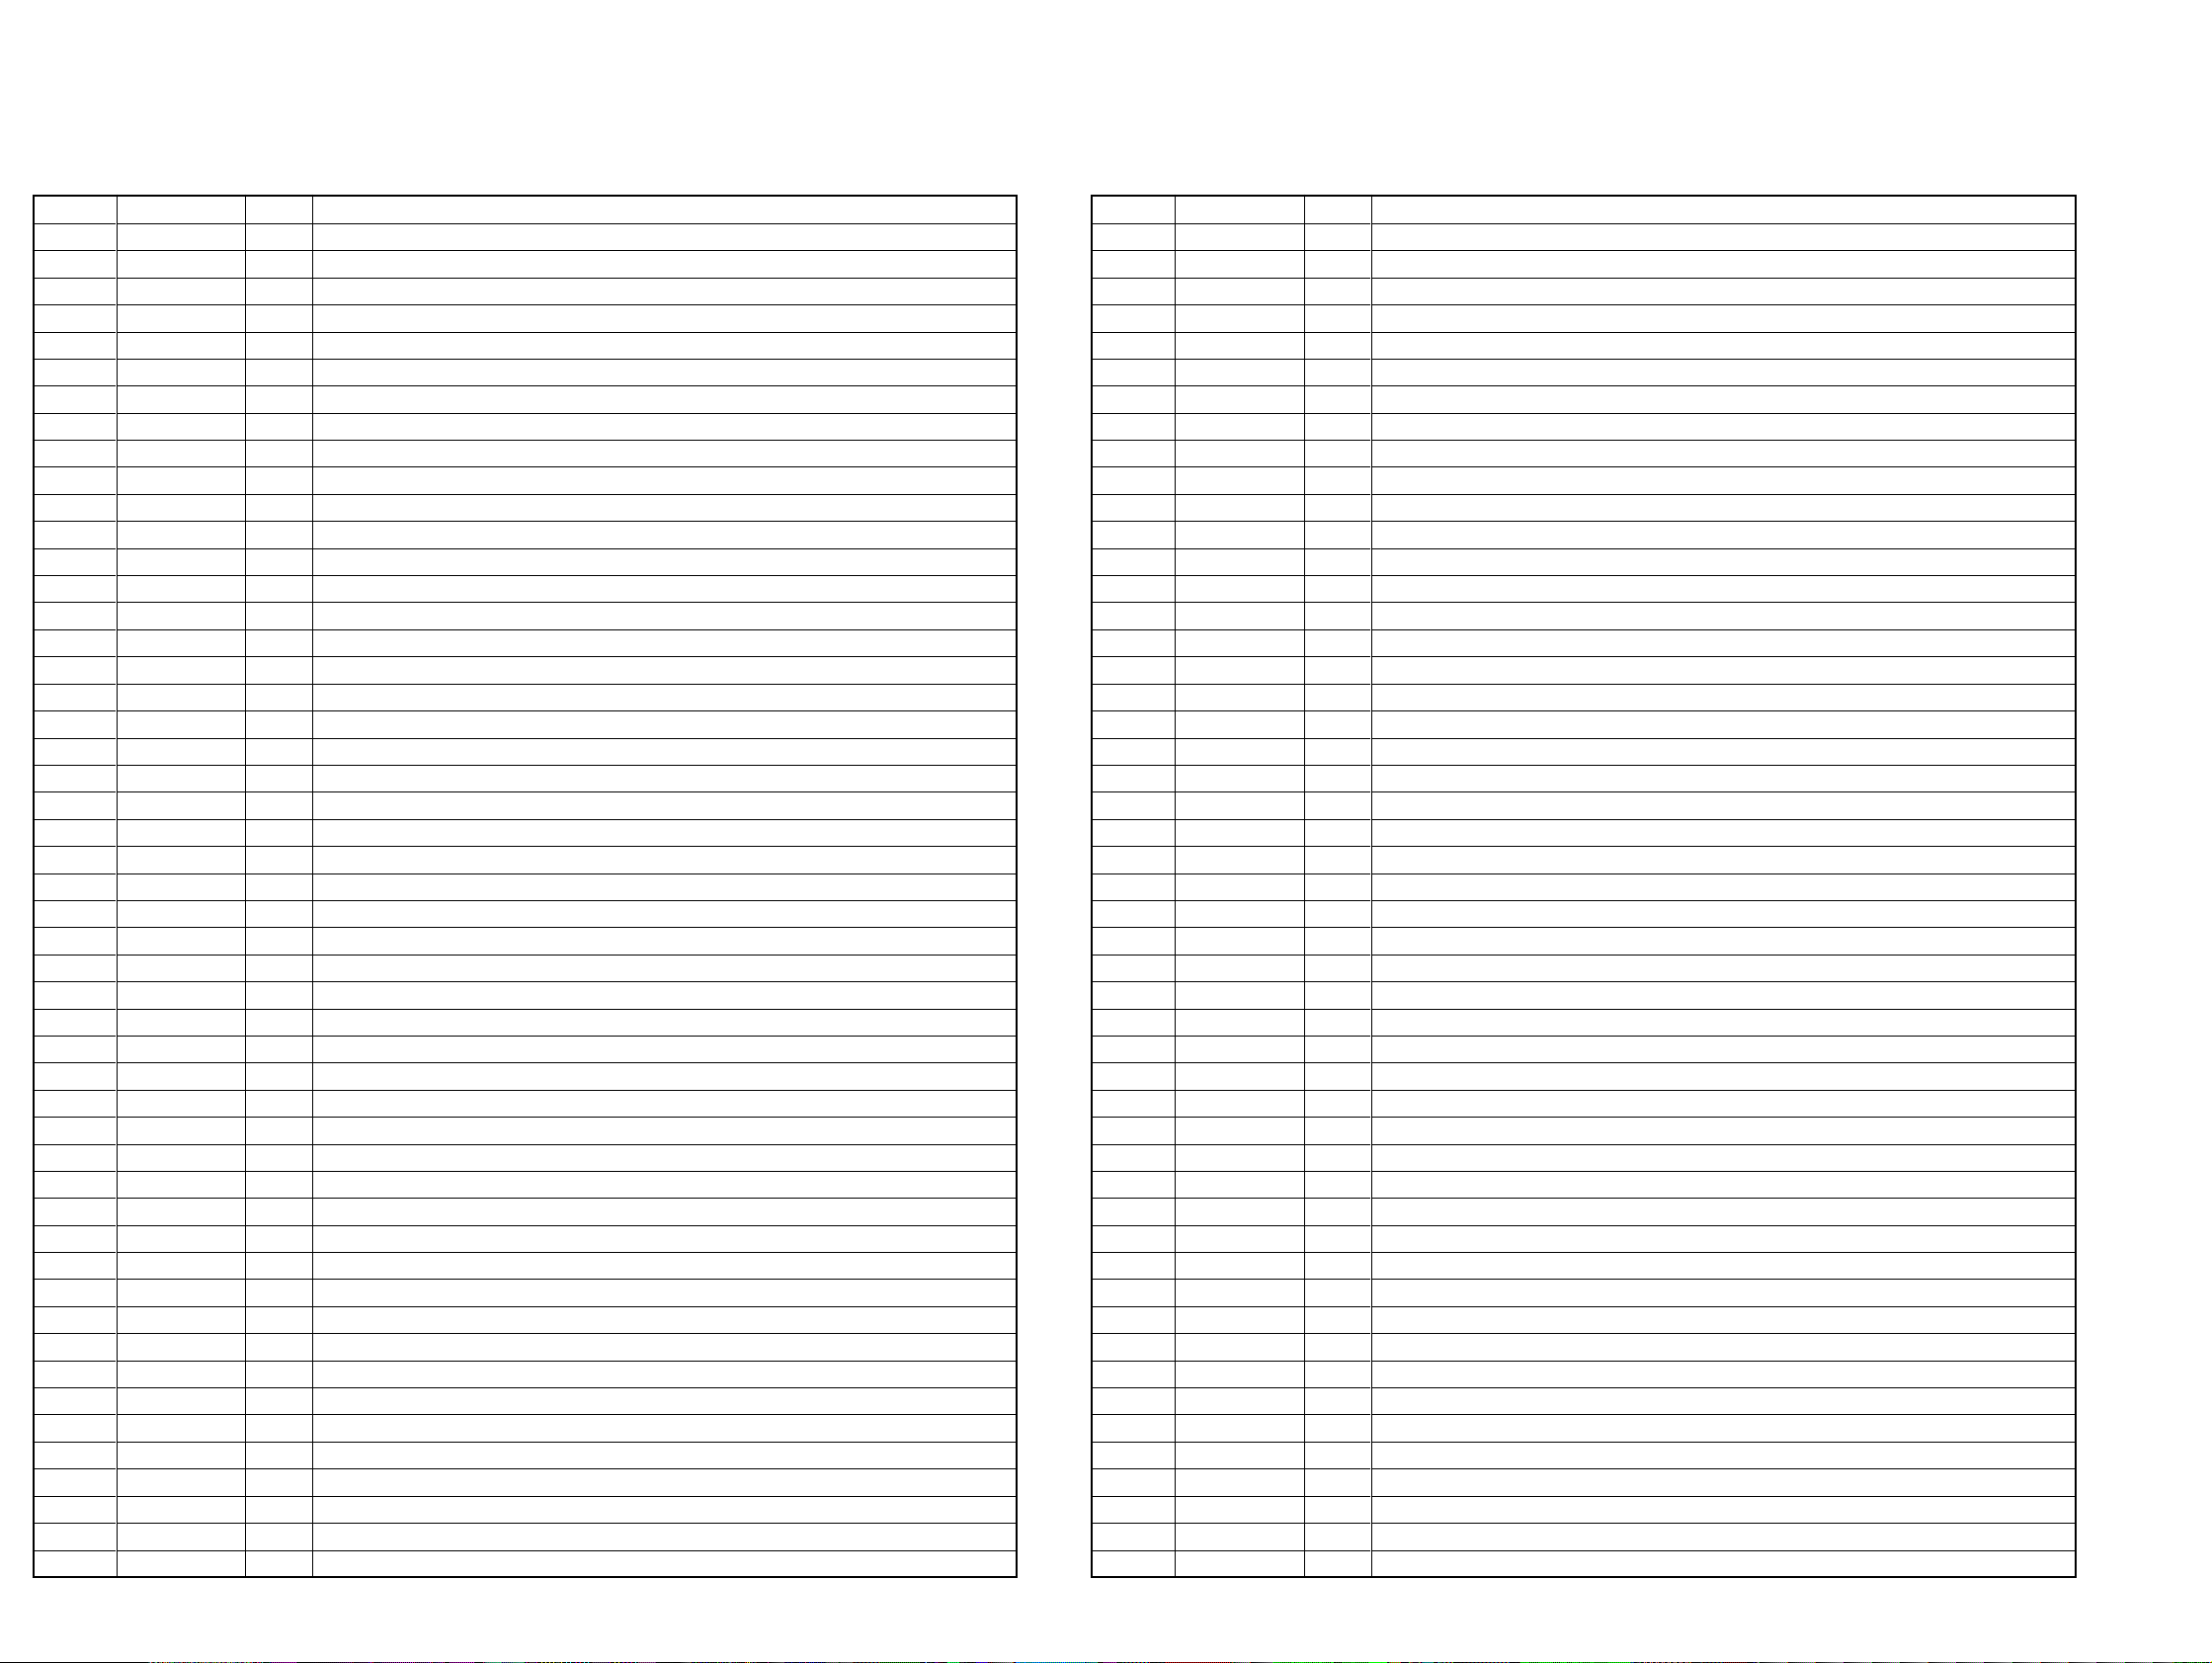
HCD-BX7/DX7/DX7J
7-24. IC PIN FUNCTION DESCRIPTION
• MAIN BOARD IC401 M30622MAA-A25FP (MASTER CONTROL)
Pin No.
1
2
3
4
5
6
7
8
9
10
11
12
13
14
15
16
17
18
19
20
21
22
23
24
25
26
27
28
29
30
31
32
33
34
35
36
37
38
39
40
41
42
43
44
45
46
47
48
49
50
Pin Name
SURROUND 1
SURROUND 2
SURROUND 3
498-DATA
498-CLK
N.C
AC-CUT
GND
GND
XC IN
XC OUT
RESET
X-OUT
VSS
X-IN
VCC
NMI
WAKE_UP
SCOR
RDS-INT
RDS-DATA
ST-MUTE
STEREO
TUNED
ST-CE
ST-DOUT
ST-DIN
ST-CLK
IIC_CLK
IIC_DATA
TXDI
SQ-DATA
SQ-CLK
RST1
CD-DATA
N.C
CD-CLK
N.C
CLOCK-OUT
SENS
HOLD
XLT
XRST
LOAD-IN
LOAD-OUT
OPEN
CLOSE
UP/DOWN SW
T-SENS
TEST MODE
I/O
O
Not used.
O
Not used.
O
Not used.
O
Data signal output for IC101 (M61504FP)
O
Clock signal output for IC101 (M61504FP)
I
Not used.
I
AC CUT ON (L) / OFF (H) CHECK
—
Connected to ground.
—
Connected to ground.
I
SUB CLOCK input. (32.768kHz)
O
SUB CLOCK output. (32.768kHz)
I
System reset input.
O
MAIN SYSTEM CLOCK output. (16MHz)
—
Vss
I
MAIN SYSTEM CLOCK input. (16MHz)
—
Power supply. (+5V)
I
PULL UP (EVER +5V)
I
WAKE UP signal input. (L)
I
CD Q-data request signal input.
I
RDS interrupt signal input.
I
RDS data signal input.
O
Tuner mute signal output.
I
STEREO detect signal input. L=ON, H=OF
I
TUNED detect signal input. L=ON, H=OFF
O
TUNER chip eneble output.
O
TUNER data output.
I
TUNER data input.
O
TUNER clock signal output.
O
IIC SCL output.
O
IIC SDA output.
—
Not used.
I
Subcode Q data input. (CD data)
I
Subcode Q data input. (CD clock)
I
Not used.
O
CD data input.
I
Not used.
O
CD clock input.
I
Not used.
I
Clock check signal input.
I
BD condition signal input.
O
MODE signal input.
O
CD latch signal output.
O
CD reset signal output.
I
Loading motor control signal input.
O
Loading motor control signal output.
I
Tray open detect signal input.
I
Tray close detect signal input.
I
Pick-up up/down detect signal input.
I
CD table detect signal input.
I
Not used.
Description
Pin No.
51
52
53
54
55
56
57
58
59
60
61
62
63
64
65
66
67
68
69
70
71
72
73
74
75
76
77
78
79
80
81
82
83
84
85
86
87
88
89
90
91
92
93
94
95
96
97
98
99
100
Pin Name
N.C
N.C
N.C
N.C
N.C
N.C
A TRIG
B TRIG
CAPM-H/L
CAPM-CONT
N.C
VCC
N.C
VSS
N.C
N.C
A HALF
A PLAY
B PLAY
AMS-IN
TC-MUTE
R/PB/PAS
NR-ON/OFF
REC-MUTE
BAIS
EQ-H/N
PB-A/B
ALC
TC-RELAY
N.C
STBY-RELAY
PROTECT
DBFB-ON/OFF
LINE-MUTE
CD-POWER
F-SHIFT
RELAY-H
POWER
N.C
A SHUT
B SHUT
SOFT-TEST
B HALF
KEY/CD ADJ
MODEL-IN
AVSS
SPEC-IN
VREF
AVCC
STK-MUTE
I/O
I
Not used.
I
Not used.
I
Not used.
I
Not used.
I
Not used.
I
Not used.
O
A deck trigger control signal output.H=ON, L-OFF
O
B deck trigger control signal output.H=ON, L-OFF
O
Capstan motor High/Low speed control signal output.
O
Capstan motor REV/FWD/STOP control signal output.H=REV, L=FWD/STOP
I
Not used.
—
POWER SUPPLY (+5V)
I
Not used.
—
Ground.
I
Not used.
I
Not used.
I
A deck half detect signal input.
I
A deck play detect signal input.
I
B deck play detect signal input.
I
AMS signal input. L=ON,H=OFF
O
Tape deck line mute ON/OFF signal output. H=ON, L=OFF
I
REC/PB/PASS select signal input.
O
DOLBY NR ON/OFF signal output. H=ON, L=OFF
O
REC mute ON/OFF signal output. L=ON, H=OFF
O
BIAS ON/OFF signal output.H=ON, L=OFF
O
EQ High/Normal select signal output. H=High, L=Normal
O
Playback deckA/B select signal output. H=deckB, L=deckA
O
ALC ON/OFF signal output. L=ON, H=OFF
O
Tape deck relay ON/OFF signal output. H=ON, L=OFF
I
Not used.
O
STANDBY relay control signal output.
I
Speaker protect signal input. L=ON, H=OFF
I
Not used.
O
Line mute signal output. L=ON, H=OFF
O
CD-POWER ON/OFF signal output. H=ON, L=OFF
O
Not used.
O
Speaker terminal relay control signal output. H=ON, L=OFF
O
POWER ON/OFF signal output. H=ON, L=OFF
O
Not used.
O
A deck reel pulse detect signal output.
O
B deck reel pulse detect signal output.
O
Not used.
O
B deck half detect signal input.
O
KEY (for jig) / CD adjust.
I
MODEL input.
—
Analog ground.
I
Version select signal input.
—
Analog Reference Voltage
—
Analog Power Supply
O
Power amplifier mute ON/OFF signal output. H=ON, L=OFF
Description
44
44
Page 45
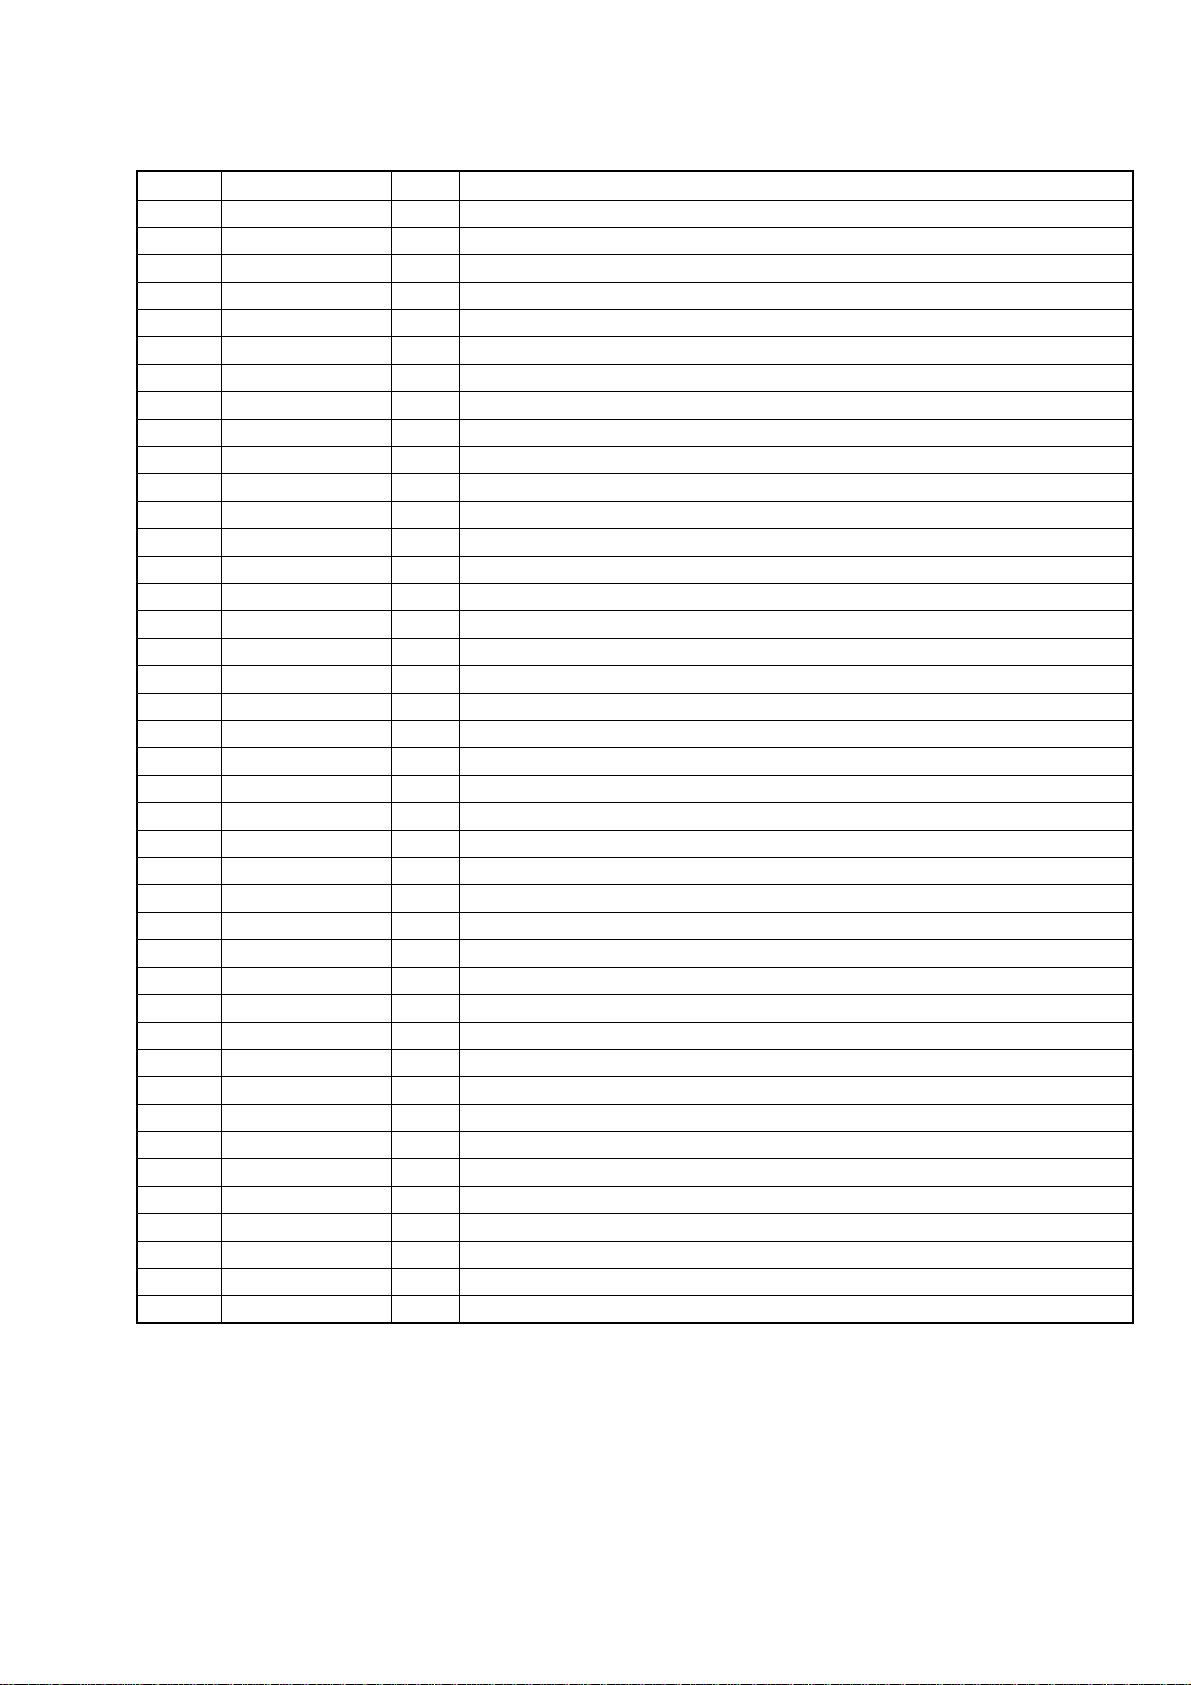
• PANEL BOARD IC601 TMP88CP77F-1A22 (DISPLAY CONTROL)
• PANEL BOARD IC601 TMP88CP77F-1A22 (DISPLAY CONTROL)
Pin No.
Pin No.
1
1
2
2
3
3
4
4
5
5
6
6
7
7
8
8
9-10
9-10
11
11
12-14
12-14
15
15
16
16
17-19
17-19
20
20
21-25
21-25
26
26
27
27
28
28
29
29
30
30
31
31
32
32
33-49
33-49
50
50
51
51
52-85
52-85
86
86
87
87
88
88
89
89
90
90
91
91
92
92
93-94
93-94
95
95
96
96
97
97
98
98
99
99
100
100
Pin Name
Pin Name
VOLUME A
VOLUME A
VOLUME B
VOLUME B
HEADPHONE
HEADPHONE
N.C
N.C
TUNER
TUNER
CD
CD
T APE A/B
T APE A/B
MD/VIDEO
MD/VIDEO
N.C
N.C
GROOVE
GROOVE
N.C
N.C
REC/PAUSE
REC/PAUSE
SURROUND
SURROUND
KEY0-2
KEY0-2
Super Low Freq (BPF 0)
Super Low Freq (BPF 0)
BPF1-5
BPF1-5
ALL BAND
ALL BAND
TIMER
TIMER
STANDBY
STANDBY
VSS
VSS
VASS
VASS
AVREF
AVREF
VDD
VDD
G17-1
G17-1
P1
P1
VDD VFT
VDD VFT
P2-35
P2-35
N.C
N.C
VKK
VKK
VDD
VDD
Xin
Xin
VSS
VSS
Xout
Xout
RESET
RESET
N.C
N.C
TEST
TEST
WAKE UP
WAKE UP
I2C data
I2C data
I2C clk
I2C clk
N.C
N.C
SIRCS
SIRCS
I/O
I/O
I
VOLUME A signal input.
I
VOLUME A signal input.
I
VOLUME B signal input.
I
VOLUME B signal input.
I
Head phone detect signal input. H=ON, L=OFF
I
Head phone detect signal input. H=ON, L=OFF
I
Not used.
I
Not used.
O
TUNER LED driver output.(high active)
O
TUNER LED driver output.(high active)
O
CD LED driver output.(high active)
O
CD LED driver output.(high active)
O
TAPE A/B LED driver output.(high active)
O
TAPE A/B LED driver output.(high active)
O
MD/VIDEO LED driver output.(high active)
O
MD/VIDEO LED driver output.(high active)
O
Not used.
O
Not used.
O
GROOVE LED driver output.(high active)
O
GROOVE LED driver output.(high active)
O
Not used.
O
Not used.
O
REC/PAUSE LED driver output.(high active)
O
REC/PAUSE LED driver output.(high active)
O
SURROUND LED driver output.(high active)
O
SURROUND LED driver output.(high active)
I
KEY input. (AD)
I
KEY input. (AD)
I
BPF input. (AD)
I
BPF input. (AD)
I
BPF input. (AD)
I
BPF input. (AD)
I
BPF input. (AD)
I
BPF input. (AD)
O
TIMER SEL LED driver output.
O
TIMER SEL LED driver output.
O
STANDBY LED output.
O
STANDBY LED output.
—
Ground.
—
Ground.
—
Ground.
—
Ground.
—
Analog reference voltage.
—
Analog reference voltage.
—
Power supply (+5V)
—
Power supply (+5V)
O
FL gride signal output.
O
FL gride signal output.
O
FL segment signal output.
O
FL segment signal output.
—
Power supply (+5V)
—
Power supply (+5V)
O
FL segment signal output.
O
FL segment signal output.
I
Not used.
I
Not used.
—
–]30V driving power for FL.
—
–]30V driving power for FL.
—
Power supply (+5V)
—
Power supply (+5V)
I
12.5MHz (Xin)
I
12.5MHz (Xin)
—
Ground.
—
Ground.
O
12.5MHz (Xout)
O
12.5MHz (Xout)
I
RESET (low active)
I
RESET (low active)
I
Not used.
I
Not used.
I
Connected to ground.
I
Connected to ground.
O
WAKE UP signal output for master controller. (PULL UP)
O
WAKE UP signal output for master controller. (PULL UP)
O
IIC SDA
O
IIC SDA
O
IIC SCL
O
IIC SCL
I
Not used.
I
Not used.
I
Remote commander input. (input capture)
I
Remote commander input. (input capture)
Description
Description
45
Page 46
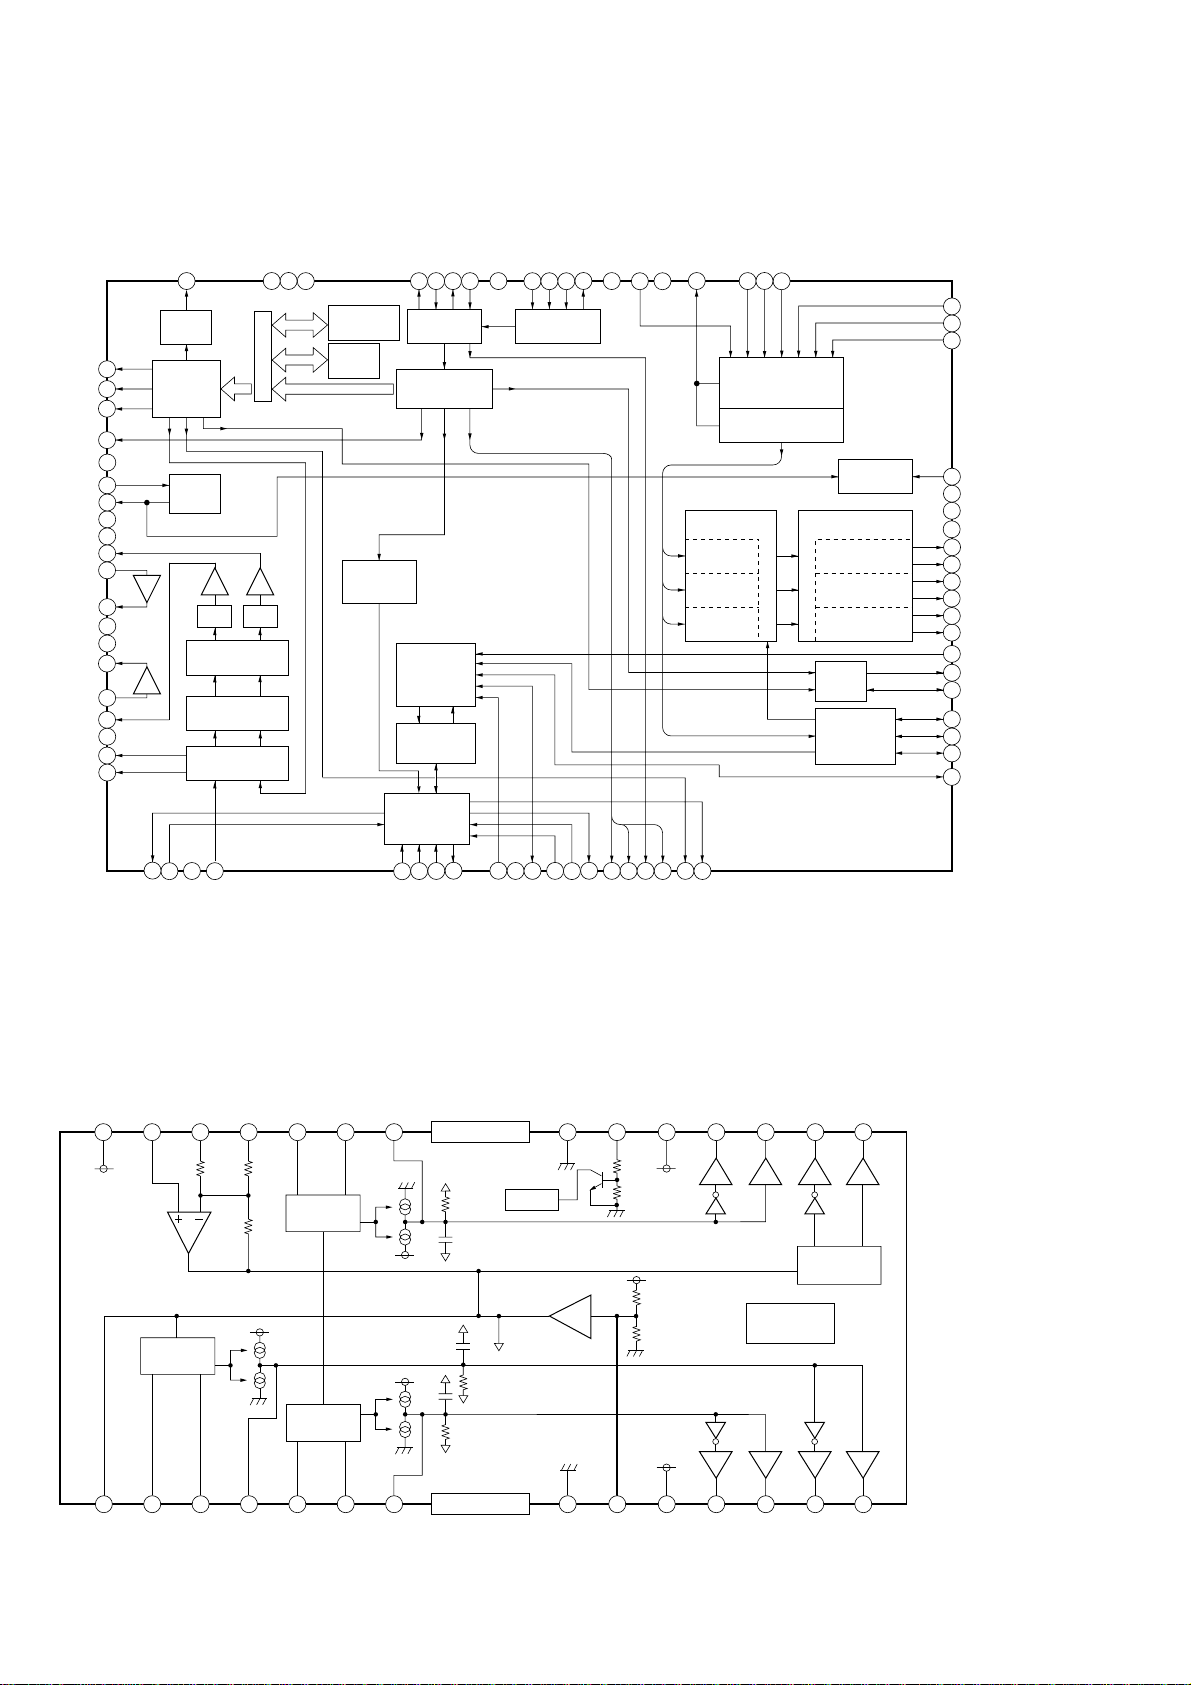
7-20. IC BLOCK DIAGRAMS
IC101 CXD2587Q (BD BOARD)
LRCK
PCMD
BCK
EMPH
XVDD
XTAI
XTAO
XVSS
AVDD1
AOUT1
AIN1
LOUT1
AVSS1
AVSS2
LOUT2
AIN2
AOUT2
AVDD2
RMUT
LMUT
VDD
AVDD3
DOUT
60
DIGITAL
OUT
61
62
63
64
65
66
67
68
69
70
71
72
73
74
75
76
77
78
79
80
D/A
INTERFACE
TIMING
LOGIC
OVER SAMPLING
PWM
3rd ORDER
NOISE SHAPER
DIGITAL FILTER
SERIAL IN
INTERFACE
59
58
INTERNAL BUS
PWM
VSS
57
ERROR
CORRECTOR
16K
RAM
SUBCODE
PROCESSOR
FILI
PCO
54
56
55
DIGITAL
PLL
EFM
DEMODULATOR
SERVO
INTERFACE
SERVO AUTO
SEQUENCER
CPU
INTERFACE
FILO
53
CLTV
AVSS3
52
ASYI
BIAS
RFAC
51
49
50
ASYMMETRY
CORRECTION
48
ASYO
AVDD0
47
46
IGEN
AVSS0
45
ADIO
44
SERVO DSP
FOCUS
SERVO
TRACKING
SERVO
SLED
SERVO
CE
TE
RFDC
43
41
42
OPERATIONAL
AMPLIFIER
ANALOG SWITCH
A/D
CONVERTER
PWM GENERATOR
CLOCK
GENERATOR
FOCUS PWM
GENERATOR
TRACKING
PWM GENERATOR
SLED PWM
GENERATOR
DIGITAL
CLV
MIRR, DFCT,
FOK
DETECTOR
SE
40
FE
39
VC
38
XTSL
37
TES1
36
TEST
35
VSS
34
33
FRDR
32
FFDR
TRDR
31
TFDR
30
SRDR
29
28
SFDR
SSTP
27
MDP
26
25
LOCK
FOK
24
DFCT
23
22
MIRR
COUT
21
3
1
2
SQSO
SQCK
XRST
4
SYSM
IC102 BA5974FP (BD BOARD)
PRFVCC
CH4BIN
INTERFACE
CH4SIN'
RF
CH4SIN
INTERFACE
F
R
INTERFACE
CH3FIN
F
CH3RIN
R
RF
CLOK
8
SENS
9
10
SCLK
11 12
VDD
MUTE
ATSK
13
14
1516171819
XUGF
XLON
SPOB
SPOA
WFCK
GND
MUTE
202122232425262728 19 18 17 16 15
XPCK
GFS
C2PO
POWVCC
20
SCOR
CH3OUTR
CH3OUTF
THERMAL
SHUTDOWN
CH4OUTR
LEVEL SHIFT
CH4OUTF
7
5
6
XLAT
DATA
CAPAIN3
R
F
F
R
1 2 3 4 5 6 7 8 9 10 11 12 13 14
GND
VREFOUT
CH1FIN
CH1RIN
CAPAIN1
CH2FIN
CH2RIN
CAPAIN2
VREFIN
POWVCC
CH2OUTR
46
CH2OUTF
CH1OUTR
CH1OUTF
Page 47
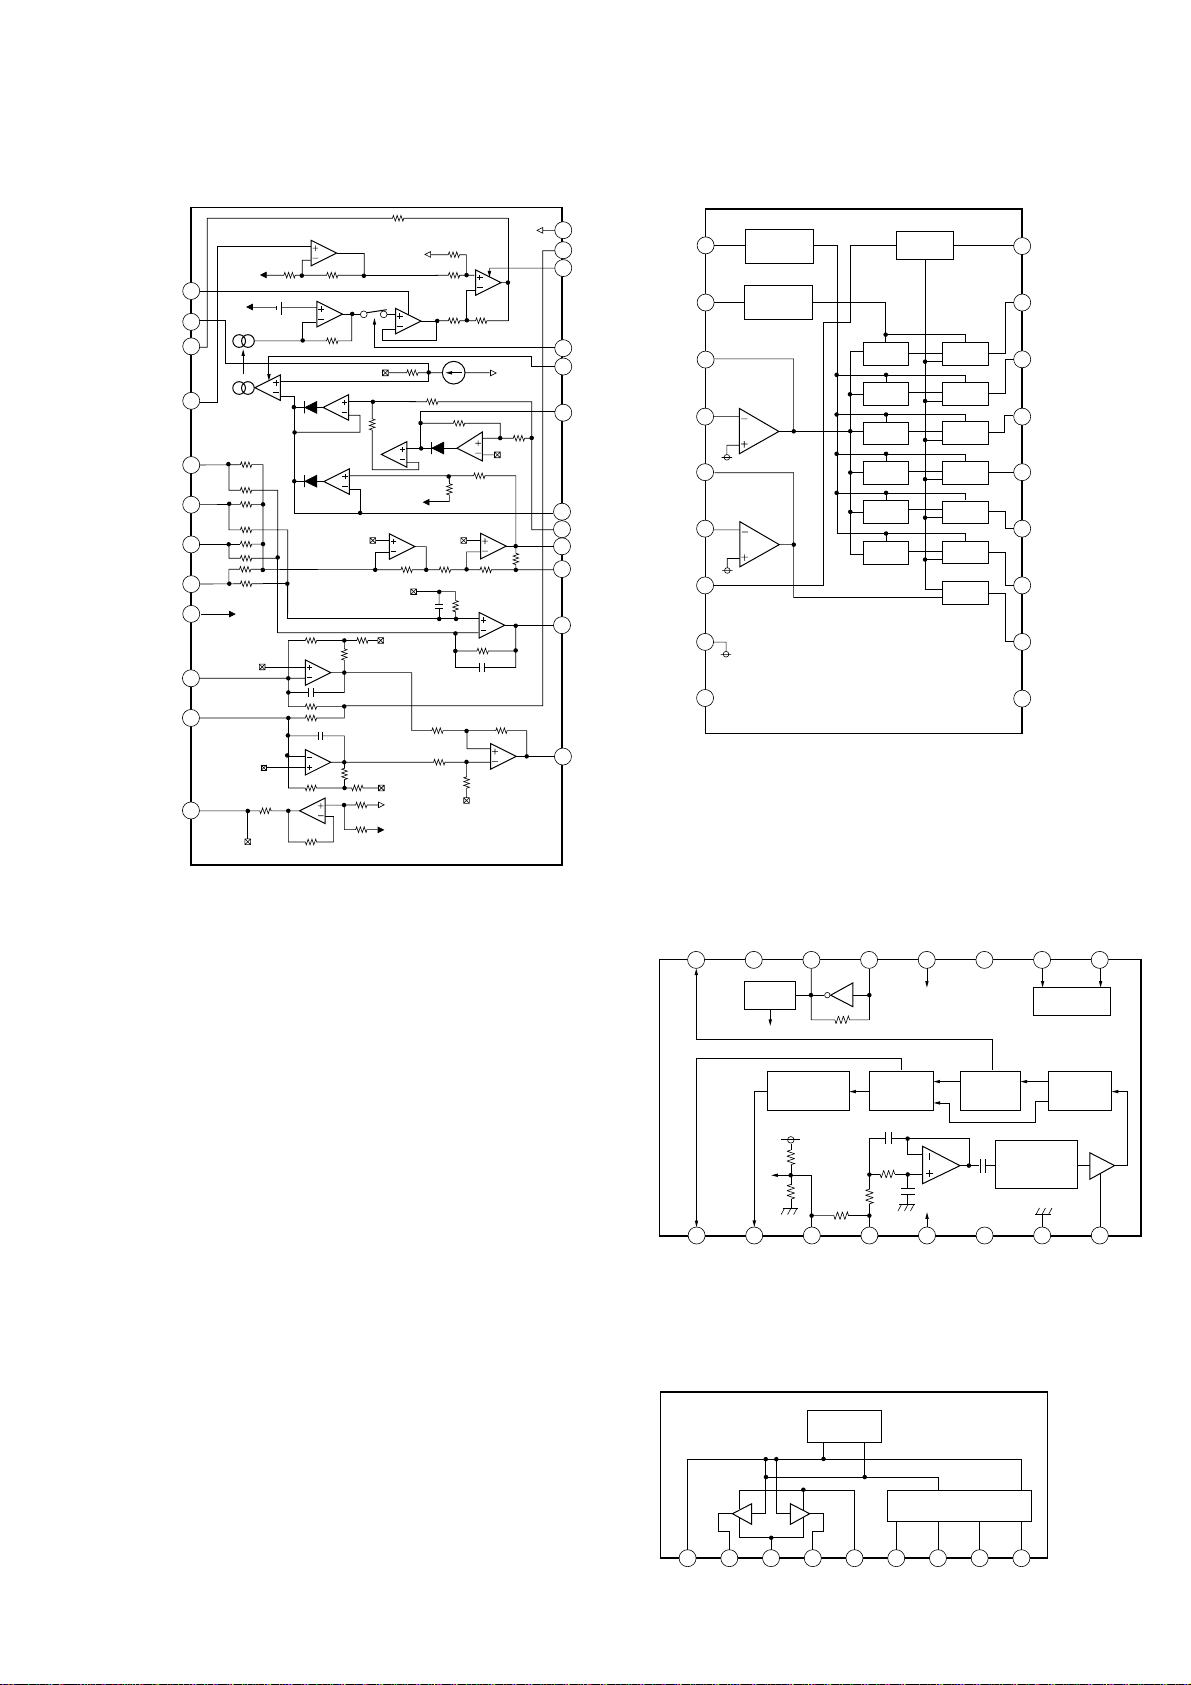
IC103 CXA2568M (BD BOARD)
2
3
14
1
f04
13
f05
12
f06
11
REC
LEVEL
10
VCC
15
f03
5
REC
NF
6
REC
IN
7
RESET
C
8
BIAS
C
9
GND1
4
16
f02
17
f01
18
RESET
R02
P01
LINE
NF
LINE
IN
REFFERENCE
CURRENT
BPF
DET
BPF
DET
BPF
DET
BPF
DET
DET
RESET
Bias
REFFERENCE
CURRENT
DET
DET
BPF
BPF
1 2 3 4 5 6 7 8
910111213141516
QUAL
VREF
VDD1
VSS1
MUX
VSS3
CMP
RCLK
XO
XI
(NC)
VDD2
VSS2
T1
T2
8TH SWITCHED
CAPACITOR
FILTER
PLL 57KHz
RDS/ARI
BIPHASE
DECODER
DEFFERENTIAL
DECODER
PLL
1187.5Hz
TEST
CLOCK
APC PD AMP
VEE
1
HOLD
AGCVTH
LD
PD
VEE
2
3
4
VREF
VC
VCC
APC LD AMP
VCC
VCC
VCC
24
23
LC/PD
LD_ON
22
HOLD_SW
21
AGCCONT
20
(50%/30%
OFF)
RF_BOT
19
IC602 BA3830F (PANEL BOARD)
VEE
VC
VC
VC
ERROR AMP
FOCUS
TRACKING
ERROR AMP
RFTC
18
RF_1
17
RFO
16
RFE
15
FE
14
TE
13
A
5
B
6
C
7
D
8
9
VEE
10
11
VC BUFFER
12
VC
VC
VC
F
E
VC
RF SUMMING AMP RF_EQ_AMP
VEE
VC
VC
VC
VC
VCC
VEE
IC682 BU1924 (MAIN BOARD)
IC701 BA6956AN (DRIVER BOARD)
TSD
CONTROL LOGIC
1 2 3 4 5 6 7 8 9
VREF
UT2
RNF
UT1
VM
VCC
FIN
GND
RIN
47
Page 48
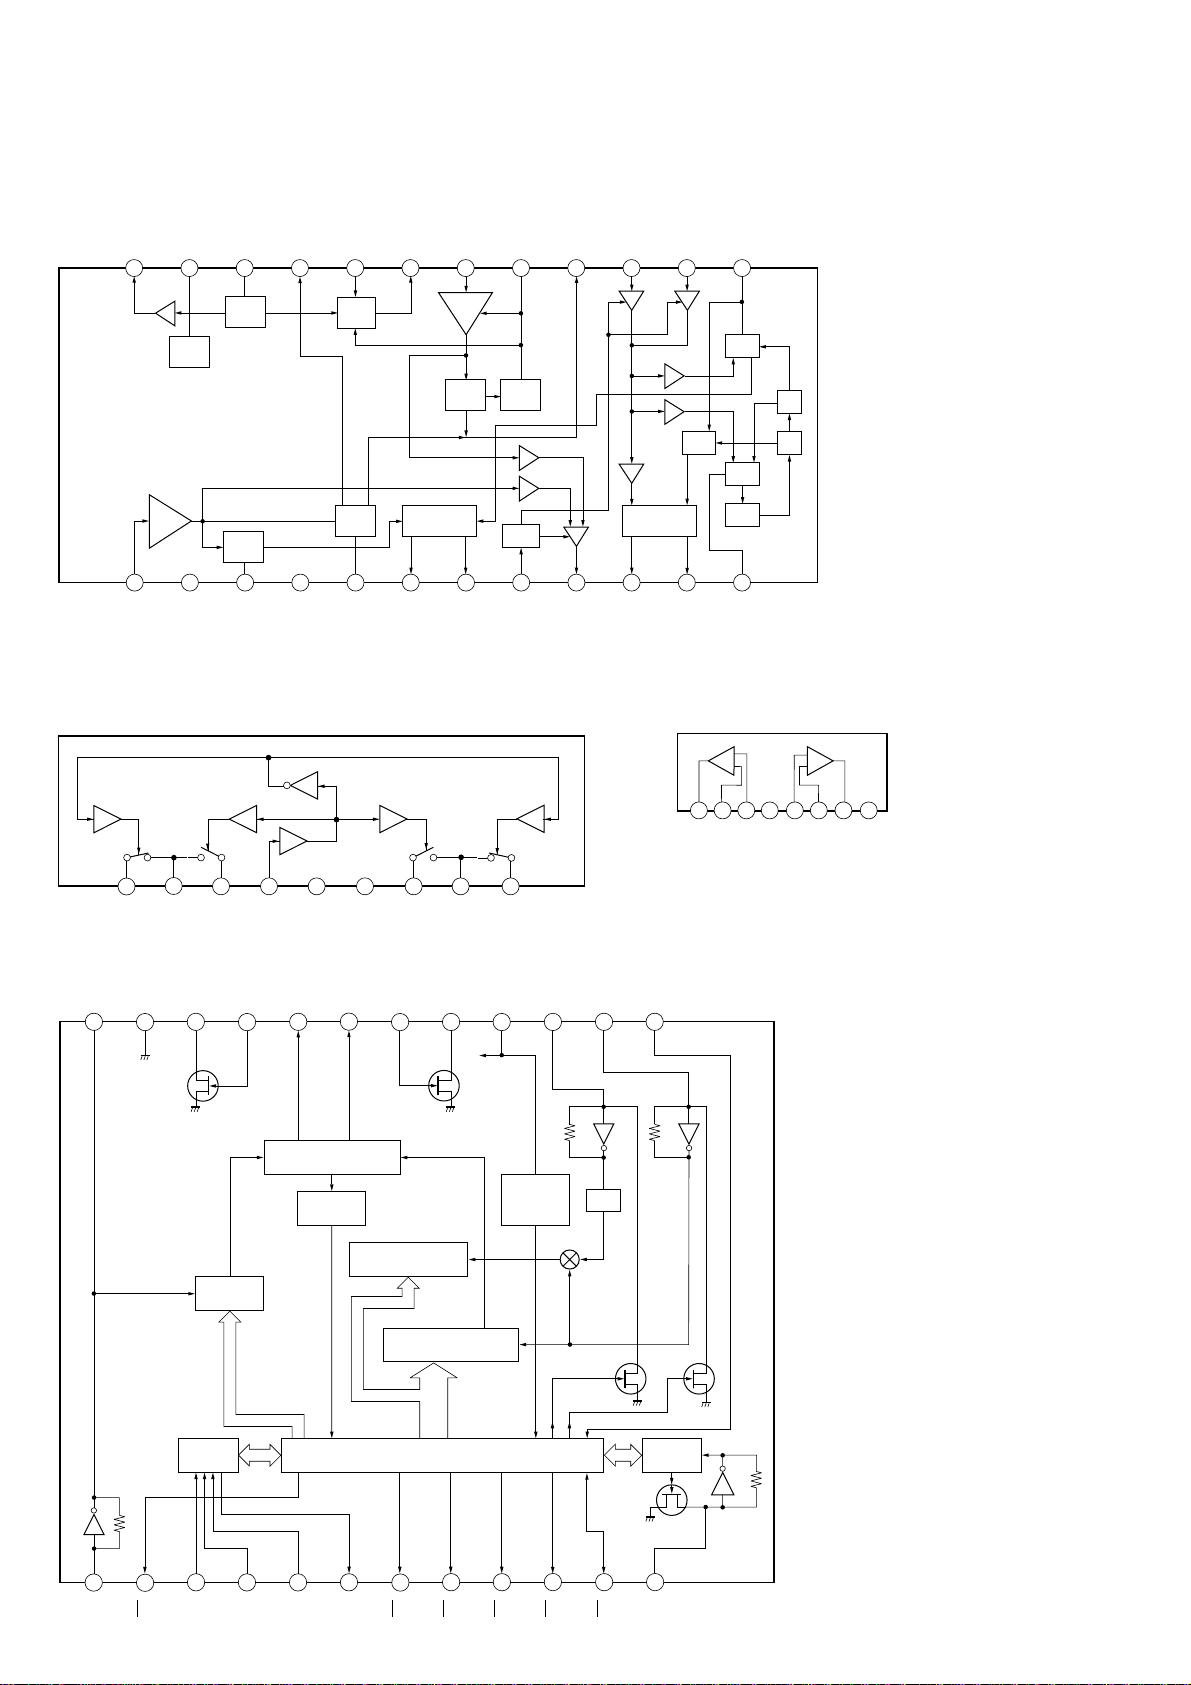
2
IC601 BA1450 (MAIN BOARD)
AM OSC OUT
24
V . REG
AM OSC
AM RF IN
FM BAND WIDTH
20212223
AM MIX OUT
19
AM IF IN
AM AGC
FM/AM DET OUT
161718
AM MPX IN
15
FM MPX IN
14 13
VCO STOP
AM
OSC
VREG
FM
IF
1 2 3 4 5 6 7 8 9 10 11 12
FM IN
VCC
SD
DET
FM SD ADJ
GND
IC302 µPC1330H (MAIN BOARD)
COMPARATER
2
1
SW R1 GND SW P1
3
5 6 7 8 9
4
CONT GND VCC SW P2 GND
AM
MIX
FM
DET
INVERTER
FM DET
LED
DRIVER
TUNED
AM IF
AM
DET
STEREO
AGC
COMP
SW R2
IN REQ MUTE
IF OUT
SD
1/2
DECODER
R OUT
SW
L OUT
1/2
PD
VCO
AM/FM
IC681 M5218AFP (MAIN BOARD)
+
–
2 3 6
1
+
–
V–
4
5
V+
7
8
IC651 LC72130 (MAIN BOARD)
XOUT
VSS
AOUT
24
22
23
REFERENCE
DIVIDER
2
C B
I / F
AIN2
21
SWALLOW COUNTER
PD2
20
1/16.1/17 4bits
PD1
19
REFERENCE
DIVIDER
SWALLOW COUNTER
DATA SHIFT REGISTER
AIN1
18
1/16.1/17 4bits
PHASE DETECTOR
CHARGE PUMP
LATCH
17
AOUT1
FMIN
VDD
15
16
POWER
ON
RESET
AMIN
I02
13
14
1/2
C B
I / F
48
3
1
2
XIN
B05
4
CE
D1
6
5
CL
D0
8
7
B01
B02
10
9
B04
B03
12
11
I01
IFIN
Page 49
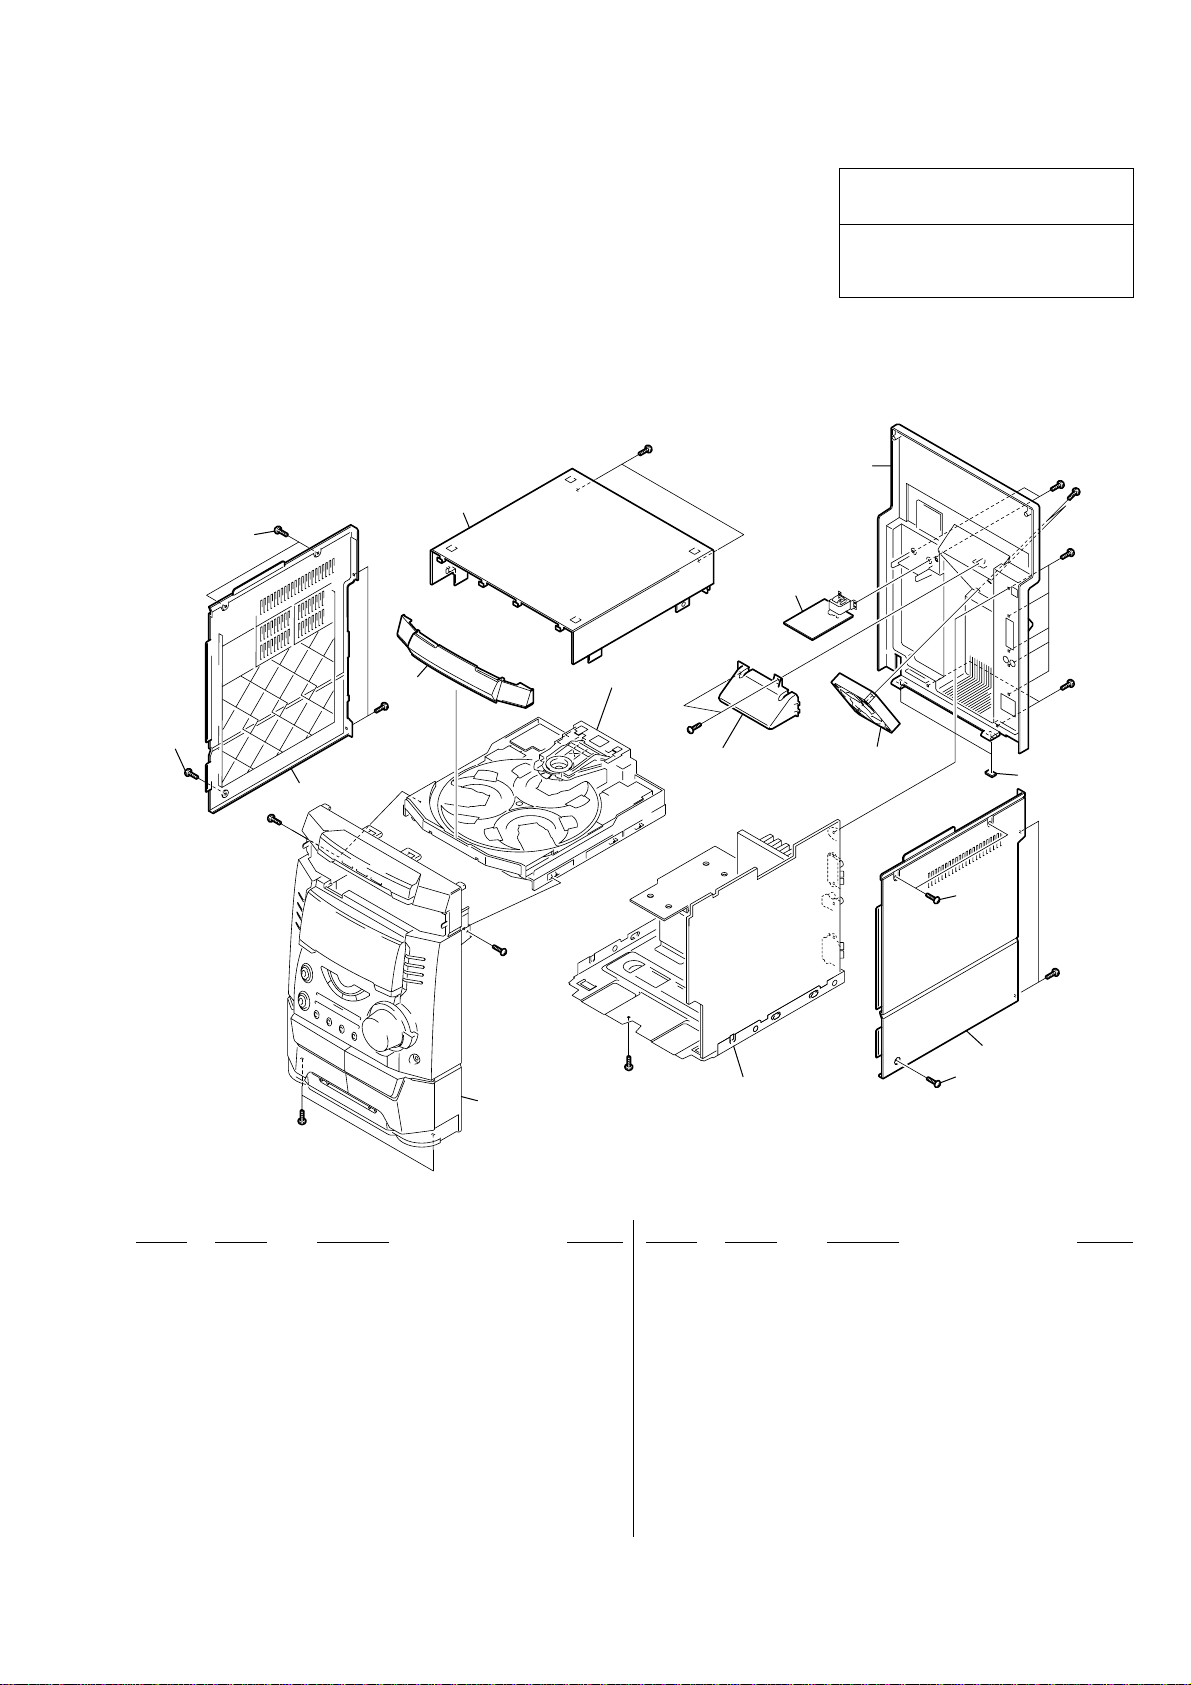
3
NOTE:
• -XX, -X mean standardized parts, so they may
have some differences from the original one.
• Items marked “*” are not stocked since they
are seldom required for routine service. Some
delay should be anticipated when ordering these
items.
• The mechanical parts with no reference number
in the exploded views are not supplied.
• Hardware (# mark) list and accessories and
packing materials are given in the last of this
parts list.
8-1. MAIN SECTION
SECTION 8
EXPLODED VIEWS
• Abbreviation
CND: Canadian model
AUS: Australian model
G : German model
EA : Saudi Arabia model
MY : Malaysia model
SP : Singapore model
TH : Thai model
KR : Korea model
MX : Mexican model
AR : Argentina model
E2 : Central and South AMERICA
E3 : Middle and Near East
The components identified by mark 0 or
dotted line with mark 0 are critical for safety.
Replace only with part number specified.
Les composants identifiés par une marque
0 sont critiques pour la sécurité.
Ne les remplacer que par une pièce portant
le numéro spécifié.
#5
6
8
#2
#
2
7
#3
4
#3
1
CD mechanism deck
#3
not supplied
#3
M961
9
3
#3
2
#3
#3
#5
Front panel section
#5
Ref. No. Part No. Description Remarks Ref. No. Part No. Description Remarks
1 3-363-099-01 SCREW(CASE 3 TP2)
2 3-363-099-41 SCREW(CASE 3 TP2)
3 4-225-038-01 SIDE PANEL L (BX7/DX7)
3 4-225-038-21 SIDE PANEL L (DX7J)
4 4-225-017-31 LOADING PANEL (DX7:TH)
4 4-225-018-11 LOADING PANEL (BX7)
4 4-225-018-21 LOADING PANEL
(DX7:SP,MY,E2,MX,AR,AUS,E3,KR)
4 4-225-018-31 LOADING PANEL (DX7:EA)
4 4-228-259-11 LOADING PANEL (DX7J)
5 4-225-039-01 SIDE PANEL R (BX7/DX7)
5 4-225-039-21 SIDE PANEL R (DX7J)
6 4-224-550-01 CASE (TOP) (EXCEPT BX7:US,CND)
6 4-224-550-21 CASE (TOP) (BX7,US,CND)
7 A-4437-194-A SUB-TRANS BOARD,COMPLETE (BX7:US)
7 A-4428-301-A SUB-TRANS BOARD,COMPLETE
7 A-4428-959-A SUB-TRANS BOARD,COMPLETE (BX7:CND)
8 4-225-041-11 BACK PANEL (BX7:,AEP,CIS,UK,G/DX7:AUS,MX)
8 4-225-041-21 BACK PANEL (DX7:EA,SP,MY,E2,AR,E3,KR)
8 4-225-041-31 BACK PANEL (BX7:US,CND)
8 4-228-592-31 BACK PANEL (DX7J)
9 4-225-252-01 CUSHION (FOOT)
M961 1-763-072-11 FAN, D.C. (BX7:US,CND/DX7/DX7J)
Chassis section
1
(BX7:AEP,CIS,UK,G)
5
49
Page 50
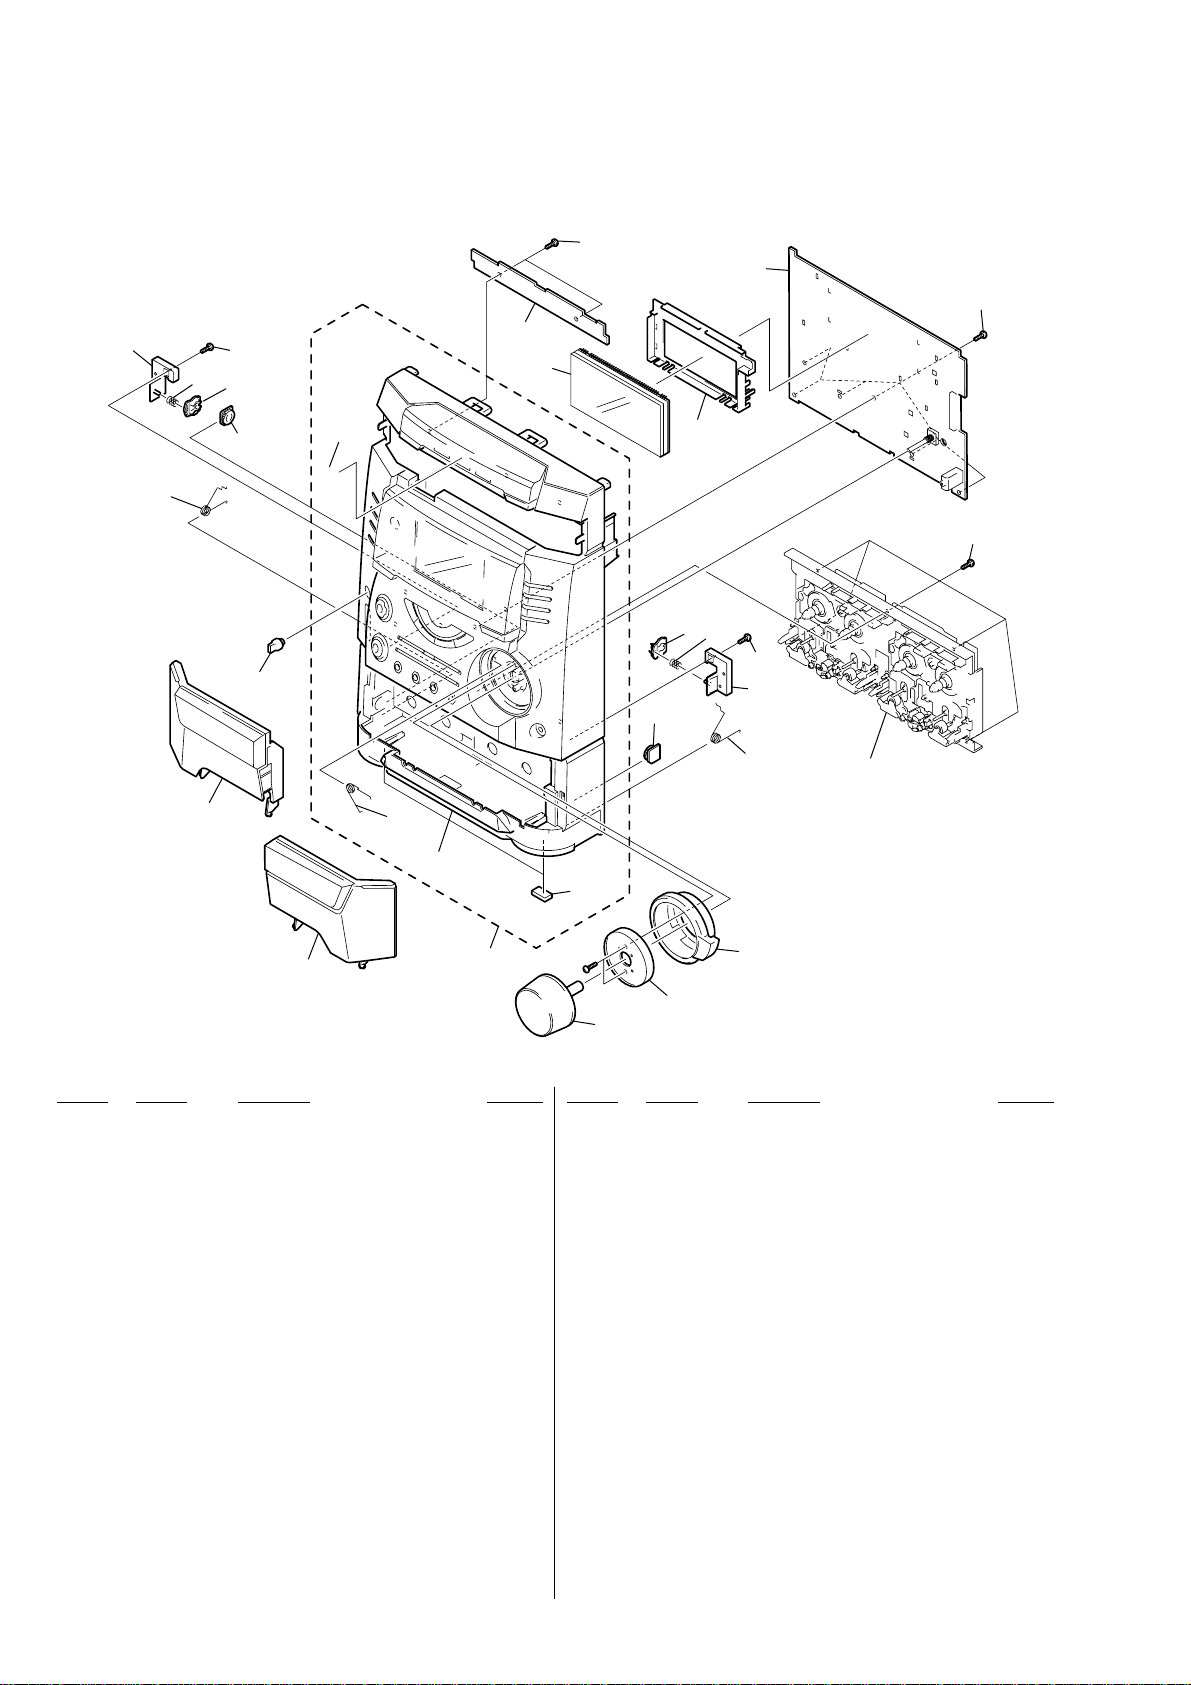
8-2. PANEL SECTION
S
* For service only
(Be sure to refer to "Service note" on page 4.)
58
59
67
61
55
60
69
68
51
71
54
FL601
67
60
65
62
59
66
67
63
64
*
67
67
Tape mechanism deck
not supplied
70
52
57
#7
not supplied
56
53
Ref. No. Part No. Description Remarks Ref. No. Part No. Description Remarks
51 X-4952-418-1 TC HOLDER (L) ASSY (EXCEPT DX7:E3)
51 X-4952-792-1 TC HOLDER (L) ASSY (DX7:E3)
52 X-4952-419-1 TC HOLDER (R) ASSY (EXCEPT DX7:E3)
52 X-4952-791-1 TC HOLDER (R) ASSY (DX7:E3)
53 4-225-032-01 VOL KNOB
54 A-4428-077-A CD SWITCH BOARD,COMPLETE
54 A-4428-905-A CD SWITCH BOARD,COMPLETE (DX7:TH)
54 A-4473-045-A CD SWITCH BOARD,COMPLETE (DX7J)
55 4-962-708-71 EMBLEM (4-A), SONY (DX7:TH/DX7J)
55 4-962-708-81 EMBLEM (4-A), SONY (EXCEPT DX7:TH/DX7J)
56 4-225-033-01 FR KNOB
57 X-4952-415-1 FRONT PANEL ASSY (BX7:AEP,CIS,UK,G)
57 X-4952-552-1 FRONT PANEL ASSY (BX7:US,CND)
57 X-4952-553-1 FRONT PANEL ASSY (DX7:EA,E3)
57 X-4952-595-1 FRONT PANEL ASSY
58 4-224-562-01 BRACKET (HEART CAM L)
59 4-224-803-01 SPRING (PUSH),COMPRESSION COIL
60 4-224-104-01 DAMPER (DX7:TH)
60 4-224-104-11 DAMPER (DX7J)
(EXCEPT DX7:TH/DX7J)
(DX7:SP,MY,E2,MX,AR,AUS,KR)
60 4-224-104-21 DAMPER (EXCEPT DX7:TH/DX7J)
61 4-224-560-01 CAM(L), HEART
62 4-224-559-01 CAM(R), HEART
63 4-224-561-01 BRACKET (HEART CAM R)
64 4-225-053-01 SPRING R
65 4-224-584-01 HOLDER (FL) (DX7:TH/DX7J)
65 4-224-584-11 HOLDER (FL) (EXCEPT DX7:TH/DX7J)
66 A-4428-075-A PANEL BOARD,COMPLETE (BX7)
66 A-4428-338-A PANEL BOARD,COMPLETE (DX7:EA)
66 A-4428-342-A PANEL BOARD,COMPLETE
(DX7:SP,MY,E2,MX,AR.AUS,E3,KR)
66 A-4428-907-A PANEL BOARD,COMPLETE (DX7:TH)
66 A-4473-047-A PANEL BOARD,COMPLETE (DX7J)
67 4-951-620-01 SCREW (2.6X8), +BVTP
68 4-224-578-01 KNOB (MIC)(DX7:TH/DX7J)
68 4-224-578-11 KNOB (MIC) (EXCEPT DX7:TH/DX7J)
69 4-225-052-01 SPRING L
70 4-225-252-01 CUSHION (FOOT)
71 4-225-054-01 SPRING FR
FL601 1-517-928-11 INDICATOR TUBE, FLUORESCENT
50
Page 51
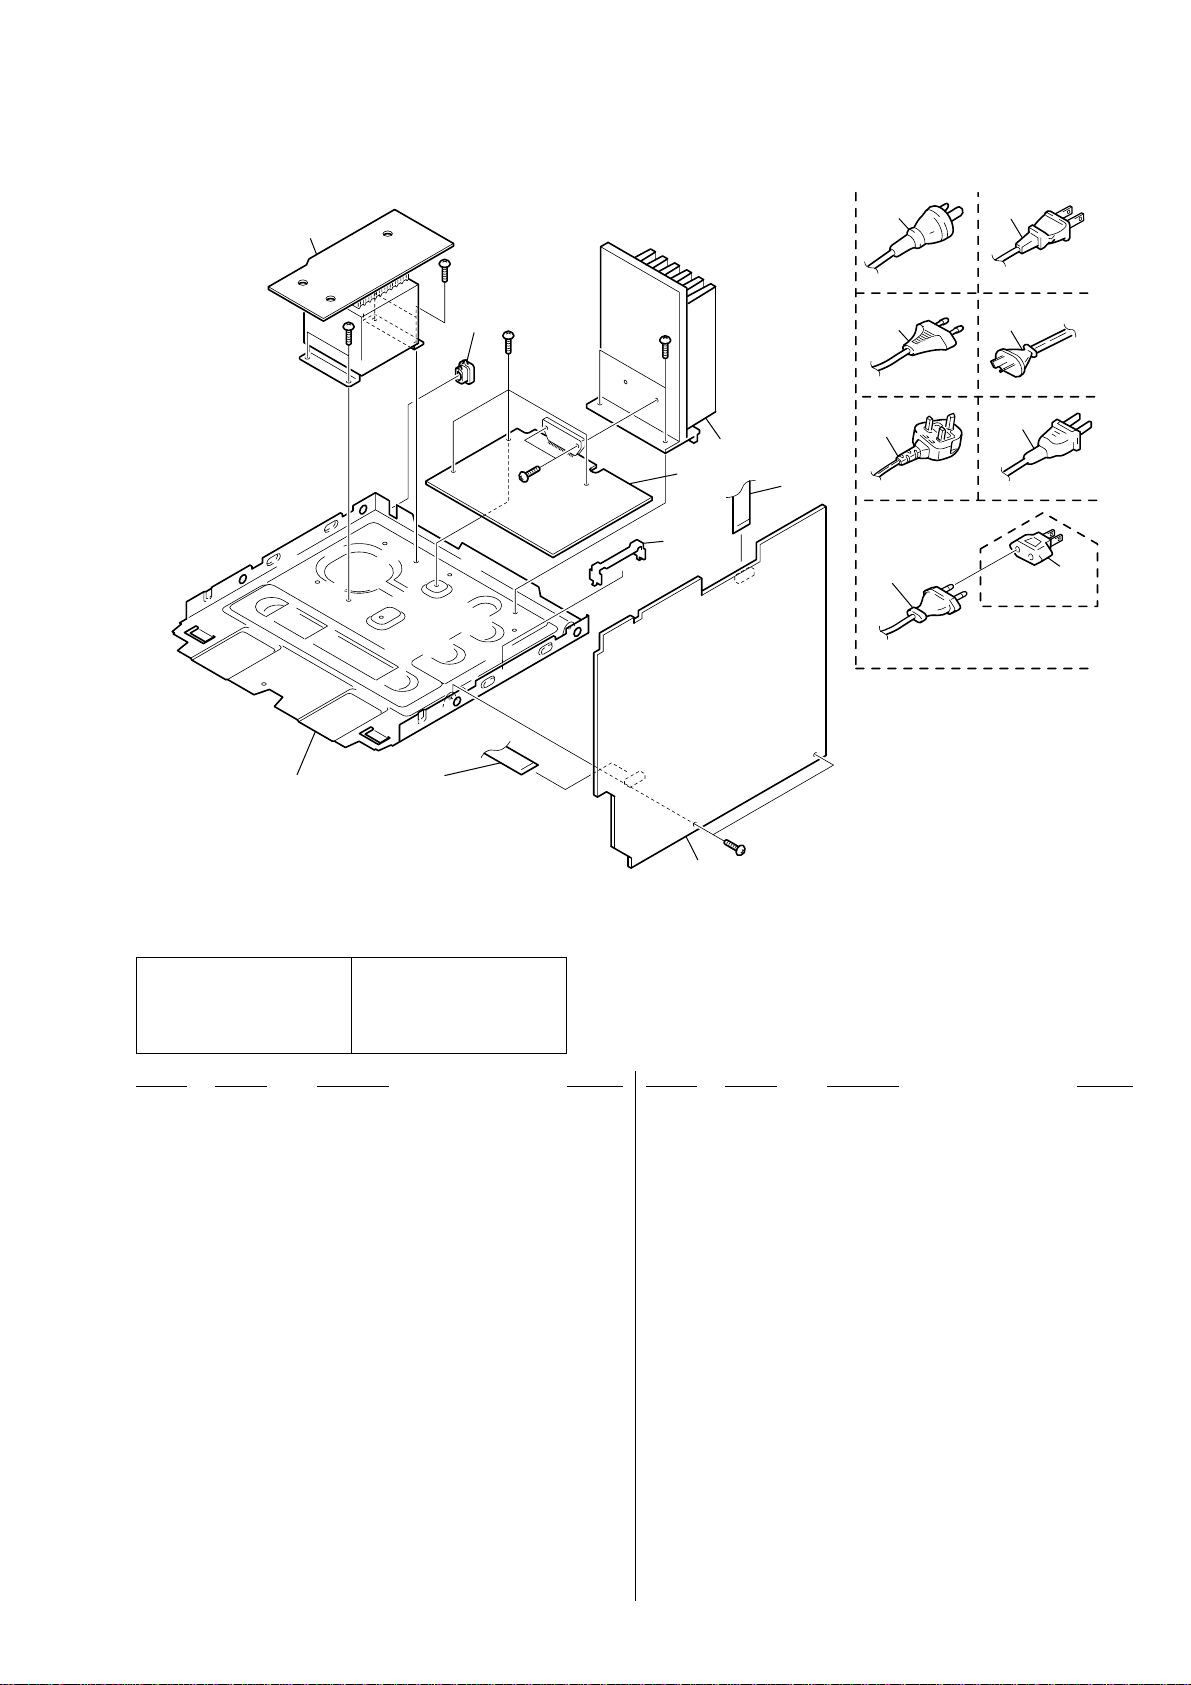
8-3. MAIN BOARD SECTION
not supplied
105
#6
101
#6
106
#3
#4
#3
107
103
not supplied
104
108
108
108
108
108
AR
US, CND
108
KR
108
UK,G
G,CIS,AEP,EA,MY,SP
E2,MX,TH
EA,MY,SP
AUS
109
#2
102
The components identified by
mark 0 or dotted line with mark
0 are critical for safety.
Replace only with part number
specified.
Ref. No. Part No. Description Remarks Ref. No. Part No. Description Remarks
101 1-773-045-11 WIRE (FLAT TYPE) (17 CORE)
102 A-4428-097-A MAIN BOARD,COMPLETE (BX7:AEP,CIS,UK,G)
102 A-4428-334-A MAIN BOARD,COMPLETE (BX7:CND,US)
102 A-4428-340-A MAIN BOARD,COMPLETE (DX7:EA)
102 A-4428-347-A MAIN BOARD,COMPLETE (DX7:SP,MY,E3)
102 A-4428-349-A MAIN BOARD,COMPLETE (DX7:E2,MXAR)
102 A-4428-351-A MAIN BOARD,COMPLETE (DX7:AUS)
102 A-4473-174-A MAIN BOARD,COMPLETE (DX7:TH)
102 A-4473-337-A MAIN BOARD,COMPLETE (DX7:KR)
102 A-4473-346-A MAIN BOARD,COMPLETE (DX7J)
* 103 4-988-533-01 HOLDER, PWB
104 1-773-122-11 WIRE (FLAT TYPE) (19 CORE)
105 A-4428-089-A TRANS BOARD,COMPLETE (BX7:US)
105 A-4428-346-A TRANS BOARD,COMPLETE
105 A-4428-536-A TRANS BOARD,COMPLETE (DX7:AUS)
105 A-4428-537-A TRANS BOARD,COMPLETE (DX7:MX)
105 A-4428-960-A TRANS BOARD,COMPLETE (BX7:AEP,G,UK,CIS)
105 A-4473-173-A TRANS BOARD,COMPLETE (DX7:TH)
105 A-4473-195-A TRANS BOARD,COMPLETE (BX7:CND)
105 A-4473-329-A TRANS BOARD,COMPLETE (DX7:KR)
Les composants identifiés par
une marque 0 sont critiques
pour la sécurité.
Ne les remplacer que par une
pièce portant le numéro spécifié.
(DX7:EA,SP,MY,E2,AR,E3)
105 A-4473-345-A TRANS BOARD,COMPLETE (DX7J)
106 3-703-571-11 BUSHING (S) (4516), CORD (DX7:TH)
* 106 3-703-244-00 BUSHING (FBS001), CORD
(EXCEPT DX7:TH,E2,MX)
106 4-966-266-01 BUSHING (S)(FBS002), CORD (DX7:E2,MX)
107 A-4428-079-A POWER AMP BOARD,COMPLETE(BX7)
107 A-4428-344-A POWER AMP BOARD,COMPLETE
(DX7:EA,SP,MY,E2,MX,AR,AUS,E3,KR)
107 A-4473-170-A POWER AMP BOARD,COMPLETE (DX7:TH)
107 A-4473-342-A POWER AMP BOARD,COMPLETE (DX7J)
0108 1-575-653-11 CORD, POWER (DX7:E3/DX7J)
0108 1-696-847-11 CORD, POWER (DX7:AUS)
0108 1-769-079-21 CORD, POWER (DX7:KR)
0108 1-777-071-21 CORD, POWER (BX7:G,AEP,CIS,DX7:EA,MY,SP)
0108 1-782-315-11 CORD, POWER (DX7:E2,MX)
0108 1-783-820-11 CORD, POWER (BX7:CND,US)
0108 1-783-941-11 CORD, POWER (DX7:AR)
0108 1-790-226-11 CORD, POWER (BX7:UK)
0108 1-791-901-11 CORD, POWER (DX7:TH)
0109 1-569-007-11 ADAPTOR, CONVERSION 2P (DX7:E3/DX7J)
0109 1-569-008-21 ADAPTOR, CONVERSION (DX7:EA,SP,MY)
0109 1-569-008-31 ADAPTOR, CONVERSION (DX7:EA,MY,SP)
51
Page 52
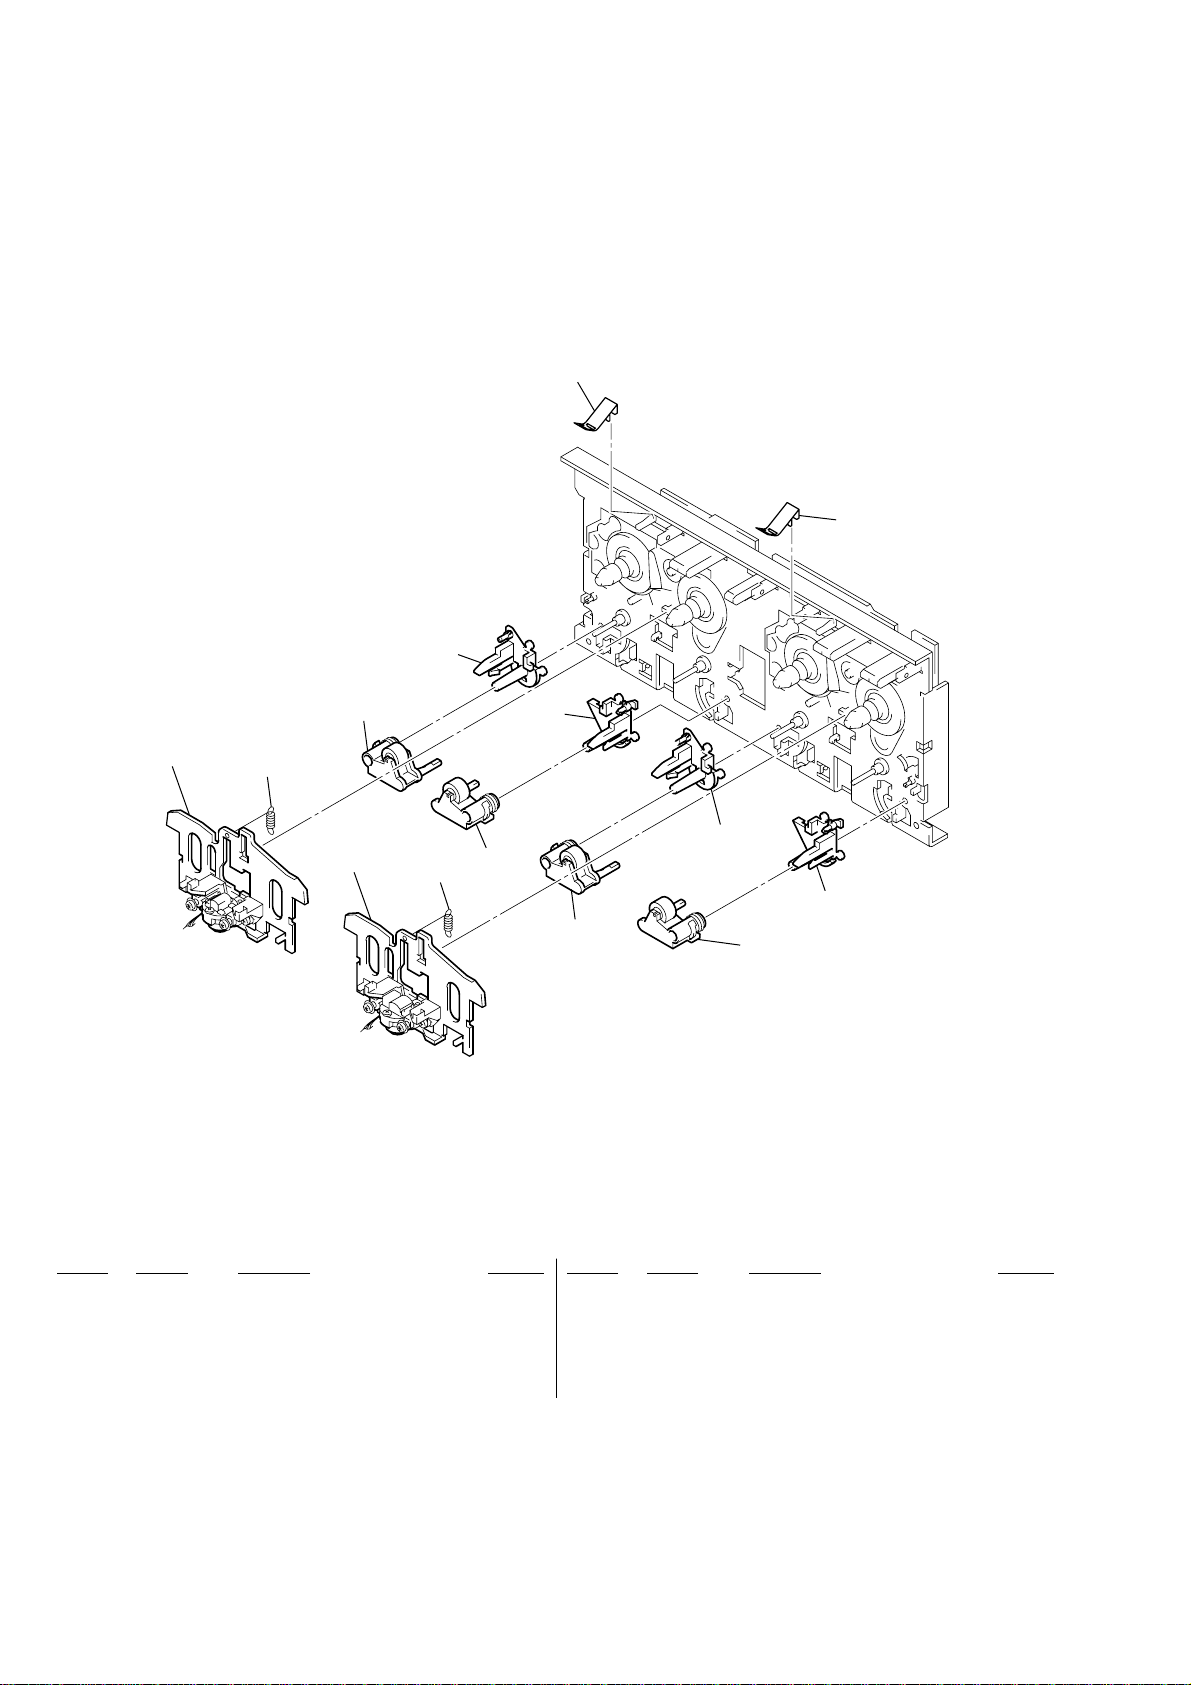
Ver 1.2 2001.08
8-4. TAPE MECHANISM DECK SECTION-1
(TCM-230MWR11)
Note: Two different types of tape mechanism are used depending on models.
They maintain compatibility as an entire mechanism even though
there are some different parts are used.
156
156
HP101
151
152
HRPE101
155
151
153
154
152
155
154
153
Ref. No. Part No. Description Remarks Ref. No. Part No. Description Remarks
151 3-016-574-01 SPRING (HEAD), TENSION
152 X-3374-156-1 PINCH LEVER (REV) ASSY
153 X-3374-155-1 PINCH LEVER (FWD) ASSY
154 3-017-365-01 BASE (PINCH LEVER FWD)
155 3-017-366-01 BASE (PINCH LEVER REV)
156 3-016-567-01 SPRING (CASSETTE), LEAF
HP101 A-2004-778-A BASE (A) ASSY, HEAD
HRPE101 A-2004-779-A BASE (B) ASSY, HEAD
52
Page 53
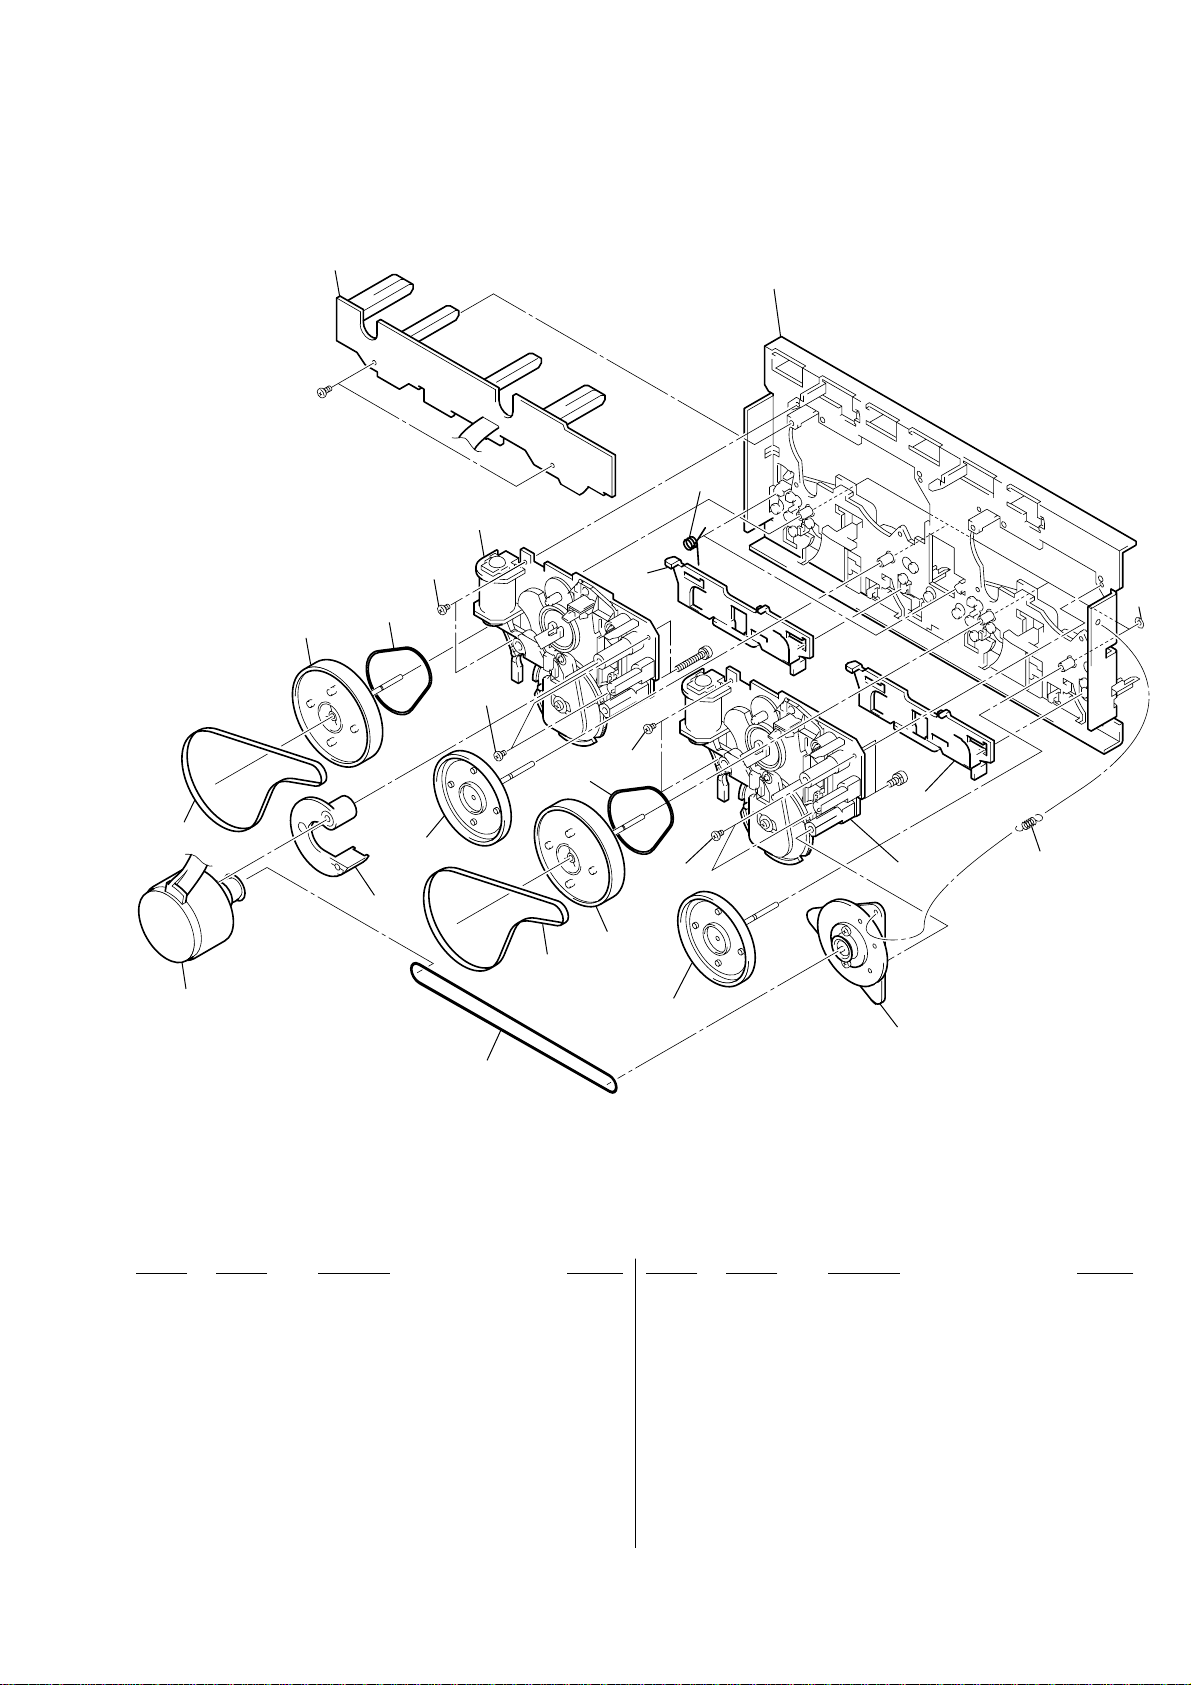
8-5. TAPE MECHANISM DECK SECTION-2
201
202
202
203
204
217
205
218
206
208
215
215
215
215
208
209
219
216
214
210
220
210
221
211
212
213
M1
207
(TCM-230MWR11)
Ver 1.2 2001.08
Ref. No. Part No. Description Remarks Ref. No. Part No. Description Remarks
201 X-4952-881-1 CHASSIS ASSY, MAIN
202 3-041-946-01 BELT (CAPSTAN B)
203 4-227-239-01 BELT (CAPSTAN C)
204 3-016-568-01 BRACKET (MOTOR)
205 X-3378-040-1 FLYWHEEL (A-FWD) ASSY
206 X-3378-041-1 FLYWHEEL (A-REV) ASSY
207 X-3374-157-1 PULLEY ASSY, TENSION
208 3-041-947-01 BELT (FR)
209 A-2004-752-A BLOCK (A) ASSY, MECHANICAL
210 3-016-566-01 SLIDER, REVERSE
211 A-2007-838-A LEAF SW BOARD, COMPLETE
212 4-228-450-01 SPRING (REVERSE SLIDER),TORSION
213 3-019-208-01 WASHER, STOPPER
214 3-027-453-01 SPRING (GROUND), TENSION
215 3-030-823-01 SCREW (+BVTT) (2X3.5)
216 A-2004-753-A BLOCK (B) ASSY, MECHANICAL
217 X-3378-042-1 FLYWHEEL (B-FWD) ASSY
218 X-3378-043-1 FLYWHEEL (B-REV) ASSY
219 7-685-851-04 SCREW +BVTT 2X4 (S)
220 7-628-254-15 SCREW +PS 2.6X6
221 7-628-254-50 SCREW +PS 2.6X16
M1 X-3378-241-1 MOTOR ASSY (INCLUDING PULLEY)
53
Page 54
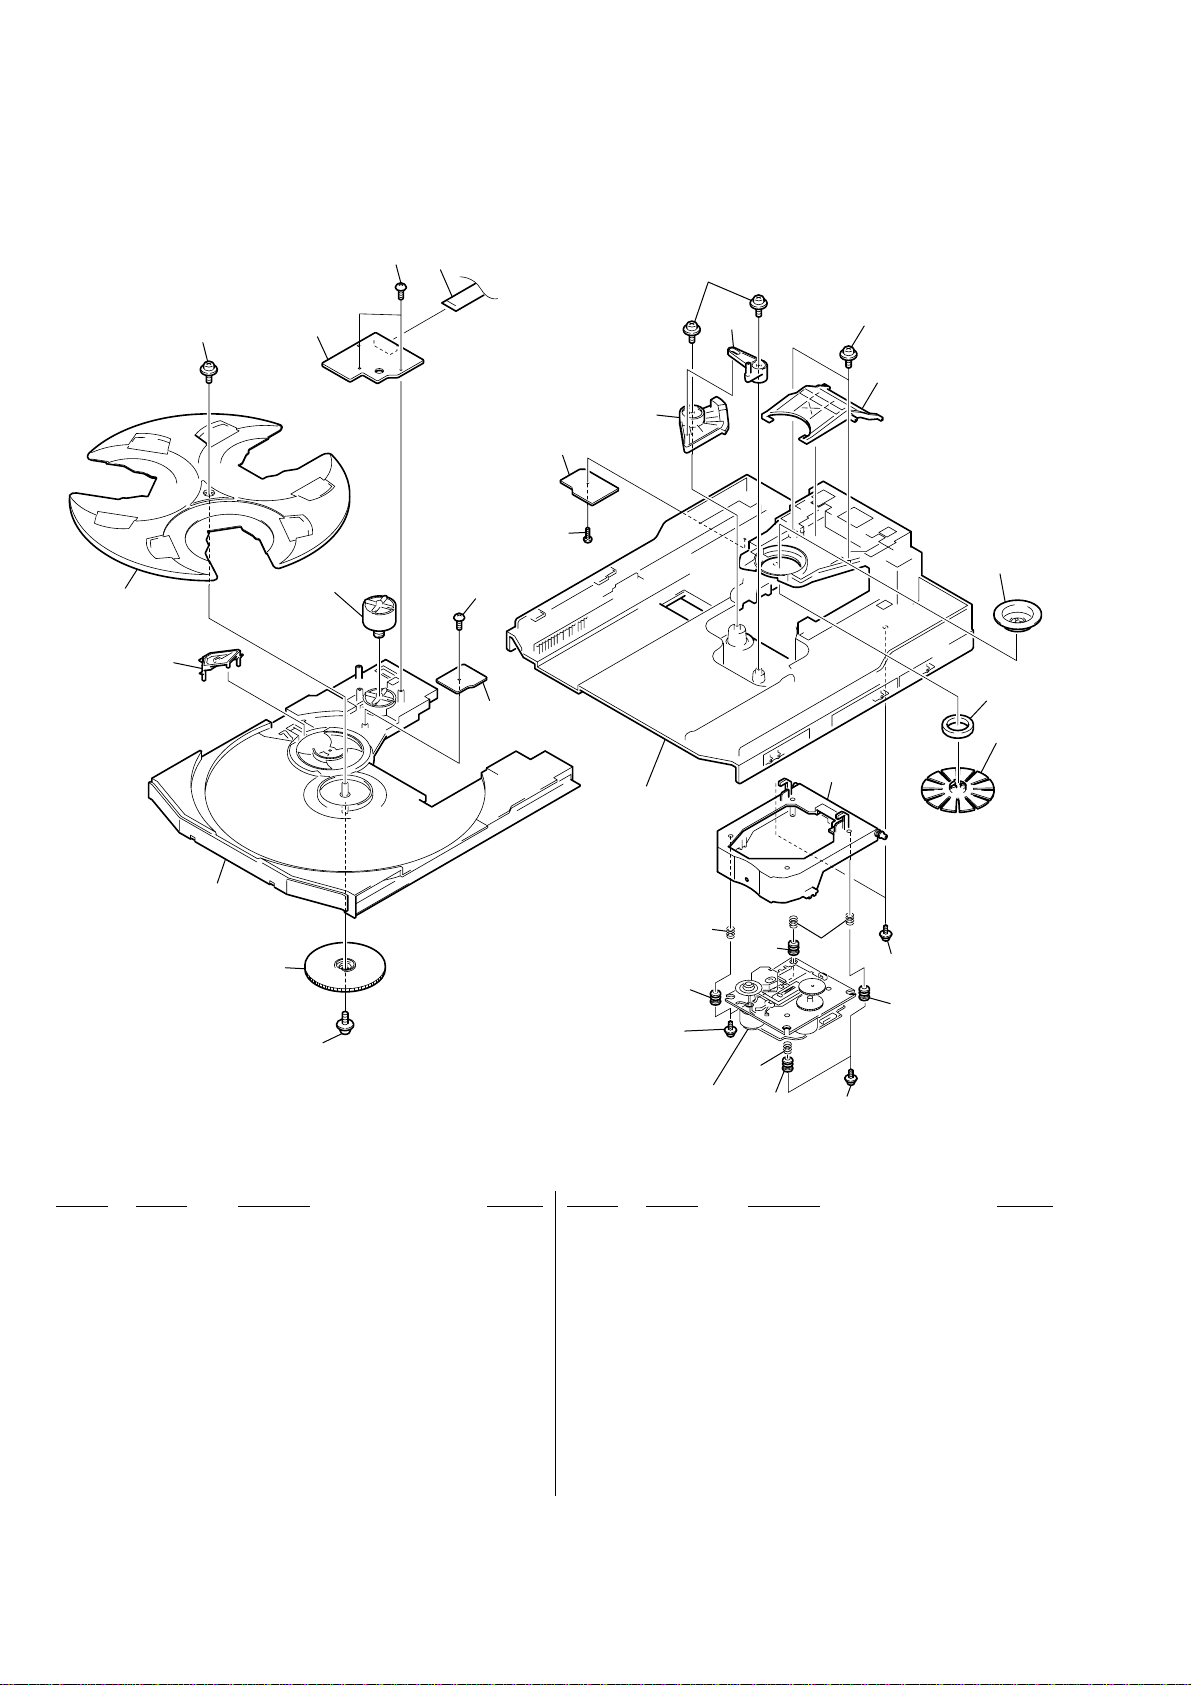
Ver 1.3 2002.08
8-6. CD MECHANISM DECK SECTION
258
259
251
255
254
256
257
M721
258
260
261
258
262
272
263
271
264
265
266
267
268
253
270
252
269
270
271
269
269
251
271
270
BU-K2BD38
Ref. No. Part No. Description Remarks Ref. No. Part No. Description Remarks
251 4-933-134-11 SCREW (+PTPWH M2.6X8)
252 4-221-679-01 CAM(RELAY)
253 4-221-675-01 TABLE
254 4-221-686-01 LEVER (CHANGE)
255 4-221-676-01 TRAY
256 4-933-134-51 SCREW (+PTPWH 2.6X8)
257 1-675-910-11 MOTOR BOARD
258 4-951-620-01 SCREW (2.6X8), +BVTP
259 1-791-983-11 WIRE (FLAT TYPE) (8 CORE)
260 1-675-911-11 ADDRESS SENSOR BOARD
261 1-675-912-11 DRIVER BOARD
262 X-4952-608-1 CAM(U/D) ASSY
263 4-221-681-01 LEVER (EX)
264 4-221-682-01 LEVER (LIFTER)
265 4-221-688-01 PULLEY (B), CHUCKING
266 1-471-035-11 MAGNET ASSY
267 X-4952-019-1 PULLEY (A) ASSY, CHUCKING
268 X-4951-889-1 HOLDER (BU) ASSY
269 4-227-549-01 INSULATOR
270 4-227-045-11 SPRING (INSULATOR), COIL
271 4-985-672-01 SCREW (+PTPWH M2.6), FLOATING
272 4-221-674-04 CHASSIS
M721 A-4672-826-A MOTOR ASSY (INCLUDING PULLEY)
269
271
54
Page 55
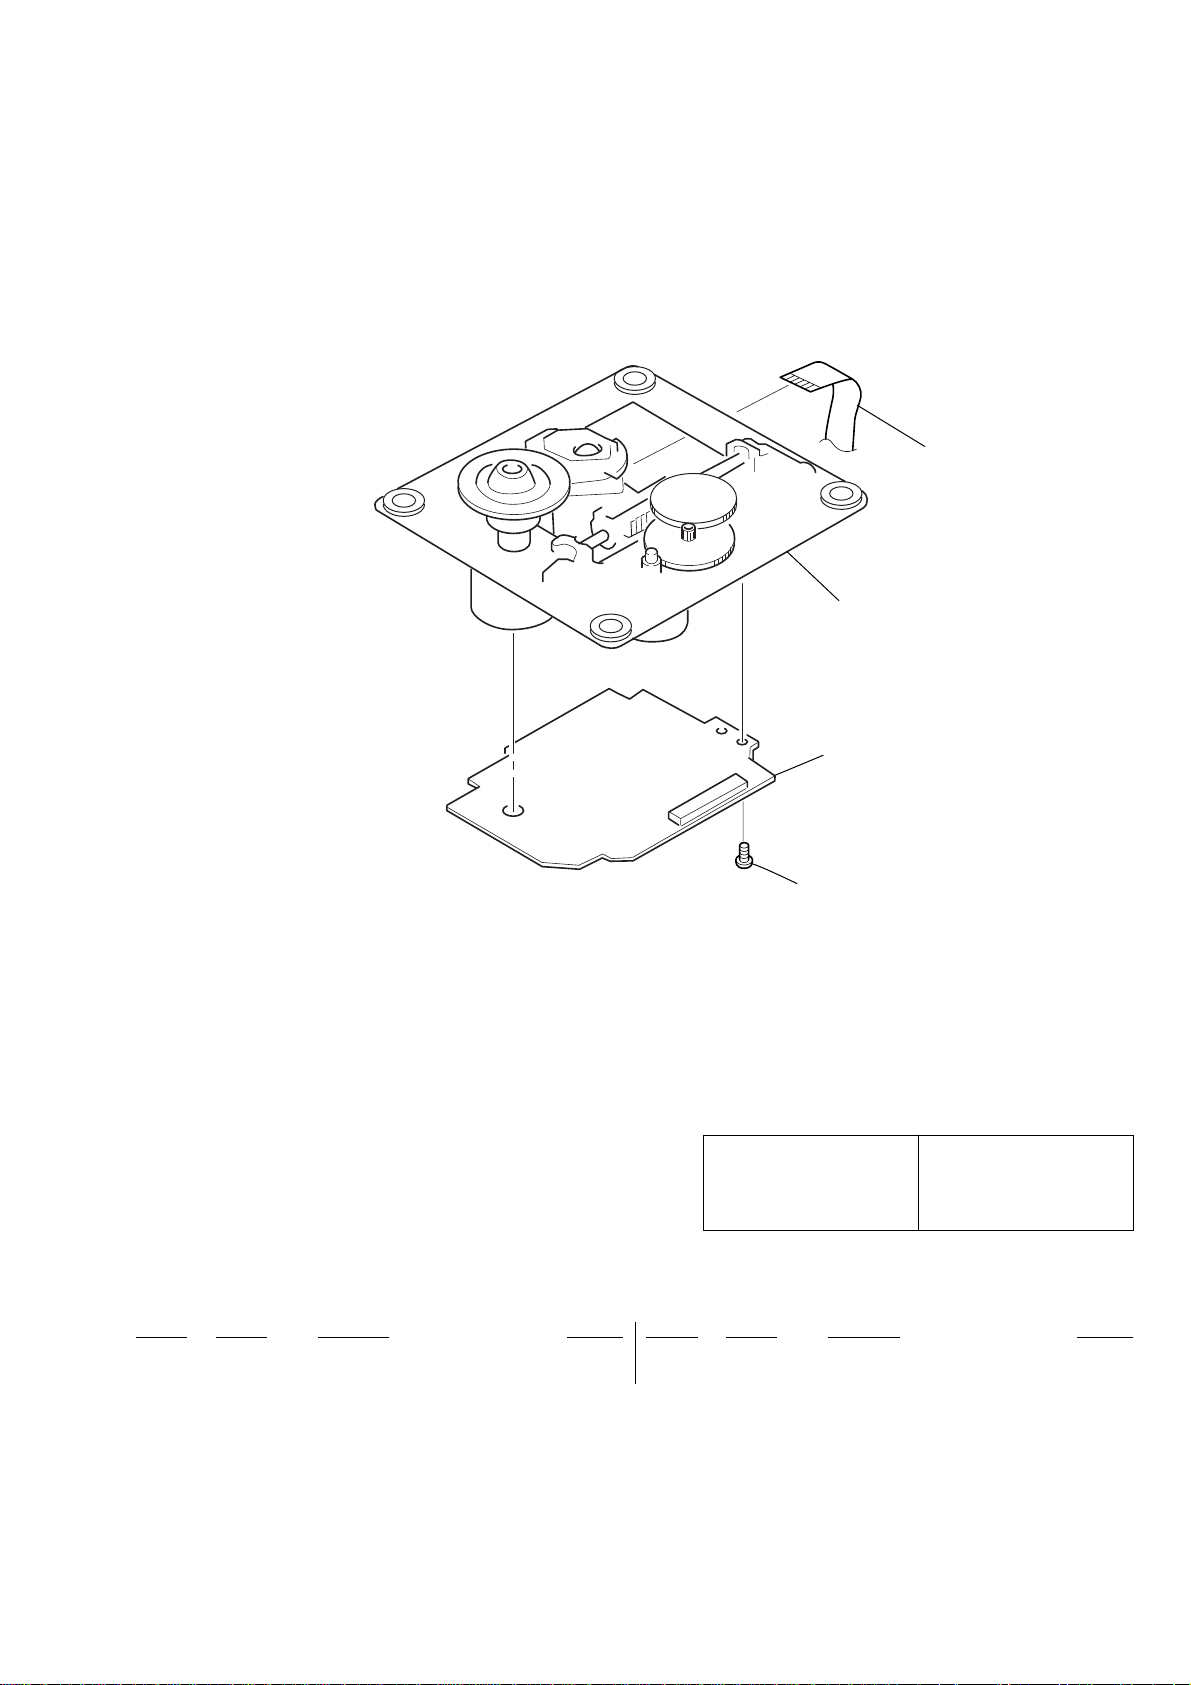
8-7. BASE UNIT SECTION
(BU-K2BD38)
Ver 1.4
302
301
303
304
The components identified by
mark 0 or dotted line with mark
0 are critical for safety .
Replace only with part number
specified.
Ref. No. Part No. Description Remarks Ref. No. Part No. Description Remarks
0 301 A-4735-357-A OP BASE ASSY (KSM-213DAP)
302 1-792-024-11 WIRE (FLAT TYPE) (16 CORE)
303 A-4724-934-A BD BOARD, COMPLETE
304 4-951-620-01 SCREW (2.6X8), +BVTP
Les composants identifiés par
une marque 0 sont critiques
pour la sécurité.
Ne les remplacer que par une
pièce portant le numéro spécifié.
55
Page 56
SECTION 9
BD
NOTE:
• Due to standardization, replacements in the
Ref. No. Part No. Description Remarks Ref. No. Part No. Description Remarks
parts list may be different from the parts
specified in the diagrams or the components
used on the set.
• -XX, -X mean standardized parts, so they
may have some difference from the original
one.
• Items marked “*” are not stocked since they
are seldom required for routine service.
Some delay should be anticipated when
ordering these items.
• CAPACITORS:
uF: µF
• RESISTORS
All resistors are in ohms.
METAL: metal-film resistor
METAL OXIDE: Metal Oxide-film resistor
F: nonflammable
Ref. No. Part No. Description Remarks Ref. No. Part No. Description Remarks
A-4724-934-A BD BOARD, COMPLETE
*****************
ELECTRICAL PARTS LIST
• COILS
uH: µH
• SEMICONDUCTORS
In each case, u: µ, for example:
uA...: µA... , uPA... , µPA... ,
uPB... , µPB... , uPC... , µPC... ,
uPD..., µPD...
• Abbreviation
CND: Canadian model
AUS : Australian model
G : German model
EA : Saudi Arabia model
MY : Malaysia model
SP : Singapore model
TH : Thai model
KR : Korea model
MX : Mexican model
AR : Argentina model
E2 : Central and South AMERICA
E3 : Middle and Near East
C182 1-163-123-00 CERAMIC CHIP 180PF 5% 50V
When indicating parts by reference number,
please include the board name.
The components identified by mark 0 or
dotted line with mark 0 are critical for safety.
Replace only with part number specified.
Les composants identifiés par une marque
0 sont critiques pour la sécurité.
Ne les remplacer que par une pièce portant
le numéro spécifié.
< CONNECTOR >
< CAPACITOR >
C101 1-163-005-11 CERAMIC CHIP 470PF 10% 50V
C102 1-164-004-11 CERAMIC CHIP 0.1uF 10% 25V
C103 1-163-005-11 CERAMIC CHIP 470PF 10% 50V
C104 1-163-009-11 CERAMIC CHIP 0.001uF 10% 50V
C108 1-164-004-11 CERAMIC CHIP 0.1uF 10% 25V
C109 1-163-011-11 CERAMIC CHIP 0.0015uF 10% 50V
C110 1-164-182-11 CERAMIC CHIP 0.0033uF 10% 50V
C111 1-163-251-11 CERAMIC CHIP 100PF 5.00% 50V
C112 1-107-682-11 CERAMIC CHIP 1uF 10.00% 16V
C114 1-163-038-91 CERAMIC CHIP 0.1uF 25V
C115 1-104-665-11 ELECT 100uF 20.00% 10V
C116 1-104-665-11 ELECT 100uF 20.00% 10V
C117 1-104-665-11 ELECT 100uF 20.00% 10V
C118 1-163-009-11 CERAMIC CHIP 0.001uF 10% 50V
C119 1-163-235-11 CERAMIC CHIP 22PF 5.00% 50V
C121 1-163-038-91 CERAMIC CHIP 0.1uF 25V
C122 1-104-665-11 ELECT 100uF 20.00% 10V
C123 1-163-021-91 CERAMIC CHIP 0.01uF 10.00% 50V
C124 1-107-823-11 CERAMIC CHIP 0.47uF 10.00% 16V
C125 1-163-038-91 CERAMIC CHIP 0.1uF 25V
C126 1-163-038-91 CERAMIC CHIP 0.1uF 25V
C127 1-104-665-11 ELECT 100uF 20.00% 10V
C129 1-163-031-11 CERAMIC CHIP 0.01uF 50V
C130 1-164-346-11 CERAMIC CHIP 1uF 16V
C131 1-126-964-11 ELECT 10uF 20.00% 50V
CN101 1-784-741-11 CONNECTOR, FFC 19P
CN102 1-793-907-11 CONNECTOR, FFC/FPC 16P
< FERRITE BEAD >
FB101 1-500-445-21 FERRITE 0UH
FB103 1-500-445-21 FERRITE 0UH
< IC >
IC101 8-752-386-85 IC CXD2587Q
IC102 8-759-549-28 IC BA5974FP-E2
IC103 8-752-085-51 IC CXA2568M-T6
< TRANSISTOR >
Q101 8-729-049-31 TRANSISTOR 2SB710-RTX
< RESISTOR >
R101 1-216-077-91 RES-CHIP 15K 5% 1/10W
R102 1-216-097-91 RES-CHIP 100K 5% 1/10W
R103 1-216-077-91 RES-CHIP 15K 5% 1/10W
R104 1-216-085-00 METAL CHIP 33K 5% 1/10W
R105 1-216-073-00 METAL CHIP 10K 5% 1/10W
R106 1-216-049-91 RES-CHIP 1K 5% 1/10W
R107 1-216-073-00 METAL CHIP 10K 5% 1/10W
R108 1-216-061-00 METAL CHIP 3.3K 5% 1/10W
R109 1-216-121-91 RES-CHIP 1M 5% 1/10W
R110 1-216-025-91 RES-CHIP 100 5% 1/10W
C133 1-164-346-11 CERAMIC CHIP 1uF 16V
C140 1-164-346-11 CERAMIC CHIP 1uF 16V
C141 1-164-346-11 CERAMIC CHIP 1uF 16V
C143 1-163-038-91 CERAMIC CHIP 0.1uF 25V
C145 1-163-038-91 CERAMIC CHIP 0.1uF 25V
C153 1-163-038-91 CERAMIC CHIP 0.1uF 25V
C159 1-163-019-00 CERAMIC CHIP 0.0068uF 10% 50V
C162 1-104-665-11 ELECT 100uF 20.00% 10V
C163 1-104-665-11 ELECT 100uF 20.00% 10V
C165 1-163-038-91 CERAMIC CHIP 0.1uF 25V
C167 1-163-237-11 CERAMIC CHIP 27PF 5.00% 50V
C168 1-163-235-11 CERAMIC CHIP 22PF 5.00% 50V
C171 1-163-009-11 CERAMIC CHIP 0.001uF 10% 50V
C172 1-163-123-00 CERAMIC CHIP 180PF 5% 50V
C181 1-163-009-11 CERAMIC CHIP 0.001uF 10% 50V
56
R111 1-216-121-91 RES-CHIP 1M 5% 1/10W
R113 1-216-121-91 RES-CHIP 1M 5% 1/10W
R114 1-216-073-00 METAL CHIP 10K 5% 1/10W
R116 1-216-001-00 METAL CHIP 10 5% 1/10W
R117 1-216-049-91 RES-CHIP 1K 5% 1/10W
R118 1-216-025-91 RES-CHIP 100 5% 1/10W
R119 1-216-059-00 METAL CHIP 2.7K 5% 1/10W
R123 1-216-073-00 METAL CHIP 10K 5% 1/10W
R124 1-216-097-91 RES-CHIP 100K 5% 1/10W
R131 1-216-033-00 METAL CHIP 220 5% 1/10W
R143 1-216-103-00 METAL CHIP 180K 5% 1/10W
R144 1-216-103-00 METAL CHIP 180K 5% 1/10W
R147 1-216-069-00 METAL CHIP 6.8K 5% 1/10W
R148 1-216-001-00 METAL CHIP 10 5% 1/10W
R149 1-216-001-00 METAL CHIP 10 5% 1/10W
Page 57
BD DRIVER HEAD (A) HEAD (B)
Ref. No. Part No. Description Remarks Ref. No. Part No. Description Remarks
R158 1-216-111-00 METAL CHIP 390K 5% 1/10W
R159 1-216-101-00 METAL CHIP 150K 5% 1/10W
R162 1-216-101-00 METAL CHIP 150K 5% 1/10W
R171 1-216-078-00 RES-CHIP 16K 5% 1/10W
R172 1-216-073-00 METAL CHIP 10K 5% 1/10W
R173 1-216-077-91 RES-CHIP 15K 5% 1/10W
R181 1-216-078-00 RES-CHIP 16K 5% 1/10W
R182 1-216-073-00 METAL CHIP 10K 5% 1/10W
R183 1-216-077-91 RES-CHIP 15K 5% 1/10W
< RESISTOR NETWORK >
RN101 1-233-576-11 RES, CHIP NETWORK 100
< SWITCH >
CD SWITCH
S645 1-762-875-21 SWITCH, KEYBOARD (DISC 3)
S646 1-762-875-21 SWITCH, KEYBOARD (OPEN/CLOSE)
**************************************************************
1-675-912-11 DRIVER BOARD
***********
< CAPACITOR >
C702 1-126-964-51 ELECT 10uF 20.00% 50V
< CONNECTOR >
CN701 1-785-336-11 PIN, CONNECTOR (LIGHT ANGLE)10P
CN702 1-785-550-11 CONNECTOR, FFC/FPC 8P
LEAF SW
S101 1-771-853-11 SWITCH, DETECTION (LIMIT IN)
< VIBRATOR >
X101 1-579-280-11 VIBRATOR, CRYSTAL 16.9344MHz
**************************************************************
A-4428-077-A CD SWITCH BOARD, COMPLETE
(EXCEPT TH,DX7J)
*************************************
A-4428-905-A CD SWITCH BOARD, COMPLETE (TH)
****************************
A-4473-045-A CD SWITCH BOARD, COMPLETE (DX7J)
******************************
< DIODE >
D630 8-719-056-13 DIODE SML79423C-TP15 (DISC 1)
D631 8-719-056-13 DIODE SML79423C-TP15 (DISC 2)
D632 8-719-056-13 DIODE SML79423C-TP15 (DISC 3)
< TRANSISTOR >
Q630 8-729-422-57 TRANSISTOR BN1A4M-TP
Q631 8-729-422-57 TRANSISTOR BN1A4M-TP
Q632 8-729-422-57 TRANSISTOR BN1A4M-TP
Q633 8-729-422-57 TRANSISTOR BN1A4M-TP
Q634 8-729-422-57 TRANSISTOR BN1A4M-TP
Q635 8-729-422-57 TRANSISTOR BN1A4M-TP
< DIODE >
D701 8-719-109-66 DIODE MTZJ-T-77-3.3B
< IC >
IC701 8-759-598-69 IC BA6956AN
< RESISTOR >
R701 1-249-411-11 CARBON 330 5% 1/4W
R702 1-249-401-11 CARBON 47 5% 1/4W F
**************************************************************
1-676-220-11 HEAD (A) BOARD
************
< CONNECTOR >
* CN1 1-564-719-11 PIN, CONNECTOR (SMALL TYPE) 3P
**************************************************************
1-676-221-11 HEAD (B) BOARD
************
< CONNECTOR >
CN2 1-564-722-11 PIN, CONNECTOR (SMALL TYPE) 6P
**************************************************************
A-2007-838-A LEAF SW BOARD, COMPLETE
**********************
< RESISTOR >
R685 1-249-417-11 CARBON 1K 5% 1/4W F
R686 1-249-418-11 CARBON 1.2K 5% 1/4W F
R687 1-249-420-11 CARBON 1.8K 5% 1/4W F
R688 1-249-422-11 CARBON 2.7K 5% 1/4W F
R689 1-247-843-11 CARBON 3.3K 5% 1/4W
R750 1-249-406-11 CARBON 120 5% 1/4W F
R751 1-249-406-11 CARBON 120 5% 1/4W F
R752 1-249-406-11 CARBON 120 5% 1/4W F
R753 1-249-406-11 CARBON 120 5% 1/4W F
R754 1-249-406-11 CARBON 120 5% 1/4W F
R755 1-249-406-11 CARBON 120 5% 1/4W F
< SWITCH >
S642 1-762-875-21 SWITCH, KEYBOARD (DISC SKIP)
S643 1-762-875-21 SWITCH, KEYBOARD (DISC 1)
S644 1-762-875-21 SWITCH, KEYBOARD (DISC 2)
< CAPACITOR >
C1001 1-107-716-11 ELECT 33uF 20.00% 10V
< CONNECTOR >
CN1001 1-568-860-21 SOCKET, CONNECTOR 17P
< DIODE >
D1001 8-719-911-19 DIODE 1SS133T-72
D1002 8-719-911-19 DIODE 1SS133T-72
< IC >
IC1001 8-749-016-76 IC RPI-321
IC1002 8-749-016-76 IC RPI-321
< TRANSISTOR >
Q1001 8-729-029-56 TRANSISTOR DTA144ESA-TP
57
Page 58
MAINLEAF SW
Ref. No. Part No. Description Remarks Ref. No. Part No. Description Remarks
< RESISTOR >
R1001 1-249-409-11 CARBON 220 5% 1/4W F
R1002 1-249-409-11 CARBON 220 5% 1/4W F
R1003 1-249-414-11 CARBON 560 5% 1/4W F
R1004 1-247-834-11 CARBON 1.3K 5% 1/4W
R1005 1-247-818-11 CARBON 300 5% 1/4W
R1006 1-247-864-11 CARBON 24K 5% 1/4W
R1007 1-247-780-00 CARBON 7.5 5% 1/4W
R1008 1-249-417-11 CARBON 1K 5% 1/4W F
< VARIABLE RESISTOR >
RV1001 1-241-785-11 RES, ADJ, CARBON 10K
RV1002 1-241-785-11 RES, ADJ, CARBON 10K
< SWITCH >
S1001 1-570-953-11 SWITCH, PUSH (1 KEY) (DECK A PLAY)
S1002 1-570-953-11 SWITCH, PUSH (1 KEY) (DECK B PLAY)
S1003 1-771-333-11 SWITCH, LEAF (DECK A HALF)
S1004 1-771-536-11 SWITCH, LEAF (DECK A 120/70)
S1005 1-771-536-11 SWITCH, LEAF (DECK A REC)
S1006 1-771-333-11 SWITCH, LEAF (DECK B HALF)
S1008 1-771-536-11 SWITCH, LEAF (DECK B 120/70)
S1009 1-771-536-11 SWITCH, LEAF (DECK B REC)
**************************************************************
A-4428-097-A MAIN BOARD, COMPLETE (AEP,G,UK,CIS)
*********************************
A-4428-334-A MAIN BOARD, COMPLETE (US,CND)
***************************
A-4428-340-A MAIN BOARD, COMPLETE (EA)
***********************
A-4428-347-A MAIN BOARD, COMPLETE (SP,MY,E3)
*****************************
A-4428-349-A MAIN BOARD, COMPLETE (E2,MX,AR)
*****************************
A-4428-351-A MAIN BOARD, COMPLETE (AUS)
************************
A-4473-174-A MAIN BOARD, COMPLETE (TH)
***********************
A-4473-337-A MAIN BOARD, COMPLETE (KR)
***********************
A-4473-346-A MAIN BOARD, COMPLETE (DX7J)
*************************
7-685-646-79 SCREW +BVTP 3X8 TYPE2 N-S
< CAPACITOR >
C111 1-163-018-00 CERAMIC CHIP 0.0056uF 5% 50V
C112 1-126-961-11 ELECT 2.2uF 20.00% 50V
C113 1-126-957-11 ELECT 0.22uF 20.00% 50V
C115 1-136-169-00 MYLAR 0.22uF 5.00% 50V
C116 1-136-169-00 MYLAR 0.22uF 5.00% 50V
C117 1-126-964-11 ELECT 10uF 20.00% 50V
C118 1-126-961-11 ELECT 2.2uF 20.00% 50V
C121 1-126-964-11 ELECT 10uF 20.00% 50V
(DX7,DX7J)
C122 1-126-964-11 ELECT 10uF 20.00% 50V
(DX7,DX7J)
C123 1-126-964-11 ELECT 10uF 20.00% 50V
(DX7,DX7J)
C124 1-163-038-91 CERAMIC CHIP 0.1uF 25V
C125 1-126-964-11 ELECT 10uF 20.00% 50V
(DX7,DX7J)
C131 1-136-169-00 MYLAR 0.22uF 5.00% 50V
C132 1-126-964-11 ELECT 10uF 20.00% 50V
C133 1-126-925-11 ELECT 470uF 20.00% 10V
C134 1-163-033-91 CERAMIC CHIP 0.022uF 50V
C135 1-126-964-11 ELECT 10uF 20.00% 50V
C140 1-163-038-91 CERAMIC CHIP 0.1uF 25V
C142 1-163-038-91 CERAMIC CHIP 0.1uF 25V
C144 1-126-964-11 ELECT 10uF 20.00% 50V
C146 1-126-925-11 ELECT 470uF 20.00% 10V
C151 1-163-001-11 CERAMIC CHIP 220PF 10% 50V
C152 1-126-961-11 ELECT 2.2uF 20.00% 50V
C153 1-126-964-11 ELECT 10uF 20.00% 50V
C154 1-126-964-11 ELECT 10uF 20.00% 50V
C155 1-126-964-11 ELECT 10uF 20.00% 50V
C156 1-136-161-00 MYLAR 0.047uF 5.00% 50V
C157 1-136-495-11 MYLAR 0.068uF 5.00% 50V
C158 1-136-495-11 MYLAR 0.068uF 5.00% 50V
C159 1-163-019-00 CERAMIC CHIP 0.0068uF 10% 50V
C160 1-163-019-00 CERAMIC CHIP 0.0068uF 10% 50V
C161 1-163-018-00 CERAMIC CHIP 0.0056uF 5% 50V
C162 1-126-961-11 ELECT 2.2uF 20.00% 50V
C165 1-136-169-00 MYLAR 0.22uF 5.00% 50V
C166 1-136-169-00 MYLAR 0.22uF 5.00% 50V
C167 1-126-964-11 ELECT 10uF 20.00% 50V
C171 1-126-964-11 ELECT 10uF 20.00% 50V
(DX7,DX7J)
C172 1-126-964-11 ELECT 10uF 20.00% 50V
(DX7,DX7J)
C175 1-126-964-11 ELECT 10uF 20.00% 50V
(DX7,DX7J)
C199 1-163-038-91 CERAMIC CHIP 0.1uF 25V
C201 1-104-665-11 ELECT 100uF 20.00% 10V
C202 1-126-935-11 ELECT 470uF 20.00% 6.3V
C203 1-163-033-91 CERAMIC CHIP 0.022uF 50V
C204 1-126-961-11 ELECT 2.2uF 20.00% 50V
C205 1-163-033-91 CERAMIC CHIP 0.022uF 50V
C101 1-163-001-11 CERAMIC CHIP 220PF 10% 50V
C102 1-126-961-11 ELECT 2.2uF 20.00% 50V
C103 1-126-964-11 ELECT 10uF 20.00% 50V
C104 1-126-964-11 ELECT 10uF 20.00% 50V
C105 1-126-964-11 ELECT 10uF 20.00% 50V
C106 1-136-161-00 MYLAR 0.047uF 5.00% 50V
C107 1-136-495-11 MYLAR 0.068uF 5.00% 50V
C108 1-136-495-11 MYLAR 0.068uF 5.00% 50V
C109 1-163-019-00 CERAMIC CHIP 0.0068uF 10% 50V
C110 1-163-019-00 CERAMIC CHIP 0.0068uF 10% 50V
58
C206 1-126-961-11 ELECT 2.2uF 20.00% 50V
C207 1-126-916-11 ELECT 1000uF 20.00% 6.3V
C208 1-163-117-00 CERAMIC CHIP 100PF 5% 50V
C209 1-126-925-11 ELECT 470uF 20.00% 10V
C301 1-126-960-11 ELECT 1uF 20.00% 50V
C302 1-130-479-00 MYLAR 0.0047uF 5% 50V
C303 1-136-165-00 MYLAR 0.1uF 5.00% 50V
C305 1-126-964-11 ELECT 10uF 20.00% 50V
C306 1-126-960-11 ELECT 1uF 20.00% 50V
C307 1-126-959-11 ELECT 0.47uF 20.00% 50V
Page 59

MAIN
Ref. No. Part No. Description Remarks Ref. No. Part No. Description Remarks
C308 1-126-964-11 ELECT 10uF 20.00% 50V
C309 1-137-194-81 MYLAR 0.47uF 5.00% 50V
C310 1-163-005-11 CERAMIC CHIP 470PF 10% 50V
C311 1-126-964-11 ELECT 10uF 20.00% 50V
C312 1-126-959-11 ELECT 0.47uF 20.00% 50V
C382 1-137-427-11 MYLAR 120PF 5.00% 50V
C383 1-163-003-11 CERAMIC CHIP 330PF 10% 50V
C384 1-163-103-00 CERAMIC CHIP 27PF 5% 50V
C385 1-126-964-11 ELECT 10uF 20.00% 50V
C410 1-163-233-11 CERAMIC CHIP 18PF 5.00% 50V
C313 1-163-009-11 CERAMIC CHIP 0.001uF 10% 50V
C314 1-126-964-11 ELECT 10uF 20.00% 50V
C315 1-126-963-11 ELECT 4.7uF 20.00% 50V
C316 1-126-933-11 ELECT 100uF 20.00% 16V
C317 1-104-665-11 ELECT 100uF 20.00% 10V
C318 1-126-964-11 ELECT 10uF 20.00% 50V
C319 1-126-961-11 ELECT 2.2uF 20.00% 50V
C320 1-126-961-11 ELECT 2.2uF 20.00% 50V
C321 1-163-131-00 CERAMIC CHIP 390PF 5% 50V
C322 1-163-117-00 CERAMIC CHIP 100PF 5% 50V
C323 1-136-157-00 MYLAR 0.022uF 5.00% 50V
C324 1-126-964-11 ELECT 10uF 20.00% 50V
C325 1-126-965-11 ELECT 22uF 20.00% 50V
C326 1-163-131-00 CERAMIC CHIP 390PF 5% 50V
C327 1-104-665-11 ELECT 100uF 20.00% 10V
C328 1-163-117-00 CERAMIC CHIP 100PF 5% 50V
C329 1-130-483-00 MYLAR 0.01uF 5% 50V
C330 1-126-964-11 ELECT 10uF 20.00% 50V
C331 1-126-965-11 ELECT 22uF 20.00% 50V
C332 1-137-427-11 MYLAR 120PF 5.00% 50V
C333 1-163-003-11 CERAMIC CHIP 330PF 10% 50V
C334 1-163-103-00 CERAMIC CHIP 27PF 5% 50V
C335 1-137-393-11 MYLAR 0.01uF 5.00% 100V
C336 1-126-961-11 ELECT 2.2uF 20.00% 50V
C337 1-136-155-00 FILM 0.015uF 5% 50V
C338 1-130-481-00 MYLAR 0.0068uF 5% 50V
C339 1-130-481-00 MYLAR 0.0068uF 5% 50V
C340 1-136-156-00 MYLAR 0.018uF 5.00% 50V
C341 1-126-960-11 ELECT 1uF 20.00% 50V
C342 1-104-664-11 ELECT 47uF 20.00% 16V
C351 1-126-960-11 ELECT 1uF 20.00% 50V
C352 1-130-479-00 MYLAR 0.0047uF 5% 50V
C353 1-136-165-00 MYLAR 0.1uF 5.00% 50V
C355 1-126-964-11 ELECT 10uF 20.00% 50V
C356 1-126-960-11 ELECT 1uF 20.00% 50V
C411 1-163-231-11 CERAMIC CHIP 15PF 5.00% 50V
C414 1-163-038-91 CERAMIC CHIP 0.1uF 25V
C416 1-126-916-11 ELECT 1000uF 20.00% 6.3V
C462 1-104-665-11 ELECT 100uF 20.00% 10V
C464 1-163-031-11 CERAMIC CHIP 0.01uF 50V
C497 1-126-964-11 ELECT 10uF 20.00% 50V
C498 1-163-038-91 CERAMIC CHIP 0.1uF 25V
C501 1-136-165-00 MYLAR 0.1uF 5.00% 50V
C502 1-136-165-00 MYLAR 0.1uF 5.00% 50V
C503 1-126-964-11 ELECT 10uF 20.00% 50V
C504 1-109-953-11 ELECT 2.2uF 20.00% 50V
C505 1-163-038-91 CERAMIC CHIP 0.1uF 25V
C601 1-163-031-11 CERAMIC CHIP 0.01uF 50V
C602 1-163-031-11 CERAMIC CHIP 0.01uF 50V
(EXCEPT US,CND)
C603 1-104-664-11 ELECT 47uF 20.00% 16V
C604 1-163-031-11 CERAMIC CHIP 0.01uF 50V
C605 1-163-031-11 CERAMIC CHIP 0.01uF 50V
C607 1-216-295-91 SHORT 0 (DX7.DX7J)
C607 1-163-031-11 CERAMIC CHIP 0.01uF 50V
(BX7)
C611 1-104-664-11 ELECT 47uF 20.00% 16V
C612 1-163-031-11 CERAMIC CHIP 0.01uF 50V
C613 1-126-960-11 ELECT 1uF 20.00% 50V
C614 1-163-031-11 CERAMIC CHIP 0.01uF 50V
C615 1-163-031-11 CERAMIC CHIP 0.01uF 50V
C616 1-163-021-91 CERAMIC CHIP 0.01uF 10.00% 50V
(DX7,DX7J)
C616 1-163-023-00 CERAMIC CHIP 0.015uF 5% 50V
(BX7)
C617 1-163-021-91 CERAMIC CHIP 0.01uF 10.00% 50V
(DX7,DX7J)
C617 1-163-023-00 CERAMIC CHIP 0.015uF 5% 50V
(BX7)
C618 1-126-957-11 ELECT 0.22uF 20.00% 50V
C619 1-163-075-00 CERAMIC CHIP 0.047uF 50V
C357 1-126-959-11 ELECT 0.47uF 20.00% 50V
C358 1-126-964-11 ELECT 10uF 20.00% 50V
C359 1-137-194-81 MYLAR 0.47uF 5.00% 50V
C360 1-163-005-11 CERAMIC CHIP 470PF 10% 50V
C362 1-163-017-00 CERAMIC CHIP 0.0047uF 5% 50V
C363 1-163-017-00 CERAMIC CHIP 0.0047uF 5% 50V
C368 1-126-964-11 ELECT 10uF 20.00% 50V
C369 1-126-961-11 ELECT 2.2uF 20.00% 50V
C370 1-126-961-11 ELECT 2.2uF 20.00% 50V
C371 1-163-131-00 CERAMIC CHIP 390PF 5% 50V
C372 1-163-117-00 CERAMIC CHIP 100PF 5% 50V
C373 1-136-157-00 MYLAR 0.022uF 5.00% 50V
C374 1-126-964-11 ELECT 10uF 20.00% 50V
C375 1-126-965-11 ELECT 22uF 20.00% 50V
C376 1-163-131-00 CERAMIC CHIP 390PF 5% 50V
C377 1-104-665-11 ELECT 100uF 20.00% 10V
C378 1-163-117-00 CERAMIC CHIP 100PF 5% 50V
C379 1-130-483-00 MYLAR 0.01uF 5% 50V
C380 1-126-964-11 ELECT 10uF 20.00% 50V
C381 1-126-965-11 ELECT 22uF 20.00% 50V
C620 1-126-962-11 ELECT 3.3uF 20.00% 50V
C621 1-126-962-11 ELECT 3.3uF 20.00% 50V
C622 1-104-664-11 ELECT 47uF 20.00% 16V
C623 1-126-964-11 ELECT 10uF 20.00% 50V
C624 1-126-960-11 ELECT 1uF 20.00% 50V
C625 1-163-125-00 CERAMIC CHIP 220PF 5% 50V
(US,CND,DX7,DX7J)
C625 1-163-137-00 CERAMIC CHIP 680PF 5% 50V
(AEP,G,UK,CIS)
C626 1-104-760-11 CERAMIC CHIP 0.047uF 10.00% 50V
C628 1-163-117-00 CERAMIC CHIP 100PF 5% 50V
(US,CND,DX7,DX7J)
C628 1-163-133-00 CERAMIC CHIP 470PF 5% 50V
(AEP,G,UK,CIS)
C629 1-126-965-11 ELECT 22uF 20.00% 50V
C630 1-126-964-11 ELECT 10uF 20.00% 50V
C631 1-163-031-11 CERAMIC CHIP 0.01uF 50V
C632 1-126-933-11 ELECT 100uF 20.00% 16V
C633 1-163-031-11 CERAMIC CHIP 0.01uF 50V
C634 1-163-016-00 CERAMIC CHIP 0.0039uF 10% 50V
C635 1-163-016-00 CERAMIC CHIP 0.0039uF 10% 50V
59
Page 60

MAIN
Ref. No. Part No. Description Remarks Ref. No. Part No. Description Remarks
C636 1-163-021-91 CERAMIC CHIP 0.01uF 10.00% 50V
C637 1-163-021-91 CERAMIC CHIP 0.01uF 10.00% 50V
C638 1-163-135-00 CERAMIC CHIP 560PF 5% 50V
(AEP,G,UK,CIS)
C641 1-163-031-11 CERAMIC CHIP 0.01uF 50V
C644 1-163-087-00 CERAMIC CHIP 4PF 50V
C645 1-163-031-11 CERAMIC CHIP 0.01uF 50V
C647 1-163-105-11 CERAMIC CHIP 33PF 5% 50V
(AEP,G,UK,CIS)
C651 1-163-239-11 CERAMIC CHIP 33PF 5.00% 50V
C652 1-163-235-11 CERAMIC CHIP 22PF 5.00% 50V
C653 1-163-009-11 CERAMIC CHIP 0.001uF 10% 50V
C655 1-163-009-11 CERAMIC CHIP 0.001uF 10% 50V
C656 1-163-031-11 CERAMIC CHIP 0.01uF 50V
C657 1-104-664-11 ELECT 47uF 20.00% 16V
C658 1-126-961-11 ELECT 2.2uF 20.00% 50V
C659 1-163-031-11 CERAMIC CHIP 0.01uF 50V
C660 1-104-664-11 ELECT 47uF 20.00% 16V
C661 1-163-031-11 CERAMIC CHIP 0.01uF 50V
C662 1-126-959-11 ELECT 0.47uF 20.00% 50V
C663 1-163-031-11 CERAMIC CHIP 0.01uF 50V
C669 1-163-031-11 CERAMIC CHIP 0.01uF 50V
C681 1-126-964-11 ELECT 10uF 20.00% 50V
(AEP,G,UK,CIS)
C682 1-163-135-00 CERAMIC CHIP 560PF 5% 50V
(AEP,G,UK,CIS)
C683 1-163-038-91 CERAMIC CHIP 0.1uF 25V
(AEP,G,UK,CIS)
C684 1-104-664-11 ELECT 47uF 20.00% 16V
(AEP,G,UK,CIS)
C685 1-126-964-11 ELECT 10uF 20.00% 50V
(AEP,G,UK,CIS)
C686 1-126-961-11 ELECT 2.2uF 20.00% 50V
(AEP,G,UK,CIS)
C687 1-163-129-00 CERAMIC CHIP 330PF 5% 50V
(AEP,G,UK,CIS)
C688 1-163-031-11 CERAMIC CHIP 0.01uF 50V
(AEP,G,UK,CIS)
C852 1-163-038-91 CERAMIC CHIP 0.1uF 25V
(AEP,G,UK,CIS)
C853 1-163-031-11 CERAMIC CHIP 0.01uF 50V
C861 1-107-717-11 ELECT 47uF 20.00% 50V
C862 1-107-721-11 ELECT 4.7uF 20.00% 100V
C863 1-107-721-11 ELECT 4.7uF 20.00% 100V
C891 1-126-964-11 ELECT 10uF 20.00% 50V
(BX7:US,CND,DX7,DX7J)
C892 1-163-038-91 CERAMIC CHIP 0.1uF 25V
(BX7:US,CND,DX7,DX7J)
C901 1-126-944-11 ELECT 3300uF 20.00% 25V
(DX7,DX7J)
C901 1-126-936-11 ELECT 3300uF 20.00% 16V
(BX7)
C902 1-136-165-00 MYLAR 0.1uF 5.00% 50V
C903 1-136-165-00 MYLAR 0.1uF 5.00% 50V
C905 1-136-165-00 MYLAR 0.1uF 5.00% 50V
C906 1-136-165-00 MYLAR 0.1uF 5.00% 50V
C907 1-126-937-11 ELECT 4700uF 20.00% 16V
C908 1-126-942-61 ELECT 1000uF 20.00% 25V
C909 1-126-952-11 ELECT 1000uF 20.00% 35V
C911 1-126-960-11 ELECT 1uF 20.00% 50V
C912 1-126-916-11 ELECT 1000uF 20.00% 6.3V
C921 1-126-960-11 ELECT 1uF 20.00% 50V
C922 1-126-933-11 ELECT 100uF 20.00% 16V
C925 1-104-665-11 ELECT 100uF 20.00% 10V
C931 1-126-964-11 ELECT 10uF 20.00% 50V
C932 1-126-935-11 ELECT 470uF 20.00% 16V
C951 1-126-960-11 ELECT 1uF 20.00% 50V
C961 1-126-960-11 ELECT 1uF 20.00% 50V
C962 1-126-926-11 ELECT 1000uF 20.00% 10V
< FILTER >
CF601 1-760-023-11 FILTER, CERAMIC (US,CND,DX7,DX7J)
CF601 1-579-185-21 FILTER, CERAMIC (AEP,G,UK,CIS)
CF602 1-760-023-11 FILTER, CERAMIC (US,CND,DX7,DX7J)
CF602 1-579-185-21 FILTER, CERAMIC (AEP,G,UK,CIS)
C689 1-163-135-00 CERAMIC CHIP 560PF 5% 50V
(AEP,G,UK,CIS)
C690 1-126-961-11 ELECT 2.2uF 20.00% 50V
(AEP,G,UK,CIS)
C691 1-163-031-11 CERAMIC CHIP 0.01uF 50V
(AEP,G,UK,CIS)
C692 1-163-245-11 CERAMIC CHIP 56PF 5.00% 50V
(AEP,G,UK,CIS)
C693 1-163-245-11 CERAMIC CHIP 56PF 5.00% 50V
(AEP,G,UK,CIS)
C694 1-163-031-11 CERAMIC CHIP 0.01uF 50V
(AEP,G,UK,CIS)
C695 1-163-031-11 CERAMIC CHIP 0.01uF 50V
(AEP, G,UK,CIS)
C801 1-163-038-91 CERAMIC CHIP 0.1uF 25V
(AEP,G,UK,CIS)
C802 1-163-038-91 CERAMIC CHIP 0.1uF 25V
(AEP,G,UK,CIS)
C803 1-163-031-11 CERAMIC CHIP 0.01uF 50V
C821 1-104-665-11 ELECT 100uF 20.00% 10V
C822 1-126-961-11 ELECT 2.2uF 20.00% 50V
C824 1-126-960-11 ELECT 1uF 20.00% 50V
C841 1-126-959-11 ELECT 0.47uF 20.00% 50V
C851 1-163-038-91 CERAMIC CHIP 0.1uF 25V
(AEP,G,UK,CIS)
< CONNECTOR >
* CN201 1-569-913-11 S0CKET, CONNECTOR 19P
CN202 1-785-336-11 PIN, CONNECTOR (LIGHT ANGLE)10P
* CN301 1-568-449-11 HOUSING, CONNECTOR (PC BOARD)3P
* CN304 1-569-934-11 SOCKET, CONNECTOR 17P
CN401 1-793-766-11 CONNECTOR, BOARD TO BOARD 30P
* CN891 1-564-506-11 PLUG, CONNECTOR 3P (US,CND,DX7,DX7J)
CN901 1-778-982-21 CONNECTOR, BOARD TO BOARD 13P
CN902 1-778-982-21 CONNECTOR, BOARD TO BOARD 13P
< DIODE >
D501 8-719-988-61 DIODE 1SS355TE-17
D502 8-719-988-61 DIODE 1SS355TE-17
D503 8-719-988-61 DIODE 1SS355TE-17
D504 8-719-988-61 DIODE 1SS355TE-17
D505 8-719-988-61 DIODE 1SS355TE-17
D506 8-719-988-61 DIODE 1SS355TE-17
D508 8-719-988-61 DIODE 1SS355TE-17
D509 8-719-988-61 DIODE 1SS355TE-17
D510 8-719-988-61 DIODE 1SS355TE-17
D511 8-719-988-61 DIODE 1SS355TE-17
D601 8-719-056-83 DIODE UDZ-TE-17-6.8B
D641 8-719-914-42 DIODE DA204K-T-146
60
Page 61

MAIN
Ref. No. Part No. Description Remarks Ref. No. Part No. Description Remarks
D651 8-719-988-61 DIODE 1SS355TE-17
D681 8-719-988-61 DIODE 1SS355TE-17 (AEP,G,UK,CIS)
D801 8-719-988-61 DIODE 1SS355TE-17
D822 8-719-988-61 DIODE 1SS355TE-17
D841 8-719-988-61 DIODE 1SS355TE-17
D861 8-719-988-61 DIODE 1SS355TE-17
D891 8-719-988-61 DIODE 1SS355TE-17 (US,CND,DX7,DX7J)
D892 8-719-988-61 DIODE 1SS355TE-17 (US,CND,DX7,DX7J)
D901 8-719-200-82 DIODE 11ES2-TB5
D902 8-719-200-82 DIODE 11ES2-TB5
D903 8-719-200-82 DIODE 11ES2-TB5
D904 8-719-200-82 DIODE 11ES2-TB5
D906 8-719-200-82 DIODE 11ES2-TB5
D907 8-719-200-82 DIODE 11ES2-TB5
D908 8-719-200-82 DIODE 11ES2-TB5
D909 8-719-200-82 DIODE 11ES2-TB5
D910 8-719-200-82 DIODE 11ES2-TB5
D911 8-719-200-82 DIODE 11ES2-TB5
D952 8-719-988-61 DIODE 1SS355TE-17
D953 8-719-988-61 DIODE 1SS355TE-17
J101 1-793-987-11 JACK, PIN 2P (MD/VIDEO)
J102 1-774-819-11 JACK, PIN 2P (SURROUND SPEAKER)
JR1 1-216-296-91 SHORT 0
JR2 1-216-296-91 SHORT 0
JR3 1-216-296-91 SHORT 0
JR4 1-216-296-91 SHORT 0
JR6 1-216-296-91 SHORT 0
JR7 1-216-296-91 SHORT 0
JR8 1-216-295-91 SHORT 0
JR9 1-216-295-91 SHORT 0
JR13 1-216-296-91 SHORT 0
JR14 1-216-296-91 SHORT 0
JR15 1-216-296-91 SHORT 0
JR17 1-216-296-91 SHORT 0
JR18 1-216-295-91 SHORT 0
JR19 1-216-296-91 SHORT 0
JR23 1-216-296-91 SHORT 0
< JACK >
< JUMPER RESISTOR >
< FERRITE BEAD >
FB201 1-216-295-91 SHORT 0
FB202 1-216-295-91 SHORT 0
FB203 1-216-295-91 SHORT 0
FB204 1-216-295-91 SHORT 0
FB416 1-216-295-91 SHORT 0
FB462 1-216-295-91 SHORT 0
FB499 1-216-295-91 SHORT 0
< FRONT END >
FE601 1-693-477-11 FRONT END (3 GANGS) (DX7,DX7J)
FE602 1-693-478-11 FRONT END (FM3 GANGS) (US,CND)
FE603 1-693-496-11 FRONT END (4 GANGS) (AEP,G,UK,CIS)
< IC >
IC101 8-759-652-04 IC M61504FP-TP
IC102 8-759-099-06 IC M5218AFP-TE1
IC104 8-759-099-06 IC M5218AFP-TE1 (DX7,DX7J)
IC201 8-749-923-04 IC TOTX178A (OPTICAL DIGITAL OUT)
IC301 8-759-652-80 IC HA12227F
IC302 8-759-143-54 IC uPC1330HA
IC303 8-759-656-83 IC NJM4580MD-TE
IC304 8-759-656-83 IC NJM4580MD-TE
IC401 8-759-652-48 IC M30622MAA-A25FP
IC501 8-759-635-63 IC M51943BSL-TP
IC601 8-759-652-00 IC BA1450
IC651 8-759-288-54 IC LC72130
IC681 8-759-099-06 IC M5218AFP-TE1 (AEP,G,UK,CIS)
IC682 8-759-541-48 IC BU1924 (AEP,G,UK,CIS)
JR24 1-216-296-91 SHORT 0
JR25 1-216-296-91 SHORT 0
JR26 1-216-296-91 SHORT 0
JR27 1-216-296-91 SHORT 0
JR29 1-216-296-91 SHORT 0
JR31 1-216-295-91 SHORT 0
JR32 1-216-296-91 SHORT 0
JR33 1-216-296-91 SHORT 0
JR34 1-216-295-91 SHORT 0
JR35 1-216-296-91 SHORT 0
JR36 1-216-295-91 SHORT 0
JR37 1-216-296-91 SHORT 0
JR38 1-216-296-91 SHORT 0
JR39 1-216-296-91 SHORT 0
JR42 1-216-295-91 SHORT 0
JR44 1-216-296-91 SHORT 0
JR45 1-216-296-91 SHORT 0
JR50 1-216-296-91 SHORT 0 (BX7)
JR51 1-216-296-91 SHORT 0
JR52 1-216-296-91 SHORT 0
JR53 1-216-296-91 SHORT 0
JR54 1-216-295-91 SHORT 0 (DX7J)
JR54 1-216-296-91 SHORT 0 (EXCEPT TH,DX7J)
JR140 1-216-296-91 SHORT 0
JR601 1-216-296-91 SHORT 0 (EXCEPT US,CND)
JR602 1-216-295-91 SHORT 0
JR603 1-216-296-91 SHORT 0
JR604 1-216-296-91 SHORT 0
JR605 1-216-296-91 SHORT 0
JR606 1-216-296-91 SHORT 0
IC911 8-759-039-69 IC uPC7805AHF
IC921 8-759-088-08 IC uPC7812AHF
IC931 8-759-604-86 IC M5F7807L
IC951 8-759-158-62 IC TA78057S
IC961 8-759-701-59 IC M5F7809L
< IFT >
IFT601 1-435-295-11 TRANSFORMER, IF
JR607 1-216-295-91 SHORT 0
JR608 1-216-296-91 SHORT 0
JR609 1-216-295-91 SHORT 0
JR611 1-216-296-91 SHORT 0
JR612 1-216-296-91 SHORT 0 (US,CND)
JR614 1-216-296-91 SHORT 0 (AEP,G,UK,CIS)
JR615 1-216-295-91 SHORT 0
JR616 1-216-295-91 SHORT 0
JR619 1-216-295-91 SHORT 0
JR632 1-216-295-91 SHORT 0 (US,CND)
61
Page 62

MAIN
Ref. No. Part No. Description Remarks Ref. No. Part No. Description Remarks
JR634 1-216-295-91 SHORT 0
JR636 1-216-295-91 SHORT 0 (AEP,G,UK,CIS)
JR640 1-216-295-91 SHORT 0 (US,CND,DX7,DX7J)
JR641 1-216-295-91 SHORT 0 (AEP,G,UK,CIS)
JR907 1-216-295-91 SHORT 0 (BX7)
Q824 8-729-113-13 TRANSISTOR FA1A4M-T1L33
Q825 8-729-120-28 TRANSISTOR 2SC1623-T1-L5L6
Q828 8-729-120-28 TRANSISTOR 2SC1623-T1-L5L6
Q829 8-729-120-28 TRANSISTOR 2SC1623-T1-L5L6
Q861 8-729-113-69 TRANSISTOR FN1F4M-T1M32
JR908 1-216-295-91 SHORT 0
JR909 1-216-295-91 SHORT 0
JR910 1-216-295-91 SHORT 0 (BX7)
JR923 1-216-295-91 SHORT 0 (EXCEPT AEP,G,UK,CIS,TH)
JR924 1-216-295-91 SHORT 0 (EXCEPT AEP,G,UK,CIS,TH)
JR928 1-216-295-91 SHORT 0 (EXCEPT BX7,TH,DX7J)
< COIL >
L201 1-414-189-31 INDUCTOR 100uH
L301 1-410-780-11 INDUCTOR 27MH
L302 1-414-193-41 INDUCTOR 220uH
L303 1-414-193-41 INDUCTOR 220uH
L351 1-410-780-11 INDUCTOR 27MH
L641 1-408-765-21 INDUCTOR CHIP 1uH (AEP,G,UK,CIS)
L642 1-216-296-91 SHORT 0 (US,CND,DX7,DX7J)
L642 1-408-783-00 INDUCTOR CHIP 33uH (AEP,G,UK,CIS)
L681 1-408-789-21 INDUCTOR CHIP 100uH (AEP,G,UK,CIS)
L801 1-420-872-00 COIL, AIR-CORE (AEP,G,UK,CIS)
L851 1-420-872-00 COIL, AIR-CORE (AEP,G,UK,CIS)
< FILTER >
LPF601 1-234-458-11 FILTER, LOW PASS
LPF602 1-234-458-11 FILTER, LOW PASS
< TRANSISTOR >
Q862 8-729-107-46 TRANSISTOR 2SC3624A-T1L15L16
Q863 8-729-107-46 TRANSISTOR 2SC3624A-T1L15L16
Q891 8-729-140-04 TRANSISTOR 2SB1116-TP-LK
Q892 8-729-620-05 TRANSISTOR 2SC2603TP-EF
(US,CND,DX7,DX7J)
Q911 8-729-141-83 TRANSISTOR 2SB1375
Q912 8-729-113-13 TRANSISTOR FA1A4M-T1L33
< RESISTOR >
R101 1-216-049-91 RES-CHIP 1K 5% 1/10W
R103 1-216-073-00 METAL CHIP 10K 5% 1/10W
R104 1-216-073-00 METAL CHIP 10K 5% 1/10W
R105 1-216-097-91 RES-CHIP 100K 5% 1/10W
(BX7,DX7)
R107 1-216-254-00 RES-CHIP 220K 5% 1/8W
R108 1-216-097-91 RES-CHIP 100K 5% 1/10W
R109 1-216-073-00 METAL CHIP 10K 5% 1/10W
R110 1-216-045-00 METAL CHIP 680 5% 1/10W
R111 1-216-073-00 METAL CHIP 10K 5% 1/10W
R112 1-216-089-91 RES-CHIP 47K 5% 1/10W
R113 1-216-057-00 METAL CHIP 2.2K 5% 1/10W
R114 1-216-097-91 RES-CHIP 100K 5% 1/10W
R115 1-216-073-00 METAL CHIP 10K 5% 1/10W
R116 1-216-049-91 RES-CHIP 1K 5% 1/10W
R121 1-216-222-00 RES-CHIP 10K 5% 1/8W
(DX7,DX7J)
Q101 8-729-120-28 TRANSISTOR 2SC1623-T1-L5L6
Q102 8-729-144-85 TRANSISTOR 2SK1133-T1B
Q103 8-729-107-46 TRANSISTOR 2SC3624A-T1L15L16
Q141 8-729-120-28 TRANSISTOR 2SC1623-T1-L5L6
Q151 8-729-120-28 TRANSISTOR 2SC1623-T1-L5L6
Q152 8-729-144-85 TRANSISTOR 2SK1133-T1B
Q153 8-729-107-46 TRANSISTOR 2SC3624A-T1L15L16
Q301 8-729-801-93 TRANSISTOR 2SD1387-34-TP
Q302 8-729-142-46 TRANSISTOR 2SC2001TP-LK
Q303 8-729-142-46 TRANSISTOR 2SC2001TP-LK
Q304 8-729-113-69 TRANSISTOR FN1F4M-T1M32
Q305 8-729-113-13 TRANSISTOR FA1A4M-T1L33
Q391 8-729-140-04 TRANSISTOR 2SB1116-TP-LK
Q392 8-729-113-13 TRANSISTOR FA1A4M-T1L33
Q393 8-729-140-04 TRANSISTOR 2SB1116-TP-LK
Q394 8-729-113-13 TRANSISTOR FA1A4M-T1L33
Q395 8-729-113-13 TRANSISTOR FA1A4M-T1L33
Q396 8-729-116-57 TRANSISTOR 2SB1068TP-K
Q397 8-729-113-13 TRANSISTOR FA1A4M-T1L33
Q501 8-729-120-28 TRANSISTOR 2SC1623-T1-L5L6
Q503 8-729-113-13 TRANSISTOR FA1A4M-T1L33
Q504 8-729-113-69 TRANSISTOR FN1F4M-T1M32
Q505 8-729-113-13 TRANSISTOR FA1A4M-T1L33
Q601 8-729-201-27 TRANSISTOR 2SC2715Y-TE85L
Q602 8-729-422-57 TRANSISTOR BN1A4M-TP
Q611 8-729-120-28 TRANSISTOR 2SC2412K-T-146-QR
Q612 8-729-120-28 TRANSISTOR 2SC2412K-T-146-QR
Q821 8-729-120-28 TRANSISTOR 2SC1623-T1-L5L6
Q822 8-729-120-28 TRANSISTOR 2SC1623-T1-L5L6
Q823 8-729-216-22 TRANSISTOR 2SA812-T1-M5M6
R122 1-216-073-00 METAL CHIP 10K 5% 1/10W
(DX7,DX7J)
R123 1-216-073-00 METAL CHIP 10K 5% 1/10W
(DX7,DX7J)
R124 1-216-065-91 RES-CHIP 4.7K 5% 1/10W
(DX7,DX7J)
R125 1-216-073-00 METAL CHIP 10K 5% 1/10W
R132 1-216-025-91 RES-CHIP 100 5% 1/10W
R133 1-216-025-91 RES-CHIP 100 5% 1/10W
R134 1-216-049-91 RES-CHIP 1K 5% 1/10W
R141 1-216-049-91 RES-CHIP 1K 5% 1/10W
R142 1-216-051-00 METAL CHIP 1.2K 5% 1/10W
R143 1-216-089-91 RES-CHIP 47K 5% 1/10W
R144 1-216-049-91 RES-CHIP 1K 5% 1/10W
R145 1-216-041-00 METAL CHIP 470 5% 1/10W
R146 1-216-041-00 METAL CHIP 470 5% 1/10W
R147 1-216-041-00 METAL CHIP 470 5% 1/10W
R151 1-216-049-91 RES-CHIP 1K 5% 1/10W
R153 1-216-073-00 METAL CHIP 10K 5% 1/10W
R154 1-216-073-00 METAL CHIP 10K 5% 1/10W
R155 1-216-097-91 RES-CHIP 100K 5% 1/10W
R157 1-216-105-91 RES-CHIP 220K 5% 1/10W
R158 1-216-097-91 RES-CHIP 100K 5% 1/10W
R159 1-216-073-00 METAL CHIP 10K 5% 1/10W
R160 1-216-045-00 METAL CHIP 680 5% 1/10W
R161 1-216-222-00 RES-CHIP 10K 5% 1/8W
R162 1-216-089-91 RES-CHIP 47K 5% 1/10W
R163 1-216-057-00 METAL CHIP 2.2K 5% 1/10W
R164 1-216-097-91 RES-CHIP 100K 5% 1/10W
R165 1-216-073-00 METAL CHIP 10K 5% 1/10W
62
Page 63
MAIN
Ref. No. Part No. Description Remarks Ref. No. Part No. Description Remarks
R166 1-216-049-91 RES-CHIP 1K 5% 1/10W
R171 1-216-073-00 METAL CHIP 10K 5% 1/10W
(DX7,DX7J)
R172 1-216-073-00 METAL CHIP 10K 5% 1/10W
(DX7,DX7J)
R173 1-216-073-00 METAL CHIP 10K 5% 1/10W
(DX7,DX7J)
R175 1-216-073-00 METAL CHIP 10K 5% 1/10W
R201 1-216-025-91 RES-CHIP 100 5% 1/10W
R202 1-216-085-00 METAL CHIP 33K 5% 1/10W
R203 1-216-025-91 RES-CHIP 100 5% 1/10W
R204 1-216-085-00 METAL CHIP 33K 5% 1/10W
R301 1-216-085-00 METAL CHIP 33K 5% 1/10W
R302 1-216-057-00 METAL CHIP 2.2K 5% 1/10W
R303 1-216-025-91 RES-CHIP 100 5% 1/10W
R304 1-216-025-91 RES-CHIP 100 5% 1/10W
R305 1-216-057-00 METAL CHIP 2.2K 5% 1/10W
R306 1-216-071-00 METAL CHIP 8.2K 5% 1/10W
R307 1-216-065-91 RES-CHIP 4.7K 5% 1/10W
R308 1-216-071-00 METAL CHIP 8.2K 5% 1/10W
R309 1-216-081-00 METAL CHIP 22K 5% 1/10W
R311 1-216-121-91 RES-CHIP 1M 5% 1/10W
R312 1-216-102-00 RES-CHIP 160K 5% 1/10W
R313 1-216-097-91 RES-CHIP 100K 5% 1/10W
R315 1-216-073-00 METAL CHIP 10K 5% 1/10W
R316 1-216-234-00 RES-CHIP 33K 5% 1/8W
R317 1-216-222-00 RES-CHIP 10K 5% 1/8W
R318 1-216-073-00 METAL CHIP 10K 5% 1/10W
R319 1-216-111-00 METAL CHIP 390K 5% 1/10W
R320 1-216-057-00 METAL CHIP 2.2K 5% 1/10W
R321 1-216-071-00 METAL CHIP 8.2K 5% 1/10W
R331 1-216-099-00 METAL CHIP 120K 5% 1/10W
R332 1-216-025-91 RES-CHIP 100 5% 1/10W
R333 1-216-067-00 METAL CHIP 5.6K 5% 1/10W
R334 1-216-100-00 RES-CHIP 130K 5% 1/10W
R335 1-216-033-00 METAL CHIP 220 5% 1/10W
R336 1-216-099-00 METAL CHIP 120K 5% 1/10W
R337 1-216-033-00 METAL CHIP 220 5% 1/10W
R338 1-216-081-00 METAL CHIP 22K 5% 1/10W
R339 1-216-075-00 METAL CHIP 12K 5% 1/10W
R340 1-216-107-00 METAL CHIP 270K 5% 1/10W
R341 1-216-033-00 METAL CHIP 220 5% 1/10W
R342 1-216-075-00 METAL CHIP 12K 5% 1/10W
R343 1-219-787-17 FUSIBLE 5.6 5% 1/4W
0 R344 1-219-787-17 FUSIBLE 5.6 5% 1/4W
R345 1-216-079-00 METAL CHIP 18K 5% 1/10W
R346 1-216-079-00 METAL CHIP 18K 5% 1/10W
R347 1-216-073-00 METAL CHIP 10K 5% 1/10W
R351 1-216-085-00 METAL CHIP 33K 5% 1/10W
R352 1-216-057-00 METAL CHIP 2.2K 5% 1/10W
R353 1-216-025-91 RES-CHIP 100 5% 1/10W
R354 1-216-025-91 RES-CHIP 100 5% 1/10W
R355 1-216-057-00 METAL CHIP 2.2K 5% 1/10W
R356 1-216-071-00 METAL CHIP 8.2K 5% 1/10W
R357 1-216-065-91 RES-CHIP 4.7K 5% 1/10W
R358 1-216-071-00 METAL CHIP 8.2K 5% 1/10W
R359 1-216-085-00 METAL CHIP 33K 5% 1/10W
R360 1-216-045-00 METAL CHIP 680 5% 1/10W
R361 1-216-057-00 METAL CHIP 2.2K 5% 1/10W
R363 1-216-057-00 METAL CHIP 2.2K 5% 1/10W
R364 1-216-045-00 METAL CHIP 680 5% 1/10W
R366 1-216-061-00 METAL CHIP 3.3K 5% 1/10W
R367 1-216-089-91 RES-CHIP 47K 5% 1/10W
R368 1-216-061-00 METAL CHIP 3.3K 5% 1/10W
R369 1-216-061-00 METAL CHIP 3.3K 5% 1/10W
R371 1-216-238-91 RES-CHIP 47K 5% 1/8W
R372 1-216-065-91 RES-CHIP 4.7K 5% 1/10W
R373 1-216-049-91 RES-CHIP 1K 5% 1/10W
R374 1-216-089-91 RES-CHIP 47K 5% 1/10W
R375 1-216-094-00 RES-CHIP 75K 5% 1/10W
R376 1-216-065-91 RES-CHIP 4.7K 5% 1/10W
R377 1-216-089-91 RES-CHIP 47K 5% 1/10W
R378 1-216-094-00 RES-CHIP 75K 5% 1/10W
R381 1-216-099-00 METAL CHIP 120K 5% 1/10W
R382 1-216-025-91 RES-CHIP 100 5% 1/10W
R383 1-216-067-00 METAL CHIP 5.6K 5% 1/10W
R384 1-216-100-00 RES-CHIP 130K 5% 1/10W
R385 1-216-296-91 SHORT 0
R386 1-216-099-00 METAL CHIP 120K 5% 1/10W
R387 1-216-033-00 METAL CHIP 220 5% 1/10W
R388 1-216-081-00 METAL CHIP 22K 5% 1/10W
R389 1-216-075-00 METAL CHIP 12K 5% 1/10W
R390 1-216-107-00 METAL CHIP 270K 5% 1/10W
R391 1-216-296-91 SHORT 0
R392 1-216-075-00 METAL CHIP 12K 5% 1/10W
R393 1-216-081-00 METAL CHIP 22K 5% 1/10W
R394 1-216-033-00 METAL CHIP 220 5% 1/10W
R396 1-216-065-91 RES-CHIP 4.7K 5% 1/10W
R407 1-216-065-91 RES-CHIP 4.7K 5% 1/10W
R409 1-216-295-91 SHORT 0
R411 1-216-109-00 METAL CHIP 330K 5% 1/10W
R413 1-216-295-91 SHORT 0
R417 1-216-073-00 METAL CHIP 10K 5% 1/10W
R418 1-216-025-91 RES-CHIP 100 5% 1/10W
R419 1-216-025-91 RES-CHIP 100 5% 1/10W
R429 1-216-025-91 RES-CHIP 100 5% 1/10W
R430 1-216-025-91 RES-CHIP 100 5% 1/10W
R432 1-216-025-91 RES-CHIP 100 5% 1/10W
R433 1-216-025-91 RES-CHIP 100 5% 1/10W
R435 1-216-033-00 METAL CHIP 220 5% 1/10W
R437 1-216-033-00 METAL CHIP 220 5% 1/10W
R440 1-216-295-91 SHORT 0
R441 1-216-295-91 SHORT 0
R442 1-216-295-91 SHORT 0
R443 1-216-295-91 SHORT 0
R444 1-216-295-91 SHORT 0
R445 1-216-295-91 SHORT 0
R446 1-216-295-91 SHORT 0
R447 1-216-295-91 SHORT 0
R448 1-216-295-91 SHORT 0
R449 1-216-295-91 SHORT 0
R467 1-216-295-91 SHORT 0
R468 1-216-295-91 SHORT 0
R469 1-216-295-91 SHORT 0
The components identified by
mark 0 or dotted line with mark
0 are critical for safety.
Replace only with part number
specified.
Les composants identifiés par
une marque 0 sont critiques
pour la sécurité.
Ne les remplacer que par une
pièce portant le numéro spécifié.
63
Page 64

MAIN
Ref. No. Part No. Description Remarks Ref. No. Part No. Description Remarks
R481 1-216-025-91 RES-CHIP 100 5% 1/10W
(BX7)
R483 1-216-073-00 METAL CHIP 10K 5% 1/10W
R484 1-216-073-00 METAL CHIP 10K 5% 1/10W
R490 1-216-174-00 RES-CHIP 100 5% 1/8W
R491 1-216-174-00 RES-CHIP 100 5% 1/8W
R493 1-216-174-00 RES-CHIP 100 5% 1/8W
R494 1-216-295-91 SHORT 0
R495 1-216-073-00 METAL CHIP 10K 5% 1/10W
R496 1-216-089-91 RES-CHIP 47K 5% 1/10W
R497 1-216-053-00 METAL CHIP 1.5K 5% 1/10W
(SP,MY,AUS,TH,E3,KR,DX7J)
R497 1-216-081-00 METAL CHIP 22K 5% 1/10W
(E2,MX,AR)
R497 1-216-073-00 METAL CHIP 10K 5% 1/10W
(EA)
R497 1-216-089-91 RES-CHIP 47K 5% 1/10W
(BX7)
R498 1-216-089-91 RES-CHIP 47K 5% 1/10W
(DX7,DX7J)
R498 1-216-073-00 METAL CHIP 10K 5% 1/10W
(US,CND)
R498 1-216-085-00 METAL CHIP 33K 5% 1/10W
(AEP,G,UK,CIS)
R499 1-216-025-91 RES-CHIP 100 5% 1/10W
R617 1-216-035-00 METAL CHIP 270 5% 1/10W
(AEP,G,UK,CIS)
R617 1-216-039-00 METAL CHIP 390 5% 1/10W
(EXCEPT EA,AEP,G,UK,CIS)
R617 1-216-041-00 METAL CHIP 470 5% 1/10W
(EA)
R618 1-216-049-91 RES-CHIP 1K 5% 1/10W
R619 1-216-025-91 RES-CHIP 100 5% 1/10W
R620 1-216-065-91 RES-CHIP 4.7K 5% 1/10W
R621 1-216-075-00 METAL CHIP 12K 5% 1/10W
R622 1-216-057-00 METAL CHIP 2.2K 5% 1/10W
R623 1-216-073-00 METAL CHIP 10K 5% 1/10W
R624 1-216-073-00 METAL CHIP 10K 5% 1/10W
R625 1-216-073-00 METAL CHIP 10K 5% 1/10W
R641 1-216-097-91 RES-CHIP 100K 5% 1/10W
R642 1-216-073-00 METAL CHIP 10K 5% 1/10W
R655 1-216-073-00 METAL CHIP 10K 5% 1/10W
R656 1-216-222-00 RES-CHIP 10K 5% 1/8W
R658 1-216-174-00 RES-CHIP 100 5% 1/8W
R659 1-216-061-00 METAL CHIP 3.3K 5% 1/10W
R660 1-216-065-91 RES-CHIP 4.7K 5% 1/10W
R661 1-216-025-91 RES-CHIP 100 5% 1/10W
R662 1-216-065-91 RES-CHIP 4.7K 5% 1/10W
R663 1-216-065-91 RES-CHIP 4.7K 5% 1/10W
R501 1-216-073-00 METAL CHIP 10K 5% 1/10W
R502 1-216-089-91 RES-CHIP 47K 5% 1/10W
R503 1-216-089-91 RES-CHIP 47K 5% 1/10W
R504 1-216-025-91 RES-CHIP 100 5% 1/10W
R505 1-216-065-91 RES-CHIP 4.7K 5% 1/10W
R506 1-216-041-00 METAL CHIP 470 5% 1/10W
R508 1-216-065-91 RES-CHIP 4.7K 5% 1/10W
R509 1-216-081-00 METAL CHIP 22K 5% 1/10W
R510 1-216-097-91 RES-CHIP 100K 5% 1/10W
R511 1-216-174-00 RES-CHIP 100 5% 1/8W
R523 1-216-073-00 METAL CHIP 10K 5% 1/10W
R524 1-216-073-00 METAL CHIP 10K 5% 1/10W
R546 1-216-073-00 METAL CHIP 10K 5% 1/10W
R547 1-216-073-00 METAL CHIP 10K 5% 1/10W
R548 1-216-073-00 METAL CHIP 10K 5% 1/10W
R566 1-216-073-00 METAL CHIP 10K 5% 1/10W
R601 1-216-295-91 SHORT 0 (EXCEPT US,CND)
R602 1-216-029-00 METAL CHIP 150 5% 1/10W
R603 1-216-037-00 METAL CHIP 330 5% 1/10W
R604 1-216-017-91 RES-CHIP 47 5% 1/10W
R605 1-216-045-00 METAL CHIP 680 5% 1/10W
R606 1-216-037-00 METAL CHIP 330 5% 1/10W
R607 1-216-053-00 METAL CHIP 1.5K 5% 1/10W
R608 1-216-017-91 RES-CHIP 47 5% 1/10W
R609 1-216-295-91 SHORT 0 (US,CND)
R610 1-216-045-00 METAL CHIP 680 5% 1/10W
R611 1-216-182-00 RES-CHIP 220 5% 1/8W
R612 1-216-214-00 RES-CHIP 4.7K 5% 1/8W
R613 1-216-206-00 RES-CHIP 2.2K 5% 1/8W
R614 1-216-035-00 METAL CHIP 270 5% 1/10W
(AEP,G,UK,CIS)
R614 1-216-039-00 METAL CHIP 390 5% 1/10W
(EXCEPT EA,AEP,G,UK,CIS)
R614 1-216-041-00 METAL CHIP 470 5% 1/10W
(EA)
R615 1-216-049-91 RES-CHIP 1K 5% 1/10W
R616 1-216-065-91 RES-CHIP 4.7K 5% 1/10W
R664 1-216-065-91 RES-CHIP 4.7K 5% 1/10W
R665 1-216-025-91 RES-CHIP 100 5% 1/10W
R666 1-216-073-00 METAL CHIP 10K 5% 1/10W
R667 1-216-222-00 RES-CHIP 10K 5% 1/8W
R668 1-216-049-91 RES-CHIP 1K 5% 1/10W
R669 1-216-065-91 RES-CHIP 4.7K 5% 1/10W
R681 1-216-025-91 RES-CHIP 100 5% 1/10W
(AEP,G,UK,CIS)
R682 1-216-073-00 METAL CHIP 10K 5% 1/10W
(AEP,G,UK,CIS)
R683 1-216-097-91 RES-CHIP 100K 5% 1/10W
(AEP,G,UK,CIS)
R684 1-216-097-91 RES-CHIP 100K 5% 1/10W
(AEP,G,UK,CIS)
R685 1-216-067-91 RES-CHIP 5.6K 5% 1/10W
(AEP,G,UK,CIS)
R686 1-216-166-00 RES-CHIP 47 5% 1/8W
(AEP,G,UK,CIS)
R688 1-216-065-91 RES-CHIP 4.7K 5% 1/10W
(AEP,G,UK,CIS)
R689 1-216-065-91 RES-CHIP 4.7K 5% 1/10W
(AEP,G,UK,CIS)
R801 1-260-304-51 CARBON 10 5% 1/2W
(AEP,G,UK,CIS)
R802 1-260-304-51 CARBON 10 5% 1/2W
(AEP,G,UK,CIS)
R804 1-216-089-91 RES-CHIP 47K 5% 1/10W
(US,CND,DX7,DX7J)
R821 1-216-238-91 RES-CHIP 47K 5% 1/8W
R822 1-216-240-00 RES-CHIP 56K 5% 1/8W
R823 1-216-222-00 RES-CHIP 10K 5% 1/8W
R824 1-216-073-00 METAL CHIP 10K 5% 1/10W
R825 1-216-065-91 RES-CHIP 4.7K 5% 1/10W
R826 1-216-085-00 METAL CHIP 33K 5% 1/10W
R827 1-216-081-00 METAL CHIP 22K 5% 1/10W
R829 1-216-230-00 RES-CHIP 22K 5% 1/8W
R831 1-216-216-00 RES-CHIP 5.6K 5% 1/8W
R841 1-216-081-00 METAL CHIP 22K 5% 1/10W
64
Page 65
PANELMAIN MOTOR
Ref. No. Part No. Description Remarks Ref. No. Part No. Description Remarks
R842 1-216-081-00 METAL CHIP 22K 5% 1/10W
R843 1-216-214-00 RES-CHIP 4.7K 5% 1/8W
R844 1-216-097-91 RES-CHIP 100K 5% 1/10W
R845 1-216-121-91 RES-CHIP 1M 5% 1/10W
R851 1-260-304-51 CARBON 10 5% 1/2W
(AEP,G,UK,CIS)
R852 1-260-304-51 CARBON 10 5% 1/2W
(AEP,G,UK,CIS)
R854 1-216-089-91 RES-CHIP 47K 5% 1/10W
(US,CND,DX7,DX7J)
R861 1-216-049-91 RES-CHIP 1K 5% 1/10W
R862 1-216-073-00 METAL CHIP 10K 5% 1/10W
R863 1-216-089-91 RES-CHIP 47K 5% 1/10W
R864 1-216-049-91 RES-CHIP 1K 5% 1/10W
R865 1-216-049-91 RES-CHIP 1K 5% 1/10W
R866 1-216-019-00 METAL CHIP 56 5% 1/10W
X401 1-567-098-41 VIBRATOR, CRYSTAL 32.768kHz
X402 1-781-107-21 VIBRATOR, CERAMIC 16MHz
X651 1-760-549-31 VIBRATOR, CRYSTAL 4.5MHz
XT681 1-579-900-21 VIBRATOR, CRYSTAL 4.332MHz (AEP,G,UK,CIS)
**************************************************************
1-675-910-11 MOTOR BOARD
C721 1-162-306-11 CERAMIC 0.01uF 30.00% 16V
< VIBRATOR >
< VIBRATOR >
**********
< CAPACITOR >
R868 1-215-891-11 METAL OXIDE 680 5% 2W
R869 1-215-891-11 METAL OXIDE 680 5% 2W
R891 1-216-222-00 RES-CHIP 10K 5% 1/8W
(DX7,DX7J)
R891 1-216-073-00 METAL CHIP 10K 5% 1/10W
(US,CND)
R892 1-216-065-91 RES-CHIP 4.7K 5% 1/10W
(US,CND,DX7,DX7J)
R893 1-216-057-00 METAL CHIP 2.2K 5% 1/10W
(US,CND,DX7,DX7J)
R911 1-216-059-00 METAL CHIP 2.7K 5% 1/10W
R912 1-216-206-00 RES-CHIP 2.2K 5% 1/8W
R914 1-216-206-00 RES-CHIP 2.2K 5% 1/8W
R966 1-216-019-00 METAL CHIP 56 5% 1/10W
< COMPOSITION CIRCUIT BLOCK >
RB641 1-234-457-11 ENCAPSULATED COMPONENT
< VARIABLE RESISTOR >
RV301 1-241-764-11 RES, ADJ, CARBON 10K
RV302 1-241-762-11 RES, ADJ, CARBON 2.2K
RV303 1-241-762-11 RES, ADJ, CARBON 2.2K
RV304 1-241-768-11 RES, ADJ, CARBON 220K
RV351 1-241-764-11 RES, ADJ, CARBON 10K
RV352 1-241-762-11 RES, ADJ, CARBON 2.2K
RV353 1-241-762-11 RES, ADJ, CARBON 2.2K
RV354 1-241-768-11 RES, ADJ, CARBON 220K
RV611 1-238-601-11 RES, ADJ, CARBON 22K
< RELAY >
RY801 1-755-372-11 RELAY (DX7,DX7J)
RY801 1-755-373-11 RELAY (BX7)
< TRANSFORMER >
T301 1-423-980-11 TRANSFORMER, BIAS OSCILLATION
T601 1-435-195-11 TRANSFORMER, DISCRIMINATOR
T602 1-234-477-11 ENCAPSULATED COMPONENT (AEP,G,UK,CIS)
< CONNECTOR >
CN721 1-770-516-31 CONNECTOR, FFC 8P
CN722 1-785-330-11 PIN, CONNECTOR (LIGHT ANGLE)4P
< SWITCH >
S701 1-771-822-11 SWITCH, LEVER (SLIDE) (OPEN/CLOSE)
**************************************************************
A-4428-075-A PANEL BOARD, COMPLETE (BX7)
*************************
A-4428-338-A PANEL BOARD, COMPLETE (EA)
************************
A-4428-342-A PANEL BOARD, COMPLETE
(SP,MY,E2,MX,AR,AUS,E3,KR)
*************************************
A-4428-907-A PANEL BOARD, COMPLETE (TH)
************************
A-4473-047-A PANEL BOARD, COMPLETE (DX7J)
**************************
4-224-584-01 HOLDER (FL) (TH,DX7J)
4-224-584-11 HOLDER (FL) (EXCEPT TH,DX7J)
< CAPACITOR >
C601 1-124-589-11 ELECT 47uF 20% 16V
C602 1-126-163-11 ELECT 4.7uF 20% 50V
C603 1-162-306-11 CERAMIC 0.01uF 30.00% 16V
C604 1-162-294-31 CERAMIC 0.001uF 10% 50V
C605 1-162-306-11 CERAMIC 0.01uF 30.00% 16V
C606 1-162-294-31 CERAMIC 0.001uF 10% 50V
C607 1-104-664-11 ELECT 47uF 20.00% 10V
C608 1-162-306-11 CERAMIC 0.01uF 30.00% 16V
C609 1-162-306-11 CERAMIC 0.01uF 30.00% 16V
C610 1-126-157-11 ELECT 10uF 20% 16V
(TH,DX7J)
< TERMINAL >
TM601 1-694-555-11 TERMINAL BOARD (4P) (FM/AM)
(US,CND,DX7,DX7J)
TM601 1-694-556-21 TERMINAL BOARD (4P) (FM/AM)
(AEP,G,UK,CIS)
TM801 1-694-635-11 TERMINAL BOARD (4P) (SPEAKER)
C611 1-126-157-11 ELECT 10uF 20% 16V
(TH,DX7J)
C612 1-162-303-11 CERAMIC 0.0033uF 30.00% 16V
C613 1-126-157-11 ELECT 10uF 20% 16V
(TH,DX7J)
C614 1-126-157-11 ELECT 10uF 20% 16V
(TH,DX7J)
C615 1-126-963-11 ELECT 4.7uF 20.00% 50V
65
Page 66

PANEL
Ref. No. Part No. Description Remarks Ref. No. Part No. Description Remarks
C616 1-162-306-11 CERAMIC 0.01uF 30.00% 16V
C617 1-162-294-31 CERAMIC 0.001uF 10% 50V
C620 1-126-933-11 ELECT 100uF 20.00% 16V
C621 1-104-664-11 ELECT 47uF 20.00% 16V
C631 1-162-294-31 CERAMIC 0.001uF 10% 50V
C632 1-162-294-31 CERAMIC 0.001uF 10% 50V
C633 1-164-159-21 CERAMIC 0.1uF 50V
(TH)
C651 1-164-159-21 CERAMIC 0.1uF 50V
C652 1-126-960-11 ELECT 1uF 20.00% 50V
C653 1-126-960-11 ELECT 1uF 20.00% 50V
C654 1-164-159-21 CERAMIC 0.1uF 50V
C655 1-162-282-31 CERAMIC 100PF 10% 50V
C656 1-162-282-31 CERAMIC 100PF 10% 50V
C657 1-162-282-31 CERAMIC 100PF 10% 50V
C658 1-162-282-31 CERAMIC 100PF 10% 50V
C659 1-162-282-31 CERAMIC 100PF 10% 50V
C660 1-162-282-31 CERAMIC 100PF 10% 50V
C661 1-162-282-31 CERAMIC 100PF 10% 50V
C662 1-162-282-31 CERAMIC 100PF 10% 50V
C663 1-162-282-31 CERAMIC 100PF 10% 50V
C664 1-162-282-31 CERAMIC 100PF 10% 50V
C665 1-162-282-31 CERAMIC 100PF 10% 50V
C666 1-162-282-31 CERAMIC 100PF 10% 50V
C667 1-162-282-31 CERAMIC 100PF 10% 50V
C668 1-162-282-31 CERAMIC 100PF 10% 50V
C669 1-162-282-31 CERAMIC 100PF 10% 50V
C670 1-162-282-31 CERAMIC 100PF 10% 50V
C671 1-162-282-31 CERAMIC 100PF 10% 50V
C717 1-126-157-11 ELECT 10uF 20% 16V
(DX7,DX7J)
C718 1-126-157-11 ELECT 10uF 20% 16V
(DX7,DX7J)
C719 1-126-961-11 ELECT 2.2uF 20.00% 50V
(DX7,DX7J)
C720 1-164-159-21 CERAMIC 0.1uF 50V
(EA,DX7J)
C721 1-162-294-31 CERAMIC 0.001uF 10% 50V
(EA,DX7J)
C722 1-162-305-11 CERAMIC 0.0068uF 30.00% 16V
(EA,DX7J)
C723 1-126-960-11 ELECT 1uF 20.00% 50V
(EA,DX7J)
C724 1-136-495-11 MYLAR 0.068uF 5.00% 50V
(EA,DX7J)
C725 1-126-959-11 ELECT 0.47uF 20.00% 50V
(EA,DX7J)
C726 1-124-465-00 ELECT 0.47uF 20% 50V
(EA,DX7J)
C727 1-136-167-00 MYLAR 0.15uF 5.00% 50V
(EA,DX7J)
C728 1-162-294-31 CERAMIC 0.001uF 10% 50V
(EA,DX7J)
C729 1-126-960-11 ELECT 1uF 20.00% 50V
(EA,DX7J)
C730 1-161-494-00 CERAMIC 0.022uF 25V
(EA,DX7J)
C731 1-162-305-11 CERAMIC 0.0068uF 30.00% 16V
(EA,DX7J)
C732 1-136-495-11 MYLAR 0.068uF 5.00% 50V
(EA,DX7J)
C733 1-104-664-11 ELECT 47uF 20.00% 10V
(EA,DX7J)
C734 1-104-664-11 ELECT 47uF 20.00% 10V
(EA,DX7J)
C735 1-126-961-11 ELECT 2.2uF 20.00% 50V
(EA,DX7J)
C736 1-126-964-11 ELECT 10uF 20.00% 50V
(DX7,DX7J)
C737 1-126-964-11 ELECT 10uF 20.00% 50V
(DX7,DX7J)
C738 1-126-961-11 ELECT 2.2uF 20.00% 50V
(DX7,DX7J)
C739 1-162-215-31 CERAMIC 47PF 5% 50V
(DX7,DX7J)
C740 1-162-282-31 CERAMIC 100PF 10% 50V
(DX7,DX7J)
C741 1-126-956-91 ELECT 0.1uF 20.00% 50V (EA)
C741 1-124-463-00 ELECT 0.1uF 20% 50V
(EXCEPT BX7,EA)
C742 1-162-215-31 CERAMIC 47PF 5% 50V
(DX7,DX7J)
C743 1-162-290-31 CERAMIC 470PF 10% 50V
(DX7,DX7J)
C744 1-162-294-31 CERAMIC 0.001uF 10% 50V
(DX7,DX7J)
C745 1-126-961-11 ELECT 2.2uF 20.00% 50V
(DX7,DX7J)
C746 1-162-306-11 CERAMIC 0.01uF 30.00% 16V
(DX7,DX7J)
C747 1-126-961-11 ELECT 2.2uF 20.00% 50V
(EA,DX7J)
C748 1-162-306-11 CERAMIC 0.01uF 30.00% 16V
(EA,DX7J)
C749 1-162-306-11 CERAMIC 0.01uF 30.00% 16V
(DX7,DX7J)
C750 1-162-282-31 CERAMIC 100PF 10% 50V
C751 1-162-282-31 CERAMIC 100PF 10% 50V
C752 1-162-282-31 CERAMIC 100PF 10% 50V
C753 1-162-282-31 CERAMIC 100PF 10% 50V
C754 1-162-282-31 CERAMIC 100PF 10% 50V
C755 1-162-282-31 CERAMIC 100PF 10% 50V
C756 1-162-282-31 CERAMIC 100PF 10% 50V
C757 1-162-282-31 CERAMIC 100PF 10% 50V
C758 1-162-282-31 CERAMIC 100PF 10% 50V
C759 1-162-282-31 CERAMIC 100PF 10% 50V
C760 1-162-282-31 CERAMIC 100PF 10% 50V
C761 1-162-282-31 CERAMIC 100PF 10% 50V
C762 1-162-282-31 CERAMIC 100PF 10% 50V
C763 1-162-282-31 CERAMIC 100PF 10% 50V
C764 1-162-282-31 CERAMIC 100PF 10% 50V
C765 1-162-282-31 CERAMIC 100PF 10% 50V
C766 1-162-282-31 CERAMIC 100PF 10% 50V
C767 1-162-282-31 CERAMIC 100PF 10% 50V
C768 1-162-282-31 CERAMIC 100PF 10% 50V
C769 1-162-282-31 CERAMIC 100PF 10% 50V
C770 1-162-282-31 CERAMIC 100PF 10% 50V
C771 1-162-282-31 CERAMIC 100PF 10% 50V
C772 1-162-282-31 CERAMIC 100PF 10% 50V
C773 1-162-282-31 CERAMIC 100PF 10% 50V
C774 1-162-282-31 CERAMIC 100PF 10% 50V
C775 1-162-282-31 CERAMIC 100PF 10% 50V
C776 1-162-282-31 CERAMIC 100PF 10% 50V
C777 1-162-282-31 CERAMIC 100PF 10% 50V
C778 1-162-282-31 CERAMIC 100PF 10% 50V
C779 1-162-282-31 CERAMIC 100PF 10% 50V
66
Page 67

PANEL
Ref. No. Part No. Description Remarks Ref. No. Part No. Description Remarks
C780 1-162-282-31 CERAMIC 100PF 10% 50V
C781 1-162-282-31 CERAMIC 100PF 10% 50V
C782 1-162-282-31 CERAMIC 100PF 10% 50V
C783 1-162-282-31 CERAMIC 100PF 10% 50V
C784 1-162-282-31 CERAMIC 100PF 10% 50V
Q624 8-729-900-80 TRANSISTOR BA1A4M-TP
Q625 8-729-900-80 TRANSISTOR BA1A4M-TP
Q626 8-729-900-80 TRANSISTOR BA1A4M-TP
Q721 8-729-119-79 TRANSISTOR 2SC2785TP-FEK (DX7,DX7J)
< RESISTOR >
< CONNECTOR >
CN601 1-793-767-11 CONNECTOR, BOARD TO BOARD 30P
< DIODE >
D601 8-719-057-30 DIODE HLMF-K205-2UL (@/1)
D602 8-719-063-93 DIODE SLR325VC-N-T32 (TIMER SELECT)
D603 8-719-109-89 DIODE MTZJ-T-77-5.6C
D611 8-719-071-41 DIODE SELS5923C-TP15 (GROOVE)
D612 8-719-071-41 DIODE SELS5923C-TP15 (CURSOL)
D613 8-719-071-41 DIODE SELS5923C-TP15 (CURSOL)
D614 8-719-071-41 DIODE SELS5923C-TP15 (V-GROOVE)
D615 8-719-072-82 DIODE SELU5E20C-STP15 (FUNCTION)
D617 8-719-063-93 DIODE SLR325VC-N-T32 (REC/PAUSE)
D618 8-719-071-41 DIODE SELS5923C-TP15 (SURROUND)
< FERRITE BEAD >
FB601 1-412-473-21 INDUCTOR 0UH
FB602 1-412-473-21 INDUCTOR 0UH
FB603 1-412-473-21 INDUCTOR 0UH (EXCEPT TH)
< FILTER >
FL601 1-517-928-11 INDICATOR TUBE, FLUORESCENT
< IC >
R603 1-249-429-11 CARBON 10K 5% 1/4W
R604 1-247-807-31 CARBON 100 5% 1/4W
R605 1-247-903-00 CARBON 1M 5% 1/4W
R606 1-247-807-31 CARBON 100 5% 1/4W
R607 1-249-429-11 CARBON 10K 5% 1/4W
R608 1-247-807-31 CARBON 100 5% 1/4W
R609 1-249-429-11 CARBON 10K 5% 1/4W
R610 1-247-807-31 CARBON 100 5% 1/4W
R611 1-249-429-11 CARBON 10K 5% 1/4W
R612 1-249-401-11 CARBON 47 5% 1/4W F
R613 1-247-893-11 CARBON 390K 5% 1/4W
R614 1-247-893-11 CARBON 390K 5% 1/4W
R615 1-249-441-11 CARBON 100K 5% 1/4W
R616 1-249-440-11 CARBON 82K 5% 1/4W
R617 1-249-429-11 CARBON 10K 5% 1/4W
R618 1-249-441-11 CARBON 100K 5% 1/4W
R619 1-249-441-11 CARBON 100K 5% 1/4W
R620 1-249-437-11 CARBON 47K 5% 1/4W
R621 1-249-440-11 CARBON 82K 5% 1/4W
R622 1-249-429-11 CARBON 10K 5% 1/4W
R623 1-249-431-11 CARBON 15K 5% 1/4W
R625 1-249-435-11 CARBON 33K 5% 1/4W
R626 1-247-895-91 CARBON 470K 5% 1/4W
R633 1-249-411-11 CARBON 330 5% 1/4W
R634 1-249-407-11 CARBON 150 5% 1/4W F
IC601 8-759-652-49 IC TMP88CP77F-1A22
IC602 8-759-570-21 IC BA3830F-E2
IC603 8-759-648-23 IC RPM6940-H4
IC721 8-759-496-40 IC M65850FP (EA,DX7J)
IC722 8-759-634-51 IC M5218AP (DX7,DX7J)
< JACK >
J631 1-785-569-11 JACK (SMALL TYPE) (PHONE)
J721 1-785-569-11 JACK (SMALL TYPE) (MIC1) (DX7,DX7J)
J722 1-785-569-11 JACK (SMALL TYPE) (MIC2) (EA,DX7J)
< COIL >
L601 1-410-509-11 INDUCTOR 10uH
< TRANSISTOR >
Q604 8-729-900-80 TRANSISTOR BA1A4M-TP
Q605 8-729-900-80 TRANSISTOR BA1A4M-TP
Q606 8-729-900-74 TRANSISTOR BA1L3Z-TP
Q607 8-729-900-74 TRANSISTOR BA1L3Z-TP
Q608 8-729-900-74 TRANSISTOR BA1L3Z-TP
Q609 8-729-900-74 TRANSISTOR BA1L3Z-TP
Q610 8-729-900-74 TRANSISTOR BA1L3Z-TP
Q611 8-729-900-74 TRANSISTOR BA1L3Z-TP
Q612 8-729-900-74 TRANSISTOR BA1L3Z-TP
Q613 8-729-900-74 TRANSISTOR BA1L3Z-TP
R635 1-249-401-11 CARBON 47 5% 1/4W F
R636 1-249-441-11 CARBON 100K 5% 1/4W
R637 1-249-441-11 CARBON 100K 5% 1/4W
R638 1-249-441-11 CARBON 100K 5% 1/4W
R639 1-249-441-11 CARBON 100K 5% 1/4W
R640 1-249-441-11 CARBON 100K 5% 1/4W
R641 1-249-441-11 CARBON 100K 5% 1/4W
R642 1-249-441-11 CARBON 100K 5% 1/4W
R643 1-249-441-11 CARBON 100K 5% 1/4W
R644 1-249-441-11 CARBON 100K 5% 1/4W
R651 1-249-429-11 CARBON 10K 5% 1/4W
R652 1-249-410-11 CARBON 270 5% 1/4W F
R653 1-249-411-11 CARBON 330 5% 1/4W
R654 1-249-413-11 CARBON 470 5% 1/4W F
R655 1-249-415-11 CARBON 680 5% 1/4W F
R656 1-249-417-11 CARBON 1K 5% 1/4W F
R657 1-249-418-11 CARBON 1.2K 5% 1/4W F
R658 1-249-418-11 CARBON 1.2K 5% 1/4W F
R659 1-249-417-11 CARBON 1K 5% 1/4W F
R660 1-249-420-11 CARBON 1.8K 5% 1/4W F
R661 1-247-843-11 CARBON 3.3K 5% 1/4W
R662 1-249-425-11 CARBON 4.7K 5% 1/4W F
R664 1-249-429-11 CARBON 10K 5% 1/4W
R665 1-249-410-11 CARBON 270 5% 1/4W F
R666 1-249-411-11 CARBON 330 5% 1/4W
Q614 8-729-900-74 TRANSISTOR BA1L3Z-TP
Q615 8-729-111-29 TRANSISTOR 2SD1616A-TP-LK
Q621 8-729-900-80 TRANSISTOR BA1A4M-TP
Q622 8-729-900-80 TRANSISTOR BA1A4M-TP
Q623 8-729-900-80 TRANSISTOR BA1A4M-TP
R667 1-249-413-11 CARBON 470 5% 1/4W F
R668 1-249-414-11 CARBON 560 5% 1/4W F
R669 1-249-414-11 CARBON 560 5% 1/4W F
R670 1-249-415-11 CARBON 680 5% 1/4W F
R671 1-249-422-11 CARBON 2.7K 5% 1/4W F
67
Page 68

PANEL
Ref. No. Part No. Description Remarks Ref. No. Part No. Description Remarks
R672 1-249-420-11 CARBON 1.8K 5% 1/4W F
R673 1-249-422-11 CARBON 2.7K 5% 1/4W F
R674 1-247-843-11 CARBON 3.3K 5% 1/4W
R675 1-249-425-11 CARBON 4.7K 5% 1/4W F
R676 1-249-427-11 CARBON 6.8K 5% 1/4W F
R677 1-249-429-11 CARBON 10K 5% 1/4W
R678 1-249-432-11 CARBON 18K 5% 1/4W
R679 1-249-429-11 CARBON 10K 5% 1/4W
R680 1-249-410-11 CARBON 270 5% 1/4W F
R681 1-249-411-11 CARBON 330 5% 1/4W
POWER AMP
R741 1-249-429-11 CARBON 10K 5% 1/4W
(DX7,DX7J)
R742 1-249-417-11 CARBON 1K 5% 1/4W F
(EA,DX7J)
R743 1-249-429-11 CARBON 10K 5% 1/4W
(EA,DX7J)
R744 1-249-441-11 CARBON 100K 5% 1/4W
R745 1-247-807-31 CARBON 100 5% 1/4W
(DX7,DX7J)
R746 1-249-417-11 CARBON 1K 5% 1/4W F
R682 1-249-413-11 CARBON 470 5% 1/4W F
R683 1-249-414-11 CARBON 560 5% 1/4W F
R684 1-249-415-11 CARBON 680 5% 1/4W F
R693 1-249-429-11 CARBON 10K 5% 1/4W
R694 1-249-429-11 CARBON 10K 5% 1/4W
R695 1-249-429-11 CARBON 10K 5% 1/4W
R696 1-249-429-11 CARBON 10K 5% 1/4W
R701 1-249-410-11 CARBON 270 5% 1/4W F
R702 1-249-408-11 CARBON 180 5% 1/4W F
R703 1-249-410-11 CARBON 270 5% 1/4W F
R704 1-249-411-11 CARBON 330 5% 1/4W
R705 1-249-410-11 CARBON 270 5% 1/4W F
R706 1-249-410-11 CARBON 270 5% 1/4W F
R721 1-260-099-11 CARBON 1K 5% 1/2W
(DX7,DX7J)
R722 1-260-100-11 CARBON 1.2K 5% 1/2W
(DX7,DX7J)
R723 1-247-863-91 CARBON 22K 5% 1/4W
(EA,DX7J)
R724 1-247-863-91 CARBON 22K 5%h 1/4W
(EA,DX7J)
R725 1-247-863-91 CARBON 22K 5% 1/4W
(EA,DX7J)
R726 1-249-437-11 CARBON 47K 5% 1/4W
(EA,DX7J)
R727 1-247-863-91 CARBON 22K 5% 1/4W
(EA,DX7J)
R728 1-249-429-11 CARBON 10K 5% 1/4W
(EA,DX7J)
R729 1-247-863-91 CARBON 22K 5% 1/4W
(EA,DX7J)
R730 1-247-863-91 CARBON 22K 5% 1/4W
(EA,DX7J)
R731 1-247-881-00 CARBON 120K 5% 1/4W
(EA,DX7J)
R732 1-249-417-11 CARBON 1K 5% 1/4W F
R733 1-249-429-11 CARBON 10K 5% 1/4W
(EA,DX7J)
R734 1-247-807-31 CARBON 100 5% 1/4W
(DX7,DX7J)
R735 1-247-885-00 CARBON 180K 5% 1/4W
(DX7,DX7J)
R736 1-249-429-11 CARBON 10K 5% 1/4W
(DX7,DX7J)
R737 1-249-437-11 CARBON 47K 5% 1/4W
(EXCEPT EA,BX7)
< VARIABLE RESISTOR >
RV721 1-225-739-11 RES, VAR CARBON 50K (ECHO LEVEL)
(EA,DX7J)
RV722 1-225-739-11 RES, VAR CARBON 50K (MIC LEVEL)
(DX7,DX7J)
< SWITCH >
S601 1-418-725-11 ENCODER, ROTARY (12 TYPE) (VOLUME)
S611 1-762-875-21 SWITCH, KEYBOARD (f)
S612 1-762-875-21 SWITCH, KEYBOARD (F)
S613 1-762-875-21 SWITCH, KEYBOARD (V-GROOVE)
S614 1-762-875-21 SWITCH, KEYBOARD (LOOP)
S615 1-762-875-21 SWITCH, KEYBOARD (CD SYNC)
S616 1-762-875-21 SWITCH, KEYBOARD (REC/PAUSE)
S617 1-762-875-21 SWITCH, KEYBOARD (ENTER/NEXT)
S618 1-762-875-21 SWITCH, KEYBOARD (M)
S619 1-762-875-21 SWITCH, KEYBOARD (AMS +)
S620 1-762-875-21 SWITCH, KEYBOARD (PAUSE)
S621 1-762-875-21 SWITCH, KEYBOARD (- AMS)
S623 1-762-875-21 SWITCH, KEYBOARD (g)
S624 1-762-875-21 SWITCH, KEYBOARD (G)
S625 1-762-875-21 SWITCH, KEYBOARD (TAPE A/B)
S626 1-762-875-21 SWITCH, KEYBOARD (STOP)
S627 1-762-875-21 SWITCH, KEYBOARD (CD)
S628 1-762-875-21 SWITCH, KEYBOARD (TUNER/BAND)
S629 1-762-875-21 SWITCH, KEYBOARD (PLAY)
S630 1-762-875-21 SWITCH, KEYBOARD (MD (VIDEO))
S631 1-762-875-21 SWITCH, KEYBOARD (m)
S632 1-762-875-21 SWITCH, KEYBOARD (SURROUND)
S633 1-762-875-21 SWITCH, KEYBOARD (DIRECTION)
S634 1-762-875-21 SWITCH, KEYBOARD (REPEAT)
S635 1-762-875-21 SWITCH, KEYBOARD (PLAY MODE)
S636 1-762-875-21 SWITCH, KEYBOARD (EDIT)
S637 1-762-875-21 SWITCH, KEYBOARD (@/1)
S638 1-762-875-21 SWITCH, KEYBOARD (GROOVE)
S639 1-762-875-21 SWITCH, KEYBOARD (EQ EDIT)
S640 1-762-875-21 SWITCH, KEYBOARD (SPECTRUM)
S641 1-762-875-21 SWITCH, KEYBOARD (DISPLAY)
< VIBRATOR >
X601 1-579-352-11 VIBRATOR, CERAMIC 12.5MHz
**************************************************************
R737 1-247-863-91 CARBON 22K 5% 1/4W
R738 1-249-417-11 CARBON 1K 5% 1/4W F
(DX7,DX7J)
R739 1-249-441-11 CARBON 100K 5% 1/4W
(DX7,DX7J)
R740 1-249-417-11 CARBON 1K 5% 1/4W F
(DX7,DX7J)
68
(EA)
A-4428-079-A POWER AMP BOARD, COMPLETE (BX7)
*****************************
A-4428-344-A POWER AMP BOARD, COMPLETE
(EA,SP,MY,E2,MX,AR,AUS,E3,KR)
************************************
Page 69
POWER AMP
Ref. No. Part No. Description Remarks Ref. No. Part No. Description Remarks
A-4473-170-A POWER AMP BOARD, COMPLETE (TH)
****************************
A-4473-342-A POWER AMP BOARD, COMPLETE (DX7J)
******************************
< CAPACITOR >
C501 1-126-963-11 ELECT 4.7uF 20.00% 50V
C502 1-162-290-31 CERAMIC 470PF 10% 50V
(DX7,DX7J)
C502 1-162-294-31 CERAMIC 0.001uF 10% 50V
(BX7)
C503 1-162-286-21 CERAMIC 220PF 10.00% 50V
C504 1-104-665-11 ELECT 100uF 20.00% 10V
C507 1-136-495-11 MYLAR 0.068uF 5.00% 50V
C508 1-136-495-11 MYLAR 0.068uF 5.00% 50V
C509 1-128-560-11 ELECT 22uF 20.00% 100V
C510 1-128-578-11 ELECT 1uF 20.00% 100V
C511 1-162-306-11 CERAMIC 0.01uF 30.00% 16V
C512 1-162-306-11 CERAMIC 0.01uF 30.00% 16V
(BX7)
C541 1-136-165-00 MYLAR 0.1uF 5.00% 50V
C542 1-127-752-11 ELECT 3300uF 20% 63V
C544 1-136-165-00 MYLAR 0.1uF 5.00% 50V
(DX7,DX7J)
C545 1-136-165-00 MYLAR 0.1uF 5.00% 50V
(DX7,DX7J)
D543 8-719-302-37 DIODE RBV-602 (DX7,DX7J)
D551 8-719-991-33 DIODE 1SS133T-77
D581 8-719-991-33 DIODE 1SS133T-77
D941 8-719-110-90 DIODE MTZJ-T-77-39D
D979 8-719-110-31 DIODE MTZJ-T-72-12B
< TERMINAL >
* EP501 1-537-738-21 TERMINAL, EARTH (DX7,DX7J)
* EP502 1-537-738-21 TERMINAL, EARTH (BX7)
< IC >
IC501 8-749-017-06 IC STK412-150 (DX7,DX7J)
IC501 8-749-016-96 IC STK402-120 (BX7)
< TRANSISTOR >
Q501 8-729-140-84 TRANSISTOR 2SC1841TP-PAFAEA
Q503 8-729-140-82 TRANSISTOR 2SA988TP-PAFAEA
Q504 8-729-140-84 TRANSISTOR 2SC1841TP-PAFAEA
Q505 8-729-140-84 TRANSISTOR 2SC1841TP-PAFAEA
(DX7,DX7J)
Q506 8-729-119-79 TRANSISTOR 2SC2785TP-FEK (DX7,DX7J)
Q551 8-729-140-84 TRANSISTOR 2SC1841TP-PAFAEA
Q581 8-729-140-84 TRANSISTOR 2SC1841TP-PAFAEA
Q941 8-729-048-52 TRANSISTOR 2SA1932 (TP)
Q942 8-729-119-76 TRANSISTOR 2SA1175TP-HFE (DX7,DX7J)
< RESISTOR >
C546 1-127-755-11 ELECT 3300uF 20% 100V
(DX7,DX7J)
C551 1-126-963-11 ELECT 4.7uF 20.00% 50V
C552 1-162-290-31 CERAMIC 470PF 10% 50V
(DX7,DX7J)
C552 1-162-294-31 CERAMIC 0.001uF 10% 50V
(BX7)
C553 1-162-286-21 CERAMIC 220PF 10.00% 50V
C554 1-104-665-11 ELECT 100uF 20.00% 10V
C557 1-136-495-11 MYLAR 0.068uF 5.00% 50V
C558 1-136-495-11 MYLAR 0.068uF 5.00% 50V
C559 1-128-560-11 ELECT 22uF 20.00% 100V
C581 1-126-967-11 ELECT 47uF 20.00% 50V
C591 1-136-165-00 MYLAR 0.1uF 5.00% 50V
C592 1-127-752-11 ELECT 3300uF 20% 63V
C596 1-127-755-11 ELECT 3300uF 20% 100V
(DX7,DX7J)
C942 1-126-964-11 ELECT 10uF 20.00% 50V
C943 1-126-968-11 ELECT 100uF 20.00% 50V
C980 1-164-159-21 CERAMIC 0.1uF 50V
< CONNECTOR >
CN502 1-778-981-21 CONNECTOR, BOARD TO BOARD 13P
CN503 1-778-981-21 CONNECTOR, BOARD TO BOARD 13P
R501 1-249-417-11 CARBON 1K 5% 1/4W F
R502 1-249-438-11 CARBON 56K 5% 1/4W
R503 1-249-411-11 CARBON 390 5% 1/4W
(DX7,DX7J)
R503 1-249-414-11 CARBON 560 5% 1/4W F
(BX7)
R504 1-249-438-11 CARBON 56K 5% 1/4W
R505 1-249-417-11 CARBON 1K 5% 1/4W F
R506 1-249-431-11 CARBON 15K 5% 1/4W
R507 1-249-441-11 CARBON 100K 5% 1/4W
R508 1-220-891-11 METAL 0.1 10% 5W
R508 1-217-156-00 METAL 0.22 20% 5W
(BX7)
R509 1-260-076-11 CARBON 10 5% 1/2W
R510 1-220-891-11 METAL 0.1 10% 5W
(DX7,DX7J)
R510 1-217-156-00 METAL 0.22 20% 5W
(BX7)
0 R511 1-212-881-11 FUSIBLE 100 5% 1/4W
0 R512 1-202-972-61 FUSIBLE 1 5% 1/4W
R513 1-249-435-11 CARBON 33K 5% 1/4W
R514 1-249-421-11 CARBON 2.2K 5% 1/4W F
R515 1-247-863-91 CARBON 22K 5% 1/4W
R516 1-249-429-11 CARBON 10K 5% 1/4W
R517 1-249-421-11 CARBON 2.2K 5% 1/4W F
< DIODE >
D501 8-719-991-33 DIODE 1SS133T-77
D502 8-719-991-33 DIODE 1SS133T-77
D503 8-719-922-03 DIODE MTZJ-T-77-18C (DX7,DX7J)
D504 8-719-922-03 DIODE MTZJ-T-77-18C (DX7,DX7J)
D541 8-719-302-38 DIODE RBV-602-01
R518 1-249-435-11 CARBON 33K 5% 1/4W
R519 1-249-439-11 CARBON 68K 5% 1/4W
R520 1-215-872-11 METAL OXIDE 3.3K 5% 1W
(DX7,DX7J)
R521 1-249-441-11 CARBON 100K 5% 1/4W
(DX7,DX7J)
R522 1-249-441-11 CARBON 100K 5% 1/4W
(DX7,DX7J)
The components identified by
mark 0 or dotted line with mark
0 are critical for safety.
Replace only with part number
specified.
Les composants identifiés par
une marque 0 sont critiques
pour la sécurité.
Ne les remplacer que par une
pièce portant le numéro spécifié.
69
Page 70
POWER AMP
Ref. No. Part No. Description Remarks Ref. No. Part No. Description Remarks
R523 1-249-441-11 CARBON 100K 5% 1/4W
R524 1-215-872-11 METAL OXIDE 3.3K 5% 1W
R541 1-249-441-11 CARBON 100K 5% 1/4W
R541 1-249-437-11 CARBON 47K 5% 1/4W
R542 1-249-441-11 CARBON 100K 5% 1/4W
R551 1-249-417-11 CARBON 1K 5% 1/4W F
R552 1-249-438-11 CARBON 56K 5% 1/4W
R553 1-249-411-11 CARBON 390 5% 1/4W
R553 1-249-414-11 CARBON 560 5% 1/4W F
R554 1-249-438-11 CARBON 56K 5% 1/4W
R555 1-249-417-11 CARBON 1K 5% 1/4W F
R556 1-249-431-11 CARBON 15K 5% 1/4W
R557 1-249-441-11 CARBON 100K 5% 1/4W
R558 1-220-891-11 METAL 0.1 10% 5W
R558 1-217-156-00 METAL 0.22 20% 5W
SENSOR SUB-TRANS TRANS
(DX7,DX7J)
(DX7,DX7J)
(DX7,DX7J)
(BX7)
(DX7,DX7J)
(DX7,DX7J)
(BX7)
(DX7,DX7J)
(BX7)
S711 1-771-821-11 SWITCH, PUSH (1 KEY) (UP/DOWN)
**************************************************************
A-4428-301-A SUB-TRANS BOARD, COMPLETE
A-4428-959-A SUB-TRANS BOARD, COMPLETE (CND)
A-4473-194-A SUB-TRANS BOARD, COMPLETE (US)
0 C971 1-113-925-11 CERAMIC 0.01uF 20.00% 250V
C973 1-126-933-11 ELECT 100uF 20.00% 16V
C975 1-126-768-11 ELECT 2200uF 20.00% 16V
C976 1-164-159-21 CERAMIC 0.1uF 50V (BX7)
C977 1-164-159-21 CERAMIC 0.1uF 50V (BX7)
< SWITCH >
(AEP,G,UK,CIS)
************************************
*****************************
*****************************
< CAPACITOR >
(US)
(BX7)
(BX7)
R559 1-260-076-11 CARBON 10 5% 1/2W
R560 1-220-891-11 METAL 0.1 10% 5W
(DX7,DX7J)
R560 1-217-156-00 METAL 0.22 20% 5W
(BX7)
0 R561 1-212-881-11 FUSIBLE 100 5% 1/4W
R581 1-249-435-11 CARBON 33K 5% 1/4W
R582 1-249-435-11 CARBON 33K 5% 1/4W
R591 1-249-441-11 CARBON 100K 5% 1/4W
(DX7,DX7J)
R591 1-249-437-11 CARBON 47K 5% 1/4W
(BX7)
R592 1-249-441-11 CARBON 100K 5% 1/4W
(DX7,DX7J)
R941 1-216-478-11 METAL OXIDE 390 5% 3W
(DX7,DX7J)
R942 1-249-429-11 CARBON 10K 5% 1/4W
R943 1-249-417-11 CARBON 1K 5% 1/4W F
R944 1-247-791-91 CARBON 22 5% 1/4W
(DX7,DX7J)
R980 1-249-429-11 CARBON 10K 5% 1/4W
< THERMISTOR >
TH501 1-807-796-11 THERMISTOR (DX7,DX7J)
**************************************************************
1-675-911-11 SENSOR BOARD
************
C978 1-164-159-21 CERAMIC 0.1uF 50V (BX7)
< CONNECTOR >
CN974 1-564-321-00 PIN, CONNECTOR 2P (BX7)
CN976 1-506-468-11 PIN, CONNECTOR 3P (BX7)
< DIODE >
0 D971 8-719-991-33 DIODE 1SS133T-77 (BX7)
D972 8-719-024-99 DIODE 11ES2-NTA2B (BX7)
D973 8-719-024-99 DIODE 11ES2-NTA2B (BX7)
D974 8-719-024-99 DIODE 11ES2-NTA2B (BX7)
D975 8-719-024-99 DIODE 11ES2-NTA2B (BX7)
< IC >
IC971 8-759-039-69 IC uPC7805AHF (BX7)
< TRANSISTOR >
Q971 8-729-119-78 TRANSISTOR 2SC2785TP-HFE (BX7)
< RESISTOR >
R974 1-249-441-11 CARBON 100K 5% 1/4W (BX7)
R975 1-249-429-11 CARBON 10K 5% 1/4W (BX7)
< RELAY >
0 RY971 1-755-276-11 RELAY, POWER (BX7)
< IC >
IC711 8-749-016-76 IC RPI-321
< RESISTOR >
R711 1-247-876-11 CARBON 75K 5% 1/4W
R712 1-247-815-91 CARBON 220 5% 1/4W
R713 1-249-429-11 CARBON 10K 5% 1/4W
70
< TRANSFORMER >
0 T972 1-435-209-21 TRANSFORMER, POWER (US,CND)
0 T972 1-435-210-11 TRANSFORMER, POWER (AEP,G,UK,CIS)
**************************************************************
A-4428-089-A TRANS BOARD, COMPLETE (US)
The components identified by
mark 0 or dotted line with mark
0 are critical for safety.
Replace only with part number
specified.
*************************
Les composants identifiés par
une marque 0 sont critiques
pour la sécurité.
Ne les remplacer que par une
pièce portant le numéro spécifié.
Page 71
Ver 1.4
TRANS
Ref. No. Part No. Description Remarks Ref. No. Part No. Description Remarks
A-4428-346-A TRANS BOARD, COMPLETE
(EA,SP,MY,E2,AR,E3)
**************************************
A-4428-536-A TRANS BOARD, COMPLETE (AUS)
**************************
R974 1-249-441-11 CARBON 100K 5% 1/4W
(BX7)
R975 1-249-429-11 CARBON 10K 5% 1/4W
(BX7)
< RELAY >
A-4428-537-A TRANS BOARD, COMPLETE (MX)
*************************
A-4428-960-A TRANS BOARD, COMPLETE (AEP,G,UK,CIS)
***********************************
A-4473-173-A TRANS BOARD, COMPLETE (TH)
*************************
A-4473-195-A TRANS BOARD, COMPLETE (CND)
**************************
A-4473-329-A TRANS BOARD, COMPLETE (KR)
*************************
A-4473-345-A TRANS BOARD, COMPLETE (DX7J)
***************************
1-533-293-31 FUSE HOLDER
< CAPACITOR >
C941 1-126-969-11 ELECT 220uF 20.00% 50V
(BX7)
< CONNECTOR >
CN975 1-564-321-00 PIN, CONNECTOR 2P (DX7,DX7J)
* CN977 1-564-528-11 PLUG, CONNECTOR 13P (DX7,DX7J)
* CN977 1-564-527-11 PLUG, CONNECTOR 12P (BX7)
< DIODE >
D977 8-719-024-99 DIODE 11ES2-NTA2B (BX7)
< FUSE >
0 F971 1-532-506-31 FUSE T6.3AL/250V (E2,E3,EA,SP,MY,AR,DX7J)
0 F973 1-532-465-31 FUSE 3.15A/250V (AEP,G,UK,CIS)
0 F973 1-576-193-21 FUSE 6.3A/125V (US,CND)
0 F974 1-532-506-31 FUSE T6.3AL/250V (AEP,G,UK,CIS,DX7,DX7J)
0 F974 1-576-193-21 FUSE 6.3A/125V (US,CND)
0 F975 1-532-506-31 FUSE T6.3AL/250V (AEP,G,UK,CIS,DX7,DX7J)
0 F975 1-576-193-21 FUSE 6.3A/125V (US,CND)
0 F976 1-532-504-31 FUSE 4A/250V (AEP,G,UK,CIS)
0 F976 1-533-949-31 FUSE, CYLINDRICAL (TIME LUG) T8.3AL/250V
(DX7,DX7J)
0 F976 1-576-108-11 FUSE 4A/125V (US,CND)
RY971 1-755-276-11 RELAY, POWER (BX7)
< SWITCH >
0 S951 1-771-291-11 SWITCH, POWER (VOLTAGE SELECTOR)
(DX7:EA,SP,MY,E2,AR,E3,DX7J)
< TRANSFORMER >
0 T971 1-435-261-11 TRANSFORMER, POWER (AEP,G,UK,EA,CIS)
0 T971 1-435-263-11 TRANSFORMER, POWER (CND)
0 T971 1-435-469-11 TRANSFORMER, POWER (US)
0 T971 1-435-325-11 POWER TRANSFORMER (DX7,DX7J)
**************************************************************
MISCELLANEOUS
***************
101 1-773-045-11 WIRE (FLAT TYPE) (17 CORE)
104 1-773-122-11 WIRE (FLAT TYPE) (19 CORE)
0 108 1-575-653-11 CORD, POWER (DX7:E3/DX7J)
0 108 1-696-847-11 CORD, POWER (DX7:AUS)
0 108 1-769-079-21 CORD, POWER (DX7:KR)
0 108 1-777-071-21 CORD, POWER (BX7:AEP,G,CIS/DX7:EA,SP,MY)
0 108 1-782-315-11 CORD, POWER (DX7:E2,MX)
0 108 1-783-820-11 CORD, POWER (BX7:US,CND)
0 108 1-783-941-11 CORD, POWER (DX7:AR)
0 108 1-790-226-11 CORD, POWER (BX7:UK)
0 108 1-791-901-11 CORD, POWER (DX7:TH)
0 109 1-569-007-11 ADAPTOR, CONVERSION 2P (DX7:E3/DX7J)
0 109 1-569-008-21 ADAPTOR, CONVERSION (DX7:EA,SP,MY)
0 109 1-569-008-31 ADAPTOR, CONVERSION (DX7:EA,SP,MY)
161 X-3378-246-1 MOTOR ASSY
259 1-791-983-11 WIRE (FLAT TYPE) (8 CORE)
266 1-471-035-11 MAGNET ASSY
0 301 A-4735-357-A OP BASE ASSY (KSM-213DAP)
302 1-792-024-11 WIRE (FLAT TYPE) (16 CORE)
HP101 A-2004-778-A BASE (A) ASSY, HEAD
HRPE101 A-2004-779-A BASE (B) ASSY, HEAD
M1 X-3378-241-1 MOTOR ASSY (INCLUDING PULLEY)
FL601 1-517-928-11 INDICATOR TUBE, FLUORESCENT
M721 A-4672-826-A MOTOR ASSY (INCLUDING PULLEY)
M961 1-698-792-11 FAN, DC (DX7:KR)
0 F977 1-532-504-31 FUSE 4A/250V (AEP,G,UK,CIS)
0 F977 1-533-949-31 FUSE, CYLINDRICAL (TIME LUG) T8.3AL/250V
(DX7,DX7J)
0 F977 1-576-108-11 FUSE 4A/125V (US,CND)
< RESISTOR >
0 R941 1-202-972-61 FUSIBLE 1 5% 1/4W
(BX7)
0 R951 1-219-120-11 FUSIBLE 0.15 5% 1/4W
0 R952 1-219-120-11 FUSIBLE 0.15 5% 1/4W
0 R953 1-219-120-11 FUSIBLE 0.15 5% 1/4W
R961 1-202-725-00 SOLID 3.3M 10% 1/2W
The components identified by
mark 0 or dotted line with mark
0 are critical for safety.
Replace only with part number
specified.
Les composants identifiés par
une marque 0 sont critiques
pour la sécurité.
Ne les remplacer que par une
pièce portant le numéro spécifié.
(US)
M961 1-763-072-11 FAN, DC (BX7:US,CND/DX7/DX7J)
**************************************************************
***************
HARDWARE LIST
***************
#1 7-628-254-05 SCREW +PS 2.6X5
#2 7-685-646-79 SCREW +BVTP 3X8 TYPE2 N-S
#3 7-685-647-79 SCREW +BVTP 3X10 TYPE2 N-S
#4 7-685-650-79 SCREW +BVTP 3X16 TYPE2 N-S
#5 7-685-648-79 SCREW +BVTP 3X12 TYPE N-S
#6 7-685-881-09 SCREW +BVTT 4X8 (S)
#7 7-685-781-09 SCREW +PTT 2X4 (2)
71
Page 72
HCD-BX7/DX7/DX7J
REVISION HISTORY
Clicking the version allows you to jump to the revised page.
Also, clicking the version at the upper right on the revised page allows you to jump to the next revised
page.
Ver. Date Description of Revision
1.0 2000.02 New
1.1 2001.06 Correction of exploded views (M721). ( SPM-01021 )
1.2 2001.08 Correction of exploded views
(Tape mechanism deck section and CD base unit section). ( SPM-01030 )
1.3 2002.08 Addition of Ref. No.272 CHASSIS for exploded views. ( SPM-02070 )
1.4 2003.12 Part No. correction of Ref. No. 301 for exploded views. ( SPM-03061 )
 Loading...