

Page 1
C1.75 Ultrasound System
Service Manual
Page 2

P01118-03 01/2003
Copyright 2003 by SonoSite, Inc.
All rights reserved. Printed in the USA.
ii C1.75 Ultrasound System Service Manual
Page 3

Manufactured by
SonoSite, Inc.
21919 30th Drive SE
Bothell, WA 98021-3904
USA
Telephone: 1-888-482-9449 or +1-425-951-1200
Fax: +1-425-951-1201
SonoSite European Headquarters
Baystrait House, Station Road
Biggleswade SG18 8AL
UK
Telephone: +44-1767-313-117
Fax: +44-1767-312-400
CAUTION:
` United States federal law restricts this device to sale by or on the order of a
physician.
“SiteCharge,” “SitePack,” “SiteStand,” and “SonoHeart,” are trademarks of SonoSite, Inc.
Non-SonoSite product names may be trademarks or registered trademarks of their respective
owners.
SonoSite products may be covered by one or more of the following U.S. patents: 4454884, 4462408,
4469106, 4474184, 4475376, 4515017, 4534357, 4542653, 4543960, 4552607, 4561807, 4566035,
4567895, 4581636, 4591355, 4603702, (4607642), 4644795, 4670339, 4773140, 4817618,
4883059, 4887306, 5016641, 5050610, 5095910, 5099847, 5123415, 5158088, 5197477, 5207225,
5215094, 5226420, 5226422, 5233994, 5255682, (5275167), 5287753, 5305756, 5353354,
5365929, 5381795, 5386830, 5390674, 5402793, (5,423,220), 5438994, 5450851, 5456257,
5471989, 5471990, 5474073, 5476097, 5479930, 5482045, 5482047, 5485842, 5492134, 5517994,
5529070, 5546946, 5555887, 5603323, 5606972, 5617863, (5634465), 5634466, 5636631,
5645066, 5648942, 5669385, (5706819), 5715823, 5718229, 5720291, 5722412, 5752517,
5762067, 5782769, 5800356, 5817024, 5833613, 5846200, 5860924, 5893363, 5916168, 5951478,
6036643, 6102863, 6104126, 6113547, 6117085, 6142946, 6203498 B1, D0280762, D0285484,
D0286325, D0300241, D0306343, D0328095, D0369307, D0379231. Other patents pending.
iii
Page 4

iv C1.75 Ultrasound System Service Manual
Page 5

Table of Contents
CHAPTER 1 Introduction 1
1.1 Description................................................................................1
1.2 System Components..................................................................1
1.3 Audience ...................................................................................2
1.4 Conventions Used in This Manual............................................2
1.5 About the System Software ......................................................3
1.6 Software Licensing ...................................................................3
CHAPTER 2 Safety 5
2.1 Electrical Safety........................................................................5
2.1.1 Equipment Protection.........................................................7
2.2 Battery Safety............................................................................7
2.3 Biological Safety.......................................................................8
2.4 Labeling Symbols .....................................................................9
CHAPTER 3 System Overview 11
3.1 Theory of Operation................................................................11
3.1.1 Transducer........................................................................12
3.1.2 Acquisition Subsystem.....................................................12
3.1.3 Processing Subsystem ......................................................12
3.1.4 Display Subsystem ...........................................................12
3.1.5 Control Subsystem ...........................................................12
3.1.6 User Interface Subsystem.................................................12
3.1.7 Power Subsystem .............................................................13
3.2 Components ............................................................................13
3.3 Controls...................................................................................13
3.4 Accessories .............................................................................15
3.4.1 SiteStand Mobile Docking Station...................................15
3.4.1.1 SiteLink Image Management Software........................16
3.4.1.2 IrfanView Software......................................................16
3.4.2 SiteStand Display .............................................................16
3.4.3 SiteCharge Dual Battery Charger.....................................18
3.4.4 SitePack Protective Carry Pack........................................18
3.4.5 Battery Pack .....................................................................19
3.4.5.1 Battery Charge Indicators ............................................19
3.4.6 External Power .................................................................19
v
Page 6

3.4.6.1 External System Connections ......................................20
3.4.7 Power Adapter..................................................................20
3.4.8 Cables ...............................................................................21
3.4.8.1 Video............................................................................21
3.4.8.2 Printer Control..............................................................21
3.4.8.3 AC Power Extension....................................................21
3.4.9 Video ................................................................................21
3.4.9.1 Video Port Cable..........................................................22
3.5 System Specifications.............................................................22
3.5.1 Physical Dimensions ........................................................22
3.5.2 Monitor.............................................................................22
3.5.3 Transducers ......................................................................22
3.5.4 Imaging Modes.................................................................22
3.5.5 Image Storage...................................................................23
3.5.6 Temperature and Humidity Limits...................................23
3.5.6.1 System Operating.........................................................23
3.5.6.2 System Shipping/Storage ............................................23
3.5.6.3 Battery Operating.........................................................23
3.5.6.4 Battery Shipping/Storage .............................................23
3.5.6.5 Transducers Operating .................................................23
3.5.6.6 Transducers Shipping/Storage .....................................23
3.5.7 Electrical...........................................................................23
3.6 Battery.....................................................................................24
3.7 Safety Requirements...............................................................24
3.7.1 Meets Electromechanical Safety Standards .....................24
3.7.2 Meets EMC/EMI Standards .............................................24
3.7.3 Meets Airborne Equipment Standards .............................25
CHAPTER 4 Setup and Operation 27
4.1 Connecting and Removing Transducers .................................27
4.2 Removing and Installing the Battery ......................................28
4.3 Turning the System On and Off..............................................29
4.4 Using AC Power .....................................................................30
4.5 Upgrading the System Software .............................................31
4.6 Obtaining A License Key .......................................................32
4.6.1 Installing A License Key..................................................33
4.6.1.1 Displaying the System Information Screen .................34
4.7 Checking and Charging the Battery........................................35
4.8 Using the SiteCharge Dual Battery Charger...........................37
vi C1.75 Ultrasound System Service Manual
Page 7

4.9 Using System Setup ................................................................38
4.9.1 Setting the Date and Time................................................39
4.9.2 Setting the Sleep Delay ....................................................39
4.9.3 Setting the Power Delay...................................................39
4.9.4 Setting the Audible Beep..................................................39
4.9.5 Setting Up A Recommended Printer................................40
4.9.6 Setting Up A Recommended VCR...................................40
4.9.7 Setting Up A Recommended Video Monitor (External)..41
4.9.8 Setting Up Function Key Assignments ............................41
4.9.9 Changing All System Setups to the Default Settings .......41
CHAPTER 5 Cleaning and Disinfecting 43
5.1 Universal Precautions .............................................................43
5.2 Receipt of Suspected Contaminated Materials .......................43
5.3 Recommended Disinfectants ..................................................44
CHAPTER 6 Troubleshooting 45
6.1 System and Subsystem Diagnosis...........................................45
6.2 Subassembly Replacement......................................................45
6.3 Test Equipment .......................................................................45
6.4 Failures....................................................................................46
6.4.1 Display..............................................................................46
6.4.2 Control Panel....................................................................46
6.4.3 Trackball...........................................................................46
6.4.4 Main PCBA ......................................................................46
6.4.5 Clearing the Main PCBA Failure.....................................47
6.4.6 Battery ..............................................................................47
CHAPTER 7 Replacement Procedures 55
7.1 Display ....................................................................................55
7.1.1 Required Parts ..................................................................55
7.1.2 Required Tools and Materials ..........................................55
7.1.3 Removing the Display......................................................56
7.1.4 Replacing the Display ......................................................58
7.2 Control Panel ..........................................................................60
7.2.1 Required Parts ..................................................................60
7.2.2 Required Tools .................................................................60
7.2.3 Removing the Control Panel ............................................60
7.2.4 Replacing the Control Panel ............................................63
vii
Page 8

7.3 Trackball .................................................................................64
7.3.1 Required Parts ..................................................................64
7.3.2 Required Tools .................................................................64
7.3.3 Removing the Trackball...................................................64
7.3.4 Replacing the Trackball ...................................................67
7.4 Main PCBA.............................................................................69
7.4.1 Required Parts ..................................................................69
7.4.2 Required Tools .................................................................70
7.4.3 Removing the Main PCBA ..............................................70
7.4.4 Replacing the Main PCBA...............................................71
7.5 Transducers.............................................................................74
7.6 SiteCharge Dual Battery Charger ...........................................74
7.7 AC Power Adapter..................................................................74
7.8 Peripherals ..............................................................................75
7.8.1 Display .............................................................................75
7.8.2 VCR..................................................................................75
7.8.3 Printer ...............................................................................75
CHAPTER 8 Performance Tests 77
8.1 Overview.................................................................................77
8.2 Test Equipment:......................................................................77
8.3 Setting Up Performance Tests ................................................78
8.3.1 Scan Reference Orientation..............................................78
8.4 Testing 2D Performance .........................................................78
8.4.1 2D Image Quality.............................................................78
8.4.2 Axial Measurement Accuracy..........................................79
8.4.3 Lateral Measurement Accuracy .......................................79
8.4.4 Penetration........................................................................80
8.5 Additional Performance Tests ................................................80
8.5.1 CPD ..................................................................................80
8.5.2 PowerMap DCPD.............................................................81
8.5.3 Image Quality Verification Test.......................................81
8.5.4 Image Review...................................................................81
8.5.5 Printer ...............................................................................82
8.5.6 Battery Charging ..............................................................82
8.5.7 Video Output ...................................................................82
8.6 Returning Products to SonoSite..............................................83
8.6.1 Contacting SonoSite Technical Support ..........................83
8.6.2 Shipping Instructions........................................................83
viii C1.75 Ultrasound System Service Manual
Page 9

APPENDIX A Parts List 85
APPENDIX B Service Event Report 97
Index 99
ix
Page 10

x C1.75 Ultrasound System Service Manual
Page 11

CHAPTER 1 Introduction
Before servicing the SonoSite ultrasound system, read and be familiar with the
information in this manual. This manual is applicable to SonoSite products
manufactured after June 23, 2000. For more information about products
manufactured prior to June 23, 2000, please refer to SonoSite Service Manual
(P00715-02).
1.1 Description
The SonoSite system is a portable, software-controlled, ultrasound system, which
has an all-digital architecture. It is used to acquire and display high-resolution, realtime, 2D, Color Power Doppler (CPD), and PowerMap (PM) Directional Color
Power Doppler (DCPD) ultrasound images. The system has cine review, image
zoom, labeling, biopsy, measurements and calculations, image storage and review,
printing and recording capabilities.
Currently, the system supports the following broadband transducers:
• C60/5-2 MHz 60-mm, curved array
• C15/4-2 MHz 15-mm, curved array
• ICT/7-4 MHz 11-mm, intracavitary array
• L38/10-5 MHz 38-mm, linear array
1.2 System Components
The SonoSite system comprises the following components:
• a hand-carried ultrasound system
• a transducer
• a power adapter
Chapter 1: Introduction 1
Page 12

The SonoSite system may include the following optional accessories:
• SiteStand mobile docking station
• SiteStand display
• SiteCharge dual battery charger
•SiteLink software
• ScanPack quick access carrier
• SitePack protective carrying case
• Power adapter (extra)
• Battery
• Video cables (3)
• Printer control cable
• Power cord
• AIUM Ultrasound Medical Safety Guidance document
• SonoSite 180 or SonoHeart User Guide
(extra)
1.3 Audience
The intended audience of this manual is properly trained field and in-house service
personnel.
1.4 Conventions Used in This Manual
These conventions are used in this manual:
• Control names and references to display elements are presented in bold-face
type.
• Operating instructions are introduced with a statement in bold-face type that
ends with a colon. For example: To read this user guide:
• When the steps in the operating instructions must be performed in a specific
order, the steps are numbered.
• Bulleted lists present information in a list, they do not imply a sequence.
• Screen display text is shown in Arial 10 pt. For example:
• The left side of the system is to your left as you face the system. The system
handle is at the top of the system, the battery compartment is at the bottom of the
system.
• Note: A note draws attention to information that is a general rule for a
procedure or is an exception to a rule (noncritical information of general
interest).
Successful upgrade.
2 C1.75 Ultrasound System Service Manual
Page 13

1.5 About the System Software
The SonoSite system contains software that controls its operation. From time to
time, SonoSite provides new software for use with the system.
Transducers that you receive from SonoSite may include new software for the
SonoSite system. This software may be either required or optional.
When the new software is required, you must install it if you wish to use the new
software features (e.g., new transducer). If you choose not to install it, you must
remove the transducer and replace it with one that is compatible with the software
that is currently installed in the system.
When the software is optional, you can either install it or choose to use the existing
software. If you choose not to install the software, the system will prompt you again
whenever the system is started, and whenever the transducer is disconnected and
then reconnected to the system. For more information on software upgrades, refer to
Chapter 4.5, Upgrading the System Software, on page 31
1.6 Software Licensing
Use of the software that you receive from SonoSite is controlled by a license key. A
license key is a number sequence containing exactly 12 decimal digits.
.
License keys are obtained from SonoSite or from its authorized representatives. You
must obtain one license key for each system that will use the new software. Refer to
Chapter 4.6, Obtaining A License Key, on page 33
license key.
Software that you receive from SonoSite may be installed and will operate for a
short period of time without requiring a valid license key. We refer to this period of
time as the “grace period.” The grace period is variable.
When you first install the software, the SonoSite system will prompt you for a
license key. If you have not yet obtained a valid license key, you can elect to use the
software as long as the grace period time has not been fully consumed. We refer to
this mode of operation as “running in the grace period.”
When the system is running in the grace period, all system functions are available.
As you use the system, the grace period is slowly consumed. When the grace period
has expired, the system will not be usable until a valid license key has been entered.
Grace period time is not consumed while the system is powered off or when it is in
“sleep” mode. Whenever the system is running in the grace period, the grace period
time remaining is available on the license update screen. For information on
displaying the license update screen, refer to Chapter 4.6.1.1, Displaying the
System Information Screen, on page 35
CAUTION:
.
for information on obtaining a
` When the grace period expires, all system functions except for licensing will
become unavailable until a valid license key is entered into the system.
Chapter 1: Introduction 3
Page 14

4 C1.75 Ultrasound System Service Manual
Page 15

CHAPTER 2 Safety
Please read this information before using the SonoSite ultrasound system. It applies
to the ultrasound system, transducers, peripherals, and accessories.
A WARNING describes precautions necessary to prevent injury or loss of life.
A CAUTION describes precautions necessary to protect the products.
2.1 Electrical Safety
This system meets EN60601-1, Class I/internally-powered equipment requirements
and Type BF isolated patient-applied parts safety requirements.
This system complies with the applicable medical equipment requirements
published in the Canadian Standards Association (CSA), European Norm
Harmonized Standard, and Underwriters Laboratories (UL) safety standards. See
Chapter 3.5, System Specifications, on page 22
For maximum safety observe the following warnings and cautions:
WARNINGS:
` Under certain circumstances, the transducer connector and back of the display
enclosure can reach temperatures that exceed EN60601-1 limits for patient
contact, therefore only the operator shall handle the system. This does not include
the transducer face. Patient contact with hot surfaces may result in discomfort or
minor risk of patient injury.
` To avoid discomfort or minor risk of operator injury when handling the
transducer connector, the system should not be operated for more than 60 minutes
continuously in a live-scan mode (as opposed to freeze or sleep modes).
` Do not operate the system in the presence of flammable gasses or anesthetics.
Explosion can result.
.
Chapter 2: Safety 5
Page 16

` Shock hazards exist if the AC power adapter is not properly grounded. Grounding
reliability can only be achieved when equipment is connected to a receptacle
marked “Hospital Only,” “Hospital Grade,” or the equivalent. The grounding
wire must not be removed or defeated.
` To avoid the risk of electrical shock, before using the transducer, inspect the
transducer face, housing, and cable. Do not use the transducer, if the transducer
or cable is damaged.
` To avoid the risk of electrical shock, always disconnect the AC power adapter
from the system before cleaning the system.
` To avoid the risk of electrical shock, do not use any transducer that has been
immersed beyond the specified cleaning or disinfection level. Refer to the
SonoSite Ultrasound System User Guide for cleaning and disinfection levels.
` To avoid the risk of electrical shock and fire hazard, inspect the AC power
adapter cord and plug on a regular basis. Ensure they are not damaged.
` Connection of peripherals not recommended by SonoSite could result in
electrical shock. Avoid electrical shock hazards by using peripherals and
accessory cables recommended by SonoSite.
` To avoid the risk of electrical shock, use commercial grade peripherals
recommended by SonoSite on battery power only. Do not connect these product
to AC mains power when using the system to scan or diagnose a patient/subject.
Call SonoSite technical support or your local representative for a list of the
commercial grade peripherals available from or recommended by SonoSite.
` The transducer must be removed from patient contact before the application of a
high-voltage defibrillation pulse.
` To avoid the risk of electrical shock to the patient/subject, do not touch the system
battery contacts while simultaneously touching a patient/subject.
CAUTIONS:
` Although your system has been manufactured in compliance with existing EMI/
EMC requirements, use of the system in the presence of an electromagnetic field
can cause degradation of the ultrasound image. If this occurs often, SonoSite
suggests a review of the system environment. Identify and remove the possible
sources of the emissions or move your system.
` Electrostatic discharge (ESD), or static shock, is a naturally occurring
phenomenon. ESD is common in conditions of low humidity, which can be
caused by heating or air conditioning. Static shock is a discharge of the electrical
energy from a charged body to a lesser or non-charged body. The degree of
discharge can be significant enough to cause damage to a transducer or an
ultrasound system. The following precautions can help reduce ESD: anti-static
spray on carpets, anti-static spray on linoleum, and anti-static mats.
` Do not use the system if an error message appears on the image display: note the
error code; call SonoSite technical support or your local representative; turn off
the system by pressing and holding the power switch until the system powers
down (6-10 seconds).
` To avoid increasing the system and transducer connector temperature, do not
block the airflow to the ventilation holes on the back of the system.
6 C1.75 Ultrasound System Service Manual
Page 17

2.1.1 Equipment Protection
To protect your ultrasound system, transducer, and accessories, follow these
precautions.
CAUTIONS:
` Excessive bending or twisting of cables can cause a failure or intermittent
operation.
` Improper cleaning or disinfecting of any part of the system can cause permanent
damage. For cleaning and disinfecting instructions, see refer to the SonoSite
Ultrasound System User Guide.
` Do not submerge the transducer connector in solution. The cable is not liquid-
tight beyond the transducer connector/cable interface.
` Do not use solvents such as thinner or benzene, or abrasive cleaners on any part
of the system.
` Remove the battery from the system if the system is not likely to be used for some
time.
` Do not spill liquid on the system.
` The top membrane of the phantom is delicate and can be damaged if handled
improperly. Only use minimum force when coupling the transducer to the
phantom.
` Do not handle PCBs without proper static protection. Damage to components
may result from improper handling.
` Damage to the system may occur if the system is incorrectly assembled,
configured or the system is connected to an improper power source.
` Do not touch the scanhead connector pins.
2.2 Battery Safety
Observe the following, to ensure that the battery does not burst, ignite, or generate
heat or fumes.
WARNINGS:
` The battery has a safety device. Do not disassemble or alter the battery.
` Charge the batteries only when the ambient temperature is between 32° and
104° F (0° and 40° C).
` Do not short-circuit the battery by directly connecting the positive and negative
terminals with metal objects.
` Do not heat the battery or discard it in a fire.
` Do not expose the battery to temperatures over 140° F (60° C). Keep it away from
fire and other heat sources.
` Do not charge the battery near a heat source, such as a fire or heater.
` Do not leave the battery in direct sunlight.
` Recharge the battery only with the SiteCharge dual battery charger or the system.
` Do not pierce the battery with a sharp object, hit it, or step on it.
` Do not use a damaged battery.
` Do not solder a battery.
Chapter 2: Safety 7
Page 18

` When connecting the battery to the SiteCharge dual battery charger or to the
system, never reverse the polarity of the battery terminals.
` The polarity of the battery terminals are fixed and cannot be switched or reversed.
Do not force the battery into the system or the SiteCharge dual battery charger.
` Do not connect the battery to an electrical power outlet.
` Do not continue recharging the battery if it does not recharge after two successive
six hour charging cycles.
CAUTIONS:
To avoid the battery bursting, igniting, or fumes from the battery, observe the
following precautions.
` Do not immerse the battery in water or allow it to get wet.
` Do not put the battery into a microwave oven or pressurized container.
` If the battery leaks or emits an odor, remove it from all possible flammable
sources.
` If the battery emits an odor or heat, is deformed or discolored, or in any way
appears abnormal during use, recharging or storage, immediately remove it and
stop using it. If you have any questions about the battery, consult SonoSite
technical support or your local representative.
` Store the battery between -4° F and 140° F (-20° C and 60° C).
` Use only SonoSite batteries.
2.3 Biological Safety
Observe the following precautions related to biological safety.
WARNINGS:
` Non-medical (commercial) grade peripheral monitors have not been verified or
validated by SonoSite as being suitable for diagnosis.
` Do not use the system if it exhibits erratic or inconsistent behavior.
Discontinuities in the scanning sequence are indicative of a hardware failure that
must be corrected before use.
` Do not use the system if it exhibits artifacts on the LCD screen, either within the
clinical image or in the area outside of the clinical image. Artifacts are indicative
of hardware and/or software errors that must be corrected before use.
` Some transducer covers contain natural rubber latex and talc, which can cause
allergic reactions in some individuals. Refer to the FDA Medical Alert, March 29,
1991.
` Perform ultrasound procedures prudently. Use the ALARA (as low as reasonably
achievable) principle.
` SonoSite does not currently recommend a specific brand of acoustic standoff.
8 C1.75 Ultrasound System Service Manual
Page 19
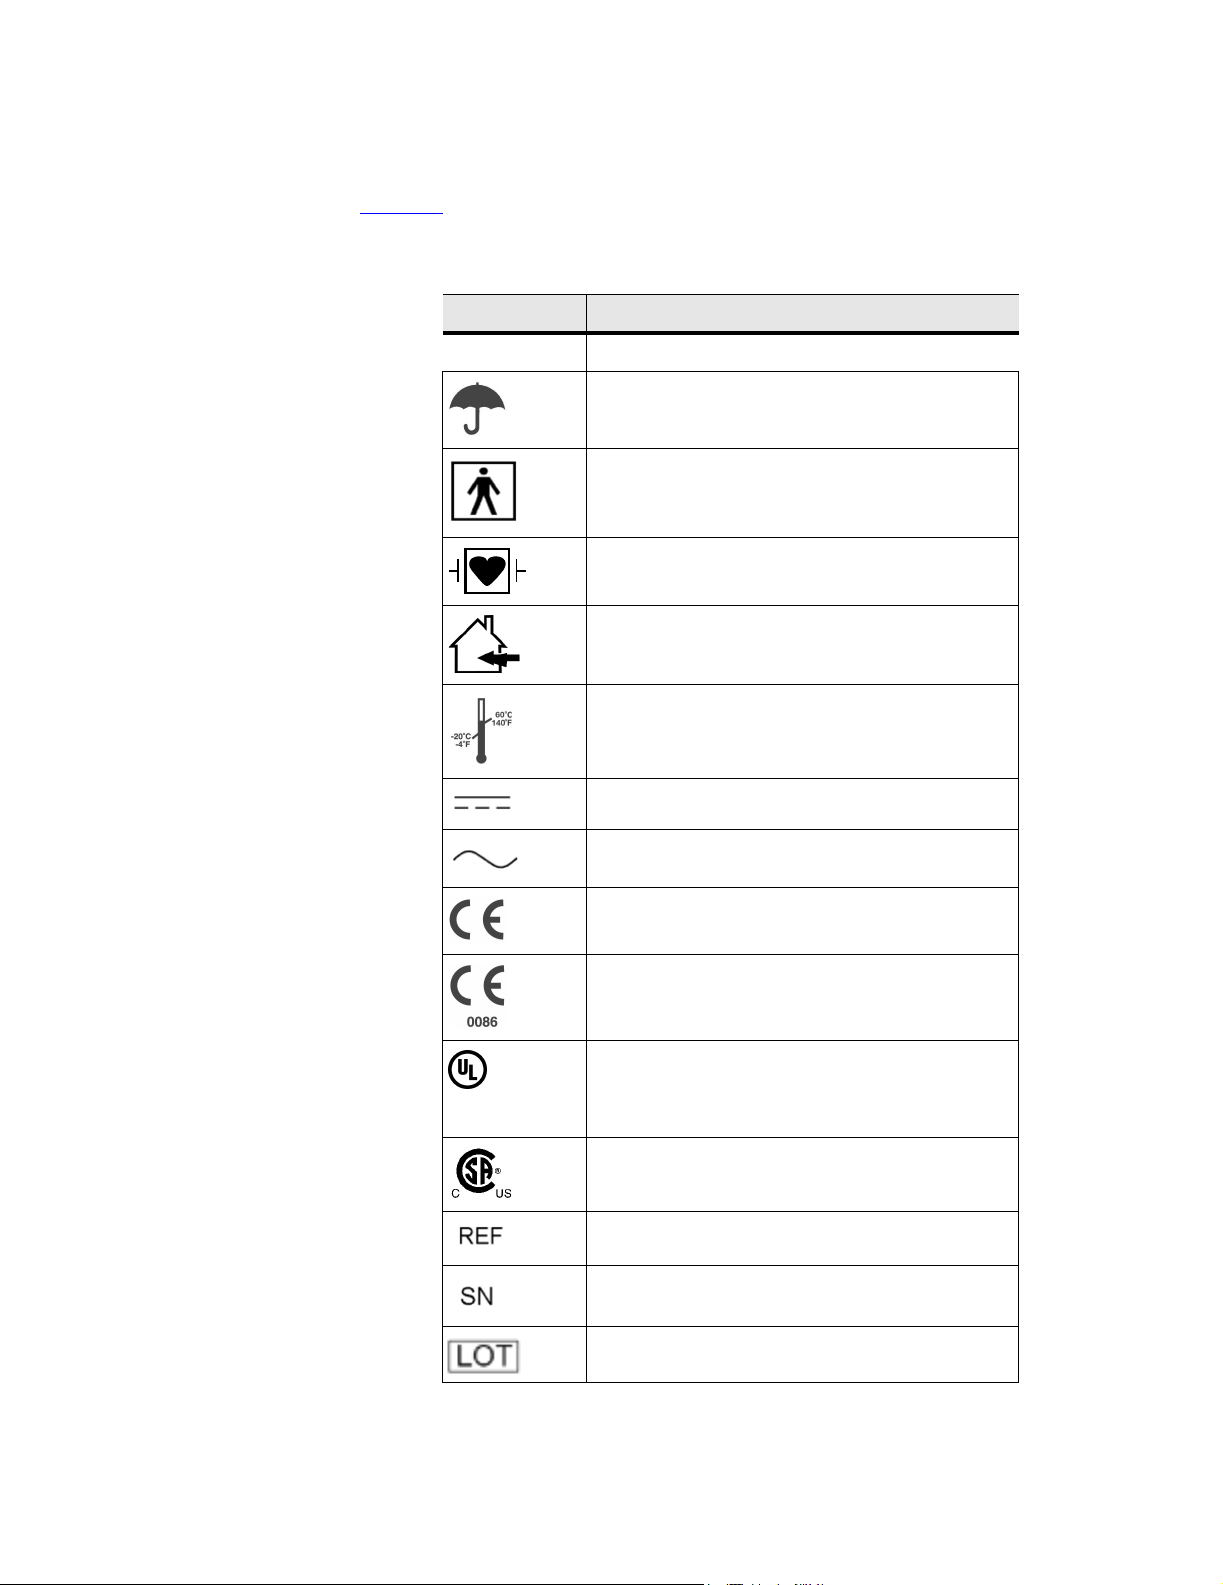
2.4 Labeling Symbols
Table 2.1 lists the symbols that are found on the products, packaging, and
containers.
Table 2.1 Labeling Symbols
SYMBOLS DESCRIPTION
SYMBOLS DESCRIPTION
Do not get wet
Type BF patient applied part
(B = body, F = floating applied part)
Type CF patient applied part
(C = cardiac, F = floating applied part)
Indoor use only
Storage temperature conditions
LISTED
UL1950
78BM
Direct Current (DC)
Alternating Current (AC)
CE marking indicating Manufacturers declaration of
compliance with Annex VII of 93/42/EEC
CE marking indicating compliance with Annex II or
Annex V and VII of 93/42/EEC certified by the British
Standards Institution
Underwriter’s Laboratories labeling
Canadian Standards Agency
Catalog number
Serial number type of control number
Batch code, date code, or lot code type of control
number
Chapter 2: Safety 9
Page 20
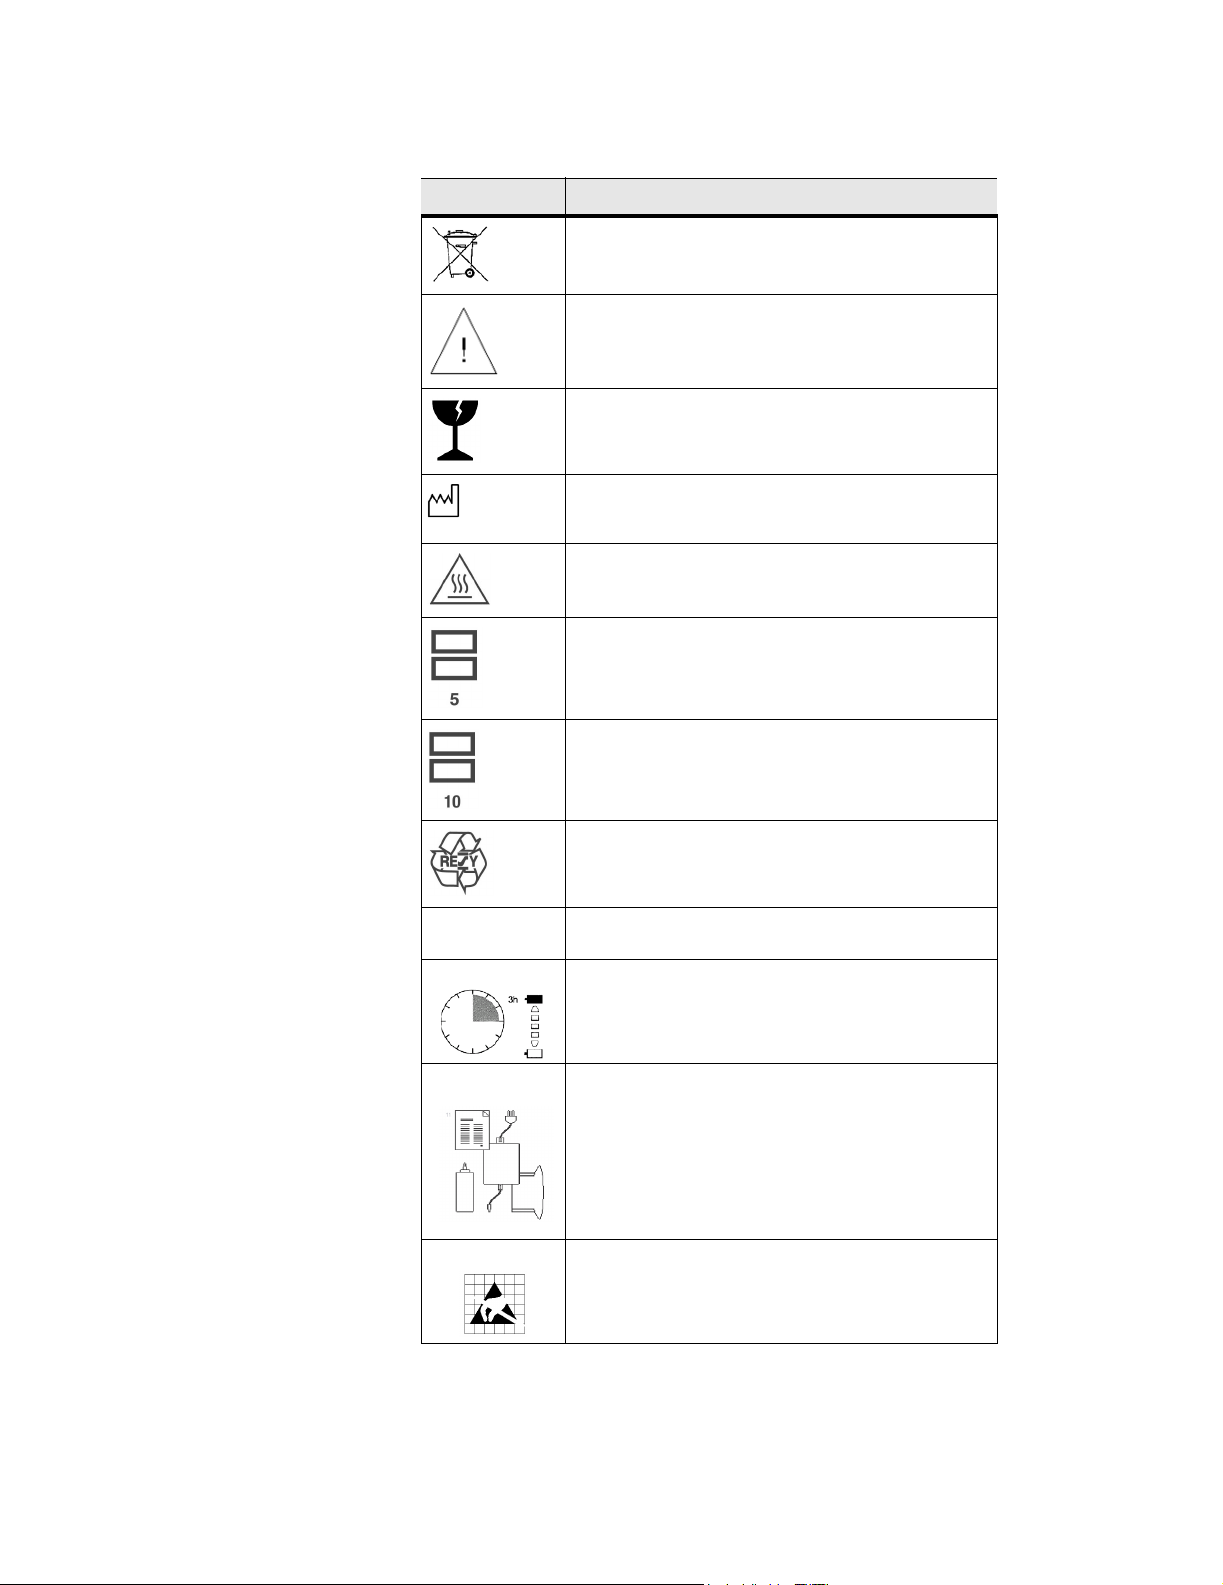
Table 2.1 Labeling Symbols, Continued
SYMBOLS DESCRIPTION
Collect separately from other household waste (see
European Commission Directive 93/86/EEC). Refer
to local regulations for disposal
Attention, see the User Guide
Fragile
Date of manufacture
Caution: hot surface
Do not stack over 5 high
IPX 7
1
4
Do not stack over 10 high
Paper Recycle
Submersible. Protected against the effects of
temporary immersion
Charge battery for 3 hours.
User Guide (1)
2
3
Power supply (2)
Battery (3)
Ultrasound gel (4)
Electrostatic sensitive devices.
10 C1.75 Ultrasound System Service Manual
Page 21
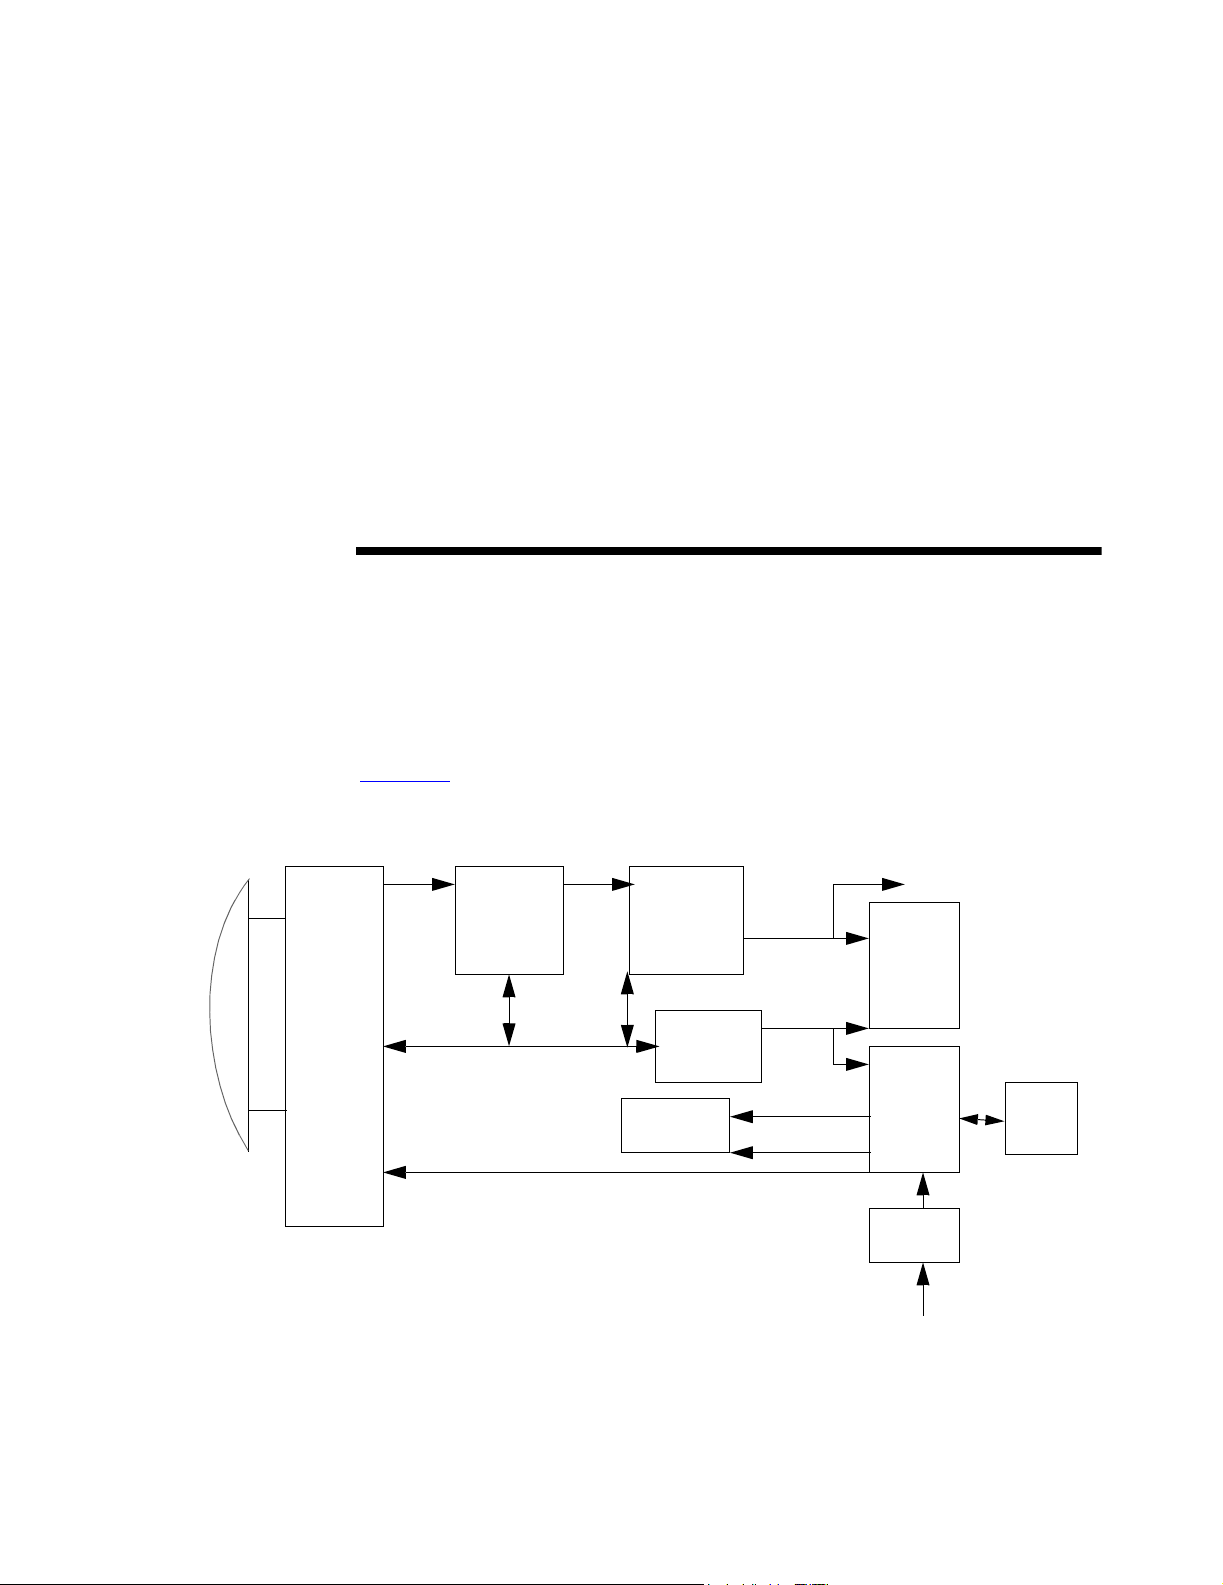
CHAPTER 3 System Overview
3.1 Theory of Operation
The SonoSite ultrasound system has seven major functional groups: the transducer,
the acquisition subsystem, the processing subsystem, the display subsystem, the
control subsystem, the user interface subsystem, and the power subsystem.
Figure 3.1
shows how these functional groups interact.
Transducer
Acquisition
subsystem
RF bus
Processing
subsystem
Pulser voltage
AQ bus
Control bus
Display
subsystem
Control
subsystem
To all
subsystems
Figure 3.1 System Block Diagram
Video bus
Serial bus
Display power
Logic power
External video to monitor,
VCR, printer ports
User
interface
subsystem
Power
subsystem
Power
adapter
External power
Battery
pack
Chapter 3: System Overview 11
Page 22

3.1.1 Transducer
The transducer elements convert the pulser voltage to acoustic energy during the
transmit portion of the ultrasound acquisition cycle. The transducer elements convert
the acoustic echo to voltage in the receive portion of the acquisition cycle. The
system transducers have 64 or more elements. The voltage developed on the
transducer elements is sensed by the acquisition subsystem.
3.1.2 Acquisition Subsystem
The acquisition subsystem consists of a beamformer and an interface to the
transducer. The beamformer times the transmit pulses to focus the acoustic beam.
The beamformer amplifies the low-level echo signal and times the receive
information to focus the receive information.
3.1.3 Processing Subsystem
The processing subsystem interfaces with the beamformer and performs high-speed
processing. The processing subsystem demodulates, filters, detects, and compresses
the signal supplied by the beamformer; it then supplies this data to the display
subsystem.
3.1.4 Display Subsystem
The display subsystem converts the detected ultrasound data into picture elements
(pixels). The software user interface graphics are combined with the ultrasound
information and converted to a video stream. The external video ports support NTSC
and PAL format.
3.1.5 Control Subsystem
The control subsystem consists of the central processing unit, program and video
memory, permanent image storage and retrieval memory, and a connection to the
user interface keys. The control software includes the acoustic power and intensity
software power group monitors, and a beamformer monitor. This software
guarantees a level of patient safety by ensuring the system is operating within
acoustic power and intensity limits.
3.1.6 User Interface Subsystem
The user interface subsystem comprises the software user interface and the form
factor. The software user interface is the interaction between the user and the screen
layout components. The form factor is the type of physical buttons, location, and
grouping of the buttons and the device size, shape, and weight. Dedicated controls
are for high usage activities and are grouped according to user workflow.
12 C1.75 Ultrasound System Service Manual
Page 23

3.1.7 Power Subsystem
The power subsystem provides the system power and protects the hardware from
destructive or unsafe conditions by detecting failures in the system through hardware
and software monitors. Detection of a fault disables the pulser supply, and signals an
error to the control subsystem. The power subsystem includes the battery pack and
the battery charging electronics.
3.2 Components
The SonoSite system components include a hand-carried ultrasound system, a
transducer, and a power adapter. The hand-carried ultrasound system contains the
system electronics, display, control panel, and battery pack. The transducer contains
the transducer, cable, and memory. The power adapter conditions the external power
so it can be used to power the system and charge the batteries while in the system.
3.3 Controls
Figure 3.2 shows the SonoSite system controls. The numbers correspond to the
control names and functional descriptions in Table 3.1
.
Chapter 3: System Overview 13
Page 24
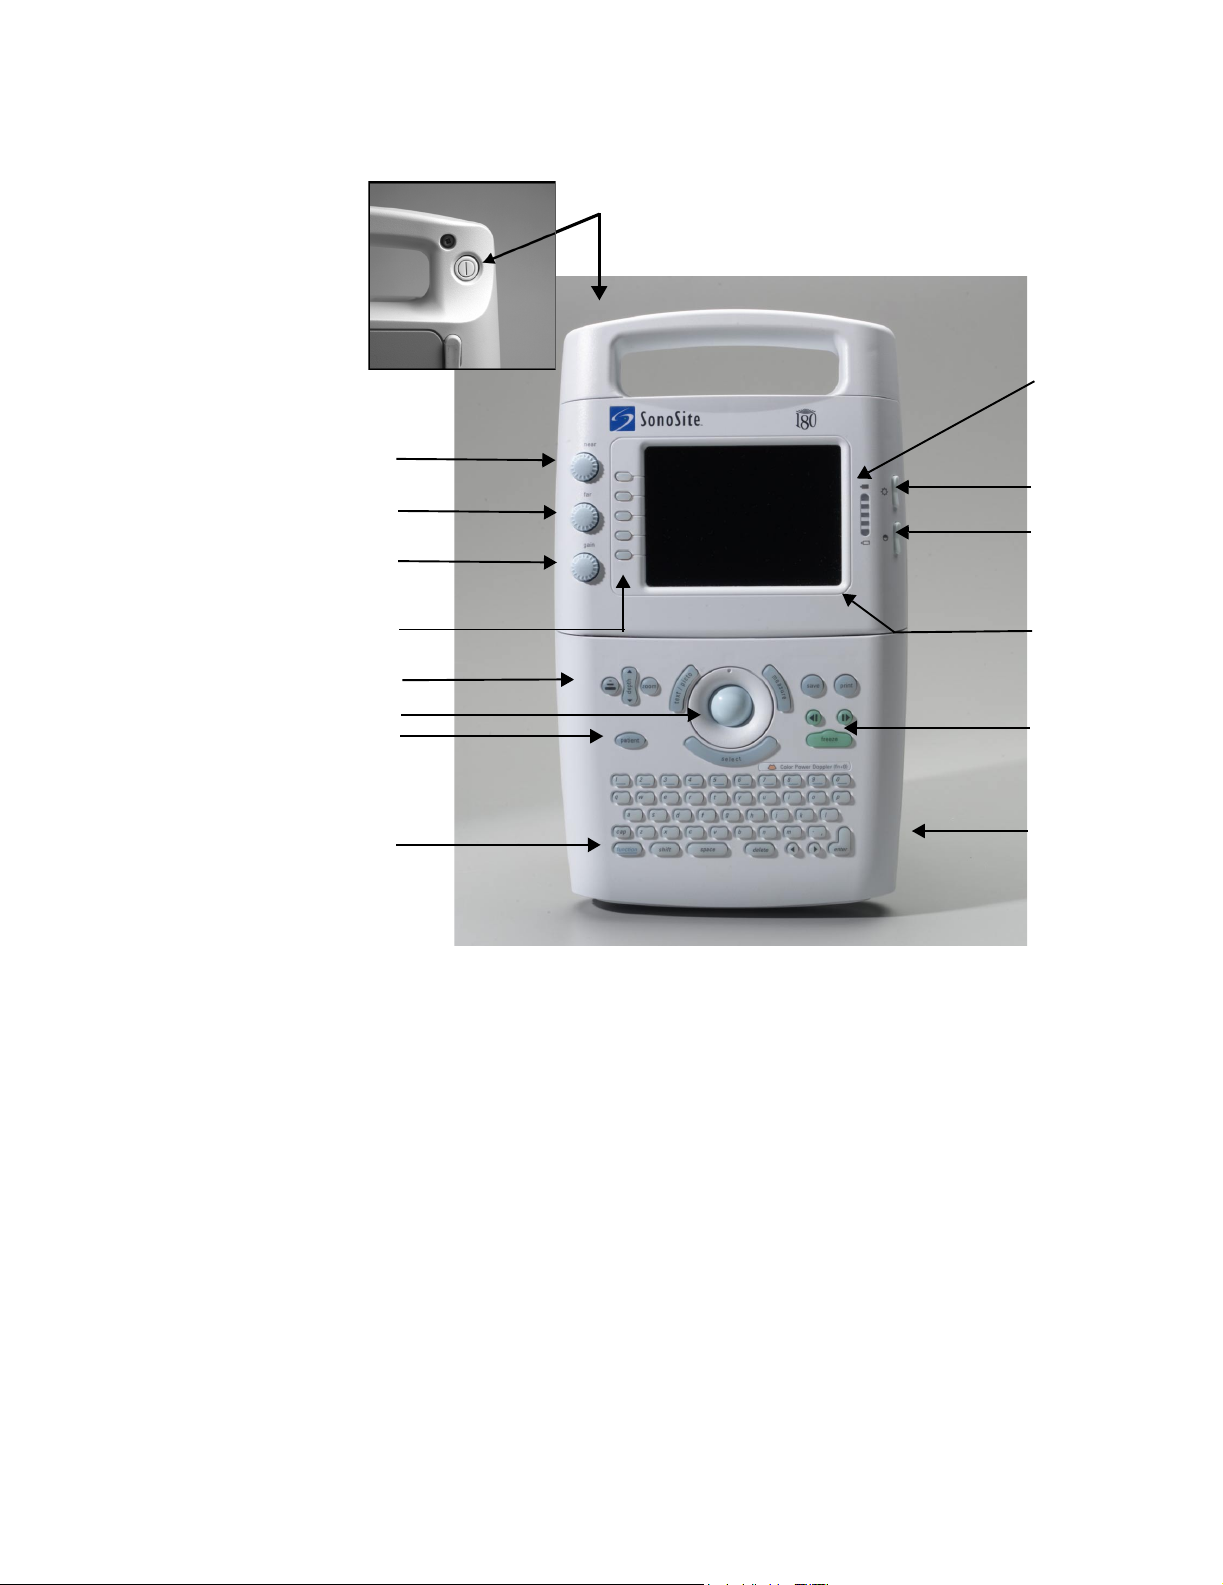
1
rear view
2
3
4
5
6
7
8
9
10
11
12
13
14
15
Figure 3.2 SonoSite Ultrasound System Controls
14 C1.75 Ultrasound System Service Manual
Page 25

Table 3.1 SonoSite Ultrasound System Controls
NUMBER CONTROLS DESCRIPTION
1 power switch (located on the rear
of the system handle)
2 near Affects gain of shallow echoes for 2D.
3 far Affects gain of deeper echoes for 2D.
4 gain Affects overall gain in 2D and CPD gain in
5 menu controls Press patient to access system menus.
6 optimize, depth, and zoom Provides an image optimization menu;
7 trackball Moves objects on the image display.
8 patient Displays the system menus.
9 function key (f1 through f6) Assigns text for quick labeling of images.
10 battery charge indicators All LEDs lit indicate a fully-charged battery.
11 LCD (liquid crystal display) monitor
brightness control
12 LCD monitor contrast control Controls LCD contrast.
13 LCD monitor Adjustable liquid crystal display monitor.
14 cine arrows and freeze control Press to move either way through the cine
15 battery release Press to release the battery.
Turns power on and/or off.
CPD.
changes the display depth; increases the
image size to 2x.
Controls LCD brightness.
series of images.
3.4 Accessories
This section describes the following optional SonoSite system accessories that may
be included with the system.
3.4.1 SiteStand Mobile Docking Station
WARNING:
` To avoid the risk of electrical shock, use commercial grade peripherals
recommended by SonoSite on battery power only. Do not connect these products
to the AC mains IEC power receptacles on the SiteStand when using the system
to scan or diagnose a patient/subject. Contact SonoSite or your local
representative for a listing of the commercial grade peripherals available from or
recommended by SonoSite.
Do not use the system if it exhibits artifacts on the LCD screen, either within the
clinical image. Artifacts are indicative of hardware and/or software errors that must
be corrected before use.
The SiteStand mobile docking station (SiteStand) (Figure 3.3
video, print, and image transfer capabilities for the system. It holds the SonoSite
system, transducers, a printer, and accessories. It also provides the following
connections: three video ports, an RS-232C port, a printer control port, and two AC
) provides power,
Chapter 3: System Overview 15
Page 26

mains IEC power receptacles. You can tilt the system and adjust the height of the
system when it is in the SiteStand.
3.4.1.1 SiteLink Image Management Software
SiteLink Image Management (SiteLink) software is available to use with your
system, a SiteStand, and a connected PC. SiteLink allows you to transfer images
from the SonoSite system to a host PC. For more information, refer to the SiteLink
Image Manager User Guide, which is available in PDF format on the SiteLink CDROM.
3.4.1.2 IrfanView Software
IrfanView software is provided with SiteLink. IrfanView allows you to view and
manipulate images that have been transferred to the PC. For more information about
IrfanView, refer to the help files that are included in the software.
3.4.2 SiteStand Display
The SiteStand may include an optional SiteStand display (Figure 3.3), which is a
Digital View Series DV-3000 Colour LCD Rugged Monitor (10.4-in. / 26.4 cm). It
includes a cable for a VGA connection and a power supply (100–240V AC input,
12V DC output).
16 C1.75 Ultrasound System Service Manual
Page 27
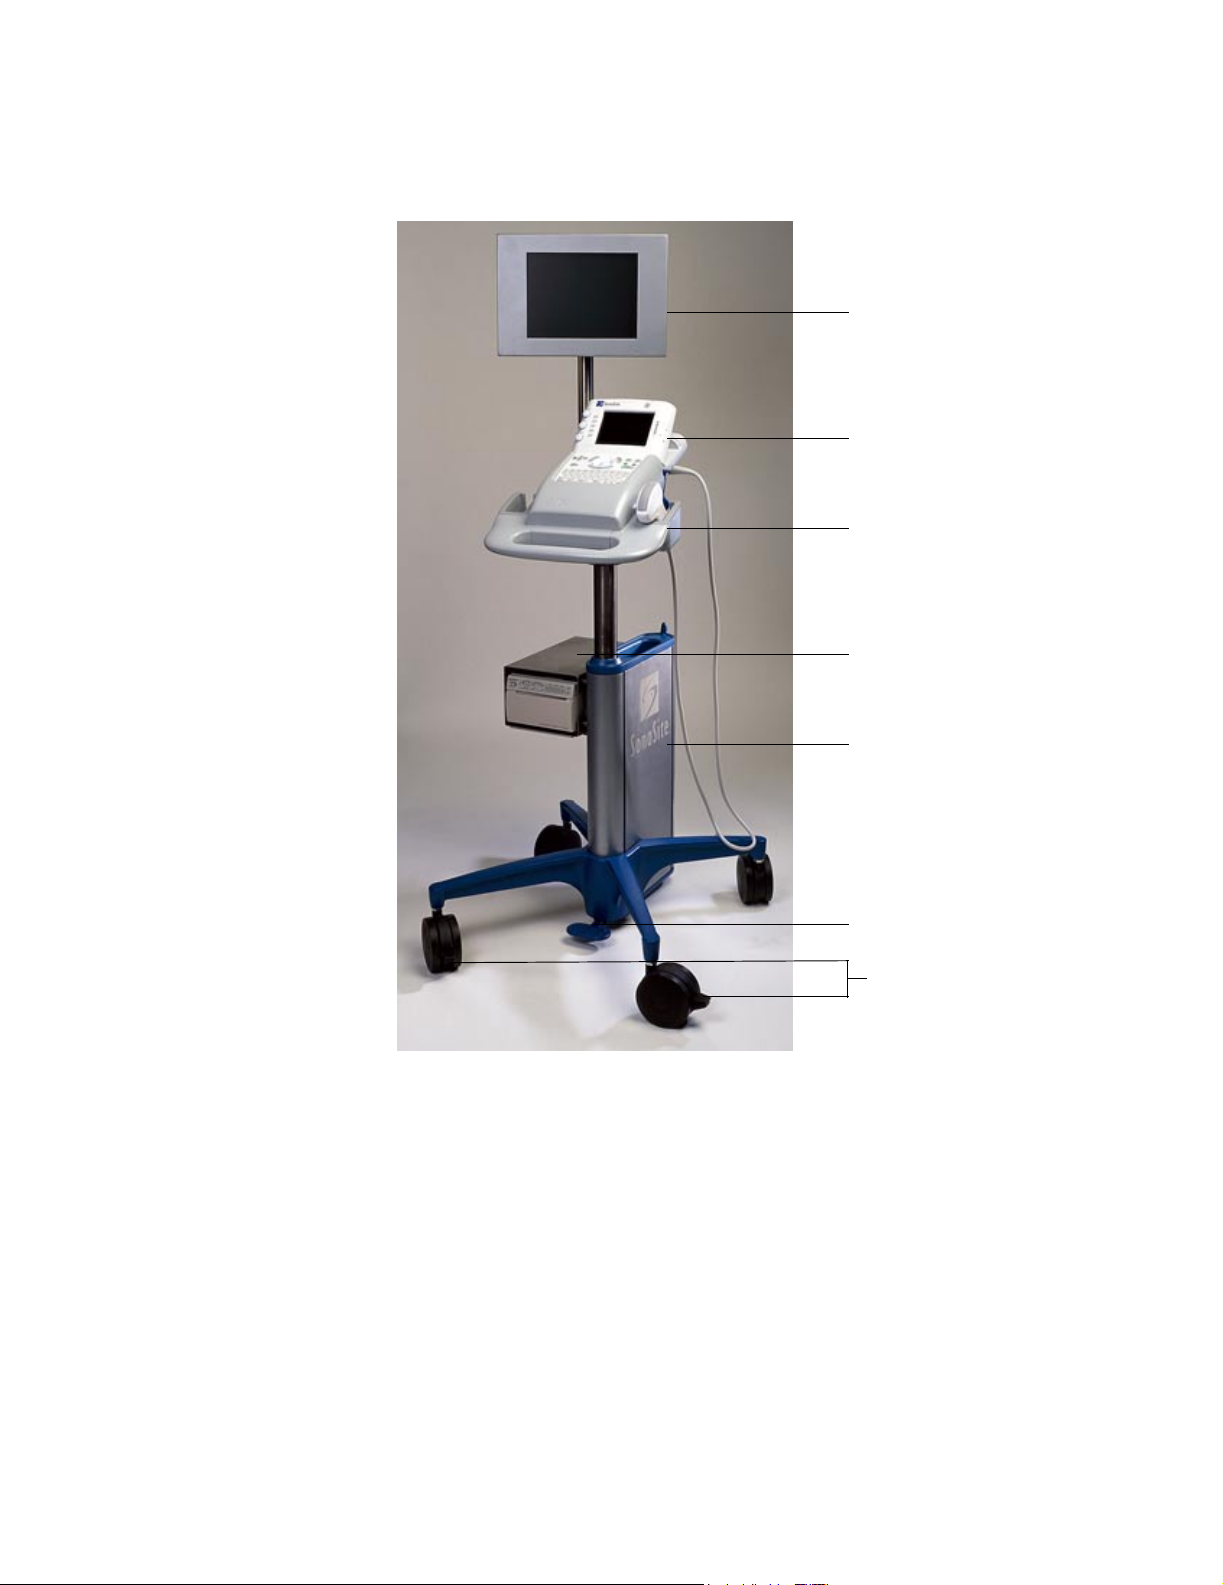
SiteStand display
SonoSite system
Sleeve
Printer tray
SiteStand
Figure 3.3 SiteStand with Display
Height adjustment
pedal
Locking levers
Chapter 3: System Overview 17
Page 28
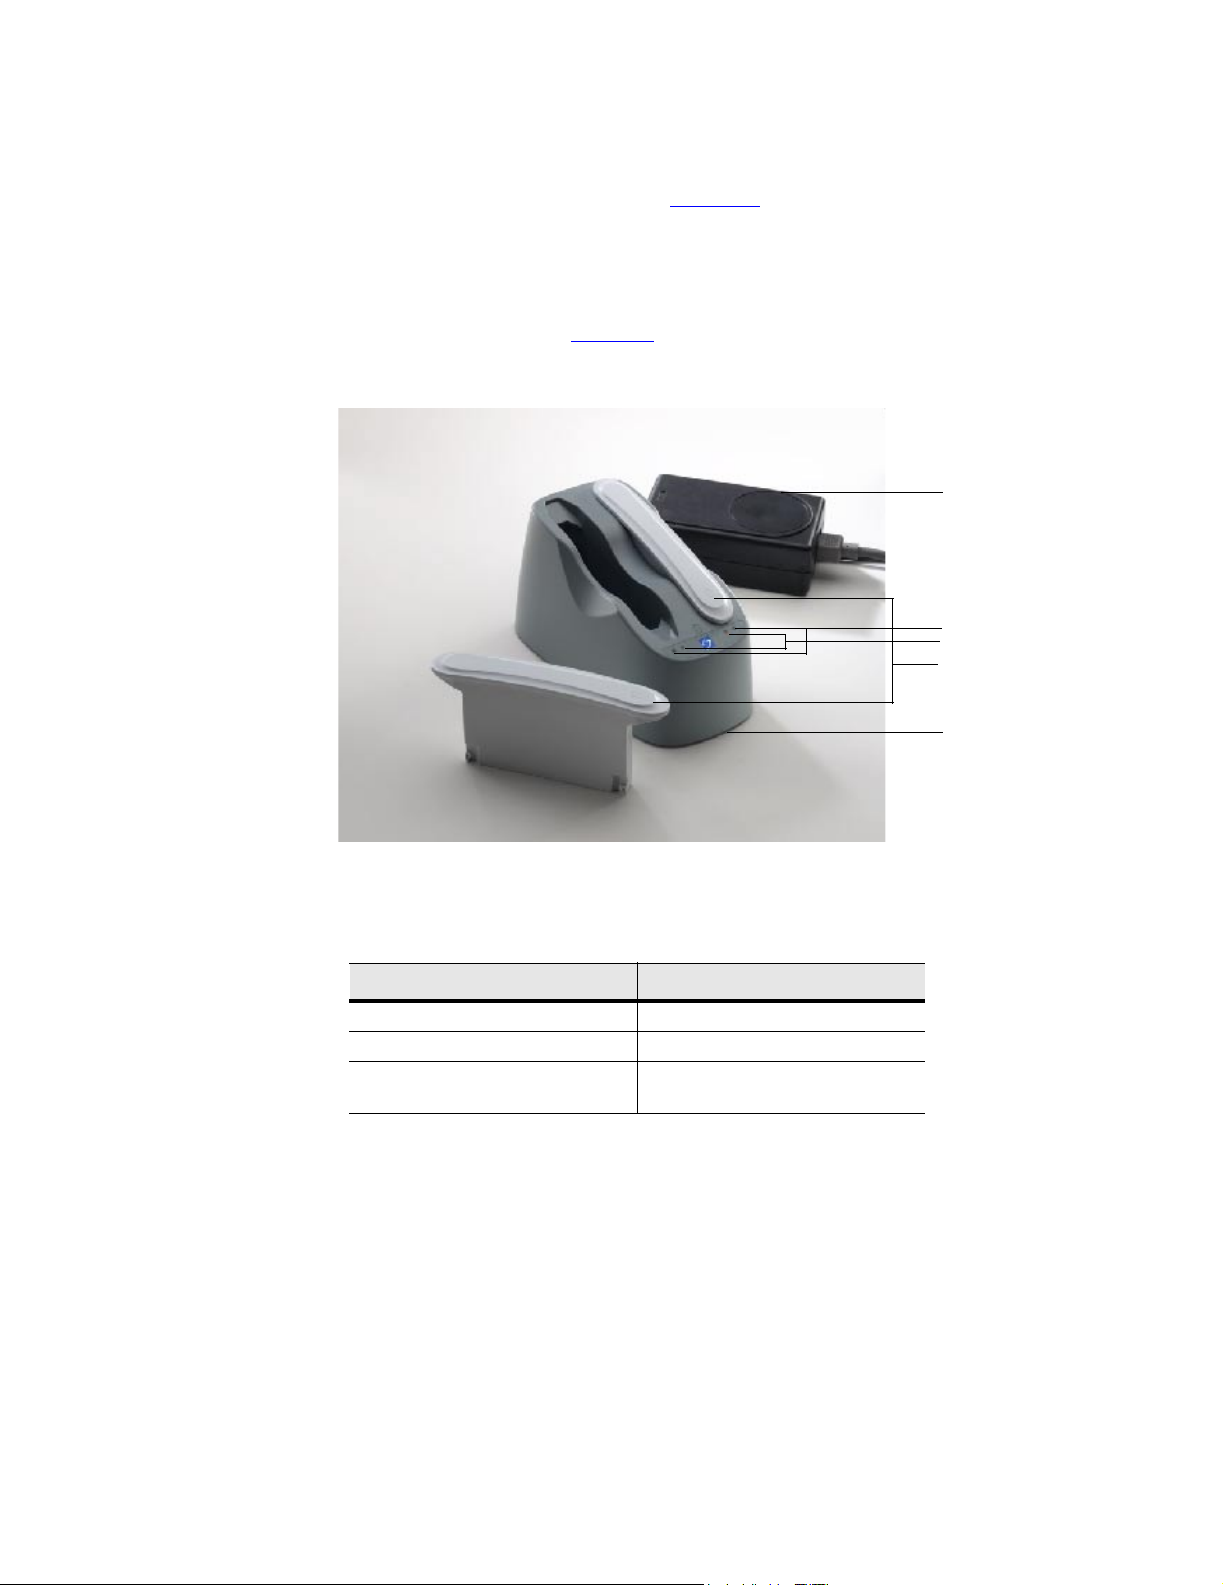
3.4.3 SiteCharge Dual Battery Charger
The SiteCharge dual battery charger (Figure 3.4) can charge two lithium-ion
batteries simultaneously. It indicates the following states for each battery: charging
state, charging fault condition, and charged state. It charges a completely discharged
six-cell battery in approximately 3.5 hours. The ambient temperature of the
SiteCharge dual battery charger should be between 32° to 104° F (0
charging to be successful. Table 3.2
system states.
describes the LEDs and their corresponding
° to 40° C) for
Power adapter
Green LEDs
Yellow LEDs
Batteries
SiteCharge dual
battery charger
Figure 3.4 SiteCharge Dual Battery Charger with Batteries and Power Adapter
Table 3.2 Charger LED Colors and Battery States
CHARGER LED COLOR BATTERY STATE
Yellow The battery is charging.
Green The battery is charged.
Flashing yellow The charger has detected a system
fault.
If the charger detects a system fault, the yellow LED on the charger will light.
Reseat the battery to clear the fault. If the fault continues, replace the battery pack.
3.4.4 SitePack Protective Carry Pack
The SitePack protective carry pack can transport the SonoSite system, three
transducers, accessories, and supplies.
18 C1.75 Ultrasound System Service Manual
Page 29

3.4.5 Battery Pack
CAUTIONS:
` See protecting against electrostatic discharge in Chapter 2, Safety, on page 5.
Use only the specified SonoSite battery pack.
The system can be powered from either a battery pack or external power.
The system is powered by a rechargeable, six-cell, 11.1 Vdc, 3.0 amp-hours,
lithium-ion battery (Figure 3.4
hours, depending upon operating conditions. The battery pack case is made of
injection molded plastic. When in use, it is inserted into the system. The battery pack
has no user-serviceable parts. The operating life of the battery ranges from 1-2 years,
depending on how you use the system. Table 3.3
specifications.
Table 3.3 Battery Pack Operation Specifications
). A fully-charged battery has a run time of 1.5 to 4
contains battery operating
BATTERY PACK OPERATION
PARAMETER
Operation time during use model 2 hours @ 77° F (25° C)
Operation time during power off
(leakage and self discharge)
Number of charge discharge cycles
(100% depth of discharge)
3.4.5.1 Battery Charge Indicators
The battery charge indicators, which consist of light-emitting diodes (LEDs) on the
system, indicate the current battery level.
• All LEDs lit mean the system battery is fully charged.
• Some LEDs lit mean the system battery is partially charged.
Table 3.4
contains the charging requirements for the system.
Table 3.4 System Charging Requirements
SYSTEM CHARGING
PARAMETER
Charge time to 80% capacity
(internal charger) with the system
off
Charge time to 80% capacity
(internal charger) with the system
on
SPECIFICATION
14 days @ 77° F (25° C)
500 @ 77° F (25° C)
SPECIFICATION
3 hours @ 77° F (25° C)
12 hours @ 77° F (25° C)
3.4.6 External Power
The external power connection provides external power to the system via the power
adapter. External power charges the battery pack and powers the system in low
battery conditions.
Chapter 3: System Overview 19
Page 30
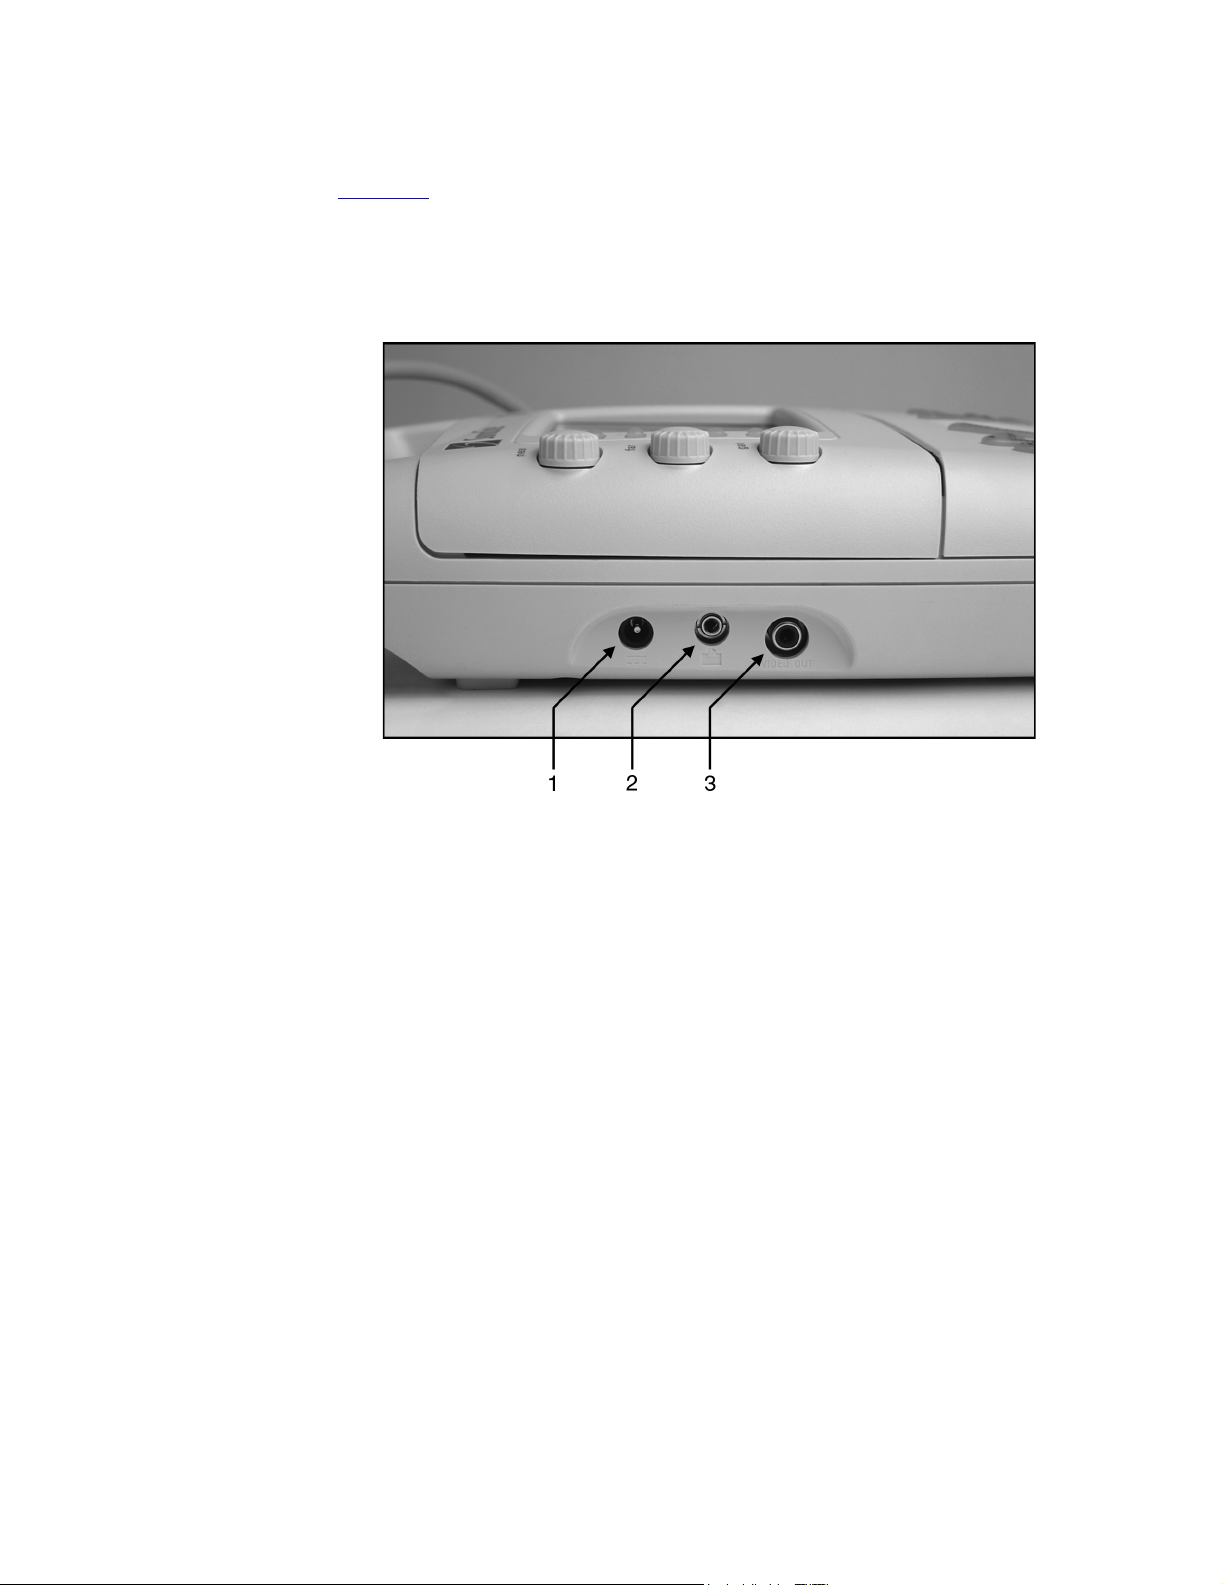
3.4.6.1 External System Connections
Figure 3.5 shows the following external system connections:
• An AC line voltage receptacle (1) connects the system to an power adapter.
• A remote control receptacle (2) connects the system to a recommended printer.
• A video receptacle (3) provides a composite video signal for a recommended
VCR, video printer, or monitor.
Figure 3.5 External System Connections
3.4.7 Power Adapter
CAUTION:
` Use only the specified SonoSite power adapter.
The SonoSite system can be powered by a universal power adapter (50–60 Hz,
100–240 VAC). When the system is plugged into a wall outlet, the battery pack
simultaneously recharges. Recharging a battery, which is not fully discharged, will
not decrease battery life. The ambient temperature shall be between 32
° and 40° C) to successfully charge a battery. To maintain battery charge, attach
(0
the power adapter to the system whenever the system is not in use.
° and 104° F
20 C1.75 Ultrasound System Service Manual
Page 31

Power Cord
Table 3.5
CONFIGU-
RATION
100-120 VAC/
60 Hz
230 VAC / 50 Hz
/ PAL
230 VAC / 60 Hz
3.4.8 Cables
3.4.8.1 Video
This video cable (10 ft / 3.1 m) connects the system to the external monitor or video
printer. It has RCA-to-BNC connectors.
This video cable (10 ft / 3.1 m) connects the system to the Sony GV-900 Digital
Video Recorder. It has RCA-to-RCA connectors.
provides power cord specifications.
Table 3.5 Power Cord Specifications
LENGTH RATING MALE PLUG
9 ft. 10 in. 250 VAC MA 5-15P
Hospital grade,
grounding type
molded on
3 m 250 VAC CEE-7/VII
grounding type
with 4.8 mm pins
molded on
FEMALE
CONNEC-
TOR
CEE-22,
molded on
CEE-22,
molded on
APPRO
-VALS
UL,
CSA
EU Manufac-
MARKING
Manufacturer,
Agency
Approvals
turer,
Agency
Approvals
This video cable (6 ft /1.8 m) connects the system to the Casio EV-660 Handheld
Monitor. It has RCA-to-Stereo connectors.
3.4.8.2 Printer Control
The printer control cable (10 ft / 3.1 m) connects the system to the video printer. It
has mini-jack to mini-jack connectors.
3.4.8.3 AC Power Extension
The AC power extension cable (1 ft / 0.3 m) connects the power supply to the
SiteStand.
3.4.9 Video
The system has one internal video path and one external video port. The internal
video is generated for input to a display. The external video is composite interlaced
video.
Any image that displays on the system display module can be recorded on a VCR,
printed, or displayed on an external monitor. The external video may be connected
to a variety of devices, such as a monitor, video printer, or VCR. The video output is
either NTSC or PAL format, which is user-configurable in system setups.
Chapter 3: System Overview 21
Page 32

3.4.9.1 Video Port Cable
The video cable has a 75 ohm impedance and is shielded. Table 3.6 provides video
cable signal specifications.
Table 3.6 Video Cable Signal
CONNECTOR PIN SIGNAL
Center conductor Video
Shield Signal ground
3.5 System Specifications
This section provides specifications for the SonoSite ultrasound system.
3.5.1 Physical Dimensions
Height: 13.3 in. (33.8 cm)
Width: 7.6 in. (19.3 cm)
Depth: 2.5 in. (6.35 cm)
Weight: 5.4 lbs (2.46 kg) with the C60/5-2 MHz transducer connected
3.5.2 Monitor
Height: 4.3 in. (10.9 cm)
Width: 3.1 in. (7.9 cm)
Diagonal: 5 in. (12.7 cm)
Brightness control
Contrast control
3.5.3 Transducers
C60/5-2 MHz 60-mm, curved array
C15/4-2 MHz 15-mm, micro-curved array
ICT/7-4 MHz 11-mm, intracavitary
L38/10-5 MHz 38-mm, linear array
3.5.4 Imaging Modes
2D Imaging (256 gray shades)
CPD Imaging (64 colors)
PowerMap DCPD Imaging (64 colors)
22 C1.75 Ultrasound System Service Manual
Page 33

3.5.5 Image Storage
Up to 120 images (depending on the configuration of the system)
Cine review
3.5.6 Temperature and Humidity Limits
3.5.6.1 System Operating
• 50–104° F (10–40° C), 15–95% R.H.
• 700-1060hPa (0.7 ATM to 1.05 ATM)
3.5.6.2 System Shipping/Storage
• -31–149° F (-35–65° C), 15–95% R.H.
• 500-1060hPa (0.5ATM to 1.05 ATM)
3.5.6.3 Battery Operating
• 50–104° F (10–40° C), 15–95% R.H.
3.5.6.4 Battery Shipping/Storage
• -4–140° F (-20–60° C), 0–95% R.H.
3.5.6.5 Transducers Operating
• 50–104° F (10–40° C), 15–95% R.H.
3.5.6.6 Transducers Shipping/Storage
• -31–149° F (-35–65° C), 15–95% R.H
3.5.7 Electrical
• System optional: 100-120/220-240 Vac, 50/60 Hz input, 16.0 Vdc output power
adapter
• SiteCharge dual battery charger input voltage: 16.0 Vdc, 2.8 A
• SiteCharge dual battery charger output voltage: 12.6 Vdc, 3.0 A (2x)
• AC power adapter input: 100-120/220-240 Vac, 50/60 Hz, 1.0-0.50 A
• AC power adapter output: + 16.0 Vdc, 2.8 A
• SiteStand input: 100-120/220-240 Vac, 50/60 Hz, 1.0-0.50 A
• SiteStand outputs: + 16.0 Vdc, 2.8 A. and 100-120/220-240 Vac, 50/60 Hz, 1.0-
0.50 A (2x)
• SiteStand display input: +12VDC, 2.75 A
Chapter 3: System Overview 23
Page 34

3.6 Battery
• 6-cell, 11.1 Vdc, 3.0 amp-hours, rechargeable, lithium-ion battery pack
• Run time: 1.5 to 4 hours, depending upon operating conditions
3.7 Safety Requirements
3.7.1 Meets Electromechanical Safety Standards
EN 60601-1:1997, European Norm, Medical Electrical Equipment-Part 1. General
Requirements for Safety.
EN 60601-1-1:1993, European Norm, Medical Electrical Equipment–Part 1.General
Requirements for Safety–Section 1-1. Collateral Standard. Safety Requirements for
Medical Electrical Systems.
EN 60601-1-2:1998, European Norm, Medical Electrical Equipment. General
Requirements for Safety-Collateral Standard. Electromagnetic Compatibility.
Requirements and Tests.
C22.2, No. 601.1:1998, Canadian Standards Association, Medical Electrical
Equipment-Part 1. General Requirements for Safety.
CEI/IEC 61157:1992, International Electrotechnical Commission, Requirements for
the Declaration of the Acoustic Output of Medical Diagnostic Ultrasonic Equipment
UL 2601-1:1999, Underwriters Laboratories, Medical Electrical Equipment-Part 1:
General Requirements for Safety.
3.7.2 Meets EMC/EMI Standards
IEC 61000-4-2:1999, International Electrotechnical Committee, Electromagnetic
Compatibility (EMC)-Part 4. Testing and Measurement Techniques-Section 4.2:
Electrostatic Discharge/Immunity Test-Basic EMC Publication
IEC 61000-4-3:1997, International Electrotechnical Committee, Electromagnetic
Compatibility (EMC)-Part 4. Testing and Measurement Techniques-Section 3:
Radiated Radio-Frequency, Electromagnetic Field Immunity Test.
IEC 61000-4-4:1995, International Electrotechnical Committee, Electromagnetic
Compatibility (EMC)-Part 4. Testing and Measurement Techniques-Section 4,
Electrical Fast Transient/Burst Immunity Test-Basic EMC Publication.
IEC 61000-4-5:1999, International Electrotechnical Committee, Electromagnetic
Compatibility (EMC)-Part 4. Testing and Measurement Techniques-Section 5,
Surge Immunity Test.
CISPR11:97, International Electrotechnical Commission, International Special
Committee on Radio Interference. Industrial, Scientific, and Medical (ISM) RadioFrequency Equipment Electromagnetic Disturbance Characteristics-Limits and
Methods of Measurement.
24 C1.75 Ultrasound System Service Manual
Page 35

3.7.3 Meets Airborne Equipment Standards
RTCA/DO160D:1997, Radio Technical Commission for Aeronautics,
Environmental Conditions and Test Procedures for Airborne Equipment, Section
21.0 Emission of Radio Frequency Energy, Category B.
Chapter 3: System Overview 25
Page 36

26 C1.75 Ultrasound System Service Manual
Page 37

CHAPTER 4 Setup and Operation
WARNING:
` CRITICAL TEST FUNCTION - A failure of the system functional tests
performed in this procedure could adversely affect safety or effectiveness of the
system.
4.1 Connecting and Removing Transducers
The system is supplied with one or more transducers. Only one transducer can be
connected to the system at a time.
WARNING:
` The transducer connector can become hot during operation. This is normal.
Operate the system in the SiteStand or on a flat, hard surface to allow air flow past
the connector.
CAUTION:
` The electrical contacts inside the system transducer receptacle may be damaged
by foreign material or by rough handling. Do not touch the electrical contacts.
Keep foreign material out of the receptacle. Keep a transducer connected to the
system whenever possible.
To connect the transducer:
1. On the transducer connector, pull the lever up and rotate it clockwise until it
snaps to a stop (Figure 4.1
lever.
2. Align the transducer connector with the transducer receptacle on the rear of the
system and insert it by pushing the transducer connector into the transducer
receptacle. The transducer connector should be easy to insert. Do not force the
transducer connector.
3. Turn the lever counterclockwise until it snaps to a stop.
). The lever should be easy to move. Do not force the
Chapter 4: Setup and Operation 27
Page 38

4. Press the lever down until it snaps into place, securing the transducer connector
to the system.
Transducer receptacle
Figure 4.1 Connecting the Transducer
To remove the transducer:
1. On the transducer connector, pull the lever up and rotate it clockwise until it
snaps to a stop (Figure 4.1
).
Transducer connector lever
2. Carefully pull the transducer connector away from the system.
4.2 Removing and Installing the Battery
WARNING:
` If you are holding the system, when you remove the battery, place your hand
beneath the battery. If it falls to the floor, it could be damaged, or cause personal
injury.
If the battery is being installed for the first time, it will need to be charged.
To remove the battery:
1. Press and hold the power switch for one second to turn off the system.
2. Locate the battery compartment at the bottom of the system.
3. If you are holding the system, place your hand beneath the battery to ensure that
it does not fall out upon release.
4. Press the battery release button (lower, right side) to release the battery.
28 C1.75 Ultrasound System Service Manual
Page 39

To install the battery:
1. Locate the battery compartment at the bottom of the system (Figure 4.2
2. Install a new battery (label side up) into the battery compartment by pushing it
into the compartment until it clicks into place. (Do not force the battery into the
compartment, check the battery orientation if the battery is difficult to install.)
Ensure that both sides of the battery are fully connected and that the battery
release button is not pressed.
).
Figure 4.2 Inserting the Battery
4.3 Turning the System On and Off
When turning power on or off, you must press and hold the power switch for
approximately one second before the system responds. This feature prevents battery
discharge, resulting from accidentally turning the system on. It also prevents
accidentally turning the system off during an exam.
The first time you turn on the system, set the date and time. See “Setting the Date
and Time” on page 40
CAUTION:
` Do not use the system if an error message appears on the image display. Note the
error code. Call SonoSite technical support or contact your local representative.
When an error code occurs, turn off the system by pressing and holding the power
switch until the system powers down.
.
Chapter 4: Setup and Operation 29
Page 40

To turn on power:
1. Locate the power switch on the back of the left side of the system handle. See
Figure 3.2, SonoSite Ultrasound System Controls, on page 14
2. Press and hold the power switch until the system beeps or until you see the
image display.
3. Release the power switch.
To turn off power:
1. Press and hold the power switch.
You will hear the system emit two sets of “high-low” beeps. The system powers
off after the second set of beeps.
2. Release the power switch.
To wake up the system:
• The system has a sleep delay, which is invoked based on the sleep delay system
setup. When the battery charge indicators are blinking, but the other system
lighting is off, press any system control to wake up the system.
4.4 Using AC Power
.
The battery charges while using the system on AC power. If the system is off and
connected to AC power, a fully discharged battery will charge in about 3 hours.
To use AC power:
1. Connect the line cord to the AC power adapter.
2. Connect the line cord to a hospital-grade, electrical outlet.
3. Connect the AC power adapter to the system AC line voltage receptacle on the
upper left side of the system (Figure 4.3
).
30 C1.75 Ultrasound System Service Manual
Page 41

Note: You must wait approximately 10 seconds after connecting to AC power before
turning on the power switch.
Figure 4.3 System Connections
Table 4.1 lists the SonoSite system connections.
Table 4.1 System Connections
NUMBER FEATURE
1 AC line voltage receptacle.
2 Remote control receptacle for an
approved printer.
3 Video receptacle for an approved VCR,
printer, or external video monitor.
4.5 Upgrading the System Software
Transducers that you receive from SonoSite may contain either required or optional
upgrades to the system software that resides on your SonoSite system. Whenever
you connect a transducer to a SonoSite system, the system communicates with a
transducer to determine if the transducer contains software that would upgrade the
system.
CAUTION:
` Initiating any upgrade of the system software erases any images stored on your
system. Do not upgrade the system software until you have determined that any
stored images are no longer needed.
Chapter 4: Setup and Operation 31
Page 42

To upgrade the system software:
1. When you first connect a transducer with new software and turn the system on,
the following message displays:
Do you want to upgrade the system software?
For required upgrades:
You must either perform the software upgrade or replace the transducer with one
that is compatible with the software currently installed on your system. Do one of
the following:
• Select no (disconnect transducer) to reject the system software upgrade.
• Select yes (up to 20 minutes) to accept the system software upgrade and go to
step 2.
For optional upgrades:
You may either install the new software or continue to use the existing software.
SonoSite recommends that you install these optional upgrades soon after receiving
them. Do one of the following:
• Select no (continue) to use the system without upgrading.
• Select yes (up to 20 minutes) to accept the upgrade and go to step 2.
2. When you have accepted the upgrade, the system loads the new software and
displays the following message:
Upgrade in progress (20 minutes total).
Note: The system upgrade can take up to 20 minutes; however, many software
upgrades will complete successfully in less time.
To cancel the upgrade in progress, select cancel.
If this is a required upgrade:
• The existing software remains installed.
• The system displays the following message:
Incompatible transducer, upgrade the system software.
If this is an optional upgrade:
• The existing software remains installed.
• The system will go to live scan.
3. When the system has loaded the new software, the following message displays:
Successful upgrade.
If the software upgrade is unsuccessful, the system displays an error code and
you must contact SonoSite technical support. For U.S. customers, call 1-877657-8118. For international customers, call 1-425-951-1330 or contact your
local representative.
4. Select reboot to restart your system.
During the restart, the initial system screen will show two progress indicator
bars. These progress indicator bars are present while the system is replacing its
operating software and will disappear when the process is completed.
32 C1.75 Ultrasound System Service Manual
Page 43

When the operating software has been replaced, the system will present you with
the license update screen so that you may license the software. At this point, the
software upgrade process is complete, but the system software is not yet
licensed. The following section explains how to license your software.
4.6 Obtaining A License Key
A license key is required to update your SonoSite system. To obtain a license key,
do one of the following:
USA/Canada Customers
• Technical support: 1-877-657-8118
• Technical support fax and email: 1-425-951-6700; service@sonosite.com
• SonoSite website: www.sonosite.com
International Customers
• Call your local representative or 1-425-951-1330.
To receive a license key, you will need to provide the following information, which
is displayed on the system information screen of your system (except for the name of
the person installing the upgrade and the system serial number):
• Name of the person installing the upgrade
• System serial number (SN) (located on the back of your system)
• License Update number
• ARM Ver: (version)
• PCBA Serial No: (number)
See Section 4.6.1.1, Displaying the System Information Screen, on page 35
system is on and the grace period expires, the license information screen can be
displayed from the system information screen.
4.6.1 Installing A License Key
When you have obtained a license key for the software, you must enter it into the
system. Once a valid license key has been entered, the system remains licensed until
the next time the system software is upgraded.
1. Turn on the system. If the software is not yet licensed, the license update screen
displays (Figure 4.4
The license update screen displays the following information: the License
Update number, the ARM Ver (version), the PCBA Serial No. (number), the
SonoSite web site address and telephone number, the license number, the
).
. If the
Chapter 4: Setup and Operation 33
Page 44

register later or done button, and the grace period (time remaining) on your
system.
Figure 4.4 License Update Screen
Note: The software versions on your system may vary based on your upgrade
and configuration.
2. Enter your license key in the license number field.
• If the license key that you entered is recognized by the system as being valid
for your system and the software you installed, a done button displays.
Select done to install the license key and license your software.
• If the license key that you entered is not recognized by the system, the
register later button remains on the screen as long as the defined grace
period has not expired.
• If the grace period has expired, the menu item will indicate this by showing
zero hours remaining in the grace period. At this point, you must then enter
a valid license key before you can use the system with this or any other
transducer.
Note: If you have entered a valid license key and you cannot complete the
licensing procedure, verify that the license key has been entered correctly.
The license key should be exactly 12 digits (for example, 123348990552) with
no other characters or punctuation.
If after confirming correct entry of the license key, you are still unable to license
your system; call SonoSite technical support. U.S. customers call 1-877-657-
8118. International customers call 1-425-951-1330 or contact your local
representative.
• If the system is on and the grace period expires, the license update screen
must be displayed from the system information screen.
34 C1.75 Ultrasound System Service Manual
Page 45

4.6.1.1 Displaying the System Information Screen
To display the system information screen:
1. Press and release function.
2. Press and release i. The system information screen displays (Figure 4.5
The system information screen displays the following information: the Boot/PIC
Vers (version), the ARM Ver (version), the PCBA Serial No (number), the
Product Name, the Status, the CPLD 1, 2, 3 Ver, CPLD SH Ver (version),
SHDB Ver (scanhead database version), and the Sh Serial No (scanhead serial
number).
Note: The software versions on your system may vary based on your upgrade
and configuration.
).
Figure 4.5 System Information Screen
To display the license update screen:
On the system information screen, select the padlock icon (upper left corner of
the screen) to display the license update screen. See Section 4.6.1, Installing A
License Key, on page 33
.
Chapter 4: Setup and Operation 35
Page 46

4.7 Checking and Charging the Battery
Note: Disconnect the system from AC power prior to checking the battery charge.
To check the battery:
Five light-emitting diodes (LEDs) on the right side of the system monitor allow you
to check the battery condition. If all LEDs are lit, the battery is fully charged. A solid
dark gray battery icon in the lower right portion of the system display indicates a low
battery. A solid white battery icon indicates approximately 10 minutes of battery life
remaining. A flashing white battery icon indicates approximately 5 minutes of
battery life remaining.
The system will operate on a fully-charged battery for 1.5 to 4 hours, depending
upon use. Ensure the battery is charged at all times to provide the longest possible
battery operation. You can set the sleep delay and power delay in system setup to
prolong battery life. See Section 4.9, Using System Setup, on page 39
When the system is not likely to be used for some time, to prevent total battery
discharge, remove the battery from the system.
To charge the battery:
CAUTION:
` Charge batteries only when the ambient temperature is between 32° and 104° F
(0° and 40° C).
.
1. Connect the line cord of the power adapter to a hospital-grade electrical outlet.
2. Connect the AC power adapter to the power receptacle on the system (1)
(Figure 4.6
3. Disconnect the system from AC power.
Note: It takes about three hours to charge a battery when the system is off.
4. Turn the system on to check the battery charge.
and Table 4.2).
36 C1.75 Ultrasound System Service Manual
Page 47

Figure 4.6 System Connections
Table 4.2 System Connections
Number Feature
1
2
DC line voltage receptacle.
Remote control receptacle for an
approved printer.
3
Video receptacle for an approved VCR,
printer, or external video monitor.
Chapter 4: Setup and Operation 37
Page 48

4.8 Using the SiteCharge Dual Battery Charger
To use the SiteCharge dual battery charger:
1. Connect the power adapter to the SiteCharge dual battery charger (Figure 4.7
2. Connect the AC line cord to a power receptacle. When the blue SonoSite logo
on the front of the SiteCharge dual battery charger lights, it indicates that the
power is on.
3. Insert one or two batteries into the SiteCharge dual battery charger (the batteries
only fit one way). Refer to Table 4.3
information.
Note: When the battery reaches full charge, the green LED will be lit.
for SiteCharge dual battery charger
).
Figure 4.7 SiteCharge Dual Batter Charger
38 C1.75 Ultrasound System Service Manual
Page 49

Table 4.3 SiteCharge Dual Battery Charger LEDs
LIGHT COLOR
(NEXT TO
BATTERY)
Yellow Lit The battery is charging. It may
Yellow Lit When lit for more than six
Yellow Flashing The battery is not properly
Green Lit The battery is fully charged
Yellow/Green Off Battery is defective. Call SonoSite technical
STATUS INDICATES SOLUTION
take up to 60 seconds for the
yellow light to come on
depending on the discharge
state of the battery.
Remove and reinsert the same
hours, charging will be
suspended.
installed.
The battery or the SiteCharge
dual battery charger is
defective.
and is ready for use. (The
SiteCharge dual battery
charger can charge one or two
batteries in less than four and
a half hours, depending on the
discharge state of the battery.)
battery. If the battery is not
fully charged within another six
hours, call SonoSite or your
local representative.
Re-install the battery into the
SiteCharge dual battery
charger. If the battery is
properly installed and the
yellow light still flashes, call
SonoSite or your local
representative.
support.
Note: If the ambient temperature is below 32°F (0°C) or above 113°F (45°C), the
charger may suspend charging due to an over/under temperature condition and the
green light will be lit. Battery operating time may be reduced.
4.9 Using System Setup
CAUTION:
` If the video format on the system is changed, you will need to turn the system
power off and then on. If you do not do this, artifacts may appear in your images.
System setup is used to customize the system. It is available by pressing patient and
selecting system setup. System setup includes settings for image orientation (four
selections), the caliper line that connects the measurement calipers (on/off), thermal
index selection (TIs
screen information settings that allow you to show or hide the following items: the
optimize icon, the time, the memory icon, and the patient name. You can also set the
audible beep, sleep delay, power delay, and the date/time. Additionally, system
setup includes the video format, printer, calcs authors, and function key assignments.
You can resume imaging from any system setup function by pressing patient.
TIb), and pictographs (on/off). System setup also includes
Chapter 4: Setup and Operation 39
Page 50

Perform the following procedures to become familiar with using system setup, then
use these basic operations to set the range of setups required for your uses.
4.9.1 Setting the Date and Time
WARNING:
` An accurate date and time are critical for accurate obstetrics calculations. Verify
that the date and time are accurate before each use of the system. The system does
not automatically adjust for daylight savings time changes.
To set the date and time:
1. Press patient. A menu appears on which system setup is listed.
2. Select system setup. A menu appears on which is listed audio, battery, date/
time.
3. Select audio, battery, date/time.
4. Select date/time. A cursor appears at the left side of the date/time display.
5. Type in the current date (year, month, day) and time in the 24-hour format
(hours, minutes). If you make a mistake, you can use the arrow keys between
the delete and enter keys to move the cursor.
6. Press patient to resume imaging.
4.9.2 Setting the Sleep Delay
To set sleep delay:
1. Repeat steps 1 through 3 in Section 4.9.1
2. Select sleep delay (min).
3. Press sleep delay (min) again to select 3, 5, or 10.
4. Press patient to resume imaging.
4.9.3 Setting the Power Delay
To set power delay:
1. Repeat steps 1 through 3 in Section 4.9.1
2. Select power delay (min).
3. Press power delay (min) again to select off, 15, or 30.
4. Press patient to resume imaging.
.
.
40 C1.75 Ultrasound System Service Manual
Page 51

4.9.4 Setting the Audible Beep
To turn on or off the audible beep:
1. Repeat steps 1 through 3 in Section 4.9.1
2. Select audible beep.
3. Press audible beep again to select on or off.
4. Press patient to resume imaging.
.
4.9.5 Setting Up A Recommended Printer
CAUTION:
` Use only peripherals recommended by SonoSite with the system.
be damaged by connecting a peripheral not recommended by SonoSite.
To set up a recommended printer:
To use the system print controls, print and print all images, the remote control
must be connected.
1. Connect a recommended printer to the system using the recommended printer
control cable. The receptacles are on the left side of the system. There are two
connections required: VIDEO OUT (3 in Figure 4.6
Figure 4.6
2. Turn on the printer. (Refer to the printer manufacturer’s instructions for specific
printer information.)
).
The system can
) and remote icon (2 in
3. Press patient. A menu appears on which is listed system setup.
4. Select system setup. A menu appears on which is listed video, printer, calcs, f
keys.
5. Select video, printer, calcs, f keys.
6. Select printer to select the type of printer connected to the system. (Only the
types of printers appearing as settings are recommended for use with the
system.) The printer is ready to print.
7. Press patient to resume imaging.
4.9.6 Setting Up A Recommended VCR
To set up a recommended VCR:
1. Connect a recommended VCR to the system using the recommended video
cable. The receptacle is on the left side of the system. There is one connection
required: VIDEO OUT (3 in Figure 4.6
2. Turn on the VCR. (Refer to the VCR manufacturer’s instructions for specific
VCR information.)
3. Press patient. A menu appears on which is listed system setup.
).
Chapter 4: Setup and Operation 41
Page 52

4. Select system setup. A menu appears on which is listed video, printer, calcs, f
keys.
5. Select video, printer, calcs, f keys.
6. Select the appropriate video format: NTSC or PAL.
7. Press patient to resume imaging.
8. Use the controls on the VCR to record the image display. A separate video
monitor, connected to the VCR, is required for playing the recording.
4.9.7 Setting Up A Recommended Video Monitor (External)
To set up a recommended video monitor (external):
1. Connect a recommended video monitor to the system using the recommended
video cable. The receptacle is on the left side of the system. There is one
connection required: VIDEO OUT (3 in Figure 4.6
2. Turn on the video monitor. (Refer to the video monitor manufacturer’s
instructions for specific information.)
).
4.9.8 Setting Up Function Key Assignments
To set up function key assignments:
Function keys 1 through 6 can be assigned text for quick and easy labeling of
images.
1. Press patient. A menu appears on which is listed system setup.
2. Select system setup. A menu appears on which is listed video, printer, calcs,
f keys.
3. Select video, printer, calcs, f keys.
4. Select function key assignment. A menu appears which lists function keys, f1
through f6.
5. The data entry cursor appears next to f1.
6. Type in your text. Use the arrow and space keys to correct mistakes.
7. Press enter to move to the next field. Continue to assign text to the remaining
function keys, as desired.
8. Select a new exam type to assign function key text and repeat the steps above, or
select done when finished. Refer to the SonoSite 180 or SonoHeart User Guide
for how to use the assigned function keys.
42 C1.75 Ultrasound System Service Manual
Page 53

4.9.9 Changing All System Setups to the Default Settings
WARNING:
` An accurate date and time are critical for accurate obstetrics calculations. Verify
that the date and time are accurate before each use of the system.
To change all system setups to the default settings:
1. Turn the system off.
2. Connect the system to AC power, see Section 4.4, Using AC Power, on page 30
3. Simultaneously press and release 1 and the power switch. The system beeps
several times and then the image display appears with all default settings.
4. Reset the system settings, see Section 4.9, Using System Setup, on page 39
.
.
Chapter 4: Setup and Operation 43
Page 54

44 C1.75 Ultrasound System Service Manual
Page 55

CHAPTER 5 Cleaning and Disinfecting
5.1 Universal Precautions
SonoSite recommends that personnel who routinely have exposure to returned
medical devices practice “universal precautions.” Universal precautions are an
approach to infectious control. It is recommended that those servicing this product
follow the prescribed standards for their area.
5.2 Receipt of Suspected Contaminated Materials
• When opening a product returned for service, if visual inspection suggests
possible contamination, take proper steps to contain the contamination.
Necessary Personal Protective Equipment (PPE) (gloves, masks, and gowns) are
worn when opening or examining a package suspected of contamination.
• Prior to transfer to a service area, the suspect package must be labeled as
“contaminated” and sealed to prevent exposure.
• Any packing materials removed from a package suspected of contamination
must be disposed of in a biohazard container.
• Any contaminated materials received with the product must also be disposed of
in an appropriate biohazard container. Contaminated materials may include
biohazardous waste and sharps.
• A disinfecting agent should be maintained for use in the event of possible
contamination of any work surface. The recommended agent for disinfecting
work surfaces is 0.5% sodium hypochlorite (bleach) solution. Prepare the agent
by mixing one part household bleach (5.25% - 6% sodium hypochlorite) to nine
parts water. The solution may be sprayed or wiped onto the work surface and
allowed to air dry.
Chapter 5: Cleaning and Disinfecting 43
Page 56

Use these recommendations when cleaning or disinfecting your ultrasound system,
transducers, and accessories. This chapter is intended to assist in effective cleaning
and disinfection. It is also intended to protect the system and transducers against
damage during cleaning or disinfection.
For more information about cleaning or disinfection solutions or ultrasound gels
used with the transducer, call SonoSite technical support or your local
representative. For information about a specific product, call the product
manufacturer.
5.3 Recommended Disinfectants
For a list of disinfectants recommended for use on the SonoSite ultrasound system
and transducers, see the SonoSite Ultrasound System User Guide.
44 C1.75 Ultrasound System Service Manual
Page 57

CHAPTER 6 Troubleshooting
6.1 System and Subsystem Diagnosis
This section covers basic diagnostic and troubleshooting procedures you may need if
the system is not operating properly. To diagnose system failures, consult Table 6.1
and the referenced diagnostic figures that follow.
Table 6.1 Troubleshooting Subassemblies and Diagnostic Figures
SUBASSEMBLIES DIAGNOSTIC FIGURES
Display Figure 6.2
External Display Figure 6.3
Keyboard Figure 6.4
Trackball Figure 6.5
System Figure 6.6
Battery Figure 6.7
6.2 Subassembly Replacement
The system is repairable through subassembly replacement.
6.3 Test Equipment
There is no test equipment required for this troubleshooting section. Test aids
include an external monitor, a spare battery, and a SiteCharge dual battery charger.
Chapter 6: Troubleshooting 45
Page 58

6.4 Failures
Maint
6.4.1 Display
Display failures can be verified by attaching an external monitor to the external
video connector. For example, if the system display is blank and the external video
is functioning properly, the system display requires servicing.
6.4.2 Control Panel
Control panel failures can be identified and verified by going to the patient
information screen and pressing each individual key on the keyboard. Function keys
can be verified by noting their response when pressed.
6.4.3 Trackball
Trackball failures are identified by either intermittent function or loss of control.
The trackball can be cleaned by removing the retainer ring and then removing the
ball.
6.4.4 Main PCBA
The main PCBA can present symptoms that may be difficult to assess. Main PCBA
failures result in “assert codes” that are output to the display. You should note these
assert codes and contact SonoSite technical support, per Appendix B, Service Event
Report, on page 97
and a maintenance icon displayed on the system screen.
Figure 6.1 Assert Code and Maintenance Icon
, for clarification of the failure. Figure 6.1 shows an assert code
enance icon
Assert code
46 C1.75 Ultrasound System Service Manual
Page 59

6.4.5 Clearing the Main PCBA Failure
After the assert code has been recorded, power down the system.
1. Press the Power switch on the system until the power turns off (approximately
5–10 seconds).
2. Turn the power back on to check if the fault has been cleared or if the condition
remains.
If the condition has cleared, the system may be used. If the condition remains,
corrective action must be taken before the system can be used.
6.4.6 Battery
Battery failures are identified when the system does not operate or does not run for
the expected duration for a given charge.
Chapter 6: Troubleshooting 47
Page 60

If System
Display Is
Blank, Attach
An External
Monitor
Ext.
Monitor
OK?
Yes
Replace
Display
Corrected?
Replace
No
Main PCBA
No
Replace
No Corrected?
Control Panel
Corrected?
No
Yes
Return
System to
SonoSite
Perform
Image Quality
Tests
Yes
Perform
Image Quality
Tests
Yes
Perform
Image Quality
Tests
Figure 6.2 Display Diagnosis
48 C1.75 Ultrasound System Service Manual
Page 61

If External
Monitor
Display
Becomes
Blank, Check
The System
Display
Sys.
Display
OK?
No
Replace
Main PCBA
Corrected?
Yes
Ext.
Monitor
Cable
OK?
No
Connect
Cable
Stop
Yes
Check And
Adjust
Video
Format
No
Corrected?
Yes
Stop
Corrected? StopYes Yes
No
Correct
Monitor?
Yes
Replace
Cable
Corrected?
No
Yes
Replace
External
Monitor
Stop
No
Return
System to
SonoSite
No
Replace
Main PCBA
Return
Monitor to
SonoSite
Corrected?No Yes Stop
Figure 6.3 External Monitor Diagnosis
Chapter 6: Troubleshooting 49
Page 62

LED Burned Out?
Key Not
Working?
Replace
Control Panel
Corrected?
No
Replace
Main PCBA
Yes
Stop
Corrected?
Yes
Perform
Image Quality
Tests
Figure 6.4 Control Panel Diagnosis
No
Return
System to
SonoSite
50 C1.75 Ultrasound System Service Manual
Page 63

Trackball
Movement
Erratic?
Trackball
Doesn't Move
Cursor?
Keybd.
OK?
No
Clean
Trackball
Corrected? StopYes Yes
No
Replace
Trackball
Replace
Control
Panel
Corrected? StopYes
No
Corrected? StopYes
No
Replace
Main PCB
Figure 6.5 Trackball Diagnosis
Corrected? StopYes
No
Return
System to
SonoSite
Chapter 6: Troubleshooting 51
Page 64

No Indication O
f
Power When You
Press The ON
Button?
Try Battery
Power Only
Make Sure
Battery Is
Fully Inserted
Listen For Two Beeps
And Look For A
Video Display.
If System Works On
Battery, Verify
Operation On AC
Power
First Remove
Battery And
Then Connect
AC Power
Working?
No
Battery
Charged?
Yes
Working?
No
Replace
Main PCB
Corrected? Yes
Yes
No
Yes
Try AC
Power
Charge or
Replace
Battery
Try AC
Power
Perform
Image Quality
Tests And
Verify AC
Power
Operation
YesWorking?
No
Replace
AC
Adapter
Working? System OKYes
No
Replace
Main PCB
Corrected? Yes
No
No Problem
Found
Perform
Image Quality
Tests And
Verify AC
Power
Operation
No
Return
System To
SonoSite
Figure 6.6 System Diagnosis
52 C1.75 Ultrasound System Service Manual
Page 65

No Indication of
Power When You
Press the ON Button?
Did You Hear Two
Beeps When You
Pressed the Power
Button? Is There A
Video Display?
No
Yes
No Problem
Found
Is Battery
Fully Inserted?
No
Insert
Battery and
Try Power
Again
Working?
No
Charge or
Replace
Battery
Yes
Yes
First Remove
Battery And
Then Connect
AC Power
No Problem
Found
Working? Yes
No
Go To System
Diagram
Replace
Battery and
Try Again
Working?
No
Go To System
Diagram
Yes
Problem
Solved
Figure 6.7 Battery Diagnosis
Chapter 6: Troubleshooting 53
Page 66

54 C1.75 Ultrasound System Service Manual
Page 67

CHAPTER 7 Replacement Procedures
7.1 Display
Note: Consult Chapter 6, Troubleshooting, on page 45 before making any repairs.
7.1.1 Required Parts
• Service Assembly, Display, SonoSite 180 (P00747) or
• Service Assembly, Display, SonoHeart (P01015) or
• Service Assembly, Display, Hill-Rom (P01407)
7.1.2 Required Tools and Materials
• A #1 Phillips screwdriver, 7.0 in. (17.8 cm / 177.8 mm)
• A torque driver, 2.0–10.0 in./lb (0.23–1.1 newton meter)
• An anti-static mat
• A wrist grounding strap
CAUTION:
` Always use correct ESD procedures. ESD damage is cumulative and may not be
noticeable at first. ESD symptoms may be first exhibited as a slight degradation
of performance or image quality.
Chapter 7: Replacement Procedures 55
Page 68

7.1.3 Removing the Display
1. Press the battery release on the lower right side of the system to remove the
system battery.
2. Use a #1 Phillips screwdriver to remove the two screws in the battery
compartment, which releases the Control Panel from the top housing
(Figure 7.1
).
Screws (2)
Battery
compartment
Figure 7.1 Removing the Control Panel
3. Insert an anti-static mat between the Control Panel and the Display to prevent
damaging the Display (Figure 7.2
).
4. Lay the Control Panel over onto the Display to expose the wire harness and flex
circuits.
5. Carefully disconnect the 100-pin flex circuit from the bottom module.
6. Disconnect the Display Wire Harness and unlatch two flex circuits connectors
from the Control Panel (Figure 7.2
).
7. Set the Control Panel aside.
56 C1.75 Ultrasound System Service Manual
Page 69

100-pin flex
circuit
Anti-static mat
40-pin flex circuit
40-pin flex circuit
Figure 7.2 Disconnecting the Display Wire Harness and Flex Circuits
Chapter 7: Replacement Procedures 57
Page 70

8. Use a #1 Phillips screwdriver to remove the four screws securing the Display
hinges to the top housing (Figure 7.3
).
9. Carefully guide the ends of the Display Wire Harness and two 40-pin flex
circuits out through the slot in the top housing and remove the old Display.
Top housing
Figure 7.3 Removing the Display
7.1.4 Replacing the Display
1. Carefully guide the ends of the replacement Display Wire Harness and two 40-
pin flex circuits through the slot in the top housing (Figure 7.4
Screws (4)
Display hinges
).
Display Wire
Harness
40-pin flex
circuits (2)
Figure 7.4 Replacing the Top Housing
2. Use a #1 Phillips screwdriver to secure the four screws on the replacement
Display hinges to the top housing (Figure 7.3
). Torque screws to
6.1 in./lb (0.7 newton meter).
3. Place the Control Panel onto the Display.
58 C1.75 Ultrasound System Service Manual
Page 71

4. Install the Display Wire Harness and flex circuits.
Note: Verify the reference designators on the flex circuits match the reference
designators on the PCBA connectors.
5. Replace the 100-pin flex circuit on the bottom module (Figure 7.5
).
Display
100-pin flex
circuit
Display Wire
Harness
Control Panel
Trackball
Anti-static mat
Figure 7.5 Placing the Control Panel onto the Display
6. Carefully replace the Control Panel by inserting the tabs on the top of the
Display into the slots.
7. Set the Control Panel into place and replace the two screws inside the battery
compartment (Figure 7.6
). Torque screws to 7.1 in./lb (0.8 newton meter).
8. Place the battery in the battery compartment.
9. Turn on the system.
10. Perform the Display tests in Chapter 8, Performance Tests, on page 77
verify that the Display is functioning properly.
to
Chapter 7: Replacement Procedures 59
Page 72

7.2 Control Panel
7.2.1 Required Parts
• Service Assembly, Control Panel, English (P00735), or
• Service Assembly, Control Panel, French (P00736), or
• Service Assembly, Control Panel, German (P00737), or
• Service Assembly, Control Panel, Spanish (P00738), or
• Service Assembly, Control Panel, Portuguese (P00739), or
• Service Assembly, Control Panel, Italian (P00740), or
• Service Assembly, Trackball (P00741)
Note: The Service Assembly, Control Panel does not include a trackball. To install a
trackball, see Section 7.3,
7.2.2 Required Tools
• A #1 Phillips screwdriver, 7.0 in. (17.8 cm / 177.8 mm)
• A torque driver, 2.0–10.0 in./lb (0.2–1.1 newton meter)
• An anti-static mat
• A wrist grounding strap
Trackball, on page 64.
7.2.3 Removing the Control Panel
1. Press the battery release on the lower right side of the system to remove the
system battery.
2. Use a #1 Phillips screwdriver to remove the two screws in the battery
compartment, which releases the Control Panel from the top housing
(Figure 7.6
).
Screws (2)
Battery
compartment
Figure 7.6 Removing the Control Panel
60 C1.75 Ultrasound System Service Manual
Page 73

3. Insert an anti-static mat between the Control Panel and the Display to prevent
damaging the Display.
4. Carefully lay the Control Panel over onto the Display to expose the Display
Wire Harness and the two 40-pin flex circuits.
5. Carefully disconnect the 100-pin flex circuit from the bottom module.
6. Disconnect the Display Wire Harness and the two 40-pin flex circuits from the
Control Panel (Figure 7.7
).
7. Remove the Control Panel.
Chapter 7: Replacement Procedures 61
Page 74

100-pin flex
circuit
Anti-static mat
Display Wire
Harness
40-pin flex circuits (2)
Figure 7.7 Disconnecting the Control Panel
62 C1.75 Ultrasound System Service Manual
Page 75

7.2.4 Replacing the Control Panel
1. Place the Control Panel onto the Display.
2. Install the wire harness and the two 40-pin flex circuits.
3. Replace the 100-pin flex circuit on the bottom module (Figure 7.7
).
4. Carefully replace the Control Panel by inserting the tabs on the top of the
assembly into the slots.
5. Set the Control Panel into place and use a #1 Phillips screwdriver to replace the
two screws inside the battery compartment. Torque the screws to
7.1 in./lb (0.8 newton meter) (Figure 7.8
).
Screws (2)
Battery
compartment
Figure 7.8 Replacing the Control Panel
6. Place the battery in the battery compartment.
7. Turn on the system.
8. To verify proper operation of the new Control Panel, perform the Control Panel
tests in Chapter 8, Performance Tests, on page 77
.
Chapter 7: Replacement Procedures 63
Page 76

7.3 Trackball
7.3.1 Required Parts
• Service Assembly, Trackball (P00741)
7.3.2 Required Tools
• A #1 Phillips screwdriver, 7.0 in. (17.8 cm / 177.8 mm)
• A torque driver, 2.0–10.0 in./lb (0.2–1.1 newton meter)
• A small, blunt punch
• An anti-static mat
• A wrist grounding strap
7.3.3 Removing the Trackball
1. Press the battery release on the lower right side of the system to remove the
system battery.
2. Use a #1 Phillips screwdriver to remove the two screws in the battery
compartment, which releases the Control Panel from the top housing
(Figure 7.8
).
3. Insert an anti-static mat between the Control Panel and the Display to prevent
damaging the Display.
4. Lay the Control Panel over onto the Display to expose the wire harness and flex
circuits.
5. Carefully disconnect the 100-pin flex circuit from the bottom module.
6. Disconnect the Display Wire Harness and the two 40-pin flex circuits from the
Control Panel.
7. Remove the Control Panel.
8. Remove the trackball retaining ring. Carefully insert the tip of a blunt punch into
the indent, turn the trackball retaining ring slightly counterclockwise. This will
release it and allow you to remove it (Figure 7.9
).
64 C1.75 Ultrasound System Service Manual
Page 77

Trackball retaining
ring
Figure 7.9 Removing the Trackball Retaining Ring
9. Remove the ball.
10. Disconnect the Trackball Wire Harness from the Control Panel.
11. Remove the foam backing from the Trackball to expose the four screws
connecting the Trackball to the Control Panel (Figure 7.10
).
Figure 7.10 Removing the Foam Backing
Foam backing
Chapter 7: Replacement Procedures 65
Page 78

12. Use a #1 Phillips screwdriver to remove the four screws that secure the
Trackball to the Control Panel (Figure 7.11
Figure 7.11 Removing the Trackball
).
Screws (4)
13. Holding the Trackball in place, carefully turn the Control Panel over and allow
the Trackball to drop off of the Control Panel, so as not to lose the pieces of the
Trackball (Figure 7.12
).
14. Remove the Trackball and note the locations of its components.
Figure 7.12 Removing the Trackball
Trackball
Trackball Wire
Harness
66 C1.75 Ultrasound System Service Manual
Page 79

7.3.4 Replacing the Trackball
1. Use a #1 Phillips screwdriver to remove the four screws holding the top cover
onto the Trackball. Discard the cover and the four screws. Be careful not to tip
the Trackball, which could cause the parts from the Trackball to spill
(Figure 7.12
2. Holding the Trackball, carefully turn the Control Panel over onto the new
Trackball and set it into place.
3. Once in place, carefully turn the Trackball over holding the Trackball in place.
4. Use a #1 Phillips screwdriver to tighten the four screws securing the Trackball
(Figure 7.13
).
). Torque the screws to 3.6 in./lb (0.4 newton meter).
Screws (4)
Figure 7.13 Securing the Trackball
5. Place the foam backing on the Trackball (Figure 7.14).
Figure 7.14 Placing the Foam Backing
Foam backing
Chapter 7: Replacement Procedures 67
Page 80

6. Turn the Control Panel over and install the new trackball retaining ring. Use
your fingers to press and turn the ring slightly clockwise until it locks into place
(Figure 7.15
Figure 7.15 Installing the Trackball Retaining Ring
).
Trackball retaining
ring
7. Turn the Trackball over and secure the Trackball Wire Harness to the Control
Panel.
8. Place the Control Panel onto the Display.
9. Install the Display Wire Harness and the two 40-pin flex circuits (Figure 7.16
10. Replace the 100-pin flex circuit on the bottom module.
100-pin flex
circuit
30-pin flex
circuits (2)
Figure 7.16 Installing the Display Wire Harness and Flex Circuits
).
11. Carefully replace the Control Panel by inserting the tabs on the top of the
Control Panel into the slots.
68 C1.75 Ultrasound System Service Manual
Page 81

12. Set the Control Panel into place and replace the two screws inside the battery
compartment (Figure 7.17
Figure 7.17 Replacing the Control Panel
). Torque the screws to 7.1 in./lb (0.8 newton meter).
Screws (2)
Battery
compartment
13. Place the battery in the battery compartment.
14. Turn on the system.
15. Perform the trackball tests in Chapter 8, Performance Tests, on page 77
verify the proper operation of the new trackball.
to
Chapter 7: Replacement Procedures 69
Page 82

7.4 Main PCBA
7.4.1 Required Parts
• Service Assembly, PCB C1.75 Main, English (P01393), or
• Service Assembly, PCB C1.75 Main, French (P01394), or
• Service Assembly, PCB C1.75 Main, German (P01395), or
• Service Assembly, PCB C1.75 Main, Spanish (P01398), or
• Service Assembly, PCB C1.75 Main, Portuguese (P01397), or
• Service Assembly, PCB C1.75 Main, Italian (P01396), or
• Service Assembly, PCB C1.75 Main, Japan (P01399)
• Service Assembly, PCB C1.75 Main, SonoHeart, English (P01400), or
• Service Assembly, PCB C1.75 Main, SonoHeart, French (P01401), or
• Service Assembly, PCB C1.75 Main, SonoHeart, German (P01402), or
• Service Assembly, PCB C1.75 Main, SonoHeart, Spanish (P01405), or
• Service Assembly, PCB C1.75 Main, SonoHeart, Portuguese (P01404), or
• Service Assembly, PCB C1.75 Main, SonoHeart, Italian (P01403)
• Service Assembly, PCB C1.75 Main, SonoHeart, Japanese (P01406)
7.4.2 Required Tools
• A #1 Phillips screwdriver, 7.0 in. (17.8 cm / 177.8 mm)
• A torque driver, 3.6 in./lb (0.4 newton meter)
• An anti-static mat
• A wrist grounding strap
7.4.3 Removing the Main PCBA
1. Press the battery release on the lower right side of the system to remove the
system battery.
2. Place the system face down.
70 C1.75 Ultrasound System Service Manual
Page 83

3. Use a #1 Phillips screwdriver to remove the eight screws securing the bottom
housing to the top housing (Figure 7.18
Figure 7.18 Removing the Bottom Housing from the Top Housing
).
Screws (8)
4. Carefully separate the bottom housing from the top housing; do not damage the
100-pin flex circuit that connects the two together.
5. Disconnect the 100-pin flex circuit from the Main PCBA.
6. Remove the bottom housing that holds the Main PCBA.
7. Use a #1 Phillips screwdriver to remove the four screws that connect the Main
PCBA to the bottom housing (Figure 7.19
40-pin flex
Figure 7.19 Removing the Main PCBA from the Bottom Housing
).
Screws (4)
8. Carefully disconnect the 40-pin flex circuit that connects the Main PCBA to the
Dock Interface PCBA (located under the Main PCBA).
9. Remove the Main PCBA.
Chapter 7: Replacement Procedures 71
Page 84

7.4.4 Replacing the Main PCBA
1. Set the replacement Main PCBA onto the bottom housing (Figure 7.20).
Figure 7.20 Replacing the Main PCBA
2. Secure the four screws that connect the Main PCBA to the bottom housing
(Figure 7.21
). Torque the screws to 3.6 in./lb (0.4 newton meter).
40-pin flex
circuit
3. Connect the 40-pin flex circuit to the Main PCBA.
4. Carefully set the top housing onto the bottom housing, connecting the 100-pin
flex circuit as it sets into position (Figure 7.22
Figure 7.21 Securing the Main PCBA to the Bottom Housing
).
Screws (4)
72 C1.75 Ultrasound System Service Manual
Page 85

Main PCBA
100-pin flex
circuit
Figure 7.22 Setting the Top Housing Onto the Bottom Housing
Chapter 7: Replacement Procedures 73
Top housing
Page 86

5. Carefully mate the bottom housing to the top housing and use the #1 Phillips
screwdriver to secure the eight screws (Figure 7.23
7.1 in./lb (0.8 newton meter).
Figure 7.23 Securing the Bottom Housing to the Top Housing
6. Place the battery into the battery compartment.
). Torque the screws to
Screws (8)
7. Turn on the system.
8. Verify that the Main PCBA is functioning properly by performing the tests in
Chapter 8, Performance Tests, on page 77
.
7.5 Transducers
There are no user-serviceable parts identified for the transducers. Return transducers
to SonoSite for exchange during the warranty period.
7.6 SiteCharge Dual Battery Charger
There are no user-serviceable parts identified for the SiteCharge dual battery
charger. Return chargers to SonoSite for exchange during the warranty period.
7.7 AC Power Adapter
There are no user-serviceable parts identified for the AC power adapter. Return
power adapters to SonoSite for exchange during the warranty period.
74 C1.75 Ultrasound System Service Manual
Page 87

7.8 Peripherals
If you need assistance in locating a service center near you, contact SonoSite
technical support.
7.8.1 Display
To return a failed display, contact the Sony Service Center at 714-220-9100. For
service, ship the display to the original OEM or send Sony displays to the following
address:
Sony Service Center
10833 Valley View
Cypress, CA 90630
United States
7.8.2 VCR
To return a failed VCR, contact the Sony Service Center at 800-282-2848 or 972931-2497. For service, ship the VCR to the original OEM for service or send Sony
VCRs to the following address:
Sony Electronics, Inc.
7517 Campbell Road
Dallas, TX 75248
United States
7.8.3 Printer
To return a failed printer, contact the Sony Service Center at 770-263-9888. For
service, ship the printer to the original OEM or send Sony printers to the
following address:
Sony Service
3175 A Northwood Parkway
Norcross, GA 90071
United States
Chapter 7: Replacement Procedures 75
Page 88

76 C1.75 Ultrasound System Service Manual
Page 89

CHAPTER 8 Performance Tests
8.1 Overview
WARNING:
` Critical Test Function - A failure of the system function tested in this section
could adversely affect safety or effectiveness of the system. While performing the
steps in this section, verify that the images on the system display and on the
external monitor are acceptable.
• Verify that all controls operate smoothly over their full range and that the system
responds properly.
• To obtain 2D images, SonoSite recommends using the RMI 413A Soft Tissue
Phantom, the RMI 403 GS Multipurpose Phantom, or the equivalent.
• To obtain Power Doppler images, SonoSite recommends using the RMI 425
Doppler Phantom, the RMI 1425A Doppler Phantom, or the equivalent.
• When making penetration measurements on a phantom, apply the phantom
reference value and tolerance to the measurement.
8.2 Test Equipment:
• SonoSite ultrasound system with a C60/5-2 MHz transducer
• RMI 413A Soft Tissue Phantom, the RMI 403 GS Multipurpose Phantom, or the
equivalent
• RMI 425 Doppler Phantom, the RMI 1425A Doppler Phantom, or the equivalent
• Acoustic gel
Chapter 8: Performance Tests 77
Page 90

8.3 Setting Up Performance Tests
To set up the performance tests:
1. Attach the C-60/5-2 MHz transducer to the system.
2. Select general for optimization and OB for exam type.
3. Couple the transducer to the phantom, adjusting gain settings and transducer for
a proper phantom image (e.g., pins are high level echoes positioned in straight
lines; cysts are sonolucent, edges are sharp, and graphite particles of the
phantom are mid grays).
8.3.1 Scan Reference Orientation
1. Verify that the correct transducer name appears in the upper right corner of the
system display.
2. Verify that the scan plane orientation mark in the image located near the skinline
corresponds to element #1 on the transducer. This can be tested by putting your
finger on the probe and running it across the transducer face. Your finger
touching the transducer face as indicated above should show up at the
orientation mark on the image format on the monitor.
3. With the array pointing down and the orientation mark to the operator’s left,
element #1 corresponds with the left side of the array.
8.4 Testing 2D Performance
To test 2D performance:
1. Use a C60/5-2 MHz transducer in 2D mode.
2. Adjust the position of the C60/50-2 MHz transducer on the phantom.
3. Use the 2D system controls to obtain an image that clearly shows both the
horizontal and vertical rows of pins.
8.4.1 2D Image Quality
To test 2D image quality:
1. Verify the ultrasound image appears uniform in both the axial and lateral
direction without any dropouts or intensity variations.
2. Verify the cystic structure at the focal zone is clearly differentiated from the
surrounding tissue and is echo-free; while solid tissue, with numerous echo
sources, appears solid.
78 C1.75 Ultrasound System Service Manual
Page 91

8.4.2 Axial Measurement Accuracy
Note: Measurements must be performed while the image is frozen.
To test axial accuracy:
1. Acquire the image.
2. Press freeze.
3. Press measure. Two calipers appear on the image display. A menu appears on
which are listed two distance icons, an ellipse icon, a delete icon, and a calcs
icon, if applicable. (If the caliper line setup is on, then a dotted line connects the
two calipers. See the SonoSite 180 or SonoHeart User Guide, if necessary.) The
first caliper in the menu is active by default.
4. Use the trackball to position one of the calipers.
5. Press select to fix the caliper and enable the other caliper.
6. Use the trackball to move the other caliper. The results update as you move the
caliper, and the measurement is complete when you finish moving the calipers.
(Press select to alternate the active caliper, and adjust the measurement with the
trackball.)
7. You can perform another distance measurement on the image by selecting the
other distance icon and repeating the preceding steps.
8. Measure the distance, center to center, of two pins that are 5-12 cm apart
vertically.
9. Verify the distance measured is within the tolerance listed in Table 8.1
8.4.3 Lateral Measurement Accuracy
To test the lateral measurement accuracy:
1. Perform steps 1 through 7 in Section 8.4.2.
2. Measure the distance, center to center, of the two pins that are 4-10 cm apart
horizontally.
3. Verify the distance measured is within the tolerance listed in Table 8.1
4. Press freeze to return the system to live 2D mode.
Table 8.1 System Measurement Accuracy
MEASUREMENTS TOLERANCE
Axial Distance +/- 2%
Lateral Distance +/- 2%
.
.
Chapter 8: Performance Tests 79
Page 92

8.4.4 Penetration
To test penetration:
1. Adjust the system controls to obtain an image that clearly shows the limits of
echo penetration as shown in Table 8.2
2. Measure from the center of the skinline to the deepest vertical position—where
the scatter echoes start to break up and tissue definition is lost.
.
Table 8.2 Imaging Performance
IMAGING
PERFORMANCE
2D Penetration 11.5 cm 6.0 cm 19.0 cm 6 cm
C60 ICT C15 L38
8.5 Additional Performance Tests
8.5.1 CPD
To test CPD:
Note: Use the RMI 425 Doppler Phantom or the RMI 1425A Doppler Phantom.
1. Connect any transducer and set up the system for CPD mode.
2. Press and release function
3. Press and release 0. The CPD image appears. (In CPD imaging, repeat these
steps to return to 2D imaging.)
To move the CPD image:
•Use the trackball to move the CPD image. While you are moving the CPD
image, you will see an outline of the new position moving on the display.
When you stop moving, the new position will display the CPD image. (The
size of the CPD image is fixed. There is no control with which to change it.)
.
To adjust CPD gain:
•Turn gain clockwise to increase the amount of CPD gain. (While in CPD
imaging, near and far affect only the 2D image; they do not affect the CPD
image.)
• Turn gain counterclockwise to decrease the amount of CPD gain.
4. Image the vessel using a Doppler phantom. Verify that as the gain controls are
increased and decreased, there is a corresponding increase and decrease in the
Doppler echo intensity. Verify that there is no flow outside of the vessel.
5. Save a CPD image by pressing freeze and then save.
80 C1.75 Ultrasound System Service Manual
Page 93

8.5.2 PowerMap DCPD
To test PowerMap DCPD:
Note: Use the RMI 425 Doppler Phantom or the RMI 1425A Doppler Phantom.
1. Connect any transducer and set up the system for PowerMap DCPD mode.
2. Press and release function
3. Press and release 0 (twice). The PowerMap DCPD image appears. (In
PowerMap DCPD imaging, repeat these steps to return to 2D imaging.)
To move the PowerMap DCPD image:
•Use the trackball to move the PowerMap DCPD image. While you are
moving the PowerMap DCPD image, you will see an outline of the new
position moving on the display. When you stop moving, the new position
will display the PowerMap DCPD image. (The size of the PowerMap DCPD
image is fixed. There is no control with which to change it.)
To adjust PowerMap DCPD gain:
•Turn gain clockwise to increase the amount of PowerMap DCPD gain.
(While in PowerMap DCPD imaging, near and far affect only the 2D
image; they do not affect the PowerMap DCPD image.)
• Turn gain counterclockwise to decrease the amount of PowerMap DCPD
gain.
4. Image the vessel using a Doppler phantom. Verify that as the gain controls are
increased and decreased, there is a corresponding increase and decrease in the
Doppler echo intensity. Verify that there is no flow outside of the vessel.
5. Save a PowerMap DCPD image by pressing freeze and then save.
.
8.5.3 Image Quality Verification Test
To test the image quality:
• Products that have had subassemblies replaced, or have otherwise been
disassembled, must have an Image Quality Verification Test performed.
• The Image Quality Verification Test should be performed after successful
completion of Section 8.3, Setting Up Performance Tests, on page 78
Section 8.5.1, CPD, on page 80
• It should be completed before returning the system to service.
• It must be performed by a certified sonographer.
.
8.5.4 Image Review
Review all saved images and verify that the images are displayed properly.
and
Chapter 8: Performance Tests 81
Page 94

8.5.5 Printer
To test printer operation:
1. Print two images in rapid succession and verify proper operation.
2. Verify the print control receptacles on the system and on the stand are
functioning correctly.
8.5.6 Battery Charging
To test battery charging operation:
1. Insert a battery into the system.
2. Remove AC power from the system AC power connector.
3. Press and hold the power switch to turn the system on. Allow the battery to
discharge. The battery indicator LEDs (to the right of the display) extinguish
from top to bottom as the battery discharges.
Note: The battery may take 1–2 hours to discharge.
4. Re-attach the AC power cord to the AC power connector.
5. Note that the battery indicator LEDs light from bottom to top as the battery
charges.
6. If charging is not evident within 30–60 minutes, refer to Chapter 6,
Troubleshooting, on page 45
8.5.7 Video Output
CAUTION:
` The video output at the video receptacle can only be verified using the
recommended video monitor, printer, or VCRs.
for troubleshooting procedures.
82 C1.75 Ultrasound System Service Manual
Page 95

To test the video output:
1. Attach an external video monitor to the video connector using the video cable.
2. Turn on the system power and verify that the video on the external monitor
matches the video on the system display.
3. If the video does not appear similar, or there is no display on the external
monitor, refer to Chapter 6, Troubleshooting, on page 45
procedures.
8.6 Returning Products to SonoSite
8.6.1 Contacting SonoSite Technical Support
For technical support of any SonoSite product, do one of the following:
• For US customers, call 1-877-657-8118.
• For international customers, call +425-951-1330.
• Connect to SonoSite on the World Wide Web at www.sonosite.com
Products, then choose Technical Support
•E-mail s
ervice@sonosite.com
.
for troubleshooting
. Select
You will be asked to provide the following information by telephone or e-mail:
• Contact name and phone number
• Product name
• Serial number
• Description of the problem
8.6.2 Shipping Instructions
A return material authorization number (RMA) is obtained by contacting SonoSite.
Contact SonoSite before returning any products.
Chapter 8: Performance Tests 83
Page 96

84 C1.75 Ultrasound System Service Manual
Page 97

APPENDIX A Parts List
This section contains a list of field-replaceable parts.
A.1 Replacement Parts List
The following tables contain all the replaceable parts for the SonoSite ultrasound
system. All quantities are one unless otherwise noted.
A.2 Ordering Replacement Parts
To order parts, contact SonoSite Technical Support as indicated in Chapter 8.6,
Returning Products to SonoSite, on page 83
.
Appendix A: Parts List 85
Page 98

A.3 Display
1
Table A.1 Display
2
3
4
FIND
NUMBER
Note: The following parts are available for purchase separately.
1 P00318 • flex circuit, display
2 P00806 • knob, tgc assembly
3 P00457 • label, sonosite logo
3 P00906 • label, sonoheart logo
4 P00044 • assembly, display, 180
PART
NUMBER
P00747 service assembly, display, sonosite 180
P01015 service assembly, display, sonoheart
P00343 • hinge, display
P00518 • screw, k30x14, cross recess panhead, tf
DESCRIPTION
86 C1.75 Ultrasound System Service Manual
Page 99

A.4 Control Panel
Table A.2 Control Panel
PART
NUMBER
P00735 service assembly, control panel, english
P00736 service assembly, control panel, french
P00737 service assembly, control panel, german
P00740 service assembly, control panel, italian
P00739 service assembly, control panel,
portuguese
P00738 service assembly, control panel, spanish
DESCRIPTION
Appendix A: Parts List 87
Page 100

A.5 Trackball
1
Table A.3 Trackball
FIND
NUMBER
Note: The following parts are available for purchase separately.
1 P00093 • retaining ring
PART
NUMBER
P00741 service assembly, trackball
P00725 • screw, k25x16, cross recess panhead
DESCRIPTION
88 C1.75 Ultrasound System Service Manual
 Loading...