


 Loading...
NETWORK SECURITY
SonicWALL Network Security Appliances
TZ 100 / TZ 200 Series
Getting Started Guide

SonicWALL TZ 100/200 series Getting Started Guide
This Getting Started Guide provides instructions for basic installation and configuration of the SonicWALL TZ 100/200 series appliance running SonicOS Enhanced.
Document Contents
This document contains the following sections:
1Setting Up Your Network - page 1
2Registering Your Appliance - page 9
3Enabling Security Services - page 13
4Advanced Network Configuration - page 21
5Advanced Deployments - page 33
6Support and Training Options - page 59
SonicWALL TZ 100/200 Series Getting Started Guide Page i
Page ii

Setting Up Your Network 1
In this Section:
This section provides pre-configuration information. Review this section before setting up your SonicWALL TZ 100/200 series appliance.
•System Requirements - page 2
•Recording Configuration Information - page 2
•Completing the Setup Wizard - page 4
•Accessing the Management Interface - page 5
•Verifying WAN (Internet) Connectivity - page 6
•Connecting Your Network Devices - page 6
•Troubleshooting Initial Setup - page 7
SonicWALL TZ 100/200 Series Getting Started Guide Page 1

System Requirements
Before you begin the setup process, verify that you have:
•An Internet connection
•A Web browser supporting Java Script and HTTP uploads. Supported browsers include the following:
|
Supported Browsers |
Browser Version |
|
|
Number |
|
|
|
|
Internet Explorer |
6.0 or higher |
|
|
|
|
Firefox |
2.0 or higher |
|
|
|
|
Netscape |
9.0 or higher |
|
|
|
|
Opera |
9.10 or higher |
|
|
for Windows |
|
|
|
|
Safari |
2.0 or higher |
|
|
for MacOS |
|
|
|
Recording Configuration Information
Record the following setup information to use during the setup process and for future reference:
Registration Information
Serial Number: |
Record the serial number found on the |
|
bottom panel of your SonicWALL |
|
appliance. |
|
|
Authentication Code: |
Record the authentication code found on |
|
the bottom panel of your SonicWALL |
|
appliance. |
|
|
Networking Information
|
LAN IP Address: |
|
|
|
Select a static IP address for your |
||||
|
|
|
|
|
|
|
|
|
SonicWALL appliance that is within the |
|
. |
|
. |
. |
|
|
range of your local subnet. If you are |
||
|
|
|
|
unsure, you can use the default IP |
|||||
|
|
|
|
|
|
|
|
|
address (192.168.168.168). |
|
|
|
|
|
|
|
|
||
|
Subnet Mask: |
|
|
|
|
|
Record the subnet mask for the local |
||
|
|
|
|
|
|
|
|
|
subnet where you are installing your |
|
|
. |
|
. |
. |
|
|
SonicWALL appliance. |
|
|
|
|
|
|
|||||
|
|
|
|
|
|
|
|
|
|
|
Ethernet WAN IP Address: |
|
Select a static IP address for your |
||||||
|
. |
|
. |
. |
|
|
Ethernet WAN. This setting only applies if |
||
|
|
|
|
you are already using an ISP that assigns |
|||||
|
|
|
|
|
|
|
|
|
a static IP address. |
|
|
|
|
|
|
|
|
|
|
Administrator Information
Admin Name: |
Select an administrator account name. |
|
(default is admin) |
|
|
Admin Password: |
Select an administrator password. |
|
(default is password) |
|
|
Page 2 System Requirements
Primary Internet Service Provider (ISP) Information
Record the following information about your current ISP:
If you connect |
You likely |
Please record |
|
|
|
|
|
|
|
|
|
|
|
|
|
|
||||||
via |
use |
|
|
|
|
|
|
|
|
|
|
|
|
|
|
|
|
|
|
|
|
|
|
|
|
|
|||||||||||||||||||
Cable modem, |
DHCP |
No Internet connection information is |
|
|||||||||||||||||||
DSL with a |
|
usually required, although some service |
|
|||||||||||||||||||
router |
|
providers require a host name. |
|
|
|
|
||||||||||||||||
|
|
Host Name: |
|
|
|
|
|
|
|
|
|
|
|
|
|
|
||||||
|
|
|
|
|
|
|
|
|
|
|
|
|
|
|
|
|
|
|
|
|
|
|
Home DSL |
PPPoE |
User Name: |
|
|
|
|
|
|
|
|
|
|
|
|
|
|
|
|||||
|
|
|
|
|
|
|
|
|
|
|
|
|
|
|
|
|||||||
|
|
Password: |
|
|
|
|
|
|
|
|
|
|
|
|
|
|
|
|||||
|
|
Note: Your ISP may require your user name |
|
|||||||||||||||||||
|
|
in the format: name@ISP.com |
|
|
|
|
||||||||||||||||
|
|
|
|
|
|
|
|
|
|
|
|
|
|
|||||||||
T1/E1, |
Static IP |
IP Address: |
|
|
. |
|
|
|
. |
|
|
|
. |
|
|
|||||||
Static |
|
|
|
|
|
|
|
|
|
|
|
|
|
|
|
|
|
|
|
|
|
|
|
Subnet Mask: |
|
. |
. |
|
. |
|
|||||||||||||||
broadband, |
|
|
|
|||||||||||||||||||
Cable or DSL |
|
|
|
|
|
|
|
|
|
|
|
|
|
|
|
|
|
|
|
|
|
|
|
Default Gateway |
|
|
|
|
|
|
|
|
|
|
|
|
|
|
|||||||
with a static IP |
|
|
. |
|
. |
|
|
. |
|
|
||||||||||||
|
|
(IP Address): |
|
|
|
|
|
|
||||||||||||||
|
|
|
|
|
|
|
|
|
|
|
|
|
|
|
|
|
|
|
||||
|
|
Primary DNS: |
|
. |
. |
|
. |
|
||||||||||||||
|
|
|
|
|
|
|
|
|
|
|
|
|
|
|
|
|
|
|
|
|||
|
|
Secondary DNS |
. |
|
|
|
|
. |
|
|
|
|
. |
|
|
|
||||||
|
|
(optional): |
|
|
|
|
|
|
|
|
|
|
|
|||||||||
|
|
|
|
|
|
|
|
|
|
|
|
|
|
|
|
|
|
|
|
|
|
|
Dial-in to a |
PPTP |
|
|
|
|
|
|
|
|
|
|
|
|
|
|
|
|
|
|
|
|
|
server |
|
Server Address: |
|
|
|
|
|
|
|
|
|
|
|
|
|
|
|
|||||
|
|
User Name: |
|
|
|
|
|
|
|
|
|
|
|
|
|
|
|
|||||
|
|
Password: |
|
|
|
|
|
|
|
|
|
|
|
|
|
|
||||||
|
|
|
|
|
|
|
|
|
|
|
|
|
|
|
|
|
|
|
|
|
|
|
Secondary ISP Information
If applicable, record the following information about your secondary ISP or WWAN service provider:
If you connect |
You likely |
Please record |
|
|
|
|
|
|
|
|
|
|
|
|
|
|
|
|
|
|||||||
via |
use |
|
|
|
|
|
|
|
|
|
|
|
|
|
|
|
|
|
|
|
|
|
|
|
|
|
|
|
|
|
|
|
|
|
|
|
|
|
|
|
|
|
|
|
|
|
|
|
|
|
|
|
|
Cable modem, |
DHCP |
|
|
|
|
|
|
|
|
|
|
|
|
|
|
|
|
|
|
|
|
|
|
|
|
|
DSL with a |
|
Host Name: |
|
|
|
|
|
|
|
|
|
|
|
|
|
|
|
|
|
|||||||
router |
|
|
|
|
|
|
|
|
|
|
|
|
|
|
|
|
|
|
|
|
|
|
|
|
|
|
Home DSL |
PPPoE |
User Name: |
|
|
|
|
|
|
|
|
|
|
|
|
|
|
|
|
|
|
||||||
|
|
|
|
|
|
|
|
|
|
|
|
|
|
|
|
|
|
|
||||||||
|
|
Password: |
|
|
|
|
|
|
|
|
|
|
|
|
|
|
|
|
|
|||||||
|
|
|
|
|
|
|
|
|
|
|
|
|
|
|
|
|
|
|
|
|
|
|
|
|
|
|
T1/E1, |
Static IP |
|
|
|
|
|
|
|
|
|
|
|
|
|
|
|
|
|
|
|
|
|
|
|
|
|
Static |
|
IP Address: |
. |
|
|
|
. |
|
|
. |
|
|
||||||||||||||
broadband, |
|
|
|
|
|
|
|
|
|
|
|
|
|
|
|
|
|
|
|
|
|
|
|
|
|
|
Cable or DSL |
|
Subnet Mask: |
|
|
. |
. |
. |
|
||||||||||||||||||
with a static IP |
|
|
|
|
|
|
|
|
|
|
|
|
|
|
|
|
|
|
|
|
|
|
|
|
|
|
|
Default Gateway |
|
|
|
|
|
|
|
|
|
|
|
|
|
|
|
|
|
||||||||
|
|
|
. |
|
. |
|
. |
|
|
|||||||||||||||||
|
|
(IP Address): |
|
|
|
|
|
|||||||||||||||||||
|
|
|
|
|
|
|
|
|
|
|
|
|
|
|
|
|
|
|
||||||||
|
|
Primary DNS: |
|
. |
|
. |
. |
|
||||||||||||||||||
|
|
|
|
|
|
|
|
|
|
|
|
|
|
|
|
|
|
|
|
|
|
|
||||
|
|
Secondary DNS |
. |
|
|
|
|
|
. |
|
|
|
|
. |
|
|
|
|||||||||
|
|
(optional): |
|
|
|
|
|
|
|
|
|
|
|
|
||||||||||||
|
|
|
|
|
|
|
|
|
|
|
|
|
|
|
|
|
|
|
|
|
|
|
|
|
|
|
Dial-in to a |
PPTP |
|
|
|
|
|
|
|
|
|
|
|
|
|
|
|
|
|
|
|
|
|
|
|
|
|
server |
|
Server Address: |
|
|
|
|
|
|
|
|
|
|
|
|
|
|
|
|
|
|
||||||
|
|
User Name: |
|
|
|
|
|
|
|
|
|
|
|
|
|
|
|
|
|
|
||||||
|
|
Password: |
|
|
|
|
|
|
|
|
|
|
|
|
|
|
|
|
|
|||||||
|
|
|
|
|
|
|
|
|
|
|
|
|
|
|
|
|
|
|
|
|
|
|
|
|
|
|
SonicWALL TZ 100/200 Series Getting Started Guide Page 3
Completing the Setup Wizard
The Setup Wizard takes you through several basic steps to get your SonicWALL TZ 100/200 series appliance configured for your network. Use the Recording Configuration Information section, on page 2 to record your configuration information as you complete the wizard.
Note: If you are having trouble accessing the Setup Wizard, see the Troubleshooting the Setup Wizard section, on page 7 of this document.
The Setup Wizard guides you through the following steps:
Change Password—Create a new password so that only you have access to the management interface. The default password is “password.”
Change Time Zone—Select the correct time zone for proper updates and time-based functionality.
WAN Network Mode—Choose your method of connecting to the Internet. This information is provided by your Internet Service Provider (ISP).
WAN Settings—Required for some WAN modes. This information is also provided by your ISP.
LAN Settings—Enter custom local network address settings, or use the default values, which work well for most networks.
LAN DHCP Settings—Allow your SonicWALL TZ 100/200 series appliance to automatically connect other local computers by specifying a DHCP range, or use the default.
Ports Assignment—Configure the extra interfaces (X2-X5) for different network requirements.
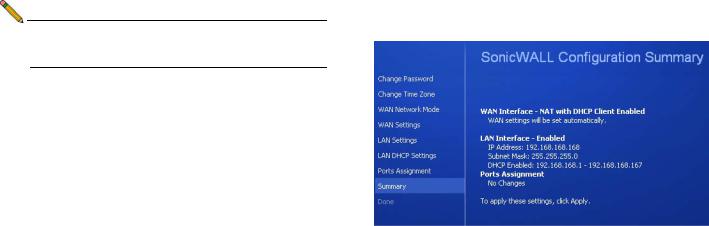
At the end of the wizard, a configuration summary displays. It is recommended that you record this information in the Recording Configuration Information section, on page 2 of this guide.
After the Setup Wizard completes, the appliance may reboot. Please wait a few minutes while the SonicWALL appliance reboots to save the updated firmware settings, and then continue with the next section of this guide.
Page 4 Completing the Setup Wizard
Accessing the Management Interface
The computer you use to manage the SonicWALL TZ 100/200 series appliance must be set up to connect using DHCP, or with a static IP address in your chosen subnet. The default subnet for LAN zone ports is 192.168.168.x.
If your SonicWALL TZ 100/200 series appliance required a
reboot after completing the Setup Wizard, wait until the  LED is no longer lit before continuing.
To access the SonicOS Web-based management interface:
1.Enter the default IP address of http://192.168.168.168, or the LAN IP address you chose during the Setup Wizard, in the Location or Address field of your Web browser.
Tip: If you changed the LAN IP of your SonicWALL during the Setup Wizard, you may need to restart your computer for changes to take effect.
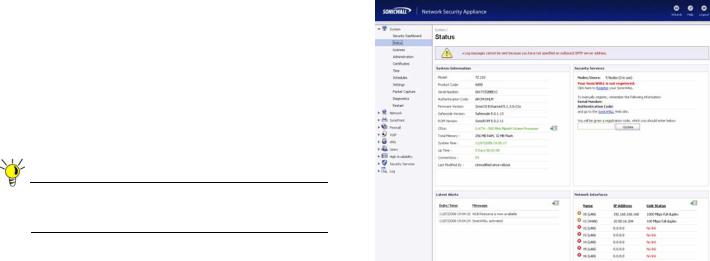
2.When the SonicWALL Management Login page displays, enter your username and password (default values are “admin” for user name and “password” for password).
If the System > Status page (shown below) displays, then you have correctly configured the SonicWALL TZ 100/200 series appliance to work with the computer on your LAN.
SonicWALL TZ 100/200 Series Getting Started Guide Page 5

Verifying WAN (Internet) Connectivity
Complete the following steps to confirm your Internet connectivity:
1.In the Windows interface, launch your Web browser.
2.Enter “http://www.sonicwall.com” in the address bar and press Enter on the keyboard. The SonicWALL website displays. If you are unable to browse to a Website, see “Troubleshooting Internet Connection” on page 7.
Connecting Your Network Devices
Connecting Directly
 Good for small networks (less than 5 clients)
 Easy to setup
 Requires less equipment
 Each interface may be configured for a different zone (LAN, WAN, DMZ)
|
LAN |
WAN |
|
|
|
|
|
Console |
X0 |
X1 |
X2 |
X3 |
X4 |
X5 |
Power |
W0 WLAN |
X2 LAN |
|
X3 LAN |
|
|
|
X4 LAN |
|
|
|||||
|
|
|
|
|
|
|
|
|
|
|
|
|
|
|
|
|
|
|
|
|
|
|
|
|
|
|
|
|
|
|
|
|
|
|
|
|
|
|
|
|
|
|
|
|
|
|
|
|
|
|
|
|
|
|
|
|
|
|
|
|
|
|
|
|
|
|
|
|
|
|
|
|
|
|
|
|
|
|
|
|
|
|
|
|
|
|
|
|
|
|
|
|
|
|
|
|
|
|
|
|
|
|
|
|
WLAN |
Desktop Clients |
LAN |
Wireless Clients |
Local Server |
|
|
|
|
Connecting With a Hub/Switch
|
LAN |
WAN |
|
|
|
|
|
Console |
X0 |
X1 |
X2 |
X3 |
X4 |
X5 |
Power |
Requires extra equipment (hub/switch) Ability to connect to multiple clients through one port
Zone security assignment (LAN, WAN, DMZ) can be applied to many clients on a
single interface
X2 LAN
Hub/Switch
W0 WLAN
|
WLAN |
|
|
|
|
|
|
|
|
|
|
|
|
|
|
|
|
|
|
|
|
|
|
|
|
|
|
|
|
|
|
|
|
|
|
|
|
|
|
|
|
|
|
|
|
|
|
|
|
|
|
|
|
|
|
|
|
|
|
|
|
|
|
|
|
|
|
|
|
|
|
|
|
|
|
|
|
|
|
|
|
|
|
|
|
|
|
|
|
|
|
|
|
|
|
|
|
|
|
Desktop Clients |
LAN |
||||||||||
|
Wireless Clients |
|
|
|
|
Local Server |
|||||||||
|
|
|
|
|
|
|
|
|
|
|
|
|
|
|
|
Page 6 Verifying WAN (Internet) Connectivity
Troubleshooting Initial Setup
This section provides troubleshooting tips for the following initial setup topics:
•Troubleshooting the Setup Wizard - page 7
•Troubleshooting Internet Connection - page 7
•Configuring DHCP IP Addressing - page 8
Troubleshooting the Setup Wizard
•If you see the login screen, but not the Setup Wizard:
•Configure your Web browser to allow pop-ups.
•Log into the security appliance using “admin” as the user name and “password” as the password. After you log in, click the Wizards button at the top right.
•If you do not see the login screen or the Setup Wizard, verify the following:
•Did you correctly enter the SonicWALL TZ 210 series appliance management IP address, 192.168.168.168, in your Web browser?
•Is your computer set to accept DHCP addressing or set to a static IP address within the 192.168.168.x subnet range? If not, see the Configuring DHCP IP Addressing section, on page 8 for instructions.
•Is the Ethernet cable connected between your computer and the LAN (X0) port on your SonicWALL?
•Do you need to add the SonicWALL appliance to your list of trusted sites in your Web browser? Use the default IP address (192.168.168.168) for this.
•Is the Test LED on the front panel of your SonicWALL appliance lit? If the Test LED stays lit for more than a few minutes after the initial power on sequence, power cycle the SonicWALL appliance.
Troubleshooting Internet Connection
If you can view the SonicWALL home page, you have configured your SonicWALL TZ 100/200 series appliance correctly. If you cannot view the SonicWALL home page, try the following:
•Renew your management station DHCP address if you changed the IP address/subnet of your network during setup.
•Restart your management station to accept new network settings from the DHCP server in the SonicWALL appliance.
•Restart your Internet router or modem to communicate with the DHCP client in the SonicWALL appliance.
•Log into the SonicOS management interface and launch the Setup Wizard again by clicking the Wizards button in the top right corner of the interface. Ensure that all of your settings are correct.
SonicWALL TZ 100/200 Series Getting Started Guide Page 7
Configuring DHCP IP Addressing
If you are having trouble connecting to the SonicWALL TZ 100/ 200 series appliance, complete the following section based on your Windows operating system flavor. Configure your management computer to obtain an IP address using DHCP.
Windows Vista
1.From the Start menu, right-click Network and select
Properties.
2.In the Tasks menu, click Manage network connections. The Network Connections windows displays.
3.Right-click on your Local Area Connection and select
Properties.
4.In the list, double-click Internet Protocol Version 4 (TCP/ IP).
5.Select Obtain an IP address automatically and Obtain a DNS address automatically.
6.Click OK, and then click OK again for the settings to take effect.
Windows XP
1.From the Start menu, highlight Connect To and then select Show All Connections.
2.Right-click on your Local Area Connection and select
Properties.
3.In the list, double-click Internet Protocol (TCP/IP).
4.Select Obtain an IP address automatically and Obtain a DNS address automatically.
5.Click OK, and then click OK again for the settings to take effect.
Windows 2000
1.From the Windows Start menu, select Settings.
2.Open Network and Dial-up Connections.
3.Click Properties.
4.Highlight Internet Protocol (TCP/IP) and click Properties.
5.Select Obtain an IP address automatically and Obtain a DNS address automatically.
6.Click OK for the settings to take effect.
Page 8 Troubleshooting Initial Setup

Registering Your Appliance 2
In this Section:
This section provides instructions for registering your SonicWALL TZ 100/200 series appliance.
•Creating a MySonicWALL Account - page 10
•Registering and Licensing Your Appliance on MySonicWALL - page 10
Note: Registration is an important part of the setup process and is necessary to receive the benefits of SonicWALL security services, firmware updates, and technical support.
SonicWALL TZ 100/200 Series Getting Started Guide Page 9
Creating a MySonicWALL Account
A MySonicWALL account is required for product registration. If you already have an account, continue to the Registering and Licensing Your Appliance on MySonicWALL section.
Perform the following steps to create a MySonicWALL account:
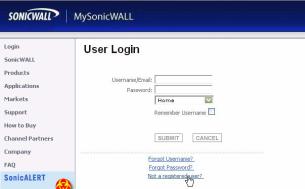
1.In your browser, navigate to www.mysonicwall.com.
2.In the login screen, click the Not a registered user? link.
3.Complete the Registration form and click Register.
4.Verify that the information is correct and click Submit.
5.In the screen confirming that your account was created, click Continue.
Registering and Licensing Your Appliance on MySonicWALL
This section contains the following subsections:
•Product Registration - page 10
•Security Services and Software - page 11
•Activating Security Services and Software - page 12
•Trying or Purchasing Security Services - page 12
Product Registration
You must register your SonicWALL security appliance on MySonicWALL to enable full functionality.
1.Login to your MySonicWALL account. If you do not have an account, you can create one at www.mysonicwall.com.
2.On the main page, type the appliance serial number in the Register A Product field. Then click Next.
3.On the My Products page, under Add New Product, type the friendly name for the appliance, select the Product Group if any, type the authentication code into the appropriate text boxes, and then click Register.
4.On the Product Survey page, fill in the requested information and then click Continue.
Page 10 Creating a MySonicWALL Account

Security Services and Software
The Service Management - Associated Products page in MySonicWALL lists security services, support options, and software, such as ViewPoint, that you can purchase or try with a free trial. For details, click the Info button.
If you purchased an appliance that is pre-licensed, you may be required to enter your activation key here unless current licenses are already indicated in the Status column with either a license key or an expiration date.
The following products and services are available for the SonicWALL TZ 100/200 series appliances:
•Gateway Service Bundles:
•Client/Server Anti-Virus Suite
•Comprehensive Gateway Security Suite
•Individual Gateway Services:
•Gateway Anti-Virus, Anti-Spyware, Intrusion Prevention
•Global Management System
•Content Filtering: Premium Edition
•High Availability Upgrade
•Desktop and Server Software:
•Enforced Client Anti-Virus and Anti-Spyware
•Global VPN Client
•Global VPN Client Enterprise
•ViewPoint
•Support Services:
•Dynamic Support 8x5
•Dynamic Support 24x7
•Software and Firmware Updates
SonicWALL TZ 100/200 Series Getting Started Guide Page 11
Loading...