


SonicOS 7
Getting Started Guide
for the TZ Series

REGULATORY MODEL NUMBERS
Regulatory Model Numbers Product Names
APL62-0F7 TZ570 / TZ670
APL62-0F8 TZ570W
APL62-0F9 TZ570P
SonicOS 7 Getting Started Guide for the TZ Series
Contents
2

Contents
Package Contents 4
Front Panel 6
Back Panel 8
Mounting Options 10
Flat Surface Option 10
Rack Mounting Option 10
Wall Mounting the TZ Appliance 11
Determining the WAN Type 12
System Requirements 13
Connectivity and Power 14
Connect Interfaces 14
Connect Power 15
Setup Options 16
Setup using Local Management 16
Setup using Cloud Management 17
Setup Using the SonicExpress App 18
Deploy Using Zero-Touch 19
Deploy Using SD-Branch 19
Running the Setup Wizard 21
Testing and Troubleshooting Connectivity 23
Registering a TZ Appliance 25
Configuring TZ Wireless LAN Settings 26
Uploading the Latest Firmware 27
Enabling PoE on the Appliance 28
SonicWall Support 30
About This Document 31
SonicOS 7 Getting Started Guide for the TZ Series
Contents
3
1
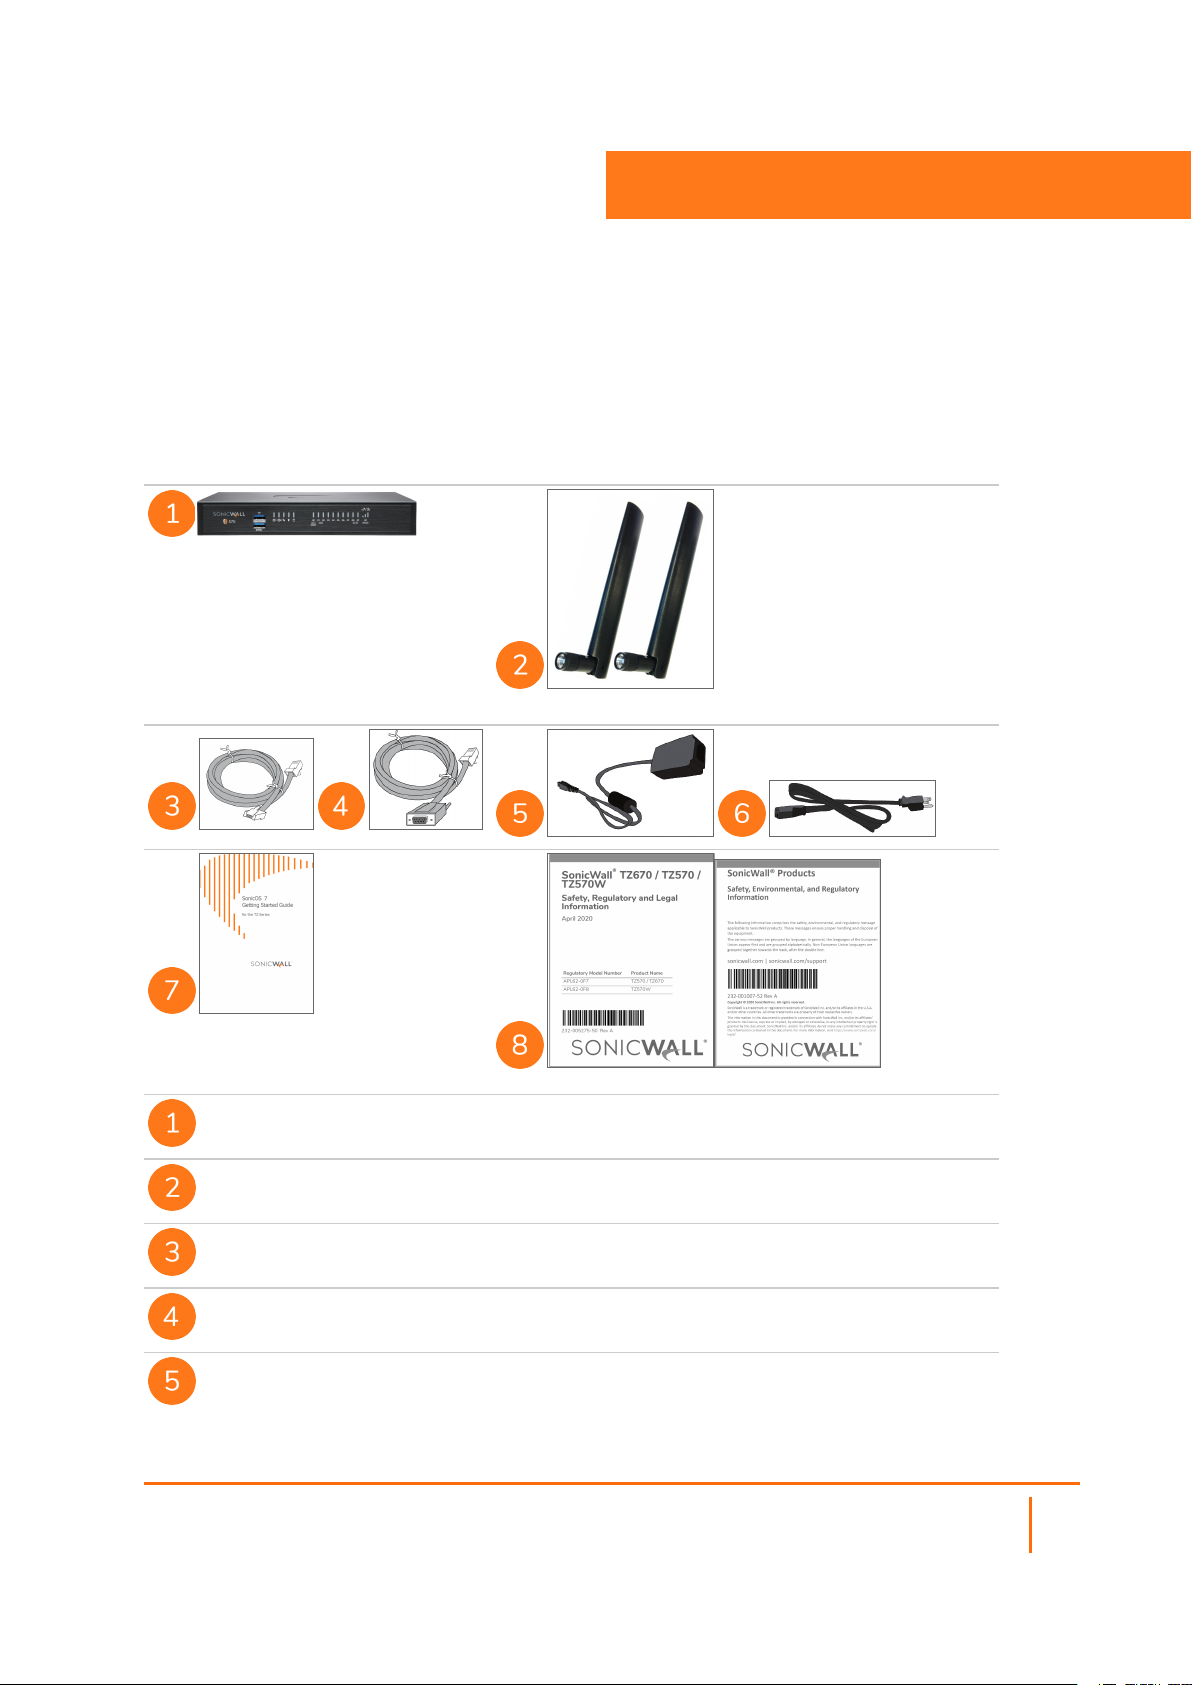
Package Contents
TZ Series appliance
Antennas (2) (TZ570W only)
Ethernet cable
Serial console cable (RJ45 to DB9)
TZ670/TZ570/TZ570W: 12VDC/60W Power adapter (1) TZ570P: 54VDC/180W Power adapter
(1)
SonicOS 7 Getting Started Guide for the TZ Series
Package Contents
4

Power cord
SonicWall TZ670/TZ570/TZ570W/TZ570P Quick Start Guide
Safety, Environmental, and Regulatory Information documents
NOTE: The included power cord is approved for use only in specific countries or regions. Before using a
power cord, verify that it is rated and approved for use in your location. The power cord is for AC mains
installation only. Refer to the TZ670 / TZ570 / TZ570W Safety, Regulatory, and Legal Information or
TZ570P Safety, Regulatory, and Legal Information document for minimum power cord rating and
additional safety information.
メモ: 添付の電源 コードに関して電気安全を確保 するために、弊社 製品 にご使用 いただく電源コードは必ず
製品同梱 の電源 コードをご使用 ください。この電 源 コードは他の製品 では使用 できません。
Items missing? Contact SonicWall Technical Support at:
https://www.sonicwall.com/support/contact-support
SonicOS 7 Getting Started Guide for the TZ Series
Package Contents
5
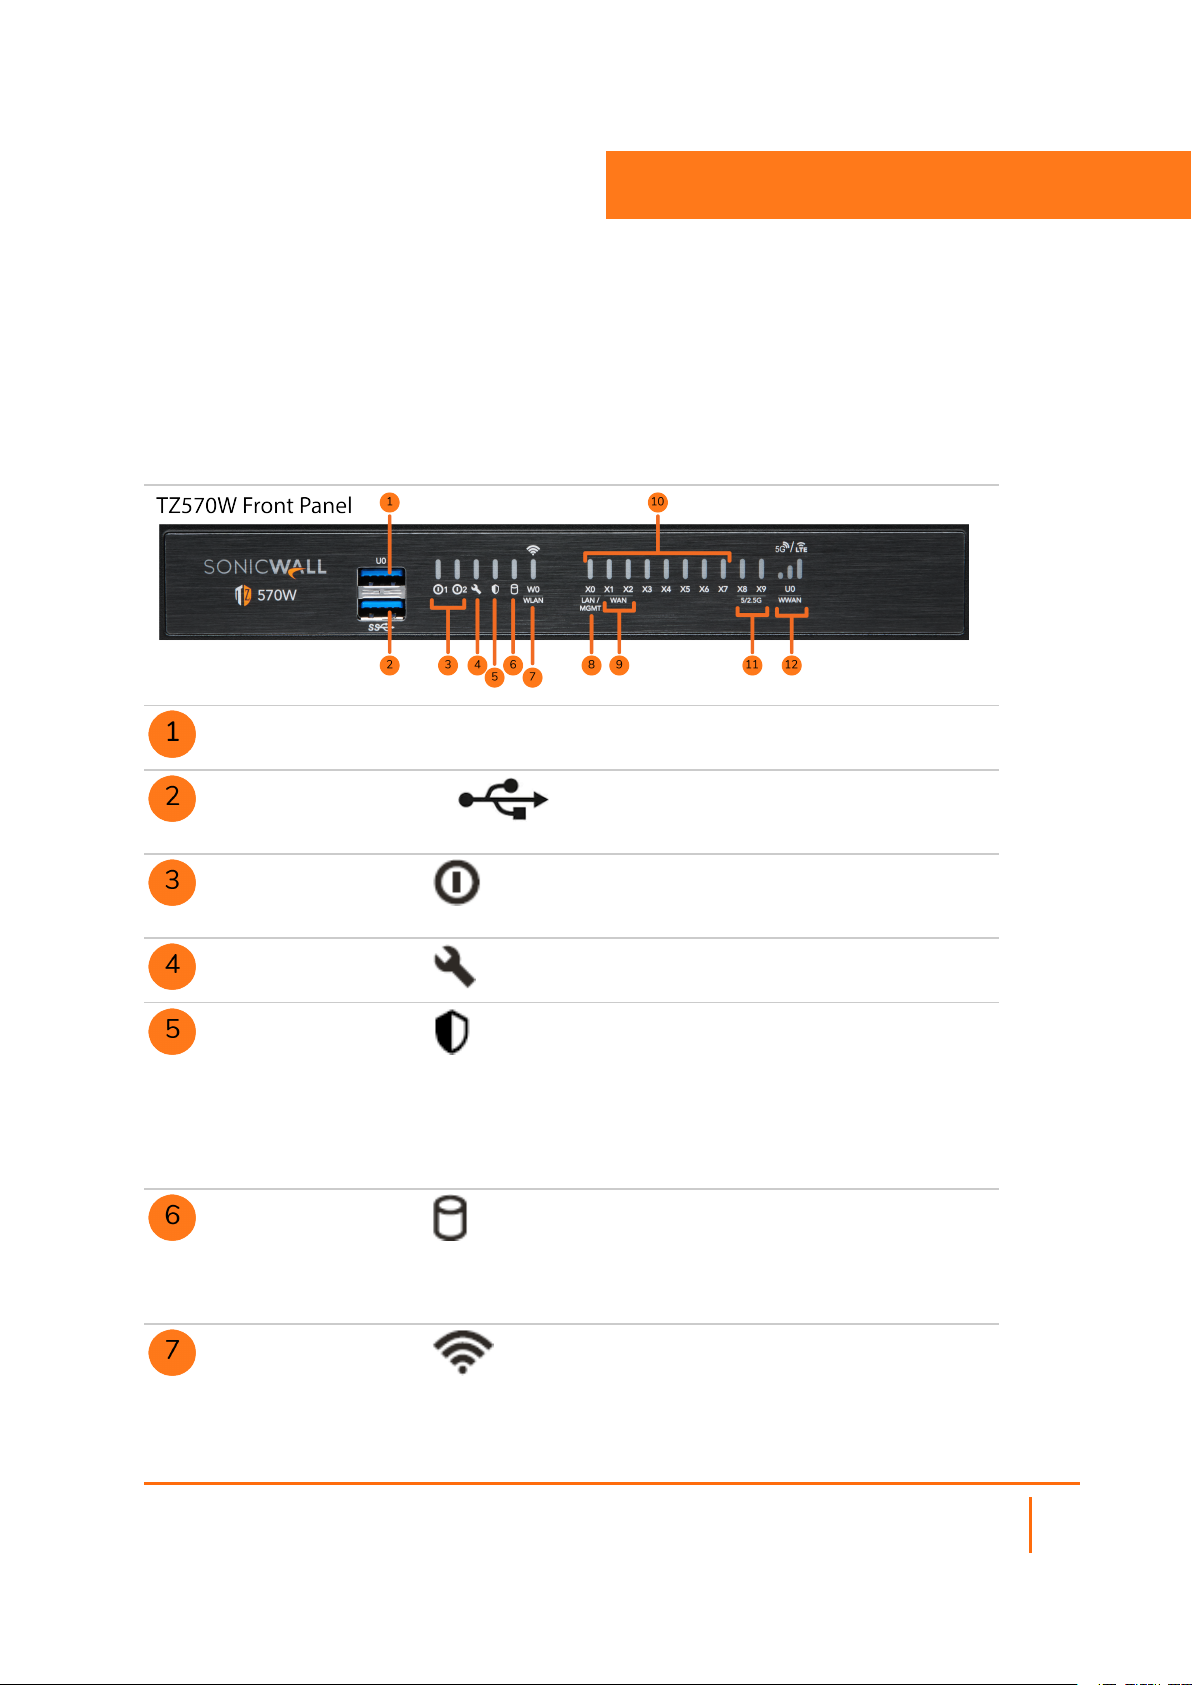
Front Panel
U0 U0 Port: USB 3.0 SuperSpeed
(SS) Port for WWAN
2
SS
USB SS 3.0 Port: For
Configuration, Recovery, Reimaging the TZ
Power LEDs: 1 = Primary, 2 =
Redundant Blue = Powered on,
Yellow = Defective adapter
Test LED: Yellow = Initializing,
Blinking Yellow = SafeMode
Security LED: Green = All
Security Services Licensed,
Blinking Yellow = Security
Services License Expired Security
Services monitored by this LED:
Gateway Anti-Virus, Intrusion
Prevention, Anti-Spyware
Storage LED: Solid Green =
Extended Storage module
present, Blinking Green =
Activity, Yellow = Storage
warning
Wireless W0 WLAN LED
(TZ570W only): Solid Green =
Wireless radio is active, Blinking
Green = Activity
SonicOS 7 Getting Started Guide for the TZ Series
Front Panel
6
XO
X1/X2
X0-X7
X8-X9
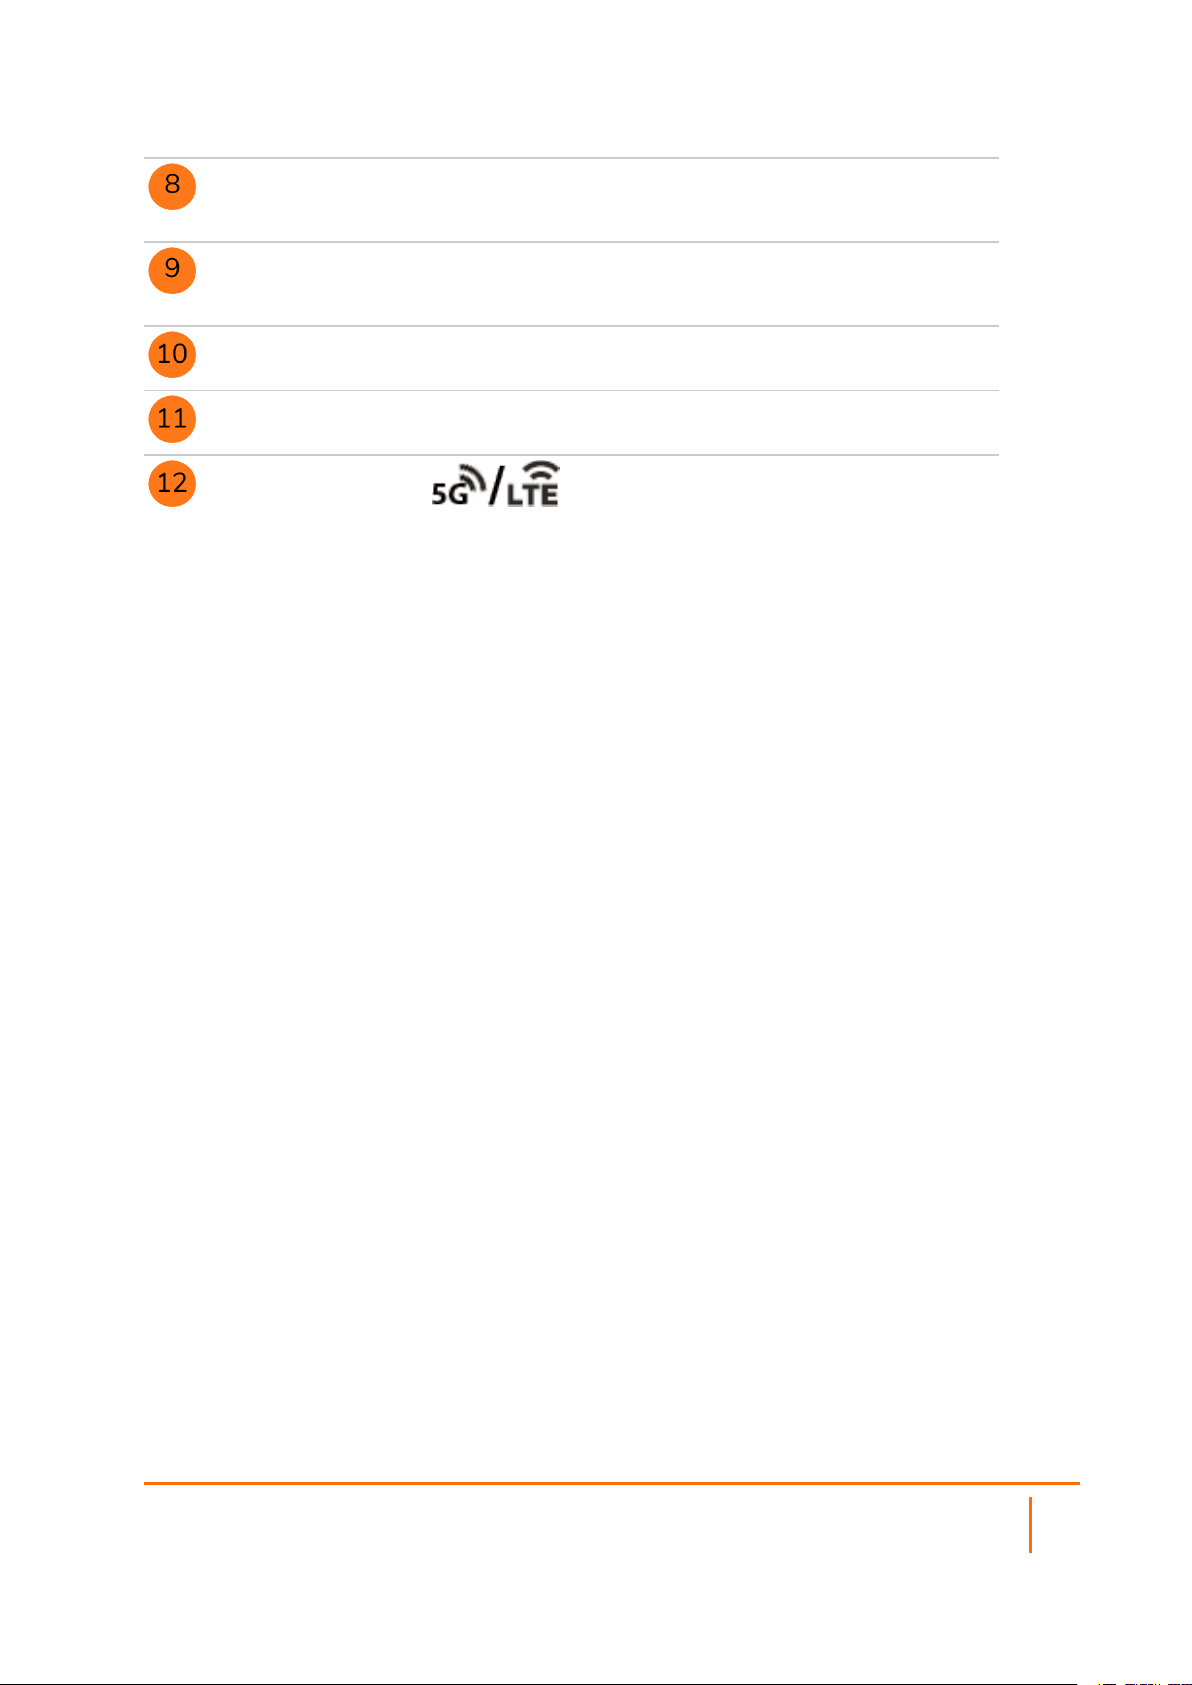
LAN/MGMT X0 Port LED: Solid
Green = 1G link, Blinking Green =
1G activity
WAN X1 and X2 Port LEDs: Solid
Green = 1G link, Blinking Green =
1G activity
U0 WWAN LEDs for USB
5G/LTE: Green = 5G/LTE signal
strength
SonicOS 7 Getting Started Guide for the TZ Series
Front Panel
7
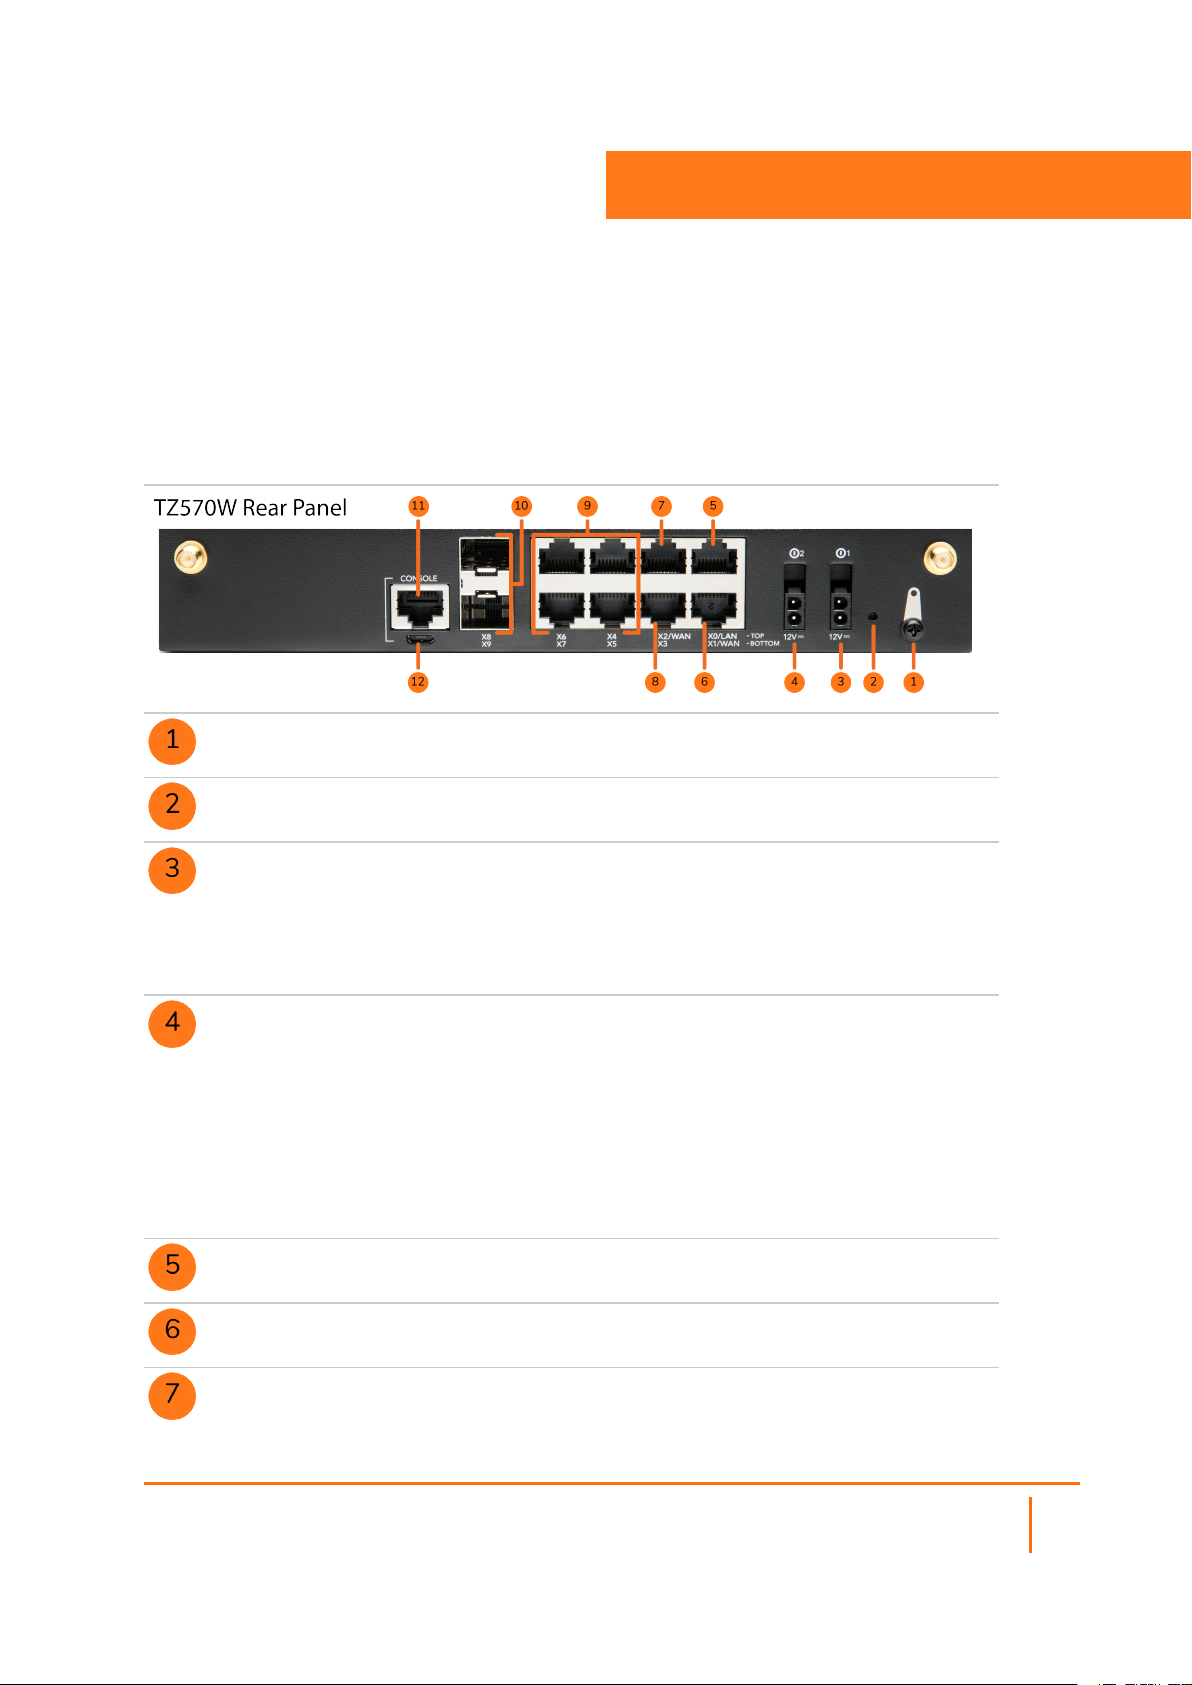
Grounding Screw
3
Back Panel
SafeMode Button: Press and hold until Test LED
starts blinking to set the TZ into SafeMode
Primary Power Input for:
l TZ670/TZ570/TZ570W: 60W 100~240VAC -
12VDC power adapter
l TZ570P: 180W 100~240VAC - 54VDC power
adapter
Redundant Power Input for:
l TZ670/TZ570/TZ570W: 60W 100~240VAC -
12VDC power adapter
l TZ570P: 180W 100~240VAC - 54VDC power
adapter
A redundant power adapter can be ordered
separately – (TZ670/TZ570/TZ570W: SKU 02SSC-3078) (TZ570P: SKU 02-SSC-0614).
X0 LAN RJ45 Port: 1 Gbps
X1 WAN RJ45 Port: 1 Gbps
X2 WAN RJ45 Port: 1 Gbps
SonicOS 7 Getting Started Guide for the TZ Series
8
Back Panel

X3 RJ45 Port: 1 Gbps
TZ570P: X3 is a PoE port
X4/X5/X6/X7 RJ45 Ports: 1 Gbps TZ570P:
X4/X5/X6/X7 are PoE ports
SFP/SFP+ Ports X8/X9: TZ670: 10 / 5 / 2.5 / 1
Gbps TZ570/TZ570W/TZ570P: 5 / 2.5 / 1 Gbps
RJ45 Console Port
Micro-USB Console Port
A Micro-USB cable is not provided with the product,
but can be ordered separately (SKU 02-SSC-5173).
SSD Storage Module – The TZ comes with a field-upgradable SSD Storage Module, accessible via a
removable panel on the bottom of the appliance. To order, refer to the price list for available SKUs.
SonicOS 7 Getting Started Guide for the TZ Series
Back Panel
9
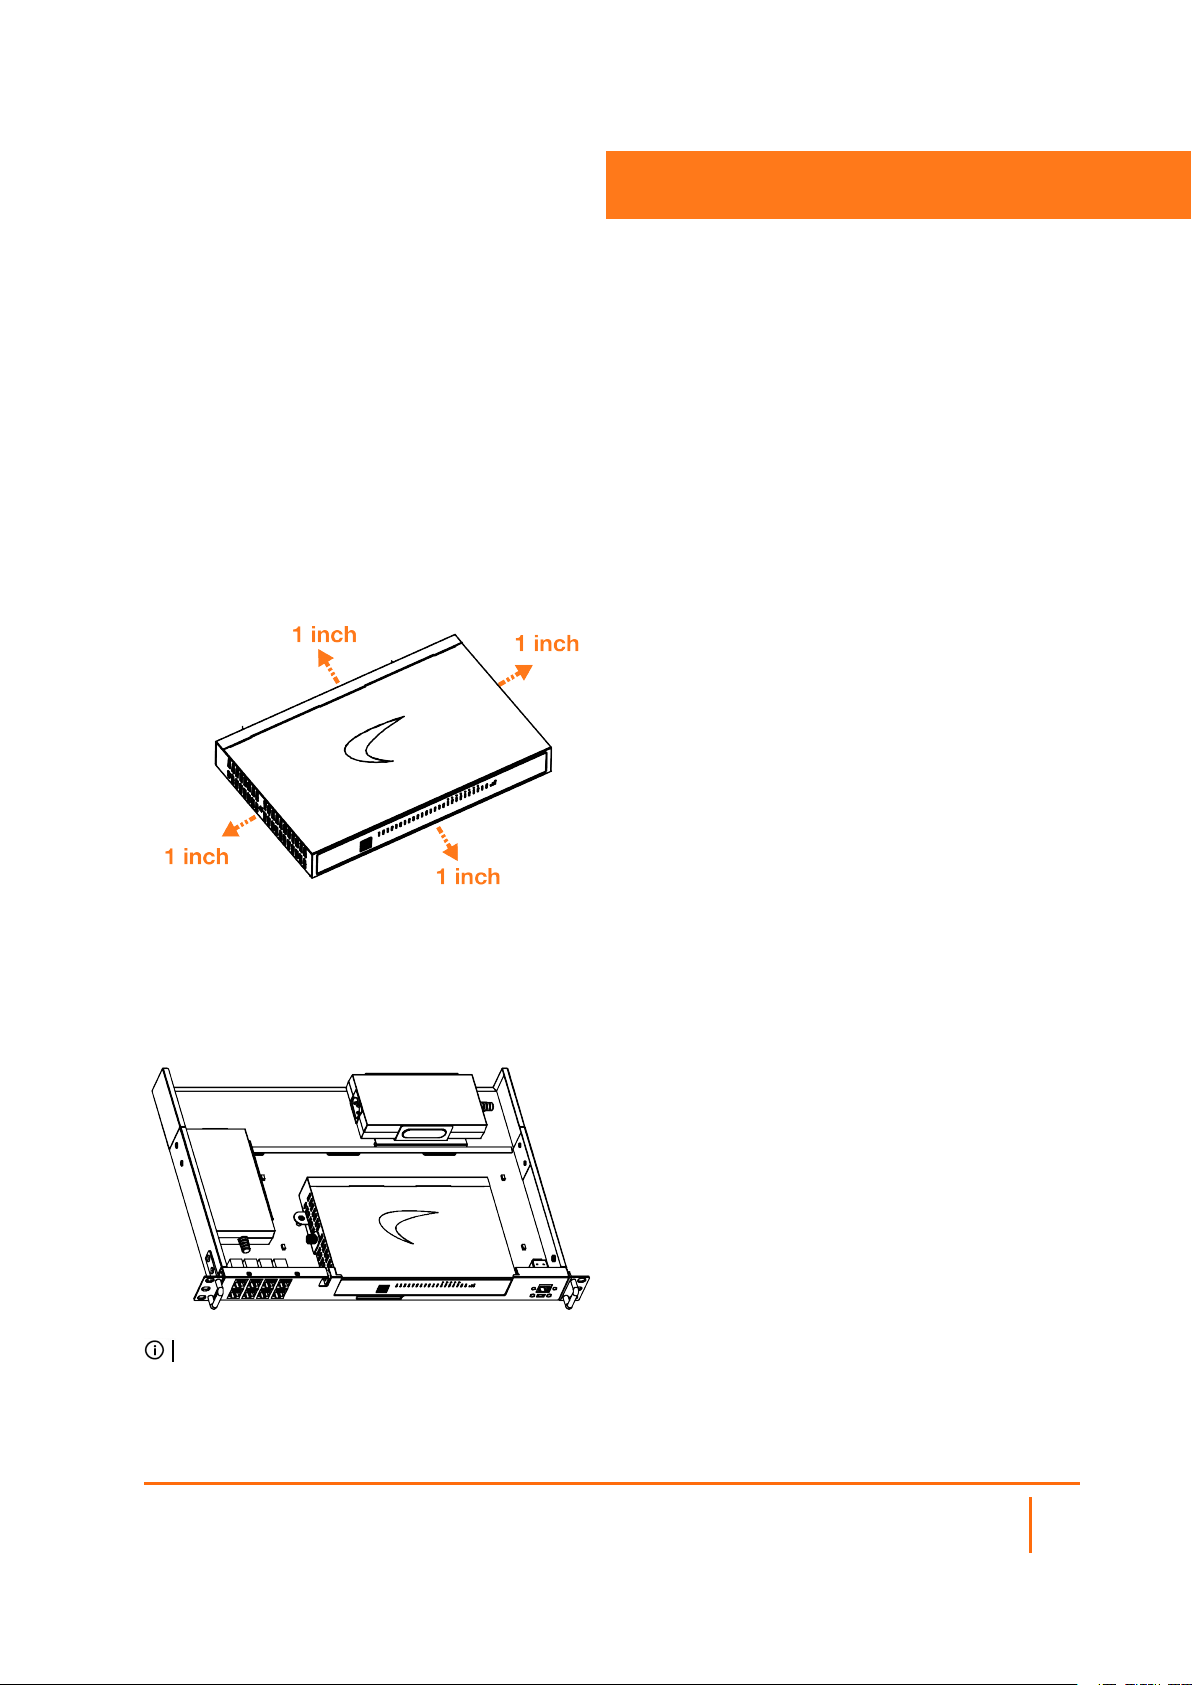
Mounting Options
Flat Surface Option
Place the TZ on a flat surface. Allow unrestricted airflow around the unit, leaving a minimum of 1 inch
(25.44mm) clearance on all sides.
4
Rack Mounting Option
SonicWall offers a rack mount tray kit for mounting your TZ and power adapter(s) in a standard 19-inch rack.
NOTE: For additional information, see the TZ Rack Mount Tray Installation Guide.
Ordering information:
SKU 02-SSC-3112 SONICWALL TZ670 / TZ570 RACKMOUNT KIT
SonicOS 7 Getting Started Guide for the TZ Series
Mounting Options
10

Wall Mounting the TZ Appliance
WARNING: Do not mount the appliance on the ceiling, it is not designed for secure ceiling
mounting.
For optional wall mounting, you need:
l Screwdriver
l Drill with appropriate size bit
l For mounting on drywall:
l Two #6 pan-head screws, 1 inch long (7mm diameter head, 25mm long)
l Two wall anchors
l For mounting on solid wood or metal:
l Two #6 pan-head wood or machine screws, 1 inch long (7mm diameter head, 25mm long)
To mount the appliance on the wall:
1.
Drill two holes 4.5 inches (11.5 cm) apart in the wall where you want to mount the appliance.
2.
If using wall anchors, insert a wall anchor into each hole.
3.
Insert a screw into each wall anchor (into each hole if not using wall anchors), leaving 3/16 inches
(0.45 cm) of the screws exposed (including screw head).
4.
Position the appliance mounting slots over the screws and press in and down until the appliance is
securely mounted.
SonicOS 7 Getting Started Guide for the TZ Series
Mounting Options
11

Determining the WAN Type
Before configuring your SonicWall appliance, you need to determine the type of WAN connection that your
setup uses. SonicWall supports the following types:
l Static—Configures the appliance for a network that uses static IP addresses.
l DHCP—Configures the appliance to request IP settings from a DHCP server on the Internet.
l PPPoE—Point-to-Point Protocol over Ethernet (PPPoE) is typically used with a DSL modem. If your
ISP requires desktop software with a username and password, select NAT with PPPoE mode.
l PPTP—Point-to-Point Tunneling Protocol (PPTP) is used to connect to a remote server. PPTP
typically supports older Microsoft Windows implementations that require tunneling connectivity.
l L2TP—Layer 2 Tunneling Protocol (L2TP) is used to transmit Layer 2 data over IP or other Layer 3
routed networks. Internet Service Providers (ISPs) often use it to enable virtual private networks
(VPNs) for customers over the Internet. It does not encrypt network traffic itself. If L2TP is not
available in the Setup Wizard, you can configure it later in the SonicOS management
interface.
l Wire Mode (2-Port Wire)—Inserts the appliance into the network using two paired interfaces.
Available Wire Mode types include Bypass, Inspect, and Secure. Bypass mode allows for quick and
non-disruptive insertion into the data path. Inspect mode extends Bypass mode with traffic inspection
for classification and flow reporting. Secure mode provides full SonicWall ReAssembly-Free Deep
Packet Inspection™ (RF-DPI) and control of network traffic.
Secure Mode also affords the same level of visibility and enforcement as conventional NAT or L2
Bridged Mode deployments, but without any L3/L4 transformations, and with no alterations of ARP or
routing behavior. If Wire Mode is not available in the Setup Wizard, you can configure it later in the
SonicOS management interface.
5
NOTE: When operating in Wire Mode, the firewall's MGMT interface is used for local management. To
enable remote management and dynamic security services and application intelligence updates, a WAN
interface (separate from the Wire Mode interfaces) must be configured for Internet connectivity.
l Tap Mode (1-Port Tap)—Using a single interface, the firewall connects to and receives mirrored
packets from an adjacent switch SPAN port. Similar to Inspect mode in Wire Mode, but with a single
port and not in the physical path of traffic. If Tap Mode is not available in the Setup Wizard, you
can configure it later in the SonicOS management interface.
For more information about WAN types including Wire Mode, Tap Mode, L2TP, and others, refer to the
SonicOS Administration documentation or online Help.
SonicOS 7 Getting Started Guide for the TZ Series
Determining the WAN Type
12

System Requirements
Before beginning the setup process, verify that you have:
l An Internet connection
l A web browser supporting Java Script and HTTP uploads
The following browsers are supported for SonicOS management:
l Chrome, version 45 and higher
l Firefox, version 38 and higher
l Internet Explorer, version 10 and higher
l Edge, all versions
l Opera, version 32 and higher
l Safari (running on non-Windows machines), version 10 and higher
6
SonicOS 7 Getting Started Guide for the TZ Series
System Requirements
13

Connectivity and Power
Connect Interfaces
l Connect the TZ WAN interface (X1 or X2) to the Internet connection using a standard Ethernet cable.
l Connect the LAN interface (X0) to your computer using a standard Ethernet cable.
7
l Connect the antennas to the appliance.
SonicOS 7 Getting Started Guide for the TZ Series
Connectivityand Power
14
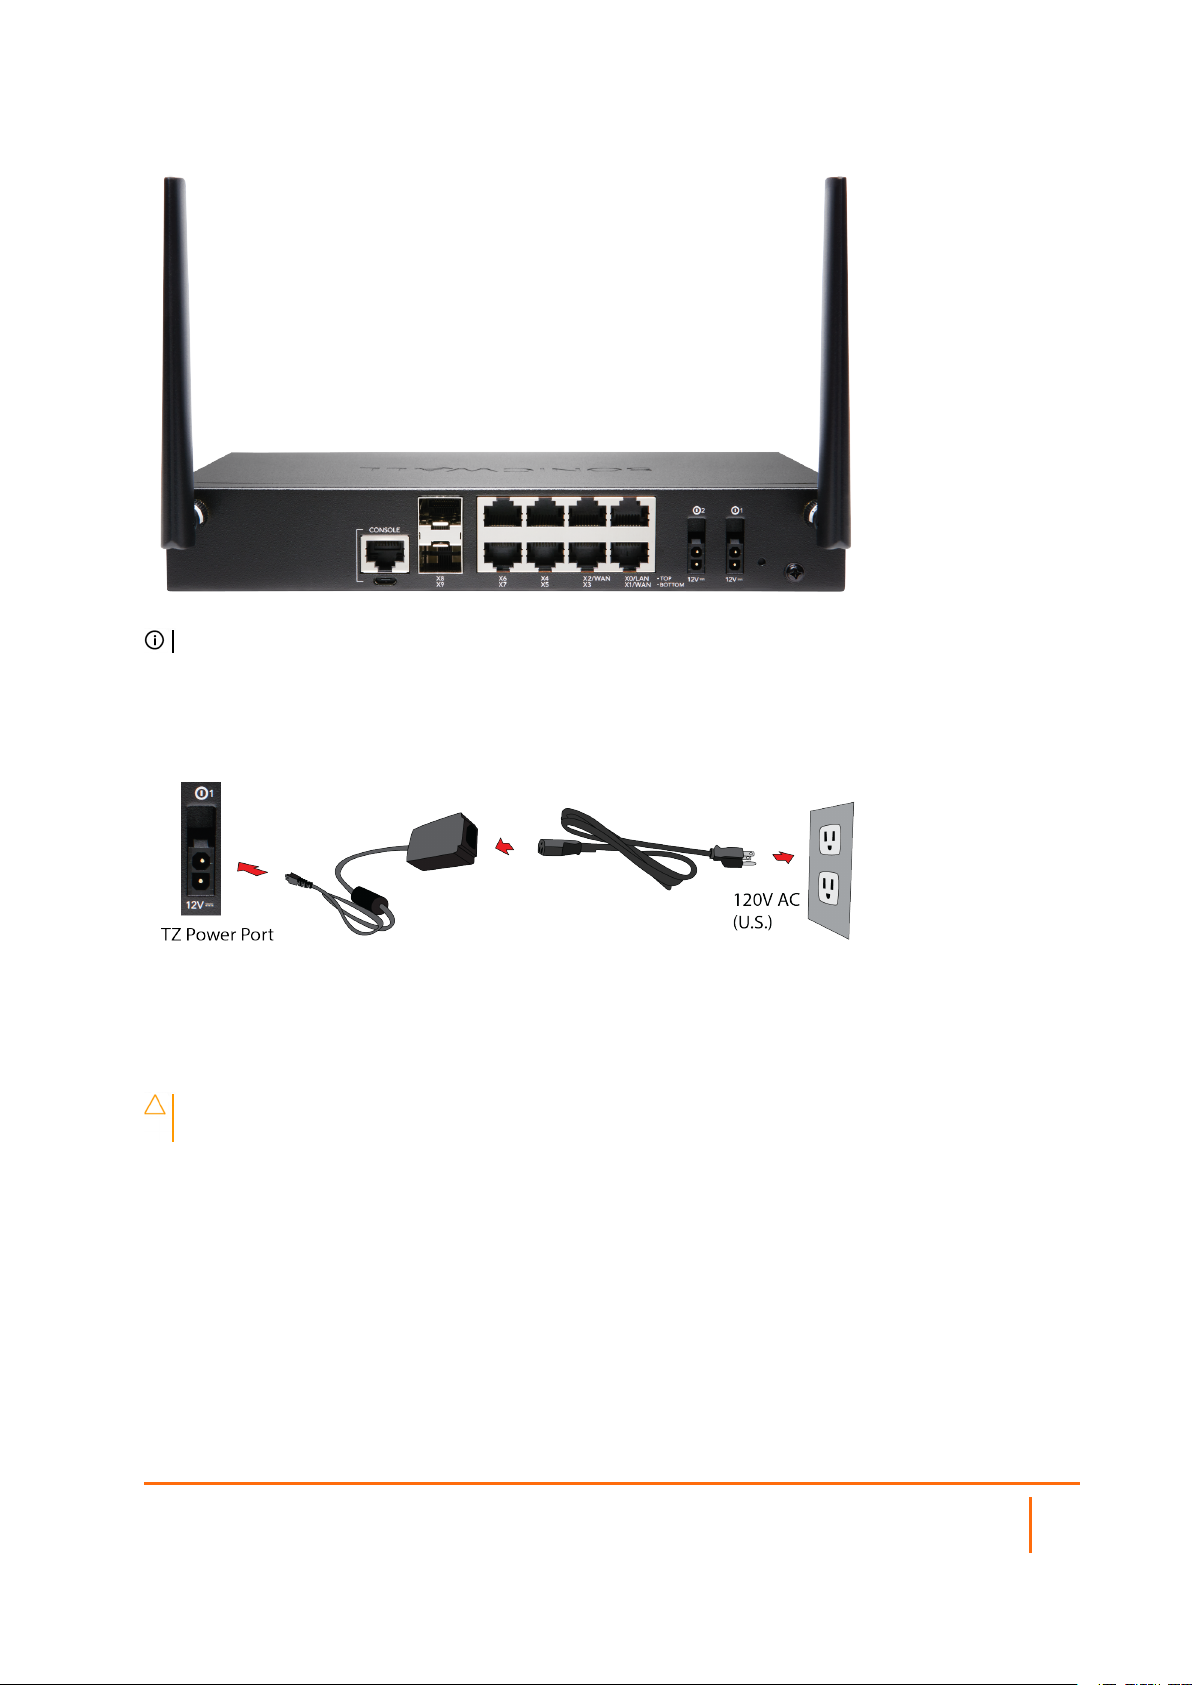
NOTE: The center antenna is labeled and is only compatible with the center antenna connector.
Connect Power
l Connect the power adapter to the appliance and to the power cable. Plug the power cable into an
appropriate outlet (100-240 volts AC).
l The TZ appliance powers on, and the Test LED lights up during the boot sequence and then turns off
when the boot sequence is complete.
CAUTION: Use only the power adapter included with this appliance. Do not use a power
adapter that is damaged or from another appliance.
SonicOS 7 Getting Started Guide for the TZ Series
Connectivityand Power
15

Setup Options
Setup using Local Management
Setup and manage your TZ by connecting it to a management computer with an Ethernet cable.
8
To minimize scrolling, set your screen resolution to at least 1920 x 1080 pixels.
To setup Local Management:
1.
Connect the TZ LAN interface (X0) to your computer.
2.
Navigate to https://192.168.168.168 in your web browser and log in with the default credentials:
3.
Username: admin
Password: password
4.
Statically assign an IP address to the computer.
5.
Launch the Setup Guide wizard or manually configure to complete initial configuration.
6.
In SonicOS, click Register and log in with your MySonicWall credentials to register your TZ.
Your TZ is now initialized and ready for use!
SonicOS 7 Getting Started Guide for the TZ Series
Setup Options
16

Setup using Cloud Management
For Cloud Management, use SonicWall Capture Security Center (CSC) with Zero Touch to manage and
configure your TZ.
NOTE: This option requires a Cloud Management license.
To manage and configure your TZ:
1.
Log into CSC at cloud.sonicwall.com using your MySonicWall credentials.
2.
Select the MySonicWall tile to register your TZ.
3.
Enable Zero Touch and NSM Essential/NSM Advanced license on your TZ in MySonicWall.
4.
Select a Data Center accordingly (for first time users only).
5.
Modify the Managed By option from On Box to Cloud, and then enable Zero Touch.
6.
Select the Network Security Manager tile in the CSC to manage your TZ from the cloud.
SonicOS 7 Getting Started Guide for the TZ Series
Setup Options
17

Setup Using the SonicExpress App
Use SonicWall SonicExpress on your smart phone to register and configure your TZ.
NOTE: After the initial setup, be sure to download the latest firmware from MySonicWall and upgrade
your TZ.
To setup using the SonicExpress App:
1.
Download and launch the SonicExpress App on your iOS or Android device.
2.
Tap Login and log in with your MySonicWall credentials.
3.
Select the Tenant for the TZ. Tenants can contain multiple SonicWall appliances.
4.
Connect your iOS/Android device to the TZ with the smart phone USB cable. This cable is not
supplied with the TZ.
SonicOS 7 Getting Started Guide for the TZ Series
Setup Options
18

NOTE: Use the USB cable from your mobile device.
5.
Use the Setup Guide to register the TZ, synchronize service licenses, change the password, and
configure essential interface settings.
Deploy Using Zero-Touch
Your SonicWall appliance is Zero-Touch enabled.
Zero-Touch makes it easy to register your unit and add it to Capture Security Center for management and
reporting in three simple steps.
For information about using Zero-Touch, see the Zero-Touch Deployment Guide on the Support portal.
After completing the Zero-Touch deployment process, you can skip to Mounting the TZ Appliance or
Enabling PoE on the Appliance in this guide.
Deploy Using SD-Branch
SD-Branch combines SD-WAN, SD-LAN, unified security and centralized management for distributed
enterprises. SonicWall Secure SD-Branch integrates next-generation firewalls, network access switches,
secure WiFi access points, endpoint security, cloud application security and single-pane-of-glass
management.
The latest SonicWall TZ series, are the first desktop form factor next-generation firewalls (NGFW) with 10 or
5 Gigabit Ethernet interfaces. The series consist of a wide range of products to suit a variety of use cases.
Designed for small, mid-sized organizations and distributed enterprise with SD-Branch locations, the 7th
generation (Gen 7) TZ series delivers industry-validated security effectiveness with best-in-class priceperformance. These NGFWs address the growing trends in web encryption, connected devices and highspeed mobility by delivering a solution that meets the need for automated, real-time breach detection and
prevention.
SonicOS 7 Getting Started Guide for the TZ Series
Setup Options
19

SonicOS 7 Getting Started Guide for the TZ Series
Setup Options
20

Running the Setup Wizard
l Navigate to https://192.168.168.168 in your web browser.
TIP: Your computer should be using DHCP IP addressing.
l Click the link in “To launch the SonicWall Setup Guide, click here.”
9
l The SonicOS Setup Guide opens.
l Click NEXT and follow the prompts in the Setup Guide.
SonicOS 7 Getting Started Guide for the TZ Series
Running the Setup Wizard
21

l On the Credentials screen, enter a new administrator password. Click NEXT.
NOTE: The default administrator credentials are Username: admin Password: password
l The automatically assigned DHCP IP server settings are displayed on the IP Configuration screen.
Click NEXT.
NOTE: For manual configuration, refer to the latest SonicOS Quick Configuration
Administration documentation.
l On the Setup Complete screen, review the settings and then click DONE. The SonicOS login screen
displays.
SonicOS 7 Getting Started Guide for the TZ Series
Running the Setup Wizard
22

Testing and Troubleshooting
To test your Internet connection:
1.
Reset your computer to use DHCP IP addressing and connect it to your LAN subnet or to the
appliance X0 interface.
2.
Point your browser to the X0 IP address configured during initial setup (default: 192.168.168.168).
3.
Log into SonicOS using the configured credentials (default: admin/password).
4.
In a command prompt window, type: ping sonicwall.com. You should receive a reply.
5.
Open another browser tab or window and point it to https://www.sonicwall.com or another valid web
site. If the site displays, you have correctly configured your appliance.
10
Connectivity
To troubleshoot your Internet connection:
l Verify that the Local Area Connection settings on your management computer are set to use either
DHCP or a static IP on the LAN subnet. Restart it or renew the DHCP address.
l Verify that the WAN interface being used for Internet connectivity is not configured in Wire Mode or
Tap Mode.
l Restart your Internet router or modem to communicate with the DHCP client in SonicOS on the
appliance.
l Check all cable connections and IP addresses.
To troubleshoot your MGMT connection, consider the following:
l Did you correctly enter the SonicWall NSA management IP address beginning with “http://” or
“https://” in your web browser?
l Did you try restarting your management station while it is connected to the appliance?
l Are the Local Area Connection settings on your computer set to a static IP address on the
192.168.1.0/24 subnet?
l Is the Ethernet cable connected to your computer and to the MGMT port on your appliance, and are
the connector clips properly seated in the ports?
To troubleshoot your LAN connection, consider the following:
l Did you correctly enter the IP address for the SonicWall X0 interface into your web browser,
beginning with “http://” or “https://”?
l Did you try restarting your management station while it is connected to the appliance?
SonicOS 7 Getting Started Guide for the TZ Series
Testing and Troubleshooting Connectivity
23

l Are the Local Area Connection settings on your computer set to one of the following:
l Obtain an IP address automatically using DHCP
l A static IP address on the default LAN subnet (192.168.168.0/24)
l A static IP address on the configured LAN subnet, if you changed it during initial setup
l Is the Ethernet cable connected to your computer and to the X0 (LAN) port on your appliance, and are
the connector clips properly seated in the ports?
SonicOS 7 Getting Started Guide for the TZ Series
Testing and Troubleshooting Connectivity
24

11
Registering a TZ Appliance
Registration is an important part of the setup process and is necessary in order to receive the benefits of
SonicWall security services, firmware updates, and technical support.
To register the appliance from SonicOS:
1.
Continue from the Setup Guide or point your browser to the appliance LAN IP address (default
https://192.168.168.168) and log in using the administrator credentials.
2.
Click Register in the top banner or on the MONITOR | Current Status | System Status page under
Security Services.
TIP: Registering the appliance from SonicOS requires that DNS Server settings are configured on the
WAN (X1) interface.
3.
Log in using your MySonicWall account name and password. If you do not have a MySonicWall
account, go to http://www.mysonicwall.com to create an account.
4.
MySonicWall directly obtains the necessary information from the appliance. When finished, a
message that the registration has been completed appears. Click CONTINUE.
SonicOS 7 Getting Started Guide for the TZ Series
Registering a TZ Appliance
25

Configuring TZ Wireless LAN Settings
To configure the TZ Wireless settings for a LAN:
1.
Log in to your TZ Wireless appliance and click the Wizards icon at the top of the screen.
2.
Select the radio button for the Wireless Guide wizard.
12
3.
Click Next and follow the prompts in the Wireless Guide wizard. For more information and
complete procedures, refer to the latest SonicOS Quick Configuration Guide.
For international (non USA or Japan) TZ370 Wireless appliances, you are asked to select a country code
when using the Wireless Guide or when you initially navigate to the DEVICE | Internal Wireless >
Settings page. Be sure to select the country code for the country in which the appliance is deployed, even if
you are not currently in that country.
IMPORTANT: If you select the country code for Canada, it cannot be changed except by contacting
SonicWall Support.
SonicOS 7 Getting Started Guide for the TZ Series
Configuring TZ WirelessLAN Settings
26

Uploading the Latest Firmware
To get and upload the latest firmware:
1.
In a web browser, navigate to http://www.mysonicwall.com.
2.
Navigate to Resources & Support > My Downloads and select TZ Series from the Select a
Product drop-down menu.
3.
Click the download button for the firmware you want and save the file to a location on your computer.
4.
On the TZ appliance, navigate to the DEVICE | Settings | Firmware and Settings page and click
Upload Firmware.
5.
Click OKto backup current settings.
6.
Click Browse to select the firmware you just downloaded, then click Upload.
13
7.
Click the Boot icon for your new firmware.
SonicOS 7 Getting Started Guide for the TZ Series
Uploading the Latest F irmware
27

14
Enabling PoE on the Appliance
If your TZ is designed for PoE support, the PoE ports must be enabled individually for powered device (PD)
detection and classification. By default, the highest port number has the highest priority in powering on a
PD. You can control the supplied power level and port priority from SonicOS.
To enable PoE and configure basic PoE settings:
1.
Point your browser to the LAN or WAN IP address and log into the appliance as an administrator
(default: admin / password).
2.
Navigate to the NETWORK | System | > PoE Settings page.
3.
Select Enable PoE. The display changes:
4.
Accept the default of 100 in the Max Power Threshold field or type in a number between 1 and 100.
This is the percentage of the maximum available power that the PoE controller allocates to the PoE
ports on the appliance.
5.
Click Accept.
SonicOS 7 Getting Started Guide for the TZ Series
Enabling PoE on the Appliance
28

6.
The NETWORK | System | > PoE Settings page displays an interactive graphical representation of
the PoE port status under PoE Status, with the PoE Monitor table showing the per port Power
Mode (802.3 AT or 802.3 AF), Power Allocation, and Power Consumption.
7.
To enable PoE power on a specific port, click the port image or checkbox of the port then click either
Configure above the PoE Monitor table, or the Edit icon in the PoE Monitor table row for that port.
The Poe Port Settings dialog displays the Power Enable option along with other options.
8.
Select Power Enable, then set the desired options and click Save.
9.
Power Mode – Changes to this option do not take effect unless a PoE device is connected to that
port. The TZ detects the mode from the device, but you can change the mode here. For example, if
the Power Mode is detected as 802.3 AT, you can change it to 802.3 AF if you know that the device
requires a lower power level.
10.
Power Priority Level – By default, this option is set to Low for all PoE ports and the highest
numbered PoE port has the highest priority for power as distributed by the PoE controller. Set this
option to High on a lower numbered port to give it a higher priority.
11.
If the Power Mode is detected as 802.3 AT and then changed to 802.3 AF, the PoE device shuts
down if its power consumption spikes above the 802.3 AF power budget for that port. Similarly,
reducing the Max Power Threshold so that not all PoE ports have some power prevents devices
connected to the lower priority ports from powering on.
12.
Repeat Step 7 and Step 8 to enable PoE power on other ports, as needed.
13.
The PoE Status display shows blue for the PoE port when an 802.3 ATdevice is connected. A green
port is displayed when an 802.3 AFdevice is connected.
See the SonicOS Network administration guide for more information.
SonicOS 7 Getting Started Guide for the TZ Series
29
Enabling PoE on the Appliance

15
SonicWall Support
Technical support is available to customers who have purchased SonicWall products with a valid
maintenance contract.
The Support Portal provides self-help tools you can use to solve problems quickly and independently, 24
hours a day, 365 days a year. To access the Support Portal, go to https://www.sonicwall.com/support.
The Support Portal enables you to:
l View knowledge base articles and technical documentation
l View and participate in the Community forum discussions at
https://community.sonicwall.com/technology-and-support.
l View video tutorials
l Access https://mysonicwall.com
l Learn about SonicWall professional services
l Review SonicWall Support services and warranty information
l Register for training and certification
l Request technical support or customer service
To contact SonicWall Support, visit https://www.sonicwall.com/support/contact-support.
SonicOS 7 Getting Started Guide for the TZ Series
30
SonicWall Support

About This Document
NOTE: A NOTE icon indicates supporting information.
IMPORTANT: An IMPORTANT icon indicates supporting information.
TIP: A TIP icon indicates helpful information.
CAUTION: A CAUTION icon indicates potential damage to hardware or loss of data if
instructions are not followed.
WARNING: A WARNING icon indicates a potential for property damage, personal injury, or
death.
SonicOS Getting Started Guide for the TZ Ser ies
Updated - December 2020
Software Version - 7
232-005546-00 Rev A
Copyright © 2020 SonicWall Inc. All rightsreserved.
The information in thisdocument is pr ovided in connection with SonicWalland/or itsaffiliates’products. No license, express or
implied, byestoppel or otherwise, to any intellectualproperty right isgranted by this document or inconnection with the sale of
products. EXCEPT AS SET FORTH IN THE T ERMS AND CONDITIONS AS SPECIFIED IN THE LICENSE AGREEMENT FOR
THIS PRODUCT, SONICWALL AND/OR ITS AFFILIATES ASSUME NO LIABILITY WHATSOEVER AND DISCLAIMS ANY
EXPRESS, IMPLIED OR STATUTORY WARRANTY RELATING TO ITS PRODUCT S INCLUDING, BUT NOT LIMITED TO,
THE IMPLIED WARRANTY OF MERCHANTABILITY, FITNESS FOR A PARTICULAR PURPOSE, OR NON-INFRINGEMENT.
IN NO EVENT SHALL SONICWALL AND/OR ITS AFFILIATES BE LIABLE FOR ANY DIRECT , INDIRECT, CONSEQUENTIAL,
PUNITIVE, SPECIAL OR INCIDENTAL DAMAGES (INCLUDING, WITHOUT LIMITATION, DAMAGES FOR LOSS OF
PROFITS, BUSINESS INTERRUPTION OR LOSS OF INFORMATION) ARISING OUT OF THE USE OR INABILITY TO USE
THIS DOCUMENT , EVEN IF SONICWALL AND/OR ITS AFFILIATES HAVE BEEN ADVISED OF THE POSSIBILITY OF SUCH
DAMAGES. SonicWalland/or itsaffiliates make no representations or warr anties with respect to the accuracy or completeness of
the contents of this document and reserves the right to make changes to specificationsand product descriptions at any time without
notice. and/or its affiliatesdo not make any commitment to update the information contained in thisdocument.
For more information, visithttps://www.sonicwall.com/legal.
End User Product Agreement
To view the SonicWallEnd User Product Agreement, go to: https://www.sonicwall.com/legal/end-user-product-agr eements/.
Open Source Code
SonicWall Inc. is able to provide a machine-readable copy of open source code with restrictive licensessuch as GPL, LGPL, AGPL
when applicable per license requirements. T o obtain a complete machine-readable copy, send your written requests, along with
certified check or money order in the amount of USD 25.00 payable to “SonicWallInc.”, to:
General Public License Source Code Request
Attn: Jennifer Anderson
1033 McCarthy Blvd
Milpitas, CA 95035
SonicOS 7 Getting Started Guide for the TZ Series
SonicWall Support
31
 Loading...