

Page 1

SonicOS and SonicOSX 7
Users
Administration Guide
for the TZand NSv Series
Page 2

Contents
Configuring Users Status 4
Logging Out Users 5
Logging Out a Single User 5
Logging Out Multiple Users 5
Displaying Inactive Users 5
Displaying Unauthenticated Users 6
Displaying the User Count 6
Refreshing the Users List 6
Configuring User Settings 7
User Login Settings 7
Setting the Authentication Method for Login 7
Setting the Single-Sign-On Methods 9
Requiring User Names be Treated as Case-Sensitive 9
Preventing Users From Logging in from More than One Location 10
Forcing Users to Log In Immediately After Changing Their Passwords 10
Displaying User Login Information Since the Last Login 10
One-Time Password Settings 10
Configuring the User Web Login Settings 11
Setting the Timeout for the Authentication Page 11
Setting How the Browser is Redirected 11
Managing Redirections to the Login Page 12
Using a CHAP challenge to Authenticate Users 13
Redirecting Unauthenticated Users 13
Adding URLs to Authentication Bypass 14
User Session Settings 14
User Session Settings for SSO-Authenticated Users 16
User Session Settings for Web Login 16
Accounting 17
Configuring RADIUS Accounting 18
Configuring TACACS+ Accounting 20
Configuring Guest Services 21
Adding Guest Profiles 21
Editing Guest Profiles 23
Deleting Guest Profiles 23
Configuring Guest Accounts 24
Adding Guest Accounts 24
Editing Guest Accounts 26
SonicOS/X 7 Users Administration Guide for the TZand NSv Series
Contents
2
Page 3

Deleting Guest Accounts 26
Deleting a Guest Account 26
Deleting Multiple Guest Accounts 26
Deleting All Guest Accounts 27
Managing Guest Status 27
Logging Out Guests 27
Logging Out All Guests 27
Configuring Local Users and Groups 28
About Authentication and Passwords 28
Using Two-Factor Authentication 28
Enforcing First Login Password Change 28
Configuring Local Users 29
Quota Control for all Users 29
Viewing Local Users 30
Adding Local Users 30
Editing Local Users 33
Configuring Local Groups 33
Adding Local Groups 34
Editing Local Groups 37
SonicWall Support 38
About This Document 39
SonicOS/X 7 Users Administration Guide for the TZand NSv Series
Contents
3
Page 4
Configuring Users Status
NOTE: References to SonicOS/X indicate that the functionality is available in both SonicOS and
SonicOSX.
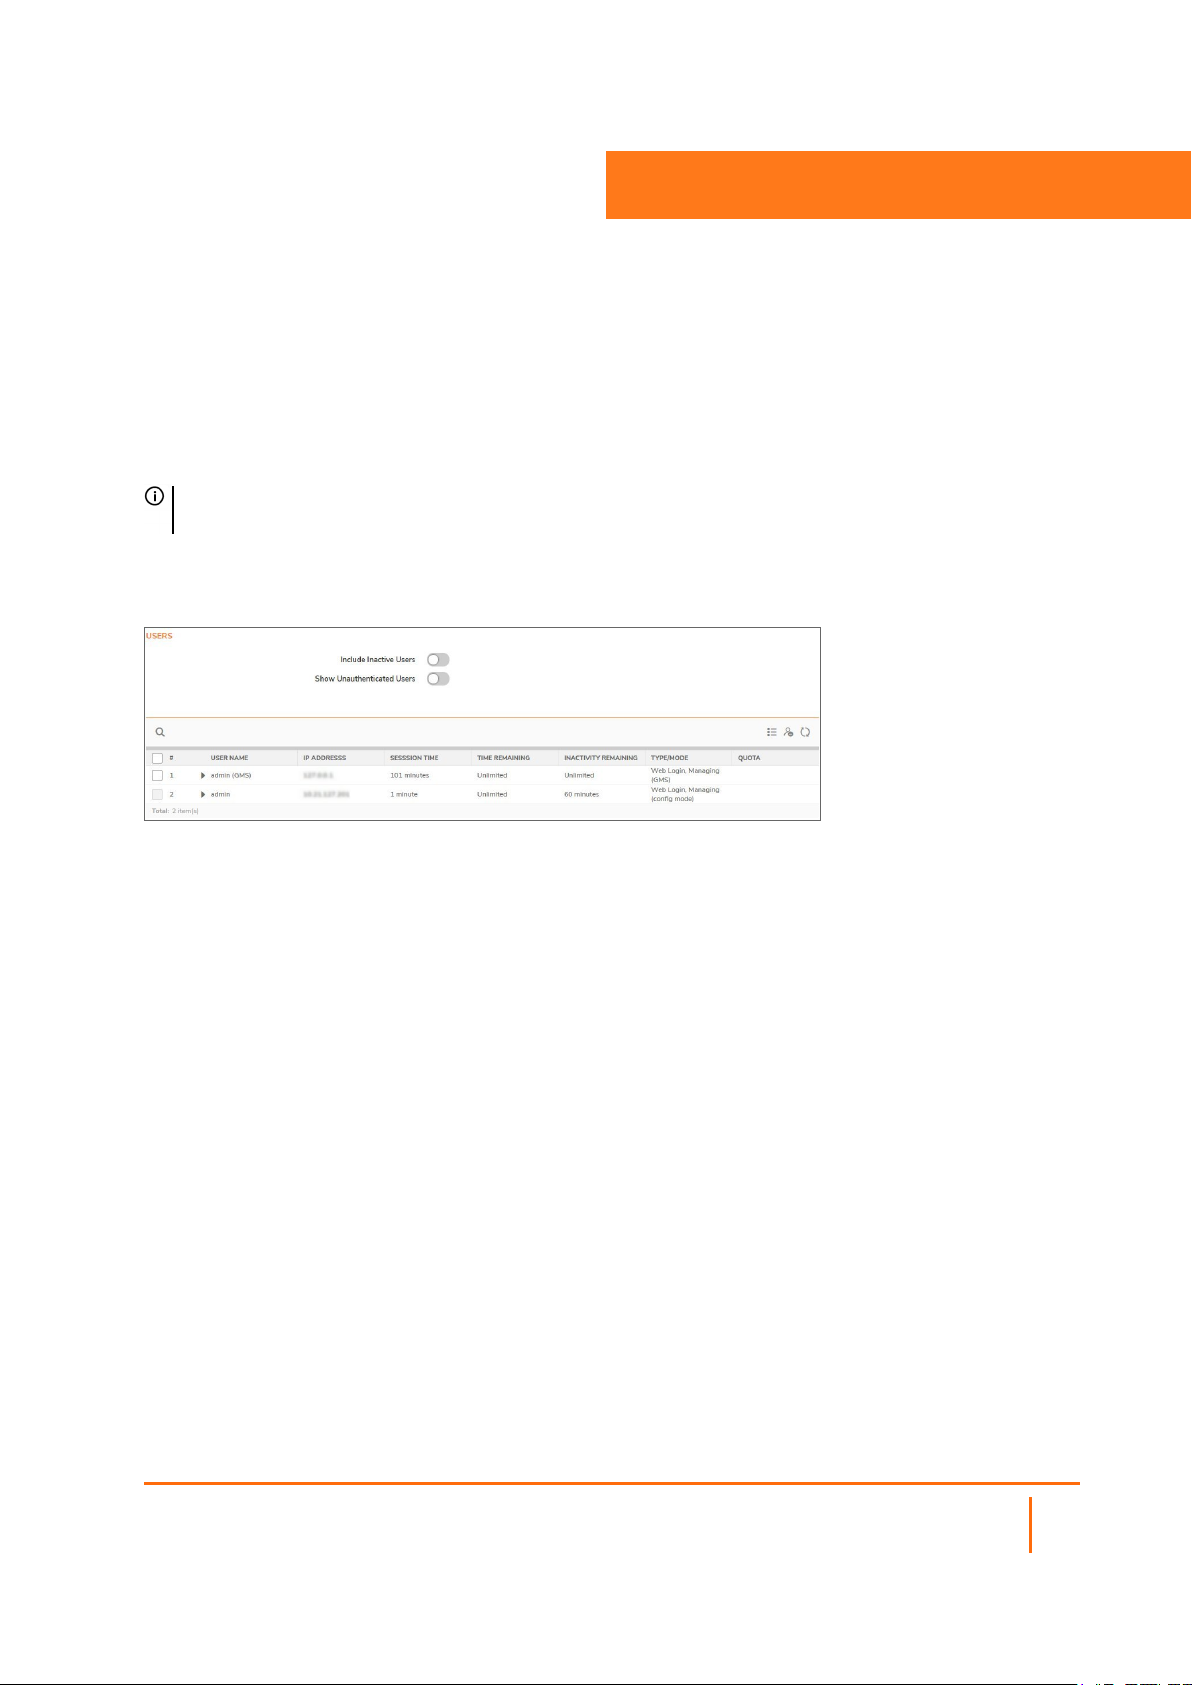
The Users > Status page displays the Active User Sessions on the firewall. IPv4 and IPv6 IP addresses
are accepted/displayed in the Active User Sessions table.
1
The Active User Sessions table lists:
l User Name
l IP Address
l Session Time
l Time Remaining
l Inactivity Remaining
l Type/Mode
l Settings
l Logout
Topics:
l Logging Out a Single User
l Logging Out Multiple Users
l Displaying Inactive Users
l Displaying Unauthenticated Users
l Displaying the User Count
l Refreshing the Users List
SonicOS/X 7 Users Administration Guide for the TZand NSv Series
Configuring Users Status
4
Page 5

Logging Out Users
Topics:
l Logging Out a Single User
l Logging Out Multiple Users
Logging Out a Single User
To log out a user:
1.
Navigate to the Users > Status page.
2.
Select the user you would like to logout.
3.
Click Logout Selected Users.
Logging Out Multiple Users
To log out multiple users:
1.
Navigate to the Users > Status page.
2.
Select the checkbox at the top left of the list, just below the Search icon, to select all of the users
currently displayed.
3.
Click Logout Selected Users.
Displaying Inactive Users
By default, only active users are displayed in the Users list.
To display inactive users:
1.
Navigate to the Users > Status page.
2.
Click the slider next to Include Inactive Users above the list.
Inactive users will now also be displayed in the Users list.
SonicOS/X 7 Users Administration Guide for the TZand NSv Series
5
Configuring Users Status
Page 6

Displaying Unauthenticated Users
To display unauthenticated users:
1.
Navigate to the Users > Status page.
2.
Click the slider next to Show Unauthenticated Users above the list.
Unauthenticated users will now also be displayed in a separate Unauthenticated Users list below
the Users list.
Displaying the User Count
To display the current user count:
1.
Navigate to the Users > Status page.
2.
Click the Show User Count icon on the far right of the toolbar above the Users list.
The User Counts window displays:
l User Type
l Active
l Inactive
l Total
3.
Click the X on the top right of User Counts window to close it.
Refreshing the Users List
To refresh the Users list:
1.
Navigate to the Users > Status page.
2.
Click the Refresh icon on the far right of the toolbar above the Users list.
SonicOS/X 7 Users Administration Guide for the TZand NSv Series
6
Configuring Users Status
Page 7

2
Configuring User Settings
In addition to the regular authentication methods, SonicOS/X allows you to use Lightweight Directory Access
Protocol (LDAP) to authenticate users. LDAP is compatible with Microsoft’s Active Directory.
For SonicWall appliances, you can select the SonicWall Single Sign-On Agent to provide Single Sign-On
functionality. Single Sign-On (SSO) is a transparent user authentication mechanism that provides privileged
access to multiple network resources with a single workstation login. SonicWall network security appliances
provide SSO functionality using the SonicWall Single Sign-On Agent (SSO Agent) to identify user activity
based on workstation IP address when Active Directory is being used for authentication. The SonicWall SSO
Agent must be installed on a computer in the same domain as Active Directory.
Topics:
l User Login Settings
l One-Time Password Settings
l Configuring the User Web Login Settings
l User Session Settings
User Login Settings
Topics:
l Setting the Authentication Method for Login
l Setting the Single-Sign-On Methods
l Requiring User Names be Treated as Case-Sensitive
l Preventing Users From Logging in from More than One Location
l Forcing Users to Log In Immediately After Changing Their Passwords
l Displaying User Login Information Since the Last Login
Setting the Authentication Method for Login
To set the authentication method for login:
1.
Navigate to the Users > Settings page.
2.
Select one of the following authentication methods from Authentication method for login:
SonicOS/X 7 Users Administration Guide for the TZand NSv Series
Configuring User Settings
7
Page 8

Local Users To configure users in the local database using the Users > Local Users
and Users > Local Groups pages. For information on configuring local
users and groups, refer to Configuring Local Users and Configuring
Local Groups.
RADIUS If you have more than 1,000 users or want to add an extra layer of
security for authenticating the user to the SonicWall. If you select Use
RADIUS for user authentication, users must log into the SonicWall
using HTTPS in order to encrypt the password sent to the SonicWall. If
a user attempts to log into the SonicWall using HTTP, the browser is
automatically redirected to HTTPS. For information on configuring
RADIUS, refer to Configuring RADIUS.
RADIUS + Local
Users
If you want to use both RADIUS and the SonicWall local user database
for authentication. For information on configuring RADIUS, refer to
Configuring RADIUS.
LDAP If you use a Lightweight Directory Access Protocol (LDAP) server or
Microsoft Active Directory (AD) server to maintain all your user account
data. For information about configuring LDAP, refer to Configuring
LDAP.
LDAP + Local Users If you want to use both LDAP and the SonicWall local user database for
authentication. For information about configuring LDAP, refer to
Configuring LDAP.
TACACS+ If you use Terminal Access Controller Access-Control System Plus
(TACAS+) protocol for authentication.
TACACS+ + Local
Users
If you use Terminal Access Controller Access-Control System Plus
(TACAS+) protocol and the SonicWall local user database for
authentication.
3.
Click Update.
SonicOS/X 7 Users Administration Guide for the TZand NSv Series
Configuring User Settings
8
Page 9

Setting the Single-Sign-On Methods
The Single-sign-on method(s) displays the status of the available method(s). You can enable/disable
methods, or click Configure to configure a single-sign-on method. The following methods are available:
To set the single-sign-on methods:
1.
Navigate to the Users > Settings page.
2.
Enable or disable the methods, or click Configure to configure a single-sign-on method. These
methods are available:
SSO Agent Configure the SSO Agent if you are using Active Directory
for authentication and the SonicWall SSO Agent is
installed on a computer in the same domain.
Terminal Services Agent Configure the SSO Agent if you are using Terminal
Services and the SonicWall Terminal Services Agent (TSA)
is installed on a terminal server in the same domain.
Browser NTLM Authentication Configure Browser NTLM Authentication if you want to
authenticate Web users without using the SonicWall SSO
Agent or TSA. Users are identified as soon as they send
HTTP traffic. NTLM requires RADIUS to be configured (in
addition to LDAP, if using LDAP), for access to MSCHAP
authentication.
RADIUS Accounting Configure RADIUS Accounting if you want a network
access server (NAS) to send user login session accounting
messages to an accounting server.
3rd Party API Configure the XML-/JSON-based REST API for third-party
devices or scripts to pass user login/logout notifications to
the firewall.
3.
Click Update.
Requiring User Names be Treated as Case-Sensitive
To require that user names are treated as case-sensitive:
1.
Navigate to the Users > Settings page.
2.
Select Case-sensitive user names. (This option is selected by default.)
3.
Click Update.
SonicOS/X 7 Users Administration Guide for the TZand NSv Series
Configuring User Settings
9
Page 10

Preventing Users From Logging in from More than One Location
To prevent users from logging in from more than one location at a time:
1.
Navigate to Users > Settings.
2.
Select Enforce login uniqueness. (This option is not selected by default.)
3.
Click Update.
Forcing Users to Log In Immediately After Changing Their Passwords
To force the user to login immediately after changing the password:
1.
Navigate to Users > Settings.
2.
Select Force relogin after password change. (This option is not selected by default.)
3.
Click Update.
Displaying User Login Information Since the Last Login
To display user login information since the last login:
1.
Navigate to the Users > Settings page.
2.
Select Display user login info since last login. (This option is not selected by default.)
3.
Click Update.
One-Time Password Settings
To configure the one-time password settings:
1.
Navigate to Users > Settings.
2.
For the One-time password Email format, choose an email format for :
l Plain Text
l HTML
3.
For the One-time password format, select the password format:
l Characters
l Characters + Numbers
l Numbers
SonicOS/X 7 Users Administration Guide for the TZand NSv Series
Configuring User Settings
10
Page 11

4.
In the One-time password length beginning and ending fields, enter the minimum and maximum
length of the password. The length must be between 4-14 characters. The default for both fields is 10
characters.
5.
Click Update.
Configuring the User Web Login Settings
Topics:
l Setting the Timeout for the Authentication Page
l Setting How the Browser is Redirected
l Managing Redirections to the Login Page
l Using a CHAP challenge to Authenticate Users
l Redirecting Unauthenticated Users
l Adding URLs to Authentication Bypass
Setting the Timeout for the Authentication Page
While the login authentication page is displayed, it uses system resources. By setting a limit on how long a
login can take before the login page is closed, you free up those resources.
To set the timeout for the Authentication Page:
1.
Navigate to Users > Settings.
2.
In the Show user authentication page for (minutes) field, enter the number of minutes that users
have to log in with their username and password before the login page times out. If it times out, a
message displays informing them what they must do before attempting to log in again. The default
time is 1 minute.
3.
Click Update.
Setting How the Browser is Redirected
To set how the browser is redirected:
1.
Navigate to Users > Settings > Web Login.
2.
From Redirect the browser to this appliance via, choose one of the following options to
determine how a user’s browser is initially redirected to the SonicWall appliance’s Web server:
l The interface IP address – Select this to redirect the browser to the IP address of the
appliance Web server interface. This option is selected by default.
l Its domain name from a reverse DNS lookup of the interface IP address – When
clicked, displays the appliance Web server’s Interface, IP Address, DNS Name, and TTL (in
seconds). This option is not selected by default.
l Its configured domain name – Select to enable redirecting to a domain name configured
on the System > Administration page.
SonicOS/X 7 Users Administration Guide for the TZand NSv Series
Configuring User Settings
11
Page 12

3.
Click Update.
NOTE: This option is available only if a domain name has been specified on the System
> Administration page. Otherwise, this option is dimmed. To enable redirection to a
configured domain name, set the firewall’s domain name on the System >
Administration page. Redirection is allowed when an imported certificate has been
selected for HTTPS web management of that page.
l The name from the administration certificate – Select to enable redirecting to a
configured domain name with a properly signed certificate. Redirecting to the name from this
administration certificate is allowed when an imported certificate has been selected for
HTTPS web management on that page.
NOTE: This option is available only if a certificate has been imported for HTTPS
management in the Web Management Settings section of the System >
Administration page. Otherwise, this option is dimmed.
TIP: If you are using imported administration certificates, use this option. If you are not
going to use an administration certificate, select Its configured domain name.
To do HTTPS management without the browser displaying invalid-certificate warnings, you
need to import a certificate properly signed by a certification authority (administration
certificate) rather than use the internally generated self-signed one. This certificate must be
generated for the appliance and its host domain name. A properly signed certificate is the
best way to obtain an appliance’s domain name.
If you use an administration certificate, then to avoid certificate warnings, the browser needs
to redirect to that domain name rather than to the IP address. For example, if you browse the
internet and are redirected to log in at https://gateway.SonicWall.com/auth.html, the
administration certificate on the appliance says that the appliance really is
gateway.sonicwall.com, so the browser displays the login page. If you are redirected to
https://10.0.02/auth.html, however, even though the certificate says it is
gateway.sonicwall.com, the browser has no way to tell if that is correct, so it displays a
certificate warning instead.
Managing Redirections to the Login Page
Limiting redirections prevents possibly overloading the SonicWall appliances’ web server by limiting
redirections to the login page should HTTP/HTTPS connections that would otherwise get redirected there be
repeatedly opened at a high rate from some unauthorized users.
To manage redirections to the login page:
1.
Navigate to Users > Settings > Web Login.
2.
In the Limit redirecting users to field, enter the number of times per minute per user. The default
value is 10 times.
3.
To further limit redirects of the same page, select the Don’t redirect repeated gets of the same
page option. This option is selected by default.
4.
If the session does not need to be encrypted, select Redirect users from HTTPS to HTTP on
completion of login.
5.
Click Update.
SonicOS/X 7 Users Administration Guide for the TZand NSv Series
Configuring User Settings
12
Page 13

Using a CHAP challenge to Authenticate Users
If using RADIUS authentication (and if the RADIUS server supports it), a CHAP challenge can be used to
authenticate users during web login. Such a login through HTTP is secure, so it is not necessary to enforce
HTTPS for login.
Administrators who use this mechanism to log into the SonicWall appliance are restricted in the
management operations they can perform. For some management operations, the appliance needs to know
the user’s password, which is not available with CHAP authentication by a remote authentication server.
Consequently, if this option is enabled, users who are members of administrative user groups might have to
log in manually through HTTPS when logging in for administration. This restriction does not apply to the
built-in admin account.
TIP: When using LDAP, this mechanism can be used normally by:
l Setting the Authentication method for login to RADIUS.
l Selecting LDAP as the mechanism for setting user group memberships in the RADIUS
configuration.
To use a CHAP challenge to authenticate users:
1.
Navigate to Users > Settings > Web Login.
2.
Select Allow HTTP login with RADIUS CHAP mode to enable type of login.
NOTE: This option is only available when the Authentication method for login is RADIUS or
RADIUS+Local Users. This option is not selected by default.
3.
Click Update.
Redirecting Unauthenticated Users
You can can redirect HTTP/HTTPS traffic from unauthenticated users to a specified URL instead of the
SonicWall’s own login page.
To redirect HTTP/HTTPS traffic from unauthenticated users:
1.
Select On redirecting unauthenticated users, redirect to an external login page URL. This
option allows users to be authenticated by an external authentication system. This option is not
selected by default.
TIP: To allow only unauthenticated users to be redirected, you need to create one or more
access rules for this situation.
NOTE: The external system can subsequently use the SSO third-party API or RADIUS
Accounting to pass the user’s name and credentials to the firewall so they are identified for such
activities as access control and logging.
2.
When you select this option, the URL field displays. Enter the URL for redirection in the field.
3.
To configure options related to the captive portal configured in a zone’s guest settings, scroll to Web
Login Settings for Guest Captive Portal.
SonicOS/X 7 Users Administration Guide for the TZand NSv Series
Configuring User Settings
13
Page 14

4.
For captive portal guest authentication, to allow the authentication page to show in a portal host
page as a frame, select Allow authentication page in frame. This option is not selected by
default.
5.
Click Update.
Adding URLs to Authentication Bypass
SonicOS/X Guest Services allows guest users to have access through your network directly to the Internet
without access to your protected network. To do this, SonicOS/X uses the IP address of the user’s computer.
Using the IP address as the identifier is useful when guest user traffic passes through a network router, as
this changes the source MAC address to that of the router. However, the user’s IP address passes through
unchanged.
If only the MAC address is used for identification, two clients behind the same router have the same MAC
address upon reaching the network security appliance. When one client gets authenticated, the traffic from
the other client is also treated as authenticated and bypasses the guest service authentication.
By using the client IP address for identification, all guest clients behind the routed device are required to
authenticate independently.
To add HTTP URLs user authentication bypass in Access Rules:
1.
Navigate to Users > Settings > Authentication Bypass.
2.
Click Add. The Add URL page displays.
3.
In the Add URLfield, enter the URL.
4.
Click Add. A change order pop-up confirmation displays.
5.
Click OK.
6.
Click Update.
User Session Settings
These settings apply to all users when authenticated through your SonicWall network security appliance.
To configure user session settings:
1.
Navigate to Users > Settings > User Sessions.
To configure settings that apply to all users who are authenticated through the firewall:
1.
Navigate to Users > Settings > User Sessions.
2.
In the Inactivity timeout (minutes) field, specify the length of time for inactivity after which users
are logged out of the firewall. The default is 15 minutes.
3.
From Don’t allow traffic from these services to prevent user logout on inactivity, select the
service or service group option to be prevented from logging out inactive users. This option saves
system overhead and possible delays re-identifying aged-out authenticated users by making them
inactive instead of logging them out. Inactive users do not use up system resources and can be
displayed on the Users> Status page. The default is None.
SonicOS/X 7 Users Administration Guide for the TZand NSv Series
Configuring User Settings
14
Page 15

4.
For the following For logging of connections on which the user is not identified options,
choose the type of logging, Log no user name or Log user name, to be done, and, optionally, the
log user name:
l If SSO fails to identify the user: Log user name Unknown SSO failed (default)
l For connections that bypass SSO: Log user name SSO Bypass (default)
NOTE: This option also can be set in the SSO Bypass section of the Enforcement of
the SSO Authentication Configuration dialog.
l For connections originating externally: Log no user name (default). If Log user name is
selected, the default user name is Unknown (external).
l For other unidentified connects: Log no user name (default). If Log user name is selected,
the default user name is Unknown.
5.
Specify how to handle a user’s connections that remain after the user logs out from the SonicWall
appliance with the Actions for remaining user connections on logout options.
Action
For connections requiring
Type of logout
user authentication 1 For other connections 2
On logout due to inactivity l Leave them alive (default)
l Terminate them
l Terminate after… minutes
On active/reported logout l Leave them alive
l Terminate them (default)
l Terminate after… minutes
1. Applies for connections through access rules that allow only specific users.
2. Applies for other connections that do not have a specific user authentication requirement.
You can set different actions for:
l Inactivity logout, where the user might or might not still be logged into the domain/computer.
l Users actively logging themselves out or being reported to the SonicWall network security
appliance as being logged out (the latter normally means that the user has logged out from
the domain/user).
6.
Click Update.
Topics:
l User Session Settings for SSO-Authenticated Users
l User Session Settings for Web Login
l Leave them alive (default)
l Terminate them
l Terminate after… minutes
l Leave them alive
l Terminate them
l Terminate after… 15
minutes (default)
SonicOS/X 7 Users Administration Guide for the TZand NSv Series
Configuring User Settings
15
Page 16

User Session Settings for SSO-Authenticated Users
To specify how inactive SSO-authenticated users are handled:
1.
Navigate to Users > Settings > User Sessions.
2.
To put a user identified to the SonicWall network security appliance through an SSO mechanism, but
no traffic has yet been received from the user, into an inactive state so they do not use resources,
select On being notified of a login make the user initially inactive until they send traffic.
The users remain in an inactive state until traffic is received. This option is selected by default.
Some SSO mechanisms do not give any way for the SonicWall network security appliance to actively
re-identify a user, and if users identified by such a mechanism do not send traffic, they remain in the
inactive state until the appliance eventually receives a logout notification for the user. For other users
who can be re-identified, if they stay inactive and do not send traffic, they are aged-out and removed
after a period (see the paragraphs that follow).
3.
If an SSO-identified user who has been actively logged in is timed out because of inactivity, then
users who cannot be re-identified are returned to an inactive state. To have users who would
otherwise be logged out on inactivity to be returned to an inactive state, select On inactivity
timeout make all user inactive instead of logged out. Doing this avoids overhead and possible
delays re-identifying the users when they become active again. This setting is selected by default.
4.
For inactive users who are subject to getting aged out, you can set the time, in minutes, after which
they are aged-out and removed if they stay inactive and do not send traffic by selecting Age out
inactive users after (minutes) and specifying the timeout in the field. This setting is selected by
default, and the minimum timeout value is 10 minutes, the maximum is 10000 minutes, and the
default is 60 minutes.
NOTE: As the reason for keeping inactive user separate from active users is to minimize the
resources used to manage them, the age-out timer runs once every 10 minutes. It might,
therefore, take up to 10 minutes longer to remove inactive users from active status.
5.
Click Update.
User Session Settings for Web Login
To configure user session settings for web login:
1.
Navigate to Users > Settings > User Sessions.
2.
Enable login session limit for web logins: Limit the time a user is logged into the firewall
through web login before the login page times out by selecting this option and typing the amount of
time, in minutes, in the Login session limit … Minutes field. This setting is selected by default
The default value is 30 minutes.
If the session times out, a message displays that reads you must log out before attempting to log in
again.
3.
Select Show user login status window with logout button to display a status window with a
Log Out button during the user’s session. The user must click Log Out to log out of the session.
This option is not selected by default.
NOTE: The window must be kept open throughout the user’s session as closing it logs the user
out.
SonicOS/X 7 Users Administration Guide for the TZand NSv Series
16
Configuring User Settings
Page 17

IMPORTANT: If this option is not enabled, the status window is not displayed and users might
not be able to log out. In this case, a login session limit must be set to ensure that they do
eventually get logged out.
The User Login Status window refreshes every (minutes) displays the number of minutes the
user has left in the login session. The user can set the remaining time to a smaller number of minutes
by entering the number and clicking Update.
When this option is enabled, a mechanism that monitors heartbeats sent from that window also can
be enabled to detect and log out users who disconnect without logging out.
IMPORTANT: If this option is not enabled, users might be unable to log out. Set a login session limit
to ensure users are logged out eventually.
4.
In the User's login status window sends status heartbeat every … Seconds field, specify how
often a heartbeat is sent back to your SonicWall network security appliance. This heartbeat notifies
your SonicWall network security appliance of your connection status and continues to be sent as long
at the status window is open. The default is 120 seconds.
5.
Select Enable disconnected user detection to have your SonicWall network security appliance
detect when the user’s connection is no longer valid and then end the session. This option is already
selected by default.
6.
In the Timeout on heartbeat from user's login status window … Minutes field, specify the time
needed without a reply from the heartbeat before ending the user session. The minimum delay
before ending the user session is 1 minute, the maximum is 65535 minutes, and the default is 10
minutes.
7.
Select Allow unauthenticated VPN users to access DNS to allow that access.
8.
Select Open user’s login status window in the same window rather than in a popup if you
do not want the login status window to open as a separate pop-up window. This option is not selected
by default.
9.
LDAP read from server options are available when the LDAP option is active. The options are:
l Automatically update the schema configuration
l Export details of the schema
10.
Click Update.
Accounting
SonicOS/X supports both RADIUS accounting and TACACS+ accounting. If both a RADIUS server and a
TACACS+ server are configured, a user’s accounting messages are sent to both servers.
Topics:
l Configuring RADIUS Accounting
l Configuring TACACS+ Accounting
SonicOS/X 7 Users Administration Guide for the TZand NSv Series
Configuring User Settings
17
Page 18

Configuring RADIUS Accounting
Topics:
l Sending RADIUS Accounting Information to Servers
l Configuring User Accounting
l Testing RADIUS Accounting
l Editing RADIUS Servers
l Deleting RADIUS Servers
Sending RADIUS Accounting Information to Servers
To send RADIUS accounting information to servers:
1.
Navigate to Users > Settings >Accounting.
2.
Next to RADIUS Accounting, click Configure.
3.
To add a RADIUS server:
a.
Click Add Server. The Settings page displays.
b.
In the Host Name or IP Address field, enter the host name or IP address .
c.
In the Port field, enter the port number.
d.
In the Shared Secret and Confirm Shared Secret fields, enter the shared secret.
e.
On the Advanced tab, from the User Name Format list, select the username format:
l User-Name
l User-Name@Domain
l Domain\User-Name
l User-Name.Domain
f.
Click Save. The RADIUS Accounting table is updated.
For each RADIUSserver you want to add, repeat these steps.
4.
Click on General Settings.
5.
In the RADIUS Accounting Server Timeout (seconds) field, enter a maximum time out, in
seconds, . The default value is 5 seconds.
6.
In the Retries field, enter the maximum number of retries. The default value is 3 retries.
7.
To send accounting data to all servers listed in the RADIUS Accounting table, select Send
accounting data to all servers.
8.
Click Enable for each RADIUSserver you want to enable.
9.
Click Update.
SonicOS/X 7 Users Administration Guide for the TZand NSv Series
Configuring User Settings
18
Page 19

Configuring User Accounting
To configure user accounting for RADIUS:
1.
Select one or more types of users.
2.
Include SSO users identified via RADIUS Accounting? is not available by default. To make it
selectable, first select the SSO-authenticated users field.
3.
From the Include list, select which users should be included:
l Domain users
l Local users
l Domain and local users
4.
Select Send interim updates to send interim updates.
Testing RADIUS Accounting
To test RADIUS accounting:
1.
Navigate to Users > Settings >Accounting.
2.
Next to RADIUS Accounting, click Configure.
3.
From the Select server to test list, select which RADIUSserver you want to test.
4.
From the Test list, select the functionality you want to test:
l SSL VPN
l User Accounting:enter the User and IPAddress
5.
Click Test.
The Test Status will update and any user attributes returned will be displayed in Returned User
Attributes.
Editing RADIUS Servers
To edit a RADIUSserver:
1.
Navigate to Users > Settings >Accounting.
2.
Next to RADIUS Accounting, click Configure.
3.
Click the Edit icon for the RADIUSserver you want to edit. The Shared Secret and Confirm Shared
Secret fields are dimmed and cannot be changed.
4.
Make any changes you need.
5.
Click Save.
Deleting RADIUS Servers
To delete a single server:
1.
Navigate to Users > Settings > Accounting.
2.
Next to RADIUS Accounting, click Configure.
3.
Hover over the far right on the row for the server you want to delete until the icons appear. Click the
Delete icon. A confirmation message displays.
SonicOS/X 7 Users Administration Guide for the TZand NSv Series
Configuring User Settings
19
Page 20

4.
Click Confirm.
5.
Click Update.
To delete one or more servers:
1.
Navigate to Users > Settings > Accounting.
2.
Next to RADIUS Accounting, click Configure.
3.
Select the servers in the RADIUS Accounting table you want to delete.
4.
Click Delete. A confirmation message displays.
5.
Click Confirm.
6.
Click Update.
Configuring TACACS+ Accounting
SonicOS/X supports TACACS+ accounting Start, Watchdog and Stop messages, but not the TACACS+
accounting proxy, that is, SonicOS/X does not forward the accounting request to the accounting server.
To configure TACACS+ accounting:
1.
Navigate to Users > Settings >Accounting.
2.
Next to TACACS+ Accounting, click Configure.
3.
To add a TACACS+ server, click Add Server.
4.
In the Host Name or IP Address field, enter the host name or IP address of the TACACS+ server .
5.
In the Port field, enter the port number of the server. The default is 49.
6.
In the Shared Secret and Confirm Shared Secret fields, enter the shared secret .
7.
Click Enabled when you are ready to put this TACACS+ server into use.
8.
Click Save.
SonicOS/X 7 Users Administration Guide for the TZand NSv Series
Configuring User Settings
20
Page 21

3
Configuring Guest Services
Guest Services determine the limits and configuration of the guest accounts. Guest accounts are temporary
accounts set up for users to log into your network.
You can create guest accounts manually as needed or generate them in batches. Guest accounts are
typically limited to a predetermined lifespan. After their lifespan, by default, the accounts are removed.
Topics:
l Adding Guest Profiles
l Editing Guest Profiles
l Deleting Guest Profiles
Adding Guest Profiles
To add a Guest Profile:
1.
Navigate to the Users > Guest Services page.
2.
Check Show guest login status window with logout to display a user login window on the user’s
workstation whenever the user is logged in. Users must keep this window open during their login
session. The window displays the time remaining in their current session. Users can log out by
clicking Logout in the login status window.
3.
Click Add Guest Profile below the Guest Profiles list to create a guest profile. The Add Guest
Profile window displays.
4.
In the Add Guest Profile window, configure these options:
l Profile Name: Enter the name of the profile.
l User Name Prefix: Enter the first part of every user account name generated from this
profile.
l Auto-generate user name: Check this to allow guest accounts generated from this profile to
have an automatically generated user name. The user name is usually the prefix plus a twoor three-digit number.
l Auto-generate password: Check this to allow guest accounts generated from this profile to
have an automatically generated password. The generated password is an eight-character
unique alphabetic string.
l Enable Account: Check this for all guest accounts generated from this profile to be enabled
upon creation.
SonicOS/X 7 Users Administration Guide for the TZand NSv Series
Configuring Guest Services
21
Page 22

l Auto-Prune Account: Check this to have the account removed from the database after its
lifetime expires.
l Enforce login uniqueness: Check this to allow only a single instance of an account to be
used at any one time. By default, this feature is enabled when creating a new guest account.
If you want to allow multiple users to login with a single account, disable this enforcement by
clearing Enforce login uniqueness.
l Activate account upon first login: To delay the Account Expiration timer until a user logs
into the account for the first time, select Activate Account Upon First Login. This option is
not selected by default.
l Account Lifetime: This setting defines how long an account remains on the security
appliance before the account expires. You can specify from 1 to 9999 in the Account Lifetime
field and select the type of duration from the drop-down menu:
l Minutes
l Hours
l Days
The default is 7 Days.
If Auto-Prune is enabled, the account is deleted when it expires. If Auto-Prune is cleared,
the account remains in the list of guest accounts with an Expired status, allowing easy
reactivation.
l Idle Timeout: Defines the maximum period of time when no traffic is passed on an activated
guest services session. Exceeding the period defined by this setting expires the session, but
the account itself remains active as long as the Account Lifetime has not expired. The Idle
Timeout cannot exceed the value set in the Session Lifetime.
You can specify from 1 to 9999 in the Account Lifetime field and select the type of duration
from the drop-down menu:
l Minutes
l Hours
l Days
The default is 10 Minutes.
l To specify the quota cycle type, select from the Quota Cycle Type Setting drop-down
menu:
l Non Cyclic (default)
l Per Day
l Per Week
l Per Month
l Session Lifetime: Defines how long a guest login session remains active after it has been
activated. By default, activation occurs the first time a guest user logs into an account.
Alternatively, activation can occur at the time the account is created by clearing Activate
account upon first login. The Session Lifetime cannot exceed the value set in the
Account Lifetime.
You can specify from 1 to 9999 in the Session Lifetime field and select the type of duration
from the drop-down menu:
l Minutes
l Hours
l Days
The default is 1 Hours.
SonicOS/X 7 Users Administration Guide for the TZand NSv Series
Configuring Guest Services
22
Page 23

l To limit the amount of data the user can receive, enter the amount, in MB, in Receive limit
(0 to disable) field. The range is from 0 (no data can be received) to 999999999 MB to
Unlimited (default).
l To limit the amount of data the user can send, enter the amount, in MB, in Transmit limit (0
to disable) field. The range is from 0 (no data can be received) to 999999999 MB to
Unlimited (default).
l Comment: Any text can be entered as a comment in the Comment field.
5.
Click Update to add the profile.
Editing Guest Profiles
To edit guest profiles:
1.
Click the Edit icon in the Configure column for the profile.
2.
Follow the steps in Adding Guest Profiles.
Deleting Guest Profiles
You can delete all guest profiles, except the Default profile.
To delete guest profiles:
1.
Select either:
l The checkbox(es) of the guest profile(s) to be deleted.
l The top left checkbox in the Guest Profiles table. All checkboxes (except for the Default
profile) become selected.
Delete Guest Profile(s) becomes active.
2.
Click Delete Guest Profile(s). A confirmation message displays.
3.
Click Update.
SonicOS/X 7 Users Administration Guide for the TZand NSv Series
Configuring Guest Services
23
Page 24

4
Configuring Guest Accounts
Lists the guest services accounts configured on the SonicWall Security Appliance. You can enable or disable
individual accounts, groups of accounts, or all accounts, as well as set the Auto-Prune feature for accounts,
set an Account or Session Expiration date or time, and you can add, edit, delete, and print accounts.
Topics:
l Adding Guest Accounts
l Editing Guest Accounts
l Deleting Guest Accounts
Adding Guest Accounts
To add a new guest account:
1.
Navigate to the Users > Guest Accounts page.
2.
Under the list of guest accounts, click Add Guest Account.
3.
Configure these parameters for the guest account:
l Profile: Select the Guest Profile from which to generate this account.
l Name: Enter a name for the account or click Generate. The generated name is the prefix in
the profile and a random two or three digit number.
l Comment: Enter a descriptive comment.
l Password: Enter the user account password or click Generate. The generated password is a
random string of eight alphabetic characters.
l Confirm Password: If you did not generate the password, re-enter it.
l Enable Guest Services Privilege: Check this for the account to be enabled upon creation.
l Enforce login uniqueness: Check this to allow only one instance of this account to log into
the security appliance at one time. Leave it unchecked to allow multiple users to use this
account immediately.
l Automatically prune account upon account expiration: Check this option to have the
account removed from the database after its lifetime expires.
l Select Activate account upon first login to begin the timing for the account expiration.
SonicOS/X 7 Users Administration Guide for the TZand NSv Series
Configuring Guest Accounts
24
Page 25

l Account Lifetime: This setting defines how long an account remains on the security
appliance before the account expires. You can specify from 1 to 9999 in the Account Expires
field and select the type of duration from the drop-down menu:
l Minutes
l Hours
l Days
The default is 7 Days.
l If Automatically prune account upon account expiration is:
l Enabled, the account is deleted when it expires.
l Disabled, the account remains in the Guest Accounts table with an Expired status
to allow easy reactivation.
l To define the maximum period of time when no traffic is passed on an activated guest
services session, enter the timeout duration in Idle Timeout. Exceeding the period defined by
this setting expires the session, but the account itself remains active as long as the Account
Lifetime has not expired. The Idle Timeout cannot exceed the value set in the Session
Lifetime.
NOTE: This setting overrides the idle timeout setting in the profile.
You can specify from 1 to 9999 in the Account Lifetime field and select the type of duration
from the drop-down menu:
l Minutes
l Hours
l Days
The default is 10 Minutes.
4.
To specify the quota cycle type, select from the Quota Cycle Type Setting drop-down menu:
l Non Cyclic (default)
l Per Day
l Per Week
l Per Month
5.
To define how long a guest login session remains active after it has been activated, specify the
duration in Session Lifetime. By default, activation occurs the first time a guest user logs into an
account. The Session Lifetime cannot exceed the value set in the Account Lifetime.
NOTE: This setting overrides the session lifetime setting in the profile.
You can specify from 1 to 9999 in the Session Lifetime field and select the type of duration from the
drop-down menu:
l Minutes
l Hours
l Days
The default is 1 Hours.
6.
Receive limit (0 to disabled): Enter the number of megabytes the user is allowed to receive. The
minimum number is 0, which disables the limit; the maximum is Unlimited, the default.
7.
Transmit limit (0 to disabled): Enter the number of megabytes the user is allowed to transmit. The
minimum number is 0, which disables the limit; the maximum is Unlimited, the default.
8.
To limit the amount of data the user can receive, enter the amount, in MB, in Receive limit (0 to
disable) field. The range is from 0 (no data can be received) to 999999999 MB to Unlimited
(default).
SonicOS/X 7 Users Administration Guide for the TZand NSv Series
Configuring Guest Accounts
25
Page 26

9.
To limit the amount of data the user can send, enter the amount, in MB, in Transmit limit (0 to
disable) field. The range is from 0 (no data can be received) to 999999999 MB to Unlimited
(default).
10.
Click Update to generate the guest account.
Editing Guest Accounts
To edit guest accounts:
1.
Click the Edit icon in the Configure column for the profile.
2.
Follow the steps in Adding Guest Accounts.
Deleting Guest Accounts
You can delete all guest profiles, except the Default profile.
Topics:
l Deleting a Guest Account
l Deleting Multiple Guest Accounts
l Deleting All Guest Accounts
Deleting a Guest Account
You can delete all guest profiles, except the Default profile.
To delete a guest account:
1.
Click the Delete icon for the guest account. A confirmation message displays.
2.
Click OK.
Deleting Multiple Guest Accounts
You can delete all guest profiles, except the Default profile.
To delete one or more guest accounts:
1.
Navigate to Users > Local Users or Users > Local Groups.
2.
Select the checkbox(es) of the guest profile(s) to be deleted.
3.
Click the Delete icons in the Configuration column. A confirmation message displays.
4.
Click OK.
SonicOS/X 7 Users Administration Guide for the TZand NSv Series
Configuring Guest Accounts
26
Page 27

Deleting All Guest Accounts
You can delete all guest profiles, except the Default profile.
To delete all guest accounts:
1.
Select the checkbox in header of the Guest Accounts table. All checkboxes (except for the Default
profile) become selected. Delete Guest Accounts becomes available.
2.
Click Delete Guest Accounts. A confirmation message displays:
3.
Click OK.
Managing Guest Status
The Guest Status page displays the current status of all of the guest accounts currently logged in.
Topics:
l Logging Out Guests
l Logging Out All Guests
Logging Out Guests
To log out one or more guests:
1.
Navigate to Users >Guest Status.
2.
Select the Guests you want to log out from the list.
3.
Click the Logout icon on the far right.
Logging Out All Guests
To log out all guests:
1.
Navigate to Users >Guest Status.
2.
Click the Logout All icon on the far right.
SonicOS/X 7 Users Administration Guide for the TZand NSv Series
Configuring Guest Accounts
27
Page 28

Configuring Local Users and Groups
Topics:
l About Authentication and Passwords
l Configuring Local Users
About Authentication and Passwords
Topics:
l Using Two-Factor Authentication
l Enforcing First Login Password Change
5
Using Two-Factor Authentication
Many user login authentication require one-time passwords (OTP). SonicOS/X provides authentication
through:
l One-Time Password (OTP) sent to the user by email
l Time-Based One-Time Password (TOTP) authentication using an authenticator application
To use this feature:
l Users must download a TOTP client app (such as Google Authenticator, DUO, or Microsoft
Authenticator) on their mobile device.
l You must select TOTP from the One-time password method list on the User Settings
page.
Enforcing First Login Password Change
SonicOS/X allows you to force users to change their password before their first login when you create or edit
a local user. You can specify the login password change for users or for groups.
SonicOS/X 7 Users Administration Guide for the TZand NSv Series
Configuring Local Users and Groups
28
Page 29

Configuring Local Users
Local users are users stored and managed on the SonicWall network security appliance’s local database. In
Users > Local Users & Groups, you can view and manage all local users, add new local users, and edit
existing local users. You can also import users from your LDAP server.
Checkbox Used to select individual local users.
Expand/Collapse
icons
Name Lists the username of the local user; when expanded lists the name(s) of the
Guest Services Indicates with a green checkmark icon whether guest services is active for the
Admin Displays the type of administration capabilities available to the local user.
VPNAccess Displays a Comment icon for each local user and each group to which the
Comments Displays a Comment icon for each local user and each group to which the
Quota For each local user, displays a Statistics icon. Mousing over the icon displays
Configure Displays the Edit and Delete icons for each local user. If an icon is dimmed or
By default, only the local user’s username is listed. Clicking the Expand icon
displays the groups to which the local user belongs.
groups to which the local user belongs.
local user.
local user is a member. Mousing over the icon displays the status of the local
group’s VPN access and that of each member of the group.
local user is a member. Mousing over the icon displays the comment entered
when the local user or group was configured or edited.
any usage quota for the local user.
otherwise disabled, that function is not available for that local user or local
group.
For information about authentication and two-factor passwords, refer to About Authentication and
Passwords.
Topics:
l Quota Control for all Users
l Viewing Local Users
l Adding Local Users
l Editing Local Users
Quota Control for all Users
The quota control for users feature provides quota control based on the user’s account. The quota can be
specified as a session lifetime, or a transmit and/or receive traffic limit. With a cyclic quota, a user can not
access the Internet upon meeting the account quota until the next cycle (day, week, or month) begins. If the
quota cycle is Non Cyclic, the user is unable to access the Internet upon meeting the quota.
SonicOS/X 7 Users Administration Guide for the TZand NSv Series
Configuring Local Users and Groups
29
Page 30

Viewing Local Users
You can view all the groups to which a user belongs on Users > Local Users & Groups. Click on the
Expand icon next to a user to view the group memberships for that user.
The columns to the right of the user’s name list the privileges that the user has. In the expanded view, it
displays which group the user gets each privilege from.
To:
l View the network resources to which the user has VPN access, hover the mouse pointer over the
Comment icon in the user’s VPN Access column.
l View the quota for the user, hover the mouse over the Statistics icon in the Quota column
l Remove the user from a group, in the expanded view, click the Remove icon in the user’s Configure
column.
NOTE: If the user cannot be deleted from a group, the icon is dimmed.
l Edit the user, click the Edit icon in the user’s Configure column. Refer to Editing Local Users for
more information.
l Delete the user or group in that row, click the Delete icon in the user’s Configure column.
NOTE: If the local user cannot be deleted from a group, the icon is dimmed.
The bottom of the Users > Local Users & Groups page displays the total number of local users:
Adding Local Users
You can add local users to the internal database on the network security appliance from the Users > Local
Users & Groups page.
NOTE: To create a user for an SSL VPN client, refer to SonicOS/X 7 SSL VPN.
Topics:
l Configuring Local Users Settings
l Configuring Local Users Groups
l Configuring Local Users VPNAccess
l Configuring Local Users User Quota
SonicOS/X 7 Users Administration Guide for the TZand NSv Series
Configuring Local Users and Groups
30
Page 31

Configuring Local Users Settings
You can add local users to the internal database on the network security appliance from the Users > Local
Users & Groups page.
NOTE: To create a user for an SSL VPN client, refer to SonicOS/X 7 SSL VPN.
To add local users to the database:
1.
Navigate to Users > Local Users & Groups.
2.
Click the Add User icon. The User Settings page displays.
3.
Select This represents a domain user if:
l If This represents a domain user is checked then any group memberships, access rights, etc.
that are set using this user object will apply for users who log in using the named domain
account (authenticated via RADIUS or LDAP) or who are identified as that domain user by
SSO. When it is checked you can then choose to have it apply for the named user account in a
specific domain, or for a user with the given name in any domain.
l If This represents a domain user is not checked, then it is a local account and anything that is
set using it will apply only for users who log in using it, authenticated locally (a password must
be set here for this case).
4.
In the Name field, enter the name associated with the user.
5.
In the Password and Confirm Password fields, enter the password assigned to the user.
6.
Optional: select User must change password to force users to change their passwords the first
time they login. This option is not selected by default.
7.
From the One-time password method list, select the method to require SSL VPN users to submit a
system-generated password for two-factor authentication:
TIP: When a Local User does not have a one-time password enabled, while a group it belongs to
does, ensure the user’s email address is configured, otherwise this user cannot login.
TIP: To avoid another password change request for this user, this option applies only to the first
login.
l Disabled (default) – If User must change password is selected, a dialog to change it
displays at the first login attempt.
l OTP via Mail – Users receive a temporary password by email after they enter their user name
and first password. After receiving the password-containing email, they can enter the second
password to complete the login process.
l TOTP – Users receive a temporary password by email after they input their user name and
first password, but to use this feature, users must download a TOTP client app (such as
Google Authentication, DUO, or Microsoft Authentication) on their mobile device.
The unbind totp key displays.
8.
In the E-mail Address field, enter the user’s email address so they can receive one-time passwords.
9.
Optional: In the Comment field, enter any comments.
10.
Click Save.
SonicOS/X 7 Users Administration Guide for the TZand NSv Series
Configuring Local Users and Groups
31
Page 32

Configuring Local Users Groups
To a user to groups:
1.
Navigate to the Users > Local Users page.
2.
Click Add User.
3.
From the Available User Groups list, select the groups(s) in which this user should be included.
4.
Click the Add (right arrow) icon to add the user to the Selected User Groups list.
To remove resource(s), from the Selected User User Groups list, select the group(s) and click the
Remove (left arrow) icon. To remove the user from all of the groups, click the Remove All (double
left arrow) icon.
Configuring Local Users VPNAccess
To configure VPNaccess for local users:
1.
Navigate to the Users > Local Users page.
2.
Click Add User.
3.
From the Available Networks list, select the network resource(s) to which this user has VPN Access
by default.
NOTE: Group VPN access settings affect remote clients and SSL VPN Virtual Office bookmarks.
4.
Click the Add (right arrow) icon to add the resource(s) to the Selected Networks list.
To remove resource(s), from the Selected Networks list, select the resource(s) and click the
Remove (left arrow) icon. To remove resources, click the Remove All (double left arrow) icon.
Configuring Local Users User Quota
To configure the quota for the user:
1.
Navigate to Users > Local Users & Groups.
2.
Click on the User Quota tab.
3.
From the Quota cycle type setting list, select:
l Non Cyclic (default)
l Per Day
l Per Week
l Per Month
4.
From the Session Lifetime list, specify the duration for how long a guest login session remains
active after it has been activated. By default, activation occurs the first time a guest user logs into an
account.
5.
From the Session Lifetime list, and select the type of duration:
l Minutes
l Hours
l Days
6.
In the Minutes/Hours/Days field, specify the duration. You can enter a value from 1 to 9999.
SonicOS/X 7 Users Administration Guide for the TZand NSv Series
Configuring Local Users and Groups
32
Page 33

7.
In the Receive Limit field, enter the amount (in MB) the amount of data the user can receive. The
range is from 0 (no data can be received) to 999999999 MB to Unlimited (default).
8.
In the Transmit Limit field, enter the amount (in MB)of data the user can send. The range is from 0
(no data can be sent) to 999999999 MB to Unlimited (default).
9.
Click Save.
Topics:
l Quota Control for all Users
Editing Local Users
You can edit local users from the Users > Local Users & Groups page.
To edit a local user:
1.
In the Local Users table, click the user’s Edit icon under Configure. The User Settings page
displays.
2.
Configure the Settings, Groups, VPN Access, Bookmark, and User Quota options exactly as
when adding a new user. Refer to Adding Local Users for more information.
Configuring Local Groups
Local groups are displayed in the Local Groups table. Certain local groups are default groups that can be
modified, but not deleted.
Checkbox Used to select individual local groups. Default local groups cannot be
changed, and, therefore, their checkboxes are dimmed.
Expand/Collapse
icons
By default, only the local group’s name is listed. Clicking the:
l Expand icon expands the listing to show all members of the group. If the
local group does not have any members, the words, No Members,
appears under that group’s listing.
l Collapse icon hides the local group’s membership.
SonicOS/X 7 Users Administration Guide for the TZand NSv Series
Configuring Local Users and Groups
33
Page 34

Name Lists both the default and configured local groups by name.
If the Enable Multiple Administrator Role option has been enabled on the
System > Administration page, the Users > Local Groups page lists
these default role-based administrator groups:
l System Administrators
l Cryptographic Administrators
l Audit Administrators
Bypass content
filters
Indicates with a green checkmark icon whether content filtering is bypassed
for the local group. Mousing over the icon displays a tooltip.
For remote users, a Comment icon displays Not applicable with remote
authentication.
Guest Services Indicates with a green checkmark icon whether guest services is active for the
local group. Mousing over the icon displays a tooltip.
For remote users, a Comment icon displays Not applicable with remote
authentication.
Admin Displays the type of administration capabilities available to the local group.
Mousing over the icon displays a tooltip regarding the listed capability.
For remote users, a Comment icon displays Not applicable with remote
authentication.
VPN Access Displays a Comment icon for each group and each member of the group.
Mousing over the icon displays the status of the local group’s VPN access and
that of each member of the group.
Comments Lists any comment provided for the local group.
UUID Lists the UUID for the connected device.
Quota Displays the usage quota assigned to that group.
Configure Displays the Edit and Delete icons for each local group and group member,
and for group members, a Remove icon. If an icon is dimmed, that function is
not available for that local group or group member.
Topics:
l Adding Local Groups
l Editing Local Groups
Adding Local Groups
Topics:
l Configuring Local Groups Settings
l Configuring Local Group Settings Members
l Configuring Local Group Settings VPNAccess
l Configuring Local Group Settings Administration
SonicOS/X 7 Users Administration Guide for the TZand NSv Series
Configuring Local Users and Groups
34
Page 35

Configuring Local Groups Settings
To add or edit a group:
1.
Navigate to the Users > Local Groups page.
2.
Click Add Group.
3.
In the Name field, enter a name for the new local group.
4.
The name of a predefined user or group cannot be edited and the field is dimmed.
5.
In the Domain field, enter the domain name. You can select the Domain from the drop-down menu.
If you enter a domain name that is not listed, you must enter the full domain name or an error
message is displayed.
6.
Optionally, in the Comment field enter a comment about the local group .
7.
Optionally, select Memberships are set by user’s location in the LDAP directory checkbox. If this
setting is enabled, when users log in or are identified through SSO, if their user object on the LDAP
server is at the location specified in LDAP Location (or under it if appropriate), they are given
membership to this user group for the session. This setting is disabled by default.
TIP: Local users and other groups also can be made members of the group on the Members
view.
If you enable this setting, the LDAP Location field becomes active.
a.
In the LDAP Location field, enter the location in the LDAP directory tree. The location can be
given as a path (for example, domain.com/users) or as an LDAP distinguished name.
NOTE: If LDAP user group mirroring is enabled, then for mirror user groups this field is
read-only and displays the location in the LDAP directory of the mirrored group.
b.
Select precisely where the location is from one of the For Users options:
l at or under the given location (default)
l at the given location
8.
Optionally, to require one-time passwords for the group, select One-time passwords. If you enable
this setting, users must have their email addresses set.
9.
Click Update.
Configuring Local Group Settings Members
To configure members for local groups:
1.
Navigate to the Users > Local Groups page.
2.
Click Add Group.
3.
Click the Members tab.
4.
In the Available User Groups list, select the members or groups that belong to this group and click
the Add (right arrow) icon.
Click the Add All icon (double right arrow) to add all users and groups.
NOTE: You can add any group as a member of another group except Everybody and All LDAP
Users. Be aware of the membership of the groups you add as members of another group.
SonicOS/X 7 Users Administration Guide for the TZand NSv Series
Configuring Local Users and Groups
35
Page 36

To remove users and/or groups from the Selected User Groups list, select the user(s) and/or group
(s) and click the Remove (left arrow) icon. To remove all users and groups, click the Remove All
(double left arrow) icon.
5.
Click Save.
Configuring Local Group Settings VPNAccess
To configure VPNaccess for local groups:
1.
Navigate to the Users > Local Groups page.
2.
Click Add Group.
3.
From the Available Networks list, select the network resource(s) to which this group has VPN
Access by default.
NOTE: Group VPN access settings affect remote clients and SSL VPN Virtual Office bookmarks.
4.
Click the Add (right arrow) icon to add the resource(s) to the Selected Networks list.
To remove resource(s), from the Selected Networks list, select the resource(s) and click the
Remove (left arrow) icon. To remove resources, click the Remove All (double left arrow) icon.
Configuring Local Group Settings Administration
To configure administration for local groups:
1.
Navigate to the Users > Local Groups page.
2.
Click Add Group.
3.
Click on the Administration tab.
4.
If the new group is to be made an administrative group by giving it membership in another
administrative group, select Members go straight to the management UI on web login. This
option is not selected by default.
5.
The If this read-only admin group is used with other administrative groups options control
what happens when users start with membership in a user group that gives read-only administration
(that is, the SonicWall Read-Only Admins group or one with membership in it) and then are added to
other administrative user groups. To give users the:
l Admin rights set by their other administrative groups with no read-only restriction, choose The
administrative rights from the other groups override this (no read-only restriction). This setting
allows the read-only admin group to be the default for a set of users, but then overrides the
default for selected users by making them members of other administrative groups so they
can do configuration. This option is selected by default. In the Local Users table, the Admin
column for the user displays the other group’s designation, such as Ltd or “Full.”
l To give member users the administration level set by their other groups, but restrict them to
read-only access, select The administrative rights from the other groups will be restricted to
read-only. In the Local Users table, the Admin column for the user displays the dual
designation, such as Rd-Only Ltd.
TIP: To do a mix of both, select the first option for SonicWall Read-Only Admins, and then
create another group that is a member of this group, but that has the second option selected (but
not vice versa).
SonicOS/X 7 Users Administration Guide for the TZand NSv Series
Configuring Local Users and Groups
36
Page 37

NOTE: If a user is a member of a read-only admin group and has membership in no other
administrative groups, then that member gets full-level access (as per SonicWall Administrators)
restricted to read-only.
6.
Click Save.
Editing Local Groups
To edit a local group:
1.
Navigate to Users > Local Groups.
2.
Click the Edit User Group icon in the Configuration column for the group that you want to edit.
The Local Group Settings dialog displays.
3.
Follow the steps in Adding Local Groups.
SonicOS/X 7 Users Administration Guide for the TZand NSv Series
Configuring Local Users and Groups
37
Page 38

SonicWall Support
Technical support is available to customers who have purchased SonicWall products with a valid
maintenance contract.
The Support Portal provides self-help tools you can use to solve problems quickly and independently, 24
hours a day, 365 days a year. To access the Support Portal, go to https://www.sonicwall.com/support.
The Support Portal enables you to:
l View knowledge base articles and technical documentation
l View and participate in the Community forum discussions at
https://community.sonicwall.com/technology-and-support.
l View video tutorials
l Access https://mysonicwall.com
l Learn about SonicWall professional services
l Review SonicWall Support services and warranty information
l Register for training and certification
l Request technical support or customer service
6
To contact SonicWall Support, visit https://www.sonicwall.com/support/contact-support.
SonicOS/X 7 Users Administration Guide for the TZand NSv Series
38
SonicWall Support
Page 39

About This Document
NOTE: A NOTE icon indicates supporting information.
IMPORTANT: An IMPORTANT icon indicates supporting information.
TIP: A TIP icon indicates helpful information.
CAUTION: A CAUTION icon indicates potential damage to hardware or loss of data if
instructions are not followed.
WARNING: A WARNING icon indicates a potential for property damage, personal injury, or
death.
SonicOS and SonicOSXUsers Administration Guide for the TZ and NSv Series
Updated - August 2020
Software Version - 7
232-005353-00 Rev B
Copyright © 2020 SonicWall Inc. All rights reserved.
The information in this document is provided in connection with SonicWalland/or its affiliates’products. No license, express or
implied, by estoppel or otherwise, to any intellectual property right is granted by this document or in connection with the sale of
products. EXCEPT AS SET FORTH IN T HE TERMS AND CONDITIONS AS SPECIFIED IN THE LICENSE AGREEMENT FOR
THIS PRODUCT, SONICWALL AND/OR ITS AFFILIATES ASSUME NO LIABILITY WHATSOEVER AND DISCLAIMS ANY
EXPRESS, IMPLIED OR STATUTORY WARRANTY RELATING T O ITS PRODUCTS INCLUDING, BUT NOT LIMITED TO,
THE IMPLIED WARRANTY OF MERCHANT ABILITY, F ITNESS FOR A PARTICULAR PURPOSE, OR NON-INFRINGEMENT.
IN NO EVENT SHALL SONICWALL AND/OR ITS AF FILIATES BE LIABLE FOR ANY DIRECT, INDIRECT, CONSEQUENTIAL,
PUNITIVE, SPECIAL OR INCIDENTAL DAMAGES (INCLUDING, WITHOUT LIMITAT ION, DAMAGES FOR LOSS OF
PROFITS, BUSINESS INTERRUPTION OR LOSS OF INF ORMATION) ARISING OUT OF THE USE OR INABILITY TO USE
THIS DOCUMENT , EVEN IF SONICWALL AND/OR ITS AFFILIATES HAVE BEEN ADVISED OF T HE POSSIBILITY OF SUCH
DAMAGES. SonicWall and/or its affiliates make no representations or warranties with respect to the accuracy or completeness of
the contents of this document and reserves the right to make changes to specificationsand product descriptionsat any time without
notice. and/or its affiliates do not make any commitment to update the information contained in this document.
For more information, visit https://www.sonicwall.com/legal.
End User Product Agreement
To view the SonicWall End User Product Agreement, go to: https://www.sonicwall.com/en-us/legal/license-agreements.
Open Source Code
SonicWall Inc. is able to provide a machine-readable copy of open source code with restrictive licensessuch as GPL, LGPL, AGPL
when applicable per license requirements. To obtain a complete machine-readable copy, send your written requests, along with
certified check or money order in the amount of USD 25.00 payable to “SonicWall Inc.”, to:
General PublicLicense Source Code Request
Attn: Jennifer Anderson
1033 McCarthy Blvd
Milpitas, CA 95035
SonicOS/X 7 Users Administration Guide for the TZand NSv Series
SonicWall Support
39
 Loading...