

Page 1

COMPREHENSIVE INTERNET SECURITY
S o n i c WALL SOHO TZW
GETTING STARTED GUIDE
How to Configure the SOHO TZW for Cable and DSL (PPPoE) Internet Service
™
Page 2

SonicWALL SOHO TZW Getting Started Guide
About this Guide
The SOHO TZW Getting Started Guide is designed for users with DSL or cable Internet service
that use dynamic IP addressing and a modem. Use this guide to get the SOHO TZW up and
running with Internet access, secure wireless networking, and remote VPN connectivity.
Follow these steps to:
Connect Your SonicWALL SOHO TZW - Place the SOHO TZW for maximum
1
wireless network performance, connect the antennas, connect the LAN and WAN
cables, and plug in the SOHO TZW into a power outlet.
Configure Your Management Station - Configure a computer’s Windows TCP/
IP settings to enabled initial access to the SOHO TZW Web Management
2
Interface. It can be any computer on a network or a stand-alone computer.
Set Up Internet Access and Wireless Networking - Use the SonicWALL Setup
Wizard to easily configure your Internet access and secure 802.11b wireless
3
network.
Configure Your Network PCs - Configure Windows TCP/IP settings for PCs on
your LAN and WLAN for accessing the Internet through the SonicWALL TZW and
4
setup the SonicWALL Global VPN Clients for secure wireless networking.
Configure the SOHO TZW for VPN Connections - Configure the SOHO TZW to
support Global VPN Client access through the WAN (Internet) port and use the
5
VPN Policy Wizard to configure the SOHO TZW for SonicWALL (LAN) to
SonicWALL (LAN) VPN connections.
What You Need
• The SonicWALL SOHO TZW Internet Security Appliance and Product CD.
• An active Cable or DSL Internet connection that uses a modem and dynamic IP addressing.
• A PC with an Ethernet adapter for wired Ethernet connectivity to the SOHO TZW for secure
initial configuration. The PC can be standalone or connected to a LAN.
• A Web browser (Microsoft Internet Explorer v5.0 or later, or Netscape Navigator v4.7 or
later). Your Web browser must support Java and HTTP uploads in order to fully manage
the SonicWALL.).
• A notebook computer with an 802.11b network card supported by the SonicWALL SOHO
TZW.
• A basic familiarity with networking terminology.
Note: If you are unfamiliar with networking terms used in this guide, see Appendix C for a
glossary of common networking terms.
SOHO TZW Getting Started Guide Page1
Page 3

Connect Your SonicWALL SOHO TZW
1
Typically the SOHO TZW provides the access point for your WLAN (Wireless LAN) as well as
your secure Internet gateway for all the computers on your LAN.
Network Deployment Options
The SonicWALL SOHO TZW supports the following network deployments:
• A stand alone 802.11b WLAN access point for secure wireless connectivity to the Internet
and between WLAN nodes.
• A secure WLAN addition to an existing wired LAN to provide complete network and Internet
access security for wired and wireless n etworks.
Page 2 SOHO TZW Getting Started Guide
Page 4

Recommendations for Optimal Wireless Performance
• Place the SOHO TZW near the center of your intended network. This can also reduce the
possibility of eavesdropping by neighboring wireless networks.
• Minimize the number of walls or ceilings between the SOHO TZW and the receiving points
such as PCs or laptops.
• Try to place the TZW in a direct line with other wireless components. Best performance is
achieved when wireless components are in direct line of sight with each other.
• Building construction can make a difference on wireless performance. Avoid placing the
TZW near walls, fireplaces, or other large solid objects. Placing the TZW near metal objects
such as computer cases, monitors, and appliances can affect performance of the unit.
• Metal framing, UV window film, concrete or masonry walls, and metallic paint can reduce
signal strength if the TZW is installed near these types of materials.
• Installing the TZW in a high place can help avoid obstacles and improve performance for
upper stories of a building.
• Neighboring wireless networks and devices can affect signal strength, speed, and range of
the SOHO TZW. Also, devices such as cordless phones, radios, microwave ovens, and
televisions may cause interference on the TZW.
Note: See Appendix A for instructions on mounting your SOHO TZW on the ceiling or wall.
SOHO TZW Hardware Overview
WAN
Link, 100, Activity
Power Light
Link, Activity
WLAN
Test Ligh t
LAN
Link, 100, Activity
Console Port
LAN Port
SOHO TZW Getting Started Guide Page3
WAN Port
Power
Page 5

Installing the Antennas
To use the wireless feature of the SOHO TZW, you must install the antennas on the back of the
appliance. Remove the antennas from the bag, and place one on each connector. The
connectors should be finger-tight only.
Attach Here
Attach Here
*For wall or ceiling mounting instructions, see Appendix A.
Adjusting the Antennas
The antennas on the SOHO TZW can be adjusted for the best radio reception. Begin with the
antennas pointing straight up, and then adjust as necessary. Note that certain areas, such as
the area directly below the SOHO TZW, get relatively poor reception. Pointing the antenna
directly at another wireless device does not improve reception. Do not place the antennas next
to metal doors or walls as this can cause interference.
Page 4 SOHO TZW Getting Started Guide
Page 6

Applying Power to the SonicWALL
Attach the power supply to the power cord. Plug the power adapter into the SonicWALL and
plug the other end into a power outlet.
The Power light turns green when power is applied to the SonicWALL. Also, the Test light
remains lit for approximately 90 seconds while the SonicWALL performs a series of diagnostic
tests.
SOHO TZW Getting Started Guide Page5
Page 7

Connecting the SonicWALL to the Network
If you already have a wired LAN, connect the SOHO TZW to the LAN port on the SOHO TZW
using the Category 5 Standard Ethernet cable. If you don’t have a wired Ethernet network,
connect the Red (crossover) Ethernet cable to the LAN port on the SOHO TZW and the
Ethernet port on a computer. This connection provides access to the SOHO TZW’s Web
Management Interface for configuring the SOHO TZW.
Connect one end of the gray Ethernet cable to your DSL modem or cable modem. Connect
the other end of the gray Ethernet cable to the WAN port of the SonicWALL. The link LED
lights indicating an active connection. If the LED does not light, try the Crossover cable.
Connect one end of the provided Crossover cable to the Ethernet port of your computer.
Connect the other end of the cable to the LAN port of your SonicWALL. The link LED lights
indicating an active connection. If the LED does not light, try the Ethernet cable.
Page 6 SOHO TZW Getting Started Guide
Page 8

Configure Your Management Station
2
The SOHO TZW is preconfigured with the IP address 192.168.168.168. To access the SOHO
TZW Web Management Interface for the first time, you must configure a computer with an IP
address in the same network range as the SonicWALL. The computer you use to manage the
SOHO TZW is called the Management Station.
Windows 2000
If the Management Station is running Windows 2000, use the following instructions:
1.From your Windows task bar, click Start then click
Settings.
2.Click Network and Dial-up Connections.
3.Double-click the network icon to open the connection
window.
4.Click Properties.
5.Highlight Internet Protocol (TCP/IP) and click
Properties.
6.Select Use the following IP address.
7.Type 192.168.168.200 in the IP address field.
8.Type 255.255.255.0 in the Subnet field.
9.If you have a DNS Server IP address from your ISP,
enter it in the Preferred DNS Server field.
SOHO TZW Getting Started Guide Page7
Page 9

Windows XP
If the Management Station is running Windows XP, use the following instructions:
1.Open the Local Area Connection Properties
window.
2.Double-click Internet Protocol (TCP/IP) to open the
Internet Protocol (TCP/IP) Properties window.
3.Select Use the following IP address and type
192.168.168.200 in the IP address field.
4.Type 255.255.255.0 in the Subnet Mask field.
5.Type the DNS IP address in the Preferred DNS
Server field. If you have more than one address, type
the second one in the Alternate DNS server field.
6.Click OK for the settings to take effect on the
computer.
Page 8 SOHO TZW Getting Started Guide
Page 10

Windows 98
1.From the Start li st, highl igh t Settings and then select
Control Panel. In the Control Pan el window, double-
click the Network icon
2.Double-click TCP/IP in the TCP/IP Properties
window.
3.Select Specify an IP Address.
4.Type 192.168.168.200 in the IP Address field.
5.Type 255.255.255.0 in the Subnet Mask field.
6.Click DNS Configuration.
7.Type the DNS IP address in the Preferred DNS
Server field. If you have more than one address, type
the second one in the Alternate DNS server field.
8.Click OK, and then click OK again.
9.Restart the computer for changes to take effect.
SOHO TZW Getting Started Guide Page9
Page 11

Windows NT
1.From the Start li st, highl igh t Settings and then select
Control Panel.
2.Double-click the Network icon in t he Control Panel
window.
3.Double-click TCP/IP in the TCP/IP Properties window.
4.Select Specify an IP Address.
5.Type 192.168.168.200 in the IP Address field.
6.Type 255.255.255.0 in the Subnet Mask field.
7.Click DNS at the top of the window.
8.Type the DNS IP address in the Preferred DNS Server
field. If you have more than one address, enter the second
one in the Alternate DNS server field.
9.Click OK, and then click OK again.
Page 10 SOHO TZW Getting Started Guide
Page 12

Set Up Internet Access and Wireless Networking
3
The SonicWALL Setup Wizard provides an easy way to configure the SOHO TZW for Internet
access and secure wireless networking. The Setup Wizard automatically detects the dynamic
IP address settings of your cable or DSL Internet service to configure your SOHO TZW for
Internet access. If you’re using PPPoE DSL Internet services, the SOHO TZW uses the NAT
with PPPoE Client network addressing mode. If you’re using cable or DSL service with
dynamic IP addressing, the SOHO TZW uses the NAT with DHCP Client network addressing
mode.
Alert! If your DSL Internet service uses PPPoE, you need the user name and password
provided by your ISP fo r your account to configure the SOHO TZW.
SonicWALL WiFiSec and GroupVPN are automatically enabled on the SOHO TZW using the
Setup Wizard to provide secure wireless networking. WiFiSec uses IPSec VPN encryption to
protect your WLAN communications. GroupVPN enables the SOHO TZW to be a VPN
gateway for WLAN clients using the SonicWALL Global VPN Client. The Setup Wizard also
configures the SOHO TZW DHCP (Dynamic Host Configuration Protocol) server to
automatically send IP addressing information to your WLAN nodes.
SOHO TZW Getting Started Guide Page11
Page 13

Using the SonicWALL Setup Wizard
Alert! Your Web browser must support Java and HTTP uploads in order to manage the SOHO
TZW. Internet Explorer 5.0 or higher, as well as Netscape Navigator 4.0 or higher, are
recommended.
Alert! Make sure your Cable or DSL modem is connected to the WAN port on your SOHO TZW
before using the Setup Wizard.
1. Launch your Web browser.
2. Type 192.168.168.168 in the Location or Address field of your browser and press Enter
or your keyboard. SonicWALL Setup Wizard launches.
If you cannot connect to the SonicWALL, check the following:
• Did you correctly enter the SonicWALL LAN IP address in your Web browser?
• Is the SonicWALL connected to the same network as your computer?
• Have you changed the TCP/IP network settings on your computer?
Alert!.Certain browser configuration may not launch the Setup Wizard. In this case, you must
log into the SOHO TZW by typing admin in the User Name field and password in the
Password field, and then clicking Login. Click the Setup Wizard on the Network>Setting
page after logging into your SOHO TZW.
Page 12 SOHO TZW Getting Started Guide
Page 14

Welcome to the SonicWALL Setup Wizard
3. To begin configuration, click Next.
Selecting the Deployment Scenario
4. Select Office Gateway as the deployment scenario. The Office Gateway deployment
scenario provides secure access for wired and wireless users on your network. Typically,
the SOHO TZW is the gateway to the Internet for your network. Click Next.
SOHO TZW Getting Started Guide Page13
Page 15

Changing the Password
5. Type a new password in the New Password field. The password should be a unique
combination of letters, or number, or symbols, or a combination of all three for the most
secure password. Avoid names, birthdays, or any obvious words. Retype the password in
the Confirm field. Click Next.
Tip! Make a mental note of your password. You need this password to log into the SOHO TZW
after the initial configurati on.
Selecting Your Time Zone
6. Select your Time Zone from the Time Zone menu. The Soni cWAL L use s an int ern al cl ock
to timestamp logs and other functions requiring time. Click Next.
Page 14 SOHO TZW Getting Started Guide
Page 16

Configuring the WAN Network Mode (NAT with DHCP Client)
7. If a DCHP server is detected on the WAN, the Setup Wizard defaults to NAT with DHCP
Client network mode. All WAN network settings are automatically detected and used for
the network mode. Click Next.
Configuring the WAN Network Mode (NAT with PPPoE Client)
8. If PPPoE is detected on the WAN, the SonicWALL defaults to NAT with PPPoE Client
network mode. All WAN network settings are automatically detected and used for the
network mode. Click Next.
9. Type in the username and password provided by your ISP into the User Name and
Password fields. Click Next.
SOHO TZW Getting Started Guide Page15
Page 17

Configuring LAN Settings
10. The default private IP address and LAN Subnet Mask entries ares acceptable for most
configurations. Click Next.
Configuring WLAN 802.11b Settings
11. Type in a new SSID in the SSID field. The Service Set ID (SSID) identifies your wireless
network. It can be up to 32 alphanumeric characters long and is case-sensitive. Select the
desired channel for your wireless port. Channel 11 is selected by default and is the most
commonly used channel. Click Next.
Tip! Record your SSID value. Your WLAN users may need the SSID when configuring their
WLAN card softwar e.
Page 16 SOHO TZW Getting Started Guide
Page 18

Configuring WiFiSec - VPN Client User Authentication
12. WiFiSec and GroupVPN are automatically enabled on the SOHO TZW to provide secure
wireless networking. Type a user name and password in the User Name and Password
fields. When WLAN users access the SonicWALL using the Global VPN Client, they are
prompted for the user name and password you enter here. Click Next.
All of your WLAN users can share this single authentication username and password or you
can create custom login usernames and passwords for each user on your WLAN.
Additional users can be entered in the Users>Settings page.
Tip! Make a mental note of the user name and password for authentication of your WLAN
clients. Your wireless network users need this information to log on to your secure WiFi wireless
network.
Configuring Wireless Guest Services
13. When Wireless Guest Services is selected, guests on your WLAN are permitted access
only to the WAN and are required to log in when accessing the Internet. Up to 10 users by
default can use the same guest account. Type in the account name and password in the
Account Name and Password fields. Configure the Account Lifetime and the Session
Timeout times.
SOHO TZW Getting Started Guide Page17
Page 19

Tip! Make a note of the user name and password for authentication of your WLAN Guest users.
They need this information to log on to your wireless network.
SonicWALL Configuration Summary
14. The Configuration Summary page displays all of the settings configured using the
Deployment Scenario Wizard. To change any of the settings, click Back until you see the
settings you want to change. To apply the current settings to the SonicWALL, click Apply.
Tip! Record the default WLAN Interface Gateway IP Address of 172.16.31.1 in the
Configuration Summary page. You need this IP address for configuring SonicWALL Global
VPN Clients on your wireless network.
Storing SonicWALL Configuration
15. Wait for the settings to take effect on the SonicWALL.
Page 18 SOHO TZW Getting Started Guide
Page 20

Congratulations!
16. When the settings are applied to the SonicWALL, the Congratulations page is displayed.
Click Restart to complete the configuration.
SOHO TZW Getting Started Guide Page19
Page 21

Configure Your PCs
4
To enable secure wireless networking and access to the Internet through the SOHO TZW, you
need to install the SonicWALL Global VPN Client on your WLAN clients for secure wireless
networking and configure the Windows TCP/IP properties for the WLAN or LAN cards.
Setting Up Your WLAN Network Cards
Most wireless cards include proprietary management software that allows the user to configure
the required wireless settings. Also note that Windows XP by default attempts to configure
wireless cards itself. It may also be necessary to manually input the SOHO TZW SSID into the
wireless card’s setup tool.
Configuring Windows TCP/IP Settings
The SonicWALL TZW uses a DHCP server to deliver IP settings for use by your LAN and WLAN
clients. Any computer accessing your WLAN or LAN must be configured as a DHCP client to
receive the necessary IP settings to access the network and the Internet.
The following instructions explain how to configure your Windows 98, Windows NT, Windows
2000, and Windows XP client TCP/IP settings to support DHCP.
Page 20 SOHO TZW Getting Started Guide
Page 22

Windows XP
Windows 2000
1.Open the Local Area Connection Properties window.
2.Double-click Internet Protocol (TCP/IP) to open the
Internet Protocol (TCP/IP) Properties window.
3.Select Obtain an IP address automatically.
4.Click OK for the settings to take effect on the computer.
I
1.In Windows 2000, click Start, then Settings.I
2.Click Network and Dial-up Connections. Double-click
the network connection name to open the Status
window.
3.Right-click the connection icon for the network adapter
and select Properties.
4.Double-click Internet Protocol (TCP/IP) to open the
TCP/IP properties window.
5.Select Obtain an IP address automatically.
6.Click OK, then OK again.
7.Click Close to finish the network configuration.
SOHO TZW Getting Started Guide Page21
Page 23

Windows NT
Windows 98
1.From the Start li st, highl igh t Settings and then select
Control Panel.
2.Double-click the Network icon in t he Control Panel
window.
3.Double-click TCP/IP in the TCP/IP Properties window.
4.Select Obtain an IP address from a DHCP server.
5.Click OK, and then click OK again.
.
1.From the Start li st, highl igh t Settings and then select
Control Panel.Double-click the Network icon in the Control
Panel window
2.Double-click TCP/IP in the TCP/IP Properties window.
3.Select Obtain an IP address automatically.
4.Click OK, and then click OK again.
5.Restart the computer for changes to take effect.
Page 22 SOHO TZW Getting Started Guide
Page 24

Setting Up the Global VPN Client for Secure Wireless Networking
The SonicWALL Global VPN Client software installs on your wireless network computers to
provide secure, encrypted communications between your wireless network computers and the
SOHO TZW. SonicWALL GroupVPN is already configured on your SOHO TZW from the Setup
Wizard to support the SonicWALL Global VPN Clients. GroupVPN uses SonicWALL’s Client
Policy Provisioning to automatically configure Global VPN Clients.
The SonicWALL Global VPN Client runs on Windows 98 SE, Windows ME, Windows NT 4.0
(service pack 6 or later), Windows 2000 Professional (service pack 3 or later), Windows XP
Professional, or Windows XP Home Edition.
Your SonicWALL Global VPN Client software can be found on the SOHO TZW product CD.
Installing the Global VPN Client
1. Copy the Global VPN Client software to your PC from the SOHO TZW CD
2. Double-click setup.exe. The Setup Wizard launches.
3. Click Next to continue installation of the VPN Client.
SOHO TZW Getting Started Guide Page23
Page 25

4. Close all applications and disable any disk protection and personal firewall software
running on your computer. Click Next.
5. Select I accept the terms of the license agreement. Click Next.
6. Click Next to accept the default location and continue installation or click Browse to specify
a different location.
Page 24 SOHO TZW Getting Started Guide
Page 26

7. Click Install. The Setup Wizard installs the Global VPN Client files on your computer.
8. Select Start VPN Global Client Automatically when users log in to automatically launch
the VPN Global Client when you log o nto the compu ter, if desired.
9. Select Launch program now to automatically launch the Global VPN Client after finishing
the installation, if desired.
10. Click Finish.
Alert! If Dial-Up Adapter is installed on your computer, you must reboot your computer after
installing the SonicWALL Global VPN Client.
Provisioning Your WiFiSec VPN Connection
Configuring the Global VPN Client on your WLAN Client is easy using the New Connection
Wizard. The provisioning data for the Global VPN Client is transparently downloaded over the
secure wireless network when you use the New Connection Wizard.
Alert! You need the SOHO TZW’s default WLAN IP address of 172.16.31.1 to provision the
Global VPN Client.
1. Choose Start>Programs>SonicWALL Global VPN Client.
SOHO TZW Getting Started Guide Page25
Page 27

2. Double-click the Make New Connection icon to launch the New Connection Wizard.
Click Next.
3. Download from a Gateway is selected by default in the Create or Import Connection
page. Click Next.
4. Type the default WLAN Interface Gateway IP address of 172.16.31.1 of the SOHO TZW in
the IP Address or Domain Name field.
5. Type a name for your VPN connection policy in the Connection Name field. Click Next.
Page 26 SOHO TZW Getting Started Guide
Page 28

6. Select Enable this connection when the program is launched, if you want to
automatically establish this VPN connection when you launch the SonicWALL Global VPN
Client.
7. Select Create a shortcut to this connection on the desktop, if you want to create a
shortcut icon on your desktop for this VPN connection.
8. Click Finish. The new VPN connection policy appears in the SonicWALL Global VPN Client
window.
Connecting to the WLAN
Connecting to your WiFiSec WLAN using the SonicWALL Global VPN Client is easy. The
WLAN users simply enable the connection policy and enter the username and password you
entered in the VPN Authentication page of the SOHO TZW Setup Wizard to log onto the WLAN
using the Global VPN Client.
If you have configured Wireless Guest Services and enforced WiFiSec on the WLAN, your
guest users are directed to a download page for the Global VPN Client software. A guest user
downloads and installs the software on their laptop. Using the IP address of the WLAN, a guest
user then creates a connection to the WLAN. Once connected to the WLAN, a guest user needs
the account name and password you setup in the SOHO TZW Setup Wizard to log into the
SOHO TZW. After logging in, the guest user can access the WAN using the privileges assigned
to the account.
Tip! You need the user name and password you entered in the Setup Wizard for logging onto
your secure WiFi wireless network.
1. Select Start>Programs>SonicWALL Global VPN Client.
2. If you selected Enable this connection when the program is launched in the New
Connection Wizard, the Global VPN Client begins establishing your secure WLAN
connection.
3. If you VPN connection isn’t automatically established when you launch the Global VPN
Client, double-click the connection policy icon in the Global VPN Client window.
4. The Enter Username and Password dialog box is displayed.
5. Type the VPN authentication username and password in the Username and Password
fields.
6. Click OK. The secure WLAN connection is established for secure Internet access.
Global VPN Client Access to a Remote SonicWALL
To use the SonicWALL Global VPN Client for secure access a remote SonicWALL through the
SonicWALL SOHO TZW, you need to create another VPN connection policy using the New
Connection Wizard. You enter the FQDN (Fully Qualified Domain Name), such as
gateway.company.com, or the IP address of the remote SonicWALL.
To establish the VPN connection through the SOHO TZW, first enable the VPN policy to the
remote SonicWALL, then enable the WLAN VPN Policy.
SOHO TZW Getting Started Guide Page27
Page 29

Disconnecting from the WLAN
To disconnect from the SOHO TZW WLAN, right click the VPN policy icon and select Disable
from the menu.
More Information on the SonicWALL Global VPN Client
The SonicWALL Global VPN Client User Guide is available at
www.sonicwall.com/support/VPN_documentation.html.
Page 28 SOHO TZW Getting Started Guide
Page 30

Configure the SOHO TZW for VPN Connections
5
SonicWALL IPSec VPN provides secure method for exchanging confidential data and network
resources with telecommuters, remote offices, suppliers and partners. You can configure the
SOHO TZW to support
• Remote access to your network from SonicWALL Global VPN Clients through the SOHO
TZW VPN gateway.
• Access another SonicWALL from the SOHO TZW for network to network VPN connections.
The SOHO TZW supports up to 50 Security Associations (SAs). An SA is one VPN connection,
which can be a Global VPN Client WLAN or WAN (Internet) connection or a SonicWALL to
SonicWALL (LAN to LAN) VPN connection.
Before You Start Configuring VPN
When designing VPN connections, be sure to document all pertinent IP Addressing information
and create a network diagram to use as a reference. A sample planning sheet is provided on
the next page.
• The SonicWALL must have a routable WAN IP address whether it is dynamic or static.
• Be sure that the networks behind the SonicWALLs are unique. The same subnets cannot
reside behind two different VPN gateways.
• In a VPN network with dynamic and static IP addresses, the VPN gateway with the dynamic
address must initiate the VPN connection.
Enabling Remote Global VPN Client Access
When you established secure (WiFiSec) wireless networking with the SOHO TZW, you setup
GroupVPN and installed the SonicWALL Global VPN Clients. To use more than one of these
SonicWALL Global VPN Clients to remotely access your network through the SOHO TZW (from
the Internet), you must purchase a Global VPN Client license upgrade at mySonicWALL.com.
The SonicWALL Global VPN Client upgrade enables the SOHO TZW to support Global VPN
Client connections from the WAN port.
You can purchase Global VPN Client software from SonicWALL, your reseller, or online at
mysonicwall.com. For more information on purchasing the Global VPN Client
www.sonicwall.com/products/vpnglobal.html.
Tip! You only need the Global VPN Client upgrade if you plan to use more than one Global VPN
Client at a time for remote access to your network via the WAN port on the SOHO TZW.
SonicWALL Global VPN Client Licenses
Global VPN Client Licensing is based on the number of simultaneous Global VPN Client
connections to a SonicWALL. If the number of simultaneous Global VPN Client connections is
exceeded, the SonicWALL does not allow any additional Global VPN Client connections. Once
the number of simultaneous Global VPN Client drops below the license limit, new Global VPN
connections can be established.
SOHO TZW Getting Started Guide Page29
Page 31

The number of Security Associations the SonicWALL SOHO TZW supports is 50. An SA refers
to all the setting s needed to cr eate a sing le VPN tunn el. A VPN tu nnel can be a Global VP N
Client to SonicWALL VPN connection o r a SonicWALL to S onicWALL conne ction for LAN to
LAN connections.
Activating Your SonicWALL Global VPN Clients
In order to activate the SonicWALL Global VPN Client license for the SOHO TZW, you must
have a valid mysonicwall.com account and your SonicWALL product must be registered to your
account. If you do not have a mysonicwall.com account, or if you have not registered your
product to your account, create an account and then follow the registration instructions at
http://www.mysonicwall.com.
Tip! See a Appendix C for instructions on setting up your mySonicWALL.com account to
register your SOHO TZW and purchase the Global VPN Client upgrade.
To activate your Global VPN Client license,
1. Log in to your mysonicwall.com account:
2. Select the registered SonicWALL Internet Security Appliance.
3. Select Global VPN Client from the Applicable Services menu.
4. Select Activate.
5. Type in your activation key in the Activation Key field.
6. Click Submit.
Upon successful activation, a confirmation message will be displayed. For future reference,
record the Serial Number of the SonicWALL product. Your license activation is now complete.
Page 30 SOHO TZW Getting Started Guide
Page 32

Site to Site VPN Configuration
In a typical VPN scenario, an office with a SOHO TZW can be configured to connect to a central
SonicWALL (hub), such as a corporate SonicWALL. The hub must have a static IP address, but
the spokes can have dynamic IP addresses.
• If your network administrator has provided you with the information to create a VPN SA
using IKE and a preshared secret, you use the VPN Policy Wizard to create an IKE using
Preshared Secret VPN policy.
• If your network administrator has provided you with the information to create a VPN SA
using IKE and Manual Key, you use the VPN Policy Wizard to create a Manual Key VPN
policy.
SOHO TZW Getting Started Guide Page31
Page 33

VPN Planning Sheet for Site-to-Site VPN Policies
You need the information below before you begin configuring Site-to-Site VPN Policies.
Site A
Workstation
LAN IP Address: ___.___.___.___
Subnet Mask: ___.___.___.___
Default Gateway: ___.___.___.___
SonicWALL
LAN IP Address: ___.___.___.___
WAN IP Address: ___.___.___.___
Subnet Mask: ___.___.___.___
Default Gateway: ___.___.___.___
Router
Internet Gateway
WAN IP Address: ___.___.___.___
Subnet Mask: ___.___.___.___
DNS Server #1: ___.___.___.___
DNS Server #2: ___.___.___.___
Additional Information
SA Name:____________________
Manual Key, SPI In_____ SPI Out_____
Enc.Key:____________________
Auth.Key:___________________
If Preshared Secret,
Shared Secret:___________________
Phase 1 DH - 1 2 5
SA Lifetime 28800 or ____________
Phase 1 Enc/Auth DES 3DES AES-128 AES-256 MD5 SHA1 (circle)
Phase 2 Enc/Auth DES 3DES AES-128 AES-256 MD5 SHA1 (circle)
ARC NULL
__ Use this SA as default route for Internet traffic
__ IP Addresses use DHCP through this SA
__ Specify destination networks below:
Network/Range Start: ___.___.___.___
Range End: ___.___.___.___
Subnet Mask: ___.___.___.___
Page 32 SOHO TZW Getting Started Guide
Page 34

Using the VPN Policy Wizard to Configure VPN Policies
The VPN Wizard quickly and easily walks you through the steps of configuring a VPN security
policy between two SonicWALL appliances.
Tip! Before you begin, you need IP addressing information for your local network as well as
your remote network. Use the VPN Planning Sheet to record your information.
Creating an IKE using Preshared Secret VPN Policy
You can create a typical VP N Policy us ing the VPN Wizard to con figure a n IPSec VPN se curity
association between two SonicWA LL appl ia nc es.
1. Click VPN Policy Wizard on the VPN>Settings page to launch the wizard.
2. Click Next.
VPN Policy Wizard Options
3. Select Typical and cl ic k Next.
SOHO TZW Getting Started Guide Page33
Page 35

VPN Policy Name and Address
4. Type a name for the policy in the Policy Name field. You may want to use the name of a
remote office or other identifying feature so that it is easily identified. Type the IP address
or Fully Qualified Domain Name of the remote destination in the IPSec Gateway Name or
Address field. Click Next.
VPN Destination Networks
5. Type the IP address of the network protected by the remote SonicWALL in the Remote
Network field. This is a private IP address on the remote network. Type the subnet mask
in the Remote Netmask field.
Page 34 SOHO TZW Getting Started Guide
Page 36

Shared Secret
6. Type a shared secret in the Shared Secret field. Use a combination of letters and numbers
to create a unique secret. Click Next.
Congratulations!
You have now configured a simple VPN tunnel using IKE and a preshared secret. To enable
the VPN policy immediately, click Apply. If you prefer to disable the policy, select Create this
Policy Disabled, and then click Apply. To automatically launch the Wizard every time a VPN
policy is created, select Use Wizard when adding VPN Policies, and then click Apply.
SOHO TZW Getting Started Guide Page35
Page 37

Creating a Manual Key VPN Policy
You can create a custom VPN Policy using the VPN Wizard to configure a different IPSec
method or configure more advanced features for the VPN Policy. Follow the steps in the
previous section, except select Customize instead of Typical.
1. Click Next to continue.
VPN Policy Name and Address
2. Type the name for the VPN Policy in the Policy Name field. Click Next.
Page 36 SOHO TZW Getting Started Guide
Page 38
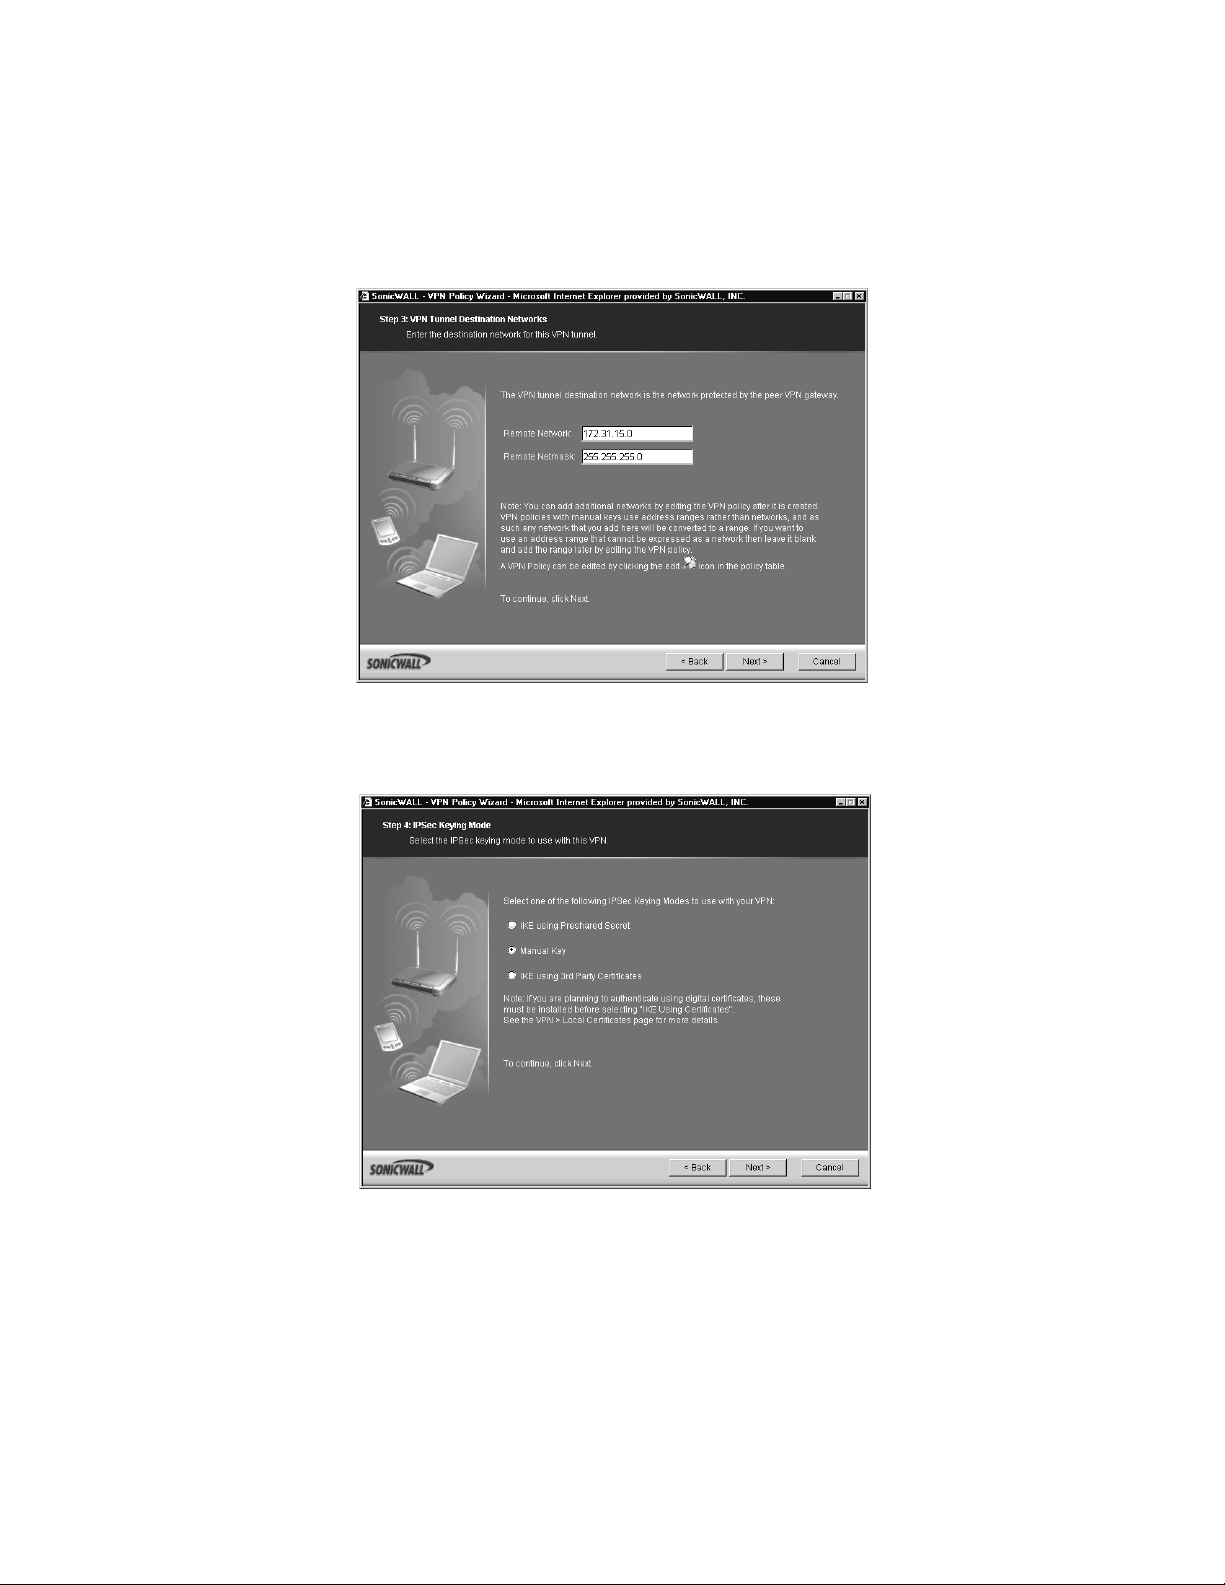
VPN Tunnel Destination Networks
3. Type the IP address range of the remote network into the Remote N etwork field.
4. Type the remote subnet in the Remote Netmask field. Click Next.
IPSec Keying Mode
5. Select Manual Key from the IPSec Keying Modes list.
SOHO TZW Getting Started Guide Page37
Page 39

Manual Key Security Association
6. Define an Incoming SPI and an Outgoing SPI. The SPIs are hexadecimal
(0123456789abcedf) and can range from 3 to 8 characters in length. Or use the default
values.
Each Security Association must have unique SPIs; no two Security Associations can share
the same SPIs. However, each Security Association Incoming SPI can be the same as the
Outgoing SPI.
7. ESP is selected by default from the Protocol menu. ESP is more secure than AH, but AH
requires less processing overhead.
8. 3DES is selected by default from the Encryption Method menu. Type a 48-character
hexadecimal key if you are using 3DES encryption.Type a 16-character hexadecimal key
in the Encryption Key field if you are using DES or ARCFour encryption. This encryption
key must match the remote SonicWALL's encryption key.
The default 48-character key is a unique key generated every time a VPN Policy is created.
9. AH is selected by default from the Authentication Key field. When a new SA is created, a
32-character key is automatically generated in the Authentication Key field. This key can
be used as a valid key. If this key is used, it must also be typed in the Authentication Key
field in the remote SonicWALL. If authentication is not used, this field is ignored.
10. Click Next.
Page 38 SOHO TZW Getting Started Guide
Page 40

Completing the VPN Policy Wizard
11. The VPN Policy is automatically enabled after you complete the wizard steps. To disable
the VPN Policy, select Create this Policy Disabled. Click Finish to complete the VPN
Policy configuration.
Where to Go from Here
SonicWALL provides a variety of resources to help you leverage your SOHO TZW investment.
Visit the SonicWALL support site at www.sonicwall.com/support for more SOHO TZW
documentation, technical support resources, and enhanced support programs.
SOHO TZW Getting Started Guide Page39
Page 41

Appendix A: Mounting the SonicWALL SOHO TZW
Wall Mounting the SOHO TZW
Follow the instructions below to mount the SOHO TZW on the wall.
1. Using the mounting plate as a template, mark the places to insert the mounting anchors.
2. Using a #2 Phillips screw driver, press the tip of the anchor into the marked places on the
hollow wall.
3. Turn the screwdriver clockwise until the anchor is flush with the wall. Repeat for the second
anchor.
4. Insert a #6 x 1
the mounting plate.
Page 40 SOHO TZW Getting Started Guide
1/4” pan head Phillips self-tapping screw into each anchor leaving a gap for
Page 42

5. Hang the mounting plate on the screws. Use the middle row of mounting holes.
6. Slide the plate down to the narrowest part of the keyhole so that the mounting plate rests
on the screws.
7. Tighten the mounting screws to secure the mounting plate.
8. Snap the SOHO TZW onto the mounting plate.
SOHO TZW Getting Started Guide Page41
Page 43

Mounting the SOHO TZW on the Ceiling
1. Locate a metal support to hang the SOHO TZW.
2. Using the mounting plate as a template, mark the places to insert the mounting anchors.
3. Drill two holes for #6 x 1-1/4” screws in the marked location.
4. Install the #6 x 1-1/4” self-tapping screws leaving a slight gap for the mounting plate.
5. Hang the mounting plate on the screws.
6. Slide the plate down to the narrowest part of the keyhole so that the mounting plate rests
on the screws.
Page 42 SOHO TZW Getting Started Guide
Page 44

7. Tighten the mounting screws to secure the mounting plate.
SOHO TZW Getting Started Guide Page43
Page 45

8. Snap the SOHO TZW onto the mounting plate.
Other Considerations for Mounting the SOHO TZW
• Mount in a location away from direct sunlight and sources of heat. A maximum ambient
temperature of 104º F (40º C) is recommended.
• Route cables away from power lines, fluorescent lighting fixtures, and sources of noise
such as radios, transmitters, and broadband amplifiers
• Ensure that no water or excessive moisture can enter the unit.
• Allow unrestricted airflow around the unit and through the vents on the side of the unit. A
minimum of 1 inch (25.44mm) clearance is recommended.
Page 44 SOHO TZW Getting Started Guide
Page 46

Appendix B: Registering Your SOHO TZW at mySonicWALL.com
After you complete the initial installation and configuration of your SonicWALL, you should
register your SonicWAL L Inter net Secur i ty App lianc e at <http ://www .my so nicwa ll .co m> .
MySonicWALL.com delivers a convenient, centralized way to register SonicWALL products
and security services. You can do the following with mySonicWALL.com:
• Access firmware and security service updates.
• Get SonicWALL alerts on services, firmware, and products.
• Check status of your SonicWALL services and upgrades linked to each registered
SonicWALL Internet security appliance.
• Manage (activate, change, or delete) your SonicWALL security services online.
• Access SonicWALL Technical Support.
Creating a New User Account
You can access mySonicWALL directly from the SOHO TZW Web Management Interface.
1. Click System to display the Status page.
2. In the Security Services section under Your SonicWALL is not Registered, clic k t he
Register link in Click here to Register your SonicWALL. The mySonicWALL.com Login
page is displayed.
3. Click the here link in If you do not have a mySonicWALL account, please click here to
create one. The mySonicWALL registration page is displayed.
4. All field marked with an * are required fields. Be sure to fill out the form completely before
submitting to the user database. Type a user name in the User Name field. Type a
password in the Password field. Confirm the password by typing it in the Confirm
Password field. For your convenience, you can record the information below.
User Name:______________________ Password:__________________
Alert! You must remember your user name and password until you have activated your
account. If you forget your password before your user account is active, you must create a new
user account.
Tip! If your security policy doesn’t allow you to write down passwords, write down a hint or a
prompt for your password.
5. Create a Secret Question and Answer to prompt you for your password if you forget it.
Personal Information
6. Complete the Personal Information section of the Registration form.
Be sure to type the correct e-mail address as the subscription code for your SonicWALL user
account is e-mailed to you. The subscription code is necessary to activate your account.
SOHO TZW Getting Started Guide Page45
Page 47

7. Select your time zone from the Time Zone menu, and then select any or all of the following
options:
• Yes, I would like to be a Beta Tester.
• No, I do not want to be contacted by SonicWALL via e-mail.
• I would like to receive security alerts from SonicWALL.
• I would like to receive product information from SonicWALL.
8. Click Submit.
9. Review your information carefully to ensure that it is accurate. Click Back on your Web
browser navigation bar to go back to the form and re-type any information.
10. If all the information is correct, click OK. A confirmation message appears notifying you that
your account must be activated within 72 hours of creating it. You also receive an
e-mail with your subscription code in it. Write your subscription code below:
Subscription code:_______________________________
Note: For security reasons, the subscriber name and part of the subscription code are masked.
11. Return to the mySonicWALL.com login screen, or alternatively, click on the link in the
e-mail message to provide your subscription code to activate your account.
12. Type the subscription code you received via e-mail into the Subscription Code field, and
click Submit.
13. Your Account Management interface appears and you can now register SonicWALL
Internet Security Appliances or Services. You can also delete or transfer appliances from
your user account.
Problems Creating a mysonicWALL.com User Account?
If you’re having trouble creating a user account on the mySonicWALL.com Web site, be sure
to check the f ollowing items in your browser:
• Accept Cookies
• Internet Explorer 5.0 or higher
• Netscape 4.5 or higher
• Allow Java scripts
• Correct Password for mysonicWALL.com
Page 46 SOHO TZW Getting Started Guide
Page 48

Quick Registration of Your SOHO TZW
To quickly register your SOHO TZW, type the serial number in the field under the Quick
Register section, and cl ick Go. The serial number automatically appears in the Serial Number
field. You can then create a Friendly Name for the appliance. If you type the incorrect serial
number into the Serial Number field, a message stating that the appliance is previously
registered may be returned. Write your SonicWALL serial number below.
SonicWALL Serial Number:____________________
After you register the SonicWALL, the Friendly Name you specified appears as a hyperlink
under Registered SonicWALL Products. Click on the Friendly Name to view the services
activated on the appliance.
Note: Services may vary from model to model and may not have the same activated fields as
the above appliance. Also, the serial number, registration code, and activation keys are masked
for security reasons.
SOHO TZW Getting Started Guide Page47
Page 49

Appendix C: Glossary of Terms
If you are unfamiliar with network terminology, review the glossary below.
• Default Gateway - A device on an internetwork that forwards packets to another network.
• DHCP - Dynamic Host Configuration Protocol (DHCP) allows communication between
network devices and a server that administers IP numbers. A DHCP server leases IP
addresses and other TCP/IP information to DHCP client that requests them. Typically, a
DHCP client leases an IP address for a period of time from a DHCP server which allows a
larger number of clients to use a set pool of IP addresses.
• DNS - Domain Name System (DNS) is a protocol that matches Internet computer names
to their corresponding IP addresses. By using DNS, a user can type in a computer name,
such as www.sonicwall.com, instead of an IP address, such as 192.168.168.168, to access
a computer.
• IP Address - A set of numbers in the format, XXX.XXX.XXX.XXX, used to address
computers on the Internet.
• LAN (Local Area Network) - Local area refers to a network in one location, Local Area Networks connect computers and devices close to each other such as on one floor of a building, one building, or a campus. LANs can connect as few as two computers or as many as
100 computers.
• NAT (Network Address Translation) - Hides internal IP addresses by converting all
internal host IP addresses to the IP address of the firewall as packets are routed through
the firewall. The firewall then retransmits the data payload of the internal host from its own
address using a translation table to keep track of which sockets on the exterior interface
equate to which sockets on the interior interface. To the Internet, all of the traffic on the
network appears to come from the same computer.
• Node - A node is a device, such as a PC or a printer, on a network with an IP address.
When a computer or other device connects to the LAN port of the SonicWALL, it is detected
via broadcast and stores the computer or other device IP address in memory. The SOHO
TZW has 25-node license for the LAN.
• PPPoE - Point to Point Protocol over Ethernet supports the transmission of network
packets over serial transmission lines such as DSL or POTS (Plain Old Telephone
Service).
• Subnet Mask - A set of numbers in IP address format using 255 in place of the XXX’s. It
determines the type of network by “masking” out numbers. A Class C network has a subnet
mask of 255.255.255.0.
• WAN (Wide Area Network) - This network connects LANs together. The networks that
make up a WAN can be located throughout a country or even around the world. If a single
company owns a WAN, it is often referred to as an enterprise network. The Internet is the
the largest WAN.
• WLAN (Wireless Local Area Network) - A LAN that uses 802.11x based wireless
protocols to enable Ethernet networ king with out cab le s.
Page 48 SOHO TZW Getting Started Guide
Page 50

SonicWALL,Inc.
1143 Borregas Avenue
Sunnyvale,CA 94089-1306
© 2002 SonicWALL, I n c .SonicWALL is a registered trademark of SonicWALL, I n c .Other product and company names mentioned herein may be
t radema rks a nd/ or registered tradema rks of their respective companies. Specif ication s and descriptions subjec t to change with out notice.
P/ N
Rev A 6/03
T: 408.745.9600
F: 408.745.9300
www.sonicwall.com
 Loading...