

Page 1

SONICWALL
Installation Guide
Page 2

Contents
About This Guide ............................ ................................................. ....3
Copyright Notice ............................. .....................................................3
Quick Start Installation Guide .......................................................... 5
Check Package Contents ................. ............................ .........................6
Installing the SonicWALL ... ................................................. ..................7
Check Link LEDs .................................... ..............................................8
Network Addressing Information ................... ............................ ...........8
Setting Up Your Management Station ................................................ ....9
Logging into the SonicWALL .......................... .....................................11
Configuring Computers on the LAN ......... ............................ ................13
1 Introducti on ............ ...................... ... .................................. .. ........ 15
Inspecting the Package ............ ................................................. ......... 15
Internet Service Provider (ISP) Information ......................... ................16
SonicWALL Configuration Overview ....................... ............................ ..1 7
2 Performing the Initial Configuration ...........................................19
Installing the SonicWALL ... ................................................. ................19
Setting Up a Management Station .... ................................................. ..2 0
Setting up your Management Station ........................... .......................21
Connecting the SonicWALL to the Network ..........................................23
Configuring your SonicWALL to Access the Internet ............. ................23
Configuring the SonicWALL in NAT (Network Address Translation) Enabled
Mode ................. ............................ ..................... ..................... ......... 24
Configuring NAT Enabled with PPPoE ..................................................31
Configuring NAT with DHCP Client Mode .............................................36
Log into the SonicWALL Management Interface ...................................42
Basic Network Terminology and Configurat ions ....................................44
Network Hardware Components ......................................... ................45
Network Types ........................ ............................ ............................ ..4 5
Firewalls ...........................................................................................45
Gateways ........... ................................................. ............................ ..4 5
Network Protocols ............................................................. ................45
IP Addressing .......................... ............................ .............................. 46
3 Registeri ng at myS on i c WALL.com ........... ....................... ... ..........51
Creating a New User Account .............................................................52
Problems Creating a MysonicWALL. com user Accou nt? .........................56
Registering Your SonicWALL Internet Security Appliance ......................57
Managing Your SonicWALL ................................... ............................ ..6 0
SonicWALL Installation Guide Page 1
Page 3

Applicable Services for SonicWALL Internet Security Appliances ............63
Activating Services Using mySonicWALL.com .......................................66
4 Hardware Desc ri ption ........ ... ........... ... ........... ... ...................... ... ..67
SonicWALL PRO 200 and PRO 300 Front Panel ........................... ......... 67
SonicWALL PRO 200 and PRO 300 Back Panel .....................................68
SonicWALL PRO 100 Front Panel .......................... ..............................69
SonicWALL PRO 100 Back Panel ................................................ ......... 70
SonicWALL SOHO3 and TELE3 Front Panel ........................................ ..7 1
SonicWALL SOHO3 and TELE3 Back Panel ...........................................72
SonicWALL GX 250 and GX 650 Front Panel ........................................73
5 Troubles h ootin g Gui de ....... ........... ... ........... ... ...................... ... ..... 77
Tips for Cable/DSL Modem Users ................................. .......................77
Erasing the Firmware .........................................................................78
6 SonicWALL Support Solutions ...................................................... 80
Support Offers ..................................................................................80
SonicWALL Support 24X7 .. .................................................................82
Deliverables ......................................................................................82
SonicWALL Support 8X5 ......................... ............................ ................83
Deliverables ......................................................................................83
Warranty Support - North America ................. ............................ ......... 84
Deliverables ......................................................................................84
Warranty Support - International ........................................................85
Deliverables ......................................................................................85
Page 2 Running H/F 2
Page 4

About This Guide
This guide pro vide s inf or mati on on regi st e r ing and i ns tall in g you r S onic W ALL In ter ne t S ec uri ty
appliance. Three commo n network configurations, Netwo rk Address Translation (NAT), NAT
with PPPoE, and NAT with DHCP Client, and are described as part of the installation process.
For more detailed information on other network settings, consult your SonicWALL Product
Family manual for complete details.
The chapters in this guide are summarized as follows:
Quick Start Guide, if you have previous network experience and are familiar with getting
connected to the Internet, then the Quick Start Guide provides abbreviated instructions on
configuring your SonicWALL to access the Internet. If, at any time during the installation, you
require assistance, refer to the following chapters for more information.
Chapter 1, Introduction, describes the contents of the package and has an overview of the
configuration process.
Chapter 2, Per formi ng the I n itial Con fig urat io n, de scr i be s t he t hr ee mo st c o mmon ways
of configuring your Soni cWALL for use as a firewall on your network
Chapter 3, Registering Your SonicWALL, describes the process of registering your
SonicWALL appliance on the MysonicWALL.com web site. You should register your SonicWALL,
any services, and u pgrades before i n stalli ng i t to access technical support, if necessary, during
installation.
Chapter 4, Hardware Description, h as descriptions of all SonicWALL produ cts. There are
both front and back descriptions of the hardware.
Chapter 5, Troubleshooting, provides solutions to problems you may encounter while
configuring your Soni cWALL.
Chapter 6, Support, outlines the support packages available from SonicWALL.
Copyright Notice
©
2002 SonicWALL, Inc. All rights reserved.
Under the copyright laws, this manual or the software described within, can not be copied, in
whole or part, without t he written co nsent of the ma nufacturer, exc ept in the normal us e of the
software to make a backup copy. The same proprietary and copyright no tic es must be affixed
to any permitted copies as were affixed to the original . This exception does not al low copies to
be made for others, whether or not sold, but all of the material purchased (with all backup
copies) can be sold, given, or loaned to another person. Under the law, copying includes
translating into another language or format.
SonicWALL is a registered trademark of SonicWALL, Inc.
Other product and company na mes mentioned herein can be trademarks and/or registered
trademarks of their respective companies.
Specifications and descriptions subject to change without notice.
SonicWA LL Installti on Gu ide Page 3
Page 5

LIMITED WARRANTY
SonicWALL, Inc. warrants the SonicWALL Internet Security Appliance (the Product) for one (1)
year from the date of purchase against defects in materials and workmanship. If there is a
defect in the hardware, SonicW ALL will replace the product at no charge, provided that it is
returned to SonicWALL w ith transpo rtation charges prepaid. A Return Materials Authorization
(RMA) number must be displayed on the outside of the package for the product being returned
for replacement or the product will be refused. The RMA number can be obtained by calling
SonicWALL Customer Service between the hours of 8:30 AM and 5:30 PM Pacific Standard
Time, Monday through F r iday .
Phone:(408) 752-7819
Fax:(408) 745-9300
Web: <http://www.sonicwall.com/support>
This warranty does not apply if the Product has been damaged by accident, abuse, misuse, or
misapplication or has been modified without the written permission of SonicWALL.
In no event shall SonicWALL, Inc. or its suppliers be liable for any damages whatsoever
(including, without limitation, damages for loss of profits, business interruption, loss of
information, or other pecuniary loss) arising out of the use of or inability to use the Product.
Some states do not allow the exclusion or limitation of implied warranties or liability for
incidental or consequential damages, so the above limitation or exclusion can not apply to you.
Where liability can not be limited unde r applicable law, the So nicWALL liability shall be limited
to the amount you paid for the Product. This warranty gives you specific legal rights, and you
can have other rights which v ary from state to state.
By using this Product, you agree to these limitations of liability.
THIS W ARRANTY A ND THE REM E D IES S ET F ORTH AB O VE ARE EXC LU S IV E AN D IN
LIEU OF ALL OTHER WARRANTIES, ORAL OR WRITTEN, EXPRESS OR IMPLIED.
No dealer, agent, or employee of SonicWALL is authorized to make any extension or addition
to this warranty.
Page 4
Page 6
Quick Start Installation Guide
Thank you for purchasing a SonicWALL Internet security appliance. The SonicWALL acts as a
secure barrier between yo ur p rivate LAN and the p ublic In ternet (WAN) to p rotect your net work
from security threats on the Internet.
If you are currently familiar with firewalls or networking equipment, the QuickStart Guide
provides i nstru ctio ns to e stabl ish c onn ectivi ty betw een y our ne tw ork and the Intern et u sing the
SonicWALL. If you are new to networ ks and th e Internet, b egin t he installation process on pag e
17.
Note: This guide covers initial installation instructions for all SonicWALL Internet security
appliances. The instructions are the same for all hardware models.
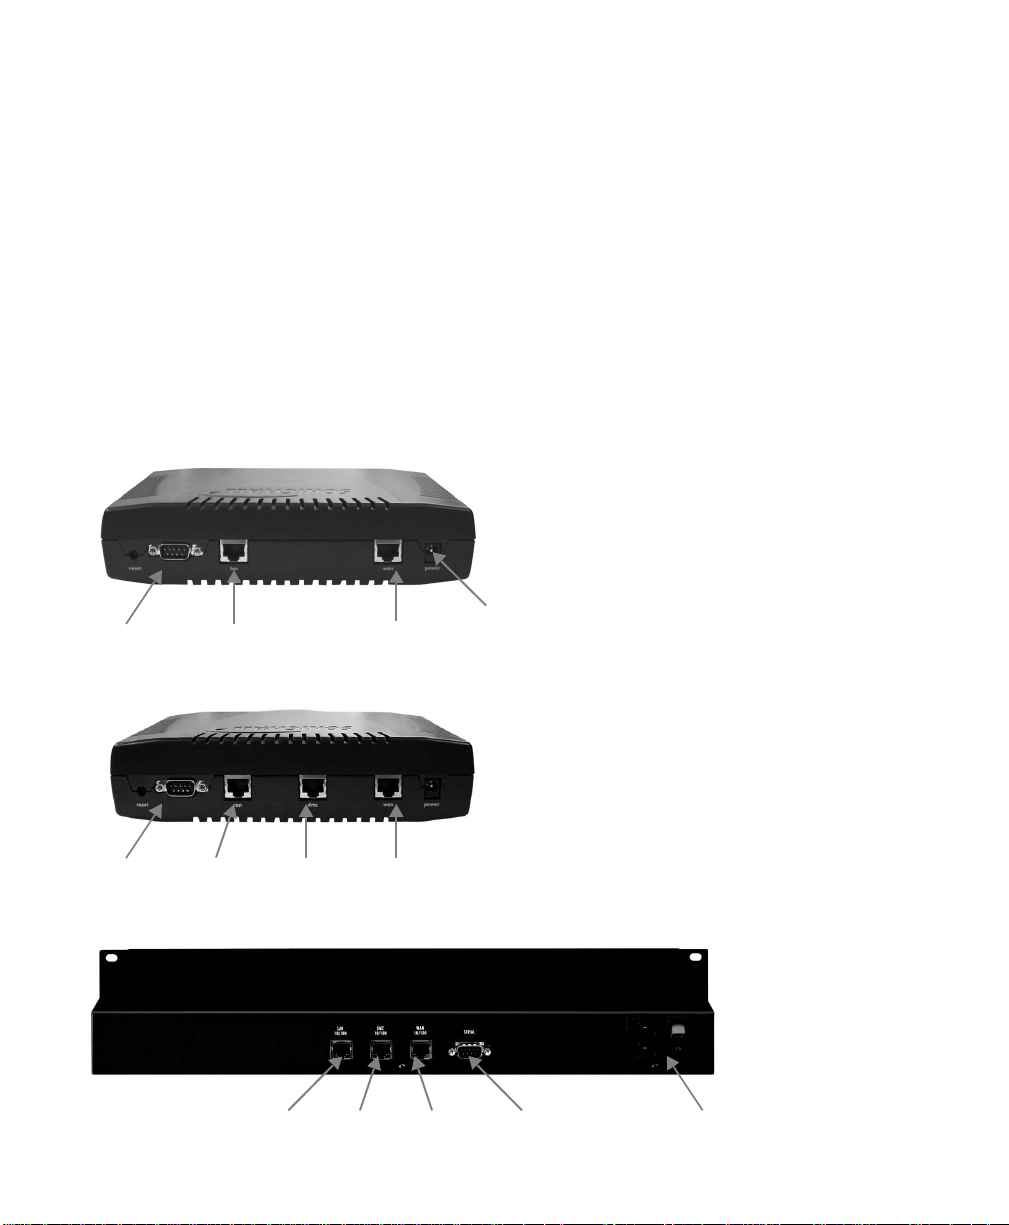
Below are rear panel descriptions for each SonicWALL hardware platform. The SonicWALL TELE3
and SOHO3 models have a LAN port and WAN port. The PRO 100, PRO 200, an d the PRO 300
have a LAN port, a WAN port, and a DMZ port. The QuickStart Guide covers only the LAN port
and the WAN port. For information on the DMZ port, please refer to your SonicWALL manual.
SonicWALL Tele3 and SOHO3
CLI
Port
CLI
Port
LAN
Port
LAN
Port
LAN
Port
DMZ
Port
DMZ
Port
WAN
Port
WAN
Port
WAN
Port
5VDC
Power
Input
5VDC
Power
Input
CLI
Port
SonicWALL PRO 100
SonicWALL PRO 200
and 300
110/220V
Power Input
SonicWALL Installation Guide Page 5
Page 7
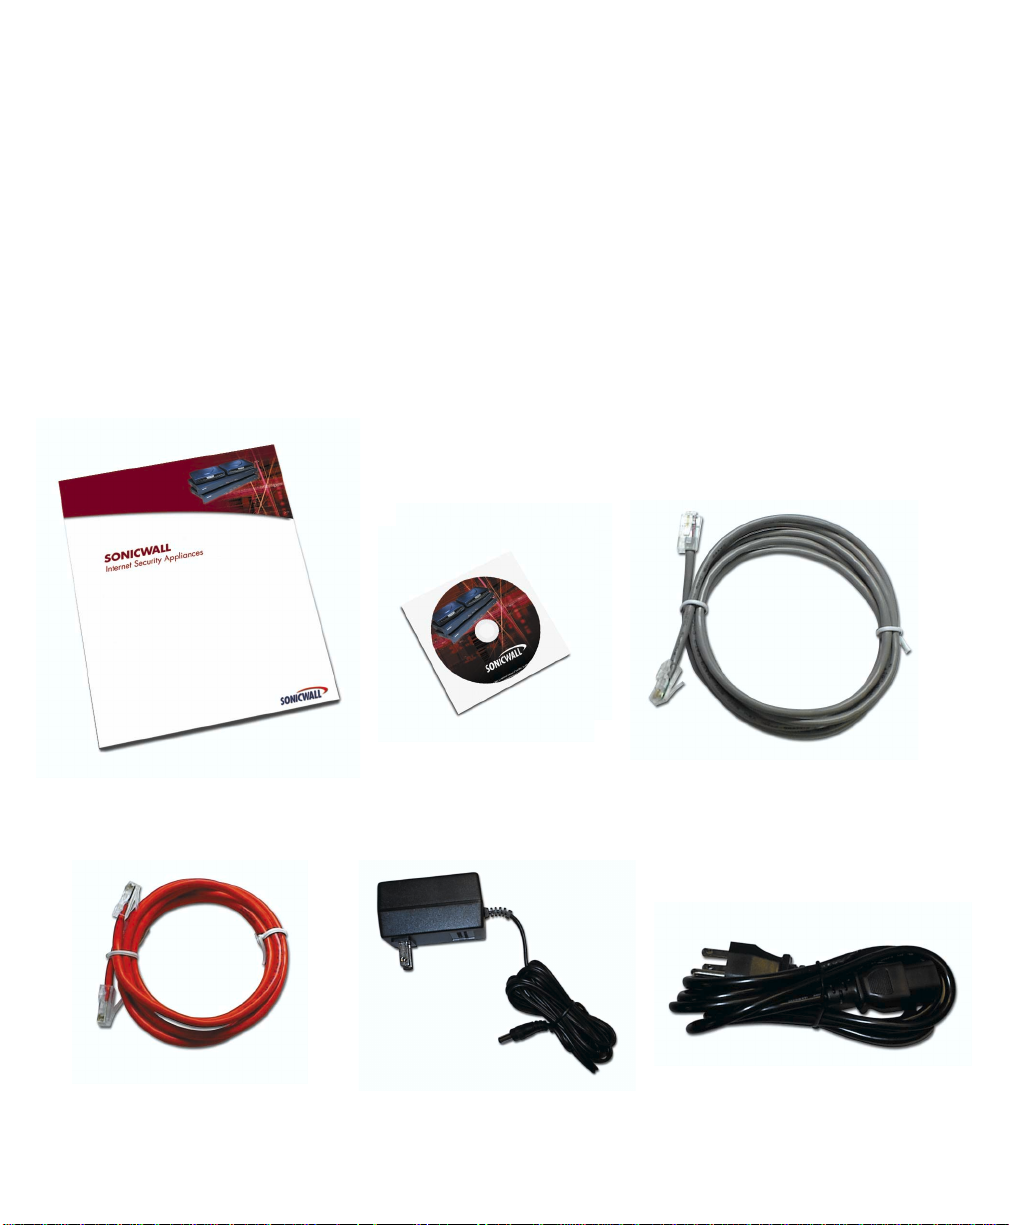
Check Package Conten ts
• One SonicWALL Internet security appliance
• One Sonic WALL Installation Guide
• One SonicWALL Manual
• One SonicWALL CD
• One Ethernet cable
• One Crossover cable (labeled “Crossover”)
• One 5 Volt DC power supply (SonicWALL TELE3, SOHO3, and PRO 100 models)
-or-
• One power cable (SonicWALL PRO 200 and PRO 300;
US only
If any items are missing from your package, contact SonicWALL, Inc. immediately.
Web: <http://www.sonicwall.com/support/>
Phone: (408) 745-9600
)
SonicWALL Manual CD Ethernet Cable (gray)
Crossover Cable (red) Power Supply* OR Power Cable*
*Note: Your actual power supply may vary from the pictures above. This does not affect functionality of the part
Page 6
.
Page 8
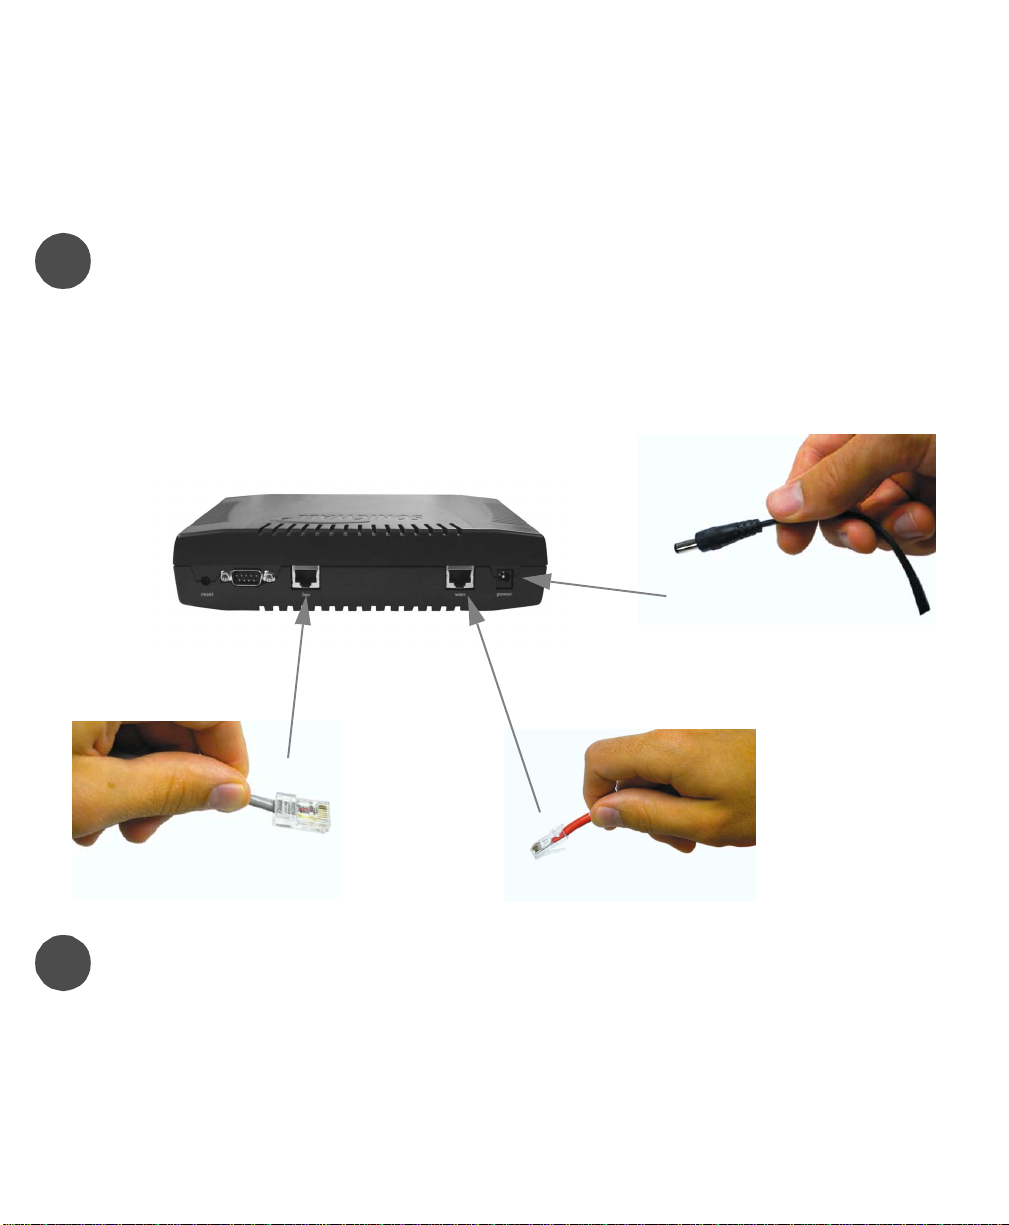
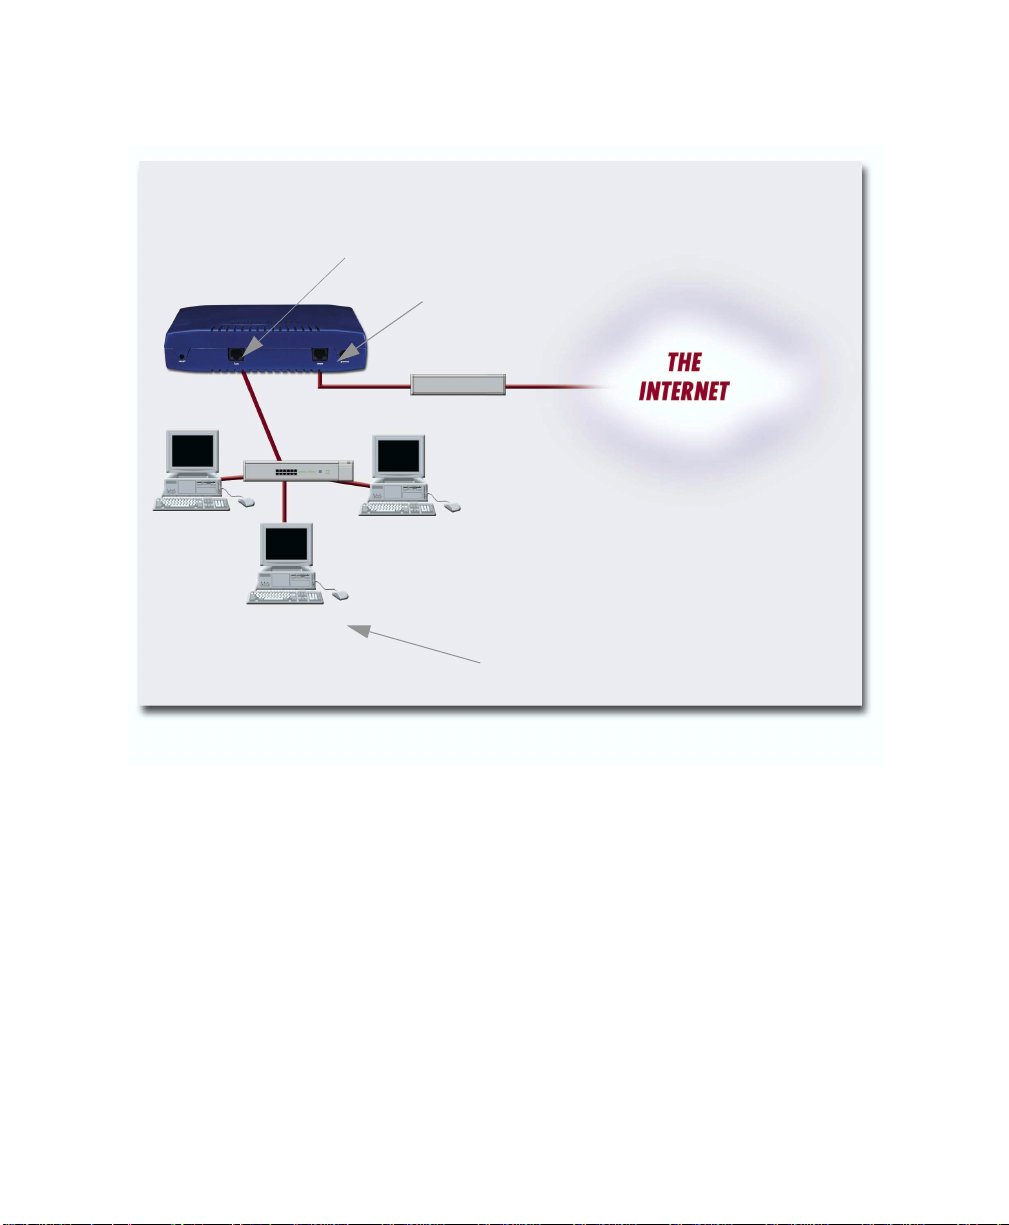
Installing the SonicWALL
Before you begin your SonicWALL installation, contact your ISP and obtain your Internet
connection information. Enter this information into Section 4. Next, place your SonicWALL on a
hard, flat surface near your cable modem, DSL modem, or Internet router.
Note: SonicWALL PRO 100, PR O 200, and PRO 300 front and rear panel views ar e different fro m
the SOHO3 pi ctured below. The same installation instructions, however, apply to all models.
Apply Power to the SonicWAL L
1
If you are installing a TELE3, SOHO3, or PRO 100, attach the power supply to the power
cord. Plug the power input into the SonicWALL and the other end into a power outlet.
If you are installing a PRO 200 or PRO 300, attach the power cable to the power input of
the SonicWALL, and plug the other end into an AC power outlet. Use the power switch to
turn on the SonicWALL.
Power
LAN W AN
Connect the SonicWALL to the Internet
Connect the SonicWALL WAN port to your cable modem, DSL modem, or Internet
2
router using the red crossover cable. The Link LED should light up indicating a
connection. If it does not light, use the grey Ethernet cable to establish a connection.
The two cables can be interchanged without damage to the SonicWALL or your
computer.
Connect the SonicWALL to Your Netw ork
Connect the grey Ethernet cable to the SonicWALL LAN port. Connect the o ther end
to your comp uter at the ne twork por t. The LAN link LED should lig ht up indic ating a
connection. If the Link LED does not light, try the red crossover cable.
SonicWALL Installation Guide Page 7
Page 9
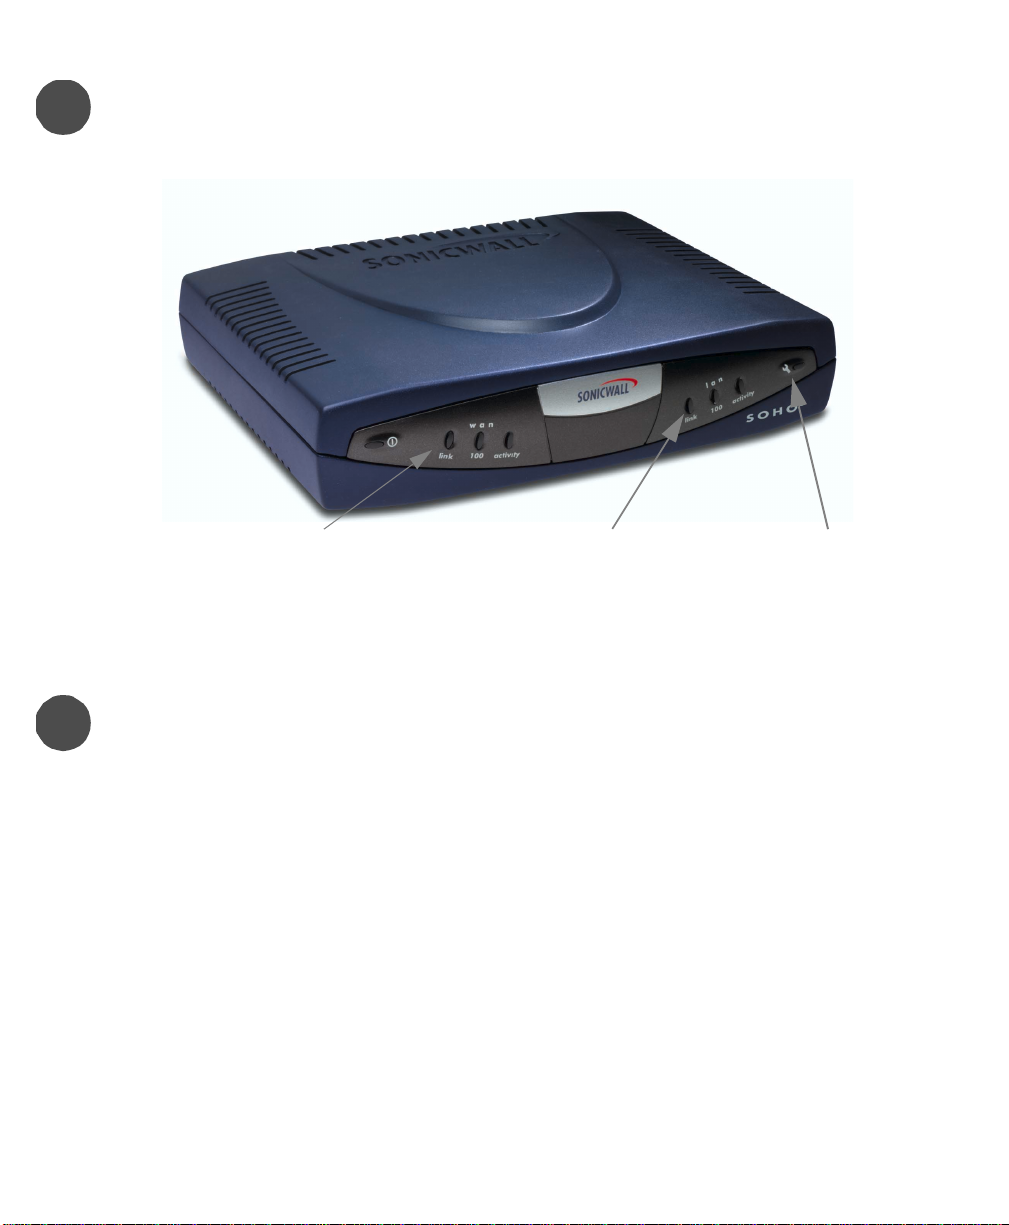
Check Link LEDs
If a Link LED doe s not l ig ht af te r c onn e cti ng a c able, t ry c onn e cti ng the ports us ing th e
3
other cable in the box. For instance, if you used the red Crossover cable to connect the
WAN port to the cable modem, DSL modem , or your Internet router and the Link LED
does not light, try connecting the grey Ethernet cable to the ports.
WAN Link LED
The SonicWALL Test LED stays lit when the SonicWALL is powered on initially. It stays lit
while the SonicWALL performs a series of diagnostic tests.
LAN Link LED
Network Addressing Information
In order to continue the installation of your SonicWALL, you need to obtain IP
4
IP Address___________ _____ User Name:____________ ___
Subnet Mask______________ Password:_________________
Default Gateway:___________
DNS Address:______________
addressing information from your Internet S ervice Provider (ISP ). The i nformation is
required to connect to the Internet.
ISP Contact Information
Telephone Number, if contact by phone__________________ or e-mail address if you
contact your ISP via e-mail_________________________.
You will use one of the following connection types to connect to the Internet:
Static IP Address NAT with PPPoE
Test LED
NAT with DHCP
Host Name:___________________
MAC Address (SonicWALL Serial
Number):_______________________
Domain Suffix:_________________
Page 8
Page 10
Setting Up Your Management Station
5
You can manage your SonicWALL from any computer on your LAN. This computer
is called the Management Station.
Contacting the SonicWALL from your PC
The SonicWALL is preconfigured with the IP address 192.168.168.168. To access
the Management interface for the first time, you have to change the IP address of
your computer to 192.168.168.200.
SonicWALL Network Diagram
SonicWALL LAN IP Address
192.168.168.168
SonicWALL WAN IP Address
(from yo ur ISP)
Cable, DSL, ISDN
Frame Relay or T1
4
SonicWALL Management Station
192.168.168.200
SonicWALL Installation Guide Page 9
Page 11

Configure TCP/IP Setting s
6
Configure your computer IP address, subnet mask, and gateway IP add ress. If the Management station is running Windows 2000, do the following:
Note: Consult your opera ting syste m manuals for specific instructions on configuring
network settings.
A TCP/IP Properties window appears.
1. From the Start menu, selec t Settings,
and then Network and Dial up
Connections.
2. Right click on the Local Area
Connection icon, and select
Properties.
3. Select Internet Protocol (TCP/IP).
4. Click Properties.
5. Select Speci f y an IP address.
6. Enter 192.168.168.200 in the IP
address field.
7. Enter 255.255.255.0 in the Subnet
mask field.
8. Enter 192.168.168.1 in the Gateway
field.
9. If there are no server IP addresses listed
in the DNS settings, use the DNS IP
addresses from your ISP.
10. Click OK, then OK again to close the
Local Area Connectio n Properti es
window.
Restart your computer if you are running Windows 95, 98, or NT. Windows 2000 does
not require restarting the computer for network settings to take effect.
Page 10
Set Up Continues →
7
Page 12

Logging into the SonicWALL
Now that you have changed the IP address of your computer, you need to log into the
SonicWALL to begin the configuration.
Configure the SonicWA LL
8
Launch you r Web browser. Becaus e you are no t connecte d to the Inter net, you ma y
get an error page displayed with a message stating that you cannot access the
Internet.
Type 192.168.168.168 into the Location or Address field at
the top of your browser and press Enter o n yo u r keyboard .
Your Web browser must support JAVA and HTTP uploads in order to fully manage the
!
SonicWALL. Internet Explorer 5.0 or higher, as well as Netscape Navigator 4.0 or
higher, are recommended.
SonicWAL L Installati o n Guide Page 11
Set Up Continues →
Page 13

The Installation Wizard
The first time you access the SonicWALL, the Installation Wizard automatically
9
launches. The Installation Wizard guides you through the initial setup.
Note: Cert ain bro w se r co n fi gura tio ns m ay no t la un ch the wizard . In th is case, y ou c an
log into the SonicWALL using “Admin” as the User Name and “password” as the
Password. After you log into the SonicWALL, click Tools, then Preferences. Click
Launch Wizard to begin configuring the SonicWALL.
!
Please note that you need your I P
addressing details from your Internet
Service Provider (ISP) to complete the
configuration of your SonicWALL
.
Be sure to register your SonicWALL at
!
<http://www.mysonicwall.com> to take
advantage of a free 30 day trial
subscription to the Content Filter List.
Also, by registering your SonicWALL,
you have access to technical support
services.
Note: Once you have completed th e Installation Wizard and restarted your Son icWALL, you can
manage the SonicWALL by typing the LAN IP address of the SonicWALL into a Web browser. You
must log into the SonicW ALL wi th the User Name “admin”a n d th e Pa ssword th a t yo u d e fined
in the Installation Wizard.
Page 12
Set Up Continues →
Page 14
Configuring Computers on the LAN
While the SonicWALL is restarting, two windows appear: one with the administrator
10
A
After the S onicWALL has resta rted, chan ge the net work setti ngs on th e comp uters on the LAN.
Each computer must be configured to get its IP address dynamically.
login pr ompt , an d the se cond with ins tructi ons fo r c onfigu ring your com pute rs on yo ur
network (LAN). Minimize the login window to view and print the Installation Wizard
instructions. Complete either A or B depending on the configuration selected during
installation.
DHCP Server Enabled
If you enabled the SonicWALL DHCP server, a screen is displayed with instructions to
config ure c om p ute r s on yo ur LAN.
P
rint this screen. You need it to
!
properly configure the computers
on your LAN.
On a Windows 2000 computer, do the following:
1. From the Start menu, selec t Settings.
2. Then select Network and Dial-up
Connections.
3. Right click on the Local Area Conne ction
icon, and then select Properties.
4. Click Internet Protocol (TCP/IP) and then
Properties.
5. Click Obtain IP address automatically.
6. You can select Obtain DNS server address
automatically or enter IP addresses of the
DNS servers.
7. Click OK, then OK again to close the
Properties window.
You may need to restart the computers on your LAN to update the network settings. The
SonicWALL is now functioning and protecting your LAN from Internet-based attacks and
break-ins.
SonicWAL L Installati o n Guide Page 13
Page 15
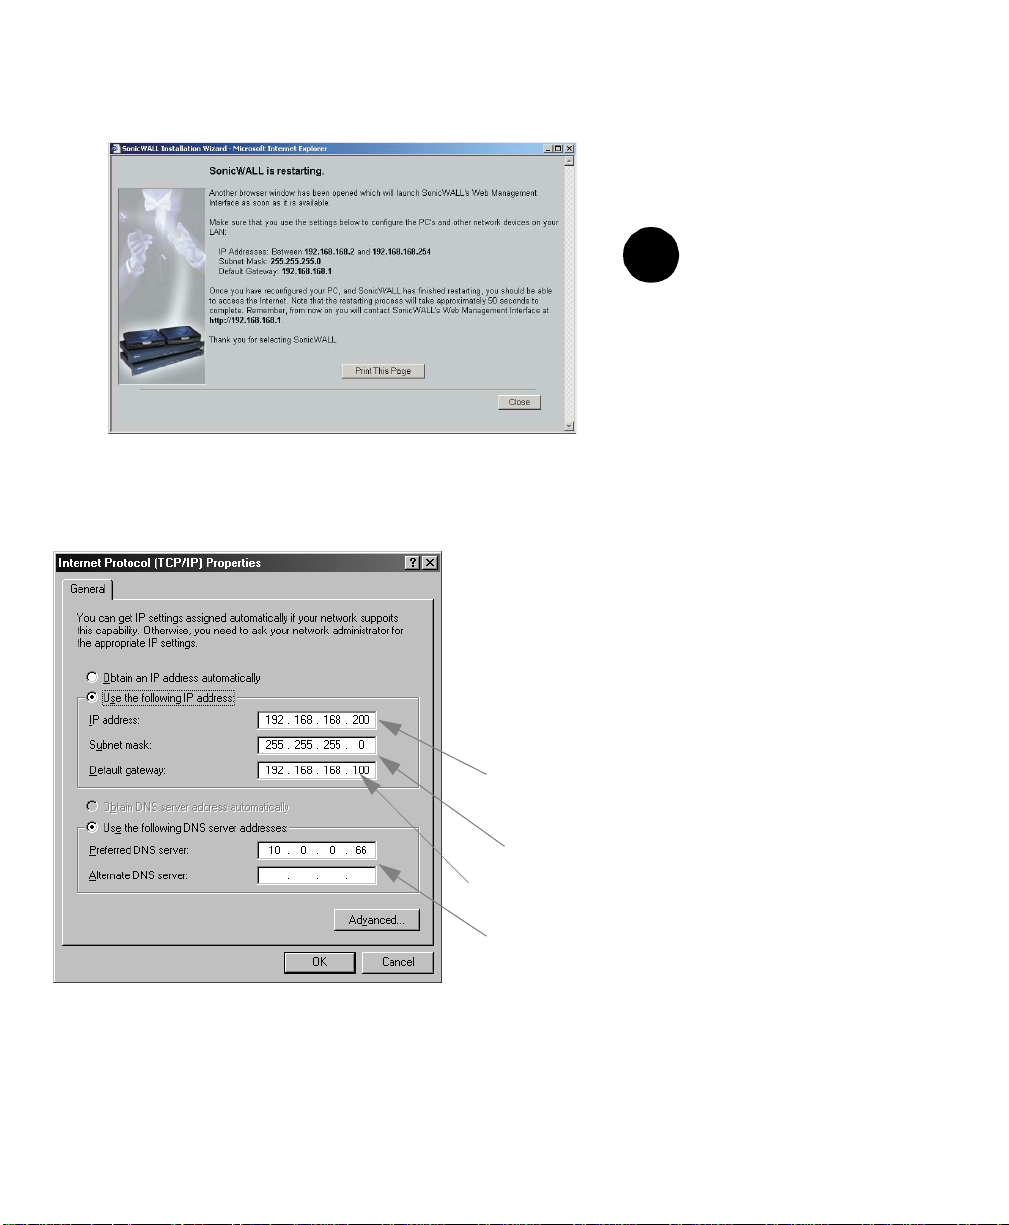
DHCP Server Disabled
B
After the SonicWALL has restarted, change the network settings on the computers located on the
LAN. Configure each computer with a static IP address from the range displayed in your
configuration instructions.
You may need to restart the computers on your LAN to update the network settings.
If you did not enable the SonicWALL DHCP server, a window with configuration
instru ct ions is displ ayed:
Print this screen. You
need the information to
!
configure computers on
your LAN.
On a Windows 2000 computer, do the following:
1. From the Start menu, selec t Settings.
2. Then select Network and Dial-up
Connections.
3. Right click on the Local Area Conne ction
icon, and then select Properties.
4. Click Internet Protocol (TCP/IP) and then
Properties.
5. Select Use the following IP address and
enter an IP address from the range indicated in
your Wizard restart screen.
6. Enter the subnet mask indicated in your Wizard
restart screen in the Subnet Mask field.
7. Enter the Default Gateway IP address in the
Gateway field.
8. Enter IP addresses of the DNS servers provided
by your ISP.
9. Click OK, then OK again to close the
Properties window.
The SonicWALL is now functioning and protecting your LAN from Internet-based attacks and
break-ins.
Page 14
Page 16

1 Introduction
This Installation Guide covers initial installation instructions for all SonicWALL Internet Security
appliances. The instructions are the same for all SonicWALL models.
The Installation Guide assumes that you have a working knowledge of the Internet and
networks. If you are unfamiliar with networking and networking terminology, read Basic
Network Terminology and Configuration, see ”Basic Networking Terminology” on
page 44, as a starting point for your installation.
Inspecting the Package
The following items should be included in the package:
• One S onicWALL Internet Security Appliance
• One power supply (not included with International SonicWALL PRO 200 or PRO 300)
• One Category 5 Ethernet crossover cable (labeled "Crossover")
• One Category 5 Ethernet standard c able
• One S oni cWALL Installation Guide
• One Companion CD
• One S onicWALL Internet Security Appliance User's Guide
If an item is missing from the package, you can contact SonicWA LL, Inc. by phone at
(408) 752-7819 or submit a Web Support Form at <http://techsupport.sonicwall.com/
swtech.html>.
Here are a f ew helpful guidelines for inst alling the SonicWALL a ppliance.
•The WAN Ethernet port should be connected to the Internet router or modem.
•The LAN Ethernet port should be connected directly to your PC, or a network hub, or a
switch on the internal, protected network.
•The DMZ Ethernet port, included with the SonicWALL PRO 100, the SonicWALL PRO 200
and the SonicWALL PRO 3 00, sh ould be co nnected to publ icly accessibl e servers , such as
Web and Mail servers.
• A crossover cable should be used when connecting the SonicWALL directly to another
computer or router.
• A standard Ethernet cable should be used wh en connecting the SonicWALL to a
network hub, switch, or modem.
Note: In some cases, you may need to switch the crossover cable with the standard cable.
Switching cables will not damage your system.
SonicWAL L Installati o n Guide Page 15
Page 17

Internet Service Provider (ISP) Information
To install your SonicWALL Internet Security appliance and connect to the Internet, you need
the following IP addressing information from your ISP.
ISP Contact Information
• Telephone Number, if contact by phone__________________ or e-mail address if you
contact your ISP via e-mail_________________________.
• Se r vi c e R ep r es e nt a t iv e’ s n ame:__________________________
Your ISP uses one of the following IP addressing methods below. Select a method and fill in
the pertinent information.
Static /Perma n e nt IP Add re s si ng
First IP Address:_________________________
Last IP Address:___________________________
Gateway IP Address:____________________
Subnet Mask:____________________________
DNS IP Address:_______________________ _____
__DHCP
Authent icati o n Met hod
__Host Name:_______________________________________
__PPPoE
__L2TP
Page 16
__MAC Add ress: (SonicWALL serial Number)________________
__N/A
Domain Suffix:_______________________________________
Username:__________________________________________
Password:___________________________________________
Addressing Method
___DHCP
___Static:
IP Address:_________________________
Gateway IP Address:_________________
Subnet Mask:________________________
DNS IP Address:_________________________
Page 18

L2TP Settings
Host Name:___________________________
Server IP:_____________________________
Username:____________________________
Password:____________________________
Note: Items in bold are required information.
Note: Be sure to store this information in a safe place after establishing your Internet
connectivity
.
SonicWALL Configuration Overview
There are three major sections to the configuration of the SonicWALL:
• Management Sta ti on Confi g urat ion - I n this s tep, configuring your computer to act as
the management station that es ta blishes connectivity with the SonicWAL L.
• SonicWALL Config uration - Configuring the SonicWALL to connect to the Internet using
the information from your ISP. If you are assign ed a single IP address from your ISP, enter
it as the SonicWALL WA N IP address during the confi g ura t ion.
• Computer Configur at io n on the L AN - You must c o nfi gure t he compute rs on yo u r LAN
to be on the same network as the SonicWALL after setting up your SonicWALL.
Note: For specific, step by step inst ructions on instal ling and configu ring your SonicW ALL,
consult the instructions beginning on page 9 of this manual.
Management Station Configuration
1. Change the TCP/IP settings of your PC to be in the same subnet as the default IP address
of the SonicWALL. Typically, set your IP address to 192.168.168.200, subnet mask
255.255.255.0, and default gateway of 192.168.168.1.
2. Open your Web br owser an d enter t he IP address , 192. 168. 168.168 , into t he Add ress f ield.
This is the default IP address of the SonicWALL.
SonicWALL Configuration
3. Use the Wizard to configure the SonicWALL with the information from your ISP. If you have
a single IP address assigned to you, enter it into the SonicWALL WAN IP Address field.
Finish the steps as outlined by the Wizard.
4. Or, if you prefer not to use the Wizard, the user name of “admin” and the password
“password” can be used to acc e ss the M a nagement interface.
5. Restart the SonicWALL.
Computer Configuration on the LAN
6. Change your TCP/IP settings of your computer to be in the same subnet as the SonicWALL.
For example, if you have used the default address of the SonicWALL, 192.168.168.1,
configure the IP settings o f y our computer to be 192.168.168 .X.
SonicWAL L Installati o n Guide Page 17
Page 19

Important: Do not set the computer IP address to be the same as the SonicWALL LAN I P
Address.
7. Open your Web browser and se e i f y ou can access a W eb site o n the Internet. If s o, you’ve
successfully completed the configuration of your SonicWALL. If you cannot access the
Internet, recheck the IP settings of your computer and your SonicWALL. Also refer to
Chapter 5 for more troubleshooting information.
Page 18
Page 20

2 Performing the Initial Configuration Installing the SonicWALL
Start by placing the SonicWALL on a hard, flat surface near your cable modem, DSL modem,
or Internet router.
ote: The hardware photos are us ed for descriptive purposes onl y. Refer to your m odel for
N
specific locations.
Connecting to Your Network
1. Apply Power to the SonicWALL - If you are i ns talli ng the Son icW A LL TE LE 3, S OH O3,
or PRO 100, attach the power supply to the power input on the SonicWALL and plug the
other end into a power outlet.
If you are installing a SonicWALL PRO 200 or a PRO 300, attach the power cable to the
power input on the SonicWALL and the other end into an AC power outlet. Use the power
switch to turn on the SonicWALL .
The Test LED stays on while th e SonicWALL perform s a series of diagnostic tests.
2. Connect the SonicWALL to your Network - Connect the S onicWALL LAN port to your
LAN network card or hub using the grey Ethernet cable prov ided in the box. If the Link LED
does not light, try the red Crossover cable.
CLI
Port
3. Connecting to the Internet - Connect the SonicWALL WAN port to your cable modem,
DSL modem, or Internet router using the red crossover cable provided in the box. If the
Link LED does not light, try the grey Ethernet cable.
LAN
WAN
Power
SonicWAL L Installati o n Guide Page 19
Page 21
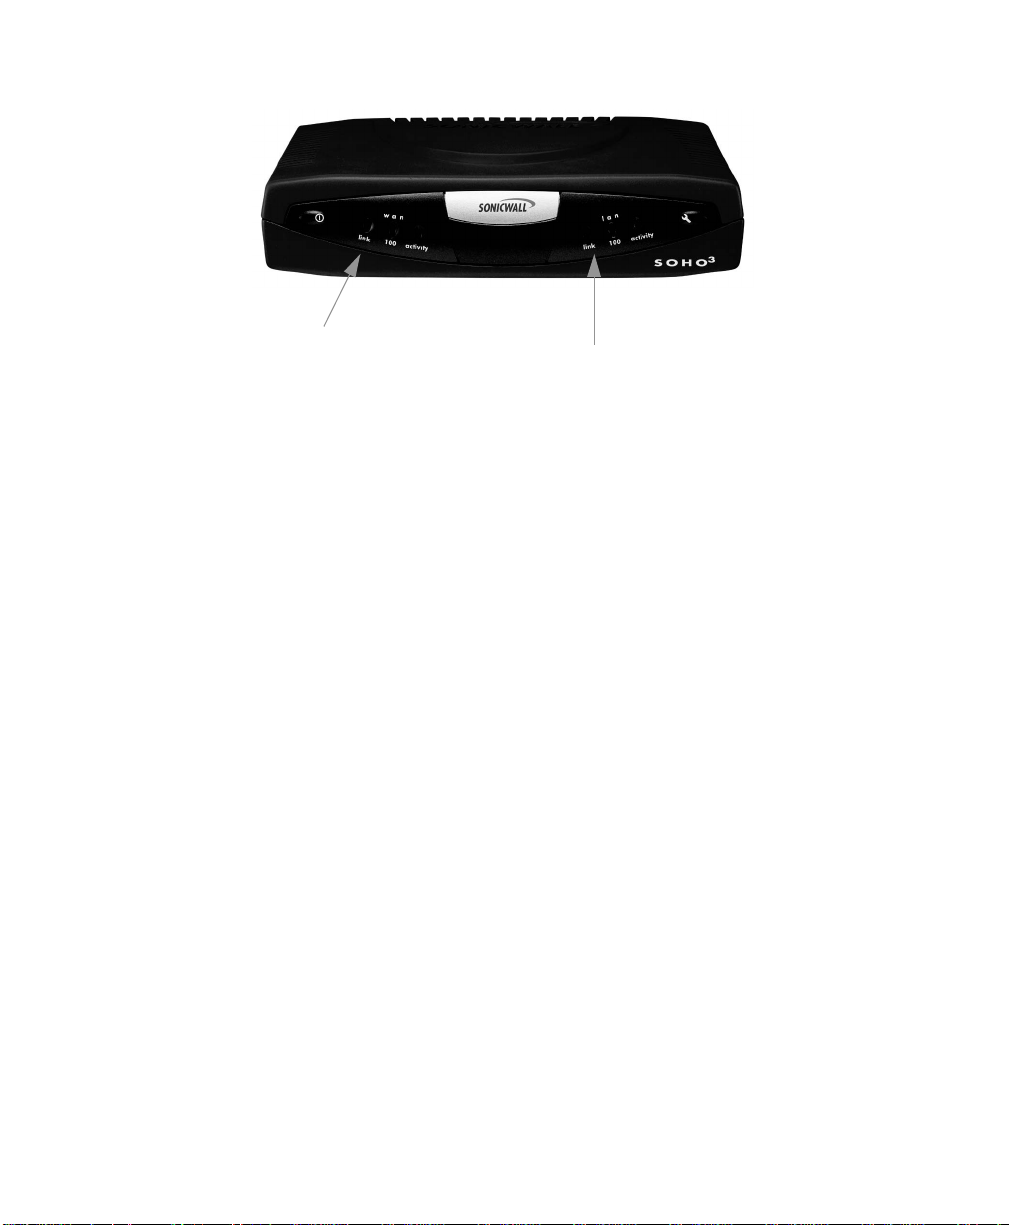
4. Checking Link LEDs
WAN LAN
The WAN Link LED and the LAN Link LED light up when the SonicWALL is properly
connected to the LAN and WAN ports of the computer and the modem.
Important: You may have to switch the red crossover cable with the standard grey cable
to establish a connection. Switch cables until a link is established. Switching between a
crossover cable and a standard cable does not damage your SonicWALL or your computer.
Setting Up a Management Station
To access the SonicWALL M anagemen t interface, you m ust set up a PC on y our LAN to be in
the same subnet (network) as the SonicWALL. This computer is called the “Management
Station”.
Accessing the SonicWALL from your PC
The SonicWALL is preconfigured to have an IP address of 192.168.168.168. To contact the
SonicWALL for the first time, you must change the M anagem ent Station (your PC) IP address
to 192.168.168.X where X is any number between 0 and 254, except 168 which is the
SonicWALL IP address. In this section , you confi gure you r Manage ment Station IP addre ss to
192.168.168.200.
Page 20
Page 22
SonicWALL Network Diagram
SonicWALL
192.168.168.168
LAN
LAN IP Address
SonicWALL WAN IP Address
Cable, DSL, ISDN,
Frame Relay, or T1
WAN
Management Station
192.168.168.200
Setting up your Management Station
All management functions on the SonicWALL are performed from a Web browser-based user
interface. Management can be performed from any computer connected to the LAN port of the
SonicWALL. The computer used for managing the SonicWALL is referred to as the Management
Station.
The following steps describe how to configure the Management Station TCP/IP settings in order
to initially access the SonicWALL. It is assumed that the Management Station can access the
Internet through an existing conn ection.
Note: If you are running Windows XP, consult your operating system documentation for
configuring TCP/IP se ttings.
SonicWAL L Installati o n Guide Page 21
Page 23

Configu ring TCP/IP Settings
The SonicWALL is pre-configured with the IP address “192.168.168.168". During the initial
configuration, it is necessary to temporarily change the IP address of the Management Station
to one in the same subnet as the SonicWALL. For initial configuration, set the IP address of the
Management Station to "192.168.168.200".
Make a note of the Management Station current TCP/IP settings. If the Management Station
accesses the Internet through an existing broadband connection, the TCP/IP settings are
helpful when configuring the IP settings of the SonicWALL.
Windows 95 or 98 computer
1. Fro m the Start list, highlight Settings and then select Control Panel.
2. Do uble-click t he Network icon in the Control Panel window.
3. Double-click TCP/IP in the TCP/IP Properties window.
4. Select the Specify an IP Address radio button.
5. Enter "192.168.168.200" in the IP Address field.
6. Enter "255.255.255.0" in the Subnet Mask field.
7. Click OK, and then click OK again.
8. Restart the computer for changes to take effect.
Windows2000
1. From the Start list, highlight Settings and then select Network and Dial Up
Connections.
2. Select the Local Area Network icon in the Network and Dial Up Connections
window.
3. Highlight TCP/IP in the Local Area Connection Properties window.
4. Select the Specify an IP Address radio button.
5. Enter "192.168.168.200" in the IP Address field.
6. Enter "255.255.255.0" in the Subnet Mask field.
7. Click OK, and then click OK again.
Macintosh computer
1. Fro m the A pple list, choose Control Panel, and then choose TCP/IP to open the TCP/
IP Control Panel.
2. Fro m the Configure list, choose Manually.
3. Enter "192.168.168.200" in the IP address field.
4. Enter “255.255.255.0 in the Subnet Mask field.
5. Click OK.
Page 22
Page 24
Connecting the SonicWALL to the Network
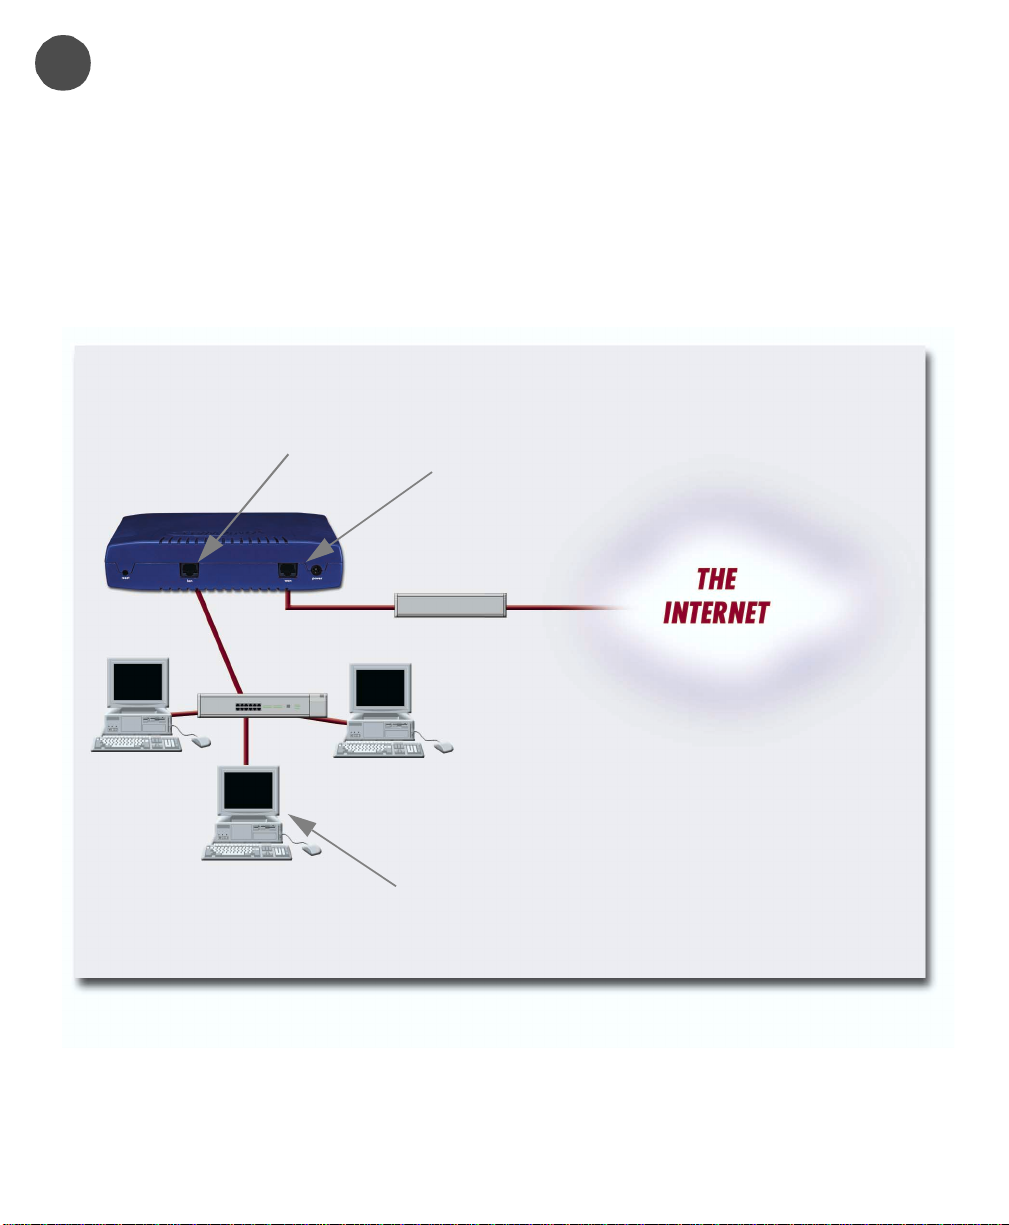
The following diagram illustrates how the SonicWALL is connected to the network:
Important: Before installing the So nicWALL on your network, register your appl iance on the
user registration web site loc ated at h tt p:/ / www.my sonicwall.com. It is s t ron gly r ecommen ded
that you create a user account before installing your SonicWALL and register any services and
upgrades for your SonicWALL.
technical support website.
As a registered user, you have access to the SonicWALL
Configuring your SonicWALL to Access the Internet
Three common n etwork configurat ions, NAT Enabled, NAT with PPPoE Client, and NAT
with DHCP Client are included in this chapter. For more network configurations, please refer
to Chapter 2, Installation, of the SonicWALL Internet Security Appliance User’s Guide.
Network Address Translation (NAT) Enabled
Using NAT to set up your SonicWALL eliminates the need for separate IP addresses for all
computers on your LAN. It is a way to conserve IP addresses available from the pool of IPv4
addresses for the Internet. If you do not have enough individual IP addresses for all computers
on your network, yo u can use NAT for you r ne twork configuration.
Essentially, NAT translates the IP addresses in one network into those for a different network.
As a form of packet filteri ng for firewa lls, it protects a network from outsi de intrusion from
hackers by replacing the internal (LAN) IP address on packets passing through a SonicWALL
with a “fake” one from a fixed pool of addresses. The actual IP addresses of computers on the
LAN are hidden from outside view.
Instructions for configuring NAT Enabled Mode begin on page 24 .
NAT with PPPoE Client
SonicWAL L Installati o n Guide Page 23
Page 25

NAT with PPPoE Client is a network prot o c ol th at use s Po in t t o Point Protocol over Ethern et
to connect with a remote site using various Remote Access Service products. This protocol is
typically found when using a DSL modem with an ISP requiring a user name and pas sword to
log into the remote server. The ISP may then allow you to obtain an IP address automatically
or give you a specific IP address.
Instructions for configuring NAT with PPPoE Client mode begin on page 31.
NAT with DHCP Client
NAT with DHCP Client is a networking mode that allows you to obtain an IP address for a
specific length of time from a DHCP server. The length of time is called a lease which is renewed
by the DHCP server typically after a few days. When the lease is ready to expire, the client
contacts the server to renew the lease. This is a common network configuratio n for cust ome rs
with cable or DSL modems. You are not assigned a specific IP address by your ISP.
Instructions for configuring NAT with DHCP Client mode begin onpage 36.
Configuring the SonicWALL in NAT (Network Address Translation) Enabled Mod e
This section describes configuring the SonicWALL appliance in the NAT mode. If you are
assigned a single IP address by your ISP, follow the instructions below. If you do not want to
use NAT Enabled mode for your network, please follow the installation instructions for
Standard mode in the SonicWALL Internet Security Appliance User’s Guide.
Note: B e s ure to have y our n e t wo r k inf o r m a t i o n incl ud ing your WA N IP a d d r ess, subne t m ask,
and DNS settings ready. This in formati on is obtained from your ISP.
Accessing the Wizard
1. Open a Web Browser. Then type the default SonicWALL IP address, "192.168.168.168",
into the Location or Address field in the Web browser.
Note: Your Web browser must be Java-enabled and support HT TP uploads in order to fully
manage SonicWALL. Internet Explorer 5.0 and above as well as Netscape Navigator 4.0 and
above are recommended
Page 24
.
Page 26
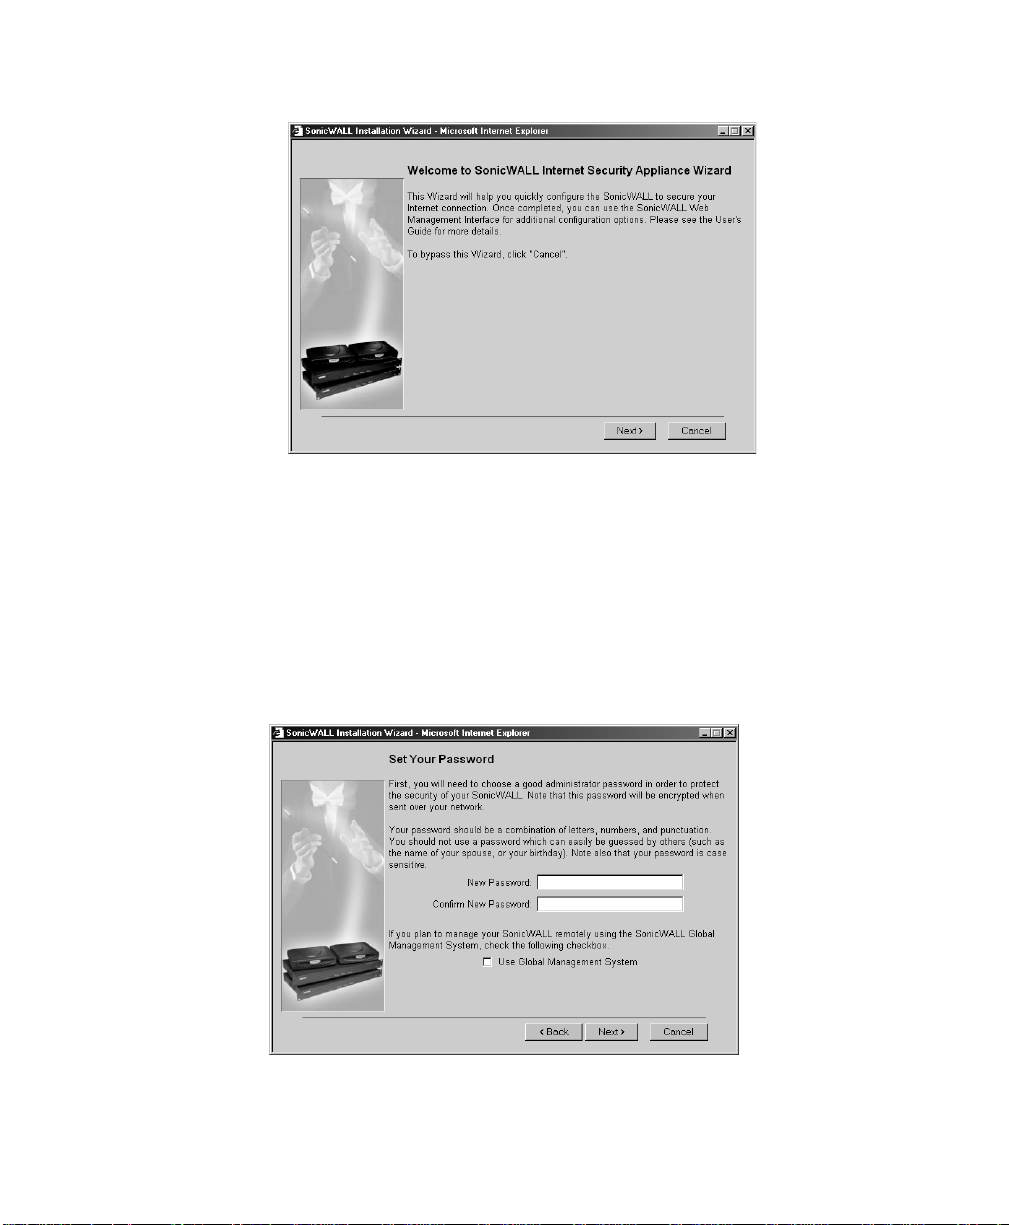
The first time you access the SonicWALL Management interface, the SonicWA LL Installation
Wizard automatically launches and begins the installation process.
The SonicWALL Installation Wizard simplifies the initial installation and configuration of the
SonicWALL. The Wizard provides a series of menu-driven instructions for setting the
administrator password and configuring the settings necessary to access the Internet.
Note: To bypass the Wizard, click Cancel. Then log into the SonicWALL Management
Interface by entering the User Name "admin" and the Password "password".
1. To configure you r SonicWALL appliance, read the instructions on the Wizard Welcome
window and click Next to continue.
Setting the Password
2. To set the password, enter a new password in the New Password and Confir m Ne w
Password fields.
SonicWAL L Installati o n Guide Page 25
Page 27
Note: It is very important to choose a password which cannot be easily guessed by othe rs.
This window also displays the Use So nicWA LL G lobal Mana geme nt Sy stem check box.
SonicWALL Global Management System (SonicW ALL GMS) is a web bro wser-based security
management system. SonicWALL GMS allows enterprises and service providers to monitor
and manage hundreds of remote SonicWA LLs from a central location. For more information
about SonicWALL GMS, contact SonicWALL Sales at (408) 745-9600.
3. Do not select the Use Global Management System check box unless your SonicWALL
is remotely managed by SonicWALL GMS. Click Next to continue.
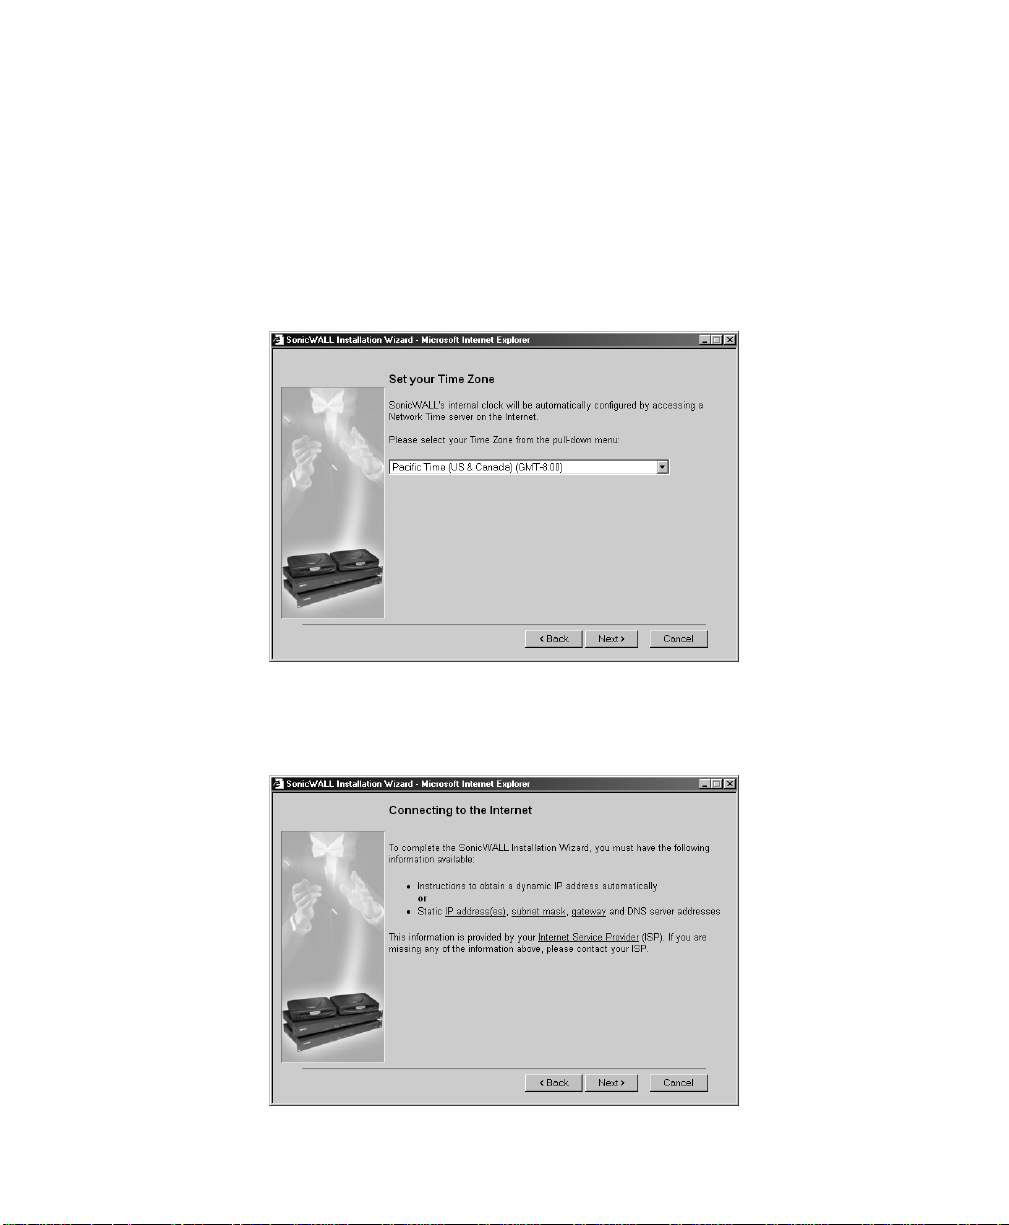
Setting the Time and Date
4. Select the appropriate Time Zone from the Tim e Zone menu. The So nicWALL internal
clock is set automatically by a Network Time Server on the Internet. Click Next to continue.
Connecting to the Internet
Page 26
Page 28

The Connecting to the Internet screen lists the information required to complete the
installation. You need instructions for obtaining an IP address autom atically or IP addresses
from your ISP. You should have all of this information from your ISP on your ISP checklist found
at the beginning of this guide.
5. Confirm that you have the proper network information necessary to configure the
SonicWALL to access the Internet. Click the hyperlinks for definitions of the networking
terms. Click Next to proceed to the next step.
Selecting Your Internet Connection
6. Select Assigned you a single static IP address, if your ISP has provided you with a
single, valid IP address. You can configure the SonicWALL to use NAT with a single, static
IP address. The advantages of Network Address Translation (NAT) are IP address
conservation, and hiding your IP address from a public WAN such as the Internet.
Confirming Network Address Translation (NAT) Mode
If you select Assigned you a single static IP address in the Connecting to th e Int ernet
window, the Use Network Address Translation (NAT) window is displayed.
SonicWAL L Installati o n Guide Page 27
Page 29

The Use Netwo rk Add ress Tran slatio n (NAT) window verifies that the SonicWALL has a
registered IP address.
Selecting NAT Enabled Mode
If you s ele ct ed Assigned you two or more static IP Addresses, the Optional-Network
Address Tr an sl ati on window is dis playe d.
7. The Optional -Network Address Translati on (NAT) window offers the ability to enable
NAT. Select Don’t Use NAT if there are enough static IP addresses for your SonicWALL,
all PCs, and all network devices on your LAN. Selecting Don’t Use NAT enables the
Standard mode. Select Use NAT if valid IP addresses are in short supply or to hide all
devices on your LAN behind the SonicWALL valid IP address. Click Next to continue.
Configuring WAN Network Settings
If you selected either NAT or Standard mode, the Getting to the Internet window is
displayed.
8. Enter the IP address provided by your ISP in the SonicWALL WAN IP Address, WAN/
DMZ Subnet Mask, WAN Gateway (Router) Address, and DNS Server Addresses.
Click Next to continue.
Page 28
Page 30

Configuring LAN Network Settings
9. The Fill in information about your LAN window allows the configuration of the
SonicWALL LAN IP Address and the LAN Subnet Mask.The SonicWALL LAN IP Address is
the private IP address assigned to the LAN port of the SonicWALL. The LAN Subnet Mask
defines the range of IP addresses on the LAN. The default values provided by the
SonicWALL work for most networks. If you do not use the default settings, enter the
SonicWALL LAN settings and click Next to continue.
Configurat io n Su m m a ry
10. The Configuration Summary window displays the configuration defined using the
Instal lation Wizard . To modify any of the sett ing s, c li c k Back to return to the Connecting
to the In ternet window. If the configuration is correct, click Next to proceed to the
Congratulations window.
SonicWAL L Installati o n Guide Page 29
Page 31

Congratulations
Note:The new SonicWALL LAN IP address, displayed in the URL field of the Congratulations
window, is used to log in and mana ge the SonicWALL.
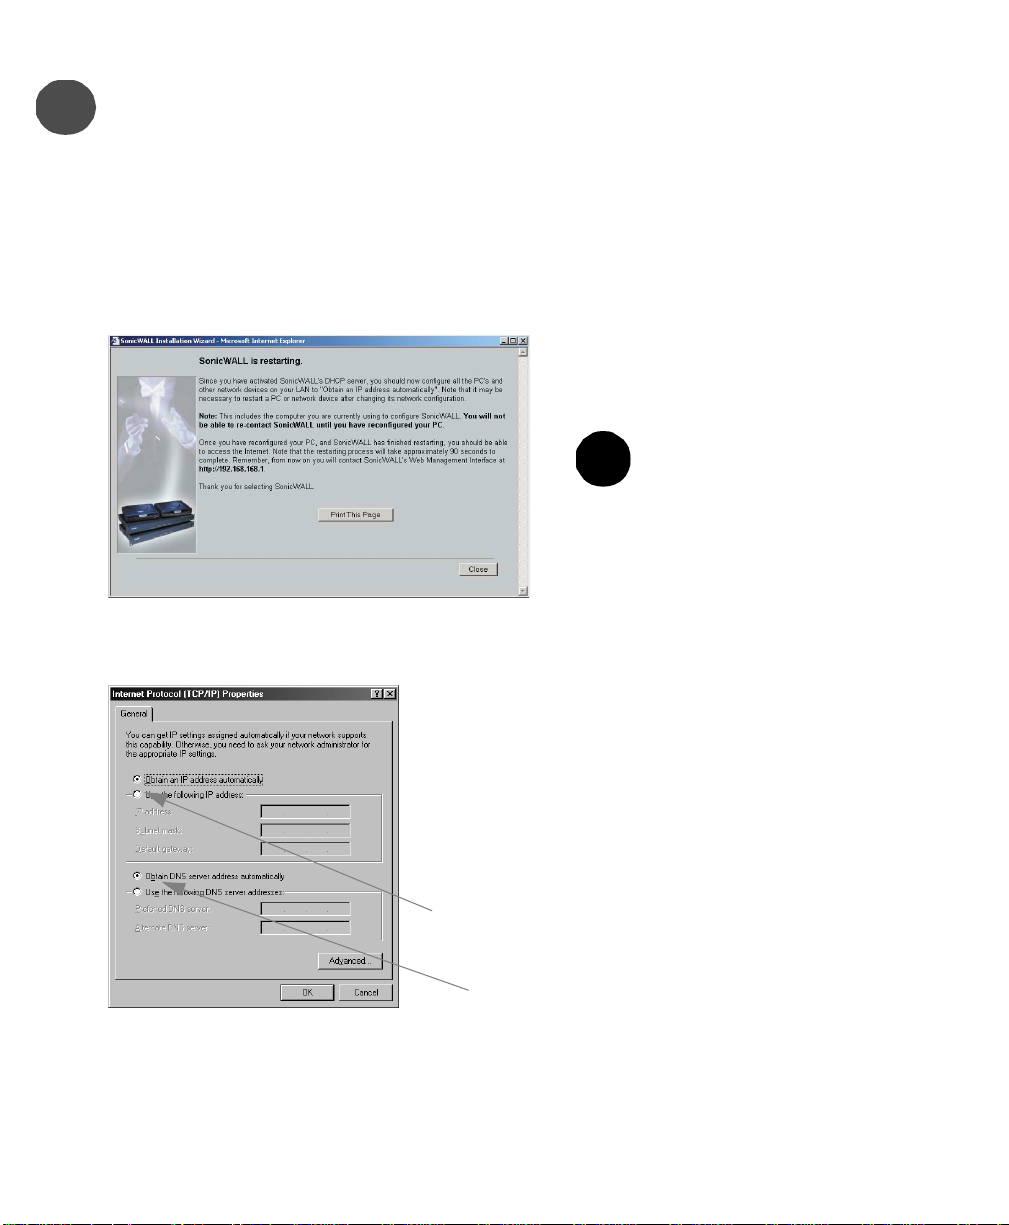
11. Click Restart to restart the SonicWALL.
Restarting
Note:The final window provides important information to help configure the computers on the
LAN. Click Print this Page to print the window information.
12. The SonicWALL takes 90 seconds to res tart. During this time, the ye llow Test LED is lit.
Click Close to exit the SonicWALL Wizard.
Page 30
Page 32

Configuring NAT Enabled with PPPoE
The first time you access the SonicWALL Management interface, the SonicWA LL Installation
Wizard automatically launches and begins the installation process.
The SonicWALL Installation Wizard simplifies the initial installation and configuration of the
SonicWALL. The Wizard provides a series of menu-driven instructions for setting the
administrator password and configuring the settings necessary to access the Internet.
Note: B e s ure to have y our n e t wo r k inf o r m a t i o n incl ud ing your WA N IP a d d r ess, subne t m ask,
and DNS settings ready. This in formati on is obtained from your ISP.
Note: To bypass the Wizard, click Cancel. Then log into the SonicWALL Management
Interface by entering the User Name "admin" and the Password "password".
To configure your SonicWALL appliance, read the instructions on the Wizard Welcome window
and click Next to continue.
SonicWAL L Installati o n Guide Page 31
Page 33

Setting the Password
Note: It is very important to choose a password which cannot be easily guessed by othe rs.
1. To set the password, enter a new password in the New Password and Confir m Ne w
Password fields.
This window also displays the Use So nicWA LL G lobal Mana geme nt Sy stem check box.
SonicWALL Global Management System (SonicW ALL GMS) is a web bro wser-based security
management system. SonicWALL GMS allows enterprises and service providers to monitor
and manage hundreds of remote SonicWA LLs from a central location. For more information
about SonicWALL GMS, contact SonicWALL Sales at (408) 745-9600.
2. Do not select the Use Global Management System check box unless your SonicWALL
is remotely managed by SonicWALL GMS. Click Next to continue.
Setting the Time and Date
Page 32
Page 34

3. Select the appropriate Time Zone from the Tim e Zone menu. The So nicWALL internal
clock is set automatically by a Network Time Server on the Internet. Click Next to continue.
Connecting to the Internet
The Connecting to the Internet screen lists the information required to complete the
installation. You need instructions for obtaining an IP address autom atically or IP addresses
from your ISP. You should have all of this information from your ISP on your ISP checklist found
at the beginning of this guide.
4. Confirm that you have the proper network information necessary to configure the
SonicWALL to access the Internet. Click the hyperlinks for definitions of the networking
terms. Click Next to proceed to the next step.
Selecting Your Internet Connection
SonicWAL L Installati o n Guide Page 33
Page 35

5. Select Provided you with desktop software, a user name and password (PPPoE),
if your ISP has provided you with desktop software, a user name and password
information.
Setting the User Name and Password for PPPoE
6. If you select Provided you with desktop software, a user name and password
(PPPoE) window, the SonicWALL ISP Settings (PPPoE) window is displayed.
7. Enter the User Name and Password provided by your ISP into the User Name and
Password fie ld s.
Configuring LAN Network Settings
8. The Fill in information about your LAN window allows the configuration of the
SonicWALL LAN IP Address and the LAN Subnet Mask.The SonicWALL LAN IP Address is
Page 34
Page 36

the private IP address assi gned to the LAN port of th e SonicWALL. The LAN Subnet Mask
defines the range of IP addresses on the LAN. The default values provided by the
SonicWALL work for most networks. If you do not use the default settings, enter the
SonicWALL LAN settings and click Next to continue.
Configuring the SonicWALL DHCP Server
9. The Optional-SonicWALL DHCP Server window configures the SonicWALL DHCP
Server. If enabled, the SonicWALL automatically configures the IP settings of computers
on the LAN. To enable the DHCP server, select the Enable DHCP Server check box, and
specify the range of IP addresses that are assigned to computers on the LAN.
If the Enable DHCP Server check box is not selected, the DHCP Server is disabled. Click
Next to continue.
Configurat io n Su m m a ry
SonicWAL L Installati o n Guide Page 35
Page 37

10. The Configuration Summary window displays the configuration defined using the
Installation Wizard. To modify any of the settings, click Back to return to the
Connecting to the Internet window. If the configuration is correct, click Next to
proceed to the Congratulations window.
Congratulations
Note:The new SonicWALL LAN IP address, displayed in the URL field of the Congratulations
window, is used to log in and mana ge the SonicWALL.
11. Click Restart to restart the SonicWALL.
Restarting
Configuring NAT with DHCP Client Mode
Accessing the Installation Wizard
Page 36
Page 38

The first time you access the SonicWALL Management interface, the SonicWA LL Installation
Wizard automatically launches and begins the installation process.
The SonicWALL Installation Wizard simplifies the initial installation and configuration of the
SonicWALL. The Wizard provides a series of menu-driven instructions for setting the
administrator password and configuring the settings necessary to access the Internet.
Note: To bypass the Wizard, click Cancel. Then log into the SonicWALL Management
Interface by entering the User Name "admin" and the Password "password".
1. To configure you r SonicWALL appliance, read the instructions on the Wizard Welcome
window and click Next to continue.
Setting the Password
Note: It is very important to choose a password which cannot be easily guessed by othe rs.
SonicWAL L Installati o n Guide Page 37
Page 39

2. To set the password, enter a new password in the New Password and Confir m Ne w
Password fields.
This window also displays the Use So nicWA LL G lobal Mana geme nt Sy stem check box.
SonicWALL Global Management System (SonicW ALL GMS) is a web bro wser-based security
management system. SonicWALL GMS allows enterprises and service providers to monitor
and manage hundreds of remote SonicWA LLs from a central location. For more information
about SonicWALL GMS, contact SonicWALL Sales at (408) 745-9600.
3. Do not select the Use Global Management System check box unless your SonicWALL
is remotely managed by SonicWALL GMS. Click Next to continue.
Setting the Time and Date
4. Select the appropriate Time Zone from the Tim e Zone menu. The So nicWALL internal
clock is set automatically by a Network Time Server on the Internet. Click Next to continue.
Connecting to the Internet
Page 38
Page 40

The Connecting to the Internet screen lists the information required to complete the
installation. You need instructions for obtaining an IP address autom atically or IP addresses
from your ISP. You should have all of this information from your ISP on your ISP checklist found
at the beginning of this guide.
5. Confirm that you have the proper network information necessary to configure the
SonicWALL to access the Internet. Click the hyperlinks for definitions of the networking
terms. Click Next to proceed to the next step.
Selecting Your Internet Connection
6. Select the option, Automatically assigns you a dynamic IP address (DHCP), the
Obtain an IP address automatically window is displayed.
The Obtain an IP address automatically window states that the ISP dynamically assigns
an IP address to the SonicWALL. To confirm this, click Next.
SonicWAL L Installati o n Guide Page 39
Page 41

Configuring LAN Network Settings
7. The Fill in information about your LAN window allows the configuration of the
SonicWALL LAN IP Address and the LAN Subnet Mask.The SonicWALL LAN IP Address is
the private IP address assi gned to the LAN port of th e SonicWALL. The LAN Subnet Mask
defines the range of IP addresses on the LAN. The default values provided by the
SonicWALL work for most networks. If you do not use the default settings, enter the
SonicWALL LAN settings and click Next to continue.
Configuring the SonicWALL DHCP Server
8. The Optional-SonicWALL DHCP Server window configures the SonicWALL DHCP
Server. If enabled, the SonicWALL automatically configures the IP settings of computers
on the LAN. To enable the DHCP server, select the Enable DHCP Server check box, and
specify the range of IP addresses that are assigned to computers on the LAN.
If the Enable DHCP Server check box is not selected, the DHCP Server is disabled. Click
Next to continue.
Page 40
Page 42

Configurat io n Su m m a ry
9. The Configuration Summary window displays the configuration defined using the
Installation Wizard. To modify any of the settings, click Back to return to the
Connecting to the Internet window. If the configuration is correct, click Next to
proceed to the Congratulations window.
Congratulations
Note:The new SonicWALL LAN IP address, displayed in the URL field of the Congratulations
window, is used to log in and mana ge the SonicWALL.
10. Click Restart to restart the SonicWALL.
SonicWAL L Installati o n Guide Page 41
Page 43

Restarting
Note:The final window provides important information to help configure the computers on the
LAN. Click Print this Page to print the window information.
The SonicWALL takes 90 seconds to restart. During this time, the yellow Test LED is lit. Click
Close to exit the SonicWALL Wizard.
Log into the SonicWALL Management Interface
Once the SonicWALL restarts, contact the SonicWALL Management interface at the new
SonicWALL LAN IP address. Enter the User Name “admin” and enter the new
administrator password to log into the SonicWALL.Th e Status page is displayed.
Page 42
Page 44

The Status tab displays the following information:
• SonicWALL Serial Number - the serial number of the S onicWALL unit.
• Number of LAN IP addresses allowed with this license - number of IP a ddresse s that
can be managed by the SonicWALL
• Regi stration code - the registration code generated when the SonicWALL is registered
at <http//www.mysonicwall.com>.
• SonicWALL Active time - the length of time in days, hours and minutes that the
SonicWALL is active.
• Firmware version - shows the current version number of the firmware installed on the
SonicWALL.
• ROM version - the version number of the ROM.
• CPU - the type and speed of the SonicWALL processor.
• VPN Hardw are Accelerator Detected - indicates the presence of a VPN Hardware Accelerator in the firewall. This allows better throughput for VPN connections.
• RAM - the amount of Random Access Memory on the board
• Flash - the size of the flash on the board
• Ethernet Speeds - network speeds of the network card
• Current Connections - number of co mputers connected to the SonicWA LL.
Other SonicWALL general status information is displayed in this section relating to other
features in the SonicWALL such as the type of network settings in use, log settings, content
filter use, and if Stealth Mode is enabled on the SonicWALL.
Refer to the SonicWALL Internet Security Appliance User’s Guide for detailed information on
managing and config uring your SonicWALL.
SonicWAL L Installati o n Guide Page 43
Page 45

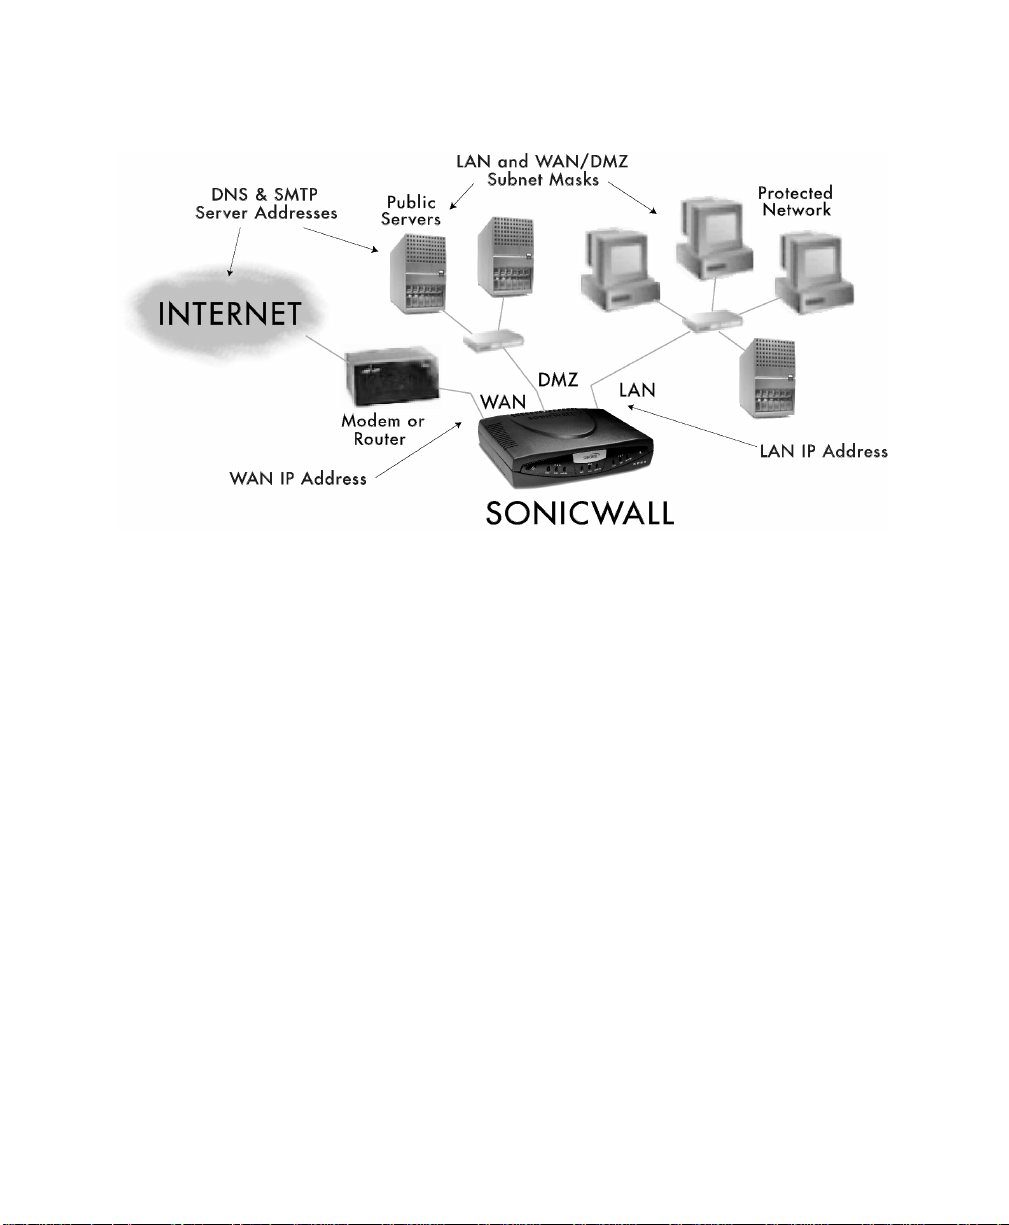
Basic Network Terminology and Configurations
The above diagram depicts a simple home network solution with the SonicWALL Internet
Security appliance.
Note:The WAN IP address is an example of an IP address and does not reflect the actual IP
address supplied by your ISP.
Basic Networking Terminology
This section provides a non-technical overview of the network protocols supported by the
SonicWALL and includes a discussion of Internet Protocol (IP) addressing.
It can be helpful to review a book on TCP/IP for an overview of protocols such as TCP
(Transmission Control Protocol), UDP (Use r Datagram Protocol), and ICMP (Internet Co ntrol
Message Protocol). The following book is recommended for beginner and intermediate network
administrators:
Teach Yourself TCP/ IP i n 14 Days Second Edition
Timothy Parker, Ph.D
SAMS Publishing
ISBN # 0-672-30885-1
Page 44
Page 46

Network Hardware Components
• Computers - IBM- compatible, MAC, notebooks, and PDAs
• Resou rces - printers, fax machines, tape backup units, and file storage devices
• Cables - crossover, ethernet
• Connectors - bridges, routers
• Network Interface Card (NIC) - a card installed inside a computer that physically connects a computer to a network and controls the flow of data from the network to the computer. The NIC has a port where the network cable is connected.
Network Types
• LAN stands for Local Area Network. Local area refers to a network in one location, Local
Area Networks connect computers and devices close to each other such as on one floor of
a building, one building, or a campus. LANs can connect as few as two computers or as
many as 100 computers.
• WAN (Wide Area Networ k) connects LANs together. Th e networks t hat make up a WAN
can be located throughout a country or even around the world. If a single company owns
a WAN, it is often referred to as an enterprise network. The Internet is currently the largest
WAN.
Firewalls
A firewall is a software or hardware system that prevents unauthori zed outside access, theft,
deletion, or modification of information stored on a local network. Typically, unauthorized
access would be via an organization’s Internet connection.
Gateways
A gateway can be a computer that ac ts as a co nnector be tween a priva t e intern al network and
another network such as the Internet. A gateway used as a firewall can transmit information
from an internal network to the Internet. Also, gateway s can examine incoming information and
determine if the information is allowed access to the network.
Network Protocols
The method that used to regulate a workstation’s access to a computer network to prevent data
collisions. The SonicWALL uses the T CP/IP protocol.
• TCP/IP - Internet Protocol, or "IP", provides connectionless data transfer over a TCP/IP
network. Since IP al one does not provide end-to-end data reliability as well as some o ther
services, other protocols such as TCP (Transmission Control Protocol) can be added to
provide these services. In TCP/IP, TCP works with IP to ensure the integrity of the data
traveling over the network. TCP/IP is the protocol of the Internet.
• FTP - File Transfer Protocol (FTP) is used to transfer documents between different types
of computers on a TCP/IP network.
SonicWAL L Installati o n Guide Page 45
Page 47

• HTTP - HyperText Transfer Protocol (HTTP) is a widely used protocol to transfer
information over the Intern et. Typically, i t is used to transfer informati on from Web servers
to Web browsers.
• UDP - User Datagram Protocol (UDP) transfers information using virtual ports between two
applications on a TCP/IP network . Sligh tly faster than TCP, it is not as reliable.
• DNS - Domain Name System (DNS) is a protocol that matches Internet computer names
to their corresponding IP addresses. By using DNS, a user can ty pe in a computer name,
such as www.s onic wal l. c om, i nst ead o f an IP ad dres s, such as 192.1 68. 168.168, to acces s
a computer.
• DHCP - Dynamic Host Configuration Protocol (DHCP) allows communication between
network devices and a server that administers IP numbers. A DHCP server leases IP
addresses and other TCP/IP information to DHCP client that requests them. Typically, a
DHCP client leases an IP address for a period of time from a DHCP server which allows a
larger number of clients to use a set pool of IP addresses.
• WINS - Windows Internet Naming Sys tem (WINS), used o n Microso ft
matches Microsoft
computers on the Microsoft
®
network computer names to IP addresses. Using this protocol allows
®
network to communicate with other networks and computers
®
TCP/IP Network s,
that use the TCP/IP suite.
• HTTPS - Secure Hyp er T ext Transfe r P rot o c ol (H TTP S) i s a p r oto co l t o tr a ns f er inf or mation
securely over the Internet. HTTPS encrypts and decrypts information exchanged between
a Web server and a Web browser using Secure Socket Layer (SSL).
• SMTP - S imple Mail Transf er Proto col (S MTP) is use d to s end an d recei ve e-mail me ssages .
Typically, SMTP is used only to send e-mail while another protocol, POP3, is used to receive
e-mail messages.
• POP3 - Post Office Protocol 3 (POP3) is used to receive e-mail messages and storing
messages on a server, referred to as a POP server.
• ICMP - Internet Control Messages Protocol (ICMP) reports errors and controls messages
on a TCP/IP network. PING uses ICMP protocol to test if a network device is available.
IP Addressing
To become part of an IP network, a network device must have an IP address. An IP address is
a unique number that di fferentiates one dev ice fro m another on the netwo rk to avoid confusion
during communication. To help illustrate IP addresses, the following sections compare an IP
address to the telephone numbering system, a system that is used every day.
Like a phone number with its long distance “1” and area code, an IP address contains a set of
four numbers. Whil e we separate phone nu mber compon ent s wi th d ashes , f or ex amp le 1 -408555-1212, IP address number components are s eparated by decimal points o r dots (called
dotted decimal notation), for example 123.45.67.89. Because computers use a binary number
system, each number in the set must be less than 255.
Page 46
Page 48

There are three components of IP addressing:
• IP address
• Subnet mask
• Def au lt ga tew ay
IP Address
Just as each household or business requires a unique phone number, a networked device (such
as a computer, printer, file server, or router) must have a unique IP address. Unlike phone
numbers, an IP address requires the entire number when communicating with other devices.
There are three classes of IP addresses: A, B, and C. Like a main business phone number that
one can call, and then be transferred through interchange numbers to an individual’s extension
number, the different classes of IP addresses provide for varying levels of “interchanges” or
subnetworks, and “extensions” or device numbers. The classes are based on estimated network
size:
• Class A — used for very large networks with hundreds of subnetworks and thousands
of devices. Class A networks use IP addresses between 0.0.0.0 and 127.0.0.0.
• Class B — used for me dium t o large n etwor ks with 1 0–100 su bnetwo rks a nd hundreds
of devices. Class B networks use IP addresses between 128.0.0.0 and 191.0.0.0.
• Class C — used for small to medium networks, usually with on ly a fe w subnetworks
and less than 250 de v ices. Class C networks use IP add ress es be tween 192.0.0.0 and
223.0.0.0.
Just as one would go to the phone company for a phone number, there are controlling bodies
for IP addresses. The overall controlling body for IP addresses worldwide is InterNIC.
Businesses or individuals can request one or many IP addresses from InterNIC. It’s a good idea
to estimate the network’s future growth when requesting the class and number of IP addresses
requested.
Subnet Mask
The IP addressing system allows subnetworks or “interchanges” to be created and device
numbers or “extensions” to be established within these subnetworks. These numbers are
created using a mathematical device call ed a s ubnet mask. A subnet mask, li ke the IP address,
is a set of four numbers in dotted decimal notation. Subnet masks typically take three forms:
• 255.0.0.0
• 255.255.0.0
• 255.255.255.0
The number 255 “masks” out the corresponding number of the IP address, resulting in IP
address numbers that are valid for the network. For example, an IP address of 123.45.67.89
and a subnet mask of 255.255.255.0 results in a sub network number of 123.45.67.0 and a
device number of 89. The I P addres s numbers tha t are actual ly val id to u se ar e those ass igned
by InterNIC. Otherwise, anyone could set up IP addresses that are duplicates of those at
another company.
SonicWAL L Installati o n Guide Page 47
Page 49

The subnet mask used for the network typically corresponds to the clas s of IP address assigned.
If the IP address is Class A, it uses a subnet mask of 255. 0.0.0. Class B addresses us e a subnet
mask of 255.255.0.0, and Class C IP addresses use a subnet mask of 255.255.255.0.
Default Ga tew a y
A default gateway is like a long distance operator. Users can dial the operator to get assistance
connecting to the end party. In complex networks with many subnetworks, gateways keep
traffic from traveling b etween di fferent subn etworks unless addressed to travel there. While
this helps to keep overall network traffic more manageable, it also introduces another level of
complexity.
To communicate with a device on another network, one must go through a gateway that
connects the two networks. Therefore, users must know the default gateway IP address. If
there is no gateway in the netwo rk, use an IP address of 0.0.0 .0 in fields that apply to a defau lt
gateway.
Network Address Translation (NAT)
NAT hides internal IP addresses by converting all internal host IP addresses to the IP address
of the firewall as pac kets are routed through the fire wall. The f irewall then retransmits the data
payload of the internal host from its own address using a translation table to keep track of
which sockets on the ext erior interface equ ate to whic h sockets on the i nterior interface. To the
Internet, all of the traffic on the network appears to come from the same computer.
Nodes
A node is a device, such as a PC or a printer, on a network with an IP address. The feature
chart shows how many node licenses for PCs or printers are included with a SonicWALL Internet
Security appliance. The TELE3 has a non-upgradeable 5-node license, but the SOHO3 is
upgradeable up to have 10, 50, or an unlimited number of node licenses. The PRO 100, PRO
200, and PRO 300 have an unlimited number of node licenses.
The TELE3, SOHO3- 10, and SOHO 3-50 allo w a maximum of 5, 10, or 50 LAN IP addresses ,
respectively, to exist on the LAN (Local Area Network). The licenses for the n odes are
counted cumulatively, not simultaneously. When the SonicWALL is turned on and
configured, the SonicWALL begins to count IP addresses against the license, and continues
to count new LAN IP addresses accessing the Internet until the appliance is rebooted.
When a computer or other device connects to the LAN port of the SonicWALL, it is detected
via broadcast and stores the computer or other device IP address in memory. If 5, 10, or
50 IP addresses have been stored in the SonicWALL, the SonicWALL does not permit any
additional machines to access the Internet. Therefore, the SonicWALL restric ts the number
of IP addresses on the LAN, not the number of simultaneous connections to the Internet.
If you have fewer than the maximum number of computers or other devices on your LAN,
but it appears that the IP license limit is exceeded, download a Tech Support Report and
review the devices with IP addresses. Rogue devices such as printers are filling up the
SonicWALL IP address limit. Tech S up po rt R ep or ts are explained in the Tools chapter
of this manual.
Page 48
Page 50

Additionally, computers with two (2) N etwork Interface Cards (NIC) can take up two IP
addresses. You must reconfigure your network to avoid these problems by turning off IP
forwarding on Windows
®
NT or Windows2000® servers using two N ICs.
SonicWAL L Installati o n Guide Page 49
Page 51

Page 50
Page 52

3 Registering at mySonicWALL.com
After you complete the initial installation and configuration of your SonicWALL, you should
register your SonicWALL Internet Security Appliance at http://www.mysonicwall.com. You
must create a user account to activate and manage services, as well as access technical
support, for all of your SonicWALL Internet Security Appliances.
Important: You must register your SonicWALL on mySonicWALL.com to access
technical support. By registering your SonicWALL, you provide the initi al information
necessary for technical support if any problems arise during installation.
Note: User interface screens may vary as mySonicWALL.com is updated with new
features. For the latest version of this manual and other SonicWALL documentation, go
to http://www.sonicwall.com/products/documentation.html
What is mySonicWALL.com?
MySonicWALL.com de livers a convenient, centralized wa y to register all your SonicWAL L
Internet Security appliances and Security Services. It eliminates the need to individually
register SonicWALL appliances and upgrades to streamline the management of all your
SonicWALL security services. Instead of registering each SonicWALL product individually,
using mySonicWALL.com allows you to have a single user profile where you can manage
all of your product registrations and security services.
What Can I Do with mySonicWALL.com?
You can do the fo llow ing with MySonicWA LL.com:
• Centrally register all your SonicWALL appliances and services
• Access firmware a nd sec urity service updates
• Get SonicW ALL alerts on services, firmware, and products
• Check status of your SonicWALL services and upgrades linked to each registered
SonicWALL Internet security appliance
• Manage (activate, change or delete) your SonicWALL security services online
SonicWAL L Installati o n Guide Page 51
Page 53

Creating a New User Account
If you currently have a mySonicWALL.com user account, you can skip this section and
proceed to Adding New Ap p li anc e s or S er vi ce s .
1. Type http://www.mysonicwall.com into your web browser.
2. As a new user, locate the s tatement, “If yo u are not a registered user, click here
the link, and an information form appears.
Account Information
3. All field marked with an * are required fields. Be sure to fill out the form completely
before submitting to the user database. Create a Use r N a m e and password for your
mySonicWALL account. Confirm the password by typi ng it in the Confirm Password
field. For your convenience, you can record the in formati on below.
User Name:______________________ Password:__________________
.” Click
Page 52
Page 54

Important: You must rem ember your user nam e and pas sword until you have activated
your account. You cannot obtain your password if you forget it before activating your
account. If you do forget your passwo rd before you r user account is active, you have to
create a new user account.
Note: If your securi ty pol icy doesn’ t allow you to write down passwor ds, write do wn a hint
or a prompt for your password.
4. Create a Secret Qu estion and Answer to prompt you for your password if you forget
it.
Personal Information
5. Complete the Personal Information section of the Registration form.
Be sure to enter the correct e-mail address as the subscription code for your SonicWALL
user account is e-mailed to you. The subscription code is necessary to activate your
account.
SonicWAL L Installati o n Guide Page 53
Page 55

6. Select your time zone fro m the Time Zo ne menu, and then select any or all of the
following options:
• Yes, I would like to be a Beta Tester.
• No, I do not want to be contacted by SonicWALL via e-mail.
• I would like to receive security alerts from SonicWALL.
• I would like to receive product information from SonicWALL.
7. Click Submit.
8. Review your information carefully to ensure that it is accurate. Click Back on your Web
browser navigation bar to go back to the form and re-enter any information.
9. If all th e informatio n is correct , click OK. A confirmation message appears notifying you
that your account must be activated within 72 hours of creating it. You also receive an
e-mail with your subscription key in it. You can return to the mySonicWALL.com login
screen, or alternatively, click on the link within the e-mail message.
Page 54
Page 56

Note: For security reasons, the subscriber name and part of the subscription code are
masked.
10. The next ti me you access your mySonicWAL L.com account, you must prov ide your
subscription code to activate your a ccount. Write your subscription code below.
Subscription code:________________________________
11. Type the subscription code you received via e-mail into the Subscription Code field,
and click Submit. Your Account Management interface appears and you can now
SonicWAL L Installati o n Guide Page 55
Page 57

register SonicWALL Internet Security appliances or services. You can also delete or
move appliances from your user account.
Problems Creating a MysonicWALL.com user Account?
If you’re having trouble creating a user account on the mySonicWALL.com website, be sure
to check the following items in your browser:
• Accept Cookies
• Internet Explorer 5.0 or higher
• Netscape 4.5 or higher
•Allow Java scripts
• Correct Password for MysonicWALL.com
User Name and Password Functions
If you forget your user name, you must send an e-mail message to Tech Support
requesting your user name. Be sure to include the e-mail address used to create the
MysonicWALL.com account.
If you forget your password, use the Forget Pas sword? Click here
Secret Question and Answer to remember your password. If you did not set up a
Secret Question and Answer for your password, a link appears allowing you to reset
your password. Be sure to use the same user name and e-mail address as your
MysonicWALL.com user account.
Page 56
. link to use yo ur
Page 58

Registering Your SonicWALL Internet Security Appliance
To register your Soni cWALL Internet Security appl iance, c lick th e hype rlink , C lick Here, in
the Registered SonicWALL Products section. Or to quickly register your appliance,
enter the Activa tion K ey of a service, or a S onicWALL Internet Secu rity appliance serial
number into the field in the Quick Register section.
Click Here
If you use the hyperlink, Click Here
your appliance by entering the Serial Number in the Add New Product field. You can also
create a Friendly Name, such as San Fra ncisco O ffice, to identif y the Son icWAL L. Using
Friendly Names can assist you with managing multiple SonicWALLs.
Quick Registration
To quickly register a SonicWALL Internet Security appliance, type the serial number in the
field under the Quick Register section, and click Go. The serial number automatically
appears in the Serial Number field. You can then create a Friendly Name for the
appliance. If you type the incorrect serial number into the Serial Number field, a message
stating that the appliance is previously registered may be returned. Write your SonicWALL
serial number below.
Registration
, a My Products page appears, and you can register
SonicWALL Serial Number:____________________
SonicWAL L Installati o n Guide Page 57
Page 59

After you register the SonicWALL, the Friendly Name appears as a hyperlink under
Registered SonicWALL Products. Click on the Friendly Name to view the services
activated on the appliance.
Note: Services may vary f rom model to model and may not have the same acti vated fiel ds
as the above appliance.
masked for security reasons.
Also, the serial number, registration code, and activation keys are
Page 58
Page 60

Status and Options
Click Status and Opt ions underneath the login information to search for the status and
options relating to a particular SonicWALL appliance. Enter the SonicWALL serial number
to search for the related information.
Information displayed includes
• Serial Number
• Product
• Registration Code
• Node Support Upgrade Key
There is also a list of applicable services with their activation keys as well as expiration
dates for subscriptions.
SonicWAL L Installati o n Guide Page 59
Page 61

Managing Your SonicWALL
You can rename your SonicWAL L, transfer your SonicWA LL, or delete your SonicWA LL in
this sectio n of Services Management.
Renam i ng Y ou r S on icW ALL
You can rename your Soni cWALL at any time in order to manage your Soni cWALLs. To
rename your So nicW ALL, click Rename in the Manage Products section. Type the new
name in the Friendly Name field, and click Submit.
After clicking Submit, a new page appears with the message that you have successfully
renamed your SonicW A LL.
Page 60
Page 62

Transfer Product
You can transfer a SonicWALL to another mySonicWALL.com user at any time. Transferring
a SonicWALL is necessary if you sell the appliance to another user, or if you want to transfer
it to another person in your company. For example, the sales manager for the East Coast
has left, and you were managing the services for his SonicWALL. However, another
manager may have an immediate need for the SonicWALL, and requests that you transfer
the appliance to him. To transfer a SonicWALL to another user, click Transfer in the
Manage Product section.
Type in the User Name of the new owner, and the e-mail address ID in the appropriate
fields. Click Submit. A page is returned with the message that you’ve successfully
transferred the SonicWALL to the new user.
SonicWAL L Installati o n Guide Page 61
Page 63

Also, an e-mail message is sent to both the old and new user as a notification that the
appliance was transferred.
Note: You can only transfer a SonicWALL to another registered user of mySonicWALL.com.
Delete Produ ct
You can also delete a SonicWALL from your mySonicWALL.com user a ccount. Click on the
Friendly N ame for the appliance, and then click Delete. A confirmatio n message a ppears
in the next window, and you have successfully deleted a SonicWALL from your user
account. You can a d d the SonicWALL back to your account at anytime.
Page 62
Page 64

Applicable Services for SonicWALL Internet Security Appliances
In the Applicable Services section of mySonicWALL.com, a list of installed and
unactivated services for your SonicWALL is displayed.
Activated services are indicated by the Installed icon with a green check mark.
Inactive services are indicated by the Activate icon with a red a rrow.
SonicWAL L Installati o n Guide Page 63
Page 65

Activated service names are also hyperlinked to an information page with Activation
Status and the Expiration Date of the service. Services can also be renewed by clicking
on the name, and entering the activation key into the Activati o n Key field.
Available Services on SonicWALL Appliances
SOHO3,
Services
TELE3, &
PRO100
PRO 200 PRO 300 GX 2500 GX 6500
Content Filter
VPN Upgrade
VPN Client
Upgrade
Premium
Support
(optional)
Page 64
Optional Optional Optional
One License 50 Licenses
Included
100 License s
Included
100
Licenses
Included
Page 66

Services
Extended
Warranty
Authentication
Serv ice - Admin
Authentication
Serv ice - Client
High Availabili ty
ViewPoint
Available Services on SonicWALL Appliances
SOHO3,
TELE3, &
PRO100
PRO 200 PRO 300 GX 2500 GX 6500
Anti-Virus
Upgrade
Firmware
download
Support 8X5
Support 24X7
(US only)
Int’l Support
SonicWAL L Installati o n Guide Page 65
Page 67

Activating Services Using mySonicWALL.com
To activate a service such as Content Filter, use the following steps:
1. Log into mySonicWALL.com using your username and password. Select the appliance
to be upgraded with the Content Filter List subscription, and click the name.
2. Click Activate next to Content Filter. The following screen appears with an
Activation Key field, and a Terms and Conditions message.
3. Type the Activation Key into the Activation Key field, and select I have read and
agreed to all of the above terms and conditions. Click Submit.
4. The Content Filter List subscription is now active, and you can download the
Content Filter List through your SonicWALL appliance.
Note: The Anti-Virus service also needs to be activated on your SonicWALL appliance.See
the Anti-Virus User’s Guide for more information.
Page 66
Page 68

4 Hardware Description
This chapter provid es detai led illu strat ions and descriptions of the SonicWALL Internet Security
Appliances front and back panels by model. Refer to this chapter to learn the location of LEDs,
switches, and connectors.
SonicWALL PRO 200 and PRO 300 Front Panel
The So nic WAL L PRO 200 fr ont pan el is sh ow n belo w, f ollow ed by a d escri ptio n of e ach it em.
The SonicWALL PRO 300 is identical to the SonicWALL PRO 200 except for the PRO 300 label
on the front panel and has 64MB of RAM.
LAN Port LEDs
Power, Test, and
Alarm LEDs
WAN Port LEDs
Link, Activity
DMZ Port LE Ds
Link, Activity
Link, Activity
SonicWALL PRO 200 and SonicWALL PRO 300 Front Panel Description
• Power
Lights up when power is applied to SonicWALL PRO or SonicWALL PRO 300.
• Test
Lights up when the SonicWALL is powered up and performing diagnostic tests to check for
proper operation. These tests take about 90 seconds. If the Test LED remains lit after this
time, the software is corrupt and must be reinstalled.
• Alarm
Lights up and flashes for 10 seconds when an event generates an alert. Alarm LED flashes
for 10 seconds. Alert events are defined in the Log Se ttin gs section in Chapter 5 of the
SonicWALL Internet Security Appliance User’s Guide.
SonicWAL L Installati o n Guide Page 67
Page 69

There are three Ethernet ports; one for each of the LAN, DMZ, and WAN ports:
• Link
Lights up when a Twisted Pair connection is made to another E the rne t de vice (usually a
hub) on the port. Note that the device connected to the SonicWALL must support the
standard Link Integrity test.
• Activity
Lights up when the SonicWALL transmits or receives a packet through the Twisted Pair port
onto the network.
SonicWALL PRO 200 and PRO 300 Back Panel
The SonicWALL PRO 200 back panel is shown below, followed by a description of each item.
The SonicWALL PRO 300 back panel is identical to the SonicWALL PRO 200.
Cooling
Vents
10Mbps/100Mbps
LAN Ethernet Port
RS-232
Serial Port
10Mbps/100Mbps
DMZ Ethernet Port
WAN Ethernet Port
Reset
Switch
10Mbps/100Mbps
5VDC, 2A
Power Input
SonicWALL PRO 200 and SonicWALL PRO 300 Back Panel Description
• (3) Twisted Pair (10Base-T, 100Base-T) Ethernet Ports
(3) Auto switch ing 10Mbps / 100Mbp s Ether net p orts p ro vide c onn ect ivi ty f or b oth Eth ern et
and Fast Ethernet networks. The Ethernet ports connect the Soni cWA LL to the LAN, DMZ,
and WAN using Twisted Pair cable with RJ45 connectors.
• Serial
DB-9 RS-232 Serial port
• Reset Switch
Resets the SonicWALL PRO 200 or the SonicWALL PRO 300 to its factory clean state. This
can be required if you forget the administrator password, or the SonicWALL firmwa re has
become corrupt.
Page 68
Page 70

• Power Input
Connects the SonicWALL to power input. The use of an Uninterruptible Power Supply (UPS)
is strongly recommended to protect the SonicWALL against damage, or loss of data due to
electrical storms, power failures, or power surges.
• Power Switch
Powers the SonicWALL on and off.
• Cooling Vents
The SonicWALL is convection co oled; an internal fan is not necessary. Do not block the
cooling vents on the SonicWALL side panels.
SonicWALL PRO 100 Front Panel
The SonicWALL PRO 100 front panel is shown below, followed by a description of each item.
Test LED
Power LED
WAN Port LEDs
Link, 100, Activity
DMZ Port LEDs
Link, 100, Activity
LAN Port LEDs
Link, 100, Activity
SonicWALL PRO 100 Front Panel Description
• Power
Lights up when power is applied to the SonicWALL PRO 100.
• Test
Lights up when the SonicWALL PRO 100 is first powered up and performing diagnostic tests
to check for proper operation. These tes ts take about 90 seconds. I f the Test LED remains
lit after this time, the software is corrupt and must be reinstalled.
SonicWAL L Installati o n Guide Page 69
Page 71

There are three Ethernet ports; one for each of the LAN, DMZ, and WAN ports:
• Link
Lights up when the Twisted Pair port is connected to a 10Mbps or 100Mbps hub or switch,
or directly connected to a computer. Note that the connected Ethernet device must support
the standard Link Integrity test.
• 100
Lights up when the Twi st e d P ai r port is connected to a 100Mbps hub or switch or directly
connected to a computer with a 100Mbps network interface.
• Activity
Flashes when the SonicW ALL PRO 100 transmi ts or receiv es a packet through th e Twisted
Pair port.
SonicWALL PRO 100 Back Panel
The SonicWALL PRO 100 back panel is shown below, followed by a description of each item.
Cooling Vents
Reset Switch
RS-232
Serial Port
10Mbps/100Mbps
LAN Ethernet Port
10Mbps/100Mbps
DMZ Ethernet Port
10Mbps/100Mpbs
WAN Ethernet Port
5VDC,2A
Power input
The SonicWALL PRO 100 Back Panel Description
• Reset Switch
Erases the firmware and resets SonicWALL PRO 100 to its factory clean state. This can be
necessar y if the admi nist rator password is f orgotten, or the firmware has become corrupt.
Instructions for erasing the SonicWALL firmware are Guide.
• Serial
DB-9 RS-232 Serial port.
• (3) Twisted Pair (10Base-T, 100Base-T) Ethernet Ports
(3) Auto switch ing 10Mbps / 100Mbp s Ether net p orts p ro vide c onn ect ivi ty f or b oth Eth ern et
and Fast Ethernet networks. The Eth ernet ports connect the SonicWALL PRO 100 to the
LAN, DMZ, and WAN using Twisted Pair cable with RJ45 connectors.
Page 70
Page 72

• Power Input
Connects to the external power supply that is provided with the SonicWALL PRO 100. The
use of an Uninterruptible Power Supply (UPS) is recommended to protect the Soni cWALL
PRO 100 against damage or loss of data due to electrical storms, power failures, or power
surges.
• Cooling Vents
• The SonicWALL PRO 100 is c onvecti on cool ed; an inte rnal f an is not necessary . Do not
block the cooling vents.
SonicWALL SOHO3 and TELE3 Front Panel
The SonicWALL SOHO3 front panel is shown below, followed by a description of each item.
The SonicWALL TELE3 is identical to the SonicWALL SOHO3 except for the TELE3 label on
the front panel and the inclusion of SonicWALL VPN.
Test LED
LAN Port LEDs
Link, 100, Activity
Power LED
WAN Port LEDs
Link, 100, Activity
SonicWALL SOHO3 and SonicWALL TELE3 Front Panel Description
• Power
Lights up when power is applied to the SonicWALL SOHO3 or SonicWALL TELE3.
• Test
Lights up when the SonicWALL is first powered up and performing diagnostic tests to check
for proper operation. These tests take about 90 seconds. If the Te st LED remains lit after
this time, the software is corrupt and must be reinstalled.
SonicWAL L Installati o n Guide Page 71
Page 73

There are two Ethernet ports; one of the following for the LAN and WAN ports:
• Link
Lights up when the Twisted Pair port is connected to a 10Mbps or 100Mbps hub or switch
or directly connected to a computer. Note that the connected Ethernet device must support
the standard Link Integrity test.
• 100
Lights up when the Twisted Pair port is connected to a 100Mbps hub or switch or directly
connected to a computer with a 100Mbps network interface.
• Activity
Flashes when the SonicWALL tra nsmits or re ceives a packet throu gh the Twisted Pair po rt.
SonicWALL SOHO3 and TELE3 Back Panel
The SonicWALL SOHO3 back panel is shown below, followed by a description of each item. The
SonicWALL TELE3 back panel is identical to the SonicWALL SOHO3.
Cooling Ven ts
5VDC,2A
Power Input
Reset Switch
RS-232
Serial Port
10Mbps/100Mbps
LAN Ethernet Po rt
10Mbps/100Mbps
WAN Ethernet Port
The SonicWALL SOHO3 and TELE3 Back Panel Description
• Reset Switch
Erases the firmware and resets the SonicWALL to its factory clean state. This can be
necessary if you forget the administrator password or the firmware has become corrupt.
• Serial Port
DB-9 RS-232 Serial port
Page 72
Page 74

• (2) Twisted Pair (10Base-T, 100Base-T) Ethernet Ports
(2) Auto switch ing 10Mbps / 100Mbp s Ether net p orts p ro vide c onn ect ivi ty f or b oth Eth ern et
and Fast Ethernet networks. The Ethernet ports connect the SonicWALL to the LAN and
WAN using Twisted Pair cable with RJ45 connectors.
• Power Input
Connects to the external power supply which is provided with the SonicWALL SOHO3 and
the SonicWALL TELE3. The u se of an Uninterrupti ble Po wer Supply (UPS ) is rec ommended
to protect against damage or loss of data due to electrical storms, power failures, or power
surges.
• Cooling Vents
The SonicWALL is convection co oled; an internal fan is not necessary. Do not block the
cooling vents on the SonicWALL SOHO3 or the TELE3 side panels.
SonicWALL GX 250 and GX 650 Front Panel
The SonicWALL GX 250 front panel is shown below, followed by a description of each item. The
SonicWALL GX 650 is identical to the SonicWALL GX 250 except for the GX 650 label on the
front panel and the types of network interfaces installed.
Power LED
Test LED
Reset Button
Serial Cable Port
Slot 1 Expansion
Slot 2
WAN
Slot 3
LAN
Slot 4
DMZ
SonicWALL GX Models Front Panel Description
• Power
Lights up green if both power suppl ies are functioning on the SonicWALL G X M odels.
If it is red, one of the power supplies has failed, and an audible alarm also sounds.
SonicWAL L Installati o n Guide Page 73
Page 75

• Test
Lights up when the SonicWALL is powered up and performing diagnostic tests for
proper operation. These tests take up to 5 minutes. If the Test LED remains lit after
this time, the firmware is corrupt and must be reinstalled.
• Serial Port
DB-9 RS-232 Serial port for a modem or null-modem cable to support Command Line
Interface Management.
There are three network interfaces on the GX Models from left to right:
• WAN
• LAN
• DMZ
The GX 250 includes two Fast Ethernet network interfaces.The GX 650 includes either Fast
Ethernet or 1000Base-SX over Fiber network interfaces. A fourth s lot for upgra des is available
on the GX 250.
Two types of network cards are available in the GX series:
• Fast Ethernet (10/ 100Base-T)
• Gigabit over Fiber (1000Base-SX)
GX 250 Front Panel
Three Fast Ethernet interfaces provide connectivity for either Ethernet and Fast Ethernet
networks. The Ethernet ports connect the SonicWALL to the LAN, DMZ, and WAN using
category 5 twisted pair cable with RJ-45 connectors. There is an additional slot available for
upgrading the appliance. The standard NIC has two LEDs:
• Link/Activity
The Link light is green when a twisted pair connection is made to another Ethernet
device (usually a switch or a hub) on the port. Note that the device connected to the
SonicWALL must support the standard link integrity test. The Link LED blinks,
indicating Activity, when th e SonicWALL transmits or receives a packet through the
Twisted Pair port onto the network.
• Network Speed
The Network Speed LED is not lit if the network speed is 10 Mbps, and the LED is
green if the network speed is 100 Mbps.
• GX650 Front Panel
Three Gigabit over Fiber ports provide connectivity for Gigabit networks. Before inserting
the cables into the network ports on the fiber optics card, remove the plug from the ports.
The 1000Base-SX interface has the following LED lights:
• Transmit (TX)
The TX light is lit when the network is transmitting data over the network connection.
Page 74
Page 76

• Receive (RX)
The RX light is lit when data is received over the network connection.
• Link
The Link LED indicates that the interface is connected to a valid link partner and is
receiving link pulses.
The 1000Base-T network interface has the following LEDs:
• Link
The Link light is green when a network connection is made to another Ethernet device
(usually a hub) on the port.
• Activity
The Activity LED blinks, indicating Activity, when the SonicWALL transmits or
receives a frame.
• Network Speed
The Network Speed light remains off if there is no connection or if a 10Mbps
connection is made. If a 100 Mbps connection is made, the LED is green. If a 1000
Mbps connection is obtained, the LED is yellow.
Reset Switch
Resets the Son icWAL L GX 250 or t he S oni c WALL GX 650 to its factor y clean state. This may be
required if you forget the administrator password, or the SonicWALL fi rmware has become
corrupt.
SonicWALL GX 250 and GX 650 Rear Panel
The SonicWALL GX 250 back panel is shown below, followed by a description of each item.
SonicWALL GX 650 back panel is identical to the SonicWALL GX 250.
Power Input
Cooling Vent
Alarm R eset Button
Power
Switches
SonicWALL GX 250 and SonicWALL GX 650 Back Panel Description
• Power Inputs
SonicWAL L Installati o n Guide Page 75
The
Page 77

There are two power input receptacles to connect the SonicWALL to the AC power
input. The unit comes standard with redundant hot swappable power supplies with
active power function correction (100-240 VAC 50/60 Hz).
• Power Switches
One power switch for each hot swappable power supply module. The audible alarm
sounds if only one power supply is functioning.
• Alarm Reset Button
The Alarm Reset button resets the audible alarm.
• Cooling Vents
The SonicWALL is convection coo led and has an in ternal fan that is not cru cial to the
function of the GX, but provides additio nal cooling to the unit. Do not bl ock t he cooling
vents on the SonicWALL front and back panels.
Page 76
Page 78

5 Troubleshooting Guide
Tips for Cable/DSL Modem Users
No Internet Access
If you are experiencing problems connecting to the Internet after installing your SonicWALL,
you should turn off your cable modem for five (5)minutes, and then turn it back on. Restart the
SonicWALL and try to access it using the LAN IP address. This is an easy fix that’s worth trying
before contacting tech support.
If you are using NAT with DHCP Client network configuration, log into the SonicWALL and
click General, then Network. Verify that the Host Name fi eld ha s i nfo r matio n in it. Your IS P
may require a Host Name to connect to the Internet.
Some ISPs require the MAC address or the Ethernet address of the SonicWALL before the IP
lease can be established. The MAC address of the SonicWALL is the serial number located on
the bottom of the appliance. It is also displayed on the Status page of the General window.
Cannot Maintain IP Address
Typically, cable modem users obtain an IP address dynamically via DHCP. The IP address is
leased for a specific period of time and then renewed by the DHCP server. If you are
experiencing trouble maintaining your lease from your service provider, configure the
SonicWALL to be “pingable” from the WAN. Some ISPs assume that if they cannot ping you,
you must not be online and the lease is not renewed by the DHCP server. Use the following
steps to solve this problem:
1. Open your Web browser and enter the LAN IP address of the SonicWALL to access the
Management interface.
2. Log into the Management interface using the user name and password you created during
configuration.
3. Click Access, then Rules.
4. Click Add New Rule.
5. Select Allow from the Action choices.
SonicWAL L Installati o n Guide Page 77
Page 79

6. Select Ping from the Service menu.
7. Select WAN from the Source menu. Enter the LAN address of your SonicWALL.
8. Click Update and the Rule is added to your Rule list.
Other Troubleshooting Tips
Be sure you can connect from your computer directly to the cable modem and establish an
Internet connection. If you can do this with your computer, but not with the SonicWALL, record
all of your Network settings and check them against the information in the SonicWALL.
Erasing the Firmware
There can be instances when it is necessary to reset the Soni cWALL to its factory c lean s tate if
the following events happen to the appliance:
• Admin istrator password is forgotten.
• The firmw a re has become corrupt, and you cannot contact the Management Interface .
• The test light comes on and stays on for more than a few minutes.
• During the troubleshooting process, you must start from a “known” state.
Once the firmware is erased, new firmware must be loaded, and the SonicWALL must be
reconfigured.
The following procedure erases all settings and reverts the unit to the factory default state. It
is necessary to follow the initial configuration procedures detailed in this manual's QuickStart
Page 78
Page 80

section to reconfigure the SonicWALL. If you n eed the firmware, download it from <http://
firmware.sonicwall.com> or load it from the CD included with the appliance. You can also
download firmware by logging into <http://www.mysonicwall.com> as a registered user.
Locating the Reset button on your SonicWALL In ternet Security Appliance
SonicWALL SOHO3, PRO 100, TELE3, SOHO 10, SOHO 50, XPRS, SOHO Telecommuter, PRO
200, PRO 300, and newer SonicWALL DMZ models use the small recessed button on the back
of the unit for this procedure. If your SonicWALL DMZ unit has a square reset button that is not
recessed on the back of the unit, follow the procedure below to locate the blue reset button.
SonicWALL 10 and 50 models, SonicWALL Plus, and older SonicWALL DMZ models have a blue
reset button inside. Open the SonicWALL unit by unscrewing the screws on the bo ttom and
gently pulling the top cover off. (The front and back panels remain in place.) Locate the blue
button towards the front between the Power, Test, and WAN LEDs.
If your SonicWALL DMZ unit has a circular reset button that is recessed in the back of the unit,
then it’s an older DMZ model and you should foll ow the procedure for locating the reset button
inside the unit.
Erasing the Firmware for all Models
1. Turn off the SonicWALL and disconnect all cables to the network.
2. Locate the recessed Reset Switch on the back panel of the SonicWALL.
3. Press and hold the Reset Switch and then apply power to the SonicWAL L. Once the
Test LED starts to flash, let go of the Reset Switch.
The Test LED flashes for approximately 90 seconds while the firmware is erased. After
completing the diagnostic sequence, the Te st LED stays lit, indicating that the firmware has
been erased. It is normal for the Test LED to stay lit after erasing the firmware. It does not go
off until the firmware is installed and loaded into memory by the automatic restart.
4. Log back into the SonicWALL at the default IP address, "http://192.168.168.168".
Make sure that the Management Station's IP address is in the sa me s ubnet as the SonicWALL--for example, "192.168.168.200".
5. The SonicWALL Management Interface displays a message stating that the firmware
has been erased. Click Browse to locate the SonicWALL firmware file on the Management Station hard drive. Or upload the firmware file that is located on the SonicWALL
Companion CD.
6. Reconfigure the SonicWALL as described in Chapter 2 of this guide.
SonicWAL L Installati o n Guide Page 79
Page 81

6 SonicWALL Support Solutions
SonicWALL’s powerful security solutions give unprecedented protection from the
risks of Internet attacks. SonicWALL’s comprehensive support services protect your
network security investment and offer the support you need - when you need it.
Knowledge Base
All SonicWALL customers have immediate, 24X7 access to our state-of-the-art
electronic support tools. Power searching technologies on our web site allow
custom ers to locate inform ation qu ickly and easi ly from our rob ust col lection of
technical information - including manuals, product specifications, operating
instructions, FAQs, web pages, and known solutions to common customer
questions and challenges.
Internet Security Expertise
Technical Support is only as good as the people providing it to you. SonicWALL
support professionals are Certified Internet Security Admini strators with years of
experience in networking and Internet security. They are also supported by the
best in c lass tools an d pr o ces ses t h at e nsu re a qu i ck and ac curate sol ution to your
problem.
Support Offers
Warranty Support - North America and International
SonicWALL products are recognized as extremely reliable as well as easy to
configure, install, and manage. SonicWALL Warranty Support enhances these
features with
•1 year, factory replacement for defective hardware
•90 days of advi sory support for instal lation and configuratio n assis tance during l ocal business hours.
•90 days of software and firmware updates
•Access to SonicWALL’s electronic support and Knowledge Base system.
SonicWALL Support 8X5
Designed for customers who need advanced technical support and the additional
benefits of ongoing software and firmware updates, SonicWALL Support 8X5 is an
annual service that includes
•Factory replacement for defective hardware
•Telephone or electronic technical support during local business hours
•Access to SonicWALL’s electronic support and Knowledge Base systems
SonicWAL L Installati o n Guide Page 80
Page 82

•All software and firmware updates and upgrades
SonicWALL Support 24X7
For customers with mission-critical network requirements who cannot afford downtime,
SonicWALL Support 24X7 is an annual subscription service that offers
• Advanced-exchanged replacement of defective hardware
• Telephone or electronic support, 24 hours, 7 days a week
• Enhanced esc alation for hi gh priority problems
• Access to SonicWALL’s electronic support and Knowledge Base systems
All of SonicWALL Support Serv ices offer a variety of support services to meet your unique
needs in cluding f ast, resp onsive service , instant access to electro nic supp ort tool s, and high
quality technical support.
SonicWALL Support Services Features and Benefits
Telephone or Web-based Technica l Support. S on icWALL’s te chn ical suppo rt experts
help solve your problems o r answer your questions quickly, reducing your risk of Internet
attack.
Knowledge Base. Instant access to solutions and documentation provides answers to
questions and solves problems electronically.
Firmware/Software Upgrades. Automatic firmware and software upgrades give instant
access to new features and capabilities, allowing you to extend your Internet security
investment.
Page 81
Annual Support Agreement. Low, fixed prices for support services allow you to budget
accurately and protect you from unexpected technical support expenses.
SonicWALL
Warranty
T elephone/Web-based
technical support
Hardwa re Replacement 1 year, return to
Software/Firmware
Updates
Enhanced Escalation Yes
90 days
8:00 a.m. - 5:0 0 p.m. ,
local time, Mo nday Friday
factory
90 days 1-year 1-year
SonicWALL
Support 8X5
1-year
8:00 a.m. - 5:00 p.m.,
local time, Monda y Friday
1 year, return to
factory
Super
SonicWALL
Support
1-year
24 hours by 7 da ys a
week
1 year, advanced
exchange
Page 83

SonicWALL Support 24X7
Overview
Available for all SonicWALL products, SonicWALL Support 24X7 includes software/
firmware technical support, and factory replacement of defective hardware. Coverage is
provided 24 hours a day, 7 days a week.
Deliverables
Coverage Hours
Support is provided during standard business hours, 24 hours per day local time, seven
days per week, in cluding locally-recognized SonicWALL holidays.
Telephone and Web-based Support
SonicWALL pro vides technical assistance during standard coverage hours by telephone or
through web-based support tools. A SonicWALL technical specialist works with you to
remotely diagnose and identify firmware and hardware not performing to documented
specifications. Web-ba sed support includes interactive communi cation with a Soni cWALL
technical specialist. SonicWALL also provides general assistance regarding usage and
documentation on a limited basis.
Hardware Service
SonicWALL Support 24X7 includes the repair or replacement of failing hardware
returned to the SonicWALL factory.
Upon diagnosis of a hardware failure, a SonicWALL technical specialist issues an RMA
number and provides instructions for returni ng the hardware to SonicWALL. Soni cWALL
ships a replacement appliance to you based upon the RMA information. You are res ponsible
for returning the failed appliance to SonicWALL w ith 30 days or be charged for the full
replacement cost.
SonicWALL does not accept failed appliances without a valid RMA number.
Software/Firmware Support
SonicWALL logs, tracks, prioritizes, and resolves software, firmware and/or documentation
bug reports and enhancement requests for software support under this agreement.
SonicWALL Support 24X7 includes priority escalation based on problem severity.
Support for software, firmware, and documentation is limited to the most current version
and the immediate prior revision.
Software/Firmware Updates
All software and firmware maintenance releases and updates are included with this
agreement. SonicWALL notifies administrators via electronic mail of new updates. The
updates are delivered exclusively via the web.
SonicWAL L Installati o n Guide Page 82
Page 84

Support Tools
SonicWALL Support 24X7 provides access to SonicWALL’s web-based support tools,
including FAQs, documentation, and Knowledge Base systems.
Availability
SonicWALL Su pport 24 X7 is an annual service available for sale at the time of product
purchase or anytime before warranty expiration.
SonicWALL S upport 8X5
Overview
Available for all products, SonicWALL Suppor t 8X5 includes software/firmw are technical
support and factory hardware replacement. Coverage is provided during standard business
hours.
Deliverables
Coverage Hours
Support is provided during standard business hours, 8:00 a.m. - 5:00 p.m. local time,
Monday through Friday, excluding locally-recognized SonicWALL holidays .
Telephone and Web-based Support
SonicWALL pro vides technical assistance during standard coverage hours by telephone or
through web-based support tools. A SonicWALL technical specialist works with you to
remotely diagnose and identify firmware and hardware not performing to documented
specifications. Web-ba sed support includes interactive communi cation with a Soni cWALL
technical specialist. SonicWALL also provides general assistance regarding usage and
documentation on a limited basis.
Page 83
Hardware Service
SonicWALL Support 8X5 includes the repair or replacement of failing hardware returned
to the SonicWALL factory.
Upon diagnosis of a hardware failure, a SonicWALL technical specialist issues an RMA
number and provides instructions for returning the hardware to Sonic WALL. Upon receipt
of the failed appliance, SonicWALL ships a fully functional replacement appliance to you.
The replacement appliance is equivalent to a new appliance.
SonicWALL does not accept failed appliances without a valid RMA number.
Software/Fi rmw ar e Support
SonicWALL logs, tracks, prioritizes, and resolves software, firmware and/or documentation
bug reports and enhancement requests for software support under this agreement.
SonicWALL Support 8X5 includes priority escalation based on problem severi ty.
Support for software, firmware, and documentation is limited to the most current version
and the immediate prior revision.
Page 85

Software/Firmware Updates
All software and firmware maintenance releases and updates are included with this
agreement. SonicWALL notifies administrators via electronic mail of new updates. The
updates are delivered exclusively via the web.
Support Tools
SonicWALL Support 8X5 provides access to SonicWALL’s web-based support tools,
including FAQs, documentation, and Knowledge Base systems.
Availability
SonicWALL Support 8X5 is an annual service available for sale at the time of product
purchase or anytime before warranty expiration.
Warranty Support -
Overview
Included with all SonicWALL products, SonicWALL warranty support includes return-tofactory hardware replacement for one year. Warranty Support also includes technical
support and software/firmware updates for 90 days. Coverage is provided during normal
business hours.
North America
Deliverables
Coverage Hours
Support is provided during standard business hours, 24 hours per day local time, seven
days per week, in cluding locally-recognized SonicWALL holidays.
Telephone and Web-based Support
SonicWALL pro vides technical assistance during standard coverage hours by telephone or
through web-based support tools for 90 days after the date of purchase. A SonicWALL
technical specialist works with you to remotely diagnose and identify firmware and
hardware not performing to documented specifications. Web-based support includes
interactive communication with a SonicWALL technical specialist. SonicWALL also provides
general assistance regarding usage and documentation on a limited basis.
Hardware Service
Warranty Support includes the repair or replacement of failing hardware returned to the
SonicWALL factory for a period of year following the date of purchase.
Upon diagnosis of a hardware failure, a SonicWALL technical specialist issues an RMA
number and provides instructions for returni ng the hardware to SonicWALL. Soni cWALL
ships a replacement appliance to you based upon the RMA information. Upon receipt of the
failed appliance, SonicWALL ships a fully functional replacement appliance to you. The
replacement appliance is equivalent to a new appliance.
SonicWALL does not accept failed appliances without a valid RMA number.
SonicWAL L Installati o n Guide Page 84
Page 86

Software/Fi rmw ar e Support
SonicWALL logs, tracks, prioritizes, and resolves software, firmware and/or documentation
bug reports and enhancement requests for software support for a period of 90 days after
the date of purchase.
Software/F irmware Update s
All software and firmware maintenance releases and updates are included for 90 days after
the date of purchase. SonicWALL notifies administrators via electronic mail of new updates.
The updates are delivered exclusively via the web.
Support Tools
Warranty Support provides access to SonicWALL’s web-based support tools, including
FAQs, documentation, and Knowledge Base systems.
Availability
This warranty is available only in the United States and Canada.
Warranty Support -
Overview
Included with all SonicWALL products, SonicWALL warranty support includes return-tofactory hardware replacement for one year. Warranty Support also includes technical
support and software/firmware updates for 90 days. Coverage is provided during normal
business hours.
International
Deliverables
Coverage Hours
Support is provided during standard business hours, 24 hours per day local time, seven
days per week, in cluding locally-recognized SonicWALL holidays.
Hardware Service
Warranty Support includes the repair or replacement of failing hardware returned to the
SonicWALL factory for a period of year following the date of purchase.
Upon diagnosis of a hardware failure, a SonicWALL technical specialist issues an RMA
number and provides instructions for returning the hardware to Sonic WALL. Upon receipt
of the failed appliance, SonicWALL ships a fully functional appliance. The replacement
appliance is equivalent to a new appliance.
SonicWALL does not accept failed appliances without a valid RMA number.
Software/F irmware Update s
Page 85
All software and firmware maintenance releases and updates are included for 90 days after
the date of purchase. SonicWALL notifies administrators via electronic mail of new updates.
The updates are delivered exclusively via the web.
Page 87

Support Tools
Warranty Support provides access to SonicWALL’s web-based support tools, including
FAQs, documentation, and Knowledge Base systems.
Availability
This warranty applied to products sold in Europe, the Mi ddle East, Africa, Asia, Cent ral and
South America.
SonicWAL L Installati o n Guide Page 86
Page 88

SonicWALL, Inc.
1160 Bordeaux Drive
Sunnyvale, CA 94089-1209
Tel: (408) 745-9600
Fax: (408) 745-9300
E-mail: info@sonicwall.com
Web: www.sonicwall.com
Part# 232-000302-00
Rev. A 03/02
 Loading...